

Page 1

HP-UX IPQoS A.01.00
Administrator’s Guide
HP-UX 11i v1 and
HP-UX 11i v2 (September 2004 or later)
Manufacturing Part Number: 5991-0736
October 2005
Printed in the US
© Copyright 2005 Hewlett-Packard Development Company, L.P.
Page 2

Legal Notices
The information in this document is subject to change without notice.
Hewlett-Packard makes no warranty of any kind with regard to this manual, including, but
not limited to, the implied warranties of merchantability and fitness for a particular purpose.
Hewlett-Packard shall not be held liable for errors contained herein or direct, indirect,
special, incidental or consequential damages in connection with the furnishing, performance,
or use of this material.
Warranty
A copy of the specific warranty terms applicable to your Hewlett- Packard product and
replacement parts can be obtained from your local Sales and Service Office.
U.S. Government License
Proprietary computer software. Valid license from HP required for possession, use or copying.
Consistent with FAR 12.211 and 12.212, Commercial Computer Software, Computer Software
Documentation, and Technical Data for Commercial Items are licensed to the U.S.
Government under vendor's standard commercial license.
Copyright Notice
Copyright © 1997-2005 Hewlett-Packard Development Company L.P. All rights reserved.
Reproduction, adaptation, or translation of this document without prior written permission is
prohibited, except as allowed under the copyright laws.
Trademark Notices
UNIX is a registered trademark in the United States and other countries, licensed
exclusively through The Open Group.
2
Page 3

1. Introduction
Overview. . . . . . . . . . . . . . . . . . . . . . . . . . . . . . . . . . . . . . . . . . . . . . . . . . . . . . . . . . . . . . 19
Benefits of HP-UX IPQoS. . . . . . . . . . . . . . . . . . . . . . . . . . . . . . . . . . . . . . . . . . . . . . . 19
DiffServ Mechanisms . . . . . . . . . . . . . . . . . . . . . . . . . . . . . . . . . . . . . . . . . . . . . . . . . . 20
Summary. . . . . . . . . . . . . . . . . . . . . . . . . . . . . . . . . . . . . . . . . . . . . . . . . . . . . . . . . . . . 24
HP-UX IPQoS Features . . . . . . . . . . . . . . . . . . . . . . . . . . . . . . . . . . . . . . . . . . . . . . . . . . 25
HP-UX IPQoS Architecture . . . . . . . . . . . . . . . . . . . . . . . . . . . . . . . . . . . . . . . . . . . . . . . 27
Planning for HP-UX IPQoS Deployment . . . . . . . . . . . . . . . . . . . . . . . . . . . . . . . . . . . . 29
Overview . . . . . . . . . . . . . . . . . . . . . . . . . . . . . . . . . . . . . . . . . . . . . . . . . . . . . . . . . . . . 29
General Planning Considerations . . . . . . . . . . . . . . . . . . . . . . . . . . . . . . . . . . . . . . . . 29
HP-UX Host Specific Planning Considerations . . . . . . . . . . . . . . . . . . . . . . . . . . . . . 30
2. Installing HP-UX IPQoS
System Requirements . . . . . . . . . . . . . . . . . . . . . . . . . . . . . . . . . . . . . . . . . . . . . . . . . . . 35
Supported Hardware . . . . . . . . . . . . . . . . . . . . . . . . . . . . . . . . . . . . . . . . . . . . . . . . . . 35
Supported Operating Systems . . . . . . . . . . . . . . . . . . . . . . . . . . . . . . . . . . . . . . . . . . . 35
Disk Space Requirements. . . . . . . . . . . . . . . . . . . . . . . . . . . . . . . . . . . . . . . . . . . . . . . 35
Patch Requirements . . . . . . . . . . . . . . . . . . . . . . . . . . . . . . . . . . . . . . . . . . . . . . . . . . . 35
Acquiring HP-UX IPQoS . . . . . . . . . . . . . . . . . . . . . . . . . . . . . . . . . . . . . . . . . . . . . . . . . 37
Installing HP-UX IPQoS . . . . . . . . . . . . . . . . . . . . . . . . . . . . . . . . . . . . . . . . . . . . . . . . . 38
Initial Installation . . . . . . . . . . . . . . . . . . . . . . . . . . . . . . . . . . . . . . . . . . . . . . . . . . . . 38
Update Installation. . . . . . . . . . . . . . . . . . . . . . . . . . . . . . . . . . . . . . . . . . . . . . . . . . . . 38
Verifying the HP-UX IPQoS Installation . . . . . . . . . . . . . . . . . . . . . . . . . . . . . . . . . . . . 40
Removing HP-UX IPQoS . . . . . . . . . . . . . . . . . . . . . . . . . . . . . . . . . . . . . . . . . . . . . . . . . 41
Contents
3. Getting Started with HP-UX IPQoS
HP-UX IPQoS Deployment Overview . . . . . . . . . . . . . . . . . . . . . . . . . . . . . . . . . . . . . . . 45
HP-UX IPQoS Deployment Components . . . . . . . . . . . . . . . . . . . . . . . . . . . . . . . . . . . . 46
HP-UX IPQoS Configuration Files . . . . . . . . . . . . . . . . . . . . . . . . . . . . . . . . . . . . . . . 46
ipqosadmin Administration Utility . . . . . . . . . . . . . . . . . . . . . . . . . . . . . . . . . . . . . . . 49
System Operation. . . . . . . . . . . . . . . . . . . . . . . . . . . . . . . . . . . . . . . . . . . . . . . . . . . . . . . 50
HP-UX IPQoS Operating States . . . . . . . . . . . . . . . . . . . . . . . . . . . . . . . . . . . . . . . . . 50
Start and Stop Scripts . . . . . . . . . . . . . . . . . . . . . . . . . . . . . . . . . . . . . . . . . . . . . . . . . 51
Starting HP-UX IPQoS - Without a Reboot . . . . . . . . . . . . . . . . . . . . . . . . . . . . . . . . 51
Stopping HP-UX IPQoS - Without a Reboot . . . . . . . . . . . . . . . . . . . . . . . . . . . . . . . . 53
3
Page 4

Contents
4. HP-UX IPQoS Configuration Files
Introduction . . . . . . . . . . . . . . . . . . . . . . . . . . . . . . . . . . . . . . . . . . . . . . . . . . . . . . . . . . . 57
Configuration File Syntax . . . . . . . . . . . . . . . . . . . . . . . . . . . . . . . . . . . . . . . . . . . . . . . 58
Syntax Rules . . . . . . . . . . . . . . . . . . . . . . . . . . . . . . . . . . . . . . . . . . . . . . . . . . . . . . . . . 59
Creating an HP-UX IPQoS Configuration File . . . . . . . . . . . . . . . . . . . . . . . . . . . . . . . 61
Filter Blocks . . . . . . . . . . . . . . . . . . . . . . . . . . . . . . . . . . . . . . . . . . . . . . . . . . . . . . . . . . . 64
Filter Attributes . . . . . . . . . . . . . . . . . . . . . . . . . . . . . . . . . . . . . . . . . . . . . . . . . . . . . . 64
Policy Blocks. . . . . . . . . . . . . . . . . . . . . . . . . . . . . . . . . . . . . . . . . . . . . . . . . . . . . . . . . . . 71
Policy Attributes . . . . . . . . . . . . . . . . . . . . . . . . . . . . . . . . . . . . . . . . . . . . . . . . . . . . . . 71
Adapter Blocks . . . . . . . . . . . . . . . . . . . . . . . . . . . . . . . . . . . . . . . . . . . . . . . . . . . . . . . . . 76
Adapter Attribute . . . . . . . . . . . . . . . . . . . . . . . . . . . . . . . . . . . . . . . . . . . . . . . . . . . . . 76
5. Administering HP-UX IPQoS
ipqosadmin Overview. . . . . . . . . . . . . . . . . . . . . . . . . . . . . . . . . . . . . . . . . . . . . . . . . . . . 81
ipqosadmin Options and Administrative Actions . . . . . . . . . . . . . . . . . . . . . . . . . . . . 81
ipqosadmin Usage Rules . . . . . . . . . . . . . . . . . . . . . . . . . . . . . . . . . . . . . . . . . . . . . . . 81
Administering HP-UX IPQoS Operating States . . . . . . . . . . . . . . . . . . . . . . . . . . . . . . 83
Using ipqosadmin to Change States . . . . . . . . . . . . . . . . . . . . . . . . . . . . . . . . . . . . . . 83
Disabling/Re-Enabling HP-UX IPQoS. . . . . . . . . . . . . . . . . . . . . . . . . . . . . . . . . . . . . 84
Displaying State Information . . . . . . . . . . . . . . . . . . . . . . . . . . . . . . . . . . . . . . . . . . . . . 86
Syntax . . . . . . . . . . . . . . . . . . . . . . . . . . . . . . . . . . . . . . . . . . . . . . . . . . . . . . . . . . . . . . 86
Option . . . . . . . . . . . . . . . . . . . . . . . . . . . . . . . . . . . . . . . . . . . . . . . . . . . . . . . . . . . . . . 86
Example. . . . . . . . . . . . . . . . . . . . . . . . . . . . . . . . . . . . . . . . . . . . . . . . . . . . . . . . . . . . . 86
Verifying a Configuration File. . . . . . . . . . . . . . . . . . . . . . . . . . . . . . . . . . . . . . . . . . . . . 87
Syntax . . . . . . . . . . . . . . . . . . . . . . . . . . . . . . . . . . . . . . . . . . . . . . . . . . . . . . . . . . . . . . 87
Options . . . . . . . . . . . . . . . . . . . . . . . . . . . . . . . . . . . . . . . . . . . . . . . . . . . . . . . . . . . . . 87
Example. . . . . . . . . . . . . . . . . . . . . . . . . . . . . . . . . . . . . . . . . . . . . . . . . . . . . . . . . . . . . 88
Loading a Configuration File . . . . . . . . . . . . . . . . . . . . . . . . . . . . . . . . . . . . . . . . . . . . . 89
Syntax . . . . . . . . . . . . . . . . . . . . . . . . . . . . . . . . . . . . . . . . . . . . . . . . . . . . . . . . . . . . . . 89
Option . . . . . . . . . . . . . . . . . . . . . . . . . . . . . . . . . . . . . . . . . . . . . . . . . . . . . . . . . . . . . . 89
Example. . . . . . . . . . . . . . . . . . . . . . . . . . . . . . . . . . . . . . . . . . . . . . . . . . . . . . . . . . . . . 90
Unloading a Configuration . . . . . . . . . . . . . . . . . . . . . . . . . . . . . . . . . . . . . . . . . . . . . . . 91
Syntax . . . . . . . . . . . . . . . . . . . . . . . . . . . . . . . . . . . . . . . . . . . . . . . . . . . . . . . . . . . . . . 91
Option . . . . . . . . . . . . . . . . . . . . . . . . . . . . . . . . . . . . . . . . . . . . . . . . . . . . . . . . . . . . . . 91
Example. . . . . . . . . . . . . . . . . . . . . . . . . . . . . . . . . . . . . . . . . . . . . . . . . . . . . . . . . . . . . 91
Showing Configuration Information . . . . . . . . . . . . . . . . . . . . . . . . . . . . . . . . . . . . . . . . 92
4
Page 5

Syntax . . . . . . . . . . . . . . . . . . . . . . . . . . . . . . . . . . . . . . . . . . . . . . . . . . . . . . . . . . . . . . 92
Options . . . . . . . . . . . . . . . . . . . . . . . . . . . . . . . . . . . . . . . . . . . . . . . . . . . . . . . . . . . . . 92
Example 1 . . . . . . . . . . . . . . . . . . . . . . . . . . . . . . . . . . . . . . . . . . . . . . . . . . . . . . . . . . . 92
Example 2 . . . . . . . . . . . . . . . . . . . . . . . . . . . . . . . . . . . . . . . . . . . . . . . . . . . . . . . . . . . 93
Showing Statistics . . . . . . . . . . . . . . . . . . . . . . . . . . . . . . . . . . . . . . . . . . . . . . . . . . . . . . 94
Syntax . . . . . . . . . . . . . . . . . . . . . . . . . . . . . . . . . . . . . . . . . . . . . . . . . . . . . . . . . . . . . . 94
Options . . . . . . . . . . . . . . . . . . . . . . . . . . . . . . . . . . . . . . . . . . . . . . . . . . . . . . . . . . . . . 94
Example 1 . . . . . . . . . . . . . . . . . . . . . . . . . . . . . . . . . . . . . . . . . . . . . . . . . . . . . . . . . . . 95
Example 2 . . . . . . . . . . . . . . . . . . . . . . . . . . . . . . . . . . . . . . . . . . . . . . . . . . . . . . . . . . . 95
Setting and Showing Log Level. . . . . . . . . . . . . . . . . . . . . . . . . . . . . . . . . . . . . . . . . . . . 96
Syntax . . . . . . . . . . . . . . . . . . . . . . . . . . . . . . . . . . . . . . . . . . . . . . . . . . . . . . . . . . . . . . 96
Option . . . . . . . . . . . . . . . . . . . . . . . . . . . . . . . . . . . . . . . . . . . . . . . . . . . . . . . . . . . . . . 96
Example. . . . . . . . . . . . . . . . . . . . . . . . . . . . . . . . . . . . . . . . . . . . . . . . . . . . . . . . . . . . . 96
6. Troubleshooting HP-UX IPQoS
Overview . . . . . . . . . . . . . . . . . . . . . . . . . . . . . . . . . . . . . . . . . . . . . . . . . . . . . . . . . . . . 101
Troubleshooting Tools . . . . . . . . . . . . . . . . . . . . . . . . . . . . . . . . . . . . . . . . . . . . . . . . . . 102
HP-UX IPQoS ipqosadmin Utility . . . . . . . . . . . . . . . . . . . . . . . . . . . . . . . . . . . . . . . 102
HP-UX System and Networking Utilities . . . . . . . . . . . . . . . . . . . . . . . . . . . . . . . . . 103
Troubleshooting Scenarios. . . . . . . . . . . . . . . . . . . . . . . . . . . . . . . . . . . . . . . . . . . . . . . 104
Installation Scenario: HP-UX IPQoS Installation Fails . . . . . . . . . . . . . . . . . . . . . . 104
HP-UX IPQoS Configuration File Verification Fails. . . . . . . . . . . . . . . . . . . . . . . . . 104
Active Configuration Is Not As Expected . . . . . . . . . . . . . . . . . . . . . . . . . . . . . . . . . 105
State Is Not As Expected . . . . . . . . . . . . . . . . . . . . . . . . . . . . . . . . . . . . . . . . . . . . . . 105
Traffic Management Problems. . . . . . . . . . . . . . . . . . . . . . . . . . . . . . . . . . . . . . . . . . 106
Corrupt or Missing HP-UX IPQoS Configuration File . . . . . . . . . . . . . . . . . . . . . . . 107
Internal Error from Corrupt or Missing HP-UX IPQoS Database File. . . . . . . . . . 108
Sample Error and Warning Messages . . . . . . . . . . . . . . . . . . . . . . . . . . . . . . . . . . . . . 109
Reporting Problems to HP . . . . . . . . . . . . . . . . . . . . . . . . . . . . . . . . . . . . . . . . . . . . . . . 111
Contents
A. HP-UX IPQoS Configuration File Attributes: Quick Reference
Summary of Configuration File Attributes . . . . . . . . . . . . . . . . . . . . . . . . . . . . . . . . . 114
B. HP-UX IPQoS Configuration File Examples
Example 1: Premium Services Class Web Server . . . . . . . . . . . . . . . . . . . . . . . . . . . . 119
5
Page 6

Contents
Example 2: Trusted Applications and DSCP . . . . . . . . . . . . . . . . . . . . . . . . . . . . . . . . 121
Example 3: Packets Can Match Multiple Filters . . . . . . . . . . . . . . . . . . . . . . . . . . . . 122
Example 4: Limit ftp Bandwidth. . . . . . . . . . . . . . . . . . . . . . . . . . . . . . . . . . . . . . . . . . 123
C. ipqosadmin Quick Reference
ipqosadmin Usage Syntax Summary . . . . . . . . . . . . . . . . . . . . . . . . . . . . . . . . . . . . . . 126
ipqosadmin Syntax Quick Reference . . . . . . . . . . . . . . . . . . . . . . . . . . . . . . . . . . . . . . 127
Glossary . . . . . . . . . . . . . . . . . . . . . . . . . . . . . . . . . . . . . . . . . . . . . . . . . . . . . . . 131
Index . . . . . . . . . . . . . . . . . . . . . . . . . . . . . . . . . . . . . . . . . . . . . . . . . . . . . . . . . . 133
6
Page 7

Tables
Table 1. Publishing History Details . . . . . . . . . . . . . . . . . . . . . . . . . . . . . . . . . . . . . . .12
Table 2. HP-UX 11i Releases. . . . . . . . . . . . . . . . . . . . . . . . . . . . . . . . . . . . . . . . . . . . .14
Table 3. HP-UX IPQoS - Relevant RFCs. . . . . . . . . . . . . . . . . . . . . . . . . . . . . . . . . . . .15
Table 3-1. HP-UX IPQoS Operating States . . . . . . . . . . . . . . . . . . . . . . . . . . . . . . . . .50
Table 4-1. Supported Transport Protocol Numbers . . . . . . . . . . . . . . . . . . . . . . . . . . .68
Table 4-2. Supported Network Protocol Numbers . . . . . . . . . . . . . . . . . . . . . . . . . . . .69
Table 6-1. Getting Information with ipqosadmin. . . . . . . . . . . . . . . . . . . . . . . . . . . .102
Table 6-2. Sample Error Messages . . . . . . . . . . . . . . . . . . . . . . . . . . . . . . . . . . . . . . .109
Table 6-3. Sample Warning and Informational Messages . . . . . . . . . . . . . . . . . . . . .110
Table A-1. Filter Attributes . . . . . . . . . . . . . . . . . . . . . . . . . . . . . . . . . . . . . . . . . . . . .114
Table A-2. Policy Attributes. . . . . . . . . . . . . . . . . . . . . . . . . . . . . . . . . . . . . . . . . . . . .116
Table A-3. Adapter Attributes. . . . . . . . . . . . . . . . . . . . . . . . . . . . . . . . . . . . . . . . . . .116
Table C-1. ipqosadmin Syntax Quick Reference. . . . . . . . . . . . . . . . . . . . . . . . . . . . .127
7
Page 8

Tables
8
Page 9

Figures
Figure 1-1. Traffic Classification and Conditioning Flow in HP-UX IPQoS. . . . . . . .22
Figure 1-2. Architectural Overview. . . . . . . . . . . . . . . . . . . . . . . . . . . . . . . . . . . . . . . .27
9
Page 10

Figures
10
Page 11

About This Document
This document describes how to install, configure, administer, and troubleshoot HP-UX
IPQoS.
The document printing date and part number indicate the document’s current edition. The
printing date will change when a new edition is printed. Minor changes may be made at
reprint without changing the printing date. The document part number will change when
extensive changes are made.
Document updates may be issued between editions to correct errors or document product
changes. To ensure that you receive the updated or new editions, subscribe to the appropriate
product support service. Contact your HP sales representative for details.
The latest version of this document can be found online at:
http://www.docs.hp.com/en/netcom.html#IPQoS.
Intended Audience
This document is intended for system and network administrators responsible for installing,
configuring, and managing HP-UX IPQoS. Administrators are expected to have knowledge of
HP-UX and networking concepts, commands and configuration, including knowledge of
Transmission Control Protocol/Internet Protocol (TCP/IP).
This document is not a tutorial.
New and Changed Documentation in This Edition
This is the first edition of this document.
11
Page 12

Publishing History
Table 1 Publishing History Details
Document
Manufacturing
Part Number
5991-0736 HP-UX IPQoS A.01.00
Administrator’s Guide
Title
Operating Systems
Supported
HP-UX 11i v1
HP-UX 11i v2 (September
2004 or later)
Publication
Date
October 2005
What Is in This Document
HP-UX IPQoS A.01.00 Administrator’s Guide is divided into several chapters, and each
contains information about installing, configuring, managing, or troubleshooting HP-UX
IPQoS.
Chapter 1 Introduction Use this chapter to obtain a summary and an overview of
HP-UX IPQoS features.
Chapter 2 Installing HP-UX IPQoS Use this chapter to learn the system
requirements and procedures necessary to install HP-UX IPQoS.
Chapter 3 Getting Started with HP-UX IPQoS Use this chapter to obtain a
summary of tasks, commands and files associated with using HP-UX IPQoS.
Chapter 4 HP-UX IPQoS Configuration Files Use this chapter to learn the details
of creating HP-UX IPQoS configuration files.
Chapter 5 Administering HP-UX IPQoS Use this chapter to learn about common
tasks involved in administering HP-UX IPQoS.
Chapter 6 Troubleshooting HP-UX IPQoS Use this chapter to learn techniques for
troubleshooting HP-UX IPQoS, what to do for common problems, and how to
report problems to HP.
Appendix A HP-UX IPQoS Configuration File Attributes Quick Reference Use
this appendix as a quick reference of configuration file syntax specifics.
Appendix B HP-UX IPQoS Configuration File Examples Use this appendix to view
sample configuration files.
Appendix C ipqosadmin Quick Reference Use this appendix as a quick reference of
ipqosadmin syntax specifics.
12
Page 13

Glossary Glossary Use the glossary to obtain definitions for commonly used terms
related to HP-UX IPQoS.
Typographic Conventions
This document uses the following conventions.
audit (5) An HP-UX manpage. In this example, audit is the name and 5 is the section
in the HP-UX Reference. On the web and on the Instant Information CD, it
may be a hot link to the manpage itself. From the HP-UX command line, you
can enter “man audit” or “man 5 audit” to view the manpage.
Book Title The title of a book. On the web and on the Instant Information CD, it may be
a hot link to the book itself.
KeyCap The name of a keyboard key. Note that Return and Enter both refer to the
same key.
Emphasis Text that is emphasized.
Bold Text that is strongly emphasized.
Bold The defined use of an important word or phrase.
ComputerOut Text displayed by the computer.
UserInput Commands and other text that you type.
Command A command name or qualified command phrase.
Variable The name of a variable that you may replace in a command or function or
information in a display that represents several possible values.
| Separates items in a list of choices.
[] The contents are optional in formats and command descriptions. If the
contents are a list separated by |, you must choose one of the items.
{} The contents are required in formats and command descriptions. If the
contents are a list separated by |, you must choose one of the items.
... The preceding element may be repeated an arbitrary number of times.
13
Page 14

HP-UX Release Name and Release Identifier
Each HP-UX 11i release has an associated release name and release identifier. The uname (1)
command with the -r option returns the release identifier. This table shows the releases
available for HP-UX 11i.
Table 2 HP-UX 11i Releases
Release
Identifier
B.11.23 HP-UX 11i v2 Intel Itanium and PA-RISC
B.11.22 HP-UX 11i v1.6 Intel Itanium
B.11.11 HP-UX 11i v1 PA-RISC
Release Name
Supported Processor
Architecture
Related Documents
The following sections list references to additional HP-UX IPQoS information.
HP Product Documentation
Information about HP-UX IPQoS can be found on docs.hp.com at:
http://www.docs.hp.com/en/netcom.html#IPQoS
Other relevant documents in this collection include:
HP-UX IPQoS A.01.00 Release Notes
HP-UX IPQoS A.01.00 Programmer’s Guide
HP-UX IPQoS White Paper
Manpages
The following is a list of manpages you can access by using the man manpagename command
after installation:
• General
ipqosadmin (1M) Information about ipqosadmin, the HP-UX IPQoS administration
utility.
• Programming (API)
Refer to the HP-UX IPQoS A.01.00 Programmer’s Guide for a list of HP-UX IPQoS
API-related manpages.
14
Page 15

Related RFCs
The following table lists RFCs associated with HP-UX IPQoS. The Internet Engineering Task
Force (IETF) RFCs listed below are available at: http://www.ietf.org/rfc.html
Table 3 HP-UX IPQoS - Relevant RFCs
RFC Description
RFC 2474 Definition of the Differentiated Services Field (DS Field) in
the IPv4 and IPv6 Headers
RFC 2475 An Architecture for Differentiated Services
RFC 2597 Assured Forwarding PHB Group
RFC 2598 An Expedited Forwarding PHB
15
Page 16

HP Welcomes Your Comments
HP encourages your feedback about this document and is committed to providing
documentation that meets your needs.
Send comments to: netinfo_feedback@cup.hp.com
Include the document title, manufacturing part number, and any comment, error found, or
suggestion for improvement you have concerning this document. Also, please include what we
did right so we can incorporate it into other documents.
16
Page 17

1 Introduction
This chapter introduces and describes HP-UX IPQoS functionality. It provides a brief
overview of the DiffServ model HP-UX IPQoS uses to accomplish Quality of Service (QoS). It
addresses the following topics:
Chapter 1 17
Page 18

Introduction
• “Overview” on page 19
• “HP-UX IPQoS Features” on page 25
• “HP-UX IPQoS Architecture” on page 27
• “Planning for HP-UX IPQoS Deployment” on page 29
Chapter 118
Page 19

Introduction
Overview
Overview
Given current technology trends, it is increasingly important to have a means available to
deal with network traffic issues. HP-UX IPQoS helps businesses meet an increasing demand
for the ability to control networking throughput, and to ensure network resources are
optimally managed.
To support specific business requirements, the Internet Engineering Task Force (IETF)
acknowledged the need for a method of providing differentiated classes of service for Internet
traffic. The Differentiated Services Working Group of the IETF defined the Differentiated
Services (DiffServ or DS) model. HP-UX IPQoS software provides IETF DiffServ-compliant
network quality of service controls for IP-based network communications.
For outbound traffic on HP-UX hosts, HP-UX IPQoS provides traffic conditioning
(transmission prioritization for specified traffic classes), Differentiated Services Code Point
(DSCP) marking, and VLAN-priority marking. HP-UX IPQoS uses a configuration that has
been loaded into the kernel, and that contains user-supplied definitions of traffic classes
(filters) and traffic-handling instructions (policies) assigned to configured adapters.
HP-UX IPQoS provides an important host-based component of a larger network traffic
management solution. HP-UX IPQoS hosts work with DS-aware routers to provide
differentiated services on the network.
IMPORTANT The span of control for HP-UX IPQoS is for an individual HP-UX host, and for
outbound traffic only.
Although the IETF DiffServ model takes a holistic network-wide view, HP-UX
IPQoS is configured on a single host, not globally on a network-wide basis. This
is consistent with the single-system administration model used with HP-UX
systems.
Benefits of HP-UX IPQoS
The DiffServ model allows for IP Quality of Service (IPQoS) distinctions to be applied to
various groupings of network traffic. IP QoS provides controls that enable you to give defined
traffic classes differentiated service.
The following factors contributed to the problems that IPQoS solves:
Chapter 1 19
Page 20

Introduction
Overview
• Over the last several years there have been unprecedented increases in network traffic. In
part, this is due to the explosive increases in Internet usage. It is also partly a result of
the tremendous increase in multimedia and wireless applications (applications extremely
susceptible to limits in bandwidth and network capacity).
• Traditional uses of the network now compete with mission critical applications. Thus
there is a greater need for guaranteed communication during unexpected situations, such
as natural disasters and other major emergencies.
• By default, IP networks merely provide “best effort” service to all traffic types. Just
keeping the network up and running is insufficient, because some traffic requires higher
performance.
• Overprovisioning expands and upgrades infrastructure equipment capacity. This
approach tries to keep ahead of peak usage, rather than strategically addressing typical
usage. It can be prohibitively expensive, because the capital investments needed to keep
congestion and queueing delays within reasonable limits during peak times are much
higher than those needed to keep up with average use.
Using DiffServ-compliant nodes (hosts and routers) is an important traffic engineering
technique that helps address these and other problems.
HP-UX IPQoS can help the network support business objectives, while helping minimize the
cost of managing network resources. It helps keep network costs down by using bandwidth
more efficiently and by eliminating the need for overprovisioning as a result of expanding the
usefulness of the existing infrastructure.
HP-UX IPQoS features can help Internet Service Providers (ISPs) and Application Service
Providers (ASPs) offer differentiated levels of network service to customers. Individual
organizations can use HP-UX IPQoS features to prioritize internal traffic.
DiffServ Mechanisms
Generally speaking, IP QoS can be achieved through any mechanism that delivers better than
best effort service to network traffic. The DiffServ model provides IP QoS in networks by
using a defined set of building blocks to build a variety of aggregate behaviors. HP-UX IPQoS
provides controls that enable you to give defined traffic classes differentiated service. It does
this by following specified bandwidth and marking characteristics.
The DiffServ architectural components include traffic classification and traffic
conditioning.
Chapter 120
Page 21

Introduction
Overview
Traffic Classification
Traffic classification filters packets in a traffic stream into distinct classes (groups) based on
the content of parts of the packet header. In the classification process, IP packets are matched
against selectors of each filter to determine if the packet belongs in that filter class. Traffic
classifiers separate and steer traffic classes to traffic conditioners for further processing.
Two types of classifiers are defined in the DiffServ model. The Behavior Aggregate (BA)
Classifier selects packets based on the DSCP only. The Multi-Field (MF) classifier selects
packets based on the values of a combination of header fields such as source address,
destination address, and transport port numbers. HP-UX IPQoS provides BA and MF
classification.
Traffic Conditioning
Traffic conditioning consists of one or more of the following actions:
Metering Metering is part of the flow control strategy. Flow control measures traffic
flow for a class, then releases packets onto the network at a specified rate.
The metering component ensures conformance to configured flow rates.
Metering measures the traffic stream against a traffic profile specified via
policies in HP-UX IPQoS. It tracks the transmission rate of traffic flows on a
per-class basis. It then compares the actual flow rate against configured
flow rates, and passes state information to other conditioning functions to
trigger a specific action for each packet.
With HP-UX IPQoS, you can reserve a percentage of the total available
bandwidth; you can also specify a maximum bandwidth. See “Policy
Attributes” on page 71 for more information.
Marking Marking marks packets with values that translate to forwarding behaviors.
Marking is the basis for potential differentiated treatment when the packet
reaches a resource that recognizes the marking, such as a DS-aware router.
Forwarding behavior determines the priority and drop precedence of traffic
about to be forwarded on the network. This can involve marking or
re-marking the DS field of an IP packet with a DS codepoint (DSCP) value.
It can also involve marking or re-marking the VLAN tag of an Ethernet
frame header with a Class of Service (CoS) priority value.
After a value is placed in the packet header, the packet forwarding behavior
is determined by the forwarding scheme used by DS-aware nodes in the
network. For example, different traffic classes can be steered to use
different routes such as reserved-traffic-only links and usage-based-billing
links. The steering depends on forwarding rules set in the DS-aware
Chapter 1 21
Page 22
Introduction
Overview
routers, and VLAN priority markings for VLAN-aware switches. You must
assign DS and VLAN priority marking values in accordance with your
forwarding scheme.
In HP-UX IPQoS, both DS fields and VLAN tags can be marked.
Policing Policing (dropping) may drop some packets to bring a traffic stream into
compliance with a traffic profile specified via policies. Policing is a subset of
shaping.
In HP-UX IPQoS, policing actions are triggered by metering results that
indicate action is warranted.
Shaping Shaping enables the delay of some or all of the packets in a traffic stream to
bring the stream into compliance with a traffic profile. Usually a finite
buffer is used, and in some cases packets are dropped if there is insufficient
buffer space to hold delayed packets.
In HP-UX IPQoS, shaping actions are triggered by metering results that
indicate action is warranted.
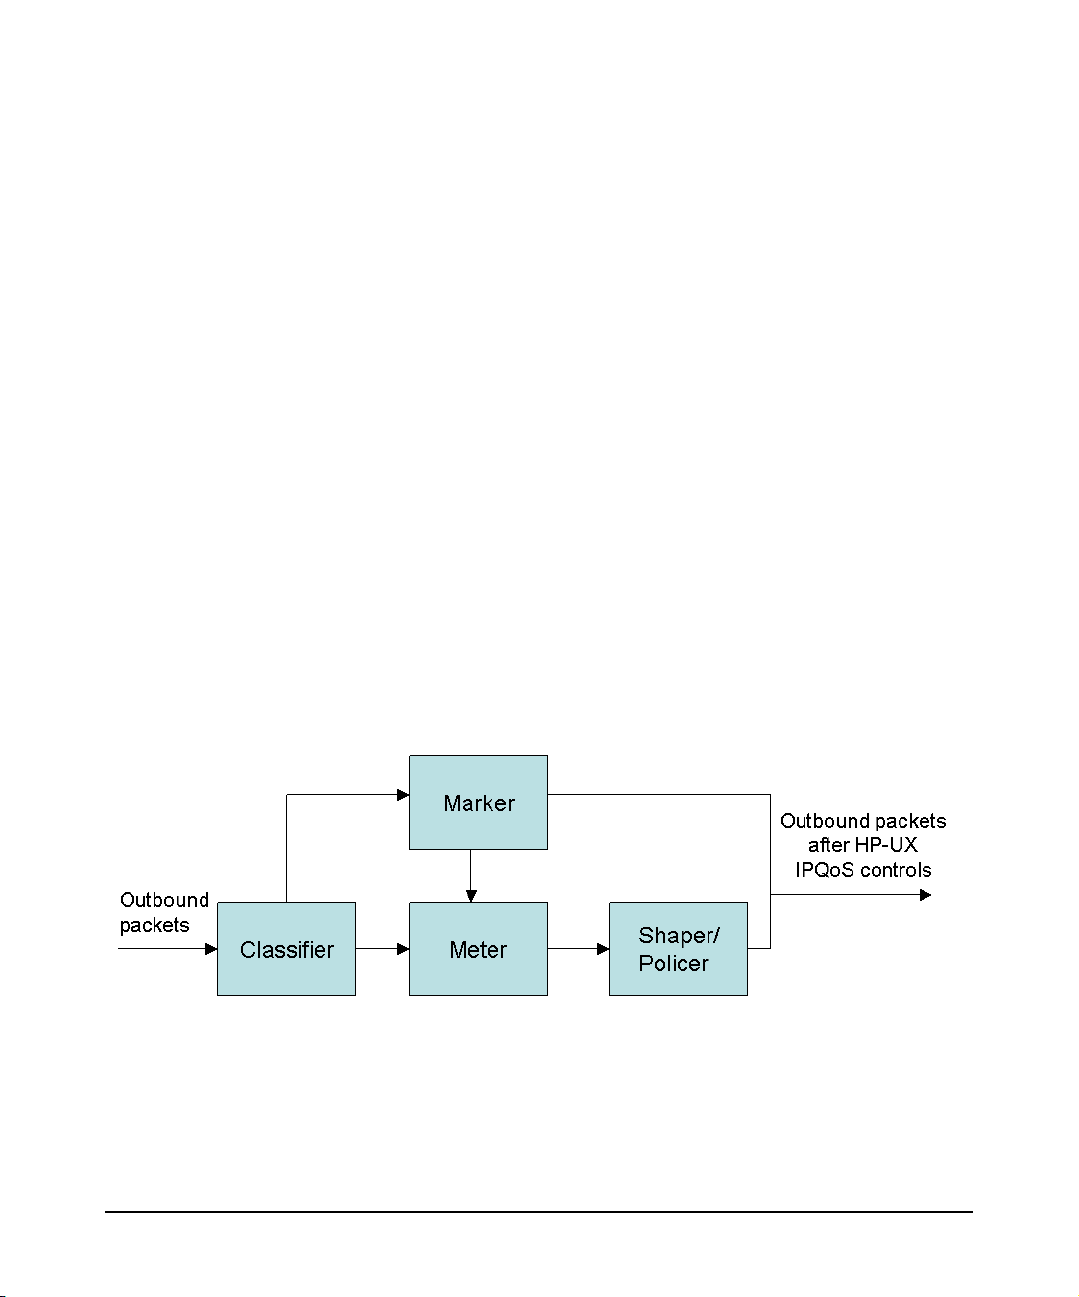
Figure 1-1 Traffic Classification and Conditioning Flow in HP-UX IPQoS
Figure 1-1 displays the flow of traffic classification and conditioning components applicable to
HP-UX IPQoS. As illustrated, outbound packets under HP-UX IPQoS control may pass
through only the marking path, only the metering path or through both paths, depending on
the specifics of the active configuration. The components shown in Figure 1-1 act as follows:
Chapter 122
Page 23

Introduction
Overview
— The classifier selects a packet in a traffic stream based the content of a part of the packet
header. In HP-UX IPQoS, classification is based on filter attributes specified in the active
HP-UX IPQoS configuration.
— The meter checks compliance to a defined traffic profile and passes results to
shaper/policer to trigger appropriate actions for in- and out-of-profile packets. In HP-UX
IPQoS, metering is based on policy attributes specified in the active HP-UX IPQoS
configuration.
— The marker can write/rewrite the DSCP and VLAN priority values. In HP-UX IPQoS,
marking is based on policy attributes specified in the active HP-UX IPQoS configuration.
— The shaper delays (and the policer drops) some packets, so that traffic maintains
compliance with a defined traffic profile. In HP-UX IPQoS, shaping actions result from
maintaining accordance with metering specifications in the active HP-UX IPQoS
configuration. HP-UX IPQoS does not perform shaping based on marking characteristics.
Other nodes, such as DS-aware routers, may perform shaping as a result of marking
specifications.
DSCP Marking
Each IP packet has a DS field. For IPv4, this is the leftmost 6-bits of the TOS field; for IPv6,
this is the leftmost 6-bits of the Traffic Class field. The DS field can be used to mark a
packet so that it receives a particular forwarding behavior. The DiffServ model defines a set of
commonly used standard DSCP’s and their corresponding forwarding behaviors. The
forwarding behavior assigned to a DSCP is referred to as the per-hop behavior (PHB). The
PHB defines the forwarding precedence a packet receives in relation to other traffic on a
DiffServ-enabled network.
A common agreement about the use and interpretation of the possible values used in the DS
field is needed for interdomain use, multivendor interoperability, and overall consistency of
expected aggregate behaviors in a network. The IETF Differentiated Services Working Group
has standardized a common layout for the six-bit field of these octets. For more information,
refer to RFC 2474 Definition of the Differentiated Service Field (DS Field) in the IPv4 and
IPv6 Headers and RFC 2475 An Architecture for Differentiated Services, which define the
architecture and the general use of the bits within the DS field.
You can select a DSCP value from a group of well-known codepoints associated with the two
key forwarding types defined in the DiffServ model. The PHB types are Expedited
Forwarding (EF) for higher priority traffic, and Assisted Forwarding (AF) for other traffic.
The well-known codepoints, which would appear in the leftmost 6-bits of the TOS or Traffic
Class fields, are 46 (101110) for the EF PHB, and a range of codepoints for the AF PHB. For
more information, refer to RFC 2597 Assured Forwarding PHB Group and RFC 2598 An
Expedited Forwarding PHB.
Chapter 1 23
Page 24

Introduction
Overview
Router and Host Behaviors with DSCP Marking An IP QoS-capable system, such as an
HP-UX IPQoS host, marks the field with a DSCP value. A DS-aware router then applies the
appropriate forwarding behavior associated with the DSCP value to the packet.
The DSCP is used for prioritizing transmission bandwidth. For example, when a router
becomes congested, it uses the DSCP values of queued packets to decide which ones to drop, if
necessary.
Routers can also use the DSCP to re-create the VLAN priority tag. Routers at the boundaries
between administrative domains, such as between ISPs, can convert tags to different values.
Minimally, the values roughly correspond to the same values in the other domain.
Unlike VLAN tags, DSCP markers do not add to the traffic, because the DSCP marker is
carried in an existing field of the IP packet.
Summary
In the DiffServ model, each traffic-generating source cooperates in two ways.
The first is traffic conditioning. Traffic conditioning reduces load peaks and consequent
queueing delays. It assures that when the source node generates data faster than the adapter
can send it, the most important traffic goes out first. HP-UX IPQoS policies use the
reservation bandwidth and maximum allowed bandwidth policy attributes to help with this
“send now or later” type of bandwidth management.
The second is marking, where sources place a VLAN or DSCP priority tag in their packets so
that infrastructure equipment can decide which packets should be sent first and which should
be dropped first.
Transmission priority (reserved and maximum bandwidth allocation) is of limited use as a
control. Since the transmission priority isn’t carried with the packet, its usefulness ends at
the first router. VLAN marking propagates through the first-hop switch. Marking the DS
field, which is carried in the packet, can have wider significance.
Chapter 124
Page 25

HP-UX IPQoS Features
HP-UX IPQoS Features
HP-UX IPQoS A.01.00 provides the following features:
• Conforms to the IETF DiffServ model
HP-UX IPQoS brings an HP-UX host into conformance to the IETF DiffServ model.
HP-UX IPQoS cooperates with QoS policies and policy management as configured in edge
and core routers, and which can also be configured in the switching infrastructure.
— Provides differentiated classes of service on outbound traffic by performing traffic
conditioning actions. Important traffic classes can take bandwidth away from less
important classes, up to user-specified limits.
❏ Classification occurs when traffic classes are defined in filters.
❏ Marking occurs when marking attributes are set in policies.
❏ Metering occurs when bandwidth is reserved for defined traffic classes in policies.
— Allows DSCP and VLAN marking on outbound traffic from the HP-UX server.
Introduction
❏ Can assign different DSCP network routing priorities (valid range 0-63).
❏ Can assigned different VLAN priorities (valid range 0-7).
IMPORTANT Conformance of HP-UX IPQoS to the IETF DiffServ model applies only to
outbound traffic on an HP-UX host.
• Supports traffic classification on broad range of packet attributes
HP-UX IPQoS supports traffic classification with any combination of the following packet
attributes: IP source or destination address or address ranges (numerically or by host
name); transport port numbers or range (numerically or by service name; can specify
source, destination, or both); transport protocol number (only tcp or udp are currently
supported); network protocol number (Ethertype); DSCP value; and destination physical
(MAC) address.
• Provides provisioned QoS management
With provisioned QoS, network resources are statically configured in anticipation of
traffic that will flow through them. Most QoS mechanisms in network devices and
computing systems use provisioned QoS; for example, priority queues, rate controls, and
packet marking. With signaled QoS, applications or the operating system dynamically
signal network devices in an attempt to reserve resources on them.
Chapter 1 25
Page 26

Introduction
HP-UX IPQoS Features
HP-UX IPQoS provides provisioned QoS only. Signaled QoS is not supported.
• Supports both IPv4 and IPv6
HP-UX IPQoS can filter on IPv4 and IPv6 addresses. (For IPv6 addresses to be
meaningful, you must to be running on an IPv6-enabled system.)
• Provides a simple configuration file format
HP-UX IPQoS configuration files are in text format and use a simple syntax. They can be
created and maintained using any common HP-UX text editor, such as vi.
• Provides a single simple utility for all administrative tasks
HP-UX IPQoS provides one inclusive command-line utility, ipqosadmin, for managing
administrative tasks related to using HP-UX IPQoS. This utility can verify, load, and
unload a configuration; and show state, active configuration, and statistical information.
• Provides an API for (optional) programmatic HP-UX IPQoS control
Optionally, you can use the HP-UX IPQoS API to configure and manage HP-UX IPQoS.
For more information on the HP-UX IPQoS API, refer to the HP-UX IPQoS A.01.00
Programmer’s Guide.
• Provides statistics for configured adapters, policies, and filters
HP-UX IPQoS can display current statistics on all active adapters, policies, and filters. or
on specific adapters, policies, and filters, using the command-line utility, ipqosadmin.
You can also reset statistics using ipqosadmin.
• No changes to existing applications are required
No changes are needed to existing applications. You can immediately realize the benefits
of HP-UX IPQoS without any recoding, recompiling, or patching.
• Compatible with HP-UX IPSec
HP-UX IPQoS is compatible with HP-UX IPSec. HP-UX IPQoS can classify traffic by
transport port numbers when used with the IPSec Authentication Header (AH). However,
HP-UX IPQoS cannot classify traffic by transport port number when used with the IPSec
Encapsulating Security Payload (ESP), because the ESP protocol encrypts the IP payload.
HP-UX IPQoS can classify other filter attributes that are in the IP layer or below (such as
IP address), independent of HP-UX IPSec encryption mechanisms.
• IEEE802.3ad (Auto Port-aggregation) compatible
HP-UX IPQoS is IEEE802.3ad and IEEE802.3 compatible.
Chapter 126
Page 27
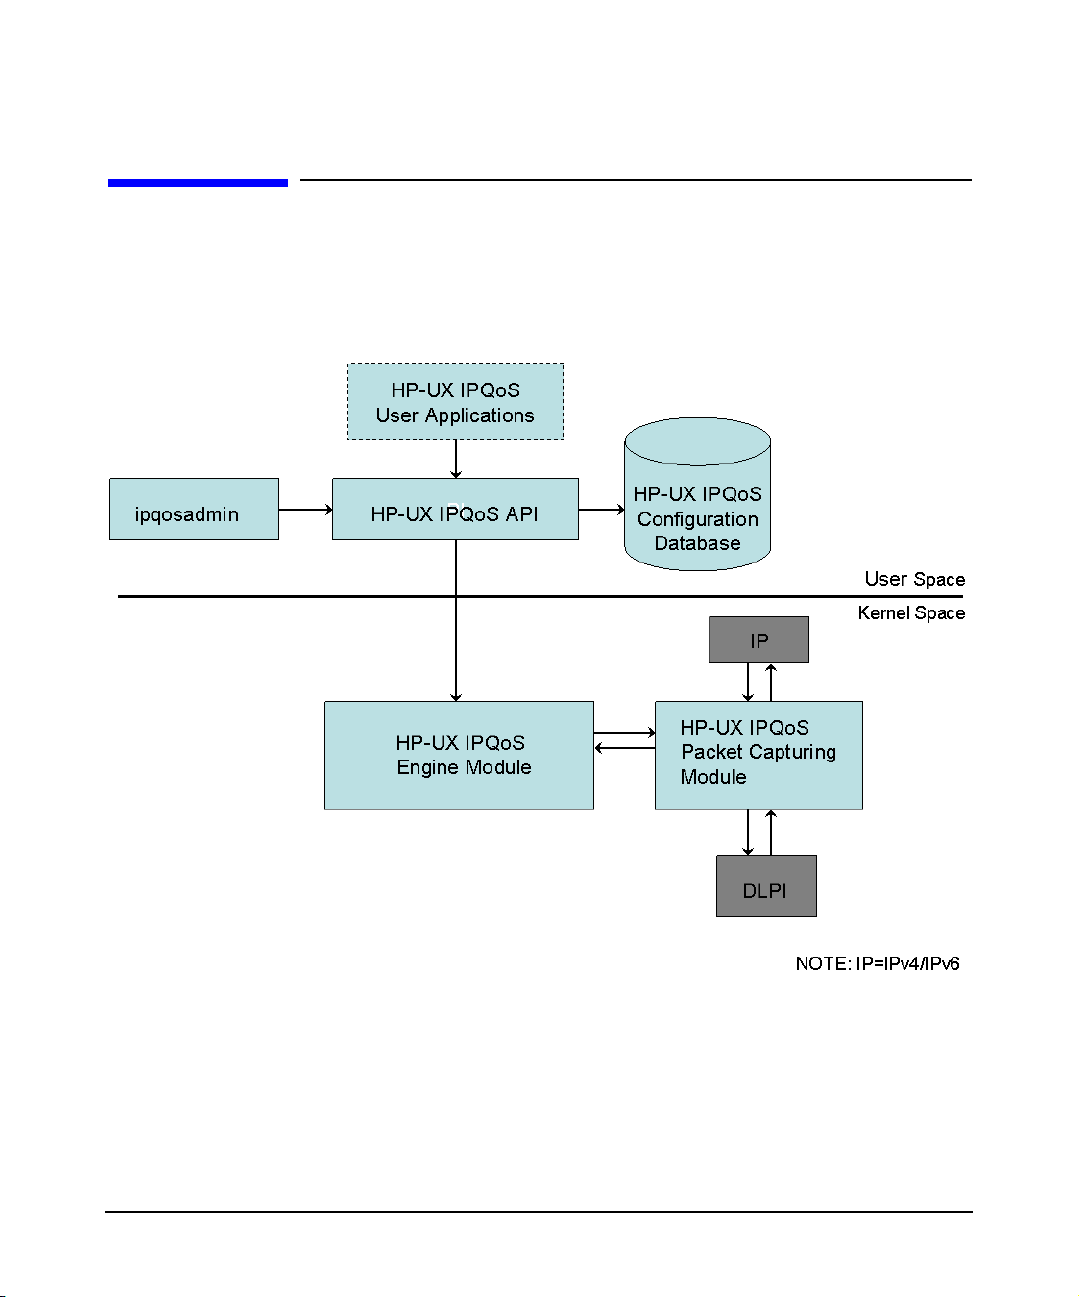
HP-UX IPQoS Architecture
HP-UX IPQoS Architecture
Figure 1-2 displays a high-level overview of the HP-UX IPQoS architecture.
Figure 1-2 Architectural Overview
Introduction
As shown in Figure 1-2, HP-UX IPQoS operates in both user space and kernel space. Also
shown in Figure 1-2, HP-UX IPQoS inserts a module between the IP and the DLPI layers,
into the STREAMS plumbed by ifconfig. To insert this module:
• HP-UX 11i v1: HP-UX IPQoS uses the autopush mechanism.
Chapter 1 27
Page 28

Introduction
HP-UX IPQoS Architecture
• HP-UX 11i v2: HP-UX IPQoS uses the INTERFACE_MODULES list in the
/etc/rc.config.d/netconf and /etc/rc.config.d/netconf-ipv6 files.
HP-UX IPQoS supports as many network adapters as are configured on the system (up to
128).
Chapter 128
Page 29

Introduction
Planning for HP-UX IPQoS Deployment
Planning for HP-UX IPQoS Deployment
Before you begin using HP-UX IPQoS, you must plan your implementation. The following
sections discuss a high-level planning overview, general planning considerations including
network-wide considerations, and HP-UX host specific planning considerations.
Overview
You need to begin by understanding the current traffic on your network. As part of your
network traffic analysis, determine where the traffic bottlenecks are, when they happen, and
what are the largest contributors. There is a general rule that assumes you will identify the
“knee of the curve”. In other words, there is often an inflection point where the steepness of
the curve changes significantly. Before the knee, incremental traffic leads to incremental
delays, whereas after the knee of the curve, incremental traffic leads to significant increased
delays.
Once you have identified where the worst bottlenecks are, define policies and filters that give
priority to essential traffic, and limit the rest. The more detail you gather, the more
specifically you can define the filters and policies.
In general, use a common sense approach to managing your network traffic. Analyze your
network thoroughly before making changes. Start with a simple filter and policy, so that
analysis can be done easily. Take measurements and determine if you are getting intended
results without unintended consequences. If so, you can continue to expand the filters and
policies to achieve your traffic management goals.
NOTE A detailed network-wide QoS planning strategy discussion is beyond the scope
of this guide.
General Planning Considerations
Implementing HP-UX IPQoS as part of your overall QoS strategy is an iterative process. As
part of your preparation and to determine how HP-UX IPQoS fits into your larger QoS
(DS-aware) network, you must take several planning steps, including the following:
• Analyze your organization’s needs and goals. Break them down into manageable sizes.
Prioritize them. Define the results needed to happen to meet specific goals.
Chapter 1 29
Page 30

Introduction
Planning for HP-UX IPQoS Deployment
As part of this analysis, you must understand the current factors preventing your
organization from achieving its network performance goals. Then you can better
understand how to use HP-UX IPQoS policies to achieve improvements in network
performance.
• Assess your network traffic. Analyze the baseline data on both your overall network as
well as on your HP-UX hosts.
Understand the typical traffic patterns and bottlenecks in the network, including
determining which traffic is most sensitive to congestion. Measure response times for
critical applications, determine the bottlenecks in response time or performance, and look
at the mix of traffic. Gather data over a long enough time period to show the effects of the
cyclical realities of your environment. Prioritize among the various types of traffic in the
network.
• Review your network topology so that you can plan a strategy for using IP QoS-enabled
systems and DS-aware routers. Determine the network resources available for QoS
management. Determine if you have the types of devices (hosts and routers) and the
capacity on the network to carry out the actions required to meet your business goals.
Decide which systems will be IP QoS-enabled and which routers will be DS-aware.
Minimally, you will need at least one IP QoS-enabled system and at least one DS-aware
router. If your local router is not DS-aware, then it will pass marked packets on to the
next hop without evaluating the DSCP marks. For each DS-aware component, you must
plan an IP QoS strategy and map it into policies.
As part of identifying specific resources for IP QoS deployment follow these steps:
1. Determine key connector devices and locate frequently used paths.
2. Know the resources that are the bottlenecks in these paths.
3. Know which adapters (NICs) on these resources you must specifically apply IP QoS
mechanisms to.
4. Isolate parts of the network that cause problems or need to be managed.
HP-UX Host Specific Planning Considerations
After examining network wide considerations, analyze HP-UX host specific considerations to
help you plan your HP-UX IPQoS implementation.
• Review, classify, and prioritize the outbound traffic HP-UX hosts generate. Determine
any groups into which outbound HP-UX host traffic can be divided. Organize these groups
into differentiated classes of service by determining appropriate classification, metering
and marking behaviors that can then be translated to filter and policy specifications.
Chapter 130
Page 31

Introduction
Planning for HP-UX IPQoS Deployment
• Design and create HP-UX IPQoS configuration files (which include defined filters and
policies) to achieve your identified goals and actions. HP-UX configuration files use filters
to define categories of traffic from packet data fields and use policies to define behaviors to
apply to the filters. Policies are assigned to configured adapters as part of the
configuration file specifics.
Start with the simplest possible cases and build on successful configurations in small
increments toward more complex configurations. Using a process of iteratively building on
successful policies can improve your efficiency in implementing HP-UX IPQoS with the
least amount of risk and potential rework.
You can use the same or similar HP-UX IPQoS configuration files on multiple machines.
Each HP-UX system must have a local configuration file, but you can create one file and
copy it to other systems that have the same or similar requirements. You can then make
modifications as needed.
• Test HP-UX IPQoS configurations on a test network.
Design representative simulation traffic and test specific HP-UX IPQoS configurations.
Analyze and measure the traffic results of the various configurations. Resolve any issues
and adjust the configurations as needed. Build up to a complete set of configurations.
To verify the effectiveness of your configurations use two logical sets of tools: one for
creating a simulated environment, and one for measuring network activity. Network
activity measurements can be segment or device focused, and look at network
performance utilization and throughput. Or alternatively, the measurements can focus on
application performance, such as response time.
HP recommends that testing be done in an isolated test network with simulated traffic.
By using a simulated environment, you can either capture live network traffic and replay
it later, or design specific traffic conditions to analyze. A simulated environment requires
the ability to play back captured or designed traffic onto the network to see the changes
once the test policies are put into effect. For example, use a test tool such as netperf.
Information on netperf can be found at http://www.netperf.org.
• When the test network meets all goals, deploy the HP-UX IPQoS configurations in a
production environment.
• Measure and analyze the effectiveness of your HP-UX IPQoS configurations, on an
ongoing basis. Modify or add HP-UX IPQoS filters and policies to the configurations as
needed. As part of the planning process, formulate metrics to measure the effectiveness of
your HP-UX IPQoS configurations and your overall QoS solution.
Chapter 1 31
Page 32

Introduction
Planning for HP-UX IPQoS Deployment
Chapter 132
Page 33

2 Installing HP-UX IPQoS
This chapter describes acquiring and installing HP-UX IPQoS. It addresses the following
topics:
Chapter 2 33
Page 34

Installing HP-UX IPQoS
• “System Requirements” on page 35
• “Acquiring HP-UX IPQoS” on page 37
• “Installing HP-UX IPQoS” on page 38
• “Verifying the HP-UX IPQoS Installation” on page 40
• “Removing HP-UX IPQoS” on page 41
Chapter 234
Page 35

Installing HP-UX IPQoS
System Requirements
System Requirements
The following are system prerequisites for installing and running HP-UX IPQoS A.01.00.
Supported Hardware
HP-UX IPQoS is supported on the following HP hardware:
• HP 9000 servers (32- or 64-bit)
• HP Integrity servers
Supported Operating Systems
HP-UX IPQoS is supported on the following HP-UX operating systems:
• HP-UX 11i v1
• HP-UX 11i v2 (September 2004 or later)
Disk Space Requirements
The total disk space requirement for HP-UX IPQoS is 3.5MBytes.
NOTE This does not include space used by variable length user files, such as
configuration files or logging output files.
Patch Requirements
The following sections list patch requirements for supported operating systems.
IMPORTANT Since patch information is subject to change, also refer to the most current
available product Release Notes to ensure you have the most current patch
information.
Chapter 2 35
Page 36

Installing HP-UX IPQoS
System Requirements
HP-UX 11i v1 Patch Requirements
The following patches are required on all HP-UX 11i v1 systems running HP-UX IPQoS
A.01.00. The patches listed below are the minimum required patches. If available, use more
recently released patches that supersede the patches listed below. You can download patches
from the HP IT Resource Center patch database at: http://www.itrc.hp.com.
• December 2004 Support Plus Patch Bundle (Quality Pack
GOLDQPK11i)—B.11.11.0412.5
HP-UX 11i v2 Patch Requirements
HP-UX IPQoS A.01.00 does not require any patches for installation on HP-UX 11i v2.
Chapter 236
Page 37

Installing HP-UX IPQoS
Acquiring HP-UX IPQoS
Acquiring HP-UX IPQoS
Follow these steps to download HP-UX IPQoS, free of charge, from HP Software Depot:
Step 1. Go to HP Software Depot at http://www.hp.com/go/softwaredepot
Step 2. Search for HP-UX IPQoS (keyword: IPQoS) and read the information on the HP-UX
IPQoS product information page.
Step 3. Click Receive for Free >> at the bottom of the page.
Step 4. Select the appropriate HP-UX IPQoS release for your operating system version.
Step 5. Enter your registration information and read and accept the Terms and Conditions.
Step 6. Click Download at the bottom of the page and save the HP-UX IPQoS release depot
to a local file on the system, for example: /tmp/IPQoS.depot
Step 7. Use the swlist -d @ /tmp/IPQoS.depot command to verify the depot file is saved
on the system.
Chapter 2 37
Page 38

Installing HP-UX IPQoS
Installing HP-UX IPQoS
Installing HP-UX IPQoS
The following sections describe the HP-UX IPQoS installation steps.
Initial Installation
To install HP-UX IPQoS, follow these steps:
Step 1. Review “System Requirements” on page 35 and ensure the system meets all the
requirements.
Step 2. Download HP-UX IPQoS, as described in “Acquiring HP-UX IPQoS” on page 37.
Step 3. Load HP-UX IPQoS using swinstall. For example, if you saved the software to
/tmp/IPQoS.depot, enter the following command:
#swinstall -s /tmp/IPQoS.depot HPUXIPQOS
Step 4. Reboot the system.
NOTE HP-UX IPQoS includes a kernel-resident module and requires either
a system reboot after installing the product or a careful manual
process.
For procedural information on how to avoid a reboot when starting
HP-UX IPQoS, see “Starting HP-UX IPQoS - Without a Reboot” on
page 51.
Update Installation
To install a newer version of HP-UX IPQoS, when you already have HP-UX IPQoS on the
system, follow these steps:
Step 1. Edit /etc/rc.config.d/ipqos. Set IPQOS=0.
Step 2. Reboot the system.
NOTE For procedural information on how to avoid a reboot when stopping
HP-UX IPQoS, see “Stopping HP-UX IPQoS - Without a Reboot” on
page 53.
Chapter 238
Page 39

Installing HP-UX IPQoS
Installing HP-UX IPQoS
Step 3. Follow steps 2-4 of the preceding procedure (Installing HP-UX IPQoS).
NOTE HP-UX IPQoS uses the standard HP-UX “newconfig” method of preserving the
original files by not overwriting them, but rather by creating files under
“newconfig” directories for new information. Thus, the HP-UX IPQoS
/opt/ipqos/db/ipqosdb.db (the active configuration database) and the
/etc/rc.config.d/ipqos files remain unchanged. New information is placed
into /usr/newconfig/opt/ipqos/db/ipqosdb.db and
/usr/newconfig/etc/rc.config.d/ipqos respectively.
Chapter 2 39
Page 40

Installing HP-UX IPQoS
Verifying the HP-UX IPQoS Installation
Verifying the HP-UX IPQoS Installation
Use the following steps to verify that HP-UX IPQoS installed successfully:
Step 1. View the following log files for error messages:
• /var/adm/sw/swinstall.log
• /var/adm/sw/swagent.log
Step 2. Run swlist -l product HPUXIPQOS to verify that the product is present on the
system.
Chapter 240
Page 41

Installing HP-UX IPQoS
Removing HP-UX IPQoS
Removing HP-UX IPQoS
Follow these steps to remove (un-install) HP-UX IPQoS:
Step 1. Edit /etc/rc.config.d/ipqos. Set IPQOS=0.
Step 2. Reboot the system.
NOTE For procedural information on how to avoid a reboot when stopping
HP-UX IPQoS, see “Stopping HP-UX IPQoS - Without a Reboot” on
page 53.
Step 3. Use the swremove tool and specify the HP-UX IPQoS product name. Run the
following command:
#swremove HPUXIPQOS
Step 4. To verify HP-UX IPQoS is no longer installed on the system, use the following
command:
#swlist -l product HPUXIPQOS
Chapter 2 41
Page 42

Installing HP-UX IPQoS
Removing HP-UX IPQoS
Chapter 242
Page 43

3 Getting Started with HP-UX IPQoS
This chapter provides deployment information to help you get started using HP-UX IPQoS. It
addresses the following topics:
• “HP-UX IPQoS Deployment Overview” on page 45
Chapter 3 43
Page 44

Getting Started with HP-UX IPQoS
• “HP-UX IPQoS Deployment Components” on page 46
• “System Operation” on page 50
Chapter 344
Page 45

Getting Started with HP-UX IPQoS
HP-UX IPQoS Deployment Overview
HP-UX IPQoS Deployment Overview
The following procedure provides a high-level summary of the deployment process for HP-UX
IPQoS.
Step 1. Acquire and install HP-UX IPQoS. See Chapter 2, “Installing HP-UX IPQoS,” on
page 33 for more information.
Step 2. Create an HP-UX IPQoS configuration file. Configuration files are where specific
IPQoS behaviors are defined for an HP-UX system. Configuration files contain the
filters, policies and adapter assignments HP-UX IPQoS uses. See Chapter 4,
“HP-UX IPQoS Configuration Files,” on page 55 for more information.
NOTE The above step describes how to implement the HP-UX IPQoS
strategies your organization has determined are important, not on
determining what these should be. It is beyond the scope of this guide
to recommend specific HP-UX IPQoS policies for your organization.
Step 3. Verify and load your HP-UX IPQoS configuration file, using the HP-UX IPQoS
utility ipqosadmin. See Chapter 5, “Administering HP-UX IPQoS,” on page 79 for
more information. You must have superuser (root) access to run ipqosadmin.
Step 4. Monitor the statistics of the your active HP-UX IPQoS configuration using
ipqosadmin -showstats. See “Showing Statistics” on page 94 in Chapter 5,
“Administering HP-UX IPQoS,” for more information.
Step 5. Repeat steps 2 - 4 as needed.
Chapter 3 45
Page 46

Getting Started with HP-UX IPQoS
HP-UX IPQoS Deployment Components
HP-UX IPQoS Deployment Components
The key administrative components used with HP-UX IPQoS are:
• HP-UX IPQoS configuration files
•HP-UX IPQoS ipqosadmin administration tool
The following sections provide overview information about each of these components.
HP-UX IPQoS Configuration Files
HP-UX IPQoS filters and policies are defined in HP-UX IPQoS configuration files as follows:
— Filters define traffic classes (filter blocks).
— Policies determine behaviors to apply to the defined traffic classes (policy blocks).
— Policies are assigned to configured adapters (NICs) (adapter blocks).
HP-UX IPQoS configuration files are created using a text editor such as vi.
There are no HP-UX IPQoS specific restrictions on the configuration file name or location. HP
recommends that you use a defined convention to locate and name the files in accordance with
your organization’s operational style.
With HP-UX IPQoS you can choose to have policies separate and in distinct configuration
files, or you can combine several conditions in fewer filters and fewer policies in one
configuration file. Consider the tradeoffs between managing a larger number of simplistic
configuration files versus managing fewer configuration files with more complex filters and
policies defined.
When you must add an action by expanding filters and policies, you can either create new
filters and policies or modify existing ones.
The Role of Filters
To prioritize preferred types of traffic, you must first classify the traffic.
Traffic classes are defined in filters. In each filter, you specify attributes such as the source
address or destination transport port number for packets you want the filter to select. A
packet matches a filter if and only if it matches every one of the attributes specified for the
filter.
Chapter 346
Page 47

Getting Started with HP-UX IPQoS
HP-UX IPQoS Deployment Components
The Role of Policies
Policies are used to decide what happens to selected classes of traffic. Policies work to
translate business-level goals into specific operational behaviors. Tailor your policies to
address specific traffic management issues.
HP-UX IPQoS policies can specify reservation bandwidth (dedicated minimal percentage of
available), maximum allowed bandwidth (percentage for non-reserved bandwidth when
available), DSCP field marking, and VLAN priority marking.
The reservation bandwidth rate specifies the rate you want to assure traffic can access when
the network is congested. If you want this rate to increase unbounded during uncongested
periods, do not specify a maximum bandwidth value. If you want to limit the traffic to a
specific rate even when there is no congestion, then specify a maximum bandwidth rate.
The reservation and maximum bandwidth rates assigned to traffic classes must take into
account the total bandwidth available on the local network to which the HP-UX IPQoS system
is attached. The percentage of the reservation bandwidth can not exceed 100% (100%-80Kbps
for HP-UX IPQoS).
General Pseudo-Syntax Example
A high-level overview of the HP-UX IPQoS configuration file syntax follows:
#######
#
# Pseudo-Syntax Configuration File Example
#
filter filter1 {
filter1_attributes
}
filter filter2 {
filter2_attributes
}
policy policy1 {
policy1_attributes
}
policy policy2 {
policy2_attributes
}
adapter lanX {
adapter_attributes
}
adapter lanY {
adapter_attributes
Chapter 3 47
Page 48

Getting Started with HP-UX IPQoS
HP-UX IPQoS Deployment Components
}
#
#####
Simple Configuration File Example
The following is an example of a valid configuration file that prioritizes outbound traffic with
a destination address in the 20.*.*.* network. In this example, outbound traffic on lan0 will
adhere to policy dst20net_p, for traffic matching filter dst20net_f.
########
# File for prioritizing traffic to specific destinations
#
####
# filter selects traffic going to destination addresses in the 20.*.*.* network
##
filter dst20net_f {
dstaddrlo 20.0.0.0
dstaddrhi 20.155.155.155
priority 1
}
####
# For all outbound traffic going to the 20.*.*.* network (traffic that
# matches filter dst20net_f) reserve 50% of lan0’s outbound bandwidth
# and allow up to 90% of lan0’s available bandwidth.
##
policy dst20net_p {
uses dst20net_f
res 50%
max 90%
}
adapter lan0 {
uses dst20net_p
}
####
This simple example illustrates the basic syntax of the configuration file.
For detailed syntax information on HP-UX IPQoS configuration files, see Chapter 4, “HP-UX
IPQoS Configuration Files,” on page 55.
To view examples of valid HP-UX IPQoS configuration files, see Appendix B, “HP-UX IPQoS
Configuration File Examples,” on page 117.
Chapter 348
Page 49

Getting Started with HP-UX IPQoS
HP-UX IPQoS Deployment Components
ipqosadmin Administration Utility
HP-UX IPQoS has one command-line administration utility, ipqosadmin, to use for all
administrative tasks related to HP-UX IPQoS. With ipqosadmin you can:
• Verify, load, and unload HP-UX IPQoS configurations
• Show the current state of HP-UX IPQoS
• Show the active configuration
• Show statistical information on the active HP-UX IPQoS configuration
• Set and show the log level for HP-UX IPQoS kernel messages
You must have superuser (root) privileges to run ipqosadmin.
See Chapter 5, “Administering HP-UX IPQoS,” on page 79 and refer to the manpage
ipqosadmin (1M) for detailed information on using ipqosadmin.
Chapter 3 49
Page 50

Getting Started with HP-UX IPQoS
System Operation
System Operation
This section provides information about relevant HP-UX IPQoS operating states including the
state after initial boot and the state after reboots. It also describes how to start and stop
HP-UX IPQoS without needing to reboot the system.
HP-UX IPQoS Operating States
HP-UX IPQoS operates in one of three possible states. Table 3-1 lists these states.
Table 3-1 HP-UX IPQoS Operating States
State Description
DISABLED HP-UX IPQoS is not running.
ENABLED but NOT FILTERING HP-UX IPQoS is running, but has no loaded
configuration.
ENABLED and FILTERING HP-UX IPQoS is running, and has a loaded
configuration.
State During Normal Operations
During normal operation, HP-UX IPQoS is typically in the ENABLED and FILTERING state
(when you have a configuration loaded) or possibly in the ENABLED but NOT FILTERING state
(when you do not have a configuration loaded). In rare cases, you may want HP-UX IPQoS to
be put into the DISABLED state or to be changed to an ENABLED state from the DISABLED state.
See “Administering HP-UX IPQoS Operating States” on page 83, for information about how to
change HP-UX IPQoS operating states.
State at Initial Boot after Installation
By default, HP-UX IPQoS comes up in the ENABLED but NOT FILTERING state during the
initial system boot process. This is a result of the start-up parameter IPQOS in the
/etc/rc.config.d/ipqos file being set to 1 by default. When IPQOS=1 HP-UX IPQoS is
automatically enabled at boot time. (When IPQOS=0, HP-UX IPQoS comes up in the DISABLED
state.)
Chapter 350
Page 51

Getting Started with HP-UX IPQoS
System Operation
State After Reboot
The HP-UX IPQoS state is preserved (unchanged) after planned and unplanned reboots. If
previously present, the active configuration is also reloaded and thus is preserved.
Start and Stop Scripts
The start and stop scripts for HP-UX IPQoS are located in /sbin/init.d/ipqos_dne and
/sbin/init.d/ipqos. These two scripts are run each time the system boots.
The /sbin/init.d/ipqos_dne script focuses on the HP-UX IPQoS Packet Capturing module
that is inserted on the HP-UX networking STREAMS stack between IP and DLPI. The
/sbin/init.d/ipqos script focuses on the HP-UX IPQoS Engine module.
Of the two scripts /sbin/init.d/ipqos_dne runs first at boot. It prepares the HP-UX IPQoS
Packet Capturing module to be placed on the networking stack once networking is started as
part of the boot process. The /sbin/init.d/ipqos script runs after networking is started and
it sets up the HP-UX IPQoS Engine module. For a brief description and graphical overview of
the architecture of these modules, see “HP-UX IPQoS Architecture” on page 27.
The /sbin/init.d/ipqos_dne and /sbin/init.d/ipqos scripts depend on the value of the
IPQOS parameter in the /etc/rc.config.d/ipqos file as follows:
—If IPQOS=1: At next boot, start script runs.
—If IPQOS=0: At next boot, start script (effectively) does not run, since it exits immediately.
The stop script runs independently of the value of the IPQOS parameter.
NOTE For normal operation leave the IPQOS parameter set to the default value (1).
If however, you want to completely stop HP-UX IPQoS, perform the following:
1. Edit /etc/rc.config.d/ipqos, set IPQOS=0.
2. Reboot the system.
If you then want to (re)-start HP-UX IPQoS, perform the following:
1. Edit /etc/rc.config.d/ipqos, set IPQOS=1.
2. Reboot the system.
Starting HP-UX IPQoS - Without a Reboot
This section describes how to start HP-UX IPQoS without rebooting the system.
Chapter 3 51
Page 52

Getting Started with HP-UX IPQoS
System Operation
Scenarios where you may want to do this include the following:
You do not want to reboot the system and:
— you are installing the software for the first time
— you have stopped HP-UX IPQoS (using the procedure that avoids a reboot) and you wish
to restart HP-UX IPQOS either with the current software or with an updated version of
the software that you have just installed.
To start HP-UX IPQoS without needing to reboot, perform the following steps:
CAUTION You must have experience manually configuring HP-UX networks to use this
procedure.
Step 1. Edit the /etc/rc.config.d/ipqos file. Set the parameter IPQOS=1.
Step 2. Run the following command:
#/sbin/init.d/ipqos_dne start
Step 3. Stop the current networking configuration using ifconfig to down and unplumb all
the IPv4 and IPv6 interfaces. First down any secondary interfaces, then down the
primary interfaces. Then unplumb the interfaces.
Step 4. Restart networking using one or more of the following:
• Run the following command:
#/sbin/init.d/net start
• If using an IPv6-enable system, run the following command:
#/sbin/init.d/net-ipv6 start
• Manually reconfigure any additional networking setup as needed.
Step 5. Run the following command:
#/sbin/init.d/ipqos start
Step 6. Examine the state of HP-UX IPQoS, by running the following command:
#ipqosadmin -state
Chapter 352
Page 53

Getting Started with HP-UX IPQoS
If this is the first time you are starting HP-UX IPQoS after an initial install the
expected state is ENABLED BUT NOT FILTERING.
If this starting of HP-UX IPQoS follows a previous stopping of HP-UX IPQoS
without a reboot, the state is restored to whatever it was when HP-UX IPQoS was
stopped (that is either ENABLED but NOT FILTERING or ENABLED and FILTERING).
If this is after an update or re-installation, HP-UX IPQoS uses the standard HP-UX
“newconfig” method of preserving the original files by not overwriting them, but
rather by creating files under “newconfig” directories for new information. Thus,
the HP-UX IPQoS /opt/ipqos/db/ipqosdb.db (the active configuration database)
and the /etc/rc.config.d/ipqos files remain unchanged. New information is
placed into /usr/newconfig/opt/ipqos/db/ipqosdb.db and
/usr/newconfig/etc/rc.config.d/ipqos respectively.
Stopping HP-UX IPQoS - Without a Reboot
This section describes how to stop HP-UX IPQoS without rebooting the system.
Scenarios where you may want to do this include the following:
You do not want to reboot the system and:
System Operation
— you are updating the software, on a system already running HP-UX IPQoS and you first
must stop HP-UX IPQoS before you can install the update software.
— you want to completely stop (isolate) HP-UX IPQoS, including remove the Packet
Capturing module from your networking stack.
— you want to remove HP-UX IPQoS (using swremove) and you must first completely stop
(isolate) HP-UX IPQoS.
To stop HP-UX IPQoS without needing to reboot, perform the following steps:
CAUTION You must have experience manually configuring HP-UX networks to use this
procedure.
Step 1. Run the following command:
#/sbin/init.d/ipqos stop
Step 2. Stop the current networking configuration using ifconfig to down and unplumb all
the IPv4 and IPv6 interfaces. First down any secondary interfaces, then down the
primary interfaces. Then unplumb the interfaces.
Chapter 3 53
Page 54

Getting Started with HP-UX IPQoS
System Operation
Step 3. Run the following command:
#/sbin/init.d/ipqos_dne stop
NOTE In HP-UX 11i v1 and HP-UX 11i v2, if you have not completed the
#/sbin/init.d/ipqos stop step, you will receive a device busy
message when you run this command. That step must precede
issuing this command.
In HP-UX 11i v1, certain applications may have opened the DLPI
device and not closed it, in which case you get a device busy
message when you run this command. If this happens, you must
identify the application and make it close DLPI, or you will need to
reboot.
Step 4. Restart networking using one or more of the following:
• Run the following command:
#/sbin/init.d/net start
• If using an IPv6-enabled system, run the following command:
#/sbin/init.d/net-ipv6 start
• Manually reconfigure any additional networking setup as needed.
Chapter 354
Page 55

4 HP-UX IPQoS Configuration Files
This chapter explains how to create HP-UX IPQoS configuration files. It addresses the
following topics:
• “Introduction” on page 57
Chapter 4 55
Page 56

HP-UX IPQoS Configuration Files
• “Configuration File Syntax” on page 58
• “Creating an HP-UX IPQoS Configuration File” on page 61
• “Filter Blocks” on page 64
• “Policy Blocks” on page 71
• “Adapter Blocks” on page 76
Chapter 456
Page 57

HP-UX IPQoS Configuration Files
Introduction
Introduction
You activate HP-UX IPQoS on your HP-UX system by creating and loading a configuration
file. You can create configuration files using a text editor, such as vi. As part of creating
configuration files, you define one or more filters and policies, and assign these to configured
adapters.
NOTE HP-UX IPQoS configuration files can be located in any directory; and there are
no restrictions on configuration file names.
Once you have created a configuration file you use the ipqosadmin utility to verify and load
the configuration file into the kernel, and to perform other administrative functions. The
ipqosadmin utility requires superuser permissions. See Chapter 5, “Administering HP-UX
IPQoS,” on page 79 for more information on ipqosadmin.
The rest of this chapter presents general syntax information, a simple example of how to
create a configuration file and also detailed syntax information including the available
attributes for the filter, policy and adapter blocks which make up configuration files.
For a brief summary of configuration file attributes, see Appendix A, “HP-UX IPQoS
Configuration File Attributes: Quick Reference,” on page 113.
To view examples of valid configuration files, see Appendix B, “HP-UX IPQoS Configuration
File Examples,” on page 117.
A sample configuration file is also provided in /opt/ipqos/examples/example.cfg.
Chapter 4 57
Page 58

HP-UX IPQoS Configuration Files
Configuration File Syntax
Configuration File Syntax
This section provides a simple example of a valid HP-UX IPQoS configuration file and several
general rules that apply to HP-UX IPQoS configuration files. For more specific syntax
information, See “Filter Blocks” on page 64, “Policy Blocks” on page 71, and “Adapter Blocks”
on page 76.
A sample configuration file follows. In this example, outbound ftp traffic on lan0 will have
reserved a minimum of 20% of the available bandwidth and up to a maximum of 30% of
available bandwidth. To accomplish this, the example defines the filter manage_ftp_f, which
is used by the policy manage_ftp_p, which is used by (assigned to) lan0.
########
# Sample file for managing outbound ftp traffic
#
####
# all ftp traffic will match the following filter
##
filter manage_ftp_f { #Filter Block
srcportlo 20
srcporthi 21
priority 1
}
####
# For all outbound ftp traffic (that is traffic that matches
# filter manage_ftp_f) reserve 20% of lan0’s outbound bandwidth
# and only allow a maximum of 30% of lan0’s available bandwidth
# to outbound ftp traffic.
##
policy manage_ftp_p { #Policy Block
uses manage_ftp_f
res 20%
max 30%
}
adapter lan0 { #Adapter Block
uses manage_ftp_p
}
####
As seen in the example, information in a configuration file falls into one of three block types,
or is a comment. The three block types are filter, policy and adapter. The purpose of the blocks
is as follows:
— Filter blocks define traffic classes. Keywords identify specific attributes of a filter.
Chapter 458
Page 59

HP-UX IPQoS Configuration Files
Configuration File Syntax
— Policy blocks define how traffic classes will be handled (metered, marked or both).
Keywords identify specific attributes of a policy, including which filters are being used by
a policy.
— Adapter blocks assign policies to specific configured adapters (NICs) on the system.
Adapter names must correspond to PPA names that can be listed by the lanscan
command at the time HP-UX IPQoS is started.
In the syntax of the configuration file, the case-sensitive block keywords filter, policy, and
adapter identify the block type being defined. The string immediately following the block
keyword is the name of the block.
You can define as many of each block type as you need.
You can visually separate blocks using curly brackets or indentation.
Syntax Rules
The following general syntax rules apply to HP-UX IPQoS configuration files:
Name Fields: Names can contain only letters, digits or underscores (_) and must begin with
a letter. Letters are case sensitive.
Numeric Fields: Numeric attributes are treated as decimal unless preceded by “0x” or “0X”,
in which case they are treated as hexadecimal. If a numeric attribute has leading 0 (zero) and
only uses digits between 0-7, it is treated as octal.
Comments: A configuration file can contain comments anywhere in the file. All text following
the pound sign (#) is considered a comment and is ignored through the end of that line. Empty
lines and comment-only lines are ignored.
Line Continuations: Line continuations are not allowed in a configuration file. Each
statement must be complete on a single line. The line length limit is 256 characters.
Visual Organization: You can use curly brackets ({}) in configuration files to help organize
information visually. Indentation and spacing can also be used to organize information
visually. Although text editors such as vi have support for indentation and ensuring
curly-brackets match, the indentation and curly brackets are ignored and bracket level
matching is not enforced.
Error and Consistency Checking: Error checking is enforced on a configuration file
whenever it is being verified or loaded (which includes a verification step). Configuration
error checking detects some, but not all, possible cases of improper configuration attributes.
Any errors found cause an abort and leave the kernel unchanged. HP-UX IPQoS sends error
messages to stderr.
Some common checks include:
Chapter 4 59
Page 60

HP-UX IPQoS Configuration Files
Configuration File Syntax
• Numeric attributes must be valid numbers for their presumed radix, and must be within
the allowable range for the specific attribute.
• Host names must resolve to IP addresses.
• Blocks cannot be nested. The appearance of the keyword (adapter, policy, filter) that
begins a block also implicitly terminates the previous block.
• Adapter names must correspond to PPA names that can be listed by the lanscan
command at the time HP-UX IPQoS is started.
• Filter and policy names must contain only letters, digits, and underscores.
• Filter names must be unique. No two filters can have the same name.
• Policy names must be unique. No two policies can have the same name.
• Filter and policy names are case sensitive. For example, if you defined a filter called
filter1, you cannot refer to the filter as Filter1 in a policy. Filter1 is not equivalent to
nor recognized as filter1.
• The maximum length for filter and policy names is 32 characters.
• You cannot refer to a filter or policy before that object has been defined. That is, forward
referencing is not allowed.
• It is important to assign priorities to filters. Doing so ensures that, in cases where a
packet matches the traffic class specified by more than one filter, the correct filter
preference, indicated by the higher priority assignment, is applied.
• A filter can be attached to multiple policies, but can only be attached to one policy per
adapter.
Since policies cause actions on filters’ traffic classes, only one action (policy) can be
applied to a given traffic class (filter). In other words, there cannot be any ambiguity as to
which policy applies to any packet transmitted from a specific adapter. Specifically, it is
important to remember:
— A filter name can be referenced in multiple policies, but never more than once in a
specific policy.
— A policy name can be referenced on multiple adapters, but never more than once for a
specific adapter.
— No filter can be named in more than one of the policies that any adapter uses.
Chapter 460
Page 61

HP-UX IPQoS Configuration Files
Creating an HP-UX IPQoS Configuration File
Creating an HP-UX IPQoS Configuration File
The following procedure provides a simple example of how to create an HP-UX IPQoS
configuration file.
In this example, outbound traffic on lan0 and lan1 must adhere to the policy
limit_ftp_policy for all traffic that matches the filter limit_ftp_filter. The effective
result of loading this configuration file is to allow outbound ftp traffic at most 25% of the
available network bandwidth on lan0 and lan1 respectively.
Use this procedure as a general guideline and modify as needed for your specific configuration
file.
Step 1. Open a file using a text editor such as vi. For example, at the prompt, enter:
#vi ftp_mgmt.qosconf
Step 2. Within the file, create filter blocks for all the traffic classes you need to define. Add
lines to the file similar to the following:
####
## define a filter called limit_ftp_filter
####
filter limit_ftp_filter {
srcportlo 20
srcporthi 21
priority 1
}
This example defines one filter, limit_ftp_filter. As defined, all ftp traffic will
match this filter.
Step 3. Within the file, create policy blocks for all the actions you need to apply to various
filters. Add lines to the file similar to the following:
####
## define a policy called limit_ftp_policy
####
policy limit_ftp_policy {
uses limit_ftp_filter
max 25%
}
Chapter 4 61
Page 62

HP-UX IPQoS Configuration Files
Creating an HP-UX IPQoS Configuration File
This example defines one policy, limit_ftp_policy. This policy allows outbound
traffic that matches filter limit_ftp_filter a maximum of 25% of the available
network bandwidth of any adapter using this policy.
Step 4. In the file, create adapter blocks for all the adapters you need to assign policies to.
Add lines to the file similar to the following:
####
## define an adapter block for lan0
####
adapter lan0 {
uses limit_ftp_policy
}
####
## define an adapter block for lan1
####
adapter lan1 {
uses limit_ftp_policy
}
The above lines assign the policy limit_ftp_policy to the two adapters lan0 and
lan1.
Step 5. Save and close the file. The file in its entirety looks as follows:
#######start of file
# define a filter called limit_ftp_filter
###
##
####
filter limit_ftp_filter {
srcportlo 20
srcporthi 21
priority 1
}
####
## define a policy called limit_ftp_policy
####
policy limit_ftp_policy {
uses limit_ftp_filter
Chapter 462
Page 63

max 25%
}
####
## define an adapter block for lan0
####
adapter lan0 {
uses limit_ftp_policy
}
####
## define an adapter block for lan1
####
adapter lan1 {
uses limit_ftp_policy
}
#
####end of file
HP-UX IPQoS Configuration Files
Creating an HP-UX IPQoS Configuration File
Step 6. Use ipqosadmin to verify the configuration file is valid. Run the following
command:
#ipqosadmin -verify -f ftp_mgmt.qosconf -verbose
If verification passes and -verbose is specified, HP-UX IPQoS displays the
following message:
#ipqosadmin -verify: Operation succeeded.
Chapter 4 63
Page 64

HP-UX IPQoS Configuration Files
Filter Blocks
Filter Blocks
A filter defines a traffic class. A traffic class is the set of all possible packets that match the
filter. The filter keyword marks the start of a filter block definition. The string immediately
following the filter keyword is the name of the block.
The pseudo-syntax of a filter block is as follows:
filter filtername {
filter_attributes
}
In each filter specify one or more attributes (traffic selection criteria), such as source address
or destination transport port number, that define the traffic class.An outbound packet
matches a filter if and only if it matches all of the attributes specified in the filter. Thus, filter
attributes are AND conditions.
IMPORTANT You do not have to specify every possible attribute for a filter. Omitted
attributes are considered “don’t cares”. You must however, specify at least one
attribute. Filters with no attributes set will cause an error message to be
generated.
You can use more than one filter to define a class of traffic that you want to regulate. For
example, to regulate all traffic being sent to different hosts that are not consecutively
numbered (for example 1.2.3.4 and 1.2.3.6 but not 1.2.3.5), define one filter for each address,
then assign both filters to the same policy.
Packets that do match any specified filter are sent out using a default policy. This policy is
referred to as the implicit default flow. This policy adheres to: a res (reservation)
bandwidth value of 80Kbps; no max (maximum) burst bandwidth value; and no DSCP or
VLAN priority marking.
Filter Attributes
Filter blocks can contain any combination of the attributes described in this section, including
no attributes, except where otherwise noted. Attributes cannot be specified more than once in
a filter.
The following rules apply to filter blocks:
• No default values are used in the syntax below.
• Valid IP addresses must be specified.
Chapter 464
Page 65

HP-UX IPQoS Configuration Files
Filter Blocks
• Attributes ending in lo[w] or hi[gh] must have a numerical value specified, a name is
not allowed.
• If you specify srcaddrlo and not srcaddrhi, or vice-versa, it is equivalent to specifying
both as having the same value. The same is true for dstaddrlo and dstaddrhi,
srcportlo and srcporthi, dstportlo and dstporthi. Essentially, this is the same as
specifying srcaddr, dstaddr, srcport or dstport.
Address and Port Attributes
Specify addresses and port numbers by using the following keywords and syntax:
srcaddrlo[w] addr
Low end of the source address range.
srcaddrhi[gh] addr
High end of the source address range.
dstaddrlo[w] addr
Low end of the destination address range.
dstaddrhi[gh] addr
High end of the destination address range.
srcaddr addr or hostname
Source address. This is equivalent to specifying the same value for both
srcaddrlo and srcaddrhi.
Do not specify this attribute with srcaddrlo or srcaddrhi.
dstaddr addr or hostname
Destination address. This is equivalent to specifying the same value for both
dstaddrlo and dstaddrhi.
Do not specify this attribute with dstaddrlo or dstaddrhi.
addr[ess] addr or hostname
Explicitly creates two filters that otherwise have the same attributes.
Specify this attribute when you want to filter on an address or name, and
you do not need to specify a direction. In one filter, dstaddrlo=dstaddrhi=
addr or hostname. In the other filter, srcaddrlo=srcaddrhi= addr or
hostname.
Do not specify this attribute with srcaddrlo, srcaddrhi, dstaddrlo or
dstaddrhi.
Chapter 4 65
Page 66

HP-UX IPQoS Configuration Files
Filter Blocks
srcportlo[w] number
Low end of the source port number range.
srcporthi[gh] number
High end of the source port number range.
dstportlo[w] number
Low end of the destination port number range.
dstporthi[gh] number
High end of the destination port number range.
srcport number or servicename
Source port. This is equivalent to specifying the same value for srcportlo
and srcporthi. Specify this attribute when you want to specify a single
source port rather than a range.
Do not specify this attribute with srcportlo or srcporthi.
dstport number or servicename
Destination port. This is equivalent to specifying the same value for
dstportlo and dstporthi. Specify this attribute when you want to specify
a single destination port rather than a range.
Do not specify this attribute with dstportlo or dstporthi.
port number or servicename
Explicitly creates two filters that otherwise have the same attributes.
Specify this attribute when you do not need to specify whether the source
host is the client or the server, such as with ftp, or smtp. In one filter,
dstportlo=dstporthi=number or servicename. In the other filter,
srcportlo=srcporthi=number or servicename.
Do not specify this attribute with srcportlo, srcporthi, dstportlo or
dstporthi.
For example, specifying port http/tcp matches web browser and web
server traffic to the filter. Since HP-UX IPQoS only applies to outbound
traffic, if you want to select the host’s outbound web server traffic, specify
srcport http/tcp. If you want to select the host’s outbound browser
traffic, specify dstport http/tcp. If you want to select both kinds of traffic,
specify port http/tcp. Both the srcport and dstport filters will be
created.
Chapter 466
Page 67

HP-UX IPQoS Configuration Files
Filter Blocks
Syntax Rules
The following rules apply to address and port attributes:
• Specify addresses and ports as singles or ranges.
• Specify IP addresses using the dot-notation for IPv4 and colon-notation for IPv6.
The address family of the first specified IP address determines the address family
recognized by the filter. If you specify an IPv4 address the filter matches IPv4 packets.
The same applies for IPv6. You cannot specify both IPv4 and IPv6 addresses in one filter.
If you want to match an address or range regardless of IP format, duplicate the filter and
specify the required address once in IPv4 for one filter and in IPv6 for the other filter.
Attach both filters to the same policy.
NOTE To filter IPv6 traffic, the system must be IPv6-enabled.
• If you specify an address but not a network protocol, then the format of the address is
used to set the network protocol.
• You can specify addresses numerically or by host name. Host names are converted using
the standard name-to-address lookup functions, and are resolved when the configuration
is loaded.
You can specify ports numerically or by the service name. The service name is converted
to a number using /etc/services. The range for valid port numbers is 0-255 inclusive.
• If a host name or service name resolves to more than one address or port, the filter is
automatically duplicated for each address or port. This is referred to as expansion.
If the original filter name is filterX, the set of expanded filters is named filterX_1,
filterX_2 and so on. If filter filterx_1 is also expanded, the set of expanded filters is
named filterX_1_1 and filterX_1_2.
For example, if filterX uses both host names and service names, then filterX is
expanded once to resolve host names to addresses. All resultant filters are expanded
again to resolve service names to port numbers.
• When a port is specified by a service name rather than a number, you can specify the
associated transport protocol on the same line. The shortcut syntax is as follows:
port_service_name/transport_protocol_name
For example: dstport http/tcp
Use this shortcut to avoid expanded filters that would otherwise be created. For example,
specifying dstport http creates dstport http/udp and dstport http/tcp.
Chapter 4 67
Page 68

HP-UX IPQoS Configuration Files
Filter Blocks
NOTE To use this shortcut, the transport protocol specified must be by name, not
by number. For example, specifying dstport http/6 is not allowed.
If a port is specified by a service name without the transport protocol immediately
following it, or if it specified as a number and the shortcut is not applicable, you can
specify the transport protocol value attribute separately, using the protocol attribute
(for example as protocol tcp), If the transport protocol is not specified either with the
service name or as a separate attribute, expanded filters are created for each protocol
number the service name converts to.
Additional Attributes
Additional filter attributes you can specify are listed below. You can combine these attributes
with address, port and priority attributes, or use any of these alone.
protocol n
Table 4-1 lists currently supported protocol assignments.
Table 4-1 Supported Transport Protocol Numbers
xport n
net[proto] n
Transport Protocol
Numbers
6TCP
17 UDP
Same as protocol n above. Synonymous with protocol attribute.
Network protocol number. For example, over Ethernet networks this
specifies the Ethertype frame.
NOTE IEEE and IEEE SNAP formats are similar enough that this
attribute works for both.)
Table 4-2 lists currently supported network protocol assignments.
Protocol
Chapter 468
Page 69

HP-UX IPQoS Configuration Files
Table 4-2 Supported Network Protocol Numbers
Filter Blocks
0x800 IP over Ethernet
0x86DD IPv6 over Ethernet
dscplo[w] n
dscphi[gh] n
dscp n
Network Protocol
Numbers
Low end of DSCP field range. Valid range is 0 to 63 inclusive.
High end of DSCP field range. Valid range is 0 to 63 inclusive.
Specifying both dscplo and dscphi creates a filter that only matches traffic
with DSCP fields within that range. To select all non-default DSCP traffic,
specify dscplo 1 and dscphi 63.
DSCP field value. Valid range is 0-63 inclusive.
This is equivalent to specifying the same value for dscplo and dscphi.
Specify this attribute when you want to specify a single DSCP value rather
than a range.
Do not specify this attribute with dscplo or dscphi.
Protocol
dstphysaddr addr Physical (MAC) address. The addr string must contain only hexadecimal
characters, optionally separated in groups of two by a separator character.
The separator character can be either a colon (:) (the format used by ARP)
or a hyphen (-). The total number of hexadecimal digits in the string must
be less than or equal to 40.
Examples of legal addresses are as follows: 00:00:00:12:34:56,
00-00-00-12-34-56, or 000000123456.
An example of an illegal address is 00:00:00:12:34-56
This address is illegal, because the separator character must be consistent.
Priority Attribute
The priority attribute syntax is as follows:
Chapter 4 69
Page 70

HP-UX IPQoS Configuration Files
Filter Blocks
pri[ority] p
Priority. Valid range is 1 to 2147483647, inclusive.
Use the priority filter attribute to assign relative importance to filters. The lower the
number the higher the priority. Hence, the highest priority is 1.
The priority attribute is only relevant in cases where a packet matches a traffic class in
more than one filter. In such cases, the policy applied to the packet is determined by the policy
using the filter with the highest priority. If the priorities are the same, then the policy
selected is undetermined.
If a packet can match the traffic class specified by more than one filter, assign relatively
higher priorities (lower numeric values) to more restrictive filters and lower priorities to less
restrictive filters. See “Example 3: Packets Can Match Multiple Filters” on page 122 in
Appendix B, “HP-UX IPQoS Configuration File Examples,” for a case that illustrates the
importance of the priority assignment.
If the priority is higher on a less restrictive filter, a warning message is generated. Because
the filter with the lower priority would never be matched, it is not a meaningful filter. In
intersection cases where filters overlap in some attributes, but not all, the presence of
intersecting overlap also generates warning messages on problematic filters.
For all filters where no priority is specified, HP-UX IPQoS assigns an equal lowest possible
priority.
Chapter 470
Page 71

HP-UX IPQoS Configuration Files
Policy Blocks
Policy Blocks
Policies define how HP-UX IPQoS handles outbound matching traffic classes (outbound
packets that match specified filters). The policy keyword marks the start of a policy block
definition. The string immediately following the policy keyword is the name of the block.
The pseudo-syntax of a policy block is as follows:
policy policyname {
policy_attributes
}
The traffic the policy acts on is determined by which filters are used by the policy. A packet
that matches any of the filters used by a policy are handled according to that policy. Thus,
policy attributes are effectively OR conditions.
The actions the policy takes on this traffic are determined by the other policy attributes
specified. You can specify metering (traffic regulation) and marking (DSCP and VLAN)
attributes.
Specify the policy attributes you need and omit all others. Except for uses, which can be
specified as many times as need, all other attributes can only be specified once per policy.
No specific attributes are required. However, HP recommends that you specify at least one
filtername for each policy. Policies that do not include any filtername attributes cause a
warning message to be sent, indicating that the policy is ignored. If any adapter then tries to
use this policy, an error message is sent.
Policy Attributes
Specify policy attributes by using the following keywords and syntax:
uses filtername [filtername...]
Specifies which packets this policy is applied to; that is, any packet that
matches all the filter attributes of any filtername specified.
The filtername specified must already be a defined filter.
Multiple unique filtername attributes can be specified on the same line,
optionally separated by commas. If you run out of room on the current line,
start another line with uses followed by the remaining filtername
attributes you need to specify. You can continue specifying filtername
attributes on as many lines as you need.
You cannot specify the same filtername more than once.
Chapter 4 71
Page 72

HP-UX IPQoS Configuration Files
Policy Blocks
res[ervation] b1[suffix]
Reserves the specified amount of bandwidth, b1[suffix], for outbound
traffic matching any filter used by the policy. Whenever there is less traffic
in this class than the reservation specified, unused bandwidth is available
for other traffic.
The b1 parameter specifies the numeric value of the reservation bandwidth.
The [suffix] parameter can be either a percent sign (%) or one of the
letters k, K, m, or M. The % is mutually exclusive with k, K, m, or M. The %
specifies a percentage of the associated adapter’s allowable bandwidth
capacity.
The valid range for b% is between 0 and 100 inclusive.
The k, K, m, and M options represent a shorthand to avoid typing zeros. Only
one of these options can be specified per instance. The k and K options both
represent 1000 bits/second. The m and M options both represent 1,000,000
bits/second. The range for b[k,K,m or M] is from 0 to the full bandwidth of
the associated adapters. If [suffix] is not specified, b1 is interpreted as
bits/second. For example, the following are all equivalent to 5000
bits/second:
• 5000
• 5k
• 5K
No white space is allowed between b1 and the [suffix].
The default reservation bandwidth if none is specified is 0. When res is 0,
the matching traffic class is always dropped. For traffic classes that you
don’t want to allow on the network, you can either specify res 0, or not
specify a res value and use the default of 0.
The sum of the reservations for all policies associated with a specific adapter
cannot be greater than the adapter’s full bandwidth minus the implicit
default flow’s rate. For example, since the implicit default flow uses
80Kbps, you can reserve only the adapter’s full bandwidth minus the
80Kbps reserved by the implicit default flow.
In the case of VLANs, the aggregate of the reservations of policies of VLANs
that are based on the same physical adapter, and the policies of the base
adapter itself, cannot exceed the speed of the physical adapter minus the
80Kbps reserved by the implicit default flow.
Chapter 472
Page 73

For example, assume lan1 speed is 100Mbps and lan5000 and lan5001 are
based on lan1. The aggregate of the reservations of all policies for lan5000,
lan5001 and lan1 cannot exceed the speed of lan1 (100Mbps) minus
80Kbps.
NOTE Circumstances beyond the control of the HP-UX IPQoS
NOTE Use of the term reservation is unrelated to the same term as
max[imum] b2[suffix]
HP-UX IPQoS Configuration Files
Policy Blocks
software can affect the transmission rate. For example, a hub
or switch might be completely saturated by traffic from other
hosts. As an analogy, think of this software as acting like a
valve on a garden hose controlling the flow of water out the
end. However, if the hose is kinked, the kink controls the flow
even more than the valve does.
used in RSVP or the IETF IntSrv model.
Specifies the maximum allowed bandwidth be limited to b2[suffix] for
traffic matching any filter used by the policy.
Thus, traffic matching any filter used by the policy gets at least as much
bandwidth as the res value specified and if the adapter has spare
bandwidth, the traffic can be sent up to, but not more than, the amount
specified by max.
The b2 parameter specifies the numeric value of the maximum bandwidth.
The [suffix] parameter for the max[imum] attribute uses the same syntax
rules as the [suffix] parameter for the res[ervation] attribute.
No white space is allowed between b2 and the [suffix].
The specified max attribute cannot be less than the specified res attribute.
The minimum value that can be specified is zero, (res must also be zero),
meaning the traffic class is always dropped. You can use this for traffic
classes that you don’t want to allow on the network.
If you do not want HP-UX IPQos to apply a maximum bandwidth allowed
limit to the traffic matching the policy, do not specify the max attribute.
Chapter 4 73
Page 74

HP-UX IPQoS Configuration Files
Policy Blocks
IMPORTANT Traffic regulation is approximate, not exact. Acceptable
IMPORTANT Both res bandwidth and max bandwidth specifications apply
dscp d
Specifies the DSCP value to be set in all matching packets.
This field is carried in the leftmost 6-bits of the TOS field for IPv4 packets,
and in the leftmost 6-bits of the Traffic Class field for IPv6 packets.
Valid values for d can range from 0 to 63 inclusive.
The significance of the value depends on router configuration specifics.
DS-aware router configuration includes a mapping between DSCP values
and per-hop behaviors (PHBs). HP-UX IPQoS does not use the DSCP values
in terms of PHB behavior, its role is solely to set DSCP values.
tolerance is plus or minus 10% of specified res and max rates.
only to first-hop transmission rates and do not imply any sort
of end-to-end bandwidth guarantee.
vpr priority
NOTE Packets transiting administrative boundaries can have their
DSCP fields changed by boundary routers. This is usually
defined in peering agreements between administrations.
DS-aware routing configuration is outside the scope of this guide. For
common mapping suggestions and additional information, refer to RFC
2597 Assured Forwarding PHB Group and RFC 2598 An Expedited
Forwarding PHB.
Specifies the three-bit priority field of the VLAN tag. HP-UX IPQoS
enables you to change the VLAN priority field only, not the VLAN ID field.
Values for priority can range between 0 to 7 inclusive.
VLAN tags are not propagated after the first hop.
Chapter 474
Page 75

HP-UX IPQoS Configuration Files
Policy Blocks
Packets not sent on a VLAN, but that are regulated by a policy that specifies
a VLAN priority, are given a VLAN header. This header contains a VLAN
ID of zero (0) and the specified VLAN priority.
You cannot specify this attribute if the relevant adapter is not a VLAN.
NOTE For HP-UX IPQoS to be able to set the VLAN priority, you
must ensure that the VLAN_PRI_OVERRIDE parameter for that
VLAN is set to IP_HEADER in /etc/rc.config.d/vlanconf.
For more information on HP-UX VLAN usage, refer to Using
HP-UX VLANs available at http://www.docs.hp.com.
Chapter 4 75
Page 76

HP-UX IPQoS Configuration Files
Adapter Blocks
Adapter Blocks
The adapter block lists the policies applied to outbound traffic, on specified adapters. The
adapter keyword marks the start of an adapter block definition. You do not create names for
specified adapters. Adapter names must correspond to PPA names that can be listed by the
lanscan command at the time HP-UX IPQoS is started.
The syntax of an adapter block is as follows:
adapter adaptername {
uses policyname [policyname...]
}
You can only specify one configured adapter per adapter block.
You must specify at least one adapter block in a configuration file.You can specify as many
adapter blocks as you need. Only specified adapters are under HP-UX IPQoS control.
You cannot name the loopback driver in an adapter block. HP-UX IPQoS does not apply to
loopback traffic. If lo0 is specified, an error message is sent.
NOTE On an OLAR-capable system, HP recommends reinstalling a configuration file
using ipqosadmin -load whenever there is a change in the system’s network
adapters. This can be incorporated into existing scripts that handle such
transitions.
Adapter Attribute
Specify the adapter attribute by using the following keyword and syntax:
uses policyname [policyname...]
Specifies which policies are used by this adapter.
The policyname specified must already be defined.
Multiple unique policyname attributes can be specified on the same line,
optionally separated by commas. If you run out of room on the current line,
start another line with uses followed by the remaining policyname
attributes you need to specify. You can continue specifying policyname
attributes on as many lines as you need.
You cannot specify the same policyname more than once.
For example, the following adapter blocks are part of a configuration file:
Chapter 476
Page 77

HP-UX IPQoS Configuration Files
Adapter Blocks
####
adapter lan0 {
uses policy1, policy2, policy3
}
adapter lan1 {
uses policy3, policy4, policy5
uses policy6, policy7
}
####
If the HP-UX host has adapters lan0, lan1, and lan2 configured, then lan2 operates outside
of HP-UX IPQoS control.
Chapter 4 77
Page 78

HP-UX IPQoS Configuration Files
Adapter Blocks
Chapter 478
Page 79

5 Administering HP-UX IPQoS
This chapter primarily explains how to use the ipqosadmin administration utility. It
addresses the following topics:
• “ipqosadmin Overview” on page 81
Chapter 5 79
Page 80

Administering HP-UX IPQoS
• “Administering HP-UX IPQoS Operating States” on page 83
• “Displaying State Information” on page 86
• “Verifying a Configuration File” on page 87
• “Loading a Configuration File” on page 89
• “Unloading a Configuration” on page 91
• “Showing Configuration Information” on page 92
• “Showing Statistics” on page 94
• “Setting and Showing Log Level” on page 96
For quick reference summary information on ipqosadmin, see Appendix C, “ipqosadmin
Quick Reference,” on page 125.
Refer to ipqosadmin (1M) for more detailed information.
Chapter 580
Page 81

Administering HP-UX IPQoS
ipqosadmin Overview
ipqosadmin Overview
HP-UX IPQoS has one command-line administration utility, ipqosadmin. It provides options
for all the administrative tasks you need to perform on HP-UX IPQoS.
ipqosadmin Options and Administrative Actions
The options and associated actions ipqosadmin performs are as follows:
Options: Actions:
-state Shows the current state of HP-UX IPQoS. (This is the default if no option is
specified.)
-verify Verifies a configuration file. (Only verifies, no kernel changes.)
-load (Verifies and if successful) Loads a configuration into the kernel, which
replaces any previous configuration.
-unload Unloads current configuration from the kernel.
-showconfig Shows the active configuration.
-showstats Shows statistics on the active configuration.
-loglevel Sets/shows current logging level for HP-UX IPQoS kernel messages.
ipqosadmin Usage Rules
The following rules apply when using ipqosadmin:
• User messages are sent to stdout and errors are sent to stderr.
• Separate arguments with white spaces (blanks, tabs, or new lines).
• Use a backslash (\) line continuation character to continue command input on multiple
lines.
•The ipqosadmin actions cannot be combined. Specify at most, one of the following, as the
first option immediately after ipqosadmin: -state, -verify, -load, -unload,
-showconfig, -showstats or -loglevel. If no option is specified, the default is
equivalent to specifying -state.
• You can run ipqosadmin from the command line.
Chapter 5 81
Page 82

Administering HP-UX IPQoS
ipqosadmin Overview
You can also control what HP-UX IPQoS configuration is in place at any time through
scripts such as sh, ksh, csh, or perl. The ipqosadmin utility, as a command-line
interface, rather than a graphical user interface, helps facilitate this. Be aware of
message related options when using ipqosadmin in scripts.
The scripts can be submitted to the cron utility. You can use the cron utility to
automatically schedule scripts to load different configuration files at different times of the
day and week. For more information regarding cron jobs and the crontab file format,
refer to the cron (1M) and crontab (1M) manpages.
Chapter 582
Page 83

Administering HP-UX IPQoS
Administering HP-UX IPQoS Operating States
Administering HP-UX IPQoS Operating States
HP-UX IPQoS has three operating states:
• DISABLED
• ENABLED but NOT FILTERING
• ENABLED and FILTERING
During normal operations HP-UX IPQoS is typically in one of the two ENABLED states. In rare
cases, you may want HP-UX IPQoS to be put in the DISABLED state or to be changed to an
ENABLED state from the DISABLED state. This section explains how to administer HP-UX
IPQoS operating states for both the more and less common scenarios.
Using ipqosadmin to Change States
HP-UX IPQoS is in the ENABLED but NOT FILTERING state, until the first configuration is
successfully loaded. Once this occurs, HP-UX IPQoS is in the ENABLED and FILTERING state.
The active configuration does not need to be unloaded before loading a new configuration file.
When a new configuration file is loaded, it replaces the existing configuration file, The state
remains ENABLED and FILTERING. Thus, typically HP-UX IPQoS remains in the ENABLED and
FILTERING state for as long as you are using active configurations.
If you want to unload the active configuration, and thus effectively run with no HP-UX IPQoS
configuration controls, run the following command:
#ipqosadmin -unload
This puts HP-UX IPQoS into the ENABLED but NOT FILTERING state.
If you decide you want to load a configuration file, run the following command:
#ipqosadmin -load -f filename -verbose
This puts HP-UX IPQoS (assuming the load was successful) into the ENABLED and FILTERING
state.
The only ipqosadmin options that can affect the state of HP-UX IPQoS are -load and
-unload. The -state option displays the state, but cannot change the state. The other options
(-verify, -showconfig, -showstats and -loglevel) have no effect on the operating state.
The -load and -unload effects on the state of HP-UX IPQoS can be summarized as follows:
• -load can:
Chapter 5 83
Page 84

Administering HP-UX IPQoS
Administering HP-UX IPQoS Operating States
— change state from ENABLED but NOT FILTERING to ENABLED and FILTERING
— or keep state in ENABLED and FILTERING (while replacing the active configuration
with the newly loaded file)
(If -load fails, state is not changed.)
• -unload can:
— change state from ENABLED and FILTERING to ENABLED but NOT FILTERING
(removing the active configuration)
— or keep state in ENABLED but NOT FILTERING (if there was not an active
configuration to remove)
Disabling/Re-Enabling HP-UX IPQoS
For some scenarios you may want to disable HP-UX IPQoS. For example, as part of a
troubleshooting effort. Or for example, in the case where you want to temporarily prohibit
applications that create/modify HP-UX IPQoS configurations from being able to do so (since in
some cases it is simpler to stop HP-UX IPQoS than to modify the application/scripts).
This section describes how to disable and re-enable HP-UX IPQoS.
Disable: To disable HP-UX IPQoS, run the following command:
#/sbin/init.d/ipqos stop
This accomplishes the following (assuming the command is successful):
— Puts HP-UX IPQoS in the DISABLED state.
— Only works ephemerally, will not propagate across reboots.
— Effectively (though not completely) disables HP-UX IPQoS.
Specifically, it isolates HP-UX IPQoS since it disables the HP-UX IPQoS Filtering
module, however it does not remove the HP-UX IPQoS module that is part of the HP-UX
networking STREAMS stack. For a brief description and graphical overview of the
architecture of these modules, see “HP-UX IPQoS Architecture” on page 27.
If the command fails, examine the displayed error messages to determine the next steps.
Re-Enabling: If you had previously placed HP-UX IPQoS in the DISABLED state (by running
/sbin/init.d/ipqos stop) and want to re-enable HP-UX IPQOS, run the following
command:
#/sbin/init.d/ipqos start
Chapter 584
Page 85

Administering HP-UX IPQoS
Administering HP-UX IPQoS Operating States
If the command is successful it reloads and re-initializes the HP-UX IPQoS Filtering module,
restores the state and configuration information saved at the time HP-UX IPQoS was
disabled (when /sbin/init.d/ipqos stop was run), and sets the log level to the value set in
the IPQOS_LOG_LEVEL parameter in the /etc/rc.config.d/ipqos file.
If the command fails, examine the displayed error messages to determine possible next steps.
Chapter 5 85
Page 86

Administering HP-UX IPQoS
Displaying State Information
Displaying State Information
To determine the state of HP-UX IPQoS, use the -state option of ipqosadmin.
The three possible states are:
— HP-UX IPQoS is DISABLED
— HP-UX IPQoS is ENABLED but NOT FILTERING
— HP-UX IPQoS is ENABLED and FILTERING
The exit status returned to the shell (“$?”) from running ipqosadmin -state is as follows:
— 0: if HP-UX IPQoS is DISABLED
— 1: if an internal error has occurred
— 2: if HP-UX IPQoS is ENABLED but NOT FILTERING
— 3: if HP-UX IPQoS is ENABLED and FILTERING
Syntax
ipqosadmin [-st[ate] [-s[ilent]]]
Option
[-s[ilent]]
Suppresses the message indicating the state of HP-UX IPQoS.
Default: Not specified.
When not specified (the default case) a message is sent to stdout indicating
the state of HP-UX IPQoS.
Example
The following example shows the state of HP-UX IPQoS.
#ipqosadmin -state
HP-UX IPQoS is ENABLED and FILTERING.
#
Chapter 586
Page 87

Administering HP-UX IPQoS
Verifying a Configuration File
Verifying a Configuration File
To verify a configuration file, use the -verify option of ipqosadmin. This option verifies the
specified configuration file for syntactical correctness. It does not load the configuration and it
has no impact on the state of HP-UX IPQoS. If a configuration is active, it continues to be
active even after the -verify of another configuration is run.
If successful, the exit status returned to the shell (“$?”) from running ipqosadmin -verify is
0, otherwise it returns 1.
Syntax
ipqosadmin -v[erify] -f[ile] filename [-verbose]
Options
-f[ile] filename
Specifies the HP-UX IPQoS configuration file to be verified. You can specify
a relative or absolute path for filename.
This is a required argument.
Default: (Not applicable)
If filename is specified as a dash (-) the input file is stdin. In this case you
can specify multiple files to be verified and they will be processed by
ipqosadmin as if they were one configuration file equivalent to
concatenating the individual files in the order specified. For example, you
can specify:
#cat file1 file2 | ipqosadmin -verify -f -
[-verbose]
Informative messages are displayed.
Default: Not specified.
When not specified (the default case) informative messages are not
displayed.
Chapter 5 87
Page 88

Administering HP-UX IPQoS
Verifying a Configuration File
Example
The following example verifies a file; because -verbose is specified, informative messages
are displayed.
#ipqosadmin -verify -f /user1/qosconf_A/qos_1.cfg -verbose
INFO: Optimizing configuration:
INFO: Optimization complete.
INFO: Checking adapter lan0 for overlapping filters...
ipqosadmin -verify: Operation succeeded.
#
Chapter 588
Page 89

Administering HP-UX IPQoS
Loading a Configuration File
Loading a Configuration File
To load a configuration file, use the -load option of ipqosadmin. The -load option first
verifies, then if successful, loads and activates the specified configuration. If successful, -load
results in the HP-UX IPQoS state being ENABLED and FILTERING.
If successful, the exit status returned to the shell (“$?”) from running ipqosadmin -load is 0,
otherwise it returns 1.
IMPORTANT The -load option replaces the current configuration, if there is one. It is not
an additive load.
Syntax
ipqosadmin -l[oad] -f[ile ] <filename> [-verbose][-a[bort]|-c[ontinue]]
Option
-f[ile] filename
Specifies the HP-UX IPQoS configuration file to be loaded. You can specify a
relative or absolute path for filename.
This is a required argument.
Default: (Not applicable)
If filename is specified as a dash (-) the input file is stdin. In this case you
can specify multiple files to be loaded and they will be processed by
ipqosadmin as if they were one configuration file equivalent to
concatenating the individual files in the order specified. For example, you
can specify:
#cat file1 file2 | ipqosadmin -load -f -
[-verbose]
Informative messages are displayed.
Default: Not specified.
When not specified (the default case) informative messages are not
displayed.
Chapter 5 89
Page 90

Administering HP-UX IPQoS
Loading a Configuration File
[-a[bort]]
Warnings are fatal (treated as errors). The verification and load process
fails if any warning messages are generated.
Default: -abort
[-c[ontinue]]
Warnings are sent to stdout, but the presence of warnings alone does not
cause the verification and load process to fail.
Default: Not specified.
NOTE The -abort option and the -continue option are mutually exclusive.
Example
The following example loads a file.
#ipqosadmin -load -f /user1/qosconf_A/qos_1.cfg -verbose
INFO: Optimizing configuration:
INFO: Optimization complete.
INFO: Checking adapter lan0 for overlapping filters...
ipqosadmin -load: Operation succeeded.
#
Chapter 590
Page 91

Administering HP-UX IPQoS
Unloading a Configuration
Unloading a Configuration
To unload a configuration, use the -unload option of ipqosadmin. If you try to display the
configuration you unloaded, it is not visible. If the state was ENABLED and FILTERING, it
changes to ENABLED but NOT FILTERING. If the state was ENABLED but NOT FILTERING, it
remains so.
Use the -unload option when you do not want to operate with any HP-UX IPQoS
configuration.
The exit status returned to the shell (“$?”) from running ipqosadmin -unload (same as for
running ipqosadmin -state) is as follows:
— 0: if HP-UX IPQoS is DISABLED
— 1: if an internal error has occurred
— 2: if HP-UX IPQoS is ENABLED but NOT FILTERING
— 3: if HP-UX IPQoS is ENABLED and FILTERING
Syntax
ipqosadmin -u[nload] [-s[ilent]]
Option
[-s[ilent]]
Suppresses the message indicating the state of HP-UX IPQoS.
Default: Not specified.
Example
The following example unloads the configuration.
#ipqosadmin -unload
HP-UX IPQoS is ENABLED but NOT FILTERING.
#
Chapter 5 91
Page 92

Administering HP-UX IPQoS
Showing Configuration Information
Showing Configuration Information
To show configuration information, use the -sc|-showconfig option of ipqosadmin. Active
configuration information is displayed if HP-UX IPQoS is in the ENABLED and FILTERING
state. In the other states (ENABLED but NOT FILTERING or DISABLED), there is no
configuration information to display.
If successful, the exit status returned to the shell (“$?”) from running ipqosadmin
-showconfig is 0, otherwise it returns 1.
Syntax
ipqosadmin -sc|-showconfig [-t[ext]|-c[onf]]
Options
[-t[ext]]
Displays the configuration in text format.
Default: -text
[-c[onf]]
Displays the configuration in a syntax format usable as valid source for a
configuration file. You can save the display output (redirect from stdout to
a file) for later use as a configuration file. This output format can be used for
backup if your configuration file is accidentally removed or corrupted
Default: Not specified.
NOTE The -text option and the -conf option are mutually exclusive.
Example 1
The following example displays output from ipqosadmin -showconfig when the state is
ENABLED and FILTERING.
#ipqosadmin -showconfig
HP-UX IPQoS is ENABLED and FILTERING
Name: current
Adapter: lan0 (00:10:83:f9:b5:44) Type: Ethernet Speed: 100Mbps
Chapter 592
Page 93

Administering HP-UX IPQoS
Showing Configuration Information
Policy: p0
Reservation: 60%
Max: 95%
Filter: f0
Destination address range: 20.0.0.0 - 20.255.255.255
Priority: 16
Policy: p1
Reservation: 15%
Max: 95%
Filter: f1
Destination address range: 30.0.0.0 - 255.255.255
Priority: 17
#
NOTE The Name: value shown at the beginning of the ipqosadmin -showconfig
output is always current.
Example 2
The following example displays output from ipqosadmin -showconfig when the state is
ENABLED but NOT FILTERING.
#ipqosadmin -showconfig
HP-UX IPQoS is ENABLED but NOT FILTERING.
#
Chapter 5 93
Page 94

Administering HP-UX IPQoS
Showing Statistics
Showing Statistics
To show or reset current statistics on the active configuration, use the -ss|-showstats
option of ipqosadmin. Statistics are displayed if HP-UX IPQoS is in the ENABLED and
FILTERING state. In the other states (ENABLED but NOT FILTERING or DISABLED), there are
no statistics to display.
If successful, the exit status returned to the shell (“$?”) from running ipqosadmin
-showstats is 0, otherwise it returns 1.
Syntax
ipqosadmin -ss|-showstats [<entity>...|-r[eset]]
Options
[<entity>...]
Displays statistics for specified entities.
[-r[eset]]
Valid specifications for <entity> are:
adaptername (for example, lan0)
adaptername/policyname (for example lan0/policy_1
adaptername/policyname/filtername
(for example. lan0/policy_1/filter_a)
If you cannot remember the exact names of specific policies or filters, run
ipqosadmin -showconfig to view the names of the configured adapters,
policies, and filters.
Default: Not specified.
When no entities are specified (the default case), displays statistics for all
configured adapters, policies and filters.
Resets statistics for all adapters, policies, and filters.
Default: Not specified.
NOTE The <entity> option and the -reset option are mutually
exclusive.
Chapter 594
Page 95

Administering HP-UX IPQoS
Showing Statistics
Example 1
The following example displays output from ipqosadmin -showstats when the state is
ENABLED and FILTERING.
#ipqosadmin -showstats
HP-UX IPQoS is ENABLED and FILTERING.
Adapter: lan0 (00:10:83:f9:b5:44) Type: Ethernet Speed: 100Mbps
Policy: p0
Packets: 146583
Bytes: 214768379
Dropped Packets: 0
Dropped Bytes:0
Filter: f0
Packets: 146583
Bytes: 214768379
Policy: p1
Packets: 292589
Bytes: 428593691
Dropped Packets: 0
Dropped Bytes: 0
Filter: f1
Packets: 292589
Bytes: 428593691
#
Example 2
The following example displays output from ipqosadmin -showstats when the state is
ENABLED but NOT FILTERING.
#ipqosadmin -showstats
HP-UX IPQoS is ENABLED but NOT FILTERING.
#
Chapter 5 95
Page 96

Administering HP-UX IPQoS
Setting and Showing Log Level
Setting and Showing Log Level
To set and show the current log level of HP-UX IPQoS kernel messages, use the -log[level]
option of ipqosadmin.
By default, HP-UX kernel messages are sent to /var/adm/syslog/syslog.log.
By default and at reboot, the log level is set to error. Changes to the log level are not
maintained across reboots.
If successful, the exit status returned to the shell (“$?”) from running ipqosadmin -loglevel
is 0, otherwise it returns 1.
Syntax
ipqosadmin -log[level] [<level>]
Option
[<level>]
Sets log level to <level>, and displays <level> as confirmation.
The <level> specified can be one of:
1. none
2. error
3. warn
4. info
5. debug
The value of <level> determines to what level HP-UX IPQoS kernel
messages are logged. The levels above are shown in ascending order. Higher
levels include all messages from lower levels. For example, debug includes
the messages of all the other levels. Specifying none is not recommended.
Default: Not specified.
If <level> is not specified (the default case), the current loglevel is
displayed, there are no changes to loglevel.
Example
The following example sets the log level to warn.
Chapter 596
Page 97

#ipqosadmin -loglevel warn
ipqosadmin -loglevel: Log level = Warning
#
Administering HP-UX IPQoS
Setting and Showing Log Level
Chapter 5 97
Page 98

Administering HP-UX IPQoS
Setting and Showing Log Level
Chapter 598
Page 99

6 Troubleshooting HP-UX IPQoS
This chapter provides procedures to troubleshoot HP-UX IPQoS. It addresses the following
topics:
• “Overview” on page 101
Chapter 6 99
Page 100

Troubleshooting HP-UX IPQoS
• “Troubleshooting Tools” on page 102
• “Troubleshooting Scenarios” on page 104
• “Sample Error and Warning Messages” on page 109
• “Reporting Problems to HP” on page 111
Chapter 6100
 Loading...