

Page 1

Backing Up and Restoring Data on HP-UX EVFS Volumes
Using HP OpenView Storage Data Protector 6.0
Legal Notices................................................................................................................................... 1
Executive Summary .............................................................................................................................. 1
Introduction......................................................................................................................................... 1
Limitations of Native Data Backup and Restore Tools on HP-UX EVFS ......................................................... 1
HP OpenView Storage Data Protector .................................................................................................... 2
Backup and Restore.......................................................................................................................... 2
Full Volume Backup of Encrypted Data to a Tape Device .......................................................................... 2
Restoring the Backed Up Data Created from an HP-UX EVFS Volume on a Tape Device ............................... 4
Performing File Level Incremental Backup of an HP-UX EVFS Volume .......................................................... 5
Restoring the File Level Incremental Backed Up Data to an HP-UX EVFS Volume .......................................... 7
Backing Up Keys of an HP-UX EVFS Volume............................................................................................ 8
Restoring the Backed Up Keys of an HP-UX EVFS Volume ......................................................................... 9
Testing Back Up and Recovery of Data on an HP-UX EVFS Volume Using HP OpenView Storage Data Protector10
Test Configuration Requirements ...................................................................................................... 10
Test Scenario 1.............................................................................................................................. 11
Test Scenario 1A - Full Volume Backup of Encrypted Data from an HP-UX EVFS Volume to a Tape Device11
Test Scenario 1B - Restoring the Backed Up Encrypted Data Created from an HP-UX EVFS Volume on a Tape
Device ...................................................................................................................................... 25
Verifying the Full Backup and Recovery of the Encrypted Data ......................................................... 30
Test Scenario 2.............................................................................................................................. 31
Test Scenario 2A - File Level Incremental Backup of an Encrypted Volume ......................................... 31
Test Scenario 2B - Restoring the File Level Incremental Backup Data to the HP-UX EVFS Volume ........... 47
Test Scenario 3.............................................................................................................................. 51
Test Scenario 3A - Backup of Keys of an HP-UX EVFS Volume.......................................................... 51
Test Scenario 3B - Restoring the Backed Up Keys of an HP-UX EVFS Volume...................................... 54
Verifying the Backup and Recovery of the Keys of an HP-UX EVFS Volume ........................................ 56
Conclusion........................................................................................................................................ 57
Related Information............................................................................................................................ 57
Page 2

Legal Notices
© Copyright 2007 Hewlett-Packard Development Company, L.P.
Confidential computer software. Valid license from HP required for possession, use or copying.
Consistent with FAR 12.211 and 12.212, Commercial Computer Software, Computer Software
Documentation, and Technical Data for Commercial Items are licensed to the U.S. Government under
vendor's standard commercial license.
The information contained herein is subject to change without notice. The only warranties for HP
products and services are set forth in the express warranty statements accompanying such products
and services. Nothing herein should be construed as constituting an additional warranty. HP shall not
be liable for technical or editorial errors or omissions contained herein.
UNIX® is a registered trademark of The Open Group.
Page 3

Executive Summary
For enterprise customers, backing up and restoring data stored on HP-UX Encrypted Volume and File
Systems (EVFS) volumes are critical. However, the available native backup tools such as cpio and dd
pose some limitations. To overcome these limitations and to offer a reliable, easy, and efficient
method to back up and restore data on HP-UX EVFS volumes, HP recommends using the HP
OpenView Storage Data Protector 6.0 (Data Protector) software.
This white paper describes how to back up and restore critical data stored on HP-UX EVFS volumes
using HP OpenView Storage Data Protector. It discusses two successfully tested scenarios for backing
up and restoring data, and one scenario for backing up and restoring keys of the HP-UX EVFS
volumes. It also discusses the limitations of the available native backup tools, such as cpio and dd.
Introduction
HP-UX EVFS protects data at rest (data on disks) by encrypting the data volumes. You can also use
HP-UX EVFS to create an encrypted backup media. It prevents anyone who gains unauthorized
physical access to the storage media from reading or using the data. HP-UX EVFS creates EVFS
volumes, which are pseudo-devices (or virtual devices) layered on Logical Volume Manager (LVM),
Veritas Volume Manager (VxVM), or physical volume devices. The HP-UX EVFS subsystem encrypts the
data written to an HP-UX EVFS volume, and decrypts data read from an HP-UX EVFS volume per the
requirements.
The operations to back up and restore large volumes of encrypted data on EVFS volumes must be
carried out without any loss of critical data, or data corruption. Existing solutions, such as cpio and
dd, which back up and restore data on EVFS volumes do not meet some of the specific backup
requirements, such as backing up of large volumes of data across multiple tapes and incremental
backups. The HP OpenView Storage Data Protector 6.0 (Data Protector), on the other hand, provides
reliable data protection while supporting effective disk image (raw disk) backups. The Data Protector
software also enables you to take full and incremental backup of data.
HP successfully tested the following: full volume backup of encrypted data from an HP-UX EVFS
volume to a tape device; restoring the backed up data from a tape device; file level incremental back
up of data on an HP-UX EVFS volume; restoring the file level incremental backed up data to an HP-UX
EVFS volume; and backing up and restoring keys of an HP-UX EVFS volume. Based on these tests, HP
has devised systematic procedures to perform these tasks using HP OpenView Storage Data Protector.
This white paper describes how to perform these tasks.
The tasks described in this white paper were tested using the Disk Image (rawdisk) Backup and File
System Backup feature supported by Data Protector. The backup media used were tape devices and
file library devices. Disk image backup was used to back up raw encrypted volumes to a tape device.
File system backup was used to perform full and incremental backup of data on an HP-UX EVFS
volume. File system backup was also used to back up the keys of an HP-UX EVFS volume.
Limitations of Native Data Backup and Restore Tools on HPUX EVFS
This section discusses the limitations of native backup tools, such as dd and cpio, when backing up
or restoring data on HP-UX EVFS volumes.
Following are the limitations of using dd to back up and restore data on HP-UX EVFS volumes:
1
Page 4

• In the case of input files, which are larger than the physical size of the tape device, the data
spans across multiple tape devices. In addition, the block size (bs) must be specified
accurately as an exact multiple of the physical device size. Failure to specify the exact block
size can result in data inconsistency, or data overlap. For more information on this limitation,
see dd(1).
• The dd tool does not provide an option to perform an incremental backup operation. As a
result, only the recently updated or changed blocks of data are backed up.
Following are the limitations of using cpio to back up and restore data on HP-UX EVFS volumes:
• The cpio tool does not support the archiving of files with sizes larger than 2 GB, and files
with user IDs or group IDs that are larger than 60 k. Files with user or group IDs greater than
60 K are archived and restored only under the user or group IDs of the current process.
HP OpenView Storage Data Protector
HP OpenView Storage Data Protector is a backup solution that provides reliable data protection and
high accessibility for your fast-growing business data. It offers comprehensive backup and restore
functionality specifically tailored for enterprise-wide and distributed environments. Data Protector is an
effective back up and restore tool for environments that range from a single system to multiple
(thousand) systems at different locations.
The Data Protector cell is the basic management unit in the data protector. It consists of a network
environment with a Cell Manager system, one or more Installation Servers, client systems, and
devices. The Cell Manager and Installation Server can be on the same system (default setting) or on
different systems.
For more information on Data Protector and the features it supports, see the HP OpenView Storage
Data Protector Concepts Guide, available at:
http://www.docs.hp.com
Backup and Restore
A backup is a process that creates a copy of data on the backup media. This copy is stored and kept
for future use in case the original is destroyed or corrupted. In most cases, the source is data on a
disk, such as files, directories, databases, and applications. If the backup is expected to be used for
disaster recovery, it needs to be consistent. Software that actually copies data to the destination is a
backup application. The destination is a backup device, such as a tape drive, with media to which a
copy of the data is written.
A restore is a process that recreates the original data from a backup copy. This process consists of the
preparation and actual restore of data, and some post-restore actions that make that data ready for
use. The source is a backup copy. A restore application is software that actually writes data to a
destination. The destination is usually a disk to which the original data is written.
Full Volume Backup of Encrypted Data to a Tape Device
This section describes how to perform a full volume backup of encrypted data from an HP-UX EVFS
volume to a tape device.
Table 1 lists the source and the target for the full volume backup of encrypted data on HP-UX EVFS
volumes.
2
Page 5

Table 1 Source and Target for Full Volume Backup of Encrypted Data on HP-UX EVFS Volumes.
Source/Target Description
Source HP-UX EVFS volume open for raw
access
Target Tape device
To perform a full volume backup of encrypted data from an HP-UX EVFS volume to a tape device,
complete the following steps:
Step 1 To configure an HP-UX EVFS volume on the source system, complete the following tasks:
1. Create a source LVM volume.
2. Create HP-UX EVFS volume device files by mapping the LVM volume to EVFS.
3. Generate user keys for the HP-UX EVFS volume.
4. Create an Encryption Metadata (EMD) area on the source HP-UX EVFS volume.
Step 2 To create a file system on an HP-UX EVFS volume, complete the following steps:
Note:
The following steps are optional
1. Enable the source HP-UX EVFS volume.
2. Create a file system on the source HP-UX EVFS volume, and mount the file system.
3. To verify if data is backed up properly, create a sample directory with sample files in
the directory on which the source HP-UX EVFS volume is mounted.
4. To unmount the file system on the HP-UX EVFS volume (if the file system exists), enter
the umount command.
Step 3 To open raw access to the HP-UX EVFS volume, complete the following tasks:
1. Disable the HP-UX EVFS volume. You must perform this step before opening the HP-
UX EVFS volume for raw access.
2. To open raw access to the source HP-UX EVFS volume, enter the evfsvol raw
command.
Caution:
After you open the volume for raw access, any entity reading data from the
HP-UX EVFS volume receives encrypted data. Any entity writing data to the
HP-UX EVFS volume writes directly to the underlying disk; EVFS does not
encrypt the text. HP recommends that you use the evfsvol raw command
only when creating encrypted backup media or restoring encrypted backup
media.
Step 4 Back up data from the HP-UX EVFS volume to the target device by using the Disk Image (raw
volume) Backup feature of HP OpenView Storage Data Protector. For more information on
using HP OpenView Storage Data Protector, see the HP Data Protector Software website at:
http://www.hp.com/go/dataprotector
3
Page 6

Step 5 Close raw access to the source HP-UX EVFS volume by entering the evfsvol close
command to begin the procedure to return the volume to its original state.
Step 6 Enable the HP-UX EVFS volume using the evfsvol enable command, and remount the file
system on the HP-UX EVFS volume.
For more information on using HP OpenView Storage Data Protector to perform a full volume
encrypted backup, see Test Scenario 1A. This scenario illustrates the full encrypted backup of raw
data from a raw volume, /dev/evfs/vg01/ldp_raw volume, to a tape device /dev/rmt/0m.
Note:
You must back up the keys of an HP-UX EVFS volume when you back up the
data on HP-UX EVFS volumes. For more information on how to back up
keys of HP-UX EVFS volumes, see Backing Up Keys of an EVFS Volume
Note:
You can also back up and restore data using Data Protector with minimum
manual intervention by specifying pre-exec and post-exec commands.
The pre-exec and post-exec commands can be set for a backup
specification and, as such, executed on the Cell Manager system, or they
can be specified as a backup object option and thus executed on the client
system where the respective Disk Agent is running.
Pre-exec and post-exec script commands can be written as executables or
shell scripts. These are not supplied by Data Protector and must be written
separately by, for example, the backup operator.
.
Note:
To perform a full volume back up of encrypted data, you must specify the
pre-exec and post-exec commands. Pre-exec commands include ensuring
that the HP-UX EVFS volume is configured; unmounting the file systems, if
any; disabling the HP-UX EVFS volume; and opening raw access to the HPUX EVFS volume. Post-exec commands include closing raw access to the
source HP-UX EVFS volume, and enabling and remounting the file system, if
any.
Restoring the Backed Up Data Created from an HP-UX EVFS Volume on a Tape Device
This section describes how to restore the backed up encrypted data (originally created from an HP-UX
EVFS volume) on a tape device.
Table 2 lists the source and the target for the recovery of backed up encrypted data that was
originally created from an HP-UX EVFS volume.
Table 2 Source and Target for Restoring the Backed Up Encrypted Data
Source/Target Description
Source Tape device (stores backed up
encrypted data from an HP-UX EVFS
volume)
4
Page 7

Target HP-UX EVFS volume open for raw
access
To restore the backed up data on a tape device (originally created from an HP-UX EVFS volume) to an
HP-UX EVFS volume by using the HP OpenView Storage Data Protector, complete the following steps:
Note:
You must restore the backed up keys of an HP-UX EVFS volume when you
restore the backed up data on the HP-UX EVFS volumes. For more
information on how to restore the backed up keys of HP-UX EVFS volumes,
see Recovering Keys of an HP-UX EVFS Volume
.
Step 1 Open raw access to the target HP-UX EVFS volume by entering the evfsvol raw
command.
Step 2 Restore the data from the tape device to the target HP-UX EVFS volume by using HP
OpenView Storage Data Protector.
Step 3 Close the raw access to the HP-UX EVFS volume by entering the evfsvol close command
Step 4 Enable the HP-UX EVFS volume, and remount the file system on the HP-UX EVFS volume.
Note:
You need to perform this step only if you want to remount the file system.
For more information on using HP OpenView Storage Data Protector to recover the data backed up
on a tape device by a full volume backup, see Test Scenario 1B. This scenario illustrates the recovery
of data (created by a full volume backup of encrypted data) from a tape device, /dev/rmt/0m, to
an HP-UX EVFS volume, /dev/evfs/vg01/ldp_raw volume, which is open for raw access.
Note:
You can also specify the pre-exec and post-exec commands to restore the
backed up data on a tape device. Specifying the pre-exec commands
includes opening raw access to the target HP-UX EVFS volume. Specifying
the post-exec commands includes closing the raw access to the target HPUX EVFS volume.
Performing File Level Incremental Backup of an HP-UX EVFS Volume
This section describes how to perform a file level incremental backup of an HP-UX EVFS volume using
HP OpenView Storage Data Protector.
You must create either a file library device, or a device that supports file system backup in the
directory mounted on the target HP-UX EVFS volume. This is required because you cannot back up the
data on an HP-UX EVFS volume directly to another HP-UX EVFS volume by using HP OpenView
Storage Data Protector.
Table 3 lists the source and the target for the file level incremental backup of an HP-UX EVFS volume.
5
Page 8

Table 3 Source and Target for a File Level Incremental Backup of an HP-UX EVFS Volume
Source/Target Description
Source HP-UX EVFS volume
Target File library device or a device that
supports file system back up in a
directory on which the HP-UX EVFS
volume is mounted.
To perform a file level incremental backup of an HP-UX EVFS volume, complete the following steps:
Step 1 To create a sample encrypted volume with a file system on the source HP-UX EVFS volume,
complete the following tasks:
1. Create a source LVM volume.
2. Create HP-UX EVFS volume device files by mapping the LVM volume to EVFS.
3. Generate user keys for the HP-UX EVFS volume.
4. Create the EMD area on the source HP-UX EVFS volume.
5. Enable the source HP-UX EVFS volume.
Important:
After encryption and decryption for an EVFS volume is enabled, any entity
reading the data from the HP-UX EVFS volume receives the data in clear
text. You must use normal HP-UX file system permissions and access control
to restrict access to the data.
6. Create a file system on the source HP-UX EVFS volume, and mount the file system.
7. Create a sample directory with sample files in the directory on which the source HPUX EVFS volume is mounted, to verify if the data is backed up and restored properly.
Step 2 To create a sample encrypted volume with a file system on the target HP-UX EVFS volume,
complete the following tasks:
1. Create a source LVM volume.
2. Create the HP-UX EVFS volume device files by mapping the LVM volume to EVFS.
3. Generate user keys for the HP-UX EVFS volume.
4. Create the EMD area on the target HP-UX EVFS volume.
5. Enable the target HP-UX EVFS volume.
6. Create a file system on the target HP-UX EVFS volume, and mount the file system.
Step 3 Ensure that the source and target HP-UX EVFS volumes are enabled.
Step 4 Pass the sample directory with the sample files, where the source HP-UX EVFS volume is
mounted, to the Data Protector. Target is the required file device in the target directory on
which the target HP-UX EVFS volume is mounted.
Step 5 Start the backup session.
6
Page 9

For more information on using HP OpenView Storage Data Protector to perform an incremental
backup of an HP-UX EVFS volume, see Test Scenario 2A. This scenario illustrates the full and the
subsequent incremental backup of encrypted data on an HP-UX EVFS volume.
Note:
You can also specify the pre-exec command to perform a file level
incremental backup. Specifying the pre-exec command includes enabling
the source HP-UX EVFS volume.
Restoring the File Level Incremental Backed Up Data to an HP-UX EVFS Volume
This section describes how to restore backed up data on a file library device in the directory mounted
on an HP-UX EVFS volume (created from an HP-UX EVFS volume) using HP OpenView Storage Data
Protector.
Table 4 lists the source and the target for restoring the file level incremental backed up data to the HPUX EVFS volumes.
Table 4 Source and Target for Restoring File Level Incremental Backed Up Data to on HP-UX EVFS Volume
Source/Target Description
Source File library device or a device that
supports file system back up in a
directory on which the HP-UX EVFS
volume is mounted.
Target HP-UX EVFS volume
The HP OpenView Storage Data Protector receives the backed up data in clear text from the source
HP-UX EVFS volume, and the original HP-UX EVFS volume (target) re-encrypts the data.
To successfully restore the file level incremental backed up data to an HP-UX EVFS volume (originally
created from another HP-UX EVFS volume) using HP OpenView Storage Data Protector, complete the
following steps:
Step 1 Ensure that the source and target HP-UX EVFS volumes are enabled.
Step 2 Restore the data from the source to the target HP-UX EVFS volume by using HP OpenView
Storage Data Protector.
Note:
You can also specify the pre-exec command to restore the file level
incremental backed up data. Specifying the pre-exec command includes
enabling the target HP-UX EVFS volume.
7
Page 10

Backing Up Keys of an HP-UX EVFS Volume
This section describes how to back up the keys of an HP-UX EVFS volume by using HP OpenView
Storage Data Protector.
EVFS uses symmetric volume encryption keys to encrypt the volume data. EVFS also uses public and
private keys to encrypt the volume encryption keys, and it uses passphrases to encrypt private keys.
Hence, it is critical to back up the keys along with the data. The keys that are backed up include the
public keys, private keys, and passphrase files in the default key storage directory
(/etc/evfs/pkey).
Note:
You must back up the keys of an HP-UX EVFS volume when you back up the
data on HP-UX EVFS volumes. However, for security reasons, HP
recommends that you back up the keys of an HP-UX EVFS volume to a
backup medium, which is different from the backup medium on which the
data is backed up.
Table 5 lists the source and the target for the backup of keys of an HP-UX EVFS volume.
Table 5 Source and Target for the Backup of Keys of an HP-UX EVFS Volume
Source/Target Description
Source Key directory structure on the client
system (where HP-UX EVFS is
configured)
Target Tape device or a file library device
To back up the keys of an HP-UX EVFS volume by using HP OpenView Storage Data Protector,
complete the following steps:
Note:
You must back up the keys whenever the keys are modified.
Step 1 To create a sample HP-UX EVFS volume, complete the following tasks:
(This step is not necessary if the source HP-UX EVFS volume already exists with the keys.)
1. Create a source LVM volume for the HP-UX EVFS volume.
2. Create HP-UX EVFS volume device files by mapping the LVM volume to EVFS.
3. Generate user keys for the EVFS volume.
Step 2 Back up the keys of the HP-UX EVFS volume to the tape, or a file library device by using HP
OpenView Storage Data Protector. For more information on using HP OpenView Storage Data
Protector, see the HP Data Protector Software website at:
http://www.hp.com/go/dataprotector
For more information on using HP OpenView Storage Data Protector to back up keys of an HP-UX
EVFS volume, see Test Scenario 3A.
8
Page 11

Restoring the Backed Up Keys of an HP-UX EVFS Volume
This section describes how to restore the backed up keys of an HP-UX EVFS volume by using HP
OpenView Storage Data Protector.
The backed up keys that are restored include public keys, private keys, and passphrase files in the
default key storage directory (/etc/evfs/pkey). HP recommends that you restore the backed up
keys after you restore the backed up data on an HP-UX EVFS volume.
Note:
Restore the passphrase files only if you are restoring the data back to the
system from which the data was backed up. If you are restoring the data to
a different system, you must create new passphrase files.
Table 6 lists the source and the target for the recovery of the backed up keys of an HP-UX EVFS
volume.
Table 6 Source and Target for the Recovery of Backed Up Keys of an HP-UX EVFS Volume
Source/Target Description
Source Tape device or a file library device
Target Key directory structure on the client
system (where HP-UX EVFS is
configured)
To restore the backed up keys of an HP-UX EVFS volume by using HP OpenView Storage Data
Protector, complete the following steps:
Step 1 To create a sample HP-UX EVFS volume, complete the following tasks (This step is not
necessary if the HP-UX EVFS volume already exists):
1. Create a source LVM volume for the HP-UX EVFS volume.
2. Create HP-UX EVFS volume device files by mapping the LVM volume to EVFS.
Step 2 Restore the keys from the backup medium to the required directory on the client system
by using HP OpenView Storage Data Protector. For more information on using HP OpenView
Storage Data Protector, see the HP Data Protector Software website at:
http://www.hp.com/go/dataprotector
You can also restore the backed up data to the target client system after restoring the keys.
For more information, see Restoring the Backed Up Encrypted Data Created from an HP-UX
EVFS Volume on a Tape Device, or Restoring the File Level Incremental Backup Data to an HPUX EVFS Volume). However, the keys must not be generated in the target client system. The
restored keys must be used (instead of the generated keys) to enable the HP-UX EVFS
volumes.
Note:
Restore the passphrase files only if you are restoring the data back to the
system from which the data was backed up. If you are restoring the data to
a different system, you must create new passphrase files.
9
Page 12

For more information on using HP OpenView Storage Data Protector to recover the backed up keys of
an HP-UX EVFS volume, see Test Scenario 3B.
Testing Back Up and Recovery of Data on an HP-UX EVFS Volume Using HP OpenView Storage Data Protector
HP successfully tested the following scenarios to validate the effective backup and recovery of data on
HP-UX EVFS volumes by using HP OpenView Storage Data Protector:
• Test Scenario 1
To verify the full volume backup of encrypted data from an HP-UX EVFS volume to a tape device,
and the recovery of data from the backup tape device to an HP-UX EVFS volume by using HP
OpenView Storage Data Protector.
Note:
If the volume size is greater than the tape size, the data spans across
multiple tapes. For more information, see Test Scenario 1A.
• Test Scenario 2
To verify the file level incremental backup and recovery of data from an HP-UX EVFS volume to a
disk partition that is also an encrypted volume, by using HP OpenView Storage Data Protector.
• Test Scenario 3
To verify the backup and recovery of keys of an HP-UX EVFS volume, by using HP OpenView
Storage Data Protector.
Test Configuration Requirements
This section discusses the test configuration requirements to replicate the scenarios to validate the
effective backup and recovery of data on HP-UX EVFS volumes.
Table 7 lists the software requirements to replicate the tests for Scenario 1 and Scenario 2.
Table 7 Test Software Configuration
Product Configuration Used
Data Protector HP OpenView Storage Data Protector
A.06.00
Data Protector Cell Manager Version: 6.0
EVFS
Table 8 lists the system requirements to replicate the tests for Scenario 1 and Scenario 2
Table 8 System Requirements
Product System Requirement
HP-UX Encrypted Volume and File System (EVFS)
A.01.00.01
10
Page 13

Data Protector
Cell Manager
Client System
(Disk Agent and
Media Agent)
Backup Medium
Test Scenario 1
HP 9000 System running HP-UX 11i v2
Integrity System running HP-UX 11i v2
Test Scenario 1
Test Scenario 2
Test Scenario 3
Tape device: HP:C7438A
Tapes used :DDS-2 and DDS-4
File library device in the directory on which
the target HP-UX EVFS volume is mounted.
Tape device or file library device
Test Scenario 1A - Full Volume Backup of Encrypted Data from an HP-UX EVFS Volume to a Tape Device
This scenario illustrates the steps performed when successfully testing a full volume backup of
encrypted data from an HP-UX EVFS volume to a tape device, by using HP OpenView Storage Data
Protector.
Table 9 lists the sample source and target in Test Scenario 1A.
Table 9 Sample Source and Target for Test Scenario 1A
Source/Target Description
Sample Source
Sample Target
Encrypted volume that is enabled for raw access,
/dev/evfs/vg01/ldp_raw volume on the
client system, evfs2.hp.com. The mount point in
this scenario is /dp_raw.
The tape device that is mounted on
/dev/rmt/0m
To perform a full volume backup of encrypted data using HP OpenView Storage Data Protector,
complete the following steps:
Step 1 To create an EVFS volume on the client system (source), evfs2.hp.com, complete the following
tasks:
1. To create an LVM volume of size 5 GB, enter the following command:
11
Page 14

$ lvcreate -L 5120 -n ldp_raw vg01
The following output is displayed:
Logical volume "/dev/vg01/ldp_raw" has been successfully created with
character device "/dev/vg01/rldp_raw".
Logical volume "/dev/vg01/ldp_raw" has been successfully extended.
Volume Group configuration for /dev/vg01 has been saved in
/etc/lvmconf/vg01.conf
2. To map the LVM volume to an HP-UX EVFS volume, enter the following command:
$ evfsadm map /dev/vg01/ldp_raw
The following output is displayed:
Volume "/dev/vg01/ldp_raw" has been successfully mapped to EVFS volume
"/dev/evfs/vg01/ldp_raw"
Step 2 To enable the HP-UX EVFS volume on the source client system, complete the following tasks:
1. To generate user keys for the HP-UX EVFS volume, enter the following command:
$ evfspkey keygen -p
The system prompts for the passphrase. Enter the passphrase and confirm it.
Enter passphrase:
Re-enter passphrase:
The following output is displayed:
Public/Private key pair "root.root" has been successfully generated
2. To create an EMD area, enter the following command:
$ evfsvol create /dev/evfs/vg01/ldp_raw
The system prompts for the owner passphrase. Enter the owner passphrase.
Enter owner passphrase:
The following output is displayed:
Encrypted volume "/dev/evfs/vg01/ldp_raw" has been successfully created
3. Enable the HP-UX EVFS volume by entering the evfsvol enable command, as follows:
$ evfsvol enable /dev/evfs/vg01/ldp_raw
The system prompts for the user passphrase. Enter the user passphrase.
Enter user passphrase:
The following output is displayed:
Encrypted volume "/dev/evfs/vg01/ldp_raw" has been successfully enabled
Step 3 To create a file system on the HP-UX EVFS volume, enter the following command:
$ newfs -F vxfs /dev/evfs/vg01/rldp_raw
The following output is displayed:
5242360 sectors, 5242360 blocks of size 1024, log size 16384 blocks
largefiles supported
version 6 layout
12
Page 15

Step 4 To create a sample directory to mount the HP-UX EVFS volume, enter the following command:
$ mkdir /dp_raw
Step 5 To mount the file system, enter the following command:
$ mount -F vxfs /dev/evfs/vg01/ldp_raw /dp_raw
Step 6 Create sample files in the directory on which the source HP-UX EVFS volume is mounted. In
this example, 5.3 GB of data is copied to the /dp_raw directory, as illustrated in the
following directory listing:
$ ll /dp_raw
drwxr-xr-x 2 root root 96 Dec 18 11:19 lost+found
-rw-rw-rw- 1 root sys 5349361664 Dec 18 15:52 temp.tar
The following output is displayed:
total 10447988
Step 7 To unmount the file system, enter the following command:
$ umount /dp_raw
Step 8 To disable the HP-UX EVFS volume, enter the following command:
$ evfsvol disable /dev/evfs/vg01/ldp_raw
The system prompts for the user passphrase. Enter the user passphrase.
Enter user passphrase:
The following output is displayed:
Encrypted volume "/dev/evfs/vg01/ldp_raw" has been successfully
disabled
Step 9 To open raw access to the HP-UX EVFS volume, enter the following command:
$ evfsvol raw /dev/evfs/vg01/ldp_raw
The following output is displayed:
"/dev/evfs/vg01/ldp_raw"?
Raw access returns encrypted data to the user.
Answer [yes/no]:yes
Successfully enabled raw access to EVFS volume
"/dev/evfs/vg01/ldp_raw"
Are you sure you want to enable raw access to
Step 10 To ensure that the HP-UX EVFS volume is open for raw access, enter the following command
and check the state of the HP-UX EVFS volume:
$ evfsadm stat /dev/evfs/vg01/ldp_raw
The following output is displayed:
orr owr odr oer
----- EVFS Volume Name -----|--- State ---|----------------
/dev/evfs/vg01/ldp_raw raw 0 0 0 0
----- EVFS Volume Name -----|--- State ---|--------------- Counters -------------|
bpr bpw bpd bpe
/dev/evfs/vg01/ldp_raw raw 2728 4670435 2704 4683083
Queues --------------|
13
Page 16
kbpsr kbpsw dkbps ekbps
----- EVFS Volume Name -----|--- State ---|---------------- Rates ---------------|
/dev/evfs/vg01/ldp_raw raw 209 18 676 90
Step 11 Connect to Data Protector Cell manager. To connect to the GUI version of the
HP OpenView Storage Data Protector, rlogin to the evfs6.hp.com system (system on which the
data protector cell manager is installed), and invoke the required path
(/opt/omni/bin/xomni) for the cell manager, as shown in the following example:
evfs6# export DISPLAY=<hostname>:0.0
evfs6# /opt/omni/bin/xomni
Starting GUI...
Please wait, this may take some time...
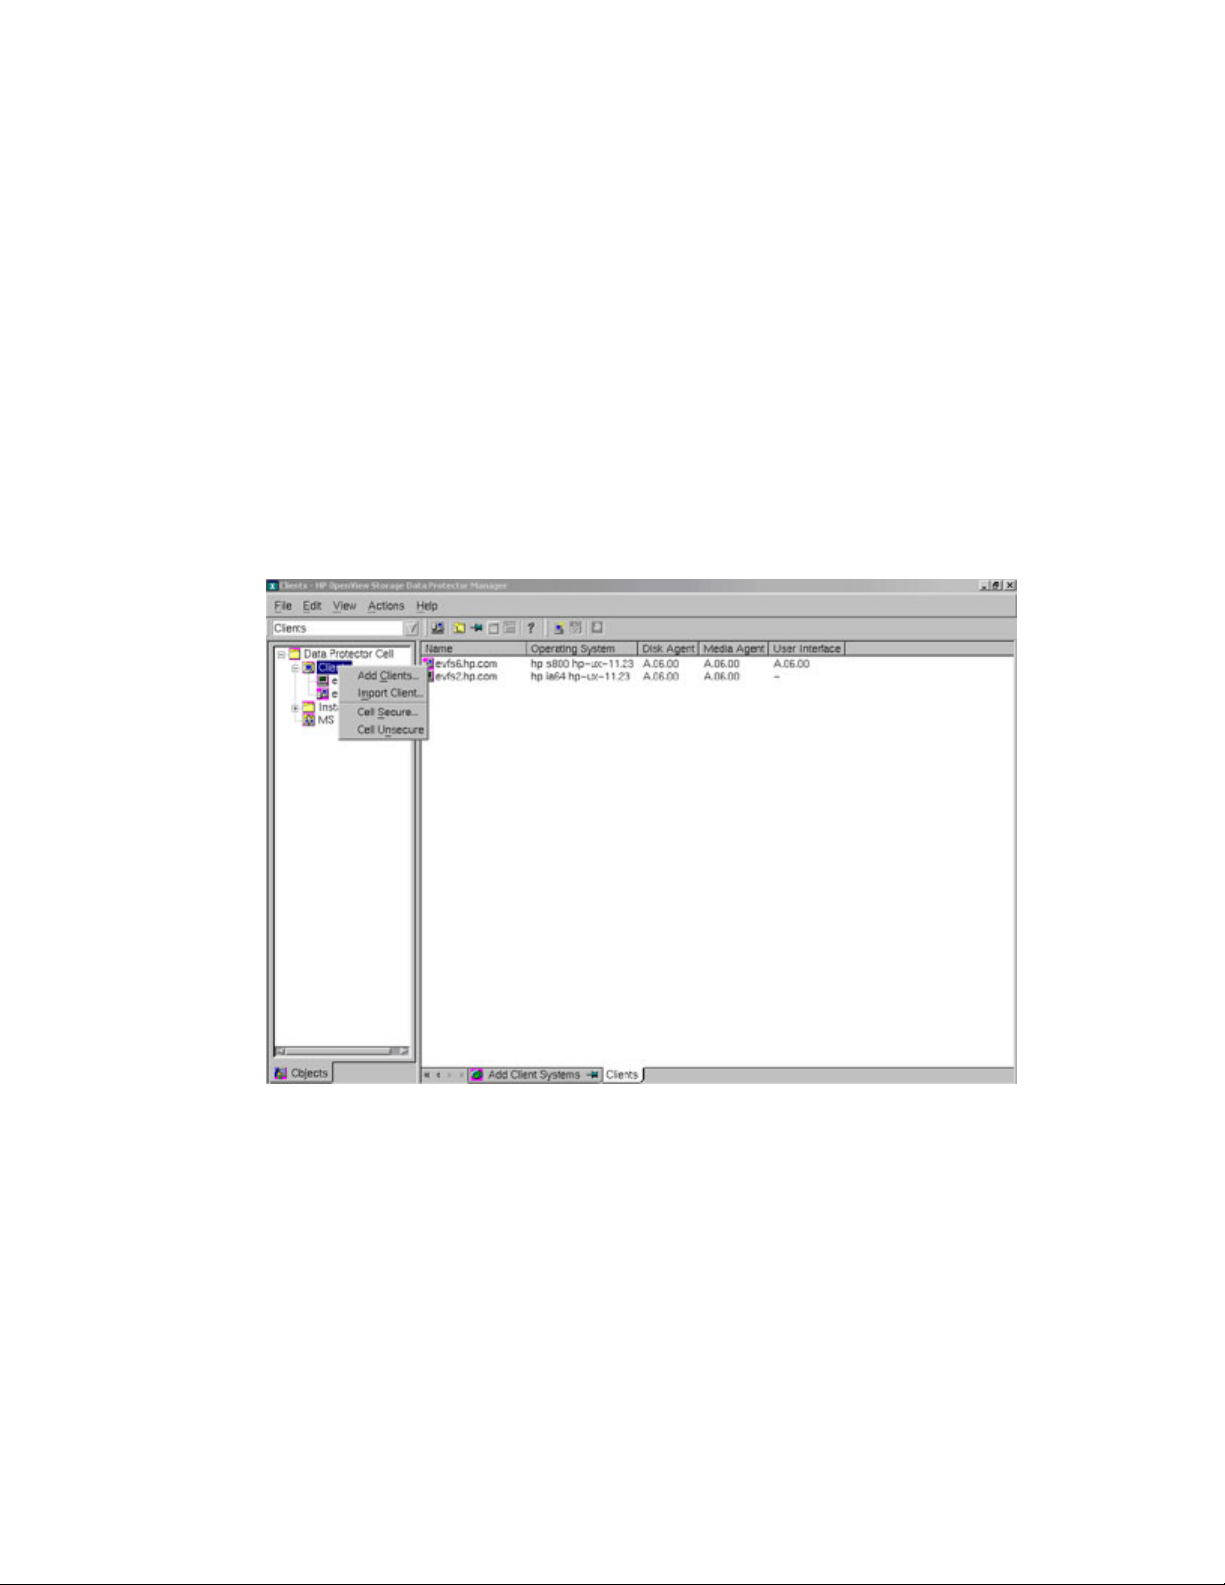
Step 12 To add the source system, evfs2.hp.com, as client to the HP OpenView Storage Data
Protector Cell Manager, complete the following tasks:
1. Select Clients in the Data Protector Cell Manager Context List.
2. Right click on Clients in the left pane, and select Add Clients, as shown in the following
figure:
3. Enter the client name, and select Add to add the client system, as shown in the following
figure:
14
Page 17
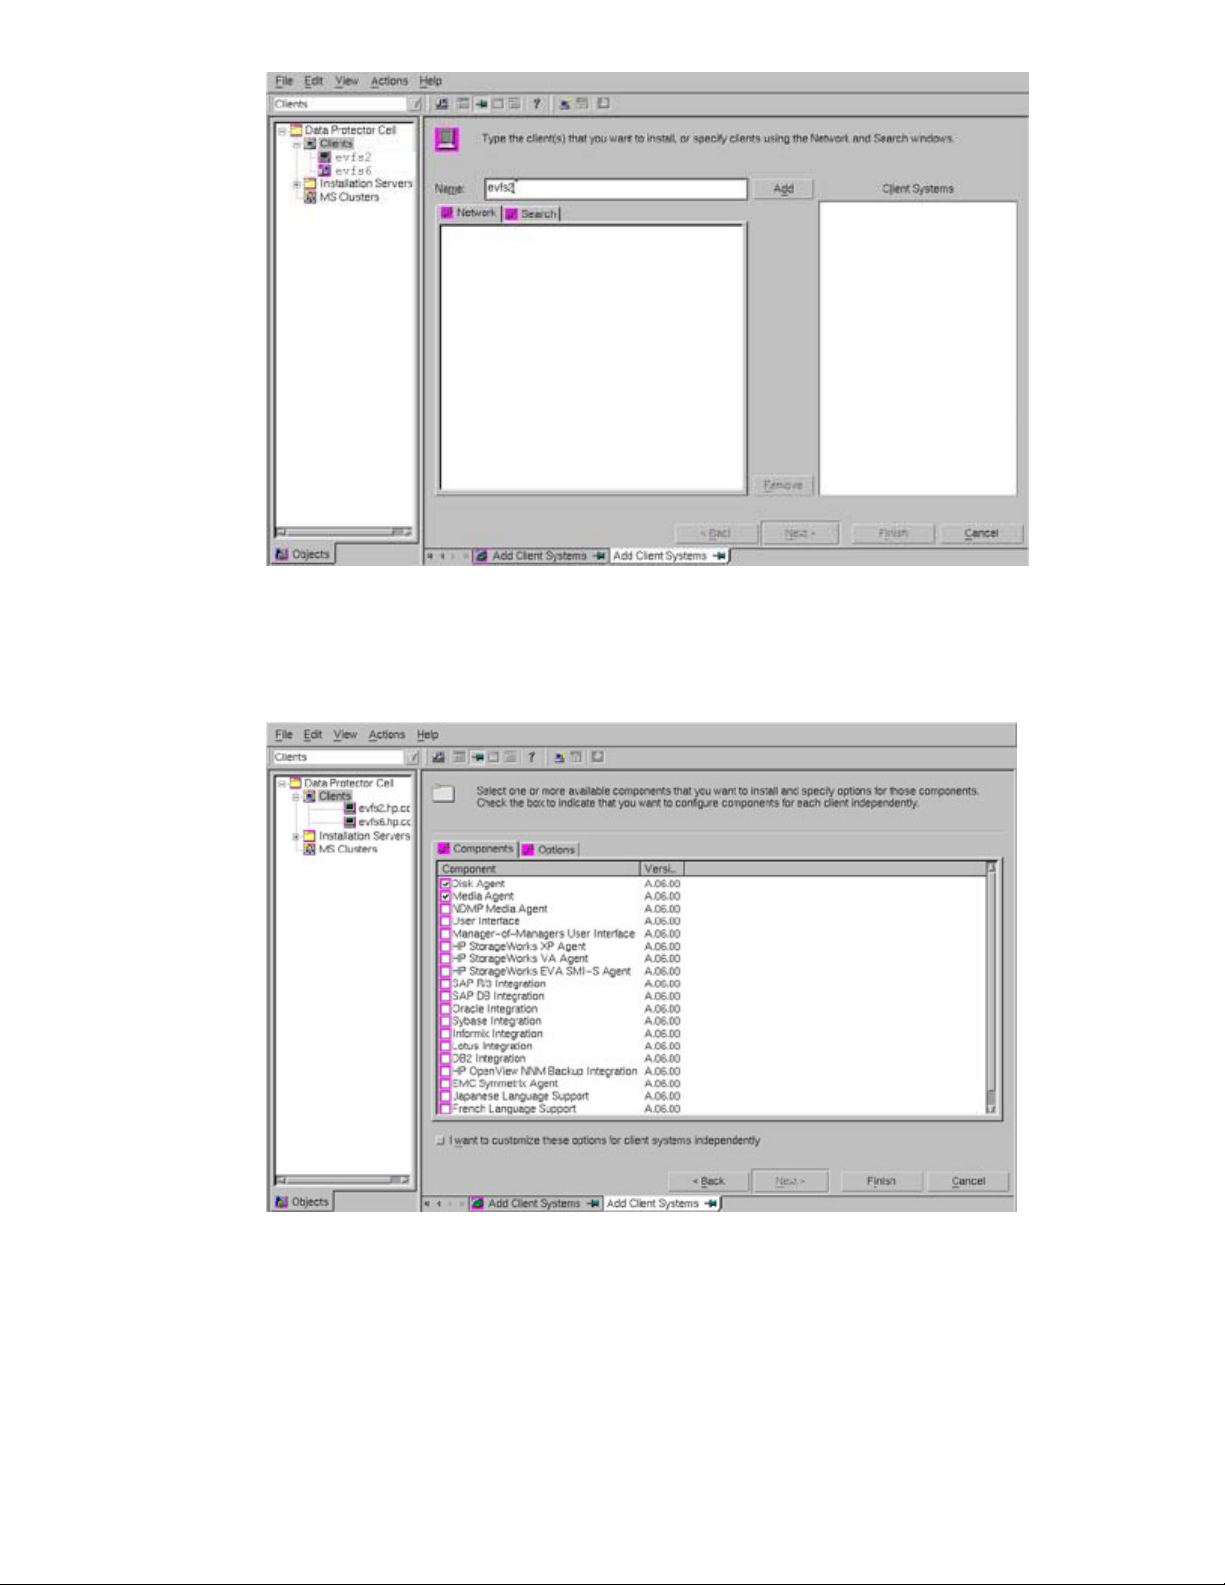
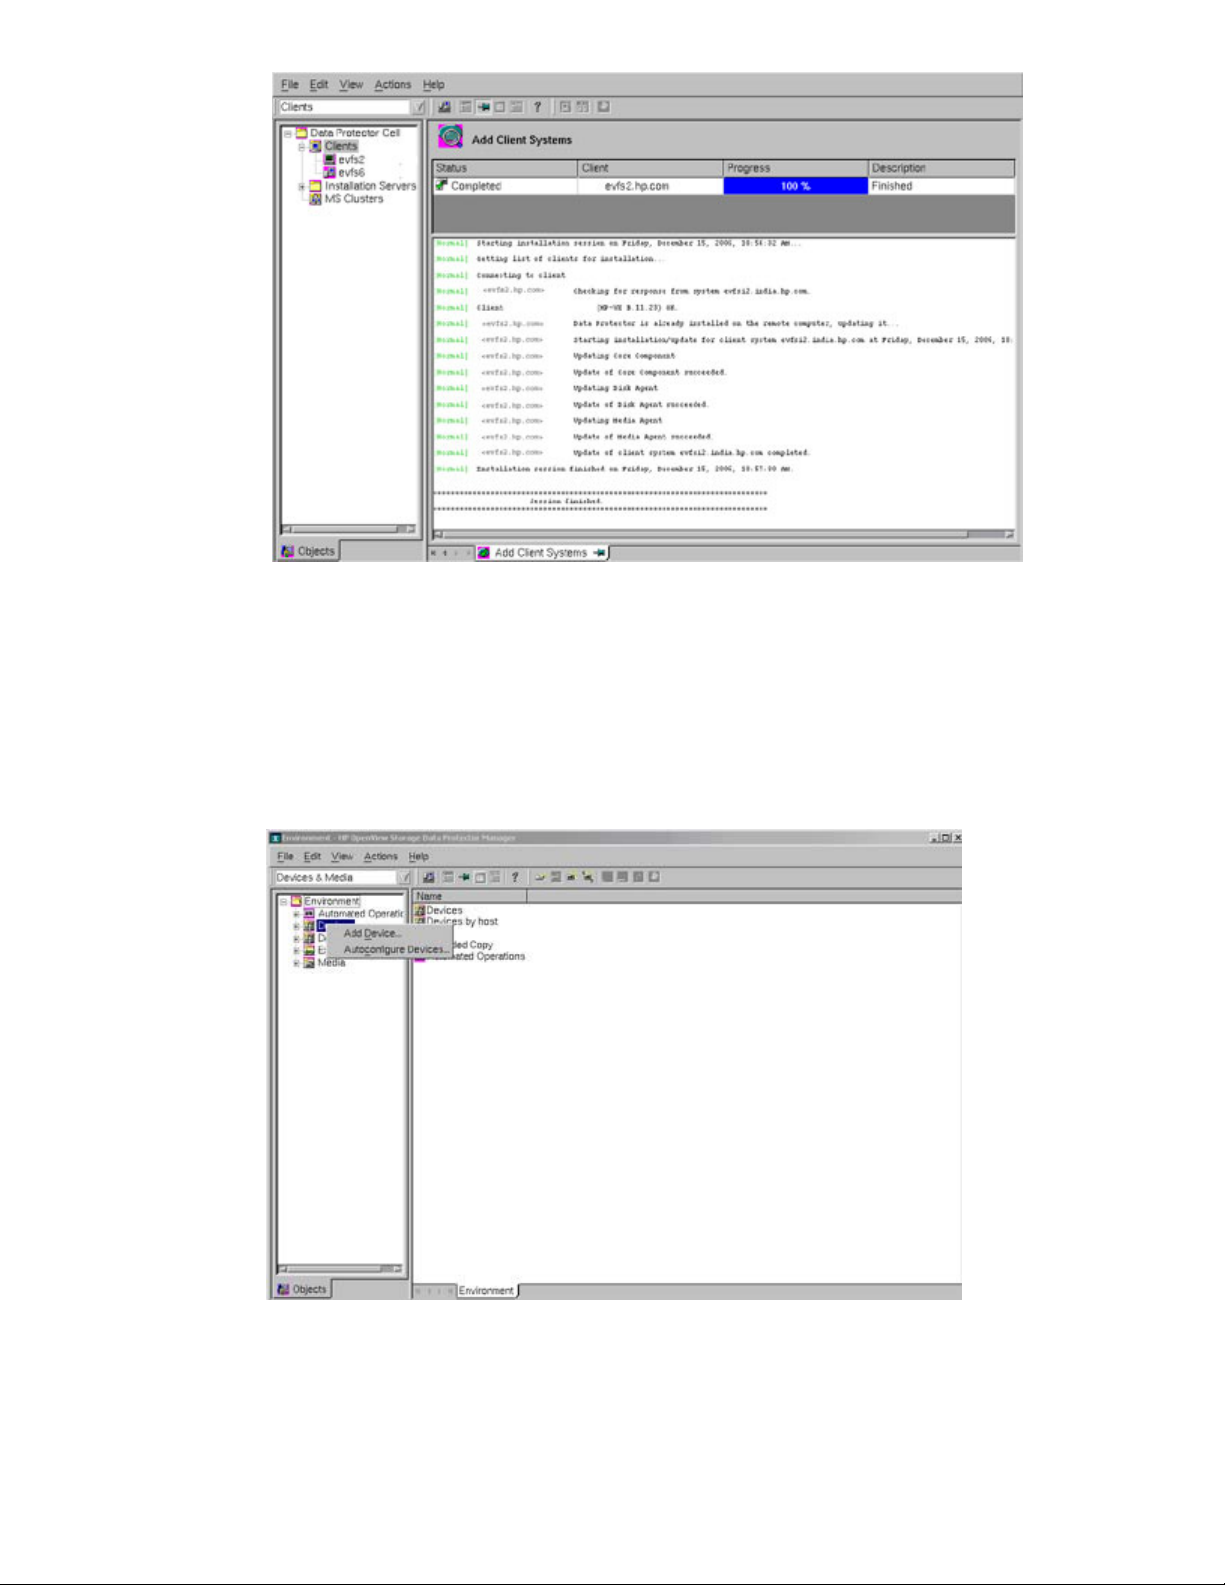
4. Select the components that must be installed on the client system, as shown in the
following figure. In this example, the Disk Agent and Media Agent are installed on the
client system.
5. Select Finish to complete installation of the required components on the client system.
15
Page 18
Step 13 Connect the tape device to the client system, evfs2.hp.com, and insert the tape.
Step 14 To auto configure, scan and format the tape device that is connected to the client system
using HP OpenView Storage Data Protector, complete the following tasks:
1. Select Devices & Media in the Data Protector Cell Manager Context List.
2. Right-click Devices in the left pane, and select Autoconfigure Devices, as shown in the
following figure.
3. Select the client system to which the tape device is connected, as shown in the following
figure:
16
Page 19

4. Select the backup devices (tape device) to be auto configured, as shown in the following
figure:
5. Specify the additional Data Protector options to complete auto configuring the tape
device, as shown in the following figure:
17
Page 20

6. Scan the configured tape device, as shown in the following figure:
7. Specify the additional Data Protector options for scanning the tape device, as shown in
the following figure:
18
Page 21

8. Format the tape device.
Step 15 To perform a full raw volume backup of the HP-UX EVFS volume to the tape, complete the
following tasks:
1. Select Backup in the Data Protector Cell Manager Context List, as shown in the following
figure.
2. In the left scoping pane, expand Backup Specifications.
3. Right-click Filesystem, and then select Add Backup, as shown in the following figure:
19
Page 22

4. In the Create New Backup dialog box, select the required template from the list of
available templates, as shown in the following figure.
5. You can skip the following steps in the wizard that specify the properties of the backup
by selecting Next. However, you must specify the backup device in the Destination
property page, as shown in the following figure:
20
Page 23

6. In the Backup Object Summary page, select Manual add..., as shown in the following
figure.
7. In the Select Backup Object page, select Disk Image Object option, and click Next, as
shown in the following figure:
21
Page 24

8. In the General Selection page, select the client with the disk image that must be backed
up, as shown in the following figure:
9. In the General Object Options property page, you must specify the options for reporting,
data protection, and catalog protection, as shown in the following figure. You can also
specify the pre-exec and post-exec scripts.
22
Page 25

10. Click Next.
11. In the Disk Image Object Options property page, specify the disk image section,
/dev/evfs/vg01/rldp_raw, which must be backed up.
To specify the raw logical volume section, you must use the following format:
/dev/vg<number>/rlvol
For example, the EVFS volume in this setup is specified as follows:
/dev/evfs/vg01/rldp_raw
The following figure illustrates how the EVFS volume is specified:
23
Page 26

12. Click Add, and then click Finish.
13. In the Backup Object Summary page, review the summary of the backup specification
and click Next, as shown in the following figure:
14. Select the Start Backup icon, and click Next, as shown in the following figure:
15. Select the FULL backup type option, and click OK, as shown in the following figure:
24
Page 27

The Session Information Message displays the status of the backup. If the size of the
backup data is larger than the size of the tape, the Data Protector prompts for a mount
request. To respond to a mount request, insert the second tape and click Confirm Mount
Request.
16. Continue with the backup session till the HP-UX EVFS volume is backed up completely.
Step 16 Close raw access to the source HP-UX EVFS volume by entering the evfsvol close
command to begin the procedure to return the volume to its original state.
Step 17 Enable the EVFS volume by entering the evfsvol enable command, and remount the file
system on the EVFS volume.
Test Scenario 1B - Restoring the Backed Up Encrypted Data Created from an HP-UX EVFS Volume on a Tape Device
This scenario illustrates the steps performed when successfully restoring encrypted backup data
(originally created from an HP-UX EVFS volume) on a tape device, by using HP OpenView Storage
Data Protector.
Table10 lists the sample source and target for Test Scenario 1B.
Table 10 Sample Source and Target for Test Scenario 1B
Source/Target Description
Sample Source
Sample Target
To restore the encrypted backed up data from a tape device, complete the following steps:
Step 1 To verify if the HP-UX EVFS volume is open for raw access, enter the following command and
Data backed up as a disk image on the tape that
is configured on the client system, evfs2.hp.com.
Encrypted volume,
/dev/evfs/vg01/ldp_raw, open for raw
access and configured on the client system,
evfs6.hp.com. The mount point in this scenario is
/dp_verify.
25
Page 28

check the state of the HP-UX EVFS volume:
$ evfsadm stat /dev/evfs/vg01/ldp_raw
The following output is displayed:
orr owr odr oer
bpr bpw bpd bpe
kbpsr kbpsw dkbps ekbps
----- EVFS Volume Name -----|--- State ---|---------------- Queues --------------|
/dev/evfs/vg01/ldp_raw raw 0 0 0 0
----- EVFS Volume Name -----|--- State ---|--------------- Counters -------------|
/dev/evfs/vg01/ldp_raw raw 5254838 4697538 2704 4710186
----- EVFS Volume Name -----|--- State ---|---------------- Rates ---------------|
/dev/evfs/vg01/ldp_raw raw 2195 18 901 89
Step 2 To create an HP-UX EVFS volume on the target client system, evfs6.hp.com, and open raw
access to the volume, complete the following tasks:
1. To create an LVM volume on the target client system, enter the following command:
evfs6# lvcreate -L 5120 -n ldp_raw vg01
The following output is displayed:
Logical volume "/dev/vg01/ldp_raw" has been successfully created with
character device "/dev/vg01/rldp_raw".
Logical volume "/dev/vg01/ldp_raw" has been successfully extended.
Volume Group configuration for /dev/vg01 has been saved in
/etc/lvmconf/vg01.conf
2. To map the LVM volume to the HP-UX EVFS volume, enter the following command:
evfs6# evfsadm map /dev/vg01/ldp_raw
The following output is displayed:
Volume "/dev/vg01/ldp_raw" has been successfully mapped to EVFS volume
"/dev/evfs/vg01/ldp_raw"
3. To generate user keys for the HP-UX EVFS volume, enter the following command:
$ evfspkey keygen -p
The system prompts for the passphrase. Enter the passphrase.
Enter passphrase:
Enter the passphrase again.
Re-enter passphrase:
The following output is displayed:
Public/Private key pair "root.root" has been successfully generated
4. To create an EMD area, enter the following command:
evfs6# evfsvol create /dev/evfs/vg01/ldp_raw
The system prompts for the owner passphrase. Enter the owner passphrase.
Enter owner passphrase:
The following output is displayed:
Encrypted volume "/dev/evfs/vg01/ldp_raw" has been successfully created
5. Enable the encrypted volume using the evfsvol enable command, as follows:
26
Page 29

evfs6# evfsvol enable /dev/evfs/vg01/ldp_raw
The system prompts for the user paraphrase. Enter the user paraphrase.
Enter user passphrase:
The following output is displayed:
Encrypted volume "/dev/evfs/vg01/ldp_raw" has been successfully enabled
-
6. To create a file system on the raw encrypted volume, enter the following command:
evfs6# newfs -F vxfs /dev/evfs/vg01/rldp_raw
The following output is displayed:
version 6 layout
5242360 sectors, 5242360 blocks of size 1024, log size 16384 blocks
largefiles supported
7. To mount the file system and verify if the file system is mounted properly, enter the
following command:
evfs6# mount -F vxfs /dev/evfs/vg01/ldp_raw /dp_verify
evfs6# ll /dp_verify
The following output is displayed:
total 0
drwxr-xr-x 2 root root 96 Dec 18 20:40 lost+found
8. To unmount the file system, enter the following command:
evfs6# umount /dp_verify
9. To disable the encrypted volume, enter the following command:
evfs6# evfsvol disable /dev/evfs/vg01/ldp_raw
The system prompts for the user paraphrase. Enter the user paraphrase.
Enter user passphrase:
Encrypted volume "/dev/evfs/vg01/ldp_raw" has been successfully disabled
10. To open raw access to the EVFS volume, enter the following command:
evfs6# evfsvol raw /dev/evfs/vg01/ldp_raw
The following output is displayed:
Are you sure you want to enable raw access to
"/dev/evfs/vg01/ldp_raw"?
Raw access returns encrypted data to the user.
Answer [yes/no]:yes
Successfully enabled raw access to EVFS volume
"/dev/evfs/vg01/ldp_raw
Step 3 To restore the data to the raw encrypted volume using Data Protector, complete the following
tasks:
1. Select Restore in the Data Protector Cell Manager Context List.
2. In the left pane, expand the appropriate data type (Filesystem, Disk Image, or Internal
Database) under Restore Objects, as shown in the following figure. In this test scenario,
Disk Image is selected as the data type.
27
Page 30

3. Select the HP-UX EVFS volume, /dev/evfs/vg01/ldp_raw, which must be restored,
as shown in the following figure:
4. Select the target client system on which the data must be restored, as shown in the
following figure. (The EVFS volume must be open for raw access. The Data Agent must be
installed on the target client system.)
28
Page 31

5. Start the restore session. The Data Protector displays a Session Information message that
notifies the successful completion of a restore session, as shown in the following figure.
Step 4 To close raw access to the HP-UX EVFS volume, enter the following command:
$ evfsvol close /dev/evfs/vg01/ldp_raw
The following output is displayed:
Successfully closed raw access to EVFS volume "/dev/evfs/vg01/ldp_raw"
Step 5 To enable the encrypted volume and mount back the file system on /dp_verify, enter the
following commands:
evfs6# evfsvol close /dev/evfs/vg01/ldp_raw
29
Page 32

evfs6# evfsvol enable /dev/evfs/vg01/ldp_raw
The following output is displayed:
Successfully closed raw access to EVFS volume "/dev/evfs/vg01/ldp_raw"
The system prompts for the user passphrase. Enter the user passphrase and confirm it.
Enter passphrase:
Re-enter passphrase:
The following output is displayed:
encrypted volume "/dev/evfs/vg01/ldp_raw" has been successfully enabled
evfs6# mount -F vxfs /dev/evfs/vg01/ldp_raw /dp_verify
Verifying the Full Backup and Recovery of the Encrypted Data
To verify if the backup and restore operations in Test Scenario 1A and Test Scenario 1B are
successful, complete the following steps:
Step 1 To view the directory listings on the source client system before the backup operation, enter
the following command:
Step 2 To view the directory listings on the target client system before the restore operation, enter the
Step 3 To view the directory listings after the subsequent recovery of encrypted data to the target
$ ll /dp_raw
The following output is displayed:
total 10447988
drwxr-xr-x 2 root root 96 Dec 18 11:19 lost+found
-rw-rw-rw- 1 root sys 5349361664 Dec 18 15:52 temp.tar
following command:
evfs6# ll /dp_verify
The following output is displayed:
total 0
drwxr-xr-x 2 root root 96 Dec 18 20:40 lost+found
client system, enter the following command:
evfs6# ll /dp_verify
The following output is displayed:
total 10447988
drwxr-xr-x 2 root root 96 Dec 18 11:19 lost+found
-rw-rw-rw- 1 root sys 5349361664 Dec 18 15:52 temp.tar
Verify the data size of the directory listings before and after the backup and restore operation
on the HP-UX EVFS volumes. If the data sizes are the same, the backup and restore
operations are successful.
30
Page 33

Test Scenario 2
Test Scenario 2A - File Level Incremental Backup of an Encrypted Volume
This scenario illustrates the steps performed when successfully testing a file level incremental backup
of an HP-UX EVFS volume, by using HP OpenView Storage Data Protector.
The data is read in the clear from an encrypted volume and the backup image is written to a disk
partition, which is an encrypted volume.
Table11 lists the sample source and target for Test Scenario 2A.
Table 11 Sample Source and Target for Test Scenario 2A
Source/Target Description
Sample Source
Encrypted volume,
/dev/evfs/vg01/ldp_test that is enabled
for encryption and decryption. The volume is
configured on the client system,
evfs2.hp.com.The mount point in this scenario is
/dp_test.
Sample Target
Encrypted volume,
/dev/evfs/vg01/ldp_backup that is
enabled for encryption and decryption. The
volume is configured on the client system,
evfs2.hp.com.The mount point is /dp_backup
To perform a full backup of an EVFS volume and subsequently an incremental backup of the EVFS
volume, complete the following steps:
Step 1 To create the HP-UX EVFS volume on the client system, evfs2.hp.com, complete the
following tasks:
1. To create a source LVM volume for the HP-UX EVFS volume, enter the
following command:
$ lvcreate -L 600 -n ldp_test vg01
The following output is displayed:
Logical volume "/dev/vg01/ldp_test" has been successfully created with
character device "/dev/vg01/rldp_test".
Logical volume "/dev/vg01/ldp_test" has been successfully extended.
Volume Group configuration for /dev/vg01 has been saved in
/etc/lvmconf/vg01.conf
2. To create a target LVM volume for the HP-UX EVFS volume, enter the
following command:
$ lvcreate -L 600 -n ldp_backup vg01
The following output is displayed:
31
Page 34

character device "/dev/vg01/rldp_backup".
Logical volume "/dev/vg01/ldp_backup" has been successfully extended.
Volume Group configuration for /dev/vg01 has been saved in
/etc/lvmconf/vg01.conf
Logical volume "/dev/vg01/ldp_backup" has been successfully created with
Step 2 To create EVFS volume device files by mapping LVM to EVFS on the target and source
volumes, enter the following commands:
$ evfsadm start
The following output is displayed:
EVFS subsystem started
$ evfsadm map /dev/vg01/ldp_test
The following output is displayed:
/dev/evfs/vg01/ldp_test"
$ evfsadm map /dev/vg01/ldp_backup
Volume "/dev/vg01/ldp_test" has been successfully mapped to EVFS volume
The following output is displayed:
"/dev/evfs/vg01/ldp_backup"
Volume "/dev/vg01/ldp_backup" has been successfully mapped to EVFS volume
Step 3 To create the EMD area on the source and the target HP-UX EVFS volumes, enter the
following commands:
$ evfspkey keygen -p
Re-enter passphrase:
The system prompts for the passphrase. Enter the passphrase.
Enter passphrase:
The following output is displayed:
Public/Private key pair "root.root" has been successfully generated
$ evfsvol create /dev/evfs/vg01/ldp_test
The system prompts for the owner passphrase. Enter the owner passphrase.
Enter owner passphrase:
The following output is displayed:
Encrypted volume "/dev/evfs/vg01/ldp_test" has been successfully created
$ evfsvol create /dev/evfs/vg01/ldp_backup
The system prompts for the owner passphrase. Enter the owner passphrase.
Enter owner passphrase:
32
Page 35

The following output is displayed:
Encrypted volume "/dev/evfs/vg01/ldp_backup" has been successfully created
Step 4 To enable the source and target HP-UX EVFS volumes, enter the following commands:
$ evfsvol enable /dev/evfs/vg01/ldp_test
The system prompts for the user passphrase. Enter the user passphrase.
Enter user passphrase:
The following output is displayed:
Encrypted volume "/dev/evfs/vg01/ldp_test" has been successfully enabled
$ evfsvol enable /dev/evfs/vg01/ldp_backup
The system prompts for the user passphrase. Enter the user passphrase.
Enter user passphrase:
The following output is displayed:
Encrypted volume "/dev/evfs/vg01/ldp_backup" has been successfully enabled
Step 5 To create a file system on the HP-UX EVFS source and backup volumes, complete the
following tasks:
1. To create a temporary directory as a mount point for the HP-UX EVFS source and
target volumes, enter the following commands:
$ mkdir /dp_test
$ mkdir /dp_backup
2.
To create a file system on the HP-UX EVFS source and backup volume, enter the
following commands:
newfs -F vxfs /dev/evfs/vg01/rldp_test
The following output is displayed:
version 6 layout613880 sectors, 613880 blocks of size 1024, log size 16384
blocks
largefiles supported
$ newfs -F vxfs /dev/evfs/vg01/rldp_backup
The following output is displayed:
version 6 layout 613880 sectors, 613880 blocks of size 1024, log size 16384
blocks
largefiles supported
3.
To mount the temporary directory on the source and target HP-UX EVFS volumes,
enter the following commands:
33
Page 36

$ mount -F vxfs /dev/evfs/vg01/ldp_test /dp_test
$ mount -F vxfs /dev/evfs/vg01/ldp_backup /dp_backup
Step 6 Create a sample directory with sample files in the source directory.
Step 7 To verify if the HP-UX EVFS is enabled on the source and target volumes, enter the following
command and check the EVFS volume state displayed in the output:
$ evfsvol display -a
The following output is displayed:
EVFS Volume Name: /dev/evfs/vg01/ldp_test
Mapped Volume Name: /dev/vg01/ldp_test
EVFS Volume State: enabled
EMD Size (Kbytes): 520
Max User Envelopes: 1024
Data Encryption Cipher: aes-128-cbc
Digest: sha1
Owner Key ID: root.root
Recovery Agent Key IDs:
Total Recovery Agent Keys: 0
User Key IDs:
Total User Keys: 0
EVFS Volume Name: /dev/evfs/vg01/ldp_backup
Mapped Volume Name: /dev/vg01/ldp_backup
EVFS Volume State: enabled
EMD Size (Kbytes): 520
Max User Envelopes: 1024
Data Encryption Cipher: aes-128-cbc
Digest: sha1
Owner Key ID: root.root
Recovery Agent Key IDs:
Total Recovery Agent Keys: 0
User Key IDs:
Total User Keys: 0
Step 8 Pass the dir/file which is created as the sample source for the Data Protector. Target the
file library device under the target directory on which the target EVFS volume is mounted.
Step 9 Start the back up session.
Step 10 Connect to Data Protector Cell manager. To connect to the GUI version of the HP OpenView
Storage Data Protector, rlogin to the evfs6.hp.com system (system on which the data
protector cell manager is installed), and invoke the required path
(/opt/omni/bin/xomni) for the Cell Manager, as shown in the following example:
evfs6# export DISPLAY=<hostname>:0.0
34
Page 37

evfs6# /opt/omni/bin/xomni
Starting GUI...
Please wait, this may take some time...
Step 11 To add the client system, evfs2.hp.com, as the client to the HP OpenView Storage Data
Protector Cell Manager, complete the following tasks:
1. Select Clients in the Data Protector Cell Manager Context List.
2. Right click Clients in the left scoping pane, and select Add Clients.
3. Enter the client name, and click Add, as shown in the following figure:
4. Select the components to be installed. In this case, we selected Disk Agent and Media
Agent to be installed, as shown in the following figure:
5. To complete the installation of the required components on the client system, select
Finish. The following window is displayed:
35
Page 38

Step 12 To add a file library device in the target directory, /dp_backup, complete the following
tasks:
1. Select Devices & Media in the Data Protector Cell Manager Context List.
2. In the left scoping pane, right-click Devices and select Add Device to open the wizard,
as shown in the following figure:
3. Enter the name of the file library device, /dp_backup, in the Device Name text box.
4. Enter the description of the file library device as Backup Volume in the Description
text box.
5. Select File Library in the Device Type drop down list.
6. Select the client system, evfs2.hp.com (where the file library device resides) in the
Client drop-down list, as shown in the following figure:
36
Page 39

7. Specify the directory or a set of directories where the file library must reside, as
shown in the following figure:
8. Enter File as the Media type of the file library device, as shown in the following
figure:
37
Page 40

9. Review the summary of the file library device configuration. The name of the device is
displayed in the list of configured devices, as shown in the following figure. The
device name also appears in the media pool to which the device was assigned.
Step 13 A full backup of an object must exist before an incremental backup of the object is
performed. Hence, the first backup of a data object is always a full backup.
To perform a full backup using HP OpenView Data Protector, complete the following
tasks:
1. Select Backup in the Data Protector Cell Manager Context list.
2. Expand Backup Specifications in the scoping pane, right-click File system, and then
click Add Backup, as shown in the following figure:
38
Page 41

3. In the Create New Backup dialog box, select the default Blank File System Backup, as
shown in the following figure:
4. Select the sample files that must be backed up in the sample directory, as shown in
the following figure:
39
Page 42

5. In the Destination property page, select the device, /dp_backup, that is configured
for backup, as shown in the following figure:
6. Select the required backup options in the Backup Specification page, as shown in the
following figure. You can also specify the dates to schedule backups.
40
Page 43

7. Verify the Review Summary page to check the backup specifications, and make the
necessary changes, as shown in the following figure:
8. Select the Start Backup icon to initiate the backup session, as shown in the following
figure:
41
Page 44

9. Select the appropriate backup type. To perform the backup of the selected object for
the first time, select backup type as FULL, as shown in the following figure:
The Session Information message displays the status of the backup and notifies when
the backup is successfully completed.
Step 14 To verify if the backup is successful, complete the following tasks:
1. To view the directory listings of the directory that is mounted on the target HP-UX
EVFS volume, enter the following command before the backup operation:
$ ll /dp_backup/
The following output is displayed:
total 0
drwxr-xr-x 2 root root 96 Dec 15 10:30 lost+found
42
Page 45

2. To view the directory listings of the directory that is mounted on the target HP-UX
EVFS volume, enter the following command after the backup operation:
$ ll /dp_backup/
The following output is displayed:
total 400
-rw-r--r-- 1 root root 204800 Dec 15 11:34
0f6a4871545823b0e566155000f.fd
drwxr-xr-x 2 root root 96 Dec 15 10:30 lost+found
The data is backed up in the file device with an .fd extension. You can use the
strings utility to search and validate a specific key string in the file, and verify if the
backup is successful.
Step 15 To perform an incremental backup using HP OpenView Storage Data Protector, complete the
following steps:
1. Append test incremental data to the sample file on the source client system.
2. Select Backup in the Data Protector Cell Manager Context.
3. Expand Backup Specifications in the scoping pane, right-click File system, and
then click Add Backup.
4. In the Create New Backup dialog box, select the default Blank File System
Backup.
5. Select the sample files that must be backed up in the sample directory, as
shown in the following figure:
6. In the Destination property page, select the device, /dp_backup, which is
configured for the backup, as shown in the following figure:
43
Page 46

7. Select the required backup options in the Backup Specification page, as shown
in the following figure. You can also specify the dates to schedule the backups.
8. Verify the Review Summary page to check the backup specifications, and
make the necessary changes, as shown in the following figure:
44
Page 47

9. Select Start Backup to initiate the backup session, as shown in the following
figure:
10. Select the appropriate back up type. To perform an Incr backup of the
selected object, select backup type as Incr, as shown in the following figure:
45
Page 48

The Session Information message displays the status of the backup and notifies
when the backup is successfully completed.
Step 16 To verify if the backup is successful, complete the following tasks:
1. To view the directory listings of the directory that is mounted on a target encrypted
volume, enter the following command before the backup operation:
$ ll /dp_backup/
The following output is displayed:
total 0
drwxr-xr-x 2 root root 96 Dec 15 10:30 lost+found
2. To view the directory listings of the directory on which the target encrypted volume is
mounted, enter the following command after the backup operation:
46
Page 49

$ ll /dp_backup
The following output is displayed:
total 800
-rw-r--r-- 1 root root 204800 Dec 15 11:34 0f6a4871545823b0e566155000f.fd
-rw-r--r-- 1 root root 204800 Dec 15 11:48 0f6a4871545823e3f5661550012.fd
drwxr-xr-x 2 root root 96 Dec 15 10:30 lost+found
The data is backed up in the file device with an .fd extension. You can also use the strings
utility to search and validate a specific key string in the file, and verify if the backup is
successful.
Test Scenario 2B - Restoring the File Level Incremental Backup Data to the HP-UX EVFS Volume
This scenario illustrates the steps performed when successfully restoring a file level backup of an HPUX EVFS volume by using HP OpenView Storage Data Protector.
Table12 lists the sample source and target for Test Scenario 2B.
Table 12 Sample Source and Target for Test Scenario 2B
Source/Target Description
Sample Source
Encrypted volume,
/dev/evfs/vg01/ldp_backup, mounted on
/dp_backup on the client system,
evfs2.hp.com.The backup data is stored in a file
library device created under /dp_backup
Sample Target
Encrypted volume,
/dev/evfs/vg01/ldp_backup, mounted on
/dp_backup on the client system,
evfs2.hp.com.
(In this example, the sample target and source
are the same. You can also select a different
system to take the backup of the data)
To restore the file level incremental backup data to the HP-UX EVFS volume, complete the following
steps:
Step 1 Verify that EVFS is enabled on the source and target HP-UX EVFS volumes by entering the
following command:
$ evfsvol display -a
The following output is displayed:
EVFS Volume Name: /dev/evfs/vg01/ldp_test
Mapped Volume Name: /dev/vg01/ldp_test
EVFS Volume State: enabled
EMD Size (Kbytes): 520
Max User Envelopes: 1024
47
Page 50

Data Encryption Cipher: aes-128-cbc
Digest: sha1
Owner Key ID: root.root
Recovery Agent Key IDs:
Total Recovery Agent Keys: 0
User Key IDs:
Total User Keys: 0
EVFS Volume Name: /dev/evfs/vg01/ldp_backup
Mapped Volume Name: /dev/vg01/ldp_backup
EVFS Volume State: enabled
EMD Size (Kbytes): 520
Max User Envelopes: 1024
Data Encryption Cipher: aes-128-cbc
Digest: sha1
Owner Key ID: root.root
Recovery Agent Key IDs:
Total Recovery Agent Keys: 0
User Key IDs:
Total User Keys: 0
Step 2 To restore the backed up data to the HP-UX EVFS volume using HP OpenView Storage Data
Protector, complete the following tasks:
1. Select Restore in the Data Protector Cell Manager Context List, as shown in the following
figure:
2. In the left scoping pane , expand Restore Objects and the target client system,
evfs2.hp.com, where the data must be restored.
3. Select the required directory in the Source property page, /dp_backup (mountpoint),
which contains the data, as shown in the following figure:
48
Page 51

4. Specify the target client in the Destination property page, where the data must be restored,
as shown in the following figure:
5. Specify the target location, /dp_backup, in the Destination property page, where the data
must be restored, as shown in the following figure.
49
Page 52

6. Click Restore to initiate the restore session.
The Session Information message displays the status of the recovery and notifies the
successful recovery of data. You can also specify the warning and error message that must be
displayed during the restore session.
Step 3 To verify if the recovery of data is successful, complete the following tasks:
1. To view the directory listings on the source client system, enter the following command
before the restore operation:
$ ll /dp_backup
The following output is displayed:
total 800
-rw-r--r-- 1 root root 204800 Dec 15 11:34
0f6a4871545823b0e566155000f.fd
-rw-r--r-- 1 root root 204800 Dec 15 11:48
0f6a4871545823e3f5661550012.fd
drwxr-xr-x 2 root root 96 Dec 15 10:30 lost+found
2. To view the directory listings on the source client system, enter the following command
after the restore operation:
$ ll /dp_backup
The following output is displayed:
total 800
-rw-r--r-- 1 root root 204800 Dec 15 11:34 0f6a4871545823b0e566155000f.fd
-rw-r--r-- 1 root root 204800 Dec 15 11:48 0f6a4871545823e3f5661550012.fd
drwxrwxrwx 2 root sys 96 Dec 15 12:11 dp_test
drwxr-xr-x 2 root root 96 Dec 15 10:30 lost+found
$ pwd
/dp_backup/dp_test
3. The restored data is created as /dp_backup/dp_test/test directory where as the original
data is in the directory /dp_test/test. Enter the following command to verify if the data
restoration is successful:
$ diff /dp_backup/dp_test/test /dp_test/test
50
Page 53

Test Scenario 3
Test Scenario 3A - Backup of Keys of an HP-UX EVFS Volume
This scenario illustrates the steps performed when successfully testing the backup of keys of an HP-UX
EVFS volume by using HP OpenView Storage Data Protector.
Table13 lists the sample source and target for Test Scenario 3A.
Table 13 Sample Source and Target for Test Scenario 3A
Source/Target Description
Sample Source
Key directory structure, /etc/evfs/pkey, on
the client system, evfs2.hp.com, where HP-UX
EVFS volume is configured
Sample Target
Tape device (or) File library device
To back up the keys of an HP-UX EVFS volume by using HP OpenView Storage Data Protector,
complete the following steps:
Step 1 To create a sample HP-UX EVFS volume on the client system (source), evfs2.hp.com, complete
the following tasks:
1. To create an LVM volume of size 5 GB, enter the following command:
$ lvcreate -L 5120 -n ldp_raw vg01
The following output is displayed:
Logical volume "/dev/vg01/ldp_raw" has been successfully created with
character device "/dev/vg01/rldp_raw".
Logical volume "/dev/vg01/ldp_raw" has been successfully extended.Volume
Group configuration for /dev/vg01 has been saved in
/etc/lvmconf/vg01.conf
2. To map the LVM volume to the HP-UX EVFS volume, enter the following command:
$ evfsadm map /dev/vg01/ldp_raw
The following output is displayed:
Volume "/dev/vg01/ldp_raw" has been successfully mapped to EVFS volume
"/dev/evfs/vg01/ldp_raw"
Step 2 To enable the encrypted volume on the source client system, complete the following tasks:
1. To generate user keys for the encrypted volume, enter the following command:
$ evfspkey keygen -p
The system prompts for the user passphrase. Enter the passphrase and confirm it.
Enter passphrase:
Re-enter passphrase:
51
Page 54

The following output is displayed:
Public/Private key pair "root.root" has been successfully generated
The keys are created in the default key storage directory (/etc/evfs/pkey).
2. To create an EMD area, enter the following command:
$ evfsvol create /dev/evfs/vg01/ldp_raw
The system prompts for the owner passphrase. Enter the owner passphrase.
Enter owner passphrase:
The following output is displayed:
Encrypted volume "/dev/evfs/vg01/ldp_raw" has been successfully created
3. Enable the encrypted volume by entering the evfsvol enable command, as follows:
$ evfsvol enable /dev/evfs/vg01/ldp_raw
The system prompts for the user passphrase. Enter the user passphrase.
Enter user passphrase:
The following output is displayed:
Encrypted volume "/dev/evfs/vg01/ldp_raw" has been successfully enabled
(Step 1 and Step 2 are performed to create a sample HP-UX EVFS volume with the user keys. If the
HP-UX EVFS volume already exists with the user keys, you can skip these steps.)
Step 3 To back up the keys of an HP-UX EVFS volume by using HP OpenView Storage Data
Protector, complete the following tasks:
1. Select Backup in the Data Protector Cell Manager Context List.
2. Expand Backup Specifications in the left scoping pane, right-click File system, and then
click Add Backup.
3. In the Create New Backup dialog box, select the default Blank File System Backup.
4. Select the directory, /etc/evfs/pkey, where the keys are stored, as shown in the
following figure:
52
Page 55

5. Select the backup device for the backup, as shown in the following figure:
- For the Test Scenario 1, the tape device is selected
- For the Test Scenario 2, the file library device is selected.
6. Continue with the remaining steps in the wizard, and click Finish.
7. Select Start Backup to initiate the backup session, as shown in the following figure.
53
Page 56

8. Select the Backup Type required. To perform the backup of the keys, select backup type
as FULL.
The Session Information message displays the status of the backup and notifies when the
backup is successfully completed.
Test Scenario 3B - Restoring the Backed Up Keys of an HP-UX EVFS Volume
This scenario illustrates the steps performed when successfully restoring the backed up keys of an HPUX EVFS volume by using HP OpenView Storage Data Protector.
Table14 lists the sample source and target for Test Scenario 3B.
Table 14 Sample Source and Target for Test Scenario 3B
Source/Target Description
Sample Source
Tape device or a file library device
Sample Target
Key directory structure, /etc/evfs/pkey, on
the client system, evfs6.hp.com, where HP-UX
EVFS is configured.
To restore the backed up keys of an HP-UX EVFS volume by using HP OpenView Storage Data
Protector, complete the following steps:
Step 1 To create an HP-UX EVFS volume on the client system (target), evfs6.hp.com, complete the
following tasks:
1. To create an LVM volume of size 5 GB, enter the following command:
$ lvcreate -L 5120 -n ldp_raw vg01
54
Page 57

The following output is displayed:
Logical volume "/dev/vg01/ldp_raw" has been successfully created with
character device "/dev/vg01/rldp_raw".
Logical volume "/dev/vg01/ldp_raw" has been successfully extended. Volume
Group configuration for /dev/vg01 has been saved in
/etc/lvmconf/vg01.conf
2. To map the LVM volume to the HP-UX EVFS volume, enter the following command:
$ evfsadm map /dev/vg01/ldp_raw
The following output is displayed:
Volume "/dev/vg01/ldp_raw" has been successfully mapped to EVFS volume
"/dev/evfs/vg01/ldp_raw"
Step 2 To restore the backed up keys of an HP-UX EVFS volume by using HP OpenView Storage
Data Protector, complete the following tasks:
1. Select Restore in the Data Protector Cell Manager Context List.
2. In the left scoping pane, expand Restore Objects and expand the source client system,
evfs2.hp.com, where the backup data is stored, as shown in the following figure:
3. Select the required directory, /etc/evfs/pkey, in the Source Property page where the
backed up keys are stored, as shown in the following figure:
55
Page 58

4. In the Destination property page, specify the target location where the backed up keys
must be restored, as shown in the following figure. You can restore the backed up keys to
the original location, a different location on the same client system, or a different client
system. In this test scenario, evfs6.hp.com was selected as the target client system,
where the backed up keys were restored.
5. Click Restore to initiate the restore session.
The Session Information message displays the status of the recovery and notifies the successful
recovery of data. You can also specify the warning and error message that must be displayed
during the restore session.
Verifying the Backup and Recovery of the Keys of an HP-UX EVFS Volume
To verify if the backup and restore operations in Test Scenario 3A and Test Scenario 3B are
successful, complete the following steps:
56
Page 59

Step 1 To view the directory listings on the source client system, evfs2.hp.com, (where the keys
are originally located), enter the following command before the backup operation:
$ ll /etc/evfs/pkey/root
The following output is displayed:
-rw------- 1 root sys 775 Oct 24 16:57 root.priv
total 32
-rw-r--r-- 1 root sys 424 Oct 24 16:57 root.pub
Step 2 To view the directory listings on the target client system, evfs6.hp.com (where the
backup keys are restored), enter the following command after the backup and restore
operation:
# ll /etc/evfs/pkey/root
The following output is displayed:
-rw------- 1 root sys 775 Oct 24 16:57 root.priv
-rw-r--r-- 1 root sys 424 Oct 24 16:57 root.pub
total 32
If the directory listings before backup and after the subsequent backup and restore operations are the
same, the backup and restore operations are successful.
Conclusion
HP-UX EVFS encrypts the data on a volume and enables you to reduce the threat of data being
compromised on these volumes. It is important to back up the data residing in these EVFS volumes,
without any loss of data. HP OpenView Storage Data Protector offer a reliable, easy, and efficient
process to back up and restore data on EVFS volumes, while overcoming the inherent limitations of
conventional backup methods, such as dd and cpio.
HP has successfully tested the backup and restore of data on HP-UX EVFS volumes by using HP
OpenView Storage Data Protector. The test scenarios discussed in this document validate that the
backup and restore operations on HP-UX EVFS volumes can be performed successfully by using HP
OpenView Storage Data Protector.
Related Information
For more information on HP-UX EVFS, see the HP-UX Encrypted Volume and File System website at:
http://h20338.www2.hp.com/hpux11i/cache/324629-0-0-0-121.html
For more information on HP-UX EVFS, see the Encrypted Volume and File System v1.0 (EVFS v1.0)
Administrator's Guide: HP-UX 11i v2 Update 2, available at:
http://docs.hp.com/en/5991-5390/index.html
For more information on the HP OpenView Storage Data Protector software, see the HP Data
Protector Software website at:
http://www.hp.com/go/dataprotector
For more information on HP OpenView Storage Data Protector, see the HP OpenView Storage Data
Protector Online Help, which is available along with the Cell Manager GUI software.
57
 Loading...