

Page 1

HP CIFS Server Administrator's Guide Version A.03.02.00
HP-UX 11i v3
HP Part Number: 5900-2578
Published: January 2013
Page 2

© Copyright 2012, 2013 Hewlett-Packard Development Company, L.P.
Confidential computer software. Valid license from HP required for possession, use or copying. Consistent with FAR 12.211 and 12.212, Commercial
Computer Software, Computer Software Documentation, and Technical Data for Commercial Items are licensed to the U.S. Government under
vendor's standard commercial license.
The information contained herein is subject to change without notice. The only warranties for HP products and services are set forth in the express
warranty statements accompanying such products and services. Nothing herein should be construed as constituting an additional warranty. HP shall
not be liable for technical or editorial errors or omissions contained herein.
HP CIFS Server is derived from the Open Source Samba product and is subject to the GPL license.
Trademark Acknowledgements
UNIX® is a registered trademark of The Open Group. Microsoft and Windows are U.S. registered trademarks of Microsoft Corporation.
Page 3

Contents
About this document....................................................................................10
Intended audience..................................................................................................................10
New and changed documentation in this edition........................................................................10
Typographical conventions.......................................................................................................10
Publishing history....................................................................................................................10
Document organization...........................................................................................................11
HP welcomes your comments...................................................................................................12
1 Introduction to the HP CIFS Server...............................................................13
HP CIFS Server description and features....................................................................................13
Features............................................................................................................................13
Samba open source software and HP CIFS Server..................................................................14
Flexibility..........................................................................................................................14
HP CIFS Server documentation: Printed and Online.....................................................................15
HP CIFS documentation roadmap.............................................................................................15
HP CIFS Server file and directory roadmap................................................................................17
2 Installing and configuring the HP CIFS Server...............................................19
HP CIFS Server requirements and limitations...............................................................................19
HP CIFS Server installation requirements...............................................................................19
HP CIFS Server memory requirements...................................................................................19
Software requirements........................................................................................................19
Swap space requirements...................................................................................................19
Memory requirements.........................................................................................................20
Step 1: Installing HP CIFS Server software..................................................................................20
An example......................................................................................................................21
Step 2: Running the configuration script.....................................................................................21
Step 3: Modify the configuration..............................................................................................22
Configuration modification..................................................................................................22
Configure case sensitivity....................................................................................................22
Configure for SMB2 Features...............................................................................................24
Configuring print services for HP CIFS version A.03.02.00......................................................24
Configuring a [printers] share.........................................................................................24
Creating a [printers] share..............................................................................................25
Setup Server for automatically uploading printer driver files................................................25
Setup Client for automatically uploading of printer drivers..................................................26
Publishing printers in an MS Windows 2003/2008 R2 ADS domain.......................................26
Setting up HP CIFS Server for publishing printers support....................................................26
Publishing printers from a windows client..........................................................................27
Verifying that the printer is published...............................................................................28
Commands used for publishing printers............................................................................29
Searching printers....................................................................................................29
Removing a printer...................................................................................................29
Re-Publishing a printer...............................................................................................29
Setting up Distributed File System (DFS) support.....................................................................29
Setting up a DFS Tree on a HP CIFS Server.......................................................................30
Setting up DFS links in the DFS root directory on a HP CIFS Server.......................................30
MC/ServiceGuard high availability support..........................................................................31
Step 4: Starting the HP CIFS Server...........................................................................................31
Starting and stopping daemons individually..........................................................................32
Configuring automatic start at system boot............................................................................32
Stopping and re-starting daemons to apply new settings.........................................................32
Contents 3
Page 4

Other samba configuration issues.............................................................................................33
Translate open-mode locks into HP-UX advisory locks..............................................................33
Performance tuning using change notify................................................................................33
Special concerns when using HP CIFS Server on a Network File System (NFS) or a Clustered File
System (CFS).....................................................................................................................33
NetBIOS names are not supported on port 445.....................................................................34
3 Managing HP-UX file access permissions from Windows
NT/XP/2000/Vista/Windows 7..................................................................35
Introduction............................................................................................................................35
UNIX file permissions and POSIX ACLs......................................................................................35
Viewing UNIX permissions from windows..............................................................................35
The VxFS POSIX ACL file permissions....................................................................................38
Using the Windows NT Explorer GUI to create ACLs...................................................................39
Using the Windows Vista Explorer GUI to create ACLs................................................................41
POSIX ACLs and Windows XP, Windows Vista and Windows 7 clients..........................................44
Viewing UNIX permissions from Windows XP, Windows Vista and Windows 7 clients.................44
Setting permissions from Windows XP, Windows Vista and Windows 7 clients...........................45
Viewing ACLs from Windows 7 clients..................................................................................46
Displaying the owner of a file..............................................................................................47
HP CIFS Server directory ACLs and Windows XP, Windows Vista and Windows 7 clients................47
Directory ACL types............................................................................................................47
Viewing ACLs from Windows 7 clients..................................................................................47
Viewing basic ACLs from Windows 7 clients.....................................................................47
Viewing advanced ACLs from Windows 2000 clients........................................................48
Mapping Windows XP directory inheritance values to POSIX...................................................49
Modifying directory ACLs from Windows XP clients................................................................50
Removing an ACE entry from Windows XP clients..............................................................52
Examples................................................................................................................52
Adding directory ACLs from Windows XP clients....................................................................54
POSIX default owner and owning group ACLs........................................................................55
POSIX ACEs with zero permissions.......................................................................................55
In conclusion..........................................................................................................................55
4 Windows style domains............................................................................57
Introduction............................................................................................................................57
Advantages of the Samba Domain model.............................................................................57
Primary domain controllers..................................................................................................57
Backup domain controllers..................................................................................................58
Advantages of backup domain controllers........................................................................58
Limitations....................................................................................................................58
Domain members...............................................................................................................58
Configure the HP CIFS Server as a PDC.....................................................................................58
Configure the HP CIFS Server as a BDC....................................................................................59
Promote a BDC to a PDC in a Samba Domain.......................................................................60
Domain member server...........................................................................................................60
Configure the HP CIFS Server as a member server..................................................................60
Join an HP CIFS Server to an NT Domian, Windows 2000/2003 (as a pre-Windows 2000
computer), or Samba Domain.............................................................................................61
Step-by-step procedure...................................................................................................62
Create the machine trust accounts.............................................................................................62
Configure domain users...........................................................................................................64
Join a Windows client to a Samba Domain................................................................................64
Roaming profiles....................................................................................................................67
Configuring roaming profiles...............................................................................................67
Configuring user logon scripts..................................................................................................68
4 Contents
Page 5

Running logon scripts when logging on.................................................................................68
Home drive mapping support...................................................................................................68
Trust relationships...................................................................................................................69
Configuring smb.conf for trusted users..................................................................................69
Establishing a trust relationship on an HP CIFS PDC with another Samba Domain......................69
Establishing a trust relationship on an HP CIFS PDC with an NT domain....................................70
Trusting an NT Domain from a Samba Domain.................................................................70
Trusting a Samba Domain from an NT domain..................................................................70
Establishing a trust relationship on an HP CIFS member server of a Samba Domain or an NT
domain............................................................................................................................70
5 Windows 2003 and Windows 2008 domains.............................................71
Introduction............................................................................................................................71
HP CIFS and other HP-UX Kerberos applications co-existence........................................................71
HP-UX Kerberos client software and LDAP integration software dependencies..................................71
Strong authentication support ..................................................................................................72
Steps to install Certification Authority (CA) on a Windows ADS server......................................72
Steps to download the CA certificates from Windows CA server..............................................73
Configuring HP CIFS server to enable startTLS........................................................................73
Joining an HP CIFS server to a Windows 2003 and Windows 2008 domain.................................74
Configuration parameters....................................................................................................74
Setting permissions for a user..............................................................................................75
Step-by-step procedure.......................................................................................................76
Trust relationships...................................................................................................................78
Establishing external trust relationships between HP CIFS PDCs and Windows 2003 and Windows
2008 domains..................................................................................................................78
Establishing a trust relationship on an HP CIFS member server of a Windows 2003 or Windows
2008 domain...................................................................................................................79
6 LDAP integration support...........................................................................81
Overview..............................................................................................................................81
HP CIFS server advantages.................................................................................................82
Network environments.............................................................................................................82
Domain model networks.....................................................................................................82
CIFS Server acting as the Primary Domain Controller (PDC)................................................82
CIFS Server acting as the member server..........................................................................82
CIFS Server acting as Backup Domain Controller (BDC) to Samba PDC................................82
CIFS server acting as an Active Directory Service (ADS) member server................................82
Workgroup model networks................................................................................................83
UNIX user authentication - /etc/passwd, NIS migration..........................................................83
The CIFS authentication with LDAP integration........................................................................83
Summary of installing and configuring......................................................................................84
Installing and configuring your directory server...........................................................................84
Installing the directory server...............................................................................................84
Configuring your directory server.........................................................................................85
Verifying the directory server...............................................................................................85
Installing LDAP-UX client services on an HP CIFS server................................................................85
Configuring the LDAP-UX client services.....................................................................................85
Quick configuration............................................................................................................86
Enabling Secure Sockets Layer (SSL)..........................................................................................89
Configuring the directory server to enable SSL.......................................................................89
Configuring the LDAP-UX client to use SSL..............................................................................90
Configuring HP CIFS Server to enable SSL.............................................................................90
Extending the Samba subschema into your directory server..........................................................91
Samba subschema differences between HP CIFS Server versions..............................................91
Procedures to extend the Samba subschema into your directory...............................................91
Contents 5
Page 6

Migrating your data to the directory server................................................................................92
Migrating all your files........................................................................................................92
An example..................................................................................................................92
Migrating individual files....................................................................................................93
Environment variables....................................................................................................93
General syntax for perl migration scripts...........................................................................93
Migration scripts...........................................................................................................93
Examples.....................................................................................................................94
Migrating your data from one backend to another.................................................................94
Configuring the HP CIFS Server................................................................................................95
LDAP configuration parameters............................................................................................95
Configuring LDAP feature support.........................................................................................96
Creating Samba users in the directory.......................................................................................97
Adding credentials.............................................................................................................97
Adding a Samba user to the LDAP directory .........................................................................98
Verifying Samba uers.........................................................................................................98
Syntax.........................................................................................................................99
Option.........................................................................................................................99
Example......................................................................................................................99
Management tools..................................................................................................................99
7 Winbind support....................................................................................100
Overview............................................................................................................................100
Winbind features..................................................................................................................100
Winbind process flow...........................................................................................................102
Winbind supports non-blocking, asynchronous functionality........................................................103
When and how to deploy Winbind........................................................................................104
Commonly asked questions...............................................................................................104
Considering alternatives....................................................................................................105
Configuring HP CIFS Server with Winbind...............................................................................107
Winbind configuration parameters.....................................................................................107
Unsupported parameters or options...............................................................................108
A smb.conf example....................................................................................................109
Configuring Name Service Switch......................................................................................109
idmap backend support in Winbind........................................................................................109
idmap rid backend support ..............................................................................................109
Limitations using idmap rid ...............................................................................................110
Configuring and using idmap rid.......................................................................................110
LDAP backend support .....................................................................................................110
Configuring the LDAP backend..........................................................................................110
Starting and stopping winbind...............................................................................................111
Starting winbind..............................................................................................................111
Stopping winbind............................................................................................................111
Automatically starting winbind at system startup...................................................................111
An Example for file ownership by winbind users.......................................................................111
wbinfo Utility.......................................................................................................................112
8 Kerberos support....................................................................................113
Introduction..........................................................................................................................113
Kerberos overview................................................................................................................113
Kerberos CIFS authentication example................................................................................114
HP-UX Kerberos application co-existence..................................................................................114
Components for Kerberos configuration...............................................................................114
Configuring krb5.keytab...................................................................................................115
6 Contents
Page 7

9 HP CIFS deployment models....................................................................117
Introduction..........................................................................................................................117
Samba domain model...........................................................................................................117
Samba Domain components..............................................................................................120
HP CIFS Server acting as a PDC....................................................................................120
HP CIFS Server acting as a BDC...................................................................................120
HP CIFS acting as the member server.............................................................................121
An example of the Samba Domain model...........................................................................121
A Sample smb.conf file for a PDC.................................................................................121
Configuration options..................................................................................................122
A Sample smb.conf file for a BDC.................................................................................123
Configuration options..................................................................................................123
A Sample smb.conf file for a domain member server.......................................................123
Configuration options..................................................................................................124
A Sample /etc/nsswitch.ldap file..................................................................................124
Windows domain model.......................................................................................................125
Components for Windows domain model...........................................................................126
An Example of the ADS domain model...............................................................................126
A sample smb.conf file For an HP CIFS ADS member server..............................................126
A sample /etc/krb5.conf file........................................................................................128
A sample /etc/nsswitch.conf file...................................................................................128
An example of Windows NT domain model........................................................................129
A Sample smb.conf file for an HP CIFS member server.....................................................129
Unified domain model...........................................................................................................131
Unified domain components..............................................................................................132
HP CIFS acting as a Windows 200x ADS member server.................................................132
Setting up the unified domain model..................................................................................132
Setting up LDAP-UX client services on an HP CIFS Server.......................................................132
Installing and configuring LDAP-UX client services on an HP CIFS Server.............................132
Configuring /etc/krb5.conf to authenticate using Kerberos...............................................133
Installing SFU 3.5 on a Window 2003 or 2008 R2 ADS Domain Controller............................133
An Example of the Unified omain Model.............................................................................133
A sample smb.conf file for an HP CIFS member server.....................................................134
A sample /etc/krb5.conf file........................................................................................134
A sample /etc/nsswitch.conf file...................................................................................135
10 Securing HP CIFS Server........................................................................136
Security protection methods....................................................................................................136
Restricting network access.................................................................................................136
Using host restrictions..................................................................................................136
An example...........................................................................................................136
Using interface protection.............................................................................................136
Interface protection example....................................................................................136
Using a firewall...........................................................................................................137
Using an IPC$ share-based denial.................................................................................137
Protecting sensitive information..........................................................................................137
Encrypting authentication.............................................................................................137
Protecting sensitive configuration files.............................................................................138
Using %m name replacement macro With caution................................................................138
Restricting execute permission on stacks..............................................................................139
Restricting user access......................................................................................................139
Automatically receiving HP security bulletins.............................................................................139
Reporting new security vulnerabilities..................................................................................140
11 Configuring HA HP CIFS........................................................................141
Overview of HA HP CIFS Server.............................................................................................141
Contents 7
Page 8

Recommended clients.......................................................................................................141
Installing highly available HP CIFS Server...........................................................................141
HA HP CIFS Server installation......................................................................................141
Configure a highly available HP CIFS Server.......................................................................142
Introduction................................................................................................................142
Instructions.................................................................................................................142
Edit the package configuration file samba.conf...............................................................144
Edit the samba.cntl control script ..................................................................................145
Edit the samba.mon monitor script.................................................................................147
Create the MC/ServiceGuard binary configuration file....................................................147
Special notes for HA HP CIFS Server.......................................................................................148
12 HP-UX configuration for HP CIFS.............................................................154
HP CIFS process model.........................................................................................................154
TDB memory-mapped access for HP CIFS Server.......................................................................154
Fixed size memory map support on HP-UX 11i v3 PA systems.................................................154
Configuration parameters.............................................................................................154
Mostly Private Address Space (MPAS) support on HP-UX 11i v3 IA systems...............................158
Unified file cache support on an HP-UX 11i v3 system...........................................................159
What to do if you encounter memory map error messages....................................................159
Constraints......................................................................................................................159
Overview of Kernel configuration parameters...........................................................................160
Configuring Kernel parameters for HP CIFS..............................................................................160
Swap space requirements.................................................................................................161
Memory requirements.......................................................................................................161
13 Tool reference.......................................................................................162
HP CIFS management tools....................................................................................................162
Smbpasswd ...................................................................................................................162
Syntax.......................................................................................................................163
Examples...................................................................................................................164
Syncsmbpasswd..............................................................................................................164
Options.....................................................................................................................164
Example....................................................................................................................164
Pdbedit ..........................................................................................................................165
Syntax.......................................................................................................................165
Examples...................................................................................................................167
net ................................................................................................................................168
Net commands...........................................................................................................168
Syntax for net user.......................................................................................................169
Examples...................................................................................................................170
wbinfo ...........................................................................................................................170
Syntax.......................................................................................................................170
Examples...................................................................................................................172
LDAP directory management tools...........................................................................................172
ldapmodify.....................................................................................................................173
Syntax.......................................................................................................................173
ldapmodify options.....................................................................................................173
Examples...................................................................................................................173
ldapsearch......................................................................................................................173
Syntax.......................................................................................................................174
ldapsearch options......................................................................................................174
Examples...................................................................................................................174
ldapdelete......................................................................................................................174
Syntax.......................................................................................................................175
ldapdelete options......................................................................................................175
8 Contents
Page 9

Examples...................................................................................................................175
Glossary..................................................................................................176
Index.......................................................................................................178
Contents 9
Page 10

About this document
This document describes how to install, configure, and administer the HP CIFS Server product. It
is the official documentation supported for the HP CIFS Server product. This document provides
HP-UX common variations, features, and recommendations tested and supported by HP. Other
documentations such as The Samba How To Collection and Using Samba, 2nd Edition supplied
with the HP CIFS Server product are provided as a convenience to the user. This document and
all the previous-release related documents are located at www.hp.com/go/hpux-networking-docs.
Intended audience
This document is intended for system administrators, who want to install, configure, and administer
the HP CIFS Server product. For additional information about the HP CIFS Server, see HP CIFS
Server documentation online at www.hp.com/go/hpux-networking-docs.
New and changed documentation in this edition
This edition documents the following changes for HP CIFS Server version A.03.02.00:
• HP CIFS Server version A.03.02.00 is based on open source Samba 3.6.6.
• HP CIFS Server now supports Windows Server 2008, Windows Server 2008r2, Windows
Vista and Windows 7 operating systems. Support for these operating systems is documented.
NOTE: Starting from version A.03.01.xx, HP CIFS Server does not provide support for CFSM.
HP provides support only for the contents described in the HP CIFS Server Administrator Guide.
Typographical conventions
Table 1 Documentation conventions
display, program/script code and
command names or parameters.
Publishing history
Table 2 Publishing history details
Document Manufacturing Part
Number
5900–2303
5900–2006
Operating Systems
Supported
11i v3
11i v3
ExamplesFontType of Information
> user logged in.MonotypeRepresentations of what appears on a
ItalicsEmphasis in text, actual document titles.
Users should verify that the power is turned off before
removing the board.
Related DocumentsBoldHeadings and sub-headings.
Publication DateSupported Product
Versions
January 2013A.03.02.00HP-UX 11i v35900-2578
April 2012A.03.01.04HP-UX 11i v2 and HP-UX
October 2011A.03.01.03HP-UX 11i v2 and HP-UX
10
5900-1743
September 2011A.03.01.02HP-UX 11i v35900-1766
May 2011A.03.01.01HP-UX 11i v2 and HP-UX
11i v3
Page 11

Table 2 Publishing history details (continued)
Document Manufacturing Part
Number
5900-1282
5990-5097
B8725-90143
Operating Systems
Supported
11i v3
v2, and HP-UX 11i v3
v2, and HP-UX 11i v3
Publication DateSupported Product
Versions
December 2010A.03.01HP-UX 11i v2 and HP-UX
March 2010A.02.04HP-UX 11i v1, HP-UX 11i
May 2009A.02.04HP-UX 11i v1, HP-UX 11i
January 2008A.02.03.0311i v1, v2 and v3B8725-90133
June 2007A.02.03.0111i v2 and v3B8725-90118
February 2007A.02.0311i v1, v2 and v3B8725-90110
August 2006A.02.0311i v1, v2B8725-90103
April 2006A.02.0211i v1, v2B8725-90101
October 2005A.02.0211i v1, v2B8725-90093
February 2005A.02.01.0111i v1, v2B8725-90079
December 2004A.02.0111i v1, v2B8725-90074
June 2004A.01.11.0111.0, 11i v1, v2B8725-90063
February 2004A.01.1111.0, 11i v1, v2B8725-90061
Document organization
This manual describes how to install, configure, administer and use the HP CIFS Server product.
The manual is organized as follows:
Chapter 1 Introduction to the HP CIFS Server Use this chapter to obtain a summary and an
introduction of HP CIFS Server architecture, available documentation resources
and product organization roadmap.
Chapter 2 Installing and Configuring the HP CIFS Server Use this chapter to learn how to
install, configure the HP CIFS Server product.
Chapter 3 Managing HP-UX File Access Permissions from Windows NT/XP Use this chapter
to understand how to use Windows NT and XP clients to view and change UNIX
file permissions and POSIX Access Control List on an HP CIFS Server.
Chapter 4 NT Style Domains Use this chapter to learn how to set up and configure the HP
CIFS Server as a PDC or BDC. This chapter also describes the process for joining
an HP CIFS Server to an NT style domain, Samba domain, or a Windows
2003/2008 R2 ADS domain as a pre-Windows 2000 compatible computer.
Chapter 5 Windows 2003 and Windows 2008 Domains Use this chapter to understand the
process for joining an HP CIFS Server to a Windows 200x Domain using Kerberos
security.
Chapter 6 LDAP-UX Integration Support Use this chapter to learn how to install, configure
and verify the HP Netscape Directory, HP LDAP-UX Integration product and HP
CIFS Server software with LDAP feature support.
Chapter 7 Winbind Support Use this chapter to learn how to set up and configure the HP
CIFS Server with the winbind support.
September 2003A.01.1011.0, 11i v1, v2B8725-90053
March 2002A.01.0811.0, 11i v1B8725-90021
Document organization 11
Page 12

Chapter 8 Kerberos Support Use this chapter to understand configuration detail which can
be used when HP CIFS Server co-exists with other HP-UX applications that make
use of the Kerberos security protocol.
Chapter 9 HP CIFS Deployment Models This chapter describes three HP CIFS deployment
models: Samba Domain, Windows Domain, and Unified Domain. Examples of
configuration files for each deployment model are provided for reference.
Chapter 10 Securing HP CIFS Server Use this chapter to understand the network security
methods that you can use to protect your HP CIFS Server.
Chapter 11 Configuring HA HP CIFS Use this chapter to understand the procedures required
to configure the active-standby or active-active High Availability configuration.
Chapter 12 HP-UX Configuration for HP CIFS This chapter provides guidance for configuring
and optimizing the HP-UX kernel and system for use with HP CIFS.
Chapter 13 Tool Reference This chapter describes tools for management of Samba user, group
account database.
HP welcomes your comments
HP welcomes your comments and suggestions on this document. We are truly committed to provide
documentation that meets your needs. You can send comments to: docsfeedback@hp.com
Please include the following information along with your comments:
• The complete title of the manual and the part number. The part number appears on the title
page of printed and PDF versions of a manual.
• The section numbers and page numbers of the information on which you are commenting.
• The version of HP-UX that you are using.
12
Page 13

1 Introduction to the HP CIFS Server
This chapter provides a general introduction to this document, HP CIFS, information about Samba,
the Open Source Software suite upon which the HP CIFS server is based, HP enhancements to the
Samba source, along with the various documentation resources available for HP CIFS.
HP CIFS Server description and features
The HP CIFS Server product implements many Windows Servers features on HP-UX. The Microsoft
Common Internet File System (CIFS) protocol, sometimes called Server Message Block (SMB), is a
Windows network protocol for remote file and printer access. Because the HP CIFS Server product
gives HP-UX access to the CIFS protocol, HP CIFS Server enables HP-UX to interoperate in network
environments exposed to Windows clients and servers by means of a Windows native protocol.
The HP CIFS Server source is based on Samba, an Open Source Software (OSS) project first
developed in 1991 by Andrew Tridgell. Samba has been made available to HP and others under
the terms of the GNU Public License (GPL). The goal of GPL software is to encourage the cooperative
development of new software. To learn about the GNU Public License, refer to the web site at
http://www.fsf.org. A Samba team continues to update the Samba source. To learn about the
Samba team, visit their web site at http://www.samba.org.
Features
HP CIFS Server merges the HP-UX and Windows environments by integrating HP-UX and Windows
features as follows:
• Authentication Mechanisms and Secure Communication Methods including:
Netscape Directory Server/Red Hat Directory Service (NDS/RHDS) via LDAP◦
◦ Windows Active Directory Services (ADS)
◦ Kerberos, NTLMv2, and SMB Signing Support
◦ HP CIFS internal mechanisms to facilitate HP-UX and Windows compatibility such as
username mapping, winbind, and idmap_rid.
• File System Access Support
• Network Printer Access Support
• Domain Features and “Network Neighborhood” Browsing
HP CIFS Server A.03.02.00 release supports the following new features:
• Full support for SMB2
SMB2 within Samba is implemented with a brand new asynchronous server architecture,
allowing Samba to display the performance enhancements SMB2 brings to Microsoft networking
technology.
• Improved Printing Support
Print subsystem has been rewritten to use automatically generated RPCs and provides greater
compatibility with the Windows SPOOLSS print subsystem architecture, including export of
printer data via registry interfaces.
HP CIFS Server description and features 13
Page 14

• Simplified Identity Mapping
For this release, ID mapping has been rewritten yet again with the goal of making the
configuration simpler and more coherent while keeping the needed flexibility and even adding
to the flexibility in some respects.
• Caching of user credentials by winbind
Winbind allows to logon using cached credentials.
Integrated authentication mechanisms means that administrators can centrally manage both UNIX
and Windows users, groups, and user attributes on their choice of Windows ADS, NT, NDS/RHDS,
or HP CIFS Server’s tdbsam or smbpasswd account databases. The CIFS clients can have their
users authenticated through a single Windows interface enabling HP-UX and Windows server
resource access by means of secure communication channels.
Integrated file system access means that users can use Windows clients and interfaces including
Windows GUIs and applications such as Microsoft Office to read, write, copy, or execute files on
HP-UX and Windows clients and servers. Users and administrators can use Windows to set access
control rights on files stored on HP-UX.
Integrated printer access means that users can publish and find network printers, download drivers
from HP-UX systems, and print to printers with Windows interfaces.
Integrated domain features and network neighborhood means that HP-UX Servers and their file
systems can participate in Windows NT or Windows 2003/2008 R2 ADS domain and can be
found through Windows interfaces along Windows resources. HP CIFS Servers can also present
their own domain.
Samba open source software and HP CIFS Server
Since the HP CIFS Server source is based on Samba open source software, it gains the advantages
of the evolutionary growth and improvement efforts of Samba developers around the world. In
addition, HP CIFS Server also provides the following support:
• Includes Samba defect fixes and features only when they meet expectations for enterprise
reliability.
• Provides HP developed defect fixes and enhancement requests for HP customers.
• Source is compiled and tuned specifically for the HP-UX platform and integrated with the latest
HP-UX environments.
• Adds customized scripts and Serviceguard templates for HP-UX environments.
• Provides documentation specifically for HP-UX users.
Flexibility
In order to accommodate a great variety of environments, HP CIFS Server provides many features
with hundreds of configuration options. Various management tools are available to establish and
control CIFS attributes. Chapter 13, “Tool Reference”, explains the management tools. Chapter 2,
“Installing and Configuring the HP CIFS Server”, discusses the installation and configuration process.
You must first understand the deployment environment and choose the appropriate features for
your server. The concept of “Samba Domain”, “Windows Domain”, and “Unified Domain” models
was developed to assist in deploying HP CIFS Server based on the particulars of various popular
network environments. Hence, Chapter 9, “HP CIFS Deployment Models”, describes each model
and the relevant configuration parameters required to establish servers in each deployment model.
Windows domain concepts are applied within the deployment models. HP CIFS Servers can
participate in either older NT style or newer Windows 2003/Windows 2008 style domains.
Chapter 4, “NT Style Domains”, describes how an HP CIFS Server can participate in an NT style
14 Introduction to the HP CIFS Server
Page 15

domain. Chapter 5, “Windows 2003 and Windows 2008 Domains”, describes how an HP CIFS
Server joins a Windows 2003 or a Windows 2008 domain as an ADS domain member server.
HP CIFS Server manages a given configuration using a configuration file, /etc/opt/samba/
smb.conf (by default) which contains configuration parameters set appropriately for the specific
installation. HP CIFS Server must also maintain internal data (including Trivial Data Base (TDB))
files and log files in the /var/opt/samba directory (by default). See Table 1-2, Table 4 (page
17), for the full HP CIFS Server product layout.
HP CIFS Server documentation: Printed and Online
The set of documentation that comprises the information you will need to explore the full features
and capabilities of the HP CIFS product consists of non-HP books available at most technical
bookstores, and this printed and online manual HP CIFS Server Administrator's Guide available
on the following web site:
http://www.docs.hp.com
A list of current recommended non-HP Samba documentation is:
• The Official Samba-3 HOWTO and Reference Guide by John H. Terpstra and Jelmer R.
Vernooij, Editors, ISBN: 0-13-145355-6.
• Samba-3 By Example Practical exercises to Successful Deployment by John H. Terpstra, ISBN:
0-13-147221-6.
• Using Samba, 2nd Edition Robert Eckstein, David Collier-Brown, Peter Kelly and Jay Ts.
(O'Reilly, 2000), ISBN: 0-596-00256-4..
• Samba, Integrating UNIX and Windows by John D Blair (Specialized Systems Consultants,
Inc., 1998), ISBN: 1-57831-006-7.
• Samba Web site: http://www.samba.org/samba/docs.
When using the HP CIFS product, HP recommends that you refer to The Samba HOWTO Collection
and Samba-3 by Example, shipped with the product in the /opt/samba/docs directory. The
book, Using Samba, 2nd Edition, can also be found in /opt/samba/swat/using_samba. All
three books are also available through Samba Web Administration Tool (SWAT).
IMPORTANT: The book Using Samba, 2nd Edition describes a previous version of Samba
(V.2.0.4). However, much of the information in Using Samba, 2nd Edition is applicable to this
version of the CIFS Server. Readers should always use the HP-provided Samba man pages or the
SWAT help facility for the most definitive information on the HP CIFS server.
NOTE: Please note that non-HP Samba documentation sometimes includes descriptions of features
and functionality planned for future releases of Samba, or that are only offered on certain operating
system platforms. The authors of these books do not always provide information indicating which
features are in existing releases and which features will be available in future Samba releases, or
are specific to a particular operating system.
HP CIFS documentation roadmap
Use the following road map to locate the Samba and HP CIFS documentation that provides details
of the features and operations of the HP CIFS Server.
Table 3 Documentation roadmap
Server Description
Document Title: Chapter: SectionHP CIFS Product
HP CIFS Server Administrator's Guide: Chapter 1, "Introduction to the HP
CIFS Server"
Samba Meta FAQ No. 2, "General Information about Samba"
Samba FAQ No. 1, "General Information"
HP CIFS Server documentation: Printed and Online 15
Page 16

Table 3 Documentation roadmap (continued)
Document Title: Chapter: SectionHP CIFS Product
Samba Server FAQ: No. 1, "What is Samba"
Using Samba: Chapter 1, "Learning the Samba"
Samba Man Page: samba(7)
HP CIFS Client Administrator's Guide: Chapter 1, "Introduction to the HP
CIFS Client"
Client Description
HP Add-on Features
Server Installation
Client Installation
Samba GUI Administration Tools
Server Configuration
Client Configuration
Server deployment models
HP CIFS Client Administrator's Guide: Chapter 1, "Introduction to the HP
CIFS Client"
HP CIFS Server Administrator's Guide: Chapter 1 "Introduction to the HP
CIFS Server," Section: "HP CIFS Enhancements to the Samba Server Source"
and Chapter 3, "Access Control Lists (ACLs)."
HP CIFS Client Administrator's Guide: Chapter 1, "Introduction to the HP
CIFS Client,". Sections: "HP CIFS Extensions" and "ACL Mappings."
HP CIFS Server Administrator's Guide: Chapter 2. "Installing and
Configuring the HP CIFS Server"
Samba FAQ: No 2, "Compiling and Installing Samba on a UNIX Host."
HP CIFS Client Administrator's Guide: Chapter 2. "Installing and Configuring
the HP CIFS Client"
Samba HOWTO and Reference Guide: Chapter 30, "SWAT - The Samba
Web Administration Tool" or Using Samba: Chapter 2, "Installing Samba
on a Unix System"
HP CIFS Server Administrator's Guide: Chapter 2, "Installing and
Configuring the HP CIFS Server"
HP CIFS Client Administrator's Guide: Chapter 2, "Installing and Configuring
the HP CIFS Client"
HP CIFS Server supports three deployment models: Samba Domain Model,
Windows Domain Model and Unified Domain Model. See HP CIFS Server
Administrator's Guide: Chapter 9, "HP CIFS Deployment Models"
Server: Samba Scripts
SMB & CIFS File Protocols
Client Utilities
Server Printing
HP CIFS Client Administrator's Guide: Chapter 8, "PAM NTLM"Configuration: PAM
HP-UX Man page: pam(3)
HP-UX Man page: pam.conf
HP CIFS Server Administrator's Guide, Chapter 2Server: Starting & Stopping
HP CIFS Client Administrator's Guide, Chapter 2.Client: Starting & Stopping
Using Samba: Appendix D, "Summary of Samba Daemons and Commands"
for detailed information about the command-line parameters for Samba
programs such as smbd, nmbd, smbstatus and smbclient.
HP CIFS Client Administrator's Guide: Chapter 9, "HP CIFS Deployment
Domain Models"
Using Samba: Chapter 1, "Learning the Samba"SMB & CIFS Network Design
Samba Meta FAQ No. 4, "Designing an SMB and CIFS Network"
Refer to man pages in SWATSamba Man Pages
Samba HOWTO and Reference GuideServer Utilities
HP CIFS Client Administrator's Guide: Chapter 5, "Command-line Utilities"
Samba HOWTO and Reference Guide: Chapter17, "classic Printing
Support"
16 Introduction to the HP CIFS Server
Page 17

Table 3 Documentation roadmap (continued)
Document Title: Chapter: SectionHP CIFS Product
Server Browsing
Client Troubleshooting
NIS and HP CIFS
Refer to Chapter 9, "Network Browsing" in Samba HOWTO and Reference
Guide for a description of browsing functionality and all browing options.
HP CIFS Client Administrator's Guide: Chapter 11, "Securing CIFS Server".Server Security
Part V, Troubleshooting, Samba HOWTO and Reference GuideServer Troubleshooting
Using Samba, "Chapter 9, Troubleshooting Samba"
Samba FAQs No. 4, "Specific Client Application Problems" and No 5,
"Miscellaneous" DIAGNOSIS.txt in the /opt/samba/docs directory
Samba Man page: debug2html(1), smbd(8), nmbd(8), smb.conf(5)
HP CIFS Client Administrator's Guide: Chapter 6, "Troubleshooting and
Error Messages"
HP CIFS now works with NIS and NIS+. For detailed information on special
options, refer to Samba HOWTO and Reference Guide.
HP CIFS Server file and directory roadmap
The default base installation directory of HP CIFS Server product is /opt/samba. The HP CIFS
configuration files are located in the directory /etc/opt/samba. The HP CIFS log files and any
temporary files are created in /var/opt/samba.
Table 1-2 briefly describes the important directories and files that comprise the CIFS Server.
Table 4 Files and directory description
/opt/samba
/opt/samba_src
/opt/samba/bin
/opt/samba/script
/opt/samba/swat
/opt/samba/HA
/var/opt/samba
/etc/opt/samba
/etc/opt/samba/smb.conf
DescriptionFile/Directory
This is the base directory for most of the HP CIFS Server
product files.
This is the directory that contains the source code for the
HP CIFS Server (if the source bundle was installed).
This is the directory that contains the binaries for HP CIFS
Server, including the daemons and utilities.
This directory contains the man pages for HP CIFS Server./opt/samba/man
This directory contains various scripts which are utilities
for the HP CIFS Server.
This directory contains html and image files which the
Samba Web Administration Tool (SWAT) needs.
This directory contains example High Availability scripts,
configuration files, and README files.
This directory contains the HP CIFS Server log files as well
as other dynamic files that the HP CIFS Server uses, such
as lock files.
This directory contains configuration files which the HP
CIFS Server uses, primarily the smb.conf file.
This is the main configuration file for the HP CIFS Server
which is discussed in great detail elsewhere.
/etc/opt/samba/smb.conf.default
/opt/samba/LDAP3
This is the default smb.conf file that ships with the HP CIFS
server. This can be modified to fit your needs.
This directory contains files which HP CIFS Server uses
for LDAP integration support.
HP CIFS Server file and directory roadmap 17
Page 18

Table 4 Files and directory description (continued)
DescriptionFile/Directory
/opt/samba/COPYING, /opt/samba_src/COPYING,
/opt/samba_src/samba/COPYING
/sbin/init.d/samba
/etc/rc.config.d/samba
/sbin/rc2.d/S900samba, /sbin/rc1.d/K100samba
These are copies of the GNU Public License which applies
to the HP CIFS Server.
This is the script that starts HP CIFS Server at boot time
and stops it at shutdown (if it is configured to do so).
This text file configures whether the HP CIFS server starts
automatically at boot time or not.
These are links to /sbin/init.d/samba which are actually
executed at boot time and shutdown time to start and stop
the HP CIFS Server, (if it is configured to do so).
18 Introduction to the HP CIFS Server
Page 19

2 Installing and configuring the HP CIFS Server
This chapter describes the procedures to install and configure the HP CIFS Server software. It
contains the following sections:
• HP CIFS Server Requirements and Limitations
• Step 1: Installing HP CIFS Server Software
• Step 2: Running the Configuration Script
• Step 3: Modify the Configuration
• Step 4: Starting the HP CIFS Server
HP CIFS Server requirements and limitations
Prior to installing the HP CIFS product, check that your system can accommodate the following
product requirements and limitations.
HP CIFS Server installation requirements
The HP CIFS Server requires approximately 215 MB of disk space for installation on an HP-UX 11i
v3 system. The HP CIFS Server source code files requires approximately 36 MB of disk space.
NOTE: The CIFS Server source code files are not required for execution of HP CIFS Server. You
can choose not to install them or you can remove them after installation at the following location:
/opt/samba_src
HP CIFS Server memory requirements
An smbd process is usually created for each new connection. Each smbd requires about 4 MB of
system memory on HP-UX 11i v3.
The smbd process may now also allocate memory for specialized caching requirements as needed.
The size and timing of these memory allocations vary widely depending on the client type and the
resources being accessed. However, most client access patterns will not trigger such specialized
caching. System administrators should routinely monitor memory utilization in order to evaluate
this dynamic memory behavior. You may need to adjust HP-UX server memory configurations to
accommodate these changes while upgrading from previous versions.
See Chapter 12, "HP-UX Configuration for HP CIFS" in this manual for more detailed information.
Software requirements
The following describes software requirements:
• HP CIFS Server A.02.04.02 or later requires LDAP-UX Integration product, J4269AA, to be
installed.
• Kerberos v5 Client E.1.6.2.10 or later is required to support HP CIFS Server integration with
a Windows 2003 or Windows 2008 ADS Domain Controller (DC) on HP-UX 11i v3.
Swap space requirements
Due to the one-process-per-client model of HP CIFS, perhaps the most stringent requirement imposed
on the system is that of swap space. HP-UX reserves a certain amount of swap space for each
process that is launched, to prevent it from being aborted in case it needs to swap out some pages
during times of memory pressure. Other operating systems, only reserve swap space when it is
needed. This results in the process not finding the swap space that it needs, in which case it has
to be terminated by the OS.
HP CIFS Server requirements and limitations 19
Page 20

Each smbd process will reserve about 2 MB of swap space and depending on the type of client
activity, process size may grow up to 4 MB of swap space. For a maximum of 2048 clients, 4 *
2048 or about 8 GB of swap space would be required. Therefore, HP recommends configuring
enough swap space to accommodate the maximum number of simultaneous clients connected to
the HP CIFS server.
Memory requirements
Each smbd process requires approximately 4 MB of memory on HP-UX 11i v3. For 2048 clients,
therefore, the system must have at least 8 GB of physical memory. This is over and above the
requirements of other applications that will be running concurrent with HP CIFS.
Step 1: Installing HP CIFS Server software
If the HP CIFS Server software has been pre-installed on your system, you may skip Step 1 and go
directly to "Step 2: Running the Configuration Script".
HP CIFS Server Upgrades:
If you are upgrading an existing HP CIFS Server configuration, HP recommends that you create a
backup copy of your current environment. The SD install procedure may alter or replace your
current configuration files. All files under /var/opt/samba, /etc/opt/samba and /opt/samba
must be saved in order to ensure that you will be able to return to your current configuration, if
necessary. For example:
$ stopsmb
or if winbind is in use, then do:
$ stopsmb -w
$ mkdir /tmp/cifs_save
$ tar -cvf /tmp/cifs_save/var_backup.tar /var/opt/samba
$ tar -cvf /tmp/cifs_save/etc_backup.tar /etc/opt/samba
$ tar -cvf /tmp/cifs_save/optsamba_backup.tar /opt/samba
Do not use the -o option with the tar command. This will ensure proper file ownership.
If a problem with the upgrade does occur, use SD to remove the entire HP CIFS Server product
and restore your previous backup version. Once this is done, you may restore the saved
configuration files and the HP CIFS Server. For example:
$ tar -xvf /tmp/cifs_save/var_backup.tar
$ tar -xvf /tmp/cifs_save/etc_backup.tar
$ tar -xvf /tmp/cifs_save/optsamba_backup.tar
This procedure is not intended to replace a comprehensive backup strategy that includes user data
files.
If you are in security = domain, or security = ads mode, it will probably be necessary
to re-join an HP CIFS Server to the domain once you restore your previous backup version. See
“Windows style domains” (page 57) and “Windows 2003 and Windows 2008 domains” (page
71) for details on how to re-join an HP CIFS Server to a Windows domain.
Overview:
Installation of the HP CIFS Server software includes loading the HP CIFS Server filesets using the
swinstall(1M) utility, completing the HP CIFS configuration procedures, and starting Samba using
the startsmb script.
Installing From a Software Depot File:
To install the HP CIFS Server software from a depot file, such as those downloadable from
http://www.hp.com/go/softwaredepot, enter the following at the command line:
20 Installing and configuring the HP CIFS Server
Page 21

swinstall options -s /path/filename ProductNumber
Where the ProductNumber is CIFS-SERVER for HP-UX 11i v3.
options is -x autoreboot=true
path must be an absolute path, it must start with /, for example,/tmp.
filename is the name of the downloaded depot file, usually a long name of the form:
CIFS-SERVER_A.03.02.00_HP-UX_B.11.31_IA_PA.depot
An example
For example, to install HP CIFS Server A.03.02.00 on an HP-UX 11i v3 system from a downloaded
depot file, enter the following command:
swinstall -x autoreboot=true \
-s /tmp/CIFS-SERVER_A.03.02.00_HP-UX_B.11.31_IA_PA.depot CIFS-SERVER
Step 2: Running the configuration script
The samba_setup configuration script is intended for new installations only. Prior to running the
samba_setup configuration script, you must obtain some basic configuration information and might
need to install additional software based on the HP CIFS deployment domain model you use. You
need to supply the following before you run the samba_setup script:
• Decide whether an HP CIFS to be a WINS server or not.
• Obtain the WINS IP address if the HP CIFS accesses an existing WINS server.
• Provide the following global LDAP parameters information if you choose to use an LDAP
backend:
◦ the fully qualified distiguished name for the LDAP directory server
◦ ldap SSL
◦ ldap suffix
◦ ldap user suffix
◦ ldap group suffix
◦ ldap admin dn
For detailed information on how to configure LDAP parameters, see “LDAP integration support”
(page 81).
• Obtain the name of your HP CIFS Server.
• Provide the following information if you choose to use the Windows NT4 domain:
the name of your domain◦
◦ the name of your Primary Domain Controller (PDC)
◦ the names of Backup Domain Controllers (BDCs)
◦ administrator user name and password
See “Windows style domains” (page 57) for detailed.
Step 2: Running the configuration script 21
Page 22

• Provide the following information if you choose to use the Windows Active Directory Server
(ADS) realm:
◦ the name of your realm
◦ the name of your Domain Controller
◦ administrator user name and password
◦ LDAP-UX Integration product is installed
◦ Ensure that the most recent Kerberos client product is installed
For detailed information on how to join an HP CIFS Server to a Windows 2000/2003 Domain
using Kerberos security, see “Windows 2003 and Windows 2008 domains” (page 71).
• Select the following authentication security type if you attempt to use the workgroup
environment:
◦ Server-level security: When this security type is specified, password authentication is
handled by another SMB password server. When a client attempts to access a specific
share, Samba checks that the user is authorized to access the share. Samba then validates
the password via the SMB password server.
NOTE: HP does not recommend you use the server-level security type, this security type
will be unavailable in the future.
◦ User-level security: When this security type is specified, each share is assigned specific
users. When a request is made for access, Samba checks the user's user name and
password against a local list of authorized users and only gives access if a match is
made.
◦ Share-level security: When this security type is specified, each share (directory) has at
least one password associated with it. Anyone with a password will be able to access
the share. There are no other access restrictions.
• Run the Samba configuration script using the command below.
/opt/samba/bin/samba_setup
The script will modify the smb.conf file according to the information that you have entered.
Step 3: Modify the configuration
Configuration modification
HP CIFS Server requires configuration modifications for the following functionality:
• Case Sensitivity for the Client and Server for UNIX Extensions
• DOS Attribute Mapping
• Print Services for version A.03.02.00
• Distributed File System (DFS) Support
• Configure MC/ServiceGuard High Availability (HA)
Configure case sensitivity
By default, the HP CIFS Server is configured to be case insensitive, like Windows.
NOTE: HP recommends that when using CIFS Extensions for UNIX, both the CIFS Client and
Server be configured to be case sensitive.
22 Installing and configuring the HP CIFS Server
Page 23

For the CIFS Server, edit the server configuration file: /etc/opt/samba/smb.conf as follows.
case sensitive = yes
For the CIFS Client configuration, in the /etc/opt/cifsclient/cifsclient.cfg file, ensure the following
default is set:
caseSensitive = yes
map system, map hidden and map archive Attributes
There are three parameters, map system, map hidden, and map archive, that can be configured
in Samba to map DOS file attributes to owner, group, and other execute bits in the UNIX file
system.
When using the CIFS Client, you may want to have all three of these parameters turned off. If the
map archive parameter is on, any time a user writes to a file, the owner execute permission will
be set. This is usually not desired behavior for HP CIFS clients or UNIX clients in general.
By default, map system and map hidden are off, and map archive is on.
To turn map archive off, modify /etc/opt/samba/smb.conf as follows:
map archive = no
map readonly attribute
The smb.conf parameter, map readonly, controls how the DOS read only attribute should be
mapped from a UNIX files system.
Three valid settings for this parameter are:
yes The read only DOS attribute is mapped to the inverse of the user (owner) write
bit in the UNIX permission mode set. If the owner write bit is not set, the read
only attribute is reported as being set on the file.
permissions The read only DOS attribute is mapped to the effective permissions of the
connecting user, as evaluated by reading the UNIX permissions and POSIX ACL
(if present). If the connecting user does not have permission to modify the file,
the read only attribute is reported as being set on the file.
no The read only DOS attribute is unaffected by permissions.
By default, the map readonly attribute is set to “yes”. Samba uses user (owner) access permission
to determine whether a file is read only. The file access permission is determined by the POSIX
write access permission for user (owner). If the write permission on a file is not set for the user
(owner), then Samba treats that file as read-only. Once Samba identifies a file as read-only, any
write access attempting to that file would immediately result in access denied error. Group members
are unable to write to a file with UNIX write access permission disabled for the user (such as 070
or 060).
If you set this parameter to “permissions”, the file access permissions for group members will
be evaluated by validating UNIX group permissions. Group members can write to files with UNIX
write permission enabled for the group (such as 060 or 070). The smb.conf parameter, store
dos attributes, must be set to No (default), otherwise, the map readonly parameter setting
will be ignored.
Step 3: Modify the configuration 23
Page 24

Configure for SMB2 Features
Table 5 List of SMB2 parameters
DefaultDescriptionParameter Name
max protocol = SMB2
smb2 max read
smb2 max write
smb2 max trans
This parameter enables SMB2
protocol. We can test SMB2 feature
only with Windows 7 or windows
vista client.
smb2 max read = 65536This option specifies the protocol
value that smbd(8) will return to a
client, informing the client of the
largest size that may be returned by
a single SMB2 read call.
NOTE: Currently this parameter is
hardcoded to 65536 and cannot be
configured.
smb2 max write = 65536This option specifies the protocol
value that smbd(8) will return to a
client, informing the client of the
largest size that may be sent to the
server by a single SMB2 write call.
NOTE: Currently this parameter is
hardcoded to 65536 and cannott be
configured.
smb2 max trans = 65536This option specifies the protocol
value that smbd(8) will return to a
client, informing the client of the
largest size of buffer that may be
used in querying file meta-data via
QUERY_INFO and related SMB2
calls.
smb2 max credits
number of outstanding simultaneous
SMB2 operations that Samba tells
the client it will allow. You should
never need to set this parameter.
async smb echo handler
Samba should fork the async smb
echo handler. It can be beneficial if
your file system can block syscalls for
a very long time. In some
circumstances, it prolongs the timeout
that Windows uses to determine
whether a connection is dead.
Configuring print services for HP CIFS version A.03.02.00
This section provides information about configuring Print Services on systems running HP CIFS
version A.03.02.00. The HP CIFS Server now provides the following NT printing functionality:
• Support for Windows Access Control Lists (ACL) on printer objects
Information about setting up and configuring each of the Print Services (except ACLs) is shown in
the following sections. Information about configuring ACL Support is discussed in a previous section.
Configuring a [printers] share
The following is a minimal printing setup. Use either one of the following two procedures to create
a [printers] share:
smb2 max credits = 8192This option controls the maximum
async smb echo handler = noThis parameter specifies whether
24 Installing and configuring the HP CIFS Server
Page 25

1. SWAT (Samba Administration Tool)
-or-
2. Create a [printers] share in the /etc/opt/samba/smb.conf file. Refer to the following example:
[hpdeskjet]
path = /tmp
printable = yes
Where "hpdeskjet" is the name of the printer to be added.
Creating a [printers] share
Configure a [printers] share in the /etc/opt/samba/smb.conf file. Refer to the following example:
[printers]
path = /tmp
printable = yes
browseable = no
This share is required if you want the printer's list to be displayed in SWAT, which is not defined
in the smb.conf file, but exists on the HP CIFS Server. If this share is not defined, the printer's list
will display only those printer shares which are defined in the smb.conf file.
Setup Server for automatically uploading printer driver files
In order to add a new driver to your Samba host using version A.03.01.04 of the software, one
of two conditions must hold true:
1. The account used to connect to the Samba host must have a uid of 0 (i.e. a root account),
or...
2. The account used to connect to the Samba host must be a member of the printer admin list.
This will require a [global] smb.conf parameter as follows:
printer admin = netadmin
The connected account must still possess access to add files to the subdirectories beneath [print$].
Keep in mind that all files are set to 'read only' by default, and that the printer admin parameter
must also contain the names of all users or groups that are going to be allowed to upload drivers
to the server, not just 'netadmin'.
The following is an example of the other parameters required:
1. Create a [print$] share in the smb.conf file that points to an empty directory named
"/etc/opt/samba/printers" on the HP CIFS Server. Refer to the following example:
[print$]
path = /etc/opt/samba/printers
browseable = yes
guest ok = yes
read only = yes
write list = netadmin
In this example, the parameter "write list" specifies that administrative lever user accounts will
have write access for updating files, on the share.
2. Create the subdirectory tree, under the [print$] share, for each architecture that needs to be
supported. Refer to the following example:
cd /etc/opt/samba/printers
mkdir W32X86
mkdir Win40
Step 3: Modify the configuration 25
Page 26

There are two possible locations (subdirectories) for keeping driver files, depending upon
what version of Windows the files are for:
For Windows NT, XP, Windows 2000, Vista, or Windows 7 driver files, the files will be stored
in the /etc/opt/samba/printers/W32X86 subdirectory.
For Windows 9x driver files, the files will be stored in the /etc/opt/samba/printers/Win40/0
subdirectory.
Setup Client for automatically uploading of printer drivers
Printer driver files can be automatically uploaded from disk to the printers on a HP CIFS Server.
Here are the steps:
1. Connect to CIFS Server by running the \\[server name] command or browse to CIFS
Server through Network Neighborhood.Make sure you are connected as a member of
the printer admin list.
2. From the CIFS Server, double click on the "Printers" or "Printers and Faxes" folder. A list of
printers available from your CIFS Server will be shown in the folder. Viewing the printer
properties will result in the error message:
The printer driver is not installed on this computer. Some printer
properties will not be accessible unless you install the printer
driver. Do you want to install the driver now?
3. Click "no" in the error dialog and the printer properties window will be displayed.
4. Click on the 'Advanced' tab, then the 'New Driver..." button.
5. Select the printer driver e.g. hp LaserJet 5i. You will be asked for the driver files. Give the
path where the driver files are located. The driver files will be uploaded from the disk, and
stored into the subdirectories under the [print$] share.
Publishing printers in an MS Windows 2003/2008 R2 ADS domain
Publishing printers makes HP CIFS Server printers searchable in an Microsoft Windows 2003/2008
R2 ADS domain. If a Windows client is a domain member of the ADS domain, that client can
search for the printer and install it.
Setting up HP CIFS Server for publishing printers support
Use the following procedures to set up an HP CIFS Server for publishing printers support:
1. Create the printer shares for each printer and a [printers] share in the smb.conf file.
The following is an example of a [printers] share:
[printers]
path = /tmp
printable = yes
browseable = yes
See the following example for settng up a specific printer share, where lj1005 is the name
of the printer:
[lj1005]
path = /tmp
printable = yes
2. Create a [print$] share in the smb.conf file and set the path parameter to a directory named
/etc/opt/samba/printers. See the following example:
[print$]
path = /etc/opt/samba/printers
use client driver = no
26 Installing and configuring the HP CIFS Server
Page 27

browseable = yes
guest ok = yes
read only = yes
write list = netadmin
In the above example, the write list parameter specifies that administrative level user
account has write access for updating files on this share. The use client driver parameter
must be set toNo.
3. Configure the printer admin parameter to specify a list of domain users that are allowed
to connect to an HP CIFS Server. See the following example:
[global]
printer admin = cifsuser1,cifsuser2
4. If the HP CIFS Server is not yet a member of the ADS domain, then run the net ads join
-U Administrator%password command to join an HP CIFS Server to the ADS domain
as a domain member server. See section "Join an HP CIFS Server to a Windows 2000/2003
Domain as an ADS Member Server" in “Windows 2003 and Windows 2008 domains” (page
71) for details.
Publishing printers from a windows client
Use the following procedures to publish printers from a windows client which is a domain member
of the ADS domain:
1. Log in to your window client as a user who is a member of the printer admin list. For example,
the user's name is cifsuser1.
2. Click on start.
3. Click on the run tab.
4. Type \\<HP CIFS Server name> in the open box to connect to an HP CIFS Server. For
example, type \\hpserverA. hpserverA is the name of an HP CIFS Server.
5. Click on the printers folder.
6. Double click on a printer and select printer, then the properties tab.
7. Click on sharing tab in the properties windows screen.
8. Check the list in the directory check-box in the sharing windows screen. See the
following screen snapshot for an example:
Step 3: Modify the configuration 27
Page 28
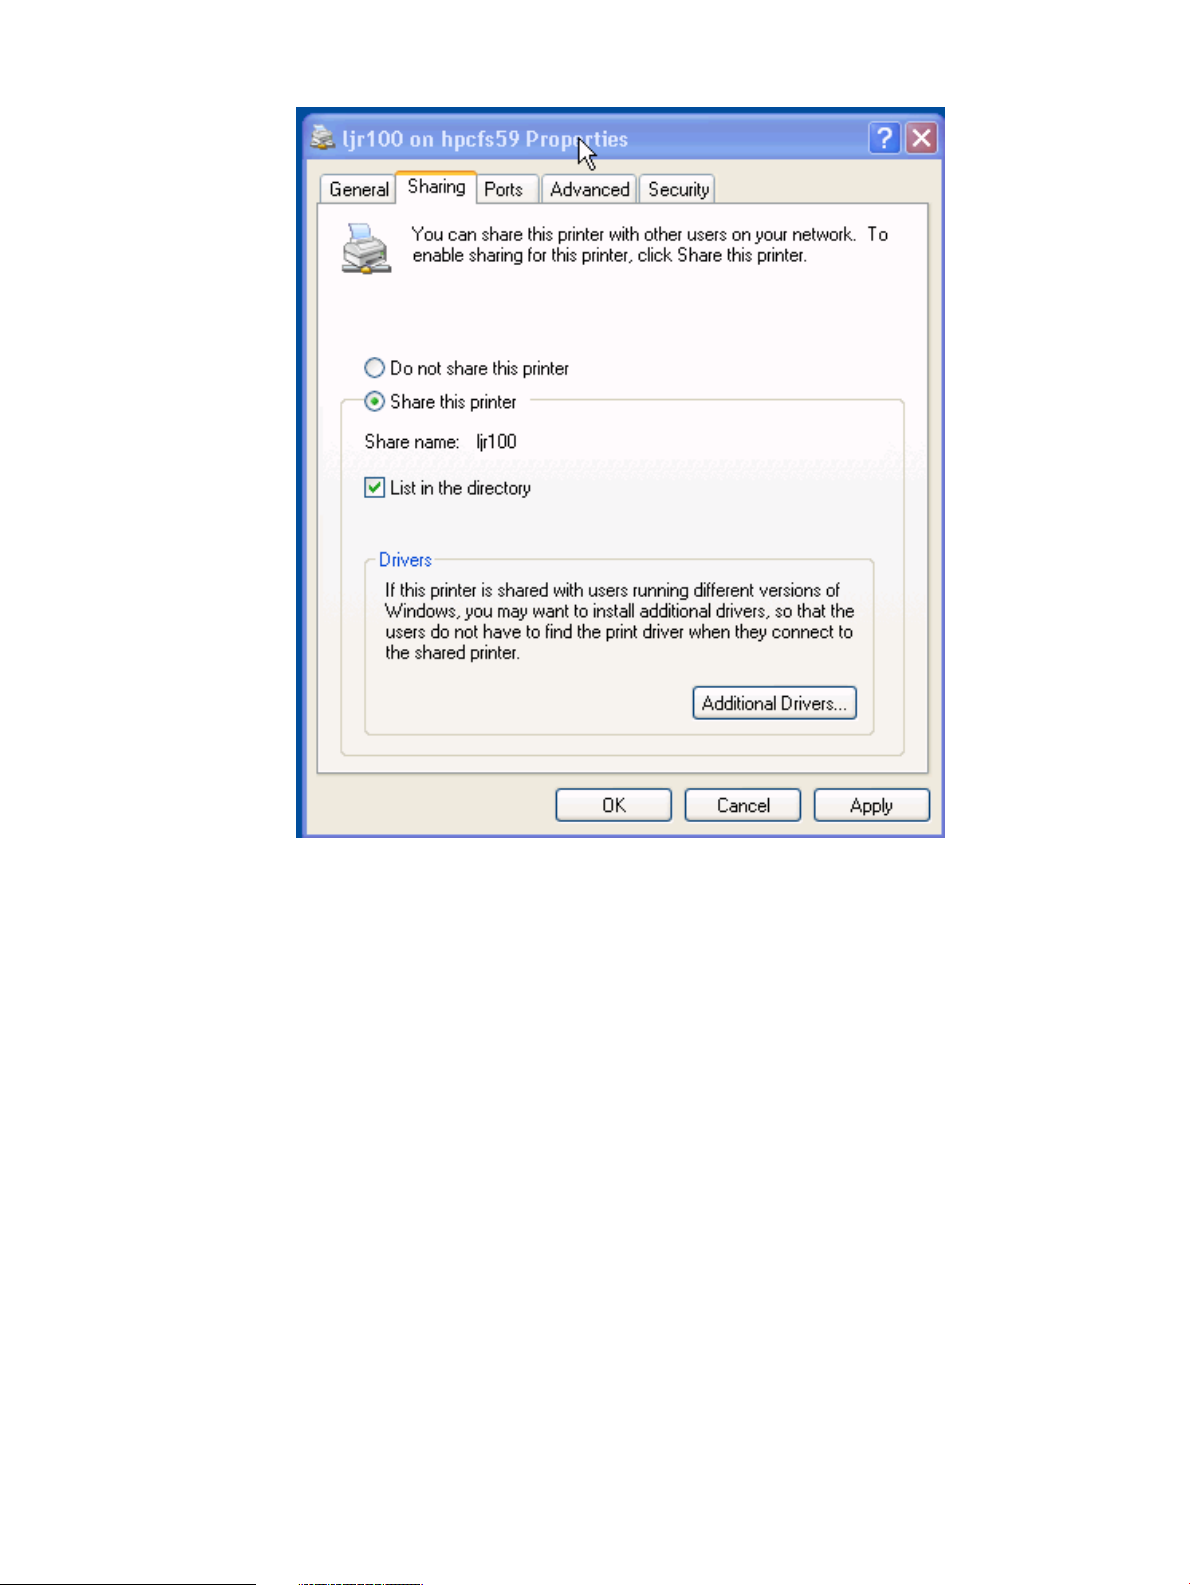
Figure 1 Publishing printer screen
Verifying that the printer is published
On an HP CIFS Server system, you can run the net ads printer search command to verify
that the printer is published. For example, verify that the printer hpdesklj2 is published, type:
$ net ads printer search hpdesklj2
After you ran the above command, the output is shown as follows:
objectClass:top
objectClass:leaf
objectClass:connectionPoint
objectClass:printQuene
printerName:hpdesklj2
serverName:HPSERVERA
On a windows client, you can also use the following steps to verify that the printer is published:
1. Log in to your window client as a user who is a member of the printer admin list. For example,
the user's name is cifsuser1.
2. Click on start.
3. Click on the search tab.
4. Click on buttons to find network printers.
5. Select the name of the ADS domain in the In box.
6. Click on the find now tab.
28 Installing and configuring the HP CIFS Server
Page 29

Commands used for publishing printers
This section describes the net ads printer command used for publishing printers support on
an HP CIFS Server.
Searching printers
To search a printer across the entire Windows 2003/2008 R2 ADS domain, run the following
command:
$ net ads printer search <printer_name>
Without specifying the printer name, the command searches all printers available on the ADS
domain.
For example, the following command searches all printers available on the ADS domain:
$ net ads printer search
After you ran the above command, the output is shown as follows:
objectClass:top
objectClass:leaf
objectClass:connectionPoint
objectClass:printQuene
printerName:hpdesklj2
serverName:HPSERVERA
objectClass:top
objectClass:leaf
objectClass:connectionPoint
objectClass:printQuene
printerName:lj1005
serverName:HPSERVERA
objectClass:top
objectClass:leaf
objectClass:connectionPoint
objectClass:printQuene
printerName:lj3200
serverName:HPSERVERB
Removing a printer
To remove a printer from the ADS domain, run the following command:
$ net ads printer remove <printer_name>
For example, the following command removes the printer lj1005 from the ADS domain:
$ net ads printer remove lj1005
Re-Publishing a printer
To publish a printer for the first time, you must use the procedures described in section "Publishing
Printers from a Windows Client". If you remove a printer, you can use the following command to
re-publish it:
$ net ads printer publish <printer_name>
For example, the following command re-publishes the printer lj1005 to the ADS domain:
$ net ads printer publish lj1005
Setting up Distributed File System (DFS) support
This section will provide the procedures for:
• Setting up a DFS Tree on a HP CIFS Server
• Setting up DFS Links in the DFS root directory on a HP CIFS Server
Step 3: Modify the configuration 29
Page 30

NOTE: HP does not recommend filesharing of the root directory. Only subdirectories under the
root should be set up for filesharing.
Setting up a DFS Tree on a HP CIFS Server
After the DFS Tree is set up using this procedure, users on DFS clients can browse the DFS tree
located on the HP CIFS Server at \\servername\DFS.
1. Select a HP CIFS Server to act as the Distributed File System (DFS) root directory.
2. Configure a HP CIFS server as a DFS server by modifying the smb.conf file to set the global
parameter host msdfs to yes. Example:
[global]
host msdfs = yes
3. Create a directory to act as a DFS root on the HP CIFS Distributed File System (DFS) Server.
4. Create a share and define it with the parameter path = directory of DFS root in the
smb.conf file. Example:
[DFS]
path = /export/dfsroot
5. Modify the smb.conf file and set the msdfs root parameter to yes. Example:
[DFS]
path = /export/dfsroot
msdfs root = yes
Setting up DFS links in the DFS root directory on a HP CIFS Server
A Distributed File System (DFS) root directory on a HP CIFS Server can host DFS links in the form
of symbolic links which point to other servers.
Before setting up DFS links in the DFS root directory, you should set the permissions and ownership
of the root directory so that only designated users can create, delete or modify the DFS links.
Symbolic link names should be all lowercase. All clients accessing a DFS share should have the
same user name and password.
An example for setting up DFS links follows:
1. Use the ln command to set up the DFS links for "linka" and "linkb" on the /export/dfsroot
directory. Both "linka" and "linkb" point to other servers on the network. Example commands:
cd /export/dfsroot
chown root /export/dfsroot
chmod 775 /export/dfsroot
ln -S msdfs:serverA\\shareA linka
ln -S msdfs:serverB\\shareB serverC\\shareC linkb
2. If you use the ls -l command on the /export/dfsroot directory, it should show an output similar
to this one:
lrwxrwxrwx l root sys 24 Oct 30 10:20
linka -> msdfs:serverA\\shareA
lrwxrwxrwx l root sys 30 Oct 30 10:25
linkb -> msdfs:serverB\\shareB, serverC\\shareC
In this example, "serverC" is the alternate path for "linkb". Because of this, if "serverB" goes
down, "linkb" can still be accessed from "serverC". "linka" and "linkb" are share names.
Accessing either one will take users directly to the appropriate share on the network.
30 Installing and configuring the HP CIFS Server
Page 31

Refer to the following screen snapshot for an example:
Figure 2 Link share names example
MC/ServiceGuard high availability support
Highly Available HP CIFS Server allows the HP CIFS Server product to run on an MC/ServiceGuard
cluster of nodes. MC/ServiceGuard allows you to create high availability clusters of HP 9000
server computers.
Template files for version A.02.02 have been revised to allow any number of cluster nodes and
other advantages over previous schemes.
NOTE: The templates are only starting points, and must be modified for the customer environment.
Consulting can be purchased from HP to assist in configuring a HA CIFS Server environment.
Step 4: Starting the HP CIFS Server
Run the script below to start Samba if you do not use winbind support:
/opt/samba/bin/startsmb
Run the script below to start Samba if you configure HP CIFS Server to use winbind support:
/opt/samba/bin/startsmb -w
or /opt/samba/bin/startsmb --winbind
When the command successfully starts Samba, a message is displayed indicating the specific
processes that have been started. When the script is successful, the exit value is 0. If the script
fails, the exit value is 1.
Samba installation and configuration are complete.
Run the following script to stop Samba if you do not use winbind support:
/opt/samba/bin/stopsmb
Run the following script to stop Samba if you use winbind support:
/opt/samba/bin/stopsmb -w
or /opt/samba/bin/stopsmb --winbind
When the script is successful, the exit value is 0. If the script fails, the exit value is 1.
Winbind execution may be controlled without affecting the execution of smbd and nmbd with the
following commands.
Step 4: Starting the HP CIFS Server 31
Page 32

Run the following command to start winbind alone:
/opt/samba/bin/startwinbind
Run the following command to stop winbind alone:
/opt/samba/bin/stopwinbind
NOTE: HP does not support the inetd configuration to start the HP CIFS Server.
Starting and stopping daemons individually
Two new options -n (nmbd only) and -s (smbd only) have been added to startsmb andstopsmb
scripts to start and stop the daemons individually. The startsmb -scommand starts the smbd
daemon. The stopsmb -s command stops the smbd daemon. The -n option starts and stops the
nmbd daemon in the same way.
Configuring automatic start at system boot
When the HP CIFS Server is first installed, it will not automatically start when the system boots.
You can enable the HP CIFS Server and related daemons to do so by editing the
/etc/rc.config.d/samba file.This configuration file contains two variables:
RUN_SAMBA=0
RUN_WINBIND=0
The RUN_SAMBA variable controls whether HP CIFS Server daemons, smbd and nmbd, will start
at system startup. The RUN_WINBIND variable controls whether the winbind daemon, winbindd,
will start at system startup. The two variables function independently.
To configure HP CIFS Server to start automatically, set RUN_SAMBA to a non-zero value. To configure
Winbind to start automatically, set RUN_WINBIND to a non-zero value. For example, if you want
HP CIFS Server and Winbind to start automatically at system startup, edit the variables in the
/etc/rc.config.d/samba file as follows:
RUN_SAMBA=1
RUN_WINBIND=1
Stopping and re-starting daemons to apply new settings
The smb.conf configuration file is automatically reloaded every minute if it changes. You can
force a reload by sending a SIGHUP to the CIFS server. Reloading the configuration file does not
affect connections to any service that is already established.
But, you must stop and re-start the CIFS server daemons to apply the new setting for the following
parameters in smb.conf:
• netbios aliases
• interfaces
• auth methods
• passdb backend
• invalid users
• valid users
• admin users
• read list
• write list
• printer admin
• hosts allow
32 Installing and configuring the HP CIFS Server
Page 33

• hosts deny
• hosts equiv
• preload modules
• wins server
• vfs objects
• idmap backend
Other samba configuration issues
Translate open-mode locks into HP-UX advisory locks
The HP CIFS Server A.02.* and A.03.* versions can translate open mode locks into HP-UX advisory
locks. This functionality prevents HP-UX processes from obtaining advisory locks on files with
conflicting open mode locks from CIFS clients. This also means CIFS clients cannot open files that
have conflicting advisory locks from HP-UX processes.
You must change the map share modes setting in smb.conf to yes to translate open mode
locks to HP-UX advisory locks. The default setting of map share modes is no.
Performance tuning using change notify
This section describes performance tuning using the Change Notify feature and internationalization.
NOTE: Starting with the Samba 3.0.25 version, the Change Notify Timeout feature is deprecated.
The Change Notify Timeout feature is replaced with the Change Notify feature. This new feature
depends on Linux iNotify, which is not available in HP-UX operating systems.
The Samba Server supports a new feature called Change Notify. Change Notify provides the
ability for a client to request notification from the server when changes occur to files or subdirectories
below a directory on a mapped file share. When a file or directory which is contained within the
specified directory is modified, the server notifies the client. The purpose of this feature is to keep
the client screen display up-to-date in Windows Explorer. The result: if a file you are looking at in
Windows Explorer is changed while you are looking at it, you will see the changes on the screen
almost immediately.
The only way to implement this feature in Samba is to periodically scan through every file and
subdirectory below the directory in question and check for changes made since the last scan. This
is a resource intensive operation which has the potential to affect the performance of Samba as
well as other applications running on the system. Two major factors affect how resource intensive
a scan is: the number of directories having a Change Notify request on them, and the size of those
directories. If you have many clients running Windows Explorer (or other file browsers) or if you
have directories on shares with a large number of files and/or subdirectories, each scan cycle
might be very CPU intensive.
Special concerns when using HP CIFS Server on a Network File System (NFS) or a Clustered File System (CFS)
Both NFS and CFS provide file system access to unique file storage from multiple systems. However,
controlling access to files, particularly files open for write access, from multiple systems poses
challenges. Applications are not necessarily network or cluster-aware. Applications may not be
Other samba configuration issues 33
Page 34

able to make use of locking mechanisms when multiple systems are involved. You need to be aware
of the following things when using HP CIFS Server in either an NFS or a Veritas CFS environment:
• CIFS Server running simultaneously on multiple nodes should not use either NFS or Veritas
CFS to concurrently share the smb.conf configuration and its subordinate CIFS system files
in /var/opt/samba/locks and /var/opt/samba/private.
There are operational reasons why multiple nodes should not share a configuration file
concurrently such a name/IP registration conflicts, etc. Also, sharing ansmb.conf file will
likely lead to sharing CIFS Server system data, increasing the likelihood of concurrent file
access and the possibility of CIFS Server corruption.
• Beginning with version A.02.02, HP CIFS Server does not start if another master daemon is
sharing the daemon PID files including a daemon on another node. (By default, PID files are
found in the /var/opt/samba/lock path). CIFS does this to prevent the problems with
sharing the CIFS Server configuration as discussed above.
• Avoid using HP CIFS Server to share Veritas CFS directories simultaneously on multiple nodes.
Since NFS and Veritas CFS provides for multiple nodes to read and write the same files
concurrently, you should use extra caution when configuring HP CIFS Server on multiple nodes
since most locking mechanisms do not span across multiple nodes. Simultaneous file access
can lead to data corruption if multiple producers overwrite each others work.
• The smb.conf parameter strict locking may be set to yes to prevent data corruption
but it may also lead to decrease performance.
By default, since HP CIFS Server provides access to files from multiple clients (and from multiple
nodes sharing an NFS or a Veritas CFS), there is the possibility of concurrent file access and
hence at least a remote chance of data corruption. Therefore, HP CIFS Server provides a "strict
locking" mechanism that can be enabled to prevent concurrent file access. When strict
locking is set toyes in smb.conf, the server checks every read and write access for file
locks, and denies access if locks exist. Since this check will be slow on some systems and well
behaved clients do ask for lock checks when it is important, HP recommends that you set
strict locking to no in smb.conf for most environments. The default value for strict
locking is no.
NetBIOS names are not supported on port 445
HP CIFS Server A.02.* and A.03.* versions (based on Samba 3.x.y) can accept connections on
port 445 as well as the original port 139. However, since port 445 connections are for SMB over
TCP and do not support the NetBIOS protocol. NetBIOS names are not supported on port 445.
This means features of Samba that depend on NetBIOS will not work. For example, the "virtual
server" technique depending on an "include = /etc/opt/samba/smb.conf.%L" which
ends up referring to another smb.conf.<netbios name> will not work.
You can use the smb.conf parametersmb ports to specify which ports the server should listen
on for SMB traffic. Set smb ports to 139 to disable port 445. By default, smb ports is set to
445 139.
34 Installing and configuring the HP CIFS Server
Page 35

3 Managing HP-UX file access permissions from Windows
NT/XP/2000/Vista/Windows 7
Introduction
This chapter describes how to use Windows NT, Windows 2000, Windows XP, Windows Vista
and Windows 7 clients to view and change standard UNIX file permissions and VxFS POSIX
Access Control Lists (ACL) on a HP CIFS server. A new configuration option, acl_schemes, is also
introduced.
UNIX file permissions and POSIX ACLs
The HP CIFS Server enables the manipulation of UNIX file permissions or VxFS POSIX ACLs from
Windows NT, Windows 2000, Windows XP, Windows Vista and Windows 7 clients. With this
capability most management of UNIX file permissions or POSIX ACLs can be done from the familiar
Windows Explorer interface.
NOTE: Although concepts of file ACLs are similar across the Windows and HP-UX platforms,
there are sufficient differences in functionality that one cannot substitute UNIX ACLs for Windows
ACLs (i.e. full emulation is not provided). For example, a Windows application that changes the
ACL data of a file may behave unexpectedly if that file resides on a HP CIFS Server.
Viewing UNIX permissions from windows
As a result of the ACL data differences in Windows and UNIX file permissions and VxFS POSIX,
Samba must map data from UNIX to Windows and Windows to UNIX.
The table below shows how UNIX file permissions translate to Windows ACL access types:
Table 6 UNIX File permission maps windows ACL
Windows access typeUNIX Permission
Special Access(R)r--
Special Access(W)-w-
Special Access(X)--x
Special Access(RW)rw-
Read(RX)r-x
Special Access(WX)-wx
Special Access(RWX)rwx
Special Accessr--
In addition to the permission modes shown above, UNIX file permissions also distinguish between
the file owner, the owning group of the file, and other (all other users and group).
UNIX file owner translation in Windows ACL
A UNIX file system owner has additional permissions that others users do not have. For example,
the owner can give away his ownership of the file, delete the file, rename the file, or change the
permission mode on the file. These capabilities are similar to the delete (D), change permissions
(P) and take ownership (O) permissions on the Windows client. Samba adds the DPO permissions
to represent UNIX file ownership in the Windows explorer interface.
Introduction 35
Page 36

For example, if a file on the UNIX file system is owned by UNIX user john and john has read and
write (rw-) permissions on that file, the Windows client will display the same permissions for user
john as:
Special Access(RWDPO)
You can also display the UNIX owner in the Windows Explorer interface. If you are in the File
Properties dialog box with the Security tab selected and you press the Ownership button, the
owning UNIX user's name will be displayed.
UNIX owning group translation in Windows ACL
The owning group on a UNIX file system is represented on the Windows client with the take
ownership (O) permission. While the meaning of the take ownership permission on Windows
doesn't exactly match the meaning of an owning group on the UNIX file system, this permission
is still translated into the take ownership permission.
This representation becomes even more significant when translating VxFS POSIX ACLs, as there
can be many groups with different permissions on an individual file in this file system. Without this
permission type, you would not be able to tell the owning group entry from other group entries.
For example, if an owning group named sales on the UNIX file system has.read and execute (r-x)
permissions on a file, the Windows client will display the permissions for group sales as:
Special Access(RXO)
UNIX other permission translation in Windows ACL
In UNIX, the other permission entry represents permissions for any user or group that is not the
owner, and doesn't belong to the owning group. This entry maps to the everyone access control
entry on the Windows client.
Windows directory and file permission translations
Windows clients display two sets of permissions for directory entries: directory permissions and
file permissions. Directory Permissions are the permissions for the directory itself. File Permissions
are the permissions inherited by the files and subdirectories created in the directory. Samba
translates UNIX permissions for a directory into Windows directory permissions and vice versa.
Windows file permissions are not supported when the translation is to/from UNIX permissions.
Windows file permissions, however, are supported with VxFS POSIX ACLs (as described in the
next section).
Setting UNIX permissions from Windows
With one exception, reversing the UNIX to Windows translations described above will always
work. You cannot, however, change the owner or owning group by adding Special Access(DPO)
or Special Access(O) to a user or group from the client.
All Windows permissions, except read, write and execute, are disregarded when applied to files
on the Samba server. These include delete (D), change permissions (P) and take ownership (O).
The table below shows how Windows access types map to UNIX permissions:
Table 7 Windows access type maps to UNIX permission
UNIX PermissionWindows access type
r--Special Access(R)
-w-Special Access(W)
--xSpecial Access(X)
rw-Special Access(RW)
r-xRead(RX)
36 Managing HP-UX file access permissions from Windows NT/XP/2000/Vista/Windows 7
Page 37

Table 7 Windows access type maps to UNIX permission (continued)
UNIX PermissionWindows access type
-wxSpecial Access(WX)
rwxSpecial Access(RWX)
r--Special Access
When mapping to UNIX file permissions from Windows, you will not be able to add new Windows
ACL entries because only the owner, owning group and other ACL entries are supported by UNIX
permissions. UNIX ignores unrecognized entries. Conversely, you cannot delete any of the three
entries listed above as these entries are required by UNIX.
Pre-defined windows permissions
The Windows Explorer ACL interface allows you to choose predefined permissions like Change
and Full Control in addition to creating custom Special Access permissions.
Figure 3 Windows explorer ACL interface
If you use pre-defined Windows access types to set permissions on a Samba share, the permissions
that are displayed later will not match what you set in Windows.
For example, Full Control will become rwx on the Samba server, and when it is displayed on the
Windows client, it will show up as Special Access (RWX).
Table 8 Windows access type maps UNIX permission
UNIX PermissionWindows Access Type
---No Access
r-xRead
rwxChange
rwxFull Control
UNIX file permissions and POSIX ACLs 37
Page 38

Figure 4 Windows special access permissions
The VxFS POSIX ACL file permissions
VxFS POSIX ACLs provide additional functionality over default UNIX file permissions. VxFS POSIX
ACLs extend the concept of UNIX file permissions in three ways.
• VxFS POSIX ACLs allow for more entries than the basic owner, group and other UNIX file
permissions.
• VxFS POSIX ACLs support default Access Control Entry (ACE) for directory permissions. This
means that any files created in that directory will automatically inherit the default ACEs of the
parent directory. It adds an inheritance permission type to directory permissions.
• A special ACE called the class ACE is used. The role of the class ACE is to limit the other
ACEs. The base UNIX permissions are not affected.
For example, if the class ACE for a file is set to read (r--), then even when ACEs grant some
users and groups write and execute access, write and execute access will not be given to
them. The class ACE acts as a mask that filters out the permissions of non-class ACEs. If the
class ACE was set to (---) or no access, other ACEs might exist, but they would not change the
effective permissions.
VxFS POSIX ACLs translated to Windows ACLs
The extra features of VxFS POSIX ACLs affect the translations to and from Windows ACLs in the
following ways:
• The extra VxFS POSIX ACEs show up as Windows ACEs on the Windows client. The permission
mode translates like a UNIX permission mode. With this feature you can also add new user
and group entries from the Windows client. The limitations to this feature will be discussed in
the next section.
• The default ACEs that are supported for inheritance by directories are translated into file
permissions for a directory on Windows. The file permissions displayed on the Windows client
represent the default ACEs on the UNIX file system of the Samba server. If the file permissions
are set on a directory on the Windows client, equivalent default ACEs are set on the directory
on the UNIX file system.
• The class ACE used to limit the other ACEs is ignored. It is not displayed on the Windows
client and there is no way to set it from the client. It would be difficult to support on the client
side, as Windows has nothing similar to a class ACE.
38 Managing HP-UX file access permissions from Windows NT/XP/2000/Vista/Windows 7
Page 39
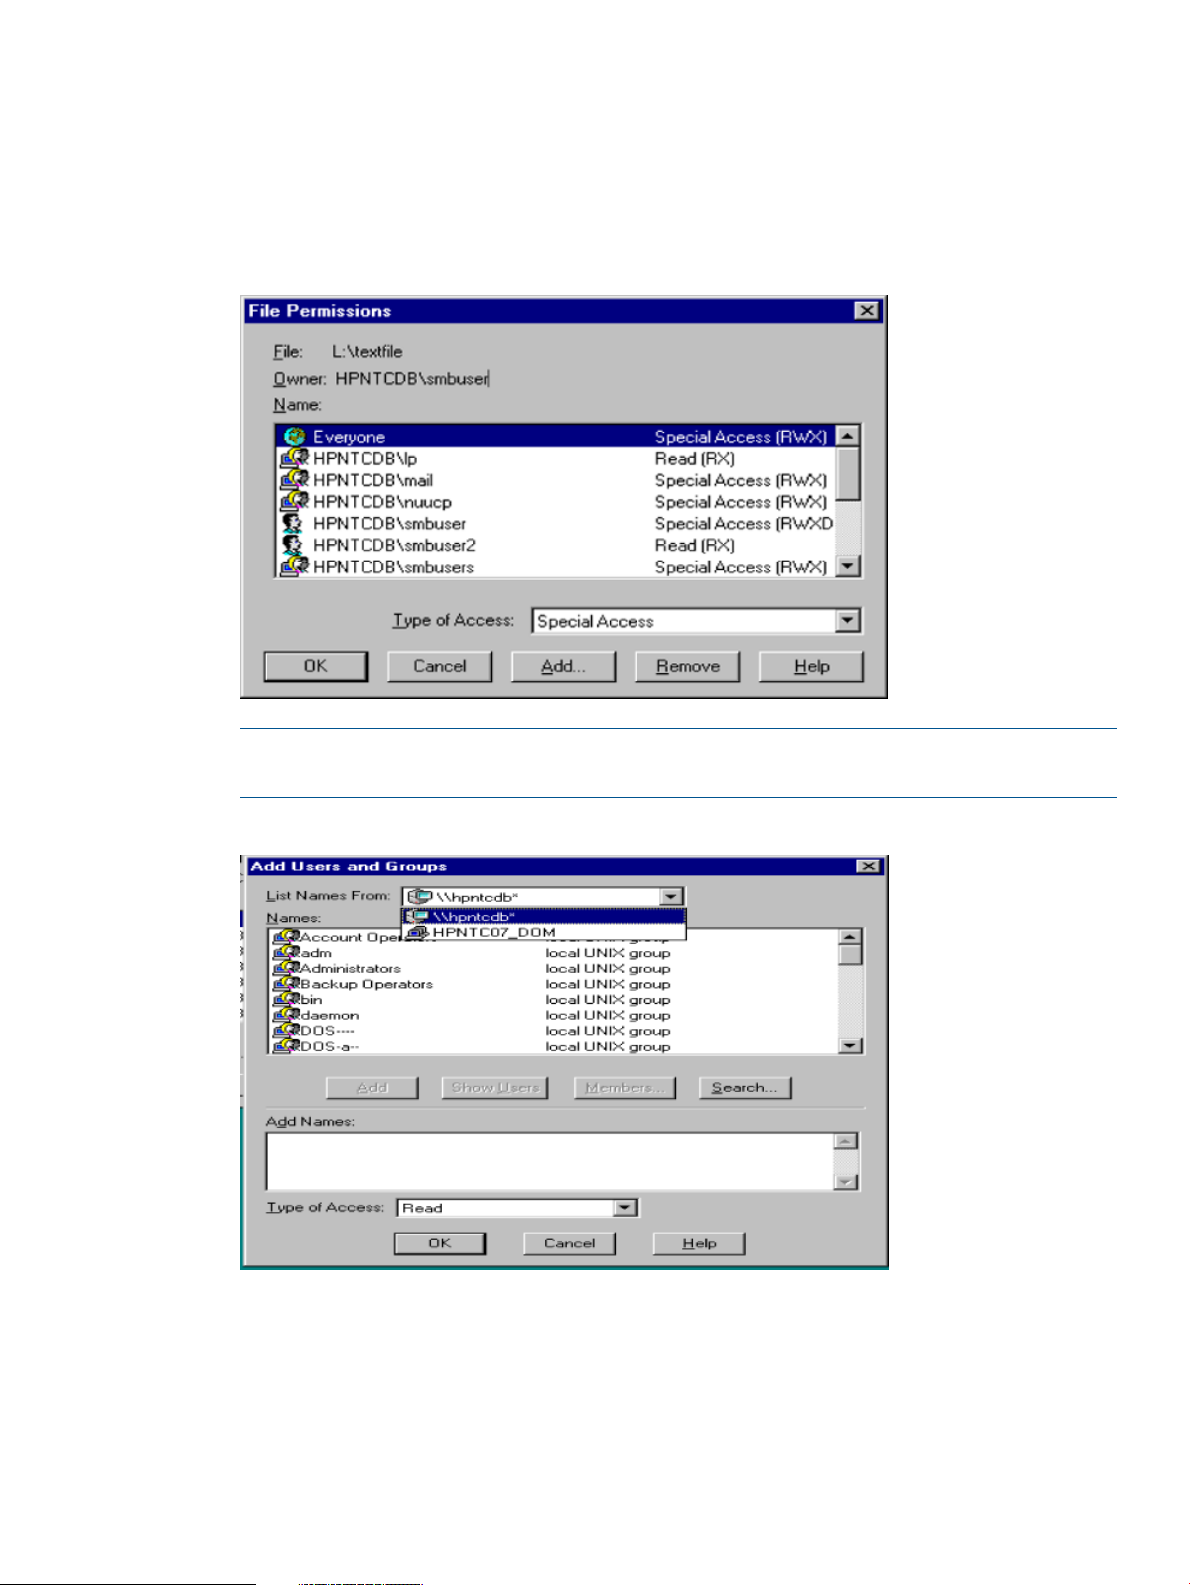
Using the Windows NT Explorer GUI to create ACLs
Use the Windows Explorer GUI to set new ACLs.
This section describes how to add new entries to the ACE list:
• Click the add button in the File/Directory Permissions dialog box of the Windows GUI to bring
up the Add Users and Groups dialog box.
Figure 5 Windows Explorer file permissions
NOTE: The List Names From field displays the source of the list of group names. It may also
show the name of your domain. Do not use the domain list to add new ACLs.
Figure 6 Windows Explorer list names from field
Instead, what you need is a list of groups and users that can be recognized by the underlying
UNIX file system.
Since the actual ACLs will be UNIX file permissions or VxFS POSIX ACLs in their final form,
the only valid groups and users are UNIX groups and users that the Samba server knows
about.
• Go to the List Names From dropdown list in the Add Users and Groups dialog box. One
screen choice is to list names on your Samba server. This is the list HP recommends.
Using the Windows NT Explorer GUI to create ACLs 39
Page 40
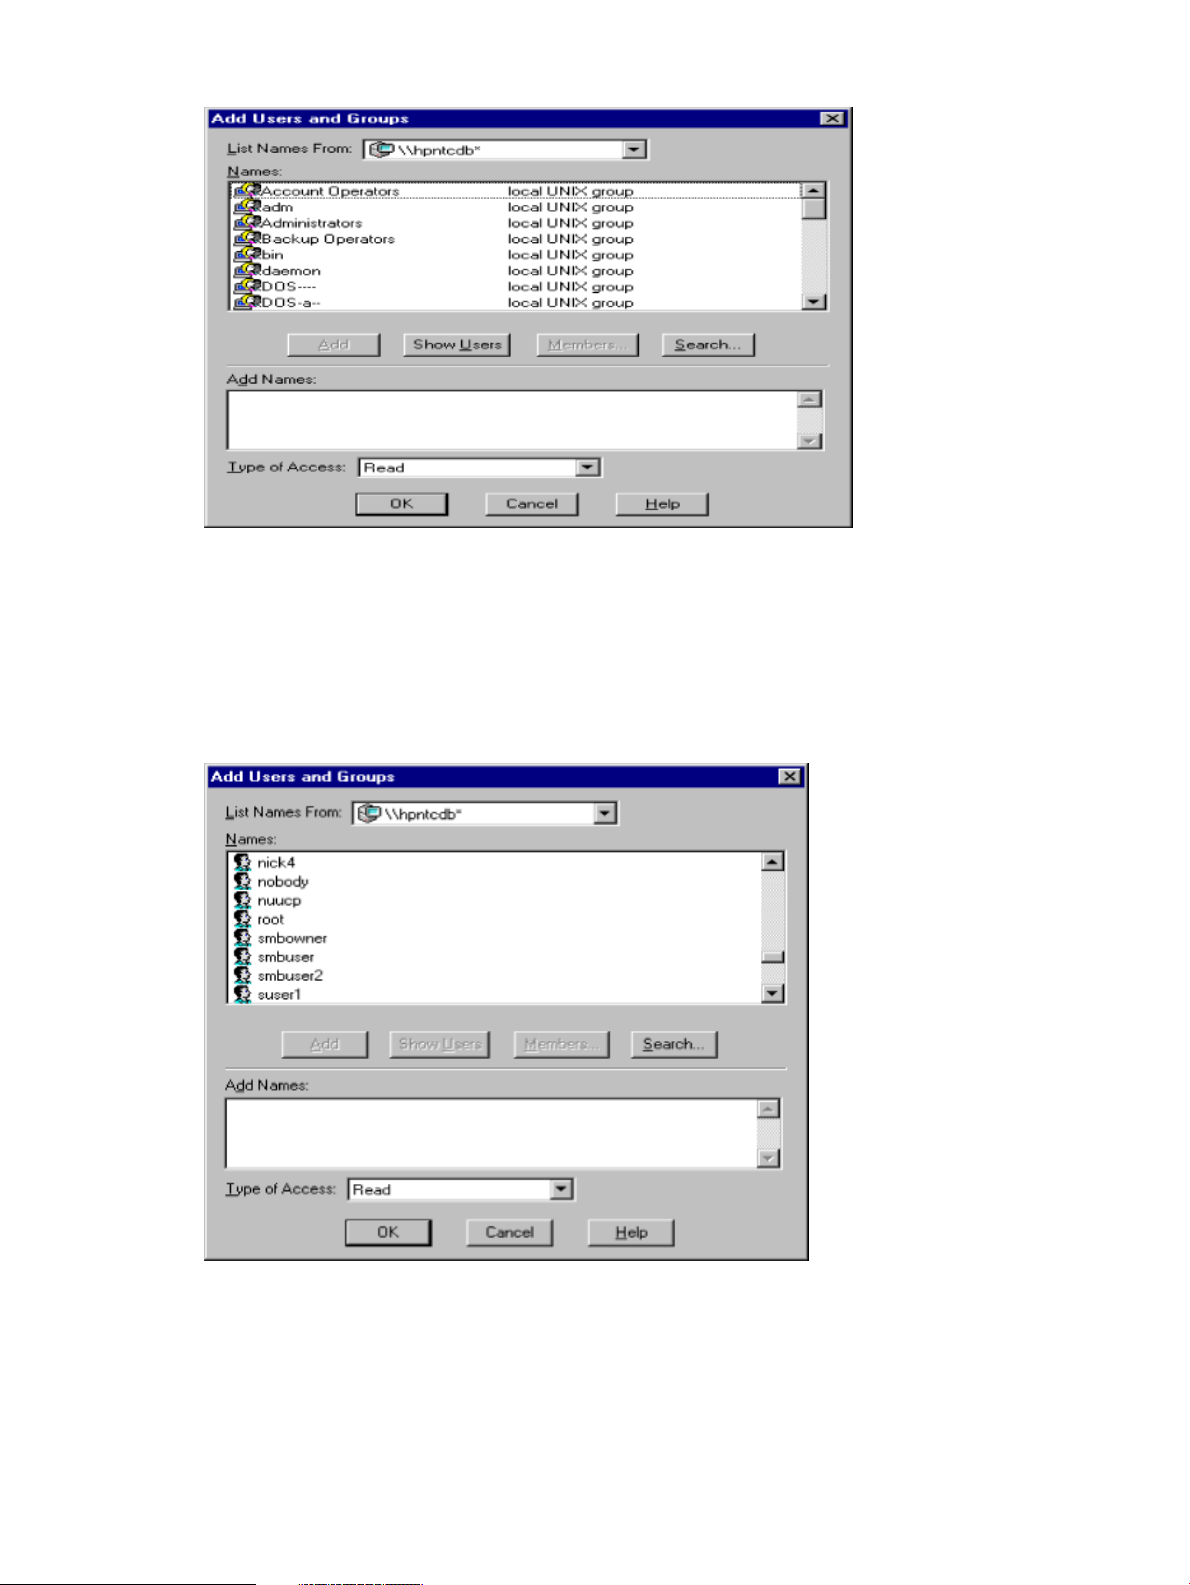
Figure 7 Windows Explorer add users and groups dialog box
• Select any name on the list that is labelled local UNIX group. Those groups are actually UNIX
groups on the Samba server.
• Optionally, click the Show Users button and all the UNIX users on the Samba server will be
added to the list as well. You will always be able to add an ACE for the local Unix groups
and the users in this list.
Figure 8 Add UNIX groups and users
• You can type user and group names into the Add Names text field to add users and groups.
If the names are valid UNIX group or user names, the users and groups will be added.
• Optionally, add the Samba server name and a backslash to the beginning of the user or group
name and it will be added (for example, server1\users1). When you select names off the
40 Managing HP-UX file access permissions from Windows NT/XP/2000/Vista/Windows 7
Page 41

name list, the GUI will put that name in the text list and automatically add the server name as
well.
• Optionally use the user name mapping feature to define a mapping of Windows user names
(or domain names) to UNIX user names. For example, you could map the Windows user
names administrator and admin to the UNIX user name root. The mapping can be either
one-to-one or many-to-one.
Samba supports the creation of ACEs with Windows user names that are mapped to UNIX
user names.
To continue the example above, you could create an ACE for the administrator user on the
Windows client and, on the Samba server, the ACE would be created for the root user. The
client will display the corresponding ACE as being for the root user, not the administrator
user.
If you add an ACE for one user name, like administrator and then display the list of ACEs and
see a new ACE for a different user name (root), it maybe confusing. As many Windows user
names can be mapped to one UNIX user name, Samba only displays the one UNIX user
name. It cannot display the Windows name that was mapped to the UNIX user name.
You also have to be careful not to create multiple conflicting ACEs for one UNIX user. For example,
in the Windows GUI you might add an ACE for the user administrator, admin and root. But when
you apply these changes, Samba maps administrator and admin to the UNIX user root and the
result is that Samba tries to add three different ACEs, all for the user root, to one file. That is not
valid and Samba ignores two of the three ACEs.
Selecting Names From the Samba Name List
The Windows user names mapped to UNIX users will also be displayed when you press the Show
Users button in the Add Users and Groups dialog box. Every valid name that you add to an ACE
is in the name list on the Samba server (after you hit the Show Users button). You do not need to
type in names or select names from the Windows domain list. If, however, you pick a name from
the Windows domain list and it happens to be a UNIX user name on the Samba server, it will be
added. This also applies to names that have a user name mapping in Samba.
There is another reason HP recommends selecting names from the Samba server's list of names
instead of typing names in manually. There might be a UNIX group and a UNIX user with the same
name. If you select a name from the list, Samba knows whether you mean the user or the group.
If you type the name in, there is no way for you to specify the user or the group and Samba may
add the ACE for a user when you meant the UNIX group with the same name.
Using the Windows Vista Explorer GUI to create ACLs
To create ACLs using the Windows Vista Explorer, complete the following steps:
Using the Windows Vista Explorer GUI to create ACLs 41
Page 42

1. Right-click the file for which users and groups must be assigned, and select Properties->Security.
The displayed page is as shown in Figure 9 (page 42).
Figure 9 Selecting file security
2. Click Edit. The Permissions page is displayed as shown in Figure 10 (page 42).
Figure 10 Permissions
42 Managing HP-UX file access permissions from Windows NT/XP/2000/Vista/Windows 7
Page 43
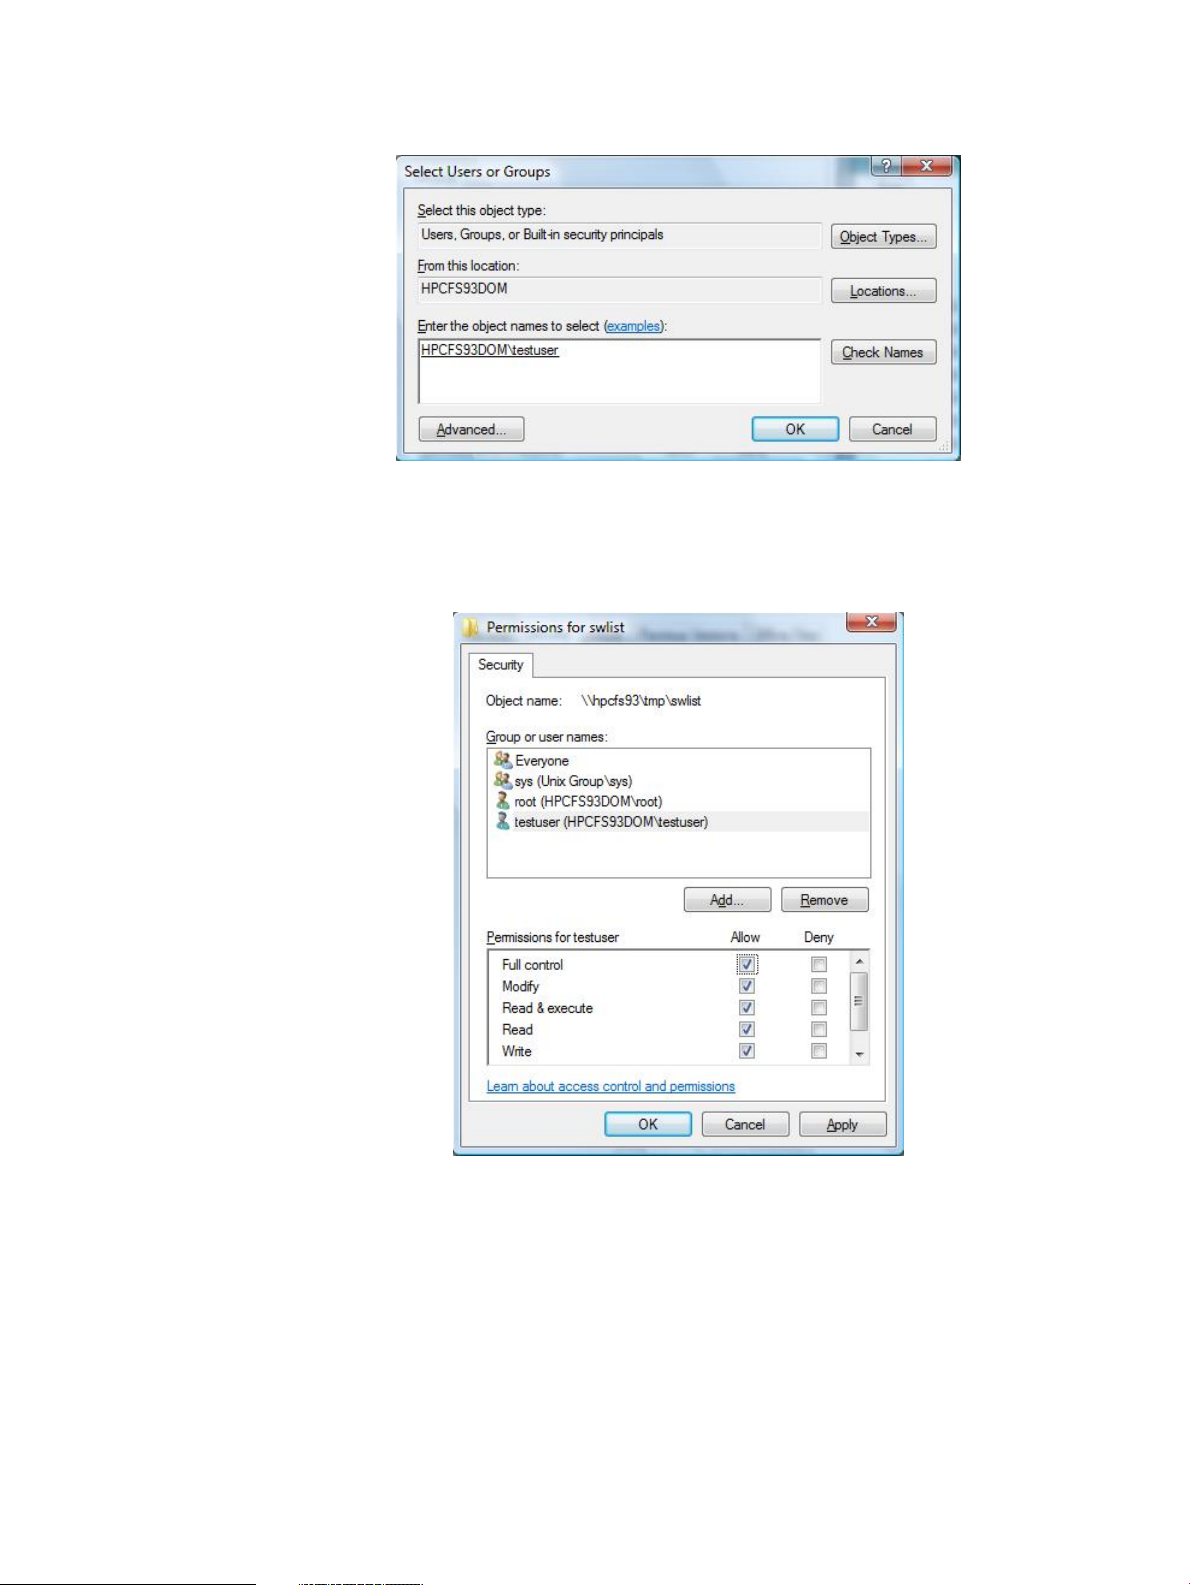
3. Click Add. The Select Users or Groups page is displayed as shown in Figure 11 (page 43).
Figure 11 Select users or groups
4. Enter the user or group name that you want to add and click Check Names.
The new user or group name is displayed as shown in Figure 12 (page 43).
Figure 12 New user or group
Using the Windows Vista Explorer GUI to create ACLs 43
Page 44

5. Set the permissions for the new user or group and click Apply.
The new user or group name and the associated permissions are displayed as shown in
Figure 13 (page 44).
Figure 13 New user or group and permissions
The new user or group is configured.
POSIX ACLs and Windows XP, Windows Vista and Windows 7 clients
The HP CIFS Server allows Windows XP clients to view and set POSIX ACL permissions. The
information in this section assumes you are familiar with Windows 2000 and Windows XP
permissions. The purpose of this section is to explain how the HP CIFS Server interprets Windows
XP permissions, and how Windows XP clients interpret and display HP-UX permissions.
Windows XP clients interact with POSIX ACLs similar to Windows clients, except for the minor
differences covered in the following sections. Learn more about ACLs and Windows XP clients in
the following sections in this chapter. You can also learn more about POSIX ACLs with man aclv.
Viewing UNIX permissions from Windows XP, Windows Vista and Windows 7 clients
The following table shows how the UNIX permissions on the HP CIFS Server are mapped to
permissions on Windows XP clients' Basic and Advanced ACL views:
Table 9 UNIX permission maps Windows XP client permissions
Permission Shown on Windows XP ClientsUNIX Permission
Advanced ViewBasic View
Readr--
Read Attributes, Read Extended Attributes,
Read Data, Read Permissions
Write-w-
44 Managing HP-UX file access permissions from Windows NT/XP/2000/Vista/Windows 7
Write Attributes Write Extended Attributes,
Append Data, Write Data, Read Permissions
Page 45

Table 9 UNIX permission maps Windows XP client permissions (continued)
Permission Shown on Windows XP ClientsUNIX Permission
None--x
Execute or Traverse Folder, Read Attributes,
Read Permissions
All Read Permissions as in the first cellRead and Executer-x
Execute or Traverse Folder
All Read Permissions as in the first cellRead, WriterwAll Write Permissions as in the second cell
Full Control and All permission bits are tickedFull Controlrwx
NoneNo boxes are ticked---
NOTE: In the table above, the permissions labeled Advanced can be viewed from the ACL dialog
box by clicking on Advanced, then View/Edit.
For a file owner ACE, Take Ownership, Delete and Change permissions flags are shown. For a
file's owning group ACE, Take ownership permission flag is shown.
However, all permissions are ticked in both Windows ACE Advanced and Basic views if a file
permission is Full Control.
Setting permissions from Windows XP, Windows Vista and Windows 7 clients
The following table shows how each Windows XP client permission is mapped to the UNIX
permission when permissions are set from a client:
Table 10 Windows XP permissions maps UNIX permissions
UNIX PermissionWindows XP
rwxFull Control
-w-Write
rwxModify
r-xRead and Execute
r--Read
r--List Folder / Read Data (Advanced)
r--Read Attributes (Advanced)
r--Read Extended Attributes (Advanced)
r--Read Permissions (Advanced)
-w-Create Files / Write Data (Advanced)
-w-Create Folder / Append Data (Advanced)
-w-Write Attributes (Advanced)
-w-Write Extended Attributes (Advanced)
--xTraverse Folder / Execute File (Advanced)
No meaning on HP-UXDelete Subfolders and Files (Advanced)
* see explanation following tableDelete (Advanced)
POSIX ACLs and Windows XP, Windows Vista and Windows 7 clients 45
Page 46

Table 10 Windows XP permissions maps UNIX permissions (continued)
* The Delete, Change Permissions, and Take Ownership permissions represent the file and group
ownership. You can only see these permissions, but you cann't set them from Windows XP clients.
When the file permission is not set to Full Control, the Delete, Change and Take Ownership
permissions are shown for the file owner. Take Ownership permission is shown for the file owning
group. Everyone and other ACEs do not show these permissions except when the permission is set
to Full Control.
NOTE: The CIFS Server ensures that at least "read" permission is set for the file owner. For
example, if a user tries to set a file's permissions to "- - -", the CIFS Server will actually set it to "r
- -".
Viewing ACLs from Windows 7 clients
1. Right-click on a file and select Properties
2. Click on the Security tab
UNIX PermissionWindows XP
* see explanation following tableChange Permissions (Advanced)
* see explanation following tableTake Ownership (Advanced)
46 Managing HP-UX file access permissions from Windows NT/XP/2000/Vista/Windows 7
Page 47

Displaying the owner of a file
1. Click on Advanced
2. Click on the Owner tab on the Access Control Settings dialog box
HP CIFS Server directory ACLs and Windows XP, Windows Vista and Windows 7 clients
Directory ACL types
Under POSIX, directory ACL contains both access and default ACEs. Access ACEs control the
access to the directory itself. Default ACEs define what permissions are set for new files and
subdirectories created under the current directory.
Viewing ACLs from Windows 7 clients
Windows 7 or XP can show ACLs on a file or a directory in Basic and Advanced views.
Viewing basic ACLs from Windows 7 clients
1. Right-click on a file or a directory and select Properties
HP CIFS Server directory ACLs and Windows XP, Windows Vista and Windows 7 clients 47
Page 48
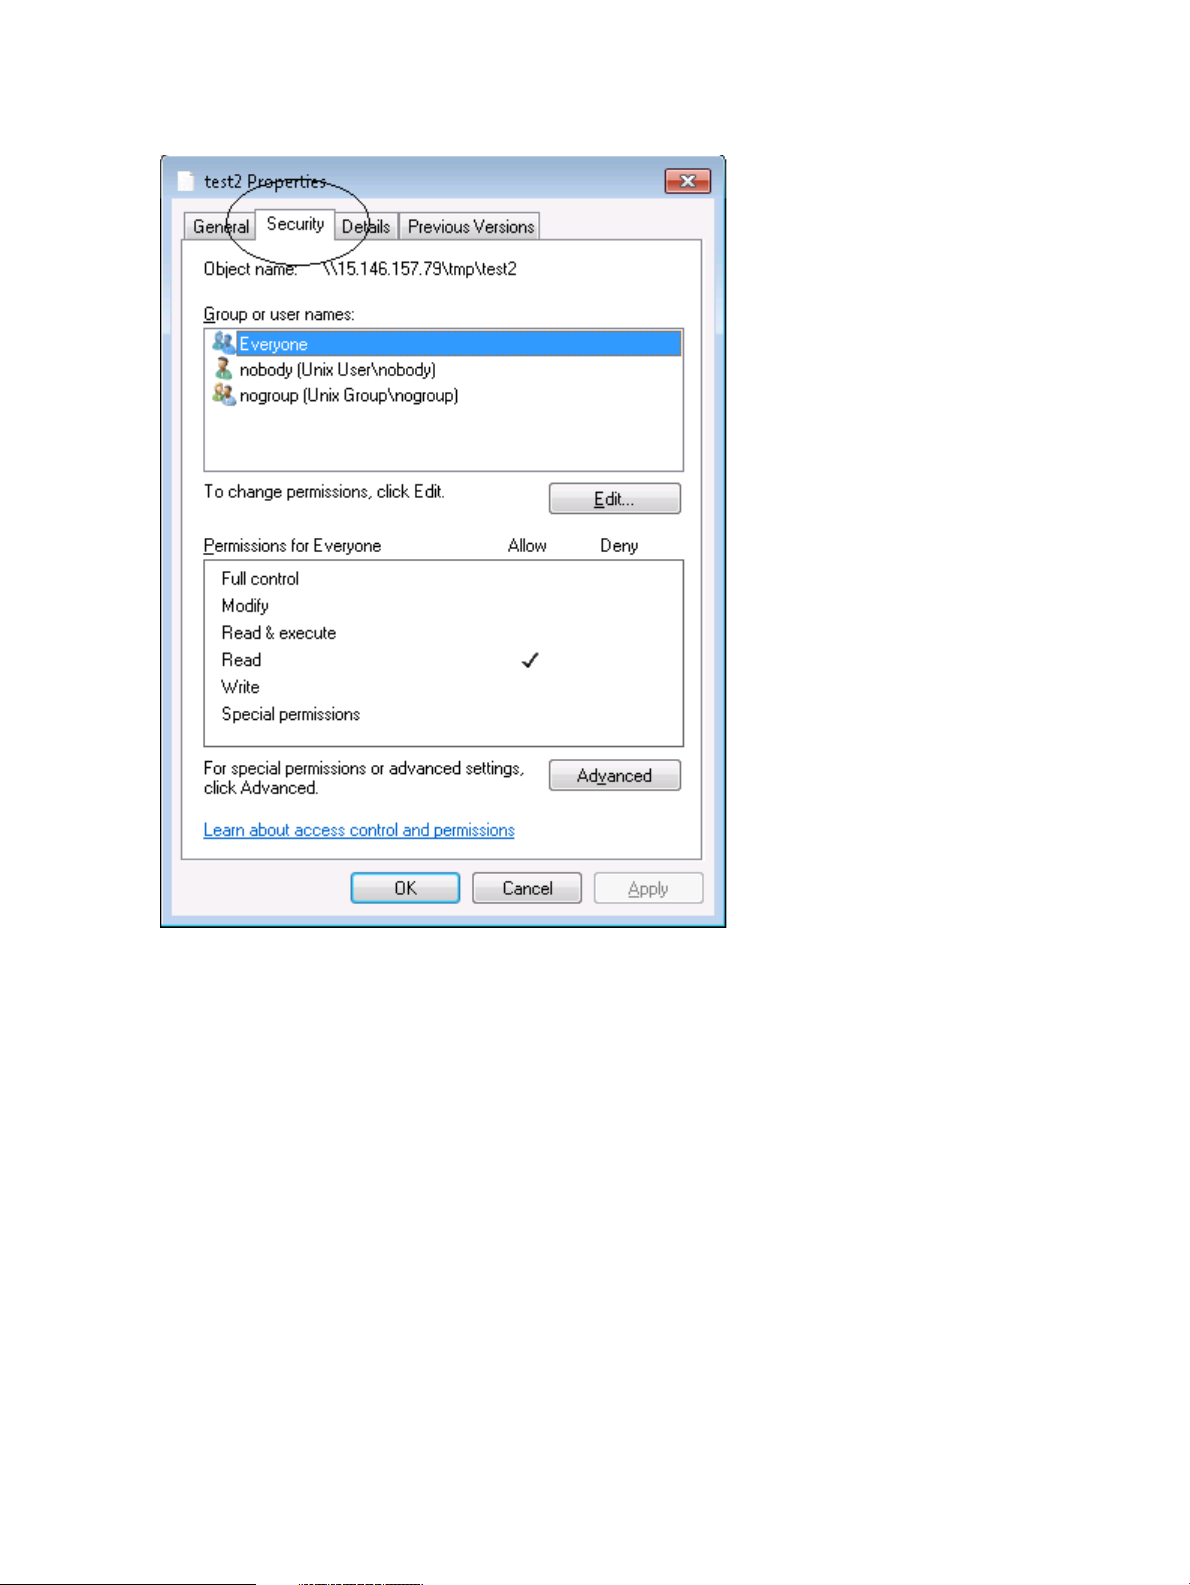
2. Click on the Security tab
Figure 14 Basic ACL viewSIX
Viewing advanced ACLs from Windows 2000 clients
1. Right-click on a file or a directory and select Properties
2. Click on the Security tab
3. Click on the Advanced button
48 Managing HP-UX file access permissions from Windows NT/XP/2000/Vista/Windows 7
Page 49

Figure 15 Advanced ACL view
Mapping Windows XP directory inheritance values to POSIX
Under POSIX, default ACEs can apply to both files and subdirectories. In a Windows XP
environment, directory ACE entries differ from POSIX and use the following Windows Inheritance
Values (Apply To values in the Windows Advanced ACE screen) to distinguish access and
default behavior:
• This folder only
• This folder, subfolders and files
• This folder and subfolders
• This folder and files
• Subfolders and files only
• Subfolders only
• Files only
When a user attempts to change or add a directory ACE from the Windows Advanced ACE screen,
the HP CIFS Server maps the Windows Inheritance Values to the corresponding POSIX ACE
type.
The following table shows how Windows Inheritance Values are mapped to POSIX:
HP CIFS Server directory ACLs and Windows XP, Windows Vista and Windows 7 clients 49
Page 50

Table 11 Mapping table for inheritance values to POSIX
POSIX Mapping by HP CIFS ServerInheritance Value
Maps to access ACE.This Folder only
An ACE of this type is mapped to both access and default ACE.This Folder, Subfolders and Files
Maps only to access ACE for this directory.This Folder and Subfolders
Maps only to access ACE for this directory.This Folder and Files
Maps to default ACE for this directory.Subfolders and Files only
Subfolders only
Files only
This type is not supported and any ACE with this type is ignored by the HP
CIFS Server.
This type is not supported and any ACE with this type is ignored by the HP
CIFS Server.
Modifying directory ACLs from Windows XP clients
NOTE: HP-UX directory ACLs are set inconsistently using the ACL Basic permission screen from
the Windows XP client.
You must use the Windows Advanced permission screen (Directory->
Properties->Security Tab->Advanced Button) to view or change POSIX directory ACLs.
This section describes how to modify a directory ACE from the Widnows XP client:
1. Right-click on a directory and select Properties
2. Click on the Security tab
3. Click on the Advanced button
4. Select an ACE, click on the View/Edit tab
50 Managing HP-UX file access permissions from Windows NT/XP/2000/Vista/Windows 7
Page 51

Figure 16 Modifying ACE permissions
5. Check/uncheck the boxes next to each permission to add/remove any permissions that you
want. Please refer to "Mapping Table for Windows XP Permissions to UNIX Permissions" for
detail information on how each permission in this window is mapped to UNIX permissions
6. Select the appropriate ACE type from Apply to dropdown list in the dialog box. Choose
the selection according to how it will be mapped to POSIX ACEs. Please refer to "Mapping
Table for Inheritance Values to POSIX" for detail information
7. Click on OK, you will be taken back to the Advanced ACE screen. Repeat the step 4 through
step 6 to modify other ACEs
8. Click on OK or Apply button on the Advanced ACE screen
HP CIFS Server directory ACLs and Windows XP, Windows Vista and Windows 7 clients 51
Page 52
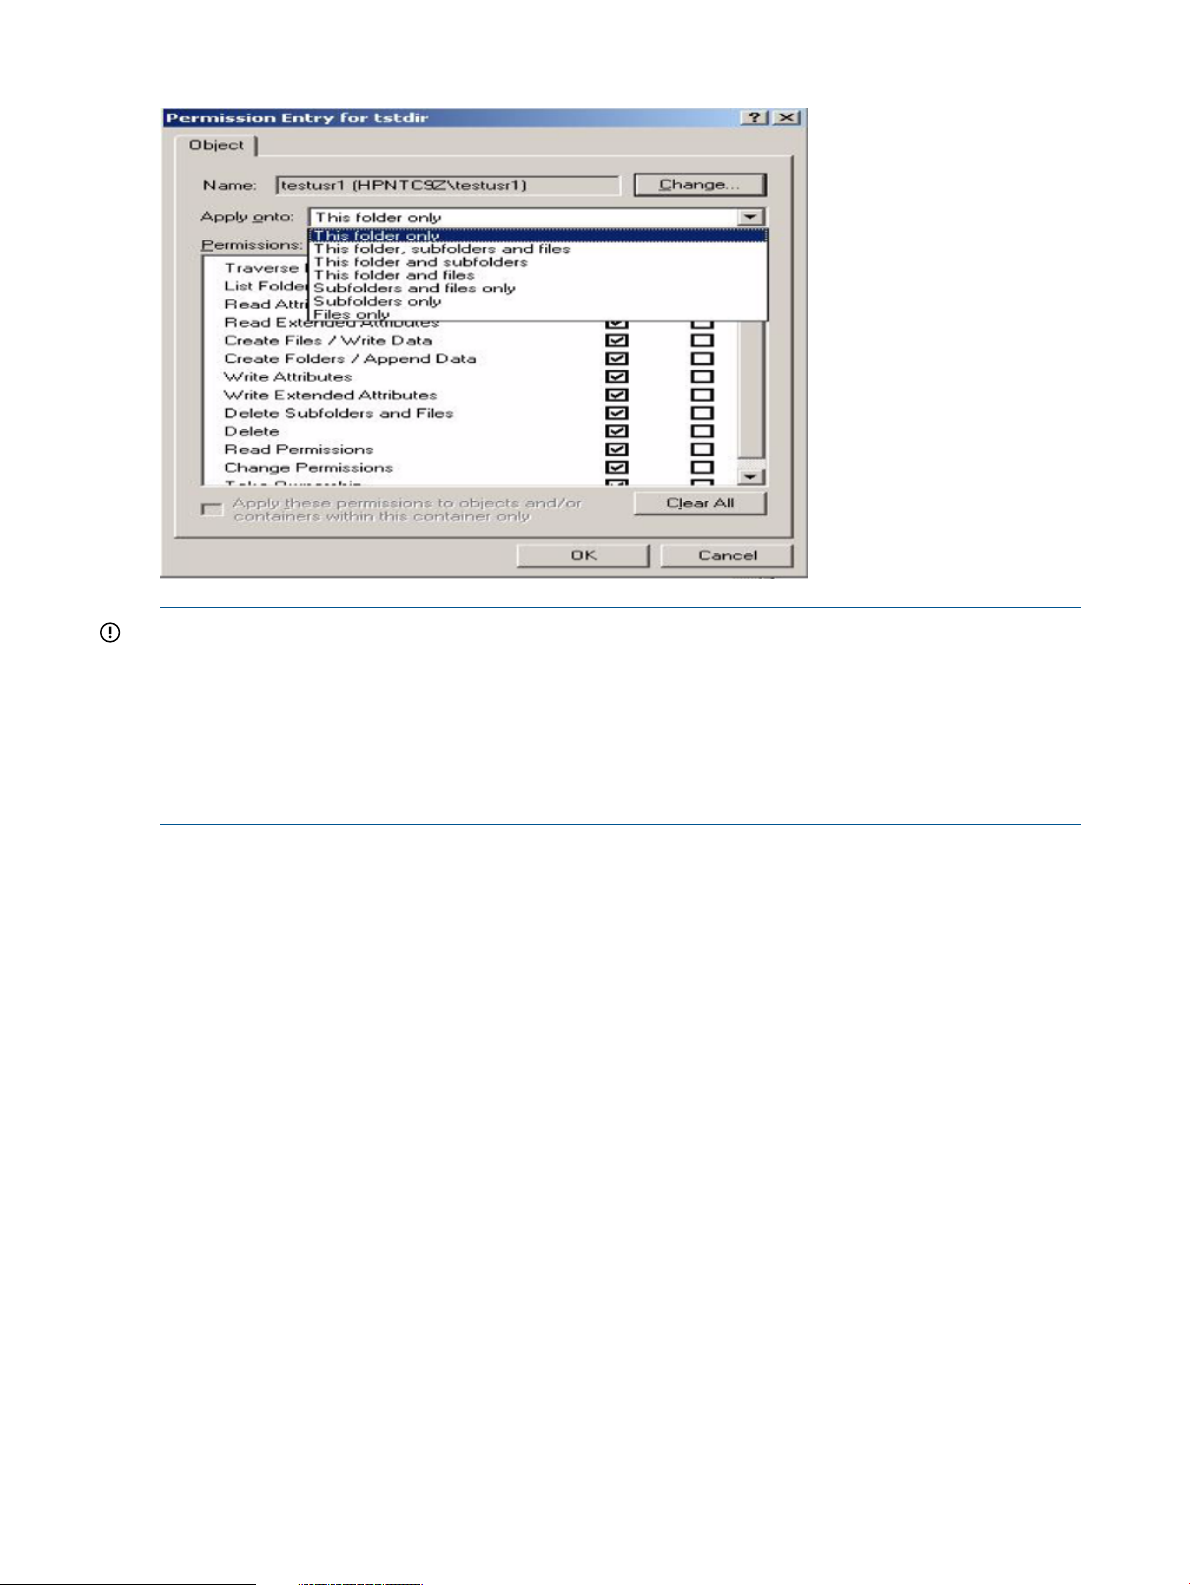
Figure 17 Modifying an ACE type with apply to value
IMPORTANT: If you want different permissions on default and access ACEs for the same user or
group , you must select two different ACE entries in the advanced ACE view dialog box before
you click on the OK button.
If you modify an ACE entry and clear both Allow and Deny check boxes, the Windows 2000 or
XP client removes that ACE and does not send it to the HP CIFS Server.
To prevent a directory owner from losing access, both access and default ACEs for the owner
should be set to Full Control permissions.
Removing an ACE entry from Windows XP clients
For mandatory ACLs (user, owning group, everyone), removing an ACE entry from the Advanced
Windows permission screen does not remove that ACE entry on the UNIX system. The HP CIFS
Server generates the missing ACEs from the existing access ACEs on the file.
For any other user or group ACEs, removing an ACE entry from the Advanced Windows screen
will remove that ACE entry on the HP CIFS Server.
Examples
Following are three examples to show the changes of the directory ACEs on the HP CIFS Server
when an ACE entry is removed from the Windows XP client.
Example 1:
In the example 1, assume that the existing directory ACEs for testdir on the HP CIFS Server
are:
# file:testdir
# owner:testuser
# owning group:users
access:owner:rwx
access:owning group:rwx
access:other:rwx
default:owner:rwx
default:owning group:r-x
52 Managing HP-UX file access permissions from Windows NT/XP/2000/Vista/Windows 7
Page 53

default:other:r-x
In the example 1, if a default owning group ACE entry, r-x, is removed from the Advanced
Windows ACE screen, the HP CIFS Server generates the missing default owning group ACE entry
based on the existing access owning group ACE, rwx, The following shows the result of changes
for the directory ACEs on the HP CIFS Server:
# file:testdir
# owner:testuser
# owning group:users
access:owner:rwx
access:owning group:rwx
access:othere:rwx
defualt:owner:rwx
default:owning group:rwx
default:other:r-x
Example 2:
In the example 2, assume that the existing directory ACEs for testdir on the HP CIFS Server
are:
# file:testdir
# owner:testuser
# owning group:users
access:owner:rwx
access:owning group:r-x
access:other:rwx
defualt:owner:rwx
default:owning group:r--
default:other:r--
In the example 2, if both access owning gorup ACE entry, r-x, and defautl owning group ACE
entry, r--, are removed from the Advanced Windows ACE screen, the HP CIFS Server generates
the missing owning group ACE entries based on the existing access owning group ACE. The
following shows the result of changes for the directory ACEs on the HP CIFS Server:
# file:testdir
# owner:testuser
# owning group:users
access:owner:rwx
access:owning group:r-x
access:other:rwx
defualt:owner:rwx
default:owning group:r-x
default:other:r--
Example 3:
In the example 3, assume that the existing directory ACEs for testdir on the HP CIFS Server
are:
# file:testdir
HP CIFS Server directory ACLs and Windows XP, Windows Vista and Windows 7 clients 53
Page 54

# owner:testuser
# owning group:users
# other group:testgroup
access:owner:rwx
access:owning group:r-x
access:other group:rw-
defualt:owner:rwx
default:owning group:r--
default:other group:r-w
In the example 3, if both access other gorup ACE entry, rw-, and defaut other group ACE entry,
r--x, are removed from the Advanced Windows ACE screen, the HP CIFS Server will remove both
access other group and default other group ACE entries.The following shows the result of changes
for the directory ACEs on the HP CIFS Server:
# file:testdir
# owner:testuser
# owning group:users
# other group:testgroup
access:owner:rwx
access:owning group:r-x
defualt:owner:rwx
default:owning group:r--
Adding directory ACLs from Windows XP clients
This section describes how to add a directory ACE from the Widnows XP client:
1. Right-click on a directory and select Properties
2. Click on the Security tab
3. Click on the Advanced button
4. Click on Add button, a select user or group window is displayed
5. You may select any user or group from the available one.
6. Click on OK, you will be prompted to enter ACE permissions and the type of ACE
7. Enter the desired permissions, click on OK
8. You will be taken to the ACE Advanced view screen, click on OK or Apply button to add the
new ACE
54 Managing HP-UX file access permissions from Windows NT/XP/2000/Vista/Windows 7
Page 55
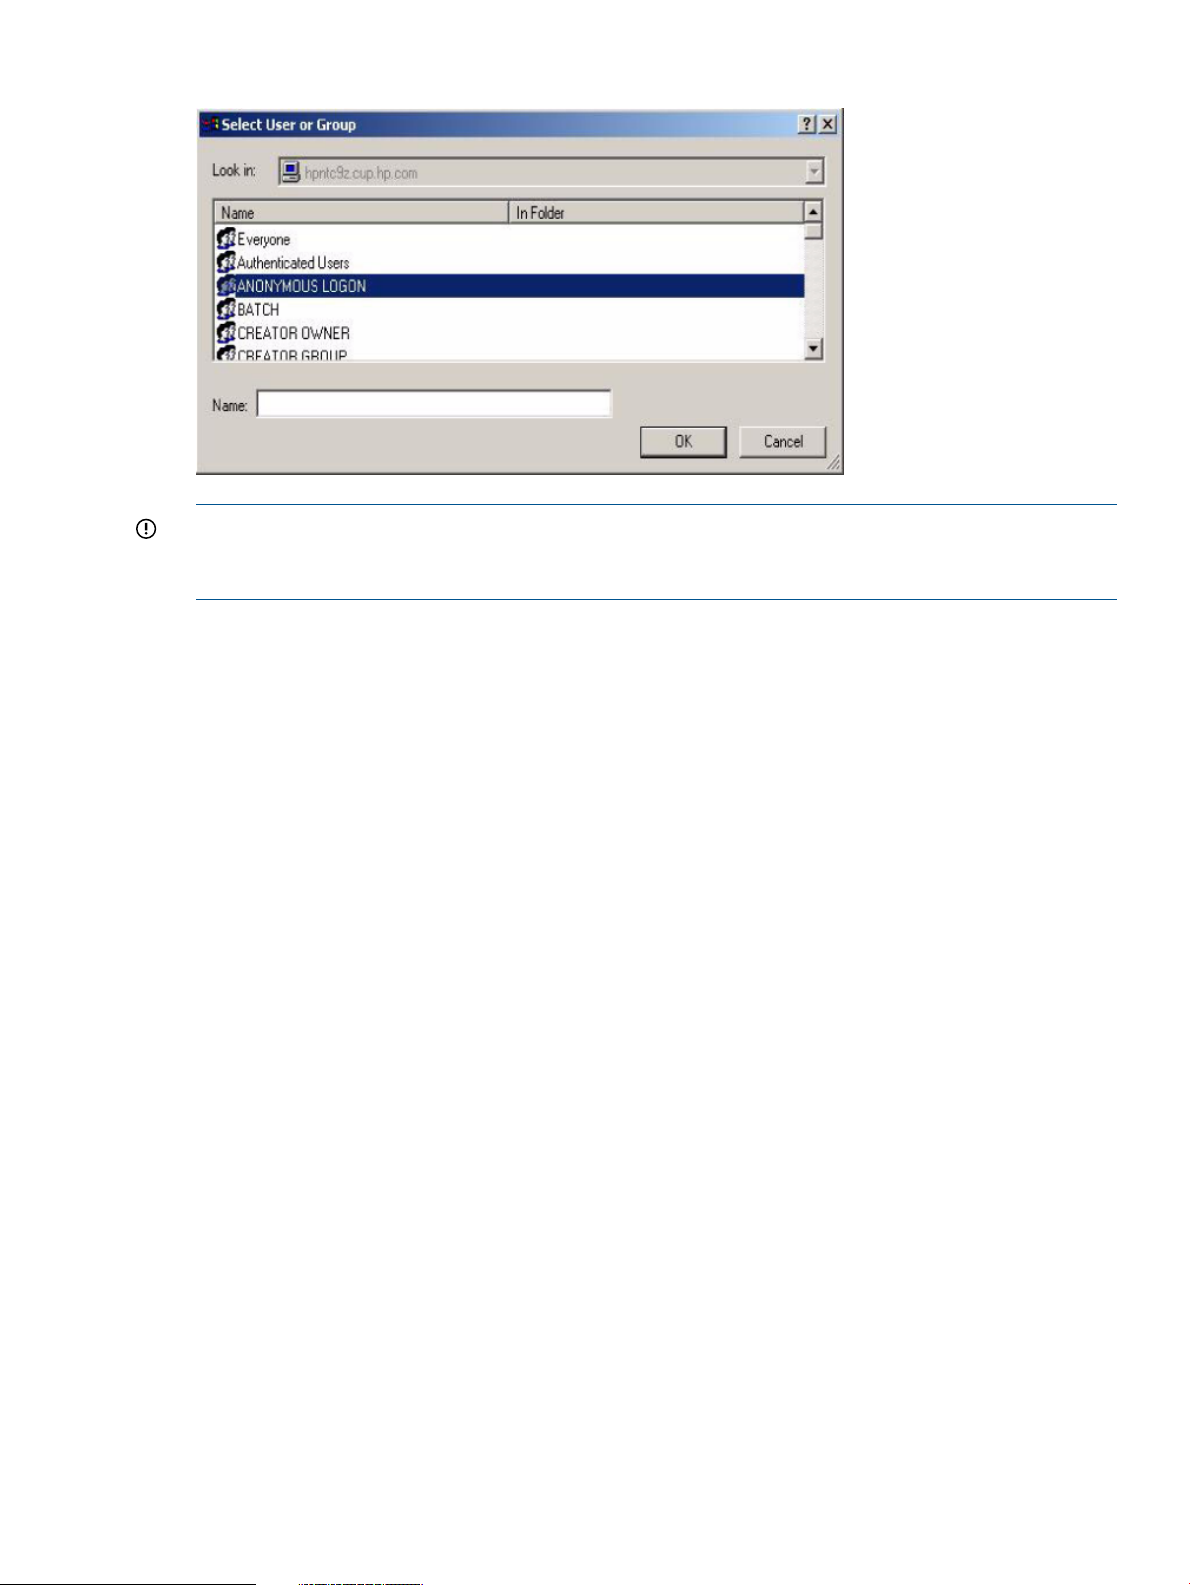
Figure 18 Selecting a new ACE user or group
IMPORTANT: POSIX ACEs with zero permission can be modified by adding an ACE and setting
the desired permissions for that user or group. A new ACE can be added by using the Add button
on the Windows ACL interface.
POSIX default owner and owning group ACLs
The POSIX default owner and default owning group ACEs are shown in the Windows interface
as Creator Owner and Creator Group.
In HP CIFS Server A.01.09 version and earlier, only one ACE each for owner, owning group and
everyone is shown if the permissions are the same on corresponding access and default ACEs.
The POSIX default owner and default owning group ACEs are shown in the Windows interface
as Creator Owner and Creator Group even if the permissions on the access and default
ACEs are the same. However, everyone is shown as only one ACE if the access and default
permissions are the same.
Changing permissions on Windows Creator Owner and Creator Group ACEs will only
modify POSIX default owner and owning group ACEs on the HP CIFS Server.
POSIX ACEs with zero permissions
POSIX owning group and everyone ACEs with zeros permissions are not displayed in the Windows
interface. For example, if a directory owning group has zero permissions on the HP CIFS Server,
an ACE for that owning group will not be shown on the Windows interface. ACEs for any other
user or group with zero permissions are shown with no permissions in the Windows interface.
POSIX ACEs with zero permission can be modified by adding an ACE and setting the desired
permissions for that user or group. A new ACE can be added by using the Add button on the
Windows ACL interface.
In conclusion
Samba ACL support is a feature that enables the manipulation of UNIX file permissions or UNIX
ACLs from Windows 2000, Windows XP, Windows Vista or Windows 7 clients.
With this feature, almost any modification you want to make to UNIX permissions or VxFS POSIX
ACLs can now be done from an Windows 2000, Windows XP, Windows Vista or Windows 7
client (with the exception of the class entry for VxFS POSIX ACLs).
Windows applications running on the Windows 2000, Windows XP, or Windows Vista client
cannot expect full Windows 2000, Windows XP, or Windows Vista ACL support. Although much
In conclusion 55
Page 56

of the Windows 2000, Windows XP, or Windows Vista ACL information is retained and retrieved
by the Samba server, some of the information may be lost or changed in some cases.
NOTE: The ACL support is not an Windows 2000, Windows XP, Windows Vista or Windows
7 ACL emulation, but rather access to UNIX ACLs through the Windows 2000, Windows XP,
Windows Vista or Windows 7 client. Therefore, you cannot run Windows applications which
require full, perfect Windows 2000, Windows XP, Windows Vista or Windows 7 ACL support.
56 Managing HP-UX file access permissions from Windows NT/XP/2000/Vista/Windows 7
Page 57

4 Windows style domains
Introduction
This chapter describes how to configure the roles that an HP CIFS Server can play in a Windows
style domain, whether it is a Samba Domain, consisting solely of HP CIFS Servers, or as a Windows
domain with a Microsoft Domain Controller (DC). Configuration of Member Servers joining a
Windows 2003 and Windows 2008 R2 ADS domain as a pre-Windows 2000 compatible
computer is described here. Chapter 5, Windows 2003 and Windows 2008 Domains, should
be consulted for configuration of Member Servers joining Domains with a Windows 2003 or
Windows 2008 Domain Controller as an ADS Member Server. Chapter 9, HP CIFS Deployment
Models describes further how the server roles can be utilized in common network deployments.
HP CIFS Server can be configured to play different roles in an Windows style Domain Model
including:
• Member Server in a Windows 2003 or Windows 2008 Domain with a Microsoft DC
• PDC in an Samba Domain where an HP CIFS Server serves as the PDC
• Backup Domain Controller (BDC) in an Samba Domain where an HP CIFS Server serves as
the PDC
• Member Server in an Samba Domain where HP CIFS Server serves as the PDC
Advantages of the Samba Domain model
The HP CIFS Server PDC domain model provides a number of advantages:
• HP CIFS Server PDC domain administrators may group workstations and servers under the
authority of a domain controller
• Domain members may be centrally administered by using domains to group related machines.
One of the benefits of this is the ability for user accounts to be common for multiple systems.
A user may now make one password change which will affect multiple systems accessed by
that user. Another benefit is that IT administration work is reduced, since there is no longer a
need for individual accounts to be administered on each system
• HP CIFS BDCs may be configured to off load some of the HP CIFS PDC authentication
responsibilities and can be promoted to a PDC if the PDC fails or needs to be taken out of
services.
Primary domain controllers
The Primary Domain Controller (PDC) is responsible for several tasks within the domain. These
include:
• Authenticating user logons for users and workstations that are members of the domain
• Acting as a centralized point for managing user account and group information for the domain
• A user logged on to the Primary Domain Controller (PDC) as the domain administrator can
add, remove or modify Windows domain account information on any machine that is part of
the domain
Introduction 57
Page 58

Backup domain controllers
Advantages of backup domain controllers
HP CIFS Server with BDC support provides the following benefits to the customer:
• The BDC can authenticate user logons for users and workstations that are members of the
domain when the wide area network link to a PDC is down. A BDC plays an important role
in both domain seurity and network integrity.
• The BDC can pick up network logon requests and authenticate users while the PDC is very
busy on the local network. It can help to add robustnees to network services.
• The BDC can be promoted to a PDC if the PDC needs to be taken out of services or fails. This
is an important feature of domain controller management. To promote a BDC to a PDC on
the HP CIFS Server, change the domain master parameter from "no" to "yes".
Limitations
The following is a list of limitations for the BDC support:
• HP CIFS Server can only function as a BDC to an HP CIFS PDC.
• HP CIFS Server and MS Windows server can each function as a BDC to its own type of PDC.
• HP CIFS Server cannot create Security Account Management (SAM) update delta files. It
cannot interoperate with a PDC to synchronize the SAM from delta files that are held by a
BDC.
• The Samba 3.0 BDC does not support replication to a PDC. Running a Samba 3.0 BDC with
a non-LDAP backend can have the difficulty in synchronizing the SAM database. Refer to
Table 5.1, Domain Backend Account Distribution Option, in the Official Samba HOWTO and
Reference Guide for more information on possible design configuration for a PDC/BDC
infrastructure.
Domain members
• The following member servers are supported:
Windows NT◦
◦ Windows 2003 and Windows 2008 R2
◦ HP CIFS Server
• Users on a domain member machine can access network resources within the domain. Some
examples of these resources are file and printer shares and application servers
• Domain members do not perform the user authentication for user logons. Instead, the member
sends the credentials to a domain controller via a secure channel. The domain controller
checks the credentials against those in its database and returns the results to the member
server. Access is granted based on the results returned
Configure the HP CIFS Server as a PDC
When configured to act as a Primary Domain Controller (PDC), the HP CIFS Server should create
machine accounts for Windows Clients (member servers). To enable this feature, choose "Primary
Domain Controller" when executing samba_setup, then verify the following:
1. The smb.conf file is as shown if the HP CIFS Server acting as a PDC does not use the LDAP
backend:
[global]
workgroup = SAMBADOM #Samba Domain
58 Windows style domains
Page 59

security = user
domain logon = yes
domain master = yes
encrypt passwords = yes
[netlogon]
comment = The domain logon service
path = /var/opt/samba/netlogon
writeable = no
guest ok = no
[profiles]
comment = profiles Service
path = /etc/opt/samba/profiles
read only = no
create mode = 600
directory mode = 770
2. The smb.conf file is as shown if the HP CIFS Server acting as a PDC uses the LDAP backend
to store UNIX and Samba account databases:
[global]
workgroup = SAMBADOM #Samba Domain
security = user
domain logon = yes
domain master = yes
encrypt passwords = yes
passdb backend = ldapsam:ldap://ldapserver:389
3. /var/opt/samba/netlogon subdirectory for the domain logon service exists.
NOTE: security: Set this parameter to user to ensure that Windows users, client machine
accounts, and passwords are stored and managed in the smbpasswd file or LDAP backend.
domain master: Set this parameter to yes in order for the HP CIFS Server to act as a PDC.
domain logon: Set this parameter to yes to provide netlogon services.
Encrypt passwords: You set this parameter to yes, the passwords used to authenticate users
are encrypted. You must set this parameter to yes when you configure a HP CIFS Server acting
as a PDC.
Configure the HP CIFS Server as a BDC
When configuring HP CIFS Server to act as a Backup Domain Controller (BDC), you need to
configure the relative domain controller parameters in the /etc/opt/samba/smb.conf file by
using the SWAT tool or an editor. The smb.conf file is shown as follows:
• The smb.conf file is as shown if the HP CIFS Server acting as a BDC does not use the LDAP
backend:
[global]
workgroup = SAMBADOM # Samba Domain
security = user
domain logon = yes
Configure the HP CIFS Server as a BDC 59
Page 60

domain master = no
encrypt passwords = yes
security = user
[netlogon]
comment = The domain logon service
path = /var/opt/samba/netlogon
writeable = no
guest ok = no
• The smb.conf file is as shown if the HP CIFS Server acting as a BDC uses the LDAP backend
to store UNIX and Samba account databases:
[global]
workgroup = SAMBADOM #Samba Domain
security = user
domain logon = yes
domain master = no
encrypt passwords = yes
passdb backend = ldapsam:ldap://ldapserver:389
• When you configure the relative domain controller parameters, ensure that the
/var/opt/samba/netlogon subdirectory for the domain logon service exists.
HP CIFS does not implement a true SAM database and nor its replication. HP CIFS implementation
of BDCs is very much like a PDC with one important difference. A BDC is configured like a PDC
except the smb.conf parameter, domain master, must be set to no.
NOTE: security: Set this parameter to user to ensure that Windows users, client machine
accounts, and passwords are stored and managed in the smbpasswd file or LDAP backend.
domain master: Set this parameter to no in order for the HP CIFS Server to act as a BDC.
domain logon: Set this parameter to yes to provide netlogon services.
Encrypt passwords: You set this parameter to yes, the passwords used to authenticate users
are encrypted. You must set this parameter to yes when you configure HP CIFS Server to act as
a BDC.
Promote a BDC to a PDC in a Samba Domain
If a PDC fails or needs to be taken out of services, simply set "domain master = yes" on a
BDC. It will then register the appropriate NetBIOS names and will assume the PDC role.
Domain member server
Configure the HP CIFS Server as a member server
When configuring HP CIFS Server to act as a domain member server, you need to configure the
relative domain parameters in the /etc/opt/samba/smb.conf file by using the SWAT tool or
an editor. The smb.conf file is shown as follows:
• The smb.conf file is as shown if the HP CIFS Server acting as a member server does not use
the LDAP backend:
[global]
workgroup = NTDOM
60 Windows style domains
Page 61

security = domain
password server = DOMPDA
encrypt passwords = yes
netbios name = myserver
• The smb.conf file is as shown if the HP CIFS Server acting as a member server uses the LDAP
backend to store UNIX and Samba account databases:
[global]
workgroup = NTDOM
security = domain
encrypt passwords = yes
passdb backend = ldapsam:ldap://ldapserver:389
netbios name = myserver
NOTE: workgroup: This parameter specifies the domain name of which the HP CIFS Server is a
member.
security: When the HP CIFS Server joins a domain as a member, this parameter must be set to
"domain".
password server: This parameter defines the NetBIOS name of the PDC machine which performs
the username authentication and validation.
encrypt passwords: If this parameter is set to yes, the passwords used to authenticate users
are encrypted.
netbios: Set this parameter to the NetBIOS name by which a member server is known.
Join an HP CIFS Server to an NT Domian, Windows 2000/2003 (as a pre-Windows 2000 computer), or Samba Domain
This section describes the procedures to join an HP CIFS Server to a Windows NT domain, Windows
2000 and Windows 2003 (as a pre-Windows 2000 computer) or Samba Domain as a member
server.
Domain member server 61
Page 62

Step-by-step procedure
1. Choose "Domain Member Server" when executing samba_setup. When prompted, you will
need to add your domain Member Server machine account to the PDC.
For Windows NT: Go to the Windows NT PDC and create a machine account for the HP CIFS
Member Server by performing the following steps:
a. Open the "start/programs/administrator/tools/server manager" tool.
b. Select the "computer/add to domain" icon and enter the host name of the HP CIFS Server.
c. Choose the "Windows NT Workstation or Server" option when you are asked for the
computer type.
For Windows 2000: Go to the Windows 2000 PDC and create a machine account for the
HP CIFS Member Server by using the Active Directory Controller Wizard.
Check the "Allow Pre-Windows 2000 computers to use this account" box
and add the computer name
For Samba (including HP CIFS): Go to the Samba Server acting as a PDC and create a machine
account for the HP CIFS Member Server by following the steps provided in Chapter 4 section
titled, "Create a Machine Trust Account.". samba_setup will then perform the "net rpc
join -U Administrator%password" command for you.
Create the machine trust accounts
A Machine Trust Account for a Windows Client (Client=member server) on a HP CIFS Server acting
as a PDC is simply a user account entry created for a machine. It is denoted by the machine name
followed by "$".
For PDCs not using LDAP (default), machine accounts will have entries in both /etc/passwd (unix
user accounts) and /var/opt/samba/private/smbpasswd (Windows user accounts).
For PDCs using LDAP, machine accounts will have posixAccount and sambaSamAccount object
class entries in a directory server database.
The following steps are used to create a machine account for a Windows Client on a HP CIFS
Server acting as a Primary Domain Controller (PDC):
1. Create the UNIX or POSIX account for a Windows Client:
• Use the following command to create the POSIX account for a Windows client in the
/etc/passwd file if LDAP is disabled:
$ useradd -c NT_workstation -d /home/temp -s /bin/false client1$
As an example, the resulting entry in the /etc/passwd file for a client machine named
"client1" would be:
client1$:*:801:800:NT_Workstation: /home/temp:/bin/false
where 801 is a uid and 800 is the group id of a group called "machines." A uid or group
id can be any unique number. You may find that uid values 0 through 100 are considered
special, and/or server specific. This may, or may not apply to your system.
The machine account is the machine's name with a dollar sign character ("$") appended
to it. The home directory can be set to /home/temp. The shell field in the /etc/passwd
file is not used and can be set to /bin/false.
• Use the following command to create the posixAccount entry for a Windows client in the
LDAP directory if LDAP is enabled:
$ /opt/ldapux/bin/ldapmodify –a –D “cn=Directory Manager” –w
dmpasswd –h ldaphostA –f new.ldif $
Where LDIF update statements specified in the new.ldif file are added to the LDAP
directory server, ldaphostA. The following is an example of LDIF update statements in
the new.ldif file:
62 Windows style domains
Page 63

dn: uid=client1$ ou=People,dc=hp,dc=com
objectclass: top
objectclass: account
objectclass: posixAccount
homeDirectory: /home/temp
loginShell: /bin/false
As an example, the resulting entry in the LDAP directory server for a client machine named
"client1" would be:
objectClass: posixAccount
cn: client1$
uid: client1$
uidNumber: 1000
gidNumber: 200
homeDirectory: /home/temp
loginShell: /bin/false
userPassword: {crypt}x
pwdLastSet: 1076466492
logonTime: 0
logofftime: 2147483647
kickoffTime: 2147483647
pwdCanChange: 0
pwdMustChange: 2147483647
rid: 1206
primaryGroupID: 1041
acctFlags: [W ]
displayName: client1$
2. Run the smbpasswd program on the Samba PDC server to create the Windows account:
• Use the following command to add the Windows account for a Windows client to the
/var/opt/samba/private/smbpasswd file if LDAP is disabled:
$ smbpasswd -a -m client1
An example of the associated machine entry in the /etc/opt/samba/private/smbpasswd
file for a client machine named "client1" would be:
client1$:*801:800:ED816800D0393DAAD3B435B51404EE:321ABEEFE10EC431B9AAFF1A1D0D47:[W
]:LCT-0000000:
• Use the following command to add the sambaSAMAccount entry for a Windows client
to the LDAP directory server if LDAP is enabled:
For ldapsam_compat backend:
$ /opt/samba/bin/smbpasswd -a -m client1
Forldapsam backend:
$ /opt/samba/bin/smbpasswd -a -m client1
An example of the associated machine entry in the LDAP directory server for a client
machine named "client1" would be:
objectClass: posixAccount
objectClass: sambaSamAccount
cn: client1$
uid: client1$
uidNumber: 1000
gidNumber: 200
homeDirectory: /home/temp
loginShell: /bin/false
gecos: Samba_Server
description: Samba_Server
userPassword: {crypt}x
pwdLastSet: 1076466492
logonTime: 0
logofftime: 2147483647
Create the machine trust accounts 63
Page 64

kickoffTime: 2147483647
pwdCanChange: 0
pwdMustChange: 2147483647
rid: 1206
primaryGroupID: 1041
lmPassword: E0AFF63989B8FA6576549A685C6AFAF1
ntPassword: E0AFF63989B8FA6576549A685C6AFAF1
acctFlags: [W ]
displayName: client1$
NOTE: You can also use utilities including pdbedit, net commands to create the machine
trust accounts. The net commands provide numerous new utility operations. For more
information on how to create machine trust accounts using pdbedit and net commands, see
SWAT help text for pdbedit, net commands.
Configure domain users
The following examples show the commands used to configure Domain Users, Domain Administrators
and Domain Guests on a HP CIFS Server configured as a PDC.
• If you are a root-level user, create a Domain User in the group named "users", located in the
/sbin/sh directory. For example:
useradd -g users -c "Domain Users" -s /sbin/sh domuser
If you are not a root-level user, create a Domain User in the group named "users", located in
the /usr/bin/sh directory. For example:
useradd -g users -c "Domain Users" -s /usr/bin/sh domuser
where domuser is the name of a Domain User.
• If you are a root-level user, create a Domain Administrator in the group named "adm", located
in the /sbin/sh directory. For example:
useradd -g adm -c "Domain Administrators" -s /sbin/sh domadmin
If you are not a root-level user, create a Domain Administrator in the group named "adm",
located in the /usr/bin/sh directory. For example:
useradd -g adm -c "Domain Administrators" -s /usr/bin/sh domadmin
where domadmin is the name of a Domain Administrator.
• If you are a root-level user, create a Domain Guest in a group named "users", located in the
/sbin/sh directory. For example:
useradd -g users -c "Domain Guest" -s /sbin/sh domguest
If you are not a root-level user, create a Domain Guest in a group named "users", located in
the /usr/bin/sh directory. For example:
useradd -g users -c "Domain Guest" -s /usr/bin/sh domguest
where domguest is the name of a Domain Guest.
Be sure that all of the users that were created (see the example above) have been added to the
/etc/passwd file.
Join a Windows client to a Samba Domain
1. Verify the following parameters in the smb.conf file:
Set the security parameter to "user."
Set the workgroup parameter to the name of the domain.
Set the encrypt passwords parameter to "yes."
64 Windows style domains
Page 65

[global]
security = user
workgroup = SAMBADOM #SAMBA Domain name
domain logon = yes
encrypt passwords = yes
2. Create the UNIX or POSIX account for a Windows Client:
• Use the following command to create the POSIX account for a Windows client in the
/etc/passwd file if the passdb backend option is set to smbpasswd:
$ useradd -c NT_workstation -d /home/temp -s /bin/false client1$
As an example, the resulting entry in the /etc/passwd file for a client machine named
"client1" would be:
client1$:*:803:808:NT_Workstation: /home/temp:/bin/false
where 803 is a uid and 808 is the group id of a group called "machines." A uid or group
id can be any unique number. You may find that uid values 0 through 100 are considered
special, and/or server specific. This may, or may not apply to your system.
The machine account is the machine's name with a dollar sign character ("$") appended
to it. The home directory can be set to /home/temp. The shell field in the /etc/passwd
file is not used and can be set to /bin/false.
• Use the following command to create the posixAccount entry for a Windows client in the
LDAP directory if the passdb backend option is set to ldapsam or ldapsam_compat:
$ /opt/ldapux/bin/ldapmodify –a –D “cn=Directory Manager” –w
dmpasswd –h ldaphostA –f new.ldif $
Where LDIF update statements specified in the new.ldif file are added to the LDAP
directory server, ldaphostA. The following is an example of LDIF update statements in
the new.ldif file:
dn: uid=client1$ ou=People,dc=hp,dc=com
objectclass: top
objectclass: account
objectclass: posixAccount
homeDirectory: /home/temp
loginShell: /bin/false
As an example, the resulting entry in the LDAP directory server for a client machine named
"client1" would be:
dn: uid=client1, ou=people,dc=hp,dc=com
objectClass: top
objectClass: posixAccount
cn: client1$
sn: client1$
uid: client1$
uidNumber: 1002
gidNumber: 202
homeDirectory: /home/client1$
loginShell: /bin/false
userPassword: {crypt}x
pwdLastSet: 1076466300
logonTime: 0
logofftime: 2147483650
kickoffTime: 2147483650
pwdCanChange: 0
pwdMustChange: 2147483650
rid: 1206
primaryGroupID: 1041
Join a Windows client to a Samba Domain 65
Page 66

acctFlags: [W ]
displayName: client1$
3. Run the smbpasswd program on the Samba PDC server to create the Windows account:
• Use the following command to add the Windows account for a Windows client to the
/var/opt/samba/private/smbpasswd file if the passdb backend option is set
tosmbpasswd:
$ smbpasswd -a -m client1$
An example of the associated machine entry in the /etc/opt/samba/private/smbpasswd
file for a client machine named "client1" would be:
client1$:*803:808:ED816822D0393DAAD3B435B51404DD:321
ABEEFE10EC431B9BBFF1A1C0C047:[W ]:LCT-0000000:
• Use the following command to add the sambaSamAccount entry for a Windows client
to the LDAP directory server if the passdb backend option is set to ldapsam or
ldapsam_compat:
$ smbpasswd -a -m client1
An example of the associated machine entry in the LDAP directory server for a client
machine named "client1" would be:
objectClass: posixAccount
objectClass: sambaSamAccount
cn: client1$
uid: client1$
uidNumber: 1002
gidNumber: 202
homeDirectory: /home/temp
loginShell: /bin/false
gecos: Samba_Server
description: Samba_Server
userPassword: {crypt}x
pwdLastSet: 1076466300
logonTime: 0
logofftime: 2147483650
kickoffTime: 2147483650
pwdCanChange: 0
pwdMustChange: 2147483650
rid: 1206
primaryGroupID: 1041
lmPassword: E0AFF63989B8FA6576549A685C6ADFC1
ntPassword: E0AFF63989B8FA6576549A685C6ADFC1
acctFlags: [W ]
displayName: client1$
4. Logon to Windows NT as a local admin user.
5. From the Windows NT desktop, click 'Start', 'Settings' and 'Control Panel'. When the Control
Panel window opens, double-click on the 'Network' icon. When the 'Network' window opens,
click the 'Identification' tab. Refer to Figure 19 (page 67) below.
6. Enter the Samba domain name in the 'Domain' field, and click on the 'Change' button. Refer
to Figure 19 (page 67) below.
66 Windows style domains
Page 67
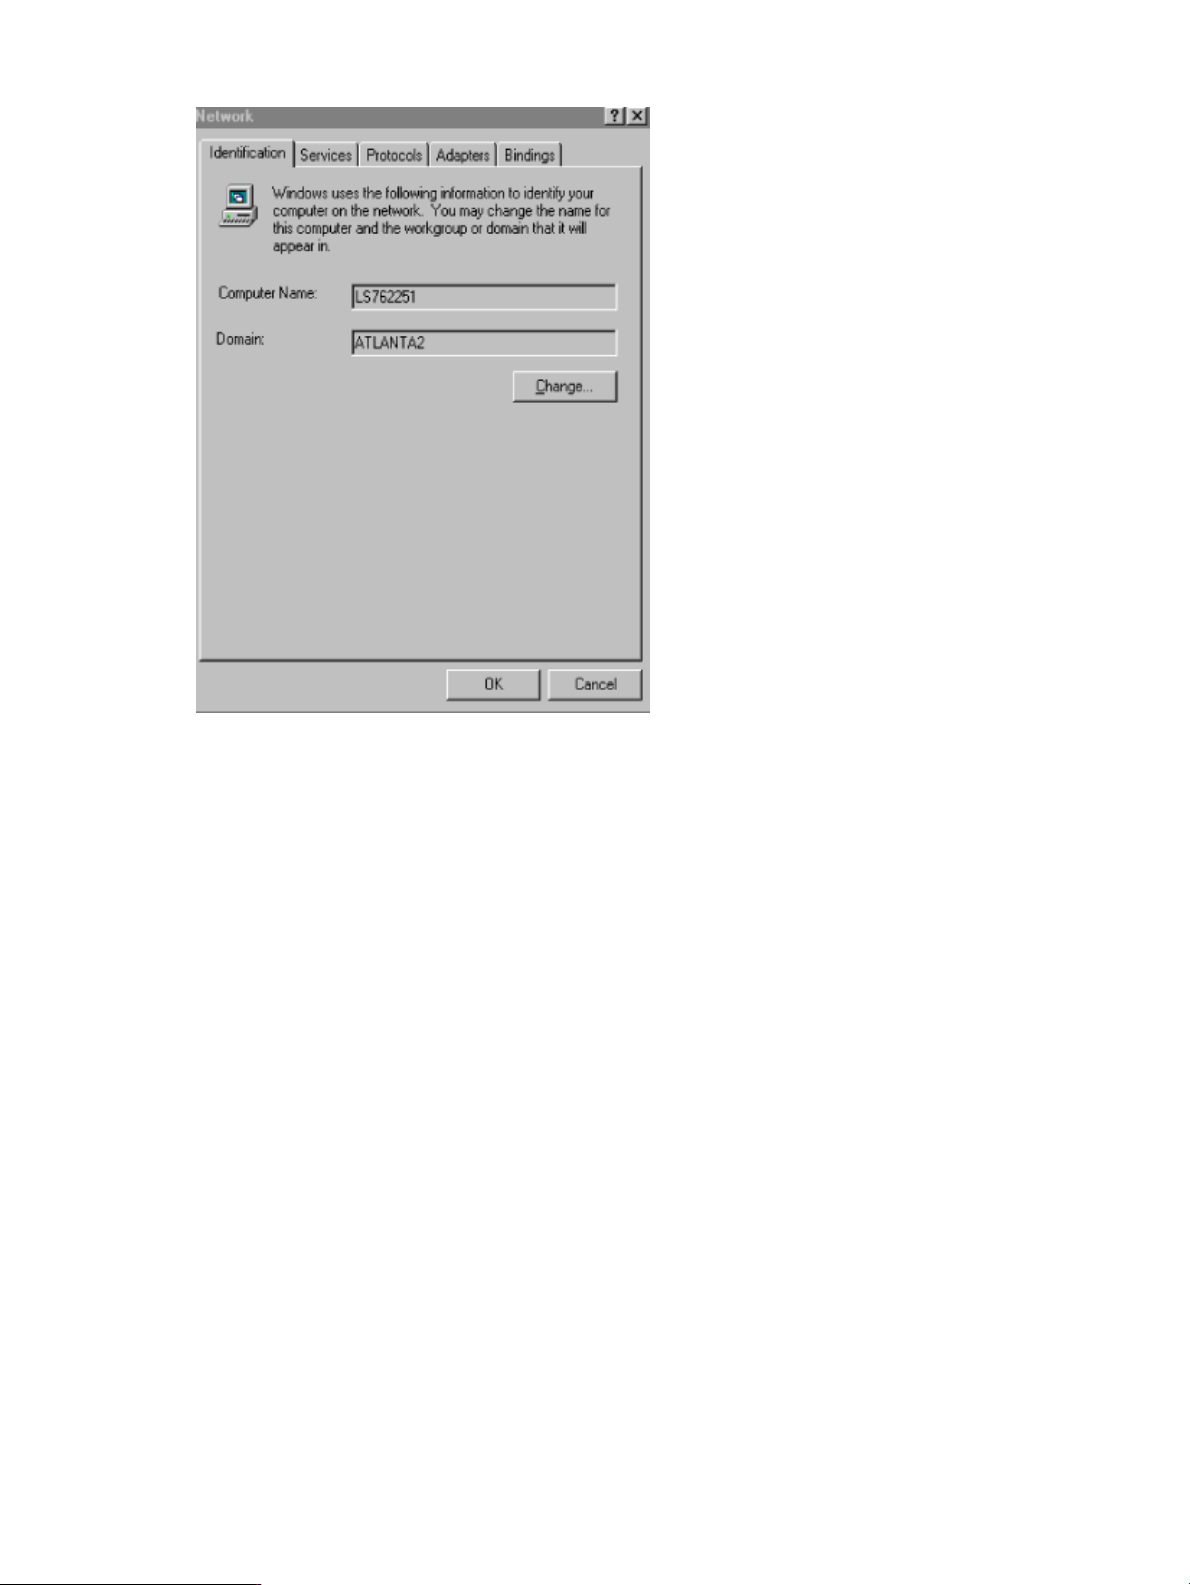
Figure 19 Entering a samba PDC domain name
Roaming profiles
The HP CIFS Server, configured as a PDC, supports Roaming Profiles with the following features:
• A user's environment, preference settings, desktop settings, etc. are stored on the HP CIFS
Server
• Roaming Profiles can be created as a share, and be shared between Windows clients
• When a user logs on to a workstation in the domain, the roaming profile is downloaded from
the share which is on a HP CIFS Server configured as a PDC, to the local machine. Upon
logout, the profile is copied back to the server
Configuring roaming profiles
Use the following procedure to configure roaming profiles:
1. Modify or enable roaming profiles by using the global parameter named logon path, in
the smb.conf file. Example:
[global]
logon path = \\%L\profile\%U
workgroup = SAMBADOM
security = user
encrypt passwords = yes
domain logon = yes
2. Create a [profiles] share for roaming profiles. Set profile acls = yes for the profile
share used for the user profile files. Do not set profile acls = yes on normal shares as
this will result in incorrect ownership of the files created on those shares. The following is an
example configuration for the [profiles] share:
[profiles]
Roaming profiles 67
Page 68

profile acls = yes
path = /etc/opt/samba/profiles
read only = no
create mode = 600
directory mode = 770
writeable = yes
browseable = no
guest ok = no
Configuring user logon scripts
The logon script configuration must meet the following requirements:
• User logon scripts should be stored in a file share called [netlogon] on the HP CIFS Server.
• Should be set to UNIX executable permission.
• Any logon script should contain valid commands recognized by the Windows client.
• A logon user should have proper access permissions to execute logon scripts.
The following is an example configuration for user logon scripts:
[global]
logon script = %U.bat
[netlogon]
path = /etc/opt/samba/netlogon
writeable = yes
browseable = no
guest ok = no
In this example, the batch (.bat) file is executed from a file share called [netlogon] on a HP CIFS
Server configured as a PDC.
Running logon scripts when logging on
A HP CIFS Server configured as a PDC can enable the execution of logon scripts when users log
on. To enable this feature, the following must be done:
• User logon scripts should be stored in a file share on the HP CIFS Server called [netlogon].
• The HP CIFS Server enables the execution of login scripts by setting the global parameter
named logon script in the smb.conf file.
• Any logon script that is to be executed on a Windows Client must be in DOS text format and
contain executable permission.
Home drive mapping support
A HP CIFS Server provides user home directories and home drive mapping functionality by using
the following two global parameters in the smb.conf file:
• login home
• logon drive
Example:
[global]
logon drive = H:
68 Windows style domains
Page 69

logon home = \\%L\%U
Trust relationships
Trust relationships enable pass-through authentication to users of one domain in another. A trusting
domain permits logon authentication to users of a trusted domain. There are various forms of trusts,
depending on the domain type and Windows 2003/2008 R2 ADS domain trusts differ from NT
Domain trusts. For more information on trusts, consult the MS TechNet papers at http://
technet.microsoft.com. For information on HP CIFS Server trust relationships with Windows
2003/2008 R2, see “Windows 2003 and Windows 2008 domains” (page 71).
HP CIFS Server supports the following external trust relationships with NT Style Domains:
• HP CIFS PDCs support external trusts between a Samba and an NT Domain. A CIFS Samba
Domain may be a trusting, trusted, or bi-directional trust (both trusting and trusted or “two
way") domain with an NT Domain.
• HP CIFS PDCs support trusts between Samba Domains. A Samba Domain may be a trusting,
trusted, or bi-directional trust domain with another Samba Domain.
• HP CIFS Member Servers of either a Samba Domain or an NT Domain will respect the trust
relationships established by their domain controller.
Transitive trusts, in which domain A trusts domain B which trusts domain C thereby domain A trusts
domain C, are not respected by HP CIFS Servers.
Configuring smb.conf for trusted users
HP CIFS Server requires an HP-UX local logon for all Samba users. Therefore, even a trusted Samba
user from another domain needs a matching local POSIX user. To allow POSIX users to be added
on-the-fly, set the add user script smb.conf configuration parameter. For Example,
add user script = /usr/sbin/useradd -g users -c "Auto_Account" \
-s /bin/false %u
Establishing a trust relationship on an HP CIFS PDC with another Samba Domain
This section decribes the procedures used to establish a trust relationship on an HP CIFS PDC with
anther Samba Domain.
Logon as root and execute the following steps on the trusted domain PDC:
1. Add a trust account for the trusting domain to /etc/passwd. Add the domain name with
the "$" using useradd command as follows:
$ useradd <trusting domain name>$
Due to the maximum name length of 8 for the useradd command, you may need to edit
/etc/passwd to add the trusting domain name account.
2. Run smbpasswd to add a trusting domain Samba account to your trusted domain backend
database and create a password for the trusting account. This password is used by the trusting
domain when it establishes the trust relationship.
$ smbpasswd -a -i <trusting domain name>
Logon as root and execute the following steps on the trusting domain PDC:
• Run net rpc trustdom to establish the trust and type the passoword that was created with
the smbpasswd command on the trusted domain PDC.
$ net rpc trustdom establish <trusted domain name>
Trust relationships 69
Page 70

Establishing a trust relationship on an HP CIFS PDC with an NT domain
Trusting an NT Domain from a Samba Domain
Use the following steps to trust an NT domain from a Samba Domain:
1. On the NT domain controller, run the User Manager utility. Go to policies/trust relationship,
add the trusting Samba domain account for CIFS Server and establish a password.
2. Logon as root on the trusting Samba Domain PDC. Run net rpc trustdom to establish
the trust and type the password that was created with the User Manager utility on the trusted
NT Domain PDC.
$ net rpc trustdom establish <trusted domain name>
Trusting a Samba Domain from an NT domain
Logon as root and execute the following steps on the trusted Samba Domain PDC:
1. Add a trust account for the trusting NT domain to /etc/passwd. Add the domain name with
the "$" using the useradd command as follows:
$ useradd <trusting NT domain name>$
Due to the name length limitation of the useradd command, you may need to edit
/etc/passwd to add the trusting NT domain name account.
2. Run smbpasswd to add a trusting NT domain Samba account to your trusted Samba domain
backend database and create a password for the trusting account. This password is used by
the trusting NT domain when it establishes the trust relationship.
$ smbpasswd -a -i <trusting domain name>
3. On the NT domain controller, run the User Manager utility. Go to policies/trust relationship.
Add the trusted Samba domain account for CIFS Server and type a password established by
the smbpasswd command on the Samba Domain PDC.
Establishing a trust relationship on an HP CIFS member server of a Samba Domain or an NT domain
HP CIFS Member Servers of an NT Domain will automatically respect the trust relationships
established by their domain controllers. No extra configuration is required.
70 Windows style domains
Page 71

5 Windows 2003 and Windows 2008 domains
Introduction
This chapter describes the process for joining an HP CIFS Server to a Windows 2003 or Windows
2008 Domain as an ADS Member Server. To join as a pre-Windows 2000 computer, see “Domain
member server” (page 60) in Chapter 4, "NT Style Domains".
By default configuration, Windows 2003 and Windows 2008 Servers utilize the Kerberos
authentication protocol for increased security. By joining an HP CIFS Server to the Windows 2003
and Windows 2008 ADS domain as a Member Server, HP CIFS Server can also participate in
the increased security. The HP-UX Kerberos Client software and LDAP-UX Integration software are
required to enable HP CIFS Server Windows 2003 and Windows 2008 ADS domain member
capability.
This chapter describes instructions for joining an HP CIFS Server to a Windows 2003 and Windows
2008 ADS Domain. For detailed information about Kerberos, see “Kerberos support” (page 113)
and white paper, "HP CIFS Server and Kerberos" available at the following web site:
http://docs.hp.com/en/netcom.html#CIFS%20%28Common%20Internet%20File%20System%29
For detailed information about LDAP, see “LDAP integration support” (page 81).
HP CIFS and other HP-UX Kerberos applications co-existence
Because the HP CIFS Server stores the Kerberos secret key in
/var/opt/samba/private/secrets.tdb by default, the standard CIFS Kerberos configuration
can only be used by HP CIFS Server users. If other HP-UX applications use the /etc/krb5.keytab
file, a mismatch of keys occurs resulting in failure for CIFS or the other applications depending
upon which key is the latest. Moreover, HP-UX Internet Services users cannot use system Kerberos
libraries to access system resources because of a mismatch in Kerberos libraries on the system.
The Internet Services (IS) suite utilizes its own Kerberos library set which is delivered with the Internet
Services product.
If you wish to use Kerberos in your network for other products as well as HP CIFS Server, you may
generate an /etc/krb5.keytab file from an HP CIFS Server and configure HP CIFS Server to
access the secret key from the /etc/krb5.keytab file instead of the
/var/opt/samba/private/secrets.tdb file. This feature provides Kerberos interoperability between
HP CIFS Server users and HP-UX Internet Services users. See “Kerberos support” (page 113), for
proper configuration.
HP-UX Kerberos client software and LDAP integration software dependencies
Kerberos v5 Client E.1.6.2.10 or later for HP-UX 11i v3 is required to support HP CIFS Server
integration with a Windows 2003 ADS Domain Controller (DC).
The following lists HP-UX Kerberos Client software dependencies:
• Kerberos v5 Client E.1.6.2.10 or later for HP-UX 11i v3 is required for keytab file support.
• Kerberos v5 Client E.1.6.2.10 or later for HP-UX 11i v3 is required for the encryption type
RC4-HMAC support.
• Kerberos v5 Client E.1.6.2.10 requires Service Pack 1 on Windows 2003.
You can download the Kerberos v5 Client (KRB5CLIENT) product from the following Software
Depot web site:
http://www.hp.com/go/softwaredepot
Enter KRB5CLIENT in the search field.
Introduction 71
Page 72

For the latest LDAP Integration software, download the product from the following web site:
http://www.hp.com/go/softwaredepot
Enter LDAP-UX Integration for HP-UX in the search field.
Strong authentication support
When you enable LDAP server signing with required signing for strong authentication support on
a Windows 2003/2008 R2 ADS Domain Controller (DC), you can enable an extended operation
of Transport Layer Security (TLS) protocol called startTLS on an HP CIFS Server to provide signing
negotiation with a Windows ADS DC. The SSL/TLS protocol provides secure communication
between an HP CIFS Server and a Windows 2003/2008 R2 ADS DC. You have flexibility to use
an un-encrypted port, 389, to establish an encrypted connection when using the startTLS feature.
If you want to enable startTLS for strong authentication support, you must perform the following
tasks before you follow the instructions to run the kinit and net ads join commands as
described in “Step-by-step procedure” (page 76) to join an HP CIFS Server to a Windows
2003/2008 R2 ADS domain as a domain member server:
• Install Certification Authority (CA) on a Windows ADS Server.
• Download and install the certificate database files, cert8.db and key3.db on the HP CIFS
Server machine from a Windows CA Server.
• Configure HP CIFS Server to enable the startTLS feature.
Steps to install Certification Authority (CA) on a Windows ADS server
You need to install SSL/TLS Certification Authority (CA) on a Windows ADS Server before you
download the certificate database file, cert8.db and key3.db, on your HP CIFS Server machine.
If you have installed MS IIS Service, you must stop and restart MS IIS Service while installing CA.
NOTE: If a previous CA has been installed on your Windows ADS Server and the CA services
do not work, you must remove them before you reinstall CA. For detailed information on how to
manually remove Windows Certificate Authority from a Windows 2003/2008 R2 ADS domain,
refer to a document from Microsoft at:
http://support.microsoft.com/kb/555151/en-us
The following steps show you how to install MS CA on a Windows ADS Server using MS Certificate
Service Installation Wizard:
1. Select Control Panel -> ADD-Remove Programs -> Add-Remove Windows Components
2. Check Certificate Service
3. Check Application Server
4. Click Next button
5. Select Enterprise Root Certificate Authority
6. Provide a common name (CN) for the system. It must be a fully qualified domain name.
7. Specify Certificate database settings log location. For example,
C:\Windows\system32\CertLog
8. To install CA services, you must temperately stop MS IIS Service if you have installed it. Then,
restart it after installation of CA services is completed.
9. Run Certificate Services in Administrator Tools to verify that installation of Windows Certificate
Authority succeeds
10. Access web browser at:
http://ads_CA_server/certsrv
72 Windows 2003 and Windows 2008 domains
Page 73

Steps to download the CA certificates from Windows CA server
Use the following steps to download the Certificate Authority certificates from a Windows 2003
CA Server using Mozilla browser 1.6.0.01.00:
1. You must install Mozilla browser on your HP-UX system.
2. Log in your HP CIFS Server machine as root.
3. Use the following command to setup your DISPLAY environment variable on your HP CIFS
Server machine:
export DISPLAY = your_machine_IP:0.0
4. Run the following command to start Mozilla browser:
/opt/mozilla/bin/mozilla &
5. Use Mozilla browser to connect to your Windows CA Server.
The following shows an example of using a link to connect to your Windows CA Server:
http://ADS CA Server name/Certsrv
6. Provide administrator and password information after you connect to your CA Server.
7. Click on the “Download a CA Certificate, Certificate Chain, or CRL” link.
8. Check “Base 64” in the Encoding method field.
9. Click on the “Download CA Certificate” link.
10. Check the “Trust this CA to identify web sites”, “Trust this CA to
identify email user”, and “Trust this CA to identify software
developers” check boxes in the Downloading Certificate window screen. Then click
the OK button.
11. Click the Open button when the file download window appears.
12. Check the “Install Certificate” button.
13. Click Next.
14. Use “Automatically select the certificate store based on the type of
certificate”. Then click the Next button.
15. Click the Finish button.
16. The CA certificates are downloaded to the following two files on your HP CIFS Server system:
/.mozilla/default/*.slt/cert8.db
/.mozilla/default/*.slt/key3.db
17. You can simply copy certificates to the file location you want. The default location of the
certificate database files is /etc/opt/ldapux. For example, the following commands copy
certificates from the /.mozilla/default/*.slt directory to the /etc/opt/samba
directory:
cd /.mozilla/default/*.slt
cp cert8.db /etc/opt/samba/cert8.db
cp key3.db /etc/opt/samba/key3.db
18. Run the following command to verify whether the certificates wok with a Windows ADS:
ldapsearch -h ADS_server_name -Z -P /etc/opt/samba/cert8.db -s base \
-b "" “(objectclass=*)”
The results from the command display if the certificates work.
Configuring HP CIFS server to enable startTLS
To configure HP CIFS Server to enable startTLS in a Windows 2003/2008 R2 ADS domain, you
must configure the smb.conf file which specifies the name of ADS Kerberos realm, ADS security,
Strong authentication support 73
Page 74

startTLS enabled, the NetBIOS name or IP address of the Windows ADS PDC machine, and the
location of the certificate database files, cert8.db and key8.db.
The following is an example for the [Global] section of the /etc/opt/samba/smb.conf file:
[Global]
realm= MYREALM
security = ADS
password server = adsdc_server
ldap server = adsdc_server
ssl cert path = /etc/opt/ldapux
To enable startTLS with an un-encrypted port 389, set:
ldap ssl = start_tls
For more information about the smb.conf configuration parameters used in the previous example,
see “Configuration parameters” (page 74).
Joining an HP CIFS server to a Windows 2003 and Windows 2008 domain
HP CIFS Server only supports the following Kerberos encryption types:
• DES-CBC-MD5
• DES-CBC-CRC
• RC4-HMAC
You must configure one of these encryption types in the /etc/krb5.conf file as shown below.
HP recommends you set the encrption type to DES-CBC-MD5 in /etc/krb5.conf unless you
have other kerberos enabled applications on the HP server that require one of the other supported
encryption types.
If your machine has already been added to the ADS with the Windows Server Manager GUI, you
may simply use Window Server Manager to delete the machine account. Then, follow the instructions
to run the "kinit" and "net ads join" commands as described below in “Step-by-step
procedure” (page 76).
Another way to resolve this problem is to *AND* the "userAccountControl" attribute value
for the CIFS member server with the ADS_UF_USE_DES_KEY_ONLY (2097152 or 0x2000000)
flag in the ADS. This can be accomplished by using the "adsiedit.msc" tool from the Windows
2003 or 2008 R2 CD or using the ldapmodify command.
NOTE: If an HP CIFS Server is currently joined to the domain as a pre-Windows 2000 member
server, please first remove the server from the domain before adding an HP CIFS Server to a
Windows domain as a ADS member server.
Configuration parameters
The following is a description of the smb.conf parameters shown in “Step-by-step procedure”
(page 76):
realm This string parameter specifies the name of the ADS kerberos realm
which has the fully qualified domain name. It must be set the same as
the kerberos realm value in krb5.conf.
ldap server This string parameter specifies the host name of the LDAP ADS PDC
Server where you want to store your data.
ldap ssl This parameter specifies the SSL/TLS support. SpecifyYes to enable
SSL feature using the encrypted port number 636 to connect to the
LDAP ADS server. If you choose to use startTLS, set this parameter to
start_tls using the un-encrypted port number 389 to connect to the
LDAP ADS server. To disable SSL, set it to No. The default value is No.
74 Windows 2003 and Windows 2008 domains
Page 75

ssl cert path This string parameter specifies the file location of the certificate
workgroup This parameter specifies the name of domain in which the HP CIFS
security When the HP CIFS Server joins to Windows 2003/2008 R2 native
password server This parameter defines the NetBIOS name or IP address of the
encrypt passwords It is an optional parameter. If this parameter is set to yes, the
netbios name Set this parameter to the NetBIOS name by which a member server is
Setting permissions for a user
When using the net ads join command on an HP-UX machine to join an HP CIFS Server to a
Windows 2003/2008 R2 ADS Domain as a member server, a normal user is not allowed to
perform the net ads join command. You must configure a Windows user to have create/delete
computer object permissions.
The following Windows users are allowed to run the net ads join command:
database files, cert8.db and key3.db. For example, ssl cert
path = /etc/opt/samba. The default value is /etc/opt/ldapux.
Server is a domain member server.
mode domain as a member server, you must set this parameter to ADS.
Windows ADS PDC machine that performs the user name authentication
and validation. The default setting of this parameter is *. If set to the
character *, then Samba will attempt to automatically locate the Primary
Domain Controllers.
passwords used to authenticate users are encrypted. The default value
is yes.
known.
• An administrator
• A user is a member of the ”Administrators”, “Domain Admins", “Enterprise Admins”or
“OU Admins” group in the Windows ADS Domain Controller, who has create/delete computer
object permissions by default.
• A normal user is granted to have create/delete computer object permissions. Without the
privilege, a normal user does not have permissions to create/delete a machine account in the
Windows ADS database for an HP CIFS Server.
Use the following procedures to grant create/delete computer object permissions to a normal user,
cifsuser, as an example on the Windows 2003 ADS Domain:
1. In the Active Directory Users and Computers console, click View and select
Advanced feature.
2. Click on the Computers object and right click on the properties tab.
3. Select the Security tab on the properties window.
4. Click on the Advanced button.
5. In the permission entries list, select Account operators(YOURADS_DOMAIN\Account
operators) with Create/Delete Computer Objects permission.
6. Click on the Add button.
7. Click on the Advanced button.
8. Click on “Object Type" for specifying search scope to "Users" only. You may need to
remain the check box on "Users" only, remove all others of check boxes. And then click on
the OK button.
9. Click on the Find Now button to look for normal user names. In the search result list, click on
the domain user name, cifsuser, who wants to use the net ads join command. Then,
click on the OK button.
Joining an HP CIFS server to a Windows 2003 and Windows 2008 domain 75
Page 76

10. Once the selected user is presented in the Enter the object name to select list,
click the OK button to get in the permission entry for Computers window.
11. In the Permissions dialog box, check Create Computer Objects and Delete
Computer Objects selections.
12. Click on the OK button
13. Click on the Apply button.
14. Click on the OK button on the Advanced Security Setting for Computers window.
15. Click on the OK button on the Computers Properties window.
Step-by-step procedure
Use the following instructions to join an HP CIFS Server to a Windows 2003/2008 R2 ADS Domain
as a member server:
1. Verify that LDAP-UX Integration product has been installed on your HP CIFS Server:
swlist | grep J4269AA
Consult “Installing LDAP-UX client services on an HP CIFS server” (page 85) in Chapter 6,
"LDAP Integration Support" if necessary.
2. On your HP CIFS Server, you need to create the Kerberos configuration file, /etc/krb5.conf,
which specifies the default realm, the location of a Key Distribution Center (KDC) server and
the logging file names. The Kerberos client depends on the configuration to locate the realm's
KDC.
If there is no /etc/krb5.conf file in existence at the time that
/opt/samba/bin/samba_setup is run, samba_setup will attempt to create and validate
an appropriately configured krb5.conf file based on the answers to the questions asked
when 'ads member server' is chosen.
The following is an example of /etc/krb5.conf which has the realm MYREALM.XYZ.COM,
and machine adsdc.myrealm.xyz.com as a KDC:
# Kerberos Configuration #
# #
# This krb5.conf file is intended as an example only. #
# See krb5.conf(4) for more details. #
#
# Please verify that you have created the directory /var/log.#
# #
# Replace MYREALM.XYZ.COM with your kerberos Realm. #
# Replace adsdc.myrealm.xyz.com with your Windows ADS DC full#
# domain name. #
# #
[libdefaults]
default_realm = MYREALM.XYZ.COM
default_tkt_enctypes = RC4-HMAC DES-CBC-CRC DES-CBC-MD5
default_tgs_enctypes = RC4-HMAC DES-CBC-CRC DES-CBC-MD5
ccache_type = 2
[realms]
MYREALM.XYZ.COM = {
kdc = adsdc.myrealm.xyz.com:88
admin_server = adsdc.myrealm.xyz.com
}
[domain_realm]
.xyz.com = MYREALM.XYZ.COM
[logging]
kdc = FILE:/var/log/krb5kdc.log
admin_server = FILE:/var/log/kadmin.log
default = FILE:/var/log/krb5lib.log
76 Windows 2003 and Windows 2008 domains
Page 77

NOTE: You must configure the port number :88 after the node name specified for the kdc
entry in the [realms]section. Kerberos v5 uses the port number 88 for the KDC service.
For detailed information on how to configure the /etc/krb5.conf file, refer to the
krb5.conf(4) man page.
3. Run the following commands to verify Kerberos configuration
log in as root
kinit <user> (e.g. Administrator@myrealm.xyz.com) (add user and password to a Windows
ADS DC if necessary)
The possible errors during verification are as follows:
• Pre-Authentication Failed means you have typed the password incorrectly.
• Clock skew too great means the time on the HP-UX machine is not synchronized
with the Windows domain controller. Execute the date command to reset the date or set
TZ=GMT and try again.
• You may see the warning message, kinit: KDC has no support for encryption
type while getting initial credentials. You must change your Administrator
password at least once from the original password that you used for Administrator when
installing your Windows 2003/2008 R2 ADS domain.
This warning message is also displayed when you do not have appropriate encryption
methods set in the /etc/krb5.conf file.
• Check the content of the /etc/krb5.conf file for syntax or content errors and ensure
that port :88 has been added to the kdc entry in the [Realms] section.
4. Use the following procedures to configure the HP CIFS Server:
• For new installations, you can run /opt/samba/bin/samba_setup and choose ADS
Member Server.
For new installations, finish samba_setup commands and verify the following smb.conf
configuration items. samba_setup will then perform the "net ads join -U
Administrator%password" command to join the ADS domain for you.
[global]
workgroup = MYREALM # Domain Name
realm = MYREALM.XYZ.COM
security = ADS
domain master = no
encrypt passwords = yes
password server = adsdc.myrealm.xyz.com
netbios name = MYSERVER
• For existing installations, modify smb.conf configuration items as follows:
[global]
workgroup = MYREALM # Domain Name
realm = MYREALM.XYZ.COM
security = ADS
domain master = no
encrypt passwords = yes
password server = adsdc.myrealm.xyz.com
Joining an HP CIFS server to a Windows 2003 and Windows 2008 domain 77
Page 78

netbios name = MYSERVER
Then join the ADS domain by manually executing the "net ads join -U
Administrator%password" command.
NOTE: If you use the startTLS feature for strong authentication support, see “Configuring HP
CIFS Server to Enable startTLS” section for more information about smb.conf configuration.
5. Use the following command to start your HP CIFS Server:
/opt/samba/bin/startsmb
6. Run the following command to verify Kerberos authentication. In the following command, the
-k option is required to force the use of Kerberos security:
smbclient -W <Window Domain> -U <user name in domain>
-k //<HP CIFS Server name>/<share> <password for user>
You can connect to the share on the HP CIFS Server if you succeed to run the smbclient
command.
Trust relationships
Trust relationships enable pass-through authentication to users of one domain in another. A trusting
domain permits logon authentication to users of a trusted domain. There are various forms of trusts,
depending on the domain type and Windows 2003/2008 R2 ADS domain trusts differ from NT
Domain trusts. For more information on trusts, consult the MS TechNet papers at http://
technet.microsoft.com. For information on HP CIFS Server trust relationships with NT Domains, see
“Windows style domains” (page 57).
Windows 2003/2008 R2 ADS domain trusts can take many forms. HP CIFS Server can support
some but not all Windows 2003/2008 R2 trusts as described below:
• HP CIFS PDCs can support external trusts which include trust relationships established between
CIFS Samba Domains and Windows 2003/2008 R2, including incoming, outgoing, and
two-way trusts.
• HP CIFS Member Servers do not support all Windows 2003/2008 R2 ADS domain
intra/inter-forest trusts. Most parent-child and child-child trusts are recognized appropriately
and shortcut trusts are supported. Shortcut trusts can be established explicitly between Windows
2003/2008 R2 ADS domain to ensure HP CIFS Servers recognized forest configurations
where necessary.
Transitive trusts, in which domain A trusts domain B which trusts domain C thereby domain A trusts
domain C, are not respected by HP CIFS Servers.
Establishing external trust relationships between HP CIFS PDCs and Windows 2003 and Windows 2008 domains
To configure the Windows domain controller for the trust relationship with the Samba domain PDC,
perform one of the following procedures as appropriate for the server in your domain.
For a Windows 2003 domain controller, use the Administrative Tools utility to perform the
following steps:
1. From the Start menu, select Programs -> Administrative Tools -> Active
Directory Domains and Trusts.
2. Right click on the desired Active Directory domain name and select Properties.
3. Select the tab Trusts, then click New Trusts. Click Next.
4. Specify the Samba PDC domain name and select Next. The Samba domain name is the
domain name specified in the “workgroup” parameter in smb.conf.
5. Select your choice of trust type, One-way: incoming, One-way: outgoing, or Two-way and
select Next.
78 Windows 2003 and Windows 2008 domains
Page 79

6. Enter and confirm the trust password.
7. Review and select Next.
8. Select Yes and select Next, two more times.
9. Select Finish and then OK.
NOTE: Windows Server 2003 Service Pack 1 (SP1) may require the RestrictAnonymous
registry subkey to be set to 0 and the value of the RestrictNullSessAccess registry subkey
also to be set to 0. Run regedit from the start button and find RestrictNullSessAccess
under HKEY_LOCAL_MACHINE\SYSTEM\CurrentControlSet\Services\ LanmanServer\
Parameters. For more details, refer to “trusts RestrictNullSessAccess” on the Microsoft TechNet
at http://technet.microsoft.com.
Alternatively, if you do not want to change the registry on Windows Server 2003 Service Pack 1
(SP1), you can use the --set-auth-user option of the wbinfo command to set a domain user
account and password for the winbind service. Using this option enables the winbind service to
authenticate itself with a valid domain user account while accessing the user and group information
from the Windows 2003 Server.
To create the corresponding configuration of the Samba domain PDC for two way trust relationship
with the Windows domain, logon as root and execute the following steps:
1. Run the following command to start the winbind daemon:
startsmb -winbind
2. Add a trust account for the trusting Windows domain to /etc/passwd. Add the trusting
domain name with the “$” using the useradd command.
For example, the following command adds a trust account for the trusting Windows domain
name, windomainA, to /etc/passwd:
useradd windomainA$
Due to the maximum name length of 8 for the useradd command, you may need to edit
/etc/passwd to add the trusting Windows domain name account.
3. Run smbpasswd to add a trusting Windows domain Samba account to your trusted Samba
domain database and create a password for the trusting account. Use the same trusting
Windows domain name specified in step 1. This password is used by the trusting Windows
domain when it establishes the trust relationship.
For example, the following command adds the trusting Windows domain account,
windomainA, to the Samba domain database:
smbpasswd -a -i windomainA$
4. Run net rpc trustdom to establish the trust with the trusted Windows domain.
For example, the following command is used to establish the trust relationship with the trusted
windows domain name, windomainA:
net rpc trustdom establish windomainA
–S <ADS domain controller server name> –U windomainA\\Administrator%pw
5. Use the following command to verify the trust relationship:
net rpc trustdom list -U root/%pw
Establishing a trust relationship on an HP CIFS member server of a Windows 2003 or Windows 2008 domain
HP CIFS Servers will not automatically recognize all intra/inter-forest trusts. CIFS member servers
will recognize most parent-child and child-child relationships and shortcut trusts but you may need
to use Windows Administrators Tool “Active Directory Domains and Trusts” to establish
explicit shortcut trusts where other trusts are desired.
Trust relationships 79
Page 80

In order for an HP CIFS Member of a Windows 2003 or Windows 2008 Domain to recognize
trusts established by its Domain Server, its /etc/krb5.conf file must declare the trusted domains
in the [realms] section (only – not [domain_realm]). For example, an HP CIFS member of
Windows 2003/2008 R2 ADS domain, mydom, which trusts trust1dom and trust2dom might
have the /etc/krb5.conf file as follows:
[libdefaults]
default_realm = MYDOM.ORG.HP.COM
default_tkt_enctypes = RC4-HMAC DES-CBC-CRC DES-CBC-MD5
default_tgs_enctypes = RC4-HMAC DES-CBC-CRC DES-CBC-MD5
ccache_type = 2
[realms]
MYDOM.ORG.HP.COM = {
kdc = myserv.mydom.org.hp.com:88
admin_server = myserv.mydom.org.hp.com
}
TRUST1DOM.ORG.HP.COM = {
kdc = trust1serv.trust1dom.org.hp.com:88
admin_server = trust1serv.trust1dom.org.hp.com
}
TRUST2DOM.ORG.HP.COM = {
kdc = trust2serv.trust2dom.org.hp.com:88
admin_server = trust2serv.trust2dom.org.hp.com
}
[domain_realm]
.org.hp.com = MYDOM.ORG.HP.COM
[logging]
kdc = FILE:/var/opt/samba/log.krb5kdc
admin_server = FILE:/var/opt/samba/log.kadmin
default = FILE:/var/opt/samba/log.krb5lib
~
80 Windows 2003 and Windows 2008 domains
Page 81

6 LDAP integration support
This chapter describes the HP CIFS Server with LDAP integration. It includes benefits of LDAP,
procedures to install, configure and verify the HP Netscape Directory Server, HP LDAP-UX Integration
product and HP CIFS Server software. It contains the following sections:
• “Overview” (page 81)
• “Network environments” (page 82)
• “Summary of installing and configuring” (page 84)
• “Installing and configuring your directory server” (page 84)
• “Installing LDAP-UX client services on an HP CIFS server” (page 85)
• “Configuring the LDAP-UX client services” (page 85)
• “Enabling Secure Sockets Layer (SSL)” (page 89)
• “Extending the Samba subschema into your directory server” (page 91)
• “Migrating your data to the directory server” (page 92)
• “Configuring the HP CIFS Server” (page 95)
• “Creating Samba users in the directory” (page 97)
• “HP CIFS management tools” (page 162)
Overview
Lightweight Directory Access Protocol (LDAP) provides a framework for the development of a
centralized management infrastructure. LDAP supports directory enabled computing by consolidating
applications, services, user accounts, Windows account and configuration information into a
central LDAP directory.
Samba customer sites with large numbers of users and servers may want to integrate the HP CIFS
Server with LDAP support. Configuring multiple HP CIFS servers to communicate with the LDAP
directory server provides a centralized and scalable management of user databases. When you
integrate the HP CIFS Server with the LDAP-UX Integration product on HP-UX, the HP CIFS Server
can store user accounts information on the Netscape Directory Server.The LDAP database can
replace /etc/passwd or NIS and smbpasswd or NT server user databases.
The LDAP directory can be used to store the Windows user information which had previously beeen
stored in the smbpasswd file. When the HP CIFS Server is configured to use the LDAP integration,
the SMBD program will use the LDAP directory to look up the Windows user information during
authentication and authorization processes. Also, when you invoke the smbpasswd program to
add, delete or change Windows user information, updates are made in the LDAP user database
rather than the smbpasswd file.
You can enable the LDAP support with configuration parameters provided by the HP CIFS Server.
HP CIFS Server will access an LDAP directory server for password, user, group, and other data
when you specify the smb.conf passwd backend parameter to ldapsam.
You can configure the ldap ssl parameter specified in the smb.conf file to enable the Secure
Sockets Layer (SSL) support. With the SSL support, the HP CIFS Server allows you to access an SSL
enabled LDAP directory to protect passwords over the network and to ensure confidentiality and
data integrity between CIFS servers and the LDAP directory server.
NOTE: While the HP CIFS Server may operate satisfactorily with other LDAP products, HP only
provides LDAP support for the HP CIFS Server with HP LDAP-UX Integration, J4269AA, HP Netscape
Directory Server, J4258CA, or HP Red Hat Directory Server, NSDirSvr7, product configurations.
Overview 81
Page 82

HP CIFS server advantages
The HP CIFS Server with the LDAP support provides the following benefits to the customer:
• Reduces the need to maintain user account information across multiple HP CIFS servers, as
LDAP provides a centralized user database management.
• Easily adds multiple HP CIFS servers or users to the LDAP directory environment. This greatly
improves the scalability of the HP CIFS Server.
• Stores and looks up user account information in the LDAP directory. This reduces the user
lookup time for large databases by providing an indexed search rather than a sequential
search.
• The amount of information stored in the smbpasswd file has no room for additional attributes.
With the LDAP support, the schema is extensible, you can store more user information into the
LDAP directory. This also eliminates the need for additional employee and user databases.
Network environments
The HP CIFS Server supports many different network environments. Features such as WINS, browser
control, domain logons, roaming profiles, and many others continue to be available to support a
diverse range of network environments. LDAP integration provides one more alternative solution
for Samba user authentication.
Domain model networks
CIFS Server acting as the Primary Domain Controller (PDC)
Since PDCs are responsible for Windows authentication, HP CIFS Servers configured as PDCs will
replace smbpasswd with LDAP enabled directory servers for Windows authentication. Other
Samba configuration items may remain unchanged. Administrators of new LDAP configurations
must also install the HP LDAP-UX Integration software and configure the LDAP client. This will also
permit the consolidation of Posix and Windows users on the LDAP directory server.
CIFS Server acting as the member server
HP CIFS Servers acting as member servers in the domain model network environment can continue
to operate as member servers by leaving their Samba configuration unchanged. The Windows
authentication requests will continue to be managed by the PDC whether through LDAP or
smbpasswd. Administrators of new LDAP configurations may want to install the HP LDAP-UX
Integration software and configure the LDAP client to consolidate Posix and Windows users on the
LDAP directory server.
If a member server (security = domain) is also configured to enable LDAP, then it will still try
to authenticate via the PDC. If the PDC authentication fails, then it will try to authenticate directly
via the LDAP directory server set in its own smb.conf configuration file.
CIFS Server acting as Backup Domain Controller (BDC) to Samba PDC
Since BDCs are also responsible for Windows authentication, HP CIFS Servers configured as BDCs
can access the LDAP directory for user authentication. BDC configuration is vey similar to PDC
configuration with the exception that you set both master browser and domain master to
no.
CIFS server acting as an Active Directory Service (ADS) member server
ADS Member Servers use LDAP libriaries and Kerberos security to access ADS Domain Controllers'
authentication services. Therefore, LDAP-UX Integration and HP Kerberos Client Library products
are required. See “Windows 2003 and Windows 2008 domains” (page 71) for details.
82 LDAP integration support
Page 83

Workgroup model networks
CIFS Server2
CIFS Server1
LDAP Directory
Server
Windows PCWindows PC
1
2
4
5
3
CIFS Protocol
LDAP Protocol
6
HP CIFS Servers configured with server mode security will attempt to authenticate Windows users
on the server specified. If LDAP is enabled, then authentication will fall back to the LDAP server if
the server mode authentication fails.HP CIFS Servers configured with share mode security may
replace smbpasswd with an LDAP directory server.HP CIFS Servers configured with as stand-alone
user mode servers may replace smbpasswd with an LDAP directory server.
UNIX user authentication - /etc/passwd, NIS migration
HP UNIX user authentication is required in addition to Samba (Windows) user authentication for
HP CIFS Server logon. You can consolidate Samba and UNIX users into a single LDAP directory
server database. However, the /etc/passwd file or NIS database files can continue to be used
for UNIX users if desired.You can use migration scripts provided by HP to migrate the /etc/
passwd file and NIS database files to the LDAP directory server. For more information on the
migration scripts, see “Migrating your data to the directory server” (page 92) .
The CIFS authentication with LDAP integration
With LDAP integration, multiple HP CIFS Servers can share a single LDAP directory server for a
centralized user database management. The HP CIFS Server can access the LDAP directory and
look up the windows user information for user authentication. The figure 6-1 shows the CIFS
authentication in the LDAP network environment:
Figure 20 The CIFS authentication with LDAP integration
The following describes the message exchanges among the Windows PC, CIFS Server and LDAP
directory server for the user authentication shown on Figure 6-1:
1. A Windows user requests a connection.
2. The CIFS Server sends a challenge to the Windows PC client.
3. The Windows PC client sends a responsepacket to the CIFS Server based on the user password
and the challenge information.
4. The CIFS Server looks up the LDAP directory server for the user data and requests data attributes
including the password information.
Network environments 83
Page 84

5. The CIFS Server receives data attributes including the password information from the LDAP
directory server. If the password and challenge information matches with information in the
client response package, the Samba user authentication succeeds.
6. If the Samba user is authenticated and is successfully mapped to a valid posix user, the CIFS
Server returns a user token session ID to the Windows PC client.
Summary of installing and configuring
The following summarizes the steps you take when installing, configuring, verifying and activating
the HP CIFS Server with the LDAP support:
• Install Directory Server, if not already installed. See “Installing the directory server” (page 84).
• Configure Directory Server, if not already configured. See “Configuring your directory server”
(page 85).
• Install the LDAP-UX Client Services on an HP CIFS Server, if not already installed. See “Installing
LDAP-UX client services on an HP CIFS server” (page 85).
• Configure the LDAP-UX Client Services on an HP CIFS Server, if not already configured. See
“Configuring the LDAP-UX client services” (page 85).
• Enable Secure Sockets Layer (SSL) if you want to use it. See “Enabling Secure Sockets Layer
(SSL)” (page 89).
• Extend the Samba subschema to the Netscape Directory Server, See “Extending the Samba
subschema into your directory server” (page 91).
• Migrate your data to your Directory Server. See “Migrating your data to the directory server”
(page 92).
• Configure the HP CIFS Server to enable LDAP support. See “Configuring the HP CIFS Server”
(page 95)
• Install your Samba Users to Directory Server. See “Creating Samba users in the directory”
(page 97).
Read subsequent sections of this chapter for more information on installing and configuring the HP
CIFS Server with the LDAP support.
Installing and configuring your directory server
This section describes how to set up and configure your Netscape/Red Hat Directory Server to
work with LDAP-UX Client Services and the HP CIFS Server.
See Preparing Your LDAP Directory for HP-UX Integration at http://docs.hp.com/hpux/internet,
for more information on directory configuration.
Installing the directory server
You need to set up the Netscape/Red Hat Directory Server if it is not already installed. HP
recommends that you install the HP Netscape Directory Server product, J4258CA, or HP Red Hat
Directory Server, NSDirSvr7. This product can be downloaded from http://software.hp.com. You
need to install it with the Netscape Directory Server product for HP-UX version 6.11/6.21 or HP
Red Hat Directory Server 7.0/7.1.
The posix schema is already installed if you have installed the Directory Server for HP-UX version
6.02 or later version. The schema is in the file /opt/ldapux/ypldapd/etc/
slapd-v3.nis.conf. For more information on the posix schema (RFC2307), see
http://www/ietf.org/rfc.html. RFC 2307 consists of object classes such as, posixAccount,
posixGroup, and so on. posixAccount represents a user entry from the /etc/passwd file.
posixGroup represents a group entry from the /etc/group file.
84 LDAP integration support
Page 85

Configuring your directory server
You need to configure the Netscape/Red Hat Directory Server if it is not already configured. For
detailed information on how to configure your Directory Server, refer to the following documentation:
• Netscape Directory Server Installation Guide
• Netscape Directory Server Configuration, Command and File Reference
• Red Hat Directory Server Installation Guide
• Red Hat Directory Server Configuration, Command and File Reference
The above documents are available at the following web site:
http://docs.hp.com/en/internet.html
Verifying the directory server
Run the following command to verify that you have installed and configured the Directory Server
properly, and verify if Directory Server daemons are up and running:
$ ps -ef | grep ns-
The output of this command is as follows:
root 17289 17288 0 18:54:34 ? 0:00 ns-httpd -d /var/opt/netscape/servers/admin-serv/config
www 17230 1 0 18:53:54 ? 0:03 ./ns-slapd -D/var/opt/netscape/servers/slapd-hpcif57 -i /var/o
Installing LDAP-UX client services on an HP CIFS server
For this version of HP CIFS Server, you must install the LDAP-UX Client Services version B.03.20
or later verson. The LDAP-UX Client Services software is available at http://www.software.hp.com.
Use swinstall(1M) to install the LDAP-UX Client Services software, the NativeLdapClient subproduct,
on an HP CIFS Server. See the LDAP-UX Client Services B.03.20 Release Notes and LDAP-UX Client
Services Administrators Guide for more details on the installation procedures. You do not need to
reboot your system after installing the product.
Configuring the LDAP-UX client services
You need to configure the LDAP-UX Client Services if it is not already configured. This section
describes major steps to configure LDAP-UX Client Services with the Netscape Directory Server
6.11/6.21 or Red Hat Directory Server 7.0/7.1. For detailed information on how to configure
the LDAP-UX Client Services, see the "Configure the LDAP-UX Client Services" section of LDAP-UX
Client Services Administrator's Guide at http://www.docs.hp.com.
You must run the setup program to configure the LDAP-UX Client Services. This requirement must
not be skipped. Otherwise, the HP CIFS Server with LDAP support will not work properly.
When you run the setup program to configure the LDAP-UX Client Services on a client system,
setup does the following major tasks for you:
• Extends your directory schema with posixAccount objectclass and attributes, if not already
done.
• Creates a configuration profile entry in your Netscape Directory from information you provide.
The profile contains the information required by clients to access user and group data in the
directory, for example:
◦ Your directory server host
◦ Your directory server network port
◦ Location of your user, group and other information in the directory
• Updates the startup file of the local client with your directory and configuration profile location.
• Downloads the configuration profile from the directory to the LDAP client system.
Installing LDAP-UX client services on an HP CIFS server 85
Page 86

• Assigns your base DN as your LDAP suffix for user and group searches.
• Starts the product daemon, ldapclientd, if you choose to start it. For LDAP-UX Client
B.03.20, you must start the client daemon for LDAP-UX functions to work.
NOTE: If the value of the security parameter is ads , running setup for the LDAP-UX Client
Services is not required.
Quick configuration
You can do a quick configuration of the LDAP-UX Client Services by selecting the default values of
the configuration parameters.
NOTE: The LDAP server is dctvm86.ind.hp.com (15.146.157.80) and dctvm105.ind.hp.com is
the LDAP client and Samba server.
Prerequisites for a quick configuration
To do a quick configuration, you must have:
• Base path in the LDAP server that you want to use for creating a new profile
• Credentials for the USER DN [cn=Directory Manager] for creating a new profile
To do a quick configuration:
1. Edit the /opt/ldapux/migrate/migrate_common.ph file and change the default group
object class under $RFC2307BI structure from ou=Group to ou=Groups.
2. Log in as root and run the setup program:
$ cd /opt/ldapux/config
$ ./setup
NOTE: The setup program displays a series of questions and provides default answers.
Press the Enter key to accept the default values, or change the values and press Enter. At any
point during the setup, you can press Ctrl-B to back up or Ctrl-C to exit the setup program.
The following is a sample log for LDAP-UX Client services.
Select which Directory Server you want to connect to:
1. HP-UX, Red Hat or Tivoli Directory
2. Windows 2003 R2/2008 Active Directory
To accept the default shown in brackets, press the Return key.
Directory Server: [1]:
Enter the host name of the directory where you want to store the profile.
Enter either the fully qualified host name (for example: sys001.hp.com)
or IP address (for example: 15.13.118.130 or 2001:0db8:3c4d:0015:0:0:abcd:ef12).
To accept the default shown in brackets, press the Return key.
Directory server host [dctvm105.ind.hp.com = 15.146.157.105]:
To accept the default shown in brackets, press the Return key.
Directory Server port number [389]:
nl
Enter the distinguished name (DN) of an existing LDAP-UX profile entry
you want to use or the DN where you want to store a new LDAP-UX profile
entry. For a new entry, all parent entries of the DN must already exist in
the directory or this step will fail,
(for example: cn=ldapuxprofile, ou=ldapuxprofile, dc=hp, dc=com)
Profile Entry DN: []: cn=samba-ldap, dc=org, dc=hp, dc=com
nl
Enter the distinguished name (DN) of the directory user allowed to
create a new LDAP-UX profile entry or to check an existing profile entry.
86 LDAP integration support
Page 87

User DN [cn=Directory Manager]:
Password:
NOTE: You must enter the DN user password, which you have given in the LDAP server
setup.
Select authentication method for users to bind/authenticate to the server
1. SIMPLE
2. SASL DIGEST-MD5
To accept the default shown in brackets, press the Return key.
Authentication method: [1]:
For high-availability, each LDAP-UX client can look for user and group
information in up to three different directory servers. Please enter either
the fully qualified host name and optional port number
(for example: sys001.hp.com:389) or IP address and optional port number
(for example: 15.13.118.130:389 or [2001:0db8:3c4d:0015:0:0:abcd:ef12]:389)
where your directory is running.
The following hosts are currently specified:
Default search host 1: [dctvm86.ind.hp.com:389 = 15.146.157.80:389]
Default search host 2: [ ]
Default search host 3: [ ]
Enter 0 to accept these hosts and continue with the setup program or
Enter the number of the hosts you want to specify [0]:
Enter the default base DN where LDAP-UX clients should look for user and
group information, (for example: ou=nis, dc=hp, dc=com)
Default base DN [dc=ind,dc=hp,dc=com]:
The setup program has all the information needed to configure a default
profile and client. You can accept default values for the remaining
parameters or configure the remaining parameters.
Accept remaining defaults? (y/n) [y]:
Are you ready to create the Profile Entry? [Yes]:
Each client system must bind to the directory to download the
LDAP-UX configuration profile entry and to access user and group
information. To perform this, the client can bind to the directory
either anonymously or as a proxy user. Anonymous access can also be
attempted if access by proxy fails.
Select the type of client binding you want.
1. Anonymous
2. Proxy
3. Proxy; if proxy fails, then use anonymous
To accept the default shown in brackets, press the Return key.
Client binding: [1]:
Updated directory server at 15.146.157.80:389
with a profile entry at
[cn=pdc1, dc=ind, dc=hp, dc=com]
Updated the local client configuration file
/etc/opt/ldapux/ldapux_client.conf
Updated the local client profile entry LDIF file
/etc/opt/ldapux/ldapux_profile.ldif
Updated the local client profile entry cache file
/etc/opt/ldapux/ldapux_profile.bin
Press any key to continue:
Configuring the LDAP-UX client services 87
Page 88

No proxy user is configured at this client.
Note : Starting the LDAP-UX daemon is now required for the LDAP-UX product !
You have created/changed the configuration profile. To make it
take effect, you need to start/restart the LDAP-UX daemon
Would you like to start/restart the LDAP-UX daemon (y/n) ? [y]:
Updated the LDAP-UX daemon configuration file
/etc/opt/ldapux/ldapclientd.conf
Restarted the LDAP-UX daemon!
To enable the LDAP Pluggable Authentication Module, save a copy of the
file /etc/pam.conf then add ldap to it. See /etc/pam.ldap for an example.
To enable the LDAP Name Service Switch, save a copy of the file
/etc/nsswitch.conf then add ldap to it. See /etc/nsswitch.ldap for an example.
LDAP-UX Client Services setup complete.
Table 12 (page 88) shows the configuration parameters and the default values that they will
be configured with.
Table 12 Configuration parameters and default values
Default ValueParameter
AnonymousType of client binding
5 secondsBind time limit
no limitSearch time limit
YesUse of referrals
0 - infiniteProfile TTL (Time To Live)
YesUse standard RFC-2307 object class attributes for supported services
YesUse default search descriptions for supported services
SimpleAuthentication method
For the detailed configuration parameters information listed in the table 6-1, see "Appendix
B: LDAP-UX Client Services Object Classes" of LDAP-UX Client Services B.03.20 Administrator's
Guide at http://www.docs.hp.com.
3. After entering all the configuration information, setup extends the schema, creates a new
profile, and configures the client to use the directory.
4. Configure the Name Service Switch (NSS).
Save a copy of the /etc/nsswitch.conf file and edit the original to specify the ldap name
service and other name services you want to use. See the /etc/nsswitch.ldap file for a
sample. You may be able to just copy /etc/nsswitch.ldap to /etc/nsswitch.conf.
See nsswitch.conf(4) for more information.
5. You will be asked whether or not you want to start the client daemon, /opt/ldapux/bin/
ldapclientd. You must start the client daemon for LDAP functions to work.
88 LDAP integration support
Page 89

6. Run the following command to verify your configuration:
$ /opt/ldapux/bin/ldapsearch -T -b "cn=schema" -s base \
"(objectclass=*)"|grep -i posix
Ensure that the posixAccount objectclass is displayed in the output when you run the
ldapsearch command. The output is as follows:
objectClasses: ( 1.3.6.1.1.1.2.0 NAME 'posixAccount' DESC 'Standard
LDAP objectclass' SUP top AUXILIARY MUST ( cn $ uid $ uidNumber $
gidNumber $ homeDirectory) MAY ( userPassword $ loginShell $ gecos
$ description ) X-ORIGIN 'RFC 2307' )
objectClasses: ( 1.3.6.1.1.1.2.2 NAME 'posixGroup' DESC 'Standard
LDAP objectclass' SUP top STRUCTURAL MUST ( cn $ gidNumber ) MAY (
userPassword $ memberUid $description ) X-ORIGIN 'RFC 2307' )
NOTE: You can use the ldapsearch command-line utility to locate and retrieve LDAP
directory entries. This utility opens a connection to the specified server using the specified
Distinguished Name (DN) and password, and locates entries based on the specified search
filter. For details, see the Netscape Directory Server Administrator's Guide or the Red Hat
Directory Server Administrator's Guide available at http://www.docs.hp.com/en/internet.html.
Enabling Secure Sockets Layer (SSL)
The HP CIFS Server provides Secure Sockets Layer (SSL) support to secure communication between
CIFS servers and SSL enabled LDAP directory servers.
If you plan to use SSL and it is not already in use for LDAP, you need to enable it on the Directory
Server and LDAP-UX clients. When you have enabled the LDAP server and clients, then you can
configure the HP CIFS Server to use SSL.
You must set up the Certification Authority (CA) Server properly before you plan to enable SSL
communication over LDAP.
Read the following subsections for more information on configuring the LDAP directory server,
LDAP-UX client and HP CIFS Server with SSL support if you plan to use it.
Configuring the directory server to enable SSL
Use the following steps to configure your Netscape Directory Server to enable SSL communication
over LDAP:
1. Obtain and install a certificate for your Directory Server, and configure the Netscape Directory
Server to trust the Certification Authority's (CA's) certificate.
For detailed instructions, see the "Obtaining and Installing Server Certificates" section of the
"Managing SSL" chapter in Netscape Directory Server 6.1 Administrator's Guide at
http://docs.hp.com.
2. Turn on SSL in your directory.
For detailed instructions on how to enable SSL in your directory server, see the "Activating
SSL" section of the "Managing SSL" chapter in Netscape Directory Server 6.1 Administrator's
Guide at http://docs.hp.com.
3. Configure the Administration Server to connect to an SSL-enabled directory server.
For detailed instructions on how to configure the administration server to connect to an SSL
enabled directory server, see Managing Servers with Netscape Console available at
http://docs.hp.com.
Enabling Secure Sockets Layer (SSL) 89
Page 90

Configuring the LDAP-UX client to use SSL
If you plan to use SSL, you need to install the Certification Authority (CA) certificate on your LDAP-UX
Client and configure the LDAP-UX Client to enable SSL.
Use the following steps to enable SSL on your LDAP client system:
1. Optionally, ensure that each user of the directory server obtains and installs a personal
certificate for all LDAP clients that will authenticate with SSL.
Downloading the certificate database from the Netscape Communicator is one way to set up
the certificate database into your LDAP-UX Client.
The certificate database files, cert7.db and key3.db, will be downloaded to either
/.netscapeor /.mozilla/default/*.slt directory on your client system depending
on the version of Netscape Communicator that you use. If you download the Certification
Authority certificate using Netscape Communicator 7.0, the certificate database files,
cert7.db and key3.db, will be downloaded to /.mozilla/default/*.slt directory.
If you download the Certificate Authority certificate using Netscape Communicator 4.75, the
certificate database files, cert7.db and key3.db, will be downloaded to /.netscape
directory.
After you download the certificate database files, cert7.db and key3.db, on your client,
you need to create a symbolic link /etc/opt/ldapux/cert7.db that points to
cert7.dband /etc/opt/ldapux/key3.db that points to key3.db.
For detailed instructions on how to install Certification Authority's certificate on your LDAP-UX
client system, see "Configuring LDAP Clients to Use SSL" section of the "Installing LDAP-UX
Client Services" chapter in LDAP-UX Client Services B.03.20 Administrator's Guide at
http://docs.hp.com
2. Configure the LDAP-UX client services to use SSL by running the setup program. For detailed
instructions on how to run the setup program to enable SSL on LDAP-UX client services, see "
Custom Configuration" subsection of the "Installing LDAP-UX Client Services" chapter in
LDAP-UX Client Services B.03.20 Administrator's Guide at http://docs.hp.com.
If the LDAP-UX client services has already been set up, modify the authenticationMethod
and preferredServerList attributes in the /etc/opt/ldapux/ldapux_profile file
as follows:
• Modify the authenticationMethod attribute to add the transport layer security
authentication method, tls:, in front of the original authentication method, simple.
For example, without SSL enabled, the original authenticationMethod entry is
authenticationMethod: simple. With SSL enabled, the authenticationMethod entry
will be authenticationMethod: tls:simple.
• Modify the preferredServerList attribute to change the regular LDAP port number,
389, to the SSL port number, 636.
For example, without SSL enabled, the original preferredServerList entry is
preferredServerList: 1.2.5.20:389. With SSL enabled, the preferredServerList entry
will be preferredServerList: 1.2.5.20:636.
Configuring HP CIFS Server to enable SSL
Configure the following smb.conf parameters to enable SSL:
• For HP CIFS Server A.02.* as well as A.03.02.00 versions, set the following parameter in
the [Global] section of the smb.conf file:
passwd backend = ldapsam:ldaps://<directory server name>
90 LDAP integration support
Page 91

Where <directory server name> is the fully qualified name of the target directory server.
• HP CIFS Server A.02.03 or later supports the start_tls option to the ldap_ssl parameter.
To enable SSL connections to the directory server, set the following parameters one of the two
ways shown below in the [Global] section of the smb.conf file:
To use the SSL port 636 set:
ldap ssl = yes
If you choose to use the Start TLS option with port 389 set:
ldap ssl = start_tls
For detailed information on how to enable SSL on the HP CIFS Server, see “LDAP configuration
parameters” (page 95).
Extending the Samba subschema into your directory server
You now need to extend the Directory Server schema with the Samba subschema from the HP CIFS
Server into your Directory Server. Ensure that you have configured your LDAP directory and LDAP-UX
Client Services before extending the schema.
Set the passwd backend parameter to ldapsam:ldap://<ldap server name>.
Samba subschema differences between HP CIFS Server versions
New HP CIFS Server releases sometimes extend the attributes for use but update are backwards
compatible with older versions of LDAP schemas.
Procedures to extend the Samba subschema into your directory
Use the following steps to extend the Samba subschema
/opt/samba/LDAP3/98samba–3.4.3.ldif in HP CIFS Server A.02.* into the Directory
Server:
1. Run the ftp commands to get the /opt/samba/LDAP3/98samba-3.4.3.ldif file from
the HP CIFS Server and place it in the Directory Server:
For example, the following commands copy /opt/samba/LDAP3/98samba-3.4.3.ldif
file from the HP CIFS Server to the /var/opt/netscape/servers/
sldapd-hostA.hp.com/config/schema/98samba-3.4.3.ldif file in the Directory
Server, hostA.hp.com:
cd /opt/samba/LDAP3
ftp hostA.org.hp.com
user root
root passwd
cd /var/opt/netscape/servers/sldapd-hostA.hp.com/config/schema
put 98samba-3.4.3.ldif
quit
2. Login to your Directory Server and restart the daemon, slapd. This is to ensure that the
sambaSamAccount subschema is recognized by the LDAP directory.
$ /var/opt/netscape/servers/slapd-<server name>/restart-slapd
For example:
$ /var/opt/netscape/servers/slapd-hostA.hp.com/restart-slapd
Extending the Samba subschema into your directory server 91
Page 92

3. Use the following ldapsearch command to verify that you have updated the schema in the
Directory Server with the Samba subschema:
$ /opt/ldapux/bin/ldapsearch -T -b "cn=schema" -s base \
"(objectclass=*)"|grep -i samb
You need to ensure that the output displays the following sambaSamAccount objectclass
when you run the ldapsearch command:
objectClasses: ( 1.3.6.1.4.1.7165.2.2.6 NAME 'sambaSamAccount'
DESC 'Samba 3.0 Auxilary SAM Account' STRUCTURAL MUST ( uid $
sambaSID )
Migrating your data to the directory server
HP recommends that all UNIX user accounts either in the /etc/passwd file or NIS database files
are migrated to the Directory Server. The LDAP-UX Integration product provides migration scripts
to accomplish the task in an automated way. These scripts are located in /opt/ldapux/migrate
directory. The two shell scripts, migrate_all_online.sh and
migrate_all_nis_online.sh, migrate all your source files in the/etc directory or NIS maps,
while the perl scripts, migrate_passwd.pl, migrate_group.pl, and migrate_hosts.pl,
migrate individual files. The shell scripts call the perl scripts. For detailed information for a complete
description of the migration scripts, and what they do, and how to use them, see the
/opt/ldapux/README files or the "Name Service Migration Scripts" section of LDAP-UX Client
Services B.03.20 Administrator's Guide at http://docs.hp.com
Migrating all your files
The two shell scripts migrate_all_online.sh and migrate_all_nis_online.sh migrate
all your name service data either to an LDAP Data Interchange Format (LDIF) file or directly into
your directory. The migrate_all_online.sh shell script gets information from the source files,
such as /etc/passwd, /etc/group, and /etc/hosts. The migrate_all_nis_online.sh
script gets information from your NIS maps using the ypcat(1) command. The scripts take no
parameters but prompt you for needed information. They also prompt you for whether to leave the
output as LDIF or to add the entries to your directory.
NOTE: HP recommends that you keeps a small subset of users in the /etc/passwd file, such
as the root user, IT manager. This allows root users having the different password across HP-UX
systems. Also, if the LDAP directory server is unavailable, you can still log into the system.
NOTE: Before you run the migration scripts, you must edit the /opt/ldapux/migrate/
migrate_common.ph file to change the default group objectclass under $RFC2307BIS structure
from ou=Group to ou=Groups. By doing this, it can match with the Samba organizational unit
defaults.
An example
The following example shows the necessary steps to import your data into the LDAP directory using
the migration script, migrare_all_online.sh:
1. Set the environment variable, LDAP_BASEDN, to specify where you want to store your data:
For example, the following command sets the LDAP base DN to org.hp.com:
$ export LDAP_BASEDN="dc=org, dc=hp, dc=com"
92 LDAP integration support
Page 93

2. Run the following script, migrate_all_online.sh, to migrate all name service data files
in the/etcfile to the LDIF file:
$ migrate_all_online.sh
Reply as appropriate to the script. In our example, use cn=Directory Manager and
credentials to bind with means the Directory Manager password.
NOTE: At this point, you have an LDAP directory server with everything you need to use as
a backend for pam and nsswitch. You need this first as the HP CIFS Server shares some
attributes from the posixAccount objectclass with the sambaSamAccount objectclass.
Migrating individual files
The following perl scripts migrate each of your source files in the /etcdirectory to LDIF. These
scripts are called by the shell scripts, described in the section “Migrating all your files” (page 92).
The perl scripts obtain their information from the input source file and output LDIF.
Environment variables
When using the perl scripts to migrate individual files, you need to set the following environment
variables:
LDAP_BASEDN The base distinguished name where you want to store your data.
For example, the following command sets the base DN to DC=org, DC=hp,
DC=com:
export LDAP_BASEDN="DC=org, DC=hp, DC=com"
General syntax for perl migration scripts
All the perl migration scripts use the following general syntax:
scriptname inputfile [outputfile]
where
scriptname This is the name of the particular script you are using. Table 6-2, lists the migration
scripts.
inputfile This is the name of the appropriate name service source file corresponding to the
script you are using.
outputfile This is an optional parameter and is the name of the file where the LDIF is saved.
stdout is the default output.
Migration scripts
The migration scripts are described in Table 6-2 below.
Table 13 Migration scripts
1
DescriptionScript Name
Creates base DN information.migrate_base.pl
Migrates groups in the /etc/group file.migrate_group.pl
Migrates hosts in the /etc/hosts file.migrate_hosts.pl
Migrates networks in the /etc/networks file.migrate_networks.pl
2
Migrates users in the /etc/passwd file.migrate_passwd.pl
Migrates protocols in the /etc/protocols file.migrate_protocols.pl
Migrates RPCs in the /etc/rpc file.migrate_rpc.pl
Migrating your data to the directory server 93
Page 94

Table 13 Migration scripts (continued)
DescriptionScript Name
3
Migrates services in the /etc/services file.migrate_services.pl
migrate_common.ph
1
Systems have been configured with the same host name, then the migration script migrate_host.pl will create multiple
entries in its resulting LDIF file with the same distinguished name for the host name for each of the IP addresses. Since
distinguished names need to be unique in an LDAP directory, you need to first manually merge the IP addresses with
one designated host record and delete the duplicated records in your LDIF file. A resulting merge might look as follows:
. . . .
dn: cn=machineA, ou=hosts, ou=unix, dc=org, dc=hp, dc=com
objectClass: top
objectClass: ipHost
ipHostNumber: 1.3.5.72
ipHostNumber: 1.3.8.4
ipHostNumber: 1.5.8.76
cn: hostA
cn: hostA.org.hp.com
. . . .
2
Netgroup
- The NIS optimization maps 'byuser' and 'byhost' are not utilized.
-Each triple is stored as a single string.
-Each triple must be enclosed by parentheses. For example, "(machine, user, domain)" is a valid triple while "machine,
user, domain" is not.
3
When migrating services data into the LDAP directory, You keep in mind that only multiple protocols can be associated
with one service name, but not multiple service ports.
Specifies a set of routines and configuration information all the perl scripts
use.
Examples
Complete the following steps to migrate the /etc/passwd file to the LDIF file:
1. Set the environment variable, LDAP_BASEDN, to specify where you want to store your data.
For example, the following command sets the LDAP base DN to org.hp.com:
$ export LDAP_BASEDN="dc=org, dc=hp, dc=com"
2. Run the following script, migrate_passwd.pl, to migrate all data in the /etc/passwd
file to the /tmp/passwd.ldif file:
$ migrate_passwd.pl /etc/passwd /tmp/passwd.ldif
A part of the output is as follows:
dn: uid=johnl,ou=People,dc=org,dc=hp,dc=com
objectclass: top
objectclass: account
objectclass: posixAccount
objectclass: Account
loginShell: /usr/bin/ksh
uidNumber: 8662
gidNumber: 8200
homeDirectory: /home/johnl
gecos: John Louie, 48S-020, 447-1890
userPassword: {crypt}aOACGvt0T, 1foacctFlags: UX
pwdLastSet: 1063301239
Migrating your data from one backend to another
Use the syncsmbpasswd tool to synchronize Samba user accounts with all currently available
POSIX user accounts in the configured password database backend. If you set the passdb
94 LDAP integration support
Page 95

backend parameter in smb.conf to ldapsam:ldap://<ldap server name>, this tool adds
Samba user accounts that correspond to existing POSIX user accounts to the LDAP directory server.
See the syncsmbpasswd (1) man page for details.
For example, use the following procedures to synchronize Samba user accounts with available
POSIX user accounts in the LDAP directory server, ldaphostA.example.hp.com:
1. Configure the passdb backend parameter in smb.conf:
$ passdb backend = ldapsam:ldap://ldaphostA.example.hp.com
2. Run the following command:
$ syncsmbpasswd
Configuring the HP CIFS Server
You must set up and configure your HP CIFS Server to enable the LDAP feature support.
LDAP configuration parameters
The following is the list of new global parameters available for you to configure the HP CIFS Server
to enable the LDAP feature. These parameters are set in the /etc/opt/samba/smb.conf file
under global parameters.
[global] Any global setting defined here will be used by the HP CIFS Server with the LDAP
support.
Table 14 Global parameters
ldap server
ldap suffix
ldap user suffix
ldap group suffix
ldap admin dn
DescriptionParameter
Specifies the host name of the Directory Server where you want to
store your data.
Specifies the base of the directory tree where you want to add users
and machine accounts information. It is also used as the Distinguished
Name (DN) of the search base, which tells LDAP where to start the
search for the entry. For example, if your base DN is "dc=org,
dc=hp, dc=com", then you need to set the value of ldapsuffix
= "dc=org, dc=hp, dc=com".
Specifies the base of the directory tree where you want to add users
information. If you do not specify this parameter, HP CIFS Server uses
the value of ldap suffix. For example, ldap user suffix =
"ou=People".
Specifies the base of the directory tree where you want to add groups
information. If you do not specify this parameter, HP CIFS Server uses
the value of ldap suffix instead. For example, ldap group
suffix = "ou=Groups".
Specifies the user Distinguished Name (DN) used by the HP CIFS
Server to connect to the LDAP directory server when retrieving user
account information. The ldap admin dn is used in conjunction
with the admin dn password stored in the /var/opt/samba/
private/secrets.tdb file. For example, ldap admin dn =
"cn = directory manager".
ldap delete dn
Specifies whether a delete operation in the ldapsam deletes the
complete entry or only the attributes specific to Samba. The default
value is No.
Configuring the HP CIFS Server 95
Page 96

Table 14 Global parameters (continued)
DescriptionParameter
ldap passwd sync
ldap replication sleep
ldap timeout
ldap ssl
Specifies whether the HP CIFS Server should sync the LDAP password
with the NT and LM hashes for normal accounts on a password
change. This option can be set to one of three values:
• Yes: Update the LDAP, NT and LM passwords and update the
pwdLastSet time.
• No: Update NT and LM passwords and update the pwdLastSet
time.
• Only: Only update the LDAP password and let the LDAP server do
the rest.
The default value is No.
When Samba is requested to write to a read-only LDAP replica, it is
redirected to talk to the read-write master server. This server then
replicates the changes back to the local server. The replication might
take some seconds, especially over slow links. Certain client activities
can become confused by the 'success' that does not immediately
change the LDAP back-end's data. This option simply causes Samba
to wait a short time and allows the LDAP server to catch up. The value
is specified in milliseconds, the maximum value is 5000 (5 seconds).
By default, ldapreplication sleep = 1000 (1 second).
Specifies in seconds how long the HP CIFS Server waits for the LDAP
server to respond to the connect request if the LDAP server is down
or unreachable. The defualt value is 15 (in seconds).
Specifies the Secure Sockets Layer (SSL) support. HP CIFS Server
A.02.03 or later supports theldap ssl = start_tls option.
Specifies Yes to enable this feature using the port number 636 to
connect to the LDAP directory server. If you choose to use Start TLS,
set it to start_tls to enable SSL using port number 389 to connect to
the LDAP directory server. To disable SSL , set it to No. By default,
this parameter is set to No.
ldap ssl ads
ldap connection
timeout
Configuring LDAP feature support
After installing the HP CIFS Server, the existing configuration continues to operate as currently
configured. To enable the LDAP support, you must configure the relative LDAP configuration
parameters in the /etc/opt/samba/smb.conf file by using the SWAT tool or the editor.
NOTE: HP recommends that new installation customers run the samba_setup program to set
up and configure the HP CIFS Server.
Specifies if the Samba must use Secure Sockets Layer (SSL) support
when connecting to the LDAP server, using the Active Domain Server
(ADS) methods.
NOTE: The Remote Procedure Call (RPC) methods are not affected
by the ldap ssl ads parameter. If the ldap ssl is value is
set to no, this will not affect the ldap ssl ads parameter.
Specifies in seconds how long the LDAP library calls must wait for
the LDAP servers to connect the request. The ldap connection
timeout parameter is useful in failure scenarios when one or more
LDAP servers are not reachable. The ldap connection timeout
parameter must be supported by the LDAP library.
NOTE: The ldap connection timeout is different from the
ldap timeout parameter as this parameter does not affect any
LDAP server operations.
By default, this parameter is set to ldap connection timeout = 2
96 LDAP integration support
Page 97

You can quickly run the samba_setup program to configure the HP CIFS Server with the LDAP
feature support as follows:
1. Run the following commands to enable the LDAP feature:
$ export PATH=$PATH:/opt/samba/bin
$ samba_setup
When running the samba_setup program, you will be asked whether you want to use LDAP
or not. Press Yes to use LDAP, and press No to disable LDAP.
2. Reply to the samba_setup program to configure the following global LDAP parameters in
the /etc/opt/samba/smb.conf file:
• ldap server
• ldap suffix
• ldap admin dn
• ldap ssl
• ldap ssl ads
• ldap user suffix
• ldap group suffix
• ldap idmap suffix
• ldap machine suffix
• ldap delete dn
• ldap passwd sync
• ldap replication sleep
• ldap timeout
See “LDAP configuration parameters” (page 95), for detailed information on how to configure
these new parameters.
NOTE: By default, the ldap ssl parameter value is set to ldap ssl = Yes. If you are
not using the SSL communication between the LDAP server and LDAP client, then you must
change the value of the parameter to ldap ssl = No.
Creating Samba users in the directory
This section describes how to create and verify your Samba users in your LDAP directory.
Adding credentials
When you use the HP CIFS Server with the LDAP feature support, the smbpasswd command
manipulates user accounts information on the LDAP directory rather than the /var/opt/samba/
private/smbpasswd file. You must add the directory manager credentials to the /var/opt/
samba/private/secrets.tdb file before creating Samba users to the LDAP directory.
Run the following command to save the LDAP credentials for the user who can modify the LDAP
directory for Samba information:
$ smbpasswd -w <password of the LDAP Directory Manager>
For example, the following command saves the credentials of the LDAP directory manager:
$ smbpasswd -w dmpasswd
Where dmpasswd is the password of the LDAP directory manager.
Creating Samba users in the directory 97
Page 98

NOTE: You must ensure that the password correctly matches with the password for the ldap
admin directory manager. This password is for user administration and is stored for later use. If
the password is incorrect, no error message is displayed, but the user administration will fail when
attempted.
Adding a Samba user to the LDAP directory
An existing POSIX user must already exists in the LDAP directory before you run the smbpasswd
-a command to add the corresponding Samba user and its sambaSamAccount information
required for HP CIFS Server user authentication.
If the POSIX user does not already exist in the LDAP directory server, you must first add the POSIX
user entry with your HP Netscape/Red Hat Directory Server commands. You can use the
ldapmodify tool to add, modify or delete the POSIX user account in an LDAP directory. See the
“LDAP directory management tools” (page 172) section in the “Tool Reference” chapter for more
information on these LDAP directory management tools.
Procedures for adding a Samba user
1. Use the ldapmodify command to create the POSIX user account entry to the LDAP directory
server:
For example, the following ldapmodify command adds the POSIX user account entry,
usercifs1, to the LDAP directory server, ldapserver:
ldapmodify -a -D "cn=Directory Manager,dc=hp,dc=com" -w dmpasswd
-h ldapserver -f new.ldif
As an example, the following LDIF update file, new.ldif, contains update statements to
create the user account, usercifs1, to the LDAP directory server:
dn: uid=usercifs1,ou=Pepole, dc=example,dc=hp,dc=com
objectclass: top
objectclass: account
objectclass: posixAccount
memberuid: usercifs1
homedirectory: /home/usercifs1
loginshell: /usr/bin/krh
gecos: Usercifs1 Hu, 40N-20
For more information on how to use the ldapmodify tool to modify the entries of the LDAP
directory server using the LDIF update file, refer to the “Creating Directory Entries” chapter in
“Part 1, Administering Red Hat Director Server” of the “Netscape/Red Hat Directory Server
Administrator's Guide”.
2. Run the smbpasswd -a command to add the sambaSamAccount information for a user to
the LDAP directory server if the smb.conf parameter, passwd_backend, is set to ldapsam:
smbpasswd -a <user name>
For example, the following command creates the Samba account for the user, cifsuser1:
smbpasswd -a cifsuser1
Verifying Samba uers
You can use the ldapsearch command-line utility to locate and retrieve LDAP directory entries.
This utility opens a connection to the specified server using the specified Distinguished Name (DN)
and password, and locates entries based on the specified search filter.
This section describes a portion of the available options for the ldapsearch command. See the
““LDAP directory management tools” (page 172) section in chapter 13, “Tool Reference” for a more
complete description of this command.
98 LDAP integration support
Page 99

Syntax
Option
Example
ldapsearch [option]
-b Specifies the starting point for the search. The value specified must be a distinguished name
that currently exits in the database.
-s Specifies the scope of the search.
-D Specifies the distinguished name (DN) with which to authenticate to the server. If specified,
this value must be a DN recognized by the Directory Server, and it must also have the authority
to search for the entries.
-w Specifies the password of the directory manager
The following example uses the ldapsearch utility to check that the user entry johnl contains
the sambaAccount objectclass:
$ /opt/ldapux/bin/ldapsearch -b "dc=org,dc=hp, dc=com" -s sub \
-D "cn=Directory Manager" -w dmpasswd "uid=johnl"
The output is shown as the follows:
dn: uid=johnl,ou=People,dc=org,dc=hp,dc=com
objectclass: top
objectclass: account
objectclass: posixAccount
objectclass: sambaAccount
loginShell: /usr/bin/ksh
uidNumber: 8662
gidNumber: 8200
homeDirectory: /home/johnl
gecos: John Louie, 48S-020, 447-1890
userPassword: {crypt}aOACGvt0T, 1fo
lmPassword: 0AED71B7494489AG2ED50F26D3C5EB07
NTPassword: 7C46DE22B8963EAA3F9F90BE4E0F661
acctFlags: UX
pwdLastSet: 1063301239
Management tools
HP no longer maintains the LDAP management scripts smbldap-tools which exist in the /opt/
samba/LDAP3/smbldap-tools directory. To see more details on smbldap-tools package, refer
to README file present in directory /opt/samba/LDAP3.
You can use LDAP directory tools provided by the LDAP-UX Integration product (such as
ladpmodify, ldapsearch and ldapdelete) and several HP CIFS Server tools to manage
CIFS data in an HP Netscape/Red Hat Directory Server database. The HP CIFS management tools
include the smbpasswd, net and pdbedit tools.
For more information about these tools, see the chapter 13, “Tool Reference”.
Management tools 99
Page 100

7 Winbind support
This chapter describes the HP CIFS winbind feature and explains when to use it and how best to
configure its use. It contains the following topics:
• “Overview” (page 100)
• “Winbind features” (page 100)
• “Winbind process flow” (page 102)
• “Winbind supports non-blocking, asynchronous functionality” (page 103)
• “When and how to deploy Winbind” (page 104)
• “Configuring HP CIFS Server with Winbind” (page 107)
• “idmap backend support in Winbind” (page 109)
• “Starting and stopping winbind” (page 111)
• “An Example for file ownership by winbind users” (page 111)
Overview
HP CIFS Server must resolve the fact that HP-UX and Microsoft Windows use different technologies
to represent user and group identity. Winbind is a CIFS feature which is one of several different
ways in which CIFS can map the Windows implementation of user and group security identifiers,
SIDs, to the HP-UX implementation of user and group identifiers, UIDs and GIDs. Further, there are
several different ways to deploy winbind to achieve this mapping. The purpose of winbind is
to automate the creation of UIDs and GIDs and maintain their correspondence to the appropriate
Windows SIDs in order to minimize identity management efforts.
Winbind is an important feature to understand before you configure HP CIFS Server because
choosing an appropriate configuration for your environment is the key to minimize IT management
problems. Choosing the best way to map identities for your environment is important because
directories and files populate file systems with permissions based on the identities of the owners.
Over time, the difficulty of changing user maps will increase unless the proper configuration is
chosen initially. This chapter will help you understand winbind and configure CIFS appropriately.
NOTE: Winbind user mapping is only appropriate when the HP CIFS Server is a member server
of a Microsoft Windows domain.
For more information about winbind, refer to chapter 24, "Winbind:Use of Domain Accounts"
in the Samba 3.0 HOWTO Reference Guide at the following web site:
http://us3.samba.org/samba/docs/man/Samba-HOWTO-Collection/
Winbind features
Winbind provides the following features:
• Identity resolution via the Name Services Switch (NSS) (as configured in /etc/
nsswitch.conf)
The Name Service Switch (NSS) is an HP-UX feature which allows system information such as
host names, user names, and group names to be resolved from different sources.
100 Winbind support
 Loading...