

Page 1
DesignJet ColorPro SeriesHP Printers
User’s Guide
HP DesignJet ColorPro CAD (C7777A)
HP DesignJet ColorPro GA (C7778A)
HP DesignJet ColorPro Series: User’s Guide (version 1)
Page 2

Acknowledgments HP ColorSmart II, HP PhotoREt II and HP ZoomSmart Scaling Technology are trademarks
of Hewlett-Packard Company.
Imation Matchprint is a trademark of Imation Corporation.
Microsoft is a U.S. registered trademark of Microsoft Corporation.
Windows is a trademark of Microsoft Corporation.
Adobe is a U.S. registered trademark of Adobe Systems Incorporated.
PostScript is a trademark of Adobe Systems Incorporated.
Notice The information contained in this document is subject to change without notice.
Hewlett-Packard makes no warranty of any kind with regard to this material, including, but
not limited to, the implied warranties of merchantability and fitness for a particular purpose.
Hewlett-Packard shall not be liable for errors contained herein or for incidental or
consequential damages in connection with the furnishing, performance, or use of this
material.
Menu
No part of this document may be photocopied, printed, or translated to another language
without the prior written consent of Hewlett-Packard Company .
© Copyright 1998, 1999
Hewlett-Packard Company
Barcelona Division
Avda. Graells, 501
08190 Sant Cugat del Vallès
Barcelona
Spain
HP DesignJet ColorPro Series: User’s Guide (version 1) page 2 of 64
Page 3

Menu
Contents
www.designjet-online.hp.com 4
About HP Customer Care 5
Printer Basics (including Imation™ Matchprint™
Inkjet System) 7
Basic Printing Tasks 15
Maintaining the Printer 35
Troubleshooti ng 37
Control Panel Menus 50
Understanding Printer Messages 58
Minimum Printing Margins 62
Understa nding the Diagnos tic Test 63
HP DesignJet ColorPro Series: User’s Guide (version 1) page 3 of 64
Page 4
www.designjet-online.hp.com
www.designjet-online.hp.com
Menu
Direct access to HP
and the information
you want,
when you need it.
Register now !
Click here
to go to the
DesignJet-On line
web-site
HP DesignJet Online is a free, web-
based “user club” exclusive to HP
DesignJet users. Having registered,
the user has unrestricted a ccess to a
range of useful services, the
emphasis being on “useful”, as this
is definitely not a sales-oriented site.
Communication from HP to users includes :
• a quarterly newsletter focussing on usage tips, technical briefings and
examples of HP DesignJet applications around the world;
• full information on worldwide HP Customer Care contacts;
• an online HP DesignJet Diagnosis trou bles hooting tool;
• a calendar of HP DesignJet-related events and programs;
• online access to training videos and selected user documents;
• immediate information on new products.
Communication from users to HP includes:
• feedback on HP DesignJet features;
• automatic contact with HP Customer Care from the troubleshooting tool,
for HP to follow up;
• the chance to ask industry experts technical questions on wide-form at
printing.
And finally , communication from user to user includes the chance to win prizes
by submitting HP DesignJet success stories, as well as a user- to-user discussion
forum where users can share best practices and ask for advice from their fellow
professionals.
HP DesignJet Onlin e is available in English, German, French, Italian, Spanish and Portuguese.
HP DesignJet ColorPro Series: User’s Guide (version 1) page 4 of 64
Page 5
About HP Customer Care
As your strategic support partner, we make it our business to help keep your
business running smoothly. HP Customer Care offers award-winning support
to ensure you get the most from your HP DesignJet.
HP Customer Care provides comprehensive, proven support expertise and
leverages new technologies to give customers unique end-to-end support.
Services include setup and installation , trou bleshooting tools, warranty
upgrades, repair and exchange services, phone and Web support, software
updates, and self-maintenance services. T o find out more about HP Customer
Care, please visit us at: www.hp.com/go/support.
What to Do Before You Call
1. Review the troubleshooting suggestion s in this document:
About HP Customer Care
Menu
- In the relevant driver documentation supplied with this printer (for users
sending PostScript files or those using M icrosoft Windows).
- If you have installed third-party software drivers and RIPs refer to that
user documentation.
- If the problem appears to be related to your software application, first
contact your software vendor.
2. If you still have difficulty, refer to the HP Support Services booklet
shipped with this printer. This document contains a comprehensive list of
various support services available to help solve printer problems.
HP DesignJet ColorPro Series: User’s Guide (version 1) page 5 of 64
Page 6

Menu
About HP Customer Care
3. If you do call one of the Hewlett-Packard offices, please have the
following information available to help us answer your questions more
quickly:
- The printer you are using (the product number and the serial number, found
on the label at the back of the printer).
- The computer you are using.
- Any special equipment or software you are using (for example, spoolers,
networks, switch-boxes, modems, or special softwar e drivers).
- The cable you are using (by part number) and where you purchased it.
- The type of interface used on your printer (parallel, or network).
- The software name and version you are currently using.
- The information (base firm ware version, an d so on) displayed in the
Information Menu (s ee page 53).
- If possible print out the Diagnostic Test (see page 63) and FAX it to the
support center helping you.
HP DesignJet ColorPro Series: User’s Guide (version 1) page 6 of 64
Page 7

Printer Basics
Printer Basics
Congratulations on your purchase of an HP DesignJet ColorPro series printer.
If you have not yet seen the Setup Poster and the Getting Started Guide provided
with the printer, you should do so now for setup instructions.
Now that the printer is set up and ready to use, take a few mome nts to get to
know the printer. This section introduces the following:
System Requirements 8
Printer Features and Benefits 9
Imation™ Matchprin t™ Inkje t System Compatibility 10
Printer Parts and Locations 11
Control Panel Layout 12
Menu
Control Panel Keys 13
Control Panel Lights 14
HP DesignJet ColorPro Series: User’s Guide (version 1) page 7 of 64
Page 8

System Requirements
Please ensure that you have the following computer setup:
Printer Basics
Menu
HP DesignJet
ColorPro GA
HP DesignJet
ColorPro CAD
Minimum: Macintosh System 7.6.1 or later: Po wer PC – 48Mb RAM
Windows 95/98: Pentium, 48Mb RAM
Windows NT 4.0: Pentium, 64Mb RAM
150Mb free hard disk space for 11"x17" (279mm x 432mm)
or A3 size printing.
CD-ROM drive.
Recommended: Macintosh System 8 or later: Power PC – 64Mb RAM
Windows 95/98, Pentium 150/166, 64 Mb RAM
Windows NT 4.0, Pentium 150/166, 64Mb RAM
Graphics intensive files may require more disk space.
Minimum: Windows 3.1x: Pentium 100, 8Mb RAM
Windows 95/98 and NT 4.0: Pentium 100, 16Mb RAM
100Mb free hard disk space for 11"x17" (279mm x 432mm)
or A3 size printing.
Recommended: Windows 3.1x: Pentium 200, 16Mb RAM
Windows 95/98: Pentium 200, 32Mb RAM
Windows NT 4.0: Pentium 200, 64Mb RAM
300Mb free hard disk space for 11"x17" (279mm x 432mm)
or A3 size printing.
Graphics intensive files may require more disk space.
Windows NT users—ensure that your system has a suitably defined amount of
virtual memory (set using Settings > Control Panel > System > Performance).
HP DesignJet ColorPro Series: User’s Guide (version 1) page 8 of 64
Page 9

Menu
Printer Features and Benefits
Seamless Workgroup Integration with Robust Network
Features
• The HP DesignJet ColorPro series printer supports all major networ king
operating systems and protocol.
• Easy printer setup and configuration with HP JetAdmin and WebJetAdmin.
• User friendly liquid-crystal display (LCD) and Key Panel for easy printer
configuration and reduced MIS intervention.
Significant Cost Savings and Speed Gains with HP’s New
Modular Ink Delivery System (MIDS)
• New half-inch printheads prints larger swathes to achieve significant speed
gains of up to 9 ppm black, 7 ppm color.
• HP’s new Modular Ink Delivery System communicates wi th a smart chip
built into each printhead and ink cartridge to monitor ink levels and
Printer Basics
printhead life.
• Printing in color becomes more affordable with lower costs per page.
Exceeds your Workgroup’s Color Expe c tati ons with HP
PhotoREt II (up to 13"x19" [330mm x 483mm])
• PhotoREt II uses t he smallest ink drop size to create m ore shades of color,
smoother transitions between tones, and crisper-looking output on any
paper.
• Prints up to 13"x19" [330mm x 483mm] / A3 oversize when you need it.
HP DesignJet ColorPro Series: User’s Guide (version 1) page 9 of 64
Page 10

Menu
Imation™ Matchprint™ Inkjet System Compatibility
If you require high-quality CMYK images created with leading- edge color
matching technology from your HP DesignJet ColorPr o GA printer, you
should install the Imation Matchprint Inkjet System. This system, produced
in conjunction with Imation Corp., a world-leading provider of color proofing
systems, consists of:
• Imation™ Matchprint™ Co lor RIP Software, with its advanced
productivity and functional featu res
• Imation™ Matchprint™ Inkj et Bases, form ulate d to delive r consis tent,
reliable color reproduction.
So the combination of your HP DesignJet ColorPr o GA printer, Imation™
Matchprint™ Color RIP software, and Im ation™ M atchprint™ Inkjet Bases
Printer Basics
enables you to create high-quality inkjet color proofs.
For further information about the Imation™ Matchprint™ Inkjet System, visit
Imation’s web site: www.imation.com.
HP DesignJet ColorPro Series: User’s Guide (version 1) page 10 of 64
Page 11
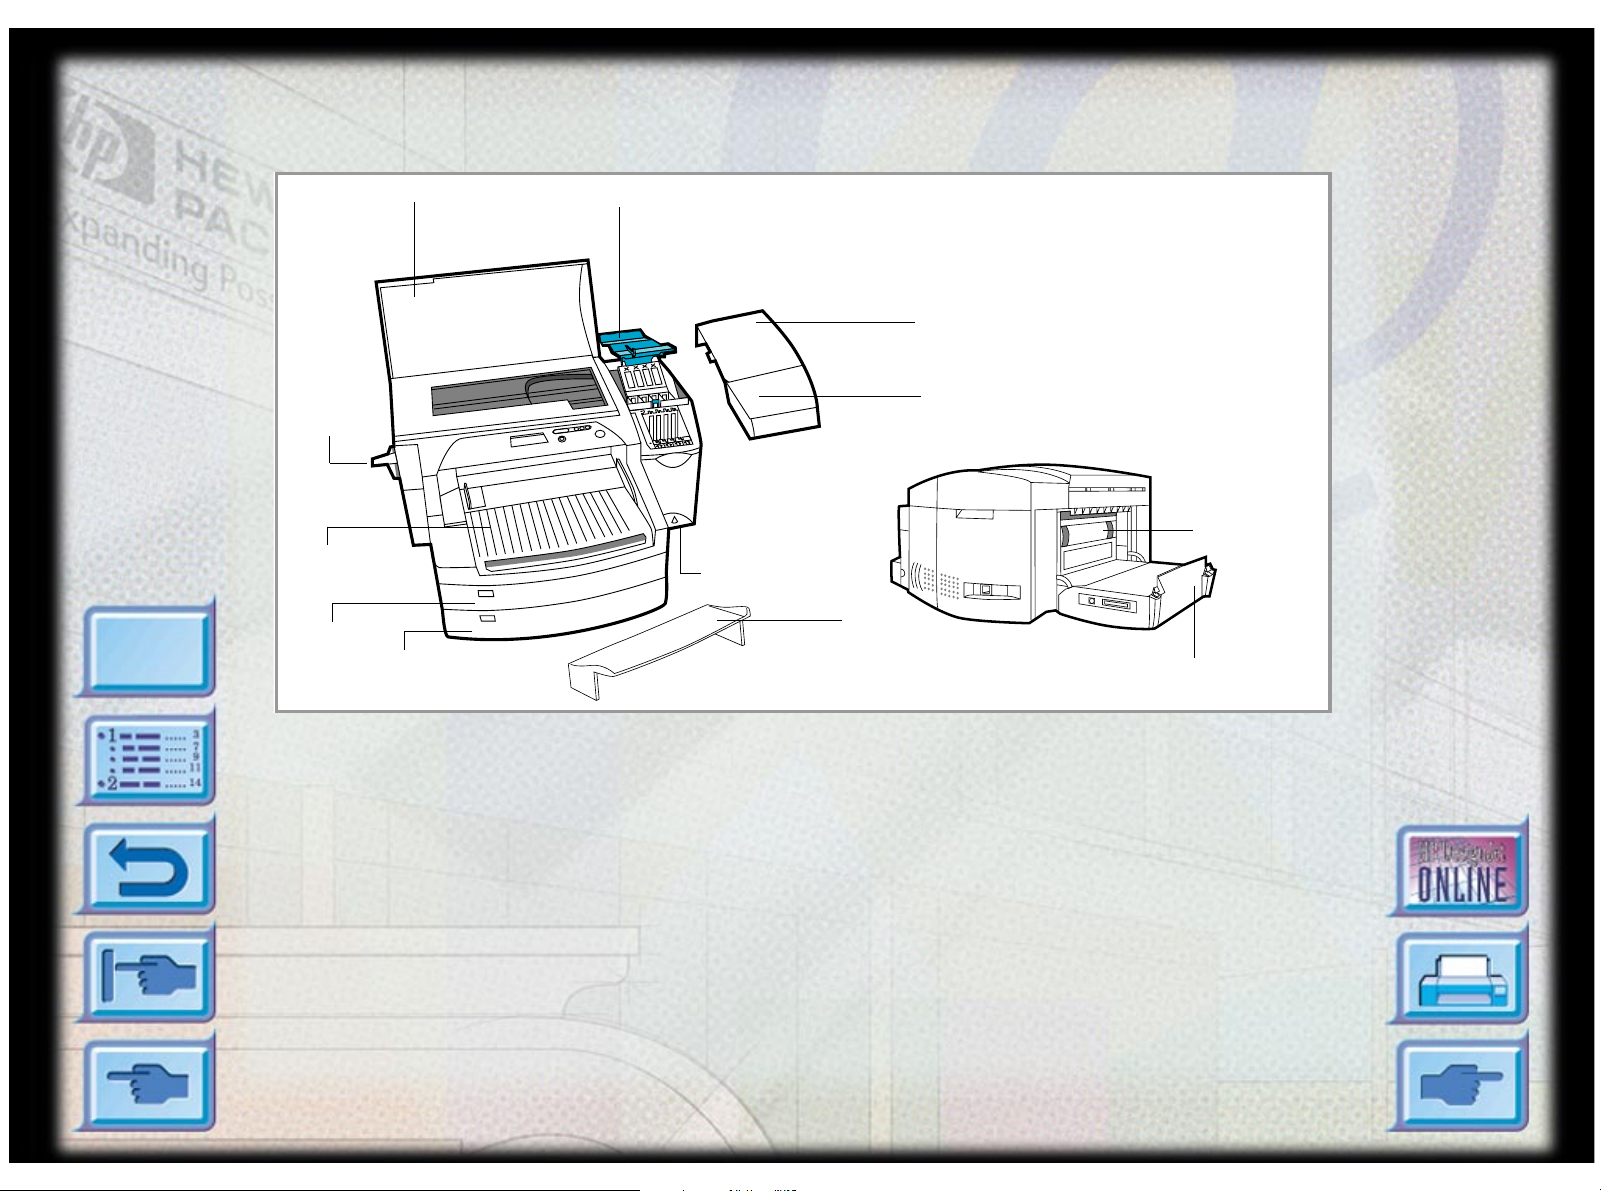
Printer Parts and Locations
Printer Basics
Menu
Paper
Knob
Tray 1/
Output Tray
Tray 2
TopCover
Tray 3
Printhead Latch
Power
Button
Printhead
Access Cover
Ink Cartridge
Door
Extended
Tray Cover
Back Panel
Rear Access
Door
HP DesignJet ColorPro Series: User’s Guide (version 1) page 11 of 64
Page 12
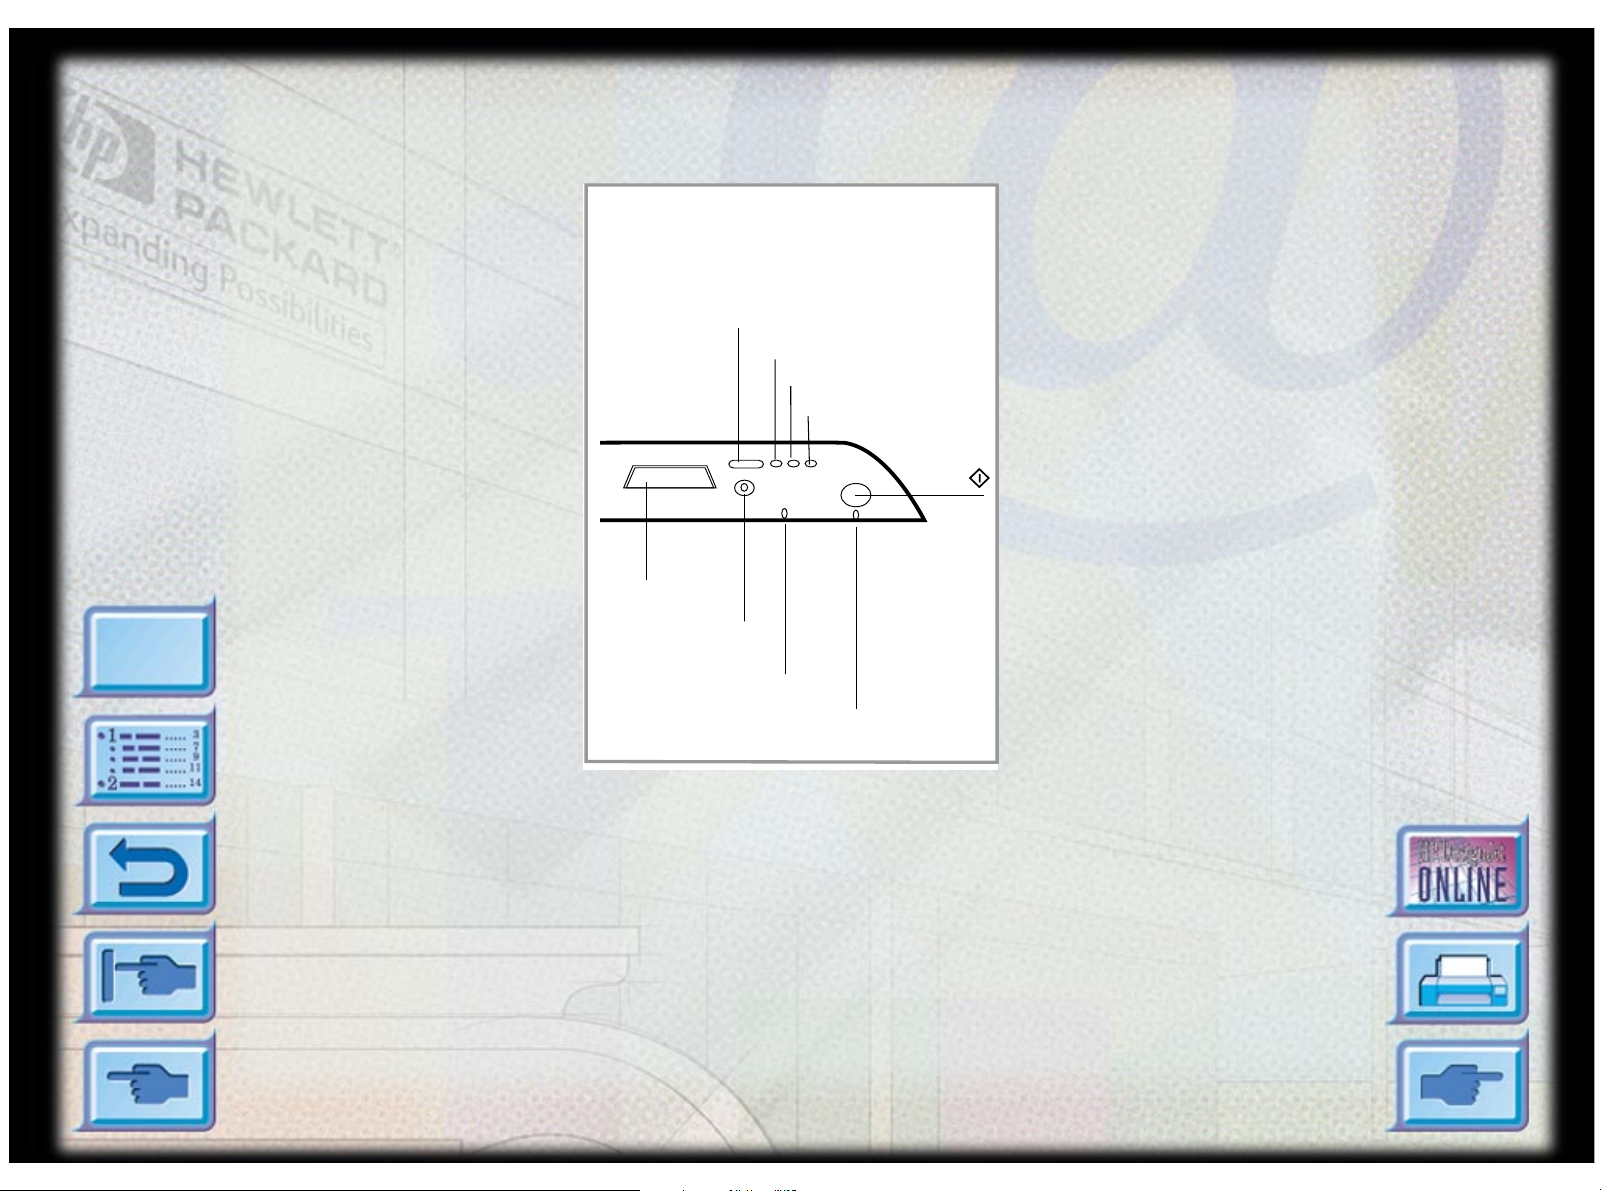
Control Panel Layout
Display Panel
Menu Button
Item Button
Value Button
Select Button
(Go)
Printer Basics
Menu
Cancel Job Button
Attention (Red)
Ready (Green)
HP DesignJet ColorPro Series: User’s Guide (version 1) page 12 of 64
Page 13
Printer Basics
Control Panel Keys
[Menu] Cycles through the control panel menus. To print a menu map from the control panel:
1. Press [Menu] until SELF TEST MENU appears.
2. Press [Item ] until PRINT MENU MAP appears.
3. Press [Select] to print the menu map.
For informat ion on each menu item , see “Contr ol Panel M enus” on page 50.
[Item] Cycles through the items of the selected menu.
[Value] • Cycles through the values of the selected menu item.
• Allows you to navigate between the different trays.
[Select] • Saves the selected value for that item. An asterisk ( *) appears next to the
selection, indicating that it is the new default. Default sett ings remain whe n the
printer is switched off or reset unless you reset all factory defaults from the
Menu
[RESETS] menu.
• Prints the selected printer information page from the control panel.
[Cancel Job] Cancels the print job that the printer is processing. The time it takes to cancel depends
on the size of the print job. (Press it only once.)
(Go)
• Places the printer either on-line or off-line.
• Allows the printer to resume printing after being off-line. Clears most printer
messages and places the printer on-line.
• Allows the printer to continue printing with a warning message such as TRAY x
LOAD [TYPE] [SIZE] or UNEXPECTED PAPER SIZE.
• Exits the control panel menus.
(To s ave a selected control panel setting, first pres s the [Select] butt on. )
• Displays unrecoverable error codes.
HP DesignJet ColorPro Series: User’s Guide (version 1) page 13 of 64
Page 14
Menu
Control Panel Lights
There are two lights on the printer:
Indicator Color Function
Attention Red Blinks when the pri nte r is in an erro r st at e, OR
Ready Green Is lit up when the printer is printing, OR
Printer Basics
requires atte ntion.
For more information, see the section on
“Troubleshooting” on page 37.
is in normal state, OR
when it is online.
HP DesignJet ColorPro Series: User’s Guide (version 1) page 14 of 64
Page 15

Menu
Basic Printing Tasks
This section presents information on basic printing tasks, such as:
Loading the Trays 16
Loading Paper in Tray 1 17
Loading Commonly-Used Media in Tray 2 18
Loading Commonly-Used Media in Tray 3 22
Loading Paper in the Rear Manual Feed 26
Monitoring and Replacing Ink Cartridges 27
Replacing Printheads 28
Using the HP DesignJet ColorPro Series Printer Software 32
Using the Printer on a Network 34
Basic Printing Tasks
HP DesignJet ColorPro Series: User’s Guide (version 1) page 15 of 64
Page 16

Loading the Trays
Basic Printing Tasks
The HP DesignJet ColorPro series printer has three paper trays and one Rear
Manual Feed for superior paper handling capabilities.
T ray 1 – This tray acts as a bypass tray . It holds up to 10 sheets of paper. This
tray should be used for media types and sizes that are seldom used.
T ray 2 – This tray holds up to 150 sheets of paper. It is recommended that you
use this tray to hold paper that is commonly used.
T ray 3 – This tray holds up to 250 sheets of paper. It is recommended that you
use this tray to hold paper that is commonly used.
Rear Manual Feed – The Rear Manual Feed is designed to provide a straight
paper path for printing on thicker media (up to 0.3mm) such as cardstock or
Menu
labels without bending. This paper path allows you to print only one sheet at
a time.
HP DesignJet ColorPro Series: User’s Guide (version 1) page 16 of 64
Page 17
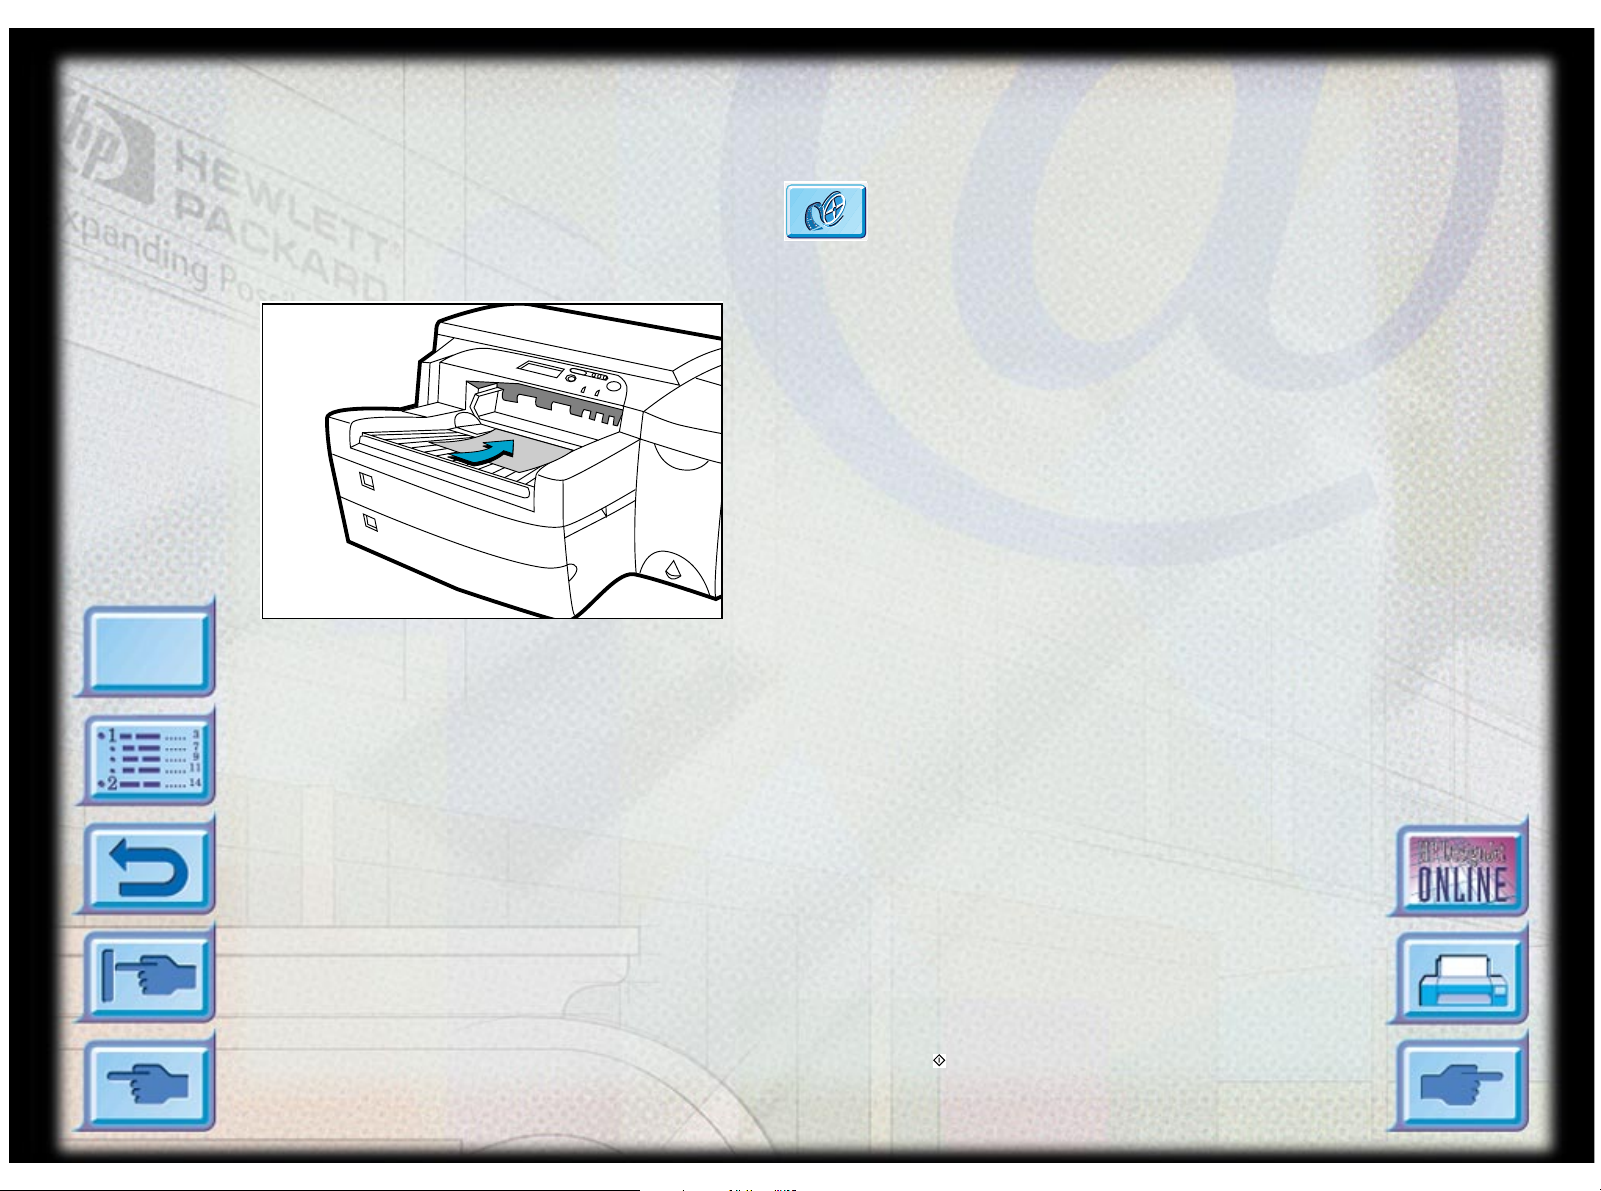
Loading Paper in Tray 1
Basic Printing Tasks
Click to see a video clip of the following
procedure.
1. Set your driver to pick paper from Tray 1 and
print your document.
For more informa tion on how to set your print
settings, please refer to the section on
“Changing Pri nt Settings” on page 3 3 .
2. After sending your print job to the printer, the
display panel will show the message “TRAY 1
LOAD [TYPE] [SIZE]” where [TYPE] and
[SIZE] are the media type and size respectively,
Menu
as specified in your printer driver.
3. Slide the paper width guide to its outermost
position before releasing it.
4. Insert up to 10 sheets of paper along the right
side of Tray 1, print side down, until they
encounter resistance.
5. Slide the paper width guide in until it stops at
the edge of the paper.
6. Press the button to print.
HP DesignJet ColorPro Series: User’s Guide (version 1) page 17 of 64
Page 18
Loading Commonly-Used Media in Tray 2
Note: Tray 2 is designed to hold up to 150 sheets of
paper and can accommodate paper sizes such as
Letter, A4, Legal, B4, A3, 11"x17" [279mm x
432mm], 13"x19" [330 mm x 483mm].
Loading Commonly-Used Media in Tray 2
Click to see a video clip of loading
Letter, A4 or Legal paper.
Click to see a video clip of loading B4,
A3, 11"x17" [279mm x 432mm],
13"x19" [330mm x 483mm] paper.
Menu
1. Remove Tray 1.
2. If you wish to change the paper size setting that
has been set in the tray, go to step 3. If you
wish to load paper using the exis ting tray
setting, go to step 5.
HP DesignJet ColorPro Series: User’s Guide (version 1) page 18 of 64
Page 19
Menu
2
2
Loading Commonly-Used Media in Tray 2
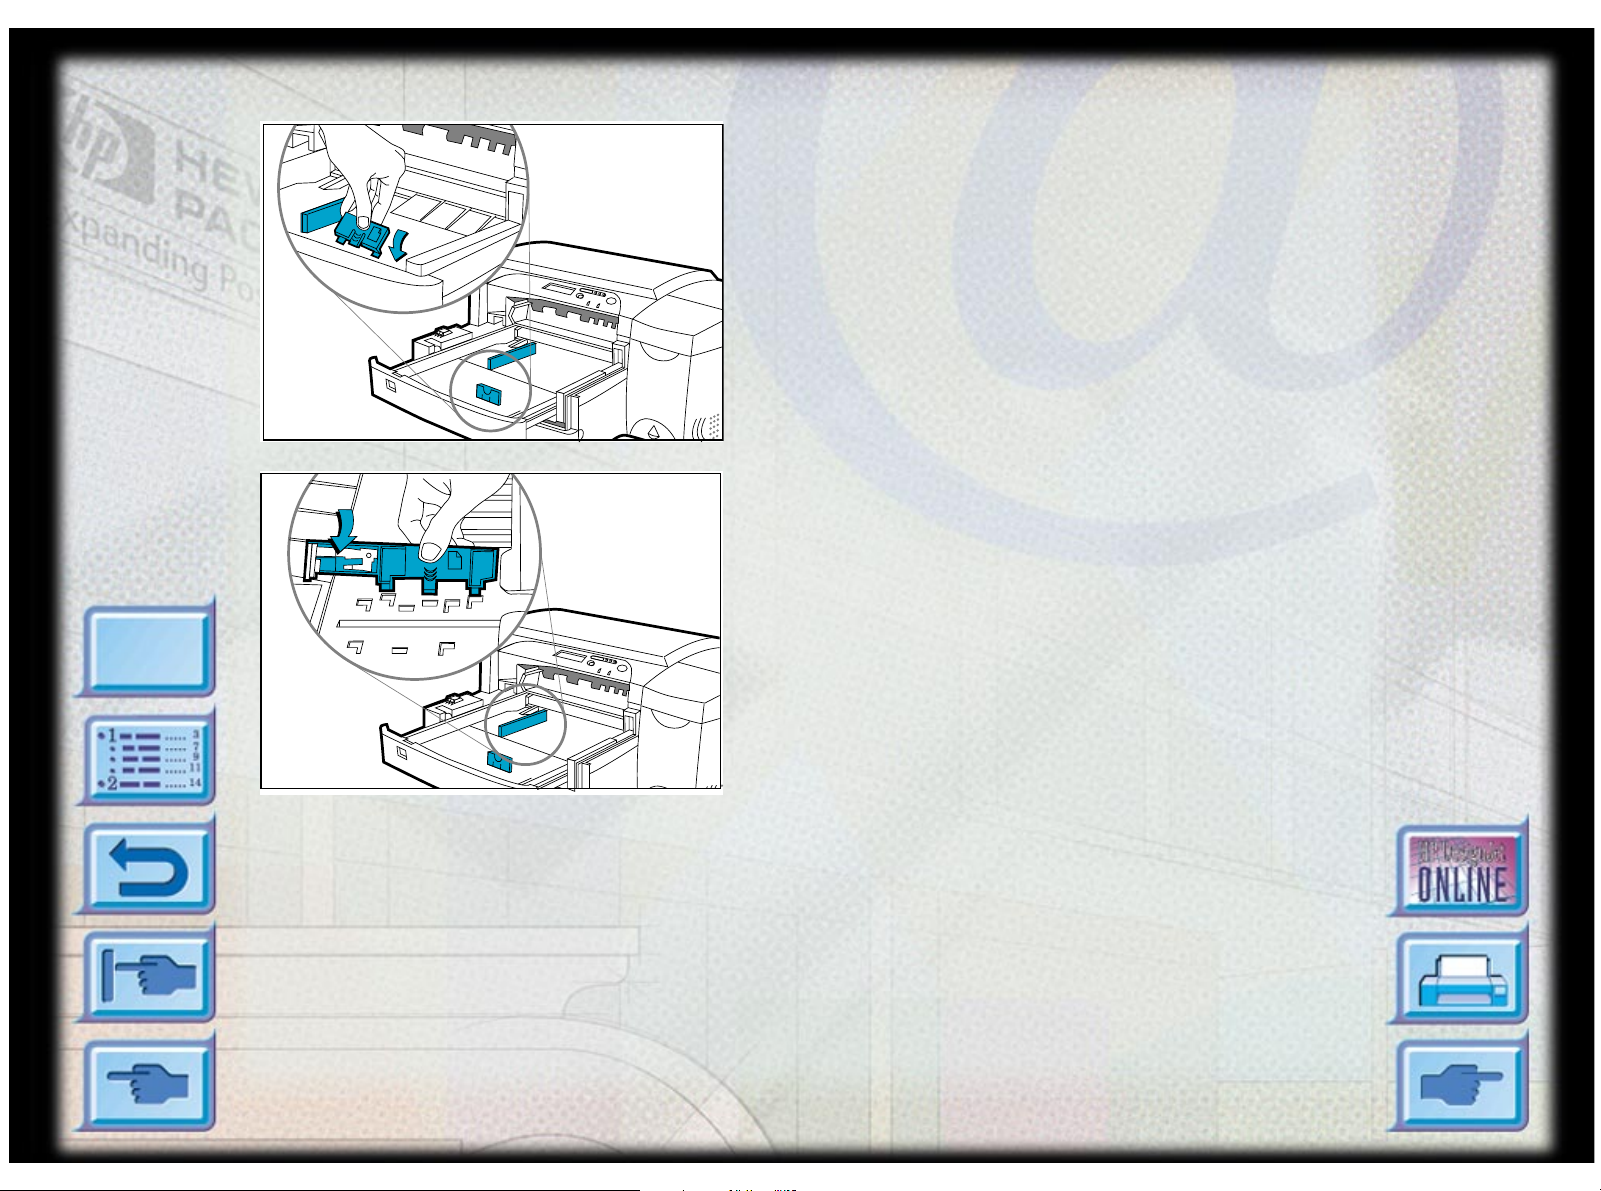
3. Snap the paper length and width guides to the
slots. Paper size markings are indicated beside
their respective slots.
HP DesignJet ColorPro Series: User’s Guide (version 1) page 19 of 64
Page 20
Menu
Loading Commonly-Used Media in Tray 2
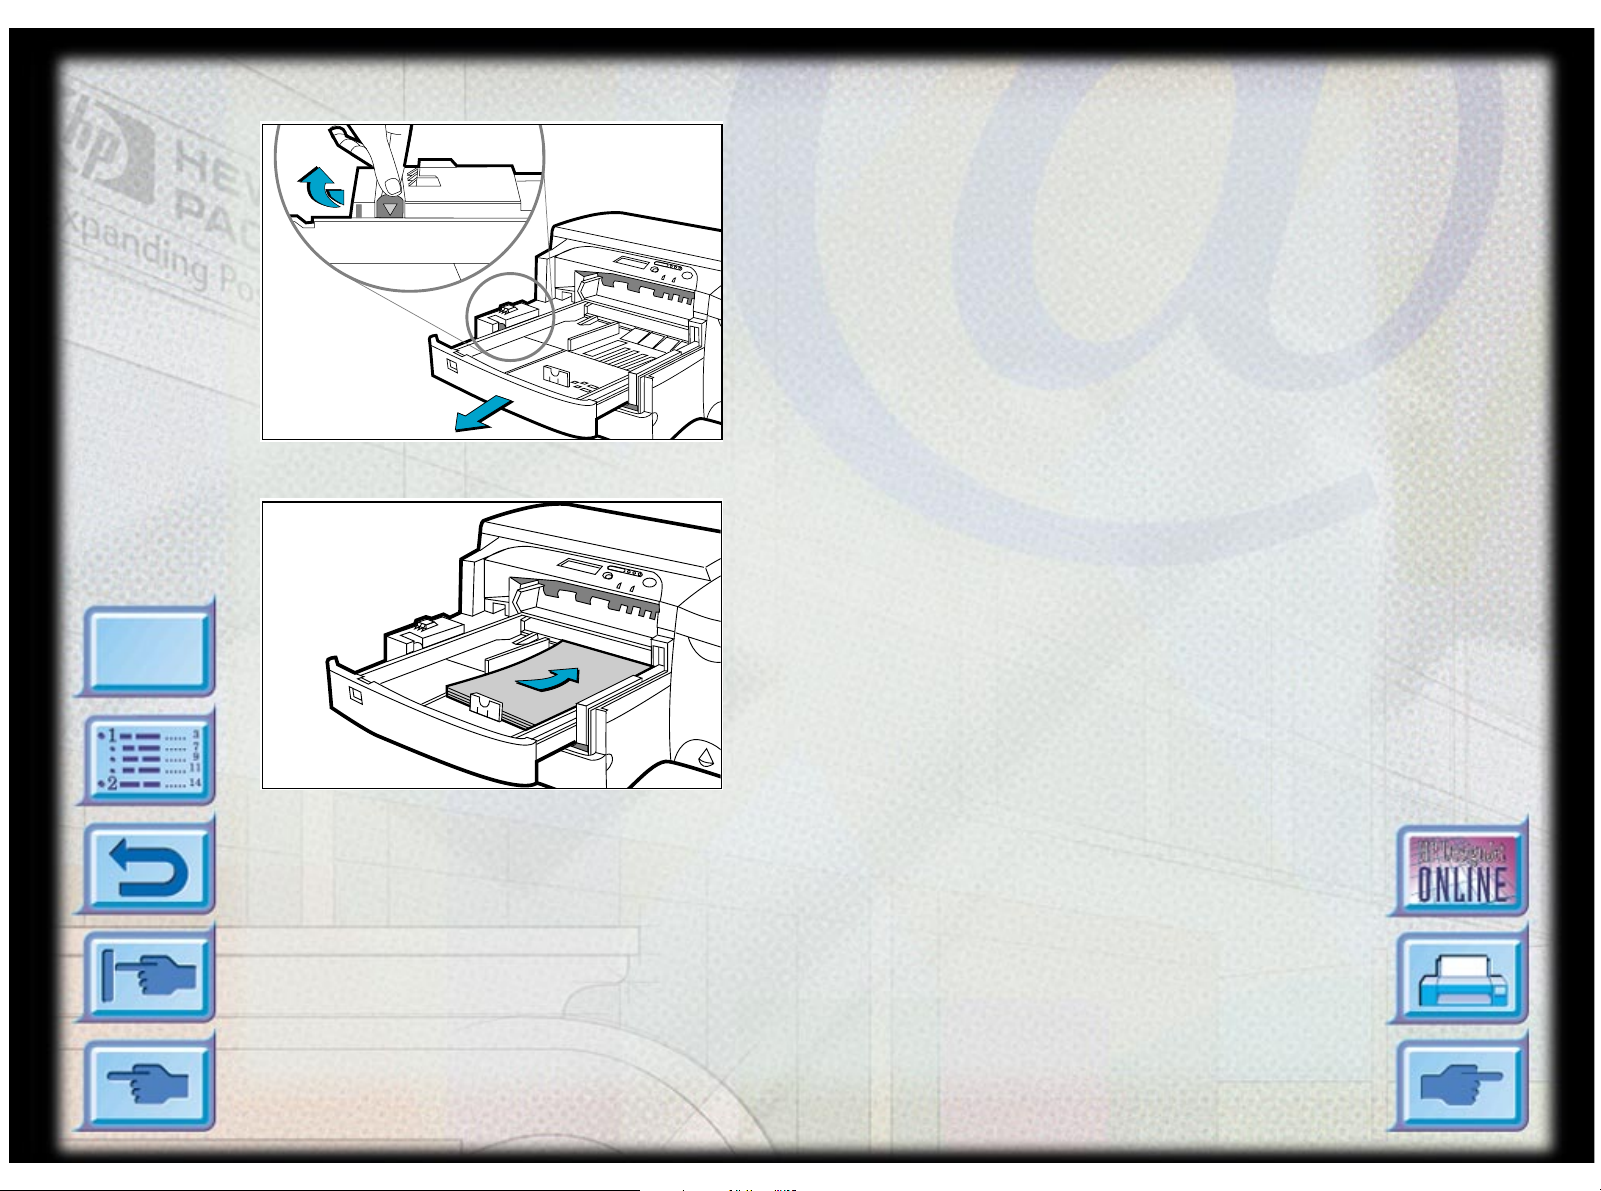
4. If you are loading paper sizes such as B4, A3,
11"x17" [279mm x 432mm], 13"x19" [330m m
x 483mm], unlock the tray lock, extend the tray
and re-lock the tray lock. If you are loading
paper sizes such as Letter, A4 and Legal, check
that the tray is not extended. If it is, unlock the
tray lock, push in the tray and re-lock the tray
lock.
5. Insert paper, print side down into the printer.
6. T ap the left side of the stack of paper to ensure
that it is flush to the rig ht sid e of the tray.
HP DesignJet ColorPro Series: User’s Guide (version 1) page 20 of 64
Page 21

Menu
Loading Commonly-Used Media in Tray 2
7. Replace Tray 1.
8. If Tray 2 is extended, place the extended tray
cover over the tray.
9. If you are loading a different type of media,
press [Menu] on the contr ol pane l until the
PAPER HANDLING MENU appears.
10. Press [Item] to select TRAY 2 TYPE=
11.Press [Value] to select the media type you have
loaded into the tray and press [Select].
HP DesignJet ColorPro Series: User’s Guide (version 1) page 21 of 64
Page 22

Menu
Loading Commonly-Used Media in Tray 3
1. Grasp the sides of Tray 3 and pull it out of the
printer.
2. If you wish to change the paper size that has
been set in the tray, go to step 3. If you wish to
load paper into the tray using the existing
Loading Commonly-Used Media in Tray 3
Click to see a video clip of loading Letter,
A4 or Legal paper .
Click to see a video clip of loading B4,
A3, 11"x17" [279mm x 432mm], 13"x19"
[330mm x 483mm] paper .
setting, go to step 5.
HP DesignJet ColorPro Series: User’s Guide (version 1) page 22 of 64
Page 23

Menu
3
A3
3
3
Loading Commonly-Used Media in Tray 3
3. Snap the paper length and width guides into the
slots. Paper size markings are indicated beside
their respective slots.
4. If you are loading paper sizes such as B4, A3,
11"x17" [279mm x 432mm], 13"x19" [330m m
x 483mm], unlock the tray lock, extend the tray
and re-lock the tray lock. If you are loading
paper sizes such as Letter, A4 and Legal, check
that the tray is not extended. If it is, unlock the
tray lock, push in the tray and re-lock the tray
lock.
HP DesignJet ColorPro Series: User’s Guide (version 1) page 23 of 64
Page 24

Menu
3
A3
Loading Commonly-Used Media in Tray 3
5. Load paper by aligning the paper edge to the
paper length guide first. Tap the left side of the
stack of paper to ens ure tha t it is flus h to the
right side of the tray.
6. Reinsert Tray 3 into the printer.
HP DesignJet ColorPro Series: User’s Guide (version 1) page 24 of 64
Page 25

Menu
Loading Commonly-Used Media in Tray 3
7. If Tray 3 is extended, place the extended tray
cover over the tray.
8. If you are loading a different type of media,
press [Menu] on the contr ol pane l until PAPER
HANDLING MENU appears.
9. Press [Item] to select TRAY 3 TYPE=
10.Press [Value] to select the media type you have
loaded into the tray and press [Select].
HP DesignJet ColorPro Series: User’s Guide (version 1) page 25 of 64
Page 26

Menu
Loading Paper in the Rear Manual Feed
1. Set your driver to pick paper from rear manual
feed and print your document.
For more informa tion on how to set your print
settings, please refer to the section on
“Changing Pri nt Settings” on page 3 3 .
2. After sending your print job to the printer, the
display panel will show the message “MNL
FEED LOAD [TYPE] [SIZE]” where [TYPE]
and [SIZE] are the media type and size
Loading Paper in the Rear Manual Feed
Click to see a video clip of the following
procedure.
respectively, as specified in your printer driver.
3. Insert the media into the r ear manual f eed at the
back of the printer, making sure that the edge of
the sheet is aligned with the alignment mark on
the left side of the slot. Wait for the printer to
grip the media.
HP DesignJet ColorPro Series: User’s Guide (version 1) page 26 of 64
Page 27

Monit oring and Replacing Ink Cartridges
The printer monitors and shows in the display the amount of ink left in each
ink cartridge. When the ink in the particular ink cartridge is about to be used
up, a warning message will appear on the display panel. At this point, your
ink cartridge will still have enough ink left in the cartridges for a few more
print jobs. However, it is recommended that you get a replacement ready as
soon as this warning message appears.
When the ink of a particular ink cartridge has fully run out, the display will
show a message [X INK OUT , REPLACE CART] (where X is the color of the
cartridge). When this happens, you will not be able to print until the
corresponding cartridge is replaced.
Click to see a video clip of the following procedure.
Monitoring and Replacing Ink Cartridges
Menu
To replace a cartridge:
1. Lift to open the ink cartridge door.
2. Remove the old ink cartr idge by pulling it upwards.
3. Remove the new ink cartridge from its packaging and insert it into its own
color-coded slot. The arrow points to the front of the printer.
4. Push down the ink cartridge firmly.
5. Close the ink cartridge door.
Note: Use only original No. 10 HP ink car tridg es. The use of incompatible
cartridges may disrupt the intricate printing system, pote ntially resulting in
reduced print quality and even printer damage. HP does not guar antee non-HP
cartridges or the damage to the printer resultin g fro m th e use of non-HP
cartridges. For more information on HP Supplies, refer to the Getting Started
Guide.
HP DesignJet ColorPro Series: User’s Guide (version 1) page 27 of 64
Page 28

Menu
Replacing Printheads
Replacing Printheads
If the printheads are faulty , the printer will show an
error message and you will not be able to print from
the printer. When this happens, replace the
printhead. For more information, refer to the section
on “Troubleshooting” on page 37.
Click to see a video clip of the foll owing
procedure.
1. Ensure that the printer is on.
2. Open the ink cartridge door.
3. Grasp the side of the printhead access cover and
lift firmly to snap the cover open and remove it
from the printer. You may have to use some
force to open the cover.
HP DesignJet ColorPro Series: User’s Guide (version 1) page 28 of 64
Page 29

Replacing Printheads
4. Release the printhead latch by pulling it
towards you to unhook. Once unhooked, bring
the latch towards the bac k of the printer.
5. Remove the damaged printhead by lifting it out
of its socket.
6. Remove the new printhead from its package.
Menu
7. Remove the protective tape from the printhead.
HP DesignJet ColorPro Series: User’s Guide (version 1) page 29 of 64
Page 30

Replacing Printheads
8. Insert the new printhead into its color-coded
slot.
9. Push the printhead down firmly .
10.Close the printhead latch. Be sure that the hook
on the printhead latch catches the carriage lock.
You may have to use some force to close the
Menu
printhead latch.
HP DesignJet ColorPro Series: User’s Guide (version 1) page 30 of 64
Page 31

Menu
Replacing Printheads
11.Ensure that the ink cartridge door is lifted.
Align the tabs of the cover with the tabs on the
printer.
12.Lower and snap to close the cover.
13.Close the ink cartridge door.
HP DesignJet ColorPro Series: User’s Guide (version 1) page 31 of 64
Page 32

Menu
Using the HP DesignJet ColorPro Series Printer Software
Using the HP DesignJet ColorPro Series Printer S oftware
The HP DesignJet ColorPro series printer comes with printer software drivers
that make printing from Macintosh- and Windows-based programs faster and
easier than ever.
HP DesignJet ColorPro GA
The Adobe PostScript driver is available with the HP DesignJet ColorPro GA
printer. Refer to the documentation for that driver for more inform ation.
HP DesignJet ColorPro CAD
Two drivers are supplied with the HP DesignJet ColorPro CAD printer:
• The AutoCAD (ADI) driver, for use with Releases 10 through 14 of
AutoCAD
• A Windows 3.1, Windows 95/98 and Windows NT 4.0 driver, for use with
Windows applications, including other CAD applications.
Refer to the documentation that comes with these drivers for more information.
HP DesignJet ColorPro Series: User’s Guide (version 1) page 32 of 64
Page 33

Using the HP DesignJet ColorPro Series Printer Software
Changing Print Settings
This section describes:
Selecting a Tray for Printing 33
Selecting Your Pri nte r 33
Changing Print Options 34
Using the Printer on a Network 34
Selecting a Tray for Printing Y ou can select a different tray from that specified
in the printer driver, if the correct paper is loaded in a different tray . To do this,
when you see a prompt like “TRAY 1 LOAD [TYPE] [SIZE]”, press the [V alue]
button until the correct tr ay is selected, and the n pres s the button to print..
Menu
Selecting Your Printer To use your HP DesignJet ColorPro series printer, make
sure th a t it is selected as the defau l t print e r.
In Windows 95, 98 or
NT 4.0:
1. Click Start, select Settings followed by Printers.
2. Click the HP DesignJet ColorPro series Printer icon to select it.
3. From the File menu, select S et As Default, then close the window.
In Windows 3.1: 1. In the Program Manager, open the Main program group.
2. Double-click Control Pane l to open it, then double-click Printers.
3. Select the HP DesignJet ColorPro series Printer from the Installed
Printers lis t, and the n clic k Set As Default Printer.
4. Click Close and exit the Control Panel.
HP DesignJet ColorPro Series: User’s Guide (version 1) page 33 of 64
Page 34

Using the HP DesignJet ColorPro Series Printer Software
Changing Print Options The HP DesignJet ColorPro series Prin t Settings
dialog box allows you to select printing options such paper type and print
quality that are not provided by the software a ppli cat ion.
Y ou can change the print settings for the current documents from your software
program. This procedure will vary depending on the software program you
are using.
1. Select either Print, Print Setup or Printer Setup from the File menu.
2. Click Printer, Setup, Options or Prop erties depending on your software
application.
3. If you click Printer in step 2, you will need to click Options, then Setup.
If you click Setup, you will either see the HP DesignJet ColorPro series
Print Settings right away, or you will need to click Options.
If you click Options, you will need to click Setup.
If you click Properties, you will see the HP DesignJet ColorPr o ser ies
Menu
Print Settings dialog box right away.
4. Change the settings in the HP DesignJet ColorPro series Print Settings
dialog box.
You can change the default settings for your printer using the same procedure
as in Selecting Your Printer above, but choosing Properties from the File
menu.
Using the Printer on a Network
The HP DesignJet ColorPro series printer has a slot where you may install one
of the supported HP JetDirect MIO print servers. An MIO card is installed as
standard in the HP DesignJet ColorPro GA printer.
HP DesignJet ColorPro Series: User’s Guide (version 1) page 34 of 64
Page 35

Maintaining the Printer
This section contains information on:
Cleaning Printheads 35
Aligning Printheads 36
Cleaning Printheads
Whenever print quality noticeably decreases it is a good idea to perform the
cleaning procedure from the printer’ s Control Panel.
The “Clean Printhead” utility consists of three levels of cleaning. Each level
of cleaning uses some ink to clear the printheads. It is recommended that you
start with Level 1 before proceeding to subsequent levels. Note that Level 3
Maintaining the Printer
Menu
takes the longest and uses the most ink.
To run the “Clean Printhead” utility through the printer’s Control Panel:
1. Press [Menu] until DIAGNOSTICS MENU appears.
2. Press [Item] to select CLEAN PRNT-HDS LEVEL 1, 2 or 3.
3. Press [Select] to clean the printheads.
HP DesignJet ColorPro Series: User’s Guide (version 1) page 35 of 64
Page 36

Menu
Aligning Printheads
Although you may not notice misalignment, it is recomm ended that you run
the “Align Printheads” utility whenever the display shows the message “PRNT HDS NOT ALIGNED”. This ensures that you have the best possible print
quality.
You may align the printheads from the printer’s Control Panel, as follows:
1. Press [Menu] until DIAGNOSTICS MENU appears.
2. Press [Item] until ALIGN PRNT-HDS appears.
3. Press [Select].
4. The printer will print a page with five set s of alignment patterns.
5. In each set (A, B, C, D or E) select the most aligned (straightest) pair of
6. Enter the corresponding numbers in the Control Panel by pressing
7. When you have entered a value for a set, press [Item] to move to the next.
lines (1, 2, 3, 4 or 5).
[Value].
Maintaining the Printer
8. When you have finished entering the values press [Select].
9. The printer will print a confirmation page consisting of two squares and a
cross.
10.Check the confirmation page to see if the lines on the squares and the
cross are aligned.
11.Realign the printheads if the confirmation page is not satisfactory .
HP DesignJet ColorPro Series: User’s Guide (version 1) page 36 of 64
Page 37

Troubleshooting
Troubleshooting
This section documents the different troubleshooting tools and steps that can
be used to assist you in diagnosing and solving most printer problems. The
sections are:
General Troubleshooting Tips 38
Nonrecoverable Error 39
Printer does not Print 40
Partial or Blank Page Printed 41
Bad or Poor Print Quality 42
Text or Graphics are Cut Off 42
Garbage Printed 43
Menu
Removing Paper Jams 44
Tips for Avoiding Paper Jams 48
Printhead Diagnostics 49
HP DesignJet ColorPro Series: User’s Guide (version 1) page 37 of 64
Page 38

General Troubleshooting Tips
1. Check the printer display panel. If the printer display panel shows a
recoverable error message refer to “Understanding Printer Messages” on
page 58 for instructions on how to resolve the problem .
Error Type Example Function
Troubleshooting
Menu
Recoverable Off-line,
INK LOW
Refer to “Understandi ng Printer
Messages” on page 58 for
information on how to resolve such
errors.
Nonrecoverable ERROR CODE:
XXXX
Your printer may have a hardware
problem. Turn off the printer and
on again. If the message persists,
call HP.
2. Check the lights on the printer. If the red light is blinking, this means that
the printer is in an error state or it requires attention. If both the lights are
blinking, the printer is in a nonrecoverable error state.
HP DesignJet ColorPro Series: User’s Guide (version 1) page 38 of 64
Page 39

Nonrecoverable
Troubleshooting
If the display panel shows a nonrecoverable error message or if the printer is
Menu
Error
in a nonrecoverable error state:
1. Turn off your printer by pressing the Power button. Remove all cables
and wait for about 10 seconds. Reconnect the cables and power on the
printer.
2. If the printer comes on and recovers from the error state, you should see
the message “READY” on the display panel.
3. Make sure that the tapes covering the ink nozzles and electrical contacts
on all the printheads have been removed.
For information on how to remove the tapes, see the section on
“Replacing Printheads” on page 28.
4. If the error persists we recommend that you call HP for assis tance. Please
have the following information ready:
• the model
• the printer serial number
• the error code number.
HP DesignJet ColorPro Series: User’s Guide (version 1) page 39 of 64
Page 40

Hints and Tips
The following is a summary of troubleshooting tips:
Troubleshooting
Menu
Printer does not
Print
• Check the power
Make sure the power cord is connected firmly to the printer and to a
working outlet, and that the printer is turned on. The green Ready light
should be lit and the display should show “READY”.
• Check printer setup
Make sure your HP DesignJet ColorPro series printer is selected as the
current or default printer. See the section on “Changing Print Settings” on
page 33.
• Check printer port selection
Make sure that the correct port is selected and that the printer is connected
to your computer properly. If your printer is connected to a switch box,
make sure that you have selected the correct switch. If your printer is on a
network, ensure that you have mapped to the correct port.
• Print a Diagnostic Page
Printing a Diagnostic Page will verify if the printer is functioning properly .
To print the diagnostic page:
1. Press [Menu] until SELF TEST MENU appears .
2. Press [Item] until PRINT DIAGNOSTIC PAGE appears.
3. Press [Select] to print the diagnos tic page.
HP DesignJet ColorPro Series: User’s Guide (version 1) page 40 of 64
Page 41

Printer does not
• Check networ k set up
Troubleshooting
Menu
Print (contin ued)
Partial or Bl a nk
Page Printed
If your printer is shared on a network, make sure that it is properly setup in
the network environment. See the Network Guide as well as the
documentation provided by your networ k vendor s.
• Check for paper feed problem
Make sure that paper is loa de d corre ctly in the trays and that paper is not
jammed in the printer. Check the printer display panel for paper jam
messages. See the section on “Loading the Trays” on page 16.
If paper is jammed in the printer, see the section on “Removing Paper
Jams” on page 44.
• Check the printhead for tape
New printheads are shipped with a prote ctive tape that cover s the nozzles.
Make sure that the protective tape covering each printhead is removed.
• Check printer setup
Make sure your HP DesignJet ColorPro series printer is selected as the
current or default pr inte r. See section on “Changing Pri nt Settings” on
page 33.
• Tray 3 pulle d out dur in g pr inting
If Tray 3 is pulled out of the printer when it is printing, the job will be
canceled and the page will be ejected. Wait until the page has been printed
and ejected from the printer before removing the tray .
HP DesignJet ColorPro Series: User’s Guide (version 1) page 41 of 64
Page 42

Bad or Poor Print
• Check print qu ality setting
Troubleshooting
Menu
Quality
Text or Graphics are
Cut Off
Check the printer setting which you have selected for this print job in the
printer software. While the EconoFast setting prints faster and uses less
ink, it may cause text to appear faded or colors to appear dull. Select
Normal or Best Print Quality in the HP Print Se ttings dialog box.
• Check paper type setting
When printing on transparencies or other special media types, select t he
corresponding media type in the HP Print Settings dialog box.
• Clean printh ea ds
Whenever print quality deteriorates, it is advisable to clean the printheads.
See the section on “Cleaning Printheads” on page 35 for instructions.
• Check margin set tings
If the text or graphics are cut off at the edges of the page, make sure the
margin settings for the document do not exceed the printable area of your
printer. For information on the printer margins for the various supported
paper sizes see “Minimum Printing Margins” on page 62.
• Check page orientation
The page orientation that you have selected may not be correct for the
document you are printing. Check your print settings and try printing
again.
HP DesignJet ColorPro Series: User’s Guide (version 1) page 42 of 64
Page 43

Text or Graphics are
• Tray 3 pulle d out dur in g pr inting
Troubleshooting
Menu
Cut Off (continued)
If Tray 3 is pulled out of the printer when it is printing, the job will be
canceled and the page will be ejected. Wait until the page has been printed
and ejected from the printer before removing the tray .
Garbage Printed • Check cable connection
Check that the printer and any network cables are securely connected to the
printer. If you are using parallel cables, ensure that it is also firmly
connected to the computer.
• Check printer setup
Make sure your HP DesignJet ColorPro series printer is selected as the
current or default pr inte r. See section on “Changing Pri nt Settings” on
page 33.
• Check docu ment file
Your document may be corrupted. Try printing another file from the same
software application.
• Check bidirectional communication or shared printer port
Disable bidirectional communication or stop sharing the printer port with
another device. There may be a conflict between the printer and other
devices such as zip drives or scanners that share the port.
- With W indows 3.1, do not share the printer port with another device.
- With Wi ndows 95, 98 or NT 4.0, disable bidi rectional printing.
HP DesignJet ColorPro Series: User’s Guide (version 1) page 43 of 64
Page 44

Menu
Removing Paper Jams
Removing Paper Jams
If paper is jammed in the printer, follow these
instructions to clear the jam:
Click to see a video clip of the foll owing
procedure.
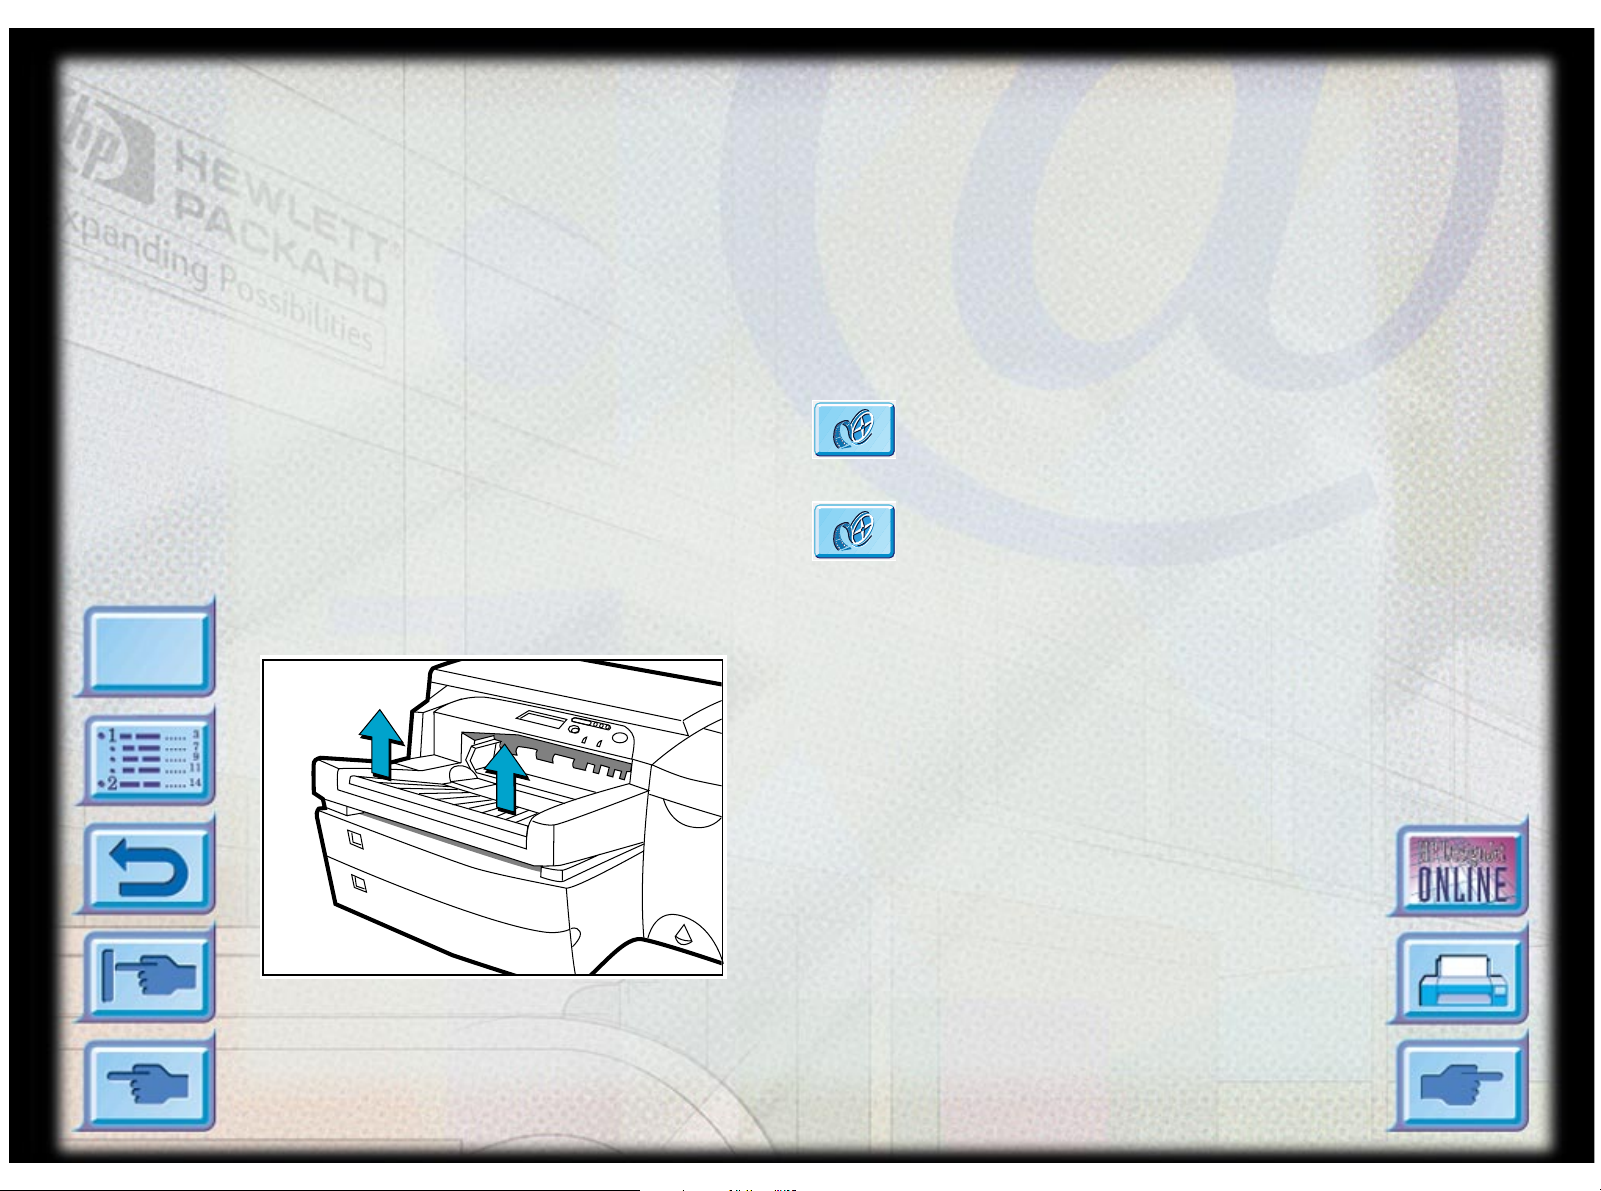
1. Remove all media from trays 1, 2 and 3. Pull
out any paper that is visibly stuck.
HP DesignJet ColorPro Series: User’s Guide (version 1) page 44 of 64
Page 45

Menu
Removing Paper Jams
2. Lift the top cover and pull out any paper that
may be stuck.
HP DesignJet ColorPro Series: User’s Guide (version 1) page 45 of 64
Page 46

Menu
Removing Paper Jams
3. If you are unable to free the jammed paper , pull
out the handle of the paper knob; pull the knob
away from the printer and rotate to remo ve the
paper.
HP DesignJet ColorPro Series: User’s Guide (version 1) page 46 of 64
Page 47

Menu
Removing Paper Jams
4. If the display still reports a paper jam, go to the
back of the printer and lower the rear access
door by lifting the two rear door latches.
5. Remove the back panel by pressing the two
catches inwards.
HP DesignJet ColorPro Series: User’s Guide (version 1) page 47 of 64
Page 48

Menu
Tips for Av oiding Paper Jams
• Make sure nothing is blocking the paper paths.
• Do not overload the trays. Tray 1 holds up to 10 sheets of paper; Tray 2
Removing Paper Jams
6. Pull out any paper that may be stuck inside.
7. Replace the back panel and make sure it fits
securely.
8. Close the rear access door and turn on the
printer.
holds up to 150 sheets and Tray 3 holds up to 250 sheets.
• Load the paper correctly.
• Do not use paper that is curled or crumpled.
HP DesignJet ColorPro Series: User’s Guide (version 1) page 48 of 64
Page 49

Printhead Diagnostics
When the display panel shows the message “PRNT-HD DIAG PRESS ”, it
means that one or more of the pens may be faulty . You will need to determine
which pen is faulty and replace it before you can continue printing.
This process requires you to remove and reinsert one printhead at a time, in the
sequence black, cyan, magenta and yellow.
To determine which is the faulty printhead:
1. Open the printhead access cover and unlock the printhead latch.
2. Remove the cyan, magenta and yellow printheads and close th e printhead
access cover.
3. The display panel will show the message “DETECTING...” as it checks
the printhead.
Printhead Diagnostics
Menu
4. If the message “B PRNT-HD FAULTY, PRESS ” appears, it means th at
the black printhead is faulty. If this happens, press the button.
Remove the printhead access cover a nd replace the faulty black printhead
with a new black printhead. F asten the printhead latch and close the
printhead access cover to verify that the new printhead is working.
If the message “B PRNT-HD OK, PRESS ” appears, it means that the
black printhead is working. Pres s the button, remove the printhe a d
access cover and reinstall the black printhead.
5. Follow the sequen ce in step 4 for each of the other printheads in turn to
verify that all the printheads are working.
6. The sequence will end when all the printheads have been checked and
found to be in working order.
HP DesignJet ColorPro Series: User’s Guide (version 1) page 49 of 64
Page 50

Menu
Control Panel Menus
You can perform most routine printing tasks from the co mputer throug h the
printer driver. This is the most convenient way to set settings on the printer.
See the Help files associated with the printer software.
You can also set the printer by changing settings in the printer’s Control Panel.
The tables below list all the menu items and their values. Additional menu
items can appear in the Control Panel, depending on which particular hardware
modules are currently installed in the printe r. The menus are:
Paper Handling Menu 51
Diagnostics Menu 52
Information M en u 53
Self Test Menu 53
Print Quality Menu 54
Control Panel Menus
MIO Me n u 54 (if an MIO card is installed)
Printing Menu 55
IO Menu 56
Resets Menu 57
Configuration Menu 57
HP DesignJet ColorPro Series: User’s Guide (version 1) page 50 of 64
Page 51

Paper Handling Menu
Item Values Explanation
Control Panel Menus
Menu
TRAY 2 TYPE=
TRAY 3 TYPE=
PLAIN
HP INKJET/HEAVY
HP PHOTO
TRNSPRNCY/IRON
RAPID TRNSPRNCY
Set the value to correspond with the paper type currently
loaded in Tray 2 or Tray 3.
PLAIN: Plain Paper or HP Brigh t White InkJet Paper
HP INKJET/HEAVY: HP Premium InkJet Paper or HP
Premium InkJet Heavyweight Paper or HP Professional
Brochure & Flyer Paper Matte Finish
HP PHOTO: HP Premium Photo Paper
TRNSPRNCY/IRON: HP Premium Transparency Film
or HP Iron-on T-shirt Transfer
RAPID TRNSPRNCY: HP Premium InkJet Rapid Dry
Transparencies.
Note: It is not advisable to load the foll owing
combination of paper types in Tray 2 and Tray 3 at the
same time:
• HP Premium InkJet Paper and HP Premium InkJet
Heavyweight Paper
• HP Premium Transparency Film and HP Iron-on Tshirt Transfer
HP DesignJet ColorPro Series: User’s Guide (version 1) page 51 of 64
Page 52

Control Panel Menus
Diagnostics Menu
Item Explanation
ALIGN PRNT-HDS This item aligns the printheads to ensure the printout is of the best possible
print quality. For more information see the section on “Aligning Printheads”
on page 36.
Menu
CLEAN PRNT-HD:
LEVEL 1
CLEAN PRNT-HD:
LEVEL 2
CLEAN PRNT-HD:
LEVEL 3
PERFORM TRAY 1
PAPER PATH TEST
PERFORM TRAY 2
PAPER PATH TEST
PERFORM TRAY 3
PAPER PATH TEST
This item cleans the printhe ad s. Level 1 is the basic leve l and shou ld be
performed first. For more information see the section on “Cleaning
Printheads” on page 35.
This item cleans the printheads. Level 2 is more thorough than Level 1, but
it should be performed only when Level 1 cleaning does not solve the print
quality problem.
For more information see the section on “Cleaning Printheads” on page 35.
This item cleans the printheads. Level 3 is most thorough, but it should be
performed only when Level 2 cleaning does not solve the print quality problem
as it uses the most ink.
For more information see the section on “Cleaning Printheads” on page 35.
This item performs a paper path te s t on Tray 1. When this is selected, the
printer will pick paper from Tray 1 until all the paper has been eject ed.
This item performs a paper path te s t on Tray 2. When this is selected, the
printer will pick paper from Tray 2 until all the paper has been eject ed.
This item performs a paper path te s t on Tray 3. When this is selected, the
printer will pick paper from Tray 3 until all the paper has been eject ed.
HP DesignJet ColorPro Series: User’s Guide (version 1) page 52 of 64
Page 53

Control Panel Menus
Information Menu
Item Explanation
BASE FW VER This item displays the firmware version of printer.
CHECK INK LEVELS This item displays the amount of ink remaining in each ink cartridge.
Menu
CHECK TOTAL RAM
SIZE
MIO FW VER This item displays the M IO print server firmware ve rs ion (f or the HP
SERVICE ID This item displays the Service Identification Number of the printer. This
This item displays the total amount of RAM installed in the printer.
DesignJet ColorPro GA) if an MIO card is installed.
number is needed when you call the HP Customer Care Center for support.
Self Test Menu
Item Explanation
PRINT DIAGNOSTIC
PAGE
PRINT EXT
DIAGNOSTIC PAGE
PRINT MENU MAP The Menu Map shows the layout of the control panel menu items.
PRINT PCL5 FONT
The Diagnostic Page shows general printer information and current
network parameters.
The Extended Diagnostic Page shows printer information that is useful
for troubleshooting.
The PCL5 Font List shows all the PCL5 fonts currently available to the
LIST
printer (for the HP DesignJet ColorPr o CA D only).
HP DesignJet ColorPro Series: User’s Guide (version 1) page 53 of 64
Page 54

Print Quality Menu
Item Values Explanation
Control Panel Menus
Menu
PRINT QUALITY= NORMAL
ECONOFAST
BEST
NORMAL: Normal mode delivers high quality output and is
the recommended setting for speed and quality. Normal mode
is the default setting for most paper types.
ECONOFAST: Draft quality printin g. EconoFast mode
prints faster than Normal mode and delivers comparable
output. Using EconoFast will also cut down on the frequency
of replacing your ink cartridges because it uses less ink.
EconoFast printing is available only when you select plain
paper or transparency as the paper type.
BEST: High quality printing. Best mode produces the highest
print quality for all paper types and eliminates the banding
effect that sometimes occurs in solid areas. However, Best
mode prints more slowly than Normal mode for most
documents.
MIO Menu
The MIO print server that is installed controls this menu and it varies
accordingly. Please refer to the documentation that comes with the print server
for more information. The MIO card is available only with the HP DesignJet
ColorPro GA pri n ter.
HP DesignJet ColorPro Series: User’s Guide (version 1) page 54 of 64
Page 55

Printing Menu
Item Values Explanation
Control Panel Menus
Menu
APPEND CR TO LF= NO
YES
ORIENT A TION= POR TRAIT
LANDSCAPE
PAPER= LETTER
LEGAL
13X19
A4
A3
11X17
JISB4
Select YES to append a carriage return to line feed
encountered in backward-compatible PCL jobs (pure text,
no job control). Some environments indi cate a new line
using only the line feed control code. This option allows
you to append the required carriage return to each line feed.
Determine the default orientation of print on the page.
Note: It is best to set the page orientation from the printer
driver or software application.
Set the paper size.
“13X19” and “11x17” are dimensions in inches, and
correspond to 330mm x 483 mm and 279 mm x 432 mm
respectively.
HP DesignJet ColorPro Series: User’s Guide (version 1) page 55 of 64
Page 56

Control Panel Menus
IO Menu
Item Values Explanation
IN JOB TIMEOUT= 5 to 300 Select the amount of time (in seconds) that the printer will wait
within a print job before endin g it. When the data from a print
job fails to be sent to the printer completely, the printer will wait
for the specified number of seconds. After that, it will abort the
job and carry on to process the next print job. Press [V alue] once
to change the setting by increments of 1 or hold down [V alue] to
scroll.
OUT JOB TIMEOUT= 0 to 300 Select the amount of time (in seconds) that the printer will wait
for the next print job before swi tc hing to a nother port. This is
useful especially when your printer is connected to two different
ports such as the parallel port and the network port. Press [V alue]
once to change the setting by increments of 1 or hold down
Menu
I/O CHANNEL
TIMEOUT=
[Value] to scroll .
0 to 300 Select the amount of time (in seconds) that the printer will receive
data from a port before switching to the next port. When the
printer is connected to different ports with data being sent to it
simultaneously from these ports, the printer will be able to toggle
between ports so that jobs sent through all ports will be given
similar priority. Press [Value] once to change the setting by
increments of 1 or hold down [Value] to scroll.
HP DesignJet ColorPro Series: User’s Guide (version 1) page 56 of 64
Page 57

Control Panel Menus
Resets Menu
Item Explanation
RESET ACTIVE I/O CHANNEL This item performs a simple reset and clears the input and
output buffers (for the active I/O only).
RESET ALL I/O CHANNELS This item performs a simple reset and clears the input and
output buffers for all I/O.
Menu
RESET MIO TO FACTORY
SETTINGS
RESET TO FACTORY SETTINGS This item performs a simple reset and restores most of the
This item resets the MIO print server and restores most of the
factory (default) settings; only if an MIO card is installed.
factory (default) settings. This item also clears the input buffer
for the active I/O.
Configuration Menu
Item Values Explanation
PERSONALITY= AUTO
HP-GL/2
PCL
Select the default printer language (personality). Possible values are
determined by which valid languages are installed in the printer.
Normally you should not change the printer language (the default is
AUTO). If you change it to a specific printer language, the printer
will not automatic ally s w itch from one language to another unles s
specific software commands are sent to the printer.
HP DesignJet ColorPro Series: User’s Guide (version 1) page 57 of 64
Page 58

Understanding Printer Messages
Understanding Printer Messages
Note: [ ] in the Message column indicates variables.
Messag e Explanation Solution
Menu
[COLOR]
CAR T FAULTY,
REPLACE
[COLOR]
CART
MISSING,
INSERT
[COLOR]
CART NEAR
EXPIRY
[COLOR]
INK LOW
[COLOR]
INK OUT,
REPLACE
CART
One of the ink cartridges (black, cyan,
magenta or yellow) is faulty.
One of the ink cartridges (black, cyan,
magenta or yellow) is missing.
One of the ink cartridges (black, cyan,
magenta or yellow) is near expiry. To obtain
optimum p rint quality , it is recommended th at
you do not use expired ink cartridges.
One of the ink cartridges (black, cyan,
magenta or yellow) is low on ink. You may
still co ntinue to prin t with th is cartri dge until
the ink has totally run out.
One of the ink cartridges (black, cyan,
magenta or yellow) is out of ink.
Replace the indicated cartridge.
Insert the indicated cartridge.
Be prepared to replace the indicated
colour ink cartridge.
Be prepared to replace the indicated
colour ink cartridge.
Replace the indicated cartridge.
[COLOR]
PRNT-HD
FAULTY,
REPLACE
One of the printheads (black, cyan, magenta
or yellow) is faulty.
HP DesignJet ColorPro Series: User’s Guide (version 1) page 58 of 64
Replace the indicated printhead.
Page 59
Understanding Printer Messages
Message Explanation Solution
Menu
[COLOR]
PRNT-HD
MISSING,
INSERT
CANCELING
JOB
CARRIAGE
JAM, OPEN
ACC COVER
CARRIAGE
JAM, OPEN
TOP COVER
LEFT BACK
PANEL OUT
One of the printheads (black, cyan, magenta
Insert the indicated printhead.
or yellow) is missing.
The printer is canceling current print job.
The carriage is jammed. Open the printhead access cover to
remove obstruction. When finished,
close the printhead access cover and
align printheads.
The carriage is jammed. Open the top cover to clear
obstruction. When finished, close the
top cover and press to resume
printing.
The left side of the back panel has not been
inserted properly.
Open the rear access cover and ensure
that the left side of the panel is
properly installed.
MEDI A IN
TRAY 1,
REMOVE
MNL FEED
LOAD
[TYPE] [SIZE]
There is media in Tray 1 which may not be the
type or size that is specified in your current
Remove the media in Tray 1 and press
the button to resume printing.
print job.
If you wish to print through Tray 1,
set your driver to pick from Tray 1
and send the print job before putting
media in Tray 1.
You have chosen to print through Tray 1. Load the paper type and size as
specified in the display panel and
press to continue printing.
HP DesignJet ColorPro Series: User’s Guide (version 1) page 59 of 64
Page 60

Understanding Printer Messages
Message Explan ation Solution
Menu
NON HP
[COLOR]
CART
A non-HP color cartridge has been detected.
HP does not guarantee non-HP cartridges.
The use of incompatible cartridges may
Use original HP ink cartridges
instead.
disrupt the intricate printing system,
potentially resulting in reduced print quality
and even printer damage.
OFFLINE The printer is off-line. Press to set the printer on-line.
PAPER JAM,
OPEN TOP
COVER
PRESS TO
CONTINUE
PRINT-HDS
NOT ALIGNED
PRNT-HD
There is paper jammed in the printer. Open the top cover to remove paper.
When finished, close the top cover
and press to resume printing.
To continue your present task, press the blue
button.
The printheads have not been aligned. For
best print quality, align the printheads before
the next print job.
Align the printheads.
For instructions see the section on
“Aligning Printheads” on page 36.
The printhead access cover is open. Close the cover to resume printing.
ACCESS
COVER OPEN
RIGHT BACK
PANEL OUT
TOP COVER
OPEN
TRAY 2 PAPER
GUIDE
REMOVED
The right side of the back panel has not been
inserted properly.
Open the rear access cover and ensure
that the right side of the panel is
properly installed.
The top cover is open. Close the cover and press to resume
printing.
One of the paper guides in Tray 2 has been
removed.
HP DesignJet ColorPro Series: User’s Guide (version 1) page 60 of 64
Insert the paper guide back into T ray
2.
Page 61

Understanding Printer Messages
Message Explanation Solution
Menu
TRAY 3 OPEN
OR GUIDE
REMOVED
TRAY
[NUMBER]
EMPTY, LOAD
& PRESS
TRAY
[NUMBER]
LOAD
[TYPE] [SIZE]
UNEXPECTED
PAPER SIZE
WRONG
MEDIA TYP E ,
[ACTION]
Tray 3 is either open or one of its paper guides
has been removed.
The specified tray is empty. Load the paper
size and type which this tray has been set up
for.
The type of paper loaded in the specified tray
is different from that expected by the printer
driver.
The specified paper size is different from the
paper size in the selected input tray. The
output was truncated to fit the paper in the
printer. Some output may have been lost.
The media type which the printer has detected
is not the type specified in your print settings.
Ensure that both the paper guides are
properly installed and that Tray 3 is
inserted into the printer.
Load the paper size and type which
this tray has been set up for. If you
wish to change the paper size setting
of this tray , please refer to the section
on “Loading the Trays” on page 16.
Either load the paper as specified, or
use the [Value] button to select a
different tray (see “Selecting a Tray
for Printing” on page 33).
Reload the correct media into the tray
and print again.
You may wish to either load in the
right media, or choose to print on
existing media. Y ou may also cancel
the current print job by pressing the
[Cancel Job] button.
HP DesignJet ColorPro Series: User’s Guide (version 1) page 61 of 64
Page 62

Minimum Printing Margins
The following are the minimum printer margins for the various supported paper
sizes. Please note that these margins are based on the portrait orientation.
Minimum Printing Margins
Menu
Paper
Size
US Letter 0.25" 6.35mm 0.25" 6.35mm 0.117" 2.97mm 0.5" 12.7mm
11" x 17" (279mm x 432mm) 0. 26" 6.6mm 0.26" 6.6m m 0.117" 2. 97mm 0.5" 12.7mm
A4 0.113" 2.87mm 0.113" 2.87m m 0.117" 2.97mm 0.5" 12.7mm
A3 0.205" 5.2mm 0.205" 5.2mm 0.117" 2.97mm 0.5" 12.7mm
B4 0.205" 5.2mm 0. 205" 5.2mm 0.117" 2. 97mm 0.5" 12.7mm
Legal 0.25" 6.25mm 0.25" 6.25mm 0.117" 2.97mm 0.5" 12.7mm
Executive 0.252" 6.4mm 0.252" 6.4mm 0.117" 2.97mm 0.5" 12.7mm
A5 0.127" 3.2mm 0.127" 3.2mm 0.117" 2.97mm 0.5" 12.7mm
B5 0.128" 3.23mm 0.128" 3.23m m 0.117" 2.97mm 0.5" 12.7mm
4" x 6" (102mm x 152mm)
Index Card
5" x 8" (127mm x 203mm)
Index Card
A6 Card 0.133" 3.38mm 0.133" 3.38m m 0.117" 2.97mm 0.5" 12.7mm
0.133" 3.38mm 0.133" 3.38m m 0.117" 2.97mm 0.5" 12.7mm
0.127" 3.2mm 0.127" 3.2mm 0.117" 2.97mm 0.5" 12.7mm
Left
Margin
Right
Margin
Top
Margin
Bottom
Margin
13" x 19" (330mm x 483mm) 0.207" 5.26mm 0.207" 5.26mm 0.117" 2.97mm 0.5" 12.7mm
Statement 0.203" 5.25mm 0.203" 5.25m m 0.117" 2.97mm 0.5" 12.7mm
Custom (4"x5.83" to 13"x19")
or (100mm x 148mm to
330mm x 483mm)
0.137" 3.48mm 0.137" 3.48mm 0.117" 2.97mm 0.5" 12.7mm
HP DesignJet ColorPro Series: User’s Guide (version 1) page 62 of 64
Page 63

Understanding the Diagnostic Test
The Diagnostic Test page is a valuable tool for troubleshooting. This will help
verify if th e printer is working.
To pri nt a Diagnostic Test:
1. Press [Menu] until SE LF TEST ME NU appears
2. Press [Item] until PRINT DIAGNOSTIC PAGE appears.
3. Press [Select] to print the diagnostic page.
The Diagnostic Test page is divided into fou r sections:
Item Description
Understanding the Diagnostic Test
Menu
¯
°
±
²
Printer Information shows general printer information such as
Firmware version number, Model and Service ID.
Built-in Bitmap Fonts shows the type of fonts that are resident in
your printer. This is different from the TrueType fonts that are
installed in your computer.
Printhead Information monitors and displays the status of your
printhead. If these bars are printed properly, it shows that the
printheads are in working order.
Ink Cartridge Information displays the amount of ink left in each
ink cartridge.
HP DesignJet ColorPro Series: User’s Guide (version 1) page 63 of 64
Page 64

The Diagnostic Test looks like this:
Understanding the Diagnostic Test
¯
°
Menu
±
²
HP DesignJet ColorPro Series: User’s Guide (version 1) page 64 of 64
 Loading...