

Page 1

Technical Reference Guide
HP Compaq 8100 Elite Series
Business Desktop Computers
Document Part Number: 601198-001
February 2010
This document provides information on the design, architecture, function,
and capabilities of the HP Compaq 8100 Elite Series Business Desktop
Computers. This information may be used by engineers, technicians,
administrators, or anyone needing detailed information on the products
covered.
Page 2

© Copyright 2010 Hewlett-Packard Development Company, L.P.
The information contained herein is subject to change without notice.
Microsoft, MS-DOS, Windows, Windows NT, Windows XP, Windows Vista, and Windows 7 are trademarks of
Microsoft Corporation in the U.S. and other countries.
Intel, Intel Core 2 Duo, Intel Core 2 Quad, Pentium Dual-Core, Intel Inside, and Celeron are trademarks of Intel
Corporation in the U.S. and other countries.
Adobe, Acrobat, and Acrobat Reader are trademarks or registered trademarks of Adobe Systems Incorporated.
The only warranties for HP products and services are set forth in the express warranty statements accompanying
such products and services. Nothing herein should be construed as constituting an additional warranty. HP shall
not be liable for technical or editorial errors or omissions contained herein.
This document contains proprietary information that is protected by copyright. No part of this document may be
photocopied, reproduced, or translated to another language without the prior written consent of Hewlett-Packard
Company.
Technical Reference Guide
HP Compaq 8100 Elite Series Business Desktop Computers
First Edition (February 2010)
Document Part Number: 601198-001
Page 3

Contents
1Introduction
1.1 About this Guide . . . . . . . . . . . . . . . . . . . . . . . . . . . . . . . . . . . . . . . . . . . . . . . . . . . . . . . . . . . . . 1–1
1.1.1 Online Viewing . . . . . . . . . . . . . . . . . . . . . . . . . . . . . . . . . . . . . . . . . . . . . . . . . . . . . . . . . 1–1
1.1.2 Hardcopy . . . . . . . . . . . . . . . . . . . . . . . . . . . . . . . . . . . . . . . . . . . . . . . . . . . . . . . . . . . . . . 1–1
1.2 Additional Information Sources . . . . . . . . . . . . . . . . . . . . . . . . . . . . . . . . . . . . . . . . . . . . . . . . . 1–1
1.3 Serial Number . . . . . . . . . . . . . . . . . . . . . . . . . . . . . . . . . . . . . . . . . . . . . . . . . . . . . . . . . . . . . . . 1–2
1.4 Notational Conventions . . . . . . . . . . . . . . . . . . . . . . . . . . . . . . . . . . . . . . . . . . . . . . . . . . . . . . . . 1–2
1.5.1 Special Notices . . . . . . . . . . . . . . . . . . . . . . . . . . . . . . . . . . . . . . . . . . . . . . . . . . . . . . . . . . 1–2
1.5.2 Values . . . . . . . . . . . . . . . . . . . . . . . . . . . . . . . . . . . . . . . . . . . . . . . . . . . . . . . . . . . . . . . . . 1–2
1.5.2 Ranges . . . . . . . . . . . . . . . . . . . . . . . . . . . . . . . . . . . . . . . . . . . . . . . . . . . . . . . . . . . . . . . . 1–2
1.5 Common Acronyms and Abbreviations . . . . . . . . . . . . . . . . . . . . . . . . . . . . . . . . . . . . . . . . . . . 1–3
2 System Overview
2.1 Introduction . . . . . . . . . . . . . . . . . . . . . . . . . . . . . . . . . . . . . . . . . . . . . . . . . . . . . . . . . . . . . . . . . 2–1
2.2 Features . . . . . . . . . . . . . . . . . . . . . . . . . . . . . . . . . . . . . . . . . . . . . . . . . . . . . . . . . . . . . . . . . . . . 2–2
2.3 System Architecture . . . . . . . . . . . . . . . . . . . . . . . . . . . . . . . . . . . . . . . . . . . . . . . . . . . . . . . . . . 2–4
2.3.1 Intel Processor Support . . . . . . . . . . . . . . . . . . . . . . . . . . . . . . . . . . . . . . . . . . . . . . . . . . . 2–6
2.3.2 Chipset . . . . . . . . . . . . . . . . . . . . . . . . . . . . . . . . . . . . . . . . . . . . . . . . . . . . . . . . . . . . . . . . 2–6
2.3.3 Support Components . . . . . . . . . . . . . . . . . . . . . . . . . . . . . . . . . . . . . . . . . . . . . . . . . . . . . 2–7
2.3.4 System Memory . . . . . . . . . . . . . . . . . . . . . . . . . . . . . . . . . . . . . . . . . . . . . . . . . . . . . . . . . 2–7
2.3.5 Mass Storage . . . . . . . . . . . . . . . . . . . . . . . . . . . . . . . . . . . . . . . . . . . . . . . . . . . . . . . . . . . 2–8
2.3.6 Serial Interface . . . . . . . . . . . . . . . . . . . . . . . . . . . . . . . . . . . . . . . . . . . . . . . . . . . . . . . . . . 2–8
2.3.7 Universal Serial Bus Interface . . . . . . . . . . . . . . . . . . . . . . . . . . . . . . . . . . . . . . . . . . . . . . 2–8
2.3.8 Network Interface Controller . . . . . . . . . . . . . . . . . . . . . . . . . . . . . . . . . . . . . . . . . . . . . . . 2–8
2.3.9 Graphics Subsystem . . . . . . . . . . . . . . . . . . . . . . . . . . . . . . . . . . . . . . . . . . . . . . . . . . . . . . 2–9
2.3.10 Audio Subsystem . . . . . . . . . . . . . . . . . . . . . . . . . . . . . . . . . . . . . . . . . . . . . . . . . . . . . . . 2–9
2.4 Specifications. . . . . . . . . . . . . . . . . . . . . . . . . . . . . . . . . . . . . . . . . . . . . . . . . . . . . . . . . . . . . . . 2–10
Technical Reference Guide www.hp.com iii
Page 4

Contents
3 Processor/Memory Subsystem
3.1 Introduction . . . . . . . . . . . . . . . . . . . . . . . . . . . . . . . . . . . . . . . . . . . . . . . . . . . . . . . . . . . . . . . . . 3–1
3.2 Intel Processors . . . . . . . . . . . . . . . . . . . . . . . . . . . . . . . . . . . . . . . . . . . . . . . . . . . . . . . . . . . . . . 3–2
3.2.1 Intel Processor Overview . . . . . . . . . . . . . . . . . . . . . . . . . . . . . . . . . . . . . . . . . . . . . . . . . . 3–2
3.2.2 Processor Changing/Upgrading . . . . . . . . . . . . . . . . . . . . . . . . . . . . . . . . . . . . . . . . . . . . . 3–3
3.3 Memory Subsystem . . . . . . . . . . . . . . . . . . . . . . . . . . . . . . . . . . . . . . . . . . . . . . . . . . . . . . . . . . . 3–4
3.3.1 Memory Upgrading . . . . . . . . . . . . . . . . . . . . . . . . . . . . . . . . . . . . . . . . . . . . . . . . . . . . . . 3–5
3.3.2 Memory Mapping and Pre-allocation . . . . . . . . . . . . . . . . . . . . . . . . . . . . . . . . . . . . . . . . 3–5
4 System Support
4.1 Introduction . . . . . . . . . . . . . . . . . . . . . . . . . . . . . . . . . . . . . . . . . . . . . . . . . . . . . . . . . . . . . . . . . 4–1
4.2 PCI Bus Overview . . . . . . . . . . . . . . . . . . . . . . . . . . . . . . . . . . . . . . . . . . . . . . . . . . . . . . . . . . . . 4–1
4.2.1 PCI 2.3 Bus Operation . . . . . . . . . . . . . . . . . . . . . . . . . . . . . . . . . . . . . . . . . . . . . . . . . . . . 4–1
4.2.2 PCI Express Bus Operation . . . . . . . . . . . . . . . . . . . . . . . . . . . . . . . . . . . . . . . . . . . . . . . . 4–3
4.2.3 Option ROM Mapping . . . . . . . . . . . . . . . . . . . . . . . . . . . . . . . . . . . . . . . . . . . . . . . . . . . . 4–4
4.2.4 PCI Interrupts . . . . . . . . . . . . . . . . . . . . . . . . . . . . . . . . . . . . . . . . . . . . . . . . . . . . . . . . . . . 4–4
4.2.5 PCI Power Management Support . . . . . . . . . . . . . . . . . . . . . . . . . . . . . . . . . . . . . . . . . . . . 4–4
4.2.6 PCI Connectors. . . . . . . . . . . . . . . . . . . . . . . . . . . . . . . . . . . . . . . . . . . . . . . . . . . . . . . . . . 4–5
4.3 System Resources . . . . . . . . . . . . . . . . . . . . . . . . . . . . . . . . . . . . . . . . . . . . . . . . . . . . . . . . . . . . 4–7
4.3.1 Interrupts . . . . . . . . . . . . . . . . . . . . . . . . . . . . . . . . . . . . . . . . . . . . . . . . . . . . . . . . . . . . . . 4–7
4.3.2 Direct Memory Access . . . . . . . . . . . . . . . . . . . . . . . . . . . . . . . . . . . . . . . . . . . . . . . . . . . . 4–8
4.4 Real-Time Clock and Configuration Memory. . . . . . . . . . . . . . . . . . . . . . . . . . . . . . . . . . . . . . . 4–9
4.4.1 Clearing CMOS . . . . . . . . . . . . . . . . . . . . . . . . . . . . . . . . . . . . . . . . . . . . . . . . . . . . . . . . . 4–9
4.4.2 Standard CMOS Locations. . . . . . . . . . . . . . . . . . . . . . . . . . . . . . . . . . . . . . . . . . . . . . . . 4–10
4.5 System Management . . . . . . . . . . . . . . . . . . . . . . . . . . . . . . . . . . . . . . . . . . . . . . . . . . . . . . . . . 4–10
4.5.1 Security Functions . . . . . . . . . . . . . . . . . . . . . . . . . . . . . . . . . . . . . . . . . . . . . . . . . . . . . . 4–10
4.5.2 Power Management . . . . . . . . . . . . . . . . . . . . . . . . . . . . . . . . . . . . . . . . . . . . . . . . . . . . . 4–12
4.5.3 System Status . . . . . . . . . . . . . . . . . . . . . . . . . . . . . . . . . . . . . . . . . . . . . . . . . . . . . . . . . . 4–12
4.5.4 Thermal Sensing and Cooling . . . . . . . . . . . . . . . . . . . . . . . . . . . . . . . . . . . . . . . . . . . . . 4–13
4.6 Register Map and Miscellaneous Functions . . . . . . . . . . . . . . . . . . . . . . . . . . . . . . . . . . . . . . . 4–14
4.6.1 System I/O Map . . . . . . . . . . . . . . . . . . . . . . . . . . . . . . . . . . . . . . . . . . . . . . . . . . . . . . . . 4–14
4.6.2 GPIO Functions . . . . . . . . . . . . . . . . . . . . . . . . . . . . . . . . . . . . . . . . . . . . . . . . . . . . . . . . 4–16
5 Input/Output Interfaces
5.1 Introduction . . . . . . . . . . . . . . . . . . . . . . . . . . . . . . . . . . . . . . . . . . . . . . . . . . . . . . . . . . . . . . . . . 5–1
5.2 SATA/eSATA Interface . . . . . . . . . . . . . . . . . . . . . . . . . . . . . . . . . . . . . . . . . . . . . . . . . . . . . . . 5–2
5.2.1 SATA Inteerface. . . . . . . . . . . . . . . . . . . . . . . . . . . . . . . . . . . . . . . . . . . . . . . . . . . . . . . . . 5–2
5.5.2 eSATA Interface. . . . . . . . . . . . . . . . . . . . . . . . . . . . . . . . . . . . . . . . . . . . . . . . . . . . . . . . . 5–3
5.3 Serial Interface. . . . . . . . . . . . . . . . . . . . . . . . . . . . . . . . . . . . . . . . . . . . . . . . . . . . . . . . . . . . . . . 5–4
5.4 Parallel Interface Support . . . . . . . . . . . . . . . . . . . . . . . . . . . . . . . . . . . . . . . . . . . . . . . . . . . . . . 5–5
5.4.1 Standard Parallel Port Mode. . . . . . . . . . . . . . . . . . . . . . . . . . . . . . . . . . . . . . . . . . . . . . . . 5–5
5.4.2 Enhanced Parallel Port Mode . . . . . . . . . . . . . . . . . . . . . . . . . . . . . . . . . . . . . . . . . . . . . . . 5–5
5.4.3 Extended Capabilities Port Mode . . . . . . . . . . . . . . . . . . . . . . . . . . . . . . . . . . . . . . . . . . . . 5–5
5.4.4 Parallel Interface Connector . . . . . . . . . . . . . . . . . . . . . . . . . . . . . . . . . . . . . . . . . . . . . . . . 5–6
5.5 Keyboard/Pointing Device Interface . . . . . . . . . . . . . . . . . . . . . . . . . . . . . . . . . . . . . . . . . . . . . . 5–7
5.5.1 Keyboard Interface Operation . . . . . . . . . . . . . . . . . . . . . . . . . . . . . . . . . . . . . . . . . . . . . . 5–7
5.5.2 Pointing Device Interface Operation . . . . . . . . . . . . . . . . . . . . . . . . . . . . . . . . . . . . . . . . . 5–8
iv www.hp.com Technical Reference Guide
Page 5

5.5.3 Keyboard/Pointing Device Interface Connector . . . . . . . . . . . . . . . . . . . . . . . . . . . . . . . . 5–8
5.6 Universal Serial Bus Interface. . . . . . . . . . . . . . . . . . . . . . . . . . . . . . . . . . . . . . . . . . . . . . . . . . . 5–9
5.6.1 USB Connector. . . . . . . . . . . . . . . . . . . . . . . . . . . . . . . . . . . . . . . . . . . . . . . . . . . . . . . . . . 5–9
5.6.2 USB Cable Data . . . . . . . . . . . . . . . . . . . . . . . . . . . . . . . . . . . . . . . . . . . . . . . . . . . . . . . . 5–10
5.7 Audio Subsystem. . . . . . . . . . . . . . . . . . . . . . . . . . . . . . . . . . . . . . . . . . . . . . . . . . . . . . . . . . . . 5–11
5.7.1 HD Audio Controller . . . . . . . . . . . . . . . . . . . . . . . . . . . . . . . . . . . . . . . . . . . . . . . . . . . . 5–12
5.7.2 HD Audio Link Bus . . . . . . . . . . . . . . . . . . . . . . . . . . . . . . . . . . . . . . . . . . . . . . . . . . . . . 5–12
5.7.3 Audio Multistreaming . . . . . . . . . . . . . . . . . . . . . . . . . . . . . . . . . . . . . . . . . . . . . . . . . . . 5–12
5.7.4 Audio Specifications . . . . . . . . . . . . . . . . . . . . . . . . . . . . . . . . . . . . . . . . . . . . . . . . . . . . 5–13
5.8 Network Interface Controller. . . . . . . . . . . . . . . . . . . . . . . . . . . . . . . . . . . . . . . . . . . . . . . . . . . 5–14
5.8.1 Wake-On-LAN Support . . . . . . . . . . . . . . . . . . . . . . . . . . . . . . . . . . . . . . . . . . . . . . . . . 5–15
5.8.2 Alert Standard Format Support . . . . . . . . . . . . . . . . . . . . . . . . . . . . . . . . . . . . . . . . . . . . 5–15
5.8.3 Power Management Support . . . . . . . . . . . . . . . . . . . . . . . . . . . . . . . . . . . . . . . . . . . . . . 5–15
5.8.4 NIC Connector . . . . . . . . . . . . . . . . . . . . . . . . . . . . . . . . . . . . . . . . . . . . . . . . . . . . . . . . 5–16
5.8.5 NIC Specifications . . . . . . . . . . . . . . . . . . . . . . . . . . . . . . . . . . . . . . . . . . . . . . . . . . . . . . 5–16
6 Integrated Graphics Subsystem
6.1 Introduction . . . . . . . . . . . . . . . . . . . . . . . . . . . . . . . . . . . . . . . . . . . . . . . . . . . . . . . . . . . . . . . . . 6–1
6.2 Functional Description . . . . . . . . . . . . . . . . . . . . . . . . . . . . . . . . . . . . . . . . . . . . . . . . . . . . . . . . 6–2
6.3 Upgrading . . . . . . . . . . . . . . . . . . . . . . . . . . . . . . . . . . . . . . . . . . . . . . . . . . . . . . . . . . . . . . . . . . 6–5
6.4 Monitor Connectors. . . . . . . . . . . . . . . . . . . . . . . . . . . . . . . . . . . . . . . . . . . . . . . . . . . . . . . . . . . 6–6
6.5.1 Analog Monitor Connector . . . . . . . . . . . . . . . . . . . . . . . . . . . . . . . . . . . . . . . . . . . . . . . . 6–6
6.5.2 DisplayPort Connector . . . . . . . . . . . . . . . . . . . . . . . . . . . . . . . . . . . . . . . . . . . . . . . . . . . . 6–7
Contents
7 Power and Signal Distribution
7.1 Introduction . . . . . . . . . . . . . . . . . . . . . . . . . . . . . . . . . . . . . . . . . . . . . . . . . . . . . . . . . . . . . . . . . 7–1
7.2 Power Distribution. . . . . . . . . . . . . . . . . . . . . . . . . . . . . . . . . . . . . . . . . . . . . . . . . . . . . . . . . . . . 7–1
7.3 Power Control . . . . . . . . . . . . . . . . . . . . . . . . . . . . . . . . . . . . . . . . . . . . . . . . . . . . . . . . . . . . . . . 7–4
7.3.1 Power Button . . . . . . . . . . . . . . . . . . . . . . . . . . . . . . . . . . . . . . . . . . . . . . . . . . . . . . . . . . . 7–4
7.3.2 Wake Up Events . . . . . . . . . . . . . . . . . . . . . . . . . . . . . . . . . . . . . . . . . . . . . . . . . . . . . . . . . 7–6
7.4 Power Management . . . . . . . . . . . . . . . . . . . . . . . . . . . . . . . . . . . . . . . . . . . . . . . . . . . . . . . . . . . 7–6
7.5 Signal Distribution. . . . . . . . . . . . . . . . . . . . . . . . . . . . . . . . . . . . . . . . . . . . . . . . . . . . . . . . . . . . 7–8
Technical Reference Guide www.hp.com v
Page 6

Contents
8SYSTEM BIOS
8.1 Introduction . . . . . . . . . . . . . . . . . . . . . . . . . . . . . . . . . . . . . . . . . . . . . . . . . . . . . . . . . . . . . . . . . 8–1
8.2 ROM Flashing . . . . . . . . . . . . . . . . . . . . . . . . . . . . . . . . . . . . . . . . . . . . . . . . . . . . . . . . . . . . . . . 8–2
8.2.1 Upgrading . . . . . . . . . . . . . . . . . . . . . . . . . . . . . . . . . . . . . . . . . . . . . . . . . . . . . . . . . . . . . . 8–2
8.2.2 Changeable Splash Screen . . . . . . . . . . . . . . . . . . . . . . . . . . . . . . . . . . . . . . . . . . . . . . . . . 8–2
8.3 Boot Functions. . . . . . . . . . . . . . . . . . . . . . . . . . . . . . . . . . . . . . . . . . . . . . . . . . . . . . . . . . . . . . . 8–3
8.3.1 Boot Device Order . . . . . . . . . . . . . . . . . . . . . . . . . . . . . . . . . . . . . . . . . . . . . . . . . . . . . . . 8–3
8.3.2 Network Boot (F12) Support . . . . . . . . . . . . . . . . . . . . . . . . . . . . . . . . . . . . . . . . . . . . . . . 8–3
8.3.3 Memory Detection and Configuration . . . . . . . . . . . . . . . . . . . . . . . . . . . . . . . . . . . . . . . . 8–3
8.3.4 Boot Error Codes . . . . . . . . . . . . . . . . . . . . . . . . . . . . . . . . . . . . . . . . . . . . . . . . . . . . . . . . 8–4
8.4 Client Management Functions. . . . . . . . . . . . . . . . . . . . . . . . . . . . . . . . . . . . . . . . . . . . . . . . . . . 8–5
8.4.1 System ID and ROM Type . . . . . . . . . . . . . . . . . . . . . . . . . . . . . . . . . . . . . . . . . . . . . . . . . 8–6
8.4.2 Temperature Status. . . . . . . . . . . . . . . . . . . . . . . . . . . . . . . . . . . . . . . . . . . . . . . . . . . . . . . 8–6
8.5 SMBIOS support . . . . . . . . . . . . . . . . . . . . . . . . . . . . . . . . . . . . . . . . . . . . . . . . . . . . . . . . . . . . . 8–7
8.6 USB Legacy Support. . . . . . . . . . . . . . . . . . . . . . . . . . . . . . . . . . . . . . . . . . . . . . . . . . . . . . . . . . 8–8
8.7 Management Engine Functions . . . . . . . . . . . . . . . . . . . . . . . . . . . . . . . . . . . . . . . . . . . . . . . . . . 8–8
A Error Messages and Codes
Index
vi www.hp.com Technical Reference Guide
Page 7

1.1 A bo u t t h is G u i d e
This guide provides technical information about HP Compaq 8100 Elite Business PC personal
computers that feature the Intel® Q57 chipset and support select Intel Pentium®, Core™ i3,
Core i5, and Core i7 processors. This document describes in detail the system's design and
operation for programmers, engineers, technicians, and system administrators, as well as
end-users wanting detailed information.
This guide primarily describes the hardware and firmware elements and primarily deal with the
system board and the power supply assembly. This guide can be used either as an online
document or in hardcopy form.
1.1.1 O n l i n e V i e w in g
Online viewing allows for quick navigating and convenient searching through the document. A
color monitor will also allow the user to view the color shading used to highlight differential
data. A softcopy of the latest edition of this guide is available for downloading in .pdf file format
at the following URL:
www.hp.com
1
Introduction
Viewing the file requires a copy of Adobe Acrobat Reader available at no charge from Adobe
Systems, Inc. at the following URL:
www.adobe.com
1.1. 2 H a r dc o py
A hardcopy of this guide may be obtained by printing from the .pdf file. The document is
designed for printing in an 8 ½ x 11-inch format.
1.2 Additional Information Sources
For more information on components mentioned in this guide refer to the indicated
manufacturers' documentation, which may be available at the following online sources:
■ HP Corporation: www.hp.com
■
Intel Corporation: www.intel.com
■
Serial ATA International Organization (SATA-IO): www.serialATA.org.
■
USB user group: www.usb.org
Technical Reference Guide www.hp.com 1-1
Page 8

Introduction
1. 3 S e r i a l N um b er
The serial number is located on a sticker placed on the exterior cabinet. The serial number is also
written into firmware and may be read with HP Diagnostics or Insight Manager utilities.
1.4 Notational Conventions
The notational guidelines used in this guide are described in the following subsections.
1.4.1 Special Notices
The usage of warnings, cautions, and notes is described as follows:
WARNING: Text set off in this manner indicates that failure to follow directions could result in bodily
Å
harm or loss of life.
CAUTION: Text set off in this manner indicates that failure to follow directions could result in damage to
Ä
equipment or loss of information.
Text set off in this manner provides information that may be helpful.
✎
1.4.2 Values
Differences between bytes and bits are indicated as follows:
MB = megabytes
Mb = megabits
1.4.3 Ranges
Ranges or limits for a parameter are shown using the following methods:
Example A: Bits <7..4> = bits 7, 6, 5, and 4.
Example B: IRQ3-7, 9 = IRQ signals 3, 4, 5, 6, 7, and 9
1-2 www.hp.com Technical Reference Guide
Page 9

1.5 Common Acronyms and Abbreviations
Table 1-1 lists the acronyms and abbreviations used in this guide.
Table 1-1
Acronyms and Abbreviations
Acronym or
Abbreviation Description
Aampere
AC alternating current
ACPI Advanced Configuration and Power Interface
A/D analog-to-digital
ADC Analog-to-digital converter
ADD or ADD2 Advanced digital display (card)
AGP Accelerated graphics port
AHCI SATA Advanced Host controller Interface
AMT Active Management Technology
Introduction
API application programming interface
APIC Advanced Programmable Interrupt Controller
APM advanced power management
AOL Alert- On-LAN™
ASIC application-specific integrated circuit
ASF Alert Standard Format
AT 1. attention (modem commands) 2. 286-based PC architecture
ATA AT attachment (IDE protocol)
ATAPI ATA w/packet interface extensions
AVI audio - vide o inte rleaved
AVGA Advanc ed VGA
AWG American Wire Gauge (specification)
BAT Basic assurance test
BCD binary-coded decimal
BIOS basic input/output system
bis second/new revision
BNC Bayonet Neill-Concelman (connector type)
bps or b/s bits per second
BSP Bootstrap processor
BTO Built to order
CAS column address strobe
CD compact disk
CD-ROM compact disk read-only memory
Technical Reference Guide www.hp.com 1-3
Page 10

Introduction
Table 1-1 (Continued)
Acronyms and Abbreviations
Acronym or
Abbreviation Description
CDS compact disk system
CGA color graphics adapter
Ch Channel, chapter
cm centimeter
CMC cache/memory controller
CMOS complimentary metal-oxide semiconductor (configuration memory)
Cntlr controller
Cntrl control
codec 1. coder/decoder 2. compressor/decompressor
CPQ Compaq
CPU central processing unit
CRIMM Continuity (blank) RIMM
CRT cathode ray tube
CSM 1. Compaq system management 2. Compaq server management
DAC digital-to-analog converter
DC direct current
DCH DOS compatibility hole
DDC Display Data Channel
DDR Double data rate (memory)
DIMM dual inline memory module
DIN Deutche IndustriNorm (connector type)
DIP dual inline package
DMA direct memory access
DMI Desktop management interface
dpi dots per inch
DRAM dynamic random access memory
DRQ data request
DVI Digital video interface
dword Double word (32 bits)
EDID extended display identification data
EDO extended data out (RAM type)
EEPROM electrically erasable PROM
EGA enhanced graphics adapter
EIA Electronic Industry Association
1-4 www.hp.com Technical Reference Guide
Page 11

Table 1-1 (Continued)
Acronyms and Abbreviations
Acronym or
Abbreviation Description
EISA extended ISA
EPP enhanced parallel port
EIDE enhanced IDE
ESCD Extended System Configuration Data (format)
EV Environmental Variable (data)
ExCA Exchangeable Card Architecture
FIFO first in/first out
FL flag (register)
FM frequency modulation
FPM fast page mode (RAM type)
FPU Floating point unit (numeric or math coprocessor)
FPS Frames per second
ft Foot/feet
Introduction
GB gigabyte
GMCH Graphics/memory controller hub
GND ground
GPIO general purpose I/O
GPOC general purpose open-collector
GART Graphics address re-mapping table
GUI graphic user interface
hhexadecimal
HDD hard disk drive
HW hardware
hex hexadecimal
Hz Hertz (cycles-per-second)
ICH I/O controller hub
IDE integrated drive element
IEEE Institute of Electrical and Electronic Engineers
IF interrupt flag
I/F interface
IGC integrated graphics controller
in inch
INT interrupt
I/O input/output
IOPS Input/output Operations Per Second
Technical Reference Guide www.hp.com 1-5
Page 12

Introduction
Table 1-1 (Continued)
Acronyms and Abbreviations
Acronym or
Abbreviation Description
IPL initial program loader
IrDA Infrared Data Association
IRQ interrupt request
ISA industry standard architecture
Kb/KB kilobits/kilobytes (x 1024 bits/x 1024 bytes)
Kb/s kilobits per second
kg kilogram
KHz kilohertz
kV kilovolt
lb pound
LAN local area network
LCD liquid crystal display
LED light-emitting diode
LPC Low pin count
LSI large scale integration
LSb/LSB least significant bit/least significant byte
LUN logical unit (SCSI)
m Meter
MCH Memory controller hub
MMX multimedia extensions
MPEG Motion Picture Experts Group
ms millisecond
MSb/MSB most significant bit/most significant byte
mux multiplex
MVA motion video acceleration
MVW motion video window
n variable parameter/value
NIC network interface card/controller
NiMH nickel-metal hydride
NMI non-maskable interrupt
NRZI Non-return-to-zero inverted
ns nanosecond
NT nested task flag
NTSC National Television Standards Committee
1-6 www.hp.com Technical Reference Guide
Page 13

Table 1-1 (Continued)
Acronyms and Abbreviations
Acronym or
Abbreviation Description
NVRAM non-volatile random access memory
ODD optical disk drive
OS operating system
PAL 1. programmable array logic 2. phase alternating line
PATA Parallel ATA
PC Personal computer
PCA Printed circuit assembly
PCI peripheral component interconnect
PCI-E PCI Express
PCM pulse code modulation
PCMCIA Personal Computer Memory Card International Association
PEG PCI express graphics
PFC Power factor correction
Introduction
PIN personal identification number
PIO Programmed I/O
PN Part number
POST power-on self test
PROM programmable read-only memory
PTR pointer
RAID Redundant array of inexpensive disks (drives)
RAM random access memory
RAS row address strobe
rcvr receiver
RDRAM (Direct) Rambus DRAM
RGB red/green/blue (monitor input)
RH Relative humidity
RMS root mean square
ROM read-only memory
RPM revolutions per minute
RTC real time clock
R/W Read/Write
SATA Serial ATA
SCSI small computer system interface
SDR Singles data rate (memory)
Technical Reference Guide www.hp.com 1-7
Page 14

Introduction
Table 1-1 (Continued)
Acronyms and Abbreviations
Acronym or
Abbreviation Description
SDRAM Synchronous Dynamic RAM
SDVO Serial digital video output
SEC Single Edge-Connector
SECAM sequential colour avec memoire (sequential color with memory)
SF sign flag
SGRAM Synchronous Graphics RAM
SIMD Single instruction multiple data
SIMM single in-line memory module
SMART Self Monitor Analysis Report Technology
SMI system management interrupt
SMM system management mode
SMRAM system management RAM
SODIMM small outline DIMM
SPD serial presence detect
SPDIF Sony/Philips Digital Interface (IEC-958 specification)
SPN Spare part number
SPP standard parallel port
SRAM static RAM
SSD solid state disk (drive)
SSE Streaming SIMD extensions
STN super twist pneumatic
SVGA super VGA
SW software
TAD telephone answering device
TAFI Temperature-sensing And Fan control Integrated circuit
TCP tape carrier package, transmission control protocol
TF trap flag
TFT thin-film transistor
TIA Telecommunications Information Administration
TPE twisted pair ethernet
TPI track per inch
TPM Trusted Platform Module
TTL transistor-transistor logic
TV television
1-8 www.hp.com Technical Reference Guide
Page 15

Table 1-1 (Continued)
Acronyms and Abbreviations
Acronym or
Abbreviation Description
TX transmit
UART universal asynchronous receiver/transmitter
UDMA Ultra DMA
UDIMM unbuffered/unregistered DIMM
URL Uniform resource locator
us/µs microsecond
USB Universal Serial Bus
UTP unshielded twisted pair
Vvolt
VAC Volts alternating current
VDC Volts direct current
VESA Video Electronic Standards Association
VGA video graphics adapter
Introduction
VLSI very large scale integration
VRAM Video RAM
Wwatt
WOL Wake -On-LAN
WRAM Windows RAM
ZF zero flag
ZIF zero insertion force (socket)
Technical Reference Guide www.hp.com 1-9
Page 16

Introduction
1-10 www.hp.com Technical Reference Guide
Page 17
2.1 Introduction
The HP Compaq 8100 Elite Business PC personal computers (Figure 2-1) deliver an outstanding
combination of manageability, serviceability, and compatibility for enterprise environments.
Based on the the Intel Q57 chipset and supporting select Intel Pentium®, Core™ i3, Core i5, and
Core i7 processors, these systems emphasize performance along with industry compatibility.
These models feature a similar architecture incorporating both PCI 2.3 and PCIe 2.0 buses. All
models are easily upgradeable and expandable to keep pace with the needs of the office
enterprise.
2
System Overview
HP 8100 Elite SFF
Figure 2-1. HP Compaq 8100 Elite Business PCs
This chapter includes the following topics:
■ Features (2.2)
■ System architecture (2.3)
■ Specifications (2.4)
Technical Reference Guide www.hp.com 2-1
HP 8100 Elite CMT
Page 18

System Overview
2.2 Features
The following standard features are included on all models unless otherwise indicated:
■ Intel Pentium Dual-Core G6950, Core i3, Core i5, or Core i7 processor (LGA1156 package)
■ Dual monitor support:
❏ One VGA connector
❏ One DisplayPort (DP) connector with Multimode support
■ PC3-6400 and PC3-8500 (DDR3) DIMM support
■ Hard drive fault prediction
■ Ten externally-accessible USB 2.0-compliant ports (four front, six rear)
■ High definition (HD) audio processor with one headphone output, at least one microphone
input, one line output, and one line input
■ Network interface controller providing 10/100/1000Base T support
■ Plug 'n Play compatible (with ESCD support)
■ Intelligent Manageability support
■ PS/2 enhanced keyboard
■ PS/2 optical scroll mouse
■ Management/security features including:
❏ Flash ROM Boot Block
❏ Diskette drive disable, boot disable, write protect
❏ Power-on password
❏ Administrator password
❏ Serial port disable
❏ Smart Cover (hood) Sense
❏ Smart Cover (hood) Lock
❏ USB port disable
❏ Intel Standard Manageability support
❏ Intel vPro Technology
❏ HP Virtual Safe Browser
❏ HP ProtectTools Embedded Security
2-2 www.hp.com Technical Reference Guide
Page 19

System Overview
Table 2-1 shows the differences in features between the different PC series based on form factor:
Table 2-1
Feature Differences by Form Factor
SFF CMT
Processor types supported Intel Core i5 Intel Core i5
Processor wattage (max) 95 W 95 W
Memory:
# & type of sockets
Maximum memory
Serial ports 1 std., 1 opt. [1] 1 std., 1 opt. [1]
Parallel ports optional optional
Drive bays:
Externally accessible
Internal
4 DDR3 UDIMMs
16 G B
1 - 5.25”, 1 - 3.5” [9]
1 - 3.5”
4 DDR3 UDIMMs
16 G B
3 - 5.25” [7]
3 - 5.25” [8]
Drive types supported 2 HDDs,
1ODD,
RAID1
PCIe slots:
x16 (graphics)
x4 (x16 connector)
x1 connector
PCI 2.3 32-bit 5-V slot, 25-watt maximum 1 3 full-height
Power Supply Unit:
Module type
power rating
NOTES:
[1] 2nd serial port requires optional cable/bracket assembly.
[2] Low-profile, 25 W maximum.
[3] Low profile, 10-watt maximum
[4] Full-length;
75-watt maximum if PCIe x4 slot is not populated,
35-watt maximum if PCIe x4 slot is populated
[5] 35-watt maximum
[6] Half-height, half-length, 10-watt maximum
[7] 3.5” devices supported with adapters
[8] 2.5” solid state drives supprted with adapter brackets
[9] Can hold a 2nd hard drive
(all low profile)
1 [2]
1 [2]
1 [3]
internal
240 -watt
2 HDDs,
2 ODDs,
RAID1
(all full height)
1 [4]
1 [5]
1 [6]
internal
320 -watt
Technical Reference Guide www.hp.com 2-3
Page 20

System Overview
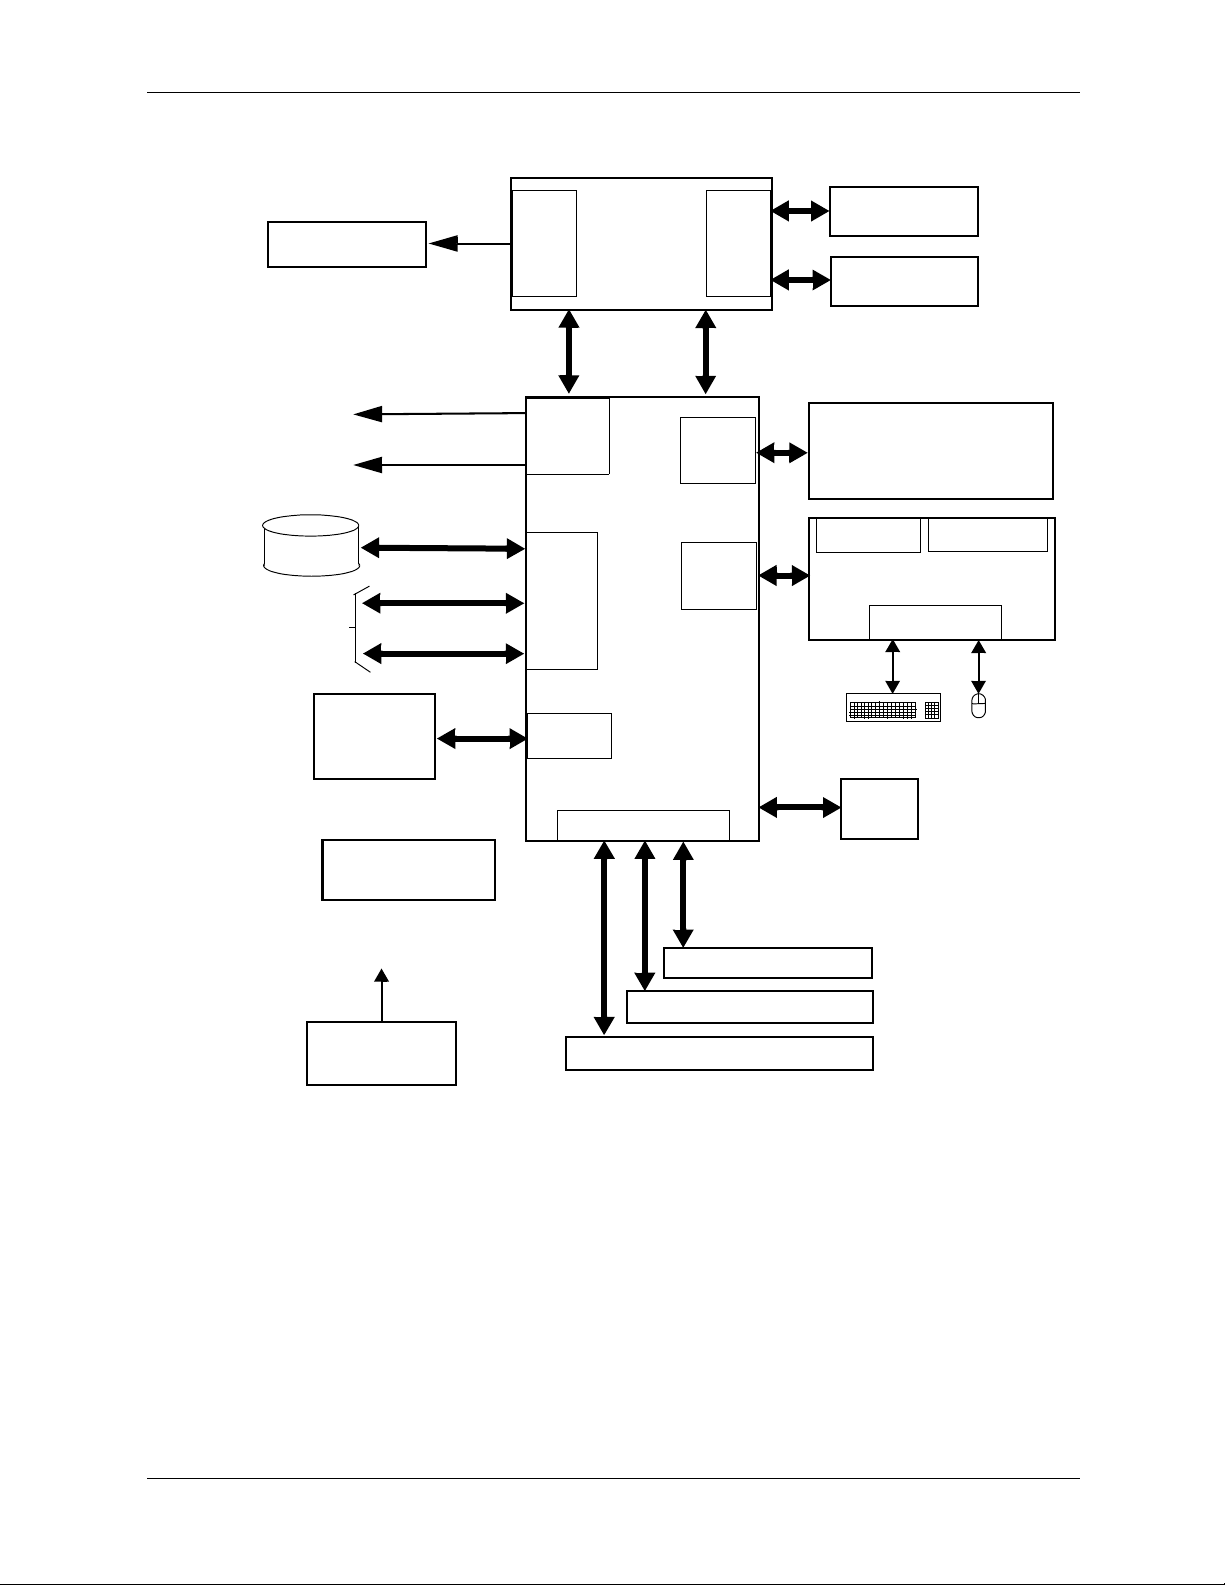
2.3 System Architecture
The systems covered in this guide feature an architecture based on the Intel Core i5 processor
and the Intel Q57 Platform Controller Hub (PCH) shown in Figure 2-2. All systems covered in
this guide include the following key components:
■ Intel Pentium Dual-Core G6950, Core i3, Core i5, or Core i7 processor.
■ Intel Q57 PCH-DO chipset
■ Super I/O (SIO) controller supporting PS/2 keyboard and mouse peripherals
■ ALC261 audio controller supporting line in, line out, microphone in, and headphones out
■ Intel 82567LM GbE network interface controller
■ HP ProtectTools Embedded Security
The Q57 PCH provides a major portion of system functionality. Designed to complement the
latest Intel processors, the Q57 PCH communicates with the processor through a
800/1066/1333-MHz Front-Side Bus (FSB). The integrated graphics controller of the Q57 can be
upgraded through a PCI Express (PCIe) x16 graphics slot. All systems include a serial ATA
(SATA) hard drive in the standard configuration.
Table 2-2 lists the differences between models by form factor.
Table 2-2.
Architectural Differences by Form Factor
Function SFF CMT
Memory sockets 4 UDIMMs 4 UDIMMs
PCIe 2.0 x16 graphics slots 1 [1] 1
PCIe x4 (x16 connector) slots 0 1
# of PCIe 2.0 x1 slots 1 [1] 1
# of PCI 2.3 slots 1 [1] 3
SATA interfaces 4 5
Notes:
[1] Low-profile slot.
2-4 www.hp.com Technical Reference Guide
Page 21
PCIe 2.0
x16 slot (PEG)
PCIe
I/F
Intel
Processor
Mem.
Cntlr.
System Overview
Ch A DDR3
SDRAM
Ch B DDR3
SDRAM
Analog
Monitor
Digital
Monitor
SATA
Hard Drive
Additional
SATA
Devices
VGA
DisplayPort
SATA
SATA
SATA/eSATA
ALC261
Audio
Subsystem
HP ProtectTools
Embedded Security
FDI
Graphics
Cntlr.
SATA
I/F [1]
Audio I/F
Q57
PCH-D0
PCI Cntlr.
DMI
USB
I/F
LPC
I/F
(6 rear ports, 4 front ports,
USB 2.0
4 internal ports via header)
Serial I/F
Parallel I/F
SIO Controller
Kybd-Mouse I/F
Keyboard
LCI
NIC
I/F
Mouse
System board
12 VDC
Power Supply
Notes:
[1] 3 SATA ports in SFF, 4 SATA ports in CMT, and 1 eSATA port in SFF and CMT.
[2] 1 in SFF, 3 in CMT
PCIe 2.0 x4 slot (x16 conn.)
PCI 2.3 slot [2]
PCIe 2.0 x1 slot
Figure 2-2. HP Compaq 8100 Elite Business PC Architecture, Block diagram
Technical Reference Guide www.hp.com 2-5
Page 22

System Overview
2.3.1 Intel Processor Support
The models covered in this guide can support an Intel Pentium Dual-Core G6950, Core i3, Core
i5, or Core i7 processor. These processors are backward-compatible with software written for
earlier x86 microprocessors and include streaming SIMD extensions (SSE, SSE2, and SSE3) for
enhancing 3D graphics and speech processing performance. Intel processors with vPro
Technology include hardware-based tools that allow corporate IT organizations to remotely
manage and protect systems.
The system board includes a zero-insertion-force (ZIF) Socket-T designed for mounting an
LGA1156-type processor package.
CAUTION: These systems can support a processor rated up to 95 watts. Exceeding these limits can
Ä
result in system damage and loss of data.
The processor heatsink/fan assembly mounting differs between form factors. Always use the
✎
same assembly or one of the same type when replacing the processor. Refer to the applicable
Service Reference Guide for detailed removal and replacement procedures of the heatsink/fan
assembly and the processor.
2.3.2 Chipset
The Intel Q57 PCH-D0 integrates a Graphics Memory Controller Hub (GMCH) and an enhanced
I/O controller hub (ICH) into a single component that provides the following functions:
■ PCI 2.3 bus controller
■ PCIe bus controller
■ LPC bus controller
■ SMBus interface
■ SATA interface
■ HD audio interface
■ RTC/CMOS function
■ IRQ controller
■ Power management logic
■ USB 1.1/2.0 controllers supporting 14 ports
■ Gigabit Ethernet controller
2-6 www.hp.com Technical Reference Guide
Page 23

2.3.3 Support Components
Input/output functions not provided by the chipset are handled by other support components.
Some of these components also provide “housekeeping” and various other functions as well.
Table 2-3 shows the functions provided by the support components.
Support Component Functions
Component Name Function
WPCD376H SIO Controller Keyboard and pointing device I/F
Serial I/F (COM1and COM2) [1]
Parallel I/F (LPT1, LPT2, or LPT3) [2]
PCI reset generation
Interrupt (IRQ) serializer
Power button and front panel LED logic
GPIO ports
Processor over temperature monitoring
Fan control and monitoring
Power supply voltage monitoring
SMBus and Low Pin Count (LPC) bus I/F
System Overview
Table 2-3
Intel 82578LM Network Interface
Controller
ALC261 HD Audio Codec Audio mixer
NOTE:
[1] COM2 requires external bracket/cable assembly.
[2] Requires external bracket/cable assembly.
2.3.4 System Memory
These systems implement a dual-channel Double Data Rate (DDR3) memory architecture. All
models support DDR3 1333-, 1066, and 800-MHz memory modules and provide four UDIMM
sockets and support a total of 16 gigabytes of memory.
10/100/1000 Fast Ethernet network interface controller.
Two digital-to-analog stereo converters
Two analog-to-digital stereo converters
Analog I/O
Supports stereo (two-channel) audio streams
Technical Reference Guide www.hp.com 2-7
Page 24

System Overview
2.3.5 Mass Storage
All models support at least two mass storage devices, with one being externally accessible for
removable media. The hard drive controller supports SATA 1.5- and 3.0-Gb/s hard drives in the
following quantities:
SFF: four SATA interfaces (one SATA port available for eSATA port option)
CMT: five SATA interfaces (one SATA port available for eSATA port option)
These systems may be preconfigured or upgraded with a SATA hard drive and one removable
media drive such as a CD-ROM drive.
2.3.6 Serial Interface
Aserial port is accessible at the rear of the chassis. These systems may be upgraded with a second
serial port option. The serial interface is RS-232-C/16550-compatible and supports standard
baud rates up to 115,200 as well as two high-speed baud rates of 230K and 460K.
2.3.7 Universal Serial Bus Interface
All models provide ten Universal Serial Bus (USB) ports. Two ports are accessible at the front of
the unit, six ports are accessible on the rear panel, and two ports are accessible through a header
on the system board. These systems support a media card reader module that connects to the
internal header. These systems support USB 1.1 and 2.0 functionality on all ports.
BIOS Setup allows for the disabling of USB ports individually or in groups. In order to secure
the system against a physical attack, ports may be disabled even if there is nothing physically
connected to them, such as the two front ports for the media card reader module when the
module is not present.
2.3.8 Network Interface Controller
All models feature an Intel 82578 gigabit (GbE) Network Interface Controller (NIC) integrated
on the system board. The controller provides automatic selection of 10BASE-T, 100BASE-TX,
or 1000BASE-T operation with a local area network and includes power-down, wake-up,
Alert-On-LAN (AOL), Alert Standard Format (ASF), and AMT features. An RJ-45 connector
with status LEDs is provided on the rear panel.
2-8 www.hp.com Technical Reference Guide
Page 25

2.3.9 Graphics Subsystem
Systems pre-configured with an Intel processor with integrated graphics controller can drive both
an external VGA monitor and a DisplayPort digital display. The controller implements Dynamic
Video Memory Technology (DVMT 3.0) for video memory. Table 2-4 lists the key features of the
integrated graphics subsystem.
Intel Integrated Graphics Controller Statistics
Recommended for Hi 2D, Entry 3D
Bus Type Int. PCI Express
Memory Amount 32 MB pre-allocated
Memory Type DVMT 3.0
Maximum 2D Resolution 2560x1600
System Overview
Table 2-4
Intel Core i5-661 Processor
Integrated Graphics Controller
Hardware Acceleration Quick Draw,
Outputs 1 VGA, 1 DisplayPort 1.1 [see text]
All systems include a legacy VGA connector and a DisplayPort connector and support dual
monitor operation. The DisplayPort includes a multimode feature that allows a DVI or VGA
adapter to be connected to the DisplayPort.
These systems include two PCIe graphics slots (one x16, one x4/x16 connector). System s
✎
preconfigured with an Intel Core i5-750 or Core i7 processor will include a PCIe graphics
adapter card installed in one of these slots.
2.3.10 Audio Subsystem
These systems use the integrated High Definition audio controller of the chipset and the ADI
ADL261 High Definition audio codec. HD audio provides enhanced audio performance with
higher sampling rates, refined signal interfaces, and audio processors with increased
signal-to-noise ratio. The audio line input jack can be re-configured as a microphone input, and
multi-streaming is supported. These systems include a 1.5-watt output amplifier driving an
internal speaker, which can be muted with the F10 BIOS control. All models include a front
panel accessible stereo microphone input jack (re-taskable as a Line-In input) and a headphone
output audio jack.
DirectX DX10,
Direct Draw,
Direct Show,
Open GL 2.1,
MPEG 1-2,
Indeo
Technical Reference Guide www.hp.com 2-9
Page 26

System Overview
2.3.11 HP ProtectTools Embedded Security
HP ProtectTools Embedded Security is a hardware/software solution providing file and folder
encrypytion service that integrates with the operating system. The software component—the HP
ProtectTools Embedded Security Manager (preinstalled), controls the basic operation of the
hardware component—the Trusted Platform Module (TPM) security chip. These components are
compliant with the Trusted Computing Group (TCG) security standards organization.
HP ProtectTools Embedded Security includes the following features:
■ Enhanced Windows operating system files and folder encryption
■ Enhanced email encryption—built-in authentication for Outlook, Outlook Express, Lotus
Notes, Eudora
■ Strengthends defense against hacking, system attacks, denial of service and network attacks
■ “Embedded smart card” functionality
■ Strengthens authentication with LANs, WANs.
■ Works with/enhances third-party security solutions
HP ProtectTools Embedded Security Manager is acecssed through a Windows Control Panel
applet. The management functions are accessible thro;ugh establishlished protocols such as
DMI, SNMP, or WEBEM.
2.4 Specifications
This section includes the environmental, electrical, and physical specifications for the systems
covered in this guide. Where provided, metric statistics are given in parenthesis. Specifications
are subject to change without notice.
Environmental Specifications (Factory Configuration)
Parameter Operating Non-operating
Ambient Air Temperature 50
Shock (w/o damage) 5 Gs [1] 20 Gs [1]
Vibration 0.000215 G
Humidity 10-90% Rh @ 28
Maximum Altitude 10,000 ft (3048 m) [2] 30,000 ft (9144 m) [2]
NOTE:
[1] Peak input acceleration during an 11 ms half-sine shock pulse.
[2] Maximum rate of change: 1500 ft/min.
Table 2-5
o
to 95o F (10o to 35o C, max.
rate of change <
wet bulb temperature
10°C/Hr)
2
/Hz, 10-300 Hz 0.0005 G2/Hz, 10-500 Hz
o
C max.
o
-22
to 140o F (-30o to 60o C, max.
rate of change <
5-95% Rh @ 38.7o C max.
wet bulb temperature
20°C/Hr)
2-10 www.hp.com Technical Reference Guide
Page 27

Table 2-6
Power Supply Electrical Specifications
Parameter Value
Input Line Voltage:
Nominal:
Maximum
Input Line Frequency Range:
Nominal
Maximum
Energy Star 4.0 with 80Plus Bronze-level compliancy Optional
Maximum Continuous Power:
SFF
CMT
NOTE:
Energy Star 4.0 with 80Plus Bronze-level compliancy option available.
100–240 VAC
90–264 VAC
50–60 Hz
47–63 Hz
240 watts
320 watts
System Overview
Table 2-7
Physical Specifications
Parameter SFF [2] CMT [3]
Height 3.95 in
(10.03 c m)
Width 13.3 in
(33.78 cm)
Depth 14.9 in
(37.85 cm)
Weight [1] 16.72 lb
(7.6 kg)
Load-bearing ability of
chassis [4]
NOTES:
[1] System configured with 1 hard drive, 1 optical media drive, and no PCI cards.
[2] Desktop (horizontal) configuration.
[3] Minitower configuration. For desktop configuration, swap Height and Width dimensions.
[4] Applicable to unit in desktop orientation only and assumes reasonable type of load such as a monitor.
77.1 lb
(35 kg)
17.63 in
(44.8 cm)
7.0 i n
(17.8 cm)
17.5 in
(44.5 cm)
26.2 lb
(11.5 k g )
77.1 lb
(35 kg)
Technical Reference Guide www.hp.com 2-11
Page 28

System Overview
2-12 www.hp.com Technical Reference Guide
Page 29
3.1 Introduction
This systems support an Intel Pentium Dual-Core G6950, Core i3, Core i5, or Core i7 processor.
These processors include an integrated dual-channel DDR3 memory controller (Figure 3-1) and
support PC3-6400, PC3-8500, and PC3-10600 memory modules. This chapter describes the
processor/memory subsystem.
3
Processor/Memory Subsystem
FDI
Intel
Processor
PCH
DDR3
SDRAM
Cntlr
DMI
Channel A
Channel B
XMM1
DIMM
or
SODIMM
DIMM
or
SODIMM
XMM3
XMM2
DIMM
DIMM
XMM4
Figure 3-1. Processor/Memory Subsystem Architecture
This chapter includes the following topics:
■ Intel processor(3.2)
■ Memory subsystem (3.3)
Technical Reference Guide www.hp.com 3-1
Page 30

Processor/Memory Subsystem
3.2 Intel Processor
These systems support an Intel Pentium Dual-Core G6950, Core i3, Core i5, or Core i7 processor
in an LGA1156 package mounted with a heat sink in a zero-insertion force socket. The mounting
socket allows the processor to be easily changed for upgrading.
3.2.1 Intel Processor Features
Primary features of the processors supported by these systems include:
■ Execution Trace Cache— A new feature supporting the branch prediction mechanism, the
trace cache stores translated sequences of branching micro-operations (ops) and is checked
when suspected re-occurring branches are detected in the main processing loop. This feature
allows instruction decoding to be removed from the main processing loop.
■ Rapid Execution Engine—Arithmetic Logic Units (ALUs) run at twice (2x) processing
frequency for higher throughput and reduced latency.
■ Up to 8 MB of L3 cache—Using a 32-byte-wide interface at processing speed, the large L3
cache provides a substantial increase in processing power over earlier processor versions.
■ Advanced dynamic execution—Using a larger (4K) branch target buffer and improved
prediction algorithm, branch mis-predictions are significantly reduced
■ Additional Streaming SIMD extensions (SSE2, SSE3, SSE4.1, and SSE4.2)—In addition to
the SSE support provided by earlier processors, the latest processors include additional
MMX instructions that enhance the following operations:
❏ Streaming video/audio processing
❏ Photo/video editing
❏ Speech recognition
❏ 3D processing
❏ Encryption processing
■ Integrated dual-channel DDR3 memory controller
■ Direct Media Interface (DMI) bus speeds up to 2.5 GT/s.
■ Flexible Display Inteface (FDI) supporting integrated and/or separate graphcis controllers
3-2 www.hp.com Technical Reference Guide
Page 31

3.2.2 Processor Changing/Upgrading
These systems use the LGA1156 ZIF (Socket T) mounting socket and require that the processor
use an integrated heatsink/fan assembly. A replacement processor must use the same type
heatsink/fan assembly as the original to ensure proper cooling. The heatsink and attachment
mechanism are specially designed provide maximum heat transfer from the processor
component.
CAUTION: Attachment of the heatsink to the processor is critical on these systems. Improper attachment
Ä
of the heatsink will likely result in a thermal condition. Although the system is designed to detect thermal
conditions and automatically shut down, such a condition could still result in damage to the processor
component. Refer to the applicable Service Reference Guide for processor installation instructions.
Table 3-1 provides a sample listing of processors supported by these systems.
Table 3-1
Supported Processors
Intel
Series
Pentium
G6950
Core i3-530 2 / 4 2.93 GHz 4 MB Yes Yes
Core i3-540 2 / 4 3.06 GHz 4 MB Yes Yes
Core i5-650 2 / 4 3.20 GHz 4 MB Yes Yes
Core i5-660 2 / 4 3.33 GHz 4 MB Yes Yes
Core i5-670 2 / 4 3.46 GHz 4 MB Yes Yes
Core i5-750 4 / 4 2.66 GHz 8 MB No No
Core i7-860 4 / 8 2.80 GHz 8 MB No Yes
Core i7-870 4 / 8 2.93 GHz 8 MB No Yes
# Cores /
# of threads
2 / 2 2.80 GHz 3 MB Yes No
Base
Clock SpeedL3Cache
Processor/Memory Subsystem
Integrated
Graphics
Controller?
Hyper-
Threading?
[
CAUTION: These systems can support a processor with a maximum power consumption of 95 watts.
Ä
Exceeding these limits can result in system damage and lost data.
Technical Reference Guide www.hp.com 3-3
Page 32

Processor/Memory Subsystem
3.3 Memory Subsystem
All models support non-ECC DDR3-800 (PC3-6400), DDR3-1066 (PC3-8500), and
DDR3-1333 (PC3-10600) memory modules. These systems support up to 16 gigabytes of
memory.
In these systems, DDR3-1333 modules operate at the same speed/rate as DDR3-1066 modules.
✎
DDR3 memory modules are not compatible with DDR2 memory modules used on previous
✎
systems.
■ DIMM1, channel A (black)
■ DIMM2, channel A (white)
■ DIMM3, channel B (black)
■ DIMM4, channel B (white)
Memory modules do not need to be installed in pairs although installation of pairs (especially
matched sets) provides the best performance. Black sockets must be populated first. The BIOS
will detect the module population and set the system accordingly as follows:
■ Single-channel mode - memory installed for one channel only
■ Dual-channel asymetric mode - memory installed for both channels but of unequal channel
capacities.
■ Dual-channel interleaved mode (recommended) - memory installed for both channels and
offering equal channel capacities, proving the highest performance.
These systems support memory modules with the following parameters:
■ Unbuffered, compatible with SPD rev. 1.0
■ 512-Mb, and 1-Gb memory technologies for x8 and x16 devices
■ CAS latency (CL) of 5 or 6 (depending on memory speed)
■ Single or double-sided
■ Non-ECC memory only
The SPD format supported by these systems complies with the JEDEC specification for 128-byte
EEPROMs. This system also provides support for 256-byte EEPROMs to include additional
HP-added features such as part number and serial number.
If BIOS detects an unsupported memory module, a “memory incompatible” message will be
displayed and the system will halt. These systems are shipped with non-ECC modules only.
An installed mix of memory module types is acceptable but operation will be constrained to the
level of the module with the lowest (slowest) performance.
If an incompatible memory module is detected the NUM LOCK will blink for a short period of
time during POST and an error message may or may not be displayed before the system hangs.
3-4 www.hp.com Technical Reference Guide
Page 33

3.3.1 Memory Upgrading
Table 3-2 shows suggested memory configurations for these systems.
Table 3-2 does not list all possible configurations.
✎
Channel A Channel B
Socket 1 Socket 2 Socket 3 Socket 4 Total
1 GB none none none 1 GB
1 GB none 1 GB none 2 GB [1]
1 GB 1 GB 1 GB 1 GB 4 GB [1]
2 GB 2 GB 2 GB 2 GB 8 GB [1]
4 GB 4 GB 4 GB 4 GB 16 GB [1]
NOTE:
[1] Dual-channel symetrical.
HP recommends using symmetrical loading (same-capacity, same-speed modules across both
channels) to achieve the best performance.
Processor/Memory Subsystem
Table 3-2.
Memory Socket Loading
CAUTION: Always power down the system and disconnect the power cord from the AC outlet before
adding or replacing memory modules. Changing memory modules while the unit is plugged into an
active AC outlet could result in equipment damage.
Memory amounts over 3 GB may not be fully accessible with 32-bit operating systems due to
✎
system resource requirements. Addressing memory above 4 GB requires a 64-bit operating
system.
3.3.2 Memory Mapping and Pre-allocation
Figure 3-2 shows the system memory map. The Q57 PCH-D0 includes a Management Engine
that pre-allocates a portion of system memory (16 MB for one module, 32 MB for two modules)
for managment functions. In addition, the internal graphics controller pre-allocates a portion of
system memory for video use (refer to chapter 6). Pre-allocated memory is not available to the
operating system. The amount of system memory reported by the OS will be the total amount
installed less
the pre-allocated amount.
Technical Reference Guide www.hp.com 3-5
Page 34

Processor/Memory Subsystem
Main
Memory
Area
DOS
Compatibilty
Area
1 FFFF FFFEh
FFE0 0000h
F000 0000h
0100 0000h
00FF FFFFh
0010 0000h
000F FFFFh
0000 0000h
High BIOS Area
DMI/APIC
Area
PCI
Memory
Area
IGC (1-64 MB)
TSEG
Main
Memory
Main
Memory
BIOS
Extended BIOS
Expansion Area
Legacy Video
Base Memory
8 GB
Top of DRAM
16 MB
1 MB
640 KB
Figure 3-2. System Memory Map (for maximum of 8 gigabytes)
All locations in memory are cacheable. Base memory is always mapped to DRAM. The next 128
✎
KB fixed memory area can be mapped to DRAM or to PCI space. Graphics RAM area is mapped
to PCI locations.
3-6 www.hp.com Technical Reference Guide
Page 35

4.1 Introduction
This chapter covers subjects dealing with basic system architecture and covers the following
topics:
■ PCI bus overview (4.2)
■ System resources (4.3)
■
Real-time clock and configuration memory (4.4
■ System management (4.5)
■
Register map and miscellaneous functions (4.6
This chapter covers functions provided by off-the-shelf chipsets and therefore describes only
basic aspects of these functions as well as information unique to the systems covered in this
guide. For detailed information on specific components, refer to the applicable manufacturer's
documentation.
4
System Support
)
)
4.2 PCI Bus Overview
This section describes the PCI bus in general and highlights bus implementation for systems
✎
covered in this guide. For detailed information regarding PCI bus operation, refer to the
appropriate PCI specification or the PCI web site: www.pcisig.com.
These systems implement the following types of PCI buses:
■ PCI 2.3 - Legacy parallel interface operating at 33-MHz
■ PCI Express - High-performance interface capable of using multiple TX/RX high-speed
lanes of serial data streams
4.2.1 PCI 2.3 Bus Operation
The PCI 2.3 bus consists of a 32-bit path (AD31-00 lines) that uses a multiplexed scheme for
handling both address and data transfers. A bus transaction consists of an address cycle and one
or more data cycles, with each cycle requiring a clock (PCICLK) cycle. High performance is
achieved during burst modes in which a transaction with contiguous memory locations requires
that only one address cycle be conducted and subsequent data cycles are completed using
auto-incremented addressing.
Devices on the PCI bus must comply with PCI protocol that allows configuration of that device
by software. In this system, configuration mechanism #1 (as described in the PCI Local Bus
specification Rev. 2.3) is employed.
Technical Reference Guide www.hp.com 4-1
Page 36

System Support
Table 4-1 shows the standard configuration of device numbers and IDSEL connections for
components and slots residing on a PCI 2.3 bus.
PCI Component Notes Function # Device #
Processor:
Q57 PCH-D0:
PCI 2.3 slot 1 0 4 7 AD16
Host/DMI Bridge
Host/PCI Expr. Bridge
Integrated Graphics Cntlr.
PCI Express x16 (PEG) slot
PCI Bridge
LPC Bridge
SATA Controller #1
SMBus Controller
SATA/eSATA Controller #2
Thermal System
USB 1.1 Controller #1
USB 1.1 Controller #2
USB 1.1 Controller #3
USB 1.1 Controller #4
USB 1.1 Controller #5
USB 1.1 Controller #6
USB 2.0 Controller #1
USB 2.0 Controller #2
GbE NIC
Intel HD audio controller
PCIe port 1
PCIe port 2
PCIe port 3
PCIe port 4
PCIe port 5
PCIe port 6
Table 4-1
PCI Component Configuration Access
[4]
[1]
[1]
[1]
0
0
0
0
0
0
2
3
5
6
0
1
2
0
1
3 [2]
7
7
0
0
0
1
2
3
4
5
28
1
2
0
30
31
31
31
31
31
29
29
29
26
26
29 [2]
29
26
25
27
28
28
28
28
28
28
PCI Bus
#
0
0
0
1
0
0
0
0
0
0
0
0
0
0
0
0
0
0
0
0
0
0
0
0
0
IDSEL
Wired to:
--
--
PCI 2.3 slot 2 0 11 7 AD17
PCI 2.3 slot 3 [3] 0 10 7 AD18
PCIe x1 slot 1 0 0 32
PCIe x1 slot 2 0 0 48
NOTES:
[1] Function not used in these systems.
[2] USB 1.1 controllers in 6+6 configuration. 8+4 configuration will have USB 1.1 controller #6 use Function 26, Device 2.
[3] CMT form factor only
[4] Function is only visible in IDE mode (not visible in AHCI orRAID SATA emulation mode).
4-2 www.hp.com Technical Reference Guide
Page 37

System Support
The PCI bus supports a bus master/target arbitration scheme. A bus master is a device that has
been granted control of the bus for the purpose of initiating a transaction. A target is a device that
is the recipient of a transaction. The Request (REQ), Grant (GNT), and FRAME signals are used
by PCI bus masters for gaining access to the PCI bus. When a PCI device needs access to the PCI
bus (and does not already own it), the PCI device asserts its REQn signal to the PCI bus arbiter (a
function of the system controller component). If the bus is available, the arbiter asserts the GNTn
signal to the requesting device, which then asserts FRAME and conducts the address phase of the
transaction with a target. If the PCI device already owns the bus, a request is not needed and the
device can simply assert FRAME and conduct the transaction. Table 4-2 shows the grant and
request signals assignments for the devices on the PCI bus.
Table 4-2.
PCI Bus Mastering Devices
Device REQ/GNT Line Note
PCI Connector Slot 1 REQ0/GNT0
PCI Connector Slot 2 REQ1/GNT1 [1]
PCI Connector Slot 3 REQ2/GNT2 [1]
NOTE:
[1] CMT form factor only
PCI bus arbitration is based on a round-robin scheme that complies with the fairness algorithm
specified by the PCI specification. The bus parking policy allows for the current PCI bus owner
(excepting the PCI/ISA bridge) to maintain ownership of the bus as long as no request is asserted
by another agent. Note that most CPU-to-DRAM accesses can occur concurrently with PCI
traffic, therefore reducing the need for the Host/PCI bridge to compete for PCI bus ownership.
4.2.2 PCI Express Bus Operation
The PCI Express (PCIe) v1.1 bus is a high-performace extension of the legacy PCI bus
specification. The PCIe bus uses the following layers:
■ Software/driver layer
■ Transaction protocol layer
■ Link layer
■ Physical layer
Software/Driver Layer
The PCIe bus maintains software compatibility with PCI 2.3 and earlier versions so that there is
no impact on existing operating systems and drivers. During system intialization, the PCIe bus
uses the same methods of device discovery and resource allocation that legacy PCI-based
operating systems and drivers are designed to use.
Transaction Protocol Layer
The transaction protocol layer processes read and write requests from the software/driver layer
and generates request packets for the link layer. Each packet includes an identifier allowing any
required responcse packets to be directed to the originator.
Technical Reference Guide www.hp.com 4-3
Page 38

System Support
Link Layer
The link layer provides data integrity by adding a sequence information prefix and a CRC suffix
to the packet created by the transaction layer. Flow-control methods ensure that a packet will
only be transferred if the receiving device is ready to accomodate it. A corrupted packet will be
automatically re-sent.
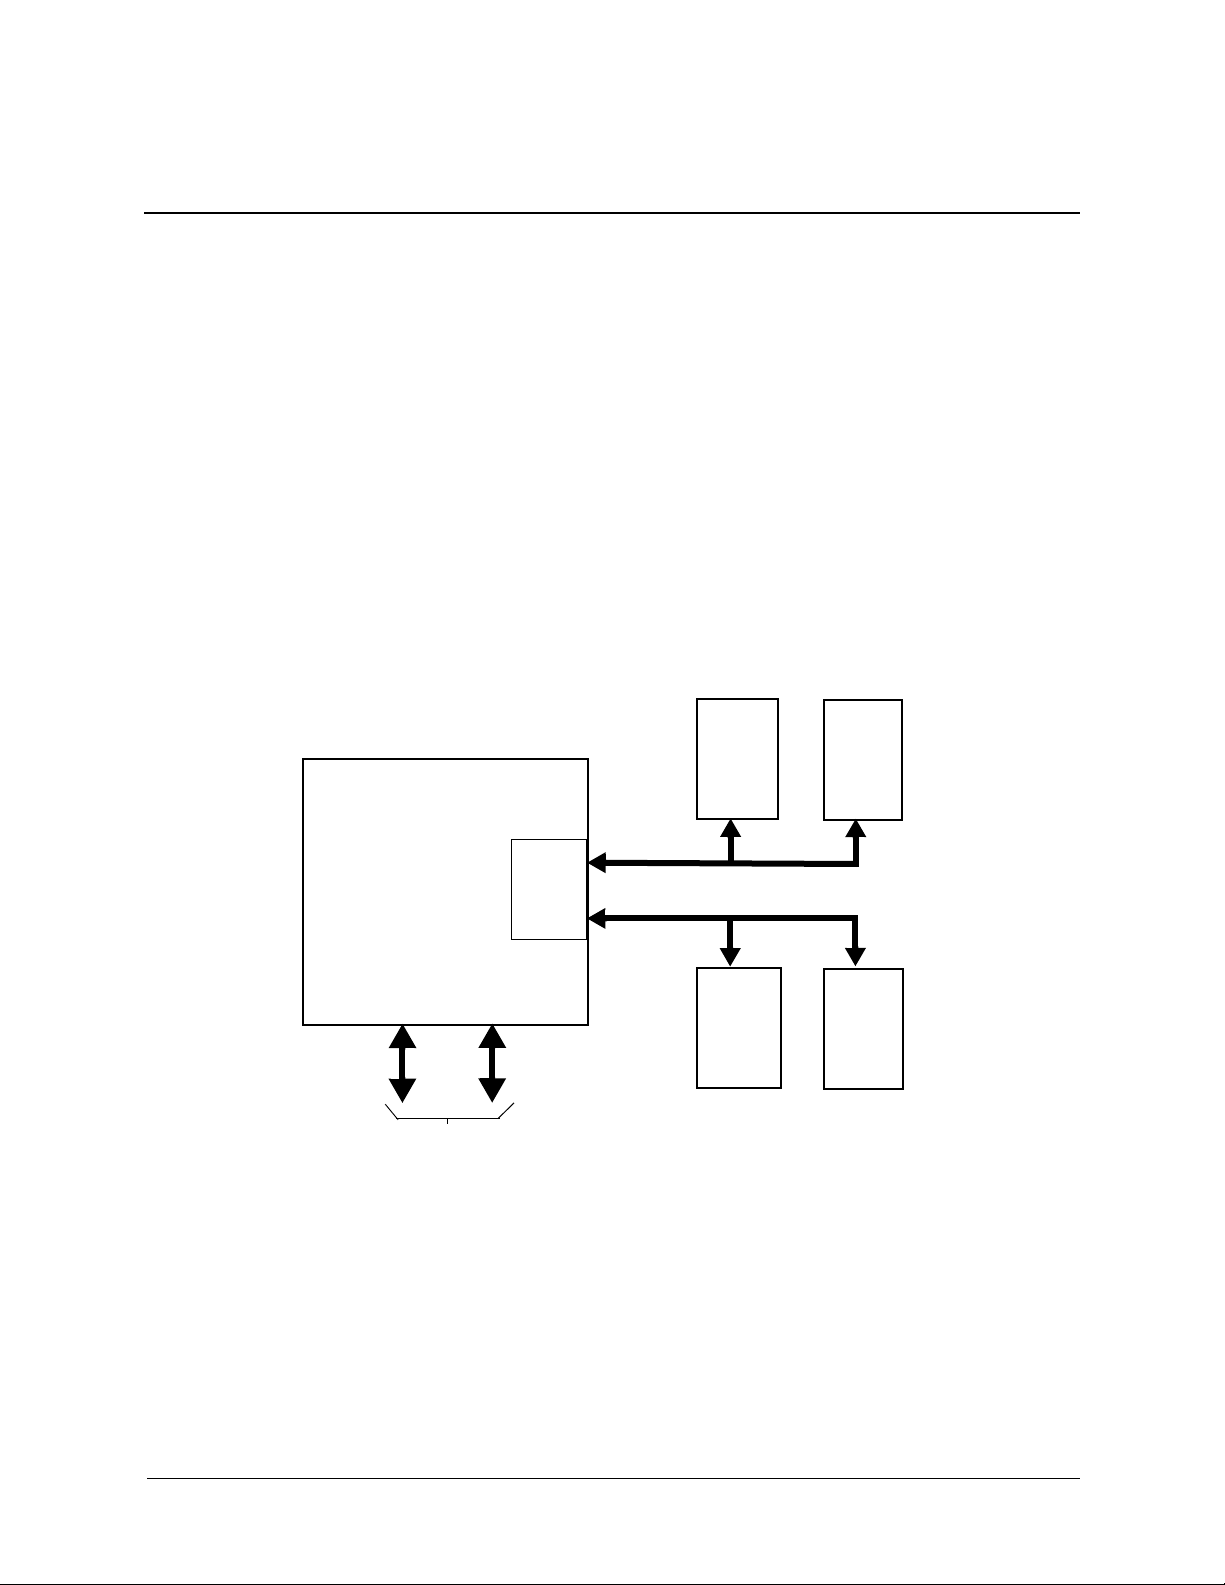
Physical Layer
The PCIe bus uses a point-to-point, high-speed TX/RX serial lane topology. One or more
full-duplex lanes transfer data serially, and the design allows for scalability depending on
end-point capabilities. Each lane consists of two differential pairs of signal paths; one for
transmit, one for receive (Figure 4-1).
System Board
Figure 4-1. PCIe Bus Lane
Each byte is transferred using 8b/10b encoding. which embeds the clock signal with the data.
Operating at a 2.5 Gigabit transfer rate, a single lane can provide a data flow of 200 MBps. The
bandwidth is increased if additional lanes are available for use. During the initialization process,
two PCIe devices will negotiate for the number of lanes available and the speed the link can
operate at. In a x1 (single lane) interface, all data bytes are transferred serially over the lane. In a
multi-lane interface, data bytes are distributed across the lanes using a multiplex scheme.
4.2.3 Option ROM Mapping
During POST, the PCI bus is scanned for devices that contain their own specific firmware in
ROM. Such option ROM data, if detected, is loaded into system memory's DOS compatibility
area (refer to the system memory map shown in chapter 3).
Device A
PCI Express Card
TX
Device B
RX
4.2.4 PCI Interrupts
Eight interrupt signals (INTA- thru INTH-) are available for use by PCI devices. These signals
may be generated by on-board PCI devices or by devices installed in the PCI slots. For more
information on interrupts including PCI interrupt mapping refer to the “System Resources”
section 4.3.
4.2.5 PCI Power Management Support
This system complies with the PCI Power Management Interface Specification (rev 1.0). The
PCI Power Management Enable (PME-) signal is supported by the chipset and allows compliant
PCI peripherals to initiate the power management routine.
4-4 www.hp.com Technical Reference Guide
Page 39
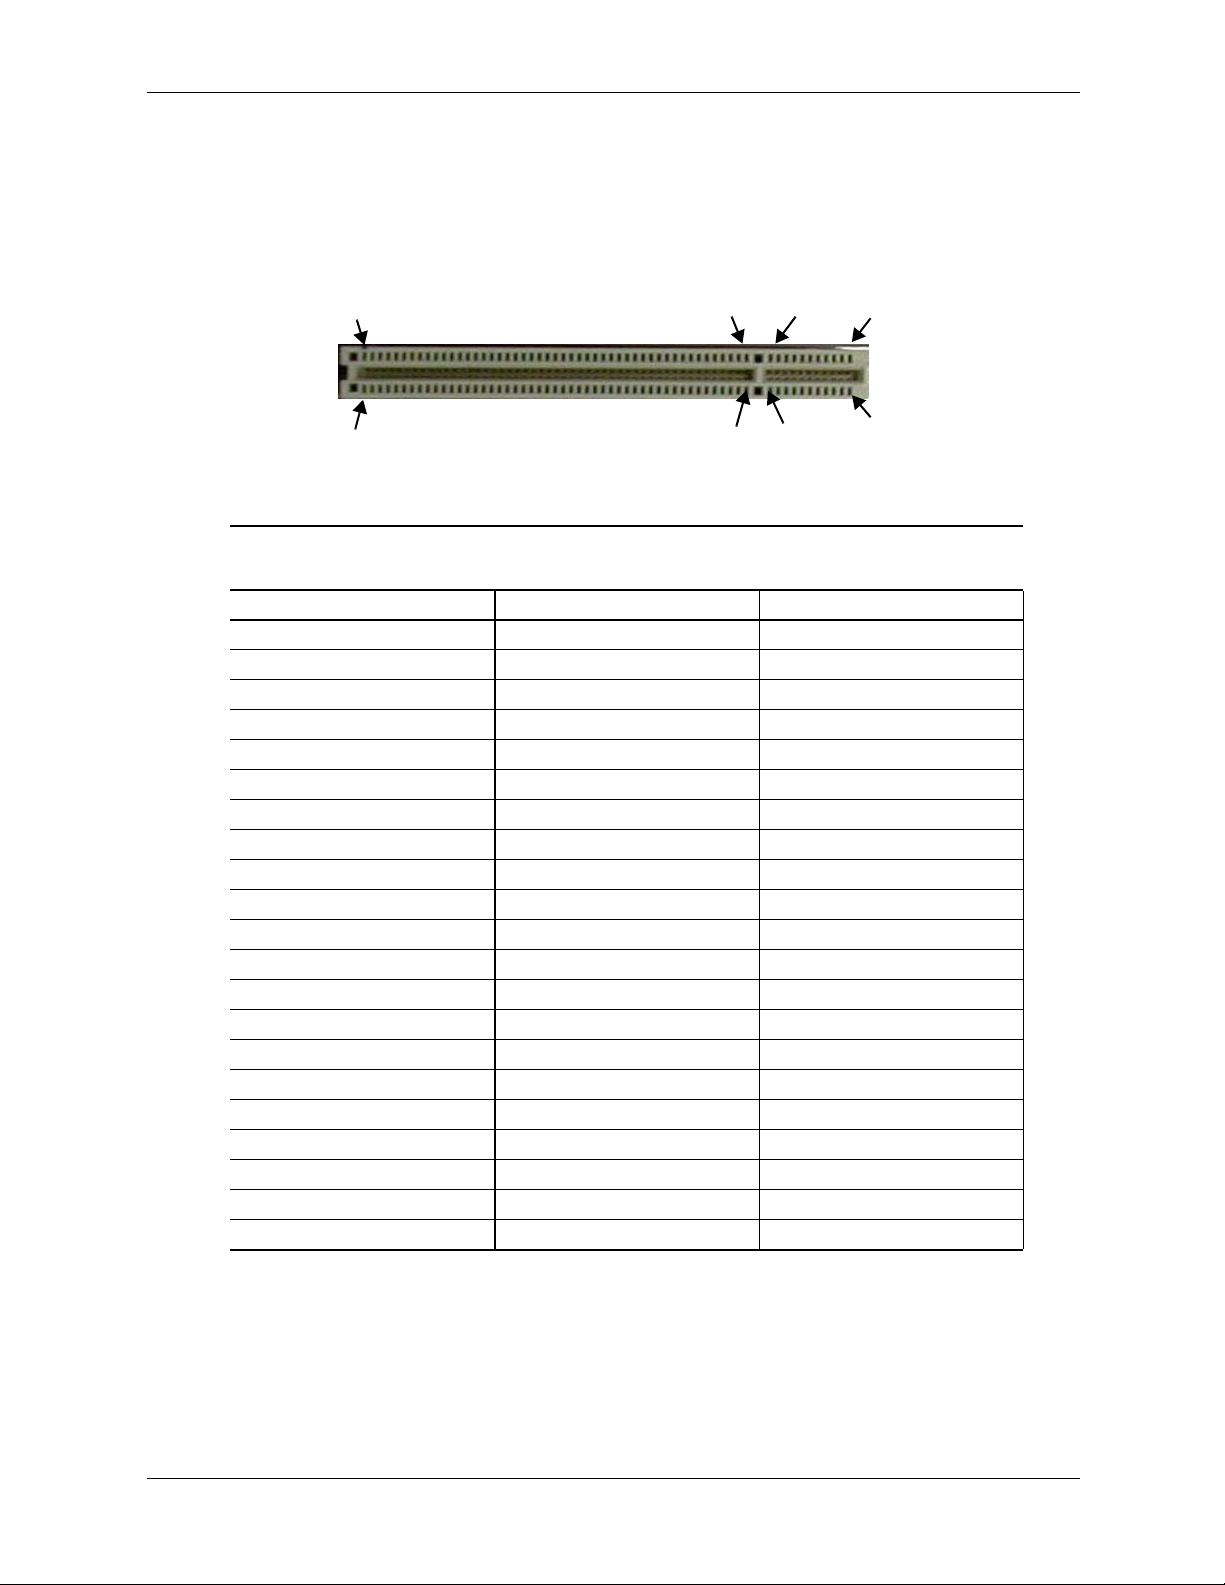
4.2.6 PCI Connectors
PCI 2.3 Connector
System Support
A1
B2
A49
B49
A52
B52
A62
B62
Figure 4-2. 32-bit, 5.0-volt PCI 2.3 Bus Connector
Table 4-3.
PCI 2.3 Bus Connector Pinout
Pin B Signal A Signal Pin B Signal A Signal Pin B Signal A Signal
01 -12 VDC TRST- 22 GN D AD28 43 +3.3 VDC PAR
02 TCK +12 VDC 23 AD27 AD26 44 C/BE1- AD15
03 GND TMS 24 AD25 GND 45 AD14 +3.3 VDC
04 TDO TDI 25 +3.3 VDC AD24 46 GND AD13
05 +5 VDC +5 VDC 26 C/BE3- IDSEL 47 AD12 AD11
06 +5 VDC INTA- 27 AD23 +3.3 VDC 48 AD10 GND
07 INTB- INTC- 28 GND AD22 49 GND AD09
08 INTD- +5 VDC 29 AD21 AD20 50 Key Key
09 PRSNT1- Reserved 30 AD19 GND 51 Key Key
10 RSVD +5 VDC 31 +3.3 VDC AD18 52 AD08 C/BE0-
11 PRSNT2- Reserved 32 AD17 AD16 53 AD07 +3.3 VDC
12 GND GND 33 C/BE2- +3.3 VD C 54 +3.3 VD C AD06
13 GND GND 34 GND FRAME- 55 AD05 AD04
14 R S V D + 3. 3 AU X 35 I RDY - G ND 5 6 A D 03 G N D
15 GND RST- 36 +3.3 VDC TRDY- 57 GND AD02
16 CLK +5 VDC 37 DEVSEL- GND 58 AD01 AD00
17 GND GNT- 38 GND STOP- 59 +5 VDC +5 VDC
18 R E Q - G N D 3 9 L O C K - + 3.3 V D C 60 AC K6 4 - R E Q 6 4 -
19 +5 VDC PME- 40 PERR- SDONE n 61 +5 VDC +5 VDC
20 AD31 AD30 41 +3.3 VDC SBO- 62 +5 VDC +5 VDC
21 A D 2 9 + 3 . 3 V D C 4 2 SE R R - G N D
Technical Reference Guide www.hp.com 4-5
Page 40

System Support
PCIe Connectors
x1 Connector
A1
A11
A12
A18
A82
x16 Connector
B1
B11
B12
B82
Figure 4-3. PCIe Bus Connectors
Table 4-4.
PCIe Bus Connector Pinout
Pin B Signal A Signal Pin B Signal A Signal Pin B Signal A Signal
01 +12 VDC PRSNT1# 29 GND PERp3 57 GND PERn9
02 +12 VDC +12 VDC 30 RSVD PERn3 58 PETp10 GND
03 RSVD +12 VDC 31 PRSNT2# GND 59 PETn10 GND
04 GND GND 32 GND RSVD 60 GND PERp10
05 SMCLK +5 VDC 33 PETp4 RSVD 61 GND PERn10
06 +5 VDC JTAG2 34 PETn4 GND 62 PETp11GND
07 GND JTAG4 35 GND PERp4 63 PETn11 GND
08 +3.3 VDC JTAG5 36 GND PERn4 64 GND PERp11
09 JTAG1 +3.3 VDC 37 PETp5 GND 65 GND PERn11
10 3.3 Vaux +3.3 VDC 38 PETn5 GND 66 PETp12 GND
11WAKE PERST#39 GND PERp567PETn12 GND
12 RSVD GND 40 GND PERn5 68 GND PERp12
13 GND REFCLK+ 41 PETp6 GND 69 GND PERn12
14 PETp0 REFCLK- 42 PETn6 GND 70 PETp13 GND
15 PETn0 GND 43 GND PERp6 71 PETn13 GND
16 GND PERp0 44 GND PERn6 72 GND PERp13
17 PRSNT2# PERn0 45 PETp7 GND 73 GND PERn13
18 GND GND 46 PETn7 GND 74 PETp14 GND
19 PE T p 1 R S VD 4 7 G N D P E Rp 7 7 5 P E Tn 14 G N D
20 PETn1 GND 48 PRSNT2# PERn7 76 GND PERp14
21 GND PERp1 49 GND GND 77 GND PERn14
22 GND PERn1 50 PETp8 RSVD 78 PETp15 GND
23 PETp2 GND 51 PETn8 GND 79 PETn15 GND
24 PETn2 GND 52 GND PERp8 80 GND PERp15
25 GND PERp2 53 GND PERn8 81 PRSNT2# PERn15
26 GND PER n2 54 PETp9 GND 82 RSVD GND
27 PETp3 GND 55 PETn9 GND
28 PETn3 GND 56 GND PERp9
4-6 www.hp.com Technical Reference Guide
Page 41

4.3 System Resources
This section describes the availability and basic control of major subsystems, otherwise known as
resource allocation or simply “system resources.” System resources are provided on a priority
basis through hardware interrupts and DMA requests and grants.
4.3.1 Interrupts
The microprocessor uses two types of hardware interrupts; maskable and nonmaskable. A
maskable interrupt can be enabled or disabled within the microprocessor by the use of the STI
and CLI instructions. A nonmaskable interrupt cannot be masked off within the microprocessor,
but may be inhibited by legacy hardware or software means external to the microprocessor.
The maskable interrupt is a hardware-generated signal used by peripheral functions within the
system to get the attention of the microprocessor. Peripheral functions produce a unique INTA-H
(PCI) or IRQ0-15 (ISA) signal that is routed to interrupt processing logic that asserts the
interrupt (INTR-) input to the microprocessor. The microprocessor halts execution to determine
the source of the interrupt and then services the peripheral as appropriate.
Most IRQs are routed through the I/O controller of the super I/O component, which provides the
serializing function. A serialized interrupt stream is then routed to the ICH component.
System Support
Interrupts may be processed in one of two modes (selectable through the F10 Setup utility):
■ 8259 mode
■ APIC mode
These modes are described in the following subsections.
8259 Mode
The 8259 mode handles interrupts IRQ0-IRQ15 in the legacy (AT-system) method using
8259-equivalent logic. If more than one interrupt is pending, the highest priority (lowest number)
is processed first.
APIC Mode
The Advanced Programmable Interrupt Controller (APIC) mode provides enhanced interrupt
processing with the following advantages:
■ Eliminates the processor's interrupt acknowledge cycle by using a separate (APIC) bus
■ Programmable interrupt priority
■ Additional interrupts (total of 24)
The APIC mode accommodates eight PCI interrupt signals (PIRQA-..PIRQH-) for use by PCI
devices. The PCI interrupts are evenly distributed to minimize latency and wired as shown in
Table 4-5.
Technical Reference Guide www.hp.com 4-7
Page 42

System Support
System Board
Connector
PCI slot 1 (J20) A B C D
PCI slot 2 (J21) [1] D A B C
PCI slot 3 (J22) [1] C D A B
The PCI interrupts can be configured by PCI Configuration Registers 60h..63h to share the
standard ISA interrupts (IRQn).
The APIC mode is supported by Windows NT, Windows 2000, and Windows XP, Windows
✎
Vista, and Windows 7 operating systems. Systems running the Windows 95 or 98 operating
system will need to run in 8259 mode.
Table 4-5.
PCI Interrupt Distribution
System Interrupts
PIRQ APIRQ BPIRQ CPIRQ DPIRQ EPIRQ FPIRQ GPIRQ
H
NOTES:
[1] CMT only
4.3.2 Direct Memory Access
Direct Memory Access (DMA) is a method by which a device accesses system memory without
involving the microprocessor. Although the DMA method has been traditionally used to transfer
blocks of data to or from an ISA I/O device, PCI devices may also use DMA operation as well.
The DMA method reduces the amount of CPU interactions with memory, freeing the CPU for
other processing tasks. For detailed information regarding DMA operation, refer to the data
manual for the Intel 82801 PCH I/O Controller Hub.
4-8 www.hp.com Technical Reference Guide
Page 43

4.4 Real-Time Clock and Configuration Memory
The Real-time clock (RTC) and configuration memory (also referred to as “CMOS”) functions
are provided by the 82801 component and is MC146818-compatible. As shown in the following
figure, the 82801 PCH component provides 256 bytes of battery-backed RAM divided into two
128-byte configuration memory areas. The RTC uses the first 14 bytes (00-0Dh) of the standard
memory area. All locations of the standard memory area (00-7Fh) can be directly accessed using
conventional OUT and IN assembly language instructions through I/O ports 70h/71h, although
the suggested method is to use the INT15 AX=E823h BIOS call.
System Support
0Dh
0Ch
0Bh
0Ah
09h
08h
07h
06h
05h
04h
03h
02h
01h
00h
Figure 4 4. Configuration Memory Map
A lithium 3-VDC battery is used for maintaining the RTC and configuration memory while the
system is powered down. During system operation a wire-Ored circuit allows the RTC and
configuration memory to draw power from the power supply. The battery is located in a battery
holder (XBT1) on the system board and has a life expectancy of three or more years. When the
battery has expired it is replaced with a CR2032 or equivalent 3-VDC lithium battery.
4.4.1 Clearing CMOS
Register D
Register C
Register B
Register A
Year
Month
Date of Month
Day of Week
Hours (Alarm)
Hours (Timer)
Minutes (Alarm)
Minutes (Timer)
Seconds (Alarm)
Seconds (Timer)
82801
Extended Config.
Memory Area
(128 bytes)
Standard Config.
Memory Area
(114 bytes)
RTC Area
(14 bytes)
FFh
80h
7Fh
0Eh
0Dh
00h
The contents of configuration memory (including the Power-On Password) can be cleared by the
following procedure:
1. Turn off the unit.
2. Disconnect the AC power cord from the outlet and/or system unit.
3. Remove the chassis hood (cover) and insure that no LEDs on the system board are
illuminated.
4. On the system board, press and hold the CMOS clear button (switch SW50, colored yellow)
for at least 5 seconds.
5. Replace the chassis hood (cover).
6. Reconnect the AC power cord to the outlet and/or system unit.
7. Turn the unit on.
To clear only the Power-On Password refer to section 4.5.1.
Technical Reference Guide www.hp.com 4-9
Page 44

System Support
4.4.2 Standard CMOS Locations
Table 4-6 describes standard configuration memory locations 0Ah-3Fh. These locations are
accessible through using OUT/IN assembly language instructions using port 70/71h or BIOS
function INT15, AX=E823h.
Configuration Memory (CMOS) Map
Location Function Location Function
00-0Dh Real-time clock 24h System board ID
0Eh Diagnostic status 25h System architecture data
0Fh System reset code 26h Auxiliary peripheral configuration
10h Diskette drive type 27h Speed control external drive
11h Reserved 28h Expanded/base mem. size, IRQ12
12h Hard drive type 29h Miscellaneous configuration
13h Security functions 2Ah Hard drive timeout
14h Equipment installed 2Bh System inactivity timeout
15h Base memory size, low byte/KB 2Ch Monitor timeout, Num Lock Cntrl
16h Base memory size, high byte/KB 2Dh Additional flags
17h Extended memory, low byte/KB 2Eh-2Fh Checksum of locations 10h-2Dh
18h Extended memory, high byte/KB 30h-31h Total extended memory tested
19h Hard drive 1, primary controller 32h Century
1Ah Hard drive 2, primary controller 33h Miscellaneous flags set by BIOS
1Bh Hard drive 1, secondary controller 34h International language
1Ch Hard drive 2, secondary controller 35h APM status flags
1Dh Enhanced hard drive support 36h ECC POST test single bit
1Eh Reserved 37h-3Fh Power-on password
1Fh Power management functions 40-FFh Feature Control/Status
Table 4-6.
NOTES:
Assume unmarked gaps are reserved.
Higher locations (>3Fh) contain information that should be accessed using the INT15, AX=E845h
BIOS function (refer to Chapter 8 for BIOS function descriptions).
4.5 System Management
This section describes functions having to do with security, power management, temperature,
and overall status. These functions are handled by hardware and firmware (BIOS) and generally
configured through the Setup utility.
4.5.1 Security Functions
These systems include various features that provide different levels of security. Note that this
subsection describes only the hardware functionality (including that supported by Setup) and
does not describe security features that may be provided by the operating system and application
software.
4-10 www.hp.com Technical Reference Guide
Page 45

System Support
Power-On / Setup Password
These systems include a power-on and setup passwords, which may be enabled or disabled
(cleared) through a jumper on the system board. The jumper controls a GPIO input to the 82801
PCH that is checked during POST. The password is stored in configuration memory (CMOS) and
if enabled and then forgotten by the user will require that either the password be cleared
(preferable solution and described below) or the entire CMOS be cleared (refer to section 4.4.1).
To clear the password, use the following procedure:
1. Turn off the system and disconnect the AC power cord from the outlet and/or system unit.
2. Remove the cover (hood) as described in the appropriate User Guide or Maintainance And
Service Reference Guide. Insure that all system board LEDs are off (not illuminated).
3. Locate the password clear jumper (header is colored green and labeled E49 on these systems)
and move the jumper from pins 1 and 2 and place on (just) pin 2 (for safekeeping).
4. Replace the cover.
5. Re-connect the AC power cord to the AC outlet and/or system unit.
6. Turn on the system. The POST routine will clear and disable the password.
7. To re-enable the password feature, repeat steps 1-6, replacing the jumper on pins 1 and 2 of
header E49.
Setup Password
The Setup utility may be configured to be always changeable or changeable only by entering a
password. Refer to the previous procedure (Power On / Setup Password) for clearing the Setup
password.
Cable Lock Provision
These systems include a chassis cutout on the rear panel for the attachment of a cable lock
mechanism.
I/O Interface Security
The SATA, serial, parallel, USB, and diskette interfaces may be disabled individually through the
Setup utility to guard against unauthorized access to a system. In addition, the ability to write to
or boot from a removable media drive (such as the diskette drive) may be enabled through the
Setup utility. The disabling of the serial, parallel, and diskette interfaces are a function of the SIO
controller. The USB ports are controlled through the 82801.
Chassis Security
Some systems feature Smart Cover (hood) Sensor and Smart Cover (hood) Lock mechanisms to
inhibit unauthorized tampering of the system unit.
Smart Cover Sensor
These systems support an optional plunger switch assembly that, when the cover (hood) is
removed, closes and grounds an input of the 82801 component. The battery-backed logic will
record this “intrusion” event by setting a specific bit. This bit will remain set (even if the cover is
replaced) until the system is powered up and the user completes the boot sequence successfully,
at which time the bit will be cleared. Through Setup, the user can set this function to be used by
Alert-On-LAN and or one of three levels of support for a “cover removed” condition:
Technical Reference Guide www.hp.com 4-11
Page 46

System Support
Level 0—Cover removal indication is essentially disabled at this level. During POST, status bit is
cleared and no other action is taken by BIOS.
Level 1—During POST the message “The computer's cover has been removed since the last
system start up” is displayed and time stamp in CMOS is updated.
Level 2—During POST the “The computer's cover has been removed since the last system start
up” message is displayed, time stamp in CMOS is updated, and the user is prompted for the
administrator password. (A Setup password must be enabled in order to see this option).
Smart Cover Lock (Optional)
These systems support an optional solenoid-operated locking bar that, when activated, prevents
the cover (hood) from being removed. The GPIO ports 44 and 45 of the SIO controller provide
the lock and unlock signals to the solenoid. A locked hood may be bypassed by removing special
screws that hold the locking mechanism in place. The special screws are removed with the Smart
Cover Lock Failsafe Key.
4.5.2 Power Management
These systems provide baseline hardware support of ACPI- and APM-compliant firmware and
software. Key power-consuming components (processor, chipset, I/O controller, and fan) can be
placed into a reduced power mode either automatically or by user control. The system can then
be brought back up (“wake-up”) by events defined by the ACPI 2.0 specification. The ACPI
wake-up events supported by this system are listed as follows:
Table 4-7.
ACPI Wake-Up Events
ACPI Wake-Up Event System Wakes From
Power Button Suspend or soft-off
RTC Alarm Suspend or soft-off
Wake On LAN (w/NIC) Suspend or soft-off
PME Suspend or soft-off
Serial Port Ring Suspend or soft-off
USB Suspend only
Keyboard Suspend only
Mouse Suspend only
4-12 www.hp.com Technical Reference Guide
Page 47

4.5.3 System Status
These systems provide a visual indication of system boot, ROM flash, and operational status
through the power LED and internal speaker, as described in Table 4-8.
.
System Operational Status LED Indications
System Status PowerLED Beeps [2] Action Required
S0: System on (normal
operation)
S1: Suspend Blinks green @ .5 Hz None None
S3: Suspend to RAM Blinks green @ .5 Hz None None
S4: Suspend to disk Off – clear None None
S5: Soft off Off – clear None None
Processor thermal shutdown Blinks red 2 times @ 1 Hz [1] 2 Check air flow, fans, heatsink
Processor not seated / installed Blinks red 3 times @ 1 Hz [1] 3 Check processor
Power supply overload failure Blinks red 4 times @ 1 Hz [1] 4 Check system board problem
Memory error (pre-video) Blinks red 5 times @ 1 Hz [1] 5 Check DIMMs, system board
Video error Blinks red 6 times @ 1 Hz [1] 6 Check graphics card or
PCA failure detected by BIOS
(pre-video)
Invalid ROM checksum error Blinks red 8 times @ 1 Hz [1] 8 Reflash BIOS ROM
Boot failure (after power on) Blinks red 9 times @ 1 Hz [1] 9 Check power supply,
Bad option card Blinks red 10 times @ 1 Hz [1] None Replace option card
NOTES:
Beeps are repeated for 5 cycles, after which only blinking LED indication continues.
[1] Repeated after 2 second pause.
[2] Beeps are produced by the internal chassis speaker.
[3] Check that CPU power connector P3 is plugged in.
System Support
Table 4-8.
Steady green None None
presence/seating
[3],
system board
Blinks red 7 times @ 1 Hz [1] 7 Replace system board
processor, sys. bd
Technical Reference Guide www.hp.com 4-13
Page 48

System Support
4.5.4 Thermal Sensing and Cooling
All systems feature a variable-speed fan mounted as part of the processor heatsink assembly. All
systems also provide or support an auxiliary chassis fan. All fans are controlled through
temperature sensing logic on the system board and/or in the power supply. There are some
electrical differences between form factors and between some models, although the overall
functionally is the same. Typical cooling conditions include the following:
1. Normal—Low fan speed.
2. Hot processor—ASIC directs Speed Control logic to increase speed of fan(s).
3. Hot power supply—Power supply increases speed of fan(s).
4. Sleep state—Fan(s) turned off. Hot processor or power supply will result in starting fan(s).
The RPM (speed) of all fans is the result of the temperature of the CPU as sensed by speed
control circuitry. The fans are controlled to run at the slowest (quietest) speed that will maintain
proper cooling.
Units using chassis and CPU fans must have both fans connected to their corresponding headers
✎
to ensure proper cooling of the system.
4.6 Register Map and Miscellaneous Functions
This section contains the system I/O map and information on general-purpose functions of the
PCH and I/O controller.
4.6.1 System I/O Map
Table 4-9 lists the fixed addresses of the input/output (I/O) ports.
4-14 www.hp.com Technical Reference Guide
Page 49

Table 4-9
System I/O Map
I/O Port Function
0000..001Fh DMA Controller 1
0020..002Dh Interrupt Controller 1
002E, 002Fh Index, Data Ports to SIO Controller (primary)
0030..003Dh Interrupt Controller
0040..0042h Timer 1
004E, 004Fh Index, Data Ports to SIO Controller (secondary)
0050..0052h Timer / Counter
0060..0067h Microcontroller, NMI Controller (alternating addresses)
0070..0077h RTC Controller
0080..0091h DMA Controller
0092h Port A, Fast A20/Reset Generator
0093..009Fh DMA Controller
00A0..00B1h Interrupt Controller 2
00B2h, 00B3h APM Control/Status Ports
00B4..00BDh Interrupt Controller
00C0..00DFh DMA Controller 2
00F0h Coprocessor error register
0170..0177h IDE Controller 2 (active only if standard I/O space is enabled for secondary controller)
01F0..01F7h IDE Controller 1 (active only if standard I/O space is enabled for primary controller)
0278..027Fh Parallel Port (LPT2)
02E8..02EFh Serial Port (COM4)
02F8..02FFh Serial Port (COM2)
0370..0377h Diskette Drive Controller Secondary Address
0376h IDE Controller 2 (active only if standard I/O space is enabled for primary drive)
0378..037Fh Parallel Port (LPT1)
03B0..03DFh Graphics Controller
03BC..03BEh Parallel Port (LPT3)
03E8..03EFh Serial Port (COM3)
03F0..03F5h Diskette Drive Controller Primary Addresses
03F6h IDE Controller 1 (active only if standard I/O space is enabled for sec. drive)
03F8..03FFh Serial Port (COM1)
04D0, 04D1h Interrupt Controller
0678..067Fh Parallel Port (LPT2)
0778..077F h Parallel Por t ( LPT1)
07BC..07BEh Parallel Port (L PT 3)
0CF8h PCI Configuration Address (dword access only )
0CF9h Reset Control Register
0CFCh PCI Configuration Data (byte, word, or dword access)
System Support
NOTE:
Assume unmarked gaps are unused, reserved, or used by functions that employ variable I/O
address mapping. Some ranges may include reserved addresses.
Technical Reference Guide www.hp.com 4-15
Page 50

System Support
4.6.2 GPIO Functions
PCH-DO Functions
The PCH-D0 provides various functions through the use of programmable general purpose
input/output (GPIO) ports. These systems use GPIO ports and associate registers of the PCH for
the following functions:
■ PCI interupt request control
■ Chassis and board ID
■ Hood (cover) sensor and lock detect
■ Media card reader detect
■ S4 state indicator
■ USB port over-current detect
■ Flash security override
■ Serial port detect
■ REQn#/GNTn# sigal control
■ Password enable
■ Boot block enable
SIO Controller Functions
In addition to the serial and parallel port functions, the SIO controller provides the following
specialized functions through GPIO ports:
■ Power/Hard drive LED control for indicating system events (refer to Table 4-8)
■ Hood lock/unlock controls the lock bar mechanism
■ Thermal shutdown control turns off the CPU when temperature reaches certain level
■ Processor present/speed detection detects if the processor has been removed. The occurrence
of this event will, during the next boot sequence, initiate the speed selection routine for the
processor.
■ Legacy/ACPI power button mode control uses the pulse signal from the system's power
button and produces the PS On signal according to the mode (legacy or ACPI) selected.
Refer to chapter 7 for more information regarding power management.
4-16 www.hp.com Technical Reference Guide
Page 51

5.1 Introduction
This chapter describes the standard interfaces that provide input and output (I/O) porting of data
and that are controlled through I/O-mapped registers. The following I/O interfaces are covered in
this chapter:
■ SATA/eSATA interfaces (5.2)
■ Serial interfaces (5.3)
■ Parallel interface support (5.4)
■ Keyboard/pointing device interface (5.5)
■ Universal serial bus interface (5.6)
■ Audio subsystem (5.7)
■ Network interface controller (5.8)
5
Input/Output Interfaces
Technical Reference Guide www.hp.com 5-1
Page 52

Input/Output Interfaces
5.2 SATA/eSATA Interfaces
These systems provide two, three, or four serial ATA (SATA) interfaces that support tranfer rates
up to 3.0 Gb/s and RAID data protection functionality. These systems can also support an
external SATA (eSATA) device through an optional bracket/cable assembly.
5.2.1 SATA interface
The SATA interface duplicates most of the functionality of the EIDE interface through a register
interface that is equivalent to that of the legacy IDE host adapter. The PCH DO component
includes Intel RAID migration technology that simplifies the migration from a single hard to a
RAID0 or RAID1 dual hard drive array without requiring OS reinstallation. Intel Matrix RAID
provides exceptional storage performance with increased data protection for configurations using
dual drive arrays. A software solution is included that provides full management and status
reporting of the RAID array, and the BIOS ROM also supports RAID creation, naming, and
deletion of RAID arrays.
The standard 7-pin SATA connector is shown in the figure below.
Pin 1
Pin 7
A
Figure 5-1. 7-Pin SATA Connector (P60-P63 on system board).
Table 5-1.
7-Pin SATA Connector Pinout
Pin Description Pin Description
1Ground 6RX positive
2 TX positive 7 Ground
3TX negative AHolding clip
4 Ground B Holding clip
5RX negative ----
B
5-2 www.hp.com Technical Reference Guide
Page 53

5.2.2 eSATA interface
These systems provide a SATA/eSATA port (connector P64 on the system board) that can
support an external SATA (eSATA) storage device. The eSATA interface provides higher
bandwidth than USB 2.0 and Firewire (1394) interfaces.
An optional bracket/cable assembly (Figure 5-2) is required to attach an eSATA device to the
system.
Figure 5-2. Optional eSATA Bracket/Cable Assembly.
Input/Output Interfaces
The following operating parameters of the eSATA interface can be set in the ROM-based Setup
utility:
■ Transfer speed: 1.5 or 3 Gbps (default set to 1.5 Gbps for reliability)
■ Emulation mode: IDE, AHCI, or RAID (default set to AHCI)
■ Port availability: Available or Hidden (default set to Available)
In the IDE or AHCI modes, the system BIOS ROM controls the hard drives and Removeable
Media Boot setting applies. In the RAID mode, the RAID option ROM controls the hard drives
and the Removeable Media Boot setting does not apply.
For hot-plug functionality, the eSATA port must be set to the AHCI or RAID mode and an AHCI
driver with hot-plug support must be loaded onto the system. This driver is pre-loaded on
systems shipped with a Windows XP or Vista image. If the system is wiped clean or the Windows
OS is re-installed, the AHCI driver can be loaded by installing the OS while the eSATA
emulation mode is set to AHCI.
Technical Reference Guide www.hp.com 5-3
Page 54

Input/Output Interfaces
5.3 Serial Interface
Systems covered in this guide may include one RS-232-C type serial interface to transmit and
receive asynchronous serial data with external devices. Some systems may allow the installation
of a second serial interface through an optional bracket/cable assembly that attaches to header
P52 on the system board. The serial interface function is provided by the super I/O controller
component that includes two NS16C550-compatible UARTs.
The UART supports the standard baud rates up through 115200, and also special high speed rates
of 239400 and 460800 baud. The baud rate of the UART is typically set to match the capability
of the connected device. While most baud rates may be set at runtime, baud rates 230400 and
460800 must be set during the configuration phase.
The serial interface uses a DB-9 connector as shown in the following figure with the pinout listed
in Table 5-4.
Figure 5-3. DB-9 Serial Interface Connector (male, as viewed from rear of chassis)
Table 5-2.
DB-9 Serial Connector Pinout
Pin Signal Description Pin Signal Description
1 CD Carrier Detect 6 DSR Data Set Ready
2 RX Data Receive Data 7 RTS Request To Send
3 TX Data Transmit Data 8 CTS Clear To Send
4 DTR Data Terminal Ready 9 RI Ring Indicator
5 GND Ground -- -- --
The standard RS-232-C limitation of 50 feet (or less) of cable between the DTE (computer) and
DCE (modem) should be followed to minimize transmission errors. Higher baud rates may
require shorter cables.
5-4 www.hp.com Technical Reference Guide
Page 55

5.4 Parallel Interface Support
These systems include a system board header (J50) that supports an optional parallel
bracket/cable assembly that provides a parallel interface for a peripheral device such as a printer.
The parallel interface supports bi-directional 8-bit parallel data transfers with a peripheral device.
The parallel interface supports three main modes of operation:
■ Standard Parallel Port (SPP) mode
■ Enhanced Parallel Port (EPP) mode
■ Extended Capabilities Port (ECP) mode
These three modes (and their submodes) provide complete support as specified for an IEEE 1284
parallel port.
5.4.1 Standard Parallel Port Mode
The Standard Parallel Port (SPP) mode uses software-based protocol and includes two
sub-modes of operation, compatible and extended, both of which can provide data transfers up to
150 KB/s. In the compatible mode, CPU write data is simply presented on the eight data lines. A
CPU read of the parallel port yields the last data byte that was written.
Input/Output Interfaces
5.4.2 Enhanced Parallel Port Mode
In Enhanced Parallel Port (EPP) mode, increased data transfers are possible (up to 2 MB/s) due
to a hardware protocol that provides automatic address and strobe generation. EPP revisions 1.7
and 1.9 are both supported. For the parallel interface to be initialized for EPP mode, a negotiation
phase is entered to detect whether or not the connected peripheral is compatible with EPP mode.
If compatible, then EPP mode can be used. In EPP mode, system timing is closely coupled to
EPP timing. A watchdog timer is used to prevent system lockup.
5.4.3 Extended Capabilities Port Mode
The Extended Capabilities Port (ECP) mode, like EPP, also uses a hardware protocol-based
design that supports transfers up to 2 MB/s. Automatic generation of addresses and strobes as
well as Run Length Encoding (RLE) decompression is supported by ECP mode. The ECP mode
includes a bi-directional FIFO buffer that can be accessed by the CPU using DMA or
programmed I/O. For the parallel interface to be initialized for ECP mode, a negotiation phase is
entered to detect whether or not the connected peripheral is compatible with ECP mode. If
compatible, then ECP mode can be used.
The ECP mode includes several sub-modes as determined by the Extended Control register. Two
submodes of ECP allow the parallel port to be controlled by software. In these modes, the FIFO
is cleared and not used, and DMA and RLE are inhibited.
Technical Reference Guide www.hp.com 5-5
Page 56

Input/Output Interfaces
5.4.4 Parallel Interface Connector
Figure 5-4 and Table 5-3 show the connector and pinout of the parallel connector provided on the
optional parallel bracket/cable assembly. Note that some signals are redefined depending on the
port's operational mode.
e
g
Figure 5-4. DB-25 Parallel Interface Connector (female, as viewed from rear of chassis)
Table 5-3.
DB-25 Parallel Connector Pinout
Pin Signal Function Pin Signal Function
1 STB- Strobe / Write [1] 14 LF- Line Feed [2]
2D0 Data 0 15ERR- Error [3]
3 D1 Data 1 16 INIT- Initialize Paper [4]
4 D2 Data 2 17 SLCTIN- Select In / Address. Strobe [1]
5D3 Data 3 18GNDGround
6D4 Data 4 19GNDGround
7D5 Data 5 20GNDGround
8D6 Data 6 21GNDGround
1
23456789-qw
rtyuiopasdf
9D7 Data 7 22GNDGround
10 ACK- Acknowledge / Interrupt [1] 23 GND Ground
11 B S Y B u s y / W a i t [ 1 ] 2 4 G N D G r o u n d
12 PE Paper End / User defined [1] 25 GND Ground
13 SLC T S e l e c t / Us e r d e f i n e d [ 1 ] - - -- - -
NOTES:
[1] Standard and ECP mode function / EPP mode function
[2] EPP mode function: Data Strobe
ECP modes: Auto Feed or Host Acknowledge
[3] EPP mode: user defined
ECP modes:Fault or Peripheral Req.
[4] EPP mode: Reset
ECP modes: Initialize or Reverse Req.
5-6 www.hp.com Technical Reference Guide
Page 57

5.5 Keyboard/Pointing Device Interface
The keyboard/pointing device interface function is provided by the SIO controller component,
which integrates 8042-compatible keyboard controller logic (hereafter referred to as simply the
“8042”) to communicate with the keyboard and pointing device using bi-directional serial data
transfers. The 8042 handles scan code translation and password lock protection for the keyboard
as well as communications with the pointing device.
5.5.1 Keyboard Interface Operation
The data/clock link between the 8042 and the keyboard is uni-directional for Keyboard Mode 1
and bi-directional for Keyboard Modes 2 and 3. (These modes are discussed in detail in
Appendix C). This section describes Mode 2 (the default) mode of operation.
Communication between the keyboard and the 8042 consists of commands (originated by either
the keyboard or the 8042) and scan codes from the keyboard. A command can request an action
or indicate status. The keyboard interface uses IRQ1 to get the attention of the CPU.
The 8042 can send a command to the keyboard at any time. When the 8042 wants to send a
command, the 8042 clamps the clock signal from the keyboard for a minimum of 60 us. If the
keyboard is transmitting data at that time, the transmission is allowed to finish. When the 8042 is
ready to transmit to the keyboard, the 8042 pulls the data line low, causing the keyboard to
respond by pulling the clock line low as well, allowing the start bit to be clocked out of the 8042.
The data is then transferred serially, LSb first, to the keyboard (Figure 5-5). An odd parity bit is
sent following the eighth data bit. After the parity bit is received, the keyboard pulls the data line
low and clocks this condition to the 8042. When the keyboard receives the stop bit, the clock line
is pulled low to inhibit the keyboard and allow it to process the data.
Input/Output Interfaces
Start
Bit
(LSb)
0 1 0 1 1 0 1 1 1 1 0
D1 D2 D3 D4 D5 D6
D0
D7
(MSb)
Parity
Stop
Bit
Data
Clock
Parameter Minimum Maximum
Tcy (Cycle Time) 0 us 80 us
Tcl (Clock Low) 25 us 35 us
Tch (Clock High) 25 us 45 us
Th (Data Hold) 0 us 25 us
Tss (Stop Bit Setup) 8 us 20 us
Tsh (Stop Bit Hold) 15 us 25 us
Th
Tcl TchTcy Tss Tsh
Figure 5-5. 8042-To-Keyboard Transmission of Code EDh, Timing Diagram
Control of the data and clock signals is shared by the 8042 and the keyboard depending on the
originator of the transferred data. Note that the clock signal is always generated by the keyboard.
After the keyboard receives a command from the 8042, the keyboard returns an ACK code. If a
parity error or timeout occurs, a Resend command is sent to the 8042.
Technical Reference Guide www.hp.com 5-7
Page 58

Input/Output Interfaces
5.5.2 Pointing Device Interface Operation
The pointing device (typically a mouse) connects to a 6-pin DIN-type connector that is identical
to the keyboard connector both physically and electrically. The operation of the interface (clock
and data signal control) is the same as for the keyboard. The pointing device interface uses the
IRQ12 interrupt.
5.5.3 Keyboard/Pointing Device Interface Connector
The legacy-light model provides separate PS/2 connectors for the keyboard and pointing device.
Both connectors are identical both physically and electrically. Figure 5-6 and Table 5-4 show the
connector and pinout of the keyboard/pointing device interface connectors.
Figure 5-6. PS/2 Keyboard or Pointing Device Interface Connector (as viewed from rear of chassis)
Table 5-4.
Keyboard/Pointing Device Connector Pinout
Pin Signal Description Pin Signal Description
1DATA Data 4+ 5 VDCPower
2 NC Not Connected 5 CLK Clock
3 GND Ground 6 NC Not Connected
5-8 www.hp.com Technical Reference Guide
Page 59

5.6 Universal Serial Bus Interface
The Universal Serial Bus (USB) interface provides asynchronous/isochronous data transfers with
compatible peripherals such as keyboards, printers, or modems. This high-speed interface
supports hot-plugging of compatible devices, making possible system configuration changes
without powering down or even rebooting systems.
These systems provide ten externally-accessible USB ports; four front panel USB ports (which
may be disabled) and six USB ports on the rear panel. In addition, these systems support a media
reader accessory that uses two USB ports through a system board header connection. The USB
2.0 controller provides a maximum transfer rate of 480 Mb/s. Table 5-5 shows the mapping of
the USB ports.
USB
Table 5-5.
PCH USB Port Mapping
USB Signals USB Connector Location (all form factors
Data 0P, 0N System board header P151
Data 1P, 1N System board header P151
Data 2P, 2N System board header P150
Input/Output Interfaces
Data 3P, 3N System board header P150
Data 4P, 4N Front panel
Data 5P, 5N Front panel
Data 6P, 6N Front panel
Data 7P, 7N Front panel
Data 8P, 8N Rear panel, quad
Data 9P, 9N Rear panel, quad
Data 10P, 10N Rear panel, quad
Data 11P, 11N Rear panel, quad
D a t a 12 P, 12 N R e a r p a n e l , d u a l
Data 13P, 13N Rear panel, dual
Technical Reference Guide www.hp.com 5-9
Page 60

Input/Output Interfaces
5.6.1 USB Connector
These systems provide type-A USB ports as shown in Figure 5-7.
Figure 5-7. Universal Serial Bus Connector (as viewed from rear of chassis)
Pin Signal Description Pin Signal Description
1 Vcc +5 VDC 3 USB+ Data (plus)
2USB-Data (minus) 4GNDGround
5.6.2 USB Cable Data
The recommended cable length between the host and the USB device should be no longer than
sixteen feet for full-channel (12 MB/s) operation, depending on cable specification (see
following table).
1 2
3 4
Table 5-6.
USB Connector Pinout
Table 5-7.
USB Cable Length Data
Conductor Size Resistance Maximum Length
20 AWG 0.036 Ω 16.4 ft (5.00 m)
22 AWG 0.057 Ω 9.94 ft (3.03 m)
24 AWG 0.091 Ω 6.82 ft (2.08 m)
26 AWG 0.145 Ω 4.30 ft (1.31 m)
28 AWG 0.232 Ω 2.66 ft (0.81 m)
NOTE: For sub-channel (1.5 MB/s) operation and/or when using sub-standard cable shorter
lengths may be allowable and/or necessary.
The shield, chassis ground, and power ground should be tied together at the host end but left
unconnected at the device end to avoid ground loops.
Table 5-8.
USB Color Code
Signal Insulation color Signal Insulation Color
Data + Green Vcc Red
Data - White Ground Black
5-10 www.hp.com Technical Reference Guide
Page 61

5.7 Audio Subsystem
These systems use the HD audio controller of the 82801 component to access and control a
Realtek ALC261 HD Audio Codec, which provides 2-channel high definition analog-to-digital
(ADC) and digital-to-analog (DAC) conversions. A block diagram of the audio subsystem is
shown in Figure 5-8. All control functions such as volume, audio source selection, and sampling
rate are controlled through software through the HD Audio Interface of the 82801 ICH
component. Control data and digital audio streams (record and playback) are transferred between
the ICH and the Audio Codec over the HD Audio Interface. The codec’s speaker output is
applied to a 1.5-watt amplifier that drives the internal speaker. A device plugged into the
Headphone jack or the line input jack is sensed by the system, which will inhibit the Speaker
Audio signal.
These systems provide the following analog interfaces for external audio devices:
Microphone In—This input uses a three-conductor 1/8-inch mini-jack that accepts a stereo
microphone. This input can be retasked to a headphones out or line in funciton.
Line In—This input uses a three-conductor (stereo) 1/8-inch mini-jack designed for connection
of a high-impedance audio source such as a tape deck. This jack can be re-tasked to a
Microphone In function.
Headphones Out—This input uses a three-conductor (stereo) 1/8-inch mini-jack that is
designed for connecting a set of 32-ohm (nom.) stereo headphones. Plugging into the
Headphones jack mutes the signal to the internal speaker and the Line Out jack as well.
Input/Output Interfaces
Line Out—This output uses a three-conductor (stereo) 1/8-inch mini-jack for connecting left
and right channel line-level signals. Typical connections include a tape recorder's Line In
(Record In) jacks, an amplifier's Line In jacks, or to powered speakers that contain amplifiers.
Header
P23
PC Beep
HD Audio I/F
HD Audio
ALC261
Codec
Speaker
Audio (L+R)
Headphone
Audio (L/R)
Line Audio
Out (L/R)
Header
P23
Audio
Amp
Front Panel
Headphones Out
Rear Panel
Line Out
Header
P6
82801 ICH
HD Audio
Interface
Front Panel
Mic In
Rear Panel
Line In [1]
NOTES:
L/R = Separate left and right channels (stereo). L+R = Combined left and right channels (mono).
[1] Can be re-configured as Microphone In
Mic Audio (L/R)
Line Audio (L/R)
Figure 5-8. Audio Subsystem Functional Block Diagram
Technical Reference Guide www.hp.com 5-11
Page 62

Input/Output Interfaces
5.7.1 HD Audio Controller
The HD Audio Controller is a PCI Express device that is integrated into the 82801 ICH
component and supports the following functions:
■ Read/write access to audio codec registers
■ Support for greater than 48-KHz sampling
■ HD audio interface
5.7.2 HD Audio Link Bus
The HD audio controller and the HD audio codec communicate over a five-signal HD Audio
Link Bus (Figure 5-9). The HD Audio Interface includes two serial data lines; serial data out
(SDO, from the controller) and serial data in (SDI, from the audio codec) that transfer control
and PCM audio data serially to and from the audio codec using a time-division multiplexed
(TDM) protocol. The data lines are qualified by the 24-MHz BCLK signal driven by the audio
controller. Data is transferred in frames synchronized by the 48-KHz SYNC signal, which is
derived from the clock signal and driven by the audio controller. When asserted (typically during
a power cycle), the RESET- signal (not shown) will reset all audio registers to their default
values.
BCLK
Frame
Start
SYNC
SDO
SDI
RST#
NOTE: Clock not drawn to scale.
Command Stream
Tag A
Response Stream
Figure 5-9. HD Audio Link Bus Protocol
5.7.3 Audio Multistreaming
Frame
Stream A
Tag B
Ta g C
Stream B
Stream C
Frame
Start
The audio subsystem can be configured (through the ADI control panel) for processing audio for
multiple applications (multi-tasking). The Headphone Out jack can provide audio for one
application while the Line Out jack can provide external speaker audio from another application.
5-12 www.hp.com Technical Reference Guide
Page 63

5.7.4 Audio Specifications
The specifications for the HD Audio subsystem are listed in Table 5-9.
HD Audio Subsystem Specifications
Parameter Measurement
Sampling Rates (DAC and ADC): 8 kHz to 192 kHz
Resolution:
DAC
ADC
Nominal Input Voltage:
Mic In (w/+20 db gain)
Line In
Input/Output Interfaces
Table 5-9.
24-bit
24-bit
.283 Vp-p
2.83 Vp-p
Subsystem Impedance:
Mic In
Line In
Line Out (minimum expected load)
Headphones Out (minimum expected load)
Signal-to-Noise Ratio
Line out
Headphone out
Microphone / line in
Total Harmonic Distortion (THD)
Line out
Headphone out
Microphone / line in
Max. Subsystem Power Output to 4-ohm Internal
Speaker (with 10% THD):
Gain Step 1.5 db
Master Volume Range -58.5 db
Frequency Response:
ADC/DAC
Internal Speaker
150K ohms
150K ohms
10K o h ms
32 ohms
90 db (nom)
90 db (nom)
85 db (nom)
-84 db
-80 db
-78 db
1.5 w a t t s
20– 20000 Hz
450–20000 Hz
Technical Reference Guide www.hp.com 5-13
Page 64
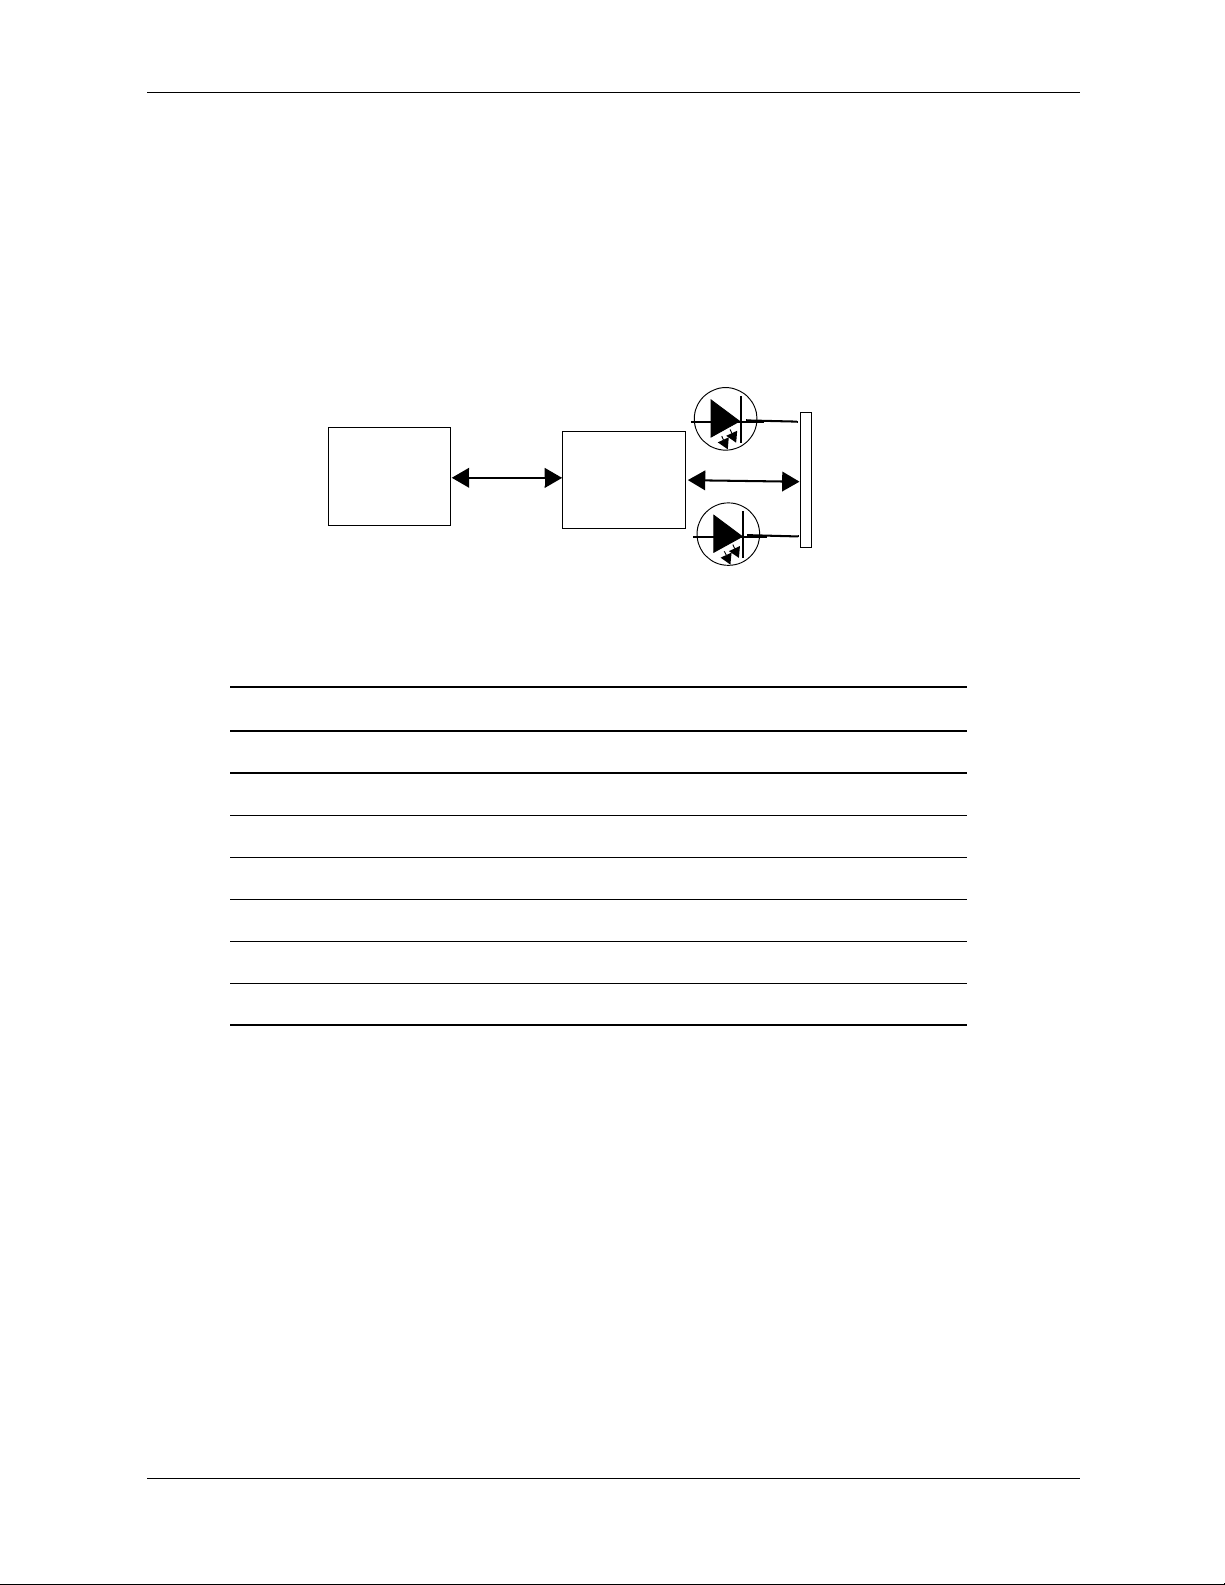
Input/Output Interfaces
5.8 Network Interface Controller
These systems provide 10/100/1000 Mbps network support through an Intel 82578V network
interface controller (NIC), a PHY component, and a RJ-45 jack with integral status LEDs (Figure
5-10). The support firmware is contained in the system (BIOS) ROM. The NIC can operate in
half- or full-duplex modes, and provides auto-negotiation of both mode and speed. Half-duplex
operation features an Intel-proprietary collision reduction mechanism while full-duplex
operation follows the IEEE 802.3x flow control specification.
Activity (green) LED
Intel
82568V
NIC
Figure 5-10. Network Interface Controller Block Diagram
Function Activity LED Speed LED
10 MB link Green (steady) Off
100 MB link Green (steady) Yellow (steady)
1000 MB link Green (steady) Green (steady)
10 MB data transfer Green (blinking) Off
Tx/Rx Data
LAN I/F
Speed (yellow/green) LED
Table 5-10. LAN LED Indications
Tx/Rx Data
RJ-45
Connector
100 MB data transfer Green (blinking) Yellow (steady)
1000 MB data transfer Green (blinking Green (steady)
The Network Interface Controller includes the following features:
■ VLAN tagging with Windows XP and Linux
■ Multiple VLAN support with Windows XP (and later)
■ Power management support for ACPI 1.1, PXE 2.0, WOL, ASF 1.0, and IPMI
■ Cisco Etherchannel support
■ Speed and Activity LED indicator drivers
The controller features high and low priority queues and provides priority-packet processing for
networks that can support that feature. The controller's micro-machine processes transmit and
receive frames independently and concurrently. Receive runt (under-sized) frames are not passed
on as faulty data but discarded by the controller, which also directly handles such errors as
collision detection or data under-run.
5-14 www.hp.com Technical Reference Guide
Page 65

For the features in the following paragraphs to function as described, the system unit must be
✎
plugged into a live AC outlet. Controlling unit power through a switchable power strip will, with
the strip turned off, disable any wake, alert, or power mangement functionality.
5.8.1 Wake-On-LAN Support
The NIC supports the Wired-for-Management (WfM) standard of Wake-On-LAN (WOL) that
allows the system to be booted up from a powered-down or low-power condition upon the
detection of special packets received over a network. The detection of a Magic Packet by the
NIC results in the PME- signal on the PCI bus to be asserted, initiating system wake-up from an
ACPI S1 or S3 state.
5.8.2 Alert Standard Format Support
Alert Standard Format (ASF) support allows the NIC to communicate the occurrence of certain
events over a network to an ASF 1.0-compliant management console and, if necessary, take
action that may be required. The ASF communications can involve the following:
■ Alert messages sent by the client to the management console.
■ Maintenance requests sent by the management console to the client.
Input/Output Interfaces
■ Description of client's ASF capabilities and characteristics.
The activation of ASF functionality requires minimal intervention of the user and requires only
booting a client system connected to a network with an ASF-compliant management console.
5.8.3 Power Management Support
The NIC features Wired-for-Management (WfM) support providing system wake up from
network events (WOL) as well as generating system status messages (AOL) and supports ACPI
power management environments. The controller receives 3.3 VDC (auxiliary) power as long as
the system is plugged into a live AC receptacle, allowing support of wake-up events occurring
over a network while the system is powered down or in a low-power state.
The Advanced Configuration and Power Interface (ACPI) functionality of system wake up is
implemented through an ACPI-compliant OS and is the default power management mode. The
following wakeup events may be individually enabled/disabled through the supplied software
driver:
■ Magic Packet—Packet with node address repeated 16 times in data portion
The following functions are supported in NDIS5 drivers but implemented through remote
✎
management software applications (such as LanDesk).
■ Individual address match—Packet with matching user-defined byte mask
■ Multicast address match—Packet with matching user-defined sample frame
■ ARP (address resolution protocol) packet
■ Flexible packet filtering—Packets that match defined CRC signature
The PROSet Application software (pre-installed and accessed through the System Tray or
Windows Control Panel) allows configuration of operational parameters such as WOL and
duplex mode.
Technical Reference Guide www.hp.com 5-15
Page 66

Input/Output Interfaces
5.8.4 NIC Connector
Figure 5-11 shows the RJ-45 connector used for the NIC interface. This connector includes the
two status LEDs as part of the connector assembly.
Figure 5-11. RJ-45 Ethernet TPE Connector (as viewed from rear of chassis)
Speed LED
5.8.5 NIC Specifications
Table 5-11. NIC Specifications
Parameter Compatibility standard orprotocol
Modes Supported 10BASE-T half duplex @ 10 Mb/s
Activity LED
Description
Pin
1 Transmit+
2 Transmit3 Receive+
6 Receive-
4, 7, 8
124 38 7 6 5
Not used
10Base-T full duplex @ 20 Mb/s
100BASE-TX half duplex @ 100 Mb/s
100Base-TX full duplex @ 200 Mb/s
1000BASE-T half duplex @ 1 Gb/s
1000BASE-TX full duplex @ 2 Gb/s
Standards Compliance IEEE 1588
IEEE 802.1ae
IEEE 802.3, 802.3ab, 802.3af, 802.3i, 802.3u, 802.3x,
802.3z
OS Driver Support MS-DOS
MS Windows XP Home/Pro, Vista Home/Pro, Windows 7
MS Windows NT 3.51 & 4.0
Novell Netware 3.x, 4.x, 5x
Novell Netware/IntraNetWare
SCO UnixWare 7
Linux 2.2, 2.4
PXE 2.0
Boot ROM Support Intel PRO/100 Boot Agent (PXE 3.0, RPL)
F12 BIOS Support Yes
Bus Inteface PCI Express x1
Power Management Support ACPI, PCI Power Management Spec.
5-16 www.hp.com Technical Reference Guide
Page 67

6.1 Introduction
This chapter describes the graphics subsystem that is integrated into the Intel Pentium Dual-Core
G6950, Core i3, and select Core i5 processors. This graphics subsystem employs the use of
system memory to provide efficient, economical 2D and 3D performance.
All systems provide dual-monitor support in the standard configuration. These systems can be
upgraded by installing a PCIe x16 graphics card in the PCIe x16 graphics slot, which disables the
integrated graphics controller
This chapter covers the following subjects:
■ Functional description (6.2)
■ Upgrading (6.3)
■ Monitor connectors (6.4)
6
Integrated Graphics Subsystem
Systems shipped with the Intel Core i5-750 or Core i7 processors require a separate PCI graphics
✎
adapter card. This adapter is not discribed in this guide.
Technical Reference Guide www.hp.com 6-1
Page 68

Integrated Graphics Subsystem
6.2 Functional Description
The integrated HD Graphics controller (hereafter referred to as an internal graphics controller)
featured in select Intel processors supported by these systems operates off the internal PCIe x16
bus of the processor and, through the Flexible Display Interface (FDI) and the Q57 PCH
component, can drive an external analog multi-scan monitor and/or a DisplayPort-compatible
digital monitor. The integrated graphics controller includes a memory management feature that
allocates portions of system memory for use as the frame buffer and for storing textures and 3D
effects.
PCIe 2.0 x16 Graphics slot
PCIe
I/F
Intel Processor
HD Graphics
Controller
FDI
Q57 PCH-D0
Digital
RGB
DisplayPort
Analog
Monitor
Monitor
PCIe 2.0 x4 slot (x16 conn.)
Figure 6-1. Integrated Graphics Subsystem, Block diagram
The integrated graphic controller of the Intel i5-661 provides the following features:
■ DirectX DX10 support
■ OpenGL 2.1 support
■ Dynamic video memory allocation, where the amount of memory required by the application
is acquired (or released) by the controller
■ Intelligent memory management allowing tiled memory addressing, deep display buffering,
and dynamic data management
■ Core engine operating up to 900 MHz
■ 2560 x 1600 maximum resolution
The integrated graphics controller uses a portion of system memory for instructions, textures,
and frame (display) buffering. At boot time, 32 megabytes of system memory is pre-allocated for
the graphics controller whether using Windows XP, Windows Vista, or Windows 7. Using a
process called Dynamic Video Memory Technology (DVMT), the integrated graphics controller
dynamically allocates display and texture memory amounts according to the needs of the
application running on the system.
6-2 www.hp.com Technical Reference Guide
Page 69

Integrated Graphics Subsystem
The total memory allocation is determined by the amount of system memory installed in a
system, along with the BIOS settings, operating system, and system load. Table 6-1 shows the
pre-allocation memory amounts.
Table 6-1.
Integrated Graphics Controller
Memory Allocation with Windows XP
System Memory Installed Pre-allocated DVMT
0.5 GB 32 MB 128 MB
1.0 G B 32 M B 512 M B
1.5 GB 32 MB 768 MB
> 2GB 32 MB 1024 MB
System memory that has been pre-allocated is not seen by the operating system, which will
report the total amount of memory installed less the amount of pre-allocated memory.
Systems running Windows Vista or Windows 7 use Protected Audio Video Path (PAVP) to
ensure smooth playback of high-definition video by off-loading video decoding from the
processor to the integrated graphics controller. BIOS can allocate addtional memory for PAVP,
which can be set through RBSU to run in Lite mode (default) or in Heavy mode. Table 6-2 shows
the PAVP memory usage for Windows Vista and Windows 7.
Table 6-2.
Integrated Graphics Controller
Memory Allocation with Windows Vista or Windows 7
Available
System Memory
Installed
1 GB Lite 952 MB 252 MB 124 MB
2 GB Lite 1976 MB 764 MB 636 MB
4 GB Lite 4024 MB 1759 MB 1631 MB
6 GB Lite 6072 MB 1759 MB 1631 MB
8 G B Lit e 812 0 M B 1759 MB 16 31 MB
NOTES:
Dedicated Video Memory (memory owned and locked for graphics use and reported by the OS):
PAVP Lite setting = 32 MB
PAVP Heavy setting = 122 MB
System Video Memory (memory locked and dedicated for gtraphics use):
PAVP Lite setting = 96 MB
PAVP Heavy setting = 6 MB
[1] Total amount of memory available for graphics as reported by the OS.
[2] Shared System Memory (memory dynamically allocated for graphics use).
PAVP
Setting
Heavy 856 MB 294 MB 166 MB
Heavy 1880 MB 806 MB 678 MB
Heavy 3928 MB 1759 MB 1631 MB
Heavy 5976 MB 1759 MB 1631 MB
Heavy 8024 MB 1759 MB 1631 MB
System
Memory
Graphics Memory [1]
Total
Available
Shared
System
Memory [2]
Technical Reference Guide www.hp.com 6-3
Page 70

Integrated Graphics Subsystem
The integrated graphics controller will use, in standard VGA/SVGA modes, pre-allocated
memory as a true dedicated frame buffer. If the system boots with the OS loading the Extreme
Graphics drivers, the pre-allocated memory will then be re-claimed by the drivers and may or
may not be used in the “extended” graphic modes. However, it is important to note that
pre-allocated memory is available only to the integrated graphics controller, not to the OS.
The DVMT function is an enhancement over the Unified Memory Architecture (UMA) of earlier
systems. The DVMT of the Q57 selects, during the boot process, the maximum graphics memory
allocation possible according on the amount of system memory installed:
The actual amount of system memory used in the “extended” or “extreme” modes will increase
and decrease dynamically according to the needs of the application. The amount of memory used
solely for graphics (video) may be reported in a message on the screen, depending on the
operating system and/or applications running on the machine.
For viewing the maximum amount of available frame buffer memory MS Windows go to the
Control Panel and select the Display icon, then > Settings > Advanced > Adapter.
The Microsoft Direct Diagnostic tool included in most versions of Windows may be used to
check the amount of video memory being used. The Display tab of the utility the “Approx. Total
Memory” label will indicate the amount of video memory. The value will vary according to OS.
Some applications, particularly games that require advanced 3D hardware acceleration, may not
✎
install or run correctly on systems using the integrated graphics controller.
Table 6-3 listed the relostions supported by the integrated graphic controller. Other resolutions
may be possible have not been tested or qualified by HP.
Table 6-3.
Integrated Graphics Controller
Supported Resolutions
Maximum Refresh Rate
Resolution
640 x 480 85 60
800 x 600 85 60
1024 x 768 85 60
128 0 x 7 2 0 85 6 0
128 0 x 1024 8 5 6 0
14 4 0 x 9 0 0 75 60
160 0 x 12 0 0 8 5 60
168 0 x 10 5 0 7 5 60
1920 x 1080 85 60-R
1920 x 1200 85 60-R
1920 x 144 0 85 n/ a
2048 x 1536 75 n/a
2560 x 1600 n/a 60 [1]
NOTES:
Other resolutions may be possible but have not been tested or qualified by HP.
[1] Only supported when using a DisplayPort connection.
Analog Digital
6-4 www.hp.com Technical Reference Guide
Page 71

6.3 Upgrading
These systems provide direct, dual-monitor support; a VGA montor and a DisplayPort monitor
can be connected and driven simultaneously. These systems also include a PCIe x16 graphics
connector that specifically supports a PCIe x16 graphics card and a PCIe x16 connector that
provides PCIe x4 operation for an x4 or x16 PCIe card.
The upgrade procedure is as follows:
1. Shut down the system through the operating system.
2. Unplug the power cord from the rear of the system unit.
3. Remove the chassis cover.
4. Install the graphics card into the PCIe x16 graphics slot or the PCIe x4/x16 slot.
5. Replace the chassis cover.
6. Reconnect the power cord to the system unit.
7. Power up the system unit:
If a PCIe graphics controller card is installed in the PCIe x16 graphics slot, the BIOS will detect
✎
the presence of the PCIe card and disable the integrated graphics controller of the processor. In
this configuration, the integrated graphics controller cannot be enabled.
Integrated Graphics Subsystem
If a PCIe graphics controller card is installed in the PCIe x4 /x16 slot, the integrated graphics
controller of the processor will be disabled by default, but can be re-enabled through the BIOS
settings to allow an alternate method of multi-monitor operation. Press the F10 key during the
boot process to enter the ROM-based Setup utility and re-enable the GMA for multi-monitor
operation. A PCIe x16 card installed in the PCIe x4/x16 slot will be limited to x4 operation.
Two PCIe graphics can be installed simultaneously to provide an alternate method for
✎
multi-monitor support. In this configuration, the integrated graphics controller (if present) will be
disabled.
Technical Reference Guide www.hp.com 6-5
Page 72
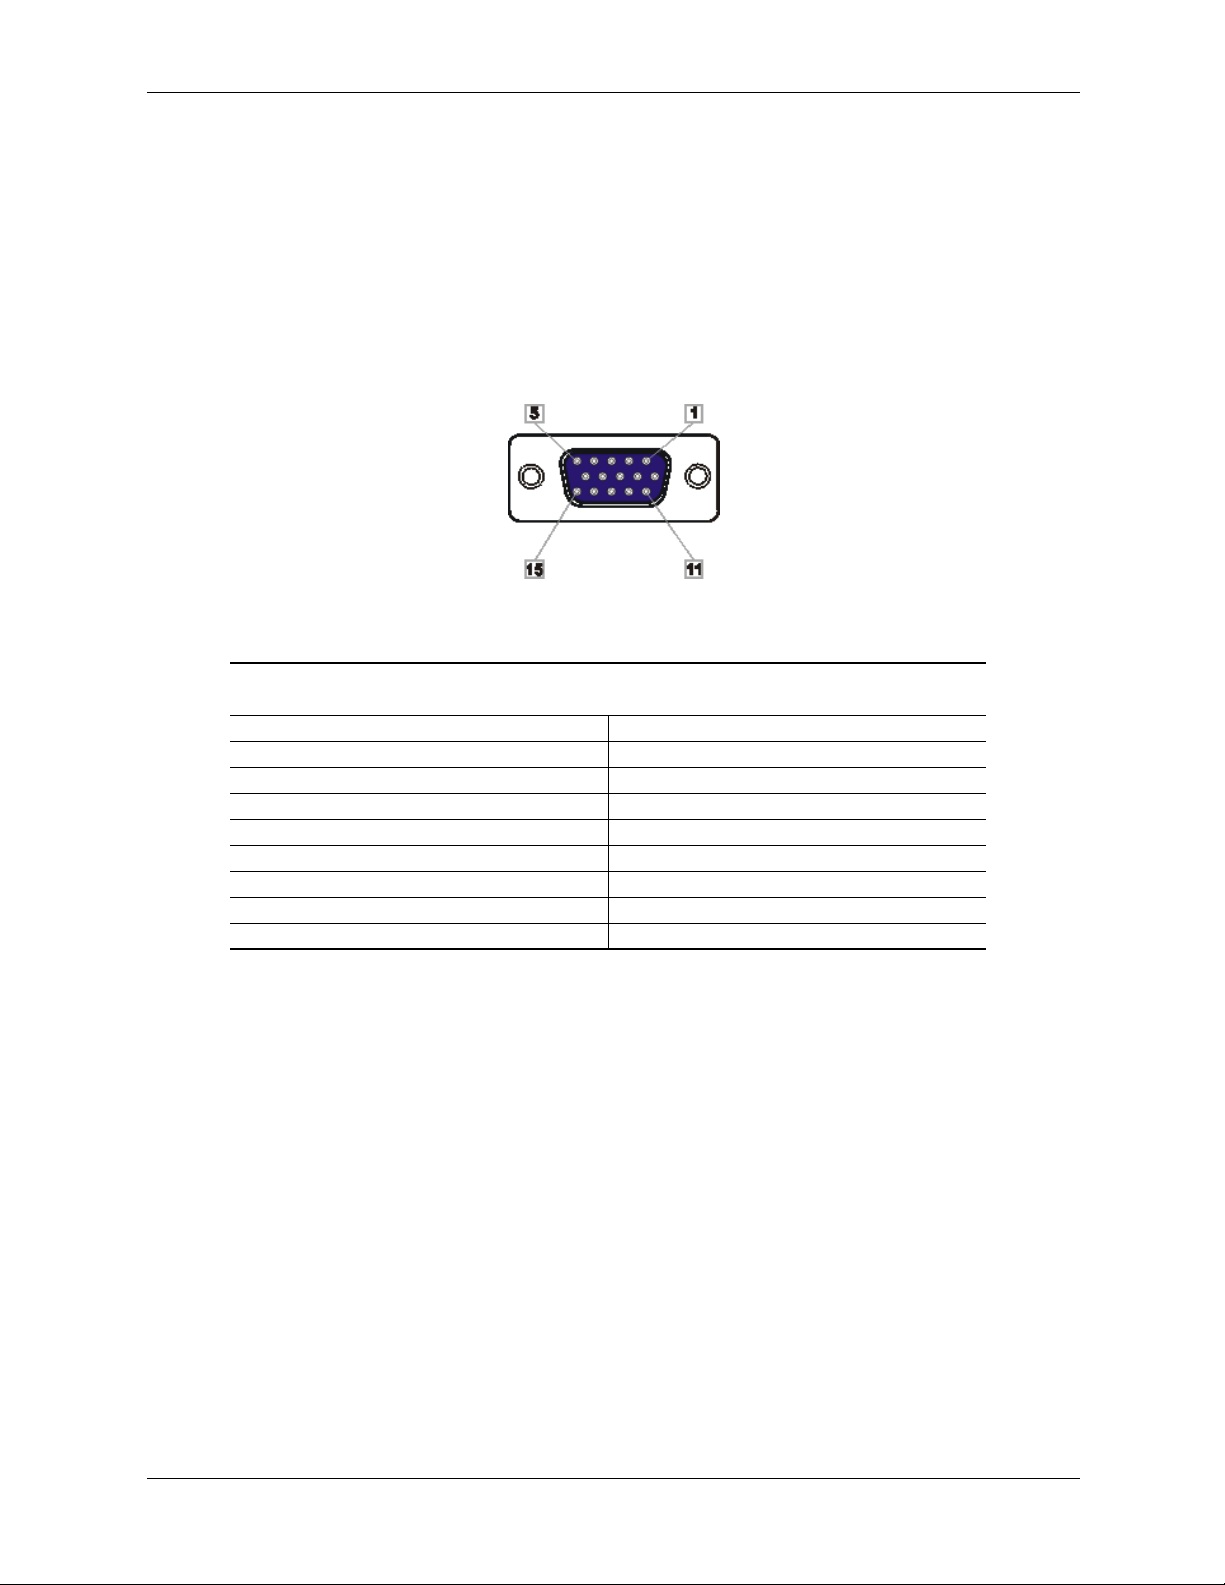
Integrated Graphics Subsystem
6.4 Monitor Connectors
All form factors provide an analog VGA connector and a DisplayPort connector, and can drive
both types of monitors simultaneously.
6.4.1 Analog Monitor Connector
All form factors include a legacyVGA connector (Figure 6-2) for attaching an analog video
monitor:
Figure 6-2. DB-15 Analog VGA Monitor Connector, (as viewed from rear of chassis).
Table 6-4.
DB-15 Monitor Connector Pinout
Pin Signal Description Pin Signal Description
1 R Red Analog 9 PWR +5 VDC (fused) [1]
2 G Blue Analog 10 GND Ground
3 B Green Analog 11 NC Not Connected
4 NC Not Connected 12 SDA DDC Data
5 GND Ground 13 HSync Horizontal Sync
6 R GND Red Analog Ground 14 VSync Vertical Sync
7 G GND Blue Analog Ground 15 SCL DDC Clock
8 B GND Green Analog Ground -- -- --
NOTE:
[1] Fuse automatically resets when excessive load is removed.
6-6 www.hp.com Technical Reference Guide
Page 73

6.4.2 DisplayPort Connector
All systems include a DisplayPort connector (Figure 6-3) for attaching a digital monitor. This
interface also supports the use of an optional adapter/dongle for converting the DisplayPort
output to a DVI, HDMI, or analog VGA output.
Figure 6-3. DisplayPort Connector, (as viewed from rear of chassis).
DB-15 Monitor Connector Pinout
Pin Signal Pin Signal
1 ML Lane (p) 0 11 Ground
2 Ground 12 ML Lane (n) 3
3 ML Lane (n) 0 13 Ground
4 ML Lane (p) 1 14 Ground
5Ground 15AUX Ch (p)
6 ML Lane (n) 1 16 Ground
7 ML Lane (p) 2 17 AUX Ch (n)
8 Ground 18 Hot Plug Detect
9 ML Lane (n) 2 19 DP Power Return
10 ML Lane (p) 3 20 DP Power
Integrated Graphics Subsystem
Table 6-5.
Technical Reference Guide www.hp.com 6-7
Page 74

Integrated Graphics Subsystem
6-8 www.hp.com Technical Reference Guide
Page 75

Power and Signal Distribution
7.1 Introduction
This chapter describes the power supplies and discusses the methods of general power and signal
distribution. Topics covered in this chapter include:
■ Power distribution (7.2)
■ Power Control (7.3)
■ Signal distribution (7.4)
7.2 Power D ist rib u tio n
These systems use a common power source power supply unit contained within the system
chassis. Figure 7-1 shows the block diagram for power generation.
7
Front Bezel
Power Button
Power Control Logic, DC/DC Converter
Power On
P1
+12 Vmain +12 Vsb
90 - 264 VAC
NOTE: Return (RTN or ground) not shown.
Conn Pin 1 Pin 2 Pin 3 Pin 4 Pin 5 Pin 6
P1 RTN RTN –12 V + 12 Vm ai n + 12 V ma in + 12 V s b
P2 FANcmd Fan Speed PS On Pwr Good RTN RTN
P3 RTN RTN +12 Vcpu
NOTES:
Connectors not shown to scale.
All + and
RTN = Return (signal ground)
– values are VDC.
System Board
& Voltage Regulators
PS
On
Fan
Cmd
-12 V
Power Supply Unit
+12 Vcpu
P2 P3
Pwr
Fan
Spd
Good
+12 Vcpu
P3
3
4
2
1
P2
2
3
4
56
4
1
1
P1
6
3
Figure 7-1. Power Distribution and Cabling, Block Diagram
Technical Reference Guide www.hp.com 7-1
Page 76

Power and Signal Distribution
Table 7-1 lists the specifications of the 240-watt power supply used in the SFF unit.
Input voltage:
115 VA C
230 VAC
Line Frequency 47–63 Hz -- -- -- -Input (AC) Current Requirement
(100 VAC rms @ 60 Hz)
Output voltage (VDC):
+12 Vmain
+12 Vcpu
+12 Vsb (aux)
–12 V
Table 7-1.
SFF 240-Watt Power Supply Unit Specifications
AC Range or
DC Regulation
90–140 VAC
180 –26 4 VAC
-- -- 4 A rms -- --
11. 62 t o 12 . 5 7
11. 62 t o 12 . 5 7
11. 0 6 t o 11. 74
–10.8 to –13.2
Min.
Current
Loading [1]
Max.
Current
Current [2]
-- -- -- --
0.5 A
1 A
0.1 A
0 A
14 A
12 A
1.3 A
0.15 A
Surge
16 A
16 A
1.5 A
0.5 A
Max.
Ripple
12 0 m V
12 0 m V
12 0 m V
12 0 m V
NOTES:
Total continuous power should not exceed 240 watts. Total surge power (<10 seconds w/duty cycle < 5 %) should not exceed
265 watts.
[1] The minimum current loading figures apply to a PS On start up only.
[2] Maximum surge duration for +12Vcpu is 1 second with 12-volt tolerance +/- 10%.
Table 7-2 lists the specifications for the 320-watt power supply used in the CMT form factor.
Table 7-2.
CMT 320-Watt Power Supply Unit Specifications
AC Range or
DC Regulation
Input voltage:
115 VA C
230 VAC
90–140 VAC
180 –26 4 VAC
Line Frequency 47–63 Hz -- -- -- -Input (AC) Current Requirement
-- -- 5.5 A rms -- --
(100 VAC rms @ 60 Hz)
Output voltage (VDC):
+12 Vmain
+12 Vcpu
+12 Vsb (aux)
–12 V
11. 62 t o 12 . 5 7
11. 62 t o 12 . 5 7
11. 0 6 t o 11. 74
–10.8 to –13.2
Min.
Current
Loading [1]
Max.
Current
Surge
Current [2]
-- -- -- --
0.5 A
1 A
0.1 A
0 A
16 A
14 A
1.3 A
0.15 A
18 A
18 A
1.5 A
0.5 A
Max.
Ripple
12 0 m V
12 0 m V
12 0 m V
12 0 m V
NOTES:
Total continuous output power should not exceed 320 watts.
[1] Minimum loading requirements must be met at all times to ensure normal operation and specification compliance.
[2] Maximum surge duration for +12Vcpu is 1 second with 12-volt tolerance +/- 10%.
7-2 www.hp.com Technical Reference Guide
Page 77

The +12Vsb (auxilary) voltage is always produced by the power supply unit as long as the
system is connected to a live AC source. When the PS On signal is asserted, the power supply
unit produces the +12 Vmain, +12 Vcpu, and -12 V outputs.
The standard 240-watt and 320-watt power suppies have a 70% minimum efficiency rating at
100% of the rated load, measured while operating from 100 VAC @60 Hz and 230 VAC @ 50
Hz.
The optional high-efficiency 240-watt and 320-watt power supplies operate at the following
efficiencies while operating from 100 VAC @60 Hz and 230 VAC @ 50 Hz :
100% of rated load: 85% efficient
50% of rated load: 89% efficient
20% of rated load: 87% efficient
7.3 Powe r Con t r ol
System power is controlled through the power button and though external events.
7.3.1 Power But t on
Pressing and releasing the power button applies a negative (grounding) pulse to the power
control logic on the system board. The resultant action of pressing the power button depends on
the state and mode of the system at that time and is described as follows:
Power and Signal Distribution
Table 7-3.
Power Button Actions
System State
Off Negative pulse, of which the falling edge results in power control logic
On, ACPI Disabled Negative pulse, of which the falling edge causes power control logic to
On, ACPI Enabled Pressed and Released Under Four Seconds:
Pressed Power Button Results In:
asserting PS On signal to Power Supply Assembly, which then initializes. ACPI
four-second counter is not active.
de-assert the PS On signal. ACPI four-second counter is not active.
Negative pulse, of which the falling edge causes power control logic to
generate SMI-, set a bit in the SMI source register, set a bit for button status,
and start four-second counter. Software should clear the button status bit within
four seconds and the Suspend state is entered. If the status bit is not cleared by
software in four seconds PS On is de-asserted and the power supply assembly
shuts down (this operation is meant as a guard if the OS is hung).
Pressed and Held At least Four Seconds Before Release:
If the button is held in for at least four seconds and then released, PS On is
negated, de-activating the power supply.
Technical Reference Guide www.hp.com 7-3
Page 78

Power and Signal Distribution
A dual-color LED located on the front panel (bezel) is used to indicate system power status. The
front panel (bezel) power LED provides a visual indication of key system conditions listed as
follows:
Power LED Condition
Steady green Normal full-on operation
Blinks green @ 0.5 Hz Suspend state (S1) or suspend to RAM (S3)
Blinks red 2 times @ 1 Hz [1] Processor thermal shut down. Check air flow, fan
Blinks red 3 times @ 1 Hz [1] Processor not installed. Install or reseat CPU.
Blinks red 4 times @ 1 Hz [1] Power failure (power supply is overloaded). Check storage
Blinks red 5 times @ 1 Hz [1] Pre-video memory error. Incompatible or incorrectly seated
Blinks red 6 times @ 1 Hz [1] Pre-video graphics error. On system with integrated
Blinks red 7 times @ 1 Hz [1] PCA failure. Check/replace system board.
Blinks red 8 times @ 1 Hz [1] Invalid ROM (checksum error). Reflash ROM using CD or
Blinks red 9 times @ 1 Hz [1] System powers on but fails to boot. Check power supply,
Blinks red 10 times @ 1 Hz [1] Bad option card.
No light System dead. Press and hold power button for less than 4
Table 7-4.
Power LED Indications
operation, and CPU heat sink.
devices, expansion cards and/or system board (CPU
power connector P3).
DIMM.
graphics, check/replace system board. On system with
graphics card, check/replace graphics card.
replace system board.
CPU, system board.
seconds. If HD LED turns green then check voltage select
switch setting or expansion cards. If no LED light then check
power button/power supply cables to system board or
system board.
NOTE:
[1] Will be accompanied by the same number of beeps, with 2-second pause between cycles.
Beeps stop after 5 cycles.
7-4 www.hp.com Technical Reference Guide
Page 79

7.3. 2 Wake U p Events
The system can be activated with a power “wake-up” of the system due to the occurrence of a
magic packet, serial port ring, or PCI power management event (PME). These events can be
individually enabled through the Setup utility to wake up the system from a sleep (low power)
state.
Wake-up functionality requires that certain circuits receive auxiliary power while the system is
✎
turned off. The system unit must be plugged into a live AC outlet for wake up events to function.
Using an AC power strip to control system unit power will disable wake-up event functionality.
The wake up sequence for each event occurs as follows:
Wake-On-LA N
The network interface controller (NIC) can be configured for detection of a “Magic Packet” and
wake the system up from sleep mode through the assertion of the PME- signal on the PCI bus.
Refer to Chapter 5, “Network Support” for more information.
Modem Ring
A ring condition on a serial port can be detected by the power control logic and, if so configured,
cause the power control logic to wake up the system.
Power and Signal Distribution
Power Management Event
A power management event that asserts the PME- signal on the PCI bus can be enabled to cause
the power control logic to wake up the system. Note that the PCI card must be PCI ver. 2.2 (or
later) compliant to support this function.
7.4 Power M an a ge m en t
These systems include power management functions that conserve energy by turning off or
inhibiting power to various subsystems and components. These functions are provided by a
combination of hardware, firmware (BIOS) and software. These systems provide the following
power management support:
■ ACPI v2.0 compliant (ACPI modes C1, S1, and S3-S5)
■ APM 1.2 compliant
■ U.S. EPA Energy Star 3.0 and 4.0 compliant
Table 7-5 shows the comparison in power states.
Technical Reference Guide www.hp.com 7-5
Page 80

Power and Signal Distribution
Power
State System Condition
G0, S0, C0, D0 System fully on. OS and
G1, S1, C1, D1 System on, CPU is executing and
G1, S2/3, C2,
D2 (Standby/or
suspend)
S4, D3
(Hibernation)
G2, S5, D3
G3 System off (mechanical). No power
cold
Table 7-5.
System Power States
application is running, all
components.
data is held in memory. Some
peripheral subsystems may be on
low power. Monitor is blanked.
System on, CPU not executing,
cache data lost. Memory is
holding data, display and I/O
subsystems on low power.
System off. CPU, memory, and
most subsystems shut down.
Memory image saved to disk for
recall on power up.
System off. All components either
completely shut down or receiving
minimum power to perform system
wake-up. PCI and PCIe 3.3V slot
power (for wake-up events) can be
selectively disabled in BIOS
configuration.
to any internal components except
RTC circuit. [1]
Power
Consumption
Maximum N/A No
Low < 2 sec after
Low < 5 sec. after
Low <25 sec. after
Minimum <35 sec. after
None — —
Transition
To S0 by [2]
keyboard or
pointing device
action
keyboard, pointing
device, or power
button action
power button
action
power button
action
OS Restart
Required
No
No
Yes
Yes
NOTES:
Gn = Global state.
Sn = Sleep state.
Cn = ACPI state.
Dn = PCI state.
[1] Power cord is disconnected for this condition.
[2] Actual transition time dependent on OS and/or application software.
7-6 www.hp.com Technical Reference Guide
Page 81

7.5 Signal Distribution
Table 7-6 lists the reference designators for LEDs, connectors, indicators, and switches used on
the system boards for systems covered in this guide. Unless otherwise indicated, components are
present on all system boards.
System Board Connector, Indicator, and Switch Designations
Designator Component function
CR1 +5 VDC LED
E1 Descriptor table override header
E14 SPI ROM boot block header
E49 / JP49 Password clear header / jumper
J9 Stacked RJ-45 & dual USB connectors
J10 Stacked quad USB connectors
J20 PCI 2.3 connector
J21 PCI 2.3 connector CMT only
J22 PCI 2.3 connector CMT only
J31 PCIe x1 connector
J32 PCIe x1 connector
J41 PCIe x16 graphics connector
J42 PCIe x4 graphics (x16) connector
J50 Parallel port
J68 Stacked keyboard, mouse PS/2 connectors
J69 VGA monitor DB-15 connector
J78 Stacked audio line-in, headphone/line-out 1/8” jacks
P1 Power supply header
P2 Power supply header
P3 Power supply header
P5 Control panel (power button, power LED) header
P6 Internal speaker header
P8 CPU fan header
P9 Chassis fan, primary, header
P23 Front panel audio header
P24 Front panel USB header
P52 Serial port, secondary, header
P53 Serial port, primary connector
P54 Serial port, primary header SFF only
P60 SATA0 (controller 1, primary master) connector (dark blue)
P61 SATA1 (controller 1, secondary master) connector (white)
P62 SATA2 (controller 1, primary slave) connector (light blue)
P63 SATA3 (controller 1, secondary slave) connector (orange) CMT only
P64 SATA4 / eSATA (controller 2, primary master) connector (black)
P124 Hood lock header
P125 Hood sense header
P126 Parallel port header
P150 Internal USB header
P151 Internal USB header
P160 SATA power
Power and Signal Distribution
Table 7-6.
Notes
Technical Reference Guide www.hp.com 7-7
Page 82

Power and Signal Distribution
System Board Connector, Indicator, and Switch Designations
P161 SATA power
SW50 Clear CMOS switch
XMM1 Memory slot (black)
XMM2 Memory slot (white)
XMM3 Memory slot (white)
XMM4 Memory slot (white)
XU1 Processor socket
XBT1 Battery socket
Figure 7-2 shows pinouts of headers used on the sytem boards.
Table 7-6. (Continued)
Power Button/LED, HD LED
Header P5 (SFF)
HD LED + 1
HD LED - 3
GND5
Pwr Btn 7
Chassis ID0 9
GND 11
Therm Diode A 13
Front Panel Audio
Header P23
Mic In Left (Tip) 1
Mic In Right (Sleeve) 3
HP Out Right 5
Sense Send 7
HP Out Left 9
Serial Port A
Header P54
UART1 DCD- 1
UART1 RX DATA 3
UART1 TX DATA 5
UART1 DTR 7
GND 9
Hood Lock
Header P124
Hood Lock 1
GND 5
2 PS LED +
4 PS LED -
8 GND
10 Chassis ID1
12 NC
14 Therm Diode C
2 Analog GND
4 Front Audio Detect#
6 Sense_1 Return
10 Sense_2 Return
2 UART1 DSR4 UART1 RTS-
6 UART1 CTS8 UART1 RI-
10 Comm A Detect-
2 Coil Conn
4 +12V
6 Hood Unlock
Power Button/LED, HD LED
Header P5 (CMT)
HD LED Cathode 1
HD LED Anode 3
GND5
M Reset 7
+5 VDC 9
NC 11
GND 13
Chassis ID2 15 16 +5 VDC
2 PS LED Cathode
4 PS LED Anode
10 NC
12 GND
18 Chassis ID1Chassis ID0 17
Serial Port B
Header P52
UART2 DTR- 1
UART2 CTS- 3
UART2 TX DATA 5
GND 7
+5.0V 9
UART2 RTS- 11
UART2 DCD- 13
+12V 15
2 UART2 RX DATA
4 UART2 DSR-
6 UART2 RI-
8 GND
10 +3.3V aux
12 Comm B Detect
14 -12V
Hood Sense
Header P125
1 Hood SW Detect
2 GND
3 Hood Sensor
6 Pwr Btn
8 GND
NOTE:
No polarity consideration required for connection to speaker header P6.
NC = Not connected
Figure 7-2. System Board Header Pinouts
7-8 www.hp.com Technical Reference Guide
Page 83

8.1 Introduction
The Basic Input/Output System (BIOS) of the computer is a collection of machine language
programs stored as firmware in read-only memory (ROM). The system BIOS includes such
functions as Power-On Self Test (POST), PCI device initialization, Plug 'n Play support, power
management activities, and the Setup utility. The firmware contained in the system BIOS ROM
supports the following operating systems and specifications:
■ Windows XP (Home and Professional versions)
■ Windows Vista Business 32-/64-Bit
■ Windows Vista Enterprise 32-/64-bit
■ Windows Vista Home Basic 32-/64-Bit
■ Windows Vista Home Premium 32-/64-Bit
■ Windows Vista Ultimate 32-/64-Bit
■ Windows 7 32-Bit Enterprise/Home Basic/Home Premium/Professional/Ultimate
8
System BIOS
■ Windows 7 64-Bit Enterprise/Home Basic/Home Premium/Professional/Ultimate
■ SCO Unix
■ DMI 2.1
■ Intel Wired for Management (WfM) ver. 2.2
■ Alert Standard Format (ASF) 2.0
■ ACPI and OnNow
■ SMBIOS 2.5
■ Intel PXE boot ROM for the integrated LAN controller
■ BIOS Boot Specification 1.01
■ Enhanced Disk Drive Specification 3.0
■ “El Torito” Bootable CD-ROM Format Specification 1.0
■ ATAPI Removeable Media Device BIOS Specification 1.0
■ Serial ATA Advanced Host Controller Interface (AHCI) 1.2
■ ATA with Packet Interface (ATA/ATAPI-7)
The BIOS firmware is contained in a 32 Mb flash ROM part. The runtime portion of the BIOS
resides in a 128KB block from E0000h to FFFFFh.
Technical Reference Guide www.hp.com 8-1
Page 84

System BIOS
8.2 ROM Flashing
The system BIOS firmware is contained in a flash ROM device that can be re-written with new
BIOS code using a flash utility locally (with F10 setup), with the HPQFlash program in a
Windows environment, or with the FLASHBIN.EXE utility in a DOS or DOS-like environment.
8.2.1 Upgrading
Upgrading the BIOS is not normally required but may be necessary if changes are made to the
unit's operating system, hard drive, or processor. All System BIOS upgrades are available
directly from HP. Flashing is done either locally through F10 setup, the HPQFlash program in a
Windows environment, or with the FLASHBIN.EXE utility in a DOS or DOS-like environment.
Flashing may also be done by deploying either HPQFlash or FLASHBIN.EXE through the
network boot function. This system includes 64 KB of write-protected boot block ROM that
provides a way to recover from a failed flashing of the system BIOS ROM. If the system BIOS
ROM fails the flash check, the boot block code provides the minimum amount of support
necessary to allow booting the system and re-flashing the system BIOS ROM with a CD or USB
disk/thumb drive.
8.2.2 Changeable Splash Screen
A corrupted splash screen may be restored by reflashing the BIOS image through F10 setup,
✎
running HPQFlash, or running FLASHBIN.EXE. Depending on the system, changing
(customizing) the splash screen may only be available with asistance from HP.
The splash screen (image displayed during POST) is stored in the system BIOS ROM and may
be replaced with another image of choice by using the Image Flash utility (Flashi.exe). The
Image Flash utility allows the user to browse directories for image searching and pre-viewing.
Background and foreground colors can be chosen from the selected image's palette.
The splash screen image requirements are as follows:
■ Format = Windows bitmap with 4-bit RLE encoding
■ Size = 424 (width) x 320 (height) pixels
■ Colors = 16 (4 bits per pixel)
■ File Size = < 64 KB
The Image Flash utility can be invoked at a command line for quickly flashing a known image as
follows:
>\Flashi.exe [Image_Filename] [Background_Color] [Foreground_Color]
The utility checks to insure that the specified image meets the splash screen requirements listed
above or it will not be loaded into the ROM.
8-2 www.hp.com Technical Reference Guide
Page 85

8.3 Boot Functions
The BIOS supports various functions related to the boot process, including those that occur
during the Power On Self-Test (POST) routine.
8.3.1 Boot Device Order
The default boot device order is as follows:
1. CD-ROM drive (EL Torito CD images)
2. Diskette drive (A:)
3. USB device
4. Hard drive (C:)
5. Network interface controller (NIC)
The above order assumes all devices are present in the initial configuration. If, for example, a
✎
diskette drive is not initially installed but added later, then drive A would be added to the end of
the order (after the NIC).
The order can be changed in the ROM-based Setup utility (accessed by pressing F10 when so
prompted during POST). The options are displayed only if the device is attached, except for USB
devices. The USB option is displayed even if no USB storage devices are present. The hot IPL
option is available through the F9 utility, which allows the user to select a hot IPL boot device.
System BIOS
8.3.2 Network Boot (F12) Support
The BIOS supports booting the system to a network server. The function is accessed by pressing
the F12 key when prompted at the lower right hand corner of the display during POST. Booting
to a network server allows for such functions as:
■ Flashing a ROM on a system without a functional operating system (OS).
■ Installing an OS.
■ Installing an application.
These systems include, as standard, an integrated Intel 82562-equivalent NIC with Preboot
Execution Environment (PXE) ROM and can boot with a NetPC-compliant server.
8.3.3 Memory Detection and Configuration
This system uses the Serial Presence Detect (SPD) method of determining the installed DIMM
configuration. The BIOS communicates with an EEPROM on each DIMM through the SMBus
to obtain data on the following DIMM parameters:
■ Presence
■ Size
■ Ty pe
■ Timing/CAS latency
Refer to Chapter 3, “Processor/Memory Subsystem” for the SPD format and DIMM data specific
✎
to this system.
Technical Reference Guide www.hp.com 8-3
Page 86

System BIOS
The BIOS performs memory detection and configuration with the following steps:
1. Program the buffer strength control registers based on SPD data and the DIMM slots that are
populated.
2. Determine the common CAS latency that can be supported by the DIMMs.
3. Determine the memory size for each DIMM and program the GMCH accordingly.
4. Enable refresh.
8.3.4 Boot Error Codes
The BIOS provides visual and audible indications of a failed system boot by using the system’s
power LED and the system board speaker. The error conditions are listed in the following table.
Visual (power LED) Audible (speaker) Meaning
Blinks red 2 times @ 1 Hz 2 beeps Processor thermal shut down. Check air flow, fan
Table 8-1
Boot Error Codes
operation, and CPU heat sink.
Blinks red 3 times @ 1 Hz 3 beeps Processor not installed. Install or reseat CPU.
Blinks red 4 times @ 1 Hz None Power failure (power supply is overloaded). Check
storage devices, expansion cards and/or system
board (CPU power connector P3).
Blinks red 5 times @ 1 Hz 5 beeps Pre-video memory error. Incompatible or
incorrectly seated DIMM.
Blinks red 6 times @ 1 Hz 6 beeps Pre-video graphics error. On system with
integrated graphics, check/replace system board.
On system with graphics card, check/replace
graphics card.
Blinks red 7 times @ 1 Hz 7 beeps PCA failure. Check/replace system board.
Blinks red 8 times @ 1 Hz 8 beeps Invalid ROM (checksum error). Reflash ROM using
CD or replace system board.
Blinks red 9 times @ 1 Hz 9 beeps System powers on but fails to boot. Check power
supply, CPU, system board.
Blinks red 10 times @ 1 Hz 10 beeps Bad option card.
NOTE: Audible indications occur only for the five cycles of the error indication. Visual indications
occur indefinitely until power is removed or until error is corrected.
8-4 www.hp.com Technical Reference Guide
Page 87

8.4 Client Management Functions
Table 8-2 provides a partial list of the client management BIOS functions supported by the
systems covered in this guide. These functions, designed to support intelligent manageability
applications, are HP-specific unless otherwise indicated.
Table 8-2.
Client Management Functions (INT15)
AX Function Mode
E800h Get system ID Real, 16-, & 32-bit Prot.
E813h Get monitor data Real, 16-, & 32-bit Prot.
E814h Get system revision Real, 16-, & 32-bit Prot.
E816h Get temperature status Real, 16-, & 32-bit Prot.
E819h Get chassis serial number Real, 16-, & 32-bit Prot.
E820h [1] Get system memory map Real
System BIOS
E81Ah Write chassis serial number Real
E827h DIMM EEPROM Access Real, 16-, & 32-bit Prot.
NOTE:
[1] Industry standard function.
All 32-bit protected-mode functions are accessed by using the industry-standard BIOS32 Service
Directory. Using the service directory involves three steps:
1. Locating the service directory.
2. Using the service directory to obtain the entry point for the client management functions.
3. Calling the client management service to perform the desired function.
The BIOS32 Service Directory is a 16-byte block that begins on a 16-byte boundary between the
physical address range of 0E0000h-0FFFFFh.
The following subsections provide a brief description of key Client Management functions.
Technical Reference Guide www.hp.com 8-5
Page 88

System BIOS
8.4.1 System ID and ROM Type
Diagnostic applications can use the INT 15, AX=E800h BIOS function to identify the type of
system. This function will return the system ID in the BX register. Systems have the following
IDs and ROM family types:
Table 8-3
System ID Numbers
System (Form Factor) System ID
SFF 304Ah
CMT 304Bh
NOTE: For all systems, BIOS ROM Family = 786G7, PnP ID = CPQ????, and Subsystem vendor ID = ????h.
The ROM family and version numbers can be verified with the Setup utility or the System Insight
Manager or Diagnostics applications.
8.4.2 Temperature Status
The BIOS includes a function (INT15, AX=E816h) to retrieve the status of a system's interior
temperature. This function allows an application to check whether the temperature situation is at
a Normal, Caution, or Critical condition.
8-6 www.hp.com Technical Reference Guide
Page 89

8.5 SMBIOS
In support of the DMI specification, PnP functions 50h and 51h are used to retrieve the SMBIOS
data. Function 50h retrieves the number of structures, size of the largest structure, and SMBIOS
version. Function 51h retrieves a specific structure. This system supports SMBIOS version 2.5
and the structure types listed in the following table:
Type Data
0 BIOS Information
1System Information
2 Base board information
3 System Enclosure or Chassis
4 Processor Information
7Cache Information
System BIOS
Table 8-3
SMBIOS Functions
8 Port Connector Information
9System Slots
13 BIOS Language Information
15 System Event Log Information
16 Physical Memory Array
17 Memory Devices
19 Memory Array Mapped Addresses
20 Memory Device Mapped Addresses
24 Cooling Device Structure
27 Hardware Security Structure
31 Boot Integrity Service Entry Point
32 System Boot Information
System information on these systems is handled exclusively through the SMBIOS.
✎
Technical Reference Guide www.hp.com 8-7
Page 90

System BIOS
8.6 USB Legacy Support
The system BIOS ROM checks the USB port, during POST, for the presence of a USB keyboard.
This allows a system with only a USB keyboard to be used during ROM-based setup and also on
a system with an OS that does not include a USB driver.
On such a system a keystroke will generate an SMI and the SMI handler will retrieve the data
from the device and convert it to PS/2 data. The data will be passed to the keyboard controller
and processed as in the PS/2 interface. Changing the delay and/or typematic rate of a USB
keyboard though BIOS function INT 16 is not supported.
8.7 Management Engine Functions
The management engine function of Intel AMT allows a system unit to be managed remotely
over a network, where or not the system is powered up or not
1
. The system BIOS can request the
management engine to generate the following alerts:
■ Temperature alert
■ Fan failure alert
■ Chassis intrusion alert
■ Watchdog timer alert
■ No memory installed alert
1.Assumes the unit is connected to an active AC outlet.
8-8 www.hp.com Technical Reference Guide
Page 91

Error Messages and Codes
A.1 Introduction
This appendix lists the error codes and a brief description of the probable cause of the error.
Errors listed in this appendix are applicable only for systems running HP/Compaq BIOS.
✎
Not all errors listed in this appendix may be applicable to a particular system model and/or
configuration.
A.2 Beep/Power LED Codes
Beep and Power LED indictions listed in Table A-1 apply only to HP-branded models.
✎
Beep/Power LED Codes
A
Table A-1.
Beeps Power LED Probable Cause
2 beeps Blinks red 2 times @ 1 Hz Processor thermal shut down. Check air flow, fan operation,
and CPU heatsink
3 beeps Blinks red 3 times @ 1 Hz Processor not installed. Install or reseat CPU.
4 beeps Blinks red 4 times @ 1 Hz Power failure (power supply is overloaded). Check storage
devices, expansion cards and/or system board (CPU power
connector P3).
5 beeps Blinks red 5 times @ 1 Hz Pre-video memory error. Incompatible or incorrectly seated
DIMM.
6 beeps Blinks red 6 times @ 1 Hz Pre-video graphics error. On system with integrated graphics,
check/replace system board. On system with graphics card,
check/replace graphics card.
7 beeps Blinks red 7 times @ 1 Hz PCA failure. Check/replace system board.
8 beeps Blinks red 8 times @ 1 Hz Invalid ROM (checksum error). Reflash ROM using CD or
replace system board.
9 beeps Blinks red 9 times @ 1 Hz System powers on but fails to boot. Check power supply, CPU,
system board.
10 beeps Blinks red 10 times @ 1 Hz Bad option card.
NOTE: Audible indications occur only for the first five cycles of the error indication. Visual
indications occur indefinitely until power is removed or until error is corrected.
Technical Reference Guide www.hp.com A-1
Page 92

Error Messages and Codes
A.3 Power-On Self Test (POST) Messages
Table A-2.
Power-On Self Test (POST) Messages
Error Message Probable Cause
Invalid Electronic Serial Number Chassis serial number is corrupt. Use Setup to enter a valid number.
Network Server Mode Active (w/o
kybd)
101-Option ROM Checksum Error A device’s option ROM has failed/is bad.
110-Out of Memory Space for
Option ROMs
102-system Board Failure Failed ESCD write, A20, timer, or DMA controller.
150-Safe POST Active An option ROM failed to execute on a previous boot.
162-System Options Not Set Invalid checksum, RTC lost power, or invalid configuration.
163-Time & Date Not Set Date and time information in CMOS is not valid.
164-Memory Size Error Memory has been added or removed.
201-Memory Error Memory test failed.
213-Incompatible Memory Module BIOS detected installed DIMM(s) as being not compatible.
214-DIMM Configuration Warning A specific error has occurred in a memory device installed in the
216-Memory Size Exceeds Max Installed memory exceeds the maximum supported by the system.
217-DIMM Configuration Warning Unbalanced memory configuration.
System is in network mode.
Recently added PCI card contains and option ROM too large to
download during POST.
identified socket.
219-ECC Memory Module
Detected ECC Modules not
supported on this platform
301-Keyboard Error Keyboard interface test failed (improper connection or stuck key).
303-Keyboard Controller Error Keyboard buffer failed empty (8042 failure or stuck key).
304-Keyboard/System Unit Error Keyboard controller failed self-test.
404-Parallel Port Address Conflict Current parallel port address is conflicting with another device.
417-Network Interface Card Failure NIC BIOS could not read Device ID of embedded NIC.
501-Display Adapter Failure Graphics display controller.
510-Splash Image Corrupt Corrupted splash screen image. Restore default image w/flash utility.
511-CPU Fan Not Detected Processor heat sink fan is not connected.
512-Chassis Fan Not Detected Chassis fan is not connected.
A-2 www.hp.com Technical Reference Guide
Recently added memory module(s) support ECC memory error
correction.
Page 93

Table A-2. (Continued)
Power-On Self Test (POST) Messages
Error Message Probable Cause
Error Messages and Codes
514-CPU or Chassis Fan not
detected.
601-Diskette Controller Error Diskette drive removed since previous boot.
605-Diskette Drive Type Error Mismatch in drive type.
912-Computer Cover Removed
Since Last System Start Up
914-Hood Lock Coil is not
Connected
916-Power Button Not Connected Power button harness has been detached or unseated from the system
919-Front Panel, MultiPort, and/or
MultiBay Risers not Detected
1156-Serial Port A Cable Not
Detected
1157-Front Cables Not Detected Cable from front panel USB and audio connectors is missing or not
1720 - S M A RT H a r d D riv e D e te ct s
Imminent Failure
CPU fan is not connected or may have malfunctioned.
Cover (hood) removal has been detected by the Smart Cover Sensor.
Smart Cover Lock mechanism is missing or not connected.
board.
Riser card has been removed or has not been reinstalled properly in
the system.
Cable from serial port header to I/O connector is missing or not
connected properly.
connected properly.
SMART circuitry on an IDE drive has detected possible equipment
failure.
1721-SMART SCSI Hard Drive
Detects Imminent Failure
1785-MultiBay incorrectly installed For integrated MultiBay/ USDT systems:
1794--Inaccessible device attached
to SATA 1
(for systems with 2 SATA ports)
1794-Inaccessible devices attached
to SATA 1 and/or SATA 5 (for
systems with 4 SATA ports)
1796-SATA Cabling Error One or more SATA devices are improperly attached. For optimal
SMART circuitry on a SCSI drive has detected possible equipment
failure.
MultiBay device not properly seated.
or
MultiBay riser not properly seated.
A device is attached to SATA 1. Any device attached to this connector
will be inaccessible while “SATA Emulation” is set to “Combined IDE
Controller” in Computer Setup.
A device is attached to SATA 1 and/or SATA 5.
Devices attached to these connectors will be inaccessible while “SATA
Emulation” is set to “Combined IDE Controller” in Computer Setup
performance, the SATA 0 and SATA 1 connectors must be used before
SATA 2 and SATA 3.
1801-Microcode Patch Error A processor is installed for which the BIOS ROM has no patch.
Check for ROM update.
Technical Reference Guide www.hp.com A-3
Page 94

Error Messages and Codes
Error Message Probable Cause
Table A-2. (Continued)
Power-On Self Test (POST) Messages
Invalid Electronic Serial
Electronic serial number has become corrupted.
Number
Network Server Mode Active
Keyboard failure while Network Server Mode enabled.
and No Keyboard Attached
Parity Check 2 Keyboard failure while Network Server Mode enabled.
A-4 www.hp.com Technical Reference Guide
Page 95

A.4 System Error Messages (1xx-xx)
Table A-3.
System Error Messages
Message Probable Cause Message Probable Cause
101 Option ROM error 109-02 CMOS clock rollover test failed
102 System board failure [1] 109-03 CMOS not properly initialized (clk test)
103 System board failure 110-01 Programmable timer load data test failed
104-01 Master int. cntlr. test failed 110-02 Programmable timer dynamic test failed
104-02 Slave int. cntlr. test failed 110-03 Program timer 2 load data test failed
104-03 Int. cntlr. SW RTC inoperative 111-01 Refresh detect test failed
105-01 Port 61 bit <6> not at zero 112-01 Speed test Slow mode out of range
105-02 Port 61 bit <5> not at zero 112-02 Speed test Mixed mode out of range
Error Messages and Codes
105-03 Port 61 bit <3> not at zero 112-03 Speed test Fast mode out of range
105-04 Port 61 bit <1> not at zero 112-04 Speed test unable to enter Slow mode
105-05 Port 61 bit <0> not at zero 112-05 Speed test unable to enter Mixed mode
105-06 Port 61 bit <5> not at one 112-06 Speed test unable to enter Fast mode
105-07 Port 61 bit <3> not at one 112-07 Speed test system error
105-08 Port 61 bit <1> not at one 112-08 Unable to enter Auto mode in speed test
105-09 Port 61 bit <0> not at one 112-09 Unable to enter High mode in speed test
105-10 Por t 61 I / O test fai l ed 112-10 Speed test High mode out of range
105-11 Port 61 bit <7> not at zero 112 -11 Speed test Auto mode out of range
105-12 Port 61 bit <2> not at zero 112-12 Speed test variable speed mode inop.
105-13 No int. generated by failsafe timer 113-01 Protected mode test failed
105-14 NMI not triggered by timer 114-01 Speaker test failed
106-01 Keyboard controller test failed 116-xx Way 0 read/write test failed
107-01 CMOS RAM test failed 162-xx Options failed (mismatch in drive type)
108-02 CMOS interrupt test failed 163-xx Time and date not set
108-03 CMOS not properly initialized 164-xx Memory size
109-01 CMOS clock load data test failed 199-00 Installed devices test failed
NOTES:
[1] 102 message code may be caused by one of a variety of processor-related problems that may be solved by replacing the
processor, although system board replacement may be needed.
Technical Reference Guide www.hp.com A-5
Page 96

Error Messages and Codes
A.5 Memory Error Messages (2xx-xx)
Table A-4.
Memory Error Messages
Message Probable Cause
200-04 Real memory size changed
200-05 Extended memory size changed
200-06 Invalid memory configuration
200-07 Extended memory size changed
200-08 CLIM memory size changed
201-01 Memory machine ID test failed
202-01 Memory system ROM checksum failed
202-02 Failed RAM/ROM map test
202-03 Failed RAM/ROM protect test
203-01 Memory read/write test failed
203-02 Error while saving block in read/write test
203-03 Error while restoring block in read/write test
204-01 Memory address test failed
204-02 Error while saving block in address test
204-03 Error while restoring block in address test
204-04 A20 address test failed
204-05 Page hit address test failed
205-01 Walking I/O test failed
205-02 Error while saving block in walking I/O test
205-03 Error while restoring block in walking I/O test
206-xx Increment pattern test failed
207-xx ECC failure
210-01 Memory increment pattern test
210-02 Error while saving memory during increment pattern test
210-03 Error while restoring memory during increment pattern test
211-01 Memory random pattern test
A-6 www.hp.com Technical Reference Guide
Page 97

Table A-4. (Continued)
Memory Error Messages
Message Probable Cause
211-02 Error while saving memory during random memory pattern test
211-03 Error while restoring memory during random memory pattern test
213-xx Incompatible DIMM in slot x
214-xx Noise test failed
215-xx Random address test
A.6 Keyboard Error Messages (30x-xx)
Table A-5.
Keyboard Error Messages
Message Probable Cause Message Probable Cause
Error Messages and Codes
300-xx Failed ID test 303-05 LED test, LED command test failed
301-01 Kybd short test, 8042 self-test
failed
301-02 Kybd short test, interface test
failed
301-03 Kybd short test, echo test failed 303-08 LED test, command byte restore test failed
301-04 Kybd short test, kybd reset failed 303-09 LED test, LEDs failed to light
301-05 Kybd short test, kybd reset failed 304-01 Keyboard repeat key test failed
302-xx Failed individual key test 304-02 Unable to enter mode 3
302-01 Kybd long test failed 304-03 Incorrect scan code from keyboard
303-01 LED test, 8042 self-test failed 304-04 No Make code observed
303-02 LED test, reset test failed 304-05 Cannot /disable repeat key feature
303-03 LED test, reset failed 304-06 Unable to return to Normal mode
303-04 LED test, LED command test failed -- --
303-06 LED test, LED command test failed
303-07 LED test, LED command test failed
Technical Reference Guide www.hp.com A-7
Page 98

Error Messages and Codes
A.7 Printer Error Messages (4xx-xx)
Table A-6
Printer Error Messages
Message Probable Cause Message Probable Cause
401-01 Printer failed or not connected 402-11 Interrupt test, data/cntrl. reg. failed
402-01 Printer data register failed 402-12 Interrupt test and loopback test failed
402-02 Printer control register failed 402-13 Int. test, LpBk. test., and data register failed
402-03 Data and control registers failed 402-14 Int. test, LpBk. test., and cntrl. register failed
402-04 Loopback test failed 402-15 Int. test, LpBk. test., and data/cntrl. reg.
failed
402-05 Loopback test and data reg.
failed
402-06 Loopback test and cntrl. reg.
failed
402-07 Loopback tst, data/cntrl. reg.
failed
402-08 Interrupt test failed 404-xx Parallel port address conflict
402-09 Interrupt test and data reg. failed 498-00 Printer failed or not connected
402-10 Interrupt test and control reg.
failed
402-16 Unexpected interrupt received
402-01 Printer pattern test failed
403-xx Printer pattern test failed
-- --
A.8 Video (Graphics) Error Messages (5xx-xx)
Table A-7.
Video (Graphics) Error Messages
Message Probable Cause Message Probable Cause
501-01 Video controller test failed 508-01 320x200 mode, color set 0 test failed
502-01 Video memory test failed 509-01 320x200 mode, color set 1 test failed
503-01 Video attribute test failed 510-01 640x200 mode test failed
504-01 Video character set test failed 511-01 Screen memory page test failed
505-01 80x25 mode, 9x14 cell test
failed
506-01 80x25 mode, 8x8 cell test failed 514-01 White screen test failed
507-01 40x25 mode test failed 516-01 Noise pattern test failed
See Table A-14 for additional video (graphics) messages.
A-8 www.hp.com Technical Reference Guide
512-01 Gray scale test failed
Page 99

A.9 Diskette Drive Error Messages (6xx-xx)
Table A-8.
Diskette Drive Error Messages
Message Probable Cause Message Probable Cause
6xx-01 Exceeded maximum soft error limit 6xx-20 Failed to get drive type
Error Messages and Codes
6xx-02 Exceeded maximum hard error
limit
6xx-03 Previously exceeded max soft limit 6xx-22 Failed to clear change line status
6xx-04 Previously exceeded max hard limit 6xx-23 Failed to set drive type in ID media
6xx-05 Failed to reset controller 6xx-24 Failed to read diskette media
6xx-06 Fatal error while reading 6xx-25 Failed to verify diskette media
6xx-07 Fatal error while writing 6xx-26 Failed to read media in speed test
6xx-08 Failed compare of R/W buffers 6xx-27 Failed speed limits
6xx-09 Failed to format a tract 6xx-28 Failed write-protect test
6xx-10 Failed sector wrap test -- --
600-xx = Diskette drive ID test 609-xx = Diskette drive reset controller test
601-xx = Diskette drive format 610-xx = Diskette drive change line test
602-xx = Diskette read test 611-xx = Pri. diskette drive port addr. conflict
603-xx = Diskette drive R/W compare test 612-xx = Sec. diskette drive port addr. conflict
604-xx = Diskette drive random seek test 694-00 = Pin 34 not cut on 360-KB drive
605-xx = Diskette drive ID media 697-00 = Diskette type error
606-xx = Diskette drive speed test 698-00 = Drive speed not within limits
607-xx = Diskette drive wrap test 699-00 = Drive/media ID error (run Setup)
608-xx = Diskette drive write-protect test
6xx-21 Failed to get change line status
Technical Reference Guide www.hp.com A-9
Page 100

Error Messages and Codes
A.10 Serial Interface Error Messages (11xx-xx)
Table A-9.
Serial Interface Error Messages
Message Probable Cause Message Probable Cause
1101-01 UART DLAB bit failure 1101-13 UART cntrl. signal interrupt failure
1101-02 Line input or UART fault 1101-14 DRVR/RCVR data failure
1101-03 Address line fault 1109-01 Clock register initialization failure
1101-04 Data line fault 1109-02 Clock register rollover failure
1101-05 UART cntrl. signal failure 1109-03 Clock reset failure
1101-06 UART THRE bit failure 1109-04 Input line or clock failure
1101-07 UART Data RDY bit failure 1109-05 Address line fault
1101-08 UART TX/RX buffer failure 1109-06 Data line fault
1101-09 Interrupt circuit failure 1150-xx Comm port setup error (run Setup)
1101-10 COM1 set to invalid INT 1151-xx COM1 address conflict
11 0 1 - 11 COM2 set to invalid INT 1152-xx COM2 address conflict
1101-12 DRVR/RCVR cntrl. signal failure 1155-xx COM port address conflict
A-10 www.hp.com Technical Reference Guide
 Loading...