

Page 1

User’s Guide
CRT Color Monitor Series
FS7600, vx74
Manuel de l’utilisateur
Moniteurs à écran cathodique couleur
FS7600, vx74
— LEA ESTO —
Guía del usuario
Serie de monitores en color de tubo de rayos catódicos
FS7600, vx74
Page 2

Page 3

English
User’s Guide
CRT Color Monitor Series
FS7600, vx74
Page 4

The information in this document is subject to
change without notice.
®
Hewlett-Packard
Company makes no warranty of any kind
with regard to this material, including, but not limited to,
the implied warranties of merchantability and fitness for a
particular purpose.
HP shall not be liable for errors contained herein or for
incidental or consequential damages in connection with the
furnishing, performance, or use of this material.
THE WARRANTY TERMS CONTAINED IN THIS
STATEMENT, EXCEPT TO THE EXTENT LAWFULLY
PERMITTED, DO NOT EXCLUDE, RESTRICT OR MODIFY
AND ARE IN ADDITION TO ANY MANDATORY
STATUTORY RIGHTS APPLICABLE TO THE SALE OF THIS
PRODUCT OR SERVICE TO YOU.
HP assumes no responsibility for the use or reliability of its
software on equipment that is not furnished by HP.
This document contains proprietary information that is
protected by copyright. All rights are reserved. No part of
this document may be photocopied, reproduced, or
translated to another language without the prior written
consent of HP.
Hewlett-Packard Company
P.O. Box 4010
Cupertino, CA 95015-4010
USA
© 2004 Hewlett-Packard Development Company, L.P.
All rights reserved.
Hewlett-Packard is a registered trademark of Hewlett-Packard
Company in the United States of America and other
countries/regions.
This product incorporates copyright protection technology that
is protected by method claims of certain U.S. patents and other
intellectual property rights owned by Macrovision Corporation
and other rights owners. Use of this copyright protection
technology must be authorized by Macrovision Corporation,
and is intended for home and other limited viewing uses only
unless otherwise authorized by Macrovision Corporation.
Reverse engineering or disassembly is prohibited. Apparatus
Claims of U.S. Patent Nos. 4,631,603, 4,577,216,
4,819,098, and 4,907,093 licensed for limited viewing
uses only.
Other brand or product names are trademarks of their
respective holders.
HP supports lawful use of technology and does not endorse or
encourage the use of our products for purposes other than those
permitted by copyright law.
Page 5

Contents
Packing Contents ..........................................1
Repacking.....................................................1
Introduction ..................................................1
Power Saving ...............................................2
Install the Monitor.........................................2
User Controls and Indicators .........................3
Using the On-Screen Menu ............................4
Individual Adjustment ...................................6
Troubleshooting ............................................9
Servicing .....................................................10
Technical Specifications ............................... 11
English
Preset Modes.............................................. 12
Agency Regulatory Notices......................... 12
Federal Communications Commission Notice........... 12
Declaration of Conformity for Products Marked
with FCC Logo, United States Only ......................... 13
Canadian Notice.................................................. 14
European Notice ..................................................14
Japanese Notice................................................... 14
Korean Notice...................................................... 14
EPA Energy Star Compliance.................................. 15
Power Cord Set Requirements ................................ 15
User’s Guide
iii
Page 6

iv User’s Guide
Page 7

Packing Contents
Introduction
The package contains:
• CRT monitor
• AC power cord
• Monitor base
• Documentation packet
Repacking
Save the original box and all packing material for
future shipping needs.
NOTE: Packing materials and product are recyclable.
This 17" CRT color monitor is a high performance
and easy to use product.
It employs the latest on-screen-menu technology. The
microprocessor capability offers 9 most commonly
used VESA timing modes preset in the factory, and
10 modes for user to adjust to the special timings that
user might have.
We hope that you will find this manual is helpful in
obtaining the fullest use of your monitor, and in
ensuring your personal safety during operation.
English
User’s Guide
1
Page 8
Power Saving
Install the Monitor
The monitor will be driven into “Power Saving” mode
by the control signal from the display controller, as
indicated by the amber-color power LED.
State Power Consumption LED Light
ON Normal Green
OFF < 4 W Amber
The power saving states will be kept until a control
signal has been detected, or the keyboard or mouse is
activated. The recovery time from Active OFF state back
to ON state is around 10 seconds.
• To connect the tilt/swivel base to the monitor, align
hooks with the sockets on bottom side of the monitor,
and gently push the base towards the front of the
monitor.
• The 15-pin D-shell signal connector on the signal
cable will connect easily to the video adapter output
on your personal computer. Lock both screws on the
connector to ensure a firm connection.
• Turn the PC power switch ON. Then turn the monitor
power switch ON by pressing the switch inward. The
green power indicator will light up.
• Allow about 30 seconds for the CRT tube to warm
up. Data will be displayed on the screen.
• If your display fails to function properly, please first
refer to the section “Troubleshooting” in this manual.
2 User’s Guide
Page 9
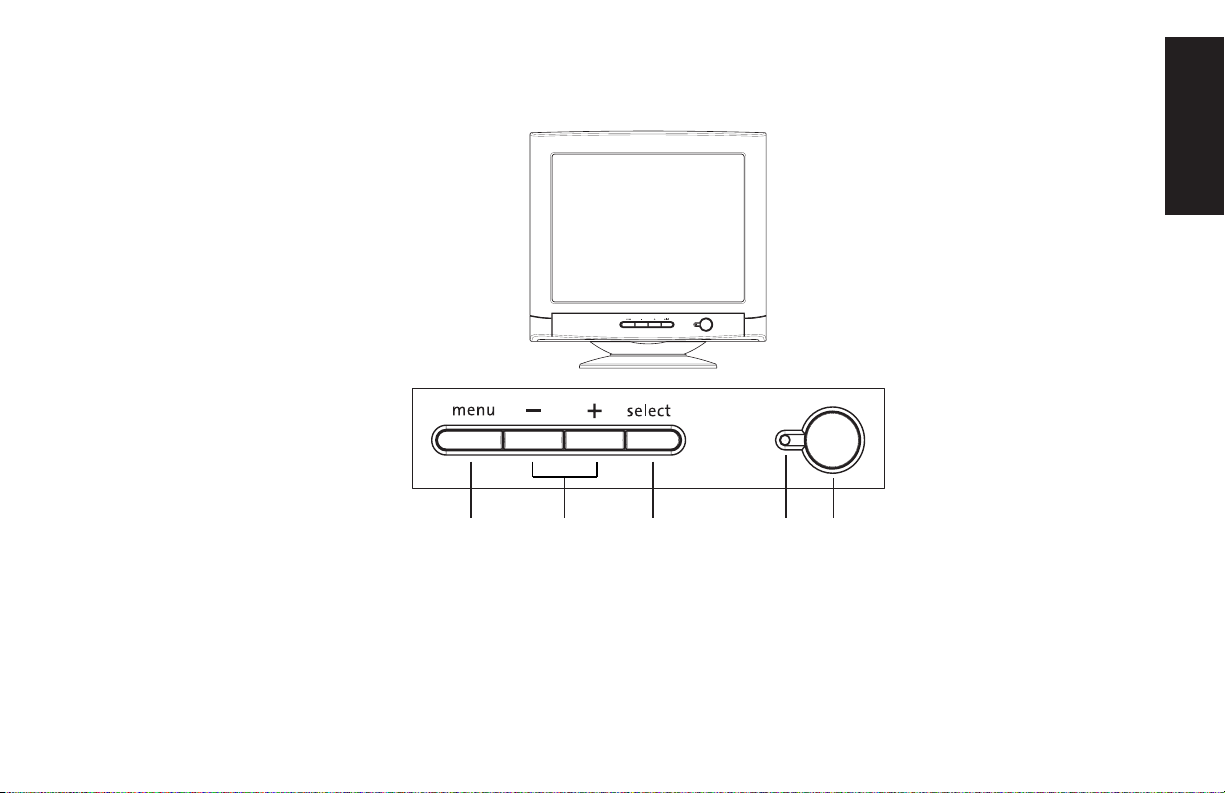
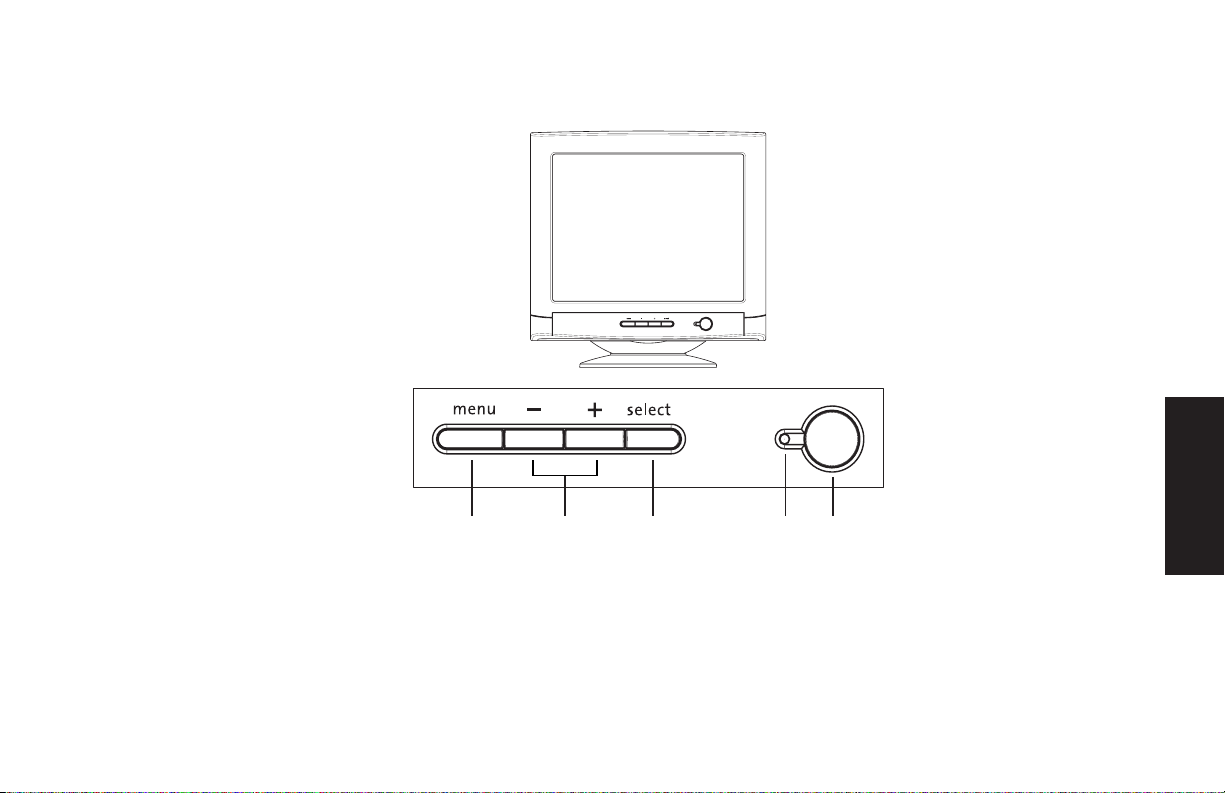
User Controls and Indicators
English
A B C 1 2
A Displays menu & exits menu
B Scrolls through menu to choose an icon for adjustment /
Adjusts level of selected icon
C Confirms menu selection
1 Power LED
2 Power ON/OFF switch
User’s Guide
3
Page 10
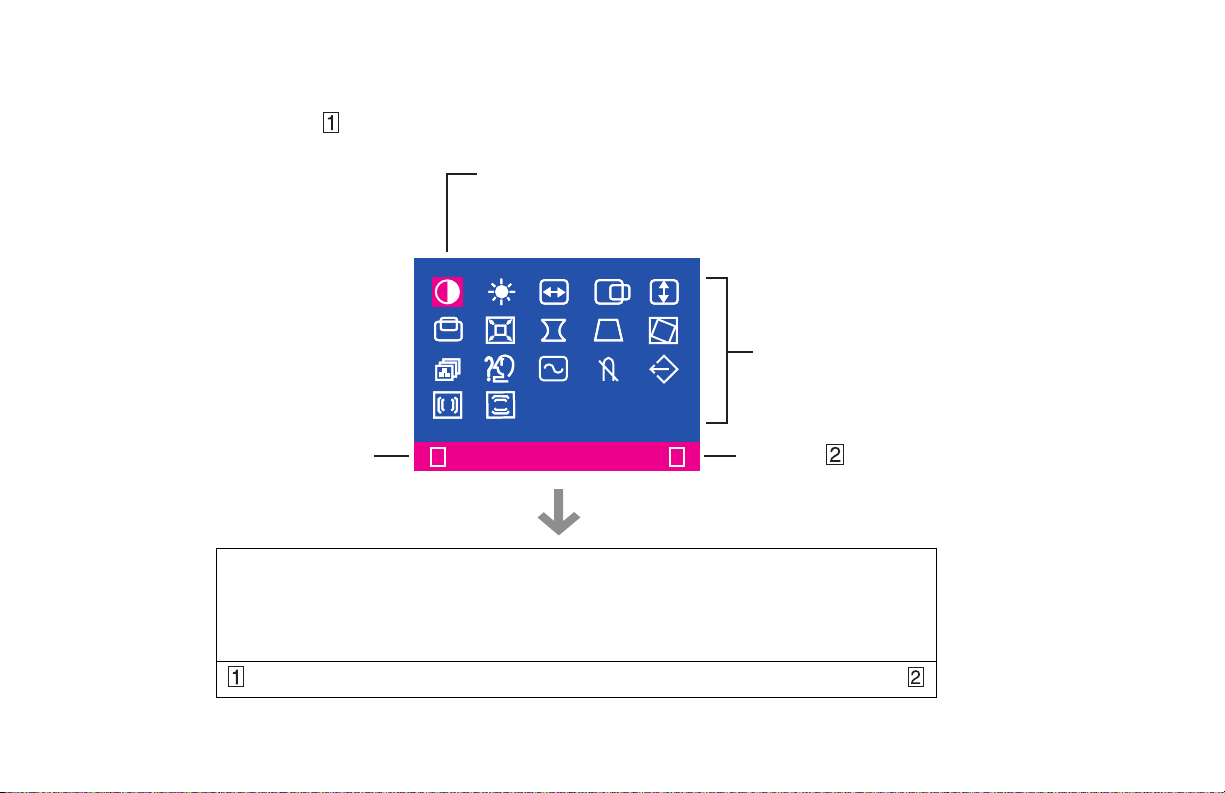
Using the On-Screen Menu
1 Menu screen — press the /menu button to display the menu below and exit menus
Select mark
Press the – + button to move the selection
mark to the desired location.
Adjustment icons
The item presently being adjusted
is shown.
CONTRAST
V. PO S ITI O N
COLOR
H. MOIRE
: CONTRAST :
4 User’s Guide
BRIGHTNESS
ZOOM
LANGUAGE
V. MO I RE
CONTRAST
H.SIZE
PINCUSHION
DISP. FREQ.
: 21 :
H. POSITION
TRAPEZOID
DEGAUSS
When the /select button is pressed,
the selected adjustment screen
appears.
V. SI Z E
ROTATION
RECALL
Page 11
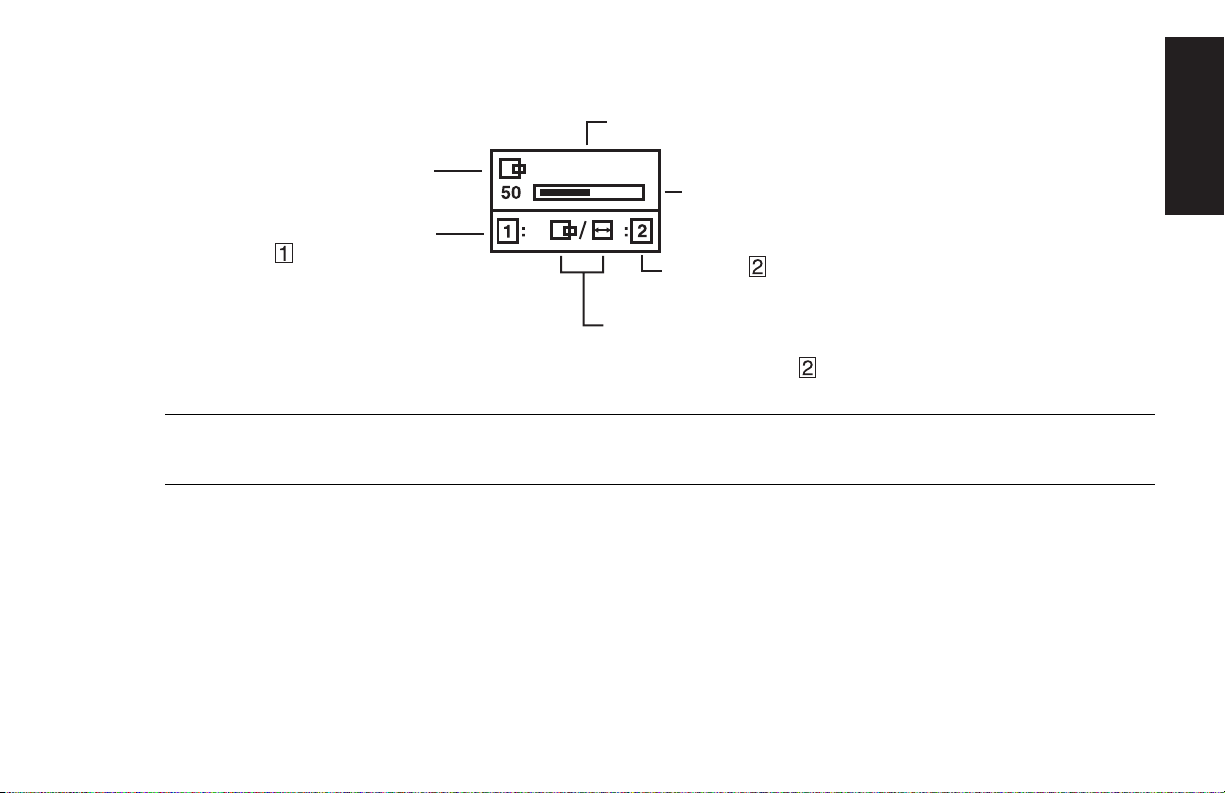
2 Adjustment screen (example: horizontal position adjustment)
Name of adjustment screen
Adjustment icon
End Button
When the /menu button is
pressed, the adjustment level
is stored, the adjustment screen
is ended, and the menu
screen returns.
NOTE: The amount of adjustment depends upon how long you depress the adjustment button. You may have to
H.POSITION
On the adjustment screen where these two adjustment
icons appear, it is possible to switch between the two
screens by pressing the /select button.
The adjustment level is shown by both a number
and a bar. It can be varied with the front – + buttons.
When the /select button is pressed,
the horizontal size adjustment screen appears.
tap the button to obtain the desired results.
English
User’s Guide
5
Page 12

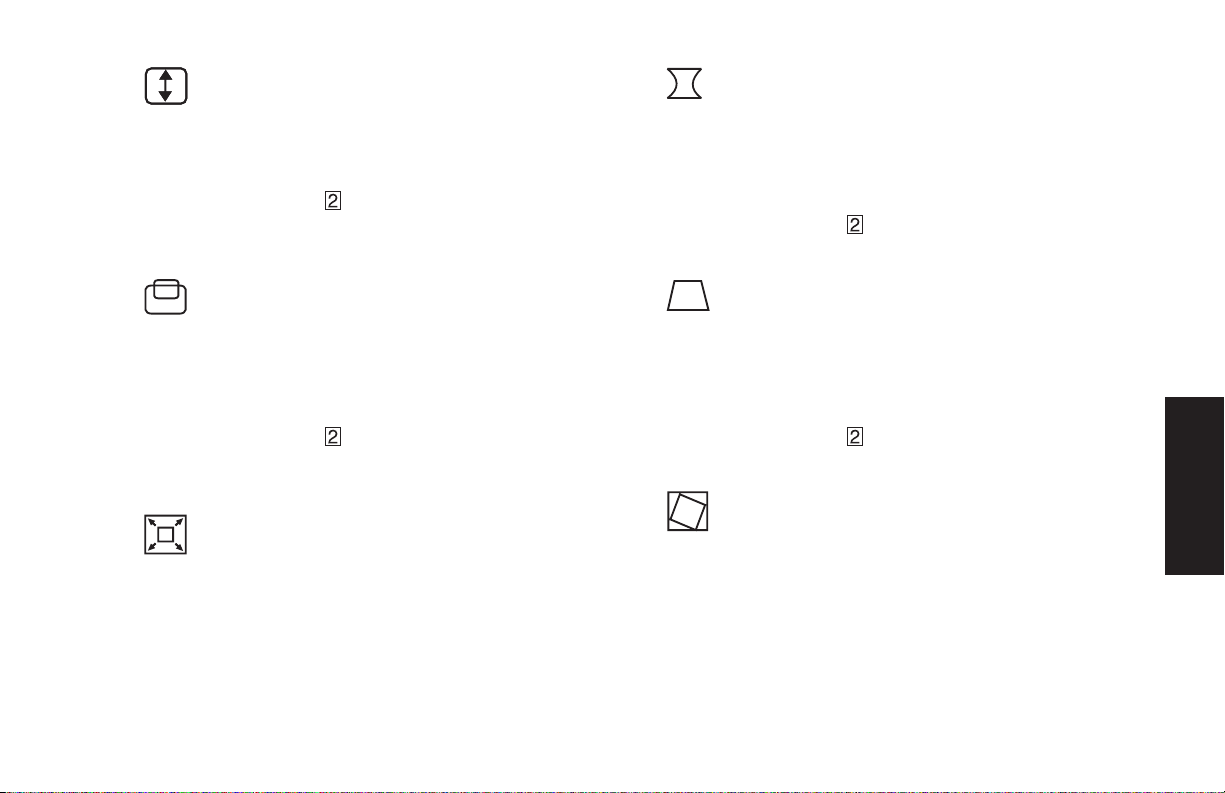
Individual Adjustment
CONTRAST adjustment
Adjust the screen contrast to match your
personal preference.
Press the – button to decrease contrast and
press the + button to increase it.
Direct operation: You can access the
CONTRAST adjustment screen by pressing
the – or + before entering the menu screen.
Press the
CONTRAST and BRIGHTNESS.
BRIGHTNESS adjustment
Adjusts the brightness to get the desired
background level.
Press the + button to make the background
lighter, the – button to make it darker.
/select key toggles between
HORIZONTAL SIZE adjustment
Fills the viewable area horizontally.
Press the – button to make the image narrower,
or press + the button to make it wider.
Press the
HORIZONTAL SIZE and HORIZONTAL
POSITION.
HORIZONTAL POSITION adjustment
Shifts the image on the screen horizontally.
Press the – button to move the screen image to
the left, or press the + button to move it to the
right.
Press the
HORIZONTAL SIZE and HORIZONTAL
POSITION.
/select key toggles between
/select key toggles between
Press the
CONTRAST and BRIGHTNESS.
6 User’s Guide
/select key toggles between
Page 13
VERTICAL SIZE adjustment
Fills the viewable area vertically.
Press the – button to make the image smaller,
or press the + button to make it larger.
Press the
/select key toggles between
VERTICAL SIZE and VERTICAL POSITION.
PINCUSHION adjustment
The image can be corrected for barrel
distortion.
Press the – button or the + button to eliminate
English
curved vertical lines.
Press the
/select key toggles between
PINCUSHION and TRAPEZOID correction.
VERTICAL POSITION adjustment
Shifts the image on the screen vertically.
Press the – button to move it downward, or press
the + button to move it upward.
Press the
/select key toggles between
VERTICAL SIZE and VERTICAL POSITION
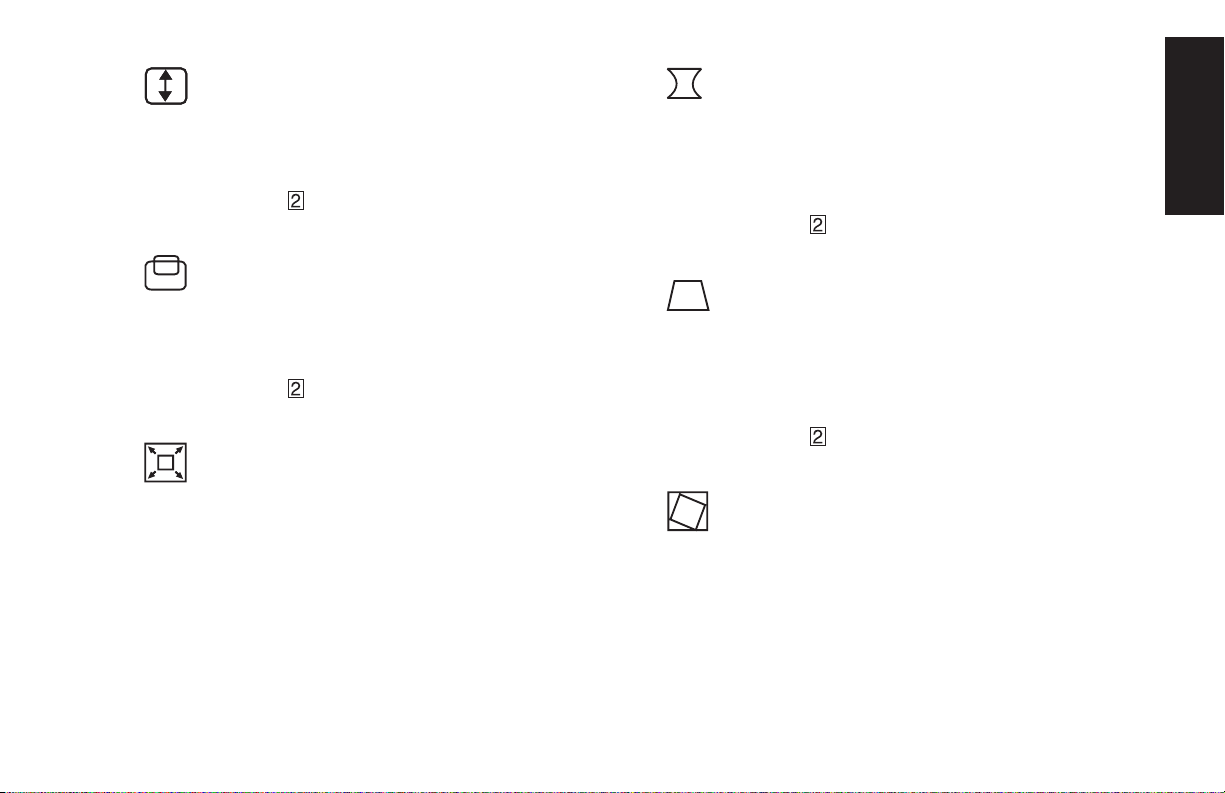
Zoom adjustment
The picture can be expanded with the zoom
control.
TRAPEZOID adjustment
The image can be corrected for the trapezoidal
distortion.
Press the – button to narrow the top edge, or
press the + button to make the top edge wider.
Press the
/select key toggles between
PINCUSHION and TRAPEZOID correction.
ROTATION adjustment
The image can be corrected for tilted picture.
Press the – button to tilt the image to the left, or
press the + button to tilt the image to the right.
User’s Guide
7
Page 14
COLOR selection
The white of the image can be adjusted.
1 Use the – + button to select: (1) 9300°K,
(2) 6500°K or (3) User color.
LANGUAGE selection
The language of the On-Screen Menu can be
selected among English, French, German,
Italian, Spanish, and Simplified Chinese. Select
with the – + buttons.
2 If the (3):the user’s color is selected,
“2” appears in the lower right of the
On-Screen Menu.
Press the
/select button to display the
USER COLOR adjustment screen.
User Color
The white of the video image can be adjusted to
the user’s preferred color.
1 Use the
/select button to select R (red),
G (green) or B (blue).
2 Use the – + button to adjust the color as
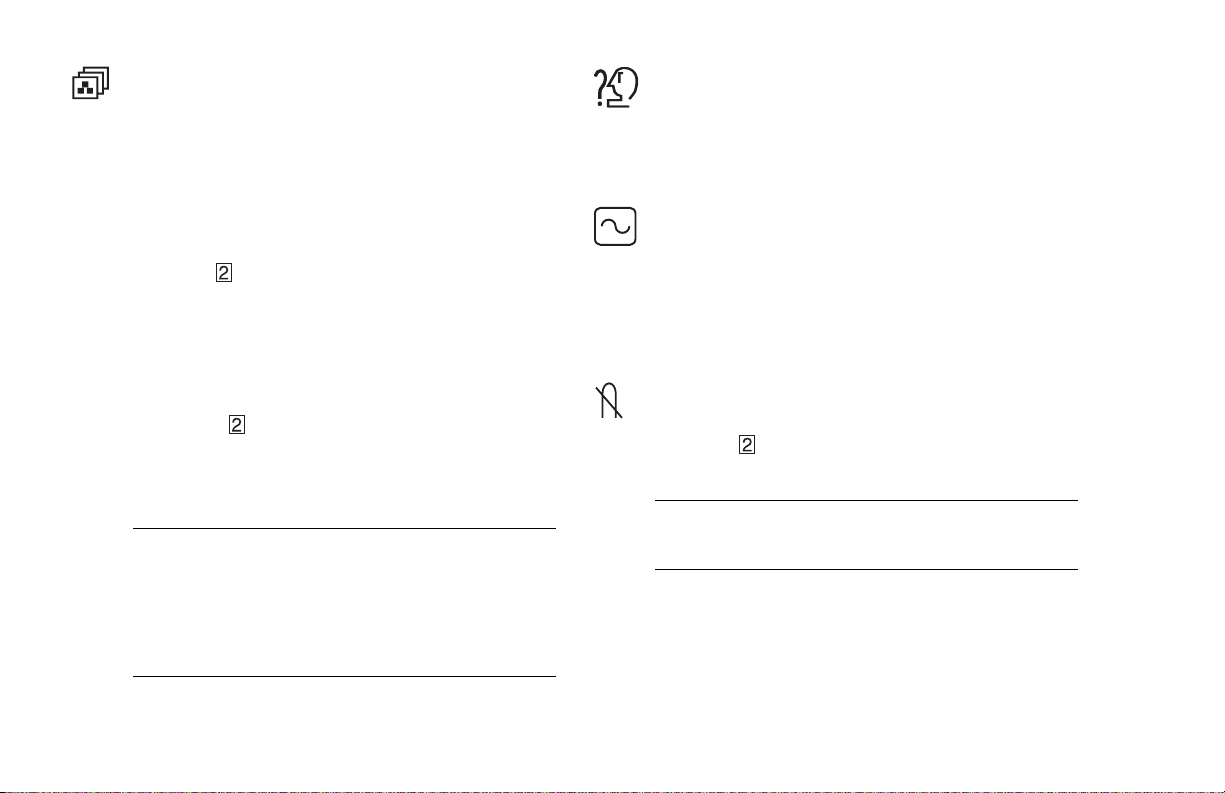
DISP. FREQ (Input frequency display)
This displays the input synchronization signal
frequency.
It identifies the horizontal and vertical frequency
sent to the monitor from the video card currently
in use.
Manual Degaussing
After moving the selector to the degauss icon,
press the
/select button. The degaussing
action takes place a few seconds later.
desired.
NOTE: A sharp snap noise may be heard when
IMPORTANT: Memory recall of the user’s color
degaussing occurs. This is normal.
is not possible, so take note of the initial setting
before adjusting.
When the monitor is turned OFF, user color
keeps the last adjustment.
8 User’s Guide
Page 15

Memory Recall
It is possible to restore adjustments to the
original factory settings. If the monitor is
operating in a user defined mode, this control
has no effect.
Horizontal Moiré
Reduce the dark wavy line Moiré pattern on the
screen.
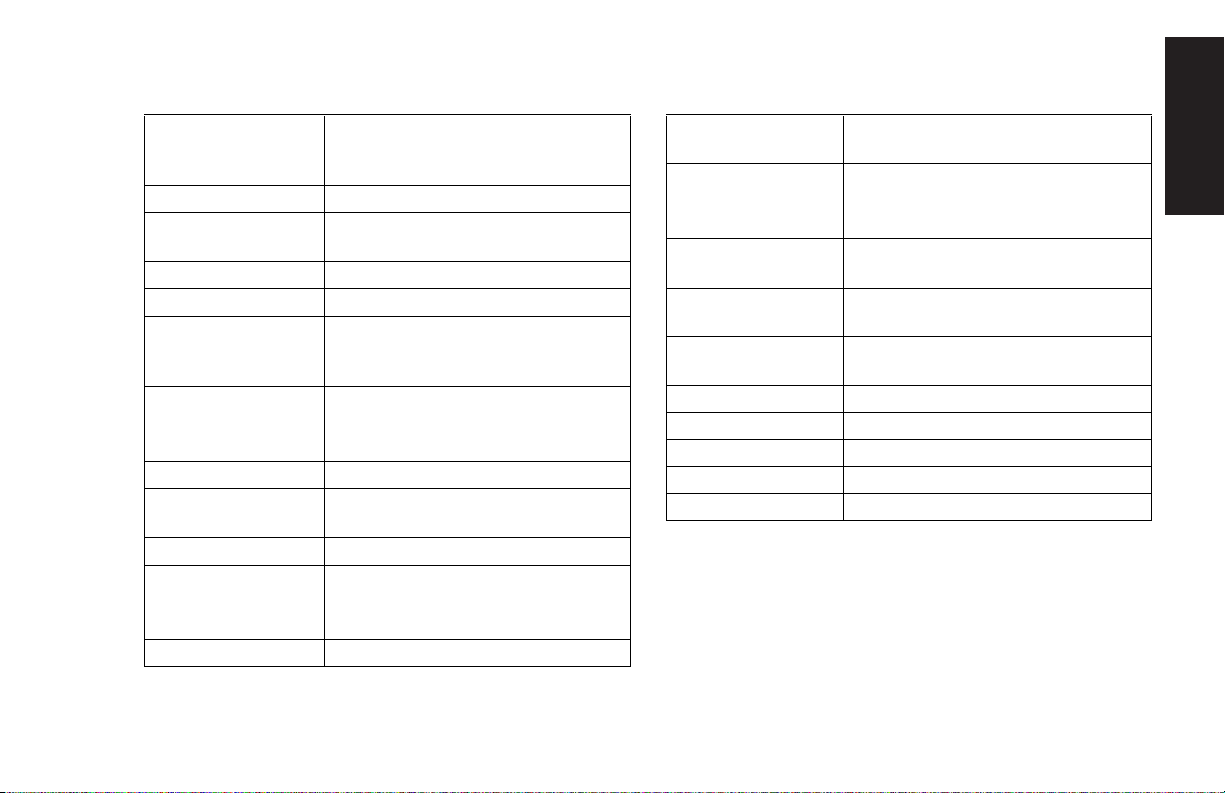
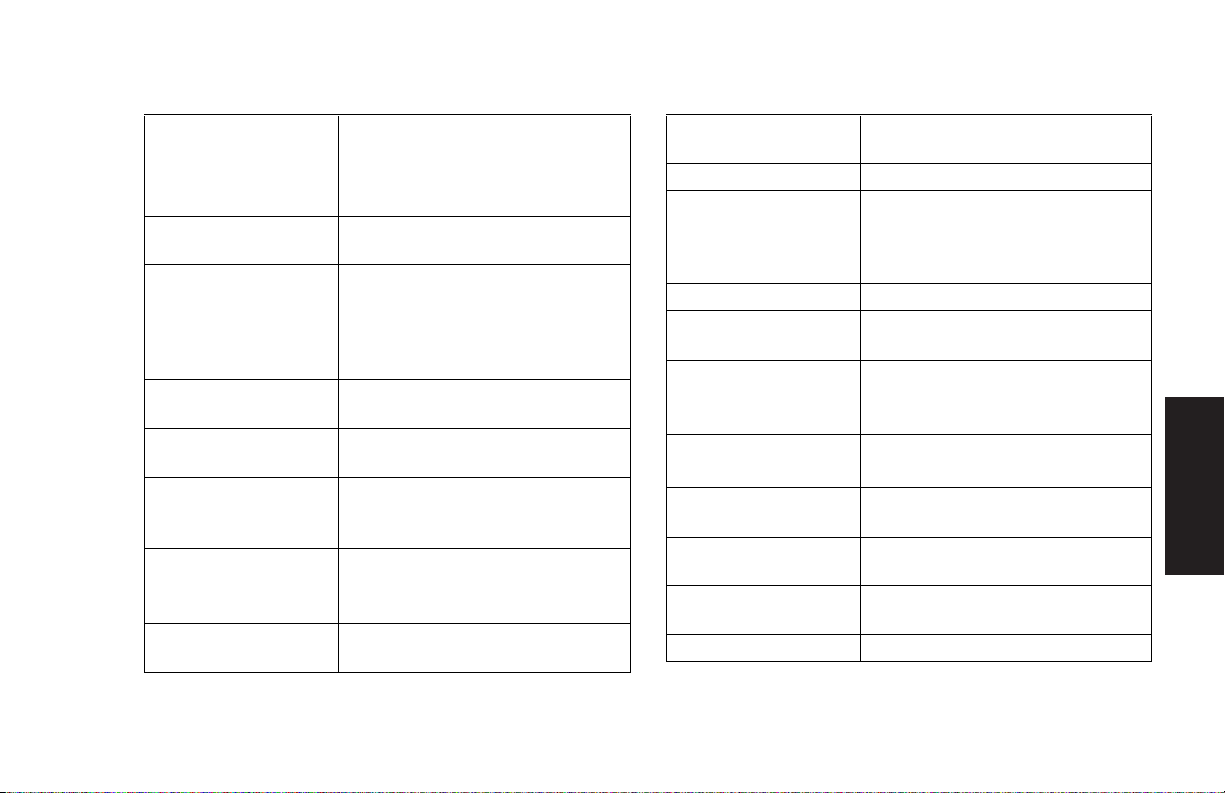
Troubleshooting
If your monitor fails to operate functionally, it may be
possible to correct the problem by making simple
checks as follows:
Problem Check & Adjust
Blank screen
(see NOTE)
• Monitor power switch, power
cord, signal cable, or connector
English
• PC power switch
Press the – or + button to minimize the
horizontal moiré image on the screen.
Vertical Moiré
Reduce the dark wavy line Moiré pattern on the
screen.
Press the – or + button to minimize the vertical
moiré image on the screen.
Display position
off-center
Display too small
or too large
Display too bright
or too dim
Refer to the operation instructions for your computer/
• Brightness & contrast controls
• Vertical centering & horizontal
phase controls
• Vertical & horizontal size controls
• Brightness & contrast controls
video adapter to ensure that you have the correct signal
output source for the monitor. Ensure that the switches
on the video adapter are set correctly for operation
with this monitor.
If the above steps fail to correct the problem contact
your dealer for servicing by qualified service personnel.
User’s Guide
9
Page 16

Please remember that the monitor should be returned
for servicing together with the power cord.
NOTE: You can easily distinguish if the problem is on
the monitor or on the computer by using the monitor’s
built-in self-test function.
With the monitor power ON, disconnect the signal
cable from monitor. If you see a “NO SIGNAL” image
on the screen, the monitor is functioning properly, and
the problem is with the PC side or signal cable.
Servicing
Refer all servicing to qualified service personnel.
Serious shock hazards exist within the covers
of this monitor.
Do not open the covers under any
circumstances — there are no user serviceable
parts inside.
10 User’s Guide
Page 17
Technical Specifications
Screen Size 17" (43 cm) visual diagonal
Viewable size 16" (40.6 cm)
Anti-Glare Coating
Dot Pitch 0.25 to 0.27mm (variable)
Display Area
Default
Display Colors Infinite
Max. Resolution 1280 Dots x 1024 Lines
Compatibility All graphic modes with horizontal
Synchronization
Horizontal:
Vertical:
Bandwidth 110 MHz
Input Signal Video RGB Analog Sync.
Signal Cable 15-pin D-sub connector
Power Input
Voltage/
Frequency
Current Rating 1.5 A
234 x 312 mm (typical)
frequencies between 30 KHz to
70 KHz
30 to 70 KHz
50 to 160Hz
TTL Separate
100 to 240V
50–60 Hz
Power
Consumption
Dimension
(W x H x D)
Weight 37.5 lbs. (maximum)
Operating
Temperature
Storage
Temperature
Humidity 20% to 80% (non-condensing)
Altitude Up to 10,000 ft / 3,048 meters
TCO’03 Some models meet TCO’03
MPRII Some models meet MPRII
Plug and Play Yes
* All performance specifications are provided by the component
manufacturers. Performance specifications represent the highest
specification of all HP’s component manufacturers’ typical level
specifications for performance and actual performance may vary
either higher or lower.
** TCO version has a different surface treatment.
*** This product is ERGONOMICS APPROVED.
75 W (MAX.)
15.9 x 16.0 x 16.7 inches
(maximum)
404 x 406 x 423 mm (maximum)
17 kg (maximum)
50°F to 95°F
10°C to 35°C
–22°F to 140°F
–30°C to 60°C
English
User’s Guide
11
Page 18
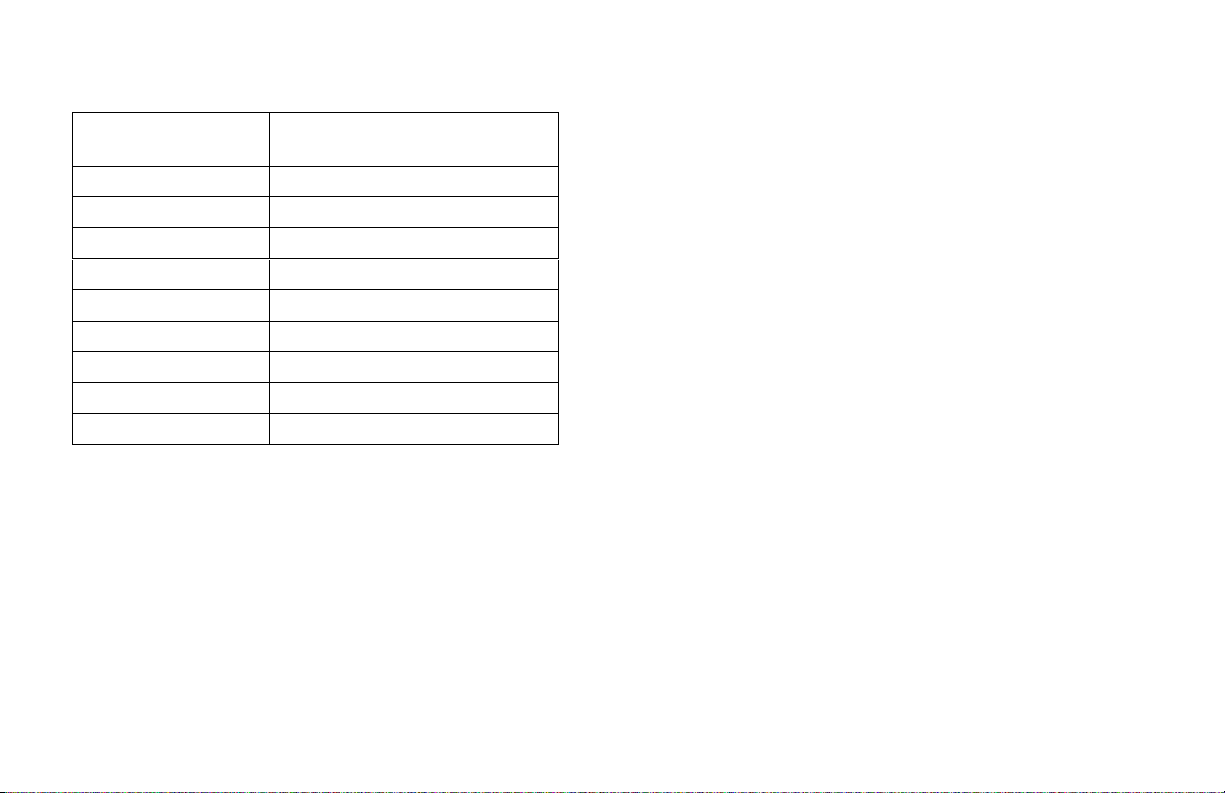
Preset Modes
Agency Regulatory Notices
Display
Resolutions
640 x 480 60 Hz
640 x 480 75 Hz
640 x 480 85 Hz
720 x 400 70 Hz
800 x 600 75 Hz
800 x 600 85 Hz
1024 x 768 75 Hz
1024 x 768 85 Hz (preferred user resolution)
1280 x 1024 60 Hz (maximum resolution)
Refresh Rates
Federal Communications
Commission Notice
This equipment has been tested and found to comply
with the limits for a Class B digital device, pursuant to
Part 15 of the FCC Rules. These limits are designed to
provide reasonable protection against harmful
interference in a residential installation. This equipment
generates, uses, and can radiate radio frequency
energy and, if not installed and used in accordance
with the instructions, may cause harmful interference to
radio communications. However, there is no guarantee
that interference will not occur in a particular
installation. If this equipment does cause harmful
interference to radio or television reception, which can
be determined by turning the equipment off and on, the
user is encouraged to try to correct the interference by
one or more of the following measures:
• Reorient or relocate the receiving antenna.
• Increase the separation between the equipment and
the receiver.
12 User’s Guide
Page 19

• Connect the equipment into an outlet on a circuit
different from that to which the receiver is connected.
• Consult the dealer or an experienced radio or
television technician for help.
Modifications
The FCC requires the user to be notified that any
changes or modifications made to this device that are
not expressly approved by Hewlett-Packard Company
may void the user’s authority to operate the equipment.
Cables
Connections to this device must be made with shielded
cables with metallic RFI/EMI connector hoods to
maintain compliance with FCC Rules and Regulations.
Declaration of Conformity for
Products Marked with FCC Logo,
United States Only
This device complies with Part 15 of the FCC Rules.
Operation is subject to the following two conditions:
(1) this device may not cause harmful interference, and
(2) this device must accept any interference received,
including interference that may cause undesired
operation.
For questions regarding your product, contact:
Hewlett-Packard Company
P. O. Box 692000, Mail Stop 530113
Houston, Texas 77269-2000
Or, call
1-800-652-6672
For questions regarding this FCC declaration, contact:
Hewlett-Packard Company
P. O. Box 692000, Mail Stop 510101
Houston, Texas 77269-2000
Or, call
(281) 514-3333
English
To identify this product, refer to the Part, Series,
or Model number found on the product.
User’s Guide
13
Page 20

Canadian Notice
This Class B digital apparatus meets all requirements of
the Canadian Interference-Causing Equipment
Regulations.
Avis Canadien
Cet appareil numérique de la classe B respecte toutes
les exigences du Règlement sur le matériel brouilleur du
Canada.
• EN61000-3-2 (IEC61000-3-2) — Power Line
Harmonics
• EN61000-3-3 (IEC61000-3-3) — Power Line Flicker
• EN60950 (IEC950) — Product Safety
Japanese Notice
European Notice
Products with the CE Marking comply with both the
EMC Directive (89/336/EEC) and the Low Voltage
Directive (73/23/EEC) issued by the Commission of the
European Community.
Compliance with these directives implies conformity
to the following European Norms (in brackets are the
equivalent international standards):
• EN55022 (CISPR 22) — Electromagnetic
Interference
• EN55024 (IEC61000-4-2,3,4,5,6,8,11) —
Electromagnetic Immunity
14 User’s Guide
Korean Notice
Page 21

EPA Energy Star Compliance
Monitors that are marked with the Energy Star® Logo
meet the requirements of the EPA Energy Star program.
As an Energy Star Partner, Hewlett-Packard Company
has determined that this product meets the Energy Star
guidelines for energy efficiency. Specific details on
using the Energy Saving features can be found in the
energy saver or power management section of the
computer manual.
The power cord must be rated for the product and
for the voltage and current marked on the product’s
electrical ratings label. The voltage and current rating
of the cord should be greater than the voltage and
current rating marked on the product. In addition, the
cross-sectional area of the wire must be a minimum of
0.75 mm² or 18AWG, and the length of the cord must
be between 6 feet (1.8 m) and 12 feet (3.6 m). If you
have questions about the type of power cord to use,
contact your HP authorized service provider.
English
Power Cord Set Requirements
The monitor power supply is provided with Automatic
Line Switching (ALS). This feature allows the monitor
to operate on input voltages between 100–120V
or 200–240V.
The power cord set (flexible cord or wall plug) received
with the monitor meets the requirements for use in the
country where you purchased the equipment.
If you need to obtain a power cord for a different
country, you should purchase a power cord that is
approved for use in that country.
A power cord should be routed so that it is not likely to
be walked on or pinched by items placed upon it
or against it. Particular attention should be paid to the
plug, electrical outlet, and the point where the cord
exits from the product.
User’s Guide
15
Page 22

16 User’s Guide
Page 23

Manuel de
l’utilisateur
Moniteurs à écran cathodique couleur
FS7600, vx74
Français
Page 24

Les informations contenues dans ce document
peuvent être modifiées sans préavis.
®
La société Hewlett-Packard
n’offre aucune garantie, quelle
qu’elle soit, concernant ce matériel, y compris, mais sans s’y
limiter, toute garantie implicite concernant sa qualité
marchande ou sa convenance à un usage particulier.
La société HP ne peut être tenue responsable en cas d’erreurs
dans ce document ou en cas de dommages accidentels ou
indirects liés à la vente, aux performances ou à l’utilisation de
ce matériel.
HORMIS DANS LES CAS OÙ LA LOI L’AUTORISE, LES
MODALITÉS DE CETTE GARANTIE NE CONSTITUENT PAS
UNE EXCLUSION, UNE RESTRICTION NI UNE
MODIFICATION, ET S’AJOUTENT À TOUS LES DROITS
RÉGLEMENTAIRES OBLIGATOIRES APPLICABLES À LA VENTE
DE CE PRODUIT OU DE CE SERVICE.
La société HP n’assume aucune responsabilité quant à
l’utilisation ou à la fiabilité de ses logiciels sur un matériel qui
n’est pas fourni par HP.
Ce document contient des informations en propriété exclusive
protégées par copyright. Tous les droits sont réservés. Aucune
partie de ce document ne peut être photocopiée, reproduite
ou traduite dans une autre langue sans l’autorisation écrite
préalable de HP.
Hewlett-Packard Company
P.O. Box 4010
Cupertino, CA 95015-4010
États-Unis
© 2004 Hewlett-Packard Development Company, L.P.
Tous droits réservés.
Hewlett-Packard est une marque déposée de Hewlett-Packard
Company aux États-Unis et dans d’autres pays/régions.
Ce produit inclut une technologie de protection de copyright
protégée par des déclarations de méthode de certains brevets
américains et d’autres droits de propriété intellectuelle
appartenant à Macrovision Corporation et autres détenteurs
de droits. L’utilisation de cette technologie de protection de
copyright doit être autorisée par Macrovision Corporation et
est destinée à l’usage des particuliers ou d’autres utilisations
de visualisation limitée dans l’absence d’autre autorisation de
Macrovision Corporation. L’analyse arrière (“reverse
engineering”) ou le désassemblage du produit sont interdits.
Brevets américains no 4,631,603, 4,577,216, 4,819,098 et
4,907,093. Produit autorisé uniquement pour une utilisation
de visualisation limitée.
Les autres marques ou noms de produits sont des marques de
commerce appartenant à leurs propriétaires respectifs.
HP est en faveur d’une utilisation licite des technologies et
n’appuie pas ni n’encourage l’utilisation de produits pour
d’autres fins que celles autorisées par la loi sur les droits
d’auteur.
Page 25

Table des matières
Contenu ........................................................1
Emballage.....................................................1
Introduction ..................................................1
Économie d’énergie.......................................2
Installation du moniteur ................................2
Boutons de réglage et indicateurs .................3
Utilisation de l’affichage à l’écran (OSD) .......4
Réglages individuels .....................................6
Dépannage .................................................10
Réparations ................................................11
Spécifications techniques ............................ 11
Modes préréglés......................................... 12
Avis de conformité des agences.................. 13
Réglementation de la FCC .....................................13
Déclaration de conformité des produits portant
le logo FCC (États-Unis uniquement) ........................ 13
Avis Canadien......................................................14
Avis européen ...................................................... 14
Avis japonais ....................................................... 15
Avis coréen.......................................................... 15
Homologation EPA Energy Star ..............................15
Cordons d’alimentation ......................................... 15
Français
Manuel de l’utilisateur
iii
Page 26

iv Manuel de l’utilisateur
Page 27

Contenu
Introduction
L’emballage contient les éléments suivants :
• Moniteur à écran cathodique
• Cordon d’alimentation c.a.
• Socle du moniteur
• Documentation
Emballage
Conservez l’emballage original pour une éventuelle
réexpédition ultérieure.
REMARQUE : Les matériaux utilisés pour l’emballage
sont recyclables.
Ce moniteur 17" (43 cm) à écran cathodique couleur
est un produit simple à utiliser et offrant de hautes
performances.
Il utilise les toutes dernières technologies en matière de
menu à l’écran. Les fonctionnalités du microprocesseur
permettent de proposer 9 modes VESA préréglés parmi
les plus couramment utilisés, et 10 modes
paramétrables par l’utilisateur.
Nous espérons que ce manuel vous apportera les
informations nécessaires pour tirer le meilleur parti de
votre moniteur dans les meilleures conditions de
sécurité.
Français
Manuel de l’utilisateur
1
Page 28

Économie d’énergie
Installation du moniteur
Le moniteur passe en mode « économie d’énergie » sur
un signal du contrôleur d’écran. Le voyant lumineux du
moniteur devient alors jaune ambré.
État
Allumé Normale Vert
ÉTEINT < 4 W Ambre
Le moniteur restera en mode économie d’énergie
jusqu’à ce qu’un signal de contrôle soit détecté ou
que le clavier ou la souris soient activés. Le temps
nécessaire pour retourner à l’état allumé à partir
du mode veille est d’environ dix secondes.
Consommation
électrique
Voyant
lumineux
• Pour monter le socle inclinable, alignez les crochets
avec les ouvertures prévues sur la face inférieure du
moniteur, puis enclenchez délicatement le socle au
bas du moniteur.
• L’extrémité du câble d’interface possède un
connecteur de contrôle à 15 broches, en forme
de D, qui se branche facilement à la sortie vidéo de
votre ordinateur personnel. Vissez les deux vis du
connecteur pour garantir un branchement solide.
• Mettez l’ordinateur sous tension. Allumez ensuite le
moniteur en appuyant sur son bouton d’alimentation.
Le témoin lumineux prend une couleur verte.
• Il faut environ 30 secondes au tube cathodique pour
être prêt à l’utilisation. Les données s’affichent alors
à l’écran.
• Si l’affichage ne fonctionne pas correctement,
reportez-vous à la section « Dépannage » de ce
document.
2 Manuel de l’utilisateur
Page 29

Boutons de réglage et indicateurs
Français
A B C 1 2
A Affiche ou ferme le menu
B Permet de se séplacer dans le menu pour choisir une icône
de réglage / Ajuste le réglage correspondant à l’icône
sélectionnée
C Confirme la sélection du menu
1 Voyant d’alimentation
2 Interrupteur d’alimentation (marche/arrêt)
Manuel de l’utilisateur
3
Page 30

Utilisation de l’affichage à l’écran (OSD)
1 Écran du menu — Appuyez sur le bouton /Menu pour afficher le menu ci-dessous ou pour sortir d’un menu.
Marque de sélection
Pour déplacer la marque de sélection à
l’emplacement désiré, appuyer sur le bouton – +
Icônes d’ajustement
Apparition de l’élément qui est
en train d’être ajusté.
CONTRASTE
V. POS ITION
POSITION V.
MOIRÉ H.
: CONTRASTE :
4 Manuel de l’utilisateur
LUMINOSITÉ
ZOOM
LANGUE
MOIRÉ V.
CONTRASTE
TAILLE H.
COUSSINET
FREQ. AFF.
: 21 :
POSITION H.
TRAPÉZOIDE
DÉGAUSSAGE
Lorsqu’on appuye sur
le bouton /select.
L’écran d’ajustement sélectionné
apparaît.
TAILLE V.
ROTATION
MÉMOIRE
Page 31

2 Écran de réglage (par exemple, réglage de la position horizontale)
Nom de l’écran d’ajustement
Icône d’ajustement
Bouton de terminaison
Le niveau d’ajustement sera retenu
en mémoire en appuyant sur
le bouton /menu. L’écran
d’ajustement sera quitté et l’écran
de menu réapparaîtra.
REMARQUE : Le niveau du réglage dépend de la durée pendant laquelle vous appuyez sur le bouton de réglage.
POSITION H.
Le niveau d’ajustement est indiqué par un chiffre ainsi
que par une barre. L’indication de ce niveau peut être
changé en appuyant sur le bouton du front – +.
L’écran d’ajustement du déplacement de l’image
apparaît en appuyant sur le bouton /select.
À l’écran d’ajustement où cettes deux icônes d’ajustement
apparaissent, il est possible de basculer entre les deux écrans
en appuyant sur le bouton /select.
Il se peut que vous deviez effectuer plusieurs pressions rapides pour obtenir le résultat souhaité.
Français
Manuel de l’utilisateur
5
Page 32

Réglages individuels
Réglage du CONTRASTE
Réglez le niveau de contraste de l’écran suivant
votre convenance personnelle.
Appuyez sur le bouton – pour diminuer le
contraste, sur le bouton + pour l’augmenter.
Utilisation directe : Vous pouvez accéder à
l’écran de réglage du contraste directement en
appuyant sur – ou + avant d’entrer dans le
menu.
Un appui sur le bouton
basculer entre CONTRASTE et LUMINOSITÉ.
Réglage de la LUMINOSITÉ
Réglez la luminosité de façon à obtenir le
niveau de fond souhaité.
Appuyez sur le bouton + pour éclaircir le fond,
sur le bouton – pour l’assombrir.
/select permet de
Réglage de la TAILLE HORIZONTALE
Remplit la surface horizontale disponible.
Appuyez sur le bouton – pour rendre l’image
plus étroite, sur le bouton + pour l’élargir.
Un appui sur le bouton
basculer entre TAILLE HORIZONALE et
POSITION HORIZONTALE.
Réglage de la POSITION HORIZONTALE
Déplace l’image horizontalement sur l’écran.
Appuyez sur le bouton – pour déplacer l’image
vers la gauche, sur le bouton + pour la déplacer
vers la droite.
Un appui sur le bouton
basculer entre TAILLE HORIZONALE et
POSITION HORIZONTALE.
/select permet de
/select permet de
Un appui sur le bouton
basculer entre CONTRASTE et LUMINOSITÉ.
6 Manuel de l’utilisateur
/select permet de
Page 33

Réglage de la TAILLE VERTICALE
Remplit la surface verticale disponible.
Appuyez sur le bouton – pour diminuer la
hauteur de l’image, sur le bouton + pour
l’augmenter.
Un appui sur le bouton
/select permet de
basculer entre TAILLE VERTICALE et POSITION
VERTICALE.
Réglage de la DISTORSION EN
COUSSINET
La distorsion en coussinet éventuelle peut être
corrigée.
Appuyez sur les boutons – ou + pour éliminer la
courbure sur la hauteur de l’image.
Un appui sur le bouton
/select permet de
basculer entre la correction de la DISTORSION
EN COUSSINET et duTRAPÉZOÏDE.
Réglage de la POSITION VERTICALE
Déplace l’image verticalement sur l’écran.
Appuyez sur le bouton – pour la déplacer vers
le bas, sur le bouton + pour la déplacer vers
le haut.
Un appui sur le bouton
/select permet de
basculer entre TAILLE VERTICALE et POSITION
VERTICALE.
Réglage du TRAPÉZOÏDE
La distorsion en trapézoïde éventuelle peut être
corrigée.
Appuyez sur le bouton – pour rendre le haut de
l’image plus étroite, sur le bouton + pour
l’élargir.
Un appui sur le bouton
/select permet de
Français
basculer entre DISTORSION EN COUSSINET
Réglage du grossissement (zoom)
L’image peut être agrandie à l’aide du bouton
et TRAPÉZOÏDE.
de zoom.
Manuel de l’utilisateur
7
Page 34

Réglage de ROTATION
Il est possible de faire pivoter l’image pour
corriger tout défaut d’inclinaison.
Appuyez sur le bouton – pour faire pivoter
l’image vers la gauche, sur le bouton + pour la
faire pivoter vers la droite.
Sélection de la COULEUR
La température du blanc de l’image peut être
modifiée.
1 Utilisez les boutons – + pour sélectionner :
(1) 9300°K, (2) 6500°K ou (3) Couleur
définie par l’utilisateur.
2 Cas n°3 : si la couleur définie par l’utilisateur
est sélectionnée, « 2 » apparaît au bas de
Couleur définie par l’utilisateur
Le blanc de l’image peut être réglé pour
correspondre à une couleur de préférence
définie par l’utilisateur.
1 Utilisez le bouton
/select pour choisir
R (rouge), V (vert) ou B (bleu).
2 Utilisez les boutons – + pour obtenir la
couleur désirée.
IMPORTANT : Il n’est pas possible de
mémoriser la couleur définie par l’utilisateur ;
il est donc conseillé de noter le réglage initial
avant toute modification.
Lorsque le moniteur est ÉTEINT, la couleur
définie par l’utilisateur est conservée.
l’écran du menu OSD.
Appuyez sur le bouton
/select pour afficher
l’écran de réglage de la couleur personnalisée.
Sélection de la LANGUE
Il est possible de choisir la langue d’affichage
du menu à l’écran. Les choix proposés sont le
français, l’anglais, l’allemand, l’italien,
l’espagnol et le chinois simplifié. La sélection
s’effectue avec les boutons – +.
8 Manuel de l’utilisateur
Page 35

FRÉQUENCE D’AFFICHAGE (Fréquence du
signal d’affichage en entrée)
Ce bouton permet d’afficher la fréquence du
signal de synchronisation en entrée.
Il indique les fréquences horizontale et verticale
Moiré horizontal
Réduit les courbes moirées apparaissant à
l’écran.
Appuyez sur les boutons – ou + pour réduire
le moiré horizontal de l’image.
du signal envoyé au moniteur par la carte
graphique en cours d’utilisation.
Dégaussage manuel
Amenez le curseur de sélection sur l’icône
de dégaussage, puis appuyez sur le bouton
/select. Le dégaussage a lieu quelques
secondes plus tard.
REMARQUE : Il se peut que le dégaussage
Moiré Vertical
Réduit les courbes moirées apparaissant à
l’écran.
Appuyez sur les boutons – ou + pour réduire
le moiré vertical de l’image.
Français
produise un bruit de déclic relativement
important. C’est un phénomène normal.
Retour aux réglages mémorisés
Il est possible de rétablir les réglages d’usine. Si
le moniteur fonctionne dans un mode défini par
l’utilisateur, ce bouton n’a aucun effet.
Manuel de l’utilisateur
9
Page 36

Dépannage
Si votre moniteur ne fonctionne pas correctement, il est
possible que le problème puisse être corrigé par les
simples vérifications suivantes :
Le problème est... Vérifiez et corrigez...
Écran vide
(voir REMARQUE)
Image non centrée • Boutons de réglage de
Image trop petite ou
trop grande
Image trop claire ou
trop sombre
Reportez-vous aux instructions d’utilisation de votre
ordinateur ou de votre carte graphique pour vous
assurez que vous disposez bien d’un signal de sortie
• Interrupteur d’alimentation du
moniteur, câble d’alimentation,
câble d’interface, ou
connecteur
• Interrupteur d’alimentation de
l’ordinateur
• Boutons de réglage de la
luminosité et du contraste
l’alignement vertical et de la
phase horizontale
• Boutons de réglage de la taille
horizontale et verticale
• Boutons de réglage de la
luminosité et du contraste
adapté au moniteur. Vérifiez que les interrupteurs sur la
carte vidéo sont correctement réglés pour une utilisation
avec ce moniteur.
Si les étapes ci-dessus ne réussissent pas à corriger le
problème, contactez votre revendeur afin d’obtenir une
réparation par du personnel technique qualifié.
Rappelez-vous qu’en cas de réexpédition pour
réparation, le moniteur doit être réexpédié avec son
cordon d’alimentation.
REMARQUE : Vous pouvez savoir facilement si le
problème provient du moniteur ou de l’ordinateur, à
l’aide de la fonction d’autotest intégré.
Le moniteur étant ALLUMÉ, débranchez le câble
d’interface du moniteur. Si un message « AUCUN
SIGNAL » apparaît à l’écran, le moniteur fonctionne
correctement, et le problème provient de l’ordinateur ou
du câble d’interface.
10 Manuel de l’utilisateur
Page 37

Réparations
Spécifications techniques
Laissez le soin de toute réparation à du personnel
technique qualifié.
Il existe un danger de choc électrique grave
dans le boîtier du moniteur.
N’ouvrez en aucun cas le boîtier du
moniteur — il ne contient aucune pièce
réparable ou remplaçable par l’utilisateur.
Taille de l’écran Diagonale de 17" (43 cm)
Affichage visible de 16" (40,6 cm)
Revêtement anti-reflet
Pas de masque 0,25 à 0,27 mm (variable)
Surface
d’affichage par
défaut
Couleurs
d’affichage
Résolution
maximale
Compatibilité Tous modes graphiques dont la
Synchronisation
Horizontale :
Verticale :
Bande passante 110 MHz
Signal d’entrée RVB vidéo analogique sync.
Câble d’interface Connecteur 15 broches en D
234 x 312 mm (surface typique)
Infinies
1280 points x 1024 lignes
fréquence horizontale est comprise
entre 30 kHz et 70 KHz.
30 à 70 kHz
50 à 160 Hz
TTL à part
Français
Manuel de l’utilisateur
11
Page 38

Alimentation
Voltage/
Fréquence
Courant nominal 1,5 A
Consommation
électrique
Dimensions
(L x H x P)
Poids 37,5 livres. (maximum)
Température de
fonctionnement
Température de
stockage
Humidité 20 % à 65 °C (sans condensation)
Altitude Jusqu’à 10000 pieds / 3048 m
Norme TCO‘O3 Certains modèles sont conformes à
MPRII Certains modèles sont conformes à
Prêt à l’emploi
(Plug and Play)
100 à 240 V
50–60 Hz
75 W (max.)
15,9 x 16,0 x 16,7 pouces
(maximum)
404 x 406 x 423 mm (maximum)
17 kg (maximum)
50 °F à 95 °F
10 °C à 35 °C
–22 °F à 140 °F
–30 °C à 60 °C
la norme TCO’03.
la norme MPRII
Oui
* Les indications de performance mentionnées sont fournies par les
fabricants des composants. Ces indications de performance
représentent le meilleur niveau atteint par les fabricants de
composants pour HP ; les performances typiques constatées peuvent
varier, en-dessus ou en-dessous de ce niveau.
** La version TCO utilise un traitement de surface différent.
*** Ce produit a reçu un AGRÉMENT D’ERGONOMIE.
Modes préréglés
Résolution
d’affichage
640 x 480 60 Hz
640 x 480 75 Hz
640 x 480 85 Hz
720 x 400 70 Hz
800 x 600 75 Hz
800 x 600 85 Hz
1024 x 768 75 Hz
1024 x 768 85 Hz (résolution préférable pour
1280 x 1024 60 Hz (résolution maximale)
Fréquence de
rafraîchissement
l’utilisateur)
12 Manuel de l’utilisateur
Page 39

Avis de conformité des agences
Réglementation de la FCC
Ce matériel a été testé et jugé conforme aux normes de
la classe B concernant les équipements numériques,
selon l’article 15 de la réglementation FCC. Ces limites
sont destinées à assurer une protection raisonnable
contre les interférences dans un environnement
résidentiel. Ce matériel génère, utilise et peut émettre
de l’énergie haute fréquence et, s’il n’est pas installé et
utilisé conformément au manuel d’utilisation, risque de
provoquer des interférences. Cependant, tout risque
d’interférences ne peut être totalement exclu : s’il
constate des interférences lors de la réception
d’émissions de radio ou de télévision (il suffit pour le
vérifier d’allumer et d’éteindre successivement
l’appareil), l’utilisateur devra prendre les mesures
nécessaires pour les éliminer. À cette fin, il devra :
• réorienter ou déplacer l’antenne réceptrice ;
• augmenter la distance séparant l’équipement du
récepteur ;
• brancher le matériel sur un autre circuit que celui du
récepteur ;
• consulter le revendeur ou un technicien de
radio/télévision expérimenté.
Modifications
La FCC requiert que l’utilisateur soit averti que toute
modification de cet équipement non approuvée
expressément pas la société Hewlett-Packard pourrait
annuler le droit de l’utilisateur d’utiliser l’équipement.
Câbles
Les câbles branchés à cet équipement doivent être
blindés et comporter des capots de connecteur
métalliques de type RFI/EMI pour être conformes aux
règles et réglementations de la FCC.
Déclaration de conformité des
produits portant le logo FCC
(États-Unis uniquement)
Ce matériel est conforme à l’alinéa 15 de la
réglementation de la FCC. Son fonctionnement est
soumis à deux conditions : (1) cet équipement ne peut
pas causer d’interférences et (2) cet équipement doit
accepter toute interférence reçue, y compris les
interférences susceptibles d’entraîner un mauvais
fonctionnement.
Français
Manuel de l’utilisateur
13
Page 40

En cas de question relative à votre produit, contactez :
Hewlett-Packard Company
P. O. Box 692000, Mail Stop 530113
Houston, Texas 77269-2000 — États-Unis
Ou appelez le :
1-800-652-6672
En cas de question relative à cette déclaration FCC,
contactez :
Hewlett-Packard Company
P. O. Box 692000, Mail Stop 510101
Houston, Texas 77269-2000 — États-Unis
Ou appelez le :
(281) 514-3333
Pour identifier ce produit, se référer aux numéros de
pièce, de série ou de modèle figurant sur le produit.
Avis Canadien
Cet appareil numérique de la classe B respecte toutes
les exigences du Règlement sur le matériel brouilleur du
Canada.
Avis européen
Les produits portant le logo CE sont conformes à la
directive EMC (89/336/EEC) et à la directive sur les
basses tensions (73/23/EEC) publiées par la
Commission de la Communauté Européenne.
Le respect de ces directives implique la conformité
aux Normes Européennes suivantes (les normes
internationales correspondantes sont indiquées entre
parenthèses) :
• EN55022 (CISPR 22) — Interférences
électromagnétiques
• EN55024 (IEC61000-4-2,3,4,5,6,8,11) —
Immunité électromagnétique
• EN61000-3-2 (IEC61000-3-2) — Limites pour les
émissions de courant harmonique
• EN61000-3-3 (IEC61000-3-3) — Limitation des
fluctuations de tension et du flicker
• EN60950 (IEC950) — Sécurité du produit
14 Manuel de l’utilisateur
Page 41

Avis japonais
Avis coréen
Homologation EPA Energy Star
Les moniteurs portant le logo Energy Star® respectent les
directives Energy Star de l’EPA (agence américaine de
protection de l’environnement). En tant que partenaire
Energy Star, Hewlett-Packard Company s’est assurée
que ce produit satisfait aux lignes directrices d’Energy
Star en matière d’utilisation efficace de l’énergie. Vous
trouverez des instructions spécifiques sur l’utilisation des
fonctions d’économie d’énergie de votre ordinateur au
chapitre « Gestion de l’alimentation » du manuel de
votre ordinateur.
Cordons d’alimentation
Le bloc d’alimentation de votre moniteur est doté d’un
sélecteur automatique de tension (ALS pour Automatic
Line Switching). Cette fonction permet au moniteur de
fonctionner avec des tensions d’entrée comprises entre
100 et 120 V ou entre 200 et 240 V.
L’ensemble du cordon d’alimentation (cordon flexible et
fiche murale) fourni avec le moniteur est conforme aux
exigences du pays où vous avez acheté l’équipement.
Si vous comptez utiliser votre ordinateur dans un autre
pays, vous devez acheter un cordon conforme à la
réglementation de ce pays.
Français
Manuel de l’utilisateur
15
Page 42

Le cordon d’alimentation doit être adapté au produit,
à la tension et au courant nominaux inscrits sur
l’étiquette du produit. La tension et le courant nominaux
du cordon doivent être supérieurs à ceux qui sont
indiqués sur le produit. De plus, la section du fil doit
être de 0,75 mm² ou 18AWG au minimum, et la
longueur du cordon doit être comprise entre 1,8 m
(6 pieds) et 3,6 m (12 pieds). Pour toute question
relative au type de cordon d’alimentation à utiliser,
contactez un fournisseur de services HP agréé.
Le cheminement du cordon d’alimentation doit être
étudié de manière à ce qu’il ne puisse pas être piétiné
ou écrasé par des objets placés sur ou contre lui. Vous
devez faire particulièrement attention à la fiche, à la
prise murale et au point où le cordon sort de l’appareil.
16 Manuel de l’utilisateur
Page 43

— LEA ESTO —
Guía del usuario
Serie de monitores en color de tubo
de rayos catódicos
FS7600, vx74
Español
Page 44

La información de este documento está sujeta a
cambios sin previo aviso.
®
Hewlett-Packard
Company no concede, respecto a este
material, garantías implícitas, ni de comercialización o
aptitud para ningún propósito concreto, ni ningún otro tipo
de garantía.
HP no será responsable de los errores que contenga este
documento, ni de los daños incidentales o consecutivos
relacionados con el suministro, rendimiento o uso de este
material.
LOS TÉRMINOS DE LA GARANTÍA CONTENIDOS EN LA
PRESENTE DECLARACIÓN, EXCEPTO EN LA MEDIDA EN
QUE LO PERMITA LA LEY, NO EXCLUYEN, RESTRINGEN
O MODIFICAN LOS DERECHOS ESTATUTARIOS
OBLIGATORIOS APLICABLES A LA VENTA DEL PRODUCTO
O SERVICIO Y SON ADICIONALES A LOS MISMOS.
HP no asume responsabilidad alguna derivada del uso o la
fiabilidad de este software si se utiliza en equipos no
suministrados por HP.
Este documento contiene información propia protegida por
derechos de autor. Reservados todos los derechos. No se
autoriza que ninguna parte de este documento sea
fotocopiada, reproducida o traducida a otro idioma, sin el
previo consentimiento escrito de HP.
Hewlett-Packard Company
P.O. Box 4010
Cupertino, CA 95015-4010
USA
© 2004 Hewlett-Packard Development Company, L.P.
Todos los derechos reservados.
Hewlett-Packard es una marca registrada de Hewlett-Packard
Company en los Estados Unidos de América y en otros países
o regiones.
Este producto incorpora una tecnología de protección de
derechos de autor que está respaldada por las
reivindicaciones de métodos de algunas patentes de EE.UU.
y otros derechos de propiedad intelectual de Macrovision
Corporation y de otros propietarios de derechos. El uso de
esta tecnología de protección de derechos de autor debe ser
autorizado por Macrovision Corporation, y está destinado a
uso doméstico y a otros usos de visualización con audiencia
limitada, a menos que Macrovision Corporation lo autorice
de otro modo. Se prohíbe la ingeniería inversa o el
desensamblaje. Las reivindicaciones de los aparatos
conforme a las patentes de EE.UU. 4.631.603, 4.577.216,
4.819.098 y 4.907.093 están autorizadas únicamente para
uso en visualizaciones de alcance limitado.
Otras marcas o nombres de productos son marcas
comerciales de sus respectivos propietarios.
HP defiende el uso legal de la tecnología y no respalda ni
fomenta el uso de sus productos para fines distintos de los
permitidos por la ley de propiedad intelectual.
Page 45

Índice de materias
Contenido de la Compra................................1
Reembalaje...................................................1
Introducción ..................................................1
Ahorro de Energía.........................................2
Instalación del Monitor..................................2
Controles e Indicadores del Usuario ..............3
Uso del Menú en Pantalla .............................4
Ajuste Individual ...........................................6
Solución de Problemas ..................................9
Mantenimiento............................................10
Características Técnicas .............................. 11
Modos Predefinidos.................................... 12
Avisos de Agencias Reguladoras ................ 13
Aviso de la Comisión Federal de Comunicaciones.... 13
Declaración de conformidad de los productos
marcados con el logotipo FCC,
sólo para Estados Unidos ......................................14
Aviso para Canadá .............................................. 14
Aviso para Europa................................................ 14
Aviso para Japón..................................................15
Aviso para Corea.................................................15
Cumplimiento con EPA Energy Star......................... 15
Requisitos del cable de alimentación....................... 16
Español
Guía del usuario
iii
Page 46

iv Guía del usuario
Page 47

Contenido de la Compra
Introducción
El paquete incluye lo siguiente:
• Monitor de tubo de rayos catódicos
• Cable de alimentación de CA (ca)
• Base del monitor
• Documentación
Reembalaje
Guarde la caja original y todo el material de embalaje
en caso resulte necesario transportar el monitor en un
futuro.
NOTA: Los materiales y el producto de embalaje son
reciclables.
Este monitor en color de tubo de rayos catódicos de
17" (43 cm) es un producto fácil de usar y de alto
rendimiento.
Utiliza la última tecnología de menús en pantalla. La
capacidad de microprocesador ofrece los 9 modos de
temporización VESA más utilizados predefinidos de
fábrica, así como 10 modos que el usuario puede
ajustar para definir los horarios especiales que pudiera
tener.
Esperamos que este manual le ayude a obtener el
máximo rendimiento del monitor y a preservar su
seguridad personal durante su utilización.
Español
Guía del usuario
1
Page 48

Ahorro de Energía
Instalación del Monitor
Con el signo de control emitido por el controlador
de exhibición, el monitor pasará al modo de
“Conservación de Energía”, como se indica por el LED
de color ámbar.
Estado Consumo de energía Indicador LED
ON Normal Verde
OFF < 4 W Ámbar
Los estados de ahorro de energía se mantienen hasta
que se detecta una señal de control o se activa el
teclado o el ratón. El tiempo de recuperación del
APAGADO al ENCENDIDO será de 10 segundos
aproximadamente.
• Para conectar la base de inclinación/basculación al
monitor, alinee los enganches con las ranuras de la
parte inferior del monitor y presione con cuidado la
base hacia la parte frontal del monitor.
• El conector de 15 patillas con forma de D del cable
se conectará fácilmente con la salida de adaptador
de vídeo de su PC. Fije ambos tornillos al conector
para comprobar que la conexión está bien
asegurada.
• Active la alimentación del equipo. A continuación
active el interruptor ON del monitor, pulsando hacia
dentro el botón. Se encenderá el indicador de
alimentación de color verde.
• Espere 30 segundos a que se caliente el tubo de
rayos catódicos. Aparecerán los datos en la
pantalla.
• Si el monitor no funciona correctamente, consulte
primero el apartado “Solución de problemas” de
este manual.
2 Guía del usuario
Page 49
Controles e Indicadores del Usuario
A B C 1 2
A Muestra el menú y lo cierra
B Se desplaza a través del menú para permitir la selección
de un icono para el ajuste/Ajusta los niveles del icono
seleccionado
C Confirma la selección del menú
1 LED de alimentación
2 Interruptor ON/OFF de alimentación
Guía del usuario
Español
3
Page 50

Uso del Menú en Pantalla
1 Pantalla de menú: pulse el /menu para mostrar el menú, que aparece a continuación, así como para cerrarlo
Marca de selección
Pulse el botón – + para desplazar la marca de selección
al lugar deseado.
Iconos de ajuste
Se muestra el artículo que se está
ajustando en ese momento.
CONTRASTE
POSICIÓN V.
COLOR
MOIRE H.
: CONTRASTE :
4 Guía del usuario
BRILLO
ZOOM
IDIOMA
MOIRE V.
CONTRASTE
TAMAÑO H.
DIST. ACER. V.
FREC. PANT.
: 21 :
POSICIÓN H.
EN TRAPECIO
DESMAGNETIZAR
Cuando se pulsa el botón /select.
Aparece la pantalla de ajuste
seleccionada.
TAMAÑO V.
ROTACIÓN
RESTABLECER
Page 51

2 Pantalla de ajuste (ejemplo: ajuste de la posición horizontal)
Nombre de la pantalla de ajuste
Icono de ajuste
Botón de finalización
Cuando pulse el botón /menu
se guardará el nivel de ajuste,
se cerrará la pantalla de ajuste y
reaparecerá la pantalla de menú.
NOTA: La cantidad de ajuste depende del tiempo que deje sin pulsar el botón de ajuste. Tal vez necesite pulsar
POSICIÓN H.
El nivel de ajuste aparece tanto con un número
como con una barra. Puede modificarlo con
los botones frontales – +.
Cuando pulsa el botón /select, aparece la pantalla
de ajuste del tamaño horizontal.
En la pantalla de ajuste en la que aparecen estos dos iconos
de ajuste puede pasar de una pantalla a otra mediante
el botón /select.
varias veces el botón para obtener los resultados deseados.
Español
Guía del usuario
5
Page 52

Ajuste Individual
Ajuste CONTRASTE
Ajuste el contraste de la pantalla para definir
el valor que prefiera.
Pulse el botón – para reducir el contraste
y + para aumentarlo.
Funcionamiento directo: Puede acceder a la
pantalla de CONTRASTE pulsando los botones
– o + antes de acceder a la pantalla de menú.
Pulse la tecla
CONTRASTE a BRILLO y viceversa.
Ajuste BRILLO
Ajuste el brillo para obtener el nivel de fondo
que desee.
/select para cambiar de
Ajuste TAMAÑO HORIZONTAL
Completa el área visible en sentido horizontal.
Pulse el botón – para reducir la imagen
y + para ampliarla.
Pulse la tecla
TAMAÑO HORIZONTAL a POSICIÓN
HORIZONTAL y viceversa.
Ajuste POSICIÓN HORIZONTAL
Desplaza la imagen de la pantalla en sentido
horizontal.
Pulse el botón – para desplazar la imagen de la
pantalla a la izquierda y + para hacerlo hacia
la derecha.
/select para cambiar de
Pulse el botón + para iluminar el fondo y – para
oscurecerlo.
Pulse la tecla
CONTRASTE a BRILLO y viceversa.
6 Guía del usuario
/select para cambiar de
Pulse la tecla
TAMAÑO HORIZONTAL a POSICIÓN
HORIZONTAL y viceversa.
/select para cambiar de
Page 53
Ajuste TAMAÑO VERTICAL
Completa el área visible en sentido vertical.
Pulse el botón – para reducir la imagen
y + para ampliarla.
Pulse la tecla
/select para cambiar de
TAMAÑO VERTICAL a POSICIÓN VERTICAL
y viceversa.
Ajuste DIST. ACER.
Puede corregir la distorsión tipo barril de la
imagen.
Pulse los botones – o + para eliminar las líneas
verticales curvas.
Pulse la tecla
/select para cambiar de
DIST. ACER. a EN TRAPECIO y viceversa.
Ajuste POSICIÓN VERTICAL
Desplaza la imagen de la pantalla en sentido
vertical.
Pulse el botón – para desplazar la imagen
hacia abajo y + para subirla hacia arriba.
Pulse la tecla
/select para cambiar de
TAMAÑO VERTICAL a POSICIÓN VERTICAL
y viceversa.
Ajuste del zoom
La imagen puede ampliarse con el control
del zoom.
Ajuste EN TRAPECIO
Puede corregir la distorsión trapezoidal de la
imagen.
Pulse el botón – para estrechar el extremo
superior o bien +para ampliarlo.
Pulse la tecla
/select para cambiar de
DIST. ACER. a EN TRAPECIO y viceversa.
Ajuste ROTACIÓN
Puede corregir la distorsión de inclinación de la
imagen.
Pulse los botones – y + para inclinar la imagen
a la izquierda y a la derecha respectivamente.
Guía del usuario
Español
7
Page 54

Selección COLOR
Puede ajustar la proporción de blanco de la
imagen.
1 Utilice el botón – + para seleccionar:
(1) 9300°K, (2) 6500°K o (3) color del
usuario.
2 Si está seleccionado el (3): color del usuario,
aparece “2” en la zona inferior derecha del
menú en pantalla.
Pulse el botón frontal
/select para observar
la pantalla de ajuste color del usuario.
Selección idioma
Puede seleccionar el idioma del menú en
pantalla entre inglés, francés, alemán, italiano,
español y Chino simplificado. Selecciónelo con
los botones – +.
FREC. PANT.
Muestra la frecuencia de la señal de
sincronización de los datos introducidos.
Identifica la frecuencia horizontal y vertical
enviada al monitor desde la tarjeta de vídeo
que se está utilizando.
Color del usuario
Puede ajustar la proporción de blanco de la
imagen con el color preferido por el usuario.
1 Utilice el botón
/select para seleccionar
R (rojo), G (verde) o B (azul).
2 Utilice el botón – + para ajustar el color
como prefiera.
IMPORTANTE: No es posible recuperar de la
memoria el color del usuario, por tanto, tome
DESMAGNETIZAR
Tras desplazar el selector al icono de
desmagnetizar, pulse el botón
/select.
La anulación del imantado tiene lugar unos
segundos después.
NOTA: Cuando se anula el imantado puede
percibirse un sonido agudo que es totalmente
normal.
nota del ajuste inicial antes de modificarlo.
Cuando apague el monitor, el color del usuario
guarda el último ajuste.
8 Guía del usuario
Page 55

RESTABLECER
Es posible recuperar los ajustes de la
configuración original de fábrica. Si el monitor
funciona en un modo definido por el usuario,
este control no surte ningún efecto.
MOIRE HORIZONTAL
Reduce el patrón moire de líneas oscuras
onduladas de la pantalla.
Pulse los botones – o + para minimizar la
imagen de moire horizontal de la pantalla.
MOIRE VERTICAL
Reduzca el patrón de moire de líneas oscuras
de la pantalla.
Pulse los botones – o + para minimizar la
imagen de moire vertical de la pantalla.
Solución de Problemas
Si el monitor no funciona, tal vez pueda corregir el
problema realizando sencillas comprobaciones de esta
forma:
Problema Compruebe y ajuste
Pantalla en blanco
(Ver NOTA)
Presentación
descentrada
Presentación
demasiado pequeña
o grande
Presentación
demasiado brillante
u oscura
• Interruptor de alimentación del
monitor, cable de alimentación,
cable de señal
• Interruptor de alimentación del
equipo
• Controles de fase de centrado
vertical y horizontal
• Controles de tamaño vertical y
horizontal
• Controles de brillo y contraste
Español
Consulte las instrucciones de funcionamiento de su PC
y del adaptador de vídeo para asegurarse de que la
señal de salida es adecuada para el monitor.
Compruebe que los interruptores del adaptador de
vídeo están correctamente configurados para su
funcionamiento con este monitor.
Guía del usuario
9
Page 56

Si los pasos anteriores no corrigen el problema,
diríjase al distribuidor para que el personal técnico
cualificado se haga cargo del problema.
Recuerde que el servicio de mantenimiento precisa que
envíe también el cable de alimentación.
Mantenimiento
Confíe el mantenimiento a personal técnico cualificado.
Si abre la cubierta del monitor corre un grave
peligro de electrocución.
NOTA: Para distinguir si el problema es del monitor o
de su PC, utilice la función de auto comprobación
integrada del monitor.
Con el monitor encendido, desconecte el cable del
monitor. Si aparece en pantalla una imagen “NO
SIGNAL” (sin señal) el monitor funciona correctamente
y el problema radica en su PC o bien en el cable.
10 Guía del usuario
No abra las cubiertas bajo ningún motivo,
ninguno de los componentes internos precisa
mantenimiento.
Page 57
Características Técnicas
Tamaño de la
pantalla
Tamaño en
puntos
Área de
visualización
Predeterminada
Barrido total
(altura x andhura)
Colores de
visualización
Resolución
máxima
Compatibilidad Todos los modos gráficos con
Sincronización
Horizontal:
Vertical:
Ancho de banda
de vídeo
17" de diagonal visible (43 cm)
Tamaño visible 16" (40,6 cm
[40.6 cm])
Capa antirreflectante
De 0,25mm (0.25mm) a 0,27mm
(0.27mm) (variable)
234 x 312 mm (típica)
Infinitos
1280 puntos x 1024 líneas
frecuencias horizontales entre
30 KHz y 70 KHz
De 30 y 70 KHz
50 a 160Hz
110 MHz
Señal de entrada Sinc. analógica RGB vídeo.
TTL aparte
Cable de señal Conector D-sub de 15 patillas
Entrada de
alimentación /
Frecuencia de
voltaje
Clase de corriente 1,5 A (1.5 A)
Consumo de
energía
Dimensión
(anchura x altura
x fondo)
Peso 37,5 (37.5) libras (máximo)
Temperatura en
funcionamiento
Temperatura en
almacenamiento
Humedad De 20% a 80% C (sin
Altitud Hasta 10000 pies / 3048 metros
100 a 240V
50–60 Hz
75 W (Máx.)
15,9 (15.9) x 16,0 (16.0) x
16,7 (16.7) pulgadas (máximo)
404 x 406 x 423 mm (máximo)
17 kg (máximo)
De 50°F a 95°F
De 10°C a 35°C
De –22°F a 140°F
De –30°C a 60°C
condensación)
(continuación)
Español
Guía del usuario
11
Page 58

(continuación)
TCO’03 Algunos modelos cumplen la
normativa TCO’03
MPRII Algunos modelos cumplen la
normativa MPRII
Plug and Play Sí
* Todas las especificaciones de rendimiento han sido proporcionadas
por los fabricantes de los componentes. Las especificaciones de
rendimiento representan la especificación más alta de todos los
niveles típicos de los fabricantes de componentes de HP y el
rendimiento real puede variar tanto superior como inferiormente.
** La versión TCO tiene un tratamiento diferente de la superficie.
*** Este producto está APROBADO ERGONÓMICAMENTE.
Modos Predefinidos
Resoluciones
de pantalla Frecuencias de actualización
640 x 480 60 Hz
640 x 480 75 Hz
640 x 480 85 Hz
720 x 400 70 Hz
800 x 600 75 Hz
800 x 600 85 Hz
1024 x 768 75 Hz
1024 x 768 85 Hz (resolución de usuario preferida)
1280 x 1024 60 Hz (resolución máxima)
12 Guía del usuario
Page 59

Avisos de Agencias
Reguladoras
Aviso de la Comisión Federal de
Comunicaciones
Este producto ha sido sometido a pruebas para
certificar que cumple con los límites establecidos para
los dispositivos digitales de clase B en la Parte 15 de
las normas de la FCC. Estos límites se han establecido
para proporcionar un grado razonable de protección
contra interferencias perjudiciales en un área
residencial. Este equipo genera, utiliza y puede emitir
energía de radiofrecuencia. De no instalarse y
utilizarse según las instrucciones, este aparato puede
causar interferencias en las comunicaciones de radio.
Sin embargo, no se puede garantizar que no se
originen interferencias en una instalación determinada.
Si este equipo causa interferencias perjudiciales para
la recepción de radio o televisión, lo que puede
determinarse por medio del encendido y el apagado
del equipo, el usuario debe intentar solucionar la
interferencia con una o varias de las medidas
siguientes:
• Cambie la orientación o ubicación de la antena.
• Aumente la distancia entre el equipo y el aparato
receptor.
• Conecte el equipo a la toma de corriente de un
circuito distinto del conectado al receptor.
• Consultar al distribuidor o a un técnico de radio o
televisión experimentado para obtener ayuda.
Modificaciones
La FCC exige que se advierta al usuario de que todo
cambio o modificación que se realice en este
dispositivo y no esté expresamente aprobado por
Hewlett-Packard Company puede anular la
autorización del usuario para manejar el equipo.
Cables
Las conexiones de este dispositivo han de realizarse
con cables apantallados con fundas de conectores
RFI/EMI metálicas para mantener el cumplimiento de
las normas y reglamentos de la FCC.
Español
Guía del usuario
13
Page 60

Declaración de conformidad de los
productos marcados con el logotipo
FCC, sólo para Estados Unidos
Este dispositivo cumple con el Apartado 15 de las
Reglas FCC. El funcionamiento está sujeto a las dos
condiciones siguientes: (1) este dispositivo no debe
provocar interferencias dañinas, y (2) este dispositivo
debe aceptar cualquier interferencia recibida, incluidas
las que puedan ocasionar un funcionamiento
incorrecto.
Para preguntas relativas al producto, póngase en
contacto con:
Hewlett-Packard Company
P. O. Box 692000, Mail Stop 530113
Houston, Texas 77269-2000 — EE.UU.
o llame al teléfono
(281) 514-3333
Para identificar este producto, indique el número de
pieza, de serie o de modelo que encontrará en el
producto.
Aviso para Canadá
Este aparato digital de Clase B cumple con todos los
requisitos de los reglamentos canadienses referentes a
los equipos que producen interferencias.
Avis Canadien
Cet appareil numérique de la classe B respecte toutes
les exigences du Règlement sur le matériel brouilleur du
Canada.
o llame al teléfono
1-800-652-6672
Para preguntas relativas a esta declaración de la FCC,
póngase en contacto con:
Hewlett-Packard Company
P. O. Box 692000, Mail Stop 510101
Houston, Texas 77269-2000 — EE.UU.
14 Guía del usuario
Aviso para Europa
Los productos con el logotipo CE cumplen tanto con la
Directiva EMC (89/336/EEC) como la Directiva de
Bajo Voltaje (73/23/EEC) emitidas por la Comisión de
la Comunidad Europea.
Page 61

El cumplimiento de estas directivas implica conformidad
a las siguientes Normas Europeas (en paréntesis se
muestran los equivalentes internacionales):
• EN55022 (CISPR 22) — Interferencias
electromagnéticas
• EN55024 (IEC61000-4-2,3,4,5,6,8,11) —
Inmunidad Electromagnética
• EN61000-3-2 (IEC61000-3-2) — Harmónicos en la
línea de alimentación
• EN61000-3-3 (IEC61000-3-3) — Inestabilidad en la
línea de alimentación
• EN60950 (IEC950) — Seguridad del producto
Aviso para Japón
Aviso para Corea
Cumplimiento con EPA Energy Star
Los monitores que portan el logotipo de Energy Star®
cumplen los requisitos del programa EPA Energy Star.
Como asociado de Energy Star, Hewlett-Packard
Company ha determinado que este producto cumple
las directrices de Energy Star en cuanto al uso eficiente
de la energía. Se puede encontrar información
específica acerca de cómo utilizar las funciones de
ahorro de energía en las secciones de ahorro de
energía o de gestión de la energía del manual del
ordenador.
Español
Guía del usuario
15
Page 62

Requisitos del cable de
alimentación
La fuente de alimentación del monitor viene con ALS
(Automatic Line Switching, Conmutación automática
de línea). Esta característica permite al monitor
funcionar a tensiones de entrada que oscilan entre
los 100–120 V o 200–240V.
El juego de cables de alimentación (cable flexible o
enchufe de pared) recibidos con el monitor cumplen los
requisitos para su utilización en el país donde se
compró el equipo.
Si necesita obtener un cable de alimentación para un
país distinto, deberá comprar un cable de alimentación
que esté homologado para su uso en ese país.
El cable de alimentación debe estar calibrado para el
producto y para la tensión y corriente marcados en la
etiqueta de valores eléctricos nominales del producto.
Los valores nominales de tensión y corriente del cable
deben ser mayores que los valores nominales de
tensión y corriente del producto. Además, la sección
transversal cable debe ser, como mínimo, de 0,75 mm²
(0.75 mm²) o 18 AWG, y la longitud del cable debe
ser de 1,8m (1.8 m) (6 pies), como mínimo, y 3,6 m
(3.6 m) (12 pies) como máximo. Si tiene preguntas
sobre el tipo de cable de alimentación que debe
utilizar, póngase en contacto con el proveedor
autorizado de HP.
El cable de alimentación debe colocarse de forma que
no pueda pisarse o quedarse pillado por elementos
que se pongan encima o se apoyen en el mismo. Hay
que prestar una atención especial al enchufe, la toma
eléctrica y el punto en el que el cable sale del
producto.
16 Guía del usuario
Page 63

Page 64

Printed in
 Loading...