

Page 1

Notebook PC User Guide
User Guide
Page 2

© Copyright 2007 Hewlett-Packard
Development Company, L.P.
Microsoft and Windows are U.S. trademarks
of Microsoft Corporation.
The information contained herein is subject
to change without notice. The only
warranties for HP products and services are
set forth in the express warranty statements
accompanying such products and services.
Nothing herein should be construed as
constituting an additional warranty. HP shall
not be liable for technical or editorial errors
or omissions contained herein.
First Edition: January 2007
Document Part Number: 436947-001
Page 3

Table of contents
1 Notebook Tour
Components ......................................................................................................................................... 1
Top components .................................................................................................................. 2
Keys .................................................................................................................... 2
TouchPad ............................................................................................................ 3
Buttons and switches .......................................................................................... 4
Lights ................................................................................................................... 5
Display components ............................................................................................ 6
Front components ................................................................................................................ 6
Rear components ................................................................................................................ 7
Right-side components ........................................................................................................ 8
Left-side components .......................................................................................................... 9
Bottom components ........................................................................................................... 10
Wireless antennae (select models only) ............................................................................ 11
Additional hardware components ...................................................................................... 12
Labels ................................................................................................................................ 13
Specifications ..................................................................................................................................... 14
Operating environment ...................................................................................................... 14
Rated input power .............................................................................................................. 14
2 TouchPad and Keyboard
TouchPad ........................................................................................................................................... 15
Using the TouchPad .......................................................................................................... 16
Using an external mouse ................................................................................................... 16
Setting TouchPad preferences .......................................................................................... 16
Keyboard ............................................................................................................................................ 17
Hotkeys .............................................................................................................................. 17
Hotkey quick reference ..................................................................................... 18
Hotkey procedures ............................................................................................ 18
Displaying and clearing system information (fn+esc) ........................................ 18
Opening Help and Support (fn+f1) .................................................................... 19
Opening the Print Options window (fn+f2) ........................................................ 19
Opening a Web browser (fn+f3) ........................................................................ 19
Switching the screen image (fn+f4) ................................................................... 20
Initiating Hibernation (fn+f5) .............................................................................. 20
Initiating QuickLock (fn+f6) ................................................................................ 21
Decreasing screen brightness (fn+f7) ............................................................... 21
Increasing screen brightness (fn+f8) ................................................................. 21
Playing, pausing or resuming an audio CD or a DVD (fn+f9) ............................ 21
ENWW iii
Page 4

Keypads ............................................................................................................................................. 22
Using the embedded numeric keypad ............................................................................... 22
Using an external numeric keypad .................................................................................... 23
3 Power management
Setting power options ......................................................................................................................... 24
Using power-saving states ................................................................................................. 24
Using the battery meter ..................................................................................................... 25
Using power plans ............................................................................................................. 26
Setting password protection on wakeup ............................................................................ 26
Using battery power ........................................................................................................................... 27
Using Battery Health in Help and Support ......................................................................... 27
Displaying the remaining battery charge ........................................................................... 27
Inserting or removing the battery ....................................................................................... 28
Charging a battery ............................................................................................................. 29
Managing low battery levels .............................................................................................. 29
Calibrating a battery ........................................................................................................... 30
Conserving battery power .................................................................................................. 33
Storing a battery ................................................................................................................ 33
Disposing of a used battery ............................................................................................... 33
Using external AC power .................................................................................................................... 34
Connecting the AC adapter ............................................................................................... 34
Shutting down the computer ............................................................................................................... 35
Stopping an audio CD or a DVD (fn+f10) .......................................................... 21
Playing previous track or section of an audio CD or a DVD (fn+f11) ................ 21
Playing next track or section of an audio CD or a DVD (fn+f12) ....................... 21
Enabling and disabling the embedded numeric keypad .................................... 22
Switching key functions on the embedded numeric keypad ............................. 23
Enabling or disabling num lock mode as you work ........................................... 23
Initiating and exiting Sleep ................................................................................ 24
Initiating and exiting Hibernation ....................................................................... 25
Viewing the current power plan ......................................................................... 26
Selecting a different power plan ........................................................................ 26
Customizing power plans .................................................................................. 26
Identifying low battery levels ............................................................................. 29
Resolving a low battery level ............................................................................. 30
Resolving a low battery level when external power is available ....... 30
Resolving a low battery level when a charged battery is
available ........................................................................................... 30
Resolving a low battery level when no power source is
available ........................................................................................... 30
Resolving a low battery level when the computer cannot exit
Hibernation ....................................................................................... 30
Step 1: Fully charge the battery ........................................................................ 31
Step 2: Disable Hibernation and Sleep ............................................................. 31
Step 3: Discharge the battery ............................................................................ 32
Step 4: Fully recharge the battery ..................................................................... 32
Step 5: Reenable Hibernation and Sleep .......................................................... 32
4 Drives
iv ENWW
Page 5

Drive care ........................................................................................................................................... 36
IDE drive light ..................................................................................................................................... 37
Hard drive ........................................................................................................................................... 38
Optical drives ...................................................................................................................................... 41
5 Multimedia
Multimedia hardware .......................................................................................................................... 46
Multimedia software ........................................................................................................................... 55
Inserting an optical disc ..................................................................................................... 42
Removing an optical disc (with power) .............................................................................. 43
Removing an optical disc (without power) ......................................................................... 44
Avoiding the Sleep state or Hibernation ............................................................................ 45
Using the optical drive ....................................................................................................... 46
Identifying the installed optical drive ................................................................. 46
Inserting an optical disc ..................................................................................... 47
Removing an optical disc (with power) .............................................................. 48
Removing an optical disc (without power) ......................................................... 49
Using media activity hotkeys ............................................................................................. 50
Using the audio features .................................................................................................... 51
Using the audio-in (microphone) jack ................................................................ 51
Using the audio-out (headphone) jack .............................................................. 51
Adjusting the volume ......................................................................................... 52
Using the video features .................................................................................................... 53
Using the external monitor port ......................................................................... 53
Using the S-Video-out jack ................................................................................ 54
Identifying preinstalled multimedia software ...................................................................... 55
Installing multimedia software from a CD (select models only) ......................................... 55
Using DVDPlay .................................................................................................................. 55
Using multimedia software ................................................................................................. 56
Preventing playback disruptions ........................................................................................ 57
Protecting the CD or DVD write process ........................................................................... 57
Changing DVD region settings .......................................................................................... 58
Observing the copyright warning ....................................................................................... 58
6 External Devices
Using a USB device ........................................................................................................................... 59
Connecting a USB device .................................................................................................. 59
Stopping a USB device ...................................................................................................... 60
Required USB software ..................................................................................................... 60
7 Memory Modules
Adding or replacing memory modules ................................................................................................ 61
Index ................................................................................................................................................................... 64
ENWW v
Page 6

vi ENWW
Page 7

1 Notebook Tour
Components
This chapter explains the hardware features of the computer.
To see a list of installed hardware in the computer:
1. Select Start > Computer > System properties.
2. In the left pane, click Device Manager.
You can also add hardware or modify device configurations using Device Manager.
NOTE Components included with the computer may vary by region and by model. The
illustrations in this chapter identify the standard features included in most computer models.
ENWW Components 1
Page 8
Top components
Keys
Component Description
(1) esc key Displays system information when pressed in combination with
the fn key.
(2) fn key Executes frequently used system functions when pressed in
combination with a function key or the esc key.
(3) Windows® logo key Displays the Windows Start menu.
(4) Embedded numeric keypad keys Can be used like the keys on an external numeric keypad.
(5) Windows applications key Displays a shortcut menu for items beneath the pointer.
(6) Function keys Execute frequently used system functions when pressed in
combination with the fn key.
2 Chapter 1 Notebook Tour ENWW
Page 9
TouchPad
Component Description
(1) TouchPad* Moves the pointer and selects or activates items on the screen.
(2) Left TouchPad button* Functions like the left button on an external mouse.
(3) TouchPad horizontal scroll zone* Scrolls left or right.
(4) Right TouchPad button* Functions like the right button on an external mouse.
(5) TouchPad vertical scroll zone* Scrolls up or down.
*This table describes default settings. To view and change TouchPad preferences, select Start > Control Panel > Hardware
and Sound > Mouse.
Can be set to perform other mouse functions, such as scrolling,
selecting, and double-clicking.
ENWW Components 3
Page 10
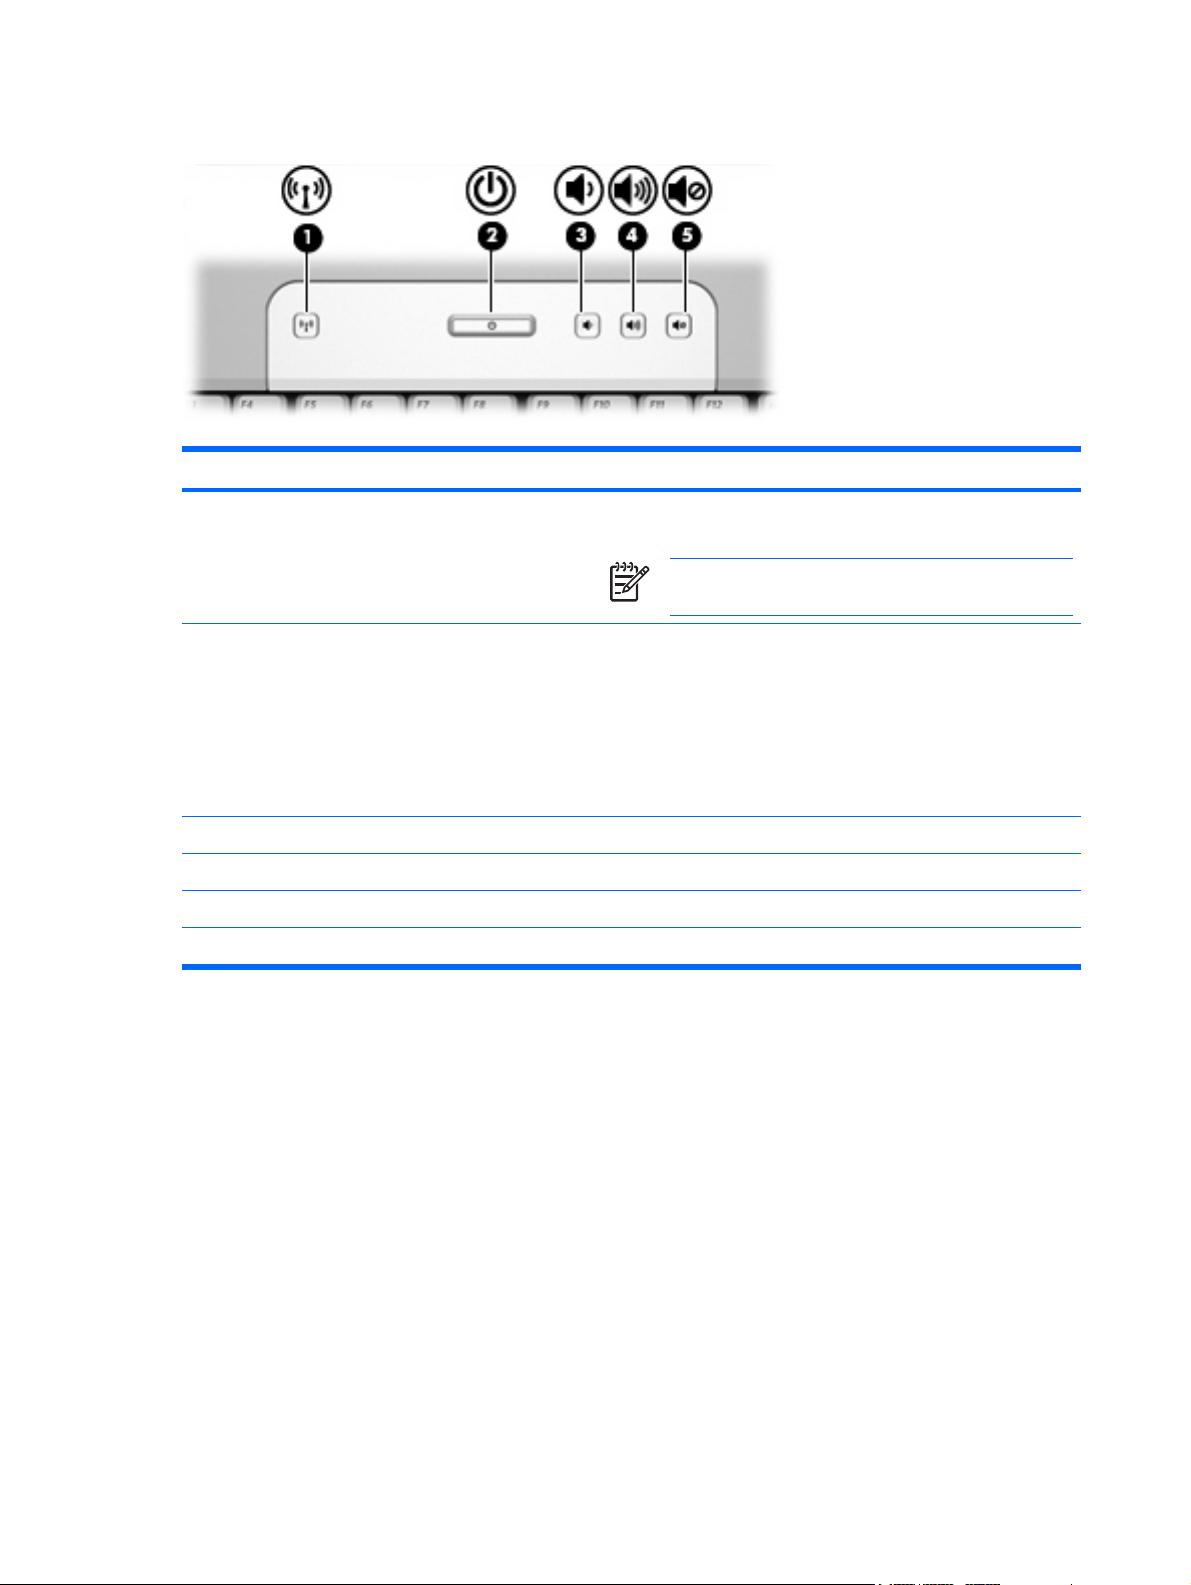
Buttons and switches
Component Description
(1) Wireless button* Turns the wireless functionality on or off, but does not create a
(2) Power button* When the computer is off, press the power button to turn on the
wireless connection.
NOTE To establish a wireless connection, a wireless
network must already be set up.
computer.
If the computer has stopped responding and Windows shutdown
procedures cannot be used, press and hold the power button for at
least 5 seconds to turn off the computer.
To learn more about your power settings, select Start > Control
Panel > System and Maintenance > Power Options.
(3) Volume down button Decreases system volume.
(4) Volume up button Increases system volume.
(5) Volume mute button Mutes system sound.
*This table describes default settings.
4 Chapter 1 Notebook Tour ENWW
Page 11
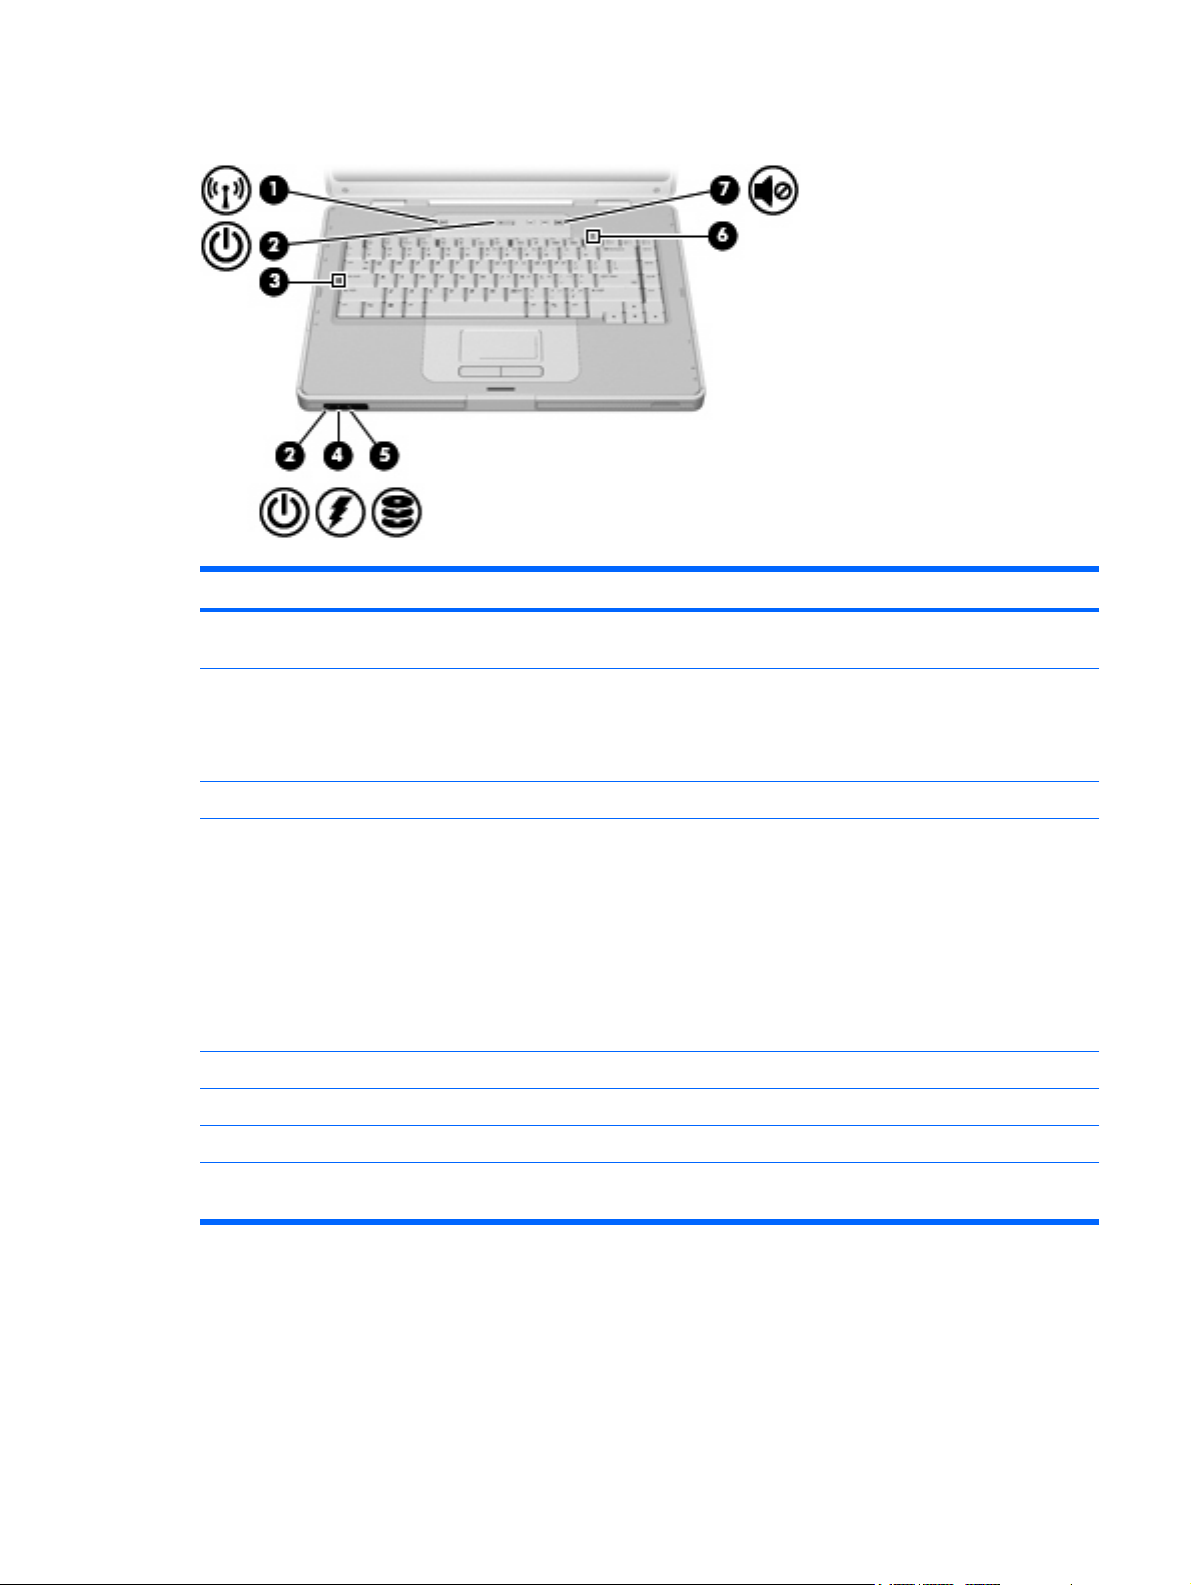
Lights
Component Description
(1) Wireless light On: An integrated wireless device, such as a wireless local area
(2) Power lights* (2) On: The computer is on.
(3) Caps lock light On: Caps lock is on.
(4) Battery light On: A battery pack is charging or is close to full charge capacity.
(5) IDE (Integrated Drive Electronics) drive light Blinking: The hard drive or optical drive is being accessed.
(6) Num lock light On: Num lock is on or the embedded numeric keypad is enabled.
(7) Volume mute light On: System sound is turned off.
*There are 2 power lights. Both display the same information. The light on the power button is visible only when the computer
is open; the other power light is always visible on the front of the computer.
network (LAN), is turned on.
Blinking: The computer is in the Sleep state.
Off: The computer is off or in Hibernation.
Blinking: A battery pack that is the only available power source has
reached a low battery level. When the battery reaches a critical
battery level, the battery light begins blinking rapidly.
Off: If the computer is plugged into an external power source, the
light is turned off when all batteries in the computer are fully
charged. If the computer is not plugged into an external power
source, the light stays off until the battery reaches a low battery
level.
ENWW Components 5
Page 12
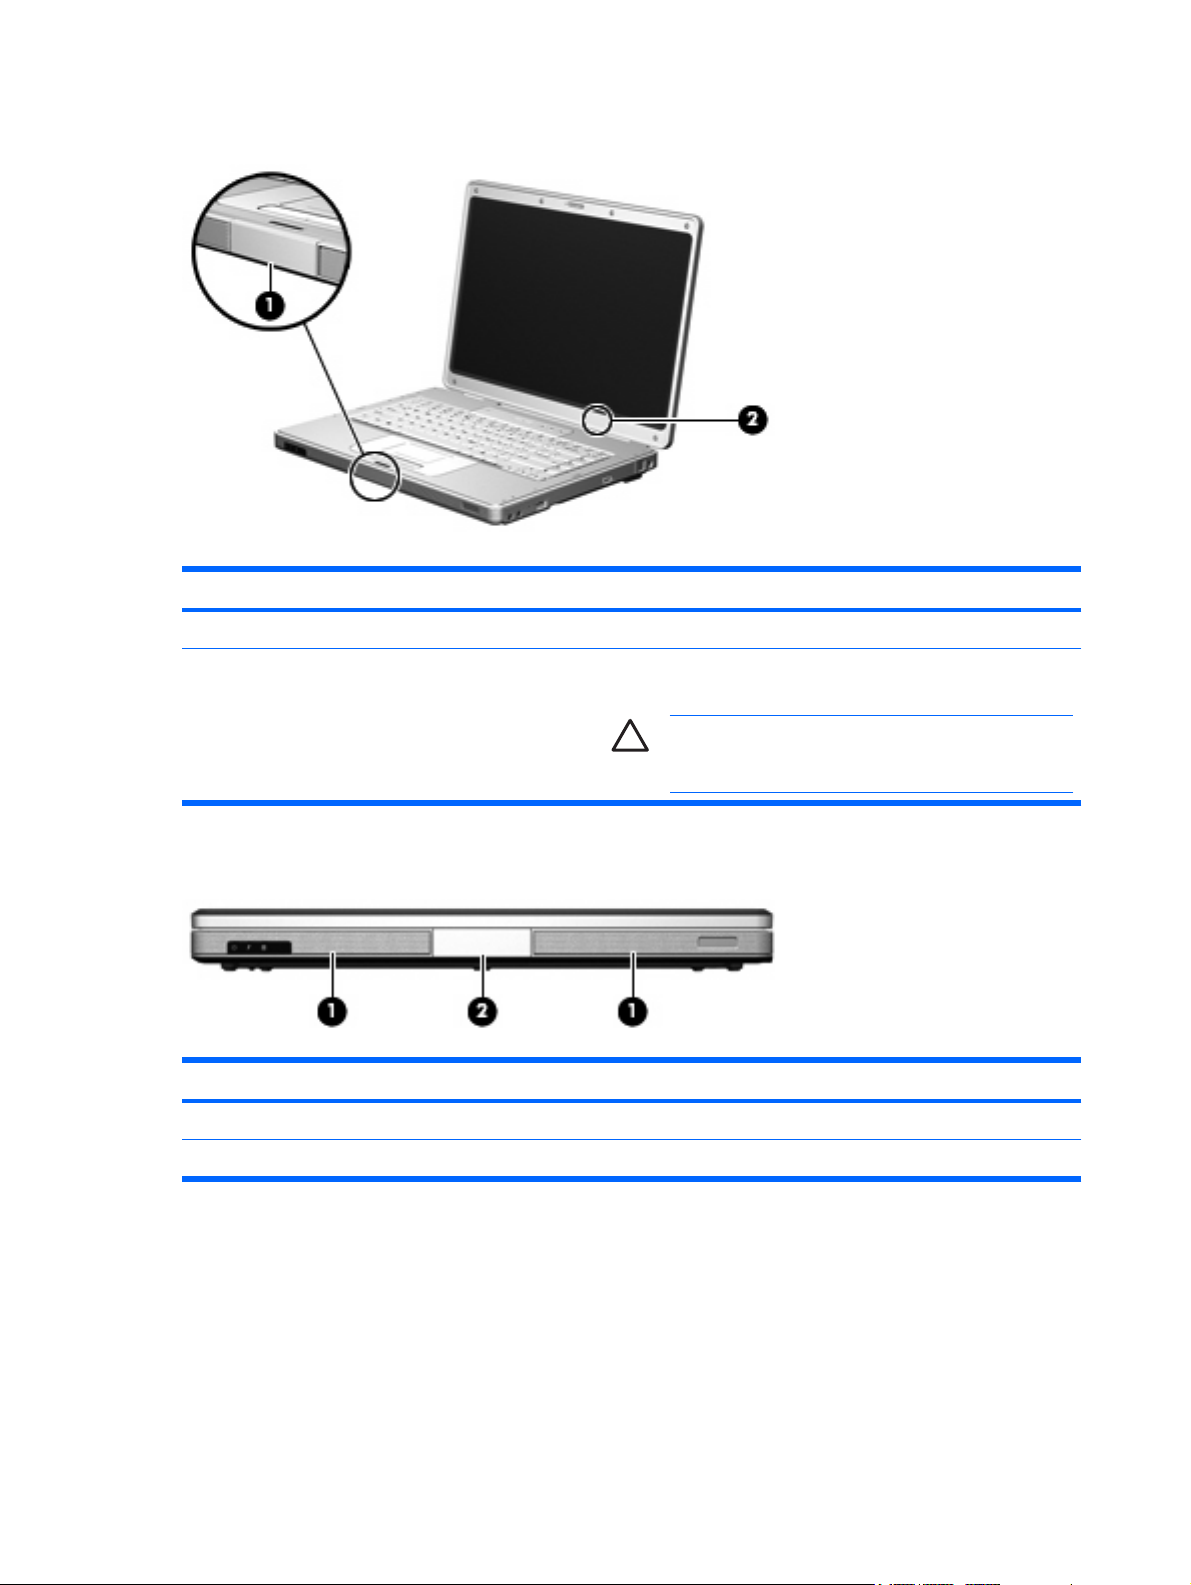
Display components
Component Description
(1) Display release button Opens the computer.
(2) Internal display switch Initiates Sleep if the display is closed while the notebook is turned
on.
Front components
Component Description
(1) Speakers (2) Produce system sound.
(2) Display release button Opens the computer.
CAUTION The internal display switch is magnetic. Keep
diskettes and other magnetic media away from magnetic
fields, which can erase data.
6 Chapter 1 Notebook Tour ENWW
Page 13
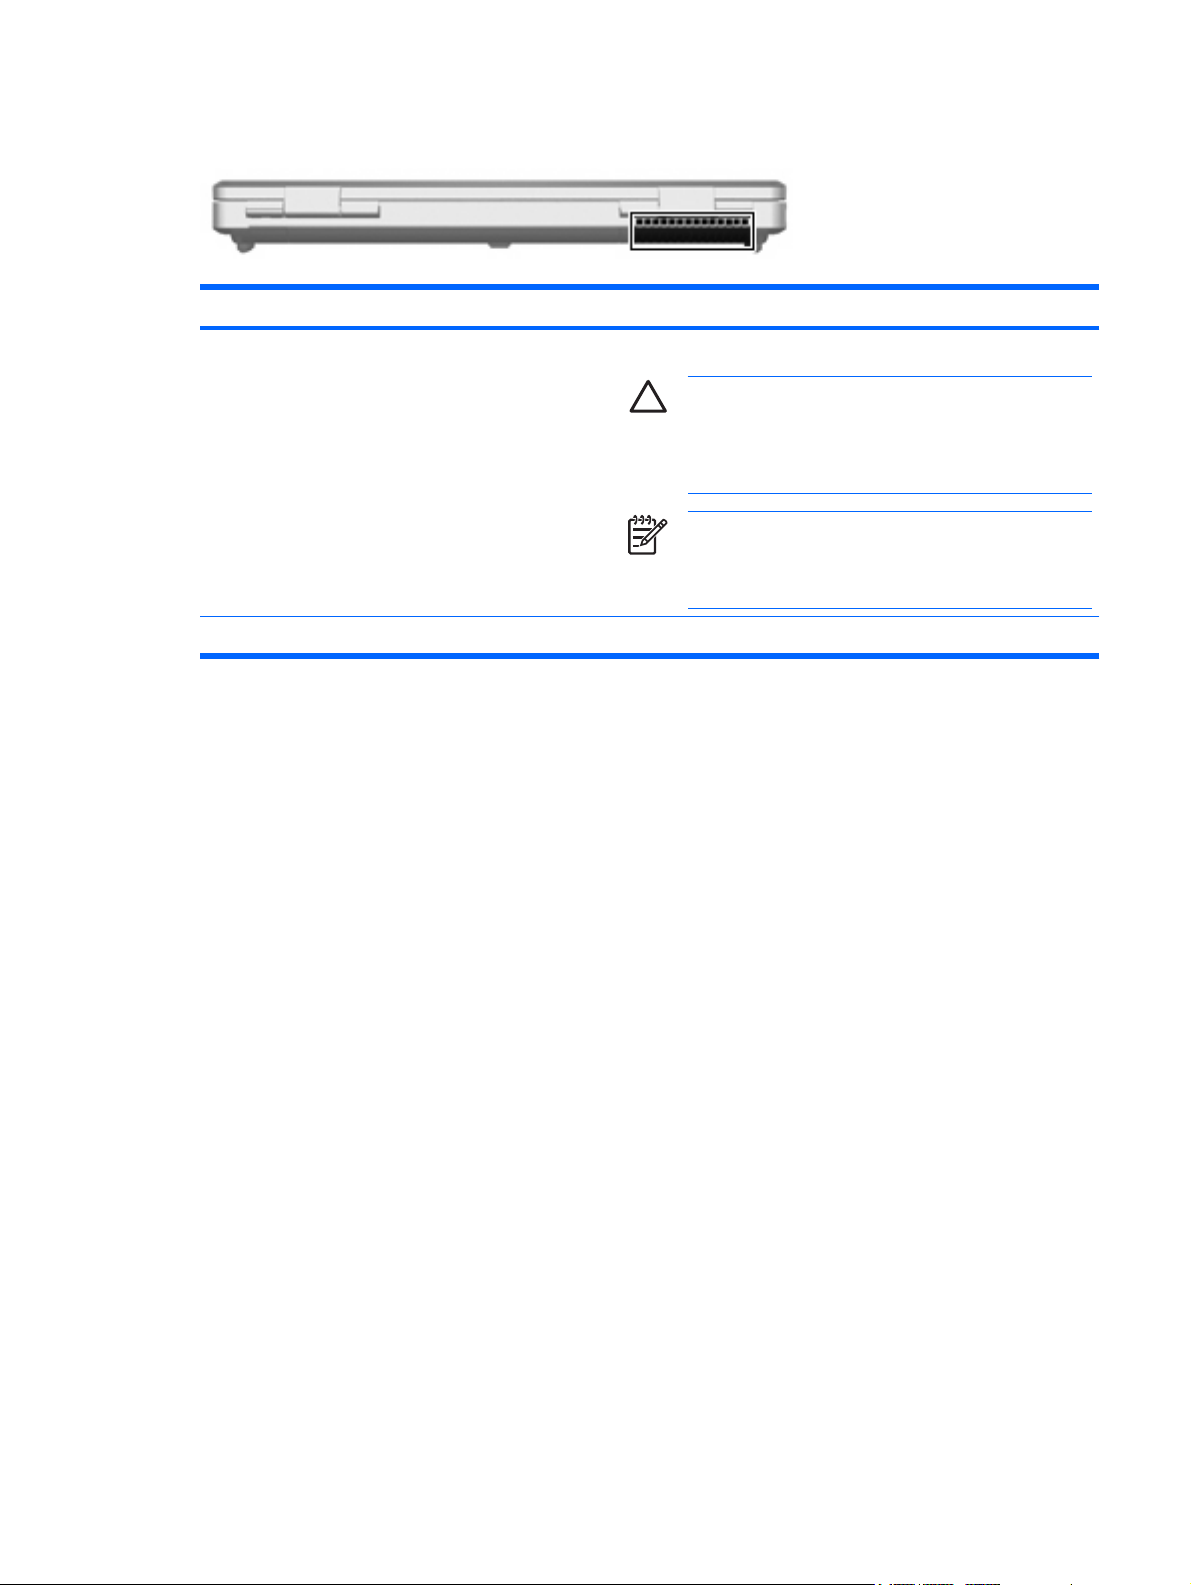
Rear components
Component Description
Vent* Provides airflow to cool internal components.
*The computer has 3 vents. The other vents are located on the bottom of the computer.
CAUTION To prevent overheating, do not obstruct
vents. Use the computer only on a hard, flat surface. Do
not allow another hard surface, such as an adjoining
optional printer, or a soft surface, such as pillows or thick
rugs or clothing, to block airflow.
NOTE The computer fan starts up automatically to cool
internal components and prevent overheating. It is normal
for the internal fan to cycle on and off during routine
operation.
ENWW Components 7
Page 14
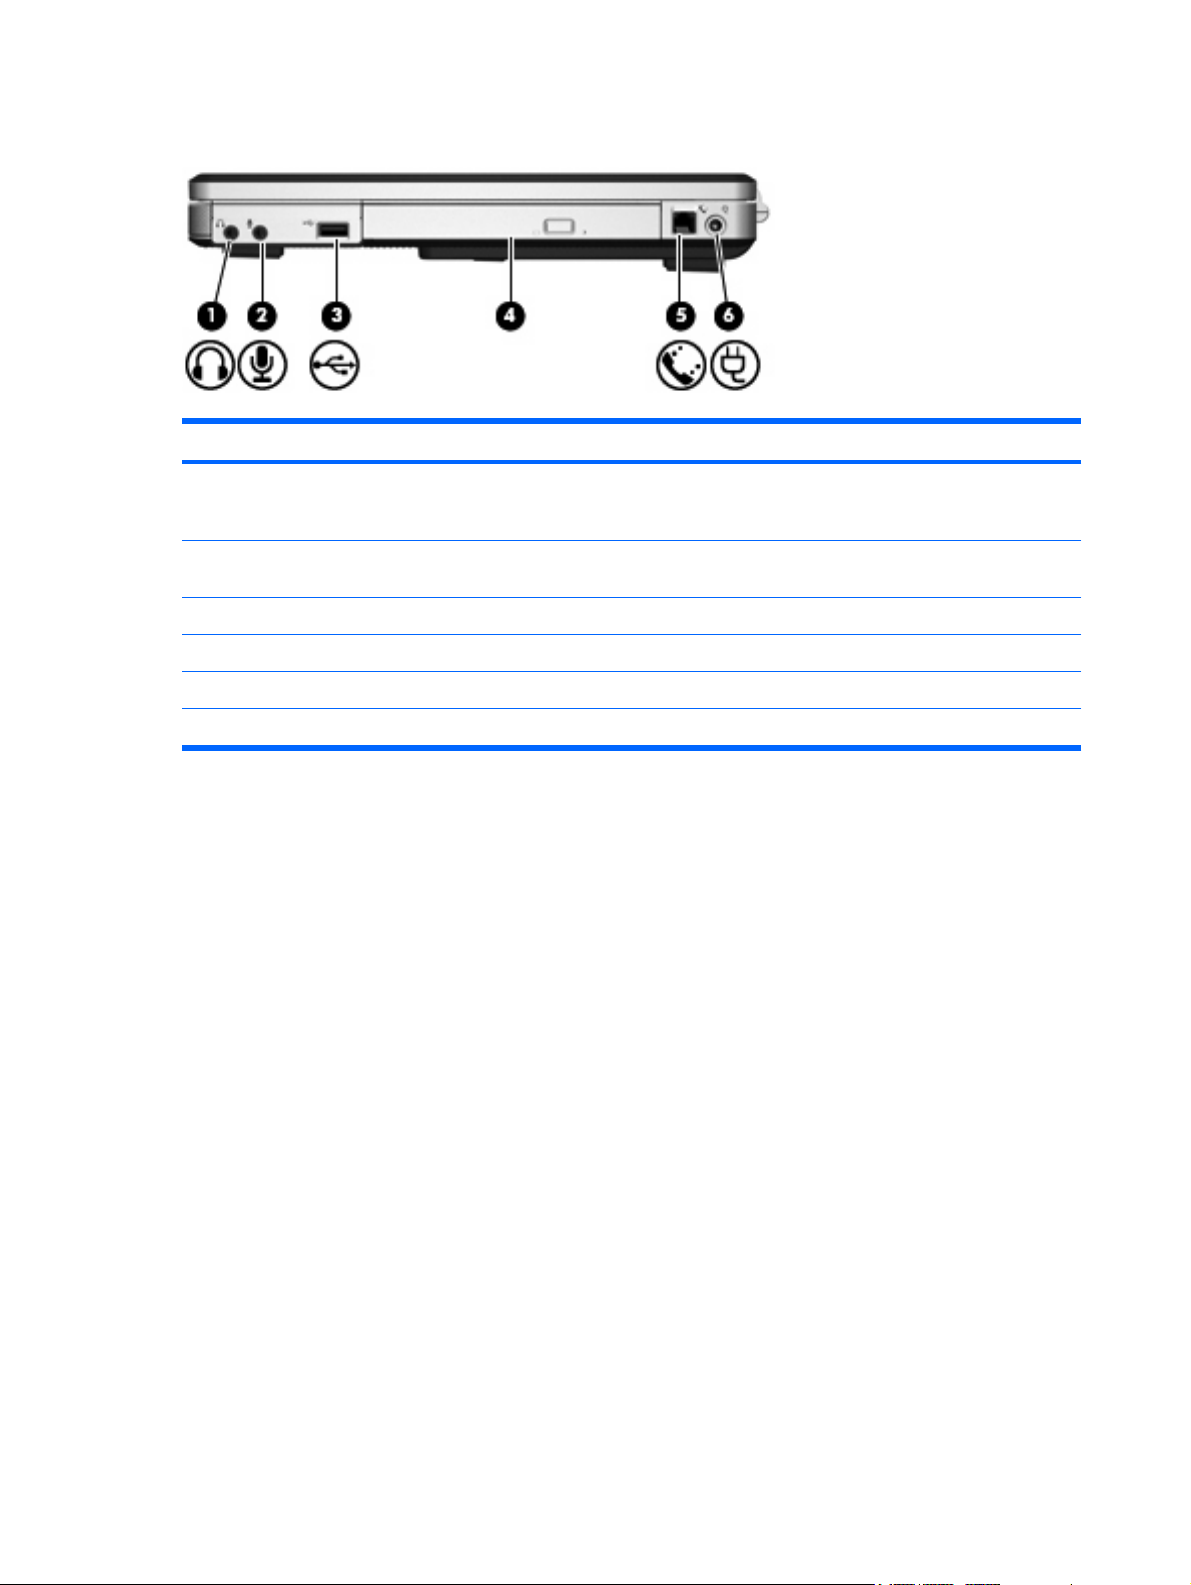
Right-side components
Component Description
(1) Audio-out (headphone) jack Produces system sound when connected to optional powered
(2) Audio-in (microphone) jack Connects an optional computer headset microphone or a
(3) USB port (select models only) Connects an optional USB device.
(4) Optical drive Reads an optical disc.
(5) RJ-11 (modem) jack Connects an optional modem cable.
stereo speakers, headphones, ear buds, a headset, or television
audio.
microphone.
(6) Power connector Connects an AC adapter or an optional power adapter.
8 Chapter 1 Notebook Tour ENWW
Page 15
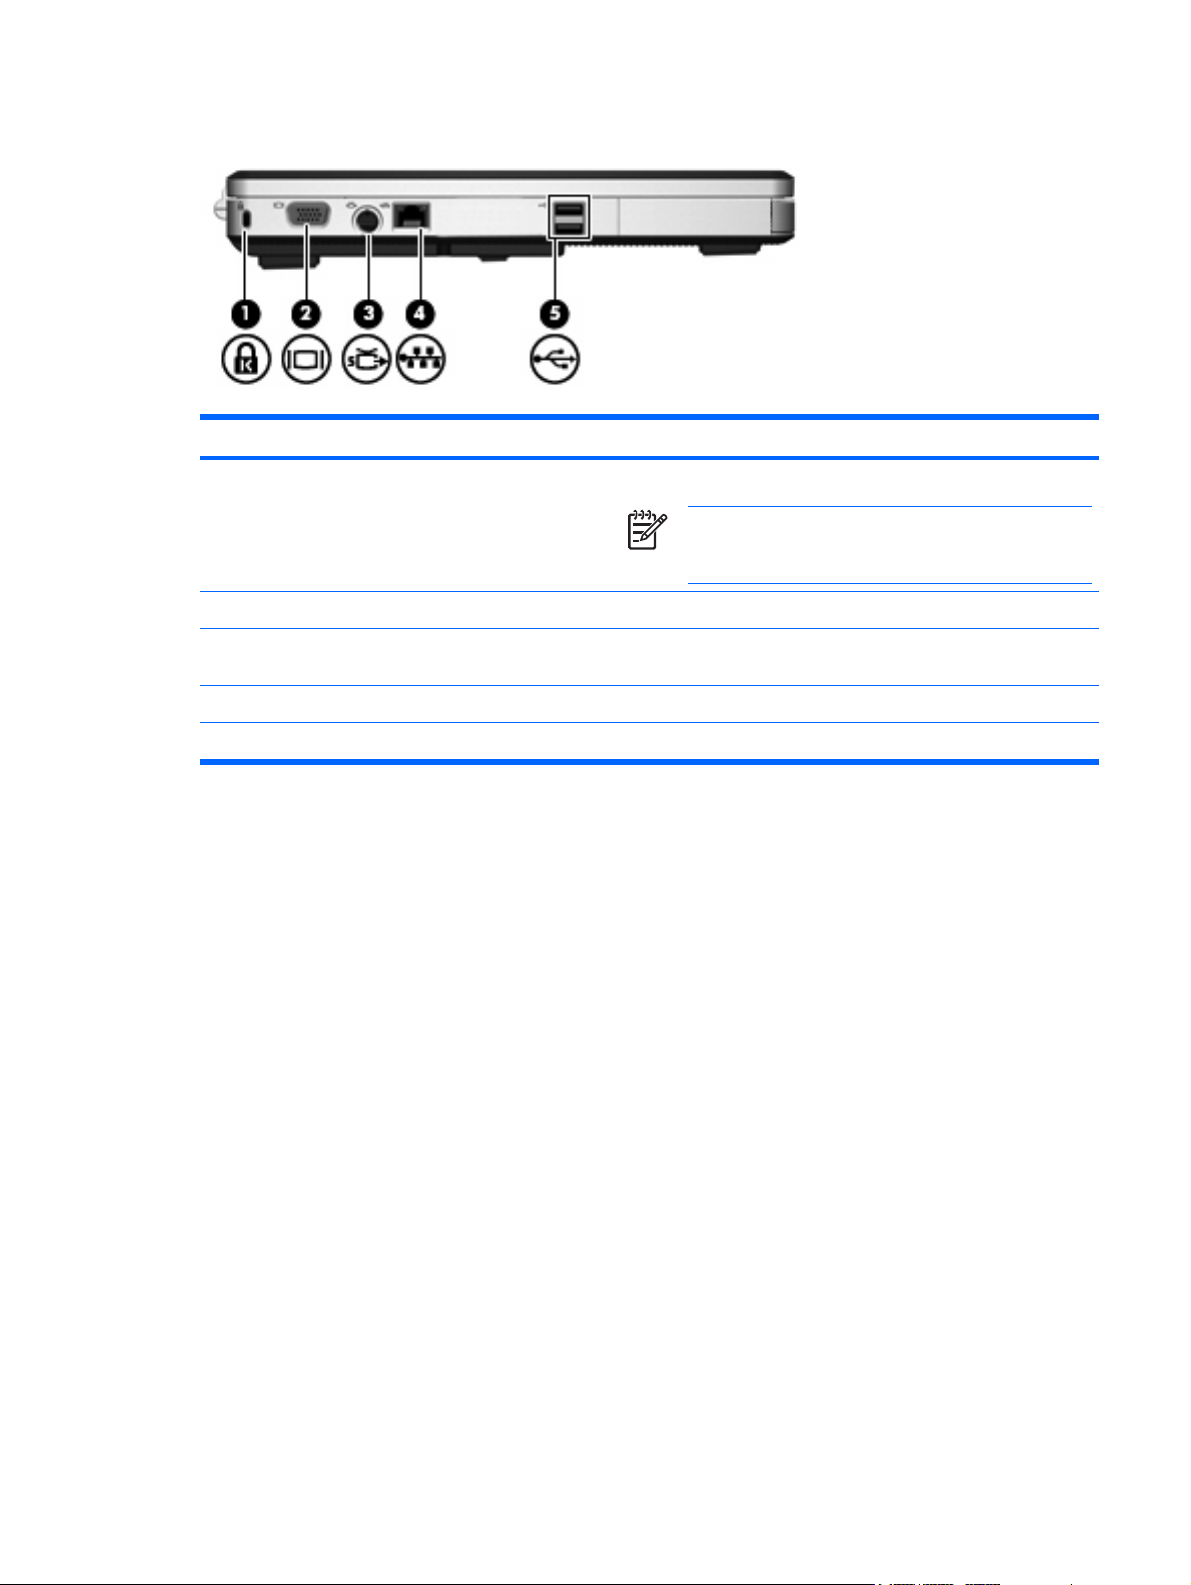
Left-side components
Component Description
(1) Security cable slot Attaches an optional security cable to the computer.
(2) External monitor port Connects an external monitor.
(3) S-Video-out jack Connects an optional S-Video device such as a television, VCR,
(4) RJ-45 (network) jack Connects a network cable.
NOTE The security cable is designed to act as a
deterrent, but may not prevent the computer from being
mishandled or stolen.
camcorder, overhead projector, or video capture card.
(5) USB ports (2) Connect an optional USB device.
ENWW Components 9
Page 16
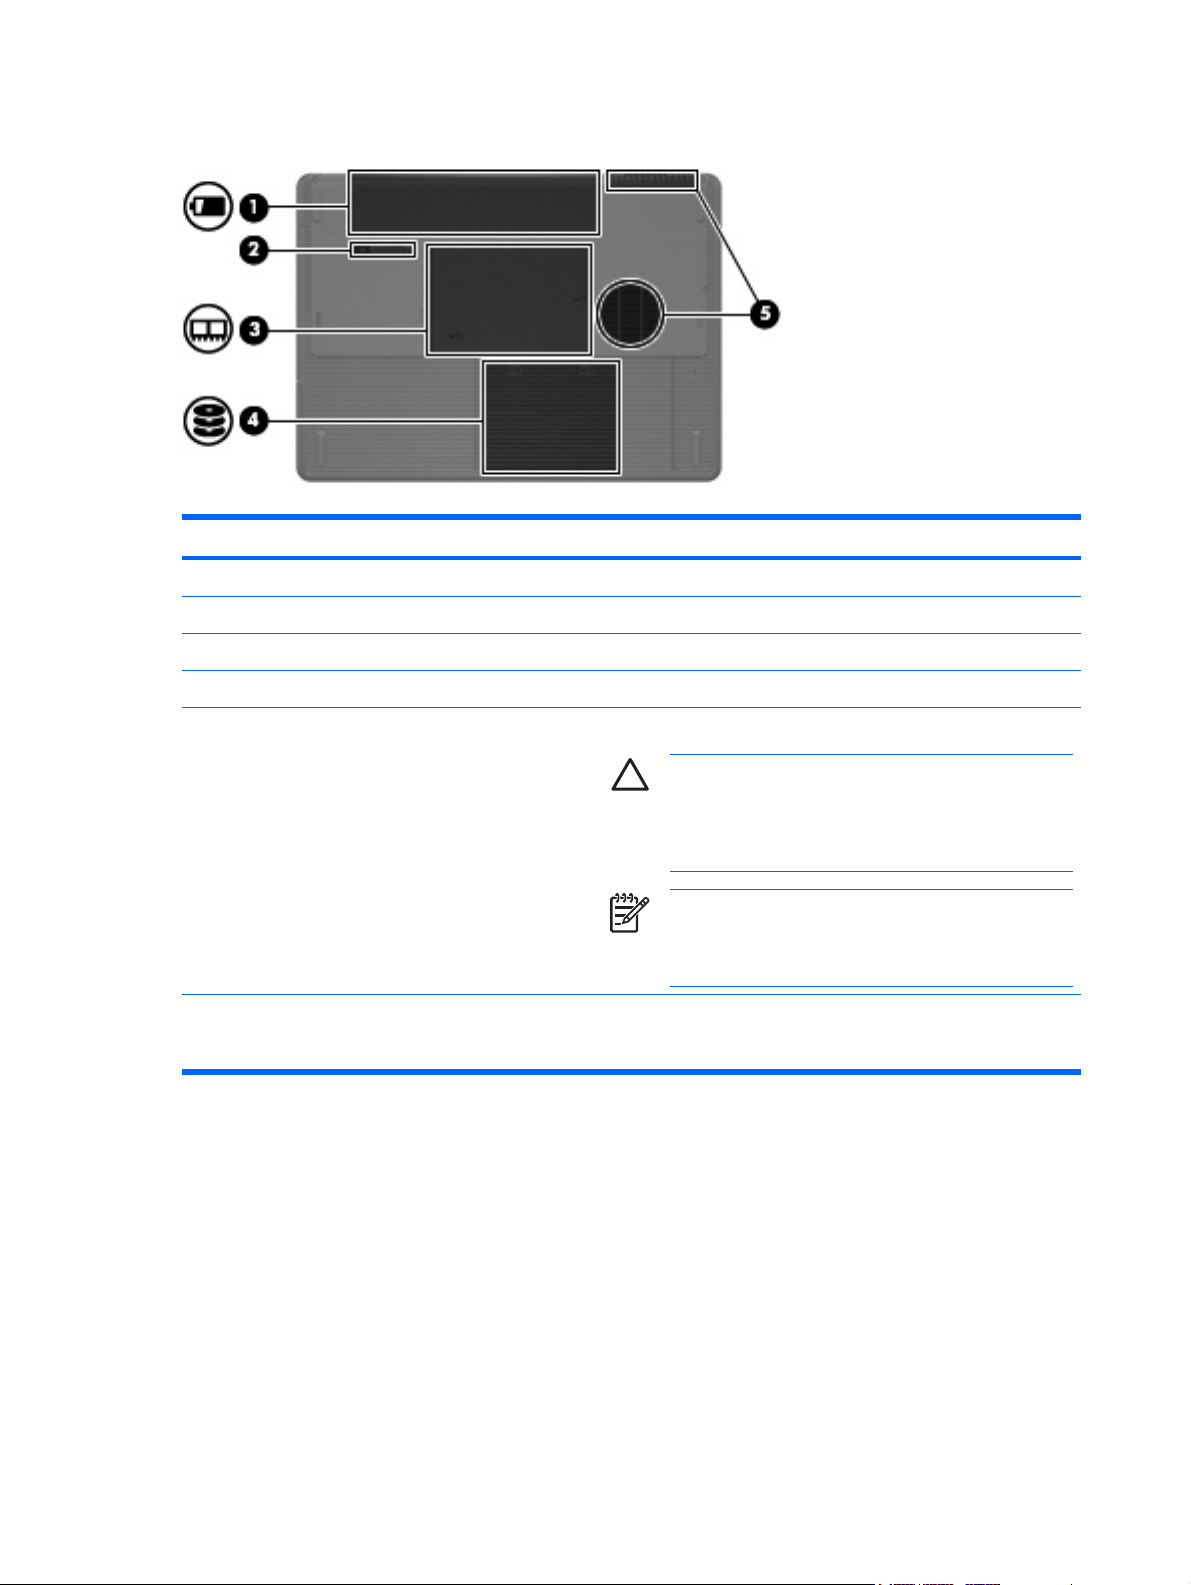
Bottom components
Component Description
(1) Battery bay Holds the primary battery pack.*
(2) Battery pack release latch Releases the battery pack from the battery bay.
(3) Memory module compartment Contains the memory module slots.
(4) Hard drive bay Holds the hard drive.
(5) Vents (2)† Enable airflow to cool internal components.
CAUTION To prevent overheating, do not obstruct
vents. Use the computer only on a hard, flat surface. Do
not allow another hard surface, such as an adjoining
optional printer, or a soft surface, such as pillows or thick
rugs or clothing, to block airflow.
NOTE The computer fan starts up automatically to cool
internal components and prevent overheating. It is normal
for the internal fan to cycle on and off during routine
operation.
*Battery packs vary by model.
†The computer has 3 vents. One other vent is located on the rear of the computer.
10 Chapter 1 Notebook Tour ENWW
Page 17
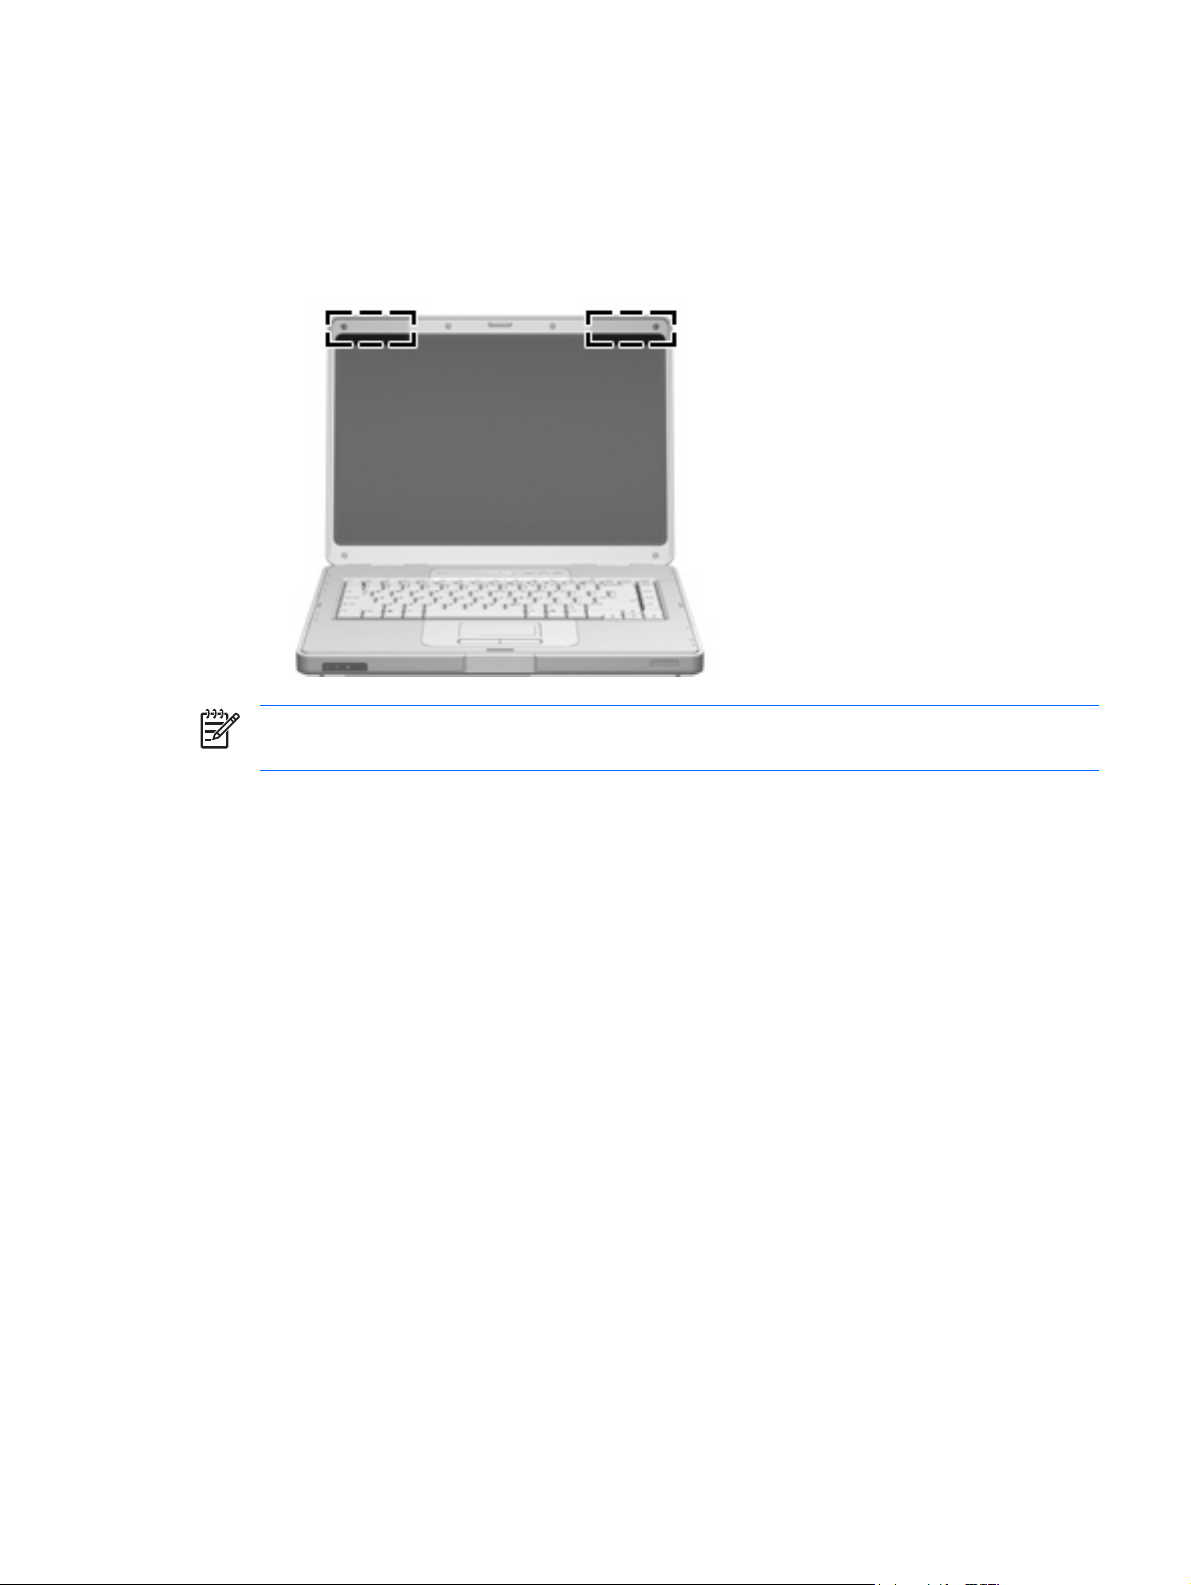
Wireless antennae (select models only)
On select computer models, at least 2 wireless antennae send and receive wireless device signals.
These antennae are not visible from the outside of the computer.
To see wireless regulatory notices, refer to your country's section of the Regulatory, Safety and
Environmental Notices located in Help and Support.
NOTE For optimal transmission, keep the areas immediately around the antennae free from
obstructions.
ENWW Components 11
Page 18
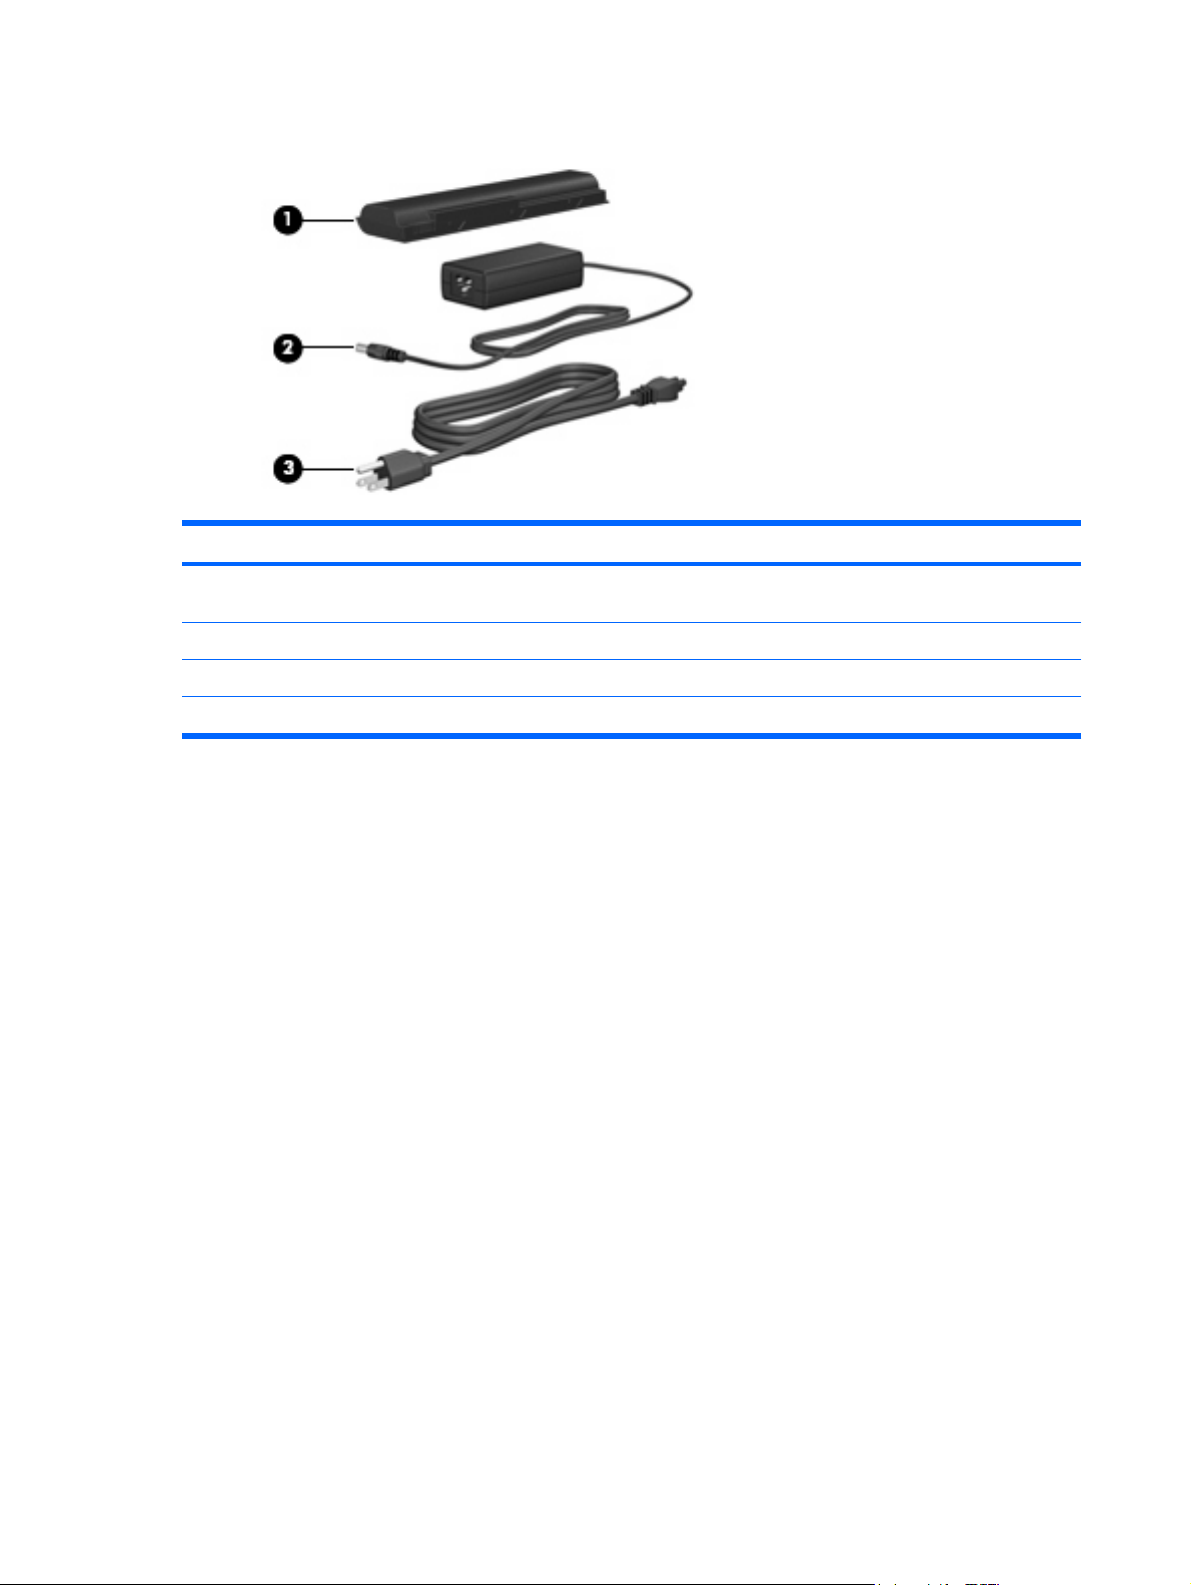
Additional hardware components
Component Description
(1) Battery pack* Powers the computer when the computer is not connected to
(2) AC adapter Converts AC power to DC power.
(3) Power cord* Connects an AC adapter to an AC outlet.
*Battery packs and power cords vary in appearance by region and country.
external power.
12 Chapter 1 Notebook Tour ENWW
Page 19

Labels
The labels affixed to the computer provide information you may need when you troubleshoot system
problems or travel internationally with the computer.
Service tag—Provides the product name, serial number (S/N), and other specifics about the
●
computer. Have this information available when you contact Customer Care. The service tag label
is affixed to the bottom of the computer.
Microsoft® Certificate of Authenticity—Contains the Windows Product Key. You may need the
●
Product Key to update or troubleshoot the operating system. This certificate is affixed to the bottom
of the computer.
Regulatory label—Provides regulatory information about the computer. The regulatory label is
●
affixed inside the battery bay.
Modem approval label—Provides regulatory information about the modem and lists the agency
●
approval markings required by some of the countries in which the modem has been approved for
use. You may need this information when traveling internationally. The modem approval label is
affixed inside the memory door.
Wireless certification labels—Provide information about optional wireless devices available on
●
select models, and the approval markings of some of the countries in which the devices have been
approved for use. An optional device may be a wireless local area network (WLAN). If the computer
model includes one or more wireless devices, a certification label is included with the computer.
You may need this information when traveling internationally. Wireless certification labels are
affixed inside the memory door.
ENWW Components 13
Page 20

Specifications
Operating environment
The operating environment information in the following table may be helpful if you plan to use or transport
the computer in extreme environments.
Factor Metric U.S.
Temperature
Operating
Nonoperating -20˚C to 60˚C -4˚F to 140˚F
Relative humidity (noncondensing)
Operating
Nonoperating 5% to 95% 5% to 95%
Maximum altitude (unpressurized)
Operating (14.7 to 10.1 psia*)
Nonoperating (14.7 to 4.4 psia*) -15 m to 12,192 m -50 ft to 40,000 ft
*Pounds per square inch absolute (psia) is another unit of measurement for altitude.
Rated input power
The power information in this section may be helpful if you plan to travel internationally with the
computer.
The computer operates on DC power, which can be supplied by an AC or a DC power source. Although
the computer can be powered from a stand-alone DC power source, it should be powered only with an
AC adapter or a DC power cord supplied by or approved for this computer.
10˚C to 35˚C 50˚F to 95˚F
10% to 90% 10% to 90%
-15 m to 3,048 m -50 ft to 10,000 ft
The computer is capable of accepting DC power within the following specifications.
Input Power Rating
Operating voltage 18.5 V dc to 19.0 V dc
Operating current 3.5 A or 4.74 A
This product is designed for IT power systems in Norway with phase-to-phase voltage not exceeding
240 V rms.
14 Chapter 1 Notebook Tour ENWW
Page 21
2 TouchPad and Keyboard
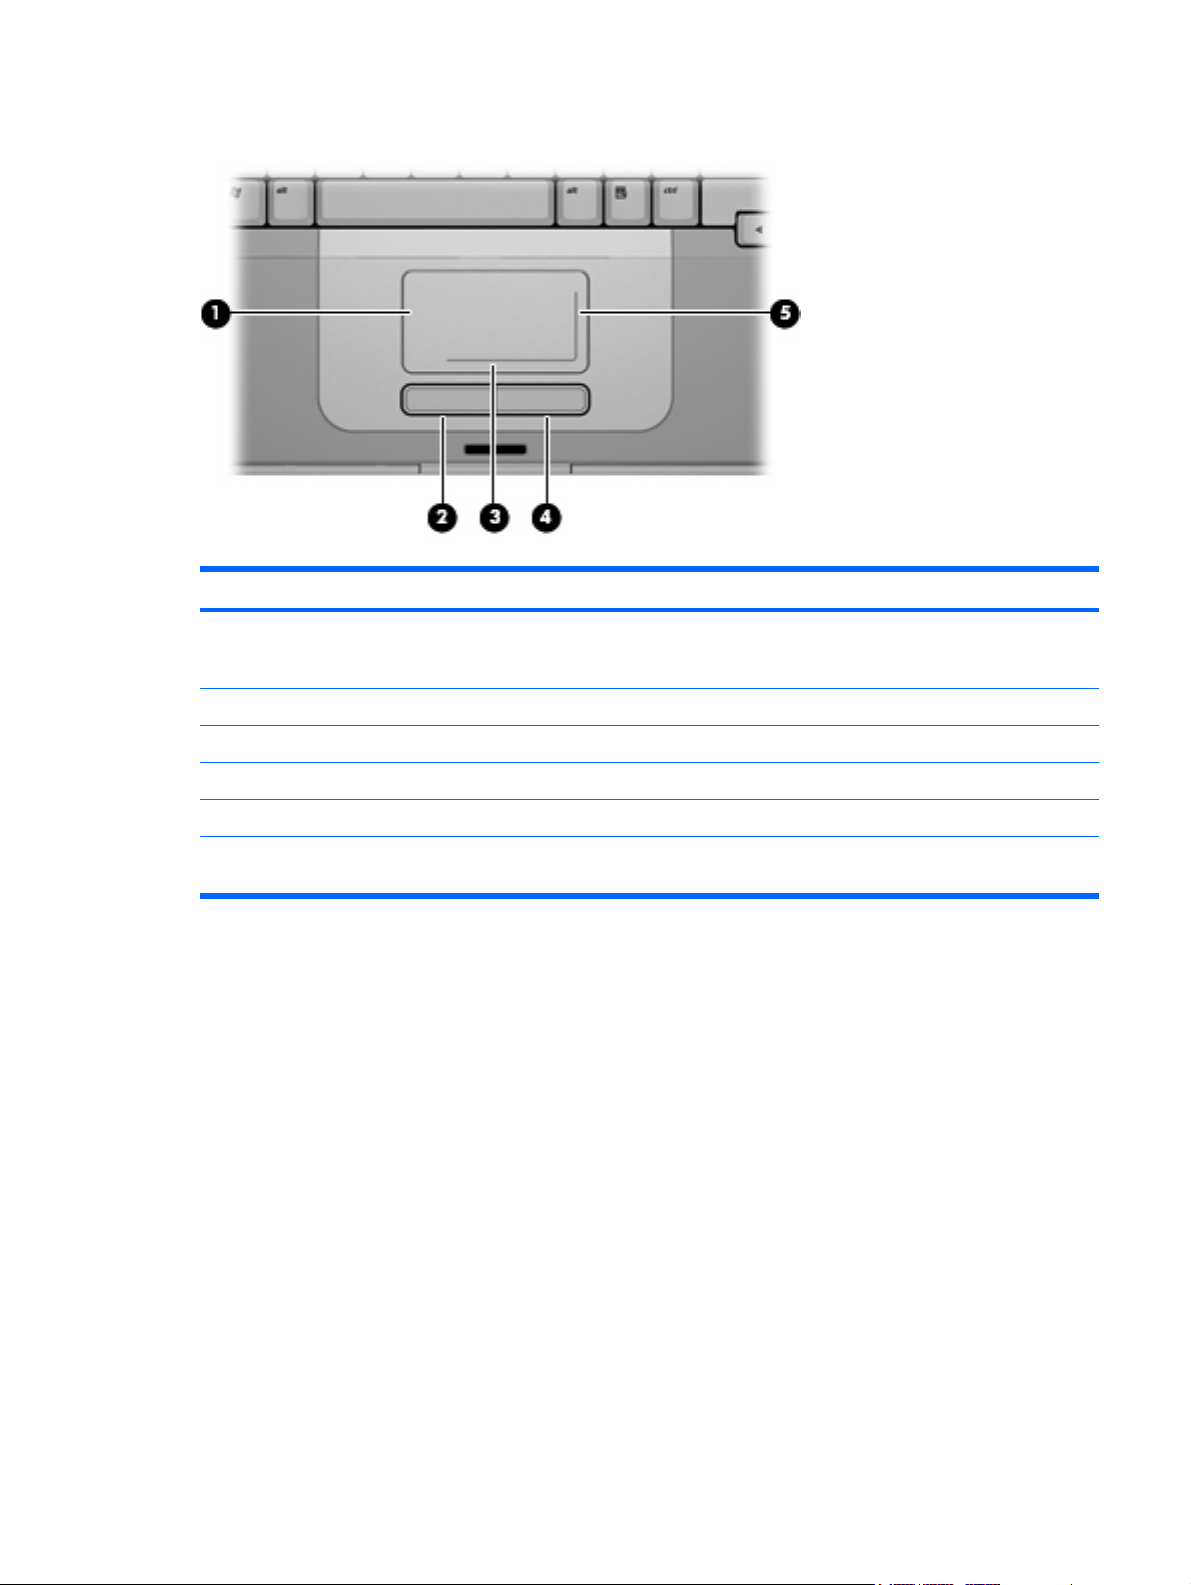
TouchPad
The following illustration and table describe the computer TouchPad.
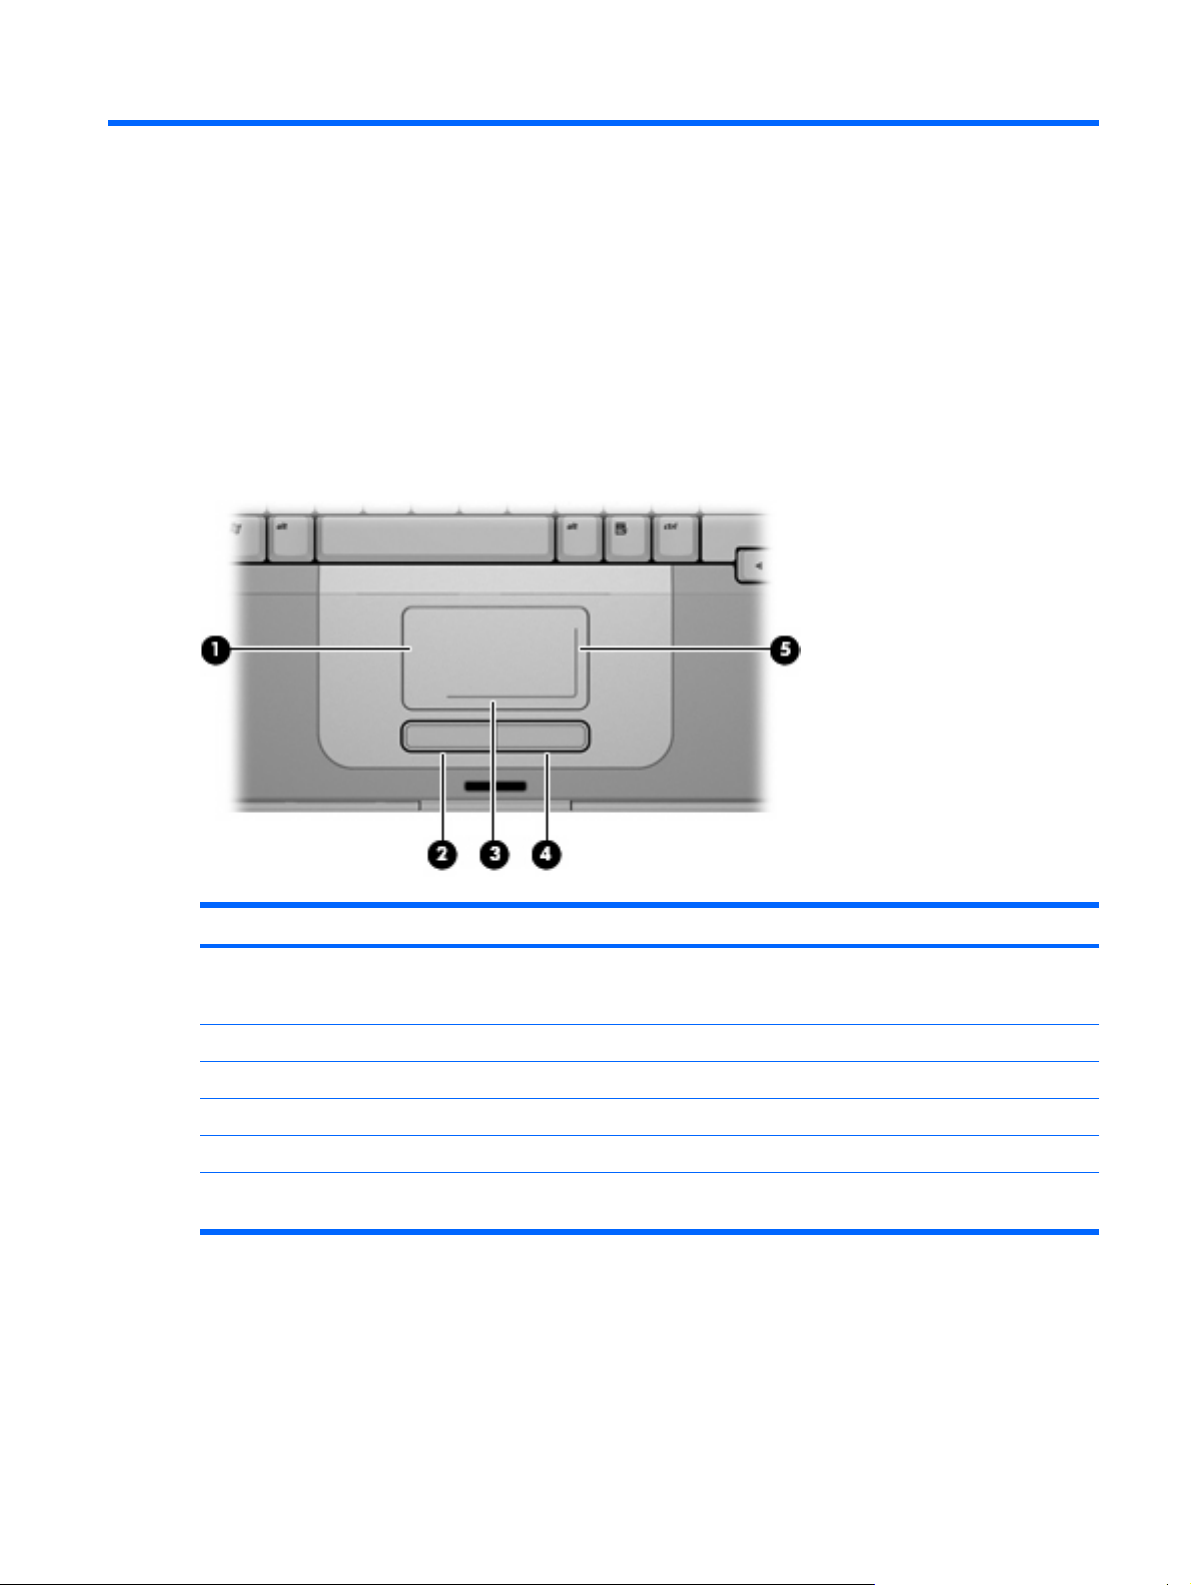
Component Description
(1) TouchPad* Moves the pointer and selects or activates items on the screen. Can be
set to perform other mouse functions, such as scrolling, selecting, and
double-clicking.
(2) Left TouchPad button* Functions like the left button on an external mouse.
(3) TouchPad horizontal scroll zone* Scrolls left or right.
(4) Right TouchPad button* Functions like the right button on an external mouse.
(5) TouchPad vertical scroll zone* Scrolls up or down.
*This table describes default settings. To view and change TouchPad preferences, select Start > Control Panel > Hardware
and Sound > Mouse.
ENWW TouchPad 15
Page 22

Using the TouchPad
To move the pointer, slide your finger across the TouchPad surface in the direction you want the pointer
to go. Use the left and right TouchPad buttons as you would the left and right buttons on an external
mouse. To scroll up and down using the TouchPad vertical scroll zone, slide your finger up or down over
the vertical white line. To scroll left and right using the TouchPad horizontal scroll zone, slide your finger
left or right over the horizontal white line.
Using an external mouse
An external USB mouse can be connected to the computer using one of the USB ports on the
computer.
Setting TouchPad preferences
Mouse Properties in Windows allows you to customize settings for pointing devices, such as button
configuration, click speed, and pointer options.
To access Mouse Properties, select Start > Control Panel > Hardware and Sound > Mouse.
16 Chapter 2 TouchPad and Keyboard ENWW
Page 23

Keyboard
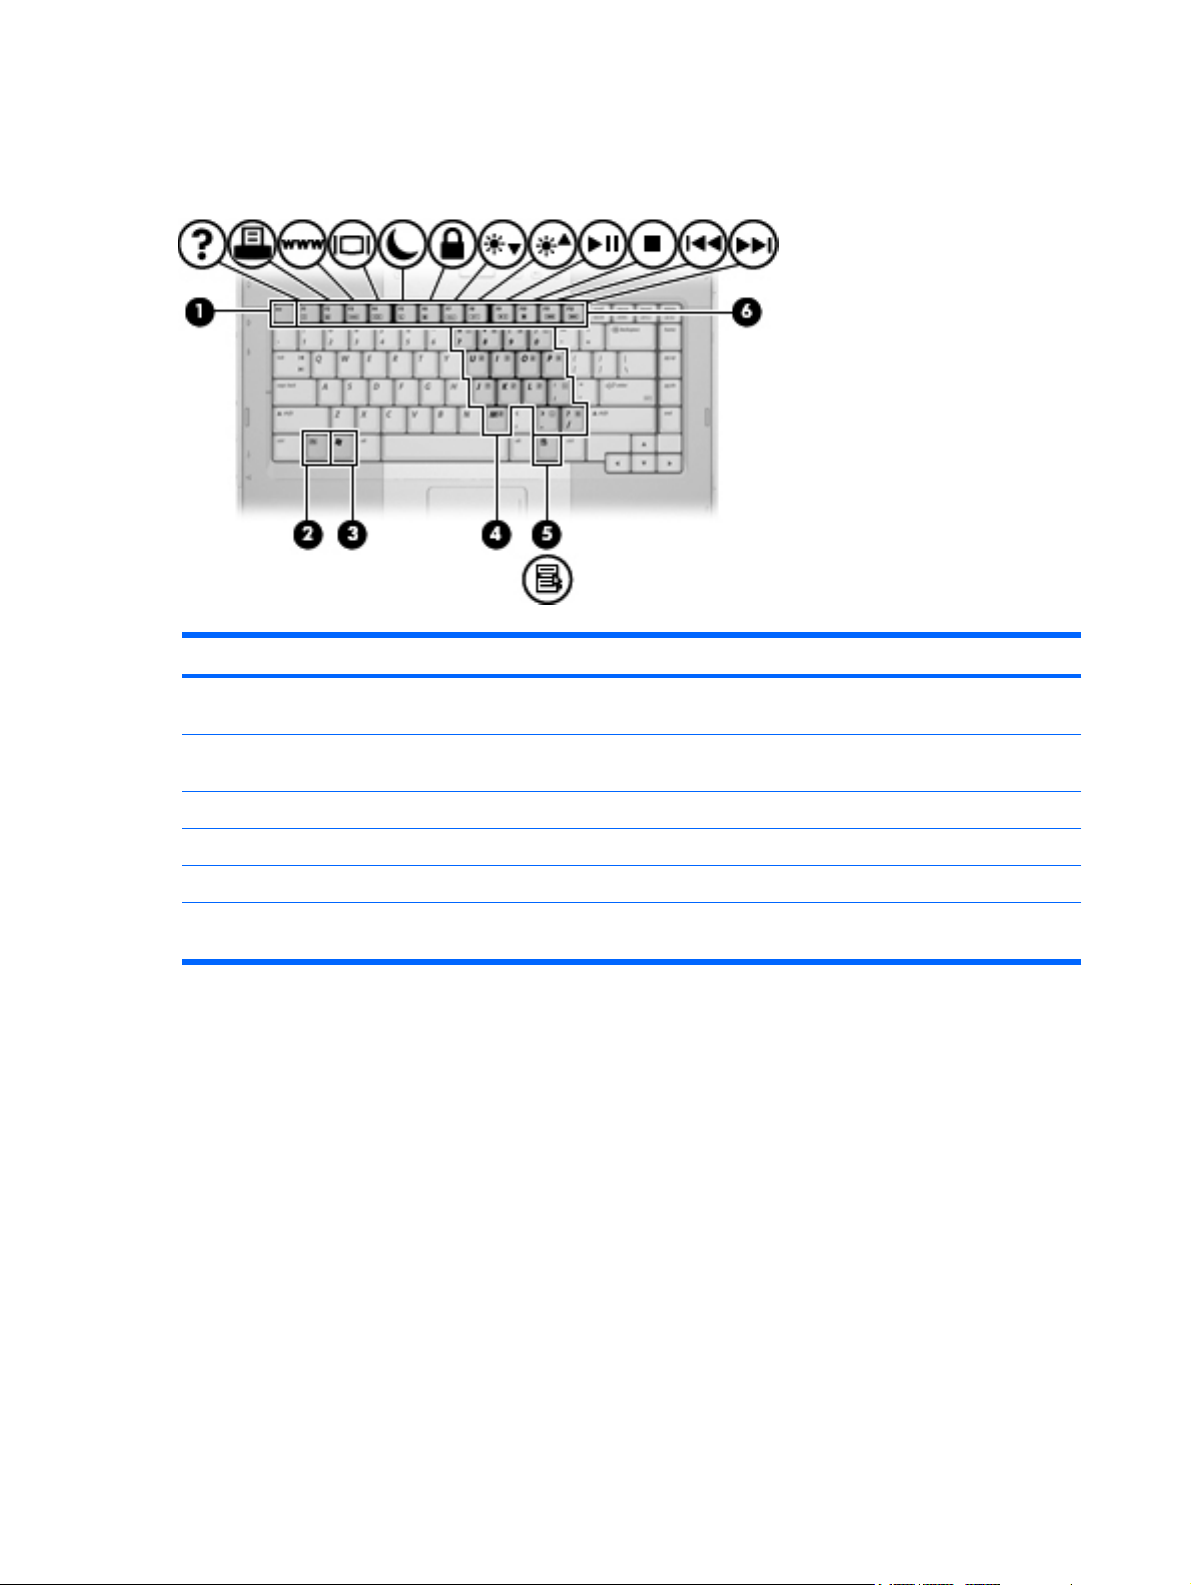
The following sections provide information on the keyboard features of the notebook.
Hotkeys
Hotkeys are combinations of the fn key (1) and either the esc key (2) or one of the function keys (3).
The icons on the f1 through f12 keys represent the hotkey functions. Hotkey functions and procedures
are discussed in the following sections.
ENWW Keyboard 17
Page 24

Hotkey quick reference
Function Key Combination
Display and clear system information. fn+esc
Open Help and Support. fn+f1
Open the Print Options window. fn+f2
Open a Web browser. fn+f3
Switch the screen image between the computer display and an external display. fn+f4
Initiate Hibernation. fn+f5
Initiate QuickLock. fn+f6
Decrease screen brightness. fn+f7
Increase screen brightness. fn+f8
Play, pause, or resume an audio CD or a DVD. fn+f9
Stop an audio CD or a DVD. fn+f10
Play the previous track or section on an audio CD or a DVD. fn+f11
Play the next track on an audio CD or a DVD. fn+f12
Hotkey procedures
To use a hotkey command on the computer keyboard, either
Briefly press the fn key, and then briefly press the second key of the hotkey command.
●
– or –
Press and hold down the fn key, briefly press the second key of the hotkey command, and then
●
release both keys at the same time.
Displaying and clearing system information (fn+esc)
Press fn+esc to display information about system hardware components and the system BIOS version
number. Press fn+esc a second time to remove the system information from the screen.
In the Windows fn+esc display, the version of the system BIOS (basic input-output system) is displayed
as the BIOS date. On some computer models, the BIOS date is displayed in decimal format. The BIOS
date is sometimes called the system ROM version number.
18 Chapter 2 TouchPad and Keyboard ENWW
Page 25

Opening Help and Support (fn+f1)
Press fn+f1 to open Help and Support.
In addition to providing information about your Windows operating system, Help and Support provides
Information about your computer, such as model and serial number, installed software, hardware
●
components, and specifications.
Answers to questions about using your computer.
●
Tutorials to help you learn to use computer and Windows features.
●
Updates for your Windows operating system, drivers, and the software provided on your computer.
●
Checkups for computer functionality.
●
Automated and interactive troubleshooting, repair solutions, and system recovery procedures.
●
Links to support specialists.
●
You can also access Help and Support by selecting Start > Help and Support.
Opening the Print Options window (fn+f2)
Press fn+f2 to open the Print Options window of the active Windows application.
Opening a Web browser (fn+f3)
Press fn+f3 to open your default Web browser.
Until you have set up your Internet or network services, the fn+f3 hotkey opens the Windows Internet
Connection Wizard.
After you have set up your Internet or network services and your Web browser home page, you can
press fn+f3 to quickly access your home page and the Internet.
ENWW Keyboard 19
Page 26

Switching the screen image (fn+f4)
Press fn+f4 to switch the screen image among display devices connected to the system. For example,
if a monitor is connected to the computer, each time you press fn+f4 the image switches among the
computer display, the monitor display, and a simultaneous display on both the computer and the
monitor.
Most external monitors receive video information from the computer using the external VGA video
standard. The fn+f4 hotkey can also toggle images among other devices receiving video information
from the computer, such as S-Video.
The following video transmission types, with examples of devices that use them, are supported by
the fn+f4 hotkey:
LCD (computer display)
●
External VGA (most external monitors)
●
S-Video (televisions, camcorders, VCRs, and video capture cards with S-Video-in jacks, on select
●
models)
Initiating Hibernation (fn+f5)
Press fn+f5 to initiate Hibernation.
When Hibernation is initiated, your information is saved to a hibernation file on the hard drive and the
computer turns off.
CAUTION To reduce the risk of information loss, save your work before initiating Hibernation.
The computer must be on before you initiate Hibernation.
To exit Hibernation, briefly press the power button.
The function of the fn+f5 hotkey can be changed. For example, you can set the fn+f5 hotkey to initiate
Sleep instead of Hibernation.
20 Chapter 2 TouchPad and Keyboard ENWW
Page 27

Initiating QuickLock (fn+f6)
Press fn+f6 to initiate the QuickLock security feature.
QuickLock protects your information by displaying the operating system Log On window. While the Log
On window is displayed, the computer cannot be accessed until a Windows user password or a Windows
administrator password is entered.
NOTE Before you can use QuickLock, you must set a Windows user password or a Windows
administrator password. For instructions, refer to Help and Support.
To use QuickLock, press fn+f6 to display the Log On window and lock the computer. Then follow the
instructions on the screen to enter your Windows user password or your Windows administrator
password and access the computer.
Decreasing screen brightness (fn+f7)
Press fn+f7 to decrease screen brightness. Hold down the hotkey to decrease the brightness level
incrementally.
Increasing screen brightness (fn+f8)
Press fn+f8 to increase screen brightness. Hold down the hotkey to increase the brightness level
incrementally.
Playing, pausing or resuming an audio CD or a DVD (fn+f9)
The fn+f9 hotkey functions only when an audio CD or a DVD is inserted. If the audio CD or the DVD
is
Not playing, press fn+f9 to begin or resume the play.
●
Playing, press fn+f9 to pause the play.
●
Stopping an audio CD or a DVD (fn+f10)
Press fn+f10 to stop the play of an audio CD or a DVD.
Playing previous track or section of an audio CD or a DVD (fn+f11)
While an audio CD or a DVD is playing, press fn+f11 to play the previous track of the CD or the previous
section of the DVD.
Playing next track or section of an audio CD or a DVD (fn+f12)
While an audio CD or a DVD is playing, press fn+f12 to play the next track of the CD or the next section
of the DVD.
ENWW Keyboard 21
Page 28

Keypads
The computer has an embedded numeric keypad and also supports an optional external numeric keypad
or an optional external keyboard that includes a numeric keypad.
(1) fn key
Component
(2) num lock light
(3) num lk key
(4) Embedded numeric keypad
Using the embedded numeric keypad
The 15 keys of the embedded numeric keypad can be used like the keys on an external keypad. When
the embedded numeric keypad is turned on, each key on the keypad performs the function indicated by
the icon in the upper-right corner of the key.
Enabling and disabling the embedded numeric keypad
Press fn+num lk to enable the embedded numeric keypad. The num lock light turns on. Press fn+num
lk again to return the keys to their standard keyboard functions. The num lock light turns off.
NOTE The embedded numeric keypad will not function while an external keyboard or keypad
is connected to the computer.
22 Chapter 2 TouchPad and Keyboard ENWW
Page 29

Switching key functions on the embedded numeric keypad
You can temporarily alternate the functions of keys on the embedded numeric keypad between their
standard keyboard functions and their keypad functions by using the fn key or the fn+shift key
combination.
To change the function of a keypad key to keypad functions while the keypad is off, press and hold
●
the fn key while pressing the keypad key.
To use the keypad keys temporarily as standard keys while the keypad is on:
●
Press and hold the fn key to type in lowercase.
●
Press and hold fn+shift to type in uppercase.
●
Using an external numeric keypad
Most keys on most external keypads function differently according to whether num lock mode is on or
off. (By default num lock mode is off.) For example:
When num lock is on, most keypad keys type numbers.
●
When num lock is off, most keypad keys function like the arrow, page up, or page down keys.
●
When num lock on an external keypad is turned on, the num lock light on the computer is turned on.
When num lock on an external keypad is turned off, the num lock light on the computer is turned off.
If an external keypad is connected, the embedded numeric keypad cannot be turned on.
Enabling or disabling num lock mode as you work
To turn num lock on or off on an external keypad as you work, press the num lk key on the external
keypad, not on the computer.
ENWW Keypads 23
Page 30

3 Power management
Setting power options
Using power-saving states
Windows has two power-saving states enabled at the factory: Sleep and Hibernation.
When you initiate Sleep, the power lights blink and the screen clears. Your work is saved to memory,
letting you exit Sleep faster than exiting Hibernation. If the computer is in the Sleep state for an extended
period or if the battery reaches a critical battery level while in the Sleep state, the computer initiates
Hibernation.
When you initiate Hibernation, your work is saved to a hibernation file on the hard drive and the computer
turns off.
CAUTION To prevent possible audio and video degradation, or loss of audio or video playback
functionality, or loss of information, do not initiate Sleep or Hibernation while reading from or
writing to a disc or an external media card.
NOTE You cannot initiate any type of networking communications or perform any computer
functions while the computer is in the Sleep state or in Hibernation.
Initiating and exiting Sleep
The system is set at the factory to initiate Sleep after 10 minutes of inactivity when running on battery
power and 25 minutes of inactivity when running on external power.
Power settings and timeouts can be changed using Power Options in Windows Control Panel.
With the computer on, you can initiate Sleep in any of the following ways:
Press the power button.
●
Close the display.
●
Click Start, and then click the Power button.
●
Click Start, click the arrow next to the Lock button, and then click Sleep.
●
You can exit Sleep in any of the following ways:
Press the power button.
●
If the display is closed, open the display.
●
24 Chapter 3 Power management ENWW
Page 31

Press a key on the keyboard.
●
Activate the TouchPad.
●
When the computer exits Sleep, the power lights turn on and your work returns to the screen where you
stopped working.
NOTE If you have set a password to be required on wakeup, you must enter your Windows
password before your work will return to the screen.
Initiating and exiting Hibernation
The system is set at the factory to initiate Hibernation after 120 minutes of inactivity when running on
battery power, 1080 minutes (18 hours) of inactivity when running on external power, or when the battery
reaches a critical battery level.
Power settings and timeouts can be changed using Power Options in Windows Control Panel.
To initiate Hibernation:
1. Click Start, and then click the arrow next to the Lock button.
2. Click Hibernate.
– or –
Press fn+f5.
▲
To exit Hibernation:
Press the power button.
▲
The power lights turn on and your work returns to the screen where you stopped working.
NOTE If you have set a password to be required on wakeup, you must enter your Windows
password before your work will return to the screen.
Using the battery meter
The battery meter is located in the notification area at the far right of the taskbar. The battery meter
allows you to quickly access power settings, view remaining battery charge, and select a different power
plan.
To display the percentage of remaining battery charge and the current power plan, move the pointer
●
over the battery meter icon.
To access Power Options, or to change the power plan, click the battery meter icon and select an
●
item from the list.
Different battery meter icons indicate whether the computer is running on battery or external power. The
icon also displays a message if the battery has reached a critical battery level.
To hide or display the battery meter icon:
1. Right-click the taskbar, and then click Properties.
2. Click the Notification Area tab.
ENWW Setting power options 25
Page 32

3. Under System icons, clear the Power check box to hide the battery meter icon, or select the
Power check box to display the battery meter icon.
4. Click OK.
Using power plans
A power plan is a collection of system settings that manages how the computer uses power. Power
plans can help you conserve power or maximize performance.
You can change power plan settings or create your own power plan.
Viewing the current power plan
Move the pointer over the battery meter icon in the notification area, at the far right of the taskbar.
▲
– or –
Select Start > Control Panel > System and Maintenance > Power Options.
Selecting a different power plan
Click the battery meter icon in the notification area, and then select a power plan from the list.
▲
– or –
Select Start > Control Panel > System and Maintenance > Power Options, and then select a
power plan from the list.
Customizing power plans
1. Click the battery meter icon in the notification area, and then click More power options.
– or –
Select Start > Control Panel > System and Maintenance > Power Options.
2. Select a power plan, and then click Change plan settings.
3. Change the Turn off the display and Put the computer to sleep timeout settings, as needed.
4. To change additional settings, click Change advanced power settings and make your changes.
Setting password protection on wakeup
To set the computer to prompt for a password when the computer exits Sleep or Hibernation, follow
these steps:
1. Select Start > Control Panel > System and Maintenance > Power Options.
2. In the left pane, click Require a password on wakeup.
3. Click Change Settings that are currently unavailable.
4. Click Require a password (recommended).
5. Click Save changes.
26 Chapter 3 Power management ENWW
Page 33

Using battery power
When a charged battery is in the computer and the computer is not plugged into external power, the
computer runs on battery power. When the computer is plugged into external AC power, the computer
runs on AC power.
If the computer contains a charged battery and is running on external AC power supplied through the
AC adapter, the computer switches to battery power if the AC adapter is disconnected from the
computer.
NOTE The display brightness is decreased to save battery life when you disconnect AC power.
To increase display brightness, use the fn+f8 hotkey or reconnect the AC adapter.
You can keep a battery in the computer or in storage, depending on how you work. Keeping the battery
in the computer whenever the computer is plugged into AC power charges the battery and also protects
your work in case of a power outage. However, a battery in the computer slowly discharges when the
computer is off and unplugged from external power.
WARNING! To reduce potential safety issues, use only the battery provided with the computer,
a replacement battery provided by HP, or a compatible battery purchased from HP.
Computer battery life varies, depending on power management settings, programs running on the
computer, display brightness, external devices connected to the computer, and other factors.
Using Battery Health in Help and Support
The Battery Health section of the Help and Support Learning Center provides the following tools and
information:
Battery Check tool to test battery performance
●
Information on calibration, power management, and proper care and storage to maximize battery
●
life
Information on battery types, specifications, life cycles, and capacity
●
To access Battery Health:
Select Start > Help and Support > Learning Center > Battery Health.
▲
Displaying the remaining battery charge
Move the pointer over the battery meter icon in the notification area, at the far right of the taskbar.
▲
– or –
View the estimated number of minutes of battery charge remaining in Windows Mobility Center:
Click the battery meter icon, and then click Windows Mobility Center.
▲
– or –
Select Start > Control Panel > Mobile PC > Windows Mobility Center.
The time shown indicates the approximate running time remaining on the battery if the battery
continues to provide power at the current level. For example, the time remaining will decrease
when a DVD is playing and will increase when a DVD stops playing.
ENWW Using battery power 27
Page 34

Inserting or removing the battery
CAUTION To prevent loss of information when removing a battery that is the sole power source,
initiate Hibernation or turn off the computer before removing the battery.
To insert the battery:
1. Turn the computer upside down on a flat surface, with the battery bay toward you.
2. Insert the battery into the battery bay (1) and rotate it downward until it is seated (2).
To remove the battery:
1. Turn the computer upside down on a flat surface, with the battery bay toward you.
2. Slide the battery release latch (1) to release the battery.
3. Pivot the battery (2) away from the computer and remove it (3).
28 Chapter 3 Power management ENWW
Page 35

Charging a battery
WARNING! Do not charge the computer battery while you are onboard aircraft.
The battery charges whenever the computer is plugged into external power through an AC adapter, an
optional power adapter, an optional expansion product, or an optional docking device.
The battery charges whether the computer is off or in use, but it charges faster when the computer is
off.
Charging may take longer if a battery is new, has been unused for 2 weeks or more, or is much warmer
or cooler than room temperature.
To prolong battery life and optimize the accuracy of battery charge displays, follow these
recommendations:
If you are charging a new battery, charge it fully before turning on the computer.
●
Charge the battery until the battery light turns off.
●
NOTE If the computer is on while the battery is charging, the battery meter in the
notification area may show 100 percent charge before the battery is fully charged.
Allow the battery to discharge below 5 percent of a full charge through normal use before charging
●
it.
If the battery has been unused for one month or more, calibrate the battery instead of simply
●
charging it.
The battery light displays charge status:
On: The battery is charging.
●
Blinking: The battery has reached a low battery level and is not charging.
●
Off: The battery is fully charged, in use, or not installed.
●
Managing low battery levels
The information in this section describes the alerts and system responses set at the factory. Some low
battery alerts and system responses can be changed using Power Options in Windows Control Panel.
Preferences set using Power Options do not affect lights.
Identifying low battery levels
When a battery that is the sole power source for the computer reaches a low battery level, the battery
light blinks.
If a low battery level is not resolved, the computer enters a critical battery level, and the battery light
continues to blink.
ENWW Using battery power 29
Page 36

The computer takes the following actions for a critical battery level:
If Hibernation is enabled and the computer is on or in the Sleep state, the computer initiates
●
Hibernation.
If Hibernation is disabled and the computer is on or in the Sleep state, the computer remains briefly
●
in the Sleep state, and then shuts down and loses any unsaved information.
Resolving a low battery level
CAUTION To reduce the risk of losing information when the computer reaches a critical battery
level and has initiated Hibernation, do not restore power until the power lights turn off.
Resolving a low battery level when external power is available
Connect one of the following devices:
AC adapter
●
Optional expansion product or docking device
●
Optional power adapter
●
Resolving a low battery level when a charged battery is available
1. Turn off the computer or initiate Hibernation.
2. Remove the discharged battery, and then insert a charged battery.
3. Turn on the computer.
Resolving a low battery level when no power source is available
Initiate Hibernation.
▲
– or –
Save your work and shut down the computer.
Resolving a low battery level when the computer cannot exit Hibernation
When the computer lacks sufficient power to exit Hibernation, follow these steps:
1. Insert a charged battery or plug the computer into external power.
2. Exit Hibernation by pressing the power button.
Calibrating a battery
Calibrate a battery under the following conditions:
When battery charge displays seem inaccurate
●
When you observe a significant change in battery run time
●
Even if a battery is heavily used, it should not need to be calibrated more than once a month. It is also
not necessary to calibrate a new battery.
30 Chapter 3 Power management ENWW
Page 37

Step 1: Fully charge the battery
WARNING! Do not charge the computer battery while you are onboard aircraft.
NOTE The battery charges whether the computer is off or in use, but it charges faster when the
computer is off.
To fully charge the battery:
1. Insert the battery into the computer.
2. Connect the computer to an AC adapter, optional power adapter, optional expansion product, or
optional docking device, and then plug the adapter or device into external power.
The battery light on the computer turns on.
3. Leave the computer plugged into external power until the battery is fully charged.
The battery light on the computer turns off.
Step 2: Disable Hibernation and Sleep
1. Click the battery meter icon in the notification area, and then click More power options.
– or –
Select Start > Control Panel > System and Maintenance > Power Options.
2. Under the current power plan, click Change plan settings.
3. Record the Turn off the display and Put the computer to sleep settings listed in the On
battery column so that you can reset them after the calibration.
4. Change the Turn off the display and Put the computer to sleep settings to Never.
5. Click Change advanced power settings.
6. Click the plus sign next to Sleep, and then click the plus sign next to Hibernate after.
7. Record the On battery setting under Hibernate after so that you can reset it after the calibration.
8. Type Never in the On battery box.
9. Click OK.
10. Click Save changes.
ENWW Using battery power 31
Page 38

Step 3: Discharge the battery
The computer must remain on while the battery is being discharged. The battery can discharge whether
or not you are using the computer, but the battery will discharge faster while you are using it.
If you plan to leave the computer unattended during the discharge, save your information before
●
beginning the discharge procedure.
If you use the computer occasionally during the discharge procedure and have set energy-saving
●
timeouts, expect the following performance from the system during the discharge process:
The monitor will not turn off automatically.
●
Hard drive speed will not decrease automatically when the computer is idle.
●
System-initiated Hibernation will not occur.
●
To discharge a battery:
1. Unplug the computer from its external power source, but do not turn off the computer.
2. Run the computer on battery power until the battery is discharged. The battery light begins to blink
when the battery has discharged to a low battery level. When the battery is discharged, the battery
light turns off and the computer shuts down.
Step 4: Fully recharge the battery
To recharge the battery:
1. Plug the computer into external power and maintain external power until the battery is fully
recharged. When the battery is recharged, the battery light on the computer turns off.
You can use the computer while the battery is recharging, but the battery will charge faster if the
computer is off.
2. If the computer is off, turn it on when the battery is fully charged and the battery light has turned
off.
Step 5: Reenable Hibernation and Sleep
CAUTION Failure to reenable Hibernation after calibration may result in a full battery discharge
and information loss if the computer reaches a critical battery level.
1. Click the battery meter icon in the notification area, and then click More power options.
– or –
Select Start > Control Panel > System and Maintenance > Power Options.
2. Under the current power plan, click Change plan settings.
3. Reenter the settings that you recorded for the items in the On battery column.
4. Click Change advanced power settings.
5. Click the plus sign next to Sleep, and then click the plus sign next to Hibernate after.
6. Reenter the setting that you recorded for On battery.
32 Chapter 3 Power management ENWW
Page 39

7. Click OK.
8. Click Save changes.
Conserving battery power
Select low power-use settings through Power Options in Windows Control Panel.
●
Turn off wireless and local area network (LAN) connections and exit modem applications when you
●
are not using them.
Disconnect external devices that are not plugged into an external power source, when you are not
●
using them.
Stop, disable, or remove any external media cards that you are not using.
●
Using the fn+f7 and fn+f8 hotkeys to adjust screen brightness as needed.
●
If you leave your work, initiate Sleep or Hibernation, or shut down the computer.
●
Storing a battery
CAUTION To prevent damage to a battery, do not expose it to high temperatures for extended
periods of time.
If a computer will be unused and unplugged from external power for more than 2 weeks, remove the
battery and store it separately.
To prolong the charge of a stored battery, place it in a cool, dry place.
Calibrate a battery before using it if it has been stored for one month or more.
Disposing of a used battery
WARNING! To reduce the risk of fire or burns, do not disassemble, crush, or puncture a battery;
short the external contacts on a battery; or dispose of a battery in fire or water. Do not expose a
battery to temperatures above 60°C (140°F). Replace the battery only with a battery approved
for this computer.
Refer to the Regulatory, Safety and Environmental Notices for battery disposal information.
ENWW Using battery power 33
Page 40

Using external AC power
External AC power is supplied through one of the following devices:
WARNING! To reduce potential safety issues, use only the AC adapter provided with the
computer, a replacement AC adapter provided by HP, or a compatible AC adapter purchased
from HP.
AC adapter included with the computer
●
Optional docking device or expansion product
●
Optional power adapter
●
Connect the computer to external AC power under any of the following conditions:
When you are charging or calibrating a battery
●
WARNING! Do not charge the computer battery while you are onboard aircraft.
When you are installing or modifying system software
●
When you are writing information to a CD or DVD
●
When you connect the computer to external AC power, the following events occur:
The battery begins to charge.
●
If the computer is turned on, the battery meter icon in the notification area changes appearance.
●
When you disconnect external AC power, the following events occur:
The computer switches to battery power.
●
The display brightness is automatically decreased to save battery life. To increase display
●
brightness, press the fn+f8 hotkey or reconnect the AC adapter.
Connecting the AC adapter
WARNING! To reduce the risk of electric shock or damage to the equipment:
Plug the power cord into an AC outlet that is easily accessible at all times.
Disconnect power from the computer by unplugging the power cord from the AC outlet (not by
unplugging the power cord from the computer).
If provided with a 3-pin attachment plug on the power cord, plug the cord into a grounded (earthed)
3-pin outlet. Do not disable the power cord grounding pin, for example, by attaching a 2-pin
adapter. The grounding pin is an important safety feature.
To connect the computer to external AC power:
1. Plug the AC adapter into the power connector (1) on the computer.
2. Plug the power cord into the AC adapter (2).
34 Chapter 3 Power management ENWW
Page 41

3. Plug the other end of the power cord into the AC outlet (3).
Shutting down the computer
CAUTION Unsaved information will be lost when the computer is shut down.
The Shut Down command closes all open programs, including the operating system, and then turns off
the display and computer.
Shut down the computer under any of the following conditions:
When you need to replace the battery or access components inside the computer
●
When you are connecting an external hardware device that does not connect to a USB port
●
When the computer will be unused and disconnected from external power for an extended period
●
To shut down the computer:
NOTE If the computer is in the Sleep state or in Hibernation, you must first exit Sleep or
Hibernation before shutdown is possible.
1. Save your work and close all open programs.
2. Click Start, and then click the arrow next to the Lock button.
3. Click Shut Down.
If the computer is unresponsive and you are unable to use the preceding shutdown procedures, try the
following emergency procedures in the sequence provided:
Press ctrl+alt+delete, and then click the Power button.
●
Press and hold the power button for at least 5 seconds.
●
Disconnect the computer from external power and remove the battery.
●
ENWW Shutting down the computer 35
Page 42

4Drives
Drive care
Drives are fragile computer components that must be handled with care. The following cautions apply
to all drives. Additional cautions are included with the procedures to which they apply.
CAUTION To reduce the risk of damage to the computer, damage to a drive, or loss information,
observe these precautions:
Initiate Sleep before you move a computer or external hard drive from one location to another.
Before handling a drive, discharge static electricity by touching the unpainted metal surface of
the drive.
Do not touch the connector pins on a removable drive or on the computer.
Handle a drive carefully; do not drop or compress the drive.
Before removing or inserting a drive, shut down the computer. If you are unsure whether the
computer is off or in Hibernation, turn the computer on, and then shut it down through the
operating system.
Do not use excessive force when inserting a drive into a drive bay.
Do not type on the keyboard or move the computer when the drive is writing to media. The write
process is sensitive to vibration.
When the battery pack is the only source of power, ensure that the battery pack is sufficiently
charged before writing to media.
Avoid exposing a drive to temperature or humidity extremes.
Avoid exposing a drive to liquids. Do not spray it with cleaning products.
Remove media from a drive before removing the drive from the drive bay, or traveling with,
shipping, or storing a drive.
If a drive must be mailed, place the drive in a bubble-pack mailer or other suitable protective
packaging and label the package “FRAGILE.”
Avoid exposing a drive to magnetic fields. Security devices with magnetic fields include airport
walk-through devices and security wands. The airport security devices that check carry-on
luggage, such as conveyor belts, use x-rays instead of magnetism and will not damage a drive.
36 Chapter 4 Drives ENWW
Page 43

IDE drive light
The IDE drive light blinks when either the primary hard drive or an optical drive is being accessed.
ENWW IDE drive light 37
Page 44

Hard drive
CAUTION To prevent system lockup and loss of information:
Shut down the computer before removing the hard drive from the hard drive bay. Do not remove
the hard drive while the computer is on, in the Sleep state, or in Hibernation.
If you are not sure whether the computer is off or in Hibernation, turn the computer on by pressing
the power button. Then shut down the computer through the operating system.
To remove the hard drive:
1. Save your work.
2. Shut down the computer and close the display.
3. Turn the computer upside down, with the hard drive bay toward you.
4. Loosen the 2 hard drive cover screws (1).
5. Lift the hard drive cover away from the computer (2).
6. Disconnect the hard drive (1) by sliding it to the right.
38 Chapter 4 Drives ENWW
Page 45

7. Lift the hard drive away from the computer (2).
To install a hard drive:
1. Lower the hard drive into the hard drive bay (1).
2. Slide the hard drive toward the hard drive connector (2) until it is fully seated.
3. Align the tabs (1) on the hard drive cover with the notches on the computer.
4. Close the cover (2).
ENWW Hard drive 39
Page 46

5. Tighten the hard drive cover screws (3).
40 Chapter 4 Drives ENWW
Page 47

Optical drives
An optical drive, such as a DVD-ROM drive, supports optical discs (CDs and DVDs). These discs are
used to store or transport data and to play music and movies. DVDs have a higher capacity than CDs.
The computer can read or write to optical drives as described in the following table.
Type of Optical Drive Read CD and
DVD-ROM
DVD/CD-RW Drive Yes Yes No No
DVD±RW Double Layer Yes Yes Yes No
LightScribe DVD±RW Double Layer Yes Yes Yes Yes
NOTE Some of the optical drives listed may not be supported by your computer. The listed drives are not necessarily
all of the supported optical drives.
Write to CD-RWWrite to DVD
±RW/R
LightScribe
ENWW Optical drives 41
Page 48

Inserting an optical disc
1. Turn on the computer.
2. Press the release button (1) on the drive bezel to release the media tray.
3. Pull out the tray (2).
4. Hold the CD or DVD by the edges to avoid touching the flat surfaces, and position the disc over
the tray spindle, with the label-side up.
NOTE If the tray is not fully accessible, tilt the disc carefully to position it over the spindle.
5. Gently press the disc (3) down onto the tray spindle until the disc snaps into place.
6. Close the media tray.
NOTE After you insert a disc, a short pause is normal. If you have not selected a default media
player, an AutoPlay dialog box opens. It prompts you to select how you want to use the media
content.
42 Chapter 4 Drives ENWW
Page 49

Removing an optical disc (with power)
If the computer is running on external or battery power:
1. Turn on the computer.
2. Press the release button (1) on the drive bezel to release the media tray, and then pull out the
tray (2).
3. Remove the disc (3) from the tray by gently pressing down on the spindle while lifting the outer
edges of the disc. Hold the disk by the edges and avoid touching the flat surfaces.
NOTE If the tray is not fully accessible, tilt the disc carefully as you remove it.
4. Close the media tray and place the disc in a protective case.
ENWW Optical drives 43
Page 50

Removing an optical disc (without power)
If external or battery power is unavailable:
1. Insert the end of a paper clip (1) into the release access in the front bezel of the drive.
2. Press in gently until the tray is released, and then pull out the tray (2).
3. Remove the disc (3) from the tray by gently pressing down on the spindle while lifting the outer
edges of the disc. Hold the disk by the edges and avoid touching the flat surfaces.
NOTE If the tray is not fully accessible, tilt the disc carefully as you remove it.
4. Close the media tray and place the disc in a protective case.
44 Chapter 4 Drives ENWW
Page 51

Avoiding the Sleep state or Hibernation
CAUTION To prevent possible audio and video degradation, or loss of audio or video playback
functionality, do not initiate Sleep or Hibernation while reading or writing to a CD or DVD.
To prevent loss of information, do not initiate Sleep or Hibernation when writing to a CD or DVD.
If Sleep or Hibernation is initiated during playback of drive media (such as a CD or DVD):
Your playback may be interrupted.
●
You may see a warning message asking if you want to continue. If this message is displayed,
●
click No.
You may need to restart the CD or DVD to resume audio and video playback.
●
ENWW Optical drives 45
Page 52

5 Multimedia
Multimedia hardware
Using the optical drive
The optical drive allows you to play, copy, and create CDs or DVDs, depending on the type of installed
drive and installed software.
Identifying the installed optical drive
To view the type of optical drive installed in the computer:
Select Start > Computer.
▲
46 Chapter 5 Multimedia ENWW
Page 53

Inserting an optical disc
1. Turn on the computer.
2. Press the release button (1) on the drive bezel to release the media tray.
3. Pull out the tray (2).
4. Hold the CD or DVD by the edges to avoid touching the flat surfaces, and position the disc over
the tray spindle, with the label-side up.
NOTE If the tray is not fully accessible, tilt the disc carefully to position it over the spindle.
5. Gently press the disc (3) down onto the tray spindle until the disc snaps into place.
6. Close the media tray.
NOTE After you insert a disc, a short pause is normal. If you have not selected a default media
player, an AutoPlay dialog box opens. It prompts you to select how you want to use the media
content.
ENWW Multimedia hardware 47
Page 54

Removing an optical disc (with power)
If the computer is running on external or battery power:
1. Turn on the computer.
2. Press the release button (1) on the drive bezel to release the media tray, and then pull out the
tray (2).
3. Remove the disc (3) from the tray by gently pressing down on the spindle while lifting the outer
edges of the disc. Hold the disk by the edges and avoid touching the flat surfaces.
NOTE If the tray is not fully accessible, tilt the disc carefully as you remove it.
4. Close the media tray and place the disc in a protective case.
48 Chapter 5 Multimedia ENWW
Page 55

Removing an optical disc (without power)
If external or battery power is unavailable:
1. Insert the end of a paper clip (1) into the release access in the front bezel of the drive.
2. Press in gently until the tray is released, and then pull out the tray (2).
3. Remove the disc (3) from the tray by gently pressing down on the spindle while lifting the outer
edges of the disc. Hold the disk by the edges and avoid touching the flat surfaces.
NOTE If the tray is not fully accessible, tilt the disc carefully as you remove it.
4. Close the media tray and place the disc in a protective case.
ENWW Multimedia hardware 49
Page 56

Using media activity hotkeys
Media activity hotkeys are combinations of the fn key (1) and 4 of the function keys. You can use these
keys to control the play of an audio CD or a DVD that is inserted in the optical drive.
NOTE To control the play of an inserted video CD, use the media activity controls in your video
CD player application.
To play, pause, or resume an inserted audio CD or a DVD, press fn+f9 (2).
●
To stop an inserted audio CD or a DVD that is playing, press fn+f10 (3).
●
To play the previous track of an audio CD or the previous chapter of a DVD that is playing,
●
press fn+f11 (4).
To play the next track of an audio CD or the next chapter of a DVD that is playing, press fn+f12
●
(5).
50 Chapter 5 Multimedia ENWW
Page 57

Using the audio features
The following illustration and table describe the audio features of the computer.
Component Description
(1) Volume down button Decreases computer sound.
(2) Volume up button Increases computer sound.
(3) Volume mute button Turns off computer sound.
(4) Audio-in (microphone) jack Connects an optional computer headset or microphone.
(5) Audio-out (headphone) jack Connects optional powered stereo speakers, headphones, ear
(6) Speakers (2) Produce computer sound.
Using the audio-in (microphone) jack
The computer is equipped with a microphone jack that supports an optional monaural (single sound
channel) microphone. Select models support a stereo (dual sound channel) microphone.
NOTE When connecting a microphone to the microphone jack, use a microphone with a 3.5-
mm plug.
Using the audio-out (headphone) jack
WARNING! To reduce the risk of personal injury, adjust the volume before putting on
headphones, earbuds, or a headset.
In addition to connecting headphones, the headphone jack is used to connect the audio function of an
audio/video device such as a television or VCR.
buds, headset, or television audio.
When connecting a device to the headphone jack use only a 3.5-mm stereo plug.
NOTE When a device is connected to the headphone jack, the internal speakers are disabled.
ENWW Multimedia hardware 51
Page 58

Adjusting the volume
You can adjust the volume using the following controls:
Computer volume buttons:
●
To mute or restore volume, press the volume mute button.
●
To decrease the volume, press the volume down button.
●
To increase the volume, press the volume up button.
●
NOTE The tapping sound made by the volume button is enabled at the factory. You can
disable the sound in the Setup Utility (f10).
Windows volume control:
●
a. Click the Volume icon in the notification area, at the far right of the taskbar.
b. Increase or decrease the volume by moving the slider up or down. Click the Mute icon to mute
the volume.
– or –
a. Right-click the Volume icon in the notification area, and then click Open Volume Mixer.
b. In the Device column, increase or decrease the volume by moving the slider up or down. You
can also mute the volume by clicking the Mute icon.
If the Volume icon is not displayed in the notification area, follow the steps below to place it there:
a. Right-click in the notification area, and then click Properties.
b. Click the Notification Area tab.
c. Under System icons, select the Volume check box.
d. Click OK.
Volume can also be adjusted within some applications.
52 Chapter 5 Multimedia ENWW
Page 59

Using the video features
The computer includes the following video features:
S-Video-out jack that connects a range of video components that allow you to maximize your
●
multimedia features
External monitor port that connects a television, monitor, or projector to the computer
●
Using the external monitor port
The external monitor port connects an external display device to the computer.
To connect a display device to the computer:
Connect the device cable to the external monitor port.
▲
NOTE If a properly connected external display device does not display an image, press fn+f4
to transfer the image to the device.
ENWW Multimedia hardware 53
Page 60

Using the S-Video-out jack
The 7-pin S-Video-out jack connects the computer to an optional S-Video device such as a television,
VCR, camcorder, overhead projector, or video capture card.
The computer can support one S-Video device connected to the S-Video-out jack, while simultaneously
supporting an image on the computer display or on any other supported external display.
NOTE To transmit video signals through the S-Video-out jack, you need an S-Video cable,
available from most electronics retailers. If you are combining audio and video functions, such
as playing a DVD movie on your computer and displaying it on your television, you also need a
standard audio cable connected to the headphone jack, available from most electronics retailers.
To connect a video device to the S-Video-out jack:
1. Plug one end of the S-Video cable into the S-Video-out jack on the computer.
2. Connect the other end of the cable to the video device, as instructed in the documentation included
with the device.
3. Press the fn+f4 keys to switch the image between display devices connected to the computer.
54 Chapter 5 Multimedia ENWW
Page 61

Multimedia software
The computer includes preinstalled multimedia software. Some models may be shipped with additional
multimedia software on an optical disc.
Depending on the hardware and software included with the computer, the following multimedia tasks
may be supported:
Playing digital media, including audio and video CDs, audio and video DVDs, and Internet radio
●
Creating or copying data CDs
●
Creating, editing, and burning audio CDs
●
Creating, editing, and burning a video or movie to a DVD or video CD
●
NOTE For details about using software included with the computer, refer to the software user
guides. These guides may be provided on CD or as online Help files within the specific
application. User guides may also be found on the software manufacturer’s Web site.
Identifying preinstalled multimedia software
To view and access the preinstalled multimedia software on the computer:
Select Start > All Programs.
▲
NOTE You can also reinstall multimedia software on the computer. Select Start > All
Programs > Software Setup.
Installing multimedia software from a CD (select models only)
To install multimedia software from a CD included with the computer:
1. Insert the multimedia software CD into the optical drive.
2. When the installation wizard opens, follow the installation instructions on the screen.
3. Restart the computer if prompted.
Repeat the installation procedure for all multimedia software on CD that you want to install.
Using DVDPlay
DVDPlay, a software solution that has a simple and easy-to-us interface, allows you to watch DVD
movies.
To open DVDPlay:
Double-click the DVDPlay icon on the desktop.
▲
– or –
Click Start > All Programs > DVDPlay.
For additional information, refer to the DVDPlay online Help.
ENWW Multimedia software 55
Page 62

Using multimedia software
To use the multimedia software installed on the computer:
1. Select Start > All Programs, and then open the multimedia application you want to use. For
example, if you want to use Windows Media Player to play an audio CD, select Windows Media
Player.
NOTE Some applications may be located in subfolders.
2. Insert the media disc, such as an audio CD, into the optical drive.
3. Follow the instructions on the screen.
– or –
1. Insert the media disc, such as an audio CD, into the optical drive.
An AutoPlay dialog box opens.
2. Click a multimedia task from the list of tasks.
56 Chapter 5 Multimedia ENWW
Page 63

Preventing playback disruptions
To reduce the possibility of playback disruption:
Save your work and close all open applications before playing a CD or a DVD.
●
Do not connect or disconnect hardware while playing a disc.
●
Do not initiate Hibernation or Sleep while playing a disc. Otherwise, you may see a warning message
asking if you want to continue. If this message is displayed, click No. After you click No:
Playback may resume.
●
– or –
Playback may stop and the screen may clear. To return to playing the CD or DVD, press the power
●
button and then restart the disc.
Protecting the CD or DVD write process
CAUTION To prevent loss of information and damage to a disc:
Before writing to a disc, connect the computer to a reliable external power source. Do not write
to a disc while the computer is running on battery power.
Before writing to a disc, close all open applications except the disc software you are using.
Do not copy directly from a source disc to a destination disc or from a network drive to a
destination disc. Instead, copy from a source disc or network drive to your hard drive, and then
copy from your hard drive to the destination disc.
Do not use the computer keyboard or move the computer while the computer is writing to a disc.
The write process is sensitive to vibration.
ENWW Multimedia software 57
Page 64

Changing DVD region settings
Most DVDs that contain copyrighted files also contain region codes. The region codes help protect
copyrights internationally.
You can play a DVD containing a region code only if the region code on the DVD matches the region
setting on your DVD drive.
If the region code on a DVD does not match the region setting on your drive, the following message is
displayed when you insert the DVD: “Playback of content from this region is not permitted.” To play the
DVD, you must change the region setting on your DVD drive. DVD region settings can be changed
through the operating system or through some DVD players.
CAUTION The region settings on your DVD drive can be changed only 5 times.
The region setting you select the fifth time becomes the permanent region setting on the DVD
drive.
The number of allowable region changes remaining on the drive is displayed in the Changes
remaining field on the DVD Region tab. The number in the field includes the fifth and permanent
change.
To change settings through the operating system:
1. Select Start > Computer > System properties.
2. In the left pane, click Device Manager.
NOTE Windows includes the User Account Control feature to improve the security of your
computer. You may be prompted for your permission or password for tasks such as installing
applications, running utilities, or changing Windows settings. Refer to Windows online Help
for more information.
3. Click the “+” sign next to DVD/CD-ROM drives.
4. Right-click the DVD drive for which you want to change region settings, and then click
Properties.
5. Make the desired changes on the DVD Region tab.
6. Click OK.
Observing the copyright warning
It is a criminal offense, under applicable copyright laws, to make unauthorized copies of copyrightprotected material, including computer programs, films, broadcasts, and sound recordings. Do not use
this computer for such purposes.
58 Chapter 5 Multimedia ENWW
Page 65

6 External Devices
Using a USB device
Universal Serial Bus (USB) is a hardware interface that can be used to connect an optional external
device, such as a USB keyboard, mouse, drive, printer, scanner, or hub, to the computer. A hub provides
additional USB ports for the system and can be connected to the computer or to another hub.
The computer has 2 standard USB ports on the left side of the computer. A third USB port on the right
side of the computer is available on select models only. The USB ports on the computer support USB
2.0 and USB 1.1 devices.
Connecting a USB device
CAUTION To prevent damage to the USB connectors, use minimal force to connect a USB
device.
To connect a USB device to the computer, connect the USB cable of the device to the USB port. The
operating system will issue a sound to indicate that a device has been connected.
NOTE The first time you connect a USB device, the "Installing device driver software" message
is displayed in the notification area, at the far right of the taskbar.
ENWW Using a USB device 59
Page 66

Stopping a USB device
CAUTION To prevent loss of information or an unresponsive system, stop the USB device
before removing it.
To stop a USB device:
1. Double-click the Safely Remove Hardware icon in the notification area, at the far right of the
taskbar.
2. Click the USB device listing.
NOTE To display the Safely Remove Hardware icon, click Show Hidden Icons in the
notification area.
3. Click Stop, and then click OK.
Required USB software
Some USB devices may require additional support software, which is usually included with the device.
For more information about device-specific software, refer to the user guide for the device.
60 Chapter 6 External Devices ENWW
Page 67

7 Memory Modules
Adding or replacing memory modules
The computer has one memory module compartment, which is located on the bottom of the computer.
The memory capacity of the computer can be upgraded by adding a memory module to the vacant
expansion memory module slot or by upgrading the existing memory module in the primary memory
module slot.
WARNING! To reduce the risk of electric shock and damage to the equipment, unplug the
power cord and remove all battery packs before installing a memory module.
CAUTION Electrostatic discharge (ESD) can damage electronic components. Before
beginning any procedure, ensure that you are discharged of static electricity by touching a
grounded metal object.
To add or replace a memory module:
1. Save your work and close all open programs.
NOTE If the computer is in the Sleep state or in Hibernation, you must first exit Sleep or
Hibernation before shutdown is possible.
2. Click Start, click the arrow next to the Lock button, and then click Shut Down.
3. Close the display.
4. Disconnect all external devices connected to the computer.
5. Disconnect the power cord.
6. Turn the computer upside down.
7. Remove the battery pack from the computer.
8. Loosen the memory module compartment cover screw (1).
ENWW Adding or replacing memory modules 61
Page 68

9. Lift the memory module compartment cover (2) away from the computer.
10. To remove a memory module:
a. Pull away the retention clips (1) on each side of the memory module . (The memory module
tilts up.)
b. Grasp the edge of the memory module (2) and gently pull the module out of the memory
module slot. (To protect a memory module after removal, place it in an electrostatic-safe
container.)
11. To insert a memory module:
a. Align the notched edge (1) of the memory module with the tab in the memory module slot.
b. With the memory module at a 45-degree angle from the surface of the memory module
compartment, press the module (2) into the memory module slot until it is seated.
62 Chapter 7 Memory Modules ENWW
Page 69

c. Press the memory module (3) down until the retention clips snap into place.
12. Align the tabs (1) on the memory module compartment cover with the notches on the computer.
13. Close the cover (2).
14. Tighten the memory module compartment cover screw (3).
15. Replace the battery pack.
16. Reconnect external power and external devices.
17. Turn on the computer.
ENWW Adding or replacing memory modules 63
Page 70

Index
A
AC adapter
identifying 12
AC adapter, connecting 34
altitude specifications 14
antennae 11
applications key, Windows 2
audio features 51
audio-in (microphone) jack 8,
51
audio-out (headphone) jack 8,
51
B
battery
calibrating 30
charging 29
conserving power 33
disposing 33
inserting 28
low battery levels 30
removing 28
storing 33
battery bay 10, 13
battery light, identifying 5
battery pack
identifying 12
battery pack release latch 10
battery power 27
bays
battery 10, 13
hard drive 10
buttons
display release 6
mute 4
power 4
TouchPad 3, 15
volume 4
volume down 51, 52
volume mute 51, 52
volume up 51, 52
wireless 4
C
cable
USB 59
calibrating battery 30
caps lock light 5
Certificate of Authenticity label 13
charging batteries 29
compartments, memory
module 10
components
bottom 10
display 6
front 6
left-side 9
rear 7
right-side 8
top 2
connection, external power 34
connector, power 8
conservation, power 33
copyright warning 58
cord, power, identifying 12
critical battery level 30
D
display
image, switching 18, 20
screen brightness
hotkeys 18, 21
display release button 6
drives
caring for 36
IDE drive light 37
optical 8
See also hard drive, optical drive
drives. 37
See also hard drive; optical drive
DVD region settings 58
DVDPlay
using 55
E
environmental specifications 14
external monitor port 9, 53
F
fn key
hotkeys 17
identifying 2
function keys
hotkeys 17
identifying 2
H
hard drive
installing 39
removing 38
hard drive bay, identifying 10
headphone (audio-out) jack 8
Help and Support hotkey 18, 19
Hibernation
exiting 25
hotkey 18, 20
initiating 25
writing to CD or DVD 45
hotkeys
audio CD or DVD
controls 18, 21
decreasing screen
brightness 18, 21
description 17
displaying system
information 18
increasing screen
brightness 18, 21
initiating Hibernation 18, 20
initiating QuickLock 18, 21
64 Index
ENWW
Page 71

media activity 50
opening Help and
Support 18, 19
opening Print Options
window 18, 19
opening Web browser 18, 19
quick reference 18
switching screen image 18,
20
using 18
hubs 59
humidity specifications 14
I
IDE drive light 5, 37
J
jacks
audio-in (microphone) 8, 51
audio-out (headphone) 8,
51
RJ-11 (modem) 8
RJ-45 (network) 9
S-Video-out 9, 53, 54
K
keyboard
hotkeys 17
keypad keys 2
keypad, embedded
enabling and disabling 22
identifying 22
switching key functions 23
using 22
keypad, external
num lock mode 23
using 23
keys
esc 2
fn 2
function 2
keypad 2
Windows applications 2
Windows logo 2
L
labels
Microsoft Certificate of
Authenticity 13
modem approval 13
regulatory 13
service tag 13
wireless certification 13
WLAN 13
latches
battery pack release 10
lights
battery 5
caps lock 5
IDE drive 5, 37
mute 5
num lock 5
power 5
wireless 5
LightScribe 41
lock, security cable 9
low battery level 30
M
media activity hotkeys 50
media controls, hotkeys 18, 21
memory
adding or replacing memory
modules 61
memory module compartment 10
memory module compartment
cover
removing 62
replacing 63
memory modules
adding 61
replacing 61
microphone (audio-in) jack 8
microphones, supported 51
Microsoft Certificate of Authenticity
label 13
modem approval label 13
monitor port, external 9
mouse, external
setting preferences 16
using 16
multimedia software
described 55
identifying 55
installing 55
using 56
mute button 4, 51, 52
mute light 5
N
network (RJ-45) jack 9
num lock light 5
num lock mode, external
keypad 23
O
operating environment
specifications 14
operating system
Microsoft Certificate of
Authenticity label 13
Product Key 13
optical disc
inserting 42, 47
removing, with power 43, 48
removing, without power 44,
49
optical drive
identifying 8, 46
supported types 41
P
pointing devices.. See
TouchPad
ports
external monitor 9, 53
USB 8, 9, 59
power
connecting 34
conserving 33
power button 4
power connector 8
power cord 12
power light 5
Print Options window hotkey 18,
19
Product Key 13
product name and number,
computer 13
Q
QuickLock hotkey 18, 21
R
rated input power
specifications 14
regulatory information
modem approval label 13
regulatory label 13
wireless certification labels 13
release button
display 6
ENWW Index 65
Page 72

release latch
battery pack 10
RJ-11 (modem) jack 8
RJ-45 (network) jack 9
S
S-Video 20
S-Video-out jack 9, 53, 54
screen brightness hotkeys 18,
21
screen image, switching 18, 20
scroll zones, TouchPad 3, 15
security cable slot 9
serial number, computer 13
service tag 13
shutdown 35
shutting down 35
Sleep
exiting 24
initiating 24
writing to CD or DVD 45
slots
memory module 10
security cable 9
software
multimedia 55
USB devices 60
speakers 6, 51
specifications
operating environment 14
rated input power 14
storing battery 33
system information
hotkey 18
system information hotkey 18
U
USB cable, connecting 59
USB devices
connecting 59
description 59
required software 60
stopping 60
USB hubs 59
USB ports, identifying 8, 9, 59
V
vents 7, 10
video features 53
video transmission types 20
volume buttons 4
volume down button 51, 52
volume mute button 51, 52
volume up button 51, 52
volume, adjusting 52
W
Web browser hotkey 18, 19
Windows applications key 2
Windows logo key 2
wireless antennae 11
wireless button 4
wireless certification label 13
wireless light 5
WLAN label 13
T
temperature specifications 14
TouchPad
identifying 15
setting preferences 16
using 16
TouchPad buttons 3, 15
TouchPad scroll zones 3, 15
traveling with the computer
environmental
specifications 14
modem approval label 13
wireless certification labels 13
66 Index ENWW
Page 73

 Loading...