

Page 1

HP Access Control (HP AC) Job Accounting
User Guide
Page 2

© Copyright 2013 Hewlett-Packard
Development Company, L.P.
Microsoft, Windows, and Windows NT are U.S.
registered trademarks of Microsoft
Corporation.
September 2013
Confidential computer software. Valid license
from HP required for possession, use or
copying. Consistent with FAR 12.211 and
12.212, Commercial Computer Software,
Computer Software Documentation, and
Technical Data for Commercial Items are
licensed to the U.S. Government under
vendor’s standard commercial license.
The information contained herein is subject to
change without notice. The only warranties for
HP products and services are set forth in the
express warranty statements accompanying
such products and services. Nothing herein
should be construed as constituting an
additional warranty. HP shall not be liable for
technical or editorial errors or omissions
contained herein.
Page 3

Table of contents
1 HP Access Control (HP AC) Job Accounting ........................................................................................................ 1
1.1 Overview .......................................................................................................................................................... 1
2 HP Access Control (HP AC) Job Accounting Architecture .................................................................................... 2
2.1 Windows print system ..................................................................................................................................... 2
2.2 HP Access Control (HP AC) Job Accounting print system integration ............................................................. 3
3 Information flow ........................................................................................................................................... 5
3.1 HP Access Control (HP AC) Job Accounting print server ................................................................................. 5
4 Getting started ............................................................................................................................................. 7
4.1 Login page ........................................................................................................................................................ 7
4.2 Information page ............................................................................................................................................. 8
4.3 Remote control panel ...................................................................................................................................... 8
4.4 General display window ................................................................................................................................... 9
4.5 License ........................................................................................................................................................... 10
4.5.1 Licensing details ...................................................................................................................... 10
4.6 User ................................................................................................................................................................ 10
4.7 Missing information ....................................................................................................................................... 11
4.8 Miscellaneous ................................................................................................................................................ 11
4.9 HP Access Control (HP AC) Job Accounting interface .................................................................................... 12
4.9.1 Information .............................................................................................................................. 12
4.9.2 Functionalities .......................................................................................................................... 12
4.9.3 Managing HP Access Control (HP AC) Job Accounting lists ..................................................... 13
4.10 Database Manager ...................................................................................................................................... 13
5 HP Access Control (HP AC) Job Accounting administration ............................................................................... 15
5.1 Accounts options ........................................................................................................................................... 16
5.2 Create an account .......................................................................................................................................... 16
5.3 Modify an account ......................................................................................................................................... 17
5.4 Delete an account .......................................................................................................................................... 17
5.5 Currencies ...................................................................................................................................................... 17
5.5.1 Add a currency .......................................................................................................................... 18
5.5.2 Define an exchange rate .......................................................................................................... 19
5.6 Delete an exchange rate ............................................................................................................................... 20
5.7 Modify a currency .......................................................................................................................................... 20
iii
Page 4

5.8 Delete a currency ........................................................................................................................................... 20
5.9 Active Directory ............................................................................................................................................. 21
5.10 Retrieving user data .................................................................................................................................... 22
5.11 Group Organization ..................................................................................................................................... 24
5.12 Group management .................................................................................................................................... 24
5.13 Group management functions .................................................................................................................... 25
5.14 Manual Scan ................................................................................................................................................. 27
5.15 Customize reports ....................................................................................................................................... 28
5.16 Email ............................................................................................................................................................ 29
5.17 Create an email address .............................................................................................................................. 30
5.18 Modify an email address ............................................................................................................................. 31
5.19 Delete an email address .............................................................................................................................. 31
5.20 Distribution lists .......................................................................................................................................... 32
5.20.1 Create a distribution list ........................................................................................................ 32
5.20.2 Modify a list ............................................................................................................................ 33
5.20.3 Delete a list ............................................................................................................................ 34
5.21 Configuring the email server ....................................................................................................................... 34
5.21.1 Configure the server .............................................................................................................. 35
5.21.2 Modify the server configuration ............................................................................................ 35
5.21.3 Delete the server configuration ............................................................................................ 36
5.22 Printer templates ........................................................................................................................................ 36
5.22.1 Create a printer template ...................................................................................................... 37
5.22.2 Assign a printer template ...................................................................................................... 38
5.22.3 Modify a printer template ...................................................................................................... 39
5.22.4 Delete a template .................................................................................................................. 39
6 Configuring data collectors .......................................................................................................................... 41
6.1 HP Access Control (HP AC) Agent .................................................................................................................. 41
6.2 HP Statistics ................................................................................................................................................... 41
6.3 HP Access Control (HP AC) Job Accounting print server ............................................................................... 42
6.4 DesignJet configuration ................................................................................................................................ 45
6.5 Schedule job retrieval .................................................................................................................................... 46
6.6 Schedule DesignJet retrieval ......................................................................................................................... 47
6.7 SAP tracking ................................................................................................................................................... 48
6.8 Direct Tracking Module (DTM) ....................................................................................................................... 48
6.8.1 DTM options ............................................................................................................................. 49
7 Viewing the print server ............................................................................................................................... 51
7.1 Print servers .................................................................................................................................................. 51
7.1.1 Printers ..................................................................................................................................... 52
iv
Page 5

8 Manage print costs ...................................................................................................................................... 54
8.1 Cost control overview .................................................................................................................................... 54
8.2 Cost management page ................................................................................................................................ 55
8.3 Actual costs: printers ..................................................................................................................................... 55
8.3.1 Manual actual costs ................................................................................................................. 55
8.3.2 Create actual printer costs ...................................................................................................... 56
8.3.3 Modify a printer actual cost ..................................................................................................... 58
8.3.4 Delete a printer actual cost ..................................................................................................... 58
8.3.5 Actual costs: media .................................................................................................................. 58
8.4 Define fixed costs .......................................................................................................................................... 60
8.4.1 Fixed costs ............................................................................................................................... 60
8.4.2 Modify a fixed cost ................................................................................................................... 63
8.4.3 Delete a fixed cost ................................................................................................................... 64
8.4.4 Lease costs ............................................................................................................................... 64
8.4.5 Schedule: Costs calculation ..................................................................................................... 66
9 Cost center .................................................................................................................................................. 67
9.1 Managing or creating ..................................................................................................................................... 67
9.1.1 Manage a cost center ............................................................................................................... 67
9.1.1.1 Add a cost center ................................................................................................ 67
9.1.1.2 Import a cost center ........................................................................................... 68
9.1.1.3 Delete a cost center ............................................................................................ 68
9.1.2 Assign users to a cost center ................................................................................................... 69
9.1.3 Assign printers ......................................................................................................................... 70
10 HP Access Control (HP AC) Job Accounting user options ................................................................................. 71
10.1 Options ........................................................................................................................................................ 71
10.1.1 User options ........................................................................................................................... 72
10.1.1.1 Language/currency .......................................................................................... 72
10.1.1.2 Number of lines in lists ..................................................................................... 73
10.1.1.3 Email address ................................................................................................... 73
10.1.1.4 Data format ...................................................................................................... 74
10.1.2 Set passwords ........................................................................................................................ 74
10.1.3 Queries in progress ................................................................................................................ 74
10.1.4 Print organization .................................................................................................................. 75
11 Perform a query ......................................................................................................................................... 77
11.1 Queries ......................................................................................................................................................... 77
11.1.1 Initiate a query ....................................................................................................................... 77
11.2 HP Access Control (HP AC) Job Accounting queries .................................................................................... 78
v
Page 6

11.2.1 Query types ............................................................................................................................ 79
11.2.1.1 Users ................................................................................................................. 79
11.2.1.2 Printers ............................................................................................................. 82
11.2.1.3 Cost centers ...................................................................................................... 86
11.2.1.4 Costs ................................................................................................................. 87
11.2.1.5 Printer options ................................................................................................. 89
11.2.1.6 Allocation .......................................................................................................... 90
11.2.1.7 Quota ................................................................................................................ 92
11.2.2 Launch a query ....................................................................................................................... 93
11.2.3 Default mode ......................................................................................................................... 93
11.2.4 Parameterized mode ............................................................................................................. 93
11.2.5 Edit results ............................................................................................................................. 94
11.3 Parameterize queries .................................................................................................................................. 94
11.3.1 Name a query ......................................................................................................................... 95
11.3.2 Recipient email addresses ..................................................................................................... 95
11.3.3 Select the domain .................................................................................................................. 95
11.3.4 Group ...................................................................................................................................... 95
11.3.5 End user ................................................................................................................................. 95
11.3.6 Document titles starting with... ............................................................................................. 96
11.3.7 Print server ............................................................................................................................ 96
11.3.8 Printer queue ......................................................................................................................... 96
11.3.9 Set printer models ................................................................................................................. 96
11.3.10 Printer .................................................................................................................................. 96
11.3.11 Date ...................................................................................................................................... 96
11.3.12 Printing date from ............................................................................................................... 96
11.3.13 To ......................................................................................................................................... 96
11.3.14 Time lapse ............................................................................................................................ 96
11.3.15 Printing for the last... .......................................................................................................... 97
11.3.16 First n... ................................................................................................................................ 97
11.3.17 Number of printed pages ..................................................................................................... 97
11.3.18 Printing cost ......................................................................................................................... 97
11.3.19 Currency ............................................................................................................................... 97
11.4 Schedule queries ......................................................................................................................................... 97
11.4.1 Once ....................................................................................................................................... 98
11.4.2 Daily ....................................................................................................................................... 99
11.4.3 Weekly ................................................................................................................................. 100
11.4.4 Monthly ................................................................................................................................ 101
11.4.5 Monthly with relative interval ............................................................................................. 102
11.4.6 Run when idle ...................................................................................................................... 103
11.4.7 Modify display parameters .................................................................................................. 103
vi
Page 7

12 Query results ........................................................................................................................................... 104
12.1 Query table ................................................................................................................................................ 104
12.2 Query status .............................................................................................................................................. 105
12.3 Viewing schedule parameters ................................................................................................................... 105
12.4 Display results ........................................................................................................................................... 105
12.4.1 Information provided ........................................................................................................... 105
12.5 Display types ............................................................................................................................................. 106
12.5.1 Manage results .................................................................................................................... 111
12.5.2 Modify parameters .............................................................................................................. 111
12.5.3 Modify the display ............................................................................................................... 112
13 Report management ................................................................................................................................ 113
13.1 Report management page ........................................................................................................................ 113
13.1.1 Create a report ..................................................................................................................... 113
14 Allocation ............................................................................................................................................... 116
14.1 Create allocation profiles .......................................................................................................................... 116
14.2 Modify profile structure ............................................................................................................................ 117
14.3 Modify field values .................................................................................................................................... 118
14.4 Modify default value ................................................................................................................................. 119
14.5 Modify list .................................................................................................................................................. 119
14.6 Delete allocation profiles .......................................................................................................................... 120
14.7 Link a job to an allocation profile ............................................................................................................. 121
14.8 Modify allocation information .................................................................................................................. 123
15 Quota module .......................................................................................................................................... 125
15.1 Quota defaults ........................................................................................................................................... 126
15.2 Quota user ................................................................................................................................................. 128
15.3 Quota cost center ...................................................................................................................................... 129
15.4 Quota printers ........................................................................................................................................... 130
15.5 Assign quota printers to cost center ........................................................................................................ 131
15.6 Import quota ............................................................................................................................................. 132
15.7 Assign cost centers to quota account ....................................................................................................... 133
15.8 Configure quota for printing using print server ....................................................................................... 134
15.9 Adding new users to the quota control .................................................................................................... 135
15.9.1 First print ............................................................................................................................. 136
15.9.2 First access to the MyQuota ................................................................................................ 136
15.9.3 First install of Quota Client .................................................................................................. 137
15.9.4 Import quota ........................................................................................................................ 137
15.10 End user notification ............................................................................................................................... 138
vii
Page 8

15.10.1 Messenger Service ............................................................................................................. 138
16 Quota Client ............................................................................................................................................ 140
17 MyQuota website ..................................................................................................................................... 141
18 Job Accounting Print Client ....................................................................................................................... 142
19 External reports ...................................................................................................................................... 144
19.1 Report activities ........................................................................................................................................ 144
19.2 External report management ................................................................................................................... 144
19.3 Manage folders .......................................................................................................................................... 145
19.4 Manage data sources ................................................................................................................................ 145
19.5 Add a data source ...................................................................................................................................... 146
19.6 Manage models ......................................................................................................................................... 147
19.6.1 Add a model ......................................................................................................................... 147
19.6.2 Delete a model ..................................................................................................................... 147
19.6.3 Assign data source to model ............................................................................................... 147
19.7 Manage reports ......................................................................................................................................... 148
19.7.1 Add a report ......................................................................................................................... 149
19.7.2 Assign model to report ........................................................................................................ 150
19.7.3 Assign data source to report ............................................................................................... 151
19.7.4 Delete a report ..................................................................................................................... 151
19.8 Launch external report ............................................................................................................................. 152
Glossary ....................................................................................................................................................... 153
viii
Page 9

List of tables
Table 8-1 Media priority ..................................................................................................................................................... 63
Table 10-1 Language/currency .......................................................................................................................................... 72
ix
Page 10

List of figures
Figure 2-1 Windows print system ........................................................................................................................................ 2
Figure 2-2 HP Access Control (HP AC) Job Accounting architecture .................................................................................... 4
Figure 3-1 Data flow ............................................................................................................................................................. 6
Figure 4-1 HP Access Control (HP AC) Job Accounting user login ........................................................................................ 7
Figure 4-2 HP Access Control (HP AC) Job Accounting Information Page ........................................................................... 8
Figure 4-3 HP Access Control (HP AC) Job Accounting remote control panel ..................................................................... 9
Figure 4-4 General display window ...................................................................................................................................... 9
Figure 4-5 View license information .................................................................................................................................. 10
Figure 4-6 Element summary table ................................................................................................................................... 11
Figure 4-7 Browser warning message ............................................................................................................................... 11
Figure 4-8 New data is loading ........................................................................................................................................... 12
Figure 4-9 Page navigation bar .......................................................................................................................................... 12
Figure 4-10 Navigate to specific page ................................................................................................................................ 13
Figure 4-11 Delete icon ...................................................................................................................................................... 13
Figure 4-12 Modify icon ...................................................................................................................................................... 13
Figure 4-13 Database Manager login ................................................................................................................................. 14
Figure 5-1 Administration page ......................................................................................................................................... 15
Figure 5-2 Accounts page ................................................................................................................................................... 16
Figure 5-3 Go and Cancel icons .......................................................................................................................................... 17
Figure 5-4 Administration page: Currencies button .......................................................................................................... 18
Figure 5-5 Add a currency ................................................................................................................................................... 19
Figure 5-6 Define exchange rate ........................................................................................................................................ 19
Figure 5-7 Modify a currency .............................................................................................................................................. 20
Figure 5-8 Delete a currency .............................................................................................................................................. 21
Figure 5-9 Active Directory ................................................................................................................................................. 21
Figure 5-10 Retrieve user data ........................................................................................................................................... 23
Figure 5-11 Group Organization ......................................................................................................................................... 24
Figure 5-12 Group selection ............................................................................................................................................... 25
Figure 5-13 Group management icons .............................................................................................................................. 26
Figure 5-14 Manual assignment ......................................................................................................................................... 27
Figure 5-15 Manual scan .................................................................................................................................................... 28
Figure 5-16 Customize report ............................................................................................................................................ 28
Figure 5-17 Customize report columns option .................................................................................................................. 29
Figure 5-18 Email configuration ........................................................................................................................................ 30
Figure 5-19 Create an address ........................................................................................................................................... 31
Figure 5-20 Modify an address ........................................................................................................................................... 31
x
Page 11

Figure 5-21 Confirm deleted address ................................................................................................................................ 32
Figure 5-22 Create distribution list .................................................................................................................................... 33
Figure 5-23 Modify Distribution list ................................................................................................................................... 33
Figure 5-24 Modify distribution list content ...................................................................................................................... 34
Figure 5-25 Verify distribution list deletion ....................................................................................................................... 34
Figure 5-26 Modify server configuration ........................................................................................................................... 35
Figure 5-27 Configure email server ................................................................................................................................... 36
Figure 5-28 Printer template selections ............................................................................................................................ 37
Figure 5-29 Create a template ........................................................................................................................................... 38
Figure 5-30 Assign a template ........................................................................................................................................... 39
Figure 5-31 Select templates to delete ............................................................................................................................. 40
Figure 5-32 Verify template selection ............................................................................................................................... 40
Figure 6-1 Device Host Name ............................................................................................................................................. 41
Figure 6-2 Device Name ...................................................................................................................................................... 42
Figure 6-3 Administration / Print server status ................................................................................................................. 42
Figure 6-4 Printers list ........................................................................................................................................................ 43
Figure 6-5 Print server tile ................................................................................................................................................. 43
Figure 6-6 Print server settings ......................................................................................................................................... 44
Figure 6-7 Device folder ..................................................................................................................................................... 45
Figure 6-8 DesignJet configuration .................................................................................................................................... 46
Figure 6-9 Add or remove DesignJet printers .................................................................................................................... 46
Figure 6-10 Schedule job retrieval ..................................................................................................................................... 47
Figure 6-11 Schedule DesignJet retrieval .......................................................................................................................... 47
Figure 6-12 SAP tracking .................................................................................................................................................... 48
Figure 6-13 DTM Trap ......................................................................................................................................................... 49
Figure 6-14 DTM options .................................................................................................................................................... 49
Figure 6-15 Snmp options .................................................................................................................................................. 50
Figure 7-1 Print organization ............................................................................................................................................. 51
Figure 7-2 Print server column ........................................................................................................................................... 52
Figure 7-3 Printer internal website .................................................................................................................................... 52
Figure 7-4 Manually define printer .................................................................................................................................... 53
Figure 8-1 Page cost management .................................................................................................................................... 55
Figure 8-2 Processing icon ................................................................................................................................................. 55
Figure 8-3 Actual printer costs ........................................................................................................................................... 56
Figure 8-4 Create a cost ...................................................................................................................................................... 57
Figure 8-5 Delete printer cost ............................................................................................................................................ 58
Figure 8-6 Actual costs: media ........................................................................................................................................... 59
Figure 8-7 Media costs ....................................................................................................................................................... 59
Figure 8-8 Fixed costs management .................................................................................................................................. 60
Figure 8-9 Create a fixed cost ............................................................................................................................................ 61
Figure 8-10 Costs priority rules .......................................................................................................................................... 62
xi
Page 12

Figure 8-11 Costs priority rules defined ............................................................................................................................ 62
Figure 8-12 Modify a fixed cost .......................................................................................................................................... 63
Figure 8-13 Delete a fixed cost .......................................................................................................................................... 64
Figure 8-14 Leasing costs .................................................................................................................................................. 64
Figure 8-15 Modify leasing costs ....................................................................................................................................... 65
Figure 8-16 Modify a cost ................................................................................................................................................... 65
Figure 8-17 Schedule: Costs calculation ............................................................................................................................ 66
Figure 9-1 Cost center — manage or create ...................................................................................................................... 67
Figure 9-2 Import cost center data .................................................................................................................................... 68
Figure 9-3 Delete a cost center .......................................................................................................................................... 69
Figure 9-4 Assign users to cost center ............................................................................................................................... 69
Figure 9-5 Assign printers to cost center ........................................................................................................................... 70
Figure 10-1 User options .................................................................................................................................................... 71
Figure 10-2 Define user options ......................................................................................................................................... 72
Figure 10-3 Query table with 10 lines ................................................................................................................................ 73
Figure 10-4 Query table with 5 lines .................................................................................................................................. 73
Figure 10-5 Change password ............................................................................................................................................ 74
Figure 10-6 Query columns ................................................................................................................................................ 75
Figure 10-7 Print organization columns ............................................................................................................................ 76
Figure 11-1 New query ....................................................................................................................................................... 78
Figure 11-2 New query — users ......................................................................................................................................... 79
Figure 11-3 Query printers ................................................................................................................................................. 82
Figure 11-4 Query cost centers .......................................................................................................................................... 86
Figure 11-5 Query costs ..................................................................................................................................................... 88
Figure 11-6 Query printer options ..................................................................................................................................... 89
Figure 11-7 Query allocation .............................................................................................................................................. 90
Figure 11-8 Query quota .................................................................................................................................................... 92
Figure 11-9 New Query page .............................................................................................................................................. 93
Figure 11-10 Parameterized mode .................................................................................................................................... 94
Figure 11-11 Schedule queries .......................................................................................................................................... 98
Figure 11-12 Query frequencies ......................................................................................................................................... 98
Figure 11-13 Query frequency: daily ................................................................................................................................. 99
Figure 11-14 Query frequency: weekly ............................................................................................................................ 100
Figure 11-15 Query frequency: monthly ......................................................................................................................... 101
Figure 11-16 Query frequency: monthly, with relative interval ..................................................................................... 102
Figure 11-17 Query frequency: run when computer dies ................................................................................................ 103
Figure 11-18 Edit query table .......................................................................................................................................... 103
Figure 12-1 Queries in progress ....................................................................................................................................... 104
Figure 12-2 Query status — possible results .................................................................................................................. 105
Figure 12-3 Query information ........................................................................................................................................ 106
Figure 12-4 Chart display ................................................................................................................................................. 107
xii
Page 13

Figure 12-5 Chart display task bar ................................................................................................................................... 107
Figure 12-6 Pie chart ........................................................................................................................................................ 108
Figure 12-7 Pie chart task bar .......................................................................................................................................... 108
Figure 12-8 Table chart .................................................................................................................................................... 108
Figure 12-9 Result display ............................................................................................................................................... 109
Figure 12-10 Excel spreadsheet ...................................................................................................................................... 110
Figure 12-11 Query results .............................................................................................................................................. 110
Figure 12-12 Manage results ........................................................................................................................................... 111
Figure 12-13 Modify query parameters ........................................................................................................................... 111
Figure 13-1 Report management screen ......................................................................................................................... 113
Figure 13-2 Customize report .......................................................................................................................................... 114
Figure 13-3 View report link ............................................................................................................................................. 115
Figure 14-1 Allocation screen .......................................................................................................................................... 116
Figure 14-2 Create allocation profile ............................................................................................................................... 116
Figure 14-3 Allocation profile information ...................................................................................................................... 117
Figure 14-4 Change profile structure ............................................................................................................................... 118
Figure 14-5 Verify delete fields ........................................................................................................................................ 118
Figure 14-6 Modify field value ......................................................................................................................................... 118
Figure 14-7 Modify default value ..................................................................................................................................... 119
Figure 14-8 Modify list ..................................................................................................................................................... 120
Figure 14-9 Select Allocation to delete ........................................................................................................................... 121
Figure 14-10 Verify delete allocation .............................................................................................................................. 121
Figure 14-11 Job allocation .............................................................................................................................................. 122
Figure 14-12 Result display, allocation ........................................................................................................................... 122
Figure 14-13 Add allocation profile parameters ............................................................................................................. 123
Figure 14-14 Allocation profile ........................................................................................................................................ 123
Figure 14-15 Modify allocation information .................................................................................................................... 124
Figure 15-1 Quota module ............................................................................................................................................... 125
Figure 15-2 Quota defaults .............................................................................................................................................. 126
Figure 15-3 Quota user .................................................................................................................................................... 128
Figure 15-4 Quota cost center ......................................................................................................................................... 129
Figure 15-5 Quota printers ............................................................................................................................................... 130
Figure 15-6 Assign to cost center .................................................................................................................................... 131
Figure 15-7 Import quota ................................................................................................................................................. 132
Figure 15-8 Create an account ......................................................................................................................................... 133
Figure 15-9 Assign cost center ......................................................................................................................................... 133
Figure 15-10 Manage cost center quotas ........................................................................................................................ 134
Figure 15-11 Enable quota for print ................................................................................................................................ 135
Figure 15-12 Print server quota ....................................................................................................................................... 135
Figure 15-13 User button ................................................................................................................................................. 136
Figure 15-14 Welcome screen ......................................................................................................................................... 137
xiii
Page 14

Figure 15-15 Import Quota .............................................................................................................................................. 138
Figure 15-16 Quota notification ....................................................................................................................................... 139
Figure 15-17 Messenger notification ............................................................................................................................... 139
Figure 16-1 User quota limit ............................................................................................................................................ 140
Figure 17-1 MyQuota web interface ................................................................................................................................ 141
Figure 18-1 Job Accounting client — Printer configuration ............................................................................................ 143
Figure 19-1 External report management ....................................................................................................................... 145
Figure 19-2 Manage folders button ................................................................................................................................. 145
Figure 19-3 Manage data sources .................................................................................................................................... 145
Figure 19-4 Add a data source ......................................................................................................................................... 146
Figure 19-5 Manage models page .................................................................................................................................... 147
Figure 19-6 Add a model .................................................................................................................................................. 147
Figure 19-7 Assign data source to model ........................................................................................................................ 148
Figure 19-8 Manage reports page .................................................................................................................................... 148
Figure 19-9 Add a report .................................................................................................................................................. 149
Figure 19-10 Add model to report ................................................................................................................................... 150
Figure 19-11 Assign data source to report page ............................................................................................................. 151
Figure 19-12 External report button ............................................................................................................................... 152
Figure 19-13 Parameterized query .................................................................................................................................. 152
xiv
Page 15

1 HP Access Control (HP AC) Job Accounting
1.1 Overview
It is now easier than ever to access information. Whether you access data using the Internet or a company
intranet, it is often necessary to print some of this information for archival purposes. This has resulted in
rising expenses for many companies, due to increased printing costs.
HP Access Control (HP AC) Job Accounting:
●
Is an easy-to-use software package that meets and exceeds the need for managed printing solutions in
business. It helps manage your print system by tracking all copy originating from workstations within
your local area network and print jobs processed through a central print server.
●
Assists companies with an extended print system or a large print volume. For instance, large
companies, universities, and organizations may want to allocate their printing costs directly to the
responsible departments. HP Access Control (HP AC) Job Accounting also assists smaller companies,
such as consulting firms or law offices, which handle a large number of certificates, contracts, and other
documents.
●
Enables you to analyze individual user printing habits and the average usage of your printers. You will
then be able to optimize the management and sharing of your printers according to their use.
●
Improves the cost management and organization of print tasks. The cost of every document printed or
copied (when using HP Access Control (HP AC) Secure Pull Print) on every print server is accounted for
and consolidated.
NOTE: Quota is only available if the HP Access Control (HP AC) Professional installation bundle is installed.
If the HP Access Control (HP AC) Express installation bundle is installed, the Quota menu does not display.
Section 1.1 Overview 1
Page 16

2 HP Access Control (HP AC) Job Accounting
Architecture
2.1 Windows print system
To better illustrate HP Access Control (HP AC) Job Accounting print system integration, it is helpful to
understand the Windows print system.
The Windows print system consists of the following three basic components:
●
An end user initiating the print spool
●
The print server processing the job
●
The printer
Figure 2-1 Windows print system
2 Chapter 2 HP Access Control (HP AC) Job Accounting Architecture
Page 17

All printers are locally declared and shared among a user group from the print server. The spooler of a
Windows print server manages your printing. The process for printing a document in Windows is as follows:
1. User chooses to print a document on a shared printer. The print job is rendered in the printer language
of the print device. This happens at the client level, on a node/client PC on the network.
2. User’s computer delivers the print job to the print server. The print job is sent over the network to the
print server.
3. Print server receives the print job and assigns a data type according to the printer language.
4. Router or print server passes the print job to the local print provider on the server (a component of the
spooler), which spools the print job (writes it to disk).
5. Local print provider polls the print processors declared on the server. When a print processor recognizes
the job’s data type (step 4), this print processor receives the print job and alters it if necessary according
to the data type to ensure that the job prints correctly.
6. Job is sent to the print monitor.
7. Print device receives the print job, translates each page into a bitmap, and sends it to the printer.
2.2 HP Access Control (HP AC) Job Accounting print system
integration
Like the Windows print system, the HP Access Control (HP AC) Job Accounting Print System Job Accounting
print server consists of three basic software components:
●
HP Access Control (HP AC) Job Accounting DS (HP AC Job Accounting Database Server)
●
HP Access Control (HP AC) Job Accounting WS (HP AC Job Accounting Web Server, the interface)
●
HP Access Control (HP AC) Job Accounting print server (HP AC Job Accounting Print Server)
These modules can be installed on either one or several machines.
CAUTION: HP Access Control (HP AC) Job Accounting does not take into account either the printers
connected to a local port (such as LPT or COM) or the printers declared on the network, for instance those
machines managed by another print server. In this last case, you will have to install an HP Access Control (HP
AC) Job Accounting print server module on the second print server.
The same is true for all copiers (HP MFP), which should be declared on the machine where the HP Access
Control (HP AC) Job Accounting print server is installed.
The following diagram provides an example of the overall HP Access Control (HP AC) Job Accounting
architecture:
Section 2.2 HP Access Control (HP AC) Job Accounting print system integration 3
Page 18

Figure 2-2 HP Access Control (HP AC) Job Accounting architecture
For more information on the HP Access Control (HP AC) Job Accounting database server and HP Access
Control (HP AC) Job Accounting web server, see the Information flow section of this guide.
4 Chapter 2 HP Access Control (HP AC) Job Accounting Architecture
Page 19

3 Information flow
3.1 HP Access Control (HP AC) Job Accounting print server
The HP Access Control (HP AC) Job Accounting Print Server is included with the spooler of your print system.
This allows HP Access Control (HP AC) Job Accounting to detect every print job sent to any of these printers.
HP Access Control (HP AC) Job Accounting keeps track of all printed documents, as well as their
characteristics, some of which are listed below:
●
Document name
●
Printer (local and shared name) and its properties (such as color or black and white, or duplex unit)
●
Job owner: name, machine name
●
Number of sent pages and printed pages for HP devices configured to send printer confirmation using
SNMP
●
The printing mode (Economode, duplex, color)
●
The date and time when the print job was sent
●
The media used (such as transparency or paper) and its size (A3, A4, letter)
NOTE: In HP Access Control (HP AC) Job Accounting, the highest level of tracking is by pages. HP Access
Control (HP AC) Job Accounting can intercept and manage job cancellations from the spooler or from the
printer (for an HP printer equipped with HP JetDirect card, using SNMP protocol).
The HP Access Control (HP AC) Job Accounting Web Server enables you to query the HP Access Control (HP AC)
Job Accounting Database Server and to access the data from the HP Access Control (HP AC) Job Accounting
Database Server. The HP Access Control (HP AC) Job Accounting Web Server also enables navigation through
the application using a Web browser. A Web browser is required to display the HP Access Control (HP AC) Job
Accounting interface.
The following diagram illustrates the data flow within your print system.
Section 3.1 HP Access Control (HP AC) Job Accounting print server 5
Page 20

Figure 3-1 Data flow
NOTE: This window presents all modules necessary to create a functional and correctly configured HP
Access Control (HP AC) Job Accounting installation— HP Access Control (HP AC) Job Accounting Print Server,
HP Access Control (HP AC) Job Accounting Database Server, HP Access Control (HP AC) Job Accounting Web
Server, the HP Access Control (HP AC) Job Accounting interface, and the HP Access Control (HP AC) Job
Accounting In Printer component.
6 Chapter 3 Information flow
Page 21

4 Getting started
4.1 Login page
After installing HP Access Control (HP AC), open the HP Access Control (HP AC) Job Accounting configuration
utility and click the HP ACJA tab. The HP Access Control (HP AC) Job Accounting login screen opens:
Figure 4-1 HP Access Control (HP AC) Job Accounting user login
NOTE: Both the default login and password are Admin. The password field is case-sensitive.
The following rules apply to the login page:
●
Entering user information on this page allows access to HP Access Control (HP AC) Job Accounting.
●
When creating an account, enter your HP Access Control (HP AC) Job Accounting user name and
password as defined by the HP Access Control (HP AC) Job Accounting administrator.
●
If the user name or password is invalid, an error message appears. Try entering them again or contact
your HP Access Control (HP AC) Job Accounting administrator.
NOTE: For the HP Access Control (HP AC) Job Accounting Administrator: A default account is created when
installing HP Access Control (HP AC) Job Accounting, to allow you to access the application for the first time.
When you are connected, it is highly recommended that you change the password of the Admin account. For
more information, see the HP Access Control (HP AC) Job Accounting user options section of this guide.
NOTE: For the HP Access Control (HP AC) Job Accounting User: The HP Access Control (HP AC) Job
Accounting administrator created your account with a user name and a password. Only your HP AC Job
Accounting administrator can provide you with this information. After accessing your account for the first
time, you can modify your password. For more information about modifying your password, see the HP
Access Control (HP AC) Job Accounting user options section of this guide.
Section 4.1 Login page 7
Page 22

4.2 Information page
When you have successfully logged into HP Access Control (HP AC) Job Accounting, the HP Access Control (HP
AC) Job Accounting Information page appears:
Figure 4-2 HP Access Control (HP AC) Job Accounting Information Page
The information page consists of two parts: the HP Access Control (HP AC) Job Accounting Remote Control
panel on the left, and the larger General Display window on the right. The HP Access Control (HP AC) Job
Accounting Remote Control panel will always be displayed and does not change appearance. The General
Display will change depending on the selection made in the Remote Control panel.
NOTE: The screen in the figure below shows what an administrator might see. End-users who have not
logged in as administrator will see fewer buttons in the Remote Control panel.
4.3 Remote control panel
The HP Access Control (HP AC) Job Accounting Remote Control panel and its functions are illustrated in the
figure below:
8 Chapter 4 Getting started
Page 23

Figure 4-3 HP Access Control (HP AC) Job Accounting remote control panel
4.4 General display window
The general display window can always be updated and accessed by clicking Home at the top of the Remote
Control panel. (See Figure 4–3, above).
Figure 4-4 General display window
Section 4.4 General display window 9
Page 24

The general display window is divided into the following sections:
●
The information about your license status. If HP Access Control (HP AC) Job Accounting is registered,
nothing is displayed.
●
Information about the current user.
●
Information about costs and exchange rates. (This information only appears for an HP Access Control
(HP AC) Job Accounting administrator.)
●
Other miscellaneous types of information.
NOTE: For the HP Access Control (HP AC) Job Accounting administrator: Read the information presented on
this page carefully. Only the proper system configuration will produce accurate query results.
4.5 License
This section provides information about HP Access Control (HP AC) Job Accounting license status.
4.5.1 Licensing details
The first 30 days of an installation can be used for evaluation purposes. This field also allows you to check
your license status with Hewlett-Packard. Currently, there are three possible licensing options, determined
by the number of users. For specific information regarding HP Access Control (HP AC) Job Accounting
licensing, contact Hewlett-Packard Company.
Figure 4-5 View license information
4.6 User
This section provides information about individual accounts, such as user name, the date of last connection,
and the number of jobs:
●
●
Completed queries (queries for which a result is available)
Launched queries (queries running and for which a result is expected)
●
Scheduled queries (queries planned but not yet run)
●
Errors in queries (queries aborted due to error)
10 Chapter 4 Getting started
Page 25

4.7 Missing information
HP Access Control (HP AC) Job Accounting automatically detects any new elements added to the print system,
whether it is a printer, media, a user, or another element. However, some information regarding these new
elements (for example, the cost of the new printer) must be defined by the administrator in order to ensure
the accuracy of query results.
NOTE: It is the HP Access Control (HP AC) Job Accounting administrator’s responsibility to view this page to
update the HP Access Control (HP AC) Job Accounting configuration on a regular basis. HP Access Control (HP
AC) Job Accounting users are not notified to update parameters surrounding elements added to the print
system.
The fields in the Missing Information section are:
●
Costs to define printers: list the printers with undefined costs. This applies to any new printer added to
a print server.
●
Costs to define media: list the media with undefined cost. This applies to any printed document,
initiated by any user, regarding a media that is not registered in HP AC Job Accounting.
●
Exchange rates to define: list the currencies with no exchange rate regarding the reference currency
(the currency set as default while installing HP AC Job Accounting).
The number of data to enter is specified in front of each field. Each line in these fields is active—click on any
of them to reach an element summary table for the missing information:
Figure 4-6 Element summary table
The elements of each line are also active. Clicking on an element allows direct access to costs and exchange
rates associated with the installation.
4.8 Miscellaneous
A warning similar to the figure below appears when cookies or JavaScript are disabled.
Figure 4-7 Browser warning message
When this occurs, HP Access Control (HP AC) Job Accounting may close abruptly or display false or out-ofdate data. To prevent this from occurring, simply enable cookies and JavaScript in your browser.
The message shown in the figure below may appear at the top of your screen:
Section 4.7 Missing information 11
Page 26

Figure 4-8 New data is loading
This message indicates that print job costs are being updated after cost parameters were modified. As soon
as the calculations are performed, this message disappears.
HP Access Control (HP AC) Job Accounting has three distinct user categories:
●
HP Access Control (HP AC) Job Accounting users
These users have an HP Access Control (HP AC) Job Accounting account. They can launch queries and get
query results (on costs, printed documents) and be informed on the print system.
●
HP Access Control (HP AC) Job Accounting administrators
These users have an HP Access Control (HP AC) Job Accounting account and the ability to launch queries
or gather statistics about the print system. Furthermore, HP AC Job Accounting administrators are able
to manage other HP AC Job Accounting accounts, currencies, exchange rates, user permissions, etc.
●
HP Access Control (HP AC) Job Accounting allocation super user
These users have an HP Access Control (HP AC) Job Accounting account. They can launch queries and
obtain query results (on costs, printed documents) and be informed on the print system. They can also
view and modify allocation information stored in the database.
4.9 HP Access Control (HP AC) Job Accounting interface
The HP Access Control (HP AC) Job Accounting interface is easy to use, with its Remote Control panel and
user-friendly buttons and icons for fast navigation through various functions.
4.9.1 Information
Every HP Access Control (HP AC) Job Accounting icon is context-sensitive. When the cursor is positioned for
several seconds on an icon, a description of the action associated with the icon will appear.
Lists and pull-down menus are built dynamically, according to what is declared/registered in HP Access
Control (HP AC) Job Accounting. For instance the printers, print servers, media, and currencies are all updated
based on information contained in other tables. You can use the Ctrl and Shift keys to choose multiple entries
in a list.
4.9.2 Functionalities
Specific icons allow you to reach a certain page or service. By clicking on any button in the HP Access Control
(HP AC) Job Accounting Remote Control panel, you will be able to access information and to launch certain
tasks. When more than one page of information is generated, the page navigation bar illustrated in the figure
below appears at the bottom of each page:
Figure 4-9 Page navigation bar
12 Chapter 4 Getting started
Page 27

To reach a specific page, click the first page number in the bar and type the number of the page you want to
reach:
Figure 4-10 Navigate to specific page
4.9.3 Managing HP Access Control (HP AC) Job Accounting lists
HP Access Control (HP AC) Job Accounting lists can be managed in any of the following ways:
●
To select one or several elements of a list, check the box on the left of the element (such as account or
query).
NOTE: The box in the title bar selects all elements of the list.
●
To delete an item, select one or more from the list and then click the Delete icon located in the title bar.
Figure 4-11 Delete icon
NOTE: Be sure to select the elements before deleting.
●
To modify the parameters of an element in the list, click the Modify icon.
Figure 4-12 Modify icon
NOTE: It is only possible to modify one element at a time.
4.10 Database Manager
The Job Accounting Database Manager is a simple tool for managing the Job Accounting database. It is not
intended to replace any SQL Management Tools that are included with SQL Server.
WARNING! Please make sure the database is backed up prior to applying any changes to the database.
Go to the Job Accounting tile > Database Manager tab.
Section 4.10 Database Manager 13
Page 28

Figure 4-13 Database Manager login
In the Server Name field, make sure to include the instance name if you used a named instance of SQL. Enter
the correct logins credentials. Click OK.
WARNING! If you delete any item in the database, any record relating to the deleted item is also deleted.
For example, if you delete a print server from the database, all printers and jobs from the print server are
deleted.
To view SQL queries, go to the Database menu and select SQL Query.
In the Database Manager, select items you want to delete:
●
Select Print servers to delete a selected print server, including all printers and jobs assigned to it.
●
Select Printers to delete a selected printer and all jobs assigned to it.
●
Select Domains to delete a selected domain, including all users and jobs assigned to it.
●
Select Users to delete a selected user and all jobs assigned to the user.
●
Select Allocation to delete a selected allocation profile and jobs assigned to it.
●
Select Jobs to delete jobs within a selected date range.
14 Chapter 4 Getting started
Page 29

5 HP Access Control (HP AC) Job Accounting
administration
Use the HP Access Control (HP AC) Job Accounting Administration page to add, delete, or modify HP Access
Control (HP AC) Job Accounting functions and parameters. HP Access Control (HP AC) Job Accounting
administration is divided into two parts:
●
The HP Access Control (HP AC) Job Accounting administrator assigns and configures individual accounts;
including HP Access Control (HP AC) Job Accounting accounts, currencies used in the application, and
email system.
●
The HP Access Control (HP AC) Job Accounting administrator defines the costs and prices (such as
printers and media), which will affect query results.
This chapter focuses on all issues regarding HP Access Control (HP AC) Job Accounting print server, accounts,
currencies, active directory, the email system, and printer templates. All administration operations will be
performed from this menu.
NOTE: The Administration menu only appears in the HP Access Control (HP AC) Job Accounting remote
control if you have Administrator rights.
Access the Administration screen by clicking Administration on the HP Access Control (HP AC) Job Accounting
remote control, as shown in the figure below:
Figure 5-1 Administration page
15
Page 30

5.1 Accounts options
To access the HP Access Control (HP AC) Job Accounting Accounts options, click Accounts on the
Administration screen.
Figure 5-2 Accounts page
This page provides information on the various accounts in the system, and allows the administrator to create
new accounts or modify existing ones.
The first time you access HP Access Control (HP AC) Job Accounting, one of your initial tasks will be to define
HP Access Control (HP AC) Job Accounting access accounts so that HP Access Control (HP AC) Job Accounting
users and administrators can use the Web interface.
5.2 Create an account
When creating a new account, determine whether the account owner will be granted administrator privileges.
1. Click Create an account.
2. Enter a unique user name.
3. Enter your password and then confirm it by entering it again. For security reasons, passwords are
masked.
NOTE: Passwords are case sensitive
4. To give administrator rights to the account owner, check the Administrator box.
16 Chapter 5 HP Access Control (HP AC) Job Accounting administration
Page 31

5.
Click the Go
Figure 5-3 Go and Cancel icons
This account has the language and currency attached by default to the Admin account. For more information
on changing the language and currency, see the HP Access Control (HP AC) Job Accounting user options
section of this guide.
icon to validate the account, or the Cancel icon to reject it and stop the operation.
5.3 Modify an account
Administrators can modify the password or the access rights attached to a user name. You may find this
function useful when reinitializing an account password.
NOTE: It is possible to modify only one account at a time.
●
To modify account information, click the Modify
●
To change the password, enter the password, and then enter the password again to confirm it.
●
To grant or withdraw administration rights, check or uncheck the Administrator box.
NOTE: The access rights of an Admin account cannot be changed.
●
Click the Go
icon to accept the modification, or the Cancel icon to reject it and stop the operation.
5.4 Delete an account
To delete an account, check the box corresponding to the user account you want to delete. Click the Delete
icon. You will be asked to confirm the deletion before the account is removed.
TIP: You can delete several accounts in one operation.
5.5 Currencies
To view defined currencies, add a currency, or define a currency exchange rate, click Currencies on the Administration page.
icon.
Section 5.3 Modify an account 17
Page 32

Figure 5-4 Administration page: Currencies button
This page lists all currencies defined in HP Access Control (HP AC) Job Accounting and provides their acronym.
These currencies may be used in HP Access Control (HP AC) Job Accounting to display costs for elements such
as printers, media, or jobs.
A currency will ultimately express a cost associated with a given printer. Each time a new cost is entered by
an HP Access Control (HP AC) Job Accounting administrator, the default currency for this cost is the same as
the currency associated with the current administrator. You can modify the currency, which is attached by
default to each HP Access Control (HP AC) Job Accounting user and administrator in the User options. For
more information, see the HP Access Control (HP AC) Job Accounting user options section of this guide.
HP Access Control (HP AC) Job Accounting contains the following default currencies:
●
US dollar
●
European Euro
●
British pound
NOTE: You may delete any currency, as long as it has not been used to express a cost.
5.5.1 Add a currency
Forms of currency are entered in Add a currency. To add a currency, complete the following steps:
18 Chapter 5 HP Access Control (HP AC) Job Accounting administration
Page 33

1. From the Currencies page, click Add a currency.
Figure 5-5 Add a currency
2. Specify the new currency name and acronym (Example: USD for a US dollar).
3.
Click the Go
icon to add the currency, or the Cancel icon to stop the operation.
5.5.2 Define an exchange rate
An exchange rate must be associated with each currency. All exchange rates are set to “0” by default.
NOTE: You must define an exchange rate for the new currency, or all costs expressed in the new currency
will be incorrect.
Use the following steps to define an exchange rate:
1. On the Currencies page, check the box beside a currency to select it.
2. Click Define an exchange rate.
Figure 5-6 Define exchange rate
Section 5.5 Currencies 19
Page 34

3. Enter the exchange rate for the currency.
4.
Click the Go
icon to accept the defined exchange rate, or the Cancel icon to stop the operation.
5.6 Delete an exchange rate
To delete an exchange rate, complete the following steps:
1. On the Currencies page, check the box beside a currency to select it.
2. Click Define an exchange rate.
3. Enter 0 in the field beside the currency, for the exchange rate you want to delete.
5.7 Modify a currency
To modify a currency name or acronym, complete the following steps:
NOTE: You can modify only one currency at a time. On the Currencies page, check the box beside a currency
to select it.
1.
Click the Modify
Figure 5-7 Modify a currency
icon to access Modify a currency screen.
2. Enter a New currency name or New local name in the designated fields.
3.
Click the Go
NOTE: You do not have to redefine the exchange rate for a modified currency.
icon to save the modifications, or the Cancel icon to stop the operation.
5.8 Delete a currency
Use the following steps to delete a currency:
1. On the Currencies page, check the box beside a currency to select it.
20 Chapter 5 HP Access Control (HP AC) Job Accounting administration
Page 35

2.
Click Delete
Figure 5-8 Delete a currency
.
3.
Click the Go
TIP: You can delete several currencies at a time.
NOTE: The exchange rates attached to a deleted currency are automatically deleted.
icon to delete the currency, or the Cancel icon to stop the operation.
5.9 Active Directory
Information regarding users, groups, domains, and computers is collected the first time a user is detected in
the database. If no network scan has been performed, only the users printing with the HP Access Control (HP
AC) Job Accounting print server will be stored in the database. After a network scan has been launched, the
information pertaining to users, groups, domains, and computers is stored in the database.
On the Active Directory screen, the administrator can create new HP Access Control (HP AC) Job Accounting
groups, which are processed like standard network groups. If a user belongs to several groups, assign the
user to a group and obtain user information through various queries.
To access the Active Directory options, click Active Directory on the Administration page.
Figure 5-9 Active Directory
The Active Directory displays the total number of users, computers, domains, and groups that are currently
tracked. These numbers will change according to the data detected on your network. The data is refreshed
once every 30 seconds.
From Active Directory, the administrator can perform the following tasks:
Section 5.9 Active Directory 21
Page 36

●
Click Retrieve user data to launch the search.
●
Click Group organization to add, delete, or organize groups.
●
Click Group management to manage groups and user assignments to groups, to charge them based on
printing activity.
●
Click Customize report to add and define columns in your queries. The summary report is not affected.
HP Access Control (HP AC) Job Accounting allows you to retrieve and use data regarding individual print
system users. This data, also called Active Directory in the Windows system (ADSI), reports the user’s group
and domain, if any. Data such as the user’s first and last name, the name and operating system of the
machine, and the user’s declaration in the system are also given based on information previously entered by
an administrator.
This user data enables accurate monitoring of print costs over a network. Individual users are charged for
printing costs, rather than costs associated with a particular workstation. For companies with a large user
base, individual accounts should be placed in different groups or domains, depending on the internal
organization. User queries can be launched by specifying a Windows domain, limiting the scope of your query.
Using this method produces faster, more precise results.
NOTE: Active Directory only supports Domain Controller on Windows 2000, 2003, and 2008. pDC on
Windows NT 4.0 is not supported.
You can add this data to your HP Access Control (HP AC) Job Accounting database using automatic or manual
retrieval. To enable automatic database updates you should have the necessary network permissions, which
can only be applied by the network administrator. These rights should be registered before any printing or
manual data retrieval.
5.10 Retrieving user data
User data can also be manually retrieved by the HP Access Control (HP AC) Job Accounting administrator.
22 Chapter 5 HP Access Control (HP AC) Job Accounting administration
Page 37

1. Click Retrieve user data to launch this operation.
Figure 5-10 Retrieve user data
2. Choose a specific Affected domain to scan.
You can also specify the login and password of an HP Access Control (HP AC) Job Accounting
administrator for the defined domain of your print system. For security purposes, the password is
encrypted and not visible.
NOTE: Passwords are case-sensitive.
NOTE: HP Access Control (HP AC) Job Accounting uses this identification to research users on the
network. The user performing the scan must have administrator rights in each affected domain—be
aware of any firewalls that may block the scan.
NOTE: If no login or password is entered, HP Access Control (HP AC) Job Accounting verifies the
network authorizations of the machine from which the search was initiated.
3. Limit the scope of information scanned by choosing Computer or Group in the options list of the Scan
type field.
The Computer option allows the retrieval of various computers and users. The Group option allows
retrieval of various groups, as well as all attached users. Complete scan retrieves all information
related to your domain by taking into account all levels of your system. This last option is selected by
default.
4.
Click the Go
icon to accept the process, or the Cancel icon to stop the operation.
NOTE: This operation must be performed for each domain of the print system. Each new user or group in
any domain is automatically added to the HP Access Control (HP AC) Job Accounting database. All lists and
drop-down menus that summarize end users, machines, groups, and domains existing in the NT system are
automatically created and updated in the HP Access Control (HP AC) Job Accounting interface, if the user has
printed. For more information on these parameters, see the Parameterize queries section of this guide.
Section 5.10 Retrieving user data 23
Page 38

5.11 Group Organization
Group Organization defines which Active Directory property to use to query group activity and costs for each
user. The three options for organization are Primary Group, Organizational Unit, or Active Directory
Properties.
Figure 5-11 Group Organization
Primary Group and Organizational Unit (default OU is Users) are the standard Active Directory properties.
Active Directory Properties allow for the selection of available AD properties; or a property can be specified
by entering a valid AD property as text. If the option is configured on the HP Access Control (HP AC) Job
Accounting Server, and security has been configured to disable Anonymous access on the HP Access Control
(HP AC) Job Accounting web site in the IIS console, a list of AD properties populates a drop-down list.
Otherwise, only an input field displays and the property must be supplied as text input.
NOTE: A complete network scan must be launched to update the database if Organizational Unit or Active
Directory Properties is selected.
5.12 Group management
Group management defines how print jobs are allocated to the groups of your network, which affects the
result of some queries and modifies the printing cost charges per group user.
A single user may belong to several groups. For example, a user can belong to the Development group, the
Accounting group, and the Management group. The user can be attached to one specific group or several, if
desired. Each user could be assigned to a favorite group. In this manner, all printing activity related to a user
24 Chapter 5 HP Access Control (HP AC) Job Accounting administration
Page 39

is counted only once, and not twice or three times, as is the case when the user belongs to several groups. To
set up this feature you will first need to choose a domain. Use the following steps to manage groups:
1. Click Group management on the “Active Directory” page.
2. Choose a Domain.
3. Click the Go
Figure 5-12 Group selection
icon to continue to the Group selection menu:
5.13 Group management functions
The Group selection window displays all the groups that have been automatically detected by HP Access
Control (HP AC) Job Accounting, and new groups that have been created manually. These new groups appear
highlighted in light blue.
Section 5.13 Group management functions 25
Page 40

Use icons to manage groups:
Figure 5-13 Group management icons
1
The right-arrow icon moves a group from the Unselected groups field to the Selected groups field. You
also can select many groups by holding the Ctrl key while making selections.
2
This icon moves all groups from Unselected groups to Selected groups.
3
The left-arrow icon moves a group from the Selected groups field to the Unselected groups field. You also
can select many groups by holding the Ctrl key while making selections.
4
This icon moves all groups from Selected groups field to the Unselected groups.
The Delete
icon is used to delete the manually created groups.
To remove any automatically-detected groups that are unnecessary, select them and click the left-arrow
icon. They are added to the Unselected groups field. This action allows them to be retrieved later if needed.
The New group field allows the creation of custom groups. Enter the name of the new group and add it to the
Selected groups window by clicking the right-arrow icon. The new group is highlighted in light blue.
Following are the rules of selection:
●
By default, all groups are selected (they appear in the “Selected groups” window).
●
You can create and delete groups you have created manually.
●
You cannot delete groups detected by the system as active (Active Directory).
●
If you delete a group with users still attached, they are moved to the unspecified group.
26 Chapter 5 HP Access Control (HP AC) Job Accounting administration
Page 41

●
To assign users manually, click Manual assignment in “Group management”:
Figure 5-14 Manual assignment
A list of users is displayed. You can only reveal the users of one particular group at a time, but it is possible to
see all users of all groups. In this case, the current assigned group is indicated between brackets for each
user.
You can choose a new destination group for each user. Select one or many users, and then select a new
destination group and click the right-arrow icon to assign the selected users to this new group. As a result of
selecting a specific group, a query is launched including the users who have just been assigned.
NOTE: This assignment is recommended for environments with a small number of users.
5.14 Manual Scan
On large networks, performing scans for new users can be a time-consuming process. After adding a new user or making a change to an existing user, the Manual Scan option can quickly update the system.
Section 5.14 Manual Scan 27
Page 42

1. Click Manual Scan on the “Group management” page:
Figure 5-15 Manual scan
To limit the list size, use the drop-down menu to confine the results to specific network groups. Use the
following steps to perform a “Manual scan”:
2. Select the new user from the list.
3.
Click the Update
icon to update the selected user.
5.15 Customize reports
Use the Customize Report function to add data from any Active Directory field in a column within a usergenerated report. Only queries reporting the user name see the additional columns.
1. Click Customize report on the “Active Directory” page to add and define new columns in your report.
Figure 5-16 Customize report
2. Define up to five columns:
28 Chapter 5 HP Access Control (HP AC) Job Accounting administration
Page 43

a. Enter the column name in the Column field.
b. Select from the Active Directory Properties drop-down list to define the column. If the drop-down
list can be populated, an input field displays (see Group organization > Active Directory properties
sub-section of Group organization section of this manual for more details.
Figure 5-17 Customize report columns option
NOTE: See Perform a query > Modify display parameters to display additional columns in the report.
5.16 Email
The email system defines both individual email addresses and distribution lists. The system provides all HP
Access Control (HP AC) Job Accounting users and administrators with a choice of email recipients. An email
server should also be configured to send query results using email (a proxy server and the SNMP port
associated).
Section 5.16 Email 29
Page 44

To create addresses and lists and configure the email server, click Email on the Administration page.
Figure 5-18 Email configuration
The HP Access Control (HP AC) Job Accounting email system enables HP Access Control (HP AC) Job
Accounting users to send query results using electronic mail as the delivery mechanism.
Email data (addresses, lists and server), if already defined, appears on the screen. The SMTP address of the
email server is displayed. You can create the addresses and distribution lists using the task bar at the top of
the page.
NOTE: Query results can only be sent in Comma-Separated Value (CSV) format.
To send your query results using email you must have all of the following:
●
A properly configured email server.
CAUTION: To configure an email server you need some parameters that may be confidential. Only
your network administrator may have access to this information.
●
A sender. The sender’s address can be defined in the User options. This operation is mandatory. Any HP
Access Control (HP AC) Job Accounting user or administrator can define their address. For more
information on this operation, see the HP Access Control (HP AC) Job Accounting user options section of
this guide.
●
Recipients for query results. For more information on this operation, see the Query results section of
this guide.
NOTE: No verification is performed on email addresses (such as access, validity, or entry). These addresses
will only be used when results are sent. Contact your system administrator to confirm that email messages
have been sent and received. If an error occurs, you will have to correct the HP Access Control (HP AC) Job
Accounting addresses.
HP Access Control (HP AC) Job Accounting contains an address book, which consists of recipient addresses
and recipient lists. You should first define individual addresses, and then create lists with these addresses.
5.17 Create an email address
This operation is not mandatory. Email addresses can be defined when launching a query. For more
information, see the Parameterize queries section of this guide.
Use the following steps to create an email address:
30 Chapter 5 HP Access Control (HP AC) Job Accounting administration
Page 45

1. From the Email screen, click Create an address.
Figure 5-19 Create an address
2. Enter the email address in the usual format: xxxxxx@xxxxxx.xxx
3.
Click the Go icon to accept the address, or the Cancel icon to reject it and stop the operation.
NOTE: All fields can contain up to 127 characters, symbols, and figures.
5.18 Modify an email address
Use the following steps to modify an existing address:
1. On the Email page, select the email address you want to modify.
2.
Click the Modify parameters
Figure 5-20 Modify an address
3.
Click the Go
icon to accept the modifications, or the Cancel icon to reject it and stop the operation.
icon to display the Modify an address page.
5.19 Delete an email address
To delete an email address, complete the following steps:
1. Select the address you want to delete in the Addresses section.
Section 5.18 Modify an email address 31
Page 46

2.
Click the Delete
NOTE: To avoid an error, confirm that you want to delete the address.
Figure 5-21 Confirm deleted address
icon.
3.
Click the Go
operation.
CAUTION: This operation cannot be canceled after it has been accepted.
icon to accept the address deletion, or the Cancel icon to reject it and stop the
5.20 Distribution lists
A distribution list consists of several email addresses grouped together. You can create a list of addresses,
and assign a name to the list. Then to send an email to all addresses contained in the list, you just need to
enter the assigned name of this list.
NOTE: This operation is not mandatory. Email addresses can be defined while launching individual queries.
For more information, see the Parameterize queries section of this guide.
5.20.1 Create a distribution list
To create an email distribution list, complete the following steps:
1. From the Email page, click Create addresses from lists.
32 Chapter 5 HP Access Control (HP AC) Job Accounting administration
Page 47

2. At the top of the screen, click Distribution lists.
Figure 5-22 Create distribution list
3. Enter a name for the list in the Name field. All existing individual email addresses appear in the Email
address field.
TIP: You can enter up to 127 characters, symbols, and figures.
4. To create a list, select an email address. To select more than one address, hold down the Ctrl and Shift
keys while selecting.
5.
Click the Go
5.20.2 Modify a list
To modify a Distribution list, complete the following steps:
1. Check the box to select the Distribution list you want to modify.
Figure 5-23 Modify Distribution list
icon to accept the list creation, or the Cancel icon to reject it and stop the operation.
Section 5.20 Distribution lists 33
Page 48

2.
Check Modify parameters
Figure 5-24 Modify distribution list content
TIP: You can modify the content of one or several fields by clicking on each field, and then entering
the relevant information.
to open the Modify a list page.
3.
Click the Go
operation.
5.20.3 Delete a list
To delete a list, complete the following steps:
1. Click to select the box next to the Distribution list you wish to delete.
2.
Click the Delete
Figure 5-25 Verify distribution list deletion
icon to accept the distribution list modifications, or the Cancel icon to stop the
icon in the column heading(s).
3.
Click the Go
CAUTION: This operation cannot be canceled after it has been accepted.
icon to accept the list deletion, or the Cancel icon to stop the operation.
5.21 Configuring the email server
When setting up your email server, you must configure the outgoing SMTP mail and the port.
CAUTION: This information may only be known by the network administrator.
34 Chapter 5 HP Access Control (HP AC) Job Accounting administration
Page 49

NOTE: You can only create one server configuration.
If the email server configuration has been defined, it will appear on your screen with its SMTP outgoing mail
and port number. You will be able to create, modify, and delete your server configuration by using the task
bar at the top of the page.
5.21.1 Configure the server
To configure the server, complete the following steps:
1. Click Configure the email server.
At Modify the server configuration,
a. Enter the Outgoing mail (SMTP) information.
b. Enter the Outgoing port number (SMTP).
c. Enter the User name and Password. This user name and password allows you to validate access to
the email server.
d. If a Domain is required, enter the NETBIOS Domain name.
Figure 5-26 Modify server configuration
2.
Click the Go
NOTE: All configuration fields can contain up to 127 characters, symbols, and figures.
icon to accept the configuration, or the Cancel icon to stop the operation.
5.21.2 Modify the server configuration
To modify the server configuration, complete the following steps:
Section 5.21 Configuring the email server 35
Page 50

1. Click Configure the email server.
Figure 5-27 Configure email server
2. On the Configuration screen, modify the content of one or several fields by selecting each field to enter
the relevant information.
3.
Click the Go
icon to accept the configuration, or the Cancel icon stop the operation.
5.21.3 Delete the server configuration
To delete the server configuration, complete the following steps:
1. Click Configure the server.
2. On the Modify the server configuration screen, delete the information entered in the fields.
3.
Click the Go
CAUTION: This operation cannot be canceled after it has been accepted.
icon to accept the configuration, or the Cancel icon stop the operation.
5.22 Printer templates
With HP Access Control (HP AC) Job Accounting printer templates, you can define the costs associated with
each model of printer and then apply that template to any printers declared on the HP Access Control (HP AC)
Job Accounting print server. Printer costs can be managed and updated from one centralized interface.
HP Access Control (HP AC) Job Accounting allows you to define custom printer templates. A printer template
contains various values related by default to a specific object type. For instance, a template for the HP
LaserJet 9050 printer would contain all prices and costs associated with that printer, such as printer price,
toner price, total number of printed pages, depreciation period, leasing cost, and maintenance cost.
For more information on actual costs, see the Manage print costs section of this guide.
A template can be allocated to one or several printers. These printers will automatically inherit the values
associated with this template as actual costs. You can manage your actual costs by clicking Page cost
management in the HP Access Control (HP AC) Job Accounting remote control.
Any printer tracked by HP Access Control (HP AC) Job Accounting can be associated as the default, with a set
of pre-defined prices and costs that are used when you launch cost queries.
36 Chapter 5 HP Access Control (HP AC) Job Accounting administration
Page 51

To create a template, assign a template to a printer, modify a template, or delete a template, click Printer
templates on the Administration page.
Figure 5-28 Printer template selections
The templates management task bar allows you to create a template or assign a template to a printer.
5.22.1 Create a printer template
To create a printer template, complete the following steps:
Section 5.22 Printer templates 37
Page 52

1. To begin template creation, click Create a template from the Printer templates page.
Figure 5-29 Create a template
2. Enter the template name. This is a required field.
3. Enter the costs in fields provided, as desired.
NOTE: Use a decimal point in costs (such as 20.00) and years as the unit of time.
4. Use the drop-down list in the Currency field to define the currency for your costs.
5.
Click the Go
NOTE: You must provide information in the Template name field.
icon to accept the data, or the Cancel icon to stop the operation.
5.22.2 Assign a printer template
A single template can be assigned to a single printer or to several printers. However, the opposite is not true;
several templates cannot be assigned to one printer.
To assign a template to a printer:
1. Select a template to assign.
38 Chapter 5 HP Access Control (HP AC) Job Accounting administration
Page 53
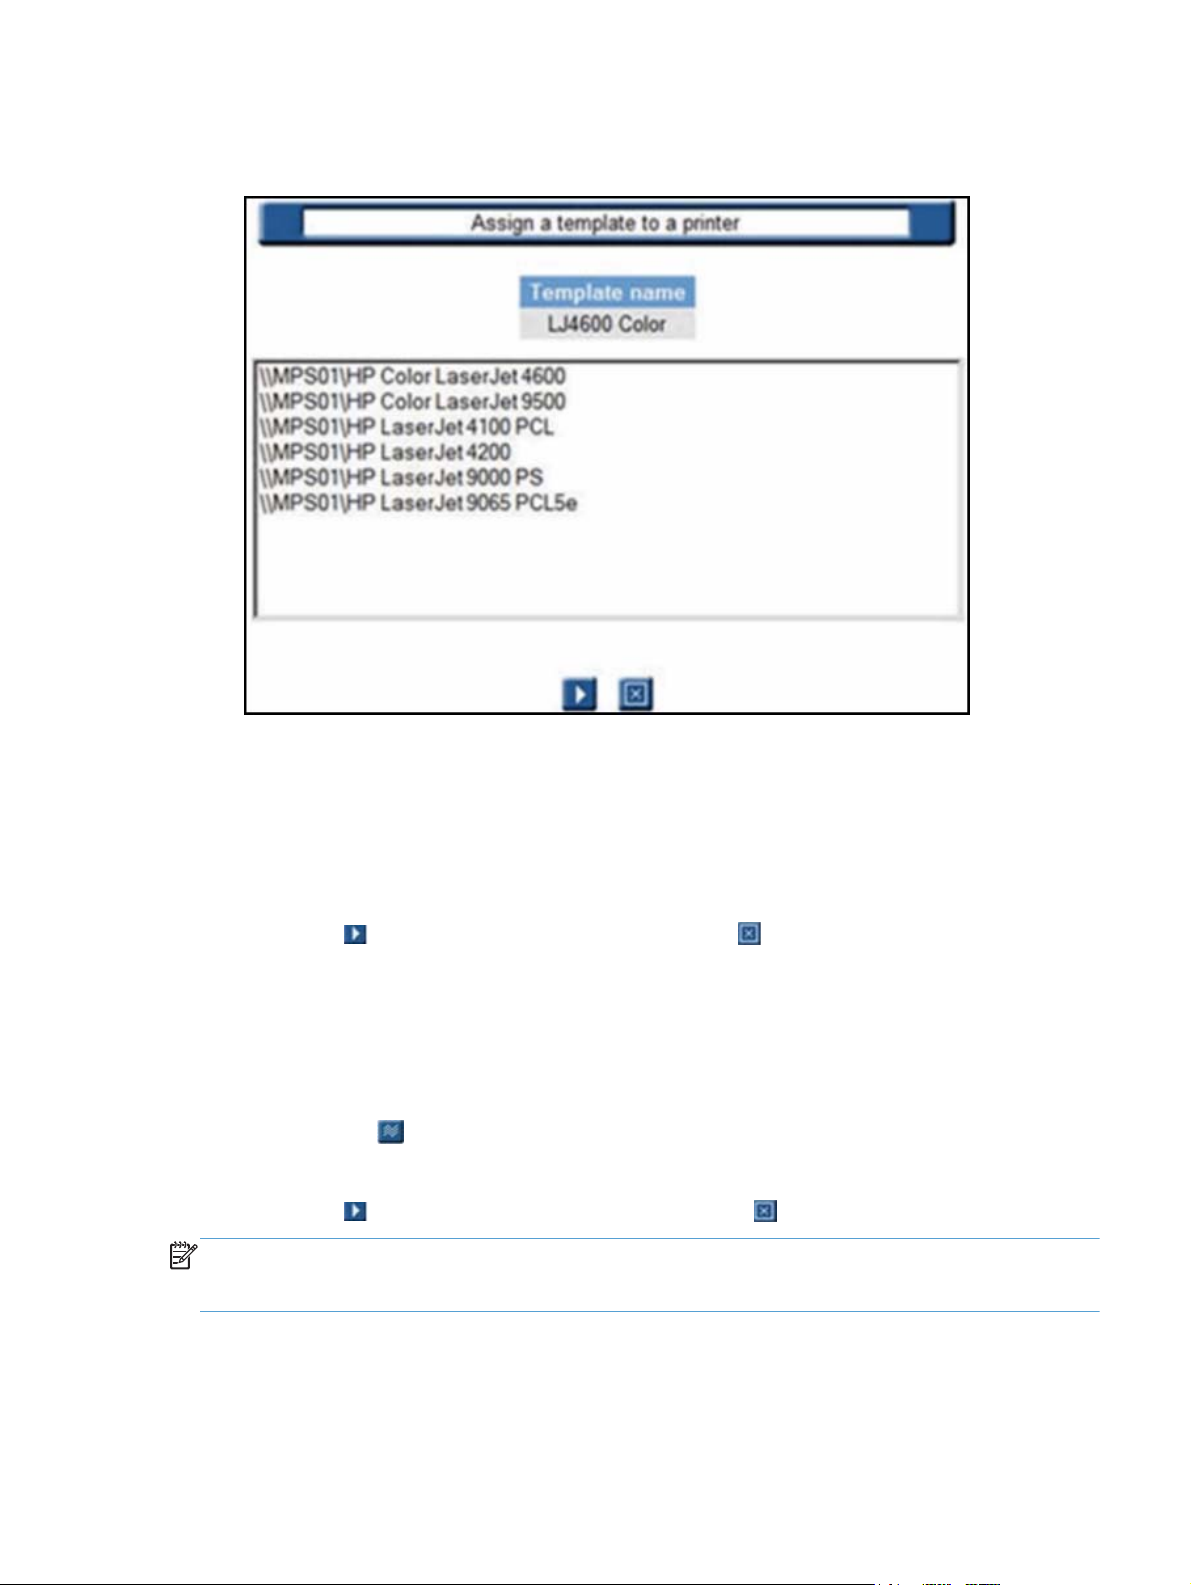
2. Click Assign a template to a printer.
Figure 5-30 Assign a template
This page lists all printers tracked by HP Access Control (HP AC) Job Accounting on your print network.
Each line in this list represents a printer in this format:
\\print server\printer.
The template name appears at the top of the page.
3. To assign the template, select a printer. To select multiple printers, use the Ctrl and Shift keys on your
keyboard.
4.
Click the Go
icon to accept the assignment, or the Cancel icon to stop the operation.
5.22.3 Modify a printer template
You can modify all costs defined in your printer template. You cannot modify the template name. You can
only modify one template at a time.
1. Select the template to modify.
2.
Click the Modify
3. Modify your data as desired.
4.
Click the Go
NOTE: If you entered a new printer price, it will dynamically appear in the printer costs. Any modification to
a printer template will change the actual costs of this printer. HP Access Control (HP AC) Job Accounting will
automatically re-calculate costs.
icon.
icon to accept the modifications, or the Cancel icon to stop the operation.
5.22.4 Delete a template
To delete a template, complete the following steps:
Section 5.22 Printer templates 39
Page 54

1. From the template management screen, select the template to delete.
Figure 5-31 Select templates to delete
2.
Click the Delete
icon in the title bar of the list. The template appears on your screen.
Figure 5-32 Verify template selection
3.
Click the Go
icon to accept the modifications, or the Cancel icon to stop the operation.
CAUTION: This operation cannot be canceled after it has been accepted.
40 Chapter 5 HP Access Control (HP AC) Job Accounting administration
Page 55

6 Configuring data collectors
6.1 HP Access Control (HP AC) Agent
The HP Access Control (HP AC) Agent allows you to capture data directly from a network printer, and
functions even if the HP Access Control (HP AC) Job Accounting print server direct tracking module is not
installed. For more information and instructions to configure HP Access Control (HP AC) Agent, see the HP
Access Control (HP AC) Agent Administrator Guide.
6.2 HP Statistics
HP Statistics is a method of capturing data directly from an HP FutureSmart printer.
NOTE: All HP FutureSmart device administrator user names and passwords must match the Device
administrator user name and password in the HP Access Control (HP AC) tool. Go to the Settings tile > Device
tab of the HP Access Control (HP AC) tool to enter the Device administrator user name and password.
To select what device information you want to display in HP Access Control (HP AC) Job Accounting reports,
go to the Settings tile > Device tab.
●
Select Device name to display the device names in job accounting reports.
●
Select Network name to display the host names of devices in job accounting reports. Make sure the Get
community name is entered in the SNMP section to be able to read the network/host names of devices.
Click Apply.
To configure an HP FutureSmart device for tracking, follow the steps below:
1. Go to the Devices tile.
2. Select the HP FutureSmart device from the device list, then click Configure.
3. Select Tracking. Click OK. An X displays under the Tracking column, indicating the HP FutureSmart
device is configured for tracking.
When multiple FutureSmart devices of the same model have the same device name, only one device is
reported in Job Accounting. Therefore, devices of the same model must have unique device names for correct
tracking. To change the device's name to be the device's host name, follow the steps below:
1. Go to the Networking > TCP/IP Settings > Network Identification page of the device EWS to determine
the Host Name of the device.
Figure 6-1 Device Host Name
Section 6.1 HP Access Control (HP AC) Agent 41
Page 56

2. Go to the General > Device Information page. In the Device Name field, enter the device's Host Name.
Click Apply.
Figure 6-2 Device Name
After jobs are tracked and the XML files are processed, you will see all your devices listed in Job Accounting.
After the XML files are processed, you will see all your devices listed in Job Accounting.
6.3 HP Access Control (HP AC) Job Accounting print server
This portion of the Administration Module allows you to view the status of HP Access Control (HP AC) Job
Accounting print server printers, as well as schedule job retrievals for printers configured as tracked printers
on a print server, and DesignJet.
To view a list of both Windows printers and HP Access Control (HP AC) Job Accounting printers for the
selected HP Access Control (HP AC) Job Accounting print server, from the Printers List column, click View.
Figure 6-3 Administration / Print server status
The Printers List screen shows the list of installed Windows printers.
42 Chapter 6 Configuring data collectors
Page 57
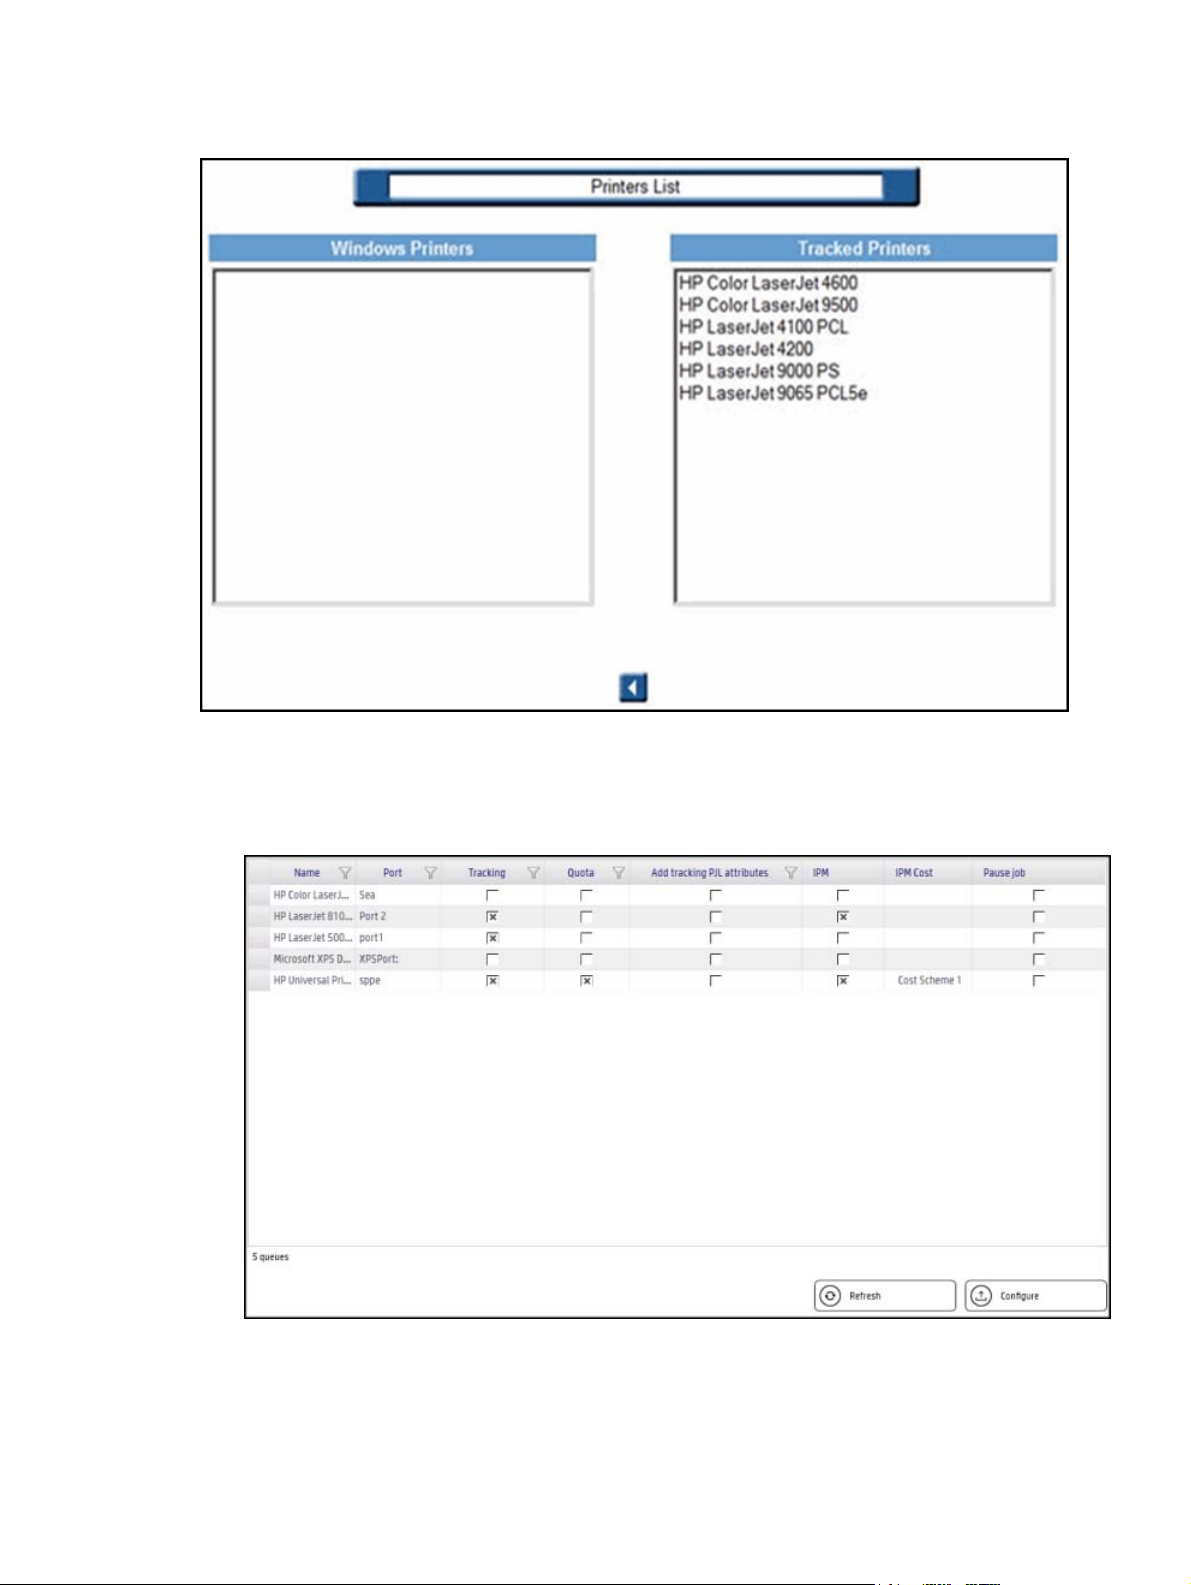
Figure 6-4 Printers list
Before HP Access Control (HP AC) Job Accounting can track a printer, it must be identified by the Print Server
tile.
1. Go to the Print Server tile.
Figure 6-5 Print server tile
2. Select a printer from the printer list, then click Configure.
3. In the Configure window, select the features you want to configure:
Section 6.3 HP Access Control (HP AC) Job Accounting print server 43
Page 58

●
Click Tracking enable tracking of print jobs sent to the selected print queue. The print queue
tracking method can be either Port Monitor or Print Processor, depending on what is selected in
the Settings tile > Print Server tab.
●
Click Quota to enable the enforcement of Job Accounting quotas for printing.
●
Click IPM to apply IPM rules and costs to the printer. See the HP Access Control (HP AC) IPM
Administrator Guide for more information.
●
Click Add tracking PJL attributes to insert Job Accounting PJL attributes in the data stream. If an
application generates a data stream that does not include the PJL header containing the user and
job information, the user and job name are reported as UNSPECIFIED in Job Accounting reports.
●
Click Pause job to automatically pause print jobs in the print queue. Print jobs must be manually
resumed by an administrator. Pause job is only available when Port Monitor is selected in the
Settings tile > Print server tab. The Windows service HP ACJA Spool Monitor must be started. Go
to Administrative Tools > Services to start the HP ACJA Spool Monitor service. Click OK.
If you installed and are running HP Access Control (HP AC) Configuration Utility on a remote print server, you
will have the following options to configure printers:
1. From the print server, open HP AC Configuration Utility and go to the Settings tile.
2. Click to open the IIS tab.
Figure 6-6 Print server settings
If desired, printer data can be auto-loaded (pushed) to the HP Access Control (HP AC) Job Accounting server
through one of these transfer protocols: FTP, HTTP, or HTTPS.
●
File Transfer Protocol (FTP) is a standard for transferring files between computers with different
operating systems. FTP is best for uploading data to an internal database server.
●
Hypertext Transfer Protocol (HTTP) differs from FTP, since connections are usually terminated after a
particular request (or series of requests) has been completed. HTTP is the preferred method of data
transfer if your database server is located off-site, or beyond your firewall.
Additional settings include Server Name, which Server Port to use when transferring the data, server Login
name, Password, and an Initial Folder in which to store the uploaded data.
TIP: To validate that a device is pushing files correctly, navigate to the folder in the directory where HP
Access Control (HP AC) is installed, and locate the Temporary folder for FTP push and Temporary DTM for
HTTP push. The Temporary folder should contain a set of folders for each device that has successfully
pushed a tracking file (.xml) to HP Access Control (HP AC) Job Accounting. The folders are identified by the
device IP address. The following figure shows the default installation directory C:\Program Files\HewlettPackard\HP AC\Temporary.
44 Chapter 6 Configuring data collectors
Page 59

Figure 6-7 Device folder
FTP mode pushes files in ..\HP AC\Temporary\x.x.x.x folder, where x.x.x.x is the printer IP address.
HTTP and HTTPS modes push files in ..\HP AC\Temporary\DTM folder. The file name starts with the printer IP
address.
TIP: The push interval can be set to 0 for real-time push.
1. Click the Snmp tab. The default SNMP setting is “public” for Set and Get. If values are changed on the
devices, all devices must have the same value or no value (public).
The default Trap level is Printer Confirmation traps. In the default mode, only printed job traps are sent.
This is used to reduce the network traffic with unwanted traps. Some versions of HP JetDirect require
that All traps mode is selected.
2. Click Save to save the new configuration information.
6.4 DesignJet configuration
NOTE: This section applies only to DesignJet printers with built-in Job Accounting.
Some DesignJet models such as the 4000, 4500, Z610, and T1100PS have a built-in tracking function which
allows HP Access Control (HP AC) Job Accounting to parse the XML accounting file. To enable this feature, the
DesignJet must be installed and configured locally on an HP Access Control (HP AC) Job Accounting print
server, allowing HP Access Control (HP AC) Job Accounting to retrieve the IP address and the queue name.
Configure networked DesignJet printers by clicking the Modify
on the HP Access Control (HP AC) Job Accounting print server Administration screen.
icon in the DesignJet configuration column
Section 6.4 DesignJet configuration 45
Page 60

Figure 6-8 DesignJet configuration
To start tracking a DesignJet printer, simply select the DesignJet from the list on the left and click the right
arrow between the columns:
Figure 6-9 Add or remove DesignJet printers
To stop tracking a DesignJet printer, select it from the right list and click the left arrow between the columns.
6.5 Schedule job retrieval
The HP Access Control (HP AC) Job Accounting administrator can use the Schedule job retrieval function to
determine precisely when, how frequently, and by what method (pull or push) HP Access Control (HP AC) Job
Accounting retrieves job data.
NOTE: For large networks, it is recommended that job retrieval be performed outside of regular business
hours.
To access the schedule parameters, click Schedule job retrieval on the HP Access Control (HP AC) Job Accounting print server Administration page.
46 Chapter 6 Configuring data collectors
Page 61

Figure 6-10 Schedule job retrieval
NOTE: If Auto-Upload is selected, the interval may be set to 0 for real-time processing.
6.6 Schedule DesignJet retrieval
DesignJet retrieval can be scheduled to occur at a designated start time on one or more days of the week, or
regularly at a specific time interval.
To access the schedule parameters, click Schedule DesignJet retrieval on the HP Access Control (HP AC) Job
Accounting print server Administration page.
Figure 6-11 Schedule DesignJet retrieval
Section 6.6 Schedule DesignJet retrieval 47
Page 62

If Account ID is enabled in the driver, HP Access Control (HP AC) Job Accounting can report the account ID as
the User name. By default, the login name is reported.
6.7 SAP tracking
SAP must be configured to report the user name in the job name (consult SAP for more details on how to
configure SAP queues).
To access the SAP user name tracking parameters, click SAP tracking on the HP Access Control (HP AC) Job
Accounting print server Administration page.
Figure 6-12 SAP tracking
If Yes is selected from the Enabled drop-down list, HP Access Control (HP AC) Job Accounting will search for
the user name in the job name for all jobs printed by the SAP user name that is defined (the default user
name is SYSTEM).
HP Access Control (HP AC) Job Accounting will extract the user name at the selection position and extract only
the number of characters selected.
If default parameters are used for all jobs printed by the user SYSTEM, HP Access Control (HP AC) Job
Accounting extracts 8 characters from the job name, starting at position “8” — and uses this as the user
name for the job.
Example: If the job name is “Job_abc_USER1234_xyz” and is printed by user SYSTEM, HP Access Control (HP
AC) Job Accounting will report this job printed by user USER1234.
6.8 Direct Tracking Module (DTM)
The Direct Tracking Module (DTM) is another method of capturing data directly from a network printer and
functions even if the HP Access Control (HP AC) Job Accounting print server module is not installed.
In order for the DTM to work, ALL of the following conditions MUST be met:
●
Printer must be manufactured by Hewlett Packard.
●
JetDirect should be installed and connected directly to the network (not locally through USB or LPT1).
48 Chapter 6 Configuring data collectors
Page 63

●
Correct/current printer drivers with Job Accounting information must be installed.
●
Printer must be capable of sending a trap.
NOTE: A trap is a packet of information provided by the printer that indicates basic job information and
print job status.
In the Devices tile, select a device from the device list, then click Configure. In the Configure window, select
Confirmation trap. Click OK.
When the selected printer receives a job, corresponding trap information appears in the Trap section on the
right.
Figure 6-13 DTM Trap
6.8.1 DTM options
To configure the DTM from a DTM server that is not on the same server as the HP Access Control (HP AC) Job
Accounting server, open the HP Access Control (HP AC) Configuration Utility and go the Settings tile > IIS tab.
Figure 6-14 DTM options
If desired, printer data can be auto-uploaded (pushed) to the HP Access Control (HP AC) Job Accounting
database server (DS) through one of three transfer protocols: FTP, HTTP, or HTTPS. Push features are
enabled only if the DTM server is not installed on the HP Access Control (HP AC) Job Accounting database
server.
The Device tab provides additional options to configure DTM.
Section 6.8 Direct Tracking Module (DTM) 49
Page 64

Figure 6-15 Snmp options
The default setting is “public” for Set and Get. If values are changed on the devices, all devices must have the
same value for Set and Get, or no value (public).
The default Trap level is Printer Confirmation traps. In the default mode, only printed job traps are sent. This
is used to reduce the network traffic with unwanted traps. Some versions of HP JetDirect require that “All
traps” mode is selected.
The trap service is using the default 162 UDP port. If the port is used by another application or service on the
same server, HP Access Control (HP AC) Job Accounting Trap service can use another port. If the port is
changed, the HP Access Control (HP AC) Job Accounting Trap service (HPACJA_SnmpTrap) needs to be
stopped and restarted and the printer reconfigured using the new port.
The Filter Delay is used if JetDirect sends the same trap multiple times in a very short interval. This occurs on
external JetDirect 300x and 500x. The delay value can be set to 50 ms for 300x and 500x. For others devices,
the default value can remain at 0.
50 Chapter 6 Configuring data collectors
Page 65
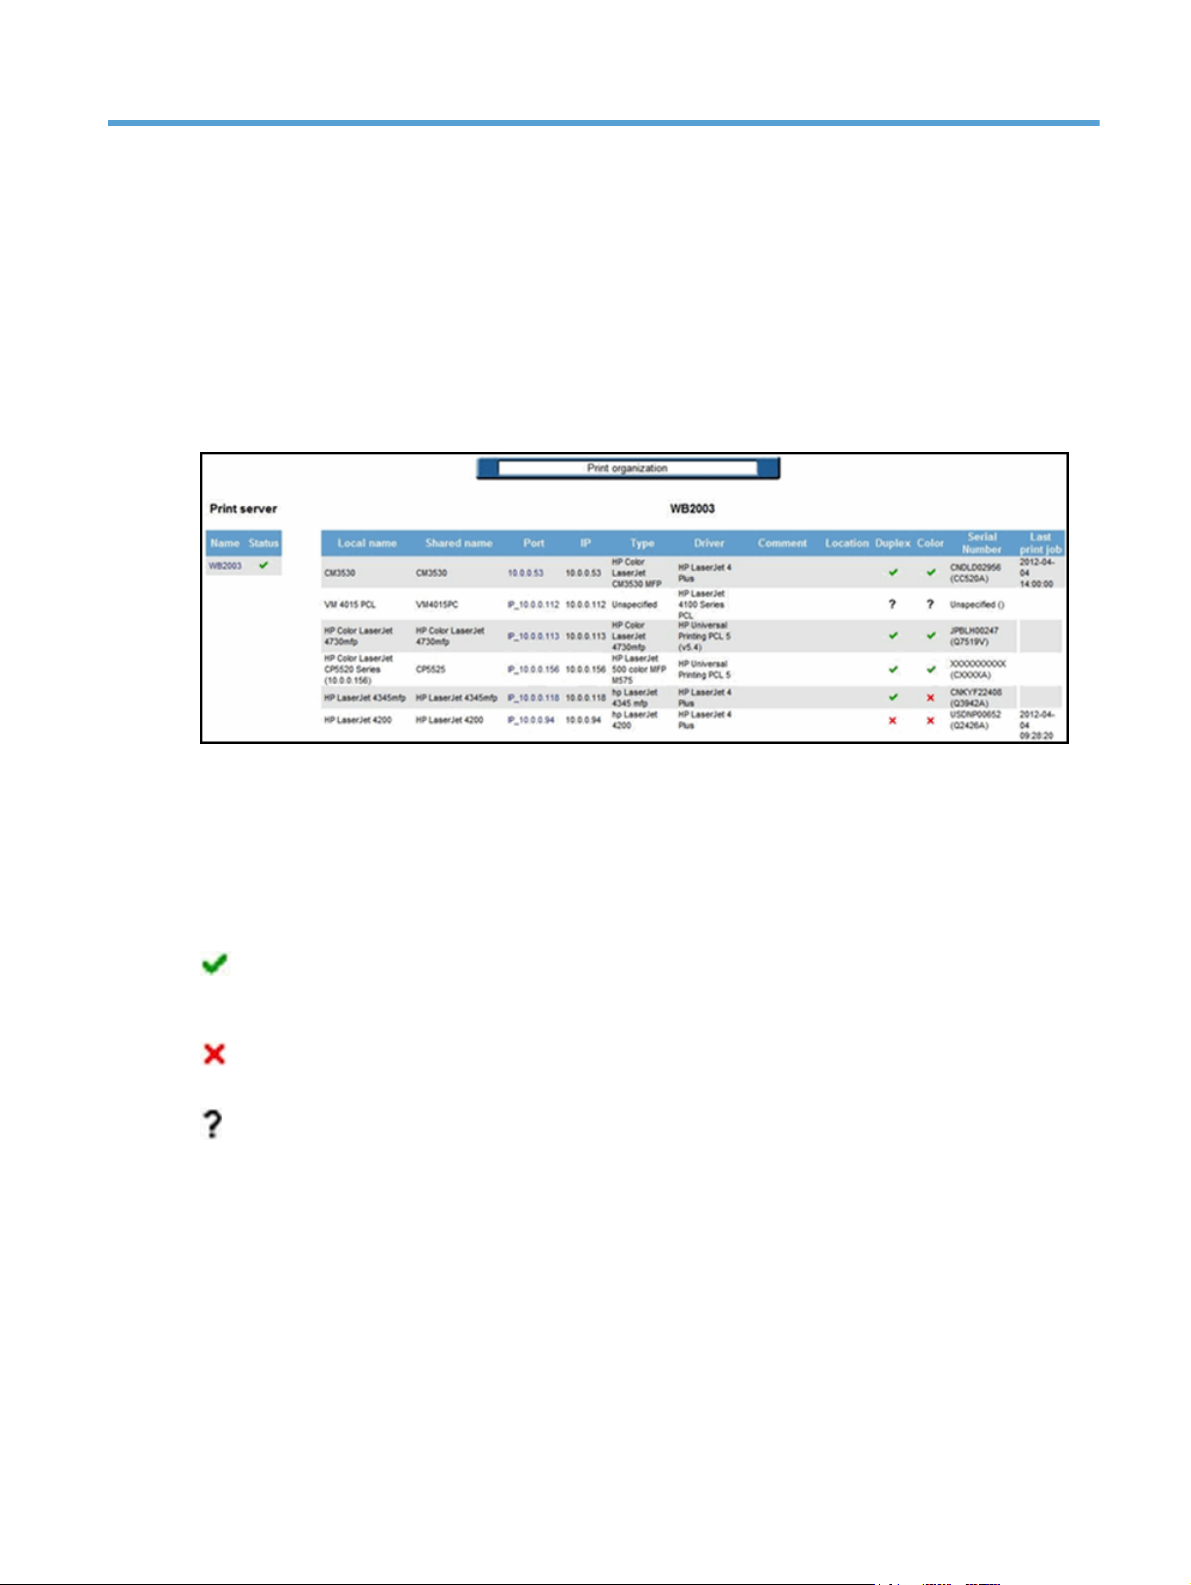
7 Viewing the print server
This HP Access Control (HP AC) Job Accounting function allows you to view the organization of your print
system—all HP Access Control (HP AC) Job Accounting print server and all printers linked to each HP Access
Control (HP AC) Job Accounting print server tracked by HP Access Control (HP AC) Job Accounting. This module
also automatically corrects print job errors and only tracks actual output.
Click Print organization in the HP Access Control (HP AC) Job Accounting remote control panel:
Figure 7-1 Print organization
This page is divided into two parts:
The left lists all print servers. Click the printer name in this column will display all individual printers
connected to that server on the right.
On the right are all printers managed by the print server selected on the left. If you click on another print
server, the printer list and the server name on the right will dynamically change.
The following icons may appear on this page:
When displayed in the Status column, this indicates the HP Access Control (HP AC) Job Accounting print
server is currently running. The Duplex or Color columns show if the printer is capable of duplex or color
printing.
The Status column shows that the HP Access Control (HP AC) Job Accounting print server is not installed;
and is also used to indicate simplex or black and white printers.
Indicates that the HP Access Control (HP AC) Job Accounting is unable to determine the printer's duplex or
color capabilities, and should be manually configured by the user.
7.1 Print servers
Print servers are displayed on the left side of the screen. These servers appear in the order in which they
were created in HP Access Control (HP AC) Job Accounting.
Click a print server in this column, and all printers managed by this server will be listed in the right column.
This list provides the printer’s local name, port name, driver name, and all available functionalists for each
Section 7.1 Print servers 51
Page 66

printer (color, duplex printing). The columns Local name and Sharing name can be sorted in ascending or
descending alphabetical order if you click on the titles of the columns.
Figure 7-2 Print server column
7.1.1 Printers
Click a printer port to get the characteristics of this printer. This reaches the internal web site of the printer,
allowing you to determine its status and administer its configuration.
Figure 7-3 Printer internal website
HP Access Control (HP AC) Job Accounting has an auto-detect feature that determines the type of printer
connected and configures accordingly. However, it may be unable to auto-detect the printer under the
following conditions:
52 Chapter 7 Viewing the print server
Page 67

●
If the printer is not manufactured by Hewlett Packard (HP).
●
If the printer is offline.
●
If the printer is installed locally (LPT1 or USB) and not on the network.
Figure 7-4 Manually define printer
After specifying the type of printer, click the Go icon to accept the information, or the Cancel icon to
stop the operation.
Section 7.1 Print servers 53
Page 68

8 Manage print costs
8.1 Cost control overview
One of the main HP Access Control (HP AC) Job Accounting benefits is its ability to produce extremely
accurate printing cost information and employ enterprise-level print cost control solutions in your
organization. The cost of a printer is linked to many factors:
●
Accessories
●
Maintenance
●
Technology (such as whether it is a laser printer)
●
Color
●
Quality
●
Speed
●
Depreciation time
Each of these factors involves a cost, which determines the cost of each printed page. To secure accurate
billing, the exact number of printed pages and associated costs must be determined. After this information is
compiled, the cost of a print job can be calculated. If the cost of any printer, media, or other element is
updated or modified, the resulting cost of all print jobs related to this printer, media, or other element will
also be dynamically updated.
CAUTION: The cost of media is independent of the printer. Media cost depends on the price of the paper in
this particular format and quality. HP Access Control (HP AC) Job Accounting automatically calculates the cost
of a print job according to the defined costs and the number of printed pages.
In addition to calculating the actual price of each print job or page, HP Access Control (HP AC) Job Accounting
also enables you to assign a fixed cost to a print job or to a printed page. These user-defined costs do not
take into account the real price involved in the print process, but rather printing characteristics, such as the
media or the color mode. For more information on these fixed costs, see the Define fixed costs section of this
guide.
You must enter the cost of all printers and media if you want to launch queries related to costs. If any of this
information is missing, all your query results containing cost information will be inaccurate.
CAUTION: If a printer’s purchase price has been defined for a printer using a printer template, it is not
necessary to redefine this cost, since it automatically becomes the real purchase price for this printer.
54 Chapter 8 Manage print costs
Page 69

8.2 Cost management page
Click Page cost management in the HP Access Control (HP AC) Job Accounting Remote control panel to reach
the printer selection page. This page allows the selection of a print server and printer, for which cost
information must be entered:
Figure 8-1 Page cost management
The print server/printer list is a dynamic list of all print servers and printers used at least once in your print
system since the initial HP Access Control (HP AC) Job Accounting installation. You can select one or more
printers, to which common costs apply. Hold the Ctrl or Shift keys while clicking to select a range of choices.
The printer selection page appears by default when you click Actual Costs: printers in the task bar at the top
of the page.
An icon may appear between the task bar and the printer list, as follows:
Figure 8-2 Processing icon
This icon indicates that HP Access Control (HP AC) Job Accounting is calculating costs. This can happen when
new costs are entered, or when defined costs are modified or entered.
8.3 Actual costs: printers
There are often several costs associated with printers; such as toner/ink, media, maintenance, and warranty.
The actual cost of a printer is determined by a combination of these variables. These costs are different than
templates, where a default cost is associated to one or several printers without taking into account the
actual costs of each printer. These costs are also opposed to fixed costs, where only one of these actual cost
components is taken into account—for instance, when only the media format of the paper is used to
determine a document printing charge.
8.3.1 Manual actual costs
To manage your actual costs:
Section 8.2 Cost management page 55
Page 70

1. Select one or several print servers or printers on the Page cost management screen selection page.
2. Click the Go to open Page cost management page. Actual printer costs may be viewed here.
Figure 8-3 Actual printer costs
The print server and printer you selected appear at the top of the page. Any costs defined for these printers
appear in the list.
From this screen, you may:
●
Create the actual costs attached to a printer by clicking Create a cost.
●
Modify the actual cost attached to a printer. Select the cost to modify and click the Modify parameters
icon.
●
Delete the actual cost attached to a printer. Select the cost to delete and click the Delete
8.3.2 Create actual printer costs
To create an actual cost, enter the appropriate information in Create cost as follows:
1. Choose a name for the cost. The default name is Cost_(the cost number). Enter up to 15 characters,
symbols, or figures.
2. Choose a cost Type from the drop-down menu: Printer, Toner, Color toner, Warranty, Maintenance,
Leasing, or Miscellaneous.
56 Chapter 8 Manage print costs
icon.
Page 71

3. Enter the Purchase / subscription cost to apply. You can enter up to 8 values. The currency used appears
next to the cost entry field. This currency is defined in your user options. See the HP Access Control (HP
AC) Job Accounting user options section of this guide.
4. Choose the Depreciation start date. By default, it is today’s date. You can choose a date between
01/01/1990 and 12/31/2100.
NOTE: Do not enter depreciation start date or period for toners. Only the number of printed pages is
relevant to depreciation allowances. The printer manufacturer provides this information.
5. Enter the Planned print volume (pages/years). You can enter up to 15 figures. The HP Access Control
(HP AC) Job Accounting administrator must estimate this number, except for toner.
6. Enter the Depreciation time (in years). Year is the only available time unit. You can enter up to 15
figures. The HP Access Control (HP AC) Job Accounting administrator must estimate this number.
Figure 8-4 Create a cost
For the first year, enter an accounting evaluation of the depreciation time of your printer. You must also
evaluate the number of pages to be printed over this depreciation period. For the following years, you will be
able to enter values based on the information provided by HP Access Control (HP AC) Job Accounting. The
currency used to express this cost is defined in your user options.
HP Access Control (HP AC) Job Accounting defines the cost of your printing jobs according to the number of
printed pages per job. The cost of a printing job depends on:
●
The page-printing mode: is this page printed in duplex or simplex mode? The duplex mode reduces your
printing cost, since you need less paper to print a document.
●
Ink price and the color or black and white printing mode.
●
Depreciation time of the various components and costs associated with the printer such as purchase
price or guaranty.
●
Printing quality (such as standard vs. fine quality printing, or ink coverage defined by the user) and the
media used.
The following limitations apply when calculating these costs:
●
HP Access Control (HP AC) Job Accounting does not include the ink coverage on the page. A one-line
page will be charged at the same price as an entire printed page.
●
The cost of electricity is not included.
Section 8.3 Actual costs: printers 57
Page 72

NOTE: HP Access Control (HP AC) Job Accounting recognizes when a print job is canceled.
8.3.3 Modify a printer actual cost
After selecting the cost to modify and clicking the Modify parameters icon, you reach the cost entry page.
This page contains all information you previously entered regarding this cost.
NOTE: If you already defined a template for your printer and want to modify your data, you must use this
section and not add a new cost using Create a printer cost. When you modify any cost, HP Access Control (HP
AC) Job Accounting calculates all print job costs in its database. If a toner cartridge must be replaced you
should not create a new toner cost, which would add to the total toner cost, but modify the cost of the former
toner.
To modify costs, as desired, click the Go icon to accept the modifications, or the Cancel icon to stop the
operation.
8.3.4 Delete a printer actual cost
You should delete the cost of any component or option which will not be sued again, or which is obsolete.
NOTE: All print jobs in the HP Access Control (HP AC) Job Accounting database will be recalculated when
there is any cost deletion.
To delete a printer actual cost:
1.
Select the cost to delete and click the Delete
2.
Click the Go
Figure 8-5 Delete printer cost
icon to accept the cost deletion, or the Cancel icon to stop the operation.
8.3.5 Actual costs: media
The price of a media depends on the paper size and type (for instance glossy, transparent paper, and weight).
Use the following steps to enter a media price.
icon.
58 Chapter 8 Manage print costs
Page 73

1. Click Actual costs: media.
Figure 8-6 Actual costs: media
The media list which displays consists of all combinations of media size and type used at lease once
since HP Access Control (HP AC) Job Accounting (HP AC) installation.
2. Choose a combination and then click the Go
icon.
3. Enter the desired amount on the Media page.
Figure 8-7 Media costs
CAUTION: If a printer’s purchase price has been defined for a printer with a printer template, it is not
necessary to redefine the cost, since it automatically becomes the real purchase price for this printer.
CAUTION: The price of media is calculated using the price of one sheet of paper in this particular format. It
does not depend on the printer, or print organization.
All costs are expressed in the currency defined in the User options section of this guide. To change the
currency type in which these costs are expressed, see the HP Access Control (HP AC) Job Accounting user
options section of this guide.
Section 8.3 Actual costs: printers 59
Page 74

8.4 Define fixed costs
This feature allows you to set a fixed price per page or for an entire document according to its characteristics,
without taking into account the actual cost of this document.
For example, assume you want to monitor your company’s printing expenditure. You want every A4
document to be charged $0.2, regardless the number of printed pages or the mode used. This price should be
set in the fixed cost management page.
8.4.1 Fixed costs
The Fixed costs management screen contains all defined fixed costs: name, amount of each fixed cost, and currency used. Click Fixed costs to open the Fixed costs management page:
Figure 8-8 Fixed costs management
From within Fixed costs you can Create a fixed cost or define the Costs priority rules
Create a fixed cost:
Select one or more elements in one or more criteria. You can combine several criteria by holding the Ctrl or
Shift keys—an A4 document can cost $0.2, a color document $0.4, and an A4 color document $0.6.
Enter the price for all selected criteria. You can enter up to 8 figures in this field. The currency used appears
next to the entry field. This currency is defined in your user options.
When your selections and prices are entered, click the Go
icon to stop the operation.
Actual costs will be assigned to all criteria for which no fixed cost is entered. These actual costs are those
associated to printers, media, and trays.
As soon as HP Access Control (HP AC) Job Accounting detects a new element of a criteria (such as a new user
or a new printer), this element is automatically added to the criteria list. If you want to associate your fixed
cost to this new element, you should modify your fixed cost by reselecting this element in your criteria.
However, if you select All for this criteria, it is not necessary to re-select it. All means that all elements in
these criteria are automatically considered.
NOTE: The Name field is required.
NOTE: If you define two fixed costs for the same criteria and elements the latest cost is considered.
icon to accept the information, or the Cancel
60 Chapter 8 Manage print costs
Page 75

Figure 8-9 Create a fixed cost
Costs priority rules: A problem may arise when several costs for a combination of common criteria have
been defined.
Example: Document A printed in letter format costs $ 0.2, document B printed in color mode costs $ 0.3, and
document C printed in letter format and color mode costs $ 0.5. At this point, priority must be assigned to
these fixed costs.
NOTE: The priorities defined in this section apply to all fixed costs. You cannot specifically define a priority
order to some of your fixed costs.
After fixed costs are defined, click Costs priority rules.
Section 8.4 Define fixed costs 61
Page 76

Figure 8-10 Costs priority rules
The list of criteria appears in default priority order. The criterion at the bottom of the list contains the lowest
priority. The criterion with the highest priority is at the top of the list. If these priorities do not suit your own
priority order, you can modify by clicking on a criteria, then by clicking Increase priority or Decrease priority
icons to move the selected criteria up or down as desired. Repeat this operation for all relevant criteria.
Figure 8-11 Costs priority rules defined
When you launch a cost query, the fixed cost that is first selected corresponds to the criteria with the highest
priority.
NOTE: You must enter priorities when you have more than one fixed cost.
NOTE: All criteria have a default priority.
NOTE: All criteria for which ALL is selected have the lowest priority.
NOTE: Any priority change involves recalculating your costs. Depending on the size of the print jobs
database, this operation may take several minutes.
HP Access Control (HP AC) Job Accounting analyzes the three documents described at the beginning of this
section according to their characteristics and the priority assigned to these characteristics.
62 Chapter 8 Manage print costs
Page 77

Table 8-1 Media priority
Document Media Printing Mode Cost
C Letter Color $0.5
B All Color $0.3
ALetterAll$0.2
As document C matches two criteria, it will be assigned $0.5 as cost. Then the priority is given to the colorprinted document. If no other criterion matches a priority, the document is charged according to its media
cost.
8.4.2 Modify a fixed cost
Complete the following steps to modify a fixed cost:
1.
Select the cost to modify, and click the Modify parameters
contains information already entered regarding this cost.
Figure 8-12 Modify a fixed cost
icon. The Modify a fixed cost page
2. After you have modified the desired data, click the Go icon to accept the modification, or the Cancel
icon to stop the operation.
CAUTION: For any modification of your fixed costs, HP Access Control (HP AC) Job Accounting will
recalculate any cost related to the modifications. This operation, depending on the quantity of jobs tracked in
the database, can take several minutes.
Section 8.4 Define fixed costs 63
Page 78

8.4.3 Delete a fixed cost
1.
Select the fixed cost to delete and click the Delete
the page.
Figure 8-13 Delete a fixed cost
2.
Click the Go
NOTE: After a fixed cost has been deleted, the actual cost of each printed page is used to calculate
printing costs. When fixed costs are deleted, HP Access Control (HP AC) Job Accounting recalculates any
cost concerned with these deletions. This operation, depending on the quantity of jobs tracked in the
database, can take several minutes.
icon to accept the cost deletion, or the Cancel icon to stop the operation.
icon. The name of the cost appears at the top of
8.4.4 Lease costs
The cost of leasing can depend on a monthly lease rate or a per-page rate for color or black-and-white
printing, faxing, or copying. Use the following steps to manage the lease costs for a printer:
1. Click Leasing costs in the bar at the top of the page.
Figure 8-14 Leasing costs
64 Chapter 8 Manage print costs
Page 79

2. Choose a Printer from the list. You can select one or more printers to which common costs apply. Hold
the Ctrl or Shift keys while clicking to select a range of choices, and then click the Go
table displaying current leasing cost parameters for the selected printer.
Figure 8-15 Modify leasing costs
icon to open the
●
To set or change the leasing costs for an entire group of printers, click Modify leasing cost.
●
To set or change the leasing costs for a single printer, click the box to the left of the printer name, and
then click the Modify
Figure 8-16 Modify a cost
Add or change monthly lease and per-page costs for the printer in the fields provided. Click the Go icon to
accept the changes, or the Cancel
All costs are expressed in the currency defined in User options. To change the currency type in which these
costs are expressed, see the HP Access Control (HP AC) Job Accounting user options section of this guide.
icon.
icon to stop the operation.
NOTE: The Cost Calculation does not need to be enabled if only Leasing costs is used. The calculation is
performed when the query is processed.
Section 8.4 Define fixed costs 65
Page 80

8.4.5 Schedule: Costs calculation
1. Click Schedule costs calculations on the navigation bar.
Figure 8-17 Schedule: Costs calculation
2. Select Schedule parameters:
Days
Start time
End time
Enabled Allows you to toggle the scheduling feature on or off. When checked, the process is started and
calculation is done. When unchecked, the calculation is disabled.
If Recalculate costs from is enabled, all the jobs printed after the selected date will be recalculated with the
current cost information. Jobs printed before the date will not be affected if a cost is changed.
66 Chapter 8 Manage print costs
Page 81

9 Cost center
9.1 Managing or creating
Cost centers are another method the administrator can use to organize, group, and track output of printers
or users. After cost centers are created and assigned, you can perform queries to determine individual or
collective use of cost centers.
To either manage or create cost centers, click Cost center in the HP Access Control (HP AC) Job Accounting
remote control:
Figure 9-1 Cost center — manage or create
9.1.1 Manage a cost center
Cost centers must be created before users or printers can be assigned to them. This process can be
performed manually by the administrator, or automatically by importing a CVS file. The steps for creating
cost centers are explained in the following sections.
9.1.1.1 Add a cost center
To add a cost center manually:
1. Enter a name for the cost center in the Add a cost center field.
2. Click Add a cost center button to add a new cost center to the list.
Section 9.1 Managing or creating 67
Page 82

9.1.1.2 Import a cost center
When adding a large number of cost centers, printers, or users, it is quicker and more efficient to import a
standard CSV file containing the data. This method also allows for both cost center creation and user/printer
assignment to occur in a single step.
CSV files can be generated through a spreadsheet program, or simply typed with a text editor and saved as
shown below:
Figure 9-2 Import cost center data
NOTE: When importing a CSV file, user names and printer names MUST match those being tracked by HP
Access Control (HP AC) Job Accounting.
To import cost centers,
1. Enter the path of the CSV file in the field or click Browse and locate it.
2. Specify whether to use a CSV with header.
3. Indicate in the field which column of the CSV file contains the names of the cost centers you wish to
create.
To assign users or printers to the imported cost center automatically, enter the column number that contains
the user name or printer in the appropriate field.
NOTE: You can assign either a user name or printer to imported cost centers – not both.
9.1.1.3 Delete a cost center
Use the following steps to delete a cost center:
68 Chapter 9 Cost center
Page 83

1. From the Manage cost center page, select the desired cost center from the list on the right and then
click the Delete
icon.
2.
Click the Go
Figure 9-3 Delete a cost center
icon to accept the deletion, or the Cancel icon to stop the operation.
9.1.2 Assign users to a cost center
After cost centers have been created or imported, use the following steps to assign user names to them.
1. Click Assign users to cost center to access the following page:
Figure 9-4 Assign users to cost center
2. Select from the list of Available users in the left column.
TIP: The list of available users can be filtered by using the drop-down menu above it.
Section 9.1 Managing or creating 69
Page 84

3. Choose a cost center from the drop-down menu on the right.
4. Click the Assign icon to assign the user to the desired cost center.
To remove all users, click the Delete icon to delete the all users from the list and then automatically import
all users tracked by HP Access Control (HP AC) Job Accounting.
9.1.3 Assign printers
Assigning printers to a cost center is very similar to assigning users. After cost centers have been created or
imported, printer names can be assigned to them.
1. Click Assign printers to cost center to display the following page:
Figure 9-5 Assign printers to cost center
2. Select from the list of Available printers in the left column.
TIP: The list of available printers can be filtered by using the drop-down menu above it.
3. Choose a cost center from the drop-down menu on the right.
4. Click the Assign icon to assign the printer to the desired cost center.
70 Chapter 9 Cost center
Page 85

10 HP Access Control (HP AC) Job Accounting
user options
10.1 Options
During the initial installation of HP Access Control (HP AC) Job Accounting, some options are set by default,
such as the language and the currency used in the application. These default options are set according to the
language defined by your operating system. When using HP Access Control (HP AC) Job Accounting you can
change the following options:
●
Language
●
Currency
●
Date format
●
Number of lines displayed in HP Access Control (HP AC) Job Accounting lists
●
Password
●
Email address
The columns of the query table can be accessed by clicking User options in the HP Access Control (HP AC) Job
Accounting remote control.
Any modifications performed to these options are only valid for the user whose login is currently being used.
Click User options in the remote control to reach the general user summary for all user options: language,
currency, interface, and date format, as well as your electronic address and the number of lines displayed in
the HP Access Control (HP AC) Job Accounting lists.
Figure 10-1 User options
From User options you can modify the following:
Section 10.1 Options 71
Page 86

●
Options appearing in the general options page
●
HP Access Control (HP AC) Job Accounting account password
●
Information provided for all launched queries
Use the task bar located at the top of the screen to make any of the changes listed above.
10.1.1 User options
Click User options in the task bar and the following page appears:
Figure 10-2 Define user options
Your user name appears at the top of the page. To accept one or several modifications performed on this
page, click the Go
icon, or click the Cancel icon to stop the operation.
10.1.1.1 Language/currency
Choose a language and a currency from the pull-down menus. The languages already defined in HP Access
Control (HP AC) Job Accounting are:
Table 10-1 Language/currency
Czech Korean
Dutch Polish
English Portuguese
Finnish Simplified Chinese
German Spanish
Hungarian Swedish
Italian Turkish
Japanese Traditional Chinese
Currencies already defined in HP Access Control (HP AC) Job Accounting are:
72 Chapter 10 HP Access Control (HP AC) Job Accounting user options
Page 87

●
US Dollar
●
Euro
●
British Pound
CAUTION: You can add currencies, but you cannot add languages. For more information regarding currency
management, see the Currencies section of this guide.
10.1.1.2 Number of lines in lists
You can modify the number of lines displayed in all HP Access Control (HP AC) Job Accounting lists such as the
query table, the results list of a recurring query, or the list of print servers and printers in the Print
Organization menu. The default number of display lines in one list is 10.
To change the number of display lines, enter the number you want in the Number of lines in lists lines field.
NOTE: Your data is not affected by this change.
For example, a query table with 10 display lines appears as follows:
Figure 10-3 Query table with 10 lines
The same query table with 5 display lines appears as follows:
Figure 10-4 Query table with 5 lines
NOTE: You can sort all queries in the query table by ascending, descending, or alphabetical order by clicking
the column title. To sort all your queries, and not only the queries displayed on the current page, all queries
must be displayed on one single page. To display all queries on one page, enter 0 in this field.
10.1.1.3 Email address
You can forward query results to a specified email address. Any HP Access Control (HP AC) Job Accounting
user or administrator can define their email address.
Section 10.1 Options 73
Page 88

Use the following steps to define an email address:
1. Click in the Email address entry field.
2. Enter/modify your address as desired. You can enter up to 127 characters, symbols, and figures. Your
email address appears each time you reach this page.
10.1.1.4 Data format
Date formats differ depending upon the country/region in which you reside. HP Access Control (HP AC) Job
Accounting allows you to configure the date format displayed in the application.
1. Click on the preferred format.
2.
Click the Go
10.1.2 Set passwords
The HP Access Control (HP AC) Job Accounting administrator defines your password when the HP Access
Control (HP AC) Job Accounting account is initially created.
Use the following steps to reset the password:
1. Click Change password.
2. Enter the new password in both fields.
Figure 10-5 Change password
icon to accept the configuration, or the Cancel icon to stop the operation.
CAUTION: Passwords are case-sensitive.
3.
Click the Go
NOTE: It is highly recommended that you change the password of the Admin account.
icon to accept the new password, or the Cancel icon to stop the operation.
10.1.3 Queries in progress
Columns
To modify content within the table, from Users options:
1. Go to Queries in progress and select the desired columns.
74 Chapter 10 HP Access Control (HP AC) Job Accounting user options
Page 89

2. Click Columns on the User options page to get the list of all displayed columns:
Figure 10-6 Query columns
By default, all options are highlighted.
3. Uncheck the title of the columns you want to hide.
4.
Click the Go
icon to accept the selections, or the Cancel icon to stop the operation.
10.1.4 Print organization
To generate a list of all displayed columns, complete the following steps:
Section 10.1 Options 75
Page 90

1. Go to Print organization.
Figure 10-7 Print organization columns
2. Uncheck the title of the column(s) you wish to hide.
3.
Click the Go
icon to accept the selections, or the Cancel icon to stop the operation.
76 Chapter 10 HP Access Control (HP AC) Job Accounting user options
Page 91

11 Perform a query
11.1 Queries
Use HP Access Control (HP AC) Job Accounting’s tracking function to get statistical data related to your
printed documents, printing system, or costs. HP Access Control (HP AC) Job Accounting only manages print
jobs processed by HP Access Control (HP AC) Job Accounting print servers. They are created by end users and
can be of any format: text, spreadsheet, word processing, or databases.
While the print job is being processed, the HP Access Control (HP AC) Job Accounting print server analyzes its
characteristics, which are then sent to the HP Access Control (HP AC) Job Accounting Database Server to be
stored. This data includes the following characteristics:
●
End users (name, login)
●
Printers (name, model, driver, characteristics)
●
Print jobs (document title, printer, number of printed pages, color media, costs per page and per printer
model)
●
Total print number per user, per printer and per day
●
Workload for each printer to determine the printer’s efficiency
●
Statistics for each printer
●
Statistics for each time period
●
Statistics for each end user
These characteristics are easily retrieved by running queries. The data is then presented in one or more
formats (table, chart, or spreadsheet).
11.1.1 Initiate a query
Queries can be initiated by clicking New Query on the HP Access Control (HP AC) Job Accounting remote
control. This chapter describes the following:
●
The various types of queries.
●
How to run a query.
●
How to modify your query parameters.
Section 11.1 Queries 77
Page 92

11.2 HP Access Control (HP AC) Job Accounting queries
The New Query page can be accessed by clicking New Query on the HP Access Control (HP AC) Job Accounting
remote control.
Figure 11-1 New query
This page is divided into three main areas:
●
The query navigation bar at the top of the page.
●
The query types in the middle of the page.
●
The task icons at the bottom of the page.
The query navigation bar allows queries to be initiated on:
●
Users who have printed at least once since HP Access Control (HP AC) Job Accounting installation.
●
Printers that have processed at least one print job since HP Access Control (HP AC) Job Accounting
installation.
●
Cost Centers that have been defined and assigned (to printers or users) by the administrator.
●
Printing costs generated by the end users or by the printers in your print system.
●
Printer options, or the frequency of use per user or per printer of the various printing modes: duplex,
color, and Economode.
●
Allocation information stored in the database.
Click the appropriate icon to choose the type of query you would like to perform. The list of all queries related
to this theme appears within the general display window. A description of each query type is provided in the
following section.
78 Chapter 11 Perform a query
Page 93

11.2.1 Query types
11.2.1.1 Users
The queries contained within this theme pertain to the printer users. Search restrictions can be any of the
following: print periods (start date, end date), the user’s name, their groups, their domain, the date when
they first printed, the document title, and cost. Some queries are limited to only the first n users matching
the specified criteria. A single user can belong to one domain, and to several groups.
Figure 11-2 New query — users
Lists of users, groups, or domains
Before launching this query, choose user/domain/group from the pull-down menu. By default, all domains
from which print jobs were processed since HP Access Control (HP AC) Job Accounting installation are
considered.
Total number of printed pages for the top n users/domains/groups
Lists the first n users/domains/groups for which the greatest number of pages was printed. Before launching
your query, choose user/domain/group in the pull-down menu. This query allows the greatest number of
printed pages to be obtained, as well as the total number of pages printed in duplex and in color mode. By
default, this query provides the 10 domains for which the greatest number of pages was printed since HP
Access Control (HP AC) Job Accounting installation. This list allows you to audit your print system, and target
the print volume per user.
Total number of printed documents for the top n users/ domains/groups
Lists the first n users/domains/groups for which the greatest number of documents was printed. Before
launching your query, choose user/domain/group in the pull-down menu. The query then considers all print
jobs. By default, this query provides the 10 domains for which the greatest number of documents was printed
Section 11.2 HP Access Control (HP AC) Job Accounting queries 79
Page 94

since HP Access Control (HP AC) Job Accounting installation. This list allows you to audit your print system
and analyze print volumes.
Total number of documents printed in Economode for the top n users/ domains/groups
Lists the first n users/domains/groups for which the greatest number of documents was printed in
Economode. Before launching your query, choose user/domain/group in the pull-down menu. This query
considers only the documents printed in this particular mode. By default, this query provides the 10 domains
for which the greatest number of documents was printed in Economode since HP Access Control (HP AC) Job
Accounting installation.
Total number of duplex pages for the top n users/ domains/groups
Lists the first n users/domains/groups for which the greatest number of duplex pages was printed. Before
launching your query, choose user/domain/group in the pull-down menu. Both short-side and long-side
printed pages are taken into account. By default, this query provides the 10 domains for which the greatest
number of duplex pages was printed since HP Access Control (HP AC) Job Accounting installation. This query
also allows the user to obtain the total number of printed pages, as well as the total number of pages printed
in color mode. This list allows audits to be conducted on the print system, and to determine if a duplex printer
is being properly used.
Total number of color pages for the top n users/ domains/groups
Lists the first n users/domains/groups for which the greatest number of color pages was printed. Before
launching your query, choose user/domain/group in the pull-down menu. By default, this query provides the
10 domains for which the greatest number of color pages was printed since HP Access Control (HP AC) Job
Accounting installation. This query also allows the user to obtain the total number of printed pages, as well
as the total number of pages printed in color mode. This list allows audits to be conducted on the print
system, and to determine the frequency of the color mode usage per group. It also enables easy
identification of how a color printer is being used (such as if a color printer is used as a black and white
printer).
Job distribution per domain/group/user
Charts the distribution of print jobs per user, group, or domain in percentage. Before launching your query,
choose user, group, or domain in the pull-down menu. This query generates a comparison of the total print
volume for all your users, groups, or domains. By default, all documents printed from all domains since HP
Access Control (HP AC) Job Accounting installation are considered. This query highlights the usage frequency
of your printers per user group (departments).
Distribution of printed pages per domain/group/user
Charts the distribution of printed pages per user, group, or domain, in percentage. Before launching your
query, choose user, group, or domain in the pull-down menu. This query generates a comparison of the total
printed page volume for all your users, groups, or domains. By default, all pages printed from all domains
since HP Access Control (HP AC) Job Accounting installation are included. This query highlights the usage
frequency of printers per user group (departments).
Number of printed pages per year/month/day/hour
Charts the total number of printed pages per year, month, day, or hour. This query also provides printing
dates. Before launching this query, choose year/month/day/hour in the pull-down menu. By default, all
pages printed by all users of all domains since HP Access Control (HP AC) Job Accounting installation are
included.
Number of duplex-printed pages per year/month/day/hour
Charts the total number of pages printed in duplex mode per year, month, day, or hour. This query also
provides printing dates. Before launching this query, choose year/month/day/hour in the pull-down menu. By
80 Chapter 11 Perform a query
Page 95

default, all pages printed in duplex mode by all users of all domains since HP Access Control (HP AC) Job
Accounting installation are included.
Number of color-printed pages per year/month/day/hour
Charts the total number of pages printed in color mode per year, month, day, or hour. This query also
provides printing dates. Before launching this query, choose year/month/day/hour in the pull-down menu. By
default, all pages printed in color mode by all users of all domains since HP Access Control (HP AC) Job
Accounting installation are included.
Number of documents printed in Economode per year/ month/day/hour
Charts the total number of documents printed in Economode per year, month, day, or hour. This query also
provides printing dates. Before launching this query, choose year/month/day/hour in the pull-down menu. By
default, all documents printed in Economode by all users of all domains since HP Access Control (HP AC) Job
Accounting installation are included.
Simplified list of printed documents
Lists all printed documents. This query provides a result regarding general characteristics: document name,
total/printed number of pages. With this query, all documents are listed according to the user who printed
the document. By default all users of all domains, who printed at least once since HP Access Control (HP AC)
Job Accounting installation, are included.
This query allows information to be generated on printed documents and their characteristics: the printing
launch date, the printer driver, the document title, the total number of printed pages and sheets in duplex
and color mode, the copy number, the domain, the print job cost related to the print server, printer and the
currency used, the job size and media. You can refine your query by defining a document title (all documents
whose title starts with a specific string). By default, all print job characteristics are taken into account.
Documents whose printing is complex can be analyzed and the document cost as near as possible to its
actual costs. Results are provided in a table.
Detailed list of printed documents
Lists all printed documents. This query provides a detailed result concerning the page: color and duplex
pages, trays, and media used for printing. With this query, all documents are listed according to the user who
executed the print spool. By default all users of all domains, who printed at least once since HP Access
Control (HP AC) Job Accounting installation, are included.
This query concerns the printed documents helps you control printing costs. The query also allows
generation of printed document characteristics: the printing launch date, the printer driver, the document
title, the total number of printed pages and sheets in duplex and color mode, the copy number, the domain,
the print job cost related to the print server, printer and the currency used, the job size and media. You can
refine your query by defining a document title (all documents whose title starts with a specific string). By
default, all print job characteristics are taken into account. Documents whose printing is complex can be
analyzed and the document cost as near as possible to its actual costs. Results are provided in a table.
Job type summary per user
Lists use information for each user, including user name, number of color printed pages, number of b/w
printed pages, number of color copied pages, number of b/w copied pages, number of faxed pages, and
number of scanned pages. Results are provided in a table.
Media type summary per user
Lists for each user the number of pages printed for each media type along with a sum of total cost and fixed
cost information.
Media size summary per user
Section 11.2 HP Access Control (HP AC) Job Accounting queries 81
Page 96

Lists for each user the number of pages printed for each color media size and b/w media size along with a
sum of total cost and fixed cost information.
11.2.1.2 Printers
The queries of this theme concern all printers in your print system tracked by HP Access Control (HP AC) Job
Accounting. The default search filter is servers. Other search parameters can be:
Printer queues: Printers declared on a print server with a specific monitor port or driver. A single physical
printer can be declared several times on the same print server with different ports or drivers.
Printer models: Consist of all printers of the same model. For instance, all HP 4500 LaserJet have the HP
4500 model.
Devices: Refers to the actual, physical printers. Several printer queues can refer to a single device.
Serial numbers : Refers to printer serial numbers.
Depending on the query, results are displayed in tables or charts.
Figure 11-3 Query printers
82 Chapter 11 Perform a query
Page 97

List of servers, printer queues, printer models, devices, or serial numbers
Lists servers, printer queues, printer models or printers tracked since HP Access Control (HP AC) Job
Accounting installation. Before launching this query, choose servers, printer queues, printer models, serial
numbers, or printers in the pull-down menu. This query informs you of the date when the device was used
and therefore declared in HP Access Control (HP AC) Job Accounting, as well as the supported options (such
as color or duplex). By default, all printers used since HP Access Control (HP AC) Job Accounting installation
are included.
Total number of printed pages for the top n servers, printer queues, printer models, printers, or serial
numbers
Lists the first n servers, printer queues, printer models, printers, or serial numbers on which the greatest
number of pages was printed. Before launching this query, choose servers, printer queues, printer models,
serial numbers, or printers in the pull-down menu. This query examines the total number of printed pages,
color-printed pages, duplex-printed pages, and printed sheets. By default, this query provides the 10 printers
on which the greatest number of pages was printed since HP Access Control (HP AC) Job Accounting
installation. This list is part of your print system audit, and allows you to target print volume per server or per
printer, and to highlight peaks as well as bottlenecks.
Total number of printed documents for the top n servers, printer queues, printer models, printers, or
serial numbers
Lists the first n servers, printer queues, printer models, printers, or serial numbers on which the greatest
number of documents was printed. Before launching this query, choose servers, printer queues, printer
models, printers, or serial numbers in the pull-down menu. By default, this query provides the 10 printers on
which the greatest number of documents was printed since HP Access Control (HP AC) Job Accounting
installation. This list is part of your print system audit, and allows you to target print volume per server or per
printer and to highlight peaks or bottlenecks.
Total number of documents printed in Economode for the top n servers, printer queues, printer models,
printers, or serial numbers
Lists the first n servers, printer queues, printer models, printers, or serial numbers on which the greatest
number of documents were printed in Economode. Before launching this query, choose servers, printer
queues, printer models, printers, and serial numbers in the pull-down menu. This query only includes the
documents printed in this mode. By default, this query provides the 10 printers on which the greatest number
of documents was printed in Economode since HP Access Control (HP AC) Job Accounting installation.
Total number of duplex-printed pages for the top n servers, printer queues, printer models, printers, or
serial numbers
Lists the first n servers, printer queues, printer models, printers, or serial numbers on which the greatest
number of pages were printed in duplex mode. Before launching this query, choose servers, printer queues,
printer models, printers, and serial numbers in the pull-down menu. Both short-side and long-side printing is
considered in this query. By default, this query provides the 10 printers on which the greatest number of
pages was printed since HP Access Control (HP AC) Job Accounting installation. It also provides the total
number of printed pages. This list is part of your print system audit, and allows you to verify whether a
duplex printer is being properly used.
Total number of color-printed pages for the top n servers, printer queues, printer models, printers, or
serial numbers
Lists the first n servers, printer queues, printer models, printers, or serial numbers on which the greatest
number of pages were printed in color mode. Before launching this query, choose servers, printer queues,
printer models, printers, and serial numbers in the pull-down menu. By default, this query provides the 10
printers on which the greatest number of pages was printed since HP Access Control (HP AC) Job Accounting
installation. It also provides the total number of printed pages, as well as the total number of duplex-printed
Section 11.2 HP Access Control (HP AC) Job Accounting queries 83
Page 98

pages. This list is part of your print system audit, and allows you to validate the use frequency of a printer’s
color mode.
Job distribution per server/printer queue/printer model/ device/serial number
Charts the distribution of print jobs per server, printer queue, printer model, device, or serial number. Before
launching your query, choose server, printer queue, printer model, device, or serial number in the pull-down
menu. This query generates a comparison of the total print volume for all servers and printers. By default, all
printers used since HP Access Control (HP AC) Job Accounting installation are included. This query highlights
the usage frequency of your printers.
Distribution of printed pages per server/printer queue/ printer model/device/ serial number
Charts the distribution of printed pages per server, printer queue, printer model, device, or serial number.
Before launching your query, choose server, printer queue, printer model, device, or serial number in the
pull-down menu. This query generates a comparison of the total printed page volume for all your servers and
printers. By default, all pages printed from all printers since HP Access Control (HP AC) Job Accounting
installation are included. This query highlights the usage frequency of all printers.
Number of printed documents per…
Charts the total number of print jobs per year, month, day, or hour. Before launching this query, choose a
technical item (server, printer model, printer queue, device, serial number) and time unit (per year/
month/day/hour) in the pull-down menu. This query provides the total number of printed documents, as well
as printing dates. You can select a specific server, printer queue, printer model, or device. By default, all
documents printed since HP Access Control (HP AC) Job Accounting installation are included.
Number of printed pages per…
Charts the total number of printed pages per year, month, day, or hour. Before launching this query, choose a
technical item (server, printer model, printer queue, device, serial number) and time unit (per year, month,
day or hour) in the pull-down menu. You can select a specific server, printer queue, printer model, or device.
This query also provides printing dates. By default, all pages printed by all users of all domains since HP
Access Control (HP AC) Job Accounting installation are included.
Number of duplex-printed pages per…
Charts the total number of pages printed in duplex mode per year, month, day, or hour. Before launching this
query, choose a technical item (server, printer model, printer queue, device, serial number) and time unit (per
year, month, day or hour) in the pull-down menu. You can select a specific server, printer queue, printer
model, device, or serial number. This query provides the total number of duplex-printed pages, as well as
printing dates. By default, all pages printed in duplex mode since HP Access Control (HP AC) Job Accounting
installation are included.
Number of color-printed pages per…
Charts the total number of pages printed in color mode per year, month, day, or hour. Before launching this
query, choose a technical item (server, printer model, printer queue, device, serial number) and time unit (per
year, month, day, or hour) in the pull-down menu. You can select a specific server, printer queue, printer
model, device, or serial number. This query provides the total number of color-printed pages, as well as
printing dates. By default, all pages printed in color mode since HP Access Control (HP AC) Job Accounting
installation are included.
Number of documents printed in Economode per…
Charts the total number of documents printed in Economode per year, month, day, or hour. This query also
provides printing dates. Before launching this query, choose a technical item (server, printer model, printer
queue, device, serial number) and time unit (per year, month, day, or hour) in the pull-down menu. You can
select a specific server, printer queue, printer model, device, or serial number. This query provides the total
84 Chapter 11 Perform a query
Page 99

number of documents printed in Economode, as well as printing dates. By default, all documents printed in
Economode since HP Access Control (HP AC) Job Accounting installation are included.
Simplified list of printed documents
Lists all printed documents. Before launching your query, choose server, printer queue, printer model, device,
or serial number in the pull-down menu. This query provides a synthetic result regarding general
characteristics such as document name and total/printed number of pages. With this query, all documents
are listed according to the printer that processed the print job. By default, all printers used at least once since
HP Access Control (HP AC) Job Accounting installation are included.
This query concerns printed documents and helps with your printing costs control. It allows information to be
gathered on printed documents and their characteristics: the print launching date, the printer driver, the
document title, the total number of printed pages and sheets in duplex and color mode, the copy number, the
domain, the print job cost related to the print server, printer and the currency used, the job size and media.
You can refine your query by defining a document title (all documents whose title starts with a specific
string). By default, all print job characteristics are included. Documents whose printing is complex can be
analyzed and the document cost as near as possible to its actual costs. Results are provided in a table.
Detailed list of printed documents
Lists all printed documents. Before launching your query, choose the server, printer queue, printer model,
device, or serial number in the pull-down menu. This query provides a detailed result concerning the page:
color and duplex pages, trays, and media used for printing. With this query, all documents are listed
according to the printer that processed the print job. By default, all printers used at least once since HP
Access Control (HP AC) Job Accounting installation are included.
This query concerns the printed documents and helps with your printing costs control. It allows information
to be gathered on printed documents and their characteristics: the printing launching date (the date and
time, when the user launched the print job and was not handled by the print server), the printer driver, the
document title, the total number of printed pages and sheets in duplex and color mode, the copy number, the
domain, the print job cost related to the print server, printer and the currency used, the job size and media.
You can refine your query by defining a document title (all documents whose title starts with a specific
string). By default, all print job characteristics are taken into account. Documents whose printing is complex
can be analyzed and the document cost as near as possible to its actual costs. Results are provided in a table.
Media type summary
Provides a summary of media used by servers, printer queues, devices, printer models, or printer serial
numbers.
Media size summary
Provides a summary of media sizes used by servers, printer queues, devices, printer models, or printer serial
numbers.
List of inactive queues, devices, models, or serial numbers
Provides a list of inactive printer queues, devices, printer models, or printer serial numbers.
Section 11.2 HP Access Control (HP AC) Job Accounting queries 85
Page 100

11.2.1.3 Cost centers
This type of query determines the usage and costs associated with users or printers assigned to a specified cost center. For more information on creating and assigning cost centers, see the Cost centers section of this guide.
Figure 11-4 Query cost centers
List of cost centers
Lists all the existing cost centers currently defined within HP Access Control (HP AC) Job Accounting.
Total number of printed pages for the top n cost centers/users/print queues
Lists the first n cost centers/users/print queues for which the greatest number of pages was printed. Before
launching your query, choose cost center/user/print queues from the drop-down menu. This query allows the
greatest number of printed pages to be obtained, as well as the total number of pages printed in duplex and
in color mode.
Total number of printed documents for the top n cost centers/users/print queues
Lists the first n cost center/users/print queues for which the greatest number of documents was printed.
Before launching your query, choose cost center/users/print queue from the drop-down menu. The query
considers all print jobs. This list allows you to audit your print system and to analyze print volumes.
Simplified list of printed documents per users/print queues
Lists all printed documents. This query provides a simplified result regarding the document’s general
characteristics: document name, total/printed number of pages. With this query, all documents are listed
according to the cost center that printed. This query allows information to be generated on printed
documents and their characteristics.
Detailed list of printed documents per users/print queues
86 Chapter 11 Perform a query
 Loading...