

Page 1

hp media center pc
updated hp media
center pc information
Page 2

Updated HP Media Center
PC Information
Please review this information and keep it with
your guides. The information describes:
Setting the location for the Media Center
television program guide.
Installing speakers.
Understanding the 6-In-1 memory card.
Recording data to CDs and DVDs.
Playing recorded TV programs.
Safeguarding your capability to play recorded
TV programs.
Using MyDVD to copy, or burn, recorded TV
programs to DVD+R or DVD+RW discs.
Switching display devices.
Updated information about software programs.
Setting PC Location for
Television Program Guide
During the initial setup of the PC, you specify
your PC country/region location. Media Center
uses this information to select the country/region
for the television program guide.
The Media Center lists United States as the PC
location. If this location does not match the ZIP
Code or postal code location you enter in the
Media Center program guide setting, you may
see an error message. In addition, you may see
No data available in the television program
guide, or you may not be able to get the correct
television program guide.
To resolve this problem, set the location for your
PC in the Control Panel first and then in the
Media Center Settings window.
Updated HP Media Center PC Information
2
Page 3

To set the PC location
1 Click Start on the taskbar, and click
Control Panel.
2 Click Date, Time, Language, and
Regional Options, if it is present.
3 Double-click Regional and Language
Options.
5 Select Change lineup, and follow the
onscreen instructions. When you enter your
postal code, do not leave any spaces. For
example, for Canadian postal code R2M 3Z4
you would enter R2M3Z4.
If you see an Invalid message, there is no guide
for your area.
4 Click the Regional Options tab.
5 In the Location box near the bottom of the tab,
select your country/region (for example,
Canada) from the drop-down list.
6 Click Apply.
7 Click OK.
To change the program
lineup in Media Center
1 Open Media Center.
2 In the Start menu select Settings.
Installing Speakers
Your PC may have a sound card with connectors
on the back of the PC for analog and digital
audio outputs (Line out -1, Line out -2, and
Line out -3), a microphone, and an audio input
(Line in). The example illustration below shows a
sound card that includes a FireWire
on the left. If your PC has a sound card with these
connectors, perform the procedure “Installing
Creative Audigy for speakers“ on page 4 of this
document.
®
connector
3 Select TV/DVD.
4 Select Guide Setup.
Updated HP Media Center PC Information
3
Page 4

Select PCs have the multi-channel audio capability
that uses the microphone, Audio (Line) In, and
Audio (Line) Out connectors on the back of the
PC. If your PC has these connectors, perform the
procedure “Installing multi-channel audio
speakers“ on page 4 of this document.
Installing Creative Audigy for speakers
After you turn on the PC for the first time and
complete the initial onscreen setup, do the
following so that your speakers work properly:
1 Close any open programs.
2 Click Start on the taskbar, choose All
Programs, Creative, and then click Install
Application for Creative Audigy.
3 The Audigy Application Setup window opens.
Click OK.
The InstallShield Wizard begins the installation
and automatically restarts the PC when the
installation completes.
Note:
If you do not do this procedure, the speakers may
produce an audible pop when the PC wakes from
standby or hibernation.
Installing multi-channel audio speakers
If your PC has multi-channel speakers capability
(select models only), you can connect speakers for
4-channel or 6-channel output. You must connect
your speaker system to the PC, and then configure
the audio software for sound output.
Note:
Multi-channel audio uses the Microphone,
Audio (Line) In, and Audio (Line) Out connectors
on the back of the PC to connect the multi-channel
speakers system to the PC.
To connect your multi-channel
speaker system to the PC
1 Turn off the PC.
2 Connect the three audio cable plugs from the
speaker system to the connectors on the back
of the PC (see the table).
Updated HP Media Center PC Information
4
Page 5

window while the USB
removes the operating system recognition
Connect speaker
channels (plugs) To PC back connector
Front speakers Audio (Line) Out (lime-green)
Rear speakers Audio (Line) In (blue)
Center/subwoofer
speakers
Mic-1 (pink)
3 Turn on the PC.
4 Turn on your speaker system.
5 Configure the multi-channel audio output;
refer to the next procedure.
To configure multi-channel audio output
for speakers configuration
1 Click Start on the taskbar.
2 Choose All Programs.
3 Choose Multi-channel Sound Manager,
and then click Multi-channel Sound
Manager again. The Audio Configuration
window opens.
Note:
If you do not see the Speaker Configuration tab,
your PC does not have the multi-channel option.
4 Click the Speaker Configuration tab. (Your
speakers must be connected to see this tab.)
5 Select the option describing the number
of speakers in your system, for example,
6 speaker mode (for 5.1 channels). You
can click the Speaker Test tab and then click on
a speaker to test it.
6 Click OK.
Understanding the
6-In-1 Memory Card Reader
The 6-In-1 memory card reader can read from
and write to six types of memory cards and to the
IBM Microdrive
Special note about the
Safely Remove Hardware utility
Warning:
Remove Hardware
Mass Storage Device is selected. Doing so
of the 6-In-1 memory card reader from
your PC. You must restart the PC to use
your reader again.
™
disk drive.
Do not click Stop in the Safely
Updated HP Media Center PC Information
5
Page 6

Warning:
media when the in-use light is blinking.
Doing so may cause data loss.
Do not insert or remove
Recording Data to CDs and DVDs
You can record data to blank or appendable
CD-R, CD-RW, DVD+R or DVD+RW discs in
different ways: open a recording program, use
the Windows
DLA (Drive Letter Access) program drag-and-drop
method.
®
XP CD Writing Wizard, or use the
If you inadvertently open the Safely Remove
Hardware window, click Close.
Understanding the in-use light
The 6-In-1 memory card reader in-use light turns
on when you insert media into a slot. The light
blinks when the memory card reader reads from
or writes to the media.
Updated HP Media Center PC Information
6
Important: The
your PC, but you can get it from the HP Web site;
see “Installing DLA Software“ on page 8 of this
document.
DLA program is not preinstalled on
Recording with RecordNow
Use RecordNow to record data and music files
to CDs and DVDs.
Page 7

You can put data files on a DVD to store them
or transfer them to another Media Center PC.
However, data files on a DVD do not play in
a DVD player.
Note:
To copy a recorded TV show to DVD to view on a
home DVD player, see “Using MyDVD to Copy
Recorded TV Programs to DVD“ on page 17 of this
document.
To open RecordNow, click Start on the taskbar,
choose All Programs, RecordNow CD/DVD
Writer, and then click RecordNow. Follow the
onscreen instructions.
Recording with MyDVD
Use MyDVD to record video files to CDs and
DVDs. MyDVD writes files to DVD that can play in
a DVD player.
To open MyDVD, click Start on the taskbar,
choose All Programs, Sonic MyDVD, and
then click Start MyDVD. Follow the onscreen
instructions.
Recording with the
Microsoft CD Writing Wizard
Use the CD Writing Wizard to record data or
music files to CDs only. The CD Writing Wizard
cannot write data to DVDs.
To copy data to a blank or appendable CD by
using the CD Writing Wizard:
1 Copy your files to a writeable CD drive folder
in My Computer by doing one of the following:
Dragging a file from a Windows Explorer
window to the writeable CD drive icon.
Or
Selecting Save As from within certain
programs, and then saving the file to the
drive.
Or
Right-clicking a file, selecting Send To, and
then selecting the drive.
Updated HP Media Center PC Information
7
Page 8

2 When you are ready to record your files to a
CD, click Start on the taskbar, and then click
My Computer.
3 Double-click your writeable CD drive icon.
The files you have copied to the drive should
appear in the drive window.
Important:
The files displayed in the drive window are
not recorded to the CD yet. You must complete the
following steps to finish the recording process.
Installing DLA Software
The DLA software is not preinstalled on your PC.
Important:
DLA allows you to use your DVD Writer/
CD Writer drive as you would a diskette drive, by
copying files to disc or by using a drag-and-drop
method.
Installing the DLA program disables the
CD Writing Wizard program.
4 Click Write these files to CD in the CD
Writing Tasks section of the drive window. The
CD Writing Wizard opens.
5 Type the name of the CD, and then click Next.
6 Insert a blank or an appendable CD.
7 Click Next. The files are being recorded to
your CD.
8 When your files have finished recording, a
message appears telling you the files have
been successfully recorded. Click Finish.
Updated HP Media Center PC Information
8
To get and install the DLA program:
1 Go to the Web site:
http://www.hp.com/cposupport
2 Type your model number into the Search box
(for example, Media Center 863n).
3 Click drivers and downloads for your
model. Click applications, if it is present.
4 Choose DLA, and then follow the onscreen
instructions to download and install the
program.
Page 9

Recording with DLA
8 Click OK.
Important:
Format a blank CD or DVD before copying
files directly to a CD or DVD. If you don’t, a
message appears telling you to format the disc or
telling you that your drive is not accessible.
1 Press the Eject button on the drive and insert the
blank disc.
2 Click Start, and then click My Computer.
3 Right-click the drive icon and select Format.
4 Under Volume Label, type in the title of the disc.
5 Under Format type, select Full or Quick
(erase). You must select the quick format for all
CD-R or DVD+R discs. You must select the full
format for a CD-RW or a DVD+RW disc the first
time you format it.
Note:
Full format can take up to 45 minutes. Quick
format usually takes less than a minute.
6 Click Start to format the disc.
7 Click Yes to the message that all files on the
disc will be erased.
When the disc formatting is complete,
you can copy your files directly to the disc
in My Computer by:
Dragging a file from a Windows Explorer
window to your drive icon.
Or
Selecting Save As from within some
programs, and then saving the file to your
drive.
Or
Right-clicking a file, selecting Send To, and
then selecting your drive.
After you record your files, if you want to read the
DLA-formatted disc on most other CD-ROM drives,
you must make the disc compatible: Insert your
disc into your drive, right-click the DVD Writer/
CD Writer drive icon, and then select Make
Compatible.
Updated HP Media Center PC Information
9
Page 10

The Make Compatible feature in DLA makes
uncompressed CD-R and DVD+R discs readable
by most read-only CD and DVD drives, even if
DLA is not installed in the PC. When you make a
disc compatible, DLA closes the session on your
disc. This means:
With a DVD+R, you are not able to add data to
the disc.
With a CD-R, you are able to add more data in
another recording session, but you need to
select Make Compatible again after you
add the files.
Playing Recorded TV Programs
Most television broadcasters do not encrypt
programs, so a recording can be played on any
Media Center PC. A recording of a broadcasterencrypted TV program, though, can be played
only on the PC that recorded it. To protect your
ability to play recorded TV programs, follow the
instructions in “Safeguarding Your Capability
to Play Recorded TV Programs“ on page 10
of this document.
Note:
To copy a recorded TV show to DVD to view on
a home DVD player, see “Using MyDVD to Copy
Recorded TV Programs to DVD“ on page 17 of
this document.
For information on playing recorded TV programs
on other devices, go to the Web site:
http://www.hp.com/go/mediacenterpc
Safeguarding Your Capability
to Play Recorded TV Programs
When you record TV programs using Media
Center, the TV program broadcaster may have an
encryption code that Microsoft includes as a
special code in the recorded files. This code is
keyed to your PC and is required to play
broadcaster-encrypted TV programs previously
recorded to hard disk, copied to DVD, or copied
to other media. When you perform a system
recovery or replace the hard disk drive in your
PC, you lose the special code.
Updated HP Media Center PC Information
10
Page 11

You can safeguard your capability to play
recorded TV programs by making a backup
CD and using it as described in the procedures
provided here. Make the backup CD now, before
you need it, so that you can use the CD after you
perform a system recovery, or replace the hard
disk drive in your PC. If you do not have the
backup CD after you perform a system recovery
or replace the hard disk drive, you will not be
able to play any previously recorded TV programs
that are broadcaster-encrypted.
The procedures that follow describe how to
prepare your PC, make the backup files you need,
copy the file to CD, and use the backup CD to
restore the files to your PC after a system recovery.
To prepare the code key files
2 Record at least one TV program.
3 Close Media Center.
4 Open the Microsoft Backup utility: Click Start
on the taskbar, choose All Programs,
Accessories, System Tools, and then click
Backup. The Backup or Restore Wizard
opens.
5 Click the Advanced Mode link near the
middle of the window.
Note:
The code key files and backup CD you make can
be used in your PC only.
1 After you set up your PC and turn it on,
complete the initial Microsoft Windows setup.
Open Media Center and complete its setup.
Updated HP Media Center PC Information
11
Page 12
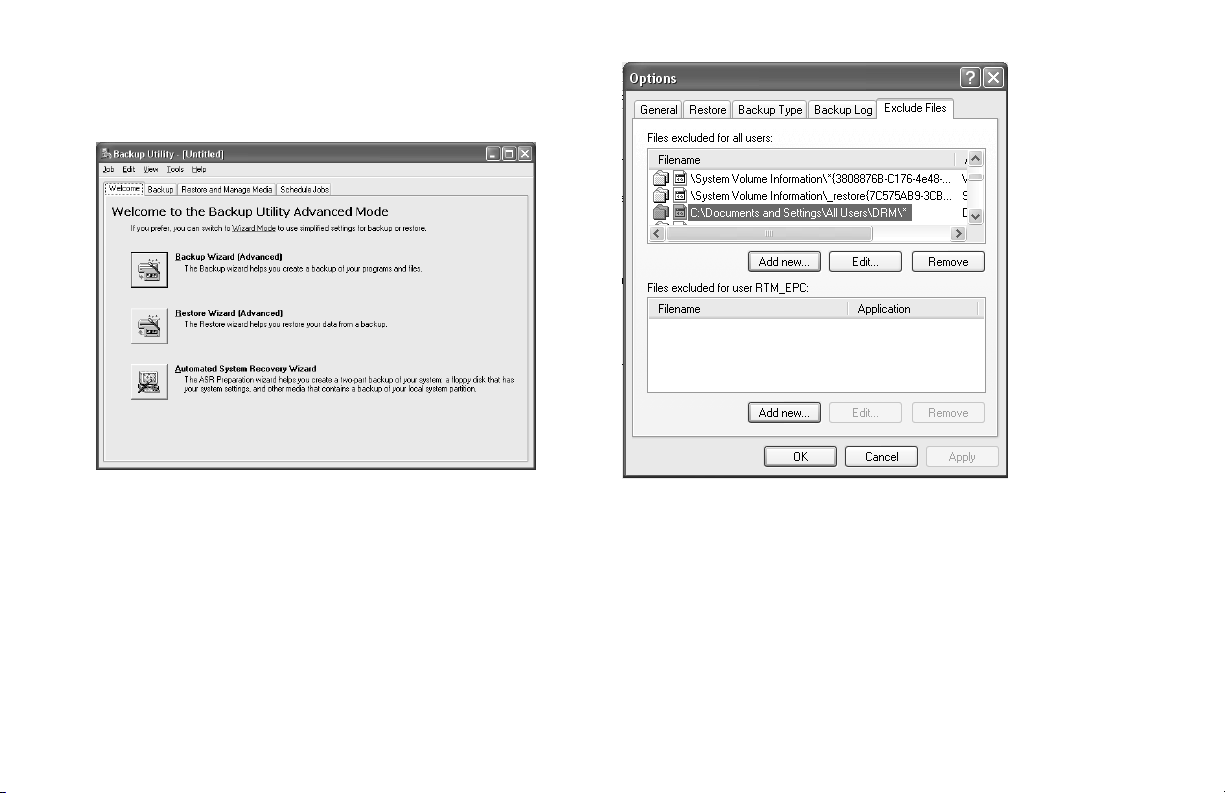
6 At the top of the Backup Utility window that
opens, click Tools and select Options.
7 Click the Exclude Files tab.
8 In the Files excluded for all users box, put your
cursor over the vertical line between Filename
and Application in the title bar, and then click
and drag the line to the right to see the full
entries.
Updated HP Media Center PC Information
12
9 Scroll down the list to see and then click the
entry: C:\Documents and Settings\All
Users\DRM\*
10 Click Remove.
11 Click Apply.
12 Click OK. The Options window closes.
Page 13

13 In the Backup Utility window, click the
Backup tab.
14 In the left box, click the plus sign (+) for
HP Pavilion (C). The file tree expands. Click the
plus sign (+) for Documents and Settings, click
the plus sign (+) for All Users, and then click the
DRM box so a check mark appears (as shown
in the next figure).
Updated HP Media Center PC Information
13
Page 14

15 Scroll down the list and click the System
State box so a check mark appears (as shown
in the next figure).
16 At the bottom of the window, beneath Backup
media or filename, click Browse. Because a
diskette is too small to save the backup file on,
you will need to save the file to the desktop
portion of the hard disk drive before writing the
file to CD. If the message Insert a disk into drive
A appears, click Cancel.
17 The Save as window opens. In the Save in box,
select Desktop from the drop-down list. In the
Save as box, use the default name or type in a
file name with the extension .bkf and then click
Save. The window closes.
18 Click Start Backup in the Backup Utility
window. The Backup Job Information window
opens.
19 Click Start Backup. The Backup Progress
window opens. When the process finishes, the
window displays The backup is complete.
20 Click Close.
21 Click the x in the upper corner of the Backup
Utility window to close it.
Continue with the next procedure.
Updated HP Media Center PC Information
14
Page 15

To make the backup CD
1 Click Start on the taskbar, choose All
Programs, RecordNow, and then click
RecordNow again. The RecordNow window
opens.
2 Click Make a Data Disc.
3 Insert a blank CD.
4 Click Next.
10 Remove the CD, label it, and store it in a safe
place for use with the next procedure. Click
Done.
11 Click the x in the upper corner of the
RecordNow window to close it.
12 Because you do not need the backup file you
created, drag the file to the Recycle Bin on the
desktop. This deletes the copy of the file that
was on the hard disk drive.
5 Click Add Files and Folders. The Select files
and folders to add window opens.
To use the code key
backup CD after system recovery
6 In the Look in box, select Desktop from the
drop-down list.
Important:
7 Click the file name so it appears in the File
name box. Click Add. The window closes.
8 On the RecordNow window, click Next. If a
warning window opens, click OK.
9 Wait while the program writes to the CD and
the disc tray ejects.
Updated HP Media Center PC Information
After performing a system recovery
procedure, use the CD you made to restore the
backup code key files before using Media Center
to record TV programs.
Warning:
procedure before recording TV. If you
open Media Center and use it to record
TV programs before completing this
procedure, you cannot play those TV
programs after you complete this
procedure.
You must perform this
15
Page 16

1 Insert the backup CD you made into a drive.
The drive window opens and shows the disc
contents.
2 Double-click the backup file name. The Backup
or Restore Wizard opens.
3 Click Next.
4 Choose Restore files and settings, and
then click Next.
5 The What to restore window opens. Click
Browse, and the browse window shows the
A drive. Click Browse again, and the window
shows Select file to catalog. Click the dropdown menu arrow and click the optical drive
with the backup CD. Click the backup file
name. Click Open and then click OK.
6 In the Items to restore box, click the plus sign
(+) for the backup file name. The file tree
expands. Click the C: box so a check mark
appears. Click the System State box so a
check mark appears. (The next figure shows the
boxes checked.)
7 Click Next.
8 The Backup or Restore Wizard window shows
the message You have created the following
restore settings. In the window, click the
Advanced button. Click Next.
9 A warning message window opens. Click OK
in the Warning window.
Updated HP Media Center PC Information
16
Page 17

10 Select Replace existing file and then click
Next. Click Next again. Click Finish. The
Restore Progress window opens.
11 Wait until the process completes, and then click
Close in the Restore Progress window.
12 A Backup Utility message window opens. Click
Yes to restart the PC. Wait until the restart
completes.
Open Media Center and complete the setup. You
can now play previously recorded TV programs
that are broadcaster-encrypted.
When you click this icon, the Shared
Documents folder on the hard disk
drive (C drive) opens and lists your
recorded TV shows by name.
The recording quality determines the size of the
file created for the recorded program. Best is the
pre-set recording quality setting. A two-hour
program recorded at Best quality produces a
large file that will not fit on one DVD. The
following table lists the recording quality and
the estimated number of minutes that fit onto
one DVD.
Using MyDVD to Copy Recorded
TV Programs to DVD
You can use MyDVD to write your recorded TV
shows to DVD for viewing and playing in a home
DVD player.
Your MyDVD program has an icon called
Get Recorded TV Shows.
Updated HP Media Center PC Information
Recording quality Minutes on one DVD (est.)
Best 80
Better 95
Good 110
Fair 190
The MyDVD program shows
you the available DVD space.
17
Page 18

This informs you when you’ve selected too
many shows (or the required space is too
large) to go onto the DVD. In this case, use the
MyDVD program to “tip and tale” trim the file,
creating two smaller files to store onto two
independent DVDs.
5 Use the arrow buttons to select the Quality
option, and then press OK on the remote
control to change the setting until Good is
selected. Select OK in the window and then
press OK on the remote control again to enter
the change.
You cannot change the recording quality of
a program after it is recorded.
To change the Recording Quality setting:
1 In the Media Center Start menu, select
Settings.
2 Select TV/DVD.
3 Select Recorder.
4 Select Defaults.
Updated HP Media Center PC Information
18
6 Press the Back button on the remote control
to return to the main Settings menu.
Switching Display Devices
When you connect more than one display device
(CRT monitor, flat panel monitor, TV, etc.) to the
PC, you can quickly change where the PC desktop
appears by pressing Alt+F5. Each time you press
the Alt+F5 key combination, the PC display
appears on the next device.
If Alt+F5 does not work, restart the PC and
try again.
Page 19

Updated Information
about Software Programs
The following information updates software
program information in your Hardware Guide.
InterVideo WinDVD lets you watch DVD
movies and video using an interactive menu.
www.myhpclub.com is a special Web site
for HP Pavilion home PC owners, including
owners of Media Center PC. You will find fun
projects, important product notices, support
updates, tips, and special offers from HP; just
press the HP button on the keyboard or enter
the address in your Internet Web browser.
GameChannel is a Web site where you
can play cool 3-D games from WildTangent.
It provides the best online gaming experience
available today, and the games are updated
all the time.
Quicken 2003 New User Edition is a
program for new users that is available on
your PC. Start organizing your finances with
Quicken: Balance your checkbook quickly, pay
bills easily, track spending, and save time!
Updated HP Media Center PC Information
19
Page 20

 Loading...