

Page 1

H
Reference
Guide
HP 81101A 50 MHz
Pulse Generator
Page 2

Front Panel Display and Softkeys
Mode / Parameter Area
Use the CURSOR keys to move
the entry focus to a mode,
parameter format, or
parameter value
Per 1.000µs Normal
Delay1 0ps
Width
LeadE
TraiE
100.0ns
5.00ns
=LeadE
OUTPUT TRG-LEVLIMITSMODE/TRG
Press a SOFTKEY to access
the required entry screen
Screen Selection Area
Modify / Enter Area
Entry Focus
OFF
Offset
Amplit
+0.0mV
1.00V
50Ω into 50.0Ω
MODE/TRG TRG-LEV MEMCARD CONFIG
Use the KNOB to select a
mode or modify parameters
and formats
Press ENTER or a UNIT key to
confirm parameter changes
MODIFY
*OFF
ON
Press MORE key to access
the additional screen menus:
GRAPH
MORE
Page 3

Reference Guide
HP 81101A 50 MHz
Pulse Generator
HP Part No. 81101-91011
Printed in Germany September 1998
Edition 1.0, E0998
Page 4

Notice
Notice
Copyright
1998 Hewlett-Packard GmbH
Herrenberger Str. 110–140
71034 Boeblingen
Germany
All rights reserved. Reproduction, adaptation or translation without prior
written permission is prohibited, except as allowed under the copyright
laws.
Warranty
This Hewlett-Packard product has a warranty against defects in material
and workmanship for a period of three years from date of shipment.
During the warranty period, Hewlett-Packard Company will, at its option,
either repair or replace products that prove to be defective. For warranty
service or repair, this product must be returned to a service facility
designated by Hewlett-Packard. The Buyer shall pay Hewlett-Packard's
round-trip travel expenses. For products returned to Hewlett-Packard for
warranty service, the Buyer shall prepay shipping charges to HewlettPackard and Hewlett-Packard shall pay shipping charges to return the
product to the Buyer. However, the Buyer shall pay all shipping charges,
duties and taxes for products returned to Hewlett-Packard from another
country. Hewlett-Packard warrants that its software and firmware
designated by Hewlett-Packard for use with an instrument will execute
its programming instructions when properly installed on that instrument.
Hewlett-Packard does not warrant that the operation of the instrument
software, or firmware, will be uninterrupted or error free.
4
Page 5

Notice
Limitation of Warranty
The foregoing warranty shall not apply to defects resulting from
improper or inadequate maintenance by the Buyer, Buyer-supplied
software or interfacing, unauthorized modification or misuse, operation
outside of the environmental specifications for the product, or improper
site preparation or maintenance.
No other warranty is expressed or implied. Hewlett-Packard specifically
disclaims the implied warranties of merchantability and fitness for a
particular purpose.
Exclusive Remedies
The remedies supplied are the Buyer’s sole and exclusive remedies.
Hewlett-Packard shall not be liable for any direct, indirect, special,
incidental, or consequential damages, whether based on contract, tort or
any other legal theory.
Assistance
Product maintenance agreements and other customer assistance
agreements are available for Hewlett-Packard products. For any
assistance, contact your nearest Hewlett-Packard Sales Office.
Certification
Hewlett-Packard Company certifies that this product met its published
specifications at the time of shipment. Hewlett-Packard further certifies
that its calibration measurements are traceable to the United States
Institute of Standards and Technology, to the extent allowed by the
Institute's calibrating facility, and to the calibration facilities of other
International Standards Organization members.
5
Page 6

About this Book
About this Book
This guide provides reference information primarily for programming the
HP 81101A via remote control.
Chapter 1 “General Programming Aspects” on page 13 gives general
hints for programming instruments like the HP 81101A using SCPI
commands.
Chapter 2 “Programming Reference” on page 25 provides detailed
information on the SCPI commands supported by the instrument.
Chapter 3 “Specifications” on page 89 lists the instrument’s technical
specifications and provides exact definitions for the instrument’s
parameters.
For an introduction and information on the HP 81101A’s user interface,
please refer to the Quick Start Guide, p/n 81101-91010.
6
Page 7

About this Book
Conventions Used in this Book
This book uses certain conventions to indicate elements of the
HP 81101A’s user interface. The following table shows some examples:
Softkeys Press the MODE/TRG softkey to access the Mode/
Trigger screen.
Hardkeys Press the MORE key to switch to the alternative
softkey layout.
Alternate Keys Press SHIFT + 0 (ON/OFF) to switch on the output.
The alternate key label—which is selected by
pressing the SHIFT key—is given in parentheses.
Screen Quotes Move the entry focus down to P
turn the knob to select
INTERNAL
ULSE-PERIOD
PLL.
and
Entry Focus The highlight field, that can be moved with the
cursor keys, to change modes, parameters, or
parameter formats.
:VOLTage:HIGH 3V
Full command for programming a 3 V high level.
The upper case letters represent the short form
of the command, which results in faster programming times.
*RST Common IEE 488 command, to reset instrument
to default status.
7
Page 8

Safety Information
Safety Information
Safety
This is a Safety Class 1 instrument (provided with terminal for protective
earthing). Before applying power, verify that the correct safety
precautions are taken (see the following warnings). In addition, note the
external markings on the instrument that are described under Safety
Symbols. Do not operate the instrument with its covers removed.
Replace fuse only with specified type.
Warning
Before turning on the instrument, you must connect the protective earth
terminal of the instrument to the protective earth conductor of the
(mains) power cord. The mains plug must only be inserted in a socket
outlet with a protective earth contact. Do not negate the protective
action by using an extension power cord without a protective grounding
conductor. Grounding one conductor of a two-conductor outlet is not
sufficient protection.
Service instructions are for trained service personnel. To avoid
dangerous electric shock, do not perform any service unless qualified to
do so. Do not attempt internal service or adjustment unless another
person, capable of rendering first aid and resuscitation, is present.
If you energize this instrument using an auto-transformer (for voltage
reduction) make sure that the common terminal is connected to the earth
terminal of the power source.
Whenever it is likely that the ground protection is impaired, you must
make the instrument inoperative and secure it against any unintended
operation.
Do not operate the instrument in the presence of flammable gases or
fumes. Operation of any electrical instrument in such an environment
constitutes a definite safety hazard.
Do not install substitute parts or perform any unauthorized modification
to the instrument.
8
Page 9

Safety Information
Capacitors inside the instrument may retain a charge even if the
instrument is disconnected from its source of supply.
Safety Symbols
Instruction Manual symbol: The instrument is marked with this symbol
when it is necessary for you to refer to the instruction manual in order to
protect against damage to the instrument.
Protected conductor symbol.
In the manuals:
WARNING
CAUTION Cautions call attention to a procedure, practice, or the like, which, if not
Warnings call attention to a procedure, practice, or the like,
which, if not correctly performed or adhered to, could result in
personal injury or loss of life. Do not proceed beyond a Warning
until the indicated conditions are fully understood and met.
correctly performed or adhered to, could result in damage to or
destruction of part or all of the equipment. Do not proceed beyond a
Caution until the indicated conditions are fully understood and met.
9
Page 10

Safety Information
10
Page 11

Contents
Notice ......................................................................................... 4
About this Book ......................................................................... 6
Safety Information .................................................................... 8
Chapter 1
Chapter 2
General Programming Aspects
The HP-IB Interface Bus ......................................................... 14
HP 81101A Remote Control .................................................... 15
Programming Recommendations ............................................ 16
Common Command Summary ................................................. 18
Status Model ............................................................................ 19
Programming Reference
HP 81101A SCPI Command Summary .................................... 26
Default Values, Standard Settings ......................................... 31
Programming the Instrument Trigger Modes ........................ 35
SCPI Instrument Command List ............................................ 38
xi
Page 12

Contents
Chapter 3 Specifications
Declaration of Conformity ..................................................... 90
HP 81101A Specifications ...................................................... 91
General ................................................................................................... 91
Timing Specifications ........................................................................... 93
Level Specifications .............................................................................. 96
Clock Sources ........................................................................................ 97
Output Modes ........................................................................................ 99
Trigger Modes ...................................................................................... 100
Trigger and Strobe Specifications ..................................................... 101
Human Interface .................................................................................. 103
Memory ................................................................................................. 103
Remote Control ................................................................................... 104
Pulse Parameter Definitions ................................................ 105
xii
Page 13

1General Programming
1
Aspects
This chapter provides general information on writing HP-IB/SCPI
programs for instruments like the HP 81101A.
Detailed information on programming the HP 81101A can be found in
Chapter 2 “Programming Reference” on page 25.
13
Page 14

General Programming Aspects
The HP-IB Interface Bus
The HP-IB Interface Bus
The Hewlett-Packard Interface Bus is the interface used for
communication between a controller and an external device, such as the
HP 81101A. The HP-IB conforms to IEEE standard 488-1987, ANSI
standard MC 1.1, and IEC recommendation 625-1.
If you are not familiar with the HP-IB, please refer to the following
books:
•
Hewlett-Packard Company: Publication 5952-0156, Tutorial
Description of Hewlett-Packard Interface Bus.
•
The Institute of Electrical and Electronic Engineers: IEEE Standard
488.1-1987, IEEE Standard Digital Interface for Programmable
Instrumentation.
•
The Institute of Electrical and Electronic Engineers: IEEE Standard
488.2-1987, IEEE Standard Codes, Formats, and Common
Commands for Use with IEEE Standard 488.1-1987.
In addition, the commands not from the IEEE 488.2 standard are defined
according to the Standard Commands for Programmable Instruments
(SCPI). For an introduction to SCPI and SCPI programming techniques,
refer to the following documents:
•
Hewlett-Packard Press (Addison-Wesley Publishing Company, Inc.):
A Beginners Guide to SCPI by Barry Eppler, 1991.
•
The SCPI Consortium: Standard Commands for Programmable
Instruments, published periodically by various publishers. To obtain a
copy of this manual, contact your Hewlett-Packard representative.
14
Page 15

General Programming Aspects
HP 81101A Remote Control
HP 81101A Remote Control
HP-IB Address You can only set the HP-IB address from the front panel of the instrument
(refer to the Quick Start Guide).
The default HP-IB address is 10.
Modes of
Operation
The HP 81101A has two modes of operation:
•
Local
The instrument is operated using the front panel keys.
•
Remote
After receiving the first command or query via the HP-IB, the
instrument is put into remote state. The front panel is locked.
To return to local operating mode, press SHIFT (LOCAL).
15
Page 16

General Programming Aspects
Programming Recommendations
Programming Recommendations
Here are some recommendations for programming the instrument:
•
Start programming from the default setting. The common command
for setting the default setting is:
*RST
•
Switch off the automatic update of the display to increase the
programming speed. The device command for switching off the
display is:
:DISPlay OFF
•
The SCPI standard defines a long and a short form of the commands.
For fast programming speed it is recommended to use the short
forms. The short forms of the commands are represented by upper
case letters. For example the short form of the command to set 100 ns
double pulse delay is:
:PULS:DOUB:DEL 100NS
•
To improve programming speed it is also allowed to skip optional
subsystem command parts. Optional subsystem command parts are
depicted in square brackets, e.g.: enable double pulse mode by
[SOURce]:PULSe:DOUBle[1] [:STATe] O N|OFF. Sufficient to use:
:PULS:DOUB ON
•
For the commands to set the timing and level parameters, except of
period/frequency, you can explicitly specify output 1 (for
compatibility reasons). If there is no output specified, the commands
will set the default output 1.
So, for setting a high level of 3 Volts for output 1 the commands are:
:VOLT:HIGH 3V # sets high level of 3 V at out 1
:VOLT1:HIGH 3V # sets high level of 3 V at out 1
•
It is recommended to test a new setting that will be programmed on
the instrument by setting it up manually.
Enable the outputs so that the instrument’s error check system is on
and possible parameter conflicts are immediately displayed.
16
Page 17

General Programming Aspects
Programming Recommendations
When you have found the correct setting, then use this to create the
program. In the program it is recommended to send the command for
enabling outputs (for example, :OUTPut ON) as the last command.
With this procedure it is possible to switch off the error check system
(:SYSTem:CHECk OFF) to increase programming speed.
The error check is enabled again by sending *RST.
*RST # set default settings
:DISP OFF # switch off display update
:SYST:CHEC OFF # switch off error check
... # other commands to set modes
... # and parameters
:OUTP ON # enable the output
• Selftest of the instrument can be invoked by the common command
*TST
• If it is important to know whether the last command is completed,
then send the common command
*OPC?
17
Page 18

General Programming Aspects
Common Command Summary
Common Command Summary
This table summarizes the IEEE 488.2 common commands supported by
the HP 81101A:
Command Parameter Description
*CLS – Clear the status structure
*ESE <0–255> Set the Standard Event Status register mask
*ESE? – Read the state of the Standard Event Status enable register
*ESR? – Read the state of the Standard Event Status event register
*IDN? – Read the Instrument's Identification string
*LRN? – Read the complete Instrument Setting
*OPC – Set the Operation Complete bit when all pending actions
are complete
*OPC? – Read the status of the Operation Complete bit
*OPT? – Read the installed options
*RCL <0–9> Recall a complete Instrument Setting from memory
*RST – Reset the instrument to standard settings
*SAV <1–9> Save the complete Instrument Setting to memory
*SRE <0–255> Set the Service Request Enable Mask
*SRE? – Read the Service Request Enable Mask
*STB? – Read the Status Byte
*TRG – Trigger
*TST? – Execute instrument’s selftest
*WAI – Wait until all pending actions are complete
18
Page 19
Status Model
TIONABLE STATUS
QUES
Voltage Warning
Current Warning
Timi ng War ning
Frequency Warning
Operation Complete
Query Error
Device Dependent Error
Execution Error
Command Error
Power On
0
1
2
3
4
5
6
7
8
9
15
OPERation Status
(NOT USED)
0
1
2
3
4
5
6
7
8
9
15
Standard Event Status
0
1
2
3
4
5
6
7
MAV
SRQ
Status
Byte
0
1
2
3
4
5
6
7
General Programming Aspects
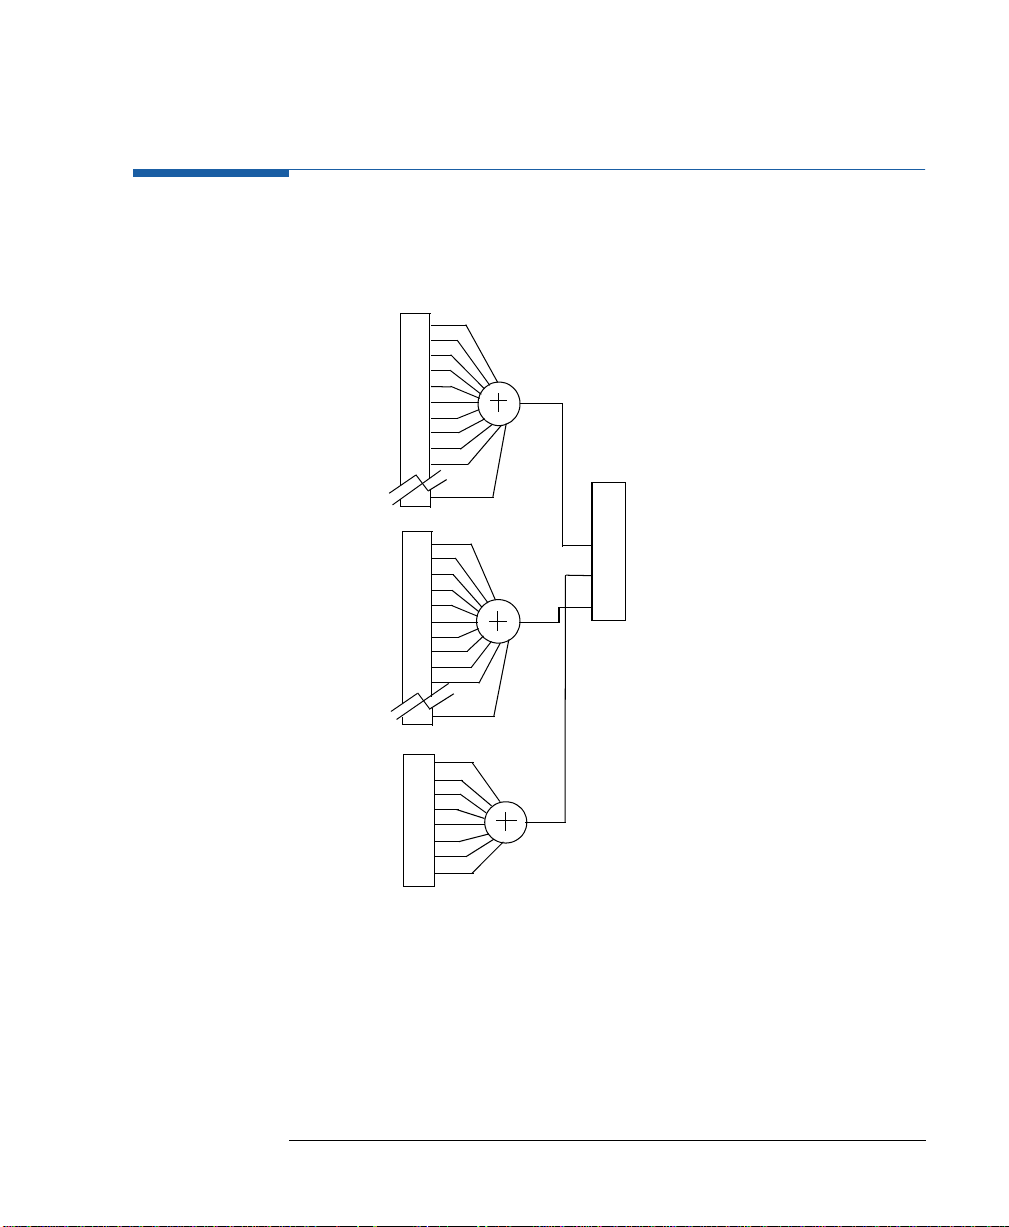
Status Model
The instrument has a status reporting system conforming to IEEE 488.2
and SCPI. The above figure shows the status groups available in the
instrument.
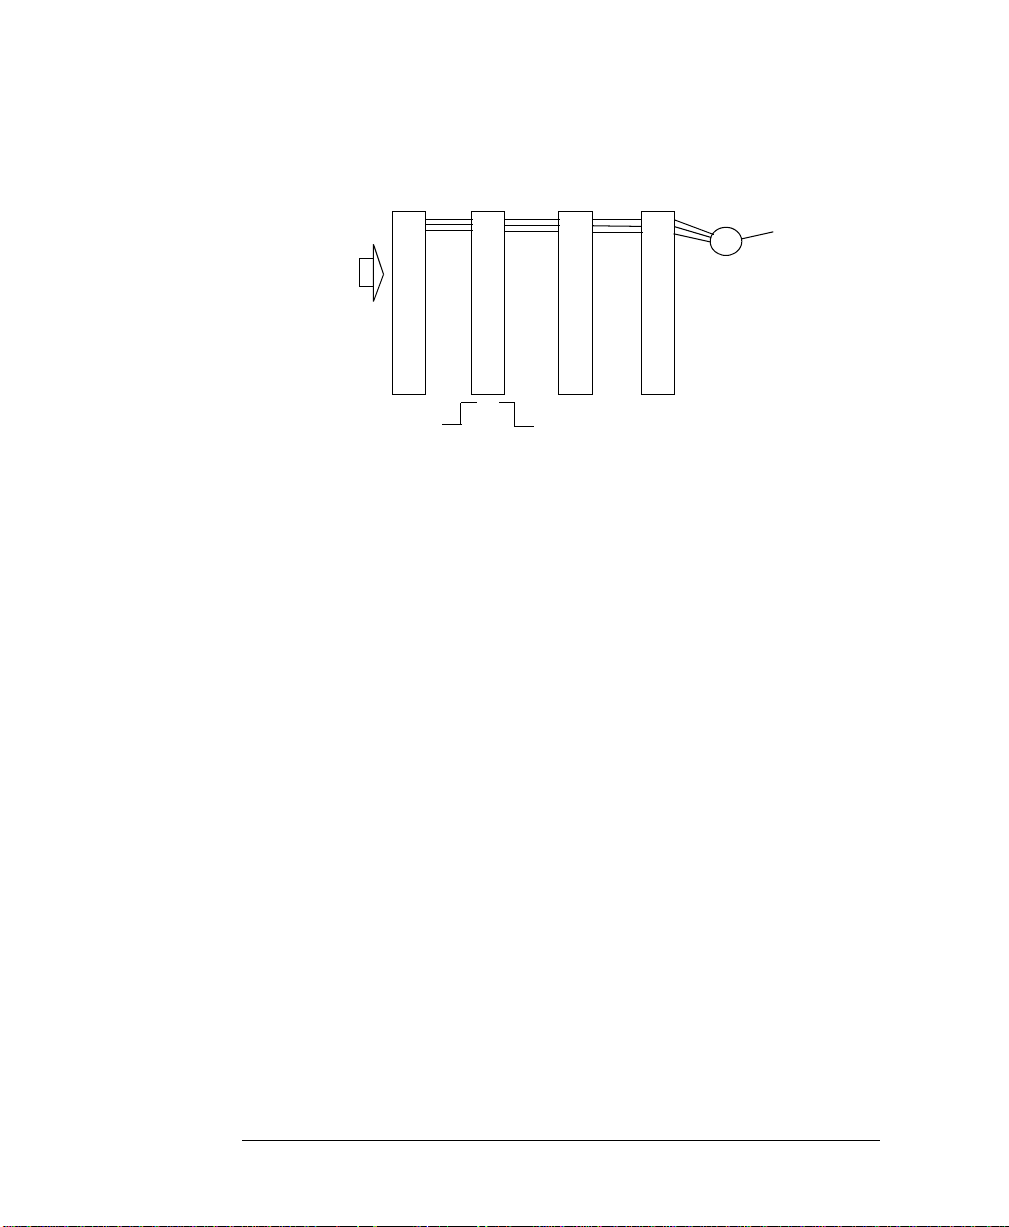
Each status group is made up of component registers, as shown in the
following figure.
19
Page 20
General Programming Aspects
Conditi
T
E
Enabl
Status Model
Register
on
ransition
Filters
vent
Register
e
Register
Summary Bit
Hardware
and Firmware
condition
1
0
PTR NTR
1
0
OR
Latched
Condition Register
A condition register contains the current status of the hardware and
firmware. It is continuously updated and is not latched or buffered. You
can only read condition registers. If there is no command to read the
condition register of a particular status group, then it is simply invisible
to you.
Transition Filters
Transition filters are used to detect changes of state in the condition
register and set the corresponding bit in the event register. You can set
transition filter bits to detect positive transitions (PTR), negative
transitions (NTR) or both. Transition filters are therefore read/write
registers. They are unaffected by *CLS.
Event Register
An event register latches transition events from the condition register as
specified by the transition filters or records status events. Querying
(reading) the event register clears it, as does the *CLS command. There is
no buffering, so while a bit is set, subsequent transition events are not
recorded. Event registers are read only.
20
Page 21

General Programming Aspects
Status Model
Enable Register
The enable register defines which bits in an event register are included in
the logical OR into the summary bit. The enable register is logically
ANDed with the event register and the resulting bits ORed into the
summary bit. Enable registers are read/write, and are not affected by
or querying.
*CLS
Although all status groups have all of these registers, not all status
groups actually use all of the registers. The following table summarizes
the registers used in the instrument status groups.
Registers in Group
Status Group
QUEStionable
*ESR?
*ESE
*STB?
*SRE
1
to query.
to set,
to query
to set,
OPERation
Standard Event Status
Status Byte
1 Present, but not used. COND and EVEN always 0.
2 Use
3 Use
4 Use
5 Use
CONDition NTR PTR EVENt ENABLe
√ √ √ √ √
xxxxx
xxx
xxx
to query
*ESE?
to query
*SRE?
2
√
4
√
3
√
5
√
21
Page 22

General Programming Aspects
Status Model
Status Byte
The status byte summarizes the information from all other status groups.
The summary bit for the status byte actually appears in bit 6 (RQS) of the
status byte. When RQS is set it generates an SRQ interrupt to the
controller indicating that at least one instrument on the bus requires
attention. You can read the status byte using a serial poll or *STB?
Bit Description
0 Unused, always 0
1 Unused, always 0
2 Unused, always 0
3 QUESTionable Status Summary Bit
4 MAV—Message AVailable in output buffer
5 Standard Event Status summary bit
6 RQS; ReQuest Service
7 OPERation Status summary Bit, unused
Standard Event Status Group
Bit Description
0 Operation Complete, set by *OPC
1 Unused, always 0
2 Query Error
3 Device Dependent Error
4 Execution Error
5 Command Error
6 Unused, always 0
7 Power On
22
Page 23

OPERation Status Group
This Status Group is not used in the instrument.
Bit Description
0 Unused, always 0
1 Unused, always 0
2 Unused, always 0
3 Unused, always 0
4 Unused, always 0
5 Unused, always 0
6 Unused, always 0
7 Unused, always 0
8 Unused, always 0
9 Unused, always 0
General Programming Aspects
Status Model
10 Unused, always 0
11 Unused, always 0
12 Unused, always 0
13 Unused, always 0
14 Unused, always 0
15 Always 0
23
Page 24

General Programming Aspects
Status Model
QUEStionable Status Group
Bit QUEStionable
0 Voltage warning
1 Current warning
2 Time warning
3 Unused, always 0
4 Unused, always 0
5 Frequency warning
6 Unused, always 0
7 Unused, always 0
8 Unused, always 0
9 Unused, always 0
10 Unused, always 0
11 Unused, always 0
12 Unused, always
13 Unused, always 0
14 Unused, always 0
15 Always 0
The QUEStionable Status group is used to report warning conditions
amongst the voltage, current, pulse timing and frequency parameters.
Warnings occur when a parameter, although not outside its maximum
limits, could be causing an invalid signal at the output because of the
actual settings and uncertainties of related parameters.
24
Page 25

2
2Programming Reference
This chapter provides reference information on the following topics:
•
“HP 81101A SCPI Command Summary” on page 26
•
“Default Values, Standard Settings” on page 31
•
“Programming the Instrument Trigger Modes” on page 35
•
“SCPI Instrument Command List” on page 38
For general programming information, please refer to Chapter 1
“General Programming Aspects” on page 13.
25
Page 26

Programming Reference
HP 81101A SCPI Command Summary
HP 81101A SCPI Command Summary
Command Parameter Description
:ARM
[:SEQuence[1] | :STARt]
[:LAYer[1]]
:EWIDTh
[:STATe]
:FREQuency
:IMPedance
:LEVel
:PERiod
:SENSe
:SLOPe
:SOURce
ON|OFF|1|0 Set/read External Width mode
<value> Set/read trigger frequency, when
<value> Set/read impedance at EXT INPUT
<value> Set/read threshold level at EXT INPUT
<value> Set/read trigger period, when PLL(INT2)
EDGE|LEVel Set/read trigger on edge or gate on level
POS|NEG|EITH Set/read trigger slope at EXT INPUT
IMM|INT2|EXT|MAN Set/read trigger source
(Trigger mode and source)
PLL(INT2) used as source
used as source
(VCO|PLL|EXT INPUT|MAN key)
see
page
39
39
40
40
41
42
42
43
:DISPlay
[:WINDow]
[:STATe]
:MMEMory
:CATalog?
:CDIRectory
:COPY
:DELete
:INITialize
:LOAD
:STATe
:STORe
:STATe
26
ON|OFF|1|0 Set/read front panel display state
[A:] Read directory of memory card
[<name>] Change directory on memory card
<source>[,A:],<dest>[,A:] Copy a file on memory card
<name>[,A:] Delete a file from memory card
[A:[DOS]] Initialize memory card to DOS format
<n>,<name> Load file from memory card to memory n
<n>,<name> Store memory n to memory card
43
44
44
45
45
45
46
46
Page 27

Programming Reference
HP 81101A SCPI Command Summary
Command Parameter Description
:OUTPut[1]
[:NORMal]
[:STATe]
:IMPedance 47
[:INTernal]
:EXTernal
:POLarity
[:SOURce]
:CURRent[1]
[:LEVel]
[:IMMediate]
[:AMPLitude]
:OFFSet
:HIGH
:LOW
:LIMit
[:HIGH]
:LOW
:STATe
:FREQency
[:CW | :FIXed]
:AUTO
:HOLD[1]
:PHASe[1]
[:ADJust]
:PULSe
:DCYCLe[1]
:DELay[1]
:HOLD
:UNIT
OFF|ON|1|0 Set/read normal output state
<value> Set/read internal source impedance of
output
<value> Set/read expected external load imped-
ance at output
NORM|INV Set/read output polarity
<value> Set/read channel amplitude current
<value> Set/read channel offset current
<value> Set/read channel high level current
<value> Set/read channel low level current
Set/read maximum current limits
Set/read minimum current limits
ON|OFF|1|0 Enable/Disable the current limits
<value> Set/read frequency of pulses
ONCE Measure frequency at CLK-IN
VOLT|CURR Switch between VOLtage and CURRent
command subtrees
<value> Set/read channel phase
<value> Set/read channel duty cycle
<value> Set/read channel delay (to leading edge)
TIME|PRATio Hold absolute delay|phase delay fixed
with varying frequency
S|SEC|PCT|DEG|RAD Set/read delay units
see
page
47
48
48
49
50
51
52
53
53
54
55
55
56
57
57
58
59
27
Page 28

Programming Reference
HP 81101A SCPI Command Summary
Command Parameter Description
:DOUBle[1]
[:STATe]
:DELay
:HOLD
:UNIT
:HOLD[1]
:PERiod
:AUTO
:TDELay[1]
:TRANsition[1]
:HOLD
:UNIT
[:LEADing]
:TRAiling
:AUTO
:TRIGger[1]
:VOLTage
:WIDTh[1]
OFF|ON Enable/disable double pulses per pulse
period
<value> Set/read delay between double pulses
TIME|PRATio Hold absolute delay|phase delay fixed
with varying frequency
S|SEC|PCT Set/read delay units
WIDTh|DCYCle|TDELay Hold Width|Duty cycle|Trailing edge de-
lay fixed with varying frequency
<value> Set/read pulse period
ONCE Measure pulse period at CLK-IN
<value> Set/read trailing edge delay
TIME|WRATio Hold absolute transitions|transitions as
width ratio fixed with varying width per
period
S|SEC|PCT Set/read transition time units
<value> Set/read leading edge transition
<value> Set/read trailing edge transition
OFF|ON|ONCE Couple trailing edge to leading edge
TTL|ECL Set/read TRIGGER|STROBE OUTput
levels
<value> Set/read channel pulse width
see
page
59
60
61
61
62
62
63
63
64
65
65
66
67
67
68
[:SOURce]
:ROSCillator
:SOURce
:EXTernal
:FREQuency
:VOLTage[1]
[:LEVel]
[:IMMediate]
[:AMPlitude]
28
INTernal|EXTernal Set/read PLL reference source
<value> Set/read frequency of external PLL
reference
<value> Set/read channel amplitude voltage
68
69
70
Page 29

HP 81101A SCPI Command Summary
Command Parameter Description
:OFFset
:HIGH
:LOW
:LIMit
[:HIGH]
:LOW
:STATe
:STATus
:OPERation
[:EVENt]?
:CONDition
:ENABle
:NTRansition
:PTRansition
:PREset
:QUEStionable
[:EVENt]?
:CONDition?
:ENABLe
:NTRansition
:PTRansition
<value> Set/read channel offset voltage
<value> Set/read channel high level voltage
<value> Set/read channel low level voltage
Set/read maximum voltage limit
Set/read minimum voltage limit
ON|OFF|1|0 Enable|Disable the voltage limits
Read Operation event register
Numeric Read Operation condition register
Numeric Set/Read Operation enable register
Numeric Set/Read Operation negative transition
register
Numeric Set/Read positive transition register
Clear and preset status groups
Read Questionable event register
Read Questionable condition register
Numeric Set/Read Questionable enable register
Numeric Set/Read Questionable negative transi-
tion register
Numeric Set/Read Questionable positive transi-
tion register
Programming Reference
see
page
71
72
73
74
74
75
75
76
76
:SYSTem
:CHECk
[:ALL]
[:STATe]
:ERRor?
:KEY
:PRESet
:SECurity
OFF Switch error checking off
Read error queue
Numeric Simulate key press or read last key
pressed
no function
78
78
79
81
29
Page 30

Programming Reference
HP 81101A SCPI Command Summary
Command Parameter Description
[:STATe]
:SET
:VERSion?
:WARNing
[:COUNt]?
:STRing?
:BUFFer?
:TRIGger
[:SEQuence [1] | :STARt]
:COUNt
:IMPedance
:LEVel
:SLOPe
:SOURce
ON|OFF Switch security on and off
Block data Set/read complete instrument setting
Read SCPI compliance setting
Read number of active warnings
Read active warnings as concatenated
string
Read maximum possible length of con-
catenated string
(Pulse mode and period source)
<value> Set/read number of triggered periods to
be generated per ARM event
<value> Set/read impedance at CLK-IN
<value> Set/read threshold level at CLK-IN
POS|NEG Set/read trigger slope at CLK-IN
IMM | INT[1] | INT2 |EXT Set/read trigger source
(IMM | VFO | PLL | CLK-IN)
see
page
82
83
83
83
84
84
84
85
86
86
86
30
Page 31

Programming Reference
Default Values, Standard Settings
Default Values, Standard Settings
Parameter *RST, Default Values
:ARM : EWIDth:STATe OFF
:FREQuency 100kHz
:IMPedance 50
:LEVel +1.00V
:PERiod 10.00µs
:SENSe EDGE
:SLOPe POS
:SOURce IMMediate
:DISPlay [:WINDow] [:STATe] ON
:MMEMory :CATalog? not applicable
:CDIRectory not applicable
:COPY not applicable
:DELete not applicable
:INITialize not applicable
:LOAD :STATe not applicable
:STORe:STATe not applicable
:OUTPut[1][:NORMal][:STATe] OFF
:IMPedance[:INTernal] 50
:EXTernal 50.0
:POLarity NORMal
[:SOURce]:CURRent[1][:LEVel][:IMM][:AMPL] 20.0mA (from 50Ω into 50Ω)
:OFFset 0.0mA (from 50Ω into 50Ω)
:HIGH +10.0mA (from 50Ω into 50Ω)
:LOW –10.0mA (from 50Ω into 50Ω)
:LIMit[:HIGH] +10.0mA
Ω
Ω
Ω
31
Page 32

Programming Reference
Default Values, Standard Settings
Parameter *RST, Default Values
:LOW –10.0mA
:STATe OFF
:FREQ [:CW|:FIXed] 1.00MHz
:AUTO not applicable
:HOLD VOLT
:PHASe[1][:ADJust] 0.0
:PULSe:
:DCYCle[1] 10.0% (derived from Width and Period)
:DELay[1] 0.0
:HOLD TIME
:UNIT S
:DOUBle[1][:STATe] OFF
:DELay 250 ns
:HOLD TIME
:UNIT S
:HOLD[1] WIDTh
[:SOURce]:PULSe:PERiod 1µs
:AUTO not applicable
:TDELay[1] 100ns
:TRANsition[1|2]:HOLD TIME
:UNIT S
[:LEADing] 5.0 ns
:TRAiling 5.0 ns
:AUTO ON
:TRIGger[1]:VOLTage TTL
:WIDTh[1] 100ns
:ROSCillator:SOURce INTernal
:EXTernal:FREQ 5MHz
32
Page 33

Programming Reference
Default Values, Standard Settings
Parameter *RST, Default Values
[:SOURce]:VOLTage[1]
:LEVel]
[IMMediate]
[:AMPLitude] 1.0V
:OFFSet 0.0V
:HIGH 500mV
:LOW –500mV
:LIMIt[:High] +500V
:LOW –500V
:STATe OFF
:STATus: :OP ERation not applica ble
:PRESet not applicable
:QUEStionable[:EVENt]? not applicable
:CONDition? not applicable
:ENABle not applicable
:NTRansition not applicable
:PTRansition not applicable
:SYSTem :CHECk [:ALL][:STATe] ON
:ERRor? not applicable
:KEY +255
:PRESet not applicable
:SECurity[:STATe] OFF
:SET not applicable
:VERSion "1992.0
:WARNing[:COUNt]? not applicable
:STRing? not applicable
:BUFFer? not applicable
:TRIGger :COUNt 1
:IMPedance 50
Ω
33
Page 34

Programming Reference
Default Values, Standard Settings
Parameter *RST, Default Values
:LEVel 1.0V
:SLOPe POSitive
:SOURce IMMediate
34
Page 35

Programming Reference
Programming the Instrument Trigger Modes
Programming the Instrument
Trigger Modes
The following figure shows the instrument’s arming/triggering model:
:ARM Event detection layer
:ARM:SOURce IMMediate (Internal VFO)
INTernal2 (Internal PLL)
EXTernal (EXT INPUT)
Manual (MAN key)
:TRIGger Event detection layer
:TRIGger:SOURce IMMediate (Internal VFO)
INTernal2 (Internal PLL)
EXTernal2 (CLK IN)
:TRIGger:COUNt n
You program the comprehensive triggering capabilities of the instrument
using the SCPI :ARM and :TRIGger subsystems. Using these two
command subsystems you can program the operating modes of the
instrument, which are set up using the M
panel.
:ARM:SENSe EDGE (Triggered)
LEVel (Gated)
armed?
yes
triggered?
yes
generate
pulse period and
increment counter
COUNTER = :TRIG:COUNt?
yes
reset counter
ODE/TRIGGER SCREEN
no
no
no
on the front
35
Page 36

Programming Reference
Programming the Instrument Trigger Modes
Use the :ARM subsystem to select the overall triggering mode of the
instrument (CONTINUOUS, TRIGGERED, GATED, EXT WIDTH), and the
:TRIGger subsystem to select the pulse period source, triggering and
number of pulse periods per :ARM event (BURST or PATTERN length).
Continuous
Set Continuous mode by arming the instrument from its internal
oscillator:
:ARM:SOURce IMMediate Arm from internal oscillator.
Tri gg er ed
Set Triggered mode by arming the instrument on edges from the EXT
INPUT:
:ARM:SOURce EXTernal1 Arm from EXT INPUT
:ARM:SENSe EDGE Arm on edge
:ARM:SLOPe POSitive Arm on positive edge
:ARM:LEVel 1V Set EXT INPUT threshold
You can also arm the instrument from the PLL and set the frequency (or
period) of the PLL to the required triggering rate:
:ARM:SOURce INTernal2 Arm from PLL
:ARM:SENSe EDGE Arm on edge
:ARM:SLOPe POSitive Arm on positive edge
:ARM:FREQuency <value> Set PLL frequency
NOTE The PLL (INTernal2) cannot be used as :ARM:SOURce (triggering rate) if
it is already being used as :TRIGger:SOURce (pulse period source).
Gated
Set Gated mode by arming the instrument on levels from the EXT INPUT:
:ARM:SOURce EXTernal1 Arm from EXT INPUT
:ARM:SENSe LEVel Arm on signal level
:ARM:SLOPe POSitive Arm on positive level
36
Page 37

Programming Reference
Programming the Instrument Trigger Modes
External Width
Set External Width mode using the :EWIDth[:STATe ] command:
:ARM:EWIDth ON Switch on EXT WIDTH mode
This command disables the arm-trigger system. The arm-trigger system is
reenabled by switching OFF EWIDth mode.
Pulses
Set Pulses mode by setting the :TRIGger:COUNt to 1 so that a single
triggered pulse period is generated for every arm event. The trigger
source sets the pulse period:
:TRIGger:COUNt 1 Single pulse period per arm event
:TRIGger:SOURce INTernal1 Pulse period f rom internal osc.
:DIGital:PATTern OFF Disable pattern data.
Pulse period Source :TRIGger SOURce
internal OSC.
internal PLL
CLK-IN
INTernal[1]
INTernal2
EXTernal2
NOTE The internal PLL (INTernal2) cannot be used as :TRIGger:SOURce
(pulse period source) if it is already being used as ARM:SOURce
(triggering rate).
Note that in triggered pulses mode the pulse period source is not relevant
because a single pulse is generated for each ARM event.
Burst
Set Burst mode by setting the :TRIGger:COUNt to the burst length
required. The trigger source sets the pulse period for the pulses within
the burst.
:TRIGger:COUNt 16 Burst of 16 pulse periods
:TRIGger:SOURce INTernal1 Pulse period from internal osc.
:DIGital:PATTern OFF Disable pattern data
37
Page 38

Programming Reference
SCPI Instrument Command List
SCPI Instrument Command List
The following reference sections list the instrument commands in
alphabetical order. In addition to a command description, the attributes
of each command are described under the following headings. Not all of
these attributes are applicable to all commands. The commands are
conform to the IEEE 488.2 SCPI standard.
Command Shows the short form of the command.
Long Shows the long form of the command.
Form Most commands can be used in different forms:
Set The command can be used to program the instrument
Query The command can be used to interrogate the instru-
ment. Add a ? to the command if necessary.
Event The command performs a one-off action.
Parameter The type of parameter, if any, accepted by the command. The minimum
and maximum value of numeric parameters can be accessed by the
option MINimum or MAXimum.
Parameter Suffix The suffixes that may follow the parameter.
Functional
Coupling
Value Coupling Any other parameter that is also changed by the command.
Range Coupling Any other parameters whose valid ranges may be changed by the
*RST value The value/state following a *RST command.
Specified Limits The specified limits of a parameter.
Absolute Limits Some parameters can be programmed beyond their specified limits.
Example Example programming statements.
Any other commands that are implicitly executed by the command.
command.
38
Page 39

Programming Reference
SCPI Instrument Command List
Command :ARM:EWID
Long
:ARM[:SEQuence[1]|STARt][:LAYer]:EWIDth[:STATe]
Form Set & Query
Parameter
*RST value
ON | OFF | 1 | 0
OFF
Description Use this command to enable the EXT WIDTH trigger mode available on
ODE/TRIGGER SCREEN
the M
the
:ARM
and
:TRIG
. When EXT WIDTH mode is switched on, the rest of
system is disabled.
In EXT WIDTH mode a signal applied to the EXT INPUT determines the
width and period of the output signal(s) from the instrument. You can
still control the edge transition times and levels of the output signal(s).
Command :ARM:FREQ
Long
:ARM[:SEQuence[1]|STARt][:LAYer]:FREQuency[:CW][:FIXed]
Form Set & Query
Parameter Numeric
Parameter Suffix
*RST value
HZ
with engineering prefixes, e.g.:
100 kHz
MHZ
is Megahertz.
Specified Limits 1 mHz to 50 MHz
Description Use this command to program the frequency of the PLL (INTernal2)
when it is used as the
:ARM:SOURce
for internal triggering of pulses,
bursts or patterns.
If you are using the PLL as
use the
[:SOURce]:FREQuency[:CW|:FIXed]
:TRIGger:SOURce
to set the pulse frequency,
command.
Example To set up bursts of four 20 MHz pulses occurring at a burst rate of 2 MHz:
:TRIG:SOUR INT
:FREQ 20 MHZ
:ARM:SOUR INT2
:ARM:SENS EDGE
:ARM:FREQ 2 MHZ
:TRIG:COUNT 4
Select internal osc. as pulse period source
Set pulse frequency to 20 MHz
Select PLL as triggering source
Sense edge of PLL signal
Set triggering frequency to 2 MHz
Set burst length to 4
39
Page 40

Programming Reference
SCPI Instrument Command List
Command :ARM:IMP
Long
:ARM[:SEQuence[1]|STARt][:LAYer]:IMPedance
Form Set & Query
Parameter Numeric
Parameter Suffix
OHM
with engineering prefixes, e.g.:
MOHM
is Megaohms.
*RST value 50 Ω
Specified Limits 50 Ω or 10 kΩ
Description Use this command to program the input impedance of the EXT INPUT
connector. Note that only two settings are available. If you try to program
any other value, it will be rounded to one of the specified values.
Example To set up the input impedance and the triggering threshold of the EXT
INPUT connector:
:ARM:IMP 50OHM
:ARM:LEV 2.5V
Set EXT INPUT impedance to 50
Set EXT INPUT threshold to 2.5 V
Ω
Command :ARM:LEV
Long
:ARM[:SEQuence[1]|STARt][:LAYer]:LEVel
Form Set & Query
Parameter Numeric
Parameter SuffixV with engineering prefixes.
*RST value +1.0 V
Specified Limits –10 V to +10 V
Description Use this command to program the triggering threshold of the EXT INPUT
connector.
Example To set up the input impedance and the triggering threshold of the EXT
INPUT connector:
:ARM:IMP 50OHM
:ARM:LEV 2.5V
Set EXT INPUT impedance to 50
Set EXT INPUT threshold to 2.5 V
Ω
40
Page 41

Programming Reference
SCPI Instrument Command List
Command :ARM:PER
Long
:ARM[:SEQuence[1]|STARt][:LAYer]:PERiod
Form Set & Query
Parameter Numeric
Parameter SuffixS or
SEC
with engineering prefixes.
*RST value 10.00 µs
Specified Limits 20 ns to 999.5 s
Description Use this command to program the period of the PLL (INTernal2) when it
is used as the
:ARM:SOURce
for internal triggering of pulses, bursts or
patterns.
If you are using the PLL as
[:SOURce]:PULSe:PERiod
:TRIGger:SOURce
use the
command to set the pulse period.
Example To set up bursts of four 50 ns pulses occurring every 500 ns:
:TRIG:SOUR INT
:PER 50 NS
:ARM:SOUR INT2
:ARM:SENS EDGE
:ARM:PER 500ns
:ARM:TRIG:COUNT 4
Select internal osc.as pulse period source
Set pulse period to 50 ns
Select PLL as triggering source
Sense edge of PLL signal
Set triggering period to 500 ns
Set burst length to 4
41
Page 42

Programming Reference
SCPI Instrument Command List
Command :ARM:SENS
Long
:ARM[:SEQuence[1]|STARt][:LAYer]:SENSe
Form Set & Query
Parameter
*RST value
EDGE | LEVel
EDGE
Description Use this command to select Triggered or Gated mode by choosing
whether the instrument arms on the edge(s) or level of the arming signal.
When sensing edges, the instrument triggers when the arming signal
crosses the selected threshold level (
:ARM:SLOP
(
). This corresponds to the Triggered mode selected on the
:ARM:LEV
) in the selected direction
Mode/Trigger screen when using the front panel.
When sensing levels, the instrument triggers as long as the arming signal
is above (
:ARM:SLOP POS
threshold level (
selected on the M
), or below (
:ARM:LEV
ODE/TRIGGER SCREEN
). This corresponds to the Gated mode
:ARM:SLOP NEG
) the selected
when using the front panel.
Command :ARM:SLOP
Long
:ARM[:SEQuence[1]|STARt][:LAYer]:SLOPe
Form Set & Query
Parameter
*RST value
POSitive | NEGative | EITHer
POS
Description Use this command to select the trigger slope for the arming signal when
triggering on edges. Use
EITHer
to trigger on both the positive and
negative edges of the arming signal. This allows you to trigger at twice
the frequency of the arming signal.
If you are arming on levels, use this command to select whether the
instrument triggers during the positive or negative cycle of the arming
signal.
42
Page 43

Programming Reference
SCPI Instrument Command List
Command :ARM:SOUR
Long
:ARM[:SEQuence[1]|STARt][:LAYer]:SOURce
Form Set & Query
Parameter
*RST value
IMMediate|INTernal[1]|INTernal2|EXTernal[1]|MANual
IMM
Description Use this command to select the triggering mode of the instrument by
selecting the source of the arming signal:
Triggering Source :ARM:SOURce Mode
Internal Osc.
PLL
EXT INPUT
MAN key
:ARM:SENSe EDGE | LEVel
Use
IMMediate|INTernal[1]
INTernal2
EXTernal1
MANual
to choose between Triggered and
Continuous
Triggered | Gated by PLL
Triggered | Gated by EXT IN
Triggered | Gated by MANKey
Gated.
Command :DISP
Long
:DISPlay[:WINDow][:STATe]
Form Set & Query
Parameter
*RST value
ON | OFF | 1 | 0
ON
Description Use this command to turn the front panel display on and off. Switching
off the display improves the programming speed of the instrument.
*RST switches the display back on. Use
:SYSTem:PRESet
to perform an
*RST without switching the display back on.
Example To switch off the front panel display:
DISP OFF
43
Page 44

Programming Reference
SCPI Instrument Command List
Command :MMEM:CAT?
Long
:MMEMory:CATalog?
Form Query
Parameter
["A:"]
*RST value Not applicable
Description Use this command to get a listing of the contents of the currently
selected directory on the memory card. As there is only one memory card
slot, the parameter A: is optional. The information returned is:
<bytes_used>,<bytes_free>[,<file_entry>]
<bytes_used>
<bytes_free>
<file_entry>
The total number of bytes used on the memory card.
The total number of bytes still available on the memory card.
String containing the name, type and size of one file:
"<file_name>,<file_type>,<file_size>"
The <file_type> is always blank. A directory name has <file_size> = 0.
Command :MMEM:CDIR
Long
:MMEMory:CDIRectory
Form Event
Parameter
["directory_name"]
*RST value Not applicable
Description Use this command to change the current directory on the memory card.
If you don't specify a directory name parameter, the root directory is
selected.
Note that you cannot use DOS pathnames as directory names, you can
only select a directory name within the current directory.
Use the directory name ".." to move back to the parent directory of the
current directory, unless you are already in the root directory "\".
Examples To change to different directories on the memory card:
:MMEM:CDIR
:MMEM:CDIR "PERFORM"
:MMEM:CDIR ".."
Select root directory
Select directory "PERFORM"
Select parent directory
44
Page 45

Programming Reference
SCPI Instrument Command List
Command :MMEM:COPY
Long
:MMEMory:COPY
Form Event
Parameter
"filename"[,"A:"],"copyname"[,"A:"]
*RST Not applicable
Description Use this command to copy an existing file filename in the current
directory to a new file copyname. If copyname is the name of a subdirectory in the current directory, a copy of the file filename is made in
the sub-directory. Use ".." as copyname to copy a file into the parent
directory of the current directory.
Examples To copy files on the memory card:
:MMEM:COPY "test1","test2"
:MMEM:COPY "test1",".."
Copy test1 to test2
Copy test1 into parent directory
Command :MMEM:DEL
Long
:MMEMory:DELete
Form Event
Parameter
"filename"
*RST Not applicable
Description Use this command to delete file filename from the currently selected
directory.
Command :MMEM:INIT
Long
:MMEMory:INITialize
Form Event
Parameter
["A:"[,"DOS"]]
*RST Not applicable
Description Use this command to initialize a memory card to DOS format.
CAUTION Initializing a memory card destroys any existing data on the card.
45
Page 46

Programming Reference
SCPI Instrument Command List
Command :MMEM:LOAD:STAT
Long
:MMEMory:LOAD:STATe
Form Event
Parameter
<n>,"filename"[,"A:"]
*RST Not applicable
Specified Limits <n> = 0 to 9 (integer)
Description Use this command to load a complete instrument setting from file
filename in the current directory into memory <n> in the instrument.
Memories 1 to 9 are the internal customer memories. Memory 0 holds the
default setting.
Examples See next command.
Command :MMEM:STOR:STAT
Long
:MMEMory:STORe:STATe
Form Event
Parameter
<n>,"filename"[,"A:"]
*RST Not applicable
Specified Limits <n> = 0 to 9 (integer)
Description Use this command to store a complete instrument setting from memory
<n> to file filename in the current directory on the memory card.
Memories 1 to 9 are the internal memories. Use memory 0 to store the
current instrument setting to a file.
Examples To load/save instrument settings from/to the memory card:
:MMEM:LOAD:STAT 1,"FREQPERF"
:MMEM:LOAD:STAT 0,"AMPTEST"
:*SAV 2
:*RCL 3"
Load FREQPERF into memory 1
Load AMPTEST as current setting
Save current setting in memory 2
Recall memory 3 as current setting
46
Page 47

Programming Reference
SCPI Instrument Command List
Command :OUTP[1]
Long
:OUTPut[1][:NORMal][:STATe]
Form Set & Query
Parameter
*RST value
ON | OFF | 1 | 0
OFF
Description Use this command to switch the normal OUTPUT on or off.
Example To switch on the output:
:OUTP ON
Command :OUTP[1]:IMP
Long
:OUTPut[1]:IMPedance[:INTernal]
Form Set & Query
Parameter Numeric
Parameter Suffix
OHM
with engineering prefixes, e.g.:
MOHM
is Megaohms.
*RST value 50 Ω
Specified Limits 50 Ω or 1 kΩ
Description Use this command to program the source impedance of the OUTPUT
connector. Note that only two settings are available. If you try to program
any other value, it will be rounded to one of the specified values.
Example To program the source impedance:
:OUTP:IMP 50OHM
Set OUTPUT impedance to 50
Ω
Command :OUTP[1]:IMP:EXT
Long
:OUTPut[1]:IMPedance:EXTernal
Form Set & Query
Parameter Numeric
Parameter Suffix
OHM
with engineering prefixes, e.g.:
MOHM
is Megaohms.
*RST value 50.0 Ω
47
Page 48

Programming Reference
SCPI Instrument Command List
Specified Limits 0.1 Ω to 1 MΩ
Description Use this command to set the expected load impedance of the device
under test at the OUTPUT connectors. If you have a non-50 Ω load, the
output levels at the device under test will not be the levels you program
or set via the front panel unless you set the expected load using this
command.
Example To set the expected load impedance:
:OUTP:IMP:EXT 47.6OHM
Set load impedance at OUTPUT to 47.6Ω
Command :OUTP[1]:POL
Long
:OUTPut[1]:POLarity
Form Set & Query
Parameter
*RST value
NORMal | INVerted
NORM
Description Use this command to invert the signal at the OUTPUT.
Example To invert and re-invert the signal:
:OUTP:POL INV
:OUTP:POL NORM
Inverted signal at OUTPUT
Normal signal at OUTPUT
Command :CURR[1]
Long
[:SOURce]:CURRent[1][:LEVel][:IMMediate][:AMPLitude]
Form Set & Query
Parameter Numeric
Parameter suffixA with engineering prefixes.
*RST value 20 mA (50 Ω into 50 Ω)
Specified Limits 10 V Outputs (from high Z into short): max. 400 mA typical
3.8V Outputs (50 Ω into short): max. 152 mA typical
48
Page 49

Programming Reference
SCPI Instrument Command List
Value coupling
Amplitude = High – Low
Offset =
High – Low
2
Range coupling Offset
Description Use this command to program the amplitude current of the OUTPUT
signal. Note that to set the OUTPUT levels in terms of current, you first
have to execute the [:SOURce]:HOLD CURRent command to enable the
[:SOUR
The available current range is limited by the combination of:
• Specified Voltage limits
• Actual OUTPUT Impedance setting :OUTPut:IMPedance
• Actual Expected Load impedance setting:
Example To program the amplitude current of the output signal:
:HOLD CURR
:CURR 75MA
CE
]:CURR
:OUTPut:IMPedance:EXTernal
ENT
subsystem.
Enable CURRENT subsystem
Set OUTPUT amplitude to 75 mA
Command :CURR[1]:OFFSet
Long
Form Set & Query
Parameter Numeric
Parameter suffix A with engineering prefixes.
*RST value 0.0 µA (50 Ω into 50 Ω)
Value coupling
[:SOURce]:CURRent[1][:LEVel][:IMMediate]:OFFSet
Amplitude = High – Low
Offset =
High – Low
2
49
Page 50

Programming Reference
SCPI Instrument Command List
Range coupling Amplitude
Description Use this command to program the offset current of the OUTPUT signal.
Note that to set the OUTPUT levels in terms of current, you first have to
execute the [:SOURce]:HOLD CURRent command to enable the
:SOURce]:CURRent subsystem.
The available current range is limited by the combination of:
• Specified Voltage limits
• Actual OUTPUT Impedance setting :OUTPut:IMPedance
• Actual Expected Load impedance setting
Example To program the offset current of the output signal:
:HOLD CURR
:CURR:OFF 50MA
Enable CURRENT subsystem
Set OUTPUT offset to 50 mA
Command :CURR[1]:HIGH
Long
[:SOURce]:CURRent[1][:LEVel][:IMMediate]:HIGH
Form Set & Query
Parameter Numeric
Parameter suffix A with engineering prefixes.
Value coupling
Amplitude = High – Low
Offset =
High – Low
2
Range coupling Low level
*RST value +10 mA (50 Ω into 50 Ω)
Specified Limits 10 V Output (from high Z into short): –396 mA to 400 mA typical
3.8 V (from 50 Ω into short): –82 mA to 152 mA typical
Description Use this command to program the high level current of the OUTPUT
signal. Note that to set the OUTPUT levels in terms of current, you first
50
Page 51

SCPI Instrument Command List
have to execute [:SOURCE]:HOLD CURRent command to enable the
[:SOURCE]:CURRent subsystem.
The available current range is limited by the combination of:
• Specified Voltage limits
• Actual OUTPUT Impedance setting :OUTPut:IMPedance
• Actual Expected Load impedance setting:
:OUTPut:IMPedance:EXTernal
Example To program the high level current of the output signal:
:HOLD CURR
:CURR:HIGH 150MA
Enable CURRENT subsystem
Set OUTPUT high level to 150 mA
Command :CURR[1]:LOW
Long
[:SOURce]:CURRent[1][:LEVel][:IMMediate]:LOW
Form Set & Query
Parameter Numeric
Programming Reference
Parameter suffix A with engineering prefixes.
Value coupling
Amplitude = High – Low
Offset =
Range coupling High level
*RST value –10 mA (50 Ω into 50 Ω)
Specified Limits 10 V Outputs (from high Z into short): –400 mA to 396 mA typical
3.8 V Outputs (from 50 Ω into short): –84 mA to 150 mA typical
Description Use this command to program the low level current of the OUTPUT
signal. Note that to set the OUTPUT levels in terms of current, you first
have to execute the [:SOURce]:HOLD CURRent command to enable
the [:SOURce]:CURRent subsystem.
The available current range is limited by the combination of:
High – Low
2
51
Page 52

Programming Reference
SCPI Instrument Command List
• Specified Voltage limits
• Actual OUTPUT Impedance setting :OUTPut:IMPedance
• Actual Expected Load impedance setting:
:OUTPUT:IMPedance:EXTern al
Example To program the low level current of the output signal:
:HOLD CURR
:CURR:LOW 50 MA
Enable CURRENT subsystem
Set OUTPUT low level to 50 mA
Command :CURR[1]:LIM
Long
[:SOURce]:CURRent[1]:LIMit[:HIGH]
Form Set & Query
Parameter Numeric
Parameter suffix A with engineering prefixes.
*RST value +10.0 mA
Description Use this command to set/read the high level current limit. If you switch
on current limiting, the high level current cannot be set above the
programmed limit.
The current is not limited by the OUTPUT hardware, this is a software
limit.
Example To set the high level current limit for the output signal:
:HOLD CURR
:CURR:LIM 50 MA
:CURR:LIM:STAT ON
Enable CURRENT subsystem
Set OUTPUT high level current limit to 50 mA
Switch on OUTPUT limits
52
Page 53

Programming Reference
SCPI Instrument Command List
Command :CURR[1]:LIM:LOW
Long
[:SOURce]:CURRent[1]:LIMit:LOW
Form Set & Query
Parameter Numeric
Parameter suffixA with engineering prefixes.
*RST value –10.0 mA
Description Use this command to set/read the low level current limit. If you switch on
current limiting, the low level current cannot be set below the
programmed limit.
The current is not limited by the OUTPUT hardware, this is a software
limit.
Example To set the low level current limit for the output:
:HOLD CURR
:CURR:LIM:LOW –50MA
:CURR:LIM:STAT ON
Enable CURRENT subsystem
Set OUTPUT low level current limit to –50 mA
Switch on OUTPUT limits
Command :CURR[1]:LIM:STAT
Long
[:SOURce]:CURRent[1]:LIMit:STATe
Form Set & Query
Parameter
*RST value
ON | OFF | 1 | 0
OFF
Description Use this command to switch the output limits on or off. When you switch
on the output limits, you cannot program the output levels beyond the
programmed limits, until you switch off the output limits. The limits
apply whether you program high/low levels or amplitude/offset levels.
NOTE You can switch the limits on and off in both the
and the
[:SOURce]:VOLTage
subsystems but the current and voltage
[:SOURce]:CURRent
limits are not enabled/disabled independently. The voltage and current
limits are always enabled/disabled together.
53
Page 54

Programming Reference
SCPI Instrument Command List
Example To set and activate the current limits for the output:
:HOLD CURR
:CURR:LIM 50MA
:CURR:LIM:LOW –50MA
:CURR:LIM:STAT ON
Enable CURRENT subsystem
Set OUTPUT high level current limit to 50 m
Set OUTPUT low level current limit to –50m
Switch on OUTPUT limits
Command :FREQ
Long
[:SOURce]:FREQuency[:CW|:FIXed]
Form Set & Query
Parameter Numeric
Parameter Suffix
Hz
with engineering prefixes, or
MHZ
for Megahertz.
Value coupling
Period =
1
Frequency
*RST value 1.00 MHz
Specified limits 1 mHz to 50 MHz
Description Use this command to set/read the pulse frequency. Select the frequency
source for the pulse frequency using
:TRIGger:SOURce
. The currently
selected source is programmed by this command. Note that the specified
limits and available resolution depend on the selected source.
You cannot set the pulse frequency if you have selected the CLK-IN
connector as the frequency source (
:TRIG:SOUR EXT
).
Example To set the pulse frequency to 40 MHz:
:TRIG:SOUR INT
:FREQ 40MHz
Select internal osc. as pulse trigger
Set pulse frequency to 40 MHz
54
Page 55

Programming Reference
SCPI Instrument Command List
Command :FREQ:AUTO
Long
[:SOURce]:FREQuency[:CW|:FIXed]:AUTO
Form Event
Parameter
ONCE
*RST value Not applicable
Description Use this command to measure the frequency at the CLK-IN connector. If
the CLK-IN connector is the selected pulse frequency source, you can
then read the measured value with
:FREQ?
Example To measure and read the frequency at the CLK-IN connector:
:TRIG:SOUR EXT
:FREQ:AUTO ONCE
:FREQ?
Select ext CLK-IN as pulse trigger
Measure frequency at CLK-IN
Query pulse frequency
Command :HOLD
Long
[:SOURce]:HOLD
Form Set & Query
Parameter
*RST value
Description Use this command to enable either of the
VOLTage | CURRent
VOLT
[:SOURce]:CURRent
subsystems.
[:SOURce]:VOLTage
or
You can control the signal levels of the instrument’s OUTPUT in terms of
voltage or current.
55
Page 56

Programming Reference
SCPI Instrument Command List
Command :PHAS[1]
Long
[:SOURce]:PHASe[1][:ADJust]
Form Set & Query
Parameter Numeric
Parameter suffix
Functional
coupling
DEG
Programming the pulse phase also executes
PHASe
or
RAD
. A parameter without a suffix is interpreted as
RAD
.
[:SOURce]:PULSe:HOLD
so that the pulse phase is held constant when the signal frequency
is changed.
Value coupling
Phase
360
Period
Delay =
×
*RST value 0.0
Specified limits 0 to 360° constrained by delay and period limits.
Description Use this command to set/read the relative phase delay of the output
signal. This is equivalent to setting an absolute or percentage pulse delay
[:SOURce]:PULSe:DELay
with
.
If you want the phase delay to remain constant when the pulse period is
varied (rather than the absolute pulse delay) use
[:SOURce]:PULSe:DELay[1]:HOLD PRATio
Example To set and hold the phase delay:
:PHAS 180 DEG
:PULS:DEL:HOLD PRAT
56
.
Set OUTPUT phase to 180
Hold OUTPUT phase constant with varying
period
°
Page 57

Programming Reference
SCPI Instrument Command List
Command :PULS:DCYC[1]
Long
Form Set & Query
Parameter Numeric
Value coupling
*RST value 10.0% (derived from width and period)
Specified limits 0.001% to 99.9%, depends on width, transition & period.
Description Use this command to program the duty cycle of the pulse signal. If you
Example To set and hold the duty cycle:
[:SOURce]:PULSe:DCYCle[1]
Width =
want to set an absolute pulse width use
If you want the pulse duty cycle to remain constant when the pulse
period is varied (rather than the absolute pulse width use)
:SOURce]:PULSe:HOLD[1] DCYCle
:PULS:DCYC 25PCT
:PULS:HOLD DCYC
Duty Cycle
100
×
Period
[:SOURce]:PULSe:WIDTh[1]
Set OUTPUT duty cycle to 25%
Hold duty cycle constant with varying period
.
Command :PULS:DEL[1]
Long
Form Set & Query
Parameter Numeric
Parameter suffixS with engineering prefixes. You can change the default unit using
Value coupling
[:SOURce]:PULSe:DELay[1]
[:SOURce]:PULSe:DELay[1]:UNIT.
Phase =
Delay
× 360
Period
Delay
Period
× 100
*RST value 0.0
Delay% =
57
Page 58

Programming Reference
SCPI Instrument Command List
Specified limits 0.00 ns to 999 s (limited by period – 20 ns)
Description Use this command to set/read the pulse delay. Delay is the time between
the start of the pulse period and the start of the leading edge of the pulse.
If you want the pulse delay to remain constant when the pulse period is
varied (rather than the phase delay) use
[:SOURce]:PULSe:DELay[1]:HOLD TIME.
Example To set and hold the pulse delay:
:PULS:DEL 500NS
:PULS:DEL:HOLD TIME
Set OUTPUT delay to 500 ns
Hold OUTPUT delay constant with varying
period
Command :PULS:DEL[1]:HOLD
Long
[:SOURce]:PULSe:DELay[1]:HOLD
Form Set & Query
Parameter TIME | PRATio
*RST value TIME
Description Use this command to set/read the coupling between the pulse period and
the pulse delay:
TIME The absolute pulse delay is held fixed when the
pulse period is varied (pulse phase varies).
PRATio The pulse phase delay (delay as ratio of period) is
held fixed when the pulse period is varied (pulse
delay varies).
Example To set and hold the pulse delay:
:PULS:DEL 500ns
:PULS:DEL:HOLD TIME
Set OUTPUT delay to 500ns
Hold OUTPUT delay constant with varying
period
58
Page 59

Programming Reference
SCPI Instrument Command List
Command :PULS:DEL[1]:UNIT
Long
[:SOURce]:PULSe:DELay[1]:UNIT
Form Set & Query
Parameter
*RST value
S | SEC | PCT | DEG | RAD
S
Description Use this command to set/read the default units for the pulse delay
parameter. The default unit of a parameter is the unit used when the
parameter is programmed to a value without a unit suffix.
Example To set the pulse delay to 50% of period:
:PULS:DEL:UNIT PCT
:PULS:DEL 50
Set OUTPUT delay unit to %
Set OUTPUT delay to 50% of period
Command :PULS:DOUB[1]
Long
[:SOURce]:PULSe:DOUBle[1][:STATe]
Form Set & Query
Parameter
*RST value
OFF | ON
OFF
Description Use this command to switch double-pulse mode on or off. In double-
pulse mode two pulses are generated per pulse period. The delay
between the leading edges of the first and second pulse can be adjusted.
59
Page 60

Programming Reference
SCPI Instrument Command List
Command :PULS:DOUB[1]:DEL
Long
[:SOURce]:PULSe:DOUBle[1]:DELay
Form Set & Query
Parameter Numeric
Parameter suffixS with engineering prefixes. You can change the default unit using
[:SOURce]:PULSe:DOUBle:DELay[1]:UNIT.
Value coupling
DblDel% =
DblDel
× 100
Period
*RST value 0.0
Specified limits 10 ns to 999.5 s (width +10 ns) to (period – width – 10 ns)
min. period: 20 ns
Description Use this command to set/read the delay between the leading edges of the
two pulses in double-pulse mode. The first pulse always starts at the start
of the pulse period.
If you want the double delay to remain constant when the pulse period is
varied (rather than the double delay as percentage of period) use
[:SOURce]:PULSe:DOUBle[1]:DELay:HOLD TIME.
Example To set and hold the double-pulse delay:
:PULS:DOUB ON
:PULS:DOUB:DEL 500NS
:PULS:DOUB:DEL:HOLD TIME
Switch on Double pulses on OUTPUT
Set interpulse delay to 500 ns
Hold interpulse delay fixed with varying
pulse period
60
Page 61

Programming Reference
SCPI Instrument Command List
Command :PULS:DOUB[1]:DEL:HOLD
Long
[:SOURce]:PULSe:DOUBle[1]:DELay:HOLD
Form Set & Query
Parameter
*RST value
TIME|PRATio
TIME
Description Use this command to set/read the coupling between the pulse period and
the double-pulse delay:
TIME The absolute double-pulse delay is held fixed when the
pulse period is varied.
PRATio The double-pulse delay as percentage of period is held
fixed when the pulse period is varied.
Example To set and hold the double-pulse delay:
:PULS:DOUB ON
:PULS:DOUB:DEL 50 PCT
:PULS:DOUB:DEL:HOLD PRAT
Switch on double-pulses on OUTPUT
Set interpulse delay to 50% of pulse
period
Hold interpulse delay as fixed percentage of pulse period
Command :PULS:DOUB[1]:DEL:UNIT
Long
[:SOURce]:PULSe:DOUBle[1]:DELay:UNIT
Form Set & Query
Parameter
*RST value
S | SEC | PCT
S
Description Use this command to set/read the default units for the double delay
parameter. The default unit of a parameter is the unit used when the
parameter is programmed to a value without a unit suffix.
Example To set the double-pulse delay to 50%:
:PULS:DOUB:DEL:UNIT PCT
:PULS:DOUB:DEL 50
Set OUTPUT double delay unit to %
Set OUTPUT double-pulse delay to 50%
of period
61
Page 62

Programming Reference
SCPI Instrument Command List
Command :PULS:HOLD[1]
Long
[:SOURce]:PULSe:HOLD[1]
Form Set & Query
Parameter
*RST value
WIDTh | DCYCle | TDELay
WIDTh
Description Use this command to set whether the pulse width, the pulse duty cycle or
the pulse trailing edge delay is held constant when the pulse period is
changed.
Example To set and hold the delay and the duty cycle:
:PULS:DEL:HOLD TIME
:PULS:DEL 20NS
:PULS:HOLD DCYC
:PULS:DCYC 25PCT
Hold OUTPUT delay fixed when frequency
varies
Set OUTPUT delay to 20ns
Hold OUTPUT duty cycle fixed when frequency varies
Set OUTPUT duty cycle to 25%
Command :PULS:PER
Long
[:SOURce]:PULSe:PERiod
Form Set & Query
Parameter Numeric
Parameter SuffixS with engineering prefixes.
Value coupling
Frequency =
1
Period
*RST value 1 µ
Specified limits 2 ns to 999.5 s
Description Use this command to set/read the pulse period. Select the pulse period
S
source using
:TRIGger:SOURce.
The currently selected source is
programmed by this command. Note that the specified limits and
available resolution depend on the selected source.
62
Page 63

Programming Reference
SCPI Instrument Command List
You cannot set the pulse period if you have selected the CLK-IN
connector as the frequency source (:TRIG:SOUR EXT).
Example To set the pulse period using the internal oscillator:
:TRIG:SOUR INT
:PULS:PER 25NS
Select internal osc. as pulse trigger
Set pulse frequency to 25 ns
Command :PULS:PER:AUTO
Long
[:SOURce]:PULSe:PERiod:AUTO
Form Event
Parameter ONCE
*RST value Not applicable
Description Use this command to measure the period at the CLK-IN connector. If the
CLK-IN connector is the selected pulse period source, you can then read
the measured value with :PULS:PER?
Example To measure the period at the CLK-IN connector:
:TRIG:SOUR EXT
:PULS:PER:AUTO ONCE
:PULS:PER?
Select ext. CLK-IN as pulse trigger
Measure period at CLK-IN
Query pulse period
Command :PULS:TDEL[1]
Long
[:SOURce]:PULSe:TDELay[1]
Form Set & Query
Parameter Numeric
Parameter Suffix S with engineering prefixes.
*RST value 100 ns
Specified Limits 10 ns to 999.5 s (max. period –10 ns)
Description Use this command to program the delay of the trailing edge of the pulse
relative to the start of the pulse period. This is an alternative method of
programming the pulse width.
63
Page 64

Programming Reference
SCPI Instrument Command List
Example To program the pulse width by means of the delay parameters:
:PULS:DEL 500NS
:PULS:DEL:HOLD TIME
:PULS:TDEL 750NS
Set OUTPUT delay to 500 ns
Hold OUTPUT delay constant with
varying period
Set OUTPUT trailing delay to 750 ns
Command :PULS:TRAN[1]:HOLD
Long
[:SOURce]:PULSe:TRANsition[1]:HOLD
Form Set & Query
Parameter
*RST value
TIME | WRATio
TIME
Description Use this command to set the coupling between transition times and the
pulse width:
TIME
The absolute transition times are held when the
pulse width is varied.
WRATio
The ratio of transition time to pulse width is held
when the pulse width is varied.
Example To set the coupling between transition times and the pulse width:
:PULS:TRAN:HOLD TIME
:PULS:TRAN:HOLD WRAT
Hold OUTPUT transitions fixed when
pulse width varies
Hold OUTPUT transition width ratio
when pulse width varies
64
Page 65

Programming Reference
SCPI Instrument Command List
Command :PULS:TRAN[1]:UNIT
Long
[:SOURce]:PULSe:TRANsition[1]:UNIT
Form Set & Query
Parameter
*RST value
S | SEC | PCT
S
Description Use this command to set the default units for the pulse transition times.
The default unit is used when the parameter is programmed to a value
without a unit suffix.
Command :PULS:TRAN[1]
Long
[:SOURce]:PULSe:TRANsition[1][:LEADing]
Form Set & Query
Parameter Numeric
Parameter suffixS with engineering prefixes, or
PCT
*RST value 5ns
Specified limits 5ns to 200ms
Parameter
coupling
By default: Trailing edge = Leading edge with
ON
.
:PULS:TRAN:TRA:AUTO OFF
Use
to enable independent programming
:PULS:TRAN:TRA:AUTO
of the trailing edge within a 1:20 ratio for the ranges.
Description Use this command to set/read the transition time of the pulse leading
edge. Note that the leading and trailing edges of the pulse have to fit
within the defined pulse width.
Example To set leading and trailing edges independently:
:PULS:TRAN1 6NS
:PULS:TRAN:TRA:AUTO OFF
:PULS:TRAN:TRA 15 NS
Set OUTPUT leading edge to 6 ns
Enable independent setting of trailing
edge
Set OUTPUT trailing edge to 15 ns
65
Page 66

Programming Reference
SCPI Instrument Command List
Command :PULS:TRAN[1]:TRA
Long
[:SOURce]:PULSe:TRANsition[1]:TRAiling
Form Set & Query
Parameter Numeric
Parameter suffixS with engineering prefixes, or PCT
*RST value 5ns
Specified limits 5 ns to 200 ms
Parameter
coupling
By default: Trailing edge = Leading edge with
ON
.
:PULS:TRAN:TRA:AUTO OFF
Use
to enable independent programming
:PULS:TRAN:TRA:AUTO
of the trailing edge within a 1:20 ratio for the ranges.
Description Use this command to set/read the transition time of the pulse trailing-
edge. Note that the leading and trailing edges of the pulse have to fit
within the defined pulse width.
Example To set the leading and trailing edges independently:
:PULS:TRAN 6NS
:PULS:TRAN:TRA:AUTO OFF
:PULS:TRAN:TRA: 15NS
Set OUTPUT leading edge to 6ns
Enable independent setting of trailing
edge
Set OUTPUT trailing edge to 15 ns
66
Page 67

Programming Reference
SCPI Instrument Command List
Command :PULS:TRAN[1]:TRA:AUTO
Long
:[SOURce]:PULSe:TRANsition[1]:TRAiling:AUTO
Form Set & Query
Parameter
*RST value
ON|OFF|ONCE
ON
Description Use this command to set/read the automatic coupling of the pulse trailing
edge transition time to the leading edge transition time.
ON The trailing edge transition time is automatically
set to the same value as the leading edge, and is
updated automatically each time the leading edge
transition time changes.
OFF The trailing edge transition time is independently
programmable.
ONCE The trailing edge transition time is set ONCE to
the same value as the leading edge.
Example To set leading and trailing edges independently:
:PULS:TRAN 6NS
:PULS:TRAN:TRA:AUTO OFF
:PULS:TRAN:TRA 15NS
Set OUTPUT leading edge to 6 ns
Enable independent setting of trailing
edge
Set OUTPUT trailing edge to 15 ns
Command :PULS:TRIG[1]:VOLT
Long
[:SOURce]:PULSe:TRIGger[1]:VOLTage[:LEVel][:IMMediate]
[:AMPlitude]
Form Set & Query
Parameter
*RST value
TTL | ECL
TTL
Description Use this command to set/read the output levels at the TRIGGER OUT
connector.
67
Page 68

Programming Reference
SCPI Instrument Command List
Command :PULS:WIDT[1]
Long
[:SOURce]:PULSe:WIDTh[1]
Form Set & Query
Parameter Numeric
Parameter suffixS with engineering prefixes
*RST value 100 ns
Specified limits 10 ns to 999.5 s (max. period –10 ns)
Description Use this command to program the width of the pulse signal. If you want
to set width as duty cycle use
[:SOURce]:PULSe:DCYCle[1]
.
If you want the pulse width to remain constant when the pulse period is
varied (rather than the duty cycle) use
[:SOURce]:PULSe:HOLD[1] WIDTh
.
Example To set and hold the pulse width:
:PULS:WIDT 50NS
:PULS:HOLD WIDTH
Set OUTPUT pulse width to 50 ns
Hold pulse width constant with varying period
Command :ROSC:SOUR
Long
[:SOURce]:ROSCillator:SOURce
Form Set & Query
Parameter
*RST value
INTernal | EXTernal
INT
Description Use this command to set/read the reference source for the PLL. If you
select the external reference (CLK-IN connector), you can choose to use
a 5 MHz or 10 MHz reference signal using
INTernal
EXTernal
Lock the PLL to a reference signal at the
Lock the PLL to its internal reference
:ROSC:EXT:FREQ
.
CLK-IN connector. The external reference signal can be 5 or 10 MHz.
68
Page 69

Programming Reference
SCPI Instrument Command List
Example To set up the external PLL reference:
:ROSC:SOUR EXT
:ROSC:EXT:FREQ 10 MHZ
Set external PLL reference (CLK-IN)
Set expected PLL reference frequency to
10 MHz
Command :ROSC:EXT:FREQ
Long
[:SOURce]:ROSCillator:EXTernal:FREQuency
Form Set & Query
Parameter Numeric
*RST value 5 MHz
Specified limits 5 MHz or 10 MHz
Description Use this command to set/read the expected reference frequency for the
PLL at the CLK-IN connector. The external reference can be a 5 or
10 MHz signal. Note that if you program any value other than the two
specified values, the value will be set to the nearest of the two specified
values.
Example To set up the external PLL reference:
:ROSC:SOUR EXT
:ROSC:EXT:FREQ 10MHZ
Set external PLL reference (CLK-IN)
Set expected PLL reference frequency to
10 MHz
69
Page 70

Programming Reference
SCPI Instrument Command List
Command :VOLT[1]
Long
Form Set & Query
Parameter Numeric
Parameter suffixV with engineering prefixes.
Value coupling
[:SOURce]:VOLTage[1][:LEVel][:IMMediate][:AMPLitude]
High = Offset +
Amplitude
2
Low = Offset
–
Amplitude
2
Range coupling With Offset, see page 71
*RST value 1.00 V
Specified limits 100 mVpp to 10.0 Vpp (values are valid from 50 Ω into 50 Ω)
Description Use this command to program the amplitude voltage of the output signal.
Note that to set the output levels in terms of voltage, you first have to
execute the
[:SOURce]:VOLTage
The available voltage range is limited by the combination of:
• Specified current limits
• Actual output impedance setting
• Actual expected load impedance setting:
:OUTput:IMPedance:EXTern al
Example To set the amplitude voltage:
:HOLD VOLT
:VOLT 5V
[:SOURce]:HOLD VOLTage
subsystem.
:OUTPut:IMPedance
Enable VOLTAGE subsystem
Set OUTPUT amplitude to 5 V
command to enable the
70
Page 71

Programming Reference
SCPI Instrument Command List
Command :VOLT[1]:OFFSet
Long
Form Set & Query
Parameter Numeric
Parameter suffixV with engineering prefixes.
Value coupling
[:SOURce]:VOLTage[1][:LEVel][:IMMediate]:OFFSet
High = Offset +
Amplitude
2
Low = Offset –
Amplitude
2
Range coupling With Amplitude, see page 70
*RST value 0.0 mV
Specified Limits –10 V to +10 V
Description Use this command to program the offset voltage of the OUTPUT signal.
Note that to set the OUTPUT levels in terms of voltage, you first have to
execute the
[:SOURce]:VOLtage
[:SOURce]:HOLD VOLTage
subsystem.
command to enable the
The available voltage range is limited by the combination of:
• Specified current limits
• Actual OUTPUT impedance setting
• Actual expected load impedance setting
:OUTput:IMPedance:EXTernal
Example To set the offset voltage:
:HOLD VOLT
:VOLT:OFF –800MV
:OUTPut:IMPedance
Enable VOLTAGE subsystem
Set OUTPUT offset to –800mV
71
Page 72

Programming Reference
SCPI Instrument Command List
Command :VOLT[1]:HIGH
Long
[:SOURce]:VOLTage[1][:LEVel][:IMMediate]:HIGH
Form Set & Query
Parameter Numeric
Parameter suffixV with engineering prefixes.
Value coupling
Amplitude = High – Low
Offset =
High – Low
2
Range coupling With low level, see page 73
*RST value 500 mV
Specified limits –9.9 V to 10.0 V (50 Ω into 50 Ω)
Description Use this command to program the high level voltage of the OUTPUT
signal. Note that to set the OUTPUT levels in terms of voltage, you first
have to execute the
[:SOURce]:VOLTage
[:SOURce]:HOLD VOLTage
subsystem.
command to enable the
The available voltage range is limited by the combination of:
• Specified current limits
• Actual OUTPUT impedance setting
• Actual expected load impedance setting
:OUTPut:IMPedance:EXTern al
Example To set the high level voltage:
:HOLD VOLT
:VOLT:HIGH 4.8V
72
:OUTPut:IMPedance
Enable VOLTAGE subsystem
Set OUTPUT high level voltage to 4.8 V
Page 73

Command :VOLT[1]:LOW
Long
Form Set & Query
Parameter Numeric
Parameter suffixV with engineering prefixes.
Value coupling
[:SOURce]:VOLTage[1][:LEVel][:IMMediate]:LOW
Amplitude = High – Low
Programming Reference
SCPI Instrument Command List
Offset =
High–Low
2
Range coupling With high level, see page 72
*RST value –500 mV
Specified limits –10.0 V to 9.9 V (50 Ω into 50 Ω)
Description Use this command to program the low level voltage of the OUTPUT
signal. Note that to set the OUTPUT levels in terms of voltage, you first
have to execute the
[:SOURce]:VOLTage
The available voltage range is limited by the combination of:
• Specified current limits
• Actual OUTPUT impedance setting
• Actual expected load impedance setting
:OUTPut:IMPedance:EXTernal
Example To set the low level voltage:
:HOLD VOLT
:VOLT:LOW 500MV
[:SOURce]:HOLD VOLTage
subsystem.
:OUTPut:IMPedance
Enable VOLTAGE subsystem
Set OUTPUT low level to 500mV
command to enable the
73
Page 74

Programming Reference
SCPI Instrument Command List
Command :VOLT[1]:LIM
Long
[:SOURce]:VOLTage[1]:LIMit[:HIGH]
Form Set & Query
Parameter Numeric
Parameter suffixV with engineering prefixes.
*RST value +500 mV
Description Use this command to set/read the high level voltage limit. If you switch
on voltage limiting, the high level voltage cannot be set above the
programmed limit. Note that the voltage is not limited by the OUTPUT
hardware, this is a software limit.
Example To set and activate the high level voltage limit:
:HOLD VOLT
:VOLT:LIM 3V
:VOLT:LIM:STAT ON
Enable VOLTAGE subsystem
Set OUTPUT high level limit to 3 V
Switch on OUTPUT limits
Command :VOLT[1]:LIM:LOW
Long
[:SOURce]:VOLTage[1]:LIMit:LOW
Form Set & Query
Parameter Numeric
Parameter suffixV with engineering prefixes.
*RST value –500 mV
Description Use this command to set/read the low level voltage limit. If you switch on
voltage limiting, the low level voltage cannot be set below the
programmed limit. Note that the voltage is not limited by the OUTPUT
hardware, this is a software limit.
Example To set and activate the low level limit:
:HOLD VOLT
:VOLT:LIM:LOW 0V
:VOLT:LIM:STAT ON
Enable VOLTAGE subsystem
Set OUTPUT low level voltage
Switch on OUTPUT limits
74
Page 75

Programming Reference
SCPI Instrument Command List
Command :VOLT[1]:LIM:STAT
Long
[:SOURce]:VOLTage[1]:LIMit:STATe
Form Set & Query
Parameter
*RST value
ON | OFF | 1 | 0
OFF
Description Use this command to switch the output limits on or off. When you switch
on the output limits, you cannot program the output levels beyond the
programmed limits, until you switch off the voltage limits. The limits
apply whether you program high/low levels or amplitude/offset levels.
NOTE You can switch the limits on and off in both the
and the
[:SOURce]:VOLTage
subsystems but the current and voltage
[:SOURce]:CURRent
limits are not enabled/disabled independently. The voltage and current
limits are always enabled/disabled together.
Example To set and activate the high and low voltage limits:
:HOLD VOLT
:VOLT:LIM 3V
:VOLT:LIM:LOW 0V
:VOLT:LIM:STAT ON
Enable VOLTAGE subsystem
Set OUTPUT high level voltage limit to 3 V
Set OUTPUT low level voltage limit to 0 V
Switch on OUTPUT limits
Command :STATus:OPERation
This command tree accesses the
OPERation
status group is not used by the instrument. Therefore, this
OPERation
status group. The
command tree is redundant.
:STATus:OPERation[:EVENt]?
•
:STATus:OPERation:CONDition?
•
:STATus:OPERation:ENABle
•
:STATus:OPERation:NTRansition
•
:STATus:OPERation:PTRansition
•
75
Page 76

Programming Reference
SCPI Instrument Command List
Command :STATus:PRESet
Long
:STATus:PRESet
Form Event
*RST value Not Applicable
Description This command
• Clears all status group event registers
• Clears the error queue
• Presets the status group enable-, PTR-, and NTR-registers as follows:
Status Group Register Preset value
OPERation ENABle
PTR
NTR
QUEStionable ENABle
PTR
NTR
Command :STATus:QUEStionable
This command tree accesses the QUEStionable status group. The
QUEStionable status group contains warning bits for voltage, current,
time and frequency parameters. A warning occurs when the output signal
could be out of specification due to the combined specification
uncertainties of many parameters, although all parameters are set within
their individually specified limits. If a parameter is set outside its
specified limits an error is generated.
The following commands are used to access the registers within the
status group:
0000000000000000
0111111111111111
0000000000000000
0000000000000000
0111111111111111
0000000000000000
76
Page 77

1. :STATus:QUEStionable[:EVENt]?
Form
*RST value
Description
Query
Not Applicable
This command reads the event register in the QUEStionable status
group.
2. :STATus:QUEStionable:CONDition?
Form
*RST value
Description
Query
Not Applicable
This command reads the condition register in the QUEStionable
status group.
3. :STATus:QUEStionable:ENABle
Form
Parameter
*RST value
Specified
limits
Description
Set & Query
Numeric
Not affected by *RST''
0 – 32767
This command sets or queries the enable register in the
QUEStionable status group.
4. :STATus:QUEStionable:NTRansition
Form
Parameter
*RST value
Specified
limits
Description
Set & Query
Numeric
Not applicable'
0 – 32767
This command sets or queries the negative transition register in
the QUEStionable status group.
Programming Reference
SCPI Instrument Command List
5. :STATus:QUEStionable:PTRansition
Form
Parameter
*RST value
Specified
limits
Description
Set & Query
Numeric
Not applicable'
0 – 32767
This command sets or queries the positive transition register in the
QUEStionable status group.
77
Page 78

Programming Reference
SCPI Instrument Command List
Command :SYST:CHEC
Long
:SYSTem:CHECk[:ALL][:STATe]
Form Set & Query
Parameter
*RST value
OFF | ON
ON
Description Use this command to switch the instrument’s error checking on or off.
Switch off the error checking if you want to improve the programming
speed of the instrument, but remember that no invalid parameter or
mode settings will be detected and reported. Error checking is switched
off by the *RST command, or when default setting is invoked.
CAUTION Error checking cannot be switched on from the front panel. Error
checking is not automatically re-enabled if you switch the instrument off
and on again. Therefore your test programs should send either *RST or
set default setting before ending.
Command :SYST:ERR?
Long
:SYSTem:ERRor?
Form Query
*RST value Not Applicable
Description Use this command to read the instrument error queue. The instrument
error queue can store up to 30 error codes on a first-in-first-out basis.
When you read the error queue, the error number and associated
message are put into the instrument’s output buffer.
If the queue is empty, the value 0 is returned, meaning N
O ERROR
. If the
queue overflows at any time, the last error code is discarded and
replaced with –350 meaning Q
UEUE OVERFLOW
.
Example To read the error queue:
Example Error
String
:SYS:ERR?
–222 "Data out of range" overlap at output 1: Width>Double
Delay
Query for errors
78
Page 79

The above message is an example of a customized description. Generic
descriptions are available in the SCPI 1995 Command Reference, items
21.8.4 to 21.8.11.
For more detailed information in the 81110A error.
Send ":SYST:WARN:STR?". Alternatively, the HELP key shows the
current errors and warnings and their description on the instruments
display.
Command :SYST:KEY
Long
:SYSTem:KEY
Form Set & Query
Parameter Numeric
Parameter suffix No suffix allowed
*RST value –1
Specified limit
Programming Reference
SCPI Instrument Command List
No. Key Description
–1 No key pressed (Query only)
0 DATA ENTRY 0
1 DATA ENTRY 1
2 DATA ENTRY 2
3 DATA ENTRY 3
4 DATA ENTRY 4
5 DATA ENTRY 5
6 DATA ENTRY 6
7 DATA ENTRY 7
8 DATA ENTRY 8
9 DATA ENTRY 9
10 DATA ENTRY .
79
Page 80

Programming Reference
SCPI Instrument Command List
No. Key Description
11 DATA ENTRY +/–
12 Cursor Up
13 Cursor Down
14 Cursor Left
15 Cursor Right
16 MAN
17 STORE
18 HELP
19 SHIFT
20 MORE
21 Softkey 1
22 Softkey 2
23 Softkey 3
24 Softkey 4
25
26
27
NANO
MICRO/MEGA
MILLI/KILO
28 ENTER
29 Modify Knob Left (counter-clockwise)
30 Modify Knob Right (clockwise)
Description In query form, this command reads the last key pressed. The buffer is
emptied by *RST and returns the value –1 when empty.
In set form, the command simulates pressing a key on the front panel.
Simulated key press are also recorded as the last key pressed.
:SYST:KEY 19 sets the instrument to LOCAL mode.
80
Page 81

Programming Reference
SCPI Instrument Command List
• In remote mode only the softkeys below the display and the S
(LOCAL) key are active. Because the instrument normally switches to
remote mode when any command is received, including
:SYSTem:KEY, simulating one of the other disabled keys has no
effect.
• If you want to simulate full front panel operation, you must prevent
the instrument from entering remote mode by using the REN line of
the HP-IB to maintain local mode (LOCAL 7 in BASIC).
If you do this, the :SYSTem:KEY command is the only command that
works. Any other commands will be buffered in the instrument blocking
any further :SYSTem:KEY commands, until remote mode is enable.
Command :SYST:PRES
Long
:SYSTem:PRESet
Form No function.
HIFT
81
Page 82

Programming Reference
SCPI Instrument Command List
Command :SYST:SEC
Long
:SYSTem:SECurity[:STATe]
Form Set & Query
Parameter
*RST value
ON|OFF
OFF
Description
CAUTION Do not switch on system security unless you are willing to erase the
instrument settings stored in the instrument. All instrument memories,
including the current setting, will be overwritten with the default settings
if you
• switch off system security
• switch the instrument off and on again
If you accidentally switch on system security, and want to rescue the
settings stored in the instrument, store the settings on a memory card.
You can then recall them from the memory card later.
Use this command to switch on system security mode. Switch on system
security if you need to make sure that all instrument settings stored in
the instrument are erased automatically when the instrument is switched
off, or when security mode is switched off.
The instrument settings are erased by overwriting them with the default
settings.
System security mode is not available via the front panel. If you want to
erase all settings by hand:
1 SHIFT + STORE (RECALL) + 0 to recall the default settings from memory
location 0.
2 STORE + 1, STORE + 2, ... STORE + 9, to store the defaults in memory
locations 1 to 9.
82
Page 83

Programming Reference
SCPI Instrument Command List
Command :SYST:SET
Long
:SYSTem:SET
Form Set & Query
Parameter Block data
*RST value Not applicable
Description In query form, the command reads a block of data containing the
instrument’s complete setup. The set-up information includes all
parameter and mode settings, but does not include the contents of the
instrument setting memories, the status group registers or the
:DISPlay[:WINDow][:STATe]
The data is in a binary format, not
ASCII, and cannot be edited.
In set form, the block data must be a complete instrument setup read
using the query form of the command.
Command :SYST:VERS?
Long
:SYSTem:VERSion?
Form Query
*RST value "1992.0"
Description Use this command to read the SCPI revision to which the instrument
complies.
Command :SYST:WARN?
Long
:SYSTem:WARNing[:COUNt]?
Form Query
*RST value Not applicable
Description Use this command to read the number of warnings which are currently
active. Note that the warning status of voltage, current, time and
frequency are also summarized by bits in the QUESTionable Status
register.
83
Page 84

Programming Reference
SCPI Instrument Command List
Command :SYST:WARN:STR?
Long
:SYSTem:WARNing:STRing?
Form Query
*RST value Not applicable
Description Use this command to read all the currently active warning messages. The
warning messages are concatenated to form a single string with a “;” as
separator between the messages.
Command :SYST:WARN:BUFF?
Long
:SYSTem:WARNing:BUFFer?
Form Query
*RST value Not applicable
Description Use this command to read the maximum possible number of characters
that could be returned by
:SYST:WARN:STR?
if all warnings were active.
Command :TRIG:COUNt
Long
:TRIGger[:SEQuence[1]]:COUNt
Form Set & Query
Parameter Numeric
*RST value 1
Specified limits 1 to 65 536
Description Use this command to set/read the number of trigger events (pulse
periods) to be generated for each arming event. This corresponds to
selecting the event mode on the M
PULSES
BURST of
Set a
trigger count to 1
each arming event. The instrument is in pulse (stream) mode.
Set a
trigger count of 2 to 65536
periods is generated for each arming event.
ODE/TRIGGER SCREEN
so that a single pulse period is generated for
:
so that a burst of 2 to 65536 pulse
84
Page 85

Programming Reference
SCPI Instrument Command List
Examples To set up a triggered burst of 16 Single Pulses at Out1, each burst
triggered by a positive edge at the EXT INPUT:
:ARM:SOUR EXT1
:ARM:SENS EDGE
:ARM:SLOP POS
:TRIG:COUN 16
:TRIG:SOUR INT1
:DIG:PATT OFF
:PULS:DOUB OFF
Set arming from EXT INPUT
Set arming on edges
Set arming on positive edges
Burst length 16
Pulse period trigger from internal osc.
Disable pattern operating mode
Ensure single pulses at OUTPUT
To set up gated pulses (Single Pulses at Out1), gated by a positive level at
the EXT INPUT:
:ARM:SOUR EXT1
:ARM:SENS LEV
:ARM:SLOP POS
:TRIG:COUN 1
:TRIG:SOUR INT1
:DIG:PATT OFF
:PULS:DOUB OFF
Set arming from EXT INPUT
Set arming on levels
Set arming on positive level 1 pulse period
Single pulse output mode
Pulse period trigger from internal osc.
Disable pattern data
Ensure single pulses at OUTPUT
Command :TRIG:IMP
Long
:TRIGger:IMPedance
Form Set & Query
Parameter Numeric
Parameter Suffix
OHM
with engineering prefixes, e.g.:
MOHM
is Megaohms.
*RST value 50 Ω
Specified Limits 50 Ω or 10 kΩ
Description Use this command to program the input impedance of the CLK-IN
connector. Note that only two settings are available. If you try to program
any other value, it will be rounded to one of the specified values.
Example To set the input impedance and the threshold of the CLK-IN connector:
:TRIG:IMP 50OHM
:TRIG:LEV 2.5V
:TRIG:SOUR EXT2
Set CLK-IN impedance to 50
Set CLK-IN threshold to 2.5V
Pulse period trigger from CLK-IN
Ω
85
Page 86

Programming Reference
SCPI Instrument Command List
Command :TRIG:LEV
Long
:TRIGger:LEVel
Form Set & Query
Parameter Numeric
Parameter SuffixV with engineering prefixes.
*RST value 1.0 V
Specified Limits –10 V to +10 V
Description Use this command to program the triggering threshold of the CLK-IN
connector.
Example To set the input impedance and the threshold of the CLK-IN connector:
:TRIG:IMP 50OHM
:TRIG:LEV 2.5V
:TRIG:SOUR EXT2
Set CLK-IN impedance to 50
Set CLK-IN threshold to 2.5V
Pulse period trigger from CLK-IN
Ω
Command :TRIG:SLOP
Long
:TRIGger:SLOPe
Form Set & Query
Parameter
*RST value
POSitive | NEGative
POS
Description Use this command to select the trigger slope for the pulse period
triggering signal applied to the CLK-IN connector.
Command :TRIG:SOUR
Long :TRIGger:SOURce
Form Set & Query
Parameter
*RST value
IMMediate | INTernal[1] | INTernal2 | EXTernal2
IMM
Description Use this command to select the pulse period source of the HP81101A by
selecting the source of the pulse period trigger signal:
86
Page 87

SCPI Instrument Command List
Pulse period sources set by :TRIG:SOUR
Pulse period source :TRIG:SOURce
Programming Reference
internal osc
internal PLL
CLK-IN
IMMediate INTernal[1]
INTernal2
EXTernal2
87
Page 88

Programming Reference
SCPI Instrument Command List
88
Page 89

3
3Specifications
In this chapter you will find the specifications of the HP 81101A Pulse
Generator.
At the end of this chapter, “Pulse Parameter Definitions” on page 105
provides detailed information on the definition of the pulse parameters
used by the instrument.
NOTE
Warranted Performance
Specifications describe the instrument’s warranted performance. Nonwarranted values are described as typical. All specifications apply after a
30 minute warm-up phase with 50 Ohm source, a 50 Ohm load resistance
and separate channels. They are valid from 0 °C to 55 °C ambient
temperature.
89
Page 90

Specifications
Declaration of Conformity
Declaration of Conformity
Manufacturer Hewlett-Packard GmbH
Boeblingen Instruments Division
Herrenberger Str.110–140
D-71034 Boeblingen, Germany
We declare that the system:
HP 81100 Family of Pulse-/Data Generators
HP 81101A 50 MHz Pulse Generator
conforms to the following standards:
Safety Standard IEC 1010-1:1990 +A1:1992EN61010-1:1993
EMC Standard EN 55011:1991 / CISPR 11 Group 1, Class B
EN 61000-4-2:1995 ESD: 4kVcd; 8 kVad;4kV c.p.
EN 61000-4-3:1995 Radiated Immunity: 3V/m 80%AM
ENV 50204: 1995 Radiated Immunity: 3V/m;50%Dty
EN 61000-4-4:1995 Fast Transients/Bursts: 0.5kV, 1kV
EN 61000-4-5:1995 Surges: 1kVdiff; 2kV com.mode
EN 61000-4-6:1995 Conducted Immunity
EN 61000-4-8:1993 Power freq. magn. field 3A/m;50Hz
IEC1000-4-11:1994 Voltage Dips and Interruptions
Supplementary
Information
The product herewith complies with the requirements of the
•
Low Voltage Directive (73/23/EEC) and the
•
EMC Directive (89/336/EEC).
During the measurements against EN55011, the I/O ports were
terminated with their nominal impedance, the HP-IB connection was
terminated with the cable HP 10833B.
When the product is connected to other devices, the user must ensure
that the connecting cables and the other devices are adequately shielded
to prevent radiation.
Boeblingen, June 09th 1998 Wolfgang Fenske
Regulation Consultant
90
Page 91

Specifications
HP 81101A Specifications
HP 81101A Specifications
General
Environmental Conditions
Operating temperature: 0°C to +55°C
Storage temperature: –40°C to +70°C
Humidity: 95% r.h. up to 40°C ambient temperature
Altitude: up to 2000 m
Installation: Category II
Pollution: Degree 2
EMC: conforms to EN50082-1, EN55011, Class B
Battery: Lithium, type CR2477-N
(HP part number 1420-0557)
Safety
IEC1010, CSA1010
Power requirements
100–240 Vac, ±10%, 50–60 Hz;
100–120 Vac, ±10%, 400 Hz
Power consumption: 300 VA max.
Maximum Dimensions (H x W x D)
89 mm x 426 mm x 521 mm
91
Page 92

Specifications
HP 81101A Specifications
Weight
Net
8.5 kg Single Channel
9.2 kg Dual Channel
Shipping
13.8 kg Dual Channel
Recalibration period
1 year recommended
Warranty
3 years standard
Acoustic Noise Emission
For ambient temperature up to 30°C,
under normal operation and at the typical operator position:
LpA = 52 dB (5.9 bel) typical {47 dB (5.3 bel) at 23°C) typical}
Measured in accordance with ISO 7779/EN 27779.
92
Page 93

Timing Specifications
Period
Period can also be entered as frequency.
Specifications
HP 81101A Specifications
Period
Range: 20 ns to 999.5 s
Resolution: 3.5 digits, 5 ps best case for VFO
Accuracy: PLL: ±0.01%
Repeatability: typically 4 times better than accuracy
RMS-jitter: PLL: 0.001% + 15 ps
Frequency range: 1.00 mHz to 50 MHz
HP 81101A
4 digits, 1 ps best case for PLL
VFO: ±5%
VFO: 0.01% + 15 ps
There are 2 period generation sources available:
• startable oscillator (variable frequency oscillator VFO)
• high-accuracy frequency generator (PLL)
Glitch-free timing changes
You can sweep your timing values without danger of spurious pulses or
drop outs that could cause measurement errors. This applies to
continuous mode with timing values < 100 ms (frequency: < 10 Hz), and
consecutive values between one-half and twice the previous value.
93
Page 94

Specifications
HP 81101A Specifications
Width
Can be entered as absolute width, duty cycle or trailing edge delay.
Width HP 81101A
Range: 10 ns to 999.5 s
Accuracy:
Duty cycle: 0.1% to 95% (depends on period and width;
Duty cycle values from 0.1% to 95% can be entered directly. For values
>95 % press SHIFT and use the Modify knob. Note that pulses may be
deteriorated or skipped due to the inaccuracy of period and width. Hence
for large values, it is better to select complement and enter 100 minus the
required duty cycle value.
Delay
Measured between trigger output and main output. Can be entered as
absolute delay, phase ° or % of period.
(max value: period –10 ns)
5% ±250 ps
±
overprogrammable to 99%)
Delay HP 81101A
Fixed delay from
TRIGGER OUT:
Additional variable range: 0.00 ns to 999.5 s
Accuracy:
17.0 ns typical
(max value: period –20 ns)
5% ±1 ns
±
94
Page 95

Specifications
HP 81101A Specifications
Double Pulse Delay
Double pulse delay and delay are mutually exclusive. Double Pulse delay
is the delay between the two pulses in Double Pulse mode.
Double Pulse Delay HP 81101A
Double Pulse
Delay range:
Accuracy: ±5 % ±500 ps
Min. period: 40 ns (25 MHz)
20 ns to 999.5 s
(width + 10 ns) to (period – width – 10 ns)
Tra ns it io n Tim e s
Measured between 10% and 90% of amplitude. Can be entered as leading/
trailing edge or % of width.
Transition Times HP 81101A
Range: 5.00 ns to 200 ms
Min. transition: 5.0 ns
7.5 ns typical for 1 kΩ source impedance
Accuracy: ±10% ±200 ps
Linearity: 3% typical for transitions >100 ns
95
Page 96

Specifications
HP 81101A Specifications
Leading and trailing edges can be programmed independently within the
following ranges (Maximum ratio 1:20):
5ns
Level Specifications
Level Parameters HP 81101A
Source impedance: selectable 50Ω ± 1% typical or 1 kΩ
Maximum external voltage: ±24 V
Short circuit current: ±400 mA
Normal/complement: selectable
ON/OFF: relay connect/disconnect output (HiZ).
Limits: high and low levels can be limited to protect the
DUT
External Load compensation
For loads ≠ 50Ω, the actual load impedance can be entered to correct the
output values.
96
Page 97

Specifications
HP 81101A Specifications
Level Parameters
Level parameters can be entered as high/low level in terms of voltage or
current or offset/amplitude.
Level Specifications (50Ω into 50Ω) (1k
Amplitude: 100 mVpp to 10.0 Vpp 200 mVpp to 20.0 Vpp
Level Window –10.0 V to +10.0 V –20.0 V to + 20.0 V
+
Level Accuracy
19 V level window):
(in +
Resolution: 10 mV 20 mV
(3% Amplitude + 75 mV) +(3% Amplitude + 150 mV)
Ω
into 50Ω)
Pulse Performance
Pulse Performance HP 81101A
Overshoot, Preshoot, Ringing: +
Settling time: 30 ns typical
Baseline noise: 8 mV RMS typical
Dynamic Crosstalk < 0.1% typical
5% of amplitude ±20 mV
Clock Sources
It is possible to select between three clock sources, the startable
oscillator (VFO), the internal PLL, or the External Clock. In Triggered
Mode the PLL can be used as the trigger source for the VFO, without the
need of an additional source.
97
Page 98

Specifications
HP 81101A Specifications
Clock / PLL Reference Input
Input Specifications HP 81101A
Input impedance: 50Ω or 10kΩ selectable
Threshold: –10 V to +10 V
Maximum input voltage: +
Input transitions: <100 ns
Input Frequency: dc to max 50 MHz
Minimum pulse width: 10 ns
Input sensitivity: <
Delay from Clock Input to TRIGGER OUT/
STROBE OUT:
Rear panel BNC connector used as:
External system clock input: pulse frequency = input frequency.
•
The input frequency can be measured.
5 MHz or 10 MHz frequency reference input for internal PLL.
•
15 V
300 mVpp typical
12 ns typical
Phase Locked Loop (PLL)
Locks either to an external frequency reference at the PLL Ref Input
•
Clk In (5 MHz or 10 MHz selectable) or to its internal reference.
High accuracy period (frequency) source.
•
When locked to the internal reference, period accuracy, resolution,
and jitter are improved.
When locked to an external frequency reference, the external
frequency affects these accuracies.
Internal triggering of bursts: the internal PLL can replace an external
•
trigger source, while the output period is determined by the startable
oscillator.
98
Page 99

Specifications
HP 81101A Specifications
External Clock
The output period is determined by the signal at clock input.
•
Frequency accuracy can be increased by using a precise external
clock.
Trigger synchronously to external clock: the output period is
•
synchronous to the signal at clock input. The signal at the External
Input is used for arming.
Output Modes
Pulses Mode
The output signal consists of single or double pulses, controlled by the
Trigger mode.
Burst Mode
The output signal consists of bursts of single or double pulses, controlled
by the Trigger mode.
Burst Parameters HP 81101A
Burst count: 2 to 65536
Format: single or double pulses
99
Page 100

Specifications
HP 81101A Specifications
Trigger Modes
Continuous
Generate continuous pulses, double pulses, or bursts.
Externally Triggered
Each active input transition (rising, falling or both) triggers a single
pulse, a double pulse, or a burst.
The trigger source can be selected from:
• External Input
• MAN Trigger key
• internal PLL.
Externally Gated
The active input level (high or low) enables pulses, double pulses, or
bursts. The last pulse, double pulse, or burst is always completed. The
gate source can be selected from:
• External Input
• MAN Trigger key
External Width
To recover a pulse shape of an external signal, applied to the External
Input, the period and width are maintained, levels and transitions can be
set.
100
 Loading...