

Page 1
Page 2

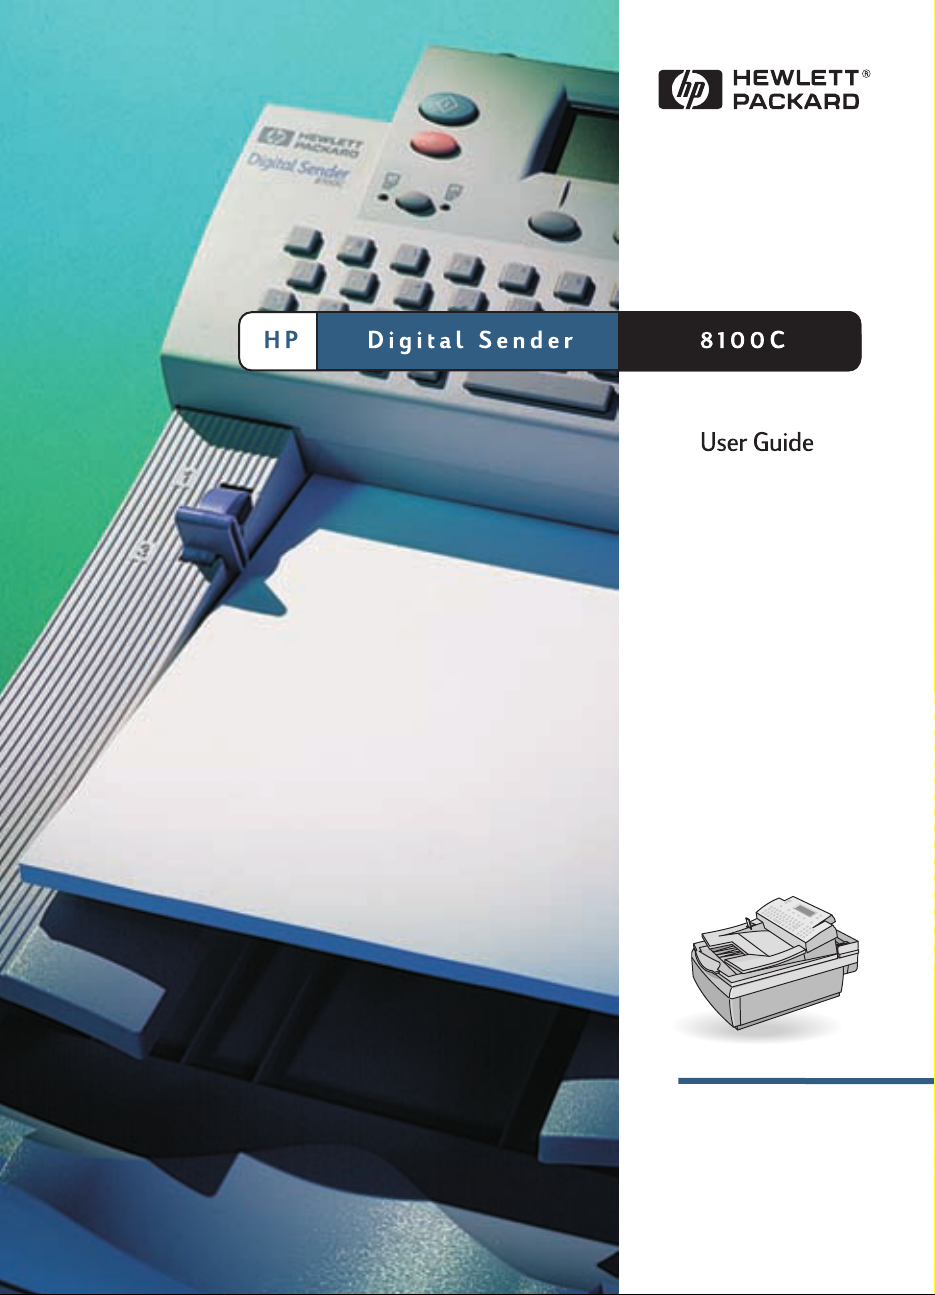
HP Digital Sender 8100C
User Guide
Page 3

2
Copyright Information
© Copyright Hewlett-Packard
Company 2000
All Rights Reserved.
Reproduction, adaptation, or
translation without prior written
permission is prohibited, except
as allowed under copyright
laws.
Publication number
C7707-90005
First Edition, April 1, 2000
Trademark Credit s
CompuServe is a U.S.
trademark of CompuServe, Inc.
Microsoft is a U.S. registered
trademark of Microsoft
Corporation. Windows, MS
Windows, and Windows NT are
U.S. registered trademarks of
Microsoft Corporation. Pentium
is a U.S. registered trademark of
Intel Corporation.
LDAP code (libldap client library
and liblber encoding/decoding
library) used courtesy of the
University of Michigan at Ann
Arbor. Copyright 1992-1996
Regents of the University of
Michigan. All rights reserved.
All other products mentioned
herein may be trademarks of
their respective companies.
Warranty
The information contained in
this document is subject to
change without notice.
Hewlett-Packard makes no
warranty of any kind with
respect to this information.
HEWLETT-PACKARD
SPECIFICALLY DISCLAIMS
THE IMPLIED WARRANTY OF
MERCHANTABILITY AND
FITNESS FOR A PARTICULAR
PURPOSE.
Hewlett-Packard shall not be
liable for any direct, indirect,
incidental, consequential, or
other damage alleged in
connection with the furnishing or
use of this information.
NOTICE TO U.S.
GOVERNMENT
USERS: RESTRICTED
RIGHTS COMMERCIAL
COMPUTER SOFTWARE:
“Use, duplication, or disclosure
by the Government is subject to
restrictions as set forth in
subparagraph (c) (1) (ii) of the
Rights in Technical Data Clause
at DFARS 52.227-7013.”
Material scanned by this
product may be protected by
governmental laws and other
regulations, such as copyright
laws. The customer is solely
responsible for complying with
all such laws and regulations.
Safety Information
WARNING!
Electrical Shock Hazard
To avoid electrical shock, use
only supplied power cords and
connect only to properly
grounded (3-hole) wall outlets.
Page 4

Contents
1 Getting started
Introduction . . . . . . . . . . . . . . . . . . . . . . . . . . . . . . . . . . . . . . . . . . . . . . . . . . . . . . . 5
Identifying digital sender parts. . . . . . . . . . . . . . . . . . . . . . . . . . . . . . . . . . . . . . . 6
Identifying control panel features . . . . . . . . . . . . . . . . . . . . . . . . . . . . . . . . 8
Managing your user profile. . . . . . . . . . . . . . . . . . . . . . . . . . . . . . . . . . . . . . . . . 10
Adding a registered user profile. . . . . . . . . . . . . . . . . . . . . . . . . . . . . . . . . . 11
Changing options for your profile . . . . . . . . . . . . . . . . . . . . . . . . . . . . . . . .13
Finding help . . . . . . . . . . . . . . . . . . . . . . . . . . . . . . . . . . . . . . . . . . . . . . . . . . . . . . 14
2 Sending documents
Introduction . . . . . . . . . . . . . . . . . . . . . . . . . . . . . . . . . . . . . . . . . . . . . . . . . . . . . . .15
Guidelines for documents . . . . . . . . . . . . . . . . . . . . . . . . . . . . . . . . . . . . . . . . . . .16
Guidelines for using the ADF . . . . . . . . . . . . . . . . . . . . . . . . . . . . . . . . . . . .16
Guidelines for using the glass . . . . . . . . . . . . . . . . . . . . . . . . . . . . . . . . . . .17
Sending double-sided documents . . . . . . . . . . . . . . . . . . . . . . . . . . . . . . . .17
Step 1 Load a document. . . . . . . . . . . . . . . . . . . . . . . . . . . . . . . . . . . . . . . . . . . . .18
Step 2 Choose a destination . . . . . . . . . . . . . . . . . . . . . . . . . . . . . . . . . . . . . . . . 20
E-mailing documents . . . . . . . . . . . . . . . . . . . . . . . . . . . . . . . . . . . . . . . . . . 20
Faxing documents. . . . . . . . . . . . . . . . . . . . . . . . . . . . . . . . . . . . . . . . . . . . . 24
Printing to HP JetSend-enabled printers. . . . . . . . . . . . . . . . . . . . . . . . . . 26
Changing settings (optional). . . . . . . . . . . . . . . . . . . . . . . . . . . . . . . . . . . . . . . . 28
3
3 Managing address books
Introduction . . . . . . . . . . . . . . . . . . . . . . . . . . . . . . . . . . . . . . . . . . . . . . . . . . . . . . .31
Using address books . . . . . . . . . . . . . . . . . . . . . . . . . . . . . . . . . . . . . . . . . . . . . . 32
Viewing address books. . . . . . . . . . . . . . . . . . . . . . . . . . . . . . . . . . . . . . . . . 33
Managing your Personal E-Mail addresses book. . . . . . . . . . . . . . . . . . . . . . . 34
Adding addresses . . . . . . . . . . . . . . . . . . . . . . . . . . . . . . . . . . . . . . . . . . . . . 34
Modifying or deleting e-mail addresses . . . . . . . . . . . . . . . . . . . . . . . . . 36
Managing your Personal E-Mail lists. . . . . . . . . . . . . . . . . . . . . . . . . . . . . . . . . 37
Creating new lists . . . . . . . . . . . . . . . . . . . . . . . . . . . . . . . . . . . . . . . . . . . . . 37
Adding addresses to existing lists . . . . . . . . . . . . . . . . . . . . . . . . . . . . . . . 39
Changing or deleting addresses in lists . . . . . . . . . . . . . . . . . . . . . . . . . . 40
Deleting e-mail lists. . . . . . . . . . . . . . . . . . . . . . . . . . . . . . . . . . . . . . . . . . . 42
Managing the Fax numbers book . . . . . . . . . . . . . . . . . . . . . . . . . . . . . . . . . . . . 43
Adding fax numbers. . . . . . . . . . . . . . . . . . . . . . . . . . . . . . . . . . . . . . . . . . . 43
Modifying or deleting fax numbers . . . . . . . . . . . . . . . . . . . . . . . . . . . . . . 45
Managing the Fax lists book . . . . . . . . . . . . . . . . . . . . . . . . . . . . . . . . . . . . . . . . 46
Creating new fax lists. . . . . . . . . . . . . . . . . . . . . . . . . . . . . . . . . . . . . . . . . . 46
Adding fax numbers to existing lists . . . . . . . . . . . . . . . . . . . . . . . . . . . . . 47
Modifying or deleting fax numbers in lists. . . . . . . . . . . . . . . . . . . . . . . . 48
Deleting fax lists. . . . . . . . . . . . . . . . . . . . . . . . . . . . . . . . . . . . . . . . . . . . . . 50
Page 5

4
4 Troubleshooting
Introduction . . . . . . . . . . . . . . . . . . . . . . . . . . . . . . . . . . . . . . . . . . . . . . . . . . . . . . .51
Clearing paper jams . . . . . . . . . . . . . . . . . . . . . . . . . . . . . . . . . . . . . . . . . . . . . . . 52
Troubleshooting the digital sender . . . . . . . . . . . . . . . . . . . . . . . . . . . . . . . . . . 56
General digital sender troubleshooting . . . . . . . . . . . . . . . . . . . . . . . . . . 56
Control panel messages . . . . . . . . . . . . . . . . . . . . . . . . . . . . . . . . . . . . . . . 59
Appendix A Warranty and support information
Hewlett-Packard limited warranty statement . . . . . . . . . . . . . . . . . . . . . . . . . . 65
Hewlett-Packard Year 2000 warranty. . . . . . . . . . . . . . . . . . . . . . . . . . . . . . . . 67
HP customer support options worldwide. . . . . . . . . . . . . . . . . . . . . . . . . . . . . . 68
HP support . . . . . . . . . . . . . . . . . . . . . . . . . . . . . . . . . . . . . . . . . . . . . . . . . . . . . . . 70
Index
Page 6

Introduction
5
1
Getting started
Introduction
Thank you for purchasing the HP Digital Sender 8100C. This color,
network digital sender helps you quickly and conveniently distribute
paper documents in electronic format. The digital sender works with
other devices and programs so you can:
●
E-mail
●
Fax
service, fax a document to one or more destinations.
●
Send to an HP JetSend-enabled printer
HP JetSend-enabled printers on your LAN/WAN network. (For
more information about HP JetSend technology and a list of
HP JetSend-enabled printers, visit
— Send a document directly to e-mail destinations.
— If your company subscribes to a supported Internet fax
— Send documents to
www.jetsend.com
.)
The digital sender also incorporates address books in which you can
store e-mail addresses, fax numbers, and distribution lists.
This user guide is intended to be used after the digital sender has
been set up and configured using the setup poster and the
administrator guide. If the digital sender is not already set up, contact
the administrator.
Page 7
6
Power switch
(on back)
Document
input tray
Control
panel
Document
output tray
Document
lever
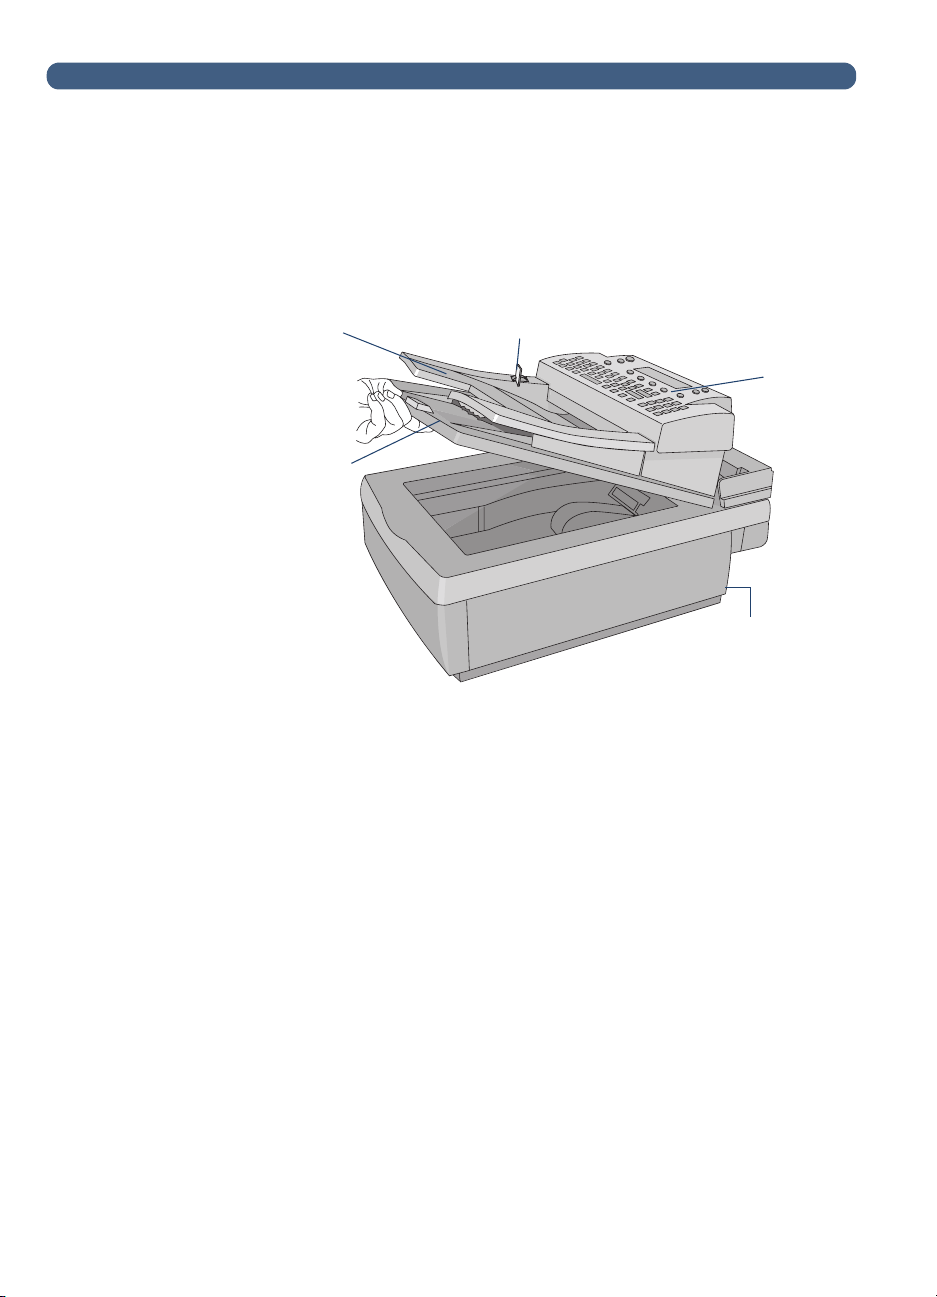
Identifying digital sender parts
Before using the digital sender, use the diagram below to familiarize
yourself with the parts of the digital sender.
Front and top view
Page 8
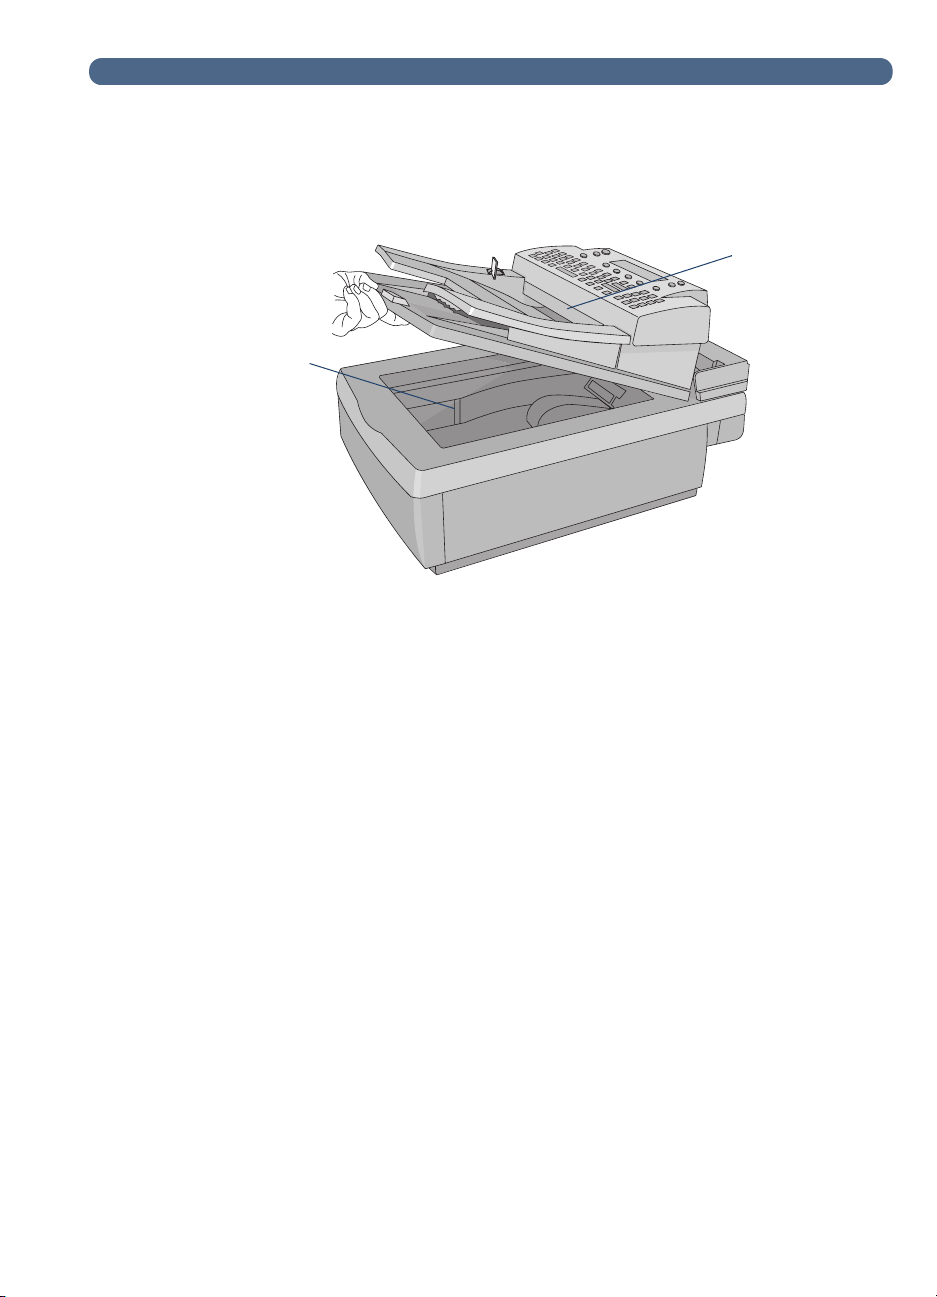
Front view with ADF unit raised
ADF unit
(raises to
reveal glass)
Glass
Identifying digital sender parts
7
Page 9
8
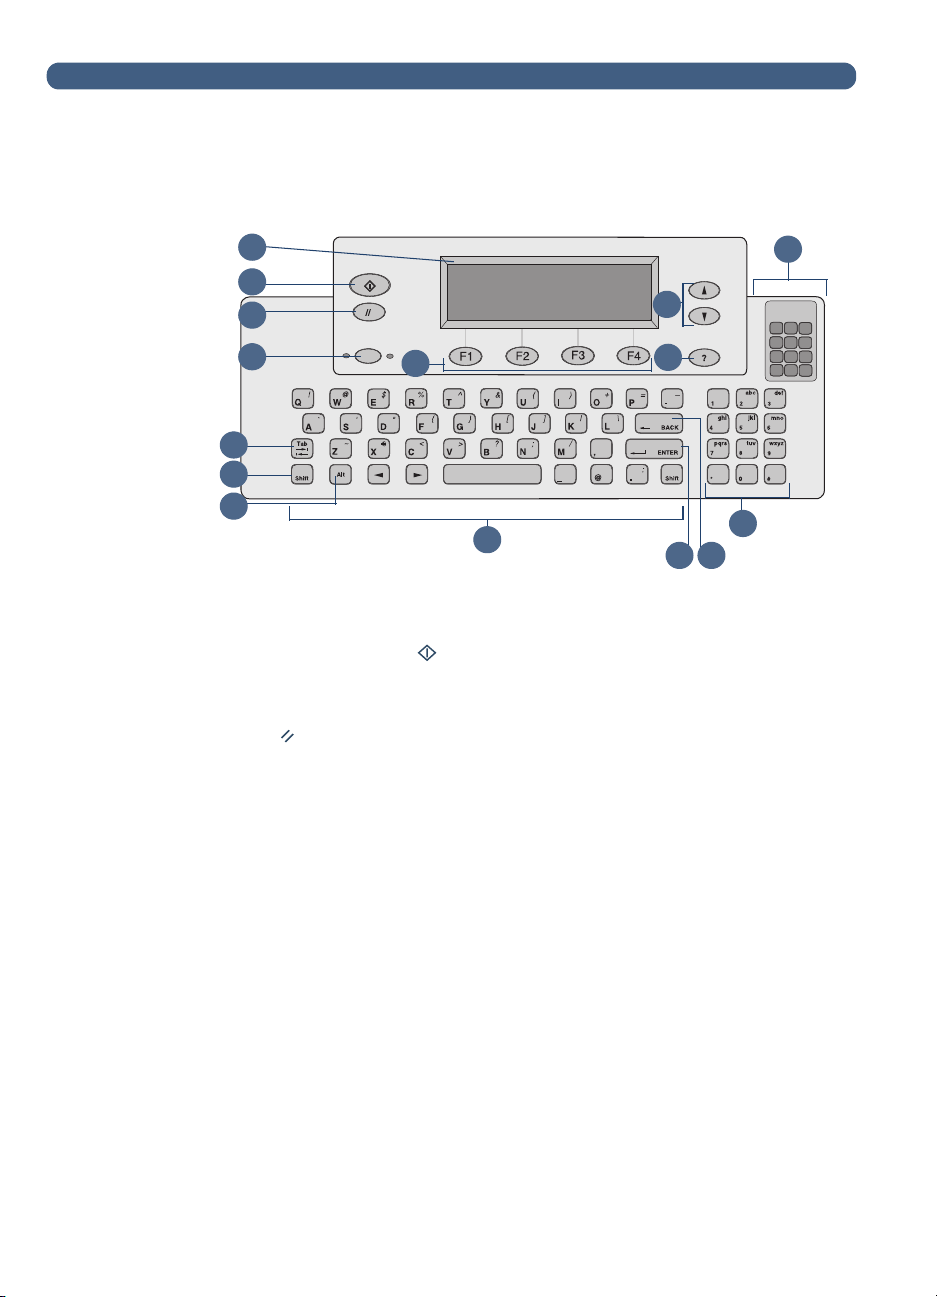
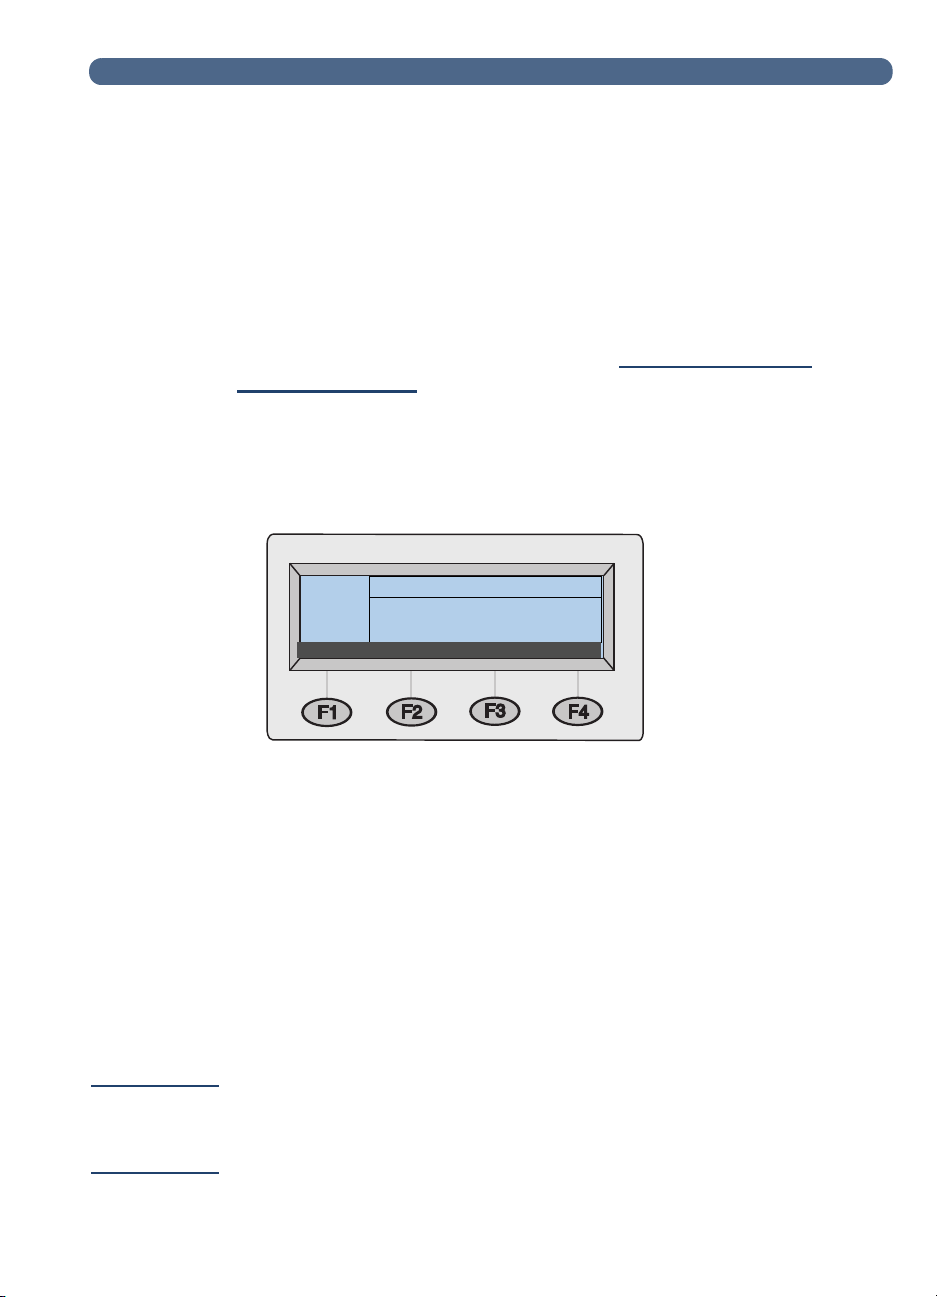
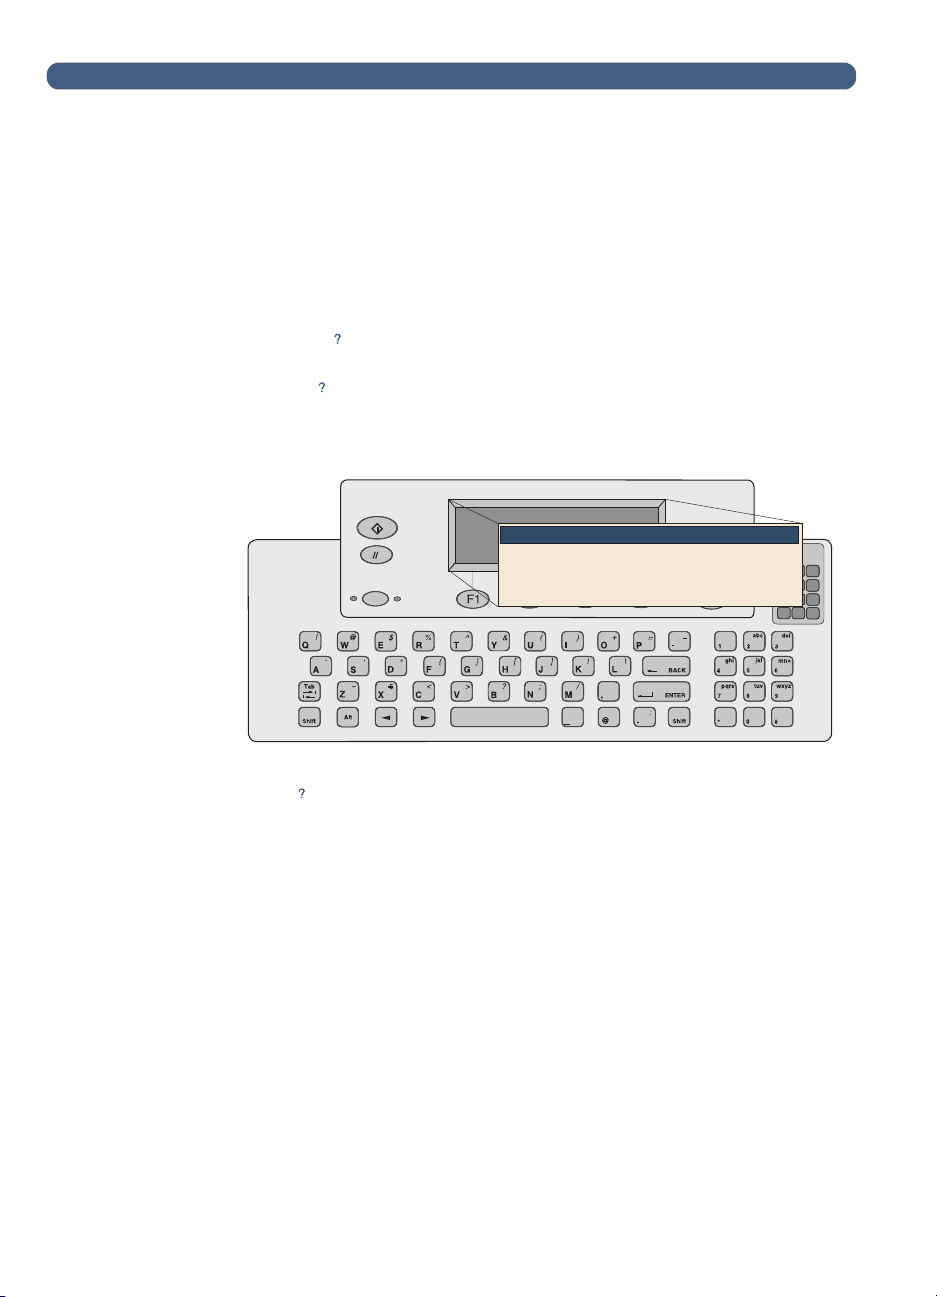
Identifying control panel features
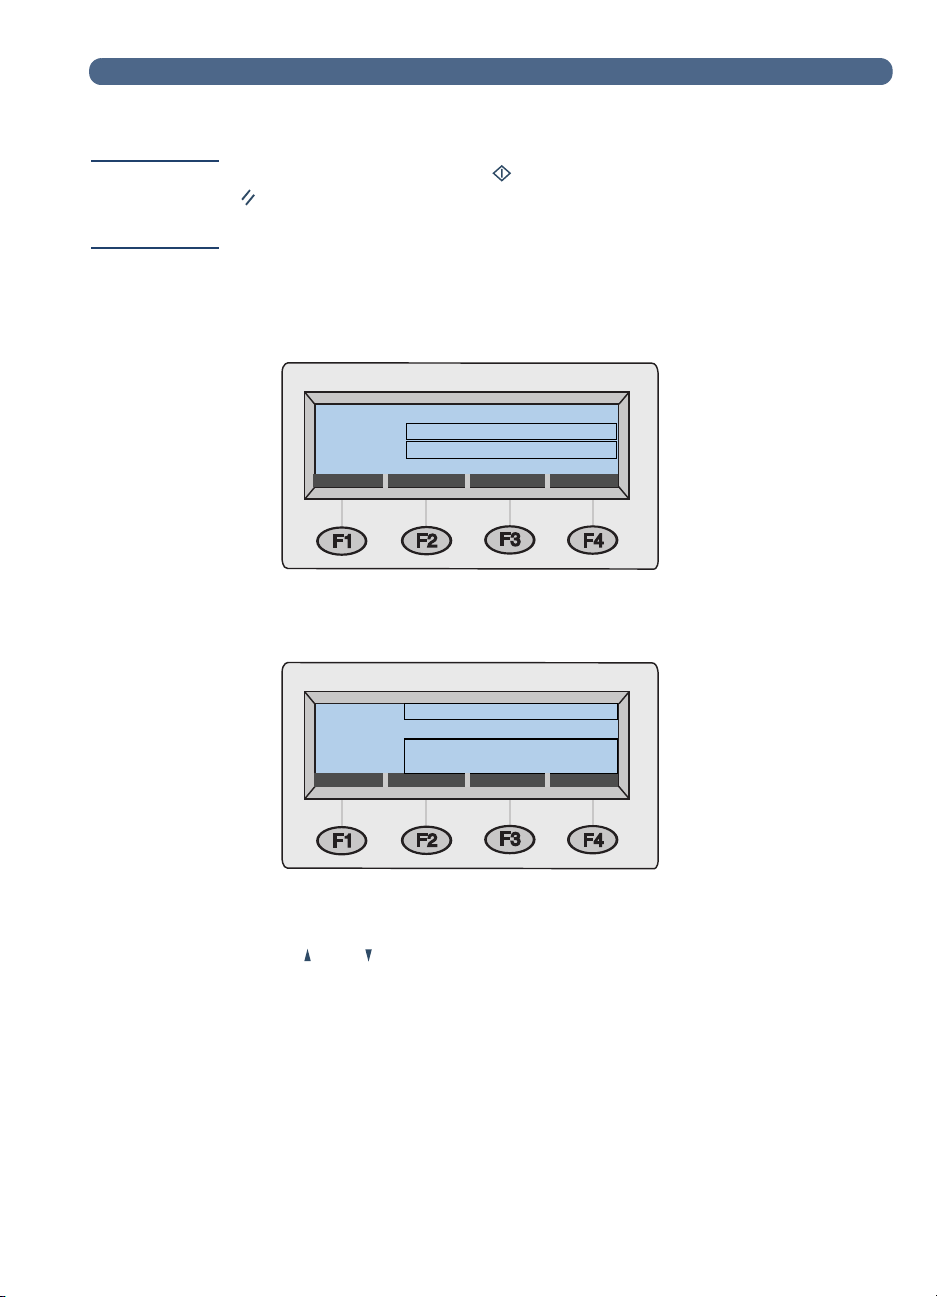
Use this diagram to familiarize yourself with control panel features.
1
2
3
4
15
13
14
5
6
7
11
8
Control Panel Display — Displays information and messages.
1
Go key — Sends a document. In the manuals, this key is shown
2
9 10
as this symbol: .
Cancel key — Stops sending process or returns to the main
3
display screen. In the manuals, this key is shown as this symbol:
.
Single-sided/double-sided key — Selects single-sided or double-
4
sided original. When referring to this key in this manual, it will be
shown like this:
INGLE
S
OUBLE-SIDED
-/D
.
12
Tab key — Moves between fields on the control panel display.
5
Shift key — When used with a letter key, produces the capital
6
case of that letter.
Alt key — When used with another key, enters the letter or
7
symbol (in purple) displayed on the upper right corner of the other
key. (For example, pressing A
Alphabetic keys — Enter letters and symbols for names,
8
LT
+B enters a “?”.)
passwords, and destinations.
Enter key — Accepts information on the control panel display or
9
moves between fields. It is shown in this manual like this: E
NTER
.
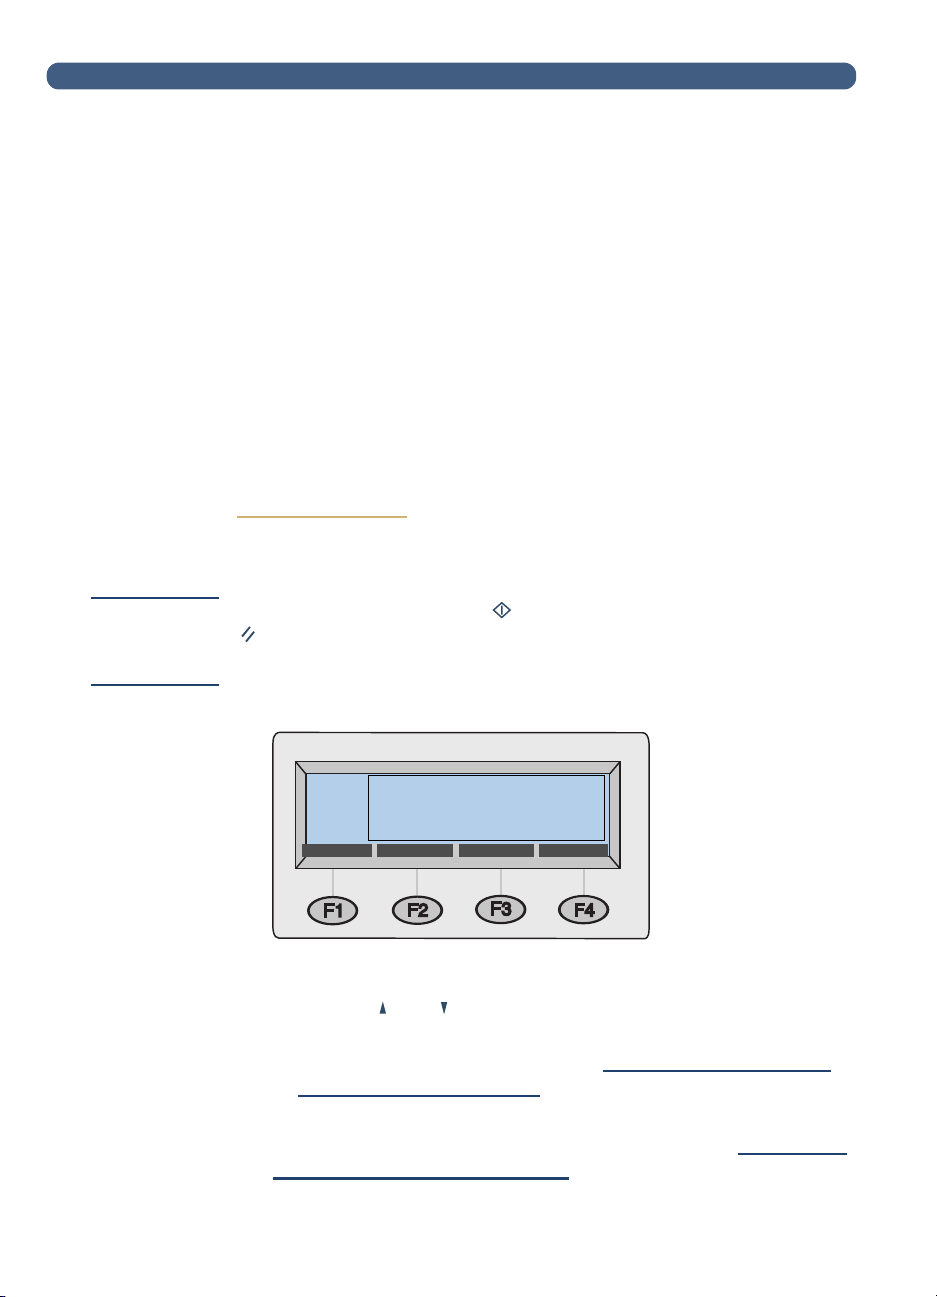
Page 10

Identifying digital sender parts
Backspace key — Deletes the last typed character or removes
10
destinations from the selection list. This key is located just above
NTER
the E
shown like this: B
Numeric keys — Enter numbers or special characters for your
11
key . When referring to this key in this manual, it will be
ACKSPACE
.
language (except English).
Special characters sticker — Contains instructions for accessing
12
the special characters available for your language (except
English).
Scroll Arrow keys — Scroll up and down or through items in a
13
field. In the manuals, these keys are shown as these symbols:
and .
Help key — Activates the Help window, which offers information
14
on the selected screen or field. In the manuals, this key is shown
as this symbol: .
Function keys — Each one performs the function displayed
15
above the key. In this manual, these keys are shown in this way:
EY NAME
K
(FX), where FX is the number of the key.
9
Page 11

10
Managing your user profile
There are two different types of users for the digital sender:
●
Registered users.
Registered user must establish a user profile,
and they have full access to all features.
●
Guest users.
Guest users do not have to establish a user profile,
but they also do not have full access to all features.
Registered users
As a registered user, you have the following privileges:
●
You can use the digital sender even if the administrator disables
guest usage.
●
You can store e-mail addresses and distribution lists in your
personal address books on the digital sender.
●
You can use e-mail addresses from your Personal or the Public
E-Mail addresses book and distribution lists from your Personal
or the Public E-Mail lists book.
●
You can store fax numbers and fax distribution lists in the public
Fax books.
●
You can use fax numbers and fax distribution lists in the public
Fax numbers book and the public Fax lists book.
Guest users
If the administrator has disabled guest usage, you cannot use the
digital sender.
If guest usage is enabled, you can:
●
Use the digital sender.
●
Use the Public E-Mail addresses book and lists book.
●
Use the public Fax numbers book and lists book.
not
You do
have personal e-mail address and distribution list books.
To create personal e-mail address books, you must be a registered
user. Register at the digital sender when prompted, or contact the
administrator if the prompt does not appear.
Page 12
Managing your user profile
Users:
Adding a registered user profile
The administrator decides whether or not you can add a registered
user profile, or if only he or she can. If you try to add yourself and are
asked for the administrator password, contact the administrator.
If the administrator allows you to set up your own profile, you can do
so from the
you send an e-mail or try to add to an e-mail or fax book. (You need a
registered user profile to have personal books.) For more information
about e-mail and fax books, see chapter 3
books” on page 31
To add a registered user profile from the Users menu
menu, or from the login dialog box the first time
Users
Managing address
“
.
11
Press A
1
Press U
2
In the
3
Users
dialog box opens.
In the
4
5
6
7
E-Mail
In the
Password
NTER
E
.
In the
Confirm
NTER
E
.
To enable the
Press O
a
To receive an e-mail confirmation for each document you
b
send, press YES (F1) at the Receive confirmations prompt.
LT+SETUP
SERS
(F4).
(F1). This dialog box opens:
field, type your name and press E
field, type your e-mail address and press E
field, type a password (optional) and press
field, type the password you just typed and press
Receipt
PTIONS
or
(F2).
Auto BCC
options, do the following:
NTER
. A new
NTER
.
Note
T o receive confirmations, your e-mail server and the links between your
e-mail and the recipient’s e-mail must support Delivery Service
Notification (DSN).
To receive a copy of every e-mail message you send, press
c
ES
(F1) at the Auto CC prompt.
Y
ACK
Press OK (F1), and then press B
8
(F4).
Page 13

12
To add a registered user profile when you send an e-mail
or access address books
Note
Note
and press E
Name
ES
(F1).
MAIL
(F1) or L
Personal E-Mail addresses
or
Press E
1
If you selected L
2
to select
lists
In the
3
At the Would you like to register as a user? prompt, press
4
Y
ISTS
(F4).
ISTS
in the previous step, use the and keys
or
Personal E-Mail
NTER
.
field, type your name and press E
From
NTER
.
If the prompt does not appear, see the administrator to register.
NTER
In the
5
In the
6
NTER
E
In the
7
NTER
E
To enable the
8
Press O
a
To receive an e-mail confirmation for each document you
b
send, press Y
field, type your e-mail address and press E
E-Mail
Password
field, type a password (optional) and press
.
Confirm
field, type the password you just typed and press
.
Receipt
PTIONS
or
Auto BCC
(F2).
ES
(F1) at the Receive confirmations prompt.
options, do the following:
.
T o receive confirmations, your e-mail server and the links between your
e-mail and the recipient’s e-mail must support Delivery Service
Notification (DSN).
To receive a copy of every e-mail message you send, press
c
ES
(F1) at the Auto CC prompt.
Y
Press OK (F1) twice.
9
Finish sending a document to e-mail or finish adding entries to
10
the books. See the appropriate procedure in chapter 2
on page 15)
.
(starting
Page 14

Managing your user profile
Changing options for your profile
If you want to change your password, user name, or other registered
user information, you can do so if the administrator allows it. If not,
you receive a message to contact the administrator.
To change options for your profile
Do one of the following:
●
Access the
Click
●
As you are e-mailing a document, accessing Lists, or logging in,
type your user name and password, and then press M
to see instructions.
here
menu and change your profile as you added it.
Users
ODIFY
(F3).
13
Page 15
14
SUBJECT FIELD: Enter the subject of
your e-mail message here. Press Enter to
FROM
TO
SUBJ
Help
Finding help
This user guide provides instructions to help you use the digital
sender, and it will also help you troubleshoot if you experience a
problem. Additionally, the digital sender itself houses Help to assist
you.
The Help for the digital sender contains context-sensitive Help. When
you press , help appears for the active field on the control panel
display. For example, if you were sending an e-mail message and
pressed with the cursor in the
Subject
field, a message like this
would appear:
:
Press again or press C
If Help is not available for a field or key, then you receive a message
to see the administrator for the digital sender.
LOSE
to exit the Help.
Page 16

Introduction
15
2
Sending documents
Introduction
The HP Digital Sender 8100C lets you send a variety of single- and
double-sided documents to e-mail addresses and distribution lists.
You can also send to any fax number if your company subscribes to
an Internet fax service.
Sending a document is a simple, two-step process:
1. Load the document.
2. Choose a destination.
Page 17

16
Guidelines for documents
The HP Digital Sender 8100C is both a sheetfed and a flatbed digital
sender. You can insert up to 25 pages (single- or double-sided) into
the automatic document feeder (ADF) and quickly send them. On the
glass, you can place documents that you cannot put in the ADF, such
as photographs, pages from books, newspaper clippings, and fragile
or lightweight documents.
Guidelines for using the ADF
Using the ADF is a fast, convenient way to send documents. The
ADF accepts documents that meet the following specifications:
●
Documents on standard Letter-, A4-, and Legal-size paper.
●
Documents consisting of up to 25 pages (for all functions except
printing to a black-and-white HP JetSend-enable printer, for
which the limit is 20 pages).
●
Documents can range in size from 148.5 by 210 mm (5.9 by 8.3
inches) to 215.9 by 355.6 mm (8.5 by 14 inches).
●
Documents can range in weight from 60 to 105 g/m2 (16 to 28 lb).
●
Documents should be square or rectangular and in good
condition (not fragile or worn).
●
Documents should be free of tears, perforations, or punch holes.
●
Documents should be free of glue, correction fluid, or wet ink.
Additionally, you should avoid multipart forms with carbon pages.
Before placing a document in the ADF, prepare the document by
doing the following:
●
Remove curls or wrinkles.
●
Remove staples, paper clips, paper sticky notes, and any other
materials from documents.
See
To load a document in the ADF” on page 18
“
to load a
document into the ADF. If your document does not meet the
guidelines or you cannot prepare it as stated above, send the
document by placing it on the glass.
Page 18

Guidelines for documents
Guidelines for using the glass
The glass is the best way to send unusual documents. Examples of
unusual documents include:
●
Documents on media lighter than 60 g/m2 (16 lb) or heavier than
105 g/m
●
Irregular sizes or shapes, such as newspaper clippings, receipts,
2
(28 lb).
or business cards.
●
Transparencies.
●
Gum-backed paper.
●
Multipart forms with carbon pages.
●
Old or worn photographs or documents.
●
Documents containing tears, perforations, punch holes, wrinkles,
or curls.
Place these types of documents on the glass one at a time and send
them. See
To load a document on the glass” on page 19
“
for
instructions.
17
Note
The maximum length the glass can accept is 297 mm (1 1.7 inches). If
your document is longer but you need to use the glass, send the
document in multiple sections.
Sending double-sided documents
You can send double-sided documents using the glass, or ADF as
long as the document meets the requirements specified in
Guidelines for using the ADF” on page 16
“
sending double-sided documents in the actual procedures for loading
and sending documents.
. You will find steps for
Page 19
18
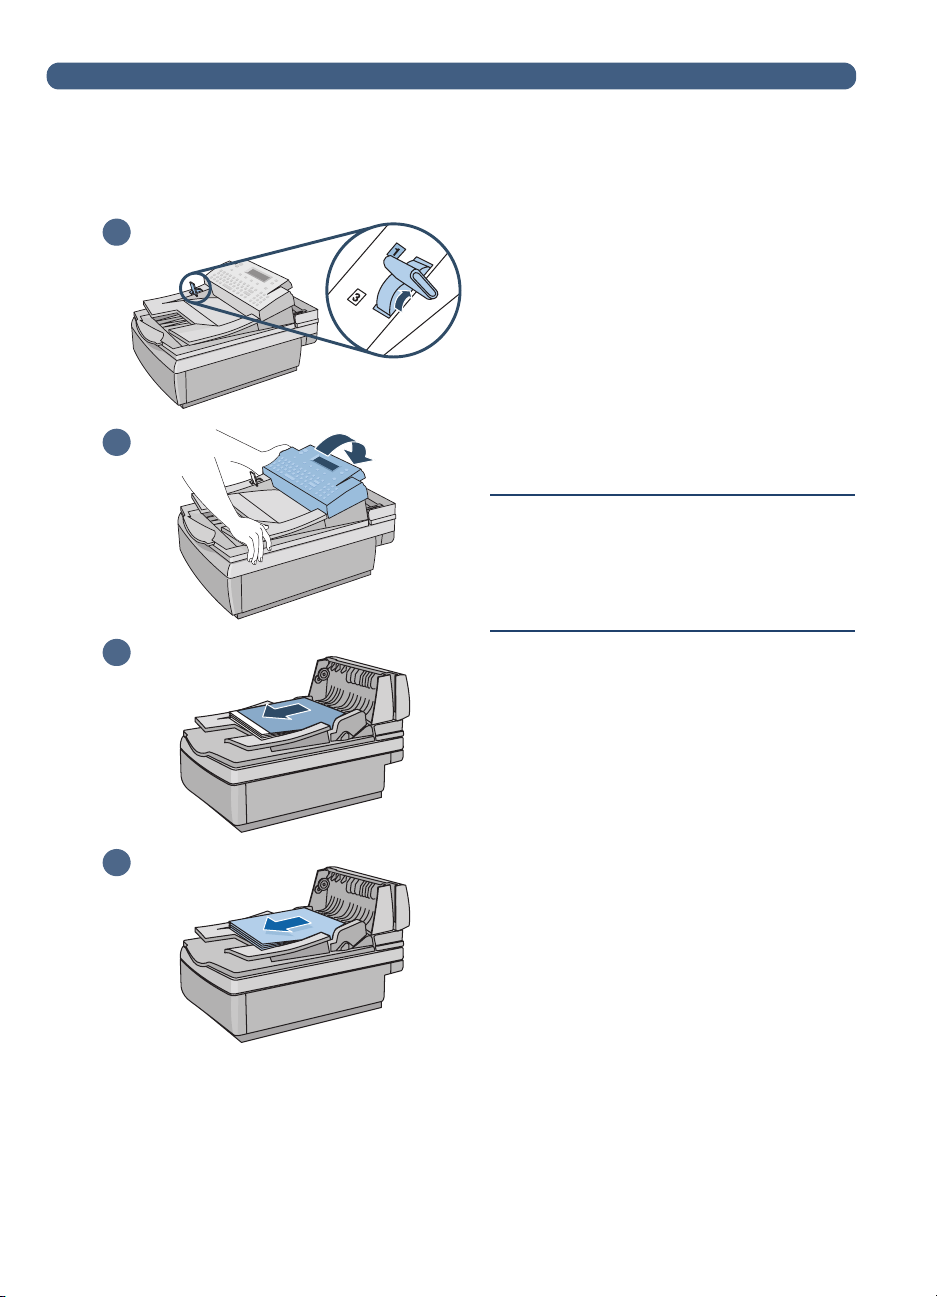
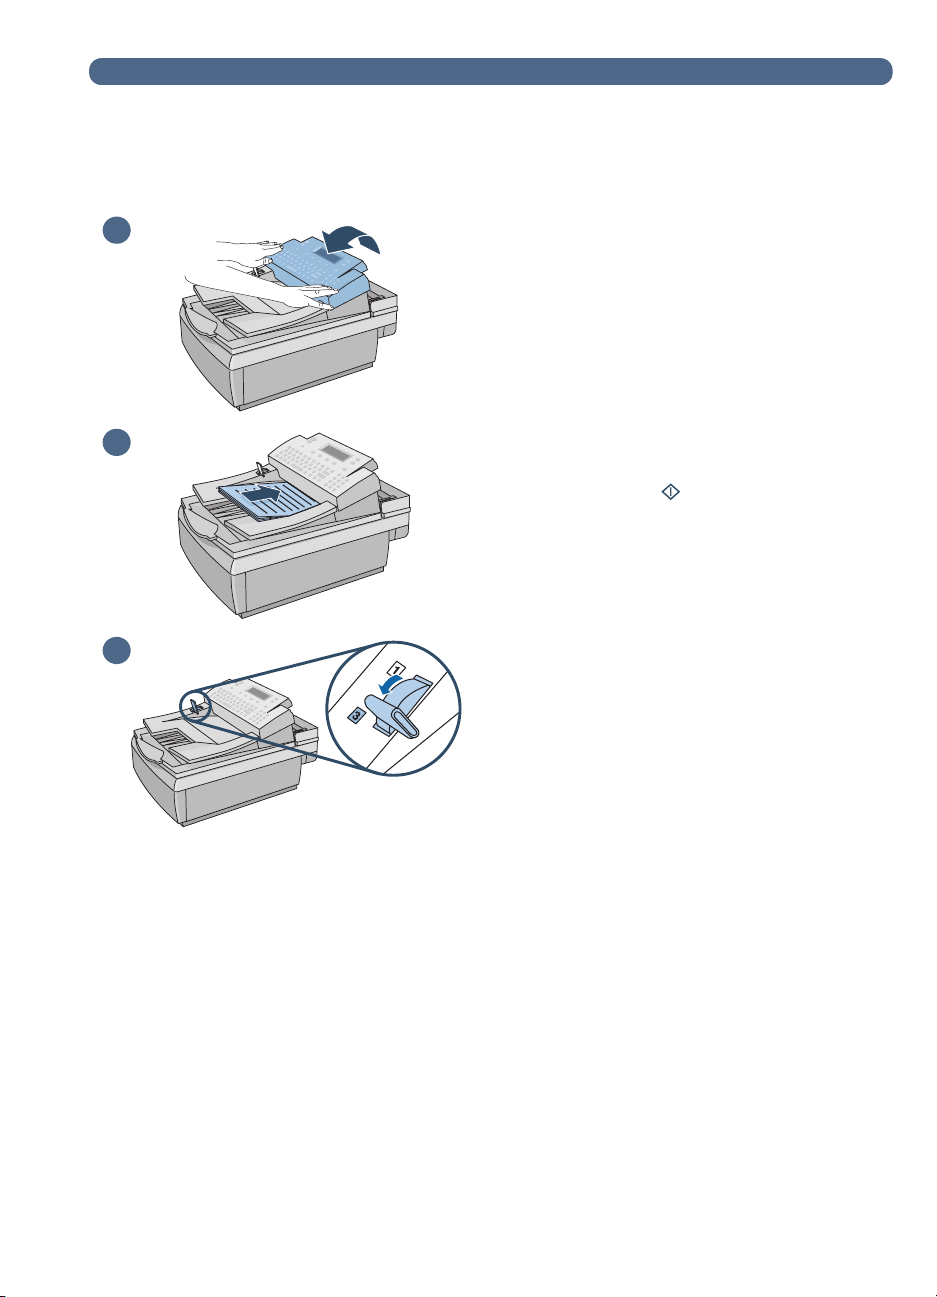
Step 1 Load a document
22
3
You can load a stack of pages in the
ADF or load one page at a time on the
glass. See
ADF"
glass
CAUTION
Before using the ADF, remove from the
document anything such as
self-adhesive notes, paper clips, or
staples, that could get caught in the
digital sender and damage it.
To load a document in the
"
or
To load a document on the
"
.”
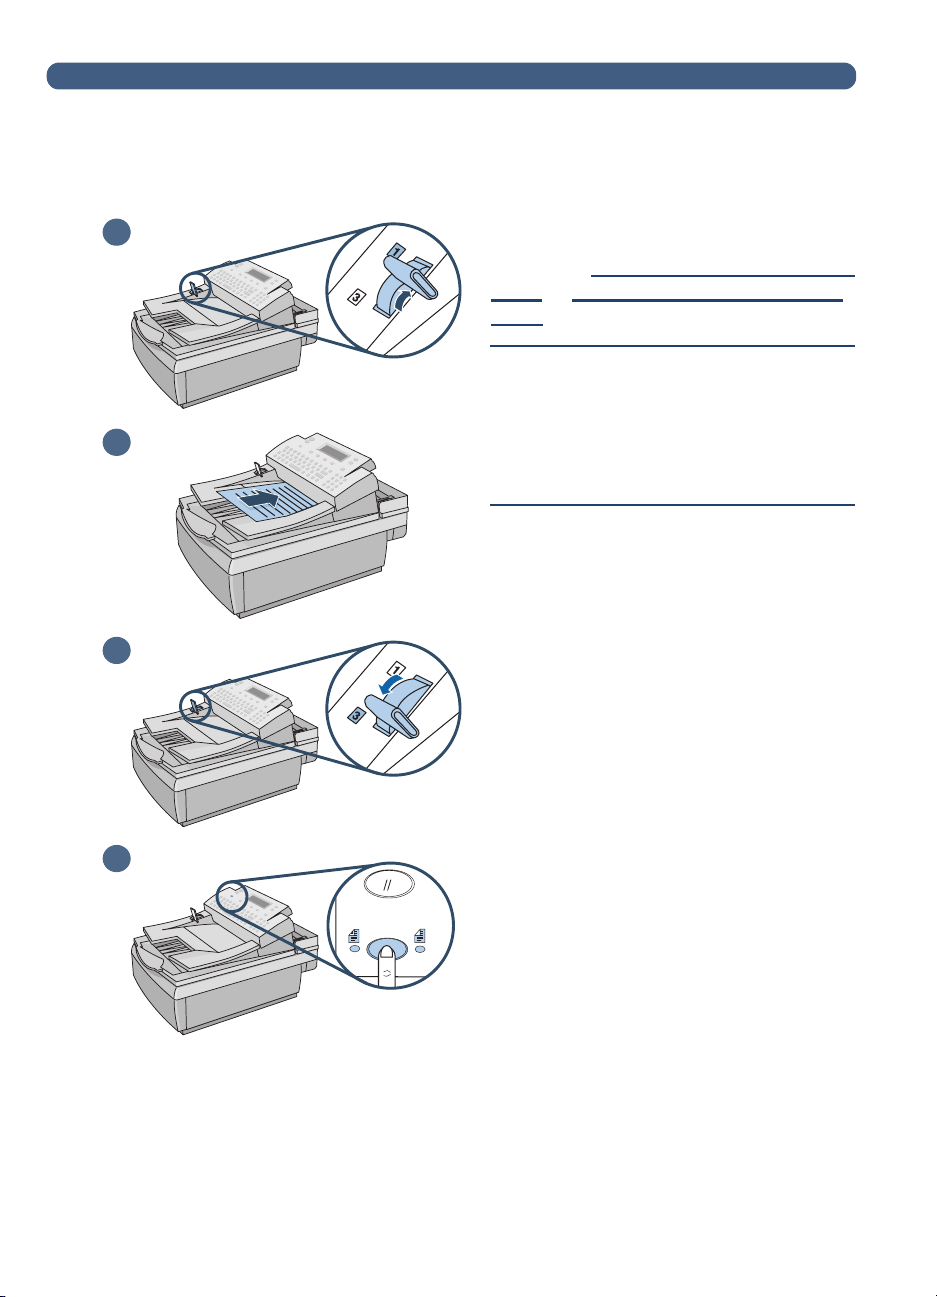
To load a document in the ADF
Raise the ADF unit and ensure
1
nothing is on the glass. Then, close
4
ADF unit.
Move the paper load lever to the
2
number 1 position.
Slide the document (up to 25 pages)
3
face up, top of page first, into the
ADF until the document stops.
Move the paper load lever to the
4
5
number 3 position.
Press the S
5
key until the light under the correct
icon is lit.
INGLE
OUBLE-SIDED
-/D
Page 20
Step 1 Load a document
19
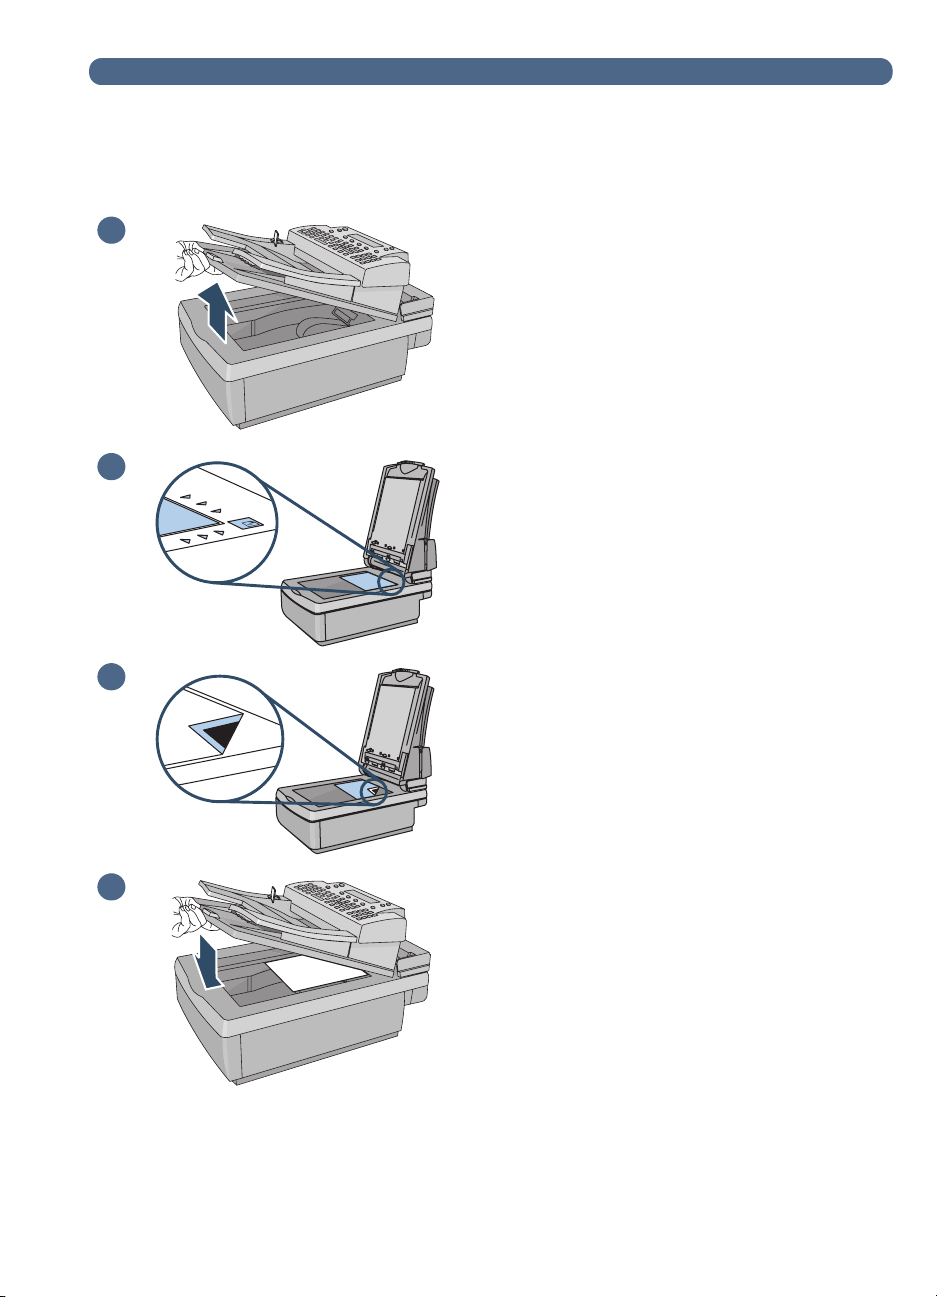
1
2
3
To load a document on the glass
Raise the ADF unit to reveal the
1
glass.
Place the page face down on the
2
glass, top edge toward the back.
Align the document in the upper-
3
right corner of the glass.
Lower the ADF unit.
4
4
Page 21

20
Step 2 Choose a destination
You can send a document to:
●
e-mail addresses or distribution lists
●
fax numbers or distribution lists (if your company subscribes to a
supported Internet fax service)
●
HP JetSend-enabled printers
E-mailing documents
When you e-mail from the digital sender, it creates a message and
attaches your document as a file. You can send to e-mail addresses
by typing an address or choosing an address or distribution list stored
in an address book. Public address books are available to all users,
while personal address books are only available to registered users.
(For more information about address books, see chapter 3
Managing address books” on page 31
“
If the administrator has configured the digital sender to work with an
LDAP server, you can also choose addresses stored on the LDAP
server.
.)
Page 22
To send to e-mail destinations
Welcome -- please sign in.
Password:
Name:
BAC
To:
Subject:
From:
BAC
Step 2 Choose a destination
21
Note
At any time before pressing to send the document, you can press
ACK
or B
(F4) to return to the main screen without saving any
settings.
AIL
Press E-M
1
(F1). If guest usage is disabled, then only
registered users can use the digital sender. This login screen
opens:
Otherwise, the main e-mail dialog box opens:
Do one of the following:
2
●
If the login dialog box opens, type your user name (or use the
and keys to scroll to it) and press E
password (if set) and press E
●
If the main e-mail dialog box opens, type your e-mail address.
Type a message in the
3
Subject
NTER
. Then, type your
NTER
.
field (optional) and press E
NTER
.
Page 23

22
Do one of the following to choose an e-mail destination:
4
●
Type an e-mail address.
●
Begin typing the name of an address or distribution list stored
in an e-mail book. As you type, the digital sender completes
the name.
●
Use the and keys to scroll destinations in an e-mail book.
●
Begin typing the name of an e-mail address on an LDAP
server and press S
EARCH
(F2) [or press S
HIFT+SEARCH
access advanced search options]. Use the and keys s to
select an address and press OK (F1).
(F2) to
Note
Note
If too many matching entries are found, you receive
a message. Press C
list and press E
ANCEL
(F4) to scroll the partial
NTER
to select a destination. Or,
further narrow the search and try again.
Repeat step 4 until you have added all the destinations you want.
5
To view the list, press T
AB
to enter the list field and use the and
keys to scroll the destinations. To remove a destination, select it and
press B
6
ACKSPACE
.
To CC or BCC someone:
Press TO/CC (F3).
a
Use the and keys to select CC (or
b
In the CC (or
c
) field, type an e-mail address or choose an
BCC
) and press E
BCC
NTER
e-mail destination from an e-mail book.
d
Press E
NTER
. The destination, preceded by “CC:” (or
“BCC:”), appears in the list field.
The Paper Size and Quality settings appear in the upper right
7
corner of the display. See
page 28
to change the Paper Size setting. (The Quality setting,
Changing settings (optional)” on
“
which is always B/W Document for faxing, cannot be changed.)
.
Page 24

Press to begin sending the document.
8
●
If you sent a single-sided document, the process is finished.
●
If you sent a double-sided document using the ADF, wait for
the first side to finish. Then, reload the document with the
second side facing up, last page on top, and press again.
●
If you used the glass, remove the page when it is finished.
Then, place the next page face down on the glass and press
. After the last page, press S
Step 2 Choose a destination
END
(F4).
23
Note
Your company’s e-mail server, not the digital sender, validates the
e-mail addresses, so the digital sender does
not
notify you if you sent
to an invalid address.
Reading file attachments
File attachments can be sent in .pdf or .tif format, depending on what
the administrator allows (see
page 28
).
Recipients can open .pdf files using Adobe Acrobat Reader, which
many people already have. If your recipients do not have Reader,
they can download a free copy of it for Windows or Macintosh from
Adobe’s website at
www.adobe.com
Windows users can read .pdf files by double-clicking them. Macintosh
users can read .pdf files by opening Reader, choosing
menu, and then selecting the file.
File
If you sent a single-page .tif file, the recipient can open it in any
program that accepts that file format. If you send a multiple page .tif
file, also known as .mtif, the user must open it using the Imaging
program.
Changing settings (optional)” on
“
. After installing Reader,
on the
Open
Page 25

24
Billing:
Fax:
<default code>
BAC
Faxing documents
If your company has Internet fax service, you can send documents
from the digital sender to fax destinations. If the service is not
configured, you receive a message. See the administrator.
When sending a fax, you can type fax numbers or you can choose fax
destinations from the public Fax numbers or lists books. (For more
information about books, see chapter 3
on page 31
.)
To fax documents
“
Managing address books”
Note
At any time before pressing to send the document, you can press
ACK
or B
1
(F4) to return to the main screen without saving any settings.
AX
Press F
(F2). If the login dialog box opens, type your user
name (or use the and keys to scroll to it) and press E
NTER
Then, type your password (if set) and press E
. This dialog
NTER
.
box opens:
Do one of the following to choose a fax destination:
2
●
Type the entire fax number, including the long-distance prefix,
area code, or other numbers. (Do
not
include a number such
as a 9 that you dial to get an outside line on your PBX
telephone system.)
●
Type the name of a fax destination stored in the public Fax
numbers or lists book. As you type, the digital sender
completes the name.
●
Use the and keys to scroll destinations in the Fax
numbers or lists book.
3
Press E
field.
To
NTER
. The fax destination appears in the field below the
Page 26

Step 2 Choose a destination
Repeat steps 2 and 3 to add more fax destinations.
4
25
Note
Note
To view the list, press T
destinations. To remove a destination, select it and press B
The Paper Size and Format settings appear in the upper right
5
corner of the display. To change these settings, see
settings (optional)” on page 28
Press to begin sending the document.
6
●
If you sent a single-sided document using the ADF, the
AB
and use the and keys to scroll the
“
Changing
.
ACKSPACE
process is finished.
●
If you sent a double-sided document using the ADF, wait for
the first side to finish. Then, reload the document with the
second side facing up, last page on top, and press again.
●
If you used the glass, remove the page when it is finished.
Then, place the next page face down on the glass and press
. After the last page, press S
END
(F4).
If fax destinations are busy , the numbers are retried as many times as
the Internet fax service specifies.
The digital sender does
not
notify you if you sent to an invalid fax
destination.
.
Page 27
26
Device:
HP LaserJet 4000
--(IP Addres
BACNESETTIN
DELE
Printing to HP JetSend-enabled printers
The digital sender is an HP JetSend-enabled device. You can use its
HP JetSend capabilities to send to printers on your company’s
network that are HP JetSend enabled and have valid TCP/IP
addresses. If you receive a message requesting a TCP/IP address
when you press P
RINT
(F3), see the administrator.
Note
You can send one copy at a time to one printer at a time.
Whether the
copies print single-sided or double-sided is determined by the
printer’s settings.
HP JetSend is a communications technology built into printers,
scanners, and computer software. HP JetSend-enabled devices can
connect, “talk” to each other, and exchange information directly from
the network. It is server- and program-independent. To find out more
about HP JetSend technology or view a list of supported printers, visit
www.jetsend.com
.
To send to an HP JetSend-enabled printer
At any time before pressing to send the document, you can press
ACK
or B
settings.
Press P
1
(F4) to return to the main screen without saving any
RINT
(F3). This dialog box opens:
Do one of the following to choose an HP JetSend-enabled printer:
2
●
Use the and keys to select a printer from the list and
press E
●
Add a new printer to the list. (See
enabled printer to the list
The Paper Size and Quality settings appear in the upper right
3
corner of the display. To change these settings, see
settings (optional)” on page 28
NTER
.
To add an HP JetSend-
"
.”)
Changing
“
.
Page 28

Step 2 Choose a destination
Press to begin sending the document.
4
●
If you sent a single-sided document using the ADF, the
process is finished.
●
If you sent a double-sided document using the ADF, wait for
the first side to finish. Then, reload the document with the
second side facing up, last page on top, and press again.
●
If you used the glass, remove the page when it is finished.
Then, place the next page face down on the glass and press
. After the last page, press S
END
(F4).
To add an HP JetSend-enabled printer to the list
27
Note
1
Press P
RINT
(F3). The list of HP JetSend-enabled printers
appears.
Press N
2
Type the DNS name or IP address for the HP JetSend-enabled
3
EW
(F3).
printer you want to add. If you do not know this information, see
the administrator.
Click
4
to finish sending a document to the new HP JetSend
here
enabled printer.
Once the list contains 64 printers, the N
EW
(F3) key disappears. Before
adding more printers, you must delete at least one existing printer from
the list. T o delete a printer, use the and keys to select it and press
ELETE
D
(F3).
Page 29

28
To:
Subject:
From:
QUALITY
FORMAT
SIZE
<your user
CLOSE
Changing settings (optional)
The Paper Size, Quality, and Format settings appear in the upper
right corner of the control panel display . Use this procedure to change
the Paper Size and Quality options. You can also use this procedure
to change the file format setting, if you see the
Settings
To change the Paper Size, Quality, and Format settings
1
menu.
With a document loaded and a destination selected, press
ETTINGS
S
(F1). The
Settings
menu appears.
Format
option on the
If you do not need to change the quality, go to step 5. Or, press
2
NTER
to select
E
Use the and keys to choose the option that most closely
3
Quality
.
matches the type of document you have.
Use this setting For this type of document
Color Document The original has a mix of text and images.
Or, the original has a mix of color and black-andwhite areas.
B/W Document The original contains text that must be clearly
transmitted. Or, the original is black and white.
Color-B/W Photo The original is a photograph.
Or, it is most important that the colors or shades
of gray in an image be clear.
4
Press E
NTER
to select the highlighted option.
Page 30

Changing settings (optional)
If you do not need to change the paper size, go to step 7. Or,
5
NTER
press until
is selected and press E
Size
.
29
Using the and keys, choose A4,
6
NTER
E
. (If the document you are sending is an irregular size,
choose the option that most closely matches.)
If you are e-mailing a document
7
Settings
Format
to choose
Press C
8
Do one of the following:
9
●
●
●
menu, you can change the file format. Press until
is selected and press E
Click
Click
Click
or
PDF
LOSE
(F1) to save and exit the
to finish sending to e-mail.
here
to finish sending to a fax destination.
here
to finish sending to an HP JetSend-enabled printer.
here
and press E
TIF
and
see the
NTER
. Then, use the and keys
NTER
Letter
.
Settings
, or
Legal
Format
dialog box.
and press
option in the
Page 31

30
Page 32

Managing address
Introduction
31
3
books
Introduction
If you are a registered user, you can store frequently used e-mail
addresses and fax numbers in books. You can also build distribution
lists of e-mail addresses or fax numbers so you can easily send
documents to groups of people.
To become a registered user, see
page 10
.
Managing your user profile” on
“
Page 33

32
Using address books
The digital sender stores addresses and fax numbers in the following
address books under the
●
Your Personal E-Mail addresses book
Stores personal e-mail addresses that you can use when sending
e-mail. No one except you and the administrator can see,
change, or use entries in this personal address book.
●
Your Personal E-Mail lists book
Stores personal e-mail distribution lists that you can use when
sending e-mail. No one except you and the administrator can
see, change, or use entries in this personal book.
●
Fax numbers book
Stores fax numbers that any user can use when sending faxes.
Only registered users or the administrator can change
information in this book.
●
Fax lists book
Stores fax distribution lists that any user can use when sending
faxes. Only registered users and the administrator can change
information in this book.
Lists
menu:
In addition, there are two other books whose entries anyone can use
when sending e-mail. However, only the administrator can change
information for entries in these books.
●
Public E-Mail addresses book
Contains predefined e-mail addresses available to any user when
sending a document.
●
Public E-Mail lists book
Contains predefined groups of e-mail addresses available to any
user when sending a document.
Page 34

Using address books
Viewing address books
Y ou can view entries in your two Personal E-Mail books as well as the
two public Fax books.
To view books
33
Note
Note
Press L
1
Use the and keys to select a book and press E
2
ISTS
(F4).
NTER
. The
login dialog box opens.
Type your user name (or use the and keys to scroll to it) and
3
NTER
press E
. Then, type your password (if set) and press E
If you are prompted to become a registered user, press Y
ES
(F1) or
NTER
see the administrator.
Scroll the list of destinations using one of these ways:
4
●
Use the and keys to move through the list.
●
Begin typing the name of a destination stored in the book. The
book displays the closest matching entry. (Continue scrolling
that area of the list by typing additional letters, or by using the
and keys.)
If you are viewing your Personal E-Mail addresses book or the Fax
numbers book, you may see destinations you did not add. Addresses
or fax numbers you typed while sending a document are automatically
added to the appropriate address book, if the administrator has enabled
this option.
If you begin typing a name incorrectly , press B
5
ACKSPACE
until you
erase the incorrect character, and then continue typing. (Or,
press S
HIFT+BACKSPACE
to erase the entire contents of the field.)
.
When finished, press B
6
ACK
(F4).
Page 35

34
Managing your Personal E-Mail addresses book
If you are a registered user, you can store e-mail addresses in your
Personal E-Mail addresses book and use the entries when you e-mail
a document. Use the procedures in this section to add, modify, and
delete addresses from your Personal E-Mail addresses book.
Note
Y ou can view and use information in the public E-mail addresses book,
but you cannot change it. Contact the administrator to make changes
to the public E-Mail addresses book.
Adding addresses
As a registered user, you can add up to 256 e-mail addresses to your
Personal E-Mail addresses book. Addresses you type while sending
a document are automatically added to your Personal addresses
book, if the administrator has enabled this option.
Page 36

To add addresses
Name:
BACK
SEARCH
Managing your Personal E-Mail addresses book
35
Press L
1
Press and press E
2
ISTS
(F4).
NTER
to select
Personal E-Mail addresses
The login dialog box opens.
Type your user name (or use the and keys to scroll to it) and
3
press E
NTER
. Then, type your password (if set) and press E
This dialog box opens:
Add an address by doing one of the following:
4
●
Type a name for this entry in the
field and press
Name
ADD(F1).
●
If the administrator set the digital sender to work with an LDAP
server, begin typing the first letters of an entry and press
EARCH
S
(F2). Use the and keys to select an entry and
press OK (F1).
NTER
.
.
Change the name and e-mail information for this entry as
5
(F3).
AB
to move between fields.
ACK
(F4).
necessary. Use T
Press S
6
To add more addresses, repeat steps 4 through 6.
7
When finished, press B
8
AVE
Page 37

36
Name:
Maria P. Martinez
--m_martinez
S. Donizetti
--s_donizetti@hp.c
JH Arp
--jh_arp@rc.com
BACK
SEARCH
DELETE
MODIFY
Modifying or deleting e-mail addresses
Once you have added addresses to your Personal E-Mail addresses
book, you can change the name and e-mail information. Changing
this information also changes it in any of your Personal distribution
lists where it appears.
If an e-mail address in your Personal E-Mail addresses book is no
longer useful, you can delete it. Deleting an address from this
address book also deletes it from any of your Personal distribution
lists where it appears.
To modify or delete e-mail addresses
Press L
1
Press and press E
2
ISTS
(F4).
NTER
to select
Personal E-Mail addresses
The login dialog box opens.
Type your user name (or use the and keys to scroll to it) and
3
NTER
press E
. Then, type your password (if set) and press E
This dialog box opens:
Select an entry using one of these ways:
4
●
Begin typing the name of an entry. The book displays the
closest matching one.
●
Use the and keys to select an entry.
Do one of the following:
5
●
Press M
between fields), and press S
●
Press D
ODIFY
(F1), make changes (using TAB to move
AVE
(F3).
ELETE
(F3), and press OK (F1) to confirm the deletion.
NTER
.
.
Repeat steps 4 and 5 to change or delete other entries.
6
When finished, press B
7
ACK
(F4).
Page 38

Managing your Personal E-Mail lists
Managing your Personal E-Mail lists
Your Personal E-Mail lists book contains distribution lists you create
using e-mail addresses. Distribution lists are useful if you regularly
send e-mail to the same group of people.
E-mail distribution lists can only consist of e-mail addresses. You
cannot create distribution lists containing both e-mail addresses and
fax destinations.
37
Note
You can view and use information in the Public E-Mail lists book, but
you cannot change it. Contact the administrator to make changes to
the Public E-Mail lists book.
Creating new lists
You can create distribution lists for your Personal lists book using email addresses from the Public E-Mail addresses book or your
Personal E-Mail addresses book, or addresses you type as you build
the list.
You might not want to create a personal distribution list if there is one
just like it in the Public E-Mail lists book. Public lists are always
available for your use.
Page 39

38
List name:
BACK
DELETE
MODIFY
To create new lists
1
2
Press L
Press E
ISTS
NTER
(F4).
to select
Personal E-Mail lists
. The login dialog
box opens.
Type your user name (or use the and keys to scroll to it) and
3
NTER
press E
. Then, type your password (if set) and press E
This dialog box opens:
In the
4
5
List name
A new dialog box opens. Add entries to the list by doing one of
field, type a name for this list and press E
the following:
●
Begin typing the name of an entry in an E-Mail addresses
book. The book displays the closest matching entry. Press
NTER
E
to select it.
●
Use the and keys to select an address and press E
●
Type a name for the new entry and press E
NTER
. A dialog box
that allows you to change information opens. Make changes
(pressing TAB to move between fields) and press S
AVE
NTER
NTER
NTER
(F3).
.
.
.
Repeat step 5 to add more e-mail addresses to this list.
6
When finished, press B
7
Repeat steps 4 through 7 to add more lists.
8
When finished, press B
9
ACK
ACK
(F4).
(F4).
Page 40

Managing your Personal E-Mail lists
Milano
Firenze
Bergamo
BACK
DELETE
MODIFY
List name:
Adding addresses to existing lists
Use this procedure to add addresses to e-mail distribution lists you
have already created.
To add addresses to existing lists
39
1
2
Press L
Press E
ISTS
NTER
(F4).
to select
Personal E-Mail lists
. The login dialog
box opens.
Type your user name (or use the and keys to scroll to it) and
3
press E
NTER
. Then, type your password (if set) and press E
This dialog box opens:
Select a distribution list using one of these ways:
4
●
Begin typing the name of a distribution list. The list displays the
closest matching entry.
●
Use the and keys to select a list.
ODIFY
Press M
5
Add an e-mail address to this list using one of these ways:
6
(F1).
NTER
.
●
Begin typing the name of an entry in an E-Mail addresses
book. The list displays the closest matching entry. Press
NTER
E
to select the highlighted one.
●
Use the and keys to select an e-mail address and press
NTER
E
.
●
Begin typing a name for a new e-mail address and press
NTER
E
. A dialog box that allows you to change information
opens. Make changes (using TAB to move between fields) and
press S
Repeat step 6 to add more addresses to this list.
7
When finished, press B
8
Repeat steps 4 through 8 to add more addresses to other
9
AVE
(F3).
ACK
(F4).
distribution lists.
When finished, press B
10
ACK
(F4).
Page 41

40
Changing or deleting addresses in lists
Use this procedure to change or delete e-mail addresses from a
distribution list in your Personal E-Mail lists book.
While in a selected distribution list, you can change the information
for an e-mail address contained in the list, as long as the address is
from your Personal E-Mail address book. When you change
information for an e-mail address from your personal book, the
address information will be updated in Your Personal E-Mail address
book and in any distribution list in which the address appears.
If the address is from the Public E-Mail addresses book, you can
delete it from your distribution list, but you cannot change information
in that address. Contact the administrator to make those changes.
Page 42

Managing your Personal E-Mail lists
Milano
Firenze
Bergamo
List name:
BACK
DELETE
MODIFY
To change or delete addresses in lists
41
1
2
Press L
Press E
ISTS
NTER
(F4).
to select
Personal E-Mail lists
. The login dialog
box opens.
Type your user name (or use the and keys to scroll to it) and
3
press E
NTER
. Then, type your password (if set) and press E
This dialog box opens:
Select a list using one of these ways:
4
●
Begin typing the name of a list. The book displays the closest
matching one. Press E
●
Use the and keys to select a list and press E
Select a destination in the list using one of these ways:
5
NTER
to select it.
NTER
.
NTER
.
●
In the
field, begin typing the name of a destination. The
Name
list displays the closest matching one.
●
Press TAB to gain access to the destinations in this list. Use
the and keys to select one.
Do one of the following:
6
●
Press M
between fields) and press S
●
Press D
ODIFY
(F1), make changes (using TAB to move
AVE
(F3).
ELETE
(F3), and press OK (F1) at the prompt to confirm
the deletion.
Repeat steps 5 through 7 to change or delete other entries in this
7
list.
ACK
Press B
8
Repeat steps 4 through 9 to change or delete entries in other
9
(F4).
lists.
When finished, press B
10
ACK
(F4).
Page 43

42
Milano
Firenze
Bergamo
BACK
List name:
Deleting e-mail lists
If they are no longer useful, you can delete distribution lists from your
Personal E-Mail lists book.
To delete e-mail lists
1
2
Press L
Press E
ISTS
NTER
(F4).
to select
Personal E-Mail lists
. The login dialog
box opens.
Type your user name (or use the and keys to scroll to it) and
3
press E
NTER
. Then, type your password (if set) and press E
This dialog box opens:
Select a distribution list using one of these ways:
4
●
Begin typing the name of a list. The book displays the closest
matching one.
●
Use the and keys to select a list.
Press D
5
Repeat steps 4 and 5 to delete other lists.
6
ELETE
(F3), and press OK (F1) to confirm the deletion.
NTER
.
When finished, press B
7
ACK
(F4).
Page 44

Managing the Fax numbers book
Registered users and the administrator can add, change, or delete
fax numbers stored in the Fax numbers book.
public fax numbers, any other registered user can also see, change,
or delete any fax number.
Managing the Fax numbers book
Because these are
43
Note
The administrator can change entries in the public Fax numbers or lists
book from the
option in the
Lists
Setup
menu.
Adding fax numbers
Only registered users can add fax numbers to the public Fax numbers
book. Fax numbers registered users type while sending a fax are also
automatically added to the Fax numbers book, if the administrator
has enabled this option.
Page 45

44
Name:
BACK
To add fax numbers
Press L
1
Use the and keys to select
2
Type your user name (or use the and keys to scroll to it) and
3
press E
When the dialog box shown below opens, type a name for this
4
entry in the
A new dialog box opens. Press T
5
Press S
6
Type the
7
ISTS
(F4).
Fax numbers
NTER
. Then, type your password (if set) and press E
field and press E
Name
HIFT+BACKSPACE
entire
fax number, including the long-distance prefix
to clear the field contents.
NTER
AB
to enter the
and press E
.
Fax #
field.
(such as a 1), an area code, or other numbers needed for long
distance.
provider, you must type
Because you are faxing using an Internet fax service
all
of these numbers.
NTER
NTER
.
.
Note
Do
not
include any code such as a 9 you dial to get an outside line from
a PBX phone system.
AVE
Press S
8
Repeat steps 4 through 8 to add more fax numbers.
9
When finished, press B
10
(F3).
ACK
(F4).
Page 46

Managing the Fax numbers book
Name:
Berlin office
Venezia office
Lyon office
BACK
DELETE
MODIFY
Modifying or deleting fax numbers
Use this procedure to modify or delete fax numbers in the public Fax
numbers book.
45
CAUTION
This is a public book that stores all fax numbers for all users. Do not
modify or delete fax numbers other users may need, or make sure that
altering the fax numbers does not negatively affect others using them.
To modify or delete fax numbers
Press L
1
Use the and keys to select
2
Type your user name (or use the and keys to scroll to it) and
3
press E
This dialog box opens:
Select fax number using one of these ways:
4
ISTS
(F4).
Fax numbers
NTER
. Then, type your password (if set) and press E
and press E
NTER
NTER
.
.
●
Begin typing the name of a destination in the Fax numbers
book. The book displays the closest matching entry.
●
Use the and keys to select an entry.
Do one of the following:
5
●
Press M
between fields), and press S
●
Press D
Repeat steps 4 and 5 to change other entries.
6
When finished, press B
7
ODIFY
(F1), make changes (using TAB to move
AVE
(F3).
ELETE
(F3), and press OK (F1) to confirm the deletion.
ACK
(F4).
Page 47

46
List name:
BACK
Managing the Fax lists book
Registered users can add, change, or delete fax distribution lists
stored in the Fax lists book.
user can also see, change, or delete any fax distribution list.
Creating new fax lists
You can create a fax distribution list from fax numbers stored in the
Fax numbers book, or fax numbers you type as you build the list.
To create new fax lists
Because these are public lists, any other
Press L
1
Use the and keys to select
2
Type your user name (or use the and keys to scroll to it) and
3
press E
When the dialog box shown below opens, type a name for this
4
new fax list in the
Add fax numbers to the list using one of these ways:
5
●
ISTS
(F4).
Fax lists
NTER
. Then, type your password (if set) and press E
List name
field and press E
and press E
NTER
.
Begin typing the name of an entry in the Fax numbers book.
The book displays the closest matching entry. Press E
select it.
●
Use the and keys to select an entry and press E
●
Type a name for a new fax entry and press E
NTER
. A dialog
box that allows you to change information opens. Make
changes and press S
AVE
(F3).
NTER
NTER
NTER
.
NTER
to
.
.
Repeat step 5 to add more fax destinations to this list.
6
When finished, press B
7
Repeat steps 4 through 7 to add more lists.
8
When finished, press B
9
ACK
ACK
(F4).
(F4).
Page 48

Managing the Fax lists book
List name:
E. European offices
W. European offices
E. North Am. offices
BACK
Adding fax numbers to existing lists
Use this procedure to add fax numbers to a fax distribution list that
has already been created.
47
CAUTION
This is a public book that stores all fax lists for all users. Do not alter
others’ lists, or make sure that altering lists does not negatively affect
others using them.
To add fax numbers to existing lists
Press L
1
Use the and keys to select
2
Type your user name (or use the and keys to scroll to it) and
3
press E
This dialog box opens:
Select a list using one of these ways:
4
ISTS
(F4).
Fax lists
NTER
. Then, type your password (if set) and press E
and press E
NTER
.
NTER
.
●
Begin typing the name of a list. The book displays the closest
matching one.
●
Use the and keys to select a list.
ODIFY
Press M
5
Add a fax destination to this list using one of these ways:
6
●
Begin typing the name of a destination in the Fax numbers
(F1).
book. The book displays the closest matching entry. Press
NTER
E
to select it.
●
Use the and keys to select a destination in the Fax
numbers book and press E
●
Begin typing a name for a new fax entry and press E
NTER
.
dialog box that allows you to change information for this entry
only opens. Make any changes and press S
AVE
(F3).
NTER
. A
Page 49

48
Repeat step 6 to add more fax numbers to this list.
7
CAUTION
When finished, press B
8
Repeat steps 4 through 8 to add more fax numbers to other fax
9
lists.
When finished, press B
10
ACK
ACK
(F4).
(F4).
Modifying or deleting fax numbers in lists
Use this procedure to modify fax numbers in or delete fax numbers
from a distribution list. If you modify the fax number, it is also
automatically updated in the public Fax numbers book and any
distribution list in which it appears.
This is a public book that stores all fax lists for all users. Do not alter
other users’ lists, or make sure that altering them does not negatively
affect others using them.
Page 50

Managing the Fax lists book
List name:
E. European offices
W. European offices
E. North Am. offices
BACK
DELETE
MODIFY
To modify or delete fax numbers in lists
49
Press L
1
Use the and keys to select
2
Type your user name (or use the and keys to scroll to it) and
3
press E
ISTS
(F4).
Fax lists
NTER
. Then, type your password (if set) and press E
and press E
This dialog box opens:
Select a list using one of these ways:
4
●
Begin typing the name of a list. The book displays the closest
matching one. Press E
●
Use the and keys to select a list and press E
Select a fax destination using one of these ways:
5
●
In the
field, begin typing the name of a destination. The
Name
NTER
to select that list.
NTER
list displays the closest matching one.
●
Press TAB to gain access to the destinations in the list. Then,
use the and keys to select one.
NTER
.
.
NTER
.
Do one of the following:
6
●
Press M
between fields), and press S
●
Press D
Repeat steps 5 and 6 to modify or delete other fax entries in this
7
ODIFY
(F1), make changes (using TAB to move
AVE
(F3).
ELETE
(F3), and press OK (F1) to confirm the deletion.
list.
Press B
8
Repeat steps 4 through 8 to modify or delete fax numbers from
9
ACK
(F4).
other lists.
When finished, press B
10
ACK
(F4).
Page 51

50
List name:
E. European offices
W. European offices
E. North Am. offices
BACK
DELETE
MODIFY
Deleting fax lists
If a fax distribution list is no longer useful, you can delete it from the
public Fax lists book.
CAUTION
This is a public book that stores all fax distribution lists for all users. Do
not delete lists that other users may need.
To delete fax lists
Press L
1
Use the and keys to select
2
login dialog box opens.
Type your user name (or use the and keys to scroll to it) and
3
press E
This dialog box opens:
ISTS
(F4).
Fax lists
NTER
. Then, type your password (if set) and press E
and press E
NTER
. The
NTER
.
Select a distribution list using one of these ways:
4
●
Begin typing the name of a list. The book displays the closest
ACK
NTER
to select the highlighted one.
(F4).
matching entry. Press E
●
Use the and keys to select a list.
Press D
5
Repeat steps 4 and 5 to delete other lists.
6
When finished, press B
7
ELETE
(F3) and press OK (F1) to confirm the deletion.
Page 52

Introduction
51
4
Troubleshooting
Introduction
This chapter is your guide for resolving problems that might occur
while you are using the HP Digital Sender 8100C. The chapter is
divided into the following sections:
●
Clearing paper jams. See
●
Troubleshooting the digital sender. See
Typically, messages appear on the control panel when there are
problems. These messages usually require some action before
sending can continue. In this chapter, you can find recommended
actions to resolve problems associated with these error messages.
Also, if you are a registered user, check your e-mail for an error
message.
page 52
.
page 56
.
Page 53
52
Clearing paper jams
1
When you have a paper jam, the control
panel displays this message:
Detected! Clear jam and press OK.
Or Press HELP for instructions
the appropriate procedure below to clear
the jam.
Paper Jam
. Use
To clear jams at the start of a
2
3
page
CAUTION
Only remove jams after raising the
control panel. Removing jammed paper
with the control panel in its normal
position can damage it.
Move the document lever to the
1
number 1 position.
While holding down on the
2
document input tray, raise the
control panel.
Remove the jammed paper.
3
Remove the document from the
4
4
ADF.
Page 54
Clearing paper jams
Press down firmly on both sides of
5
6
7
5
the control panel until both sides
click.
Smooth the jammed page, place it
6
on top of the document stack, and
reload the document.
Move the document lever to the
7
number 3 position.
The destinations to which you were
8
sending are still set in the digital
sender. Press to begin sending
the document again.
53
Page 55

54
1
To clear jams at the end of a
page
Move the document lever to the
1
number 1 position.
While holding down on the
2
document input tray, raise the
control panel.
2
3
While holding the document output
3
tray down, raise the document input
tray (and the control panel).
Remove the jammed paper.
4
4
Page 56

Clearing paper jams
Close the ADF unit and control
5
6
5
panel. Press each down firmly until it
clicks.
After removing the stack from the
6
ADF, smooth the jammed page,
add it to the top of the stack, and
reinsert the stack.
Move the document lever to the
7
number 3 position.
The destinations to which you were
8
sending are still set in the digital
sender. Press to begin sending
the document again.
55
7
Page 57

56
Troubleshooting the digital sender
Troubleshooting for the digital sender is divided into two sections,
General digital sender troubleshooting and Control panel messages.
General digital sender troubleshooting includes problems that might
occur that do not generate error messages.
Note
As a general rule for all problems, check the control panel for relevant
messages. See
Control panel messages” on page 59
“
General digital sender troubleshooting
Use the table below to solve common problems encountered while
using the digital sender. The control panel does not display a
message for these types of problems. If the control panel is displaying
a message, see
General digital sender troubleshooting
Problem Actions
Digital sender is not
sending documents.
Control panel is not
working.
Digital sender does not
accept your password.
Image quality is poor.
Make sure the power cord is securely connected to the digital se nder and is
●
plugged into the power outlet.
Make sure the digital sender is turned on.
●
Make sure that if you are using the ADF that the document lever is in the
●
correct position. See
Make sure the power cord is plugged into the power outlet and the power
●
outlet is receiving power.
Make sure the control panel cable is securely connected.
●
Check the control panel contrast. You can change the contrast if needed
●
using S
Verify that you are using the correct password.
●
Passwords are case-sensitive. Make sure you enter your password with the
●
correct combination of uppercase and lowercase letters.
If scanned pages are blank, white, or have repeated vertically striped
●
patterns, make sure that a page is not already on the glass.
Make sure that the document you are trying to send is placed face up in the
●
ADF or face down on the glass.
If you are using the ADF, the ADF window may need to be replaced. See
●
the administrator guide for instructions.
Make sure the glass is clean. If the glass is dirty, clean it with a dry, soft
●
cloth.
If the problem is with the image quality of jobs sent to a printer, check the
●
settings at the printer.
Control panel messages” on page 59
“
HIFT+ALT
+ or S
.
.
“
To load a document in the ADF” on page 18
HIFT+ALT
+.
.
Page 58

Troubleshooting the digital sender
General digital sender troubleshooting (continued)
Problem Actions
When using the ADF, the
digital sender does not
feed the document at all.
When using the ADF, the
digital sender is feeding
multiple sheets, skewing
pages, or jamming
frequently.
Your private address
books are not accessible
at the control panel.
An item loaded in the ADF
keeps jamming.
Digital sender is sending
items very slowly.
An e-mail transmission
you sent did not arrive at
the destination e-mail
address.
An e-mail attachment you
sent could not be opened
by the recipient.
●
Ensure that the document lever is being used correctly. Otherwise, the
digital sender scans the glass instead of the item in the ADF. See
a document in the ADF” on page 18
●
The control panel or document input tray may not be securely latched.
While holding down on the document output tray, raise the document input
tray and then lower it into place, pressing firmly. Then, raise the control
panel and lower it until both sides snap into place.
●
If the pages look like they skewing as they feed into the ADF, this is normal.
Send an e-mail to yourself to check that the resulting document is not
skewed.
●
Make sure the left edge of the document is placed against the left side of
the document input tray.
●
The maximum number of pages the ADF can hold is 25, depending on the
type of media being loaded.
●
The maximum number of pages the output tray can hold is 25. Make sure
more pages are not stacking up in the output tray.
●
Make sure the type of media being loaded meets required specifications.
See
Guidelines for documents” on page 16
“
●
When sending an e-mail message, you must type your user name in the
FROM field exactly as it appears in your user profile. (You cannot access
your personal address books simply by typing your e-mail address.)
●
Your password must be typed exactly as it appears in your user profile.
Passwords are case-sensitive, so be sure you enter the correct
combination of uppercase and lowercase letters.
●
Make sure you have removed anything such as staples and self-adhesive
notes on the document. See
Guidelines for documents” on page 16
“
guidelines.
●
If you are sending a document that is too small, it might jam in the ADF.
The smallest document you can place in the ADF is 148.5 by 210 mm (5.9
by 8.3 in). Use the glass to send the document.
●
If you are sending a document that is too large or on an unacceptable type
of media, it might jam in the ADF. Use the glass to send the document.
●
Y ou might have selected a Quality setting that is making the document into
a large file that is sending slowly (for example, Color-B/W Photo). Wait for
the document to send or, to speed up the sending process, try choosing a
different setting (for example, B/W Document).
●
Contact the network administrator to see if the network is working properly.
●
If you typed the e-mail address at the control panel, make sure you typed it
correctly.
●
See if you received a “returned mail” message in your e-mail inbox. Often,
this message explains why the e-mail was not delivered.
●
Resend the job and CC yourself. If the message arrives in your e-mail, the n
it may be a problem with recipient’s e-mail. If it does not arrive, it may be
your e-mail network.
●
If you sent a multiple page document in .mtif format, the user must open it
using the Imaging program. If the recipient doe s not have this progr am, you
must send the document as a .pdf (read in Acrobat Reader), or send each
page of the document separately in .tif format.
57
To load
“
.
.
for
Page 59

58
General digital sender troubleshooting (continued)
Problem Actions
A fax transmission you
sent did not arrive at the
destination fax machine.
A document sent to a
printer did not print.
E-mail confirmations of email transmissions are not
being received.
The bottom of a page that
you sent is cut off.
●
The receiving fax machine might be turned off or experiencing an error
condition such as out of paper or toner. Check with the recipient.
●
Make sure you entered the entire fax number, including the long-distance
access number, such as a 1, and the area code or other numbers needed
to dial long distance. These numbers must be dialed even if it is a local fax
number.
●
The Internet fax service’s server might be busy sending other faxes or
waiting to redial other faxes. Wait and retry.
●
For information about the transmission, check any fax notifications that
might have been returned (for example, e-mail notifications in your e-mail
inbox, or printed transaction reports, if these reports are possible with your
Internet service provider).
●
Resend the job to the recipient and yourself. If the message arrives at your
fax, then it may be a problem with recipient’s fax or network. If it does not
arrive, it may be your network.
●
Make sure the printer is online and working properly.
●
Make sure that all cabling is securely connected.
●
The job might have been lost because of a serious internal problem. All
pending jobs are sometimes lost when this happens. Resend the
document.
●
Make sure you are sending to a supported HPJetSend-enabled printer. To
view a list of supported printers, visit
●
Your company’s e-mail server might not support DSN (Deli v ery Status
Notification), or one of the links to the receiving e-mail address does not
support DSN.
●
Verify that the e-mail notification is enabled in your profile. See
your user profile” on page 10
●
If sent from the flatbed, the document page might be too long. The
maximum length that the flatbed can handle is 279 mm (11 in). The ADF
can handle pages up to 355.6 mm (14 in) long.
●
If sent to a printer, the page might be too complex (require too much
memory) for the printer to process. If possible, choose a printer with more
memory.
www.jetsend.com
.
.
Managing
“
Page 60

Troubleshooting the digital sender
Control panel messages
This following table lists the messages the control panel might display
while you are using the digital sender, the cause of the message, and
recommended actions.
59
Note
The messages are listed in alphabetical order. Messages that report
normal status are not included.
Control panel messages
Message Description Action
AB Error
Digital sender halted.
Configuration changed.
Please wait...
Device unreachable. You selected the Print
Duplicate addressee exists.
Last recipient not added.
Duplicate fax number exists.
Last fax recipient not added.
E-mail server not available.
Contact the administrator.
Errors were found when
checking the address book.
Initialize address book?
Internal error.
Digital Sender halted.
codes
codes
An internal problem in
accessing address books
has occurred.
The administrator is updating
the digital sender with
changes. The digital sender
is unavailable for use while
the update takes place.
function, but the destination
printer is off.
Notification message only.
You selected or entered a
duplicate e-mail destination.
The digital sender uses only
the first one you entered.
Notification message only.
You selected or entered a
duplicate fax destination. The
digital sender uses only the
first one you entered.
You selected the e-mail
function, but the e-mail
server is turned off or cannot
be reached.
An internal check of the
address book database
found significant problems.
Internal problem.
Turn the digital sender off and then back
●
on.
If the problem persists, note the codes
●
and contact the administrator.
Wait until the message clears.
Make sure the destination printer is turned
on.
No action required.
No action required.
Turn the digital sender off and then on
●
again.
Make sure all cabling is securely
●
connected.
If the problem persists, contact the
●
administrator.
Contact the administrator.
Turn the digital sender off and then back
●
on.
If the problem persists, note the codes
●
and contact the administrator.
Page 61

60
Control panel messages (continued)
Message Description Action
Invalid credentials. Check
account name and password.
Invalid PIN. Job canceled. You incorrectly entered the
JetDirect not responding.
Please check the card or the
firmware version.
JetSend subsystem busy. The digital sender has
LDAP protocol error.
Search error.
Low resources. There is not enough space
Missing page in second pass.
Job canceled.
Network error
No destination available. No destination has been
No matches found. There is no entry in the LDAP
No pages scanned. Job
canceled.
. There is a problem with the
codes
The name and password that
have been configured for
authenticating LDAP
searches are invalid.
PIN (personal identification
number) for the HP JetSendenabled printer to which you
were sending.
The firmware version of the
HP JetDirect print server
(interface card) installed in
the digital sender is not
compatible with the product.
another HP JetSend job
pending.
The LDAP search could not
complete because of a
problem with a network
connection or LDAP server.
on the hard drive to process
the job (for example,
because too many other jobs
are pending).
You selected the duplex
mode, but there are fewer
pages in the second pass
than in the first.
HP JetDirect print server.
configured for the
customized function key that
you selected.
directory that matches your
search string and search
criteria.
After a paper-jam error, you
did not reinsert a document
in the ADF.
Contact the administrator.
Resend the document, entering the correct
PIN number.
Contact the administrator.
The pending HP JetSend job must complete
before you can submit another one. Wait and
retry.
●
Turn the digital sender off and then back
on.
●
If the problem persists, contact the
administrator.
Try again later.
Press any key to clear the message. Check
your pages and retry the job.
●
Turn the digital sender off and then back
on.
●
Note the codes and contact the
administrator.
Contact the administrator.
Check the accuracy of your search string
and search criteria.
Press any key to clear the message. Place
the document in the ADF and try again.
Page 62

Troubleshooting the digital sender
Control panel messages (continued)
Message Description Action
Object not found. Check your
configuration.
Paper feeder not connected.
Check the paper feeder
cable.
Partial results. Check your
configuration.
Search error. An unexpected problem
Sorry, you have typed an
incorrect password. Please
retype your password.
Sorry. The database is full.
Please contact the
administrator to be added to
this digital sender.
Sorry. The database is full.
Please delete other entries
that are no longer needed.
Sorry. The database is full.
Please delete other lists that
are no longer needed.
Sorry. Unable to auto-save
new addresses. If you want
to auto-save more, please
remove un-needed
addresses.
Sorry. Unable to auto-save
new fax numbers. If you want
to auto-save more, please
remove un-needed numbers.
Either the search root or the
name/password combination
for authenticating searches in
the LDAP server is incorrect.
The ADF unit is not securely
connected to the digital
sender.
The search root for searches
in the LDAP server is
incorrect.
occurred in the LDAP search.
The digital sender did not
recognize the password you
typed.
The maximum number of
registered users has already
been added to this digital
sender.
The address book is full.
The address book is full.
The address book is full. The
last address you typed is not
added to the address book.
The address book is full.
Contact the administrator.
Make sure the cable that attaches the ADF
unit to the digital sender is connected
securely.
Contact the administrator.
●
Try the search again.
●
Turn the digital sender off and then on
again. Then, try the search again.
●
If the problem persists, contact the
administrator.
●
Press any key to clear the message, and
then retype the password. Passwords are
case-sensitive, so make sure you enter
the correct combination of lowercase and
uppercase letters.
●
If the problem persists, contact the
administrator.
●
Press any key to clear the message.
Then, contact the administrator.
●
Press any key to clear the message.
Then, delete entries from that address
book.
●
If the problem persists, contact the
administrator.
●
Press any key to clear the message.
Then, delete lists from that address book.
●
If the problem persists, contact the
administrator.
●
Press any key to clear the message.
Then, delete entries from your address
book.
●
If the problem persists, contact the
administrator.
●
Press any key to clear the message.
Then, delete entries from the fax address
book.
●
If the problem persists, contact the
administrator.
61
Page 63

62
Control panel messages (continued)
Message Description Action
The DNS configuration is
inconsistent. Please check.
The e-mail configuration is
inconsistent. Please check.
The LDAP configuration is
inconsistent. Please check.
The LDAP server is currently
unreachable. Contact the
administrator.
There is a problem with the
DNS (Domain Name System)
configuration.
There is a problem with the
e-mail configuration.
There is a problem with the
LDAP configuration.
There is a problem with
either the LDAP server or the
network.
●
Turn the digital sender off and then back
on.
●
If the problem persists, contact the
administrator.
●
Turn the digital sender off and then back
on.
●
If the problem persists, contact the
administrator.
●
Turn the digital sender off and then back
on.
●
If the problem persists, contact the
administrator.
●
Try again later.
●
If the problem persists, contact the
administrator.
The printers are
unreachable. Contact the
administrator.
The search took too much
time. Search canceled.
The user name you typed
was not found. Contact the
administrator.
The WINS configuration is
inconsistent. Please check.
This display name is already
in use. Please choose a
different name.
This list name is already in
use. Please choose a
different name.
This operation can require
several minutes. Do you
really want to proceed?
This user name is already in
use. Please choose a
different name.
An HP JetSend-enabled
printer cannot be reached.
The LDAP search timed out.
The digital sender did not
recognize the user name you
entered.
There is a problem with the
WINS (Windows Internet
Naming Service)
configuration.
An existing entry in this book
already uses the name you
tried to give to a new entry.
An existing entry in this list
book already uses the name
you tried to give to a new
entry.
You are being asked to
confirm that you want to
check the address book
database.
The name you chose as a
registered user name is
already in use.
Contact the administrator.
●
Narrow the scope of your search, either
by entering a longer search string or using
different search criteria.
●
If the problem persists, contact the
administrator.
●
Try again.
●
If the problem persists, contact the
administrator.
Contact the administrator.
Choose a different name for the new entry.
Choose a different name for the new entry.
Contact the administrator.
Choose a different name as your registered
user name.
Page 64

Troubleshooting the digital sender
Control panel messages (continued)
Message Description Action
This will clear the
configuration and all the
destinations. Do you really
want to proceed?
This will clear your changes.
Do you really want to
proceed?
Too many e-mail recipients.
Last e-mail recipient deleted.
T oo many fax reci pients. Last
fax recipient deleted.
Too many matches. If the
recipient was not found,
press CANCEL and refine
your query.
Partial results.
items found.
number
Unexpected pages in second
pass. Job canceled.
You do not have sufficient
access rights.
You need to become a
registered user to use this
digital sender. Please contact
the administrator.
You need to register to use
this digital sender.
Your profile is not enabled.
Contact the administrator.
You are being asked to
confirm that you want to reset
the digital sender to the
factory defaults.
You are being asked to
confirm that you want to
discard all changes made in
the configuration menu.
You can send an e-mail
message to a maximum of
1,024 e-mail addresses
(including all those in
distribution lists).
You can send a fax to a
maximum of 1,024
destinations.
The number of entries that
matches the criteria in your
LDAP search is greater than
the maximum number of
results that the digital sender
has been configured to
return.
You selected duplex mode
and there are more pages in
the second pass than in the
first.
The account name used to
authenticate searches with
LDAP server has insufficient
rights to access the
information.
Only registered users are
allowed to use the digital
sender, and only the
administrator can make you a
registered user.
Only registered users are
allowed to use the digital
sender.
The administrator needs to
validate new user profiles
and any changes made to
user profiles.
Contact the administrator.
Contact the administrator.
Press O
continue with the transmission. Send the
same message again to all the recipients
who were not included in the first
transmission.
Press O
continue with the transmission. Send the
same fax again to all the recipients who were
not included in the first transmission.
●
Narrow the scope of your search, either
by entering a more specific search string
or using different search criteria.
●
If the problem persists, contact the
administrator.
Press any key to clear the message. Check
your pages and retry the job.
Contact the administrator.
Contact the administrator.
●
Register as a user from the Users menu
(under Setup), or the login prompt, if it
appears.
●
If you cannot register yourself, contact the
administrator.
Contact the administrator.
K
(F1) to clear the message and
K
(F1) to clear the message and
63
Page 65

64
Page 66

Hewlett-Packard limited warranty statement
Warranty and support
65
A
information
Hewlett-Packard limited warranty statement
HP PRODUCT
HP Digital Sender 8100C
HP warrants HP hardware, accessories, and supplies against
1
defects in materials and workmanship for the period specified
above. If HP receives notice of such defects during the warranty
period, HP will, at its option, either repair or replace products
which prove to be defective. Replacement parts may be either
new or like-new.
HP warrants that HP software will not fail to execute its
2
programming instructions, for the period specified above, due to
defects in material and workmanship when properly installed and
used. If HP receives notice of such defects during the warranty
period, HP will replace software media which does not execute its
programming instructions due to such defects.
DURATION OF HARDWARE
WARRANTY
One year
HP does not warrant that the operation of HP products will be
3
uninterrupted or error free. If HP is unable, within a reasonable
time, to repair or replace any product to a condition as warranted,
customer will be entitled to a refund of the purchase price upon
prompt return of the product.
HP products may contain remanufactured parts equivalent to new
4
in performance or may have been subject to incidental use.
The warranty period begins on the date of the delivery or on the
5
date of installation if installed by HP. If customer schedules or
delays HP installation more than 30 days after delivery, warranty
begins on the 31st day from delivery.
Page 67

66
Warranty does not apply to defects resulting from improper or
6
inadequate maintenance or calibration, software, interfacing,
parts or supplies not supplied by HP, unauthorized modification or
misuse, operation outside of the published environmental
specifications for the product, or improper site preparation or
maintenance.
Note
Operation of the digital sender beyond the limit of its nominal duty cycle
(scanning greater than the equivalent of 3,300 pages per month) shall
be deemed digital sender abuse and all repairs thereafter are to be
billed on a time-and-materials basis.
TO THE EXTEND ALLOWED BY LOCAL LAW, THE ABOVE
7
WARRANTIES ARE EXCLUSIVE AND NO OTHER W ARRANTY,
WHETHER WRITTEN OR ORAL, IS EXPRESSED OR IMPLIED
AND HP SPECIFICALLY DISCLAIMS THE IMPLIED
WARRANTIES OF MERCHANTABILITY, SATISFACTORY
QUALITY, AND FITNESS FOR A PARTICULAR PURPOSE.
HP will be liable for damage to tangible property per incident up
8
to the greater of $300,000 or the actual amount paid for the
product that is the subject of the claim, and for damages for
bodily injury or death, to the extent that all such damages are
determined by a court of competent jurisdiction to have been
directly caused by a defective HP product.
TO THE EXTENT ALLOWED BY LOCAL LAW, THE REMEDIES
9
IN THIS WARRANTY STATEMENT ARE THE CUSTOMER’S
SOLE AND EXCLUSIVE REMEDIES. EXCEPT AS INDICATED
ABOVE, IN NO EVENT WILL HP BE LIABLE FOR LOSS OF
DATA OR FOR DIRECT, SPECIAL, INCIDENTAL,
CONSEQUENTIAL (INCLUDING LOST PROFIT OR DATA), OR
OTHER DAMAGE, WHETHER BASED IN CONTRACT, TORT,
OR OTHERWISE.
FOR CONSUMER TRANSACTIONS IN AUSTRALIA AND NEW
10
ZEALAND; THE WARRANTY TERMS CONTAINED IN THIS
STATEMENT, EXCEPT TO THE EXTENT LAWFULLY
PERMITTED, DO NOT EXCLUDE, RESTRICT OR MODIFY
AND ARE IN ADDITION TO THE MANDATORY STATUTORY
RIGHTS APPLICABLE TO THE SALE OF THIS PRODUCT TO
YOU.
Page 68

Hewlett-Packard Year 2000 warranty
Hewlett-Packard Year 2000 warranty
Subject to all of the terms and limitations of the HP Limited Warranty
Statement provided with this HP Product, HP warrants that this HP
product will be able to accurately process date data (including, but not
limited to, calculating, comparing, and sequencing) from, into, and
between the 20th and 21st centuries, and the year 1999 and 2000,
including leap year calculations, when used in accordance with the
Product documentation provided by HP (including any instructions for
installing patches or upgrades), provided that all other products (e.g.,
hardware, software, firmware) used in combination with such
HP product(s) properly exchange date data. The duration of the Year
2000 warranty extends through January 31, 2001.
67
Page 69

68
HP customer support options worldwide
You can call HP for support using the table below. For all other
support information, such as obtaining printer drivers or help using an
online server, see
HP support” on page 70
“
replacement part or information not listed in one of these two tables,
see the administrator guide.
Customer Support and Product Repair Assistance for the U.S. and Canada
(See the administrator guide for additional product repair information.)
Call (1) (208) 323-2551 in the U.S. Monday through Friday from 6 am to 6 pm (Mountain Time) free of
charge for 90 days. The 90-day period begins with the first supp ort ca ll, and it must b e within the o ne-year
hardware warranty period. However, your standard long-distance phone charges still apply. Have your
product nearby and your serial number ready when calling.
After your free telephone-support period has expired, fee-based telephone assistance is available to
answer your product questions. Call (1) (900) 555-1500 ($2.50* per minute, U.S. only) or call
1-800-999-1148 ($25* per call, Visa or MasterCard, U.S. and Canada) Monday through Friday from 6 am
to 6 pm (Mountain Time).
to change.
Charges begin only when you connect with a support technician. *Prices subject
European Customer Support Center Language
and In-Country Options Available
Open Monday through Friday 8:30–18:00 CET
HP provides a free telephone support service for 90 days. The 90-day period begins with the first support
call, and it must be within the one-year hardware warranty period. By calling a telephone number listed
below, you will be connected to a responsive team waiting to help you. If you require support after your 90day free phone support has expired, you can receive support for a fee through th e same telephone
number. The fee is charged on a per-incident basis. When calling HP, have the following information ready:
product name and serial number, date of purchase, and description of the problem.
(unless otherwise noted)
. If you need a
English
Czech
Danish
Dutch
Finnish
French
German
Greek
Ireland: +353 (0)1 662 5525
U.K.: +44 (171) 512-5202
International: +44 (0)171 512 52 02
+42 (0)2 6130 7310
(08:00-18:00 Monday-Thursday;
08:00-16:30 Friday)
(45) 3929-4099
Belgium: +32 (0)2 626 8806
Netherlands: +31 (0)20 606 8751
+358 (0)203 47 288
Belgium:+32 (0)2 626 8807
France: +33 (0)1 43 62 34 34
Germany: +49 (0)180 52 58 143
(24PF/min)
Austria: +43 (0)7114 201080
+30 (0)1 689 64 11
(09:00-17:00 CET)
Hebrew
Hungarian
Italian
Norwegian
Polish
Portuguese
Russian
Spanish
Swedish
Switzerland
Turkey
+972 (0)9 9524848
CET Sunday-Thursday)
+36 (0)1 382 1111
Italy: +39 02 264 10350
+47 22 11 6299
+351 (0)1 3176333
Portugal: +7 095 797 3520
(09:00-18:00 CET)
+27 86 000 1030
(08:00-17:00 CET)
Spain: +46 (0)8 619 2170
+41 (0)848 80 11 11
+90 212 224 59 25
+44 (0)171 512 52 02
(09:00-18:00
Page 70

HP customer support options worldwide
69
All other countries worldwide:
during the warranty period. If you require support after your warranty has expired, additional product repair
services, or if your country is not listed below, see the administrator guide.
Argentina (541) 778 8380
Australia +61 3 8877-8000
Brazil (011 ) 829 6612
Canada (1) (905) 206-4663
China +86 (0)10 6564 5959
Chile 800 360 999
Hong Kong +85 (2) 2802 4098
India +91 11 682-6035
Indonesia +62 (21) 350 3408
Korea (Seoul) +82 (2) 3270 0700
Korea (outside Seoul) 080 999-0700
Use the telephone number below for your country to obtain support
Japan +81 3 3335-8333
Malaysia +60 (3) 295 2566
Mexico 01 800 472 6684
Middle East/Africa (41) (22) 780-7111
New Zealand +64 (9) 356 6640
Philippines +63 (2) 867 3551
Singapore +65 272 5300
South Africa +34 902 321 123
+91 11 682-6069
Taiwan +886 (2) 2717 0055
Thailand +66 (2) 661 4000
Venezuela 800 47 888
Viet Nam +84 (0) 8 823 4530
Page 71

70
HP support
Online services:
access to information over your
Internet connection, we suggest
these services:
Obtaining software utilities and
electronic Information:
HP direct ordering for
accessories or supplies:
HP Support Assistant compact
disc:
HP Service Information:
HP Service Agreements:
Locating HP Resellers:
for 24-hour
World Wide Web URL
HP printer software, plus product and support information may be
obtained from the following URLs:
for HP Digital Sender 8100C
in the U.S.
in Europe
Printer drivers may be obtained from the following sites:
in Japan
in Korea
in Taiwan
or the local driver website
America Online
U.S., France, Germany, and U.K. - Printer drivers, updated HP printer
software, and support documentation to help answer your questions
about HP products are available. Use Keyword HP to start your tour
or call 1-800-827-6364 preferred customer # 1118 to subscribe. In
Europe, call the appropriate number below:
Austria 022 58 58 485
France +353 1 704 90 00
Germany 0180 531 31 64 (24PF/min)
Switzerland 0848 80 10 11
United Kingdom 0800 279 1234
See
“
HP customer support options worldwide” on page 68
Call 1-800-538-8787 (U.S.) or 1-800-387-3154 (Canada).
This support tool offers a comprehensive online information system
designed to provide technical and product information on HP
products. To subscribe to this quarterly service call 1-800-457-1762
in the U.S. or Canada;
+31 555 384279 in Europe (0800 960 274 in the U.K.);
(65) 740-4477 in the Asia/Pacific region; and 1-801-431-1587 in Latin
America.
To locate HP-Authorized Dealers, call 1-800-243-9816 (U.S.) or
1-800-387-3867 (Canada).
Call 1-800-835-4747 (U.S.) or 1-800-268-1221 (Canada).
Extended Service: 1-800-446-0522.
Hewlett-Packard appliances, peripherals, personal computers,
supplies, and accessories are available at HP authorized resellers
worldwide. To find the one nearest to you, call:
United States: 1-877-DSENDER (373-6337)
Canada: 1-800-387-3867
Europe: Visit
- Firmware upgrades, printer drivers, updated
www.digitalsender.hp.com
www.hp.com
www2.hp.com
www.jpn.hp.com/drivers
www.hp.co.kr
www.hp.com.tw
www.dds.com.tw
- America Online/Bertelsmann is available in the
.
www2.hp.com
Assistance
your country name.
. Once there, click
, click
Other Countries
, and click
Page 72

Index
71
Symbols
.pdf files
e-mailing
opening
reading attachments
20
23
23
.tif files
reading attachments
23
A
A4 paper size, selecting
28
accessories and supplies warranty
Acrobat Reader
attaching
downloading and installing
location
23
23
23
adding
address book passwords
e-mail addresses
registered users
address books.
11
See
11
34
books
ADF (automatic document feeder)
clearing paper jams
guidelines
illustration
loading
16
6
18
54
using for double-sided documents
Adobe Acrobat Reader.
Acrobat Reader
See
agreements
service
70
alphabetic keys
Alt key
8
America Online support service
applications.
attachments, reading .pdf
attachments, reading .tif
authorized dealers
8
See
70
programs
23
23
70
automatic document feeder (ADF).
(automatic document feeder)
B
B/W Document setting
Back key
8
28
black and white
document settings
photograph settings
blank pages
28
28
56
65
See
17
ADF
books
adding fax numbers to
changing e-mail addresses in
changing fax numbers in
deleting e-mail addresses from
deleting fax numbers from
managing personal e-mail lists
managing public Fax lists
passwords for personal
personal
32
43
36
45
36
45
37
46
11
personal not accessible at control panel
Public E-Mail addresses
Public E-Mail lists
public Fax lists
32
public Fax numbers
renaming e-mail addresses in
renaming fax numbers in
32
32
32
36
45
C
Cancel key
field
CC
8
20
changing
e-mail addresses
e-mail lists
fax lists
46
fax numbers
format
28
paper size
quality
28
settings
28
36
40
45
28
characters
sticker for special
using special on keypad
cleaning the glass
8
8
56
clearing paper jams
at end of page
at start of page
Color Document setting
color documents, printing
color photographs
color setting
Color-B/W Photo setting
54
52
28
26
28
28
28
configuring
password for personal books
registered users
11
11
confirmations
DNS support
11, 12
of e-mail transmissions not arriving
57
58
Page 73

72
control panel
books not accessible
display
8
features
8
illustration
messages
not working
8
59
56
customer support options worldwide
57
68
D
dealers, authorized
defects in product
70
65
deleting
e-mail addresses
e-mail addresses in lists
e-mail lists
fax lists
50
fax numbers
fax numbers in lists
Delivery Service Notification (DSN)
36
41
42
45
49
11, 12
description
digital sender
5
destinations
sending to e-mail
sending to fax number
21
24
display
control panel
8
distribution lists
adding e-mail addresses to
adding fax numbers to
creating fax
46
creating personal e-mail
deleting e-mail
deleting fax
42
50
modifying addresses in
modifying fax numbers in
39
47
37
41
49
DNS (Domain Name System) configuration problem
62
document guides
paper
6
document input tray
document lever
document output tray
6
6
6
documents
black-and-white settings
color setting
e-mailing
28
20
e-mailing .pdf files
faxing
24
guidelines for
loading in ADF
16
18
loading on glass
not printing at printer
pages cut off bottom
preparing to send
printing
26
28
20
19
58
58
16
printing color
26
reading .pdf attachments
reading .tif attachments
sending double-sided
23
17
sent as e-mail messages not arriving
sent as faxes not arriving
types supported
16
double-sided
sending with ADF
sending with glass
Double-Sided key
drivers, printer
17
17
8
70
DSN (Delivery Service Notification)
duplex.
double-sided
See
E
e-mail
configuration problem
server unavailable
62
59
e-mail addresses
adding
34
adding to lists
changing
changing in lists
deleting
renaming
39
36
40
36
36
e-mail transmissions
confirmations not arriving
not arriving at destinations
e-mailing
.pdf files
20
documents
to destinations
Enter key
20
21
8
equipment
troubleshooting
errors.
See
56
troubleshooting
F
FAX function key
24
fax transmissions
not arriving
sending
58
24
features
control panel
product
feeding problems
format, changing
From field
front panel.
5
20
See
8
57
28
control panel
function keys
FAX
24
illustration
PRINT
8
26
23
57
58
11, 12
58
57
Page 74

73
G
glass
cleaning
56
guidelines
loading
16
19
sending double-sided documents
glass, scanner
Go key
guest users
6
8
10
H
hardware
repair assistance
troubleshooting
warranty
65
68
56
Help
key
8
online for digital sender
HP authorized dealers
HP JetSend.
See
14
70
JetSend
HP Support Assistant compact disc
I
I-fax.
Internet fax
See
illustrations
ADF unit
arrow keys
Back key
Cancel key
control panel
document input tray
document lever
document output tray
Enter key
Go key
Help key
numeric keys
power switch
scanner glass
Single-Sided/Double-Sided key
special character sticker
image quality problems
internal errors
Internet fax service
6
8
8
8
6, 8
6
6
6
8
8
8
8
6
6
8
8
56
60
24
J
jams
clearing at end of page
clearing at start of page
troubleshooting
54
52
57
JetDirect print server not responding
JetSend
adding printers
device unreachable
invalid PIN
not responding
26
59
60
60
17
70
60
K
keyboard.
See
keypad
keypad
illustration
8
keys
alphabetic
Alt
arrow
Back
Cancel
Enter
function
Go
Help
illustration
numeric
Single-Sided/Double-Sided
Tab
8
8
8
8
8
8
8
8
8
8
8
8
8
L
language support options
68
LDAP (Lightweight Directory Access Protocol)
configuration problem
protocol error
server unavailable
legal paper size, selecting
letter paper size, selecting
62
60
62
28
28
levers
document
limited warranty statement
lists, distribution.
6
65
distribution lists
See
loading
ADF
18
documents on glass
19
M
media.
documents
See
messages
control panel
59
N
networks
errors
60
notifications
DNS support
of e-mail transmissions not arriving
numeric keys
11, 12
58
8
O
online Help
digital sender
online support services
opening .pdf files
14
70
23
options
sending
28
output tray, document
6
Page 75

74
overview
digital sender
5
P
pages
bottom cut off
missing in second pass
too many in second pass
panel, control.
58
control panel
See
60
63
paper jams
clearing at end of page
clearing at start of page
troubleshooting
54
52
57
paper size
choices
28
selecting
28
passwords
for personal books
not accepted
PC.
PDF files.
See
computer
See
11
56
.pdf files
personal books
description
32
personal e-mail lists
deleting
42
deleting addresses from
41
Personal E-Mail lists book
creating lists
managing
37
37
personal identification number (PIN), invalid
photographs
black-and-white settings
sending color
28
28
PIN (personal identification number), invalid
power
switch
6
PRINT function key
print quality problem
26
56
printers
color
26
documents not arriving
drivers
70
58
printing
color documents
documents
problems.
product features
profiles, user.
26
26
troubleshooting
See
5
user profiles
See
Public E-Mail addresses book
description
32
Public E-Mail lists book
description
using
32
37
public Fax lists book
description
32
60
60
public Fax numbers book
description
using
32
24
Q
quality setting
changing
types
28
28
R
Reader.
reading .pdf files
reading .tif files
Acrobat Reader
See
23
23
registered users
adding
11
adding e-mail addresses
renaming
e-mail addresses
fax numbers
repair and replacement
repair assistance
replacement and repair
36
49
65
68
65
S
scanner glass
scroll arrow keys
6
8
searches
slow
62
too many matches
63
sending
black-and-white documents
black-and-white photographs
changing settings
color documents
color photographs
guidelines
options
28
28
28
28
17
preparing documents for
to a printer
to e-mail destinations
to fax destinations
when to use glass
26
21
24
17
servers
e-mail unavailable
LDAP unavailable
service agreements
59
62
70
service and support
language options
options worldwide
warranty information
68
68
66
settings
black-and-white document
black-and-white photographs
changing
color documents
color photographs
28
28
28
34
28
28
16
28
28
Page 76

75
simplex.
Single-Sided/Double-Sided key
size of paper, changing
slow sending problem
software, utilities
Single-Sided/Double-Sided key
See
8
28
57
70
special characters
sticker
8
speed, problems
statements of warranty
field
Subject
57
65
20
supplies and accessories warranty
support agreements
70
support and service
language options
options worldwide
warranty information
Support Assistant compact disc
switch, power
68
68
66
70
6
T
Tab key
8
field
To
20
trays
document input
document output
6
6
troubleshooting
control panel
DNS configuration
e-mail configuration
e-mail transmissions
fax transmissions
general
hardware
image quality
internal errors
LDAP configuration
misfeeds
network errors
paper jams
repair assistance
slow sending
WINS configuration
56
62
62
57
58
56
56
56
60
62
57
60
57
68
57
62
65
U
user profiles
adding
11
description
10
users
description
profiles
types
utilities, software
10
10
10
70
W
warranty
hardware
limited
service and support
year 2000
65
65
66
67
websites
Adobe Systems Incorporated
HP
70
weight, paper
16
white pages when sending
23
56
WINS (Windows Internet Naming Service)
configuration problem
World Wide Web support service
worldwide, support options
WWW support service
62
70
68
70
Y
Y2K warranty
year 2000 warranty
67
67
Page 77

76
Page 78

 Loading...