

Page 1

®
HP DeskJet 670C Series Printer
User’s Guide
Manual Part Number
C5884-90126
Page 2

ACKNOWLEDGEMENTS
••••••••••••••••••••••••••••••••••••••••••••••••••••••••••••••••••••••••••••••••••
Univers™ is a trademark of Linotype AG and its subsidiaries in the U.S.
and other countries.
CG Times is a product of Agfa Corporation based on Times New Roman
under license from The Monotype Corporation plc. and scalable
outlines are licensed from Agfa Division of Miles Inc.
Adobe and Adobe Type Manager are trademarks of Adobe Systems
Incorporated.
Microsoft®, Windows®, and MS Windows® are U.S. registered
trademarks of Microsoft Corporation.
TrueType™ is a U.S. trademark of Apple Computer, Inc.
Monotype® is a U.S. registered trademark of The Monotype
Corporation.
NOTICE
••••••••••••••••••••••••••••••••••••••••••••••••••••••••••••••••••••••••••••••••••
The information contained in this document is subject to change
without notice.
Hewlett-Packard makes no warranty of any kind with regard to
this material, including, but not limited to, the implied warranties
of merchantability and fitness for a particular purpose.
Hewlett-Packard shall not be liable for errors contained herein or for
incidental or consequential damages in connection with the furnishing,
performance, or use of this material.
No part of this document may be photocopied, reproduced, or
translated to another language without the prior written consent of
Hewlett-Packard Company.
PRI NTING HISTORY
•••••••••••••••••••••••••••••••••••••••••••••••••••••••••••••••••••••••••••••••••••
Edition 1, Nov. 1997
© Copyright 1997 by Hewlett-Packard Company
••••••••••••••••••••••••••••••••••••••••••••••••••••••••••••••••••••••••••••••••••••••••••••••••••••••••••••••••••••••••••••••
ii
Page 3
T ABLE OF CONTENTS
FIRST TIME SETUP
SEVEN SIMPLE STEPS TO SETTING UP
YOUR PRINTER
Step 1 - Unpack your printer.................................... 3
Step 2 - Put paper in your printer ............................4
Step 3 - Plug in your printer .....................................6
Step 4 - Insert the print cartridges........................... 7
Step 5 - Connect the printer to the computer..........10
Step 6 - Install the printer software....................... 11
Step 7 - Align the print cartridges ......................... 13
Print a Page............................................................. 14
What the Buttons and Lights Do ........................... 15
System Requirements ............................................ 16
SECTION 1
USING THE HP PRINTER SOFTWARE
How Printing Works ............................................... 18
About Fonts ............................................................ 19
Opening the HP Print Settings Box ...................... 20
How to Print ........................................................... 21
Checking Printing Progress ................................... 22
How to Print on Both Sides of the Paper ............. 23
If Something Goes Wrong During Printing ........... 25
About Printing in Color ......................................... 26
Updating the Printer Software .............................. 26
SECTION 2
USING PAPER, CARDS, ENVELOPES,
TRANSPARENCIES, AND LABELS
Determining the Print Side of Paper .................... 27
Guidelines for Using Paper .................................... 28
Selecting and Storing Paper, Envelopes,
Cards, Labels, and Transparencies ....................... 29
Using Standard Size Paper .................................... 31
Using Non-Standard Size Paper ............................ 33
Using Index Cards and Postcards ......................... 36
Using Envelopes ..................................................... 38
Using Avery Paper Labels ...................................... 42
Adding Paper, Envelopes, Cards,
or Transparencies .................................................. 44
Removing Paper, Envelopes, Cards,
or Transparencies .................................................. 44
••••••••••••••••••••••••••••••••••••••••••••••••••••••••••••••••••••••••••••••••••••••••••••••••••••••••••••••••••••••••••••••
iii
Page 4

T ABLE OF CONTENTS
SECTION 3
USING PRINT CARTRIDGES
Storing and Using Print Cartridges ....................... 45
Aligning the Print Cartridges ................................ 46
Removing a Print Cartridge ................................... 46
Cleaning the Print Cartridges ............................... 47
Printer Cleaning Procedure .................................. 48
SECTION 4
IF YOU HAVE A PRINTING PROBLEM
How You Can Find the Solution ............................ 51
Where’s the HP Toolbox? ...................................... 52
Using the HP Toolbox ............................................ 52
If Nothing Prints .................................................... 53
If Paper, Envelopes, Cards, Labels, or Trans-
parencies Don’t Pass Through the Printer ........... 55
If Print Quality is Poor ........................................... 57
If Margins are Printed Wrong ................................ 58
If Text or Pictures are Printed Wrong .................. 59
If Colors are Printed Wrong .................................. 59
Contacting Customer Support .............................. 61
SECTION 5
REFERENCE, SPECIFICATIONS,
AND ORDERING INFORMATION
Maintaining Your Printer ....................................... 65
Increasing Printer Performance ............................ 66
Ink Drying Times ................................................... 67
About Page Orientation ......................................... 67
Specifications ......................................................... 70
Regulatory Notices ................................................. 72
Available Supplies and Accessories ...................... 73
Ordering Information ............................................. 75
APPENDIX: Printing from DOS 77
INDEX 87
••••••••••••••••••••••••••••••••••••••••••••••••••••••••••••••••••••••••••••••••••••••••••••••••••••••••••••••••••••••••••••••
iv
Page 5

SECTION ONE
USING THE HP PRINTER SOFTWARE
Windows Users
explained in this section of the User’s Guide provides complete
printer control for use with programs designed for the
Windows 95 and Windows 3.1x operating systems. When you
install the printer software for Windows as described in
Time Setup section
software is installed for your use.
In order to use all of the features of your HP DeskJet 670C
Series printer, make sure it is selected as the default printer in
your Windows operating system. Because most software
programs supersede the settings in the Windows operating
system, be sure to also select the HP DeskJet 670C Series
printer as the default printer from within your software
programs. To set the default printer:
• For Windows 95, from the taskbar select
Settings
670C Series
HP DeskJet 670C Series printer. Click
and click to select
• For Windows 3.1x, open the Window’s
usually located in the
Printers
default.
DOS Users — See the appendix,
specific information on printing from your DOS software
programs.
, then select
icon and set the
—
The printer software for Windows
First
of this User’s Guide, all necessary printer
Start
, then select
Printers
printer icon to open the queuing dialog for the
Set As Default
Main
. Then double-click the
Printer
on the menu bar
.
Control Panel
program group. Double-click the
HP DeskJet 670C Series
Printing from DOS,
HP DeskJet
, which is
printer as the
for
••••••••••••••••••••••••••••••••••••••••••••••••••••••••••••••••••••••••••••••••••••••••••••••••••••••••••••••••••••••••••••••
17
Page 6

SECTION ONE
•••••••••••••••••••••••••••••••••••••••••••••••••••••••••••••••••••••••••••••••••••••••••••••••••••••••••••••••••••••••••••••••
How Printing Works
1.
You lay out the page and choose the text, pictures, fonts, and
colors from your software program (such as a word processor or
drawing program).
2.
Select settings such as paper type, paper size, orientation, and
print quality in the HP print settings box (see page 20).
SharingDetailsGeneral ServicesPaperSetup
Automatic
Manual
Print in Grayscale
Print Quality
Options
ICM
Default
OK Cancel
Check your printing status, and get help on how to print and
3.
Normal
Help
EconoFastBest
how to solve your printing problems in the HP Toolbox (see
page 52).
Troubleshooting Printer Services
How Do I?
Learn How To...
Select the button next to the item you wish to learn more
about.
Replace Print Cartridges
Load Paper
Change Print Settings
Print on a variety of paper types, sizes and envelopes
Print on both sides of the page
4.
Your software program and the printer software send
information to the printer, where it is translated into dots of ink
on the page.
5.
The printer sends information about printing progress and any
errors to the computer, which displays messages on your
screen.
••••••••••••••••••••••••••••••••••••••••••••••••••••••••••••••••••••••••••••••••••••••••••••••••••••••••••••••••••••••••••••••
18
Page 7

••••••••••••••••••••••••••••••••••••••••••••••••••••••••••••••••••••••••••••••••••••••••••••••••••••••••••••••••••••••••••••••
6.
The printer picks up the top sheet from the stack in the lower
USING THE HP PRINTER SOFTWARE
(IN) tray, prints on it, passes it to the upper (OUT) tray, then
picks up the next top sheet from the stack in the IN tray.
7.
Your printer will print at different speeds, depending on the
complexity of the job and the print quality you have chosen. If
you have a lot of graphics, it‘ll take longer to print, and color
printing takes longer than black and white.
About Fonts
With your HP DeskJet 670C Series printer, you can print
TrueType fonts provided with other software programs or, when
using Adobe Type Manager, you can also print Type 1 fonts.
••••••••••••••••••••••••••••••••••••••••••••••••••••••••••••••••••••••••••••••••••••••••••••••••••••••••••••••••••••••••••••••
19
Page 8
SECTION ONE
•••••••••••••••••••••••••••••••••••••••••••••••••••••••••••••••••••••••••••••••••••••••••••••••••••••••••••••••••••••••••••••••
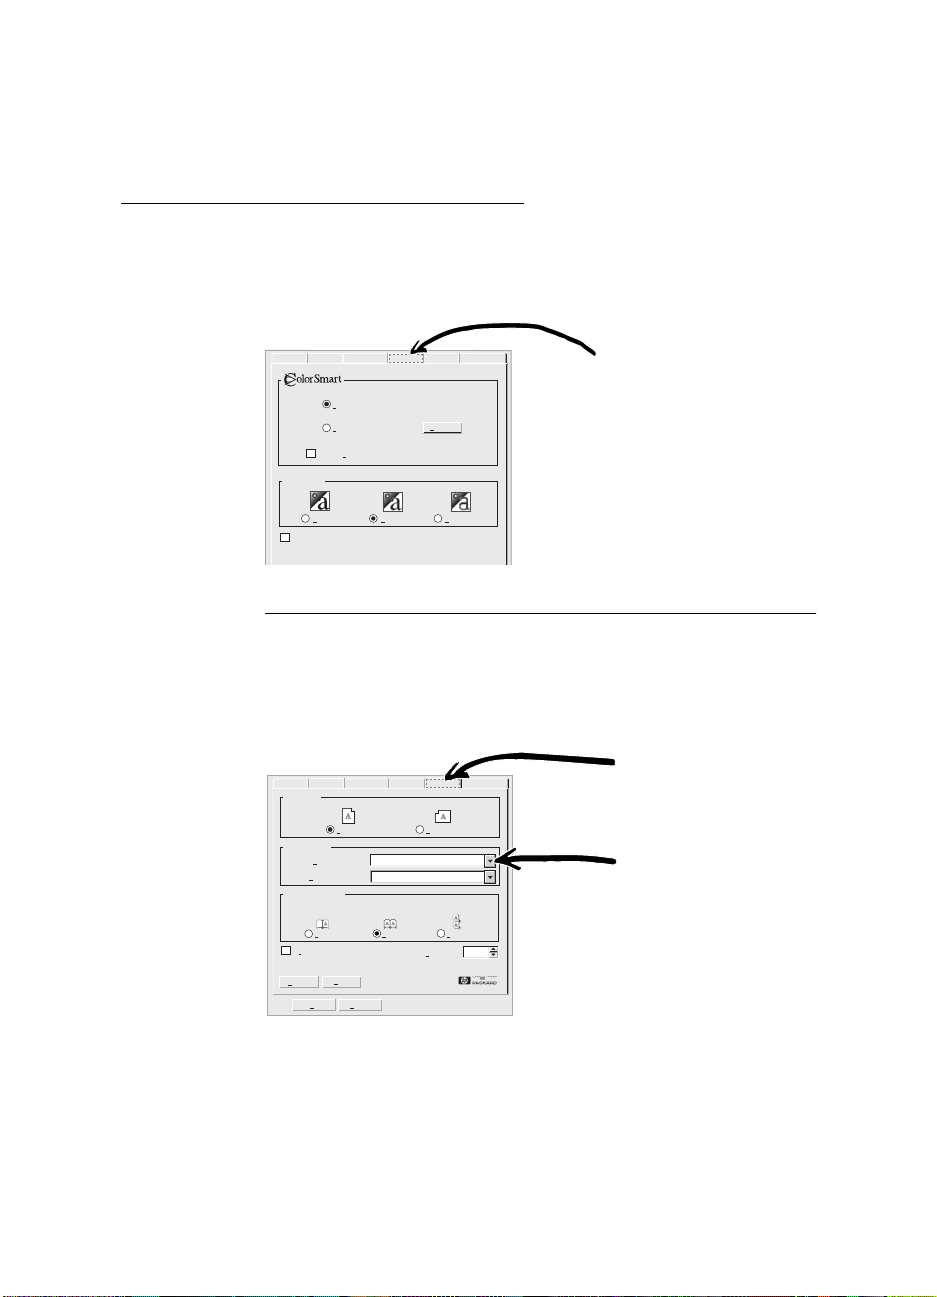
Opening the HP Print Settings Box
To open the HP print settings box:
• Click
• Or, click
File
, then click
that appears next click either
File
and (if
click
Properties
Printer Setup
Print(er) Setup
or
Setup
. (In this situation, clicking
or
Print Setup
Setup
or
Options
isn’t listed) click
. On the dialog
.
Print
. Then
Options
won’t get you to the HP print settings box.) If you still don’t see
the box, click
Setup, Options
, or
Properties
.
right paper size
Print
clearly.
Align your
black and
color
cartridges,
and clean
them when
necessary.
General
Maintain My Printer
Default
Save time and color
ink.
Click here to print
drafts of color
documents in shades
of gray.
Select the
appropriate
General Details Sharing Setup Paper Services
Orientation
settings.
Automatic
Manual
Help
SharingDetails
Paper Options
Paper Size:
Paper Type:
Two-sided Printing
Default
Normal
Choose the
and type for
the job.
Details Sharing Setup Paper Services
Select the maintenance task you wish to perform.
Align the print cartridges.
Clean the print cartridges.
Print a self-test page.
“Test printer communication.”
General
Help
OK Cancel
Print in Grayscale
Print Quality
ICM
Default
OK Cancel
Book
Ordered Printing
OK Cancel
Setup
Portrait
Help
Options
EconoFastBest
Landscape
Index Card (4x6 in.)
Plain Paper
TabletNone
Copies
Save money and
trees.
Print on both sides of
the paper.
ServicesPaper
1
Fine-tune
your printing.
Pick options to
create the
effect you want.
Save time
and ink.
Click
EconoFast
print quality.
Show your finished work at its best.
Click Best print quality.
••••••••••••••••••••••••••••••••••••••••••••••••••••••••••••••••••••••••••••••••••••••••••••••••••••••••••••••••••••••••••••••
20
Page 9
••••••••••••••••••••••••••••••••••••••••••••••••••••••••••••••••••••••••••••••••••••••••••••••••••••••••••••••••••••••••••••••
USING THE HP PRINTER SOFTWARE
How to Print
1.
Check your print settings.
Choose your print settings in the HP print settings box.
Choose color options and the print quality on the Setup tab.
Details Sharing Setup Paper Services
General
Automatic
Manual
Print in Grayscale
Print Quality
ICM
Normal
Options
EconoFastBest
Setup Tab
N OTE
Depending upon the operating system running on your computer, your boxes may
differ from the Windows 95 boxes shown here.
Choose paper size, paper type, orientation, and two-sided
printing options on the Paper tab.
Paper Tab
General Detail Sharing Setup Paper Services
Orientation
Paper Options
Paper Size:
Paper Type:
Two-sided Printing
Book
Ordered Printing
Default
OK Cancel
Portrait
Help
Letter (8.5 x 11 in.)
Plain Paper
Landscape
Copies
Click the Down
Arrow; Then Click
Your Selection
TabletNone
1
••••••••••••••••••••••••••••••••••••••••••••••••••••••••••••••••••••••••••••••••••••••••••••••••••••••••••••••••••••••••••••••
21
Page 10

SECTION ONE
•••••••••••••••••••••••••••••••••••••••••••••••••••••••••••••••••••••••••••••••••••••••••••••••••••••••••••••••••••••••••••••••
2.
Click OK in the Print box of your software program to start
printing.
You might need to click
File
and then click
Print
to reach the
Print box.
Print
Printer
Name:
HP DeskJet 690C Series Printer
Status:
Idle
Type:
HP Deskjet 690C Series Printer
Where:
LPT2:
Comment:
Page range
All Current
page
Pages:
Enter page numbers and/or page ranges
separated by commas. For example, 1,3,5-12
Selection
Document
Copies
Number of copies:
3
2
1
PrintPrint what:
OK Cancel Options...
Properties
Print to
1
Collate
3
2
1
Click OK
That’s all there is to it. The printer will print one page at a time
until it finishes, delivering each printed page neatly into the
printer’s upper (OUT) tray.
While You’re Printing
It takes a few moments for the printing to start, while the
printer gets information from the computer. During printing, the
printer might pause occasionally to receive more information.
(Don’t worry, it’s normal.)
If You Run Out of Paper Before You’re Finished
The printer will prompt you to add more paper. Put the paper in
the lower (IN) tray, and press the resume button.
Checking Printing Progress
Double-click the
HP Toolbox
of the screen in the taskbar (Windows 95) or on the desktop
(Windows 3.1) every time you start a print job. See “Where’s the
HP Toolbox?” on page 52.
The Printer Services tab on the HP Toolbox tells you which page
is printing.
••••••••••••••••••••••••••••••••••••••••••••••••••••••••••••••••••••••••••••••••••••••••••••••••••••••••••••••••••••••••••••••
22
icon, which appears at the bottom
Page 11

••••••••••••••••••••••••••••••••••••••••••••••••••••••••••••••••••••••••••••••••••••••••••••••••••••••••••••••••••••••••••••••
USING THE HP PRINTER SOFTWARE
How to Print on Both Sides of the Paper
The easiest way to save paper is to print on both sides of it. Just
put the paper through the printer twice: The first time through
it prints the odd-numbered pages and the second time through
it prints the even.
Put the paper in the lower (IN) tray.
1.
Make sure there’s no paper in the upper (OUT) tray.
In the HP print settings box, click the Paper tab, and click
2.
as the paper type.
Paper
3. Then click Book or Tablet.
Click the Paper tab
General Detail Sharing Setup Paper Services
Orientation
Plain
Paper Options
Paper Size:
Paper Type:
Two-sided Printing
Book
Ordered Printing
Default
OK Cancel
Portrait
Letter (8.5 x 11 in.)
Plain Paper
Help
Landscape
Copies
Click Book so the sheets
can be bound on the left
TabletNone
1
Click Tablet so the sheets
can be bound at the top
4. Print your document.
The printer automatically prints only the odd-numbered pages.
••••••••••••••••••••••••••••••••••••••••••••••••••••••••••••••••••••••••••••••••••••••••••••••••••••••••••••••••••••••••••••••
23
Page 12

SECTION ONE
•••••••••••••••••••••••••••••••••••••••••••••••••••••••••••••••••••••••••••••••••••••••••••••••••••••••••••••••••••••••••••••••
5. Put the printed pages back in the lower (IN) tray of the printer.
A message on the screen tells you how to put the printed pages
back in the printer. The following illustration shows how to put
the paper back in the printer for portrait orientation and the
Book option.
2184117
Odd-numbered pages
print first
even-numbered pages
6. When the paper is ready, click Continue.
Reload to print the
••••••••••••••••••••••••••••••••••••••••••••••••••••••••••••••••••••••••••••••••••••••••••••••••••••••••••••••••••••••••••••••
24
Page 13

••••••••••••••••••••••••••••••••••••••••••••••••••••••••••••••••••••••••••••••••••••••••••••••••••••••••••••••••••••••••••••••
USING THE HP PRINTER SOFTWARE
If Something Goes Wrong During Printing
Sometimes, in spite of your best efforts, something goes wrong
during printing. Maybe a paper jams in the printer or nothing
happens at all.
• If the printer detects that something is wrong, it displays a
message on your screen. Respond appropriately to the content
of the message on your screen.
Out of Paper
The printer is out of paper.
Load more paper, then press the “Resume” button on
the front of the printer. Click “How do I” for detailed
instructions on loading paper.
Retry “How Do I”
• If you notice that something is wrong, click the Troubleshooting
tab in the HP Toolbox and follow the instructions on the screen.
How Do I?
Troubleshooting Printer Services
Help Me Fix My Printer
Select the symptom which matches what you are seeing
with your printer.
No page came out of the printer.
A blank page came out.
Placement on the page is wrong.
Print quality is poor.
Something on the page is missing or incorrect.
Troubleshooting Tab
• For some specific details about printing problems and how to
solve them, see Section 4, If You Have a Printing Problem, in
this User’s Guide.
••••••••••••••••••••••••••••••••••••••••••••••••••••••••••••••••••••••••••••••••••••••••••••••••••••••••••••••••••••••••••••••
25
Page 14
SECTION ONE
•••••••••••••••••••••••••••••••••••••••••••••••••••••••••••••••••••••••••••••••••••••••••••••••••••••••••••••••••••••••••••••••
About Printing in Color
Your HP DeskJet 670C Series printer prints in color when a
color-capable software program is used with the printing
software. Your printer is especially smart about printing color.
(That’s why HP called the technology ColorSmart™!) When you
print a document in color, the printer marks each element in
your document — text and graphics (such as pie charts with
solid blocks of color) — and renders each at its vivid best.
To print in color, be sure you have created colored text or
pictures within your document, then turn on color printing in
your software program. Color printing is typically turned on in
your software program’s Print box. By default, the printer
software is set for color printing; however, you can print drafts
of your color documents in grayscale if you want to save time
and ink.
How to Turn Off Color
To economize on the use of the color print cartridge, print draft
copies of your color documents in grayscale. Grayscale printing
is significantly faster than color printing, and it gives you a good
approximation of your final output. To print in grayscale:
In the HP print settings box (see page 20), click the Setup tab,
then click Print in Grayscale.
Print in Grayscale
An “X” means that color is turned off
Updating the Printer Software
HP periodically provides updates of the printer software. These
updates may include enhancements that improve the
performance of your printer. See Contacting Customer
Support on page 61 for how to obtain updated printer software.
••••••••••••••••••••••••••••••••••••••••••••••••••••••••••••••••••••••••••••••••••••••••••••••••••••••••••••••••••••••••••••••
26
Page 15

SECTION TWO
USING PAPER, CARDS,
ENVELOPES, TRANSPARENCIES,
AND LABELS
Determining the Print Side of Paper
Be sure to insert all paper, transparencies, cards, envelopes, and
Avery paper labels print side down into the IN tray of the
printer. For plain paper, the print side is identified by a symbol
or word on the packaging.
• For letterhead paper, load the letterhead side down and
forward.
• For HP Premium Transparency Film, load the rough side down
with the adhesive strip forward.
• For HP Premium InkJet Paper, load the print side down with
the corner arrow pointed forward.
• For HP Premium Glossy Paper, load the glossy side down.
• For Avery Paper Labels, load the label side down.
Letterhead Paper
HP Premium
Transparency Film
HP Premium
InkJet Paper
Avery Paper
Labels
N OTE
2184053
Be sure the settings in the software match the type of paper loaded in your printer.
••••••••••••••••••••••••••••••••••••••••••••••••••••••••••••••••••••••••••••••••••••••••••••••••••••••••••••••••••••••••••••••
27
Page 16

SECTION TWO
••••••••••••••••••••••••••••••••••••••••••••••••••••••••••••••••••••••••••••••••••••••••••••••••••••••••••••••••••••••••••••••
Guidelines for Using Paper
• To obtain the best print quality and to avoid getting paper
jammed in the paper feed rollers of the printer, always use
paper, envelopes, index cards, postcards, Avery paper labels,
and transparency film that conform in weight, type, and size
with those listed in the Specifications on page 70.
• Load only one type of paper, envelope, or transparency at a time
in the IN tray, making sure the right edge of the stack is aligned
with the right edge of the IN tray.
Steve: I think we need to
• When using index cards or postcards, make sure the right edge
of the card stack is aligned with the left side of the raised card
guide.
• Never load more than
1
/
4
inch (
1
/
cm) of cards or Avery paper labels, or 20 envelopes
2
1
/
inch (1 cm) of paper or transparencies,
2
into the IN tray at one time.
• Always load index cards and postcards where the paper is
longer than wide when placed in the IN tray.
• When using the single envelope slot, always lower the card
guide in the IN tray, be sure that paper is loaded in the IN tray,
and be sure to push the envelope all the way into the slot.
• Only use Avery paper labels that are specifically designed for
use with HP InkJet printers. Do not use plastic or clear labels.
• Always use software settings that match the type and size of the
paper, envelopes, transparencies, or cards in the printer.
• Some types of paper, such as transparencies, glossy paper, and
coated cards, need longer drying times. The printer software
automatically provides the appropriate drying time for each
printed page based on the paper type, print quality, and inks
printed. To eliminate this drying time, select either the HP
Transparency (Pause Control)
Control)
paper type. You can then remove the printed page from
or the HP Glossy Paper (Pause
the OUT tray, set it aside to dry, and continue printing.
••••••••••••••••••••••••••••••••••••••••••••••••••••••••••••••••••••••••••••••••••••••••••••••••••••••••••••••••••••••••••••••
28
Page 17

USING PAPER, CARDS, ENVELOPES, TRANSPARENCIES, AND LABELS
••••••••••••••••••••••••••••••••••••••••••••••••••••••••••••••••••••••••••••••••••••••••••••••••••••••••••••••••••••••••••••••
Selecting and Storing Paper, Envelopes,
Cards, Labels, and Transparencies
N OTE
Always use paper, envelopes, index cards, post cards, and other paper stock that
conforms in weight, type, and size with that listed in the Specifications on page 70.
Selecting Paper
The HP DeskJet 670C Series printer prints on plain paper,
HP Premium Glossy Paper, HP Premium InkJet Paper, and
HP Premium Transparency Film. Most bond paper yields
excellent printing results and is appropriate for your letterhead
stationery.
Use these guidelines to select paper:
• Most papers have a side conditioned for printing and a side not
conditioned for printing. Before you purchase large quantities of
a paper, print on both sides of a few sheets of the paper to
determine if it produces acceptable quality printing on its
“print” side.
• Be sure that your paper does not have tears, dust, wrinkles, or
curled or bent edges.
• Only load one type, size, and weight of paper in the printer at
one time.
• For color printing, most bond paper produces good results.
However, choose HP Premium InkJet Paper or HP Premium
Glossy Paper to produce intense, high quality color results.
Selecting Envelopes
• Print on a few envelopes before you purchase large quantities.
• Use high-quality envelopes that are thin and sharply creased.
• Do not use envelopes with thick or crooked edges, or envelopes
that are damaged, curled, wrinkled, or irregularly shaped.
• Do not use envelopes that are shiny or embossed, or envelopes
with clasps or windows.
••••••••••••••••••••••••••••••••••••••••••••••••••••••••••••••••••••••••••••••••••••••••••••••••••••••••••••••••••••••••••••••
29
Page 18

SECTION TWO
••••••••••••••••••••••••••••••••••••••••••••••••••••••••••••••••••••••••••••••••••••••••••••••••••••••••••••••••••••••••••••••
Selecting Transparencies, Labels, and Other Paper
• To achieve best color print quality, use only the recommended
HP Premium Transparency film for printing transparency slides.
This transparency film was designed specifically for use with
your printer.
• Only use Avery paper labels that are specifically designed for
use with HP InkJet printers.
• Do not use plastic or clear labels. The ink formulated for use
with this printer does not dry when used with plastic or clear
labels.
• Do not use paper or Avery paper labels that are damaged,
folded, curled, or wrinkled.
• Do not use Avery paper labels that are over two years old.
• Do not print on partially used sheets of Avery paper labels.
• Do not use paper with cutouts or perforations, except HP
approved Avery paper labels.
• Do not use multiple-part forms.
• Do not use paper that is heavily textured or embossed.
Storing Paper, Envelopes, Cards, Labels, and
Transparencies
Store your paper in its packaging until you use it. Protect the
paper from temperature and humidity extremes by wrapping it
tightly in plastic.
Always store Avery paper labels flat in the original package to
avoid wrinkling or bending.
••••••••••••••••••••••••••••••••••••••••••••••••••••••••••••••••••••••••••••••••••••••••••••••••••••••••••••••••••••••••••••••
30
Page 19
USING PAPER, CARDS, ENVELOPES, TRANSPARENCIES, AND LABELS
••••••••••••••••••••••••••••••••••••••••••••••••••••••••••••••••••••••••••••••••••••••••••••••••••••••••••••••••••••••••••••••
Using Standard Size Paper
Use this procedure to print on standard size paper or
transparency film with your HP DeskJet 670C Series printer.
Paper and transparency sizes that are considered standard are:
U.S. Letter (8.5 x 11 inches) and U.S. Legal (8.5 x 14 inches).
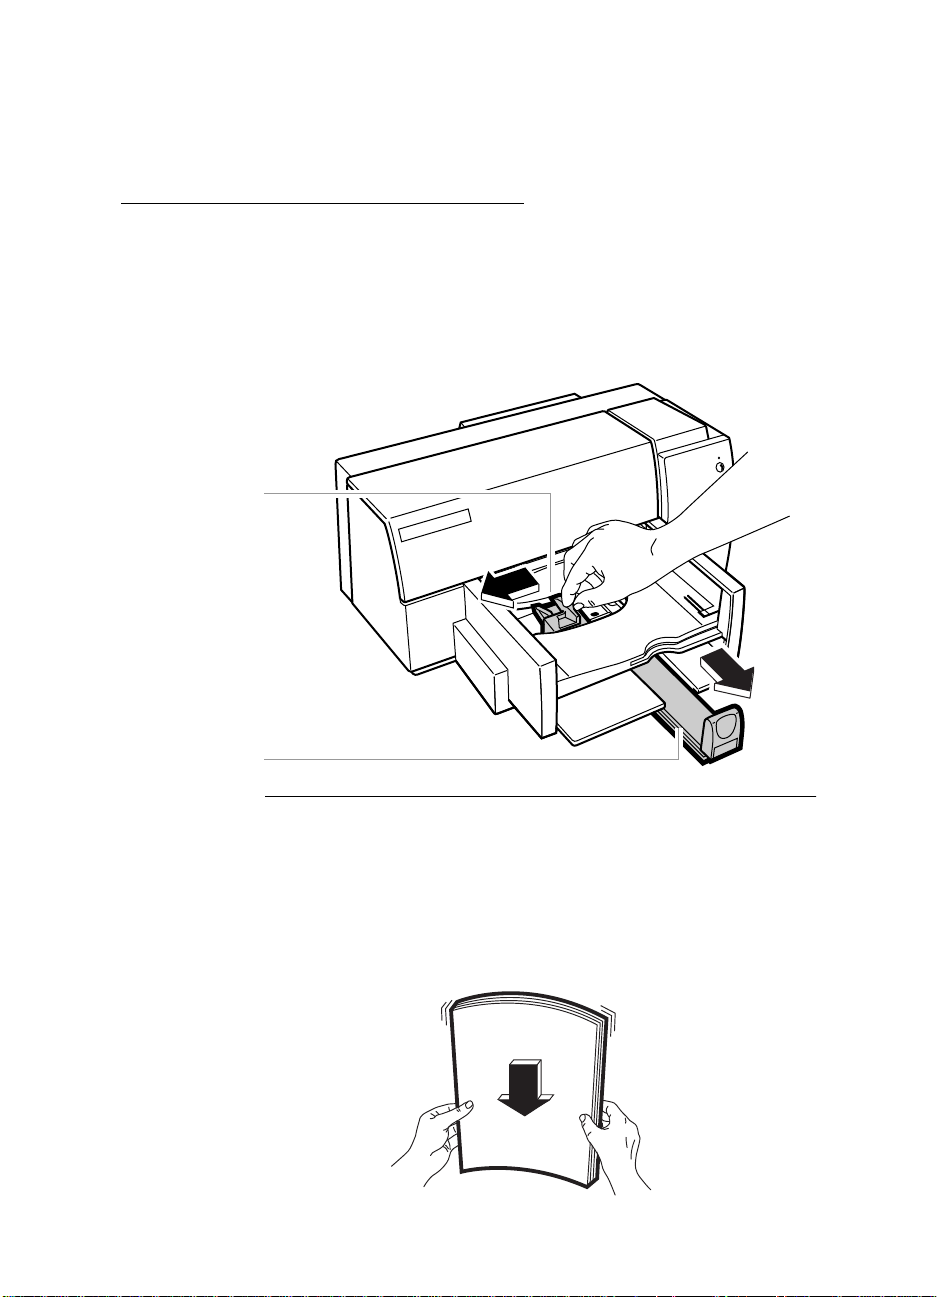
1. Slide the paper width adjuster to its leftmost position.
2. Pull out the paper length adjuster.
Paper Width
Adjuster
Paper Length
Adjuster
N OTE
2184037
Make sure the card guide (used when printing on index cards and postcards) is in
the down position. (See the drawing on page 36 in the procedure Using Index
Cards and Postcards for the location of the card guide.)
3. Remove up to approximately
the packaging. Fan the edges of the paper stack to separate the
pages. Then tap the short edge of the stack on a flat surface to
even the stack.
••••••••••••••••••••••••••••••••••••••••••••••••••••••••••••••••••••••••••••••••••••••••••••••••••••••••••••••••••••••••••••••
1
/
inch (1 cm) stack of paper from
2
2162040
31
Page 20
SECTION TWO
••••••••••••••••••••••••••••••••••••••••••••••••••••••••••••••••••••••••••••••••••••••••••••••••••••••••••••••••••••••••••••••
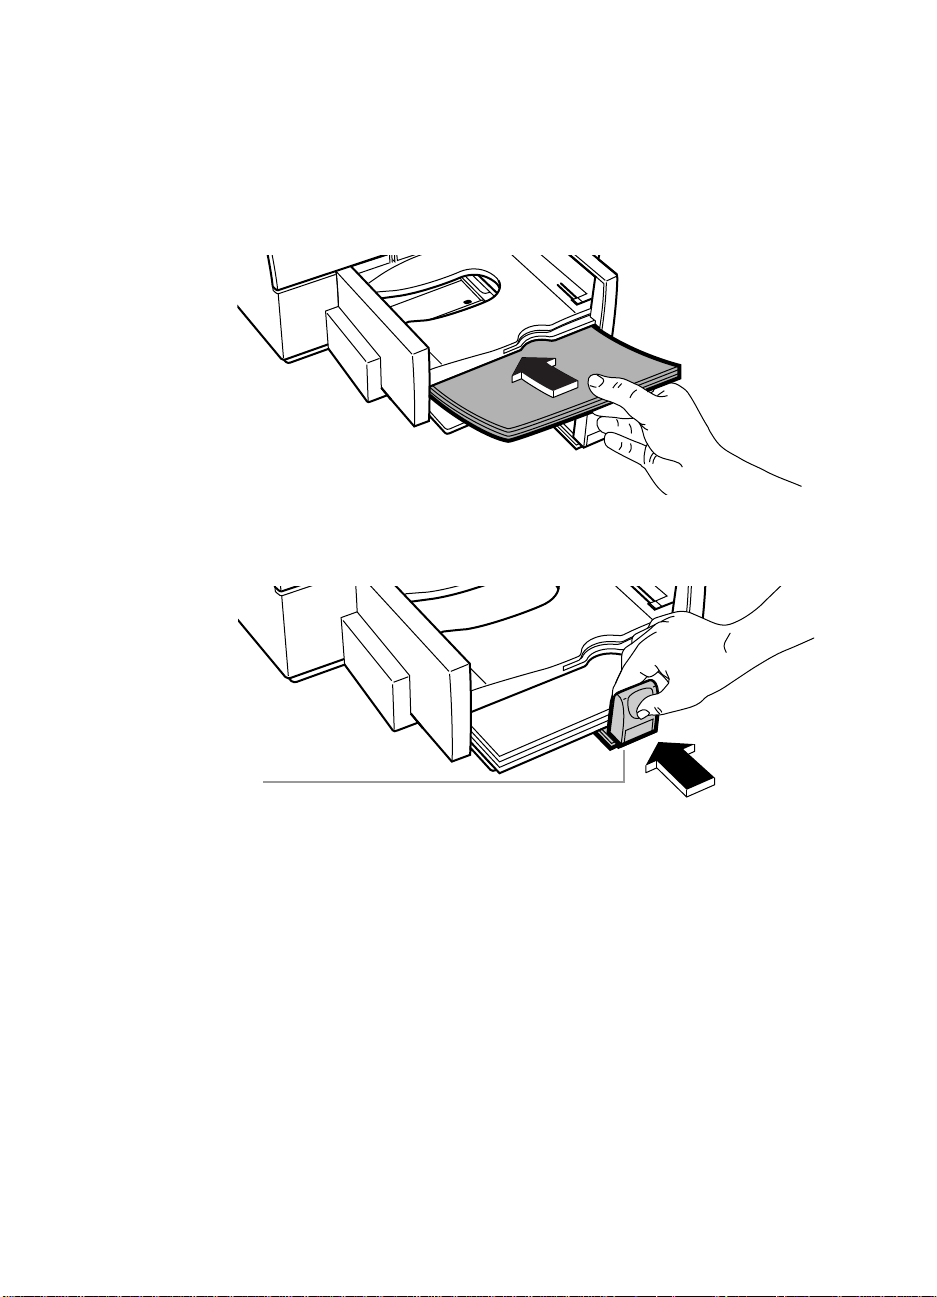
4. Insert the paper evenly into the IN tray, print side down, until it
stops. Align the right edge of the stack with the right edge of the
IN tray.
2184021
5. Push the paper length adjuster in toward the paper until it
stops.
Paper Length
Adjuster
2184022
Make sure the paper does not bend in the IN tray.
6. Set the software to print on the size and type of paper now in
the printer.
••••••••••••••••••••••••••••••••••••••••••••••••••••••••••••••••••••••••••••••••••••••••••••••••••••••••••••••••••••••••••••••
32
Page 21

USING PAPER, CARDS, ENVELOPES, TRANSPARENCIES, AND LABELS
••••••••••••••••••••••••••••••••••••••••••••••••••••••••••••••••••••••••••••••••••••••••••••••••••••••••••••••••••••••••••••••
Using Non-Standard Size Paper
Use this procedure to print on non-standard size papers with
your HP DeskJet 670C Series printer. Paper sizes that are
considered non-standard are those with a width between 5 and
8.5 inches (127 and 215 mm) and a length between 5.83 and
14 inches (148 and 356 mm).
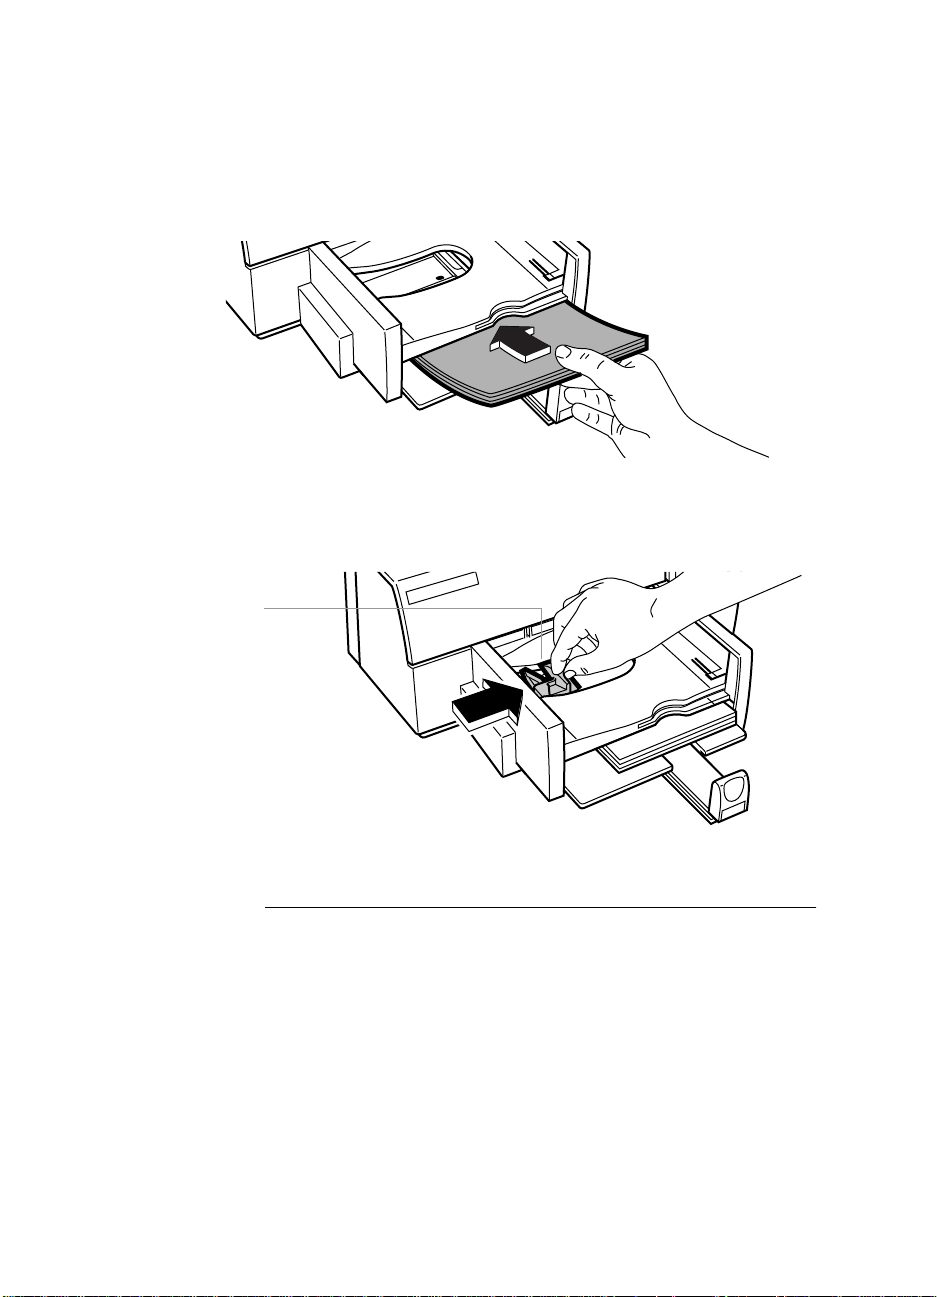
1. Slide the paper width adjuster to its leftmost position.
2. Pull out the paper length adjuster and remove any paper from
the IN tray.
Paper Width
Adjuster
Paper Length
Adjuster
N OTE
2184037
Make sure the card guide (used when printing on index cards and postcards) is in
the down position. (See the drawing on page 36 in the procedure Using Index
Cards and Postcards for the location of the card guide.)
3. Remove up to a
and tap the short edge of the stack on a flat surface to even the
stack.
4. Insert the non-standard size paper evenly into the IN tray, print
side down, until it stops.
••••••••••••••••••••••••••••••••••••••••••••••••••••••••••••••••••••••••••••••••••••••••••••••••••••••••••••••••••••••••••••••
1
/
inch (1 cm) stack of paper from its package
2
33
Page 22
SECTION TWO
••••••••••••••••••••••••••••••••••••••••••••••••••••••••••••••••••••••••••••••••••••••••••••••••••••••••••••••••••••••••••••••
5. Align the right edge of the paper stack with the right side of the
IN tray.
2184023
6. Slide the paper width adjuster to the right until it aligns with the
left edge of the paper stack.
Paper Width
Adjuster
Make sure the paper does not bend in the IN tray.
N OTE
When the paper is shorter in length than approximately 8
release the handle of the paper length adjuster as shown on page 36 before you
push in the paper length adjuster. Lowering the paper length adjuster handle
reduces the paper capacity of the IN tray to a maximum stack height of
(0.8 cm).
••••••••••••••••••••••••••••••••••••••••••••••••••••••••••••••••••••••••••••••••••••••••••••••••••••••••••••••••••••••••••••••
2
/
inches (22 cm),
3
5
/16 inch
34
Page 23

USING PAPER, CARDS, ENVELOPES, TRANSPARENCIES, AND LABELS
••••••••••••••••••••••••••••••••••••••••••••••••••••••••••••••••••••••••••••••••••••••••••••••••••••••••••••••••••••••••••••••
7. Push the paper length adjuster in toward the paper until it
stops.
Paper Length
Adjuster
8. Set the software to print on the size and orientation of the paper
N OTE
2184025
Make sure the paper does not bend in the IN tray.
now in the printer.
Be sure that the page orientation set in the software matches the orientation in
which you placed the paper into the IN tray. If they do not match, the printer might
print off the end of the paper.
••••••••••••••••••••••••••••••••••••••••••••••••••••••••••••••••••••••••••••••••••••••••••••••••••••••••••••••••••••••••••••••
35
Page 24

SECTION TWO
••••••••••••••••••••••••••••••••••••••••••••••••••••••••••••••••••••••••••••••••••••••••••••••••••••••••••••••••••••••••••••••
Using Index Cards and Postcards
Use this procedure to print on index cards or postcards with
your HP DeskJet 670C Series printer. Make sure the index cards
or postcards that you use with your printer conform in size and
weight to those listed in the Specifications on page 70.
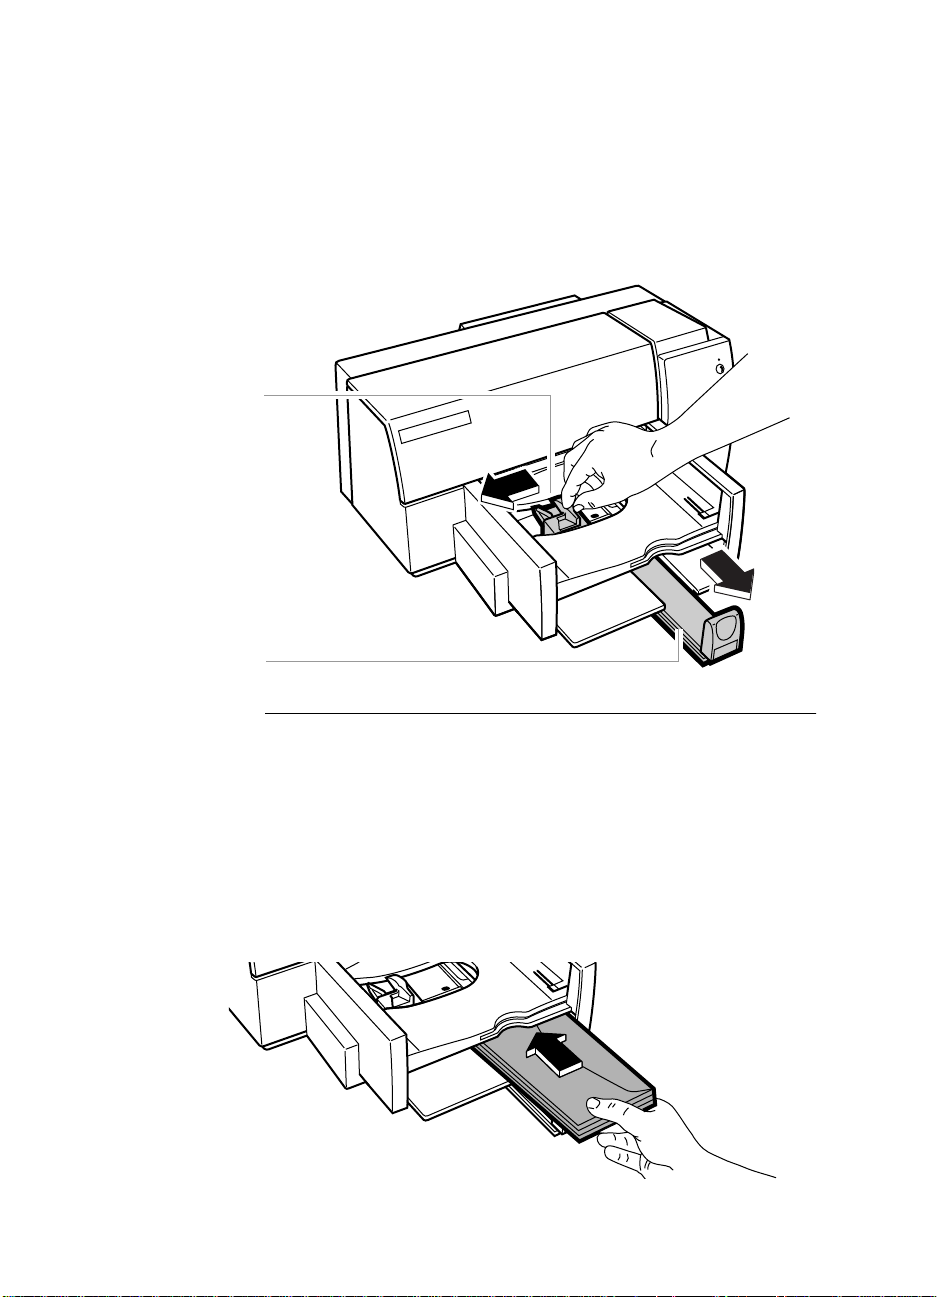
1. Remove the OUT tray.
OUT Tray
2184008
2. Raise the card guide.
Card Guide
2162009
3. Remove up to a
1
/
4
inch (
1
/
cm) stack of cards from their
2
packaging and tap the short edge of the stack on a flat surface to
even the stack.
••••••••••••••••••••••••••••••••••••••••••••••••••••••••••••••••••••••••••••••••••••••••••••••••••••••••••••••••••••••••••••••
36
Page 25
USING PAPER, CARDS, ENVELOPES, TRANSPARENCIES, AND LABELS
••••••••••••••••••••••••••••••••••••••••••••••••••••••••••••••••••••••••••••••••••••••••••••••••••••••••••••••••••••••••••••••
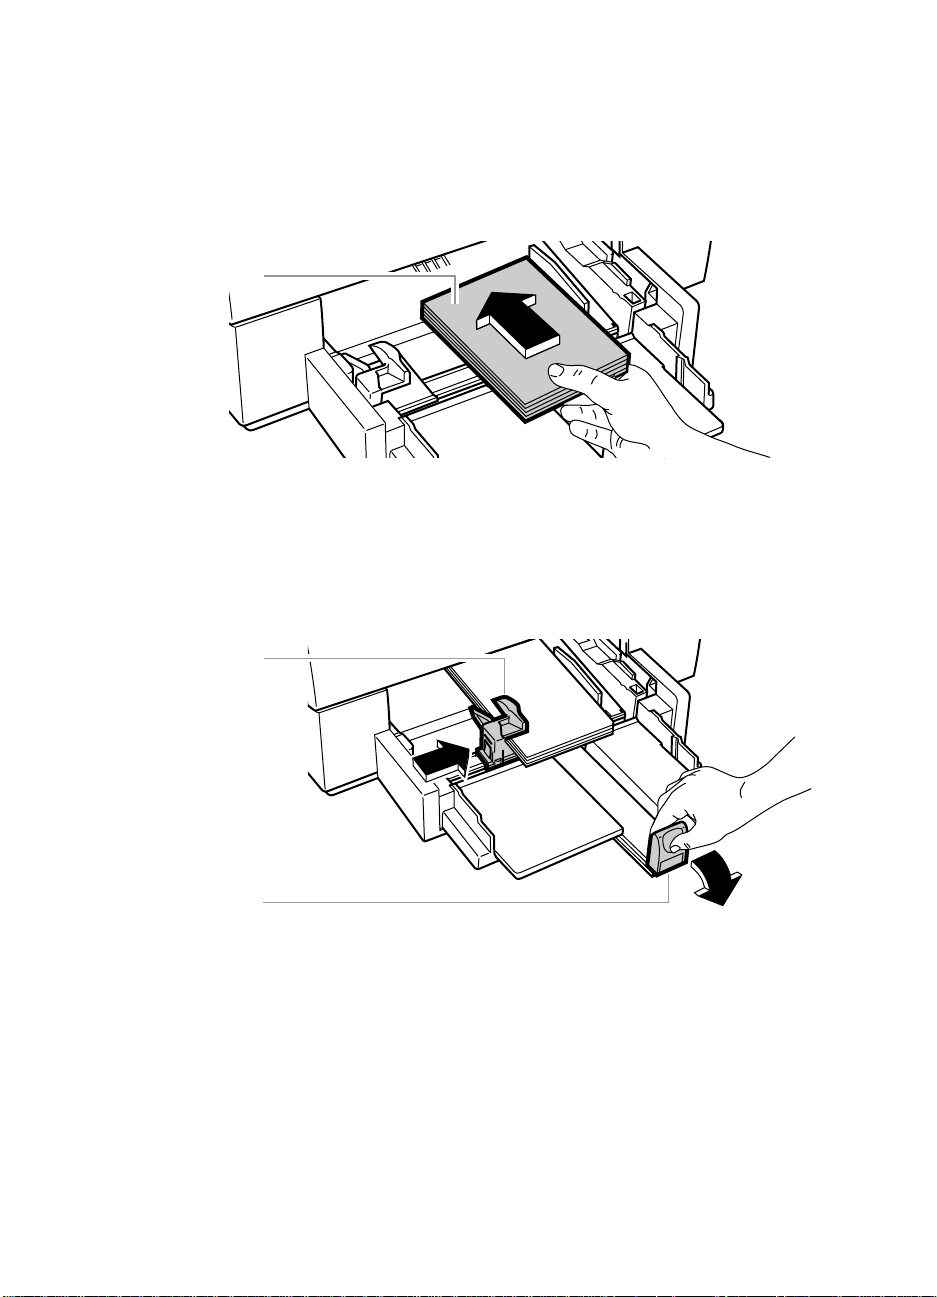
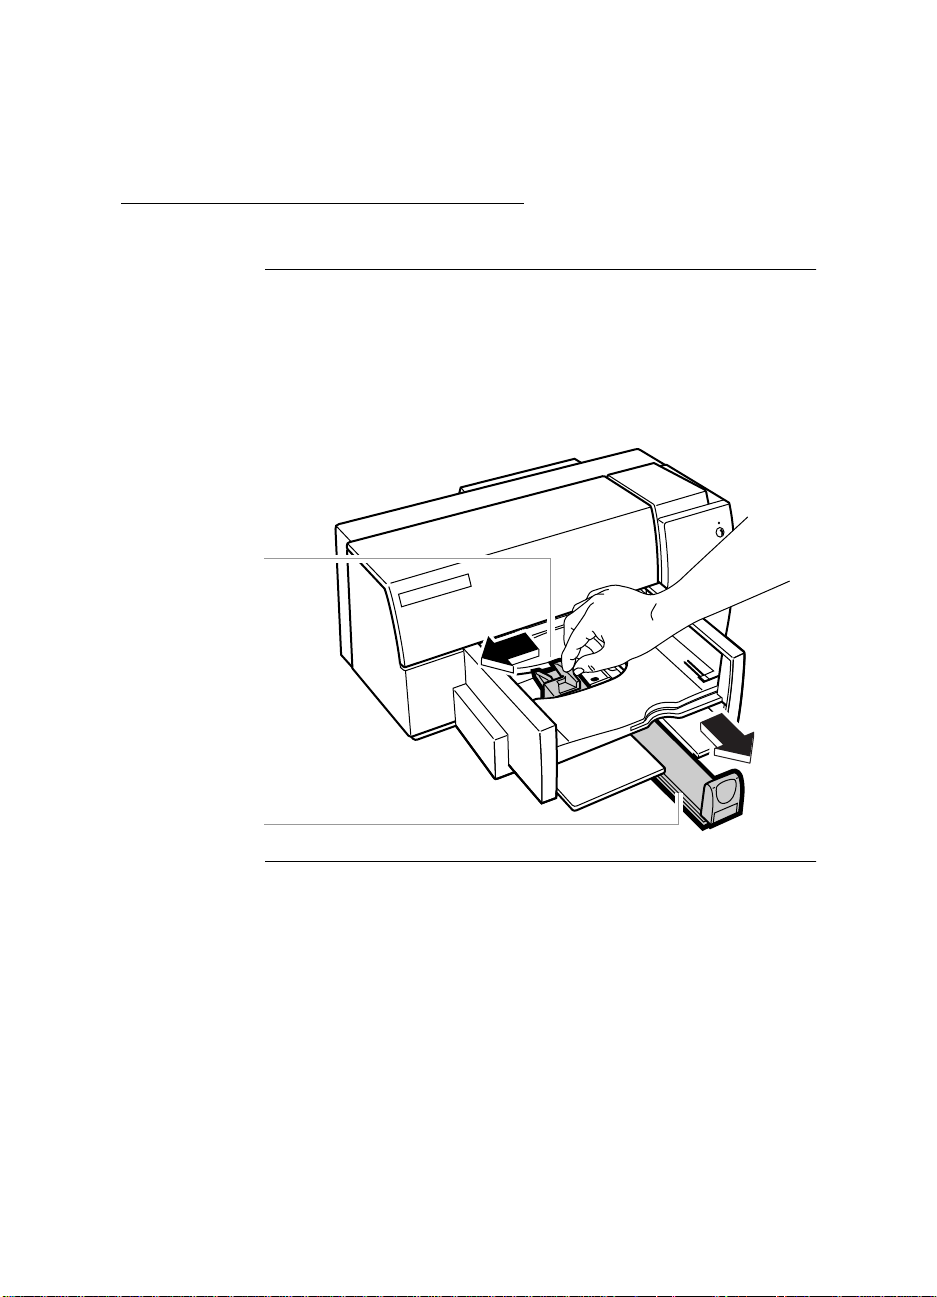
4. Insert the cards into the IN tray. Align the right edge of the card
stack with the card guide.
Card Stack
2162026
5. Slide the paper width adjuster to the right until it aligns with the
left edge of the card stack.
6. Press the inside of the paper length adjuster handle to release
and lower it.
Paper Width
Adjuster
Paper Length
Adjuster Handle
••••••••••••••••••••••••••••••••••••••••••••••••••••••••••••••••••••••••••••••••••••••••••••••••••••••••••••••••••••••••••••••
2162038
37
Page 26

SECTION TWO
••••••••••••••••••••••••••••••••••••••••••••••••••••••••••••••••••••••••••••••••••••••••••••••••••••••••••••••••••••••••••••••
7. Push the paper length adjuster in toward the card stack until it
stops.
Paper Length
Adjuster with
Handle Released
2162028
8. Replace the OUT tray. If you encounter difficulty replacing the
OUT tray, lift the top cover, wait a few moments for the print
cartridge cradles to move to the center position, replace the
OUT tray, then lower the top cover.
Make sure the cards do not bend in the IN tray.
9. Set the software to print on the size and type of cards now in the
printer.
Using Envelopes
The HP DeskJet 670C Series printer allows you to load up to 20
envelopes at a time in the IN tray or to feed a single envelope
through the printer (without first removing the paper from the
IN tray) by using the single envelope slot. When using the single
envelope slot, you can alternate printing on an envelope then on
a piece of paper. This feature is useful when printing a series of
letters and their corresponding envelopes.
N OTE
Using loosely creased or thick envelopes reduces the capacity of the IN tray.
Because of these variations in envelope styles, the IN tray might accommodate
less than 20 envelopes.
Always use envelopes that conform in weight, type, and size
with those listed in the Specifications on page 70.
••••••••••••••••••••••••••••••••••••••••••••••••••••••••••••••••••••••••••••••••••••••••••••••••••••••••••••••••••••••••••••••
38
Page 27

USING PAPER, CARDS, ENVELOPES, TRANSPARENCIES, AND LABELS
••••••••••••••••••••••••••••••••••••••••••••••••••••••••••••••••••••••••••••••••••••••••••••••••••••••••••••••••••••••••••••••
Using the Single Envelope Slot
The single envelope slot allows you to print on either a No. 10 or
a DL size envelope. Other envelope sizes are not supported with
the single envelope slot.
N OTE
Do not remove the paper from the IN tray, and be sure the card guide is in the
down position, before using the single envelope slot.
1. Remove a No. 10 or a DL size envelope from its packaging.
2. Slide the envelope evenly into the single envelope slot, address
side down (flap side up).
2184005
Make sure the creased flap edge of the envelope aligns with the
right side of the single envelope slot.
3. Slide the envelope through the slot until it stops.
Make sure the envelope is inserted all the way into the slot and
that it is not skewed or bent.
4. Set the software to print on the size and type of envelope now in
the printer.
5. Be sure to reset the software for the paper in the IN tray after
printing on the envelope is completed.
••••••••••••••••••••••••••••••••••••••••••••••••••••••••••••••••••••••••••••••••••••••••••••••••••••••••••••••••••••••••••••••
39
Page 28
SECTION TWO
••••••••••••••••••••••••••••••••••••••••••••••••••••••••••••••••••••••••••••••••••••••••••••••••••••••••••••••••••••••••••••••
Loading Envelopes in the IN Tray
1. Slide the paper width adjuster to its leftmost position.
2. Pull out the paper length adjuster and remove any paper from
the IN tray.
Paper Width
Adjuster
Paper Length
Adjuster
2184037
N OTE
Make sure the card guide (used when printing on index cards and postcards) is in
the down position. (See the drawing on page 36 in the procedure Using Index
Cards and Postcards for the location of the card guide.)
3. Remove a stack of up to 20 envelopes from their packaging and
tap the short edge of the envelopes on a flat surface to even the
stack.
4. Slide the envelopes evenly into the IN tray, address side down
(flap side up).
2184030
••••••••••••••••••••••••••••••••••••••••••••••••••••••••••••••••••••••••••••••••••••••••••••••••••••••••••••••••••••••••••••••
40
Page 29

USING PAPER, CARDS, ENVELOPES, TRANSPARENCIES, AND LABELS
••••••••••••••••••••••••••••••••••••••••••••••••••••••••••••••••••••••••••••••••••••••••••••••••••••••••••••••••••••••••••••••
5. Make sure the creased flap edge of the stack aligns with the
right side of the IN tray.
6. Slide the paper width adjuster to the right until it aligns with the
left edge of the envelope stack.
2184031
7. For size Invitation A2 and C6 envelopes, press the inside of
the paper length adjuster handle to release and lower it.
Lowering the paper length adjuster handle reduces the capacity
of the IN tray to no more than 10 envelopes.
8. For all sizes of envelopes, push the paper length adjuster in
toward the envelopes until it stops.
Paper Length
Adjuster
2184032
Make sure the envelopes do not bend in the IN tray.
9. Set the software to print on the size and type of envelopes now
in the printer.
••••••••••••••••••••••••••••••••••••••••••••••••••••••••••••••••••••••••••••••••••••••••••••••••••••••••••••••••••••••••••••••
41
Page 30
SECTION TWO
••••••••••••••••••••••••••••••••••••••••••••••••••••••••••••••••••••••••••••••••••••••••••••••••••••••••••••••••••••••••••••••
Using Avery Paper Labels
Use this procedure to print on sheets of Avery paper labels.
N OTE
Before printing on Avery paper labels, make sure that the label package states the
labels are paper labels designed specifically for use with HP InkJet printers. Also,
inspect the labels to make sure that they are not sticky, wrinkled, or pulling away
from their protective backing. Only use full sheets of Avery paper labels.
1. Slide the paper width adjuster to its leftmost position.
2. Pull out the paper length adjuster.
Paper Width
Adjuster
Paper Length
Adjuster
N OTE
2184037
Make sure the card guide (used when printing on index cards and postcards) is in
the down position. (See the drawing on page 36 in the procedure Using Index
Cards and Postcards for the location of the card guide.)
3. Remove up to 25 sheets (U.S. letter or A4 size sheets) of Avery
paper labels from their packaging. Fan the edges of the label
stack to separate the pages.
4. Place the sheets of Avery paper labels, print side down, on top
of approximately 25 sheets of plain paper. Be sure the combined
stack of labels and paper does not exceed approximately
1
(
/
cm) in height. Tap the short edge of the stack on a flat
2
surface to even the stack.
••••••••••••••••••••••••••••••••••••••••••••••••••••••••••••••••••••••••••••••••••••••••••••••••••••••••••••••••••••••••••••••
42
1
/
inch
4
Page 31

USING PAPER, CARDS, ENVELOPES, TRANSPARENCIES, AND LABELS
••••••••••••••••••••••••••••••••••••••••••••••••••••••••••••••••••••••••••••••••••••••••••••••••••••••••••••••••••••••••••••••
5. Insert the combined stack of Avery paper labels and paper
evenly into the IN tray, print side down, until it stops. Align the
right edge of the stack with the right edge of the IN tray.
2184021
6. Push the paper length adjuster in toward the printer until it
stops.
Paper Length
Adjuster
2184022
Make sure the sheets do not bend in the IN tray.
7. Set the software to print on the size, type, and orientation of
labels now in the printer. Typically, use the Normal print mode
and a plain paper type when printing on Avery paper labels.
••••••••••••••••••••••••••••••••••••••••••••••••••••••••••••••••••••••••••••••••••••••••••••••••••••••••••••••••••••••••••••••
43
Page 32

SECTION TWO
••••••••••••••••••••••••••••••••••••••••••••••••••••••••••••••••••••••••••••••••••••••••••••••••••••••••••••••••••••••••••••••
Adding Paper, Envelopes, Cards, or Transparencies
If the printer runs out of paper, envelopes, cards, or
transparencies while it is printing, the resume light flashes
and an alert box appears on your computer screen prompting
you to add in more paper. To add items to the IN tray, remove all
remaining paper from the IN tray and combine it with a new
stack of the same paper. Tap the stack on a flat surface to even
the stack. The stack should not exceed
envelopes, or transparencies and should not exceed
1
(
/
cm) for cards or Avery paper labels. Push the resume
2
1
/
inch (1 cm) for paper,
2
1
/
inch
4
button to continue printing.
Removing Paper, Envelopes, Cards, or
Transparencies
1. Remove the OUT tray.
2. Remove the paper, envelopes, cards, or transparencies.
3. Replace the OUT tray. If you encounter difficulty replacing the
OUT tray, lift the top cover, wait a few moments for the print
cartridge cradle to move to its center position, replace the OUT
tray, then lower the top cover.
2184029
N OTE
Make sure the card guide (used when printing on index cards and postcards) is in
the down position. (See the drawing on page 36 in the procedure Using Index
Cards and Postcards for the location of the card guide.)
••••••••••••••••••••••••••••••••••••••••••••••••••••••••••••••••••••••••••••••••••••••••••••••••••••••••••••••••••••••••••••••
44
Page 33

SECTION THREE
USING PRINT CARTRIDGES
Storing and Using Print Cartridges
To maintain excellent print quality from your print cartridges:
• Keep print cartridges in their sealed packages, at room
temperature (60°- 78°F or 15.6°- 26.6°C), until you are ready to
use them.
• Turn off the printer and allow the print cartridges to return to
the right side of the printer for proper capping of the nozzles
before unplugging the power module or turning off any attached
power strip.
N OTE
When either print cartridge runs out of ink, replace the empty print cartridge. If you
do not have a new print cartridge, leave the empty print cartridge in the cradle until
you can replace it. The printer will not print with only one print cartridge installed.
CAUTION
The ink in the cartridges has been carefully formulated by Hewlett-Packard to
ensure superior print quality and compatibility with the printer. Do not attempt to
refill a print cartridge; damage to the printer or print cartridge resulting from
modifying or refilling a print cartridge is not the responsibility of Hewlett-Packard.
To install the print cartridges in your printer, follow the
procedure Insert the Print Cartridges on page 7.
N OTE
Be careful not to touch the ink nozzles or the copper contacts.
••••••••••••••••••••••••••••••••••••••••••••••••••••••••••••••••••••••••••••••••••••••••••••••••••••••••••••••••••••••••••••••
45
Page 34

SECTION THREE
••••••••••••••••••••••••••••••••••••••••••••••••••••••••••••••••••••••••••••••••••••••••••••••••••••••••••••••••••••••••••••••
Aligning the Print Cartridges
You must align the black and color print cartridges each time
you replace or reinstall a print cartridge. This ensures that the
black and color inks are aligned when used together on the same
line of text or within the same picture.
N OTE
DOS users can align the print cartridges from the HP DeskJet Control Panel for
DOS. See the appendix, Printing from DOS, for details.
1. Make sure the printer is on and the power light is lit.
2. Be sure the printer’s IN tray contains plain paper.
Don’t waste your HP Premium Glossy paper by using it to align
the cartridges.
3. Double-click the HP Toolbox icon on the computer screen.
4. Click the Printer Services tab. Then click Align the print
cartridges
. Follow the directions on the computer screen.
Removing a Print Cartridge
1. With the printer turned on, open the top cover.
In a few moments the print cartridge cradles automatically move
to the center of the printer and the resume light flashes.
2. Grasp the top of the print cartridge and pull it toward you until
the cartridge pops loose.
3. Lift the print cartridge out of the cradle.
4. Discard the cartridge if it is empty of ink.
CAUTION
••••••••••••••••••••••••••••••••••••••••••••••••••••••••••••••••••••••••••••••••••••••••••••••••••••••••••••••••••••••••••••••
46
Keep new and used cartridges out of the reach of children.
Page 35
••••••••••••••••••••••••••••••••••••••••••••••••••••••••••••••••••••••••••••••••••••••••••••••••••••••••••••••••••••••••••••••
USING PRINT CARTRIDGES
Cleaning the Print Cartridges
Clean the print cartridges when you notice that lines or dots are
missing from your printed text and graphics, as shown to the
left. Usually, the print cartridges can be cleaned from the
HP Toolbox or from the buttons on the front of the printer.
N OTE
Do not clean the print cartridges unnecessarily, as this wastes ink and shortens the
print cartridge life.
N O TE
DOS users can clean the print cartridges from the HP DeskJet Control Panel for
DOS. See the appendix, DOS Printing Guide, for details.
From the HP Toolbox:
1. Double-click the HP Toolbox icon on the computer screen.
2. Click the Printer Services tab.
3. Click Clean the print cartridges. Follow the directions on the
computer screen.
From the printer buttons:
1. With the printer turned on, press and hold down the power
button.
2. While still holding down the power button, press and release
the resume button seven times.
3. Release the power button.
••••••••••••••••••••••••••••••••••••••••••••••••••••••••••••••••••••••••••••••••••••••••••••••••••••••••••••••••••••••••••••••
47
Page 36

SECTION THREE
k
v
o
••••••••••••••••••••••••••••••••••••••••••••••••••••••••••••••••••••••••••••••••••••••••••••••••••••••••••••••••••••••••••••••
Printer Cleaning Procedure
n ame jstujn
am noft juest
labore qusft
kitft ghockn
N OTE
1
2
3
Ink streaking is easily prevented or corrected by doing
scheduled cleaning to three areas of the printer: the print
cartridges, the print cartridge cradle, and the service station. It
is recommended that you preform this cleaning every 3 months.
Materials You Will Need
Before you start, make sure you have the following materials
available.
• Cotton swabs or any soft material that will not come apart or
leave fibers (for example, a scrap piece of clean cotton cloth)
• Distilled, filtered, or bottled water (Tap water may contain
contaminants that can damage the print cartridges.)
Be careful not to get ink on your hands or clothing.
Remove the Print Cartridges
1. Turn the printer on and lift the printer’s top cover. The print
cartridges will move to the center of the printer.
7539-01
2. After the print cartridges have moved to the center of the
printer, unplug the black power cord from the back of the
printer.
3. Remove the print cartridges and place them on their sides on a
scrap piece of paper.
CAUTION
••••••••••••••••••••••••••••••••••••••••••••••••••••••••••••••••••••••••••••••••••••••••••••••••••••••••••••••••••••••••••••••
48
Once you’ve removed the print cartridges, make sure that they are not outside of
the printer more than 30 minutes.
Page 37

••••••••••••••••••••••••••••••••••••••••••••••••••••••••••••••••••••••••••••••••••••••••••••••••••••••••••••••••••••••••••••••
USING PRINT CARTRIDGES
Clean the Print Cartridges
1. Grasp the black print cartridge by the colored cap.
2. Dip a clean cotton swab into distilled water and squeeze any
excess water from the swab.
3. Clean the face and edges of the print cartridge as shown. Do not
wipe the nozzle plate.
4. Hold the print cartridge up to the light to inspect for fibers on
the face and edges. If fibers are still present, repeat steps 2 and
3 until the fibers are gone.
5. Repeat steps 1-4 with the color print cartridge using a clean,
moistened cotton swab to avoid any contamination.
DO NOT Clean
Nozzle Plate
Clean
CAUTION
Keep print cartridges out of reach of children.
Clean the Print Cartridge Cradle
1. Locate the cradle that held the print cartridges.
2. Locate the three black, hook-shaped arms on the bottom of the
cradle. Slightly raising the front of the printer will give a better
view. Lower the printer before proceeding.
3. Using clean, moistened swabs, wipe the flat surfaces (shaded
area) on the undersides of each arm from back to front. Repeat
until no ink residue is seen on a clean swab.
7539-08
••••••••••••••••••••••••••••••••••••••••••••••••••••••••••••••••••••••••••••••••••••••••••••••••••••••••••••••••••••••••••••••
49
Page 38

SECTION THREE
••••••••••••••••••••••••••••••••••••••••••••••••••••••••••••••••••••••••••••••••••••••••••••••••••••••••••••••••••••••••••••••
Clean the Service Station
1. Using a clean, moistened swab, clean the rim of the sponge
holder.
2. Remove any built-up ink and fibers from the top of the sponge. If
the sponge is higher than the rim, use the cotton swab to push it
below the rim.
3. Using a clean, moistened swab, clean wiper 1 and the top
surface of cap 1.
CAUTION
4. Using a clean, moistened swab, clean wiper 2 and the top
Cap 2
Wiper 2
Cap 1
Wiper 1
Sponge
Rim
1. Reinstall the print cartridges and close the printer’s top cover.
2. Reinsert the power cord into the back of the printer.
3. Print a self-test page. On the Printer Services tab of the
4. Examine the printout for ink streaking.
N OTE
Use a light force when cleaning the print cartridge caps. A heavy force may unseat
the caps, eventually causing damage to the print cartridges.
surface of cap 2.
7539-13
Reinstall the Print Cartridges
HP Toolbox, click the Print a self-test page button.
This procedure should remove all fibers that would cause ink to streak on a print-
out; however, it is possible that fibers may have been missed. If the printout still
shows streaking, repeat the procedure until the self-test printout is clear and sharp.
It is recommended that you perform this cleaning every 3 months. This procedure
and additional maintenance tips are located on the Would Wide Web at
http://www.deskjet-support.com/maintenance.
••••••••••••••••••••••••••••••••••••••••••••••••••••••••••••••••••••••••••••••••••••••••••••••••••••••••••••••••••••••••••••••
50
Page 39

SECTION FOUR
IF YOU HAVE A PRINTING PROBLEM
How You Can Find the Solution
If you get a message at the computer screen, follow the
instructions given. If you don’t receive an error message, but you
suspect a printer problem, check the HP Toolbox: click its
Troubleshooting tab, then click the appropriate category and
explore the possible solutions. See page 52 for how to locate the
HP Toolbox. See page 52 for how to use the tabs of the
HP Toolbox for troubleshooting.
If your printer does not print, go directly to If Nothing
Prints, next. Otherwise, find the symptom that most closely
matches your printer’s problem in the following troubleshooting
tables. For each listed symptom, more than one solution is
possible. The first solution given is the most probable corrective
action for the symptom. However, if that solution does not solve
the problem, perform the other solutions in the order they
appear until the problem is solved.
If you are unable to solve a problem using the
information in this section, refer to Contacting Customer
Support at the end of this section.
••••••••••••••••••••••••••••••••••••••••••••••••••••••••••••••••••••••••••••••••••••••••••••••••••••••••••••••••••••••••••••••
51
Page 40

SECTION FOUR
•••••••••••••••••••••••••••••••••••••••••••••••••••••••••••••••••••••••••••••••••••••••••••••••••••••••••••••••••••••••••••••
Where’s the HP Toolbox?
The HP Toolbox tells you how to print and how to troubleshoot
your printing problems. It even aligns and cleans your print
cartridges for you. For each Windows system, here are a couple
of places to find it.
Windows 95
• Double-click the HP Toolbox shortcut icon on the desktop.
• Click the HP Toolbox icon in the taskbar. (The HP Toolbox icon
is displayed in the taskbar when the HP Toolbox is open and
you’re printing).
Windows 3.1x
The HP Toolbox appears on the desktop whenever you’re
printing. To open the HP Toolbox at any other time:
• Double-click the HP Toolbox icon in the HP DeskJet Utilities
group in the Program Manager.
• Double-click the HP Toolbox icon. It’s on your desktop when you
start your computer.
N OTE
If you’re having trouble finding the desktop, press ALT+TAB until you see it.
Using the HP Toolbox
When problems occur, the quickest way to find a solution is to
use the “online” troubleshooting feature. With a few clicks of the
mouse button, you’ll find your specific problem and details on
how to fix it.
1. Double-click the HP Toolbox icon.
2. Click the Troubleshooting tab.
3. Click the appropriate category.
4. Click on the description of the problem.
5. Click to further explore possible solutions.
••••••••••••••••••••••••••••••••••••••••••••••••••••••••••••••••••••••••••••••••••••••••••••••••••••••••••••••••••••••••••••••
52
Page 41

••••••••••••••••••••••••••••••••••••••••••••••••••••••••••••••••••••••••••••••••••••••••••••••••••••••••••••••••••••••••••••••
IF YOU HAVE A PRINTING PROBLEM
If Nothing Prints
When the printer is in the ready-to-print state, the power
light is lit and the resume light is off. When the computer is
sending a file to the printer, and when the printer is printing a
file, the power light blinks and the resume light is off.
When the printer needs attention or when a printer error
occurs, either the resume light blinks or both lights blink
alternately.
If both print cartridge cradles contain properly installed print
cartridges, and if paper, envelopes, cards, Avery paper labels, or
transparencies are loaded in the printer, and if the printer does
not print, observe the state of the printer’s power and resume
lights, and then find the symptom in the following table that
best matches the observed condition of your printer.
For each listed symptom, more than one solution is usually
possible. The first solution given is the most probable corrective
action for the symptom. However, if that solution does not solve
the problem, perform the other solutions in the order they
appear until the problem is solved.
Symptom Solution
Both lights on
the front of the
printer are off,
and nothing
prints.
••••••••••••••••••••••••••••••••••••••••••••••••••••••••••••••••••••••••••••••••••••••••••••••••••••••••••••••••••••••••••••••
The printer is not turned on or is improperly connected to the power source.
Make sure the power module plug is firmly inserted in the printer’s power
socket and the other end of the cord is plugged into an outlet. Make sure
any attached power strip is turned on and plugged into an outlet. If possible,
try using a different power outlet. Then turn on the printer by pressing the
power
The printer is in an undefined state. If open, close the top cover on the
printer. Cycle the power to the printer by pressing the power
may need to press the power
The printer failed or the computer-to-printer connection failed. Turn off the
printer, disconnect the printer cable from the back of the printer, and turn
the printer on again. If the lights stay off, the printer failed: see Contacting
Customer Support on page 61.
button.
button. You
button a second time.
53
Page 42

SECTION FOUR
•••••••••••••••••••••••••••••••••••••••••••••••••••••••••••••••••••••••••••••••••••••••••••••••••••••••••••••••••••••••••••••
Symptom Solution
The power
light is on, but no
page came out
of the printer.
Make sure the printer is on, that all connections are firm, and you are using
the correct cable; the bi-directional HP IEEE-1284 Compliant Parallel
Interface cable is recommended.
Make sure the top cover of the printer is closed, and you put paper into the
lower (IN) tray correctly.
The printer may not be in the ready-to-print state. Press the resume
button on the front of the printer. If the resume light is blinking, check the
error message displayed on your computer screen for additional
instructions. Resend the document. If the document still doesn’t print, cycle
the power to the printer off and back on by pressing the power button
twice. Then resend the document.
The printer is improperly connected to the computer. Make sure the printer
cable is firmly connected to the parallel port of the printer and the computer.
Close any screen saver or other software programs that are open and
running in the background. Restart Windows, then reinstall the printer
software.
Make sure your software is properly set up for the printer. Follow the
instructions in your software program’s manual.
Tape is covering the ink nozzles or vent hole of a print cartridge. Remove the
print cartridge and remove any pieces of tape. Reinstall the print cartridge.
One of the print cartridges is improperly installed in the printer. Make sure
each print cartridge snaps into place with the arrow aligned with the dot(s)
on the cradle top. Make sure that both print cartridge cradles contain a
properly installed print cartridge.
One of the print cartridges is clogged or out of ink. Clean the print cartridges
as described on page 47. If this doesn’t fix the problem, install a new print
cartridge.
Both lights are
on, and nothing
The printer failed. Turn off the printer and turn it on again. If the lights stay
on, see Contacting Customer Support on page 61.
prints.
The printer
appears to be
printing, but the
paper is blank
when ejected.
••••••••••••••••••••••••••••••••••••••••••••••••••••••••••••••••••••••••••••••••••••••••••••••••••••••••••••••••••••••••••••••
Make sure both print cartridges are properly installed, that tape is not
covering the ink nozzles, and that the cartridges are not clogged or out of ink.
Make sure you’ve selected the HP DeskJet 670C Series printer as the default
printer.
54
Page 43

••••••••••••••••••••••••••••••••••••••••••••••••••••••••••••••••••••••••••••••••••••••••••••••••••••••••••••••••••••••••••••••
IF YOU HAVE A PRINTING PROBLEM
Symptom Solution
The resume
light is blinking
and nothing
prints.
The top cover of the printer is open. Close the top cover.
One of the print cartridges is improperly installed in the printer. Open the top
cover. Make sure both print cartridges snap into place with the arrows
aligned with the dot(s) on the cradle top. Then close the top cover.
The printer is out of paper. Load paper as described in Section 2. Push the
paper length adjuster toward the paper until it stops. Make sure the paper
does not bend in the IN tray. Press the resume button on the front of
the printer.
The paper is improperly loaded. Remove paper and reload it. Push the paper
length adjuster toward the paper until it stops. Make sure the paper does not
bend in the IN tray. Press the resume button on the front of the printer.
The printer did not receive a form feed command from the software
program. Press the resume button on the printer to initiate a manual
form feed.
If Paper, Envelopes, Cards, Labels, or
Transparencies Don’t Pass Through
the Printer
Symptom Solution
Paper does not
get picked up
from the IN tray.
The paper in the IN tray is not pressed against the paper feeder of the
printer. See Section 2 for the correct paper loading procedure.
The paper path in the printer is blocked. Clear the paper path.
Paper does not
advance into the
printer, or paper
does not eject
from the printer.
••••••••••••••••••••••••••••••••••••••••••••••••••••••••••••••••••••••••••••••••••••••••••••••••••••••••••••••••••••••••••••••
You are printing on a transparency or special paper and the automatic dry
timer is operating correctly. Wait for the page to drop into the OUT tray.
Paper is improperly loaded or the OUT tray is improperly installed. See
Section 2 for paper and tray loading procedures.
Different paper types, sizes, or weights are loaded in the IN tray at the same
time. Remove the stack and reload one paper type and size.
The printer did not receive a form feed command from the software
program. When the resume light blinks, press the resume button on
the printer to initiate a manual form feed.
The paper is jammed in the printer. Clear the paper path.
55
Page 44

SECTION FOUR
•••••••••••••••••••••••••••••••••••••••••••••••••••••••••••••••••••••••••••••••••••••••••••••••••••••••••••••••••••••••••••••
Symptom Solution
Printer
advances
multiple sheets
of paper.
Printer ejects
piece after piece
of paper, printing
only a single
character on
each piece.
Envelopes do
not advance into
the printer from
the IN tray or the
single envelope
slot.
Cards do not
advance into the
printer.
The paper is stuck together. Remove the paper, separate stuck paper, and
reload it.
Too much paper is in the IN tray at one time. Remove a few sheets of paper.
Different paper types, sizes, or weights are loaded in the IN tray at the same
time. Remove the stack and reload paper of only one type and size.
The printer failed or the computer-to-printer connection failed. Turn off the
printer, disconnect the printer cable from the back of the printer, and turn
the printer on again. Print a self-test as described on page 14. If the self-test
doesn’t print, the printer failed: see Contacting Customer Support on
page 61. If the printer is not the problem, cancel all print jobs at the
computer, reconnect the printer cable, and resend the file to the printer. If
the printout is still garbled, the problem may be with the printer cable, the
cable connections, the computer port, or the selected printer driver. Try
another printer cable. If the printer cable is not the problem, see Contacting
Customer Support on page 61.
The envelopes are improperly loaded. See Section 2 for the correct
envelope loading procedure.
The envelopes in the IN tray are bent or damaged, or too many or too few
envelopes are loaded in the IN tray.
The cards are incorrectly loaded in the IN tray. See Section 2 for the correct
card loading procedure.
An unsupported type of card is loaded in the IN tray.
••••••••••••••••••••••••••••••••••••••••••••••••••••••••••••••••••••••••••••••••••••••••••••••••••••••••••••••••••••••••••••••
56
Page 45

••••••••••••••••••••••••••••••••••••••••••••••••••••••••••••••••••••••••••••••••••••••••••••••••••••••••••••••••••••••••••••••
IF YOU HAVE A PRINTING PROBLEM
If Print Quality is Poor
You can often solve print quality problems by using only the
print side of the paper, envelopes, cards, or transparencies, or
by loading a different media type.
Symptom Solution
Print is fuzzy, or
lines or dots are
missing from the
characters in the
printout, making
the ink coverage
inconsistent.
Color and black
printing are
mispositioned.
Garbled or
strange text
characters
(such as hearts
or smiling faces),
or distorted
graphic images
appear in
printout.
Ink is smearing
or paper is
wrinkling.
The connection between a print cartridge and the cradle is intermittent.
Remove the print cartridge and reinstall it.
You can control the amount of ink on the page by changing the Print Quality
(on the Setup tab of the HP print settings box).
You may have run out of ink. Replace the cartridges.
If ink is smearing or is splotchy, you might need to clean the ink cartridges,
as described on page 47.
The print cartridges need to be aligned, as described in page 46.
The printer failed or the computer-to-printer connection failed. Turn off the
printer, disconnect the printer cable from the back of the printer, and turn
the printer on again. Print a self-test as described on page 14. If the self-test
doesn’t print, the printer failed: see Contacting Customer Support on
page 61. If the printer is not the problem, reconnect the printer cable and
resend the file to the printer. If the printout is still garbled, the problem may
be with the printer cable, the cable connections, or the computer port. Try
another printer cable. If the printer cable is not the problem, see Contacting
Customer Support on page 61.
Let the ink dry before you handle the printed pages.
Make sure the paper type setting matches the type of paper, cards,
envelopes, or transparency film in the printer.
Darker intensity settings print more ink; lighter intensity settings print less ink.
Reduce the amount of ink printed by manually reducing the intensity setting.
The paper is inappropriate. Try another type of paper.
The wrong type of labels were used or the labels were loaded incorrectly in
the IN tray. The ink does not dry on plastic and clear labels.
The print cartridges, cradle, or service station needs cleaning. Perform the
cleaning procedures as described beginning on page 48.
••••••••••••••••••••••••••••••••••••••••••••••••••••••••••••••••••••••••••••••••••••••••••••••••••••••••••••••••••••••••••••••
57
Page 46

SECTION FOUR
•••••••••••••••••••••••••••••••••••••••••••••••••••••••••••••••••••••••••••••••••••••••••••••••••••••••••••••••••••••••••••••
If Margins are Printed Wrong
If the placement of text and pictures on your printed pages is
not what you expected, first be sure that you have set your
software to print within the printable area for the size and
orientation of paper, envelopes, or cards loaded in the printer.
Symptom Solution
Margins are not
printing as
expected.
Printing is
slanted on
paper,
envelope, or
card.
Check your margin settings in the software program; make sure they are in
accordance with those listed in this User’s Guide.
Check the page orientation in the software program or in the HP print
settings box. Make sure the paper is loaded in the correct orientation.
Paper. The paper was improperly loaded. Align the paper stack against the
right side of the printer. Make sure no paper is over the paper width adjuster.
Make sure the paper does not bend in the IN tray.
Cards. The cards are incorrectly loaded into the printer. Make sure the card
guide is raised and align the right edge of the card stack against the card
guide.
Envelopes. The left margin of the envelope is always at least 0.84 inch
(21 mm). The envelopes are incorrectly loaded into the printer. Align the
envelope stack against the right side of the IN tray. Make sure the card guide
is down. When printing on an individual envelope inserted into the single
envelope slot, make sure the right side of the envelope presses evenly
against the right side of the single envelope slot.
The paper is improperly loaded, or the OUT tray is improperly installed. See
Section 2 for the correct paper and tray loading procedures.
Unsupported or different paper types, sizes, or weights are loaded in the
printer. Remove the stack and reload paper of only one type, size, and
weight.
••••••••••••••••••••••••••••••••••••••••••••••••••••••••••••••••••••••••••••••••••••••••••••••••••••••••••••••••••••••••••••••
58
Page 47

••••••••••••••••••••••••••••••••••••••••••••••••••••••••••••••••••••••••••••••••••••••••••••••••••••••••••••••••••••••••••••••
IF YOU HAVE A PRINTING PROBLEM
If Text or Pictures are Printed Wrong
If the text or pictures of your documents are printed incorrectly
on the pages, first be sure that you have set your software to
print within the printable area of the paper loaded in the printer.
Then make sure that you have used the formatting features of
your software to create the design or layout as you intended.
Symptom Solution
Font selections
are not printing.
The printout is
illegible.
Black and white
instead of color,
or wrong colors
are printed.
The fonts are not installed or are selected improperly. See your software
program manual for selecting fonts within the program. Also make sure that
the selected fonts are installed on your computer.
The wrong printer driver may be selected. Reinstall the printer driver using
the installation instructions in First Time Setup.
The print settings in your software program are incorrect. Make sure the print
settings in your software program are set as desired.
See If Print Quality is Poor on page 57.
See If Colors are Printed Wrong next.
If Colors are Printed Wrong
If you observe that the colors in your documents are printed
incorrectly on the pages, first be sure that you have set your
software for color printing. Next, be sure the print cartridges are
aligned.
If you still experience problems with the printing of colors, find
the symptom and solution in the following table.
Symptom Solution
Missing colors. Color printing is not selected in your software. Be sure to select a color
••••••••••••••••••••••••••••••••••••••••••••••••••••••••••••••••••••••••••••••••••••••••••••••••••••••••••••••••••••••••••••••
printout mode in the HP print settings box.
The color print cartridges may need cleaning. Clean the print cartridges as
described on page 47.
Make sure you didn’t select Print in Grayscale in the HP print settings box.
59
Page 48

SECTION FOUR
•••••••••••••••••••••••••••••••••••••••••••••••••••••••••••••••••••••••••••••••••••••••••••••••••••••••••••••••••••••••••••••
Symptom Solution
Printed colors
don’t match
screen colors.
Colors appear
washed out.
Black ink is
mixing with color
ink along the
print boundaries.
Black printing is
fading and the
colors are
missing or hues
are changing.
The print settings are inappropriate. See your software program’s manual for
the correct print settings.
The color print cartridge has run out of one or more inks. Install a new color
print cartridge.
The paper is inappropriate. Try another type of paper. For high-quality color
printing results, use HP Premium Glossy Paper.
One of the print cartridges is clogged. Print a self-test as described on
page 14.
You can control the amount of ink on the page by changing the Print Quality
(on the Setup tab of the HP print settings box). If the printing appears faded
or the colors are dull, click Normal or Best. If the colors bleed into one
another or the ink smears on the sheet, click Normal or EconoFast. You may
have run out of ink. Replace the cartridges.
The paper is inappropriate. Try another type of paper. See Section 5. For
high-quality color printing results, use HP Premium Glossy Paper.
The transparency was moved or placed in a protective sleeve while still wet.
Allow 10 to 15 minutes for the ink to dry before moving it
The print settings are inappropriate. See your software program’s manual for
the correct print settings.
The paper is inappropriate. Try another type of paper.
The print cartridges are misaligned. Align the print cartridges as described on
page 46.
One of the print cartridges is running out of ink. Replace the empty print
cartridge and align the print cartridges as described on page 46.
A print cartridge is dirty or clogged. Print a self-test as described on page 14.
Black and white
output instead of
color.
Color printing is not selected in your software; be sure to select a color
printout mode.
Make sure you do not have Print in Grayscale selected in the HP print setting
box.
The color settings are inappropriate; adjust them in the software.
••••••••••••••••••••••••••••••••••••••••••••••••••••••••••••••••••••••••••••••••••••••••••••••••••••••••••••••••••••••••••••••
60
Page 49

••••••••••••••••••••••••••••••••••••••••••••••••••••••••••••••••••••••••••••••••••••••••••••••••••••••••••••••••••••••••••••••
IF YOU HAVE A PRINTING PROBLEM
Contacting Customer Support
If you have questions, either general ones regarding how your
printer works or specific ones regarding a problem you’re
having, you have several possibilities for getting the answers.
Troubleshooting using the Toolbox
If you have a specific problem, the quickest way to find a
solution might be right at your fingertips. Check the online
troubleshooting feature, located in the HP Toolbox (see page 52
to find out how to get to the Toolbox). If the suggestions in the
Toolbox don’t solve your problem, you still have many options,
as described next.
Electronic support information
If you have a modem connected to your computer and subscribe
to an online service or have direct access to the Internet, you
can obtain a wide variety of information about your printer.
User forums
You can get friendly help from knowledgeable users and system
operators in the CompuServe and America Online user forums.
In the user forums, you can leave your question and check back
later for ideas and solutions suggested by other users. You can
read through old messages left by other users to see if anyone
else has had a problem similar to yours, and has provided the
solution online.
Also, both forums keep a list of FAQs (Frequently Asked
Questions) which you can peruse for hints.
CompuServe: Go to the HP Peripherals forum (Go HPPER). To
subscribe to CompuServe, in the U.S. call 1-800-848-8199 and
ask for representative #51. Candadian residents should consult
their phone directory for the nearest CompuServe office. (This
service is not operated by Hewlett-Packard.)
America Online: Access the HP forum. Click “keyword” on the
“Go To” menu, type “HP”, and press the Enter key to bring the
HP forum home page directly to your screen.
••••••••••••••••••••••••••••••••••••••••••••••••••••••••••••••••••••••••••••••••••••••••••••••••••••••••••••••••••••••••••••••
61
Page 50

SECTION FOUR
•••••••••••••••••••••••••••••••••••••••••••••••••••••••••••••••••••••••••••••••••••••••••••••••••••••••••••••••••••••••••••••
HP web site
If you have access to the Internet, you can check out HP’s web
site at URL http://www.hp.com or
http://www.hp.com/go/peripherals for support documentation
and the latest news from HP.
HP First Fax
Technical documentation and troubleshooting information is
available 24 hours a day, seven days a week, every day of the
year. Dial (800) 333-1917 from any touch-tone phone to access
HP First Fax. By selecting from a series of menu choices, you
can identify documents containing the information you need.
You may request up to three documents per call. We’ll fax them
to you within minutes.
Printer software
Printer software allows your printer to talk with your computer.
(Printer software is also referred to as a printer driver or a
printer file.) If you need to replace or upgrade a printer driver,
you have several options:
• Download the driver by accessing CompuServe, America Online,
or HP’s web site, as described on the previous page.
• Download the driver from the HP Bulletin Board. You’ll need a
modem and communications software, set to N, 8, 1. Dial (208)
344-1691 and choose from the menus provided.
• If you don’t have access to CompuServe, America Online, or the
World Wide Web, you can get a new driver (if one is available)
on disks. HP provides Windows 3.1, 3.11, or Windows 95 printer
drivers and printer driver updates for the cost of the disks plus
shipping. You can order them by calling (970) 339-7009
Monday-Saturday, 24 hours a day. (For DOS printer drivers,
contact the manufacturer of your software program.)
••••••••••••••••••••••••••••••••••••••••••••••••••••••••••••••••••••••••••••••••••••••••••••••••••••••••••••••••••••••••••••••
62
Page 51

••••••••••••••••••••••••••••••••••••••••••••••••••••••••••••••••••••••••••••••••••••••••••••••••••••••••••••••••••••••••••••••
IF YOU HAVE A PRINTING PROBLEM
Calling HP Customer Support
Our friendly support staff can help you get your printer up and
running or help you figure out how to get your broken printer
repaired. Call our HP support phone at (208) 344-4131. They’re
ready to help you Monday-Friday from 6:00 am to 10:00 pm
(MST) and Saturdays from 9:00 am to 4:00 pm (MST).
The Customer Support representatives might ask you to try a
few things, so please be at your computer and printer when you
call. This service is free during the warranty of your printer; only
long distance charges may apply.
After the warranty
You can still get help from HP, for a fee. Prices are subject to
change without notice. (Online help is still available for free!)
• For quick questions in the United States only, call (900) 555-
1500. The charges are $2.50 per minute and begin when you
connect with a support technician.
• For calls from Canada, or for calls in the U.S. that you anticipate
might be longer than ten minutes in length, call (800) 999-1148.
The fee is $25 per call, charged to your Visa or MasterCard.
• HP also offers a variety of options to complement the standard
warranty. Call (800) 446-0522 in the U.S. or (800) 268-1221 in
Canada for details.
Extended warranty options
If you would like to extend your printer coverage beyond the
one year factory warranty, you have the following options:
• Consult your reseller to get extended coverage.
• If your reseller does not offer service contracts, please call
Hewlett-Packard directly and ask about our service agreement
offering. In the U.S. call (800) 446-0522, in Canada call (800)
268-1221. For service agreements outside the U.S. and Canada,
contact your local HP Sales Office.
A note about letters
If you need technical help or have something you want to say to
HP, it is best that you call us when you are in front of your
computer and printer. This way we can work through the
problem quickly. If you write a letter to HP, then we must call
you back, which can be very difficult to do. Because of this, we
request that you call us rather than write us, so we can help you
immediately!
••••••••••••••••••••••••••••••••••••••••••••••••••••••••••••••••••••••••••••••••••••••••••••••••••••••••••••••••••••••••••••••
63
Page 52

SECTION FOUR
•••••••••••••••••••••••••••••••••••••••••••••••••••••••••••••••••••••••••••••••••••••••••••••••••••••••••••••••••••••••••••••
••••••••••••••••••••••••••••••••••••••••••••••••••••••••••••••••••••••••••••••••••••••••••••••••••••••••••••••••••••••••••••••
64
Page 53

SECTION FIVE
REFERENCE, SPECIFICATIONS,
AND ORDERING INFORMATION
Maintaining Your Printer
• Use a soft cloth moistened with water to wipe dust, smudges,
and stains off.
• Keep print cartridges in their sealed containers, at room
temperature, until you are ready to use them.
• Keep the print cartridges in their print cartridge cradles at all
times to keep them from drying out or becoming clogged.
• Do not unplug the printer before printing is complete and the
print cartridge cradles have returned to their “home” position on
the right side of the printer; doing so can dry out the print
cartridges.
• The printer does not work with only one print cartridge
installed. If one of the print cartridges runs out of ink, leave the
empty cartridge in the cradle until you can replace it.
• The interior of the printer does not require cleaning. Keep fluids
away from the interior of the printer.
••••••••••••••••••••••••••••••••••••••••••••••••••••••••••••••••••••••••••••••••••••••••••••••••••••••••••••••••••••••••••••••
65
Page 54

SECTION FIVE
•••••••••••••••••••••••••••••••••••••••••••••••••••••••••••••••••••••••••••••••••••••••••••••••••••••••••••••••••••••••••••••
Increasing Printer Performance
The print speed and overall performance of your printer can be
affected by several things:
• The amount of RAM in your computer can determine how fast
your documents are sent to the printer. Increasing the amount
of RAM in your computer can speed up this process as well as
make your computer work more efficiently when you are doing
other things besides printing.
• The printer driver that you are using to print your documents
can make a significant difference in the quality of your printed
output. Make sure you are using an up-to-date version of an HP
printer driver designed specifically for your printer model. See
Contacting Customer Support on page 61 for how to get an
updated printer driver.
• The size and complexity of the documents you print can make a
difference in your printer’s performance. Graphics are usually
more complex and print more slowly than a file that contains
only text.
• The processing speed of your computer determines how fast
your document is sent to the printer. For example, a computer
with a 486 processor runs faster than a computer with a 386
processor.
• Running numerous software programs at one time slows down
printing, because they are using the RAM in your computer.
Therefore, limit the number of programs or documents you
open at one time.
• Screen fonts are stored in RAM, which means they use up
memory that the printer may need in order to print. Delete fonts
you do not often use.
••••••••••••••••••••••••••••••••••••••••••••••••••••••••••••••••••••••••••••••••••••••••••••••••••••••••••••••••••••••••••••••
66
Page 55

••••••••••••••••••••••••••••••••••••••••••••••••••••••••••••••••••••••••••••••••••••••••••••••••••••••••••••••••••••••••••••••
REFERENCE, SPECIFICATIONS, AND ORDERING INFORMATION
Ink Drying Times
The HP DeskJet 670C Series printer automatically sets the
drying time for each printed page (based on paper type, print
quality, and inks printed) to ensure that the ink does not smear
before the page is ejected into the OUT tray. You can override
the automatic timer and force the page to be ejected into the
OUT tray by pressing the resume button. The standard times
allotted for ink drying are listed in the following table.
Standard Drying Times
Paper Type
Plain Paper 0 sec. 0 sec. 14 sec. 20 sec. 25 sec. 25 sec.
Premium Paper 0 sec. 0 sec. 15 sec. 20 sec. 25 sec. 25 sec.
Transparency or
Glossy Paper
EconoFast
Black Color
1 min. 2 min. 3 min. 6 min. 4 min. 6 min.
Normal
Black Color
Black Color
Best
About Page Orientation
The HP DeskJet 670C Series printer prints in portrait or
landscape orientation. Portrait orientation is the default for
paper; landscape is the default for envelopes. Select the page
orientation in your software program or in the Paper tab of the
printer software.
Portrait
Custom Paper Limitations
When the Custom Paper Size paper setting is selected in the
printer software, the paper width must be between 5 and 8.5
inches (127 and 215 mm) and the paper length must be
between 5.83 and 14 inches (148 and 356 mm).
Landscape
The Printable Area
The HP DeskJet 670C Series printer can print within the area
described here. Most software programs allow you to specify
where print appears on the page with margin settings or column
width settings. When you set margins or columns in your
software, be sure to set them within the printer’s printable area.
••••••••••••••••••••••••••••••••••••••••••••••••••••••••••••••••••••••••••••••••••••••••••••••••••••••••••••••••••••••••••••••
67
Page 56

SECTION FIVE
•••••••••••••••••••••••••••••••••••••••••••••••••••••••••••••••••••••••••••••••••••••••••••••••••••••••••••••••••••••••••••••
Minimum Margins* for Paper and Cards in Portrait Orientation from
Windows Programs
Paper Size
U.S. letter 8.5 x 11 in. (216 x 279 mm) 0.25 in. (6.3 mm) 0.59 in. (14.9 mm)
U.S. legal 8.5 x 14 in. (216 x 356 mm) 0.25 in. (6.3 mm) 0.59 in. (14.9 mm)
A4 size 8.27 x 11.7 in. (210 x 297 mm) 0.13 in. (3.4 mm) 0.59 in. (14.9 mm)
A5 size 5.8 x 8.3 in. (148 x 210 mm) 0.125 in. (3.2 mm) 0.84 in. (21.2 mm)
B5 size 7.2 x 10.1 in. (182 x 257 mm) 0.167 in. (4.2 mm) 0.84 in. (21.2 mm)
Executive 7.25 x 10.5 in. (184 x 267 mm) 0.25 in. (6.3 mm) 0.59 in. (14.9 mm)
U.S. cards 4 x 6 in. (102 x 152 mm) 0.125 in. (3.2 mm) 0.84 in. (21.2 mm)
U.S. cards 5 x 8 in. (127 x 203 mm) 0.125 in. (3.2 mm) 0.84 in. (21.2 mm)
A6 cards 4.1 x 5.83 in. (105 x 148 mm) 0.125 in. (3.2 mm) 0.84 in. (21.2 mm)
Hagaki postcards 3.9 x 5.8 in. (100 x 148 mm) 0.167 in. (4.2 mm) 0.84 in. (21.2 mm)
*Note: The top margin is 0.04 inch (1 mm) for all paper sizes.
Left and Right
Margins
Bottom Margin
Minimum Margins* for Envelopes in Landscape Orientation
from Windows Programs
Envelope Size Left Margin Right Margin
U.S. No. 10 4.12 x 9.5 in. (105 x 241 mm) 0.84 in. (21.2 mm) 0.04 in. (1 mm)
DL 4.33 x 8.66 in. (110 x 220 mm) 0.84 in. (21.2 mm) 0.04 in. (1 mm)
C6 4.48 x 6.37 in. (114 x 162 mm) 0.84 in. (21.2 mm) 0.04 in. (1 mm)
Invitation A2 4.37 x 5.75 in. (111 x 146 mm) 0.84 in. (21.2 mm) 0.04 in. (1 mm)
*Note: The top and bottom margins are 0.125 inch (3.2 mm) for all envelope sizes.
N OTE
The printing margins in effect when printing from a DOS program can vary. See
the documentation provided with your DOS program for more information.
••••••••••••••••••••••••••••••••••••••••••••••••••••••••••••••••••••••••••••••••••••••••••••••••••••••••••••••••••••••••••••••
68
Page 57

••••••••••••••••••••••••••••••••••••••••••••••••••••••••••••••••••••••••••••••••••••••••••••••••••••••••••••••••••••••••••••••
REFERENCE, SPECIFICATIONS, AND ORDERING INFORMATION
Printable Areas:
Printable Area
For Sheet Paper:
Printable Area
For Cards:
Printable Area
Printable Area
U.S. 4x6 Cards
95 x 129 mm
(3.75 X 5.12 in.)
U.S. 5x8 Cards
121 x 179 mm
(4.75 x 7.12 in.)
A6 Cards
99 x 125 mm
(3.88 x 4.95 in.)
Hagaki Postcards
92 x 124 mm
(3.6 x 4.92 in.)
U.S. letter size paper
203 x 262 mm (8.0 x 10.37 in.)
U.S. legal size paper
203 x 337 mm (8.0 x 13.37 in.)
A4 size paper
203 x 279 mm (8.0 x 11.07 in.)
A5 size paper
140 x 187 mm (5.55 x 7.42 in.)
B5 size paper
174 x 233 mm (6.8 x 9.22 in.)
Executive size paper
171 x 249 mm (6.75 x 9.87 in.)
Printable Area
For Envelopes:
Printable Area
U.S. No. 10 98 x 218 mm (3.88 x 8.62 in.)
DL 104 x 196 mm (4.08 x 7.78 in.)
C6 107 x 139 mm (4.24 x 5.49 in.)
A2 105 x 122 mm (4.13 x 4.87 in.)
••••••••••••••••••••••••••••••••••••••••••••••••••••••••••••••••••••••••••••••••••••••••••••••••••••••••••••••••••••••••••••••
69
Page 58

SECTION FIVE
•••••••••••••••••••••••••••••••••••••••••••••••••••••••••••••••••••••••••••••••••••••••••••••••••••••••••••••••••••••••••••••••
Specifications
Print Method
Plain paper drop-on-demand thermal inkjet
printing
Black Print Speed*
Best mode: 1 page per minute
Normal mode: 2.5 pages per minute
Normal mode (DOS): 134 cps at 10 cpi
EconoFast: 4 pages per minute
EconoFast (DOS): 270 cps at 10 cpi
Color Print Speed*
Best mode: 0.3 pages per minute
Normal mode: 0.75 pages per minute
EconoFast: 1.5 pages per minute
Black Resolution
Best mode: 600 x 600 dpi
Normal mode: 600 x 300 dpi
EconoFast: 300 x 300 dpi
Color Resolution
300 x 300 dpi on plain paper
Resolution on glossy and premium
paper and transparency film:
600 x 300 dpi black and color
DOS (graphics)
Full-page 75, 150, 300 dpi
Printer Command Language
HP PCL Level 3
Character Sets
United Kingdom (ISO 4), German (ISO 21),
French (ISO 69), Italian (ISO 15), Danish/
Norwegian (ISO 60), Swedish (ISO 11), Spanish
(ISO 17), ANSI ASCII (ISO 6), Legal, PC-8,
Roman-8, PC-850, PC-8 Danish/Norwegian,
ECMA-94 Latin 1 (ISO 8859/1), PC-852, Latin 2
(ISO 8859/2), Latin 5 (ISO 8859/9), and PC-8
Turkish
Vertical Alignment
± 0.002 in.
Software Compatibility
MS Windows compatible.
Compatible with an extensive range of DOS
software programs.
OS/2 compatible.
Reliability
20,000 hours MTBF
1000 total pages per month max.
Built-in (internal) Fonts
Courier (Portrait and Landscape
Orientations)
Pitch: 5, 10, 16.67, 20 cpi
Point size: 6, 12, 24 pt.
Style: Upright (Italic: 5, 10, 20 cpi)
Stroke weight: Normal, Bold
CG Times (Portrait and Landscape
Orientations)
Pitch: Proportional
Point size: 5, 6, 7, 8, 10, 12, 14 pt
Style: Upright, Italic
Stroke weight: Normal, Bold
Letter Gothic (Portrait and Landscape
Orientations)
Point and pitch: 6, 12, and 24 pt. for 6,12 and
24 cpi
(Upright Only): 4.75, 9.5, and 19 pt. for
16.67 cpi
Style: Upright
Stroke weight: Normal, Bold
Univers (Portrait and Landscape
Orientations)
Pitch: Proportional
Point size: 5, 6, 7, 8, 10, 12, 14 pt
Style: Upright (Italic: 5, 6, 10, 12 pt)
Stroke weight: Normal, Bold
Product Certifications
Safety Certifications with Power Module:
C2175A-UL, CSA, NOM C2176A-UL, TÜV,
SEMKO, NEMKO, FIMKO, KEMA, LCIE, EZU,
SEV C2177A-UL, SINGAPORE C2178A-UL, JET
C2179A-UL C2180A-UL, SABS C2181A-UL,
AUSTRALIA C2182A-UL, JUN
EMI Certifications with Power Module: FCC Class
B when used with a Class B computing device
(USA), EMC Directive 89/336/EEC (European
Community), VCCI (Japan), SABS (So. Africa)
*Approximate figures. Exact speed will vary
depending on the system configuration, software
program, and document complexity.
••••••••••••••••••••••••••••••••••••••••••••••••••••••••••••••••••••••••••••••••••••••••••••••••••••••••••••••••••••••••••••••
70
Page 59

••••••••••••••••••••••••••••••••••••••••••••••••••••••••••••••••••••••••••••••••••••••••••••••••••••••••••••••••••••••••••••••
REFERENCE, SPECIFICATIONS, AND ORDERING INFORMATION
Recommended Media Weight
Paper: 60 to 135 g/m2 (16 to 36 lb)
Envelopes: 75 to 90 g/m
2
(20 to 24 lb)
Cards: 110 to 200 g/m2 (110 lb index max.; 8.5 pt
max. thickness)
Media Size
US letter 216 x 279 mm (8.5 x 11 in.)
US legal 216 x 356 mm (8.5 x 14 in.)
Executive 184 x 267 mm (7.25 x 10.5 in.)
EuropeanA4 210 x 297 mm
European A5 148.5 x 210 mm
B5-JIS 182 x 257 mm
Custom size: Width 127 to 216 mm (5.0 to 8.5
in.); Length 148 to 356 mm (5.83 to 14 in.)
US No. 10 envelope 104.7 x 241.3 mm (4.12 x 9.5
in.)
Invitation A2 Envelope (5.5) 4
3
/8 x 5 3/4 in.
European DL envelope 220 x 110 mm
European C6 envelope 114 x 162 mm
Index card 101.6 x 152.4 mm (4 x 6 in.)
Index card 127 x 203.2 mm (5 x 8 in.)
European A6 card 105 x 148.5 mm
Japanese Hagaki Postcard 100 x 148 mm
US HP Premium Transparency Film 216 x 279 mm
(8.5 x 11 in.)
European A4 HP Premium Transparency Film
210 x 297 mm
US HP Premium Glossy Paper 216 x 279 mm
(8.5 x 11 in.)
European A4 HP Premium Glossy Paper
210 x 297 mm
US HP Premium InkJet Paper 216 x 279 mm
(8.5 x 11 in.)
European A4 HP Premium InkJet Paper
210 x 297 mm
Media Handling (Built-In Feeders)
Sheets: up to 100 sheets
Multiple envelopes: up to 20 envelopes
Single envelope: only 1 envelope
Cards: up to 30 cards
Transparencies: up to 50 sheets
Labels: up to 25 sheets of Avery paper labels. Use
only U.S. letter or A4 size sheets. Use only Avery
paper labels specifically designed for use with HP
InkJet printers.
OUT tray capacity: up to 50 sheets
Buttons/Lights
Resume and power
I/O Interface
Centronics parallel, IEEE 1284 compliant with
1284-B receptacle
Printer Memory
512 Kbyte built-in RAM
32 Kbyte receive buffer
Dimensions
436 mm (17.2 in.) W x 199 mm (7.9 in.) H x
405 mm (16 in.) D
Weight
5.3 kg (11.6 lb)
Power Requirements
Power modules:
Input Voltage (depends on power module
ordered): 100, 120, 127, 220, 230, or 240 VAC
(+10%, -10%)
Frequency:
100 VAC 50/60 Hz (+3 Hz, -3 Hz)
120 VAC 60 Hz (+3 Hz, -3 Hz)
127 VAC 60 Hz (+3 Hz, -3 Hz)
220 VAC 50 Hz (+3Hz, -3 Hz)
220 VAC 60 Hz (+ 3 Hz, -3 Hz)
230 VAC 50 Hz (+3Hz, -3 Hz)
240 VAC 50 Hz (+3 Hz, -3 Hz)
Power consumption:
2 watts maximum when off
4.5 watts maximum non-printing
12 watts maximum printing
Operating Environment
Maximum operating temperature:
5°C (41°F) to 40°C (104°F)
Humidity: 10-80% RH non-condensing
Recommended operating conditions for best
print quality: 15°C (59°F) to 35°C (95°F), 20 to
80% RH non-condensing
Storage temperature: -40°C (-40°F) to 60°C
(140°F)
Declared noise emissions in accordance with ISO
9296:
Normal
Sound Power, L
Sound Pressure, L
: (1B =10dB)
wAd
: (bystander positions)
pAm
Mode
6.3 B
50 dB
••••••••••••••••••••••••••••••••••••••••••••••••••••••••••••••••••••••••••••••••••••v•••••••••••••••••••••••••••••••••••••••••
71
Page 60

SECTION FIVE
•••••••••••••••••••••••••••••••••••••••••••••••••••••••••••••••••••••••••••••••••••••••••••••••••••••••••••••••••••••••••••••
Regulatory Notices
FCC Statement (USA)
The United States Federal Communications Commission (in 47 CFR 15.105) has specified that the
following notice be brought to the attention of users of this product.
This equipment has been tested and found to comply with the limits for a Class B digital device,
pursuant to part 15 of the FCC Rules. These limits are designed to provide reasonable protection
against harmful interference in a residential installation. This equipment generates, uses and can
radiate radio frequency energy and, if not installed and used in accordance with the instructions may
cause harmful interference to radio communications. However, there is no guarantee that
interference will not occur in a particular installation. If this equipment does cause harmful
interference to radio or television reception, which can be determined by turning the equipment off
and on, the user is encouraged to try to correct the interferences by one or more of the following
measures:
• reorient or relocate the receiving antenna
• increase the separation between the equipment and the receiver
• connect the equipment into an outlet on a circuit different from that to which the receiver is
connected
• consult the dealer or an experienced radio/TV technician for help
Use of a shielded cable is required to comply within Class B limits of Part 15 of FCC Rules.
Pursuant to Part 15.21 of the FCC Rules, any changes or modifications to this equipment not
expressly approved by Hewlett-Packard Company may cause harmful interference and void the FCC
authorization to operate this equipment.
LED Indicator Statement
The display LEDs meet the requirements of
EN 60825-1.
Power Adapter Statement
The power adapter cannot be repaired. If it is
defective it should be discarded or returned to the
supplier.
RRL (Korean) Class B Product
.
VCCI (Japan) Class 2 Product
••••••••••••••••••••••••••••••••••••••••••••••••••••••••••••••••••••••••••••••••••••••••••••••••••••••••••••••••••••••••••••••
72
Page 61

••••••••••••••••••••••••••••••••••••••••••••••••••••••••••••••••••••••••••••••••••••••••••••••••••••••••••••••••••••••••••••••
REFERENCE, SPECIFICATIONS, AND ORDERING INFORMATION
Available Supplies and Accessories
Supply/Accessories HP Reorder Number
HP IEEE-1284 Compliant Parallel Interface Cable
(with one 1284-A connector for the computer port and one 1284-B
connector for the printer port)
2 meter length C2950A
3 meter length C2951A
HP Centronics Parallel Interface Cable C2912B or HP24542D
Print Cartridge
Black Print Cartridge 51629A or 29A
Color Print Cartridge 51649A or 49A
Media
HP Premium Transparency Film (U.S. letter, 50 sheets) C3834A
HP Premium Transparency Film (U.S. letter, 20 sheets) C3828A
HP Premium Transparency Film (European A4, 50 sheets) C3835A
HP Premium Transparency Film (European A4, 20 sheets) C3832A
HP Premium Glossy Paper (U.S. Letter, 50 sheets) C3836A
HP Premium Glossy Paper (U.S. Letter, 10 sheets) C3833A
HP Premium Glossy Paper (European A4, 50 sheets) C3837A
HP Premium Glossy Paper (European A4, 10 sheets) C3831A
HP Premium InkJet Paper (U.S. Letter, 200 sheets) 51634Y
HP Premium InkJet Paper (European A4, 200 sheets) 51634Z
HP Greeting Card Paper (20 sheets, 20 envelopes) C1812A
HP Photo Paper (U.S. Letter, 20 sheets) C1846A
HP Photo Paper (European A4, 20 sheets) C1847A
HP Bright White InkJet Paper (U.S. Letter, 500 sheets) C1824A
HP Bright White InkJet Paper (European A4, 500 sheets) C1825A
HP PrinterPal Fax Accessory C2970A
••••••••••••••••••••••••••••••••••••••••••••••••••••••••••••••••••••••••••••••••••••••••••••••••••••••••••••••••••••••••••••••
73
Page 62

SECTION FIVE
•••••••••••••••••••••••••••••••••••••••••••••••••••••••••••••••••••••••••••••••••••••••••••••••••••••••••••••••••••••••••••••
Replaceable Parts HP Reorder Number
Power Module
U.S.A., Canada 120V/60Hz 9100-5124 (C2175A)
Europe (except U.K.), 230V/50Hz 9100-5132 (C2176A)
Japan, 100V/50/60 Hz 9100-5130 (C2178A)
U.K., 240V/50Hz 9100-5131 (C2177A)
South Africa, 220V/50Hz 9100-5128 (C2180A)
Australia, 240V/50Hz 9100-5127 (C2181A)
China, Argentina, 220V/50Hz 9100-5129 (C2179A)
Korea, 220V/60Hz 9100-5126 (C2182A)
HP DeskJet 670C Series Printer User’s Guides
U.S. English User’s Guide C5884-90126
Asian English User’s Guide C5884-90127
International English User’s Guide C5884-90128
Simplified Chinese User’s Guide C5884-90146
French User’s Guide C5884-90134
German User’s Guide C5884-90135
Italian User’s Guide C5884-90139
Spanish User’s Guide C5884-90147
Dutch User’s Guide C5884-90132
Swedish User’s Guide C5884-90148
Norwegian User’s Guide C5884-90142
Danish User’s Guide C5884-90131
Finnish User’s Guide C5884-90133
Portuguese User’s Guide C5884-90144
Hungarian User’s Guide C5884-90138
Polish User’s Guide C5884-90143
Czechoslovakian User’s Guide C5884-90130
Russian User’s Guide C5884-90145
Turkish User’s Guide C5884-90151
Greek User’s Guide C5884-90136
Arabic User’s Guide C5884-90129
Thai User’s Guide C5884-90149
Hebrew User’s Guide C5884-90137
Japanese User’s Guide C5884-90140
Korean User’s Guide C5884-90141
Traditional Chinese User’s Guide C5884-90150
Access Door (Top Cover) Assembly C5884-60018
Base Foot Assembly (4 ea.) C2162-60098
Paper Tray Assembly C5884-60016
••••••••••••••••••••••••••••••••••••••••••••••••••••••••••••••••••••••••••••••••••••••••••••••••••••••••••••••••••••••••••••••
74
Page 63

••••••••••••••••••••••••••••••••••••••••••••••••••••••••••••••••••••••••••••••••••••••••••••••••••••••••••••••••••••••••••••••
REFERENCE, SPECIFICATIONS, AND ORDERING INFORMATION
Ordering Information
To order printer supplies or accessories, call your nearest HP dealer.
If your dealer does not have the supplies, call HP DIRECT at the following
numbers for fast shipping service:
U.S.
• Within the U.S.: (800) 538-8787
• To order replaceable parts within the U.S.: (800) 227-8164
• For information on HP Service Agreements within the U.S.:
(800) 835-4747 (Monday–Friday: 7:30 am to 12 noon PST and 1:00 pm
to 4:00 pm PST)
Canada
• Canada: (800) 387-3154, (905) 206-4725,
Fax: (905) 206-3485/-3739,
Hewlett-Packard (Canada) Ltd., 5150 Spectrum Way,
Mississauga, Ontario L4W 5G1
• Toronto: (416) 671-8383
Latin America
• Latin America Headquarters:
(305) 267-4220,
Fax: (305) 267-4247,
5200 Blue Lagoon Drive, Suite 950,
Miami, FL 33126
• Argentina:
(54 1) 781-4061/69, Fax: (54 1) 781-4090,
Hewlett-Packard Argentina, Montañeses 2140,
1428 Buenos Aires, Argentina
• Brazil:
(5511) 725-1444, Fax: (5511) 725-1244,
Edisa Hewlett-Packard, Alameda Rio Negro, 750 Alphaville,
06400 Barueri São Paulo, Brazil
• Chile:
(56 2) 203-3233, Fax: (56 2) 203-3234,
Hewlett-Packard de Chile SA, Av. Andres Bello 2777, Oficina 1302, Las
Condes, Santiago, Chile
• Mexico:
(52 5) 326-4600, Fax: (54 1) 326-4539,
Hewlett-Packard de México, S.A. de C.V, Prolongación Reforma 470,
Colonia Lomas de Santa Fe, C.P. 01210 México, D.F.
• Venezuela:
(58 2) 239-5664/-4244/-4133, Fax: (58 2) 239-6289, Hewlett-Packard
do Venezuela C.A., Tercera Transversal Los Ruices Norte, Edificio
Segre 2do y 3er piso, Caracas 1071, Venezuela
Elsewhere in the world
• Hewlett-Packard Company, Intercontinental Headquarters,
3495 Deer Creek Road, Palo Alto, Ca 94304, U.S.A.
••••••••••••••••••••••••••••••••••••••••••••••••••••••••••••••••••••••••••••••••••••••••••••••••••••••••••••••••••••••••••••••
75
Page 64
SECTION FIVE
•••••••••••••••••••••••••••••••••••••••••••••••••••••••••••••••••••••••••••••••••••••••••••••••••••••••••••••••••••••••••••••
DECLARATION OF CONFORMITY
according to ISO/IEC Guide 22 and EN 45014
Manufacturer’s Name: Hewlett-Packard Company
Manufacturer’s Address:
Hewlett-Packard Co. Hewlett-Packard Singapore (PTE) Ltd.
Vancouver Division Asia Hardcopy Manufacturing Operation
18110 S.E. 34th Street 20 Gul Way
Camas, WA 98683 Singapore 629196
Hewlett-Packard Espanola, S.A.
Barcelona Division
Avenida Graells, 501
08190 Sant Cugat del Valles
Barcelona, Spain
declares, that the product(s):
Product Name: DeskJet Printers Power Modules
Model Number(s): C5884A C2176A & C2177A
Product Options: All
conforms to the following Product Specifications:
Safety: IEC 950 : 1991 Second Edition +A1 +A2 +A3/EN 60950 : 1992 +A1+A2+A3
EEC 825-1 : 1993/EN 60825-1 : 1994 Class 1 for LEDs
EMC: EN55022 : 1994 Class B/CISPR 22 : 1993 Class B
EN 50082-1 : 1992
IEC 801-2 : 1991 Second Edition/prEN 55024-2 : 1992 : 4 kV CD, 8 kV AD
IEC 801-3 : 1984/prEN 55024-3 : 1991 - 3 V/m
IEC 801-4 : 1988/prEN 55024-4 : 1993 : 0.5 kV Signal Lines, 1 kV Power Lines,
IEC 1000-3-2 : 1995/EN 61000-3-2 : 1995*
IEC 1000-3-3 : 1994/EN 61000-3-3 : 1995
Supplementary Information:
The products herewith comply with the requirements of the Low Voltage Directive 73/23/EEC
and the EMC Directive 89/336/EEC and carries the CE marking accordingly. The products were
tested in a typical configuration.
*Products have less than 75 Watts active input power.
Vancouver, WA., January 7, 1997
Al Grube
Customer Assurance Manager
European Contact: Your local Hewlett-Packard Sales and Service Office or Hewlett-Packard
GmbH, Department ZQ/ Standards Europe, Herrenberger Straße 130,
D-71034 Böblingen FAX:+49-7031-143143
••••••••••••••••••••••••••••••••••••••••••••••••••••••••••••••••••••••••••••••••••••••••••••••••••••••••••••••••••••••••••••••
76
Page 65

APPENDIX
PRINTING FROM DOS
Printing In DOS
This section includes:
• When to use the HP DeskJet Control Panel for DOS
• Commonly asked questions about DOS printer drivers
There are two different ways you can control print settings
when you are getting ready to print a document: The
HP DeskJet Control Panel for DOS and DOS printer drivers.
Both of these are described in the following pages.
HP DeskJet Control Panel for DOS
DOS users have access to many printer features through specific
DOS printer drivers; however, many software manufacturers do
not develop printer drivers for their software programs. The
HP DeskJet 670C Series printers provide their own DOS
software control panel for improved printer control when DOS
printer drivers are not available or when certain print settings
are not available through DOS software programs.
N OTE
The HP DeskJet Control Panel for DOS is not a printer driver. It should be used to
set print settings that are not available through DOS software programs. Printer
drivers are supplied by the manufacturers of your DOS software programs. If your
DOS software program does not include a printer driver for the HP DeskJet 670C
Series printers, contact the manufacturer of the software program or use one of
the alternate printer drivers listed on page 78.
••••••••••••••••••••••••••••••••••••••••••••••••••••••••••••••••••••••••••••••••••••••••••••••••••••••••••••••••••••••••••••••
77
Page 66
APPENDIX
•••••••••••••••••••••••••••••••••••••••••••••••••••••••••••••••••••••••••••••••••••••••••••••••••••
DOS Printer Drivers
What is a printer driver?
If you use DOS software programs (whether or not they are
running within Microsoft Windows), you need a specific printer
driver for each DOS program in order to print to your
HP DeskJet printer.
Printer drivers allow you to access the printer’s features from
your software program’s print selections or menus. These
features include print quality, page orientation, paper type,
paper size, and character sets.
How can I get a printer driver?
DOS software manufacturers provide and update printer drivers
for their DOS software programs. The best driver to use is the
one designed specifically for the HP DeskJet printer model you
are using. However, many times you can achieve satisfactory
results by using a different HP DeskJet printer driver.
The following table lists commonly used DOS software programs
and their recommended printer drivers.
DOS Software
Program
WordPerfect 5.1, 5.1+, 6.0 HP DeskJet 600, 670C or
Harvard Graphics 3.0 HP DeskJet 540
Lotus 1-2-3 2.x, 3.x, 4.0 HP DeskJet 540
MS Word 5.5, 6.0 HP DeskJet 560C
Version
Recommended
Printer Driver
850C
How do I install DOS printer drivers?
To install DOS printer drivers, follow the instructions supplied
by the software manufacturer. After you have installed the
printer driver, you will need to set up the driver from within the
software program. If you have any questions or concerns about
the performance of your printer when using one of these
drivers, contact the software manufacturer.
Why doesn’t my software program have a printer driver
for my HP DeskJet printer?
Most of the software industry is focused on the development of
individual software programs that are compatible with Microsoft
Windows. Hewlett-Packard uses this common development
standard to supply a printer driver for use with all Microsoft
••••••••••••••••••••••••••••••••••••••••••••••••••••••••••••••••••••••••••••••••••••••••••••••••••••••••••••••••••••••••••••••
78
Page 67

••••••••••••••••••••••••••••••••••••••••••••••••••••••••••••••••••••••••••••••••••••••••••••••••••••••••••••••••••••••••••••••
PRINTING FROM DOS
Windows compatible software programs. This is the reason that
fewer DOS printer drivers are being developed.
If there is not a DOS printer driver for my HP DeskJet
printer, is there another printer driver I can use instead?
Selecting a printer driver for your specific HP DeskJet printer in
each DOS software program that you use ensures the best
support for your printer. If an HP DeskJet 670C Series printer
driver is not available within your software program, HP
recommends that you select one of the following drivers.
Printer Driver Level of Support
HP DeskJet 850C Color printing
HP DeskJet 670C Color printing
HP DeskJet 560C Color printing
HP DeskJet 550C Color printing
HP DeskJet 600 Color printing
HP DeskJet 540 Color printing
HP DeskJet 500C Color printing
HP DeskJet 320 Color printing
HP DeskJet 310 Color printing
HP DeskJet 520 Monochrome printing
HP DeskJet 510 Monochrome printing
HP DeskJet 500 Monochrome printing
HP DeskJet PLUS Monochrome printing
HP DeskJet Monochrome printing
••••••••••••••••••••••••••••••••••••••••••••••••••••••••••••••••••••••••••••••••••••••••••••••••••••••••••••••••••••••••••••••
79
Page 68

APPENDIX
•••••••••••••••••••••••••••••••••••••••••••••••••••••••••••••••••••••••••••••••••••••••••••••••••••
HP DeskJet Control Panel for DOS
This section includes:
• Installation and use of the HP DeskJet Control Panel for DOS
• Cleaning and aligning print cartridges
• Supported Character sets
Installing the HP DeskJet Control Panel for DOS
To access the printer’s features, install the HP DeskJet Control
Panel for DOS as described below.
Before you install the DOS control panel:
1. Perform all setup procedures given in the beginning of this
User’s Guide.
2. Make sure that both the computer and the printer are turned
on. If necessary, press the power button to turn on the
printer.
To install the DOS control panel:
1. Insert Installation Disk 3 into your computer’s floppy disk drive.
2. At the DOS prompt (C:\>), type your computer’s floppy disk
drive designator (for example A:\), then type INSTALL and press
Enter, as in:
A:\INSTALL
3. Follow the instructions on the screen to install the HP DeskJet
Control Panel for DOS.
If you encounter problems with the installation:
If you receive a message that the installation of the control panel
was unsuccessful, reinstall the control panel.
If the installation is again unsuccessful, or if the control panel
software is damaged or missing, contact your authorized
HP dealer.
Selecting print settings from the DOS control panel
Use the Control Panel to:
• Clean and align the print cartridges
• Select print settings that may not be available from some DOS
programs
• Monitor the printer’s status at any time
••••••••••••••••••••••••••••••••••••••••••••••••••••••••••••••••••••••••••••••••••••••••••••••••••••••••••••••••••••••••••••••
80
Page 69

••••••••••••••••••••••••••••••••••••••••••••••••••••••••••••••••••••••••••••••••••••••••••••••••••••••••••••••••••••••••••••••
PRINTING FROM DOS
Typically, duplicate print settings that are selected from a DOS
software program override print settings selected in the
HP DeskJet Control Panel for DOS.
HP DeskJet Control Panel
This is the
for DOS.
Your HP DeskJet Control
Panel for DOS may vary
from this example.
To access the HP DeskJet Control Panel for DOS, type
the DOS (C:\>) prompt.
C:\>DJCP
After the HP DeskJet Control Panel for DOS appears, you can
activate its selections in one of two ways:
• With the mouse — Move the mouse to position the pointer on
the desired selection, then click the left mouse button.
• With the keyboard — Press the key that corresponds to the
highlighted letter in the selection name.
Help in the HP DeskJet Control Panel for DOS
For information on the HP DeskJet Control Panel for DOS,
select the About This Program button on the HP DeskJet
Control Panel for DOS screen.
Also, context sensitive help appears at the bottom of the control
panel screen as print selections
Refer to the readme file, README2.TXT, for more information.
The README2.TXT file is located in the C:\DESKJET directory.
DJCP at
••••••••••••••••••••••••••••••••••••••••••••••••••••••••••••••••••••••••••••••••••••••••••••••••••••••••••••••••••••••••••••••
81
Page 70

APPENDIX
•••••••••••••••••••••••••••••••••••••••••••••••••••••••••••••••••••••••••••••••••••••••••••••••••••
Cleaning the Print Cartridges
Clean the print cartridges when you notice that lines or dots are
missing from your printed text and graphics. From DOS, the
print cartridges can be cleaned by using the HP DeskJet Control
Panel for DOS, or by using the buttons on the front of the
printer.
N OTE
Do not clean the print cartridge unnecessarily, as this wastes ink and shortens the
print cartridge life.
From the HP DeskJet Control Panel for DOS:
1. At the DOS prompt, type DJCP and press Enter. The HP DeskJet
Control Panel for DOS appears.
2. Select Clean Print Cartridge.
3. Follow the instructions on the screen.
From the printer buttons:
1. With the printer turned on, press and hold down the power
button.
2. While still holding down the power button, press and release
the resume button seven times.
3. Release the power button.
Aligning the Print Cartridges
Align the print cartridges when you notice that color ink does
not properly line up with black ink. From DOS, the print
cartridges can be aligned by using the HP DeskJet Control Panel
for DOS.
From the HP DeskJet Control Panel for DOS:
1. At the DOS prompt, type DJCP and press Enter. The HP DeskJet
Control Panel for DOS appears.
2. Select Align Print Cartridge.
3. Follow the instructions on the screen.
Supported Character Sets
A character set is a collection of the symbols and characters that
constitute all elements of a language or discipline (legal),
including punctuation and numbers. The HP DeskJet Control
Panel for DOS can be used to select a default character set.
••••••••••••••••••••••••••••••••••••••••••••••••••••••••••••••••••••••••••••••••••••••••••••••••••••••••••••••••••••••••••••••
82
Page 71

••••••••••••••••••••••••••••••••••••••••••••••••••••••••••••••••••••••••••••••••••••••••••••••••••••••••••••••••••••••••••••••
PRINTING FROM DOS
The HP DeskJet 670C Series printers support the following
character sets:
United Kingdom (ISO 4), German (ISO 21), French (ISO 69),
Italian (ISO 15), Danish/Norwegian (ISO 60), Swedish (ISO 11),
Spanish (ISO 17), ANSI ASCII (ISO 6), Legal, PC-8, Roman-8,
PC-850, PC-8 Danish/Norwegian, ECMA-94 Latin 1 (ISO 8859/
1), PC-852, Latin 2 (ISO 8859/2), Latin 5 (ISO 8859/9), and PC-8
Turkish.
DOS Reference
This section describes:
• Lines of text per page
• Printer commands and control codes
Lines of Text Per Page
Line spacing is the vertical distance between printed lines on
the page. The default line spacing for HP DeskJet printers is six
printed vertical lines per inch (lpi).
When printing a partial page without sending a form-feed
command, the resume light blinks. Press the resume
button to finish printing. The page ejects automatically.
Number of Lines/Characters in Landscape Orientation
Paper Size
U.S. letter 45 (48) 60 (64) 103 172 206
European A4 45 (48) 60 (63) 110 183 220
U.S. legal 45 (48) 60 (64) 133 222 266
Lines Per Page
6 lpi 8 lpi
Characters Per Line
10 cpi 16.67 cpi 20 cpi
Printer Commands and Control Codes
You can use printer commands and control codes to control the
selection of character sets and other aspects of your printer.
Refer to your software program manual for specific information
on how to send commands to your printer. Listings of the
printer commands, control codes, and character sets are also
available from HP First Fax. Refer to Customer Support in
Section 4 for information on contacting HP First Fax.
••••••••••••••••••••••••••••••••••••••••••••••••••••••••••••••••••••••••••••••••••••••••••••••••••••••••••••••••••••••••••••••
83
Page 72

APPENDIX
•••••••••••••••••••••••••••••••••••••••••••••••••••••••••••••••••••••••••••••••••••••••••••••••••••
Internal Printer Fonts
Internal fonts are bitmapped or scalable fonts that are stored in
the printer.
The following bitmapped internal fonts are supplied for the
HP DeskJet 670C Series printers:
Proportionally-Spaced
Fonts
CG Times 5, 6, 7, 8, 10, 12, 14
CG Times Italic 5, 6, 7, 8, 10, 12, 14
Univers 5, 6, 7, 8, 10, 12, 14
Univers Italic 5, 6, 10, 12
:
Point Sizes
Fixed-Pitch Fonts Point Sizes Pitches
Courier 6, 12, 24 5, 10, 16.67, 20
Courier Italic 6, 12, 24 5, 10, 20
Letter Gothic 6, 12, 24 6, 12, 24
Letter Gothic 4.75, 9.5, 19 16.67
Letter Gothic Italic 6, 12, 24 6, 12, 24
The default font is a portrait-oriented Courier 10 pitch, 12 point,
upright, medium-weight. It prints if you do not select a font
through your DOS software program.
••••••••••••••••••••••••••••••••••••••••••••••••••••••••••••••••••••••••••••••••••••••••••••••••••••••••••••••••••••••••••••••
84
Page 73

••••••••••••••••••••••••••••••••••••••••••••••••••••••••••••••••••••••••••••••••••••••••••••••••••••••••••••••••••••••••••••••
PRINTING FROM DOS
If Problems Occur
When printing from DOS-based software programs,
printer errors and status are sometimes reported in the
HP DeskJet Control Panel for DOS. If you suspect a problem
with the printer, first check the HP DeskJet Control Panel for
DOS. If the printer status indicates a problem, find the indicated
problem in the troubleshooting tables in the user’s guide and try
the given solution(s).
If you are unable to solve a problem using these
troubleshooting tables in the user’s guide, refer to
Customer Support on page 61 for a listing of resources
available to you for the support and maintenance of your
printer.
••••••••••••••••••••••••••••••••••••••••••••••••••••••••••••••••••••••••••••••••••••••••••••••••••••••••••••••••••••••••••••••
85
Page 74

APPENDIX
•••••••••••••••••••••••••••••••••••••••••••••••••••••••••••••••••••••••••••••••••••••••••••••••••••
••••••••••••••••••••••••••••••••••••••••••••••••••••••••••••••••••••••••••••••••••••••••••••••••••••••••••••••••••••••••••••••
86
Page 75

INDEX
••••••••••••••••••••••••••••••••••••••••••••••••••••••••••••••••••••••••••••••••••••••••••••••••••••••••••••••••••••••••••••••
A
A2 size envelopes 41, 68, 69,
71
A4/A5/A6 size paper 68, 69, 71
accessories
included with printer
ordering 73–75
adding paper 27–28, 44
aligning print cartridges 13, 46
Avery labels 28, 30, 42–43
2
B
B5-JIS size paper 68, 69, 71
Best mode 20, 67
bitmapped fonts 70
black print speed 70
blank paper ejected 54
blinking lights 15, 54, 55
Book option 23
boxes
HP print settings
Print 22
buffer size 71
buttons
identifying lit buttons
power button 7, 15
resume button 15, 22
21
7, 15
D
default printer 54
DL size paper 68, 69, 71
DOS
81
help
HP DeskJet Control Panel for
DOS
80–83
installing HP DeskJet Control
Panel for DOS
installing printer drivers 78
internal printer fonts 84
lines of text per page 83
print settings 80
printer commands and control
codes
printer drivers 77
printing in DOS 77
printing problems 85
recommended drivers 78
reference 83
system requirements 16
using the HP DeskJet Control
Panel for DOS
double-sided printing 20
choosing paper 23
how it works 23–24
drying times 28, 67
80
83
77
E
C
C6 size paper 41, 68, 69, 71
cables
connecting
ordering 73, 75
changing print cartridges 45
characters
character sets
per line 70
print problems 56, 59
cleaning
print cartridges
printer 48, 65
clearing print errors 15
color
options
printing 21
color print cartridges 9
color print speed 70
color printing
color print speed
color resolution 70
print problems 59
selecting paper 29
CompuServe 61
computer
location with printer
system requirements 16
custom paper size 67, 71
customer support 61
••••••••••••••••••••••••••••••••••••••••••••••••••••••••••••••••••••••••••••••••••••v•••••••••••••••••••••••••••••••••••••••••
10
70, 82
47
21
70
6
EconoFast 20, 67
envelopes
error messages 22, 25
errors, clearing 15
European paper sizes 71
even-numbered pages 23
Executive size paper 68, 69, 71
41, 68, 69, 71
A2 size
C6 size 41, 68, 69, 71
loading 28, 40–41, 44
margin problems 58
print problems 56
printable area 69
printing 38–41
removing 44
selecting 29
storing 30
F
fax accessory 73
FCC statement 72
fonts
internal
70, 84
G
glossy paper 27, 71, 73
grayscale
alternative to color
turning on and off 20
20
H
Hagaki postcards 68, 69, 71
help, getting 25, 61
HP DeskJet Control Panel for
77, 80–83
DOS
HP First Fax 62
HP Premium Glossy paper 27,
71, 73
HP Premium InkJet paper 27,
71, 73
HP print settings box
Book option
double-sided printing 23
finding 20, 21
grayscale 26
Paper tab 20, 21
Services tab 20
Setup tab 20, 21, 26
Tablet option 23
HP PrinterPal 73
HP Toolbox 22, 47
icon 22
Troubleshooting tab 25
HP Transparency Film 27, 30,
71, 73
HP web site 61
23
I
I/O interface 71
IN tray 19, 22, 55
index cards
initializing printer software 12
ink
installing
68, 69, 71
A6 cards
adding 44
margin problems 58
print problems 56
printable area 68, 69
printing 28, 36–38
removing 44
storing 30
U.S. cards 68, 69, 71
aligning print cartridges
46
cleaning print cartridges
47–50
drying times 28, 67
nozzles 7
replacing print cartridges 45
HP DeskJet Control Panel for
80
DOS
print cartridges 7–9
printer software 11–12
13,
87
Page 76

••••••••••••••••••••••••••••••••••••••••••••••••••••••••••••••••••••••••••••••••••••••••••••••••••••••••••••••••••••••••••••••
intensity 21
interface port, illustrated 10
internal fonts 70
Internet, accessing HP site 61
invitational A2 envelopes 41,
68, 69, 71
ISO/IEC Declaration of
Conformity
76
J
jams, paper 25
L
labels
landscape orientation 67, 69
letterhead 27
lights
loading 31–43
loading paper 22
28, 42–43
loading
printing 28, 30, 42–43
selecting 29
storing 30
15, 54, 55
blinking
identifying 7, 15
power light 15
resume light 7, 15
M
margins 58, 67, 69
media size 71
media weight 71
messages 22, 25
Microsoft Windows
installing printer software
11–12
for
modes, printing
20
Best
EconoFast 20
Normal 67
N
network configurations 16
No. 10 size paper 68, 69, 71
non-standard size paper 33–35
Normal print mode 67
nothing passes through printer
55
nothing prints 53, 55
O
odd-numbered pages 23
online user forums 61
on-screen error messages 25
operating environment 71
orientation 21
OUT tray 19, 22, 55
••••••••••••••••••••••••••••••••••••••••••••••••••••••••••••••••••••••••••••••••••••••••••••••••••••••••••••••••••••••••••••••
P
page orientation 28, 35, 67
paper
color printing
determining print side 29
double-sided printing 23
ink drying times 28, 67
jams 25
loading 22, 27–28, 44
orientation 21
printable area 68, 69
removing 44
selecting 29, 30
size 21
storing 30
trays 19, 22
troubleshooting problems 55
types 21
paper length adjuster 4, 5
paper size option 21
paper sizes and types
A2 size envelopes
A4/A5/A6 size paper 42–43,
68, 69
B5 size paper 68, 69
C6 size paper 68, 69
custom size 67, 71
DL size 68, 69, 71
European 71
Executive size 68, 69
Executive size paper 68, 69,
71
Hagaki postcards 68, 69, 71
index cards 36–38, 68, 69,
71
invitational A2 envelopes 41,
68, 69, 71
labels 28, 30, 42–43
non-standard size 33–35
postcards 36–38
single envelope 28, 39
standard size 5, 31–32, 71
U.S. cards 68, 69
U.S. Legal size 31, 68, 69, 71
U.S. Letter size 31, 68, 69,
71
U.S. No. 10 68, 69, 71
Paper tab (HP print settings box)
20
Book option 23
Tablet option 23
paper type option 21
paper width adjuster 4
photo cartridge 21
picture print problems 59
portrait page orientation 28, 67
postcards
adding
Hagaki postcards 68, 69, 71
loading 28
margin problems 58
printable area 68, 69
29
41, 68, 71
44
postcards (continued)
power button 15
power consumption 71
power light 15
power module 2
power requirements 71
Print box 22
print cartridge 2
print cartridges
print method 70
print modes
print problems
print quality problems 47–50,
print queue 22
print resolution 70
print settings 77, 80
print speed, factors influencing
printable area 67, 69
printer
36–38
printing
removing 44
storing 30
U.S. cards 68, 69
statement 72
13, 46, 82
aligning
cleaning 47–50, 82
color print cartridges 9, 73
illustrated 8
installing 7–9
ordering 73, 75
removing 45
replacing 45
storing 45
using 45
67
Best
EconoFast 67
Normal 67
characters
clearing errors 15
color printing 59
margin problems 58
nothing passes through printer
nothing prints 53, 55
paper jam 55
print is slanted 58
print quality problems
text 59
57
choosing 20, 21
color matching 21
finding 20
intensity 21
printing 22
19
cable
deciphering error messages
drivers 62
drivers for DOS 77
enhancing performance 66
files 62
55, 59
55
47–50, 57
10
25
88
Page 77

••••••••••••••••••••••••••••••••••••••••••••••••••••••••••••••••••••••••••••••••••••••••••••••••••••••••••••••••••••••••••••••
printer (continued)
installing print cartridges
7–9
internal printer fonts 84
loading 22
loading paper 5, 28, 44
location with computer 6
maintaining 65
operating environment 71
package contents 2
paper length adjuster 4, 5
paper trays 19
paper width adjuster 4
power consumption 71
power requirements 71
printer self test 14
printer software 12–16
product certifications 70
system requirements 16
unpacking 2–3
printer cable 10
printer command language 70
printer dimensions 71
printer documentation 74
printer drivers
alternates
defined 78
installing for DOS 78
recommendations 78
printer memory 71
printer replaceable parts 73–75
printer software 62
printer specifications 70
printer supplies or accessories
printer weight 71
PrinterPal 73
printing
color
color resolution 70
double-sided 23–24
envelopes 38–41
how it works 18
in DOS 77
ink drying times 28, 67
margins 58, 67, 69
page orientation 28, 35, 67
printable area 67, 69
quality 48
removing paper 44
selecting paper 29, 30
self-test 14
using the HP DeskJet Control
problems
printing
progress, checking 22
Product 70
79
73–75
29
Panel for DOS
22–25
77
R
regulatory notices 72–76
replacing print cartridges 45
resolution 70
resume button 7, 15, 22
resume light 7, 15
S
safety certification 70
self-test 14
Services tab (HP print settings
20
box)
settings, print
Setup tab (HP print settings box)
single envelope slot 39
size, paper 21
software
specifications 70
speed, printing 19
standard ink drying times 28, 67
standard size paper 5, 31–32
stuck paper 25
system requirements 16
20, 21
choosing
color matching 21
finding 20
intensity 21
printing 22
20, 21, 26
compatibility
installing 11–12
70
T
tab
21
Paper
Setup 21, 26
Troubleshooting 25
Table option 23
taskbar 22
technical support 61
text, print problems 59
transparencies
ink drying time
loading film 28, 44
removing 44
selecting film 29
storing 30
tray
22
IN
OUT 22
troubleshooting
cards do not advance
color printing 59
DOS printing 85
double-sided documents 23
envelopes do not advance 56
error messages 25
installing DOS control panel
80
lines or dots missing in
printout
margin problems 58
nothing prints 53
67
56
82
troubleshooting (continued)
paper advances multiple
56
sheets
paper does not advance 55
paper jam 55
poor print quality 47–50, 57
print quality problems
47–50, 57
printer only prints one
character per page
printer self-test 14
printing pictures 59
printing text 59
Troubleshooting tab 25
two-sided printing 23–24
56
U
U.S. cards 68, 69, 71
U.S. Legal size paper 31, 68, 69,
71
U.S. Letter size paper 31, 68
user forums, online 61
V
vertical alignment 70
W
Windows 3.1 52
Windows 95 52
world wide web, HP URL 61
••••••••••••••••••••••••••••••••••••••••••••••••••••••••••••••••••••••••••••••••••••••••••••••••••••••••••••••••••••••••••••••
89
Page 78

Page 79

Hewlett-Packard Limited Warranty Statement
HP Product Duration of Limited Warranty
Software 90 Days
Print cartridges 90 Days
Printer 1 Year
A. Extent of Limited Warranty
1. Hewlett-Packard (HP) warrants to the end-user
customer that HP products will be free from defects
in materials and workmanship, for a specified time
after the date of purchase by the customer. The
duration of this limited warranty is stated above.
Certain additional conditions and limitations of HP’s
warranty are stated in the user’s guide. Those
conditions and limitations include:
a. For software products, the warranty applies only
to the media upon which the product is recorded;
and
b. HP does not warrant the operation of any product
to be uninterrupted or error free.
2. HP’s limited warranty covers only those defects
which arise as a result of normal use of the product,
and do not apply to any:
a. Improper or inadequate maintenance;
b. Software or interfacing not supplied by HP;
c. Unauthorized modification or misuse;
d. Operation outside the product’s environmental
specifications, including duty cycle abuse or use of a
mechanical switchbox without a designated surge
protector;
e. Use of non-supported printing media or memory
boards; or
f. Improper site preparation or maintenance.
3. For HP printer products, the use of a non-HP print
cartridge or a refilled print cartridge does not affect
either the warranty to the customer or any HP
support contract with the customer; print cartridge
includes both toner cartridges and ink cartridges.
However, if printer failure or damage is attributable
to the use of a non-HP or refilled print cartridge, HP
will charge its standard time and materials charges to
service the printer for the particular failure or
damage.
4. If any software media product or print cartridge
product proves defective during the applicable
warranty period, and if the product is covered by
HP’s warranty, the customer shall return the product
for replacement.
5. If HP receives, during the applicable warranty period,
notice of a defect in a hardware product which is
covered by HP’s warranty, HP shall either repair or
replace the product, at its option. Any replacement
product may be either new or like-new, provided that
it has functionality at least equal to that of the
product being replaced.
6. If HP is unable to repair or replace, as applicable, a
defective product which is covered by HP’s warranty,
HP shall, within a reasonable time after being
notified of the defect, refund the purchase price for
the product, provided the customer returns the
product.
7. HP’s warranty is valid in any country where the HP
products listed above are distributed by HP, except
for the Middle East, Africa, and France’s
“Departements D’Outre Mer”; for those excepted
areas, the warranty is valid only in the country of
purchase. Contracts for additional warranty services,
such as on-site service, may be available from any
authorized HP service facility where the listed HP
product is distributed by HP or an authorized
importer.
8. This Limited Warranty Statement gives the customer
specific legal rights. The customer may also have
other rights which vary from state to state in the
United States, from province to province in Canada,
and from country to country elsewhere in the world.
B. Limitations of Warranty
1. NEITHER HP NOR ANY OF ITS THIRD PARTY
SUPPLIERS MAKES ANY OTHER WARRANTY OF ANY
KIND, WHETHER EXPRESS OR IMPLIED, WITH
RESPECT TO HP PRODUCTS. HP AND ITS THIRD
PARTY SUPPLIERS SPECIFICALLY DISCLAIM THE
IMPLIED WARRANTIES OF MERCHANTABILITY AND
FITNESS FOR A PARTICULAR PURPOSE.
2. To the extent that this Limited Warranty Statement is
inconsistent with the law of the locality where the
customer uses the HP product, this Limited Warranty
Statement shall be deemed modified to be consistent
with such local law. Under such local law, certain
limitations of this Limited Warranty Statement may
not apply to the customer. For example, some states
in the United States, as well as some governments
outside the United States (including provinces in
Canada), may:
a. Preclude the disclaimers and limitations in this
Warranty Statement from limiting the statutory
rights of a consumer (e.g. Australia and the United
Kingdom);
b. Otherwise restrict the ability of a manufacturer to
make such disclaimers or impose such limitations;
or
c. Grant the customer additional warranty rights,
specify the duration of implied warranties which
the manufacturer cannot disclaim, or not allow
limitations on how long an implied warranty lasts.
3. To the extent allowed by local law, the remedies
provided in this Warranty Statement are the
customer’s sole and exclusive remedies.
C. Limitations of Liability
1. EXCEPT FOR THE OBLIGATIONS SPECIFICALLY SET
FORTH IN THIS WARRANTY STATEMENT, IN NO
EVENT SHALL HP BE LIABLE FOR ANY DIRECT,
INDIRECT, SPECIAL, INCIDENTAL, OR
CONSEQUENTIAL DAMAGES, WHETHER BASED ON
CONTRACT, TORT, OR ANY OTHER LEGAL THEORY
AND WHETHER ADVISED OF THE POSSIBILITY OF
SUCH DAMAGES.
Page 80

 Loading...