

Page 1

5350 Monochrome Laser Printer
Quick Start Guide
Page 2
Important Information
This equipment generates and uses radio frequ ency energ y
and if not installed and used properly, that is , in accordance
with the manufacturer's instructions, may cau se interference
in radio and television reception. It has been type tested and
found to comply with the limits for class B computing devices
in accordance with the specification in su bpart J of part 1 5 of
FCC rules, which are designed to provide reasonab le protection against such interference in a residential installation.
However, there is no guarantee that interfere nce will not occur in a partial installation. I f this equip ment does cause interference to radio or television reception, which can be
determined by turning the equipment off and on, the user is
encouraged to try to correct the interference by on e or m ore
of the following measures:
■ Reorient the receiving antenna,
■ Relocate the peripheral away from the recei v er,
■ Move the peripheral away from the receiver
■ Plug the peripheral into a different outlet, so that the peri-
pheral and receiver are on different branch circuits
If necessary, the user should consult the de aler o r an expe rienced radio/television technician for addition al suggestions.
The user may find the following booklet, prepared by the Federal Communications Commission, he lpful: “How to Ide ntify
and Resolve Radio-TV Interfere nc e Pr o bl em s ” .
This booklet is available from the U.S. Gover nment Printing
Office, Washington DC 20402 Stock No. 004.000.00345.4.
WARNING: To comply with FCC regulations on electromagnetic interference for a class B computing device, the printer
cable must be shielded. To assure compliance with FCC regulations for a computing device, use a shielded interf ace cable with a metal shell connector. The use of cables not
properly shielded may result in violating FCC regulations.
This digital apparatus does not exceed the class B limits for
radio noise emissions from digital ap paratus as set out in the
radio interference regulations of the Canadian department of
communications.
This unit complies with DOC standard C108.8-M 1983
ATTENTION: Le présent appareil nu mérique n'ement pas de
bruits radioélectriques déspassant les li mites applicables aux
appareils numériques de la classe B prescrites da ns le règlement sur le brouillage radio-électrique édicté par le mi nstère
des communications du Canada.
This device fulfils the European standards requirements by complying with the Directive of the Commission dated May 3, 1989 (89/336/ EEC) relatin g to electr omagnetic
compatibility and the Directive dated February 19, 1973 (73/23/EEC) relating to lowvoltage electrical equipment. Conformity with the above mentioned Directives is indicated by the
CE symbol attached to the device.
Note: Conformity may be affected by:
■ using interface cables not complying with the specifications
■ non-observance of important inst ructions in the operator's manual
■ installing components not approved for this device by the manufacturer
■ unauthorized manipulation
The paper used is made of raw materials treated
with a chlorine-free bleaching process.
WARNING For continued protection against risk of fire, replace only with same type and rating of fuse. Only trained and qualified
personnel may open covers or remove parts that are not explicitly shown and described in the User Guide as being
accessible to the operator.
Page 3

Quick Start Guide Table of contents
9035
Quick
Start
Guideenbook
SeiteiDonnerstag9November
2006
3:12
15
Table of contents
Chapter 1 Introduction . . . . . . . . . . . . . . . . . . . . . . . . . . . . . . . . . . . . . . . . . . . . . . . .1
About this manual . . . . . . . . . . . . . . . . . . . . . . . . . . . . . . . . . . . . . . . . . . . . .1
Conventions . . . . . . . . . . . . . . . . . . . . . . . . . . . . . . . . . . . . . . . . . . . . . 1
General Safety Guidelines. . . . . . . . . . . . . . . . . . . . . . . . . . . . . . . . . . . . . . . 2
Safety Precautions . . . . . . . . . . . . . . . . . . . . . . . . . . . . . . . . . . . . . . . . 2
Handling the Printer. . . . . . . . . . . . . . . . . . . . . . . . . . . . . . . . . . . 2
Printer Components. . . . . . . . . . . . . . . . . . . . . . . . . . . . . . . . . . . . . . . . . . . . 3
Chapter 2 Setting Up Your Printer . . . . . . . . . . . . . . . . . . . . . . . . . . . . . . . . . . . . 6
Checking Your Package. . . . . . . . . . . . . . . . . . . . . . . . . . . . . . . . . . . . . . . . .6
Preparing a Location for the Printer. . . . . . . . . . . . . . . . . . . . . . . . . . . . . . . . 7
Dimensions. . . . . . . . . . . . . . . . . . . . . . . . . . . . . . . . . . . . . . . . . . . . . .7
Installation Precautions. . . . . . . . . . . . . . . . . . . . . . . . . . . . . . . . . . . . . 7
Space Requirements . . . . . . . . . . . . . . . . . . . . . . . . . . . . . . . . . . . . . .8
ENGLISH
Installation procedure. . . . . . . . . . . . . . . . . . . . . . . . . . . . . . . . . . . . . . . . . . .9
Setting an IP address manually . . . . . . . . . . . . . . . . . . . . . . . . . . . . . . . . . .20
Removing the Tape . . . . . . . . . . . . . . . . . . . . . . . . . . . . . . . . . . . . . . . 9
Installing Options . . . . . . . . . . . . . . . . . . . . . . . . . . . . . . . . . . . .9
Installing the Toner Cartridge . . . . . . . . . . . . . . . . . . . . . . . . . . . . . . . 10
Loading Paper . . . . . . . . . . . . . . . . . . . . . . . . . . . . . . . . . . . . . . . . . . 13
Connecting the Power Cord . . . . . . . . . . . . . . . . . . . . . . . . . . . . . . . . 16
Turning the Printer On . . . . . . . . . . . . . . . . . . . . . . . . . . . . . . . . . . . .16
Printing a Configuration Summary . . . . . . . . . . . . . . . . . . . . . . . . . . . 18
Example of a Configuration Summary. . . . . . . . . . . . . . . . . . . . 19
i
Page 4

Table of contents Quick Start Guide
9035
Quick
Start
Guideenbook
SeiteiiDonnerstag9November
2006
3:12
15
Chapter 3 Installing Printer Drivers. . . . . . . . . . . . . . . . . . . . . . . . . . . . . . . . . . . 23
Driver Installation. . . . . . . . . . . . . . . . . . . . . . . . . . . . . . . . . . . . . . . . . . . . . 23
TGNet Admin administration program . . . . . . . . . . . . . . . . . . . . . . . . . . . . . 25
Chapter 4 Specifications. . . . . . . . . . . . . . . . . . . . . . . . . . . . . . . . . . . . . . . . . . . . . 27
Chapter 5 Options and supplies . . . . . . . . . . . . . . . . . . . . . . . . . . . . . . . . . . . . . . 28
ii
Page 5
Quick Start Guide Chapter 1 Introduction
9035
Quick
Start
Guideenbook
Seite1Donnerstag9November
2006
3:12
15
Chapter 1
Introduction
About this manual
This quick start guide is intended to provide guidance for the proper installation
of your printer. If you require more information to install your printer, consult
the User Guide located on the CD-ROM. For further help, please contact your
dealer or responsible representative (see addresses at the rear cover page of this
manual).
ENGLISH
Conventions
STOP
This following conventions are used throughout this manual to emphasize
certain procedures or information:
NOTE: A note is a tip or extra information that may be helpful in installing or using the
printer.
CAUTION: A caution message provides information that may help you avoid equipment
damage, process failure, or inconvenience. Read all caution messages carefully.
WARNING! A warning message indicates the possibility of personal injury if a specific
procedure is not performed exactly as described in the guide. Pay close attention to these sections
and read them fully to prevent possible injury.
1
Page 6
Chapter 1 Introduction Quick Start Guide
9035
Quick
Start
Guideenbook
Seite2Donnerstag9November
2006
3:12
15
General Safety Guidelines
Before operating the printer, read the following instructions carefully:
z Follow all the operating procedures provided in this manual.
z Follow all the hazard warnings on the printer and in the manual. Failure to do
so can cause injury to yourself or damage to the printer.
z Do not make perform any operation or action in any way other than provided
in this manual. When in doubt, contact your dealer or service company.
z Keep in mind that hazard warnings in this manual or on the printer cannot
cover every possible case, as it is impossible to predict and evaluate all circumstances beforehand. Be alert and use your common sense.
For detailed informations informations on Safety Guidelines please refer to the User Guide on
the CD-ROM.
Precautions
Handling the
2
Safety
Printer
This printer is available in the power specifications 110 V and 230 V. The
specifications that apply to your printer depend on your machine configuration.
To prevent fire or shock hazards, connect the power plug only to a properly rated
power outlet.
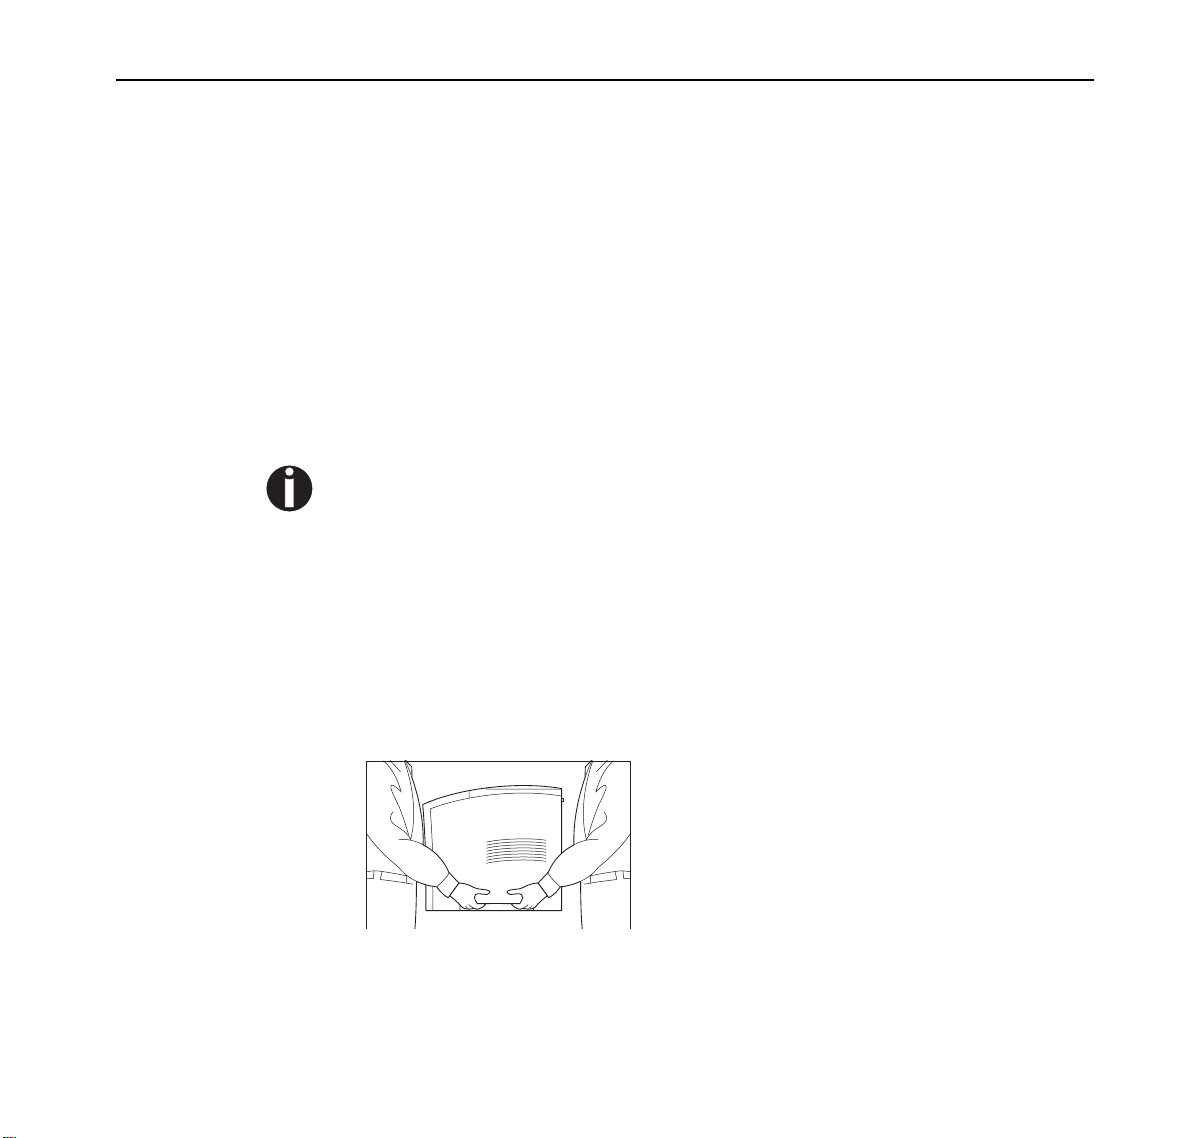
z The weight of the printer without paper tray, toner cartridge, and paper is
about 21 kg (46 lbs). Never attempt to lift the printer alone.
z To lift the printer, have two individuals facing each other from the front and
the rear of the printer grasp the recessed areas on each side of the printer. Do
not lift the printer by grasping any area other than these recessed areas.
Page 7
Quick Start Guide Chapter 1 Introduction
9035
Quick
Start
Guideenbook
Seite3Donnerstag9November
2006
3:12
15
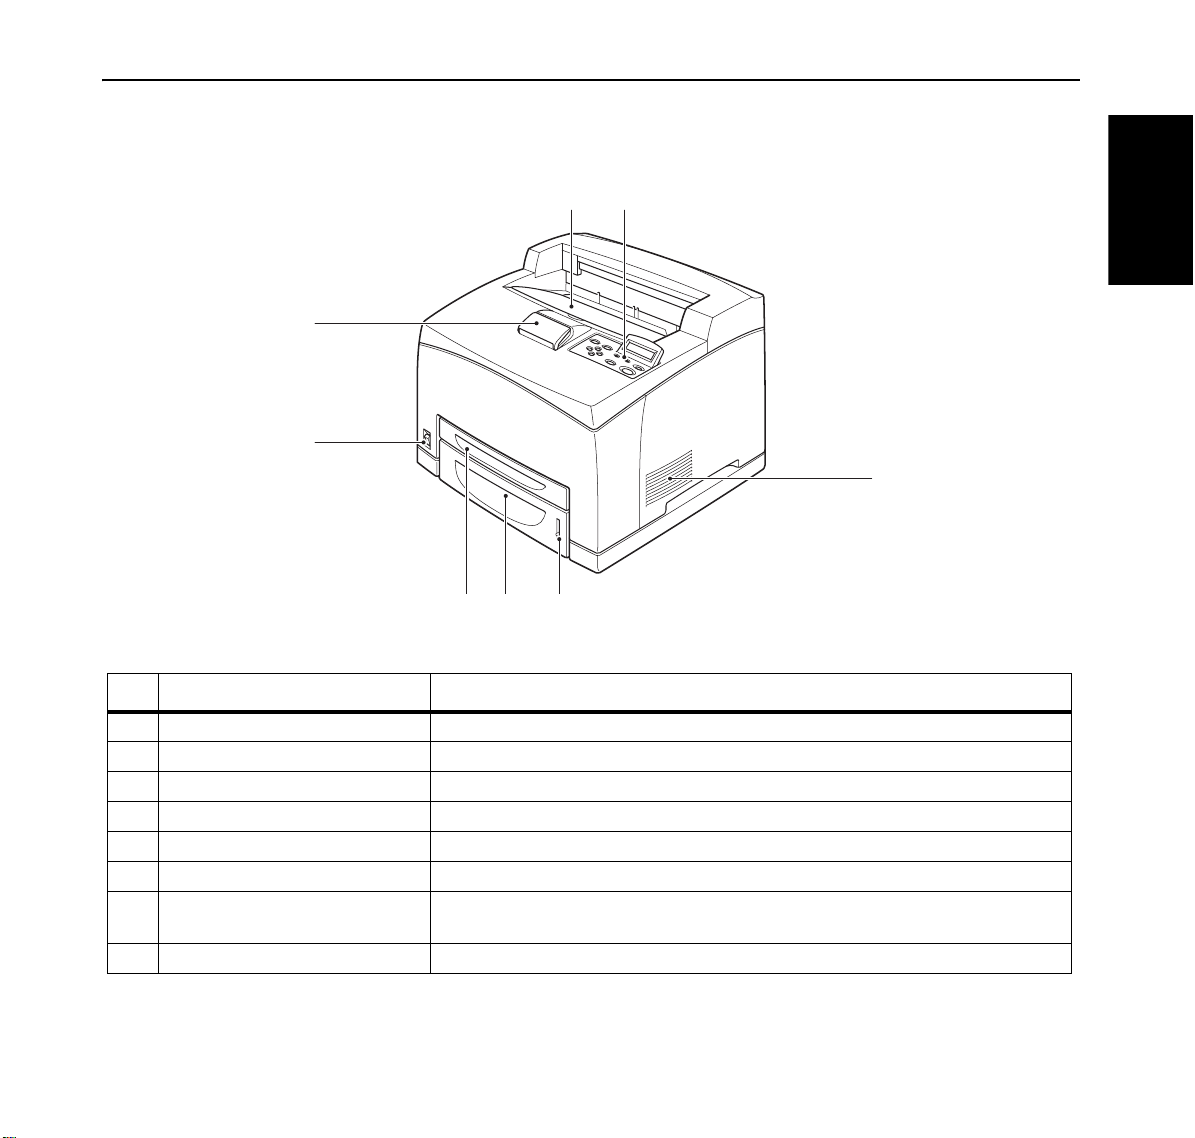
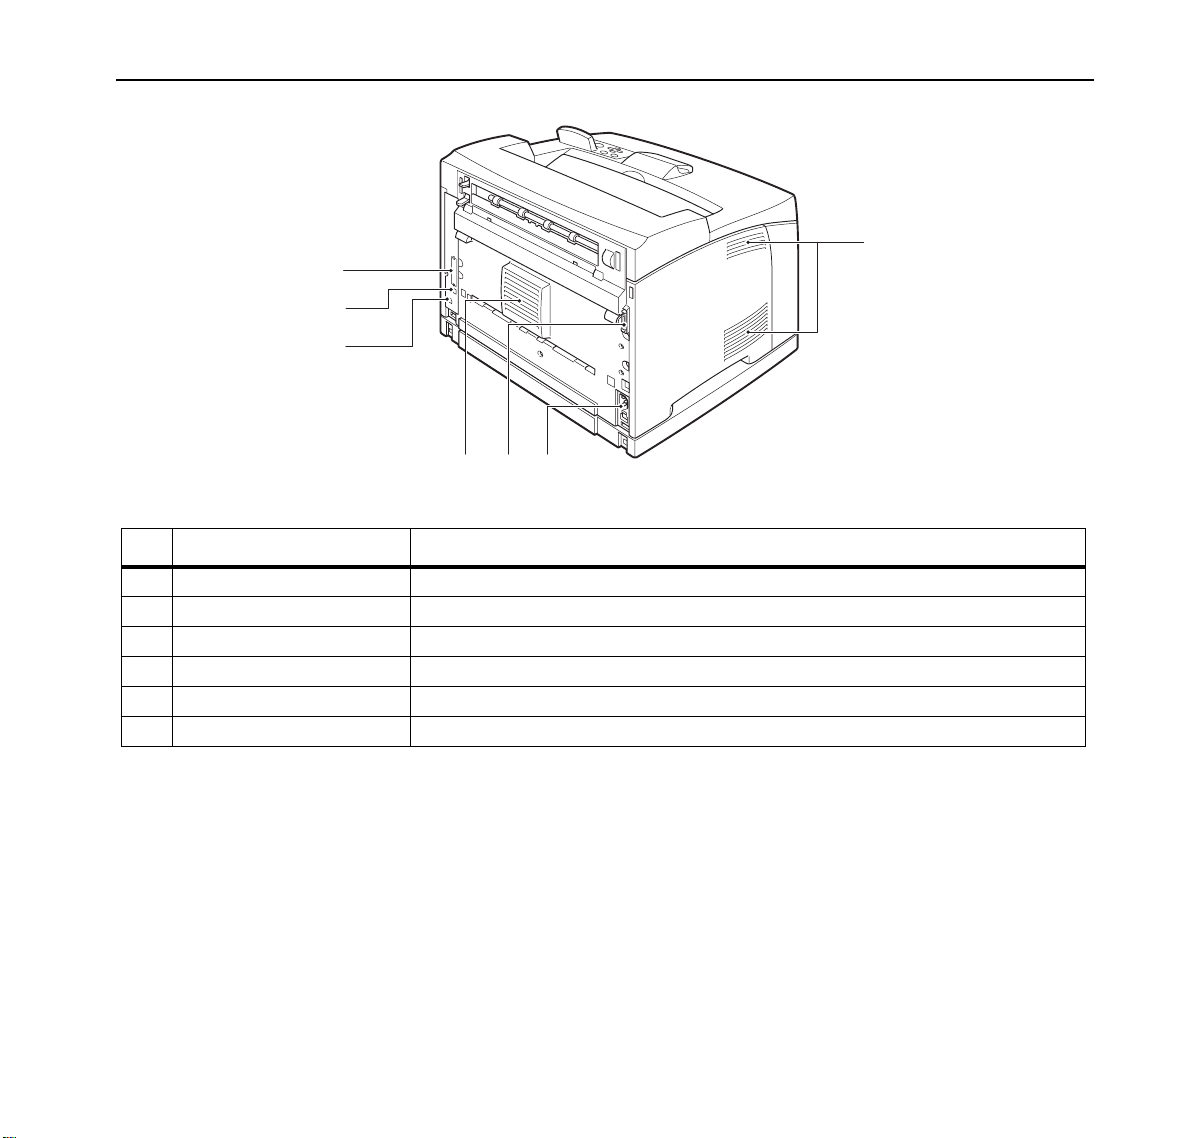
Printer Components
12
8
7
3
ENGLISH
6
No. Name Description
1 Center output tray Print jobs are output with the printed side facing down.
2 Control panel Consists of operation buttons, indicators, and the display.
3 Ventilation hole Releases heat to prevent the interior of the printer from heating up.
4 Paper meter Indicates the amount of paper remaining.
5 Paper tray (A4/150 sheets) Load paper here.
6 Paper tray (A4/550 sheets) Load paper here.
7 Pow er switch Switches the power of the printer on and off. Pushing the switch to the <I> side
switches it on and pushing it to the <O> side switches it off.
8 Paper stopper Raise this when printing on paper larger than A4 size.
45
3
Page 8
Chapter 1 Introduction Quick Start Guide
9035
Quick
Start
Guideenbook
Seite4Donnerstag9November
2006
3:12
15
1
4
5
6
23
1
No. Name Description
1 Ventilation hole Releases heat to prevent the interior of the printer from heating up.
2 Duplex module connector Connect the optional duplex module here.
3 Power cord connector Connect the power cord here.
4 USB port Connect the USB cable here.
5 Ethernet 10/100 port Connect the Ethernet cable here.
6 Parallel port Connect the parallel cable here.
4
Page 9
Quick Start Guide Chapter 1 Introduction
9035
Quick
Start
Guideenbook
Seite5Donnerstag9November
2006
3:12
15
1
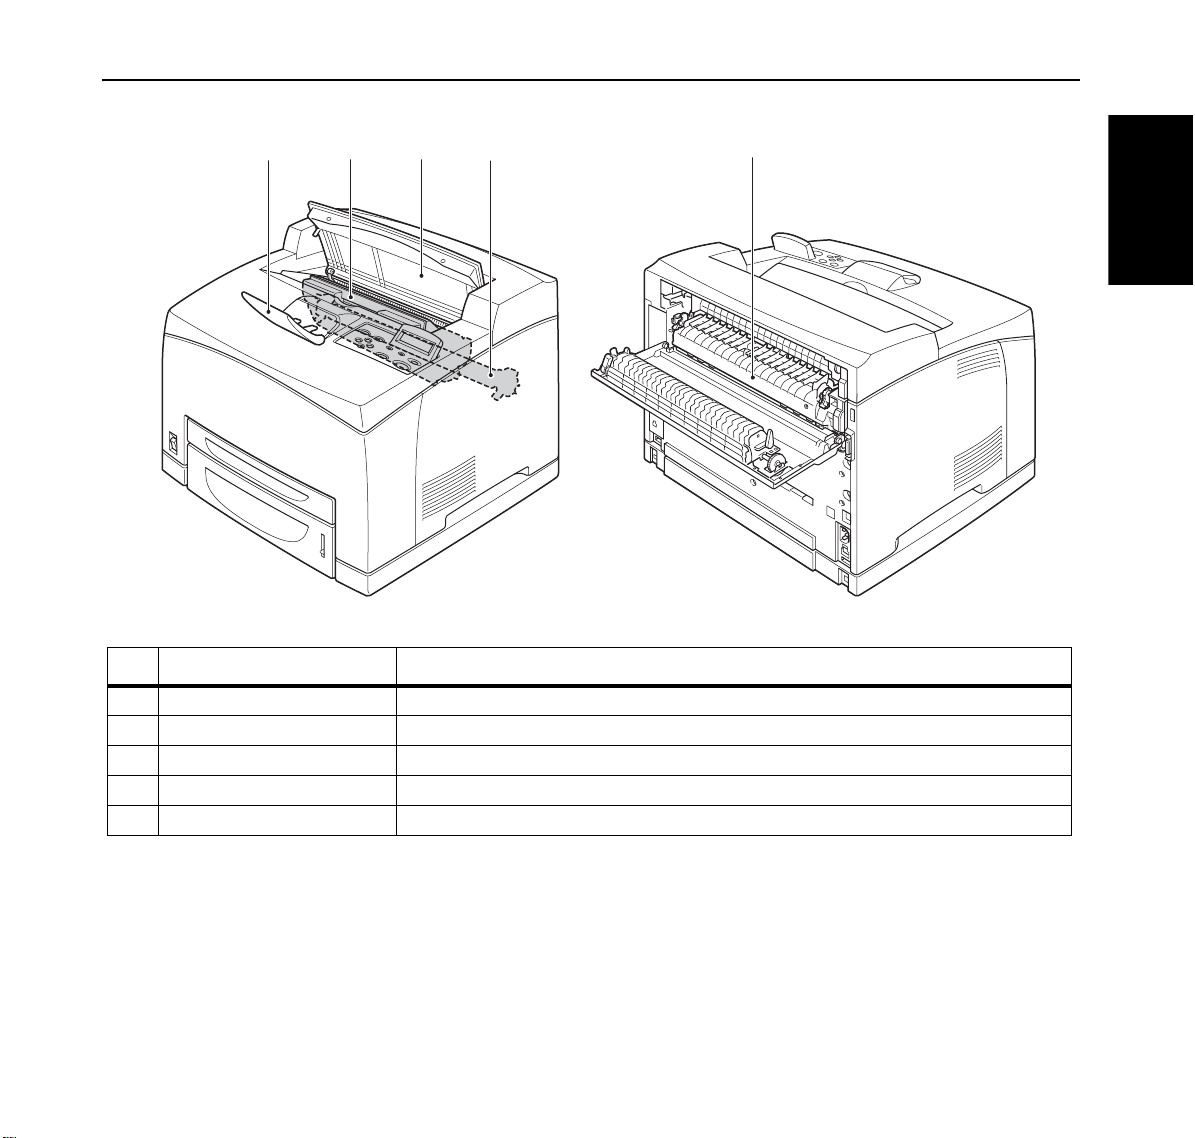
No. Name Description
1 Paper stopper Raise this when printing on paper larger than A4 size.
2 Toner Cartridge Contains the toner and the photosensitive drum.
3 Top cover Open this when replacing the Toner Cartridge and removing jammed paper.
4 Fuser unit Fixes the toner on the paper. Do not touch this when using the printer as it is hot.
5 Transf er roll cartridge Transfers the toner image on the surface of the photosensitive drum to the paper.
2
35
4
ENGLISH
5
Page 10
Chapter 2 Setting Up Your Printer Quick Start Guide
9035
Quick
Start
Guideenbook
Seite6Donnerstag9November
2006
3:12
15
Chapter 2
Setting Up Your Printer
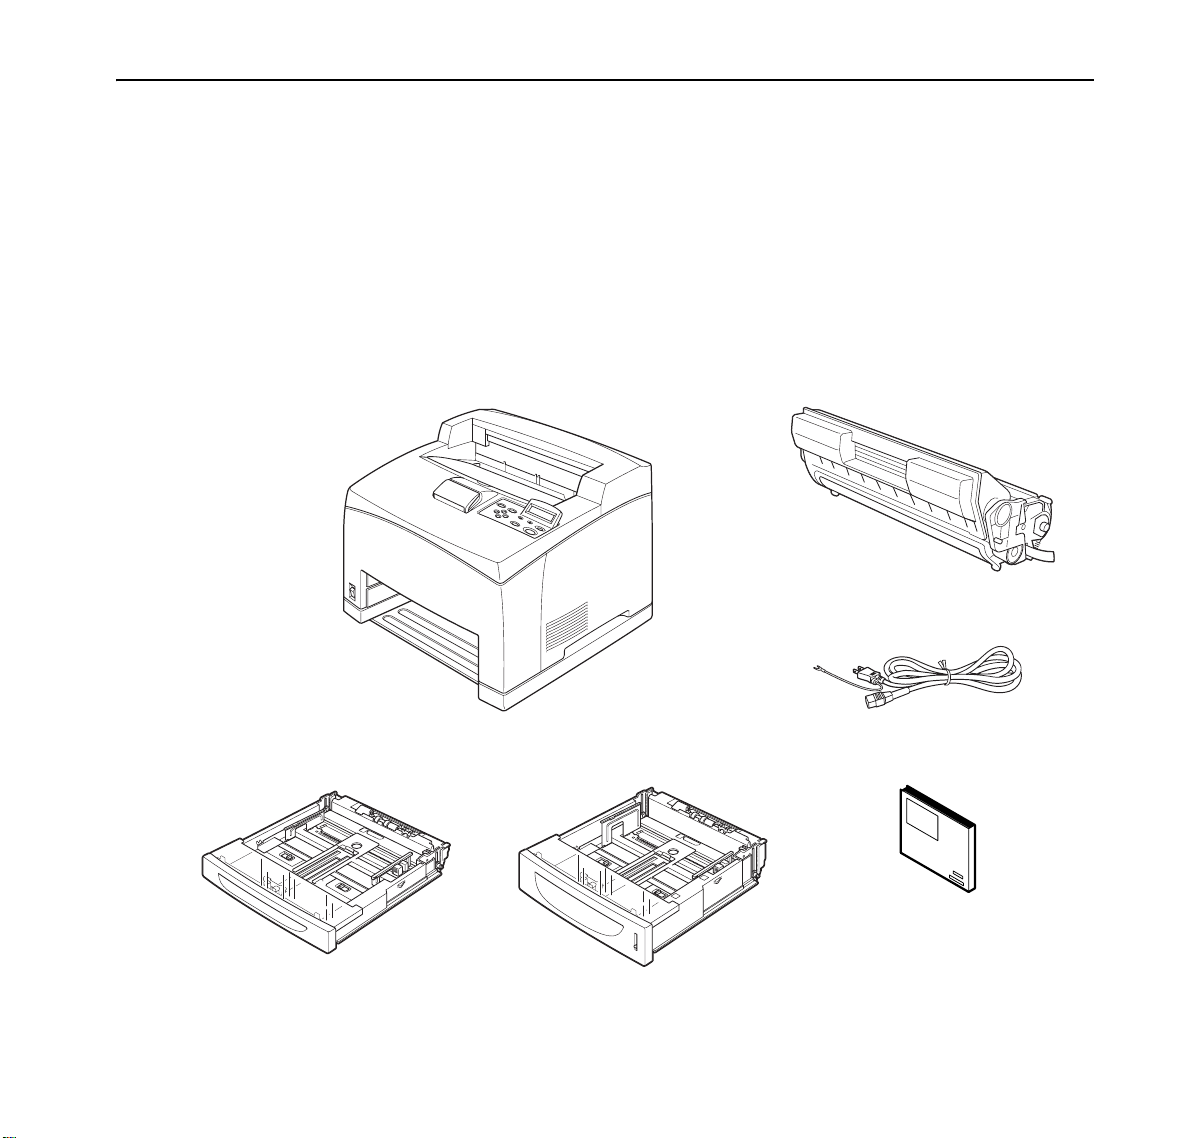
Checking Your Package
Before installing the printer, check that all the items are contained in the package.
Should any components be missing or damaged, contact your dealer.
Toner Cartridge
Printer
Paper tray (A4/150 sheets), paper tray (A4 /5 5 0 she e ts)
6
Power cord
Quick Start Guide
and CD-ROM
Page 11

Quick Start Guide Chapter 2 Setting Up Your Printer
9035
Quick
Start
Guideenbook
Seite7Donnerstag9November
2006
3:12
15
Preparing a Location for the Printer
Dimensions
Installation
Precautions
STOP
z Printer Height: 404 mm (15.9 in)
z Printer Width (left to right): 422 mm (16.6 in)
z Printer Depth (front to back): 465 mm (18.3 in)
Before unpacking your laser printer, it is recommended that you read the
following to assist locating a suitable spot for your new laser printer. To make
optimum use of the printer, observe the following precautions when locating the
printer.
The installation surface must be stable and very sturdy to support the considerable weight of the
printer. If the printer falls over, there is a severe risk of injuries.
z Place the printer on a horizontal, sturdy and stable surface. The printer may
cause injury if it falls over.
z Always place the printer under the following conditions:
Temperature: 10 to 35º C (50º to 95º F)
Humidity: 15 to 85% (non-condensation)
z Be sure to keep the temperature to below 28º C (82º F) if the humidity is 85%.
If the temperature changes drastically from a cold environment to a warm
environment, condensation may develop inside the printer and cause print
problems. Therefore, be sure to let the printer rest for some time to adjust to
the new temperature.
ENGLISH
z Do not subject the printer to direct sunlight or a malfunction may result.
z Do not place the printer in a location with poor ventilation, or high level of
dust, otherwise a fire hazard or electric shock may result.
z Do not place the printer near heaters or similar objects, otherwise a fire hazard
may result.
7
Page 12

Chapter 2 Setting Up Your Printer Quick Start Guide
9035
Quick
Start
Guideenbook
Seite8Donnerstag9November
2006
3:12
15
z Never block the ventilation openings of the printer, otherwise the internal tem-
perature will build up and cause a fire hazard.
z Do not place the printer near alcohol, benzine, or other volatile and flammable
materials, or a fire hazard may result.
Space
Requirements
A certain amount of space is required for proper operation of the printer and also
for performing printer maintenance and replacing consumables. Use the
following figures to plan for appropriate clearances when determining a location
for your printer.
Be sure to leave ample space between the ventilation openings on the printer and the nearest wall
or other surface, otherwise overheating may occur leading to a fire hazard. For easy operation,
maintenance and replacing of consumables, you should also leave the clearances shown below
around the printer. Installation of the printer should be carried out by qualified service personnel.
200 mm
255 mm
402 mm
300 mm
8
Page 13

Quick Start Guide Chapter 2 Setting Up Your Printer
9035
Quick
Start
Guideenbook
Seite9Donnerstag9November
2006
3:12
15
Installation procedure
Removing
the Tape
Installing
Options
When the printer is first taken out of the packaging box, the covers of the printer
are taped as shown in the diagram. Remove the tapes.
ENGLISH
If you have purchased any optional accessories, please refer to the User Guide on
the CD ROM.
If there are no optional accessories to install, proceed to the next section,
“Installing the Toner Cartridge”.
9
Page 14

Chapter 2 Setting Up Your Printer Quick Start Guide
9035
Quick
Start
Guideenbook
Seite10Donnerstag9November
2006
3:12
15
Installing the
Toner Cartridge
STOP
When installing the Toner Cartridge, take note of the following points:
Never throw an Toner Cartridge into an open flame. It can cause an explosion and you can get
burned.
z Do not subject it to direct sunlight or strong light.
z When installing the Toner cartridge, select a location not subject to strong light
and try to finish the installation within 5 minutes.
z Do not touch the surface of the photosensitive drum.
z Do not stand or place the Toner Cartridge upside down. The drum might get
damaged.
z A drum shutter protects the photosensitive drum from light. Do not open the
drum shutter.
z Toner is not harmful to the human body, but if some toner has come into con-
tact with your skin, you can wash it off with cold water and soap. If toner gets
on your clothing, you should try to immediately remove it with a vacuum
cleaner which has got a fine filter.
1
Open the top cover.
10
Do not touch any parts inside the
printer.
Page 15

Quick Start Guide Chapter 2 Setting Up Your Printer
9035
Quick
Start
Guideenbook
Seite11Donnerstag9November
2006
3:12
15
2
Take the Toner Cartridge out of
the box and shake it 7 to 8 times
as shown in the diagram.
3
Place the Toner Cartridge on a
flat surface and pull the seal out
horizontally.
ENGLISH
When pulling out the seal, pull it out horizontally. The tape might break if it is pulled
out diagonally. After the seal has been pulled out, do not shake or bump the Toner
Cartridge.
4
Hold the Toner Cartridge by the
grip and insert it into the slot
inside the printer.
11
Page 16

Chapter 2 Setting Up Your Printer Quick Start Guide
9035
Quick
Start
Guideenbook
Seite12Donnerstag9November
2006
3:12
15
Do not touch any parts inside the printer. Ensure that the Toner Cartridge is firmly set.
5
Close the top cover securely.
When printing text at 5% coverage, you can expect a toner cartridge life of approximately 17,000 pages (10,000 pages for the toner cartridge that is shipped with the
printer).
12
Page 17

Quick Start Guide Chapter 2 Setting Up Your Printer
9035
Quick
Start
Guideenbook
Seite13Donnerstag9November
2006
3:12
15
Loading Paper
See the User Guide on CD-ROM for details on the type and size of paper that
can be loaded in the paper tray.
1
Place the paper tray on a flat surface.
2
Remove the lid of the tray.
ENGLISH
3
If the base plate of the paper tray
is raised, push it down.
13
Page 18

Chapter 2 Setting Up Your Printer Quick Start Guide
9035
Quick
Start
Guideenbook
Seite14Donnerstag9November
2006
3:12
15
4
Squeeze the length guide and slide
it to the desired paper size.
5
Squeeze the right width guide and
slide it to the desired paper size.
14
6
Load the paper with the side to be
printed facing up and with all 4
corners aligned. Make sure that
the right width guide is correctly
aligned with the paper size. Do
not place paper over the right
width guide.
Do not load paper exceeding the maximum fill line or the maximum capacity allowed.
Align the right width guide with the paper width correctly. If the right width guide is not
in place, the paper will not be properly fed and may cause a paper jam.
Page 19

Quick Start Guide Chapter 2 Setting Up Your Printer
9035
Quick
Start
Guideenbook
Seite15Donnerstag9November
2006
3:12
15
7
Close the lid of the paper tray.
8
The lid of the tray must be firmly
closed. If not, the paper might be
misaligned.
ENGLISH
15
Page 20

Chapter 2 Setting Up Your Printer Quick Start Guide
9035
Quick
Start
Guideenbook
Seite16Donnerstag9November
2006
3:12
15
Connecting the
Power Cord
1
Connect the power cord to the
power cord connector at the back
of the printer.
2
Make sure that the power switch
has been firmly pushed to the
<O> position and then insert the
other end of the power cord to a
correctly rated power outlet.
If the power cord has an earth
wire, connect it as well.
Turning the
Printer On
16
1
Press the power switch to the
<I> position the power on.
Page 21

Quick Start Guide Chapter 2 Setting Up Your Printer
9035
Quick
Start
Guideenbook
Seite17Donnerstag9November
2006
3:12
15
The printer motors run for 2 or 3 minutes when you first turn the power on.
The top line of the LCD display reads:
Loading
Followed by asterisks progressing across the
bottom line:
Loading
**************
Following an LED self test, asterisks progress
across both lines of the display, the beeper
sounds …
**************
**************
Initializing
… and the Power On Self Test ends with the
top line of the display reading:
Ready
ENGLISH
While turned on, the printer will go into the standby state if it remains idle for a period of time.
When you have finished using the printer for the day or you do not intend to use
it for a long period of time, switch off the power.
17
Page 22

Chapter 2 Setting Up Your Printer Quick Start Guide
9035
Quick
Start
Guideenbook
Seite18Donnerstag9November
2006
3:12
15
Printing a
Configuration
Summary
Your printer can print a configuration summary that lists the currently selected
status of menu options, media selections in trays, options installed and other
relevant information about your printer. To print a Configuration Summary,
either press the INFO key once when the Start/Stop LED is lit or follow these
steps:
1
From the Ready status, press MENU, the
control panel display will read either
“Paper Menu” or “Job Library”.
2
Press PREVIOUS or NEXT until the
display reads:
Menu
Paper Menu
Menu
Functions
3
Press SELECT, the display will read:
Functions
Reset Printer
4
Press NEXT or PREVIOUS until the
display reads:
Functions
Print Summary
5
Press SELECT.
18
Depending upon the options installed and menu settings, your Configuration Summary may vary.
A two page Configuration Summary will print. An example of a Configuration Summary appears on the following page.
Page 23

Quick Start Guide Chapter 2 Setting Up Your Printer
9035
Quick
Start
Guideenbook
Seite19Donnerstag9November
2006
3:12
15
Example of a
Configuration
Summary
ENGLISH
19
Page 24

Chapter 2 Setting Up Your Printer Quick Start Guide
9035
Quick
Start
Guideenbook
Seite20Donnerstag9November
2006
3:12
15
Setting an IP address manually
If you require to set an IP address manually into the printer, as opposed to letting
the printer receive one from a DHCP source, then you have to ensure that
DHCP is switched off. Use the following procedure to switch DHCP off.
1
Press the MENU button on the control panel.
2
Press the NEXT button until the text
“Interface Menu” is shown on the second
line of the display.
3
Press the SELECT button to enter the interface menu.
4
Press NEXT until the text “Network 1
Setup” is shown on the display.
5
Press SELECT.
6
Press NEXT until “DHCP” is shown on
the display.
Menu
Interface Menu
Interface Menu
Network 1 Setup
Network 1 Setup
DHCP
20
7
8
9
10
Press SELECT.
Press the NEXT button until “Off ” is
shown on the second line of the interface.
Press SELECT.
Press START/STOP button to finish.
DHCP
Off
Page 25

Quick Start Guide Chapter 2 Setting Up Your Printer
9035
Quick
Start
Guideenbook
Seite21Donnerstag9November
2006
3:12
15
Use the following procedure to enter the interface menu and add the IP Address
and other related settings.
1
Press the MENU button on the control panel.
2
Press the NEXT button until the text
“Interface Menu” is shown on the second
line of the display.
3
Press the SELECT button to enter the interface menu.
4
Press NEXT until the text “Network 1
Setup” is shown on the display.
Menu
Interface Menu
Interface Menu
Network 1 Setup
5
Press SELECT.
6
Press NEXT until “IP ADDRESS” is
shown on the display.
Network 1 Setup
IP Address
7
Press SELECT.
ENGLISH
8
Use NEXT/PREVIOUS buttons to change the digit.
9
Press SELECT for the next digit.
10
Press SELECT after all digits are set.
11
The control Panel shows again “IP
Address”.
12
Press NEXT and “Subnet Mask” is shown
on the display.
13
Repeat steps 7 – 10.
Network 1 Setup
IP Address
Network 1 Setup
Subnet Mask
21
Page 26

Chapter 2 Setting Up Your Printer Quick Start Guide
9035
Quick
Start
Guideenbook
Seite22Donnerstag9November
2006
3:12
15
14
The control Panel shows again “Subnet
Mask”.
Network 1 Setup
Subnet Mask
15
Press NEXT and “Default Gateway” is
shown on the display.
Network 1 Setup
Default Gateway
16
Repeat steps 7 – 10.
17
The control Panel shows again “Default
Gateway”.
Network 1 Setup
Default Gateway
18
Press START/STOP button to finish.
Print a configuration summery to check the proper setting of the IP Address, Subnet Mask and
Default Gateway.
22
Page 27

Quick Start Guide Chapter 3 Installing Printer Drivers
9035
Quick
Start
Guideenbook
Seite23Donnerstag9November
2006
3:12
15
Chapter 3
Installing Printer Drivers
Driver Installation
1
Load the cd into the drive.
ENGLISH
2
After it loads select I Accept to the opening screen as shown.
23
Page 28

Chapter 3 Installing Printer Drivers Quick Start Guide
9035
Quick
Start
Guideenbook
Seite24Donnerstag9November
2006
3:12
15
3
Read carefully the instruction about the USB connection. Click Menu.
24
4
5
Click the appropriate Driver (International or USA).
Select your operating system and follow the instructions on the screen.
Page 29

Quick Start Guide Chapter 3 Installing Printer Drivers
Quick
Start
Guideenfm
Seite25Donnerstag9November
2006
3:41
15
TGNet Admin administration program
The printer is supported by the TGNet Admin administration program, available
from our web site. Network discovery, administration, remote monitoring and
remote panel management options are available to the administrator.
ENGLISH
25
Page 30

Chapter 3 Installing Printer Drivers Quick Start Guide
9035
Quick
Start
Guideenbook
Seite26Donnerstag9November
2006
3:12
15
The TGNet Admin program includes a virtual control panel function that allows
the user to remotely manage the printer. The virtual control panel functions
allow the administrator to remotely control many printers without having to go
to each printer to modify the printer settings.
26
Page 31

Quick Start Guide Chapter 4 Specifications
9035
Quick
Start
Guideenbook
Seite27Donnerstag9November
2006
3:12
15
Chapter 4
Specifications
Machine type Desktop
Printing system Laser xerography
Printing speed 34 sheets/minute (for continuous printing of the same
A4-sized document by short edge feed)
Warm-up time Maximum of 17 seconds from power on at 22° C
Resolution 1200 dots/25.4 mm and 600 dots/25.4 mm
Paper size A4, A5, B5 JIS, B5 ISO, 8.5 × 11" (Letter),
8.5 × 13" (Legal 13), 8.5 × 14" (Legal 14),
7.5 × 11.5" (Executive), 5.5 × 8.5" (Statement)
Paper type
Plain, Thick1, Thick2 paper (60-216 g/m
envelopes*, labels*
some envelopes and labels cannot be used due to the paper quality and size
*
2
), transparencies,
ENGLISH
Standard paper tray Paper tray (A4/150 sheets): 150 sheets
Optional paper tray Paper tray (A4/550 sheets): 550 sheets
Output tray capacity 500 sheets
Operating noise 53.6 db(A) or less during operation, 27 db(A) or less during
Power 100 V ± 10%, 50/60 Hz ± 3 Hz
Maximum power consumption 995 W or less during operation,
Dimensions 422 (W) × 465 (D) × 404 (H) mm
Weight 21.0 kg
Paper tray (A4/550 sheets): 550 sheets
standby mode
220 V ± 10%, 50/60 Hz ± 3 Hz
13 W or less during standby mode
27
Page 32

Chapter 5 Options and supplies Quick Start Guide
9035
Quick
Start
Guideenbook
Seite28Donnerstag9November
2006
3:12
15
Chapter 5
Options and supplies
Contact your dealer to order printing options/supplies, or you can purchase
options/supplies directly from the manufacturer (see addresses at the rear cover
page of this manual). The table below list available printer options and order
numbers.
Option/Supply Order No.
Process Unit Toner Cartridge (17 K) 062415
Tray Module 550 Sheet (max. of two modules) 062412
Duplex Unit 062413
Offset Catch Tray 062414
Face Up Tray (not available in US) 086514
28
PostScript/PCL Font Module 062458
PCL Font Module 062457
Harddisk MLXXXF-HD
Memory 128 MB 093053
Memory 256 MB 093054
Page 33

“All rights reserved. Translations, reprinting or copying by any means of this manual complete or in part or in any different form requires our explicit
approval. We reserve the right to make changes to this manual without notice. All care has been taken to ensure accuracy of information contained
in this manual. However, we cannot accept responsibility for any errors or damages resulting from errors or inaccuracies of information herein.”
TRADEMARK ACKNOWLEDGEMENTS
• Centronics is a trademark of Centronics Data
Computer Corporation.
• PCL and PCL6 are trademarks of Hewlett-Packard
Company.
• IBM and IBM PC are trademarks of International
Business Machines Corporation.
• Apple, AppleTalk, TrueType, Laser Writer and
Macintosh are trade-m ar ks of Apple Computer, Inc.
• Microsoft, Windows, Windows 9x, Windows 2000,
Windows NT and MS-DOS are registered
trademarks of Microsoft Corporation.
• PostScript is a trademark of Adobe Systems Inc.
• All other brand or product names are trademarks of
their respective companies or organizations.
Page 34

© November 2006
 Loading...