

Page 1

HP Deskjet 460
Getting started guide
使用入门指南
시작 안내서
Panduan untuk mulai inicial
スタート ガイド
使用入門指南
Page 2

Copyright Information
© 2005 Copyright Hewlett-Packard Development Company,
L.P.
Reproduction, adaptation or translation without prior written
permission is prohibited, except as allowed under the
copyright laws.
The information contained herein is subject to change without
notice.
The only warranties for HP products and services are set forth
in the express warranty statements accompanying such
products and services. Nothing herein should be construed as
constituting an additional warranty. HP shall not be liable for
technical or editorial errors or omissions contained herein.
1, 6/2005
Trademark Credits
Microsoft and Windows are registered trademarks or
trademarks of Microsoft Corporation in the United States and/
or other countries/regions.
The Bluetooth trademarks are owned by Bluetooth SIG, Inc.,
U.S.A. and used by Hewlett-Packard under license.
The SD Logo is a trademark.
版权信息
© 2005 Copyright Hewlett-Packard Development Company,
L.P.
未经事先书面许可,严禁进行任何形式的
复制、改编或翻译,除非版权法另有规定。
此处包含的信息如有更改,恕不另行通知。
HP 产品和服务的所有保修事项已在产品和服务所附带的保修
声明中列出,此处内容不代表任何额外保修。 HP 公司对此处
任何技术性或编辑性的错误或遗漏概不负责。
1, 6/2005
商标说明
Microsoft 和 Windows 是 Microsoft Corporation 在美国和 / 或
其他国家 / 地区的注册商标。
Bluetooth,(蓝牙)是 Bluetooth SIG, Inc., U.S.A. 所拥有的商
标并授予 Hewlett-Packard 使用许可。
SD 徽标是一个商标。
Safety Information
Always follow basic safety precautions when using this product
to reduce risk of injury from fire or electric shock.
1. Read and understand all instructions in the documentation
that comes with the printer.
2. Observe all warnings and instructions marked on the
product.
3. Unplug this product from wall outlets before cleaning.
4. Do not install or use this product near water, or when you
are wet.
5. Install the product securely on a stable surface.
6. Install the product in a protected location where no one
can step on or trip over the line cord, and the line cord
cannot be damaged.
7. If the product does not operate normally, see
“Maintaining and troubleshooting” in the onscreen user's
guide on the Starter CD.
8. There are no user-serviceable parts inside. Refer servicing
to qualified service personnel.
2
安全信息
使用此产品时,请始终遵守基本的安全防范措施以降低导致
火灾及电击伤害的危险。
1. 请阅读并理解此打印机随附文档中的所有
说明。
2. 请遵守产品上标注的所有警告及说明。
3. 在清洁本产品前,请从插座上拔下插头。
4. 切勿在水边,或在身上潮湿时安装或使用
本产品。
5. 请将本产品安装在平稳的表面上。
6. 请将本产品安装在受保护的场所,以免有人踩到线路线
或被线路线绊倒,以使线路线不受到损害。
7. 如果本产品没有正常运行,请参阅 Starter CD 上联机用
户指南的 “疑难解答”。
8. 未随机提供用户耐用的零件。请向已授权的服务人员咨
询维修事宜。
Page 3

안전 정보
Informasi Keselamatan
화재나 감전으로 인한 부상의 위험을 줄이기 위해 본 제품 사
용시 항상 기본 안전 주의사항을 따르십시오.
1. 프린터와 함께 제공되는 사용 설명서의 모든 지침을
읽고 이해하십시오.
2. 제품에 표시된 모든 경고와 지시를 준수하십시오.
3. 청소하기 전에는 콘센트에서 제품의 플러그를
뽑으십시오.
4. 본 제품을 물가나 몸이 젖은 상태 에서 설치 또는
사용하지 마십시오.
5. 제품은 안전한 곳에서 안전하게 설치하십시오.
6. 라인 코드를 밟거나 발에 걸리지 않으며 손상을 입지
않는 보호된 장소에 제품을 설치하십시오.
7. 제품이 정상적으로 작동하지 않을 경우, Starter CD에 있
는 온라인 사용자 설명서의 문제 해결을
참조하십시오 내부에는 사용자가 서비스할 수 있는
부품은 없습니다.
8. 서비스는 승인된 서비스 직원에게 맡기십시오.
安全に関する情報
Harap selalu mengikuti acuan-acuan dasar keselamatan ketika
menggunakan produk ini untuk mengurangi risiko luka bakar
atau luka akibat kejutan listrik.
1. Baca dan pahami semua petunjuk yang diberikan
di dalam dokumentasi yang disertakan dengan printerini.
2. Simak semua peringatan dan instruksi yang dicetak atau
ditempel atas produk.
3. Putuskan dahulu hubungan dengan sumber listrik sebelum
produk ini dibersihkan.
4. Jangan meletakkan atau menggunakan produk ini dekat
air, atau bila Anda basah.
5. Tempatkan produk ini di atas permukaan yang kokoh dan
stabil.
6. Tempatkan produk ini di lokasi yang terlindung sehingga
kabelnya tidak terinjak, tersandung sehingga menjadi
rusak.
7. Apabila produk ini tidak beroperasi dengan normal,
coba baca bagian Cara mengatasi masalah.
8. Tidak terdapat bagian-bagian di dalam produk ini yang
dapat diperbaiki sendiri oleh pengguna. Harap minta
teknisi atau staf ahli yang berwenang untuk
memperbaikinya.
安全資訊
火災や感電によるけがの危険を避けるため、この製品を使
用する場合は、常に基本的な安全に関する注意を厳守して
ください。
1. プリンタに付属のマニュアルに記載されているすべて
の説明を読み、理解するようにしてください。
2. 製品に記載されているすべての警告および説明を厳守
してください。
3. クリーニングの前にこの製品をコンセントから取り外
してください。
4. この製品を水気の近くに設置すること、または身体が
濡れているときに設置しないでください。
5. 製品は、安定した面にぐらつかないよう設置してくだ
さい。
6. ケーブルやコードに足をとられないような場所に設置
してください。また、ケーブルやコードが損傷しない
ような場所を選びます。
7. 製品が正しく機能しない場合は、Starter CD のオンス
クリーン ユーザーズ ガイドにある「メンテナンスと
トラブルシューティング」を参照してください。
8. 内部にはユーザーが修理可能な部品はありません。修
理については、認定のサービス担当者にお問い合わせ
ください。
使用本產品時,請務必遵守基本的安全注意事項,以降低火
及電擊的傷害。
1. 閱讀並瞭解隨印表機一同提供的文件中的所有指示。
2. 查看產品標示的所有警告及指示。
3. 清潔前取下牆壁的產品插座。
4. 請勿在近水或潮濕的情況下安裝或使用本產品。
5. 在穩固的表面安裝本產品。
6. 在線材不受踐踏的安全位置安裝本產品,且線材必須是
完好的。
7. 若產品無法正常運作,請參閱 Starter CD 上的聯機使用
者指南之 「疑難排解」。
8. 其中無使用者可自行維修的零件。請將產品送修合格的
服務人員。
3
Page 4
1
2
3
4
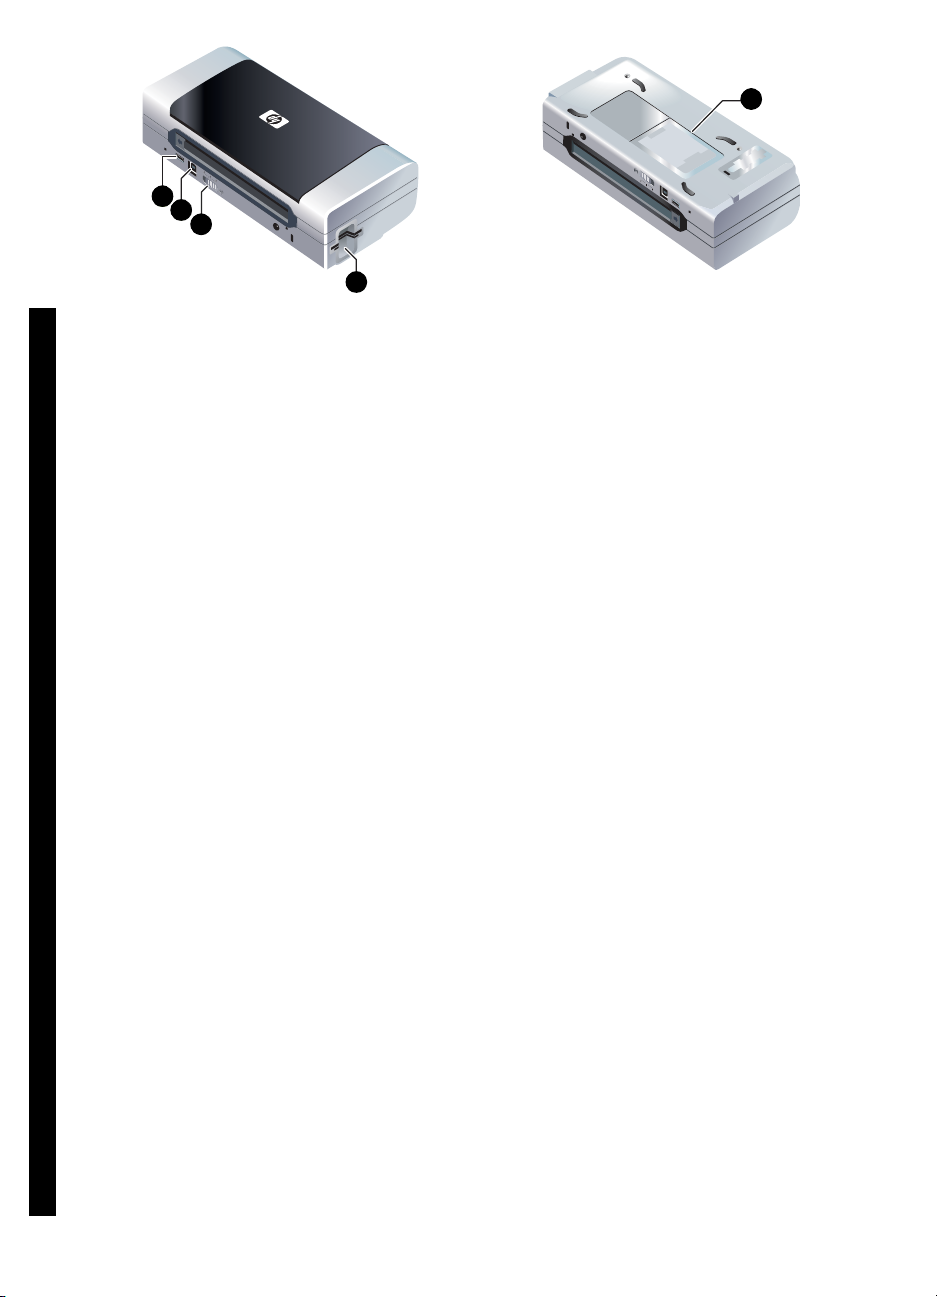
HP Deskjet 460 series printer.
This printer provides quick, professional mobile printing.
You can print directly via USB cable from computers and
PictBridge cameras, from digital camera memory cards
or USB flash drives with DPOF files, or wirelessly from
802.11 or Bluetooth
®
-enabled devices.
5
For detailed information, see the onscreen user’s guide on the
Starter CD. 1) PictBridge/USB Host Port, 2) Universal serial
bus (USB) port, 3) Wireless profile switch, 4) CompactFlash™
card slot/Memory card slot, 5) Card holder.
HP Deskjet 460 系列打印机。
简
本打印机提供快速而专业化的移动打印。
体
您可通过计算机 USB 电缆和 PictBridge 摄相机或从数字照
中
相机内存卡或 USB 闪存盘以 DPOF 文件直接打印,或从
802.11 或支持蓝牙 (Bluetooth
文
HP Deskjet 460 시리즈 프린터
한
이 프린터는 빠르고 전문적인 모바일 인쇄 기능을 제공합니
국
다.
English English EnglishEnglish English
어
컴퓨터 및 PictBridge 카메라에서 USB 케이블을 사용하여 직
접 인쇄하거나 DPOF 파일을 사용해서 디지털 카메라 메모
리 카드/USB 플래시 드라이브에서 또는 802.11/
®
Bluetooth
Printer seri HP Deskjet 460.
Menggunakan printer ini, penggunanya dapat mencetak di
mana saja (mobile), dengan cepat dan profesional.
Anda dapat mencetak langsung dari komputer dan kamera
PictBridge yang dihubungkan dengan kabel USB, atau dari
kartu memori kamera digital dan flash drive USB dengan file
DPOF, atau secara nirkabel dari alat-alat yang memenuhi
standar 802.11 serta Bluetooth
Bahasa Indonesia
가능 장치에서 무선으로 인쇄할 수 있습니다.
®
)功能的设备无线打印。
®
.
有关更多信息,请参阅 Starter CD 上的在线用户指南。
1) PictBridge/USB 主机端口,2) 通用总线串口 (USB),3) 无
线配置规范开关, 4) CompactFlash™ 插卡槽 / 内存卡槽,
5) 名片夹。
자세한 내용은 Starter CD에 있는 화면상의 사용 설명서를
참조하십시오. 1) PictBridge/USB 호스트 포트, 2) 범용 직렬
버스(USB) 포트, 3) 무선 프로파일 스위치,
4) CompactFlash™카드 슬롯/메모리 카드 슬롯, 5) 카드 홀
더.
Untuk memperoleh keterangan lebih rinci, silakan merujuk
panduan pengguna onscreen yang terdapat di dalam
CD Starter. 1) PictBridge/USB Host Port, 2) Port Universal
serial bus (USB), 3) Sakelar profil nirkabel, 4) Selot kartu
untuk CompactFlash™/Memory, 5) Dudukan kartu.
4
Page 5
H
P
D
ejks
e4
t
6
1
3
Hj
P
D
e
s
k
e
4t6
2
w0f
H
P
,
4
6bw
eD
0t
s
k
j
e
4t6
4
1
2
3
2
1
5
0
H
P
4
D
6w
e
0
s
k
j
e
f
t
H
P
46
D
e
se
k
w0
j
b
H
t
t
c0
46
1b
b
DP
1
.
d
2
r
0
8
a
C
,
e
F
C
04
N
se
4
A
L
k
c
W
6
b
j
,
0f4,
t
w
6
0
w
f
6
,
4
6
w0
0
b
w
t
b
t
1
4
6
HP Deskjet
460cb, 460wf, 460wbt
HP Deskjet
460wbt
1
1
.
2b
0
8
d
ra
C
F
CN
HP Deskjet
460wf
A
L
W
3
2
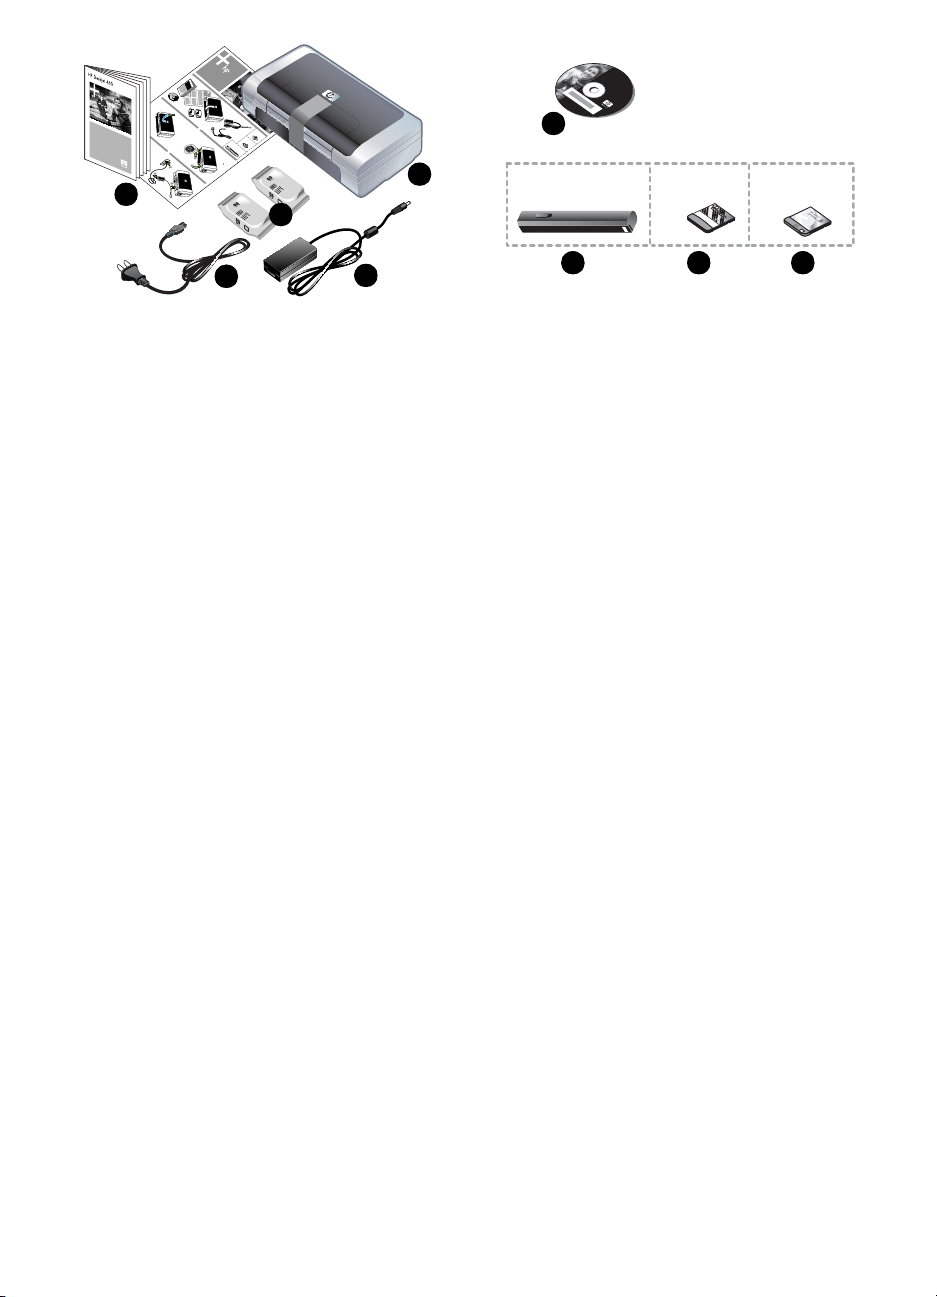
Check the package contents.
HP Deskjet 460 series printer, 2) power adapter,
1)
3) power cord, 4) black and tricolor print cartridges,
5) printed documentation,
检查包装箱中的物品。
1) HP Deskjet 460 系列打印机, 2) 电源适配器, 3) 电源
线, 4) 黑色和彩色打印墨盒, 5) 印刷文件,
패키지 내용물을 확인합니다.
1) HP Deskjet 460 시리즈 프린터, 2) 전원 어댑터, 3) 전
원코드, 4) 검정색 및 삼원색 프린트 카트리지, 5) 출력본
문서,
7
98
6) Starter CD (software and electronic documentation),
7) Battery (included with HP Deskjet 460cb, 460wf, and
460wbt), 8) Bluetooth printer card (HP Deskjet 460wbt) ,
9) 802.11 printer card (HP Deskjet 460wf).
6) Starter CD (软件和电子文件), 7) 电池 (HP Deskjet
460cb、 460wf 和 460wbt 自带), 8) 蓝牙打印机插卡
(HP Deskjet 460wbt 自带), 9) HP 802.11 打印机插卡
(HP Deskjet 460wf 自带)。
6) Starter CD (소프트웨어 및 전자 문서), 7) 배터리(HP
Deskjet 460cb, 460wf, 460wbt에 포함됨), 8) Bluetooth 프린
터 카드(HP Deskjet 460wbt), 9) 802.11 프린터 카드
(HP Deskjet 460wf).
Memeriksa isi kemasan.
1) Printer seri HP Deskjet 460, 2) adaptor listrik,
3) kabel listrik, 4) kartrid cetak hitam dan triwarna,
5) dokumentasi cetakan,
6) CD Starter (perangkat lunak dan dokumentasi elektronik,
7) Baterai (disertakan dengan HP Deskjet 460cb, 460wf,
dan 460wbt), 8) kartu printer (printer card) Bluetooth
(HP Deskjet 460wbt), 9) kartu printer 802.11 (HP Deskjet
460wf).
5
Page 6
1
2
1
2
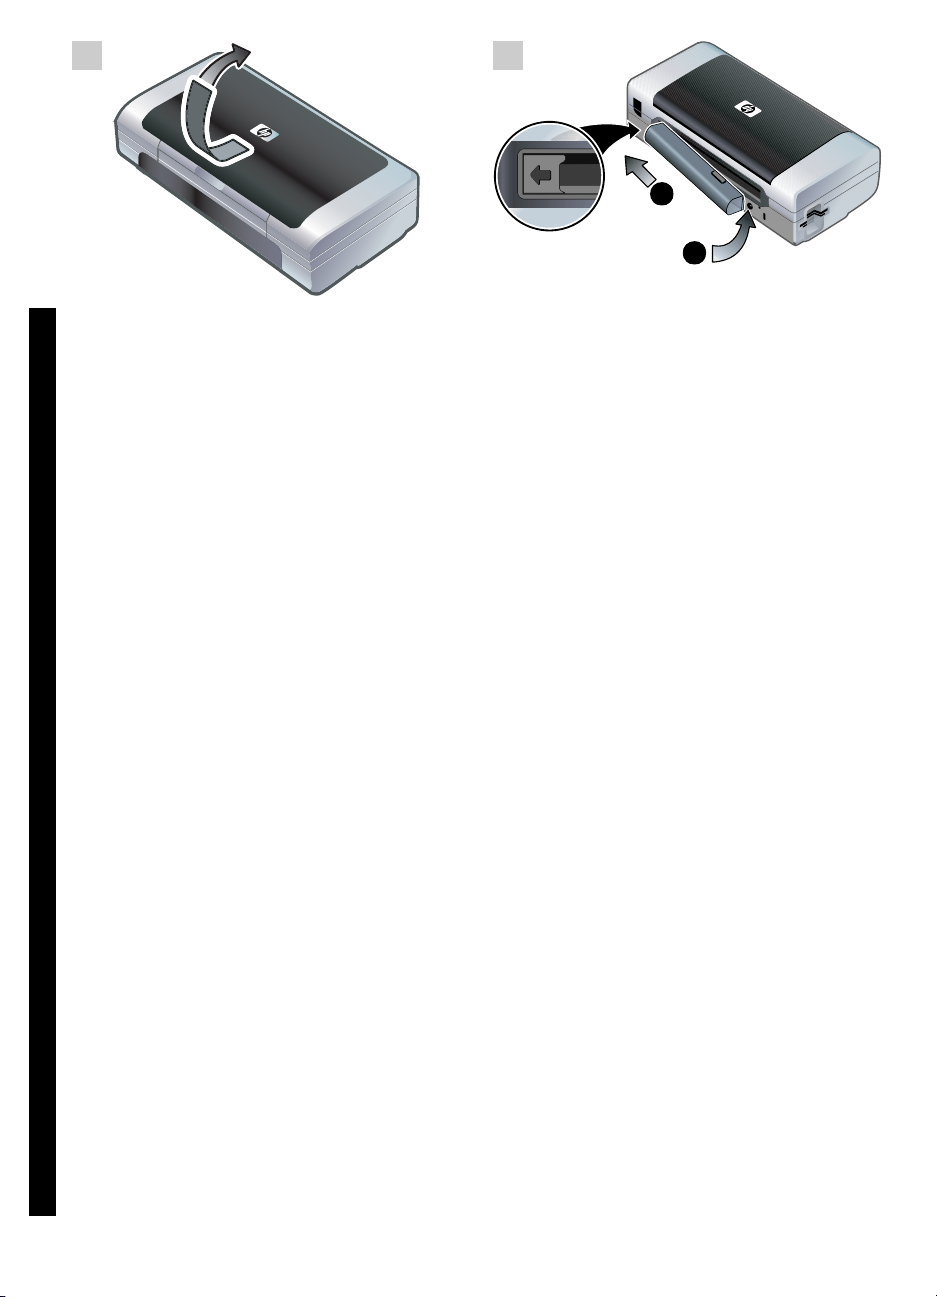
Step 1: Remove the packing tape.
Remove all packing tape from the printer.
步骤 1: 去除包装胶带。
简
去除打印机的所有包装胶带。
体
中
文
단계 1: 포장 테이프를 제거합니다.
한
프린터에서 포장 테이프를 모두 제거하십시오.
국
English English EnglishEnglish English
어
Step 2: Battery.
Slide the battery into the battery slot at an angle until
1)
the battery is flush with the contacts.
into the battery slot until the battery clicks into place.
步骤 2: 电池。
1) 以一定角度将电池斜着滑入电池槽,直到电池与接触点
对齐。 2) 将电池推入电池槽,直到电池喀哒一声到位。
단계 2: 배터리
1) 배터리 접촉 부분에 서로 닿을 때까지 다음 그림에서의
각도로 배터리 슬롯에 배터리를 밀어 넣습니다. 2) 딸깍 소
리가 날 때까지 배터리 슬롯에 배터리를 밀어 넣으십시오.
2) Push the battery
Step 1: Menyingkirkan pita kemasan.
Singkirkan semua pita kemasan yang terdapat pada printer.
Bahasa Indonesia
6
Step 2: Baterai.
1) Miringkan baterai dan geser ke dalam dudukan baterai
hingga tepat menyentuh kutub-kutubnya. 2) Tekan baterai
hingga tepat masuk ke dalam dudukannya dengan
mengeluarkan bunyi klik.
Page 7

Note: Use only the battery specifically designed for use
with this printer. See the onscreen user’s guide on the
Starter CD for more information.
Fully charge the battery before using (approximately 4
hours for the first charge, 2 hours for subsequent
charges). When the battery is charging, the battery
charging light is green. If the light is red while charging,
the battery might be faulty and need to be replaced. See
the onscreen user’s guide on the Starter CD for
instructions on replacing the battery.
注: 本打印机只能使用专为打印机使用所设计的电池。有
关更多信息,请参阅 Starter CD 上的在线用户指南。
주: 이 프린터에서 사용하도록 설계된 배터리만 사용해야
합니다. 자세한 내용은 Starter CD에 있는 사용 설명서를 참
조하십시오.
Catatan: Hanya gunakan baterai yang secara khusus telah
dirancang untuk digunakan dengan printer ini. Rujuk
panduan pengguna onscreen di dalam CD Starter untuk
keterangan lebih lanjut.
在使用以前,先将电池充足电(第一次充电大约需要 4 小
时,日后充电需要 2 小时)。在电池充电时,电池充电指示
灯亮绿色。如果电池充电时指示灯亮红色,可能表示电池
有问题需要替换。有 关替换电池的说明,请参阅 Starter CD
上的在线用户指南。
사용하기 전에 배터리를 완전히 충전합니다(처음 충전 시
약 4시간, 그 이후에는 약 2시간). 배터리 충전 표시등은 배
터리 충전 시 초록색입니다. 충전 중 표시등이 빨간색이면
배터리에 장애가 있거나 교체가 필요한 것일 수 있습니다.
배터리 교체에 대한 자세한 내용은 Starter CD에 있는 사용
설명서를 참조하십시오.
Isi baterai hingga penuh sebelum menggunakannya (kira-
kira 4 jam untuk pengisian yang pertama, 2 jam untuk
berikutnya). Pada waktu baterai diisi, lampu pengisian
baterai berwarna hijau. Apabila lampu berwarna merah
saat baterai diisi, baterai mungkin rusak dan perlu diganti.
Silakan merujuk panduan pengguna onscreen di dalam CD
Starter untuk mendapatkan petunjuk mengenai cara
mengganti baterai.
7
Page 8
3
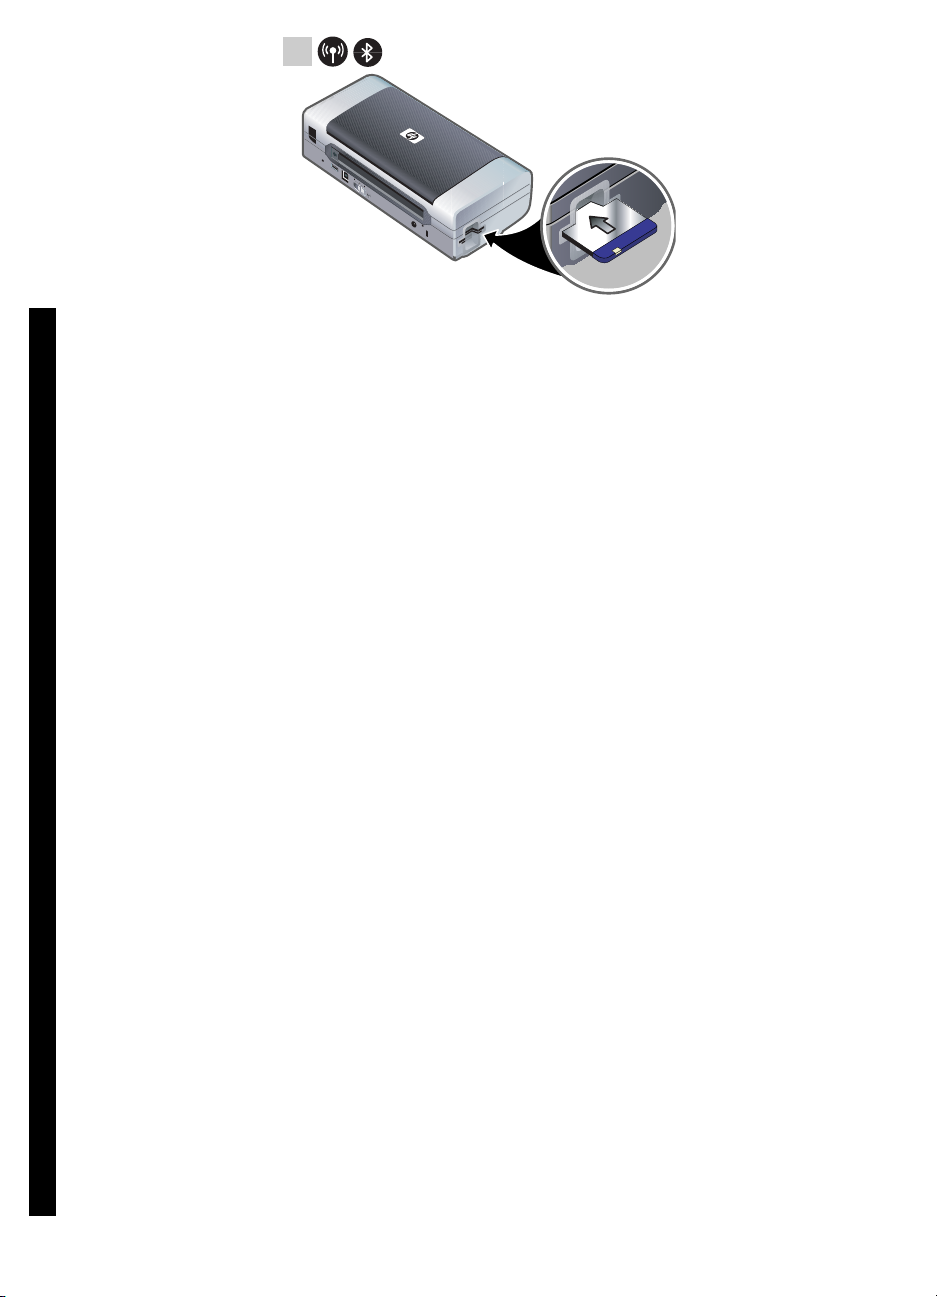
Step 3: Install the wireless printer card (HP Deskjet 460wf or
HP Deskjet 460wbt).
1)
Insert the HP 802.11 printer card or Bluetooth card,
with the lights facing up, into the CompactFlash™ card
slot.
步骤 3: 安装无线打印机插卡 (HP Deskjet 460wf 或 HP
简
Deskjet 460wbt 自带)。
体
1) 指示灯面朝上,将 HP 802.11 打印机插卡或蓝牙插卡插
中
入 CompactFlash™ 卡槽。
文
단계 3: 무선 프린터 카드를 설치합니다(HP Deskjet 460wf
한
또는 HP Deskjet 460wbt).
국
1) 표시등을 위쪽으로 향하게 하여 HP 802.11 프린터 카드
English English EnglishEnglish English
어
또는 Bluetooth 카드를 CompactFlash™카드 슬롯에 꽂습니
다.
Note: If you are installing a Bluetooth card, make sure
that your Bluetooth host device and operating system are
supported by the printer. For more information, refer to
http://www.hp.com/support/dj460.
注意:若要安装蓝牙插卡,请确保您的蓝牙主机设备及操
作系统均受打印机支持。有关更多信息,请浏览
http://www.hp.com/support/dj460。
주: Bluetooth 카드를 설치하는 경우 프린터가 Bluetooth 호
스트 장치와 운영 체제를 지원하는지 확인하십시오. 자세한
내용은 http://www.hp.com/support/dj460을 참조하십시
오.
Step 3: Memasang kartu printer nirkabel (HP Deskjet 460wf
atau HP Deskjet 460wbt).
1) Sisipkan kartu printer HP 802.11 atau kartu Bluetooth ke
dalam selot kartu CompactFlash™ dan pastikan bahwa
lampu pada kartu menghadap ke atas.
Bahasa Indonesia
8
Catatan: Apabila Anda memasang kartu Bluetooth, pastikan
bahwa alat di mana Bluetooth dipasang serta sistem
operasinya terdukung oleh printer. Untuk keterangan lebih
lanjut, harap rujuk
http://www.hp.com/support/dj460.
Page 9
4
1
5
3
3
2
1
1
2
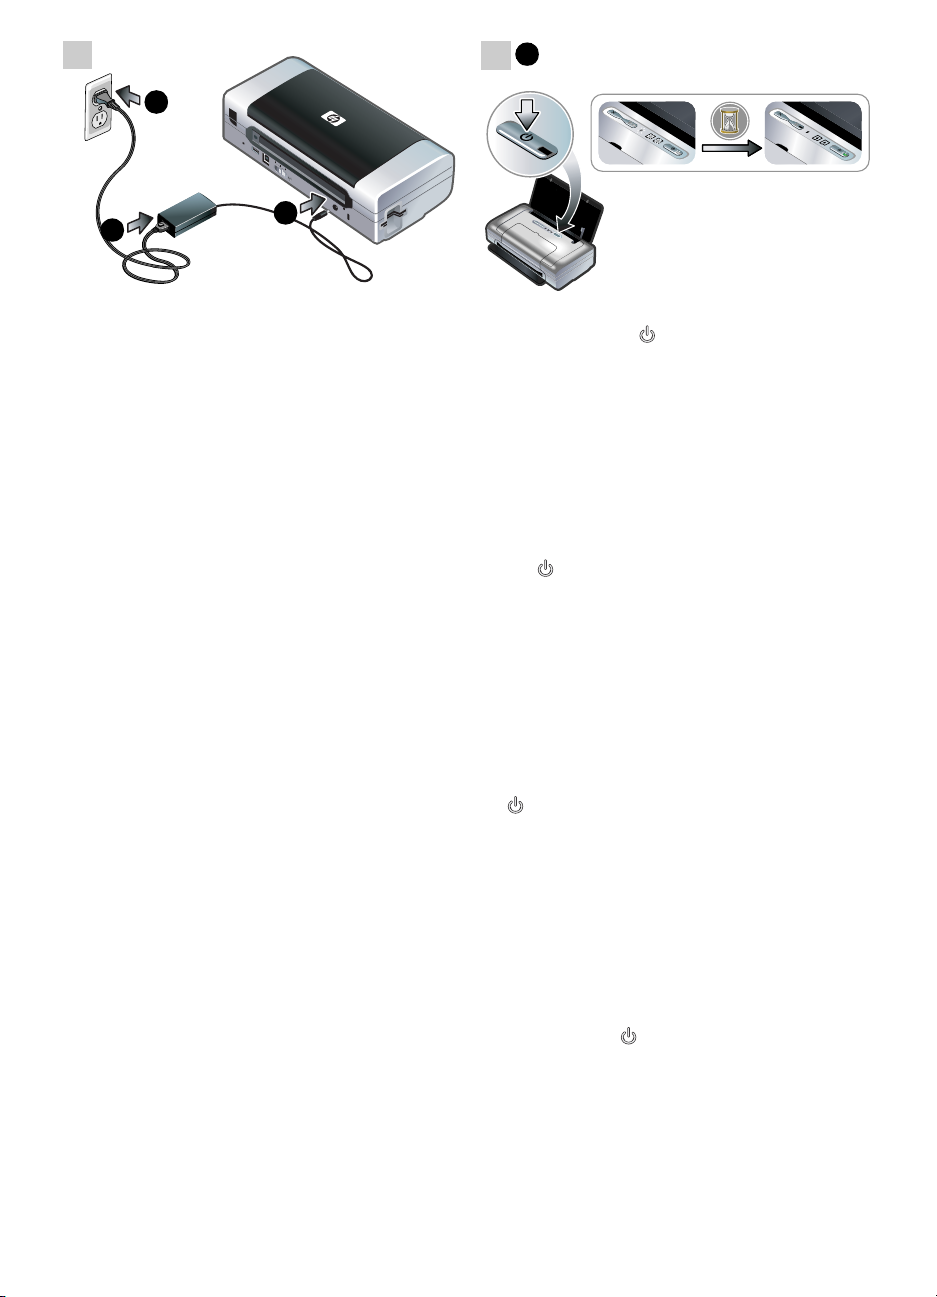
Step 4: Connect the power cord.
Connect the power adapter to the printer. 2) Connect
1)
the power cord to the power adapter.
3) Connect the
other end of the power cord to an alternating current
(AC) power outlet.
步骤 4: 连接电源线。
1) 将电源适配器连接打印机。 2) 将电源线连接电源适配
器。 3) 将电源线另一端连接交流 (AC) 电源插座。
Step 5: Turn on the printer and install the print cartridges.
Press and hold the (power button) to turn on the
1)
printer. Printer lights will flash in sequence.
Note: Wait
until the power light is the only printer light that remains
lit.
步骤 5: 打开打印机并安装打印墨盒。
1) 按住 (电源按钮)打开打印机。打印机指示灯会按次
序闪烁。注意:一直等到只剩下电源指示灯还亮着。
단계 4: 전원 코드를 연결합니다.
1) 전원 어댑터를 프린터에 연결합니다. 2) 전원 코드를 전
원 어댑터에 연결합니다. 3) 전원 코드의 다른쪽 끝을 교류
전류(AC) 전원 콘센트에 연결합니다.
Step 4: Menghubungkan kabel listrik.
1) Hubungkan adaptor listrik dengan printer. 2) Hubungkan
kabel listrik dengan adaptor listrik. 3) Colokkan ujung lain
kabel listrik ke sumber listrik AC (arus listrik bolak-balik).
단계 5: 프린터를 켜고 프린트 카트리지를 끼웁니다.
1) (전원 단추)를 길게 눌러서 프린터를 켭니다. 프린터
표시등이 순서대로 깜박입니다. 주: 전원 표시등만 켜진 상
태로 유지될 때까지 기다리십시오.
Step 5: Menyalakan printer dan memasang kartrid cetak.
1) Tekan dan tahan (tombol daya) untuk menyalakan
printer. Lampu-lampu printer akan berkedip secara
berurutan. Catatan: Tunggu sampai lampu daya merupakan
satu-satunya lampu yang masih menyala.
9
Page 10
2 3
H
P
Tr
i-color
Print
C
artr
idg
e
H
P
B
la
ck
Pr
in
t
Ca
rtr
i
dge
4 5
H
P
T
P
r
r
i
in
c
t
o
C
l
o
a
r
r
t
r
id
g
e
H
P
B
P
l
r
a
i
n
c
t
k
C
a
r
t
r
i
d
g
e
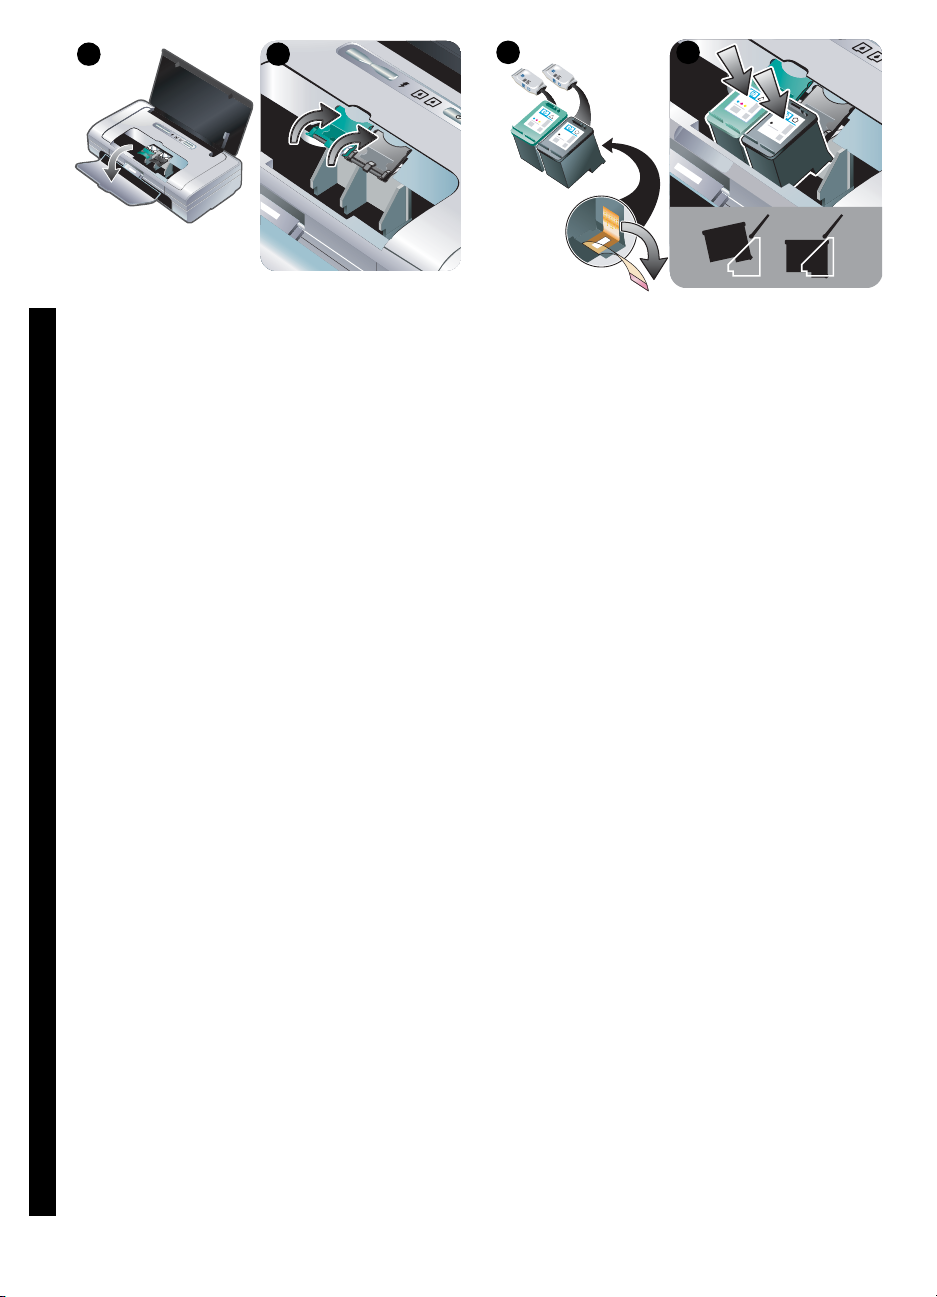
2) When the power light is the only light lit, open the
front access cover and wait for the carriage to stop at the
cartridge change position.
3) Lift up the print cartridge
latches.
2) 当只有电源指示灯亮的时候,打开前检修盖并且等到滑
简
架停在墨盒更换位置。 3) 向上提起打印墨盒的固定锁。
体
中
文
2) 전원 표시등만 켜져 있으면 앞쪽 덮개를 열고, 카트리지
한
가 카트리지 변경 위치에서 멈출 때까지 기다립니다. 3) 잉
국
크 카트리지 걸쇠를 들어 올립니다.
English English EnglishEnglish English
어
4) Remove each print cartridge from its package, and
then remove the protective tape from the print cartridge.
5) Insert the color print cartridge into the left cradle
compartment and the black print cartridge into the right
cradle compartment. Press down on both cartridges to
ensure they are seated completely in the cradles.
4) 从每个打印墨盒包装中取出墨盒,然后去除打印墨盒的
保护胶带。 5) 将彩色打印墨盒插入左底槽,将黑色打印墨
盒插入右底座。将两个墨盒向下压,确保已完全固定在底
座内。
4) 패키지에서 인쇄 카트리지를 제거한 다음 인쇄 카트리지
에서 보호 테이프를 제거합니다. 5) 컬러 잉크 카트리지를
왼쪽 함에, 검정 잉크 카트리지는 오른쪽 함에 끼우고 밀어
넣습니다. 양쪽 카트리지를 눌러서 카트리지함에 완전히 끼
우십시오.
2) Pada waktu lampu daya saja yang masih menyala, buka
penutup akses depan dan tunggu gandaran pembawa
kartrid (carriage) berjalan dan berhenti di posisi
penggantian kartrid. 3) Angkat pengancing kartrid cetak.
Bahasa Indonesia
10
4) Keluarkan masing-masing kartrid cetak dari kemasannya,
dan kemudian singkirkan pita pelindung dari kartrid cetak.
5) Pasang kartrid cetak berwarna ke dalam dudukannya di
sebelah kiri dan kartrid cetak hitam di sebelah kanan. Tekan
ke bawah untuk memastikan kedua kartrid itu telah
terpasang dengan mantap di tempatnya.
Page 11
6 7
6
2
1
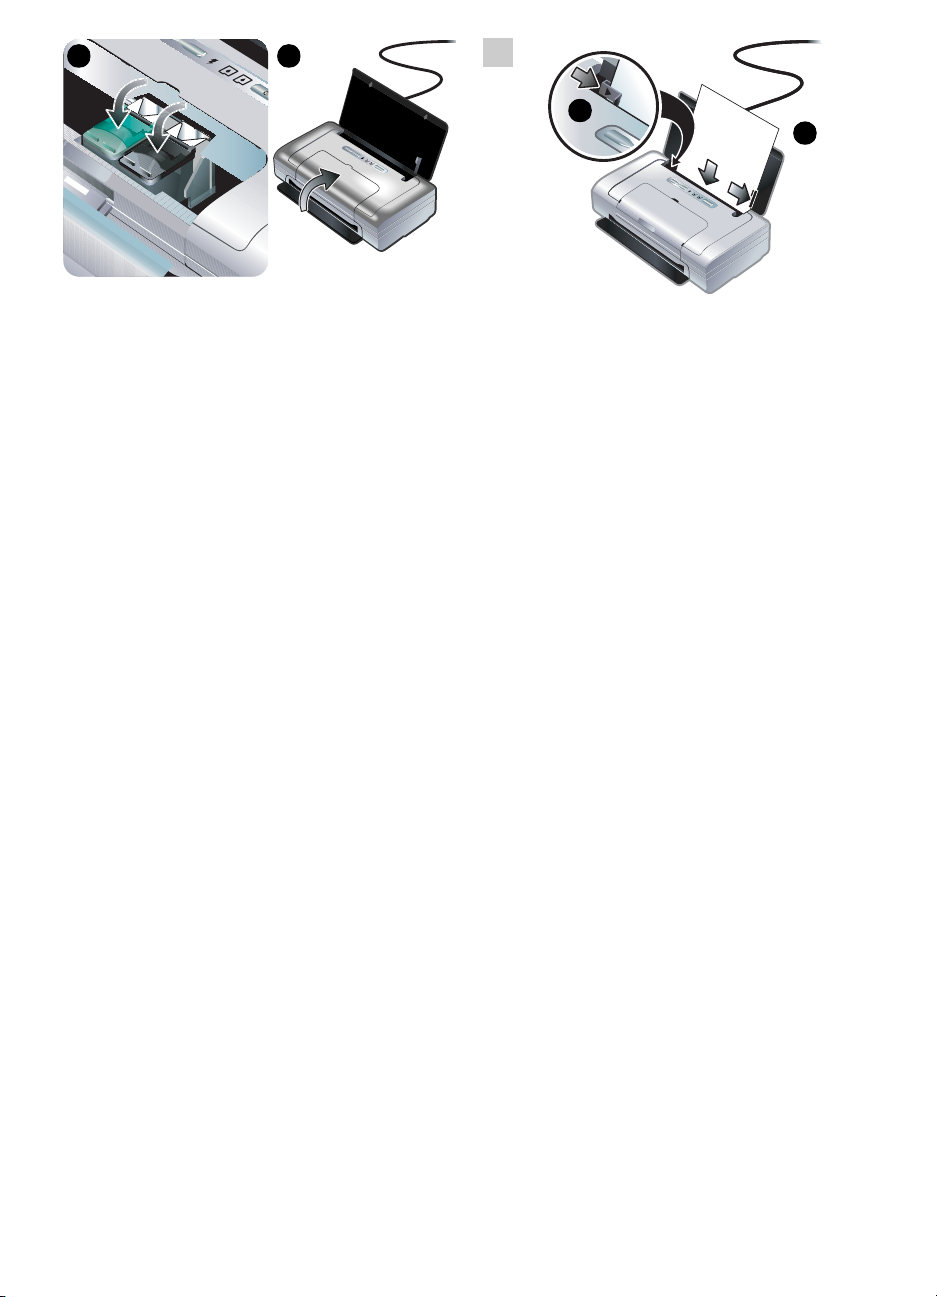
6) Snap the cartridge latches onto the print cartridges.
7) Close the front access cover. Note: Do not open the
front access cover until the printer has finished intializing.
6) 将墨盒固定锁卡到打印墨盒上。 7) 关上前检修盖。注
意: 在打印机未完成初始化之前,不要打开前检修盖。
6) 카트리지 걸쇠를 잉크 카트리지에 딸깍 소리가 날 때까
지 밀어 넣습니다. 7) 앞면 덮개를 닫습니다. 참고: 프린터
가 초기화될 때까지 앞면 액세스 덮개를 열지 마십시오.
Step 6: Load paper in the input tray.
Insert up to 50 sheets of plain paper or 10 sheets of
1)
photo paper into the tray.
2) Slide the paper guide
snugly against the edge of the paper.
步骤 6: 将纸张装入进纸盘。
1) 纸盘最多可插入 50 页普通纸或 10 张相纸。2) 滑动纸张
导板,让它贴着纸张边缘。
단계 6: 입력 용지함에 용지를 넣습니다.
1) 용지함에 일반 용지(최대 50 매) 또는 인화지(최대 10매)
를 넣습니다. 2) 용지 조정대를 용지 가장자리에 꼭 맞게 밀
어 넣습니다.
6) Tautkan pengancing kartrid pada kartrid cetak. 7) Tutup
penutup akses depan. Catatan: Jangan membuka penutup
akses depan sebelum printer selesai melakukan inisialisasi.
Step 6: Memuat kertas ke dalam baki kertas.
1) Tempatkan paling banyak 50 lembar kertas polos atau
10 lembar kertas foto ke dalam baki. 2) Geser pemandu
kertas hingga dengan ringan menyentuh tepi kertas.
11
Page 12

7
Step 7: Connect the printer.
Close any running applications and insert the Starter CD
into the CD drive. The CD menu starts automatically. If
the CD menu does not start automatically, double-click
Setup icon on the Starter CD.
the
步骤 7: 连接打印机。
简
关闭任何运行中的应用程序并将 Starter CD 插入 CD 驱动
体
器。 CD 菜单会自动启动。如果 CD 菜单不自动启动,请双
中
击 Starter CD 上的安装图标。
文
단계 7: 프린터를 연결합니다.
한
실행 중인 응용 프로그램을 닫고 Starter CD를 CD 드라이브
국
에 넣습니다. CD 메뉴가 자동으로 실행됩니다. CD 메뉴가
English English EnglishEnglish English
어
자동으로 시작되지 않으면 Starter CD의 설정 아이콘을 두
번 클릭하십시오.
On the CD menu, click Install Printer Driver (Windows) or
Install Driver (Mac OS). Follow the onscreen instructions
to complete the software installation.
在 CD 菜单上,单击 “安装打印机驱动程序”( Windows)
或“安装驱动程序”( Mac OS)。 按照屏幕上的说明完成
软件安装。
CD 메뉴에서 프린터 드라이버 설치(Windows) 또는 Install
Driver (Mac OS)를 클릭합니다. 화면상의 지침에 따라 소프
트웨어 설치를 완료합니다.
Step 7: Menghubungkan printer.
Tutup semua aplikasi yang masih aktif dan masukkan
CD Starter ke dalam drive CD. Menu CD akan tampil secara
otomatis. Apabila menu CD tidak tampil secara otomatis,
klik dua kali pada ikon Setup di CD Starter.
Bahasa Indonesia
12
Pada menu CD, klik Install Printer Driver (Windows) atau
Install Driver (Mac OS). Ikuti instruksi yang ditampilkan
pada layar untuk menyelesaikan instalasi perangkat lunak.
Page 13
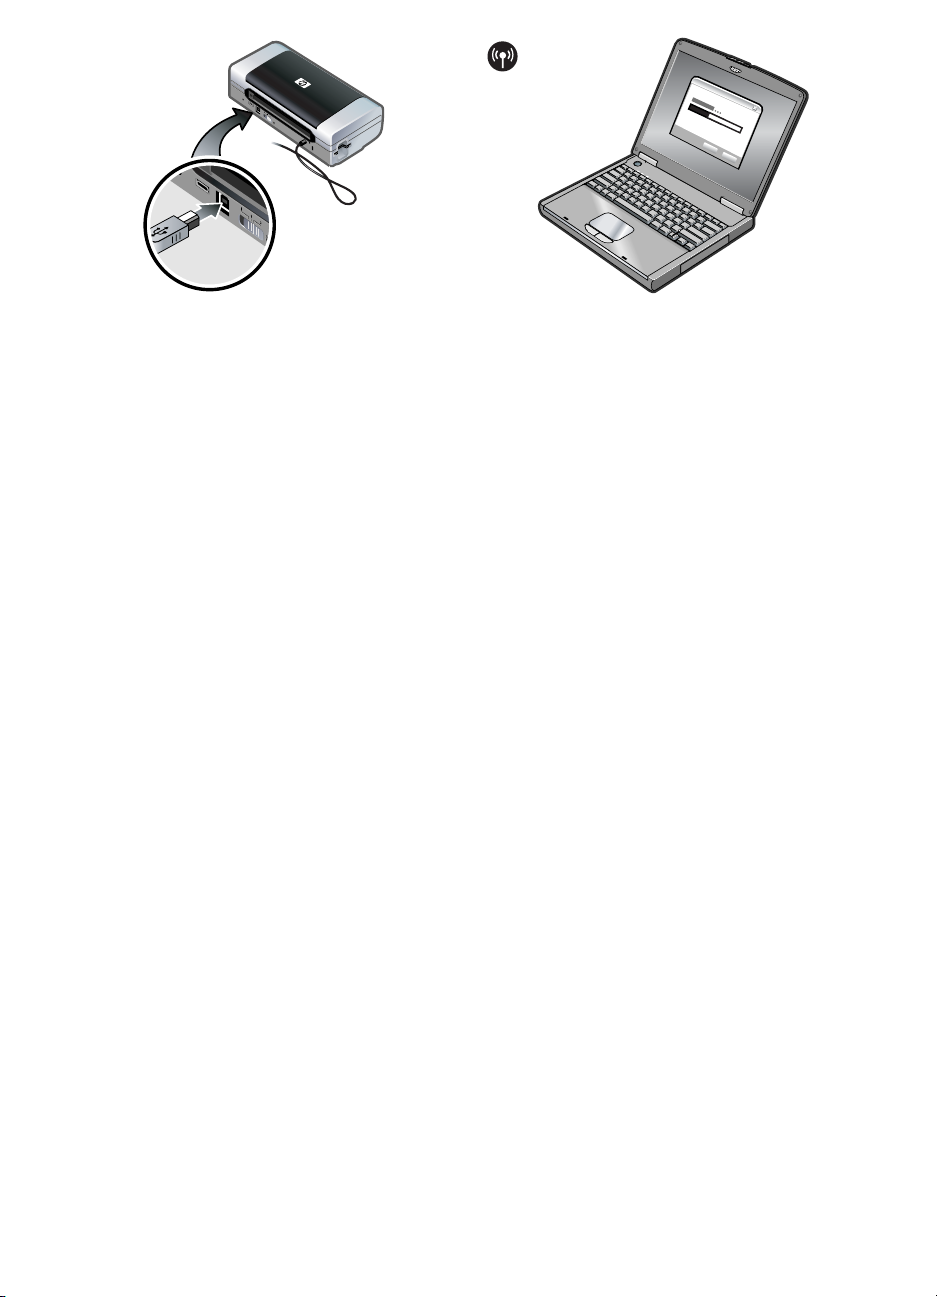
USB connection: Windows®. Connect the USB cable when
prompted.
Mac OS. Connect the USB cable after the
software is installed.
802.11 wireless connection: Windows and Mac OS. Have a
USB cable nearby to connect the printer when prompted
and then remove it after setup.
Mac OS only. Complete
the installation using the Setup program and HP Deskjet
460 Network Setup Tool.
Note: The printer will turn off and on when it receives the
settings through the USB cable. Remove the USB cable
when prompted.
USB 连接:Windows®。当出现提示时连接一根 USB 电缆。
Mac OS。软件安装后连接 USB 电缆。
®
USB 연결: Windows
결합니다. Mac OS. 소프트웨어가 설치되면 USB 케이블을
연결합니다.
Hubungan USB: Windows
diminta. Mac OS. Hubungkan kabel USB setelah perangkat
lunak selesai diinstal.
. 메시지가 나타나면 USB 케이블을 연
®
. Hubungkan kabel USB saat
802.11 无线连接:Windows 和 Mac OS。手边准备一根
USB 电缆,可当出现提示时用来连接打印机,然后在安装
后去除。仅限 Mac OS。使用 “安装”程序和“HP Deskjet
460 网络设置工具”完成安装。
注意:打印机在通过 USB 电缆接收到新的设置后,将会先
关闭再重新开启电源。当出现提示时去除 USB 电缆。
802.11 무선 연결 Windows 및 Mac OS. 메시지가 나타날
때 프린터를 연결할 수 있도록 가까운 곳에 USB 케이블을
준비해 놓고, 설정이 끝나면 제거하십시오. Mac OS에만 적
용. Setup 프로그램과 HP Deskjet 460 네트워크 설정 도구
를 사용하여 설치를 마칩니다.
주: USB 케이블을 통해 설정을 수신하면 프린터가 꺼졌다
가 켜집니다. 메시지가 나타나면 USB 케이블을 제거합니다
Sambungan nirkabel 802.11: Windows dan Mac OS.
Gunakan kabel USB yang telah disiapkan untuk
menghubungkan printer saat diminta dan kemudian
lepaskan setelah selesai melakukan setup (pengaturan). Mac
OS saja. Selesaikan instalasi dengan menggunakan
program Setup dan HP Deskjet 460 Network Setup Tool
(sarana untuk mengatur jaringan).
Catatan: Printer akan dimatikan dan dihidupkan secara
otomatis saat menerima setelan melalui kabel USB.
Lepaskan kabel USB saat diminta.
.
13
Page 14

Note: Current 802.11 settings will be saved to the current
position of the wireless profile switch. The wireless profile
switch is used to switch between 802.11 profile settings
when changing wireless networks. See “About 802.11
wireless printing” on page 25 for information about
configuring wireless settings.
Bluetooth wireless connection: Windows. 1) Select Other
when prompted for the port and Skip when
Port
prompted to connect the printer and complete printer
driver installation.
software on your computer, locate the COM port number
for the Bluetooth Client assigned to your Bluetooth
device.
2) Using the Bluetooth configuration
注意: 当前的 802.11 设置将被保存到无线配置规范开关的
简
当前位置。当更换无线网络时,无线配置规范开关可用于
体
在 802.11 配置规范设置间切换。有关配置无线设置的信
中
息,请参阅页码 32 上的 “关于 802.11 无线打印”。
文
주: 현재의 802.11 설정이 무선 프로파일 스위치의 현재 위
한
치에 저장됩니다. 무선 프로파일 스위치는 무선 네트워크를
국
변경할 때 802.11 프로파일 설정들 간에 전환하기 위해 사
English English EnglishEnglish English
어
용됩니다. 무선 설정 구성 정보는 40페이지의 "802.11 무
선 인쇄 정보"를 참조하십시오.
Catatan: Setelan 802.11 yang sekarang akan disimpan di
posisi sekarang pada sakelar profil nirkabel. Sakelar profil
nirkabel digunakan untuk berpindah-pindah di antara
setelan-setelan profil 802.11 ketika ganti jaringan nirkabel.
Rujuk “Mengenai pencetakan nirkabel 802.11” di 49 untuk
memperoleh keterangan tentang cara mengatur setelan
nirkabel
Bahasa Indonesia
蓝牙无线连接:Windows。 1) 当提示输入端口时选择其它
端口,并当提示连接打印机时选择跳过完成打印机驱动程
序安装。 2) 使用您的计算机上的蓝牙配置软件,找到指定
给您的蓝牙设备的蓝牙客户机 COM 端口号。
Bluetooth 무선 연결: Windows. 1) 포트를 지정하라는 메시
지가 나타나면 다른 포트를 선택하고 프린터에 연결하라는
메시지가 나타나면 건너뛰기를 선택한 후 프린터 드라이버
설치를 마칩니다. 2) 컴퓨터에 설치된 Bluetooth 구성 소프
트웨어를 사용하여 Bluetooth 장치에 할당된 Bluetooth
Client의 COM 포트 번호를 찾습니다.
Sambungan nirkabel Bluetooth: Windows. 1) Pilih Other
Port (port lain) saat diminta untuk memilih port dan Skip
(lewatkan) saat diminta untuk menghubungkan printer dan
menyelesaikan instalasi driver printer. 2) Gunakan perangkat
lunak pengaturan Bluetooth di komputer Anda, cari nomor
port (COM port) untuk Bluetooth Client yang dikaitkan
dengan alat Bluetooth Anda.
14
Page 15

For example, if you are using a 3Com Bluetooth adapter
on your computer, open the Bluetooth Connection
Manager, select
COM ports from the Tools menu, and
take note of the COM port number of the 3Com
Bluetooth Serial Client port.
3) From the Windows desktop, click the Start button,
Settings, and then click Printers or Printers and
point to
Faxes
. 4) Right-click the printer icon, and then click
Properties. 5) Click the Ports tab and select the COM port
as identified in step 2.
6) Click Apply, and then click OK.
例如,若计算机使用 3Com 蓝牙适配器,请打开 “蓝牙连
接管理器”, 选择 “工具”菜单的 COM 端口,记下
“3Com 蓝牙客户机串口”的 COM 端口号。
예를 들어, 컴퓨터에서 3Com Bluetooth 어댑터를 사용하고
있는 경우 Bluetooth Connection Manager를 열고 도구 메뉴
에서 COM 포트를 선택한 다음 3Com Bluetooth Serial Client
포트의 COM 포트 번호를 메모하십시오.
Sebagai contoh, bila Anda menggunakan adaptor Bluetooth
3Com di komputer Anda, buka Bluetooth Connection
Manager (pengelola sambungan), pilih COM ports dari
menu Tools, dan catat nomor port (COM port) untuk port
serial 3Com Bluetooth Serial Client.
3) 在 Windows 桌面,单击开始按钮,指向设置,然后单击
打印机或打印机和传真。 4) 右击打印机图标,然后单击属
性。 5) 单击端口选项卡,选择步骤 2 所示的 COM 端口。
6) 单击应用,然后单击确定。
3) Windows 바탕 화면에서 시작 단추를 클릭하고 설정을
가리킨 다음 프린터 또는 프린터 및 팩스를 클릭합니다. 4)
프린터 아이콘을 마우스오른쪽 단추로 클릭하고 속성을 클
릭합니다. 5) 포트 탭을 클릭한 후 단계 2에서 찾은 COM
포트를 선택합니다. 6) 적용을 클릭하고 확인을 클릭합니다
3) Dari desktop Windows, klik tombol Start, tujukan kursor
pada Settings, dan kemudian klik Printers atau Printers and
Faxes. 4) Klik kanan pada ikon printer, dan kemudian klik
Properties. 5) Klik pada tab Ports dan pilih port COM yang
telah diidentifikasi pada langkah 2. 6) Klik Apply, dan
kemudian klik OK.
.
15
Page 16

Mac OS. Select Bluetooth in the Print Center and then
Add.
select
English
English
Mac OS。 从 “打印中心”, 选择蓝牙,再选添加。 注意:要从另一个支持蓝牙功能的设备打印,其打印程序
简
体
English
中
文
Note: To print from other Bluetooth-enabled devices, the
process is similar (install printer drivers and perform
printer discovery). See the onscreen user’s guide on the
Starter CD for more information. See “Problems installing
software” on page 24 for help connecting the printer.
See the onscreen user’s guide on the Starter CD for
information on connecting with mobile devices such as
phones and PDAs.
十分类似 (安装打印机驱动程序,进行打印机检测)。 有
关更多信息,请参阅 Starter CD 上的在线用户指南。有关
连接打印机的帮助,请参阅页码 31 上的 “解决安装问
题”。 有 关 连接如电话和 PDA 等移动设备的信息,请参阅
Starter CD 上的在线用户指南。
Mac OS. 프린트 센터에서 Bluetooth를 선택하고 Add
한
(추가)를 선택합니다.
국
English
어
Mac OS. Pilih Bluetooth di dalam Print Center dan kemudian
pilih Add.
English
Bahasa Indonesia
16
주: 다른 Bluetooth 가능 장치에서 인쇄하는 경우 유사한 프
로세스가 적용됩니다(프린터 드라이버 설치 및 프린터 검색
자세한 내용은 Starter CD에 있는 사용 설명서를 참조하
십시오. 프린터 연결과 관련하여 도움이 필요하면 38페이
지의 "설치 문제 해결" 을 참조하십시오. 휴대폰이나 PDA와
같은 모바일 장치에 연결하는 방법은 Starter CD에 있는 사
용 설명서를 참조하십시오.
Catatan: Untuk mencetak dari alat-alat Bluetooth lain,
prosesnya serupa (instal driver printer dan lakukan
pendeteksian printer). Lihat panduan pengguna onscreen di
CD Starter Anda untuk keterangan lebih lanjut. Rujuk
“Mengatasi masalah instalasi” di 47 untuk mendapatkan
bantuan mengenai cara menghubungkan printer. Rujuk
panduan pengguna onscreen di CD Starter untuk
mendapatkan informasi mengenai cara menghubungkan
printer dengan alat-alat mobile seperti telepon dan PDA.
).
Page 17
8
9
Step 8: Test the software installation.
To test the software installation and printer connection,
print a document from an application you use frequently.
See “Problems installing software” on page 24 if you are
unable to print.
步骤 8: 测试软件安装。
要测试软件安装和打印机连接,从经常使用的应用程序中
打印一份文档。如果不能打印,请参阅页码 31 上的 “解
决安装问题”。
단계 8: 소프트웨어 설치를 테스트합니다.
소프트웨어 설치와 프린터 연결을 테스트하려면 자주 사용
하는 응용 프로그램에서 문서를 인쇄해 보십시오. 인쇄할
수 없으면 38페이지의 "설치 문제 해결"을 참조하십시오.
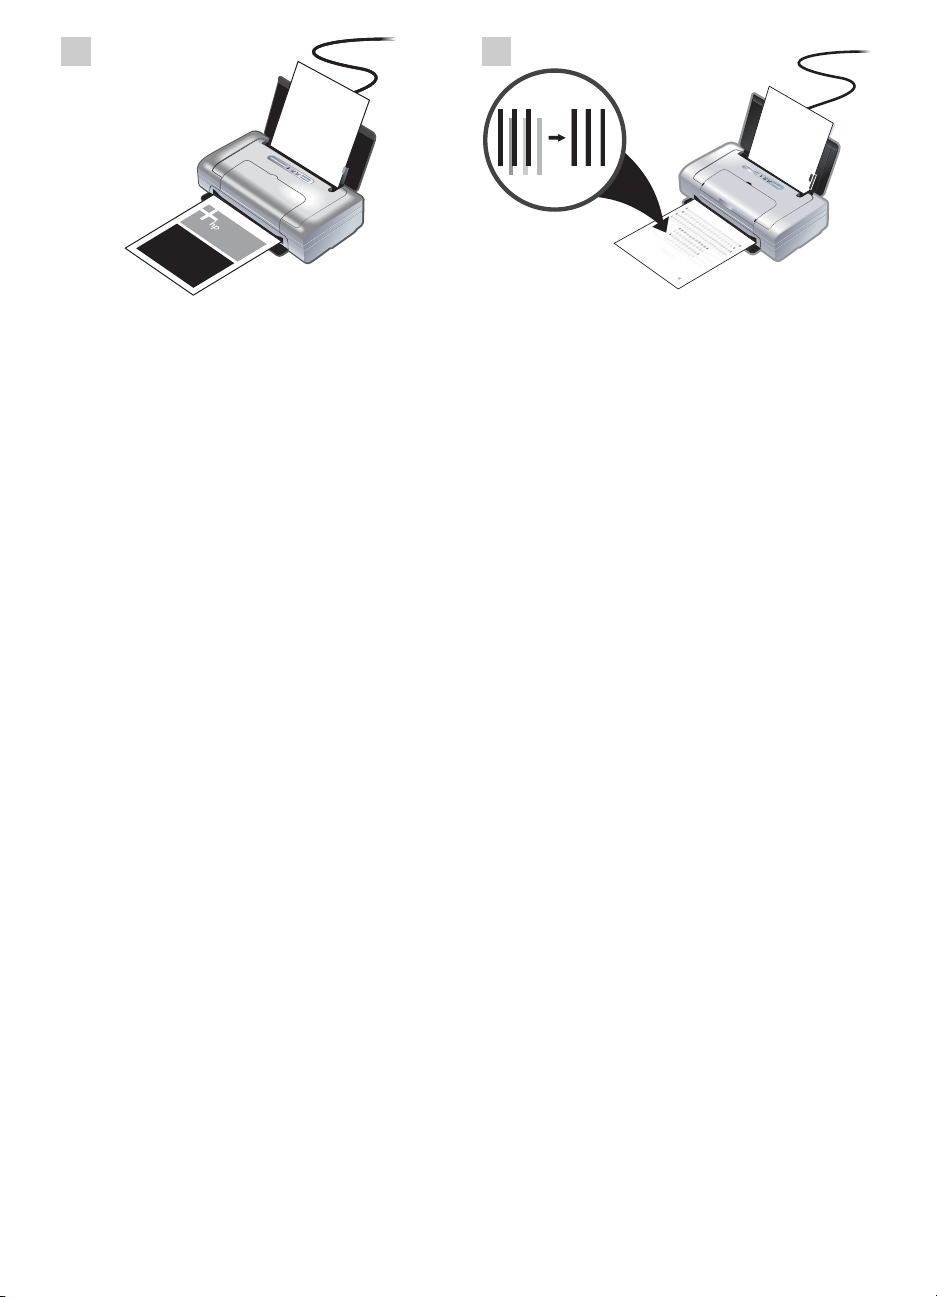
Step 9: Align the print cartridges.
Whenever you install a new print cartridge, you should
align the print cartridges for the best possible print
quality.
步骤 9: 校准打印墨盒。
每次安装新的打印墨盒时,都应校准打印墨盒,以获得可
能的最佳打印质量。
단계 9: 인쇄 카트리지를 정렬합니다.
새 프린트 카트리지를 설치할 때는 최고의 인쇄 품질을 위
해 항상 프린트 카트리지를 정렬해야 합니다.
Step 8: Menguji hasil instalasi perangkat lunak.
Untuk menguji keberhasilan instalasi perangkat lunak dan
hubungan printer, coba cetak satu dokumen dari suatu
aplikasi yang sering Anda gunakan. Lihat “Mengatasi
masalah instalasi” di 47 bila Anda tidak berhasil mencetak.
Step 9: Menyejajarkan (align) kartrid cetak.
Bilamana Anda memasang kartrid cetak baru, hendaknya
Anda sejajarkan kartrid-kartrid cetak supaya menghasilkan
mutu cetakan paling baik.
17
Page 18

Windows: 1) Click Start, point to Programs, point to
HP Deskjet 460 Series, and then click the Toolbox icon.
2) Click the Printer Services tab, and then click Align Print
English
English
Cartridges
3) Follow the onscreen instructions to complete the
alignment procedure.
. The printer prints an alignment page.
Mac OS X: 1) Make the Finder active by clicking on the
Finder icon located in the Dock. Click File and select New
Finder Window
then select
Utility. Click
3) Follow the onscreen instructions to complete the
alignment procedure.
. 2) Select Library, Printer, hp, Utilities, and
HP Printer Selector to open the HP Printer
Align. The printer prints an alignment page.
Windows: 1) 单击开始,指向程序,指向 HP Deskjet 460
简
系列,然后单击“工具箱”图标。 2) 单击打印机服务选项
体
卡,然后单击校准打印墨盒。此时打印机会打印校准页。
English
中
3) 按照屏幕上的说明完成校准过程。
文
Windows: 1) 시작을 클릭하고 프로그램, HP Deskjet 460 시
한
리즈를 차례로 가리킨 다음 도구 상자 아이콘을 클릭합니다
국
2) 프린터 서비스 탭을 클릭한 다음 프린트 카트리지 정렬
English
어
을 클릭합니다. 정렬 페이지가 인쇄됩니다. 3) 화면상의 지
침에 따라 정렬 절차를 완료합니다.
Windows: 1) Klik Start, arahkan kursor pada Programs,
arahkan pada HP Deskjet 460 Series, dan klik ikon Toolbox.
2) Klik pada tab Printer Services, dan kemudian klik Align
English
Print Cartridges. Printer akan mencetak halaman
penyejajaran (alignment). 3) Ikuti instruksi yang ditampilkan
pada layar untuk menyelesaikan prosedur penyejajaran.
Bahasa Indonesia
Mac OS X:1) 单击位于 Dock 的寻找器图标,激活寻找器。
单击文件并选择新寻找器窗口。 2) 选择程序库,打印机,
hp,实用程序,再选 HP 打印机选择器打开 “HP 打印机实
用程序”。 单击校准。此时打印机会打印校准页。 3) 按照屏
幕上的说明完成校准过程。
Mac OS X: 1) 도크에 있는 파인더 아이콘을 클릭하여 파인
.
더를 활성화합니다. File (파일)을 클릭하고 New Finder
Window (새 파인더 창)를 선택합니다. 2) Library, Printer,
hp, Utilities (라이브러리, 프린터, hp, 유틸리티)를 선택하고
HP Printer Selector를 선택하여 HP 프린터 유틸리티를 엽니
다. Align (정렬)을 클릭합니다. 정렬 페이지가 인쇄됩니다.
3) 화면상의 지침에 따라 정렬 절차를 완료합니다.
Mac OS X: 1) Aktifkan Finder dengan mengklik pada ikon
Finder yang terletak di Dock. Klik File dan pilih New Finder
Window. 2) Pilih Library, Printer, hp, Utilities, dan kemudian
pilih HP Printer Selector untuk membuka HP Printer Utility.
Klik Align. Printer mencetak halaman penyejajaran. 3) Ikuti
instruksi yang ditampilkan pada layar untuk menyelesaikan
prosedur penyejajaran.
18
Page 19
10
Step 10: Register the printer.
Register the printer to receive important support and
technical information. If you did not register your printer
while installing the software, you can register later at
http://www.register.hp.com.
步骤 10: 注册打印机。
注册打印机以收到重要的支持和技术信息。如果在安装软
件时未注册打印机,日后还可在下述网站上注册:
http://www.register.hp.com。
단계 10: 프린터를 등록합니다.
프린터를 등록하면 지원 및 기술 정보를 받으실 수 있습니
다. 프린터를 등록하지 않았으면, 소프트웨어를 설치하는
동안 나중에 다음 사이트에서 등록할 수 있습니다.
http://www.register.hp.com
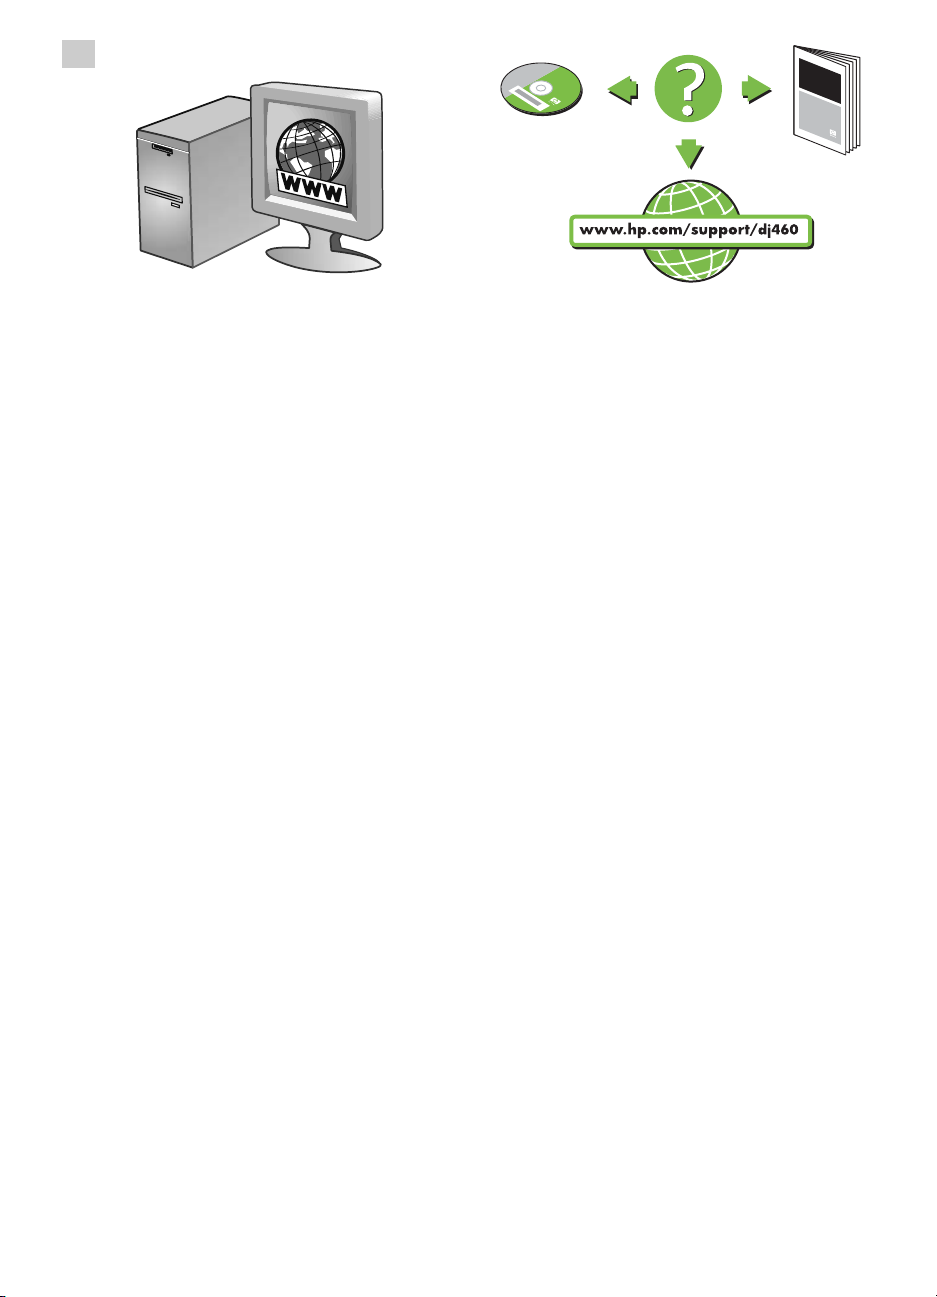
Congratulations!
Your printer is ready to use.
For information about using the printer and
troubleshooting, refer to the following resources:
• Onscreen documentation on the Starter CD
• HP Instant Support (see the onscreen user’s guide)
• Product support site:
http://www.hp.com/support/dj460
恭喜您!
打印机可以使用了。
有关使用打印机和故障排除的信息,请参阅以下资源:
• Starter CD 上的在线说明文件
• HP 即时支持 (请参阅在线用户指南)
• 产品支持网站:
http://www.hp.com/support/dj460
축하합니다!
프린터를 사용할 준비가 되었습니다.
프린터 사용 및 문제 해결 정보는 다음 리소스를 참조하십
시오.
•StarterCD에 있는 화면상의 문서
• HP Instant Support (사용 설명서 참조)
• 제품 지원 사이트:
http://www.hp.com/support/dj460
Step 10: Melakukan registrasi printer.
Registrasikan printer Anda supaya dapat memperoleh
dukungan dan informasi teknis penting. Kalau Anda belum
meregistrasikan printer Anda saat menginstal perangkat
lunak, Anda dapat melakukan registrasi kemudian di
http://www.register.hp.com.
Selamat!
Printer Anda sekarang sudah siap digunakan.
Untuk mendapatkan informasi mengenai cara menggunakan
printer dan mengatasi masalah-masalah, silakan merujuk
sumber informasi berikut ini:
• Dokumentasi onscreen di CD Starter
• HP Instant Support (lihat panduan pengguna onscreen)
• Situs dukungan produk:
http://www.hp.com/support/dj460
19
Page 20
Travel tips
The following tips will help you prepare for traveling with your printer:
• If you are bringing an extra black or photo print cartridge, follow these guidelines: For a partially used
black print cartridge, or a partially used or full photo print cartridge, store it in the travel holder to
prevent ink leakage. A newly opened black print cartridge will leak slightly at high altitudes (such as in
airplanes). To avoid this, wait to install new black cartridges until you reach your destination. Until then,
keep them in their original, taped packaging.
• Turn off the printer using the power button. This ensures that the print cartridges return to the home
position at the left side of the printer and lock in place.
• If you need to buy print cartridges while traveling to another country/region, see the online help called
“Traveling with your HP mobile printer”, available through the Toolbox or HP Printer Utility, for regional
cartridge compatibility information.
• Use only the power adapter that is supplied with the printer. Do not use any other voltage transformer or
converter. The power adapter can be used with AC power sources of 100 to 240 volts, 50 or 60 Hz.
• Remove the battery if you will not be using the printer for more than a month.
• When traveling with photo paper, pack it flat so it doesn’t warp or curl. Photo paper should be flat
before printing. If the corners of the photo paper curl more than 10mm (3/8 inch), flatten the paper by
putting it in the resealable storage bag, then rolling the bag on a table edge until the paper is flat.
Printer buttons and lights
The printer lights indicate printer status and are useful for diagnosing printing problems. This chapter provides
a list of light status light combinations, what they indicate and how to solve the problem.
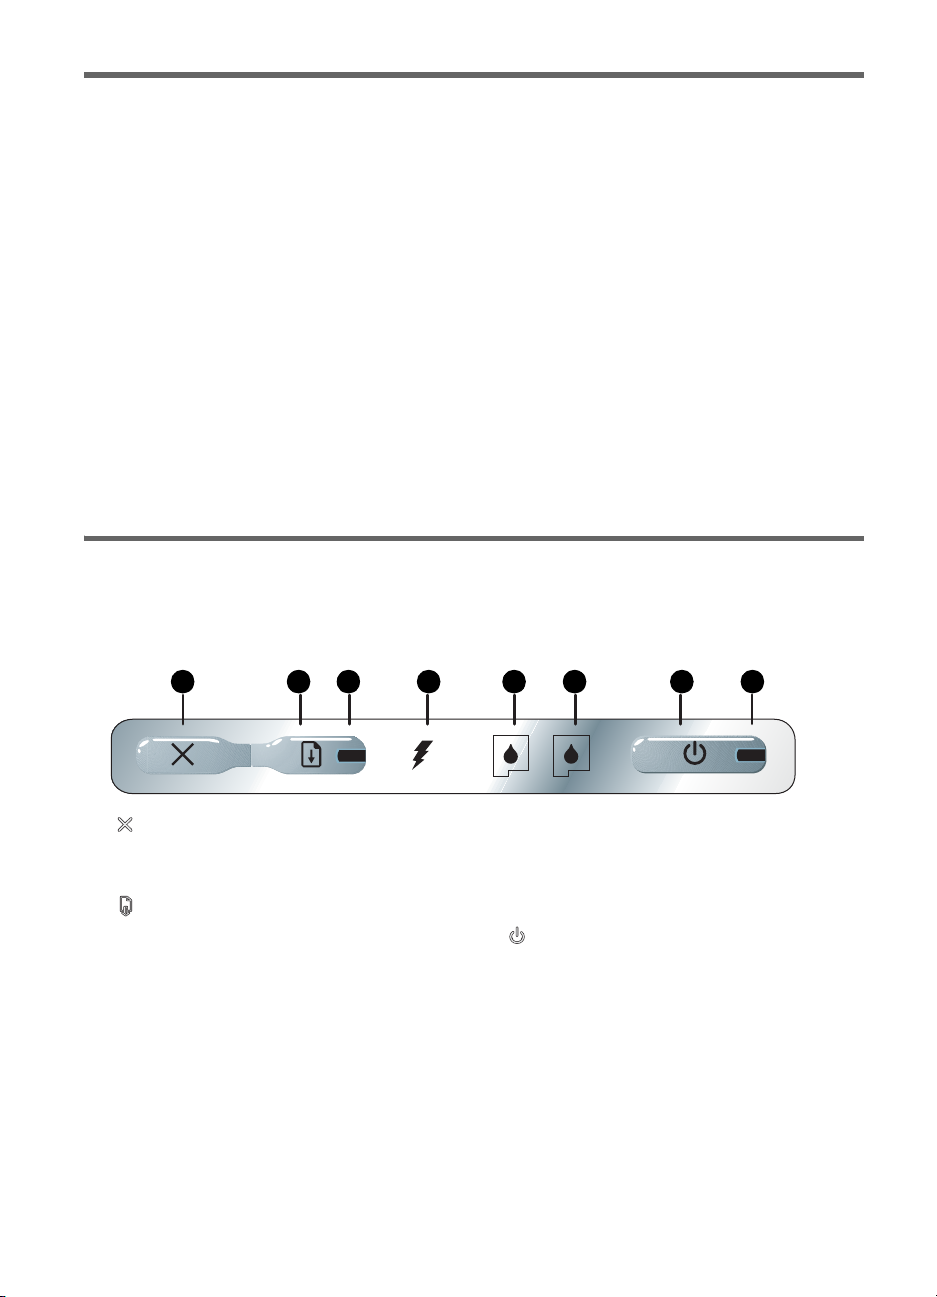
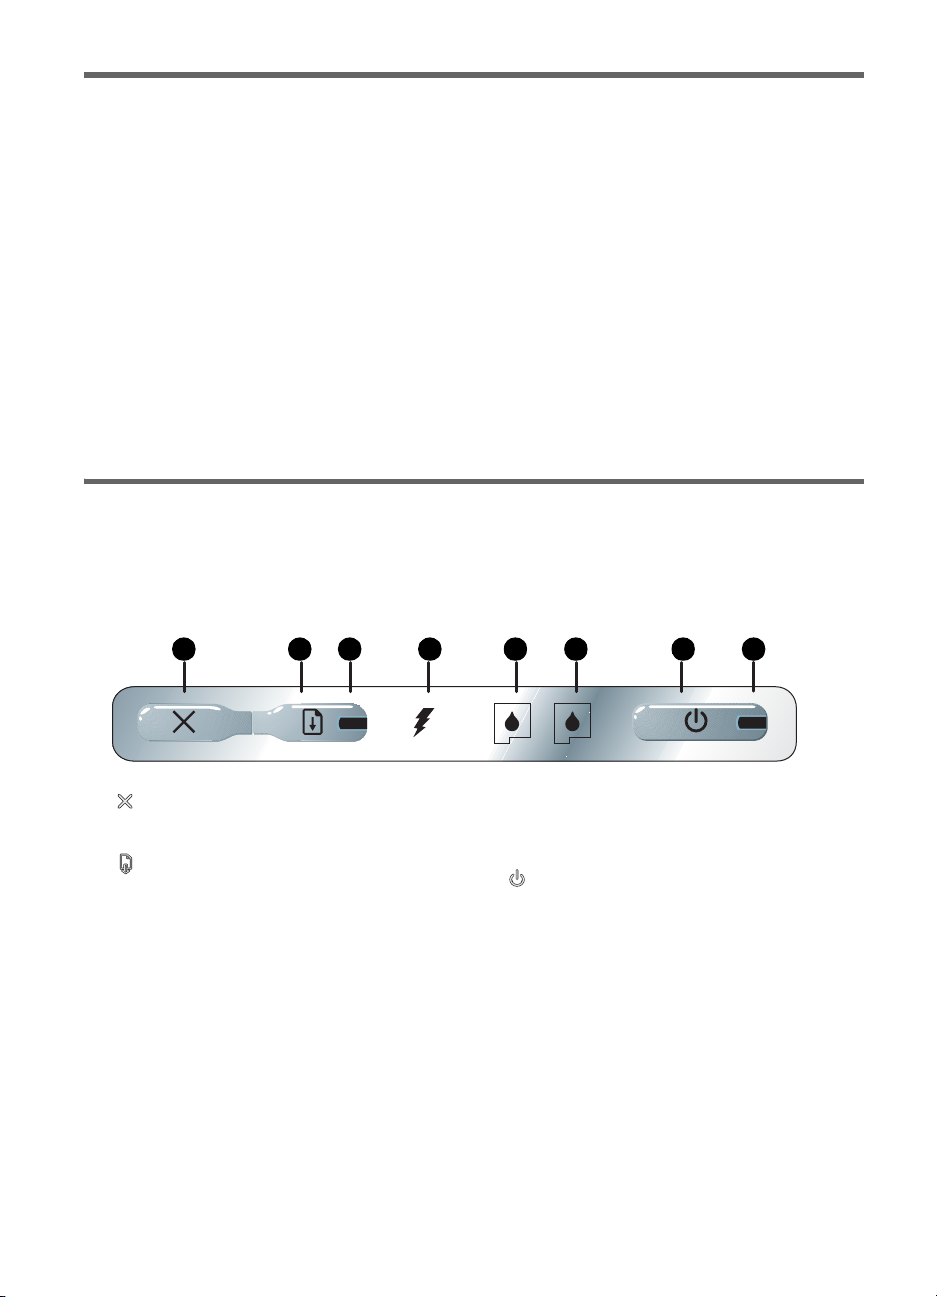
1 2 3 4 5 6 7 8
1. (Cancel button) – Cancels the current print job. The
time it takes to cancel depends on the size of the print
job. Press this button only once to cancel a queued print
job.
2. (Resume button) – Resumes a print job that is waiting or after temporary interruption (for example, when
adding print media to the printer).
3. Resume light – Lights up in amber when a print job is
waiting, and blinks or turns on to relay status or a need
for intervention (see the table below).
4. Battery charging light – Lights up in green when the bat-
tery is charging.
20
5. Left print cartridge light –Blinks when the left print cartridge is absent or improperly functioning. Turns on solid
when the ink is low or empty.
6. Right print cartridge light –Blinks when the right print
cartridge is absent or improperly functioning. Turns on
solid when the ink is low or empty.
7. (Power button) – Turns the printer off or on.
8. Power ligh t – Lights up in green when the printer is
turned on using the AC adapter or a 41-100% charged
battery. When powered by battery, lights up in amber
when battery is 10-40% charged, and red when battery
is below 10% charged. Blinks during printing.
Page 21
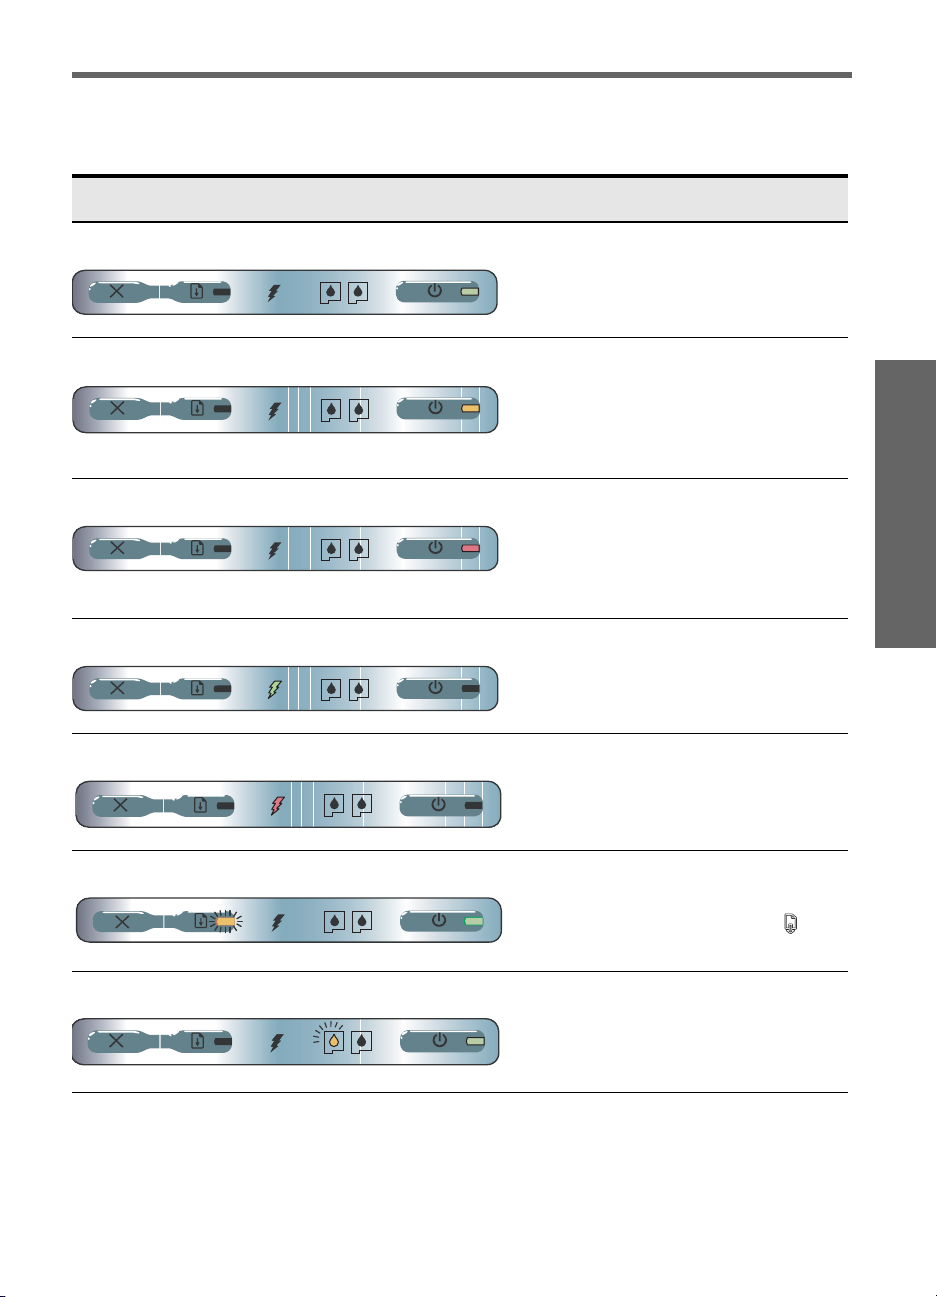
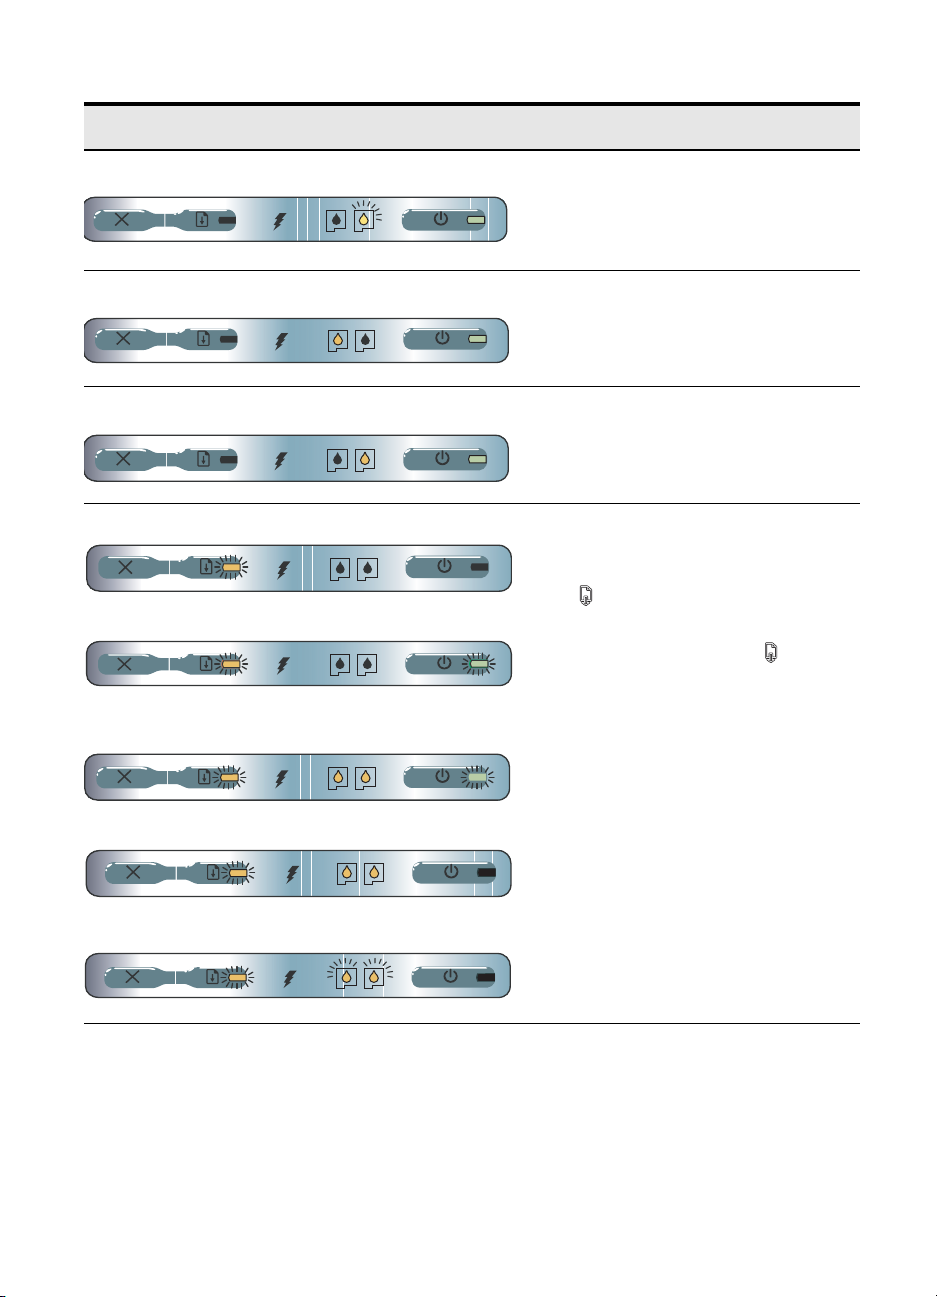
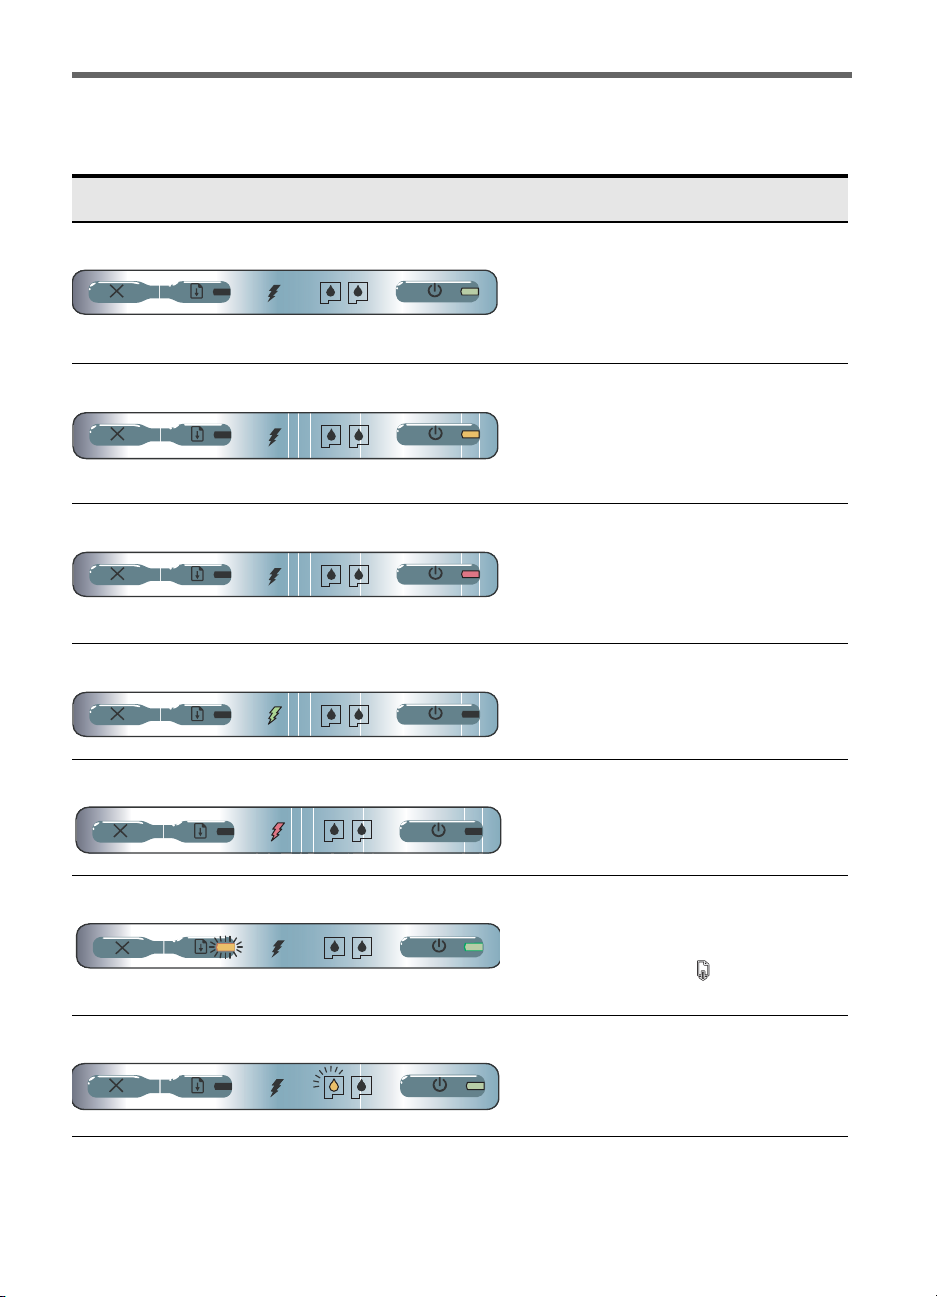
Printer light patterns
Light description and light pattern Explanation and recommended action
Power light is green.
Power light is amber.
Power light is red.
Battery charge light is green.
Battery charge light is red.
If using AC power: Printer is turned on and idle.
If using battery power: Battery is 41-100%
charged and printer is turned on and idle.
• No action required.
Battery is 10-40% charged and printer is turned
on and idle.
• Plug in the power adapter to begin
recharging the battery.
See the onscreen user’s guide on the
Starter CD for more information.
Battery is less than 10% charged and printer is
turned on and idle.
• Plug in the power adapter to begin
recharging the battery.
See the onscreen user’s guide on the
Starter CD for more information.
Battery is charging.
• No action required.
Battery is faulty.
• Replace the battery.
See the onscreen user’s guide on the
Starter CD for more information.
English
Power light is green and Resume light blinks.
Left print cartridge light blinks.
Printer is paused either to wait for media to dry,
out of paper, or processing Digital Print Order
Format (DPOF) printing.
• If out of paper, load paper. Press
(Resume button) to continue the print job.
The left print cartridge needs attention.
• Reinstall the print cartridge and try to print.
If the error persists, replace the cartridge.
See the onscreen user’s guide on the
Starter CD for more information.
21
Page 22
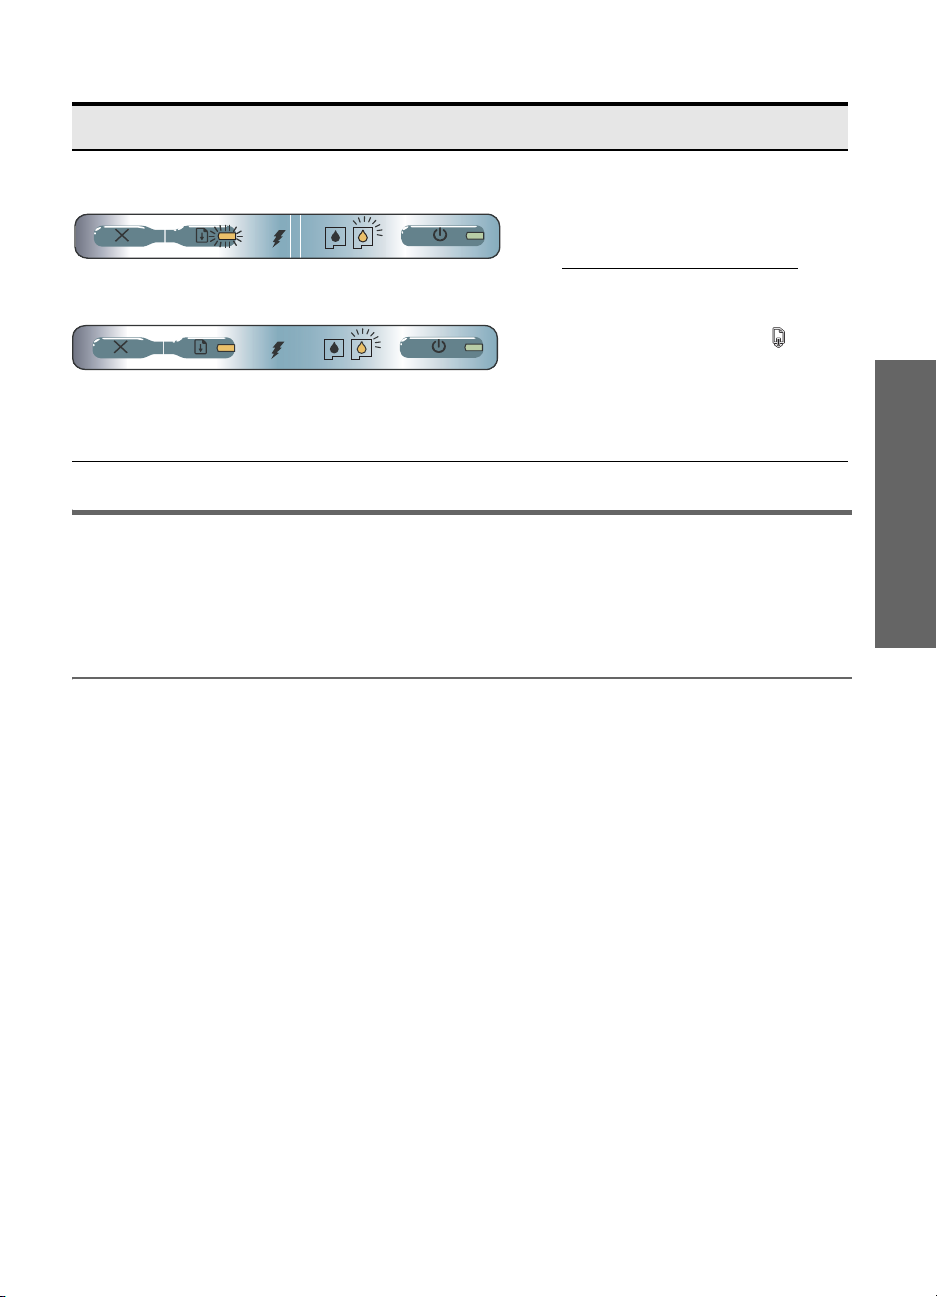
Light description and light pattern Explanation and recommended action
Right print cartridge light blinks.
Left print cartridge light on.
Right print cartridge light on.
Power light off, resume light blinks.
Power light blinks, resume light blinks.
Power light blinks, resume light blinks, left and right print
cartridge lights on.
The right print cartridge needs attention.
• Reinstall the print cartridge and try to print.
If the error persists, replace the cartridge.
See the onscreen user’s guide on the
Starter CD for more information.
Tri-color print cartridge is low on ink.
• Replace the print cartridge. See the
onscreen user’s guide on the Starter CD for
more information.
Right print cartridge is low on ink.
• Replace the print cartridge.
See the onscreen user’s guide on the
Starter CD for more information.
Media jam or paper motor stall.
• Clear the jammed paper. See the onscreen
user’s guide on the Starter CD for more
information. After clearing the jam, press
(Resume button) to continue the print
job.
If no paper jam exists, press (Resume
button). If this does not work, try turning the
printer off and then on again, and resend
the print job.
Resume light blinks, left and right print cartridge lights on.
Resume light blinks, left and right print cartridge lights cycle.
22
Page 23
Light description and light pattern Explanation and recommended action
Power light on, resume light blinks, right print cartridge light
turns on twice as long as off.
Power light on, resume light on, right print cartridge light turns
on twice as long as off.
Ink service module almost full.
• If you have a replacement for the ink
service module, replace it immediately by
following the instructions that come with it.
• Otherwise, visit:
http://www.hp.com/support/dj460
or call Customer Support to get a
replacement.
In the meantime, you can press
(Resume button) to continue printing, but
this light error state will remain until the ink
service module is replaced. When the ink
service module is full, the printer will stop
printing.
Solving installation problems
This section provides troubleshooting suggestions for some of the most common problems associated with
hardware and software installation.
Problems printing
English
Check the printer to ensure the following
• Power light is on and not blinking. When the printer is first turned on, it takes about a minute to
initialize.
• No lights on the control panel are lit or blinking and that the printer is in the Ready state. If lights are lit
or blinking, see page 21.
• Ensure power cord and other cables are working and firmly connected to the printer.
• All packing tape and shipping materials are removed from the printer.
• Print cartridges are properly installed in their correct carriage compartments. Press down firmly on each
one to ensure proper contact.
• Ensure you have removed the tape from each print cartridge.
• Ensure that the cartridges are not damaged.
• Print cartridge latches and covers are closed.
• Media is loaded correctly in the input tray and is not jammed in the printer.
23
Page 24

Problems installing software
Check the computer requirements
• Make sure the computer meets the system requirements. See the onscreen user’s guide on the Starter
CD.
Check the installation preliminaries
• Before installing software on a Windows computer, ensure all other programs are closed.
• If the computer does not recognize the path to the CD drive that you type, ensure you are specifying the
correct drive letter.
• If the computer cannot recognize the Starter CD in the CD drive, inspect the CD for damage. You can
download the printer driver from http://www.hp.com/support/dj460.
• In the Windows device manager, make sure that the USB drivers have not been disabled.
Reinstall the printer software
• If you are using Windows and the computer cannot detect the printer, run the Scrubber utility (located
in the Utils\Scrubber folder on the Starter CD) to perform a clean driver uninstallation. Restart your
computer, and reinstall the printer driver. See “To uninstall the printer software” in the onscreen user’s
guide on the Starter CD.
Problems setting up 802.11 or Bluetooth wireless
communication
If you have problems printing from an 802.11 or Bluetooth wireless connection, try the following
suggestions:
24
Check the wireless printer card
• Make sure the wireless printer card is inserted properly.
• Make sure you inserted the wireless printer card before or after, and not during, printer initialization.
• If the light on the wireless printer card is not on, do the following:
a. Remove the wireless printer card.
b. Turn off the printer, wait a few seconds, and then turn it back on again.
c. Reinsert the card when the printer is in the Ready state. If there is no response, repeat this
procedure a few times. If there is still no response, contact HP.
• To see if the wireless printer card is working, try printing using another wireless device. If you still
cannot print, the wireless printer card might be faulty. Replace the card if necessary.
Check the wireless settings
• Make sure the wireless profile switch on the back of the printer is switched to the correct wireless profile
you are using. Make sure you are using a profile that was configured during installation.
• If you cannot communicate with the printer after completing the software installation and removing the
USB cable, then one or more of the following wireless settings might be incorrect:
• Network Name (SSID)
• Communication Mode (infrastructure or ad hoc)
• Channel (ad hoc networks only)
• Security settings (such as Authentication Type and Encryption)
Page 25

• To configure Bluetooth settings or monitor printer status (such as ink levels) using the Toolbox
(Windows), you must connect the printer to your computer using a USB cable.
Check the wireless signal
Wireless communication can be interrupted or unavailable if there is signal interference, distance or signal
strength problems, or if the printer is not ready for some reason.
• Make sure the printer is within range of the 802.11 or Bluetooth sending device. 802.11 printing
allows wireless printing up to 100 meters (300 feet). Bluetooth printing allows wireless printing up to 10
meters (30 feet).
• If a document doesn't print, there could be signal interruption. If a message appears on the computer
explaining that there is a signal problem, cancel the print job and then resend it from the computer.
General wireless troubleshooting tips
• Delete and re-add the printer in the Print Center (Mac OS).
• PING the printer: If turning off the printer and turning it back on again does not solve the problem (or,
deleting and re-adding the printer in the Print Center doesn't work on the Mac OS), do the following:
a. Print a wireless configuration page:
b. PING the printer using MS-DOS (Windows) or Terminal (Mac OS) to verify network
communication.
• Manually assign the IP address for the printer in the Ports tab of the printer properties.
• Boxes might appear when trying to print Asian fonts from a mobile phone on printers purchased outside
Asia. Asian fonts for Bluetooth mobile phone printing are only supported by models purchased in Asia.
• Printing larger files using a Bluetooth wireless connection can result in printing issues. Try printing a
smaller file.
• Wireless communication drains power from the printer battery. Check the battery charge level.
See the onscreen user’s guide on the Starter CD for more wireless network troubleshooting and
configuration information.
hold (Cancel button) down for two seconds.
English
About 802.11 wireless printing
This section provides a quick overview of factory default 802.11 wireless communication with the printer.
See the onscreen user’s guide on the Starter CD to:
• Set up the printer on an infrastructure network.
• Set up multiple printers at one time using the 802.11 Wireless Profile Configuration Utility.
• Solve problems with 802.11 connections that do not use the factory default configuration.
• Set up the printer with an 802.11 connection without using a USB cable.
802.11 wireless printing using factory defaults
The setup instructions describe setting up a single printer for wireless communication using an ad-hoc
network and factory defaults.
The factory default Wireless Network settings are:
• Communication mode: ad hoc
• Network Name (SSID): hpsetup
• Security (encryption): disabled
Once the printer is connected to the computer, either wirelessly or through the USB cable, you can change
the SSID by configuring wireless profiles using the HP Toolbox (Windows) or HP Deskjet 460 Network
Setup Tool (Mac OS).
25
Page 26

Communication mode
On an “ad hoc” network, the network communication mode is set to ad hoc, and the printer communicates
directly with other wireless devices without the use of a wireless access point (WAP).
Network name (SSID)
By default, the printer looks for an ad hoc network with the network name, or Service Set Identifier (SSID),
“hpsetup.”
Wireless security settings
The printer’s factory default setting is open network and security (encryption) disabled. The printer will
attempt to detect and automatically associate to open wireless network named “hpsetup”. The network does
not require security for authentication or encryption.
All devices on the ad hoc network must:
• Be 802.11-compatible
• Have ad hoc as the communication mode
• Have the same network name (SSID)
• Be on the same subnet
• Be on the same channel
• Have the same 802.11 security settings
Wireless profile switch
The printer includes an 802.11 wireless profile switch so you can store settings for up to three 802.11
computers or networks. This allows you to easily move the printer from home to office or between any three
wireless network environments. The “current” profile is the one associated with the current position (1, 2, or
3) of the wireless profile switch on the printer. For more information, see the onscreen user’s guide on the
Starter CD.
26
Page 27

Hewlett-Packard limited warranty statement
HP product Duration of Limited Warranty
Software 90 days
Accessories 90 days
Print cartridges Until the HP print cartridge has been depleted of HP ink, or until the
“end of warranty” date printed on the cartridge, whichever occurs
first.
Printer peripheral hardware (see below for details) 1 year
*For more detailed warranty information, see http://www.hp.com/support/inkjet_warranty
Extent of limited warranty
1. Hewlett-Packard warrants to the end-user customer that the
HP products specified above will be free from defects in
materials and workmanship for the duration specified above,
which duration begins on the date of purchase by the
customer.
2. For software products, HP’s limited warranty applies only to
a failure to execute programming instructions. HP does not
warrant that the operation of any product will be
uninterrupted or error free.
3. HP’s limited warranty covers only those defects that arise as
a result of normal use of the product, and does not cover any
other problems, including those that arise as a result of:
a. Improper maintenance or modification;
b. Software, media, parts, or supplies not provided or
supported by HP; or
c. Operation outside the product’s specifications.
d. Unauthorized modification or misuse.
4. For HP printer products, the use of a non-HP ink cartridge or
a refilled ink cartridge does not affect either the warranty to
the customer or any HP support contract with the customer.
However, if printer failure or damage is attributable to the
use of a non-HP or refilled ink cartridge, HP will charge its
standard time and materials charges to service the printer for
the particular failure or damage.
5. If HP receives, during the applicable warranty period, notice
of a defect in any product which is covered by HP’s
warranty, HP shall either repair or replace the product, at
HP’s option.
6. If HP is unable to repair or replace, as applicable, a
defective product which is covered by HP’s warranty, HP
shall, within a reasonable time after being notified of the
defect, refund the purchase price for the product.
7. HP shall have no obligation to repair, replace, or refund until
the customer returns the defective product to HP.
8. Any replacement product may be either new or like new,
provided that it has functionality at least equal to that of the
product being replaced.
9. HP products may contain remanufactured parts,
components, or materials equivalent to new in performance.
10. HP’s Limited Warranty Statement is valid in any country/
region where the covered HP product is distributed by HP.
Contracts for additional warranty services, such as on-site
service, are available from any authorized HP service facility
in countries/regions where the product is distributed by HP
or by an authorized importer.
Limitations of warranty
TO THE EXTENT ALLOWED BY LOCAL LAW, NEITHER HP NOR
ITS THIRD PARTY SUPPLIERS MAKES ANY OTHER WARRANTY
OR CONDITION OF ANY KIND, WHETHER EXPRESS OR
IMPLIED WARRANTIES OR CONDITIONS OF
MERCHANTABILITY, SATISFACTORY QUALITY, AND FITNESS
FOR A PARTICULAR PURPOSE.
Limitations of liability
1. To the extent allowed by local law, the remedies provided in
this Warranty Statement are the customer’s sole and
exclusive remedies.
2. TO THE EXTENT ALLOWED BY LOCAL LAW, EXCEPT FOR
THE OBLIGATIONS SPECIFICALLY SET FORTH IN THIS
WARRANTY STATEMENT, IN NO EVENT SHALL HP OR ITS
THIRD PARTY SUPPLIERS BE LIABLE FOR DIRECT, INDIRECT,
SPECIAL, INCIDENTAL, OR CONSEQUENTIAL DAMAGES,
WHETHER BASED ON CONTRACT, TORT, OR ANY OTHER
LEGAL THEORY AND WHETHER ADVISED OF THE
POSSIBILITY OF SUCH DAMAGES.
Local law
1. This Warranty Statement gives the customer specific legal
rights. The customer may also have other rights which vary
from state to state in the United States, from province to
province in Canada, and from country/region to country/
region elsewhere in the world.
2. To the extent that this Warranty Statement is inconsistent with
local law, this Warranty Statement shall be deemed
modified to be consistent with such local law. Under such
local law, certain disclaimers and limitations of this
Warranty Statement may not apply to the customer. For
example, some states in the United States, as well as some
governments outside the United States (including provinces
in Canada), may:
a. Preclude the disclaimers and limitations in this Warranty
Statement from limiting the statutory rights of a customer
(e.g. the United Kingdom);
b. Otherwise restrict the ability of a manufacturer to
enforce such disclaimers or limitations; or
c. Grant the customer additional warranty rights, specify
the duration of implied warranties which the
manufacturer cannot disclaim, or allow limitations on
the duration of implied warranties.
3. FOR CONSUMER TRANSACTIONS IN AUSTRALIA AND
NEW ZEALAND, THE TERMS IN THIS WARRANTY
STATEMENT, EXCEPT TO THE EXTENT LAWFULLY
PERMITTED, DO NOT EXCLUDE, RESTRICT, OR MODIFY,
AND ARE IN ADDITION TO, THE MANDATORY
STATUTORY RIGHTS APPLICABLE TO THE SALE OF THE HP
PRODUCTS TO SUCH CUSTOMERS.
27
Page 28
旅行提示
以下提示有助于在旅行前对打印机的准备工作:
• 如果要随带一个额外的黑色或照相打印墨盒,请遵照以下指示:对于部分使用的黑色打印墨盒,或部
分使用的或满的照相打印墨盒,请将它放置在打印墨盒旅行包中防止墨水漏出。新打开的黑色打印墨
盒在高海拔位置上会轻微漏出 (如在飞机上)。为避免墨水漏出,请在到达目的地后再安装新的黑色
打印墨盒。在那之前,请将它原样密封包装好。
• 使用电源按钮关闭打印机的电源。这样能保证打印墨盒退回到打印机左侧的起始位置并锁定在位。
• 如果您在其它国家 / 地区旅行时需要购买打印墨盒,请参阅“工具箱”或 “ HP 打印机实用程序”中的
“携带打印机旅行”在线帮助部分,查看当地的打印墨盒兼容性信息。
• 务必仅使用随打印机提供的电源适配器。不要使用其它任何电压转换器或变压器。该电源适配器可用
于 100 至 240 伏、 50 或 60 Hz 的 AC 电源。
• 如果有一个月以上的时间不会使用打印机,请取出电池。
• 当您携带相纸旅行时,请将相纸平放,以免弯折或卷曲。打印前应将相纸压平。若相纸的四个角卷曲
度超出 10 毫米 (3/8 英寸), 请 将 相 纸放入可重新密封的贮存袋,将袋子在桌缘滚动,直到纸张平
整为止。
打印机按钮和指示灯
打印机的指示灯表示打印机的状态,有助于诊断打印问题。本章提供了一个列表,其中包括状态指示灯组
合、指示的故障内容及故障排除方法。
1 2 3 4 5 6 7 8
1. (取消按钮) – 取消当前打印作业。取消打印作业
所用的时间长短,取决于打印作业的大小。要取消队
列中的打印作业,仅按此按钮一次。
2. (继续按钮) – 继续打印正在等待或暂时中断 (如
给打印机添加打印介质)的作业。
3. 继续指示灯 – 打印作业在等待时,亮琥珀色;并可闪
烁或点亮来传递打印机状态或需要用户干预的信息
(请参阅下表)。
4. 电池充电指示灯 – 当电池充电时亮绿色。
28
5. 左侧打印墨盒指示灯 – 当左侧墨盒未安装或工作不正
常时闪烁。当墨水不足或用完时,指示灯稳定亮起。
6. 右侧打印墨盒指示灯 – 当右侧墨盒未安装或工作不正
常时闪烁。当墨水不足或用完时,指示灯稳定亮起。
7. (电源按钮) – 开启或关闭打印机的电源。
8. 电源指示灯 – 当打印机使用交流适配器或充电量为 41-
100% 的电池通电后亮绿色。如果使用电池电源,当电
池电量为 10-40% 时亮琥珀色;而电量低于 10% 时亮
红色。闪烁表示正在打印。
Page 29

打印机指示灯模式
指示灯描述和指示灯模式 说明及建议操作
电源指示灯亮绿色。
电源指示灯亮琥珀色。
电源指示灯亮红色。
电池充电指示灯亮绿色。
电池充电指示灯亮红色。
如果使用 AC 电源:打印机的电源已开启,并
处于空闲状态。
如果使用电池电源:电池电量为 41-100%,打
印机的电源已开启,且处于空闲状态。
• 不必采取行动。
电池电量为 10-40%,打印机的电源已开启,
且处于空闲状态。
• 插入电源适配器开始对电池充电。
有关详细信息,请参见 Starter CD 上的在
线用户指南。
电池电量低于 10%,打印机的电源已开启,处
于空闲状态。
• 插入电源适配器开始对电池充电。
有关详细信息,请参见 Starter CD 上的在
线用户指南。
电池正在充电。
• 不必采取行动。
电池有问题。
• 替换电池。
有关详细信息,请参见 Starter CD 上的在
线用户指南。
简
体
中
文
电源指示灯亮绿色;继续指示灯闪烁。
左侧打印墨盒指示灯闪烁。
右侧打印墨盒指示灯闪烁。
打印机暂停等候介质干燥或纸张已用完,或正
在处理 DPOF 打印。
• 如果纸张已用完,请装纸。按 (继续按
钮)继续打印作业。
需要留意左侧打印墨盒。
• 重新安装打印墨盒并尝试打印。如果问题
仍然存在,替换墨盒。有关详细信息,请
参见 Starter CD 上的在线用户指南。
需要关注右侧打印墨盒。
• 重新安装打印墨盒并尝试打印。如果问题
仍然存在,替换墨盒。有关详细信息,请
参见 Starter CD 上的在线用户指南。
29
Page 30

指示灯描述和指示灯模式 说明及建议操作
左侧打印墨盒指示灯亮起。
右侧打印墨盒指示灯亮起。
电源指示灯熄灭;继续指示灯闪烁。
电源指示灯闪烁,继续指示灯闪烁。
电源指示灯闪烁、继续指示灯闪烁、左右打印墨盒指示灯亮
起。
继续指示灯闪烁、左右打印墨盒指示灯亮起。
彩色打印墨盒的墨水不足。
• 替换打印墨盒。有关详细信息,请参见
Starter CD 上的在线用户指南。
右侧打印墨盒的墨水不足。
• 替换打印墨盒。
有关详细信息,请参见 Starter CD 上的在
线用户指南。
介质卡住了或纸张马达停止。
• 清除卡纸。有关详细信息,请参见 Starter
CD 上的在线用户指南。清除卡塞的介质
后,按 (继续按钮)继续执行打印作
业。
如果没有卡纸,按 (继续按钮)。 如 果
这一方法无效,尝试关闭打印机的电源然
后再开启,并重新发送打印作业。
继续指示灯闪烁、左右打印墨盒指示灯循环亮起。
电源亮起、继续指示灯闪烁、右侧打印墨盒指示灯亮两次、
灭两次,时间等长。
电源亮起、继续指示灯亮起、右侧打印墨盒指示灯亮两次、
灭两次,时间等长。
30
墨水服务模块几乎满了。
• 如果您有替换用的墨水服务模块,请立即
按照随模块提供的说明进行替换。
• 否则,请访问:
http://www.hp.com/support/dj460
或电洽 “客户支持”部门以得到替换用的
模块。
与此同时,可以按 (继续按钮)继续打
印。但在替换墨水服务模块以前,指示灯
保持此错误状态。当墨水服务模块满时,
打印机将停止打印。
Page 31

解决安装问题
本节就与硬件和软件安装有关的某些最常见问题提供如何排除故障的建议。
打印问题
检查打印机确保下列几项:
• 电源指示灯已点亮且没有闪烁。打印机电源首先打开时,需要大约一分钟的时间初始化。
• 控制面板上没有指示灯点亮或闪烁,而且打印机处于 “就绪”状态。如果有指示灯点亮或闪烁,请参
见页码 28。
• 确保电源线和其它电缆都可正常操作且已与打印机牢固连接。
• 将打印机内的所有包装胶带和装运材料取出。
• 已在适当的滑架槽中正确安装打印墨盒。用力按每个打印头和墨盒,确保接触良好。
• 确保已从每个打印墨盒上去除胶带。
• 确保墨盒没有损坏。
• 确保打印墨盒固定锁和机盖均已关上。
• 确保介质已正确装入进纸盘,且打印机内没有卡纸。
安装软件问题
查看计算机要求
• 确保计算机满足系统要求。请参阅 Starter CD 上的在线用户指南。
简
体
中
文
检查安装的必要条件
• 在 Windows 计算机上安装软件前先确保已关闭所有其它程序。
• 若计算机不能辨识您所输入的光驱路径,确保已指定了正确的光驱代号。
• 若计算机不能辨识光驱中的 Starter CD 光盘,检查光盘是否损坏。可从
http://www.hp.com/support/dj460 下载打印机驱动程序。
• 在 Windows 设备管理器下,确保 USB 驱动程序可用。
重新安装打印机软件
• 如果您使用 Windows 操作系统,而您的计算机无法检测到该打印机,运行 Scrubber 实用程序 (位
于 Starter CD 盘中的 Utils\Scrubber 文件夹),完全卸载驱动程序。重新启动计算机并重新安装打印
机驱动程序。请参见 Starter CD 上的在线用户指南中的 “要卸载打印机软件”。
设置 802.11 或蓝牙无线通信时发生问题
若您从 802.11 或蓝牙无线连接打印时有问题,请尝试以下建议:
检查无线打印机插卡
• 确保无线打印机插卡已正确插入。
• 确保您在打印机初始化之前或之后而非打印机初始化期间插入无线打印机插卡。
• 若无线打印机插卡上的指示灯不亮,请执行以下步骤:
31
Page 32

a. 取出无线打印机插卡。
b. 关闭打印机,等候几秒钟,再重新开启打印机。
c. 当打印机处于 “就绪”状态时,重新插入卡。若无响应,重复该步骤几次。若仍无任何响应,请
联系 HP。
• 要查看无线打印机插卡是否能正常工作,请尝试使用另一个无线设备来打印。若您仍然无法打印,无
线打印机插卡可能已故障。必要时可更换插卡。
检查无线设置
• 确保打印机背面的无线配置规范开关已转到所用的正确无线配置规范档。确保使用的是在安装期间所
配置的规范。
• 当完成软件安装并移除 USB 电缆后,如果您不能连接到打印机,那么下列一项或多项无线设置可能有
误:
• 网络名称 (SSID):
• 通信模式(基础体系或 ad hoc)
• 信道 (仅限 ad hoc 网络)
• 安全设置 (如授权方式和加密)
• 要使用 “工具箱”配置蓝牙设置或监控打印机状态 (如墨水量), 您 必须使用一根 USB 电缆将打印
机连接到计算机。
检查无线信号
若有信号干扰、距离或信号强度问题、或如果打印机基于某种原因尚未就绪,无线通信可能遭受干扰或无
法使用。
• 确保打印机在 802.11 或蓝牙发送设备的量程内。 802.11 打印以无线方式打印最长可达 100 米
(300 英尺)。蓝牙打印以无线方式打印最长可达 10 米 (30 英尺)。
• 若文档不打印,可能有信号干扰。若计算机上出现的讯息解释有信号问题,请取消打印作业,然后再
从计算机重新发送文档。
一般无线故障排除提示
• 从 “打印中心”( Mac OS)删除并重新添加打印机。
• 轮询打印机:若关闭打印机后再将它重新开启无法解决问题 (或者,在 Mac OS,从 “打印中心”删
除并重新添加打印机不起作用),请执行以下步骤:
a. 打印无线配置页:
b. 使用 MS-DOS (Windows)或 Terminal (Mac OS)轮询打印机来核实网络通讯。
• 在打印机属性的 “端口”选项卡,以手动方式指定打印机的 IP 地址。
• 当尝试从移动电话在非亚洲国家出售的打印机上打印亚洲字体时,可能会显示对话框。蓝牙移动电话
打印用的亚洲字体仅有亚洲购买的打印机型号支持。
• 使用蓝牙无线连接打印较大的文件,可能造成打印问题。尝试打印较小文件。
• 无线通信会耗用打印机电池的电量。请检查电池充电量。
有关详细信息,请参见 Starter CD 上的在线用户指南。
按住 (取消按钮) 2 秒钟。
关于 802.11 无线打印
本节快速总结有关打印机的原厂默认 802.11 无线通信。
请参见 Starter CD 光盘的在线用户指南:
• 设置基础体系网络上的打印机。
• 使用 802.11 无线规范配置实用程序一次设置多部打印机。
• 解决不使用原厂默认配置的 802.11 连接的问题。
• 不使用 USB 电缆,通过 802.11 连接设置打印机。
32
Page 33

使用原厂默认值的 802.11 无线打印
设置说明描述如何使用 ad-hoc 网络和原厂默认值设置单台打印机来进行无线通信。
原厂默认的无线网络设置值为:
• 通信模式:ad hoc
• 网络名称 (SSID):hpsetup
• 安全性 (加密):已禁用
一旦打印机以无线方式或通过 USB 电缆连接计算机后,就能用 HP “工具箱”(Windows) 或
HP Deskjet 460 “网络设置工具”(Mac OS) 来配置无线配置文件,并更改 SSID。
通信模式
网络通信模式在 “ad hoc”网络上设置为 “ad hoc”,且打印机可与其它无线装置直接通信,无需使用无
线接入点 (WAP)。
网络名称 (SSID)
根据默认,打印机寻找具有该名称的 ad hoc 网络,或 “服务设置识别码”(SSID),即 hpsetup。
无线安全性设置
打印机的原厂设置值为开放网络且安全性 (加密)已禁用。打印机会尝试检测并自动与称为 hpsetup 的开
放无线网络关联。网络无需认证或加密安全防护。
Ad hoc 网络上的全部装置均须:
• 符合 802.11 无线连接标准
• 以 ad hoc 为通信模式
• 具有相同的网络名称 (SSID)
• 在相同的子网之上
• 在相同的频道之上
• 具有相同的 802.11 安全性设置值
简
体
中
文
无线配置规范开关
打印机包含一个 802.11 无线配置规范开关,可令您保存多达三个 802.11 计算机或网络的设置文件。
您便能够将打印机轻易地从家中移到办公室,或在任何三个无线网络环境间移动。“当前”配置规范与打
印机的无线配置规范开关的当前位置 (1、 2、或 3)关联。有关更多信息,请参见 Starter CD 上的在线
用户指南。
33
Page 34

Hewlett-Packard 有限保修声明
HP 产品
有限保修期限
软件 90 天
附件 1 年 (随打印机购买)或 90 天 (若分别购买)
打印墨盒 若在包装箱上所印有效日期以前安装:6 个月有限保修。
打印机外设硬件 (参见以下详细说明) 1 年
http://www.hp.com/support/inkjet_warranty
有限保修范围
1. Hewlett-Packard 向最终用户保证:以上列出的 HP 产品在
上述期限内无材料和工艺瑕疵,期限自客户购买之日起计
算。
2. 对于软件产品, HP 的有限保修仅适用于无法执行程序指令
的故障。 HP 并不保证任何产品的运行不会中断或没有错
误。
3. HP 的有限保修仅适用于产品在正常使用情况下出现的瑕
疵,不适用于其它任何问题,包括由以下原因导致的问题:
a. 维护或修改不当;
b. 非 HP 提供或支持的软件、介质、部件或配件;
c. 在产品规格外进行操作;
d. 未授权的修改或滥用。
4. 在 HP 打印机产品上使用非 HP 打印墨盒或重新装灌的墨
盒并不影响 HP 对客户的保证或与客户的任何 HP 支持合
同。 但是,如果因使用非 HP 或重新装灌的打印墨盒而造
成打印机故障或损坏, HP 将对特定故障或损坏按维修打印
机的标准时间和材料收费。
5. 如果在适用的保修期内 HP 收到关于在 HP 保修范围内的
任何产品瑕疵通知,由 HP 决定对产品进行修理或替换。
6. 如果 HP 无法在适用的情况下修理或替换 HP 保修范围内
的有瑕疵产品, HP 将在收到瑕疵通知后的合理时间内退还
产品的购买款项。
7. 如果用户不把有瑕疵的产品退回 HP, HP 则没有义务修
理、替换或退款。
8. 替换的产品可能是全新或近似新的,只要其性能至少与被
替换产品相同。
9. HP 产品可能包含性能上相等于新的再生产部件、组件或材
料。
10. HP 的 “有限保修声明”在任何由 HP 经销 HP 保修产品
的国家/地区均有效。 在 由 HP 或授权的进口商经销 HP
产品的国家 / 地区,可从任何授权的 HP 维修站得到有关
附加保修服务 (如现场服务)合同。
保修限制
在当地法律允许的范围内, HP 及其第三方供应商均不
作其他任何保证或任何种类的要件,无论是对适销性、
质量满意度或对特殊用途的适用性都不作任何明示或暗
示的保证或要件。
责任限制
1. 在当地法律允许的范围内,本 “保修声明”中提供的补偿
是客户唯一且排他的补偿。
2. 在当地法律允许的范围内,除本 “保修声明”中具体列出
的责任外,在任何情况下,对任何直接、间接、特殊、偶
然或继起性损坏,无论是基于合同、侵权、或其他任何法
律理论,且无论是否对此类损坏发生的可能性有无通知,
HP 或其第三方供应商均不承担责任。
当地法律
1. 本 “保修声明”赋予客户特定的法律权利。 客户可能还有
其它权利,具体因美国的州、加拿大的省以及世界其它地
方的国家/地区而各有不同。
2. 如果本 “保修声明”与当地法律不一致,则应将本 “保修
声明”视作修改成与当地法律一致。 在当地法律的制约
下,本 “保修声明”的某些免责声明和限制可能不适用于
客户。 例如,在美国的某些州以及美国以外的一些政府
(包括加拿大的省)可能:
a. 阻止本 “保修声明”中的免责声明和限制来限定客户
的法定权利 (如英国);
b. 以其他方式限制生产商实施此类免责声明或限制的能力
;或者
c. 授予客户其他保修权利、指定生产商不能否认的暗示保
修期限、或允许限制暗示保修期限。
3. 对于澳大利亚和新西兰的消费者交易,在法律许可的范围
内,本 “保修声明”中的条款并不排除、限制或修改适用
于向此类用户销售的 HP 产品的强制性法定权利,且是对
这些法定权利的补充。
34
Page 35

여행 정보
프린터를 가지고 여행할 경우 아래의 정보를 참조하시면 도움이 될 것입니다.
• 여분의 검정색 프린트 카트리지나 포토 프린트 카트리지를 가지고 가는 경우, 다음 지침을 따르십시
오. 일부 사용한 검정색 프린트 카트리지, 또는 일부 사용하거나 전혀 사용하지 않은 포토 프린트 카트
리지의 경우 잉크가 새지 않도록 여행용 홀더에 넣어 운반하십시오. 새로 개봉한 검정색 프린트 카트
리지의 경우 비행기 내부와 같이 고도가 높은 곳에서는 잉크가 약간 샐 수도 있습니다. 이를 방지하려
면 목적지에 도착한 후 새로운 카트리지를 설치하는 것이 좋습니다. 목적지에 도착할 때까지는 원래
포장지의 테이프를 뜯지 마십시오.
• 전원 단추를 눌러 프린터를 끄십시오. 이렇게 하면 프린트 카트리지가 원래 위치인 프린터의 왼쪽으로
다시 고정됩니다.
• 다른 국가/지역을 여행하는 도중 프린트 카트리지를 구입해야 하는 경우 온라인 도움말 "HP 모바일
프린터와 함께 떠나는 여행"에서 해당 지역의 카트리지 호환 정보를 확인하십시오. 이 온라인 도움말
은 도구 상자 또는 HP 프린터 유틸리티에서 액세스할 수 있습니다.
• 프린터와 함께 제공된 전원 어댑터만 사용하십시오. 다른 변압기 또는 변환기를 사용하지 마십시오.
전원 어댑터는 100 – 240V, 50 – 60Hz의 AC 전원에 사용할 수 있습니다.
•1개월 이상 프린터를 사용하지 않는 경우 배터리를 제거해 두십시오.
• 인화지를 가지고 다닐 때는 휘지 않도록 관리하십시오. 인쇄하기 전에 인화지를 잘 펴야 합니다. 인화
지 모서리가 10mm(3/8 인치) 이상 휘면 적당한 보관용 가방에 넣어서 인화지가 펴질 때까지 탁자 가
장자리에 가방을 굴려 주십시오.
프린터 단추 및 표시등
프린터 표시등은 프린터의 상태를 나타내며 인쇄 문제 발생 시 분석 자료로 유용하게 사용됩니다. 이 장에
서는 상태 표시등 목록과 함께 각 표시등에 관한 설명 및 문제 해결 방법을 제공합니다.
1 2 3 4 5 6 7 8
한
국
어
1. (취소 단추) – 현재 인쇄 작업을 취소합니다. 작업을
취소하는 데 소요되는 시간은 인쇄 작업의 크기에 따라
다릅니다. 인쇄 대기열에 있는 작업을 취소하려면 이
단추를 한 번만 누르십시오.
2. (재시작 단추) – 대기 중이거나 일시적인 중단
(예: 인쇄 용지를 프린터에 추가할 때) 후 인쇄 작업을
다시 시작합니다.
3. 재시작 표시등 – 인쇄 작업이 대기 중일 때 노란색 표
시등이 켜지고, 중계 상태 또는 사용자 개입의 필요성
을 알리는 표시등이 깜박거리거나 켜집니다(아래 표 참
조).
4. 배터리 잔량 표시등 – 배터리가 충전 중일 때 녹색으로
켜집니다.
5. 왼쪽 프린트 카트리지 표시등 – 왼쪽 프린트 카트리지
가 없거나 제대로 작동하지 않을 때 깜박거립니다. 잉
크가 부족하거나 비어 있으면 켜진 상태로 유지됩니
다.
6. 오른쪽 프린트 카트리지 표시등 – 오른쪽 프린트 카트
리지가 없거나 제대로 작동하지 않을 때 깜박거립니
다. 잉크가 부족하거나 비어 있으면 켜진 상태로 유지
됩니다.
7. ( 전원 단추) – 전원을 끄거나 켭니다.
8. 전원 표시등 – AC 어댑터 또는 배터리 잔량이 41100%인 배터리를 사용하여 프린터를 켜면 녹색으로
켜집니다. 배터리에 의한 전원 공급 시, 배터리 잔량이
10 – 40%일 경우 노란색이고 10% 미만일 경우 적색
입니다. 인쇄 중일 때는 깜박거립니다.
35
Page 36
프린터 표시등 정보
표시등 설명 및 표시등 정보 설명 및 권장 조치
전원 표시등이 녹색임
전원 표시등이 노란색임
전원 표시등이 적색임
배터리 잔량 표시등이 녹색임
배터리 잔량 표시등이 적색임
전원을 사용하는 경우: 프린터의 전원이 켜져
있으나 유휴 상태입니다.
배터리 전원을 사용하는 경우: 배터리가 41100% 정도 충전되면 프린터가 켜지고 유휴 상
태에 놓입니다.
• 조치가 필요하지 않습니다.
배터리가 10-40% 정도 충전되면 프린터가 켜
지고 유휴 상태에 놓입니다.
• 전원 어댑터를 꽂아 배터리 재충전을 시작
합니다.
자세한 내용은 Starter CD에 있는 사용 설
명서를 참조하십시오.
배터리 잔량이 10% 이하이며, 프린터의 전원
은 켜져 있으나 유휴 상태입니다.
• 전원 어댑터를 꽂아 배터리 재충전을 시작
합니다.
자세한 내용은 Starter CD에 있는 사용 설
명서를 참조하십시오.
배터리가 충전 중입니다.
• 조치가 필요하지 않습니다.
배터리에 장애가 발생했습니다.
• 배터리를 교체하십시오.
자세한 내용은 Starter CD에 있는 사용 설
명서를 참조하십시오.
전원 표시등이 녹색이고 재시작 표시등이 깜박거림
왼쪽 프린트 카트리지 표시등이 깜박거림
36
프린터가 용지 건조를 위해 대기 중이거나,
DPOF 인쇄를 처리 중이거나 용지가 없어 일시
중지된 상태입니다.
• 용지가 없으면 용지를 넣으십시오. 인쇄
작업을 계속하려면 (재시작 단추)를 누
르십시오.
왼쪽 프린트 카트리지 점검이 필요합니다.
• 프린트 카트리지를 다시 끼우고 인쇄해 보
십시오. 오류가 지속되면 카트리지를 교체
하십시오. 자세한 내용은 Starter CD에 있
는 사용 설명서를 참조하십시오.
Page 37

표시등 설명 및 표시등 정보 설명 및 권장 조치
오른쪽 프린트 카트리지 표시등이 깜박거림
왼쪽 프린트 카트리지 표시등이 켜져 있음
오른쪽 프린트 카트리지 표시등이 켜져 있음
전원 표시등이 꺼지고, 재시작 표시등이 깜박거림
전원 표시등이 깜박거리고, 재시작 표시등이 깜박거림
전원 표시등과 재시작 표시등이 깜박거림. 왼쪽 및 오른쪽
프린트 카트리지 표시등이 켜져 있음
오른쪽 프린트 카트리지 점검이 필요합니다.
• 프린트 카트리지를 다시 끼우고 인쇄해 보
십시오. 오류가 지속되면 카트리지를 교체
하십시오. 자세한 내용은 Starter CD에 있
는 사용 설명서를 참조하십시오.
삼원색 프린트 카트리지의 잉크가
부족합니다.
• 프린트 카트리지를 교체하십시오. 자세한
내용은 Starter CD에 있는 사용 설명서를
참조하십시오.
오른쪽 프린트 카트리지의 잉크가
부족합니다.
• 프린트 카트리지를 교체하십시오.
자세한 내용은 Starter CD에 있는 사용 설
명서를 참조하십시오.
용지가 걸렸거나, 용지 모터가 작동하지 않습
니다.
• 걸린 용지를 제거하십시오. 자세한 내용은
Starter CD에 있는 사용 설명서를 참조하
십시오. 걸린 용지를 제거한 후 (재시작
단추)를 클릭하여 인쇄 작업을 계속하십시
오.
걸린 용지가 없으면 (재시작 단추)를 누
릅니다. 그래도 문제가 해결되지 않으면
프린터를 껐다가 켠 후에 다시 인쇄해 보
십시오.
한
국
어
재시작 표시등이 깜박거리고, 왼쪽 및 오른쪽 프린트 카트리
지 표시등이 켜져 있음
재시작 표시등이 깜박거리고, 왼쪽 및 오른쪽 인쇄 카트리
표시등이 차례로 켜짐
37
Page 38

표시등 설명 및 표시등 정보 설명 및 권장 조치
전원 표시등이 켜져 있고, 재시작 표시등이 깜박거림. 오른
쪽 프린트 카트리지 표시등이 두 번 켜졌다 꺼짐
전원 표시등과 재시작 표시등이 켜져 있음. 오른쪽 프린트
카트리지 표시등이 두 번 켜졌다 꺼짐
설치 문제 해결
이 절에서는 하드웨어 및 소프트웨어 설치와 관련된 가장 일반적인 문제 몇 가지와 그에 대한 해결 방안
을 제공합니다.
인쇄 문제
잉크 서비스 모듈이 거의 가득 찬 상태입니다.
• 교체할 잉크 서비스 모듈이 있으면 제품에
함께 제공된 지침서에 따라 즉시 교체하십
시오.
• 그렇지 않은 경우 다음 페이지를 방문하십
시오:
http://www.hp.com/support/dj460
또는 고객 지원 센터에 문의하여 교체 제
품을 구입하십시오.
부품을 교체하지 않아도 (재시작
단추)를 클릭하면 인쇄를 계속할 수 있으
나, 표시등 오류 상태는 잉크 서비스 모듈
을 교체할 때까지 표시됩니다. 잉크 서비
스 모듈이 가득 차면 프린터가 인쇄를 중
지합니다.
38
프린터에서 다음 사항을 확인하십시오.
• 전원 표시등이 켜졌으며 깜박이지 않는가. 프린터를 처음 켜는 경우 초기화하는 데 약 1분의 시간이
필요합니다.
• 제어판 표시등이 켜지거나 깜박이지 않으면 프린터가 준비 상태에 있는 것입니다. 표시등이 켜지거
나 깜박이면 36페이지의 를 참조하십시오.
• 전원 코드 및 다른 케이블이 프린터에 단단히 연결되어 있으며 올바르게 작동하고 있는가.
• 모든 포장 테이프와 포장재를 프린터에서 제거했는가.
• 프린트 카트리지가 올바른 카트리지함에 설치되어 있는가. 각 카트리지를 세게 눌러 올바르게 접촉
되도록 하십시오.
• 각 프린트 카트리지에서 테이프를 제거했는지 확인합니다.
• 카트리지가 손상되지 않았는가.
• 프린트 카트리지 래치와 덮개가 닫혀 있는가.
• 입력 용지함에 용지를 올바르게 넣고 프린터에서 용지가 걸리지 않았는가.
Page 39

소프트웨어 설치 문제
컴퓨터 요구 사항 확인
• 컴퓨터가 시스템 요구 사항을 충족시키는지 확인하십시오. Starter CD에 있는 온라인 사용 설명서를
참조하십시오.
설치 예비 작업 확인
• Windows 컴퓨터에 소프트웨어를 설치하기 전에 다른 모든 프로그램을 종료해야 합니다.
• 사용자가 입력하는 CD 드라이브 경로를 컴퓨터가 인식하지 못하는 경우 올바른 드라이브 문자를 지
정했는지 확인하십시오.
• 컴퓨터가 CD 드라이브에서 Starter CD를 인식하지 못하는 경우 CD가 손상되었는지 확인하십시오.
프린터 드라이버는 http://www.hp.com/support/dj460에서 다운로드할 수 있습니다.
• Windows 장치 관리자에서 USB 드라이버가 비활성화되어 있지 않은지 확인하십시오.
프린터 소프트웨어 다시 설치
• Windows를 사용하는 컴퓨터가 프린터를 찾지 못하는 경우 제거 유틸리티(Starter CD의
Utils\Scrubber 폴더)를 실행하여 드라이버를 제거하십시오. 컴퓨터를 다시 시작하고 프린터 드라이
버를 다시 설치하십시오. Starter CD에 있는 사용 설명서의 “프린터 소프트웨어를 설치 제거하려면"ٛ
을 참조하십시오.
802.11 또는 Bluetooth 무선 통신 설정 문제
802.11 또는 Bluetooth 무선 연결을 이용하여 인쇄할 때 문제가 발생한 경우에는 다음과 같이 조치해 보
십시오.
무선 프린터 카드 점검
• 무선 프린터 카드가 올바르게 끼워졌는지 확인합니다.
• 프린터 초기화 전후에(도중이 아니라) 무선 프린터 카드를 끼웠는지 확인합니다.
• 무선 프린터 카드 표시등이 켜지지 않은 경우 다음을 수행하십시오.
a. 무선 프린터 카드를 제거합니다.
b. 프린터를 끄고 몇 초간 기다렸다가 다시 켭니다.
c. 프린터가 준비 상태가 되면 카드를 다시 끼웁니다. 응답이 없으면 이 절차를 몇 번
반복하십시오. 그래도 응답이 없으면 HP에 연락합니다.
• 무선 프린터 카드가 작동하는지 확인하려면 다른 무선 장치를 사용해서 인쇄해 보십시오. 그래도 인
쇄할 수 없으면 무선 프린터 카드 결함일 수 있습니다. 필요하면 카드를 교체하십시오.
한
국
어
무선 설정을 점검하십시오.
• 프린터 후면의 무선 프로파일 스위치가 올바른 무선 프로파일에 맞춰져 있는지 확인하십시오. 설치
도중에 구성한 프로파일을 사용하고 있는지 확인하십시오.
• 소프트웨어 설치 및 USB 케이블 제거를 완료한 후 프린터와 통신할 수 없는 경우 다음 무선 설정 중
하나 이상이 잘못된 것입니다.
• 네트워크 이름(SSID)
• 통신 모드(인프라 또는 Ad Hoc)
• 채널(Ad Hoc 네트워크에만 해당)
• 보안 설정(예: 인증 유형 및 암호화)
• 도구 상자(Windows)를 사용하여 프린터 상태(예: 잉크량)를 모니터하거나 Bluetooth 설정을 구성하
려면 USB 케이블로 프린터와 컴퓨터를 연결해야 합니다.
39
Page 40

무선 신호를 점검하십시오.
신호 간섭이나 거리 또는 신호 세기 문제가 있거나 프린터가 준비 상태에 놓이지 않으면 무선 통신이 중
단되거나 무선 통신을 사용할 수 없습니다.
• 프린터가 802.11 또는 Bluetooth 전송 장치 범위 내에 있는지 확인하십시오. 802.11 인쇄 기능을 사
용하면 최대 100미터(300피트) 거리에서 무선 인쇄 작업이 가능하고 Bluetooth 인쇄 기능을 사용하
면 최대 10미터(30피트) 거리에서 무선 인쇄 작업이 가능합니다.
• 문서가 인쇄되지 않으면 신호 간섭이 있는 것일 수 있습니다. 신호 문제가 있음을 알리는 메시지가
나타나면 인쇄 작업을 취소하고 컴퓨터에서 다시 작업을 전송하십시오.
일반적인 무선 문제 해결 팁
• 프린트 센터에서 프린터를 삭제한 후 다시 추가합니다(Mac OS).
• 프린터를 핑(PING)합니다. 프린터를 껐다가 다시 켜도 문제가 해결되지 않으면(또는 Mac OS에서
프린트 센터로부터 프린터를 삭제했다가 다시 추가할 수 없으면) 다음을 수행하십시오.
a. 무선 구성 페이지를 인쇄합니다.
b. MS-DOS (Windows) 또는 터미널(Mac OS)에서 프린터를 핑(PING)하여 네트워크 통신을 확인
합니다.
• 프린터 속성의 포트 탭에서 프린터의 IP 주소를 수동으로 할당합니다.
• 아시아 지역 이외에서 구입한 프린터에서 휴대폰을 사용해 아시아 글꼴을 인쇄하려고 하면 상자가
나타날 수 있습니다. Bluetooth 휴대폰 인쇄용 아시아 글꼴은 아시아 지역에서 구입한 모델에서만 지
원합니다.
• Bluetooth 무선 연결을 사용하여 큰 파일을 인쇄하면 인쇄 문제가 발생할 수 있습니다. 더 작은 파일
을 인쇄해 보십시오.
• 무선 통신에는 프린터 배터리 전원이 사용됩니다. 배터리 충전량을 확인하십시오.
자세한 무선 네트워크 문제 해결 및 구성 정보는 Starter CD에 있는 사용 설명서를 참조하십시오.
2초 동안 (취소 단추)를 누릅니다.
802.11 무선 인쇄 정보
이 절에서는 프린터를 사용한 출고시 기본 802.11 무선 통신에 대해 간략하게 설명합니다.
다음 사항에 대해서는 Starter CD에 있는 사용 설명서를 참조하십시오.
• 인프라 네트워크에서 프린터를 설정합니다.
• 802.11 무선 프로파일 구성 유틸리티를 사용하여 한 번에 여러 프린터를 설정할 수 있습니다.
• 출고시 기본 구성을 사용하지 않는 802.11 연결 문제를 해결합니다.
• USB 케이블을 사용하지 않고 802.11 연결로 프린터를 설정합니다 .
출고시 기본값을 사용한 802.11 무선 인쇄
설정 지침에서는 Ad-Hoc 네트워크와 출고시 기본값을 사용하여 무선 통신에 맞게 하나의 컴퓨터를 설정
하는 방법을 설명합니다.
출고시 기본 무선 네트워크 설정은 다음과 같습니다.
• 통신 모드: ad hoc
• 네트워크 이름(SSID): hpsetup
• 보안(암호화): 사용 안함
무선으로 또는 USB 케이블을 사용하여 프린터를 컴퓨터에 연결한 후에는 HP 도구 상자(Windows) 또는
HP Deskjet 460 네트워크 설정 도구(Mac OS)를 사용하여 무선 프로파일을 구성하여 SSID를 변경할 수
있습니다.
통신 모드
"Ad Hoc" 네트워크에서는 네트워크 통신 모드가 Ad Hoc으로 설정되며 프린터는 무선 액세스 포인트
(WAP )를 사용하지 않고 다른 무선 장치와 직접 통신합니다.
40
Page 41

네트워크 이름(SSID)
기본적으로 프린터는 네트워크 이름이 있거나 "hpsetup"서비스 설정 ID (SSID)를 갖는 Ad Hoc 네트워크
를 찾습니다.
무선 보안 설정
프린터의 출고시 기본값은 개방형 네트워크로, 보안(암호화) 기능이 해제되어 있습니다. 프린터는
"hpsetup" 개방형 무선 네트워크를 찾아서 자동으로 연결하려 시도합니다. 이러한 네트워크는 인증 또는
암호화를 위한 보안을 요구하지 않습니다.
Ad Hoc 네트워크의 모든 장치는 다음 조건을 충족해야 합니다.
• 802.11과 호환되어야 함
• 통신 모드로 Ad Hoc을 가져야 함
• 같은 네트워크 이름(SSID)을 가져야 함
• 같은 서브넷에 있어야 함
• 같은 채널에 있어야 함
• 같은 802.11 보안 설정을 가져야 함
무선 프로파일 스위치
프린터에는 최대 3개의 802.11 컴퓨터 또는 네트워크에 대한 설정을 저장할 수 있도록 802.11 무선 프
로파일 스위치가 포함되어 있습니다. 이 스위치를 사용하면 프린터를 집에서 사무실로 또는 세 개의 무선
네트워크 환경들 간에 쉽게 이동할 수 있습니다. "현재" 프로파일은 프린터에 있는 무선 프로파일 스위치
의 현재 위치(1, 2 또는 3)와 연관된 프로파일입니다. 자세한 내용은 Starter CD에 있는 화면상의 사용 설
명서를 참조하십시오.
한
국
어
41
Page 42

Hewlett-Packard 제한 보증 조항
HP Product
제한 보증 기간
HP 제품 90일
액세서리 프린터와 함께 구매 시 1년; 별도 구매 시 90일
인쇄 카트리지 상자에 인쇄된 날짜 이전에 설치한 경우 6개월 한정 보.
프린터 주변 장치 하드웨어(자세한 내용은 아래 참조)1년
http://www.hp.com/support/inkjet_warranty
제한 보증 범위
1. Hewlett-Packard는 일반 사용자가 제품을 구입한 날로
부터 정해진 기간 동안 위의 HP 제품이 재료와 기술에
있어
결함이 없음을 보증합니다.
2. 소프트웨어 제품의 경우 HP의 제한 보증은 프로그래밍
지침을 실행할 수 없을 경우에만 적용됩니다. HP는
제품이 작동 중에 중단되지 않거나 오류가 발생하지
않음을 보증하지 않습니다.
3. HP의 제한 보증은 제품을 정상적으로 사용하여 발생한
결함에 대해서만 적용되며 다음의 경우에는 적용되지
않습니다.
a. 부적절한 유지 보수 또는 개조
b. HP 에서 지원하지 않는 소프트웨어, 매체, 부품 또는
소모품
c.제품 사양에서 벗어난 작동
d. 승인 없는 변경 및 오용.
4. HP 프린터 제품의 경우 HP 제품이 아닌 인쇄 카트리지나
잉크를 다시 채운 인쇄 카트리지를 사용했더라도 고객
보증이나 고객과의 HP 지원 계약이 적용됩니다. 그러나,
프린터의 고장이나 손상이 HP 제품이 아닌 인쇄 카트리지
를 사용하거나 잉크를 다시 채운 인쇄 카트리지의 사용으
로
인해 발생한 경우에는 HP는 프린터의 특정한 고장이나
손상을 수리를 위한 표준 시간 및 재료에 대한 비용을
고객에게 부과합니다.
5.보증 기간 중에 보증 범위에 적용되는 제품의 결함이 있음
을 통지 받으면 HP는 HP의 재량에 따라 제품을 수리하거나
교환해 드립니다.
6. HP의 보증 범위에 적용되는 결함 있는 제품을 HP에서
수리할 수 없거나 교환해 드릴 수 없는 경우 결함을 통지
받은 후 합당한 기간 안에 제품의 구입가를 환불해
드립니다.
7. HP는 고객이 결함 있는 제품을 HP에 반품하기 전에는
수리, 교체 또 는 환불할 의무가 없습니다.
8. 교환해 주는 제품은 신품이거나 적어도 교체할 제품과
동일한 기능을 가진 신품과 같은 제품입니다.
9. HP 제품은 신품과 동일한 성능의 재생된 부품, 구성 부품
또는 재료를 사용할 수도 있습니다.
10. HP의 제한 보증 조항은 HP가 제품을 판매하는 모든 국가
및 지역에 적용됩니다. 현장 서비스 같은 추가 보증 서비스
에 대한 계약은 HP나 공인 수입업체가 판매하는 국가에서
승인 받은 HP 서비스 시설을 통해 이루어질 수 있습니다.
보증 제한
지역법이 허용하는 범위에서, HP나 어떤 협력업체도 상업성,
품질 만족성, 또는 특정 목적에의 적합성에 대한 어떠한 종류의
다른 보증이나 조건도 명시적 또는 암시적으로 제시하지
않습니.
책임 제한
1. 지역법이 허용하는 범위에서 위에서 제시된 배상은
고객에게 유일하고도 독점적인 배상입니다.
2. 지역법이 허용하는 범위에서 HP 또는 협력업체는 이 보증
조항에 특별히 명시한 책임을 제외하고 어떠한 계약이나
불법 행위, 또는 다른 어떤 법적 이론 근거에 관계없이 직
접, 간접, 특별, 우발적, 또는 결과적인 손해에 대해서 책임
을 지지 않습니다.
지역법
1. 이 보증 조항은 고객에게 특정한 법적 권리를 부여합니다.
고객에 대한 권리는 미국의 주, 캐나다의 지방 및 전세계
국가에 따라 다를 수 있습니다.
2.이 보증 조항이 지역법과 일치하지 않는 부분이 있는 경우
지역법과 일관되게 수정되어야 할 것입니다. 지역법에 따
라 보증의 일부 조항 및 제한이 고객에게 적용되지 않을 수
도 있습니다. 예를 들어, 미국 내의 일부 주와 미국 이외의
일부 국가(캐나다 지방 포함)에서는 다음 사항이 적용됩니
다.
a.이 보증 조항에서 명시된 조항과 제한 고객의 법적
권리를 제한할 수 없습니다(예: 영국).
b. 그렇지 않으면 그러한 권리 포기와 제한을 두는
제조업체의 자격을 제한합니다.
c.고객에게 추가 보증 권리를 부여하거나 암시적 보증
기간이 지속되는 기간에 대해 제조업체가 권리를
포기하거나 제한할 수 없는 보증 기간을 지정합니다.
3.호주나 뉴질랜드 고객 거래의 경우 이 보증 조항은 법적으
로 허용되는 범위를 제외하고는 해당 고객에 대한 HP 제품
판매에 적용할 수 있는 법적 권리에 추가되며 이러한 법적
권리를 제외, 제한 또는 수정하지 않습니다.
42
Page 43

Saran-saran untuk perjalanan
Saran-saran berikut akan membantu Anda mempersiapkan perjalanan dengan membawa printer Anda:
• Bila Anda membawa satu kartrid cetak hitam atau kartrid cetak foto ekstra: Untuk kartrid cetak hitam
yang telah digunakan sebagian, atau kartrid cetak foto yang telah digunakan maupun yang masih
penuh, simpanlah di wadah khusus (travel holder) untuk mencegah kebocoran tinta. Kartrid cetak hitam
yang baru dibuka akan bocor sedikit jika berada pada ketinggian yang ekstrem (misalnya di dalam
pesawat terbang). Untuk menghindari kejadian ini, sebaiknya Anda tunggu sampai Anda mencapai
tempat tujuan sebelum Anda memasang kartrid itu. Selama itu, simpan kartrid itu dalam pita kemasan
aslinya.
• Matikan printer dengan menekan tombol daya. Dengan cara ini kartrid cetak akan terkunci dengan
aman di tempat yang telah disediakan di bagian kiri printer.
• Bila Anda perlu membeli kartrid cetak saat Anda di negara/kawasan lain, rujuk ‘help’ (bantuan)
dengan judul “Traveling with your HP mobile printer” (Bepergian dengan printer mobile HP Anda), yang
dapat diakses dengan Toolbox atau HP Printer Utility, untuk mendapatkan informasi mengenai kartrid
yang sesuai untuk kawasan itu.
• Hanya gunakan adaptor listrik yang telah disertakan dengan printer. Jangan menggunakan transformer
atau pengubah tegangan lain yang mana pun. Adaptor listrik ini dapat digunakan dengan sumber
listrik AC dengan tegangan 100 sampai 240 volt, pada frekuensi 50 atau 60 Hz.
• Keluarkan baterai bila Anda tidak berencana menggunakan printer lebih dari satu bulan.
• Bila Anda membawa kertas foto dalam perjalanan, kertas itu hendaknya dipak rata agar tidak
melengkung atau terlipat. Kertas foto harus rata permukaannya sebelum digunakan untuk mencetak. Bila
lebih dari 10 mm (3/8) dari salah satu ujung kertas foto melengkung, ratakan kertas itu dengan
meletakkannya di dalam bungkus penyimpanan yang dapat disegel kembali, kemudian gulingkan pada
tepi meja hingga kertas rata kembali.
43
Bahasa Indonesia
Page 44
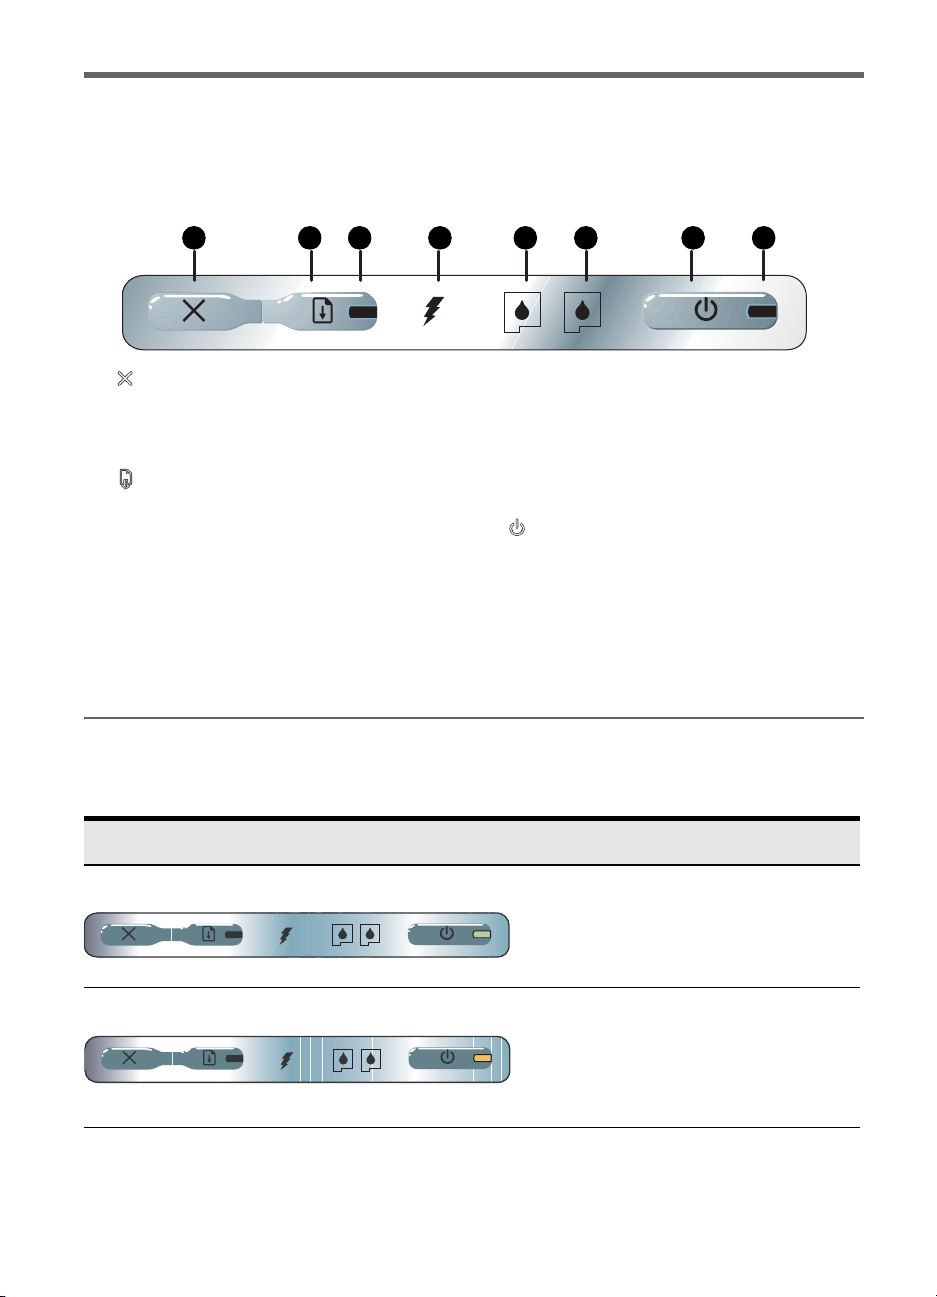
Tombol dan lampu printer
Lampu-lampu printer menunjukkan status printer dan berguna untuk menentukan penyebab masalah
pencetakan. Di dalam bab ini diberikan daftar status lampu, kombinasi nyala lampu, apa yang indikasikan
dan bagaimana mengatasinya.
1 2 3 4 5 6 7 8
1. (Tombol batal) – Membatalkan file yang sedang
dicetak. Waktu yang dibutuhkan untuk membatalkan
bergantung pada besarnya file yang dicetak. Tekan
tombol ini sekali saja untuk membatalkan file yang
menunggu giliran untuk dicetak.
2. (Tombol lanjutkan) – Melanjutkan pencetakan yang
menunggu atau setelah terhenti (misalnya, terhenti
karena harus menambahkan media cetak ke dalam
printer).
3. Lampu lanjutkan – Menyala dengan warna kuning bila
ada file yang menunggu untuk dicetak, dan berkedip
atau menyala untuk menyampaikan status atau bila
perlu dilakukan tindakan (lihat tabel di bawah).
4. Lampu pengisian baterai – Menyala dengan warna
hijau bila baterai sedang diisi.
5. Lampu kartrid cetak kiri –Berkedip bila tidak terdapat
kartrid cetak kiri atau kartrid cetak kiri tidak berfungsi
dengan baik. Menyala (tidak berkedip) bila tinta
tinggal sedikit atau kosong.
6. Lampu kartrid cetak kanan –Berkedip bila tidak
terdapat kartrid cetak kanan atau kartrid cetak kanan
tidak berfungsi dengan baik. Menyala bila tinta tinggal
sedikit atau kosong.
7. (Tombol daya) – Menghidupkan atau mematikan
printer.
8. Lampu daya – Menyala dengan warna hijau saat
printer dihidupkan menggunakan adaptor listrik AC
atau baterai yang terisi 41 – 100% . Bila printer
berjalan dengan kekuatan baterai, lampu akan
berwarna kuning bila daya baterai di antara 10-40%,
dan berwarna merah bila daya berada di bawah 10%.
Berkedip selama pencetakan.
Pola lampu printer
Penjelasan mengenai lampu dan pola lampu Penjelasan dan tindakan yang disarankan
Lampu daya berwarna hijau.
Bila menggunakan listrik AC: Printer aktif dan
siap.
Bila menggunakan tenaga baterai: Baterai
terisi antara 41-100%, printer aktif dan siap.
• Tidak diperlukan tindakan.
Lampu daya berwarna kuning.
44
Baterai terisi antara 10-40%, printer aktif dan
siap.
• Pasang adaptor listrik untuk mulai mengisi
baterai.
Rujuk panduan pengguna onscreen di
CD Starter untuk keterangan lebih lanjut.
Page 45
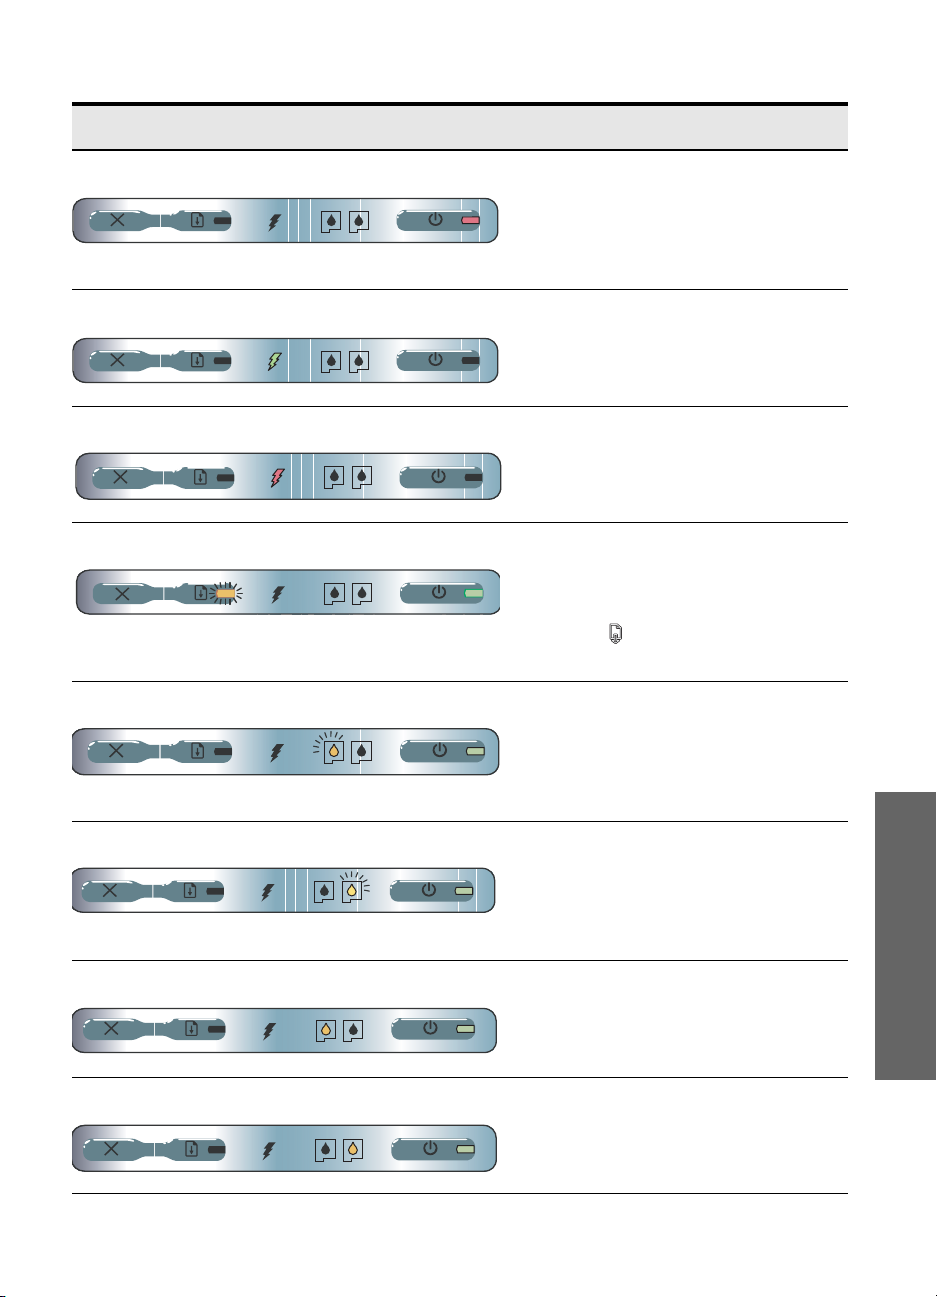
Penjelasan mengenai lampu dan pola lampu Penjelasan dan tindakan yang disarankan
Lampu daya berwarna merah.
Lampu pengisian baterai berwarna hijau.
Lampu pengisian baterai berwarna merah.
Lampu daya berwarna hijau dan Lampu lanjutkan berkedip.
Lampu kartrid cetak kiri berkedip.
Kekuatan baterai berada pada tingkat di
bawah 10%, printer aktif dan siap.
• Pasang adaptor listrik untuk mulai mengisi
baterai.
Rujuk panduan pengguna onscreen di
CD Starter untuk keterangan lebih lanjut.
Baterai sedang diisi.
• Tidak diperlukan tindakan.
Baterai rusak.
• Ganti baterai.
Rujuk panduan pengguna onscreen di
CD Starter untuk keterangan lebih lanjut.
Printer jeda karena menunggu media menjadi
kering, kehabisan kertas atau sedang
memproses pencetakan Digital Print Order
Format (DPOF).
• Bila kehabisan kertas, tambah kertas.
Tekan (Tombol lanjutkan) untuk
melanjutkan pencetakan.
Kartrid cetak kiri memerlukan perhatian.
• Pasang kembali kartrid cetak dan coba
untuk mencetak. Bila masih bermasalah,
ganti kartrid. Rujuk panduan pengguna
onscreen di CD Starter untuk keterangan
lebih lanjut.
Bahasa Indonesia
Lampu kartrid cetak kanan berkedip.
Lampu kartrid cetak kiri menyala.
Lampu kartrid cetak kanan menyala.
Kartrid cetak kanan memerlukan perhatian.
• Pasang kembali kartrid cetak dan coba
untuk mencetak. Bila masih bermasalah,
ganti kartrid. Rujuk panduan pengguna
onscreen di CD Starter untuk keterangan
lebih lanjut.
Tinta kartrid cetak triwarna tinggal sedikit.
• Ganti kartrid cetak. Rujuk panduan
pengguna onscreen di CD Starter untuk
keterangan lebih lanjut.
Tinta kartrid cetak kanan tinggal sedikit.
• Ganti kartrid cetak.
Rujuk panduan pengguna onscreen di
CD Starter untuk keterangan lebih lanjut.
45
Page 46
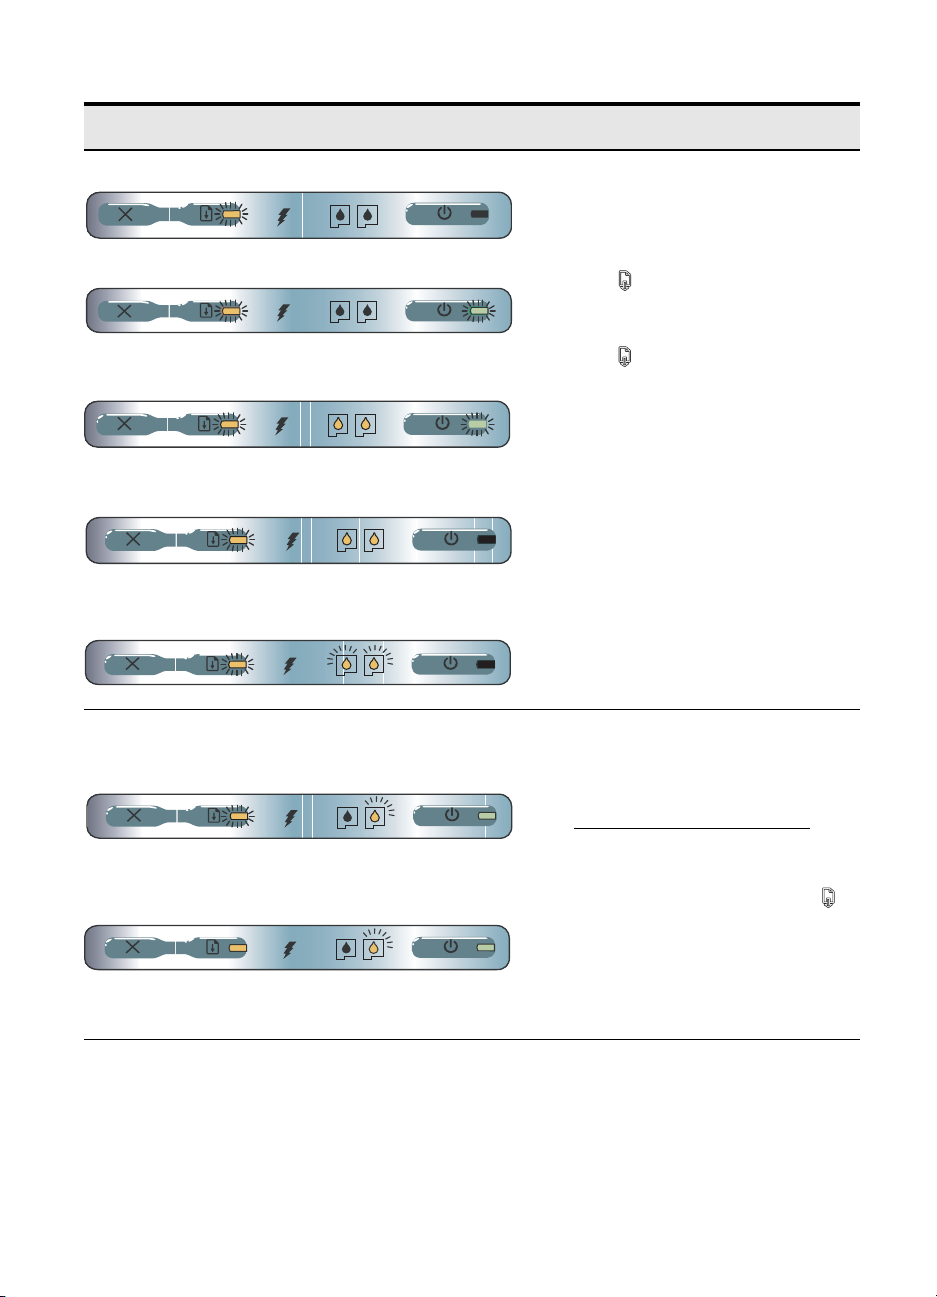
Penjelasan mengenai lampu dan pola lampu Penjelasan dan tindakan yang disarankan
Lampu daya mati, lampu lanjutkan berkedip.
Lampu daya berkedip, lampu lanjutkan berkedip.
Lampu daya berkedip, lampu lanjutkan berkedip, lampu
kartrid cetak kiri dan kanan menyala.
Lampu lanjutkan berkedip, lampu kartrid cetak kiri dan kanan
menyala.
Tombol lanjutkan berkedip, lampu kartrid cetak kiri dan
kanan menyala secara bergilir.
Lampu daya menyala, lampu lanjutkan berkedip, lampu
kartrid cetak kanan berkedip (waktu menyala dua kali lebih
lama daripada waktu mati).
Lampu daya menyala, lampu lanjutkan menyala, lampu
kartrid cetak kanan berkedip (waktu menyala dua kali lebih
lama daripada waktu mati).
Media tersangkut atau motor penggerak kertas
macet.
• Keluarkan kertas yang tersangkut. Rujuk
panduan pengguna onscreen di CD Starter
untuk keterangan lebih lanjut. Setelah
mengeluarkan kertas yang tersangkut,
tekan (Tombol lanjutkan) untuk
melanjutkan pencetakan.
Bila tidak ada kertas yang tersangkut,
tekan (Tombol lanjutkan). Bila ini tidak
berhasil, coba matikan printer dan
kemudian nyalakan lagi, dan cetak ulang
file tadi.
Modul layanan tinta hampir penuh.
• Bila Anda mempunyai modul layanan tinta
pengganti, gantikan segera dengan
mengikuti instruksi yang disertakan.
• Bila tidak, kunjungi:
http://www.hp.com/support/dj460
atau hubungi Dukungan Pelanggan untuk
mendapatkan modul pengganti.
Sementara itu, Anda dapat menekan
(Tombol lanjutkan) untuk melanjutkan
pencetakan, tapi nyala lampu yang
menandakan suatu kesalahan tetap terjadi
hingga modul layanan tinta diganti. Bila
modul layanan tinta penuh, printer akan
berhenti mencetak.
46
Page 47

Mengatasi masalah instalasi
Di dalam bagian ini disediakan saran untuk mengatasi masalah-masalah yang paling umum yang
bertalian dengan perangkat keras dan instalasi perangkat lunak.
Masalah mencetak
Periksa printer Anda untuk memastikan hal-hal berikut
• Lampu daya menyala dan tidak berkedip. Ketika printer dihidupkan, printer membutuhkan waktu kira-
kira satu menit untuk mempersiapkan diri.
• Lampu-lampu pada panel kontrol tidak menyala maupun berkedip dan printer dalam keadaan Ready
(siap). Bila ada lampu yang menyala atau berkedip, rujuk halaman 44.
• Pastikan kebel listrik dan kabel lain dalam keadaan baik dan telah dihubungkan ke printer dengan
aman.
• Semua pita kemasan dan bahan pelindung pengiriman telah disingkirkan dari printer.
• Kartrid cetak telah dipasang dengan benar di tempatnya yang secara khusus telah disediakan. Tekan
ke bawah dengan mantap untuk memastikan kontak listrik yang sempurna.
• Pastikan bahwa Anda telah melepaskan pita dari masing-masing kartrid cetak.
• Pastikan kartrid tidak dalam keadaan rusak.
• Penutup kartrid sudah ditutup dan pengancing kartrid sudah dikaitkan.
• Media sudah diisikan ke dalam baki kertas dengan benar dan tidak ada yang tersangkut di dalam
printer.
Masalah instalasi perangkat lunak
Periksa persyaratan komputer
• Pastikan komputer memenuhi persyaratan (system requirement) yang dibutuhkan. Silakan merujuk
panduan pengguna onscreen di CD Starter.
Periksa persiapan instalasi
• Sebelum menginstal perangkat lunak di komputer yang menggunakan Windows, pastikan semua
program lain telah ditutup.
• Bila komputer tidak dapat mengenali drive CD yang Anda ketik, pastikan huruf drive yang Anda ketik
benar.
• Bila komputer tidak dapat mengenali CD Starter di dalam drive CD, coba diteliti apakah CD itu rusak.
Anda dapat mendownload driver printer dari http://www.hp.com/support/dj460.
• Di daftar driver dalam Windows Device Manager, pastikan driver USB tidak dimatikan.
Instal ulang perangkat lunak printer
• Bila Anda menggunakan Windows dan komputer tidak dapat mendeteksi printer, jalankan Scrubber
utility (terletak di Utils\Scrubber folder dalam CD Starter) untuk membongkar instalasi driver secara
tuntas (clean uninstallation). Restart (matikan dan hidupkan lagi) komputer Anda dan instal ulang driver
printer. Rujuk “To uninstall the printer software” (Untuk membongkar instalasi perangkat lunak) di
panduan pengguna onscreen di dalam CD Starter.
Bahasa Indonesia
47
Page 48

Masalah dengan pengaturan komunikasi nirkabel
802.11 atau Bluetooth
Bila Anda menghadapi masalah saat mencetak dengan koneksi nirkabel 802.11 atau Bluetooth, coba
saran-saran berikut:
Periksa kartu printer nirkabel
• Pastikan kartu printer nirkabel dipasang dengan benar.
• Pastikan bahwa Anda menyisipkan kartu printer nirkabel sebelum atau sesudah printer melakukan
inisialisasi, bukan saat melakukan inisialisasi.
• Bila lampu di kartu printer nirkabel tidak menyala, lakukan hal berikut:
a. Keluarkan kartu printer nirkabel.
b. Matikan printer, tunggu beberapa detik, dan kemudian hidupkan lagi.
c. Sisipkan kartu lagi setelah printer berada dalam keadaan Ready (Siap). Bila tidak ada respons,
ulangi presedur ini beberapa kali. Namun, bila tetap tidak ada respons, hubungi HP.
• Untuk mengetahui apakah kartu printer nirkabel tidak rusak, coba cetak dengan alat nirkabel lain. Bila
Anda masih gagal mencetak, kartu printer nirkabel itu mungkin rusak. Ganti kartu bila perlu.
Periksa setelan nirkabel
• Pastikan sakelar profil nirkabel di balik printer telah disetel dengan benar ke profil nirkabel yang Anda
gunakan. Pastikan Anda menggunakan profil yang telah dikonfigurasikan selama instalasi.
• Bila Anda tidak dapat berkomunikasi dengan printer setelah menyelesaikan instalasi perangkat lunak
dan telah melepaskan kabel USB, mungkin salah satu atau beberapa setelan nirkabel berikut tidak
benar:
• Network name/nama jaringan (SSID)
• Communication Mode/modus komunikasi (infrastructure atau ad hoc)
• Channel/saluran (jaringan ad hoc saja)
• Security settings/setelan keamanan (seperti Authentication Type dan Encryption)
• Untuk melakukan konfigurasi Bluetooth atau memantau status printer (misalnya tinta yang tersisa di
kartrid) dengan menggunakan Toolbox (Windows), Anda harus menghubungkan printer dan komputer
Anda dengan kabel USB.
Periksa sinyal nirkabel
Komunikasi nirkabel dapat terhenti atau bahkan tidak tersedia bila terjadi, misalnya, gangguan sinyal,
masalah jangkauan atau kekuatan sinyal, atau bila printer belum siap karena satu dan lain alasan.
• Pastikan bahwa printer berada di dalam jarak jangkau alat 802.11 atau Bluetooh yang mengirim
sinyal. Dengan 802.11 Anda dapat mencetak secara nirkabel sampai jarak 100 meters (300 feet).
Sedangkan dengan Bluetooth jangkauan nirkabel untuk mencetak hanya sampai 10 meters (30 feet).
• Bila dokumen tidak tercetak, mungkin terjadi gangguan sinyal. Bila suatu pesan tampil di layar
komputer yang memberitahukan tentang adanya masalah sinyal, batalkan pencetakan dan kemudian
kirim ulang perintah cetak tadi dari komputer.
Saran umum mengatasi masalah nirkabel
• Hapus printer dan tambahkan printer lagi di dalam Print Center (Mac OS).
• PING printer: Bila dengan mematikan printer dan menghidupkannya lagi tidak mengatasi masalah
(atau, dengan menghapus printer dan menambahkannya lagi di Print Center masih tidak jalan untuk
Mac OS), lakukan yang berikut:
a. Cetak halaman konfigurasi nirkabel:
b. PING printer menggunakan MS-DOS (Windows) atau Terminal (Mac OS) untuk memeriksa ada
tidaknya komunikasi jaringan.
tahan (Tombol Batal) ke bawah selama dua detik.
48
Page 49

• Secara manual berikan alamat IP untuk printer, lakukan ini dengan membuka ‘Properties’ printer dan
masuk ke tab Port.
• Mungkin Anda akan melihat kotak-kotak sebagai pengganti font bila Anda mencoba mencetak font
bahasa Asia dari telepon selular dengan printer yang dibeli di luar Asia. Font Asia untuk pencetakan
dengan telepon selular Bluetooth hanya didukung oleh model yang dibeli di Asia.
• Mencetak file-file besar menggunakan koneksi nirkabel Bluetooth dapat menimbulkan persoalan-
persoalan pencetakan. Coba cetak file yang lebih kecil.
• Komunikasi nirkabel menggunakan banyak daya baterai printer. Periksa daya baterai yang masih
tersisa.
Rujuk panduan pengguna onscreen di CD Starter untuk memperoleh informasi lebih lanjut mengenai
konfigurasi dan cara mengatasi masalah jaringan nirkabel.
Mengenai pencetakan nirkabel 802.11
Di bagian ini diberikan pandangan sekilas mengenai komunikasi nikabel 802.11 standar (baku) dari
pabrik untuk printer.
Rujuk panduan pengguna onscreen di dalam CD Starter untuk:
• Mengatur printer di dalam jaringan “Infrastructure”.
• Mengatur beberapa printer sekaligus menggunakan 802.11 Wireless Profile Configuration Utility.
• Mengatasi masalah koneksi 802.11 yang tidak menggunakan konfigurasi baku pabrik.
• Mengatur printer dengan koneksi 802.11 tanpa menggunakan kabel USB.
Pencetakan nirkabel 802.11 menggunakan konfigurasi baku pabrik
Instruksi pengaturan menjelaskan cara mengatur sebuah printer tunggal untuk komunikasi nirkable
menggunakan jaringan ad-hoc dan konfigurasi baku pabrik.
Setelan baku pabrik untuk Wireless Network (jaringan nirkabel) adalah:
• Communication mode: ad hoc
• Network Name (SSID) : hpsetup
• Security (encryption): disabled
Setelah printer dihubungkan dengan komputer, baik secara nirkabel maupun menggunakan kabel USB,
Anda dapat mengubah SSID dengan mengkonfigurasikan profil nirkabel menggunakan HP Toolbox
(Windows) atau HP Deskjet 460 Network Setup Tool (Mac OS).
Bahasa Indonesia
Modus komunikasi (Communication mode)
Di dalam jaringan “ad hoc”, modus komunikasi jaringan diatur menjadi ad hoc, dan printer berkomunikasi
secara langsung dengan alat nirkabel lain tanpa menggunakan Wireless Access Point (titik akses nirkabel
= WAP).
Nama jaringan (Network name = SSID)
Bila tidak dispesifikasikan, printer akan mencari jaringan ad hoc dengan nama jaringannya, atau Service
Set Identifier (SSID), “hpsetup.”
Setelan keamanan nirkabel (Security settings)
Setelan baku printer dari pabrik adalah jaringan terbuka dan keamanan (enkripsi) dinonaktifkan. Printer
akan mencoba mendeteksi jaringan nirkabel terbuka dengan nama “hpsetup”.dan secara otomatis
mengaitkan diri dengan jaringan itu. Jaringan itu tidak memerlukan syarat keamanan untuk otentikasi atau
enkripsi.
Semua jaringan di dalam jaringan ad hoc harus:
• Kompatibel dengan standar 802.11
• Menggunakan modus komunikasi ad hoc
49
Page 50

• Menggunakan nama jaringan yang sama (SSID)
• Berada dalam subnet (subjaringan) yang sama
• Berada dalam channel (saluran) yang sama
• Menggunakan setelan keamanan 802.11 yang sama
Sakelar profil nirkabel
Printer ini dilengkapi dengan sakelar profil nirkabel 802.11 yang dapat Anda gunakan untuk menyimpan
sampai tiga perangkat setelan untuk komputer atau jaringan 802.11. Dengan demikian Anda dapat
dengan mudah memindahkan printer dari rumah ke kantor atau berganti-ganti di antara tiga lingkungan
jaringan nirkabel. Profil yang “sekarang” (current) adalah profil yang berhubungan dengan posisi
sekarang (1, 2, atau 3) dari sakelar profil nirkabel pada printer. Untuk informasi lebih lanjut, rujuk
panduan pengguna onscreen di CD Starter.
50
Page 51

Pernyataan Garansi Terbatas Hewlett-Packard
Produk Hewlett-Packard Masa Garansi Terbatas
Perangkat lunak 90 hari
Aksesori 90 hari
Tabung tinta (Ink cartridge) Hingga tinta HP habis dipakai dari dalam kartrid cetak HP,
Perangkat keras pendukung printer
(lihat rician berikut)
*Untuk informasi garansi lebih rinci, lihat http://www.hp.com/support/inkjet_warranty.
Cakupan Garansi Terbatas
1. Hewlett-Packard (“HP”) memberikan garansi kepada
pelanggan akhir (end-user costumer) bahwa semua produk
HP yang dicantumkan di atas akan bebas dari kerusakan
bahan maupun pengerjaan selama masa yang ditentukan
di atas, sejak tanggal pembeliannya oleh pelanggan.
2. Untuk perangkat-lunak, garansi terbatas HP hanya berlaku
jika perangkat lunak gagal melaksanakan berbagai
pertunjuk pemrograman. HP tidak memberikan garansi
bahwa pengoperasian produk akan bebas gangguan
atau kesalahan.
3. Garansi terbatas HP hanya mencakup cacat yang
diakibatkan oleh penggunaan produk dengan normal,
dan tidak mencakup masalah lain, termasuk yang
diakibatkan oleh:
a. Perawatan dan modifikasai yang tidak benar;
b. Perangkat lunak, media, suku cadang, atau pasokan
yang tidak disediakan atau didukung oleh HP;
c. Pengoperasian yang tidak sesuai dengan spesifikasi
produk;
d. Modifikasi yang tidak resmi atau penyalahgunaan.
4. Untuk produk printer HP, penggunaan tabung tinta non HP
atau tabung tinta isi ulang tidak mempengaruhi garansi
ataupun kontrak bantuan HP untuk pelanggan. Tetapi, jika
gangguan atau kerusakan printer disebabkan oleh
penggunaan tabung tinta non HP atau isi ulang, HP akan
membebankan biaya sesuai dengan waktu standar dan
bahan yang digunakan untuk memperbaiki gangguan atau
kerusakan tertentu pada printer.
5. Jika selama masa garansi yang berlaku HP menerima
pemberitahuan mengenai cacat pada produk yang dicakup
oleh garansi HP, HP akan memperbaiki atau mengganti
produk itu, menurut pilihan HP.
6. Jika HP tidak bisa memperbaiki atau mengganti produk
cacat yang tercakup oleh garansi HP sebagaimana
mestinya, maka dalam kurun waktu yang wajar setelah
diberitahu tentang adanya cacat itu, HP akan
menggembalikan uang pembelian produk.
7. HP tidak berkewajiban memperbaiki, mengganti, atau
mengembalikan uang pembelian sebelum pelanggan
mengembalikan produk cacat itu ke HP.
8. Produk pengganti bisa berupa produk baru atau seperti
baru, dengan ketentuan bahwa kegunaannya minimal
setara dengan produk yang diganti.
9. Produk HP dapat mengandung suku-cadang, komponen,
atau bahan hasil daur-ulang yang kinerjanya setara dengan
yang baru.
10. Pernyataan Garansi Terbatas HP berlaku di setiap negara/
wilayah di mana produk HP yang dijamin garansi
didistribusikan oleh HP. Kontrak untuk layanan garansi
tambahan, seperti layanan di tempat, dapat diperoleh dari
setiap fasilitas layanan HP resmi di negara/wilayah di
mana produk itu didistribusikan oleh HP atau oleh
importir resmi.
atau hingga tanggal “habisnya masa garansi” yang dicetak di atas
kartrid tinta HP, mana yang lebih dahulu.
1 tahun
Batasan Garansi
SESUAI DENGAN YANG DIIZINKAN OLEH HUKUM SETEMPAT,
BAIK HP MAUPUN PEMASOK PIHAK KETIGANYA TIDAK
MENYEDIAKAN GARANSI ATAU PERSYARATAN LAIN
APAPUN, BAIK GARANSI ATAUPUN PERSYARATAN YANG
DINYATAKAN SECARA TERSURAT ATAUPUN TERSIRAT YANG
MENYANGKUT DATA JUAL, MUTU YANG MEMUASKAN, DAN
KESESUAIAN UNTUK TUJUAN TERTENTU.
Batasan Tanggung Jawab
1. Sesuai dengan yang diizinkan oleh hukum setempat, gantirugi yang tercantum dalam Pernyataan Garansi ini adalah
ganti-rugi satu-satunya dan menyeluruh bagi pelanggan.
2. SESUAI DENGAN YANG DIIZINKAN OLEH HUKUM
SETEMPAT, KECUALI UNTUK KEWAJIBAN YANG SECARA
SPESIFIK DITETAPKAN DALAM PERNYATAAN GARANSI
INI, DALAM PERISTIWA APA PUN HP ATAU PEMASOK
PIHAK KETIGA TIDAK BERTANGGUNG JAWAB ATAS
KERUSAKAN LANSUNG, TIDAK LANGSUNG, KHUSUS,
INSIDENTAL, ATAU KERUGIAN SEBAGAI AKIBAT, BAIK
BERDASARKAN KONTRAK, KELALAIAN, ATAU TEORI
HUKUM LAINNYA, DAN BAIK DIBERITAHUKAN TENTANG
KEMUNGKINAN TERJADINYA KERUSAKAN TERSEBUT.
Hukum Setempat
1. Pernyataan Garansi ini memberikan hak khusus kepada
pelanggan. Pelanggan dapat juga memiliki hak-hak lain
yang bisa berbeda-beda di berbagai negara bagian di
Amerika Serikat, di berbagai provinsi di Kanada, dan di
berbagai nergara/wilayah lain di dunia.
2. Jika Pernyataan Garansi ini tidak sesuai dengan hukum
setempat, Penyataan Garansi ini akan dianggap telah
dimodifikasi agar sesuai dengan hukum setempat.
Menurut hukum setempat tersebut, pengesampingan dan
pembatasan tertentu dari Pernyataan Garansi ini mungkin
tidak berlaku untuk pelanggan. Misalnya, beberapa negara
bagian di Amerika Serikat, dan juga beberapa
pemerintahan di luar Amerika Serikat, dan juga beberapa
negara di luar Amerika Serikat (termasuk provinsi-provinsi di
Kanada), dapat:
a. Mengecualikan pengesampingan dan pembatasan
Pernyataan Garansi ini sehingga tidak membatasi hak
yang wajib dimiliki pelanggan (misalnya Inggris);
b. Membatasi kemampuan pabrik pembuat untuk
melaksanakan pengesampingan atau pembatasan
seperti itu; atau
c. Memberikan hak tambahan kepada pelanggan,
menentukan kurun waktu masa garansi tersirat yang
tidak bisa dikesampingkan oleh pabrik pembuat, atau
mengizinkan batas kurun waktu masa garansi tersirat.
3. UNTUK TRANSAKSI PELANGGAN DI AUSTARALIA DAN
SELANDIA BARU, KETENTUAN DALAM PERNYATAAN
GARANSI INI, KECUALI SEJAUH YANG DIIZINKAN OLEH
HUKUM, TIDAK MENGECUALIKAN, MEMBATASI,
ATAU MENGUBAH, DAN MERUPAKAN TAMBAHAN
ATAS HAK YANG WAJIB MENURUT UNDANG-UNDANG
YANG BERLAKU UNTUK PENJUALAN PRODUK HP
KEPADA PELANGGAN.
51
Page 52

1
2
3
4
HP Deskjet 460 シリーズ プリンタ
日
このプリンタは、優れた高速モバイル印刷を提供する製
本
品です。 コンピュータから USB ケーブル使ってコン
語
ピュータから直接印刷できるほか、PictBridge カメラ、デ
ジタル カメラのメモリ カード、DPOF ファイルを保存し
た USB Flash ドライブ、802.11 または Bluetooth
バイスからワイヤレスで印刷することも可能です。
®
対応デ
5
詳細は、Starter CD に収録されているオンスクリーン ユー
ザーズ ガイドを参照してください。 1) PictBridge/USB ホス
ト ポート、2) USB(ユニバーサル シリアル バス)ポー
ト、3) ワイヤレス プロファイルのスイッチ、
4) CompactFlash™ カード スロット / メモリ カード ス
ロット、5) カード ホルダー。
HP Deskjet 460 系列印表機。
繁
本印表機提供迅速而專業的行動列印功能。
體
您可以透過電腦的 USB 電纜線和 PictBridge 攝影機,從數
中
位照相機記憶卡或具有 DPOF 檔案的 USB 快閃驅動器直接
文
列印,或是從 802.11 或支援 Bluetooth
印。
®
功能的裝置無線列
請參閱 Starter CD 光碟片所附的線上使用指南中的詳細資
訊。 1) PictBridge/USB 主機連接埠,2) 通用序列匯流排
(USB)連接埠,3) 無線設定檔開關,4) CompactFlash™
介面卡插槽 / 記憶卡插槽,5) 名片框。
52
Page 53

H
P
D
ejks
e4
t
6
1
3
Hj
P
D
e
s
k
e
4t6
2
w0f
H
P
,
4
6bw
eD
0t
s
k
j
e
4t6
4
1
2
3
2
1
5
0
H
P
4
D
6w
e
0
s
k
j
e
f
t
H
P
46
D
e
se
k
w0
j
b
H
t
t
c0
46
1b
b
DP
1
.
d
2
r
0
8
a
C
,
e
F
C
04
N
se
4
A
L
k
c
W
6
b
j
,
0f4,
t
w
6
0
w
f
6
,
4
6
w0
0
b
w
t
b
t
1
4
6
HP Deskjet
460cb, 460wf, 460wbt
HP Deskjet
460wbt
1
1
.
2b
0
8
d
ra
C
F
CN
HP Deskjet
460wf
A
L
W
3
2
パッケージの内容を確認します。
1) HP Deskjet 460 シリーズ プリンタ、2) 電源アダプタ、
3) 電源コード、4) ブラックおよび 3 色プリント カート
リッジ、5) 印刷マニュアル、
檢查包裝箱中的物品。
1) HP Deskjet 460 系列印表機,2) 電源變電器,3) 電源
線,4) 黑色和彩色列印墨水匣,5) 書面文件,
7
98
6) Starter CD ( ソフトウェアおよびマニュアルの電子ファ
イル )、7) バッテリ (HP Deskjet 460cb、460wf、460wbt
に付属 )、8) Bluetooth プリンタ カード (HP Deskjet
460wbt)、9) 802.11 プリンタ カード (HP Deskjet 460wf)。
6) Starter CD 光碟片 (軟體和電子說明文件),7) 電池
(附帶 HP Deskjet 460cb、460wf 和 460wbt),
8) Bluetooth 印表機插卡(HP Deskjet 460wbt),9) 802.11
印表機插卡 (HP Deskjet 460wf)。
53
Page 54

1
2
1
2
ステップ 1: パッケージ テープを取り除きます。
日
プリンタからすべてのパッケージ テープを取り除いてく
本
ださい。
語
步驟 1: 移除包裝膠帶。
繁
移除印表機內的所有包裝膠帶。
體
中
文
English English EnglishEnglish
ステップ 2: バッテリ。
1) バッテリを傾けてバッテリ スロットにスライドさせ、
接触部にバッテリがあたるまで挿入します。2) カチッと
いう音がするまで、バッテリをバッテリ スロットに押し
込みます。
步驟 2: 電池。
1) 以一定的角度將電池裝入電池安裝槽內,直到電池對齊
接點為止。2) 將電池推入電池安裝槽,直到電池卡入其固
定位置為止。
54
Page 55
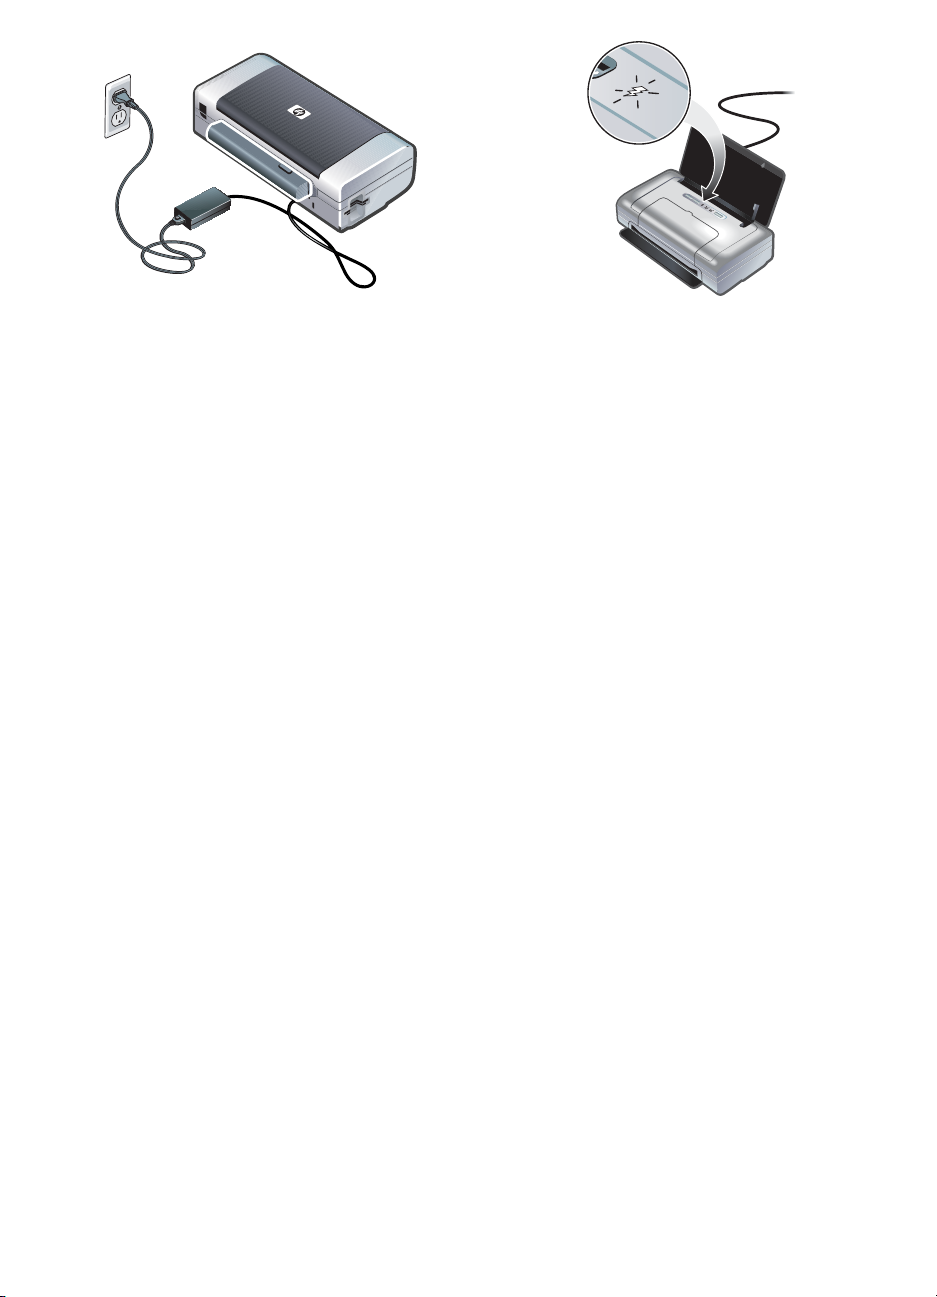
注 : このプリンタ専用のバッテリのみをご使用ください。
詳細は、Starter CD に収録されているオンスクリーン
ユーザーズ ガイドを参照してください。
使用する前に、バッテリを完全に充電します(最初の充
電では約 4 時間、それ以降は約 2 時間かかります)。充電
中は、バッテリの充電ライト(LED)が緑色に点灯しま
す。充電中にライトが赤く点灯する場合は、バッテリが
故障している可能性があります。バッテリを交換してく
ださい。バッテリの交換については、Starter CD に収録さ
れているオンスクリーン ユーザーズ ガイドを参照してく
ださい。
備註: 請採用專門針對此類印表機而設計的電池。請參閱
Starter CD 光碟片所附的線上使用指南中的詳細資訊。
開始使用電池之前,請先將它充滿電 (第一次充電大約需
要 4 小時,之後只需 2 小時左右)。電池充電時,電池充
電指示燈亮綠燈。如果指示燈在充電時亮紅燈的話,表示
電池可能有問題而需要更換。請參閱 Starter CD 光碟片所
附的線上使用指南中有關更換電池的指示。
55
Page 56

3
ステップ 3: ワイヤレス プリンタ カードを取り付けます
日
(HP Deskjet 460wf または HP Deskjet 460wbt)。
本
1) ライトがある面を上にした状態で HP 802.11 プリンタ
語
カードまたは Bluetooth カードを CompactFlash™ カード
スロットに挿入します。
步驟 3: 安裝無線印表機插卡 (HP Deskjet 460wf 或 HP
繁
Deskjet 460wbt)。
體
1) 將 HP 802.11 印表機插卡或 Bluetooth 介面卡的指示燈面
中
朝上插入 CompactFlash™ 介面卡插槽。
文
注 : Bluetooth カードを取り付ける場合は、プリンタに
よって Bluetooth ホスト デバイスとオペレーティング シ
ステムがサポートされていることを確認してください。
詳しくは、http://www.hp.com/support/dj460 を参照して
ください。
備註:如果您安裝的是 Bluetooth 介面卡,請確定您的
Bluetooth 主機裝置和作業系統都受到印表機的支援。請瀏
覽 http://www.hp.com/support/dj460 參閱詳細資訊。
56
Page 57

4
1
5
3
3
2
2
ステップ 4: 電源コードを接続します。
1) プリンタに電源アダプタを接続してください。2) 電源
アダプタに電源コードを接続します。3) 電源コードのも
う一端をコンセント(交流(AC)電源)に差し込みます。
步驟 4: 連接電源線.
1) 將電源變電器接上印表機。2) 將電源線接上電源變點
器。3) 將電源線的另一端接上交流電 (AC)電源插座。
1
1
ステップ 5: プリンタの電源を入れ、プリント カートリッ
ジを取り付けます。
1) (電源ボタン)を押しながら、プリンタの電源を入
れます。プリンタのライトが順番に点滅します。注 : 電源
ライトだけが点灯するまで待機します。
步驟 5: 開啟印表機的電源並安裝列印 墨水匣。
1) 按住 (電源按鈕)來開啟印表機的電源。印表機指示
燈會輪流閃爍。備註:請等到只剩下電源指示燈還亮,而
其他的印表機指示燈都熄滅。
57
Page 58

2 3
H
P
Tr
i-color
Print
C
artr
idg
e
H
P
B
la
ck
Pr
in
t
Ca
rtr
i
dge
4 5
H
P
T
P
r
r
i
in
c
t
o
C
l
o
a
r
r
t
r
id
g
e
H
P
B
P
l
r
a
i
n
c
t
k
C
a
r
t
r
i
d
g
e
2) 電源ライトだけが点灯したら、前面のアクセス カバー
日
を開き、キャリッジが交換位置で停止するのを待ちます。
本
3) プリント カートリッジのラッチを押し上げます。
語
2) 只有電源指示燈亮著的時候,打開前機蓋並等候墨水匣
繁
座停在更換墨水匣的位置。3) 向上抬起列印墨水匣固定鎖。
體
中
文
English English EnglishEnglish
4) パッケージからプリント カートリッジを取り出し、プ
リント カートリッジから保護テープを取り除きます。
5) 左の収納部にカラー プリント カートリッジ、右の収納
部にブラック プリント カートリッジを挿入します。両方
のカートリッジを押し込み、収納部に完全に収まってい
ることを確認します。
4) 從包裝材料中取出每一個列印墨水匣,然後去除列印墨
水匣上的保護膠帶。5) 將彩色列印墨水匣插入左底槽,將
黑色列印墨水匣插入右底槽。將兩個墨水匣往下壓,以確
保墨水匣都完全地固定在底座當中。
58
Page 59

6 7
6
2
1
6) カートリッジのラッチをプリント カートリッジにス
ナップし、固定します。7) 前面アクセス カバーを閉めま
す。注 : プリンタの初期化が完了するまで、前面アクセス
カバーを開けないでください。
6) 將墨水匣固定鎖卡到列印墨水匣上。7) 關上前機蓋。備
註: 在完成印表機的初始化程序之前,請勿將前機蓋打開。
ステップ 6: 給紙トレイに用紙をセットします。
1) 普通紙は 50 枚、フォト用紙は 10 枚までトレイにセッ
トできます。2) 用紙ガイドを用紙の縁に合うまでスライ
ドさせます。
步驟 6: 將紙材裝入進紙匣。
1) 紙匣最多可裝入 50 張普通紙或 10 張相紙。2) 調整紙張
導板的位置,讓它輕輕地靠在紙的邊緣上。
59
Page 60

7
ステップ 7: プリンタを接続します。
日
実行しているアプリケーションを閉じ、Starter CD を CD
本
ドライブに挿入します。CD メニューが自動的に実行され
語
ます。CD メニューが自動的に開始されない場合は、
Starter CD で Setup アイコンをダブルクリックします。
步驟 7: 連接印表機。
繁
關閉任何執行中的應用程式並將 Starter CD 插入光碟機。
體
CD 功能表會自動啟動。如果 CD 功能表無法自動啟動,請
中
連按兩下 Starter CD 上的安裝圖示。
文
English English EnglishEnglish
CD メニューで [ プリンタ ドライバのインストール ]
(Windows)または [ ドライバのインストール ]
(Mac OS)をクリックします。画面に表示される指示に
従って、ソフトウェアのインストールを完了します。
在 CD 功能表上,按一下 「安裝印表機驅動程式」
(Windows)或 Install Driver (Mac OS)。依照螢幕上的指
示完成軟體安裝。
60
Page 61

USB の接続 :Windows® の場合。メッセージが表示された
ら、USB ケーブルを接続します。Mac OS の場合。ソフト
ウェアをインストールしてから、USB ケーブルを接続し
ます。
802.11 ワイヤレス接続 :Windows および Mac OS の場合。
メッセージが表示されたら USB ケーブルでプリンタを接
続し、セットアップの後取り外します。Mac OS のみ :
セットアップ プログラムと HP Deskjet 460 ネットワーク
セットアップ ツールを使用してインストールを完了しま
す。
注 : USB ケーブルを通して設定を受信すると、プリンタが
いったんオフになり、またオンに戻ります。メッセージ
が表示されたら、USB ケーブルを取り外します。
USB 連接﹕ Windows®。出現提示時連接 USB 電纜。Mac
OS。 在安裝軟體之後連接 USB 電纜。
802.11 無線連接﹕ Windows 和 Mac OS。備妥一條 USB 電
纜以便在出現提示時連接印表機並在安裝之後將它移除。
只限於 Mac OS。使用 Setup (安裝程式)和 HP Deskjet
460 Network Setup Tool (網路安裝工具)來完成安裝程
序。
備註:印表機將在透過 USB 電纜接收到新的設定值時關閉
之後再重新開啟。出現提示時移除 USB 電纜。
61
Page 62

注: 現在の 802.11 設定が現在のワイヤレス プロファイル
日
スイッチ位置に保存されます。ワイヤレス プロファイル
本
スイッチは、ワイヤレス ネットワークを変更する際に、
語
複数の 802.11 プロファイル設定を切り替えるために使用
します。ワイヤレス設定の構成については、74 ページ
ページの「802.11 ワイヤレス印刷について」を参照して
ください。
Bluetooth ワイヤレス接続 :Windows の場合。1) ポートを
指定するように要求されたら [ その他のポート ] を選択
し、プリンタに接続するように要求されたら [ スキップ ]
を選択してプリンタ ドライバのインストールを完了しま
す。 2) コンピュータの Bluetooth 設定ソフトウェアを使用
して、Bluetooth デバイスに割り当てられた Bluetooth クラ
イアントの COM ポート番号を見つけます。
備註:目前的 802.11 設定值將會被儲存到無線設定檔開關
繁
的目前位置。如果要變更無線網路,可用無線設定檔開關
體
在 802.11 設定檔設定之間切換。請參閱頁 81 上的關於
中
802.11 無線列印中有關設定無線設定值的詳細資訊。
文
English English EnglishEnglish
Bluetooth 無線連接﹕ Windows。1) 出現輸入連接埠的提示
時,請選取其他連接埠,而當出現連接印表機的提示時請
選取跳過,並完成印表機驅動程式的安裝程序。 2) 使用電
腦上的 Bluetooth 組態軟體來找出指定給 Bluetooth 裝置的
Bluetooth 用戶端的 COM 連接埠號碼。
62
Page 63

たとえば、3Com Bluetooth アダプタを使用している場合
は、Bluetooth Connection Manager(接続マネージャ)を
開き、[ ツール ] メニューから [COM ポート ] を選択しま
す。3Com Bluetooth Serial Client(シリアル クライアン
ト)ポートの COM ポート番号を書きとめておきます。
3) Windows デスクトップから、[ スタート ] ボタンをク
リックし、[ 設定 ] - [ プリンタ ] または [ プリンタと
ファックス ] をクリックします。4) プリンタのアイコンを
右クリックしてから、[ プロパティ ] をクリックします。5)
[ ポート ] タブをクリックし、ステップ 2 で確認した
COM ポートを選択します。6) [ 適用 ] をクリックし、さ
らに [OK] をクリックします。
例如,如果您使用電腦上的 3Com Bluetooth 變電器,請開
啟 「Bluetooth 連接管理員」,從 「工具」功能表中選取
COM 連接埠,並且記下 3Com Bluetooth 序列用戶端連接埠
的 COM 連接埠號碼。
3) 從 Windows 桌面,按一下開始按鈕,指向設定,然後按
印表機或印表機和傳真。4) 用滑鼠右鍵按一下印表機圖示,
然後按內容。5) 按一下連接埠標籤,然後選取與步驟 2 相
同的 COM 連接埠。6) 按一下套用,然後再按確定。
63
Page 64

Mac OS の場合。プリンタ センターで [Bluetooth] を選択
日
し、[ 追加 ] を選択します。
本
語
注 : ほかの Bluetooth 対応デバイスから印刷する場合でも、
手順はほぼ同じです(プリンタ ドライバをインストール
し、プリンタの検出を実行します)。詳細は、Starter CD
に収録されているオンスクリーン ユーザーズ ガイドを参
照してください。プリンタの接続については、73 ページ
ページの「ソフトウェアのインストールに関する問題」
を参照してください。携帯電話や PDA などのモバイル デ
バイスとの接続については、Starter CD に収録されている
オンスクリーン ユーザーズ ガイドを参照してください。
Mac OS。請選取 Print Center 中的 Bluetooth,然後選取
繁
Add (新增)。
體
中
文
English English EnglishEnglish
備註:若要從其他支援 Bluetooth 功能的裝置列印,其操作
程序差不多 (安裝印表機驅動程式並執行印表機偵測)。
請參閱 Starter CD 光碟片所附的線上使用指南中的詳細資
訊。請參閱頁 80 上的解決安裝問題中有關連接印表機的說
明。請參閱 Starter CD 光碟片所附的線上使用指南中有關
連接電話和 PDA 等行動裝置的資訊。
64
Page 65

8
9
ステップ 8: ソフトウェア インストールをテストします。
ソフトウェア インストールとプリンタの接続をテストす
るには、頻繁に使用するアプリケーションからドキュメ
ントを印刷してみます。印刷できない場合は、73 ページ
ページの「ソフトウェアのインストールに関する問題」
を参照してください。
步驟 8: 測試軟體安裝。
請從您經常使用的應用程式中列印一份文件,以便測試軟
體安裝和印表機連接。如果無法列印,請參閱頁 80 上的解
決安裝問題。
ステップ 9: プリント カートリッジの位置を調整します。
新しいプリント カートリッジを取り付けたときは、最高
の印刷品質を得るため、プリント カートリッジの位置を
調整します。
步驟 9: 校準列印墨水匣。
每次安裝新的列印墨水匣時,請校準列印墨水匣以取得最
佳的列印品質。
65
Page 66

Windows: 1) [ スタート ] をクリックし、[ プログラム ] -
日
[HP Deskjet 460 Series] をポイントしてから、[ ツールボッ
本
クス ] アイコンをクリックします。2) [ プリンタ サービス
語
] タブをクリックしてから、[ プリント カートリッジの位
置調整 ] をクリックします。位置調整ページが印刷されま
す。3) 画面に表示される指示に従って、位置調整の手順
を完了します。
Mac OS X:1) Dock にある Finder アイコンをクリックして、
Finder をアクティブにします。[ ファイル ] をクリックし、
[ 新規 Finder ウィンドウ ] を選択します。2) [ ライブラリ ]
- [Printer] - [hp] - [Utilities] を選択してから、[hp printer
selector] を選択し、[HP プリンタ ユーティリティ ] を開き
ます。[ 位置調整 ] をクリックします。位置調整ページが
印刷されます。3) 画面に表示される指示に従って、位置
調整の手順を完了します。
Windows﹕ 1) 按一下開始,指向程式集,指向 HP Deskjet
繁
460 系列,然後按一下 「工具箱」圖示。2) 按一下印表機
體
保養標籤,然後按校準列印墨水匣。此時印表機便會列印
中
校準頁面。3) 按照螢幕上的指示來完成校準程序。
文
English English EnglishEnglish
Mac OS X﹕ 1) 按一下位於 Dock 中的 Finder (尋找器)圖
示以便啟用 Finder。按一下 File (檔案),然後選擇 New
Finder Window (新尋找器視窗)。 2) 選取 Library、
Printer、hp、Utilities (程式庫、印表機、hp、公用程式),
然後選取 HP Printer Selector 以開啟 HP Printer Utility (HP
印表機公用程式)。 按 一 下 校準。此時印表機便會列印校準
頁面。3) 按照螢幕上的指示來完成校準程序。
66
Page 67

10
ステップ 10: プリンタを登録します。
プリンタを登録すると、重要なサポートや技術情報を利
用できます。ソフトウェアのインストール中にプリンタ
を登録しなかった場合は、後で登録することができます。
http://www.hp.com/support/dj460 をご利用ください。
步驟 10: 註冊印表機。
註冊印表機以接收重要的支援和技術資訊。如果在安裝軟
體時未註冊您的印表機,日後可在以下網站進行註冊﹕
http://www.register.hp.com。
これで印刷の準備が整いました。
優れたモバイル印刷をお楽しみください。
プリンタの使い方やトラブルシューティングについては、
次のリソースをご利用ください。
•StarterCD のオンスクリーン マニュアル
•HPインスタント サポート(オンスクリーンのユー
ザーズ ガイドを参照)
• 製品のサポート サイト :
http://www.hp.com/support/dj460
恭喜您!
您的印表機可以使用了。
有關使用印表機和疑難排解的資訊,請參閱以下資源:
• Starter CD 光碟片所附的線上說明文件
• 「HP 立即支援」(請參閱線上使用指南的說明)
• 產品支援網站﹕
http://www.hp.com/support/dj460
67
Page 68

旅行のヒント
次のヒントは、プリンタをご旅行に携帯する場合の準備に役立ててください。
• 予備のブラックおよびフォト プリント カートリッジを携帯する場合は、次のガイドラインに従って
ください。一部使用したブラック プリント カートリッジや一部使用、または未使用のフォト プリ
ント カートリッジは、トラベル ホルダに入れて、インクの漏れを防止してください。開封したばか
りのブラック プリントカートリッジは、飛行機での移動など、高度が高まると多少の漏れが生じま
す。これを防ぐには、目的地に到着するまで、新しいブラック カートリッジを取り付けないでくだ
さい。ご旅行先に到着するまで、オリジナルの箱に入れ、テープを剥がさないようにしてください。
• 電源ボタンを使ってプリンタの電源をオフにします。これで、プリント カートリッジがプリンタの
左側にあるホーム位置に戻り、ロックされます。
• 別の国 / 地域にご旅行中、プリント カートリッジを購入する必要がある場合は、「HP モバイル プリ
ンタを携帯する場合」というオンライン ヘルプを参照してください。オンライン ヘルプは、ツール
ボックスまたは HP プリンタ ユーティリティに付属しており、地域のカートリッジ互換性情報が記
載されています。
• プリンタに付属している電源アダプタのみをご利用ください。その他の変圧器や変換器はご使用に
ならないでください。電源アダプタは、100 ~ 240 ボルト、50 または 60 Hz の AC 電源とともに
使用できます。
• プリンタを 1 ヵ月以上使用しない場合は、バッテリを取り外してください。
• フォト用紙をお使いの場合は、反ったり曲がったりしないよう、平らな状態で保管してください。
フォト用紙は、印刷前に平らにしてください。フォト用紙の隅が 10mm(3/8 インチ)以上丸まっ
ている場合は、開閉が可能な袋に入れて用紙が平らになるまでテーブルの縁などに袋をこすり合わ
せ、用紙を平らにします。
68
Page 69

プリンタのボタンおよびライト(LED)
プリンタのランプは、プリンタの状態を示し、印刷の問題を診断する場合に役立ちます。ここでは、ラ
ンプの状態を示すランプの組み合わせリスト、示している状態、問題の解決方法について説明します。
1 2 3 4 5 6 7 8
1. (キャンセル ボタン ) - 現在の印刷ジョブをキャン
セルします。キャンセルにかかる時間は、印刷ジョ
ブの大きさによって異なります。キューにある印刷
ジョブをキャンセルするには、このボタンを 1 回だ
け押してください。
2. (再開ボタン ) - 待機している、またはプリンタに
印刷用紙を追加する場合など、一時的に停止した印
刷ジョブを再開します。
3. 再開ランプ - 印刷ジョブが待機中の場合に、黄色に点
灯します。点滅または点灯する場合は、状態のリ
レーまたは操作が必要であることを示します(下の
表を参照)。
4. バッテリ充電ランプ - バッテリを充電しているとき
に、緑色に点灯します。
5. 左プリント カートリッジ ランプ ñ 左のプリント カー
トリッジが装着されていない、または正しく機能し
ていない場合に点滅します。点灯する場合は、イン
クが少なくなっている、またはなくなっていること
を示します。
6. 右プリント カートリッジ ランプ ñ 右のプリント カー
トリッジが装着されていない、または正しく機能し
ていない場合に点滅します。点灯する場合は、イン
クが少なくなっている、またはなくなっていること
を示します。
7. (電源ボタン) - プリンタの電源をオン / オフにし
ます。
8. 電源ランプ - プリンタの電源が AC アダプタを使用し
ていてオンになっている場合、またはバッテリの充
電状態が 41 ~ 100% の場合は、緑色に点灯します。
バッテリ電源の場合、バッテリの充電状態が 10 ~
40% になると黄色に点灯、10% になると赤色に点灯
します。印刷中は点滅します。
プリンタのランプのパターン
ランプの説明とパターン 説明と推奨操作
電源ランプが緑色に点灯する。
AC 電源を使用している場合 : プリンタの電源
がオンで、アイドル状態になっています。
バッテリ電源を使用している場合 : バッテリ
の充電状態が 41 ~ 100% です。プリンタの
電源がオンで、アイドル状態になっています。
• 操作は必要ありません。
日
本
語
電源ランプが黄色に点灯する。
バッテリの充電状態が 10 ~ 40% です。プリ
ンタの電源がオンで、アイドル状態になって
います。
• 電源アダプタを接続し、バッテリの充電
を開始してください。
詳しくは、Starter CD に収録されている
オンスクリーン ユーザーズ ガイドを参
照してください。
69
Page 70

ランプの説明とパターン 説明と推奨操作
電源ランプが赤色に点灯する。
バッテリ充電ランプが緑色に点灯する。
バッテリ充電ランプが赤色に点灯する。
電源ランプが緑色に点灯し、再開ランプが点滅する。
左プリント カートリッジ ランプが点滅する。
バッテリの充電状態が 10% です。プリンタ
の電源がオンで、アイドル状態になっていま
す。
• 電源アダプタを接続し、バッテリの充電
を開始してください。
詳しくは、Starter CD に収録されている
オンスクリーン ユーザーズ ガイドを参
照してください。
バッテリを充電しています。
• 操作は必要ありません。
バッテリに問題があります。
• バッテリを交換してください。
詳しくは、Starter CD に収録されている
オンスクリーン ユーザーズ ガイドを参
照してください。
メディアが乾くのを待機している、用紙がな
い、DPOF(Digital Print Order Format)印刷中
などのため、プリンタが一時停止状態になっ
ています。
• 用紙がない場合は、用紙をセットしてく
ださい。 (再開ボタン)を押して、印刷
ジョブを続行します。
左のプリント カートリッジに問題がありま
す。
• プリント カートリッジを装着し直して、
もう一度印刷を実行してください。エ
ラーが解決できない場合は、カートリッ
ジを交換してください。詳しくは、
Starter CD に収録されているオンスク
リーン ユーザーズ ガイドを参照してく
ださい。
右プリント カートリッジ ランプが点滅する。
70
右のプリント カートリッジに問題がありま
す。
• プリント カートリッジを装着し直して、
もう一度印刷を実行してください。エ
ラーが解決できない場合は、カートリッ
ジを交換してください。詳しくは、
Starter CD に収録されているオンスク
リーン ユーザーズ ガイドを参照してく
ださい。
Page 71

ランプの説明とパターン 説明と推奨操作
左プリント カートリッジ ランプが点灯する。
右プリント カートリッジ ランプが点灯する。
電源ランプが消灯し、再開ランプが点滅する。
電源ランプが点滅し、再開ランプが点滅する。
電源ランプが点滅、再開ランプが点滅、左右のプリント
カートリッジ ランプが点灯する。
プリント カートリッジ(カラー)のインクが
少なくなっています。
• プリント カートリッジを交換してくださ
い。詳しくは、Starter CD に収録されて
いるオンスクリーン ユーザーズ ガイド
を参照してください。
右のプリント カートリッジのインクが少なく
なっています。
• プリント カートリッジを交換してくださ
い。
詳しくは、Starter CD に収録されている
オンスクリーン ユーザーズ ガイドを参
照してください。
紙詰まり、または用紙モーターが停止してい
ます。
• 詰まった紙を取り除いてください。詳し
くは、Starter CD に収録されているオン
スクリーン ユーザーズ ガイドを参照し
てください。紙詰まりを解消した後で、
(再開ボタン)を押して、印刷ジョブ
を続行します。
紙詰まりがない場合は、 (再開ボタン)
を押してください。これでも問題が解決
できない場合は、プリンタの電源をいっ
たんオフにしてから、もう一度オンにし、
印刷ジョブを再開します。
日
本
語
再開ランプが点滅、左右のプリント カートリッジ ランプ
が点灯する。
再開ランプが点滅、左右のプリント カートリッジ ランプ
が順番に点灯する。
71
Page 72

ランプの説明とパターン 説明と推奨操作
電源ランプが点灯、再開ランプが点滅、右のプリント カー
トリッジ ランプが消灯状態の 2 倍の長さで点灯する。
電源ランプが点灯、再開ランプが点灯、右のプリント カー
トリッジ ランプが消灯状態の 2 倍の長さで点灯する。
インク サービス モジュールがほぼいっぱい
になっています。
• 交換用のインク サービス モジュールが
ある場合は、付属の指示にしたがって、
直ちに交換してください。
• または、
http://www.hp.com/support/dj460
利用いただくか、カスタマ ケアに連絡
し、交換品をご注文ください。
交換するまでの間、 (再開ボタン)を押
して印刷を続行できますが、このランプ
状態は、インク サービス モジュールを
交換するまで解消されません。インク
サービス モジュールがいっぱいになる
と、プリンタが印刷を停止します。
インストール問題の解決
ここでは、ハードウェアやソフトウェアのインストールに関する一般的な問題について、トラブル
シューティングの解決法を説明します。
をご
印刷の問題
72
プリンタで次のことを確認します。
• 電源ランプが点灯していて、点滅していないことを確認します。プリンタを最初にオンにすると、
初期化におよそ 1 分かかります。
• コントロール パネルのライトが点灯または点滅していない場合は、プリンタが使用できる状態に
なっています。ランプが点灯または点滅している場合は、69 ページを参照してください。
• 電源コードやほかのケーブルがしっかりとプリンタに接続されていて、機能していることを確認し
ます。
• プリンタから、すべてのパッケージ用テープや梱包材を取り除いてください。
• プリント カートリッジが正しい収納部にしっかりと取り付けられていることを確認します。正しく
接触するよう、両方のカートリッジをしっかりと押し込んでください。
• それぞれのプリント カートリッジからテープを取り除かれていることを確認します。
• カートリッジが損傷していないことを確認します。
• プリント カートリッジのラッチやカバーが閉まっていることを確認します。
• 用紙が給紙トレイに正しくセットされていて、紙詰まりがないことを確認します。
Page 73

ソフトウェアのインストールに関する問題
コンピュータの必要条件を確認します。
• コンピュータが必要なシステム条件を満たしていることを確認します。Starter CD に収録されてい
るオンスクリーン ユーザーズ ガイドを参照してください。
インストール準備を整えます。
•Windows のコンピュータにソフトウェアをインストールする前に、ほかのすべてのプログラムが開
いていないことを確認してください。
• 入力した CD ドライブのパスをコンピュータが認識しない場合は、正しいドライブを指定したこと
を確認してください。
•CD ドライブ の Starter CD をコンピュータが認識しない場合は、CD が損傷していないことを確
認します。プリンタ ドライバは、http://www.hp.com/support/dj460 からダウンロードできます。
•Windows のデバイス マネージャで USB ドライバが無効になっていないことを確認してください。
プリンタ ソフトウェアを再インストールします。
•Windows でコンピュータがプリンタを検出しない場合は、Starter CD の Utils\Scrubber フォルダ
にある Scrubber ユーティリティを実行して、クリーン ドライバ アンインストールを実行します。
コンピュータを再起動してから、プリンタ ドライバを再インストールします。Starter CD に収録さ
れているオンスクリーン ユーザーズ ガイドの「プリンタ ソフトウェアをアンインストールするに
は」を参照してください。
802.11 または Bluetooth ワイヤレス通信の設定
に関する問題
802.11 または Bluetooth ワイヤレス通信の設定に関して問題がある場合は、次の手順に従ってくださ
い。
日
本
語
ワイヤレス プリンタ カードを確認します。
• ワイヤレス プリンタ カードが正しく挿入されていることを確認します。
• プリンタの初期化中ではなく、初期化の前後にワイヤレス プリンタ カードを挿入してください。
• ワイヤレス プリンタ カードのランプが点灯しない場合は、次のことを実行します。
a. ワイヤレス プリンタ カードを取り出します。
b. プリンタをオフにして数秒待ってから、再びオンにします。
c. プリンタが準備状態になったら、カードを再び挿入します。反応がないときは、この手順を数
回繰り返してください。それでも反応がないときは、HP までご連絡ください。
• ワイヤレス プリンタ カードが機能しているかどうか確認するには、ほかのワイヤレス デバイスを
使って印刷してみてください。印刷できない場合は、ワイヤレス プリンタ カードに問題がある可
能性があります。必要に応じてカードを交換してください。
ワイヤレス設定を確認します。
• プリンタの背面にあるワイヤレス プロファイル スイッチが、使用するワイヤレス プロファイルに
正しく切り替わっていることを確認します。インストール中に設定したプロファイルを使用してい
ることを確認してください。
• ソフトウェアのインストール完了後、USB ケーブルを取り除いた後にプリンタと通信できない場合
は、次のワイヤレス設定のいずれか、または複数が正しくない可能性があります。
• ネットワーク名 (SSID)
• 通信モード(インフラストラクチャまたはアドホック)
73
Page 74

• チャンネル(アドホック ネットワークのみ)
• セキュリティ設定(認証タイプや暗号化など)
• ツールボックス(Windows)を使って Bluetooth 設定を指定、または、プリンタのステータス(イ
ンクのレベルなど)を監視するには、USB ケーブルを使ってプリンタをコンピュータに接続する必
要があります。
ワイヤレス信号を確認します。
ワイヤレス通信は信号の干渉がある、距離が遠い、信号が弱い場合や、プリンタが何らかの理由で準備
できていないときなどに中断したり、利用できなくなることがあります。
•802.11 または Bluetooth の送信デバイスの範囲内にプリンタがあることを確認してください。
802.11 印刷では、100 メートル(300 フィート)までのワイヤレス印刷が可能です。Bluetooth
印刷では、10 メートル(30 フィート)までのワイヤレス印刷が可能です。
• ドキュメントを印刷できない場合は、信号が中断している可能性があります。信号に問題があると
いうメッセージが表示された場合は、その印刷ジョブをキャンセルし、コンピュータからもう一度
実行します。
一般的なワイヤレス トラブルシューティングのヒント
• プリント センター(Mac OS)でプリンタを削除してから、もう一度追加します。
•PING コマンドの実行 : プリンタをオフにしてから、再びオンにしても(または、プリント セン
ター(Mac OS)でプリンタを削除してから、もう一度追加しても)問題が解決しない場合は、次の
手順に従ってください。
a. ワイヤレス設定ページを印刷します。
b. MS-DOS プロンプト(Windows)またはターミナル(Mac OS)使って、プリンタに対して
PING コマンドを実行し、ネットワーク通信を確認します。
• プリンタ プロパティの [ ポート ] タブでプリンタの IP アドレスを手動で割り当てます。
• アジア圏外で購入した携帯電話やプリンタからアジアのフォントを印刷しようとすると、文字では
なく四角形が印刷されることがあります。Bluetooth 携帯電話印刷用のアジアフォントは、アジアで
購入したモデルでのみサポートされています。
• Bluetooth ワイヤレス接続を使用してサイズの大きなファイルを印刷すると、問題が生じる可能性が
あります。小さいファイルを印刷してみてください。
• ワイヤレス通信はプリンタ バッテリを消費します。バッテリの残量を確認してください。
ワイヤレス ネットワークのトラブルシューティングや設定情報については、Starter CD に収録されて
いるオンスクリーン ユーザーズ ガイドを参照してください。
( キャンセル ボタン ) を 2 秒間押し続けます。
802.11 ワイヤレス印刷について
ここでは、プリンタとの工場出荷時デフォルト 802.11 ワイヤレス通信について概要を説明します。
Starter CD に収録されているオンスクリーン ユーザーズ ガイドを参照してください。
• インフラストラクチャ ネットワークでプリンタをセットアップします。
•802.11 ワイヤレス プロファイル構成ユーティリティを使用して、一度に複数のプリンタをセット
アップできます。
• 工場出荷時のデフォルト設定を使用していない 802.11 接続で問題を解決します。
•USB ケーブルを使用しないで、802.11 接続でプリンタをセットアップします。
工場出荷時のデフォルトを使った 802.11 ワイヤレス印刷
セットアップ手順では、アドホック ネットワークと工場出荷時のデフォルト設定を使って、ワイヤレス
通信のプリンタを 1 台セットアップする方法について説明します。
工場出荷時のデフォルト ワイヤレス ネットワーク設定は、次のとおりです。
• 通信モード : アド ホック
74
Page 75

• ネットワーク名 (SSID):hpsetup
• セキュリティ ( 暗号化 ): 無効
ワイヤレスまたは USB ケーブルを使用してプリンタとコンピュータを接続したら、HP ツールボックス
(Windows)または HP Deskjet 460 ネットワーク セットアップ ツール(Mac OS)を使用して、ワイ
ヤレス プロファイルを設定し、SSID を変更できます。
通信モード
「アドホック」ネットワークでは、ネットワーク通信モードがアドホックに設定され、プリンタがワイヤ
レス アクセス ポイント (WAP ) を使わずに、ほかのワイヤレス デバイスと直接通信します。
ネットワーク名 (SSI D)
デフォルトで、プリンタは、「hpsetup」というネットワーク名、または SSID(サービス設定識別子)を
もつアドホック ネットワークを探します。
ワイヤレス セキュリティの設定
プリンタの工場出荷時デフォルト設定は、オープン ネットワークで、セキュリティ(暗号化)が無効に
なっています。プリンタは、「hpsetup」というオープンなワイヤレス ネットワークを検出し、自動的に
通信しようとします。ネットワークは、認証または暗号化にセキュリティを必要としません。
アドホック ネットワークにあるすべてのデバイスは、次の条件を満たす必要があります。
•802.11 互換である
• 通信モードとしてアドホックを使用する
• 同じネットワーク名 (SSID) を使用する
• 同じサブネットにある
• 同じチャンネルにある
• 同じ 802.11 セキュリティ設定を使用する
ワイヤレス プロファイルのスイッチ
プリンタには、802.11 ワイヤレス プロファイルのスイッチが備わっており、3 つまでの 802.11 コ
ンピュータまたはネットワークの設定を保存できます。これにより、自宅からオフィスなど、3 つまで
のワイヤレス ネットワーク環境で簡単にプリンタを移行することができます。「現在」のプロファイル
は、プリンタにあるワイヤレス プロファイル スイッチの現在の位置 (1、2、3) に関連付けられてい
ます。詳しくは、Starter CD に収録されているオンスクリーン ユーザーズ ガイドを参照してくださ
い。
日
本
語
75
Page 76

Hewlett-Packard 限定保証文
HP 製品 限定保証期間
ソフトウェア 90 日間
アクセサリ 90 日間
プリント カートリッジ プリント カートリッジの HP のインクがなくなるまで、または
カートリッジに記載されている「保証期間終了」日のいずれか早
い方
プリンタ周辺ハードウェア(詳しくは下記を参照
してください。)
* 保証に関して詳しくは、http://www.hp.com/support/inkjet_warranty を参照してください。
1 年間
限定保証の延長
1. Hewlett-Packard は、保証期間中、前述の HP 製品がその材
質や製造上の欠陥がないことを保証します。保証期間は
お客様が購入された日より開始されます。
2. ソフトウェア製品では、HP の限定保証がプログラムの指
示を実行できない場合にのみ適用されます。HP はいかな
る製品に対しても動作に中断がないこと、またはエラー
がないことを保証しません。
3. HP の限定保証は、製品の通常の使用条件で生じた欠陥に
対してのみ適用されます。次に記載される事項などが原
因で生じた問題については、保証は適用されません。
a. 不適切なメンテナンスまたは改造、
b. HP がサポートまたは提供していないソフトウェア、
メディア、部品、サプライ品の使用、または、
c. 製品仕様の範囲外での使用。
d. 承認されていない改造や誤使用。
4. HP のプリンタ製品に、HP 以外のインク カートリッジや
再充填したインク カートリッジをお使いになった場合で
も、保証の適用や HP のサポートのご利用には影響しませ
ん。ただし、プリンタの故障や損傷が HP 以外のインク
カートリッジや再充填したカートリッジに起因する場合
は、その故障や損傷に対する標準的な修繕サービス費用
や交換部品代を請求させていただきます。
5. 対象となる保証期間中に、HP の保証が適用される製品の
欠陥について HP が通知を受けた場合、HP の選択により、
その製品を修理または交換するものとします。
6. HP の保証の対象となる欠陥製品に対して HP による修理
または交換が不可能な場合、欠陥が通知されてから一定
期間内に、HP はお客様に購入金額を返済いたします。
7. お客様が欠陥製品を返却するまで、HP には修理、交換、
返金の義務はありません。
8. 交換製品は新品または新品同様品となり、交換される製
品と同等またはそれ以上の性能を備えているものとしま
す。
9. HP 製品は新品と同等の性能を備えた再生部品、コンポー
ネント、材料を含む場合があります。
10. HP の限定保証文は、保証の対象となる HP の製品が HP
によって頒布されているすべての国と地域で適用されま
す。オンサイト サービスなど、保証サービスの追加契約
については、HP によって製品が頒布されている国や地域
の HP 正規サービス窓口または、正規輸入代行業者にお問
い合わせください。
保証の限定
地方の準拠法によって認められる最大の限度で、HP および
サード パーティのサプライヤでは、特に市場性、満足できる
品質、特定目的に対する適合性についての、明示もしくは黙
示のいかなる種類のいかなる保証や条件も否認します。
責任の限定
1. 地方の準拠法によって認められる最大の限度で、本保証
文で提供される救済は、お客様の唯一の救済手段となる
ものとします。
2. 地方の準拠法によって認められる最大の限度で、本保証
文で規定されている場合を除き、HP およびサード パー
ティのサプライヤは、契約、不法行為、その他のいかな
る法理論を問わず、また HP がこのような損害の可能性を
勧告されていたかどうかに関わらず、直接的損害、間接
的損害、特別損害、偶発的損害、または派生的損害につ
いては、一切責任を負いません。
地方準拠法
1. 本保証文は、お客様に特定の法的権利を与えるものです。
お客様は、法律上の他の権利を有することがあります。
それらの権利は、米国、カナダ、その他世界各国の州や
地域ごとに異なります。
2. 本保証文が地方の準拠法と矛盾する範囲について、本保
証文は、このような地方の準拠法に合わせて改定される
ものとします。このような地方準拠法では、本保証文に
記載されている一部の免責または制限がお客様に適用さ
れないことがあります。例えば、米国の一部の州および
米国外(カナダの州を含む)の司法管轄区では、
a. 本保証文の免責や制限が、お客様の制定法上の権利を
限定することを認めていない場合があります(例えば
英国)。
b. または、製造者がこのような免責や制限を行う権利を
制限する場合があります。
c. また、お客様に保証に関して追加の権利を与えたり、
黙示的保証の期間を特定(この場合、製造者は拒否で
きません)したり、黙示的保証期間の制限を承認した
りする場合があります。
3. オーストラリアとニュージーランドでの消費者取引に関
して、法律で認められる場合を除き、本保証文の規定は、
対象となる HP 製品のお客様への販売に対する強制的な制
定法上の権利を除外、制限、修正、追加するものではあ
りません。
76
Page 77

攜帶外出時的提示
下面的提示,可協助您將印表機準備好,以便攜帶外出:
• 如果您打算攜帶額外的黑色或彩色列印墨水匣,請遵守下列原則﹕請將經部份使用的黑色列印墨水匣
或是經部份使用或全滿的相片列印墨水匣存放在旅行包裝筒中,以免油墨向外滲漏。剛打開的黑色列
印墨水匣在高海拔的地方 (例如飛機上)會稍微滲漏。為了避免滲漏,請等到抵達目的地之後再安裝
新的黑色墨水匣。尚未抵達目的地之前,請將墨水匣留在原本以膠帶密封的包裝中。
• 用電源按鈕關閉印表機的電源。這樣可確保將列印墨水匣移回並鎖定在印表機左邊的起始位置。
• 如果您在其他國家 / 地區旅行時需要購買列印墨水匣,請參閱「工具箱」或 HP Printer Utility 中的「攜
帶 HP 行動印表機旅行」線上說明,查閱有關當地墨水匣相容性的資訊。
• 請務必只採用隨印表機所附的電源變電器。不要用任何其它的變壓器或是轉換器。電源變電器適用於
100 到 240 伏特、50 或 60 Hz 的交流電源。
• 如果會有一個月以上的時間不用印表機,請將電池取出。
• 攜帶相紙出外旅行時,請將紙張放平包裝,以免折彎或捲曲。相紙應該在列印之前保持平整。如果相
紙的四角捲起超過 10 公釐 (3/8 英吋)的話,請將相紙放在可重新密封的貯藏袋,將貯藏袋放在桌
子邊緣滾動,直到紙張被壓平為止。
印表機按鈕和指示燈
印表機的指示燈可以顯示印表機的狀態,對於列印問題的診斷很有幫助。本章提供了一個清單,其中包括
狀態指示燈組合、代表的問題內容以及解決問題的方法。
1 2 3 4 5 6 7 8
1. (取消按鈕) – 取消目前的列印作業。取消過程所
需的時間,依據列印作業的大小而定。取消佇列中的
列印作業時,只按這個按鈕一次即可。
2. (繼續按鈕) – 繼續等候中的列印作業或是在暫時
中斷 (例如正在將列印紙材裝入印表機)之後繼續列
印。
3. 繼續指示燈 – 當有列印作業在等候時亮黃燈,在處於
延遲狀態中或者需要操作員介入 (請參閱下表)時會
閃爍或點亮。
4. 電池充電指示燈 – 當電池充電時亮綠燈。
5. 左側列印墨水匣指示燈 – 當沒有左側列印墨水匣或無
6. 右側列印墨水匣指示燈 – 當沒有右側列印墨水匣或無
7. (電源按鈕) – 將印表機開啟或關閉。
8. 電源指示燈 – 使用交流 (AC)變電器或充電量在 41-
繁
體
中
文
法正常運作時會閃爍。當油墨存量過低或墨水匣已空
時持續點亮。
法正常運作時會閃爍。當油墨存量過低或墨水匣已空
時持續點亮。
100% 的電池開啟印表機時亮綠燈。由電池供應電力
時,當電池充電量在 10-40% 時亮黃燈,而當電池充
電量在 10% 以下時亮紅燈。閃爍的時候,表示正在列
印。
77
Page 78

印表機指示燈模式
指示燈說明和模式 說明及建議操作
電源指示燈亮綠燈。
電源指示燈亮黃燈。
電源指示燈亮紅燈。
電池充電指示燈亮綠燈。
電池充電指示燈亮紅燈。
採用交流電源時:印表機的電源已開啟而且印
表機正在閒置狀態。
採用電池電源時:電池充電量在 41-100%;印
表機的電源已開啟而且印表機正在閒置狀態。
• 不需要任何操作。
電池充電量在 10-40%;印表機的電源開啟而
且處於閒置狀態。
• 插上電源變電器來開始為電池充電。
請參閱 Starter CD 光碟片所附的線上使用
指南中的詳細資訊。
電池充電量在 10% 以下;印表機的電源有打
開而且印表機正在閒置狀態。
• 插上電源變電器來開始為電池充電。
請參閱 Starter CD 光碟片所附的線上使用
指南中的詳細資訊。
電池正在充電。
• 不需要任何操作。
電池有故障。
• 更換電池。
請參閱 Starter CD 光碟片所附的線上使用
指南中的詳細資訊。
電源指示燈亮綠燈而繼續指示燈在閃爍。
左側列印墨水匣指示燈在閃爍。
右側列印墨水匣指示燈在閃爍。
78
印表機已被暫停以等候紙材上的油墨晾乾、紙
張用完或是正在處理 「數位影像列印模式」
(DPOF)列印作業。
• 如果紙張已經用完,請添裝紙張。按
(繼續按鈕)來繼續列印作業。
左側列印墨水匣有問題。
• 重新安裝一次列印墨水匣,然後試著再印
一次。如果還有問題,請更換墨水匣。請
參閱 Starter CD 光碟片所附的線上使用指
南中的詳細資訊。
右側列印墨水匣有問題。
• 重新安裝一次列印墨水匣,然後試著再印
一次。如果還有問題,請更換墨水匣。請
參閱 Starter CD 光碟片所附的線上使用指
南中的詳細資訊。
Page 79

指示燈說明和模式 說明及建議操作
左側列印墨水匣指示燈點亮。
右側列印墨水匣指示燈點亮。
電源指示燈熄滅,繼續指示燈在閃爍。
電源指示燈在閃爍,繼續指示燈在閃爍。
電源指示燈在閃爍、繼續指示燈在閃爍、左側及右側列印墨
水匣指示燈點亮。
繼續指示燈在閃爍、左側及右側列印墨水匣指示燈點亮。
彩色列印墨水匣的墨水快要用完了。
• 更換列印墨水匣。請參閱 Starter CD 光碟
片所附的線上使用指南中的詳細資訊。
右側列印墨水匣的油墨快要用完了。
• 更換列印墨水匣。
請參閱 Starter CD 光碟片所附的線上使用
指南中的詳細資訊。
紙材夾住,或是紙張驅動馬達停止。
• 清除夾紙。請參閱 Starter CD 光碟片所附
的線上使用指南中的詳細資訊。清除夾紙
之後,按 (恢復按鈕)來繼續列印作
業。
如果沒有夾紙,請按 (繼續按鈕)。如
果這樣無法解決問題,請試著關閉印表機
的電源然後再打開,然後重新傳送一次列
印作業。
繁
體
中
文
繼續指示燈在閃爍、左側及右側列印墨水匣指示燈循環。
電源指示燈點亮,繼續指示燈在閃爍,右側列印墨水匣指示
燈等長地點亮又熄滅兩次。
電源指示燈點亮,繼續指示燈點亮,右側列印墨水匣指示燈
等長地點亮又熄滅兩次。
油墨保養模組快要滿了。
• 如果有替換的墨水保養模組,請按照模組
所附的說明,立刻更換新的模組。
• 否則,請瀏覽﹕
http://www.hp.com/support/dj460
或致電 「客戶支援服務」部門以取得更換
用的模組。
在更換之前,可以按 (繼續按鈕)來繼
續列印,但是會一直有這個指示燈錯誤狀
態,直到更換新的墨水保養模組。當油墨
保養模組裝滿之後,印表機就會停止列
印。
79
Page 80

解決安裝問題
本節就與硬體和軟體安裝有關的某些最常見的問題提供疑難排解的建議。
列印問題
請檢查印表機以確定下列幾項﹕
• 電源指示燈已點亮而且沒有閃爍。首先將印表機電源打開時,需要大約一分鐘的時間初始化。
• 控制面板上沒有任何指示燈點亮或閃爍,而且印表機處於 「就緒」狀態。如果有指示燈點亮或閃爍,
請參閱頁 77。
• 確保電源線和其他電纜線都可正常操作而且已牢固地連接印表機。
• 將印表機內的所有包裝膠帶和裝運材料全都取出。
• 列印墨水匣已正確地安裝在適當的墨水匣座底槽中。用力往下按每個列印噴頭和墨水匣,確定接觸良
好。
• 確定已將膠帶從每一個列印墨水匣上移除。
• 確定墨水匣沒有受損。
• 確定列印墨水匣固定鎖和機蓋都已關上。
• 確定紙材已正確裝入進紙匣,而且印表機內沒有夾紙。
安裝軟體問題
檢查電腦規定
• 確定電腦符合系統需求。請參閱 Starter CD 光碟片所附的線上使用指南﹕
檢查安裝的必要先決條件
• 在執行 Windows 系統的電腦上安裝軟體之前,請先確定已將所有其他程式關閉。
• 如果電腦無法識別您所輸入的光碟機路徑,請確定您已指定了正確的光碟機代碼。
• 如果電腦無法識別光碟機中的 Starter CD 光碟片,請檢查光碟片是否已損壞。您可以從
http://www.hp.com/support/dj460 下載印表機驅動程式。
• 在 Windows 裝置管理程式中,請確定沒有將 USB 驅動程式停用。
重新安裝印表機軟體
• 如果是使用 Windows 而電腦無法偵測到印表機,請執行 Scrubber 公用程式 (位於 Starter CD 上
的 Utils\Scrubber 資料夾中)來執行乾淨的驅動程式解除安裝程序。將電腦重新啟動,並重新安裝印
表機驅動程式。請參閱 Starter CD 光碟片所附的線上使用指南中的 「若要解除安裝印表機軟體」。
設定 802.11 或 Bluetooth 無線通訊時發生問題
如果您無法從 802.11 或 Bluetooth 無線連接列印,請嘗試以下的建議﹕
檢查無線印表機介面卡
• 確定無線印表機介面卡已正確地插入。
• 請確定您是在印表機初始化之前或之後而不是在初始化印表機的期間插入無線印表機介面卡。
80
Page 81

• 如果無線印表機介面卡上的指示燈不亮,請執行以下步驟﹕
a. 取出無線印表機介面卡。
b. 關閉印表機,等候幾秒鐘,然後重新將印表機開啟。
c. 等印表機進入 「就緒」狀態之後重新插入介面卡。如果沒有任何回應,請重覆此程序幾次。如果
仍然沒有回應,請與 HP 聯絡。
• 若要查看無線印表機介面卡是否可以正常運作,請試著使用另一個無線裝置來列印。如果仍然無法列
印,無線印表機介面卡可能有故障。請在必要時更換介面卡。
檢查無線通訊的設定值
• 請確定將印表機背面的無線設定檔開關轉到您所使用的正確的無線設定檔。確定使用安裝期間所設定
的設定檔。
• 如果在完成軟體安裝並去除 USB 電纜之後無法與印表機通訊,那麼以下的一個或多個無線設定值可
能不正確﹕
• 網路名稱 (SSID)
• 通訊模式 (紅外線或 ad hoc)
• 頻道 (僅限於 ad hoc 網路)
• 安全性設定 (例如認證類型和加密)
• 若要使用 「工具箱」(Windows)來設定 Bluetooth 設定值或監控印表機狀態 (例如油墨存量), 您
必須用一條 USB 電纜將印表機連接到電腦上。
檢查無線信號
如果有信號干擾、距離或信號強度問題或者印表機因為某種原因而未就緒的話,無線通訊可能會被中斷或
無法使用。
• 請確定印表機在 802.11 或 Bluetooth 發送裝置的量程之內。802.11 列印可以進行長達 100 公尺
(300 英呎)的無線列印。Bluetooth 列印可以進行長達 10 公尺 (30 英呎)的無線列印。
• 如果無法列印某份文件,可能是信號中斷的問題。如果電腦上顯示的訊息說明有信號問題,請取消列
印作業,然後從電腦重新傳送。
一般無線疑難排解提示
• 在 Print Center (Mac OS)中刪除和重新加入印表機。
• 輪詢印表機﹕如果將印表機關閉之後再重新開啟無法解決問題 (或者,在 Mac OS 系統上的 Print
Center 中刪除和重新加入印表機沒有任何作用),請執行以下步驟﹕
a. 列印無線組態頁面﹕
b. 請使用 MS-DOS (Windows)或 Terminal (Mac OS)來輪詢印表機以確認網路通訊。
• 在印表機內容中的 「連接埠」標籤,以手動方式指定印表機的 IP 位址。
• 試著從行動電話在亞洲以外的地區購買的印表機上列印亞洲字型時,可能會出現方塊。只有在亞洲購
買的型號支援用於 Bluetooth 行動電話列印的亞洲字型。
• 使用 Bluetooth 無線連接來列印大型檔案可能會造成列印問題。請試著列印較小的檔案。
• 無線通訊會耗盡印表機電池的電力。請檢查電池充電量。
請參閱 Starter CD 光碟片所附的線上使用指南中詳細的無線網路疑難排解和設定資訊。
按住 (取消按鈕) 2 秒鐘。
關於 802.11 無線列印
本節快速總覽與印表機的原廠預設 802.11 無線通訊。
請參閱 Starter CD 光碟片的線上使用指南以﹕
• 設定基礎系統網路上的印表機。
• 使用 802.11 無線設定檔組態公用程式一次設定多台印表機。
• 解決不使用原廠預設組態的 802.11 連接問題。
繁
體
中
文
81
Page 82

• 在不使用 USB 纜線的情形下,設定印表機的 802.11 連結。
使用原廠預設值的 802.11 無線列印
安裝指示說明如何使用 ad-hoc 網路和原廠預設值來設定單一印表機以進行無線通訊。
原廠預設的無線網路設定值為﹕
• 通訊模式:ad hoc
• 網路名稱 (SSID)﹕ hpsetup
• 安全性 (加密)﹕已停用
一旦印表機以無線的方式或是通過 USB 電纜線連接電腦之後,您就能使用「HP 工具箱」(Windows)或
HP Deskjet 460 Network Setup Tool (Mac OS)來設定無線設定檔,以變更 SSID。
通訊模式
在 ad hoc 網路上,網路通訊模式被設定為 ad hoc,且印表機可與其他無線裝置直接通訊而無需使用無線
存取點 (WA P)。
網路名稱 (SSID)
根據預設值,印表機會尋找有此名稱的 ad hoc 網路,或是 「服務設定識別碼」(SSID), 即 hpsetup。
無線安全性設定
印表機的原廠設定值為開放網路而且安全性 (加密)已停用。印表機會視圖偵測並自動與稱為 hpsetup 的
開放無線網路建立關聯性。網路不需要認證或加密的安全防護。
Ad hoc 網路上的所有裝置都必須﹕
• 與 802.11 無線連接相容
• 以 ad hoc 為通訊模式
• 具有相同的網路名稱 (SSID)
• 在相同的子網之上
• 在相同的頻道之上
• 具有相同的 802.11 安全性設定
82
無線設定檔開關
印表機包含了一個 802.11 無線設定檔開關,以便您儲存多達三個 802.11 電腦或網路的設定檔。這可讓
您將印表機輕易地從家中移到辦公室,或在任何三個無線網路環境之間移動。「目前」設定檔是指與印表
機上的無線設定檔開關目前的位置 (1、2 或 3)關聯的設定檔。請參閱 Starter CD 光碟片所附的線上使
用指南中的詳細資訊。
Page 83

Hewlett-Packard 有限保固聲明
HP 產品 有限保固期限
軟體 90 天
配件 一年 (隨印表機購買)或 90 天 (另行個別購買)
列印墨匣 如果在包裝上所印的有效日期前安裝,具有六個月的有限保
固。
印表機週邊硬體 (參閱下述詳情) 一年
http://www.hp.com/support/inkjet_warranty
有限保固內容
1. Hewlett-Packard 向用戶保證,上述的 HP 產品在從
客戶購貨日期開始計算之上述的保固期限內,不會
有材料或製造過程上的瑕疵。
2. 對於軟體產品,HP 的有限保固僅適用於無法執行程
式指令的情形。 HP 無法保證任何產品的作業,一定
不會中斷或是不會發生錯誤。
3. HP 的有限保固僅適用於產品在正常使用狀況下所出
現的瑕疵;而不包含任何其它問題,並且不包括下
述情形所產生的問題:
a. 不良的維護和修改;
b. 使用不是 HP 提供或支援的軟體、紙材、
零件、和耗材;
c. 在產品適用的規格範圍之外使用;
d. 未授權的修改或是濫用。
4. 在 HP 印表機產品上使用非 HP 廠牌或是重灌墨水
的列印墨匣,不會影響客戶的保固權益或是任何客
戶所購買的
HP 支援服務合約。但是,如果因為使用非 HP 廠牌
或是重灌墨水的列印墨匣,而造成印表機的故障或
損壞,則對於該特定故障或損壞的修理服務,HP 以
標準的時間和材料費用收費。
5. 如果 HP 在適用的保固期限內,收到任何受 HP 保
固保證之產品有瑕疵的通知,HP 得以決定為客戶修
理或是更換該產品。
6. 如果 HP 無法適當地修理或更換在 HP 保固期內的
有瑕疵產品,則在收到有瑕疵之通知後的一段合理
期間內,HP 會向客戶退還該產品的原購買金額。
7. 客戶必須先將有瑕疵的產品退還給 HP 後,HP 才有
修理、更換、或退款的義務。
8. 用來更換的產品,可能是全新或近似全新的產品;
如果是近似全新的產品,其性能最少會和被更換的
產品一樣。
9. H P 的產品中,可能會包含性能等於新品,但是有翻
修過的零件、元件、和材料。
10. HP 的 《有限保固聲明》適用於任何 HP 有銷售所
保證之 HP 產品的國家或地區。 在任何 HP 或授權
進口商有銷售所保證之 HP 產品的國家或地區,用
戶可向任何授權的 HP 維修單位購買額外的保固服
務合約,例如是到府服務的合約。
保固的限制
在當地法律允許的範圍內,HP 及其協力廠商均不做任
何其他的保證或提供任何形式的條款;不論是適銷性、
品質滿意度、或特定用途的適用性,都沒有任何明確或
暗示的保證或條款。
責任的限制
1. 在當地法律允許的範圍內,此保固聲明所提供的補
償,是客戶唯一而所有的補償。
2. 在當地法律允許的範圍內,除了此保固聲明上述的
明確義務以外,對於任何直接、間接、特殊、附屬、
或後果性損害,不論是以合約、侵權、或任何其他
法律理論為基礎,亦不論是否有事先通知這種損害
的可能性,HP 及其協力廠商均不負任何責任。
當地法律
1. 本 《保固聲明》為客戶提供明確的法律權益。 美國
的各州、加拿大的各省、以及全球的各國家或地區,
均可能有不同的法律,因此客戶可能還會有其他的
權益。
2. 如果本 《保固聲明》和當地法律有所抵觸,則此
《保固聲明》視為自動修訂,以符合當地法律的規
定。如果有這樣的當地法律,則本 《保固聲明》的
某些聲明事項和限制,可能不適用於該地區的客戶。
例如美國某些的州,以及美國以外的某些政府 (包
括加拿大的省),可能會:
a. 禁止此 《保固聲明》內的聲明事項和限制條文
來限制客戶的法定權益 (例如是英國);
b. 或是另外限制製造廠商施行這種聲明事項和限制
條文;或是
c. 為客戶提供額外的保固權益、指定製造廠商所不
能拒絕之暗示性保固的期限、或是允許暗示性保
固服務期限的限制。
3. 對於澳洲和紐西蘭的消費性交易,除法律允許的範
圍外,本 《保固聲明》內的條款,並不排除、限制、
或修改 HP 產品銷售給這些客戶時所適用的法定權
益,而是另外提供的額外權益。
83
Page 84

© 2005 Hewlett-Packard Development Company, L.P.
www.hp.com/support/dj460
Pendaftaran Petunjuk Penggunaan (Manual)
dan Kartu Jaminan/Garansi dalam
Bahasa Indonesia No:
0001/1.824.51
084/1.824.51
*C8150-90007*
*C8150-90007*
C8150-90007
 Loading...