

Page 1

HP 4400 Enterprise Virtual Array Installation
Guide
Abstract
This guide describes how to install the HP 4400 Enterprise Virtual Array (EVA4400) and is intended for users with knowledge
of storage area networks and basic operating system commands and utilities.
The EVA4400 is customer self installable. However, you may purchase installation service by an HP-authorized service provider
if preferred. For more information, contact HP technical support in North America at 1-800-474-6836. Outside North America,
call HP technical support at the nearest location. Telephone numbers for worldwide technical support are listed on the HP
website: http://www.hp.com/support.
To assist you in installing the EVA4400, videos of the procedures have been produced. Go to the Services Media Library
website: http://www.hp.com/go/sml and navigate to your product to view these videos.
HP Part Number: 5697-1146
Published: September 2011
Edition: 8
Page 2

© Copyright 2008, 2011 Hewlett-Packard Development Company, L.P.
Confidential computer software. Valid license from HP required for possession, use, or copying. Consistent with FAR 12.211 and 12.212, Commercial
Computer Software, Computer Software Documentation, and Technical Data for Commercial Items are licensed to the U.S. Government under
vendor's standard commercial license.
The information contained herein is subject to change without notice. The only warranties for HP products and services are set forth in the express
warranty statements accompanying such products and services. Nothing herein should be construed as constituting an additional warranty. HP shall
not be liable for technical or editorial errors or omissions contained herein.
WARRANTY STATEMENT: To obtain a copy of the warranty for this product, see the warranty information website:
http://www.hp.com/go/storagewarranty
Microsoft®, Windows®, Windows® XP, and Windows NT® are U.S. registered trademarks of Microsoft Corporation.
UNIX® is a registered trademark of The Open Group.
Printed in Puerto Rico
Page 3

Contents
1 Review and confirm your plans.....................................................................5
Overview................................................................................................................................5
Prerequisites.............................................................................................................................5
Plan your storage configuration..................................................................................................5
System and performance expectations....................................................................................6
RAID levels.........................................................................................................................6
HP P6000 Command View implementation..................................................................................7
2 Prepare your site........................................................................................8
Overview................................................................................................................................8
Provide adequate structural support for the floor...........................................................................8
Provide adequate clearance space and ventilation........................................................................8
Provide adequate and redundant sources of power.......................................................................9
Remove product from packaging.................................................................................................9
3 Install components....................................................................................10
Overview..............................................................................................................................10
Rack installation best practices.................................................................................................10
Attach the brackets for a longer chassis.....................................................................................11
Converting the rails.................................................................................................................12
Attach the rails.......................................................................................................................12
Install the enclosures...............................................................................................................14
Installing the hard drives into the drive bays...............................................................................16
Installing SFPs........................................................................................................................17
4 Connect cables and power cords...............................................................18
Overview..............................................................................................................................18
Cabling best practices.............................................................................................................18
Connecting the Fibre Channel cables........................................................................................18
Connecting device port Fibre Channel cables to the EVA (rear view).........................................18
Connecting Fibre Channel cables to the EVA (front end)..........................................................19
Connecting cables to an HSV300-S controller enclosure (front end)..........................................19
Labeling cables using labeling kit........................................................................................19
Connecting the power cords....................................................................................................19
5 Turn on power..........................................................................................20
Power on the devices...............................................................................................................20
Verify the operating status of the EVA........................................................................................20
Verify the operating status of the disk enclosures.........................................................................21
Verify the operating status of the Fibre Channel switches and adapters..........................................22
Installing Fibre Channel drivers.................................................................................................22
Configuring the embedded switch in an HSV300-S controller.......................................................22
Verify the operating status of the servers....................................................................................24
6 Connecting to the management module......................................................25
Overview..............................................................................................................................25
Connecting to the management module.....................................................................................25
Connecting through a public network...................................................................................25
Connecting through a private network..................................................................................26
Accessing HP P6000 Command View on the management module...............................................27
Changing the default operating mode.......................................................................................27
Accessing the HP P6000 Control Panel through HP P6000 Command View...................................28
Contents 3
Page 4

7 Configuring servers using HP P6000 SmartStart...........................................29
Configuring management servers using HP P6000 SmartStart.......................................................29
Configuring application servers for Windows using HP P6000 SmartStart......................................29
8 Using and monitoring your storage.............................................................30
Using your storage.................................................................................................................30
Firmware recovery .................................................................................................................30
HP Insight Remote Support software..........................................................................................30
9 Support and other resources......................................................................31
Contacting HP........................................................................................................................31
HP technical support..........................................................................................................31
Subscription service............................................................................................................31
Documentation feedback....................................................................................................31
Related information.................................................................................................................32
Documents........................................................................................................................32
HP websites......................................................................................................................32
Typographic conventions.........................................................................................................33
Customer self repair................................................................................................................33
Rack stability..........................................................................................................................34
Location of WWN and serial number........................................................................................34
A EVA4400 cabling diagrams......................................................................36
Connecting device port Fibre Channel cables to the EVA4400 (rear view)......................................36
Connecting Fibre Channel cables to the EVA4400 (front end).......................................................37
Connecting to the HSV300-S controller enclosure........................................................................39
4 Contents
Page 5

1 Review and confirm your plans
Overview
Before installing the EVA, HP recommends that you:
• Develop an installation and configuration plan for your environment.
• Review all videos and documentation.
• Determine if the EVA will be fabric-attached (connected to Fibre Channel switch) or
direct-attached (connected to Fibre Channel adapter in server). The EVA4400 is factory
configured for fabric-attached. To change to direct-attached mode, see “Connecting to the
management module” (page 25).
NOTE: Models of the EVA4400 with an embedded switch (also known as the HSV300-S
controller) are configured in fabric-attach mode and must remain fabric-attached.
Prerequisites
Prerequisites for using this product include:
• A Fibre Channel switch installed in your environment
• An equipment cabinet suitable for 2U sized enclosures
• A management server running Windows for HP P6000 Command View software (server-based
management)
• A management module running HP P6000 Command View software (array-based management)
• A CD-ROM drive attached to either the management server or the server attached to the
management module
Plan your storage configuration
Proper planning of the system storage and its subsequent performance is critical to a successful
deployment of the EVA. Improper planning or implementation can result in wasted storage space,
degraded performance, or inability to expand the system to meet growing storage needs. Planning
considerations include:
• System and performance expectations
• Striping methods
• RAID levels
• Hard drive sizes and types
• Spare drives
• Array sizing (capacity)
NOTE: For the minimum supported configuration, and other configuration information, see the
QuickSpecs document at: http://www.hp.com/go/eva4400
Overview 5
Page 6

System and performance expectations
To help determine the best way to configure your storage, rank the following three storage
characteristics in order of importance:
• Fault tolerance (high availability)
• I/O performance
• Storage efficiency
With your priorities established, you can determine which striping method and RAID level to use.
As highlighted in the following section, some configuration methods offer greater fault tolerance,
while other configuration methods offer better I/O performance or storage efficiency.
RAID levels
Vraid is the HP term for the implementation of RAID (Redundant Array of Independent Disks) storage.
Vraid is also referred to as redundancy in HP management software. Virtual disks with HP Vraid
use three key RAID methods: data striping, data mirroring, and parity error checking. Unlike
traditional RAID, all HP Vraid levels distribute data across all available physical disks.
Data striping improves speed by performing virtual disk I/O with an entire group of physical disks
at the same time. Mirroring provides data redundancy by storing data and a copy of the data.
Parity also provides data redundancy by storing data and the calculated parity for each stripe of
data. If a subset of the data on a physical disk becomes corrupt or the entire physical disk fails,
the data can be automatically recovered from redundancy so that data loss does not occur.
The EVA has four Vraid types: Vraid0, Vraid1, Vraid5, and Vraid6. Each Vraid type provides
unique I/O speed and has a different level of data redundancy, which directly effects the amount
of physical space used. Once a virtual disk is created, the Vraid type or level cannot be changed.
See Table 1 (page 6) for a comparison of the different RAID levels.
Table 1 Raid Level Comparison
RAID methodData redundancyBest practicesSummary
StripingNoneIMPORTANT: HP does not
recommend using Vraid0 for virtual
Vraid0 is optimized for I/O
speed and efficient use of
Vraid0
disks when high availability isphysical disk capacity, but
provides no data redundancy. required. Consider Vraid0 only for
noncritical storage. Vraid0 virtual
disks provide the best performance
for applications that use random I/O.
Striping and
mirroring
HighIn general, Vraid1 virtual disks
provide better performance
Vraid1 is optimized for data
redundancy and I/O speed,
Vraid1
characteristics over a wider range of
application workloads than Vraid5.
but uses the most physical disk
space.
IMPORTANT: Vraid1 uses
about 100% more physical
disk space than Vraid0.
Striping and
parity
MediumVraid5 virtual disks provide as good
or better performance than Vraid1
Vraid5 provides a balance of
data redundancy, I/O speed,
Vraid5
for applications that use sequentialand efficient use of physical
writes. Vraid5 has much lowerdisk space. Vraid5 uses about
random write performance in20% more physical disk space
than Vraid0. comparison to Vraid1, but has much
higher capacity efficiency.
Striping and
double parity
Very highPerformance characteristics of Vraid6
for random and sequential write
Vraid6 is similar to Vraid5, but
provides a higher level of
Vraid6
workloads will be slightly slower thanredundancy by storing two
Vraid5. Vraid6 provides the highestparity blocks per stripe instead
6 Review and confirm your plans
Page 7

Table 1 Raid Level Comparison (continued)
RAID methodData redundancyBest practicesSummary
of one. Vraid6 uses 33% more
physical disk space than
Vraid0.
level of redundancy protection of all
the Vraid types.
NOTE: For best practice information, see the HP 4400 Enterprise Virtual Array configuration
best practices white paper available at:
http://h18006.www1.hp.com/storage/arraywhitepapers.html?jumpid=reg_R1002_USEN
HP P6000 Command View implementation
HP P6000 Command View can be implemented in two ways:
• Server-based management—HP P6000 Command View is installed on a management server
connected to the EVA, providing management of multiple HP EVA storage systems. All
components of the software suite (HP P6000 Command View, HP Command View EVAPerf,
HP Storage System Scripting Utility, SMI-S EVA) are installed. Server-based management is
applicable to all EVA models.
• Array-based management—Beginning with HP Command View EVA 8.1, the EVA4400 is
shipped with HP P6000 Command View pre-installed on the management module within the
controller enclosure. Only one component of the software suite (HP P6000 Command View)
is installed. Array-based management is applicable to the EVA4400 only.
HP P6000 Command View implementation 7
Page 8

2 Prepare your site
Overview
Preparing your site means providing:
• Physical rack space for the equipment
• AC power for the EVA
• Proper ventilation and temperature conditions
• LAN or Fibre Channel cables to attach the EVA hardware to your network.
To ensure continuous, safe, and reliable operation of your equipment, place your system in an
approved environment.
Consider using the HP Enterprise Configurator (eCO) to help plan and configure racks and
rack-mountable devices. The eCO is available on the HP website:
http://h30099.www3.hp.com/configurator
Click Configure under Disk products.
Provide adequate structural support for the floor
Calculate the total weight of your equipment and verify that your site can support the weight.
Provide adequate clearance space and ventilation
Be sure to provide adequate clearance around the front and back of the racks. Provide at least
25 inches (63.5 cm) in the front of the rack to allow the doors to open fully and provide at least
30 inches (76.2 cm) in the rear of the rack to allow for servicing and airflow.
If there are unused spaces in your rack, attach blanking panels across those empty spaces to force
the airflow through the components instead of through the open spaces.
8 Prepare your site
Page 9

Provide adequate and redundant sources of power
Make sure that you have two high-line power feeds installed near your computer. These two power
sources usually come from the same external power grid, but occasionally may originate from
different grids or even entirely different sources.
For protection against a power-source failure, obtain and include two uninterruptible power supplies
in your installation.
For power consumption specifications, see the QuickSpecs document at:
http://www.hp.com/go/eva4400
Remove product from packaging
1. Remove product from boxes.
2. Verify that contents match your expectations and site requirements.
• EVA4400 controller enclosure should contain:
One 2U controller enclosure with two HSV300 or HSV300–S controller modules,
two power supply modules, two fan modules, and two battery modules installed.
◦
◦ Rack mounting hardware
◦ Two 2.0 meter FC copper cables
◦ Two power cords
◦ Installation documentation
◦ XCS controller software recovery CD
• Each FC disk shelf should contain:
◦ One 2U M6412 disk enclosure, two power supply modules, two fan modules, and
two battery modules.
◦ Rack mounting hardware kit
◦ Two 0.41 meter FC copper cables
◦ Two power cords
3. Inspect for damage.
If damage is present, contact your local HP representative.
Provide adequate and redundant sources of power 9
Page 10

3 Install components
Overview
Component installation includes:
• Rail kits
• Controller and disk enclosures
• Disk drives
NOTE: If you have ordered the factory integrated product, skip this chapter and go to “Turn on
power” (page 20).
Rack installation best practices
In addition to industry-standard recommendations, consider the following:
• Locate the heaviest items, such as uninterruptable power supplies (UPS) and additional disk
enclosures near the bottom of the rack.
• To make cabling easy, install the disk enclosures below the controller enclosure.
• Install similar components next to each other in the rack. Because enclosures, switches, and
servers are of differing depths, if you have more than one of a device, mount those devices
adjacent to one another to accommodate working behind the rack.
WARNING! To reduce the risk of personal injury or damage to the equipment, be sure that:
• At least two people lift the storage system during removal or installation, if the weight, exceeds
22.7 kg (50 lb). If the system is being loaded into the rack above chest level, a third person
MUST assist with aligning the system with the rails while the other two people support the
weight of the system.
• The leveling jacks on the rack are extended to the floor.
• The full weight of the rack rests on the leveling jacks.
• The stabilizing feet are attached to the rack if it is a single-rack installation.
• The racks are coupled together in multiple-rack installations.
• Only one component in a rack is extended at a time. A rack may become unstable if more
than one component is extended.
• To prevent damage and to ease insertion of the device into the rack, support the weight of
the device and keep it level when sliding it into the rack.
Review Figure 1 (page 11) before installing the EVA components in the rack.
10 Install components
Page 11
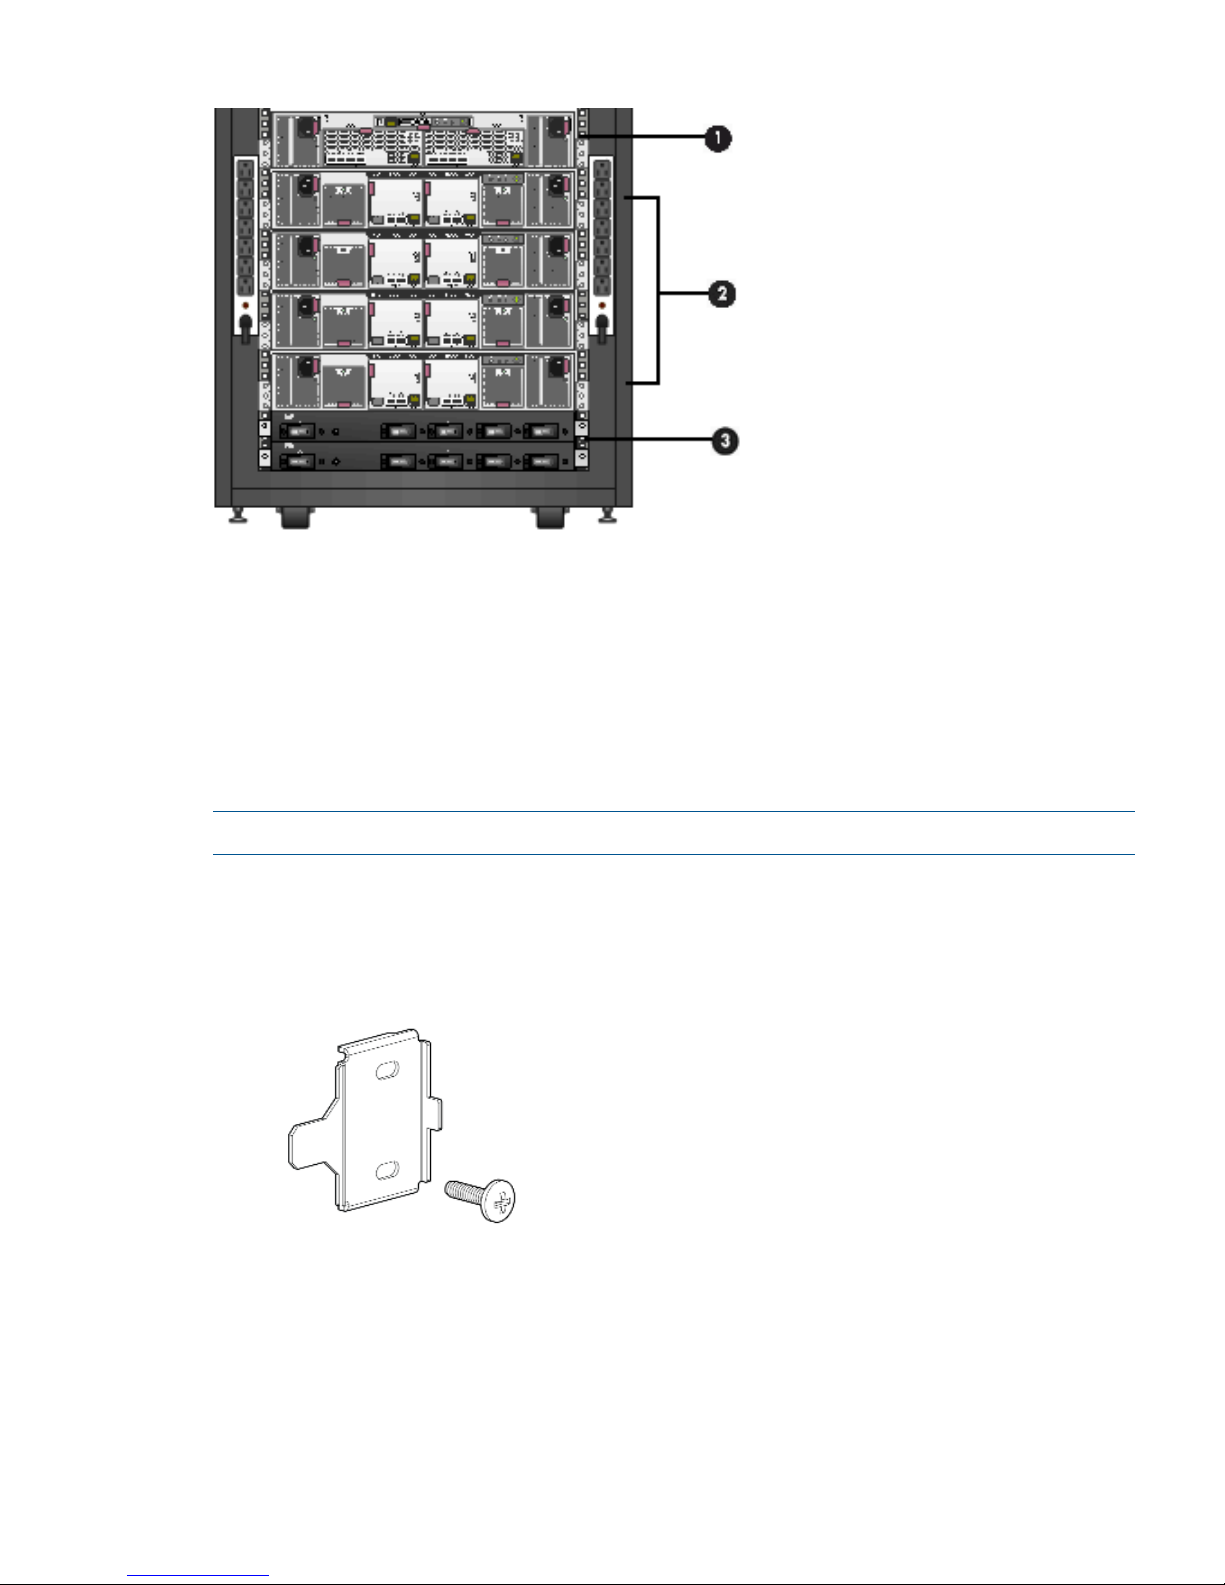
Figure 1 Typical EVA installed in rack (preferred layout)
1. Controller enclosure
2. Disk enclosures
3. PDU (at rear of enclosure)
Attach the brackets for a longer chassis
If you are installing a longer chassis into your cabinet, such as for the controller enclosure, you
must remove the shipping retaining bracket and install the smaller brackets supplied in the accessory
kit.
NOTE: A No. 2 Phillips head screwdriver is required for this procedure.
1. Remove the existing thumbscrew and shipping retaining bracket from the rear of the rail.
2. Insert a screw through the bottom hole of the new bracket and loosely secure the bracket to
the rear of the rail.
Figure 2 Inserting screw into the new bracket
Attach the brackets for a longer chassis 11
Page 12
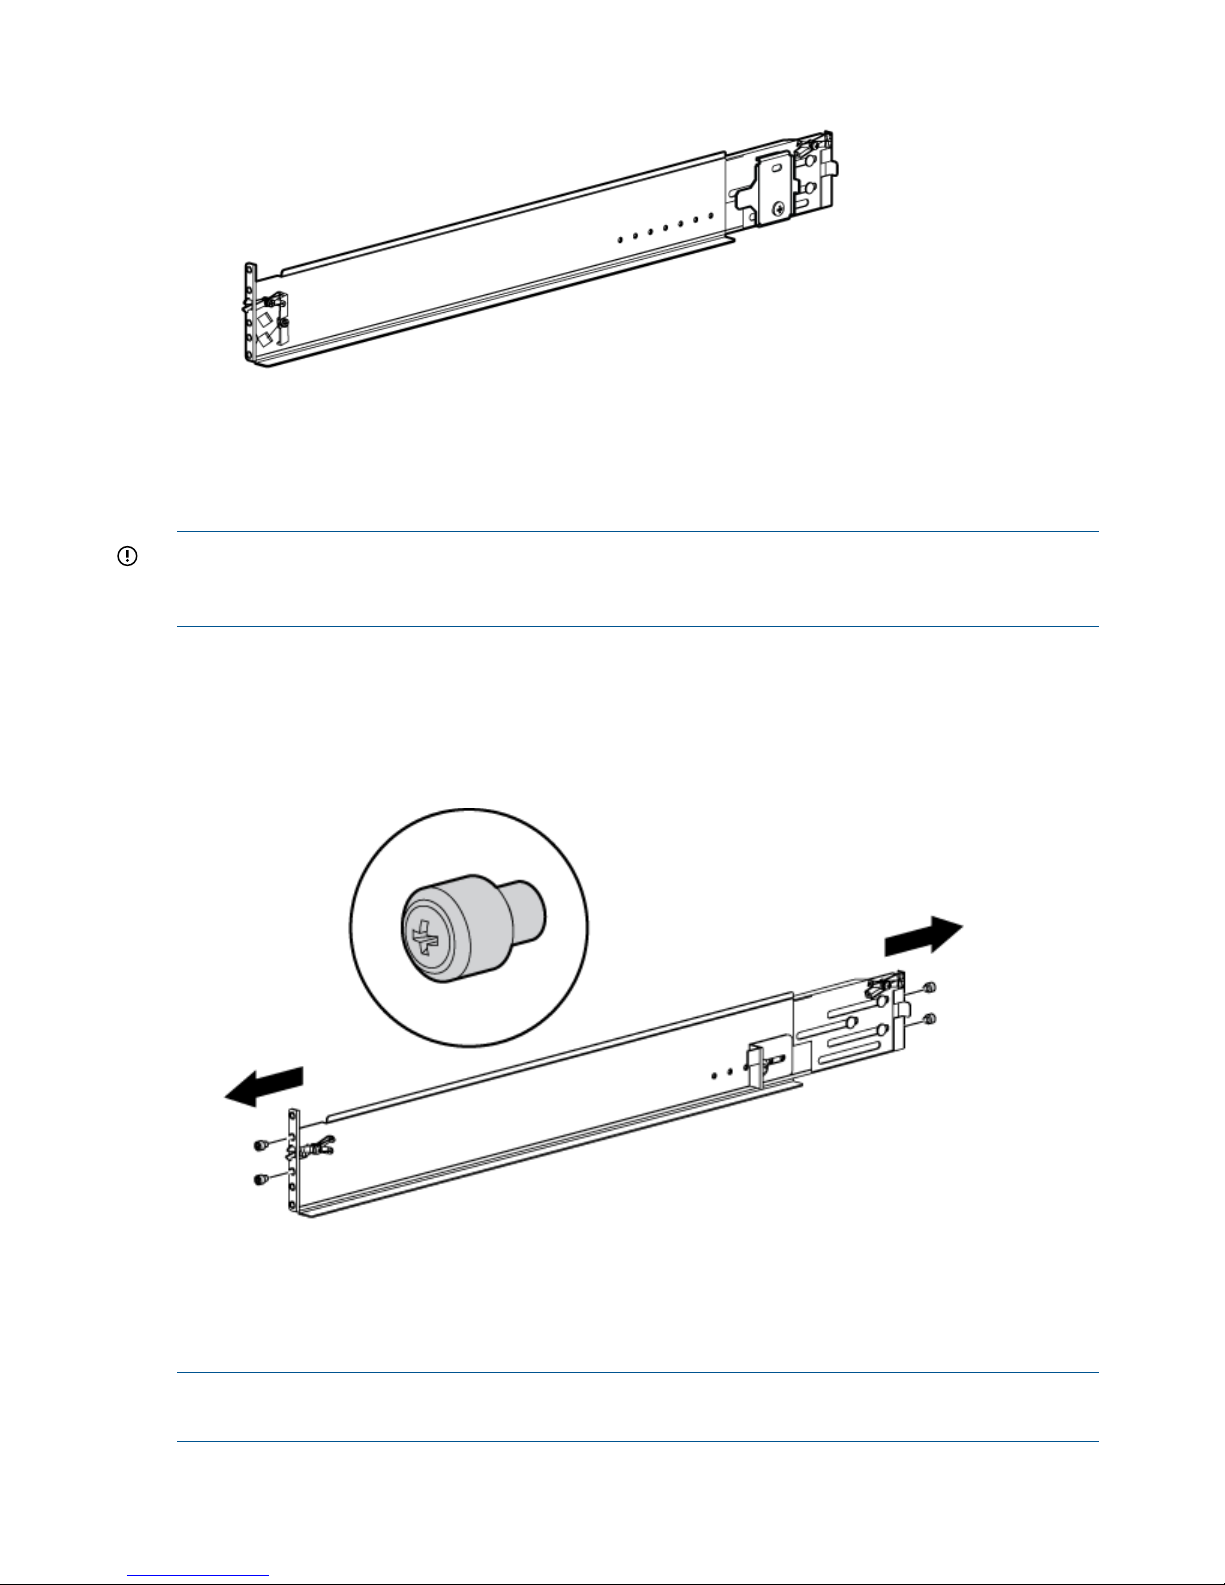
Figure 3 Attaching the brackets
3. Repeat Step 1 and Step 2 for the remaining rail.
Converting the rails
The rail kit supplied with the disk enclosure comes configured for square-hole racks.
IMPORTANT: Do not remove the pins from the ends of the rails unless you are converting the
rails for use in round-hole racks. These load-bearing pins are designed to fit through the holes
without being removed.
To convert the rails for a round-hole rack:
1. Locate the bag of eight round-hole pins included in the rail kit.
2. Use a No. 2 Phillips screwdriver to remove the standard pins from the front and back of the
left and right rails (four pins on each rail).
Figure 4 Configuring the rails
3. Insert the round-hole pins into the eight holes on the rails where the standard pins were
removed.
Attach the rails
NOTE: The left and right rails are designated by the letters R (right) and L (left) stamped in the
metal on the front of the rack.
12 Install components
Page 13

Consider the following when installing the rails:
• Installing the rails does not require any tools for assembly.
• HP recommends that you install all the rail kits before installing any other components.
• Ensure that the rails are level before installing any other components.
WARNING! Before you begin, ensure that the rack is sufficiently stable. If provided, lower the
rack leveler feet and make sure any required stabilizers are installed. If provided, extend the anti-tip
device. Failure to extend the anti-tip device could cause personal injury or damage if the rack tips
over.
1. On the rear of the rail, squeeze the scissor latch (1, Figure 5 (page 13)) together to insert the
rail and pins through the rack holes (2) until the latch engages.
Figure 5 Attaching the rear rail
2. On the front of the rail, pull the locking latch to release the scissors latch (1, Figure 6 (page
14)) and squeeze the scissors latch together to insert the rail and pins through the rack upright
holes (2) until the latch engages (3).
Attach the rails 13
Page 14

Figure 6 Attaching the front rail
3. Loosen the locking nut (1, Figure 7 (page 14)) on the shipping retaining bracket (2) and slide
the bracket to the farthest position on the rear of the rail. This moves the bracket out of the
way to allow you to install the chassis in the rails.
NOTE: Figure 7 (page 14) shows a disk enclosure rail and bracket. If you are installing a
longer chassis into your cabinet, such as a chassis for a controller enclosure, see “Attach the
brackets for a longer chassis” (page 11) for additional information.
Figure 7 Locking nut and retaining bracket
4. After attaching the rail, grab and move the rail gently to be sure it is firmly engaged in the
rack and that all latches are engaged in the rack holes.
5. Repeat Step 1 through Step 4 for the other rail.
Install the enclosures
To install disk and controller enclosures:
1. Remove the bezels installed over the thumbscrews on the front of the enclosure (Figure 8 (page
15)).
14 Install components
Page 15

Figure 8 Removing bezels from enclosure
2. Align the enclosure with the rails and slide it into the rack (Figure 9 (page 15)).
Figure 9 Installing an enclosure (view from front of rack)
3. Continue sliding the enclosure into the rack until the front edge is flush with the front of the
rack (1, Figure 10 (page 16)). Tighten the enclosure thumbscrews into the rack (2) taking care
not to strip the thumbscrews.
Install the enclosures 15
Page 16

Figure 10 Securing the rear of the enclosure in the rack (view from front of rack)
4. Reattach the front bezel covers.
5. At the rear of the rack, loosen the thumbscrew on the shipping retaining bracket (1,
Figure 11 (page 16)) and slide the bracket forward (2) until the tab engages the slot in the
chassis. Tighten the thumbscrew on the bracket.
Figure 11 Securing the rear of the enclosure (view from rear of rack)
6. Repeat 1 through 5 to install the controller enclosures.
Installing the hard drives into the drive bays
After the disk enclosures are secured in the rack, install the hard drives into the drive bays. Drives
must be installed in the proper bay sequence (see Figure 12 (page 17)) in the enclosures for
optimum HP P6000 Command View performance and data integrity.
For example, if you have four enclosures, and eight drives, you should install four drives into bay
1 of each enclosure and four drives into bay 2 of each enclosure. Do not install all the drives into
enclosure 1 and leave the other enclosures empty.
16 Install components
Page 17

Figure 12 Disk drive numbering
CAUTION: Install hard drives in the enclosures only after securing the enclosures in the rack:
• An enclosure populated with hard drives is too heavy to lift safely.
• Movement of an enclosure during installation might damage the internal storage media of
installed hard drives.
CAUTION: Follow industry-standard practices when handling hard drives. Internal storage media
can be damaged when drives are shaken, dropped, or roughly placed on a work surface. When
installing a hard drive, make sure it is fully seated in the drive bay. To remove a hard drive, press
the release button and pull the drive only slightly out of the enclosure. Then, to allow time for the
internal disk to stop rotating, wait approximately 10 seconds before completely removing the drive
from the enclosure.
To install the hard drives:
1. Insert the disk drive into the drive bay (1, Figure 13 (page 17)) until it clicks, locking the drive.
2. Rotate the drive lever to the right (2, Figure 13 (page 17)) until it locks.
Figure 13 Installing drives into the enclosures
Installing SFPs
The HSV300-S controller uses Small Form Factor Pluggable (SFPs) transceiver modules on the FC
ports. Four SFPs are factory installed in the HSV300-S, but you will need to install additional SFPs
if you plan to use more than four switch ports. If you purchased extra SFPs, install them now,
following the instructions shipped with the SFPs.
NOTE: The HSV300-S requires 4 Gb or higher SFPs.
Installing SFPs 17
Page 18

4 Connect cables and power cords
Overview
NOTE: If you have ordered the factory integrated product, skip this section and go to “Turn on
power” (page 20).
To connect cables and power cords:
1. Read the cabling best practices.
2. Attach Fibre Channel and/or LAN cables to controller, drives, and servers.
3. Label all cables using the supplied cable labeling kit.
4. Plug in all power cables.
Cabling best practices
• Use the shortest possible cable between devices. Shorter cables are easier to manage and
route along the back of the rack. In addition, shorter cables reduce the possibility of signal
degradation that may occur over longer distances.
• Gather the cables in the rear of the EVA to ensure that the cabling in the back of the rack
system does not interfere with system operation or maintenance. Bind the cables loosely with
cable ties and route the excess cables out of the way, along the side of the rack. When the
cables are tied together and routed down the side of the rack, system components and
indicators are easily visible and accessible.
• Attach a label near both ends of each cable to identify the device connected to that cable.
Include the device type, device name, port, or other information that you think will be helpful.
• Use colored markers to color code both ends of each cable, to help you visually identify a
particular cable without having to read or locate the label.
• In multipath configurations, you may want to loosely bind the matching pair of cables
connecting devices.
Connecting the Fibre Channel cables
To connect the EVA to the SAN, use standard Fibre Channel cables, observing the following caution
for good cabling-handling practices.
CAUTION: Use appropriate precautions when handling Fibre Channel cables:
• Touching the end of a Fibre Channel cable will either damage the cable or cause performance
problems, including intermittent difficulties accessing the storage.
• Whenever a Fibre Channel cable is not connected, replace the protective covers on the ends
of the cable.
• Make certain that the Fibre Channel cables are installed and supported so that no excess
weight is placed on the connectors. This prevents damage to the connector and cable. Excess
cable should be loosely coiled and tied out of the way, being careful not to coil the cable in
a tight loop. The minimum bend radius is 25 mm for 50, 62.5, and 9 micron fiber optic cable.
Connecting device port Fibre Channel cables to the EVA (rear view)
See Figure 24 (page 36) and Figure 25 (page 37) in Appendix A.
18 Connect cables and power cords
Page 19

Connecting Fibre Channel cables to the EVA (front end)
See Figure 26 (page 38) and Figure 28 (page 39) in Appendix A for front end connections with
server-based management. See Figure 27 (page 38) and Figure 29 (page 39) in Appendix A for
front end connections with array-based management.
Connecting cables to an HSV300-S controller enclosure (front end)
See Figure 30 (page 40) for server-based management or Figure 31 (page 40) for array-based
management in Appendix A.
Labeling cables using labeling kit
Label each end of each cable using the materials in the supplied labeling kit.
Connecting the power cords
WARNING! To reduce the risk of electric shock or damage to the equipment:
• Do not disable the power cord grounding plug. The grounding plug is an important safety
feature.
• Plug the power cord into a grounded (earthed) electrical outlet that is easily accessible at all
times.
• To remove power to the equipment, unplug the power cord from the power supply.
• Route the power cord so that it is not likely to be walked on or pinched by items placed against
it. Pay particular attention to the plug, electrical outlet, and the point where the cord is attached
to the EVA.
To protect your system from power failure related downtime, each EVA ships with a redundant
power supply. See Table 2 (page 19) to determine the best method for connecting your power
supplies to your power source to eliminate downtime due to power-related failure.
When connecting the power cables, use the power cables shipped with the EVA. After power is
supplied to the EVA, the power supply automatically senses the input voltage and the power supply
LED illuminates as solid amber.
Table 2 Power cable connections
Level of ProtectionConnection Method
Protects you from downtime when one of the EVA power supplies fails.
The remaining power supply/fan module can operate the EVA until you install a
replacement module.
EVA power supplies connected to
one power source
Protects you from downtime when one of the EVA power supplies fails.
Protects you from data loss when one of your power sources fails, due to a pulled
cable or tripped breaker.
EVA power supplies connected to
two separate power sources
The remaining power source can power the EVA until the failed power source is
restored or relocated.
Depending on the cause and duration of the power outage, you can use this time
to properly shut down your storage sub-system.
Protects you from downtime when one of the EVA power supplies fails.
Protects you from data loss when one or both of your power sources fails, due to
a pulled cable, tripped breaker, or local power outage.
EVA power supplies connected to:
• Two uninterruptible power
supplies
The remaining power source or the UPS will power the EVA until power is restored
to the source. Depending on the cause and duration of the power outage, you
can use this time to properly shut down your storage sub-system.
• Two separate power sources
For more information about power sources, see the HP 4400 Enterprise Virtual Array User Guide.
Connecting the power cords 19
Page 20

5 Turn on power
Power on the devices
After the EVA and its disk enclosures are installed and connected to the SAN, power up all of the
devices in the SAN and verify that they are operating properly.
1. Apply power to the power distribution unit (PDU) in the rack:
• If the controller enclosure was shipped with the power button in the ON position, the
controller enclosure and connected disk enclosures will automatically power on. Otherwise,
press the power/standby button on the front panel of the controller enclosure.
• When the controller enclosure is powered on, the LED for the power/standby buttons
changes from amber to solid green.
• Wait for a solid green LED on each disk enclosure to ensure that each enclosure has
successfully powered on.
2. Apply power to each external Fibre Channel switch.
3. Wait (up to five minutes) for the EVA to complete its startup routine and for the Fibre Channel
switches to boot.
4. Apply power to the servers in the SAN with access to the EVA, start the operating system,
and log on as administrator.
CAUTION: When you power on the server, the monitor may display a “New Hardware
Found” message and to a prompt to install an HBA driver. Cancel out of this window to prevent
the installation of an unsupported HBA driver.
5. Verify that each component in the SAN is operating properly as described in the following
sections.
Verify the operating status of the EVA
To verify the operating status of the EVA, view the LEDs on the EVA.
Each module of the EVA is equipped with an LED display (Figure 14 (page 21)). See Table 3 (page
21) for LED information. The enclosure external health LED (2) on the panel should be lit when the
unit is operating properly. Check the LEDs located on the enclosure first before checking the LEDs
on individual replaceable units in the EVA.
20 Turn on power
Page 21

Figure 14 EVA4400 front panel LEDs
Table 3 EVA4400 status lights during startup
Fault conditionOperating conditionStartup conditionLED functionNumber
N/AOff—Blinking if turned
on remotely
Blinking blueUID (Unit ID)1
GreenBlinking greenEnclosure external health2
Blinking amberOffOffEnclosure fault warning3
Amber—Indicates link
lost
GreenSolid amberLink to host4
Blinking
green—Indicates
GreenSolid amberFan condition5 (2 LEDs)
charging or defective
FRU
Blinking
amber—Indicates
defective FRU
GreenSolid amberBattery condition6 (2 LEDs)
If the LED patterns described in Table 3 (page 21) are not illuminated:
• Check your cable connections between the device and the EVA.
• Check the availability of your power source.
• Review the installation procedures.
• Remove and reinsert the module.
Verify the operating status of the disk enclosures
To verify that the disk enclosures and hard drives are operating properly, view the enclosure and
hard drive LEDs and compare them with the patterns described in the documentation for these
devices. If the LEDs indicate a fault, see the HP 4400 Enterprise Virtual Array User Guide.
Verify the operating status of the disk enclosures 21
Page 22

Figure 15 Rear and front view of the disk enclosure
Verify the operating status of the Fibre Channel switches and adapters
To verify that your switches are operating properly, view the switch LEDs and compare them with
the patterns described in the documentation for these devices. If the LEDs indicate a fault, see the
documentation that came with the switch for help.
Optional Step: If you will be using Fibre Channel to attach the EVA to your existing servers, you
must install Fibre Channel adapters in those servers and test the Fibre Channel adapters prior to
installing HP P6000 Command View.
Ensure that you have the correct quantity and length of Fibre Channel cables available to attach
your servers to the EVA.
Installing Fibre Channel drivers
If you are using Windows, the HP P6000 SmartStart software automatically loads the required
Fibre Channel drivers. This occurs during this installation process when you run HP P6000
SmartStart.
For other operating systems, load the drivers as directed in (Configuring application servers) in
the HP 4400 Enterprise Virtual Array User Guide.
Configuring the embedded switch in an HSV300-S controller
The embedded switch in an HSV300-S controller has a default IP addresses that may not be visible
in your network. Any configuration changes must be made to both embedded switches in an
HSV300-S controller enclosure. This process involves connecting a cable from the Ethernet port of
each switch to a laptop computer and supplying switch addresses that are valid for your network.
NOTE: For complete switch configuration and management instructions, see the HP Fabric OS
6.1.x administrator guide at: http://www.hp.com/support/manuals. Under Storage, click Disk
Storage Systems and then click HP 4400 Enterprise Virtual Array under EVA Disk Arrays.
To configure an embedded switch in an HSV300-S controller:
1. Obtain a laptop and an Ethernet cable (straight-through or crossover type), and change the
IP address of the laptop to have an address in the same IP range as the embedded switch (for
example 10.77.77.79, with a subnet mask of: 255.255.255.0).
22 Turn on power
Page 23

NOTE: The embedded switch has an MDI-X port that supports straight-through or crossover
Ethernet cables. Use a Cat 5e or greater cable.
If needed, you can connect directly to the switch using the console port (2, Figure 16 (page
23)) and the provided console cable (manufacturing part number 259992–001). You may
need a USB adapter for this cable if your laptop does not have a serial port.
2. Connect the Ethernet port (2, Figure 16 (page 23)) of the embedded switch to the laptop.
Figure 16 HSV300-S rear view
1. Console port
2. Ethernet port
3. Browse to http://10.77.77.77 for the Controller 1 switch.
NOTE: Fibre Channel switches are referred to as left slot switch and right slot switch in
Brocade Web Tools.
The switch management GUI (Brocade Web Tools) appears (Figure 17 (page 24)).
Configuring the embedded switch in an HSV300-S controller 23
Page 24

Figure 17 Switch Management GUI
4. Change the IP address and other settings of the switch as appropriate for your network. You
may also rename the switch or perform other configuration activities at this time.
5. Remove the Ethernet cable from the first switch and connect the cable to the Ethernet port (2,
Figure 16 (page 23)) of the other embedded switch. Browse to http://10.77.77.78 for
the Controller 2 switch and repeat 4.
NOTE: If you are renaming or performing other configuration activities on the Controller 2
switch, be aware that two switches cannot have the same domain ID in the same fabric.
Verify the operating status of the servers
Although the EVA is not yet visible to the server, verify that the server is operating properly. A
simple test is to verify that your operating system loaded and then open a software application or
your browser.
If your server is not operating properly, see the documentation that came with the server for help.
24 Turn on power
Page 25

6 Connecting to the management module
Overview
This chapter describes several optional procedures. Complete the procedures in this chapter if any
of the following situations apply. Otherwise, continue with “Configuring servers using HP P6000
SmartStart” (page 29).
• Run HP P6000 Command View from the management module, which eliminates the requirement
for a management server.
• Change the default operating mode (via the HP P6000 Control Panel) for a direct connect
configuration.
• Access the HP P6000 Control Panel to view array state and status information and edit basic
configuration settings. See the HP P6000 Control Panel user guide for more information.
The management module has an MDI-X port that supports straight-through or crossover Ethernet
cables. Use a Cat 5e or greater cable to connect the management module from its Ethernet jack
(1, Figure 18 (page 25)) to the management server.
Figure 18 management module
1. Status LEDs
2. Ethernet jack
3. Reset button
Connecting to the management module
You can connect to the management module through a public or a private network.
NOTE: To aggregate additional HP Command View servers into a SPoG (Single Pane of Glass)
when the servers reside on a different IP network from the SPoG web server, some additional
configuration settings may be needed. To configure the system if the HP Command View servers
reside on a different network and you would like them visible in the SPoG, see Discovery URI under
Discovery configuration settings in the HP Management Integration Framework Administrator Guide.
If you use a laptop to connect to the management module, configure the laptop to have an address
in the same IP range as the management module (for example 192.168.0.2, with a subnet mask
of 255.255.255.0).
Connecting through a public network
1. Initialize the EVA4400 storage system, using HP P6000 SmartStart or HP P6000 Command
View.
2. If it is currently connected, disconnect the public network LAN cable from the back of the
management module in the controller enclosure.
3. Press and hold the recessed Reset button (3, Figure 18 (page 25)) for 4 to 5 seconds. If you
are running HP Command View EVA 9.3 or later, the green LED on the management module
(1, Figure 18 (page 25)) blinks to indicate the configuration reset has started. The reset may
take up to 2 minutes to complete. When the reset is completed, the green LED turns solid. This
Overview 25
Page 26

sets IP addresses of 192.168.0.1/24 (IPv4) and fd50:f2eb:a8a::7/48 (IPv6). If you are
running a version earlier than HP Command View EVA 9.3 on the management module, the
amber LED will flash momentarily when the reset is completed.
IMPORTANT: At initial setup, you cannot browse to the HP P6000 Control Panel until you
perform this step.
4. Do one of the following:
• Temporarily connect a LAN cable from a private network to the management module.
• Temporarily connect a laptop computer to the management module using a LAN patch
cable.
5. Browse to https://192.168.0.1:2373 or https://[fd50:f2eb:a8a::7]:2373/and
log in as an HP administrator. HP recommends that you either change or delete the default
IPv4 or IPv6 addresses to avoid duplicate address detection issues on your network. The default
user name is admin. No password is required. The HP P6000 control panel GUI appears.
IMPORTANT: The HP P6000 Control Panel previously used port 2372 but now uses 2373.
If you change the password for the administrator or user account for the HP P6000 Control
Panel, be sure to record the new passwords since they cannot be cleared without resetting
the management module. HP recommends that you change the default passwords.
6. Select Administrator Options > Configure Network Options.
7. Enter an IP address and other network settings that apply.
NOTE: The management module firmware reserves IP addresses for internal communications.
If you are using HP Command View EVA 9.2 or earlier, the reserved IP addresses are 10.0.0.1
through 10.0.0.3. Later versions of the management module firmware will also use these
addresses if the array has older controller firmware loaded. The latest versions of controller
and management module firmware, however, use the reserved IP address range from
10.253.251.230 through 10.253.251.249. The management module cannot be configured
to use these addresses, nor can it communicate with external systems that fall within the reserved
address range (for example, web client, router, DNS server, and so on).
8. Click Save Changes.
The new IP address is stored and remains in effect, even when the storage system is later shut
down or restarted. The IP address changes immediately, causing you to lose connectivity to
the HP P6000 Control Panel.
IMPORTANT: The new IP address will be lost if the storage system is later uninitialized or
the management module is reset.
9. Remove the LAN cable connecting to the private network and reconnect the cable to the public
network.
10. From a computer on the public network, browse to https://newly configured ip
address:2373 and log in. The HP P6000 control panel GUI appears.
Connecting through a private network
1. Press and hold the recessed Reset button (3, Figure 18 (page 25)) for 4 to 5 seconds. If you
are running HP Command View EVA 9.3 or later, the green LED on the management module
(1, Figure 18 (page 25)) blinks to indicate the configuration reset has started. The reset may
take up to 2 minutes to complete. When the reset is completed, the green LED turns solid. This
sets IP addresses of 192.168.0.1/24 (IPv4) and fd50:f2eb:a8a::7/48 (IPv6). If you are
26 Connecting to the management module
Page 27

running a version earlier than HP Command View EVA 9.3 on the management module, the
amber LED will flash momentarily when the reset is completed.
2. Browse to https://192.168.0.1:2373 and log in as an HP administrator. HP recommends
that you either change or delete the default IPv4 or IPv6 addresses to avoid duplicate address
detection issues on your network. The default user name is admin. No password is required.
The HP P6000 control panel GUI appears.
IMPORTANT: At initial setup, you cannot browse to the HP P6000 control panel until you
perform this step.
3. Select Administrator Options > Configure Network Options.
NOTE: The management module firmware reserves IP addresses for internal communications.
If you are using HP Command View EVA 9.2 or earlier, the reserved IP addresses are 10.0.0.1
through 10.0.0.3. Later versions of the management module firmware will also use these
addresses if the array has older controller firmware loaded. The latest versions of controller
and management module firmware, however, use the reserved IP address range from
10.253.251.230 through 10.253.251.249. The management module cannot be configured
to use these addresses, nor can it communicate with external systems that fall within the reserved
address range (for example, web client, router, DNS server, and so on).
4. Enter an IP address and other network settings that apply.
5. Click Save Changes.
The new IP address is stored and remains in effect, even when the storage system is later shut
down or restarted. The IP address changes immediately, causing you to lose connectivity to
the HP P6000 Control Panel.
IMPORTANT: The new IP address will be lost if the storage system is later uninitialized or
the management module is reset.
The new IP address is stored and remains in effect, even when the storage system is shut down
or restarted.
NOTE: If you uninitialize the storage system, wait one minute before reinitializing or you
may lose the IP address.
6. From a computer on the private network, browse to https://newly configured ip
address:2373 and log in. The HP P6000 control panel GUI appears.
Accessing HP P6000 Command View on the management module
To access HP P6000 Command View on the management module complete the following:
1. Click Launch HP P6000 Command View.
2. Click Use management module server.
The logon window appears.
3. Enter the username and password for accessing HP P6000 Command View.
Changing the default operating mode
By default, the EVA4400 is shipped to operate in a Fibre Channel switch environment and is
configured in fabric mode. If you choose to connect the EVA4400 directly to a server, you must
change the default operating mode of the EVA4400 to direct mode. If you do not change this
mode, the EVA4400 will be unable to communicate with your server. Use the HP P6000 Control
Panel to change the default operating mode.
Accessing HP P6000 Command View on the management module 27
Page 28

NOTE: Change your browser settings for the HP P6000 Control Panel window as described in
the HP P6000 Command View Installation Guide. You must have administrator privilege to change
the settings in the HP P6000 Control Panel.
To change the default operating mode:
1. Connect to the management module using one of the methods described in “Connecting
through a public network” (page 25) or “Connecting through a private network” (page 26).
2. Log into the HP P6000 Control Panel as an administrator. The default username is admin and
the password field is blank. For security reasons, change the password after you log in.
3. Select Administrator Options > Configure controller host ports.
The HP P6000 Control Panel is displayed (Figure 19 (page 28)).
Figure 19 HP P6000 Control Panel Configure controller host ports page
4. In the Topology box, select Direct from the dropdown menu.
5. Click Save Changes.
6. Change the default operating mode for the other controller.
7. Close the HP P6000 Control Panel and remove the Ethernet cable from the server.
Accessing the HP P6000 Control Panel through HP P6000 Command View
1. Select the EVA4400 storage system you want to access.
2. Select Hardware > Controller Enclosure > Management Module.
3. Click Launch HP P6000 Control Panel.
On rare occasions, the Launch HP P6000 Control Panel button may not appear due to invalid
array state or if the management module IP address is unknown to HP P6000 Command View.
28 Connecting to the management module
Page 29

7 Configuring servers using HP P6000 SmartStart
Configuring management servers using HP P6000 SmartStart
Use this procedure if you are connecting the EVA4400 to a management server for server-based
management. To complete array configuration for array-based management, see “Completing the
array configuration” in the HP P6000 Command View Installation Guide.
1. Insert the HP P6000 SmartStart CD in the drive of the management server. The HP P6000
SmartStart tool runs automatically.
2. Read the conceptual information and browse the online help.
3. Click Configure as Management Server on the display (Figure 20 (page 29)).
4. Follow the prompts to configure this system as your management server.
Figure 20 Configure as management server option
Configuring application servers for Windows using HP P6000 SmartStart
1. Insert the HP P6000 SmartStart CD in the drive of an application server. This may be the same
server as your management server.
The HP P6000 SmartStart tool runs automatically.
2. Select one of the options shown in Figure 21 (page 29) to initially configure the application
server or to create and mount additional storage volumes:
Figure 21 Configure storage initially or add storage
3. Repeat this configuration process for each server in your HP P6000 Command View
configuration.
NOTE: To configure non-Windows application servers, see "Configuring application servers"
in the HP 4400 Enterprise Virtual Array User Guide. See Related information for document
location.
Configuring management servers using HP P6000 SmartStart 29
Page 30

8 Using and monitoring your storage
Using your storage
To use the storage you have installed:
1. Start a server application.
2. Browse to a file system window and verify the drive letter of the virtual drive you have created.
Firmware recovery
A recovery CD containing the original XCS firmware installed on the array is shipped along with
your EVA4400. The CD is only needed for recovery purposes. The latest firmware can be found
on the HP software depot web page: http://h20392.www2.hp.com/portal/swdepot/index.do
HP Insight Remote Support software
HP strongly recommends that you install HP Insight Remote Support software to complete the
installation or upgrade of your product and to enable enhanced delivery of your HP Warranty,
HP Care Pack Service or HP contractual support agreement. HP Insight Remote Support supplements
your monitoring, 24x7 to ensure maximum system availability by providing intelligent event
diagnosis, and automatic, secure submission of hardware event notifications to HP, which will
initiate a fast and accurate resolution, based on your product’s service level. Notifications may be
sent to your authorized HP Channel Partner for on-site service, if configured and available in your
country. The software is available in two variants:
• HP Insight Remote Support Standard: This software supports server and storage devices and
is optimized for environments with 1-50 servers. Ideal for customers who can benefit from
proactive notification, but do not need proactive service delivery and integration with a
management platform.
• HP Insight Remote Support Advanced: This software provides comprehensive remote monitoring
and proactive service support for nearly all HP servers, storage, network, and SAN
environments, plus selected non-HP servers that have a support obligation with HP. It is
integrated with HP Systems Insight Manager. A dedicated server is recommended to host both
HP Systems Insight Manager and HP Insight Remote Support Advanced.
Details for both versions are available at:
http://www.hp.com/go/insightremotesupport
To download the software, go to Software Depot:
http://www.software.hp.com
Select Insight Remote Support from the menu on the right.
30 Using and monitoring your storage
Page 31

9 Support and other resources
Contacting HP
HP technical support
For worldwide technical support information, see the HP support website:
http://www.hp.com/support
Before contacting HP, collect the following information:
• Product model names and numbers
• Technical support registration number (if applicable)
• Product serial numbers
• Error messages
• Operating system type and revision level
• Detailed questions
Subscription service
HP recommends that you register your product at the Subscriber's Choice for Business website:
http://www.hp.com/go/wwalerts
After registering, you will receive e-mail notification of product enhancements, new driver versions,
firmware updates, and other product resources.
Documentation feedback
HP welcomes your feedback.
To make comments and suggestions about product documentation, please send a message to
storagedocsFeedback@hp.com. All submissions become the property of HP.
Contacting HP 31
Page 32

Related information
Documents
For documents referenced in this guide, see the Manuals page on the Business Support Center
website:
http://www.hp.com/support/manuals
HP websites
• HP:
http://www.hp.com
• HP Storage:
http://www.hp.com/go/storage
• HP Partner Locator:
http://www.hp.com/service_locator
• HP Software Downloads:
http://www.hp.com/support/downloads
• Hp Software Depot:
http://www.software.hp.com
• HP Single Point of Connectivity Knowledge (SPOCK):
http://www.hp.com/storage/spock
• HP SAN manuals:
http://www.hp.com/go/sdgmanuals
32 Support and other resources
Page 33

Typographic conventions
Table 4 Document conventions
UsesConvention
Cross-reference links and email addressesBlue text: Table 4 (page 33)
Website addressesBlue, underlined text: http://www.hp.com
Bold text
• Keys that are pressed
• Text typed into a GUI element, such as a box
• GUI elements that are clicked or selected, such as menu and
list items, buttons, tabs, and check boxes
Text emphasisItalic text
Monospace text
• File and directory names
• System output
• Code
• Commands, their arguments, and argument values
Monospace, italic text
• Code variables
• Command variables
Emphasized monospace textMonospace, bold text
Indication that the example continues....
An alert that calls attention to important information that if not
understood or followed can result in personal injury.
WARNING!
An alert that calls attention to important information that if not
understood or followed can result in data loss, data corruption,
or damage to hardware or software.
CAUTION:
An alert that calls attention to essential information.
IMPORTANT:
An alert that calls attention to additional or supplementary
information.
NOTE:
An alert that calls attention to helpful hints and shortcuts.
TIP:
Customer self repair
HP customer self repair (CSR) programs allow you to repair your HP product. If a CSR part needs
replacing, HP ships the part directly to you so that you can install it at your convenience. Some
parts do not qualify for CSR. Your HP-authorized service provider will determine whether a repair
can be accomplished by CSR.
For more information about CSR, contact your local service provider or see the CSR website:
http://www.hp.com/go/selfrepair
Typographic conventions 33
Page 34

Rack stability
Rack stability protects personnel and equipment.
WARNING! To reduce the risk of personal injury or damage to equipment:
• Extend leveling jacks to the floor.
• Ensure that the full weight of the rack rests on the leveling jacks.
• Install stabilizing feet on the rack.
• In multiple-rack installations, fasten racks together securely.
• Extend only one rack component at a time. Racks can become unstable if more than one
component is extended.
Location of WWN and serial number
For service and support purposes, the location of the controller serial number, world wide name
(WWN), and controller product number (after removing the controller front bezel) is shown in the
red circle in Figure 22 (page 34).
Figure 22 Location of WWN and serial number
NOTE: For products ordered as bundled products that contain multiple products, the product
number and serial number needed for service and support is shown in the circled area in
Figure 23 (page 35), callouts 3 and 4.
34 Support and other resources
Page 35

Figure 23 Location of WWN and serial number for bundled products
Location of WWN and serial number 35
Page 36

A EVA4400 cabling diagrams
This appendix contains cabling diagrams for common EVA4400 installation environments. If you
plan to configure the EVA4400 with an iSCSI device, see the HP P6000 iSCSI Connectivity User
Guide. See Related information for the location of this guide.
Connecting device port Fibre Channel cables to the EVA4400 (rear view)
This section shows two views of how to connect cables to the controller. Figure 24 (page 36) shows
the controller mounted on top of the disk shelves in the rack, and Figure 25 (page 37) shows the
controller with disk shelves mounted above and below it.
• For configurations with the controller above the disk enclosures, attach the cables to the EVA
as shown in Figure 24 (page 36).
NOTE: All controller device port A cabling must be plugged into the A I/O modules on all
enclosures. All controller B device port cabling must be plugged into the B I/O modules on
all enclosures.
Figure 24 Fibre Channel cabling for the EVA (rear view, top-mounted controller)
1. This cable connects controller 1, device port 1B (top left—Cntrl 1, DP1B) to I/O module B, port 2 (bottom
right—I/O B, P2).
2. This cable connects controller 2, device port 1A (top right—Cntrl 2, DP1A) to I/O module A, port 2 (bottom
left—I/O A, P2).
• For configurations with the controller between the disk enclosures, attach the cables to the
EVA as shown in Figure 25 (page 37).
NOTE: All controller device port A cabling must be plugged into the A I/O modules on all
enclosures. All controller B device port cabling must be plugged into the B I/O modules on
all enclosures.
36 EVA4400 cabling diagrams
Page 37

Figure 25 Fibre Channel cabling for the EVA (rear view, mid-mounted controller)
1. This cable connects controller 1, device port 1B (top left—Cntrl 1, DP1B) to I/O module B, port 2 (bottom
right—I/O B, P2).
2. This cable connects controller 2, device port 1A (top right—Cntrl 2, DP1A) to I/O module A, port 2 (bottom
left—I/O A, P2).
Connecting Fibre Channel cables to the EVA4400 (front end)
You can cable the front end of your EVA4400 either to external Fibre Channel switches or directly
to servers. See Figure 26 (page 38) and Figure 28 (page 39) for front end connections with
server-based management. See Figure 27 (page 38) and Figure 29 (page 39) for front end
connections with array-based management.
NOTE: The cabling diagrams in Figure 26 (page 38) through Figure 29 (page 39) require fabric
connect mode, which is the default as shipped.
Connecting Fibre Channel cables to the EVA4400 (front end) 37
Page 38

Figure 26 Cabling the controller to front end component—Fibre Channel to switch detail view with
server-based management
1. File server
2. Management server
3. Database server
4. Fiber channel switch
5. LED status indicators for cabling connections to disk enclosures. See Figure 24 (page 36) and Figure 25 (page 37)
for cabling connections.
Figure 27 Cabling the controller to front end components—Fibre Channel to switch detail view with
array-based management
1. File server
2. Database server
3. Fiber channel switch
4. LED status indicators for cabling connections to disk enclosures. See Figure 24 (page 36) and Figure 25 (page 37)
for cabling connections.
38 EVA4400 cabling diagrams
Page 39

Figure 28 Cabling the controller to front end components—Direct Fibre Channel to servers with
server-based management
1. Management server
2. Database server
3. LED status indicators for cabling connections to disk enclosures. See Figure 24 (page 36) and Figure 25 (page 37)
for cabling connections.
Figure 29 Cabling the controller to front end component—direct Fibre Channel to servers with
array-based management
1. File server
2. Database server
3. Indicates cabling connections to disk enclosures. See Figure 24 (page 36) and Figure 25 (page 37) for cabling
connections.
Connecting to the HSV300-S controller enclosure
The HSV 300-S controller enclosure includes a switch within each controller. The switches are
configured to be redundant during the manufacturing process. Figure 30 (page 40) and
Figure 31 (page 40) show an HSV300-S controller enclosure with external hosts connected to the
embedded Fibre Channel switches.
NOTE: Additional external switches can be connected to the HSV300-S controller enclosure.
Connecting to the HSV300-S controller enclosure 39
Page 40

Figure 30 HSV300-S controller enclosure in an embedded Fibre Channel switch configuration with
server-based management
1. Management server
2. Database server
3. Indicates cabling connections to disk enclosures. See Figure 24 (page 36) and Figure 25 (page 37) for cabling
connections.
Figure 31 HSV300-S controller enclosure in an embedded Fibre Channel switch configuration with
array-based management
1. File server
2. Database server
3. Indicates cabling connections to disk enclosures. See Figure 24 (page 36) and Figure 25 (page 37) for cabling
connections.
40 EVA4400 cabling diagrams
 Loading...