

Page 1
Quick
Reference
Guide
English
HP LaserJet 4050, 4050 T,
4050 N, and 4050 TN Printers
Page 2

Page 3

Quick
Reference
Guide
HP LaserJet 4050,
4050 T, 4050 N, and
4050 TN Printers
Page 4

© Copyright Hewlett-Packard
Company 1999
All Rights Reserved.
Reproduction, adaptation, or
translation without prior written
permission is prohibited, except
as allowed under the copyright
laws.
Publication number
C4251-90927
First edition, February 1999
Warranty
The information contained in
this document is subject to
change without notice.
Hewlett-Packard makes no
warranty of any kind with
respect to this information.
HEWLETT-PACKARD
SPECIFICALLY DISCLAIMS
THE IMPLIED WARRANTY OF
MERCHANTABILITY AND
FITNESS FOR A
PARTICULAR PURPOSE.
Hewlett-Packard shall not be
liable for any direct, indirect,
incidental, consequential, or
other damage alleged in
connection with the furnishing
or use of this information.
Hewlett-Packard Company
11311 Chinden Boulevard
Boise, Idaho 83714 USA
Page 5

Contents
Control Panel . . . . . . . . . . . . . . . . . . . . . . . . . . . . . . .1
To Change a Control Panel Setting. . . . . . . . . . . . . . .2
Using the Printer Online Help System. . . . . . . . . . . . .3
To Check the Printer’s Configuration. . . . . . . . . . . . . .4
To Print a Menu Map. . . . . . . . . . . . . . . . . . . . . . .4
To Print a Configuration Page. . . . . . . . . . . . . . . .4
To Print a PCL or PS Font List . . . . . . . . . . . . . . .4
Common Printer Messages. . . . . . . . . . . . . . . . . . . . .5
Printing Tasks . . . . . . . . . . . . . . . . . . . . . . . . . . . . . . 8
Manually Feeding Paper from Tray 1 . . . . . . . . . . . . .8
Loading Tray 1. . . . . . . . . . . . . . . . . . . . . . . . . . . . . . . 9
Loading Tray 2 (4050/4050 N). . . . . . . . . . . . . . . . . . 10
Loading Trays 2 and 3 (4050 T/4050 TN) . . . . . . . . .11
Loading Optional 500-Sheet Tray . . . . . . . . . . . . . . . 12
Loading Envelopes in the Envelope Feeder . . . . . . . 13
Special Paper in Tray 1 . . . . . . . . . . . . . . . . . . . . . . .14
Envelopes . . . . . . . . . . . . . . . . . . . . . . . . . . . . . .14
Letterhead/Pre-Punched. . . . . . . . . . . . . . . . . . .14
Transparencies . . . . . . . . . . . . . . . . . . . . . . . . . .14
Labels . . . . . . . . . . . . . . . . . . . . . . . . . . . . . . . . .14
Card Stock/ Custom Sizes . . . . . . . . . . . . . . . . . 14
Selecting the Output Bin . . . . . . . . . . . . . . . . . . . . . . 15
EN
Contents
Page 6

Paper Jams. . . . . . . . . . . . . . . . . . . . . . . . . . . . . . . .16
Locations . . . . . . . . . . . . . . . . . . . . . . . . . . . . . . . . . .16
Input Tray Areas . . . . . . . . . . . . . . . . . . . . . . . . . . . .17
Trays 2 or 3. . . . . . . . . . . . . . . . . . . . . . . . . . . . .17
Optional Envelope Feeder . . . . . . . . . . . . . . . . .18
Top Cover Area . . . . . . . . . . . . . . . . . . . . . . . . . . . . .19
Toner Cartridge Area. . . . . . . . . . . . . . . . . . . . . . . . . 20
Optional Duplexer . . . . . . . . . . . . . . . . . . . . . . . . . . . 21
Output Areas . . . . . . . . . . . . . . . . . . . . . . . . . . . . . . .22
Solving Repeated Paper Jams . . . . . . . . . . . . . . . . .23
Output Quality Problems . . . . . . . . . . . . . . . . . . . .25
Examples. . . . . . . . . . . . . . . . . . . . . . . . . . . . . . . . . . 25
Troubleshooting Steps. . . . . . . . . . . . . . . . . . . . . . . . 26
Continue Printing When Toner Is Low. . . . . . . . . . . . 28
Checking the Toner Level . . . . . . . . . . . . . . . . . . . . . 29
Resetting the HP TonerGauge . . . . . . . . . . . . . . . . .30
Resetting the Printer . . . . . . . . . . . . . . . . . . . . . . . . . 31
Paper Sizes Supported . . . . . . . . . . . . . . . . . . . . . .33
For More Information. . . . . . . . . . . . . . . . . . . . . . . .37
Contents
EN
Page 7
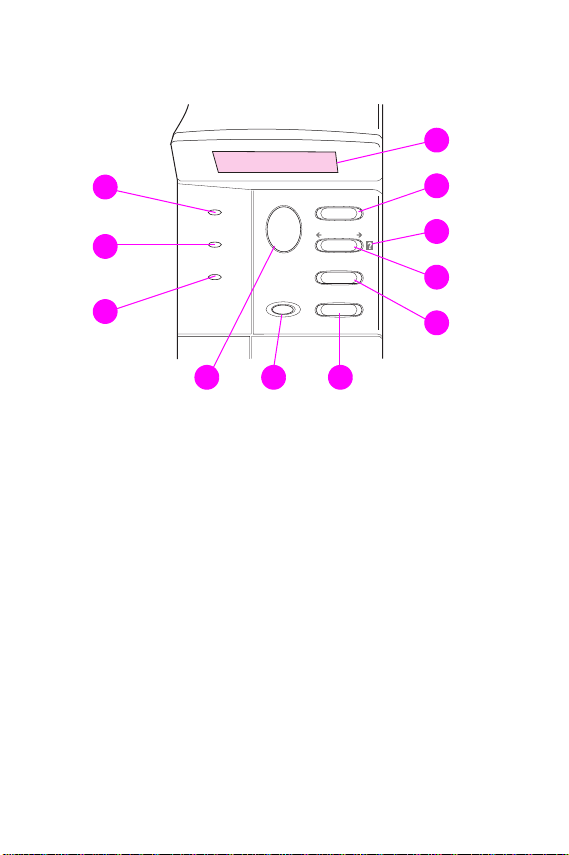
Control Panel
1
11
10
Ready
Data
Attention
Go
Cancel
Job
Menu
Item
– Value +
Select
9
7
Two-line display
1
Cycles through menus
2
Printer online help
3
Cycles through selected menu’s items
4
Cycles through selected menu item’s values
5
Saves selected control panel setting
6
Cancels current print job
7
Places printer online or offline, resumes printing,
8
68
and exits menus
Action is required–see display*
9
Processing information*
10
Printer is online*
11
* When LED is lit.
2
3
4
5
EN
Control Panel – 1
Page 8

To Change a Control Panel Setting
1
2
3
4
5
[Menu]
Press
Press
Press
Press
[Item]
[– Value +]
[Select]
until the desired menu appears.
until the desired item appears.
until the desired setting appears.
to save the selection. An asterisk (*)
will appear beside the new setting.
[Go]
Press
to exit the menu.
2 – Control Panel
EN
Page 9

Using the Printer Online Help System
This printer features an online help system on the
control panel that provides instructions for resolving
most printer errors. Certain control panel error
messages alternate with instructions on accessing the
online help system.
Whenever a
message alternates with
press the
instructions.
Note
Press
[Go]
appears in an error message, or a
[?]
FOR HELP PRESS THE ? KEY
key to navigate through a sequence of
[Item]
to exit the online help system.
,
EN
Control Panel – 3
Page 10

To Check the Printer’s Configuration
From the printer, you can print the following information
pages, which give details about the printer and its
configuration:
• Menu Map
• Configuration Page
• PCL or PS Font List
To Print a Menu Map:
1
2
3
To Print a Configuration Page:
1
2
3
To Print a PCL or PS Font List:
1
2
3
[Menu]
Press
[Item]
Press
Press
Press
Press
Press
Press
Press
until
[Select]
[Menu]
[Item]
until
[Select]
[Menu]
[Item]
until
PS FONT LIST
[Select]
Press
INFORMATION MENU
until
PRINT MENU MAP
to print the menu map.
INFORMATION MENU
until
PRINT CONFIGURATION
to print the configuration page.
INFORMATION MENU
until
PRINT PCL FONT LIST
appears.
to print the font list.
appears.
appears.
appears.
appears.
appears.
or
PRINT
4 – Control Panel
EN
Page 11

Common Printer Messages
Printer Messages and Explanations
Message Explanation
ACCESS DENIED
MENUS LOCKED
ENV FEEDER LOAD
[TYPE] [SIZE]
MANUALLY FEED
[TYPE] [SIZE]
OFFLINE
PERFORM PRINTER
MAINTENANCE
The control panel function you are trying to
access has been locked. See your network
adminstrator.
Load the requested envelope type and size into
the envelope feeder.
Make sure that the envelope size and type are
set correctly from the Paper Handling Menu.
Press
loaded in the feeder.
Press
types and sizes. Press
type or size.
Load the requested paper into Tray 1.
Press
in Tray 1.
Press
types and sizes. Press
alternate type or size.
Press
To ensure optimum print quality, the printer
prompts you to perform routine maintenance
every 200,000 pages. To order a Printer
Maintenance Kit, see the online user’s guide
that came with the printer.
if the desired envelope is already
[Go]
[– Value +]
[Go]
[– Value +]
[Go]
to scroll through the available
if the desired paper is already loaded
to scroll through the available
to place the printer online.
[Select]
[Select]
to accept the
to accept the
EN
Control Panel – 5
Page 12

Printer Messages and Explanations (Continued)
Message Explanation
TRAY X LOAD
[TYPE] [SIZE]
13.X PAPER JAM
[LOCATION]
Load the requested paper into the specified
tray (x). (See the sections on loading paper.)
Make sure that the trays are correctly adjusted
for size.The tray type settings (and size for
Tray 1) must be set from the printer’s control
panel.
If you are trying to print A4 or letter-size paper
and this message appears, make sure the
default paper size is set correctly from the
Printing Menu in the printer’s control panel.
Press [Go] to print from the next available tray.
Press [– Value +] to scroll through the available
types and sizes. Press [Select] to accept the
alternate type or size.
Remove jammed paper from the specified
location (see the section on Paper Jam
Locations).
Open the top cover.
Remove the toner cartridge and clear all paper
from underneath the toner cartridge area.
Caution
Ensure that all jammed paper is removed before
closing the top cover.
Open and close the top cover to clear the
message.
If the message persists after all jams have been
cleared, a sensor might be stuck or broken.
Contact an HP-authorized service or support
provider. (See the HP Customer Care Service
and Support pages in the online user’s guide.)
6 – Control Panel
EN
Page 13

Printer Messages and Explanations (Continued)
Message Explanation
41.3 UNEXPECTED
PAPER SIZE
The paper size you are trying to print is not the
same as the control panel setting.
Reload the tray with the correct paper size.
Make sure that the control panel setting is
correctly adjusted for size. (The printer will
continue trying to print the job until size settings
are correct.)
If you are printing from the optional 500-sheet
paper tray, check the paper size indication knob
located on the right front side of the tray and set
it to the correct paper size.
Ensure all multiple paper feeds are cleared from
paper tray areas.
After performing the actions above, press
The page containing the error will automatically
be reprinted. (Or, press
the job from the printer’s memory.)
[Cancel Job]
[Go]
to clear
.
EN
Control Panel – 7
Page 14

Printing Tasks
Manually Feeding Paper from Tray 1
The Manual Feed feature allows you to print on special
paper from Tray 1, such as envelopes or letterhead. If
Manual Feed is selected, the printer will print only from
Tray 1.
Select Manual Feed through the software or printer
driver. Manual Feed can also be enabled from the
Paper Handling Menu in the printer’s control panel.
Note
Settings in the software application and printer driver
override control panel settings.
When Manual Feed is selected, if
the printer automatically prints (if paper is in the tray). If
TRAY 1 MODE=CASSETTE
Tray 1 whether or not Tray 1 is loaded. This enables you
to load different paper if necessary. Press
from Tray 1.
8 – Printing Tasks
the printer prompts to load
TRAY 1 MODE=FIRST
[Go]
to print
EN
Page 15
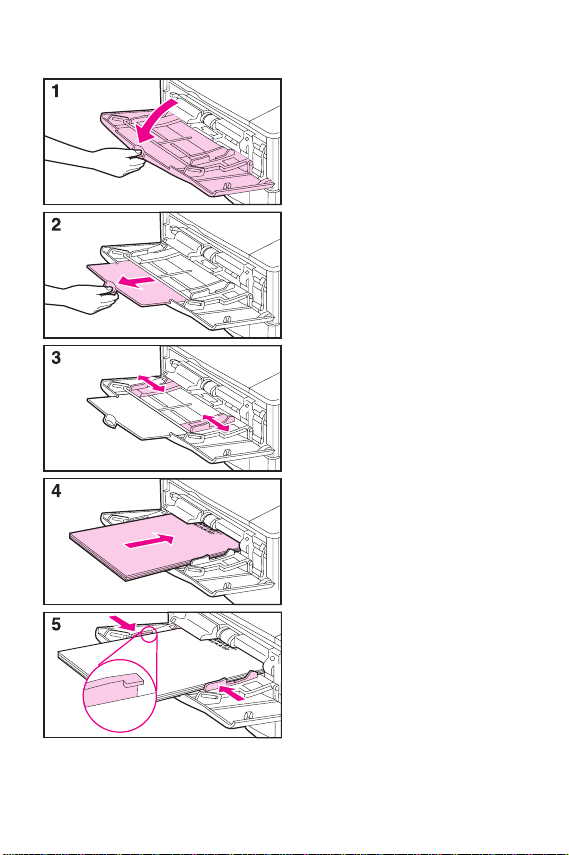
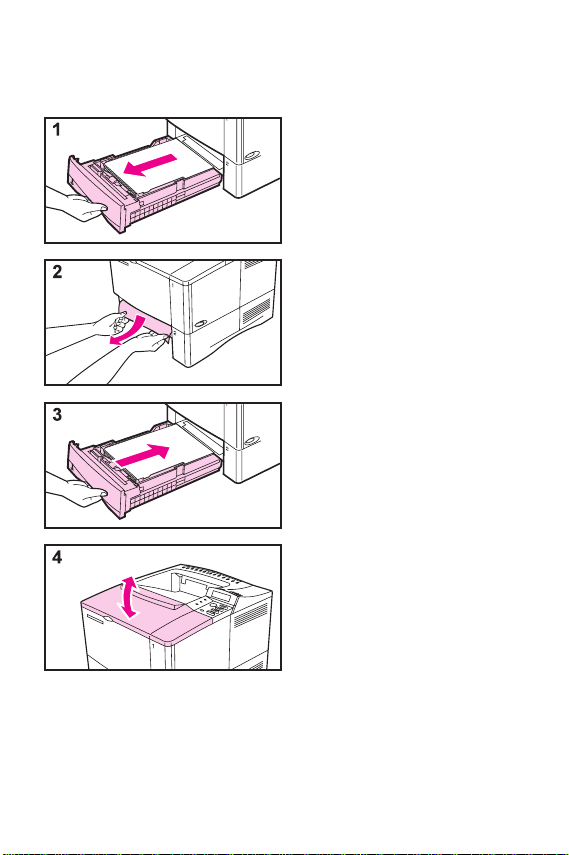
Loading Tray 1
Note
To avoid paper jams,
do not load trays while
the printer is printing.
EN
Printing Tasks – 9
Page 16

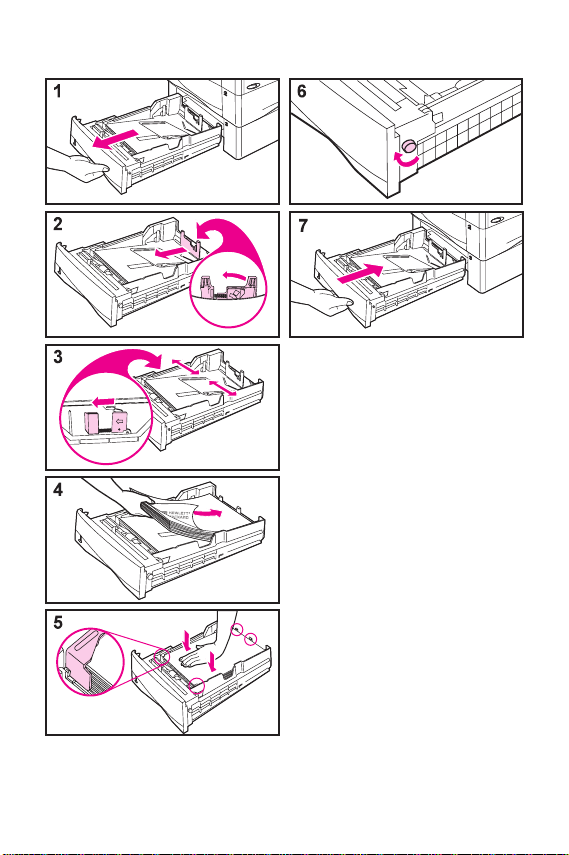
Loading Tray 2 (4050/4050 N)
Note
Make sure paper is
under the front and back
paper tabs to avoid
paper jams.
10 – Printing Tasks
EN
Page 17

Loading Trays 2 and 3 (4050 T/4050 TN)
Note
Make sure paper is
under the front and back
paper tabs to avoid
paper jams.
EN
Printing Tasks – 11
Page 18
Loading Optional 500-Sheet Tray
Note
Make sure paper is
under the front and back
paper tabs to avoid
paper jams.
12 – Printing Tasks
EN
Page 19

Loading Envelopes in the Envelope Feeder
EN
Printing Tasks – 13
Page 20

Special Paper in Tray 1
Envelopes
Letterhead/
Pre-Punched
Transparencies
Labels
Card Stock/
Custom Sizes
14 – Printing Tasks
EN
Page 21

Selecting the Output Bin
Top
Output
Bin
Rear
Output
Bin
Use the top output bin when
printing on the following:
• over 50 sheets of paper,
continuously
• transparencies
EN
Opening the rear output bin
might improve output quality
with the following:
• envelopes
• labels
• small custom-size paper
• postcards
• heavy paper
Printing Tasks – 15
Page 22

Paper Jams
Locations
5 1
1
Top cover area
2
Input tray area (optional envelope feeder)
3
Input tray areas
4
Optional duplexer
5
Output areas (top and rear)
2
34
16 – Paper Jams
EN
Page 23
Input Tray Areas
Trays 2 or 3
EN
Paper Jams – 17
Page 24

Optional Envelope Feeder
18 – Paper Jams
EN
Page 25

Top Cover Area
EN
Paper Jams – 19
Page 26
Toner Cartridge Area
20 – Paper Jams
EN
Page 27

Optional Duplexer
EN
Paper Jams – 21
Page 28

Output Areas
22 – Paper Jams
EN
Page 29

Solving Repeated Paper Jams
If paper jams occur frequently, try the following:
• Check all the paper jam locations. A piece of paper
might be stuck somewhere in the printer.
• Check that paper is correctly loaded in the trays,
that the trays are correctly adjusted for the loaded
paper size, and that the trays are not overfilled.
• Check that all trays and paper handling accessories
are completely inserted into the printer. (If a tray is
opened during a print job, this might cause a paper
jam.)
• Check that all covers and doors are closed. (If a
cover or door is opened during a print job, this might
cause a paper jam.)
• Try printing to a different output bin.
• The sheets might be sticking together. Try bending
the stack to separate each sheet. Do not fan the
stack.
• If you are printing from Tray 1, try feeding fewer
sheets of paper or fewer envelopes at a time.
• If you are printing from the envelope feeder, make
sure it is loaded correctly, pushing the bottom
envelope in slightly farther than the top envelopes.
Continued on the next page.
EN
Paper Jams – 23
Page 30

• If you are printing small sizes (less than 5 inches
long), feed paper short edge first.
• Turn over the stack of paper in the tray. Also try
rotating the paper 180°.
• Check the quality of the paper being printed.
Damaged or irregular paper should not be used.
• Use only paper that meets HP specifications.
• Avoid using paper that has already been used in a
printer or copier. (Do not print on both sides of
envelopes, transparencies, or labels.)
• Check that the power supplied to the printer is
steady, and meets printer specifications.
• Clean the printer as shown in the online user’s
guide.
• Perform routine printer maintenance. Order the
Printer Maintenance Kit. See the online user’s
guide that came with the printer.
24 – Paper Jams
EN
Page 31
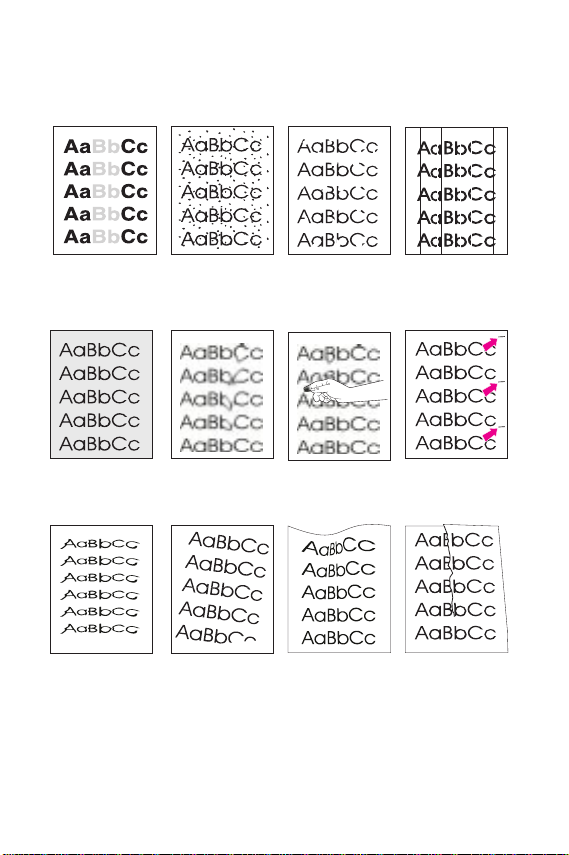
Output Quality Problems
Examples
Light Print or
Fade
Background
Misformed
Characters
EN
Specks
(front or
back)
Toner SmearGray
Page Skew
Dropouts
Loose Toner
Curl or Wave Wrinkles or
Output Quality Problems – 25
Lines
Repeating
Defects
Creases
Page 32

Troubleshooting Steps
Light Print or Fade
Specks
Dropouts
Lines
Gray Background
Toner Smear
Loose Toner
Repeating Defects
Misformed
Characters
Page Skew
Curl or Wave
Wrinkles or Creases
✓✓✓✓✓ ✓
✓✓✓
✓
✓✓
✓✓✓ ✓✓✓ ✓ ✓✓✓
✓✓✓ ✓✓
✓✓
✓✓
✓✓✓
Troubleshooting Steps
(Follow the steps in the
order they are listed.)
1. Print a few more pages
to see if the problem
will correct itself.
2. Clean the inside of the
printer or use the
printer’s cleaning
page.
3. Make sure
EconoMode is off.
4. Turn over the stack of
paper in the tray. Also
try rotating the paper
180°.
5. Check the paper (or
other print media) type
and quality.
6. Check the printer’s
environmental
specifications.
7. Make sure paper is
loaded correctly and
that the guides are not
too tight or too loose
against the paper
stack.
8. Print to a different
output bin.
9. Adjust the toner
density setting.
26 – Output Quality Problems
EN
Page 33

Troubleshooting Steps (Continued)
Troubleshooting Steps
(Follow the steps in the
order they are listed.)
Light Print or Fade
Specks
Dropouts
Lines
Gray Background
Toner Smear
Loose Toner
Repeating Defects
Misformed
Characters
Page Skew
Curl or Wave
Wrinkles or Creases
✓✓
✓
✓✓✓✓✓✓✓
✓✓
✓✓✓✓✓✓ ✓
✓✓✓✓✓✓✓✓ ✓ ✓✓✓
10. Change the fuser
mode setting to High or
choose rough paper
type from the printer
driver.
11. Redistribute the toner.
(See page 28.)
12. Install a new HP toner
cartridge. (See
instructions provided
with the toner
cartridge.)
13. To alternate small and
standard paper, from
the Configuration
Menu set
PAPER SPEED=SLOW.
14. Order and install the
Printer Maintenance
Kit.
15. After trying all the
steps suggested
above, contact an HPauthorized service or
support provider. (See
the HP Support pages
in the online user’s
guide.)
SMALL
EN
Output Quality Problems – 27
Page 34

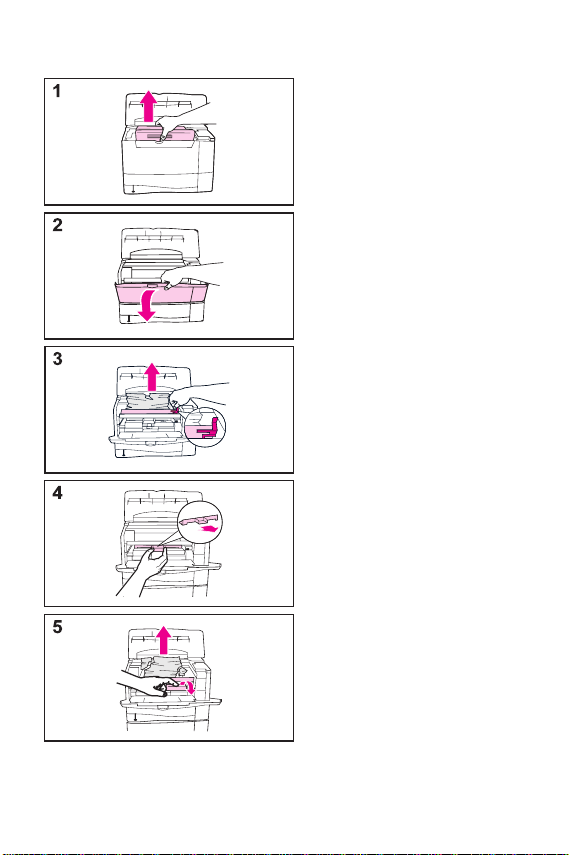
Continue Printing When Toner Is Low
Caution
To prevent damage to
the toner cartridge, do
not expose it to light for
more than a few
minutes.
Note
After reinserting the
toner cartridge, the
message
CARTRIDGE = NO
displays for 30 seconds .
Ignore this message
when removing the
toner cartridge to
redistribute toner.
NEW TONER
28 – Output Quality Problems
EN
Page 35

Checking the Toner Level
The user can find out how much toner is left in the
printer cartridge by printing a configuration page. The
Toner Level section on the configuration page provides
a graphical representation of how much toner is left in
the cartridge.
Note
After replacing a toner cartridge, select
TONER CARTRIDGE=NO
message is displayed on the
control panel. Failure to do so might make the toner le vel
value inaccurate.
when the
YES
NEW
EN
Output Quality Problems – 29
Page 36

Resetting the HP TonerGauge
After a new toner cartridge is installed, the user must
reset the HP T onerGauge from the control panel. When
the top cover is closed after installing the new toner
cartridge, the
displayed on the control panel for approximately 30
seconds. To reset the HP TonerGauge:
1
Press
2
Press
3
Press
Note
[Menu]
Press
appears, if the
no longer displayed on the control panel. Press
repeatedly until
complete steps 1 through 3 above.
NEW TONER CARTRIDGE=NO
[– Value +]
[Select]
[Go]
to save the selection.
to exit the menu.
repeatedly until
until
YES
appears.
CONFIGURATION MENU
NEW TONER CARTRIDGE=NO
NEW TONER CARTRIDGE=NO
message is
message is
[Item]
appears, then
30 – Output Quality Problems
EN
Page 37

Resetting the Printer
You can reset the printer by selecting the reset items in
the Resets Menu.
Use this menu with caution. You can lose buffered page
data or printer configuration settings when you select
these items. Only reset the printer under the following
circumstances:
• You want to restore the printer's default settings.
• Communication between the printer and computer
has been interrupted.
• You are using both the serial and parallel I/O ports,
and one of the ports is having problems.
(The items in the Resets Menu will clear all memory in
the printer, while
job.)
[Cancel Job]
clears only the current
EN
Output Quality Problems – 31
Page 38

Resets Menu Items
Item Explanation
RESET MEMORY
RESTORE FACTORY
SETTINGS
RESET ACTIVE
I/O CHANNEL
RESET ALL I/O
CHANNELS
This item clears the printer buffer and the active
I/O input buffer, and resets the control panel to
the current settings.
Resetting memory during a print job can result in
data loss.
This item performs a simple reset and restores
most of the factory (default) settings. This item
also clears the input buffer for the active I/O.
Resetting memory during a print job can result in
data loss.
This item performs a simple reset and clears the
input and output buffers (for the active I/Os only).
Resetting memory during a print job can result in
data loss.
This item performs a simple reset and clears the
input and output buffers for all I/Os.
32 – Output Quality Problems
EN
Page 39

Paper Sizes Supported
Supported Sizes, Tray 1
Tray 1 Dimensions Weight Capacity
Minimum Size
(custom)
Maximum Size
Transparency
Labels
Envelopes
* For paper sizes smaller than 5 in (127 mm), the paper should be fed short
edge first.
3 by 5 in*
(76 by 127 mm)
8.5 by 14 in
(216 by 356
mm)
Same as
minimum and
maximum paper
sizes listed
above.
16 to 53 lb
(60 to 199 g/m
Thickness:
0.0039 in to
0.0045 in
(0.099 to
0.114 mm)
Thickness:
0.005 in to
0.007 in
(0.127 mm to
0.178 mm)
20 to 28 lb
(75 to 105 g/m
100 sheets of
20 lb
2
)
(75 g/m
paper
transparencies
50 labels
10 envelopes
2
)
75
2
)
EN
Paper Sizes Supported – 33
Page 40

Supported Sizes, Trays 2 and 3
Trays 2 and 3
(4050 T/
4050 TN) Dimensions Weight Capacity
Letter 8.5 by 11 in
(216 by 279
mm)
A4 8.3 by 11.7 in
(210 by 297
mm)
Executive 7.3 by 10.5 in
(191 by 267
mm)
Legal 8.5 by 14 in
(216 by 356
mm)
B5 (ISO)
(Custom)
6.9 by 9.9 in
(176 by 250
mm)
16 to 28 lb
(60 to 105 g/m
250 sheets of
20 lb
(75 g/m
2
50-100
)
transparencies
2
) paper
B5 (JIS) 7.2 by 10 in
(182 by 257
mm)
A5
(Custom)
5.8 by 8.2 in
(149 by 210
mm)
34 – Paper Sizes Supported
EN
Page 41

Supported Sizes, Tray 2 (4050/4050 N)
Tray 2
(4050 /4050 N) Dimensions Weight Capacity
Letter 8.5 by 11 in
A4 8.3 by 11.7 in
Legal 8.5 by 14 in
(216 by 279
mm)
(210 by 297
mm)
(216 by 356
mm)
16 to 28 lb
(60 to 105 g/m
500 sheets of
20 lb
(75 g/m
2
50-100
)
transparencies
2
) paper
EN
Paper Sizes Supported – 35
Page 42

Supported Sizes, Optional 500-Sheet Tray
Optional
500-Sheet
Tray Dimensions Weight Capacity
Letter 8.5 by 11 in
A4 8.3 by 11.7 in
Executive 7.3 by 10.5 in
Legal 8.5 by 14 in
B5 (ISO)
(Custom)
B5 (JIS) 7.2 by 10 in
A5
(Custom)
Executive (JIS)
(Custom)
16K
(Custom)
Custom 5.8 by 8.2 in up to
(216 by 279 mm)
(210 by 297 mm)
(191 by 267 mm)
(216 by 356 mm)
6.9 by 9.9 in
(176 by 250 mm)
(182 by 257 mm)
5.8 by 8.2 in
(148 by 210 mm)
8.5 by 13 in
(216 by 330 mm)
7.75 by 10.75 in
(197 by 327 mm)
8.5 by 14 in
(149 by 210 up to
216 by 356 mm)
16 to 28 lb
(60 to 105 g/m
(75 g/m
2
)
transparencies
500 sheets of
20 lb
2
) paper
50-100
36 – Paper Sizes Supported
EN
Page 43

For More Information
• See the online user’s guide that came with the
printer.
• See the printer software or printer driver help.
EN
For More Information – 37
Page 44

38 – For More Information
EN
Page 45

Page 46

Printedonatleast
50%TotalRecycledFiberwith
atleast10%Post-ConsumerPaper
Copyright© 1999
Hewlett-Packard Co.
Printed in USA
Manual Part No.
C4251-90927
*C4251-90927*
*C4251-90927*
C4251-90927
 Loading...