

Page 1

HP Deskjet D4300 series
Windows Help
Page 2

HP Deskjet D4300 Printer series
HP Photosmart Software Help
Page 3

© 2007 Hewlett-Packard Development
Company, L.P.
Hewlett-Packard Company
notices
The information contained in this
document is subject to change without
notice.
All rights reserved. Reproduction,
adaptation, or translation of this
material is prohibited without prior
written permission of Hewlett-Packard,
except as allowed under copyright laws.
The only warranties for HP products
and services are set forth in the express
warranty statements accompanying
such products and services. Nothing
herein should be construed as
constituting an additional warranty. HP
shall not be liable for technical or
editorial errors or omissions contained
herein.
Acknowledgements
Windows and Windows XP are U.S.
registered trademarks of Microsoft
Corporation. Windows Vista is either a
registered trademark or trademark of
Microsoft Corporation in the United
States and/or other countries.
Accessibility
Your HP printer provides a number of
features that make it accessible for
people with disabilities.
product accessibility, visit HP's Web
site at:
www.hp.com/accessibility.
Visual
The printer software is accessible for
users with visual impairments or low
vision through the use of Windows
accessibility options and features. It
also supports most assistive technology
such as screen readers, Braille readers,
and voice-to-text applications. For
users who are color blind, colored
buttons and tabs used in the software
and on the HP printer have simple text
or icon labels that convey the
appropriate action.
Mobility
For users with mobility impairments, the
printer software functions can be
executed through keyboard
commands. The software also supports
Windows accessibility options such as
StickyKeys, ToggleKeys, FilterKeys,
and MouseKeys. The printer doors,
buttons, paper trays, and paper guides
can be operated by users with limited
strength and reach.
Support
For more details about the accessibility
of this product and HP's commitment to
Page 4

Contents
1Welcome....................................................................................................................................6
2 Special features........................................................................................................................8
3 Get started
The printer at a glance................................................................................................................9
Buttons and lights.....................................................................................................................10
Power button and light........................................................................................................11
Cancel button.....................................................................................................................11
Resume button and light.....................................................................................................12
Print Cartridge Status lights................................................................................................12
Front USB port lights..........................................................................................................14
Paper trays...............................................................................................................................14
Unfold the paper trays........................................................................................................15
Input tray.............................................................................................................................16
Paper guide........................................................................................................................16
Output tray..........................................................................................................................16
Fold the paper trays............................................................................................................17
Print cartridges..........................................................................................................................18
Use print cartridges.............................................................................................................19
Replace print cartridges......................................................................................................19
Ink-backup mode......................................................................................................................19
Ink-backup mode output.....................................................................................................20
Exit ink-backup mode.........................................................................................................20
Contents
4 Connect the printer
USB..........................................................................................................................................21
5 Print photos using the front USB port
About the front USB port..........................................................................................................22
Print photos from the front USB port........................................................................................22
About the front USB port lights.................................................................................................23
6 Print photos
Print borderless photos.............................................................................................................25
Print photos with a border.........................................................................................................27
HP Real Life Technologies photo fix........................................................................................29
Photo print cartridge.................................................................................................................30
Advanced color settings...........................................................................................................30
Exif Print...................................................................................................................................31
Store and handle photo paper..................................................................................................31
Save money and ink when printing photos...............................................................................32
Share photos with friends and family........................................................................................32
Other photo projects.................................................................................................................32
1
Page 5

7 Print other documents
Print e-mail................................................................................................................................34
Print documents........................................................................................................................35
Print letters................................................................................................................................36
Print envelopes.........................................................................................................................37
Print postcards..........................................................................................................................38
Print hagaki cards ....................................................................................................................39
Print index cards and other small media..................................................................................40
Print labels................................................................................................................................41
Contents
Print transparencies..................................................................................................................42
Print brochures.........................................................................................................................43
Print greeting cards..................................................................................................................44
Print booklets............................................................................................................................44
Print posters..............................................................................................................................46
Print iron-on transfers...............................................................................................................47
8 Printing tips
Print a test page.......................................................................................................................49
Printing shortcuts......................................................................................................................49
Create printing shortcuts....................................................................................................50
Delete printing shortcuts.....................................................................................................50
Fast/Economical printing..........................................................................................................51
General Everyday printing........................................................................................................51
Presentation printing.................................................................................................................51
Select a paper type...................................................................................................................51
Select a specific paper type................................................................................................51
Change the print speed or quality.............................................................................................52
View the print resolution...........................................................................................................52
Maximum dpi............................................................................................................................52
Print in grayscale......................................................................................................................53
Set the page order....................................................................................................................53
Set a custom paper size...........................................................................................................54
Print multiple pages on a single sheet of paper........................................................................55
Resize a document ..................................................................................................................55
Print preview.............................................................................................................................56
Two-sided printing....................................................................................................................56
Bound two-sided documents....................................................................................................57
Print a Web page......................................................................................................................58
9 Printer software
Make the HP Deskjet the default printer...................................................................................60
Set default print settings...........................................................................................................60
Printer Properties dialog box....................................................................................................61
What's This? help.....................................................................................................................62
Download printer software updates..........................................................................................62
2
Page 6

Contents
10 Maintenance
Install print cartridges...............................................................................................................63
Choose the right print cartridges........................................................................................63
Selection numbers..............................................................................................................64
Printing with one print cartridge..........................................................................................64
Installation instructions.......................................................................................................64
Align print cartridges.................................................................................................................66
Automatically clean print cartridges..........................................................................................66
Calibrate print quality................................................................................................................67
View estimated ink levels.........................................................................................................67
Maintain the printer body..........................................................................................................68
Remove ink from your skin and clothing...................................................................................68
Manually clean print cartridges.................................................................................................68
Maintain print cartridges...........................................................................................................69
Print cartridge storage and handling...................................................................................70
Print cartridge protector......................................................................................................70
Printer Toolbox.........................................................................................................................71
11 Shop for ink supplies ............................................................................................................72
12 Troubleshooting
Error messages........................................................................................................................73
Print cartridge error messages...........................................................................................73
Incorrect print cartridge or print cartridge missing........................................................73
Print cartridge problem message..................................................................................74
Print cartridge carriage is stuck....................................................................................74
"Paper Mismatch" or "Paper Size" message......................................................................76
Out of paper........................................................................................................................77
There was an error writing to USB port..............................................................................77
Two-way communication cannot be established or Printer not responding.......................77
Installation problems.................................................................................................................77
Printer lights are on or flashing.................................................................................................80
Power light is flashing ........................................................................................................80
Resume light is flashing......................................................................................................81
Both Power and Resume lights are flashing.......................................................................81
Print Cartridge Status lights are on or flashing...................................................................82
Front USB port lights are flashing.......................................................................................83
Printer does not print................................................................................................................83
Verify the following.............................................................................................................83
Check the printer lights.......................................................................................................83
Unable to print....................................................................................................................83
If the printer still does not print...........................................................................................89
Document prints slowly.............................................................................................................89
Print cartridge problems...........................................................................................................90
Resolving print cartridge error messages...........................................................................90
Print cartridge carriage is stalled........................................................................................93
Paper problems........................................................................................................................96
Paper jam...........................................................................................................................96
Out of paper........................................................................................................................98
Printer prints on multiple sheets at once..........................................................................102
Contents
3
Page 7

Contents
Photos do not print correctly...................................................................................................102
Check the paper tray........................................................................................................102
Check the printer properties.............................................................................................103
Part of the photo is faded.................................................................................................103
Fading occurs on the edges of a photo......................................................................103
Fading occurs near the edges of a photo...................................................................104
Problems with borderless documents.....................................................................................104
Borderless printing guidelines..........................................................................................104
Part of the photo is faded.................................................................................................105
Fading occurs on the edges of a photo......................................................................105
Fading occurs near the edges of a photo...................................................................106
Photo has an unwanted border........................................................................................106
For most paper types..................................................................................................106
For photo paper with a tear-off tab.............................................................................107
Print quality is poor.................................................................................................................108
Wrong, inaccurate, or bleeding colors..............................................................................108
Ink is not filling the text or graphics completely................................................................111
The printout has a horizontal band of distortion near the bottom of a borderless
print...................................................................................................................................112
Printouts have horizontal streaks or lines.........................................................................113
Printouts are faded or have dull colors.............................................................................115
Printouts seem blurry or fuzzy..........................................................................................116
Printouts are slanted or skewed.......................................................................................117
Ink streaks on the back of the paper................................................................................117
Document is misprinted..........................................................................................................119
Front USB port problems........................................................................................................120
If you continue to have problems............................................................................................121
A HP support
Ink cartridge warranty information..........................................................................................122
Support process.....................................................................................................................122
HP support by phone..............................................................................................................122
Phone support period.......................................................................................................123
Placing a call....................................................................................................................123
After the phone support period.........................................................................................123
B Technical information
Printer specifications..............................................................................................................124
Notice to Windows 2000 users...............................................................................................124
4
Page 8

Contents
Environmental product stewardship program.........................................................................124
Paper use.........................................................................................................................125
Plastics.............................................................................................................................125
Material safety data sheets...............................................................................................125
Recycling program............................................................................................................125
HP inkjet supplies recycling program...............................................................................125
Energy Star® notice.........................................................................................................125
Disposal of waste equipment by users in private households in the European
Union................................................................................................................................127
Regulatory notices..................................................................................................................127
FCC statement..................................................................................................................128
Notice to users in Korea...................................................................................................128
VCCI (Class B) compliance statement for users in Japan................................................129
Notice to users in Japan about the power cord................................................................129
Toxic and hazardous substance table..............................................................................129
HP Deskjet D4300 Printer series declaration of conformity..............................................130
Index............................................................................................................................................131
Contents
5
Page 9
1 Welcome
Welcome to the HP Deskjet D4300 Printer series Help. This guide primarily explains how
to use your computer and the printer together. For more information on transferring
photos from digital cameras and other USB devices to your computer using the printer,
see the following table and select an appropriate topic. You can also use the table of
contents pane on the left to locate information.
If you are using the product with a Windows 2000 computer, some features may not be
available. For more information, see
NOTE: For information about installing the software, see the Setup Guide that came
with the printer.
Welcome
Section Description
Special features Learn about some of the printer's special features.
Get started Learn how to operate the printer and use and replace the print
USB Learn how to connect the printer to your computer.
Print photos using the front
USB port
Print photos Learn how to print photos, adjust the appearance of photos
Print other documents Learn how to print a variety of documents, including e-mail,
Printing tips Learn how to use printing shortcuts, select a paper type, change
Printer software Learn how to make the HP Deskjet the default printer, set default
Maintenance Learn how to install and care for print cartridges, view how much
HP support Find out how to contact HP support.
Notice to Windows 2000 users.
cartridges.
Learn how to use the front USB port on the printer to transfer and
print photos from a digital camera.
before you print, install a photo print cartridge, store and handle
photo paper, and share photos with friends and family.
greeting cards, envelopes, labels, posters, booklets,
transparencies, and iron-on media.
the print resolution, set the page order, print multiple pages on
a single sheet, preview a document, and use two-sided printing.
print settings, and download printer software updates.
ink is left in a print cartridge, print a test page, and remove ink
stains.
6Welcome
Page 10

(continued)
Section Description
Troubleshooting Find a solution to a hardware or software problem.
Shop for ink supplies Learn how to order supplies for the printer.
Printer specifications Learn about the paper capacity, requirements, and other
specifications for the printer.
HP inkjet supplies recycling
Find out how to recycle print cartridges.
program
Welcome
Welcome 7
Page 11

2 Special features
Congratulations! The HP Deskjet is equipped with several exciting features:
• Borderless printing: Use the entire page surface when printing photos and with the
borderless printing feature. For information, see
brochures.
• Six-ink upgradeable printing: Enhance photo printing with a photo print cartridge
(purchased separately). For information, see
• Ink-backup mode: Print with one print cartridge. For information, see
mode.
• Printing from a digital camera: Transfer photos from a digital camera to your
computer using the front USB port for easy printing. For information, see
using the front USB port.
• Print Cartridge Status display: Know when a print cartridge is low on ink by viewing
the print cartridge status lights. For more information, see
lights.
• Panoramic printing: Print panoramic photos with borders or without borders.
• HP Vivera Inks: Get true-to-life photo quality and exceptional fade resistance with
vivid colors that last. HP Vivera Inks are specially formulated and scientifically tested
for quality, purity and fade resistance.
Print borderless photos or Print
Photo print cartridge.
Ink-backup
Print photos
Print Cartridge Status
Special features
8 Special features
Page 12
3 Get started
• The printer at a glance
Buttons and lights
•
Paper trays
•
Print cartridges
•
Ink-backup mode
•
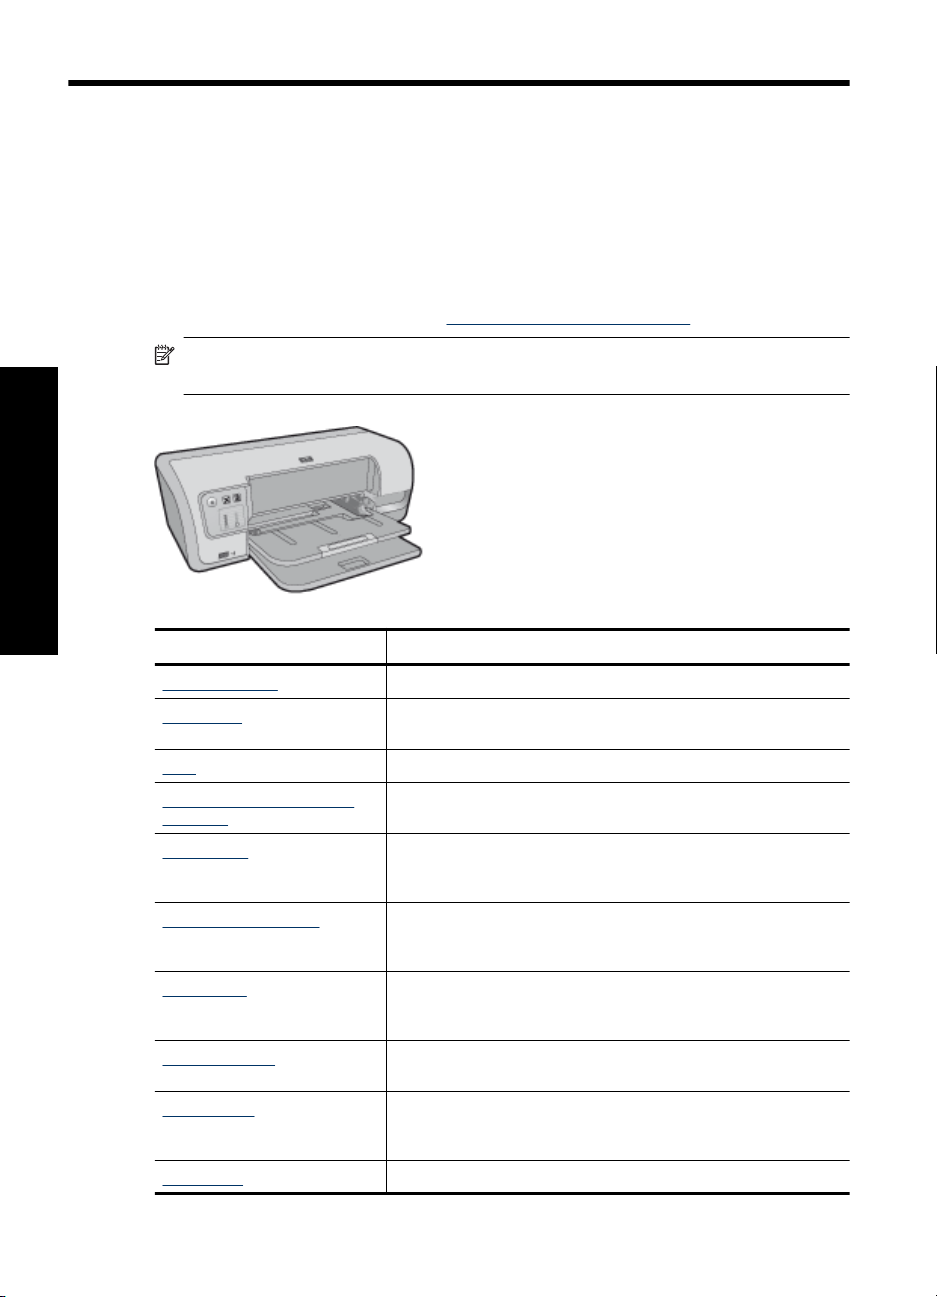
The printer at a glance
Click the links below to learn about the printer features.
1 Buttons and lights
2 Front USB port
3 Paper trays
1 Print cartridges
Get started
Get started 9
Page 13
Chapter 3
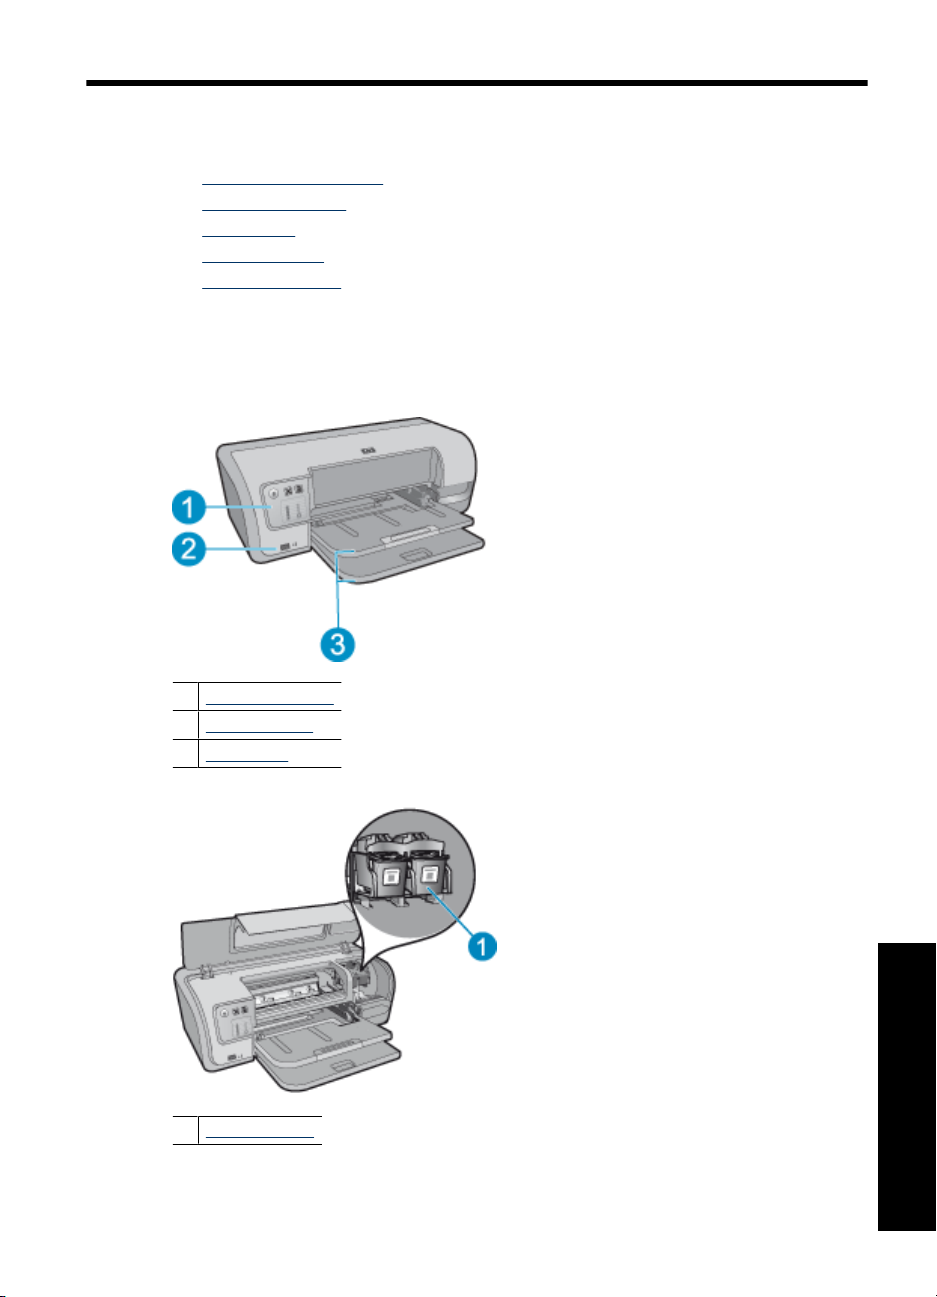
1 USB port
Buttons and lights
Use the printer buttons to turn the printer on and off, cancel a print job, and restart a job.
The printer lights give you visual cues about the status of the printer.
Get started
10 Get started
1 Power button and light
2 Cancel button
3 Resume button and light
4 Print Cartridge Status lights
5 Front USB port lights
Page 14
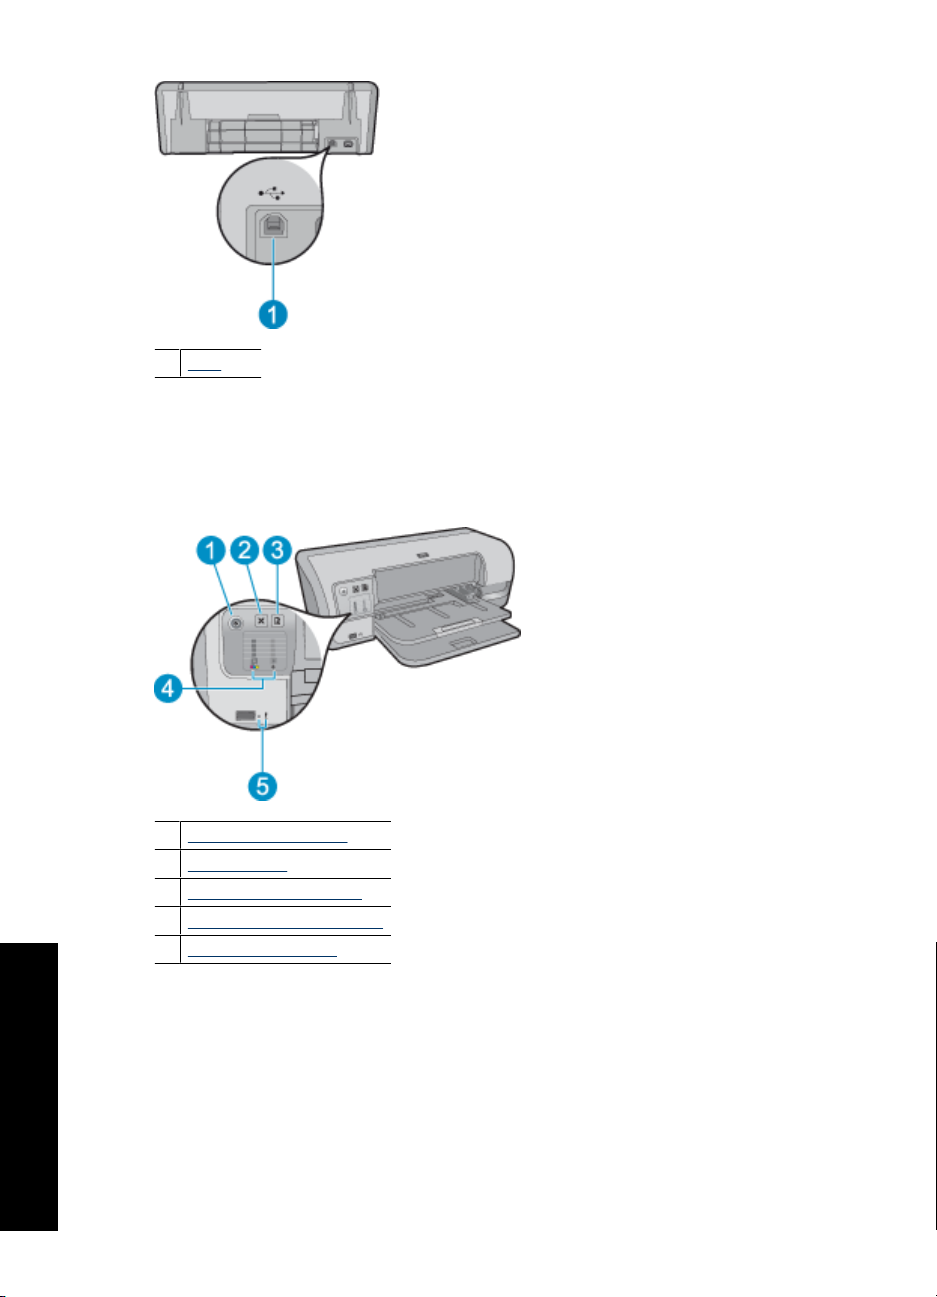
Power button and light
Use the Power button to turn the printer on and off. It can take a few seconds for the
printer to turn on after you press the Power button.
1 Power button and light
The Power light flashes when the printer is processing.
CAUTION: Always use the Power button to turn the printer on and off. Using a power
strip, surge protector, or a wall-mounted switch to turn the printer on and off might
cause printer failure.
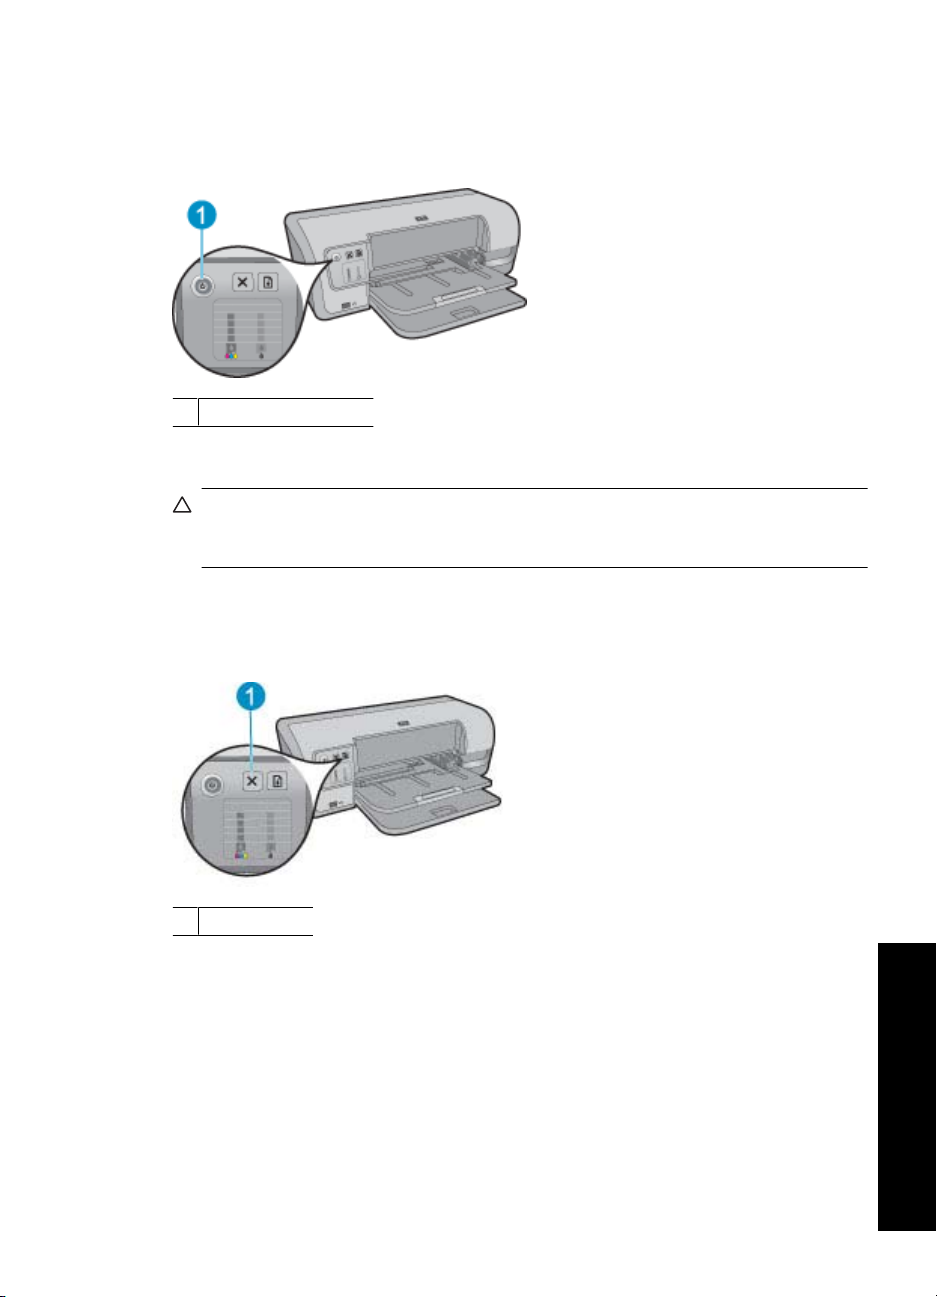
Cancel button
Use the Cancel button to cancel the current print job.
1 Cancel button
Get started
Buttons and lights 11
Page 15
Chapter 3
Resume button and light
The Resume light flashes when an action is required, such as loading paper or clearing
a paper jam. When the problem is solved, press the Resume button to continue printing.
1 Resume button and light
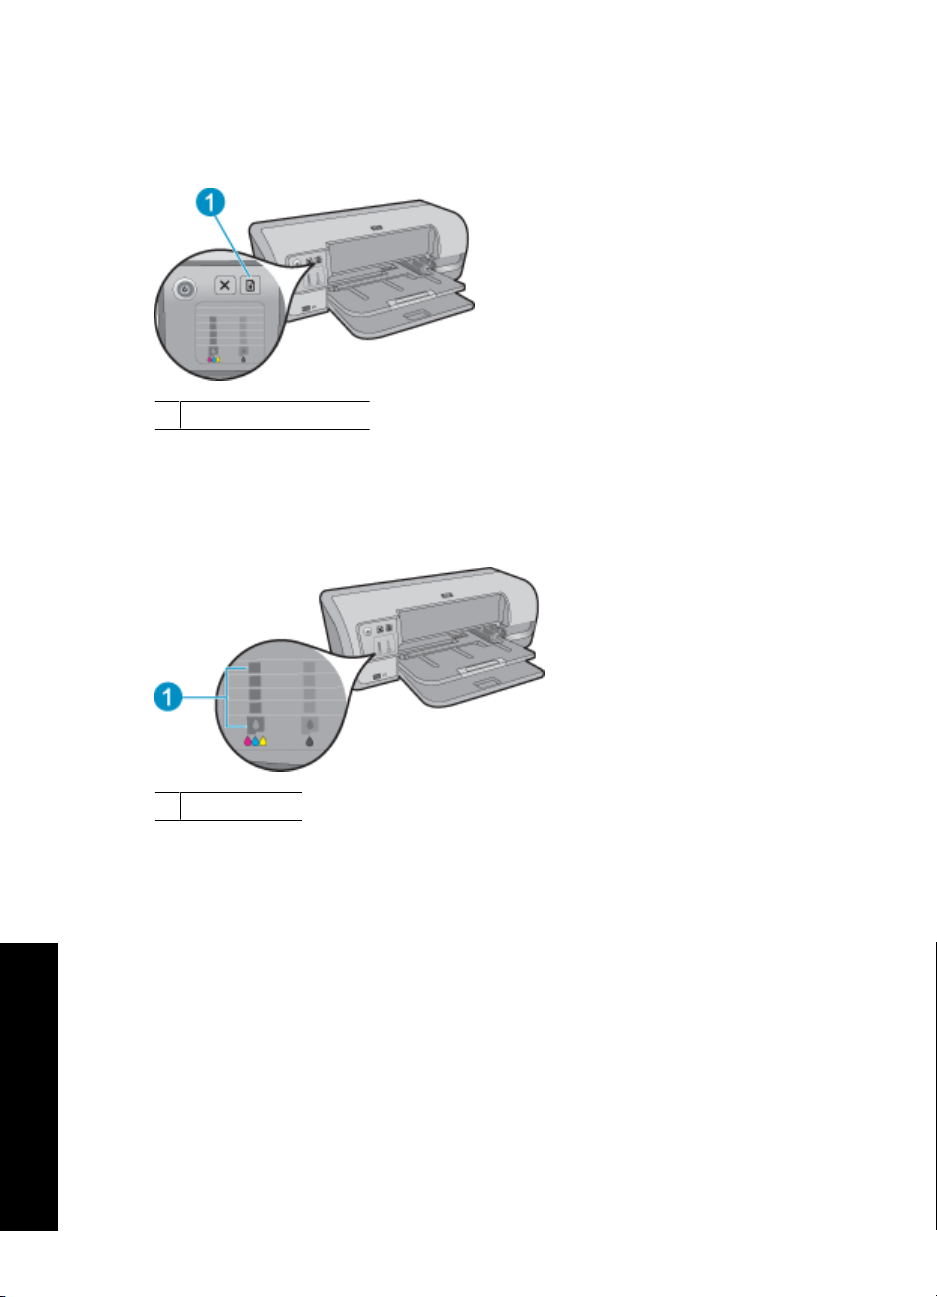
Print Cartridge Status lights
The Print Cartridge Status lights and the Ink Level lights offer the status and ink level
information for each print cartridge.
Get started
12 Get started
1 Ink Level lights
Page 16
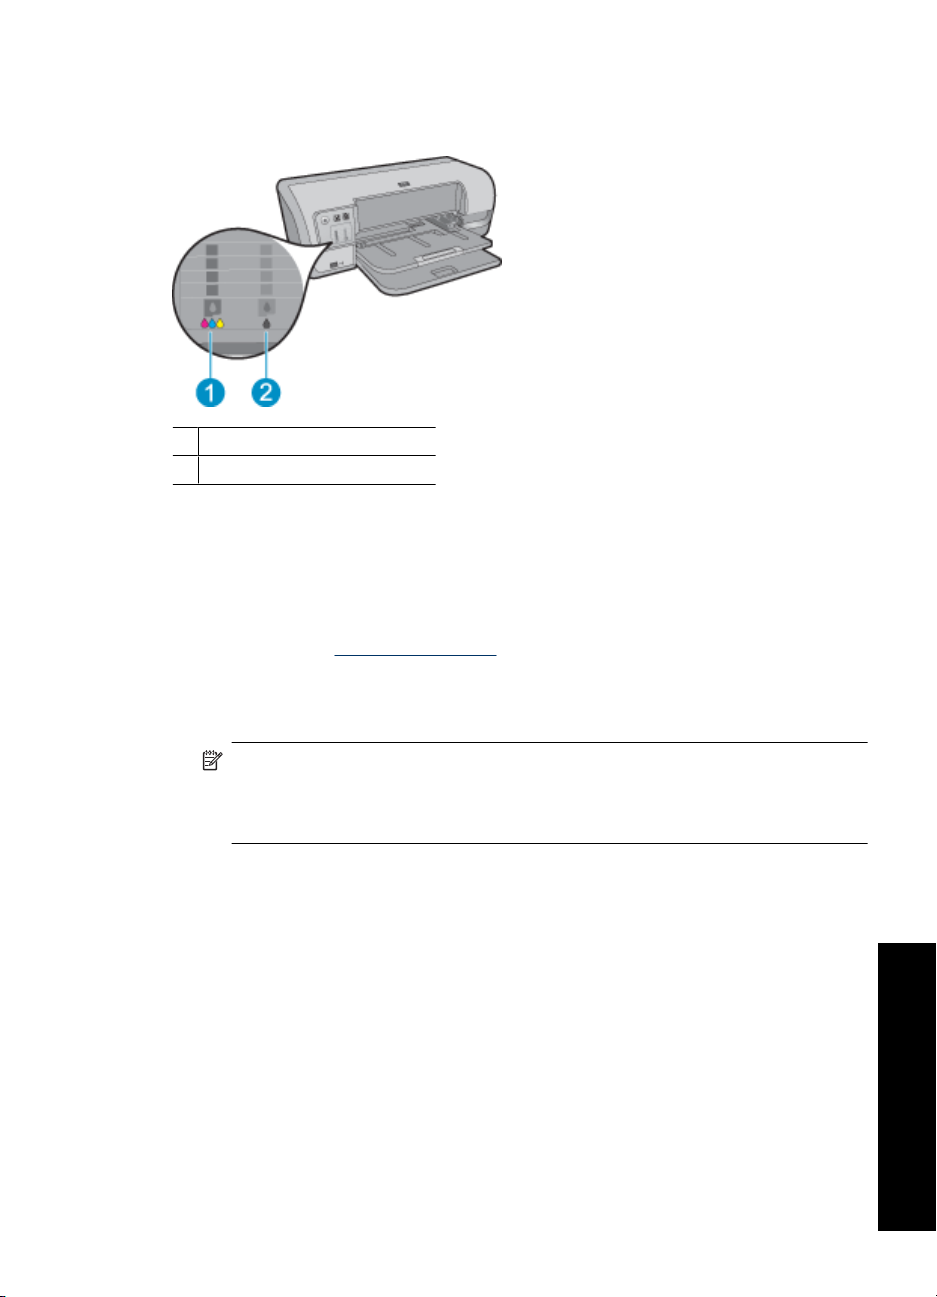
The Ink Level lights show ink level information for each print cartridge, four for the tri-color
cartridge and four for the black/photo cartridge.
1 Tri-color print cartridge light
2 Black/Photo print cartridge light
1. The left status light represents the tri-color print cartridge, which is installed in the left
side of the print cartridge carriage.
• The light is on and solid when the tri-color print cartridge is low on ink.
• The light flashes when the tri-color print cartridge needs to be serviced.
2. The right status light represents the black or the photo print cartridge. For more
information, see
Photo print cartridge. One of these print cartridges is installed in the
right side of the print cartridge carriage.
• The light is on and solid when the black or photo print cartridge is low on ink.
• The light flashes when the black or photo print cartridge needs to be serviced.
NOTE: Ink level warnings and indicators provide estimates for planning
purposes only. When you receive a low-ink warning message, consider having a
replacement cartridge available to avoid possible printing delays. You do not need
to replace the print cartridges until print quality becomes unacceptable.
Buttons and lights 13
Get started
Page 17
Chapter 3
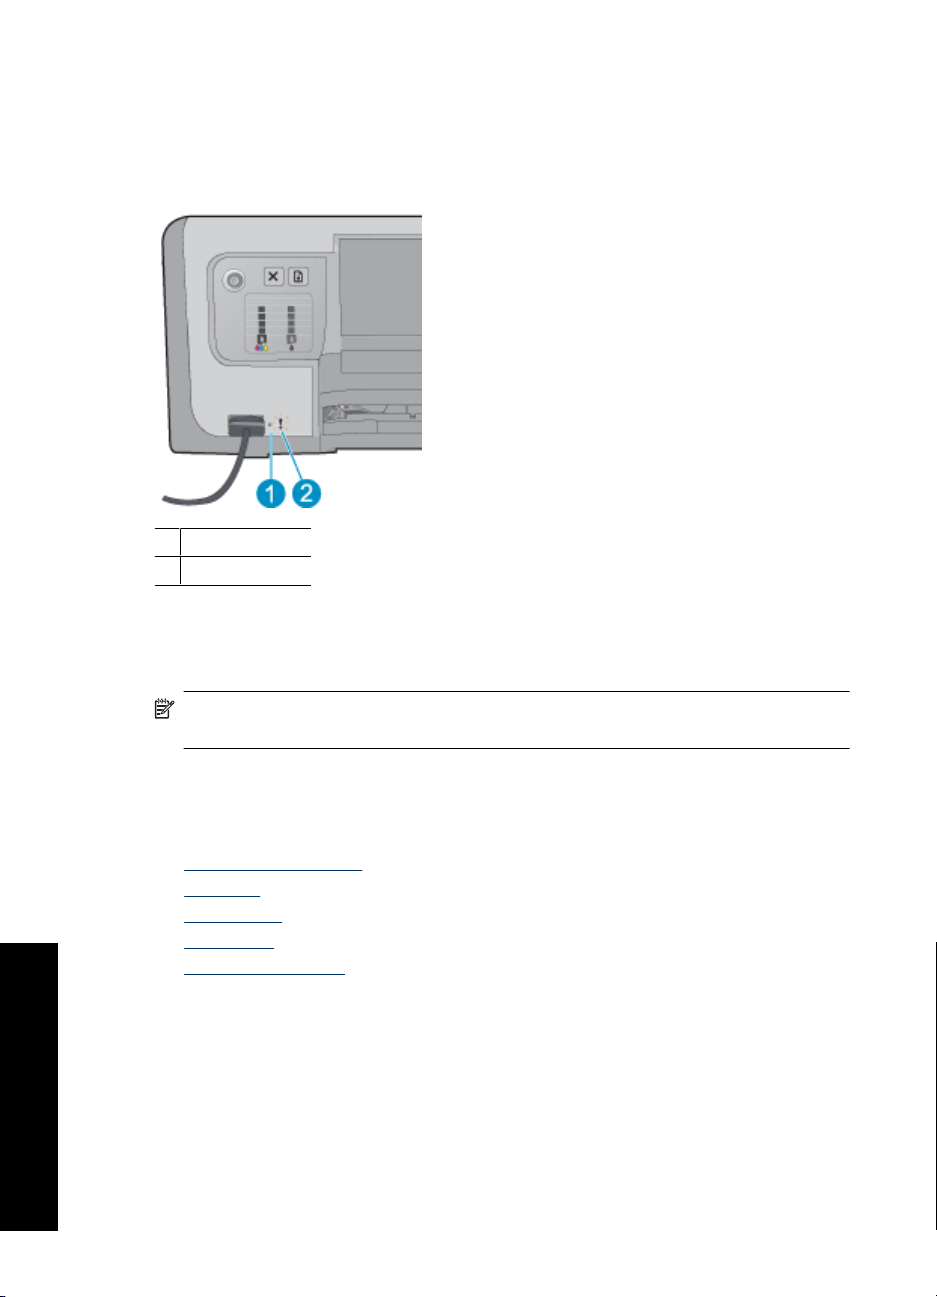
Front USB port lights
To transfer photos from a digital camera, external card reader, or USB flash drive, to your
computer, just plug the camera or other device into the printer's front USB port. You can
then print the photos using HP Photosmart Software.
1 Connection light
2 Error light
Paper trays
Get started
When the camera is connected correctly, the Connection light is illuminated. The
Connection light blinks green when printing from the camera. If the camera is not set to
the correct mode for downloading photos, the Error light flashes.
NOTE: You can also use the front USB port to download images from external card
readers, USB flash drives, and other USB devices.
For information about the paper trays, select one of these topics.
•
Unfold the paper trays
Input tray
•
Paper guide
•
Output tray
•
Fold the paper trays
•
14 Get started
Page 18
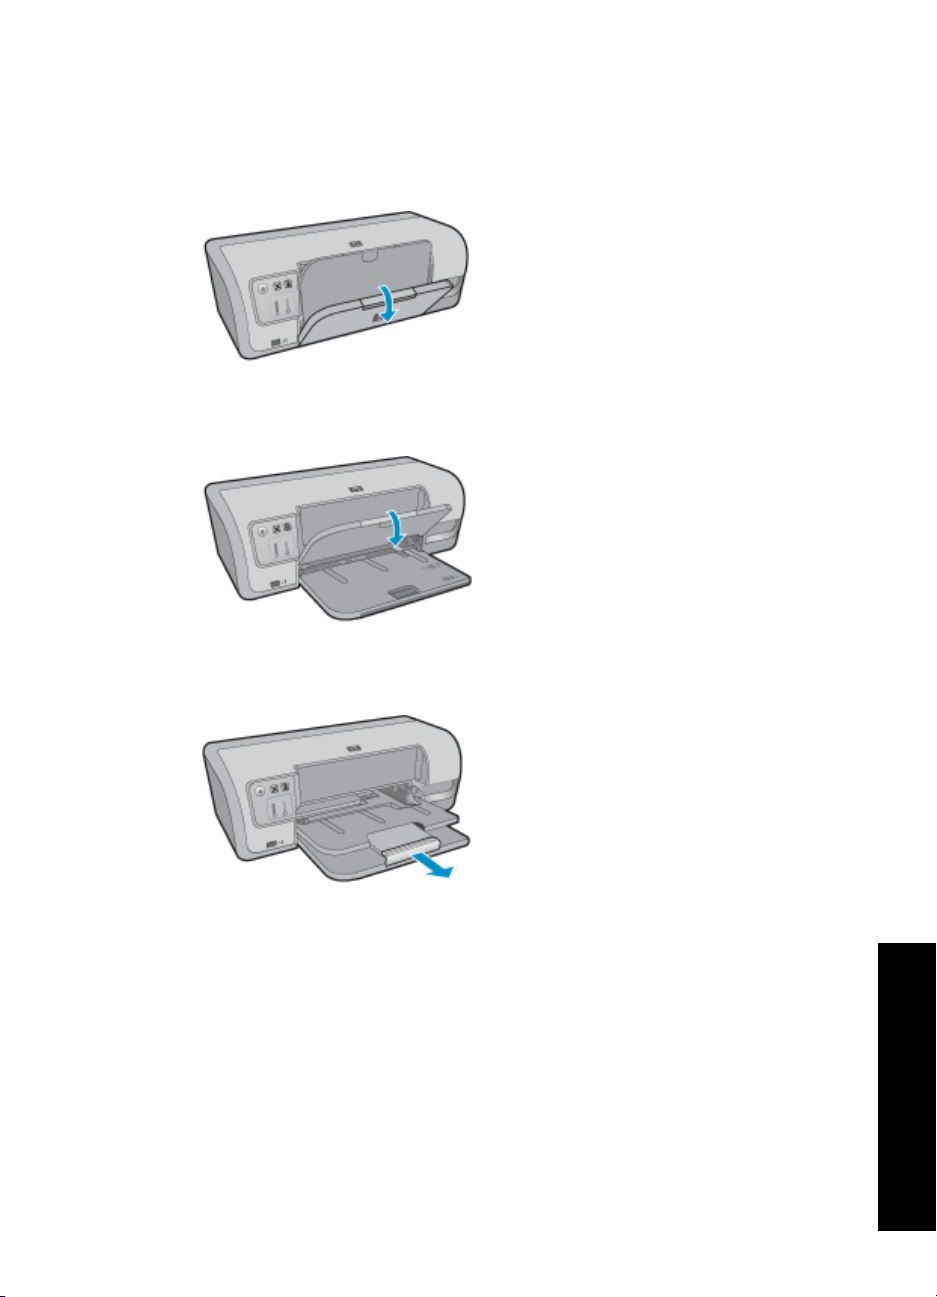
Unfold the paper trays
To unfold the paper trays
1. Lower the input tray.
2. Lower the output tray.
3. Pull out the output-tray extension.
Paper trays 15
Get started
Page 19
Chapter 3
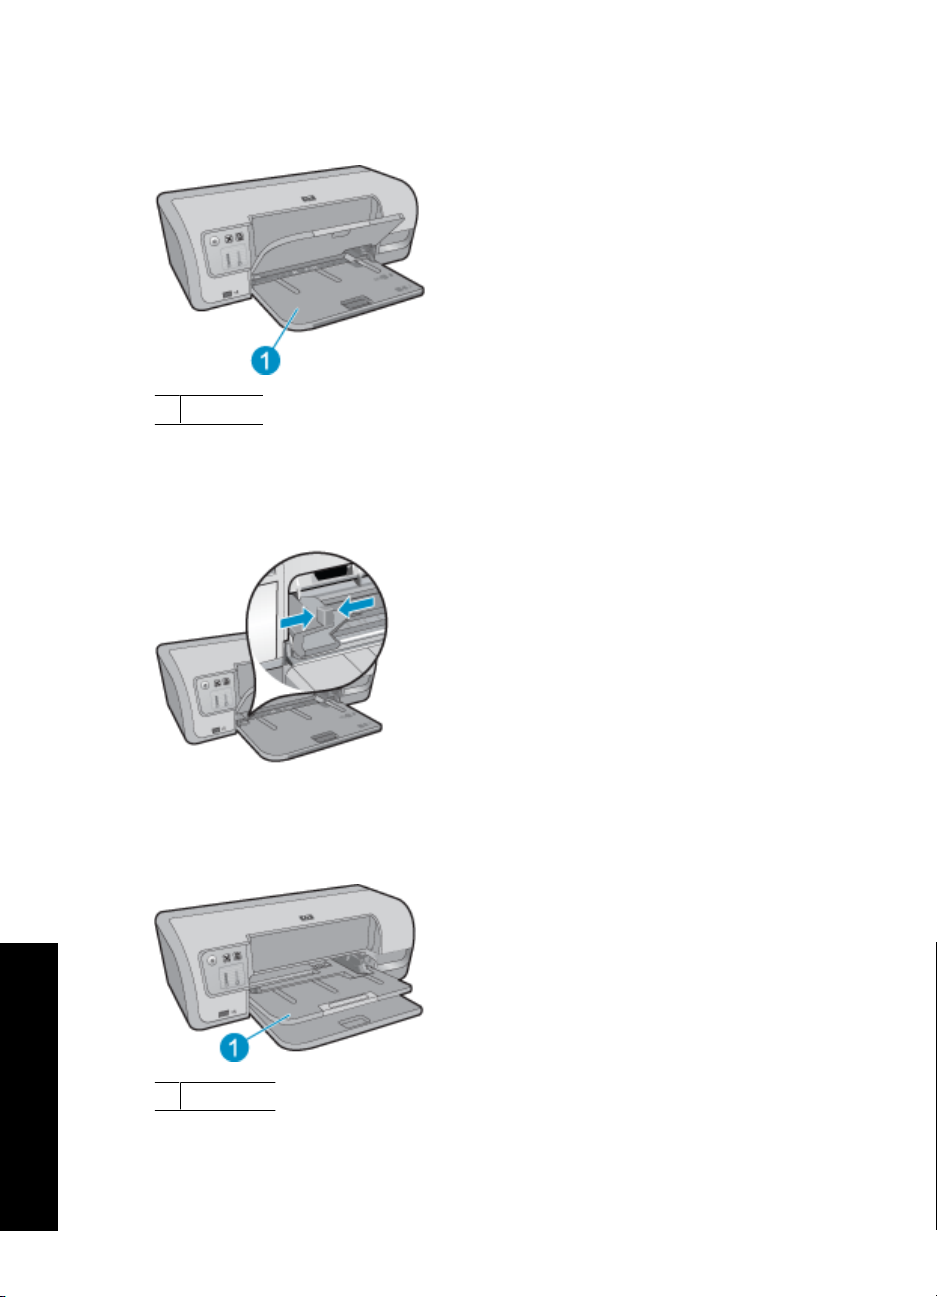
Input tray
The input tray holds paper or other media.
1 Input tray
Paper guide
Print on different sizes of media by sliding the paper guide to the right or to the left.
Output tray
Get started
16 Get started
Printed pages are deposited in the output tray.
1 Output tray
Raise the output tray to load paper or other media. Lower the output tray before printing.
Page 20
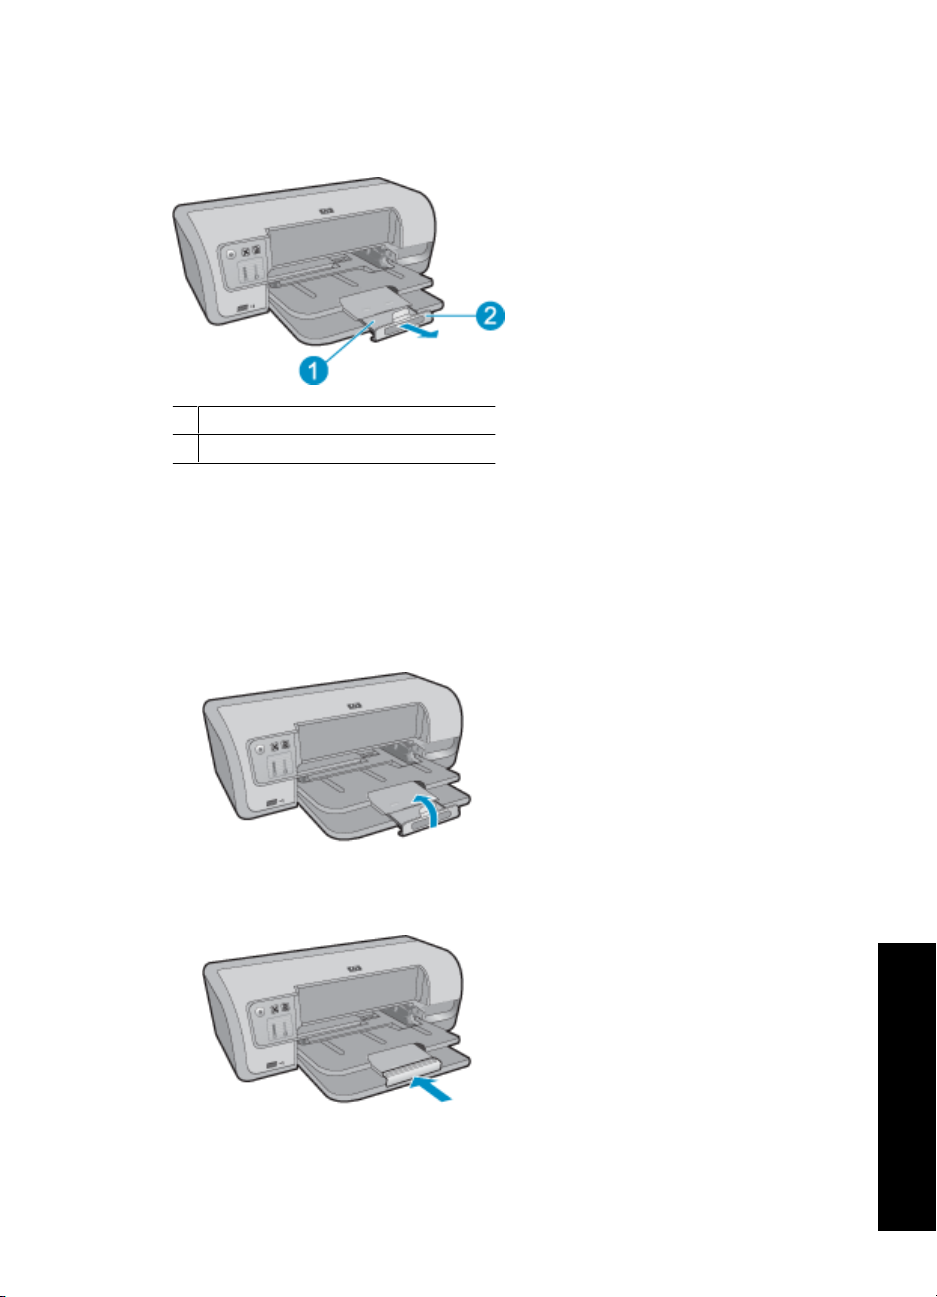
To prevent paper from falling out of the output tray, pull out both sections of the outputtray extension. If you are printing in the Fast Draft mode, raise the output-tray extension
stop.
1 Second section of output-tray extension
2 Output-tray extension stop
Fold the paper trays
To fold the paper trays
1. Remove paper or other media from the paper trays.
2. If the output-tray extension stop is raised, lower it and then push the second section
of the output-tray extension in.
3. Push the first section of the output-tray extension into the output tray.
Paper trays 17
Get started
Page 21
Chapter 3
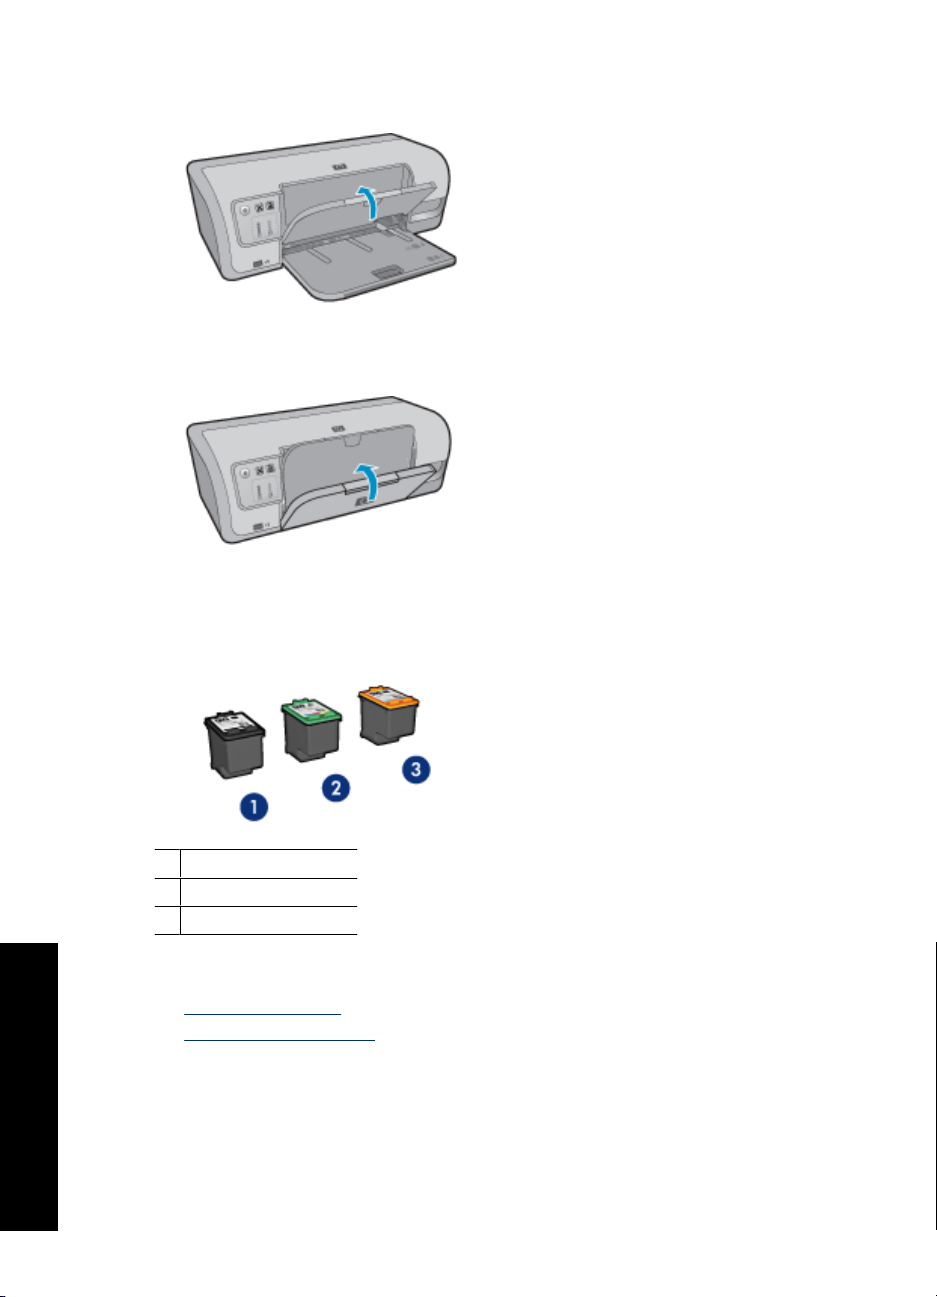
4. Raise the output tray.
5. Raise the input tray.
Print cartridges
Three print cartridges can be used with the printer.
1 Black print cartridge
2 Tri-color print cartridge
3 Photo print cartridge
For information about using the print cartridges, see the following topics:
•
Use print cartridges
Replace print cartridges
•
Get started
18 Get started
Page 22
Use print cartridges
The print cartridges can be used in the following ways:
• Everyday printing: Use the black and tri-color print cartridges for everyday print jobs.
• Quality color photos: For more vibrant colors when printing color photographs or
other special documents, remove the black print cartridge and install a photo print
cartridge. The photo print cartridge, in combination with the tri-color print cartridge,
provides you with virtually grain-free photos.
Replace print cartridges
When buying print cartridges, look for the print cartridge selection number.
You can find the selection number in three places:
• Selection number label: Look at the label on the print cartridge that you are replacing.
1 Selection number label
• Printer documentation: For a list of print cartridge selection numbers, see the
reference guide that came with the printer.
• Print Cartridge Ordering Information dialog box: For a list of print cartridge selection
numbers, open the printer
the Print Cartridge Information button.
The printer can operate in ink-backup mode. For more information, see
mode.
For information about installing a replacement print cartridge, see
instructions.
Ink-backup mode
In the ink-backup mode, the printer operates with only one print cartridge. The ink-backup
mode is initiated when a print cartridge is removed from the print cartridge carriage.
Toolbox, click the Estimated Ink Level tab, and then click
Ink-backup
Installation
Get started
Ink-backup mode 19
Page 23
Chapter 3
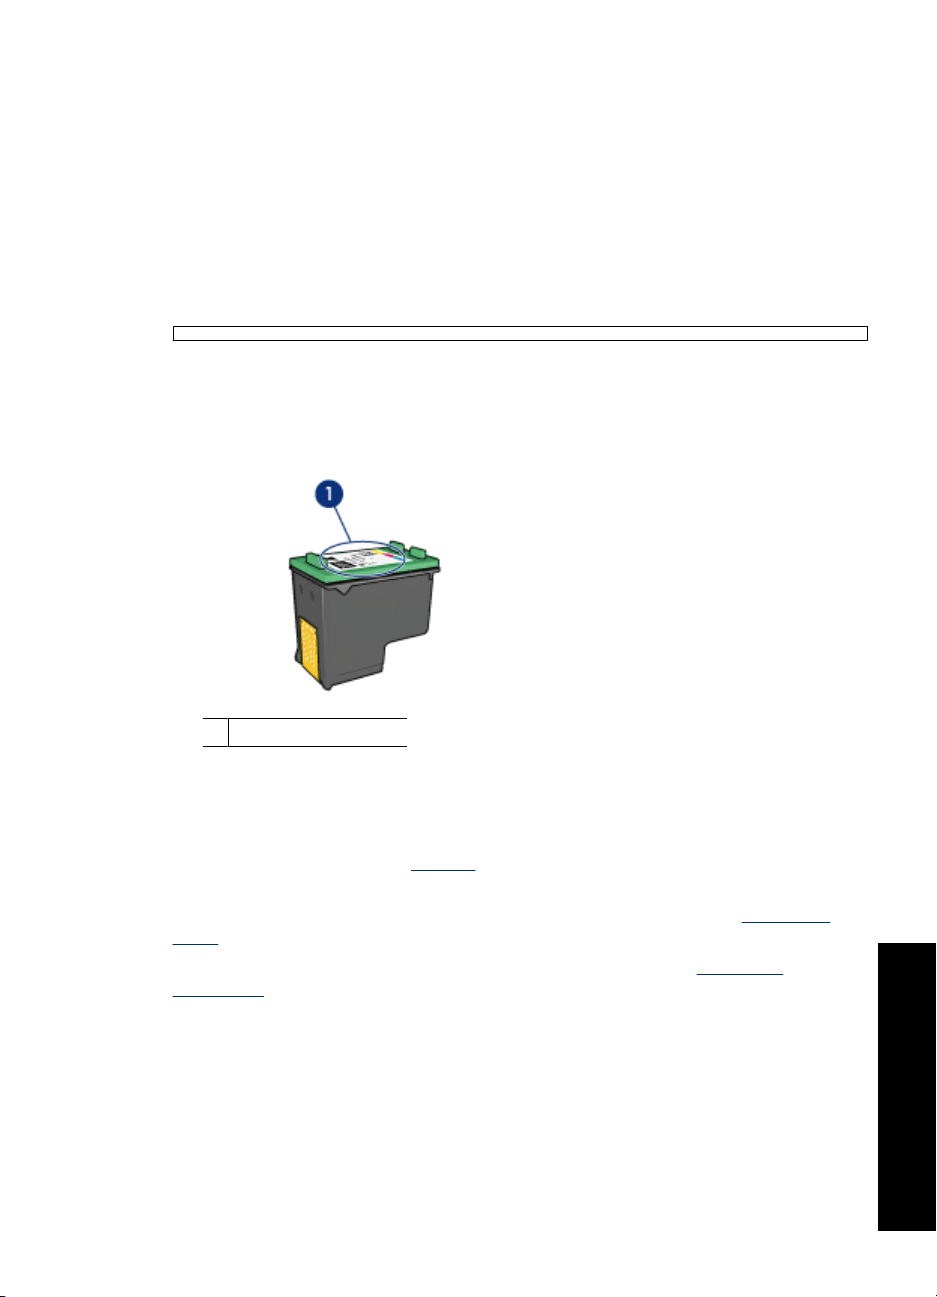
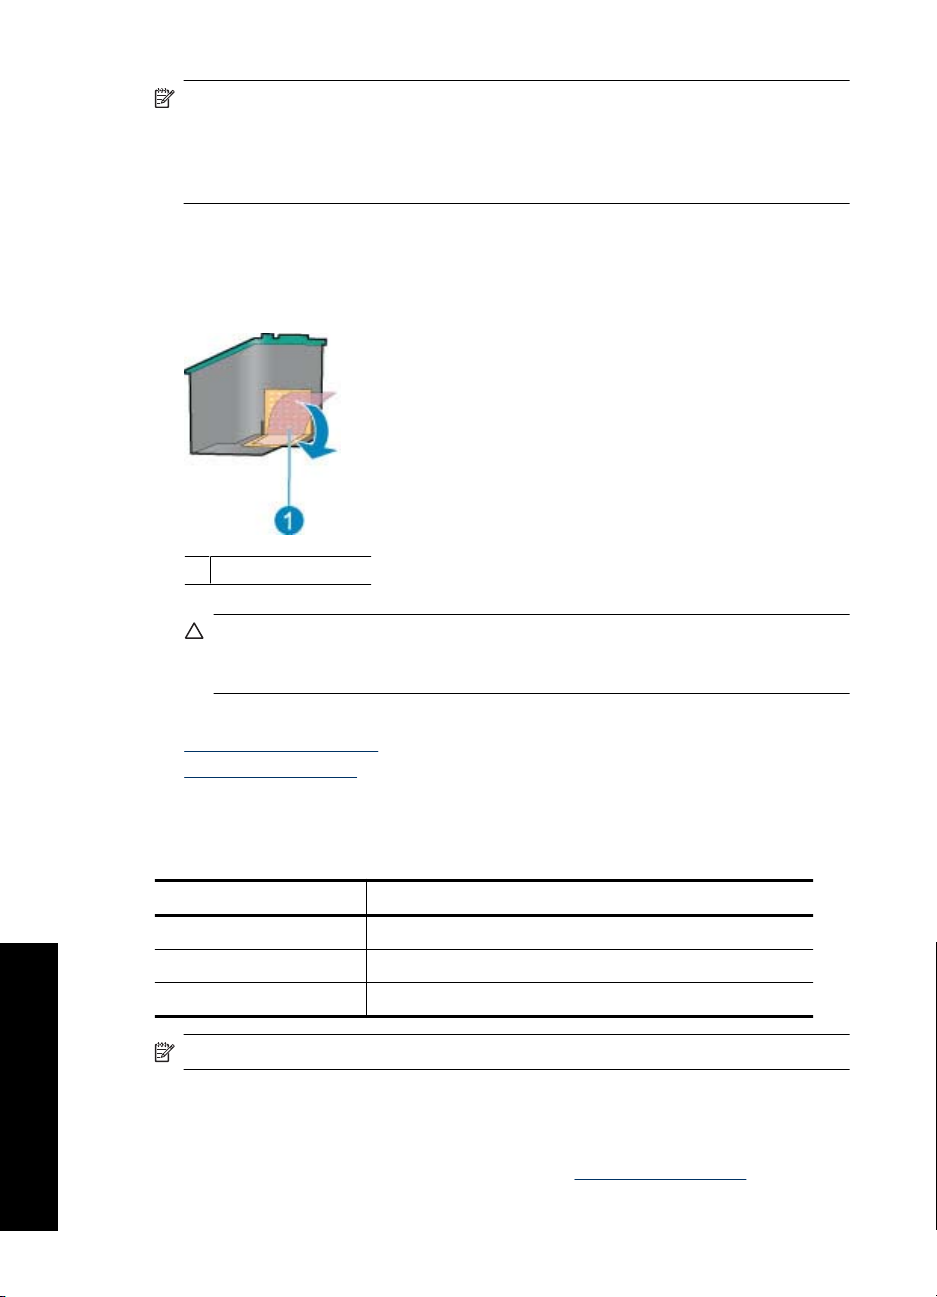
NOTE: When the printer operates in ink-backup mode, a message is displayed on
screen. If the message is displayed and two print cartridges are installed in the printer,
verify that the protective piece of plastic tape has been removed from each print
cartridge. When plastic tape covers the print cartridge contacts, the printer cannot
detect that the print cartridge is installed.
To remove plastic tape from a print cartridge
▲ Hold the print cartridge so that the copper strips are on the bottom and facing toward
the printer, and then carefully remove the plastic tape.
1 Remove plastic tape
CAUTION: Do not touch the print cartridge ink nozzles or copper contacts.
Touching these parts will result in clogs, ink failure, and bad electrical connections.
Do not remove the copper strips. They are required electrical contacts.
For more information about ink-backup mode, see the following topics:
•
Ink-backup mode output
Exit ink-backup mode
•
Ink-backup mode output
Printing in ink-backup mode slows the printer and affects the quality of printouts.
Installed print cartridge Result
Black print cartridge Colors print as grayscale.
Tri-color print cartridge Colors print but black is grayed and is not a true black.
Photo print cartridge Colors print as grayscale.
NOTE: HP does not recommend using the photo print cartridge for ink-backup mode.
Exit ink-backup mode
Get started
Install two print cartridges in the printer to exit ink-backup mode.
For information about installing a print cartridge, see
Install print cartridges.
20 Get started
Page 24
4 Connect the printer
• USB
USB
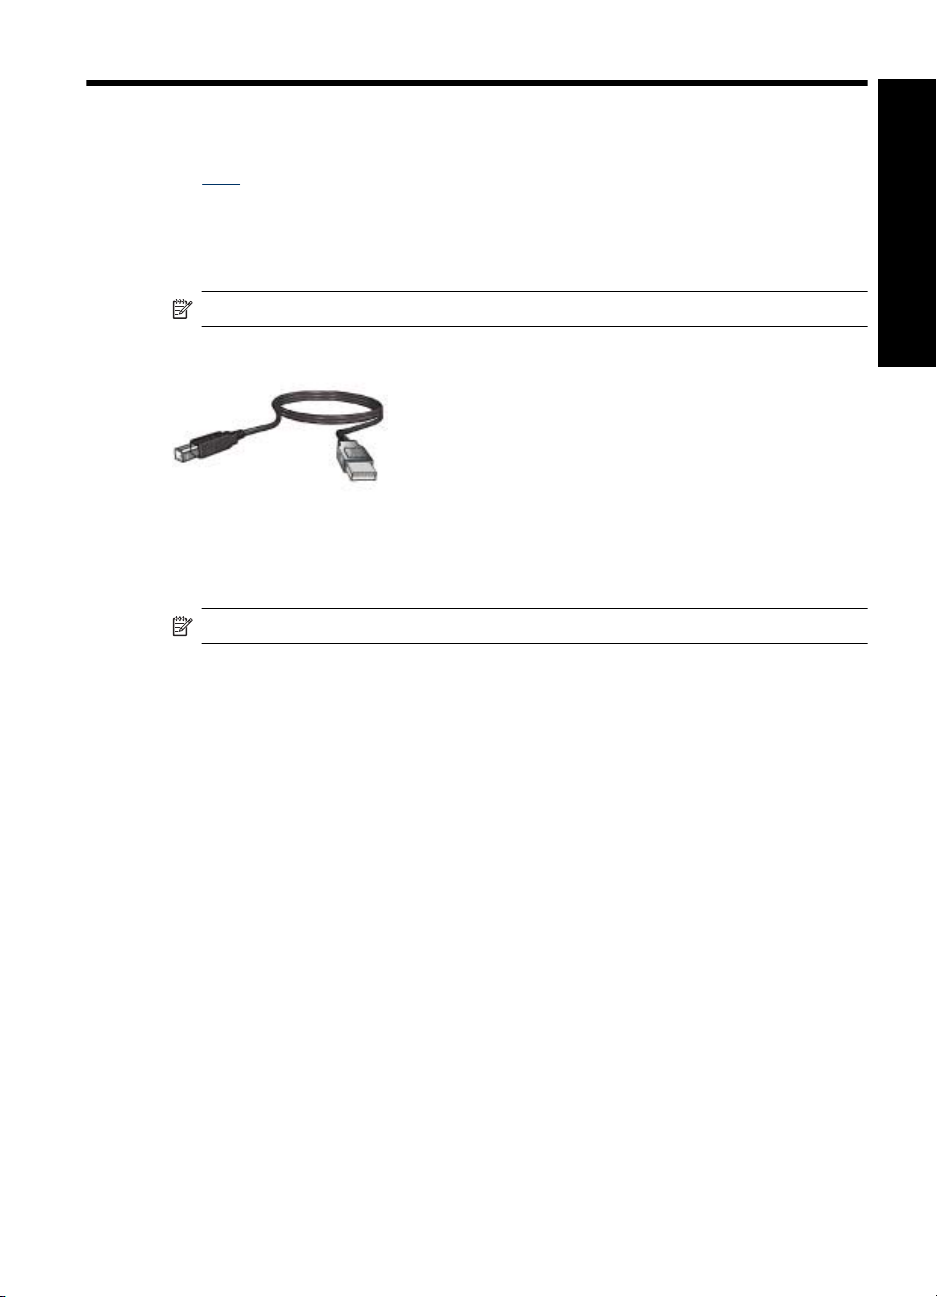
The printer connects to the computer with a universal serial bus (USB) cable.
NOTE: For best printing performance, use a USB 2.0 compatible cable.
For instructions about connecting the printer with a USB cable, see the Setup Guide that
came with the printer.
NOTE: A USB cable might not be packaged with your printer.
Connect the printer
Connect the printer 21
Page 25
5 Print photos using the front USB
port
You can transfer photos from a digital camera, external card reader, or USB flash drive
to your computer, and then print them. For more information, check the following topics:
•
About the front USB port
Print photos from the front USB port
•
About the front USB port lights
•
About the front USB port
Print photos using the front USB
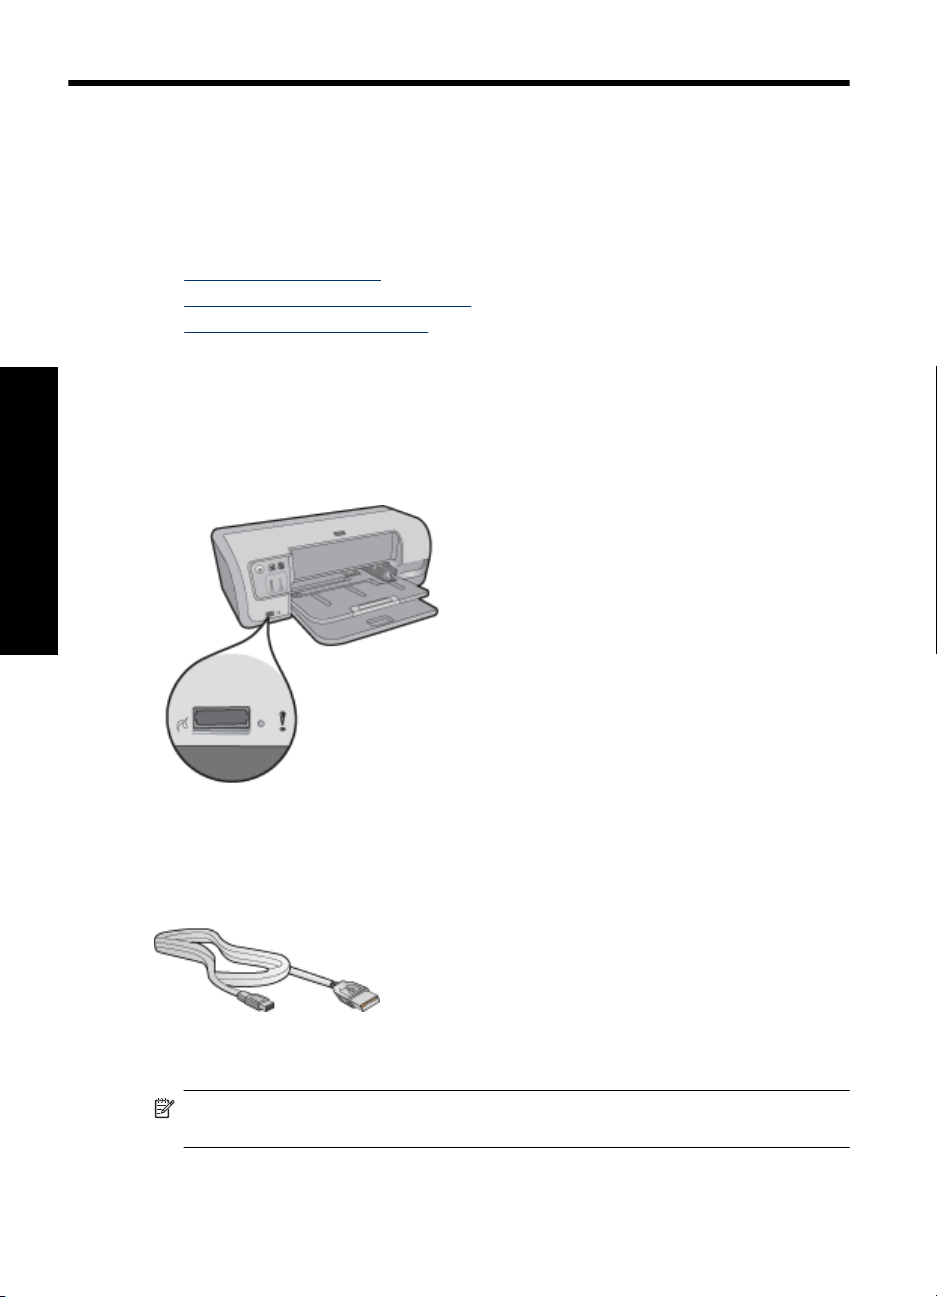
To transfer photos from a digital camera, external card reader, or USB flash drive, to your
computer, just plug the camera or other device into the printer's front USB port. You can
then print the photos using HP Photosmart Software.
port
In order to transfer photos from your digital camera to the computer for printing, using the
front USB port, you need a USB cable that is compatible with your camera. HP
recommends that you use a cable that is less than 3 meters long.
Print photos from the front USB port
NOTE: To print using these instructions, the HP Photosmart Software must be
installed on your computer.
22 Print photos using the front USB port
Page 26

To print from the front USB port
1. Load photo paper into the printer.
For instructions about loading photo paper, click one of the following options:
Print borderless photos
•
Print photos with a border
•
2. Connect your camera or other USB device to the front USB port using a USB cable.
The green Connection light should be illuminated. For more information, see
the front USB port lights.
3. Turn on your camera or device, and then set it to transfer photos.
If you do not know how to set the camera or device to transfer photos, see the
documentation that came with the camera or device.
4. If you attached an HP digital camera to the front USB port, the HP Photosmart
Software starts automatically.
If you attached a non-HP digital camera or another device, start the HP Photosmart
Software manually. For more information, see HP Photosmart Software Help.
5. Before printing photos you must transfer them to your computer's hard drive. Do one
of the following:
• If the photos are displayed at the top of the HP Photosmart Software dialog box,
click Save, and then follow the onscreen instructions.
• If the photos are not displayed at the top of the HP Photosmart Software dialog
box, click Browse photos. Follow the onscreen instructions to locate the photos.
Click Save, and then follow the onscreen instructions.
After the files are transferred the HP Photosmart Software dialog box is displayed.
6. Click Print, and then follow the onscreen instructions.
For more information on using the HP Photosmart Software, see the HP Photosmart
Software Help.
About
Print photos using the front USB
port
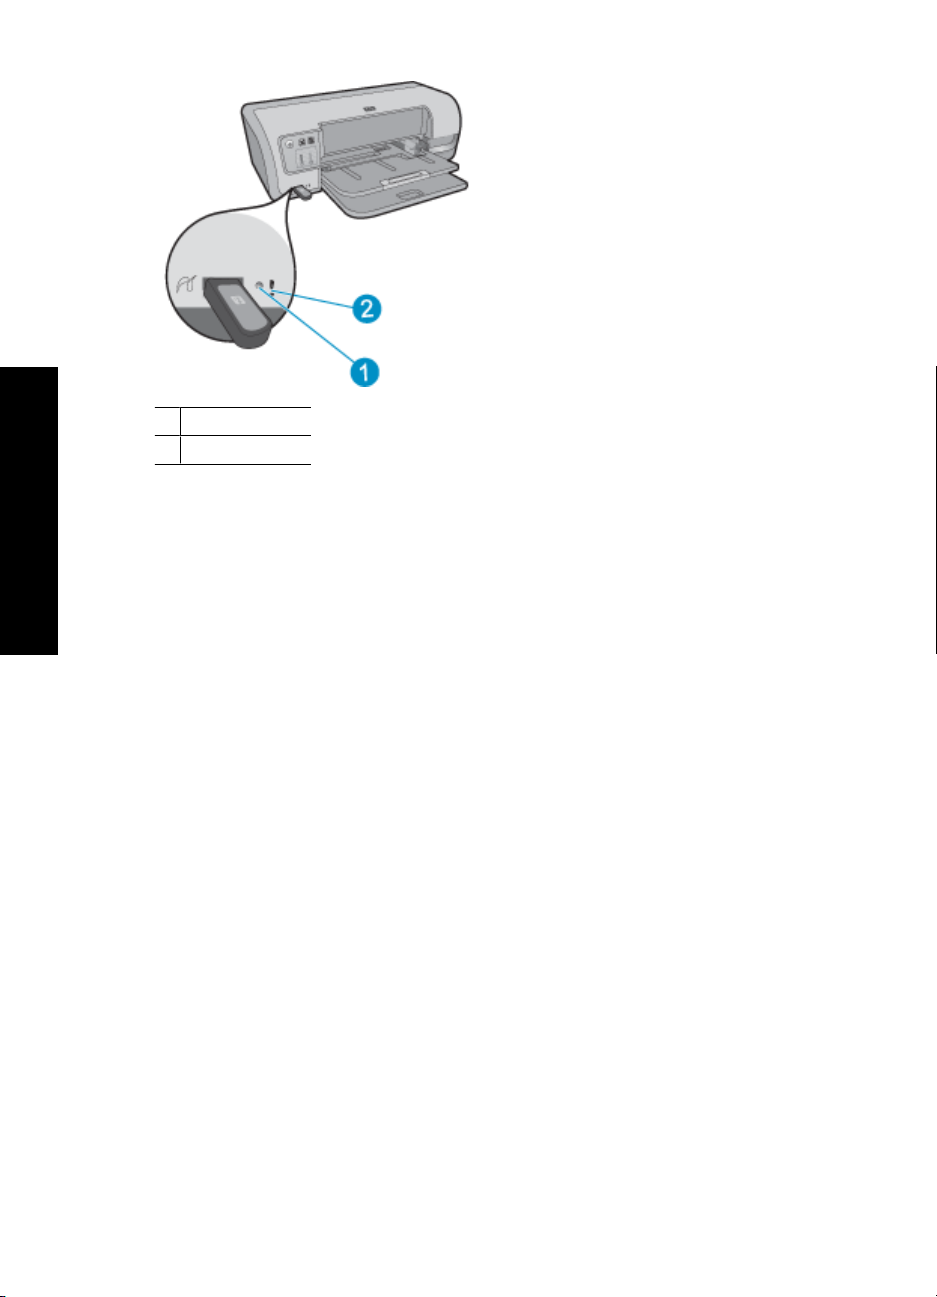
About the front USB port lights
The lights on the front USB port let you know if the device is connected correctly and if
the photos are transferring.
• When the camera is connected correctly, the Connection light is illuminated. The
Connection light blinks green when photos are transferring.
• If the camera is not set to the correct mode for transferring photos, the Error light
flashes.
About the front USB port lights 23
Page 27
port
Chapter 5
Print photos using the front USB
1 Connection light
2 Error light
24 Print photos using the front USB port
Page 28
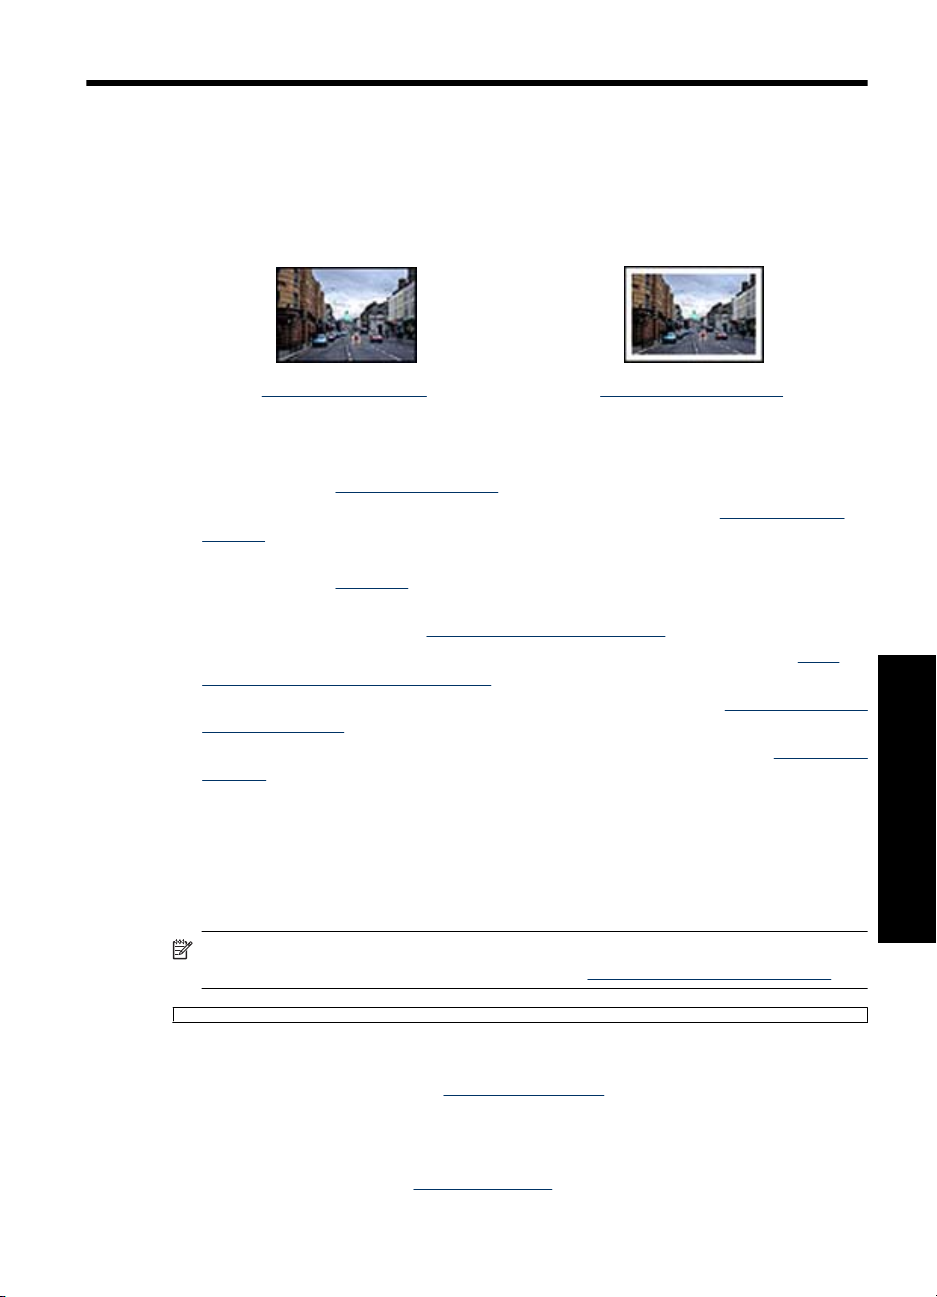
6 Print photos
The printer software offers several features that make printing digital photos easier and
improve photo quality.
Learn how to print photos
Print borderless photos. Print photos with a border.
Learn how to perform other photo printing tasks
• Use the photo print cartridge for great colors and virtually grain-free photos. For more
information, see
• Improve printed colors in your photos. For more information, see
settings.
• Print an Exif Print-formatted photo if you have Exif Print-enabled software. For more
information, see
• Prevent photo paper from curling for great photos everytime. For more information
on storing photo paper, see
• Save more by using HP Everyday Photo Paper. For more information, see
money and ink when printing photos.
• Show your photos to friends and family. For more information, see
friends and family.
• Learn how to create a variety of photo projects. For more information, see
projects.
Photo print cartridge.
Exif Print.
Advanced color
Store and handle photo paper.
Save
Share photos with
Other photo
Print borderless photos
Use borderless printing to print to the edges of certain paper types and to print on a range
of paper sizes—from 4 x 6 inch photo paper to a 210 x 594 mm (8.5 x 11 inch) custom
photo size.
NOTE: If you are using the product with a Windows 2000 computer, some features
may not be available. For more information, see
Guidelines
• For high-quality results, use a
print cartridge.
• Do not print borderless photos in ink-backup mode. Always have two print cartridges
installed in the printer.
For more information, see
Print photos
Notice to Windows 2000 users.
photo print cartridge in combination with the tri-color
Ink-backup mode.
Print photos 25
Page 29
Chapter 6
• Open the file in a software program such as HP Photosmart Software and resize the
photo. Ensure that the size corresponds to the paper size that you want to use.
• For maximum fade resistance, use HP Premium Plus Photo Paper.
• Verify that the photo paper that you are using is flat. For information about preventing
photo paper from curling, see the
photo paper storage instructions.
• Do not exceed the input tray capacity: 30 sheets of photo paper.
Prepare to print
1. Raise the output tray.
2. Slide the paper guide all the way to the left.
3. Verify that the photo paper is flat.
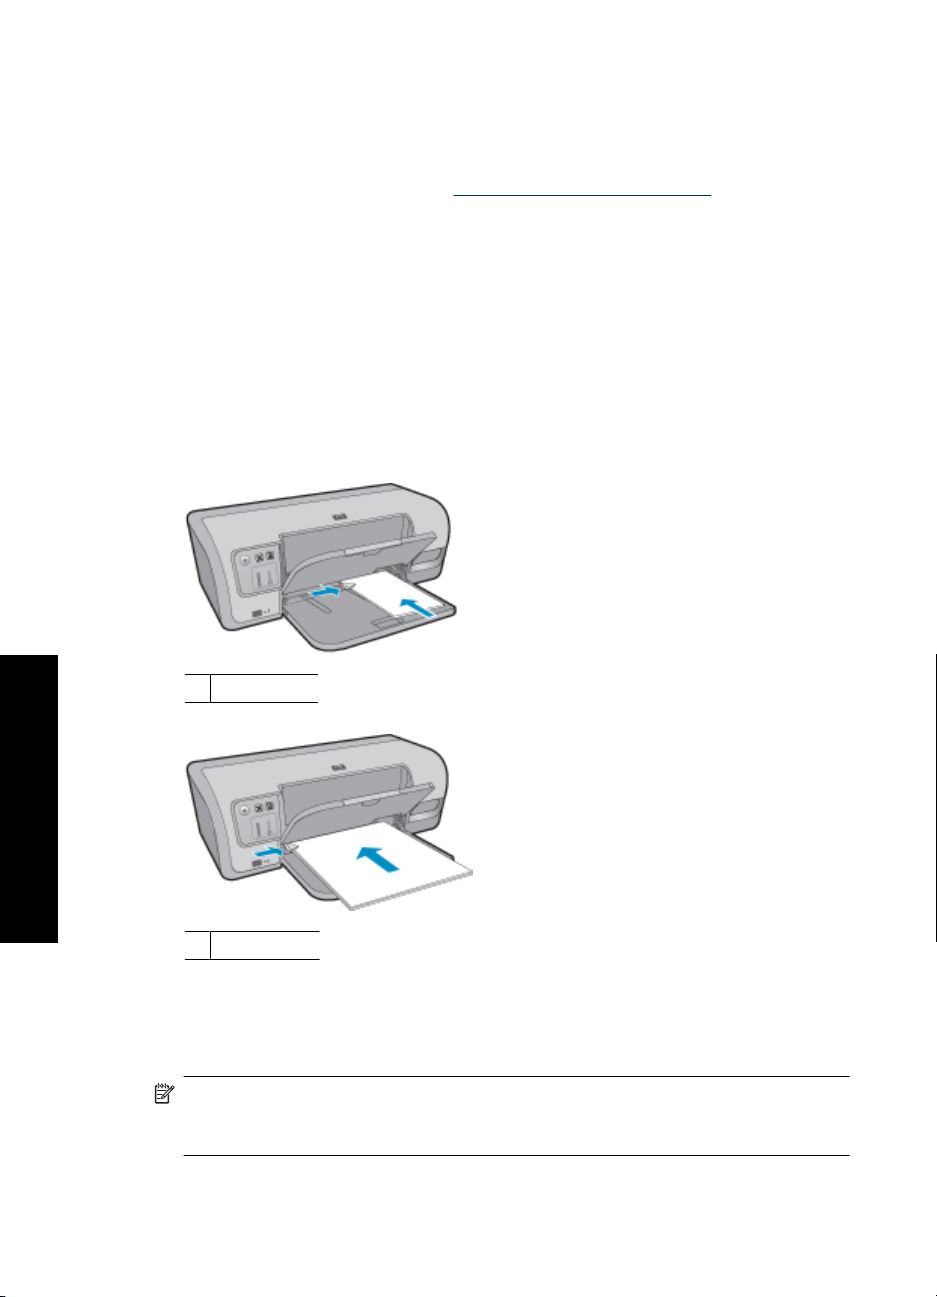
4. Place the photo paper in the right side of the input tray. The side to be printed on
should face down and the short edge should point towards the printer.
5. Push the paper into the printer until it stops.
6. Slide the paper guide firmly against the edge of the paper.
Print photos
26 Print photos
1 Small photos
2 Large photos
7. Lower the output tray.
Print
NOTE: If your software program includes a photo printing feature, follow the
instructions that are provided with the software program. Otherwise, follow these
instructions.
Page 30
1. Open the photo in a software program that allows editing, such as HP Photosmart
Software.
2. Open the
3. Click the Printing Shortcuts tab.
4. In the Printing Shortcuts list, click Photo Printing-Borderless, and then select the
following options:
• Print Quality: Normal or Best
• Paper Type: An appropriate photo paper type
• Paper Size: An appropriate borderless photo paper size
• Orientation: Portrait or Landscape
5. If necessary, change the HP Real Life Technologies settings. For more information,
see
6. Select any other print settings that you want, and then click OK.
Use the What's This? help to learn about the features that appear in the Printer
Properties dialog box. For more information, see
Printer Properties dialog box.
NOTE: For maximum dpi quality, go to the Advanced tab, and then select
Enabled from the Maximum dpi drop-down list. For more information, see
Maximum dpi.
HP Real Life Technologies photo fix.
Print photos with a border
NOTE: If you are using the product with a Windows 2000 computer, some features
may not be available. For more information, see
What's This? help.
Notice to Windows 2000 users.
Guidelines
• For high-quality results, use a
print cartridge.
• For maximum fade resistance, use HP Premium Plus Photo Paper.
• Open the file in a software program such as HP Photosmart Software and assign the
photo size. Ensure that the size corresponds to the paper size on which you want to
print the photo.
• Verify that the photo paper that you are using is flat. For information about preventing
photo paper from curling, see the
• Do not exceed the input tray capacity: 30 sheets of photo paper.
Prepare to print
1. Raise the output tray.
2. Slide the paper guide all the way to the left.
3. Verify that the photo paper is flat.
photo print cartridge in combination with the tri-color
photo paper storage instructions.
Print photos with a border 27
Print photos
Page 31

Chapter 6
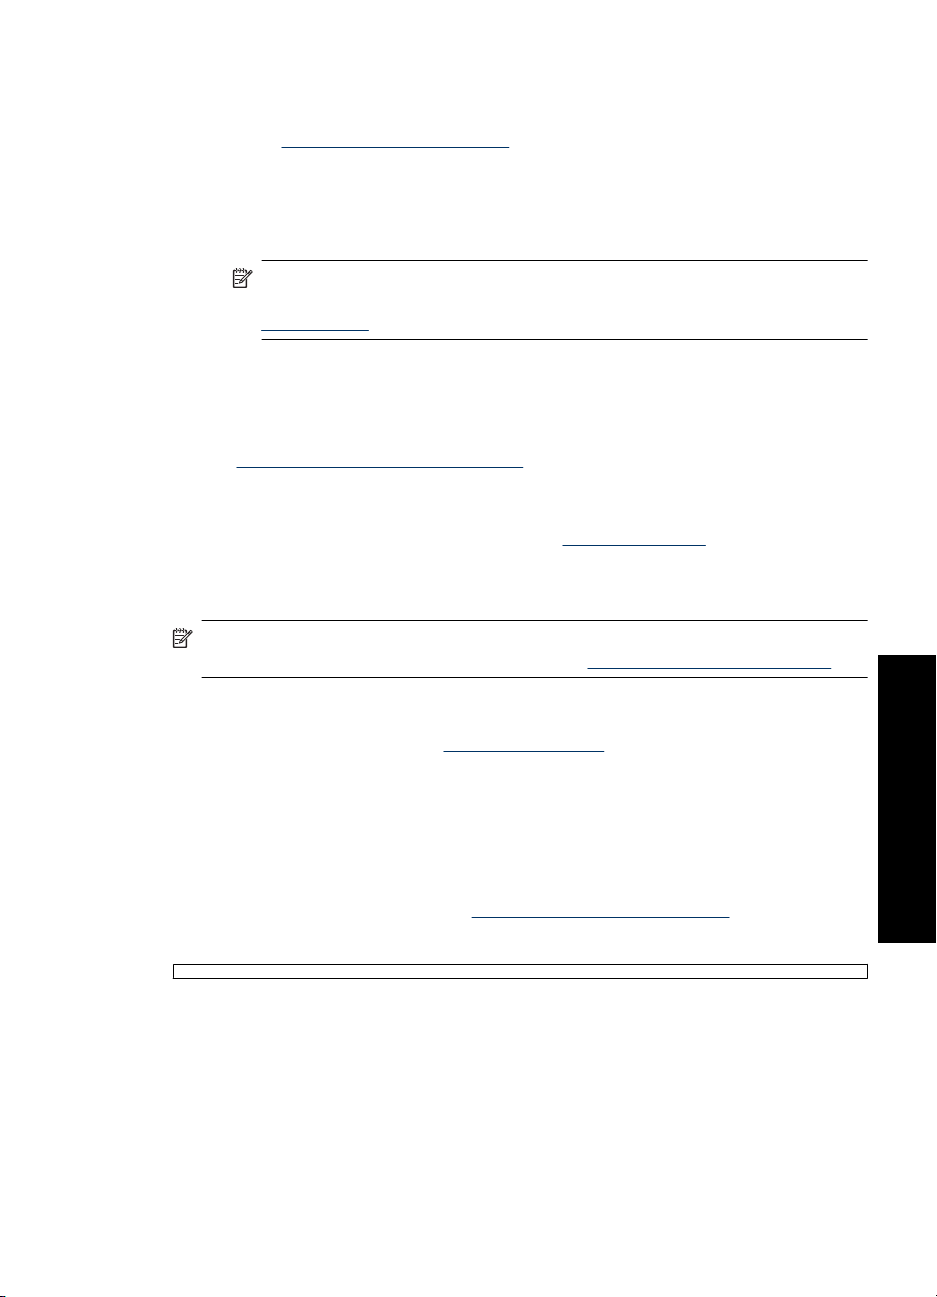
4. Place the photo paper in the right side of the input tray. The side to be printed on
should face down and the short edge should point towards the printer.
NOTE: Some paper sizes might extend beyond the edge of the input tray.
5. Push the paper into the printer until it stops.
6. Slide the paper guide firmly against the edge of the paper.
1 Small photos
Print photos
28 Print photos
2 Large photos
7. Lower the output tray.
Print
NOTE: If your software program includes a photo printing feature, follow the
instructions that are provided with the software program. Otherwise, follow these
instructions.
1. Open the photo in a software program that allows editing, such as HP Photosmart
Software.
2. Open the
Printer Properties dialog box.
3. Click the Printing Shortcuts tab.
Page 32

4. In the Printing Shortcuts list, click Photo Printing-with white borders, and then
select the following options:
• Print Quality: Normal or Best
NOTE: For maximum dpi quality, go to the Advanced tab, and then select
Enabled from the Maximum dpi drop-down list. For more information, see
Maximum dpi.
• Paper Type: An appropriate photo paper type
• Paper Size: An appropriate photo paper size
• Orientation: Portrait or Landscape
5. If necessary, change the HP Real Life Technologies settings. For more information,
HP Real Life Technologies photo fix.
see
6. Select any other print settings that you want, and then click OK.
Use the What's This? help to learn about the features that appear in the Printer
Properties dialog box. For more information, see
HP Real Life Technologies photo fix
HP Real Life Technologies enhance the quality of your printed photos.
In most cases, you do not need to change the Basic default print setting. The Basic setting
sharpens the images that you print, and improves the quality and clarity of low resolution
images, such as those downloaded from the Internet.
You can change the setting to Full if the images that you print are under exposed or over
exposed, contain dark areas or red eye, or have colors that appear washed out.
You can also select the Off setting if you prefer to edit the image manually in a software
program such as HP Photosmart Software.
What's This? help.
TIP: You can remove red-eye coloring in the photo when using the Off or Basic
mode by selecting the Remove red eye check box.
To change the HP Real Life Technologies setting
1. Open the
2. Click the Features tab.
3. In the HP Real Life Technologies Photo fix drop-down list, select the appropriate
setting for the photo you are printing.
Printer Properties dialog box.
HP Real Life Technologies photo fix 29
Print photos
Page 33

Chapter 6
Photo print cartridge
The photo print cartridge, when used in conjunction with the tri-color print cartridge,
provides virtually grain-free photos. It offers exceptional fade resistance for photos that
are printed on HP Premium Plus Photo Paper.
The photo print cartridge can be purchased separately if it is not included with your printer.
To install the photo print cartridge
▲ To install the photo print cartridge, remove the black print cartridge from the printer,
and then install the photo print cartridge in the right side of the print cartridge carriage.
NOTE: To learn how to install a print cartridge, see Installation instructions. To
protect and store a print cartridge when it is not in the printer, see
cartridges.
Maintain print
To use the photo print cartridge
Printer Properties dialog box.
NOTE: For maximum dpi quality, go to the Advanced tab, and then select
Enabled from the Maximum dpi drop-down list. For more information, see
Maximum dpi.
Print photos
1. Open the
2. Click the Printing Shortcuts tab.
3. In the Printing Shortcuts list, click either Photo Printing-Borderless or Photo
Printing-with white borders.
4. In the Print Quality drop-down list, click Normal or Best.
5. In the Paper Type drop-down list, select the appropriate photo paper type.
6. Select any other print settings that you want, and then click OK.
Advanced color settings
Use the Advanced Color Settings dialog box to adjust how printed colors appear in your
photos.
Adjusting these settings causes the printed colors to differ from the colors that appear on
your computer monitor.
30 Print photos
Page 34

To specify advanced color settings
1. Open the
2. Click the Color tab, and then click the More Color Options button.
3. You can adjust the following settings:
4. After specifying the color settings, click OK.
5. Select any other print settings that you want, and then click OK.
Exif Print
Exif Print (Exchangeable Image File Format 2.2) is an international digital imaging
standard that simplifies digital photography and enhances printed photos. When a photo
is taken with an Exif Print-enabled digital camera, Exif Print captures information such as
exposure time, type of flash, and color saturation, and stores it in the image file. The
printer software then uses this information to automatically perform image-specific
enhancements to create outstanding photos.
To print Exif Print-enhanced photos, you must have the following items:
• A digital camera that supports Exif Print
• Exif Print-enabled photo software, such as HP Photosmart Software
Printer Properties dialog box.
The Advanced Color Settings dialog box is displayed.
• Adjust the Brightness, Saturation, and Color Tone to affect how overall colors
are printed.
• Adjust the Cyan, Magenta, Yellow, and Black sliders to specify the level of each
color that is used in printing.
NOTE: When you adjust color settings, the changes are reflected in the Preview
box.
To print Exif Print-enhanced photos
1. Open the photo in an Exif Print-enabled software program that allows editing, such
as HP Photosmart Software.
2. Open the
3. Click the Features tab.
4. In the Paper Type drop-down list, click More, and then select the appropriate photo
paper type.
5. In the Print Quality drop-down list, click Normal or Best.
6. Select any other print settings that you want, and then click OK.
The printer software automatically optimizes the printed image.
Printer Properties dialog box.
NOTE: For maximum dpi quality, go to the Advanced tab, and then select
Enabled from the Maximum dpi drop-down list. For more information, see
Maximum dpi.
Store and handle photo paper
Follow these instructions to maintain the quality of HP brand photo paper.
Print photos
Exif Print 31
Page 35

Chapter 6
Storage
• Keep unused photo paper in a sealed plastic bag. Store the packaged photo paper
on a flat surface in a cool place.
• When you are ready to print, remove only the paper that you plan to use immediately
from the plastic bag. When you have finished printing, return any unused photo paper
to the plastic bag.
• Do not leave unused photo paper in the paper tray. The paper might start to curl,
which can reduce the quality of your photos.
Handling
• Always hold photo paper by its edges. Fingerprints on photo paper can reduce print
quality.
• If the corners of the photo paper curl more than 10 mm (0.4 inch), flatten the paper
by putting it in the storage bag, and then gently bending it in the opposite direction of
the curl until the paper lies flat.
Photo paper should be flat before it is printed on.
Save money and ink when printing photos
To save money and ink when printing photos, use HP Everyday Photo Paper and set the
print quality to Normal.
HP Everyday Photo Paper is designed to create quality photos with less ink.
NOTE: For higher-quality photos, use HP Premium Plus Photo Paper and set the
print resolution to Best or Maximum dpi. For more information on enabling the
maximum dpi mode, see
Maximum dpi.
Share photos with friends and family
If you have installed the HP Photosmart software, you can use HP Photosmart Share to
easily share images by e-mail without the use of large file attachments. HP Photosmart
Print photos
Share lets you:
• Select and share images
• Create online albums to share, organize, or store photos
• Order professionally processed prints online (availability varies by country/region)
NOTE: You must have Internet access to use HP Photosmart Share.
Other photo projects
The HP Photosmart Software coordinates the functions of HP imaging devices: scanners,
cameras, printers, and all-in-one devices. Depending on the devices you have installed
and their capabilities, you can quickly and easily organize, edit, and share digital images.
32 Print photos
Page 36

If you performed the default typical installation of the printer software, you also installed
the HP Photosmart Software. With HP Photosmart Software you can easily:
• Organize, edit, and share digital images in creative ways
• Print photos and digital images
• Transfer images from a camera or memory card
• View images as a slide show
• Edit images
• Create photo album pages and flyers
• Share photos with friends and family
For more information on using the HP Photosmart Software:
• Check the Contents panel on the left. Look for the HP Photosmart Software Help
contents book at the top.
• If you do not see the HP Photosmart Software Help contents book at the top of the
Contents panel, access the software help through the HP Solution Center.
Other photo projects 33
Print photos
Page 37

7 Print other documents
E-mail Documents Letters Envelopes
Postcards Hagaki cards Index cards Labels
Transparencies Brochures Greeting cards Booklets
Posters Iron-on transfers
Printing tips: Minimize your cost and effort while maximizing the quality of your printouts
with printing tips.
Printer software: Learn about the printer software.
Print e-mail
Guidelines
Do not exceed the input tray capacity: 100 sheets of plain paper.
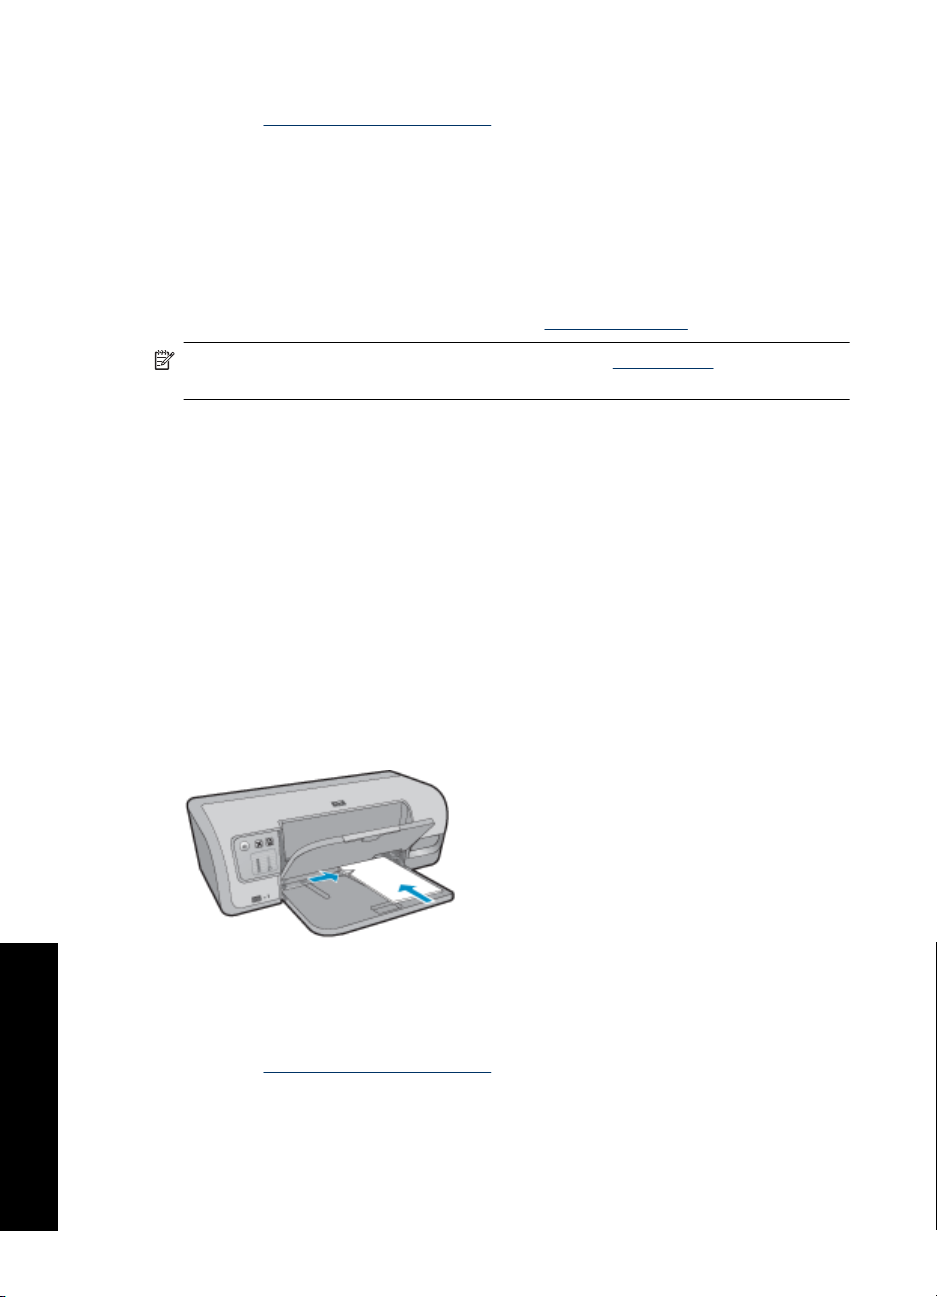
Prepare to print
1. Raise the output tray.
2. Slide the paper guide all the way to the left.
3. Place plain paper in the right side of the input tray. The side to be printed on should
Print other documents
34 Print other documents
face down.
4. Push the paper into the printer until it stops.
Page 38

5. Slide the paper guide firmly against the edge of the paper.
6. Lower the output tray.
Print
1. Open the
2. Click the Printing Shortcuts tab.
3. In the Printing Shortcuts list, click General Everyday Printing or Fast/Economical
Printing, and then specify the following print settings:
• Paper Type: Plain paper
• Paper Size: An appropriate paper size
4. Select any other print settings that you want, and then click OK.
Use the What's This? help to learn about the features that appear in the Printer
Properties dialog box. For more information, see
Printer Properties dialog box.
What's This? help.
Print documents
Guidelines
• For draft documents, use
• To save paper, use
• Do not exceed the paper tray capacity: 100 sheets of paper.
Prepare to print
1. Raise the output tray.
2. Slide the paper guide all the way to the left.
3. Place plain paper in the right side of the input tray. The side to be printed on should
face down.
4. Push the paper into the printer until it stops.
NOTE: Depending on the paper size, the paper might extend over the edge of
the tray.
Fast/Economical printing.
Two-sided printing.
Print other documents
Print documents 35
Page 39

Chapter 7
5. Slide the paper guide firmly against the edge of the paper.
6. Lower the output tray.
Print
1. Open the
2. Click the Printing Shortcuts tab.
3. In the Printing Shortcuts list, click General Everyday Printing, and then specify
the following print settings:
• Paper Type: Plain paper
• Paper Size: An appropriate paper size
4. Select the following print settings:
• Print Quality if you want a print quality other than Normal
• Print On Both Sides if you want to print on both sides of the paper
5. Select any other print settings that you want, and then click OK.
Use the What's This? help to learn about the features that appear in the Printer
Properties dialog box. For more information, see
Printer Properties dialog box.
For more information, see
Two-sided printing.
What's This? help.
Print letters
Guidelines
• For information about printing an envelope for your letter, see
• Do not exceed the input tray capacity: 100 sheets of paper.
Prepare to print
1. Raise the output tray.
2. Slide the paper guide all the way to the left.
Print other documents
36 Print other documents
3. Place plain paper in the right side of the input tray. The side to be printed on should
face down.
4. Push the paper into the printer until it stops.
envelopes.
NOTE: If you are using letterhead paper, the letterhead should face down and
point toward the printer.
Page 40

5. Slide the paper guide firmly against the edge of the paper.
6. Lower the output tray.
Print
1. Open the
2. Click the Printing Shortcuts tab.
3. In the Printing Shortcuts list, click Presentation Printing, and then specify the
following print settings:
• Paper Type: Plain paper
• Paper Size: An appropriate paper size
4. Select any other print settings that you want, and then click OK.
Use the What's This? help to learn about the features that appear in the Printer
Properties dialog box. For more information, see
Printer Properties dialog box.
What's This? help.
Print envelopes
Guidelines
• Avoid using envelopes that have the following features:
• Clasps or windows
• Thick, irregular, or curled edges
• Shiny or embossed coatings
• Wrinkles, tears, or other damage
• You can print a single envelope or multiple envelopes.
• Align the envelope edges before inserting the envelopes in the input tray.
• Do not exceed the input tray capacity: 10 envelopes.
Prepare to print
1. Raise the output tray, and then remove all paper from the input tray.
2. Slide the paper guide all the way to the left.
3. Place the envelopes in the right side of the tray. The side to be printed on should face
down. The flap should be on the left side.
4. Push the envelopes into the printer until they stop.
Print other documents
Print envelopes 37
Page 41

Chapter 7
5. Slide the paper guide firmly against the edge of the envelopes.
6. Lower the output tray.
Print
1. Open the
2. Click the Features tab, and then select the following print settings:
• Paper Type: Plain paper
• Size: An appropriate envelope size
3. Select any other print settings that you want, and then click OK.
Use the What's This? help to learn about the features that appear in the Printer
Properties dialog box. For more information, see
Printer Properties dialog box.
What's This? help.
Print postcards
Guidelines
Do not exceed the input tray capacity: 30 postcards.
Prepare to print
1. Raise the output tray, and then remove all paper from the input tray.
2. Slide the paper guide all the way to the left.
3. Place the cards in the right side of the input tray. The side to be printed on should
face down and the short edge should point toward the printer.
4. Push the cards into the printer until they stop.
5. Slide the paper guide firmly against the edge of the cards.
Print other documents
6. Lower the output tray.
38 Print other documents
Page 42

Print
1. Open the
2. Click the Features tab, and then specify the following print settings:
• Paper Type: Click More, click Specialty Papers, and then select an appropriate
• Print Quality: Normal or Best
• Size: An appropriate card size
3. Select any other print settings that you want, and then click OK.
Use the What's This? help to learn about the features that appear in the Printer
Properties dialog box. For more information, see
NOTE: For information on resolving an out-of-paper message, see Out of paper.
Printer Properties dialog box.
card type.
Print hagaki cards
(Japan only)
Guidelines
Do not exceed the input tray capacity: 30 hagaki cards
Prepare to print
1. Raise the output tray, and then remove all paper from the input tray.
2. Slide the paper guide all the way to the left.
3. Place the cards in the right side of the input tray. The side to be printed on should
face down and the short edge should point toward the printer.
4. Push the cards into the printer until they stop.
5. Slide the paper guide firmly against the edge of the cards.
What's This? help.
6. Lower the output tray.
Print other documents
Print hagaki cards 39
Page 43
Chapter 7
Print
1. Open the
2. Click the Features tab, and then specify the following print settings:
• Paper Type: Click More, click Hagaki, and then select an appropriate hagaki card
• Print Quality: Normal or Best
• Size: An appropriate hagaki card size
3. Select any other print settings that you want, and then click OK.
Use the What's This? help to learn about the features that appear in the Printer
Properties dialog box. For more information, see
NOTE: If an out-of-paper message is displayed, see Out of paper for help in
resolving the problem.
Printer Properties dialog box.
type.
What's This? help.
Print index cards and other small media
Guidelines
Do not exceed the input tray capacity: 30 cards.
Prepare to print
1. Raise the output tray, and then remove all paper from the input tray.
2. Slide the paper guide all the way to the left.
3. Place the cards in the right side of the input tray. The side to be printed on should
face down and the short edge should point toward the printer.
4. Push the cards into the printer until they stop.
5. Slide the paper guide firmly against the edge of the cards.
6. Lower the output tray.
Print other documents
40 Print other documents
Print
1. Open the
2. Click the Features tab, and then specify the following print settings:
• Paper Type: Plain paper
• Size: An appropriate card size
3. Select any other print settings that you want, and then click OK.
Printer Properties dialog box.
Page 44

Use the What's This? help to learn about the features that appear in the Printer
Properties dialog box. For more information, see
NOTE: For information on resolving an out-of-paper message, see Out of paper.
Print labels
Guidelines
• Use only paper, plastic, or clear labels that are designed specifically for inkjet printers.
• Use only full sheets of labels.
• Avoid using labels that are sticky, wrinkled, or pulling away from the protective
backing.
• Do not exceed the input tray capacity: 20 sheets of labels (use only Letter or A4-size
sheets).
Prepare to print
1. Raise the output tray, and then remove all paper from the input tray.
2. Slide the paper guide all the way to the left.
3. Fan the edges of the label sheets to separate them, and then align the edges.
4. Place the label sheets in the right side of the input tray. The label side should face
down.
5. Push the sheets into the printer until they stop.
6. Slide the paper guide firmly against the edge of the sheets.
What's This? help.
7. Lower the output tray.
Print
NOTE: If your software program includes a label printing feature, follow the
instructions that are provided with the software program. Otherwise, follow the
instructions below.
1. Open the Printer Properties dialog box.
2. Click the Printing Shortcuts tab.
Print labels 41
Print other documents
Page 45

Chapter 7
3. In the Printing Shortcuts list, click General Everyday Printing, and then specify
the following print settings:
• Paper Type: Plain paper
• Paper Size: An appropriate paper size
4. Click OK.
Use the What's This? help to learn about the features that appear in the Printer
Properties dialog box. For more information, see
Print transparencies
Guidelines
• For great results, use HP Premium Inkjet Transparency Film.
• Do not exceed the input tray capacity: 30 transparencies.
Prepare to print
1. Raise the output tray, and then remove all paper from the input tray.
2. Slide the paper guide all the way to the left.
3. Place the transparencies in the right side of the tray. The side to be printed should
face down and the adhesive strip should face up and toward the printer.
4. Carefully push the transparencies into the printer until they stop, so that the adhesive
strips do not catch on one another.
5. Slide the paper guide firmly against the edge of the transparencies.
What's This? help.
6. Lower the output tray.
Print
1. Open the
2. Click the Printing Shortcuts tab.
3. In the Printing Shortcuts list, click Presentation Printing, and then specify the
Print other documents
42 Print other documents
following print settings:
• Paper Type: Click More, and then select an appropriate transparency film.
• Paper Size: An appropriate paper size
4. Select any other print settings that you want, and then click OK.
Use the What's This? help to learn about the features that appear in the Printer
Properties dialog box. For more information, see
Printer Properties dialog box.
What's This? help.
Page 46

Print brochures
Guidelines
• Do not print borderless brochures in ink-backup mode. Always have two print
cartridges installed in the printer.
For more information, see
• Open the file in a software program and assign the brochure size. Ensure that the
size corresponds to the paper size on which you want to print the brochure.
• Do not exceed the input tray capacity: 20 sheets of brochure paper.
Prepare to print
1. Raise the output tray.
2. Slide the paper guide all the way to the left.
3. Place the paper in the right side of the input tray. The side to be printed on should
face down.
4. Push the paper into the printer until it stops.
5. Slide the paper guide firmly against the edge of the paper.
Ink-backup mode.
6. Lower the output tray.
Print
1. Open the
2. Click the Features tab.
3. If you are printing brochures without borders, select the Borderless Printing check
box.
4. Specify the following print settings:
• Print Quality: Best
• Paper Type: Click More, and then select an appropriate HP inkjet paper.
• Orientation: Portrait or Landscape
• Size: An appropriate paper size
• Two-sided printing: Manual
5. Click OK to print.
Use the What's This? help to learn about the features that appear in the Printer
Properties dialog box. For more information, see
Printer Properties dialog box.
For more information, see
Two-sided printing.
What's This? help.
Print brochures 43
Print other documents
Page 47

Chapter 7
Print greeting cards
Greeting cards
• Unfold prefolded cards, and then place them in the input tray.
• For great results, use HP Greeting Card Paper.
• Do not exceed the input tray capacity: 20 cards.
Prepare to print
1. Raise the output tray, and then remove all paper from the input tray.
2. Slide the paper guide all the way to the left.
3. Fan the edges of the greeting cards to separate them, and then align the edges.
4. Place the greeting cards in the right side of the input tray. The side to be printed on
should face down.
5. Push the cards into the printer until they stop.
6. Slide the paper guide firmly against the edge of the cards.
7. Lower the output tray.
Print
NOTE: If your software program includes a greeting card printing feature, follow the
instructions that are provided with the software program. Otherwise, follow the
instructions below.
1. Open the Printer Properties dialog box.
2. Click the Features tab, and then specify the following print settings:
• Print Quality: Normal
• Paper Type: Click More, and then select an appropriate card type.
• Size: An appropriate card size
3. Select any other print settings that you want, and then click OK.
Print other documents
Use the What's This? help to learn about the features that appear in the Printer
Properties dialog box. For more information, see
Print booklets
Booklet printing automatically arranges and resizes the pages of a document so that when
the document is folded into a booklet, the page order is correct.
44 Print other documents
What's This? help.
Page 48

For example, when a four-page booklet is printed on both sides of the paper, the pages
are reordered and printed like this:
Guidelines
Do not exceed the input tray capacity: 100 sheets of paper.
Prepare to print
1. Raise the output tray.
2. Slide the paper guide all the way to the left.
3. Place plain paper in the right side of the input tray. The side to be printed on should
face down.
4. Push the paper into the printer until it stops.
5. Slide the paper guide firmly against the edge of the paper.
6. Lower the output tray.
Print
1. Open the
Printer Properties dialog box.
2. Click the Printing Shortcuts tab.
3. In the Printing Shortcuts list, click Two-sided (Duplex) Printing.
4. In the Print On Both Sides drop-down list, select one of the following binding options:
• Left Edge Booklet
• Right Edge Booklet
5. Select any other print settings that you want, and then click OK.
Print booklets 45
Print other documents
Page 49

Chapter 7
6. When prompted, reload the printed pages in the paper tray as shown below.
7. Click Continue to finish printing the booklet.
Use the What's This? help to learn about the features that appear in the Printer
Properties dialog box. For more information, see
Print posters
Guidelines
• For poster printing, sections of the poster are automatically arranged on individual
sheets that can be taped together. After the sections of a poster have been printed,
trim the edges of the sheets and tape the sheets together.
What's This? help.
• Do not exceed the input tray capacity: 100 sheets of paper.
Prepare to print
1. Raise the output tray.
2. Slide the paper guide all the way to the left.
3. Place plain paper in the right side of the input tray. The side to be printed on should
Print other documents
46 Print other documents
face down.
4. Push the paper into the printer until it stops.
Page 50

5. Slide the paper guide firmly against the edge of the paper.
6. Lower the output tray.
Print
1. Open the
2. Click the Features tab, and then specify the following print settings:
• Paper Type: Plain paper
• Orientation: Portrait or Landscape
• Size: An appropriate paper size
3. Click the Advanced tab, and then click Printer Features.
4. In the Poster Printing drop-down list, select the number of sheets for the poster.
5. Click the Select Tiles button.
6. Check that the number of tiles that are selected matches the number of sheets for
the poster, and then click OK.
7. Select any other print settings that you want, and then click OK.
Use the What's This? help to learn about the features that appear in the Printer
Properties dialog box. For more information, see
Printer Properties dialog box.
What's This? help.
Print iron-on transfers
Guidelines
• When printing a mirror image, the text and the pictures are horizontally reversed from
what is displayed on the computer screen.
• Do not exceed the input tray capacity: 12 iron-on transfers.
Print other documents
Print iron-on transfers 47
Page 51

Chapter 7
Prepare to print
1. Raise the output tray, and then remove all paper from the input tray.
2. Slide the paper guide all the way to the left.
3. Place the iron-on transfer paper in the right side of the input tray. The side to be printed
on should face down.
4. Push the paper into the printer until it stops.
5. Slide the paper guide firmly against the edge of the paper.
6. Lower the output tray.
Print
NOTE: If your software program includes an iron-on transfer printing feature, follow
the instructions that are provided with the software program. Otherwise, follow the
instructions below.
1. Open the Printer Properties dialog box.
2. Click the Features tab, and then specify the following print settings:
• Print Quality: Normal or Best
• Paper Type: Click More, click Specialty Papers, and then click HP Iron-On
Transfer Paper.
• Size: An appropriate paper size
3. Click the Advanced tab.
4. Click Printer Features, and then set Mirror Image to On.
5. Select any other print settings that you want, and then click OK.
Use the What's This? help to learn about the features that appear in the Printer
Properties dialog box. For more information, see
Print other documents
48 Print other documents
NOTE: Some iron-on transfer software programs do not require you to print a
mirror image.
What's This? help.
Page 52

8 Printing tips
Learn how to use printing shortcuts, select a paper type, change the print resolution, set
the page order, print multiple pages on a single sheet, preview a document, and use twosided printing. Click any of the following links:
Check your printer
•
Connect the printer.
Print a test page.
•
Save time
•
Printing shortcuts.
Set the page order.
•
Save money
•
Fast/Economical printing.
Print multiple pages on a single sheet of paper.
•
Print in grayscale.
•
Two-sided printing.
•
Enhance the quality of prints
•
Set a custom paper size.
Select a paper type.
•
Change the print speed or quality.
•
View the print resolution.
•
Maximum dpi.
•
Resize a document.
•
Printing tips
Print a test page
You can print a test page to verify that the printer can print from the computer correctly.
To print a test page
1. Load Letter or A4 unused plain white paper in the paper tray.
2. Open the printer
3. On the Device Services tab, click the Print a Test Page button.
The Print a Test Page dialog box is displayed.
4. Click the Print Page button.
Recycle or discard the test page.
Printing shortcuts
Use printing shortcuts to print with print settings that you use often. The printer software
has several specially designed printing shortcuts that are available in the Printing
Shortcuts list.
Toolbox.
Printing tips 49
Page 53

Chapter 8
NOTE: When you select a printing shortcut the appropriate printing options are
automatically displayed. You can leave them as is or change them.
This section contains the following topics:
•
Use printing shortcuts
Create printing shortcuts
•
Delete printing shortcuts
•
Printing tips
Use printing shortcuts
Use the Printing Shortcuts tab for the following print tasks:
•
General Everyday printing
Photo Printing–Borderless
•
Photo Printing–with white borders
•
Two-sided printing
•
Presentation printing
•
Fast/Economical printing
•
Booklet Printing
•
Create printing shortcuts
In addition to the printing shortcuts that are available in the Printing Shortcuts list, you
can create your own printing shortcuts.
If you frequently print on transparency film, for example, you can create a printing shortcut
by selecting the Presentation Printing shortcut, changing the paper type to HP Premium
Inkjet Transparency Film, and then saving the modified shortcut under a new name; for
example, Transparency Presentations. After creating the printing shortcut, simply select
it when printing on transparency film rather than changing the print settings each time.
To create a printing shortcut
1. Open the
Printer Properties dialog box.
2. Click the Printing Shortcuts tab.
3. In the Printing Shortcuts list, click a printing shortcut.
The print settings for the selected printing shortcut are displayed.
4. Change the print settings to those you want in the new printing shortcut.
5. In the Type new shortcut name here box, type a name for the new printing shortcut,
and then click Save.
The printing shortcut is added to the list.
Delete printing shortcuts
You might want to delete printing shortcuts that you no longer use.
To delete a printing shortcut
1. Open the
2. Click the Printing Shortcuts tab.
50 Printing tips
Printer Properties dialog box.
Page 54

3. In the Printing Shortcuts list, click the printing shortcut that you want to delete.
4. Click Delete.
The printing shortcut is removed from the list.
NOTE: Only the shortcuts that you have created can be deleted. The original HP
shortcuts cannot be deleted.
Fast/Economical printing
Use Fast/Economical printing to produce draft-quality printouts quickly.
To use Fast/Economical printing
1. Open the
2. Click the Printing Shortcuts tab.
3. In the Printing Shortcuts list, click Fast/Economical Printing.
4. Specify the print settings that you want, and then click OK.
Printer Properties dialog box.
General Everyday printing
Use General Everyday printing to print documents quickly. For more information, see:
•
Print documents
Print e-mail
•
Presentation printing
Use Presentation printing to print high-quality documents, including letters, brochures,
and transparencies. For more information, see:
•
Print letters
Print brochures
•
Print transparencies
•
Select a paper type
To determine the paper type used for a printing job, select a specific paper type.
Printing tips
Select a specific paper type
When printing a higher-quality document, HP recommends that you select a specific
paper type.
To select a specific paper type
1. Open the
2. Click the Features tab.
3. Click More in the Paper Type drop-down list, and then select the paper type that you
want to use.
Printer Properties dialog box.
Fast/Economical printing 51
Page 55

Chapter 8
4. Click OK.
5. Select any other print settings that you want, and then click OK.
Change the print speed or quality
The HP Deskjet automatically chooses a print quality and speed setting depending on
the paper type setting you select. You can also change the print quality setting to
Printing tips
customize the speed and quality of the print process.
Print quality settings
• Fast Draft produces draft-quality output at the fastest printing speed, while using the
least amount of ink.
• Normal provides the best balance between print quality and speed and is appropriate
for most documents.
• Best provides the best balance between high quality and speed and can be used for
high quality prints. For most documents, the Best setting prints more slowly than the
Normal setting.
NOTE: For maximum dpi quality, go to the Advanced tab, and then select
Enabled from the Maximum dpi drop-down list. For more information, see
dpi.
To select a print quality and speed
1. Open the
2. Click the Features tab.
3. In the Paper Type drop-down list, select the type of paper that you have loaded.
4. In the Print Quality drop-down list, select the appropriate quality setting for your
project.
Printer Properties dialog box.
Maximum
View the print resolution
The printer software displays the print resolution in dots per inch (dpi). The dpi varies
according to the paper type and print quality that you select in the printer software.
To view the print resolution
1. Open the
2. Click the Features tab.
3. In the Paper Type drop-down list, select the type of paper that you have loaded.
4. In the Print Quality drop-down list, select the appropriate print quality setting for your
project.
5. Click the Resolution button to view the print resolution dpi.
Printer Properties dialog box.
Maximum dpi
Use maximum dpi mode to print high-quality, sharp images.
52 Printing tips
Page 56

To get the most benefit from maximum dpi mode, use it to print high-quality images such
as digital photographs. When you select the maximum dpi setting, the printer software
displays the optimized dots per inch (dpi) that the HP Deskjet printer will print.
Printing in maximum dpi takes longer than printing with other settings and requires a large
amount of disk space.
NOTE: If a photo print cartridge is also installed, the print quality is enhanced. A
photo print cartridge can be purchased separately if it is not included with the
HP Deskjet.
To print in Maximum dpi mode
1. Open the
2. Click the Advanced tab.
3. In the Printer Features area, select Enabled from the Maximum dpi drop-down list.
4. Click the Features tab.
5. In the Paper Type drop-down list, click More, and then select the appropriate paper
type.
6. In the Print Quality drop-down list, click Maximum dpi.
7. Select any other print settings that you want, and then click OK.
Printer Properties dialog box.
NOTE: To disable maximum dpi mode, select Disabled from the drop-down list.
NOTE: To view the maximum dpi that the HP Deskjet printer will print, click
Resolution.
Printing tips
Print in grayscale
To print in grayscale
1. Open the
2. Click the Color tab.
3. Click Print In Grayscale.
4. In the Print In Grayscale drop-down list, select from the following options:
• High Quality: uses all the available colors to print your photo in grayscale. This
• Black Ink Only: uses black ink to print your photo in grayscale. The gray shading
5. Select any other print settings that you want, and then click OK.
Printer Properties dialog box.
creates smooth and natural shades of gray.
is created by varying patterns of black dots, which might result in a grainy image.
Set the page order
The page order determines the order in which your multipage documents print.
To set the page order
1. Open the
2. Click the Advanced tab.
Printer Properties dialog box.
Print in grayscale 53
Page 57

Chapter 8
3. Click Document Options, and then click Layout Options.
4. Select one of the following Page Order options:
• Front to back: Prints the first page of the document last. This setting saves time
because you do not have to reorder the printed pages. It is the appropriate setting
for most print jobs.
• Back to front: Prints the last page of the document last.
5. Select any other print settings that you want, and then click OK.
Printing tips
Set a custom paper size
Use the Custom Paper Size dialog box to print on a special paper size.
NOTE: This feature is not available for all paper types.
To define a custom paper size
1. Open the
2. Click the Features tab.
3. In the Size drop-down list, select Custom.
The Custom Paper Size dialog box is displayed.
4. In the Name box, type a name for the custom paper size.
5. In the Width and Length boxes, type the dimensions of the custom paper size.
The minimum and maximum dimensions are displayed beneath Width and Length.
6. Click the unit of measurement: Inches or Millimeters.
7. Click Save to save the custom paper size.
8. Click OK to exit the Custom Paper Size dialog box.
9. To use the custom paper size, select its name in the Size drop-down list.
Printer Properties dialog box.
54 Printing tips
Page 58

Print multiple pages on a single sheet of paper
You can print up to 16 pages on a single sheet of paper.
Printing tips
To print multiple pages on a single sheet of paper
1. Open the
2. Click the Features tab.
3. In the Pages Per Sheet drop-down list, select the number of pages that you want to
appear on each sheet of paper.
4. In the Page Order drop-down list, select a layout for the pages.
A preview of the page order is displayed at the top of the Features tab.
5. Select any other print settings that you want, and then click OK.
Printer Properties dialog box.
Resize a document
Use the printer software to print a document that is formatted for one paper size on
another paper size. Doing this can be useful if you do not have the correct paper size
available.
For example, if you have created a document that is formatted for letter-size paper, but
you do not have any letter-size paper available, you can print the document on another
paper size that is available.
Print multiple pages on a single sheet of paper 55
Page 59

Chapter 8
To resize a document for a different paper size
1. Open the
2. Click the Features tab.
3. Click Scale to paper size, and then select the target paper size in the drop-down list.
4. Select any other print settings that you want, and then click OK.
Printing tips
Print preview
Use the print preview function to view a printout on your computer before printing a
document. If the printout does not look correct, you can cancel the print job and adjust
the print settings as needed.
To preview a printed document
1. Open the
2. Click the Features or the Color tab.
3. Select the Show preview before printing check box.
4. Select any other print settings that you want, and then click OK.
5. Do one of the following:
Printer Properties dialog box.
The target paper size is the size of the paper on which you are printing, not the size
for which the document was formatted.
Printer Properties dialog box.
Before the document prints, a preview is displayed.
• Click OK to print the document.
• Click Cancel to cancel the print job. Adjust the print settings as needed before
printing the document.
Two-sided printing
Use two-sided printing, also called duplexing, to print on both sides of the paper. Printing
on both sides of the paper is not only economical, but environmentally conscious as well.
To print a two-sided document
1. Open the
2. Click the Printing Shortcuts tab.
3. In the Printing Shortcuts drop-down list, click Two-sided (Duplex) Printing.
4. In the Print On Both Sides drop-down list, click Manually.
5. Select any other print settings that you want, and then click OK.
The printer prints the odd-numbered pages first.
56 Printing tips
Printer Properties dialog box.
Page 60

6. After the odd-numbered pages have been printed, reload the printed pages with the
printed side facing up.
7. Click Continue to print the even-numbered pages.
To create a two-sided document with a binding, see
Bound two-sided documents
If you want to bind printed pages into a book, you can adjust the print settings to
accommodate the binding.
Bound two-sided documents can have a book binding (binding on the side) or a tablet
binding (binding at the top). Book binding is the most common type of binding.
To print a two-sided document with a book binding
▲ Follow the
instructions for basic two-sided printing.
Printing tips
Bound two-sided documents.
To print a two-sided document with a tablet binding
1. Open the
2. Click the Features tab.
3. In the Two-sided printing drop-down list, click Manual.
4. Select the following check boxes:
• Flip Pages Up
• Preserve Layout
5. Select any other print settings that you want, and then click OK.
The printer prints the odd-numbered pages first.
Printer Properties dialog box.
Bound two-sided documents 57
Page 61

Printing tips
Chapter 8
6. After the odd-numbered pages have been printed, reload the printed pages, with the
printed side facing up according to the document orientation, portrait or landscape.
Figure 8-1 Portrait
Figure 8-2 Landscape
7. Click Continue to print the even-numbered pages.
Print a Web page
You can print a Web page from your Web browser on the HP Deskjet.
If you use Internet Explorer 6.0 or higher for Web browsing, you can use HP Smart Web
Printing to ensure simple, predictable web printing with control over what you want and
how you want it printed. You can access HP Smart Web Printing from the toolbar in
Internet Explorer. For more information about HP Smart Web Printing, see the help file
provided with it.
To print a Web page
1. Make sure you have paper loaded in the input tray.
2. On the File menu in your Web browser, click Print.
TIP: For best results, select HP Smart Web Printing on the File menu. A check
mark appears when it is selected.
The Print dialog box appears.
3. Make sure the product is the selected printer.
58 Printing tips
Page 62

4. If your Web browser supports it, select the items on the Web page that you want to
include in the printout.
For example, in Internet Explorer, click the Options tab to select options such as As
laid out on screen, Only the selected frame, and Print all linked documents.
5. Click Print or OK to print the Web page.
TIP: To print Web pages correctly, you might need to set your print orientation to
Landscape.
Printing tips
Print a Web page 59
Page 63

9 Printer software
• Make the HP Deskjet the default printer
Set default print settings
•
Printer Properties dialog box
•
What's This? help
•
Download printer software updates
•
Make the HP Deskjet the default printer
You can set the HP Deskjet as the default printer to use from any software program. This
means that the HP Deskjet is automatically selected in the printer drop-down list when
you click Print from the File menu in a software program.
Windows Vista users
1. On the Windows taskbar, click Start, and then click Control Panel.
Printer software
2. Click Printers.
3. Right-click the HP Deskjet icon, and then click Set as default printer.
Windows XP users
1. On the Windows taskbar, click Start, and then click Printers and Faxes.
2. Right-click the HP Deskjet icon, and then click Set as Default Printer.
Windows 2000 users
1. On the Windows taskbar, click Start, point to Settings, and then click Printers.
2. Right-click the HP Deskjet icon, and then click Set as Default Printer.
Set default print settings
The HP Deskjet uses default print settings for all documents unless you specify other
settings.
60 Printer software
Page 64

To save time when printing, set the default print settings to options that you use often.
That way, you do not have to specify the options every time you use the printer.
To change the default print settings
1. Double-click the HP Digital Imaging Monitor icon on the right side of the Windows
taskbar.
1 HP Digital Imaging Monitor icon
Printer software
The HP Solution Center is displayed.
2. In the HP Solution Center, click Settings, point to Print Settings, and then click
Printer Settings.
3. Make changes to the print settings, and then click OK.
Printer Properties dialog box
The printer is controlled by software that is installed on your computer. Use the printer
software, also known as the printer driver, to change the print settings for a document.
To change the print settings, open the Printer Properties dialog box.
NOTE: The Printer Properties dialog box is also referred to as the Printing
Preferences dialog box.
To open the Printer Properties dialog box
1. Open the file that you want to print.
2. Click File, click Print, and then click Properties or Preferences.
The Printer Properties dialog box is displayed.
Printer Properties dialog box 61
Page 65

Chapter 9
NOTE: The path to the Printer Properties dialog box can vary depending on the
software program you are using.
What's This? help
Use the
Properties dialog box.
What's This? help to learn about the features that you see on the Printer
What's This? help
Use What's This? help to learn more about the available printing options.
To use What's This? help
1. Move the cursor over the feature that you want to learn more about.
2. Click the right mouse button.
The What's This box is displayed.
3. Move the cursor over the What's This? box, and then click the left mouse button.
An explanation of the feature is displayed.
Printer software
Download printer software updates
Download the latest printer software update every few months to ensure you have the
latest features and improvements.
To download a printer software update
1. Make sure you are connected to the Internet.
2. From the Windows Start menu, click Programs or All Programs, point to HP, and
then click HP Update.
The HP Update window is displayed.
3. Click Next.
HP Update searches the HP Web site for printer software updates.
• If the computer has the most recent version of the printer software installed, No
updates are available for your system at this time is displayed in the
HP Update window.
• If the computer does not have the most recent version of the printer software
installed, a list of options to download later versions of the software is displayed
in the HP Update window.
4. If a software update is available, select the check box beside the update name.
5. Click Install.
6. Follow the onscreen instructions.
Download HP Photosmart Software
Installing the printer software update you download from the HP Web site does not update
the HP Photosmart Software you might have installed on the computer. For information
about updating the HP Photosmart Software, see the HP Photosmart Help.
62 Printer software
Page 66

10 Maintenance
• Install print cartridges
Align print cartridges
•
Automatically clean print cartridges
•
Calibrate print quality
•
View estimated ink levels
•
Maintain the printer body
•
Remove ink from your skin and clothing
•
Manually clean print cartridges
•
Maintain print cartridges
•
Printer Toolbox
•
Install print cartridges
When you need to replace print cartridges, make sure you have the correct print
cartridges for your printer, and then install them in the print cartridge carriage.
•
Choose the right print cartridges
Selection numbers
•
Printing with one print cartridge
•
Installation instructions
•
Choose the right print cartridges
HP recommends that you use original HP print cartridges. Original HP cartridges are
designed and tested with HP printers to help you easily produce great results, time after
time. Wherever you purchase printing supplies, check to see which of the following
options are available for your printer.
NOTE: Standard and value choices use the same cartridge selection numbers. For
more information, see
Choose original HP cartridges for how you print
• Standard for everyday printing: You occasionally print directions, documents, and
even a photo now and then, but you still expect high quality and reliable printing. Our
standard cartridges give you the right value at the right price for your everyday printing
needs. Look for the blue package.
• Value for frequent printing: You print a lot—from e-mails and school reports to
family photos and holiday greetings. Buy more, save more with HP’s value offerings.
Look for the green package.
• Specialty for performance printing: You want advanced printing performance with
vivid, long-lasting lab-quality photos or HP specialty inks that offer enhanced
performance over standard formulations. Look for the red package.
Selection numbers.
Maintenance 63
Maintenance
Page 67

Chapter 10
Choose cartridge combinations for best results
• Text and graphics: Combine tri-color and black print cartridges.
• Color photos: Combine tri-color and photo print cartridges.
Always install the tri-color print cartridge in the left side of the print cartridge carriage.
Install the black or photo print cartridge in the right side of the print cartridge carriage.
Selection numbers
When buying replacement print cartridges, look for the print cartridge selection number.
You can find the selection number in three places:
• Selection number label: Look at the label on the print cartridge that you are replacing.
1 Selection number label
• Printer documentation: For a list of print cartridge selection numbers, see the
reference guide that came with the printer.
• Print Cartridge Information dialog box: For a list of print cartridge selection
numbers, open the printer
the Print Cartridge Information button.
Maintenance
Printing with one print cartridge
The printer can operate with only one print cartridge installed. For more information, see
Ink-backup mode.
Installation instructions
Always install the tri-color print cartridge in the left side of the print cartridge carriage.
Install the black or photo print cartridge in the right side of the print cartridge carriage.
To replace a print cartridge
1. Verify that the printer is turned on.
2. Load Letter or A4 plain, white paper in the paper tray.
3. Open the printer cover.
Toolbox, click the Estimated Ink Level tab, and then click
64 Maintenance
Page 68

4. Wait until the print cartridge carriage moves to the right side of the printer and is idle
and quiet.
5. Press down on the print cartridge, and then slide it out of the print cartridge carriage.
6. Remove the replacement print cartridge from its packaging and carefully remove the
plastic tape. Hold the print cartridge so that the copper strips are on the bottom and
facing toward the printer.
1 Remove plastic tape
CAUTION: Do not touch the print cartridge ink nozzles or copper contacts.
Touching these parts will result in clogs, ink failure, and bad electrical connections.
Do not remove the copper strips. They are required electrical contacts.
Install print cartridges 65
Maintenance
Page 69

Chapter 10
7. Slide the print cartridge at a slight upward angle into the carriage until the cartridge
snaps into place.
8. Close the printer cover.
Align print cartridges for optimum print quality.
For information about storing print cartridges, see
For information about recycling empty print cartridges, see
program.
Maintain print cartridges.
HP inkjet supplies recycling
WARNING! Keep both new and used print cartridges out of the reach of children.
Align print cartridges
After installing a print cartridge, align the print cartridges to ensure the best print quality.
To align print cartridges
Maintenance
1. Load Letter or A4 unused plain white paper in the paper tray.
2. Open the printer
3. Click Align the Print Cartridges.
4. Click Align, and then follow the onscreen instructions.
The HP Deskjet prints a test page, aligns the print cartridges, and calibrates the
printer. Recycle or discard the test page.
Toolbox.
Automatically clean print cartridges
If your printed pages are faded or if they contain ink streaks, the print cartridges might be
low on ink or might need to be cleaned. For more information, see
levels.
If the print cartridges are not low on ink, clean the print cartridges automatically.
View estimated ink
66 Maintenance
Page 70

To clean the print cartridges
1. Open the printer
2. Click Clean the Print Cartridges.
3. Click Clean, and then follow the onscreen instructions.
If your documents are still faded after cleaning, manually clean the print cartridge
contacts. For more information, see
CAUTION: Clean print cartridges only when necessary. Unnecessary cleaning
wastes ink and shortens the life of the cartridge.
Toolbox.
Calibrate print quality
Perform a print quality calibration if light or dark horizontal lines appear in documents that
are printed with the tri-color and black print cartridges.
Before performing a print quality calibration, clean the print cartridges, and then reprint
the document. If the lines still occur, perform a print quality calibration. For more
information on cleaning the cartridges, see
To calibrate print quality
1. Load Letter or A4 unused plain white paper in the paper tray.
2. Verify that both a black and a tri-color print cartridge are installed in the printer.
3. Open the printer
4. Click Print Quality Calibration.
5. Click Continue, and then follow the onscreen instructions.
Toolbox.
Manually clean print cartridges.
Automatically clean print cartridges.
View estimated ink levels
Follow these instructions to view the estimated ink levels of the print cartridges that are
installed in the printer:
NOTE: Ink from the cartridges is used in the printing process in a number of different
ways, including in the initialization process, which prepares the device and cartridges
for printing, and in printhead servicing, which keeps print nozzles clear and ink flowing
smoothly. In addition, some residual ink is left in the cartridge after it is used. For more
information, see
To check the ink levels
1. Open the printer
2. Click the Estimated Ink Levels tab.
NOTE: If the print cartridges were used before being installed in the printer, or have
been refilled, the estimated ink levels on the Estimated Ink level tab may be
inaccurate or unavailable.
The Estimated Ink Levels tab also contains print cartridge ordering information. To view
this information, click the Print Cartridge Information button.
www.hp.com/go/inkusage.
Toolbox.
Maintenance
Calibrate print quality 67
Page 71

Chapter 10
Maintain the printer body
Because the HP Deskjet ejects ink onto the paper in a fine mist, ink smudges will
eventually appear.
To remove smudges, stains, or dried ink from the exterior
1. Turn off the HP Deskjet, and then disconnect the power cord.
2. Wipe the outside of the HP Deskjet with a soft cloth that has been lightly moistened
with water.
CAUTION: Do not use any type of cleaning solution. Household cleaners and
detergents might damage the printer finish. Keep all fluids away from the interior. Do
not lubricate the metal rod on which the print cartridge carriage slides. Noise is normal
when the carriage moves back and forth.
Remove ink from your skin and clothing
Follow these instructions to remove ink from your skin and clothing:
Surface Remedy
Skin Wash the area with an abrasive soap.
White fabric Wash the fabric in cold water and use chlorine bleach.
Color fabric Wash the fabric in co ld water and use sudsy ammonia.
CAUTION: Always use cold water to remove ink from fabric. Warm or hot water can
set the ink into the fabric.
Manually clean print cartridges
Maintenance
68 Maintenance
CAUTION: Do not clean the print cartridge contacts unless you are having a problem
with print quality and other measures have not been successful. For more information,
see
Print quality is poor.
If the HP Deskjet is used in a dusty environment, a small amount of debris can accumulate
on the print cartridge contacts. This debris can cause ink streaks on printed pages. The
problem can be corrected by manually cleaning the print cartridge contacts.
You need the following items to clean the print cartridges:
• Distilled water (tap water can contain contaminants that can damage the print
cartridge)
• Cotton swabs or other soft, lint-free material that will not stick to the print cartridge
Be careful not to get ink on your hands or clothing as you clean. For more information,
see
Remove ink from your skin and clothing.
Page 72

To prepare to clean
1. Open the HP Deskjet cover.
2. Wait until the print cartridge carriage moves to the right side of the HP Deskjet and is
idle and quiet.
3. Remove the print cartridges and place them on a piece of paper, with the copper strips
facing up.
CAUTION: Do not leave the print cartridges outside the HP Deskjet for more
than 30 minutes.
To manually clean print cartridge contacts
1. Lightly moisten a cotton swab with distilled water and squeeze any excess water from
the swab.
2. Gently wipe the print cartridge copper contacts with the cotton swab.
CAUTION: Do not touch the print cartridge ink nozzles. Touching the ink nozzles
will result in clogs, ink failure, and bad electrical connections.
1 Ink nozzles (do not touch)
2 Copper contacts
3. Repeat this process until no ink residue or dust appears on the swab.
4. Insert the print cartridges in the HP Deskjet, and then close the cover. For more
information, see
Installation instructions.
Maintain print cartridges
Follow these guidelines to maintain and store HP print cartridges and to ensure consistent
print quality.
•
Print cartridge storage and handling
Print cartridge protector
•
Maintenance
Maintain print cartridges 69
Page 73

Chapter 10
Print cartridge storage and handling
Follow these guidelines to help maintain HP print cartridges and ensure consistent print
quality:
• When you remove a photo print cartridge from the printer, store it in a print cartridge
protector to prevent the ink from drying out. If you do not have a print cartridge
protector, you can use an airtight plastic container to protect your print cartridge. For
more information, see
Print cartridge protector.
• Keep all unused print cartridges in their original sealed packages until they are
needed. Store print cartridges at room temperature (15° to 35° C or 59° to 95° F).
• Do not remove the plastic tape covering the ink nozzles until you are ready to install
the print cartridge in the printer. If the plastic tape has been removed from the print
cartridge, do not attempt to reattach it. Reattaching the tape damages the print
cartridge.
CAUTION: Always turn the printer off with the Power button before you unplug the
power cord or turn off a power strip. This allows the printer to store the print cartridges
properly. When you store the printer, always leave the active print cartridges inside
the printer.
Print cartridge protector
If you have purchased an HP photo print cartridge, you can store it in the protector that
comes with the print cartridge. If you do not have a print cartridge protector, you can use
an airtight plastic container to protect your print cartridge.
Maintenance
70 Maintenance
To insert the print cartridge into the print cartridge protector
▲ Slide the print cartridge at a slight angle into the protector, and snap it securely in
place.
Page 74

To remove the print cartridge from the print cartridge protector
1. Press down and back on the top of the protector to release the print cartridge.
2. Slide the print cartridge out of the protector.
CAUTION: Do not drop the print cartridge. Dropping the print cartridge can
damage it.
Printer Toolbox
The printer Toolbox contains a number of useful tools to enhance the performance of the
printer.
Use the printer Toolbox to perform the following tasks:
•
Align print cartridges
Calibrate print quality
•
Automatically clean print cartridges
•
Print a test page
•
View estimated ink levels
•
To open the printer Toolbox
1. Open the
2. Click the Features tab, and then click the Printer services button.
The Toolbox is displayed.
Printer Properties dialog box.
Printer Toolbox 71
Maintenance
Page 75

11 Shop for ink supplies
To find the print cartridge reorder number, see the printed documentation that came with
the HP Deskjet. You can also use the software that came with the HP Deskjet to find out
the reorder number for the print cartridge. You can order print cartridges online from the
HP Web site. Additionally, you can contact a local HP reseller to find out the correct print
cartridge reorder number for your device and purchase print cartridges.
To order HP papers and other supplies, go to
choose your country/region, follow the prompts to select your product, and then click one
of the shopping links on the page.
NOTE: At this time, some portions of the HP Web site are available in English only.
NOTE: Ordering print cartridges online is not supported in all countries/regions. If it
is not supported in your country/region, contact a local HP reseller for information
about purchasing print cartridges.
To order print cartridges from your desktop
▲ Click the Shop for HP Supplies icon on your desktop to connect to HP SureSupply .
You will see a list of original HP printing supplies that are compatible with your device,
as well as options to conveniently purchase the supplies you need (options vary by
country/region).
If you deleted this icon from your desktop, click the Start menu, point to the HP folder,
then click Shop for Supplies.
To order HP printing supplies through the HP Solution Center
1. In the HP Solution Center, click Settings, point to Print Settings, and then click
Printer Toolbox.
www.hp.com/buy/supplies. If prompted,
2. Click the Estimated Ink Levels tab.
3. Click Ink Cartridge Ordering Information.
The ink cartridge reorder numbers appear.
4. Click Order Online.
HP sends detailed printer information, including model number, serial number, and
ink supply levels, to an authorized online reseller. The supplies you need are
preselected; you can change quantities, add or remove items, and then check out.
Shop for ink supplies
72 Shop for ink supplies
NOTE: You can also open the Printer Toolbox from the Print Properties dialog
box. In the Print Properties dialog box, click the Features tab, and then click
Printer Services.
Page 76

12 Troubleshooting
• Error messages
Installation problems
•
Printer lights are on or flashing
•
Printer does not print
•
Document prints slowly
•
Print cartridge problems
•
Paper problems
•
Photos do not print correctly
•
Problems with borderless documents
•
Print quality is poor
•
Document is misprinted
•
Front USB port problems
•
If you continue to have problems
•
Error messages
If an error message displays on the computer screen, check the following topics for a
solution:
•
Print cartridge error messages
"Paper Mismatch" or "Paper Size" message
•
Out of paper
•
There was an error writing to USB port
•
Two-way communication cannot be established or Printer not responding
•
Troubleshooting
Print cartridge error messages
If you receive a print cartridge error message, see one of the following topics:
•
Incorrect print cartridge or print cartridge missing
Print cartridge problem message
•
Print cartridge carriage is stuck
•
Print cartridge is in the wrong slot
•
Non-HP print cartridges
•
Previously used genuine HP cartridge
•
Original HP ink depleted
•
Low on ink
•
Printing in ink-backup mode
•
Incorrect print cartridge or print cartridge missing
The printer can only print when the correct print cartridges are installed. If you receive a
print cartridge error message, one or both of the print cartridges cannot be used in the
printer.
Troubleshooting 73
Page 77

Chapter 12
Troubleshooting
To resolve the problem, follow the instructions in Resolving print cartridge error
messages.
Print cartridge problem message
The printer cannot print if the print cartridges are faulty, or if they are not installed properly.
If you receive a message stating there is a problem with a print cartridge, follow the
instructions in
Resolving print cartridge error messages to resolve the problem.
Print cartridge carriage is stuck
If the printer stalls while you are printing a document, follow the instructions in
Print
cartridge carriage is stalled.
Print cartridge is in the wrong slot
Solution: Always install the tri-color print cartridge in the left print cartridge carriage
compartment.
Install the black or photo print cartridge in the right print cartridge carriage
compartment.
Cause: If you received this error message, the print cartridge was installed in the
wrong side of the print cartridge carriage.
Non-HP print cartridges
Solution: Follow the prompts on the computer screen to continue or replace the
indicated print cartridges. For more information, see
Replace print cartridges.
HP recommends that you use genuine HP print cartridges. Genuine HP print
cartridges are designed and tested with HP printers to help you easily produce great
results, time after time.
NOTE: HP cannot guarantee the quality or reliability of non-HP supplies. Printer
service or repairs required as a result of using a non-HP supply will not be covered
under warranty.
If you believe you purchased genuine HP print cartridges, go to:
www.hp.com/go/anticounterfeit
Cause: The product detected that a non-HP print cartridge was installed.
Previously used genuine HP cartridge
Solution: Check the print quality of the current print job. If it is satisfactory, follow
the prompts on the computer screen to continue.
Ink levels might not be available for the indicated print cartridges. Ink level warnings
and indicators provide estimates for planning purposes only. When you receive a lowink warning message, consider having a replacement cartridge available to avoid
possible printing delays. You do not need to replace the print cartridges until print
quality becomes unacceptable.
74 Troubleshooting
Page 78

Cause: A genuine HP print cartridge was previously used in another printer.
Original HP ink depleted
Solution: Follow the prompts on the computer screen to continue or replace the
indicated print cartridges. For more information, see
Replace print cartridges.
Ink levels might not be available for the indicated print cartridges. Ink level warnings
and indicators provide estimates for planning purposes only. When you receive a lowink warning message, consider having a replacement cartridge available to avoid
possible printing delays. You do not need to replace the print cartridges until print
quality becomes unacceptable.
HP recommends that you use genuine HP print cartridges. Genuine HP print
cartridges are designed and tested with HP printers to help you easily produce great
results, time after time.
NOTE: HP cannot guarantee the quality or reliability of non-HP supplies. Printer
service or repairs required as a result of using a non-HP supply will not be covered
under warranty.
If you believe you purchased genuine HP print cartridges, go to:
www.hp.com/go/anticounterfeit
Cause: The original HP ink in the indicated print cartridges has been depleted.
Low on ink
Solution: Ink level warnings and indicators provide estimates for planning purposes
only. When you receive a low-ink warning message, consider having a replacement
cartridge available to avoid possible printing delays. You do not need to replace the
print cartridges until print quality becomes unacceptable. If you have installed a refilled
or remanufactured print cartridge, or a cartridge that has been used in another printer,
the ink level indicator may be inaccurate or unavailable.
For more information on replacing print cartridges, see
Replace print cartridges.
Cause: At least one of the print cartridges is estimated to be low on ink and may
need to be replaced soon.
Troubleshooting
Printing in ink-backup mode
Solution: If you receive the ink-backup mode message and two print cartridges are
installed in the printer, verify that the protective piece of plastic tape has been
Error messages 75
Page 79

Chapter 12
Troubleshooting
removed from each print cartridge. When plastic tape covers the print cartridge
contacts, the printer cannot detect that the print cartridge is installed.
To remove plastic tape from a print cartridge
▲ Hold the print cartridge so that the copper strips are on the bottom and facing
toward the printer, and then carefully remove the plastic tape.
1 Remove plastic tape
CAUTION: Do not touch the print cartridge ink nozzles or copper contacts.
Touching these parts will result in clogs, ink failure, and bad electrical
connections. Do not remove the copper strips. They are required electrical
contacts.
Cause: When the printer detects that only one print cartridge is installed, ink-backup
mode is initiated. This printing mode lets you print with a single print cartridge, but it
slows the printer and affects the quality of printouts.
"Paper Mismatch" or "Paper Size" message
When printing #10 envelopes from the Envelope Tool in Microsoft Word, a Paper
Mismatch or Paper Size error displays, and the Resume and Cartridge lights also blink.
Try the following solutions:
•
Solution 1: Press the Resume button
Solution 2: Set the paper size in Microsoft Word
•
Solution 1: Press the Resume button
Solution: After the error message opens, press the Resume button. The envelope
will then print correctly.
If this did not solve the issue, try the next solution.
Solution 2: Set the paper size in Microsoft Word
Solution: In Microsoft Word, prior to printing envelopes, set the paper size to #10
envelope on the Features tab of the Printer Preferences dialog box.
76 Troubleshooting
Page 80

NOTE: Do not set the paper size from the Printers folder or from the printer icon
located in the lower-right hand corner of the screen next to the clock, because this
will affect all applications. Only set the paper size in Microsoft Word.
To set the paper size in Microsoft Word
1. In Microsoft Word, click File, and then click Print.
2. Make sure that the appropriate printer is selected, and then click Properties.
3. Click the Features tab.
4. In the Size drop-down list, select Envelope #10.
5. Click OK on the Printer Properties dialog box.
6. Click Cancel on the Print dialog box.
7. Print the envelope using the Envelopes and Labels feature in Microsoft Word. The
envelope should print without any errors.
NOTE: When you are finished printing envelopes, set the paper size back to
the default print settings.
Out of paper
If you receive an out of paper message, follow the guidelines in Out of paper.
There was an error writing to USB port
The printer might not be receiving correct data from another USB device or USB hub.
Connect the printer directly to the USB port on the computer.
Troubleshooting
Two-way communication cannot be established or Printer not responding
The printer might not be able to communicate with the computer if the USB cable is too
long.
If you receive this error message, make sure that the USB cable is not greater than 3
meters (approximately 9.8 feet) in length.
NOTE: For best printing performance, use a USB 2.0 compatible cable.
Installation problems
If the software installation program stops or fails, check the following topics for more
information:
•
Installation program stops
"Unknown Device" message displays
•
Printer name does not appear
•
If you continue to have problems, visit HP Technical Support at
www.hp.com/support.
Installation problems 77
Page 81

Chapter 12
Troubleshooting
Installation program stops
Cause: If the installation program stops when it looks for new hardware, one of the
following issues is causing a communication problem:
• The USB cable is old or defective.
• Software, such as an antivirus program, is running.
• Another device, such as a scanner, is connected to the computer.
Solution:
To resolve the problem
1. Make sure that no USB devices other than the printer, the keyboard, and the
mouse are connected to the computer.
2. Disconnect and reconnect the USB cable.
3. Make sure that the printer is connected directly to a USB port on the computer
(instead of through a USB hub).
4. If the installation program still does not locate the printer, replace the USB cable,
and then continue to the next step.
5. Click Cancel, and then restart the computer.
6. Turn the printer off, and then disconnect the USB cable and power cord.
7. Quit any antivirus programs or other software programs that are running on the
computer.
NOTE: To quit an antivirus program, follow the manufacturer’s instructions.
8. Reinstall the printer software:
a. Insert the printer software CD into the drive.
b. Follow the onscreen instructions. When the installation program prompts you,
connect the USB cable and the power cord to the printer, and then make sure
that the printer is on.
NOTE: Do not connect the USB cable until you are told to do so.
c. Follow the onscreen instructions to finish the installation.
9. Restart the antivirus program.
"Unknown Device" message displays
Cause: During installation, an “Unknown Device” message might be displayed
when you connect a USB cable between the printer and the computer. A possible
cause might be a defective USB cable.
Solution:
NOTE: This is not a problem if you are using Windows 2000. If you are using
Windows 2000 and this message is displayed, you can continue with the software
installation.
78 Troubleshooting
Page 82

To resolve the problem
1. Disconnect the USB cable from the printer.
2. Disconnect the power cord from the printer.
3. Wait approximately 30 seconds.
4. Reconnect the power cord to the printer.
5. Reconnect the USB cable to the printer.
6. If the “Unknown Device” message is still displayed, replace the USB cable.
Printer name does not appear
Solution: If the printer software seems to install correctly, but the printer name does
not appear in the list of printers when you click Print on the File menu or in the Printers
folder in Control Panel, try reinstalling the printer software.
To reinstall the printer software
1. Quit any antivirus programs or other software programs that are running on the
computer.
NOTE: To quit an antivirus program, follow the manufacturer’s instructions.
2. Uninstall the printer software:
a. Insert the printer software CD into the drive, and then follow the onscreen
instructions.
NOTE: If the installation program does not start automatically, click your
CD drive letter in Windows Explorer, then double-click the setup.exe file.
For example, double-click D:\setup.exe.
Troubleshooting
b. When prompted, click Remove All.
3. Reinstall the printer software:
a. Insert the printer software CD into the drive.
b. Follow the onscreen instructions to finish the installation.
4. Restart the antivirus program.
Installation problems 79
Page 83

Chapter 12
Printer lights are on or flashing
The printer lights indicate the printer status.
Troubleshooting
1 Power light
2 Resume light
3 Print Cartridge Status lights
4 Front USB port lights
To resolve the problem that is causing the lights to flash, click the appropriate link.
NOTE: There may be more than one reason why the printer lights are flashing, so
you may see several solutions.
• Power light is flashing
Resume light is flashing
•
Both Power and Resume lights are flashing
•
Print Cartridge Status lights are on or flashing
•
Front USB port lights are flashing
•
Power light is flashing
1 Power light
80 Troubleshooting
Page 84

If the Power light is flashing, the printer is preparing to print. The light stops flashing when
the printer has received all data.
Resume light is flashing
1 Resume light
If the Resume light is flashing, check the following conditions:
• The printer might be out of paper.
Place paper in the input tray, and then press the Resume button.
• There might be a paper jam.
For information about clearing a paper jam, see
• The printer might be stalled.
For more information about correcting the problem, see
stalled.
Troubleshooting
Paper jam.
Print cartridge carriage is
Both Power and Resume lights are flashing
The printer might need to be restarted.
1. Press the Power button to turn off the printer, and then press the Power button to
restart the printer.
Proceed to step 2 if the lights continue to flash.
2. Press the Power button to turn off the printer.
3. Disconnect the printer power cord from the electrical outlet.
4. Reconnect the printer power cord to the electrical outlet.
5. Press the Power button to turn on the printer.
Printer lights are on or flashing 81
Page 85

Chapter 12
Print Cartridge Status lights are on or flashing
The printer has two print cartridge status lights.
Troubleshooting
1. The left status light represents the tri-color print cartridge, which is installed in the left
side of the print cartridge carriage.
2. The right status light represents the black or the photo print cartridge. One of these
print cartridges is installed in the right side of the print cartridge carriage. For more
information, see
If one or both Print Cartridge Status lights are on and not flashing
• Check to see if a print cartridge is low on ink. For more information, see
estimated ink levels.
Photo print cartridge.
View
NOTE: Ink level warnings and indicators provide estimates for planning
purposes only. When you receive a low-ink warning message, consider having a
replacement cartridge available to avoid possible printing delays. You do not need
to replace the print cartridges until print quality becomes unacceptable.
• If neither print cartridge is low on ink, press the Resume button. If the Print Cartridge
Status light remains on, turn the printer off, and then on again.
If one or both Print Cartridge Status lights are on and flashing
• The light on the left blinks when the tri-color print cartridge (on the left) is the problem,
the light on the right blinks when the black or photo cartridge (on the right) is the
problem. For resolving the error with the problem cartridge, see
cartridge error messages.
• If both lights are flashing, verify that the correct print cartridges are installed. For more
information, see
• If you were printing a borderless document when the light started flashing, see
Borderless printing guidelines.
82 Troubleshooting
Resolving print
Install print cartridges.
Page 86

Otherwise, follow these steps:
1. Raise the printer cover, remove the print cartridge on the right, and then lower the
cover.
2. Follow one of these steps:
• If the Power light is flashing: Open the printer cover, reinsert the print cartridge
that you removed, and then remove the other print cartridge. Proceed to step 3.
• If the Power light is off: There is a problem with the print cartridge that you
removed. Proceed to step 3.
3.
Manually clean the print cartridge.
After cleaning the print cartridge, reinsert it into the printer.
If the light continues to flash, see
Front USB port lights are flashing
If the front USB port lights are flashing, follow the instructions in Front USB port lights are
flashing.
Printer does not print
• Verify the following
Check the printer lights
•
Unable to print
•
If the printer still does not print
•
Verify the following
Verify the following conditions if the printer is not printing:
• The printer is connected to the power source.
• The cable connections are secure.
• The printer is turned on.
• The print cartridges are the correct print cartridges for the printer and are properly
installed.
For more information, see
• The paper or other media is correctly loaded in the paper tray.
• The printer cover is closed.
• The rear access door is attached.
Print cartridge problems.
Print cartridges and Installation instructions.
Troubleshooting
Check the printer lights
The printer lights indicate the printer status and alert you to potential problems.
For more information, see
Unable to print
Try the following solutions:
Solution 1: Make sure the printer is turned on
•
Solution 2: Print a test page
•
Printer lights are on or flashing.
Printer does not print 83
Page 87

Chapter 12
Troubleshooting
• Solution 3: Clear the print queue
Solution 4: Check the printer cable connection
•
Solution 5: Verify the printer driver configuration
•
Solution 6: Check if the printer is paused or offline
•
Solution 7: Clear the print queue manually
•
Solution 8: Restart the print spooler
•
Solution 9: Verify whether the software application is causing the problem
•
Solution 1: Make sure the printer is turned on
Solution: Look at the Power light located on the front of the printer. If it is not lit, the
printer is turned off. Make sure the power cord is firmly connected to the printer and
plugged into a power outlet. Press the Power button to turn on the printer.
Cause: The product was turned off.
If this did not solve the issue, try the next solution.
Solution 2: Print a test page
Solution: Print a test page to see if the product can print and is communicating with
the computer.
To print a test page
1. Load Letter or A4 unused plain white paper in the paper tray.
2. Open the printer
Toolbox.
3. On the Device Services tab, click the Print a Test Page button.
The Print a Test Page dialog box is displayed.
4. Click the Print Page button.
Recycle or discard the test page.
If the test page fails to print, make sure you set up the product properly. See the Setup
Guide that came with the product for information about setting it up.
Cause: The product was not set up properly.
If this did not solve the issue, try the next solution.
84 Troubleshooting
Page 88

Solution 3: Clear the print queue
Solution: Restart your computer to clear the print queue.
To clear the print queue
1. Restart your computer.
2. After the computer has restarted, check the print queue.
a. Depending upon your operating system, do one of the following:
• Windows Vista: On the Windows taskbar, click Start, click Control
Panel, and then click Printers.
• Windows XP: On the Windows taskbar, click Start, click Control Panel,
and then click Printers and Faxes.
• Windows 2000: On the Windows taskbar, click Start, point to Settings,
and then click Printers.
b. Double-click the icon for your product to open the print queue.
If there are no print jobs pending, the issue might have been resolved.
3. Try to print again.
Cause: The computer needed to be restarted to clear the print queue.
If this did not solve the issue, try the next solution.
Solution 4: Check the printer cable connection
Solution: Disconnect the USB cable from the computer and product, and then
reconnect it.
Troubleshooting
To disconnect and reconnect the USB cable
1. Disconnect the USB cable from the product.
2. Disconnect the USB cable from the computer.
3. Leave the USB cable disconnect for 5-6 seconds.
4. Reconnect the USB cable to the product and the computer.
Printer does not print 85
Page 89

Chapter 12
After reconnecting the USB cable, the product should start printing the jobs in
queue.
NOTE: If you are connecting the product through a USB hub, make sure the
hub is turned on. If the hub is on, try connecting directly to your computer.
Troubleshooting
5. If the product does not start printing automatically, start another print job.
Cause: The USB cable needed to be disconnected.
If this did not solve the issue, try the next solution.
Solution 5: Verify the printer driver configuration
Solution: Check to make sure the product is set as the default printer and that it is
using the correct printer driver.
To verify that the product is set as the default printer
1. Depending upon your operating system, do one of the following:
• Windows Vista: On the Windows taskbar, click Start, click Control Panel, and
then click Printers.
• Windows XP: On the Windows taskbar, click Start, click Control Panel, and
then click Printers and Faxes.
• Windows 2000: On the Windows taskbar, click Start, point to Settings, and
then click Printers.
2. Make sure the correct product is set as the default printer.
The default printer has a check mark in a black circle next to it.
3. If the wrong product is set as the default printer, right-click the correct product and
select Set as Default.
To verify the print driver
1. Depending upon your operating system, do one of the following:
• Windows Vista: On the Windows taskbar, click Start, click Control Panel, and
then click Printers.
• Windows XP: On the Windows taskbar, click Start, click Control Panel, and
then click Printers and Faxes.
• Windows 2000: On the Windows taskbar, click Start, point to Settings, and
then click Printers.
2. Right-click the icon next to the product, and select Properties.
3. Click the Ports tab to verify that the product is using the correct port.
The port that the product is using is highlighted and has a check mark next to it.
The product should be set to use a DOT4 or the USB00X (where X is replaced
by a number) port.
4. If the product is using the wrong port, click the correct port to select it.
The port that the product is now using is highlighted and has a check mark next
to it.
5. Click the Advanced tab.
86 Troubleshooting
Page 90

6. Check the driver listed in the Driver drop-down menu to verify that the product is
using the correct driver.
The name of your product should be listed as the driver.
7. If the wrong driver is selected, select the correct driver from the Driver drop-down
menu.
8. Click OK to save your changes.
Cause: If there was more than one product configured on the same computer, the
product in use was not be set as the default printer, or the wrong driver might have
been configured.
If this did not solve the issue, try the next solution.
Solution 6: Check if the printer is paused or offline
Solution: Check to make sure the product is not paused or offline.
To check if the printer is paused or offline
1. Depending upon your operating system, do one of the following:
• Win do ws Vi sta : O n t he Windows taskbar, click Start, click Control Panel, and
then click Printers.
• Windows XP: On the Windows taskbar, click Start, click Control Panel, and
then click Printers and Faxes.
• Windows 2000: On the Windows taskbar, click Start, point to Settings, and
then click Printers.
2. Double-click the icon for your product to open the print queue.
3. On the Printer menu, make sure there are no check marks next to Pause
Printing or Use Printer Offline. If a check mark is present on either option, click
the menu option to remove it. If the menu has the Use Printer Online option,
select that option to put a check mark next to it.
4. If you made any changes, try to print again.
Cause: The product was paused or offline.
If this did not solve the issue, try the next solution.
Troubleshooting
Printer does not print 87
Page 91

Chapter 12
Troubleshooting
Solution 7: Clear the print queue manually
Solution: Manually clear the print queue.
To clear the print queue manually
1. Depending upon your operating system, do one of the following:
• Windows Vista: On the Windows taskbar, click Start, click Control Panel, and
then click Printers.
• Windows XP: On the Windows taskbar, click Start, click Control Panel, and
then click Printers and Faxes.
• Windows 2000: On the Windows taskbar, click Start, point to Settings, and
then click Printers.
2. Double-click the icon for your product to open the print queue.
3. On the Printer menu, click Cancel all documents or Purge Print Document,
and then click Yes to confirm.
4. If there are still documents in the queue, restart the computer and try printing
again after the computer has restarted.
5. Check the print queue again to make sure it is clear, and then try to print again.
If the print queue is not clear, or if it is clear but jobs are still failing to print, proceed
to the next solution.
Cause: The print queue needed to be manually cleared.
If this did not solve the issue, try the next solution.
Solution 8: Restart the print spooler
Solution: Restart the print spooler.
To stop and restart the print spooler
1. Depending upon your operating system, do one of the following:
• Windows XP and Windows Vista: On the Windows taskbar, click Start, and
• Windows 2000: On the Windows taskbar, click Start, point to Settings, and
2. Double-click Administrative Tools, and then double-click Services.
3. Scroll down the list and click Print Spooler, and then click Stop to stop the
service.
4. Click Start to restart the service, and then click OK.
5. Restart the computer and try printing again after the computer has restarted.
Cause: The print spooler needed to be restarted.
If this did not solve the issue, try the next solution.
88 Troubleshooting
then click Control Panel.
then click Control Panel.
Page 92

Solution 9: Verify whether the software application is causing the problem
Solution: Verify whether the software application is the problem.
To verify the software application
1. Close the software application and reopen it.
2. Try to print again from the software application.
NOTE: The printer might not support printing from a DOS application.
Determine if the software application is Windows-based or DOS-based by
checking the system requirements of the application.
3. Try printing from Notepad to see if the issue is the software application or the
driver.
To print from Notepad
a. On the Windows taskbar, click Start, and then click Programs or All
Programs.
b. Click Accessories, and then click Notepad.
c. Type a few characters of text into Notepad.
d. Click File, and then click Print.
4. If printing is successful from Notepad but not the software application, contact the
manufacturer of that application for support.
Cause: The software application was failing or could not interface with the print
driver correctly.
If the printer still does not print
1. Select the topic below that best describes the problem:
Paper jam
•
Out of paper
•
Printer ejects paper
•
Print cartridge carriage is stalled
•
2. If the printer still does not print, shut down, and then restart your computer.
Troubleshooting
Document prints slowly
Multiple software programs are open
The computer resources are insufficient for the printer to print at its optimum speed.
To increase printer speed, close all unnecessary software programs when printing.
Complex documents, graphics, or photos are printing
Documents containing graphics or photos print more slowly than text documents.
Document prints slowly 89
Page 93

Chapter 12
Troubleshooting
Best or Maximum dpi print mode is selected
The printer prints more slowly when Best or Maximum dpi is selected as the print quality.
To increase the printer speed, select a different print quality mode.
Printer is in ink-backup mode
The printer might print more slowly if it is in ink-backup mode. For more information, see
Ink-backup mode.
To increase the print speed, use two print cartridges in the printer.
Printer software is outdated
Outdated printer software might be installed.
For information about updating the printer software, see
updates.
Computer does not meet system requirements
If your computer does not have enough RAM or a large amount of free space on the hard
drive, the printer processing time will be longer.
1. Verify that the computer hard disk space, RAM, and processor speed meet the system
requirements.
The system requirements are listed in the Readme file that came with the printer.
2. Make space available on the hard drive by deleting unwanted files.
Download printer software
Print cartridge problems
• Resolving print cartridge error messages
Print cartridge carriage is stalled
•
Resolving print cartridge error messages
After you install a print cartridge, one or both of the print cartridge status lights begin to
blink. The printer will not print. One of the following messages may appear on your
computer screen:
Print Cartridge Problem
Incorrect Print Cartridge(s)
Incorrectly Installed Cartridge(s)
Print Cartridge(s) Missing
NOTE: In the procedures below, the "problem" cartridge is identified by the blinking
light. The light on the left blinks when the tri-color print cartridge (on the left) is the
problem and the light on the right blinks when the black or photo cartridge (on the
right) is the problem. If both lights blink, either both cartridges are the problem, or the
printer cannot determine the problem cartridge.
90 Troubleshooting
Page 94

To determine which cartridge is having the problem
1. Make sure the printer is on.
2. Open the printer cover. Wait until the print cartridge carriage moves to the right side
of the printer and is idle and quiet.
3. Remove the tri-color print cartridge from the slot on the left. Press down on the
cartridge, and then slide it out of the print cartridge carriage.
4. Close the printer cover.
5. Check to see if the error has been resolved.
• If the error has been resolved, then there is a problem with the tri-color print
cartridge.
• If the error has not been resolved, continue to the next step.
6. Open the cover and reinsert the tri-color print cartridge by sliding it forward into the
slot on the left. Then push the print cartridge forward until it snaps into place.
Troubleshooting
7. Repeat the steps to remove the other print cartridge from the slot on the right.
Print cartridge problems 91
Page 95

Chapter 12
Troubleshooting
8. Check to see if the error has been resolved.
• If the error has been resolved, then there is a problem with the black print
cartridge.
• If the error has not been resolved, then there is a problem with both print
cartridges.
9. When you have identified the problem cartridge, continue with the following solutions.
Work through the following sections in order. When the print cartridge light stops blinking,
you have solved the problem.
•
Solution 1: Remove and reinstall the print cartridges
Solution 2: Clean the print cartridge contacts
•
Solution 3: Print in ink-backup mode
•
Solution 1: Remove and reinstall the print cartridges
Solution: The print cartridge may not have full electrical contact with the printer.
Removing and reinstalling the cartridge may help.
NOTE: HP cannot guarantee the quality of remanufactured or refilled cartridges.
To verify and install the correct print cartridges
1. Make sure the printer is on. Press the Power button if it is not lit.
2. Open the printer cover, and then wait until the print cartridge carriage is idle and
silent.
3. Press down lightly on the end of the problem cartridge to release it.
4. Slide the cartridge out and inspect it:
1 Ink nozzles (do not touch)
2 Copper contacts
• Check the electrical contacts for debris.
• Make sure all the clear nozzle protective tape has been removed.
92 Troubleshooting
CAUTION: Do not touch the copper electrical contacts or the ink nozzles.
CAUTION: Do not attempt to remove the copper electrical strip!
Page 96

5. Read the selection number on the print cartridge label and make sure it is
compatible with your printer. Compatible print cartridges are listed in the reference
guide that came with your printer.
1 Selection number
6. If the print cartridge has the wrong selection number, install a new print cartridge.
For more information, see
Installation instructions.
7. Close the printer cover.
If this did not solve the issue, try the next solution.
Solution 2: Clean the print cartridge contacts
Solution: If the print cartridge selection number is correct and the previous solution
did not resolve the problem, try cleaning the print cartridge. For more information, see
Manually clean print cartridges.
If the print cartridge status light continues to flash after cleaning the print cartridge,
replace the print cartridge. For more information, see
Replace print cartridges.
If this did not solve the issue, try the next solution.
Troubleshooting
Solution 3: Print in ink-backup mode
Solution: If you do not have a replacement print cartridge, you can still print in ink
backup mode. Remove the problem cartridge and print with the remaining cartridge.
For more information, see
Print cartridge carriage is stalled
The print cartridge cradle (carriage) may get stuck on either side or in the middle of the
printer. This is called a carriage stall. When this happens, the error message Print
Cartridge Cradle is Stuck may appear.
Ink-backup mode.
Print cartridge problems 93
Page 97

Chapter 12
Troubleshooting
Try the following solutions:
•
Solution 1: Turn the power off and on
Solution 2: Clear any paper jams
•
Solution 3: Move the printer carriage
•
Solution 4: Verify the power source
•
Solution 5: Remove and reinstall the print cartridges
•
Solution 1: Turn the power off and on
Solution: Turn the power off and then back on.
CAUTION: Check for any loose or broken parts in the printer. If you find loose
or broken parts, go to
www.hp.com/support.
To turn off the printer
1. Turn off the printer by pressing and releasing the Power button. If it will not turn
off, proceed to the next solution.
2. After the printer turns off, press the Power button to turn the printer back on.
NOTE: The printer may go through a warm-up period of up to two minutes.
Lights may flash, and the carriage may move. Wait until this warm-up period
is complete before continuing to the next step.
3. If the Power light is on and does not blink, print a self-test page. For more
information, see
Print a test page.
If this did not solve the issue, try the next solution.
Solution 2: Clear any paper jams
Solution: Clear the printer of any jammed paper. For more information, see
jam.
If this did not solve the issue, try the next solution.
94 Troubleshooting
Paper
Page 98

Solution 3: Move the printer carriage
Solution: If the printer carriage is still stuck, try moving it as described in the
following procedure.
To move the printer carriage
1. Press the Power button to turn off the printer, and then disconnect the power cord
from the printer.
2. Open the printer cover and try to move the print carriage from side to side by hand.
1 Print carriage in the access door
Troubleshooting
If the print carriage does not move, then your printer needs to be serviced. If the
print carriage does move, then proceed to the next step.
3. Verify that the print cartridges are locked into the printer carriage and have not
come loose. Also, verify that there are no obstructions under or around the printer
carriage to prevent it from moving.
4. Verify that the printer carriage can move freely across the width of the printer by
gently pushing the carriage to the left, and then to the right. Clear any obstructions.
5. Close the printer cover and reconnect the power cord.
6. Press the Power button to turn on the printer.
7. Try the print job again to see if this procedure resolved the issue.
If this did not solve the issue, try the next solution.
Print cartridge problems 95
Page 99

Chapter 12
Troubleshooting
Solution 4: Verify the power source
Solution: Verify that the printer is properly connected to a suitable power source.
To verify the power source
1. Verify that the computer and the printer have the correct power plugs depending
on your country/region.
2. Remove the printer cable from any power strips or surge suppressors, and then
plug it directly into a power outlet.
3. Try the print job again to see if this procedure resolved the issue.
NOTE: If the printer prints when plugged directly into a power outlet, the
power strip or surge suppressor may not be allowing sufficient voltage to reach
the printer.
If this did not solve the issue, try the next solution.
Solution 5: Remove and reinstall the print cartridges
Solution: Improper placement or installation of the print cartridges can cause the
printer carriage to stall. Remove and reinstall the print cartridges. For more
information, see
Install print cartridges.
Paper problems
• Paper jam
Printer does not feed paper
•
Printer ejects paper
•
Out of paper
•
Printer prints on multiple sheets at once
•
Paper jam
To clear a paper jam
1. Press the Resume button.
If the paper jam does not clear, then go to the next step.
2. Turn off the printer.
3. Disconnect the printer power cord from the electrical outlet.
96 Troubleshooting
Page 100

4. Remove the rear access door. Press the handle to the right, and then pull out the
door.
5. Remove any paper that is inside the printer by pulling it out from the back of the printer.
If you are printing labels, verify that a label did not become detached from the label
sheet while passing through the printer.
6. Replace the rear access door securely.
Troubleshooting
7. If the paper jam cannot be removed from the back of the printer, raise the printer
cover, remove the paper jam from the front of the printer, and then lower the cover.
CAUTION: Remove the paper jam carefully as it is possible to damage the
printer when removing paper from the front.
8. Reconnect the printer power cord to the electrical outlet.
9. Turn on the printer, and then press the Resume button.
10. Reprint the document.
NOTE: If paper jams occur frequently, try using a heavier paper. See Printer
specifications for paper weight specifications.
Printer does not feed paper
Solution: Try one or more of the following solutions:
• Reduce the number of sheets in the input tray.
• Remove the paper from the input tray, and then reload it.
Paper problems 97
 Loading...