

Page 1
About this document
Replacement
Instructions
hp StorageWorks
MSA SAN Switch 2/8
These instructions apply to the MSA1000
product family. The part may also be used
in other HP products. Please refer to
documentation for your specific product
for detailed replacement instructions.
If the product in which this part is being replaced is still under HP
warranty, then the replacement part(s) referred to in these Replacement
Instructions is provided under the terms and conditions of the
Hewlett-Packard Company Limited Warranty for that product. A copy of
this Limited Warranty may be viewed at:
http://h18006.www1.hp.com/products/storageworks/warranty.html
If this is a trade sale part (product out of warranty), then the replacement
part(s) referred to in these Replacement Instructions is provided under HP’s
express limited warranty statement, which may be viewed at:
http://customerops.corp.hp.com/1sw/pdm_om/warranty_support/policies/
2330100.doc
The replacement part takes on either the Limited Warranty Period of the
part being replaced or a ninety-day period that begins upon installation
of the replacement part, whichever is greater.
The information contained on these replacement instructions is subject to
change without notice. The only warranty for this replacement product is
as noted above. Nothing in these replacement instructions should be
construed as constituting an additional warranty. The information
provided in these replacement instructions is provided “AS IS” and HP is
not liable for technical or editorial errors or omissions contained herein.
© Copyright 2004 Hewlett-Packard Development Company, L.P.
Please note that this document is protected by federal copyright law and
that no part of this document may be copied, reproduced or translated
without the prior written consent of Hewlett-Packard Development
Company, L.P.
Printed in the USA.
MSA SAN Switch 2/8 Replacement Instructions
First Edition (April 2004)
Part Number: 358185-001
This document details the procedures for replacing a failed
MSA SAN Switch 2/8 in HP StorageWorks Modular Smart
Array (MSA) storage systems.
Verifying component failure
Before replacing the switch use the following methods to
verify the component failure.
■ If the service indicator LED flashes amber, it indicates a
failure.
■ Check the controller LCD for one of the error messages
listed in Tab le 1.
Table 1: LCD Error Messages
No. Message
514 FIBRE SWITCH HARDWARE FAILURE
515 FIBRE DEVICE HARDWARE FAILURE
516 FIBRE SUBSYSTEM FAILURE
Before you begin
Read the following cautions and information before beginning
removal and replacement procedures.
WARNING: To reduce the risk of injury from laser
radiation or damage to the equipment, observe the
following precautions:
■ Do not open any panels, operate controls, make
adjustments, or perform procedures to a laser device
other than those specified herein.
■ Do not stare into the laser beam when panels are
open.
Caution: Be sure the replacement part is available before
removing the failed component. Removing a component
impacts cooling within the enclosure.
Caution: Parts can be damaged by electrostatic discharge.
Use proper anti-static protection. Refer to the
documentation that shipped with your system for additional
information.
Caution: It is important to follow these instructions when
replacing components in the MSA. If the procedure is done
improperly, it is possible to lose data or damage
equipment.
Note: Before replacing the MSA SAN Switch 2/8 it is important to
stop all system access (for example, application, system I/O, or
RAW device file path/s) to the device.
358185- 001
Page 2
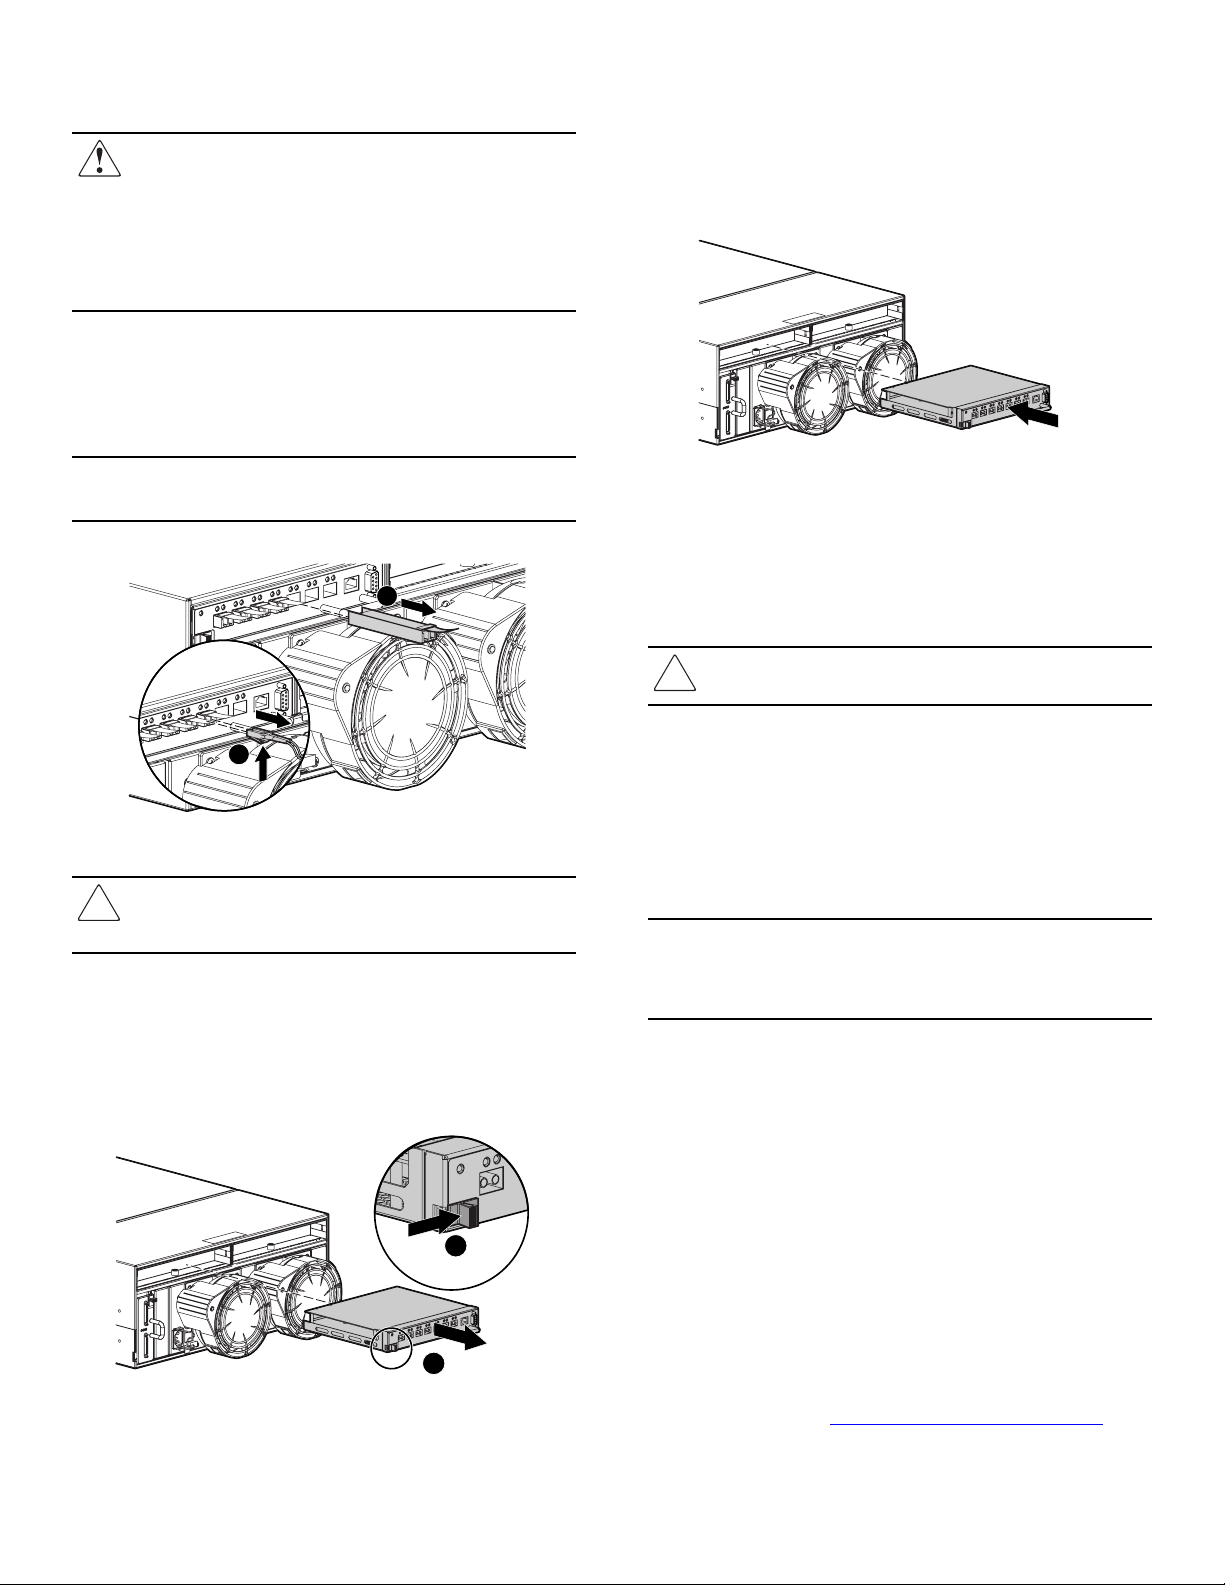
Step 1: Removing the SFP transceiver
WARNING: To reduce the risk of injury from laser
radiation or damage to the equipment, observe the
following precautions:
■ Do not open any panels, operate controls, make
adjustments, or perform procedures to a laser device
other than those specified herein.
■ Do not stare into the laser beam when panels are
open.
1. Press the release clip on the bottom of the cable connector
1 to remove the Fibre Channel cable.
2. Pull the transceiver out of the device by pulling up and out
on the plastic tab 2.
Step 3: Installing the switch
To install the new switch:
1. Slide the switch straight in. The release latch should
automatically close.
2. Make sure the release latch has closed and is secure.
Note: Be sure to label each cable with the port it is being removed
from.
2
1
15099
Figure 1: Removing the SFP transceiver
Caution: Touching the end of a fibre cable damages the
cable. Whenever a fibre cable is not connected, replace
the protective covers on the ends of the cables.
Step 2: Removing the switch
To remove the switch:
1. Slide the port-colored release latch 1 to the right.
2. Slide the switch 2 straight out.
15070
Figure 3: Installing the switch
Step 4: Installing the SFP transceiver
Insert the SFP transceiver(s) into the new switch and replace
the Fibre Channel cable.
Caution: To reduce the risk of damage to the equipment,
do not use excessive force when inserting the transceiver.
Step 5: Configuring the switch
Do not connect the switch to a configured SAN without first
configuring the switch. Also verify that the replacement switch
is working properly.
Refer to chapters 3 and 4 in the HP StorageWorks MSA SAN
Switch 2/8 Installation Guide for detailed instructions.
Note: All switches in the fabric must be running the same version of
firmware. Refer to “Upgrading or Restoring the Switch Firmware,” in
the
HP StorageWorks MSA SAN Switch 2/8 Installation Guide
detailed instructions.
for
Verifying the replacement
After replacing the failed switch be sure that:
■ The service indicator LED is solid green. Unread error log
messages may cause the LED to remain flashing. Be sure
all error messages that have been responded to are deleted.
■ No new error messages are displayed on the LCD.
Figure 2: Removing the switch
1
Returning the failed component
Please follow the return instructions provided in the new
component package.
2
15069
Additional information
For additional information, refer to the MSA technical
documents web site at
http://www.hp.com/go/msa1000
.
 Loading...