

Page 1

Software Guide
HP Notebook Series
Document Part Number:355385-001
November 2003
This guide explains how to manage notebook power, use
multimedia software, and update or restore system software. It
also provides instructions for using the Setup and support
utilities.
Page 2

© 2003 Hewlett-Packard Development Company, L.P.
Microsoft
Corporation. SD Logo is a trademark of its proprietor.
The information contained herein is subject to change without notice. The
only warranties for HP products and services are set forth in the express
warranty statements accompanying such products and services. Nothing
herein should be construed as constituting an additional warranty. HP shall
not be liable for technical or editorial errors or omissions contained herein.
® and Windows® are U.S. registered trademarks of Microsoft
Software Guide
HP Notebook Series
First Edition November 2003
Reference Number: nx9100/nx9105/nx9110/zv5000/zx5000
Document Part Number: 355385-001
Page 3

Contents
1Power
Selecting a Power Source. . . . . . . . . . . . . . . . . . . . . . . . . 1–1
Standby, Hibernation and Shutdown . . . . . . . . . . . . . . . . 1–2
Standby . . . . . . . . . . . . . . . . . . . . . . . . . . . . . . . . . . . 1–2
Hibernation . . . . . . . . . . . . . . . . . . . . . . . . . . . . . . . . 1–2
Shutdown. . . . . . . . . . . . . . . . . . . . . . . . . . . . . . . . . . 1–3
Choosing Standby, Hibernation or Shutdown . . . . . . . . . 1–4
When Resuming After a Short Interval . . . . . . . . . . . 1–4
When Resuming After a Week or More . . . . . . . . . . 1–4
When External Power Supply Is Disrupted or
Uncertain . . . . . . . . . . . . . . . . . . . . . . . . . . . . . . . . . . 1–4
When Using Infrared or Drive Media . . . . . . . . . . . . 1–5
Standby, Hibernation and Shutdown Procedures. . . . . . . 1–5
Identifying Power Controls and Indicators . . . . . . . . 1–6
Using the Default Power Settings . . . . . . . . . . . . . . . . . . 1–8
Turning the Notebook or Display On or Off . . . . . . . 1–8
Initiating or Resuming from Hibernation . . . . . . . . . 1–9
Initiating or Resuming from Standby . . . . . . . . . . . 1–10
Using Emergency Shutdown Procedures . . . . . . . . 1–10
Setting Power Preferences . . . . . . . . . . . . . . . . . . . . . . . 1–11
Accessing Power Options Window . . . . . . . . . . . . . 1–11
Displaying Power Meter Icon on Taskbar. . . . . . . . 1–11
Setting or Changing a Power Scheme . . . . . . . . . . . 1–12
Using a Security Password . . . . . . . . . . . . . . . . . . . 1–12
Processor Performance Controls . . . . . . . . . . . . . . . . . . 1–13
Accessing Windows XP Processor Controls. . . . . . 1–13
Software Guide iii
Page 4

Contents
2 Security
Security Features Quick Reference . . . . . . . . . . . . . . . . . 2–2
About Passwords . . . . . . . . . . . . . . . . . . . . . . . . . . . . . . . 2–3
Forgotten Passwords . . . . . . . . . . . . . . . . . . . . . . . . . 2–3
Using HP and Windows Passwords. . . . . . . . . . . . . . 2–3
About QuickLock (Fn+F6) . . . . . . . . . . . . . . . . . . . . . . . 2–4
About Power-On Passwords . . . . . . . . . . . . . . . . . . . . . . 2–5
Setting, Changing or Deleting Power-On
Passwords . . . . . . . . . . . . . . . . . . . . . . . . . . . . . . . . . 2–5
Entering Power-On Passwords . . . . . . . . . . . . . . . . . 2–7
About Administrator Passwords . . . . . . . . . . . . . . . . . . . 2–8
Setting, Changing or Deleting Administrator
Passwords . . . . . . . . . . . . . . . . . . . . . . . . . . . . . . . . . 2–8
Entering Administrator Passwords . . . . . . . . . . . . . 2–11
Using Other Device Security . . . . . . . . . . . . . . . . . . . . . 2–11
Protecting System Information . . . . . . . . . . . . . . . . . . . 2–12
Using System Information. . . . . . . . . . . . . . . . . . . . 2–12
Setting System Information Options . . . . . . . . . . . . 2–12
Protecting Your Notebook . . . . . . . . . . . . . . . . . . . . . . . 2–13
Using Security Software Measures . . . . . . . . . . . . . . . . 2–14
Connecting an Optional Security Cable. . . . . . . . . . . . . 2–15
3 Multimedia
Using CDs and DVDs . . . . . . . . . . . . . . . . . . . . . . . . . . . 3–1
Protecting Playback . . . . . . . . . . . . . . . . . . . . . . . . . . 3–1
Observing the Copyright Warning . . . . . . . . . . . . . . 3–2
Using Hotkeys and Quick Launch Buttons
(Select Models) . . . . . . . . . . . . . . . . . . . . . . . . . . . . . . . . 3–2
HP Image Zone (Select Models) . . . . . . . . . . . . . . . . 3–4
InterVideo Home Theater (Select Models) . . . . . . . . 3–5
Reprogramming the Quick Launch Buttons
(Select Models) . . . . . . . . . . . . . . . . . . . . . . . . . . . . . 3–5
iv Software Guide
Page 5

Playing Audio and Video CDs with Windows Media
Player . . . . . . . . . . . . . . . . . . . . . . . . . . . . . . . . . . . . . . . . 3–6
Playing CDs. . . . . . . . . . . . . . . . . . . . . . . . . . . . . . . . 3–6
Playing DVDs and Video CDs with InterVideo
WinDVD (Select Models) . . . . . . . . . . . . . . . . . . . . . . . . 3–6
General DVD Tips. . . . . . . . . . . . . . . . . . . . . . . . . . . 3–6
Playing DVDs or Video CDs. . . . . . . . . . . . . . . . . . . 3–7
Using DVD Region Settings . . . . . . . . . . . . . . . . . . . 3–7
Changing Region Settings . . . . . . . . . . . . . . . . . . . . . 3–8
Using InterVideo WinDVD Creator (Select Models) . . . 3–8
Preparing to Use InterVideo WinDVD Creator . . . . 3–9
Choosing Recording Media. . . . . . . . . . . . . . . . . . . . 3–9
Creating DVDs and Video CDs. . . . . . . . . . . . . . . . 3–10
Sonic RecordNow!. . . . . . . . . . . . . . . . . . . . . . . . . . . . . 3–10
4 Software Updates and Restorations
Updating Software . . . . . . . . . . . . . . . . . . . . . . . . . . . . . . 4–1
Accessing Notebook Product Information . . . . . . . . 4–2
Accessing Notebook ROM Information . . . . . . . . . . 4–2
Downloading and Installing Software Updates . . . . . . . . 4–3
Downloading and Installing ROM Updates . . . . . . . 4–4
Downloading and Installing Other Software. . . . . . . 4–7
Recovery Procedures . . . . . . . . . . . . . . . . . . . . . . . . . . . . 4–8
Before You Begin . . . . . . . . . . . . . . . . . . . . . . . . . . . 4–9
Using the System Restore Utility. . . . . . . . . . . . . . . . . . 4–10
Setting a Restore Point . . . . . . . . . . . . . . . . . . . . . . 4–10
Restoring to a Restore Point . . . . . . . . . . . . . . . . . . 4–10
Repairing or Reinstalling Drivers . . . . . . . . . . . . . . . . . 4–11
Repairing or Reinstalling Applications . . . . . . . . . . . . . 4–12
Reinstalling Applications from Your
Hard Drive . . . . . . . . . . . . . . . . . . . . . . . . . . . . . . . . 4–12
Reinstalling Applications from the Driver
Recovery CD . . . . . . . . . . . . . . . . . . . . . . . . . . . . . . 4–13
Contents
Software Guide v
Page 6

Contents
Repairing or Reinstalling the Operating System . . . . . . 4–13
Repairing the Operating System . . . . . . . . . . . . . . . 4–14
About Operating System Reinstallation . . . . . . . . . 4–15
Backing Up Your Data . . . . . . . . . . . . . . . . . . . . . . 4–15
Reinstalling the Operating System . . . . . . . . . . . . . 4–16
Installing a Retail Version of an Operating System. . . . 4–19
Configuring Your Notebook . . . . . . . . . . . . . . . . . . . . . 4–19
Opening the Setup Utility . . . . . . . . . . . . . . . . . . . . 4–19
Navigating and Selecting in the Setup Utility . . . . . 4–20
Restoring Setup Utility Default Settings . . . . . . . . . 4–23
Exiting the Setup Utility . . . . . . . . . . . . . . . . . . . . . 4–23
Using the Help and Support Center . . . . . . . . . . . . . . . . 4–23
Using Support Telephone Numbers. . . . . . . . . . . . . . . . 4–25
Obtaining Support Telephone Numbers . . . . . . . . . 4–25
Preparing to Call Technical Support . . . . . . . . . . . . 4–26
Index
vi Software Guide
Page 7

Selecting a Power Source
The notebook can run on internal power from a battery pack or
on external power from an AC adapter and other devices. The
following table describes the best power source for general tasks.
Task Use This Power Source:
1
Power
Work in most software
applications.
Charge or calibrate a battery
pack in the notebook.
Install or modify system
software or write to any
drive media.
Software Guide 1–1
■ Charged battery pack in the
notebook.
■ External power, such as an
AC adapter or optional
HP Notebook Expansion Base.
External power, such as an
AC adapter or optional HP Notebook
Expansion Base.
For more details, refer to the
✎
“Battery Packs” chapter in
Hardware Guide
the
this CD.
External power, such as an
AC adapter or optional HP Notebook
Expansion Base.
on
Page 8

Power
Standby, Hibernation and Shutdown
This section describes Standby, Hibernation, and shutdown,
and explains when to implement them. Standby and Hibernation
are energy-saving features that can be initiated by you or by
the system.
The amount of time a battery pack can hold a charge to support
Standby or Hibernation varies by notebook configuration and
the condition of the battery pack.
Standby
Standby reduces power to system components that are not in use.
When Standby is initiated, your work is saved in random access
memory (RAM) and the screen is cleared. When you resume
from Standby, your work returns to the screen where you left off.
■ Saving your work before initiating Standby is not usually
necessary, but it is a recommended precaution.
■ When the notebook is in Standby, the power/Standby light
blinks.
Hibernation
Hibernation saves system memory to the hard drive, takes a
snapshot of the notebook image, and shuts down the notebook.
When you resume from Hibernation, your work returns to the
screen exactly as you left it.
CAUTION: If the configuration of the notebook system is changed during
Ä
Hibernation, resuming operation from Hibernation may not be possible.
When the notebook is in Hibernation:
■ Do not add or remove memory modules.
■ Do not insert or remove the hard drive.
■ Do not connect or disconnect external devices.
■ Do not insert or remove any drive media.
■ Do not change the notebook configuration.
1–2 Software Guide
Page 9

CAUTION: To prevent loss of data during a low-battery condition,
Ä
do not disable Hibernation when the battery pack is in a low-battery
condition.
CAUTION: If Hibernation is disabled, the system does not
Ä
automatically save your system memory when the notebook reaches
a critical low-battery condition.
When possible, save your work before initiating Hibernation so
that no data is lost. Do not change the notebook configuration
during Hibernation.
If a power-on password has been set, the password must be
entered to resume from Hibernation. If you cannot resume from
Hibernation when power is restored to the system, you will be
prompted to delete the restoration data and proceed with system
boot. Unsaved data will be lost.
Hibernation is enabled by default, but can be disabled. To verify
that Hibernation is enabled, select Start > Control Panel >
Performance and Maintenance > Power Options. Then select the
Hibernate tab. Make sure that the Enable Hibernation check box
is selected.
Power
Shutdown
Shutdown turns off the notebook. Whether to leave a battery pack
in the notebook or in storage depends on how you work.
■ Leaving the battery pack in the notebook enables the battery
pack to charge whenever the notebook is connected to
external power and also protects your work during a power
outage.
■ A battery pack in the notebook discharges more quickly, even
when the notebook is turned off, than a battery pack that has
been removed from the notebook and is stored in a cool, dry
location.
Software Guide 1–3
Page 10

Power
Choosing Standby, Hibernation or Shutdown
Your choice of Standby, Hibernation, or shutdown will depend on
how you work. The amount of time a battery pack can support
Standby or Hibernation or hold a charge varies by notebook
configuration and the condition of the battery pack. A fully
charged new battery pack can typically support Standby for up to
48 hours and Hibernation for several weeks.
When Resuming After a Short Interval
Initiate Standby for shorter intervals of inactivity and Hibernation
for longer intervals or for more power conservation.
■ Initiating Standby clears the screen and uses less power than
leaving the notebook on, and your work returns quickly to
the screen when you resume from Standby.
■ Initiating Hibernation clears the screen and uses much less
power than Standby. Returning to work saved in Hibernation
takes longer than returning to work saved in Standby, but it is
faster than returning to your place manually after restarting
the notebook.
When Resuming After a Week or More
If the notebook will be idle for a week or more, shut down the
notebook to extend the life of an inserted battery pack. If you
remove the battery pack during this time, store it in a cool, dry
location.
When External Power Supply Is Disrupted or Uncertain
If an external power supply is uncertain or disrupted—for
example, because of an electrical storm—save your work, and
then initiate Hibernation or shut down the notebook.
1–4 Software Guide
Page 11

When Using Infrared or Drive Media
CAUTION: To prevent possible video and audio degradation and loss
Ä
of audio or video playback functionality, do not initiate Standby or
Hibernation while using drive media.
Standby and Hibernation interfere with the use of infrared
communication and drive media. Infrared is included on select
notebook models.
■ If the notebook is in Standby or Hibernation, you cannot
initiate an infrared transmission.
■ If Standby or Hibernation is accidentally initiated while drive
media (such as a diskette, disk, CD, or DVD) is in use:
❏ Your playback may be interrupted.
❏ You may see a warning message: “Putting the computer
into Hibernation or Standby may stop the playback. Do
you want to continue?” Select No.
❏ Resume from Hibernation or Standby by briefly pressing
the power button.
Power
❏ Audio and video may resume, or you may need to restart
the media.
Standby, Hibernation and Shutdown Procedures
This section explains the default Standby, Hibernation, and
shutdown procedures and includes information about turning the
display on or off. Refer to the illustration that most closely
matches your notebook.
Software Guide 1–5
Page 12
Power
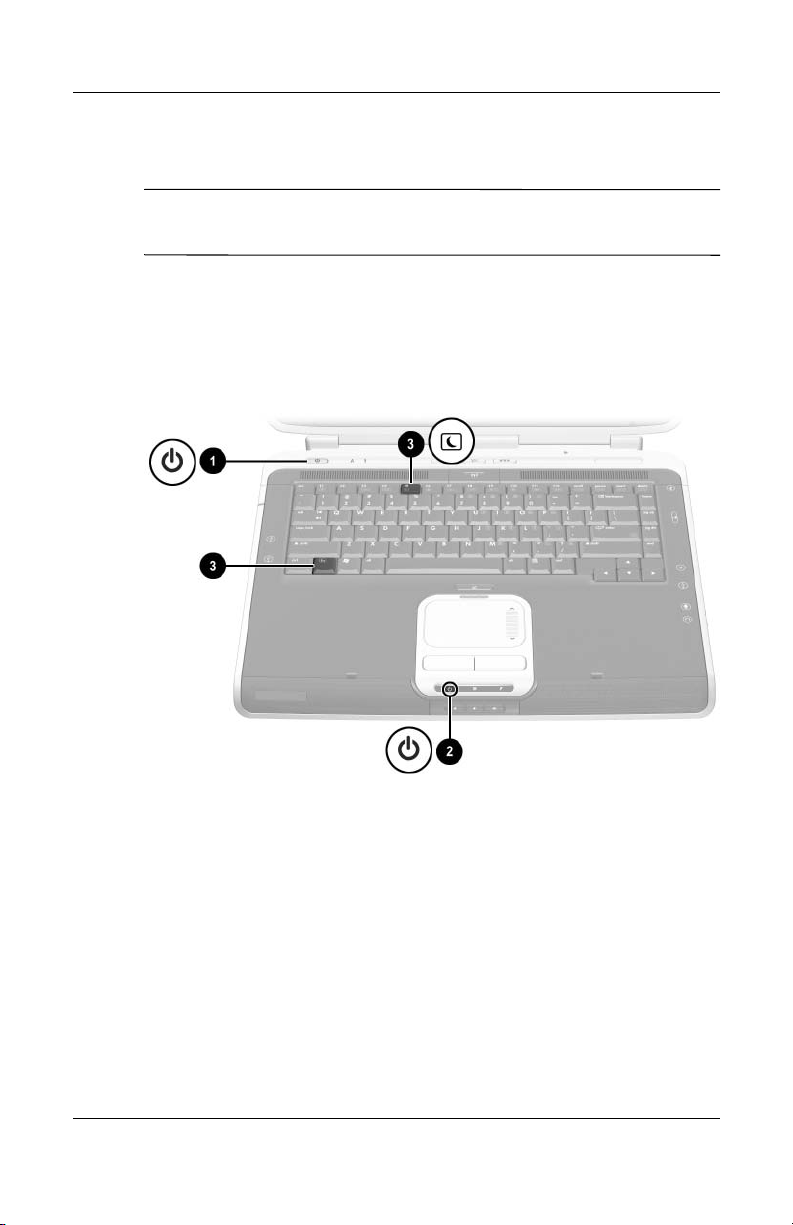
Identifying Power Controls and Indicators
In this guide, the function keys are capitalized (Fn, F5). The
✎
function keys on your keyboard may be lowercase (fn, f5).
1 Power button
2 Power/Standby light
3 Fn+F5 hotkey (to initiate Standby)
Identifying power controls and indicators
1–6 Software Guide
Page 13
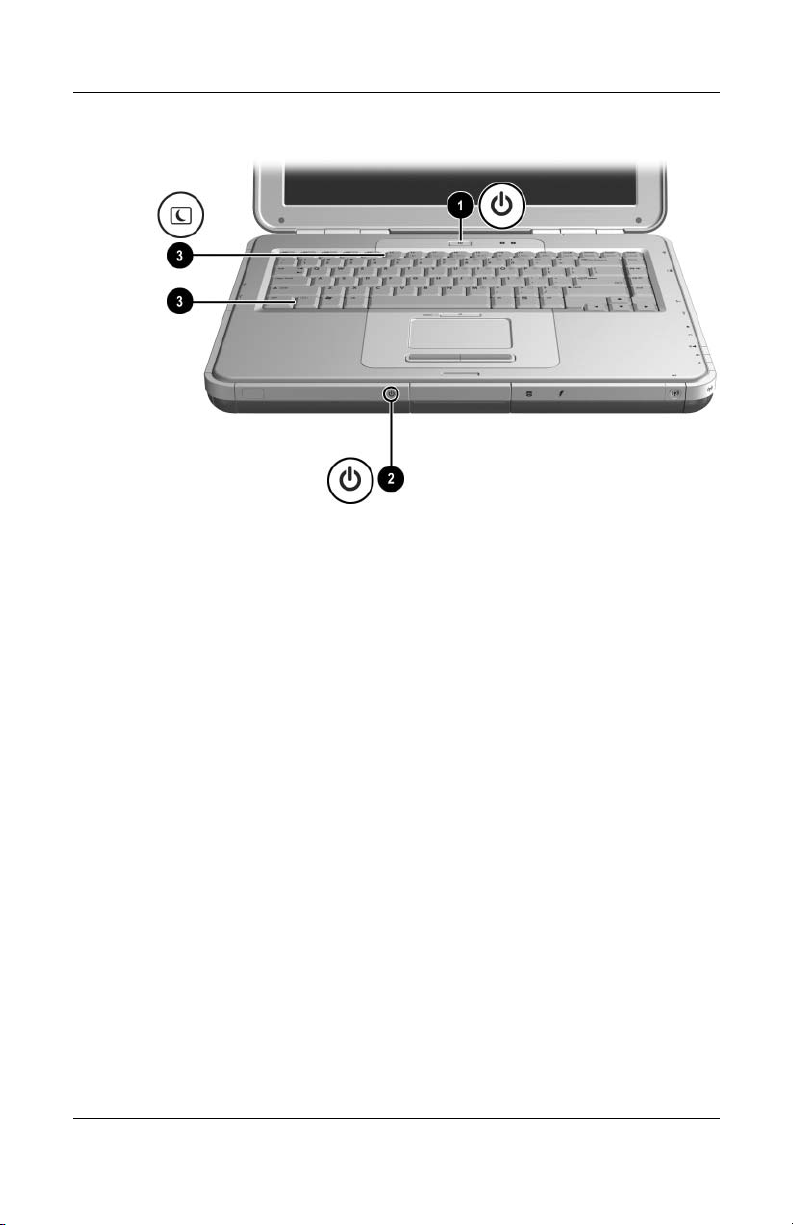
Identifying power controls and indicators
Power
Software Guide 1–7
Page 14

Power
Using the Default Power Settings
The following tables describe the default power settings on the
notebook. You can change many of these settings according to
your preferences. If you want to change the default settings, see
“Setting Power Preferences” later in this chapter.
Turning the Notebook or Display On or Off
Task Procedure Results
Turn on the
notebook.
Shut down the
notebook.*
Turn off the
display if the
notebook is
closed while
power is on.
*If the system is unresponsive, and you are unable to shut down the notebook
with these procedures, press and continue to hold down the power button for at
least 4 seconds. See “Using Emergency Shutdown Procedures” later in this
chapter.
Press the power button.
Pressing the power
✎
button returns the
notebook to “on” from
Standby, Hibernation,
or shutdown.
■ For Windows XP
Professional: Select Start >
Shut Down > Shut Down.
■ For Windows XP Home:
Select Start > Turn off
Computer > Tur n off.
No action required. Closing the notebook
■ Power/Standby light
turns on.
■ Operating system
loads.
■ Power/Standby light
turns off.
■ Operating system
shuts down.
■ Notebook turns off.
activates the display switch
that turns off the display.
1–8 Software Guide
Page 15

Initiating or Resuming from Hibernation
Task Procedure Result
Power
User-initiated
Hibernation.
System-initiated
Hibernation
(with Hibernation
enabled).
With the notebook on:
■ Briefly press the power
button
-or-
■ Select Start > Shut
Down > Hibernate. (If the
Hibernate option is not
displayed, press and
hold shift.)
In the Power Options
✎
window, you can
change the default
settings for the power
button or the display
switch.
If the notebook is running on
external power, the system will
not initiate Hibernation.
If the notebook is running on
battery power, the system
initiates Hibernation:
■ After 30 minutes of
notebook inactivity, or
■ When an inserted battery
pack reaches a critical
low-battery condition
(3 percent of a full charge
remaining).
■ Power/Standby light
turns off.
■ Screen clears.
■ Power/Standby light
turns off.
■ Screen clears.
Resume from
user-initiated or
system-initiated
Hibernation.
Software Guide 1–9
Press the power button.
If Hibernation was
✎
initiated by a critical
low-battery condition,
attach AC power or a
charged battery pack
to resume.
■ Power/Standby light
turns on.
■ Your work returns to
the screen.
Page 16

Power
Initiating or Resuming from Standby
Task Procedure Result
User-initiated
Standby.
System-initiated
Standby.
Resume from
user-initiated or
system-initiated
Standby.
With the notebook on:
■ Press Fn+F5, or
■ Select Start > Shut
Down > Standby.
If the notebook is running on
external power, the system will
not initiate Standby.
If the notebook is running on
battery power, the system
will initiate Standby after
10 minutes of notebook
inactivity.
Briefly press the power button,
TouchPad, left or right
TouchPad button, or any
keyboard key.
■ Power/Standby light
blinks.
■ Screen clears.
■ Power/Standby light
blinks.
■ Screen clears.
■ Power/Standby light
turns on.
■ Your work returns to
the screen.
Using Emergency Shutdown Procedures
If the notebook is unresponsive to the Microsoft® Windows®
shutdown procedure, try one of the following emergency
shutdown procedures:
■ If the notebook is running Windows XP Professional, press
ctrl+alt+del. Select Shut down from the drop-down list, and
then select OK.
■ If the notebook is running Windows XP Home or does
not respond to
for 5 seconds.
■ Press Fn+power button.
■ Unplug the notebook from external power and remove the
battery pack.
ctrl+alt+del, press and hold the power button
1–10 Software Guide
Page 17

Setting Power Preferences
Many of the default power settings, such as timeouts, alarms,
and power button settings, can be changed in the Power Options
window. For example, you can set an audio alert to warn you
when the battery reaches a low-power condition.
On some notebook models, processor performance can also
✎
be managed in the Power Options window. For details, see
“Processor Performance Controls” later in this chapter.
Accessing Power Options Window
To access the Power Options window:
■ Select the Power Meter icon on the taskbar, or
■ Select Start > Control Panel > Performance and
Maintenance > Power Options.
Displaying Power Meter Icon on Taskbar
Power
To show the Power Meter icon on the taskbar:
1. Access the Power Options window (see previous section).
2. Select the Advanced tab.
3. Select the Always Show Icon on the Taskbar check box.
4. Select the OK button.
The Power Meter icon changes shape to indicate whether
✎
the notebook is running on battery power or external power.
Select the icon at any time to display the Power Options window.
If you cannot see an icon that you have placed on the taskbar, the
✎
icon may be hidden. Select the arrow or thick vertical bar on
the taskbar and expand to view the icons.
Software Guide 1–11
Page 18

Power
Setting or Changing a Power Scheme
The Power Schemes tab in the Power Options window assigns
power levels to system components. You can assign different
schemes depending on whether the notebook is running on a
battery pack or AC power.
You can also set a Power Scheme that initiates Standby or turns
off the display or hard drive after a time interval (timeout) that
you specify.
To set or change a Power Scheme:
1. Access the Power Options window (see previous section).
2. Select the Power Schemes tab.
3. Select options from the drop-down list.
4. Select Save As and name the new Power Scheme.
5. Select OK.
Using a Security Password
You can add a security feature that prompts you for a password
when the notebook turns on or resumes from Standby or
Hibernation.
To set a password prompt:
1. Access the Power Options window.
2. Select the Advanced tab.
3. Select the Prompt for password when the computer resumes
from Standby check box.
4. Select OK.
For more information about using security passwords, see “About
Power-On Passwords” in Chapter 2.
1–12 Software Guide
Page 19

Power
Processor Performance Controls
Windows XP Home and Windows XP Professional provide
unique software that allows the user to control processor
performance. The CPU (central processing unit) speed can be set
for optimal performance or for optimal power conservation.
For example, the software can be set to trigger an automatic
change in processor speed when the power source changes
between AC power and battery power, or when notebook use
changes between active and idle.
Accessing Windows XP Processor Controls
To access Windows XP Home and Windows XP Professional
processor performance controls, select Start > Control Panel >
Performance and Maintenance > Power Options > Power
Schemes.
The user sets the desired Power Scheme and that, in turn, sets the
processor controls. Each Power Scheme for AC power or battery
power equates to one of the following processor levels:
■ None: Always runs at the highest performance state.
■ Adaptive: Performance state is selected based on CPU
demand.
■ Degrade: Starts at lowest performance state, then uses linear
performance reduction (stop clock throttling) as the battery
discharges.
■ Constant: Always runs at the lowest performance state.
Software Guide 1–13
Page 20

Power
When you choose a Power Scheme, you are setting the AC power
and battery power modes shown in the following table. No other
user intervention is required to control the performance of your
notebook processor.
Power Scheme AC Power Battery Power
Home/Office Desk None Adaptive
Portable/Laptop Adaptive Adaptive
Presentation Adaptive Degrade
Always On None None
Minimal Power
Management
Max Battery Adaptive Degrade
Adaptive Adaptive
1–14 Software Guide
Page 21

2
Security
This chapter describes some of the security features that may be
provided on your notebook. For information about Windows XP
Home or Windows XP Professional security features, refer to
your operating system documentation.
Software Guide 2–1
Page 22

Security
Security Features Quick Reference
To Protect Against This Risk Use This Feature
Unauthorized use of the notebook QuickLock and power-on
password
Unauthorized access to the Setup
utility
Unauthorized access to the
processor serial number and other
system identification information
Software viruses Norton AntiVirus software
Unauthorized removal of the
notebook
Administrator password
System Information
Security cable slot (used with an
optional security cable)
The purpose of security
✎
solutions is to act as a
deterrent. These
solutions do not prevent
the product from being
mishandled or stolen.
Your notebook also has a DriveLock security feature. For more
information about this feature, refer to the notebook’s online Help
and Support Center by selecting Start > Help and Support.
2–2 Software Guide
Page 23

About Passwords
Forgotten Passwords
Most security features use passwords. When you set a password,
write it down and store it in a secure location.
■ If you forget your power-on password or Administrator
password, you cannot start the notebook or resume from
Hibernation until an authorized service provider resets the
notebook. Refer to the Worldwide Telephone Numbers
booklet included with the notebook to contact an HP
Customer Care Center.
■ If you forget the DriveLock user password but know your
DriveLock master password, you can remove DriveLock
protection from the drive.
■ If you forget both your user and master DriveLock
passwords, the hard drive is permanently unusable.
Using HP and Windows Passwords
Security
HP security features and Windows operating system security
features work independently from each other. For example,
a device disabled in Setup cannot be enabled in Windows.
Also, you must use an HP password at an HP password prompt
and a Windows password at a Windows password prompt. For
example:
■ If a power-on password is set, the power-on password (not
a Windows password) must be entered when the notebook
starts up or resumes from Hibernation.
■ If you set Windows to prompt for a password before
resuming from Standby, a Windows password (not a
power-on password) must be entered to resume from
Standby.
Software Guide 2–3
Page 24

Security
■ An Administrator password and a Windows Administrator
password are not interchangeable.
However, the same word or series of letters, numerals, or
slashes used for an HP password can also be used for another
HP password or as a Windows password, with these
considerations:
❏ HP passwords can be any combination of up to 32 letters
and numbers and are not case sensitive.
❏ HP passwords must be set and entered with the same type
of keys. For example, an HP password set with keyboard
number keys will not be recognized if it is entered with
internal keypad number keys. (For information about the
internal keypad, refer to the “TouchPad and Keyboard”
chapter in the Hardware Guide on this CD.)
About QuickLock (Fn+F6)
In this guide, the function keys are capitalized (Fn, F5). The
✎
function keys on your keyboard may be lowercase (fn, f5).
The QuickLock operating system security feature disables the
keyboard and displays the logon screen. QuickLock does not
disable the TouchPad.
Before you can use this feature, you must set a Windows system
password. For instructions, refer to your operating system
documentation.
After you set your Windows system password:
■ To initiate QuickLock, press the Fn+F6 hotkey.
■ To disable QuickLock, enter your Windows system
password.
2–4 Software Guide
Page 25

About Power-On Passwords
A power-on password prevents unauthorized use of the notebook.
After being set, a power-on password must be entered each time
the notebook is turned on or restarted, or when the notebook
resumes from Hibernation. A power-on password:
■ Does not display as it is set, entered, changed, or deleted.
■ Must be set and entered with the same keys. For example,
a password set with keyboard number keys will not be
recognized if entered with embedded keypad number keys.
■ Can include up to 8 alphanumeric characters and is not
case sensitive.
Setting, Changing or Deleting Power-On Passwords
A power-on password is set, changed, or deleted in the
Setup utility.
Setting a Power-On Password
Security
To set a power-on password:
1. Open the Setup utility by pressing
<F10> to enter setup” prompt is displayed in the lower left
corner of the screen.
2. Select Security from the menu bar. (To select a menu, use
the arrow keys.)
3. Select the Power-On Password field.
4. Type the password in the Enter New Password field, and then
press
enter.
5. Type the password in the Confirm New Password field, and
then press
Software Guide 2–5
enter.
F10 while the “Press
Page 26

Security
6. When you are prompted to continue, press enter.
7. To save your preferences and exit the Setup utility:
a. Press
esc (or select Exit from the menu bar).
b. Select Exit Saving Changes.
c. Then follow the instructions on the screen.
Changing a Power-On Password
To change a power-on password:
1. Open the Setup utility by pressing
<F10> to enter setup” prompt is displayed in the lower left
corner of the screen.
2. Select Security from the menu bar. (To select a menu, use
the arrow keys.)
3. Select the Power-On Password field.
4. Type the current password in the Enter Current Password
field, and then press
5. Type the new password in the Enter New Password field,
and then press
6. Type the new password in the Confirm New Password field,
and then press
7. When you are prompted to continue, press enter.
8. To save your preferences and exit the Setup utility:
enter.
enter.
enter.
F10 while the “Press
a. Press
esc (or select Exit from the menu bar).
b. Select Exit Saving Changes.
c. Then follow the instructions on the screen.
2–6 Software Guide
Page 27

Deleting a Power-On Password
To delete a power-on password:
Security
1. Open the Setup utility by pressing
F10 while the “Press
<F10> to enter setup” prompt is displayed in the lower left
corner of the screen.
2. Select Security from the menu bar. (To select a menu, use
the arrow keys.)
3. Select the Power-On Password field.
4. Type the current password in the Enter Current Password
field, and then press
enter 3 times.
5. When you are prompted to continue, press
6. To save your preferences and exit the Setup utility:
a. Press
esc (or select Exit from the menu bar).
b. Select Exit Saving Changes.
c. Then follow the instructions on the screen.
Entering Power-On Passwords
When you turn the notebook on, restart it, or resume from
Hibernation, you are prompted for a password. Type your
password using the same keys you used to set the password,
and then press
password, you must restart the notebook to try again.
enter. After 3 unsuccessful attempts to enter the
enter.
Software Guide 2–7
Page 28

Security
About Administrator Passwords
An Administrator password protects the configuration settings
and system identification information in the Setup utility. After
it is set, this password must be entered to access Setup. An
Administrator password:
■ Is not interchangeable with a Windows Administrator
password, although both can use the same word or series of
letters, numbers, or slashes.
■ Does not display as it is set, entered, changed, or deleted.
■ Must be set and entered with the same keys. For example,
an Administrator password set with keyboard number keys
will not be recognized if you enter it with internal keypad
number keys.
■ Can include any combination of up to 32 letters and numbers
and is not case sensitive.
Setting, Changing or Deleting Administrator Passwords
An Administrator password is set, changed, or deleted in the
Setup utility.
Setting an Administrator Password
To set an Administrator password:
1. Open the Setup utility by turning on (not restarting) the
notebook.
2. Press
3. Select Security from the menu bar. (To select a menu, use
4. Select the Administrator password, and then press
2–8 Software Guide
F10 while the “Press <F10> to enter setup” prompt is
displayed in the lower left of the screen.
For navigation instructions, press
the arrow keys.)
F1.
enter.
Page 29

Security
5. Type the password in the New Password field, and then
enter.
press
6. Type the password in the Confirm New Password field, and
then press
enter.
7. When you are prompted to continue, press enter.
8. To save your preferences and exit the Setup utility:
a. Press
esc (or select Exit from the menu bar).
b. Select Exit Saving Changes.
c. Then follow the instructions on the screen.
Your preferences are set as you exit Setup and are in effect when
the notebook restarts.
Changing an Administrator Password
To change an Administrator password:
1. Open the Setup utility by turning on (not restarting) the
notebook.
2. Press
3. Select Security from the menu bar. (To select a menu, use the
4. Select the Administrator password, and then press
5. Type the current password in the Enter Current Password
6. Type the new password in the Enter New Password field, and
F10 while the “Press <F10> to enter setup” prompt is
displayed in the lower left of the screen.
For navigation instructions, press
F1.
arrow keys.)
field, and then press
then press
enter.
enter.
enter.
7. Type the password in the Confirm New Password field, and
then press
Software Guide 2–9
enter.
Page 30

Security
8. When you are prompted to continue, press enter.
9. To save your preferences and exit the Setup utility:
a. Press
esc (or select Exit from the menu bar).
b. Select Exit Saving Changes.
c. Then follow the instructions on the screen.
Your preferences are set as you exit Setup and are in effect when
the notebook restarts.
Deleting an Administrator Password
To delete an Administrator password:
1. Open the Setup utility by turning on (not restarting) the
notebook.
2. Press
3. Select Security from the menu bar. (To select a menu, use the
4. Select the Administrator password, and then press
5. Type the current password in the Enter Current Password
6. When you are prompted to continue, press enter.
F10 while the “Press <F10> to enter setup” prompt is
displayed in the lower left of the screen.
For navigation instructions, press
F1.
arrow keys.)
field, and then press
enter.
enter.
7. To save your preferences and exit the Setup utility.
a. Press
esc (or select Exit from the menu bar).
b. Select Exit Saving Changes.
c. Then follow the instructions on the screen.
Your preferences are set as you exit Setup and are in effect when
the notebook restarts.
2–10 Software Guide
Page 31

Entering Administrator Passwords
At the Setup prompt, type your password (using the same type
of keys you used to set the password), and then press
3 unsuccessful attempts to enter the Administrator password,
you must restart the notebook to try again.
Using Other Device Security
The Device Security feature also allows a user or administrator to
set the system startup preferences by enabling or disabling
notebook devices. To set system startup preferences in Device
Security:
1. Open the Setup utility by turning on (not restarting) the
notebook.
Security
enter. After
2. Press
3. Select Security from the menu bar. (To select a menu, use the
4. In the Device Security field:
5. To save your preferences and exit the Setup utility.
F10 while the “Press <F10> to enter setup” prompt is
displayed in the lower left of the screen.
arrow keys.)
a. Select Enable/Disable floppy boot during boot time.
b. Select Enable/Disable CD-ROM boot during boot time.
a. Press
b. Select Exit Saving Changes.
c. Then follow the instructions on the screen.
esc (or select Exit from the menu bar).
Software Guide 2–11
Page 32

Security
Protecting System Information
Using System Information
System Information options allow you to:
■ Display or enter the notebook serial number, asset tag, and
ownership tag.
■ Display a battery pack serial number.
Setting System Information Options
1. Open the Setup utility by turning on (not restarting) the
notebook.
2. Press
3. To view general system information, select
4. To view or enter identification values for system components,
5. To confirm the information or your preferences, press
6. To save your preferences and exit the Setup utility.
Your preferences are set as you exit Setup and are in effect when
the notebook restarts.
F10 while the “Press <F10> to enter setup” prompt is
displayed in the lower left of the screen.
For navigation instructions, press
Main menu > System Information.
select Main menu > System IDs.
a. Press
b. Select Exit Saving Changes.
c. Then follow the instructions on the screen.
esc (or select Exit from the menu bar).
F1.
F10.
2–12 Software Guide
Page 33

Protecting Your Notebook
When you use your notebook to access a network or the Internet,
you expose the notebook to security and privacy threats in the
form of viruses, worms, and hackers. These security and privacy
occurrences can potentially disable the notebook operating
system, software applications, and personal files. Using a
combination of software and hardware security measures can
significantly help in the prevention, the detection, and often the
repair of these occurrences.
Security
Software Guide 2–13
Page 34

Security
Using Security Software Measures
HP recommends that you follow these three protective security
software measures to improve your notebook security and to
reduce the severity of security access threats.
Step Use this Security Measure For More Information
1 Install antivirus software before
connecting to the Internet or a
network. (Some notebook
models are shipped with
antivirus software.)
Keep the virus definition files up
to date to maintain protection
against newly discovered
viruses.
2 Install Microsoft Windows
updates by downloading the
updates as they become
available.
3 Install the Microsoft Internet
Connection Firewall or an
equivalent firewall.
Microsoft:
http://www.microsoft.com/security/antivirus
Symantec:
http://securityresponse.symantec.com
Refer to the online Help File within
the antivirus software.
http://windowsupdate.microsoft.com
Refer to the Help and Support
Center. Select Start > Help &
Support. Enter “Firewall” in the
Search field and press enter.
Using a firewall can block access to Internet games, or to printer
✎
and file sharing within a network. If this occurs, you can disable
the firewall or contact your firewall provider for configuration
information. Disabling the firewall will leave you unprotected.
2–14 Software Guide
Page 35

Security
Connecting an Optional Security Cable
The purpose of security solutions is to act as a deterrent. These
✎
solutions do not prevent the product from being mishandled or
stolen.
Refer to the illustration that is the closest match to your notebook.
To install an optional security cable:
1. Loop the security cable 1 around a secured object.
2. Insert the key 2 into the cable lock 3.
3. Insert the cable lock (with the key inserted) into the security
cable slot 4 on the notebook.
4. Turn the key counterclockwise and remove it.
Connecting the optional security cable
Software Guide 2–15
Page 36

Security
Connecting the optional security cable
2–16 Software Guide
Page 37

Using CDs and DVDs
This chapter provides general instructions for using select
multimedia hotkeys and Quick Launch buttons, playing CDs
and DVDs, and using multimedia software. Multimedia software
applications included with your notebook vary by model.
Protecting Playback
CAUTION: To prevent possible video and audio degradation and loss
Ä
of audio or video playback functionality, do not initiate Standby or
Hibernation while using drive media.
CAUTION: Do not insert or remove a device while running multimedia
Ä
applications, because the application may pause or stop playing.
3
Multimedia
If Standby or Hibernation is accidentally initiated while drive
media (such as a diskette, disk, CD, CD-RW, or DVD) is in use:
■ Your playback may be interrupted.
■ You may see a warning message: “Putting the computer into
Hibernation or Standby may stop the playback. Do you want
to continue?” Select No.
Resume from Hibernation or Standby by pressing the power
button. Audio and video may resume automatically, or you may
need to restart the media.
Software Guide 3–1
Page 38

Multimedia
Observing the Copyright Warning
It is a criminal offense, under applicable copyright laws, to make
unauthorized copies of copyright-protected material, including
computer programs, films, broadcasts, and sound recordings.
This notebook should not be used for such purposes.
Using Hotkeys and Quick Launch Buttons (Select Models)
In this guide, the function keys are capitalized (Fn, F5). The
✎
function keys on your keyboard may be lowercase (fn, f5).
Hotkeys are preset combinations of the
function keys. The
many of the same tasks as Windows Media Player or InterVideo
WinDVD.
■ To play, pause, or resume an audio CD or DVD, press the
Fn+F9 hotkey 1.
■ To stop an audio CD or DVD, press the Fn+F10 hotkey 1.
■ To play the previous track of an audio CD or DVD, press the
Fn+F11 hotkey 1.
■ To play the next track of an audio CD or DVD, press the
Fn+F12 hotkey 1.
The 4 hotkeys work correctly with DVDs, but are not designed
✎
for use with video CDs (VCDs).
For details about all of the keyboard hotkeys, refer to the
“TouchPad and Keyboard” chapter in the Hardware Guide on
this CD.
Refer to the illustration that most closely matches your notebook.
Fn+F9 through Fn+F12 hotkeys 1 perform
Fn key and one of the
3–2 Software Guide
Page 39

Multimedia
Select notebook models have 2 multimedia Quick Launch
buttons—the Picture button and the Media button—to access
default software applications.
■ To access the default photo and imaging software application,
press the Picture button 2. This opens the My Pictures folder
on your screen, and then launches the default photo and
imaging software application.
■ To open the default multimedia software application, press
the Media button 3.
Identifying the multimedia hotkeys and Quick Launch buttons
Software Guide 3–3
Page 40

Multimedia
Identifying the notebook multimedia hotkeys
HP Image Zone (Select Models)
HP Image Zone is a digital and imaging software application.
The application manages digital photos, scanned images, and
video clips. It also provides tools for editing images, sending
images to friends and family, and using images in projects and
multimedia CDs.
Only select models have this software. To launch HP Image Zone,
press the Picture button. This will access the My Pictures folder
and then launch HP Image Zone. Refer to the HP Image Zone
online Help for feature descriptions and detailed user instructions.
3–4 Software Guide
Page 41

Multimedia
InterVideo Home Theater (Select Models)
InterVideo Home Theater is a multimedia software application.
The application records and plays digital media content: audio
CDs, MP3s, pictures, video clips, DVDs, and VCDs.
Only select models have this software. To launch InterVideo
Home Theater, press the Media button. Refer to the Home
Theater online Help for feature descriptions and detailed user
instructions.
Reprogramming the Quick Launch Buttons (Select Models)
A Quick Launch button can be assigned to any software
application, an Internet or network destination, or a data file. For
example, a Quick Launch button can be assigned to open your
Internet browser to a favorite Web page; to open an application,
such as Microsoft Word; or to open a specific file, such as an
Excel worksheet.
Button assignments can be grouped into schemes. When you
select a scheme, only the button assignments within that scheme
are active. Button assignments and schemes are set up, changed,
or deleted in the Quick Launch buttons window.
To reprogram a button:
1. Select Start > Control Panel > Printers and Other Hardware >
Quick Launch Buttons.
2. On the Settings tab, select the button you want to reprogram.
3. Type a label for the button, and then select the application,
document, folder, or Web site you want the button to open.
If you want an icon for the button to appear on the taskbar or on
the desktop, select that option on the Advanced tab.
Software Guide 3–5
Page 42

Multimedia
Playing Audio and Video CDs with Windows Media Player
The Windows Media Player software application is included with
the notebook operating system.
Playing CDs
To open Windows Media Player to play a CD:
1. Insert a CD into the optical drive and close the tray. Wait
several seconds. If Windows Media Player does not open,
access the software by selecting Start > All Programs >
Windows Media Player.
2. Select the Play button to play the CD and the Stop button to
stop the CD, or use the hotkeys described in “Using Hotkeys
and Quick Launch Buttons (Select Models)” in this chapter.
To access Windows Media Player Help, select Help on the
✎
Windows Media Player menu bar.
Playing DVDs and Video CDs with InterVideo WinDVD (Select Models)
InterVideo WinDVD is a software application that enables you
to play DVD movies or video CDs.
General DVD Tips
In addition to the instructions in the WinDVD Player Help file,
the following tips may be useful:
■ If the notebook is docked in an optional HP Notebook
Expansion Base, dock or undock the notebook before starting
a DVD (not while playing a DVD).
■ For best playback quality, save your files and close all open
applications before playing a DVD.
3–6 Software Guide
Page 43

■ If the DVD displays a “Playback Of Content From This
Region Is Not Permitted” error message, change the region
setting as described in the next section, and then restart
the DVD.
■ For more information about using WinDVD, select Help on
the WinDVD menu bar.
Playing DVDs or Video CDs
To play a DVD or video CD:
1. Insert the DVD or video CD into the optical drive.
2. If Intervideo WinDVD does not open after a short pause,
select Start > All Programs > InterVideo WinDVD >
InterVideo WinDVD.
3. Follow the instructions on the screen.
Using DVD Region Settings
Most DVDs that contain copyrighted files also contain region
codes. The region codes help protect copyrights internationally.
Multimedia
You can play a DVD containing a region code only if the region
code on the DVD matches the region setting on your DVD drive.
If the region code on a DVD does not match the region setting
on your drive, a “Playback Of Content From This Region Is Not
Permitted” message is displayed when you insert the DVD. To
play the DVD, you must change the region setting on your
DVD drive.
CAUTION: The region setting on your DVD drive can be changed only
Ä
5 times.
■ The region setting you select the fifth time becomes the permanent
region setting on the drive.
■ The number of allowable region changes remaining on the drive is
displayed in the Remaining Times Until Permanent field in the
WinDVD window. The number in the field includes the fifth and
permanent change.
Software Guide 3–7
Page 44

Multimedia
Changing Region Settings
To change the region setting on drive media:
1. Insert the DVD into the optical drive.
2. If the WinDVD window does not open after a short pause,
select Start > All Programs > InterVideo WinDVD >
InterVideo WinDVD.
3. Select the Properties icon in the lower right corner of the
window.
4. Select the General tab.
5. Select the button for the region.
6. Select the OK button.
Using InterVideo WinDVD Creator (Select Models)
InterVideo WinDVD Creator allows you to create digital
video movies. You can capture video from your digital video
camcorder, edit the video, author menus and chapters, and burn
your movie to a DVD or a video CD. Before you can create
DVDs or video CDs on some notebook models, you must install
this application using the InterVideo WinDVD Creator CD
included with the notebook.
3–8 Software Guide
Page 45

Preparing to Use InterVideo WinDVD Creator
CAUTION: To prevent loss of data and damage to a DVD:
Ä
■ Before writing to a DVD, connect the notebook to a reliable external
power source. Do not write to a DVD while the notebook is running
on battery power.
■ Before writing to a DVD, close all open applications (including
screen savers and antivirus software) except InterVideo WinDVD
Creator.
■ Do not copy directly from a DVD to another DVD or from a network
drive to a DVD. Instead, copy from a DVD or network drive to your
hard drive, and then copy from your hard drive to the DVD.
■ Do not type on the notebook keyboard or move the notebook while
the notebook is writing to a DVD. The write process is sensitive to
vibration.
Choosing Recording Media
HP recommends using high-quality media that correspond to the
maximum speed of the optical drive. The notebook can write or
copy to DVDs that provide one-time, non-erasable recording
(DVD+R) or to DVDs that provide erasable recording
(DVD+RW).
Multimedia
In order to write data to a DVD, you must use a blank DVD+R
✎
disc or a DVD+RW disc on which the format has not been
finalized.
Software Guide 3–9
Page 46

Multimedia
Creating DVDs and Video CDs
To open InterVideo WinDVD Creator:
» Select Start > All Programs > InterVideo > WinDVD Creator.
For instructions on creating DVDs and video CDs, select Help on
the WinDVD Creator menu bar.
Sonic RecordNow!
Sonic RecordNow! can be used to create backups of data or
audio CDs or DVDs, transfer audio files from CDs to a hard
drive, and create personalized audio CDs. RecordNow! is
preinstalled on your notebook. For more information about
RecordNow! capabilities and instructions on creating data and
audio CDs and DVDs, refer to the Sonic RecordNow! Tutorial
and online Help.
3–10 Software Guide
Page 47

Software Updates and
Updating Software
For optimal notebook performance and to make sure your
notebook remains compatible with changing technologies, install
the latest versions of the software provided with your notebook
as they become available.
To update notebook software:
1. Prepare for any update by identifying your notebook type,
series or family, and model.
Prepare for a ROM (read-only memory) update by identifying
the ROM version currently installed on the notebook.
2. Access the updates at the HP Web site.
3. Download and install the updates.
4
Restorations
The notebook ROM stores the BIOS (basic input-output system).
✎
The BIOS determines how the notebook hardware interacts with
the operating system and external devices and also supports such
notebook services as time and date.
If your notebook connects to a network, consult with your
✎
network administrator before installing any software updates,
particularly a ROM update.
4–1
Page 48

Software Updates and Restorations
Accessing Notebook Product Information
To access the updates for your notebook, you will need the
following information:
■ The product category is Notebook.
■ The product family name and series number are printed on
the display bezel.
■ The product name, product number, and serial number are
provided on the Service Tag label on the bottom of unit.
The product name, notebook model, and notebook serial number
are also displayed in the same section of the Setup utility that
displays ROM information, as described in the next section.
Accessing Notebook ROM Information
To determine whether an available ROM update is a later
ROM version than the ROM version currently installed on
the notebook, you need to know the version of the currently
installed ROM.
ROM information is displayed in the Setup utility. The Setup
utility is a non-Windows utility that does not support the
TouchPad.
4–2
1. Open the Setup utility by turning on or restarting the
notebook.
2. Press
F10 while the “Press <F10> to enter setup” prompt is
displayed in the lower left of the screen.
For navigation instructions, press
F1.
3. To view general system information, select Main menu >
System Information.
4. To view or enter identification values for system components,
select Main menu > System IDs.
Page 49

Software Updates and Restorations
5. To confirm the information or your preferences, press F10.
6. To save your preferences and exit the Setup utility.
a. Press
b. Select Exit Saving Changes.
c. Then follow the instructions on the screen.
Your preferences are set as you exit Setup and are in effect when
the notebook restarts.
esc (or select Exit from the menu bar).
Downloading and Installing Software Updates
Most software at the HP Web site is packaged in a compressed
file called a SoftPaq. Some ROM updates may be packaged in a
compressed file called a RomPaq. Other ROM updates may be
provided as a CPQFlash SoftPaq.
Most download packages contain a file named Readme.txt. A
Readme.txt file contains detailed descriptive, installation, and
troubleshooting information about the download. The Readme.txt
files included with RomPaqs are English only.
The following sections provide instructions for downloading and
installing the following:
■ A ROM update
■ A SoftPaq containing an update other than a ROM update
4–3
Page 50

Software Updates and Restorations
Downloading and Installing ROM Updates
CAUTION: To prevent serious damage to the notebook or an unsuccessful
Ä
installation, download and install a ROM update only while the notebook
is connected to reliable external power. (Do not download or install a ROM
update while the notebook is docked or running on battery power.) During
the download and installation:
■ Do not unplug the notebook from the electrical outlet.
■ Do not shut down the notebook or initiate Standby or Hibernation.
■ Do not insert, remove, connect, or disconnect any device, cable,
or cord.
4–4
Page 51

Downloading ROM Update
To download a ROM update:
1. Access the page at the HP Web site that provides software for
your notebook:
❏ Select Start > Help and Support, and then select a
software update link.
-or-
❏ Visit the HP Web site at:
http://www.hp.com/support
2. Follow the instructions on the screen to identify your
notebook and access the ROM update you want to download.
3. At the download area:
a. Record the date, name, or other identifier of any ROM
update that is later than the ROM currently installed on
your notebook. (You may need to identify the update later,
after it has been downloaded to the hard drive.)
b. Record the path to the default or custom location on the
hard drive to which the ROM package will download.
(You may need to access the ROM package after it has
been downloaded.)
Software Updates and Restorations
c. Follow the online instructions to download your selection
to the hard drive.
4–5
Page 52

Software Updates and Restorations
Installing ROM Update
ROM installation procedures vary. To install a ROM update,
follow any instructions that are displayed on the screen after the
download is complete. If no instructions are displayed:
1. Open Windows Explorer by selecting Start > All Programs >
Accessories > Windows Explorer.
2. In the left pane of the Windows Explorer window:
a. Select My Computer and then your hard drive
designation. (The hard drive designation is typically Local
Disk C.)
b. Then follow the path you recorded earlier to the folder on
your hard drive that contains the update.
3. To begin the installation, open the folder, and then select the
file with an .exe extension—for example, Filename.exe.
(The ROM update installation begins.)
4. To complete the installation, follow the instructions on the
screen.
4–6
After a message on the screen reports a successful installation,
✎
you can delete the downloaded file from the destination folder.
Page 53

Software Updates and Restorations
Downloading and Installing Other Software
To update software other than a ROM update:
1. Access the page at the HP Web site that provides software for
your notebook:
❏ Select Start > Help and Support, and then select a
software update link.
-or-
❏ Visit the HP Web site at:
http://www.hp.com/support
2. Follow the instructions on the screen to identify your
notebook and access other software you want to download.
3. At the download area:
a. Write down the date, name, or other identifier of the
software you plan to download. (You will need to identify
the update later, after it has been downloaded to the hard
drive.)
b. Follow the online instructions to download the software
to the hard drive.
4. When the download is complete, open Windows Explorer by
selecting Start > All Programs > Accessories > Windows
Explorer.
5. In the left pane of the Windows Explorer window:
a. Select My Computer and then your hard drive
designation. (The hard drive designation is typically
Local Disk C.)
b. Then follow the path you recorded earlier to the folder
on your hard drive that contains the update.
6. To begin the installation, open the folder, select the name
or number of the software package you have downloaded.
4–7
Page 54

Software Updates and Restorations
7. Select the file that includes an .exe extension—for example,
Filename.exe. (The installation begins.)
8. To complete the installation, follow the instructions on the
screen.
After a message on the screen reports a successful installation,
✎
you can delete the downloaded file from the HP folder.
Recovery Procedures
CAUTION: To prevent loss of notebook functionality, perform the
Ä
procedures described in this section only while the notebook is connected
to reliable external power through the AC adapter. During a software
restoration, repair, or reinstallation:
■ Do not unplug the notebook from external power.
■ Do not shut down the notebook or initiate Standby or Hibernation.
■ Do not insert, remove, connect, or disconnect any device, cable,
or cord.
4–8
Page 55

Software Updates and Restorations
Before You Begin
HP recommends that you try to restore your system by using the
✎
System Restore utility before you consider repairing or
reinstalling your operating system.
Perform the following restore procedures in the order presented.
Step Description Refer to
1 Return the notebook to a system
restore point.
2 Try to solve or diagnose the
problem by using the Help and
Support Center.
3 Review troubleshooting
procedures.
4 Reinstall all HP drivers. The “Repairing or Reinstalling Drivers”
5 If you suspect the problem could
be caused by a preinstalled or
preloaded application, try
reinstalling the application.
6 Repair the operating system. The “Repairing the Operating System”
7 Reinstall the operating system. The “About Operating System
The “Using the System Restore Utility”
section
Start > Help and Support > Fixing a
problem
Troubleshooting
The
Documentation Library CD
section
The “Repairing or Reinstalling
Applications” section
section
Reinstallation” section
guide on the
4–9
Page 56

Software Updates and Restorations
Using the System Restore Utility
The System Restore utility enables you to safeguard your system
files and settings by using restore points, which are restorable,
benchmark “snapshots” of your system.
The notebook sets restore points, called system restore points, at
regular intervals and might set additional restore points whenever
you change your personal settings or add software or hardware.
Setting additional restore points manually provides additional
protection for your system files and settings. HP recommends that
you manually set restore points:
■ Before you add or extensively modify software or hardware.
■ Periodically, whenever the system is performing optimally.
Setting a Restore Point
To set a system restore point manually:
1. Select Start > Help and Support > System Restore.
2. Select Create a restore point, and then follow the instructions
on the screen.
Restoring to a Restore Point
To restore the notebook to a restore point:
1. Select Start > Help and Support > System Restore.
2. Select Restore my computer to an earlier time, and then
follow the instructions on the screen.
4–10
Page 57

Software Updates and Restorations
Repairing or Reinstalling Drivers
All drivers required for notebook functionality can be reinstalled
from the Driver Recovery CD included with your notebook. If
you have not reinstalled your operating system, these drivers can
also be reinstalled from your hard drive.
The driver reinstallation process repairs or replaces most
corrupted drivers and reinstalls most deleted drivers.
■ To reinstall the drivers required for notebook functionality
from your hard drive—Select Start > All Programs >
Software Setup, and then follow the instructions on the
screen. (When you are prompted to select the drivers you
want to reinstall, you can select or clear the check boxes for
some or all of the listed drivers.)
■ To reinstall the drivers required for notebook functionality
from the Driver Recovery CD—While running Windows,
insert the Driver Recovery CD into the optical drive, and
then follow the instructions on the screen. (When you are
prompted to select the drivers you want to reinstall, you can
select or clear the check boxes for some or all of the listed
drivers.)
If the CD does not open within several seconds, select Start >
Run. Type
the optical drive) into the Open text field, and then select OK.
D:\SWSETUP\APPINSTL\SETUP.EXE (where D indicates
4–11
Page 58

Software Updates and Restorations
Repairing or Reinstalling Applications
All applications preinstalled or preloaded on your notebook can
be repaired or reinstalled by using the Driver Recovery CD.
If you have not reinstalled your operating system, some
✎
applications preloaded on your notebook, such as those available
in the Software Setup utility, can also be repaired or reinstalled
from your hard drive.
The application reinstallation process repairs or replaces
corrupted system files within the application and reinstalls
deleted system files within the application.
■ In most cases: If the application you are repairing or
reinstalling is still installed on your notebook, the
reinstallation process does not affect your settings within the
application.
■ In all cases: If an application has been deleted from your
notebook, the reinstallation process reinstalls the application
or utility to the factory image.
Reinstalling Applications from Your Hard Drive
To reinstall a preloaded application or utility from your hard
drive:
» Select Start > All Programs > Software Setup, and then
follow the instructions on the screen. (When you are
prompted to select the software you want to reinstall,
select or clear the appropriate check boxes.)
4–12
Page 59

Software Updates and Restorations
Reinstalling Applications from the Driver Recovery CD
To reinstall a preloaded or preinstalled application from the
Driver Recovery CD :
» While running Windows, insert the CD into the optical drive,
and then follow the instructions on the screen. (When you are
prompted to select the applications you want to reinstall,
select or clear the appropriate check boxes.)
If the CD does not open within several seconds, select Start >
Run. Type
the optical drive) into the Open text field, and then select OK.
D:\SWSETUP\APPINSTL\SETUP.EXE (where D indicates
Repairing or Reinstalling the Operating System
The Operating System Recovery CD included with your notebook
can be used to repair or to reinstall the operating system. Both
operations might take a few hours to complete.
■ Repairing the operating system preserves your data and
settings.
■ Reinstalling the operating system deletes all files on the
notebook. After the operating system has been reinstalled,
all drivers required for notebook functionality must be
reinstalled. To fully restore your system, you will also need
to reinstall all other software that is not a part of the
operating system.
4–13
Page 60

Software Updates and Restorations
Repairing the Operating System
To repair the operating system without deleting your
personal data:
1. Insert the Operating System Recovery CD (included with the
notebook) into the optical drive.
2. Turn off the notebook using the standard Windows shutdown
procedure. If the notebook is unresponsive:
a. If the notebook is running Windows XP Professional,
ctrl+alt+del. Select Shut down from the drop-down
press
list, and then select OK.
b. If the notebook is running Windows XP Home or does
not respond to
button for 5 seconds.
3. Turn on the notebook by briefly pressing the power button.
If the Operating System Recovery CD does not open after
several minutes, the boot order settings on your notebook
might have been changed from the default settings. For
information about changing boot order settings, refer to the
Boot Menu in the “Configuring Your Notebook” section in
this chapter.
ctrl+alt+del, press and hold the power
4–14
4. When prompted, press any key to boot from CD. (After a
few minutes, the Welcome to Setup screen is displayed.)
5. Press
enter to continue. (A Licensing Agreement screen is
displayed.)
6. Press
F8 to accept the agreement and continue. (The Setup
window is displayed.)
7. Press
R to repair the selected Windows installation. (The
repair process begins.)
After the repair process is complete, which might take a
few hours, the notebook restarts in Windows.
Page 61

Software Updates and Restorations
About Operating System Reinstallation
If you could not solve the problem by repairing the operating
system as described in the previous section, it might be necessary
to reinstall the operating system.
Backing Up Your Data
CAUTION: Personal data and any software you have installed on the
Ä
notebook will be lost during the operating system reinstallation
procedure described in this section. To protect your data, back up your
data before beginning the procedure.
To back up your data you can do any of the following:
■ Purchase optional system backup software.
■ Copy individual data files to storage devices other than your
hard drive.
■ Use the system backup utility available in Windows XP
Professional:
Select Start > All Programs > Accessories > System
Tools > Backup.
If you plan to select the items you want to back up, rather than
backing up your entire system, the following suggestions might
be helpful:
■ On many notebooks, data files are stored by default in the My
Documents folder. If you created data files in other locations,
be sure to check all the possible locations.
■ Templates are often stored in the folders of their associated
applications. For example, a Microsoft Word template that
you created might be stored at
Temp la te s.
C:\ Program Files\ Microsoft Office\
4–15
Page 62

Software Updates and Restorations
■ The shortcuts on a desktop are often stored in C:\ Documents
and Settings\ (Your User Account)\ Desktop.
■ If you have customized the settings in a window, toolbar, or
menu bar, you might want to take a screen shot of that
element. The screen shot could be a time-saving reference
when you begin resetting your preferences. A screen shot is a
copy of an element on the screen. To copy the element from
the screen and paste it into a Word document:
a. Display the element on the screen.
b. Copy the element or entire screen:
◆ To copy only the active window, press alt+prt sc.
◆
To copy the entire screen, press prt sc.
c. To paste the copied image into a document, open Word,
and then select Edit > Paste.
Reinstalling the Operating System
During the reinstallation, you might be prompted for your
✎
Product Key. Your Product Key is provided on the Microsoft
Certificate of Authenticity label affixed to the bottom of the
notebook.
4–16
To reinstall the operating system using the Operating System
Recovery CD included with the notebook:
1. Insert the Operating System Recovery CD into the optical
drive.
2. Turn off the notebook by using the standard Windows
shutdown procedure. If the notebook is unresponsive:
a. If the notebook is running Windows XP Professional,
ctrl+alt+del. Select Shut down from the drop-down
press
list, and then select OK.
b. If the notebook is running Windows XP Home or does
not respond to
button for 5 seconds.
ctrl+alt+del, press and hold the power
Page 63

Software Updates and Restorations
3. Turn on the notebook by briefly pressing the power button.
If the Operating System Recovery CD does not open after
several minutes, the boot order settings on your notebook
might have been changed from the default settings. For
information about changing boot order settings, refer to the
Boot Menu in the“Configuring Your Notebook” section in
this chapter.
4. When prompted, press any key to boot from CD. (After a
few minutes, the Welcome to Setup screen is displayed.)
5. Press
enter to continue. (A Licensing Agreement screen is
displayed.)
6. Press
7. Press
8. Press
9. Press
10. Select Format the partition using the NTFS file system
11. Press F to format the drive. (The reinstallation process begins.)
After the reinstallation process is complete, which might take a
few hours, the notebook restarts in Windows.
Windows, follow the on-screen instructions.
After you reinstall the operating system, you must reinstall the
✎
drivers required for notebook functionality, You might need to
reinstall drivers for some external devices.
After you have finished reinstalling drivers, you should reinstall
✎
preloaded, preinstalled, and optional software.
F8 to accept the agreement and continue. (The Setup
window is displayed.)
esc to continue installing a fresh copy of the operating
system.
enter to set up the operating system.
C to continue setup using this partition.
(Quick), and then press
caution explains that formatting this drive will delete all
current files.)
enter. (A caution is displayed. The
To properly set up
4–17
Page 64

Software Updates and Restorations
Reinstalling Other Software
After you have reinstalled drivers, you can begin to reinstall other
software. To reinstall optional software, refer to the installation
instructions included with the software. Installation instructions
are usually provided on the software CD, in the CD package, or at
the Web site of the software provider or manufacturer.
For more information about reinstalling a specific multimedia
application that was included with your notebook, such as Sonic
RecordNow!, InterVideo WinDVD, or InterVideo WinDVD
Creator, refer to the“Multimedia” chapter in the Software Guide.
Updating Reinstalled Software
HP strongly recommends that you update all reinstalled software.
Depending on the settings you used on your former configuration,
some software might have been automatically updated without
your knowledge. Use the following update procedures as soon as
your notebook is connected to the Internet.
■ To update your operating system, select Start > Help and
Support > Windows Update, and then follow the instructions
on the screen.
■ For information about updating the drivers on a device
connected to the notebook, select Start > Help and Support.
Type
update device driver in the Search text field, and then press
the
enter key.
■ To update optional software, follow the instructions included
with the software. Many applications include an update
feature that you can access from a Help button or menu item
within the application.
4–18
Page 65

Software Updates and Restorations
Installing a Retail Version of an Operating System
The Windows operating system provided on the notebook or on
the Operating System Recovery CD is enhanced by HP. The HP
enhancements add power and security features and provide
supplementary support for external devices such as drives and
PC Cards.
CAUTION: Replacing an operating system enhanced by HP with a
Ä
retail version of an operating system will result in the loss of all HP
enhancements. In some cases, the loss of these enhancements might
result in an unresponsive system or the loss of complete USB support.
Configuring Your Notebook
The BIOS (basic input and output system) Setup utility, which
is also referred to as the Setup utility, helps you configure your
notebook operation. The utility is a preinstalled, ROM-based
information and customization utility that can be used even
when your operating system is not working or will not load.
Opening the Setup Utility
The Setup utility reports information about the notebook and
provides settings for startup, password, port, Setup utility
appearance, and other preferences. To access most settings:
1. Start up or restart the notebook.
2. Before Windows opens and while the “Press <F10> to enter
setup” prompt is displayed in the lower left corner of the
screen, press
On some models, you must start up (not restart) the notebook to
access the settings for a hard drive password.
F10.
4–19
Page 66

Software Updates and Restorations
Navigating and Selecting in the Setup Utility
Because the Setup utility is not Windows-based, it does not
support the TouchPad. Navigation and selection are by keystroke.
■ To navigate, use the up and down arrow keys or tab.
To select an item, use the arrow keys to select the item, and
■
then press
To close a display but remain in the Setup utility, press esc.
■
An on-screen guide to navigation and selection is displayed at the
lower edge of most Setup utility submenu screens. To minimize
keystrokes by using the
enter.
alt Key Activates Accelerators feature:
1. Press and hold
alt. (A letter or number in most on-screen
items is highlighted.)
2. Press the keyboard key corresponding to the highlighted
letter or number in the item you want to select.
For example, to select an on-screen OK button, press
When the “O” in OK is highlighted, press
O.
alt.
4–20
Page 67

Software Updates and Restorations
The following tables describe BIOS settings for the BIOS version
at publication. If your BIOS is a different version, some settings
may differ from those shown.
Main Menu
Setting Description Default
BIOS Revision Shows the current BIOS
version.
System Time Sets the time using 24-hour
format. Values set take effect
immediately.
System Date Sets the date using dd/mm/yy
format (except English, which
uses mm/dd/yy format).
System
Memory
Serial Number Displays the serial number as
Service ID Displays an identifier used for
Shows the extended
memory size.
shown on the bottom of unit.
repair service.
Detected
automatically
Detected
automatically
Detected
automatically
Detected
automatically
Detected
automatically
Detected
automatically
Security Menu
Setting Description Default
Power-On
Password
Administrator
Password
Shows when a power-on
password is set.
Shows when an administrator
password is set.
Clear
Clear
4–21
Page 68

Software Updates and Restorations
Boot Menu
Setting Description Default
1. Floppy
Diskette
Devices
2. CD-ROM
3. +Hard Drive
4. Network
Adapter
Shows the order of boot
devices. Move the entries to
change the order. If the
notebook has more than one
device in a + category, you
can select the one scanned.
Built-in LAN provides
diskless boot from a network
server.
1. Floppy
2. CD-ROM
3. +Hard Drive
4. Network
Exit Menu
Setting Description Default
Exit Saving
Changes
Exit Discarding
Changes
Load Setup
Defaults
Saves Setup changes, then
exits and reboots.
Discards any Setup changes
made since last save, then
exits and reboots. Does not
affect password, date, or time
changes.
Restores default settings, and
remains in Setup. Does not
affect password, date, or time
changes.
Clear
Clear
Clear
Diskette
Drives
Adapter
4–22
Page 69

Software Updates and Restorations
Restoring Setup Utility Default Settings
To return all Setup utility settings to default values, select Exit
menu > Load Setup Defaults. (Identification information,
including ROM version information, is retained.)
Exiting the Setup Utility
The Setup utility exit options are on the Exit menu. After you
select an option, the Setup utility closes and Windows opens.
■ To close the utility and save your changes from the current
session, select Exit Saving Changes.
■ To close the utility without saving changes from the current
session, select Exit Discarding Changes.
Using the Help and Support Center
To access the online Help and Support Center:
1. Press the
2. Follow the on-screen directions to select the online Help and
Support Center feature that you need.
Fn+F1 hotkey or select Start > Help and Support.
The Help and Support Center provides a comprehensive online
resource tool for contacting an HP support specialist, for
downloading the latest software driver updates and product
information, and for learning more about using and maintaining
your notebook.
In the Help and Support Center, you can:
■ Learn how to use the software tools for working with your
favorite music, video, games, and photos (select models).
■ Get basic and detailed information about Windows XP for
customizing your notebook.
■ Set up your notebook for networking and for communicating
on the Web.
4–23
Page 70

Software Updates and Restorations
■ Use administration tools to manage areas such as passwords,
file backups, system restore, and user accounts.
■ Learn how to print, fax, run performance and maintenance
tools, and install and configure new hardware.
■ Troubleshoot and fix common notebook problems.
■ Protect your notebook files by using security and privacy
features such as Norton AntiVirus software.
■ Undo changes to your notebook with System Restore.
■ Improve performance of your hard drive and battery pack.
■ Contact an HP support specialist or use Remote Assistance to
get additional help.
■ Download the latest drivers, utilities, software updates, and
product documentation for your notebook.
■ Use tools and resources to manage and support your
Windows operating system.
■ Find compatible hardware and software.
4–24
Page 71

Software Updates and Restorations
Using Support Telephone Numbers
Obtaining Support Telephone Numbers
If you cannot solve a notebook problem by using the online
Help and Support Center installed on your notebook or the
documentation included with the notebook, you may need to
contact HP. To obtain a list of worldwide customer support
telephone numbers or to locate the HP office near you, use one of
the following methods:
■ Select Start > Help and Support.
■ Refer to the Worldwide Telephone Numbers booklet
(English only) included with your notebook to contact
an HP Customer Care Center.
■ Visit the HP Web site at:
http://www.hp.com/support
4–25
Page 72

Software Updates and Restorations
Preparing to Call Technical Support
To provide the fastest possible resolution of your problem, have
the notebook and the following information available when
you call:
■ Product name, serial number, and product number are
provided on Service Tag label affixed to the bottom of
the notebook.
■ Purchase date on the invoice.
■ Conditions under which the problem occurred.
■ Error messages that have been displayed.
■ Operating system version number and registration number.
To display the operating system version number and
registration number, select Start > Control Panel >
Performance and Maintenance > System > General.
■ Brand and model of an optional printer.
4–26
Page 73

Index
A
AC power
devices that supply 1–1
using Hibernation with 1–9
using Standby with 1–10
Administrator password
changing 2–8, 2–9, 2–10
deleting 2–8, 2–9, 2–10
entering 2–11
features 2–8
setting 2–8, 2–9, 2–10
applications. See software;
software updates
audio CDs, playing
3–6
B
backup
procedures 4–15
System Restore 4–10
when to do 4–15
battery pack
causing CD or DVD write
corruption
when to remove 1–3
battery power vs. AC power 4–8
BIOS (basic input output system)
4–1
boot order
3–9
4–14
C
CDs
CD-R vs. CD-RW 3–9
Driver Recovery 4–11, 4–12
Operating System Recovery
4–16
playing audio and video CDs
3–6
playing, with WinDVD 3–7
customer support 4–25
D
device security 2–11
display switch
default settings 1–8
display, internal
brightness 2–4
Driver Recovery CD 4–16
drivers
in retail operating systems 4–19
obtaining 4–11
reinstalling 4–17
DVDs
creating with WinDVD Creator
3–8
DVD-R vs. DVD-RW 3–9
playing, with WinDVD 3–7
region settings for 3–7
Software Guide Index–1
Page 74

Index
E
emergency shutdown steps 1–10
End User License Agreement,
operating system repair
4–14
F
Fn key, in hotkeys 3–2
function keys
3–2
H
Hibernation
changing configuration during
1–2
default settings 1–9
defined 1–2
initiating 1–9
interfering
with drive media 3–1
with infrared or drive media
1–5
setting preferences 1–11
when to use 1–2
hotkeys
identifying 3–2
QuickLock 2–4
I
icons
displaying power icon 1–11
finding hidden 1–11
InterVideo WinDVD. See
WinDVD Creator
K
keys
Fn 3–2
hotkeys 3–2
prt sc 4–16
L
lock, security cable (optional)
2–15
locked system, emergency
shutdown steps
1–10
M
model, identifying notebook 4–2
multimedia
3–1
N
notebook model, product
information
4–2
O
operating system
installing retail version of 4–19
reinstalling 4–15
repairing 4–13
P
passwords 4–19
combining 2–3
DriveLock 2–3
forgotten 2–3
power-on 2–4, 2–5
Windows 2–4
playback tips 3–6
power button
default settings 1–8
identifying 1–6
power conservation
using Hibernation 1–2
using Standby 1–2
power features
displaying Power Meter icon
1–11
emergency shutdown 1–10
Index–2 Software Guide
Page 75

Index
power schemes 1–12
power-on passwords 1–12
setting preferences 1–11
shutting down notebook 1–8
turning on notebook 1–8
power settings, default 1–8
power, AC vs battery
power/Standby light
power-on password
about 2–4
combining with other
passwords
defined 2–5
setting, changing, deleting 2–5
4–8
1–6
2–3
Q
Quick Launch buttons
assigning 3–5
identifying 3–3
QuickLock 2–4
R
region settings for DVDs 3–7
reinstalling the operating system
4–13
repairing the operating system
4–13
resetting the notebook, emergency
shutdown steps
restore point
ROM
defined 4–1
determining current version of
4–2
downloading and installing 4–4
obtaining updates 4–3
RomPaq, downloading 4–3
1–10
4–10
S
security cable lock 2–15
security features
Administrator password 2–8
device security 2–11
if you forget passwords 2–3
power-on passwords 1–12, 2–3
quick reference 2–2
serial number, notebook 4–2
series, notebook
settings, BIOS
Setup
Administrator password 2–8,
2–9, 2–10
protecting with password 2–8
setting Administrator password
preferences in
Setup utility 4–19
shutdown
default settings 1–8
emergency procedures 1–10
shutting down the notebook 2–14
sleep. See Standby
SoftPaq
described 4–3
downloading and installing 4–7
software
backing up 4–10, 4–15
repairing, reinstalling 4–12
RomPaq 4–3
Setup utility 4–19
SoftPaq 4–3
updating software 4–1
Windows Media Player 3–6
WinDVD 3–6
WinDVD Creator 3–8
2–15
4–2
4–21
2–8
Software Guide Index–3
Page 76

Index
Software Setup
reinstalling applications 4–12
reinstalling drivers 4–11
software updates
downloading and installing
4–4, 4–7
obtaining 4–3
preparing for 4–1
Standby
default settings 1–10
defined 1–2
interfering
with infrared or drive media
1–5, 3–1
setting preferences 1–11
when to use 1–2
system information, using 2–12
System Restore
4–10
T
technical support 2–3, 4–25
telephone numbers, service and
support
troubleshooting, System Restore
4–10
4–25
U
unresponsive system, emergency
shutdown steps
1–10
V
video CDs (VCDs)
caution with media hotkeys
3–2, 3–6
playing, with WinDVD 3–7
W
Windows Media Player 3–6
Windows passwords
WinDVD Creator
creating DVDs 3–8
error message 3–7
preparing to use 3–9
tips for using 3–6
2–3
Index–4 Software Guide
 Loading...