

Page 1

DocuColor 3535
printer/copier
user guide
Page 2

©
Copyright 2003 by Xerox Corporation. All Rights Reserved.
Copyright protection claimed includes all forms and matters of copyrighted material and information now allowed by statutory or judicial
law or hereinafter granted, including without limitation, material generated from the software programs that are displayed on the screen
such as styles, templates, icons, screen displays, looks, etc.
Internet Explorer is a copyright protected program of Microsoft Corporation. Novell® and NetWare® are registered trademarks of Novell,
Inc. Netscape® is a registered trademark of Netscape Communications Corporation. Adobe® and PostScript® are registered trademarks
of Adobe Systems Incorporated. TIFF is a copyright of Adobe Systems Incorporated. AppleTalk, LaserWriter, and Macintosh are
trademarks of Apple Computer, Inc. PCL® and HP-GL® are registered trademarks of Hewlett-Packard Corporation. WinZip® is a
registered trademark of Nico Mak Computing, Incorporated. ACITS LPR Printing for Windows 95 is a copyright of the University of Texas
at Austin.
®
, The Document Company®, The stylized X, and all Xerox product names and product numbers mentioned in this publication are
Xerox
trademarks of XEROX CORPORATION. Other company brands and product names may be trademarks or registered trademarks of the
respective companies and are also acknowledged.
Printed in the U.S.A.
Page 3

Table of Contents
Table of Contents iii
Safety Notices vii
Electrical S a fe ty vi i
Disconnect Device viii
Laser Safety viii
Maintenance Safety ix
Operational Safety ix
Ozone Safety x
Notices xi
Radio Frequency Emissions xi
FCC xi
In Canada xi
Safety Extra Low Voltage Approval xii
Certifications in Europe xii
It’s Illegal in the USA xiii
It’s Illegal in Canada xv
Environmental Notices for the USA xvi
Environmental Notices for Canada xvi
Product Recycling and Disposal xvii
Conventions xviii
Symbols xviii
Copy 1–1
Getting to Know Your Copier 1–1
Control Panel 1–4
Power Switch 1–8
Audio Tones 1–8
Duplex Automatic Document Feeder (DADF) 1–8
Xerox DocuColor 3535 Printer/Copier iii
iii
Page 4

TABLE OF CONTENTS
Document Glass 1–8
Paper Trays 1–9
Output Trays 1–10
Power Saver Mode 1–11
Quick Start Guide to Copying 1–12
Making Copies Using the DADF 1–12
Making Copies from the Document Glass 1–13
Making Copies Using Features 1–14
Copier Features 1–18
Basic Copying Tab 1–18
Added Features Tab 1–31
Image Quality Tab 1–43
Output Format Tab 1–52
Scan Options Tab 1–66
Job Assembly Tab 1–76
Duplex Automatic Document Feeder (DADF) 1–82
Component Names and Functions 1–82
Documents Not Recommended 1–84
Loading the Documents 1–84
Job Status 1–86
Checking Current Jobs 1–86
Changing the Print Priority 1–87
Checking Completed Jobs 1–88
Machine Status 1–89
Machine Information 1–91
Print 2–1
Overview 2–1
Scan 3–1
Overview 3–1
How to Scan 3–2
Creating Job Templates 3–4
Scanning Features 3–4
Basic Scanning Tab 3–4
Scan Options Tab 3–10
Image Quality / File Format Tab 3–21
How to Pause or Cancel a Scanning Job 3–25
Scanning in Batches 3–25
Managing Scanned Documents 3–26
Configuring the Client for Scanning 3–26
iv
Xerox DocuColor 3535 Printer/Copier
Page 5

TABLE OF C ONTENTS
Machine Administrator 4–1
Overview 4–1
System Settings 4–2
Setting and Changing the Administrator Password 4–3
Entering and Exiting the System Settings Mode 4–5
Entering the System Settings Mode 4–5
Exiting System Settings Mode 4–6
Changing Settings in System Settings Mode 4–6
Common Settings 4–7
Machine Clock/T imers 4–8
Audio Tone 4–10
Screen Defaults 4–12
Paper Tray Attributes 4–13
Printing Priority 4–20
Image Quality Adjustment 4–21
Other Machine Settings 4–26
Copy Mode Settings 4–26
Basic Copying Presets 4–27
Copy Defaults 4–28
Copy Control 4–41
Original Size Defaults 4–42
Reduce/Enlarge Presets 4–43
Custom Colors 4–44
Network Settings 4–44
Scan Mode Settings 4–46
Basic Scanning Presets 4–46
Scan Defaults 4–47
Scan Size Defaults 4–51
Output Size Defaults 4–52
Reduce/Enlarge Presets 4–53
Other Scan Settings 4–54
Auditron Administration 4–56
Create/Check Accounts 4–57
Deleting/Resetting Data by Account 4–58
Enabling Auditron Mode 4–59
System Administrator Data 4–60
Delete/Reset All Account Data 4–61
Specifications 5–1
Loading Paper 5–1
Trays 1, 2, 3, and 4 5–2
Xerox DocuColor 3535 Printer/Copier
v
Page 6

TABLE OF CONTENTS
Tray 5 (Bypass) 5–3
Auto Tray Switching 5–3
Loading Stock 5–4
Machine Specifications 5–12
Speed by Media 5–12
Dimensions and Weight 5–13
Finisher (Optional Accessory) 5–14
Using the Finisher 5–14
Maintenance 6–1
Ordering Consumables 6–2
Cleaning the DADF and Document Glass 6–3
Cleaning the ROS Window 6–4
Changing Toner Cartridges 6–7
Changing Staple Cartridges 6–10
Changing the Fuser 6–11
Changing the Waste Toner Container 6–14
Changing Drum Cartridges 6–16
Troubleshooting 7–1
Paper Jam Clearance 7–2
Paper Jams at the Top Left Cover 7–3
Paper Jams at the Left Center Cover 7–4
Paper Jams at the Bottom Left Cover 7–4
Paper Jams in Trays 1 to 4 7–5
Paper Jams in Tray 5 (Bypass) 7–5
Paper Jams in the Duplex Unit 7–6
Paper Jams in the Finisher 7–6
Document Jams 7–8
Document Jams on the Left Cover (Top) 7–8
Jams on Original Input Area and Document Glass 7–9
Stapler Faults 7–10
Resolving Hardware Problems 7–11
Toner Cartridge 7–11
Resolving Programming Problems 7–12
Resolving Processor Problems 7–13
Resolving Output Problems using Basic Copying, Added Features,
and Image Quality Tabs 7–16
Calling for Service 7–20
Fault Codes 7–21
vi
Xerox DocuColor 3535 Printer/Copier
Page 7

Electrical Safety
Safety Notices
The Xerox DocuColor 3535 and the recommended supplies have
been designed and tested to meet strict safety requirements.
Attention to the following notes will ensure the continued safe
operation of your printer/copier.
• Use only the power cord supplied with this equipment.
• Plug the power cord directly into a correct ly grounded
electrical outlet. Do not use an extension cord. If you do not
know whether or not an outlet is grounded, consult a qualified
electrician.
• Do not use a ground adapter plug to connect this equipment to
an electrical outlet that lacks a ground connection terminal.
WARNING: You may get a severe electrical shock if the
outlet is not correctly grounded.
• Do not place the printer/copier where people may step on or
trip on the power cord. Do not place object s on the power cord.
• Do not override or disable electric al or mechanical interlocks.
• Do not obstruct the ventilation openings. These openings are
provided to prevent overheating of the machine.
WARNING: Never push objects of any kind into slots or
openings on this equipment. Making a contact with a voltage
point or shorting out a part could result in fire or electrical
shock.
Xerox DocuColor 3535 Printer/Copier
vii
vii
Page 8
Disconnect Device
• If any of the following conditions occur, immediately switch off
the power to the machine and disconnect the power cord from
the electrical outlet. Call an autho rized Xerox service
representative to correct the problem.
– The machine emits unusual noises or odors.
– The power cord is damaged or frayed.
– A wall panel circuit breaker, fuse, or other safety device
has been tripped.
– Liquid is spilled into the press.
– The machine is exposed to water.
– Any part of the machine is damaged.
The power cable is the disconnect device for this equipment. It is
attached to the back of the machine as a plug-in device. To
remove all electrical power from the machine, disconnect the
power cable from the electrical outlet.
Laser Safety
Use of controls, adjustments, or procedures other than those
specified in this documentat ion may result in a hazardous
exposure to laser radiation. This equipment complies with
international safety st andards. Wit h specific regard to laser safety,
the equipment complies with performanc e standards for laser
products set by government, national, and international agencies
as a Class 1 laser produc t. It does not emit haza rdous light , as t he
beam is totally enclosed during all phases of customer operation
and maintenance.
viii
Xerox DocuColor 3535 Printer/Copier
Page 9

Maintenance Safety
Operational Safety
• Do not attempt any maintenance procedure that is not
specifically described in the documentation that is supplied
with your press.
• Do not use aerosol cleaners. The use of supplies that are not
approved may cause poor performance of the press, and
could create a dangerous condition.
• Use the supplies and cleaning materials only as directed in
this manual. Keep all of these materials out of the reach of
children.
• Do not remove the covers or guards that are fastened with
screws. There are no parts behind these covers that you can
maintain or service.
Do not perform any maintenance procedures unless you have
been trained to do them by a Xerox representative, or unless a
procedure is specifically desc ri bed in one of the man uals in clu ded
with your press.
Your Xerox equipment and supplies were designed and tested to
meet strict safety requirements. These include safety agency
examination, approval, and compliance with established
environmental standards.
Your attention to the following safety guidelines will help ensure
the continued safe operation of your digital press:
• Use the materials and supplies specifically designed for your
digital press. The use of unsuitable materials may result in
poor performance of the machine and possibly a hazardous
situation.
• Follow all warnings and instructions that are marked on or
supplied with the machine.
• Place the machine in a room that provides adequate spac e for
ventilation and servicing.
• Place the machine on a level, solid surface (not on a thick pile
carpet) that has adequate strength to support the weight of the
machine.
Xerox DocuColor 3535 Printer/Copier
ix
Page 10
• Do not attempt to move the machine. A leveling device that
was lowered when your machine was installed may damage
the carpet or floor.
• Do not set up the machine near a heat source.
• Do not set up the machine in direct sunlight.
• Do not set up the machine in line wi th the col d air f l ow from an
air conditioning system.
• Do not place containers of coffee or other liquid on the
machine.
• Do not block or cover the slots and openings o n the machine.
Without adequate ventilation, the machine may overheat.
• Do not attempt to override any electrical or mechanical
interlock devices.
WARNING: Be careful when working in areas identified with
this warning symbol. These areas may be very hot and could
cause personal injury.
If you need any additional safety information concerning the
machine or materials, contact your Xerox representative.
Ozone Safety
This product produces ozone during normal oper ation. The ozone
is heavier than air, and the quantity is dependent on print volume.
Providing the correct environmental parameters, as specified in
the Xerox installation procedures, ensures that concentration
levels meet safe limits.
If you need additional information about ozone, request t he Xerox
publication, OZONE, 600P83222, by calling 1-800-828-6571 in
the USA. For a French language version, call 1-800-828-6571 in
the USA, then press 2.
x
Xerox DocuColor 3535 Printer/Copier
Page 11

Notices
Radio Frequency Emissions
FCC
The following applies to the product when equipped with the
Token Ring or Banyan Vines connectivity options:
This equipment has been tested and found to comply with the
limits for a Class A digital device, pursuant to Part 15 of the
Federal Communications Commission Rules. These limits are
designed to provide reasonable protection against harmful
interference when the equipment is operated in a commercial
environment. This equipment generates, use s, and can radiate
radio frequency energy and, if not installed and used in
accordance with the instruction manual, ma y cause harmful
interference to radio communications. Operation of this equipment
in a residential area is li kely to cause har mful interference i n which
case the user will be required to cor rec t the in ter ference at his/h er
own expense.
In Canada
Changes or modifications to this equipment not specifically
approved by the Xerox Corporation may void the user’s authority
to operate this equipment.
Shielded cables must be used with this equipment to maintain
compliance with FCC regulations.
This digital apparatus does not exceed the Class A l imi ts for radio
noise emissions from digital apparatus as defined in the Radio
interference regulations of Industry Canada.
Xerox DocuColor 3535 Printer/Copier
xi
Page 12
Safety Extra Low Voltage Approval
The Xerox DocuColor 3535 is in compliance with various
governmental agencies and nat ional safety regulati ons. All system
ports meet the Safety Extra Low Voltage (SELV) circuits for
connection to customer-owned devi ces and networks. Addit ions of
customer-owned or third-party acce ssories that are attached to
the press must meet or exceed the re quirement s previousl y listed.
All modules that requir e external connection must be installed per
the installation procedure.
Certifications in Europe
The CE marking that is applied to this product symbolizes Xerox
Europe’s Declaration of Conformit y with the following applicable
Directives of the European Union as of the dates indicated:
January 1, 1995: - Council Directive 73/23/EEC amended by
Council Directive 93/68/EEC, approximation of the laws of the
member states related to low voltage equipment.
January 1, 1996: - Council Directive 89/336/EEC, approximation
of the laws of the member states related to electromagnetic
compatibility.
Changes or modifications to this equipment not specifically
approved by Xerox Europe may void the user’s authority to
operate the equipment.
Shielded cables must be used with this equipment to maintain
compliance with the EMC Directive 89/336/EEC.
This equipment is not primarily intended for use in a domestic
environment.
A full declaration defining the relevant Directives and referenced
standards can be obtained from your Xerox Europe
representative.
WARNING: In order to allow this equipment to operate in
proximity to Industrial, Scientific and Medical (ISM)
equipment, the external radiation from ISM equipment may
have to be limited or special mitigation measures taken.
WARNING: This is a Class A product. In a domestic
environment, this product may cause radio interference, in
which case the user may be required to take adequate
measures.
xii
Xerox DocuColor 3535 Printer/Copier
Page 13

It’s Illegal in the USA
Congress, by statute, has forbidden the reproduction of the
following subjects under certain circumstances. Pena lties of fine
or imprisonment may be imposed on those guilty of making such
reproductions.
1. Obligations or Securities of the United States Government,
such as:
Certificates of Indebtedness National Bank Currency
Coupons from Bonds Federal Reserve Bank Notes
Silver Certificates Gold Certificates
United States Bonds Treasury Notes
Federal Reserve Notes Fractional Notes
Certificates of Deposit Paper Money
Bonds and Obligations of certain agencies of the government,
such as FHA, etc.
Bonds. (U.S. Savings Bonds may be photographed only for
publicity purposes in connection with the campaign for the sale
of such bonds.)
Internal Revenue Stamps. (If it is necessary to reproduce a
legal document on which there is a canceled revenue stamp,
this may be done provided the re production of t he document is
performed for lawful purposes.)
Postage Stamps, canceled or uncancel ed. (For philatelic
purposes, Postage Stamps may be photographed, provided
the reproduction is in black and white and is less than 75% or
more than 150% of the linear dimensions of the original.)
Postal Money Orders.
Bills, Checks, or Draft s of money drawn by or upon au thori zed
officers of the United States.
Stamps and other representatives of value, of whatever
denomination, which have been or may be issued under any
Act of Congress.
2. Adjusted Compensation Certificates for Veterans of the World
Wars.
3. Obligations or Securities of any For eign Government, Bank, or
Corporation.
Xerox DocuColor 3535 Printer/Copier
xiii
Page 14

4. Copyrighted material, unless permissi on of the copyright
owner has been obtained or the reproduction falls within the
“fair use” or library reproduction rights provisions of the
copyright law. Further information of these provisions may be
obtained from the Copyright Office, Library of Congress,
Washington, D.C. 20559. Ask for Circular R21.
5. Certificates of Citizenship or Naturalization. (Foreign
Naturalization Certificates may be photographed.)
6. Passports. (Foreign Passports may be photographed.)
7. Immigration Papers.
8. Draft Registration Cards.
9. Selective Service Induction Papers that bear any of the
following Registrant’s information:
Earnings or Income Dependency Status
Court Record Previous military service
Physical or mental condit ion
Exception: U. S. Army and Navy discharge cert ificates may be
photographed.
10. Badges, Identification Cards, Passes, or Insignia carried by
military personnel, or by members of the various Federal
Departments, such as FBI, Treasury, etc. (unless photograph
is ordered by the head of such department or bureau.)
Reproducing the following is also prohibited i n certain states:
Automobile Licenses - Drivers’ Licenses - Automobile
Certificates of Ti tle.
The above list is not all inclusive , and no liability i s assumed for it s
completeness or accuracy. In case of doubt, consult your attorney.
xiv
Xerox DocuColor 3535 Printer/Copier
Page 15

It’s Illegal in Canada
Parliament, by statute, has forbi dden the reproduction of the
following subjects under certain circumstances. Pena lties of fines
or imprisonment may be imposed on those guilty of making such
copies.
1. Current bank notes or current paper money.
2. Obligations or securities of a governme n t or bank.
3. Exchequer bill paper or revenue paper.
4. The public seal of Canada or of a province, or the seal of a
public body or authority in Canada, or of a court of law.
5. Proclamations, orders, regulat ions or appointment s, or notices
thereof (with intent to falsely cause same to purport to have
been printed by the Queen’s Printer for Canada, or the
equivalent printer for a province).
6. Marks, brands, seals, wrappers or designs used by or on
behalf of the Government of Canada or of a province, the
government of a state other than Canada or a department,
board, Commission or agency establ ished by the Government
of Canada or of a province or of a government of a state other
than Canada.
7. Impressed or adhesive stamps used for the purpose of
revenue by the Government of Canada or of a province or by
the government of a state other than Canada.
8. Documents, registers or records kept by public officials
charged with the duty of making or issuing certified copies
thereof, where the reproduction falsely purports to be a
certified c o py thereof.
9. Copyrighted material or trademarks of any manner or kind
without the consent of the copyright or trademark owner.
The above list is provided for your convenience and assistance,
but it is not all inclusive, and no liabi lity is assumed for its
completeness or accuracy. In case of doubt, consult your solicitor.
Xerox DocuColor 3535 Printer/Copier
xv
Page 16
Environmental Notices for the USA
As an ENERGY STAR® partner, Xerox Corporation has
determined that this printer/copi er model meets the
guidelines for energy effic iency.
ENERGY STAR is a registered United States trademark.
The
ENERGY STAR Program is a team effort between the
Environment Protection Agency and the of fic e equip ment in dustry
to promote energy-efficient copiers, printers, fax, multifunction
machines, personal computers, and monitors. Reduci ng product
energy consumption helps combat smog, aci d rain and long-term
changes to the climate by decreasing the emissions that result
from generating electricity.
Environmental Notices for Canada
Terra Choice Environmental Services, Inc. of Canada has verified
that this Xerox product conforms to all applicable Environmental
Choice EcoLogo requirements for minimized impact to the
environment.
ENERGY STAR
Environment Canada established the Environmental Choice
program in 1988 to help consumers identify environmentally
responsible products and services. Copier, printer, digital press,
and fax products must meet energy efficiency and emissions
criteria, and exhibit comp at ibil ity wit h recy cle d supplies. Curr ently,
Environmental Choice has more than 1600 approved products
and 140 licensees. Xerox has been a leader in offering EcoLogo
approved products. In 1996, Xerox became the first company
licensed to use the Environmental Choic e EcoLogo for its copiers,
printers, and fax machines.
xvi
Xerox DocuColor 3535 Printer/Copier
Page 17

Product Recycling and Disposal
Xerox operates a worldwide equipment takeb ack and reuse/
recycle program. Contact your Xerox sales representative (1-800ASK-XEROX) to determine whether this Xerox product is par t of
the program. For more information about Xerox environmental
programs, visit www.xerox.com/envir onment.html.
If your product is not part of the Xerox program and you are
managing its disposal, please note that the product may contain
lead, mercury and other materials whose disposal may be
regulated due to environmental cons iderations. For recycling and
disposal information, contact your local authorities. In the United
States, you may also refer to the Electronic Industri es Alliance
web site at www.eiae.org.
Xerox DocuColor 3535 Printer/Copier
xvii
Page 18
Symbols
Conventions
St andardized conventi ons have been used in this manual t o assist
you in visually locating and identifying information quickly.
CAUTION: This symbol alerts you to an action that may cause
damage to hardware, software, or result in the loss of data.
WARNING: Warnings alert you to an action that may cause
bodily injury.
The 1 2 3... symbol indicates the beginning of a task or work
process you should use to complete a procedure and is followed
by the first step of a numbered procedure, task, or work process.
1
2
3
NOTE: This calls your attention to information that is helpful, but
not essential to complete a procedure or task.
xviii
Xerox DocuColor 3535 Printer/Copier
Page 19

1. Copy
Getting to Know Your Copier
Your new Xerox DocuColor 3535 works as a digital copier. This
section will provide an introduction to your new product.
For more information about copy features, refer to the section
entitled Copier Features in this chapter.
Xerox DocuColor 3535 Printer/CopierXerox DocuColor 3535 Printer/Copier
Xerox DocuColor 3535 Printer/Copier
1–1
Page 20
10
2
1
3
4
5
6
7
8
9
11
12
13
14
15
17
16
1–2
Xerox DocuColor 3535 Printer/Copier
Page 21
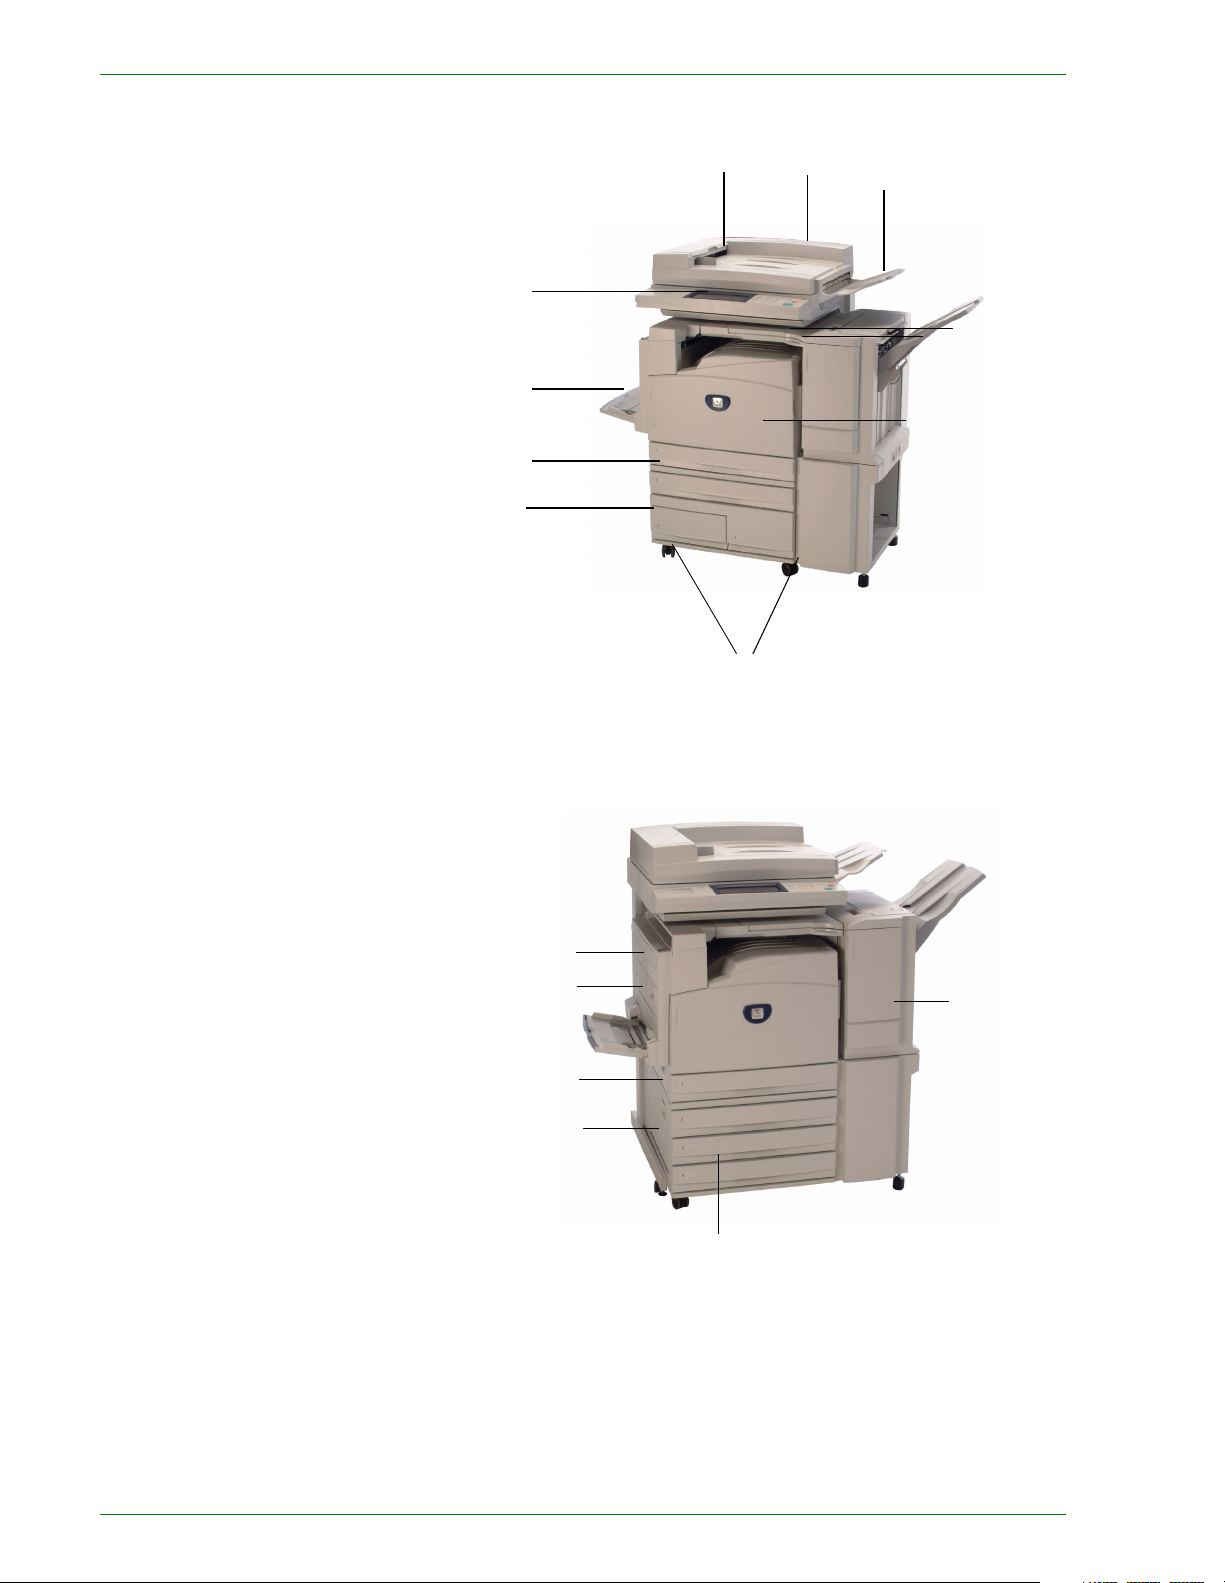
Number Name Function
1
2 Original Input Area Location where originals are fed onto platen glass for copying.
3 Original Catch Tray Original return area.
4 Control Panel Used to program the copier for individual jobs.
5 Center Output Tray Output delivered here face down.
6 Power Switch Powers machine On/Off.
7 Front Door Panel Access for consumables replacement.
8 Trays 1 & 2 Adjustable paper trays: 5.5x8.5 in. through 11x17 in. (A5
9 Trays 3 & 4 (T andem Tray
10 Tray 5 (Bypass) For specialty papers which cannot be loaded in Trays 1 - 4.
11 Casters Lockable casters for mobility and safety.
12 Left Upper Cover Push the release lever up to access the paper path.
13 Duplex Cover Open this cover to access paper path.
Duplex Automatic
Document Feeder
(DADF)
Module)
Automatically feeds up to 50 documents. Also works as a
Document Glass cover when making copies from the document
glass.
through A3) holding up to 520 sheets based on paper weight.
High capacity paper trays holding a total of 2080 sheets of 8.5 x
11 in. (A4 and B5) based on paper weight.
14 Left Side Middle Cover Access to paper path.
15 Left Side Lower Cover Access to paper path.
16 Trays 3 & 4 (3-Tray
Module)
17 Finisher (Optional
Accessory)
Paper trays holding 520 sheets each of 8.5 x 11 in. (A4 and B5)
based on paper weight.
Finisher (Optional Accessory) that accomodates up to 1000
sheets of output and offers stapling options.
Xerox DocuColor 3535 Printer/Copier
1–3
Page 22
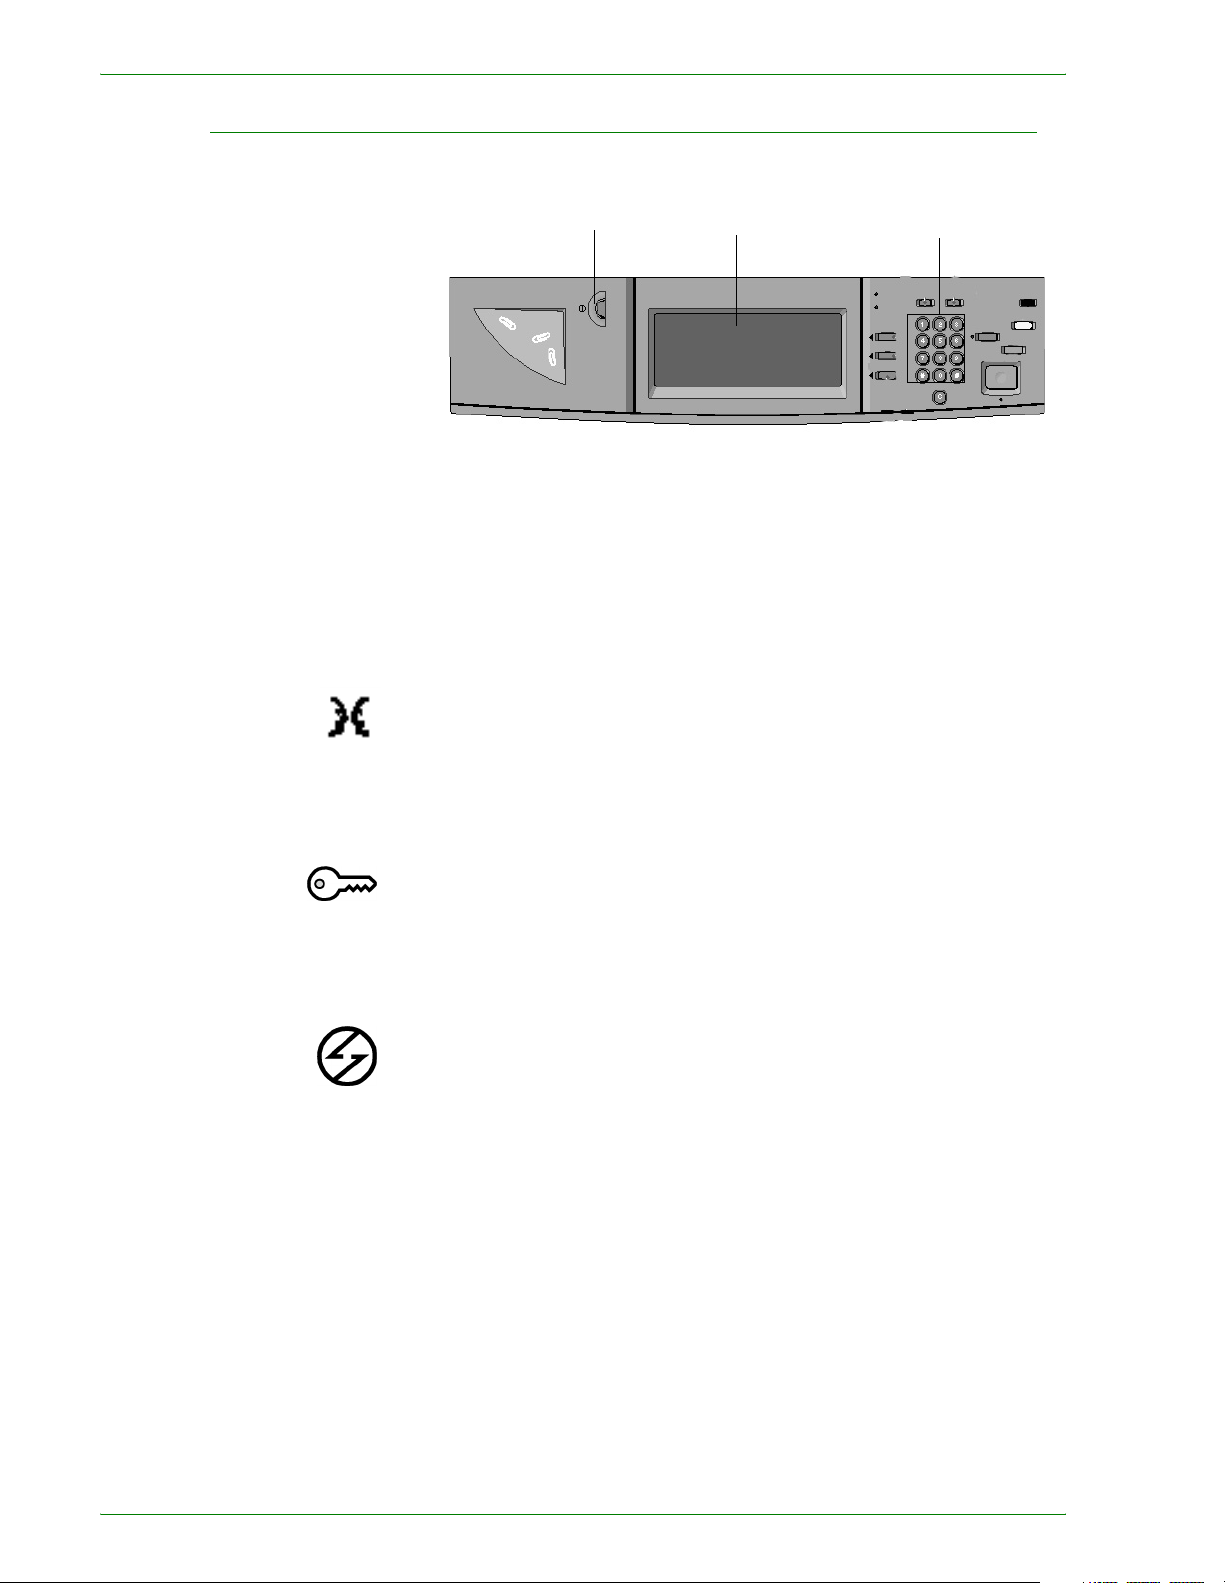
Control Panel
Contrast Dial Touch Screen Numeric Keypad
The Control Panel is used to program individual jobs.
• The Numeric Keypad is used to enter copy quantity or other
numeric information.
• The Contrast Dial a djust s the bri ghtness of t he touch sc reen.
• The Touch Screen is where you make selections for the jobs
you are programming.
Language Use this feature to change the language on t he Touch Screen. The
language set will remain until the machine is powered off/on.
Access Use this feature to change machine default setting s, and to create
or modify user access numbers.
Power Saver Lights up green and is initiated automatical ly if the machine is left
idle for a specific amount of time. Press the Power Saver button
to bring the machine back to full power after the warm-up period.
1–4
Xerox DocuColor 3535 Printer/Copier
Page 23
Interrupt Stops the printer/copier during the current job. This allows
another job to be run. There are two indications that the job has
been interrupted:
• The printer/copier displays a message indic ating that Job
Interrupt has been selected, and it is ready to copy.
• The indicator light flashes to acknowledge that the Interrupt
button has been selected. The light will continue to flash until
the printer/copier has completed the activity in process. The
light will remain constant to ident if y inter rupt has oc curr ed and
a new job can be programmed.
After Interrupted jobs are complete , press the Interrupt button
again to return the machine to the first job.
Clear All Returns the machine to the or ig inal Default State. When the Clear
All button is selected in Interrup t mo de, default settings are
applied only to the interrupting job.
Stop Pressing Stop will halt the copy job in process at the completion of
the current activity. A message asking if you want to press Start
to continue the job or Clear All to cancel the job is displ ayed on
the Touch Screen.
Start Initiates a job or continues the copying process.
Clear Clears an incorrect numeric entry.
Xerox DocuColor 3535 Printer/Copier
1–5
Page 24
Job Memory Indicator lights when data is stored in the machine's memory.
Online Indicator lights when dat a is being received from a client.
Features Allows you to alternate between scanning and copying feature
screens.
Job Status Allows you to check or cancel jobs currently executing, or to
check or print saved documents.
Machine Status Allows you to check the machine status, meters, the state of
consumables, and output report s.
1–6
Xerox DocuColor 3535 Printer/Copier
Page 25
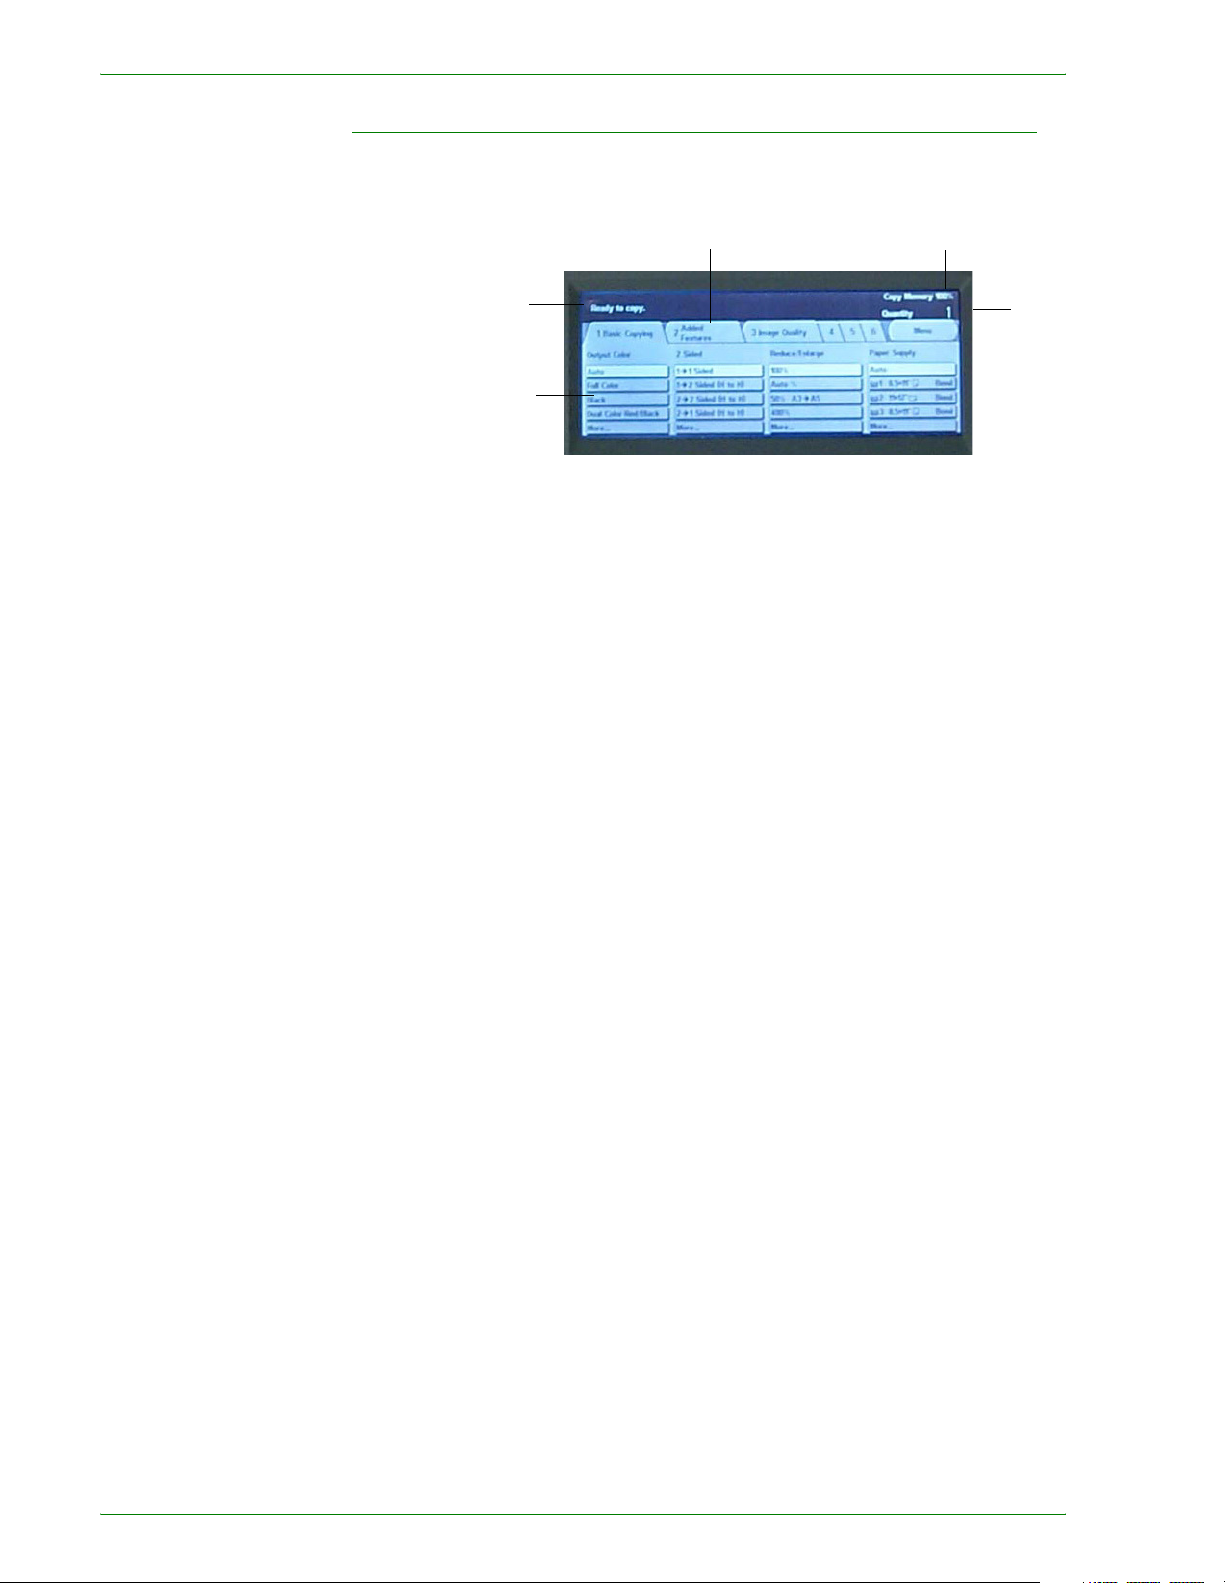
Touch Screen
y
Message
Area
Selection
Buttons
Press the buttons and tabs displayed in the Touch Screen to
select features or respond to on screen instructions. The selected
buttons are highlighted to ind icat e activation. Buttons that do not
have three-dimensional shadows are not active, and cannot be
selected.
Tab
Unused
Memory
Quantit
Message Area Messages such as machine status and operation instruc tions are
displayed here
Unused Memory The amount of memory remaining to store a scanned original is
displayed prior to output.
Quantity The copy quantity i s entered usi ng the keyp ad, and appear s in the
upper right corner of the message area. Select between 1 - 999.
Tab Feature Tabs displayed on the Touch Screen contain the
programmable selections available for each feature.
Selection Buttons Allow for the selection of feature / functions required for the
desired output. Buttons identifi ed, as More… have additional
features, which will be displayed when this button is selected.
Xerox DocuColor 3535 Printer/Copier
1–7
Page 26

Power Switch
The power switch is located on the r ight top corner of the machine.
Press the switch to the ( | ) position to turn the power on.
Ground Fault Protector Located at the rear of the machine where the power cord attaches.
The Ground Fault Protector removes all power from the machine if
a fault is detected in the power to the printer/c opier. To reset the
GFI, press the switch in.
Audio Tones
Tone volume may be adjusted or turned off in System Settings
mode. Three types of Audio Tones are available to assist the
operator in selecting features and functions.
Single Tone Acknowledges when a feature is selected, or a job has been
completed.
Double Tone Acknowledges an alert, such as a paper jam or consumable
replacement.
Triple Tone Acknowledges an improper selecti on or an error in button
selection has occurred.
Duplex Automatic Document Feeder (DADF)
Automatically feeds up to 50 documents onto the glass for
copying. Documents must be placed face up into the Document
Handler.
Document Glass
When using the Document Glass the original document must be
placed face down and in the upper left-hand corner of the
Document Glass.
NOTE: The DADF must be closed for the Auto Color option to
function
1–8
Xerox DocuColor 3535 Printer/Copier
Page 27

Paper Trays
Trays 1,2,3 and 4 are locat ed at the lower front of the printer/
copier. Tray 5 (Bypass) is located on the left side of the printer/
copier.
There are two possible tr ay configurations on t he DocuColor 3535.
Option 1 is a 3-Tray module. Option 2 is a Tandem Tray module.
3-Tray Module
Trays 1 - 4 The 3-Tray Module consists of Trays 1 - 4. Trays 1 - 4 are all
adjustable from 5.5x8.5 i n. through 11x17 in. (A5 through A3), and
can each accommodate up to 520 sheets based on paper weight.
Tandem Tray Module
The Tandem Tray Module consists of 4 paper trays.
With the Tandem Tray Module:
Trays 1 and 2 Adjustable from 5.5x8. 5 in. through 11x17 in. (A5 through A3), and
can each accommodate up to 520 sheets based on paper weight.
Trays 3 and 4 High capacity paper trays accommodating a total of 2080 sheets,
(8.5x11 in., A4, and B5) based on paper weight.
All Tray Modules
Trays 1 - 4 can feed Transparencies and paper weights 18 lb. to
110 lb. (64 to 220 gsm). The machine automatically det ects the
size and orientation of loaded paper. The paper type must be set
in System Setting mode.
Trays 1 - 4 can accommodate approximately 300 striped
transparencies and approximately 450 stripeless transparenc ies.
Both striped and stripeless transparencies can be used, but
stripeless transparencies are recommended. It is not
recommended that you output more than 20 transparencies at a
time. If your job is larger than 20 pages, use th e Transparency
Separators feature.
NOTE: Transparencies cannot be delivered to the Finisher
(optional accessory). Transparencies cannot be used for 2 Sided
output.
NOTE: When making copies you can select Transparencies from
Tray 5 (Bypass). If you want to select Transparencies from Trays
1-4, your System Administrator must change the Paper Type
setting in System Settings mode. To select Transparencies for
print jobs, you can select the correct paper type in the printer
driver at the client.
Xerox DocuColor 3535 Printer/Copier
For more information on selecting paper type, refer to the Machine
Administrator chapter.
1–9
Page 28

Output Trays
Tray 5 (Bypass)
Feeds specialty papers, non-standard sizes, and 12x18 in., and
can accommodate up to 95 sheets based on paper weight.
Approximately 20 transparencies should be loaded in Tray 5
(Bypass) at a time.
The Center Output Tray delivers output face down, and holds up
to 400 sheets. The Center Output Tray holds up to 200 sheets
when the Finisher (optional accessory) is i nstalled.
The Finisher Tray (optional accessory) holds up to 1000 sheets,
and can staple dual and single staples.
NOTE: The DocuColor printer/copier should not be moved after it
has been installed. Moving may damage the equipment, carpet or
floor. If equipment must be moved, please contact your Xerox
representative for assistance.
1–10
Xerox DocuColor 3535 Printer/Copier
Page 29

Power Saver Mode
Power Saver Mode automatically cuts off the electricity to the
machine if it is left unused for a cert ai n duration. The Power Saver
feature has two modes, a Low Power mode and Sleep mode. The
machine enters the Low Power mode after the preset time has
elapsed if the machine is left unused for a fixed period of time.
The machine then enters the Sleep mode if a further preset time
elapses.
• Low Power mode
In this mode, the power to the control panel and fuser unit is
lowered to save power. The display goes out, and the Power
Saver button on the control panel lights. To use the machine,
press the Power Saver button. Power Saver goes out to
indicate that the Power Saver feature is canceled. The default
is 15 minutes.
• Sleep mode
In this mode, the power is lowered more than in the Low
Power mode. The display goes out, and the Power Saver
button on the control pane l lights. To use the machine, press
the Power Saver button. Power Saver goes out to indica te that
the Power Saver feature is canceled. The Sleep mode default
is 45 minutes after Low Power mode is engaged.
For more information on setting Power Saver mode timers, refer to
the Machin e Ad ministrato r chapter in this guide.
Exiting the Power Saver Mode
The Power Saver mode can be exited in two ways:
• By pressing the Power Saver button
• By receiving a print job
Xerox DocuColor 3535 Printer/Copier
1–11
Page 30
Quick Start Guide to Copying
This section will lead you quickly through a number of f eatures
and steps used in making copies.
For more information about copy features, refer to the section
entitled Copier Features, in this chapter.
Making Copies Using the DADF
1 Place original in the Original Input Area face up. A stack of up to
50 originals may be place in the tray.
2 Slide the documents forward until the green indicator lights,
indicating the document is inserted correctly.
3 Adjust the side guide to the size of the paper. The guide should
just touch the side of the document.
4 Press the Start button.
5 Remove the copies from the output tray. Remove the originals
from the Original Catch Tray of the DADF.
1–12
Xerox DocuColor 3535 Printer/Copier
Page 31

Making Copies from the Document Glass
1 Open the Document Cover.
2 Place the original face down on the Document Glass, aligning the
left rear corner with the registration guide.
3 Close the cover before making a copy.
4 Press the Start button.
5 Remove the copies from the output tray. Remove the original
document from the Document Glass.
Xerox DocuColor 3535 Printer/Copier
1–13
Page 32

Making Copies Using Features
The feature tabs on the Touch Screen enable you to configure the
printer/copier to suit your copying needs.
The procedure below leads you quickly through a number of
features you may want to use in making copies. It assumes that
the feature tabs are in the default configuration.
For more information about copy features, refer to the section
entitled Copier Features, in this chapter.
1 Press Clear All to clear any previous programming
Use any of the following steps that apply to your job and desir ed
outcome.
2 Use the Numeric Keypad to enter the desired quantity. If you make
a mistake, press the Clear button on the numeric keypad to clear
an incorrect quantity
3 Select the option in Output Color if a setting other than the default,
Auto Color, is desired.
Perform one of the following:
• Press the desired Output Color option on the Basic Copying
tab.
• Press More… to see additional options
Press the desired option and press the Save button to return to
the Basic Copying screen.
1–14
Xerox DocuColor 3535 Printer/Copier
Page 33

4 Select an option under 2 Sided if a setting other than the default, 1
to 1 Sided, is desired.
If another option is desired, perform one of the fol lowing:
• 1 to 1 Sided for default one-sided copies.
• 1 to 2 Sided for two-sided copies from one-sided input.
• Press Head to Head for two-sided, head-to-head output,
as for books.
• Press Head to Toe for two-sided, head to toe output , as for
calendars.
• 2 to 2 Sided for two-sided copies from two-sided input.
You must specify the original orientation and the copy
orientation.
• Press Head to Head for two-sided head- to-head output,
as for books.
• Press Head to Toe for two-sided, head-to-toe output, as
for calendars.
• 2 to 1 Sided for one-sided copies from two-sided originals.
• Press Head to Head if your original documents are two-
sided, head-to-head.
• Press Head to Toe if your original documents are two-
sided head-to-toe.
Select the icon that most closely resembles the Original
Orientation for the loaded document(s). Press Save.
5 Select an option in Reduce/Enlarge if a setting oth er than the
default, 100%, is desired.
If another option is desired, perform one of the fol lowing:
• Press the desired Reduce/Enlarge option on the Basic
Copying screen.
• Press More… to see additional options.
Press the desired option and touch the Save button to return to
the Basic Copying screen.
Xerox DocuColor 3535 Printer/Copier
1–15
Page 34

6 Select an option in Paper Supply if a tray other than the default,
Auto Paper, is desired.
If another option is desired, perform one of the fol lowing:
• Press the desired Paper Supply option on the Basic Copying
screen.
• Press More… to see additional options.
Press the desired option and touch the Save button to return to
the Basic Copying screen.
7 On the Added Features tab, s ele ct Output to program the desired
copy output option.
• Press Collated for colla ted output. Collated will autom atically
be selected when the DADF is used.
• Press Collated / Stapled to direct output to the Finisher
(optional Accessory). Press Finisher Tray to set the Output
Destination. Press Stapling on the Output scr een to select
the Original Orientation and Staple Position on the output.
Select the desired option and press the Save button to return to
the Basic Copying screen.
8 On the Image Quality tab, select Original Type to displa y th e
Original Type screen.
• Press an option for Original Type if a setting other than the
default is desired.
Press the Save button to return to the Image Quality scr een.
1–16
Xerox DocuColor 3535 Printer/Copier
Page 35

9 If other features are desired, select the appropriate feature tab
and feature button on the Touch Screen.
10 Perform one of the following:
• If you use the Duplex Automatic Document Feeder, place the
document face up into the Original Input Area. The Document
Feeder Lamp lights when the document is in the correct
position. Ensure that the paper guide is against the original
document.
• Raise the Duplex Automatic Document Feeder (DADF) and
place the document face down on the Document Glass.
• Ensure that the document lies against the regis tration area
at the left rear corner of the glass.
• Lower the Duplex Automatic Document Feeder (DADF).
11 Press the Start button.
12 When copying is completed, perform the following:
• Remove the copies from the Center Output Tray or Finisher
Tray on the right side of the pri nter/copier.
• Remove the original document(s) f rom the Document Gl ass or
Original Catch Tray.
Xerox DocuColor 3535 Printer/Copier
1–17
Page 36

Copier Features
Basic Copying Tab
Output Color Allows you to select the co lo rs to be u se d fo r copying.
Below is a brief description of each feature available on the Basic
Copying tab. Each feature is explained in detail on the following
pages.
2 Sided Allows you to select one or two-sided origi nals, with options for
one or two-sided output.
Reduce/Enlarge Allows you to select the size of the output image from automatic
reduction/enlargement, preset values, or variable independent
ratios for the image length and widt h.
Paper Supply Allows you to select the tray tha t contai ns the corr ect output paper
size and type.
1–18
Xerox DocuColor 3535 Printer/Copier
Page 37

Output Color
The Output Color feature allows you to select the desired output
color.
The following options are available:
Auto The Auto Color option enables the copier to determine if the
document is black and white or color. If the document is black and
white, the Black option is selected auto matically. If the document
is colored, the Full Color option is selected.
The DADF must be closed for t he Auto Colo r op ti on to f unction. In
order for the scanner to accurat ely sense color on a document, the
color area must be greater than 50 mm
inches
2
). If the color area is less, select the Full Color option.
Also some very dark color s may be s ensed as black. I n thi s case,
select the Full Color option as well.
2
(approximately 2
NOTE: With Auto selected, the printer/copier runs at the speed for
color copying, even if the originals are B/W.
NOTE: The sensitivity of Auto for detecting color vs. B/W can be
adjusted in System Settings mode under Output Color
Recognition.
Full Color Enables the copier to make copies using all four toner colors :
Yellow, Magenta, Cyan and Black.
Black The Black option should be selected when the desired output is a
black and white copy. Black and white copies can be made from
any original. With Black selected only Black toner is used.
Dual Color The Dual Color option enables the copier to make copies in two
preset colors. The color of colored areas and black areas of the
document can be specified.
Single Color The color setting Red, Green, Blue, Yellow, Magent a, or Cyan can
be selected.
NOTE: Custom colors can be programmed in System Settings
mode under Setting Custom Colors.
Xerox DocuColor 3535 Printer/Copier
1–19
Page 38

You can select several Output Color options from the Basic
Copying tab or select the More… button to get a complete set of
options.
1 On the Basic Copying tab select More… under Output Color to
display the Output Color screen.
2 Select the desired option:
•Auto
• Full Color
• Black
• Dual Color
• Single Color
3 Select Start to make copies or Save to select additional features.
NOTE: Dual Color cannot be used with Negative Image.
NOTE: When Single Color or Dual Color is selected, Original Type
cannot be selected.
1–20
Xerox DocuColor 3535 Printer/Copier
Page 39

2 Sided
Use the 2-Sided feature to select one or two-sided originals, with
options for one or two-sided output.
The following options are available:
1 to 1 Sided Makes one-sided copies from one-sided input. This is the default
setting.
1 to 2 Sided Makes two-sided copies from one-sided input.
2 to 2 Sided Makes two-sided copies from two-sided input.
2 to 1 Sided Makes one-sided copies from two-sided input.
Xerox DocuColor 3535 Printer/Copier
1–21
Page 40

You can select several 2 Sided options fr om the Basic Copying tab
or use the Added Features tab.
1 On the Basic Copying tab select More… under 2 Sided.
2 Select the desired option:
• 1 to 1 Sided
• 1 to 2 Sided
• Select Head to Head for two-sided, head-to- head output,
as for books.
• Select Head to Toe for two-sided, head-to-toe output, as
for calendars.
1–22
Xerox DocuColor 3535 Printer/Copier
Page 41

• 2 to 2 Sided
Select the option for your Originals
• Head to Head if your originals are two-sided, head-t o-
head.
• Head to Toe if your originals are two-sided, head-to-toe.
Select the option for your Copies
• Head to Head for two-sided, head-to-head output, as for
books.
• Head to Toe for two-sided, head-to-toe output, a s for
calendars.
• 2 to 1 Sided
• Select Head to Head if your originals are two-sided, head-
to-head.
• Select Head to Toe if your originals are two-sided, head-
to-toe.
3 Select the icon that most closely resembles the Original
Orientation for the loaded document(s).
4 Select Start to make copies or Save to select additional features.
NOTE:1 to 2 Sided or 2 to 2 Sided cannot be selected when using
Auto Size Detect for Tray 5 (Bypass), Repeat Image, Book
Duplex, Transparency Separators, Poster, or Booklet Creation.
Xerox DocuColor 3535 Printer/Copier
1–23
Page 42

Reduce/Enlarge
The Reduce/Enlarge feature allows you to copy the image at
different magnifications. Copies may be reduced to 25% or
enlarged to 400%, in 1% increments.
The following options are available:
100% Copies are the same size as the original. This is the default
setting.
Auto% This option automatically reduces or enlarges the copy, based on
the size and orientation of the document and the paper supply
selected. This option is applied only to standard size documents.
The copy image will be reduced or enlarged in the same
proportions for X (horizontal) and Y (vertical) directions.
Auto Paper selection is not available when Auto% is selected.
Presets% There are 7 preset percentages to choose from. The selected
percentage displays in the value box on the Reduce/Enlarge
screen. These presets can be changed in System Settings mode.
1–24
Xerox DocuColor 3535 Printer/Copier
Page 43

Variable% Select the Variable% option to enter the desired percentage for
Reduce/Enlarge. Use either the up and down arrows or the
number buttons that display on the Touch Screen.
Independent X-Y% Select the Independent X-Y% option to copy the image at
different, independent magnifications from 25% to 400% for the X
and Y directions.
For example, you can enlarge the image to 129% in the X
direction and reduce it to 64% in the Y direction by using the
Touch Screen arrows.
Independent X-Y% Auto The Auto option automatically calculates the reduction and
enlargement based on the original document size and on the
output paper size when using Independent X-Y%. The copy image
will be reduced or enlarged in the different propor tions for X and Y
directions.
You can select several Reduce/Enlarge options from the Basic
Copying tab or select the More… button to get a complete set of
options.
Using Presets%
1 On the Basic Copying tab select More… under Reduce/Enlarge.
2 On the Reduce/Enlarge screen, select the Presets% option.
3 Select 100%, Auto%, or the desired preset percentage.
4 Select Start to make copies or Save to select additional features.
Xerox DocuColor 3535 Printer/Copier
1–25
Page 44

Using Variable%
1 Under Reduce/Enlarge on the Basic Copying tab select More…
2 On the Reduce/Enlarge screen, select the Variable% option.
3 Perform one of the following:
• Press the arrow buttons to increase or decrease the
percentage value in increments of 1.
• Use the Numeric Keypad on the Touch Screen to enter a
specific percentage fr om 25 throug h 400. Press the Clear (C)
button to clear the value entered.
4 Select Start to make copies or Save to select additional features.
1–26
Xerox DocuColor 3535 Printer/Copier
Page 45

Using Independent X-Y%
1 Under Reduce/Enlarge on the Basic Copying tab select More…
2 On the Reduce/Enlarge screen, select the Independent X-Y%
option.
3 Perform one of the following:
• Press the up arrow to increase the percentage value for X,
X&Y, or Y in increments of 1.
• Press the down arrow to decrease t he percentage value for X,
X&Y or Y in decrements of 1.
• Press Auto.
4 Select Start to make copies or Save to sel ect additional feat ures.
Xerox DocuColor 3535 Printer/Copier
1–27
Page 46

Paper Supply
The Paper Supply option enables you to select output paper size
and type.
The Basic Copying tab displays the Auto Paper selection feature.
This option enables the copier to automatically detect the original
document size and select the same standard size paper from
Trays 1, 2, 3, or 4.
The Basic Copying tab also display s the cont ents of three other
trays enabling you to specify your selection for output size. The
Paper Supply More… button enables you to access the Paper
Supply screen.
The paper size displayed for Trays 1, 2, 3, and 4 is set when you
adjust the paper guides as part of the process of loading paper.
The paper type for the trays can be set in System Settings mode.
You may select both the paper size and paper type on the detail
screen when loading paper in to Tray 5 (Bypass).
1 On the Basic Copying tab under Paper Supply, select one of the
following:
• Select Auto to enable the copier to automatical ly select the
appropriate paper.
• Select More… to display the Paper Supply screen.
2 If More... is selected, select the tray that d isplays the desired
paper.
3 Select Start to make copies or Save to select additional features.
1–28
Xerox DocuColor 3535 Printer/Copier
Page 47
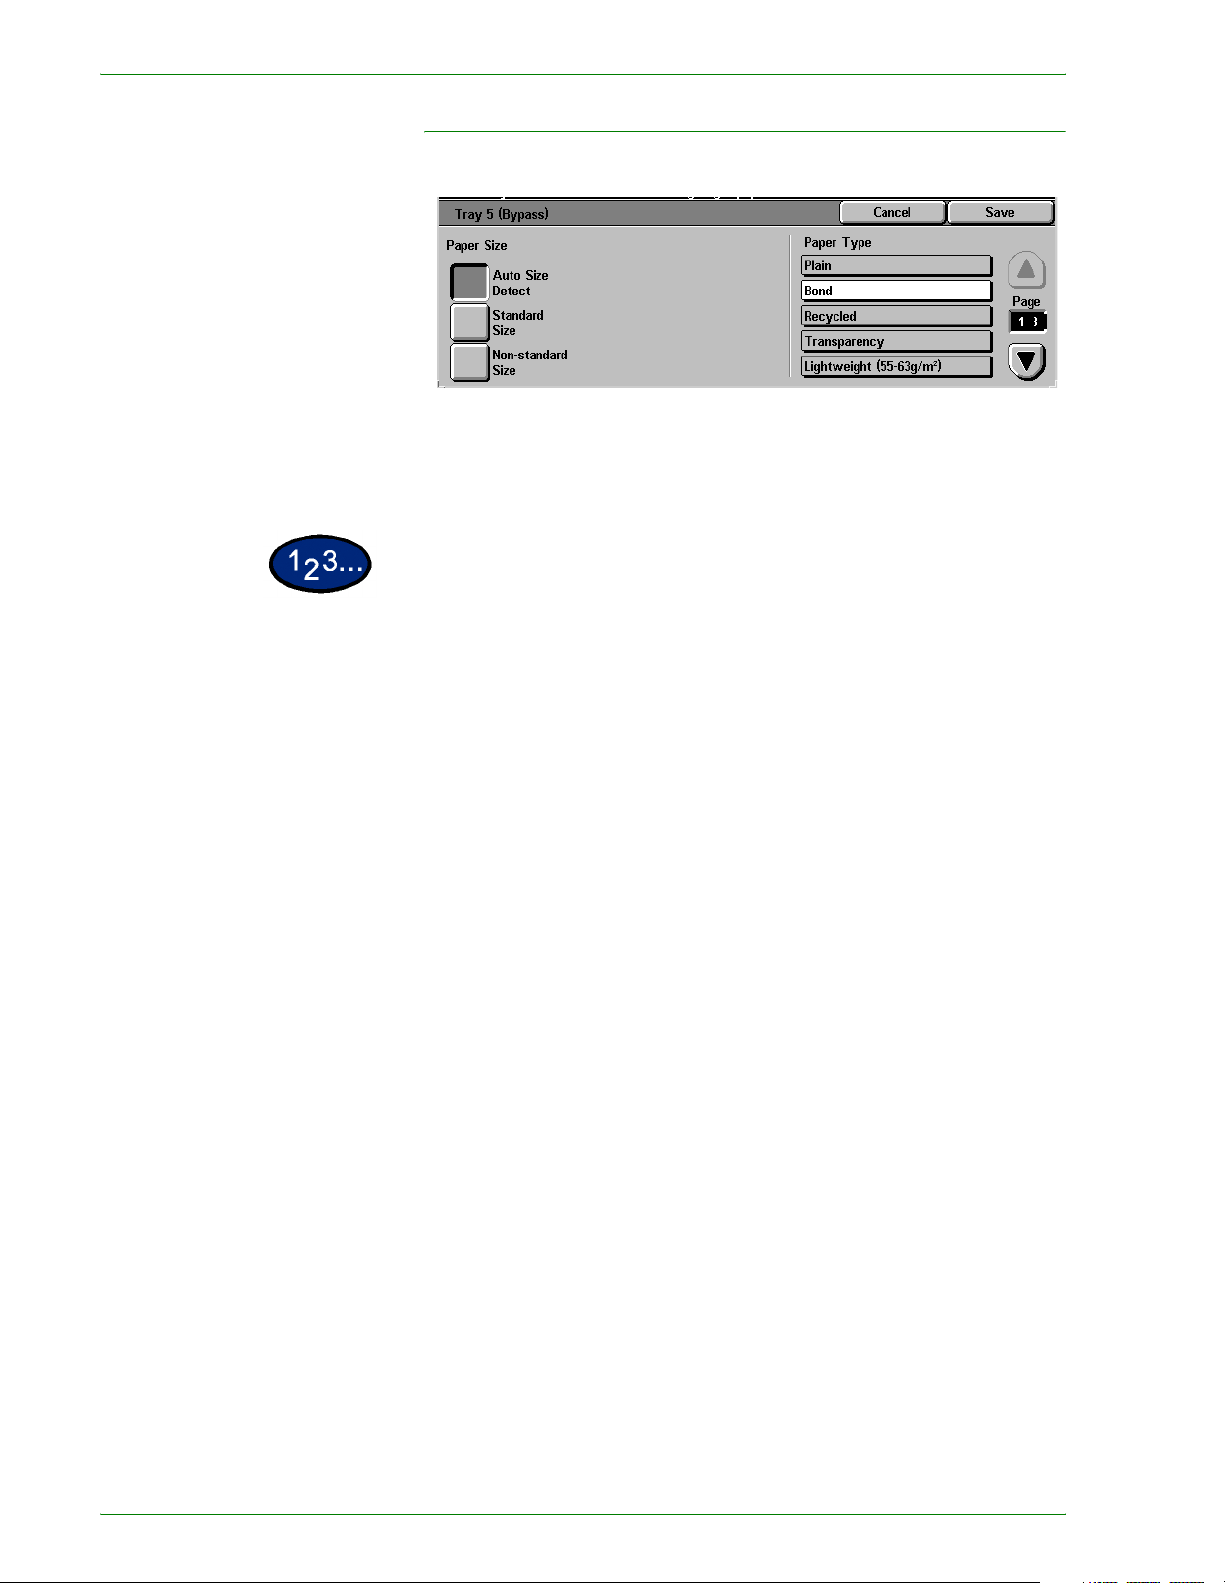
Programming Paper Supply for Tray 5 (Bypass)
You must select the paper size and paper type when loading
paper into T ray 5 (Bypass). Auto Size Detect can be used with
standard size paper.
1 On the Basic Copying tab select More… under Paper Supply.
2 Select Tray 5 (Bypass) to display the Tray 5 (Bypass) screen.
3 Perform one of the following to select Paper Size:
• Select Auto Size Detect.
• Select Standard Size.
• Select the paper size from the list. Use the up and down
arrows to see more selections.
• Select Non-standard Size and enter in the X (width) and Y
(length) dimensions by using the arrows.
• Press the left or right arrows to decrease or increase the X
dimension (140-483mm or 5.5-19.0 inches).
• Press the up or down arrows to increase or decrease the Y
dimension (100-305mm or 3.9-12.0 inches).
Xerox DocuColor 3535 Printer/Copier
1–29
Page 48

4 Select the appropriate Paper Type using the up and down arrow
buttons. You can select Plain, Bond, Recycled, T ran spar ency, and
Lightweight - Extra Heavyweight paper.
5 Select Save to return to the Paper Supply screen.
6 Select Start to make copies or Save to select additional features.
NOTE:Paper Tray 5 cannot be used with the following features:
Auto Size Detect with 1 to 2-Sided and 2 to 2-Sided, Auto
Reduction/Enlargement, Auto Center, Corner Shift, Negative
Image, Mirror Image, Book Duplex, Booklet Creation, Multiple Up,
Repeat Image, Bound Originals and Poster.
1–30
Xerox DocuColor 3535 Printer/Copier
Page 49

Added Features Tab
Below is a brief description of each featur e available on the Added
Features tab. Each feature is explained in detail on the following
pages.
2 Sided Allows you to select one or two-sided origi nals, with options for
one or two-sided output.
Output Enables you to select the desired output order and destination of
the output.
Margin Shift Enables you to center a document image, shift the image to one
edge or move the image to a specified edge of the output copy.
Border Erase Allows you to erase any undesired images around the border or
center of a document.
Xerox DocuColor 3535 Printer/Copier
1–31
Page 50

2 Sided
Use the 2 Sided feature to select one or two-sided originals, with
options for one or two-sided output.
The following options are available:
1 to 1 Sided Makes one-sided copies from one-sided input. This is the default
setting.
1 to 2 Sided Makes two-sided copies from one-sided input.
2 to 2 Sided Makes two-sided copies from two-sided input.
2 to 1 Sided Makes one-sided copies from two-sided input.
1–32
Xerox DocuColor 3535 Printer/Copier
Page 51

You can select several 2 Sided options fr om the Basic Copying tab
or the Added Features tab.
1 On the Added Features tab select 2 Sided.
2 Select the desired option:
• 1 to 1 Sided
• 1 to 2 Sided
• Select Head to Head for two-sided, head-to- head output,
as for books.
• Select Head to Toe for two-sided, head-to-toe output, as
for calendars.
Xerox DocuColor 3535 Printer/Copier
1–33
Page 52

• 2 to 2 Sided
Select the option for your Originals
• Head to Head if your originals are two-sided, head-t o-
head.
• Head to Toe if your originals are two-sided, head-to-toe.
Select the option for your Copies
• Head to Head for two-sided, head-to-head output, as for
books.
• Head to Toe for two-sided, head-to-toe output, a s for
calendars.
• 2 to 1 Sided
• Select Head to Head if your originals are two-sided, head-
to-head.
• Select Head to Toe if your originals are two-sided, head-
to-toe.
3 Select the icon that most closely resembles the Original
Orientation for the loaded document(s).
4 Select Start to make copies or Save to select additional features.
NOTE:1 to 2-Sided or 2 to 2-Sided cannot be selected when using
Auto Size Detect for Tray 5 (Bypass), Repeat Image,
Transparency Separators, Poster, or Booklet Creation.
1–34
Xerox DocuColor 3535 Printer/Copier
Page 53

Output
The Output feature enables you to select the desti nation of the
output and determine whether it will be collated or uncollated.
The following options are available:
Auto The copier automatically determines which output mode (collated
or uncollated) for t he job and delivers the copi es to the output tray.
Collated Collated sets are delivered to the output tray.
Uncollated Uncollated sets are delivered to the output tray.
Collated refers to copies that are deli vered as sets. Each copy set
is in the order in which the originals were place in the DADF. For
example, if the originals are placed in the DADF in 1, 2, 3 order
and you want to make 3 copies, the copy sets will output in 1, 2, 3
order.
Uncollated refers to copies that are de li vered in the or der in whi ch
they were copied. For example, if the originals are placed in the
DADF in 1, 2, 3 order and you want to make 3 copies, the copy
sets will output in 1, 1, 1, 2, 2, 2, 3, 3, 3 order.
Xerox DocuColor 3535 Printer/Copier
1–35
Page 54

1 On the Added Features tab select Output.
2 Select the desired option:
•Auto
•Collated
• Uncollated
3 If you have a Finisher (optional accessory), select the desired
Output Destination:
• Center Output Tray
•Finisher Tray
4 Select Start to make copies or Save to select additional features.
1–36
Xerox DocuColor 3535 Printer/Copier
Page 55

Stapling
This section describes the procedure for progr amming the Output
feature to staple output. You must have a Finisher (optional
accessory) to staple output.
1 On the Added Features tab select Output/Stapling.
2 Select Collated/Stapling.
3 Select Stapling. The Stapling screen is displayed.
4 Select the desired stapling position.
The Finisher Tray is automatically selected as the Output
Destination.
5 Select the desired Original Orientat ion:
• Head to Top
• Head to Left
Select Save.
6 Select Start to make copies or Save to select additional features.
Xerox DocuColor 3535 Printer/Copier
1–37
Page 56

Margin Shift
The Margin Shift feature allows you to shift the positi on of the
image on the copy. The image can be centered on the copy or
moved to the top, bottom, left or right. When copying both sides,
different settings can be set for Side 1 and Side 2.
The following types of Margin Shift are available:
No Shift Copies are made without shifting the original. Th is is the default
setting.
Auto Center Select this to center an image on the copy when the original and
copy paper are a different size. It may also be used to center a
reduced or enlarged image on the output paper.
Corner Shift Select this to move your image to a specified corner.
Variable Shift Select this to move your image up, down, left or right by entering
in a value. The range is from 0 to 50mm (0.0-2.0 inches) in 1mm
(0.1 inch) increments.
1–38
Xerox DocuColor 3535 Printer/Copier
Page 57

Using the Auto Center Feature
1 On the Added Features tab select Margin Shift.
2 Select Auto Center.
3 Select Start to make copies or Save to select additional features.
Xerox DocuColor 3535 Printer/Copier
1–39
Page 58

Using the Margin Shift/Variable Shift Feature
1 On the Added Features tab select Margin Shift.
2 Select Margin Shift/Variable Shift.
3 Select the desired option:
• Side 1
• Side 2
4 Select the desired shift option:
• No Shift
• Auto Center
• Corner Shift
• Press the arrow icon that illust rates the desired location of
the image on the output copy.
• Variable Shift
• Press the left arrow to s hift the image toward the le ft edge.
Press the right arrow to shift the image toward the right
edge.
• Press the up arrow to shift the image t oward the t op edge.
Press the down arrow to s hif t t he i mage towar d t he bott om
edge.
5 Select the icon that most closely resembles the Original
Orientation for the original.
6 Select Start to make copies or Save to select additional features.
1–40
Xerox DocuColor 3535 Printer/Copier
Page 59

Border Erase
The Border Erase feature enables you to eliminate unwanted
marks near the edges of the original from the output copy. The
range for Border Erase is 0 through 50mm (0.0 through 2.0
inches) in 1mm (0.1 inch) increments.
Border Erase options can be used individually or combined
together:
Top & Bottom For Normal the default is 2mm (0.1 inch). For Variable Erase the
default is 5mm (0.2 inch).
Left & Right For Normal the default is 2mm (0.1 inch). For Variable Erase the
default is 5mm (0.2 inch).
Center The default is 0mm (0 inches).
The selected settings are applied to both sides of 2-sided copies.
When the image is reduced or enlarged, the selected percentage
will be applied to the Border Erase.
When making copies the copier adds a margin of 2mm (0.1 inch)
to all sides. This cannot be eliminated.
Xerox DocuColor 3535 Printer/Copier
1–41
Page 60

1 On the Added Features tab select Border Erase.
2 Select Variable Erase.
3 Press the up or down arrows to increase or decrease the Border
Erase amount(s) for Top & Bottom, Left & Right, and Center.
4 Select the icon that most closely resembles the Original
Orientation for the loaded document(s).
5 Select Start to make copies or Save to select additional features.
1–42
Xerox DocuColor 3535 Printer/Copier
Page 61

Image Quality Tab
Below is a brief description of each fe ature availa ble on the Image
Quality tab. Each feature is explained in detail on the following
pages.
Original Type Enables you to select the type of original document you wish to
copy to ensure optimum copy quality.
Auto Exposure Prevents the backgroun d color of an ori ginal from appearing on
the output copies.
Lighter/Darker/Contrast Allows you to adjust the lightness, darkness and contrast of the
output copy.
Sharpness/Color
Saturation
Allows you to adjust the amount of edge definition and the overall
richness of the color of the output copy.
Color Shift Allows you to shift all of the copy colors toward the adjacent hue.
Color Balance Enables you to set the balance of Yellow, Magenta, Cyan and
Black by varying degrees of density for each color.
Image Quality Presets Automatically adjust s the image quality settings to produce output
with various predetermined eff ects.
Xerox DocuColor 3535 Printer/Copier
1–43
Page 62

Original Type
The Original T ype feature enables you to define the kind of or iginal
document you wish to copy. The copier automatically makes
adjustments to optimize the copy based on the or iginal type.
The following types are available:
Text & Photo Use for original documents that contain pictures and printed text,
as you often see in magazines or professional journals.
NOTE:This is the default setting. Originals do not have to contain
photographs and text. Simply use this setting to apply the best
sharpness and density levels automatically for optimum color
quality on all your color copies.
Tex t Use for text documents composed of fine line characters or other
high contrast documents with bright, dense colors. Selecting this
option suppresses background color.
Photo Use for photographs or lithographs.
Other Color Originals Use for original documents containing colored background such
as maps, originals marked by highlighte r pens, and documents
printed on inkjet printers.
1–44
Xerox DocuColor 3535 Printer/Copier
Page 63

1 On the Image Quality tab select Original Type.
2 Select the type of Original:
• Text & Photo
Select the Photo Type that best describes the photo in the
original document
• Halftone: Use this option when copying from newspapers
or magazines
• Photograph: Use this option when copying photos
• Color Copies: Use this option when copying Xerographic
reproductions
• Text
• Photo
Select the Photo Type that best describes the photo in the
original document
• Halftone: Use this option when copying from newspapers
or magazines
• Photograph: Use this option when copying photos
• Color Copies: Use this option when copying Xerographic
reproductions
• Other Color Originals
Select the option that best describes the original document
• Map: Use this option when copying from originals with
colored backgrounds such as maps
• Highlighted Originals: Use this option when copying from
originals marked with highlighter pen
• Inkjet Originals: Use this option when copying from
originals made on Inkjet printers
3 Select Start to make copies or Save to select additional features.
Xerox DocuColor 3535 Printer/Copier
1–45
Page 64

Auto Exposure
This feature prevents the background color of an original from
appearing on the output copy. A newspaper or colored paper are
examples of this type of original.
1 On the Image Quality tab select Auto Exposure.
2 Select On.
3 Select Start to make copies or Save to select additional features.
1–46
Xerox DocuColor 3535 Printer/Copier
Page 65

Lighter/Darker/Contrast
The Lighter/Darker feature enables you to adjust the overall
lightness or darkness of the output copy. Contrast allows you to
adjust the clearness of the image. If you increase the Contrast,
the copy appears sharp & vivid and is composed of mainly high
and low density elements. If you decrease the Contrast, the copy
is softer and renders more uniformly using mid-tones.
There are seven levels of adjustment for Lighter/ Darker and five
levels of adjustment for Contrast.
1 On the Image Quality tab select Lighter/Darker/Contrast.
2 Press the up and down arrows to Lighten or Darken the original.
3 Press the up and down arrows to adjust the Contrast the original.
4 Select Start to make copies or Save to select additional features.
Xerox DocuColor 3535 Printer/Copier
1–47
Page 66

Sharpness/Saturation
The Sharpness feature allows you to adjust the amount of edge
definition on the copies. The Color Saturation feature allows you
to adjust the overall richness of col or on the copy. There are five
levels of adjustment for each feature.
1 On the Image Quality tab select Sharpness/Saturation.
2 Press the up and down arrows to increase or decrease the
Sharpness of the original.
3 Press the up and down arrows to adjust the Color Saturation of
the original.
4 Select Start to make copies or Save to select additional features.
NOTE:Color Saturation cannot be adjusted when the Black is
selected for Output Color.
1–48
Xerox DocuColor 3535 Printer/Copier
Page 67

Color Shift
The Color Shift feature allows you to shift all of the copy colors
toward the adjacent hue.
If you select one of the Warm buttons, the red colors shift toward
the yellow hue, the green color s shift toward the cyan hue, and the
blue colors shift toward the magent a hue. All colors between these
original colors also shift in the same direction.
If you select one of the Cool buttons, the red colors shift toward
the magenta hue, the blue colors shift toward the cyan hue, and
the green colors shift toward the yel low hue. Again, all colors
between these original colors also shift in the same direction.
1 On the Image Quality tab select Color Shift.
2 Press the button for the desired Color Shift ranging from Coolest
to Warmest.
3 Select Start to make copies or Save to select additional features.
NOTE:Color Shift cannot be adjusted when Black is selected for
Output Color.
Xerox DocuColor 3535 Printer/Copier
1–49
Page 68

Color Balance
The Color Balance feature allows you to adjust the balance
between colors and the overall amount of color on the outpu t
copies. You can adjust the levels of all four process colors
(Yellow, Magenta, Cyan, and Black) for their low, medium and high
density ranges.
1 On the Image Quality tab select Color Balance.
2 Select the button for the color you want to adjust.
3 Select the desired density (Low, Medium, High) and perform one
of the following:
• Press the up arrow to increase the amount of color to be
added.
• Press the down arrow to decrease the amount of color to be
added.
4 Select Start to make copies or Save to select additional features.
1–50
Xerox DocuColor 3535 Printer/Copier
Page 69

Image Quality Presets
The Image Quality Presets feature automatically changes Image
Quality settings to produce various predetermi ned effects.
The following options are available:
Normal Makes no changes to the image quality and produces copies with
the same quality and density of the original. This is the default
setting.
Lively Uses the highest color saturation to produce rich, vivid output
colors.
Bright Produces a sharp, clear image on the copy.
Warm Produces a soft image on the copy by transforming low density
colors into light and reddish colors . Use this setting to apply a light
pink tone to skin colors and to give a soft tone to dark, warm
colors.
Cool Produces a strong, clear blue tone on the copy. This setting can
be used to make the blue color of water stronger and to make
dark, cold colors clearer.
Background Suppression Prevents undesired marks or images that ar e printed on the back
of an original from appearing on the output copies.
Auto Contrast Adjusts brightness and satu ration to produce clearer looking
images.
1 On the Image Quality tab select Image Quality Presets.
2 Press the button for the desired option.
3 Select Start to make copies or Save to select additional features.
Xerox DocuColor 3535 Printer/Copier
1–51
Page 70

Output Format Tab
Below is a brief description of each feature availabl e on the Output
Format tab. Each feature is explained in detail on the following
pages.
Multiple Up Allows you to copy 2 or 4 images from multiple originals onto a
single page.
Transparency Separators Allows you to insert blank paper separators between
transparencies. Also copy sets can be made in conjunction with
the transparencies.
Covers Allows you to add covers to your copied sets using paper drawn
from a different tray than your copies.
Repeat Image Allows you to copy a single image multiple times onto one page.
Poster Allows you to create a poster size reproduction of the original
Mirror Image/Negative
Image
document by creating multiple images that can be trimmed and
joined together after.
Enables you to create negative, mirror or negati ve mirr or images
on your output copy.
1–52
Xerox DocuColor 3535 Printer/Copier
Page 71

Multiple Up
The Multiple Up feature enables you to copy 2 or 4 images from
multiple originals onto a single page.
NOTE:When using this feature place the originals in the DADF.
NOTE:Depending on the size of the original, some image loss
might occur along the edge of the image.
The following options are available:
1 Up Copies one image on each output copy.
2 Up Copies two images on each output copy.
4 Up Copies four images on each output copy.
Xerox DocuColor 3535 Printer/Copier
1–53
Page 72

1 On the Output Format tab select Multiple Up.
2 Select the desired option:
• 1 Up
• 2 Up
Select the desired Image Order:
• Left to Right
• Right to Left
• Top to Bottom
1–54
Xerox DocuColor 3535 Printer/Copier
Page 73

•4 Up
Select the desired Image Order:
• Horizontally from the upper left corner
• Horizontally from the upper right corner
• Vertically from the upper left corner
• Vertically from the upper right corner
3 Select the icon that most closely resembles the Original
Orientation for the loaded documents.
4 Select Start to make copies or Save to select additional features.
NOTE:Multiple Up cannot be used with the following features:
Auto Paper Tray Selection, Bound Originals, Book Duplex, Poster,
Repeat Image, Booklet Creation, and Mixed Size Originals.
NOTE:When Border Erase or Margin Shift is used with Multiple
Up, the erase or shift amount is reflected on each original
document.
Xerox DocuColor 3535 Printer/Copier
1–55
Page 74

Transparency Separators
When the Transparency Separators feature is used, the copier
automatically inserts a blank sheet of paper between the
transparency copies. In additi on to the transp are ncy set, you may
also select copy sets.
The following options are available:
Off Copies are made without transparency sepa rat ors.
Blank Separators A blank sheet of paper is inserted between every transparency.
Only one set can be made.
Separators + N Sets A blank sheet of paper is i nserted between every t ranspar ency. In
addition the quantity selected determines how many copy sets (N
sets) will also be made as part of the job.
No Separators + N Sets A transp arency set is made without blank separators . In addition
the quantity selected determines how many copy set s (N set s) will
also be made as part of the job.
NOTE:When using this feature, load transparencies into a Paper
Tray. Make sure that there is paper of the same size and
orientation in another tray for the separators and/or copy sets.
NOTE:Separators are blank sheets of paper and are not added to
the Meter count.
1–56
Xerox DocuColor 3535 Printer/Copier
Page 75

Selecting Blank Separators
1 On the Output Format tab select Transparency Separators.
2 Select Blank Separators.
3 Select Paper Tray Settings.
4 Select the size/orientati on of the transparencies loaded in the
5 Select the paper tray to use for the Blank Separators.
6 Select Start to make copies or Save to select additional features.
Xerox DocuColor 3535 Printer/Copier
Paper Tray.
1–57
Page 76

Selecting Separators + N Sets
1 On the Output Format tab select Transparency Separators.
2 Select Separators + N Sets.
3 Select Paper Tray Settings.
4 Select the size/orientati on of the transparencies loaded in the
Paper Tray.
5 Select the paper tray to use for the Separators and N sets.
6 Select Save.
7 Select Start to make copies or Save to select additional features.
NOTE:Transparency Separators cannot be used with the following
features: Uncollated, Reduce/Enlarge, Covers, Booklet Creation,
Book Duplex, and 2-Sided output.
1–58
Xerox DocuColor 3535 Printer/Copier
Page 77

Covers
This feature allows you to add covers to your copied sets, using
paper drawn from a dif ferent tray than your copies. You can have
blank or printed covers.
The following options are available:
No Covers No Covers are added to the copy set. This is the default setting.
Front Covers A Front Cover is added to the copy set with or without an image.
Front & Back Covers A Front & Back Cover is added to the copy set with or without an
image.
To copy an image on only one side of the cover when making 2-
Sided copies, insert a blank sheet in the ori ginal set of documents
in the appropriate position before making copies.
Xerox DocuColor 3535 Printer/Copier
1–59
Page 78

1 On the Output Format tab select Covers.
2 Select the desired option:
• No Covers
• Front Covers
• Front & Back Covers
3 If you selected Front Covers or Front & Back Covers, select the
desired Printed Covers option.
4 Select Paper Tray Settings.
5 Select the correct paper tray for the Body Pages and Covers .
6 Select Save.
7 Select Start to make copies or Save to select additional features.
NOTE:Covers cannot be used with the following features:
Uncollated, Repeat Image, Poster, Transparency Separators,
Booklet Creation, and Auto Paper selection.
1–60
Xerox DocuColor 3535 Printer/Copier
Page 79

Repeat Image
The Repeat Image feature enables you to copy a single image
multiple times onto one page.
The following options are available:
Off This is the default setting, which produces only one image per
output page.
Auto Repeat This option enables the copier to automatically determine the
number of output images that will fit on a single page.
Variable Repeat With this option you can specify the number of images that will
print on a single sheet by selecting the number of rows and
columns.
Xerox DocuColor 3535 Printer/Copier
1–61
Page 80

1 On the Output Format tab select Repeat Image.
2 Select the desired option:
• Off
• Auto Repeat
• Variable Repeat
• Press the up arrow to increase the number of images to
print in a column, or press the do wn arr ow to decrease t he
number. The range is from 1 through 33.
• Press the up arrow to increase the number of images to
print in a row, or press the down arrow to decrease the
number. The range is from 1 through 23.
3 For Auto Repeat and V ar iable Repeat select the Image Layout for
the output copy.
• Even: Centers all the images on the output copy.
• Bias: Places the images one after the other on the output
copy.
4 Select Start to make copies or Save to select additional features.
NOTE:Repeat Image cannot be used with the following features:
Auto Paper selection, Multiple Up, Bound Originals, Poster, Book
Duplex, Covers, and Booklet Creation.
1–62
Xerox DocuColor 3535 Printer/Copier
Page 81

Poster
This feature allows you to create a poster size reproduction of t he
original document by creat ing multiple images that can be tri mmed
and joined together after. There will be a 10mm image overlap on
the copies to allow for the trimming and join ing required to
assemble the copies into a poster.
When using this feature place the origi nal on t he Document Gla ss
in the same orientation as the orient ation of the paper loaded in
the selected paper tray. The DADF cannot be used.
The following options are available:
2 x 2 The document is copied and divided onto a total of four sheets,
two in the X direction and two in the Y direction.
3 x 3 The document is copied and divided onto a total of nine sheets,
three in the X direction and three in the Y direction.
4 x 4 The document is copied and divided onto a total of sixteen sheets,
four in the X direction and four in the Y direction.
Xerox DocuColor 3535 Printer/Copier
1–63
Page 82

1 On the Output Format tab select Poster.
2 Select the desired option:
• 2 x 2
•3 x 3
• 4 x 4
3 Select the desired Paper Tray.
4 Select Start to make copies or Save to select additional features.
NOTE:Poster cannot be used with the following features: Tray 5
(Bypass), Auto Paper Tray selection, 1 to 2 Sided, 2 to 2 Sided,
Multiple Up, Collated, Repeat Image, Bound Originals, Covers,
Book Duplex, Transparency Separators, Booklet Creation, and
Build Job.
1–64
Xerox DocuColor 3535 Printer/Copier
Page 83

Mirror Image/ Negative Image
When the Mirror Image feature is selected, the output copy
appears as a mirror image reflection of the original document.
The Negative Image feature reverses the colors of the whole
document image.
NOTE:Negative Image cannot be used with Dual Color.
NOTE:When Negative Image is used with Border Erase, the
Border Erase area becomes white.
1 On the Output Format tab select Mirror Image/ Negative Image.
2 Select the desired options:
• Select On or Off for Mirror Image.
• Select On or Off for Negative Image.
3 Select Start to make copies or Save to select additional features.
Xerox DocuColor 3535 Printer/Copier
1–65
Page 84

Scan Options Tab
Below is a brief description of each feature available on the Scan
Options tab. Each feature is explained in det ail on the following
pages.
Original Size Enables you to specify the size of th e original document to be
copied.
Mixed Size Originals Allows you to place documents of mixed sizes into the DADF for
copying.
Bound Originals Automatically scans two adjoining pages of a bound document
and copies them onto two separate sheets of paper .
Image Rotation Automatically rotates the image to match the copy output paper
when the original orientation and the copy paper are different.
Original Orientation Allows you to indicate the top o f the original so that your out put will
be oriented as desired.
Book Duplex Allows you to make two-sided copies from a bound original.
1–66
Xerox DocuColor 3535 Printer/Copier
Page 85

Original Size
Use the Original Size feature to specify the original document
size.
The following options are available:
Auto Detect The copier automatically recognizes the si ze of standard
documents in the DADF or on the Document Glass. This is the
default setting.
Standard Sizes Select the document size from one of the 11 preset sizes. These
presets can be changed in System Settings mode. You must
place the original on the Document Glass.
Non-standard Sizes Allo ws you to manuall y enter the size of the document placed on
the Document Glass.
Xerox DocuColor 3535 Printer/Copier
1–67
Page 86

1 On the Scan Options tab select Original Size.
2 Perform one of the following:
• Select Auto Size Detect to have the cop ier i dentif y t he size of
the original document.
• Select the appropriate size of the document fr om one of the
preset size buttons.
• Enter the width (X) and length (Y) dimensi ons of the original
document.
• Press the arrow buttons to decrease or increase the X and
Y dimensions. X dimensions range from 15 to 43 2mm (0.6
to 17.0 inches ) in 1 mm (0 . 1 inc h ) in c re ments. Y
dimensions range from 15 to 297mm (0.6 to 1 1.7 i nches) in
1 mm (0.1 inch) increments.
3 Select Start to make copies or Save to select additional features.
1–68
Xerox DocuColor 3535 Printer/Copier
Page 87

Mixed Size Originals
This option allows you to place documents of standard mixed
sizes into the DADF for copying. When the Mixed Size Originals
feature and Auto Paper selection are selected, the copier
automatically identifies each document size and selects the
appropriate paper tray. You can also specify a paper tray so that
all copies are made on the same size paper.
1 On the Scan Options tab select Mixed Size Originals.
2 Select the desired option:
• Off: when documents are all the same size.
• On: when documents are different sizes.
3 Load the mixed size originals with one edge of ev ery sheet aligned
evenly against the top left corner of the DADF to avoid misfeeds.
4 Select the icon that most closely resembles the Original
Orientation for the loaded documents.
5 Select Start to make copies or Save to select additional features.
NOTE:Mixed Size Originals cannot be used with the following
features: Covers, Transparency Separators, Multiple Up, Auto
Repeat Image, and Booklet Creation.
Xerox DocuColor 3535 Printer/Copier
1–69
Page 88

Bound Originals
The Bound Originals feature enables you to copy a bound
document such as books, magazines, notebooks, or st apled sets .
When this feature is selected, each page is copi ed onto a
separate sheet of paper.
You must place your bound document face down in the upper left
corner of the Document Glass. The DADF cannot be used.
The following options are available:
Off This is the default.
Left Page then Right Copies are made starting from the left page of a bound document.
Right Page then Left Copies are made starting from the right page of a bound
document.
Top Page then Bottom Copies are made starting from the top page of a bound document.
When using the Bound Originals feature, the Center Erase option
is available. This option al lows you to r emove the shadow caus ed
by the center binding of bo und documents when they are copied.
1–70
Xerox DocuColor 3535 Printer/Copier
Page 89

1 On the Scan Options tab select Bound Originals.
2 Select the desired format:
• Left Page then Right
• Right Page then Left
• Top Page then Bottom
3 Select which pages are to be copied:
• Both Pages
• Left Page Only
• Right Page Only
4 Press the left and right arr ows to decrease or increase the Center
Erase amount from 0 to 50mm (0.0 to 2.0 inches).
5 Select Start to make copies or Save to select additional features.
NOTE:Bound Originals cannot be used with the following
features: Auto Size Detect for Tray 5, Multiple Up, Repeat Image,
Book Duplex, and Poster.
Xerox DocuColor 3535 Printer/Copier
1–71
Page 90

Image Rotation
This feature allows the machine to automatically rotate the image
so that the orientation of the document matches the output paper.
The following options are available:
Off The copier will not rotate the image even if the orientation differs
from the output paper.
Always On The copier will automatically rotate the image if the orientation
differs from the output paper.
On during Auto The copier will automatically rotate the image if the orientation
differs from the output paper only when Auto Paper selection is
selected, or Auto % is selected in Reduce/Enlarge. If a specific
paper tray is selected wit hout Auto %, image rotation will not
occur.
1 On the Scan Options tab select Image Rotation.
2 Select the desired option:
• Off
• Always On
• On during Auto
3 If using Mixed Size Originals, select Rotation Direction. Select
the desired option:
• Portrait Original - Left Edge
• Portrait Original - Right Edge
1–72
Xerox DocuColor 3535 Printer/Copier
Page 91

4 Select Start to make copies or Save to select additional features.
NOTE:Image Rotation cannot be used with the following features:
Auto Size Detect for Paper Tray 5, Repeat Image and Poster.
NOTE:When Booklet Creation is selected, Image Rotation occurs
automatically regardless of the Image Rotation setting.
Original Orientation
The document orientation must be set to indicate the top of the
original when using the following features: 2-Sided, Margin Shift,
Border Erase, Multiple Up, Repeat Image, Mixed Size Originals,
and Independent X-Y%.
Original Orientation is designed as follows:
Head to Top Select this when placing the top of the document at the top of the
DADF or Document Glass.
Head to Left Select this when placing the top of the document towards the left
of the DADF or Document Glass.
Xerox DocuColor 3535 Printer/Copier
1–73
Page 92

Book Duplex
The Book Duplex feature enables you to make 2 Sided copies of a
bound document such as books, magazines, notebooks, or
stapled sets.
You must place your bound document face down in the upper left
corner of the Document Glass. The DADF cannot be used.
The following options are available:
Left Page then Right Copies are made starting from the left page of a bound document.
Right Page then Left Copies are made starting from the right page of a bound
document.
Top Page then Bottom Copies are made starting from the top page of a bound document.
Along with the Book Duplex feature, Center Erase is of fered . This
option allows you to remove the shadow caused by the center
binding of bound documents when they are copied.
1–74
Xerox DocuColor 3535 Printer/Copier
Page 93

1 On the Scan Options tab select Book Duplex.
2 Select the desired option:
• Left Page then Right
• Right Page then Left
• Top Page then Bottom
3 Select Start Page & End Page and select the desired options.
Press Save to return to the Book Duplex screen.
4 Press the left and right arr ows to decrease or increase the Center
Erase amount from 0 to 50mm (0.0 to 2.0 inches).
5 Select Start to make copies or Save to select additional features.
Xerox DocuColor 3535 Printer/Copier
1–75
Page 94

Job Assembly Tab
Below is a brief description of each feature available on the Job
Assembly tab. Each feature is explained in detail on the following
pages.
Stored Jobs Allows you to program various feature settings in the built-in
copier memory as a single job.
Build Job Allows you to build a job using different settings for each page or
segment of a job.
Booklet Creation Automatically copies your origi nals such that the o utput set can be
folded into a booklet.
1–76
Xerox DocuColor 3535 Printer/Copier
Page 95

Stored Jobs
The Stored Jobs feature allows you to program various feature
settings in the built-in copi er memory as a si ngle j ob. Up to 8 j obs
can be stored and up to 18 ch aracters can be entered fo r each j ob
name. This feature is especially helpful for complex jobs that you
run frequently.
You can retrieve stored jobs and apply their programming featur es
to a new copy job. Deleting stored jobs frees that memory
position for storing different jobs.
Storing a Job
1 Program the features and options you want to save for future use.
2 On the Job Assembly tab select Stored Jobs.
3 Select Store.
4 Select the desired icon to identify the job number.
5 Select Enter/Change Name to name the job.
6 Select the job number.
7 Enter a name up to 18 characters long for the stored job and
select Save.
8 Select Close.
Xerox DocuColor 3535 Printer/Copier
1–77
Page 96

Deleting a Job
1 On the Job Assembly tab select Stored Jobs.
2 Select Delete.
3 Select the job number you want to delete.
4 Select the desired option:
• Yes: to confirm the deletion.
• No: to cancel the deletion.
5 Select Close.
You can now store a new job in place of the job you deleted.
Retrieving a Job
1 On the Job Assembly tab select Stored Jobs.
2 Select the job number you want to retrieve.
3 Select Close.
4 Select Start to make copies.
1–78
Xerox DocuColor 3535 Printer/Copier
Page 97

Build Job
Build Job enables you to program, scan, and store individual job
segments of a large or complex job, and then print a ll the
segments as one complete job.
1 On the Job Assembly tab, select Build Job.
2 Select On.
3 To make a sample set of your originals, select On for Sample Set.
Select Save.
4 Load your originals for the first segment of the job.
5 Set the desired features for the job and press Start.
6 Check that Next Original is selected while the document is being
copied.
Xerox DocuColor 3535 Printer/Copier
1–79
Page 98

7 Load the next segment of the job, and set the desired features.
• Chapter Division - If you select Chapter Division, the next
document will be copied onto Side 1, if 2 Sided is selected.
• Change Settings - Select Change Settings to change job
features for the next segment of the job. When you select
Change Settings, the Basic Copying screen is displayed.
Select the desired features.
8 Select Start. Repeat steps 5 through 7 for each job segment.
9 Select Last Original after the last segment is scanned.
• Sample Set Off - If you select ed Off for Sample Set, the entire
job will be output.
• Sample Set On - If you selected On for Sample Set, one copy
of the job will be output.
• Check the sample set, and select whether or not to output
the remaining number of copies. Select Start.
1–80
Xerox DocuColor 3535 Printer/Copier
Page 99

Booklet Creation
This feature copies your originals to make a booklet. The
maximum number of originals that can be used is 100.
If the number of originals is not a multiple of four, blank pages will
be automatically added.
The following options are available to indicate binding location:
Left Bind / Top Bind Use this for a booklet that will be bound in a le ft to right format or
top to bottom format, such as a calendar.
Right Bind Use this for output that will be bound in a right to left format.
1 On the Job Assembly tab select Booklet Creation.
2 Select the required binding location.
• Left Bind/Top Bind
• Right Bind
3 Select Gutter if you want to add sp ace in t he center of y our output
for a gutter ranging from 0 to 50mm (0.0 to 2.0 inches).
4 Select Covers if you want to add a cover to the job.
5 Select Originals to specify 1 or 2 Sided originals and their
orientation.
6 Select Start to make copies or Save to select additional features.
NOTE:Booklet Creation cannot be used with Auto Paper
selection, Mixed Size Originals, 2 Sided, Uncollated, Multiple Up,
Repeat Image, Poster, Covers, and Transparency Separators.
Xerox DocuColor 3535 Printer/Copier
1–81
Page 100

Duplex Automatic Document Feeder (DADF)
This section describes the Duplex Automatic Document Feeder
(DADF) for the DocuColor Series printer/copier.
The DADF automatically feeds up to 50 sheets of the same size
documents or mixed size documents, one at a time, onto the
Document Glass, feeding the top sheet first. Documents are
delivered to the Original Catch Tray after they have been copied.
NOTE: If the DADF belt is dirty and the original is a thin or
transparent document, background may appear on the output.
This may also occur when copies are made using the Document
Glass. Place a white sheet of paper of the same size on top of the
document being copied to eliminate background until the belt is
cleaned.
Component Names and Functions
The following items are the principal components of the Duplex
Automatic Document Feeder.
Document Feed Lamp This lamp displays a green arrow when a document is inserted
correctly into the feeder. This light can also indicate a document
jam.
Original Catch Tray Documents are delivered to thi s tray.
Original Input Area Place documents here to start copying.
1–82
Xerox DocuColor 3535 Printer/Copier
 Loading...