

Page 1

User's Guide
HP OfficeJet
Model 330 and Model 350
Page 2

.
Copyright HewlettPackard Company 1995,
1996
All rights are reserved.
No part of the document
may be photocopied,
reproduced, or translated
to another language
without the prior written
consent of
Hewlett-Packard
Company.
Eclipse FAX9is a US.
registered trademark of
Pheonix Technologies,
Ltd. Microsoft9is a U.S.
registered trademark of
Microsoft Corporation.
Windows is a U.S.
trademark of Microsoft
Corp.
Publication number:
C4661-90001
First Edition,
December 1995
Second Edition
May 1996
Printed in USA.
This product
approved for use in the
United States
Canada Only. Local
country laws may
prohibit the use of this
product outside of United
States and Canada. It is
strictly forbidden by law
in virtually every country
to connect nonapproved
telecommunications
equipment (fax
machines) to public
telephone networks.
is
and
Hewlett-Packard will not
honor the warranty or
provide service and
support of this product if
used outside of United
States and Canada.
!
Safety Information
Always follow basic
safety precautions when
using this product to
reduce risk of injury from
fire or electric shock.
1. Read and understand
all instructions in the
user's guide.
WARNING:
Potential Shock Hazard
2. Use only a grounded
electrical outlet when
connecting the HP
OfficeJet to a power
source. If you don't
know whether the
outlet is grounded,
check with a qualified
electrician.
3. Telephone lines can
develop hazardous
voltages. To avoid
electric shock, do not
touch the contacts on
the end of the cord, or
the TEL and LINE
sockets on the back of
the HP OfficeJet.
Replace damaged
cords immediately.
4. Never install
telephone wiring
during a lightning
storm.
5. Observe all warnings
and instructions
marked on the
product.
6. Unplug this product
from wall outlets and
telephone jacks before
cleaning.
7. Do not install or use
this product near
water, or when you
are wet.
8. Install the product
securely on a stable
surface.
9. Install the product in a
protected location
where no one can step
on or trip over line
cord, and the line cord
will not be damaged.
10.If the product does not
operate normally, see
Troubleshooting.
11.No operatorserviceable parts
inside. Refer servicing
to qualified service
personnel.
CAUTION:
This heading is followed
by information that alerts
you to potential damage
to equipment or loss of
data.
WARNING:
This heading is followed
by information that alerts
you to a potential safety
hazard.
Notice:
The information
contained in this
document is subject to
change without notice.
Hewlett-Packard shall not
be liable for errors
contained herein or for
consequential damages in
connection with the
furnishing, performance,
or use of this material.
Information regarding
FCC Class B, Parts 15
and 68 requirements can
be found in the back of
the
User's Guide
This product may
contain remanufactured parts that have
been fully tested to
meet 100% of
original performance
specifications.
.
Complete the following information. You'll need it if you contact your dealer or
Hewlett-Packard Co.:
DATE OF PURCHASE
--
MO. DAY
SERIAL NUMBER
YEAR
(Located on the back of the machine.)
Page 3

Contents
1. Using theHP OfficeJet Manager 1-1..............
Introducing the HP OfficeJet Manager 1-2..................
Running the HP OfficeJet Manager 1-3.....................
Using the HP OfficeJet Manager Help System 1-4.........
Using the File Menu 1-5.................................
Running Eclipse FAX SE from the
HP OfficeJet Manager 1-5............................
Cleaning the Print Cartridge 1-5.......................
Using the OfficeJet Setup Menu 1-6.......................
Modifying Device Settings 1-6........................
UsingSendFaxSetup 1-8............................
Changing the Header for Your Outgoing Faxes 1-8......
Selecting Dialing Mode 1-9........................
Setting Automatic Redial Option 1-9.................
Setting up Speed Dialing (for Paper Faxes Only) 1-10.....
Storing Speed Dial Codes for Individuals 1-11..........
Storing Speed Dial Codes for Groups 1-12.............
Changing Send Fax Quality 1-13.......................
Changing the contrast 1-13..........................
Changing the resolution 1-13........................
Using Receive Fax Setup 1-14.........................
Selecting Auto or Manual
Receive Mode for incoming faxes 1-15................
Changing the number of rings to answer 1-15...........
Setting Automatic Reduction 1-16....................
Setting Backup Reception 1-16......................
Distinctive Ring 1-17..............................
Silent Detect 1-17.................................
Remote Service 1-18...............................
Changing the Loaded Paper Size 1-18...................
Reducing Copies of Originals 1-19......................
Setting DOS Printing Options 1-19......................
Controlling Sound Settings 1-21........................
Using the Options Menu 1-22.............................
Being notified of errors or warnings 1-22.................
Using the AutoPrompt 1-23...........................
Setting PC Faxing options 1-24........................
Enabling or disabling PC Faxing 1-24.................
Including a PC-fax header 1-24......................
Routing Received Faxes 1-25........................
L
Page 4

Printing Logs and Reports 1-26............................
Printing a Fax Log Report Automatically 1-26.............
Printing Fax Logs 1-26...............................
Printing HP OfficeJet Reports 1-29.....................
The Speed Dial Report 1-29.........................
The Menu Settings Report 1-31......................
The Self Test Report 1-35...........................
The Power Fail Report 1-37.........................
2. Sending Paper Faxes 2-1.........................
What You Need to Know... 2-2...........................
Dialing from the front panel 2-2.......................
Sending a Paper Fax Using the AutoPrompt 2-4..............
Sending a Paper Fax Using the Front Panel 2-5...............
Sending Paper Faxes to Multiple Fax Numbers 2-7............
Sending a Paper Fax at a Future Time 2-8...................
Sending a Fax to Another
`Fax Machine Upon Request (Being Polled) 2-10.............
Asking to Receive a Fax from Another Fax Machine (Polling) 2-11
Adjusting the Resolution 2-12.............................
Adjusting the Contrast 2-13...............................
3. Faxing and Scanning:
Sending from and Receiving to Your PC 3-1........
Introducing Eclipse FAX SE 3-3..........................
Using Eclipse FAX SE 3-4...............................
Using the Help System 3-5...........................
Sending PC Faxes 3-6..................................
Preparingtosendafax(SendSetup) 3-6................
Viewing the Eclipse FAX SE Cover Pages 3-8.........
Sending a fax from a Windows application 3-10...........
Modifying the selected phonebook 3-12................
Using the Special Options 3-14......................
Sending a Quick Note from Eclipse FAX SE 3-16..........
Using the Send Log to view,
-print, resend, delete, or reschedule faxes 3-18.............
Changing the display 3-18..........................
Viewing Faxes 3-19...............................
Rescheduling a fax 3-20............................
Resending a fax from the Send Log 3-21...............
Printing the Send Log 3-22..........................
Printing a fax 3-22................................
Deleting faxes 3-22................................
Sending a fax to more than one recipient 3-23.............
LL
Page 5

Adding a New Phonebook 3-26............................
Using Speed Dial for paper faxes 3-26.................
Adding entries from other applications 3-26............
Using Eclipse FAX SE to add a new Phonebook 3-27.....
Adding names to a Phonebook 3-28.....................
Modifying a Phonebook 3-29..........................
Deleting a Phonebook 3-30............................
Creating a group of names from
one or more Phonebooks 3-30..........................
Modifying a Phonebook from
the Send Fax Dialog Box 3-32.........................
Importing names and fax numbers
from other applications 3-33...........................
Importing a file of existing entries 3-33................
Receiving Faxes to Your PC 3-35..........................
Receiving a fax to your PC (Receive Setup) 3-35..........
Using the Receive Log to view, print, or delete faxes 3-36...
Changing the Display 3-36..........................
Deleting Faxes 3-37...............................
Forwarding a Fax 3-38...............................
Printing Faxes and Files 3-39..............................
Printing an entire fax from the Send o r Receive Log 3-39....
Printing selected pages
of a fax from the Send or Receive Log 3-39..............
Printing a file from Eclipse FAX SE 3-40................
Using Menus and Toolbars to View Faxes 3-41...............
Viewing a fax 3-41..................................
The View menu 3-42..............................
Zooming in on a page 3-43..........................
ThePagemenu 3-43...............................
The Tools menu 3-44..............................
The View toolbar 3-44.............................
The Thumbnail toolbar 3-46.........................
Scanning 3-47..........................................
Scanning using the AutoPrompt 3-47....................
Scanning using Eclipse Fax SE 3-49....................
Scanning and faxing 3-49...........................
Using Eclipse Fax SE to scan and view, or print 3-51.....
Using Advanced Eclipse FAX SE Features 3-53...............
Faxing a document to a file 3-53........................
Faxing a saved file from Eclipse FAX SE 3 -55............
Adding text to a fax 3-56..............................
Preparing the document 3-57........................
Adding text with the Edit toolbar 3-59.................
LLL
Page 6

Adding an image to a PC fax 3-61......................
Method 1: Adding an image
to a fax sent from a Windows application 3-62..........
Method 2: Adding an image
to a document saved as a file in Eclipse FAX SE 3-62....
Method 3: adding an image
to a fax selected from the Send or Receive Log 3-62......
Using the Place Image Window to Add an Image 3-63....
Sending Multiple Documents as a Fax 3-65...............
Collecting Documents 3-65.........................
Method 1: Adding documents
to a fax sent from a Windows application 3-66..........
Method 2: Adding documents
to a fax saved as a file in Eclipse FAX SE 3-67.........
Method 3: Adding Documents
to a Fax Selected from the
Send Log or Receive Log 3-67.......................
Using the Collect dialog box 3-67.......................
Adding an Image to Cover Pages 3-70...................
Using Letterhead and Second Sheets in faxes 3-73.........
Creating Letterhead and Second Sheets 3-74............
Method 1: Faxing Your
Existing Letterhead to a File 3-74....................
Method 2: Scanning Your Existing Letterhead 3-74......
Method 3: Creating Letterhead in Eclipse FAX SE 3-75...
Saving Letterhead and
Second Sheets Files in Eclipse FAX SE 3-76............
Sending faxes with Letterhead and Second Sheets 3-78...
Using the Fax Preview Feature 3-79.....................
Setting the New Page Paper Size 3-80...................
4. Making Copies and Printing 4-1..................
What You Need to Know 4-2.............................
Choosing media 4-2................................
Tips for Loading Paper and Other Media 4-3.............
Using the AutoPrompt to Make Copies 4-4..................
Using the Front Panel to Make Copies 4-5..................
Adjusting the Contrast 4-7...............................
Using the HP OfficeJet 4-8...............................
Printer Options 4-8.....................................
Opening the HP OfficeJet Printer Options 4-9................
Reviewing the Printer Settings 4-10.....................
Choosing the Grayscale Options 4-12....................
Reviewing the Grayscale Options 4-12................
Printing Envelopes With Windows Applications 4-13..........
Loading Envelopes 4-14..................................
L
Y
Page 7

5. Using the Front Panel 5-1........................
When and How to Use the Front Panel 5-2..................
Using the Menu Buttons 5-3..............................
Tutorial: Moving in the Menu System
and Entering Words and Symbols 5-4..................
Using Send Fax Setup 5-7...............................
Changing the Header for Your Outgoing Faxes 5-7........
Printing Logs and Reports 5-7............................
Changing the Send Fax Quality 5-8........................
Adjusting the Contrast 5-8...........................
Adjusting the Resolution 5-8..........................
Changing the Loaded Paper Size 5-9.......................
Using Speed Dial Setup 5-10..............................
Inserting a Pause in a Speed Dial Number 5-10............
Setting Up a Speed Dial Group 5-10.....................
Controlling Sounds 5-11.................................
Selecting Tone or Pulse Dialing Mode
and Setting Automatic Redial 5-11......................
Using Receive Fax Setup 5-12.............................
Changing the Receive Mode 5-12.......................
Setting the Number of Rings to Answer, Setting Automatic
Reduction, Setting Backup Reception, Enabling Silent
Detect, Enabling Remote Service,
Enabling Distinctive Ring 5-12........................
Scheduling a Fax 5-13...................................
Controlling the Appearance of Your Printed Documents 5-13....
Changing Copy Reduction 5-14............................
Clean the Print Cartridge 5-14.............................
6. Troubleshooting & Maintenance 6-1...............
Troubleshooting 6-2....................................
When you need help 6-2.............................
Error Notification: Beeps, Blinking Light, Messages 6-8....
Understanding the Displayed Messages 6-9..............
Solving Problems While Printing, Faxing, or Copying 6-21..
Maintaining Your HP OfficeJet 6-28........................
Changing the Print Cartridge 6-29......................
Y
Page 8

7. Reference 7-1..................................
Product Specifications 7-2...............................
Ordering Information 7-6................................
Obtaining a Material Safety Data Sheet (MSDS) 7-7..........
Warranty Information 7-7...............................
One-Year Limited Warranty 7-7.......................
Exclusions 7-7.....................................
Warranty Limitations 7-8............................
Regulatory Information 7-8..............................
Notice to Users of the U. S. Telephone
`Network: FCC Requirements 7-8.....................
Electromagnetic or Radio Frequency
`Interference: FCC Requirements 7-10..................
Notice to Users of the Canadian Telephone
Network: DOC Requirements 7-11.....................
Y
L
Page 9
If You Don't Read
Anything Else...
We know you'll want to get started using your HP OfficeJet as
quickly as possible, and this short section shows you how, with a
summary of the basic information and procedures. If you have
questions about any of this information, consult the online help or the
appropriate chapter in this manual. Later, you may find this section
useful when you need a quick reminder of a procedure.
The table below summarizes the HP OfficeJet's capabilities.
HP OfficeJet
Printer/Fax/Copier/Scann
er
AutoPrompt
HP OfficeJet Series 300
Manager
(Windows software)
Eclipse FAX SE
(Windows software)
HP OfficeJet DOS printer
drivers
* For convenience and readability in this manual, the name "HP OfficeJet Series
The HP OfficeJet Model 350 Printer/Fax/Copier/Scanner also comes
with OmniPage Limited Edition, a lite OCR (optical character
recognition) software application, from Caereú.
*
300 Manager" has been shortened to "HP OfficeJet Manager."
N
prints (as an HP DeskJet).
N
sends and receive paper faxes.
N
makes convenience copies.
N
scans documents to your PC.
N
sends paper faxes (documents loaded in
the loading tray).
N
makes convenience copies.
N
scans documents to your PC.
N
sets up the HP OfficeJet from your PC.
N
shows the current status of the
HP OfficeJet.
N
prints reports.
N
sets up PC fax options.
N
sends and receive PC faxes.
N
scans documents into PC files.
N
print from DOS applications.
)RUHZRUGL
Page 10

Key Things to Remember about Faxing
In General
N
Some of the settings that you can make with the HP OfficeJet
Manager apply to both PC and paper faxes; others apply only to
paper faxes. For details, see "Modifying Device Settings" in chapter
1.
N
Use Eclipse FAX SE to set up phonebook entries. Phonebook entries
are used for PC faxes only.
N
Use the HP OfficeJet Manager to set up speed dial entries. Speed dial
entries are used only for sending paper faxes from the HP OfficeJet
front panel.
Sending Faxes
N
You can load your paper document in the loading tray, then return to
your PC to send it using the AutoPrompt. You can even use the
AutoPrompt to include a PC cover page with your paper fax.
N
You can also send paper faxes using the front panel buttons.
N
You can send PC faxes from any Windows application by selecting
E-FAX on OfficeJet as your printer.
N
You can also use Eclipse FAX SE to fax quick notes and scan
documents to your PC. (The AutoPrompt is a quick and easy way to
scan documents to your PC.)
N
To set the resolution for PC faxes, use Send Setup in Eclipse FAX
SE, not the Resolution button on the device.
Receiving Faxes
N
Use the HP OfficeJet Manager to specify whether received faxes
should be printed or sent to the PC.
N
Use Eclipse FAX SE to view and print faxes received to your PC.
)RUHZRUGLL
Page 11
Send paper faxes, scan documents, and
make copies by loading your document
in the
fax/copy loading tray
.
Flip this
legal extension
legal-size documents.
backward to support
Lift the
top cover
to
change the print car`
tridge.
Remove received faxes, print
jobs, reports, and copies from
the
output tray
.
Load paper in the
paper tray
for received
faxes, print jobs, reports, and copies.
sl-1a
)RUHZRUGLLL
Page 12
Using the AutoPrompt
Whenever you load a paper document into the loading tray of your
HP OfficeJet, the AutoPrompt immediately displays on your PC
screen.
The AutoPrompt lets you return to your PC so you can quickly send
your fax, make your copy, or scan your document and continue your
work. Because of its immediate availability, the AutoPrompt is the
recommended method for all of your faxing, copying, and scanning.
The next few pages describe the basics of using the AutoPrompt.
)RUHZRUGLY
Page 13
Sending a paper fax
using the AutoPrompt
1.
When you click the AutoPrompt
displays.
Enter the name and fax number of the recipient and the total number
of pages the person will receive.
Fax
button, the Send Fax dialog box
Optionally, you can also choose to send a PC fax cover sheet with this
paper fax by clicking the Send Cover checkbox and selecting a cover
sheet.
2.
Click the
For more information, refer to the online help o r chapter 2 of this
manual. (Chapter 3 shows each of the cover sheets available.)
Send Fax
button.
)RUHZRUGY
Page 14
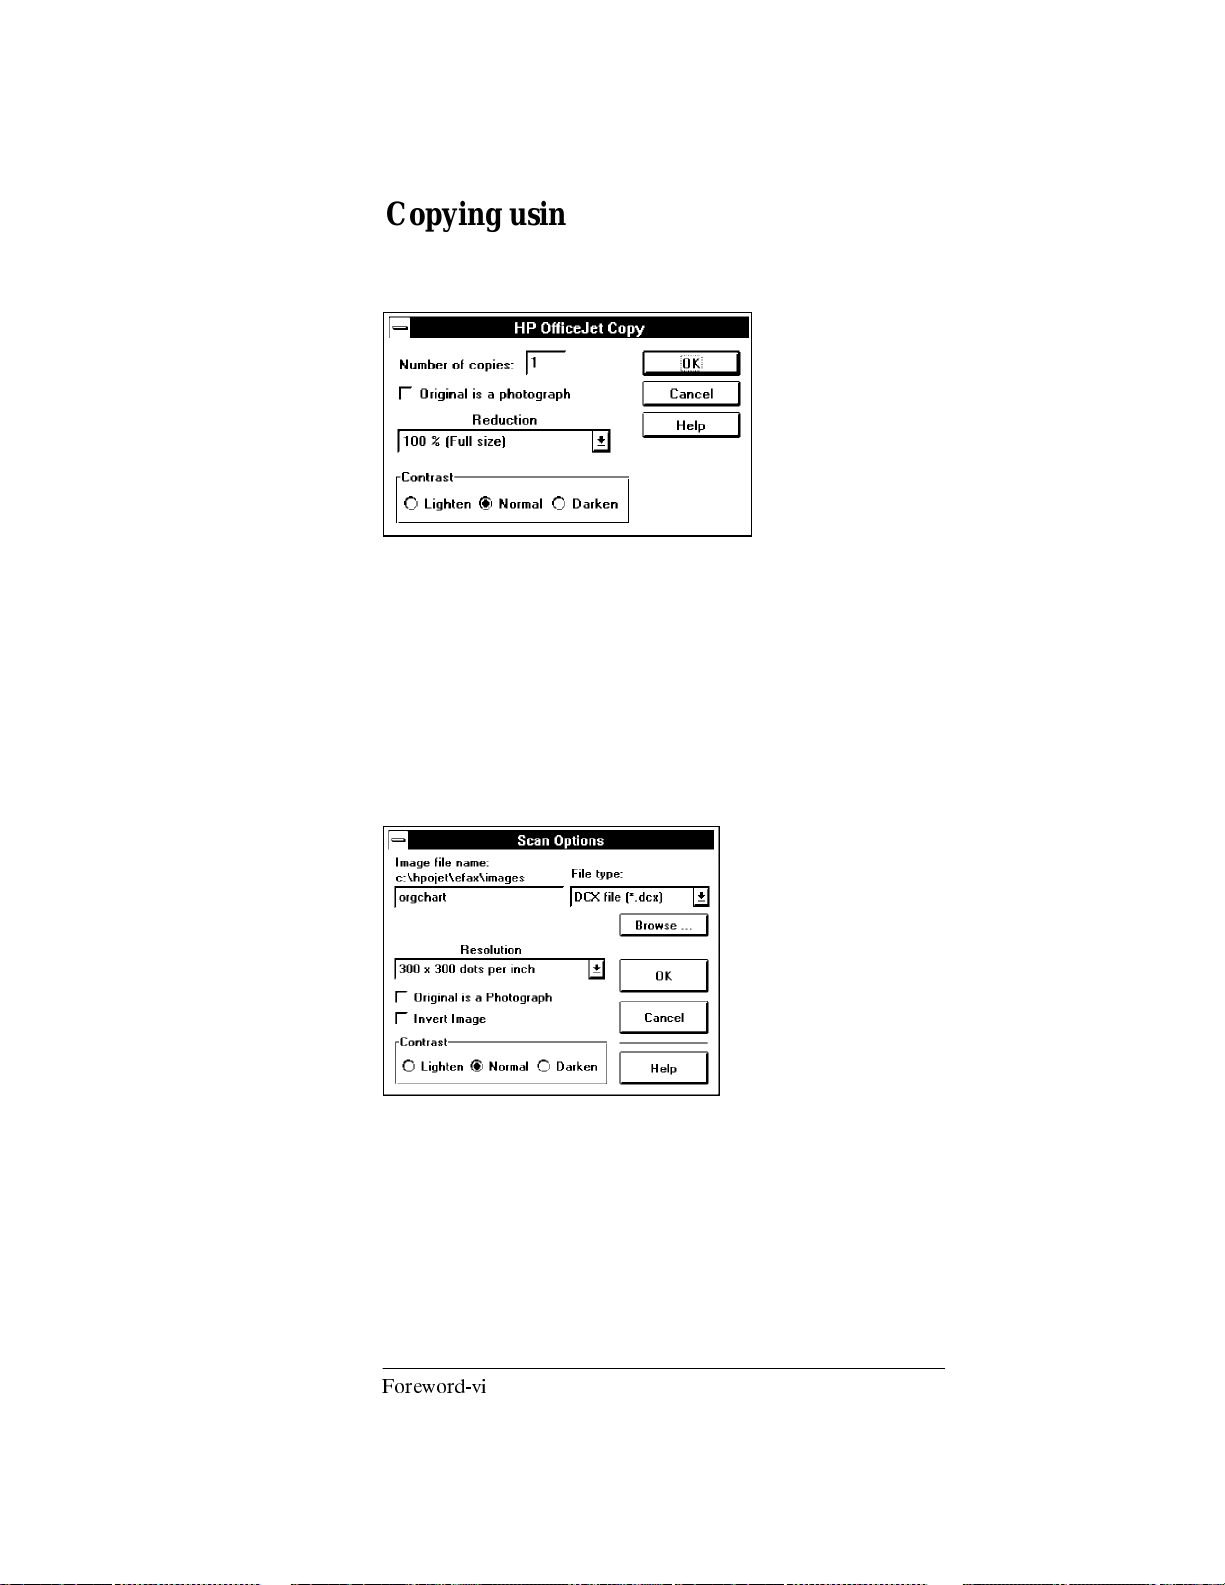
Copying using the AutoPrompt
When you press the
This allows you to set the number of copies and any reduction or
contrast setting you might want. For more information, refer to the
online help or chapter 4 of this manual.
Copy
button, a Copy dialog box displays.
Scanning using the AutoPrompt
When you press the
displays.
Scan
button, the Scan Options dialog box
You must specify a PC filename for your scanned document.
Additionally, you can select the resolution, adjust the contrast, or
invert the image. For more information, refer to the online help or
chapter 3 of this manual.
)RUHZRUGYL
Page 15
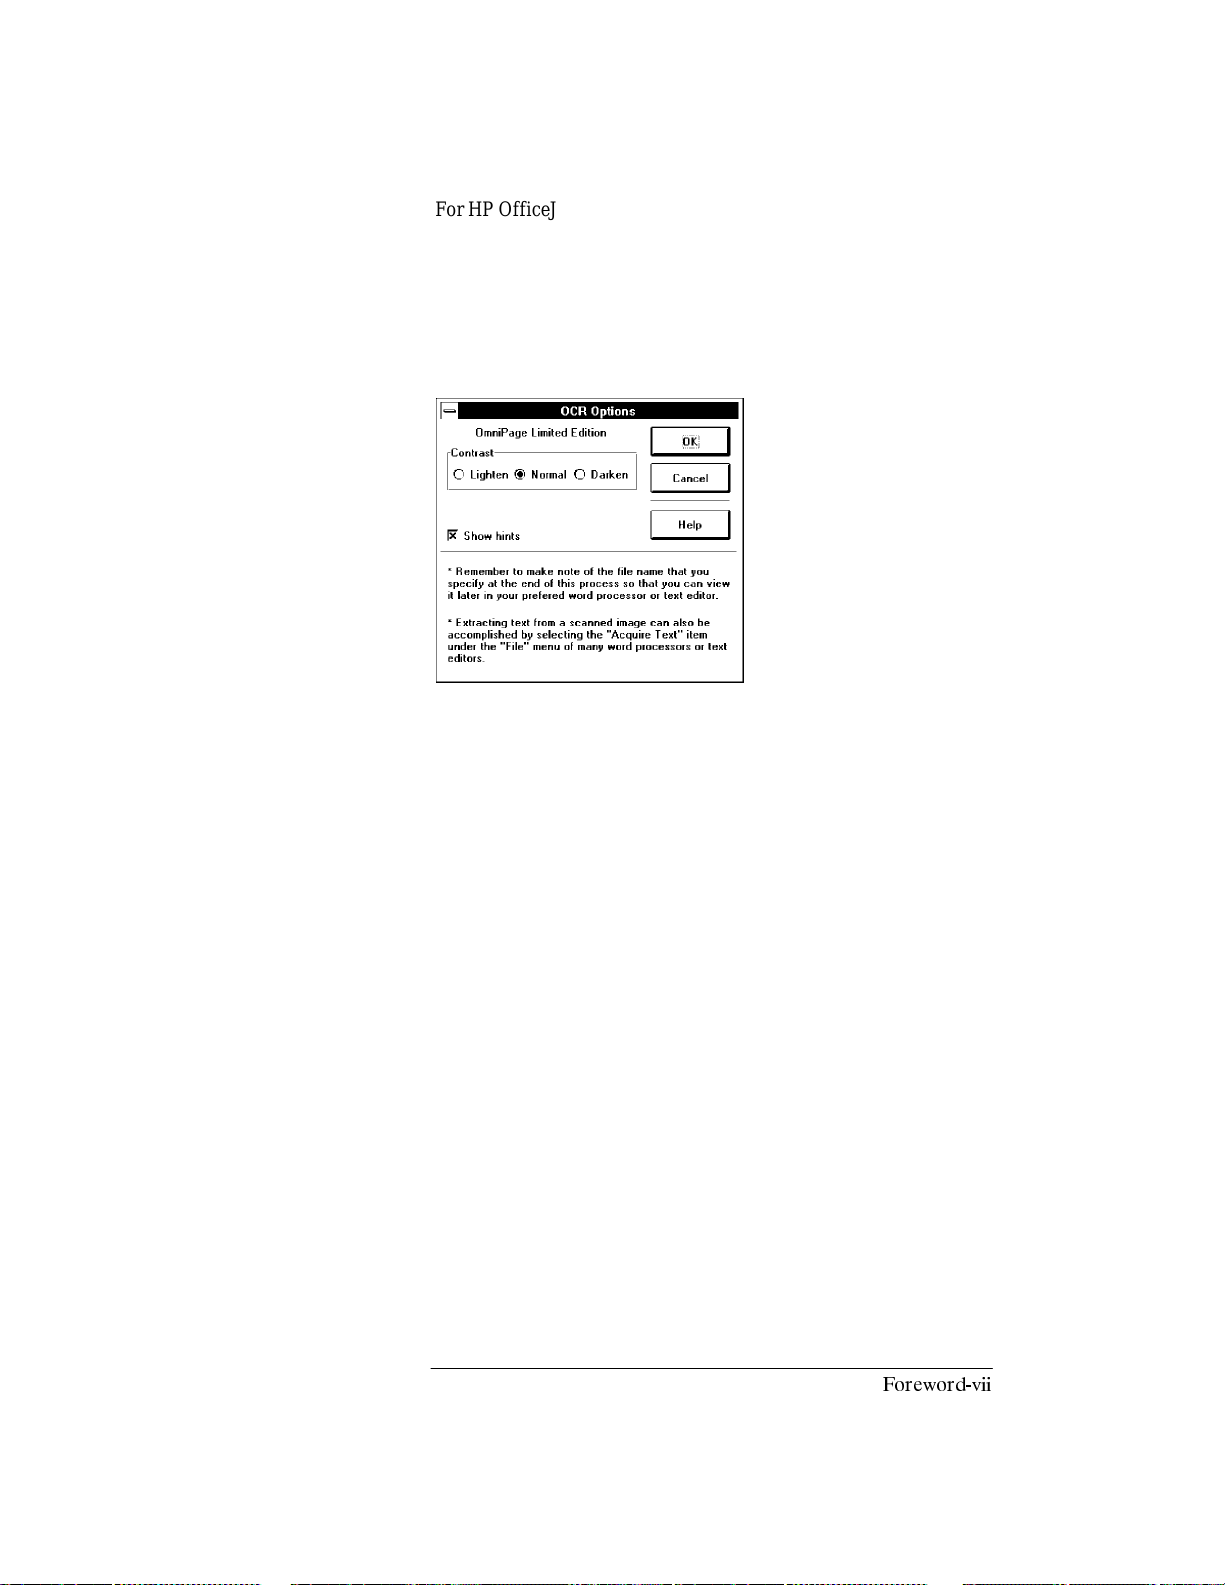
For HP OfficeJet Model 350 users who have already installed their
OmniPage Limited software, a fourth option, Scan with OCR,isalso
available on the AutoPrompt. (OCR m eans "Optical Character
Recognition," meaning that as the document is scanned, recognized
characters will be captured into a file you can open in your word
processor and edit.) When you press the
Scan with OCR
button, the
OCR Options dialog box displays.
When you clickOK,your document is scanned and you are prompted
to indicate the directory and filename for the scanned text. For more
information, refer to your OmniPage Limited Edition manual.
Turning off
AutoPrompt
Turning on
AutoPrompt
again
TurningoffandontheAutoPrompt
You can click the
screen. The AutoPrompt will redisplay the next time you load a
document in the fax loading tray.
Or you can completely turn off the AutoPrompt feature by clicking
the checkbox to the left of "Don't show AutoPrompt when a
document is loaded" on the AutoPrompt screen. Then, whenever you
load a document, you must send it or copy it using the front panel
buttons.
To turn on the AutoPrompt feature again, open the HP OfficeJet
Manager by double-clicking its icon in the HP OfficeJet Series 300
group. Then select the
The AutoPrompt screen will display the next time you load a
document in the loading tray.
Close
button to remove the AutoPrompt from your
Options
menu and choose
AutoPrompt/Enable
)RUHZRUGYLL
.
Page 16
Sending a Fax
Directly from Your PC
1.
Using your Windows application, create the document you want to
fax.
Name
and
number boxes
Fax
2.
Choose
E-FAX on OfficeJet as the printer.
3.
Use the application's Print command to "print" the document. The
Eclipse FAX SE Send Fax dialog box appears.
4.
In the Send Fax dialog box,
:
:
File/Print Setup
enter name and fax number o f the intended recipients
then click the
Send Fax
in your Windows application and select
button to send it.
Send Fax
button
5.
When the fax is sent, you can either save your PC file or close
without saving it.
)RUHZRUGYLLL
Page 17
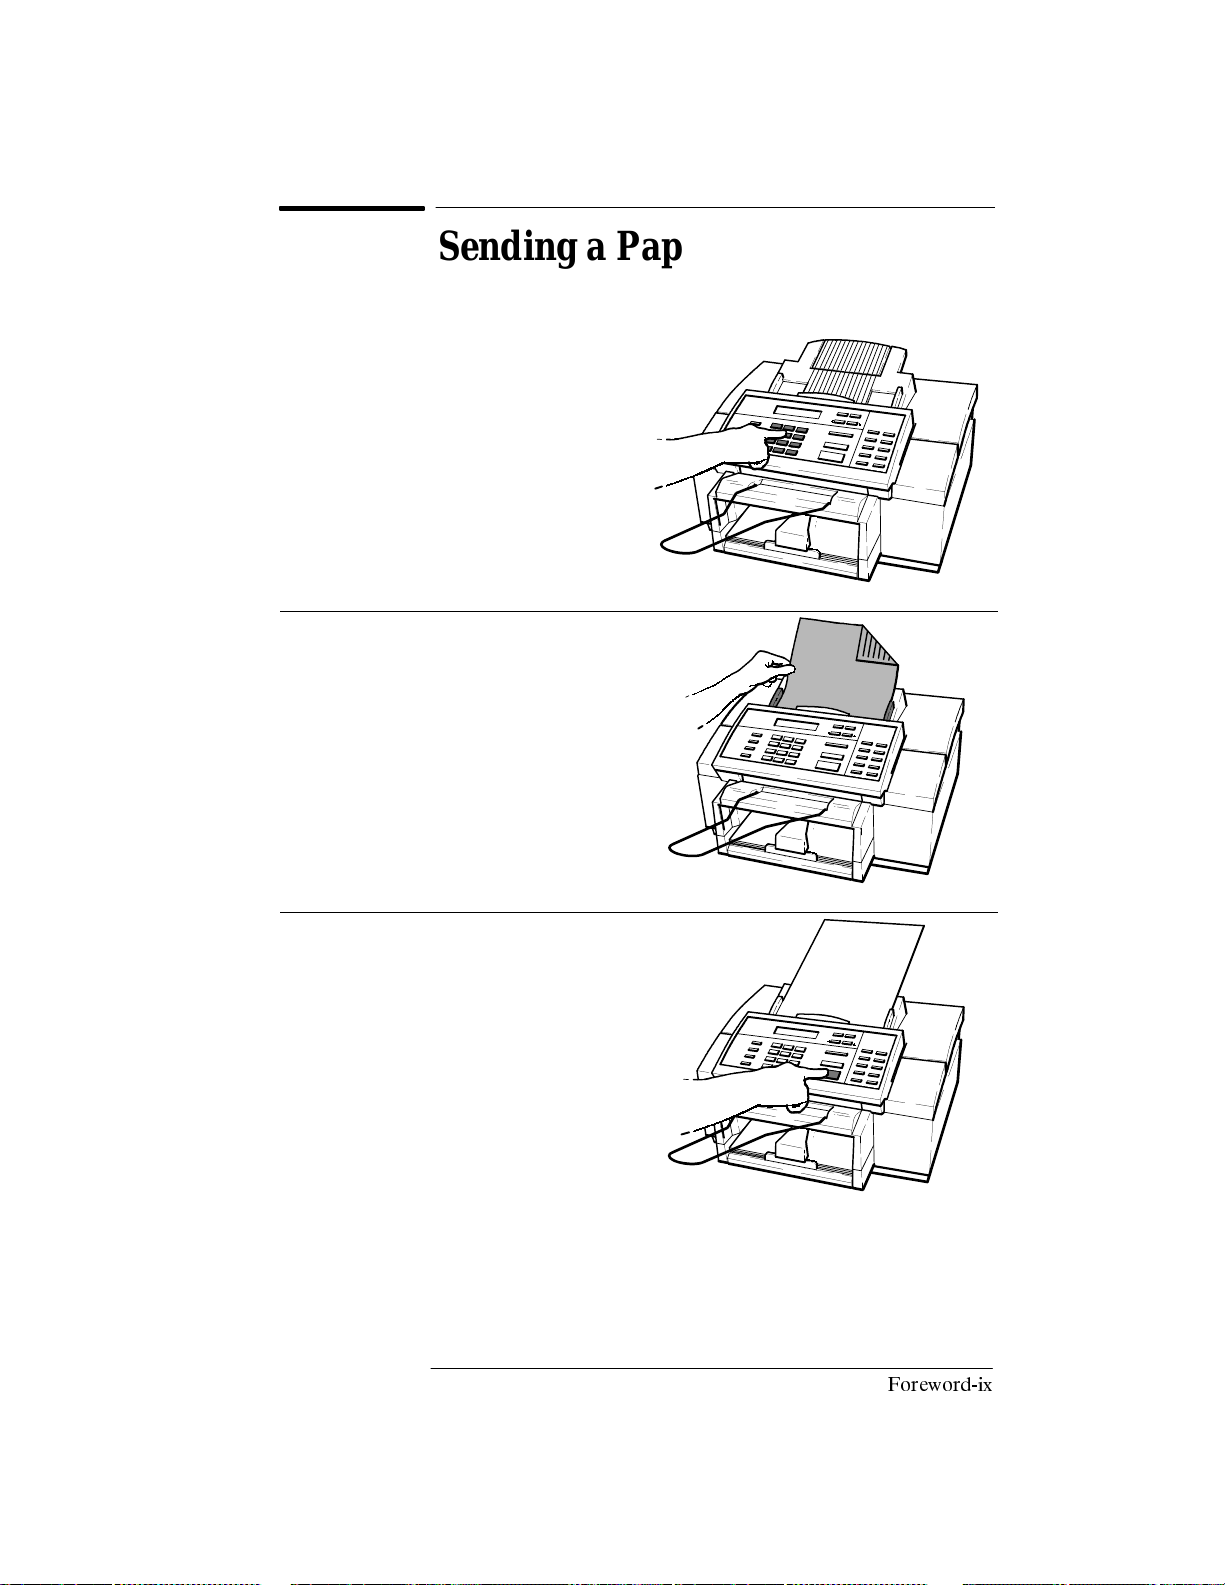
Sending a Paper Fax
Using the Front Panel
1. Dial
2. Load
3.
the fax number using one of the
following methods.
N
Use the numeric buttons on the
HP OfficeJet.
N
Press the
and a 2-digit code.
N
Press one of the 10 One-Touch
buttons.
your document face-down in the
fax loading tray.
Depending on the thickness of the
pages, you can load up to 20 pages in
the loading tray.
Press
Start/Copy
Speed Dial
to begin.
button
sl-46b
sl-19a
sl-47
)RUHZRUGL[
Page 18

Making Copies
Using the Front Panel
1.
Adjust the document guide, if
necessary, then load your document
face-down in the loading tray.
Depending on the thickness of the
page, you can load up to 20 pages.
sl-46b
2.
Press
Start/Copy
, then enter the
number of copies you want (up to 99
copies).
Note
: If you only want one copy, you
don't need to enter the "1," just skip to
Step 3.
3.
Press
Start/Copy
again to begin
copying.
sl-47a
sl-46a
sl-47b
)RUHZRUG[
Page 19

1Usingthe
HP OfficeJet Manager
Topic Page
Introducing the HP OfficeJet Manager 1-2..................
Running the HP OfficeJet Manager 1-3.....................
Using the HP OfficeJet Manager Help System 1-4..........
Using the File Menu 1-5.................................
Running Eclipse FAX SE
from the HP OfficeJet Manager 1-5......................
Cleaning the Print Cartridge 1-5........................
Using the OfficeJet Setup Menu 1-6.......................
Modifying Device Settings 1-6.........................
UsingSendFaxSetup 1-8.............................
Setting up Speed Dialing (for Paper Faxes Only) 1-10........
Changing Send Fax Quality 1-13.........................
Using Receive Fax Setup 1-14...........................
Changing the Loaded Paper Size 1-18.....................
Reducing Copies of Originals 1-19.......................
Setting DOS Printing Options 1-19.......................
Controlling Sound Settings 1-21.........................
Using the Options Menu 1-22.............................
Being notified of errors or warnings 1-22..................
Using the AutoPrompt 1-23.............................
Setting PC Faxing options 1-24..........................
Printing Logs and Reports 1-26............................
Printing a Fax Log Report Automatically 1-26..............
Printing Fax Logs 1-26................................
Printing HP OfficeJet Reports 1-29.......................
Page 20
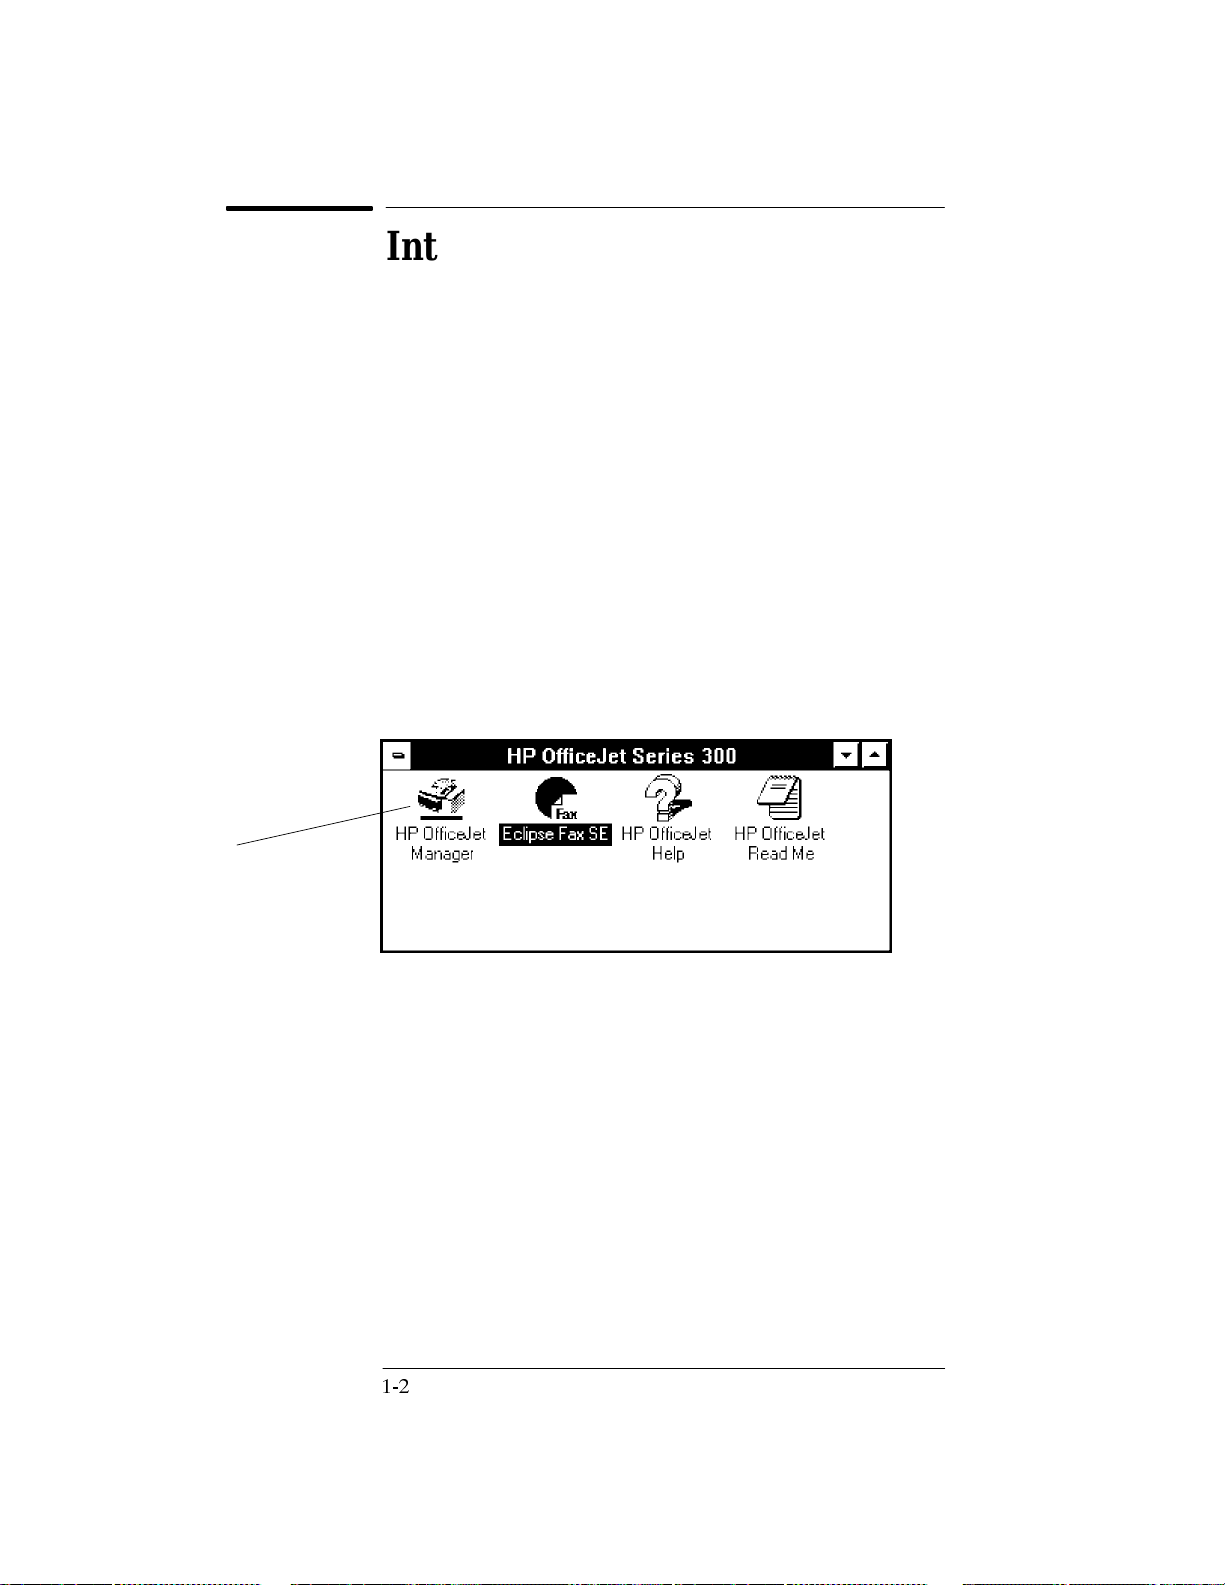
Introducing the
HP OfficeJet Manager
In this chapter, you will learn how to use the HP OfficeJet Manager,
a software application program that allows you to manage tasks such
as monitoring the status of your HP OfficeJet, printing logs and
reports, and modifying device settings that were preinstalled at the
factory. All of the information in this chapter can also be found in the
HP OfficeJet Manager's online help system.
1.
To access the HP OfficeJet Manager, first make sure you have
Windows 3.1 running on your PC.
2.
Find the HP OfficeJet Series 300 window on your Program Manager
screen. If it is minimized, (that is, it displays as an icon on your
screen), double-click the icon to open it.
The HP OfficeJet Series 300 window displays several icons, among
which are the HP OfficeJet Manager and Eclipse Fax SE. Eclipse Fax
SE is a software program that allows you to manage tasks such as
scanning, receiving, sending and printing faxes from the PC, and is
covered in detail in chapter 3.
The HP OfficeJet
Manager icon
3.
Click the HP OfficeJet Manager icon.
Page 21
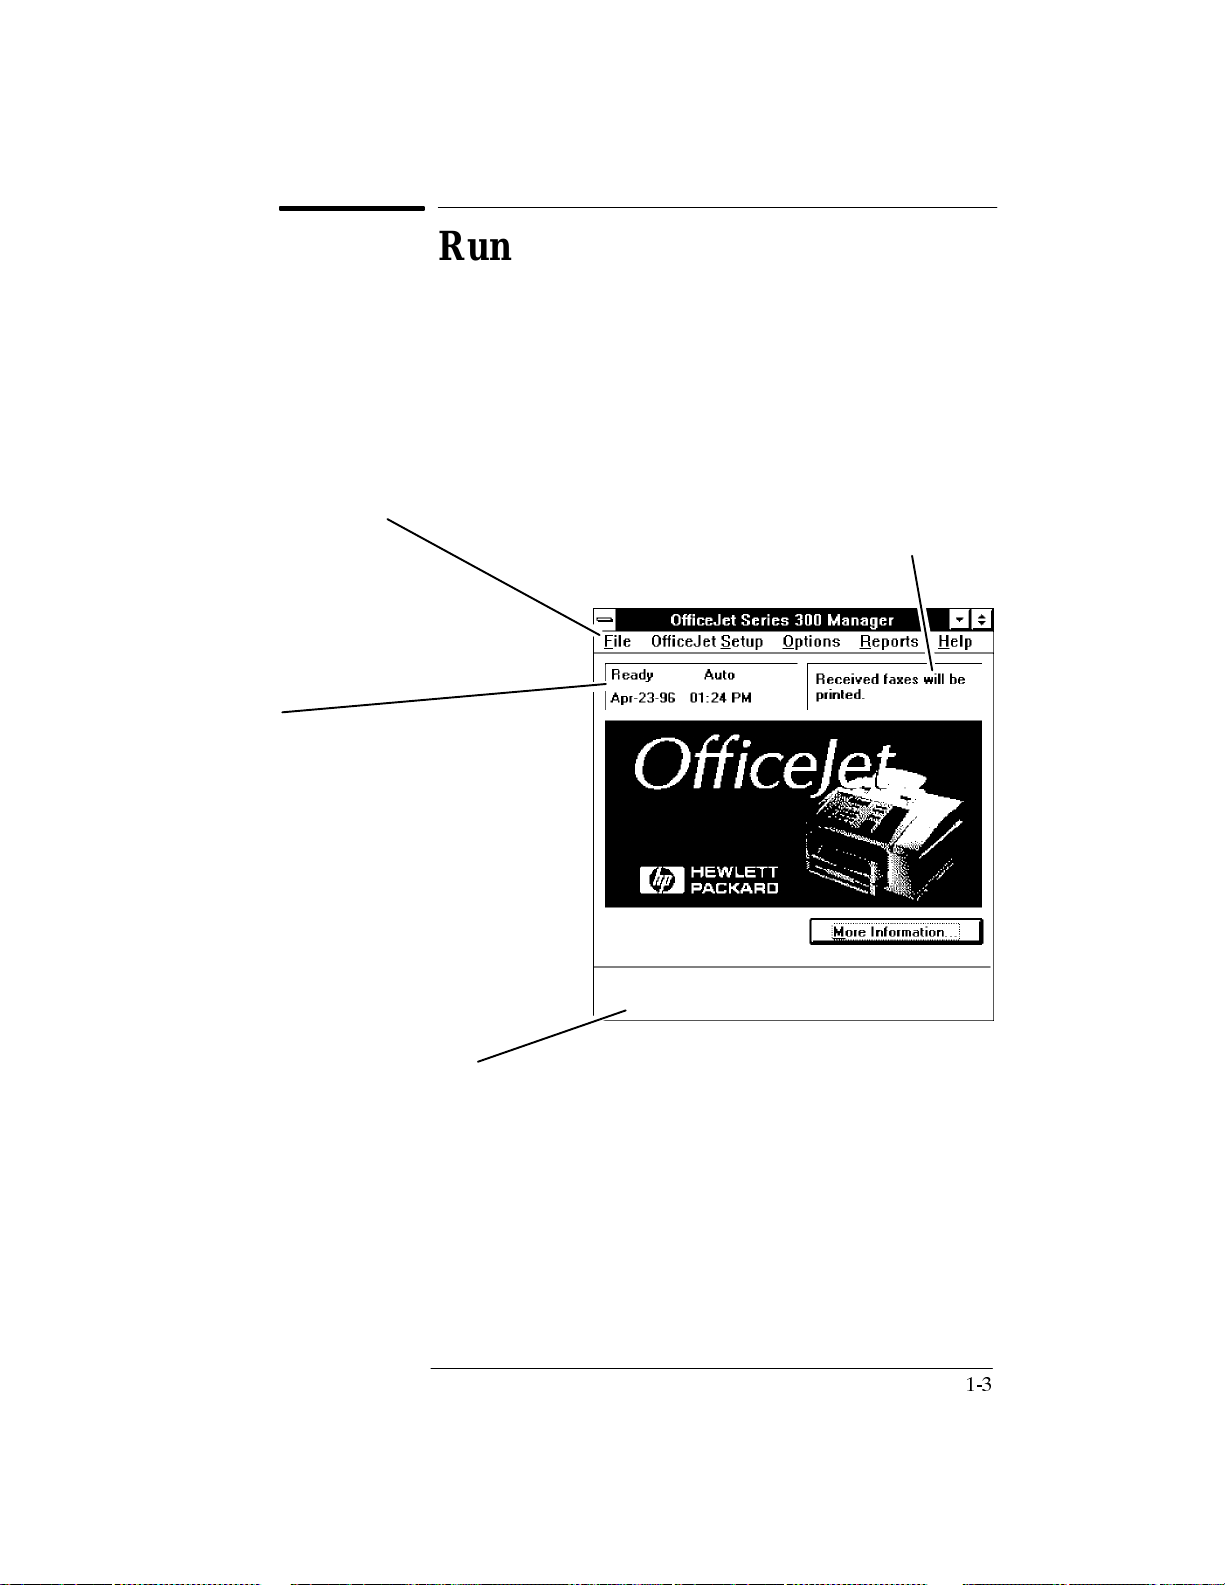
Running the HP OfficeJet
Manager
To run the HP OfficeJet Manager, double-click the HP OfficeJet
Manager icon. The HP OfficeJet Manager window appears. A menu
bar is displayed across the top of the window, with the headings
OfficeJet Setup,Options,Reports
and
Help
.
File
,
All of the choices in the
are described in this chapter.
TheStatusareashowsyouthesamein`
formation as on the front panel display
of your HP OfficeJet. When error mes`
sages display here, press the
formation
to get directions on how to fix the prob`
lem.
button (bottom right corner)
Menu Bar
More In`
This area shows whether received faxes will be
routed to the printer or the PC. Change this set`
ting using
Options/PC Faxing
.
This area shows information about your menu choices.
To look up menu options for each main menu, move your mouse so
the screen pointer points to the menu heading. Then click the mouse
button. Each of the menu options are explained in this chapter. To
close the HP OfficeJet Manager, choose
File/Exit.
Page 22

Using the HP OfficeJet Manager Help
System
The HP OfficeJet Manager has an online help system. When you
choose
menu appears. The menu items are explained below.
Help
from the HP OfficeJet Manager menu bar, a drop-down
N
Choose
system.
N
Choose
specific topics.
N
Choose
about the HP OfficeJet Manager.
N
Choose
solve problems and get customer support.
N
Choose
version of the HP OfficeJet Manager.
Help on specific topics is also available from many HP OfficeJet
Manager dialog boxes, as explained in the following pages. Clicking
Help
the
relevant Help topic.
For more information on Windows-based help systems, refer to the
Windows Help system in your Windows User's Guide.
Help/Contents
Help/Search
Help/Using OfficeJet Series 300 Manager
Help/Technical Support
Help/About OfficeJet Series 300 Manager
button in one of these dialog boxes will take you to the
to display the contents of the online help
for detailed information and instructions on
to learn more
for information about how to
to look up your
Page 23
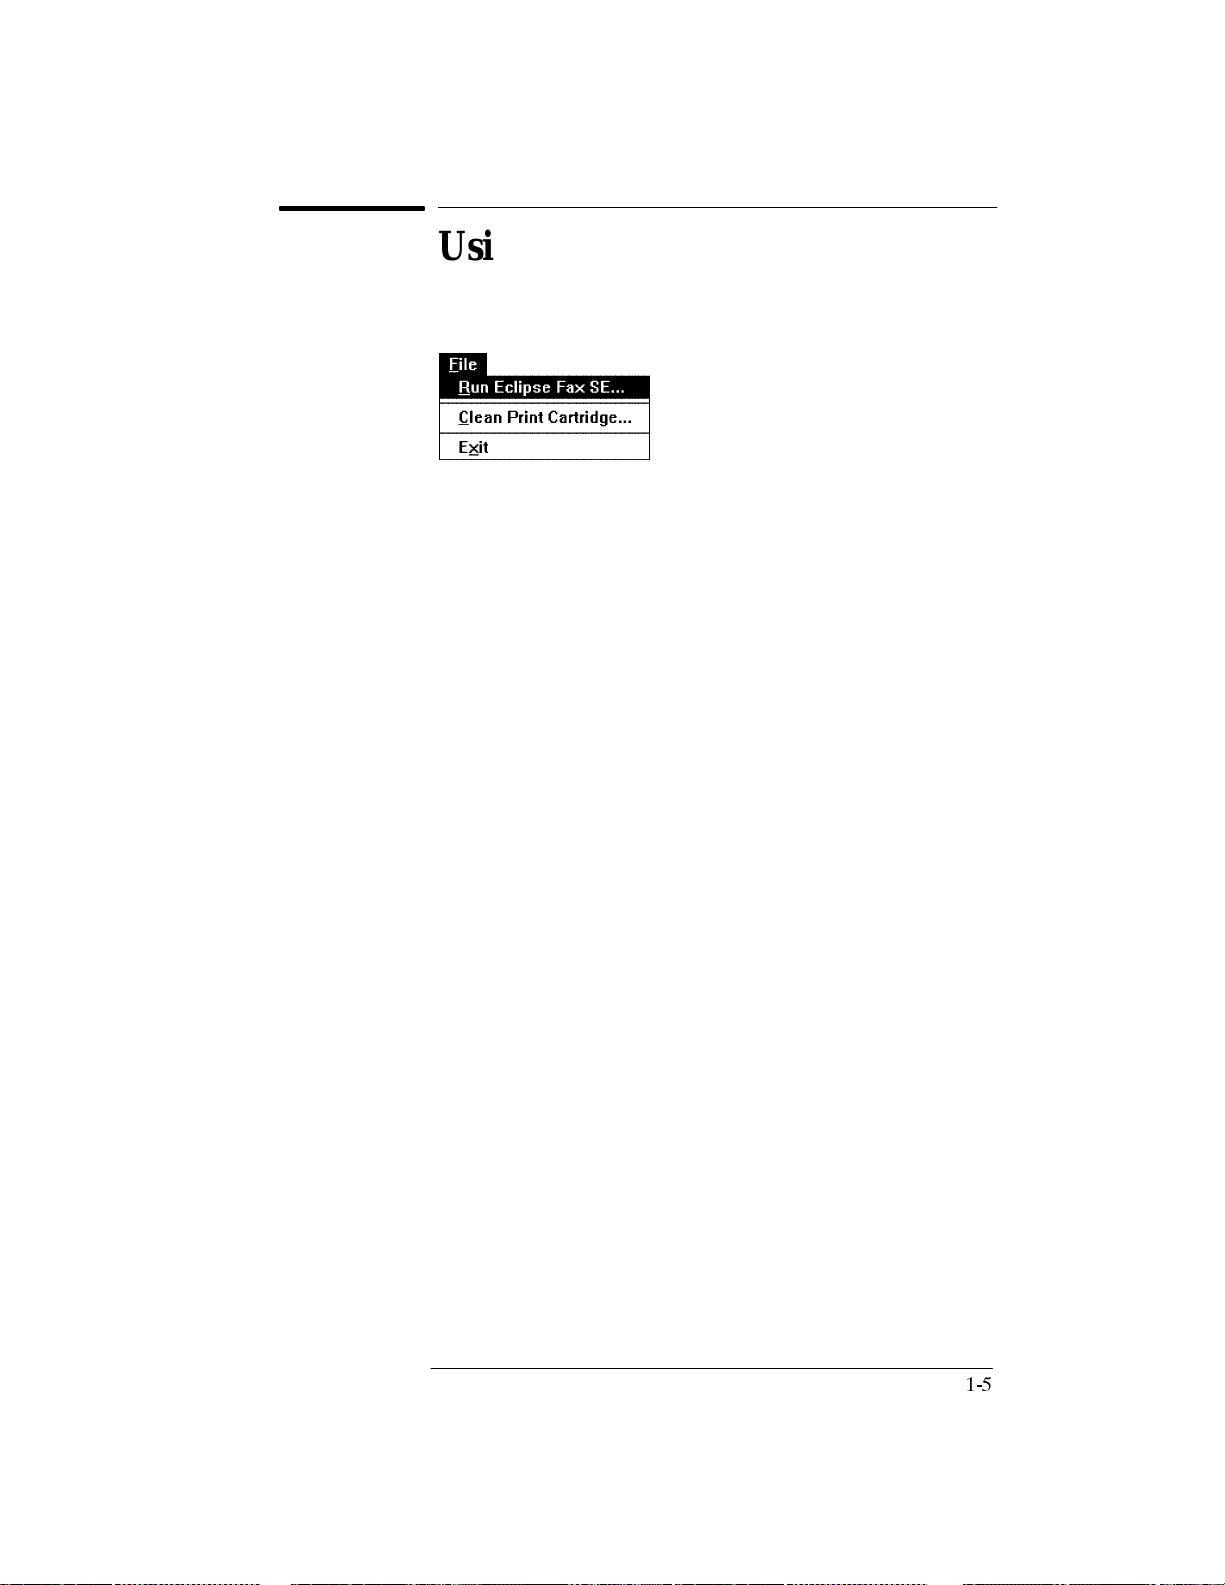
Using the File Menu
When you choose
following drop-down menu appears.
from the main OfficeJet Manager menu, the
File
Running Eclipse FAX SE
from the HP OfficeJet Manager
To run Eclipse FAX SE directly from the HP OfficeJet Manager,
choose
complete information.
File/Run Eclipse FAX SE
and then refer to chapter 3 for
Cleaning the Print Cartridge
If the print quality is poor, it may mean the print cartridge requires
cleaning. However, as the problem can be attributed to other causes,
refer to the Troubleshooting chapter first for alternate solutions, as
unnecessarily cleaning the print cartridge shortens its life.
If you need to clean the print cartridge, choose
Cartridge
.
File/Clean Print
Page 24

Using the OfficeJet Setup Menu
When you choose
OfficeJet Setup
from the main OfficeJet Manager
menu, a drop-down menu appears, which you can use to configure
the HP Officejet device settings.
Modifying Device Settings
The table below summarizes all the device settings you can change
with the HP OfficeJet Manager. It also lists factory settings
(defaults).
Setting Use Whenever You Need To... Applies To...
Send Fax Setup
Speed Dial Setup
Send Fax Quality
:
Change the
name, and number) printed at the top of all faxed
pages.
:
Specify tone or pulse.
Dialing Mode=Tone.
:
Specify automatic redial for faxes that fail the
first time.
Redial=On
:
Add, change, or delete frequently-used names
and fax numbers.
:
Add, change, or delete a speed dial group, to
send a fax to multiple recipients.
:
Print a report of speed dial entries.
:
Change the contrast (light, normal, or dark) for
copies and outgoing faxes.
Contrast=Normal.
:
Change the resolution (standard, fine, or photo)
for outgoing faxes.
Resolution=Standard.
Fax Header
The factory setting is Automatic
.
(current date and time,
The factory setting is
The factory setting is
The factory setting is
Paper and PC faxes.
Automatic Redial is
managed from the
PC for PC faxes.
Paper faxes only.
Paper faxes and
copies. (Eclipse
FAX SE has its own
Resolution setting
for PC faxing.)
Page 25

Receive Fax Setup
Loaded Paper Size Specify type of paper currently loaded: Letter,
Copy Reduction Specify the percentage of copy to be reduced,
Printing Options
(DOS)
Sounds Turn off or adjust the volume of sounds device
:
Change the Receive Mode to indicate whether
you want the HP OfficeJet to automatically
answer all phone calls or whether you want to
manually answer the phone.
:
Change the number of rings before the HP
OfficeJet answers (only applicable when receive
mode is set to Auto). The factory setting is
to Answer=2
:
Reduce page size of incoming faxes to match
paper size loaded in tray. The factory setting is
Automatic Reduction=On
:
If an error occurs, specify that incoming faxes be
received to memory.
Backup Reception=On.
:
Specify a distinctive ringing service.
setting is Distinctive Ring=Off.
:
Receive faxes from older-model fax machines
that don't emit a fax signal.
Silent Detect=Off.
:
Allow remote dial-in.
Remote Service=Off.
Legal, A4, Exec, or Envelope. Change this setting to
match the size of paper.
U.S. is Loaded Paper Size=Letter.
relative to the original.
Reduction=100%.
Setup the HP OfficeJet as a printer for a DOS
application.
makes.
The factory settings are Ringer=On,
Beeps=On, Ring and Beep Volume=Soft.
.
.
The factory setting is
The factory
The factory setting is
The factory setting is
The factory setting for the
The factory setting is Copy
Applies To...Use Whenever You Need To...Setting
Paper and PC faxes.
Paper and PC faxes.
Rings
Paper faxes.
Paper faxes.
Paper and PC faxes.
Paper and PC faxes.
Paper faxes.
Paper faxes.
DOS applications.
Paper and PC faxes.
Page 26
Using Send Fax Setup
To set up header information, dialing mode, and automatic redial,
choose
box appears, with the fax header at the top of the page, as shown
below. First, review the header information for outgoing faxes. All of
the headers for your outgoing faxes will contain this information.
OfficeJet Setup/Send Fax Setup
. The Send Fax Setup dialog
Changing the Header for Your Outgoing Faxes
1.
To change the month, day, or year in the
number you want to change and type in a new number.
2.
To change the numbers in the
want to change and type in a new number. If you want to express time
in terms of 24 hours rather than AM/PM (13:00 rather than 1:00 PM),
change the time from AM/PM to the 24-hour clock first. Then change
the numbers.
3.
Type your name or your company name in the
4.
Type your fax number in the
Time
Fax Header Number
Date
box, double-click the
box, double-click the number you
Fax Header Name
box.
box.
Page 27

Selecting Dialing Mode
Dialing Mode offers you an option between Pulse and Tone. In the
Dialing Mode
capability; choose
box, choose
Pulse
need to switch from
like, for example, charging your fax number to a credit card. To
switch from Pulse to Tone, type an asterisk (*) after the fax number.
Note, this feature only works if your Dialing Mode has been set to
Pulse;
you cannot switch from
example below shows you exactly how this procedure works.
EXAMPLE
Tone
if your telephone has touch-tone
if it does not. If you select pulse, you may
PulsetoTone
to perform certain transactions
TonetoPulse
when dialing. The
To send a fax to the number (111) 222-3333, and then switch to
Tone
dialing to enter a credit card number, you would enter the fax number
as 111 222 3333 *. Then enter your credit card number.
You can place the * in Speed Dial entries, Eclipse Fax SE phonebook
entries and numbers you dial from the front panel of the OfficeJet
(for paper faxes) for switching from
PulsetoTone
.
Setting Automatic Redial Option
The factory setting is
HP OfficeJet encounters a busy signal, it will redial that fax number
automatically five times (the number varies by country). The first
redial occurs after a 1-minute wait; the next four redials occur after
5-minute waits. During this wait period, the redial timer is displayed
as a countdown. To initiate the next redial without waiting, press the
Redial/Pause
button located on the front panel (this applies to paper
faxes only).
Automatic Redial=On
. With this setting, if the
Page 28

Setting up Speed Dialing
(for Paper Faxes Only)
The speed dialing feature allows you to store frequently used fax
numbers (either to individuals or groups) by assigning code numbers
to them and thus quickens the dialing process. You can only use
speed dial codes when sending a paper fax, using the front panel of
the fax machine to dial the code. To create entries for PC faxing
using Eclipse FAX SE, refer to chapter 3, "Using Phonebooks."
After storing a name, you can send your paper fax by pressing the
Speed Dial
OfficeJet, and entering the code number which corresponds to the
name.
The first 10 speed dial codes are automatically assigned to the 10
One-Touch buttons on the right of the HP OfficeJet front panel. Store
the 10 fax numbers you dial most frequently into speed dial codes 1
through 10. Then, just load your paper document and press the
appropriate One-Touch button, before pressing Start.
The group speed dial feature allows you to store selected speed dial
entries in groups. For example, you may want to create a group of
client or vendor speed dial numbers. You can have as many as five
groups of related fax numbers. After storing a number, you can send
a fax to that number by simply pressing the
on the front panel of the HP OfficeJet and entering the group code
(any number between 61 through 65). Your fax will be sent to every
person in that group.
button located on the left side of the front panel of the HP
Speed Dial
button located
When you've finished assigning names and fax numbers to the speed
OK
dial codes, click the
dialog box. You may also click the
box without saving your settings, o r the
this topic.
button to save your settings and close the
Cancel
button to close the dialog
Help
button to get help for
Page 29
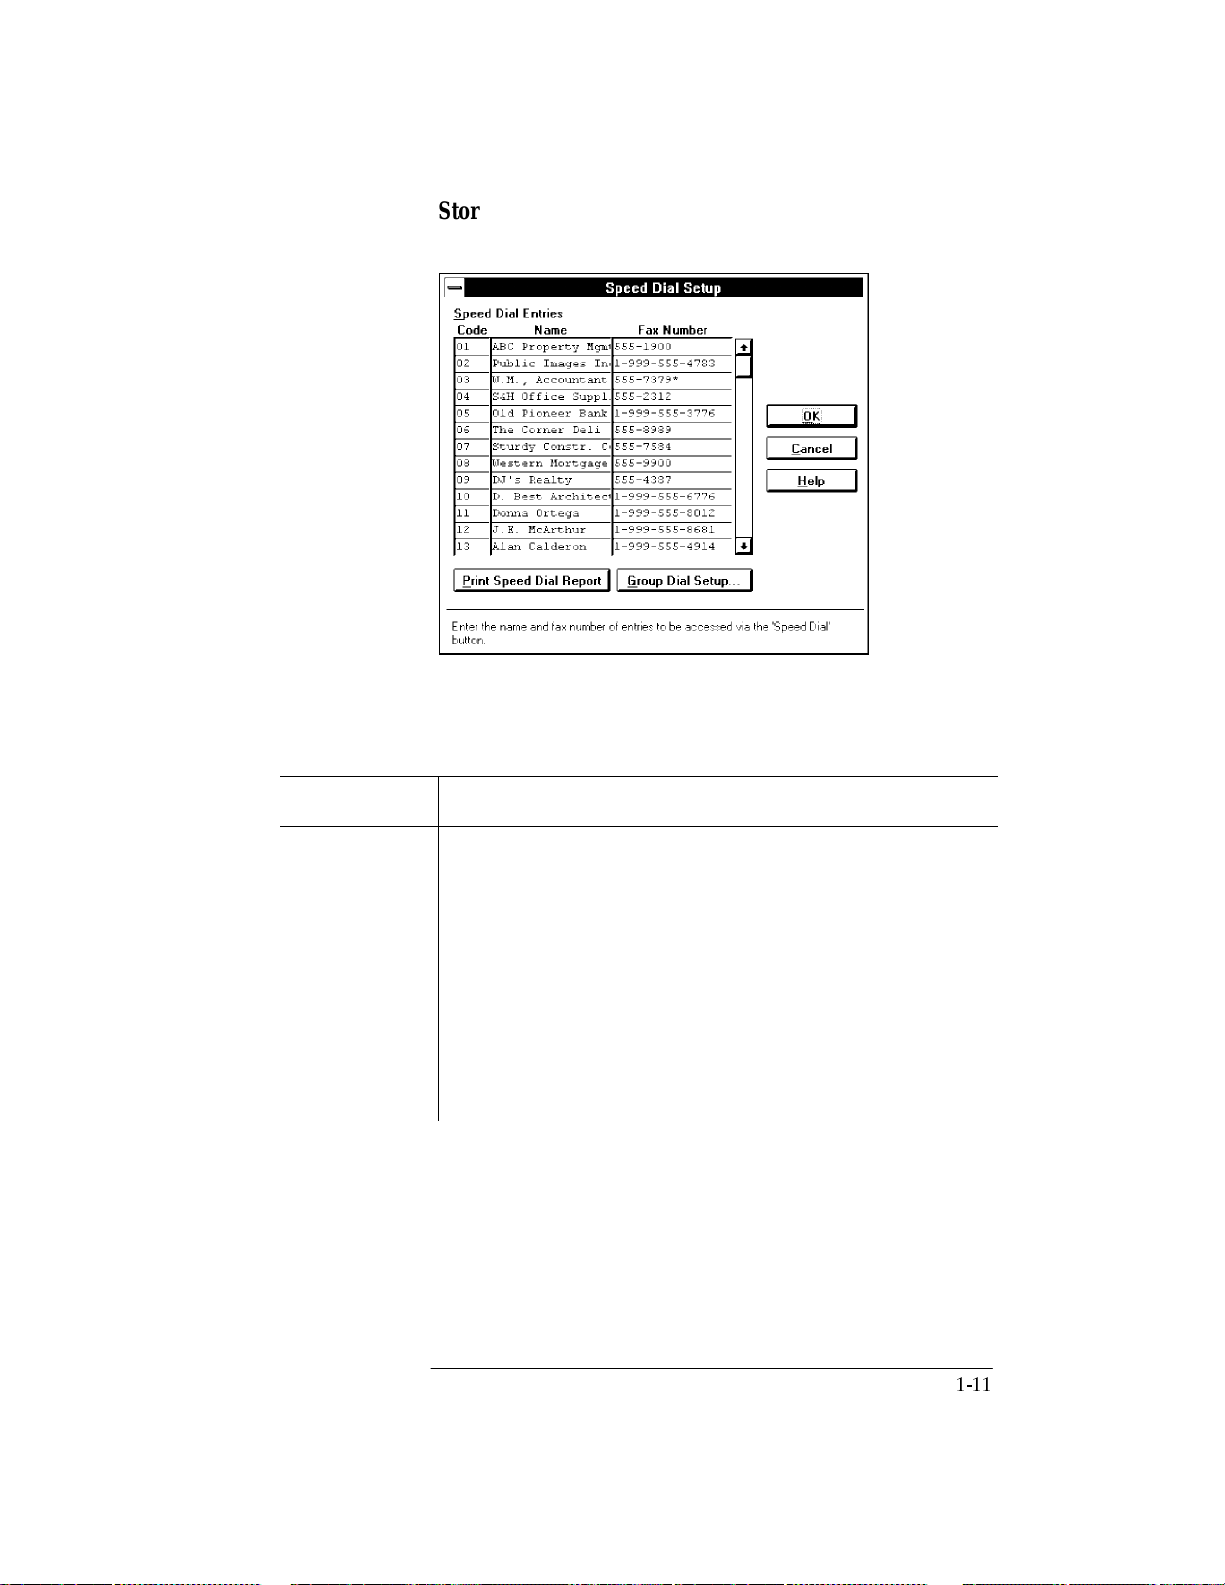
Storing Speed Dial Codes for Individuals
1.
2.
Choose
In the
OfficeJet Setup/Speed Dial Setup
Name
and
Fax Number
boxes, across from each code, type the
recipient's name (person or company name) and fax number. Use the
Tab key to move from one column to the other. (Be sure to include
any necessary prefixes; for example, 1 for long-distance numbers.)
Special
Characters Use in Fax Numbers
asterisk (*) If the Dialing M ode is set to pulse, adding the asterisk switches the dialing
mode from pulse to tone. If the Dialing Mode is set to tone, the asterisk
causes a "*" tone to be emitted. (In Eclipse FAX SE only, a capitalTcan
be used instead of an asterisk.)
pound or number
sign (#)
hyphen (-) Inserts a 2-second pause in the fax number when you need to wait for an
space or blank Spaces and blanks are ignored.
If the Dialing Mode is set to tone, a pound or number sign causes a "#"
tone to be emitted. If the Dialing Mode is set to pulse, this character is
ignored.
access tone or when using a credit card. For example, placing "----"ina
speed dial number causes four pauses to occur. (In Eclipse FAX SE only, a
comma (,) can be used instead of a hyphen.
.
3.
Click the
button to save your settings and close the dialog box.
OK
Page 30
To delete an entry, highlight the name by clicking it, and press the
Delete key on your keyboard.
To print a report showing all the information you have stored in speed
dial codes, click the
Print Speed Dial Report
button at the bottom of
the dialog box.
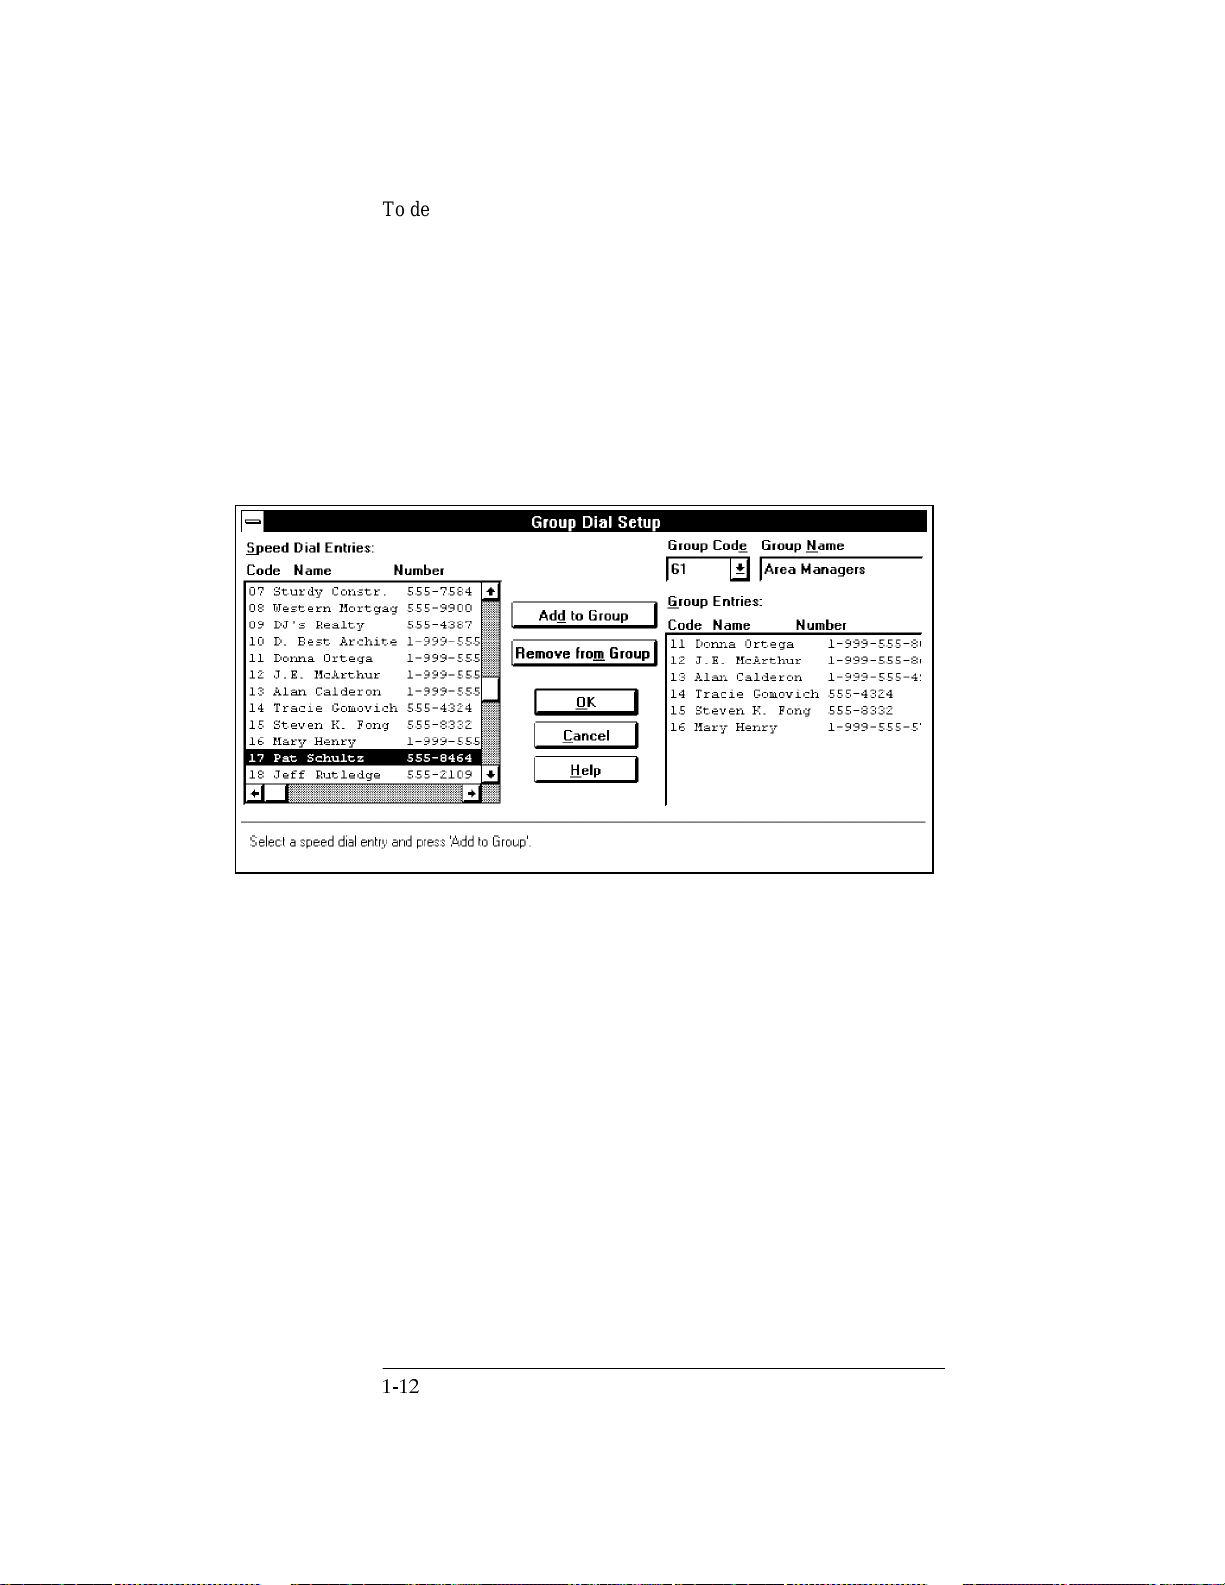
Storing Speed Dial Codes for Groups
1.
2.
Speed Dial Setup
Select
Click the
Group Dial Setup
Setup dialog box.
from the
OfficeJet Setup
menu.
button at the bottom of the Speed Dial
3.
The first time you open this dialog box, Code 61 will be displayed in
Group Code
the
box. To select the next code, click on the arrow to the
right of this code.
4.
In the
Group Name
box type a name for the group of related names
(for example, Clients).
5.
Next, highlight each name that you want to add to this group and
click the
from the group by highlighting it and clicking the
Group
Add to Group
button. If you add a name by mistake, delete it
Remove from
button. (Note, you cannot add names by typing them in; you
can only select from the list of individuals you entered previously.)
6.
Click the
OK
button to save your settings and close the dialog box.
Page 31

Changing Send Fax Quality
When you choose
Quality dialog box appears.
OfficeJet Setup/Send Fax Quality
, the Send Fax
Changing the contrast
To modify the
Darken
N
Normal
N
(factory setting).
Lighten
N
Avoid sending faxes written in pencil, but if you do, change the
contrast to Darken first.
Contrast
for originals that are too light.
for documents with acceptable lightness/darkness
for originals that are too dark.
of copies or outgoing paper faxes, click:
Changing the resolution
To modify the resolution (sharpness) of outgoing paper faxes, click:
Standard
N
illustrations), or when the transmission speed is more important
than quality.
Fine
N
Photo
N
capture images containing different shades of gray or color. This
selection causes documents to be scanned as halftone images.
Copies are automatically made with the best resolution. For this
reason, a photograph may not fit completely in memory and you may
not be able to make multiple copies. You will need to make
individual copies.
After you've made your changes, click
close the dialog box.
your settings;
displays help for this topic.
for text only faxes (no photographs or graphic
to make text and line drawings as sharp as possible.
when faxing or making copies of photographs or to
OK
to save your settings and
Cancel
closes the dialog box without saving
Default
returns selections to factory settings; and
Help
Page 32

Note
: For PC scanning, you can override the settings made here. For
more information, see chapter 3 or the online help system for Eclipse
FAX SE.
Using Receive Fax Setup
When you choose
Setup dialog box appears. The settings in this dialog box were
determined during installation. You need only modify these settings
if the conditions that existed at setup have changed.
When you have finished, clickOKto save your settings and close the
dialog box.
Default
for this topic.
returns selections to factory settings; and
OfficeJet Setup/Receive Fax Setup
closes the dialog box without saving your settings;
Cancel
, the Receive Fax
displays help
Help
Page 33

Selecting Auto or Manual
Receive Mode for incoming faxes
Before you select the auto or manual Receive Mode setting for
incoming faxes, review the setup information in your Installation
Guide to make sure your system is cabled correctly. Then make your
selection based on the following.
Choose
If This Is Your Situation...
A separate telephone number for receiving fax calls
only (no voice calls).
One telephone number for both phone and fax
calls, andnotelephone answering machine.
One telephone number for both phone and fax
calls, and youdohave a telephone answering
machine.
One telephone number for both phone and fax
calls, and you subscribe to a
service
from your telephone company.
distinctive ringing
this setting
Auto.
Manual.
Auto.
Auto, and click the
Distinctive Ring
button in the
Settings box.
Changing the number of rings to answer
When the receive mode is set to Auto, HP OfficeJet answers the call
automatically, after a specified number of rings.
N
To change the setting, click the arrow to the right of the
Answer
box to show the desired number, then click on the
Rings to
number.
Answering machines also have a rings-to-answer feature. If you have
an answering machine connected (according to scenario 3 in the
Installation Guide), make sure the number of
Rings to Answer
in this
dialog box is set to a higher number than that of your answering
machine.
The HP OfficeJet "listens" while the answering machine plays its
greeting. If the HP OfficeJet detects fax tones, it will cut off the
answering machine and receive the fax.
Page 34

Setting Automatic Reduction
Automatic Reduction
The
your incoming fax to fit the paper loaded in the tray. The Factory
setting is
from the checkbox. The two scenarios below demonstrate what
happens if you turn auto reduction on or off.
Automatic Reduction=On
setting automatically reduces each page of
. To turn it off, remove the check
Example 1
letter-size paper loaded in the HP OfficeJet. With
Reduction=On
original. With
into two pages.
Example 2
letter-size paper loaded in the HP OfficeJet. With
Reduction=On
Auto Reduction=Off
The HP OfficeJet cannot print on the bottom 1/2 inch of the page, so
a fax that fills a letter-size page may print on two pages if Automatic
Reduction is turned off. You should always leave the Automatic
Reduction setting On, unless maintaining the original size is
important to you.
:`
You receive a fax on legal-size paper, but have
Auto
, the page will be a 75% reduction of the legal-size
Auto Reduction=Off
:`
You receive a fax on letter-size paper and also have
, each page you receive may be reduced slightly. With
, the page may be split into two pages.
, the legal-size original will be split
Auto
Setting Backup Reception
The HP OfficeJet has a backup capability for receiving faxes and
storing them in memory if it is unable to print them for the following
reasons:
N
The paper tray is empty.
N
The wrong paper size is loaded for receiving faxes (only Letter,
Legal, and A4 paper are valid for faxes).
N
The print cartridge is out of ink or is not installed.
N
There's a paper jam.
With the
faxes will be received to memory. If
incoming calls will be answered, nor incoming faxes received, until
the circumstance listed above is corrected.
If you are printing a file from your PC or copying when a fax is
received, the fax will be saved to memory, regardless of the
Reception
stored in memory print immediately.
Backup Reception=On
setting. When the printing or copying is complete, faxes
(the factory setting), incoming paper
Backup Reception=Off
, no
Backup
Page 35

Distinctive Ring
"Distinctive ring" is a service provided by a telephone company. You
need to check with your telephone company to see if it is offered in
your area. If it is offered, it allows you to have two or three phone
numbers on the same phone line and is cheaper than having separate
lines. It is easy to tell the phone numbers apart because each one has
a distinctive ring: the first phone number has a single ring, the second
has a double ring, and the third has a triple ring.
Distinctive Ring
The
between voice and fax calls when both are received on the same
phone line, but it only works with your telephone company's
distinctive ring service. The factory setting is
the HP OfficeJet automatically (Receive mode is set to
calls. If you have subscribed to your telephone company's
all
distinctive ring service, ask your telephone company to assign the
single ring to phone numbers that receive voice calls and multiple
rings to phone number(s) that receive fax calls. Then Check the
Distinctive Ring
phone and receive faxes only when it detects a multiple ring.
(At the time of publication, distinctive ring services`also known by
other names`were available only in certain parts of the U.S. and
some Asian countries.)
feature allows the HP OfficeJet to distinguish
Distinctive Ring=Off
Auto
)answers
checkbox to allow the HP OfficeJet to answer the
;
Silent Detect
To receive faxes from older-model fax machines that don't emit a fax
signal, click the
these silent models represented about 5% of the fax machines in use.
The factory setting is
following are true:
Silent Detect
checkbox. At the time of publication,
Silent Detect=Off
. Modify only when all of the
N
You receive a fax from an older-model fax machine.
N
our telephone answering machine is directly connected to the
Y
HP OfficeJet.
N
Receive Mode
The
is set to
Auto.
Page 36

Remote Service
If you've contacted a Hewlett-Packard service representative about a
problem, you may be asked to turn the remote service settingOnby
clicking the checkbox. The factory setting is
Reset
it to
after the problem has been diagnosed.
Off
Remote Service=Off
.
Changing the Loaded Paper Size
Use
OfficeJet Setup/Loaded Paper Size
in the lower paper tray. The table below shows the paper sizes that
you can use for each HP OfficeJet function.
Task Valid Paper Sizes
Printing Letter, Legal, A4, Exec, Envelope
Faxing Letter, Legal, A4
Copying Letter, Legal, A4
Letter: 8.5 x 11 inches (216 x 279 mm)
Legal: 8.5 x 14 inches (216 x 356 mm)
A4: 8.27 x 11.7 inches (210 x 297 mm)
Exec: 7.25 x 10.5 inches (184 x 267 mm)
Envelope: Either (1) U.S. No. 10 envelopes, 4.12 x 9 .5 inches (105 x
241 mm), or (2) European DL envelopes, 8.66 x 4.33 inches (220 x
110 mm)
to change the size of the paper
Page 37

Reducing Copies of Originals
To make reduced copies of originals, select
Reduction
and slide the mouse down the list of percentages displayed
OfficeJet Setup/Copy
in the drop-down menu. Release the mouse button after your
selection has be highlighted.
Setting DOS Printing Options
To set printing options for DOS software applications, choose
OfficeJet Setup/Printing Options (DOS)
HP OfficeJet DOS printing characteristics and any DOS application
that prints afterward will use these settings unless the application's
printer driver overrides them.
Your DOS software application supplies printer drivers for many
printer models. A printer driver that supports your printer features
may already be in your software application. Your access to some
printer features, such as font selection, depends on your software
application and the printer driver installed.
Note
:`If you use DOS software applications and Windows
applications, be sure to exit Windows before running your DOS
applications. Do not print from the Windows MS DOS Prompt.
The following table summarizes the choices you can make from the
HP OfficeJet Manager for DOS printing.
. These selections update the
Font
Font Size
Print Quality
Carriage Return
Orientation
The character set the printer uses for printing.
Normal or Condensed.
Letter (highest) or Draft (quickest).
Carriage Return (CR) only or Carriage Return and
Line Feed (CR and LF).
Portrait or Landscape.
Page 38

Do the following before changing any settings on this dialog box.
1.
Determine if your DOS software application provides a printer driver
that you can use.
Check the printer selection or printer setup menu in your software
application for a list of printer models. The list below identifies
recommended printer driver selections you can use and the type of
support that each offers:
Use this printer driver: For this type of printer support:
HP DeskJet 520 printer All printer features
HP DeskJet 510 printer All printer features
HP DeskJet 500 printer All printer features except for some fonts and
2.
Select the printer driver using the instructions provided by your
envelope printing
software application manual.
If the HP DeskJet 520 printer is not listed, use one of the alternate
printer drivers listed and contact your software company to determine
if an HP DeskJet 520 printer driver is available.
3.
Print a few documents from your software applications to make sure
documents are printing correctly.
Note:`
You may need to add or change the MODE statement in your
computer's AUTOEXEC.BAT file. The MODE statement tells your
computer where to send printing information. This statement is not
always required. If the HP OfficeJet does not print, check your
AUTOEXEC.BAT file to make sure the MODE statement for a
Centronics parallel connection to the LPT1 port is:`
MODE LPT1:,,P
If you are not familiar with your AUTOEXEC.BAT file, see your
DOS manual for information.
.
Page 39

Controlling Sound Settings
To modify the sounds produced by your HP OfficeJet, select
OfficeJet Setup/Sounds
selected. To turn the ringer and beeps on/off, or to modify the
volume, click the checkbox. Click the
settings and close the dialog box.
This table describes the different sounds that may be heard and the
items on the
Type of Sound Occurs When... Adjust using...
Rings You receive a call on the telephone
line connect ed to the HP OfficeJet.
One Short Beep You press a button on the front
panel.
Three Short Beeps You press an incorrect button on the
front panel.
Nine Short Beeps An error occurs.
One Long Beep You send or receive a fax
successfully(without error).
Sounds
. A marked setting indicates the feature is on or
OK
button to save your
dialog box that controls them.
Ringer
and
Ring and Beep Volume
Beeps
and
Ring and Beep Volume
Ring and Beep Volume
Ring and Beep Volume
Ring and Beep Volume
.
.
.
.
.
To adjust the volume of fax tones of outgoing faxes, slide the volume
control slider located on the right side of the HP OfficeJet toward the
minus sign (-) to decrease the volume, and toward the plus sign (+) to
increase it.
Page 40

Using the Options Menu
The
When
Options
menu gives you three options to choose from:
,
AutoPrompt
,and
PC Faxing
.
Notify
Being notified of errors or warnings
Whenever an error and/or warning occurs, you have the option to
make the HP OfficeJet Manager window pop to the foreground, so
that you ar e alerted immediately. The factory setting is (
Errors Occur
and selecting from the three choices shown below.
You can be notified when
jams inside the device), when
example, a warning would alert you when the print cartridge is
getting low), or
the foreground to alert you to errors or warnings).
A list of error messages requiring a response from the user, together
with recovery information is included in chapter 6, and also provided
in the online help.
. Change this setting by choosing
Errors Occur
Warnings and Errors Occur
(the HP OfficeJet Manager would never pop to
Never
Options/Notify When
(for example, when paper
Notify When)
(for
Page 41

Using the AutoPrompt
Whenever you place a paper document into the loading tray of your
HP OfficeJet, the AutoPrompt will be displayed on your PC screen.
You can either choose the AutoPrompt on your PC screen to fax,
copy, or scan the document, or use the HP OfficeJet front panel
buttons to fax or copy your document.
N
When you press the
displays. Enter the name and fax number of the recipient, plus the
total number of pages being faxed (including the PC fax cover sheet,
if there is one).
N
To send a paper fax, click the
N
When you press the
allowing you to select the number of copies, as well as the reduction
or contrast setting.
N
When you press the
displays. You must specify a PC filename for your scanned
document. Additionally, you can select the resolution, adjust the
contrast, or invert the image.
N
For HP OfficeJet Model 350 users, who have already installed their
OmniPage Limited Edition software, a fourth option, Scan with OCR,
is also available. (Scanning with OCR, which stands for Optical
Character Recognition, means that as the document is scanned,
recognized characters are captured into a file you can open in your
word processor and edit.) The factory set directory for scanned files
is C:\OPLIMIT. After your document is scanned, you can save it in a
file on your PC by specifying a filename and filetype.
Fax
button, an abbreviated Send Fax dialog box
Send Fax
Copy
button, a Copy dialog box displays,
Scan
button, the Scan Options dialog box
button.
Page 42

Turning off
AutoPrompt
You can turn off the HP OfficeJet Series 300 AutoPrompt feature by
clicking the box to the left of "Don't show AutoPrompt when a
document is loaded" on the AutoPrompt screen or by choosing
Options/AutoPrompt
and selecting
Disable
.
Turning on
AutoPrompt
again
To turn on the AutoPrompt feature again, open the HP OfficeJet
Manager. Choose
Options/AutoPrompt
and select
Enable
.The
AutoPrompt screen will appear the next time you load a document in
your HP OfficeJet loading tray.
Setting PC Faxing options
Choose
received faxes to your PC or printer, and to turn off the HP OfficeJet
header if you are using a PC fax software application that imposes its
own header. It is a legal requirement to include the originating fax
name, number, and date on all outgoing faxes. Do not turn off the PC
fax header information unless you are certain your PC fax software is
already including this information.
Enabling or disabling PC Faxing
If you want to receive faxes to your PC or use a program other than
Eclipse Fax SE to send faxes from your PC, you must mark the
Enable PC Faxing
IncludingaPC-faxheader
Options/PC Faxing
checkbox.
to turn on/off PC faxing capability, route
The HP OfficeJet includes a header on every PC fax. If you are using
a PC faxing software package o ther than Eclipse Fax SE that also
includes a header, you may have two headers printing on every
outgoing fax. If this happens, turn off the HP OfficeJet header by
removing the check from the
Include Fax Header on PC Faxes
box.
Again, your outgoing faxes whether on paper or generated from the
PC must, by law, include the originating fax name, number, and date.
Page 43

Routing Received Faxes
When PC faxing is enabled, you will be asked to specify whether to
route incoming faxes to the HP OfficeJet printer or to your PC.
To Printer
N
on the HP OfficeJet and immediately removed from the device's
memory.
To PC
N
files on your PC, where you can view, print, delete, or save them
to other files and then send them as faxes. To receive faxes on
the PC, the PC must be turned on and the Windows program
must be running.
`If you select this option, incoming faxes are printed
`If you select this option, incoming faxes are saved as
Page 44

Printing Logs and Reports
The Reports menu offers three choices:
,and
Log
Print Reports.
Automatic Log,Print Fax
Printing a
Fax L og Report Automatically
When you choose
Manager menu, the Automatic Fax Log dialog box appears. You can
choose to have the fax log printed whenever errors occur, whenever
you send a fax, when either of those conditions occur, or never. The
factory setting is
error occurs). When you select
printed every time you send a fax.
Reports/Automatic Log
(
Error Only
the log is printed automatically when an
Send or ErrororSend only
from the HP OfficeJet
, a report is
Printing Fax Logs
To print a log of the last fax or the last 30 faxes sent and received,
choose
(accessible from the
report is shown on the next page.
Print Fax Log
from the
HP OfficeJet Manager
Reports/Automatic Logs
menu
menu).A sample Fax Log
Page 45

HP OfficeJet
Printer/Fax/Copier/Scanner
Personal
faxes
Last 30
Identification Result Pages Type Date Time Duration Diagnostic
555-3756 OK 03 Sent Oct-19 10:14A 00:02:05 001000000000
999-555-4783 Stop 02 Received Oct-19 01:21P 00:01:38 001000000000
555-1900 No Answer 00 Poll-in Oct-20 09:57A 00:00:09 001000000000403
Public Images Inc. Busy 00 Sent Oct-20 11:48A 00:00:08 001000000000
555-7990 Error 01 Poll-out Oct-20 04:38P 00:01:18 001000000000411
555-7990 Jammed 0 3 Sent Oct-20 05:10P 00:02:40 001000000000
Mary Henry No Document 00 Sent Oct-21 01:00A 00:00:21 001000000000
999-555-8012 PowerFail 01 Received Oct-21 08:43A 00:01:27 001000000000
555-4382 Power Fail 00 Sent Oct-21 08:43A 00:00:05 001000000000
The Corner Deli Cover Open 00 Sent Oct-21 11:15A 00:00:14 001000000000
555-4164 No Dial Tone 00 Sent Oct-21 11:51A 00:00:12 001000000000
Fax Log Report
Austen Enterprises
111-2222
Apr-23-96 2:30PM
for
As the sample above shows in eight columns, the Fax Log Report is a
detailed record of who the fax was sent to, whether it was successful,
the page count, whether it was sent or received, the date, time,
duration, and diagnostic check. Each of these columns is explained in
detail in the table below.
Heading Description
Identification The location a document is
number and only the first 20 digits are shown.
: If you send a fax to a location using a speed dial name, the name not
Note
the fax number will be displayed. In the example above, the name "Public
Images Inc," not the number is displayed.
Result
"OK" indicates the fax was successfully transmitted.
"Stop"
"
means you pressed the
No answer
" means the receiving fax machine did not answer. Call recipi`
ent to make sure the fax machine is ready to receive faxes.
"
" indicates the receiving fax machine is busy and you should try
Busy
again later, or set Auto Redial to "On" to allow the phone number to b e
redialed, automatically, up to five times.
sent toorreceived from
button to cancel the fax.
STOP
is identified by the fax
Page 46

DescriptionHeading
Result
(continued)
Pages The number of pages successfully sent or received.
Type "Sent"and "Received"indicates whether the fax was sent or received.
Date The date of transmission.
Time
Duration
Diagnostic
"Error" means the fax failed during transmission, due to an error. Try
again and/or contact the recipient to ensure the fax machine is ready to
receive faxes. If receiving a fax, ask the sender to retransmit it.
"Jammed" means the loaded paper jammed while being drawn into the
machine for faxing or copying. Open the front panel by pulling the top
ledge of the panel toward you, remove the paper jam and close the front
panel. Resume faxing or copying.
"No document" means the document scheduled for faxing at a later time
(with the Send Fax Later feature) was not there.
"Power fail" means the power failed during send or receive mode, details
of which are recorded in the Power Fail report. See "Power Fail Report" at
the end of this chapter.
"Cover open" means the fax was aborted during transmittal because the
front panel was opened. Part or all of the document will need to be resent.
"No dial tone" means an absence of a dial tone on the connecting tele`
phone line. Check your connections and try again.
Note: The total number of pages sent is listed in this column if a fax is sent
from memory (as with faxes scheduled for a future time and group faxes).
For example, "02/02" means that two out of two pages were sent.
"Poll-in" means the fax was received after polling another fax machine.
"Poll-out" the fax was sent to another fax machine that polled yours.
The time of the transmission.
The time it took to transmit the fax in hours, minutes, and seconds.
A 12- or 15-digit code used by HP service representatives to diagnose send/
receive problems.
Page 47

Printing HP OfficeJet Reports
Choose
Samples and explanations for each report are provided at the end of
this chapter.
N
N
N
N
A Power Fail report is printed automatically if power fails while a fax
is being transmitted, or is pending. If the Power Fail report issues
either of these warnings "These faxes were in the process of being
received but were not completely printed," or "These faxes were not
completely sent," the fax(es) will have to be resent.
Reports/Print Reports
Speed Dial
fax numbers.
Menu Settings
currently-selected settings (marked with an asterisk) in a
hierarchical diagram.
Self Test
current and factory settings of menu items, and informs you of
print cartridge problems and the current version of your product.
Print Demo
OfficeJet and demonstrates print quality.
. This report lists stored speed dial codes, names, and
. This report describes the menu layout as well as
. This report prints samples of internal fonts, lists
. This report summarizes key features of the HP
to print any of the following reports.
The Speed Dial Report
The Speed Dial report lists speed dial codes, names, and fax numbers
you have programmed using either the HP OfficeJet Manager or the
front panel.
Heading Description
Speed Dial Code
Number
Name The names that correspond to individual speed dial codes (1-60), or group
Fax Number The fax number you entered for this speed dial code.
A speed dial code programmed during Speed Dial setup.
Codes 1 through 60 are allocated to individual speed dial numbers, and
codes 61 through 65 are reserved for group speed dial numbers.
speed dial codes (61-65).
Page 48

HP OfficeJet
Personal Printer/Fax/Copier/Scanner
Speed Dial
Code Number Name Fax Number
01 ABC Property Mgmt 555-1900
02 Public Images Inc. 1-999-555-4783
03 W.M., Accountant 555-7379
04 S&H Office Supplies 555-2312
05 Old Pioneer Bank 1-999-555-3776
06 The Corner Deli 555-8989
07 Sturdy Constr. Co. 555-7584
08 Western Mortgage 555-9900
09 DJ's Realty 555-4387
10 D. Best Architects 1-999-555-6776
11 Donna Ortega 1-999-555-8012
12 Paul Arnold 1-999-555-8681
13 Alan Calderon 1-999-555-4914
14 Tracie Gomovich 555-4324
15 Steven K. Fong 555-8332
16 Mary Henry 1-999-555-5773
17 Pat Schultz 555-8464
18 Jeff Rutledge 555-2109
19 Jane Markowitz 555-4951
20 Mike Bentley 555-8146
Speed Dial Report for
Austen Enterprises
111-2222
Apr-23-96 08:30AM
21 Jane Letrich 555-6562
22 Betty Matlock 555-9255
23 Alan Klein 555-4898
61 Area Managers
11 Donna Ortega 1-999-555-8012
12 Paul Arnold 1-999-555-8681
13 Alan Calderon 1-999-555-4914
14 Tracie Gomovich 555-4324
15 Steven K. Fong 555-8332
16 Susen Henry 1-999-555-5773
Page 49

The Menu Settings Report
The Menu Settings report shows both the menu layout and the
currently-selected settings in a hierarchical diagram. The current
selections are marked with an asterisk in the report, just as they are
on the front panel display. Refer to this report to look at current
selections and review other available ones before making changes. A
sample report on the next page shows the selected factory settings.
Page 50

HP OfficeJet
Personal Printer/Fax/Copier/Scanner
MENU
Time/Date, Header
Reports
Time/Date
Fax Header
Fax Log
Menu Settings Report for
Austen Enterprises.
111-2222
Apr-23-96 09:36 AM
Print Now
Last Fax
Last 30 Faxes
Fax/Copy Contrast
Paper Size
Fax Settings
Menu Settings
Self Test
Print Demo
Print All
Speed Dial/One-Touch
Normal *
Lighten
Darken
Letter (8.5x11 in) *
A4 (210x297mm)
Legal (8.5x14 in)
Exec (7.25x10.5 in)
Envelopes
Speed Dial Setup
Group Dial Setup
Phone Setup
Automatic Log
Rings to Answer
Ringer
Ring/Beep
Volume
Button Beeps
Dialing Mode
Auto Redial
Distinctive
Ring
Error only*
Send or error
Send only
Off
On *
Off
Soft*
Loud
On *
Off
Tone *
Pulse
On *
Off
Off *
On
Page 51

Remote Ser`
vice
Off *
On
Printer Set`
tings
Send Fax Later
Polling Set`
up
Backup Reception
Silent De`
tect
Auto Reduc`
tion
Error Correc`
tion
Character
Set
Carriage Re`
turn
Perf Skip
Mode
Text Scale
Mode
Orientation
Printer Font
Print Quality
Setup
Cancel
Send
Receive
Send
On *
Off
Off *
On
Off *
On
On *
Off
PC-8 *
HP Roman 8
PC-8 Danish/Nor
UK ISO 4
German ISO 21
French ISO 69
Italian ISO 15
Nor v.1 ISO 60
Swed Names ISO
11
Spanish ISO 17
ASCII
Portug ISO 16
PC-850
ECMA-94 Latin 1
HP legal
CR only *
CR and LF
On *
Off
Off *
On
Portrait *
Landscape
Normal *
Condensed
Letter *
Draft
Page 52

Copier Settings
Clean Pen
Printer Status
Copy Reduc`
tion
Ready*
Offline
100% *
95%
90%
85%
80%
75% Legal-to-Letter
70%
Page 53

The Self Test Report
To look at samples of internal fonts, review current and factory
settings, locate any print cartridge problems, as well as product
version information, you will need to print the Self Test report.
HP OfficeJet
Personal
Printer/Fax/
Copier/Scanner
Self Test Report
Austen Enterprises.
111-2222
Apr-23-96 09:52 AM
Font Samples:
Courier --- abcdefg ABCDEFG 123456789 @#$%^&*
Courier Italic --- abcdefg ABCDEFG 123456789 @#$%^&*
CG Times --- abcdefg ABCDEFG 123456789 @#$%^&*
CG Times Italic --- abcdefg ABCDEFG 123456789 @#$%^&*
Letter Gothic --- abcdefg ABCDEFG 123456789 @#$%^&*
Letter Gothic Italic --- abcdefg ABCDEFG 123456789 @#$%^&*
Univers --- abcdefg ABCDEFG 123456789 @#$%^&*
Univers Italic --- abcdefg ABCDEFG 123456789 @#$%^&*
Menu Feature Current Setting Factory Setting
Fax Header:
ACME Co.
619 555-1234
Automatic Log:
Fax/Copy Contrast:
Paper Size:
Rings to Answer:
Ringer:
Ring/Beep Volume:
Button Beeps:
Dialing Mode:
Auto Redial:
Distinctive Ring:
Remote Service:
Backup Reception:
Silent Detect:
Auto Reduction:
Character Set:
Carriage Return:
Perf Skip Mode:
Text Scale Mode:
Orientation:
Printer Font:
Print Quality:
Printer Status:
Copy Reduction:
Error only
Normal
Letter (8.5x11 in)
2
On
Soft
On
Tone
On
Off
Off
On
Off
On
PC-8
CR only
On
Off
Portrait
Normal
Draft
Ready
100%
Error only
Normal
Letter (8.5x11 in)
2
On
On
Tone
On
Off
Off
On
Off
On
PC-8
CR only
On
Off
Portrait
Normal
Letter
Ready
100%
This symbol ( ) indicates that the current setting is different from the factory setting.
Self Test: PASSED Firmware Version 1.0 LIU Type 15
Print Cartridge Tests:
31
11121
41
for
Soft
Page 54

Heading Description
Font Samples Sample characters and numbers shown for each of the eight internal fonts.
MENU Features All menu items are listed.
Current Settings The current selection for that menu item.
Factory Settings The setting selected at the factory for that menu item.
Self Test: Passed Internal electronics tested and are working correctly.
Self Test: Failed The internal electronics failed their self test. Please call for service. (See
"Getting Help" in chapter 6 for Customer Support Center numbers.)
Firmware/Version The version number of your HP OfficeJet internal firmware. You may be
asked to provide this number when you talk to a customer support
representative.
LIU Type The type of line interface unit (LIU) in your HP OfficeJet. The LIU (the
module into which you plugged your telephone cords) controls your fax
transmissions (send and receive). You may be asked to provide this
information when you talk to a customer support representative.
Print Cartridge
Tests
This diagonal pattern and area will help you diagnose print cartridge nozzle
problems. If the diagonal line is not continuous (if white gaps break the
line), or if the area fill is not filled in solidly with ink (horizontal white
lines appear in it), some of the nozzles in your print cartridge may be
clogged, so they're not releasing ink.
If you think your nozzles are clogged, see "Solving Problems While
Printing, Faxing, or Copying" in chapter 6 for cleaning and reseating
instructions.
11121
11121
??
The Power Fail Report
A Power Fail report is printed
fax is being transmitted or pending. The following sample shows you
the information contained in the report.
31
41
No gaps =
Nozzles okay
31
41
White gaps =
Clogged nozzles
Solid area fill =
Nozzles okay
White lines =
Clogged nozzles
automatically
if power is lost while a
Page 55

If your power fail report heading is "These faxes were in the process
of being received but were not completely printed," ask the sender to
resend the document.
If your report's heading is, "These faxes were not completely sent,"
you may have to resend the entire document.
HP OfficeJet
Personal
Power failed at 08:43AM on Apr-23-96
These faxes were in the process of being received but were not completely
Identification Result Pages Type Date Time Duration Diagnostic
999 555 8012 Power fail 01 Received Oct-21 08:43A 00:01:27 001000000000
These faxes were not completely
Identification Result Pages Type Date Time Duration Diagnostic
5554382 Powerfail 00 Sent Oct-21 08:43A 00:00:05 001000000000
Printer/Fax/Copier/Scanner
sent:
Power Fail Report
Austen Enterprises.
111-2222
Apr-23-96 08:59AM
printed:
for
Page 56

2 Sending
Paper Faxes
Topic Page
What You Need to Know... 2-2...........................
Dialing from the front panel 2-2.......................
Sending a Paper Fax Using the AutoPrompt 2-4..............
Sending a Paper Fax Using the Front Panel 2-6...............
Sending Paper Faxes to Multiple Fax Numbers 2-8............
Sending a Paper Fax at a Future Time 2-9...................
Sending a Fax to Another
Fax Machine Upon Request (Being Polled) 2-11...............
Asking to Receive a Fax from
Another Fax Machine (Polling) 2-12........................
Adjusting the Resolution 2-13.............................
Adjusting the Contrast 2-14...............................
Page 57

What You Need to Know...
This chapter explains how to send paper documents to other fax
machines, as well as send a loaded document on request (being
polled), or retrieve a document from another fax machine (polling).
To send faxes from, and receive faxes to, your PC, refer to chapter 3.
To fax a document that is stapled or secured with paper clips,
remove the staples and paper clips from the document before faxing.
CAUTION
Failure to remove staples and paper clips before faxing can cause
permanent damage to the scanner inside the HP OfficeJet.
Dialing from the front panel
There are several ways to dial a fax number from the front panel.
N
Use the numeric keypad on
the HP OfficeJet.
N
Press the
Speed Dial
(at the top left of the front
panel) and a 2-digit code us`
ing the numeric keypad on
the HP OfficeJet.
N
Press one of the 10 OneTouch buttons at the right of
the front panel.
button
Speed Dial
01
03
05
07
09
through
0
through
0
9
9
02
04
06
08
10
2`2
Page 58

Redial/Pause
To immediately start redialing the last fax number you dialed, press
Redial/Pause
.
The
Redial/Pause
N
Immediately start redialing the last fax number you dialed.
If you press
button allows you to do two things:
Redial/Pause
while the automatic redial timer is
displayed, the next redial begins immediately. Note, however,
you cannot redial a group of fax numbers.
N
Insert a pause into the dialing sequence.
If you press
Redial/Pause
while in the middle of entering a fax
number, a dash (-) is displayed in the fax number and the dialing
will pause momentarily at that point.
Page 59

Sending a Paper Fax
Using the AutoPrompt
1. Load
2.
your document face-down in the fax loading tray. (Depending
on the thickness of the paper, you can load up to 20 pages. However,
if you have problems, try sending a few pages at a time.) Wait a few
seconds while the HP OfficeJet begins to load the bottom page. Note
that the selected resolution shows on the bottom line of the display.
sl-19a
Look at your PC; the AutoPrompt should be displayed.
(If the AutoPrompt is not displayed, open it by selecting
AutoPrompt
Enabled.)
2`4
the HP OfficeJet Manager and change the setting to
from
Options/
Page 60

3.
Click the
4.
Enter the name and fax number of the recipient. Optionally, you can
button, the Send Fax dialog box displays.
Fax
also choose to send a PC fax cover sheet with this paper fax by
clicking the Send Cover checkbox and selecting a cover sheet.
5.
Enter the number of pages being f axed (the total number placed in the
loading tray, including the cover page, if any).
(The total number of pages is required for the Send Log. The
HP OfficeJet sends all pages you have loaded for faxing regardless of
the number here. It is beneficial to enter the correct number here so
when you reference the Send Log, all of the information regarding
sent faxes is correct. Note, too, that you cannot view a paper fax from
the Send Log; you can view only PC cover sheets for your paper
faxes and PC faxes.)
6.
Click the
Send Fax
button to send your paper fax (and PC fax cover
sheet, if you added one).
Page 61

Sending a Paper Fax
Using the Front Panel
1. Dial
2. Load
the fax number using one of the
following methods.
N
Use the numeric buttons on the
HP OfficeJet.
N
Press the
and a 2-digit code.
N
Press one of the 10 One-Touch
buttons.
N
Pick up the handset and dial from
a telephone connected directly to
your HP OfficeJet. If you
dial this way, stay on the line
through step 3.
your document, face-down, in
the fax loading tray. (Depending on the
thickness of the paper, you can load up
to 20 pages. However, if you have
problems, try sending a few pages at a
time.) Wait a few seconds while the
HP OfficeJet beg in s to load the bottom
page. Note that the selected resolution
shows on the bottom line of the dis`
play.
Speed Dial
button
sl-46b
sl-19a
3.
Press
Start/Copy
Note:`
If you dialed from a telephone
connected directly to your HP Office`
Jet and a person picks up the phone
on the receiving end, ask them to p ress
the Start button on their machine to
start receiving the fax. You can replace
the handset at anytime.
to begin.
2`6
sl-47
Page 62

Helpful Hints:
N
If the line is busy, the fax number may be redialed automatically
several times. Or, you may choose to manually redial with the
button instead. See "Redialing with the
beginning of this chapter.
N
If you want to send a fax to someone you're already talking to on a
telephone connected directly to your HP OfficeJet, just load the
document and press
person on the other end to press the Start button on their fax machine
after hearing the fax tone.
Start/Copy
; you don't need to dial. Ask the
Redial/Pause
Button" at the
Redial
Page 63

Sending Paper Faxes
to Multiple Fax Numbers
The following procedure lets you manually send a paper fax to
several numbers you have not already grouped. If your document
does not fit into memory, you will need to send the document to each
fax number, one at a time.
this:
Do
1.
Dial a fax number OR press
Speed Dial
code number. (The example
shows "5552312.")
2.
Press
Copy
3.
Press
number.
4.
Repeat steps 1 and 2 until
you've entered all your fax
numbers (up to 10 fax num`
bers can be entered). Then
press2to quit adding fax
numbers.
5.
Load your document. The
bottom line of the display
will tell you how many fax
numbers will be dialed ("3"
in the example).
and a two-digit
Enter/Save
).
to enter another fax
1
(not
Start/
Using
these buttons: For this display:
0
Enter/Save
1
2
through
9
Press START to send
5552312
Enter another?
1=Yes 2=No
Enter fax number
2:
Load document
then press START
Loading document
Group size: 3
Press START to send
Group size: 3
6.
Press
Start/Copy
document is scanned into
memory, then the fax num`
bers are dialed, one at a time,
in the same sequence in
which you entered them.
. First the
2`8
Start/Copy
Storing...
Memory used: 40%
Page 64

MENU:
Fax Settings
Sending a Paper Fax
Send Fax
Later
this:
Do
1.
Press the
display the menu.
2.
3.
4.
5.
Right Arrow
Press
times to move to "Fax Set`
tings."
Enter/Save
Press
"Fax Settings."
Right Arrow
Press
times to move to "Send Fax
Later."
Enter/Save
Press
"Send Fax Later."
at a Future Time
You can schedule a fax to be sent automatically, up to 24 hours later
than the current time. You can also send a paper fax at a future time
by using the Scan and Fax feature of Eclipse FAX SE. Refer to
chapter 3 for complete information.
Menu
button to
to select
to select
multiple
multiple
Using
these buttons: For this display:
Menu
Enter/Save
Enter/Save
MENU
Time/Date, Header
MENU
Fax Settings
FAX SETTINGS
Speed Dial Setup
FAX SETTINGS
Send Fax Later
SEND FAX LATER
Setup
6.
7.
(Continued on next page)
Enter/Save
Press
"Setup."
Enter the time at which you
want the fax to be sent. (If
you previously set the time in
AM/PM format, you will be
prompted to press
2
or
for PM.)
to select
1
for AM
Enter/Save
0
through
Enter start time
12:00
9
Enter start time
01:00
Page 65

Using
Do this: For this display:
8.
Enter the fax number.
OR press
Speed Dial
and a
these buttons:
through
0
9
Enter fax number
5554138
two-digit code number.
OR press a One-Touch but`
ton.
9.
Press
Enter/Save
to save the
fax number you entered.
10.
Press1to store the document
in memory until the fax start
time, or press2to load the
document in the fax loading
tray until the fax start time.
Enter/Save
1
OR
2
Store fax now?
1=Yes 2=No
Load document,
then press START
OR
Load document,
in fax tray
11.
If you pressed1in step 10,
load the document and press
Start/Copy
. (If the message
"Memory full" displays,
leave the entire document in
the fax loading tray until the
start time.)
OR
If you pressed2in step 10,
load the document and leave
it there until the start time.
You may remove the docu`
ment if you need to send
another fax or make copies;
just replace it before the start
time (on the bottom line of
the display).
If you want to cancel a scheduled fax: Repeat steps 1 through 5,
then press
Enter/Save
Start/Copy
Right Arrow
to display "Cancel Send," then press
to cancel the scheduled fax.
Storing...
Memory used: 40%
OR
Document loaded
Faxat1:00AM
2`10
Page 66

MENU:
Fax Settings
Sending a Fax to Another Fax
Polling
Setup
Machine Upon Request (Being
Polled)
The following procedure allows another fax machine to instruct the
HP OfficeJet to send it a paper fax. You can only be polled by one
other fax machine at a time. You must repeat the procedure for each
fax machine you want to poll the HP OfficeJet.
this:
Do
1.
Press the
display the menu.
2.
Press
times to move to "Fax Set`
tings."
3.
Press
"Fax Settings."
4.
Press
times to move to "Polling
Setup."
5.
Press
"Polling Setup." ("Receive"
displays.)
6.
Press
"Send."
7.
Press
"Send."
Menu
button to
Right Arrow
Enter/Save
Right Arrow
Enter/Save
Right Arrow
Enter/Save
to select
to select
to select
multiple
multiple
to move to
Using
these buttons: For this display:
Menu
Enter/Save
Enter/Save
Enter/Save
Load document
MENU
Time/Date, Header
MENU
Fax Settings
FAX SETTINGS
Speed Dial Setup
FAX SETTINGS
Polling Setup
POLLING SETUP
POLLING SETUP
Receive
Receive
POLLING SETUP
Send
8.
Load your document into the
fax loading tray.
To cancel a to-be-polled setup: Remove the document from the fax
loading tray, then press the
Stop
Waiting for poll
button.
Page 67
MENU:
Fax Settings
Asking to Receive a Fax from
Polling
Setup
Do
this:
1.
Press the
display the menu.
2.
3.
4.
5.
6.
Right Arrow
Press
times to move to "Fax Set`
tings."
Enter/Save
Press
"Fax Settings."
Right Arrow
Press
times to move to "Polling
Setup."
Enter/Save
Press
"Polling Setup." ("Receive" is
displayed.)
Enter/Save
Press
"Receive."
Another Fax Machine (Polling)
Use the following procedure to poll another fax machine. You can
poll only one fax machine at a time.
Menu
button to
multiple
to select
multiple
to select
to select
Using
these buttons: For this display:
Menu
Enter/Save
Enter/Save
Enter/Save
Enter fax number:
MENU
Time/Date, Header
MENU
Fax Settings
FAX SETTINGS
Speed Dial Setup
FAX SETTINGS
Polling Setup
POLLING SETUP
Receive
7.
Enter the number of the fax
machine you want to poll
(OR press
two-digit code number).
8.
Press
number you entered. It will
be dialed immediately.
Speed Dial
Enter/Save
to save the
2`12
and a
0
Enter/Save
through
9
Enter fax number:
5553658
Dialing . . .
5553658
Page 68

Resolution
Adjusting the Resolution
The Resolution setting affects the quality at which your outgoing
faxes are scanned. Change the Resolution setting before faxing or
copying. Either use the HP OfficeJet Manager (
Fax Quality
instructions described here.
Refer to the following when changing the resolution (sharpness) of
outgoing faxes.
N
N
N
Do
this:
1.
Press the
once to display the current
resolution setting, which is
marked with an asterisk (*).
(The example shown is
"Standard.")
2.
Press
times until the setting you
want is displayed. (The ex`
ample shown is "Photo.")
3.
Press
setting you displayed. Note
that an asterisk denotes your
new selection.
4.
Press
the Ready display.
Resolution
Resolution
Enter/Save
Enter/Save
multiple
to select the
to return to
OfficeJet Setup/Send
dialog box) described in chapter 1 or the front panel
Standard
illustrations), or when the transmission speed is more important
than quality.
Fine
take longer to send a fax.
Photo
color (such as photographs). This selection causes documents to
be scanned as halftone images.
button
for text only faxes (no photographs or graphic
to make text and line drawings as sharp as possible. It may
to capture images containing different shades of gray or
Using
these buttons: For this display:
Resolution
Resolution
Resolution
Enter/Save
RESOLUTION
Standard *
RESOLUTION
Photo
RESOLUTION
Photo *
Ready Auto
Apr-23-96 10:30 AM
Page 69

MENU:
Fax/Copy
Contrast
Adjusting the Contrast
The
your outgoing faxes and copies, as they are scanned. Change the
Contrast setting before faxing or copying. Either use the HP OfficeJet
Manager (
chapter 1, or the front panel instructions described here.
Refer to the following when changing the lightness or darkness of
outgoing faxes.
N
N
N
this:
Do
1.
Press the
display the menu. "Time/
Date, Header" is displayed.
2.
Press
times to move to "Fax/Copy
Contrast."
3.
Press
"Fax/Copy Contrast." Note
that the current setting is
marked with an asterisk (*).
4.
Press
contrast setting you want is
displayed. ("Darken" is
shown as an example.)
5.
Press
displayed setting. An asterisk
denotes your new selection.
6.
Press
the Ready display.
Menu
button to
Right Arrow
Enter/Save
Right Arrow
Enter/Save
Enter/Save
multiple
to select
until the
to select the
to return to
Fax/Copy
Darken
Normal
Contrast setting affects the lightness and darkness of
OfficeJet Setup/Send Fax Quality
for originals that are too light.
for documents with acceptable lightness/darkness
(factory setting).
Lighten
for originals that are too dark.
Using
these buttons: For this display:
Menu
Enter/Save
Enter/Save
Enter/Save
dialog box) described in
MENU
Time/Date, Header
MENU
Fax/Copy Contrast
FAX/COPYCONTRAST
Normal *
FAX/COPY CONTRAST
Darken
FAX/COPY CONTRAST
Darken *
Ready Auto
Apr-23-96 10:30 AM
2`14
Page 70

3 Faxing and
Scanning:
Sending from and
Receiving to
Your PC
Topic Page
Introducing Eclipse FAX SE 3-3..........................
Using Eclipse FAX SE 3-4...............................
Using the Help System 3-5............................
Sending PC Faxes 3-6..................................
Preparing to send a fax (Send Setup) 3-6..................
Sending a fax from a Windows application 3-10.............
Sending a Quick Note from Eclipse FAX SE 3-16...........
UsingtheSendLogtoview,
`print, resend, delete, or reschedule faxes 3-18.............
Sending a fax to more than one recipient 3-23..............
Adding a New Phonebook 3-26............................
Adding names to a Phonebook 3-28......................
Modifying a Phonebook 3-29............................
Deleting a Phonebook 3-30.............................
Creating a group of names from one or more Phonebooks 3-30.
Modifying a Phonebook from the Send Fax Dialog Box 3-32..
Importing names and fax numbers from other applications 3-33
Receiving Faxes to Your PC 3-35..........................
Receiving a fax to your PC (Receive Setup) 3-35............
Using the Receive Log to view, print, or delete faxes 3-36.....
Forwarding a Fax 3-38.................................
Printing Faxes and Files 3-39..............................
Printing an entire fax from the Send o r Receive Log 3-39.....
Printing selected pages
`of a fax from the Send or Receive Log 3-39...............
Printing a file from Eclipse FAX SE 3-40..................
Page 71

Using Menus and Toolbars to View Faxes 3-41...............
Viewing a fax 3-41....................................
Scanning 3-47..........................................
Scanning using the AutoPrompt 3-47.....................
Scanning using Eclipse Fax SE 3-49......................
Using Advanced Eclipse FAX SE Features 3-53...............
Faxing a document to a file 3-53.........................
Faxing a saved file from Eclipse FAX SE 3-55..............
Adding text to a fax 3-56...............................
Adding an image to a PC fax 3-61........................
Sending Multiple Documents as a Fax 3-65................
Using the Collect dialog box 3-67........................
Adding an Image to Cover Pages 3-70....................
Using Letterhead and Second Sheets in faxes 3-73...........
Using the Fax Preview Feature 3-79......................
Setting the New Page Paper Size 3-80.....................
Page 72

Introducing Eclipse FAX SE
Eclipse FAX SE is a software program that allows you to scan and
fax documents from your PC, as well as send and receive faxes
directly to your PC, rather than to the device itself.
First make sure you are in your Windows desktop. When you click
on the HP OfficeJet icon, the HP OfficeJet Series 300 program
window displays, among its icons, the HP OfficeJet Manager and
Eclipse FAX SE. The OfficeJet Manager is explained in Chapter 1;
this chapter discusses the features of Eclipse Fax SE. All of this
information is also contained in the online help system.
Eclipse FAX SE not only allows you to fax and scan using your PC,
but it lets you modify your documents before faxing, as well as
perform other tasks such as:
N
Set up as many as six phonebooks.
A phone book is a list of names and fax numbers that you can
store in memory by assigning a code number to it for easy recall.
It is similar to Speed Dial entry used for paper faxing, explained
in chapter 2.
N
Create a document in any Windows application and then fax it
directly from your PC.
N
Receive faxes directly to your PC. Once an incoming fax has
been received, you can use Eclipse FAX SE to view, print, or
delete it.
N
Forward a fax you've received to another recipient.
N
Route the fax to a file, to be saved for future faxing.
N
Scan a document into your PC to be sent as a fax, saved as a file,
or printed.
N
Add text and images to the faxes.
N
Modify cover pages and use your letterhead and second sheets
with faxes.
N
Send two or more documents as a fax.
Page 73

Using Eclipse FAX SE
To access Eclipse FAX SE, do one of the following:
N
Choose
menu.
N
Double-click the Eclipse FAX SE icon in the HP OfficeJet Series
300 program window.
N
Click the Fax or Scan button in the AutoPrompt window.
The Eclipse FAX SE icon
File/Run Eclipse FAX SE
from the HP OfficeJet Manager
The Eclipse FAX SE window appears. The five menu options,
Send, Receive, Scan
are explained in detail in this chapter, as well as in the online help
system.
For information about Windows-based help systems, refer to the
Windows User's Guide.
and
, shown in the menu bar across the top,
Help
File,
Page 74

Using the Help System
Eclipse FAX SE has a comprehensive online help system, designed
Help
to help you look up the topics quickly. When you choose
the Eclipse FAX SE menu bar, a drop-down menu is displayed (see
figure on previous page).
from
N
Choose
system.
N
Choose
specific topics.
N
Choose
information and customer support.
N
Choose
Eclipse FAX SE.
To get help on specific topics like Send Setup, Send Fax, Phonebook,
Receive Setup, and HP OfficeJet Scanner, click the
dialog box of the selected menu item.
Note
:`Each time you send a fax, a data file is added to your disk.
Because these files take u p a lot of disk space, use
unneeded files frequently.
Help/Contents
Help/Search
Help/Technical Support
Help/About
to display the contents of the online help
for detailed information and instructions on
to look up information about your version of
for help with troubleshooting
Help
button in the
Send Log
to delete
Page 75

Sending PC Faxes
You can use Eclipse Fax SE to send a fax directly from your PC,
instead of from the device, and you can use the AutoPrompt to fax,
copy, and scan paper documents.
Preparing to send a fax (Send Setup)
Before using Eclipse FAX SE (or any Windows application) to send
faxes, review the setup information, preinstalled at the factory, to
make sure it is correct. If you need to modify current settings such as
Resolution, Cover Page,orNew Page Paper Size,
below.
1.
Open Eclipse FAX SE.
2.
Choose
box displays.
Send/Setup
from the menu bar. The Send Fax Setup dialog
follow the steps
Page 76

Change any of the following as necessary.
Resolution
Standard
N
N
- you are given two options. The factory setting is
.
Standard
Best Available
resolution (the default) is 204 x 98 dpi.
resolution is 204 x 196 dpi.
Note, for faxes sent from your PC, the resolution you choose h ere
will override the setting made from the HP OfficeJet Manager or
using the front panel. However, it will not affect the resolution of
paper faxes.
Cover Page Information
box - Make sure the information is current.
Otherwise, you have the option to change your name, company name,
and fax number.
New Page Paper Size
that is opened when you choose
3.
Click the
OK
- This setting determines the size of the page
File/New Page
button to save your changes; the
from the main menu.
Cancel
button at any
time to close the dialog box without saving your changes; and the
Help
button to access the online help.
Page 77

Viewing the Eclipse FAX SE Cover Pages
1.
Choose
cannot view the cover pages from the Send menu.)
2.
In the
double-clicking on it.
3.
In the Directories box, choose HPOJET\EFAX\IMAGES by double
clicking on each of the three directory names. The names of five
cover pages appear, and you can choose from the different styles.
4.
Click on the cover page you want to view; it will be displayed (see
below).
Although you can print each cover page, write filenames on them,
and keep them for reference, you cannot modify them here. To
modify the cover pages, see "Modifying Cover Pages" later in this
chapter.
File/Open File
List Files of Type
from the Eclipse FAX SE menu bar. (You
box, choose Cover Page (.CVR) by
Shadow
Page 78

Roundbox
Halfpage
Notebox
Thinline
Page 79

Sending a fax
from a Windows application
To fax a document from a Windows application, other than Eclipse
FAX SE, follow these steps.
1.
In your Windows application (Word for Windows, Lotus 1-2-3,
Excel, and so on), create the document you want to fax.
2.
Select E-FAX on OfficeJet as your printer by choosing
Setup
, or the equivalent command for your application. ClickOK,or
the equivalent button. It may take a few seconds for the change to
occur. If you know that E-FAX is the selected printer, skip to step 3.
The application's Print Setup (or equivalent) dialog box appears, with
the name of the selected printer. The sample dialog bo x below is
from Word for Windows 6.0.
File/Print
3.
Choose
necessary if you used step 2)
appears.
4.
Select the range of pages you want to fax.
Note:`
for number of copies to 1 and see "Sending a Fax to More Than One
Recipient."
5.
Click the
printing has started, the Send Fax dialog box appears.
File/Print
To send the fax to more than o ne recipient, leave the setting
OK
(depending on the application, this step may not be
The application's Print dialog box
.
button. After a message is displayed informing you the
Page 80

The Name box
The
Company box
The
Phonebook box
6.
In the
name)
box, type the name of the recipient (
Name
personorcompany
. To select the recipient's name from an existing Eclipse FAX
SE phonebook, go to step 7. (For more information about
phonebooks, see "Adding, Changing, or Deleting a Phonebook from
the Send Fax Dialog Box" later in this chapter.)
In the
Company
box, type or select the recipient's company
(optional).
In the
box, type the recipient's fax number, including prefix and
Fax
area code, if necessary.
Using the Clear Button
To remove entries in the Name, Company, Fax, Voice (telephone), and
Phonebook Note boxes, use the Clear button. The Clear button only
removes information from the Send Fax dialog box, but does not delete it
from the selected phonebook
.
Nowskiptostep8.
Page 81

7.
In the
Phonebook
box, select the phonebook you want by clicking on
it.
Next, click the arrow to the right of the
box and click the
Name
recipient's name, or, type the f irst few letters of the recipient's last
name and press the Tab key.
N
To view the names of people associated with a company, click
the arrow to the right of the
Company
company. Next, click the arrow to the right of the
box and select the
Name
Names associated with the company appear.
Note
:`You must select the name of the company in order to use this
feature; if you type the name of the company, then click the
box arrow, all the names in the phonebook are displayed.
When you select a name f rom a phonebook, Eclipse FAX SE fills in
the
Phonebook Note
box, as well as the
Fax
Company,Voice
(telephone)
,and
boxes, if this information has been added to the
phonebook. Add the area code or prefix, if required.
For information about the
Fax to Phonebook
and
Group
buttons, see
``Sending a Fax to More Than One Recipient."
N
Click the
Phonebook
button if you want to add, delete, or rename
a phonebook. The procedure for modifying the Phonebook is
explained below.
box.
Name
Modifying the selected phonebook
N
To send a fax and add the recipient to the phonebook, type the
person's name and other information, then click the
N
To add a
Note
Company,Voice
for a name that is already in the phonebook, type the
information, then click the
N
To delete an entry from the phonebook, select the entry and click
Delete
button
.
the
(telephone) number, and/or
Update
button
.
Add
Phonebook
button
.
Page 82

8.
The
Fax Cover Sheet
N
To send the selected cover page with your fax, click the
button.
Cover
N
To send a different cover page, click the
click the arrow to the right of the box and click the cover page
you want.
N
To send no cover page with the fax, leave the
unchecked.
Eclipse FAX SE offers a choice of five cover sheets. For cover page
illustrations, see "Viewing the Eclipse FAX SE Cover Pages" earlier
in this chapter. For instructions on modifying cover pages, see
"Adding an Image to Cover Pages" later in this chapter.
9.
If you haven't created a letterhead for use with Eclipse FAX SE, the
Other Sheets: Letterhead
letterhead, see "Creating Letterhead and Second Sheets," later in this
chapter.
If you have created a letterhead, this box displays the name of the last
letterhead you used.
N
To fax the first page of your document on the selected letterhead,
click the
N
To choose a different letterhead, click the
then click the arrow to the right of the box and double-click the
name of the letterhead you want.
10.
If you haven't created second sheets for use with Eclipse FAX SE, the
Other Sheets: 2nd Sheets
second sheets, see "Creating Letterhead and Second Sheets," later in
this ch apter.
If you have created second sheets, this box displays the name of the
last second sheet you used.
box shows the name of the last cover sheet used.
Send Cover
Send Cover
box is blank. For information about creating
Letterhead
button.
Letterhead
box is blank. For information about creating
button, then
button;
Send
button
N
To fax the second and subsequent pages of your document on the
selected second sheet, click the
N
To choose a different second sheet, click the
then click the arrow to the right of the box and double-click the
name of the second sheet that you want.
2nd Sheets
button.
2nd Sheets
button;
Page 83

11.
Under
Schedule
N
Skip this box if you want your fax sent at the current date and
, do one of the following:
time, but after any pending faxes that are scheduled for the same
date and time. (This is the default.)
N
Click the
Immediately
checkbox if you want to send this fax
before any pending faxes. The fax will be sent when you click
the
Send Fax
button (or, if the HP OfficeJet is busy, as soon as it
is free).
N
To schedule the fax, double-click the parameter you want to
change (hour, minute, month, day, or year). Then either type a
new time or use the arrows to set the time you want. (Eclipse
FAX SE uses a 24-hour clock`midnight is 00:00, noon is 12:00,
1:00 p.m. is 13:00, and so on.) The fax will be sent at the
scheduled time. (The Send Log will show the exact date and time
sent.)
12.
After completing your entries in this dialog box, click the
button.
Note:`
When you send a PC fax, the HP OfficeJet waits until 1-2
pages have been downloaded before it tries to connect with the
receiving fax machine (this minimizes fax connect time). When
transmission begins, the PC must have downloaded the rest of the
fax. If the HP OfficeJet finds that another PC application is
interfering with the process, it may temporarily block (or slow down)
the application in order to allow the fax to continue. (This also
applies to mouse movement.)
Send Fax
Using the Special Options
To use one of the
Special
options before sending your fax (you can
choose only one option from the Send Fax dialog box; you can
choose more later in the process), click on the following options:
Fax Preview:
Send Fax
View your fax before sending it. When you click the
button, the fax is displayed with the Thumbnail toolbar. See
"Using Menus and Toolbars to View Faxes," later in this chapter.
Mark Up:
Send Fax
Add text to your fax before sending it. When you click the
button, the fax is displayed with the Edit toolbar. See
"Adding Text to a Fax," later in this chapter.
Page 84

Place Image:
click the
Add an image to your fax before sending it. When you
Send Fax
button, the fax is displayed with the Place Image
window open. See "Adding an Image to a PC Fax," later in this
chapter.
Append Pages:
you click the
Add documents to your fax before sending it. When
Send Fax
button, the fax is displayed with the Collect
Pages dialog box open. See "Sending Multiple Documents as a Fax,"
later in this chapter.
If You Get A Busy Signal:
Automatic Redial
T
he
setting of the HP OfficeJet Manager , if turned
on, allows both paper and PC fax numbers to be redialed five times in
the event of a busy signal, both from other Windows applications and
from Eclipse FAX SE (see "Sending a Quick Note from Eclipse FAX
SE," next).
If a PC fax fails because of a busy signal, and
Automatic Redial=Off
,
the fax number is not redialed.
If a PC fax fails because of a busy signal, and
Automatic Redial=On
,
the fax remains in the Send Log with a status of Pending. It is
redialed according to your country's regulations. If you cancel the fax
Cancel
before all the redials take p lace, either by clicking the
button
in the Eclipse FAX SE "Sending" message box, or by pressing the
Stop
button located on the front panel, the automatic redials stop, and
the fax is placed in the Send Log with a status of Terminated.
If a PC fax fails for a reason other than a busy signal (no answer, dial
tone, etc.), the fax is not retried, and is listed in the Send Log with a
status of Terminated.
If a PC fax transmission reaches a busy signal and you want to
prevent redials, highlight the fax in the Send Log (status = Pending)
Delete
andclickthe
button.
Page 85

Sending a Quick Note from
Eclipse FAX SE
The Quick Note feature lets you add a note to a cover page before
sending a fax, and is the easiest way to fax a short message.
1.
From the Eclipse FAX SE menu bar, choose
For the Quick Note feature, the Send Fax dialog box looks like this.
A default cover page is selected;
selected; and the
Other Sheets
Include Note on Cover Sheet
Special
and
Send/Quick Note
options are not available.
.
is
2.
Complete the
and include any required prefix with the fax number. (For more
details see "Sending a Fax from a Windows Application," earlier in
this ch apter.)
Name
and
Fax
options, schedule the fax, if necessary,
Page 86

3.
Click the
Send Fax
button. The Cover Sheet Notes dialog box
appears.
4.
Move your cursor to the
box by clicking in it or by pressing the
Note
Tab key, and type your note.
5.
Click the
6.
(For an explanation of the Duplicate and Duplicate All options, see
Send Fax
button.
"Sending a Fax to More Than One Recipient," later in this chapter.)
After completing this procedure, you will be returned to the Eclipse
FAX SE window.
Page 87

Using the Send Log to view, print,
resend, delete, or reschedule faxes
Eclipse FAX SE keeps a log (list) of the faxes you have sent, which
you can use to view, modify, print, delete, or reschedule faxes.
The
To open the Send Log, choose
menu bar. The Send Log appears. To close the Send Log, either click
Cancel
the
Show
buttons The
button or double-click in the upper left corner.
Changing the display
Send/Log
from the Eclipse FAX SE
Display
buttons
Use the
All Faxes
Use the
N
N
Show
buttons to display either
.
Display
Click the
names (people or companies), selected from a phonebook or
specified in the Send Fax dialog box.
Click the
(usually, their fax numbers), received from their fax machines.
buttons to change the display in the
Names
button (the default) to display the recipients'
ID's
button to display the recipients' fax identifiers
Unsent Faxes,Sent Faxes
Destination
,or
field.
Page 88

Viewing Faxes
1.
To view a fax, do one of the following:
N
double-click on the entry in the Send Log, or,
N
highlight the entry and click the
The fax is displayed, with the View toolbar and additional menu
choices.
2.
Close the fax opened from
3.
Choose
To add text and images, as well as other documents to the fax, refer
to these sections: "Adding Text to a Fax"; "Adding an Image to a
Fax"; " Sending Multiple Documents as a Fax"; and "Using Menus
and Toolbars to View Faxes."
File/Close
to return to the Eclipse FAX SE window.
Send Log
View
.
button.
Viewing Fax Information
To view the technical information about a fax, highlight the entry in
the Send Lo g and click the
the
following information:
N
N
N
N
N
button again. The Send Log Details box provides the
Details
Fax:
The recipient's fax number.
File Type:
been deleted but the Sen d L og entry kept (see "Deleting Faxes").
File:
see "Managing Files."
File Spec's:
Application:
document's title in that application, if it has one; and the number
of pages in the document, if it contains more than one.
File type will be "File Deleted" if the data file has
The filename. For information about filenames and types,
The resolution and the file's size, in bytes.
The application in which the fax originated; the
button. To turn the box off, click
Details
Note, while you cannot view a paper fax sent using the AutoPrompt,
you can view the accompanying PC cover page, if there is one.
Page 89

Rescheduling a fax
1.
Set the display to
2.
Highlight the entry and click the
dialog box appears.
Unsent FaxesorAll Faxes
Resched
.
button. The Reschedule Fax
Note, the
Unsent Faxes
is set to
3.
Enter a new name and fax number to send the fax to a different
Resched
All Faxes
button is only available when the display is set to
and the pending faxes are displayed, or when the display
and a pending fax is highlighted.
recipient.
4.
Do one of the following:
N
Click theOKbuttontosendthefaximmediately.
N
Click the
Send Immediately
button to send this fax ahead of any
other faxes waiting to be sent at this time.
N
Use the
Date
and
arrows to schedule the fax for a different
Time
date or time.
5.
Click the
button. The fax will be sent at the scheduled time.
OK
Page 90

Resending a fax from the Send Log
You can resend a fax from the Send Log even if the fax has a status
of Completed or Terminated (unless it was a paper fax sent using the
AutoPrompt).
1.
Set the Send Log display to
2.
Highlight the entry and click the
dialog box appears.
3.
Enter a new name and fax number to send the fax to a different
recipient (optional).
4.
Do one of the following:
N
Click theOKbutton to send the fax immediately.
N
5.
Click the
Click the
other faxes waiting to be sent at this time.
N
Use the
date or time.
Send Immediately
and
Date
button. The fax will be sent at the scheduled time.
OK
Sent FaxesorAll Faxes
Resend
button to send this fax ahead of any
arrows to schedule the fax for a different
Time
button. The Resend a Fax
.
Page 91

Printing the Send Log
To print the Send Log, from the
button. The Printer Setup dialog box appears; select HP OfficeJet
Printer, if it isn't selected and click the
printed.
Send Log
OK
menu click the
button. The Send Log is
Print Log
Printing a fax
For information on printing faxes, see "Printing Faxes and Files" later
in this chapter.
Deleting faxes
To delete one or more faxes from the Send Log, follow these steps.
Note, once a fax has been deleted, it can't be recovered.
N
To delete one fax, highlight the entry and click the
button.
N
To delete more than one fax, hold down the Ctrl key and
highlight the entries by clicking on them. When you have
highlighted all the entries you want to delete, click the
button.
N
To delete every fax that is currently displayed in the Send Log,
click the
log?" Click the
If the fax status was Pending, the data file and the entry are both
deleted. If the fax had a status other than Pending, the message
shown below appears. Click the
delete both the fax's data file and the entry in the Send Log. Click
Delete Data File Only
the Send Log.
Delete All
button. You are asked, "Delete all items in the
Yes
button.
Delete Data File and Entry
to delete the fax's data file but keep the entry in
Delete
Delete
button to
Page 92

Sending a fax
to more than one recipient
You can send a fax to every person in a phonebook, selected
individuals from one phonebook, or individuals from more than one
phonebook.
Before sending a group fax, make sure all the recipients have been
added to the phonebooks first. (For more information, see "Using
Phonebooks.") Then follow the first five steps of "Sending a Fax
from a Windows Application" or the first step of "Sending a Quick
Note from Eclipse FAX SE." When the Send Fax dialog box appears,
follow these steps:
1.
Do one of the following:
N
To send a fax to every person in a phonebook, select the
phonebook and click the
Send Fax
N
To send a fax to selected recipients from one phonebook or to
recipients from more than one phonebook, click the
button in the Send Fax dialog box. The Group dialog box
appears.
In the
which you want to choose recipients. Then either double-click
each desired recipient in the
highlight each desired recipient and click the
names you select appear in the
button to send your fax.
Select Phonebook
Fax to Phonebook
box, select the first phonebook from
Phonebook Contents
Group Members
button. Click the
Group
box, or
Add
button. The
box.
Page 93

When you have finished adding recipients from this phonebook,
select another phonebook. Continue in this manner until you
have added all the recipients you want. If you add a recipient by
mistake, highlight the name and click the
Remove
button.
If you have fewer than six existing phonebooks, you can save
this group of names as a new phonebook. Press the
Save As
button. The Save Group to Phonebook dialog box appears. Type
a name for the new phonebook and click the
OK
button. You
will be returned to the Group dialog box.
OK
After adding recipients for the fax, click the
return to the Send Fax dialog box. Click the
button. You will
Send Fax
buttontosend
your fax.
2.
If you are sending a quick note, or if you chose the
Cover Sheet
the name of the first recipient in the
In the
option, the Cover Sheet Notes dialog box appears, with
Name
Note
box, type a note for the recipient shown in the
box.
Include Note on
Name
or, if you don't want to send a note to this recipient, click the arrow to
the right of the
Name
box and select another recipient. Then do one
of the following:
N
To send the previous note to this new recipient, click the
Duplicate
N
To send the previous note to this new recipient and every other
recipient, click the
to this r ecipient, press the Tab key or click in the
button;
Duplicate All
button; to send a different note
Note
box, then
type the new note. Repeat for the other recipients. (For all
recipients of a phonebook to receive the same note, you must
select a second name and click the
When you're finished adding notes, click the
Duplicate All
Send Fax
button.)
button.
box;
Page 94

3.
If you did not choose one of the
the procedure. Your fax will be sent at the scheduled time to each
recipient in the group.
4.
If you did choose one of the
now. If you chose:
Special
options, you are finished with
Special
options, the option takes place
N
Fax Preview
See "Using Menus and Toolbars to View Faxes."
N
Mark Up
"Adding Text to a Fax."
N
Place Image
open. See "Adding an Image to a Fax."
N
Append Pages
dialog box open. See "Sending Multiple Documents as a Fax."
Refer to the "Special Options" section at the end of this chapter.
, your fax is displayed with the Thumbnail toolbar.
, your fax is displayed with the Edit toolbar. See
, your fax is displayed with the Place Image window
, your fax is displayed with the Collect Pages
Page 95

Adding a New Phonebook
If you need to send the same fax to different groups of people, such
as vendors, clients, or colleagues, to save time and duplication,
Eclipse FAX SE allows you to create phonebooks in which you can
store a list of names, fax numbers, and related information for easy
recall. Although Eclipse only comes with Phonebook 1, it lets you
create a total of six phonebooks. You also have the option of deleting
Phonebook 1 and adding six new ones.
Using Speed Dial for paper faxes
While Eclipse FAX SE allows you to create phonebooks for PC
faxing only, the HP OfficeJet Manager lets you create speed dial
entries for paper faxes. See "Using Speed Dial Setup for Paper
Faxes" in chapter 1, and "Sending a Paper Fax Using the Front Panel"
in chapter 2.
Adding entries from other applications
You can import other entries like a Winfax or CAS phonebook, or
entries from an existing file with names, phone numbers, and fax
numbers directly into Eclipse FAX SE. Or, you can use another
application to create your entries, and then import them into Eclipse
FAX SE. See "Importing Names and Fax Numbers into Eclipse FAX
SE" for more information.
Page 96

Using Eclipse FAX SE to add a new Phonebook
1.
Open Eclipse FAX SE.
2.
From the Eclipse FAX SE menu bar, choose
The Phonebook dialog box appears.
3.
In the
4.
Click the
Phonebook Title
button. The phonebook is added to Eclipse FAX SE.
Add
box, type the name of the phonebook.
File/Open Phonebook
.
Once you have created six phonebooks, the
button will turn
Add
gray. You will have to delete a phonebook before you can add
another one.
5.
When you have finished adding phonebooks, click the
OK
button.
Page 97

Adding names to a Phonebook
1.
From the Eclipse FAX SE menu bar, choose
File/Open Phonebook
The Phonebook dialog box appears.
2.
3.
Phonebook Title
In the
box, type the name of the phonebook.
For each person or company, and related information, you want to
add to the phonebook, first:
N
Complete the
Name
Name
:
Type the name of the person or company as you want it to
and
Fax
boxes - this is required.
appear on the cover pages. If you need to add more than one
entry for this person or company`a home fax number and an
office fax number, for example`include the other information in
parentheses; text in parentheses doesn't appear on cover pages.
Fax
: Type the fax number, including area code and dialing
prefix, if necessary. See the table on the next p age for more
information about fax numbers.
N
Complete the
Company
Company,Voice
:
Type the name of the company where the person
,and
Notes
boxes - this is optional.
works. You can add any number of names to a company. To use
a company name that is already in the phonebook, click the
arrow to the right of the
Company
box and choose the company
you want. To look at company names you've already added,
select the company name and click the arrow to the right of the
Name
box.
.
:
Voice
For your reference only, type the phone number of the
person or company.
:
Notes
For your reference only, type a note about the person or
company.
N
When you have finished entering information for this entry, click
Add
the
4.
When you have finished making additions to the phonebook, click the
OK
button.
button.
Page 98

Special
Characters Use in Fax Numbers
asterisk (*) If the Dialing Mode is set to pulse, the asterisk switches the dialing mode
from pulse to tone. If the Dialing Mode is set to tone, the asterisk causes a
"*" tone to be emitted. (In Eclipse FAX SE only, a capitalTcan be used
instead of an asterisk.)
pound or number
sign (#)
hyphen (-) Inserts a 2-second pause in the fax number when you need to wait for an
space or blank Spaces and blanks are ignored.
If the Dialing Mode is set to tone, a pound or number sign causes a "#"
tone to be emitted. If the Dialing Mode is set to pulse, this character is
ignored.
access tone or when using a credit card. For example, placing "----"ina
speed dial number causes four pauses to occur. (In Eclipse FAX SE only, a
comma (,) can be used instead of a hyphen.)
Modifying a Phonebook
To add, change, or delete n ames in an existing phonebook:
From the Eclipse FAX SE menu bar, choose
1.
The Phonebook dialog box appears.
Click the arrow to the right of the
2.
Phonebook Title
of phonebooks. Using the up and down arrows, if necessary, highlight
the phonebook that you want to modify.
Do
3.
of the following:
one
File/Open Phonebook
box to display a list
.
To add an entry to the selected phonebook, type the information
N
andclickthe
To modify an entry, select it by clicking the arrow to the right of
N
the
box and highlighting the entry. After you have made
Name
the desired changes, click the
To remove an entry, select it and click the
N
Add
button.
Update
button.
Delete
button.
Page 99

Deleting a Phonebook
1.
From the Eclipse FAX SE menu bar, choose
The Phonebook dialog box appears.
2.
3.
4.
Phonebook Title
In the
Click the
You'll be asked if you want to delete the current phonebook and all
associated entries. Click the
Delete
box, select the phonebook.
button.
Yes
button.
File/Open Phonebook
Creating a group of names
from one or more Phonebooks
To send a fax to selected recipients from one phonebook, or to
recipients from more than one phonebook:
1.
From the Eclipse FAX SE menu bar, choose
The Phonebook dialog box appears.
2.
Click the
Group
button. The Group dialog box appears.
File/Open Phonebook
.
.
Existing phonebook
New group of names
Page 100
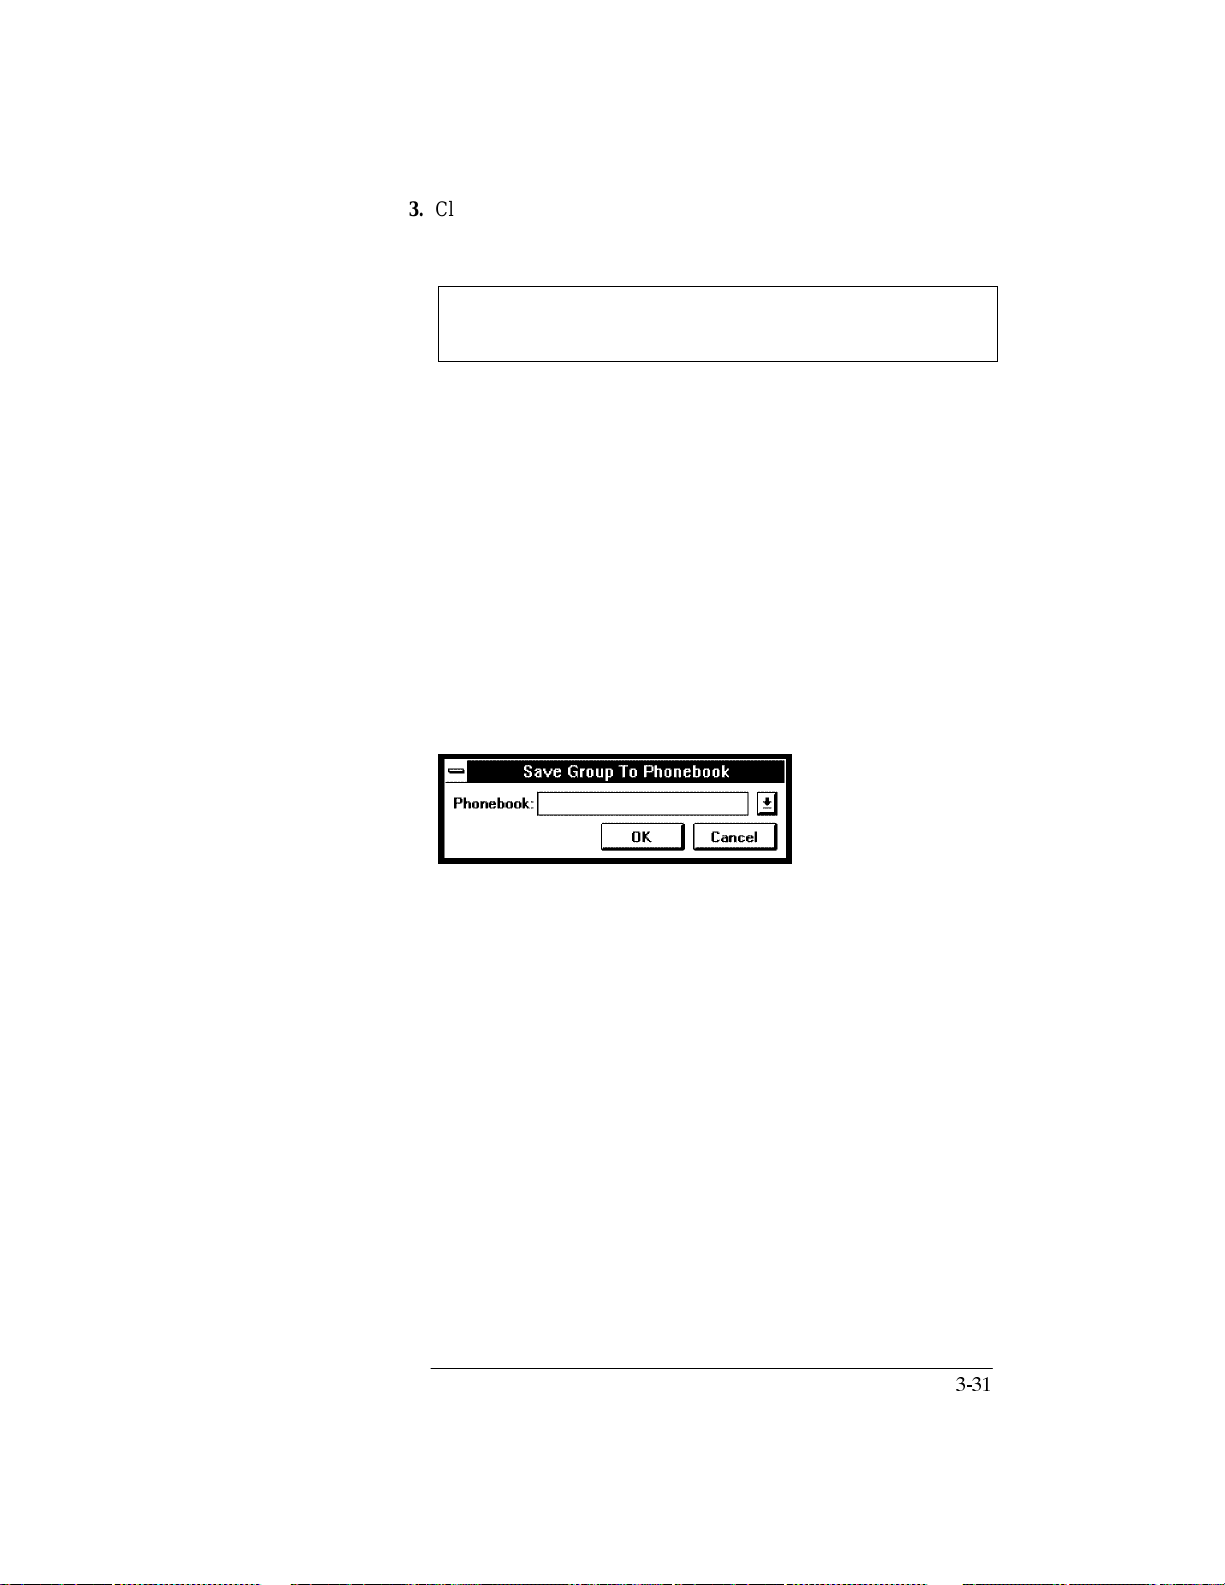
3.
Click the arrow to the right of the
Select Phonebook
phonebook from which to copy names. The
box and select a
Phonebook Contents
displays the names in that phonebook, with the first name highlighted.
Using the Remove Button
If you add a name in error to the new or modified phonebook, delete it
by highlighting it and clicking the
4.
Either double-click the first name that you want to add to the new or
modified phonebook, or highlight it and click the
5.
Repeat for each name that you want to add.
6.
Repeat for another phonebook (optional).
7.
When you have added all the names you want, do one of the
Remove
button.
Add
button.
following:
N
Click theOKbutton. You will return to the Phonebook dialog
box. Click the
OKorCancel
buttontoreturntotheEclipseFAX
SE window.
N
Click the
Save As
button if you want to save the new or modified
phonebook and stay in the Group dialog box to create another
new or modified phonebook.
The Save Group to Phonebook dialog box appears.
box
8.
Do one of the following:
N
To create a new phonebook, type a name for it and click the
button.
N
To add the entries to an existing phonebook, click the arrow to
the right of the
OK
Cancel
button.
9.
Click the
the
time.
OK
Phonebook
box, select the phonebook, and click
button to return to the Phonebook dialog box at any
 Loading...