

Page 1
hp business inkjet 2600/2600dn
Page 2

Page 3
1
Tour the Product
Page 4

table of contents
Tour the Product...........................................................................................................................1
product overview .........................................................................................................................5
unique product features................................................................................................................6
product positioning statement ........................................................................................................7
product placement.......................................................................................................................8
benefits.......................................................................................................................................9
localization ...............................................................................................................................10
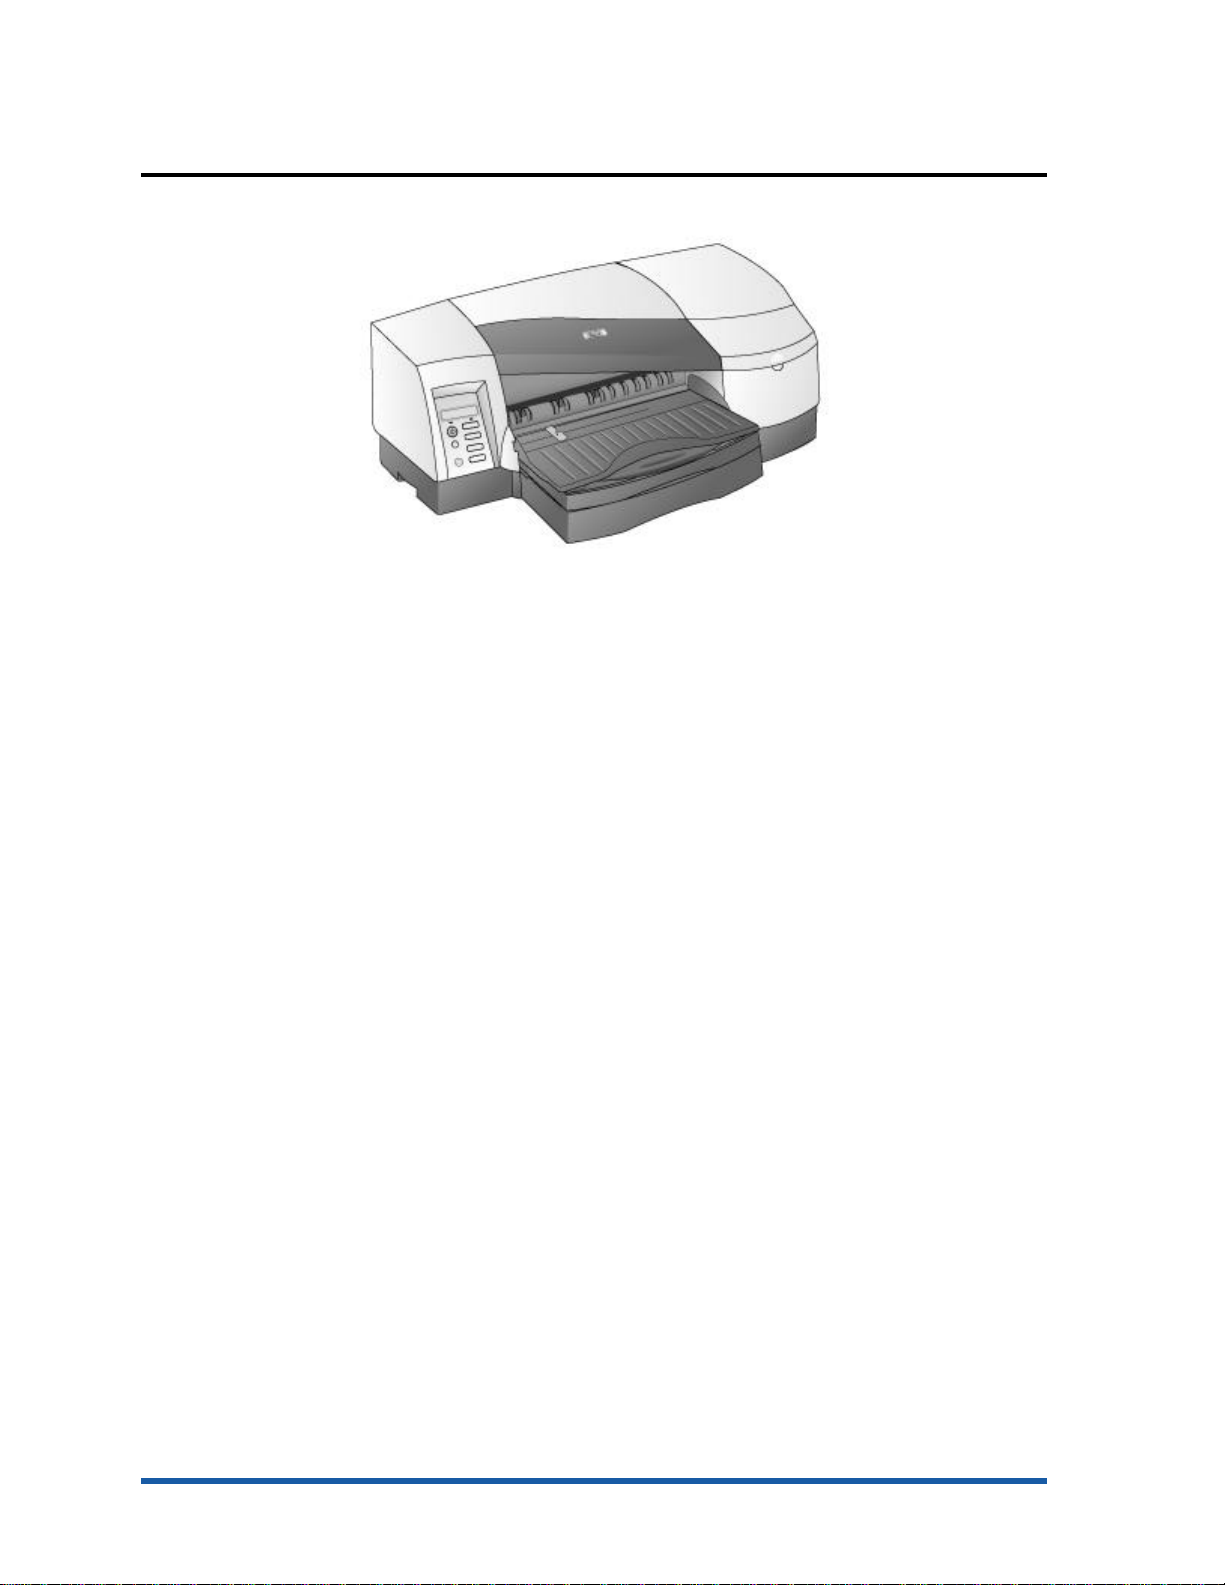
the printers................................................................................................................................12
top of the printer........................................................................................................................13
controls.....................................................................................................................................14
rear of the printer.......................................................................................................................15
front of the printer......................................................................................................................16
auto-duplex unit.........................................................................................................................17
specifications.............................................................................................................................18
hardware accessories.................................................................................................................19
overview of user replaceable components.....................................................................................20
compatible hp media types.........................................................................................................21
upgrades..................................................................................................................................22
CREW parts ..............................................................................................................................23
consumable part numbers...........................................................................................................24
printheads.............................................................................................................................24
ink cartridges .........................................................................................................................24
date labels ............................................................................................................................25
value added services .................................................................................................................26
Embedded Web Server (EWS).................................................................................................26
hp instant support web site ......................................................................................................26
education and training...............................................................................................................27
service and support....................................................................................................................28
support..................................................................................................................................28
online support ........................................................................................................................28
telephone support...................................................................................................................28
telephone support......................................................................................................................29
regional repair strategy..............................................................................................................31
warranty period.........................................................................................................................32
repair and warranty information...............................................................................................32
hewlett-packard limited warranty statement...................................................................................33
1 - 2 hp restricted Tour the Product
Page 5

table of figures
top of the printer........................................................................................................................13
controls.....................................................................................................................................14
rear of the printer.......................................................................................................................15
front of the printer......................................................................................................................16
auto-duplex unit.........................................................................................................................17
Tour the Product hp restricted 1 - 3
Page 6

1 - 4 hp restricted Tour the Product
Tour the Product hp restricted 1 - 5
Page 7
product overview
• Product positioning: High-performance, wide-format business inkjet designed for
workgroups
• Product features:
• High speed color printing on any media up to 13 inches x 19 inches with
• Robust network solutions with internet capabilities
• Prints a lot more for a lot less
• Product price: US$ 999 (Base) and US$ 1399 (DN)
uncompromised print quality
Page 8

unique product features
• High-speed color printing:
• Maximum of 15/11ppm draft and maximum of 8/6 ppm normal
• HP PhotoREt III print quality
• Low Total Cost of Ownership (TCO) with 2.2 cents mono cpp and 8.4 cents color
cpp
• Superior network performance with support for:
• HP PCL5C/Postscript 3 emulation
• HP enhanced input/output (EIO) JetDirect (internal)
• Built-in Universal Serial Bus (USB) and parallel ports
• Embedded Web server
• LaserJet compatible office drivers and installer
• Remote printer management using an embedded web server with:
• Remote printer & supplies status
• Remote printer configuration
• Remote printer diagnostic/troubleshooting
• Email/Alerts
• Link to hp instant support
• Usage information, such as amount of ink and number of pages
• Event log
• Ink supplies ordering
• hp business store
• Support for accessories and consumables:
• KCMY high-capacity individual ink cartridges
• Auto-duplex unit for double-sided printing
1 - 6 hp restricted Tour the Product
Page 9

product positioning statement
hp's high performance, wide format business inkjet designed for the workgroup
Tour the Product hp restricted 1 - 7
Page 10
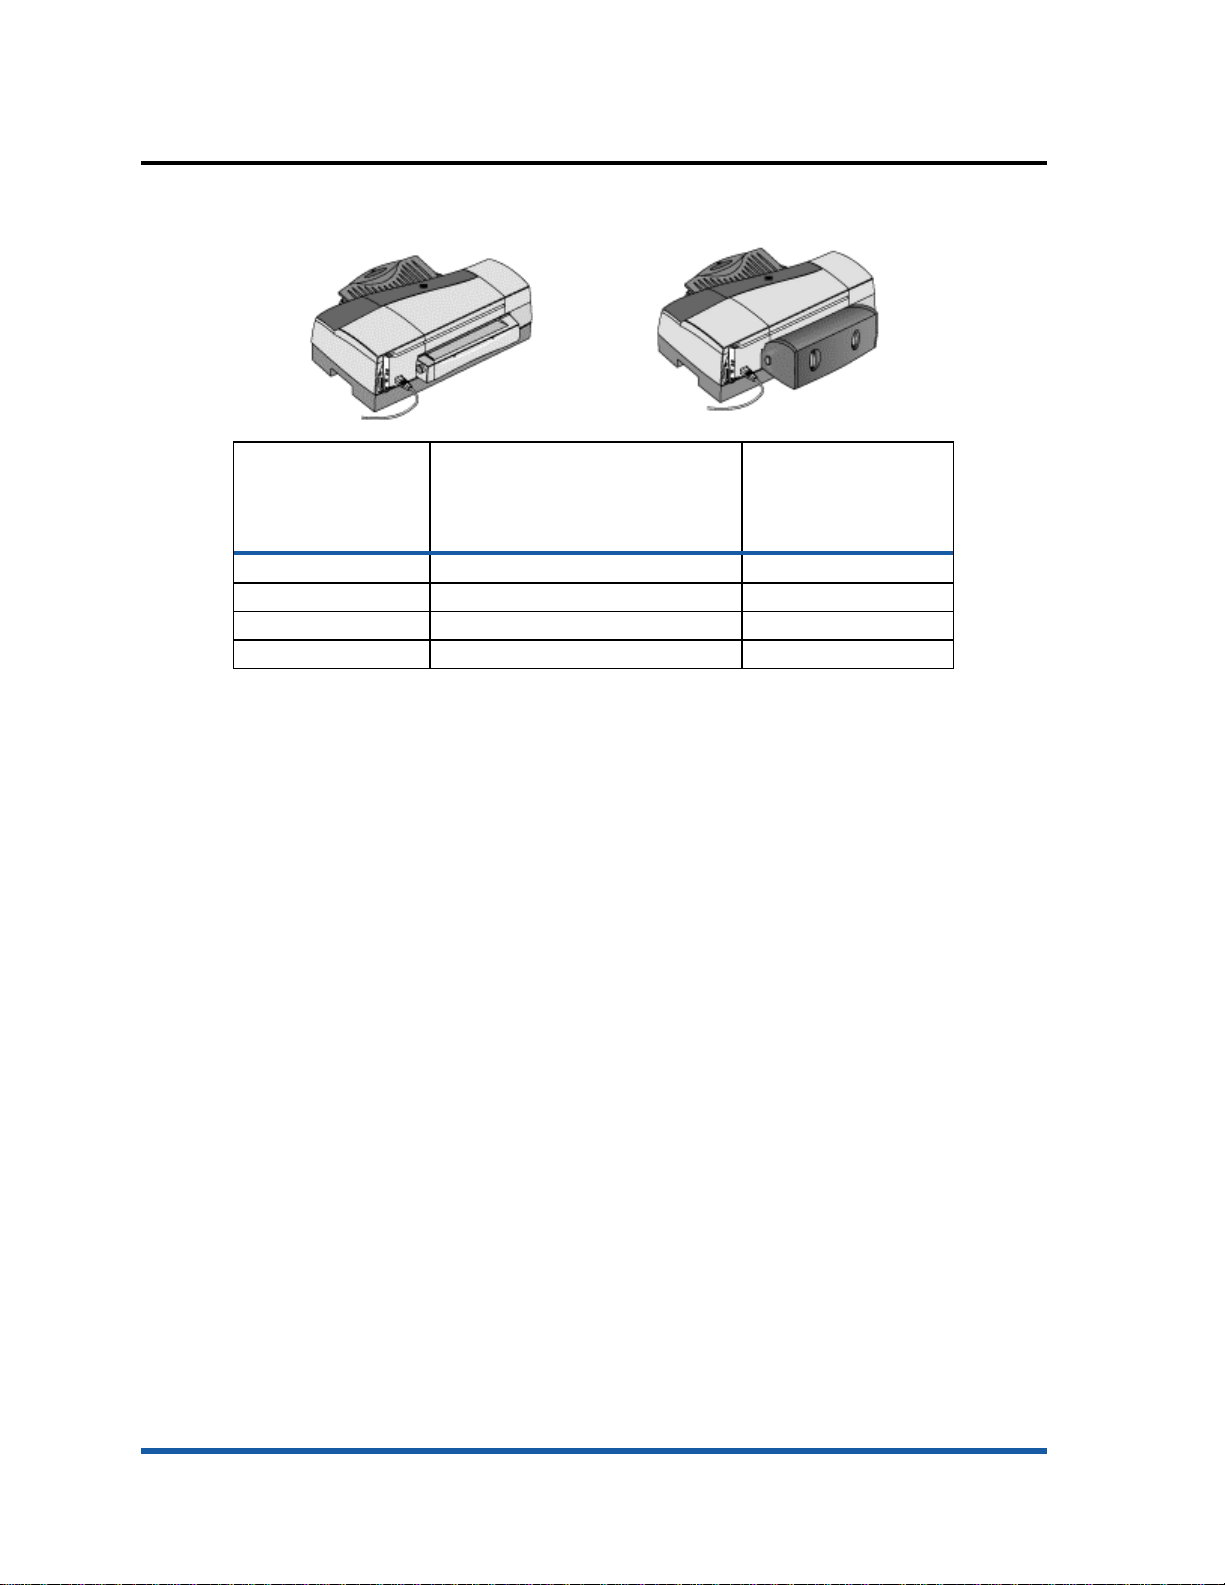
product placement
hp business inkjet 2600 hp business inkjet
Base Unit Comes with EIO 615N print server and
Part number: C8109A Part number: C8110A
Street price: $ 999 Street price: $ 1399
Placement: worldwide Placement: worldwide (except Japan,
comparison between hp business inkjet 2600 and 2600dn
2600dn
auto-duplex unit
China, and Taiwan)
1 - 8 hp restricted Tour the Product
Page 11

benefits
• Support for up to 13x19 inches paper
• Support for PCL5C/PS3 language
• Superior print quality with HP PhotoREt III
• Cost-efficient 4-pen operation
• Superior network performance and manageability
• Embedded Web server for remote printer management and e-services
• Auto-duplex printing
• High-quality and high-speed CAD checkplots
• Support for wide variety of paper
• AutoCAD ADI solutions (over the network)
Tour the Product hp restricted 1 - 9
Page 12

localization
Danish, Greek,
Russian, Polish,
• Front Panel
• Packaging
• Manual
• PCL5C/PS3/ADI Driver
Items Europe NA/LAR Asia-
Front Panel WW - English,
Packaging • UGFD/IPAS -
German, French,
Portuguese, Italian,
Dutch, Spanish,
Norwegian, Finnish,
Swedish, Danish,
Czech, Polish, and
Russian
English,
German,
French, Dutch,
Italian,
Portuguese,
Arabic, and
Spanish
• NFSD/GRPC Norwegian,
Finnish,
Swedish,
WW - English,
German, French,
Portuguese, Italian,
Dutch, Spanish,
Norwegian, Finnish,
Swedish, Danish,
Czech, Polish, and
Russian
UFPS - US English,
Euro French,
Portuguese, and
Spanish
Pacific
WW - English,
German, French,
Portuguese,
Italian, Dutch,
Spanish,
Norwegian,
Finnish, Swedish,
Danish, Czech,
Polish, and
Russian
UTCK - US
English,
Traditional
Chinese, and
Korean
and Czech
1 - 10 hp restricted Tour the Product
Page 13

Manual • UGFD -
English,
Russian, Polish,
English, Euro
German,
French, and
Dutch
• NFSD Norwegian,
Finnish,
Swedish, and
Danish
• IPAS - Italian,
Spanish,
Portuguese,
and Arabic
• GRPC - Greek,
and Czech
PCL5C/PS3/ADI
Driver
WW - English,
German, French,
Portuguese, Italian,
Dutch, Spanish,
Norwegian, Finnish,
Swedish, Danish,
Czech, Polish, Russian
• U - US English
• UFPS - US
French,
Portuguese,
and Spanish
WW - US English,
German, French,
Portuguese, Italian,
Dutch, Spanish,
Norwegian, Finnish,
Swedish, Danish,
Czech, Polish,
Russian
• U - US
English
• UK - US
English
and
Korean
WW- English,
German, French,
Portuguese,
Italian, Dutch,
Spanish,
Norwegian,
Finnish, Swedish,
Danish, Czech,
Polish, Russian
localization options
Tour the Product hp restricted 1 - 11
Page 14
the printers
Dimensio
n
Width 724 mm (28.5 inches) 724 mm (28.5 inches)
Height 283 mm (11.1 inches) 283 mm (11.1 inches)
Depth 568 mm (22.4 inches) 645 mm (25.4 inches)
Weight 18 kg (39.7 lb) 19.5 kg (43 lb)
hp business inkjet
2600
printer comparison
hp
business
inkjet
2600dn
1 - 12 hp restricted Tour the Product
Page 15
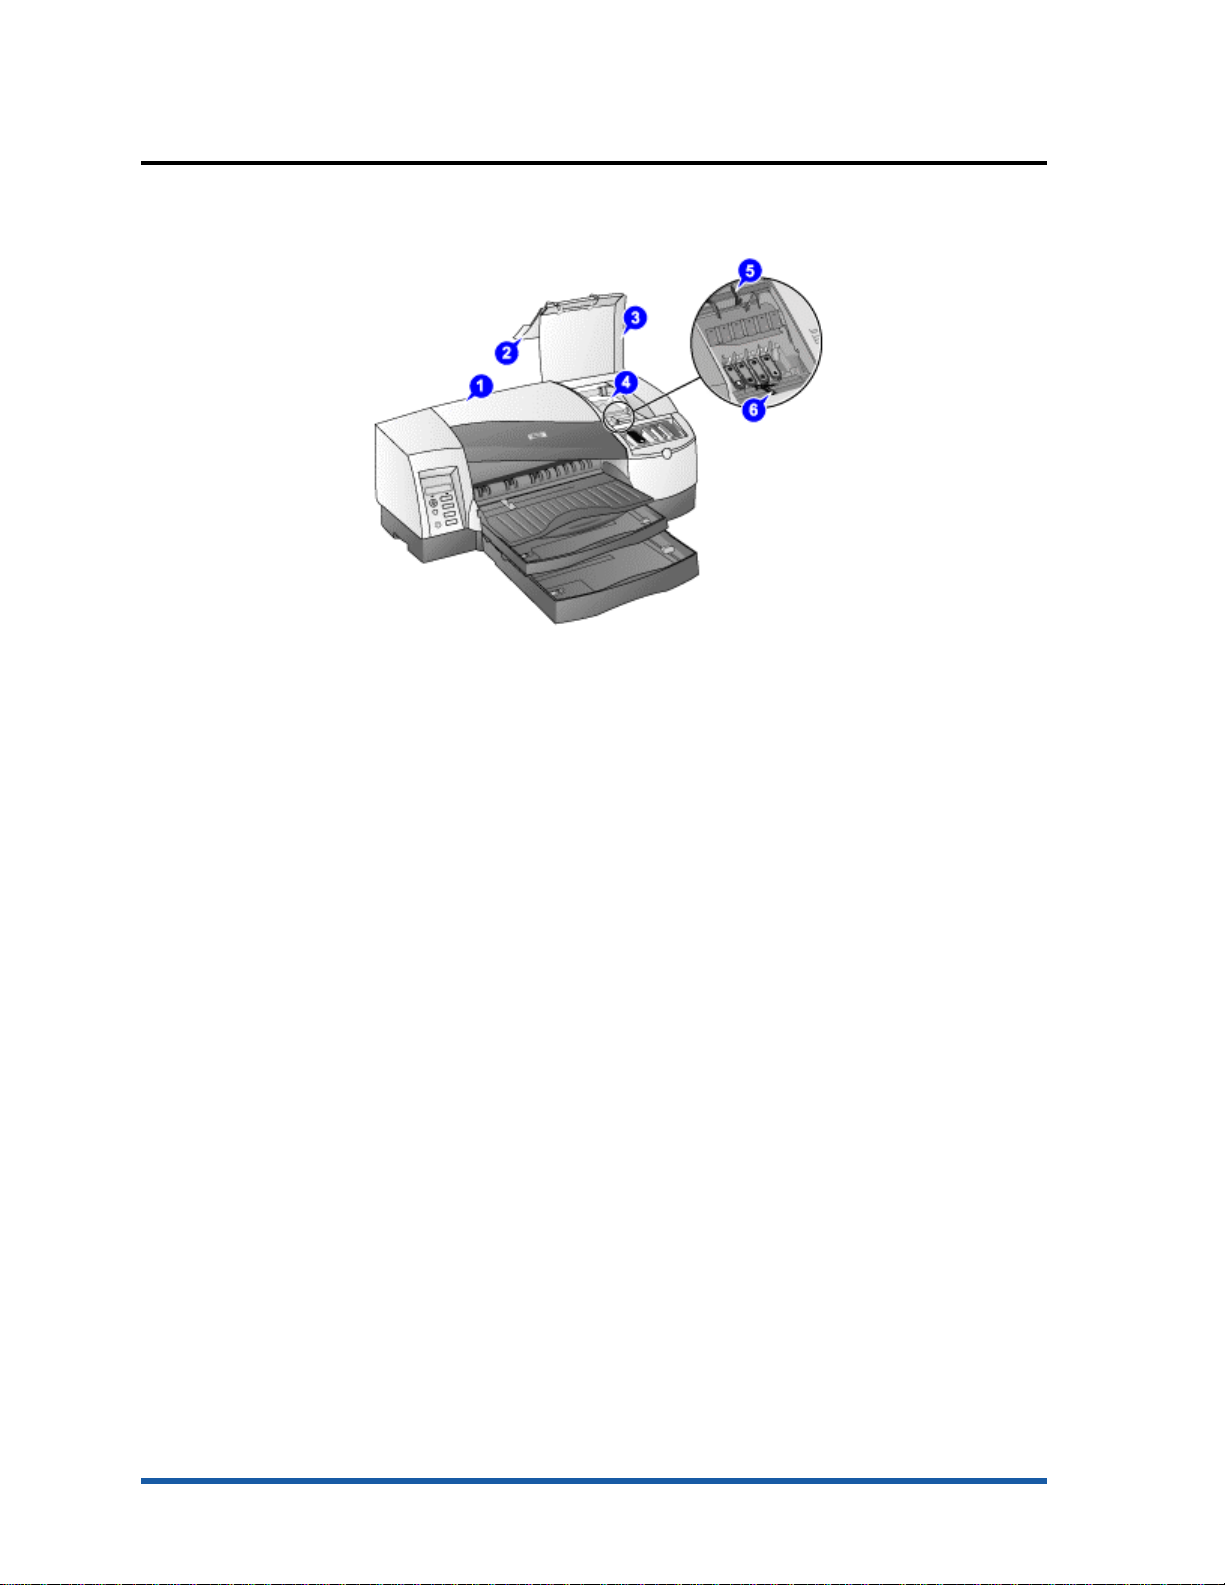
top of the printer
The components located at the top of the printer are:
1. Top cover - Provides access to the interior components of the printer.
2. Ink cartridge cover - Provides access to ink cartridges.
3. Printhead cover - Provides access to printheads.
4. Printhead access latch - Provides access to install or remove printheads from their
respective color-coded sockets.
5. Hook - Connects to the carriage lock. It must be engaged for the printer to operate.
6. Carriage lock - Secures the printhead access latch.
top of the printer
Tour the Product hp restricted 1 - 13
Page 16
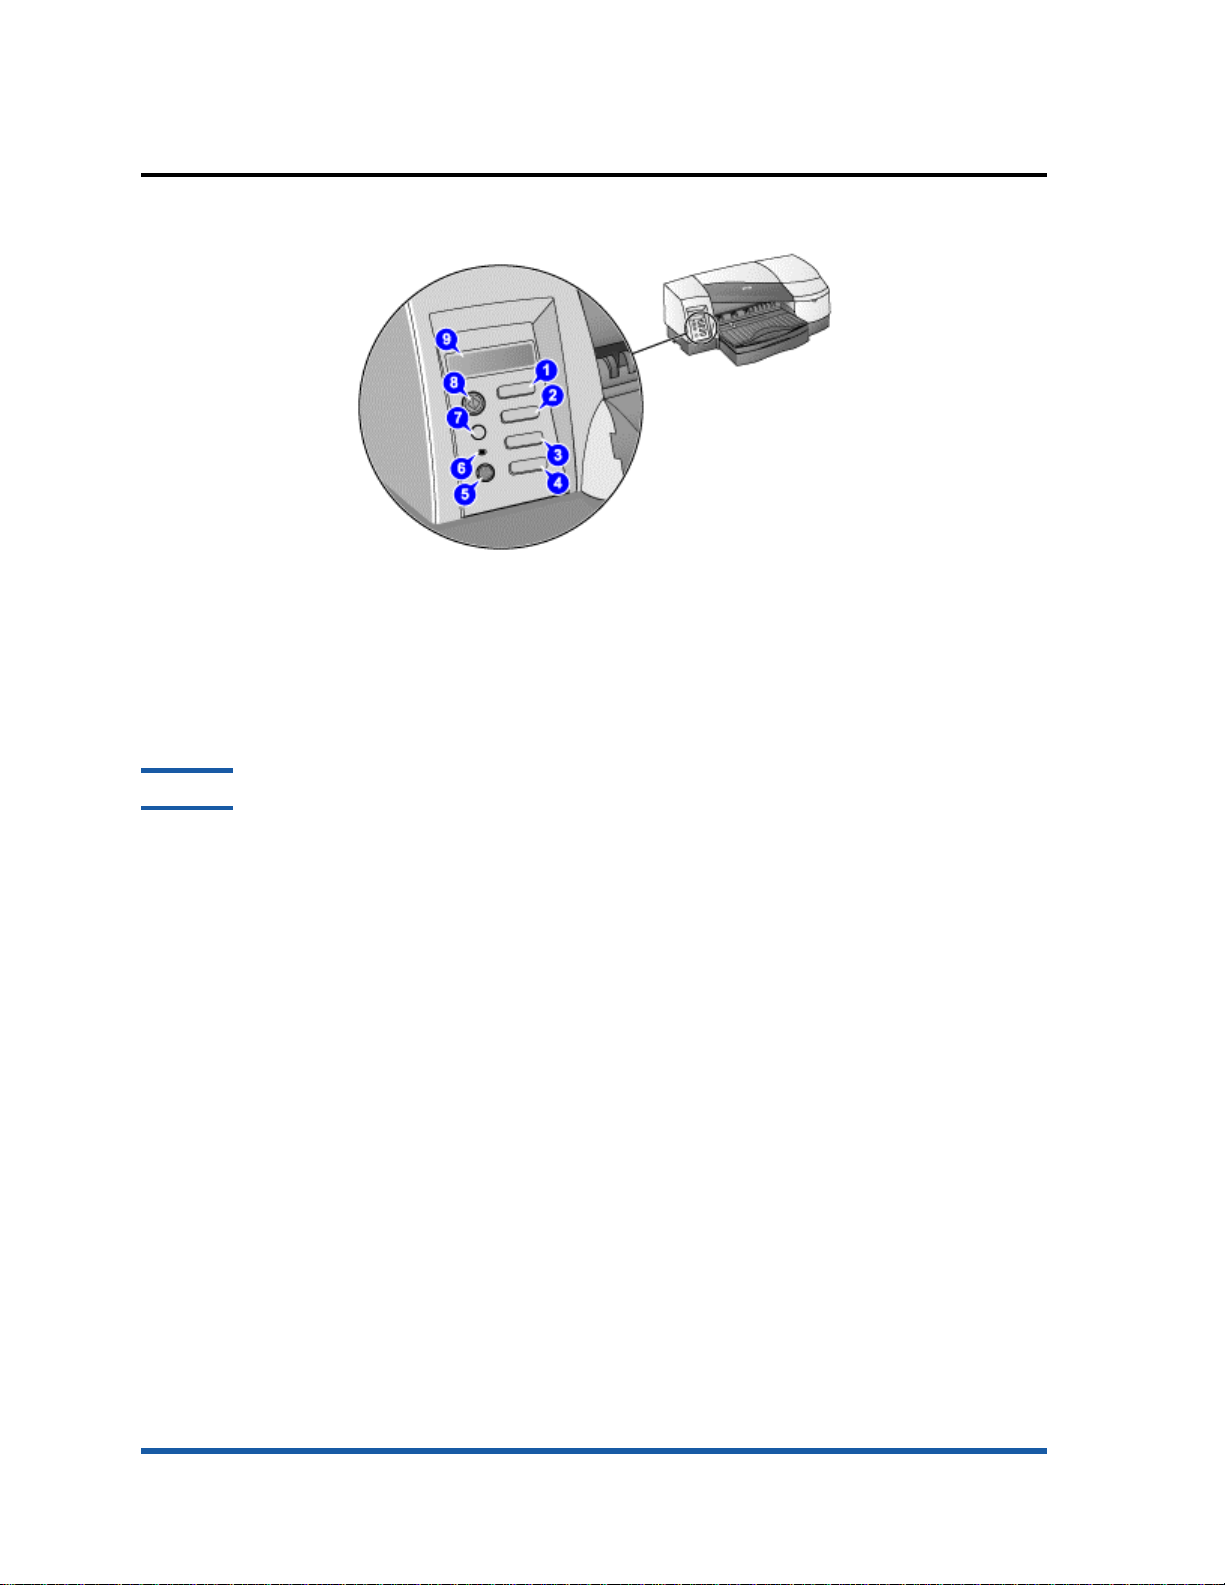
controls
controls
The purpose of the LCD control panel:
• Configure printer settings.
• View printer status.
• View printer messages.
• Diagnose printer problems.
Note
Additional menu items can appear in the LCD control panel depending on the hardware
modules installed in the printer.
The components located at the control panel are:
1. MENU - Displays the menu options available in the LCD control panel.
2. ITEM - Displays the menu items within a selected menu. Also moves the cursor within
the VALUE character string.
3. VALUE - Displays the values available for the selected menu item. Also used to input
numbers larger than 9. Use the ITEM key to change or move the cursor to the 10s
and 100s column.
4. SELECT - Selects the value that is currently shown on the LCD display.
5. POWER - Turns the printer off or on.
6. Indicator LED - Indicates the printer status based on the color of the light displayed.
The indicator lights up when a printer is online (green) and blinks when a printer is
printing (green) or when an error occurs on the printer (amber). When the printer
encounters a non-recoverable error, the LED turns off.
7. CANCEL - Cancels the current print job. Press this button only once to cancel a
queued print job.
8. RESUME - Continues a print job that is kept waiting.
9. LCD display - Displays status messages and ink levels in ink cartridges.
1 - 14 hp restricted Tour the Product
Page 17
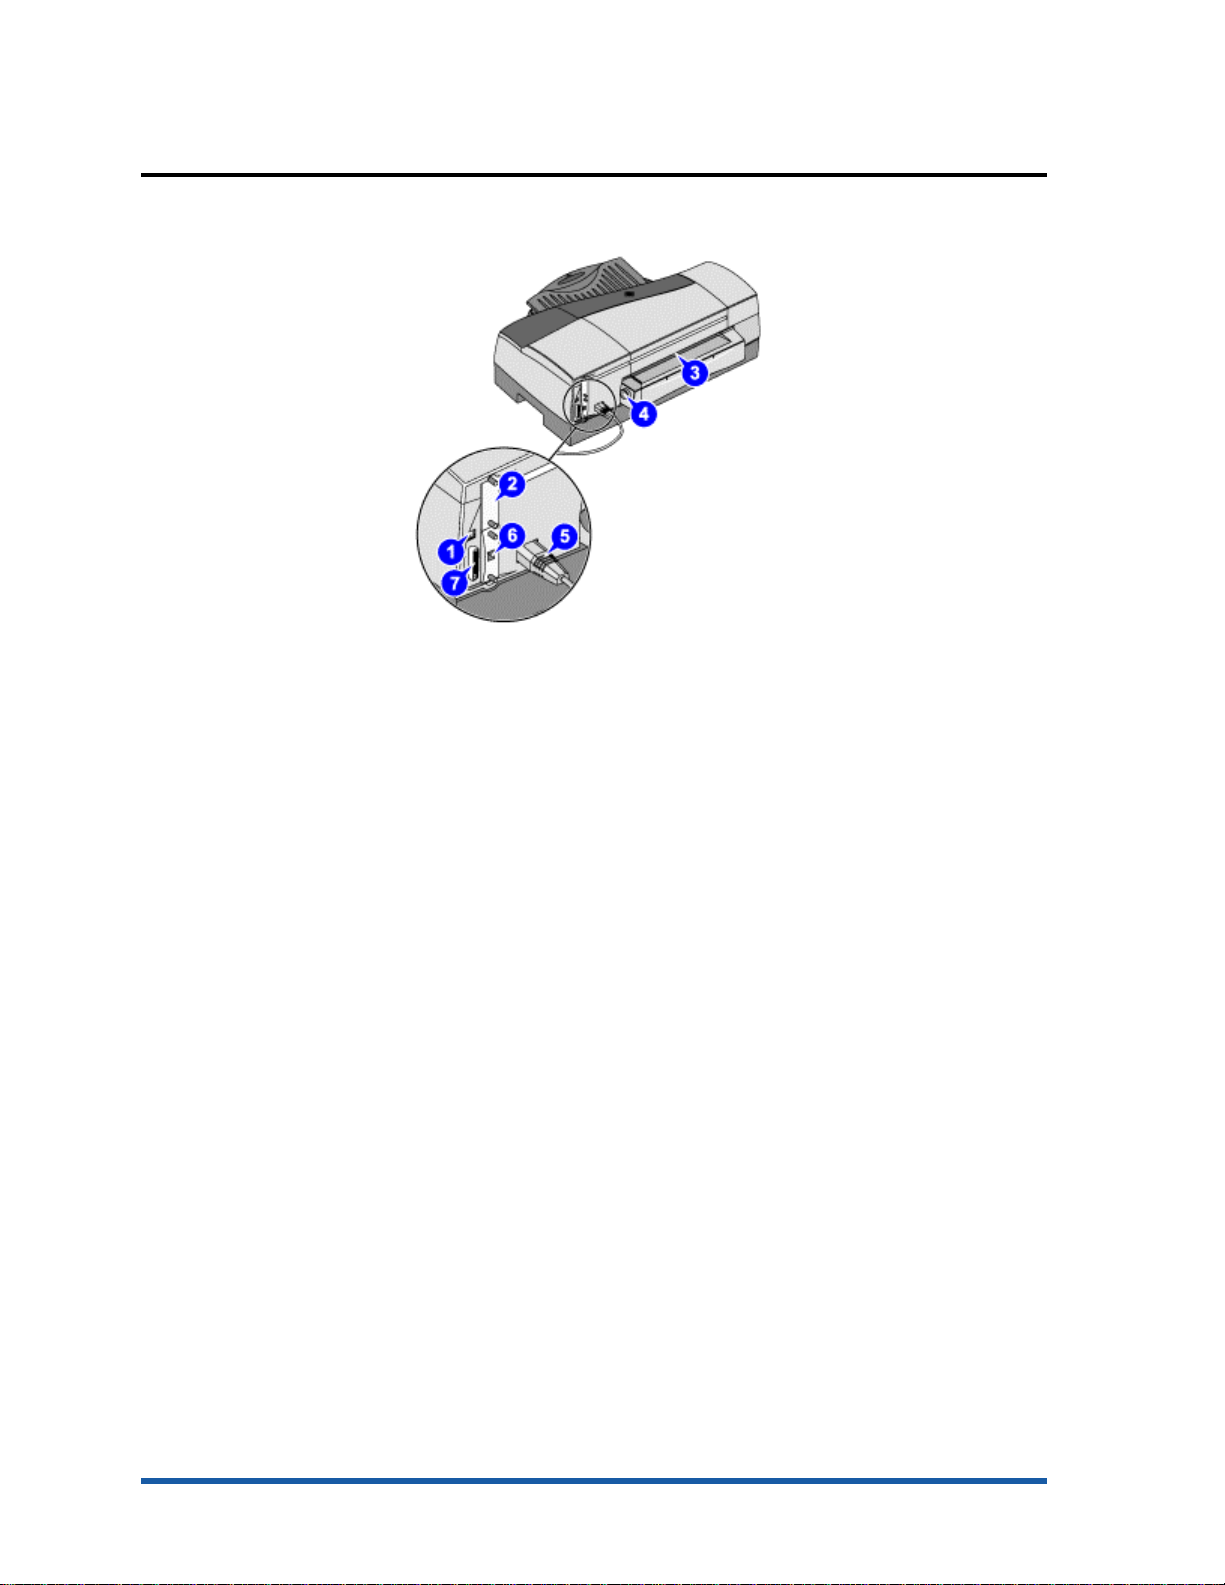
rear of the printer
The components located at the rear of the printer are:
1. USB port - Connect the USB cable to this port.
2. HP PCL 5C/PS3 Card - Install the printer memory.
3. Rear manual feed - Holds a single sheet of paper. It must be removed to install the
auto-duplex unit.
4. Rear manual feed release button - Push the buttons to slide the rear manual feed into
the printer or out of the printer.
5. Power input - Attach the power cord.
6. EIO slot - Install an HP JetDirect print server in this slot (comes by default with the hp
business inkjet 2600dn).
7. Parallel port - Connect the parallel cable to this port.
rear of the printer
Tour the Product hp restricted 1 - 15
Page 18
front of the printer
The components located at the front of the printer are:
1. Tray extension lock - Expands the tray to accommodate larger media sizes. Both trays
1 and 2 have tray extension locks.
2. LCD control panel - Configures printer settings and view printer messages.
3. Tray 2 base - Holds tray 2 and supports the printer.
4. Output tray - Collects the printed pages.
5. Tray 1 - Holds up to 150 sheets of paper or 80 transparencies. This is the default tray
for A4.
6. Tray 2 - Holds up to 250 sheets of paper. This is the default tray for A3.
7. Front manual feed - Holds up to 10 sheets of paper or 3 transparencies.
8. Paper guides - Guides the paper into the printer.
front of the printer
1 - 16 hp restricted Tour the Product
Page 19
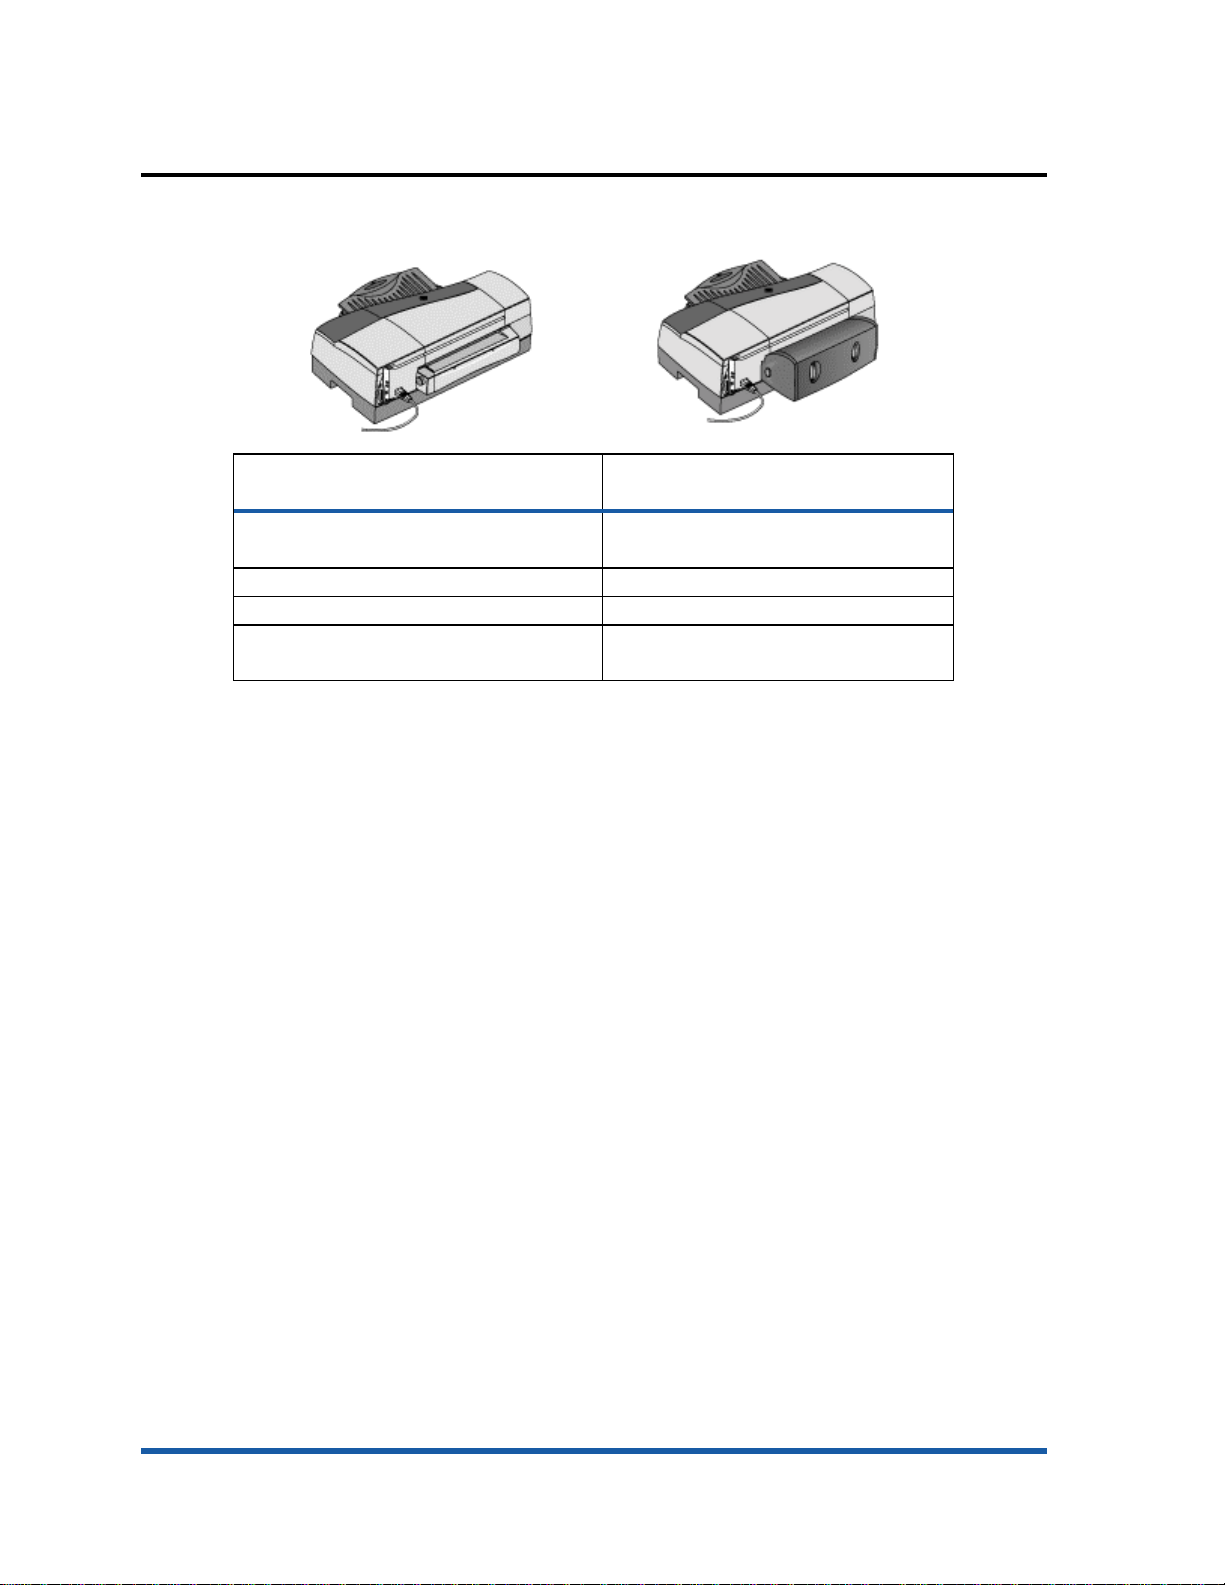
auto-duplex unit
The printer automatically prints on both sides of paper by using a printing accessory called
the auto-duplex unit. The auto-duplex unit is attached at the rear of the printer.
The components of the auto-duplex unit are:
1. Buttons - Press to remove the auto-duplex unit from the printer.
2. Rear cover - Remove to clear a paper jam from the auto-duplex unit.
3. Handles - Press to remove the rear cover from the auto-duplex unit.
auto-duplex unit
Note
The auto-duplex unit is a standard accessory provided with the hp business inkjet 2600dn.
Tour the Product hp restricted 1 - 17
Page 20

specifications
Please refer to the datasheet for detailed information.
Datasheet
1 - 18 hp restricted Tour the Product
Page 21
hardware accessories
Note
HP recommends the last two part numbers in the above table for any Intel specified laptop memory
of PC-100 SDRAM (64mb/128mb) capacity.
accessories part
numb
er
Auto-duplex unit C8219A US$ 129
HP Jetdirect 615n EIO
(10/100 Base-TX)
HP JD 610N EIO [10/100] J4169A US$ 335
HP JD 610N EIO [TR] J4167A US$ 479
HP JD 600N EIO [10BT] J3110A US$ 249
HP JD 600N EIO [BNC] J3111A US$ 289
HP JD 300X [10/100] J3263A US$ 255
HP JD 500X [TR] J3264A US$ 530
HP JD 500X [10/100] J3265A US$ 336
HP JD 175X [10BT] J6035A US$ 199
HP JD170X [10BT] J3258B US$ 144
64 MB SDRAM, PC-100
module
128MB SDRAM, PC-100
module
HP IEEE-1284 compliant AB parallel cable, 2m
HP IEEE-1284 compliant AB parallel cable, 3m
HP USB A-B, 2m C6518A
J6057A TBD
C2387A
C2388A
C2950A
C2951A
street
price
hardware accessories of hp business inkjet 2600
Tour the Product hp restricted 1 - 19
Page 22

overview of user replaceable components
part
name
C8109-67016 Second tray (with base) svc 3%
C8108-67036 Assy - Cleanout Trough SVC 5%
C8108-67044 Assy - Tray Main SVC 10%
C8108-67045 Assy - Output Tray SVC 10%
C4810A HP No. 11 Black Printhead
C4811A HP No. 11 Cyan Printhead
C4812A HP No. 11 Magenta
C4813A HP No. 11 Yellow Printhead
C4844A HP No. 10 Black ink
C4836A HP No. 11 Cyan ink
C4837A HP No. 11 Magenta ink
C4838A HP No. 11 Yellow ink
description relative
replacement rate
Printhead
cartridge
cartridge
cartridge
cartridge
user replaceable components
1 - 20 hp restricted Tour the Product
Page 23

compatible hp media types
Please refer to the datasheet for information on:
• Compatible hp media types and details
• Ordering information
Datasheet
Tour the Product hp restricted 1 - 21
Page 24

upgrades
model upgrades
Purchase the auto duplex unit (part number C8219A) and the HP Jetdirect card to upgrade
from hp business inkjet 2600 to hp business inkjet 2600dn.
firmware upgrades
The firmware will be 100% flashable throughout the life of the product.
software upgrades
Upgrade the printer software by using the following URL:
http://www.hp.com/support/ hp business inkjet 2600/2600dn
1 - 22 hp restricted Tour the Product
Page 25

CREW parts
Assy Door access svc (Top
The parts that can be removed or replaced by the user are called CREW parts. The following
table lists the name and part number of the CREW parts of the hp business inkjet
2600/2600dn:
part name part
Diesel Printer Engine Svc C8109-67001 10%
cover)
Printhead door assy svc C8109-67011 5%
Second tray (with base)
svc
Sella Card Formatter PCA C8109-67018 5%
Filter assy svc C8109-67024 100%
relative
number
C8109-67010 3%
C8109-67016 3%
CREW parts of hp business inkjet 2600/2600dn
replacement rate
Tour the Product hp restricted 1 - 23
Page 26
consumable part numbers
printheads
name part
HP No. 11
Black Printhead
HP No. 11
Cyan Printhead
HP No. 11
Magenta
Printhead
HP No. 11
Yellow
Printhead
ink cartridges
nam
e
Black ink
cartridge
HP No. 10
Black ink
cartridge
HP No. 11
Cyan ink
cartridge
HP No. 11
Magenta ink
cartridge
HP No. 11
Yellow ink
cartridge
ink
no.
C4810A 5 cc. ~ $39 ~ $35
C4811A 5 cc. ~ $39 ~ $35
C4812A 5 cc. ~ $39 ~ $35
C4813A 5 cc. ~ $39 ~ $35
consumable part numbers of printheads
part
no.
C4840A 28cc In-Box Only In-Box Only 700
C4844A 69cc $38.99 ~ $34 1750
C4836A 28cc $38.99 ~ $34 1750
C4837A 28cc $38.99 ~ $34 1750
C4838A 28cc $38.99 ~ $34 1750
ink
capacit
y
capacit
y
list
pric
e
(US
$)
list
pric
e
(US
$)
street
price
(US$)
street
price
(US$)
page
s out
consumable part numbers of ink cartridges
1 - 24 hp restricted Tour the Product
Page 27

date labels
• Install-by Date - This date is printed on the retail box for both ink cartridges and
printheads. Install the ink cartridges and printheads before the Install-by date for
optimized performance.
• Manufacture Date - This date is printed on the pouch for both ink cartridges and
printheads. The number is in the following format: YYMMDDhhmm. For example, a
printhead manufactured on November 19, 1999 at 1:12 pm has a Manufacture
Date of 9911191312.
• End-of-Warranty Date - This date is printed directly on the ink cartridges and printheads.
It is the date by when the warranty period for the ink cartridges and printheads will
be over.
Tour the Product hp restricted 1 - 25
Page 28

value added services
Embedded Web Server (EWS)
The hp business inkjet 2600/2600dn is equipped with an embedded web server that is
actually a remote management tool. Using a standard Web browser, this remote
management tool allows you to do the following:
• View the printer and ink supplies status
• View the usage and event log
• Send alerts notifications
• Configure printer, events, and security information
• Perform printer diagnostics
hp instant support web site
It is a Web site that hosts a set of dynamic Web resources for printers. These resources help in
tracking the status and usage of the printer. In addition, the hp instant support Web site helps
in managing the printer and planning the purchase of consumables.
Access the hp instant support Web site to view the following information:
• Printer usage pattern
• Error alerts
• On-line troubleshooting tips for error alerts
1 - 26 hp restricted Tour the Product
Page 29

education and trainin g
available on the Starter
Procedures for using the
troubleshoot the HP
and support information
documentation/training information purpos
e
release notes Includes installation
and the latest printer
information
Includes last minute
changes and software
troubleshooting tips.
reference guide Procedures for setting
up, maintaining, and
troubleshooting the
printer.
setup poster Illustrated setup
information. It is
CD.
Printer Driver Online Help (Windows only)
printer.
HP Jetdirect Print Server Administrator's Guide Procedures for
configuring and
troubleshooting the HP
JetDirect print server.
Embedded Web Server Provides configuration,
status, and diagnostic
information about the
printer.
• http://www.hp.com/support/businessinkjet2600
• http://www.hp.com
Provides the latest
printer software,
product information
To set up the
printer.
To set up the
printer.
To use the printer.
To set up and
JetDirect print
server.
HP Business Inkjet 2600 NPI training Training for authorized
Tour the Product hp restricted 1 - 27
available for the
printer.
service providers,
bench technicians, call
centers, customer care
centers, customer
engineers, repair
technicians, response
centers, and software
engineers.
education and training available for the printer
To use the printer
and troubleshoot
the printer
problems.
Page 30

service and support
HP offers various support services to troubleshoot and diagnose printer problems and provides
instructions for service and repair. HP also provides documentation and online and telephone
support for troubleshooting.
support
• Express Exchange or unit exchange by courier assist.
• Support Packs available
• Free repair during the 1-year warranty period
online support
HP provides several resources on the Web for troubleshooting. Access the URL
http://www.hp.com/go/support for help regarding the following parameters:
• Setting up and using the printer
• Downloading printer drivers
• Solving a problem
• Ordering a product
Customers can also find product information on the following Web site:
http://www.hp.com
telephone support
• Available worldwide
• Available free during the warranty period
Representatives at Customer Care Center answer questions regarding the setup,
configuration, installation, and operation of the printer. They also help troubleshoot and
diagnose printer problems and provide instructions for service and repair. Before calling a
Customer Care Center representative, the customer needs to provide information regarding:
• Results of a configuration page
• Brand and model of the computer
• Operating system of the computer
• Printer driver installed
1 - 28 hp restricted Tour the Product
Page 31

telephone support
After warranty: If your product is not under warranty, you
910 910 ($27.50 charged to your phone account) from
Before making a call, print a diagnostic page from the Toolbox utility or the LCD panel and
then fill in the following information for the Customer Care Center representative.
• Printer model
• Serial number of the printer
• Brand and model of the computer
• Version of printer software
• Printer driver
• CPU speed
• RAM size
The telephone service at the HP Customer Care Center is available free of cost during the
printer warranty period. Customer support representatives answer questions regarding the
setup, configuration, installation, and operation of the printer. They also help troubleshoot
and diagnose printer problems and provide instructions for service and repair.
region phone number
Africa/Middle
East
Argentina • Buenos Aires: 11 4778 8380
Australia • During warranty: 3 8877 8000
41 22 780 71 11
• Outside Buenos Aires: 0810 555 5520
•
can call 613 8877 8000. A per-incident, out-ofwarranty support fee of $27.50(inc GST) will be
charged to your credit card. You can also call 1902
9:00 am to 5:00 PM, Monday to Friday. (Charges and
support hours are subject to change without notice.)
Austria 0660 6386
Belgium • Dutch: 02 626 88 06
• French: 02 626 88 07
Brazil • Sao Paulo: 11 3747 7799 or 11 4197 4998
• Outside Sao Paulo: 0800 15 7751 or 0800 13 0999
Chile 800 36 0999
China 010 6564 5959 or 800 810 5959
Colombia 9 800 91 9477
Czech Republic 02 471 7327
Denmark 39 29 4099
Finland 0203 4 7 288
France 01 43 62 34 34
Germany 0180 52 58 143
Greece 01 6189890
Hong Kong 300 28555
Hungary 36 1 252 4505
India 9111 682 6035
Tour the Product hp restricted 1 - 29
Page 32

Indonesia 21 350 3408
Ireland 01 662 5525
Italy 02 264 10350
Japan 0570 000511
Korea • Seoul: 02 3270 0700
• Outside Seoul: 080 999 0700
Malaysia 03 295 2566
Mexico • Mexico City: 5258 9922
• Outside Mexico City: 01 800 472 6684
New Zealand 09 356 6640
Norway 22 11 6299
Peru 0 800 10111
Philippines 2 867 3551
Poland 22 37 5065 or 22 37 5065
Portugal 1 441 7 199
Puerto Rico 1 877 232 0589
Russia 095 923 50 01
Singapore 272 5300
Spain 902 321 123
Sweden 8 619 2170
Switzerland 0 848 80 11 11
Taiwan 2 2717 0055
Thailand 2 6614000
The Netherlands 020 606 8751
Turkey 1 216 579 71 71
United Kingdom 0 207 512 5202
Venezuela • Caracas: 207 8488
• Outside Caracas: 800 10111
Vietnam 8 823 4530
call center numbers
1 - 30 hp restricted Tour the Product
Page 33

regional repair strategy
The regional repair strategy includes:
• US – Express Exchange
• Europe – next day unit exchange by courier assist
• AP – Return to bench (3-5 days)
The various support packs available are:
• H3676E HP Supportpack, 2-year, next-day, onsite, electronic pack (for US only)
• H3675A HP Supportpack, 3-year, next-day, onsite, physical pack (for US only)
• H3675E HP Supportpack, 3-year, next-day, onsite, electronic pack (for US only)
• H3679E HP Supportpack, 2-year, next-day, exchange, electronic pack (for US only)
• H3678A HP Supportpack, 3-year, next-day, exchange, physical pack (for US only)
• H3678E HP Supportpack, 3-year, next-day, exchange, electronic pack (for US only)
• H7708A HP Supportpack, 3-year, next-day exchange, physical pack (for Europe only)
• H7708E HP Supportpack, 3-year, next-day exchange, electronic pack (for Europe only)
• H7598A HP Supportpack, 3-year, return to HP, physical pack (for Europe only)
• H7598E HP Supportpack, 3-year, return to HP, electronic pack (for Europe only)
• H7615A HP Supportpack, 3-year, express repair, physical pack (for AP only)
• H7615E HP Supportpack, 3-year, express repair, electronic pack (for AP only)
• H7620A HP Supportpack, 1-unit, network install, physical pack
• H7620E HP Supportpack, 1-unit, network install, electronic pack
Tour the Product hp restricted 1 - 31
Page 34

warranty period
hp product duration of limited warranty
Printer software 90 days
Accessories 1 year (90 days if purchased separately)
Ink cartridges and printheads End of warranty date
Printer peripheral hardware 1 year
Printer 1 year
Warranty Strategy
By Default
• HP/Dealer Unit Exchange 4U
• HP send a refurbished unit to customer
• Customer sends defective unit back to HP
• Turnaround time of 2-3 days
Support Packs
Next-Day On-site
• 2 year - $275
• 3 year - $449
Next Day Exchange
• 2 year
• 3 year - $170
Network Install (1 unit) - $250
duration of limited warranty of hp products
repair and warranty information
Hewlett-Packard warrants to the end-user customer that the HP product will be free from
defects for the specified duration from the date of purchase. HP's limited warranty covers
those defects that arise due to normal use.
1 - 32 hp restricted Tour the Product
Page 35

hewlett-packard limited warranty statement
The limited warranty statement for the printer is available in the hp business inkjet
2600/2600dn, user guide.
Please refer to the document for detailed warranty information.
hp business inkjet 2600/2600dn user guide
Tour the Product hp restricted 1 - 33
Page 36

1 - 34 hp restricted Tour the Product
Page 37

2
Setup and Configure
Page 38

table of contents
Setup and Configure....................................................................................................................1
hardware setup requirements........................................................................................................5
contents of the box.......................................................................................................................6
unpacking the printer and printer components.................................................................................9
unpacking the printer................................................................................................................9
unpacking the auto-duplex unit ..................................................................................................9
overall setup procedure ..............................................................................................................11
setting the LCD language............................................................................................................15
installing tray 2..........................................................................................................................16
installing the auto-duplex unit......................................................................................................17
installing the hp jet direct EIO print server.....................................................................................18
installing additional memory........................................................................................................19
installing additional memory ....................................................................................................19
testing the memory installation..................................................................................................20
installing ink cartridges...............................................................................................................21
part number and ink capacity information .................................................................................21
expiration dates......................................................................................................................21
maintenance guidelines for ink cartridges..................................................................................21
install ink cartridges ................................................................................................................21
installing printheads...................................................................................................................23
printhead part numbers...........................................................................................................23
expiration dates......................................................................................................................23
power-on sequence.................................................................................................................23
installing printheads................................................................................................................23
maintenance guidelines for ink cartridges..................................................................................25
paper type matrix ......................................................................................................................26
paper capacity and weight matrix...............................................................................................27
guidelines for loading paper.......................................................................................................28
printing a demo page................................................................................................................29
software installation requirements.................................................................................................30
specifications for operating system compatibility .........................................................................30
specifications for network operating system compatibility .............................................................30
contents of software CD ROM......................................................................................................31
Windows 9X/NT4/2000 users ................................................................................................31
WinOS/2 users......................................................................................................................31
Macintosh users......................................................................................................................31
OS2/Unix users......................................................................................................................31
startup page of CD browser........................................................................................................32
install the printer software ...........................................................................................................33
printer software components for Windows .................................................................................33
installing the printer driver if the USB cable is not connected........................................................33
installing the printer driver if the USB cable is connected .............................................................38
installing the printer driver by using a parallel port.....................................................................38
installing the Macintosh printer software .......................................................................................42
installing the printer driver by using the Starter CD......................................................................42
installing the printer driver by using the Chooser menu item in the Apple menu..............................44
2 - 2 hp restricted Set Up and Configure
Page 39

installing the printer driver for printers that use AppleTalk............................................................47
installing the printer software on Mac OS X ...............................................................................51
browsing documentation.............................................................................................................52
registering the product................................................................................................................53
customization utility.....................................................................................................................54
optional software .......................................................................................................................55
testing the software installation ....................................................................................................56
uninstalling the printer software ...................................................................................................57
installing toolbox........................................................................................................................59
web deployment of drivers..........................................................................................................60
connectivity options.....................................................................................................................61
USB cable..............................................................................................................................61
parallel cable ........................................................................................................................61
EIO.......................................................................................................................................62
connectivity specifications.........................................................................................................62
connecting to a network..............................................................................................................63
peer-to-peer network ...............................................................................................................63
client-server network................................................................................................................63
establishing a network connection using the EIO module ................................................................64
troubleshooting setup issues.........................................................................................................65
troubleshooting power on issues...................................................................................................67
testing the software installation ....................................................................................................69
printing a diagnostic page..........................................................................................................70
Set Up and Configure hp restricted 2 - 3
Page 40

table of figures
content of the box - 1....................................................................................................................6
content of the box - 2....................................................................................................................7
unpacking the printer...................................................................................................................9
unpacking the auto-duplex unit....................................................................................................10
setup poster - 1..........................................................................................................................11
setup poster - 2..........................................................................................................................12
installing the auto-duplex unit......................................................................................................17
installing the HP JetDirect EIO print server......................................................................................18
removing the HP PCL 5C/PS3 Card .............................................................................................19
Pressing the DIMM.....................................................................................................................20
installing ink cartridges...............................................................................................................22
lifting the printhead cover...........................................................................................................24
pulling the latch forward and down.............................................................................................24
removing the protective tape from the printheads...........................................................................24
8. inserting the printheads........................................................................................................25
startup page of the CD browser...................................................................................................32
running the Starter CD ................................................................................................................42
clicking Install............................................................................................................................43
clicking Restart...........................................................................................................................44
clicking the Apple menu .............................................................................................................44
clicking the Chooser menu item....................................................................................................45
double-clicking LaserWriter 8 ......................................................................................................45
selecting hp business inkjet 2600.................................................................................................46
clicking the Auto Setup button......................................................................................................46
displaying the installed printer.....................................................................................................47
clicking the Desktop Printer Utility alias..........................................................................................47
selecting File -> New..................................................................................................................47
selecting the Printer (AppleTalk) option.........................................................................................48
clicking the Change button..........................................................................................................48
selecting the PPD file name.........................................................................................................49
clicking the Change button in the AppleTalk Printer Selection section................................................49
selecting the AppleTalk printer name............................................................................................50
saving the desktop printer...........................................................................................................50
displaying the installed AppleTalk printer.....................................................................................51
browse documentation................................................................................................................52
customization utility.....................................................................................................................54
optional software .......................................................................................................................55
configuration page ....................................................................................................................56
uninstalling printer software - step 1.............................................................................................57
clicking the Next button. .............................................................................................................57
uninstalling printer software - step 2.............................................................................................58
uninstalling printer software - step 3.............................................................................................58
connectivity options.....................................................................................................................61
configuration page ....................................................................................................................69
image diagnostics page.............................................................................................................70
2 - 4 hp restricted Set Up and Configure
Page 41

hardware setup requirements
disk
operating
system
Windows 95 and
Windows 98
Windows Me • Pentium 166 Mhz
Windows XP • Pentium 233 MHz
Windows NT 4.0 • Pentium 100 Mhz
Windows 2000 • Pentium 166 MHz
Mac OS 8.6 or
later
minimum operating
system requirements
• 486DX-100 Mhz
• 16-MB RAM
• 30-MB free hard-
space
• 32-MB RAM
• 30-MB free hard
disk space
• 64-MB RAM
• 30-MB free hard
disk space
• 32-MB RAM
• 30-MB free hard
disk space
• 64-MB RAM
• 30-MB free hard
disk space
16-MB RAM 32-MB RAM
recommended operating
system requirements
• Pentium 266 Mhz
• 32-MB RAM
• 40-MB free hard disk
space
• Pentium 266 Mhz
• 32-MB RAM
• 40-MB free hard disk
space
• Pentium 300 MHz
• 128-MB RAM
• 40-MB free hard disk
space
• Pentium 266 Mhz
• 64-MB RAM
• 40-MB free hard disk
space
• Pentium 266 Mhz
• 64-MB RAM
• 40-MB free hard disk
space
minimum and recommended system requirements
Set Up and Configure hp restricted 2 - 5
Page 42

contents of the box
content of the box - 1
2 - 6 hp restricted Set Up and Configure
Page 43

Tray 1 is the default tray for A4 size media and tray 2 is the default tray for A3 size media. To
content of the box - 2
The hp business inkjet 2600/2600dn is packaged with the following components:
• Output tray: It supports up to 100 sheets of paper.
• Tray 1: It supports the following types of media:
•
• Paper: Up to 150 sheets
• Transparencies: Up to 80 sheets
• Envelopes: Up to 15 envelopes
• Cards: Up to 60 cards
• Tray 2: It can support up to 250 sheets of plain paper and HP media.
Note
Set Up and Configure hp restricted 2 - 7
change the default tray setting use the Service menu.
• Tray 2 base: It supports tray 2 and is the base of the printer.
• Auto-duplex unit: It is an optional accessory for the hp business inkjet 2600 Base SKU. It is
however available in the hp business inkjet 2600dn. The auto-duplex unit is used to
print on both sides of a paper.
Page 44

• Ink cartridges box: It includes four ink cartridges of the following colors:
• Black No. 10
• Cyan No. 11
• Magenta No. 11
• Yellow No. 11
• Printheads box: It includes four printheads of the following colors:
• Black No. 11
• Cyan No. 11
• Magenta No. 11
• Yellow No. 11
• Reference guide: It provides information to set up the printer.
• Setup poster: It provides illustrated setup information.
• Front panel label: It provides labels that identify the LCD control panel parts.
• Power cord: It connects the printer to a power outlet.
• Starter CD: It enables you to perform the following activities:
• Install the printer software
• Browse documentation
• Register the product
• Create a custom software installer
• Install the optional software
2 - 8 hp restricted Set Up and Configure
Page 45

unpacking the printer and printer components
unpacking the printer
The printer box consists of the following components on the basis of the types of SKUs:
• hp business inkjet 2600 Base SKU: Packaged with the base printer
• hp business inkjet 2600dn SKU: Packaged with the base printer, hp jetdirect 610n EIO
internal print server, and the auto-duplex unit.
unpacking the printer
The steps to unpack the printer and its components are:
1. Unpack the printer.
2. Remove the packing tape and shipping foam.
unpacking the auto-duplex unit
To print on both sides of paper automatically use the auto-duplex unit. It is an optional
accessory that is available with the hp business inkjet 2600dn SKU. The auto-duplex unit can
be purchased separately for the hp business inkjet 2600 Base SKU.
Set Up and Configure hp restricted 2 - 9
Page 46

unpacking the auto-duplex unit
The steps to unpack the auto-duplex unit are:
1. Unpack the auto-duplex unit.
2. Remove the packing tape and shipping foam.
2 - 10 hp restricted Set Up and Configure
Page 47

overall setup procedure
setup poster - 1
Set Up and Configure hp restricted 2 - 11
Page 48

setup poster - 2
setup procedure steps
Unpack the printer and its
components
Install the printer trays Installing tray 2
1. Unpack the printer.
2. Remove the packing tape and shipping foam.
1. Position the tray 2 base in the location where you
want to place the printer.
2. Lift the printer and align it with the tray 2 base
and set the printer on top of the tray 2 base.
3. Place the tray 2 cover on the end of the tray.
4. Align tray 2 with the opening in the tray 2 base
and slide the tray into the base until it snaps into
place.
Installing the output tray
1. Align the output tray with the slots above the tray
1 opening.
2. Slide the output tray firmly into the printer until it
snaps into place.
Installing tray 1
1. Slide tray 1 into the printer below the output tray
until it snaps into place.
2 - 12 hp restricted Set Up and Configure
Page 49

Install the auto-duplex unit 1. Push the rear manual feed release buttons and
the hook catches the carriage
lock. Next, push the latch towards the rear of the
When the initialization is complete, an alignment
slide the rear manual feed out of the printer,
simultaneously.
2. Slide the auto-duplex unit into the printer.
Load paper and configure
media sizes and types
Connect the power cord
and turn on the printer
Install ink cartridges 1. Lift the ink cartridge cover and remove each ink
Install and align the
printheads
1. Pull the tray out of the printer. To load tray 2,
remove the tray 2 cover.
2. Slide the paper length guide and paper width
guide to their outermost positions.
3. To load paper larger than legal size, extend the
tray.
4. Place paper into the tray:
o Up to 150 sheets of paper or 80 sheets
of transparencies into tray 1
o Up to 250 sheets of paper into tray 2
5. Slide the paper length guide and paper width
guide until they fit against the media.
6. Replace the tray 2 cover if tray 2 is loaded.
7. Align the tray with the opening in the printer and
slide it back into place.
8. In the LCD control panel, set the type and size of
paper loaded in each tray.
1. Connect the power cord to the printer and an
alternating current power outlet.
2. Turn on the printer.
cartridge from its package.
2. Align the colored arrows and insert each ink
cartridge into its respective color-coded socket.
3. Press each ink cartridge to ensure proper contact.
1. Ensure that the printer is turned on.
2. Lift the printhead cover.
3. Pull the latch forward and down to release the
hook from the carriage lock. Next, lift and push
the latch toward the rear of the printer.
4. Remove each printhead from its package and
remove the protective tape from each printhead.
5. Insert each printhead into its respective colorcoded socket.
6. Press each printhead to ensure proper contact.
7. Lift the latch so that
Set Up and Configure hp restricted 2 - 13
printer.
8. Close the printhead and ink cartridge covers.
9. Wait while the printer initializes printheads.
page prints.
Page 50

Install the printer software
and connect the interface
cable
Windows
• Installing the printer driver if the USB cable is not
connected
• Installing the printer driver if the USB cable is
connected
• Installing the printer driver by using a parallel
port
• Installing the printer driver by using a network
connection
Macintosh
• Installing the printer software on Mac OS 8.6 to
9.1 using a USB cable
• Installing the printer software on Mac OS 8.6 to
9.1 using a network connection
• Installing the printer software on Mac OS X
2 - 14 hp restricted Set Up and Configure
Page 51

setting the LCD language
Configure the printer to display messages and print configuration pages in the required
language.
Note
When the printer is turned on for the first time, you can set the language to display messages
in a different language.
The steps to configure the LCD control panel language are:
1. Turn off the printer.
2. Turn on the printer while holding down the VALUE button on the LCD control panel
simultaneously.
3. Press VALUE to scroll through the language list.
4. Press SELECT to confirm the language selection.
Set Up and Configure hp restricted 2 - 15
Page 52

installing tray 2
The steps to install tray 2 are:
1. Remove the tape on the tray 2 base.
2. Position the tray 2 base in the location where you want to place the printer. The
printer is designed to fit directly on top of the base.
3. Lift the printer and align it with the pin on the tray 2 base.
Note
Ensure that you remove the tape on the tray 2 base.
4. Set the printer on top of the tray 2 base.
5. Place the tray 2 cover towards the end of the tray.
6. Align tray 2 with the opening in the tray 2 base, and then slide the tray into the base
until it snaps into place.
2 - 16 hp restricted Set Up and Configure
Page 53

installing the auto-duplex unit
Use the auto-duplex unit to print on both sides of paper. The auto-duplex unit is packaged
with the hp business inkjet 2600dn. It can be purchased separately for the hp business inkjet
2600. When printing on both sides of paper, the printer might require additional memory.
Note
When the auto-duplex unit is installed, the rear manual feed is unavailable.
The steps to install the auto-duplex unit in the printer are:
1. Slide the rear manual feed out of the printer by pushing the rear manual feed
release buttons.
2. Slide the auto-duplex unit into the printer.
installing the auto-duplex unit
Set Up and Configure hp restricted 2 - 17
Page 54

installing the hp jet direct EIO print server
The HP Jetdirect EIO print server contains electronic components that can be damaged by static
HP Jetdirect external or internal print server. The HP Jetdirect printer server can be used in both
client-server and peer-to-peer network configuration.
The hp business inkjet 2600dn has a preinstalled HP Jetdirect 615n (EIO) internal print server.
If you have purchased an hp business inkjet 2600, purchase the internal HP Jetdirect print
server separately.
Note
Caution
Note
In case of an hp business inkjet 2600dn, do not install the HP JetDirect print server.
electricity. To prevent the build up of static electricity: Maintain contact with a bare sheet metal
surface on the printer. Wear a grounding wrist strap. Handle the print server with caution.
Avoid touching the electronic components or circuit paths.
HP recommends users to buy the ID 615 for network connection.
The steps to install the HP Jetdirect EIO print server are:
1. Turn off the printer and unplug the power cord.
2. Unscrew and remove the metal plate at the rear of the printer.
3. Insert the print server by aligning it with the guide rails in the printer.
4. Press the print server into the slot.
5. Tighten each thumbscrew, alternatively, until both the screws are secure.
6. Connect the network cable to the print server.
installing the HP JetDirect EIO print server
2 - 18 hp restricted Set Up and Configure
Page 55

installing additional memory
installing additional memory
The printer has one Dual Inline Memory Module (DIMM) slot for upgrading printer memory.
The DIMMs are available in 64MB & 128 MB for a maximum of 176 MB. Purchase
additional memory as an accessory.
Note
Caution
Any laptop memory, which is Intel specified PC-100 SDRAM (64mb/128mb) capacity will
work with the printer. However, hp recommends the 2 part numbers C2387A & C2388A.
Static electricity can damage DIMMs. Ensure that you wear an antistatic wrist strap.
Alternatively, touch the surface of the antistatic package of the DIMM and the bare metal on
the printer.
The steps to install additional printer memory are:
1. Print a configuration page to note the memory capacity of the printer before adding
more memory.
2. Turn off the printer.
3. Unplug the power cord and disconnect all cables.
4. Remove the HP PCL 5C/PS3 Card from the rear of the printer by loosening the two
thumbscrews.
removing the HP PCL 5C/PS3 Card
5. Remove the DIMM from the antistatic package. Align the DIMM with the DIMM slot
on the HP PCL 5C/PS3 Card.
Set Up and Configure hp restricted 2 - 19
Page 56

Note
Ensure that the locks on either side of the DIMM slot are open or facing outward.
6. Press the DIMM into the slot at an angle until the locks on either side of the DIMM
snap into place.
Pressing the DIMM
7. Press the DIMM further until it snaps against the card.
8. Replace the HP PCL 5C/PS3 Card and fasten the two thumbscrews.
9. Reattach the cables and power cord. Turn on the printer and test the DIMM.
Note
testing the memory installation
After installing additional printer memory, test the memory installation.
The steps to test the memory installation are:
1. Ensure that READY appears on the LCD control panel when the printer is turned on.
If an error message appears, the DIMM might be installed incorrectly.
2. Print a configuration page.
3. Compare the memory section of the configuration page with the configuration page
printed before the DIMM installation.
If the amount of memory has not increased, perform the following checks:
• The DIMM might not be installed correctly. Reinstall the DIMM.
• The DIMM might be defective. Use a different DIMM.
2 - 20 hp restricted Set Up and Configure
Page 57

installing ink cartridges
part number and ink capacity information
part number name ink capacity
C4840A Black ink cartridge 28cc
C4844A HP No. 10 Black ink cartridge 69cc
C4836A HP No. 11 Cyan ink cartridge 28cc
C4837A HP No. 11 Magenta ink cartridge 28cc
C4838A HP No. 11 Yellow ink cartridge 28cc
expiration dates
• Install-by date: The Install-by date is printed on the retail box for ink cartridges. Install the
ink cartridges before the date given in the Install-by date for optimized performance.
• End-of-Warranty date: The End-of-Warranty date is printed on the ink cartridges. The
End-of-Warranty date specifies the date by which the warranty period for the ink
cartridges end.
maintenance guidelines for ink cartridges
• Keep the ink cartridges sealed in the original packaging until ready to use.
• Keep the opened ink cartridges in the printer or sealed in a plastic bag.
• Store ink cartridges at room temperature.
• Use a first-in first-out inventory process to avoid having expired ink cartridges in stock.
• Power off the printer by pressing the Power button to return the Carriage to the Service
Station. The Service Station caps the printhead ink nozzles to prevent them from
drying.
ink cartridge specifications
install ink cartridges
The steps to install ink cartridges are:
1. Lift the ink cartridge cover and remove each ink cartridge from its package.
2. Align the colored arrows and insert each ink cartridge into its respective color-coded
socket.
3. Press each ink cartridge to ensure proper contact.
Set Up and Configure hp restricted 2 - 21
Page 58

installing ink cartridges
2 - 22 hp restricted Set Up and Configure
Page 59

installing printheads
printhead part numbers
part number name
C4810A HP No. 11 Black Printhead
C4811A HP No. 11 Cyan Printhead
C4812A HP No. 11 Magenta Printhead
C4813A HP No. 11Yellow Printhead
expiration dates
• Install-by date: The Install-by date is printed on the retail box for printheads. Install the
printheads before the date given in the Install-by date for optimized performance.
• End-of-Warranty date: The End-of-Warranty date is printed on the printheads. The End-of-
Warranty date specifies the date by which the warranty period for the printheads
end.
power-on sequence
Perform the power-on sequence to unlock the carriage and uncap the pens. This must be
done before the printheads can be changed. In a physical no power situation (no-power
connection or power cord) undo the filter to unlock the carriage and uncap the printheads.
The steps to perform the power-on sequence are:
1. Insert the power cord into the power input slot.
2. Power on the printer.
3. Undo the filter in a no-power setting.
printhead specifications
installing printheads
The steps to install printheads are:
1. Ensure that the printer is turned on and the ink cartridges are installed.
2. Lift the printhead cover.
Set Up and Configure hp restricted 2 - 23
Page 60

lifting the printhead cover
3. Pull the latch forward and down to release the hook from the carriage lock.
pulling the latch forward and down
4. Lift and push the latch toward the rear of the printer.
5. Remove each printhead from its package and remove the protective tape from each
printhead.
removing the protective tape from the printheads
6. Insert each printhead into its respective color-coded socket.
Note
2 - 24 hp restricted Set Up and Configure
The color sequence of printheads is different from the color sequence of ink cartridges.
Page 61

inserting the printheads
7. Press each printhead to ensure proper contact.
8. Lift the latch so that the hook catches the carriage lock. Next, push the latch towards
the rear of the printer.
9. Close the printhead and ink cartridge covers.
10. Ensure that there is paper in Tray 1.
11. Wait while the printer initializes printheads. When the initialization is complete, an
alignment page prints.
maintenance guideline s for ink cartridges
• Keep the printheads sealed in the original packaging until ready to use.
• Keep the printheads that are open in the printer or sealed in a plastic bag.
• Store printheads at room temperature.
• Power off the printer by pressing the POWER button. Powering off with the POWER
button returns the Carriage to the Service Station. The Service Station caps the
printhead ink nozzles to prevent them from drying.
Note
Turn on the power to install the print heads.
Set Up and Configure hp restricted 2 - 25
Page 62

paper type matrix
tray
duplex
duplex unit can cause jams
media types
Everyday paper (HP Office
Paper/HP Office Recycled
Paper/HP Multipurpose Paper)
Business communication paper
(HP Bright White Inkjet/HP
Professional Brochure and Flyer
Paper /HP Premium
Inkjet/Heavyweight Paper)
Presentation paper(HP Premium
Inkjet Transparency Film/HP
Premium Plus Inkjet/Transparency
Film)
Photo paper (HP Premium Plus
Photo Paper/HP Premium Photo
Paper/HP Photo Paper/HP
Colorfast Photo Paper/HP Photo
Quality Paper)
Design paper (HP Design Glossy
Paper/HP Design Heavyweight
Paper)
tray 2 manual
1
Y Y Y Y
Y N (Only
Heavyweight
Brochure and
Bright White
papers)
Y N Y N
Y N Y N
Y N Y N
feed
units
Y Y
auto-
unit
Caution
paper types supported by hp business inkjet 2600/2600dn
Some media, such as envelopes and cards, can only be used with tray 1 or the rear manual
feed. Using this media in tray 2, the front manual feed, or the autoand might damage the printer and auto-duplex unit.
2 - 26 hp restricted Set Up and Configure
Page 63

paper capacity and weight matrix
110 to 199
Up to 60 cards
Up to 250 plain paper
manual feed
Rear manual
110 to 199
tray or
bin
Tray 1 • Paper
Tray 2 Paper 60 to 135 g/m2
Front
feed
Auto-duplex
unit
size or type of
paper
• Transparencies
• Envelopes
• Cards
• Paper
• Transparencies
• Paper
• Transparencies
• Envelopes
• Cards
Paper 60 to 135 g/m2 N.A.
weight capacity
• 60 to 135
g/m2
• N.A.
• 75 to 90
g/m2
•
g/m2
• 60 to 135
g/m2
• N.A.
• 60 to 270
g/m2
• N.A.
• 75 to 90
g/m2
•
g/m2
• Up to 150
sheets
• Up to 80
transparencies
• Up to 15
envelopes
•
• Up to 10 sheets
• Up to 3 sheets
• Single sheet
• N.A.
• N.A.
• N.A.
supported paper capacity and weight
Set Up and Configure hp restricted 2 - 27
Page 64

guidelines for loading paper
The guidelines for loading paper are:
• Extend paper trays to print on paper larger than the legal size, such as 11x17 inches,
Super B/A3+, A3, and B5.
• Insert paper in portrait orientation. To print in landscape orientation, make the
appropriate selection through the software.
• Load only one type of paper at a time into the paper path to prevent jams. When using a
different type of paper, remove the existing paper and realign it with new paper
before loading.
• Use paper or transparency that conforms to printer specifications.
• Avoid using paper that is heavily textured or does not accept ink.
• Use paper whose margins match or exceed the minimum margin settings in portrait
orientation.
• Change the paper settings in the printer to use a new type or size of paper in a tray.
Settings in the printer driver and software application override LCD control panel
settings.
2 - 28 hp restricted Set Up and Configure
Page 65

printing a demo page
Print a demo page to check the printer setup.
You can print a demo page without connecting the printer to the computer. The demo page
does not ensure that the computer and printer are properly connected because they are
independent of each other. The steps to print a demo page by using the LCD control panel
are:
1. Press the MENU button until INFORMATION MENU appears on the LCD.
2. Press the ITEM button until PRINT DEMO appears.
3. Press the SELECT button.
Set Up and Configure hp restricted 2 - 29
Page 66

software installation requirements
specifications for operating system compatibility
• Windows 95
• Windows 98
• Windows Me
• Windows NT 4.0
• Windows 2000
• Windows XP
• Mac OS 8.6 and later (including Mac OS X)
• AutoCAD releases 13, 14, and AutoCAD 2000
specifications for network operating system compatibility
hp business inkjet 2600
• Windows 95/98/Me
• Windows NT 4.0/2000/XP
hp business inkjet 2600dn
• Windows 95/98/Me
• Windows NT 4.0/2000/XP
• Novell NetWare 4.x, 5.x, NDS, and NDPS
• HP-UX 10.20, 11.x
• Solaris 7, 8
• RedHat Linux 6.2
• SuSE Linux 6.4
• Mac OS 8.6 and later
• Networking solutions provided by the network operating system vendors
• IBM OS/2 Warp 4.x, AIX 3.2.5 and later
• MPE-iX
• Artisoft LANtastic
2 - 30 hp restricted Set Up and Configure
Page 67

contents of software CD ROM
Windows 9X/NT4/2000 users
• User-friendly CD shell
• Win 9X/Me/NT4/2000 PCL5C and PScript printer drivers and Installer
• Documentation:
• Release Notes
• User Guide
• HP Jetdirect Administrators Guide
• Diesel Web site
• Web Register
• Administrative Tools:
• Embedded Web Server
• Optional software:
• Make Disk Software
• HP Web JetAdmin
• PANTONE Color Palettes
WinOS/2 users
• User Guide
• Release Notes
Macintosh users
• User Friendly CD Shell
• Apple PS LaserWriter printer driver, Diesel PPD, and Installer
• Web Register
• User Guide
• Diesel Web site
• Release Notes
OS2/Unix users
• Readme files in corresponding sub-directories
• Solutions available on IBM Website
Set Up and Configure hp restricted 2 - 31
Page 68

startup page of CD browser
startup page of the CD browser
The startup page of the CD browser consists of the following options:
1. Printer driver: Install the necessary software from the computer or the network.
2. Browse documentation: Browse the latest documentation available for the printer.
3. Register product: Register the printer by using this option.
4. Customization utility: Create a custom software installer that can be copied to floppy
disks, the local hard drive, or the network drive.
5. Optional software: Install various optional software that are available for the printer.
2 - 32 hp restricted Set Up and Configure
Page 69

install the printer software
Install the printer software for local or network printing. For local printing, connect the printer
by using a universal serial bus (USB) or a parallel cable.
Warning
printer software components for Windows
installing the printer driver if the USB cable is not connected
Note
Ensure not to connect the printer by using both the USB and parallel cable.
The printer software includes:
• Printer drivers:
• PCL 5C
• PostScript
• ADI, version 4.01, to support AutoCAD releases 13 and 14 and AutoCAD 2000
• HP Business Inkjet 2600 Series Toolbox
• Screen fonts
• Customization utility
1. Start Windows and ensure that no other Windows applications are running.
2. Insert the Starter CD into the CD-ROM drive. The CD executes automatically.
If the CD does not execute automatically, select the Start -> Run menu command. Type "<CD
ROM drive>:\SETUP" in the command line box. For example, type "D:\SETUP" if the D: is the
CD ROM drive.
3. Click Install Printer Driver from the CD menu.
Set Up and Configure hp restricted 2 - 33
Page 70

4. Choose the required language and click OK . Follow the instructions on the screen.
5. Click Connected to this computer and click Next .
2 - 34 hp restricted Set Up and Configure
Page 71

6. Click USB and then click Next . Follow the instructions on the screen to complete the
installation.
Note
Install only one printer driver if connecting the printer using a USB cable.
Set Up and Configure hp restricted 2 - 35
Page 72

7. Select the required driver and click the Next button.
8. Select the required components and click the Next button.
2 - 36 hp restricted Set Up and Configure
Page 73

9. Click the Install button.
10. Click the Finish button.
Set Up and Configure hp restricted 2 - 37
Page 74

installing the printer driver if the USB cable is connected
If the USB cable is connected to the ports on the computer and the printer before installing the
printer software, the Found New Hardware wizard appears on the computer screen.
1. Click Next in the Found New Hardware wizard.
2. Click Search for the best driver for your device and click Next .
3. Insert the Starter CD into the CD-ROM drive. If the CD menu appears, click Exit twice
to close the CD menu.
4. Select Specify a location . Click Browse to locate the installation files depending
on the operating system and click OK .
5. Click Next . Follow the instructions on the screen.
6. Click Next and click Finish .
7. If using Windows 98 or Windows Millennium Edition, repeat steps 3 to 7 to complete
the installation.
installing the printer driver by using a parallel port
1. Start Windows and ensure that no other Windows applications are running.
2. Insert the Starter CD into the CD-ROM drive. The CD executes automatically.
Note
2 - 38 hp restricted Set Up and Configure
If the CD menu does not execute automatically, select the Start -> Run menu command. Type
"<CD ROM drive>:\SETUP". For example, type "D:\SETUP" if D is the CD ROM drive.
3. Click Install Printer Driver on the CD menu.
Page 75

4. Choose the required language and click OK . Follow the instructions on the screen.
5. Click Connected to this computer and click Next .
Set Up and Configure hp restricted 2 - 39
Page 76

6. Click Parallel . Follow the instructions on the screen to complete the installation.
Note
If the Express Install using HP recommended defaults check box is selected, the installation
program uses the default options. To specify installation options, clear this check box.
2 - 40 hp restricted Set Up and Configure
Page 77

7. Click the Finish button.
8. Connect the parallel cable to the computer and the printer.
Set Up and Configure hp restricted 2 - 41
Page 78

installing the Macintosh printer software
installing the printer driver by using the Starter CD
1. Insert the Starter CD into the CD-ROM drive. The CD menu runs automatically. Click
Install Driver.
running the Starter CD
2. Click Install and follow the instructions on the screen.
2 - 42 hp restricted Set Up and Configure
Page 79

clicking Install
3. Click Restart to complete the installation.
Set Up and Configure hp restricted 2 - 43
Page 80

clicking Restart
installing the printer driver by using the Chooser menu item in the Apple
menu
1. Click the Apple menu on the Desktop.
2 - 44 hp restricted Set Up and Configure
Page 81

clicking the Apple menu
2. Click the Chooser menu item.
clicking the Chooser menu item
3. In the Chooser window, double-click LaserWriter 8 to display a list of PostScript
printers.
double-clicking LaserWriter 8
4. Select hp business inkjet 26002 from the list of PostScript printers and click
Setup .
Set Up and Configure hp restricted 2 - 45
Page 82

selecting hp business inkjet 2600
5. Click the Auto Setup button in the Setup dialog box to install the printer.
clicking the Auto Setup button
2 - 46 hp restricted Set Up and Configure
Page 83

displaying the installed printer
installing the printer driv er for printers that use AppleTalk
1. Click the Desktop Printer Utility alias.
clicking the Desktop Printer Utility alias
2. Select File -> New .
selecting File -> New
3. Select the Printer (AppleTalk) option from the Create Desktop list in the New
Desktop printer window and click OK .
Set Up and Configure hp restricted 2 - 47
Page 84

selecting the Printer (AppleTalk) option
4. Click the Change button in the PostScript Printer Description (PPD) File
section.
clicking the Change button
5. Select the HP Business Inkjet 2600 option from the list of PPD file names and
click Select .
2 - 48 hp restricted Set Up and Configure
Page 85

selecting the PPD file name
6. Click the Change button in the AppleTalk Printer Selection section.
clicking the Change button in the AppleTalk Printer Selection section
7. Select the hp business inkjet 26002 from the list of PostScript printers in the
AppleTalk Printer window and click OK .
Set Up and Configure hp restricted 2 - 49
Page 86

selecting the AppleTalk printer name
8. Specify a name for desktop printer in the Save desktop printer as: text box and
click Save .
saving the desktop printer
2 - 50 hp restricted Set Up and Configure
Page 87

displaying the installed AppleTalk printer
installing the printer software on Mac OS X
1. To connect the printer to a network, install the HP Jetdirect print server on the printer
and print a Configuration page.
2. Connect the network cable between the HP Jetdirect print server and a network port if
using a network connection.
3. Insert the Starter CD into the CD-ROM drive. The CD menu executes automatically.
Follow the instructions on the screen.
4. To connect the printer by using a USB cable, connect the cable between the ports on
the computer and the printer.
5. Open the Print Center (located in the Dock at the bottom of the screen), and then click
Add Printer .
6. From the pop-up menu, select . USB .
7. Select HP Business Inkjet 2600 from the list, and then click Add . A blue dot
appears beside the printer name, indicating that the printer is now the default
printer.
Set Up and Configure hp restricted 2 - 51
Page 88

browsing documentation
Browse the latest documentation available for the printer by using the Browse Documentation
option. Access the following documentation using the CD browser:
1. Release Notes - It includes installation and late-breaking information.
2. Users guide - It includes the information related to:
• Setting up the printer
• Installing the printer software
• Troubleshooting the printer
• Maintaining the printer
3. HP JetDirect Guide - It enables you to access the following information:
• Configure the printer for network printing
• Troubleshoot the HP JetDirect print server
4. Setup Poster - It is a graphical roadmap to set up the printer
5. Printer Web Site - It enables you to access the printer Web site for information related
to the printer. Click the Printer Web site button to access the following Web site:
http://www.hp.com/.
browse documentation
2 - 52 hp restricted Set Up and Configure
Page 89

registering the product
Register the printer by clicking the Register Product button. This button enables access to the
following Web site:
http://register.hp.com/servlet/WebReg.servlets.EntryServlet?appID=java_wreg_wreg_genpg
Perform the following activities by accessing the hp registration Web site:
• Create a profile
• Update a profile
Acquire the following information by accessing the hp registration Web site:
• Enhanced customer service
• Fast expert technical support
• Timely notices of product and software upgrades
• Free newsletters with exclusive guidelines
• Special offers specific to your requirements
Set Up and Configure hp restricted 2 - 53
Page 90

customization utility
Create a custom software installer that can be copied to floppy disks, local hard drives, or
network drives. Perform the following activities by accessing the customization utility option:
1. Copy printer drivers - Copy the printer driver to a selected media. The resulting files
can be used with Add Printer Wizard of Microsoft.
2. Create customized utility - Create an interactive installer customized by language,
operating system, model, and components.
3. Copy Entire Printing System Installer - Copy the printing system installer for the
selected language and operating system to media other than floppy disks, for
example shared network location.
customization utility
2 - 54 hp restricted Set Up and Configure
Page 91

optional software
The various optional software that are available for the printer are:
1. HP WebJet Admin - Download HP WebJet Admin from the Internet for a network
printer management tool that is Web browser-based. Download HP WebJet Admin
from the following URL:
http://pandi.itrc.hp.com/pdi/t3/CDA/SeriesDisplay/0,1953,27905,00.html?produ
ct_type_oid=13037&currCatID=Print+Servers+and+Network+Software%21Installatio
n+%26+Management+Software&lsidebarLayId=79&rsidebarLayId=62
2. Install AutoCAD driver - Install the AutoCAD driver for AutoCAD Release 13/14.
3. PANTONE Color Palletes - Download PANTONE color palletes.
optional software
Set Up and Configure hp restricted 2 - 55
Page 92

testing the software installation
configuration page
Verify the working condition of the printer by printing a configuration page.
Print a configuration page to diagnose printer problems.
The configuration page provides information to the user about printer identification and
firmware versions, hardware configuration in terms of trays, RAM, installable options
(personalities, expansion RAM, EIO cards), networking, and consumables status.
The steps to print a configuration page are:
1. Press MENU on the LCD control panel until INFORMATION MENU appears.
2. Press ITEM until PRINT CONFIGURATION appears.
3. Press SELECT to print the Configuration page.
2 - 56 hp restricted Set Up and Configure
Page 93

uninstalling the printer software
The steps to uninstall the printer software are:
1. Select Programs -> hp business inkjet printer 2600 series ->; HP
Business Inkjet 2600 Series Uninstaller menu command.
uninstalling printer software - step 1
2. Click the Next button on the Welcome screen.
clicking the Next button.
3. Select the components that are to be uninstalled in the Components dialog box.
Set Up and Configure hp restricted 2 - 57
Page 94

uninstalling printer software - step 2
4. Click Finish to uninstall the required components.
uninstalling printer software - step 3
2 - 58 hp restricted Set Up and Configure
Page 95

installing toolbox
You can install the Toolbox only from the Starter CD. The steps to install the Toolbox are:
1. Start Windows and ensure that no other Windows applications are running.
2. Insert the Starter CD into the CD-ROM drive. The CD executes automatically.
3. Click Install Printer Driver in the CD menu.
4. Choose the required language and click OK .
5. Click the Next button in the Welcome screen.
6. Click the Yes button in the HP Software License Agreement dialog box.
7. Click Connected to the network , and click Next .
8. Click the Client Setup radio button in the Network Setup dialog box and click
the Next button.
9. Specify the network path of the printer in the Specify Network Path dialog box
and click the Next button.
10. Select Custom Installation radio button in the Installation Type dialog box
and click the Next button.
11. Select the HP Business Inkjet 2600 Series Toolbox check box in the
Components dialog box and click the Next button.
12. Click the Install button in the Ready To Install dialog box to install the Toolbox.
Set Up and Configure hp restricted 2 - 59
Page 96

web deployment of drivers
You can deploy the printer drivers from the Starter CD. In addition, you can deploy the
following printer drivers from the HP Web site:
• Full Printing System
• PCL5 + USB Driver
• PCL5 Driver
• PS Driver
• PS + USB Driver
• PS Driver
• LJ Utility
• ADI Driver
• Pantone
• ICC Profiles (CMYK)
• JetAdmin 3.4 support
• Firmware download utility
• WebJetAdmin support
• PS model script
Personality Driver Type
PCL5+PS Full Printing System (Including the Toolbox)
PCL5 Add Printer (Lite) (Excluding the Toolbox)
PS Add Printer (Lite) (Excluding the Toolbox)
PS Printing Software
Mac LJ Utility N.A.
HP-GL/2 ADI driver for AutoCAD R13/14
PS Pantone Palettes
PS ICC Profiles
JetAdmin 3.4 support Device plug-in
printer driver available from the Web
2 - 60 hp restricted Set Up and Configure
Page 97

connectivity options
USB cable
Use a USB cable, having a part number of C6518A, to connect the printer to the computer if
the following two conditions are fulfilled:
• The computer has a USB port.
• The computer has any one of the following operating systems:
• Windows 98
• Windows Millennium Edition (Me)
• Windows 2000
• Windows XP
If the computer does not meet the specifications, use a parallel cable to connect the printer to
the computer.
In most cases, after you install the printer software and connect the printer to the computer,
install additional printers with USB cables without reinstalling the printer software. It is
recommended to install the software before connecting the printer to the computer.
connectivity options
Warning
Ensure to connect the USB cable only when prompted by the computer.
parallel cable
Use a parallel cable, having part numbers C2950A or C2951A, to connect the printer to the
computer if the following two conditions are fulfilled:
• The computer has a parallel port.
• The computer has any one of the following operating systems:
• Windows 95
• Windows 98
• Windows Millennium Edition
Set Up and Configure hp restricted 2 - 61
Page 98

• Windows NT 4.0
• Windows 2000
• Windows XP
EIO
Install an HP Jetdirect print server in the EIO slot of the printer. By default, the hp business
inkjet 2600dn includes a print server in this slot.
The printer is shared in a network environment by connecting it directly to the network with an
HP Jetdirect external or internal print server. In addition, computers running in the Windows
environment can share the printer when it is directly connected to a computer on the network.
The HP Jetdirect printer server can be used in both client-server and peer-to-peer network
configuration.
connectivity specifications
product name specification
hp business inkjet
2600
hp business inkjet
2600dn
• IEEE 1284-compliant bi-directional parallel
• USB port
• One open EIO slot
• HP PCL5C and PostScript 3 Emulation Personalities
Card in second EIO slot
• IEEE 1284-compliant bi-directional parallel
• USB port
• HP PCL5C and PostScript 3 Emulation Personalities
Card in first EIO slot
• HP Jetdirect internal print server for Fast Ethernet
10/100Base-TX in second EIO slot
Note
connectivity specifications of hp business inkjet 2600/2600dn
EIO and personality cards can be swapped between slots.
2 - 62 hp restricted Set Up and Configure
Page 99

connecting to a network
The HP Jetdirect print server can be used in both client-server and peer-to-peer network
configurations.
peer-to-peer network
In a peer-to-peer network, the printer software is installed on each computer, and the system is
configured to send print jobs directly to the printer. Each individual computer manages its own
print jobs. Peer-to-peer printing is more suitable for smaller networks.
client -server network
On a client-server network, client computers send print jobs to dedicated server computers that
control the use of each printer. Client-server printing is normally used in small work groups
where dedicated computer servers manage the printing needs of many users. Access the HP
Jetdirect Print Server Administrator guide on the starter CD for information to set up the printer
on a network.
The HP Jetdirect Print Server Administrator guide provides the following information:
• HP Software Solutions for HP Jetdirect print servers:
• HP Web JetAdmin, a web-based tool for managing network peripherals
• HP IP/IPX Printer Gateway for NDPS
• HP LaserJet Utility to set up printers on AppleTalk networks
• TCP/IP Configurations
Set Up and Configure hp restricted 2 - 63
Page 100

establishing a network connection using the EIO module
When setting up the printer by using a network connection, connect the printer to the network
and then install the software.
1. Install the HP Jetdirect print server in the printer.
Note
Note
The print server must be installed before installing the printer software.
2. Connect the network cable between the HP Jetdirect print server and a network port.
3. Start Windows and ensure that no other Windows applications are running.
4. Insert the Starter CD into the CD-ROM drive. The CD executes automatically.
If the CD menu does not execute automatically, select the Start -> Run menu command. Type
the <CD ROM drive>:\SETUP. For example, type D:\SETUP if the D: is the CD ROM drive.
5. Click Install Printer Driver in the CD menu.
6. Choose the required language and click OK .
7. Follow the instructions on the screen.
8. Click Connected to the network , and click Next .
9. Click Basic Server or Peer-to-Peer Network Setup and click Next . Follow
the instructions on the screen to complete the installation procedure.
2 - 64 hp restricted Set Up and Configure
 Loading...