

Page 1

contents
User’s Guide
HP OfficeJet Pro 1175C
Page 2

©Copyright Hewlett-Packard Company 1998
All rights are reserved. No part of the document
may be photocopied, reproduced, or translated to
another language without the prior written consent
of Hewlett-Packard Company.
Publication number: C5365-90000
First edition: February 1998
Printed in U.S.A., Germany or Singapore
Acknowledgments
AGaramond, Garamond, Adobe™ and
PhotoDeluxe are registered trademarks of Adobe
Systems, Incorporated, which may be registered in
certain jurisdictions.
MS-DOS®, Windows®, and Internet Explorer are
registered trademarks of Microsoft Corporation.
OmniPage Limited Edition is a registered
trademark of Caere Corporation.
WinFax PRO is a registered trademark of
Symantec Corporation.
Intel® and Pentium® are registered trademarks of
Intel Corporation.
Notice
The information contained in this document is
subject to change without notice and should not be
construed as a commitment by the HewlettPackard Company.
Hewlett-Packard assumes no responsibility for
any errors that may appear in this document,
nor does it make expressed or implied warranty
of any kind with regard to this material,
including, but not limited to, the implied
warranties of merchantability and fitness for a
particular purpose.
Company shall not be liable for incidental or
consequential damages in connection with, or
arising out of the furnishing, performance, or use
of this document and the program material which
it describes.
The Hewlett-Packard
: Regulatory information can be found in
Note
Chapter 15 of this User’s Guide.
It is not lawful in many places to make copies of
the following items. When in doubt, check with a
legal representative first.
◆
Governmental paper or documents:
- Passports
- Immigration papers
- Selective service papers
- Identification badges, cards, or insignias
◆
Governmental stamps:
- Postage stamps
- Food stamps
◆
Checks or drafts drawn on Governmental
agencies
◆
Paper currency, traveler’s checks, or money
orders
◆
Certificates of deposit
◆
Copyrighted works
Page 3
Please complete the following for future reference.
HP OfficeJet Pro 1170C Series:
Serial Number:
Date of Purchase:
Place of Purchase:
Address:
Phone Number:
Service Contract Number:
Date of Contract Expiration:
Adobe PhotoDeluxe Serial Number: HGW100B7100005-459
Caere OmniPage LE Serial Number:
Symantec WinFax PRO Serial Number:
Safety Symbols
Owner’s Information
!
If present, this symbol is placed on
the OfficeJet Pro where it is necessary
for you to refer to the manual in order
to understand a hazard.
If present, this symbol is placed on
the OfficeJet Pro within the area
where hazardous voltage is present.
Only trained service persons should
perform work in this area.
If present, this symbol is placed on
the OfficeJet Pro within the area
where electrostatic discharge (ESD)
may occur. ESD can damage the
OfficeJet Pro’s electronic
components. Avoid touching
electronic components or circuit
paths. Use proper grounding devices
when circuits are open to outside
areas.
Page 4

Page 5

contents
Chapter 1 — Welcome!
Copying Features . . . . . . . . . . . . . . . . . . . . . . . . . . . . . . . . . . . . . . . . . . . . . . . . . . . . . . 1-1
Printing Features . . . . . . . . . . . . . . . . . . . . . . . . . . . . . . . . . . . . . . . . . . . . . . . . . . . . . . . 1-1
Scanning Features . . . . . . . . . . . . . . . . . . . . . . . . . . . . . . . . . . . . . . . . . . . . . . . . . . . . . . 1-1
About This Guide . . . . . . . . . . . . . . . . . . . . . . . . . . . . . . . . . . . . . . . . . . . . . . . . . . . . . . . . . . 1-2
Conventions Used . . . . . . . . . . . . . . . . . . . . . . . . . . . . . . . . . . . . . . . . . . . . . . . . . . . . . . 1-2
Chapter 2 — Setting Up Your New HP OfficeJet Pro
Choosing a Location and Environment for Your OfficeJet Pro . . . . . . . . . . . . . . . . . . . . . . . 2-1
Before You Start . . . . . . . . . . . . . . . . . . . . . . . . . . . . . . . . . . . . . . . . . . . . . . . . . . . . . . . . . . . 2-2
Direct Connection . . . . . . . . . . . . . . . . . . . . . . . . . . . . . . . . . . . . . . . . . . . . . . . . . . . . . . . . . . 2-2
Parallel Port Mode/Type . . . . . . . . . . . . . . . . . . . . . . . . . . . . . . . . . . . . . . . . . . . . . . . . . . . . . 2-3
Eight Easy Steps to Set Up Your HP OfficeJet Pro . . . . . . . . . . . . . . . . . . . . . . . . . . . . . . . . 2-4
Step 1 — Unpack Your HP OfficeJet Pro. . . . . . . . . . . . . . . . . . . . . . . . . . . . . . . . . . . . . . . . 2-4
Step 2 — Attach the Front Panel Overlay. . . . . . . . . . . . . . . . . . . . . . . . . . . . . . . . . . . . . . . . 2-6
Step 3 — Unlock Your HP OfficeJet Pro . . . . . . . . . . . . . . . . . . . . . . . . . . . . . . . . . . . . . . . . 2-7
Step 4 — Load Paper Into Your HP OfficeJet Pro . . . . . . . . . . . . . . . . . . . . . . . . . . . . . . . . . 2-8
Step 5 — Insert the Color and Black Print Cartridges . . . . . . . . . . . . . . . . . . . . . . . . . . . . . 2-10
Step 6 — Connect the Cable and Power Cord . . . . . . . . . . . . . . . . . . . . . . . . . . . . . . . . . . . 2-12
Step 7 — Install the Software . . . . . . . . . . . . . . . . . . . . . . . . . . . . . . . . . . . . . . . . . . . . . . . . 2-14
Step 8 — Align Your Tri-Color and Black Print Cartridges. . . . . . . . . . . . . . . . . . . . . . . . . 2-24
Chapter 3 — Copying
How to Make Copies. . . . . . . . . . . . . . . . . . . . . . . . . . . . . . . . . . . . . . . . . . . . . . . . . . . . . . . . 3-2
Controlling How Copies Will Look . . . . . . . . . . . . . . . . . . . . . . . . . . . . . . . . . . . . . . . . . . . . 3-3
Number of Copies . . . . . . . . . . . . . . . . . . . . . . . . . . . . . . . . . . . . . . . . . . . . . . . . . . . . . 3-4
Scan To Fax . . . . . . . . . . . . . . . . . . . . . . . . . . . . . . . . . . . . . . . . . . . . . . . . . . . . . . . . . . 3-4
Copy Quality . . . . . . . . . . . . . . . . . . . . . . . . . . . . . . . . . . . . . . . . . . . . . . . . . . . . . . . . . 3-4
Reduce/Enlarge Options . . . . . . . . . . . . . . . . . . . . . . . . . . . . . . . . . . . . . . . . . . . . . . . . . 3-5
Paper Types . . . . . . . . . . . . . . . . . . . . . . . . . . . . . . . . . . . . . . . . . . . . . . . . . . . . . . . . . . 3-7
Lighter/Darker . . . . . . . . . . . . . . . . . . . . . . . . . . . . . . . . . . . . . . . . . . . . . . . . . . . . . . . . 3-7
Color Intensity . . . . . . . . . . . . . . . . . . . . . . . . . . . . . . . . . . . . . . . . . . . . . . . . . . . . . . . . 3-7
TE (Text Enhancement) . . . . . . . . . . . . . . . . . . . . . . . . . . . . . . . . . . . . . . . . . . . . . . . . . 3-8
ELC (Enhance Light Colors) . . . . . . . . . . . . . . . . . . . . . . . . . . . . . . . . . . . . . . . . . . . . . 3-8
Changing Other Front Panel Settings . . . . . . . . . . . . . . . . . . . . . . . . . . . . . . . . . . . . . . . . . . . 3-9
Front Panel Language . . . . . . . . . . . . . . . . . . . . . . . . . . . . . . . . . . . . . . . . . . . . . . . . . . . 3-9
Copy Paper Size . . . . . . . . . . . . . . . . . . . . . . . . . . . . . . . . . . . . . . . . . . . . . . . . . . . . . . . 3-9
Set Defaults . . . . . . . . . . . . . . . . . . . . . . . . . . . . . . . . . . . . . . . . . . . . . . . . . . . . . . . . . 3-10
Factory Defaults . . . . . . . . . . . . . . . . . . . . . . . . . . . . . . . . . . . . . . . . . . . . . . . . . . . . . . 3-10
Clear/Stop . . . . . . . . . . . . . . . . . . . . . . . . . . . . . . . . . . . . . . . . . . . . . . . . . . . . . . . . . . . 3-10
Using the Automatic Document Feeder (ADF) . . . . . . . . . . . . . . . . . . . . . . . . . . . . . . . . . . 3-11
HP OfficeJet Pro User’s Guide v
Page 6

Chapter 4 — Printing
Start Printing . . . . . . . . . . . . . . . . . . . . . . . . . . . . . . . . . . . . . . . . . . . . . . . . . . . . . . . . . . . . . 4-1
Stop Printing. . . . . . . . . . . . . . . . . . . . . . . . . . . . . . . . . . . . . . . . . . . . . . . . . . . . . . . . . . . . . . 4-3
Stop a Print Job from the HP OfficeJet Pro . . . . . . . . . . . . . . . . . . . . . . . . . . . . . . . . . .4-3
Stop a Print Job from Windows 95/98 . . . . . . . . . . . . . . . . . . . . . . . . . . . . . . . . . . . . . .4-3
Chapter 5 — Scanning
Scanning Methods . . . . . . . . . . . . . . . . . . . . . . . . . . . . . . . . . . . . . . . . . . . . . . . . . . . . . . . . . 5-1
Scanning Tips. . . . . . . . . . . . . . . . . . . . . . . . . . . . . . . . . . . . . . . . . . . . . . . . . . . . . . . . . . . . . 5-2
Scanning While Working in a File. . . . . . . . . . . . . . . . . . . . . . . . . . . . . . . . . . . . . . . . . . . . . 5-2
Scanning Using HP ScanPicture . . . . . . . . . . . . . . . . . . . . . . . . . . . . . . . . . . . . . . . . . . .5-2
Scanning Pictures in TWAIN-Aware Programs . . . . . . . . . . . . . . . . . . . . . . . . . . . . . . .5-3
Scanning Text Using Acquire Text . . . . . . . . . . . . . . . . . . . . . . . . . . . . . . . . . . . . . . . . .5-4
Scanning Using a Standalone Program . . . . . . . . . . . . . . . . . . . . . . . . . . . . . . . . . . . . . . . . . 5-5
Scanning Pictures Using HP PictureScan . . . . . . . . . . . . . . . . . . . . . . . . . . . . . . . . . . . .5-5
Scanning Text Using Caere OmniPage LE . . . . . . . . . . . . . . . . . . . . . . . . . . . . . . . . . . .5-6
Editing Your Scanned Pictures . . . . . . . . . . . . . . . . . . . . . . . . . . . . . . . . . . . . . . . . . . . . . . . 5-7
Chapter 6 — Communicating
Scanning Using WinFax PRO . . . . . . . . . . . . . . . . . . . . . . . . . . . . . . . . . . . . . . . . . . . . . . . . 6-1
Scanning Using Scan To Fax . . . . . . . . . . . . . . . . . . . . . . . . . . . . . . . . . . . . . . . . . . . . .6-1
Scanning Using Symantec WinFax PRO Standalone . . . . . . . . . . . . . . . . . . . . . . . . . . .6-2
Chapter 7 — All About Paper
HP Papers. . . . . . . . . . . . . . . . . . . . . . . . . . . . . . . . . . . . . . . . . . . . . . . . . . . . . . . . . . . . . . . . 7-1
Paper Choices When Copying . . . . . . . . . . . . . . . . . . . . . . . . . . . . . . . . . . . . . . . . . . . . . . . . 7-2
Using the Right Front Panel Paper Type When Copying . . . . . . . . . . . . . . . . . . . . . . . .7-2
Paper Choices When Printing . . . . . . . . . . . . . . . . . . . . . . . . . . . . . . . . . . . . . . . . . . . . . . . . 7-3
Using the Right Print Settings in the OfficeJet Pro Print Properties Dialog . . . . . . . . . .7-3
Tips on Loading Paper in the Paper Tray . . . . . . . . . . . . . . . . . . . . . . . . . . . . . . . . . . . .7-4
Special Considerations When Using Transparency Film. . . . . . . . . . . . . . . . . . . . . . . . . . . . 7-4
Input Tray Requirements . . . . . . . . . . . . . . . . . . . . . . . . . . . . . . . . . . . . . . . . . . . . . . . . . . . . 7-5
Automatic Document Feeder Requirements . . . . . . . . . . . . . . . . . . . . . . . . . . . . . . . . . . . . . 7-5
Chapter 8 — Sharing the OfficeJet Pro Over a Network
Setting Up for Peer-to-Peer Printing and File Sharing. . . . . . . . . . . . . . . . . . . . . . . . . . . . . . 8-1
Setting Up the Server . . . . . . . . . . . . . . . . . . . . . . . . . . . . . . . . . . . . . . . . . . . . . . . . . . .8-2
Setting Up Client Computers . . . . . . . . . . . . . . . . . . . . . . . . . . . . . . . . . . . . . . . . . . . . .8-2
How to Share Files Across a Peer-to-Peer Network . . . . . . . . . . . . . . . . . . . . . . . . . . . . . . . 8-5
Chapter 9 — Maintaining Your HP OfficeJet Pro
Cleaning the Exterior Case. . . . . . . . . . . . . . . . . . . . . . . . . . . . . . . . . . . . . . . . . . . . . . . . . . . 9-1
Cleaning the Glass . . . . . . . . . . . . . . . . . . . . . . . . . . . . . . . . . . . . . . . . . . . . . . . . . . . . . . . . . 9-1
vi Contents
Page 7

Chapter 10 — Getting Help
HP Multimedia Product Tour . . . . . . . . . . . . . . . . . . . . . . . . . . . . . . . . . . . . . . . . . . . . . . . . 10-1
HP Scanning Tutorial . . . . . . . . . . . . . . . . . . . . . . . . . . . . . . . . . . . . . . . . . . . . . . . . . . . . . . 10-2
On-Line Help. . . . . . . . . . . . . . . . . . . . . . . . . . . . . . . . . . . . . . . . . . . . . . . . . . . . . . . . . . . . . 10-2
Caere OmniPage LE, Adobe PhotoDeluxe, and Symantec WinFax PRO . . . . . . . . . . 10-2
HP PictureScan Help . . . . . . . . . . . . . . . . . . . . . . . . . . . . . . . . . . . . . . . . . . . . . . . . . . 10-3
1170C Series Toolbox . . . . . . . . . . . . . . . . . . . . . . . . . . . . . . . . . . . . . . . . . . . . . . . . . 10-3
Chapter 11 — Support Services
Get Help from HP . . . . . . . . . . . . . . . . . . . . . . . . . . . . . . . . . . . . . . . . . . . . . . . . . . . . . . . . . 11-1
On-Line Services . . . . . . . . . . . . . . . . . . . . . . . . . . . . . . . . . . . . . . . . . . . . . . . . . . . . . 11-1
HP Customer Support . . . . . . . . . . . . . . . . . . . . . . . . . . . . . . . . . . . . . . . . . . . . . . . . . . 11-3
Imaging for Internet Plug-In . . . . . . . . . . . . . . . . . . . . . . . . . . . . . . . . . . . . . . . . . . . . . 11-5
Get Help from Caere for OmniPage LE . . . . . . . . . . . . . . . . . . . . . . . . . . . . . . . . . . . . . . . . 11-6
U.S. Support . . . . . . . . . . . . . . . . . . . . . . . . . . . . . . . . . . . . . . . . . . . . . . . . . . . . . . . . . 11-6
International Support . . . . . . . . . . . . . . . . . . . . . . . . . . . . . . . . . . . . . . . . . . . . . . . . . . 11-6
Get Help from Adobe for PhotoDeluxe. . . . . . . . . . . . . . . . . . . . . . . . . . . . . . . . . . . . . . . . . 11-6
U.S. Support . . . . . . . . . . . . . . . . . . . . . . . . . . . . . . . . . . . . . . . . . . . . . . . . . . . . . . . . . 11-6
Dial-Up Service for U.S. Users . . . . . . . . . . . . . . . . . . . . . . . . . . . . . . . . . . . . . . . . . . 11-6
International Support . . . . . . . . . . . . . . . . . . . . . . . . . . . . . . . . . . . . . . . . . . . . . . . . . . 11-7
Dial-Up Service for International Users . . . . . . . . . . . . . . . . . . . . . . . . . . . . . . . . . . . . 11-7
Get Help from Symantec for WinFax PRO. . . . . . . . . . . . . . . . . . . . . . . . . . . . . . . . . . . . . . 11-7
Support Available . . . . . . . . . . . . . . . . . . . . . . . . . . . . . . . . . . . . . . . . . . . . . . . . . . . . . 11-7
Chapter 12 — Troubleshooting
How to Clear a Paper Jam in the Automatic Document Feeder . . . . . . . . . . . . . . . . . . . . . . 12-1
How to Clear a Paper Jam in the Paper Tray. . . . . . . . . . . . . . . . . . . . . . . . . . . . . . . . . . . . . 12-1
Paper Jam with Front Panel Message . . . . . . . . . . . . . . . . . . . . . . . . . . . . . . . . . . . . . . 12-1
Paper Jam with No Front Panel Message . . . . . . . . . . . . . . . . . . . . . . . . . . . . . . . . . . . 12-2
How to Use the Self Test Page . . . . . . . . . . . . . . . . . . . . . . . . . . . . . . . . . . . . . . . . . . . . . . . 12-2
Aligning Cartridges . . . . . . . . . . . . . . . . . . . . . . . . . . . . . . . . . . . . . . . . . . . . . . . . . . . . . . . . 12-3
Using the Self Test Page . . . . . . . . . . . . . . . . . . . . . . . . . . . . . . . . . . . . . . . . . . . . . . . . . . . . 12-3
Cleaning Cartridges. . . . . . . . . . . . . . . . . . . . . . . . . . . . . . . . . . . . . . . . . . . . . . . . . . . . . . . . 12-4
Front Panel Messages . . . . . . . . . . . . . . . . . . . . . . . . . . . . . . . . . . . . . . . . . . . . . . . . . . . . . . 12-5
On-Screen Messages . . . . . . . . . . . . . . . . . . . . . . . . . . . . . . . . . . . . . . . . . . . . . . . . . . . . . . 12-7
Chapter 13 — Adding and Removing Software Programs
Uninstalling Software . . . . . . . . . . . . . . . . . . . . . . . . . . . . . . . . . . . . . . . . . . . . . . . . . . . . . . 13-1
Uninstalling the HP OfficeJet Pro Product Software . . . . . . . . . . . . . . . . . . . . . . . . . . 13-1
Uninstalling Adobe PhotoDeluxe . . . . . . . . . . . . . . . . . . . . . . . . . . . . . . . . . . . . . . . . . 13-2
Uninstalling Caere OmniPage LE . . . . . . . . . . . . . . . . . . . . . . . . . . . . . . . . . . . . . . . . 13-2
Uninstalling Symantec WinFax PRO, Imaging for the Internet, and
Microsoft Internet Explorer . . . . . . . . . . . . . . . . . . . . . . . . . . . . . . . . . . . . . 13-2
Reinstalling HP OfficeJet Pro Software . . . . . . . . . . . . . . . . . . . . . . . . . . . . . . . . . . . . . . . . 13-2
Installing HP Components Only . . . . . . . . . . . . . . . . . . . . . . . . . . . . . . . . . . . . . . . . . . 13-2
Installing HP OfficeJet Pro Partner Software . . . . . . . . . . . . . . . . . . . . . . . . . . . . . . . . 13-3
Installing the Office 97 Utility . . . . . . . . . . . . . . . . . . . . . . . . . . . . . . . . . . . . . . . . . . . . . . . 13-3
HP OfficeJet Pro User’s Guide vii
Page 8

Chapter 14 — Hewlett-Packard Limited Warranty
Warranty Service . . . . . . . . . . . . . . . . . . . . . . . . . . . . . . . . . . . . . . . . . . . . . . . . . . . . . . . . . 14-1
Express Service . . . . . . . . . . . . . . . . . . . . . . . . . . . . . . . . . . . . . . . . . . . . . . . . . . . . . . .14-1
Warranty Upgrades. . . . . . . . . . . . . . . . . . . . . . . . . . . . . . . . . . . . . . . . . . . . . . . . . . . . . . . . 14-2
Returning Your HP OfficeJet Pro for Service . . . . . . . . . . . . . . . . . . . . . . . . . . . . . . . . . . . 14-2
Before You Call . . . . . . . . . . . . . . . . . . . . . . . . . . . . . . . . . . . . . . . . . . . . . . . . . . . . . .14-2
Prepare Your HP OfficeJet Pro for Shipment . . . . . . . . . . . . . . . . . . . . . . . . . . . . . . . .14-3
Chapter 15 — Technical Information
System Requirements. . . . . . . . . . . . . . . . . . . . . . . . . . . . . . . . . . . . . . . . . . . . . . . . . . . . . . 15-1
Regulatory Notices. . . . . . . . . . . . . . . . . . . . . . . . . . . . . . . . . . . . . . . . . . . . . . . . . . . . . . . . 15-5
Declaration of Conformity . . . . . . . . . . . . . . . . . . . . . . . . . . . . . . . . . . . . . . . . . . . . . . . . . . 15-7
Ordering Accessories and Supplies . . . . . . . . . . . . . . . . . . . . . . . . . . . . . . . . . . . . . . . . . . . 15-8
viii Contents
Page 9

Welcome!
1
Congratulations! You have just purchased the one system that will
handle
HP OfficeJet Pro.
With your HP Of ficeJet Pro, you can copy, print, or scan documents in
full color or in black and white.
Copying Features
You can produce high-quality color and black and white copies, using
a variety of paper types and sizes, including iron-on transfers.
You can enlarge or reduce the size of the copies you make, from 25%
to 400% of the image’s original size. You can make the image lighter
or darker, adjust the color intensity, and specify the quality of the
copies you make. You can also use special digital copying features to
help you create business cards, brochures, name badges—even
posters. And you’ll be able to load up to 30 originals at a time in your
automatic document feeder.
all
your crucial office functions efficiently—the
Printing Features
You can print in color or in black and white on a variety of paper types
and sizes.
Scanning Features
You can scan pictures and text up to 8.5 x 11.69 in. (210 x 297 mm)
for use in all your documents.
HP OfficeJet Pro User’s Guide 1-1
Page 10

About This Guide
This User’s Guide will help you get started and will show you how to
perform the most common tasks with your HP OfficeJet Pro.
If you find you need additional information, use the 1170C Series
Toolbox on your desktop. Or for late-breaking updates, check the
OfficeJet Pro website at the following address:
http://www.hp.com/go/officejet-pro
Conventions Used
Throughout this Guide, we use specific conventions to help you
quickly identify information:
boldface
CAUTION
NOTE
“quotation marks” Information enclosed in quotation marks identifies
TIP
WARNING
Bold typeface identifies a specific button name or
command you need to enter.
The Caution label calls attention to an operating
procedure, practice, or the like, which, if not
correctly performed or adhered to, could result in
damage to or destruction of part or all of the product
or your data. Do not proceed beyond a Caution label
until you fully understand and have met the indicated
conditions.
The Note label precedes information you need to
know before you continue reading or performing a
procedure.
the exact message that appears on the front panel
display or your computer screen.
The Tip label precedes helpful hints and
recommendations.
The Warning label calls attention to a procedure,
practice, or the like, which, if not correctly
performed or adhered to, could result in personal
injury. Do not proceed beyond a Warning label until
you fully understand and have met the indicated
conditions.
1-2 Welcome!
Page 11

Setting Up Your New
HP OfficeJet Pro
2
This chapter presents recommendations for placement of your
HP OfficeJet Pro and presents the eight simple steps for unpacking and
setting up your HP OfficeJet Pro. Be sure to perform the steps in the
order listed.
Choosing a Location and Environment for Your OfficeJet Pro
◆
Use your OfficeJet Pro only within normal of fice temperature and
humidity ranges. The recommended range is 59
o
–
(15
35oC) and 20%–80% humidity ranges.
◆
Avoid direct sunlight or locations where a quick change in
temperature might cause condensation inside the machine.
◆
Make sure the location is well ventilated. Dust, gases, or fumes
(such as ammonia or paint thinner) can damage the machine.
◆
Choose a site that is level, flat, and stable. The OfficeJet Pro will
vibrate and needs to be on a sturdy surface.
◆
Be sure a grounded outlet is nearby and easily accessible.
◆
T o ensure that you can open the automatic document feeder all the
way , make sure to place your Of ficeJet Pro at least 9 in. (230 mm)
from the wall.
o
–
95oF
HP OfficeJet Pro User’s Guide 2-1
Page 12

Before You Start
Before you start setting up your HP OfficeJet Pro:
◆
Have this User’s Guide and installation CD-ROMs ready.
◆
If you will be installing WinFax PRO, have your Windows 95/98
CD-ROM or installation diskettes available.
Direct Connection
The HP OfficeJet Pro must be connected directly to your computer’s
parallel port. Do not use a switch box or the pass-through port of
another parallel port product such as a scanner, tape dri ve, Zip™ drive,
or CD-ROM drive.
CAUTION
Connecting your HP OfficeJet Pro to a switch box or the pass-through port
of another parallel product can cause erratic behavior of both products and
the possible loss of information.
2-2 Setting Up Your New HP OfficeJet Pro
Page 13

Parallel Port Mode/Type
In order to scan using your HP OfficeJet Pro, you must have your
computer’s parallel port set to one of the following modes:
ECP (Extended
Capabilities Port)
Bi-Directional Allows communication back and forth between
You can determine the mode of your computer’s parallel port. Most
computers have a Setup, CMOS, Hardware Configuration, or other
screen that can be accessed during the boot process. This screen
shows your computer’ s current settings, including parallel port mode.
To learn more about changing the parallel port mode in your
computer, consult the User’s Guide that came with your computer or
read the ECP document that will be automatically installed in your
HP OfficeJet Pro 1170C Series program folder when you install your
software.
A vailable in recently manuf actured computers.
This mode ensures the fastest scanning speed.
Note: Your computer may have ECP mode, but
it may not be turned on.
your computer and the OfficeJet Pro. Scanning
will be slower than with ECP mode.
HP OfficeJet Pro User’s Guide 2-3
Page 14
Eight Easy Steps to Set Up Your HP OfficeJet Pro
To set up your HP OfficeJet Pro properly, follow the eight easy steps
in the order shown below.
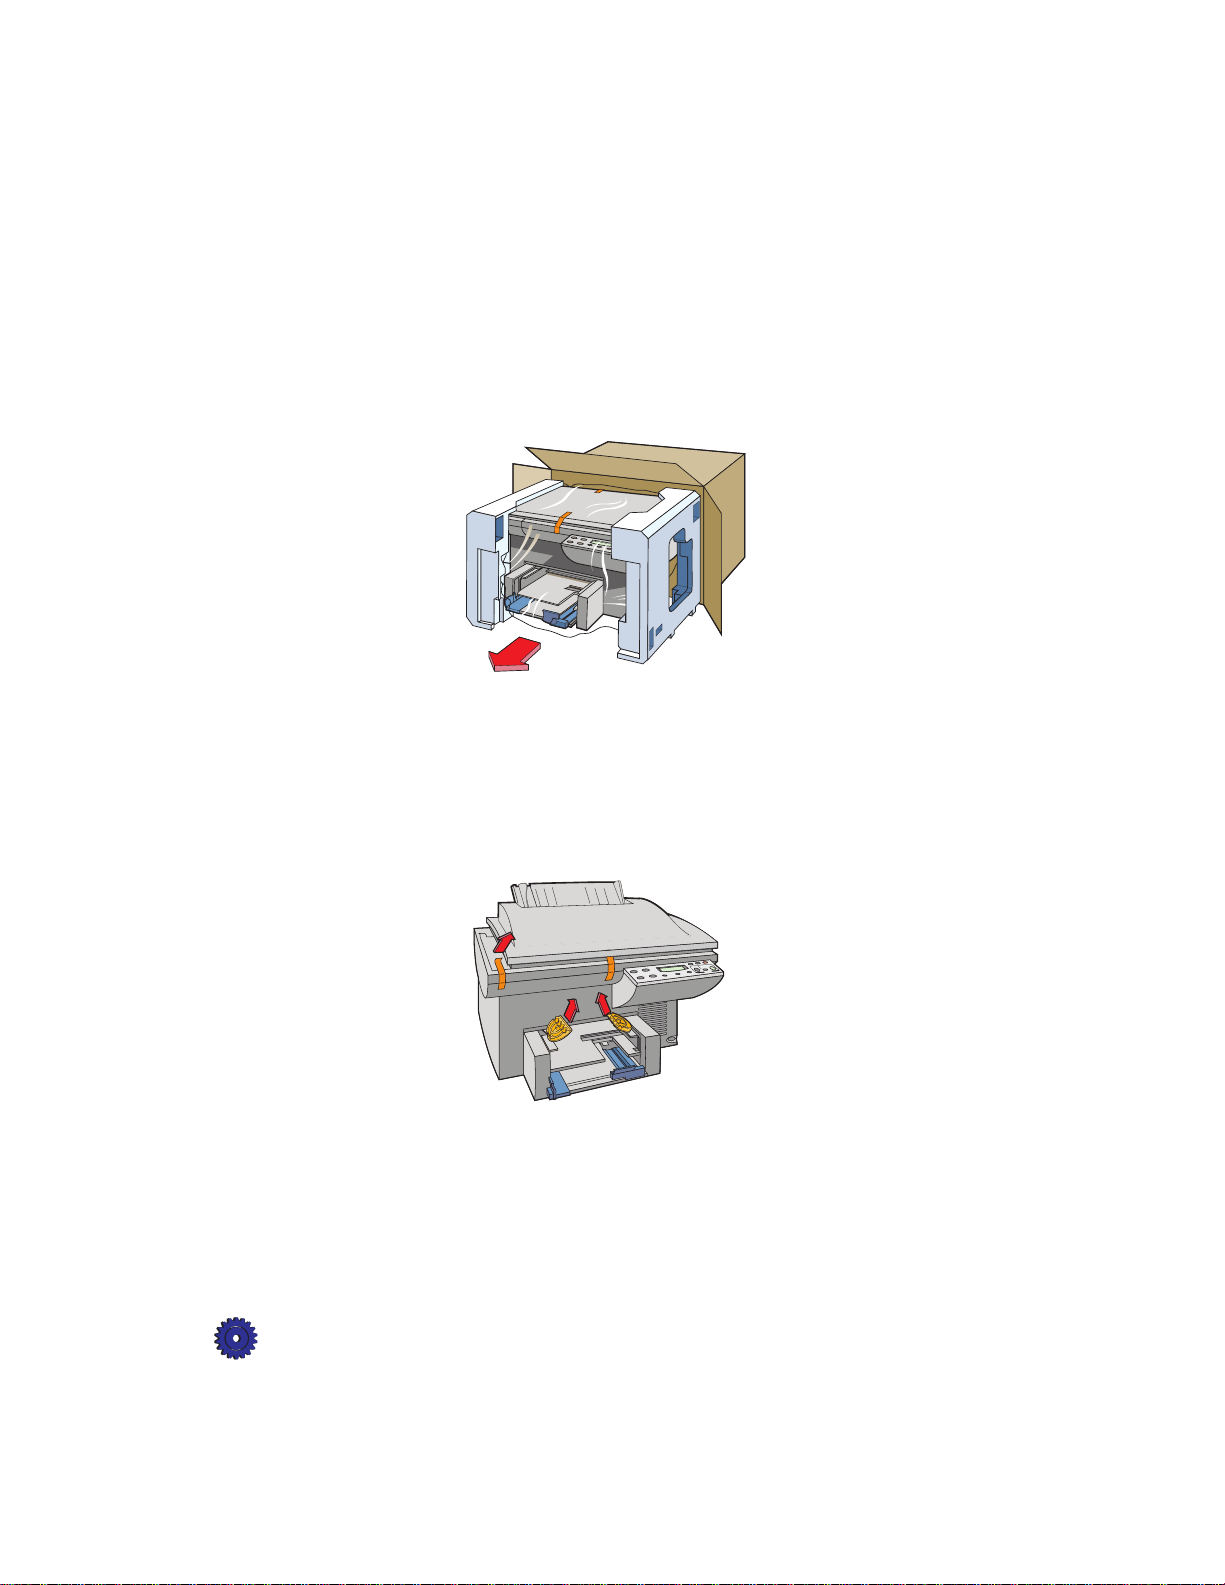
Step 1 — Unpack Your HP OfficeJet Pro
1
Remove the cardboard tray containing the accessory items.
2
Rest the box on its side, and pull out your HP OfficeJet Pro.
3
Remove the packing material and the orange packing tape from
the outside of the product.
TIP
Save the packaging materials in case you ever move or
ship your HP Office Jet Pro.
4
Remove the two yellow/orange plastic inserts from the print tray
by pulling up and toward the center of the product.
2-4 Setting Up Your New HP OfficeJet Pro
Page 15
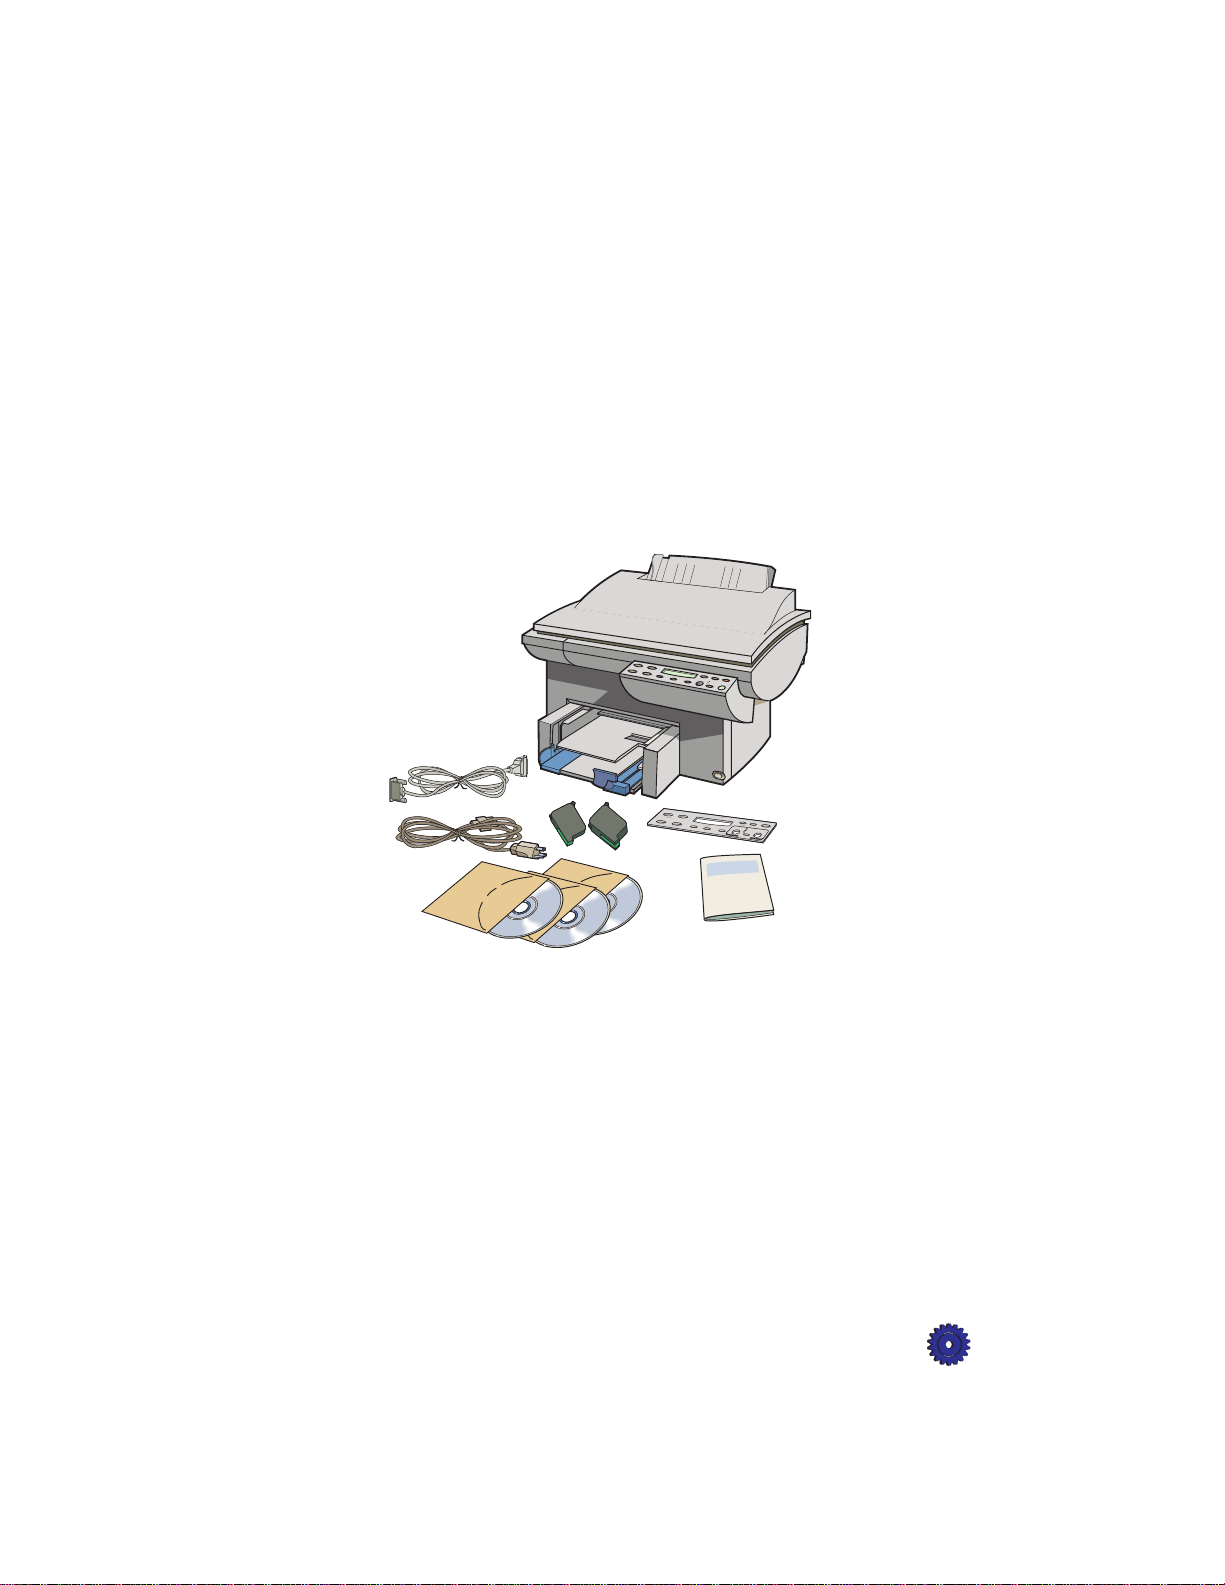
5
Verify that the following items are included with your
HP OfficeJet Pro:
a
front-panel overlay (has text on it)
b
this User’s Guide
c
CD-ROM disks
d
one black and one tri-color print cartridge
e
power cord
f
IEEE-1284 parallel printer cable
If any of the items are missing or damaged, contact the dealer from
whom you purchased your HP OfficeJet Pro.
f
e
d
c
HP OfficeJet Pro User’s Guide 2-5
a
b
Page 16
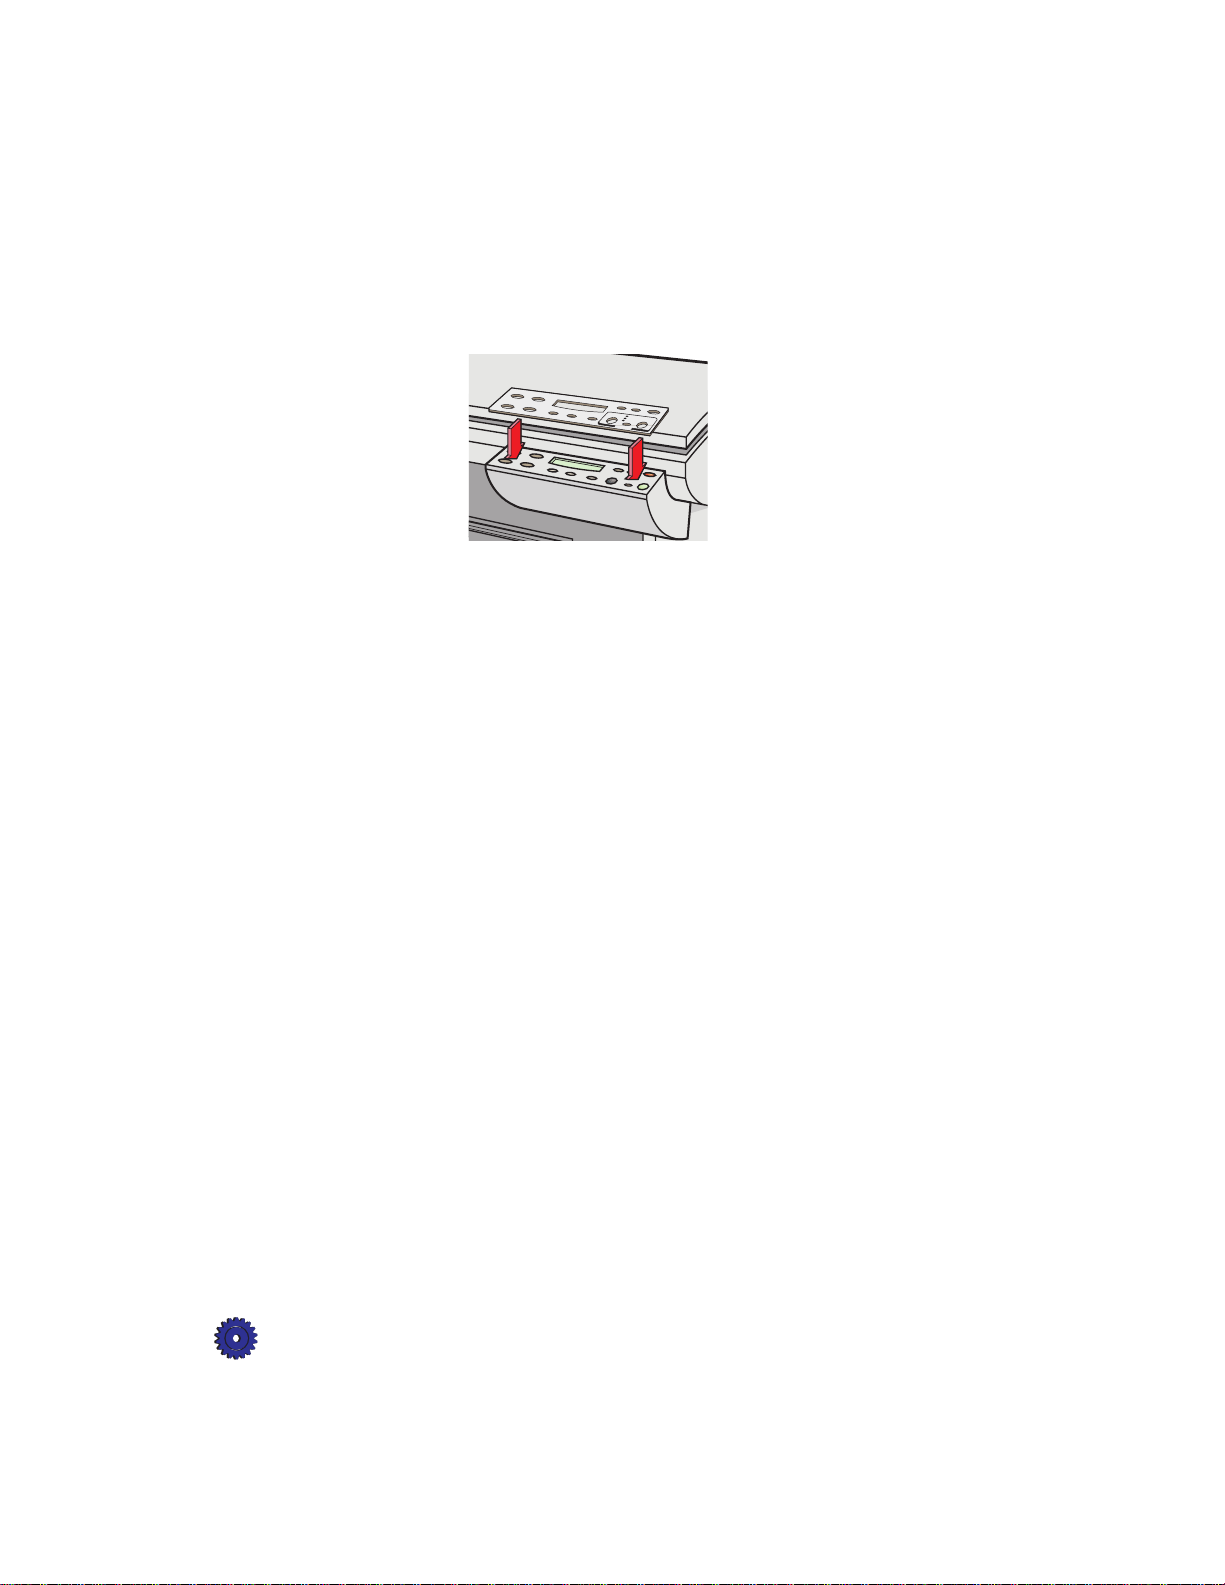
Step 2 — Attach the Front Panel Overlay
1
Align the front panel overlay with the front panel buttons.
2
Push straight down firmly on both ends and the middle to snap the
overlay into place.
2-6 Setting Up Your New HP OfficeJet Pro
Page 17
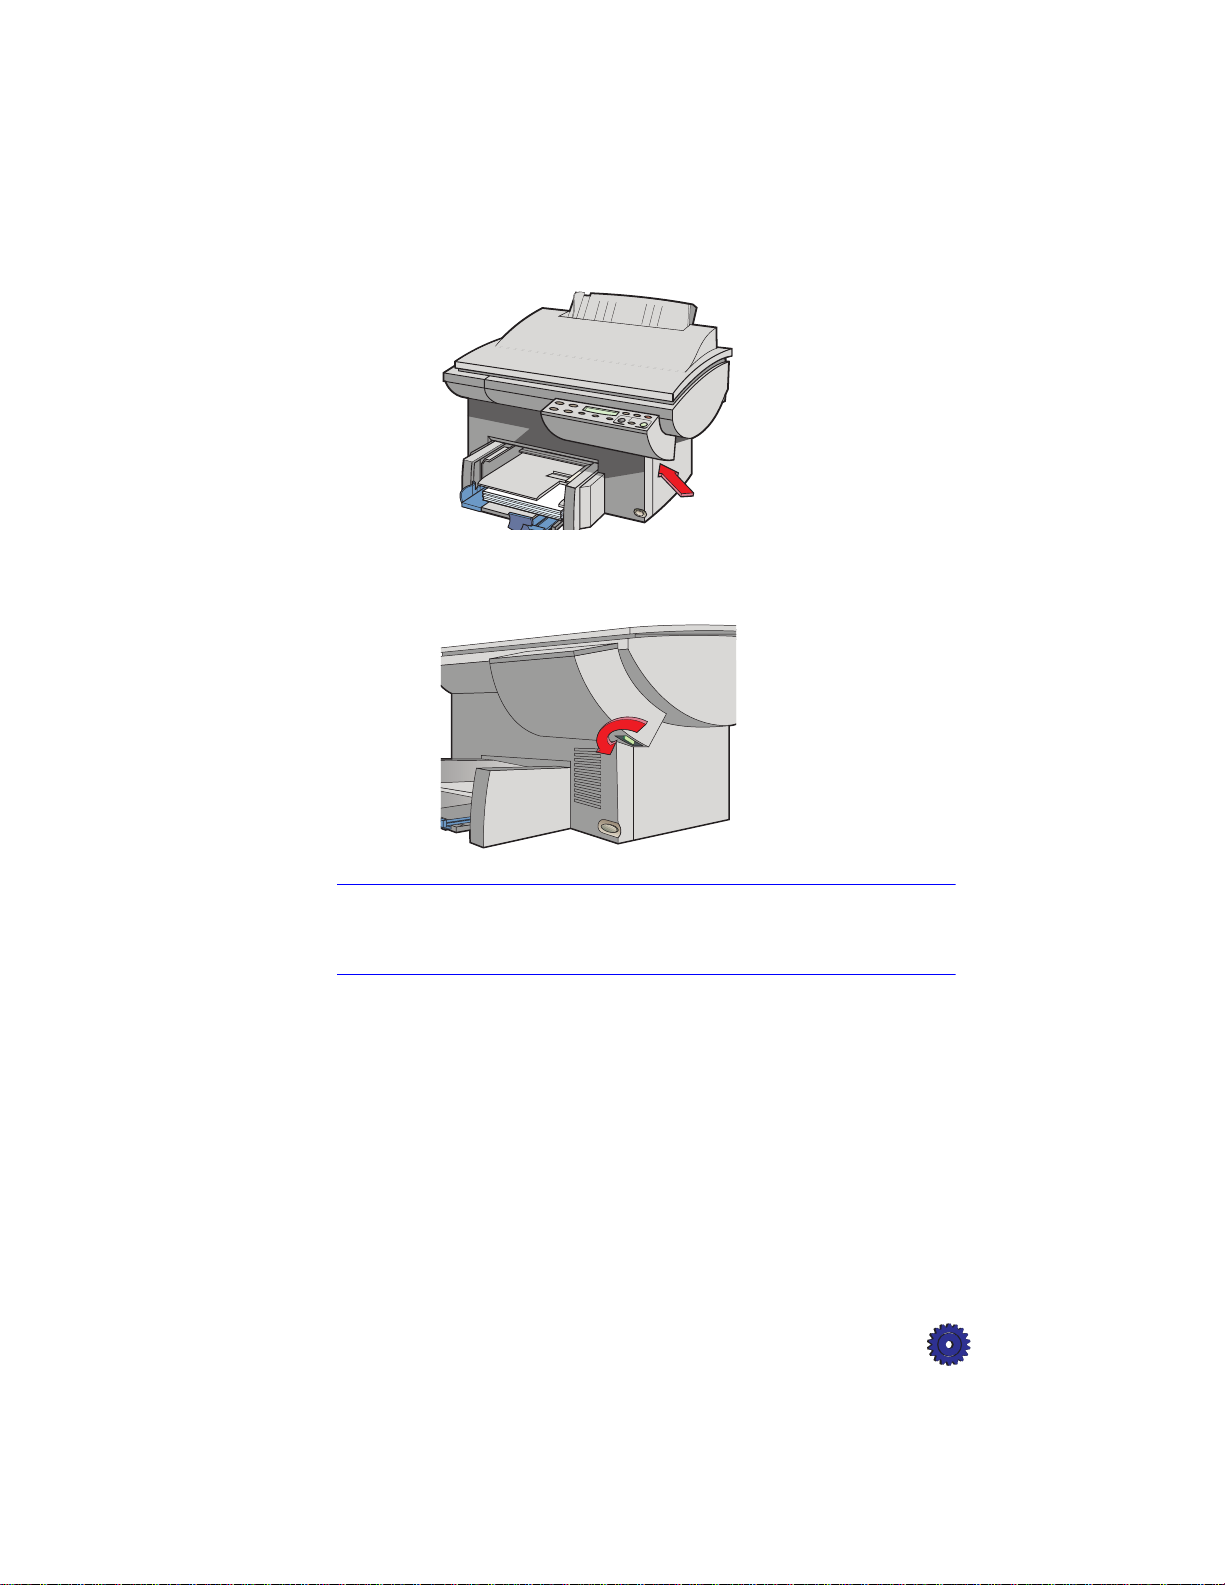
Step 3 — Unlock Your HP OfficeJet Pro
The scanner lock is under the front panel.
Unlock the scanner by twisting the green knob (lever) under the front
panel, toward the back of your HP OfficeJet Pro, until it stops. The
knob (lever) only turns one way.
NOTE
Leave the scanner unlocked unless you need to move your HP OfficeJet Pro.
Locking the scanner protects it during moving. Refer to “Prepare Your
HP OfficeJet Pro for Shipment” on 14-3 for locking instructions.
HP OfficeJet Pro User’s Guide 2-7
Page 18
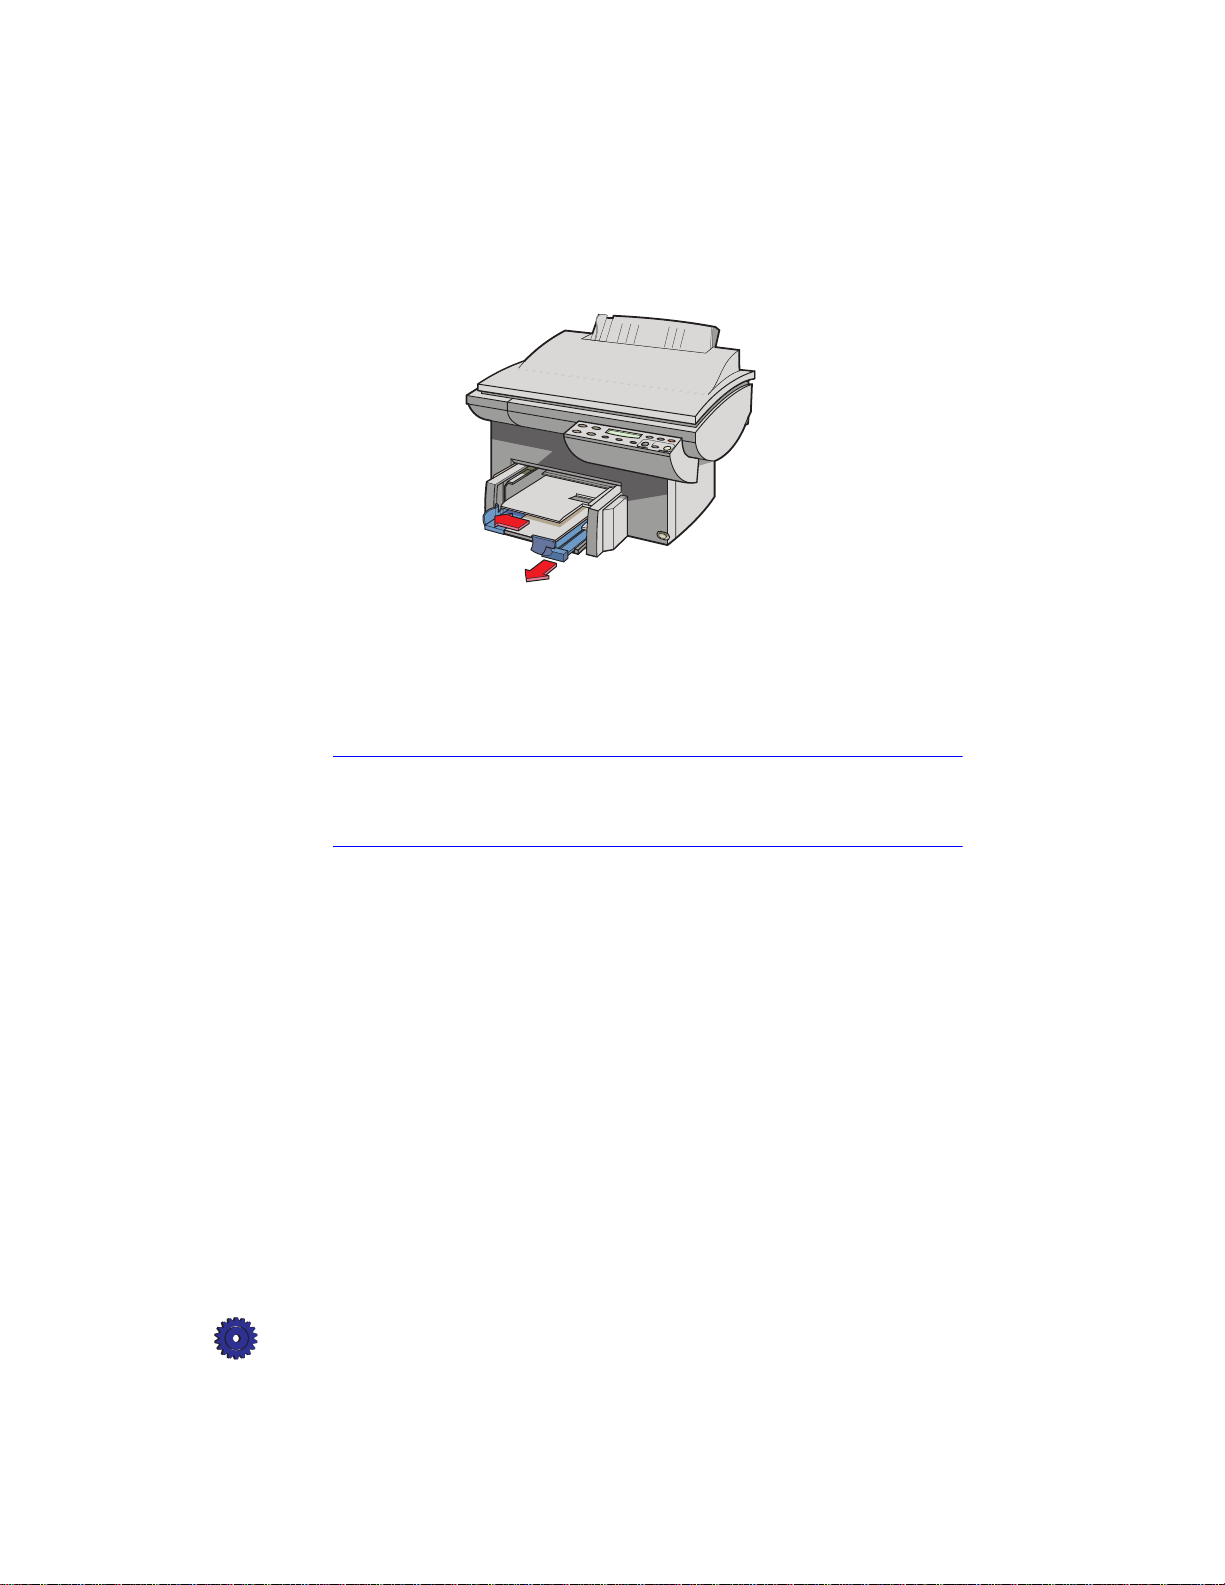
Step 4 — Load Paper Into Your HP OfficeJet Pro
1
Remove the yellow/orange shipping inserts from the paper tray, if
you have not already done so.
2
Slide the paper width and length adjusters to their outermost
positions.
3
Insert up to 150 sheets of paper [approximately a 3/4 in. (19 mm)
stack of paper] into the bottom (IN) tray, print side down, until it
stops.
NOTE
2-8 Setting Up Your New HP OfficeJet Pro
The output tray (top tray) can hold a maximum of 50 sheets. If you are making
more than 50 copies, remove the excess copies from the output tray. If you do
not, the excess copies may either fall off the tray or cause a paper jam.
Page 19
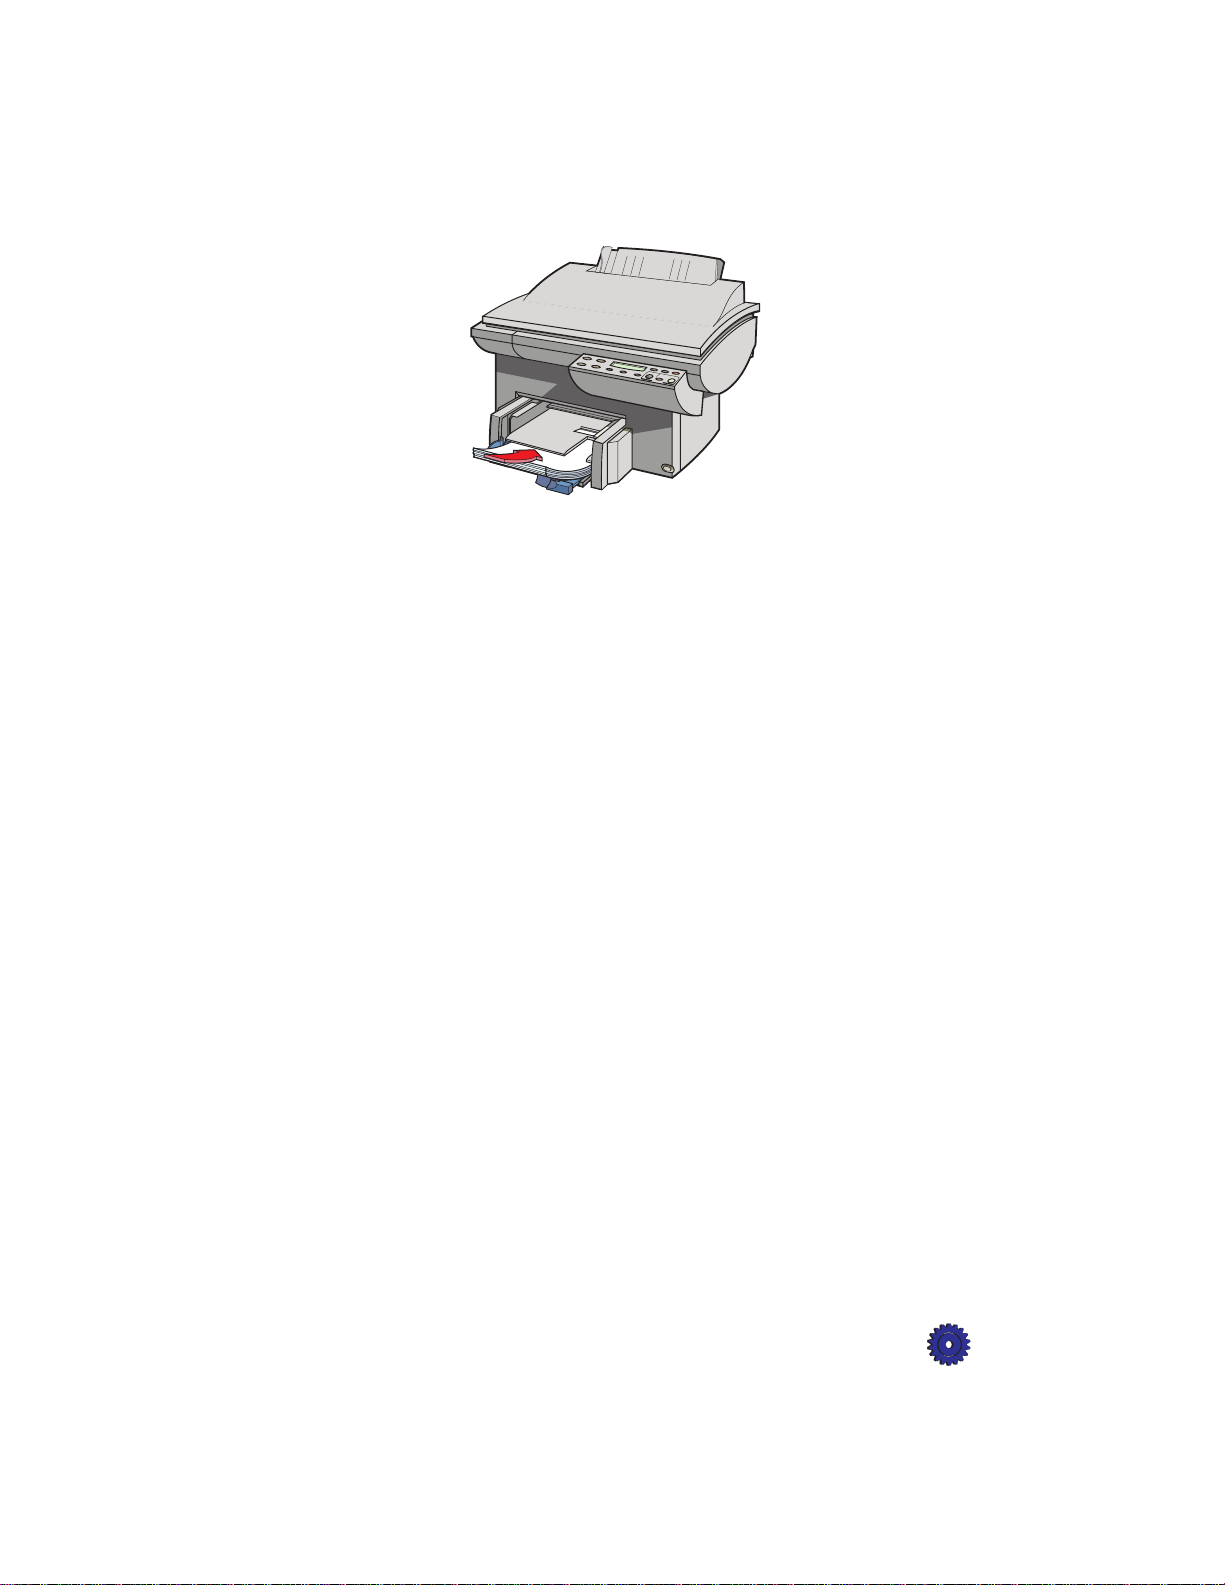
4
Slide the paper width and length adjusters in until they stop at the
edges of the paper.
See “Tips on Loading Paper in the P aper Tray” on 7-4 for information
on loading specific paper types.
HP OfficeJet Pro User’s Guide 2-9
Page 20
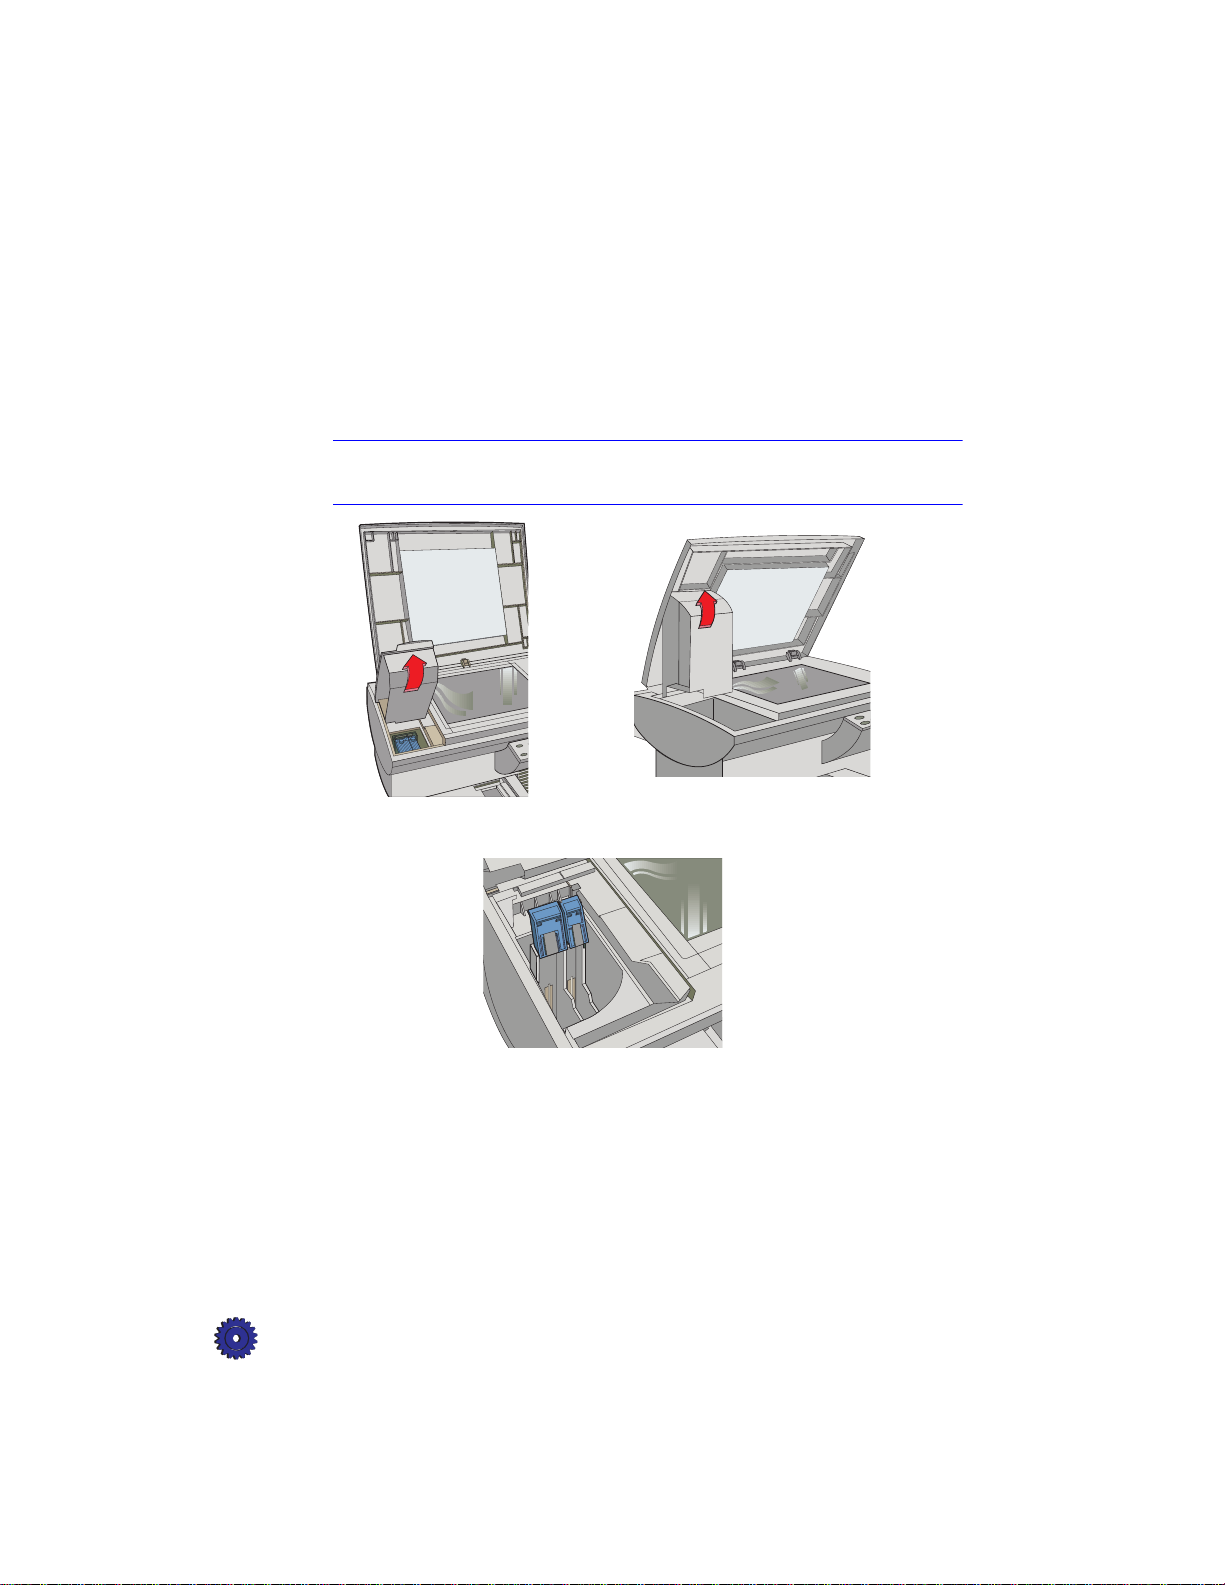
Step 5 — Insert the Color and Black Print Cartridges
1
Lift the document cover , open the print cartridge access cover , and
remove the yellow/orange shipping insert from the inside of the
cartridge cradles.
TIP
Keep and store the shipping insert and other packing
materials in case you ever need to move or ship your
OfficeJet Pro.
NOTE
Use the print cartridge access cover to prop open the document cover while
you insert the print cartridges.
2
Lift up both print cartridge latches.
2-10 Setting Up Your New HP OfficeJet Pro
Page 21
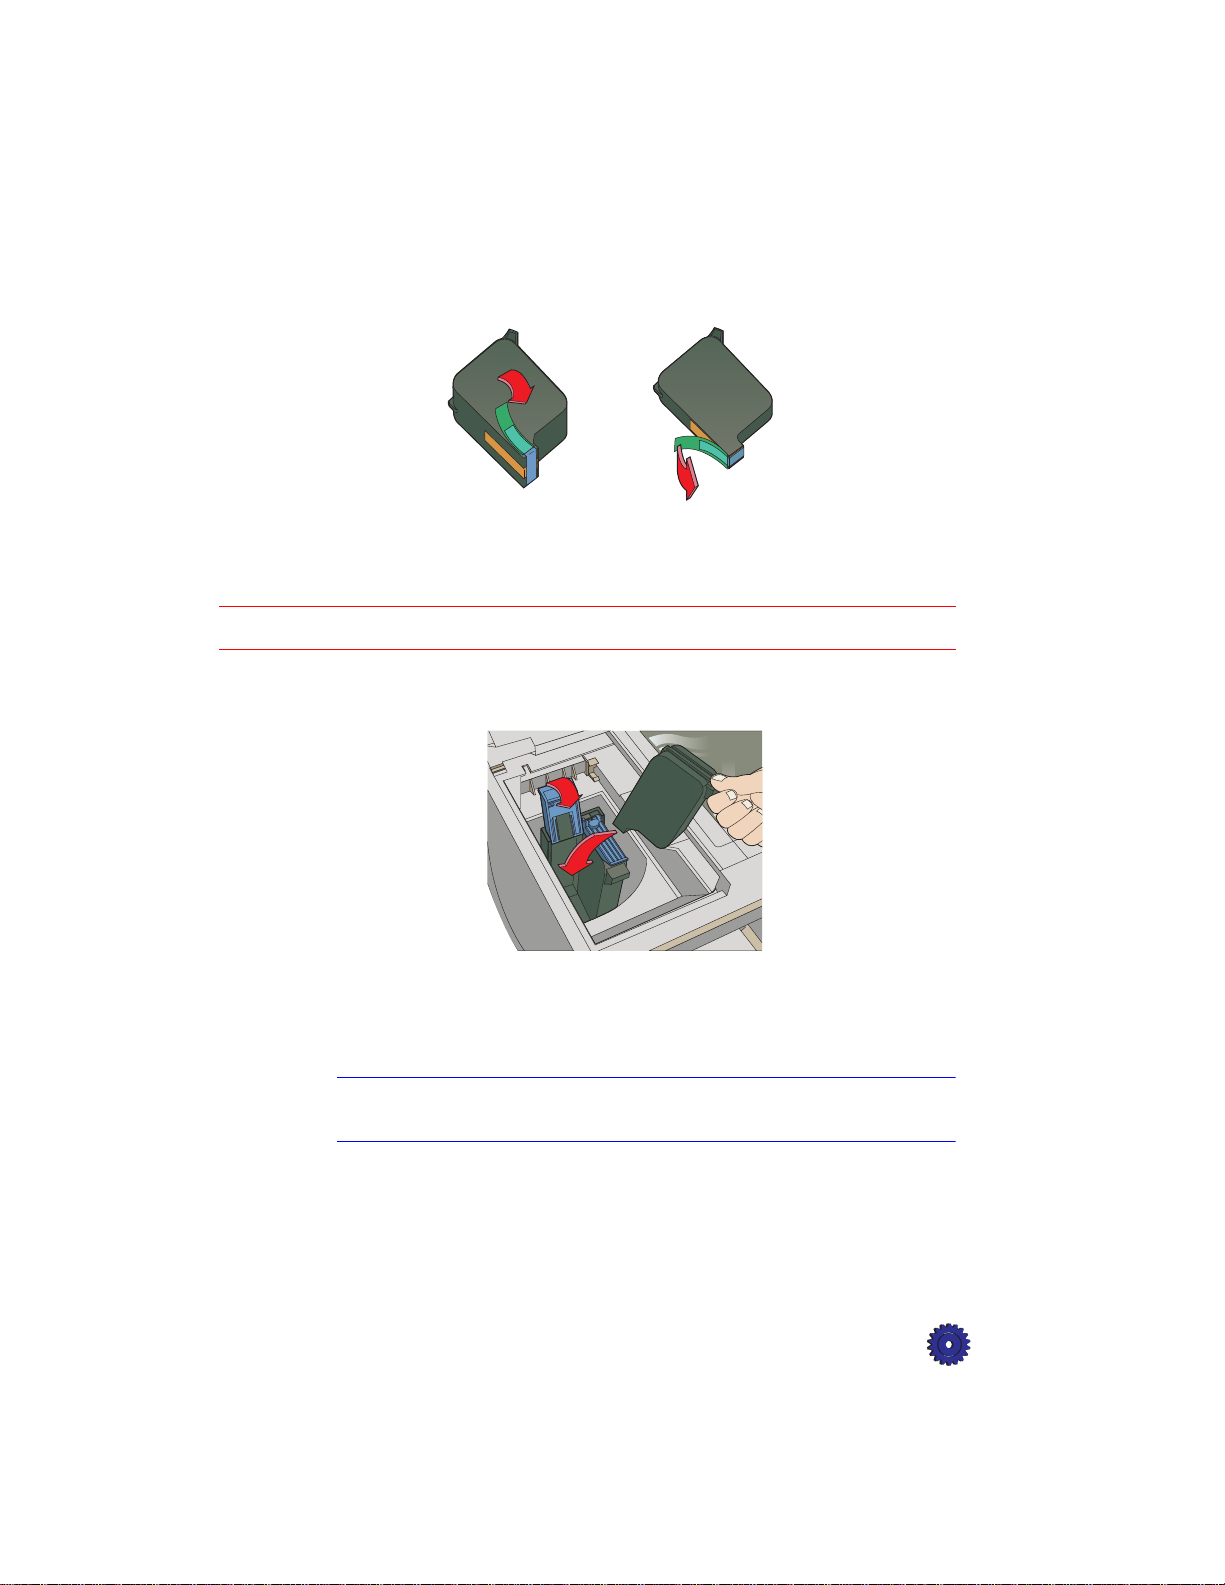
3
Remove the tri-color print cartridge (the thicker one) from its
package and, being careful to touch only the black plastic, gently
remove both the green pull tab and blue tape covering the
nozzles.
CAUTION
tri-color print cartridge,
part number C1823A
black print cartridge,
part number C51645A
Be careful not to touch the gold-colored contacts.
4
Push the tri-color print cartridge firmly down into the cradle on
the left, and close the cartridge latch.
5
Repeat steps 3 and 4 to install the black print cartridge into the
cradle on the right.
6
Close the print cartridge access cover.
NOTE
Both print cartridges must be correctly installed (with the green tab and blue
tape removed) for your HP OfficeJet Pro to work.
HP OfficeJet Pro User’s Guide 2-11
Page 22
Step 6 — Connect the Cable and Power Cord
NOTE
Use the cable that was shipped with your product. It is a special IEEE-1284
parallel cable that is necessary for the proper functioning of your
HP OfficeJet Pro. If you choose to buy a longer cable, make sure it is an
IEEE-1284 compliant parallel cable.
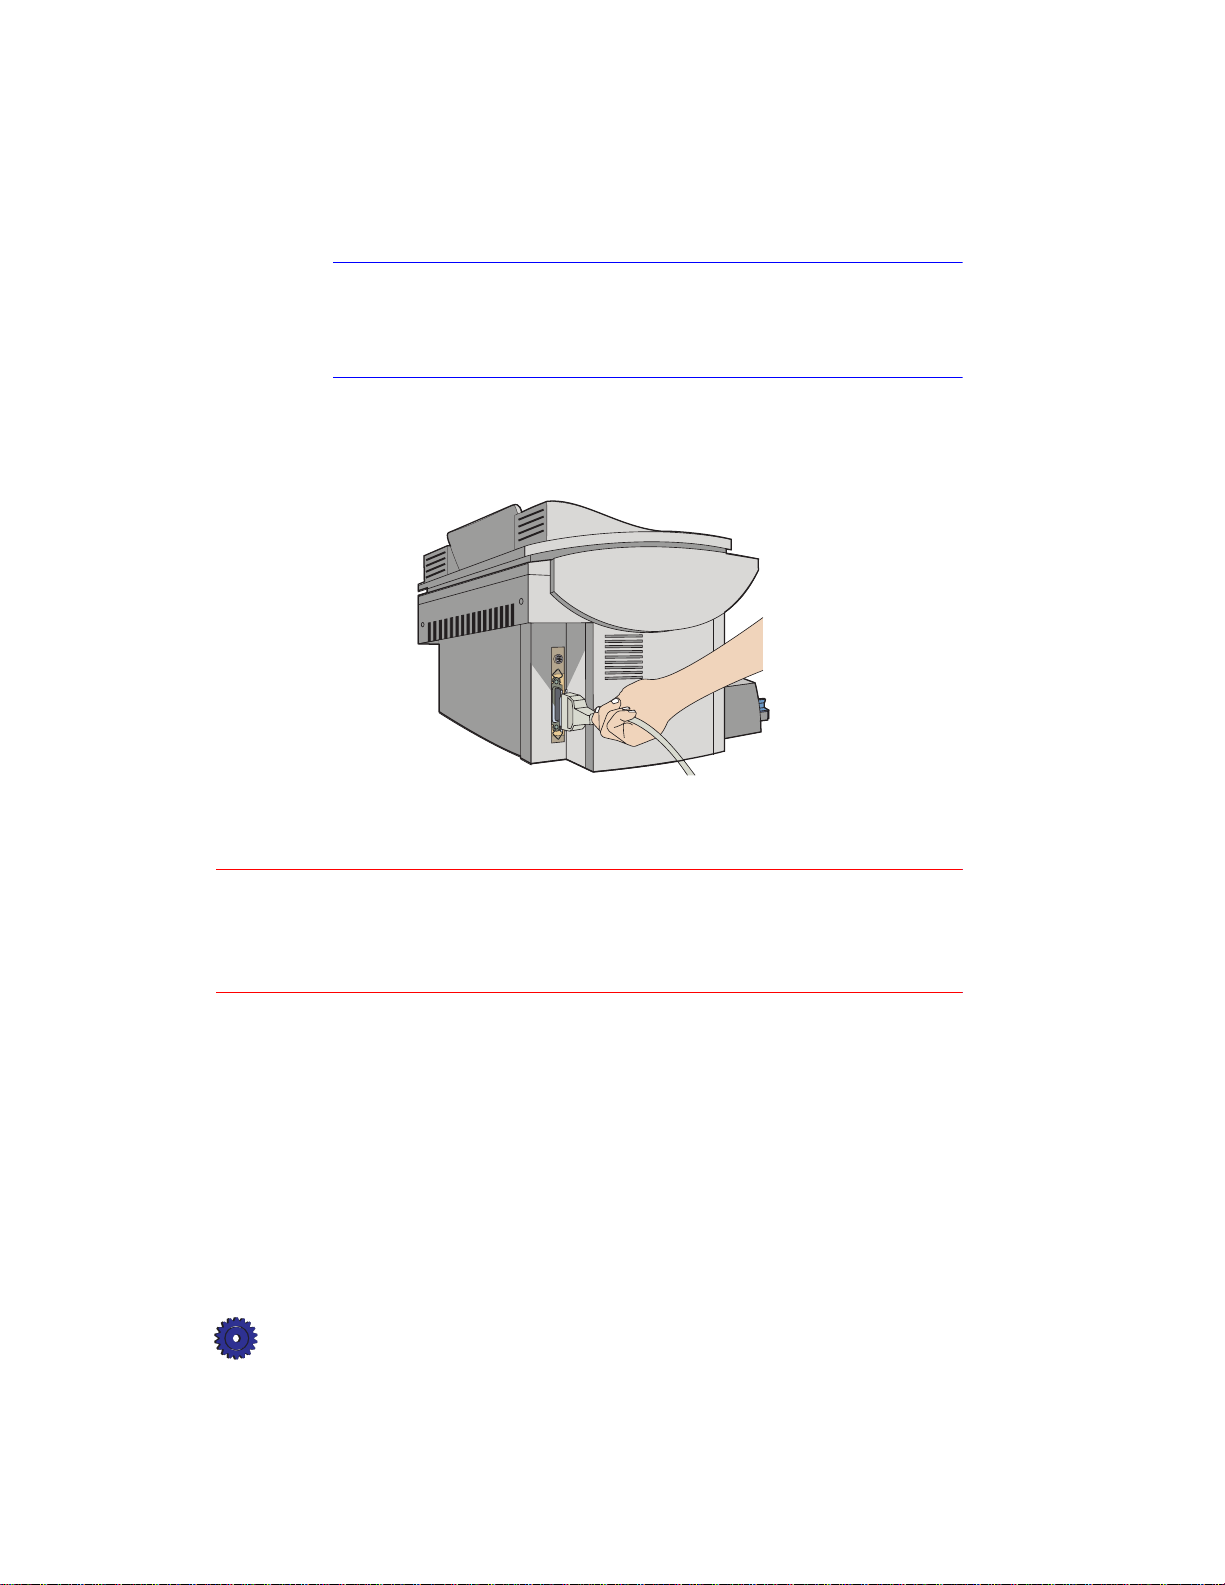
1
Connect the printer cable to HP OfficeJet Pro, snapping both clips
into the notches. (The connector is located on the left side toward
the back of the product.)
2
Plug the other end of the cable into your computer’s parallel port,
and tighten the screws.
CAUTION
Do not connect your HP OfficeJet Pro to a switch box or the pass-through
port of another parallel product, such as a scanner, tape drive, Zip™drive,
or CD-ROM drive. Doing so can cause erratic behavior of both products
and the possible loss of information.
2-12 Setting Up Your New HP OfficeJet Pro
Page 23
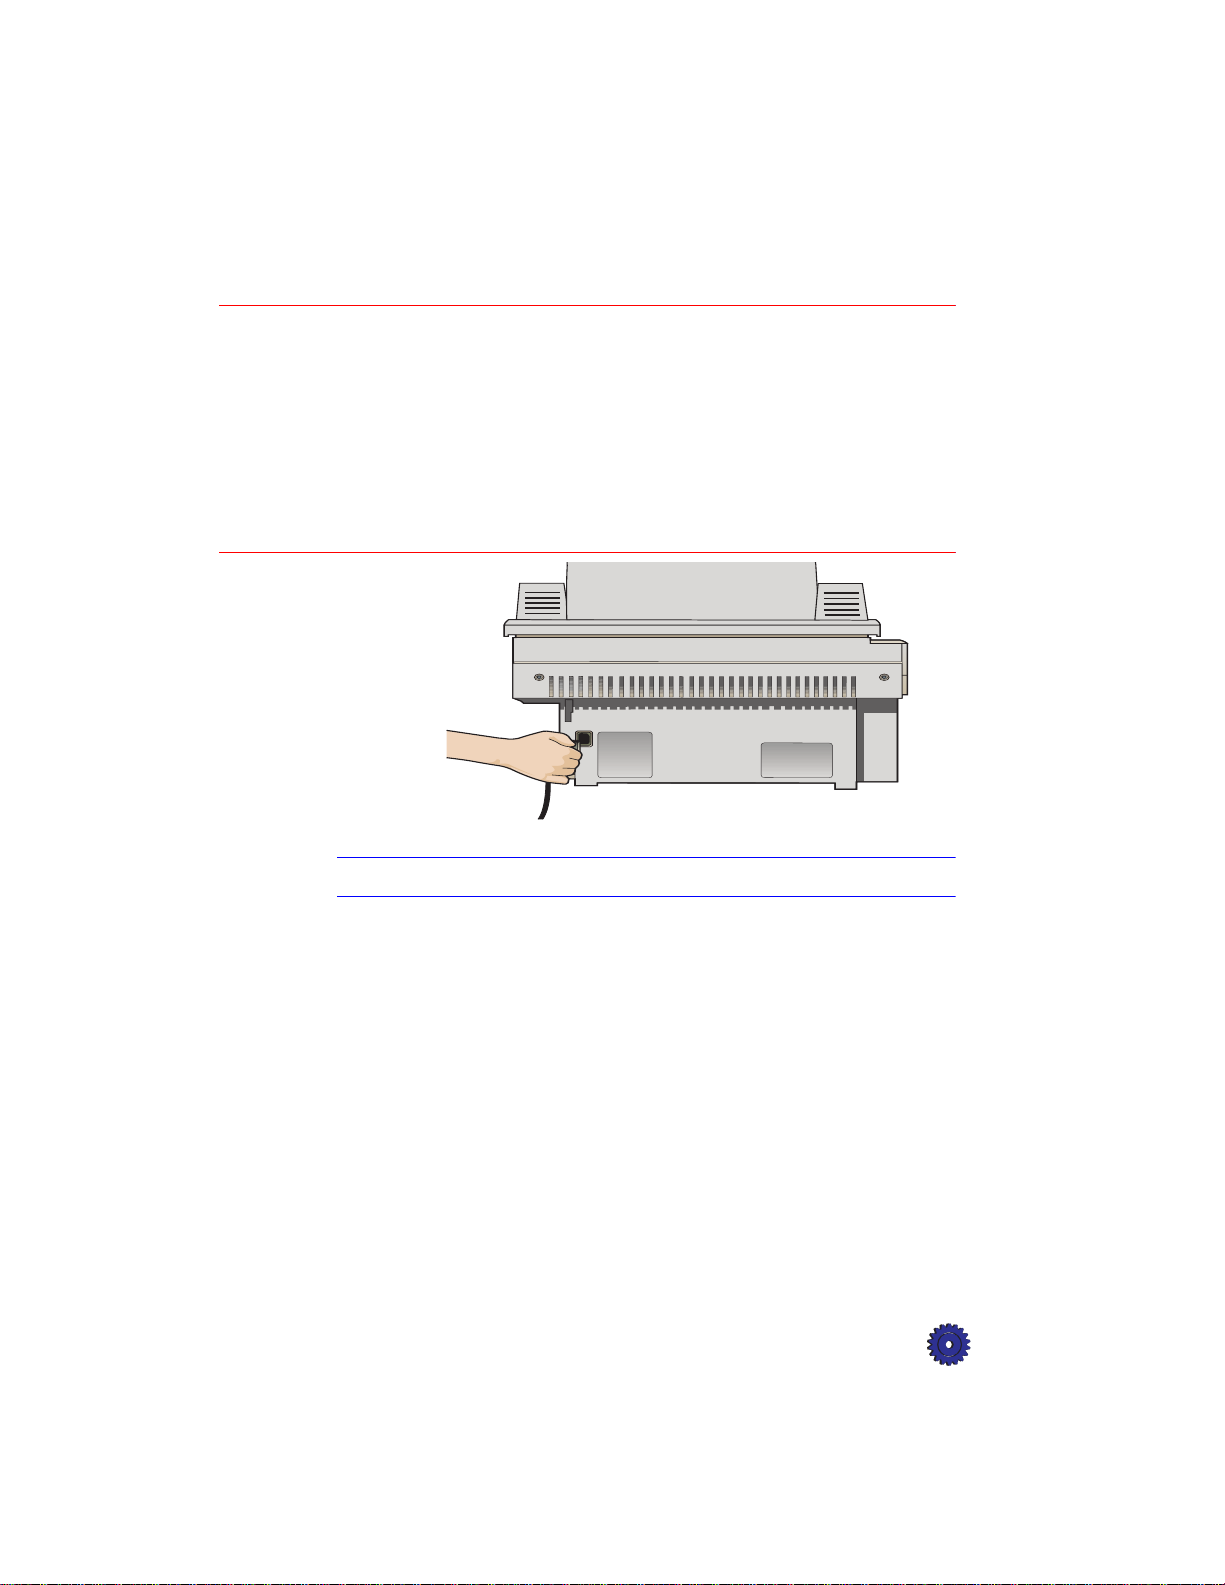
The HP OfficeJet Pro comes with the power cord for the country to
which it is shipped. If the plug on your power cord does not look
familiar, contact your dealer or local HP Sales and Support Office.
WARNING In case there is an emergency and you need to shut off power to the
HP OfficeJet Pro, choose an outlet that is easy for everyone to access.
Power is present in the product even if the white button in the lower right front
corner of the OfficeJet Pro has been turned off. To completely shut off power,
you must disconnect the power cord.
Be sure to use the power cord with a properly grounded outlet to avoid
electric shock.
NOTE
Do not turn on your HP OfficeJet Pro yet!
HP OfficeJet Pro User’s Guide 2-13
Page 24
Step 7 — Install the Software
NOTE
Do not turn on your HP OfficeJet Pro yet!
Now you need to install software so that the HP Off iceJet Pro can work
with your computer.
HP Software
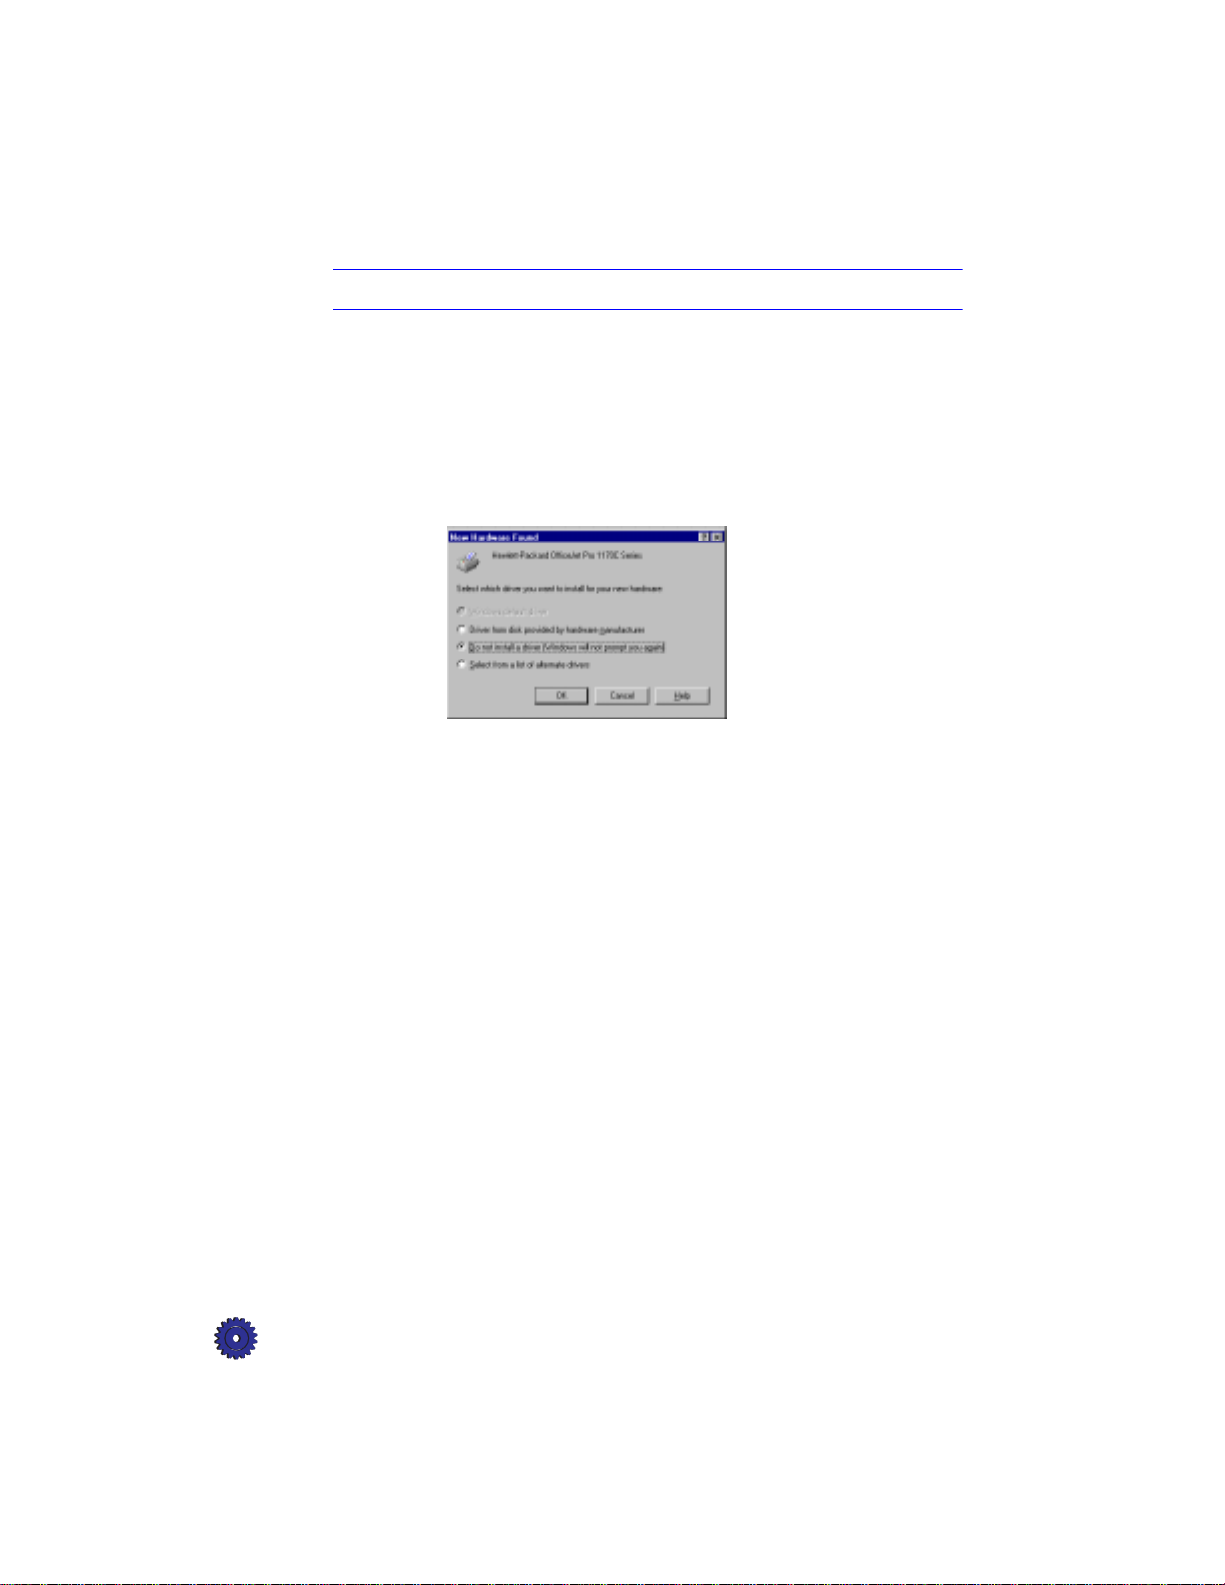
1
Turn on or reboot your computer.
key on your
If you see the following screen, press the
keyboard to close the “New Hardware Found” dialog.
2
Start the installation by doing one of the following:
◆
Insert CD-ROM #1 into your computer’ s CD-R OM drive. The
software installation setup should start automatically (in less
than a minute).
◆
If the software installation does not start automatically, from
the Task bar, select the Start menu, and select
z:\setup
(substitute your CD-ROM drive letter for the “z”).
Esc
Run
. Enter
The “Welcome” screen appears. Click
2-14 Setting Up Your New HP OfficeJet Pro
Next>
.
Page 25
3
The HP License Agreement is displayed. Click
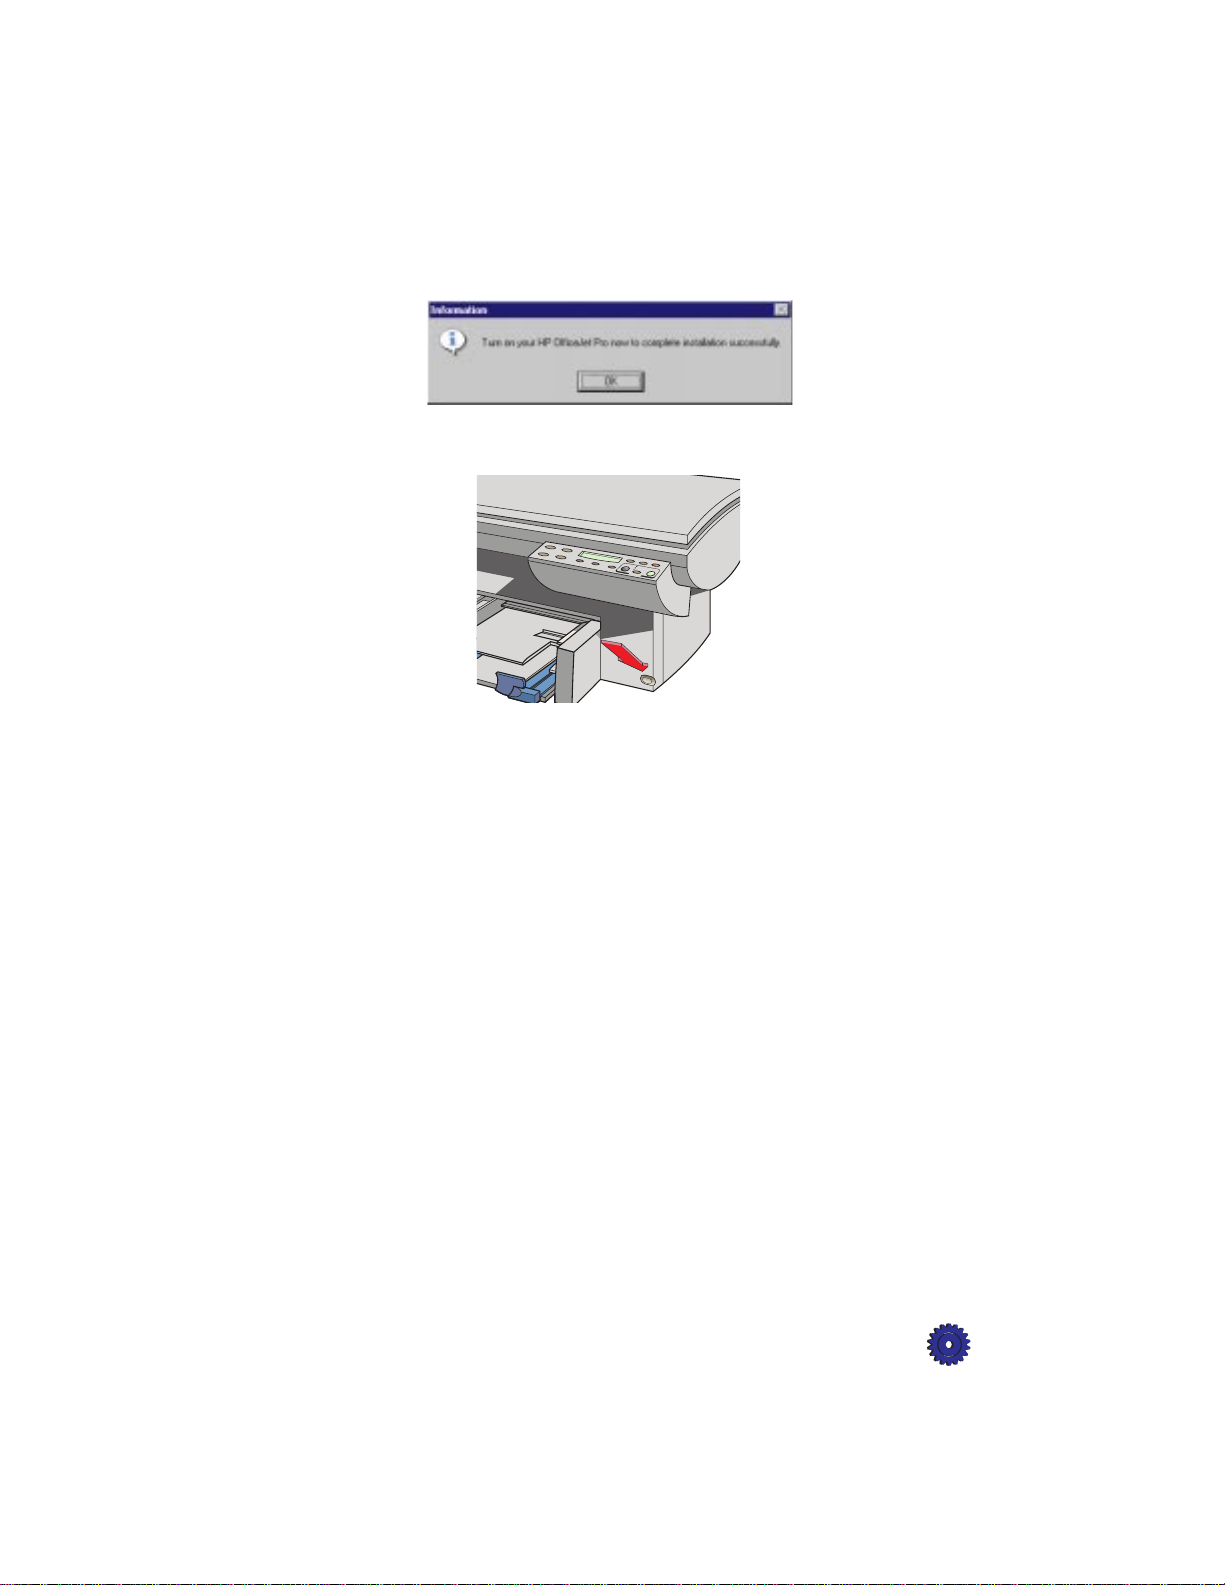
4
A dialog appears, instructing you to turn on your
HP OfficeJet Pro.
5
Turn on your HP Of ficeJet Pro no w, by pressing the white button
in the lower right front corner of the product, and click
to continue.
Yes
OK
.
HP OfficeJet Pro User’s Guide 2-15
Page 26
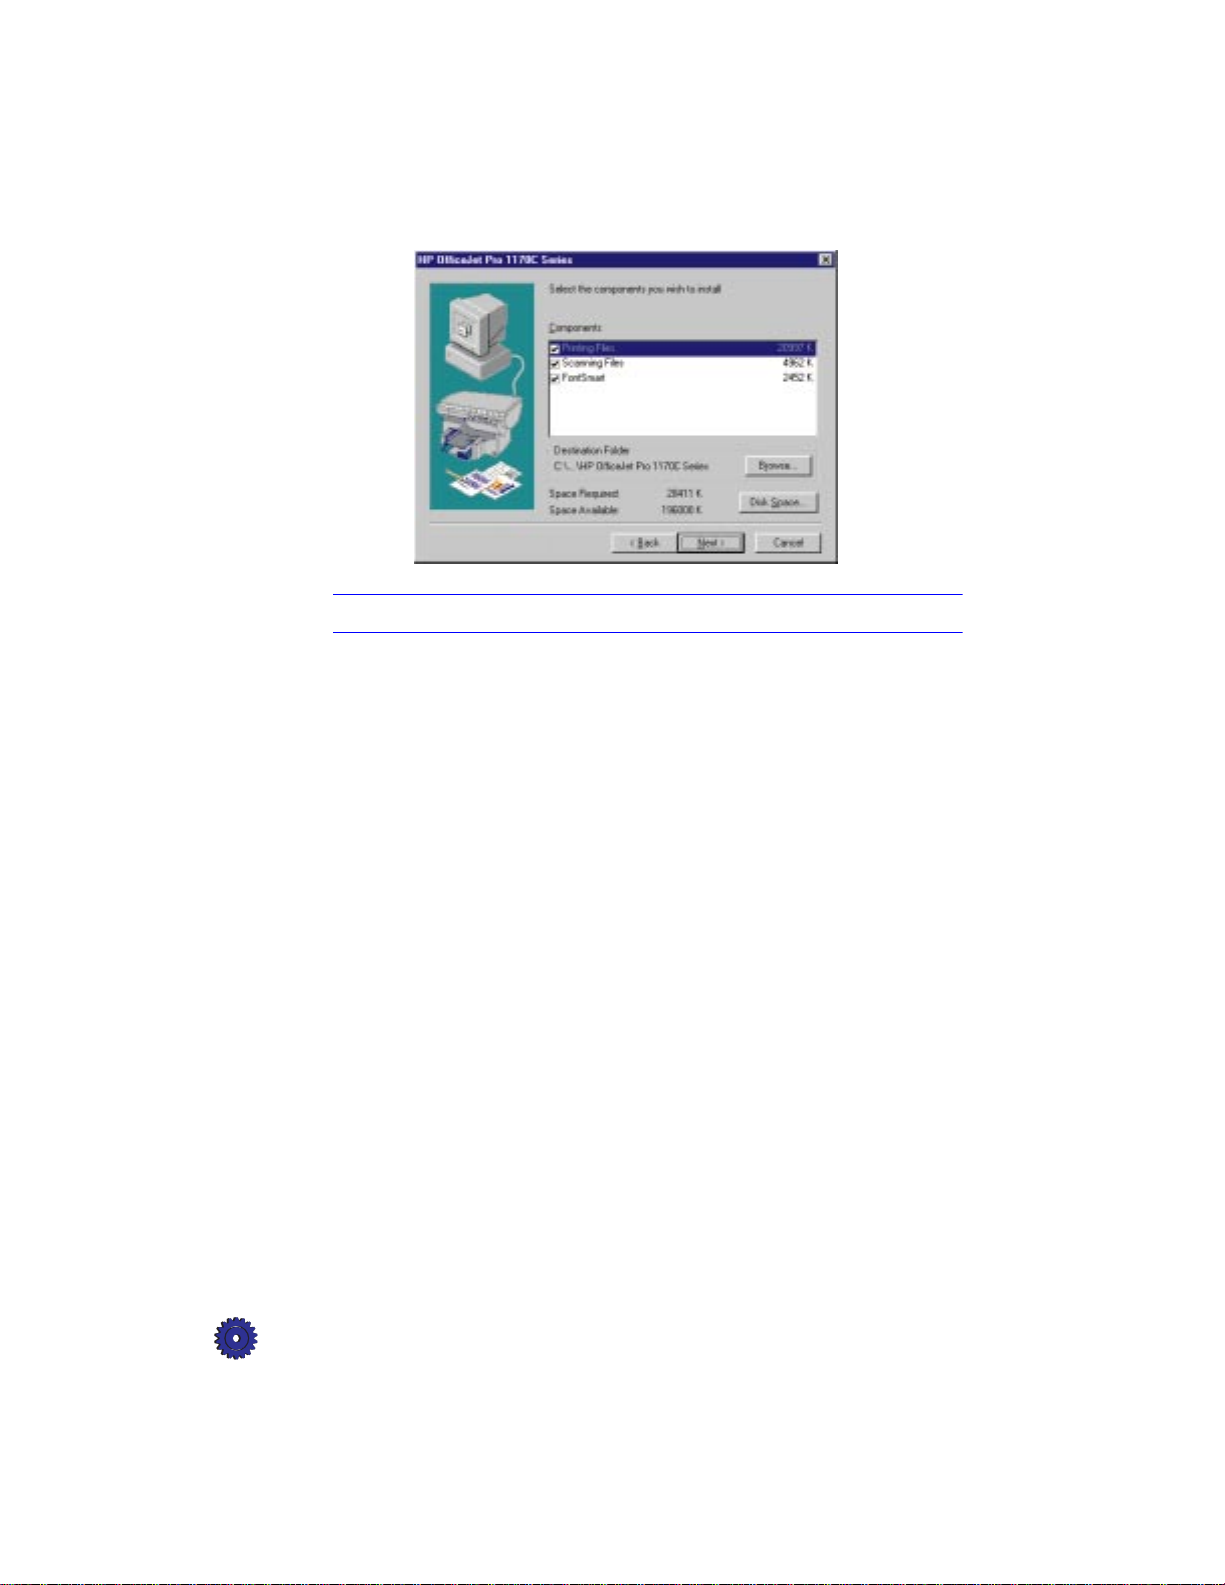
6
The following screen appears.
NOTE
You must install both the printing and scanning software in order to scan.
HP FontSmart comes with TrueT ype fonts and allo ws you to easily
install and remove other fonts on your system.
Browse…
Click
HP OfficeJet Pro software. Click
to select a different destination folder for the
Next>
to continue.
2-16 Setting Up Your New HP OfficeJet Pro
Page 27

7
A “Testing Device Connection” message is displayed while the
installation program tests the cable connection between your
computer and the HP OfficeJet Pro.
If the bi-directional communications test fails, you will need to
set the front panel language and page size manually, following
the instructions on page 3-9. The communications problem must
be resolved before you will be able to scan.
After installing your software, refer to “Messages on Your PC,
Cable Test Failed” under Troubleshooting in the 1170C Series
Toolbox on your Windows desktop.
HP OfficeJet Pro User’s Guide 2-17
Page 28
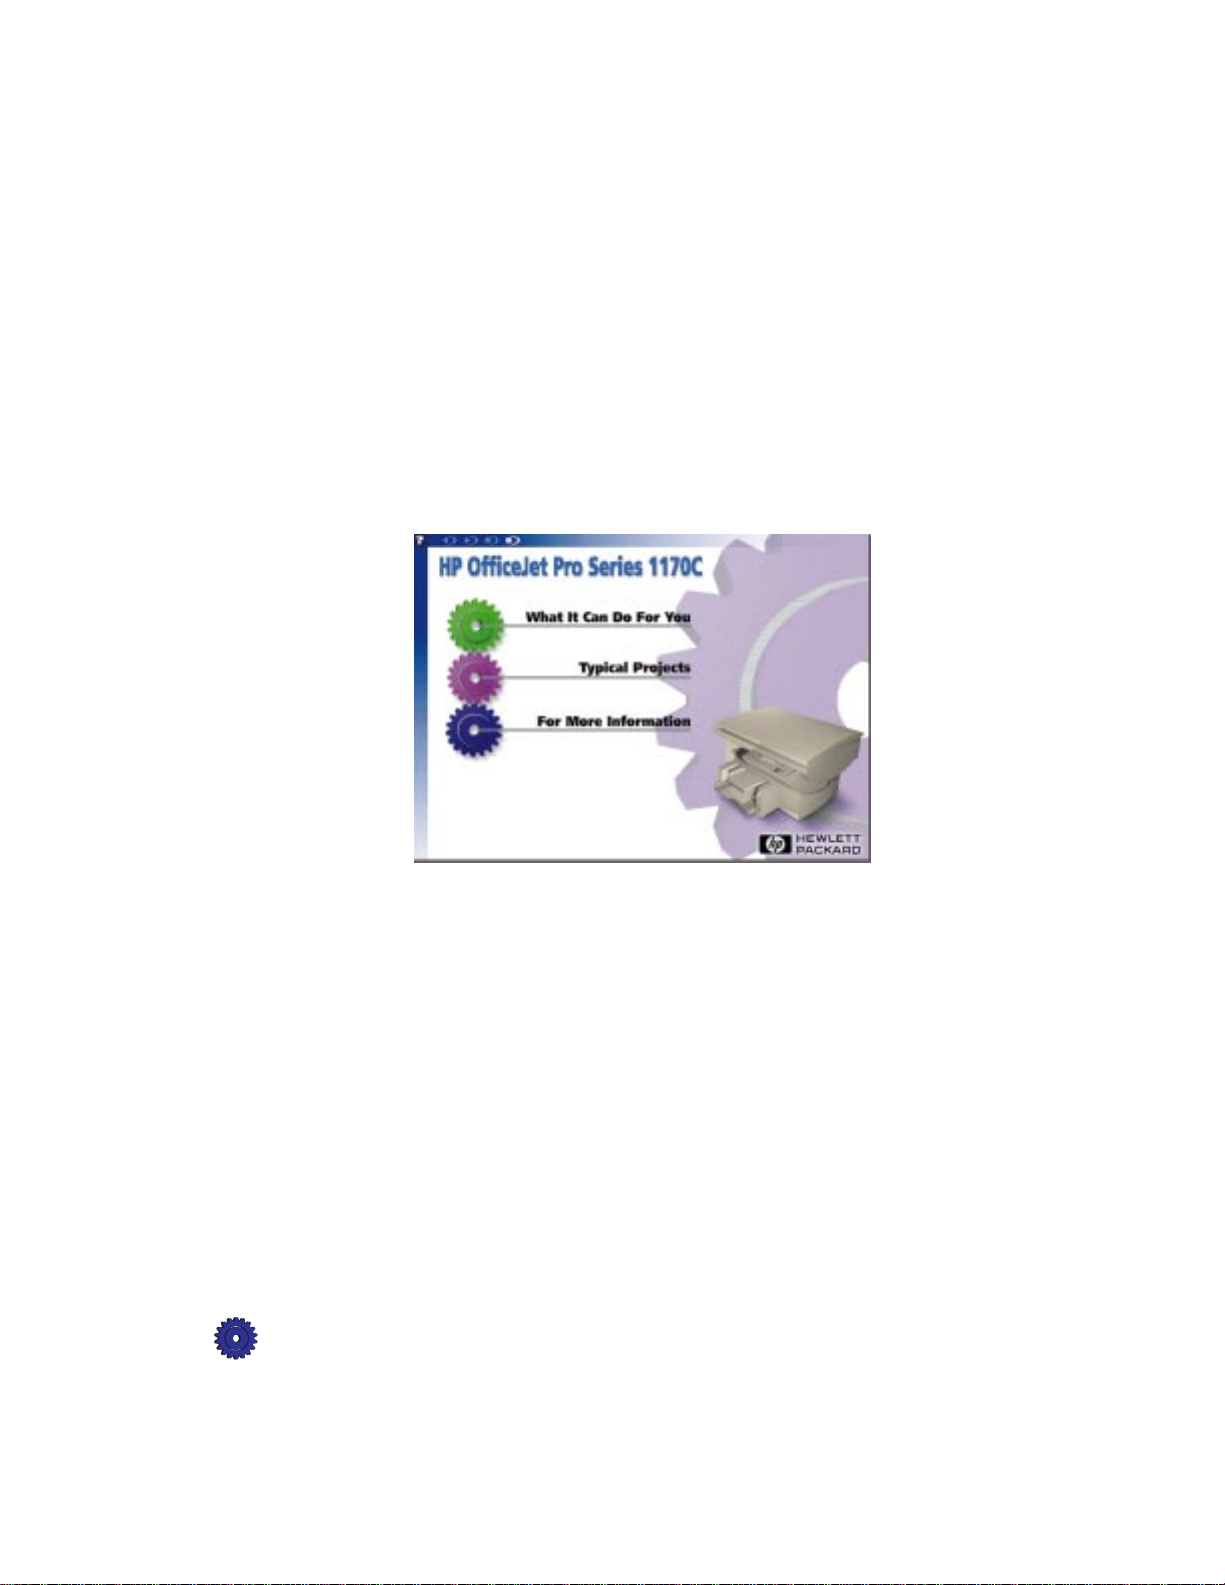
Product Tour
8
Next, you will be invited to take the HP OfficeJet Pro 1170C
Series Product Tour.
The Product Tour is a 3–5 minute overview of the capabilities of
your HP OfficeJet Pro. We recommend that you take the Tour
before using the product for the first time. Click
continue.
Next>
to
Insert CD-ROM#2, as prompted, and click
At the end of the Tour (or at any point during the Tour), click the
exit tour
continue installing your software.
At this point, you have finished installing the HP softw are and can
print and scan with your OfficeJet Pro.
button at the top of the screen to exit the Tour and
to take the Tour.
OK
2-18 Setting Up Your New HP OfficeJet Pro
Page 29
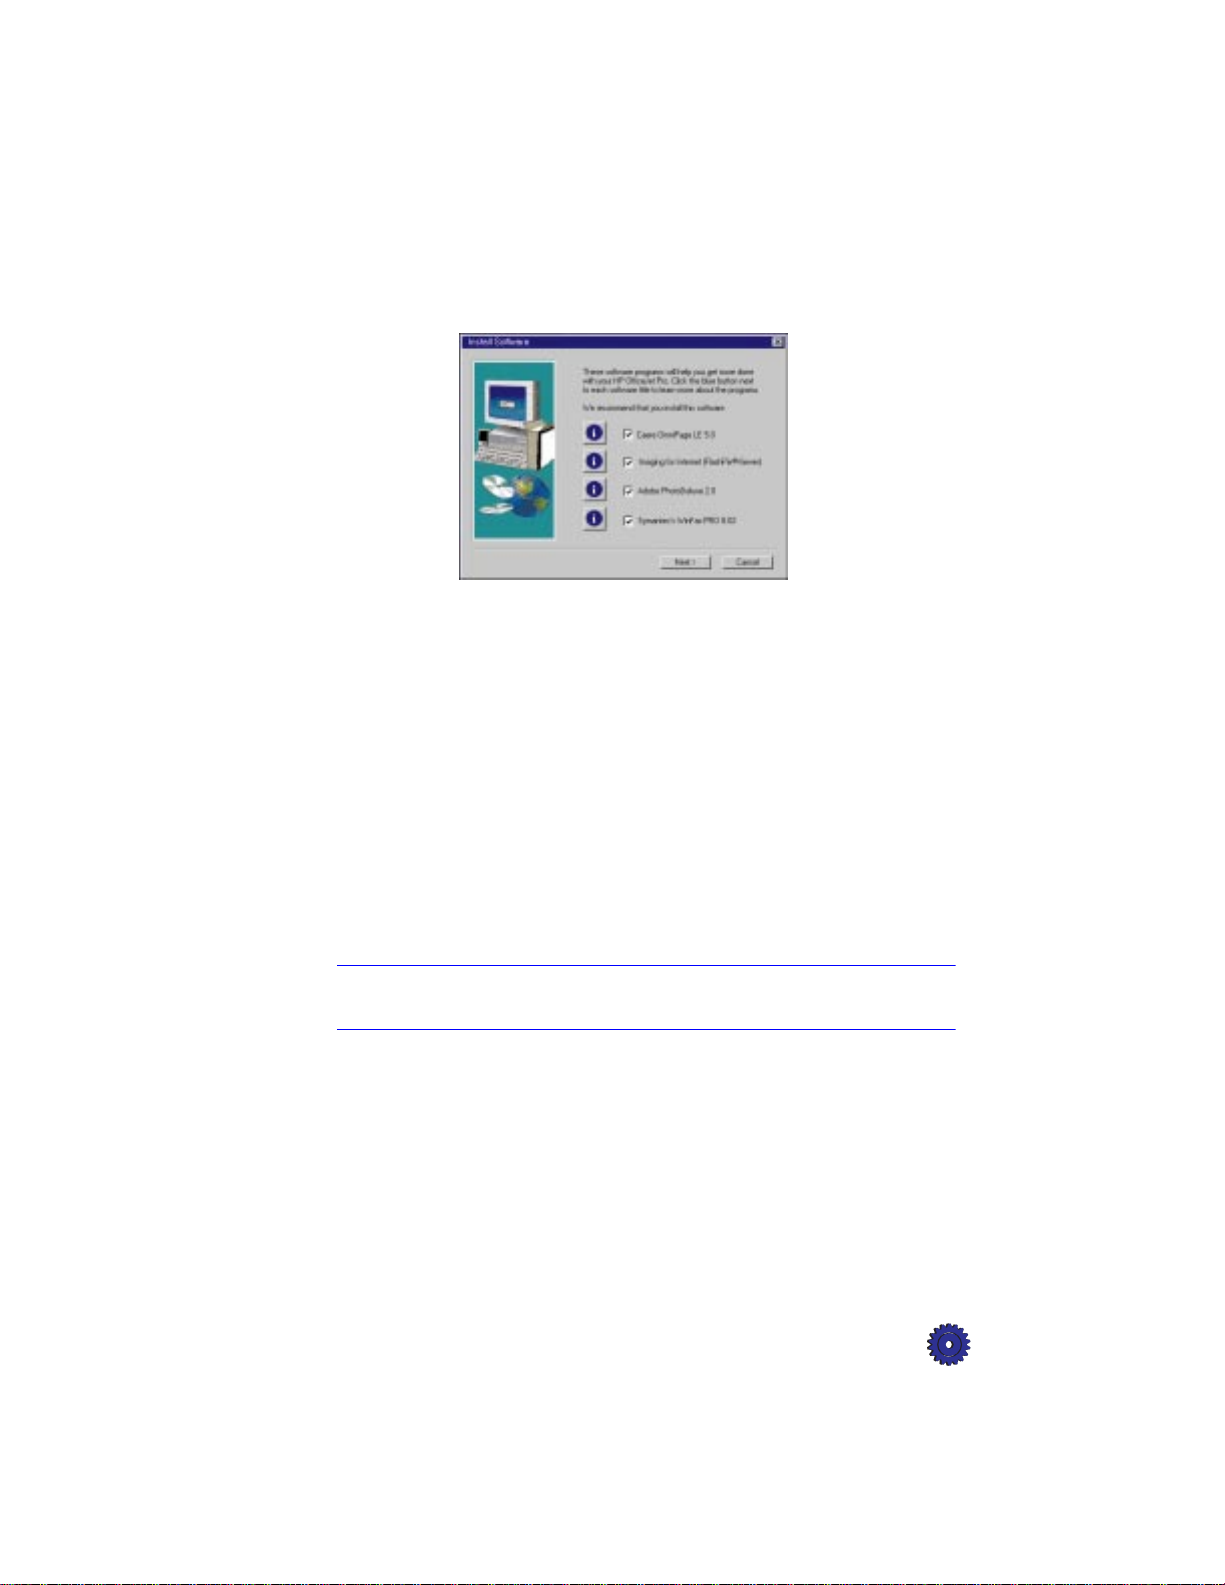
Additional Software
9
After you have completed the Tour, the “Install Software” dialog
box appears. These software packages from Hewlett-Packard
partners will enhance the capabilities of your OfficeJet Pro.
Click to put a checkmark next to the software product you want
to install.
◆
Caere Omnipage LE allows you to scan text into a format you
can edit with your word processor.
◆
Imaging for the Internet allows you to view and print
®
FlashPix
Internet access, do not install this software (click the
checkmark off).
◆
Adobe PhotoDeluxe allows you to edit the images you scan.
◆
Symantec WinFax PRO allows you to send faxes using the
fax modem in your PC and your OfficeJet Pro. If you do not
have a fax modem, do not install this software (click the
checkmark off).
images off the Internet. If you do not have
NOTE
Have your Windows 95/98 installation CD-ROM or installation diskettes
available if you are installing Symantec WinFax PRO.
HP OfficeJet Pro User’s Guide 2-19
Page 30
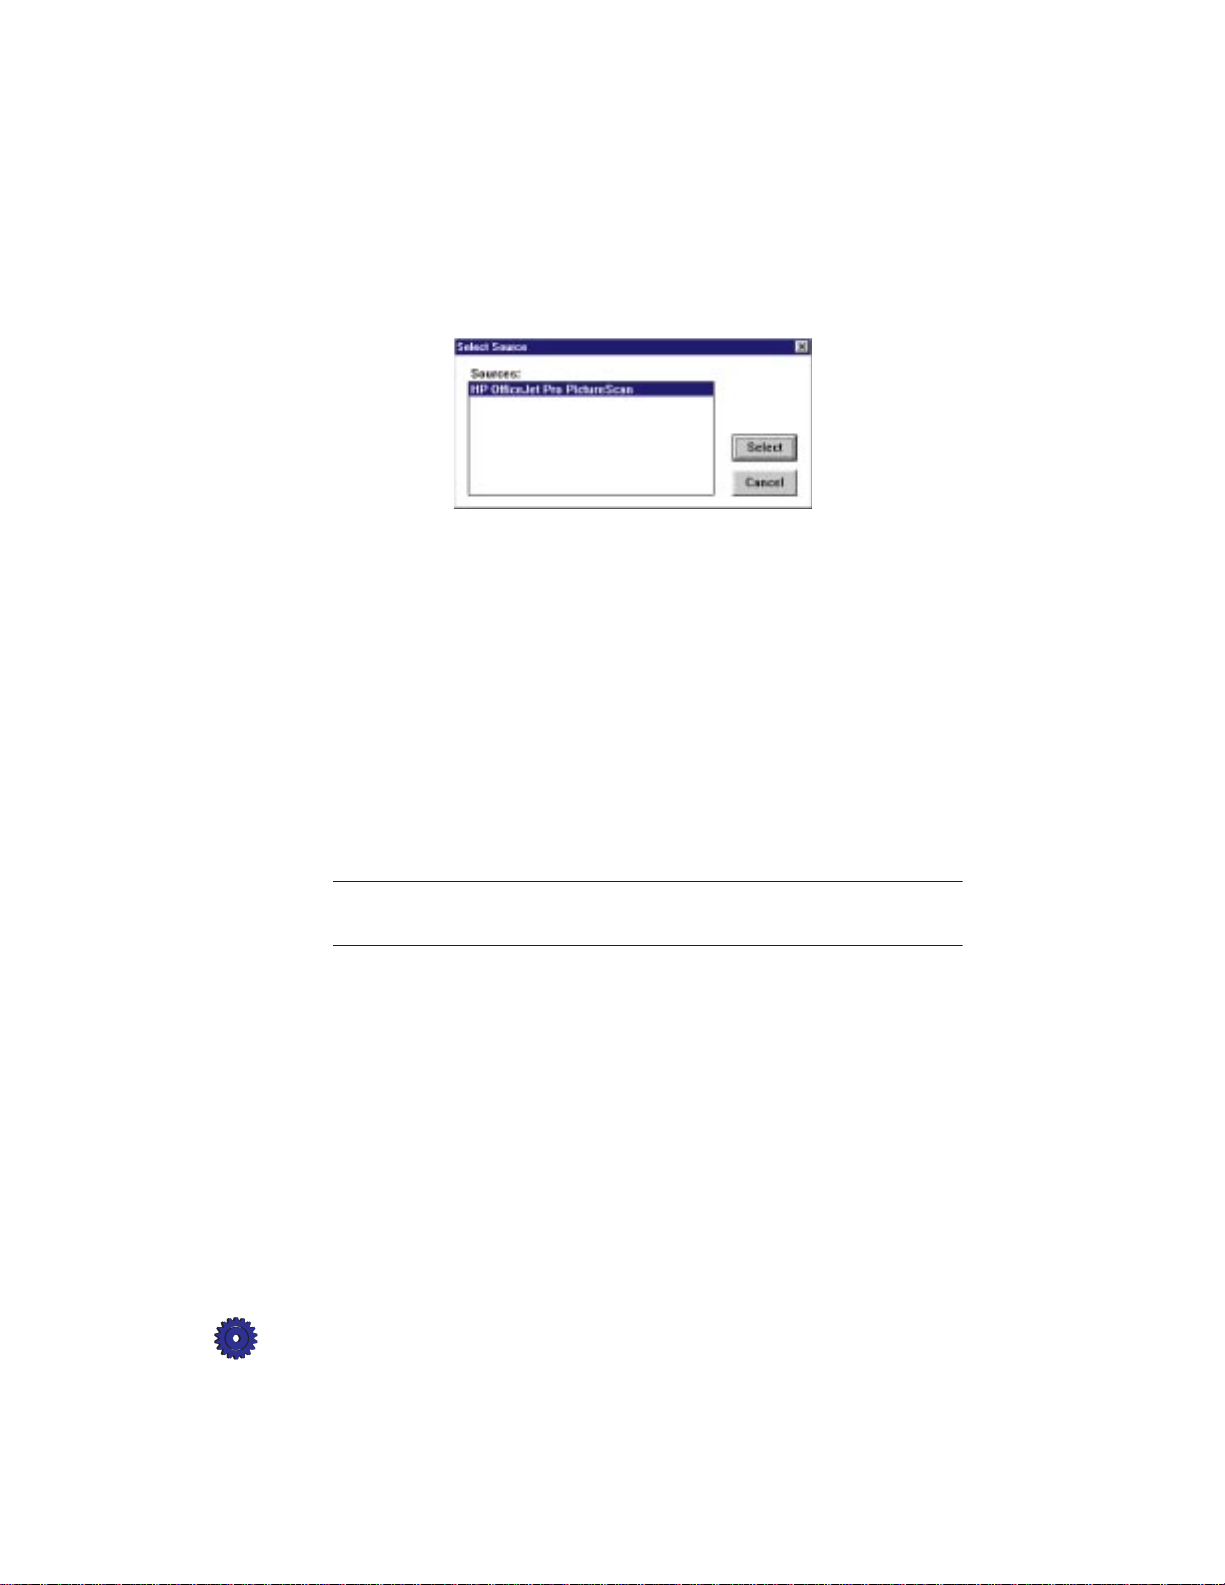
Installing Caere OmniPage Limited Edition Software
10
If you install Caere OmniPage, follow the directions on the screen.
When you see the following screen, be sure to select
HP OfficeJet Pro PictureScan.
Installing HP Imaging for the Internet Software
11
If you are installing Imaging for the Internet, follow the directions
on the screen.
An Imaging for the Internet User Guide will be installed in the
Imaging for Internet program folder, along with a README file.
Do not view the README now; view it later, after you finish
setting up your OfficeJet Pro.
Installing Adobe PhotoDeluxe Software
12
If you are installing Adobe PhotoDeluxe, follow the directions on
the screen. We recommend the “Typical” installation.
Microsoft Internet Explorer will be installed as part of the process.
NOTE
2-20 Setting Up Your New HP OfficeJet Pro
If Adobe PhotoDeluxe asks to install Microsoft Internet Explorer, installing it
will not change your default Web Browser.
Page 31

Installing Symantec WinFax PRO Software
13
If you are installing Symantec WinFax PR O, insert the Symantec
. Then follow the
WinFax PRO CD-ROM now, and click
instructions on the screen.
a
When you see this screen, enter your fax number and other
dialing information as necessary. Click the
you are not sure what to enter.
b
When you see this screen, enter your name or your fax
number in the CSID field.
OK
Help
button if
HP OfficeJet Pro User’s Guide 2-21
Page 32

c
If you see the following screen (you might not), insert your
Windows 95/98 installation CD-ROM or diskettes. (If you do
not have Windows 95/98 CD or diskettes, but the
Windows 95/98 Setup files are on your hard drive, go to
step 1).
1)
Using either the Explorer or the Browse CD button, go
to the Win 95/98 directory. The dialog box should tell
you the exact directory and file it is looking for.
2)
When you are asked if you want to set WinFax PRO as
your default printer, be sure to answer
3)
When you see a message similar to: “Could not open the
file names: ‘Z:\WINFAX\WINFAX80\DISK.ID’”
remove your Windows 95/98 CD, reinsert your
.
WinFax PRO CD, and click
Retry
No
.
IMPORTANT
If you do not have the Windows 95/98 setup files and cannot install
these files, WinFax PRO will not work properly. You must reinstall
WinFax PRO after you have located your Windows 95/98 software.
2-22 Setting Up Your New HP OfficeJet Pro
Page 33

d
When you see the following screen, if you do not have a
voice modem, uncheck TalkWorks by clicking the box.
When you have made all necessary entries, Symantec
WinFax PRO will be installed.
14
Next, you will be prompted to restart your computer. You must
reboot your computer before you can use the HP OfficeJet Pro.
Click
Finish
The first time you restart your computer after installing the
HP OfficeJet Pro, you will be invited to register your product
electronically . The information you provide to HP is confidential
and is used to help us improve our products. And, when you
register electronically, we install a free gift as our way of saying
thank you!
.
HP OfficeJet Pro User’s Guide 2-23
Page 34

Step 8 — Align Your Tri-Color and Black Print Cartridges
Before you start using your HP OfficeJet Pro, you need to align the
tri-color and black print cartridges to ensure the best copy and print
quality.
When you turn on your HP OfficeJet Pro for the first time, you will see
the message “Initializing,” followed by the message “Press Resume to
Align Cartridges” on the front panel display.
NOTE
If the message is not in your language, you will need to change the front panel
language before proceeding with the next step. Go to page 3-9 for instructions
on how to change the language.
1
Press the
The OfficeJet Pro prints a page with two sets of paired lines on it.
A set of numbered, horizontal lines appears at the top of the page,
and a set of vertical lines, each with a unique letter, appears at the
bottom of the page.
The mid-range number for horizontal alignment appears on the
front panel display.
Select/Resume
button.
2-24 Setting Up Your New HP OfficeJet Pro
Page 35

2
Look closely at the set of horizontal bars, and determine which
set of black and color lines is aligned the best.
3
Select the number on the front panel display that represents the
best horizontal alignment pattern, and press
) and Minus (–) buttons on the front
If necessary , use the Plus (
panel to change the number on the display.
The mid-range letter for vertical alignment appears on the front
panel display.
4
Now look closely at the set of vertical bars and determine which
set lines up the best.
5
Select the letter that represents the best vertical alignment on the
page and press
If necessary , use the Plus (
panel to change the letter on the display.
6
The HP OfficeJet Pro then prints another page to conf irm that the
print cartridges are correctly aligned.
7
Match the alignment in Sample 2 to the alignment in Sample 1.
8
If the lines are straight, the Align Cartridges procedure is
complete.
If the lines are not straight, you may want to repeat the Align
Cartridges procedure. T o do this, press the
message “ Align Cartridges” is displayed, press
and then repeat steps 2–6.
Select/Resume
+
.
) and Minus (–) buttons on the front
+
Select/Resume
button until the
Menu
Select/Resume
.
,
Congratulations! You have finished setting up your
HP OfficeJet Pro. Now you are ready to start using it.
HP OfficeJet Pro User’s Guide 2-25
Page 36

2-26 Setting Up Your New HP OfficeJet Pro
Page 37

Copying
3
This chapter explains how to make copies and how to use the special
copying features of the HP OfficeJet Pro. It also explains how to use
other features on the front panel and special considerations of the
automatic document feeder.
NOTE
The scanner light remains on for approximately 12 hours after you turn on the
HP OfficeJet Pro or make the first copy of the day. This keeps the bulb warm
for optimal performance. The bulb uses very little power. After 12 hours, the
OfficeJet Pro turns off the scanner bulb to save energy, and displays a “Power
Save On” message. When you are ready to use the OfficeJet Pro again, just
press any button on the front panel.
HP OfficeJet Pro User’s Guide 3-1
Page 38

How to Make Copies
1
If it is not already on, turn on the HP OfficeJet Pro by pressing the
white button on the lower right front corner of the product.
2
Manually (on the copy glass)
the original face down on the glass along the two green borders,
and close the document cover.
Put the long edge of your original along the longer green border.
: Lift the document cover, place
NOTE
3-2 Copying
Be sure to place
the two green borders. Some features of the HP OfficeJet Pro look for items
specifically in that corner.
Using the automatic document feeder
with the printed-side facing back in the document feeder, with the
top of the document to the right. Adjust the page guide to the
length of the original(s).
all
originals, including small photographs, in the corner along
: Load the original(s)
Page 39

When the originals are in place, the phrase “Document Loaded”
appears briefly on the display, and lights flash.
NOTE
Refer to “Automatic Document Feeder Requirements” on page 7-5 for
information on the types of paper you can use in the document feeder.
3
If you are making more than one copy, specify the number of
copies to make.
4
If desired, adjust the way your copy will look using the Copy
Quality, Reduce/Enlarge, Lighter/Darker, and Color Intensity
buttons. See “Controlling How Copies Will Look” later in this
chapter for details.
5
Start copying:
◆
◆
Press the
Press the
button to make a black and white copy.
Black
button to make a color copy.
Color
Controlling How Copies Will Look
You can change the default copy settings to produce copies that look
the way you want them to.
NOTE
There is a small margin around the edge of paper that the HP OfficeJet Pro
cannot copy onto. See “Copy Margins” on 15-3 for details.
This section explains how to use the following settings and options:
◆
Number of copies
◆
Scan To Fax
◆
Copy quality
HP OfficeJet Pro User’s Guide 3-3
Page 40

◆
Reduce/enlarge features
◆
Paper types
◆
Lighter/darker
◆
Color intensity
◆
Text enhancement (TE)
◆
Enhance light colors (ELC)
◆
Copy paper size
◆
Set defaults
NOTE
TIP
The copy settings are reset to their default settings two minutes after each
copy job is complete.
If you consistently use front panel settings other than the default,
consider establishing those settings as your new defaults. See “Set
Defaults” on 3-10 for more information.
Number of Copies
To specify the number of copies, when “1 Copy” or “x Copies” is
displayed on the front panel, press the Plus (
) or Minus (–) button
+
until the number of copies you want to make is displayed.
Scan To Fax
When you press the Scan T o Fax button, the HP Of ficeJet Pro scans the
original you have placed on the scanner glass or in the automatic
document feeder, and launches Symantec WinFax PRO. For
information on using this feature, see page 6-1.
Copy Quality
The Copy Quality button changes the speed and quality of the copies
you make. You can choose from the following three copy settings:
◆ Best produces the highest copy quality for all paper and eliminates
the banding (striping) effect that sometimes occurs in solid areas.
The Best setting copies more slowly than the Normal setting.
◆ Normal delivers high-quality output and is the recommended
setting for most of your copying. Normal is the default copy
quality setting for most paper types, and is faster than Best.
◆ Fast copies faster than the Normal setting, and the text is of
comparable quality . Using Fast also cuts down on the frequency of
replacing your print cartridges because it uses less ink.
3-4 Copying
Page 41

T o change the Copy Quality setting, press the
Copy Quality
button,
the small button directly beneath the three quality settings (Best,
Normal, Fast), until the light next to the copy quality setting you want
to use is lit.
Reduce/Enlarge Options
Using the HP OfficeJet Pro’s digital Reduce/Enlarge features, you
can quickly and easily reduce or enlarge images to the size you want.
NOTE
NOTE
Some Reduce/Enlarge features let you specify the exact percent reduction
or enlargement you want to use. The Minus/Plus (
) signs next to the
– +
feature name let you know whether this option is available. Press the
Minus (
the Minus (–) or Plus (+) button to change the percentage in increments o
◆
◆
) or Plus (+) button once to change the percentage by 1. Hold down
–
f 5.
Normal 100% makes a copy that is the same size as your original.
Entire 91% reduces your copy to ensure that all the edges are
copied.
◆
Auto Fit pre-scans the original to determine where its edges are.
Auto Fit then reduces or enlarges the original to fit on the paper
you are copying onto.
When enlarging, Auto Fit increases the size of the copy to the
largest size that will fit on the page without distorting the image,
and centers the image on the page.
Use Auto Fit or Entire 91% to slightly reduce your original and ensure that
you copy the entire page. Entire 91% is a faster solution, because it uses a
fixed percentage to make the copy—no pre-scan is needed to calculate the
size of the original. Auto Fit is an easy solution—the Auto Fit feature
calculates the reduction percentage for you, and all your copies will be the
same size.
◆
Custom 100% (
) lets you specify (using the plus or minus
– +
buttons) the exact reduction or enlargement percentage to use.
You can specify any percentage between 25% and 400%.
HP OfficeJet Pro User’s Guide 3-5
Page 42

◆
Poster 400% (
) determines how to divide up the original image
– +
and enlarge each part to end up with an image that is up to 400%
larger than your original. You can specify a different total
enlargement percentage using the Minus (
) or Plus (+) buttons. A
–
poster may be created using up to 25 sheets of paper (5 sheets wide
and 5 sheets long).
For example, you can use Poster to create posters of your work to
display in your office or store. Use HP Premium Photo Paper for a
glossy , near-photo-quality look.
NOTE
NOTE
There is a minimum 1/4-inch overlap on all pages of the poster. This ensures
that key elements on the page do not get cut off, and makes it easy for you to
paste the pages of the poster together.
◆
Clone 100% (
) fits as many copies of the original as will fit on
– +
one sheet of the paper you are using. You can specify a reduction
or enlargement using the Minus (
) or Plus (+) buttons.
–
For example, you can use Clone to make extra copies of special
photographs for family and friends. For glossy , near-photo-quality
copies, use HP Premium Photo Paper.
◆
Mirror 100% (
) reverses the image of your original and makes
– +
a copy based on the percent reduction/enlargement you specify.
You can use Mirror to copy favorite photos or images onto
HP Iron-On T-Shirt Transfers. Then iron the image to make
custom t-shirts, banners, and flags. You can also use Mirror to
copy presentation materials onto HP Premium Transparency f ilm.
Then, when you flip each film over to make your presentation, you
can write on it and erase, without worrying about smearing the ink.
When you select Iron-On as the paper type on the front panel, the
HP OfficeJet Pro automatically selects Mirror as the Reduce/Enlarge setting.
To change Reduce/Enlarge settings:
1
Press the
want is displayed.
2
If the feature you are using allows, press the Plus (+) or Minus (–)
button to change the reduce/enlarge percentage.
3
Press the
setting, or press the
3-6 Copying
Reduce/Enlarge
Select/Resume
Clear/Stop
button repeatedly , until the setting you
button to select the new reduce/enlar ge
button to cancel.
Page 43

Paper Types
The Paper Type you select affects how the HP OfficeJet Pro makes
copies. It is important to select the appropriate Paper T ype setting for
the kind of paper you are copying onto. Review the table on page 7-3
for more information.
To change Paper Type:
1
Press the
of available paper types.
2
When the paper type you are using is listed, press
Paper T ype
Select/Resume
button repeatedly to scroll through the list
to choose it.
Lighter/Darker
Use the Lighter/Darker button to adjust the lightness and darkness of
the copies you make.
To make copies Lighter or Darker:
1
Press the
lightness/darkness values appears on a scale on the display.
2
To make your copy darker, press the Plus (+) button. The dot
moves to the right.
To make your copy lighter, press the Minus (
moves to the left.
Lighter/Darker
button. The range of
) button. The dot
–
3
Press
Select/Resume
to confirm your selection.
Color Intensity
Use the Color Intensity feature to make the colors on your copy more
vivid or more subtle.
To change Color Intensity:
1
Press the
values appears on a scale on the display.
2
To produce copies with more intense or vivid colors, press the
Plus (
To produce copies with paler, more subtle colors, press the
Minus (
3
Press
Color Intensity
) button. The round dot moves to the right on the scale.
+
) button. The round dot moves to the left on the scale.
–
Select/Resume
button. The range of color intensity
to choose the new color intensity setting.
HP OfficeJet Pro User’s Guide 3-7
Page 44

TE (Text Enhancement)
TE sharpens the edges of black text. It is turned on by default and
should, in most situations, be left on. However, turn TE off if:
◆
Large, black typefaces look splotchy (not smooth).
◆
Horizontal grainy or white bands appear in light- to medium-gray
areas.
◆
Thin, colored objects or lines contain black sections.
NOTE
TE is automatically turned off when Photo Paper is selected.
To turn TE On/Off:
1
Press the
display.
2
Press the Plus (+) and Minus (–) buttons to switch between ❍ (off)
and
●
(on).
3
Press
Select/Resume
button until “TE” appears on the front panel
Menu
to confirm your selection.
ELC (Enhance Light Colors)
Use the Enhance Light Colors (ELC) setting to enhance light-color
backgrounds in documents, such as maps, photos, and invoices, so the
background is included on the copy. The ELC feature improves the
appearance of very pale colors. Turn on ELC if pale colors are cop ying
as white.
To change the ELC setting:
1
Press the
panel display.
2
Press the Plus (+) and Minus (–) buttons to switch between ❍ (off)
●
(on).
and
3
Press the
button repeatedly until ELC appears on the front
Menu
Select/Resume
button to confirm the change.
3-8 Copying
Page 45

Changing Other Front Panel Settings
This section explains how to use the following settings and options:
◆
Front panel language
◆
Copy paper size
◆
Set defaults
◆
Factory defaults
◆
Clear/Stop
Front Panel Language
You established the Front Panel Language when you first set up your
HP OfficeJet Pro. To switch to a different language, follow these
steps.
1
While holding down the
Intensity
The current language is displayed.
2
Press the Plus (+) or Minus (–) button to scroll through the
available languages until the language you need appears.
The following languages are available: English, Español,
Deutsch, Français, Italiano, Nederlands, Dansk, Norsk,
Portugués, Svenska, and Suomi.
button, then release both buttons.
Select/Resume
button, press the
Color
3
Press
Select/Resume
4
You will be prompted to change Paper Size. See steps 3 and 4 in
the next section.
to choose the displayed language.
Copy Paper Size
With your HP OfficeJet Pro, you can copy on either
letter- (8.5 x 11 inches) or A4- (210 x 297 mm) sized paper.
To change Copy Paper Size:
1
Press the
Size” on the front panel display.
2
Press
Select/Resume
3
Press the Plus (+) or Minus (–) button to toggle between the two
paper sizes.
4
Press
Select/Resume
button repeatedly until you see “Copy Paper
Menu
to view the current default paper size.
when you see the paper size you want.
HP OfficeJet Pro User’s Guide 3-9
Page 46

Set Defaults
If you consistently use settings on the front panel other than the
default, you can establish those setting as your new default.
NOTE
The default setting is always indicated by a solid dot.
You can change default settings for all your front panel options. To
establish new defaults, first set all options the way you want them to
be. Then use the Set Defaults feature to save all the settings.
Here is an example using Auto Fit.
1
Press the
displayed.
2
Press
Reduce/Enlarge setting from Normal 100% to Auto Fit.)
3
Press the
panel display.
4
Press the
saved as defaults” is displayed. (This step saves the new
setting—Auto Fit—as your default.)
Reduce/Enlarge
Select/Resume
button until “Set Defaults” appears on the front
Menu
Select/Resume
button repeatedly until “Auto Fit” is
. (This step changes your regular
button. The message “Current settings
Factory Defaults
You can return all the front panel settings to their factory defaults at
one time.
To return to Factory Defaults:
1
Press the
Defaults” on the front panel display.
button repeatedly until you see “Factory
Menu
2
Press
The message “Returned to factory defaults” appears on the front
panel display.
Clear/Stop
Use the Clear/Stop button to cancel copy settings you have specified
or to stop copying.
◆
When you press the
they are reset to default settings.
◆
When you press the
“Copy Cancelled” appears on the front panel display. After a few
seconds, the HP OfficeJet Pro cancels the job.
3-10 Copying
Select/Resume
Clear/Stop
.
Clear/Stop
button to cancel copy settings,
button to stop copying, the phrase
Page 47

Using the Automatic Document Feeder (ADF)
With the automatic document feeder , you can feed up to 30 originals
at a time. You can use letter-sized or A4-sized originals in the feeder .
Here are some other tips:
◆
Always feed your originals with the printed-side facing back in
the document feeder, and the top of the document to the right.
◆
Do not mix paper types or sizes in the ADF.
◆
Load only originals printed on 16–24 lb. paper in the document
feeder. Originals on lighter or heavier paper will not feed
correctly and may jam in the feeder.
◆
To prevent paper jams, use the ADF with plain paper or
HP Premium InkJet paper only.
◆
Do not use photo paper, transparency film, photos, labels, or
envelopes in the document feeder.
◆
When you make more than one copy using the document feeder ,
you will need to collate the sets manually.
◆
For instructions on how to clear an automatic document feeder
paper jam, see page 12-1.
◆
Do not load colored originals printed on a color laser printer.
◆
Slick-surfaced papers will jam in the ADF. A full-page color
graphic printed on a color laser printer develops a slick surface.
HP OfficeJet Pro User’s Guide 3-11
Page 48

3-12 Copying
Page 49

Printing
Using your HP OfficeJet Pro, you can print on many sizes and types of
paper, such as letter -, A4-, and legal-sized paper . You can also print on
envelopes, transparency film, labels, cards, and even custom-sized
letterhead or stationery.
For more information on printing on these types of paper, see page 7-2.
Start Printing
1
4
If it is not already on, turn on HP OfficeJet Pro by pressing the
white button located on the lower right front corner of the product.
NOTE
The scanner light remains on for approximately 12 hours after you turn on the
HP OfficeJet Pro or make the first copy of the day. This keeps the bulb warm
for optimal performance. The light uses very little power. After 12 hours, the
OfficeJet Pro turns off the scanner bulb to save energy, and displays a “Power
Save On” message. When you are ready to use the OfficeJet Pro again, just
press any button on the front panel.
2
Load up to 150 sheets of paper into the bottom (IN) tray of the
HP OfficeJet Pro. For more detailed instructions on loading paper,
see page 7-4.
HP OfficeJet Pro User’s Guide 4-1
Page 50

3
Change the print settings as necessary:
a
From your software program’s File menu, select
will see a dialog box similar to the one below.
b
Click the
Series print setup dialog box is displayed.
Properties
button. The HP OfficeJet Pro 1170C
Print.
You
NOTE
4-2 Printing
c
Here is where you specify Paper Size, Paper Type, and Print
Quality for the file you are printing. Make necessary
adjustments, then click
The settings you change here remain in effect while you are using the current
program. To make your changes permanent, make them in the Control Panel
Printers folder.
to return to the Print dialog.
OK
Page 51

TIP
4
When all setup options are set correctly, from your software
program’s File menu, select
Stop Printing
You can stop printing a file using either the HP OfficeJet Pro or
Windows 95/98.
Stop a Print Job from the HP OfficeJet Pro
◆
Press the
For detailed instructions on changing print settings,
such as Paper Size and Orientation, see the 1170C
Series Toolbox. For information on accessing help, see
page 10-3.
.
Print
Clear/Stop
button on the front panel to stop printing.
Stop a Print Job from Windows 95/98
1
On the taskbar, click
Settings menu.
2
Double-click the
3
From the list, select the document you want to cancel.
4
From the Document menu, select
HP OfficeJet Pro 1170C Series
, and then select
Start
Printers
Cancel Printing
HP OfficeJet Pro User’s Guide 4-3
from the
icon.
.
Page 52

NOTE
Most programs that were designed for Windows 95/98 use the
Windows 95/98 print spooler. The above procedure will work to stop printing
in these programs. If the procedure does not work, your program may not use
the Windows 95/98 spooler (for example, PowerPoint in Microsoft Office 95
and 97). If this happens, follow the instructions for canceling “Background
Printing” in the on-line help for your program.
4-4 Printing
Page 53

Scanning
Using your HP OfficeJet Pro and the software programs that come
with it, you can scan text and pictures and then make changes to them.
This chapter highlights the methods you can use to scan text and
pictures.
For more information on scanning, including step-by-step instructions,
refer to the OfficeJet Pro Scanning Tutorial. See page 10-2 for more
information.
Scanning Methods
You can scan in several different ways.
While working in a word processing, spreadsheet, or presentation
program:
5
◆
ScanPicture
processing, spreadsheet, or presentation program.
◆
Acquire Text
Caere OmniPage LE, while working in most word processing
programs.
◆
TWAIN
TWAIN-aware programs like Adobe PhotoShop.
Using a standalone program:
◆
HP PictureScan (Scan to a File)
HP PictureScan, a program in your HP OfficeJet Pro 1170C Series
folder, and save it as a graphics file.
◆
Caere OmniPage LE
program in the Caere Applications folder, and save it as a text or
document file.
—Scan and import pictures while working in a word
—Scan and import editable text using
—Scan and import pictures while working in
—Scan pictures using
—Scan text using Caere OmniPage LE, a
HP OfficeJet Pro User’s Guide 5-1
Page 54

Using Scan To Fax and WinFax PRO:
◆
Scan T o F ax
—Launch WinFax PR O from the Of ficeJet Pro front
panel, and scan pictures or text into a fax to send. (See Chapter 6.)
◆
WinFax PR O
—Scan pictures or text into a ready-to-send fax file.
(See Chapter 6.)
Scanning Tips
◆
Never scan at a higher resolution or bit depth than you need. It
does not improve the quality, and just takes up disk space.
◆
Photos typically are not high resolution, so scanning at a
resolution greater than 100 dpi will not improve the quality of the
scanned photo image.
◆
If you want higher resolution for your photos, use the
OfficeJet Pro 300 dpi printer destination under the Options menu.
Keep in mind that one full-page scan at that resolution can use as
much as 24 MB of disk space. See the Scanning Tutorial for more
information.
◆
If you are scanning something to go on a web site or display
screen, remember that most screens only display at 72 dpi.
◆
If you want to save an image in FlashPix (.fpx) format, launch
Adobe PhotoDeluxe, and use the TWAIN feature to scan the
image. Then save it as a .fpx file type.
Scanning While Working in a File
NOTE
5-2 Scanning
Scanning Using HP ScanPicture
With HP ScanPicture, you can scan pictures directly into the document
you are working on. It is the easiest way for you to scan. Most 32-bit
Windo ws 95/98 programs that allow cutting and pasting (for example,
word processing programs, spreadsheets, and presentation packages)
can use ScanPicture.
ScanPicture is automatically listed on the File menu of many programs
after you complete the HP OfficeJet Pro installation.
Microsoft Office 97 Users: If you installed Office 97 after installing your
HP OfficeJet Pro software, you will need to run a special program to “turn on”
this feature in your Office 97 programs. See “Installing the Office 97 Utility” on
13-3 for more information.
Page 55

To use ScanPicture:
1
Place the item you want to scan against the green borders on the
scanner glass.
NOTE
You cannot use the automatic document feeder with the ScanPicture option.
2
Place your cursor in the document where you want your scanned
image to be placed, and select
3
A preview scan displays. The animated selection border shows
the portion that will be scanned.
a
To crop a square or rectangular-shaped image, click the
square marquee button and pull the border to where you
want it.
b
To crop an irregularly shaped image, click the lasso button
and draw around the area you want scanned.
TIP
If you want to change the size of your scanned image,
ScanPicture
from the File menu.
your final picture will look better if you change the size
to the required dimensions before you import it into your
document. To do this, click the Options button, and click
the Rulers icon. Then specify the size you want the
scanned image to be.
4
Click
Accept
The image you scanned is imported into your document.
.
Scanning Pictures in TWAIN-Aware Programs
TWAIN1 is an industry standard software/hardware interface that
allows you to scan images directly into a software program using a
menu command.
TWAIN is a part of many graphics programs, such as Adobe
PhotoDeluxe. Scanning using TWAIN is similar to using
HP’s ScanPicture. The specific procedure is different for each
TWAIN-aware program. Here is an example of how the TWAIN
feature works in Adobe PhotoDeluxe.
1. TWAIN is an acronym for Technology Without An Interesting Name.
HP OfficeJet Pro User’s Guide 5-3
Page 56

1
Open a file using Adobe PhotoDeluxe.
2
Place the item(s) you want to scan against the green borders on the
scanner glass or in the automatic document feeder (ADF). If you
are using the ADF, be sure to place the originals with the printed
side facing back and to the right.
NOTE
NOTE
When you scan using the automatic document feeder, the entire image is
scanned, without a preview scan. To change the size of the scanned image,
you will need to edit it after it is saved.
3
Click
Get Photo
4
Click the
5
Enter a name for your image file, and click OK.
The image file is placed in your “My Photos” directory.
6
To open the file, double-click its icon in the “My Photos” folder.
Scanners
on the task list, then click the
icon.
Get Photo
tab.
Scanning Text Using Acquire Text
If you installed Caere OmniPage LE, a new menu item called Acquire
Text will now be available in the File menu of many word processing
programs. You can use this feature to scan text directly into your word
processing files for editing.
If Acquire Text does not appear on your File menu, check to make sure that
“OCR Aware” is selected in Caere OmniPage LE. To do this, launch Caere
OmniPage LE, and select OCR Aware from the Tools menu. Refer to the
Caere OmniPage LE on-line help for more information.
NOTE
5-4 Scanning
To use the Acquire Text feature:
1
Create or open a file using your word processing program.
2
Place the document you want to scan against the green borders on
the scanner glass or in the automatic document feeder (ADF). If
you are using the ADF, be sure to place the originals with the
printed side facing back and the top to the right.
3
Select
Acquire Text
The first time you use Caere’s OmniPage LE, a registration screen will display.
from the File menu.
Page 57

4
Click
The pages will be scanned and imported into your file, ready for
editing.
Scan
.
Scanning Using a Standalone Program
Scanning Pictures Using HP PictureScan
With HP PictureScan, you can scan pictures and save them in a new
file. You will find PictureScan listed as
HP OfficeJet Pro 1170C Series folder under your Start menu.
To scan using PictureScan:
1
Place the item(s) you want to scan against the green borders on
the scanner glass or in the automatic document feeder (ADF). If
you are using the ADF, be sure to place the originals with the
printed side facing back and the top to the right.
1. Scan
in the
NOTE
NOTE
When you scan using the automatic document feeder, the entire image is
scanned, without a preview scan. To change the size of the scanned image,
you will need to edit it after it is saved.
2
Select
1. Scan
3
Click
Pictures
A preview of the image displays. The animated selection border
shows the portion that will be scanned.
a
To crop a square or rectangular-shaped image, click the
square marquee button and pull the border to where you
want it.
b
To crop an irregularly shaped image, click the lasso button
and draw around the area you want scanned.
4
Click
Accept
looks.
5
Enter a name for the image file, select a file type, and click
See the on-line Scanning Tutorial for information on file types and
file sizes.
For multiple pages, the images will be saved as name, name01, name02,
and so forth, where “name” is the filename you entered.
in the HP OfficeJet Pro 1170C Series folder.
, and then click
when you are satisfied with how the scanned image
Scan
.
Save
.
HP OfficeJet Pro User’s Guide 5-5
Page 58

TIP
If you want to save an image in FlashPix (.fpx) format, launch
Adobe PhotoDeluxe, and use the TWAIN feature to scan the image.
Then save it as a .fpx file type. See “Scanning Pictures in
TWAIN-Aware Programs” on 5-3.
Scanning Text Using Caere OmniPage LE
To scan text and save it in a new text file:
1
Under the Start menu, select
OmniPage Limited Edition
2
From the File menu, select
3
In the Load Scanner window:
a
Click
Feeder
document feeder.
b
Click
Flatbed
glass.
if you are scanning using the automatic
if you are scanning one item on the scanner
Programs
from the Caere Applications folder.
New Job
and then select
to create a new file.
NOTE
NOTE
If a page is loaded in the automatic document feeder, the Load Scanner
window will not display.
4
Click
Caere OmniPage LE scans the loaded images and imports them as
separate pages in your new “Job” file.
5
After the page is scanned, click the
Caere OmniPage LE processes the image and converts it into
editable text.
If you are scanning multiple pages using the automatic document feeder, the
next page will not be scanned unless you click the OCR button to convert the
previous page.
6
Name your new file, and save it.
to start scanning.
Scan
OCR
button.
5-6 Scanning
Page 59

Editing Your Scanned Pictures
You can edit your scanned pictures using the image editor software
provided with your HP OfficeJet Pro.
◆
If you used ScanPicture to place an image in a document, simply
double-click the image to start Adobe PhotoDeluxe. After you
have finished editing your picture, click the
HP ScanPicture
document.
◆
If you saved the scanned image as a graphics file, open the image
using Adobe PhotoDeluxe, and then modify it as needed.
button. The modified picture appears in your
Exit & Return to
NOTE
For detailed information on using Adobe PhotoDeluxe, refer to its on-line
help.
HP OfficeJet Pro User’s Guide 5-7
Page 60

5-8 Scanning
Page 61

Communicating
This chapter explains how to scan and send it as a fax file attachment
using the HP OfficeJet Pro and Symantec WinFax PRO. To scan and
send e-mail, refer to the Symantec WinFax PRO on-line help.
Scanning Using WinFax PRO
Scanning Using Scan To Fax
With the OfficeJet Pro, you can scan a page (or multiple pages),
automatically launch Symantec WinFax PR O, and include the scanned
pages in the fax you send.
To use Scan To Fax:
1
Place the item(s) you want to scan against the green borders on the
scanner glass or in the automatic document feeder (ADF). If you
are using the ADF, be sure to place the originals with the printed
side facing back and the top to the right.
6
2
Press the
HP OfficeJet Pro.
The page (or pages) are scanned and included as separate pages in
your fax. After all pages have been scanned, the Symantec W inFax
PRO “Send Fax Wizard” window is displayed on your computer.
3
On your computer, enter destination information for your fax, and
add a cover page, message, and attachments, if desired.
4
Press
Scan To Fax
Finish
to send the fax.
button on the front panel of your
HP OfficeJet Pro User’s Guide 6-1
Page 62

Scanning Using Symantec WinFax PRO Standalone
1
Place the page(s) you want to scan against the green borders on the
scanner glass or in the automatic document feeder (ADF). If you
are using the ADF , place the originals with the printed side f acing
back and the top to the right.
2
On the taskbar, click
WinFax PRO
The main Symantec WinFax PRO window appears.
3
From the Tools menu, select
After all pages have been scanned, the Symantec WinFax PRO
“Send Fax Wizard” window is displayed on your computer.
4
Enter destination information for your fax, and add a cover page
and message, if desired.
5
Press
Finish
from the WinFax PRO directory.
to send the fax.
, and from the Programs menu select
Start
, then select
Scan
Scan and Send
.
NOTE
For details on using other Symantec WinFax PRO features and options, refer
to the Symantec WinFax PRO on-line help, or visit Symantec’s website at
http://www.symantec.com.
6-2 Communicating
Page 63

HP Papers
All About Paper
7
This chapter explains the paper types you can use when copying and
printing. It also presents some tips on loading paper and transparency
film, and specifies paper requirements for originals used in the
automatic document feeder.
For a current list of HP papers, visit our website:
http://www.hp.com/go/officejet-pro
The HP OfficeJet Pro is designed to copy and print onto a variety of
paper types and weights, including plain paper. Be sure that all paper
is free of rips, dust, wrinkles, and curled or bent edges.
For highest quality results, use HP papers.
◆
HP Bright White InkJet Paper delivers high-contrast colors and
sharp text. It is opaque enough for two-sided color printing, with
no show-through. It is ideal for newsletters, reports, proposals, and
flyers.
◆
HP Premium Photo Paper is a high-quality, glossy-finish,
photo-based inkjet paper. It looks and feels lik e a photograph and
can be mounted under glass or in an album. HP Photo paper dries
rapidly and resists fingerprints and smudges.
◆
HP Iron-On T -Shirt T ransfers can be used to transfer your designs
or photos (either by copying or printing) onto t-shirts, sweatshirts,
and fabric crafts.
◆
HP Premium Transparency Film is designed to make your color
presentations vivid and ev en more impressiv e. This film is easy to
use and easy to handle and dries quickly without smudging.
HP OfficeJet Pro User’s Guide 7-1
Page 64

◆
HP Premium Heavyweight InkJet paper is matte-coated on both
sides for double-sided copying. It is the perfect choice for
near-photographic reproductions and business graphics for report
covers, special presentations, brochures, mailers, and calendars.
◆
HP Premium InkJet Paper is the ultimate coated paper for
high-resolution printing. A smooth-matte finish makes it ideal for
your special documents.
NOTE
See page 7-5 for automatic document feeder paper requirements.
Paper Choices When Copying
You should copy only onto letter- and A4-sized papers.
Using the Right Front Panel Paper Type When Copying
The Paper T ype you select determines how the HP OfficeJet Pro copies
onto the paper you are using. Each time you load a different type of
paper in the paper tray or document feeder, be sure to set the
corresponding Paper Type on the front panel.
For this Kind of Paper Select this Paper Type
Copier paper or letterhead Plain Paper
HP Bright White InkJet Paper Plain Paper
HP Premium Transparency Film Transparency
HP Premium Photo Paper Photo Paper
HP Premium InkJet Paper Premium InkJet
HP Premium Heavyweight InkJet Paper Premium InkJet
HP Iron-On T-Shirt Transfers Iron-On
See “Paper Types” on page 3-7 for information about setting Paper
Type on the front panel.
NOTE
Front panel settings affect copying only. To select Paper Types for printing,
see “Paper Choices When Printing” below.
7-2 All About Paper
Page 65

Paper Choices When Printing
The HP OfficeJet Pro is designed to print on man y sizes and types of
paper, such as letter-, A4-, and legal-sized paper. You can also print
on envelopes, labels, cards—even custom-sized letterhead or
stationery.
Using the Right Print Settings in the OfficeJet Pro Print
Properties Dialog
The Print Settings you choose in the Print Properties dialog tell the
printer how to work with the specific paper you are using. It is
important that you specify the correct Print Settings (see page 4-1 for
details on setting and using Print Properties).
For this Kind of Paper Select this Paper Type
HP Bright White InkJet paper Plain Paper
Copier paper Plain Paper
Letterhead Plain Paper
HP Premium InkJet Paper HP Premium InkJet Paper
NOTE
HP Premium Heavyweight InkJet
paper
HP Premium Photo paper HP Premium Photo Paper
HP Iron-On T-Shirt Transfers HP Iron-On — automatically selects
HP Premium Transparency Film HP Transparency
Labels Plain Paper
HP Premium InkJet Paper
Flip Horizontal
—
A4-size labels designed for use in
HP InkJet products, such as DeskJet
Printers (like Avery
be sure to use letter- or
TM
InkJet labels)
The Print Setting you choose automatically sets the optimal print
quality for the paper you are using.
If you are printing on special HP papers, the OfficeJet Pro automatically
chooses the Best print quality to ensure the clearest, crispest results.
HP OfficeJet Pro User’s Guide 7-3
Page 66

Tips on Loading Paper in the Paper Tray
◆ All paper: Load paper print-side down with the letterhead (or top
of page) going into the tray first. Be sure paper is loaded fully
forward in the paper tray.
◆ HP Premium InkJet Paper: Locate the gray arrow on the
nonprinting side of the paper, and insert paper with the arro w side
facing up.
◆ HP Premium Photo Paper: Load the shin y side facing down.
Always load at least 5–10 sheets in the paper tray. You can place
the photo paper sheets on top of plain paper in the paper tray.
◆ HP Premium Transparency F ilm: Insert the film so that the white
transparency strip, with arrows and the HP logo, is on top and
going into the tray first.
◆ HP Iron-On T-Shirt Transfers: For best results, manually feed
one sheet at a time, with the unprinted side facing down. Flatten
the transfer sheet completely before using; do not load curled
sheets. To prevent curling, keep transfer sheets sealed until just
before printing.
Special Considerations When Using Transparency Film
◆
Load a maximum of 80 transparency sheets at a time.
◆
Be sure to specify “Transparency” as the Paper Type setting.
◆
Ink dries slower on film. Be sure to allo w enough time for the ink
to dry before using the transparency.
◆
If you are copying from a transparency (that is, your original is
printed on transparency film), place a blank piece of paper over the
transparency on the copier glass.
NOTE
We recommend using only HP Premium Transparency Film when copying or
printing on transparencies. Other transparency film can jam in the
OfficeJet Pro.
7-4 All About Paper
Page 67

Input Tray Requirements
Recommended Use Not Recommended
Paper heavier than 36 lb (135 g/m2)
16- to 36-lb (60- to 135-g/m2)
◆
copier paper or letterhead
HP Premium InkJet Paper
◆
HP Premium Photo Paper
◆
HP Bright White InkJet Paper
◆
HP Premium Transparency Film
◆
Letter-, legal, or A4-size paper
◆
HP Premium Heavyweight InkJet
◆
paper
HP Iron-On T-Shirt Transfers
◆
Envelopes
◆
Labels
◆
Custom paper sizes
◆
◆
or lighter than 16 lb (60 g/m
Paper with cutouts or perforations
◆
Photo paper other than
◆
HP Premium Photo
Transparency film other than
◆
HP Premium
Any size paper other than Letter
◆
or A4
Heavyweight paper other than
◆
HP Premium
Multiple-part forms or label stock
◆
Automatic Document Feeder Requirements
2
)
NOTE
◆
Load a maximum of 30 originals at a time.
◆
Load only plain paper (white and color), letterhead, and
–
HP Premium InkJet in the 16
◆
Always insert originals with the printed-side facing back in the
24 lb (60–90 g/m2) range.
feeder and the top of the paper to the right.
◆
Do not start copying until the “Document loaded” message
appears on the front panel display and you see the Copy Quality
lights flash.
◆
Do not load colored originals printed on a color laser printer.
Do not load photos, paper sizes other than letter or A4, photo paper,
transparency film, labels, or envelopes in the automatic document feeder.
Doing so may cause a paper jam.
Slick-surfaced papers will jam in the ADF. A full-page color graphic printed
on a color laser printer develops a slick surface.
HP OfficeJet Pro User’s Guide 7-5
Page 68

7-6 All About Paper
Page 69

Sharing the
OfficeJet Pro Over a
Network
8
This chapter explains how to set up the HP OfficeJet Pro and your
computers for network printing and file sharing.
IMPORTANT
NOTE
Contact your network administrator before setting up your
OfficeJet Pro for file sharing. Your company may have security
guidelines for you to follow.
Hewlett-Packard does not provide support for peer-to-peer networks,
file sharing, and printing. Check your Windows Help system or
Microsoft for assistance.
After this is done, all computers that are set up properly will be able to:
◆
Print to the HP OfficeJet Pro.
◆
Access files on the computer directly connected to the
HP OfficeJet Pro.
Your computers must already be networked to use this procedure.
Setting Up for Peer-to-Peer Printing and File Sharing
T o set up for peer-to-peer printing and file sharing, you will need to set
up your “server” computer and “client” computers.
◆
A “Server” is the computer that is connected directly to the
HP OfficeJet Pro using the supplied IEEE-1284 cable.
◆
A “Client” is another computer on your network that needs to be
set up to print to the shared HP OfficeJet Pro 1170C Series.
HP OfficeJet Pro User’s Guide 8-1
Page 70

Setting Up the Server
1
Install the HP OfficeJet Pro 1170C Series software on the server,
as described in Chapter 2 of this User’s Guide.
2
Next, set up the server so that other computers on the network can
print to the HP OfficeJet Pro and access files.
NOTE
NOTE
See “Enabling file and printer sharing” and “Sharing your printer with other
people” in Microsoft Windows 95/98 Help for detailed instructions.
3
Now, create a special folder that people using other computers on
the network will be allowed to access. Name this folder
appropriately , so that it is identif ied clearly as a shared folder (for
example, “Share” or “Scanfiles”).
Setting Up Client Computers
Installing Printing Software
The HP OfficeJet Pro 1170C Series printing software must be installed
on each “client” computer that will be printing to the HP OfficeJet Pro.
1
Run
Setup.exe
CD-ROM #1 or where ver your network administrator installed the
software.
The CD may automatically run setup for you.
2
When you see the “Welcome” screen, click
3
When you see the “HP Software License Agreement” screen, click
.
Yes
, from either the HP OfficeJet Pro 1170C Series
.
Next>
4
When you are asked to “Turn on your HP OfficeJet Pro now...”
.
OK
click
5
On the “Select HP Components” screen, click
remove the check mark. (You are not installing the scanning
software on the client computer’s hard disk because the scanning
software does not work over a network.)
6
When the Communications Test fails, click
7
When you see the “Results of Communication Test” dialog box,
.
Next>
click
8
Select a Model Number when you are prompted to do so.
8-2 Sharing the OfficeJet Pro Over a Network
Scanning Files
Continue>
.
to
Page 71

9
When you are asked to take the Product Tour, click
tour now
10
When you are asked to insert CD-ROM#2, click
11
Click
12
After your computer restarts, you will see the “Electronic
Registration” screen. Click
and
appear again.
Printing and font software is now installed on this client
computer.
13
Repeat this procedure for all client computers.
to remove the check mark, and then click
Finish
Yes
to restart the client computer.
Never Register
in the second screen so the registration screen does not
for the first screen
View the
Next
Cancel
>.
.
Redirecting Client Printing Software to the OfficeJet Pro
When the printing software is installed, printing is automatically
directed to the “LPT1” port. It needs to be redirected for all client
computers that will print to the HP OfficeJet Pro.
1
On a client computer, open the Windows 95/98 “Printer” folder
(instructions for doing this are available in W indows 95/98 Help).
2
Select the
it once.
HP OfficeJ et Pro 1170C Series
icon by clicking on
3
From the File menu, select
4
In the “Properties” window, click the
Add Port
button.
Properties
HP OfficeJet Pro User’s Guide 8-3
.
Details
tab, then click the
Page 72

5
In the “Add Port” dialog, click the
of networked printers.
6
In the “Browse for Printer” dialog, click on the Off iceJet Pro, then
click
OK
.
Browse…
button to see a list
7
Click OK to select the network path to the printer.
8-4 Sharing the OfficeJet Pro Over a Network
Page 73

8
Click OK again to enable printing to the redirected port.
9
To print to the shared HP OfficeJet Pro 1170C Series from your
software programs, select it using each program’ s “Print” dialog.
How to Share Files Across a Peer-to-Peer Network
1
Follow the “Opening a shared folder” procedure in
Windows 95/98 Help to access the file or folder you need.
2
Copy the file from the shared folder to your computer.
HP OfficeJet Pro User’s Guide 8-5
Page 74

8-6 Sharing the OfficeJet Pro Over a Network
Page 75

Maintaining Your
HP OfficeJet Pro
With minimal maintenance you can keep your HP OfficeJet Pro in top
working condition. Perform the following maintenance procedures as
necessary .
Cleaning the Exterior Case
Use a soft, damp, lint-free cloth to wipe dust, smudges, and stains off
the case. The interior of the HP OfficeJet Pro does
cleaning.
Cleaning the Glass
Dirty copier glass (fingerprints, smudges, etc.) slows down copying
and scanning performance by as much as half a minute! This is
because the scanner is actually processing the smudges on the glass.
Be sure to keep the glass clean and free from dust, smudges, and
fingerprints.
Keep fluids away from the interior of the HP OfficeJet Pro.
not
require
9
WARNING Turn off the HP OfficeJet Pro and unplug the power cord before cleaning.
Even though the HP OfficeJet Pro is off, power is still being supplied if the
power cord is plugged in.
HP OfficeJet Pro User’s Guide 9-1
Page 76

To clean the glass:
1
Turn off the HP OfficeJet Pro, remove the power cord, and then
raise the document cover.
2
Clean the glass with a soft cloth or sponge slightly moistened with
warm water and a mild soap or detergent. You may also use glass
cleaner.
CAUTION
Do not use abrasives, acetone, benzene, or carbon tetrachloride on the
glass; these can damage the glass. Do not place liquids directly on the
glass. They may seep under it and damage your HP OfficeJet Pro.
3
Rinse the soft cloth or sponge with clean water, wring out excess
water, and wipe the remaining soap or detergent off the glass.
4
Dry the glass with a chamois or cellulose sponge to prevent
spotting. If soap or detergent does not clean the glass sufficiently,
you can use isopropyl alcohol as a cleaning agent.
9-2 Maintaining Your HP OfficeJet Pro
Page 77

Getting Help
Your OfficeJet Pro includes several resources to help you get started
and use the product to full advantage. This chapter describes the types
of help available.
HP Multimedia Product Tour
The on-line tour for the OfficeJet Pro gi ves you a brief introduction to
the all-in-one product and its capabilities.
10
You can run the Tour either from the HP OfficeJet Pro 1170C Series
folder or from the 1170C Series Toolbox.
HP OfficeJet Pro User’s Guide 10-1
Page 78

HP Scanning Tutorial
The OfficeJet Pro scanning tutorial answers your questions about
scanning—from the basics (“What is scanning anyway?”) to the more
advanced (“How do I change resolution?”).
The Tutorial also gi ves you step-by-step instructions for scanning, and
gives you important tips on using the HP OfficeJet Pro to its full
potential.
TIP
The Scanning Tutorial is designed to be used as both an
introduction to scanning and a reference tool. You do not have to
go through the Tutorial from start to finish; you can end it at any
time.
You can run the Tutorial either from the HP OfficeJet Pro 1170C
Series folder or from the 1170C Series Toolbox.
On-Line Help
On-line help is available for the OfficeJet Pro and the programs that
come with it.
Caere OmniPage LE, Adobe PhotoDeluxe, and Symantec
WinFax PRO
To access on-line help in Caere OmniPage LE, Adobe PhotoDeluxe,
and Symantec WinFax PRO, just select an option from the Help menu
while working in these programs. Symantec WinFax PRO also
features an on-line tour/tutorial, which is also very helpful.
10-2 Getting Help
Page 79

HP PictureScan Help
The main HP PictureScan window includes a Help button at the
bottom of the screen. Click it to view detailed information on using
PictureScan.
For help on
scanning using
PictureScan, click
here.
1170C Series Toolbox
Your 1170C Series Toolbox help presents detailed procedures for
many tasks you will perform with your HP OfficeJet Pro. The
Toolbox help also includes troubleshooting information. When
problems occur, look for a description of the particular symptoms you
are experiencing. You will find details on how to fix it.
HP OfficeJet Pro User’s Guide 10-3
Page 80

Y ou access this help from the HP OfficeJet Pro 1170C Series folder , or
by double-clicking the 1170C Series Toolbox icon on your desktop.
You can also select HP OfficeJet Pro Help from the Help menu of
many of your word processing, spreadsheet, or presentation programs.
The
How Do I?
day. It includes a complete copy of your HP Limited Warranty,
information about HP papers, and quick access to the on-line tour and
tutorial.
If you are having trouble copying, printing, or scanning, go the toolbox
T roubleshooting
copying problems, and lists messages you may see as you work.
Using the
cartridges, print a self-test page, test the communication between your
HP OfficeJet Pro and your computer, test the scanner, and calibrate
your screen.
10-4 Getting Help
Product Services
tab features help for many tasks you perform every
tab. It includes help for printing, scanning, and
tab, you can clean and align print
Page 81

Support Services
This chapter explains how to get support for the OfficeJet Pro 1170C
Series and the other software programs included with your all-in-one
product.
Get Help from HP
If you are unable to find the answer you need in this book or in on-line
help, you can contact one of the HP support services listed in the
following pages.
Some support services are available only in the U.S. and Canada, while
others are available in many countries w orldwide. If a support service
number is not listed for your country , contact your nearest authorized
HP dealer for help.
11
On-Line Services
Internet
For the most up-to-date product information, driver support, and
answers to frequently asked questions, visit the Hewlett-Packard
OfficeJet Pro World Wide Web home page at the following address:
http://www.hp.com/go/officejet-pro
This website is updated whenever information and support contact
numbers change.
HP Distribution Center
To order current printer and scanner drivers in the U.S., dial
1-888-HP DISKS (1-888-473-4757).
HP OfficeJet Pro User’s Guide 11-1
Page 82

In Europe, dial one of the following numbers:
+49 180 5 290220
◆
+44 870 606 9081
◆
In Latin America, drivers are available in English, Spanish, and
Portuguese. Dial one of the following numbers:
Outside Brazil: (011) 55-11-268-7269
◆
Any city in Brazil, outside São Paulo
◆
City:
In São Paulo: 268-7269
◆
(011) 268-7269
In Asia and Australia, dial one of the following numbers:
Asia Pacific: 65-740-4477
◆
Australia: +61 3 9690 9100
◆
HP FIRST
Call HP FIRST to request information to be faxed directly to you.
Hewlett-Packard offers this service free of charge. To use HP FIRST,
you need a touch-tone phone, and a 9600-baud, Group 3 facsimile
machine so you can receive the information.
In the U.S. and Canada, phone 1-800-333-1917.
11-2 Support Services
Page 83

If you need to contact HP Customer Support, do the following before
you call:
1
Make sure that the OfficeJet Pro is plugged in and po wered on, that
the specified inkjet print cartridges are installed correctly , and that
the recommended paper is properly loaded in the input tray.
2
Review the setup section (Chapter 2) and the troubleshooting
section (Chapter 12) in this User’s Guide.
3
Try resetting the OfficeJet Pro by powering it off, then on again,
using the white button in the lower right front corner of the
product.
4
Call the HP FIRST toll-free number (see page 11-2) and/or check
HP’s Internet site (http://www.hp.com/go/officejet-pro) for
information that might help you quickly resolve your problem.
5
If you are still experiencing problems and need to speak with an
HP Customer Support Representative:
a
Have your serial number ready.
b
Print a Self Test Page (see “Using the Self Test Page”
on 12-3).
c
Make a color copy.
d
Be prepared to describe the problem you are experiencing in
detail.
6
Call HP Customer Support.
Calling in the U.S. and Canada During Warranty
Call 208-323-2551 Monday through Friday from 6:00 am to 10:00 pm
Mountain Standard Time (MST) and Saturdays from 9:00 am to
4:00 pm MST. This service is free during the warranty period;
however, your standard long-distance phone charges still apply.
Calling in the U.S. and Canada Post Warranty
If your product is not under warranty , you can call 1-800-999-1148. A
per-call, out-of-warranty support fee will be charged to your credit
card. You can also call 1-900-555-1500 ($2.50 per minute) from
7:00 am to 6:00 pm MST and Saturdays from 9:00 am to 3:00 pm
MST. Charges begin only when you are connected with a support
technician. (Prices and hours are subject to change without notice.)
11-4 Support Services
Page 84

Calling in Europe
The numbers listed below are current as of the printing date of this
User’s Guide. For a list of current international HP Support Service
numbers, visit this address:
http://www.hp.com/cpso-support/ecscphone
You can call the HP support center in the following countries. This
service is free during the warranty period; however, your standard
long-distance phone charges will apply.
Austria: 0660-6386
◆
Belgium (Dutch): 02-626-8807
◆
Belgium (French): 02-626-88-06
◆
Denmark: 39-29-4099
◆
Europe (English): +44-171-512-5202
◆
Finland: 02-03-47-288
◆
France: 01-43-623-434
◆
Germany: 0180-525-8143
◆
Ireland: 01-662-5525
◆
Italy: 022-641-0350
◆
Netherlands: 020-606-8751
◆
Norway: 22-11-6299
◆
Portugal: 01-441-7199
◆
Spain: 902-321-123
◆
Sweden: 08-619-2170
◆
Switzerland (French &
◆
German): 084-880-1111
United Kingdom:
◆
0171-512-5202
Calling in Australia and New Zealand
Call (03) 9272-8000 in Australia or (09) 356 6640 in New Zealand.
This service is free for 12 months from the date of original purchase;
however, your standard long-distance phone charges still apply. For
technical assistance after the free period, a $25 flat fee per single
incident will apply.
Calling Elsewhere in the World
Contact your local dealer or nearest HP Sales and Support Office for
information on obtaining technical assistance or hardware repair
services.
Imaging for Internet Plug-In
For technical support for Imaging for Internet, visit our website:
http://image.hp.com
HP OfficeJet Pro User’s Guide 11-5
Page 85

Get Help from Caere for OmniPage LE
U.S. Support
In the U.S., call 408-395-8319, or fax Caere at 408-395-5120.
International Support
Internationally, call one of the following numbers, or fax Caere at
+49 (0) 180 523 53 12.
English (Australia, New Zealand): +61 (0) 2 9450 0777
◆
English (Europe): +49 (0) 180 523 52 81
◆
French: +49 (0) 180 523 52 90
◆
German: +49 (0) 180 523 52 82
◆
Italian: +49 (0) 523 52 73
◆
Spanish (Europe): +49 (0) 180 523 52 74
◆
You can also visit Caere’s website at the following address:
http://www.caere.com
Get Help from Adobe for PhotoDeluxe
U.S. Support
If you need assistance with Adobe PhotoDeluxe, in the U.S., call
206-628-5727.
Dial-Up Service for U.S. Users
Product support and information for Adobe PhotoDeluxe are available
through the following services:
Service How to Contact Service Provided
Adobe BBS 206-623-6984 updates/text/files
America Online Keyword ADOBE forum/updates
CompuServe ADOBEAPP forum/updates
Fax 206-628-5737 common Q&A
Internet techdocs@adobe.com e-mail help
World Wide Web http://www.adobe.com updates/text/files
11-6 Support Services
Page 86

International Support
These numbers are for international Adobe users.
Austria: Int + 44-131-451-6882
◆
Belgium: Int + 44-131-451-6883
◆
France: Int + 44-131-451-6889
◆
Germany: Int + 44-131-451-6884
◆
Italy: Int + 44-131-451-6890
◆
Netherlands: Int + 44-131-451-6885
◆
Sweden: Int + 44-131-451-6886
◆
Switzerland: Int + 44-131-451-6887
◆
UK and Ireland: Int + 44-131-451-6888
◆
Dial-Up Service for International Users
Service How to Contact Service Provided
CompuServe ADOBEAPP forum/updates
Faxback dial number listed above, and
World Wide
Web
select option 3
http://www.adobe.com updates/text/files
common Q&A
Get Help from Symantec for WinFax PRO
For technical assistance for WinFax PRO, contact Symantec on the
World Wide Web at the following address:
http://www.symantec.com
Support Available
Symantec offers Standard Care, free of charge for all registered users
for 90 days from the date of the first support call.
North America
In the U.S., call 716-843-1018. In Canada, call 416-441-3301.
HP OfficeJet Pro User’s Guide 11-7
Page 87

International
Symantec offers telephone support in English, French, German, and
Dutch from 9:00 a.m. to 5:00 p.m. CET Monday through Friday.
Dutch (+31) 071 524 7270
◆
English (+44) 0171 616 5810
◆
French (+33) 1 64 53 80 70
◆
German (+49) 069 66410360
◆
Numbers for Specific Countries
Country Phone Fax
Austria +43 1 50 137 5020 +43 1 50 137 5025
Belgium +32 271 31 700 +32 271 31 725
Denmark +45 354 45700 +45 354 45725
Finland +358 9229 30410 +358 9229 30425
France +33 1 645 38050 +33 1 645 38055
Germany +49 69 664 10300 +49 69 664 10333
Ireland +353 1 8118032 +353 1 8118033
Italy +39 2 482-70000 +39 2 482-70025
Luxembourg +352 29 84 795020 +352 29 84 795025
Netherlands +31 20 504 0565 +31 20 504 0566
Norway +47 23 053300 +47 23 053325
Sweden +46 870 39 615 +46 870 39 624
Switzerland +41 1 2126262 +41 1 2126264
United Kingdom +44 1711 61 665600 +44 171 61 65700
11-8 Support Services
Page 88

Troubleshooting
12
This chapter presents procedures for resolving paper jams in the paper
tray and automatic document feeder. It also lists messages that may
appear on the HP OfficeJet Pro front panel display or on your
computer screen. For more troubleshooting help, see
“Troubleshooting” in the 1170C Series Toolbox. See “1170C Series
Toolbox” on page 10-3 for instructions on how to access and use the
Toolbox.
How to Clear a P aper Jam in the A utomatic Document Feeder
You will see the following message on the front panel display:
“Automatic Document Feeder Jam. Clear jam then press
Select/Resume.”
1
Lift the automatic document feeder to expose the paper jam.
2
Gently remove the paper.
3
Replace your originals in the automatic document feeder.
4
Press the
Select/Resume
button on the front panel to continue.
How to Clear a Paper Jam in the Paper Tray
Paper Jam with Front Panel Message
The message “Paper Jam” appears on the OfficeJet Pro front panel
display when paper cannot feed from the bottom paper tray properly.
HP OfficeJet Pro User’s Guide 12-1
Page 89

To resolve this problem:
1
Press and hold down the
When you do this, the paper rollers in the HP OfficeJet Pro move
forward to help eject the jammed paper.
2
If this does not work, press and hold down
The paper rollers move in reverse.
3
If the paper is still jammed, repeat steps 1 and 2 to move the paper
rollers forward and backward.
4
Gently remove the paper.
5
If all else fails, remove the paper tray by pinching together the two
levers under the paper tray. Pull the tray toward you, and gently
remove the jammed paper. Then slide the paper tray back into the
copier.
6
Turn the copier off, then on again to continue copying.
Select/Resume
button.
Select/Resume
again.
Paper Jam with No Front Panel Message
If paper has jammed in the copier, but no message is displayed, press
and hold down the
press the
Paper T ype
Select/Resume
button. Then follow the directions on page 12-1.
button on the front panel, then
How to Use the Self Test Page
The Self Test Page lets you know whether the OfficeJet Pro is
operating properly . It lists current, default front panel settings and tells
whether the automatic document feeder is attached properly. You can
also use the Self Test Page to check print alignment.
To print a Self Test Page:
1
Press the
on the front panel display.
2
Press the
The test page printout has a set of lines which should appear
unbroken, and colored bars which should appear solid. The
intensity of the colors will vary, depending on the type of paper
you are using (that is, plain paper, HP Premium InkJet Paper, and
so on).
12-2 Troubleshooting
button until the message “Self T est Page” appears
Menu
Select/Resume
button.
Page 90

3
Check to make sure the margins are aligned and not skewed.
a
Fold the Self Test Page in half carefully so that the “A” and
the “C” along the left margin line up.
b
Line up the equal signs (=).
c
Verify that the vertical line next to the “A” appears between
the two vertical lines next to the “C” (does not have to be
centered).
4
If the alignment is satisfactory , the copier mechanism is working
properly .
If the alignment is not satisfactory , see “Troubleshooting” in your
1170C Series Toolbox, and read the “Self-test page” topic.
5
If the Troubleshooting help does not resolve the problem, contact
HP Customer Support. See “HP Customer Support” on
page 11-3.
Aligning Cartridges
Use the Align Cartridges feature whenever you install new print
cartridges. See “Step 8 — Align Your Tri-Color and Black Print
Cartridges” on 2-24 for step-by-step instructions.
Using the Self Test Page
Use the Self T est P age to check the print cartridges and to determine
whether the automatic document feeder is successfully installed.
To Print a Self Test Page:
1
Press the
front panel display.
2
Press
The message “Printing” appears on the front panel display , and a
Self Test Page will be printed. See page 12-2 for more
information.
Menu
Select/Resume
button repeatedly until you see “Self T est” on the
.
HP OfficeJet Pro User’s Guide 12-3
Page 91

Cleaning Cartridges
Use the Clean Cartridges feature when the Self Test Page shows
streaking or white lines through any of the colored bars. Do not clean
cartridges unnecessarily . This wastes ink and shortens the life of your
print cartridges.
To clean the cartridges:
1
Press the
Cartridges” on the front panel display.
2
Press
Select/Resume
The message “Printing a Cleaning Check Sheet” appears on the
front panel display, and a Print Cartridge Cleaning Page will be
printed.
button repeatedly until you see “Clean
Menu
.
NOTE
If copy or print quality still seems poor after you clean the cartridges, replace
the one that is affected.
12-4 Troubleshooting
Page 92

Front Panel Messages
Message What You Should Do
Power Save On. The front panel displays this message when the Of ficeJet Pro
Door Open. Close cartridge
door.
Paper Jam. Press and hold
Resume to eject paper.
ADF Paper Jam. Refer to “How to Clear a Paper Jam in the Automatic
Busy. Can’t start another
copy job.
Out of Paper. Replace paper
then press Resume.
has not been used for 12 hours or more. Press any button on
the front panel or load originals in the automatic document
feeder.
Close the print cartridge door.
To clear the paper jam, press and hold the Select/Resume
button. The paper should eject. If this does not work, refer to
the procedures on page 12-1.
If only one or two sheets of paper are in the paper tray, the
OfficeJet Pro might not pick up the paper properly , causing a
jam in the copier.
Remove the papers that are jammed, and add more paper to
the paper tray.
Document Feeder” on page 12-1.
You will see this message when you try to start a new copy
job before the first job is complete, or you try to change front
panel settings while a copy job is in progress.
W ait until the first copy job is complete before trying to start
another.
If the paper tray is empty, load paper in the paper tray, and
press Select/Resume.
If the paper is not inserted correctly, adjust the paper, then
press Select/Resume.
Remove original from the
document glass.
Remove and check (black or
color) cartridge.
No Cartridge. Insert (black
or color) cartridge.
Remove and check black
cartridge. Verify Part
Number: C51645A.
Remove the original from the document glass, then press the
Select/Resume on the front panel to continue.
One of the print cartridges is either incorrectly installed, the
wrong type, or defective.
Remove the print cartridge (black or tri-color), and then
replace it in the carriage stall.
Make sure to remove the tape from the print cartridge, and
close the latch securely.
A print cartridge is missing. Insert the missing cartridge.
The wrong black cartridge may be installed. Remove it, and
replace it with the correct cartridge, part number C51645A.
HP OfficeJet Pro User’s Guide 12-5
Page 93

Front Panel Messages (Continued)
Message What You Should Do
Remove and check color
cartridge. Verify Part
Number: C1823A.
Unlock scanner. The scanner is locked. See “Step 3 — Unlock Your
Cartridge carriage blocked. Unblock the cartridge, and turn power off then on again.
Scanner bulb failing. The scanner bulb is becoming too dim to work properly.
Turn Power off then on
again.
Additional cleaning will be
ineffective. Replace
cartridge.
Manual Feed. Insert paper
and press Resume.
The wrong tri-color cartridge may be installed. Remove it,
and replace it with the correct cartridge, part number
C1823A.
HP OfficeJet Pro” on 2-7 for unlocking instructions.
Turn po wer of f, then on ag ain. If the message continues and
the light flickers or does not come on, your OfficeJet Pro
needs to be serviced. See page 14-2 for more information.
A system error has occurred that you cannot resolve
yourself.
Turn power off, then on again. If this message appears
repeatedly, or remains on the display, call HP Customer
Support for help (see page 11-3).
Replace the print cartridge.
You are printing, and have requested Manual Feed in the
Print Properties dialog.
Insert paper in the manual feed tray, and press
Select/Resume.
Cannot connect to PC; see
User’s Guide.
12-6 Troubleshooting
First, check to make sure your computer is turned on. If it is,
next check the cable connection between your computer and
the OfficeJet Pro. Be sure to use only the special IEEE-1284
parallel printer cable that came with your product. The
connection must be direct, not through any other parallel
product, such as a CD-ROM drive.
After you have checked all connections, open the 1170C
Series Toolbox. Click the Product Services tab, and select
Check Product Communication.
Then try to print or scan again. If the problem persists, one
of the programs the OfficeJet Pro uses during scanning may
not be installed, or may already be running.
Check to be sure that the file hpmdlbia.exe is installed in
your c:\windows\system folder . If it is, restart your computer
and try again.
If it is not, you must reinstall the HP components. First,
uninstall the HP components (see page 13-1). Then reinstall
the HP components following the procedure on page 13-2.
Page 94

On-Screen Messages
Message What You Should Do
Disk full. The image you are scanning will create a file that is too large
Cannot find all the necessary
files to run WinFax PRO.
Reinstall WinFax PRO.
Can’t restart PictureScan. It
is already running.
Can’t find PictureScan or
PictureScan is already
running.
Verify that the OfficeJet Pro
is turned on.
to fit on the designated disk.
◆
Save the file on a different disk.
◆
Free up disk space, and try again.
◆
Save the image in a different format or resolution.
See the Scanning Tutorial for tips on scanning and file sizes.
Symantec WinFax PRO has not been installed or has
corrupted files. Close and save any open files. Uninstall
Symantec WinFax PRO following the procedure on
page 13-2. Then reinstall Symantec WinFax PRO CD
following the procedure on page 13-3.
PictureScan or Caere OmniPage LE may already be running,
or one of the programs may not have closed properly.
Save and close any open files. Then reboot your computer
and try again.
One of the programs the OfficeJet Pro uses during scanning
may not be installed, or may already be running.
Save and close any open files. Then reboot your computer
and try to scan again. If you are still unable to scan, you may
be missing critical HP components.
First, uninstall HP components (page 13-1). Then reinstall
the HP components (page 13-2).
Make sure that the OfficeJet Pro is turned on. Press the white
button in the lower right front corner of the product.
Make sure you are using the
cable that came in your box.
Verify that the cable is
securely connected to your
OfficeJet Pro and directly to
the parallel port of your PC.
You must use an IEEE-1284 cable with the OfficeJet Pro.
The cable that came with your product meets this
requirement. If you decide to buy a longer cable, make sure
it is IEEE-1284 compliant. Using a different type of cable
may cause communication problems.
Verify that the parallel cable is securely connected to your
OfficeJet Pro and directly to the parallel port of your
computer. Do not connect your OfficeJet Pro through a
switch box pass-through device; communication errors may
occur. When the cable is connected properly, turn your
OfficeJet Pro off and then on again.
HP OfficeJet Pro User’s Guide 12-7
Page 95

On-Screen Messages (Continued)
Message What You Should Do
Remove original from the
document glass then press
Select/Resume on the front
panel.
Your scan has been
cancelled due to
communication failure.
Can’t find all the necessary
files to run WinFax PRO.
An original sheet is already present on top of the document
glass. Remove this original and press the Select/Resume
button before you re-feed an original through the automatic
document feeder.
1. If this is the first time you have attempted to scan from the
OfficeJet Pro, the parallel cable between your computer
may be loose or defective. Check both connections and try
again.
2. A non-cable related communications error may have
occurred. Select OK and restart the scan. Y ou may need to
restart your computer.
You need to install Symantec WinFax PRO. Follow the
instructions on page 13-3.
12-8 Troubleshooting
Page 96

Adding and Removing
Software Programs
This chapter explains how to remove HP OfficeJet Pro software from
your computer. It also explains how to reinstall the software, if
necessary.
Uninstalling Software
When you install a software program on your computer, man y files on
your system are either added or changed because of the new program.
When you need to remove a software program, you need to remove all
files associated with that program, not just the files you see in a
particular program folder. Do
from your hard drive. Be sure to “uninstall” it properly , using either the
special uninstaller program that came with the product or using the
Windows 95/98 “Add/Remove” feature, as instructed below.
13
not
simply remove the executable file
NOTE
During the uninstall process, if you are asked whether you would like to
remove Shared files, answer “No.” Other programs that use these files may
not work properly if the files are deleted.
Uninstalling the HP OfficeJet Pro Product Software
1
From the taskbar, select
Control Panel.
2
Double-click the
3
Select
HP OfficeJet Pro 1170C Series
Add/Remove
4
Go back to the Control Panel, and open the Printers folder.
Add/Remove Programs
button.
HP OfficeJet Pro User’s Guide 13-1
Start
, then select
, and click the
Settings
icon.
and go to the
Page 97

5
Select the
Delete
This step removes the HP OfficeJet Pro 1170C Series software.
6
Restart Windows.
HP OfficeJet Pro
from the File menu.
printer, and delete it by selecting
Uninstalling Adobe PhotoDeluxe
1
From the taskbar, select
PhotoDeluxe 2.0
folder.
2
Follow the directions on the screen.
from the Adobe PhotoDeluxe 2.0 program
Start
, then select
Uninstall
Uninstalling Caere OmniPage LE
1
Run OmniPage Limited Edition.
2
Under the Tools menu, select
3
In the OCR Aware dialog, deselect
clicking off its checkmark. Then click
4
Restart Windows.
5
Delete the
C:\OPLIMIT
folder.
OCR Aware
Enable OCR Aware
OK
.
by
.
Uninstalling Symantec WinFax PRO, Imaging for the
Internet, and Microsoft Internet Explorer
1
From the taskbar, select
Control Panel.
2
Click
Add/Remove Programs
3
Select the program you want to remove, and click the
Add/Remove
4
Follow the directions on the screen.
button.
Start
, then select
.
Reinstalling HP OfficeJet Pro Software
Installing HP Components Only
T o reinstall only the HP software components (printing and scanning),
follow the directions in Chapter 2, starting on page 2-14. When the
“Insert CD-ROM #2” message is displayed, click
13-2 Adding and Removing Software Programs
Settings
Cancel
and go to the
.
Page 98

Installing HP OfficeJet Pro Partner Software
If you did not install some of the available third-party software
programs when you installed your OfficeJet Pro, follow these
procedures to install them separately.
1
Insert CD-ROM #2 in your computer’s CD-ROM drive.
2
From the task bar, select the
3
Enter
z:\setup
the “z”).
The “Install Software” screen appears.
4
Make sure there is a check in the box next to the software product
you want to install, and click
(substitute your CD-ROM drive letter for
menu, and then select
Start
.
Next>
Run
.
NOTE
If you are installing Symantec WinFax PRO, be sure to have your
Windows 95/98 installation CD-ROM available.
5
Follow the instructions on the screen.
For more information, see the software installation procedure
beginning on page 2-14.
Installing the Office 97 Utility
If you install Office 97 after installing your HP OfficeJet Pro
software, you must run a special program before you can scan
pictures into these programs. The procedure below explains how to
run the utility.
1
Insert CD-ROM #2 into your CD-ROM drive.
2
From the taskbar, select
Windows Explorer
HP OfficeJet Pro User’s Guide 13-3
.
Page 99

3
Navigate to your CD-ROM drive, and open the
Office 97 Patch
4
Double-click
The “InstallShield” dialog box is displayed.
5
Click
6
When the patch has been installed, click OK.
7
Restart your computer.
You will now be able to scan while working in your Office 97
programs.
to install the Office 97 patch.
Yes
folder.
setup.exe
.
HP ScanPicture
13-4 Adding and Removing Software Programs
Page 100

Hewlett-Packard
Limited Warranty
HP OfficeJet Pro 1170C, 1175C
Duration of Limited Warranty (Hardware): 1 Year
Duration of Limited Warranty (Software): 90 Days
Duration of Limited Warranty (Print Cartridges): 90 Days
To review a complete copy of your warranty, see “Warranty
Information” in your HP OfficeJet Pro 1170C Series Toolbox.
Warranty Service
Express Service
T o obtain HP e xpress repair service, the customer must contact an HP
service office or an HP Customer Support Center for basic
troubleshooting first.
14
If a customer unit needs a minor part replacement and these parts can
normally be replaced by the customer, the customer-replaceable
components may be serviced through expedited part shipment. In this
event, HP will prepay shipping charges, duty and taxes; provide
telephone assistance on replacement of the component; and pay
shipping charges, duty, and taxes for any part that HP asks to be
returned.
For some repairs, the HP Customer Support Center may direct
customers to designated Authorized Service Providers who are
certified by HP to service the HP OfficeJet Pro.
If you need to return your OfficeJet Pro to HP for repair, HP will
expedite the repair of your unit by using an express deli very service to
expedite the return of the repaired or exchanged unit.
HP OfficeJet Pro User’s Guide 14-1
 Loading...