

Hotpoint-ariston SL B22 AA0 User Manual [ru]
IT Istruzioni per l’uso
EN Operating instructions
FR Mode d’emploi
RU Инструкциипоэксплуатации
TR Kullanmatalimatları
PT Instruções de Utilização
UA Інструкціїзексплуатації
KZ Пайдаланунұсқаулығы
20
21
9
6
22
24 25
26
27
29
23
28
30
31
10
11
12
5
8
4
7
3
13
14
15
16
17
2
1
32
19
34
33
SL B24 AA0 | SL B22 AA0 | SL B20 AA0
38 3837
SL B16 AA0 | SL B16 APR
35
36
18
39
42
SL C20 AA0 | SL C18 AA0| SL D16 APR
40
41
A
B
C
D
E
F
G
H
I
L
M
N
O
P
Q
R S
it
ISTRUZIONI PER LA SICUREZZA
LEGGERE E RISPETTARE LE SEGUENTI INFORMAZIONI IMPORTANTI
• Prima di utilizzare l’apparecchio, leggere le presenti istruzioni di sicurezza.
Conservarle nei pressi dell’apparecchio per riferimento futuro. Le presenti
istruzioni sono altresì disponibili sul sito www.hotpoint.eu
• Le presenti istruzioni e l’apparecchio stesso sono corredati da importanti
messaggi relativi alla sicurezza da osservare sempre. Il costruttore decli
na ogni responsabilità per mancata osservanza delle istruzioni di sicurezza, usi non appropriati dell’apparecchio o errate impostazioni dei comandi.
AVVERTENZE SULLA SICUREZZA
-
•
Tenere l’apparecchio fuori dalla portata di neonati e bambini molto piccoli (0-3 anni). Tenere l’apparecchio fuori dalla portata dei bambini (3-8
anni), salvo qualora costantemente sorvegliati.
• L’utilizzo di questo apparecchio da parte di bambini di età superiore a
8 anni e persone con ridotte capacità siche, sensoriali o mentali o con
esperienza e conoscenza inadeguate è consentito solo sotto sorveglianza.
Queste persone possono viceversa utilizzare l’apparecchio se è stato loro
insegnato a farlo in condizioni di sicurezza e se sono a conoscenza dei
pericoli derivanti dall’utilizzo. I bambini non devono giocare con l’apparec
chio. La pulizia e la manutenzione possono essere effettuate da bambini
solo se sorvegliati da adulti.
USO CONSENTITO
• ATTENZIONE: l’apparecchio non è destinato a essere messo in
funzione per mezzo di un temporizzatore esterno o di un sistema con
comando a distanza separato.
• L’apparecchio è destinato a usi domestici e applicazioni simili, quali:
locali adibiti a cucina per il personale dei negozi, ufci e altri luoghi di lavoro;
agriturismi; dai clienti di alberghi, motel, bed & breakfast e altri ambienti
residenziali.
• L’apparecchio non è indicato per un uso professionale. Non utilizzare
questo apparecchio all’aperto.
• ATTENZIONE: poiché il tubo contiene collegamenti elettrici, non
utilizzarlo per aspirare acqua e non immergerlo in acqua per pulirlo. Il tubo
deve essere controllato regolarmente e non deve essere utilizzato in caso
di danneggiamento per evitare il rischio di folgorazioni.
• Non utilizzare l’apparecchio per aspirare ceneri, carboni ardenti o altre
6
it
• sostanze calde per evitare il rischio di incendio. Non utilizzare l’apparecchio
per aspirare liquidi o sostanze umide per evitare il rischio di folgorazioni.
• Non utilizzare l’apparecchio su persone o animali per evitare il rischio
di lesioni.
INSTALLAZIONE
• Non riparare o sostituire alcuna parte dell’apparecchio se non speci-
catamente indicato nel manuale d’uso. Dopo aver disimballato l’apparecchio, assicurarsi che non sia stato danneggiato durante il trasporto. In caso
di problemi, rivolgersi al rivenditore o al servizio post vendita di zona. Dopo
il montaggio, i riuti di imballaggio (plastica, parti in polistirolo, ecc.) devono
essere tenuti fuori dalla portata dei bambini per evitare il rischio di soffoca
-
mento.
• Rimuovere tutti i materiali di imballaggio, incluse eventuali etichette
adesive, prima di mettere in funzione l’apparecchio.
AVVERTENZE ELETTRICHE
• Prima di collegare l’apparecchio, vericare che le speciche elettriche
corrispondano ai valori del proprio sistema di alimentazione. La targhetta
della tensione si trova sul fondo dell’apparecchio.
• Deve essere possibile staccare l’apparecchio dall’alimentazione elettri-
ca scollegandolo in caso di spina accessibile oppure tramite un interruttore
multipolare installato a monte della presa e l’apparecchio deve essere do
tato di messa a terra in conformità alle norme nazionali in materia di sicurezza elettrica.
• Non utilizzare prolunghe, prese multiple o adattatori. Non utilizzare
l’apparecchio con parti del corpo bagnate o a piedi nudi. Non utilizzare
l’apparecchio se il cavo di alimentazione o la spina hanno subito danni, se
non funziona correttamente o se è caduto o è stato danneggiato. Se il cavo
di alimentazione è danneggiato, sostituirlo con uno identico per evitare il
rischio di folgorazioni.
PULIZIA E MANUTENZIONE
• AVVERTENZA: Accertarsi che l’apparecchio sia spento e scollegato
dall’alimentazione elettrica prima di qualsiasi operazione di pulizia o manu
tenzione per evitare il rischio di folgorazioni. Evitare l’uso di pulitrici a getto
di vapore.
• Non spruzzare eventuali detergenti direttamente sull’apparecchio per
evitare il rischio di folgorazioni.
7
it
DESCRIZIONE
DELL’APPARECCHIO
1. Spazzola normale/tappeti
2. Pedale di regolazione setole
3. Spazzola Parquet
4. Spazzola Turbo
5. Spazzola Imbottiti*
6. Spazzola Deluxe Parquet*
7. Regolatore lunghezza tubo
8. Tubo telescopico in metallo
9. Impugnatura
10. Tubo essibile in plastica
11. Maniglia
12. Tasto di apertura/chiusura del
Trolley System
13. Tasto di apertura vano polvere
14. Coperchio vano polvere
15. Ingresso di aspirazione
16. Dispositivo di sbloccaggio
17. Indicatore sacchetto pieno/
indicatore contenitore polvere pieno
18. Tasto avvio/arresto
19. Tasto avvolgicavo
20. Pulsanti +/- per regolazione elettronica
della potenza*
21. Pulsante stand by*
22. Vano batterie*
23. Regolatore d’aria
INTRODUZIONE
Benvenuti nel Floor Care di Hotpoint-Ariston.
Vi ringraziamo per aver acquistato l’aspirapolvere a traino Trolley Power e vi raccomandiamo di registrare questo prodotto su www.
hotpoint.eu per garantirvi i massimi beneci
dall’assistenza Hotpoint-Ariston.
Il Trolley Power è stato progettato per garantire prestazioni ottimali, assicurandovi sempre la massima
praticità d’utilizzo.
L’esclusivo Trolley System vi offre infatti la massima
maneggevolezza, consentendovi di muovervi facilmente in casa senza urtare i mobili, e il Remote Power Control, ove presente, vi permette di regolare la
potenza di aspirazione direttamente dall’impugnatura,
senza alcuno sforzo e senza chinarvi.
Prima di utilizzare l’apparecchio, è impor-
tante leggere attentamente le presenti istruzioni e conservarle con cura per successive consultazioni.
24. Ricevitore segnale Remote Power Control*
25. Regolatore elettronico di potenza*
26. Bocchetta di precisione
27. Bocchetta per superci delicate
28. Vano accessori
29. Stazionamento orizzontale
30. Pure Clean Hepa 13
31. Griglia di aerazione
32. Cavo di alimentazione
Versione con sacchetto:
33. Supporto sacchetto
34. Sacchetto Pure Clean
35. Filtro motore
36. Griglia ltro motore
37. Guarnizione
38. Vano polvere
Versione senza sacchetto:
38. Vano polvere
39. Contenitore polvere
40. Griglia di protezione ltri
41. Pre-ltro
42. Pure Clean Hepa 13
* solo per alcuni modelli
ISTRUZIONI GENERALI PER
LA SICUREZZA
La sicurezza del vostro aspirapolvere è conforme alle
speciche tecniche e alla normativa vigente.
Non utilizzate l’apparecchio per scopi diversi da quello per cui è stato prodotto. L’uso improprio può provocare danni a persone e/o cose.
La tensione della vostra installazione deve
corrispondere a quella dell’aspirapolvere
(230 V). Qualsiasi errore di collegamento può causare danni irreversibili all’apparecchio ed annullarne la garanzia.
• Non lasciate l’apparecchio in
funzione senza sorveglianza.
•
Tenete i bambini lontani
dall’apparecchio.
• Controllate i bambini per evitare
che giochino con l’apparecchio.
•
Spegnete l’apparecchio e
8
it
togliete la spina dalla presa
di corrente quando non lo
utilizzate, oppure prima di
inserire o togliere le varie parti e
prima di pulirlo. Per scollegarlo,
spegnetelo, prendete la spina e
disinseritela dalla presa a muro
facendo attenzione a non tirare
il cavo.
• Non mettete in funzione
l’apparecchio se il cavo o la
spina risultano danneggiati,
oppure se l’apparecchio non
funziona in modo corretto o
ha subito un qualsiasi danno.
Portate l’apparecchio presso un
centro di assistenza autorizzato
afnché sia esaminato, riparato
o sia eseguita una regolazione
elettrica o meccanica.
• L’apparecchio può essere utilizzato da bambini sopra gli 8 anni
e da persone con ridotte capa-
cità siche, sensoriali o mentali,
da persone inesperte o che non
abbiano familiarità con il prodotto, solo se sorvegliate da una
persona responsabile della loro
sicurezza o se abbiano ricevuto istruzioni preliminari sull’uso
dell’apparecchio.
• L’apparecchiatura è intesa per
uso domestico e per applicazioni simili, quali:
- cucine per il personale di ne-
gozi, ufci ed altri ambienti lavorativi;
- agriturismo;
- clienti in alberghi, motel ed altri
alloggi di tipo residenziale;
- ambienti tipo bed & breakfast.
• Non utilizzate il cavo di alimentazione per spostare e trasportare l’apparecchio.
• Dopo ogni utilizzo, scollegate la spina dalla presa afferrando la spina e riavvolgete il cavo di alimentazione.
• Non piegate il cavo di alimentazione né passatelo su bordi taglienti poiché potrebbe danneggiarsi.
• Non lasciate e non utilizzate l’apparecchio sopra
o vicino amme, forni, materiali inammabili o
altre fonti di calore.
• Non usate l’aspirapolvere su persone o animali.
Tenete lontano i terminali di aspirazione dal corpo quando l’apparecchio è in funzione.
• Nei casi in cui si sospetta un guasto, scollegate
immediatamente la spina dalla presa elettrica.
• Non immergete l’aspirapolvere in acqua o in un
qualsiasi altro liquido, né spruzzate sostanze liquide sull’apparecchio.
• L’apparecchio non va lasciato all’aperto ed esposto alle intemperie.
• Per motivi di sicurezza vi consigliamo, per la pulizia delle scale, di tenere l’aspirapolvere sempre
al di sotto della vostra posizione.
• Non utilizzate l’apparecchio per l’aspi-
razione di sostanze liquide o umide, in
quanto potrebbe essere compromesso il funzionamento dell’apparecchio.
• Non aspirate materiali inammabili né oggetti incandescenti (es. cenere, mozziconi di sigarette,
ecc.); parti dell’aspirapolvere potrebbero incendiarsi.
• Non aspirate oggetti acuminati o taglienti in
quanto potrebbero causare danni all’apparecchio.
• L’aspirazione di polveri particolarmenti sottili (es.
farina, ecc.) potrebbe provocare delle piccole
scariche elettrostatiche. Durante l’aspirazione
di tali materiali vi consigliamo di non utilizzare il
tubo telescopico in metallo, ma solamente il tubo
essibile in plastica, impostando la potenza di
aspirazione al minimo.
• Per la vostra sicurezza, ogni eventuale riparazione o intervento sull’apparecchio deve essere
eseguito esclusivamente dal personale autorizzato Hotpoint-Ariston.
• Non viene assunta responsabilità alcuna in caso
di danni risultanti da un uso dell’apparecchio non
appropriato.
PRIMA DELL’USO
Rimuovete ogni adesivo, plastica di protezione o custodia di cartone dall’apparecchio. Accertatevi che
9

it
tutte le parti adesive siano rimosse con un panno
morbido inumidito.
Assemblaggio
1. Agganciate il tubo essibile in plastica (10) all’
ingresso di aspirazione (15) no a sentire lo
scatto. Per sganciarlo, premete il dispositivo di
sbloccaggio (16) e slatelo.
2. Inserite il tubo telescopico in metallo (8) nell’im-
pugnatura (9) no al bloccaggio. Per regolarne
l’altezza agite sul regolatore lunghezza tubo (7).
3. Inlate la spazzola normale/tappeti (1), o l’acces-
sorio che vi occorre (fate riferimento al capitolo
“Accessori”), nell’estremità del tubo telescopico
in metallo no al bloccaggio.
Nel caso il vostro apparecchio sia dotato di
Remote Power Control è necessario inserire le batterie fornite in dotazione( fate riferimento
al capitolo “Caratteristiche”, paragrafo “Remote
Power Control”).
USO
DELL’ ASPIRAPOLVERE (A)
L’apparecchio è dotato di un dispositivo di
sicurezza che non consente la chiusura del
coperchio vano polvere nel caso in cui il sacchetto non sia stato installato correttamente. Evitate
di forzare la chiusura del coperchio vano polvere
e assicuratevi che tutte le parti siano incastrate
nella posizione corretta, afnchè la leva di sicurezza permetta di chiudere il coperchio vano polvere.
Non utilizzate l’aspirapolvere senza ltri,
sacchetto Pure Clean, supporto sacchetto,
o contenitore polvere, in quanto l’apparecchio potrebbe danneggiarsi.
1. Srotolate il cavo di alimentazione (32) e inserite
la spina dell’apparecchio in una presa elettrica
(230 V).
Prima di collegare l’apparecchio alla presa
elettrica vi consigliamo di srotolare tutto il
cavo di alimentazione (indicatore giallo: 6,5 m; indicatore rosso: 7m) per evitare il surriscaldamento e il danneggiamento dello stesso.
2. Premete il tasto di avvio/arresto (18) per avviare
l’apparecchio.
3. Premete il tasto di apertura/chiusura del Trolley
System (12) per estrarre la maniglia (11) no al
suo bloccaggio, all’altezza desiderata, e affer-
rate la maniglia per trasportare l’aspirapolvere
durante le operazioni di pulizia.
4. Per selezionare l’intensità di aspirazione desiderata, a seconda del modello, agite sui pulsanti
+/- per la regolazione elettronica della potenza
(20) del Remote Power Control, oppure ruotate
manualmente il regolatore elettronico di potenza
(25).
Si consiglia di utilizzare una potenza di
aspirazione bassa su superci delicate per
evitare di danneggiarle (es. tendaggi, tessuti, cuscini, ecc.) o almeno di aprire il regolatore d’aria
per ridurre “l’effetto ventosa”.
5. Per mettere l’aspirapolvere in pausa, ove presente, potete utilizzare, a seconda del modello,
il pulsante stand by (21) del Remote Power Control oppure lo Start & Stop, semplicemente inserendo la spazzola nell’apposito stazionamento
orizzontale (29).
6. Per spegnere l’apparecchio premete nuovamente il tasto di avvio/arresto.
7. Staccate la spina dalla presa elettrica e premete
il tasto avvolgicavo (19), no al totale avvolgimento.
Assicuratevi che durante l’avvolgimento del
cavo, questo non si attorcigli.
8. Riponete l’apparecchio bloccando la scopa
nell’apposito stazionamento orizzontale o verticale.
Non mettete in funzione l’aspirapolvere se il
tubo essibile in plastica risulta attorciglia-
to, l’apparecchio potrebbe danneggiarsi.
CARATTERISTICHE
Remote Power Control (B)
Il Remote Power Control, ove presente, vi permette
di regolare la potenza di aspirazione direttamente
dall’impugnatura (9), senza alcuno sforzo e senza
chinarvi. Durante l’utilizzo dell’aspirapolvere potete
anche mettere in stand by il vostro apparecchio semplicemente premendo il pulsante di stand by (21).
Per inserire o cambiare le batterie del vostro Remote
Power Control:
1. Aprite il vano batterie (22).
2. Posizionate le due batterie AAA, prestando attenzione all’indicazione dei poli positivo e negativo,
3. Richiudete il vano batterie no a sentire lo scatto.
10
it
Trolley System (C)
Il Trolley System vi permette di manovrare facilmente
il vostro aspirapolvere durante le operazioni di pulizia
e di trasportarlo, con il minimo sforzo, da una stanza
all’altra.
1. Premete il tasto di apertura/chiusura del Trolley
System (12) per estrarre la maniglia (11) no al
suo bloccaggio, all’altezza desiderata.
2. Terminate le operazioni di pulizia, premete il
tasto di apertura/chiusura del Trolley System e
chiudete la maniglia no al suo bloccaggio.
Per riporre l’aspirapolvere potete utilizzare
direttamente la maniglia del Trolley System,
assicurandovi di averla bloccata correttamente.
Start & Stop (D)
La funzione Start & Stop, ove presente, vi consente
di mettere in stand by l’aspirapolvere e di bloccare
la scopa in “posizione di parcheggio”, semplicemente inserendo la spazzola nell’apposito stazionamento
orizzontale (29).
Dual System (E)
Il Trolley Power nella versione Trolley Dual Clean (se
disponibile) vi offre un’esperienza di utilizzo estremamente versatile. Questo aspirapolvere può infatti essere utilizzato sia nella modalità con sacchetto che in
modalità senza sacchetto, direttamente assemblando
il kit di conversione già presente nella confezione, che
consiste in sacchetto Pure Clean (34), supporto per
sacchetto (33), guarnizione (37), griglia ltro motore
(36), fornita già assemblata con il ltro motore (35),
che possono essere montati nel seguente modo:
1. Vericate che l’apparecchio sia scollegato dalla
presa elettrica.
2. Aprite il coperchio vano polvere (14) premendo il
tasto di apertura vano polvere (13) ed estraete il
contenitore polvere (39).
3. Incastrate la guarnizione nell’apposito incavo nel
perimetro del vano polvere (38).
4. Inserite la griglia ltro motore (fornita già assem-
blata con il ltro motore) nelle apposite guide del
vano polvere.
5. Inlate il sacchetto Pure Clean nel supporto sac-
chetto no in fondo; quindi posizionatelo nell’apposito vano polvere.
6. Chiudete il coperchio vano polvere no a sentire
lo scatto di avvenuta chiusura.
Per tornare ad utilizzare il vostro aspirapol-
vere con il contenitore polvere, ricordatevi
di rimuovere tutte le seguenti parti: il sacchetto
Pure Clean, il supporto per sacchetto, la guarni-
zione, il ltro motore e la griglia ltro motore.
PULIZIA E MANUTENZIONE
Prima di effettuare le operazioni di pulizia e
manutenzione assicuratevi di aver scollegato la spina dalla presa elettrica. Per la pulizia
dell’apparecchio, delle parti interne e degli accessori, non utilizzate sostanze aggressive né materiali abrasivi. Assicuratevi che l’apparecchio sia
completamente asciutto prima del successivo utilizzo.
Assicuratevi che tutte le parti siano perfet-
tamente asciutte prima di rimontarle.
Vi consigliamo la pulizia del ltro almeno
ogni 4 mesi in modo da ripristinarne il pote-
re ltrante. Vi raccomandiamo comunque di sostituire il ltro almeno una volta l’anno per garantire
la massima prestazione.
Pulizia dell’apparecchio
Utilizzate un panno morbido asciutto o leggermente
inumidito per pulire le parti in plastica (scocca, vano
polvere, tubo essibile ecc.) e il tubo telescopico in
metallo (8).
Pulizia degli accessori
Per la pulizia degli accessori fate riferimento al capitolo “Accessori”.
Pulizia vano polvere (F)
Per la pulizia ordinaria del vano polvere (38):
1. Aprite il coperchio vano polvere (14) premendo il
tasto di apertura vano polvere (13).
2. A seconda del modello, slate il sacchetto Pure
Clean (34) o il contenitore polvere (39).
3. Procedete alla pulizia del vano polvere eliminan-
do i residui di sporco con un pennellino; eventualmente aiutatevi con un panno morbido inumidito, assicurandovi di asciugare completamente
tutte le parti.
4. Riposizionate correttamente il sacchetto Pure
Clean o il contenitore polvere e chiudete il co-
perchio vano polvere no a sentire lo scatto di
avvenuta chiusura.
11
it
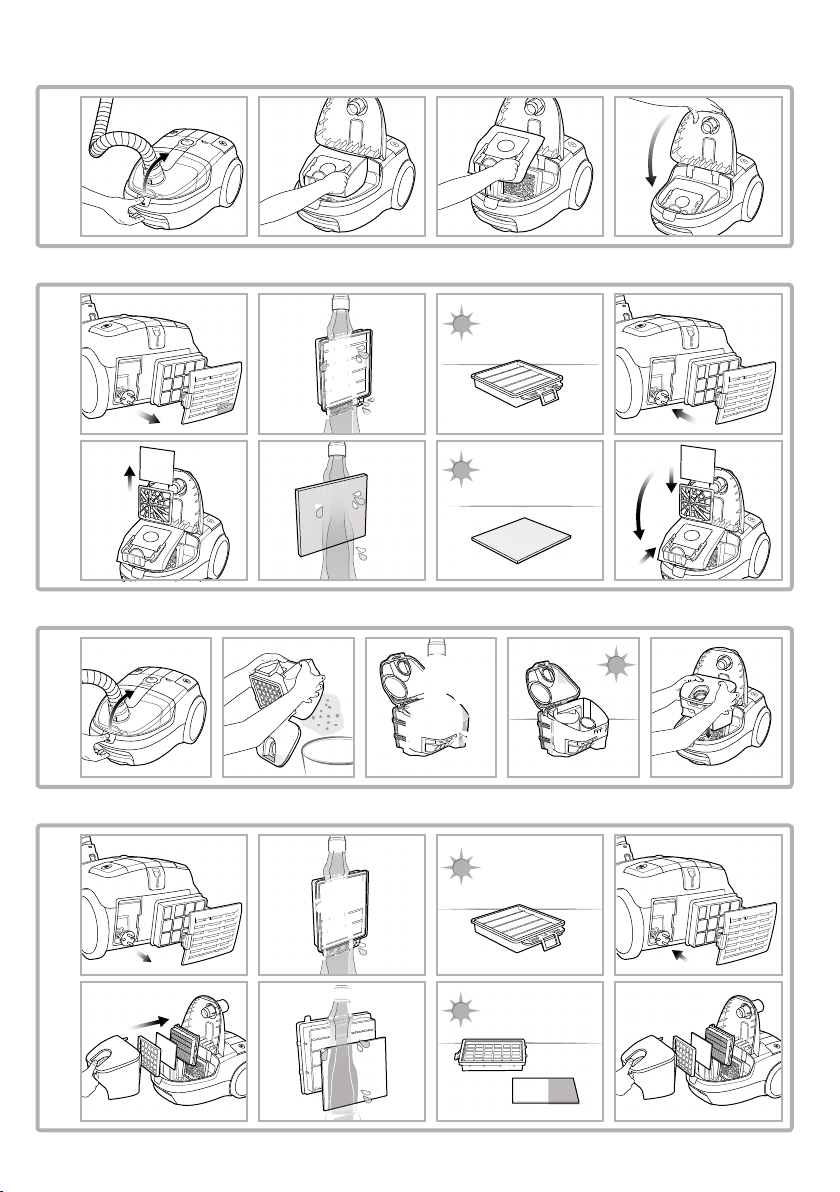
Sostituzione sacchetto Pure
Clean (G)
Vi raccomandiamo di utilizzare sempre i sacchetti originali Pure Clean Hotpoint-Ariston
(solo su modelli selezionati) in quanto il particolare tessuto in cui sono realizzati vi permette una ltrazione ottimale dell’aria, massima polvere trattenuta, prestazioni elevate e
una lunga vita del motore.
Il sacchetto Pure Clean (34) è realizzato in tessuto e
quindi, rispetto ad un tradizionale sacchetto in carta, è
più resistente ed in grado di trattenere le particelle di
polvere più sottili in modo più efcace, assicurandovi
la massima igiene.
Vi raccomandiamo di sostituire il sacchetto
Pure Clean appena l’indicatore sacchetto
pieno si illumina di rosso e comunque di cambiarlo almeno una volta l’anno per garantirvi sempre
la migliore igiene del vostro apparecchio. I pori
del sacchetto intasati dalle particelle di polvere
riducono infatti la potenza di aspirazione del motore e potrebbero danneggiarlo.
1. Vericate che l’apparecchio sia scollegato dalla
presa elettrica.
2. Aprite il coperchio vano polvere (14) premendo il
tasto di apertura vano polvere (13).
3. Sganciate il supporto per sacchetto (33) e slate
il sacchetto Pure Clean (34).
Smaltite il sacchetto utilizzato, secondo le
norme locali sullo smaltimento riuti.
4. Inserite un nuovo sacchetto Pure Clean nel sup-
porto sacchetto no in fondo; quindi riposizionatelo nell’apposito vano.
5. Chiudete il coperchio vano polvere no a sentire
lo scatto di avvenuta chiusura.
Se il coperchio vano polvere non dovesse
chiudersi agevolmente, signica che il sacchetto Pure Clean e/o il relativo supporto sacchetto non sono stati montati correttamente. Evitate di
forzare la chiusura del coperchio vano polvere e
assicuratevi che entrambi siano incastrati nella
posizione corretta, afnché la leva di sicurezza
permetta di chiudere il coperchio vano polvere.
Pulizia ltri (H)
modello con sacchetto
Il ltro Pure Clean Hepa 13 assicura la massima pro-
tezione contro gli allergeni garantendovi una qualità
dell’aria restituita dall’apparecchio completamente li-
bera da residui di polvere (potere ltrante > 99,95 %).
Per la pulizia del ltro Pure Clean Hepa 13 (30):
1. Smontate la griglia di aerazione (31) agendo sulla linguetta di apertura.
2. Rimuovete il ltro Pure Clean Hepa 13 sbloccan-
do la linguetta di apertura.
3. Lavate il ltro direttamente sotto il rubinetto evitando un getto dell’acqua troppo forte.
4. Tenetelo in posizione tale da far scorrere l’acqua
parallelamente alle pieghe.
5. Lasciatelo asciugare a temperatura ambiente
nché tutte le sue parti risultino completamente
asciutte.
6. Posizionate nuovamente il ltro Pure Clean
Hepa 13 prestando attenzione alla posizione
degli incastri.
7. Rimontate la griglia di aerazione nell’apposito
alloggiamento no a sentire lo scatto.
Per la pulizia dei ltri del vano polvere (38):
8. Aprite il coperchio vano polvere (14) premendo il
tasto di apertura vano polvere (13).
9. Slate il sacchetto Pure Clean (34), la griglia l-
tro motore (36) e il ltro motore (35) dalla griglia
ltro motore.
10. Procedete alla pulizia del ltro motore lavandolo
direttamente sotto il rubinetto, evitando un getto
dell’acqua troppo forte e strizzatelo delicatamente.
11. Effettuate la pulizia della griglia ltro motore, eli-
minando i residui di polvere con un pennellino;
eventualmente aiutatevi con un panno morbido
inumidito.
12. Incastrate nuovamente il ltro motore nella gri-
glia ltro motore facendo attenzione ad inserirlo
delicatamente negli appositi incastri.
13. Inlate nuovamente l’assemblato griglia ltro
motore nelle apposite guide nel vano polvere.
14. Inserite correttamente il sacchetto Pure Clean
con l’apposito supporto sacchetto.
15. Chiudete il coperchio vano polvere no a sentire
lo scatto di avvenuta chiusura.
Pulizia contenitore polvere (I)
modello senza sacchetto
Per la pulizia ordinaria del contenitore polvere:
1. Aprite il coperchio vano polvere (14) premendo il
tasto di apertura vano polvere (13) ed estraete il
contenitore polvere (39).
12
it
2. Aprite il coperchio e svuotate il contenitore polvere.
3. Procedete alla rimozione di eventuali residui di
sporco, lavando il contenitore polvere sotto l’acqua corrente.
4. Lasciate asciugare completamente a tempera-
tura ambiente nché tutte le sue parti risultino
completamente asciutte.
5. Richiudete il coperchio del contenitore polvere
no allo scatto e riposizionate il contenitore polvere nel vano polvere.
6. Chiudete il coperchio vano polvere no a sentire
lo scatto di avvenuta chiusura.
Pulizia ltri (L)
modello senza sacchetto
In questo modello sono presenti due Pure Clean
Hepa 13. Il ltro Pure Clean Hepa 13 assicura la massima protezione contro gli allergeni garantendovi una
qualità dell’aria restituita dall’apparecchio completa-
mente libera da residui di polvere (potere ltrante >
99,95 %).
Per la pulizia del ltro Pure Clean Hepa 13 (30) po-
steriore:
1. Smontate la griglia di aerazione (31) agendo sulla linguetta di apertura.
2. Rimuovete il ltro Pure Clean Hepa 13 sbloccan-
do la linguetta di apertura.
3. Lavate il ltro direttamente sotto il rubinetto evitando un getto dell’acqua troppo forte.
4. Tenetelo in posizione tale da far scorrere l’acqua
parallelamente alle pieghe.
5. Lasciatelo asciugare a temperatura ambiente
nché tutte le sue parti risultino completamente
asciutte.
6. Posizionate nuovamente il ltro Pure Clean
Hepa 13 prestando attenzione alla posizione
degli incastri.
7. Rimontate la griglia di aerazione nell’apposito
alloggiamento no a sentire lo scatto.
Per la pulizia dei ltri del vano polvere (38):
8. Aprite il coperchio vano polvere (14) premendo il
tasto di apertura vano polvere (13).
9. Slate il contenitore polvere (39).
10. Sbloccando la linguetta di apertura, rimuovete il
ltro Pure Clean Hepa 13, il pre-ltro (41) e la
griglia di protezione ltri (40).
11. Effettuate la pulizia della griglia di protezione
ltri, eliminando i residui di polvere con un pennellino; eventualmente aiutatevi con un panno
morbido inumidito.
12. Procedete alla pulizia del pre-ltro lavandolo
direttamente sotto il rubinetto evitando un getto
dell’acqua troppo forte e strizzatelo delicatamente.
13. Lavate il ltro Pure Clean Hepa 13 direttamente sotto il rubinetto evitando un getto dell’acqua
troppo forte.
14. Tenetelo in posizione tale da far scorrere l’acqua
parallelamente alle pieghe.
15. Lasciatelo asciugare a temperatura ambiente
nché tutte le sue parti risultino completamente
asciutte.
16. Riposizionate il pre-ltro nell’apposita rientranza
del ltro Pure Clean Hepa 13, bloccando entrambi i ltri con la griglia di protezione.
17. Montate l’assemblato pre-ltro, ltro Pure Clean
Hepa 13 e griglia di protezione ltri sul conteni-
tore polvere, prestando attenzione alla posizione
degli incastri e ssandolo no a sentire lo scatto.
18. Inlate nuovamente il contenitore polvere nel
vano polvere.
19. Chiudete il coperchio vano polvere no a sentire
lo scatto di avvenuta chiusura.
ACCESSORI
Gli accessori possono far parte della dotazione di serie, a seconda del modello, o possono essere acquistati presso i centri autorizzati Hotpoint-Ariston.
Spazzola normale/tappeti (M)
La spazzola normale/tappeti (1) è adatta alla pulizia
quotidiana di pavimenti duri e lisci nonché di tappeti
e moquette. Agite sul pedale di regolazione setole (2)
per pulire:
Pavimenti duri
Tappeti e moquette
Spazzola Parquet (N)
La spazzola Parquet (3) è adatta per la pulizia di pavimenti particolarmente delicati come i pavimenti in
legno. Le speciali setole naturali vi permettono di po-
terla utilizzare sulle superci più delicate in estrema
tranquillità.
Spazzola Turbo (O)
La spazzola Turbo (4) è particolarmente indicata per
la pulizia in profondità di tappeti a pelo corto e moquette nonché per aspirare il pelo di animali dome-
13

it
stici. La rotazione della spazzola viene azionata dalla
corrente aspirante dell’aspirapolvere. Una freccia sotto la spazzola turbo indica la possibile apertura per
rimuovere gli oggetti intrappolati.
Spazzola Deluxe Parquet (P)
La spazzola Deluxe Parquet (6) è particolarmente
adatta per la pulizia di pavimenti delicati e parquet.
La spazzola è dotata di delicatissime setole rotanti,
azionate dalla corrente aspirante dell’aspirapolvere, e
di morbide ruote che vi permettono di salvaguardare i
pavimenti delicati.
Per la pulizia delle parti in plastica della spazzola De-
luxe Parquet, slate la spazzola dal tubo telescopico
in metallo (8) e utilizzate un panno morbido asciutto
o leggermente inumidito. Per la pulizia delle setole
rotanti ruotate la chiusura di sicurezza in posizione
e slatela. Smontate quindi la spazzola rotante e
procedete alla pulizia aiutandovi eventualmente con
delle forbici nel caso di capelli o li attorcigliati, facendo particolare attenzione a non danneggiare le setole.
Parquet, slate la spazzola dal tubo telescopico in
metallo (8) e utilizzate un panno morbido asciutto o
leggermente inumidito. Per la pulizia delle setole aspirate lo sporco utilizzando la bocchetta di precisione
(26).
Spazzola imbottiti (Q)
La spazzola imbottiti (5) è indicata per la pulizia di
superci particolari come divani, materassi, coperte,
cuscini, ecc. La spazzola è dotata di setole rotanti,
azionate dalla corrente aspirante dell’aspirapolvere
che vi permettono di pulire in profondità e di rimuovere eventuali peli, capelli o acari dai tessuti. Inoltre,
grazie alla griglia protettiva, le setole non entrano in
contatto con la supercie da pulire, assicurandovi la
massima delicatezza sui tessuti.
Per la pulizia delle parti in plastica della spazzola imbottiti, slate la spazzola dal tubo telescopico in metallo (8) e utilizzate un panno morbido asciutto o leggermente inumidito. Per la pulizia delle setole rotanti,
sganciate il coperchio agendo sugli appositi agganci.
Smontate quindi la spazzola rotante e procedete alla
pulizia aiutandovi eventualmente con delle forbici nel
caso di capelli o li attorcigliati facendo particolare attenzione a non danneggiare le setole.
Bocchetta di precisione (R)
La bocchetta di precisione, posizionata nel vano accessori (28), vi aiuta a raggiungere angoli, fessure e
punti più difcili.
Bocchetta per superci delicate (S)
La bocchetta per superci delicate, posizionata nel
vano accessori (28), è indicata per essere utilizzata
su superci che richiedono particolare attenzione,
quali radiatori, mobili, ecc. Le speciali setole naturali
vi permettono di poterla utilizzare sulle superci più
delicate in estrema tranquillità.
ASSISTENZA
Prima di contattare l’Assistenza:
• Vericare se l’anomalia può essere risolta autonomamente (vedi “Risoluzione dei problemi”).
• In caso negativo, contattare il Numero Unico
Nazionale 199.199.199.
Comunicare:
• il tipo di anomalia
• il modello dell’ apparecchio (Mod.)
• il numero di serie (S/N)
Queste informazioni si trovano sulla targhetta
caratteristiche sul prodotto o nel libretto Condizioni di
Garanzia.
Non ricorrete mai a tecnici non autorizzati e riutate
sempre l’installazione di pezzi di ricambio non originali.
Assistenza
Attiva
7 giorni su 7
Se nasce il bisogno di assistenza o manutenzione basta chiamare il Numero Unico Nazionale 199.199.199*
per essere messi subito in contatto con il Centro Assistenza Tecnica più vicino al luogo da cui si chiama.
È attivo 7 giorni su 7, dal lunedì al venerdì dalle ore
08:00 alle ore 20:00, il sabato dalle ore 09:00 alle ore
18:00, la domenica dalle ore 09:00 alle ore 13:00.
*Al costo di 14,25 centesimi di Euro al minuto (iva inclusa) dal Lun.
al Ven. dalle 08:00 alle 18:30, il Sab. dalle 08:00 alle 13:00 e di 5,58
centesimi di Euro al minuto (iva inclusa) dal Lun. al Ven. dalle 18:30
alle 08:00, il Sab. dalle 13:00 alle 08:00 e i giorni festivi, per chi chiama
dal telefono sso.
Per chi chiama da radiomobile le tariffe sono legate al piano tariffario
dell’operatore telefonico utilizzato. Le suddette tariffe potrebbero essere
soggette a variazione da parte dell’operatore telefonico; per maggiori
informazioni consultare il sito www.hotpoint.eu.
14
SALVAGUARDIA DELL’AMBIENTE
SMALTIMENTO MATERIALI DI IMBALLAGGIO
Il materiale di imballaggio è riciclabile al
100% ed è contrassegnato dal simbolo di
riciclaggio (*). Le diverse parti dell’imballaggio devono quindi essere smaltite in
modo responsabile, in conformità alle
norme stabilite dalle autorità locali.
SMALTIMENTO ELETTRODOMESTICI
Questo prodotto è stato fabbricato con materiale riciclabile o riutilizzabile. Disfarsene seguendo le normative locali per lo smaltimento
dei riuti. Per ulteriori informazioni sul trattamento, recupero e riciclaggio di elettrodome-
stici, contattare l’ufcio locale, il servizio di raccolta dei
riuti domestici o il negozio presso il quale l’apparec-
chio è stato acquistato. Questo apparecchio è contrassegnato in conformità alla direttiva europea 2012/19/
UE sui riuti di apparecchiature elettriche ed elettroniche (RAEE). Mediante il corretto smaltimento del prodotto, l’utente contribuisce a prevenire le possibili conseguenze negative per l’ambiente e la salute derivanti
da uno smaltimento inadeguato. Il simbolo (*) sul prodotto o sulla documentazione di accompagnamento
indica che questo prodotto non deve essere trattato
come riuto domestico, ma deve essere consegnato
presso l’idoneo punto di raccolta per il riciclaggio di apparecchiature elettriche ed elettroniche.
it
DICHIARAZIONI DI
CONFORMITÀ
Questo apparecchio soddisfa i requisiti per la progettazione ecocompatibile del Regolamento europeo n.
666/2013, n. 665/2013.
Aspirapolvere testata per uso sia su supercie dure
sia su tappeto (uso generico) e vericata sulla base
degli standard europei:
EN 60312-1;
EN 60704-1;
EN 60704-2-1
15

it
RISOLUZIONE DEI PROBLEMI
Problema Possibili cause / Soluzioni
L’aspirapolvere non si
accende.
L’indicatore sacchetto pieno
o l’indicatore contenitore
polvere pieno si accende anche se non è ancora pieno.
La potenza di aspirazione è
bassa.
Il Remote Power Control non
funziona.
• La spina potrebbe essere non inserita oppure potrebbe non riuscire
a fare contatto.
• Cambiate il sacchetto. Nei casi in cui vengono aspirate grandi quantità di polveri molto sottili (es. farina, ecc.) può accadere che l’indicatore sacchetto pieno si illumini di rosso, anche se il sacchetto non è
ancora pieno. Ciò accade in quanto il sacchetto Pure Clean è in grado
di trattenere anche le particelle di polveri più sottili, garantendovi la
massima igiene.
• Effettuate la pulizia del contenitore polvere per i modelli senza sacchetto.
• Effettuate la pulizia dei ltri e in caso sostituiteli.
• Assicuratevi che il tubo telescopico, il tubo essibile e la spazzola non
presentino ostruzioni.
• Effettuate la pulizia dei ltri e in caso sostituiteli.
• Assicuratevi che il tubo telescopico, il tubo essibile e la spazzola non
presentino ostruzioni.
• Cambiate il sacchetto. Nei casi in cui vengono aspirate grandi quantità di polveri molto sottili (es. farina, ecc.) potrebbe accadere che il
sacchetto Pure Clean si intasi.
• Effettuate la pulizia del contenitore polvere e dei suoi ltri.
• Le batterie inserite non sono sufcientemente cariche.
• Le batterie non sono state posizionate correttamente all’interno del
vano batterie. Posizionate le due batterie AAA, prestando attenzione
all’indicazione dei poli positivo e negativo.
• Rimuovete le batterie, quindi riposizionatele nuovamente, prestando
attenzione all’indicazione dei poli positivo e negativo.
• Potrebbero esserci apparecchi elettronici e/o ostacoli che disturbano
e/o schermano il segnale ad infrarossi del Remote Power Control.
Si avvertono piccole scariche elettrostatiche durante
l’aspirazione.
L’aspirapolvere emette un sibilo o vibra durante l’utilizzo.
16
• L’aspirazione di polveri particolarmenti sottili (es. farina, ecc.) potrebbe provocare delle piccole scariche elettrostatiche. Durante l’aspirazione di tali materiali vi consigliamo di non utilizzare il tubo telescopico
in metallo, ma solamente il tubo essibile in plastica, impostando la
potenza di aspirazione al minimo.
• Uno o più accessori non sono stati montati correttamente. Vericate
che i ltri e le spazzole siano stati assemblati secondo le presenti
istruzioni. Nel modello con sacchetto assicuratevi inoltre che la guarnizione sia incastrata correttamente.
• Il sacchetto/contenitore polvere è pieno. Sostituite il sacchetto o effettuate la pulizia del contenitore polvere.
• Effettuate la pulizia dei ltri e in caso sostituiteli.
• Il regolatore d’aria è aperto. Assicuratevi che sia chiuso correttamente.

it
Il coperchio vano polvere
non si chiude.
La spazzola si sposta con
difcoltà.
Il cavo non si riavvolge agevolmente.
• Il sacchetto Pure Clean o il contenitore polvere non sono stati montati correttamente. Assicuratevi che siano incastrati nella posizione
corretta, afnché la leva di sicurezza permetta di chiudere il coperchio vano polvere.
• Diminuite la potenza di aspirazione, soprattutto su tappeti e tessuti
in generale. Aprite il regolatore d’aria per ridurre “l’effetto ventosa”.
• Assicuratevi che durante l’avvolgimento del cavo, questo non si attorcigli. In caso di bloccaggio, srotolate nuovamente tutto il cavo d’alimentazione e ripetete le operazioni di avvolgimento.
17
iten
SAFETY INSTRUCTIONS
IMPORTANT TO BE READ AND OBSERVED
• Before using the appliance, read these safety instructions. Keep them
nearby for future reference. These instructions are also available on
www.hotpoint.eu
• These instructions and the appliance itself provide important safety
warnings, to be observed at all times. The manufacturer declines any
liability for failure to observe these safety instructions, for inappropriate
use of the appliance or incorrect setting of controls.
SAFETY WARNINGS
•
Very young children (0-3 years) should be kept away from the ap-
pliance. Young children (3-8 years) should be kept away from the appli-
ance unless continuously supervised.
•
Children from 8 years old and above and persons with reduced
physical, sensory or mental capabilities or lack of experience and
knowledge can use this appliance only if they are supervised. Alterna-
tively these people can use if have been given instructions on safe appliance use and if they understand the hazards involved. Children shall
not play with the appliance. Cleaning and user maintenance shall not
be made by children without supervision.
PERMITTED USE
•
CAUTION: the appliance is not intended to be operated by means
of an external timer or separate remote controlled system.
•
This appliance is intended to be used in households and similar
applications such as: staff kitchen areas in shops, ofces and other
working environments; farm houses; by clients in hotels, motels, bed &
breakfast and other residential environments.
•
This appliance is not for professional use. Do not use the appliance
outdoors.
•
CAUTION: The hose contains electrical connections, do not use it
to suck up water and do not immerse in water for cleaning. The hose
should be checked regularly and must not be used if damaged - risk of
electrical shock.
•
Do not use the appliance to vacuum ash or hot coals or any other
hot substance - risk of re. Do not use the appliance to vacuum liquid
or damp substances - risk of electrical shock.
18
• Do not use the appliance on persons or animals - risk of injury.
INSTALLATION
iten
•
Do not repair or replace any part of the appliance unless speci-
cally stated in the user manual. After unpacking the appliance, make
sure that it has not been damaged during transport. In the event of
problems, contact the dealer or your nearest After-sales Service. Once
assembled, packaging waste (plastic, styrofoam parts etc.) must be
stored out of reach of children - risk of suffocation.
•
Remove all packaging materials, including any adhesive label, be-
fore operating the appliance.
ELECTRICAL WARNINGS
•
Before connecting the appliance, verify that the electrical ratings
cor responds to your supply system ratings. The rating plate is on the
bot tom of the appliance.
•
It must be possible to disconnect the appliance from the power supply by unplugging it if the plug is accessible, or by a multi-pole switch
in stalled upstream of the socket and the appliance must be earthed, in
conformity with national electrical safety standards.
•
Do not use extension leads, multiple sockets or adapters. Do not
use the appliance when you are wet or barefoot. Do not operate this
appliance if it has a damaged power cable or plug, if it is not working
properly, or if it has been damaged or dropped. If the power cable is
damaged, it must be replaced with an identical one - risk of electrical
shock.
CLEANING AND MAINTENANCE
•
WARNING: Ensure that the appliance is switched off and disconnected from the power supply before performing any cleaning or main-
tenance operation - risk of electrical shock. Never use steam cleaning
equipment.
•
Do not directly spray cleaners on the appliance – risk of electrical
shock.
19
iten
DESCRIPTION OF THE
VACUUM CLEANER
1. Standard/Carpet brush
2. Bristle-adjustment pedal
3. Parquet brush
4. Turbo brush
5. Upholstery brush*
6. Deluxe Parquet brush*
7. Pipe length regulator
8. Metal extension pipe
9. Hand grip
10. Plastic hose
11. Carrying handle
12. Trolley System opening/closing button
13. Dust compartment opening button
14. Dust compartment lid
15. Suction inlet
16. Release
17. Full dust bag/container indicator
18. Start/Stop button
19. Cord-rewind button
20. Buttons +/- for electronic power adjustment*
21. Standby button*
22. Battery compartment*
INTRODUCTION
Thank you for purchasing our Trolley Power
vacuum cleaner. In doing so you have opted
for an effective, high performance appliance.
We advise you to register this product on
www.hotpoint.co.uk to make sure you are
entitled to all the benets made available by
Hotpoint Customer Service.
The Trolley Power was designed to ensure optimum
performance and consistent usability.
The exclusive Trolley System ensures maximum
manouverability and helps you move freely around
the house without knocking against the furniture. The
Remote Power Control (if available) enables you to
adjust the suction power directly and effortlessly from
the hand grip, with no need to bend.
Before you begin using the appliance, it is
important that you carefully read these
instructions and keep them for further reference.
GENERAL SAFETY RULES
The safety features of your vacuum cleaner comply
with the technical specications and regulations in
force.
23. Air regulator
24. Remote Power Control signal receiver*
25. Electronic power regulator*
26. Precision nozzle
27. Nozzle for delicate surfaces
28. Attachment compartment
29. Horizontal housing
30. Pure Clean Hepa 13 lter
31. Air grill
32. Power cord
Version with dust bag:
33. Dust bag support
34. Pure Clean dust bag
35. Motor lter
36. Motor lter grill
37. Gasket
38. Dust compartment
Version without dust bag:
38. Dust compartment
39. Dust container
40. Filter protection grill
41. Pre-lter
42. Pure Clean Hepa 13 lter
* on some models only
Do not use the appliance for any use other than its
intended use. Any improper use could cause damage
to persons and/or property.
The voltage of your system must match the
voltage of the vacuum cleaner (230 V). Any
connection error could cause irreversible damage
to the appliance and void its warranty.
• This appliance shall not be used
by children.
• Keep the appliance and its cord
out of reach of children.
• This appliance can be used by
children aged from 8 years and
above and persons with reduced physical, sensory or mental
capabilities or lack of experience and knowledge if they have
been given supervision or instruction concerning use of the
appliance in a safe way and un-
20
iten
derstand the hazards involved.
• The equipment was designed
for household and similar uses
such as in:
• - staff kitchen areas in shops,
ofces and other work environments;
• - farm houses;
• - hotels, motels and other
residential environments by
the guests;
• - bed&breakfast-type envi-
ronments.
• Supervise children to prevent
them from playing with the appliance.
• Turn unit off and unplug from
outlet when not in use, before
putting on or taking off parts, and
before cleaning. To disconnect,
turn unit off, grasp plug, and pull
out from wall outlet. Never yank
on cord.
• Do not operate any appliance
with a damaged cord or plug or
after the appliance malfunctions
or has been damaged in any
manner. Return the appliance to
an authorized service facility for
examination, repair, or electrical
or mechanical adjustment.
• Do not leave the appliance unattended while it is running.
• Never use the power cord to move or carry the
appliance around.
• After use, disconnect the plug from the electrical
outlet and rewind the power cord.
• Do not bend the power cord and keep it away
from sharp edges to avoid any damage.
• Never leave or use the appliance over or close
to ames, ovens, ammable materials or other
sources of heat.
• Do not use the vacuum cleaner on persons or
animals. Keep the suction ends away from your
body while it is in operation.
• Should you suspect a failure, immediately unplug
it from the electrical outlet.
• Never immerse the vacuum cleaner in water
or any other liquid. Never spray any liquid
substances onto the appliance.
• Do not leave the appliance in the open air and
exposed to inclement weather conditions.
• For safety, we advise you to keep the vacuum
cleaner always lower than your own position
when cleaning the stairs.
• Never suck up any liquid or damp
substances as this could affect the
operation of the appliance.
• Never suck up any ammable materials or
incandescent objects such as ash, cigarette
ends etc. Some parts of the vacuum cleaner
could catch re.
• Never suck up any sharp or cutting objects as
this could damage the appliance.
• If very ne dust or powders are sucked up such
as our, etc. small electrostatic discharges could
occur. When sucking up materials previously
mentioned, we advise not to use the metal
extension pipe, but only the plastic exible hose
and to set a low suction power level.
• For your safety, every repair or maintenance
action should be carried out on the appliance
only by Hotpoint authorised staff.
• No responsibility shall be accepted in case of
damage resulting from any improper use of the
appliance.
BEFORE FIRST USE
Remove all adhesives, protective plastic materials
and cardboard packaging. Make sure all adhesive
parts are removed with a soft damp cloth.
Assembling
1. Fasten the plastic exible hose (10) to the suction
inlet (15) until it clicks into place. To remove it,
press the release (16) and pull it out.
2. Fit the metal extension pipe (8) into the hand
grip (9) until it locks into place. Use the length
regulator (7) to adjust the length of the pipe.
3. Fit the standard/carpet brush (1) or the attachment
you need (see chapter “Attachments”) into the
end of the metal extension pipe until it locks into
place.
21

iten
If your appliance is equipped with a Remote
Power Control, you will need to insert the
batteries supplied (see paragraph “Remote Power
Control” under chapter “Features”).
USING
THE VACUUM CLEANER (A)
The appliance is equipped with a safety
device that prevents the dust-compartment
lid from closing unless the dust bag has been
correctly installed. Do not force the dust bag lid to
close and make sure all the parts are in the correct
position to allow you to close the lid.
Do not use the vacuum cleaner without
lters, Pure Clean dust bag, dust bag
support or dust container, as the appliance could
get damaged.
1. Unwind the power cord (32) and plug the
appliance into an electrical outlet (230 V).
We advise you to unwind the entire power
cord (yellow marker: 6,5m; red marker: 7m)
to avoid any overheating and damage.
2. Press the start/stop button (18) to start the
appliance.
3. Press the Trolley System opening/closing
button (12) to extend the carrying handle (11)
to the desired length until it locks into place.
Then manoeuvre the vacuum cleaner using the
carrying handle when cleaning the house.
4. To select the desired suction intensity (based on
the model) use the +/- button and electronically
adjust the power (20) of the Remote Power
Control; or manually rotate the electronic power
regulator (25).
We advise you to use a low suction power
on delicate surfaces such as curtains,
fabrics, cushions etc to avoid any damage; or at
least open the air regulator to reduce the suction
effect.
5. To pause the vacuum cleaner, if this feature is
available, you can use the standby button (21)
on the Remote Power Control or the Start & Stop
function (based on the model). Just insert the
brush into its horizontal housing (29).
6. To switch off the appliance press the start/stop
button again.
7. Disconnect the plug from the electrical outlet and
press the cord-rewind button (19) until rewinding
is complete.
Make sure the cord does not get entangled
during rewinding.
8. Secure the oor head into its horizontal / vertical
housing and store the appliance.
Do not start the vacuum cleaner if the
plastic exible hose is entangled, as this
could damage the appliance.
FEATURES
Remote Power Control (B)
The Remote Power Control (if available) enables you
to adjust the suction power directly and effortlessly
from the hand grip (9), with no need to bend. When
using the vacuum cleaner, you can keep it on standby
by pressing the standby button (21).
To insert or change the batteries of your Remote
Power Control:
1. Open the battery compartment (22).
2. Insert two AAA batteries, making sure of the
positive and negative poles.
3. Close the battery compartment until it clicks into
place.
Trolley System (C)
The Trolley System allows you to move your vacuum
cleaner easily when cleaning and carry it from room
to room effortlessly.
1. Press the opening/closing button on the Trolley
System (12) to pull out the carry handle (11) until
it locks into place at the desired length.
2. Having completed your cleaning, press the
opening/closing button on the Trolley System
and close the carrying handle until it locks into
place.
Use the Trolley System's carrying handle to
store the appliance, making sure you have
correctly locked it into place.
Start & Stop (D)
The Start & Stop function (if available) lets you keep
the vacuum cleaner on stand-by and lock the cleaning
head in the park position: just insert the brush into its
horizontal housing (29).
Dual System (E)
The Trolley Dual Clean (if available) version of the
Trolley Power makes your use of the appliance
extremely versatile because it can be used with or
without dust bag. Just assemble the conversion kit
in the package: it comprises a Pure Clean dust bag
(34), dust bag support (33), gasket (37), and motor
lter grill (36) already tted to the motor lter (35). The
assembling takes place as follows:
1. Make sure the appliance is disconnected from
the electrical outlet.
22
2. Press the dust-compartment opening button
(13) to open the dust compartment lid (14) and
remove the dust container (39).
3. Fit the gasket into the special groove along the
perimeter of the dust compartment (38).
4. Fit the motor lter grill (already tted to the motor
lter) into the special dust-compartment guides.
5. Slide the Pure Clean dust bag into the dust bag
support all the way; then place it into the special
dust compartment.
6. Close the dust compartment lid until it clicks into
place.
To use the vacuum cleaner with the dust
container, remember to remove all the
following parts: Pure Clean dust bag, dust bag
support, gasket, motor lter and motor lter grill.
CLEANING AND
MAINTENANCE
Before cleaning or maintaining the vacuum
cleaner, make sure it has been unplugged
from the electrical outlet. Do not use aggressive
substances or abrasive materials to clean the
appliance, its internal parts and attachments.
Make sure it is thoroughly dry before using again.
Make sure all its parts are thoroughly dry
before replacing them.
We advise you to clean the lter at least
every 4 months to restore its ltering power.
In any case we recommend replacing the lter at
least every year to ensure maximum performance.
Cleaning the appliance
Use a dry or slightly damp soft cloth to clean the
plastic parts (body, dust compartment, exible hose
etc) and the metal extension pipe (8).
Cleaning the attachments
Before cleaning the attachments refer to the chapter
“Attachments”.
Cleaning the dust compartment (F)
For the routine cleaning of the dust compartment (38):
1. Press the dust-compartment opening button (13)
to open the dust compartment lid (14).
2. Based on the model, remove the Pure Clean
dust bag (34) or the dust container (39).
3. Clean the dust compartment by removing any
residual dirt with a small brush. If needed, use a
damp soft cloth, taking care to wipe all its parts
entirely dry.
4. Re-place the Pure Clean dust bag or dust
container correctly and close the dust
compartment lid until it clicks into place.
iten
Replacing the Pure
Clean dust bag (G)
We recommend always using Hotpoint
original Pure Clean dust bags (on selected
models only), because their special fabric
allows optimum air ltration, maximum dust/
powder retention, high performances and a
long motor life.
As the Pure Clean dust bags (34) are made of fabric,
they are more resistant than conventional paper bags
and can retain very ne dust/powder particles more
effectively, thus ensuring maximum hygiene.
We recommend replacing the Pure Clean
bag as soon as the full-bag indicator
illuminates. Change at least once a year to be
always sure of the hygienic condition of your
vacuum cleaner. The pores of a bag clogged with
dust/powder particles reduce the motor's suction
power and can cause damage.
1. Make sure the appliance is disconnected from
the electrical outlet.
2. Press the dust-compartment opening button (13)
to open the dust compartment lid (14).
3. Release the bag support (33) and remove the
Pure Clean dust bag (34).
Dispose of the dust bag in compliance with
all local regulations on waste disposal.
4. Slide a new Pure Clean dust bag into the dust
bag support completely; then place it back into
the special compartment.
5. Close the dust compartment lid until it clicks into
place.
If you are nding it difcult to close the dust
compartment lid, it is likely that the Pure
Clean dust bag and/or its dust bag support have
not been assembled correctly. Do not force the
dust bag lid to close, make sure both parts are in
the correct position to allow lid closure.
Cleaning the lters (H)
model with dust bag
The Pure Clean Hepa 13 lter ensures
maximum protection against allergens and
maintains high air quality, as the air given back
by the appliance is entirely free from dust/
powder residues (ltering power > 99.95 %).
To clean the Pure Clean Hepa 13 lter (30):
1. Disassemble the air grill (31) using the opening
tab.
2. Remove the Pure Clean Hepa 13 lter by
releasing the opening tab.
3. Wash the lter under running water, taking care
23

iten
that the jet of water is not too strong.
4. Hold it so that the water ows parallel to its folds.
5. Let it dry at room temperature until all its parts
are thoroughly dry.
6. Replace the Pure Clean Hepa 13 lter, paying
attention to the position of the notches.
7. Fit the air grill into its housing until it clicks into
place.
To clean the dust compartment lters (38):
8. Press the dust-compartment opening button (13)
to open the dust compartment lid (14).
9. Remove the Pure Clean dust bag (34), motor
lter grill (36) and motor lter (35) from the motor
lter grill.
10. Clean the motor lter by washing it under running
water, taking care that the jet of water is not too
strong. Then gently shake water loose.
11. When cleaning the motor lter grill, remove
any dust/powder residues with a small brush. If
needed, use a damp soft cloth.
12. Fit the motor lter into the motor lter grill again,
taking care to position it gently into the special
notches.
13. Slide the motor lter grill assembly into the
special guides in the dust compartment.
14. Fit the Pure Clean dust bag using the special dust
bag support.
15. Close the dust compartment lid until it clicks into
place.
Cleaning the dust container (I)
model without dust bag
For the routine cleaning of the dust container:
1. Press the dust-compartment opening button (13)
to open the dust compartment (14) and remove
the dust container (39).
2. Open the lid and empty the dust container.
3. Remove any residual dirt by washing the dust
container under running water.
4. Let it dry at room temperature until all its parts
are thoroughly dry.
5. Close the dust container lid until it clicks into
place and replace it into the dust compartment.
6. Close the dust compartment lid until it clicks into
place.
Cleaning the lters (L)
model without dust bag
This model comprises two Pure Clean Hepa 13 lters.
The Pure Clean Hepa 13 lter ensures maximum
protection against allergens and high air quality,
because the air given back by the appliance is entirely
free from dust/powder residues (ltering power >
99.95 %).
To clean the Pure Clean Hepa 13 lter (30) in the
back:
1. Disassemble the air grill (31) using the opening
tab.
2. Remove the Pure Clean Hepa 13 lter by
releasing the opening tab.
3. Wash the lter under running water, taking care
that the jet of water is not too strong.
4. Hold it so that the water ows parallel to its folds.
5. Let it dry at room temperature until all of it’s parts
are thoroughly dry.
6. Re-place the Pure Clean Hepa 13 lter, paying
attention to the positions of the notches.
7. Fit the air grill into its housing until it clicks into
place.
To clean the dust compartment lters (38):
8. Press the dust-compartment opening button (13)
to open the dust compartment (14).
9. Remove the dust container (39).
10. Release the opening tab and then remove the
Pure Clean Hepa 13 lter, pre-lter (41) and lter
protection grill (40).
11. When cleaning the lter protection grill, remove
any dust/powder residues with a small brush. If
needed, use a damp soft cloth.
12. Clean the pre-lter by washing it under running
water, taking care that the jet of water is not too
strong. Allow to dry.
13. Wash the Pure Clean Hepa 13 lter under
running water, taking care that the jet of water is
not too strong.
14. Hold it so that the water ows parallel to its folds.
15. Let it dry at room temperature until all its parts
are thoroughly dry.
16. Fit the pre-lter into the special indentation of the
Pure Clean Hepa 13 lter, locking both lters in
place using the protection grill.
17. Fit the pre-lter, Pure Clean Hepa 13 lter
and protection grille assembly onto the dust
container, paying attention to the positions of the
notches, until it clicks into place.
18. Re-place the dust container into the dust
compartment.
19. Close the dust compartment lid until it clicks into
place.
ATTACHMENTS
The attachments can either be supplied as standard
features (based on the model) or be purchased
separately from Hotpoint authorised centres.
Standard/Carpet brush (M)
The standard/carpet brush (1) is suitable for
24
iten
vacuuming hard and smooth oors as well as carpets
on a daily basis. Use the bristle-adjustment pedal (2)
to clean:
Hard oors
Carpets
To clean the plastic parts of the standard/carpet
brush, remove the brush from the metal extension
pipe (8) and wipe with a dry or slightly damp soft cloth.
To clean the bristles, remove any dirt using, if needed,
the precision nozzle (26).
Parquet brush (N)
The Parquet brush (3) is suitable for vacuuming
delicate areas such as wooden oors. The special
natural bristles enable you to use on very delicate
surfaces without harm.
Turbo brush (O)
The Turbo brush (4) is ideal for the in-depth
vacuuming of short-pile carpets and removing pet
hair. The rotation of the brush is operated by the
vacuum cleaner's suction power. An arrow under the
brush indicates where it can be opened for dislodging
trapped objects.
Deluxe Parquet brush (P)
The Deluxe Parquet brush (5) is suitable for
vacuuming delicate and parquet oors. The brush is
equipped with very delicate rotating bristles, which
are operated by the vacuum cleaner's suction power,
and soft wheels protecting delicate oors. To clean
the plastic parts of the Deluxe Parquet brush, remove
the brush from the metal extension pipe (8) and wipe
with a dry or slightly damp soft cloth. To clean the
rotating bristles, turn the safety lock into position and
remove, then disassemble the rotating brush and
start cleaning. Remove any hairs or threads that got
entangled using scissors, taking care not to damage
the bristles.
Upholstery brush (Q)
The Upholstery brush (6) is suitable for vacuuming
surfaces such as sofas, mattresses, blankets,
cushions etc. It is equipped with rotating bristles
operated by the vacuum cleaner’s suction power that
enable you to clean in depth and remove any fur, hairs
or mites from fabrics. The protection grill prevents the
bristles from touching the surfaces to be cleaned, thus
ensuring maximum on fabrics.
Precision nozzle (R)
The precision nozzle in the attachment compartment
(28) helps you vacuum corners, crevices and other
difcult-to-reach areas.
Nozzle for delicate surfaces (S)
The nozzle for delicate surfaces in the attachment
compartment (28) is suitable for vacuuming surfaces
requiring special care such as radiators, furniture etc.
Its special natural bristles enable you to use it on very
delicate surfaces without any harm. Disposal of old
SAFEGUARDING THE ENVIRONMENT
DISPOSAL OF PACKAGING MATERIALS
The packaging material is 100% recyclable and is marked with the recycle symbol
(*). The various parts of the packaging
must therefore be disposed of responsibility and in full compliance with local au-
thority regulations governing waste disposal.
SCRAPPING OF HOUSEHOLD APPLIANCES
This appliance is manufactured with recyclable or reusable materials. Dispose of it in
accordance with local waste disposal regulations. For further information on the tre-
atment, recovery and recycling of household
electrical appliances, contact your local authority, the
collection service for household waste or the store
where you purchased the appliance. This appliance is
marked in compliance with European Directive
2012/19/EU, Waste Electrical and Electronic
Equipment (WEEE). By ensuring this product is disposed of correctly, you will help prevent negative
consequences for the environment and human health. The (*) symbol on the product or on the accompanying documentation indicates that it should not be
treated as domestic waste but must be taken to an
appropriate collection center for the recycling of electrical and electronic equipment.
DECLARATIONS OF CONFORMITY
This appliance meets the Eco Design requirements of
European Regulation n. 666/2013, n. 665/2013.
Vacuum Cleaner tested for use on both hard surface
and on carpet (general purpose) and veried on the
basis of the standard Europe:
EN 60312-1;
EN 60704-1;
EN 60704-2-1
25

iten
TROUBLESHOOTING
Problem Possible causes / Solutions
The vacuum cleaner cannot
be switched on.
The full dust bag/container
indicator lights up although
it is not full yet.
Low suction power.
Remote Power not working.
Small electrostatic
discharges occur while
sucking up.
• The plug was not inserted or is not making contact.
• Change the dust bag. If large quantities of very ne dust/powder are
sucked up (e.g. our, etc), the full dust bag indicator may light up
although the bag is not full yet. The reason is that the Pure Clean
dust bag is able to retain very ne dust/powder particles, thus
ensuring maximum hygiene.
• Clean the dust container in models without dust bag.
• Clean the lters and, if needed, replace them.
• Make sure the expansion pipe, exible hose and brush are not
blocked.
• Clean the lters and, if needed, replace them.
• Make sure the expansion pipe, exible hose and brush are not
blocked.
• Change the dust bag. If large quantities of very ne dust/powder are
sucked up (e.g. our, etc), the Pure Clean dust bag may become
clogged.
• Clean the dust container and its lters.
• Battery not charged.
• The batteries were positioned incorrectly inside the battery
compartment. Position the two AAA batteries making sure of the
positive and negative poles.
• Remove batteries; then position them again, making sure of the
positive and negative poles.
• Electronic appliances or obstacles may be interfering or shielding
with the infrared signal.
• If very ne dust or powders are sucked up such as our, etc. small
electrostatic discharges could occur. When sucking up materials
previously mentioned, we advise not to use the metal extension pipe,
but only the plastic exible hose and to set a low suction power level.
The vacuum cleaner whistles
or vibrates when in use.
The brush moves with
difculty.
The dust compartment lid
cannot be closed.
26
• One or more attachments were assembled incorrectly. Make sure the
lters and brushes were assembled according to these instructions.
In the model with dust bag make sure that the gasket is correctly in
place too.
• The dust bag/container is full. Replace the dust bag or clean the dust
container.
• Clean the lters and, if needed, replace them.
• The air regulator is open. Make sure it was closed correctly.
• Reduce suction power, especially on carpets and fabrics in general.
Open the air regulator to reduce the “suction effect”.
• The Pure Clean dust bag or dust container was assembled incorrectly.
Make sure it is correctly in place so that the safety lever will let you
close the dust compartment lid.

fr
CONSIGNES DE SÉCURITÉ
CONSIGNES IMPORTANTES À LIRE ET À RESPECTER
• Avant d’utiliser l’appareil, veuillez lire ces consignes de sécurité. Veuillez
les conserver à portée de main pour pouvoir les consulter ultérieurement.
Ces instructions sont également disponibles sur le site www.hotpoint.eu
• Ces instructions et l’appareil lui-même comportent d’importants
avertissements de sécurité qu’il faut toujours respecter. Le fabricant
décline toute responsabilité en cas de non-respect de ces consignes
de sécurité, d’utilisation non appropriée de l’appareil ou de mauvais
réglage des commandes.
AVERTISSEMENTS DE SÉCURITÉ
•
Les très jeunes enfants (de 0 à 3 ans) doivent être tenus à distance
de l’appareil. Les jeunes enfants (de 3 à 8 ans) doivent être tenus à
distance de l’appareil s’ils ne sont pas surveillés.
• Les enfants de 8 ans et plus et les personnes dont les capacités
physiques, sensorielles ou mentales sont réduites ou qui ne possèdent pas
l’expérience et les connaissances requises ne peuvent utiliser cet appareil
que sous surveillance. En alternative, ces personnes peuvent utiliser
l’appareil si elles ont reçu des instructions sur la manière d’utiliser l’appareil
en toute sécurité et compris les dangers impliqués. Les enfants ne doivent
pas jouer avec l’appareil. Le nettoyage et les opérations d’entretien incombant
à l’utilisateur ne doivent pas être réalisés par des enfants sans surveillance.
UTILISATION AUTORISÉE
• ATTENTION : l’appareil n’est pas conçu pour être utilisé avec une
minuterie externe ou un système de commande à distance.
• Cet appareil est conçu pour être utilisé dans un environnement
domestique ou similaire tel que : l’espace cuisine réservé au personnel
d’un magasin, d’un bureau ou d’un autre environnement de travail ; les
gîtes ruraux ; par les clients dans les hôtels, motels, chambres d’hôtes
et autres environnements résidentiels.
• Cet appareil n’est pas destiné à un usage professionnel. N’utilisez
pas l’appareil à l’extérieur.
• ATTENTION : le exible contient des connexions électriques. Ne
l’utilisez jamais pour aspirer de l’eau et ne l’immergez jamais dans l’eau
pour le nettoyer. Le exible doit être vérié régulièrement et ne doit pas
être utilisé s’il est endommagé - risque d’électrocution.
27it27
fr
• N’utilisez pas l’appareil pour aspirer des cendres ou toute autre
substance chaude - risque d’incendie. N’utilisez pas l’appareil pour
aspirer des liquides ou des substances humides - risque d’électrocution.
• N’utilisez pas l’appareil sur des personnes ou des animaux - risque
de blessure.
INSTALLATION
• Ne réparez et ne remplacez aucune pièce de l’appareil, à moins
que cela ne soit spéciquement indiqué dans le mode d’emploi. Après
avoir déballé l’appareil, assurez-vous qu’il n’a pas été endommagé
pendant le transport. En cas de problèmes, contactez le revendeur ou
le Service Après-vente le plus proche. Une fois l’appareil assemblé, les
déchets d’emballage (plastique, parties en polystyrène, etc.) doivent
être stockés hors de portée des enfants - risque d’étouffement.
• Retirez tous les matériaux d’emballage, y-compris les étiquettes
autocollantes, avant d’utiliser l’appareil.
AVERTISSEMENTS ÉLECTRIQUES
• Avant de brancher l’appareil, vériez que les caractéristiques
électriques indiquées correspondent à celles de votre alimentation
électrique. La plaque signalétique se situe sous l’appareil.
• Il doit être possible de déconnecter l’appareil de l’alimentation en le
débranchant si la che est accessible ou en agissant sur un interrupteur
multipolaire installé en amont de la prise et l’appareil doit être raccordé
à la terre, conformément aux normes nationales en vigueur en matière
de sécurité électrique.
• N’utilisez pas de rallonges, de prises multiples ou d’adaptateurs.
N’utilisez pas l’appareil si vous êtes mouillé ou à pieds nus. N’utilisez
pas l’appareil si son câble ou sa che d’alimentation sont endommagés,
s’il ne fonctionne pas correctement, s’il a été endommagé ou s’il est
tombé. Si le câble d’alimentation est endommagé, il doit être remplacé
par un câble identique - risque d’électrocution.
NETTOYAGE ET ENTRETIEN
• AVERTISSEMENT : assurez-vous que l’appareil est éteint et déconnecté
de l’alimentation électrique avant toute opération de nettoyage ou d’entretien
- risque d’électrocution. N’utilisez jamais de nettoyeur vapeur.
• Ne vaporisez jamais de produits de nettoyage sur l’appareil - risque
d’électrocution.
28it28
fr
DESCRIPTION DE L'APPAREIL
1. Brosse normale/tapis
2. Pédale de réglage des poils de la brosse
3. Brosse Parquet
4. Brosse Turbo
5. Brosse pour meubles*
6. Brosse Deluxe Parquet*
7. Réglage de la longueur du tube
8. Tube télescopique en métal
9. Poignée
10. Tube exible en plastique
11. Poignée du corps
12. Bouton d'ouverture/fermeture du Trolley System
13. Bouton d'ouverture du compartiment à poussière
14. Couvercle du compartiment à poussière
15. Bouche d'aspiration
16. Dispositif de déverrouillage
17. Indicateur de sac plein/indicateur du récipient
poussière plein
18. Bouton marche/arrêt
19. Bouton de l'enrouleur du cordon
20. Boutons +/- pour le réglage électronique de la
puissance*
21. Bouton Stand-by*
22. Logement des piles*
23. Régulateur d'air
INTRODUCTION
Bienvenue dans le Floor Care de HotpointAriston. Nous vous remercions d'avoir acheté
l'aspirateur traineau Trolley Power et nous
vous recommandons d'enregistrer ce produit
sur www.hotpoint.eu an d’obtenir tous les
avantages de l'assistance Hotpoint-Ariston.
Le Trolley Power est conçu pour des performances
optimales, en vous garantissant une extrême facilité
d'utilisation.
Le Trolley System exclusif offre une maniabilité
unique, en vous permettant de vous déplacer
facilement dans la maison sans heurter les meubles.
Le Remote Power Control quant à lui, vous permet
de régler la puissance d'aspiration directement sur la
poignée, sans aucun effort et sans vous baisser.
Avant d'utiliser l'appareil, il est important de
lire attentivement ces instructions et de les
conserver avec soin pour toute référence
ultérieure.
24. Récepteur du signal Remote Power Control*
25. Régulateur électronique de la puissance*
26. Embout suceur
27. Embout pour surfaces délicates
28. Compartiment pour les accessoires
29. Position parking
30. Pure Clean Hepa 13
31. Grille d'aération
32. Cordon d'alimentation
Version avec sac:
33. Support pour sac
34. Sac Pure Clean
35. Filtre moteur
36. Grille du ltre moteur
37. Joint
38. Compartiment à poussière
Version sans sac :
38. Compartiment à poussière
39. Récipient à poussière
40. Grille de protection des ltres
41. Pré-ltre
42. Pure Clean Hepa 13
* sur certains modèles uniquement
CONSIGNES GÉNÉRALES DE
SÉCURITÉ
La sécurité de votre aspirateur est conforme aux
spécicités techniques et aux réglementations en
vigueur.
N'utilisez pas l'appareil à d'autres ns que celles
pour lesquelles il a été produit. Une utilisation
incorrecte peut entraîner des dommages corporels et
endommager des biens.
La tension de votre installation doit
correspondre à celle de l'aspirateur (230 V).
Toute erreur de raccordement peut provoquer
des dommages irréversibles à l'appareil et
annuler la garantie.
• Ne laissez pas l’appareil en
marche sans surveillance.
• Tenez les enfants à distance de
l'appareil.
• Surveillez les enfants an de
les empêcher de jouer avec
l'appareil.
29it29

fr
• Éteignez l'appareil et
débranchez-le de la prise de
courant lorsque vous ne l'utilisez
pas, avant d'installer ou de
retirer les différents accessoires
et avant son nettoyage. Pour le
déconnecter, éteignez l'appareil,
• N’utilisez pas le cordon d’alimentation pour
• Après chaque utilisation, débranchez la che
saisissez la che et débranchez-
la de la prise de courant. Ne tirez
jamais sur le cordon lui-même.
• N'utilisez jamais un appareil
• Ne pliez pas le cordon d’alimentation et ne
présentant un cordon ou une
che endommagés, ayant
• Ne laissez pas et n’utilisez pas cet appareil
montré des défaillances ou ayant
été endommagé de quelque
manière que ce soit. Renvoyez
• N’utilisez pas l’aspirateur sur les personnes ou
l'appareil à un centre de service
agréé pour qu'il y soit examiné,
• Si une panne est soupçonnée, débranchez
réparé ou réglé du point de vue
électrique ou mécanique.
• Ne mettez pas l’aspirateur dans de l’eau ou
• L’appareil peut être utilisé par
des enfants de plus de 8 ans,
par des personnes dont les ca-
• L’appareil ne doit pas être laissé à l’extérieur ni
• Pour des raisons de sécurité, nous
pacités physiques, sensorielles
ou mentales sont réduites, et
par des personnes inexpéri-
• N’utilisez pas l’appareil pour aspirer
mentées ou qui ne connaissent
pas ce produit, à condition qu’elles soient surveillées par une
• N’aspirez pas d’ objets inammables ou
personne responsable de leur
sécurité ou qu’elles aient reçu
des instructions préliminaires
• N’aspirez pas d’objets pointus ou tranchants,
sur l’utilisation de l’appareil.
• Cet appareil est conçu pour un
• L’aspiration de poussières particulièrement
usage domestique et autres
applications similaires, telles
que
- kitchenettes pour le personnel
de magasins, bureaux et autres
lieux de travail;
- gîtes ruraux ;
• Pour votre sécurité, toute éventuelle réparation
- clientèle d’hôtels, de motels
ou autres logements de type
résidentiel
- hébergements type chambre
d’hôtes.
déplacer et transporter l’appareil.
de la prise en tirant directement sur la che et
non pas sur le cordon puis rembobinez le cordon
d’alimentation.
le passez pas sur des bords tranchants qui
pourraient l’endommager.
au-dessus ou près de ammes, de fours, de
matériaux inammables ou d’autres sources de
chaleur.
les animaux. Tenez les embouts d’aspiration loin
du corps lorsque l’appareil est en marche.
immédiatement la che de la prise électrique.
dans tout autre liquide et ne vaporisez pas de
substances liquides sur l’appareil.
exposé aux intempéries.
recommandons pendant le nettoyage des
escaliers, de toujours tenir l’aspirateur en
dessous de vous.
des liquides ou des substances
humides, car vous pourriez compromettre
son fonctionnement.
incandescents (par exemple, des cendres, des
mégots de cigarettes, etc.). Des parties de
l’aspirateur pourraient s’enammer.
car ils peuvent provoquer des dommages à
l’appareil.
nes (par ex. la farine, etc.) pourrait provoquer
de petites décharges électrostatiques. Lors
de l’aspiration de ces matériaux, nous vous
recommandons de ne pas utiliser le tuyau
télescopique en métal mais uniquement le tuyau
en plastique, en programmant la puissance
d’aspiration au minimum.
ou intervention sur l’appareil doit être effectuée
30it30
 Loading...