

HOTPOINT FQ 61 GP.1 User Manual
Istruzioni per l’uso
FORNO
Sommario
IT
|
|
|
|
|
|
Installazione, 2-3 |
|
IT |
|
GB |
|
FR |
|
||
|
|
|
Posizionamento |
||||
|
|
|
|
|
|
Collegamento elettrico |
|
|
|
|
|
|
|
||
Italiano, 1 |
English,12 |
Français, 22 |
Targhetta caratteristiche |
||||
|
|
|
|
|
|
Descrizione dell’apparecchio, 4 |
|
ES |
|
PT |
|
NL |
|
||
|
|
|
Vista d’insieme |
||||
|
|
|
|
|
|
Pannello di controllo |
|
Espanol, 32 |
Portuges, 42 |
Nederlands, 52 |
|||||
|
|||||||
|
|
|
|
|
|
Avvio e utilizzo, 5 |
|
|
|
|
|
|
|
||
DE |
|
|
|
|
|
Avviare il forno |
|
|
|
|
|
|
|
Utilizzare il timer |
|
Deutsch, 62 |
|
|
|
|
Programmi, 6-7 |
||
|
|
|
|
|
|
||
|
|
|
|
|
|
Programmi di cottura |
|
|
|
|
|
|
|
Consigli pratici di cottura |
|
|
|
|
|
|
|
Tabella cottura |
|
FZ 61 P.1/HA |
|
|
|
|
Precauzioni e consigli, 8 |
||
FZ 61 P.1 IX/HA |
|
|
|||||
FZ 62 P.1/HA |
|
|
|
|
Sicurezza generale |
||
FZ 62 P.1 IX/HA |
|
|
Smaltimento |
||||
FZ 61 P.1 /Y /HA |
|
|
Risparmiare e rispettare l’ambiente |
||||
FZ 61 P.1 IX /Y /HA |
|
|
Manutenzione e cura, 9-10 |
||||
FZ 62 P.1 /Y /HA |
|
|
|||||
FZ 62 P.1 IX /Y /HA |
|
|
Escludere la corrente elettrica |
||||
FZ 62 GP.1 /Y /HA |
|
|
Pulire l’apparecchio |
||||
FZ 62 GP.1 IX /Y /HA |
|
|
Pulire la porta |
||||
FQ 61 GP.1 /HA |
|
|
Sostituire la lampadina |
||||
FZ 61 GP.1 /Y /HA |
|
|
Pulizia automatica FAST CLEAN |
||||
FZ 61 GP.1 IX /Y /HA |
|
|
|
||||
Assistenza, 11
Assistenza attiva 7 giorni su 7
Installazione
È importante conservare questo libretto per poterlo IT consultare in ogni momento. In caso di vendita, di
cessione o di trasloco, assicurarsi che resti insieme all’apparecchio per informare il nuovo proprietario sul funzionamento e sui relativi avvertimenti.
Leggere attentamente le istruzioni: ci sono importanti informazioni sull’installazione, sull’uso e sulla sicurezza.
Posizionamento
Gli imballaggi non sono giocattoli per bambini e vanno eliminati secondo le norme per la raccolta differenziata (vedi Precauzioni e consigli).
L’installazione va effettuata secondo queste istruzioni e da personale professionalmente qualificato. Una errata installazione può causare danni a persone, animali o cose.
Incasso
Per garantire un buon funzionamento dell’apparecchio è necessario che il mobile abbia le caratteristiche adatte:
•i pannelli adiacenti il forno devono essere di materiale resistente al calore;
•nel caso di mobili in legno impiallacciato, le colle devono essere resistenti alla temperatura di 100°C;
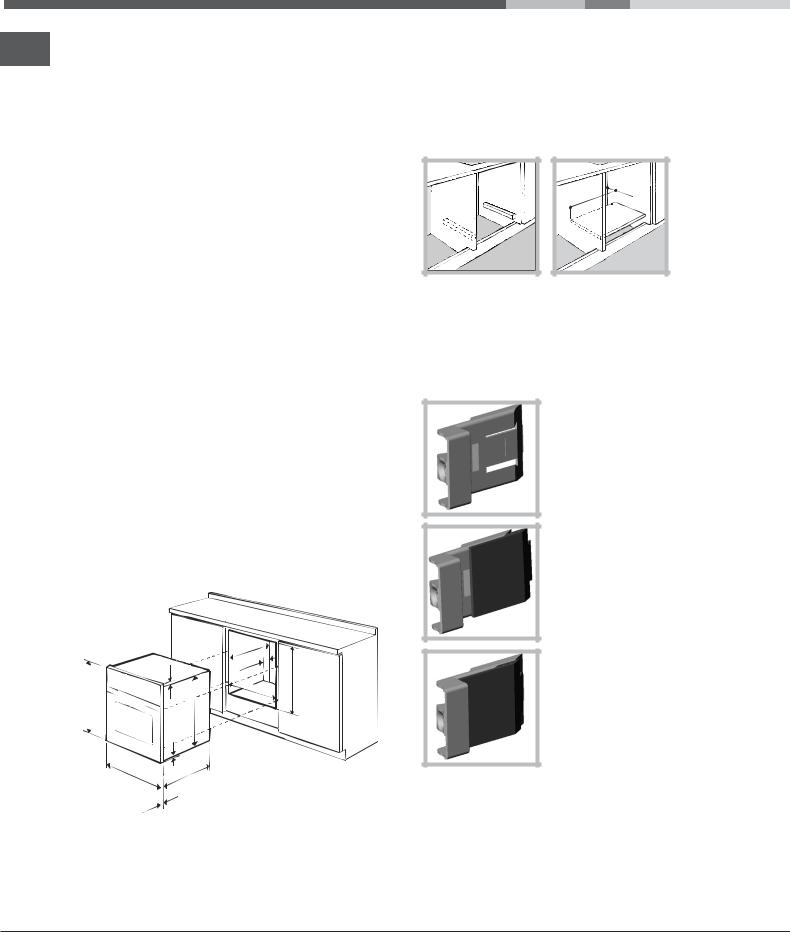
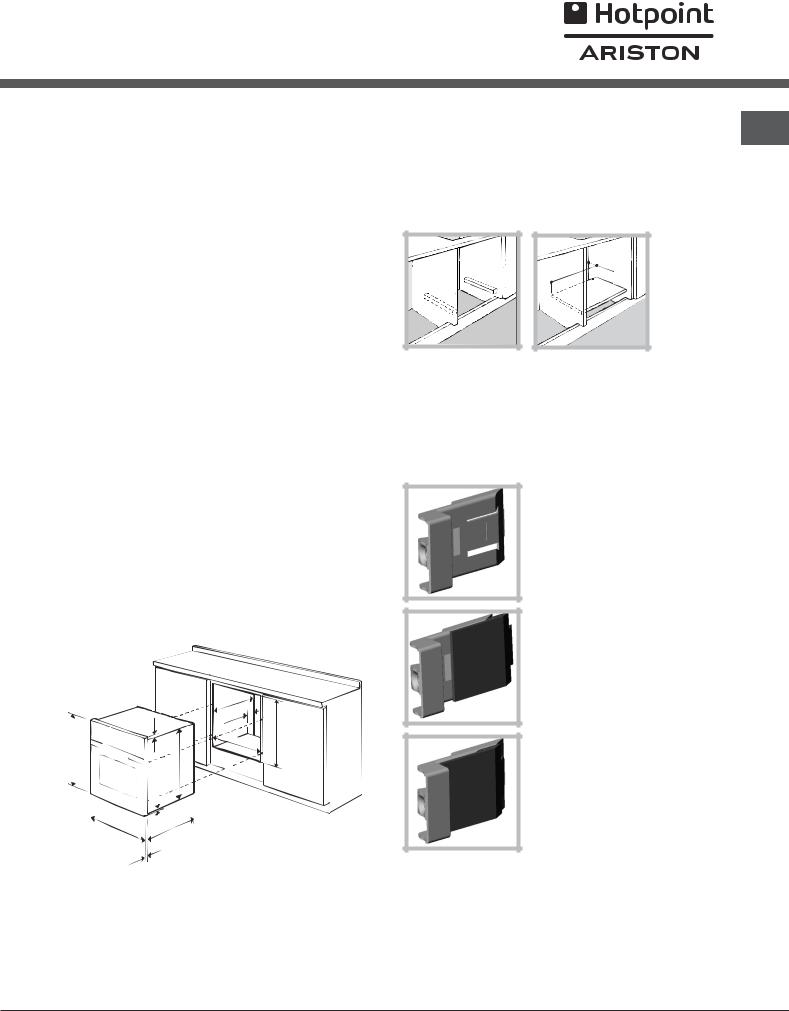
•per l’incasso del forno, sia nel caso di inserimento sottotavolo (vedi figura) che a colonna, il mobile deve avere le seguenti dimensioni:
|
23 mm. |
595 mm. |
567 mm. |
|
5 mm. |
595 |
|
m |
|
mm. |
. |
|
m |
|
|
|
545 |
|
. |
|
|
m |
|
|
m |
|
24 |
|
|
|
|
|
|
. |
|
|
|
in |
|
|
|
.m |
|
|
|
m |
|
|
|
|
m |
|
|
|
547 |
|
|
|
|
|
|
|
. |
|
45 |
mm |
|
||
|
|
|
|
|
|
558 |
mm. |
||
|
|
|
||
593 mm.
Una volta incassato l’apparecchio non debbono essere possibili contatti con le parti elettriche. Le dichiarazioni di consumo indicate in targhetta
caratteristiche sono state misurate con questo tipo di installazione.
Aerazione
Per garantire una buona aerazione è necessario eliminare la parete posteriore del vano. È preferibile installare il forno in modo che appoggi su due listelli in legno oppure su un piano continuo che abbia un’apertura di almeno 45 x 560 mm (vedi figure).
. |
45 |
mm |
|
m |
|
. |
|
m |
|
|
|
560 |
|
|
|
Centraggio e fissaggio
Regolare i 4 tacchetti posti lateralmente al forno,
in corrispondenza dei 4 fori sulla cornice perimetrale, in base allo spessore della fiancata del mobile:
spessore di 20 mm: rimuovere la parte mobile del tacchetto (vedi figura);
spessore di 18 mm: utilizzare la prima scanalatura, come già predisposto dal fabbricante
(vedi figura);
spessore di 16 mm: utilizzare la seconda scanalatura (vedi figura).
Per fissare l’apparecchio al mobile: aprire la porta del forno e avvitare 4 viti a legno nei 4 fori posti sulla cornice perimetrale.
Tutte le parti che assicurano la protezione debbono essere fissate in modo tale da non poter essere tolte senza l’aiuto di qualche utensile.
2
Collegamento elettrico
I forni dotati di cavo di alimentazione tripolare sono predisposti per il funzionamento con corrente alternata, con tensione e frequenza indicate nella targhetta caratteristiche (vedi sotto).
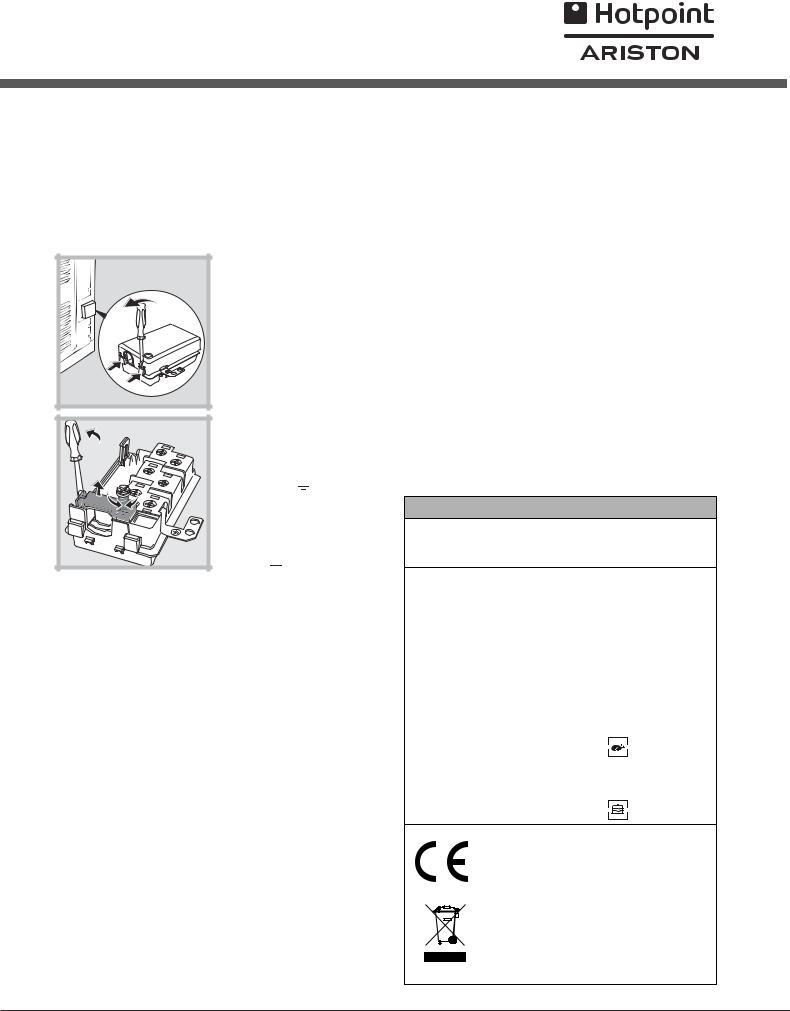
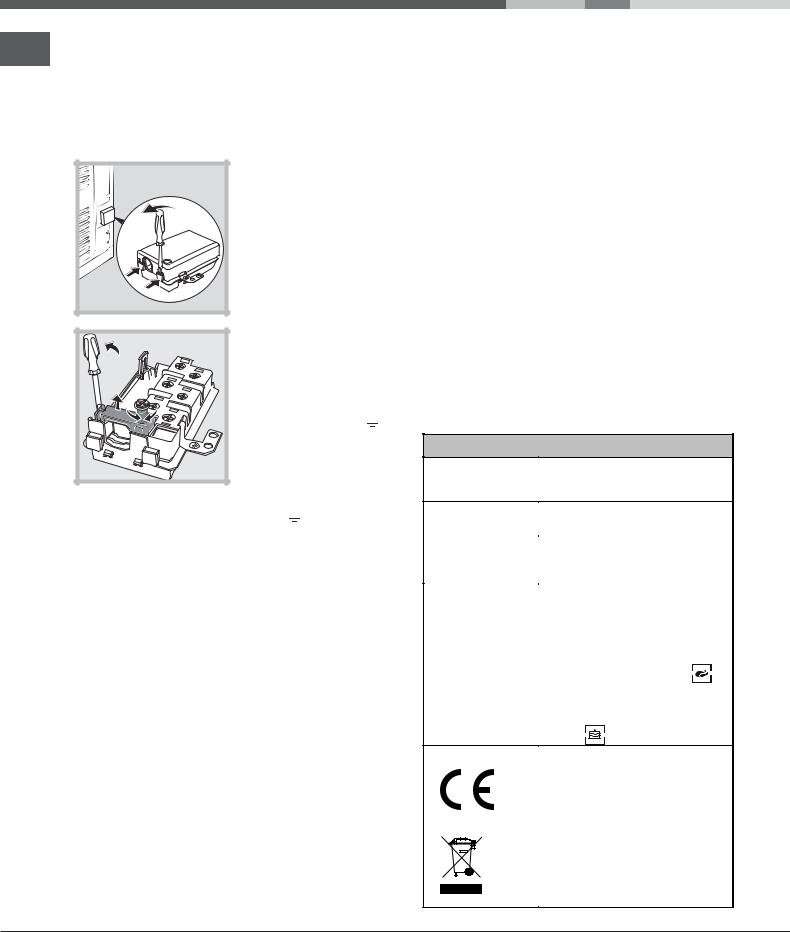
Montaggio del cavo di alimentazione
1. Aprire la morsettiera facendo leva con un cacciavite sulle linguette laterali del coperchio: tirare e aprire il coperchio (vedi figura).
2. Svitare la vite del serracavo e toglierlo facendo leva con un cacciavite (vedi figura).
3. Togliere le viti dei contatti L-N- e poi fissare i cavetti sotto le teste delle viti rispettando i colori Blu
(N) Marrone (L) GialloVerde ( ).
).
Allacciamento del cavo di alimentazione alla rete
Montare sul cavo una spina normalizzata per il carico indicato nella targhetta caratteristiche (vedi a fianco). In caso di collegamento diretto alla rete è necessario interporre tra l’apparecchio e la rete un interruttore onnipolare con apertura minima fra i contatti di 3 mm dimensionato al carico e rispondente alle norme in vigore (il filo di terra non deve essere interrotto dall’interruttore). Il cavo di alimentazione deve essere posizionato in modo tale che in nessun punto superi di 50°C la temperatura ambiente.
L’installatore è responsabile del corretto collegamento elettrico e dell’osservanza delle norme di sicurezza.
Prima di effettuare l’allacciamento accertarsi che:
•la presa abbia la messa a terra e sia a norma di legge;
•la presa sia in grado di sopportare il carico massimo di potenza della macchina, indicato nella targhetta caratteristiche (vedi sotto);
• la tensione di alimentazione sia compresa nei valori |
IT |
nella targhetta caratteristiche (vedi sotto); |
|
|
•la presa sia compatibile con la spina dell’apparecchio. In caso contrario sostituire la presa o la spina; non usare prolunghe e multiple.
Ad apparecchio installato, il cavo elettrico e la presa della corrente devono essere facilmente raggiungibili.
Il cavo non deve subire piegature o compressioni.
Il cavo deve essere controllato periodicamente e sostituito solo da tecnici autorizzati (vedi Assistenza).
L’azienda declina ogni responsabilità qualora
queste norme non vengano rispettate.
TARGHETTA CARATTERISTICHE
larghezza cm 43,5 Dimensioni altezza cm 32
profondità cm 41,5
Volume |
lt. 58 |
|
|||
|
|
||||
Collegamenti |
tensione a 220-240V ~ 50/60Hz |
||||
potenza massima assorbita |
|||||
elettrici |
|||||
2560-3050W |
|
||||
|
|
||||
|
|
|
|||
|
Direttiva 2002/40/CE |
|
|||
|
sull’etichetta dei forni elettrici. |
||||
|
Norma EN 50304 |
|
|||
ENERGY |
Consumo energia convezione |
||||
Naturale – funzione di |
|||||
LABEL |
riscaldamento: |
|
|
Tradizionale; |
|
|
Consumo energia dichiarazione |
||||
|
Classe convezione Forzata - |
||||
|
funzione di |
|
|||
|
riscaldamento: |
Pasticceria. |
|||
Questa apparecchiatura è conforme alle seguenti Direttive Comunitarie: 2006/95/CEE del 12/12/06 (Bassa Tensione) e successive modificazioni - 89/336/CEE del 03/05/89 (Compatibilità Elettromagnetica) e successive modificazioni - 93/68/CEE del 22/07/93 e successive modificazioni. 2002/96/CE
3
Descrizione dell’apparecchio
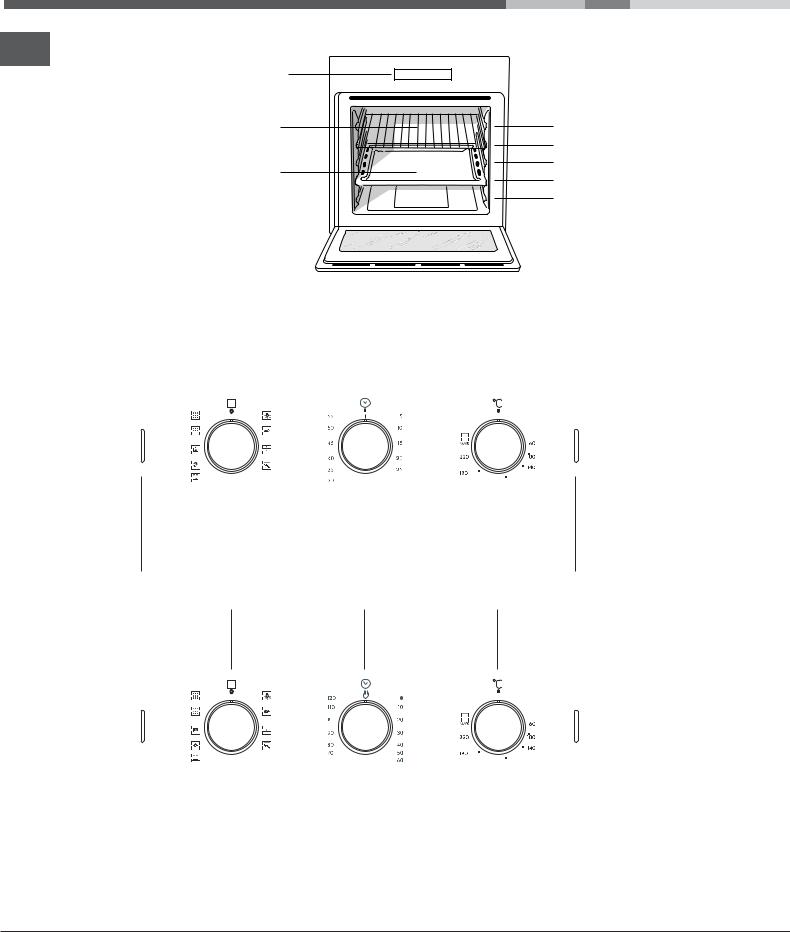
Vista d’insieme
IT
Pannello di controllo |
GUIDE di |
|
|
scorrimento dei |
|
|
ripiani |
|
Ripiano GRIGLIA |
posizione 5 |
|
|
posizione 4 |
|
Ripiano LECCARDA |
posizione 3 |
|
posizione 2 |
||
|
||
|
posizione 1 |
Pannello di controllo
|
|
|
|
Manopola |
|
|
|
|
Manopola |
|
|
|
|
Manopola |
|||||||||||||
|
|
|
|
PROGRAMMI |
|
|
|
|
TIMER * |
|
|
|
|
TERMOSTATO |
|||||||||||||
|
|
|
|
|
|
|
|
|
|
|
|
|
|
|
|
|
|
|
|
|
|
|
|
|
|
|
|
|
|
|
|
|
|
|
|
|
|
|
|
|
|
|
|
|
|
|
|
|
|
|
|
|
|
|
|
|
|
|
|
|
|
|
|
|
|
|
|
|
|
|
|
|
|
|
|
|
|
|
|
|
|
|
|
|
|
|
|
|
|
|
|
|
|
|
|
|
|
|
|
|
|
|
|
|
|
|
|
|
|
|
|
|
|
|
|
|
|
|
|
|
|
|
|
|
|
|
|
|
|
|
|
|
|
|
|
|
|
|
|
|
|
|
|
|
|
|
|
|
|
|
|
|
|
|
|
|
|
|
|
|
|
|
|
|
|
|
|
|
|
|
|
|
|
|
|
|
|
|
|
|
|
|
|
|
|
|
|
|
|
|
|
|
|
|
|
|
|
|
|
|
|
|
|
|
|
|
|
|
|
|
|
|
|
|
|
|
|
|
|
|
|
|
|
|
|
|
|
|
|
|
|
|
|
|
|
|
|
|
|
|
|
|
|
|
|
|
|
|
|
|
|
|
|
|
|
|
|
|
|
|
|
|
|
|
|
|
|
|
|
|
|
|
|
|
|
|
|
|
|
|
|
|
|
|
|
|
|
|
|
|
|
|
|
|
|
|
|
|
|
|
|
|
|
|
|
|
|
|
|
|
|
|
|
|
|
|
|
|
|
|
|
|
|
|
|
|
|
|
|
|
|
|
|
|
|
|
|
|
|
|
|
|
|
|
|
|
|
|
|
|
|
|
|
|
|
|
|
|
|
|
|
|
|
|
|
|
|
|
|
|
|
|
|
|
|
|
|
|
|
|
|
|
|
|
|
|
|
|
|
|
|
|
|
|
|
|
|
|
|
|
|
|
|
|
|
|
|
|
|
|
|
|
|
|
|
|
|
|
|
|
|
|
|
|
|
|
|
|
|
|
|
|
|
|
|
|
|
|
|
|
|
|
|
|
|
|
|
|
|
|
|
|
|
|
|
|
|
|
|
|
|
|
|
|
|
|
|
|
|
|
|
|
|
|
|
|
|
|
|
|
|
|
|
|
|
|
|
|
|
|
|
|
|
|
|
|
|
|
|
|
|
|
|
|
|
|
|
|
|
|
|
|
|
|
|
|
|
|
|
|
|
|
|
|
|
|
|
|
|
|
|
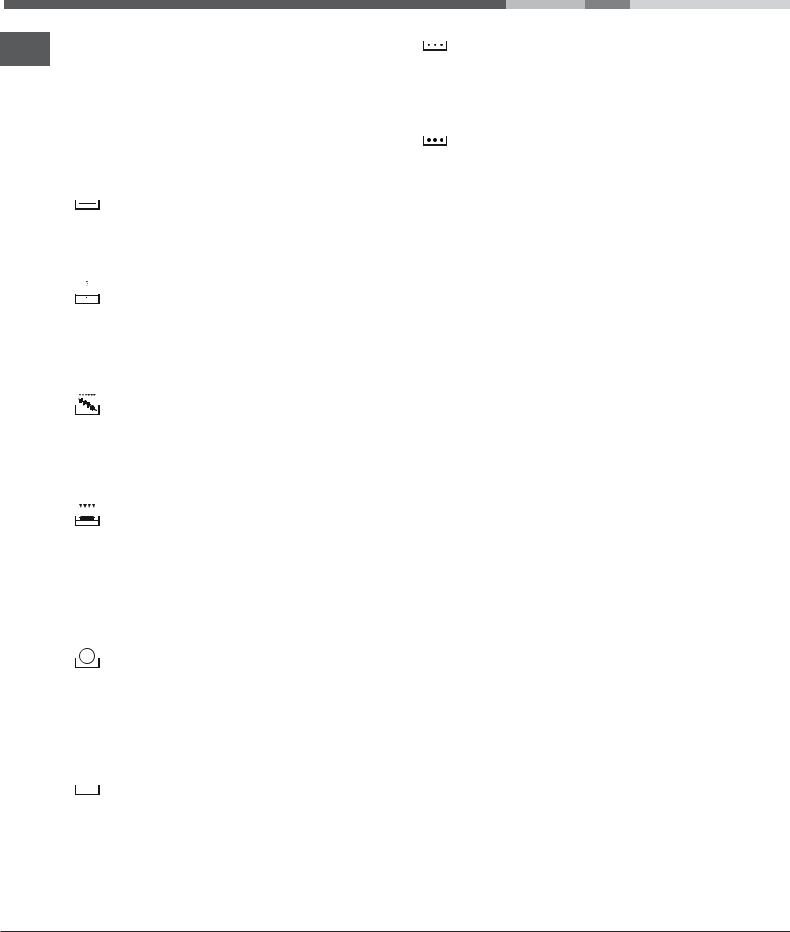
Spia |
|
|
- PRERISCALDAMENTO (lampeggia) |
|
|
- PROGRAMMA IN CORSO (fissa) |
|
Spia |
- SEGNALAZIONE ERRORE (lampeggia rapidamente) |
PORTA BLOCCATA * |
|
Manopola |
Manopola |
Manopola |
PROGRAMMI |
TIMER DI FINE |
TERMOSTATO |
|
COTTURA * |
|
|
|
|
|
|
|
|
|
|
|
|
|
|
|
|
|
|
|
|
|
|
|
|
|
|
|
|
|
|
|
|
|
|
|
|
|
|
|
|
|
|
|
|
|
|
|
|
|
|
|
|
|
|
|
|
|
|
|
|
|
|
|
|
|
|
|
|
|
|
|
|
|
|
|
|
|
|
|
|
|
|
|
|
|
|
|
|
|
|
|
|
|
|
|
|
|
|
|
|
|
|
|
|
|
|
|
|
|
|
|
|
|
|
|
|
|
|
|
|
|
|
|
|
|
|
|
|
|
|
|
|
|
|
|
|
|
|
|
|
|
|
|
|
|
|
|
|
|
|
|
|
|
|
|
|
|
|
|
|
|
|
|
|
|
|
|
|
|
|
|
|
|
|
|
|
|
|
|
|
|
|
|
|
|
|
|
|
|
|
|
|
|
|
|
|
|
|
|
|
|
|
|
|
|
|
|
|
|
|
|
|
|
|
|
|
|
|
|
|
|
|
|
|
|
|
|
|
|
|
|
|
|
|
|
|
|
|
|
|
|
|
|
|
|
|
|
|
|
|
|
|
|
|
|
|
|
|
|
|
|
|
|
|
|
|
|
|
|
|
|
|
|
|
|
|
|
|
|
|
|
|
|
|
|
|
|
|
|
|
|
|
|
|
|
|
|
|
|
|
|
|
|
|
|
|
|
|
|
|
|
|
|
|
|
|
|
|
|
|
|
|
|
|
|
|
|
|
|
|
|
|
|
|
|
|
|
|
|
|
|
|
|
|
|
|
|
|
|
|
|
|
|
|
|
|
|
|
|
|
|
|
|
|
|
|
|
|
|
|
|
|
|
|
|
|
|
|
|
|
|
|
|
|
|
|
|
|
|
|
|
|
|
|
|
|
|
|
|
|
|
|
|
|
|
|
|
|
|
|
|
|
|
|
|
|
|
|
|
|
|
|
|
|
|
|
|
|
|
|
|
|
|
|
|
|
|
|
|
|
|
|
|
|
|
|
|
|
|
|
|
|
|
|
|
|
|
|
|
|
|
|
|
|
|
|
|
|
|
|
|
|
|
|
|
|
|
|
|
|
|
|
|
|
|
|
|
|
|
|
|
|
|
|
|
|
|
|
|
|
|
|
|
|
|
|
|
|
|
|
|
|
|
|
|
|
|
|
|
|
|
|
|
|
|
|
|
|
|
|
|
|
|
|
|
|
|
|
|
|
|
|
|
|
|
|
|
|
|
|
|
|
|
|
|
|
|
|
|
|
|
|
|
|
|
|
|
|
|
|
|
|
|
|
|
|
|
|
|
|
|
|
|
|
|
|
|
|
|
|
|
|
|
|
|
|
|
|
|
|
|
|
|
|
|
|
|
|
|
|
|
|
|
|
|
|
|
|
|
|
|
|
|
|
|
|
|
|
|
|
|
|
|
|
|
|
|
|
|
|
|
|
|
|
|
|
|
|
|
|
Spia |
|
|
||||||||||||||||||||||||||||||||
|
- PRERISCALDAMENTO (lampeggia) |
|
|
||||||||||||||||||||||||||||||||
|
- PROGRAMMA IN CORSO (fissa) |
Spia |
|||||||||||||||||||||||||||||||||
|
- SEGNALAZIONE ERRORE (lampeggia rapidamente) |
PORTA BLOCCATA * |
|||||||||||||||||||||||||||||||||
* Presente solo in alcuni modelli.
4

Avvio e utilizzo
Alla prima accensione fare funzionare il forno a vuoto per almeno un’ora con il termostato al massimo e a porta chiusa. Poi spegnere, aprire la porta del forno
e aerare il locale. L’odore che si avverte è dovuto all’evaporazione delle sostanze usate per proteggere il forno.
Avviare il forno
1.Selezionare il programma di cottura desiderato ruotando la manopola PROGRAMMI.
2.Il forno entra nella fase di preriscaldamento, sul pannello di controllo lampeggia la spia PRERISCALDAMENTO.
3.Scegliere la temperatura ruotando la manopola TERMOSTATO. Una lista con le cotture e le relative temperature consigliate è consultabile nella Tabella cottura (vedi Programmi).
4.La spia PROGRAMMA IN CORSO accesa fissa sul pannello di controllo segnala che il preriscaldamento è completo: introdurre gli alimenti da cuocere.
5.Durante la cottura è sempre possibile:
-modificare il programma di cottura agendo sulla manopola PROGRAMMI;
-modificare la temperatura agendo sulla manopola TERMOSTATO;
-interrompere la cottura riportando la manopola PROGRAMMI in posizione “0”.
6. In caso di black-out, se la temperatura del forno non si è abbassata troppo, l’apparecchio è dotato di un sistema che riattiva il programma dal punto in cui è stato interrotto.
Nel programma BARBECUE non è previsto il preriscaldamento.
Non appoggiare mai oggetti sul fondo del forno perché si rischiano danni allo smalto.
Porre sempre i recipienti di cottura sulla griglia in dotazione.
Ventilazione di raffreddamento
Per ottenere una riduzione delle temperature esterne, alcuni modelli sono dotati di una ventola di raffreddamento. Questa genera un getto d’aria che esce tra il pannello di controllo e la porta del forno. A fine cottura la ventola rimane attiva finché il forno non è sufficientemente freddo. Nel programma PASTICCERIA si avvia solo a forno caldo, mentre all’inizio dei programmi FAST CLEAN la ventola funziona a bassa velocità.
A fine cottura la ventola rimane attiva finché il forno |
IT |
|
non è sufficientemente freddo. |
||
|
||
|
|
Luce del forno
Si accende selezionando con la manopola PROGRAMMI. Rimane accesa quando si seleziona un programma di cottura. Coi due programmi di FAST CLEAN invece si spegne automaticamente.
Utilizzare il timer*
1.Occorre anzitutto caricare la suoneria, ruotando la manopola TIMER di un giro quasi completo in senso orario.
2.Tornando indietro in senso antiorario, impostare il tempo desiderato facendo coincidere i minuti indicati sulla manopola TIMER con il riferimento fisso sul pannello di controllo.
3.Il timer è un contaminuti: a tempo scaduto emette un segnale acustico.
Il timer non controlla l’accensione e lo spegnimento del forno.
Utilizzare il timer di fine cottura*
1.Occorre anzitutto caricare la suoneria, ruotando la manopola TIMER DI FINE COTTURA di un giro quasi completo in senso orario.
2.Tornando indietro in senso antiorario, impostare il tempo desiderato facendo coincidere i minuti indicati sulla manopola TIMER DI FINE COTTURA con il riferimento fisso sul pannello di controllo.
3.A tempo scaduto emette un segnale acustico e spegne il forno.
4.Quando il forno è spento il timer di fine cottura può essere usato come un normale contaminuti.
Per utilizzare il forno in funzionamento manuale, escludendo cioè il timer di fine cottura, occorre ruotare la manopola TIMER DI FINE COTTURA fino al simbolo '.
* Presente solo in alcuni modelli.
5
Programmi
Programmi di cottura
IT
Per tutti i programmi è impostabile una temperatura tra 60°C e MAX, tranne:
•BARBECUE (si consiglia di impostare solo su MAX);
•GRATIN (si consiglia di non superare la temperatura di 200°C).
 Programma FORNO TRADIZIONALE
Si attivano i due elementi riscaldanti inferiore e superiore. Con questa cottura tradizionale è meglio utilizzare un solo ripiano: con più ripiani si ha una cattiva distribuzione della temperatura.
 Programma MULTICOTTURA
Si attivano tutti gli elementi riscaldanti (superiore, inferiore e circolare) ed entra in funzione la ventola. Poiché il calore è costante in tutto il forno, l’aria cuoce e rosola il cibo in modo uniforme. È possibile utilizzare fino a un massimo di due ripiani contemporaneamente.
 Programma BARBECUE
Si attiva l’elemento riscaldante superiore.
La temperatura elevata e diretta del grill è consigliata per gli alimenti che necessitano di un’alta temperatura superficiale. Effettuare le cotture con la porta del forno chiusa.
 Programma GRATIN
Si attiva l’elemento riscaldante superiore ed entra in funzione la ventola. Unisce all’irradiazione termica unidirezionale, la circolazione forzata dell’aria all’interno del forno. Ciò impedisce la bruciatura superficiale degli alimenti aumentando il potere di penetrazione del calore. Effettuare le cotture con la porta del forno chiusa.
 Programma FORNO PIZZA
Si attivano gli elementi riscaldanti inferiore e circolare ed entra in funzione la ventola. Questa combinazione consente un rapido riscaldamento del forno, con un forte apporto di calore in prevalenza dal basso. Nel caso si utilizzi più di un ripiano alla volta, è necessario cambiarli di posizione tra loro a metà cottura.
 Programma FORNO PASTICCERIA
Si attiva l’elemento riscaldante posteriore ed entra in funzione la ventola, garantendo un calore delicato e uniforme all’interno del forno. Questo programma è indicato per la cottura dei cibi delicati (ad es. dolci che necessitano di lievitazione) e preparazioni “mignon” su tre ripiani contemporaneamente.
 Programma FAST CLEAN
È il programma di pulizia automatica e integrale
del forno tramite pirolisi (vedi Manutenzione e cura).
Il ciclo del programma è preimpostato a 90 minuti.
 Programma FAST CLEAN INTENSIVO
È il programma di pulizia automatica e integrale
del forno tramite pirolisi (vedi Manutenzione e cura).
Il ciclo del programma è preimpostato a 120 minuti.
Consigli pratici di cottura
Nelle cotture ventilate non utilizzare le posizioni dei ripiani 1 e 5: sono investite direttamente dall’aria calda, che potrebbe provocare bruciature sui cibi delicati.
Nelle cotture BARBECUE e GRATIN, disporre
la leccarda in posizione 1 per raccogliere i residui di cottura (sughi e/o grassi).
MULTICOTTURA
•Utilizzare le posizioni dei ripiani 2 e 4, mettendo alla 2 i cibi che richiedono maggior calore.
•Disporre la leccarda in basso e la griglia in alto. BARBECUE
•Inserire la griglia in posizione 3 o 4, disponendo gli alimenti al centro della griglia.
•Si consiglia di impostare il livello di energia al massimo. Non allarmarsi se la resistenza superiore non resta costantemente accesa: il suo funzionamento è controllato da un termostato.
FORNO PIZZA
•Utilizzare una teglia in alluminio leggero, appoggiandola sulla griglia in dotazione. Con la leccarda si allungano i tempi di cottura e difficilmente si ottiene una pizza croccante.
•Nel caso di pizze molto farcite è consigliabile inserire la mozzarella a metà cottura.
6

Tabella cottura
IT
|
|
Peso |
Posizione |
Preriscaldamento |
Temperatura |
Durata |
|
Programmi |
Alimenti |
cottura |
|||||
(Kg) |
dei ripiani |
(minuti) |
consigliata |
||||
|
|
(minuti) |
|||||
|
|
|
|
|
|
||
|
|
|
|
|
|
|
|
|
Anatra |
1 |
3 |
15 |
200 |
65-75 |
|
Forno |
Arrosto di vitello o manzo |
1 |
3 |
15 |
200 |
70-75 |
|
Arrosto di maiale |
1 |
3 |
15 |
200 |
70-80 |
||
Tradizionale |
|||||||
Biscotti (di frolla) |
- |
3 |
15 |
180 |
15-20 |
||
|
|||||||
|
Crostate |
1 |
3 |
15 |
180 |
30-35 |
|
|
|
|
|
|
|
|
|
|
Pizza (su 2 ripiani) |
1 |
2 e 4 |
15 |
230 |
15-20 |
|
|
Lasagne |
1 |
3 |
10 |
180 |
30-35 |
|
|
Agnello |
1 |
2 |
10 |
180 |
40-45 |
|
|
Pollo arrosto + patate |
1+1 |
2 e 4 |
15 |
200 |
60-70 |
|
|
Sgombro |
1 |
2 |
10 |
180 |
30-35 |
|
Multicottura |
Plum-cake |
1 |
2 |
10 |
170 |
40-50 |
|
|
Bignè (su 2 ripiani) |
0.5 |
2 e 4 |
10 |
190 |
20-25 |
|
|
Biscotti(su 2 ripiani) |
0.5 |
2 e 4 |
10 |
180 |
10-15 |
|
|
Pan di spagna (su 1 ripiano) |
0.5 |
2 |
10 |
170 |
15-20 |
|
|
Pan di spagna (su 2 ripiani) |
1 |
2 e 4 |
10 |
170 |
20-25 |
|
|
Torte salate |
1.5 |
3 |
15 |
200 |
25-30 |
|
|
|
|
|
|
|
|
|
|
Sogliole e seppie |
1 |
4 |
5 |
MAX |
8-10 |
|
|
Spiedini di calamari e gamberi |
1 |
4 |
5 |
MAX |
6-8 |
|
|
Filetto di merluzzo |
1 |
4 |
5 |
MAX |
10 |
|
|
Verdure alla griglia |
1 |
3 o 4 |
5 |
MAX |
10-15 |
|
Barbecue |
Bistecca di vitello |
1 |
4 |
5 |
MAX |
15-20 |
|
|
Cotolette |
1 |
4 |
5 |
MAX |
15-20 |
|
|
Hamburger |
1 |
4 |
5 |
MAX |
7-10 |
|
|
Sgombri |
1 |
4 |
5 |
MAX |
15-20 |
|
|
Toast |
n. 4 |
4 |
5 |
MAX |
2-3 |
|
|
|
|
|
|
|
|
|
Gratin |
Pollo alla griglia |
1.5 |
2 |
5 |
200 |
55-60 |
|
Seppie |
1.5 |
2 |
5 |
200 |
30-35 |
||
|
|||||||
|
|
|
|
|
|
|
|
|
Pizza |
0.5 |
3 |
15 |
220 |
15-20 |
|
Forno Pizza |
Arrosto di vitello o manzo |
1 |
2 |
10 |
220 |
25-30 |
|
|
Pollo |
1 |
2 o 3 |
10 |
180 |
60-70 |
|
|
|
|
|
|
|
|
|
|
Crostate |
0.5 |
3 |
15 |
180 |
20-30 |
|
|
Torta di frutta |
1 |
2 o 3 |
15 |
180 |
40-45 |
|
|
Plum-cake |
0.7 |
3 |
15 |
180 |
40-50 |
|
|
Pan di spagna |
0.5 |
3 |
15 |
160 |
25-30 |
|
Forno |
Crêpes farcite (su 2 ripiani) |
1.2 |
2 e 4 |
15 |
200 |
30-35 |
|
Cake piccoli (su 2 ripiani) |
0.6 |
2 e 4 |
15 |
190 |
20-25 |
||
Pasticceria |
|||||||
Salatini di sfoglia al formaggio (su 2 |
0.4 |
2 e 4 |
15 |
210 |
15-20 |
||
|
|||||||
|
ripiani) |
0.7 |
1 e 3 e 5 |
15 |
180 |
20-25 |
|
|
Bignè (su 3 ripiani) |
0.7 |
1 e 3 e 5 |
15 |
180 |
20-25 |
|
|
Biscotti (su 3 ripiani) |
0.5 |
1 e 3 e 5 |
15 |
90 |
180 |
|
|
Meringhe (su 3 ripiani) |
|
|
|
|
|
|
|
|
|
|
|
|
|
7

Precauzioni e consigli
L’apparecchio è stato progettato e costruito in IT conformità alle norme internazionali di sicurezza.
Queste avvertenze sono fornite per ragioni di sicurezza e devono essere lette attentamente.
Sicurezza generale
•L’apparecchio è stato concepito per un uso di tipo non professionale all’interno dell’abitazione.
•L’apparecchio non va installato all’aperto, nemmeno se lo spazio è riparato, perché è molto pericoloso lasciarlo esposto a pioggia e temporali.
•Per movimentare l’apparecchio servirsi sempre delle apposite maniglie poste sui fianchi del forno.
•Non toccare la macchina a piedi nudi o con le mani o i piedi bagnati o umidi.
•L’apparecchio deve essere usato per cuocere alimenti, solo da persone adulte e secondo le istruzioni riportate in questo libretto.
•Durante l'uso dell'apparecchio gli elementi riscaldanti e alcune parti della porta forno diventano molto calde. Fare attenzione a non toccarle e tenere i bambimi a distanza.
•Evitare che il cavo di alimentazione di altri elettrodomestici entri in contatto con parti calde del forno.
•Non ostruire le aperture di ventilazione e di smaltimento di calore.
•Impugnare la maniglia di apertura della porta al centro: ai lati potrebbe essere calda.
•Utilizzare sempre guanti da forno per inserire o estrarre recipienti.
•Non rivestire il fondo del forno con fogli di alluminio.
•Non riporre materiale infiammabile nel forno: se l’apparecchio viene messo inavvertitamente in funzione potrebbe incendiarsi.
•Assicurarsi sempre che le manopole siano nella posizione “l”/“¡” quando l’apparecchio non è utilizzato.
•Non staccare la spina dalla presa della corrente tirando il cavo, bensì afferrando la spina.
•Non fare pulizia o manutenzione senza aver prima staccato la spina dalla rete elettrica.
•In caso di guasto, in nessun caso accedere ai meccanismi interni per tentare una riparazione. Contattare l’Assistenza (vedi Assistenza).
•Non appoggiare oggetti pesanti sulla porta del forno aperta.
•Non è previsto che l'apparecchio venga utilizzato da persone (bambini compresi) con ridotte capacità fisiche, sensoriali o mentali, da persone inesperte o che non abbiano familiarità con il prodotto, a meno che non vengano sorvegliate da una persona responsabile della loro sicurezza o non abbiano ricevuto istruzioni preliminari sull'uso dell'apparecchio.
•Evitare che i bambini giochino con l'apparecchio.
Smaltimento
•Smaltimento del materiale di imballaggio: attenersi alle norme locali, così gli imballaggi potranno essere riutilizzati.
•La direttiva Europea 2002/96/CE sui rifiuti di apparecchiature elettriche ed elettroniche (RAEE), prevede che gli elettrodomestici non debbano essere smaltiti nel normale flusso dei rifiuti solidi urbani. Gli apparecchi dismessi devono essere raccolti separatamente per ottimizzare il tasso di recupero e riciclaggio dei materiali che li compongono ed impedire potenziali danni per la salute e l’ambiente. Il simbolo del cestino barrato è riportato su tutti i prodotti per ricordare gli obblighi di raccolta separata.
Per ulteriori informazioni, sulla corretta dismissione degli elettrodomestici, i detentori potranno rivolgersi al servizio pubblico preposto o ai rivenditori.
Risparmiare e rispettare l’ambiente
•Azionando il forno negli orari che vanno dal tardo pomeriggio fino alle prime ore del mattino, soprattutto nel caso dei programmi FAST CLEAN, si collabora a ridurre il carico di assorbimento delle aziende elettriche.
•Si raccomanda di effettuare sempre le cotture al BARBECUE e GRATIN a porta chiusa: sia per ottenere migliori risultati che per un sensibile risparmio di energia (10% circa).
•Mantenere efficienti e pulite le guarnizioni, in modo che aderiscano bene alla porta e non procurino dispersioni di calore.
8

Manutenzione e cura
Escludere la corrente elettrica
Prima di ogni operazione isolare l’apparecchio dalla rete di alimentazione elettrica.
Pulire l’apparecchio
•Le parti esterne smaltate o inox e le guarnizioni in gomma possono essere pulite con una spugnetta imbevuta di acqua tiepida, e sapone neutro. Se le macchie sono difficili da asportare usare prodotti specifici. Si consiglia di sciacquare abbondantemente e di asciugare dopo la pulizia. Non usare polveri abrasive o sostanze corrosive.
•L’interno del forno va pulito preferibilmente ogni volta dopo l’uso, quando è ancora tiepido. Usare acqua calda e detersivo, risciaquare e asciugare con un panno morbido. Evitare gli abrasivi.
•Gli accessori possono essere lavati come normali stoviglie, anche in lavastoviglie.
Non utilizzare mai pulitori a vapore o ad alta pressione per la pulizia dell’apparecchio.
Pulire la porta
Pulire il vetro della porta con spugne e prodotti non abrasivi e asciugare con un panno morbido; non usare materiali ruvidi abrasivi o raschietti metallici affilati che possono graffiare la superficie e causare la frantumazione del vetro.
Per una pulizia più accurata è possibile smontare la porta del forno:
1. aprire completamente la porta (vedi figura);
2. alzare e ruotare le levette poste sulle due cerniere
(vedi figura);
3. afferrare la porta ai due lati
esterni, richiudendola IT lentamente ma non del tutto.
Poi tirare la porta verso di sé estraendola dalla sua sede (vedi figura). Rimontare la porta seguendo il procedimento
in senso contrario.
Controllare le guarnizioni
Controllare periodicamente lo stato della guarnizione attorno alla porta del forno. In caso risulti danneggiata rivolgersi al Centro Assistenza più vicino (vedi Assistenza). È consigliabile non usare il forno
fino all’avvenuta riparazione.
Sostituire la lampadina
Per sostituire la lampadina di illuminazione del forno:
cavità |
lampadina |
guarnizione |
coperchio |
1.Togliere il coperchio in vetro, servendosi di un cacciavite.
2.Svitare la lampadina e sostituirla con una analoga: potenza 15 W, attacco E 14.
Rimontare il coperchio, prestando attenzione a posizionare correttamente la guarnizione (vedi figura).
9

Pulizia automatica FAST CLEAN
IT
I programmi FAST CLEAN portano la temperatura interna del forno a raggiungere i 500°C e attivano il processo di pirolisi, ossia la carbonizzazione dei residui. Lo sporco viene letteralmente incenerito. Durante la pulizia automatica, le superfici possono diventare molto calde: tenere i bambini a distanza. Attraverso il vetro della porta forno è possibile notare alcune particelle che si illuminano: si tratta di una combustione istantanea, assolutamente normale, che non comporta alcun pericolo.
Prima di attivare i programmi FAST CLEAN:
•con una spugna umida togliere dall’interno del forno i residui più consistenti. Non usare detergenti;
•estrarre tutti gli accessori;
•non lasciare strofinacci o presine sulla maniglia.
L’attivazione dei programmi è possibile solo dopo aver chiuso la porta del forno.
Per attivare FAST CLEAN normale (90 min) ruotare la manopola PROGRAMMI su .
.
Per attivare FAST CLEAN INTENSIVO (120 min) ruotare la manopola PROGRAMMI su .
.
Scegliere il programma intensivo solo in caso di forno molto sporco.
Dispositivi di sicurezza
•la porta si blocca automaticamente non appena la temperatura raggiunge valori elevati;
•in caso di evento anomalo, l’alimentazione degli elementi riscaldanti viene interrotta.
Al termine della pulizia automatica
La spia PROGRAMMA IN CORSO si spegne, ma rimane accesa la spia PORTA BLOCCATA. Per poter aprire la porta del forno è necessario attendere che la temperatura del forno sia scesa a un livello accettabile e la spia PORTA BLOCCATA si spenga. A questo punto è possibile constatare la presenza
di alcuni depositi di polvere bianca sul fondo e sulle pareti del forno: rimuoverle con una spugna umida a forno freddo.
Se invece si desidera approfittare del calore immagazzinato per avviare una cottura, le polveri possono anche restare: non comportano alcun pericolo per gli alimenti da cucinare.
10
Assistenza
Attenzione:
L’apparecchio è dotato di un sistema di diagnostica automatica che consente di rilevare eventuali IT malfunzionamenti:
•la spia SEGNALAZIONE ERRORE sul pannello di controllo lampeggia rapidamente
•il forno si spegne automaticamente
•entra in funzione la ventola
In questi casi è necessario l’intervento dell’Assistenza tecnica.
Non ricorrere mai a tecnici non autorizzati.
Comunicare:
•Il tipo di anomalia;
•Il modello della macchina (Mod.)
•Il numero di serie (S/N)
Queste ultime informazioni si trovano sulla targhetta caratteristiche posta sull’apparecchio
Assistenza attiva 7 giorni su 7
In caso di necessità d’intervento chiamare il Numero Unico Nazionale 199.199.199*.
Un operatore sarà a completa disposizione per fissare un appuntamento con il Centro Assistenza Tecnico Autorizzato più vicino al luogo da cui si chiama.
È attivo 7 giorni su 7, sabato e domenica compresi, e non lascia mai inascoltata una richiesta.
*Al costo di 14,26 centesimi di Euro al minuto(iva inclusa) dal Lun. al Ven. dalle 08:00 alle 18:30, il Sab. dalle 08:00 alle 13:00 e di 5,58 centesimi di Euro al minuto (iva inclusa) dal Lun. al Ven. dalle 18:30 alle 08:00, il Sab. dalle 13:00 alle 08:00 e i giorni festivi, per chi chiama da telefono fisso.
Per chi chiama da radiomobile le tariffe sono legate al piano tariffario dell’operatore telefonico utilizzato.
Le suddette tariffe potrebbero essere soggette a variazione da parte dell’operatore telefonico; per maggiori informazioni consultare il sito www.aristonchannel.com.
11

Operating Instructions
OVEN
|
|
|
|
|
|
|
|
|
|
|
|
|
|
|
|
|
|
|
Contents |
|
GB |
|
|
|
|
|
|
|
|
|
|
|
|
|
|
|
|||
|
|
|
|
|
|
|
|
|
Installation, 13-14 |
|
|
|
|
|
|
|
|
|
|
|
|
|
|
|
|
|
|
|
|
|
|
|
IT |
|
GB |
|
FR |
|
Positioning |
|
|
|
|
|
|
|
|
|
Electrical connections |
|
|
|
|
|
|
|
|
|
|
|
|
|
Italiano, 1 |
English,12 |
Français, 22 |
Data plate |
|||
ES |
|
PT |
|
NL |
|
|
|
|
|
|
|
Espanol, 32 |
Portuges, 42 |
Nederlands, 52 |
|||
|
|
|
|
|
|
DE |
|
|
|
|
|
|
|
|
|
|
|
Deutsch, 62 |
|
|
|
|
|
FZ 61 P.1/HA
FZ 61 P.1 IX/HA
FZ 62 P.1/HA
FZ 62 P.1 IX/HA
FZ 61 P.1 /Y /HA
FZ 61 P.1 IX /Y /HA
FZ 62 P.1 /Y /HA
FZ 62 P.1 IX /Y /HA
FZ 62 GP.1 /Y /HA
FZ 62 GP.1 IX /Y /HA
FQ 61 GP.1 /HA
FZ 61 GP.1 /Y /HA
FZ 61 GP.1 IX /Y /HA
Description of the appliance, 15
Overall view Control panel
Start-up and use, 16
Starting the oven
How to use the timer
Cooking modes, 17-18
Cooking modes
Practical cooking advice
Cooking advice table
Precautions and tips, 19
General safety Disposal
Respecting and conserving the environment
Maintenance and care, 20-21
Switching the appliance off Cleaning the appliance Cleaning the oven door Replacing the light bulb
Automatic cleaning with the FAST CLEAN function Assistance
Installation
!Before placing your new appliance into operation please read these operating instructions carefully. They contain important information for safe use, for installation and for care of the appliance.
!Please keep these operating instructions for future reference. Pass them on to possible new owners of the appliance.
Positioning
!Keep packaging material out of the reach of children. It can become a choking or suffocation hazard (see Precautions and tips).
!The appliance must be installed by a qualified person in compliance with the instructions provided. Incorrect installation may cause harm to persons, animals or may damage property.
Fitting the appliance
Use the appropriate cabinet to ensure that the appliance functions properly.
•The panels adjacent to the oven must be made of heat-resistant material.
•Cabinets with a veneer exterior must be assembled with glues which can withstand temperatures of up to 100°C.
•to install the oven under the counter (see diagram) and in a kitchen unit, the cabinet must have the following dimensions:
|
23 mm. |
595 mm. |
567 mm. |
|
5 mm. |
595 |
|
m |
|
mm. |
. |
|
m |
|
|
|
545 |
|
. |
|
|
m |
|
|
m |
|
24 |
|
|
|
|
|
|
. |
|
|
|
in |
|
|
|
.m |
|
|
|
m |
|
|
|
|
m |
|
|
|
547 |
|
|
|
|
|
|
|
. |
|
45 |
mm |
|
||
|
|
|
|
|
|
558 |
mm. |
||
|
|
|
||
593 mm.
! The appliance must not come into contact with electrical parts once it has been installed.
The consumption indications on the data plate have been calculated for this type of installation.
Ventilation
GB
To ensure good ventilation, the back panel of the cabinet must be removed. It is advisable to install the oven so that it rests on two strips of wood, or on a completely flat surface with an opening of at least 45 x
560 mm (see diagrams).
. |
45 |
mm |
|
m |
|
. |
|
m |
|
|
|
560 |
|
|
|
Centring and fastening
Position the 4 tabs on the side of the oven according to the 4 holes of the outer frame. Adjust the tabs according to the thickness of the cabinet side panel, as shown below:
thickness of 20 mm: take off the removable part of the tab (see diagram)
thickness of 18 mm: use the first groove, which has already been set in the factory (see
diagram)
thickness of 16 mm: use the second groove (see diagram)
Secure the appliance to the cabinet by opening the oven door and putting 4 screws into the 4 holes of the outer frame.
! All parts which ensure the safe operation of the appliance must not be removable without the aid of a tool.
13
Electrical connections
GB
! Ovens equipped with a three-pole power supply cable are designed to operate with alternating current at the voltage and frequency indicated on the data plate located on the appliance (see below).
Fitting the power supply cable
1. Open the terminal board by inserting a screwdriver into the side tabs of the cover. Use the screwdriver as a lever by pushing it down to open the cover
(see diagram).
2. Loosen the cable clamp screw and remove it, using a screwdriver as a lever (see figure).
3. Remove the wire contact screws L-N-  , then fasten the wires under the screw heads, respecting the colour code: Blue (N), Brown
(L) and Yellow-Green Verde ( ).
).
Connecting the supply cable to the mains
Install a standardised plug corresponding to the load indicated on the data plate (see side).
The appliance must be directly connected to the mains using an omnipolar circuit-breaker with a minimum contact opening of 3 mm installed between the appliance and the mains, suitable for the load indicated and complying with current electrical regulations (the earthing wire must not be interrupted by the circuit-breaker). The supply cable must not come into contact with surfaces with temperatures higher than 50°C.
! The installer must ensure that the correct electrical connection has been made and that it is compliant with safety regulations.
Before connecting to the power supply, make sure that:
•The appliance is earthed and the plug is compliant with the law.
•The socket can withstand the maximum power of the appliance, which is indicated on the data plate (see below).
•The voltage must be in the range between the values indicated on the data plate (see below).
•The socket is compatible with the plug of the appliance. If the socket is incompatible with the plug, ask an authorised technician to replace it. Do not use extension cords or multiple sockets.
!Once the appliance has been installed, the power supply cable and the electrical socket must be easily accessible.
!The cable must not be bent or compressed.
!The cable must be checked regularly and replaced by authorised technicians only (see Assistance).
!The manufacturer declines any liability should
these safety measures not be observed.
DATA PLATE
width 43.5 cm
Dimensions height 32 cm depth 41,5 cm
Volume |
lt. 58 |
|
|
|
|
|
|
|
|
||
Electrical |
voltage: 220-240V ~ 50/60Hz |
||||
maximum power absorbed |
|||||
connections |
|||||
2560-3050W |
|
|
|
||
|
|
|
|
||
|
|
|
|
||
|
Directive 2002/40/EC on the label |
||||
|
of electric ovens. |
||||
|
Standard EN 50304 |
||||
ENERGY LABEL |
Energy consumption for Natural |
||||
convection – heating mode: |
|||||
|
Convection mode. |
|
|
||
|
|
||||
|
Declared energy consumption for |
||||
|
Forced convection Class – heating |
||||
|
mode: |
Baking. |
|||
This appliance conforms to the following European Economic Community directives:
2006/95/EEC of 12/12/06 (Low Voltage) and subsequent amendments;
- 89/336/EEC of 03/05/89 (Electromagnetic Compatibility) and subsequent amendments;
- 93/68/EEC of 22/07/93 and subsequent amendments.
- 2002/96/EC
14

Description of the appliance
Overall view
GB
Control panel |
GUIDES for the |
|
|
sliding racks |
|
GRILL |
position 5 |
|
|
position 4 |
|
DRIPPING PAN |
position 3 |
|
position 2 |
||
|
||
|
position 1 |
Control panel
|
|
|
|
SELECTOR |
|
|
|
|
TIMER |
|
|
|
|
THERMOSTAT |
|||||||||||||
|
|
|
|
knob |
|
|
|
|
knob * |
|
|
|
|
knob |
|||||||||||||
|
|
|
|
|
|
|
|
|
|
|
|
|
|
|
|
|
|
|
|
|
|
|
|
|
|
|
|
|
|
|
|
|
|
|
|
|
|
|
|
|
|
|
|
|
|
|
|
|
|
|
|
|
|
|
|
|
|
|
|
|
|
|
|
|
|
|
|
|
|
|
|
|
|
|
|
|
|
|
|
|
|
|
|
|
|
|
|
|
|
|
|
|
|
|
|
|
|
|
|
|
|
|
|
|
|
|
|
|
|
|
|
|
|
|
|
|
|
|
|
|
|
|
|
|
|
|
|
|
|
|
|
|
|
|
|
|
|
|
|
|
|
|
|
|
|
|
|
|
|
|
|
|
|
|
|
|
|
|
|
|
|
|
|
|
|
|
|
|
|
|
|
|
|
|
|
|
|
|
|
|
|
|
|
|
|
|
|
|
|
|
|
|
|
|
|
|
|
|
|
|
|
|
|
|
|
|
|
|
|
|
|
|
|
|
|
|
|
|
|
|
|
|
|
|
|
|
|
|
|
|
|
|
|
|
|
|
|
|
|
|
|
|
|
|
|
|
|
|
|
|
|
|
|
|
|
|
|
|
|
|
|
|
|
|
|
|
|
|
|
|
|
|
|
|
|
|
|
|
|
|
|
|
|
|
|
|
|
|
|
|
|
|
|
|
|
|
|
|
|
|
|
|
|
|
|
|
|
|
|
|
|
|
|
|
|
|
|
|
|
|
|
|
|
|
|
|
|
|
|
|
|
|
|
|
|
|
|
|
|
|
|
|
|
|
|
|
|
|
|
|
|
|
|
|
|
|
|
|
|
|
|
|
|
|
|
|
|
|
|
|
|
|
|
|
|
|
|
|
|
|
|
|
|
|
|
|
|
|
|
|
|
|
|
|
|
|
|
|
|
|
|
|
|
|
|
|
|
|
|
|
|
|
|
|
|
|
|
|
|
|
|
|
|
|
|
|
|
|
|
|
|
|
|
|
|
|
|
|
|
|
|
|
|
|
|
|
|
|
|
|
|
|
|
|
|
|
|
|
|
|
|
|
|
|
|
|
|
|
|
|
|
|
|
|
|
|
|
|
|
|
|
|
|
|
|
|
|
|
|
|
|
|
|
|
|
|
|
|
|
|
|
|
|
|
|
|
|
|
|
|
|
|
|
|
|
|
|
|
|
|
|
|
|
|
|
|
|
|
|
|
|
Indicator light |
|
- PREHEATING (blinks) |
|
- COOKING UNDER WAY (constant) |
DOOR LOCK |
- ERROR (blinks rapidly) |
indicator light * |
SELECTOR |
COOKING TIMER * |
THERMOSTAT |
knob |
Knob |
knob |
|
|
|
|
|
|
|
|
|
|
|
|
|
|
|
|
|
|
|
|
|
|
|
|
|
|
|
|
|
|
|
|
|
|
|
|
|
|
|
|
|
|
|
|
|
|
|
|
|
|
|
|
|
|
|
|
|
|
|
|
|
|
|
|
|
|
|
|
|
|
|
|
|
|
|
|
|
|
|
|
|
|
|
|
|
|
|
|
|
|
|
|
|
|
|
|
|
|
|
|
|
|
|
|
|
|
|
|
|
|
|
|
|
|
|
|
|
|
|
|
|
|
|
|
|
|
|
|
|
|
|
|
|
|
|
|
|
|
|
|
|
|
|
|
|
|
|
|
|
|
|
|
|
|
|
|
|
|
|
|
|
|
|
|
|
|
|
|
|
|
|
|
|
|
|
|
|
|
|
|
|
|
|
|
|
|
|
|
|
|
|
|
|
|
|
|
|
|
|
|
|
|
|
|
|
|
|
|
|
|
|
|
|
|
|
|
|
|
|
|
|
|
|
|
|
|
|
|
|
|
|
|
|
|
|
|
|
|
|
|
|
|
|
|
|
|
|
|
|
|
|
|
|
|
|
|
|
|
|
|
|
|
|
|
|
|
|
|
|
|
|
|
|
|
|
|
|
|
|
|
|
|
|
|
|
|
|
|
|
|
|
|
|
|
|
|
|
|
|
|
|
|
|
|
|
|
|
|
|
|
|
|
|
|
|
|
|
|
|
|
|
|
|
|
|
|
|
|
|
|
|
|
|
|
|
|
|
|
|
|
|
|
|
|
|
|
|
|
|
|
|
|
|
|
|
|
|
|
|
|
|
|
|
|
|
|
|
|
|
|
|
|
|
|
|
|
|
|
|
|
|
|
|
|
|
|
|
|
|
|
|
|
|
|
|
|
|
|
|
|
|
|
|
|
|
|
|
|
|
|
|
|
|
|
|
|
|
|
|
|
|
|
|
|
|
|
|
|
|
|
|
|
|
|
|
|
|
|
|
|
|
|
|
|
|
|
|
|
|
|
|
|
|
|
|
|
|
|
|
|
|
|
|
|
|
|
|
|
|
|
|
|
|
|
|
|
|
|
|
|
|
|
|
|
|
|
|
|
|
|
|
|
|
|
|
|
|
|
|
|
|
|
|
|
|
|
|
|
|
|
|
|
|
|
|
|
|
|
|
|
|
|
|
|
|
|
|
|
|
|
|
|
|
|
|
|
|
|
|
|
|
|
|
|
|
|
|
|
|
|
|
|
|
|
|
|
|
|
|
|
|
|
|
|
|
|
|
|
|
|
|
|
|
|
|
|
|
|
|
|
|
|
|
|
|
|
|
|
|
|
|
|
|
|
|
|
|
|
|
|
|
|
|
|
|
|
|
|
|
|
|
|
|
Indicator light |
|
|
||||||||||||||||||||||||||||||||
|
- PREHEATING (blinks) |
|
|
||||||||||||||||||||||||||||||||
|
- COOKING UNDER WAY (constant) |
DOOR LOCK |
|||||||||||||||||||||||||||||||||
|
- ERROR (blinks rapidly) |
indicator light * |
|||||||||||||||||||||||||||||||||
* Only available on certain models
15

Start-up and use
! The first time you use your appliance, heat the empty GB oven with its door closed at its maximum temperature
for at least half an hour. Ensure that the room is well ventilated before switching the oven off and opening the oven door. The appliance may produce a slightly unpleasant odour caused by the burning away of protective substances used during the manufacturing process.
Starting the oven
1.Select the desired cooking mode by turning the SELECTOR knob.
2.The oven will start the preheating phase, on the control panel the indicator light PREHEATING will blink.
3.Select the desired temperature with the
THERMOSTAT knob. See the Cooking advice table for cooking modes and the suggested cooking temperatures (see Cooking Modes).
4.When preheating is finished, the COOKING UNDER WAY indicator light will stay on: place the food in the oven.
5.You may do the following during cooking:
-change the cooking mode by turning the SELECTOR knob
-change the temperature by turning the
THERMOSTAT knob
- stop cooking by turning the SELECTOR knob to the “0” position.
6. In case of a blackout, if the oven was already operating, an automatic system within the appliance will reactivate the cooking mode from where it was interrupted as long as the temperature did not drop below a certain level.
! There is no preheating in the BARBECUE mode.
Never put objects directly on the oven bottom to avoid damaging the enamel coating.
Always place cookware on the rack(s) provided.
Cooling ventilation
In order to cool down the external temperature of the oven, some models are fitted with a cooling fan that blows out air between the control panel and the oven door.
Once the cooking has been completed, the cooling fan remains on until the oven has cooled down sufficiently. In the BAKING mode, the cooling fan goes on only when the oven is hot. At the beginning of the FAST CLEAN modes, the cooling fan operates at low speed.
! Once the cooking has been completed, the cooling fan remains on until the oven has cooled down sufficiently.
Oven light
It goes on when selecting  with the SELECTOR knob. It stays on when a cooking mode is selected. When a FAST CLEAN mode is selected the oven light turns off automatically.
How to use the timer*
1.To set the buzzer, turn the TIMER knob clockwise almost one complete revolution.
2.Turn the knob anticlockwise to set the desired time: align the minutes shown on the knob with the indicator on the control panel.
3.The timer operates in minutes: when the selected time has elapsed, a buzzer will sound.
The timer does not turn the oven on or off.
Using the cooking timer*
1.To set the buzzer, turn the COOKING TIMER knob clockwise almost one complete revolution.
2.Turn the knob anticlockwise to set the desired time: align the minutes shown on the COOKING TIMER knob with the indicator on the control panel.
3.When the selected time has elapsed, a buzzer sounds and the oven turns off.
4.When the oven is off the cooking timer can be used as a normal timer.
To use the oven manually, in other words when you do not wish to use the end of cooking timer, turn the COOKING TIMER knob until it reaches the ' symbol.
* Only available on certain models
16
Cooking modes
Cooking modes
A temperature value can be set for all cooking modes between 60°C and Max, except for the following modes
•BARBECUE (recommended: set only to MAX power level)
•GRATIN (recommended: do not exceed 200°C).
 TRADITIONAL OVEN mode
Both the top and bottom heating elements will come on. With this traditional cooking mode, it is best to use one cooking rack only; if more than one rack is used, the heat will be distributed unevenly.
 MULTI-COOKING mode
All the heating elements (top, bottom and circular), as well as the fan, will come on. Since the heat remains constant throughout the oven, the air cooks and browns food uniformly. A maximum of two racks may be used at the same time.
 BARBECUE mode
The top heating element comes on.
The high and direct temperature of the grill is recommended for food that requires high surface temperature. Always cook in this mode with the oven door closed.
 GRATIN mode
The top heating element, as well as the fan, will come on. This combination of features increases the effectiveness of the unidirectional thermal radiation of the heating elements through forced circulation of the air throughout the oven. This helps prevent food from burning on the surface, allowing the heat to penetrate right into the food. Always cook in this mode with the oven door closed.
 PIZZA mode
The bottom and circular heating elements, as well as the fan, will come on. This combination heats the oven rapidly by producing a considerable amount of heat, particularly from the bottom element. If you use more than one rack simultaneously, switch the position of the dishes halfway through the cooking process.
BAKING mode |
GB |
The rear heating element and the fan come on, guaranteeing the distribution of heat delicately and uniformly throughout the oven. This mode is ideal for baking and cooking temperature sensitive foods such as cakes that need to rise and to prepare certain tartlets on 3 shelves simultaneously.
 FAST CLEAN mode
This mode cleans the oven automatically and thoroughly by pyrolysis (see Maintenance and care).
! The default setting is 90 minutes.
 INTENSIVE FAST CLEAN mode
This mode cleans the oven automatically and thoroughly by pyrolysis (see Maintenance and care).
! The default setting is 120 minutes.
Practical cooking advice
!Do not place racks in position 1 and 5 during fanassisted cooking. Excessive direct heat can burn temperature sensitive foods.
!In the BARBECUE and GRATIN cooking modes, place the dripping pan in position 1 to collect cooking residues (fat and/or grease).
MULTI-COOKING
•Use position 2 and 4, placing the food that requires more heat on 2.
•Place the dripping pan on the bottom and the rack on top.
BARBECUE
•Insert the rack in position 3 or 4. Place the food in the centre of the rack.
•We recommend that you set the maximum power level. The top heating element is regulated by a thermostat and may not always be on.
PIZZA MODE
•Use a light aluminium pizza pan. Place it on the rack provided.
For a crispy crust, do not use the dripping pan (prevents crust from forming by extending cooking time).
•If the pizza has a lot of toppings, we recommend adding the mozzarella cheese on top of the pizza halfway through the cooking process.
17

Cooking advice table
GB
Cooking |
Foods |
Weight |
Rack position |
Pre-heating |
Recommended |
Cooking |
modes |
|
(in kg) |
|
time (min) |
temperature |
time |
|
|
|
|
|
|
(minutes) |
Convection |
Duck |
1 |
3 |
15 |
200 |
65-75 |
Oven |
Roast veal or beef |
1 |
3 |
15 |
200 |
70-75 |
|
Pork roast |
1 |
3 |
15 |
200 |
70-80 |
|
Biscuits (short pastry) |
- |
3 |
15 |
180 |
15-20 |
|
Tarts |
1 |
3 |
15 |
180 |
30-35 |
Multi-cooking |
Pizza (on 2 racks) |
1 |
2 and 4 |
15 |
230 |
15-20 |
|
Lasagne |
1 |
3 |
10 |
180 |
30-35 |
|
Lamb |
1 |
2 |
10 |
180 |
40-45 |
|
Roast chicken + potatoes |
1+1 |
2 and 4 |
15 |
200 |
60-70 |
|
Mackerel |
1 |
2 |
10 |
180 |
30-35 |
|
Plum cake |
1 |
2 |
10 |
170 |
40-50 |
|
Cream puffs (on 2 racks) |
0.5 |
2 and 4 |
10 |
190 |
20-25 |
|
Biscuits (on 2 racks) |
0.5 |
2 and 4 |
10 |
180 |
10-15 |
|
Sponge cake (on 1 rack) |
0.5 |
2 |
10 |
170 |
15-20 |
|
Sponge cake (on 2 racks) |
1 |
2 and 4 |
10 |
170 |
20-25 |
|
Savoury pies |
1.5 |
3 |
15 |
200 |
25-30 |
Barbecue |
Soles and cuttlefish |
1 |
4 |
5 |
MAX |
8-10 |
|
Squid and prawn kebabs |
1 |
4 |
5 |
MAX |
6-8 |
|
Cod filet |
1 |
4 |
5 |
MAX |
10 |
|
Grilled vegetables |
1 |
3 or 4 |
5 |
MAX |
10-15 |
|
Veal steak |
1 |
4 |
5 |
MAX |
15-20 |
|
Cutlets |
1 |
4 |
5 |
MAX |
15-20 |
|
Hamburgers |
1 |
4 |
5 |
MAX |
7-10 |
|
Mackerels |
1 |
4 |
5 |
MAX |
15-20 |
|
Toasted sandwiches |
n.° 4 |
4 |
5 |
MAX |
2-3 |
Gratin |
Grilled chicken |
1.5 |
2 |
10 |
200 |
55-60 |
|
Cuttlefish |
1.5 |
2 |
10 |
200 |
30-35 |
Pizza Mode |
Pizza |
0.5 |
3 |
15 |
220 |
15-20 |
|
Roast veal or beef |
1 |
2 |
10 |
220 |
25-30 |
|
Chicken |
1 |
2 or 3 |
10 |
180 |
60-70 |
Baking Mode |
Tarts |
0.5 |
3 |
15 |
180 |
20-30 |
|
Fruit cakes |
1 |
2 or 3 |
15 |
180 |
40-45 |
|
Plum cake |
0.7 |
3 |
15 |
180 |
40-50 |
|
Sponge cake |
0.5 |
3 |
15 |
160 |
25-30 |
|
Stuffed pancakes (on 2 racks) |
1.2 |
2 and 4 |
15 |
200 |
30-35 |
|
Small cakes (on 2 racks) |
0.6 |
2 and 4 |
15 |
190 |
20-25 |
|
Cheese puffs (on 2 racks) |
0.4 |
2 and 4 |
15 |
210 |
15-20 |
|
Cream puffs (on 3 racks) |
0.7 |
1 and 3 and 5 |
15 |
180 |
20-25 |
|
Biscuits (on 3 racks) |
0.7 |
1 and 3 and 5 |
15 |
180 |
20-25 |
|
Meringues (on 3 racks) |
0.5 |
1 and 3 and 5 |
15 |
90 |
180 |
18

Precautions and tips
! The appliance was designed and manufactured in compliance with international safety standards. The following warnings are provided for safety reasons and must be read carefully.
General safety
•The appliance was designed for domestic use inside the home and is not intended for commercial or industrial use.
•The appliance must not be installed outdoors, even in covered areas. It is extremely dangerous to leave the appliance exposed to rain and storms.
•When handling the appliance, always use the handles provided on the sides of the oven.
•Do not touch the appliance with bare feet or with wet or moist hands and feet.
•The appliance must be used to cook food by adults only and according to the instructions in this manual.
•When the appliance is in use, the heating elements and some parts of the oven door become extremely hot. Make sure you don't touch them and keep children well away.
•Ensure that the power supply cable of other electrical appliances does not come into contact with the hot parts of the oven.
•The openings used for ventilation and dispersion of heat must never be covered.
•Always grip the oven door handle in the centre: the ends may be hot.
•Always use oven gloves to place cookware in the oven or when removing it.
•Do not use aluminium foil to line the bottom of the oven.
•Do not place flammable materials in the oven: if the appliance is switched on by mistake, it could catch fire.
•Always make sure the knobs are in the “l”/“¡” position when the appliance is not in use.
•When unplugging the appliance always pull the plug from the mains socket, do not pull on the cable.
•Never carry out any cleaning or maintenance work without having unplugged the plug from the mains.
•In the case of a malfunction, under no circumstances should you attempt to repair the appliance yourself. Repairs carried out by inexperienced persons may cause injury or further malfunctioning of the appliance. Contact a Service Centre (see Assistance).
• |
Do not rest heavy objects on the open oven door. |
GB |
|
• |
The appliance should not be operated by people |
||
|
|||
|
(including children) with reduced physical, |
|
|
|
|
||
|
sensory or mental capacities, by inexperienced |
|
|
|
individuals or by anyone who is not familiar with |
|
|
|
the product. These individuals should, at the very |
|
|
|
least, be supervised by someone who assumes |
|
|
|
responsibility for their safety or receive |
|
|
|
preliminary instructions relating to the operation of |
|
|
|
the appliance. |
|
|
• |
Do not let children play with the appliance. |
|
Disposal
•Observe local environmental standards when disposing packaging material for recycling purposes. Observe existing legislation when disposing of the old appliance.
•The European Directive 2002/96/EC on Waste Electrical and Electronic Equipment (WEEE), requires that old household electrical appliances must not be disposed of in the normal unsorted municipal waste stream. Old appliances must be collected separately in order to optimise the recovery and recycling of the materials they contain and reduce the impact on human health and the environment. The crossed out “wheeled bin” symbol on the product reminds you of your obligation, that when you dispose of the appliance it must be separately collected. Consumers should contact their local authority or retailer for information concerning the correct disposal of their old appliance.
Respecting and conserving the environment
•By using the appliance in the hours between late afternoon and early morning, you can help reduce the energy consumption, especially when using the FAST CLEAN modes.
•Always keep the oven door closed when using the BARBECUE and GRATIN mode to attain best results and to save energy (approximately 10%).
•Regularly check the door seals and wipe clean to ensure they are free of debris so that they stick properly to the door and do not allow heat to disperse.
19
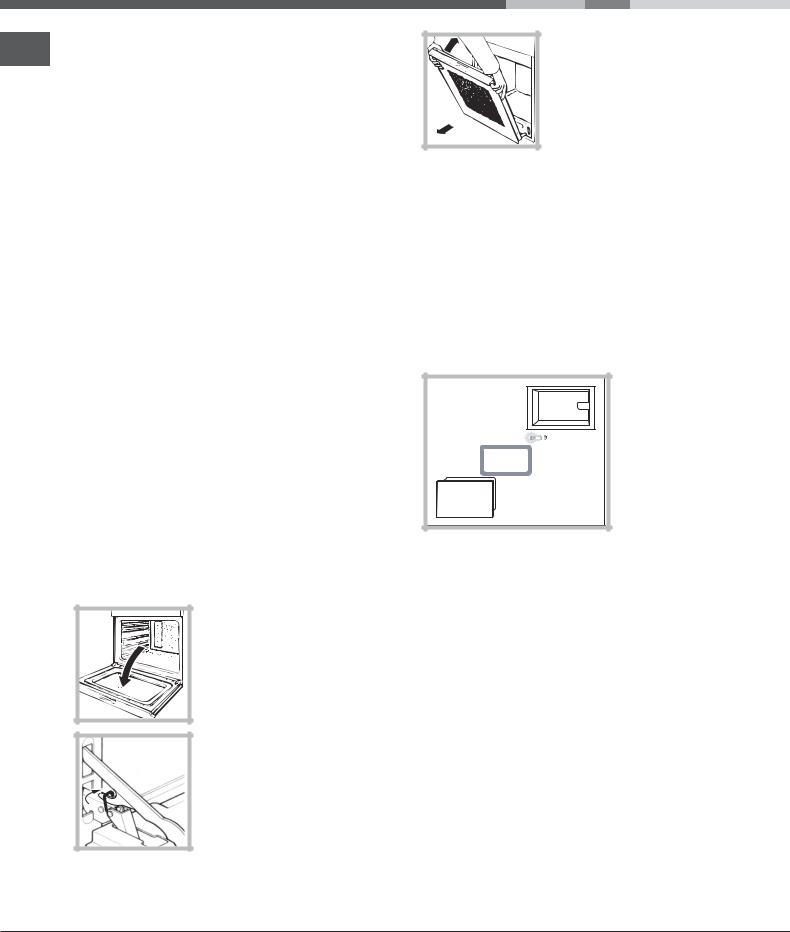
Maintenance and care
Switching the appliance off
GB
Disconnect your appliance from the electricity supply before carrying out any work on it.
Cleaning the appliance
•The stainless-steel or enamel-coated external parts as well as the rubber seals may be cleaned using a sponge that has been soaked in lukewarm water and neutral soap. If these stains are difficult to remove, use only specialised products. After cleaning, rinse and dry thoroughly. Do not use abrasive powders or corrosive substances.
•Ideally, the inside of the oven should be cleaned after each use, when it is still lukewarm. Use hot water and detergent, rinse and dry with a soft cloth. Do not use abrasive products.
•The accessories can be washed like everyday crockery (even in your dishwasher).
!Never use steam cleaners or pressure cleaners on the appliance.
Cleaning the oven door
Clean the glass part of the oven door using a sponge and a non-abrasive cleaning product, then dry thoroughly with a soft cloth. Do not use rough abrasive material or sharp metal scrapers as these could scratch the surface and cause the glass to crack. To clean more thoroughly, you can remove the oven door.
1. Open the oven door fully (see diagram)
3. Grip the door on the two external sides and close it approximately half way.
Pull the door towards you lifting it out of its seat (see diagram).
To replace the door, reverse this sequence.
Inspecting the seals
Check the door seals around the oven periodically. If the seals are damaged, please contact your nearest After-sales Service Centre (see Assistance). We recommend not using the oven until the seals have been replaced.
Replacing the light bulb
To replace the oven light bulb:
Oven |
compartment |
Lamp |
Seal |
Glass door |
1.Remove the glass lid using a screwdriver.
2.Remove the light bulb and replace it with a similar one: Wattage 15 W, cap E 14.
Replace the glass cover taking care to position the seal correctly (see diagram).
2. Lift up and turn the small levers located on the two hinges (see diagram)
20
Automatic cleaning with the FAST
CLEAN function
With the FAST CLEAN modes, the internal temperature of the oven reaches 500°C. The pyrolysis process is activated and burns away food and grime residues. Keep children away from the appliance during the automatic cleaning cycle as surfaces may become very hot. Particles may ignite inside the oven due to the spontaneous combustion process. Do not worry, this process is both normal and hazard-free.
Before initiating the FAST CLEAN modes:
•Remove large or course food residues from inside of the oven using a damp sponge. Do not use detergents.
•Remove all accessories.
•Do not place tea towels or pot holders over the oven handle.
!The programme may only be started once the oven door has been closed.
To enable the FAST CLEAN NORMAL mode (90 min.), turn the SELECTOR knob to .
.
To enable the FAST CLEAN INTENSIVE mode (120 min.), turn the SELECTOR knob to .
.
! Select the FAST CLEAN INTENSIVE mode only when the oven is exceptionally soiled.
Safety devices
•The door is locked automatically as soon as the temperature exceeds a certain value.
•Should a malfunction occur, the heating elements will switch off.
Once the automatic cleaning cycle is over
GB
The COOKING UNDER WAY indicator light will turn off and the DOOR LOCK indicator light will stay on. You will have to wait until the temperature inside the oven has cooled down sufficiently before you can open the oven door and the DOOR LOCK indicator light will turn off.
White powder deposits may remain on the bottom and sides of the oven, remove these deposits with a damp sponge once the oven has cooled down completely.
Alternatively, you can make use of the already heated oven, in which case it is not necessary to remove the deposits, they are completely harmless and will not affect your food in any way.
Assistance
Communicating:
•appliance model (Mod.)
•serial number (S/N)
This information is found on the data plate located on the appliance and/or on the packaging.
21

Mode d’emploi
FR
IT |
|
GB |
|
|
FR |
|
|
|
|
|
|
|
|
Italiano, 1 |
English,12 |
Français, 22 |
||||
|
|
|
|
|
|
|
ES |
|
PT |
|
NL |
|
|
|
|
|
|
|
|
|
Espanol, 32 |
Portuges, 42 |
Nederlands, 52 |
||||
DE
Deutsch, 62
FZ 61 P.1/HA
FZ 61 P.1 IX/HA
FZ 62 P.1/HA
FZ 62 P.1 IX/HA
FZ 61 P.1 /Y /HA
FZ 61 P.1 IX /Y /HA
FZ 62 P.1 /Y /HA
FZ 62 P.1 IX /Y /HA
FZ 62 GP.1 /Y /HA
FZ 62 GP.1 IX /Y /HA
FQ 61 GP.1 /HA
FZ 61 GP.1 /Y /HA
FZ 61 GP.1 IX /Y /HA
FOUR
Sommaire
Installation, 23-24
Positionnement
Raccordement électrique
Plaquette signalétique
Description de l’appareil, 25
Vue d’ensemble
Tableau de bord
Mise en marche et utilisation, 26
Mise en marche du four Utilisation du minuteur
Programmes, 27-28
Programmes de cuisson
Conseils de cuisson
Tableau de cuisson
Précautions et conseils, 29
Sécurité générale Mise au rebut
Economies et respect de l’environnement
Nettoyage et entretien, 30-31
Mise hors tension Nettoyage de l’appareil Nettoyage de la porte
Remplacement de l’ampoule d’éclairage Nettoyage automatique FAST CLEAN Assistance
 Loading...