

Page 1
INSTRUCTIONS FOR USE AND INSTALLATION
INDUCTION HOBS
ISTRUZIONI D’USO E INSTALLAZIONE
PIANI INDUZIONE
INSTALLATIONS- UND BEDIENUNGSANLEITUNG
CERANFELDER
MANUAL DE UTILIZAÇÃO E DE INSTALLAÇÃO
PLACAS DE INDUÇÃO
INSTALLATIE- EN GEBRUIKSINDTRUCTIES
INDUCTIEKOOKPLAAT
GB
IT
DE
PT
ES
NL
BRUGS- OG INSTALLATIONSVEJLEDNING
INDUKTIONSKOGEPLADER
KÄYTTÖ- JA ASENNUSOHJEET
INDUKTIOLIESITASOT
DA
FIN
HOOVER - Via Privata Eden Fumagalli - 20047 Brugherio (Milano) - Italy
Page 2
GENERAL WARNINGS
READ THE INSTRUCTIONS BOOKLET CAREFULLY TO MAKE THE MOST OF YOUR HOB.
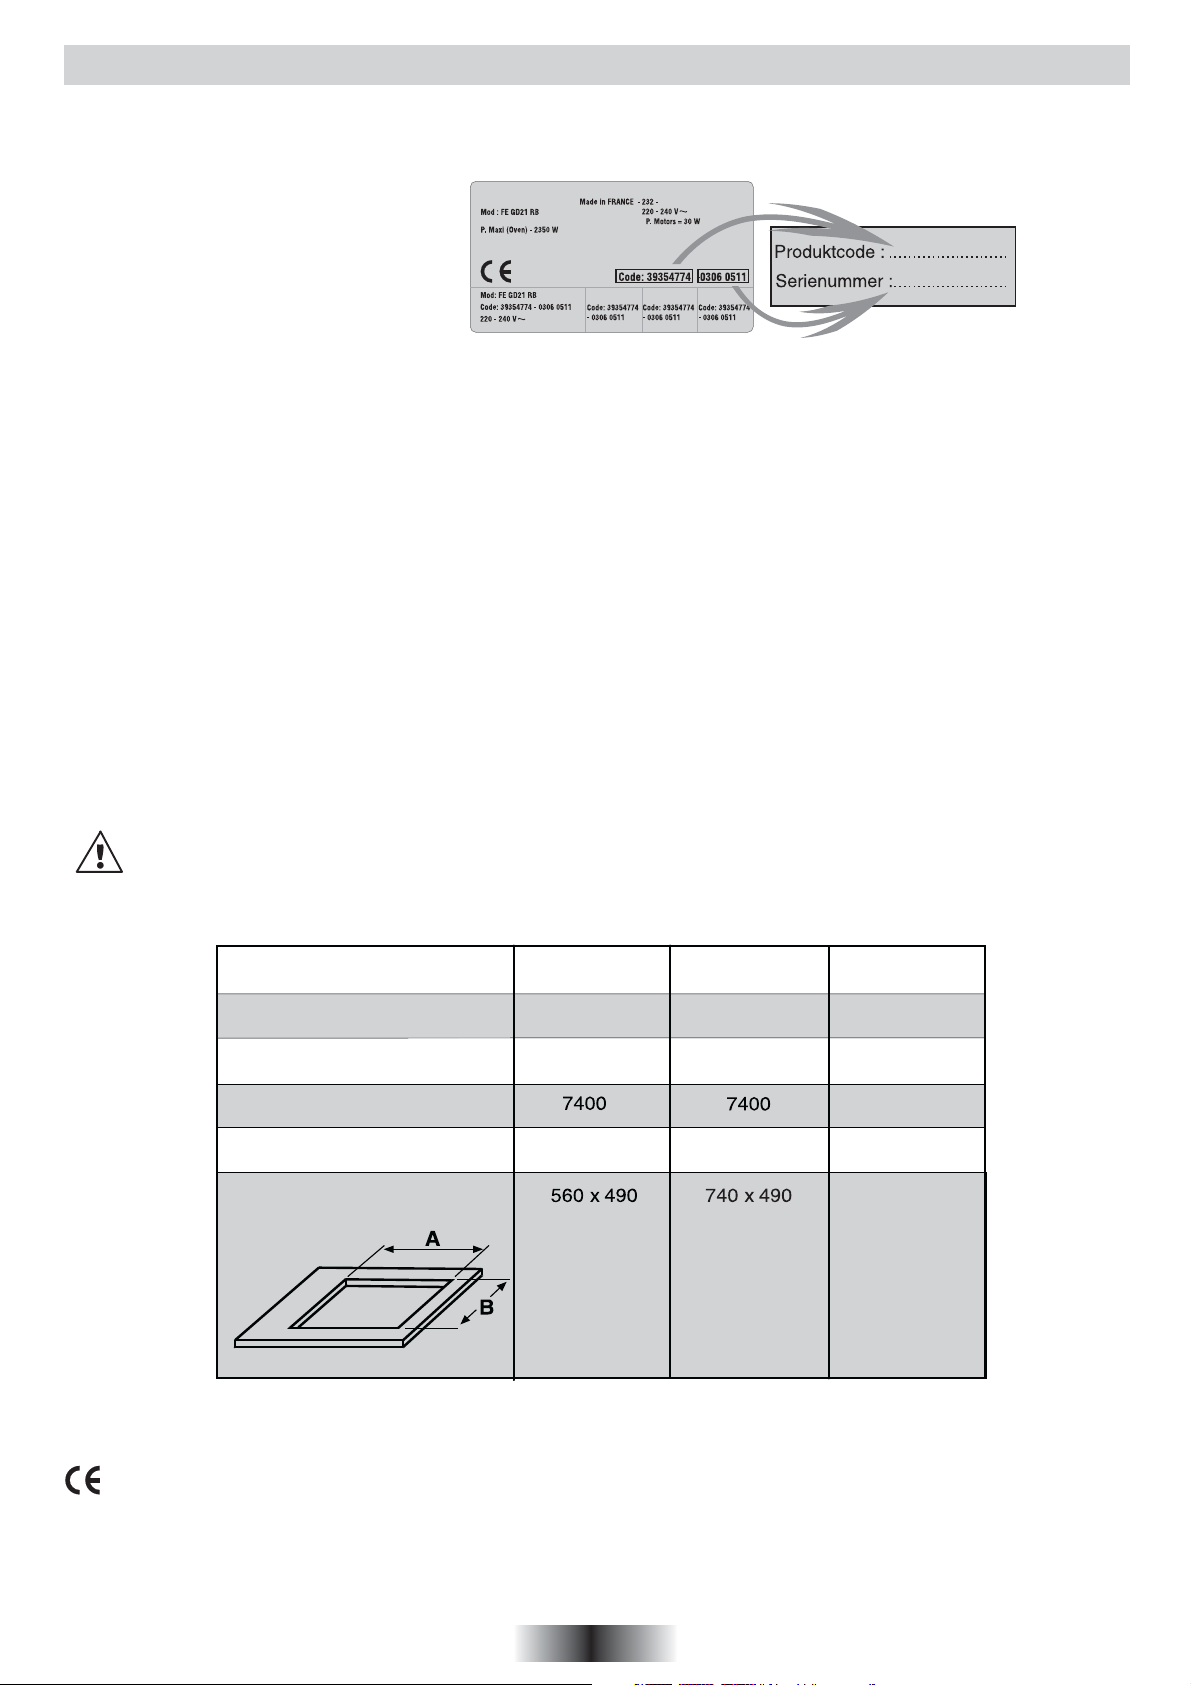
We recommend you keep the instructions for installation and use for later reference, and before installing the hob, note its serial number
below in case you need to get help from the after sales service.
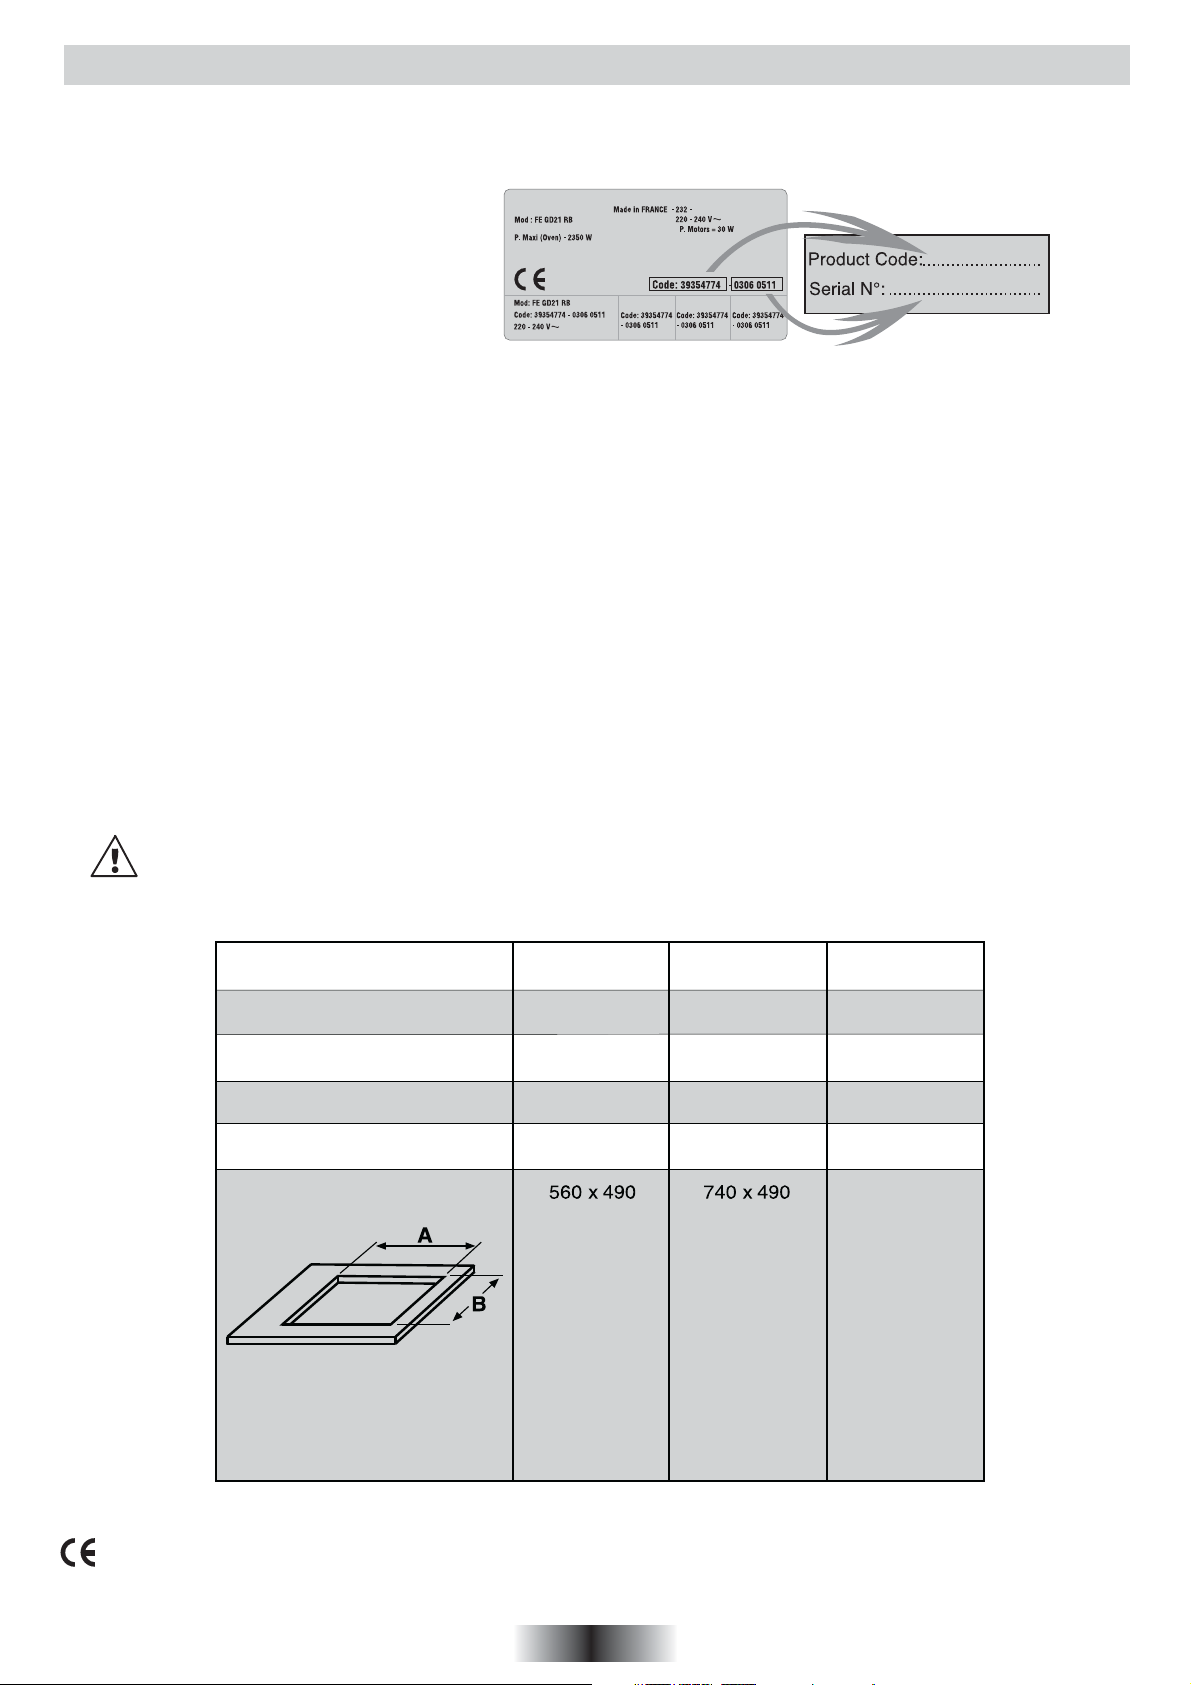
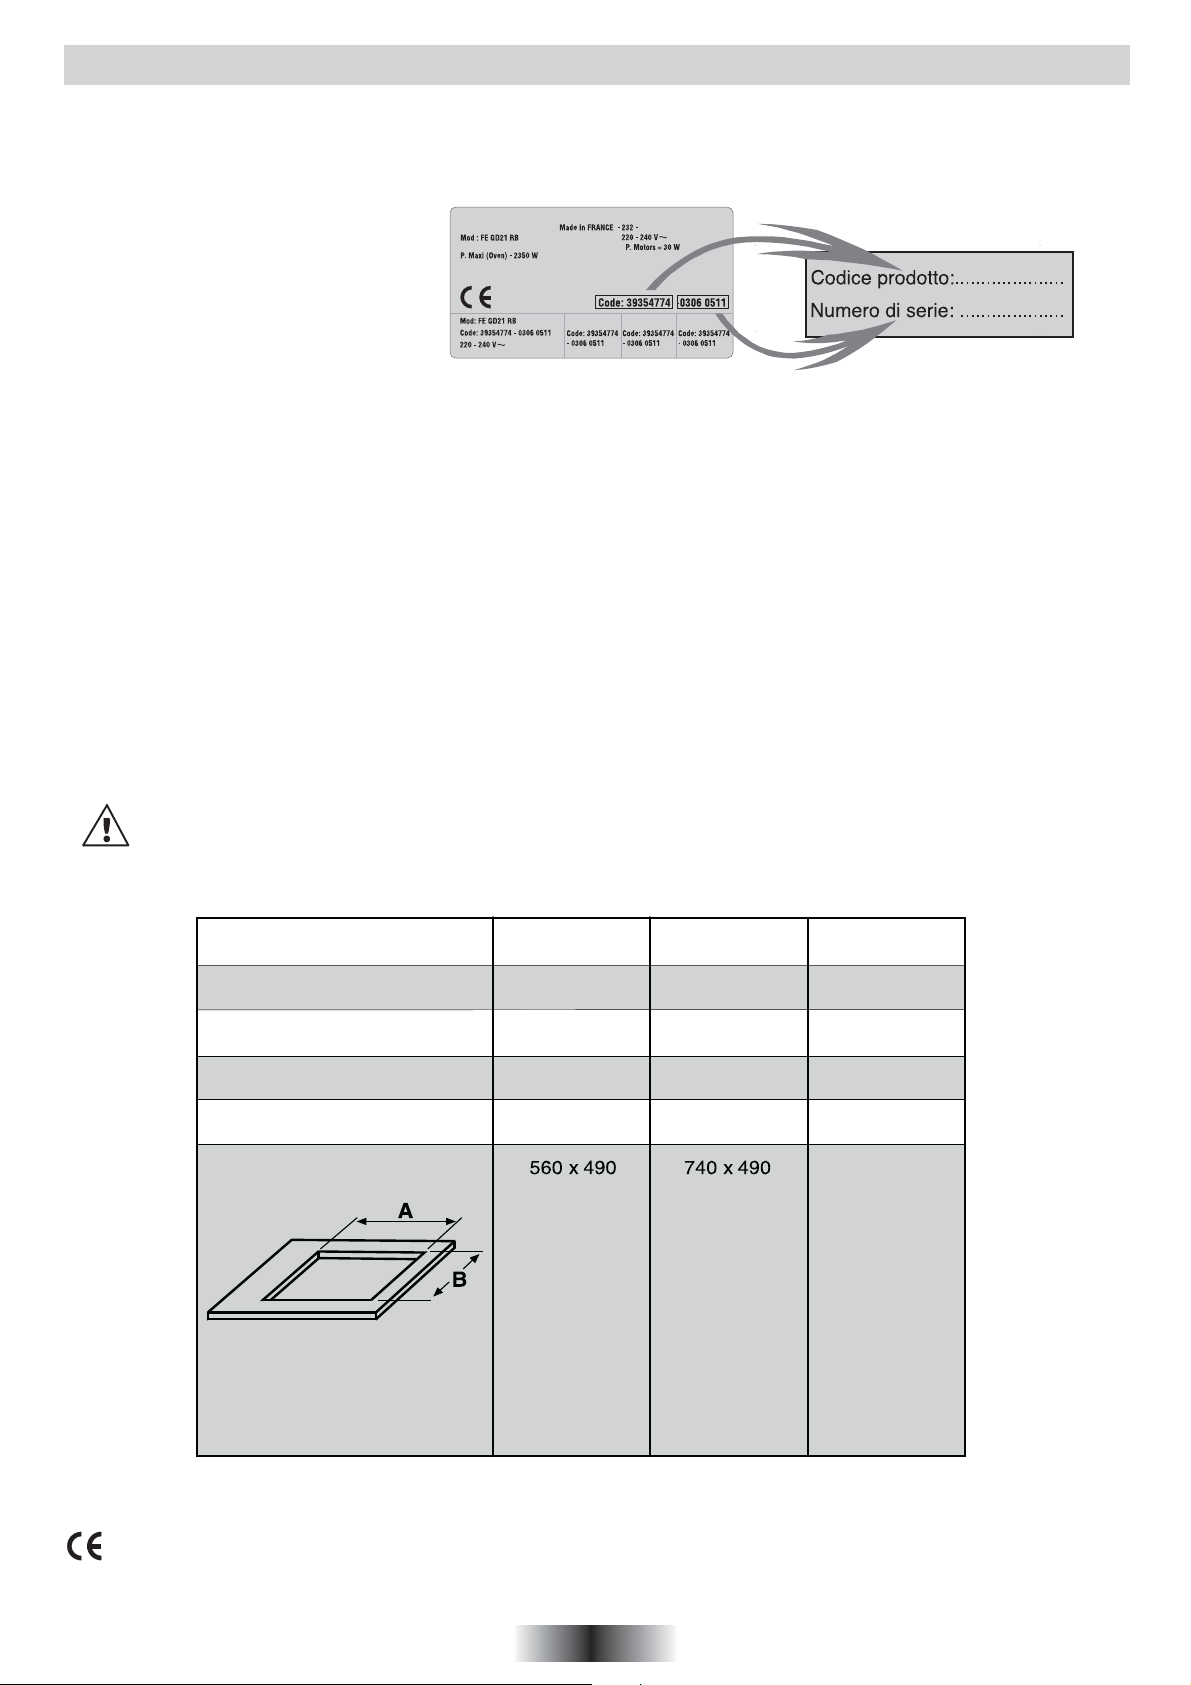
Identification plate
(located under the hob's bottom casing)
• It is strongly recommended to keep children away from the cooking zones while they are in operation or when they are switched off,
so long as the residual heat indicator is on, in order to prevent the risks of serious burns.
• When cooking with fats or oils, take care always to watch the cooking process as heated fats and oils can catch fire rapidly.
• The hob’s control area is sensitive, do not place hot containers on it.
• Aluminium foil and plastic pans must not be placed on heating zones.
• After every use, some cleaning of the hob is necessary to prevent the build up of dirt and grease. If left, this is recooked when the
hob is used and burns giving off smoke and unpleasant smells, not to mention the risks of fire propagation.
• Do not left metallic objects such as knives, forks, spoons or lids on the induction zone,because if they are too large or too heavy, they
could become hot.
• Never cook food directly on the glass ceramic hob. Always use the appropriate cookware.
• Always place the pan in the centre of the unit that you are cooking on.
• Do not use the surface as a cutting board.
• Do not slide cookware across the hob.
• Do not store heavy items above the hob. If they drop onto the hob, they may cause damage.
• Do not use the hob as a working surface.
• Do not use the hob for storage of any items.
• In the unlikely event of a surface crack appearing, do not use the hob. Immediately disconnect the hob from the electrical power supply
and call the After Sales Service.
• This appliance is not intended for use by persons (including children) with reduced physical, sensory or mental capabilities, or lack
of experience and knowledge, unless they have been given supervision or instruction concerning use of the appliance by a person
responsible for their safety.
• Children should be supervised to ensure that they do not play with the appliance.
Warning: this appliance complies with current safety regulations and electromagnetic compatibility regulations. Nevertheless,
people with a pacemaker should not use this appliance. It is impossible to guarantee that all such devices found on the
market comply with current safety regulations and electromagnetic compatibility regulations, and that dangerous interference
will not occur. It is also possible that people with other types of device, such as a hearing aid, could experience some
discomfort.
COOKING HOB
Cooking zones
Supply voltage (V/Hz)
Installed electric power (W)
Product size
(W x D x H in mm)
Building-in dimensions
(AXB)
4 Induction 4 Induction
220-240
50/60 Hz
574 x 505 x 55 752 x 505 x 55
HVI 740HVI 640
220-240
50/60 Hz
HGI 7544
4 Induction
220-240
50/60 Hz
74007400 7400
752 x 505 x 55
740 x 490
We are constantly striving to improve product quality and as such may modify appliances to incorporate the latest technical improvements.
Appliance complies with European Directives 73/23/EEC and 89/336/EEC, replaced by 2006/95/EC and 2004/108/EC, and
subsequent amendments.
1 GB
Page 3
INSTALLATION
Installing a domestic appliance can be a complicated operation which if not carried out correctly, can seriously affect consumer
safety. It is for this reason that the task should be undertaken by a professionally qualified person who will carry it out in
accordance with the technical regulations in force. In the event that this advice is ignored and the installation is carried out
by an unqualified person, the manufacturer declines all responsibility for any technical failure of the product whether or not
it results in damage to goods or injury to individuals.
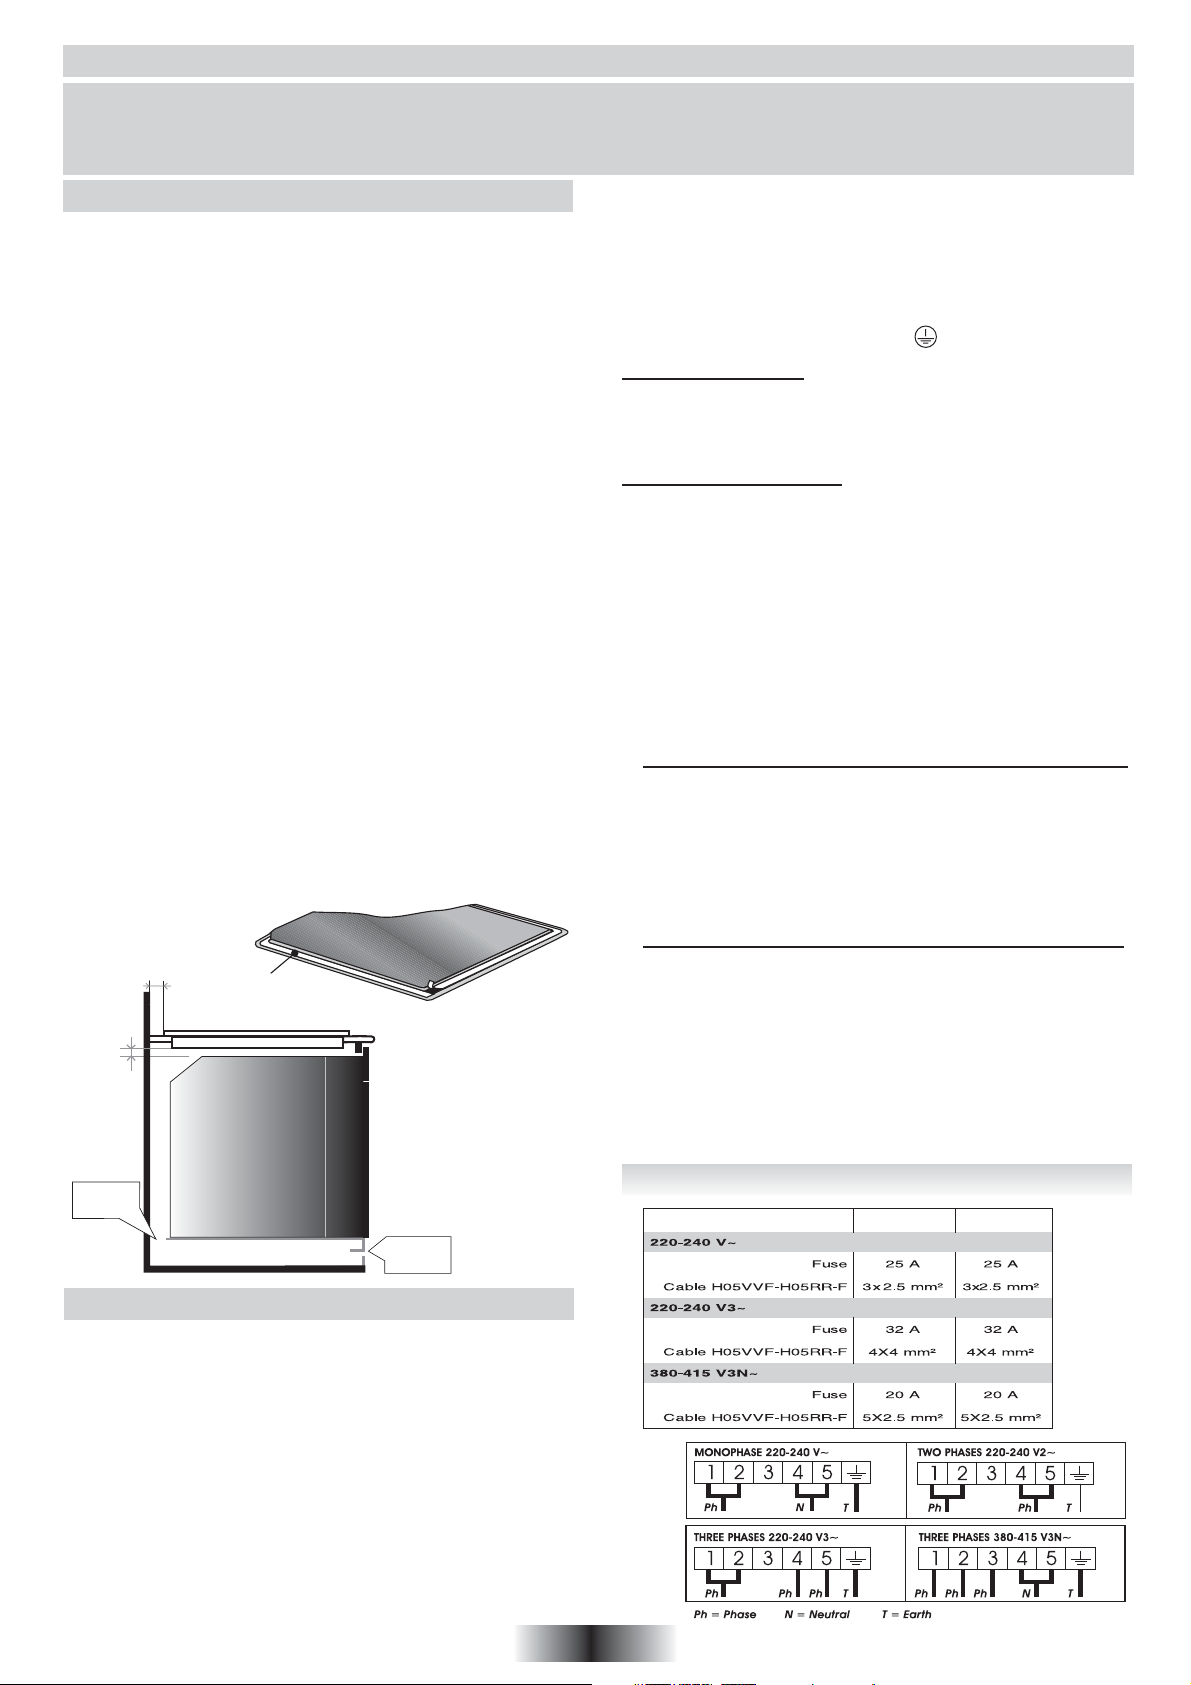
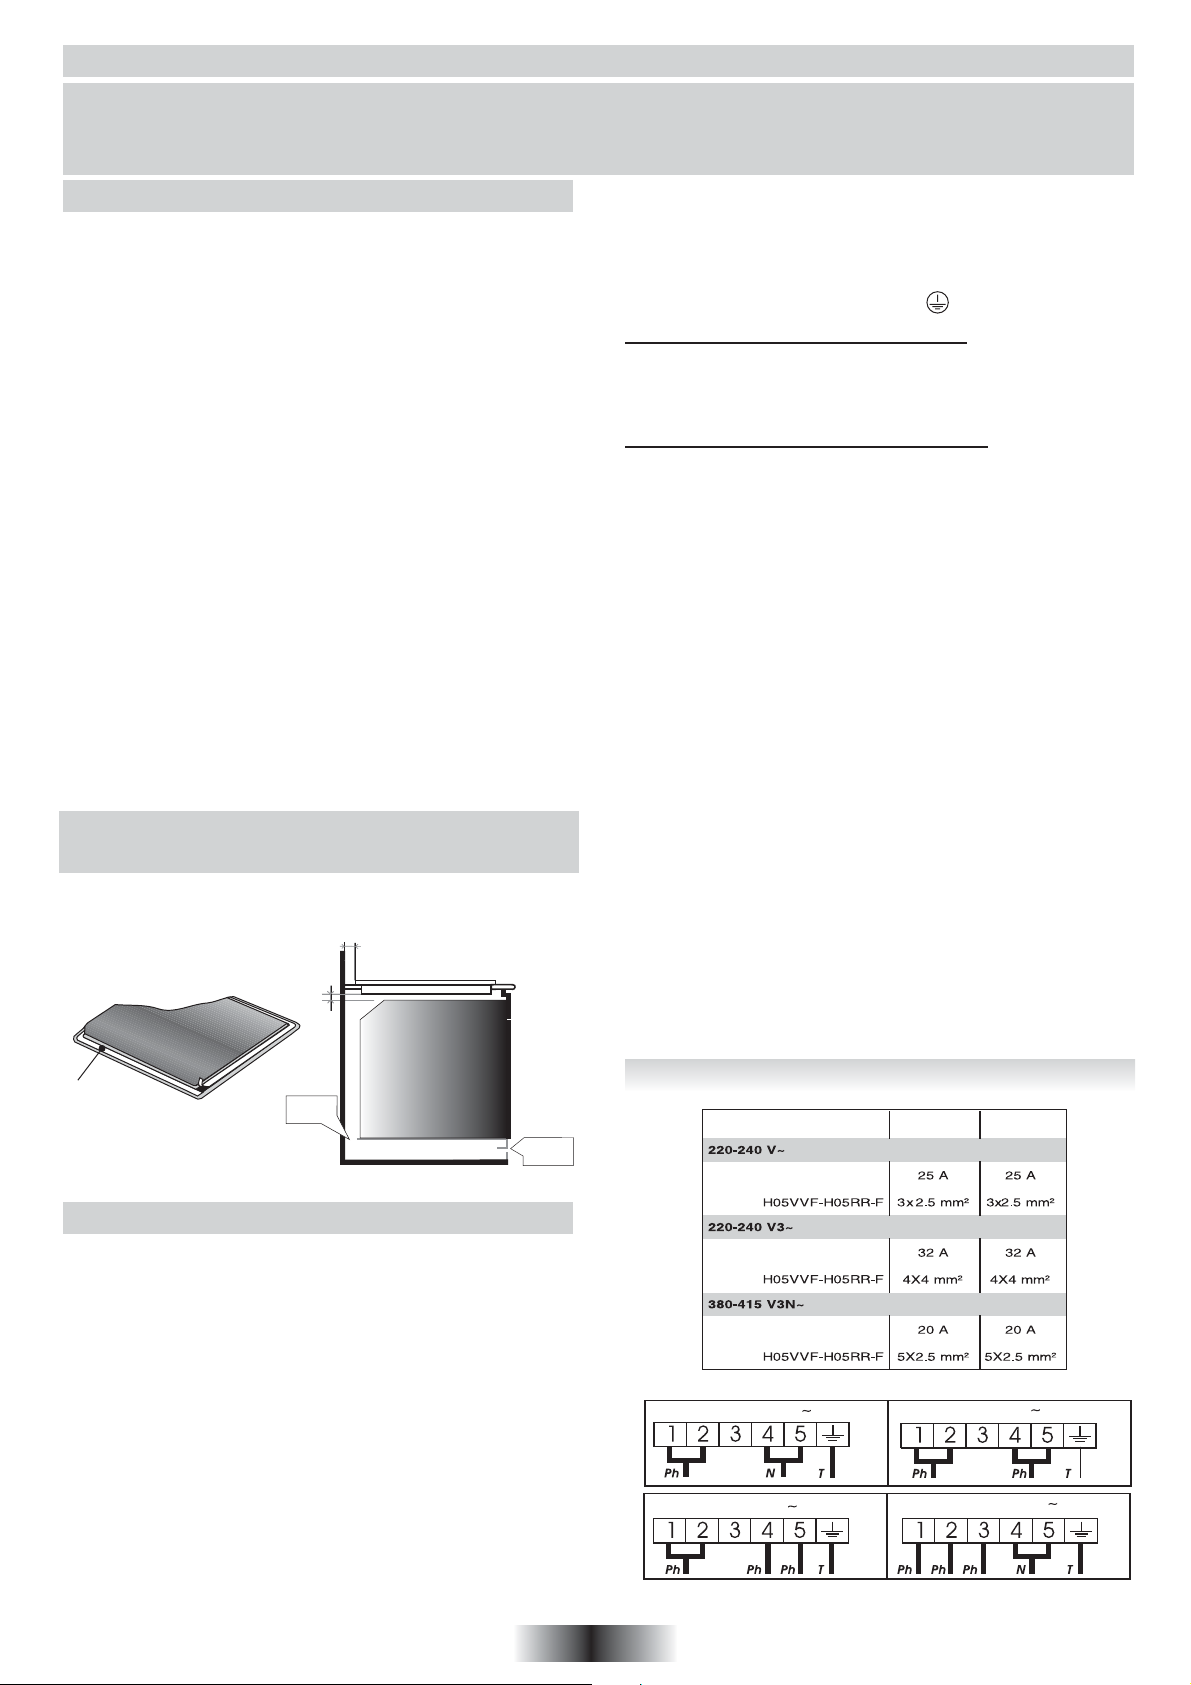
BUILT-IN
The furniture in which your hob will be installed and all adjacent
furniture, should be made from materials that can withstand high
temperatures. In addition, all decorative laminates should be fixed
with heat-resistant glue.
Installation:
• A watertight seal is supplied with the hob.
Before fitting:
- turn the hob upside down, with the glass surface facing downwards.
Make sure the glass is protected.
- fit the seal round the hob.
- make sure that it is correctly fitted to avoid any leakage into the
supporting cabinet.
• It it important to fit the hob on a level supporting surface.
• Deformations caused by incorrect fitting can alter the specifications
of the worktop and the performance of the hob.
• Leave a gap of at least 5 cm between the appliance and any
neighbouring vertical surfaces.
• It is absolutely essential that the recess conforms with the
dimensions indicated.
• The height of the flush-mounted part of the hob is 5,5 cm.
• If there is an intermediate division :
- the clearance between the bottom of the casing and an
intermediate floor or part of a furniture unit must greater than
2,5 cm so as to allow air circulate.
The minimum distance should be 8 cm.
- furthermore, you should ensure that there is at the rear a
ventilation (8 cm) on all the width.
• You can not build the hob in above an oven with no fan, a
dishwasher, fridge, freezer or washing machine.
• The body of the hob is fitted which 4 location holes to take the
fixing clamps intended to fix the hob in the unit. Place the 4 fixing
clamps, before building-in the hob, in such a way that the hob
is placed perfectly in the support unit.
Hob
25 mm
mini
50 mm
Seal
• The manufacturer cannot be held responsible for any accidents
resulting from the use of an appliance which is not connected
to earth, or with a faulty earth connection continuity.
• Any queries regarding the power supply cord should be referred
to After Sales Service or a qualified technician, connect the wire
in accordance with the following colours/codes:
BLUE - NEUTRAL (N)
BROWN - LIVE (L)
YELLOW-GREEN - EARTH ( )
• MODEL WITH PLUG
The hob is fitted with a power supply cord with plug which
allow to be connected to a power supply of 220-240 V between
phases or between phase and neutral.
• Connect to a 25 Amp socket.
• MODEL WITHOUT PLUG
The hob is fitted with a power supply cord which allows it to
be connected only to a power supply of 220-240 V between
phases or between phase and neutral.
• Connect to a socket, to choose the correct fuse, you must refer
on the table.
It is however possible to connect the hob to :
Two phases 220-240V2~, Threephases 220-240V3~
or Three phases 380-415V3N~.
To proceed to the new connection, you must adhere the following
instructions.
• Before making the connection make sure that the installation is
protected by a suitable fuse, see table, and that it is fitted with
wires of a large enough section to supply the appliance normally.
1-
Operations to be carried out on the existing connection :
- turn over the hob, glass side against the work top, taking care
to protect the glass.
- open the cover.
- pull out the supply cord :
. remove the screws retaining the shunt bars and the conductors
of the supply cord,
. unscrew he cable clamp to release the power supplying cord,
. pull out the supply cord.
2-
Operations to be carried out to make a new connection :
- choose the power supply cord in accordance with the
recommendations in the table.
- pass the power supply cable into the clamp.
- strip the end of each conductor of the supply cord on a 10 mm
length, by taking in account the requested length of the cord for
the connection to the terminal block.
- according to the installation and with the help of shunt bars which
you should have recovered in the first operation, fix the conductor
as shown on the chart.
- screw the cable clamp and fix the cover.
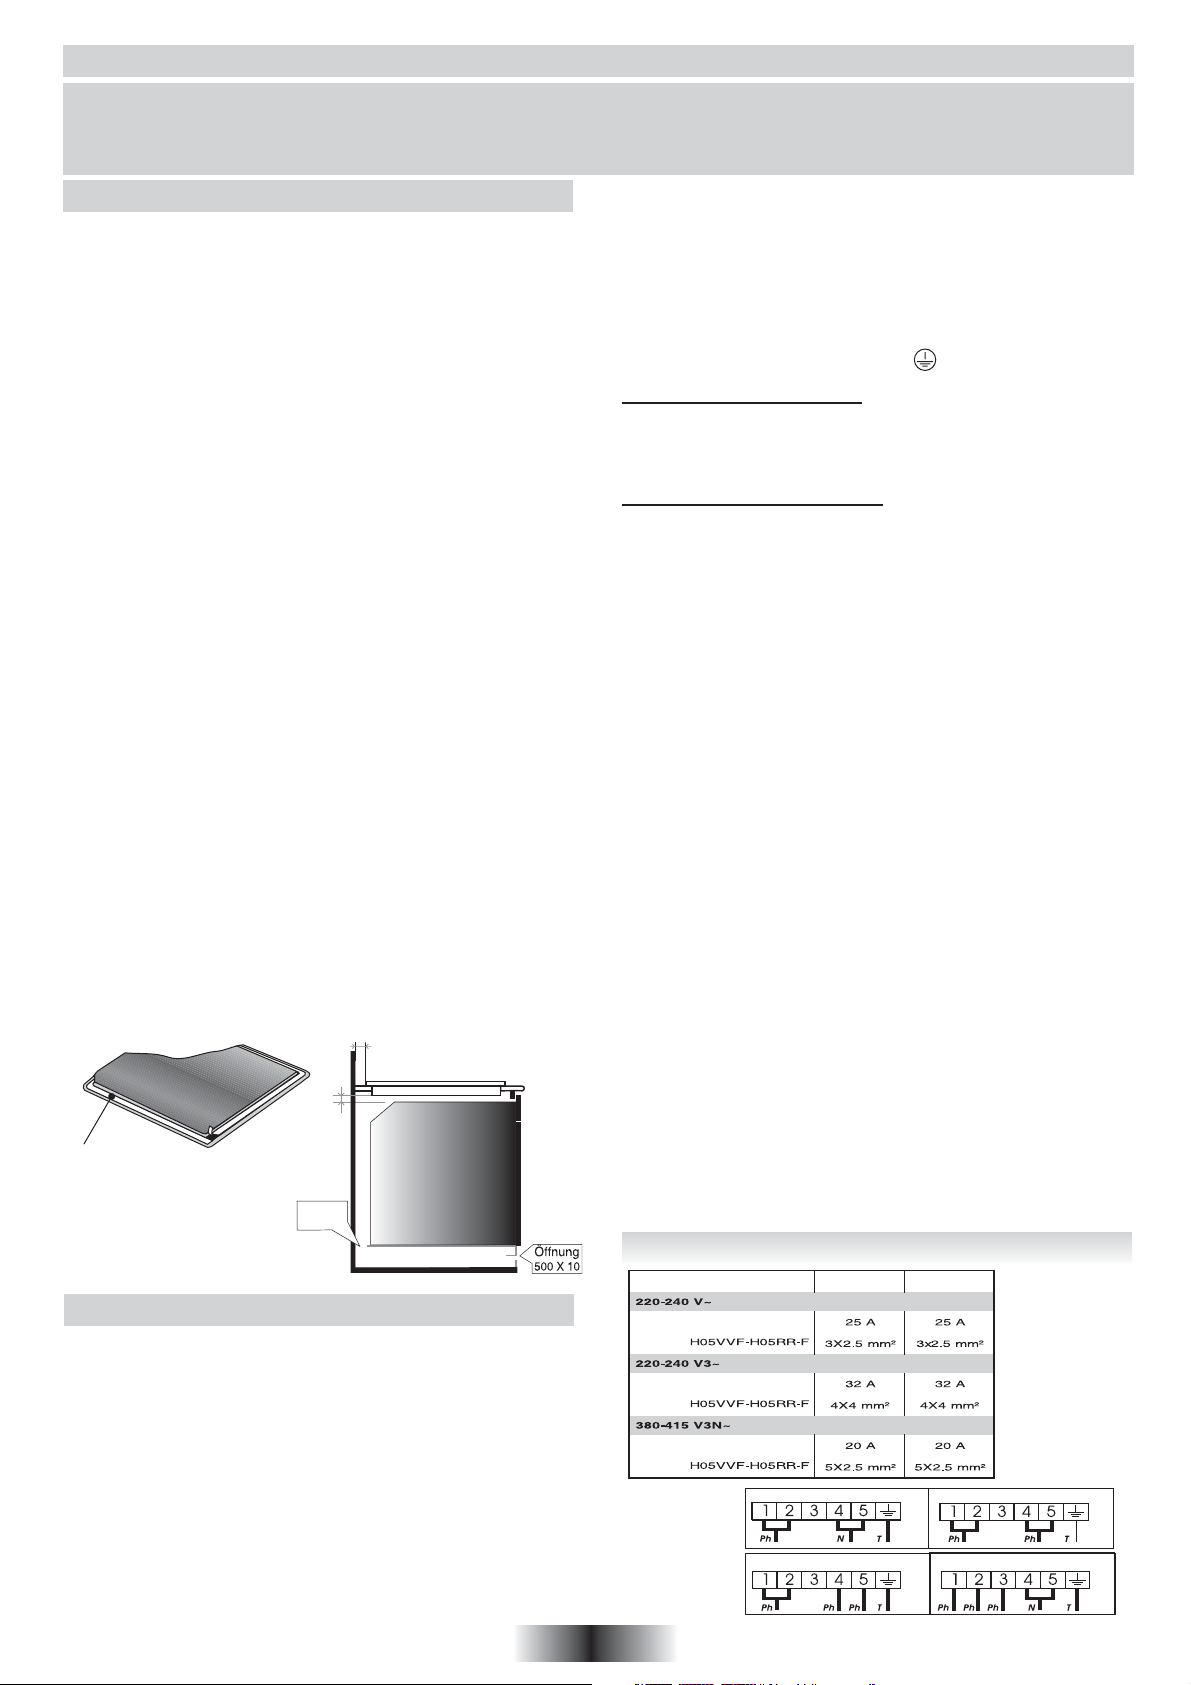
Opening
500 X 50
Opening
500 X 10
ELECTRICAL CONNECTION
"The installation must conform to the standard directives."
The manufacturer declines all responsibility for any damage that
may be caused by unsuitable or unreasonable use.
Warning :
• Always check before any electrical operation, the supply tension
shown on the electricity meter, the adjustment of the circuitbreaker, the continuity of the connection to earth to the installation
and that the fuse is suitable.
• The electrical connection to the installation should be made via
a socket with a plug with earth, or via an omnipole cut-out switch
with an opening gap of at least 3 mm.
If the appliance has a socket outlet, it must be installed so that
the socket outlet is accessible.
• The yellow/green wire of the power supply cable must be
connected to the earth of both power supply and appliance
terminals.
CONNECTION TO THE TERMINALS ON THE TERMINAL BLOCK:
HVI 640
HVI 740
2 GB
Page 4
INDUCTION
Control unit
USE PROCEDURE
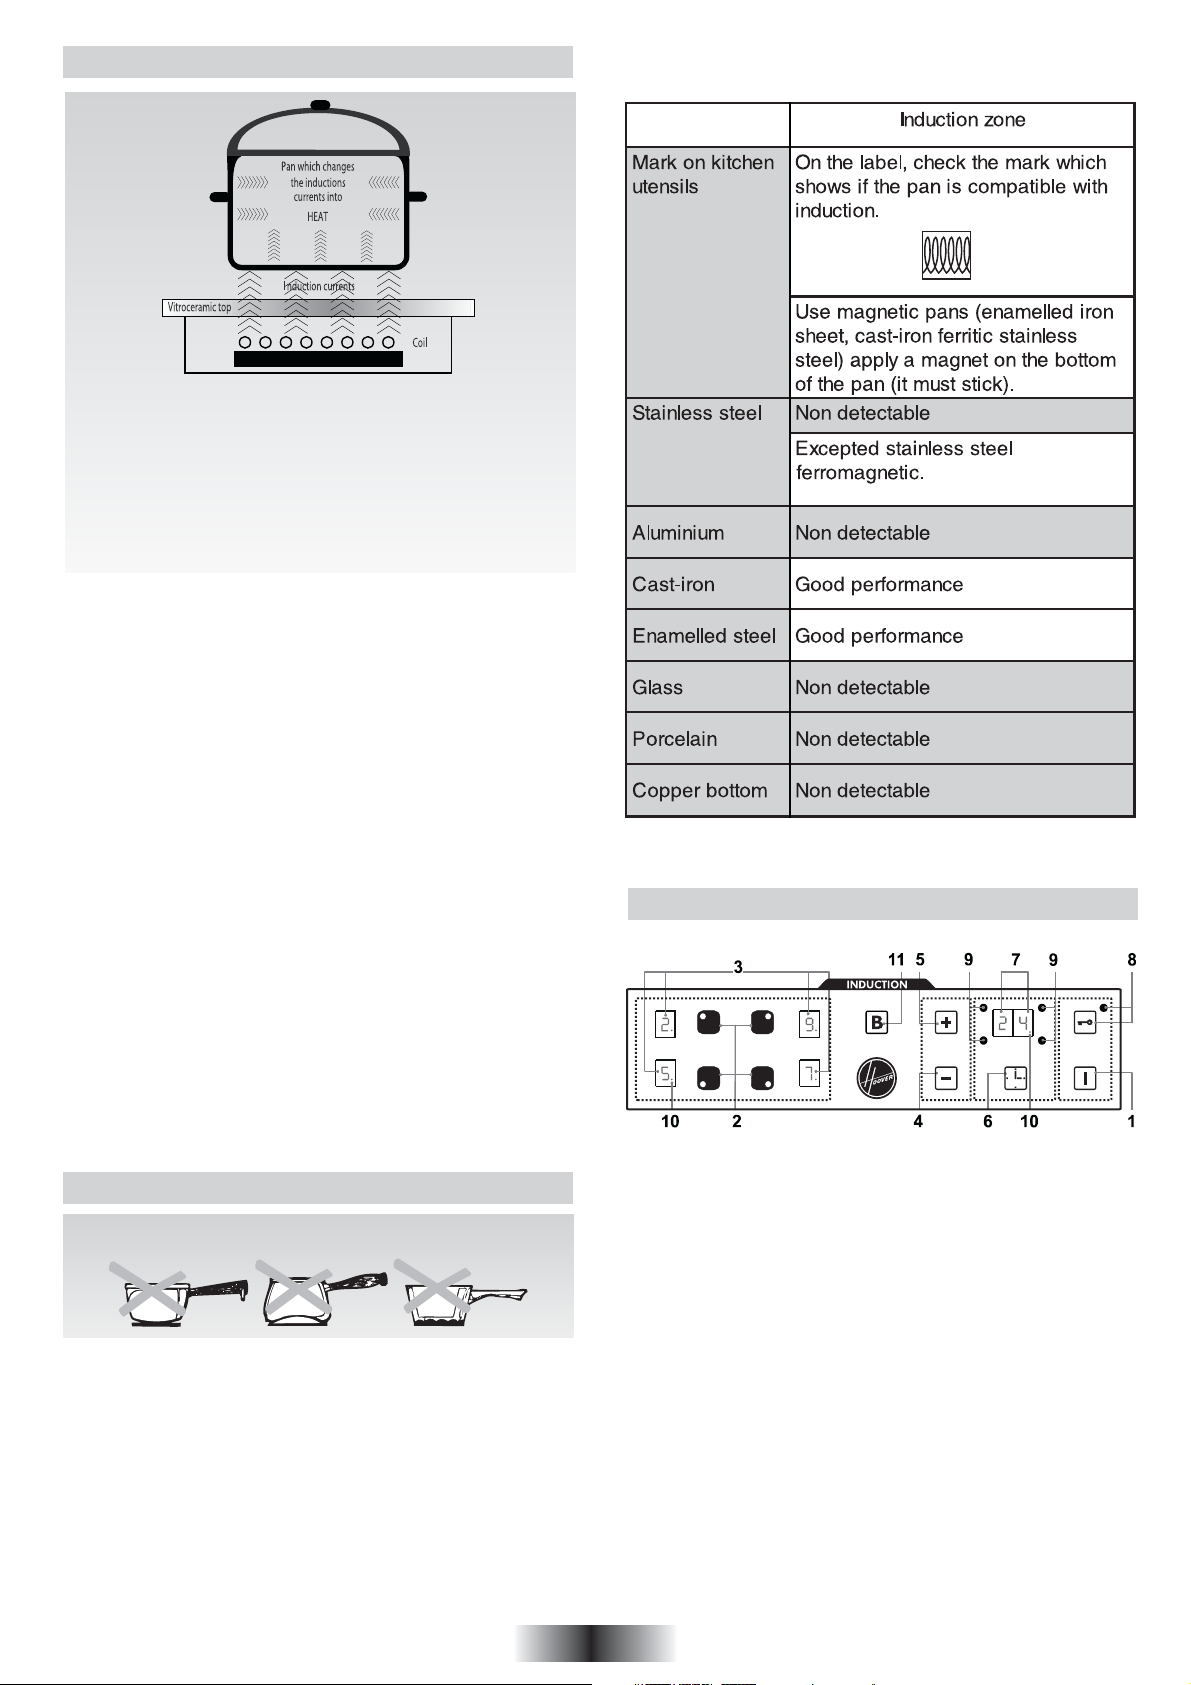
An electronic generator powers a coil located inside the appliance.
This coil creates a magnetic field, so that when the pan is placed
on the hob, it is permeated by the induction currents.
These currents make the pan into a real heat transmitter,
while the glass ceramic hob remains cold.
This system is designed for use with magnetic-bottomed
pans.
Put simply, induction technology has two main advantages :
- as heat is emitted only by the pan, heat is maintained at its
maximum level and cooking takes place without any heat loss.
- There is no thermal inertia, as cooking automatically starts when
the pan is placed on the hob and stops when it is removed.
A HIGH SAFETY APPLIANCE ....
If your hob is correctly installed and used, the safety devices will
rarely be needed.
• Ventilation fan : to protect and cool the supply and control
components. It has two speeds, operating automatically. The
fan works even if the plates are off and this till the
electronic system has enough cooled down.
• Safety "Transistor" : a probe checks permanently the
temperature of the electronic components. If the heat is increasing
excessively, it automatically decreases the power of the
plates then cuts them down (the display for power level is flashing)
as far as the temperature of the components meets with the
standard again, the hob starts working.
• Safety "Empty pan" : a probe is placed under each heating
area. It will immediately detect a wrong temperature for the
empty pan, or the glass ceramic.
• Safety "Detection" : the presence detector allows the working
and so the heating. A small object (eg a spoon, knife or ring)
placed on the heating area will not be considered as a pan and
therefore the hob will not come on.
• Safety "Boiling over and splashing" : if any boiling over and
splashing occur, the hob will stop. If a big spill or object covers
at least two buttons, for at least 10 seconds, clean up the spill
or remove the object, the hob is not operating.
The following information will help you select the pans best adapted
to obtain good results.
HOW TO OPERATE THE HOB
HOB COOKWARE ADVICE
Using good quality cookware is critical for setting the best
performance from your hob.
• Always use good quality cookware with perfectly flat and
thick bases : using this type of cookware will prevent hot spots
that cause food to stick. Thick metal pots and pans will provide
an even distribution of heat.
• Ensure that the base of the pot or pan is dry : when filling
pans with liquid or using one that has been stored in the
refrigerator, ensure that the base of the pan is completely dry
before placing it on the hob. This will help to avoid staining the hob.
• Use pans whose diameter is wide enough to completely
cover the surface unit : the size of the pan should be no smaller
than the heating area. If it is slightly wider the energy will be
used at its maximum efficiency.
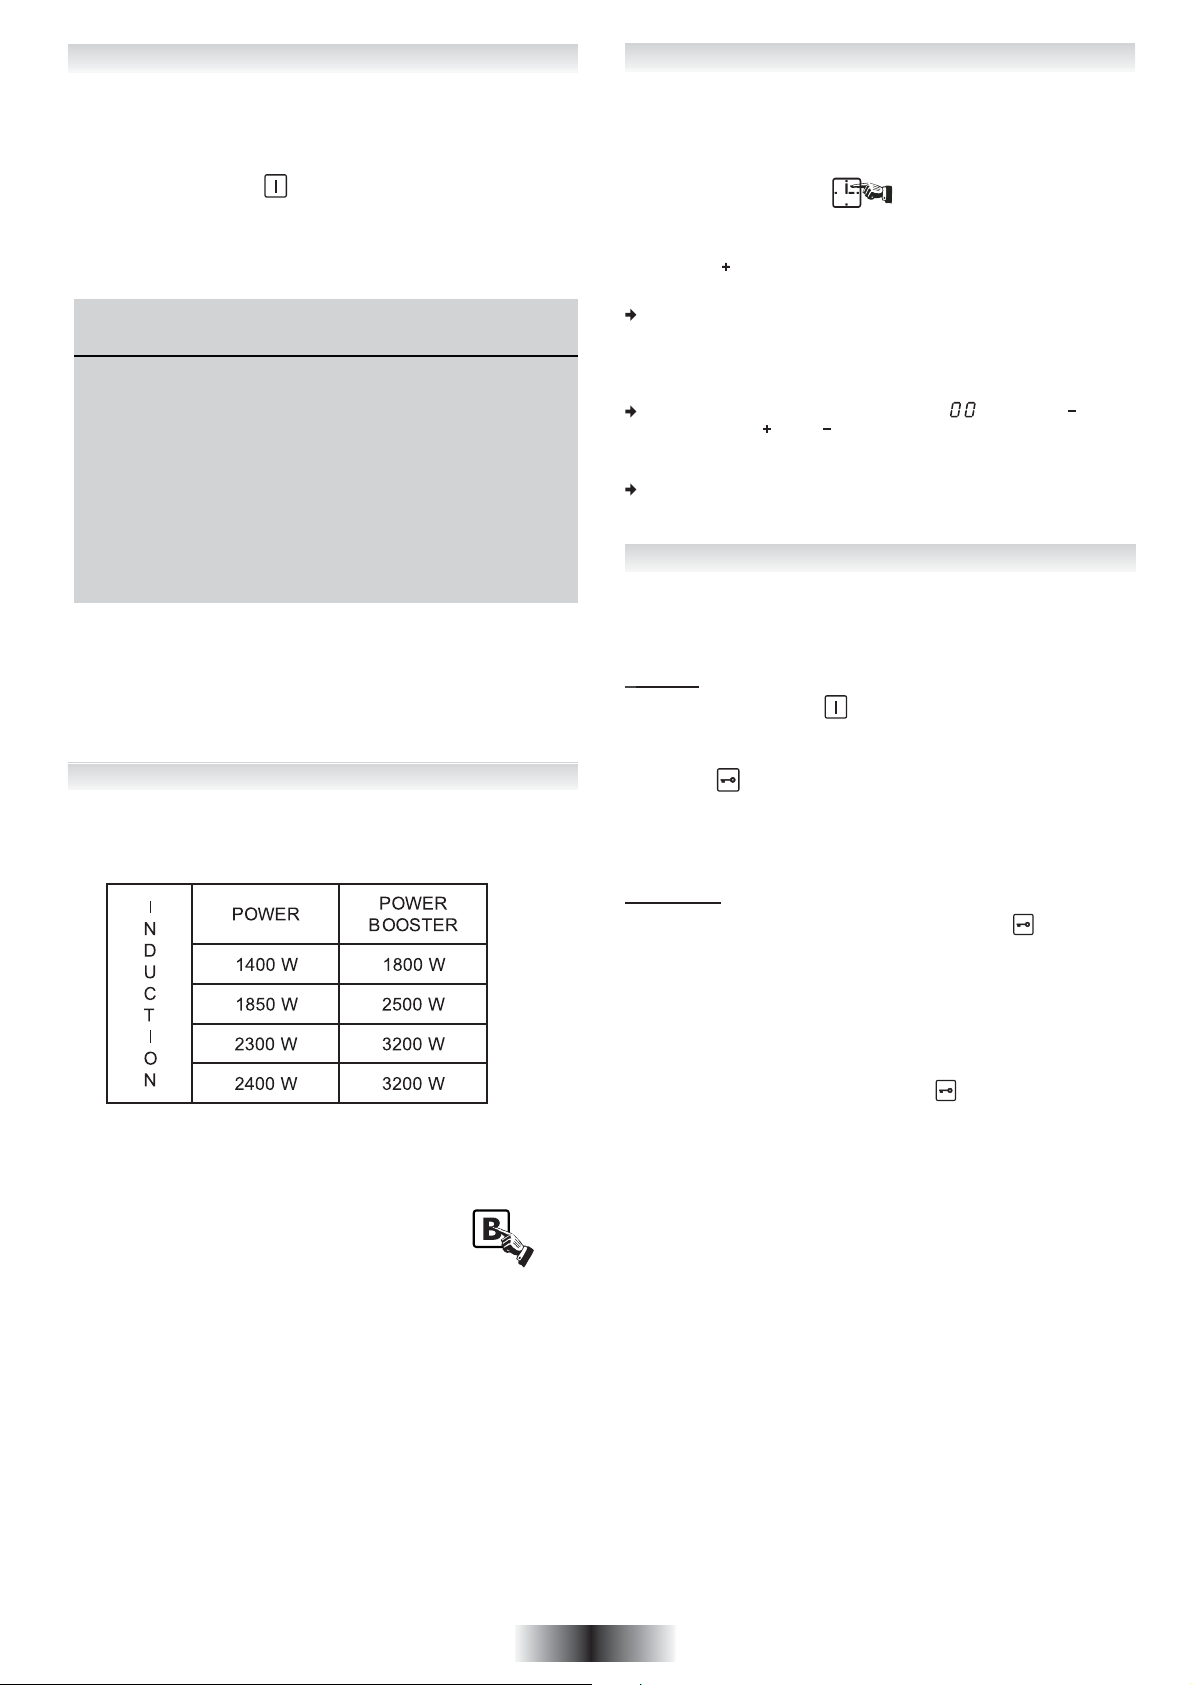
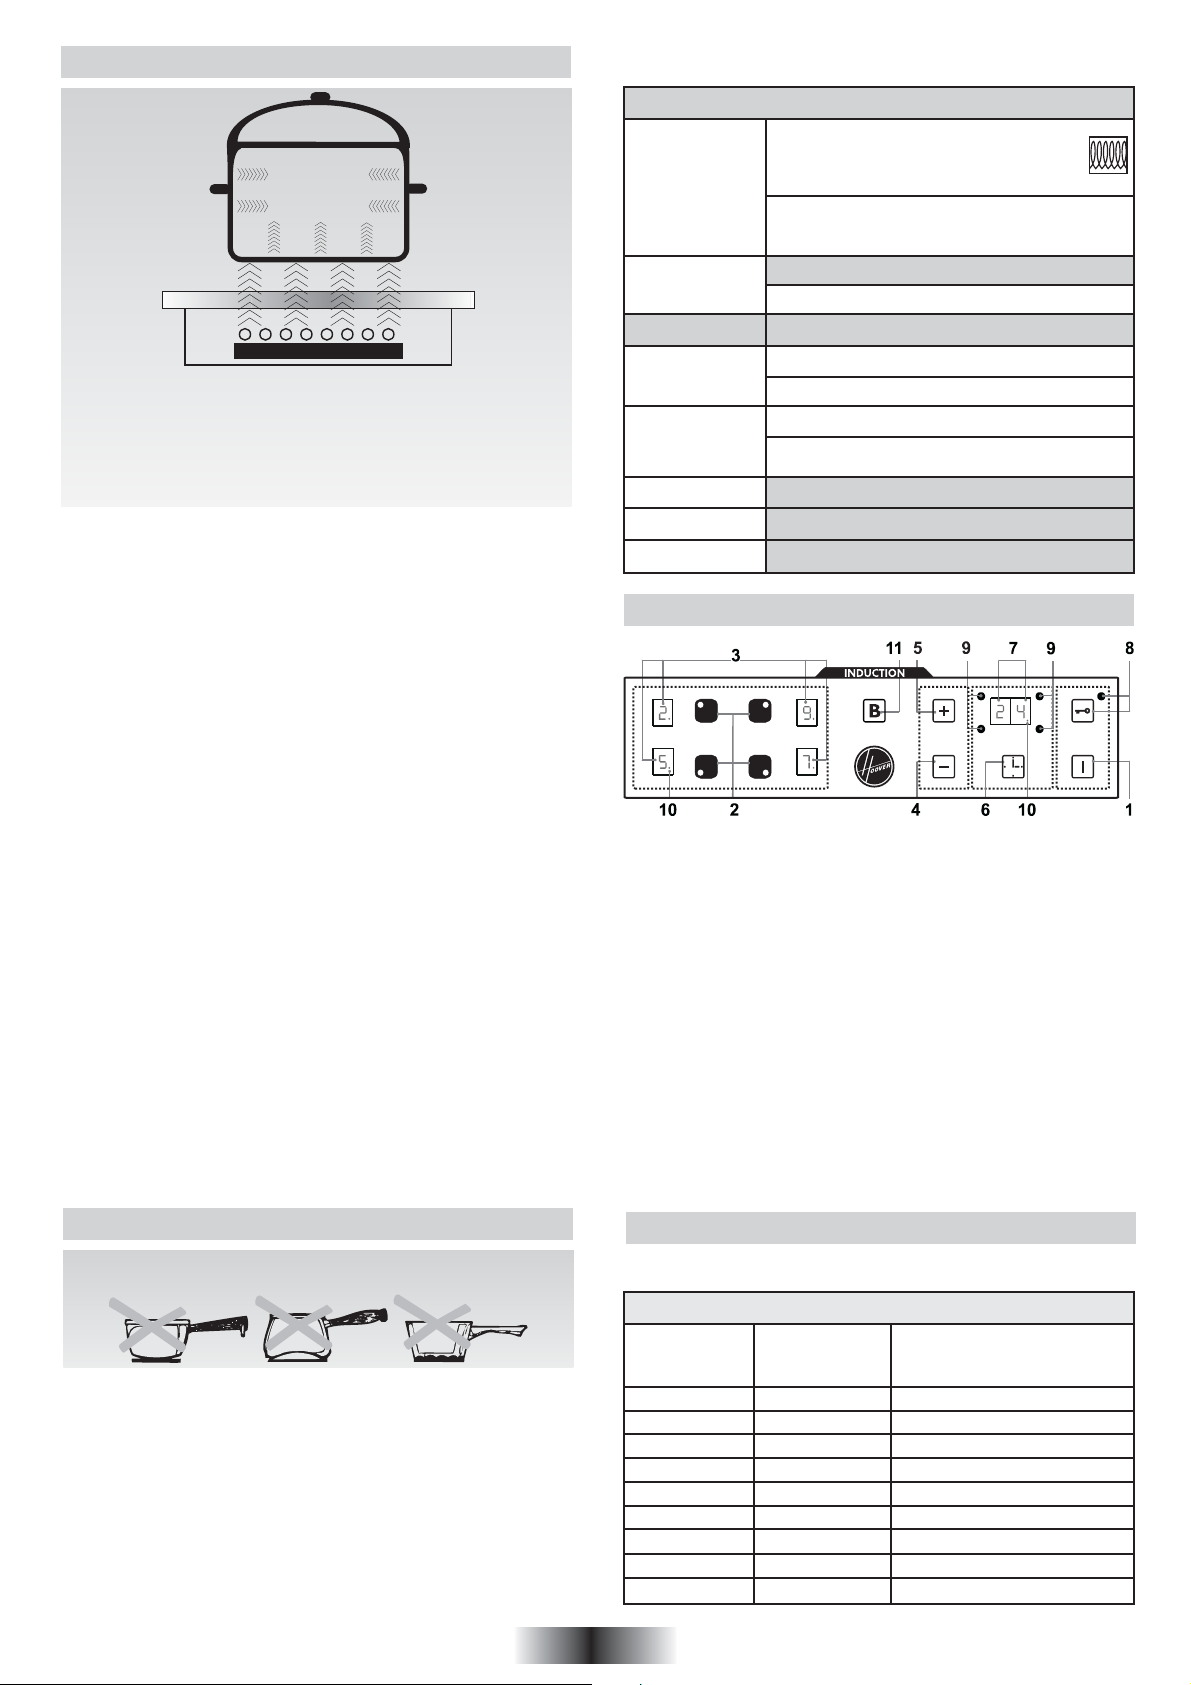
1 - HOB ON / OFF BUTTON
2 - COOKING ZONE SELECTION BUTTON
3 - DISPLAY: heat level, residual heat indicator, booster operation..
4 - “-” BUTTON
5 - “+” BUTTON
6 - “TIMER” SELECTION BUTTON
7 - TIMER DISPLAY
8 - CONTROL LOCKING BUTTON WITH INDICTOR LAMP
9 - COOKING ZONE PROGRAMMING INDICATOR: when
displayed, it shows that the timer controls the cooking zone
10 - CONTROL LED:
. on: the cooking zone or timer is active, modification is possible
. off: the cooking zone or timer is set to the last recorded data
11 - Booster selection button
3 GB
Page 5
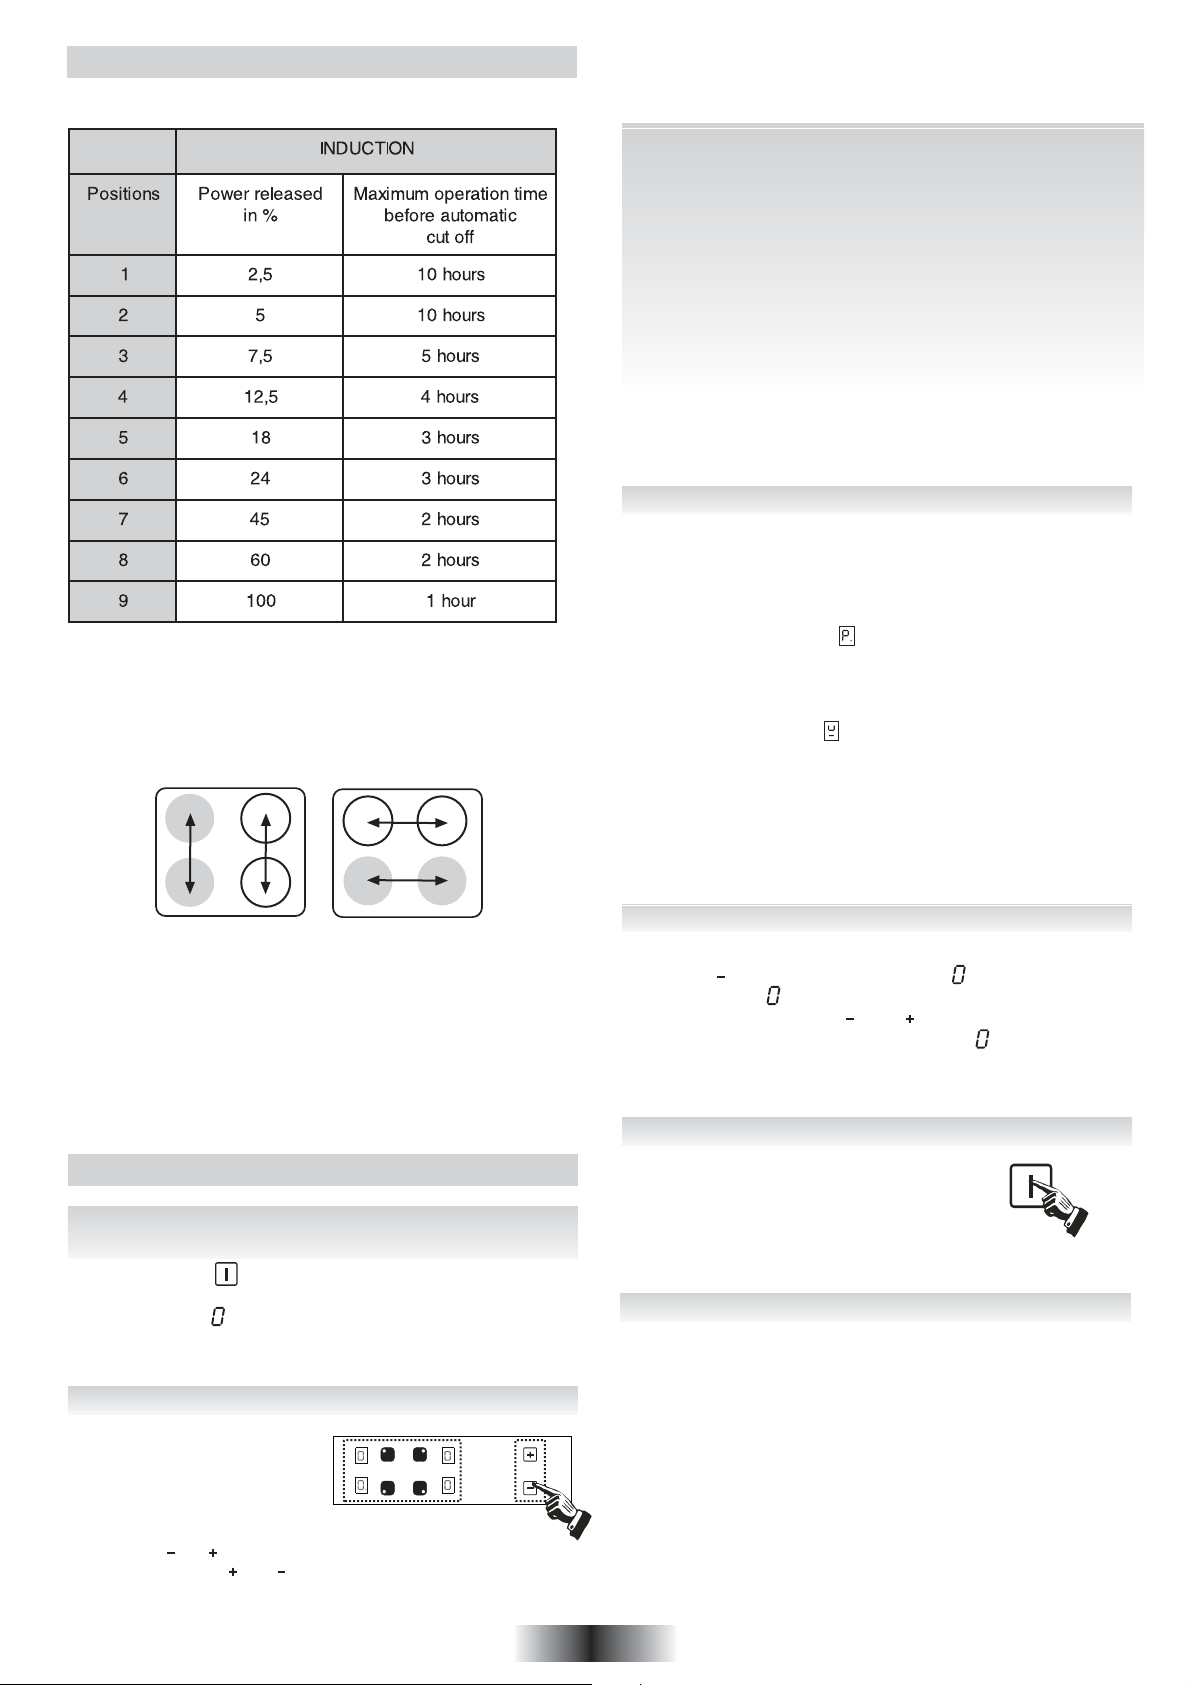
THE DIFFERENT POSITION
The different positions correspond to the following power ratings :
For increased safety, the cooking zones cut off automatically if
they are left on too long.
The cut off depends on the heat level used.
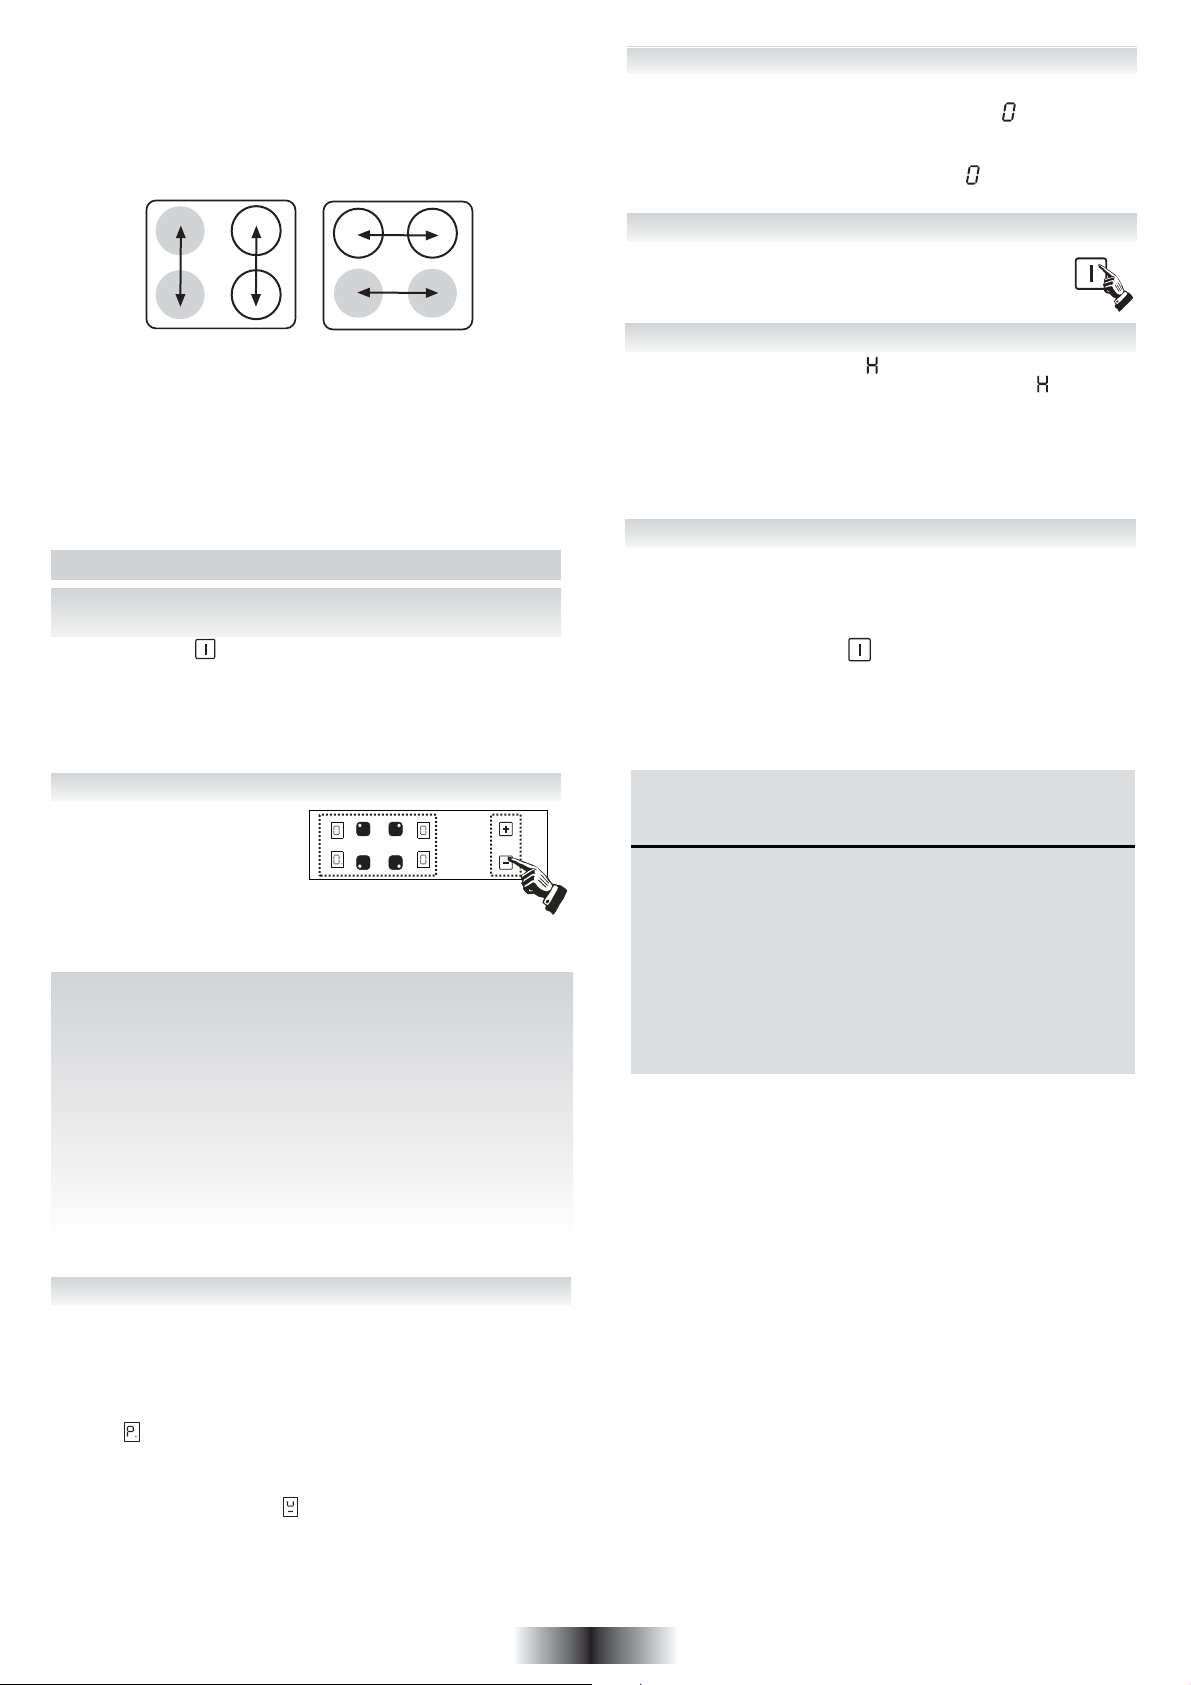
NOTE:
The induction hob works with a generator wich supplies
simultaneously 2 zones per area, according to model :
The following examples are for information only. Personal
experience should then let you adapt these settings to your taste
and habits.
0 : Off
U : Simmering to 65°C
1 : )
2 : ) ..... Melting heat
3 : Keeping hot
4 : Heating up
5 : Thawing, stewing, full cooking, low temperature
cooking
6 : Cooking without lid
7 : Frying, meat browning and roasting
8 : High temperature cooking and roasting, seizing
9 : Frying, seizing
Booster : Boiling large quantities of liquids...
• PAN DETECTOR
When the hob is operating, the pan detector provides the advantage
of automatically stopping or starting the heat of the cooking zone
in contact with or on removal of the pan.
If therefore offers energy savings.
If the cooking zone is used with a suitable pan* :
shows the heat level or when the booster is operating.
the display
* The induction needs pans compatibles so fitted with magneticbottomed, see table page 3 and pans big enough to fully cover
the zone.
If the cooking zone is used without a pan or with an unsuitable
pan :
the display shows . The zone does not start. If no pan
is detected after 10 minutes, the starting operation is cancelled.
IMPORTANT:
To stop the cooking zone, you must stop the hob normally,
you cannot just remove the pan. The pan detector does not
work as the hob on/off button.
Each area take in charge a maximum power of 3700 W.
Consequently, in the same area, when the Booster function is on
and the second plate has reached a power level of 9 or 8 the
latest is automatically decreased to the level 7 and this decrease
is shown by a flashing display for information.
Warning :
it stops and the plate starts heating again at the setting 9, the
power of the generator being decreased, the power level of the
second plate comes back to its previous setting.
the Booster works during 10 minutes, after this time,
THE USE
• After powering up the hob, wait 8 seconds to activate the
electronic controls.
- Press the button , for 3 seconds.
Electronic control of the hob is activated. In each display zone
the heat level is displayed and the control LED blinks.
- After a few seconds whithout use, the electronic control goes off
and the starting operation has to be repeated.
• STARTING A COOKING ZONE
- Press the selection button of
the required cooking zone. In
the display zone, the control
LED is on steady. It shows that
the zone is live.
• STOPPING A COOKING ZONE
- Press the selection button of the required cooking zone.
- Press the button to display heat level . Now the zone goes
off, the indicator goes off after 10 seconds.
- To stop rapidly, press the and buttons at the same time.
The heat level automatically goes down to .
The cooking zone goes off.
• GENERAL STOP
The cooking zones and the timer can be
stopped at any moment by pressing for
3 seconds on the On-Off button.
• RESIDUAL HEAT INDICATOR
The control panel tells the user when the surface temperature
of the cooking zones exceeds about 60°C, by the following
displaying: “H” . When the temperature goes back below 60°C,
the “H” display goes off.
For ending the cooking, we advise switching off the cooking zone
and using the residual heat of the zone to finish cooking gently.
N.B. After a cut in the current, the residual heat indicator disappears
completely, even if the surface temperature exceeds 60°C.
- Press the or button to select a heat level between 1 and
9. Hold down the or button and the heat level increases
or decreases gradually.
4 GB
Page 6
• FAST HEATER OPERATION
All zones are fitted with a "Fast heater" which allows to get a faster
temperature increase of the heating areas. Ideal to seal meat or
to bring quickly to the boil large quantitites of liquids.
Starting the fast heater
. Press the on/off button .
. Start the required zone, press the + button to obtain position “9”,
release the button briefly and press it again; the display alternates
showing “A” (fast heater) and “9” (heat level).
. If necessary choose the required heat position.
Cooking Power released Time of fast
position % heater minutes
000
U (65°C) 131
263
3115
4 16 6,5
5 19 8,5
6 32 2,5
7 45 3,5
8 65 4,5
9 100 0
E.g. 1800 W zone at position 6 = 32% of 1800 W power
released = 576W
When the “Fast heater” is on, the zone supplies 1800 W
power for 2.5 minutes, and adjusts to 576 W after this time.
. When the "Fast heater" is done, the display of the power level
remains steady.
• ACTIVATION OF THE BOOSTER FUNCTION
The booster function allows to get by a simple pressure the
cooking zone working with a high power according to the zone,
for 10 minutes period.
Ideal to bring to the boil large quantities of liquids ...
• PROGRAMMING A COOKING ZONE
Every cooking zone can be programmed for a maximum time of
99 minutes. Only one zone, at a time, can be programmed.
- Start the required zone by following the previous instructions.
The control LED near the heat level must be displayed, it shows
that the zone is live.
- Press the Timer button .
The zone mark around the timer display shows the controlled
zone.
- Press the or - button to select the time in minutes.
This is saved automatically after three seconds.
The programmed time can be modified at any moment by pressing
the timer selection button, the timer control LED must be on.
When the time has run, the cooking zone goes off automatically
and an audible beep sounds for 1 minute. Press the timer
button to stop it.
The programmed time can be reset to using the button
or pressing the and buttons at the same time, the cooking
zone is then no longer linked to the timer but stays operational.
So you will have to stop the zone independently.
The timer can be used alone as a reminder, it will ring at the end
of the programmed time.
• LOCKING BUTTON OPERATION
The locking function holds the current settings, or prevents anyone
from starting the hob. It is also used for cleaning the control strip
as the controls can be locked without the hob being on.
To lock :
- Press the on/off button .
- Start the required cooking zones.
- Select a heat level for each of them;
- Press the button to set the data ; in this way no other button
works, except the on/off button.
The locking indicator lamp comes on.
To unlock :
Activation of the BOOSTER function :
- Press the setting key of the cooking zone fitted
with the booster function.
The control led is displayed.
- Press the key to start the Booster.
The Booster is active for 10 minutes.
The P mark (power) appears.
When the time is over, the power level decreases to 9.
A pressure on the key "-" cancels the booster function, and the
power level decreases to 9.
To release the locking function just press the button ; the
indicator lamp goes off, all the controls work again.
If when the controls are locked, the timer is on, the time will be
counted automatically and the zone switched off at the end of the
programmed time.
If the locking control is on when the hob is finally shut down,
the locking control stays operational and prevents any action
when the hob is restarted, press the button to release the
locking function.
5 GB
Page 7
CLEANING AND MAINTENANCE
• Before carrying out any maintenance work on the hob, allow it
to cool down.
• Only products, (creams and scrapers) specifically designed for
glass ceramic surfaces should be used. They are obtainable
from hardware stores.
• Avoid spillages, as anything which falls on to the hob surface
will quickly burn and will make cleaning more difficult.
• It is advisable to keep away from the hob all substances which
are liable to melt, such as plastic items, sugar, or sugar-based
products.
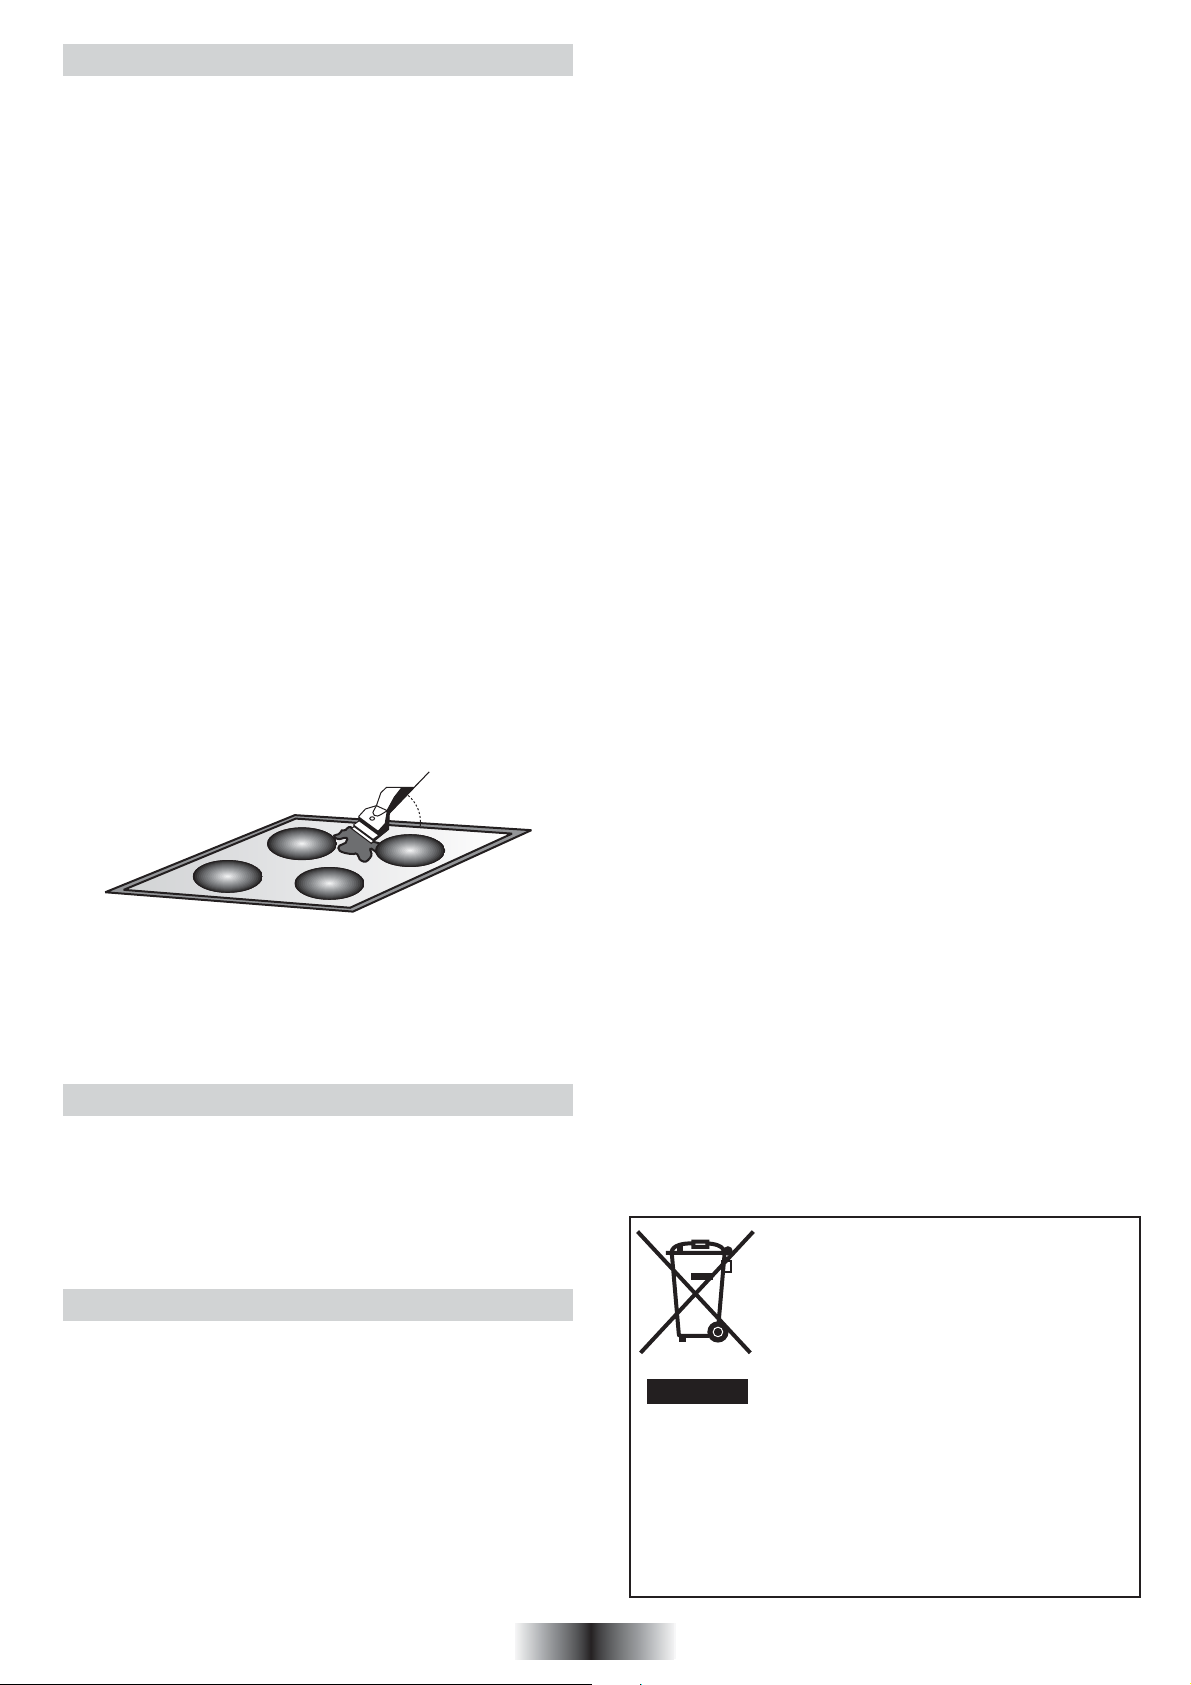
MAINTENANCE:
- Place a few drops of the specialised cleaning product on the
hob surface.
- Rub any stubborn stains with a soft cloth or with slightly damp
kitchen paper.
- Wipe with a soft cloth or dry kitchen paper until the surface is
clean.
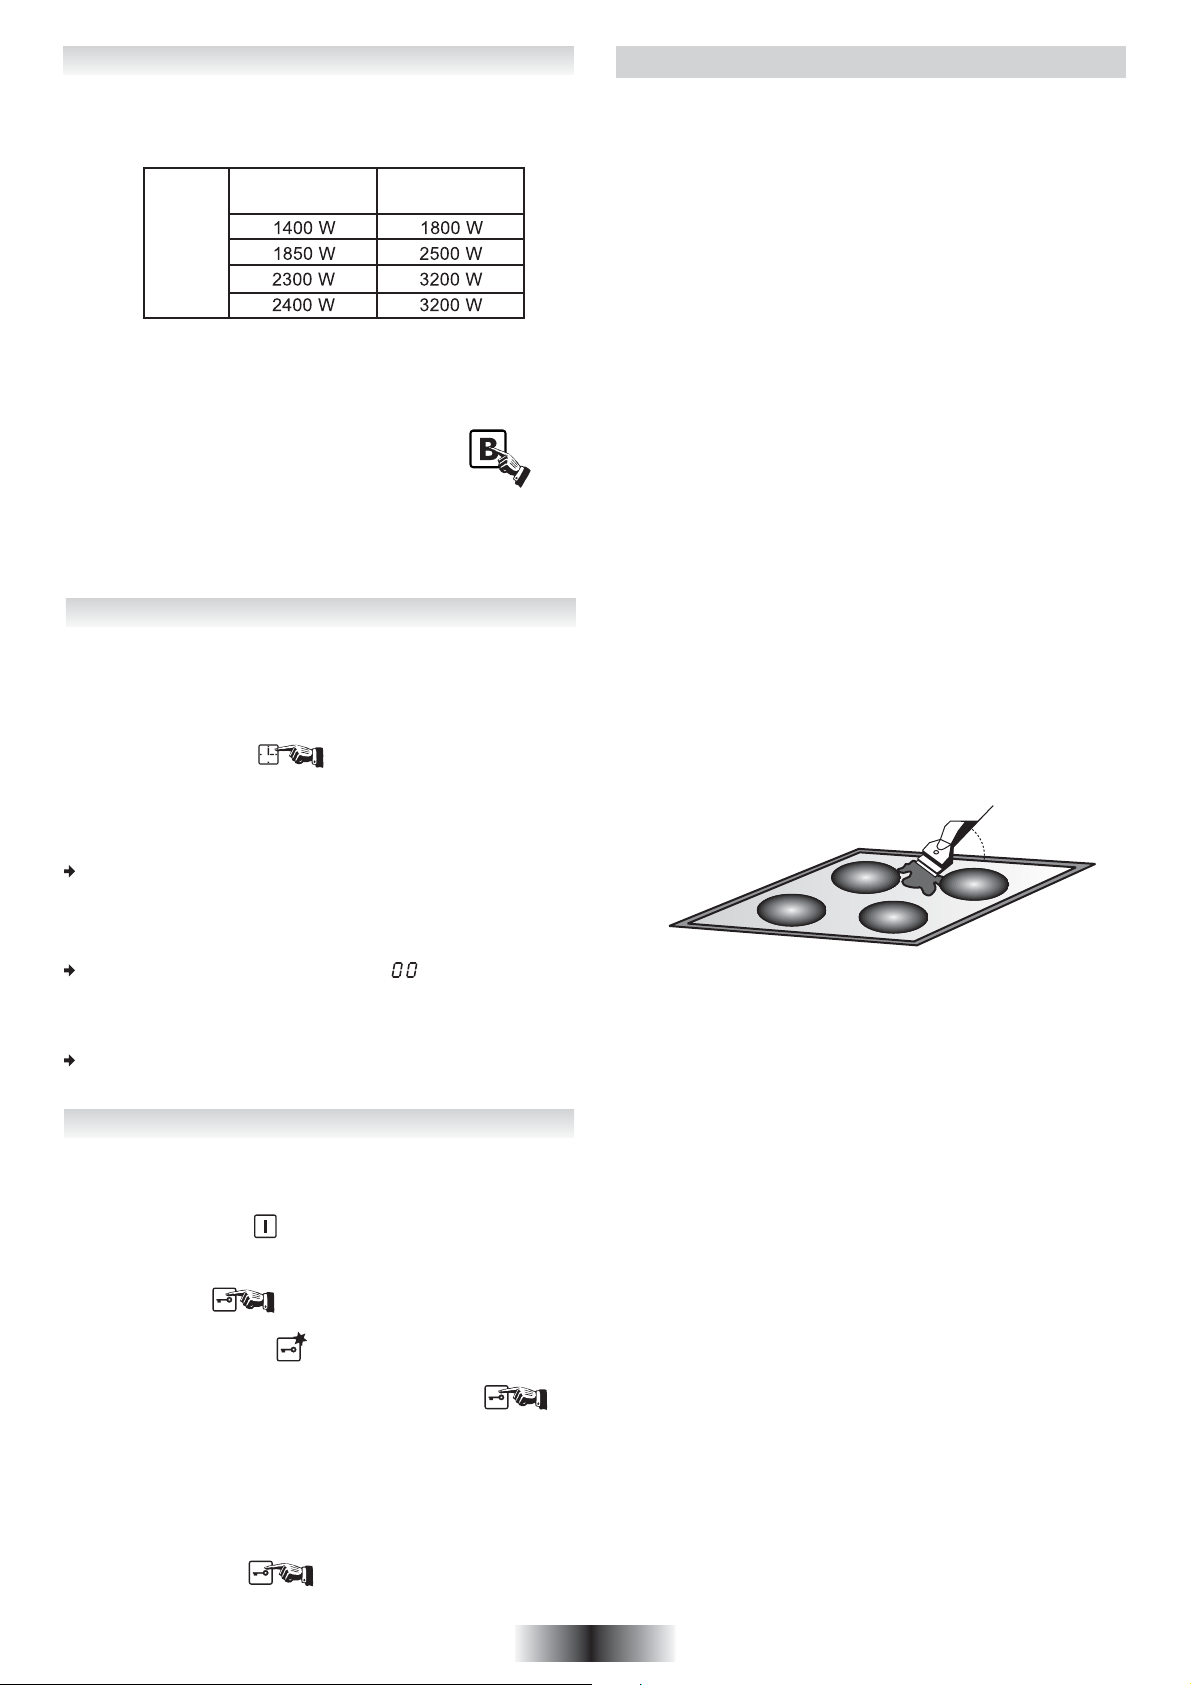
If there are still some stubborn stains:
- Place a few more drops of specialised cleaning fluid on the
surface.
- Scrape with a scraper, holding it at an angle of 30° to the hob,
until the stains disappear.
- Wipe with a soft cloth or dry kitchen paper until the surface is
clean.
- Repeat the operation if necessary.
A FEW HINTS:
Frequent cleaning leaves a protective layer which is essential to
prevent scratches and wear. Make sure that the surface is clean
before using the hob again. To remove marks left by water, use
a few drops of white vinegar or lemon juice. Then wipe with
absorbent paper and a few drops of specialised cleaning fluid.
The control knobs can be removed for a complete cleaning.
The glass ceramic surface will withstand scraping from flatbottomed cooking vessels, however, it is always better to lift them
when moving them from one zone to another.
NB:
30° Maxi
Do not use a sponge which is too wet.
Never use a knife or a screwdriver.
A scraper with a razor blade will not damage the surface, as
long as it is kept at an angle of 30°.
Never leave a scraper with a razor blade within the reach of
children.
Never use abrasive products or scouring powders.
Foods cook slowly.
• Improper cookware being used. Pan bases should be flat, fairly
heavy-weight and the same diameter as the heat zone selected.
Tiny scratches (may appear as cracks or abrasions) on the
glass surface of the hob.
• Incorrect cleaning methods, cookware with rough bases, or
coarse particles (salt or sand) trapped between the cookware
and the surface of the hob.
Use recommended cleaning procedures, be sure cookware
bases are clean before use and use cookware with smooth
bases.
Metal markings (may appear as scratches).
• Do not slide aluminium cookware across the surface.
Use recommended cleaning procedure to remove marks.
• Incorrect cleaning materials have been used, spillage or grease
stains remain on the surface, use a razor scraper and
recommended cleaning product.
Dark streaks or specks.
• Use a razor scraper and recommended cleaning product.
Areas of discoloration on cooktop.
• Marks from aluminium and copper pans as well as mineral
deposits from water or food can be removed with the cleaning
cream.
Hot sugar mixtures / plastic melted to the surface.
• See the Glass Hob Cleaning section.
The hob is out of order, or some heat zones do not work.
• The shunt bars are not properly fitted on the terminal block.
Check the connection is made in conformity with the instructions
page 2.
The hob does not operate.
• A big spill or object covers at least two buttons, for at least 10
seconds. Clean up the spill or remove the object.
• The control panel is locked. Press the “Locking” button to release.
The hob does not cut off
• The control panel is locked. Press the “Locking” button to release.
Refer to the section, page 5.
The hob stops automatically
• A spill covers at least two buttons for more than 10 seconds; the
hob switches to safety, and an audible beep sounds so long as
the buttons are covered. Clean up the spill or remove the object.
• The cooking zones stop automatically if they are left on for too
long. Refer to the section, page 4.
Frequency of on/off operations for cooking zones
• The on-off cycles vary according to the required heat level:
- low level: short operating time,
- high level: long operating time.
“H” display, residual heat indicator, blinking
• The electronic temperature is too high. A technician should verify
the fitting in compliance with the recommendations, page 2.
AFTERCARE
Before calling out a Service Engineer please check the
following:
— that the plug is correctly inserted and fused;
If the fault cannot be identified:
switch off the appliance — do not tamper with it — call the Aftercare
Service Centre. The appliance is supplied with a guarantee
certificate that ensures that it will be repaired free of charge at the
Service Centre.
PROBLEM SOLVING
The induction hob gives shorings out.
• Normal. The cooking fan of the electronic components is on.
The induction hob gives a light whistling out.
• Normal. According to the working frequency of the inductors, a
light whistling can occur when using several cooking zones on
maximum power.
Cooking zones that do not maintain a rolling boil or a fast
enough frying rate.
• You must use pans which are absolutely flat.
• Pan bottoms should closely match the diameter of the heat zone
selected.
This appliance is marked according to the
European directive 2002/96/EC on Waste
Electrical and Electronic Equipment (WEEE).
By ensuring this product is disposed of correctly,
you will help prevent potential negative
consequences for the environment and human
health, which could otherwise be caused by
inappropriate waste handling of this product.
The symbol on the product indicates that this
product may not be treated as household waste.
Instead it shall be handed over to the applicable collection point
for the recycling of electrical and electronic equipment
Disposal must be carried out in accordance with local
environmental regulations for waste disposal.
For more detailed information about treatment, recovery and
recycling of this product, please contact your local city office,
your household waste disposal service or the shop where you
purchased the product.
6 GB
Page 8
AVVERTENZE GENERALI
LEGGERE ATTENTAMENTE LE ISTRUZIONI INCLUSE IN QUESTO LIBRETTO. Vi danno importanti indicazioni sulla sicurezza
d'installazione, d'impiego e di pulizia, ed anche qualche consiglio per un'ottimale utilizzo del piano di cottura. Conservare con cura
questo documento per consultazione ulteriore e notare qui sotto, prima dell'installazione del piano, il numero di serie dell'apparecchio,
nel caso di un ulteriore richiesta d'intervento del servizio di assistenza.
Placca segnaletica
(situata sotto la cassetta inferiore del piano)
• Tutti le parti accessibili sono calde durante il funzionamento del piano, tenere lontano i bambini durante il funzionamento del prodotto
e fino a quando non si spegneranno le spie di calore residuo.
• Si raccomanda, dopo ogni utilizzo, un minimo di pulizia dell'apparecchio, per evitare l'accumulo di sporcizie e grassi.
Questi, infatti, ricuocerebbero ad ogni uso dell'apparecchio, carbonizzandosi e liberando fumi ed odori sgradevoli, con il rischio di
incendiarsi.
• I grassi di cottura o l'olio caldo provocano degli schizzi. Badare di non allontanarsi dall'apparecchio, tali sostanze possono
infiammarsi.
• Non depositare oggetti sulla parte comandi dei piani con comandi digitali.
• La carta stagnola e i recipienti in materia plastica non devono essere appoggiati sulle superfici calde.
• Si raccomanda di non depositare oggetti metallici o coperchi sul piano (il metallo é conduttore e assorbe il calore).
• Non cucinare mai direttamente sul piano, utilizzare sempre le pentole.
• Appoggiare sempre la pentola ben centrata sul bruciatore da utilizzare.
• Non utilizzare la superficie vetroceramica né come piano per tagliare né come piano di lavoro.
• Non far scivolare le pentole sul piano: rischio di graffiature.
• Non appoggiare oggetti pesanti sul piano, potrebbero cascare e rovinare il piano.
• Non lasciare oggetti depositati sul piano di qualunque tipo essi siano.
• Nel raro caso che possa esserci un’incrinatura sotto il piano in vetroceramica, staccare immediatamente l’apparecchio dall’alimentazione,
e chiamare direttamente il Servizio Assistenza.
•
Questo apparecchio non è destinato ad essere usato da bambini e persone incapaci o inesperte all'uso del prodotto, a meno che non
vengano sorvegliate o istruite riguardo all'uso dell'apparecchio da una persona responsabile della loro sicurezza.
Attenzione! Questo apparecchio é conforme alla direttiva in materia di sicurezza e di compatibilità elettromagnetica. Tuttavia,
le persone portatrici di pacemaker devono mantenersi a distanza dall’apparecchio. Non é infatti possibile garantire che ogni
pacemaker presente sul mercato sia effettivamente conforme alla normativa valida in materia di sicurezza e di compatibilità
elettromagnetica e che non possano manifestarsi interferenze in grado di compromettere il corretto funzionamento
dell’apparecchio medesimo. Anche altri apparecchi, per esempio i dispositivi per l’udito, potrebbero essere soggetti ad
anomalie.
PIANO COTTURA
Bruciatori
Tensione alimentazione
Potenza elettrica installata (W)
Dimensioni prodotto (l x p x h)mm.
Dimensioni foro incasso (AxB)
(V/Hz)
4 Induzione 4 Induzione
220-240
50/60 Hz
574 x 505 x 55 752 x 505 x 55
HVI 740HVI 640
220-240
50/60 Hz
HGI 7544
4 Induzione
220-240
50/60 Hz
74007400 7400
752 x 505 x 55
740 x 490
Tutte queste caratteristiche sono indicative, il produttore non è responsabile per errori di stampa. Perseguendo una politica di aggiornamento
tecnico-qualitative, il produttore si riserva il diritto di apportarvi modifiche migliorative, rispettando le norme vigenti.
DICHIARAZIONE DI CONFORMITÀ:Questa apparecchiatura, nelle parti destinate a venire a contatto con sostanze alimentari,
É conforme alla prescrizione della Direttiva CEE 89/109 e al D.L. di attuazione n° 108 del 25.01.92.
Apparecchio conforme alle Direttive Europee 73/23/CEE e 89/336/CEE , sostituite rispettivamente da 2006/95/CE e 2004/108/CE,
e successive modifiche.
7 IT
Page 9
INSTALLAZIONE
Il collegamento e la messa in funzione degli apparecchi elettrodomestici nel loro ambiente è un’operazione delicata che, se non
viene effettuata correttamente, può causare delle conseguenze anche gravi per la sicurezza dei consumatori. Per questo è
importantissimo che l’operazione di collegamento venga svolta da un professionista , che DEVE attenersi alle norme tecniche in
vigore. Se nonostante questa raccomandazione, il consumatore deciderà di realizzare personalmente il collegamento, il produttore
non sarà ritenuto responsabile per eventuali incidenti tecnici sul prodotto, e neppure per eventuali incidenti a cose o persone.
INSERIMENTO NEL MOBILE
Il mobile o il supporto in cui deve essere incassato il piano e le
pareti dei mobili attigui devono essere di un materiale resistente
per sopportare una temperatura elevata.
Inoltre è necessario che il rivestimento che ricopre il mobile o il
supporto sia fissato con una colla resistente alle alte temperature
affinché non si scolli.
Una guarnizione di tenuta stagna è consegnata con il piano di
cottura.
Prima dell’installazione:
Girare il piano, parte in vetro verso il basso.
Abbiate cura di proteggere il vetro.
Mettere la guarnizione avvolta intorno al piano.
Abbiate cura nell’eseguire il lavoro, in quanto tutto questo eviterà
qualsiasi infiltrazione dentro il mobile di supporto.
• Assicurarsi che la superficie sulla quale verrà installato il prodotto
sia piana.
• Possibili deformazioni provenienti da una errata installazione
del piano cottura possono influire negativamente sul
funzionamento dell’apparecchio.
• Prevedere uno spazio di almeno 5 cm. fra il piano di cottura e
le pareti che lo circondano.
• Realizzare il foro per l’inserimento come indicato in figura.
• La parte incassata del piano cottura ha un’altezza di 5,5 cm.
• Nel caso di un pannello divisorio :
- assicurarsi che la distanza fra la parte sottostante l’apparecchio
ed il pannello e/o qualsiasi altra parete del mobile, superi i
2,5 cm per garantire la circolazione dell’aria (ovvero la distanza
minima tra il piano di lavoro ed il pannello divisorio è 8 cm).
- prevedere dietro l’apparecchio uno spazio di 8 cm per una
corretta ventilazione.
• Non è possibile installare questo prodotto sopra un forno
non raffreddato, una lavastoviglie, un frigorifero, un
congelatore o una lavatrice.
• Il fondo del piano é dotato di 4 alloggiamenti per le squadrette
di fissaggio che bloccano il piano al mobile. Posizionare
le 4 squadrette prima dell’inserimento del piano nel mobile.
Piano
25 mm
mini
50 mm
- Qualsiasi intervento dovrà essere effettuato dal Servizio di
Assistenza o comunque da una persona qualificata, assicurarsi
di rispettare il seguente codice-colore durante il collegamento
dei singoli fili:
BLU - NEUTRO (N)
MARRONE - FASE (L)
GIALLO-VERDE - TERRA ( )
• MODELLO CON PRESA DI CORRENTE
Questo apparecchio é venduto provvisto di cordone di
alimentazione con presa di corrente e deve essere utilizzato
esclusivamente con una tensione di 220-240 V monofase.
• Allaciarlo ad una presa di corrente da 25 Ampere.
• MODELLO SENZA PRESA DI CORRENTE
Questo apparecchio é venduto provvisto di cordone di
alimentazione senza spina e deve essere utilizzato
esclusivamente con una tensione di 230 V tra fasi o tra fase
e neutro.
• dopo aver verificato che il fusibile è adeguato (vedere tabella),
collegare alla presa
La morsetteria offre anche diverse possibilità di collegamento:
Bifase 220-240 V2~ Trifase 220-240 V3~ Trifase 380-415 V3N~
Per procedere al collegamento, attenersi scrupolosamente alle
indicazioni di sotto indicate:
• Prima di realizzare il collegamento, verificare che l’installazione
sia protetta da un fusibile appropriato, vedere la tabella sottostante,
controllare la sezione dei fili dell’installazione.
1– Operazioni da eseguire sul collegamento esistente
• Girare il piano, con la parte del vetro contro il piano di lavoro,
facendo molta attenzione a proteggere il vetro!
• sollevare il coperchio.
• scollegare il cavo alimentazione presente:
. svitare le viti che fissano i conduttori del cavo e i ponticelli,
. allentare le viti del serracavo
. sfilare il cavo alimentazione
2– Operazioni da eseguire per realizzare il nuovo collegamento
• Scegliere il cavo d’alimentazione attenendosi sempre alla tabella.
• posizionare il cavo nel passacavo,
• spelare l’estremità dei conduttori e collegarli ai terminali. Far
riferimento alle informazioni della tabella seguente ed alla
numerazione presente sulla morsettiera, utilizzare i ponticelli
recuparati nell’operazione precedente,
• Riavvitare il passacavo,
• Chiudere il coperchio della morsettiera.
Guarnizione
Apertura
500 X 50
Apertura
500 X 10
COLLEGAMENTO ELETTRICO
L’installazione deve essere conforme alle norme vigenti del Paese
d'installazione.
Il produttore declina ogni responsabilità nel caso questa disposizione
non venga rispettata.
Attenzione:
- Prima di effettuare il collegamento, controllare la tensione
d’alimentazione indicata sul contatore, la regolazione del
disgiuntore, il calibro del fusibile e la continuità della “terra”.
- Il collegamento alla rete deve essere effettuato mediante una
presa di corrente munita di messa a terra o mediante dispositivo
a interruzione omnipolare con una distanza di apertura dei contatti
di almeno 3 mm.
- Il filo di protezione verde/giallo deve essere collegato ai morsetti
di terra, da una parte per l’apparecchio e dall’altra parte per il
collegamento.
- Non possiamo essere ritenuti responsabili per incidenti o per le
eventuali conseguenze di incidenti dall’uso di un apparecchio
non collegato a terra o cui la messa a terra sia difettosa.
CONNESSIONI ELETTRICHE SULLA MORSETTIERA
HVI 640
Fusibile
Cavo
Fusibile
Cavo
Cavo
Monofase 220-240 V
Trifase 220-240 V3
Ph = Fase N = Neutro T = Terra
Fusibile
Bifase 220-240 V2
Trifase 380-415 V3N
8 IT
HVI 740
Page 10
INDUZIONE
IL RECIPIENTE TRASFORMA
IL FLUSSO
D’INDUZIONE
IN CALORE
Flusso induzione
Superficie vetro
Induttore
Un generatore elettronico alimenta una bobina all’interno
dell’apparecchio. L’induttore crea un campo magnetico che induce
delle correnti detti “correnti d’induzione” le quali attraversano il
recipiente disposto sul piano cottura. Tali correnti trasformano il
recipiente in vero e proprio generatore di calore mentre la superficie
di vetro rimane fredda.
Il sistema funziona SOLO con pentole aventi fondo metallico
magnetico
L’induzione consente di ottenere due risultati fondamentali :
- essendo il calore trasmesso dal solo recipiente, la potenza di
riscaldamento restituita è massima e la cottura avviene senza
dispersione di calore,
- non esiste inerzia termica in quanto il contatto del recipiente
sulla zona di cottura ne comanda o interrompe la messa in
servizio (inizio o arresto istantaneo della cottura).
UN APPARECCHIO AL ALTA SICUREZZA....
Il vostro piano a induzione è dotato di numerosi dispositivi di
sicurezza per proteggerlo contro qualsiasi funzionamento anormale
o errato. Se il piano é installato ed utilizzato correttamente tali
dispositivi entreranno in funzione solo di rado.
• Turbina di ventilazione : protegge e raffredda gli organi di
comando e di alimentazione. Ha due velocità che vengono
attivate automaticamente. La turbina funziona anche se le zone
cottura sono spente, e continua a funzionare fino a quando il
comando elettronico non è sufficientemente raffreddato.
• Sicurezza "Transistor" : una sonda sorveglia in permanenza
la temperatura delle componenti elettroniche. Se il calore aumenta
in modo eccessivo, automaticamente diminuisce la potenza delle
zone cottura sino a giungere al loro totale spegnimento (in questo
caso il display del livello di potenza lampeggia) fin tanto che la
temperatura dei componenti non rientri negli standard; a questo
punto il piano riprende a funzionare.
• Sicurezza pentola vuota : una sonda installata sotto ogni zona
di cottura rileva la temperatura anormala di un recipiente vuoto
o della superficie in vetro del piano.
• Sicurezza “Segnalazione” : il rivelatore di presenza pentola
abilita il funzionamento della zona cottura. Un oggetto metallico
di piccole dimensioni (cucchiaio, coltello,...) posto sulla zona di
cottura non verrà rilevato, per cui il riscaldamento non avrà
luogo.
• Sicurezza ”fuoriuscita” : sono previste protezioni per arrestare
il funzionamento del piano nel caso di un’eventuale fuoriuscita
di liquidi. Per poter far ripartire il piano è necessario pulire le
tracimazioni.
FUNZIONAMENTO
Le informazioni seguenti vi aiuteranno a scegliere i recipienti più
adatti e migliori per ottenere dei buoni risultati.
INDUZIONE
Simbolo sulle
pentole
INOX Non utilizzabile
ALLUMINIO Non utilizzabile
GHISA Buone prestazioni
Ferro smaltato Buone prestazioni
Vetro Non utilizzabile
Porcellana Non utilizzabile
Fondo in rame Non utilizzabile
Verificare la presenza del marchio a lato
sull’etichetta della pentola. Tale simbolo
identifica i materiali idonei per la cottura
ad induzione.
Utilizzare pentole magnetiche (ferro smaltato,
ghisa, acciaio ferritico) per verificare utilizzare
una calamita (deve essere attratta)
Ad eccezione dell’inox ferritico
ATTENZIONE: può graffiare la superficie in vetro
Si raccomandano pentole con fondo piatto,
spesso e spigoli arrotondati
UTILIZZO DEL PIANO VETROCERAMICA
1. Tasto ON / OFF
2. Tasto selezione zona cottura
3. Display : livello potenza, spia calore residuo, booster, ...
4. Tasto “-“
5. Tasto “+”
6. Tasto TIMER
7. Display TIMER
8. Tasto BLOCCO DI SICUREZZA + spia
9. Indicatore zona cottura, se acceso indica che il timer controlla
la zona interessata
10. LED di controllo :
acceso: la zona di cottura o il timer sono attivi, è possibile
modificare i parametri
spento: la zona cottura o il timer mantengono i parametri
scelti
11. Tasto BOOSTER
CONSIGLI D’UTILIZZO
Per ottenere dei buoni risultati di cottura, è necessario
utilizzare dei recipienti di buona qualità.
• Utilizzare recipienti di buona qualità con fondo piatto e
spesso: il fondo assolutamente piatto elimina tutti i punti di
surriscaldamento sui quali si attaccano gli alimenti e lo spessore
del metallo permette una perfetta distribuzione del calore.
• Assicurarsi che il fondo del recipiente sia asciutto: al momento
di riempire il recipiente o quando viene utilizzata una pentola
che esce direttamente dal frigorifero, ad esempio, assicurarsi
che il fondo sia perfettamente asciutto; questa precauzione
eviterà che il piano di cottura si sporchi.
• Utilizzare recipienti di diametro sufficientemente grande da
coprire completamente il fuoco: è consigliabile assicurarsi
che il fondo sia grande almeno quanto la zona di cottura. Se il
fondo è leggermente più grande, l’energia viene utilizzata in
maniera ottimale.
LE DIVERSE POSIZIONI
Le diverse posizioni corrispondono ai seguenti livelli di potenza :
INDUZIONE
Max tempo di funzionamento
prima del cut-off
(spegnimento forzato)
9 IT
Posizione
% potenza
1 2,5 10 ore
2 5 10 ore
3 7,5 5 ore
4 12,5 4 ore
5 18 3 ore
6 24 3 ore
7 45 2 ore
8 60 2 ore
9 100 1 ora
Page 11
Per garantire la sicurezza le zone cottura si spengono
automaticamente se sono lasciate funzionare per un tempo
eccessivo. I tempi per lo spegnimento forzato dipendono dal livello
di potenza.
NOTA:
II piano induzione contiene due generatori, ciascuno dei quali
comanda simultaneamente due zone cottura (area):
• SPEGNERE UNA ZONA DI COTTURA
- Premere il tasto della zona di cottura desiderata.
- Premere il tasto - fino a che il display indica . Ora la zona di
cottura è spenta, il display si spegne dopo 10 secondi.
- Per spegnere immediatamente premere contemporaneamente
i tasti - e + . Il display scende subito a e la zona di cottura
si spegne.
• SPEGNERE TUTTO IL PIANO
Le zone di cottura ed il timer possono essere fermati
quando si desidera premendo il tasto On \ Off
Ogni generatore può fornire fino ad un massimo di 3700 W. Di
conseguenza, per la stessa area, quando la funzione Booster è
attiva e la seconda zona cottura è messa al livello 8 o 9, la potenza
di quest’ultima è automaticamente ridotta al livello 7; tale situazione
è segnalata dal lampeggio del display che segnala il livello di
potenza.
ATTENZIONE: come indicato nella
tabella precedente la funzione
Booster è attiva per 10 minuti, trascorsi i quali la zona cottura
riprende a funzionare al livello 9, anche la potenza della seconda
zona cottura, se ridotta per problemi di potenza massima, ritorna
all’impostazione desiderata.
USO
• Attendere alcuni secondi dopo la prima accensione del piano
per permettere l’attivazione dei comandi elettronici.
- Premere il tasto per 3 secondi.
I comandi del piano sono attivi. Viene visualizzato il livello di
potenza ”0” ad ogni zona di cottura. I LED di controllo
lampeggiano.
-Trascorsi 10 secondi senza alcun utilizzo, i controlli elettronici
si spengono e la procedura di accensione deve essere ripetuta.
• ACCENDERE UNA ZONA DI COTTURA
- Premere il tasto di selezione
della zona di cottura desiderata.
Il led di controllo della zona
interessata diventa fisso,
indicando che la zona è attiva.
- Premere i tasti - o + e selezionare il livello di potenza da 1 a
9. Tenendo premuti i tasti + o - il livello di potenza aumenta o
diminuisce progressivamente.
Le seguenti indicazioni sono fornite solo a titolo indicativo. La
Vostra personale esperienza Vi permetterà di adattare le cotture
al Vostro gusto.
0 : Spento
U : Cotture delicate
1 : )
2 : ) ..... Sciogliere, fondere
3 : Mantenimento in caldo
4 : Riscaldamento
5 : Scongelamento, cotture lente
6 : Cotture senza coperchio
7 : Friggere, rosolare, arrostire
8 : Cotture a temperatura elevata, arrostire
9 : Friggere
Booster : Portare ad ebollizione grandi quantità di liquidi...
• INDICATORE DI CALORE RESIDUO
Sul display compare la lettera quando la superficie della zona
di cottura supera la temperatura di 60°C. La lettera si spegne
quando la temperatura scende sotto i 60°C.
Suggerimento: utilizzare il calore residuo della zona di cottura per
completare la cottura in modo lento.
N.B. dopo una interruzione di corrente, la spia di calore residuo
si spegne, anche se la temperatura di superficie supera i 60°C.
• RISCALDAMENTO RAPIDO
Ogni zona di cottura è equipaggiata con una funzione che permette
un aumento veloce della temperatura.
Ideale per portare velocemente a bollitura grandi quantità di liquidi
Attivare il riscaldamento rapido
- Premere il tasto ON / OFF
- Attivare la zona di cottura desiderata, premere il tasto sino ad
ottenere il livello di potenza 9 , rilasciare brevemente il tasto e
premerlo di nuovo; sul display appaiono alternativamente A e 9
(livello di potenza).
- Se necessario ridurre la potenza al livello desiderato.
Livello
Impostato
Potenza fornita
(%)
Tempo
inserimento
Riscaldamento
Rapido
(minuti)
000
U (65°C) 131
263
3115
4 16 6,5
5 19 8,5
6 32 2,5
7 45 3,5
8 65 4,5
9 100 0
Esempio zona cottura da 1800 W in posizione 6 = 32% di 1800 W
= 576 W forniti. Quando il RISCALDAMENTO RAPIDO è attivo,
la zona funziona a 1800W per 2,5 minuti, poi si porta ai 576
W impostati.
A funzione riscaldamento rapido terminata il livello di potenza è
fisso sul display
• RILEVAZIONE PENTOLA
Quando il piano è in funzione il rilevatore della pentola fornisce
il vantaggio di fermare o far partire automaticamente la zona di
cottura in funzione della presenza/assenza della pentola stessa.
Il sistema offre quindi la funzione aggiuntiva di risparmio di energia.
Se la zona cottura è utilizzata con una pentola adatta*:
il
display indica il livello di potenza o il funzionamento della funzione
booster “ ”.
* L’induzione richiede pentole con fondo idoneo, vedere tabella
pagina 9, e di diametro sufficiente a coprire l’intera zona utilizzata.
Se la zona cottura è utilizzata con una pentola non adatta:
sul display appare il simbolo “ ” . La zonacottura non si accende.
Se nessuna pentola viene rilevata trascorsi 10 minuti l’operazione
di accensione viene cancellata:
IMPORTANTE:
La zona cottura deve essere fermata manualmente, non è
possibile farlo solo togliendo la pentola. La funzione di
rilevamento della pentola non è equivalente ad un tasto
ON/OFF.
10 IT
Page 12
• UTILIZZO DELLA FUNZIONE BOOSTER
La funzione booster permette, con la sola pressione di un tasto,
di ottenere una zona cottura con potenza elevata per 10 minuti.
Ideale per portare ad ebollizione grandi quantità di liquidi.
I
N
D
U
Z
I
O
N
E
POTENZA
POTENZA
BOOSTER
Attivazione della funzione BOOSTER :
- Premere il tasto della zona cottura dotata della funzione
booster.
Il led di controllo si accende.
- Premere il tasto per attivare
la funzione Booster.
La funzione Booster è attiva per 10 minuti.
Sul display appare il simbolo P (potenza).
Trascorsi i10 minuti il livello di potenza si riporta a 9.
Premendo il tasto “-“ la funzione booster viene disattivata ed il
livello di potenza dimunuisce.
• PROGRAMMAZIONE DELLA ZONA DI COTTURA
Ogni zona di cottura può essere programmata per funzionare sino
ad un massimo di 99 minuti. E’ possibile programmare una zona
alla volta.
- Attivare la zona di cottura seguendo le indicazioni precedenti.
Il LED di controllo vicino all’indicatore di potenza deve essere
acceso; questo indica che la zona è attiva
- Premere il tasto Timer .
Di fianco al display del timer si accende la spia di programmazione
della zona cottura che viene programmata.
- Premere il tasto + per selezionare il tempo in minuti.
L’impostazione è memorizzata dopo 3 secondi.
Il tempo di programmazione può essere modificato a piacere
premendo il tasto timer, il LED di controllo deve essere acceso.
Trascorso il tempo impostato la zona di cottura si spegne
automaticamente. Un segnale sonoro è emesso per 1 minuto
(premere qualsiasi tasto per spegnerlo prima).
Il tempo impostato può essere riportato utilizzando il tasto -
o premendo contemporaneamente i tasti + e - , il funzionamento
della zona di cottura è ora indipendente dal timer ma rimane
funzionante.
Per spegnere la zona di cottura seguire le istruzioni precedenti.
Il timer può essere utilizzato come promemoria, suonerà allo
scadere del tempo impostato.
MANUTENZIONE DEL PIANO VETROCERAMICA
• E’ importante prima di iniziare la pulizia della superficie in
vetroceramica, attendere che la stessa si sia completamente
raffreddata.
• Per la pulizia della superficie in vetroceramica devono essere
utilizzati solo prodotti specifici: crema e lametta. I suddetti prodotti
si trovano facilmente in commercio, nei supermercati.
• Evitare le fuoriuscite di liquido, le sostanze che cadono sul piano
di cottura si carbonizzano rapidamente e sono quindi più difficili
da pulire.
• Si raccomanda di tenere lontano dal piano di cottura tutto quanto
possa fondere, come ad esempio, tutti gli oggetti di plastica, la
carta stagnola, lo zucchero……
MANUTENZIONE:
- Versare qualche goccia di un prodotto specifico per la pulizia
della superficie in vetroceramica.
- Strofinare con insistenza dove vi fossero delle macchie insistenti,
con l’aiuto di uno straccio asciutto, o di una spugna leggermente
umida.
- Asciugare con uno straccio asciutto fino a quando la superficie
non sia pulita.
Se dopo questa manutenzione le macchie persistono:
- Versare di nuovo qualche goccia di un prodotto specifico.
- Strofinare con l’aiuto di una lametta rispettando l’angolo di 30°
rispetto al piano, insistendo fino alla scomparsa delle macchie.
- Asciugare con uno straccio asciutto o della carta assorbente
fino a che la superficie non sia pulita.
- Ripetere l’operazione se necessario.
CONSIGLI:
Una pulizia frequente farà in modo di mantenere sempre lucido
il vostro piano.
Assicurarsi che la superficie sia pulita prima di riutilizzare il piano.
Per togliere le tracce d’acqua e di calcare, utilizzare qualche
goccia d’aceto bianco, o di succo di limone. Per concludere
asciugare con l’aiuto di un foglio di carta assorbente poi applicare
qualche goccia di prodotto specifico e asciugare.
Il vetro del piano in vetroceramica sopporta lo sfregamento degli
utensili da cucina a fondo piatto, ma è comunque consigliabile
sollevarli prima di appoggiarli.
NOTA :
- Evitare d’usare una spugna troppo bagnata.
- Non utilizzare mai utensili affilati.
- L’utilizzo di una lametta da barba non può danneggiare la
superficie, se la si tiene inclinata di 30° rispetto al piano.
- Tenere lontano dalla portata dei bambini la lametta.
- Non utilizzare dei prodotti abrasivi o delle pagliette metalliche.
30° Maxi
• BLOCCO DI SICUREZZA
La funzione di blocco mantiene inalterate le scelte effettuate o
previene l’accensione accidentale del piano cottura. E’ utile anche
durante la pulizia della zona dei comandi.
- Per attivare:
- Premere il tasto on/off .
- Attivare le zone cottura richieste.
- Selezionare il livello di potenza desiderato.
- Premere il tasto per bloccare le scelte. Ad eccezione
del tasto ON/OFF nessun altro tasto è ora attivo.
La spia di blocco comandi si accende.
Per togliere la funzione di blocco premere il tasto ; la
spia si spegne ed i comandi funzionano nuovamente.
Se il timer è attivo quando i controlli vengono bloccati, il conto
alla rovescia prosegue e la zona di cottura interessata viene
automaticamente spenta allo scadere del tempo impostato.
Se la funzione di blocco è attivata a piano spento, i comandi sono
bloccati e questo evita qualsiasi accensione accidentale o non
voluta. Premere il tasto per togliere la funzione di blocco.
11 IT
Page 13

SERVIZIO ASSISTENZA CLIENTI
PROBLEMI E SOLUZIONI
CERTIFICATO DI GARANZIA CONVENZIONALE: cosa fare?
Il Suo prodotto è garantito, alle condizioni e nei termini riportati
sul certificato inserito nel prodotto ed in base alle previsioni del
decreto legislativo 24/02, nonché del decreto legislativo 6 settembre
2005, n. 206, per un periodo di 24 mesi decorrenti dalla data di
consegna del bene.
Così come riportato nei testi dei Decreti Legislativi citati, il certificato
di garanzia dovrà essere da Lei conservato, debitamente compilato,
per essere mostrato al Servizio Assistenza Tecnica Autorizzato,
in caso di necessità, unitamente ad un documento fiscalmente
valido rilasciato dal rivenditore al momento dell’acquisto (bolla di
consegna, fattura, scontrino fiscale, altro) sul quale siano indicati
il nominativo del rivenditore, la data di consegna, gli estremi
identificativi del prodotto ed il prezzo di cessione
Resta pure inteso che, salvo prova contraria, poiché si presume
che i difetti di conformità che si manifestano entro sei mesi dalla
consegna del bene esistessero già a tale data, a meno che tale
ipotesi sia incompatibile con la natura del bene o con la natura
del difetto di conformità, il Servizio di Assistenza Tecnica Autorizzato
Gias, verificato il diritto all’intervento, lo effettuerà senza addebitare
il diritto fisso di intervento a domicilio, la manodopera ed i ricambi.
Per contro, nel successivo periodo di diciotto mesi di vigenza della
garanzia, sarà invece onere del consumatore che intenda fruire
dei rimedi accordati dalla garanzia stessa provare l’esistenza del
difetto di conformità del bene sin dal momento della consegna;
nel caso in cui il consumatore non fosse in grado di fornire detta
prova, non potranno essere applicate le condizioni di garanzia
previste e pertanto il Servizio di Assistenza Tecnica Autorizzato
Gias effettuerà l’intervento addebitando al consumatore tutti i costi
relativi.
ESTENSIONE DELLA GARANZIA FINO A 5 ANNI : come?
Le ricordiamo inoltre che sullo stesso certificato di garanzia
convenzionale Lei troverà le informazioni ed i documenti necessari
per prolungare la garanzia dell’apparecchio sino a 5 anni e così,
in caso di guasto, non pagare il diritto fisso di intervento a domicilio,
la manodopera ed i ricambi.
Per qualsiasi informazione necessitasse, La preghiamo rivolgersi
al numero telefonico del Servizio Clienti 199.12.13.14.
ANOMALIE E MALFUNZIONAMENTI: a chi rivolgersi ?
Per qualsiasi necessità il centro assistenza autorizzato è a Sua
completa disposizione per fornirLe i chiarimenti necessari;
comunque qualora il Suo prodotto presenti anomalie o mal
funzionamenti, prima di rivolgersi al Servizio Assistenza Autorizzato,
consigliamo vivamente di effettuare i controlli indicati sotto.
UN SOLO NUMERO TELEFONICO PER OTTENERE ASSISTENZA.
Qualora il problema dovesse persistere, componendo il “Numero
Utile” sotto indicato, sarà messo in contatto direttamente con il
Servizio Assistenza Tecnica Autorizzato
che opera nella Sua zona di residenza.
Attenzione, la chiamata è a pagamento;
il costo verrà comunicato, tramite
messaggio vocale, dal Servizio clienti
dell’operatore telefonico utilizzato. Dettagli sono presenti sul sito
internet www.hoover.it
MATRICOLA DEL PRODOTTO. Dove si trova?
E’ indispensabile che comunichi al Servizio Assistenza Tecnica
Autorizzato la sigla del prodotto ed il numero di matricola (16
caratteri che iniziano con la cifra 3) che troverà sul certificato di
garanzia oppure sulla targa matricola del prodotto (applicata sotto
al prodotto). In questo modo Lei potrà contribuire ad evitare
trasferte inutili del tecnico, risparmiando oltretutto i relativi costi.
Questo elettrodomestico è marcato conformemente
alla Direttiva Europea 2002/96/CE sui rifiuti da
apparecchiature elettriche ed elettroniche (WEEE).
Assicurandovi che questo prodotto sia smaltito
correttamente, aiuterete ad evitare possibili
conseguenze negative all’ambiente e alla salutedelle
persone, che potrebbero verificarsi a causa d’un errato
trattamento di questo prodotto giunto a fine vita. Il simbolo sul prodotto
indica che questo apparecchio non può essere trattato come un
normale rifiuto domestico; dovrà invece essere consegnato al punto
più vicino di raccolta per il riciclo delle apparecchiature elettriche ed
elettroniche. Lo smaltimento deve essere effettuato in accordo con
le regole ambientali vigenti per lo smaltimento dei rifiuti. Per
informazioni più dettagliate sul trattamento, recupero e riciclo di
questo prodotto, per favore contattare l’ufficio pubblico di competenza
(del dipartimento ecologia e ambiente), o il vostro servizio di raccolta
rifiuti a domicilio, o il negozio dove avete acquistato il prodotto.
Il piano induzione emette rumori .
• Normale. La ventola di raffreddamento dei componenti elettronici
è in funzione.
Il piano induzione emette un leggero fischio.
• Normale. In funzione della frequenza del generatore induzione,
potrebbe essere udito un leggero fischio quando più zone di
cottura stanno funzionando al massimo.
I fuochi non mantengono i sughi o le fritture a fuoco basso.
Utilizzare esclusivamente recipienti a fondo piatto. Il fondo del
recipiente deve ricoprire interamente il diametro del fuoco scelto.
Cotture troppo lente.
Utilizzo dei recipienti non adatti. Utilizzare solo degli utensili a
fondo piatto pesante e con un diametro almeno uguale al fuoco.
Graffi o scalfitture sulla superficie in vetro del piano.
Errato sistema di pulizia, utilizzo di recipienti con fondo ruvido,
presenza di particelle abrasive (sale, sabbia, zucchero) tra il piano
e il fondo del recipiente.
Consultare il capitolo relativo alla pulizia, assicurarsi che i fondi
dei recipienti siano adatti prima dell’utilizzo e utilizzare solo
recipienti con fondo liscio.
Segni di metallo (possono sembrare graffi)
Non far scivolare dei recipienti di alluminio sul piano. Attenersi
alle istruzioni di pulizia. Se non vengono utilizzati dei materiali di
buona qualità, le macchie di qualsiasi tipo esse siano persisteranno.
Aiutatevi con una lametta da barba e seguite le istruzioni del
capitolo "MANUTENZIONE”.
Macchie scure
Utilizzare una lametta da barba e seguire il capitolo
“MANUTENZIONE”.
Macchie sul piano
Macchie causate da recipienti in alluminio, dall’acqua o da alimenti,
possono essere eliminate con una crema pulente.
Segni di caramello o di plastica fusa sul piano.
Controllare il capitolo “MANUTENZIONE”.
Il piano non funziona (piani con comandi digitali).
• Un oggetto o residuo di cibo sta coprendo almeno due comandi
per almeno 10 secondi. Effettuare la pulizia o rimuovere l’oggetto
• Il pannello comandi è bloccato, sbloccarlo.
Il piano non si spegne
• Il pannello comandi è bloccato, sbloccarlo.
Il piano si spegne automaticamente
• Un residuo di cibo copre almeno due comandi per almeno 10
secondi; il piano si spegne per sicurezza ed un segnale sonoro
viene emesso sino alla pulizia del residuo di cibo.
• Le zone di cottura si spengono automaticamente se vengono
fatte funzionare per un tempo troppo lungo. Vedere la tabella di
pagina 9.
Il piano non funziona oppure alcuni fuochi non sono
funzionanti.
I ponticelli (shunt) sulla morsettiera non sono posizionati
correttamente. Fate controllare da un professionista che il raccordo
sia stato effettuato conformemente alle raccomandazioni della
pagina 8.
ON \ OFF frequenti delle zone di cottura
• I cicli ON \ OFF variano a seconda del livello di potenza scelto:
- bassa potenza: tempi di funzionamento brevi,
- alta potenza: tempi di funzionamento lunghi.
Simbolo “H” , indicatore del calore residuo, lampeggia
• La temperatura del modulo elettronico di comando è troppo
elevata. Un tecnico qualificato deve verificare le condizioni di
installazione; vedere pagina 8.
12 IT
Page 14
ALLGEMEINE HINWEISE
LESEN SIE DIE BEDIENUNGSANLEITUNG SORGFÄLTIG DURCH, UM DEN GRÖßTMÖGLICHEN NUTZEN AUS IHREM GERÄT
ZU ZIEHEN. Wir empfehlen Ihnen, die Installations- und Bedienungsanleitung für eine spätere Nutzung aufzubewahren. Notieren Sie
auf diesem Heft VOR DER INSTALLATION die Seriennummer des Gerätes, die bei einem eventuellen späteren Einsatz des Kundendienstes
nötig ist.
Matrikelschild:
(befindet sich auf der Unterseite des Gerätes)
• Um das Risiko von Verbrennungen auszuschließen, halten Sie Kinder fern, wenn das Gerät im Betrieb ist, auch nachdem die
Kochstellen abgeschaltet wurden, solange die Restwärmeanzeige leuchtet.
• Wenn Sie mit Fett oder Öl kochen, achten Sie darauf, immer den Kochvorgang zu überwachen, da sich zu heißes Fett oder Öl leicht
entzünden kann.
• Keine Alufolie oder Kunststoffbehälter auf die heiße Ceranoberfläche abstellen.
• Lassen Sie keine metallischen Gegenstände wie Messer, Gabeln, Löffel oder Deckel auf dem Induktionsfeld liegen, da sie, wenn sie
sehr groß bzw. lang oder besonders schwer sind, sehr heiß werden können!
• Wir empfehlen Ihnen, das Ceranfeld nach jeder Benutzung zu reinigen, um eine Ansammlung von Verschmutzungen und Fettrückständen
zu vermeiden. Sie würden sich bei jeder neuen Benutzung erhitzen und verkohlen und dabei störenden Rauch und unangenehme
Ausdünstungen verbreiten. Außerdem stellen sie ein Brandrisiko dar.
• Die Steuerplatine des Gerätes ist empfindlich. Achten Sie darauf, keine heißen Behälter darauf abzustellen.
• Niemals direkt auf dem Ceranfeld kochen. Benutzen Sie stets Kochgeschirr.
• Stellen Sie Töpfe und Pfannen immer in die Mitte des Kochfelds.
• Benutzen Sie die Ceranoberfläche nicht als Schneidebrett oder Arbeitsfläche.
• Schieben Sie das Kochgeschirr nicht von Kochfeld zu Kochfeld: das könnte Kratzer verursachen.
• Bewahren Sie keine schweren Gegenständen über dem Ceranfeld auf, sie könnten herunterfallen und das Ceranfeld beschädigen.
• Benutzen Sie die Ceranoberfläche nicht als Aufbewahrungsort für irgendwelche Gegenstände
• Im unwahrscheinlichen Fall, dass auf der Kochfläche ein Riss auftreten sollte, unterbrechen Sie sofort die Stromzufuhr zum Ceranfeld
und setzen Sie sich mit unserem Kundendienst in Verbindung.
•
Kinder oder Personen mit eingeschränkten körperlichen oder geistigen Fähigkeiten oder mit ungenügenden Kenntnissen und Erfahrung
dürfen nur dann das Gerät benutzen, wenn sie beaufsichtigt werden oder hinreichend Anweisungen zur sicheren Behandlung des
Gerätes durch eine für ihre Sicherheit verantwortliche Person erhalten haben.
• Kinder sind zu beaufsichtigen, um sicher zu stellen, dass sie nicht mit dem Gerät spielen.
Dieses Gerät entspricht derzeitigen Richtlinien für Sicherheit und elektromagnetische Verträglichkeit. Trotzdem sollten sich
Personen mit Herzschrittmacher von diesem Gerät fernhalten. Es ist unmöglich zu versichern, dass jeder auf dem Markt
verfügbare Herzschrittmacher der gültigen Richtlinie für Sicherheit und elektromagnetische Verträglichkeit entspricht und dass
keine Interferenzen entstehen, die den korrekten Betrieb des Gerätes gefährden. Möglicherweise kann es auch bei anderen
Geräten, wie z. B. Hörgeräten, zu Störungen kommen.
KOCHMULDEN
Kochstellen
Spannung/Frequenz
Gesamtanschulusswert (W)
Maße (B x T x H) mm.
Einbaumaße (AxB)
Alle Daten dienen der Information. Bemüht, die Qualität ihrer Produkte stets zu verbessern, behält sich Der Hersteller leichte Änderungen
in Verbindung mit technischen Innovationen vor.
(V/Hz)
4 Induktion 4 Induktion
220-240
50/60 Hz
574 x 505 x 55 752 x 505 x 55
HVI 740HVI 640
220-240
50/60 Hz
HGI 7544
4 Induktion
220-240
50/60 Hz
7400
752 x 505 x 55
740 x 490
Das Gerät entspricht den Europäischen Richtlinien 73/23/CEE und 89/336/CEE, ersetzt durch 2006/95/CE bzw. 2004/108/CE ,
und deren nachträglichen Veränderungen.
13 DE
Page 15
INSTALLATION
Der Einbau und die Installation eines Elektrogerätes sind Arbeiten, die mit besonderer Sorgfalt durchgeführt werden müssen. Eine nicht
fachgerechte Installation kann die Sicherheit des Gerätes beeinträchtigen und die Unversehrtheit des Benutzers gefährden. Es ist daher
zwingend notwendig, die Installationsarbeiten einem qualifizierten Fachmann zu überlassen, der sie nach allen Regeln der Kunst und gemäß
der geltenden Normen durchführen kann. Sollte der Endverbraucher trotz dieser dringenden Empfehlung die Installation selber vornehmen, lehnt
der Hersteller jede Verantwortung für technische Defekte am Gerät oder für eventuell resultierende Schäden an Personen oder Sachen ab.
EINBAU
Das Möbel oder die Arbeitsplatte, in die das Ceranfeld eingebaut
werden soll, so wie die Wände der angrenzenden Möbel müssen
aus hitzebeständigem Material bestehen.
Insbesondere bei Schränken aus Furnierholz müssen die
verwendeten Klebstoffe hitzebeständig sein, um Verformungen
und Entleimungen zu vermeiden.
Installation:
• Mit dem Ceranfeld wird ein Dichtungsstreifen mitgeliefert.
Gehen Sie wie folgt vor:
- Drehen Sie das Gerät mit dem Glas nach unten um. Schützen
Sie dabei die Glasoberfläche.
- Kleben Sie den Dichtungsstreifen rund um das Gerät.
- Achten Sie auf einen einwandfreien Sitz des Dichtungsstreifens,
um das Durchsickern von Feuchtigkeit in das untenstehende
Möbel zu verhindern
• Bitte achten Sie darauf, dass das Kochfeld in eine ebene Fläche
eingebaut wird.
• Eventuelle Verformungen, die wegen einer fehlerhaften und
unsachgemäßen Montage verursacht worden sind, können die
Eigenschaften der Arbeitsfläche verändern und somit die Leistung
des Kochfelds beeinträchtigen.
• Zwischen dem Kochfeld und den Wänden der angrenzenden
Möbel sorgen Sie für einen Abstand von mindestens 5 cm.
• Der Ausschnitt muss unbedingt den angegebenen Abmessungen
entsprechen.
• Die Höhe des in der Arbeitsplatte bzw. im Möbel eingebauten
Teils des Kochfelds beträgt 5,5 cm.
• Bei Vorhandensein von Zwischenplatten:
- Der Abstand zwischen dem Boden des Gehäuses und der dem
angrenzenden Möbel gehörigen Zwischenplatte muss größer
als 2,5 cm sein, damit die Luftzirkulation ermöglicht wird. Der
Mindestabstand der angrenzenden Möbel / des Rahmens zu
dem Kochfeld beträgt dementsprechend 8 cm.
- Außerdem müssen Sie sicherstellen, dass auch hinter den
Kochfeldern bzw. entlang der ganzen Breite der Luftumlauf
(8 cm) gewährleistet ist.
• Das Ceranfeld darf nicht über einem Ofen ohne Ventilator,
einem Geschirrspüler, einem Kühlschrank, einem
Gefrierschrank oder einer Waschmaschine montiert werden.
• Der Körper des Kochfeldes ist mit 4 Positionierlöchern für die
Klammern zur Befestigung der Ceranfeldes selber im Möbel bzw.
in der Arbeitsplatte ausgestattet.
Vor dem Einbau des Kochfelds positionieren Sie die vier
Klemmen so, dass das Kochfeld fest in der Einbaueinheit sitzt.
Gerätegehäuse
Dichtungsstreifen
25 mm
mini
Öffnung
500 X 50
50 mm
• Wir lehnen jegliche Verantwortung für Schäden oder deren
Folgen ab, die aus der Benutzung eines nicht oder mangelhaft
geerdeten Gerätes resultieren.
• Alle Eingriffe am Versorgungskabel sind ausschließlich durch
den Werkskundendienst oder durch ähnlich qualifiziertes
Fachpersonal durchzuführen, achten Sie beim Anschluss der
einzelnen Kabel unbedingt auf die folgende Farbenbelegung:
BLAU - NULLLEITER (N)
BRAUN - PHASE (L)
GELB-GRÜN - ERDE ( )
• MODELL MIT STECKDOSE
Das Gerät ist mit einem Netzkabel und mit einer Steckdose
versehen, der nur den Anschluß zwischen Phasen bzw., Phase
und Nulleiter mit einer Spannung von 220-240 V ermöglicht.
• Anschluß an einer Steckdose 25 Ampere.
• MODELL OHNE STECKDOSE
Das Kochfeld bedarf keines Stromversorgungskabels. Es ist
nämlich mit einem Klemmbrett zur Auswahl des für die
elektrische Hausinstallation geeigneten Anschlusses
ausgestattet.
Das Klemmbrett hat unterschiedliche Anschlussmöglichkeiten:
Zweiphasig 220-240 V2~, Dreiphasig 220-240 V3~,
Dreiphasig 380-415 V3N~
Um eine neue Verbindung herzustellen, beachten Sie bitte
folgende Anweisungen:
• Bevor Sie die Verbindung herstellen, stellen Sie sicher, dass das
Gerät durch eine angemessene Sicherung geschützt – siehe
hierzu die unten stehende Tabelle - und mit Kabeln mit zu einer
normalen Versorgung ausreichendem Querschnitt ausgestattet ist.
1- Arbeiten an bereits vorhandenen Anschlüssen:
• Drehen Sie das Kochfeld so um, dass die Seite aus Glas auf
der Arbeitsplatte aufliegt, wobei für einen geeigneten Schutz des
Glases zu sorgen ist.
• Klappen Sie den Deckel auf
• Drehen Sie die Schrauben heraus, welche die Einheit mit den
Shunt-Schienen und den Leitern des Netzkabels halten;
• Lösen Sie die Kabelschellen, um das Netzkabel entfernen zu
können;
• ziehen Sie das Netzkabel heraus.
2- Schritte zur Herstellung einer neuen Verbindung
- Wählen Sie das Netzkabel gemäß den Anweisungen in der
unten stehenden Tabelle.
- Führen Sie das Netzkabel durch die Kabelschelle hindurch;
- Isolieren Sie die Enden jedes Leiters auf eine Länge von 10 mm
ab; dabei berücksichtigen Sie die erforderliche Länge des
Netzkabels für den Anschluss an das Klemmbrett.
- Auf der Grundlage der nachstehenden Tabelle positionieren Sie
die Shunt-Schienen, die Sie im dem vorherigen Arbeitsschritt
aufgehoben haben, unter Beachtung der entsprechenden
Markierungen auf dem Klemmbrett (die Shunt-Schienen
ermöglichen es, eine Brücke zwischen zwei Klemmen
herzustellen) und befestigen Sie die Leiter. Überprüfen Sie die
Befestigung an den verschiedenen Klemmen.
- Schrauben Sie die Kabelschelle wieder auf und schließen Sie
den Deckel fest.
ANSCHLUSS AN DIE KLEMMEN VOM KLEMMBRETT
ELEKTRISCHER ANSCHLUSS
Installation des Gerätes muss gemäß den im Land der Installation
geltenden Normen erfolgen. Die Hersteller lehnt jede Verantwortung
für die Missachtung dieser Richtlinie ab.
Achtung:
• Vor dem elektrischen Anschluss überprüfen Sie die auf dem
Zähler angegebene Netzspannung, die Sicherung und die
einwandfreie Erdung der Hausinstallation.
• Der elektrische Anschluss ans Stromnetz erfolgt mit einem
Stecker mit Erdung oder mittels einer Vorrichtung zur allpoligen
Unterbrechung mit einem Öffnungsabstand zwischen den
Kontakten von mindestens 3 mm.
Wenn das Gerät an einer Steckdose angeschlossen wird, muss
diese auch nach der Installation leicht zugänglich sein.
• Das gelb-grüne Erdungskabel muss an die Klemmleiste des
Gerätes einerseits und der Hausinstallation andererseits
angeschlossen werden.
14 DE
Kabel
Kabel
Kabel
HVI 740HVI 640
Sicherung
Sicherung
Sicherung
Einphasig 220-240 V~
Dreiphasig 220-240 V3~ Dreiphasig 380-415 V3N~
Ph = Phase N = Nulleiter T = Erdung
Zweiphasig 220-240 V2~
Page 16

INDUKTION
Topf
verwandelt
die Induktionsströme
in Hitze
Induktionströme
Glaskeramikfeld
Elektronischer Generator
BESCHREIBUNG DES VERFAHRENS
Ein elektronischer Generator versorgt eine im Inneren
des Geräts untergebrachte Magnetspule.
Diese Wicklung erzeugt ein magnetisches Feld, so
dass der Kochtopf, wenn er auf dem Kochfeld abgestellt wird, von
den Induktionsströmen durchzogen wird.
Diese Ströme machen den Topf zu einem wahren Wärmeleiter,
während die Glaskeramikoberfläche kalt bleibt.
Dieses System ist für den Gebrauch mit Kochtöpfen mit
magnetischem Boden ausgelegt.
Magnetspule
Um es mit einfachen Worten auszudrücken:
Das Induktionsverfahren bietet zwei Hauptvorteile:
- Da die Kochfläche nur durch die Abwärme des Topfes oder der
Pfanne erwärmt wird, wird die Hitze auf ihrem höchsten Niveau
erhalten und der Kochvorgang erfolgt ohne messbaren Energieverlust.
- Es entsteht keine Wärmeträgheit, da das Induktionsfeld erst
dann arbeitet, wenn der Kochtopf auf dem Ceranfeld platziert
wird, und die Stromzufuhr unterbrochen wird, wenn er entfernt wird.
DIE SICHERHEITSVORRICHTUNGEN - Wenn Ihr Kochfeld
sachgemäß installiert und benutzt wird, kommt der Einsatz der
Schutzvorrichtungen äußerst selten vor.
• Ventilator: Zum Schutz der Stromversorgungs- und
Steuervorrichtungen. Er verfügt über zwei Geschwindigkeiten,
die automatisch geschaltet werden. Der Ventilator läuft selbst,
wenn das Kochfeld abgeschaltet ist, und zwar solange, bis die
elektronischen Vorrichtungen sich ausreichend abgekühlt haben.
• Sicherheitstransistor: Eine Sonde überprüft ständig die
Temperatur an den elektronischen Komponenten. Wenn die
Hitze einen zu hohen Wert erreicht, wird die Leistung des
Kochfeldes automatisch verringert bzw. heruntergeschaltet (die
Leistungsanzeige blinkt), bis es sich ausschaltet. Sobald die
Temperatur an den Komponenten auf das von den Normen
vorgeschriebene Niveau zurückgesunken ist, startet das Kochfeld
wieder.
• Schutzvorrichtung gegen den "leeren Kochtopf": Unter jeder
Kochzone befindet sich eine Vorrichtung, die jede eventuelle
Fehltemperatur, die für den leeren Topf oder für die
Glaskeramikoberfläche nicht geeignet ist, sofort erkennt.
• Schutzvorrichtung "Erkennung": Der Präsenzsensor erlaubt
erst den Betrieb und somit die Erwärmung. Liegt ein kleiner
Gegenstand (zum Beispiel ein Löffel, ein Messer oder ein
Ring) auf dem Kochfeld, wird er nicht als Kochtopf erkannt und
demzufolge setzt sich das Kochfeld nicht in Betrieb.
• Schutzvorrichtung "Überkochen und Spritzer": Im Falle von
eventuellem Überkochen, schaltet sich das Kochfeld automatisch
ab. Entfernen Sie die Speiseresten, um das Kochfeld wieder in
Betrieb zu setzen
WAHL DES RICHTIGEN KOCHGESCHIRRS
Die Benutzung von gutem Kochgeschirr ist sehr wichtig,
um beste Ergebnisse mit Ihrem Ceranfeld zu erzielen:
• Benutzen Sie immer Kochgeschirr von guter Qualität mit
gleichmäßig flachem Boden: Der flache Boden verhindert
vereinzelte heiße Stellen und somit das Anbrennen der Speisen.
Dicke Metalltöpfe und Pfannen ermöglichen eine gleichmäßige
Verteilung der Hitze.
• Vergewissern Sie sich, dass der Boden Ihres Kochgeschirrs
trocken ist: Wenn Sie die Töpfe mit Flüssigkeit füllen, oder
wenn Sie Kochgeschirr benutzen, das im Kühlschrank aufbewahrt
wurde, vergewissern Sie sich, dass der Boden völlig trocken ist.
Das ist eine notwendige Maßnahme, um Ihr Kochfeld nicht zu
verschmutzen.
• Benutzen Sie Kochgeschirr, dessen Durchmesser groß
genug ist, um das Kochfeld völlig abzudecken: Der
Durchmesser des Kochgeschirrs sollte nicht kleiner sein als das
Kochfeld. Wenn der Durchmesser etwas größer ist, wird die
Energie der Kochstelle optimal genutzt.
Folgende Hinweise werden Ihnen bei der Auswahl des jeweils
geeigneten Kochgeschirrs und somit zum Erzielen bester
Kochleistungen behilflich sein.
TOUCH-CONTROL-BEDIENTAFEL
1 - EIN/AUS TASTE
2 - TASTE ZUR AUSWAHL DER KOCHZONE
3 - DISPLAY: Wärmestufe oder Restwärmeanzeige
4 - TASTE “-”
5 - TASTE “+”
6 - TIMER TASTE
7 - TIMER DISPLAY
8 - KONTROLLVERRIEGELUNGSTASTE MIT ANZEIGELAMPE
9 - ANZEIGE ZUR PROGRAMMIERUNG DER KOCHZONE:
Wenn angezeigt, heißt dies, das der Timer gerade die jeweilige
Kochzone überwacht
10 - KONTROLLEUCHTE :
. On: Die Kochzone oder der Timer ist aktiv, Änderung der
Einstellungen sind möglich,
. Off: Die Kochzone oder der Timer ist auf die zuletzt
programmierten Angaben einsgestellt.
11 - BOOSTER-FUNKTION TASTE
15 DE
Page 17

DIE VERSCHIEDENEN WÄRMESTUFEN
Die verschiedenen Positionen entsprechen den folgenden Stromwerten
INDUKTION
Maximale
Wärme-
stufen
Leistung
in %
Betreibszeit vor dem
automatischen
Abschalten
Stunden
Stunden
Stunden
Stunden
Stunden
Stunden
Stunden
Stunden
Stunden
Zur Erhöhung der Sicherheit schalten sich die Kochfelder
automatisch aus, wenn sie zu lange in Betrieb gewesen sind. Die
zulässige maximale Betriebszeit hängt vom jeweils eingestellten
Temperaturniveau ab.
ANMERKUNG: Die Kochfelder werden von einem Generator
gespeist, welcher 2 Kochzonen je Bereich gleichzeitig versorgt,
und zwar je nach Modell:
Jeder Bereich kann eine maximale Leistung von 3700 W erreichen.
Demzufolge, wenn in einem Bereich der Booster in Betrieb ist
und die zweite Kochzone des Bereiches eine Leistungsstufe von
9 oder 8 erreicht hat, wird die Energieversorgung dieser
Kochstelle automatisch auf Stufe 7 herabgesetzt. Dieser Rückgang
wird durch ein blinkendes Display angezeigt.
Achtung: Wie in der Leistungstabelle angegeben, arbeitet der
Booster für maximal 10 Minuten. Nach Ablauf dieser höchsten
Betriebszeit schaltet er sich aus und die Kochzone geht bei
Erreichen der Stufe 9 wieder an; da die Leistung des Generators
gesunken ist, geht die Leistungsstufe der zweiten Platte auf den
ursprünglich eingestellten Wert zurück.
ANWEISUNGEN FÜR DEN GEBRAUCH
• Nachdem Sie das Ceranfeld eingeschaltet haben, warten Sie
ca. 8 Sekunden, um die elektronische Steuerung zu aktivieren.
- Drücken Sie die Taste für 3 Sekunden
Nun ist die elektronische Steuerung des Gerätes aktiviert. Für
jede Kochzone erscheint die Hitzeleistung “0” und die
Leuchtanzeige der Steuerung blinkt.
- Wenn Sie 10 Sekunden lang nichts unternehmen, schaltet sich
die elektronische Steuerung ab und Sie müssen den
Einschaltvorgang wiederholen.
• KOCHSTELLE EINSCHALTEN
- Betätigen Sie den Knopf,
welcher der Kochzone
zugeordnet ist, die Sie benutzen
möchten. Im Displaybereich die
Kontrolleuchte kontinuierlich. Das
bedeutet, daß die Kochzone aktiv
ist.
Die nachfolgenden Beispiele dienen zu Ihrer Information. Die
persönliche Erfahrung wird Ihnen ermöglichen, die vorgeschlagenen
Einstellungen Ihren Bedürfnissen und Ihrem Geschmack
anzupassen.
0 : Aus
U: 65°C
1 : )
2 : ) ..... Schmelzen
3 : Warmhalten
4 : Aufwärmen
5 : Auftauen, schmoren, garen bei niedriger Temperatur
6 : Garen ohne Deckel
7 : Anbraten, rösten, Fleischbraten
8 : Garen und braten bei hoher Temperatur, backen
9 : Frittieren, Wasser zum Kochen bringen
Booster : Aufkochen von großen Flüssigkeitsmengen
• METALLBODENERKENNUNG (Induktion)
Wenn das Kochfeld in Betrieb ist, sorgt die Metallbodenerkennung
für das automatische Aus- oder Einschalten der Wärmezufuhr an
die Kochzone, wenn der Kochtopf davon entfernt bzw. darauf
gelegt wird. Somit wird Energieeinsparung ermöglicht.
Wenn die Kochstelle mit geeignetem Kochgeschirr benutzt wird*: Das
Display zeigt die Wärmestufe oder, wenn der Booster aktiv ist,
ein an.
* Die Induktion erfordert den Gebrauch von geeignetem, d.h. mit
einem Metallboden ausgestattetem Kochgeschirr, siehe Tabelle;
deren Durchmesser muss außerdem mindestens so groß wie der
Durchmesser der Kochzone sein, damit diese
vollständig bedeckt wird.
Wenn die Kochstelle eingeschaltet ist aber kein geeigneter oder
gar kein Kochtopf darauf steht:
Auf dem Display erscheint das Symbol Die Kochzone startet
nicht. Wenn kein Kochtopf bzw. kein Metallboden erkannt wird,
wird der Startbefehl nach 10 Minuten automatisch rückgängig
gemacht.
WICHTIG:
Um die Kochstelle auszuschalten, müssen Sie das Kochfeld
ordnungsgemäß ausschalten, anstatt einfach den Kochtopf zu
entfernen. Der Metallbodenmelder hat nicht die Funktion eines
Ein-/Aus-Schalters.
• KOCHSTELLE ABSCHALTEN
Die Kochstelle muss aktiv sein. Die Leuchtanzeige für die Steuerung
im Einstellungsfeld muss leuchten. Sollte das nicht der Fall sein,
wählen sie erneut die gewünschte Kochzone.
- Drücken Sie die Taste “-” bis die Leistung “0” erscheint. Die
Kochzone schaltet sich augenblicklich ab. Nach 10 Sekunden
erscheint die Anzeige “0”.
- Um schnell abzuschalten, drücken Sie gleichzeitig die Tasten
“+” und “-”. Die Leistung geht sofort auf “0” zurück und die
Kochzone schaltet sich ab.
• CERANFELD ABSCHALTEN
Es ist jederzeit möglich, die Funktion der
Kochzonen und des Minutenzählers durch
Drücken der Taste ON-OFF für 3
Sekunden abzuschalten.
• RESTWÄRMEANZEIGE
Um anzuzeigen, dass die Temperatur der Kochstellenoberfläche
über 60°C beträgt, erscheint im Steuerungsfeld die Anzeige: “H”.
Wir empfehlen, gegen Ende der Garzeit die Kochzone abzuschalten
und die Restwärme auszunutzen, um den Garvorgang schonend
zu Ende zu bringen.
Wenn die Temperatur unter 60°C gefallen ist, erlischt die
Anzeige “H”.
HINWEIS: Nach einem eventuellen Stromausfall bleibt die
Restwärmeanzeige ausgeschaltet, selbst wenn die Temperatur
der Glasoberfläche über 60°C beträgt.
- Drücken Sie die Taste oder um eine Leistung zwischen 1
und 9 zu wählen.
- Wenn Sie die Taste oder gedrückt halten, erhöhen bzw.
vermindern Sie die eingestellte Leistung.
16 DE
Page 18

• LEISTUNGSVERSTÄRKER
Alle Kochzonen des Ceranfelds sind mit einem Leistungsverstärker ausgestattet, der bei Bedarf einen schnelleren
Temperaturanstieg der Kochzonen ermöglicht.
Leistungsverstärker einschalten:
- Schalten Sie die gewünschte Kochzone ein, drücken Sie die
Taste “+” bis zur Position “9”, lassen Sie kurz los und drücken
Sie erneut die Taste “+” . Die Anzeige zeigt blinkend “A”
“Leistungs-verstärker” und “9” Hitzeleistung.
- Schalten Sie bei Bedarf auf die gewünschte Hitzeleistung zurück.
Einstellung
der
Kochzone
0 : 0 % : 0 : 0 STD.
1 : 3 % : 1 : 6 STD.
2 : 6 % : 3 : 6 STD.
3 : 11 % : 5 : 5 STD.
4 : 16 % : 6,5 : 5 STD.
5 : 19 % : 8,5 : 4 STD.
6 : 32 % : 2,5 : 1,5 STD.
7 : 45 % : 3,5 : 1,5 STD.
8 : 65 % : 4,5 : 1,5 STD.
9 : 100 % : 0 : 1,5 STD.
BEISPIEL: eine Kochzone mit 1800 W Leistung ist auf Pos.
6 eingestellt: entwickelte Leistung: 32% von 1800 W
entwickelte
Leistung
(%)
Dauer der
erhöhten
Leistung
(Minuten)
maximale
Funktionsdauer
vor
automatischem
Abschalten *
Wenn die Funktion “Leistungsverstärker” eingeschaltet ist, liefert
die Kochzone die volle Leistung von 1800 W während 2,5 Minuten
und schaltet erst nach dieser Zeit auf 576 W herunter.
Wenn der “Leistungsverstärker” aktiv ist, bleibt die Anzeige der
Leistungsstufe permanent eingeschaltet.
• AKTIVIERUNG DER BOOSTER-FUNKTION
Die Booster-Funktion ermöglicht durch einfachen Knopfdruck den
Betrieb der Kochstelle über einen Zeitraum von 10 Minuten bei
einer mächtigen Leistung je nach Bereich.
Ideal, wenn eine große Flüssigkeitsmenge zum Kochen gebracht
werden soll.
I
N
D
U
K
T
I
O
N
LEISTUNG
LEISTUNG
• PROGRAMMIERUNG EINER KOCHSTELLE
Jede Kochzone ist für eine maximale Dauer von 99 Minuten
programmierbar. Man kann nur jeweils EINE Kochstelle
programmieren.
- Schalten Sie die gewünschte Kochzone mit den oben beschriebenen Anweisungen ein.
Die Leuchtdiode für die Leistungsanzeige
muss leuchten, um anzuzeigen, daß die Kochzone aktiv ist.
- Drücken Sie die Taste Minutenzähler
Die Anzeige der Kochstelle um das Einstellungsfeld des
Minutenzählers weist auf die gesteuerte Kochzone hin
- Drücken Sie die Taste “+” oder “-” um eine Dauer in Minuten
zu wählen.
Die eingestellte Zeit wird nach drei Sekunden
automatisch gespeichert.
Die eingestellte Zeit kann jederzeit verändert werden. Drücken
Sie die Wahltaste für den Minutenzähler, die Leuchtdiode des
Minutenzählers muss leuchten. Wenn die Zeit abgelaufen ist,
schaltet sich die Kochzone automatisch ab und es ertönt ein
akustisches Signal. Drücken Sie die Minutenzähler Taste, um
es zu unterbrechen.
Die eingestellte Zeit kann wieder auf “00” gebracht werden,
entweder mit der Taste “-” oder durch gleichzeitiges Drücken
auf die Tasten “-” und “+”. Somit wird die Kochzone nicht mehr
über den Minutenzähler gesteuert und muss manuell abgeschaltet
werden.
Der Minutenzähler kann auch einzeln als Eieruhr benutzt werden.
Am Ende der Zeit ertönt ein Klingelzeichen.
• VERRIEGELUNGSTASTE
Die Verriegelungsfunktion dient dazu, die eingestellte Leistungsstufe
zu erhalten oder zu verhindern, daß jemand das Kochfeld
einschaltet. Sie wird deshalb dann benutzt, wenn das Bedienfeld
gereinigt werden soll: Die Tasten werden nämliche verriegelt und
das Kochfeld bleibt ausgeschaltet.
Um das Kochfeld zu sperren:
- Aktivieren Sie Die Kochzonen, die Sie verwenden möchten.
- Wählen Sie für jede Kochzone die gewünschte Wärmestufe.
- Drücken Sie auf die Taste , um die Angaben einszustellen;
in diesem Zustand ist keine andere Taste in Betrieb, bis auf den
Ein-/Aus-Schalter.
Die Verriegelungsanzeigelampe erleuchtet.
Um das Kochfeld zu entsperren:
Um die Verriegelungsfunktion abzustellen, müssen Sie nur die
Taste drücken, die Anzeigelampe geht aus und alle Tasten
sind wieder betriebsbereit.
Ist der Timer, wenn die Befehlstasten verriegelt sind, eingeschaltet,
wird die Zeit automatisch abgezählt und die entsprechende
Kochzone wird bei Ablauf der eingestellten Kochzeit ausgeschaltet.
Aktivierung der Booster-Funktion
- Drücken Sie den Einstellknopf der mit der BoosterFunktion ausgestatteten Kochzone.
Die Kontrollanzeige leuchtet au
- Drücken Sie den Knopf zum Starten
der Booster-Funktion.
Der Booster ist nun 10 Minuten lang in
Betrieb.
Wenn die o.a. Zeit abgelaufen ist, sinkt die Leistung auf Stufe 9.
Ein "P" (Power) erscheint.
f
Durch Betätigung der Taste "-" wird die Booster-Funktion
aufgehoben und die Leistung geht auf Stufe 9 zurück
17 DE
Ist die Verriegelungsfunktion aktiv, wenn das Kochfeld abgeschaltet
wird, bleibt sie in Betrieb und verhindert jeden Eingriff, wenn das
Kochfeld wieder eingeschaltet wird. Um dann die Verriegelung
freizugeben, brauchen Sue nur, die Taste zu drücken.
.
Page 19

REINIGUNG UND PFLEGE DES
CERANFELDES
• Vor der Reinigung der Glaskeramikoberfläche warten Sie
bitte ab, bis diese vollständig abgekühlt ist.
• Benutzen Sie ausschließlich spezifische Reinigungsmittel
für Ceranoberflächen, wie z.B. Reinigungscremen und
Schaber. Nehmen Sie handelsübliche Produkte, die leicht
auf dem Markt zu finden sind.
• Vermeiden Sie das Überlaufen von Speisen auf die
Glasoberfläche. Diese verkohlen schnell während des
Kochvorgangs und erschweren die Reinigung.
• Halten Sie alles, was schnell schmelzen kann, wie
Gegenstände aus Kunststoff, Alufolie aber auch Zucker und
stark zuckerhaltige Produkte, von der Glasoberfläche fern.
PFLEGE :
- Beträufeln Sie die Ceranoberfläche mit einigen Tropfen eines
spezifischen Reinigungsmittel für Ceranfelder
- Wischen Sie die Flecken weg mit einem weichen Tuch oder mit
leicht befeuchtetem Küchenpapier
- Trocknen Sie die Oberfläche mit einem weichen Tuch oder mit
Küchenpapier ab.
Sollten noch hartnäckige Flecken vorhanden sein:
- Beträufeln Sie die Oberfläche erneut mit dem Reinigungsmittel.
- Entfernen Sie die Flecken mit einem Schaber, wobei
dieser in einem Winkel von ca. 30° zur Ceranoberfläche gehalten
werden soll.
- Trocknen Sie die Oberfläche mit einem weichen Tuch oder mit
Küchenpapier ab.
- Wiederholen Sie den Vorgang falls notwendig.
30° Maxi
EINIGE EMPFEHLUNGEN:
Durch häufiges Reinigen bildet sich eine Schutzschicht, die
Abnutzung und Kratzer vorbeugt.
Versichern Sie sich, dass die Ceranoberfläche sauber ist, bevor
Sie das Ceranfeld erneut benutzen.
Um Kalk- und Wasserflecken zu entfernen, benutzen Sie einige
Tropfen Essig oder Zitronensaft. Trocknen Sie mit Küchenkrepp
gut ab. Wischen Sie schließlich mit einigen Tropfen eines
spezifischen Reinigungsmittel ab.
Die Ceranoberfläche kann die Reibung von flachen Geschirrböden
zwar gut aushalten, es ist jedoch empfehlenswert, Töpfe und
Pfannen anzuheben, um sie zu verschieben.
ACHTUNG:
- Vermeiden Sie den Gebrauch eines zu nassen Schwammes.
- Benutzen Sie niemals Werkzeuge aus Stahl wie Messer oder
Schraubenzieher.
- Die Benutzung eines Schabers mit Rasierklinge kann die
Oberfläche nicht beschädigen, wenn ein Neigungswinkel
von 30° zwischen Schaber und Oberfläche eingehalten wird.
- Lassen Sie bitte den Schaber mit Klinge nicht in Reichweite
von Kindern.
- Benutzen Sie keine ätzenden Mittel oder Stahlwolle zur
Reinigung der Ceranoberfläche.
TECHNISCHER KUNDENDIENST
Sollte Ihr Ceranfeld einmal nicht richtig funktionieren, prüfen
Sie zuerst, ob die Stromversorgung gewährleistet ist. Ist die
Ursache der Fehlfunktion nicht ausfindig zu machen, wenden Sie
sich bitte an Ihren zuständigen Werkskundendienst unter Angabe
des Modells und der Seriennummer, die auf dem Typenschild
angegeben sind. Auf Ihr Gerät gewähren wir eine Garantie von
24 Monaten ab Kaufdatum. Bewahren Sie Ihre Kaufrechnung
sorgfältig auf und legen Sie sie bei Bedarf als Garantienachweis
dem Kundendienst vor. Die Garantiebedingungen sind im
beigefügten Serviceheft angegeben.
Die Speisen kochen zu langsam
• Das falsche Kochgeschirr wurde ausgesucht. Wählen Sie ziemlich
schweres Geschirr mit flachem Boden, dessen Durchmesser
mindestens dem Durchmesser der Kochfläche entspricht.
Leichte Kratzer oder Abreibungen erscheinen auf dem Glas
Ihres Ceranfeldes.
• Es wurden die falschen Reinigungsmethoden angewendet,
Kochgeschirr mit rauem Boden wurde benutzt oder raue
Gegenstände wie Salz oder Sand befanden sich zwischen
Kochtopf und Ceranfeld. Verwenden Sie die empfohlenen
Reinigungsmethoden, vergewissern Sie sich, dass die Böden
Ihrer Kochtöpfe und das Kochgeschirr sauber sind und achten
Sie auf glatte Böden. Kleine Kratzer sind nicht mehr zu entfernen,
aber sie werden im Laufe der Zeit mit einer guten Reinigung
weniger sichtbar.
Metallrückstände:
• Schieben Sie Aluminiumtöpfe nicht über die Kochflächen.
Verwenden Sie die empfohlenen Reinigungsmethoden.
• Die falschen Reinigungsmittel/Gegenstände wurden verwendet,
die Flecken bleiben auf der Oberfläche. Verwenden Sie den
Schaber mit der Rasierklinge und die empfohlene
Reinigungsmethode.
Dunkle Flecken
• Verwenden Sie den Schaber mit der Rasierklinge und die
empfohlene Reinigungsmethode.
Helle Verfärbungen auf dem Ceranfeld
• Rückstände von Aluminium- oder Kupferpfannen, sowie
Mineralablagerungen durch Wasser oder Lebensmittel können
mit der Reinigungscreme entfernt werden.
Geschmolzener Zucker oder Plastik
• Lesen Sie den Abschnitt zur Reinigung und Pflege des
Ceranfeldes.
Das Ceranfeld funktioniert nicht.
• Größere Überlaufreste oder ein Gegenstand bedecken
mindestens 2 Tasten für mehr als 10 Sekunden. Reinigen Sie
die Oberfläche oder entfernen Sie den Gegenstand.
• Das Bedienfeld ist durch die Sperrfunktion blockiert.
Um die Sperre aufzuheben, drücken Sie die Taste
“Sperrfunktion”
Das Ceranfeld lässt sich nicht ausschalten.
• Das Bedienfeld ist durch die Sperrfunktion blockiert.
Um die Sperre aufzuheben, drücken Sie die Taste
“Sperrfunktion”. Schauen Sie im Kapitel “Die verschiedenen
Wärmestufen” unter dem Punkt über die “maximale
Funktionsdauer” nach.
Das Ceranfeld schaltet sich automatisch ab
• Größere Überlaufreste oder ein Gegenstand bedecken
mindestens 2 Tasten für mehr als 10 Sekunden. Das Ceranfeld
schaltet auf Sicherheitsbetrieb um und ein akustisches Signal
ertönt, solange die Tasten bedeckt bleiben. Reinigen Sie die
Oberfläche oder entfernen Sie den Gegenstand.
• Die Kochflächen schalten sich nach einer gewissen Zeit
automatisch ab, wenn sie für längere Zeit in Betrieb sind. Siehe
Kapitel “Die verschiedenen Wärmestufen” unter dem Punkt über
die “maximale Funktionsdauer”.
Ein- und Abschaltphasen der Kochzonen
• Die Ein- und Abschaltphasen der Kochstellen variieren je nach
der eingestellten Leistungsstufe
- niedrige Leistung: kurze Einschaltphasen
- hohe Leistung: lange Einschaltphasen
Das Ceranfeld bzw. eine oder mehrere Kochflächen
funktionieren nicht.
• Die Shunt-Brücken wurden nicht korrekt auf dem Klemmbrett
positioniert. Lassen Sie durch einen Fachmann überprüfen, dass
der elektrische Anschluss nach den Anweisungen erfolgt ist.
Die Aufschrift “H” in der Restwärmeanzeige blinkt.
• Die Temperatur des elektronischen Moduls ist zu hoch.
Lassen Sie durch einen Fachmann überprüfen, dass der Einbau
nach den Anweisungen erfolgt ist.
PROBLEMLÖSUNGEN
Das Induktionsfeld stößt ein Brummen aus.
• Normal. Der Lüfter der elektronischen Komponenten ist
eingeschaltet.
Das Kochfeld stößt ein leises pfeifendes Geräusch aus:
• Normal. In Abhängigkeit von der Häufigkeit, mit der die Induktoren
eingesetzt werden, kann ein leises Pfeifen zu hören sein, wenn
mehrere Kochfelder gleichzeitig bei höchster Leistungsstufe
betrieben werden.
Die Kochzonen halten keine konstante Kochtemperatur oder
das Anbraten geht nicht schnell genug
• Sie sollten Kochgeschirr mit absolut flachem Boden verwenden.
Wenn Licht zwischen dem Boden des Kochgeschirrs und dem
Kochfeld durchdringt, wird die Hitze nicht richtig weitergeleitet.
• Der Boden des Kochgeschirrs muss den Durchmesser
der Kochfläche völlig bedecken.
18 DE
Dieses Elektrohaushaltsgerät ist entsprechend der EURichtlinie 2002/96/CE über Elektro- und ElektronikAltgeräte (WEEE) gekennzeichnet. Bitte sorgen Sie
dafür, dass das Gerät ordnungsgemäß entsorgt wird,
damit mögliche negative Auswirkungen auf Umwelt und
Gesundheit vermieden werden, die bei einer unsachgemäßen
Entsorgung des Altgerätes entstehen könnten. Das Symbol auf dem
Produkt bedeutet, dass dieses Gerät nicht in den normalen Hausmüll
gehört, sondern den jeweiligen kommunalen Rücknahmesystemen für
Elektro- und Elektronik-Altgeräte übergeben werden muss. Die Entsorgung
muss im Einklang mit den geltenden Umweltrichtlinien für die
Abfallentsorgung erfolgen.
Für nähere Informationen über Entsorgung und Recycling dieses Produktes
wenden Sie sich bitte an Ihre kommunalen Einrichtungen (Umweltamt)
oder an die Abfallentsorgungsgesellschaft Ihrer Stadt bzw. an Ihren
Händler.
Page 20

INDICAÇÕES DE CARÁCTER GERAL
LER ATENTAMENTE ESTE MANUAL, PARA PODER TIRAR TODO O PARTIDO DO APARELHO. Aconselhamos que este manual seja
guardado para posterior consulta e que nele seja anotado, antes da instalação do aparelho, o respectivo número de série
para os casos em que, eventualmente, seja necessário recorrer à intervenção do Serviço Após Venda.
Placa de identificação
(na parte inferior do aparelho)
• Durante o funcionamento do aparelho ou após desligar uma das placa de cozedura, aconselha-se a manter as crianças afastadas
enquanto o indicador de calor residual estiver aceso, para evitar o risco de queimaduras graves.
• Sempre que cozinhar com margarina, óleo ou qualquer outra gordura, ter o cuidado de ir vigiando o cozinhado, porque as gorduras,
quando muito aquecidas, podem rapidamente inflamar.
• As folhas de alumínio e os recipientes de plástico não devem ser colocados sobre as superfícies quentes.
• Após utilização da placa vitrocerâmica, convém fazer uma pequena limpeza para evitar a acumulação de sujidade e de gordura, pois
estas, se tornarem a cozer, queimam e provocam fumo e cheiros desagradáveis, sem contar com o risco de propagação de
incêndio.
• Nunca deixe objectos de metal, como, por exemplo, facas, garfos, colheres ou tampas, na zona de indução, na medida em que, se
forem demasiado grandes ou demasiado pesados, podem aquecer excessivamente.
• O painel de comando da placa é muito sensível; não lhe pôr em cima recipientes quentes.
• Nunca cozinhar directamente sobre a placa sem utilizar recipientes.
• Colocar sempre os recipientes bem ao centro da placa de cozedura seleccionada.
• Não utilizar a superfície da placa como tábua para cortar alimentos ou para efectuar outros trabalhos.
• Não arrastar os recipientes sobre a placa, pois pode riscar.
• Não colocar objectos pesados em cima placa, porque podem cair e danificá-la.
• Não colocar sobre a placa nenhum objecto seja ele de que natureza for.
• No caso improvável de aparecer uma racha no vidro, desligar imediatamente o aparelho da corrente e contactar directamente o
Serviço Após Venda.
•
Este aparelho não está indicado para ser utilizado por crianças e por pessoas incapazes ou inexperientes no que toca à utilização
do produto, excepto se forem devidamente supervisionadas ou instruídas sobre a utilização do aparelho por uma pessoa responsável
pela sua segurança.
• As crianças devem ser vigiadas de modo a assegurar que não brinquem com o aparelho.
AVISO: Este electrodoméstico obedece às normas actuais de segurança e de compatibilidade electromagnética. Apesar
disso, pessoas com “pacemaker” não deverão utilizar este electrodoméstico. È impossível garantir que tais aparelhos
encontrados no mercado obedeçam às normas actuais de segurança e de compatibilidade electromagnética e que, tais
interferências perigosas não possam ocorrer. Também é possível que pessoas com outros tipos de dispositivos, tais como,
aparelhos auditivos podem sentir algum desconforto.
Zonas de calor
Voltagem/Frequencia (V/Hz)
Potencia eléctrica (W)
Dimensões do produto
(l x p x h mm.)
Dimensões de encastramento
(AXB)
HVI 740HVI 640
4 Inductions 4 Inductions
220-240
50/60 Hz
574 x 505 x 55 752 x 505 x 55
220-240
50/60 Hz
HGI 7544
4 Inductions
220-240
50/60 Hz
74007400 7400
752 x 505 x 55
740 x 490
Todas as características são dadas a título meramente indicativo. O fabricante, sempre com a constante preocupação de melhorar a
qualidade da sua produção, pode introduzir modificações nos seus aparelhos por evolução da técnica, no estrito cumprimento das
normas de consumo em vigor.
Este aparelho está em conformidade com as Directivas Europeias 73/23/EEC e 89/336/EEC, substituídas pelas 2006/95/EC
e 2004/108/EC, e respectivas alterações posteriores.
19 PT
Page 21

INSTALAÇÃO
A instalação de aparelhos electrodomésticos no local a que se destinam é uma operação delicada que, caso não seja
devidamente efectuada, pode ter graves consequências relativamente à segurança dos seus utilizadores.
Assim sendo, torna-se imperativo confiar esta tarefa a um profissional, para que a sua execução seja feita de acordo com
as normas técnicas em vigor. Se apesar deste aviso a instalação for feita por alguém não qualificado, o Fabricante declina
qualquer responsabilidade em caso de avaria técnica do produto, quer provoque ou não danos materiais e/ou pessoais.
ENCASTRAMENTO
O móvel ou o suporte, em que vai ser encastrado o aparelho,
assim como as paredes desse móvel que lhe poderão ficar
justapostas devem ser de material resistente a altas temperaturas.
Além disso, a colagem do revestimento desse móvel ou desse
suporte deverá ser de cola resistente ao calor, para evitar que descole.
Instalação:
• Com a placa vitrocerâmica é fornecida uma junta vedante. Para
sua aplicação:
- virar a placa, com a face de vidro para baixo; ter o cuidado de
proteger o vidro;
- colocar a junta à volta da placa;
- ter o cuidado de aplicar devidamente a junta, para evitar
infiltrações no móvel que lhe serve de suporte.
• A placa tem de ser instalada sobre uma superfície de apoio que
esteja nivelada e seja plana.
• Eventuais deformações provocadas por um encastre incorrecto
podem alterar as especificações da placa e o seu desempenho.
• Deixe um intervalo de, pelo menos, 5 cm entre a placa e quaisquer
superfícies verticais adjacentes.
• É fundamental o vão para o encastre da placa apresentar as
dimensões indicadas.
• A parte da placa que é instalada de modo a ficar nivelada com
a superfície adjacente tem uma altura de 5,5 cm.
- Se no móvel onde a placa vai ser encastrada existir uma divisória
intermédia, o espaço livre entre o fundo da caixa da placa e a
divisória intermédia ou prateleira do móvel tem de ser superior
a 2,5 cm, a fim de permitir a circulação do ar. Além disso, deve
sempre certificar-se de que, na parte de trás do móvel, existe
uma abertura de ventilação (8 cm), que se estenda a toda a
largura do mesmo.
É estritamente proibido o encastre da placa por cima de um
forno que não tenha uma ventoinha, por cima de uma máquina
de lavar loiça, de um frigorífico, de uma arca congeladora ou
de uma máquina de lavar roupa.
O corpo da placa dispõe de 4 orifícios de localização, destinados
a receber os grampos de fixação que fixam a placa ao móvel.
Antes de proceder ao encastre da placa, instale os 4 grampos
de fixação de modo a que a placa fique perfeitamente posicionada
no móvel de suporte.
Caixa que forma o
aparelho
Junta
10 mm
mini
Abertura
500 X 50
50 mm
Abertura
500 X 10
LIGAÇÃO ELÉCTRICA
A instalação eléctrica a que vai ser ligado o aparelho deve estar
conforme às normas vigentes no país.
O fabricante declina qualquer responsabilidade em caso de incumprimento desta disposição.
Atenção:
• Antes da ligação, verificar o seguinte: a corrente de alimentação
indicada no contador, a regulação do disjuntor, a adequação do
fusível e a continuidade da terra da instalação.
• A ligação à rede deve ser feita através de tomada de corrente
com ligação à terra ou através de um dispositivo de corte
omnipolar, com uma distância de abertura dos contactos de pelo
menos 3 mm.
Caso o aparelho possua ficha eléctrica, esta deve ficar acessível
quando o aparelho for instalado.
• Um dos lados do fio de protecção (verde/amarelo) deve ser
ligado aos bornes de terra do aparelho e o outro lado do fio à
instalação.
• Declinamos qualquer responsabilidade por acidentes ou pelas
suas eventuais consequências, em caso de não ligação à terra
do aparelho ou por uma ligação à terra com deficiente
continuidade.
• Qualquer intervenção no cabo de alimentação deve ser imperativamente efectuada pelo Serviço Após Venda ou por um técnico
com qualificação idêntica. A placa vitrocerâmica é fornecida sem
cabo de alimentação. Possui uma placa de bornes que permite
escolher o tipo de ligação eléctrica adequada à instalação, ao
efectuar a ligação dos fios individuais, deve sempre certificarse de que respeita o seguinte código de cores:
AZUL - NEUTRO (N)
CASTANHO - FASE (L)
AMARELO-VERDE - TERRA (
)
• MODELO COM TOMADA DE CORRENTE
Este aparelho tem un cabo de alimentação com toma de
corrente que só permite a ligação à corrente de 220-240 V
entre fases ou entre fases e neutro.
• Ligar a uma tomada de corrente de 25 Amperes.
• MODELO SEM TOMADA DE CORRENTE
A placa está equipada com um cabo de alimentação que só
permite a ligação da placa a uma fonte de alimentação de
energia de 220-240 V entre fases ou entre a fase e o neutro.
• Ligue o cabo de alimentação a uma tomada; para
seleccionar o fusível correcto, tem de consultar a tabela.
Apesar de a placa ser fornecida com um cabo de alimentação,
ela também pode ser ligada a:
Monofásica 220-240V2~ ou
Corrente trifásica 220-240 V3~ ou Corrente trifásica 380-415V3N~.
Para poder realizar a ligação nova tem de seguir rigorosamente
as instruções apresentadas em seguida.
• Antes de proceder à ligação, certifique-se de que a instalação
está protegida por um fusível do tipo e com a amperagem
adequados, consulte a tabela ; certifique-se também de que a
instalação dispõe de fios com uma secção suficiente para assegurar
uma alimentação normal de energia à placa.
1- Operações a serem levadas a cabo na ligação existente:
- volte a placa de pernas para o ar, com o lado com o vidro
voltado para baixo, tendo o cuidado de proteger o vidro.
- Abra a tampa.
- Libertar o cabo de alimentação:
- remova os parafusos que prendem o bloco de terminais que
contém as barras de derivação e os condutores para o cabo de
alimentação,
- desaperte o serra-cabos para libertar o cabo de alimentação.
- Extraia o cabo de alimentação.
2- Operações a serem levadas a cabo para efectuar uma ligação
nova:
- Seleccione o cabo de alimentação de acordo com as
recomendações da tabela apresentada.
- Assente o cabo de alimentação no interior do serra-cabos.
- Descarne a extremidade de cada condutor do cabo de
alimentação numa extensão de 10 mm, tendo em atenção o
comprimento de cabo necessário para efectuar a ligação ao bloco
de terminais.
- Assim, de acordo com as instruções de instalação e com a ajuda
de barras de derivação* que deve ter recuperado na primeira
operação, fixe os condutores da forma indicada no diagrama
abaixo.
- Volte a aparafusar o serra-cabos e monte e prenda a tampa.
LIGAÇÃO AOS TERMINAIS DO BLOCO DE TERMINAIS
HVI 740HVI 640
FUSIVEL
CABO
FUSIVEL
CABO
FUSIVEL
CABO
Monofásica 220-240 V~
Trifásica 220-240 V3~ Trifásica 380-415 V3N~
Ph = Fase N = Neutro T = Terra
Bifásica 220-240 V2~
20 PT
Page 22

INDUÇÃO
Récipient
qui transforme
le flux d’induction
en chaleur
Flux d’induction
Dessus vitrocéramique
Module commande/contrôle
Bobine
MODO DE FUNCIONAMENTO
Um gerador electrónico alimenta de energia uma bobina localizada
no interior da placa. Esta bobina gera um campo magnético, pelo
que, quando é colocado um recipiente sobre a placa, ele é
permeado pelas correntes de indução. Estas correntes transformam
o recipiente num autêntico transmissor de calor, enquanto a
superfície vitrocerâmica da placa se mantém fria.
Este sistema foi concebido para ser utilizado com recipientes com
fundo magnético.
Em termos simples, a tecnologia de indução apresenta duas
vantagens principais:
- como o calor só é emitido pelo recipiente, ele é mantido no seu
nível mais elevado e a cozedura tem lugar sem que haja qualquer
perda de calor.
- não há qualquer inércia térmica, na medida em que a cozedura
se inicia automaticamente assim que o recipiente é colocado
sobre a placa, interrompendo-se quando ele é removido da
mesma.
Esta placa caracteriza-se por um nível de segurança elevado....
Se a placa for correctamente instalada e utilizada, os dispositivos
de segurança que a equipam raramente irão ser necessários.
• Ventoinha de ventilação: para proteger e refrigerar os
componentes de alimentação e de comando. Esta ventoinha tem
duas velocidades, operando de forma automática. A ventoinha
mantém-se em funcionamento mesmo que as zonas de cozedura
estejam desactivadas, continuando a funcionar até o sistema
electrónico ter arrefecido o suficiente.
• Dispositivo de segurança “transístor”: uma sonda verifica
permanentemente a temperatura dos componentes electrónicos.
Se a sonda registar um aumento excessivo da temperatura, ela
desencadeia uma redução automática da potência das zonas de
cozedura, até a temperatura dos componentes equivaler à
temperatura predefinida (o indicador de nível de potência fica a
piscar); uma vez atingida a temperatura predefinida, a placa
retoma o seu funcionamento normal.
• Dispositivo de segurança “Recipiente vazio”: está instalada
uma sonda por baixo da zona de aquecimento. Esta sonda detecta
imediatamente tanto o facto de o recipiente estar a registar uma
temperatura errada, como o facto de a temperatura da superfície
vitrocerâmica da placa não estar dentro dos limites predefinidos
(ambos estes aspectos podem ser denotadores de que foi colocado
um recipiente vazio sobre a placa).
• Dispositivo de segurança “Detecção”: é este dispositivo de
detecção que possibilita o funcionamento da placa e, por
conseguinte, o aquecimento dos recipientes. Um objecto de
pequenas dimensões (como, por exemplo, uma colher, uma faca
ou um garfo) colocado sobre a zona de aquecimento não será
reconhecido como um recipiente, pelo que a placa não entrará
em funcionamento.
• Dispositivo de segurança "Derrame e salpicos”: se ocorrer
um derrame ou se se registarem quaisquer salpicos, o
funcionamento da placa é interrompido. Se um derrame ou um
objecto grande cobrir pelo menos duas das teclas do painel de
comandos durante, pelo menos, 10 segundos, limpe o derrame
ou remova o objecto; enquanto o derrame ou o objecto cobrir as
duas (ou mais) teclas, o funcionamento da placa é interrompido.
A ESCOLHA DOS RECIPIENTES
Há que utilizar recipientes de qualidade para obter bons
• Usar recipientes de boa qualidade com o fundo plano. O
fundo rigorosamente plano elimina os pontos de aquecimento
excessivo que fazem com que os alimentos peguem e a
espessura de um metal de boa qualidade permite a perfeita
distribuição do calor.
• Ter o cuidado de verificar que o fundo dos recipientes está
seco. Quando se enche um recipiente ou quando, por exemplo,
se retira do frigorífico, há que ter esta precaução para evitar
sujar a placa.
resultados:
• Utilizar recipientes com diâmetro suficiente para cobrir toda
a placa de cozedura.
O fundo do recipiente deve ser pelo menos tão grande como
a zona de cozedura; se for ligeiramente maior, a energia é
aproveitada da melhor forma.
As informações que se seguem vão ajudá-lo a seleccionar os
recipientes mais indicados para obter bons resultados.
ZONA DE INDUÇÃO
Marca inscrita
nos recipientes
Aço inoxidável Não detectável
Alumínio Não detectável
Ferro fundido Bom desempenho.
Aço esmaltado Bom desempenho.
Vidro Não detectável
Porcelana Não detectável
Fundo de cobre Não detectável
Na etiqueta do recipiente, verifique a
marca que indica que esse recipiente é
compatível com indução, podendo, por
conseguinte, sendo utilizado em placas
de indução
Utilize exclusivamente recipientes com fundo
magnético (ferro esmaltado, ferro fundido, aço
inoxidável ferrítico); para se certificar de que
o recipiente em causa pode ser utilizado na
placa, aplique um íman ao fundo do recipiente
(o íman tem de ficar agarrado).
Excepto aço inoxidável ferromagnético
Aviso: Pode riscar a superfície da placa de indução.
Recomendamos a escolha de recipientes de
fundo liso, espesso e macio.
DESCRIÇÃO DA PLACA
1 - TECLA ON / OFF
2 - TECLA DE SELECÇÃO DA ZONA DE COZEDURA
3 - DISPLAY: nível de potência, indicador de calor residual,
função booster..
4 - TECLA “-”
5 - TECLA “+”
6 - TECLA DE SELECÇÃO DO “TIMER”
7 - DISPLAY DO “TIMER”
8 - TECLA DE CONTROLO DO BLOQUEIO COM INDICADOR
LUMINOSO
9 - INDICADOR DA PROGRAMAÇÃO DA ZONA DE
COZEDURA: quando no display, indica que a zona de
cozedura está controlada pelo timer
10- INDICADOR LUMINOSO DO CONTROLO:
. on: a zona de cozedura ou o timer está activo, é possível
fazer modificações
. off: a zona de cozedura ou o timer está programado de acordo
com a última programação realizada
11- Tecla de selecção da função Booster
21 PT
Page 23

AS DIFERENTES POSIÇÕES
As diferentes posições correspondem aos seguintes níveis de
potência:
INDUÇÃO
Potência
Posições
Para maior segurança, as zonas de cozedura desligam-se automaticamente se forem deixadas ligadas durante demasiado tempo.
O momento em que as zonas são desligadas depende do nível
de potência seleccionado.
NOTA: A placa de indução opera com um gerador que alimenta
simultaneamente duas zonas por área:
Cada área pode registar uma potência de, no máximo, 3700 W.
Assim sendo, sempre que, numa mesma área, o intensificador
estiver ligado e a segunda zona de cozedura dessa área tiver
atingido um nível de potência 9 ou 8, a potência desta última zona
de cozedura é automaticamente reduzida para o nível 7, sendo
esta redução assinalada pelo facto de a indicação da respectiva
potência ficar a piscar.
Aviso:
tal como é indicado na tabela com os níveis de potência,
o intensificador só funciona durante 10 minutos; passado esse
tempo, deixa automaticamente de funcionar e a zona de cozedura
em causa retoma o nível de potência 9, registando-se uma redução
da potência do gerador e também um aumento do nível de potência
da segunda zona de cozedura dessa área, que volta a assumir
o nível de potência anteriormente regulado.
libertada
em %
Tempo operação
máximo até
ao desligamento
automático
10 horas
10 horas
5 horas
4 horas
3 horas
3 horas
2 horas
2 horas
1 hora
UTILIZAÇÃO DO APARELHO
• Depois de ligar a placa vitrocerâmica, esperar 8 segundos
para activar o comando electrónico.
- Pressionar a tecla durante 3 segundos.
O comando electrónico da placa fica activo. O nível de potência
surge em cada zona de afixação e o testemunho de comando
pisca.
- Caso não haja qualquer intervenção durante 10 segundos, o
comando electrónico desactiva-se, pelo que deve novamente
proceder-se à activação.
• ACTIVAÇÃO DE UMA PLACA DE COZEDURA
- Pressionar a tecla da placa que
pretende utilizar. O testemunho
de comando da zona de
afixação torna-se fixo, o que
indica que essa zona está ligada.
- Pressionar a tecla ou para seleccionar o nível de potência
entre 1 e 9.
- Se se mantiver premida a tecla ou , o nível de potência aumenta ou diminui progressivamente.
Os exemplos que se seguem são dados a título meramente
indicativo. A experiência de cada utilizador levará à adaptação
destas regulações, conforme o seu gosto e hábitos pessoais.
0 : Desligado
U : Mijotage à 65°C
1 : )
2 : ) ..... Derreter
3 : Manter quente
4 : Aquecer
5 : Descongelar, estufar, cozer no ponto, cozer a
6 : Cozer sem tampa
7 : Saltear, corar e assar carne
8 : Cozer e assar a alta temperatura, alourar
9 : Fritar
Intensificador: Temperatura ideal para ferver grandes
• DETECTOR DA PRESENÇA DE RECIPIENTES
Quando a placa está em operação, o detector da presença de
recipientes oferece a vantagem de ligar automaticamente a
produção de calor na zona de cozedura quando nela é colocado
um recipiente e de a desligar quando o recipiente nela colocado
é removido. Ou seja, esta é uma função que permite poupar
energia.
baixa temperatura
quantidades de líquidos...
Se na zona de cozedura for utilizado um recipiente apropriado*:
é apresentada a indicação do nível de potência ou a indicação
“P”, que assinala o funcionamento do intensificador.
* Para que a placa de indução possa ser utilizada, têm de ser
usados recipientes compatíveis, equipados com fundos magnéticos;
consulte a tabela apresentada na página 21; por outro lado, além
de terem um fundo magnético, os recipientes têm de ter um fundo
suficientemente grande para cobrir a zona de cozedura.
Se na zona de cozedura for utilizado um recipiente que não
é apropriado:
activada. Se não for detectada a presença de qualquer recipiente
depois de decorridos 10 minutos, a operação de arranque é
cancelada.
IMPORTANTE: Para desligar a zona de cozedura, tem de
desligar a placa da forma normal, não basta remover o
recipiente da zona de cozedura em causa. O detector da
presença de recipientes não actua da mesma forma que a
tecla de ligar/desligar a placa.
• DESACTIVAÇÃO DE UMA PLACA DE COZEDURA
A zona de cozedura deve estar a funcionar. O testemunho de
comando deve estar aceso na zona de afixação. Caso contrário,
seleccionar novamente a placa de cozedura pretendida.
- Pressionar a tecla até aparecer afixado o nível de potência
A placa de cozedura desliga então instantaneamente e a
indicação desaparece ao fim de 10 segundos.
- Para desligar rapidamente, pressionar ao mesmo tempo as
teclas e . O nível de potência baixa automaticamente para
. A placa desliga-se.
• DESACTIVAÇÃO GERAL
Pode parar-se, a qualquer momento, o funcionamento
das placas de cozedura e do conta-minutos, pressionando
para tal a tecla ligar/desligar, durante 3 segundos.
• INDICAÇÃO DE CALOR RESIDUAL
Quando a temperatura da superfície das zonas de cozedura ultrapassa cerca de 60°C, o utilizador é de tal informado através da
afixação “H” do painel de comando. Logo que a temperatura
para menos de 60°C, a afixação
é apresentada a indicação . A zona não é
baixa
“H”
apaga-se.
No final da cozedura dos alimentos, aconselhamos a desligar a
placa e a aproveitar o seu calor residual, para que o cozinhado
possa terminar brandamente.
N.B.: Após corte da corrente, a indicação de calor residual
desaparece definitivamente e o mesmo acontece quando a
temperatura da superfície ultrapassa os 60°C.
22 PT
Page 24

• OPERAÇÃO DO DISPOSITIVO DE AQUECIMENTO RÁPIDO
Cada uma das zonas de cozedura da placa está equipada
com um dispositivo de aquecimento rápido, para aumentar
mais depressa a temperatura da zona de cozedura:
Como ligar o dispositivo de aquecimento rápido
- Prima a tecla de ligar/desligar .
- Seleccione a zona de cozedura pretendida, active-a, prima a
tecla "+" para seleccionar o nível de potência "9", liberte
brevemente a tecla "+" e, em seguida, volte a premir esta
tecla; as indicações apresentadas alternam rapidamente entre
"A", dispositivo de aquecimento rápido, e "9", nível de potência.
- Se necessário reduza o nível de potência seleccionado.
• PROGRAMAÇÃO DE UMA PLACA DE COZEDURA
Podem programar-se as placas de cozedura com uma duração
máxima de 99 minutos.
As placas podem ser programadas uma de cada vez.
- Ligar a placa de cozedura pretendida, repetindo para tal as
operações anteriormente indicadas.
O testemunho de comando,
junto de nível de potência, deve ficar afixado, indicando assim
que a placa está ligada.
- Pressionar a tecla do conta-minutos .
A identificação da placa, junto à afixação do conta-minutos, recorda
qual a placa accionada.
Pressionar a tecla “+” ou “-” para seleccionar os minutos.
-
As diferentes
posições
000
U65°C-
131
263
3115
4 16 6,5
5 19 8,5
6 32 2,5
7 45 3,5
8 65 4,5
9 100 0
Por exemplo, zona de 1800 W regulada para o nível de
potência 6: a potência libertada equivale a 32% da potência
máxima de 1800 W
Quando a função "Dispositivo de aquecimento rápido" está
activada, a zona de cozedura liberta uma potência de 1800
W durante 2,5 minutos e, em seguida, regula uma potência de
576 W.
• ACTIVAÇÃO DO FUNCIONAMENTO DO INTENSIFICADOR
A função de intensificação permite que, mediante uma simples
pressão numa tecla, a potência da zona de cozedura em causa
aumente, dependendo da zona em causa, durante um período
de 10 minutos. Trata-se da função ideal para ferver grandes
quantidades de líquidos...
Potência
libertada
(%)
Potência
nominal
Tempo de ligação do
dispositivo de
aquecimento
rápido (minutos)
Potência do
intensificador
O registo é feito automaticamente ao fim de três segundos.
O tempo programado pode ser modificado em qualquer momento,
voltando para tal a pressionar a tecla de selecção do contaminutos. O testemunho de comando do conta-minutos deve
acender. Uma vez esgotado o tempo marcado, a placa de
cozedura desliga automaticamente, ouvindo-se então um sinal
sonoro durante 1 minuto.
O tempo programado pode ser posto a “00” com tecla “-” : a
placa de cozedura deixa então de estar sob controlo do contaminutos, mas permanece em funcionamento, pelo que será
necessário desligá-la manualmente.
O conta-minutos pode ser utilizado apenas como auxiliar de
memória; ouvir-se-á um sinal sonoro no final do tempo programado.
• FUNCIONAMENTO DA TECLA DE TRANCIAMENTO
A função de trancamento fixa as regulações do momento ou evita
que alguém ponha a funcionar a placa vitrocerâmica. Também
se utiliza para limpeza do painel de comandos, já que os comandos
podem trancar-se sem que a placa esteja a funcionar.
- Pôr a funcionar a ou as placas pretendidas.
- Escolher a potência que se deseja para cada uma delas.
- Pressionar a tecla para registo dos dados.Só fica então
acessível a tecla ligar/desligar, pois todas as outras deixam de
ficar operacionais.
O testemunho do trancamento acende-se.
Para anular o trancamento, basta voltar a pressionar a
tecla ;
O testemunho apaga-se e todos os comandos ficam novamente
operacionais.
Se o conta-minutos estiver activo quando os comandos são
trancados, no final do tempo programado, o tempo será descontado
automaticamente e a placa desligada.
Activação do funcionamento do INTENSIFICADOR:
- Prima a tecla de selecção da zona de
cozedura equipada
O indicador luminoso de controlo fica aceso.
- Prima a tecla para activar o funcionamento do intensificador O intensificador mantém-se activo durante 10 minutos.
No visor de indicação da potência é apresentada a indicação “P”
(potência).
23 PT
Se o comando do trancamento estiver activo quando se
desliga definitivamente a placa, este ficará operacional e
impedirá qualquer acção quando a placa for posta novamente
a funcionar. Pressionar a tecla para destrancar os
comandos da placa.
Page 25

LIMPEZA DA PLACA VITROCERÂMICA
• É importante esperar que a superfície vitrocerâmica da placa
arrefeça completamente, antes de a limpar.
• Utilizar apenas produtos de limpeza próprios para superfícies
vitrocerâmicas (creme e raspador), à venda vulgarmente no
comércio.
• Evitar que os alimentos transbordem. Os alimentos que
caem na superfície de cozedura queimam rapidamente, o
que torna difícil a sua limpeza.
• Recomenda-se a manter afastado da superfície de cozedura
tudo o que é susceptível de derreter, tal como objectos
plásticos, açúcar ou produtos à base de açúcar.
LIMPEZA:
- Aplicar algumas gotas de produto de limpeza próprio para
superfícies vitrocerâmicas.
- Nas zonas manchadas, caso existam, passar, com mais
insistência, um pano macio ou papel de cozinha ligeiramente
humedecido.
- Lavar, se necessário.
- Limpar depois com um pano macio ou papel de cozinha secos,
até a superfície ficar limpa.
Se após esta limpeza corrente as manchas continuarem:
- Aplicar novamente algumas gotas do produto próprio.
- Raspar com um raspador, mantendo um ângulo de
30º em relação à superfície, até as manchas persistentes
desaparecerem. Se necessário, lavar.
- Limpar com um pano macio ou papel de cozinha secos, até a
superfície ficar limpa.
- Repetir a operação, se necessário.
CONSELHOS:
As limpezas frequentes deixam uma camada protectora essencial
à prevenção de riscos e desgaste.
Certificar-se de que a superfície está limpa, antes de utilizar a
placa.
Para retirar manchas de água e de calcário, aplicar algumas gotas
de vinagre branco ou sumo de limão. Lavar e limpar com papel
absorvente e depois utilizar o produto de limpeza próprio para
limpeza final.
O vidro vitrocerâmico suporta o arrastar dos recipientes de cozinha
com fundo plano, mas, apesar de tudo, é aconselhável levantálos para os deslocar.
NOTA :
- Evitar usar uma esponja demasiado húmida.
- Nunca utilizar utensílios de aço, tais como facas ou chaves
de fendas.
- Se o raspador com lâmina de barbear for utilizado de forma
a fazer um ângulo de 30º em relação à superfície não causará
quaisquer danos.
- Não deixar o raspador com a lâmina ao alcance de crianças.
- Não utilizar produtos abrasivos ou pós que possam riscar.
30° Maxi
ASSISTÊNCIA TÉCNICA
Antes de telefonar para a assistência técnica
Se a placas não estiver a trabalhar, recomendamos que:
verifique se o forno está devidamente ligado à corrente (ficha
correctamente introduzida na tomada).
Se lhe for impossível detectar a causa da avaria:
desligue o forno da corrente, não o tente reparar e ligue para
os serviços de assistência técnica.
Antes de ligar para os serviços de assistência técnica, porém,
tome nota do número de série do forno, constante da respectiva
placa de características.
PROBLEMAS E SOLUÇÕES
A placa de indução emite vibrações.
• É normal. A ventoinha de refrigeração dos componentes
electrónicos está em funcionamento.
A placa de indução emite um assobio baixo.
• É normal. Dependendo da frequência de funcionamento dos
indutores, pode ser emitido um assobio baixo quando estão a
ser simultaneamente utilizadas várias zonas de cozedura à
potência máxima.
As placas de cozedura não conseguem manter de forma
pouco viva a fervura ou a fritura
• Utilizar apenas recipientes com fundo plano.
• O fundo do recipiente deve cobrir totalmente o diâmetro da placa
de cozedura seleccionada.
Cozeduras demasiado lentas.
• Utilização de recipientes não adequados. Usar apenas recipientes
com fundo plano, pesado e com diâmetro pelo menos igual ao
da placa de cozedura.
Pequenos riscos ou superfície vidrada da placa vitrocerâmica
arranhada
• Mau método de limpeza ou uso de recipientes com o fundo
irregular, podendo haver areia ou sal entre a placa e o fundo do
recipiente. Consultar o capítulo «LIMPEZA». Certificar-se de
que o fundo dos recipientes está limpo, antes de os utilizar, e
usar apenas recipientes com fundo plano. Os riscos só podem
ser atenuados se for feita uma limpeza correcta.
Marcas de metal
• Não arrastar os recipientes de alumínio sobre a placa. Consultar
os conselhos de limpeza.
• Não estão a ser usados bons materiais e as manchas, sejam
de que natureza forem, continuam. Consultar o capítulo
“LIMPEZA” e usar uma lâmina de barbear.
Manchas escuras
• Consultar o capítulo «LIMPEZA» e usar uma lâmina de barbear
Marcas ténues na placa
• Marcas provenientes de recipientes de alumínio ou de cobre e
também de depósitos de minerais, de água ou de alimentos.
Podem ser retiradas com creme de limpeza.
Caramelização ou plástico derretido sobre a placa
• Consultar o capítulo «LIMPEZA».
O aparelho ou algumas placas de cozedura não funcionam
• As caixas de derivação não estão bem posicionadas na placa
de bornes. Mandar verificar se a ligação está de acordo com as
instruções.
O aparelho não funciona
• Houve bastante transbordo de alimento ou um objecto a tapar,
durante 10 segundos, no mínimo, duas teclas. Limpar o
transbordo ou retirar o objecto.
• O painel de comando está trancado. Para o destrancar carregar
na tecla “Trancamento”.
O aparelho não desliga
• O painel de comando está trancado. Para o destrancar carregar
na tecla «Trancamento».
O aparelho pára automaticamente
• Houve bastante transbordo de alimento ou um objecto a tapar,
durante mais de 10 segundos, duas teclas, pelo que o sistema
de segurança da placa vitrocerâmica foi accionado, dando
origem a um sinal sonoro. Limpar o alimento que veio por fora
ou retirar o objecto.
• As placas de cozedura param automaticamente se forem
deixadas a funcionar durante bastante tempo. Consultar o
capítulo “Duração de funcionamento”.
Frequência de funcionamento da acção ligar/desligar das
placas de cozedura
• Os ciclos de corte/funcionamento variam em função do nível de
potência solicitado:
- nível baixo: tempo de funcionamento curto,
- nível forte: tempo de funcionamento longo.
A indicação de calor residual, letra «H», aparece a piscar
• A temperatura electrónica é demasiado elevada. Deve ser
verificado, por um técnico, o encastramento, que deve obedecer
às instruções.
Este electrodoméstico está marcado de acordo
com o disposto na directiva europeia 2002/96/CE
relativa aos resíduos de equipamentos eléctricos
e electrónicos (REEE).
Ao assegurar que este produto seja
correctamente eliminado, estará a prevenir
eventuais consequências negativas para o
ambiente e para a saúde, que, de outra forma,
poderiam resultar de um tratamento incorrecto
deste produto, quando eliminado.
O símbolo patente neste produto indica que ele não pode ser
tratado como lixo doméstico. Em vez disso, deve ser entregue
no centro de recolha apropriado, para reciclagem do equipamento
eléctrico e electrónico.
A eliminação deste produto deve ser levada a cabo de acordo
com os regulamentos localmente aplicáveis à eliminação e ao
tratamento de lixo e resíduos.
Para obter informações mais detalhadas sobre o tratamento, a
recuperação e a reciclagem deste produto, agradecemos que
entre em contacto com a entidade municipal competente, com
o serviço de eliminação de lixos e resíduos ou com o
estabelecimento comercial onde adquiriu o produto.
24 PT
Page 26

CONSIGNAS DE SEGURIDAD - RECOMENDACIONES
LEA ATENTAMENTE ESTE MANUAL PARA SACAR TODO EL PARTIDO DE SU ENCIMERA. Le recomendamos conserve el manual
de instalación y uso para poder consultarlo en el futuro, y anote más abajo, antes de la instalación de la encimera, el número de serie
del aparato por si requiere la intervención del Servicio de Asistencia Técnica.
Placa de características
Mod : FE GD21 RB
P. Maxi (Oven) - 2350 W
Made in FRANCE - 232 -
220 - 240 V
P. Motors = 30 W
(está bajo el cajón inferior de la encimera)
Mod: FE GD21 RB
Code: 39354774 - 0306 0511
220 - 240 V
Code: 39354774 -0306 0511
Code: 39354774
Code: 39354774
- 0306 0511
- 0306 0511
Code: 39354774
- 0306 0511
• Durante el funcionamiento o tras haber apagado un quemador, y mientras el indicador de calor residual permanezca encendido, se
recomienda encarecidamente mantener a los niños alejados de la placa para evitar riesgos de quemaduras graves.
• Cuando cocine con grasas o aceite, no deje la cocción sin vigilancia pues las grasas o el aceite sobrecalentados pueden inflamarse
con rapidez.
• Nunca deje sobre las superficies calientes hojas de papel de aluminio ni recipientes de plástico.
• El quemador halógeno de la encimera vitrocerámica emite una luz fuerte: nunca mire fijamente las lámparas de este quemador.
• Después de cada utilización es necesario limpiar ligeramente la encimera para evitar la acumulación de suciedad y grasas. Éstas, a
cada nuevo uso, se irían requemando hasta carbonizarse, lo que desprende humo y olores desagradables además de suponer un
riesgo de incendio.
• No deje objetos metálicos como cuchillos, tenedores, cucharas o tapaderas en la zona de inducción ya que si son muy grandes o
pesados podrían calentarse.
• La zona de mandos de la encimera es delicada, así que nunca deje sobre la misma recipientes calientes.
• Nunca cocine directamente sobre la encimera: utilice recipientes.
• Coloque siempre el recipiente bien centrado sobre el quemador a utilizar.
• Nunca utilice la superficie de la encimera para cortar alimentos o como mesa de trabajo.
• Nunca deslice los recipientes sobre la encimera: podría rayar su superficie.
• Nunca deje objetos pesados por encima de la encimera, pues podrían caerse y dañarla.
• No deposite nunca sobre la encimera ningún objeto, sea el que sea.
• En el improbable caso de que aparezca una fisura en el cristal, desenchufe inmediatamente el aparato de la red y diríjase directamente
al Servicio de Asistencia Técnica.
•
Este aparato no esta destinado a ser usado por niños, personas discapacitadas o inexpertas en su uso a no ser que sean vigiladas
o instruidas sobre el uso del aparato por una persona responsable de su seguridad.
• Vigile a los niños de manera que se asegure que no juegan con el aparato.
Este aparato cumple con la normativa de seguridad y compatibilidad electromagnética. No obstante, las personas que tengan
implantados marcapasos deben abstenerse de acercarse a manejar este aparato. Es imposible asegurar que el 100% de
estos dispositivos que se encuentran en el mercado cumplan la normativa vigente de compatibilitad electromagnética, y que
no se produzcan interferencias que pongan en peligro el correcto funcionamiento del mismo. También es posible que las
personas con otro tipo de dispositivos, come audífonos, puedan sentir algún tipo de molestia.
ENCIMERAS
FUEGOS
Tensión / frecuencia (V/Hz)
Potencia eléctrica instalada (W)
Dimensión producto
(l x p x h mm)
Dimensión de empotramiento
(AXB)
HVI 740HVI 640
4 Inducción 4 Inducción
220-240
50/60 Hz
574 x 505 x 55 752 x 505 x 55
220-240
50/60 Hz
HGI 7544
4 Inducción
220-240
50/60 Hz
74007400 7400
752 x 505 x 55
740 x 490
Todas las características se dan a título meramente indicativo. A causa de su intención de mejorar constantemente la calidad de su
producción, el fabricante se reserva el derecho de aportar a sus aparatos modificaciones fruto de la evolución técnica, respetando
siempre las condiciones establecidas en el Código del Consumo.
Aparato confrome a la Directiva Europea 73/23/CEE e 89/336/CEE , sustituida respectivamente de 2006/95/CE y 2004/108/CE,
y sucesivas modificaciones.
25 ES
Page 27

INSTALACIÓN
La instalación funcional de electrodomésticos en su entorno es una operación delicada que, de no efectuarse correctamente, puede
tener graves consecuencias para la seguridad de los usuarios. En estas circunstancias, es imprescindible confiar esta tarea a un
profesional, que la llevará a cabo según las normas técnicas vigentes. Si, a pesar de esta recomendación, el usuario efectúa por sí
mismo la instalación, el fabricante declina toda responsabilidad en caso de fallo técnico del aparato, tenga o no como consecuencia
daños materiales o personales.
EMPOTRAMIENTO
El mueble o el soporte en los cuales debe empotrarse la encimera,
así como las paredes del mueble que podrían yuxtaponerse al
mismo, deben ser de un material resistente a las altas temperaturas.
Además, es necesario que el revestimiento que recubre el mueble
o el soporte se fije con una cola resistente al calor para evitar que
se despegue.
Instalación:
• Con la encimera se entrega una junta de estanqueidad. Para
proceder a su colocación,
- darle la vuelta a la encimera, con la parte del cristal hacia abajo,
con cuidado de no dañar el cristal.
- colocar la junta alrededor de todo el perímetro de la encimera.
- colocarla cuidadosamente en su lugar para evitar cualquier
infiltración en el mueble soporte.
Es importante colocar la placa en una superficie de apoyo nivelada.
• Las deformaciones provocadas por la colocación incorrecta
pueden alterar las especificaciones de la encimera y el
funcionamiento de la placa.
• Deje un hueco de 5 cm como mínimo entre el aparato y cualquier
superficie vertical cercana.
• Es muy importante que el hueco se corresponda con las medidas
indicadas.
• La altura de la montura nivelada de la placa es de 5,5 cm.
• Si hay una división intermedia, el espacio entre el fondo del
revestimiento y el suelo intermedio o parte de un mueble ha de
ser superior a 2,5 cm para permitir la circulación del aire. Además,
ha de asegurarse de que el hueco total de ventilación en la parte
posterior sea de 8 cm de ancho.
• No puede colocar la placa encima de un horno sin ventilador,
lavavajillas, nevera, congelador o lavadora.
• La placa encaja con 4 agujeros de colocación para que las
pinzas de fijación sujeten la placa al aparato.
Coloque las 4 pinzas de fijación, antes de instalar la placa, de
forma que la placa encaje perfectamente con la unidad de soporte.
CAJÓN DE LA
ENCIMERA
Apertura
500 X 10
25 mm
mini
Apertura
500 X 50
50 mm
JUNTA
• Cualquier intervención relacionada con el cable de alimentación
debe obligatoriamente ser efectuada por el Servicio de Asistencia
Técnica, o por una persona de cualificación similar, asegurese
de respetar el siguiente código de colores durante la conexión
de cada cable:
AZUL - NEUTRO (N)
MARRÓN - FASE (L)
AMARILLO-VERDE - TIERRA ( )
• MODELO CON TOMA DE CORRIENTE
L'aparato e suministrado de un cable de alimentación con
toma de corriente y permite la conexión exclusivamente con
corriente de 220-240 V entre fases o entre fase y neutro.
• Conectar a una toma de corriente de 25 amperios.
• MODELO SIN TOMA DE CORRIENTE
L'aparato e suministrado de un cable de alimentación sin
toma de corriente y permite la conexión exclusivamente con
corriente de 220-240 V entre fases o entre fase y neutro.
• Conectar a una toma de corriente, el fusible debe elegirse en
función de la tabla de conexión.
También es possible adaptar el aparato para una conexión
en: Bifasico 220-240 V2~ ,Trifasico 220-240 V3~
o Trifasico 380-415 V3N~.
Para proceder a una nueva conexión, es imperativo respectar
las consignas siguientes:
• antes de realizar la conexión, verificar que la instalación esta
protegida por un fusible apropiado, ver datos tecnicos, y inclue
cables de sección suficiente para suministrar energia al aparato
correctamente.
1- Operaciones para ser realizadas sobre la conexión existente:
• Girar la placa, la cara de cristal contra el plano de trabajo
tomando cuidado de proteger el cristal.
• Abrir la tapa.
• Desatornille los tornillos de la placa a bornes que mantienen
los puentes derivadores y los hilos conductores del cable de
alimentación.
• Desatornille el sujetacable para retirar el cable de alimentación.
• Retirelo.
2• Operaciones que deben efectuarse para realizar la nueva
conexión:
- Elija el cable de alimentación en función de las recomendaciones
de la tabla,
- pase el cable por el sujetacables,
- pele la extremidad de cada conductor del cable de alimentación
sobre una longitud de 10 mm., teniendo en cuenta la
longitud necesaria del cable de alimentación para la conexión
a la placa a bornes,
- como se indica en la tabla colocar los puentes derivadores que
habrán recuperado en la primera operación respetando
los marcados sobre la placa a bornes (los puentes derivadores
permiten establecer un puente entre dos bornas), y fijar los
conductores.
- atornillar el sujetacables y cierre la tapa.
CONEXIÓN CON LOS BORNES DEL APARATO :
CONEXION ELÉCTRICA
«La instalación del aparato citado en la referencia debe cumplir
la normativa vigente en el país de su instalación». El Fabricante
declina toda responsabilidad en caso de incumplimiento de esta
disposición.
Atención:
• Antes de proceder a la conexión, compruebe el voltaje de
alimentación de su contador, el ajuste del disyuntor, el calibre
del fusible y la continuidad de la toma de tierra de la instalación.
• La conexión eléctrica a la red debe hacerse mediante una toma
de corriente con toma de tierra, o mediante un interruptor de
corte omnipolar que tenga un espacio de apertura entre los
contactos de por lo menos 3 mm.
Si el aparato requiere una toma de corriente, debe instalarse de
forma que dicha toma sea accesible.
• El cable de protección verde/amarillo debe estar conectado a
las bornas de tierra, al aparato por un extremo y a la instalación
por el otro.
• No seremos responsables de ningún incidente, ni de sus
eventuales consecuencias, derivado del uso de un aparato sin
toma de tierra, o conectado a una toma de tierra cuya continuidad
sea defectuosa.
26 ES
Cable
Cable
Cable
HVI 740HVI 640
Monofasico 220-240 V~
Trifasico 220-240 V3~ Trifasico 380-415 V3N~
Ph = Fase N = Neutro T = Tierra
Bifasico 220-240 V2~
Page 28

INDUCCIÓN
Recipiente que
transforma el flujo de
inducción
en calor
FLUJO DE INDUCCIÓN
Encimera
PROCEDIMIENTO
Hay un generador electrónico que está conectado a una bobina
situada dentro del aparato.
La bobina crea un campo magnético que cuando se coloca la
cazuela encima del foco, ese campo magnético se extiende
mediante las corrientes de inducción.
Estas corrientes hacen que la cazuela se convierta en una
transmisor de calor mientras la vitrocerámica se mantiene fría.
Este sistema esta diseñado para utilizar cazuelas con base
magnética.
La instalación de tecnología de inducción sencilla tiene dos
ventajas:
- como es la olla la única que emite calor, éste se mantiene al
nivel máximo y la cocción se realiza sin pérdida de calor.
- no hay inercia térmica ya que la cocción empieza
automáticamente cuando se coloca la cazuela en el foco, y se
detiene cuando se retira.
• Utilizar recipientes de un diámetro suficiente para cubrir
completamente el quemador: hay que asegurarse de que el
fondo sea por lo menos igual de grande que la zona de cocción.
Si el fondo es ligeramente mayor, la energía se aprovechará mejor.
A continuación encontrará información que le será útil a la hora
de elegir los recipientes más indicados para obtener buenos
resultados.
UN APARATO DE ALTA SEGURIDAD....
Si la placa se instala y utiliza correctamente apenas se necesitarán
los dispositivos de seguridad.
• Ventilador: para proteger y enfriar los componentes de suministro
y control. Tiene dos velocidades, que funcionan automáticamente.
El ventilador funciona incluso con los focos apagados y hasta
que el sistema electrónico se haya enfriado lo suficiente.
• "Transistor" de seguridad: un sensor comprueba
constantemente la temperatura de los componentes electrónicos.
Si el calor aumenta de forma excesiva, el transistor
automáticamente disminuye la energía de los focos, y a
continuación interrumpe el suministro (parpadea la luz de nivel
de energía) hasta que los componentes recuperan la temperatura
normal, luego la placa empieza a trabajar.
• Sistema de seguridad "Cazuela Vacía ": se coloca un sensor
debajo de cada zona de calor. Éste detecta automáticamente
una temperatura errónea para la cazuela vacía, o la vitrocerámica.
• "Detección" de Seguridad: La presencia del detector permite
el funcionamiento y el calentamiento. Un objeto pequeño (por
ejemplo, una cuchara, cuchillo o anillo) colocado sobre la zona
de calor no se considerará una cazuela, por lo que el foco no
se pondrá en funcionamiento.
• Sistema de seguridad de "desbordamiento y salpicadura”:
si se derrama o salpica algo, el foco se detendrá. Si se produce
un gran derrame o un objeto cubre dos o más botones durante
10 segundos como mínimo, limpie lo vertido o retire el objeto,
la placa no estará funcionando.
LA ELECCIÓN DE LOS UTENSILIOS
Para obtener óptimos resultados de cocción es necesario
utilizar recipientes de buena calidad:
• Utilizar recipientes de buena calidad, de fondo plano y
espeso: el fondo rigurosamente plano suprimirá los puntos de
sobrecalentamiento sobre los que los alimentos tienden a
pegarse, y el espesor del metal permitirá una perfecta distribución
del calor.
• Asegurarse de que el fondo de los recipientes esté seco:
al llenar un recipiente o cuando se utiliza una cazuela que ha
estado en la nevera, por ejemplo, asegúrese de que el recipiente
esté bien seco; esta precaución evitará que la encimera se ensucie.
PRESENTACIÓN DEL QUADRO DE MANDOS
1 - TECLA PARA ENCENDER/APAGAR LA ENCIMERA
2 - TECLA DE SELECCIÓN DEL QUEMADOR
3 - VISUALIZADOR: potencia, indicador del calor residual,
funcionamiento booster, indicador del bloqueo...
4 - TECLA “-”
5 - TECLA “+”
6 - TECLA DE SELECCIÓN DEL RELOJ
7 - VISUALIZADOR DEL RELOJ
8 - TECLA DE BLOQUEO CON INDICADOR DE BLOQUEO
9 - PILOTO DEL QUEMADOR PROGRAMADO: si se enciende
indica que el quemador está controlado por el reloj
10 - DIODO DE COMANDO :
. encendido: el quemador o el rejo está activado, se puede
modificar,
. apagado: el quemador o el reloj está fijado en la última
información registrada
11 - TECLA DE SELECCIÓN DE LA FUNCIÓN BOOSTER
27 ES
Page 29

LAS DIFERENTES POSICIONES
Las diferentes posiciones corresponden a los índices de potencia
siguientes:
Para una mayor seguridad, las zonas de cocción se desconectan
automáticamente si se dejan encendidas durante mucho tiempo.
La desconexión depende del nivel de calor utilizado.
NOTA:
El foco de inducción funciona con un generador que alimenta a
la vez dos focos por zona, seg
ún el modelo.
Los ejemplos siguientes se dan meramente a título indicativo. Al
final, su experiencia personal le permitirá adaptar estos ajustes
a sus gustos y costumbres.
0 : Paro
U : Cocción a temperatura de 65°C
1 : )
2 : ) ..... Fundir
3 : Mantener el calor
4 : Recalentamiento
5 : Descongelación, estofados, cocción en su punto,
6 : Cocción sin tapadera
7 : Saltear, dorar carnes y asados
8 : Cocciones y asados a alta temperatura, soasar
9 : Fritura, ....
Booster: Hervir gran cantidad de líquido..
• DETECTOR DE CAZUELAS (INDUCCIÓN)
cocción a baja temperatura
.....
Si la zona de cocción se utiliza con una cazuela adecuada*:
el panel indica el nivel de calor o “P” cuando el potenciador está
en funcionamiento.
* La inducción requiere cazuelas compatibles que encajen con
el fondo magnético, véase tabla y que sean lo suficientemente
grandes para cubrir la zona de cocción por completo.
Si la zona de cocción se utiliza sin cazuela o con una cazuela
inadecuada:
El panel muestra . La zona de cocción no empieza a funcionar.
La operación de arranque se detiene cuando no se detecta cazuela
alguna transcurridos 10 minutos.
IMPORTANTE:
Para apagar la zona de cocción, debe apagar el foco con
normalidad, no puede retirar la cazuela. El detector de cazuelas
no funciona como botón de encendido y apagado.
En consecuencia, en la misma zona, cuando la función de Booster
está encendida y el segundo foco ha alcanzado un nivel de
potencia de 8 o 9, éste desciende automáticamente hasta el nivel
7; este descenso se refleja mediante una lucecita que parpadea
a modo de información.
Advertencia: tal y como se indica en el panel de potencia, el
Booster funciona durante 10 minutos, una vez transcurrido este
tiempo, se detiene y el foco empieza a calentarse de nuevo en
el punto 9, con el descenso de la potencia del generador, el nivel
de potencia del segundo foco vuelve al punto previo.
UTILIZACIÓN DE LA ENCIMERA
• Una vez conectada la encimera, esperar 8 segundos antes
de activar los comandos electrónicos.
- Pulse la tecla , durante 3 segundos.
El comando electrónico de la encimera está activado. En cada
zona de visualización puede verse el nivel de potencia “0” y el
diodo de comando parpadea.
- Si no se hace nada en 10 segundos, el comando electrónico se
apaga y hay que volver a empezar el proceso de encendido.
• ACTIVACIÓN DE UN QUEMADOR
- Pulse la tecla de selección del
quemador deseado. En la zona
de visualización, el diodo de
comando ya no parpadea sino
que está encendido. Esto indica
que la zona está activada.
- Pulse la tecla “ + ” o “ - ” para elegir un nivel de potencia entre 1
y 9.
• Si mantiene la presión sobre la tecla“ + ” o “ - ”, el nivel de
potencia aumenta o disminuye progresivamente.
• PARO DE UN QUEMADOR
En la zona de visualización el diodo de comando debe estar
encendido. Si no es así, seleccione de nuevo el quemador deseado.
- Pulse la tecla “ - ” hasta que se visualice el nivel de potencia
“0”.
Instantáneamente el quemador se apaga, y la indicación “0”
desaparece pasados 10 segundos.
- Para un paro rápido, pulsar simultáneamente las teclas “ + ” y
“ - ”.
El nivel de potencia desciende automáticamente a “0”. El
quemador se apaga.
• PARO GENERAL
El funcionamiento de los quemadores y
del reloj puede detenerse en cualquier
momento pulsando durante 3 segundos
la tecla Encendido-Apagado.
• INDICADOR DE CALOR RESIDUAL
El cuadro de mandos informa al usuario de que la temperatura
de la superficie de las zonas de cocción sobrepasa
aproximadamente los 60°C, mostrando la letra “H”. Cuando la
temperatura baje de los 60°C, la letra “H” desaparecerá.
Para finalizar las cocciones, le recomendamos apague la zona
de cocción y aproveche el calor residual del quemador para acabar
la cocción suavemente.
Nota: tras un corte del suministro eléctrico, el indicador de calor
residual desaparece definitivamente, aunque la temperatura de
la superficie sobrepase los 60°C.
28 ES
Page 30

• FUNCIONAMIENTO DEL ACELERADOR DE CALOR
L’acelerador de calor permite obtener un aumento de la temperatura más rápido de las zonas de cocción:
- Pulse la tecla .
- Ponga en marcha el quemador deseado y pulsar la tecla "+"
hasta la posición 9, reducir brevemente la presión y volver a
pulsar la tecla "+" : en el visualizador se muestran
alternadamente "A" (acelerador de calor) y "9" (nivel de potencia).
- Reducir si es necesario a la posición de calor deseada : en el
visualizador se muestran alternadamente "A" (acelerador de
calor) y el nuevo nivel de potencia.
Posición Potencia Duración de aceleración
de cocción liberada % de calor (minutos)
000
U65°C-
131
263
3115
4 16 6,5
5 19 8,5
6 32 2,5
7 45 3,5
8 65 4,5
9 100 0
Ej : Quemador de 1800 W en posición 6 = potencia liberada
32% de 1800 W
cuando la función «Acelerador de calor» está
activada, el quemador proporciona una potencia de 1800 W
durante 2,5 minutos, y se regula hasta 576 W transcurrido este
tiempo.
Cuando el “Calentamiento rápido” está activado, el display del
nivel de potencia permanece fijo.
• ACTIVACIÓN DE LA FUNCIÓN DE POTENCIACIÓN DE
LA TENSIÓN (INDUCCIÓN)
La función de potenciación permite, con una sencilla presión en
la zona cocción, trabajar con una potencia más importante,
dependiendo de la zona, durante 10 minutos. Es ideal para poner
a punto de ebullición gran cantidad de líquido...
I
N
D
U
C
C
I
Ó
N
POTENCIA
POTENCIA
BOOSTER
• PROGRAMACIÓN DE UN QUEMADOR
Cada quemador es programable por un tiempo total de 99 minutos.
Solo puede programarse un solo quemador a la vez.
- Encender el quemador deseado repitiendo el proceso antes
citado.
El diodo de comando cerca del nivel de potencia debe
activarse: indica que el quemador está activado.
- Pulsar la tecla Reloj .
El piloto del quemador alrededor de la visualización del reloj indica
de qué quemador se trata.
. Pulse la tecla “ + ” o “ - ” para elegir una duración en minutos.
Se registra automáticamente pasados tres segundos.
el tiempo programado puede modificarse en cualquier momento
reactivando la tecla de selección del reloj. El diodo de comando
del reloj debe estar encendido. Una vez transcurrido el tiempo,
el quemador se apaga automáticamente y se oye una
indicación sonora durante 1 minuto.
el tiempo programado puede ponerse a “00” con la tecla “ - ”,
o pulsando simultaneamente las teclas “ + ” y “ - ” de modo que
el quemador ya no está controlado por el reloj pero sigue siendo
operativo. Así, habrá que apagar el quemador independientemente.
el reloj puede utilizarse simplemente como recordatorio: al final
del tiempo programado sonará un timbre.
• FUNCIONAMIENTO DE LA TECLA DE BLOQUEO
La función bloqueo permite fijar los ajustes del momento, o evitar
que alguien pueda poner en marcha la encimera. Se utiliza también
para la limpieza de los comandos, ya que asi es imposible que
la encimera se ponga en marcha involuntariamente durante la
limpieza.
Para bloquear la encimera :
- Pulsar la tecla encendido/apago .
- Poner en marcha el quemador o quemadores deseados.
- Elegir un nivel de potencia para cada uno de ellos.
- Pulsar la tecla para fijar los parámetros; de hecho, ninguna
otra tecla es accesible, a excepción de la tecla Encendido/Apagado.
El piloto de bloqueo se enciende.
Para detener :
Para detener la función bloqueo, basta con volver a pulsar la tecla
, el piloto se apaga y todos los comandos son accesibles de
nuevo.
Si en el momento de bloquear los comandos el reloj estuviera
activo, el tiempo se descontará automáticamente y se apagará
el quemador al final del tiempo programado.
Si el comando de bloqueo estuviera activado en el momento del
apagado definitivo de la encimera, el comando de bloqueo
permanecerà operativo e impedirá un funcionamiento hasta nueva
orden. Pulsar la tecla para desbloquear.
Una vez transcurridos los 10 minutos, el nivel de potencia desciende
a 9.
Pulsando una vez el botón “-“se cancela la función potenciación,
y el nivel de potencia desciende a 9.
29 ES
Page 31

MANTENIMIENTO
• Es muy importante, antes de efectuar la limpieza de la superficie
vitrocerámica de la encimera, esperar a que ésta esté
completamente fría.
• Solo deben utilizarse los productos específicos para la limpieza
de la superficie vitrocerámica, crema y rascador. No le será
difícil encontrarlos en establecimientos de productos de limpieza.
• Evite los desbordamientos: la suciedad resultante se carboniza
rápidamente sobre el cristal y después es mucho más difícil de limpiar.
• Recomendamos mantener alejado del plan de cocción cualquier
objeto que pueda fundirse, como objetos de plástico, azúcar o
productos con alto contenido del mismo.
MANTENIMIENTO:
- vierta algunas gotas de un producto limpiador específico para
la superficie vitrocerámica.
- frote, insistiendo en las zonas manchadas si las hubiera, con
un trapo suave o un papel de cocina ligeramente humedecido.
- enjuague, si es necesario.
- seque con un trapo suave o papel de cocina seco hasta que la
superficie quede limpia.
Si después aún persisten algunas manchas:
- vierta de nuevo algunas gotas de un producto específico.
- rasque, ayudándose de un rascador, manteniéndolo siempre en
un ángulo de 30° en relación a la encimera hasta que desaparezcan las manchas más recalcitrantes.
Enjuague, si es necesario.
- seque con un trapo suave o papel de cocina seco hasta que la
superficie quede perfectamente limpia.
- repita el proceso si es necesario.
CONSEJOS:
La limpieza frecuente produce una película protectora esencial
para evitar las rayaduras y el desgaste.
Asegúrese de que la superficie esté limpia antes de volver a
utilizar la encimera.
Para eliminar los rastros de agua y cal, utilice algunas gotas de
vinagre blanco o zumo de limón. Enjuague y seque con papel de
cocina, y después aplique algunas gotas de un producto específico
y seque.
El cristal vitrocerámico resiste el rozamiento con los recipientes
de cocción de fondo plano, pero es recomendable levantarlos de
la superficie para desplazarlos.
30° Maxi
NB:
- Evite el uso de una esponja demasiado húmeda.
- Nunca utilice un objeto de acero, como un cuchillo o un
destornillador.
- La utilización de un rascador con una hoja de afeitar no
dañará la superficie, siempre que se respete un ángulo de 30°.
- Nunca deje el rascador con la hoja de afeitar al alcance de
los niños.
- No utilice productos abrasivos ni polvos detergentes.
ASISTENCIA TÉCNICA
En caso de incorrecto funcionamiento le aconsejamos:
— verificar la buena conexión del enchufe en la toma de corriente.
En caso de que no se determine la causa del mal funcionamiento:
apagar el aparato sin manipularlo y llamar al Servicio de
Asistencia Técnica. Antes de llamar al Centro de Asistencia
recuerde tomar nota del número de matrícula situado en la
tarjeta matrícula del producto.
El aparato está dotado de un certificado de garantía que le permite
disponer del Servicio Asistencia Técnica.
PROBLEMAS Y SOLUCIONES
La placa de inducción hace algún crujido.
• Normal. El ventilador de cocción de los componentes electrónicos
está encendido.
La placa de inducción silba un poco.
• Normal. Según la frecuencia de trabajo de los inductores, puede
surgir un ligero silbido cuando utilice varias zonas de cocción
a máxima potencia.
Los quemadores no mantienen las ebulliciones en recipientes
pequeños o las frituras son poco potentes.
• Utilice solo recipientes de fondo plano. Si puede verse luz entre
el recipiente y la encimera, esto significa que el quemador no
transmite correctamente el calor.
• El fondo del recipiente debe cubrir por completo el diámetro del
quemador elegido.
Cocciones demasiado lentas.
• Utilización de recipientes no adaptados. Utilice solo recipientes
de fondo plano, pesados y de un diámetro por lo menos igual
al del quemador.
Pequeñas rayaduras o arañazos en la superficie vitrocerámica
de la encimera.
• Si se utiliza un método de limpieza inadecuado, o se utilizan
recipientes de fondo rugoso, aparecerán entre la encimera y el
fondo del recipiente partículas como arenilla o sal. Consulte el
capítulo “MANTENIMIENTO”, asegúrese de que los fondos
de los recipientes están limpios antes de usarlos y utilice solo
recipientes de fondo liso. Las rayaduras pueden atenuarse
únicamente si se realiza una buena limpieza.
Marcas de metal.
• No deslice recipientes de aluminio sobre la encimera. Siga las
recomendaciones de mantenimiento.
• No utiliza materiales adecuados, y las manchas persisten. Utilice
una hoja de afeitar y siga las recomendaciones del capítulo
“MANTENIMIENTO”.
Manchas oscuras.
• Utilice una hoja de afeitar y siga las recomendaciones del capítulo
“MANTENIMIENTO”.
Zonas claras sobre la encimera.
• Se trata de marcas procedentes de recipientes de aluminio o
cobre, pero también sedimentos minerales, restos de agua o
alimentos; pueden eliminarse con crema limpiadora.
Restos de caramelización o plástico fundido sobre la encimera.
• Siga las recomendaciones del capítulo “MANTENIMIENTO“.
La encimera no funciona.
• Un desbordamiento considerable o un objeto cubre por lo menos
2 teclas, durante 10 segundos como mínimo. Limpie el
desbordamiento o bien retire el objeto.
• El cuadro de mandos está bloqueado. Para desbloquearlo, pulse
la tecla “Bloqueo”.
La encimera no se apaga.
• El cuadro de mandos está bloqueado. Para desbloquearlo, pulse
la tecla “Bloqueo”. Consulte el capítulo.
La encimera se apaga automáticamente
• Un desbordamiento o un objeto cubre durante más de 10
segundos por lo menos 2 teclas, la encimera entra en modo
seguridad y se oye un bip. Limpie el desbordamiento o bien
retire el objeto.
• Los quemadores se apagan automáticamente si se dejan en
funcionamiento durante demasiado tiempo. Consulte el capítulo
“Duración de funcionamiento”.
Frecuencia de funcionamiento apagado/encendido sobre
quemadores
• Los ciclos apagado/encendido varían en función del nivel de
potencia solicitado:
- nivel bajo: tiempo de funcionamiento corto,
- nivel elevado: tiempo de funcionamiento largo.
La letra «H», que indica el calor residual, parpadea.
• La temperatura electrónica es demasiado elevada.
Un técnico debe comprobar que el empotramiento se haya hecho
según las recomendaciones.
La encimera no funciona, o algunos quemadores non
funcionan.
• Los puentes derivadores no están correctamente colocados en
el cuadro de bornas. Haga comprobar la conexión para ver si
está hecha según las recomendaciones.
Este electrodomestico está marcado conforme
a la directiva Europea 2002/96/CE sobre los
residuos de aparatos eléctricos y electrónicos
(WEEE).
Asegurándose que este producto ha sido
eliminado correctamente, ayudará a evitar
posibles consecuencias negativas en el ambiente
y la salud de las personas, que pudiera verificarse
por causa de un anómalo tratamiento de este
producto.
El simbolo sobre el producto indica que este aparato no puede
ser tratado como un residuo doméstico normal, en su ligar deberá
ser entregado al centro de recogidas para reciclaje de aparatos
eléctricos y electrónicos.
La eliminación debe ser efectuada de acuerdo con las reglas
medioambientales vigentes para el tratamiento de los residuos.
Para informacion más detallada sobre el tratamiento, recuperación
y reciclaje de este producto, por favor contacte con la oficina
compentente (del departamento de ecología y mediomabiente),
o su servicio de recogida a domicilio si lo hubiera o el punto de
venta donde compró el producto.
30 ES
Page 32

ALGEMENE AANWIJZINGEN
LEES AANDACHTIG DEZE GEBRUIKSAANWIJZING TENEINDE UW KOOKVLAK OPTIMAAL TE KUNNEN BENUTTEN. Wij raden
u aan deze installatie- en gebruiksaanwijzing te bewaren voor toekomstige raadpleging, en vooraleer het kookvlak in te bouwen, hieronder
het serienummer van het kookvlak te noteren voor een eventuele tussenkomst van onze naverkoopdienst.
Identificatieplaatje
(aan de onderkant van het kookvlak)
• Het is ten zeerste aangeraden kinderen op afstand te houden tijdens het opwarmen en het koelen van een kookzone zolangde icoonje
voor resthitte brandt, om ernstige brandwonden te voorkomen.
• Wanneer u met olie of vet kookt, houd het kookproces onder ogen daar verhitte olie of vet snel kan vuur vatten.
• Plaats geen aluminiumfolie of plastieken bakjes op de warme kookzones.
• De halogeenzone waarmee het kookvlak is uitgerust straalt een aanzienlijk sterk licht uit; vermijd deze lampen langdurig aan te staren.
• Wij raden u aan na elk gebruik het kookvlak schoon te maken om accumulatie van vuil en vetten te vermijden. Zoniet koken en verkolen
deze resten en verwekken ze bij elk verder gebruik rook en onaangename geuren. Ze kunnen eveneens een brand verwekken.
• Leg nooit metalen voorwerpen, zoals messen, vorken, lepels of deksels, op de inductieplaat. Bij een bepaalde grootte en massa
kunnen deze voorwerpen warm worden en de kookplaat beschadigen.
• De bedieningsconsole van het kookvlak is zeer gevoelig, plaats hier geen hete pannen.
• Nooit direct op het kookvlak koken, maak gebruik van kookpannen.
• De pan steeds centraal op de kookzone plaatsen.
• Gebruik het oppervlak van de kookzone niet als snijd- of werkvlak.
• Verschuif de pannen niet op het kookvlak; risico voor krassen.
• Geen zware voorwerpen boven het kookvlak plaatsen, ze zouden kunnen vallen en het kookvlak beschadigen.
• Sla geen voorwerpen op het kookvlak op.
• Het gebruik van dit apparaat is niet bedoeld voor personen (inclusief kinderen) met verminderde lichamelijke, zintuiglijke of geestelijke
capaciteiten of tekort van ervaring en kennis, tenzij er toezicht of instructie is van een persoon die verantwoordelijk is voor hun veiligheid.
• Kinderen moeten in de gaten worden gehouden worden, om er zeker van te zijn dat ze niet met het apparaat gaan spelen.
Productcode:
Serienummer
Opgelet: Dit apparaat voldoet aan de richtlijn voor veiligheid en elektromagnetische compatibiliteit. Toch dienen personen
met pacemakers uit de buurt van dit apparaat te blijven. Er kan onmogelijk worden gegarandeerd dat elke op de markt
beschikbare pacemaker voldoet aan de geldende richtlijn voor veiligheid en elektromagnetische compatibiliteit en dat er
geen interferenties ontstaan die de juiste werking van de pacemaker in gevaar bregen. Eventueel kunnen ook bij andere
apparaten, zoals bijv. gehoorapparaten, storingen ontstaan.
KOOKPLATEN
Kookzones
Spanning/Frequentie (V/Hz)
Vermogen Elektrische
Installatie (W)
Afmeting (l x p x h) mm.
Inbouwruimte (AxB)
4 Inductions 4 Inductions
220-240
50/60 Hz
574 x 505 x 55 752 x 505 x 55
HVI 740HVI 640
220-240
50/60 Hz
HGI 7544
4 Inductions
220-240
50/60 Hz
74007400 7400
752 x 505 x 55
740 x 490
Alle gegevens worden ter informatie verstrekt. Met als doel een voortdurende verbetering van de productkwaliteit, behoudt de fabrikant
zich het recht voor de apparaten te wijzigen volgens de laatste stand van de technische evolutie en rekening houdend met de
voorwaarden bepaald in de Verbruikscode.
Dit apparaat voldoet aan de Europese Richtlijnen 73/23/EEC en 89/336/EEC, vervangen door 2006/95/EC and 2004/108/EC en
eventuele wijzigingen
31 NL
Page 33

INSTALLATIE
Huishoudapparaten in werking stellen is een delicate taak die, indien niet correct uitgevoerd, ernstige gevolgen kan hebben voor de veiligheid
van de gebruiker. Onder deze voorwaarden is het imperatief deze taak aan een beroepsinstallateur over te laten, die deze volgens de geldende
technische normen uitvoert. Indien ondanks deze aanbeveling de verbruiker zelf voor de installatie zorgt, wijst de fabrikant groep alle
verantwoordelijkheid af in geval van technisch defect dat al of niet schade heeft veroorzaakt aan personen en/of aan goederen.
INBOUW
Het meubel of de tafel waarin het kookvlak wordt geïntegreerd
alsook de eventueel aangrenzende meubelwanden moeten
vervaardigd zijn uit een temperatuurbestendig materiaal. Het is
dan ook vereist dat de bekleding die het meubel of de tafel afdekt
wordt bevestigd door een temperatuurbestendige lijm om te
voorkomen dat deze loskomt.
Installatie:
• Het kookvlak wordt geleverd met een dichtingstrip. Voor de
plaatsing van deze strip,
- bescherm zorgvuldig het glasoppervlak en keer het kookvlak
om, met het glasoppervlak naar onder.
- plaats de afdichtstrip rondom het kookvlak.
- installeer deze heel zorgvuldig teneinde alle infiltratie in het
steunmeubel te vermijden.
• Zorg dat het oppervlak waarop de kookplaat moet rusten,
volkomen vlak is.
• Eventuele vervormingen ten gevolge van een slecht geplaatste
kookplaat, kunnen de prestaties van het apparaat nadelig
beïnvloeden.
• Neem een ruimte van circa 5 mm in acht tussen het apparaat
en de aangrenzende wanden.
• Het gat dat in het meubel moet worden aangebracht om de
kookplaat in te bouwen, moet over de afmetingen beschikken
die vermeld staan in de tekening.
• Het ingebouwde deel van de kookplaat is 5 cm hoog.
• Indien een tussenschot aanwezig is:
- zorg dan voor een ruimte van ten minste 2,5 cm tussen de
onderzijde van het apparaat en het tussenschot, zodat lucht kan
circuleren. Ten opzichte van het werkblad moet de
afstand dus 8 cm bedragen;
- houd dan aan de achterzijde van het schot een ruimte van 8 cm
aan voor de doorlaat van lucht.
• De kookplaat mag niet worden ingebouwd boven een
ongeventileerde oven, een vaatwasmachine, een koelkast,
een diepvrieskast of een wasmachine.
Kookvlakframe
25 mm
mini
Uitsparing
500 X 50
50 mm
Afdichtstrip
Uitsparing
500 X 10
ELEKTRISCHE AANSLUITING
De installatie voor het apparaat moet worden uitgevoerd in
overeenstemming met de geldende normen in het land van
installatie. De fabrikant groep wijst alle verantwoordelijkheid
af in geval deze schikking niet wordt nageleefd.
Opgelet :
• Vooraleer het apparaat aan te sluiten, controleer de voedingsspanning op de teller, de instelling van de stroomverbreker,
het kaliber van de smeltveiligheid en de aardleidingcontinuïteit
van de installatie.
• De elektriciteitsvoorziening moet gebeuren via een stopcontact
met aardleiding of via een omnipolaire breukvoorziening met
een contactopening van minstens 3 mm. Indien het kookvlak is
voorzien van een stekker, moet het stopcontact op een
toegankelijke plaats worden aangebracht.
• De groen/gele beveiligingsdraad moet verbonden worden aan
aardingklemmen van het apparaat enerzijds en van de installatie
anderzijds.
• Onze verantwoordelijkheid dekt geen enkel incident of eventuele
gevolgen hiervan die kunnen voorkomen bij het gebruik van een
apparaat zonder aardingleiding of waarvan de aardingleiding
defect is.
• Onze verantwoordelijkheid dekt geen enkel incident of eventuele
gevolgen hiervan die kunnen voorkomen bij het gebruik van een
apparaat zonder aardingleiding of waarvan de aardingleiding
defect is.
• Elke tussenkomst in verband met de stroomvoorzieningskabel
moet imperatief door de naverkoopdienst of door een persoon
met een gelijkwaardige beroepsbekwaamheid verwezenlijkt
worden, verbind de draden dan volgens onderstaande kleur/codes
(wij raden aan dit door een erkende installateur te laten doen):
BLAUW - NEUTRAAL (N)
BRUIN - FASE (L)
GEEL-GROEN - AARDE ( ).
• MODEL MET STEKKER
De kookplaat wordt geleverd met voedingskabel om op 220240 Volt te worden aangesloten tussen fases of tussen een
fase en de nul. Uw installateur kan u meer vertellen.
• MODEL ZONDER STEKKER
De kookplaat wordt geleverd zonder voedingskabel. Zij is
voorzien van een klemmenbord, zodat de elektrische
aansluiting al naar gelang de installatie-eisen kan worden
uitgevoerd.
Het klemmenbord biedt drie aansluitmogelijkheden:
Tweefasing 220-240 V2 ~, Driefasig 220-240 V3 ~,
Driefasig 380-415 V3N ~.
De elektrische installatie moet worden beveiligd met een geschikte
zekering (zie tabel) en moet over draden beschikken met een
doorsnede die voldoende is om het apparaat op juiste wijze van
stroom te voorzien.
Ga bij het aansluiten als volgt te werk:
1. Handelingen om uit te voeren op de bestaande aansluiting
· Keer de kookplaat ondersteboven: met de glaszijde naar het
werkblad gericht; bescherm hierbij het glas!
· Open het kapje
· Trek aansluitsnoer uit
. Verwijder de schroeven, verwijder de u U-vormige metalen
plaatjes (Shunts) en de snoer geleiders
. Schroef de kabel klemmen die om het aansluitsnoer zitten los
. Trek aan het aansluit snoer
2. Sluit de stroomvoorzieningkabel als volgt aan:
• Kies de gepaste stroomvoorzieningkabel in functie van de
aanbevelingen op de tabel op.
• plaats de shuntplaatjes in overeenstemming met de aanduidingen
op het klembord en met de gegevens van de tabel op ( de
shuntplaatjes zorgen voor de verbinding van twee klemmen).
• maak de uiteinden van elke geleider van de
stroomvoorzieningkabel bloot en bevestig deze aan de klemmen,
rekening houdend met de gegevens van de tabel op.
• schroef de kabelklem los,
• plaats de stroomvoorzieningkabel in de kabelklem. Zodra de
stroomvoorzieningkabel aan het klembord is aangesloten, schroef
de kabelklem vast aan en installeer de afdekplaat.
Nota: zorg ervoor dat de schroeven van het klembord vast zijn
aangeschroefd.
AANSLUITINGEN AAN HET KLEMBORD:
HVI 740HVI 640
Smeltveiligheid
Dikte
Smeltveiligheid
Dikte
Smeltveiligheid
Dikte
ENKELFASING
DRIEFASING DRIEFASING
Ph = Fase N = Neutraal T= Aarding
TWEEFASING
32 NL
Page 34

INDUCTIE
Glasplaat
Pan die
inductiestroom
in warmte omzer
Inductiestroom
• Gebruik pannen met een doormeter die de kookzone volledig
dekt: zorg ervoor dat de panbodem minstens even groot is als
de kookzone. Indien de bodem lichtjes groter is, wordt
de energie optimaal gebruikt.
De onderstaande informatie helpt u bij het kiezen van de meest
geschikte pan voor de beste resultaten.
INDUCTIE
Controleer of op het etiket een logostaat dat
aangeeft dat de pan geschikt is voor i
nductiekookplaten
Symbolen
Spoel
Het principe van inductie is eenvoudig.
PRINCIPE VAN EEN INDUCTIEPLAAT
Een elektronische module (generator) voedt en
bedient elektrisch een spoel (inductor) binnenin het apparaat.
Deze spoel wekt een zodanig magnetisch veld op
dat zogenaamde inductiestromen door de pan op
de kookplaat worden gevoerd.
Door deze inductiestromen verandert de pan in
een ware warmtebron, terwijl het glaskeramische oppervlak
koud blijft.
Voor inductiekoken is het gebruik van magnetische pannen vereist.
De inductietechniek kent twee fundamentele aspecten:
- de warmte wordt alleen door de pan afgegeven, waardoor het
verwarmingsvermogen maximaal is en er kan worden gekookt
zonder warmteverlies;
- er is geen sprake van thermische traagheid; de verwarming stopt
onmiddellijk zodra de pan van de kookplaat wordt genomen en
start zodra die erop wordt geplaatst.
OPTIMALE VEILIGHEID
De inductiekookplaat is voorzien van meerdere veiligheden ter
bescherming tegen een onjuiste werking. Wordt uw kookplaat
naar behoren geïnstalleerd en gebruikt, dan zullen
deze veiligheden slechts sporadisch in werking treden.
• Ventilator: koelt en beschermt de bedienings- en
voedingsonderdelen. De ventilator heeft twee snelheden, die
automatisch worden gekozen. De ventilator werkt ook wanneer
de kookzones zijn uitgeschakeld, maar de elektronica nog niet
voldoende is afgekoeld.
• Transistor-veiligheid: een sonde waakt voortdurend over de
temperatuur van de elektronische componenten. Wordt deze
temperatuur te hoog, dan verlaagt de sonde automatisch het
vermogen van de kookzones en schakelt ze vervolgens uit (het
vermogensniveau wordt knipperend weergegeven). Zodra de
temperatuur van de onderdelen normaal is, werkt de kookplaat
weer.
• Legepanveiligheid: een sonde onder elke kookzone controleert
op abnormale temperaturen ten gevolge van een lege pan en
op een te hoge temperatuur van de glaskeramische plaat.
• Detectieveiligheid: de aanwezigheidsdetector geeft al dan niet
toestemming voor de inschakeling van kookzones. Een
ongeschikte pan of een klein voorwerp (koffielepel, mes,
ring, enz.) op een kookzone wordt niet als pan gezien en de
zone wordt in dat geval niet verwarmd.
• Overkook- en spatveiligheid: speciale beveiligingen schakelen
de kookplaat uit wanneer een pan overkookt of erg spat. Wanneer
ten minste twee toetsen minimaal 10 seconden
worden bedekt door kookvocht of een groot voorwerp, dan wordt
de kookplaat automatisch uitgeschakeld.
SELECTIE VAN KOOKGERIEF
Het gebruik van kwaliteitspannen is onontbeerlijk voor
het bekomen van goede kookresultaten
• Gebruik kwaliteitspannen met een vlakke bodem: de volmaakt
vlakke bodem vermijdt verhittingspunten waarop het voedsel
kan aanbranden en de dikte van het metaal verschaft een perfecte
warmteverdeling.
• Controleer of de panbodem droog is: bij het vullen van de
pan of bij gebruik van bijvoorbeeld een pan uit de koelkast,
controleer of deze volledig droog is; deze voorzorg vermijdt de
vervuiling van het kookvlak.
Gebruik magnetische pannen (geëmailleerd
staal, gietijzer en ferritisch roestvrij staal).Test
dit door een magneet op de bodem te plaatsen
(die moet blijven vastzitten).
Inox
Aluminium Niet detecteerbaar
Gietijzer
Geëmailleerd Staal
Glas
Porselein Niet detecteerbaar
Koperen
bodem
Niet detecteerbaar
Behalve ferritisch roestvrij staal
Goede prestaties
Attentie: kan krassen op de glasplaat achterlaten
Goede prestaties
Bij voorkeur een platte, dikke en gladde bodem
Niet detecteerbaar
Niet detecteerbaar
GEBRUIK VAN VITROKERAMISCH KOOKVLAK
1 - AAN/UIT-toets van de kookplaat
2 - Keuzetoets voor de kookzone
3 - Displayzones voor het vermogensniveau of de restwarmte...
4 - Toets “-”
5 - Toets “+”
6 - Keuzetoets van de timer
7 - Timerdisplay
8 - Vergrendelingstoets met controlampje
9 - Indicator voor kookzoneprogrammering: licht op wanneer de
kookzone met de timer is ingesteld.
10 - DIODE:
. brandt: de kookzone of de timer is actief; wijzigen is mogelijk;
. gedoofd: de kookzone of de timer is ingesteld op de laatst
opgeslagen waarde
11 - Boosterdisplay
33 NL
Page 35

INSTELSTANDEN
De verschillende standen staan voor de warmteverdeling van de
volgende zones:
Positie
Voor een optimale veiligheid worden de kookzones automatisch
uitgeschakeld als ze te lang zijn ingeschakeld. Het moment
waarop dat gebeurt, hangt samen met het gebruiktevermogen.
Let op:
de inductiekookplaat werkt met een generator die de twee
kookzones tegelijkertijd bedient, volgens het model:
%
vermogen
Werkingsduur
tot
automatische
uitshakeling
De volgende voorbeelden worden ter informatie aangegeven. De
ervaring zal u toelaten deze instellingen aan uw persoonlijke
smaak en gewoonten aan te passen.
0 : U i t
1 : ) kooken aan 65°C
2 : ) Smelten
3 : Warm houden
4 : Opwarmen
5 : Ontdooien, stoven, garen, op lage temperatuur
6 : Koken zonder deksel
7 : Doorbakken vlees en gebraad
8 : Gebraad aan hoge temperatuur koken
9 : Frituren
Booster :
koken
Het aan de kook brengen van grote
hoeveelheden vloeistof...
• PANDETECTOR VOOR DE INDUCTIEKOOKZONE
Elke inductiekookzone beschikt over een pandetector.
De pandetector zorgt ervoor dat wanneer de kookzone is
ingeschakeld, de verwarming van de kookzone automatisch wordt
gestart als een pan wordt geplaatst en wordt gestopt als een pan
wordt weggenomen. Op deze manier wordt een energiezuinige
werking gerealiseerd.
Wordt op de kookzone een geschikte pan* geplaatst:
geeft de displayzone het vermogensniveau weer of als Booster
is geactiveerd.
* voor inductiekoken zijn magnetische pannen vereist (zie de
tabel).
dan
Wordt op de kookzone geen of een ongeschikte pan geplaatst:
dan toont de displayzone . De kookzone wordt niet ingeschakeld.
Wordt binnen 10 minuten geen pan gedetecteerd, dan wordt de
inwerkingstelling geannuleerd.
Om de kookzone uit te schakelen, kan niet worden volstaan met
simpelweg de pan weg te nemen. De kookzone moet normaal
worden uitgeschakeld.
BELANGRIJK: de pandetector kan niet worden gebruikt als
AAN/UIT-toets voor de kookzone.
Als de Boosterfunctie is geactiveerd en als de tweede kookzone
op vermogensniveau 9 of 8 staat, wordt deze laatste
dientengevolge automatisch verlaagd tot niveau 7. Er verschijnt
een knipperende informatiemededeling bij deze niveauverlaging.
Let op: zoals in de vermogenstabel is aangegeven, is de
Boosterfunctie voor een periode van 10 minuten actief. Hierna
verdwijnt de Booster en de kookzone keert terug naar
vermogensniveau 9. Omdat het vermogen van de generator wordt
verminderd, neemt de tweede kookzone het beginniveau weer
aan.
GEBRUIK VAN DE KOOKPLAAT
•Wacht 8 seconden na het aanzetten van het kookvlak vooraleer
de elektronische bediening te activeren.
- Druk op de toets gedurende 3 seconden.
De elektronische bediening van het kookvlak is ingeschakeld.
Elke displayzone geeft nu het vermogenniveau “0” aan en de in
werking icoon knippert.
- Tenzij u binnen 10 seconden reageert, dooft de elektronische
bediening en de opstartprocedure moet herhaald worden.
• ACTIVEREN VAN EEN KOOKZONE
- Druk op de selectietoets van
de gewenste kookzone. De
bedieningsdiode op het
displayscherm blijft constant
branden. Dit betekent dat de
kookzone in werking is.
- Druk op de “+” of “-” toets om het vermogenniveau van 1 tot 9
in te stellen.
- Bij het aanhoudend indrukken van de “+” of “-” toetsen verhoogt
of verlaagt het vermogenniveau geleidelijk.
• UITZETTEN VAN EEN KOOKZONE
Hiervoor moet de kookzone in werking zijn. De bedieningsdiode
op het displayscherm moet constant branden. Indien dit niet het
geval is, selectioneer opnieuw de gewenste kookzone.
- Druk op de “-” toets tot het vermogenniveau “0” op het
displayscherm verschijnt. De kookzone gaat onmiddellijk uit, de
“0” icoon verdwijnt na 10 seconden.
- Om snel uit te zetten, druk gelijktijdig op de”+” en “-” toetsen.
Het vermogenniveau loopt automatisch “0” tot terug. De kookzone
wordt uitgeschakeld.
• UITZETTEN VAN HET VOLLEDIGE KOOKVLAK
De werking van de kookzones en van de timer
kunnen ten allen tijde worden stopgezet door
de aan/uit toets gedurende 3 seconden in te
drukken.
• WAARSCHUWINGICOON VOOR RESTHITTE
Zodra de temperatuur van het kookzone-oppervlak ongeveer 60°
overschrijdt verschijnt de volgende indicatie op de
bedieningsconsole: “H”.
We raden u aan de kookzone uit te schakelen voor het einde van
de bereidingstijd en van de residuele hitte gebruik te maken om
het kookproces zachtjes te voleindigen.
Zodra de temperatuur minder dan 60° bedraagt verdwijnt de
“H” indicatie.
N.B. : na het uitzetten mits stroomonderbreking verdwijnt de
resthitte-icoon definitief zelfs wanneer de oppervlaktemperatuur
meer dan 60° bedraagt.
34 NL
Page 36

• WERKING VAN DE SNELLE OPWARMFUNCTIE
Alle kookzones zijn voorzien van een snelle opwarmfunctie
die toelaat de kookzone snel op temperatuur te brengen
Activeren van de snelle opwarmfunctie
- Start de gewenste kookzone op, kies met behulp van de toets
de “+” positie “9”, laat de toets even los en druk ze vervolgens
weer in; het scherm vertoont afwisselend “A” (snel opwarmen)
en “9” (vermogenniveau).
- Verminder indien nodig door de gewenste kookpositie te selecteren.
Kookpositie Geleverd Werkingsduur tot
vermogen % automatische uitshakeling
0 0 0
U65°C-
131
263
3115
4 16 6,5
5 19 8,5
6 32 2,5
7 45 3,5
8 65 4,5
9 100 0
• PROGRAMMEREN VAN EEN KOOKZONE
Elke kookzone kan worden geprogrammeerd voor een maximale
duur van 99 minuten.
De kookzones moeten individueel geprogrammeerd worden.
- Zet de gewenste kookzone aan volgens de voorgaande instructies.
De bedieningsdiode bij het vermogenniveau moet branden, ze
duidt aan dat de kookzone actief is.
- Druk op de timer toets .
Het symbool van de kookzone op de timerdisplay duidt de
geactiveerde kookzone aan.
- Druk op de of “ - ” toets tot de gewenste kooktijd op
het displayscherm verschijnt.
De ingestelde tijd wordt na 3 seconden automatisch geregistreerd
de ingestelde kooktijd kan op ieder ogenblik gewijzigd worden
door de selectietoets van de timer te heractiveren; de in werking
icoon moet branden. Zodra de ingestelde tijd is verlopen gaat
de kookzone automatisch uit en het kookvlak bliept gedurende
1 minuut. Druk op de toets om het bliepen te stoppen.
De ingestelde kooktijd kan op “00” worden teruggebracht met
de “ - ” toets, het kookvlak is dus niet meer aan de timer gebonden
maar blijft operationeel. De kookzone moet dus manueel worden
uitgezet.
De timer kan afzonderlijk worden als alarmsignaal gebruikt
worden; een bel rinkelt dan na afloop van de ingestelde tijd.
Bvb.: kookzone van 1800 W in positie 6 = geleverd vermogen
32 % van 1800 W
met geactiveerde “snelle opwarmfunctie” levert de kookzone een
vermogen van 1800 W gedurende 25 minuten en stelt deze na
deze periode in op 576 W.
Als de “Snel brander” klaar is, zal het dispay van het warmte
niveau gelijk blijven!
• ACTIVEREN VAN DE BOOSTERFUNCTIE
Met BOOSTER kan door een enkele druk gedurende 10 minuten
een vermogen van de kookzone van van 1800 W of 3000 W
verkregen worden. Ideaal om vlees dicht te schroeien
of om grote hoeveelheden vloeistof aan de kook te brengen (soep,
groente....).
I
VERMOGEN
BOOSTER
VERMOGEN
N
D
U
C
T
I
E
• VERGRENDELINGSTOETS
Met de vergrendelingsfunctie kunnen actuele instellingen
worden vastgezet of kan worden voorkomen dat iemand de
kookplaat per ongeluk inschakelt. Deze functie is tevens
handig tijdens het reinigen van het bedieningsgedeelte, omdat
de bediening kan worden vergrendeld terwijl de kookplaat is
uitgeschakeld.
· Stel de gewenste kookzone(s) in werking.
· Kies voor elk van hen een vermogensniveau.
· Druk op toets om de waarden vast te zetten. Hierna kan
geen enkele toets meer worden gebruikt, behalve de AAN/UITtoets.
Het controlelampje van de vergrendeling gaat branden.
- Om de vergrendelingsfunctie op te heffen, hoeft alleen opnieuw
op toets te worden gedrukt. Het controlelampje dooft en alle
bedieningstoetsen kunnen nu weer worden gebruikt.
Als de timer actief is op het moment van vergrendeling van de
bediening, dan zal de tijd automatisch worden afgetrokken en zal
de kookzone na het verstrijken van de geprogrammeerde tijd
worden uitgeschakeld.
Als de vergrendelingsfunctie actief is terwijl de kookplaat geheel
wordt uitgeschakeld, dan blijft de vergrendeling actief en belet die
dat de kookplaat opnieuw in werking kan worden gesteld. Druk
op toets om te ontgrendelen.
35 NL
Page 37

ONDERHOUD VAN HET VITROKERAMISCH KOOKVLAK
• Voor de schoonmaak van het glasoppervlak van de kookzone
is het belangrijk te wachten tot deze volledig is afgekoeld.
• Gebruik slechts specifieke schoonmaakproducten voor het
reinigen van het oppervlak van de kookzone, zoals smeer en
krabber. Deze zijn makkelijk verkrijgbaar in de handel.
• Vermijd overkoken; de resten die op het kookvlak vallen branden
snel aan en zijn nadien moeilijk te verwijderen.
• Het is aanbevolen alle stoffen die kunnen smelten zoals plastieken
voorwerpen, suiker en suikerbevattende producten op afstand
te houden van het kookvlak.
ONDERHOUD:
- breng enkele druppels van een specifiek reinigingsmiddel op
het vitrokeramisch oppervlak aan.
- poets met een licht bevochtigde zachte doek of keukenrolpapier,
vooral de vervuilde delen.
- spoel af indien nodig.
- wis het oppervlak af met een droge zachte doek of
keukenrolpapier, tot het volledig schoon is.
Indien na deze onderhoudsbeurt de vlekken aanhouden
- breng opnieuw enkele druppels van een specifiek reinigingsmiddel
op het vitrokeramisch oppervlak aan.
- verwijder met de hulp van een krabber de hardnekkigste vlekken,
rekening houdend met een hoek van 30° ten opzichte
van het kookvlak.
- spoel af indien nodig.
- wis het oppervlak af met een droge zachte doek of
keukenrolpapier, tot het volledig schoon is.
- herhaal de voorgaande procedure indien nodig.
RAADGEVINGEN:
Regelmatige schoonmaakbeurten vormen een beschermende
laag die essentieel is voor het behoeden van krassen en slijtage.
Zorg ervoor dat het kookvlak zuiver is alvorens deze weer te
gebruiken.
Gebruik enkele druppels witte azijn of citroensap om de wateren kalksporen weg te werken.
Wis vervolgens af met een keukenrolpapier, breng enkele druppels
van een specifiek reinigingsmiddel aan en droog het oppervlak af.
Het vitrokeramisch kookvlak is bestand tegen de wrijving van
kookgerief met vlakke bodem, maar het is aanbevolen deze tijdens
het verplaatsen op te heffen.
NOTA :
- Vermijd het gebruik van een te vochtige spons.
- Gebruik nooit stalen voorwerpen zoals messen en
schroevendraaiers.
- Bij gebruik van een krabber zal dit het oppervlak niet
beschadigen zolang een invalhoek van 30° wordt
aangehouden.
- Houd de krabber met scheermes op afstand van kinderen.
- Gebruik geen bijtende producten of schuurpoeders.
30° Maxi
Te traag kookproces.
• Gebruik van niet aangepaste pannen. Gebruik uitsluitend
kookgerief met een vlakke, zware bodem en met een diameter
die overeenstemt met de kookzone.
Kleine krassen op het glazen oppervlak.
• Verkeerde reinigingsmethode, of pannen met ruwe bodem, of
zand- of zoutdeeltjes tussen het kookvlak en de pan. Raadpleeg
het hoofdstuk “ONDERHOUD”.
Zorg ervoor dat de panbodem vóór gebruik zuiver is
en gebruik uitsluitend pannen met een gladde bodem.
De krassen kunnen slechts beperkt worden door een
doelmatige schoonmaak.
Sporen van metaal
• Verschuif geen voorwerpen in aluminium op het kookvlak;
raadpleeg de schoonmaakinstructies.
• U gebruikt verkeerd kookgerief.
De vlekken blijven. Neem een krabber en volg de instructies van
het hoofdstuk “ONDERHOUD”.
Donkere vlekken
• Neem een krabber en volg de instructies van het hoofdstuk
“ONDERHOUD”.
Heldere vlekken op het kookvlak.
• Sporen van aluminium of koperen pannen, maar eventueel ook
van water, mineraal- of voedselresten.
Deze kunnen verwijderd worden met een reinigingscrème.
Gesmolten suiker of plastiek op het kookvlak.
• Raadpleeg het hoofdstuk “ONDERHOUD”.
Het kookvlak werkt niet.
• Een grote overborreling of voorwerp bedekt minstens 3
bedieningstoetsen gedurende minimum 10 seconden. Reinig de
overborreling of verwijder het voorwerp.
• De bedieningsconsole is vergrendeld. Druk op de vergrendelingtoets om de bedieningen te ontgrendelen.
Het kookvlak schakelt niet uit.
• De bedieningsconsole is vergrendeld. Druk op de vergrendelingtoets om de bedieningen te ontgrendelen. Raadpleeg het
hoofdstuk “Werkingsduur”.
Het kookvlak schakelt automatisch uit.
• Een grote overborreling bedekt minstens 2 bedieningstoetsen
gedurende minimum 10 seconden, het kookvlak schakelt in
veiligheidsmodus en bliept. Reinig de overborreling of verwijder
het voorwerp.
• De kookzones stoppen automatisch wanneer ze gedurende een
tamelijk lange periode zijn ingeschakeld. Raadpleeg het hoofdstuk
“Werkingsduur”.
Stop/start cyclusduur van kookzones.
• De stop/startcyclus hangt af van het gewenste vermogenniveau:
- laag vermogen: korte werkingsduur,
- hoog vermogen: lange werkingsduur.
Het gehele kookvlak of sommige kookzones werken niet.
• Vraag een technieker te controleren of de aansluiting
overeenstemt met de instructies.
De «H» resthitte icoon knippert.
• De temperatuur van de elektronische componenten is te hoog.
Vraag een technieker de installatie van het kookvlak te controleren
in overeenstemming met de instructies.
SERVICE DIENST
Alvorens u de Service Dienst belt Indien de kookplaat niet werkt,
raden wij u aan:
— na te gaan of het apparaat goed is aangesloten.
Indien u de oorzaak niet kunt ontdekken:
— haal de stekker uit het stopcontact of sluit de elektriciteit van
de oven af middels de hoofdschakelaar
— gebruik de oven niet meer en ga er niet zelf aan sleutelen
— bel de Service Dienst
Noteert u, voordat u de Service Dienst belt, het typenummer van
uw oven (zie binnenzijde van de ovendeur) Bij de oven zit een
garantiecertificaat, welke u recht geeft op één jaar garantie vanaf
de datum van aankoop.
TROUBLESHOOTING
De inductieplaat maakt een brommend geluid.
• Dit is normaal. De koelventilator voor de elektronische
componenten draait.
De inductieplaat maakt een licht fluitend geluid.
• Dit is normaal. Gezien de bedrijfsfrequentie van de
inductoren, kan een licht fluitend geluid hoorbaar zijn
als meerdere kookzones op maximaal vermogen
worden gebruikt.
De kookzones handhaven geen lichte bouillon of frituur.
• Gebruik uitsluitend pannen met vlakke bodem. Bij de minste
afstand tussen de pan en het kookvlak is een correcte
warmteoverdracht tussen de kookzone en de pan onmogelijk.
• De bodem van de pan moet volledig de diameter van de
geselecteerde kookzone dekken.
Dit apparaat voldoet aan de Europese richtlijnen
2002/96/EC voor elektrische en elektronische
afval.
Door dit apparaat correct te verwijderen, helpt
u het potentiële negatieve gevolg voor de
omgeving en menselijke gezondheid te
voorkomen., welke anders door onjuiste
verwijdering zou kunnen worden veroorzaakt.
Het symbool op het product duidt aan dat dit
product niet behandeld zal worden als huishuidelijk afval. In
plaats daarvan zal het apparaat naar het verzamelpunt voor de
recycling van elektrische en elektronische uitrusting gaan.
De verwijdering moet in overeenstemming met plaatselijke
milieuvoorschriften voor afvalverwerking uitgevoerd worden
Voor meer gedetailleerde informatie over de verwijderingvan dit
product, neemt u contact op met uw gemeenlijke reinigingsdienst
of de dealer waar u het apparaat heeft gekocht.
36 NL
Page 38

GENERELLE ADVARSLER
LÆS INSTRUKTIONSVEJLEDNINGEN OMHYGGELIGT FOR AT FÅ STØRST MULIGT UDBYTTE AF PLADEN
Vi anbefaler, at du gemmer brugs- og installationsvejledningen til senere brug, samt at du noterer serienummeret nedenfor, inden du
installerer pladen, hvis du får behov for at få hjælp fra servicecenteret.
Mærkeplade
(placeret under pladens bundbeklædning)
• Hold børn væk fra kogezonerne, mens disse anvendes, eller efter at de er slukket, så længe indikatoren for restvarme er tændt, for
at undgå alvorlige forbrændinger.
• Overvåg altid tilberedningen af mad med fedt eller olie nøje, da varmt fedt eller olie hurtigt kan bryde i brand.
• Pladens kontrolområde er meget følsomt, placer ikke varme genstande derpå.
• Placer ikke aluminiumsfolie og plastemballage på kogezonerne.
• Hver gang pladen bruges, er det nødvendigt at rengøre den for at forhindre, at der samler sig snavs og fedt. Hvis der sidder rester,
varmes disse op igen, næste gang pladen bruges, og der afgives røg og ubehagelige lugte. Desuden er der risiko for, at der opstår
brand.
• Efterlad ikke metalliske objekter som knive, gafler, skeer eller låg på induktionszonen, da objekterne kan blive varme, hvis de er for
store eller tunge.
• Det frarådes at kigge direkte på halogenelementerne.
• Undgå at berøre varmezonerne, mens de er i brug eller et stykke tid, efter at de har været brugt.
• Tilbered aldrig mad direkte på den glaskeramiske plade. Brug altid egnet kogegrej.
• Placer altid panden på midten af den kogezone, du bruger.
• Brug ikke kogepladen som skærebræt.
• Skub ikke køkkenudstyr hen over kogepladen.
• Opbevar ikke tunge genstande over kogepladen. De kan medføre skader, hvis de falder ned på kogepladen.
• Brug ikke kogepladen som arbejdsbord.
• Brug ikke kogepladen til opbevaring af ting.
• Brug ikke kogepladen, hvis det usandsynlige skulle ske, at overfladen sprækker. Træk straks stikket ud af kontakten, og ring til
servicecenteret.
• Denne maskine er ikke beregnet til at blive anvendt af personer (herunder børn) med nedsatte fysiske og mentale evner samt sanser
eller af personer med manglende erfaring eller viden, medmindre disse har modtaget vejledning eller instruktion i anvendelsen af
maskinen af en person, der er ansvarlig for deres sikkerhed.
• Børn skal være under opsyn for at sikre, at de ikke leger med maskinen.
Advarsel: Dette apparat overholder alle gældende sikkerhedsbestemmelser og krav vedrørende elektromagnetisk
kompatibilitet. Personer med pacemaker frarådes dog at bruge apparatet. Det kan ikke garanteres, at alle markedsførte
apparater af denne type overholder de gældende sikkerhedsbestemmelser og krav vedrørende elektromagnetisk kompatibilitet,
og at der ikke kan opstå farlig interferens. Personer med andre typer af medicinske anordninger, f.eks. høreapparater, kan
også opleve et vist ubehag.
KOGEPLADE
Brændere
Forsyningsspænding (V/Hz)
Installeret elektrisk effekt
Produktstørrelse (l x p x h)mm.
Indbygningsmål (AxB)
r (W)
4 Induktion 4 Induktion
220-240
50/60 Hz
574 x 505 x 55 752 x 505 x 55
HVI 740HVI 640
220-240
50/60 Hz
HGI 7544
4 Induktion
220-240
50/60 Hz
74007400 7400
752 x 505 x 55
740 x 490
Vi bestræber os hele tiden på at forbedre kvaliteten af vores produkter, og derfor kan vi ændre apparaterne for at inkorporere de seneste
tekniske forbedringer.
Denne maskine oppfylder Direktiv 73/23/EEC og 89/336/EEC (kompensert med 2006/95/EC og 2004/108/EC) med efterfølgende
ændringer.
37 DA
Page 39

INSTALLATION
Installation af en husholdningsmaskine kan være kompliceret, som kan få alvorlig betydning for brugerens sikkerhed, hvis
den ikke udføres korrekt. Derfor skal installationen udføres af en kvalificeret fagmand i overensstemmelse med gældende
tekniske bestemmelser. I tilfælde af at dette råd ignoreres, og installationen udføres af en person uden kvalifikationer, afviser
fabrikanten ethvert ansvar for tekniske problemer med produktet, uanset om dette resulterer i tings- eller personskade.
INDBYGNING
Det møbel, hvori kogepladen skal installeres, og alle tilstødende
møbler skal være fremstillet af materialer, som kan modstå høje
temperaturer. Endvidere skal alle dekorationslaminater være
fastgjort med varmebestandig lim.
Installation:
• Med pladen følger en vandtæt forsegling.
Inden montering:
- vend pladens øverste side nedad, således at glasfladen peger
nedad.
Sørg for, at glasset er beskyttet.
- placer forseglingen rundt om pladen.
- sørg for, at den placeres korrekt for at undgå utætheder ind til
det understøttende kabinet.
Det er vigtigt at installere kogepladen på en plan og stabil overflade.
• Deformeringer forårsaget af forkert montering kan ændre
specifikationerne for bordpladen og kogepladens ydeevne.
• Sørg for, at der er en åbning på mindst 5 cm mellem apparatet
og eventuelle tilstødende lodrette sider.
• Det er ekstremt vigtigt, at fordybningen har de angivne mål.
• Højden på den planforsænkede del af kogepladen er 5,5 cm.
• Hvis der er en mellemliggende deling, skal afstanden mellem
kabinettets bund og et mellemliggende gulv eller del af et møbel
være større end 2,5 cm, så luften kan cirkulere. Desuden skal
du kontrollere, at der er 8 cm til ventilation i hele bagsidens
bredde.
• Du må ikke montere kogepladen over en ovn uden ventilation
eller over en opvaskemaskine, et køleskab, en fryser eller
en vaskemaskine.
• Kogepladens kabinet har fire monteringshuller til de klemmer,
der skal fastgøre kogepladen til enheden.
Placer de fire fastgørelsesklemmer, inden kogepladen monteres,
på en sådan måde, at kogepladen er placeret korrekt på den
understøttende enhed.
Kogeplade
Forsegling
25 mm
mini
50 mm
• MODEL MED STIK
Kogepladen er monteret med ledning og stik til strøm forsyning
220-240V mellem faser eller mellem fase og neutral.
• monter til 25 amp.
• MODEL UDEN STIK
Kogepladen er udstyret med en ledning, der kun kan tilsluttes
til et strømudtag med 220-240 V mellem faserne eller mellem
fase og nul.
• Tilsluttes til en stikkontakt. Se tabellen for at vælge korrekt
sikring.
Det er dog også muligt at tilslutte kogepladen til:
2-faset 220-240V2~, 3-faset 220-240V3~
eller 3-faset 380-415V3N~.
Når du foretager ny tilslutning, skal du følge nedenstående
anvisninger.
• Inden du foretager tilslutning, skal du sikre, at installationen er
beskyttet af en passende sikring (se tabel), og at den er forsynet
med tråde med tilstrækkeligt tværsnit til at klare almindelig
forsyning.
1- Foretag følgende på den eksisterende tilslutning:
- Vend kogepladen med glassiden mod bordet - husk at beskytte
glasset.
- Åbn dækslet.
- Træk ledningen ud:
. Fjern de skruer, der holder på parallelkredsene og ledningens
ledere,
. Skru kabelklemmen af for at frigøre ledningen,
. Træk ledningen ud.
2- Sådan skal du gøre for at foretage ny tilslutning:
- Vælg ledning i overensstemmelse med anbefalingerne i tabellen.
- Træk ledningen igennem kabelklemmen.
- Fjern det yderste af hver leder, i 10 mm’s længde, og husk at
tage højde for den påkrævede længde på ledningen for tilslutning
til klemrækken.
- Ved hjælp af parallelkredsene, som nu bør være retableret i
henhold til anvisningerne ovenfor, skal du derefter fastgøre
ledningen som vist i skemaet.
- Skru kabelklemmen fast og fastgør dækslet.
Åbning
500 X 50
Åbning
500 X 10
ELTILSLUTNING
"Installationen skal overholde standarddirektiverne".
Producenten fralægger sig ethvert ansvar for skader, som skyldes
upassende eller urimelig brug.
Advarsel!
• Kontroller altid følgende inden enhver elinstallation: Den spænding,
der fremgår af elmåleren, effektafbryderens justering,
installationens jordforbindelse, samt at den anvendte sikring er
korrekt.
• Installationens strømforsyning skal føres via et stik med
jordforbindelse eller via en flerpolet afbryder med en kontaktåbning
på mindst 3 mm.
Hvis maskinen er forsynet med en stikkontakt, skal den installeres,
så der er adgang til stikkontakten.
• Den gule/grønne tråd på elledningen skal tilsluttes jordforbindelsen
på både netledningen og apparatets klemmer.
• Fabrikanten kan ikke holdes ansvarlig for ulykker, der skyldes
brugen af et apparat uden jordforbindelse eller med defekt
jordforbindelse.
• Kontakt servicecenteret eller en kvalificeret tekniker, hvis du har
spørgsmål angående netledningen, skal tråden tilsluttes i henhold
til følgende farver/koder:
BLÅ - NUL (N)
BRUN - STRØMFØRENDE (L)
GUL-GRØN - JORD ( )
TILSLUTNING TIL KLEMMERNE PÅ KLEMRÆKKEN:
HVI 640
Sikring
Kabel
Sikring
Kabel
Sikring
Kabel
1-FASET 220-240 V~ 2-FASET 220-240 V2~
3-FASET 220-240 V3~ 3-FASET 380-415 V3N~
F = Fase N = Nul T = Jord
HVI 740
38 DA
Page 40

INDUKTION
TEKNOLOGI
En elektronisk generator fører strøm til en spole inden i apparatet.
Denne spole skaber et magnetisk felt, der sender induktionsstrøm
til kogepladen, og dermed opvarmes panden.
Disse strømme udvikler varme i panden, mens den glaskeramiske
kogeplade forbliver kold.
Dette system er udviklet til brug sammen med pander med
magnetiske bunde.
Induktionsteknologien har kort sagt to store fordele:
- Varmen opretholdes ved det maksimale niveau, da den kun
afgives af panden, så madlavning kan finde sted uden varmetab.
- Der er ingen termisk inerti, da madlavningen automatisk starter,
når panden placeres på kogepladen. Madlavningen stopper, når
panden fjernes fra kogepladen.
Følgende oplysninger kan hjælpe dig med at vælge de bedst
egnede pander til at opnå gode resultater.
INDUKTIONSZONE
Mærke på
køkkenredskaber
Rustfrit stål Ikke undersøgt
Aluminium Ikke undersøgt
Støbejern Godt resultat
Emaljeret stål Godt resultat
Glas Ikke undersøgt
Porcelæn Ikke undersøgt
Kobberbund Ikke undersøgt
Mærket på etiketten viser, om panden
er egnet til induktion
Brug magnetiske pander (emaljeret jern,
støbejern, ferritisk rustfrit stål) – hold en magnet
op til bunden af panden (den skal hænge fast).
Med undtagelse af ferromagnetisk rustfrit stål
Advarsel! Kan ridse overfladen
Flad, tyk og glat bund anbefales
SÅDAN BRUGER DU DEN GLASKERAMISKE
PLADE
ET APPARAT MED STOR SIKKERHED....
Du får sjældent brug for sikkerhedsfunktionerne, hvis kogepladen
er monteret korrekt.
• Ventilationsblæser: Til beskyttelse og afkøling af forsynings-
og kontrolkomponenter. Den har to hastigheder, der virker
automatisk. Blæseren kører, indtil det elektroniske system er
tilstrækkeligt afkølet, selv hvis kogepladerne er slukket.
• Sikkerhed "Transistor": En målesonde kontrollerer permanent
temperaturen af de elektroniske komponenter. Sonden reducerer
automatisk strømmen til pladerne, hvis varmen er for høj, og
slukker dem derefter (indikatoren for effektniveau blinker).
Kogepladen tændes igen, når komponenternes temperatur har
den korrekte temperatur.
• Sikkerhed "Tom pande": Der er placeret en målesonde under
hvert varmeområde. Den registrerer automatisk en forkert
temperatur for den tomme pande eller glaskeramikken.
• Sikkerhed "Registrering": Tilstedeværelsesdetektoren tillader
opvarmning og derfor madlavning. Et lille objekt, f.eks. en ske,
en kniv eller en ring, der er placeret på varmeområdet, registreres
ikke som en pande, og derfor tændes kogepladen ikke.
• Sikkerhed "Overkogning og sprøjt": Kogepladen slukkes, hvis
noget koger over eller sprøjter. Hvis et stort spild eller et objekt
dækker mindst to knapper, virker kogepladen ikke i mindst 10
sekunder. Du skal tørre den spildte væske op eller fjerne objektet.
RÅD ANGÅENDE KOGEGREJ TIL PLADEN
Det er afgørende at bruge kogegrej af god kvalitet for at
få mest muligt ud af kogepladen.
• Anvend altid kogegrej af god kvalitet med tyk og helt flad
bund: Hvis du bruger den slags kogegrej, undgår du varme
steder, der får maden til at brænde på. Gryder og pander med
tyk metalbund giver en jævn varmefordeling.
• Sørg for, at gryden eller panden er tør under bunden: Når
du hælder væske i panden eller bruger en pande, der har stået
i køleskabet, skal du kontrollere, om bunden på panden er helt
tør, inden du sætter den på pladen. På denne måde undgår du,
at pladen bliver snavset.
• Brug pander med en diameter, der er stor nok til at dække
kogezonen helt: Panden må ikke være mindre end varmezonen.
Hvis den er en lidt bredere, bruges energien optimalt.
1 - KOGEPLADENS TÆND/SLUK-KNAP
2 - KOGEZONEKNAP
3 - DISPLAY: varmeniveau, indikator for restvarme, boosterfunktion.
4 - “-”-KNAP
5 - “+”-KNAP
6 - “TIMER”-KNAP
7 - TIMERDISPLAY
8 - LÅSEKNAP MED INDIKATOR
9 - INDIKATOR FOR PROGRAMMERING AF KOGEZONE: Når
den vises, betyder det, at timeren styrer kogezonen
10 - LED-KONTROLINDIKATOR:
. Tændt: Kogezonen eller timeren er aktiveret, ændringer kan
foretages
. Slukket: Kogezonen eller timeren er indstillet til de sidst
registrerede data
11 - Booster-knap
DE FORSKELLIGE POSITIONER
De forskellige positioner svarer til følgende strømeffekter:
INDUKTION
Positioner
1 2,5 10 timer
2 5 10 timer
3 7,5 5 timer
4 12,5 4 timer
5 18 3 timer
6 24 3 timer
7 45 2 timer
8 60 2 timer
9 100 1 time
Til forbedring af sikkerheden slukkes kogezonerne automatisk,
hvis de står tændt for længe.
Slukningen afhænger af det aktuelle varmeniveau.
Frigjort energi i
%
Maks. driftstid inden
automatisk slukning
39 DA
Page 41

BEMÆRK!
Induktionskogepladen
får strøm fra en
generator, der forsyner
to plader pr. område
samtidigt:
Hvert område kan maksimalt modtage 3700 W.
Når boosterfunktionen er aktiveret i det samme område, og den
anden kogeplade har effektniveauet 9 eller 8, reduceres denne
plade automatisk til niveau 7. Denne reduktion vises som en
blinkende indikator.
Advarsel!
i 10 minutter. Herefter stopper den, og pladen varmes igen ved
effektniveau 9. Niveauet for den anden plade vender tilbage til
den oprindelige indstilling, da forsyningen fra generatoren er
reduceret.
Som indikeret i effektoversigten virker boosterfunktionen
ANVENDELSE
• Når du tænder for pladen, skal du vente 8 sekunder med at
aktivere den elektroniske kontrol.
- Tryk på knappen i 3 sekunder.
Nu aktiveres den elektroniske kontrol af pladen. I hvert
displayområde vises varmeniveauet, og LED-kontrolindikatoren
blinker.
- Efter 10 sekunder uden at blive brugt slukker den elektroniske
kontrol, og startproceduren skal gentages.
• SÅDAN TÆNDER DU FOR EN KOGEZONE
- Tryk på knappen for at vælge
den ønskede kogezone. I
displayområdet lyser LEDkontrolindikatoren konstant. Det
betyder, at zonen er aktiveret.
- Tryk på knappen - eller + for at vælge et varmeniveau mellem
1 og 9. Hold knappen + eller - ned, hvorefter varmeniveauet
stiger eller falder lidt efter lidt.
Følgende eksempler er kun illustrative. På baggrund af dine egne
erfaringer kan du nu foretage disse indstillinger ud fra smag og
brug.
0 : Slukket
1 : )
2 : ) ..... Smeltevarme
3 : Varmevedligeholdelse
4 : Opvarmning
5 : Optøning, lavt blus, fuldt blus, småkogning
6 : Kogning uden låg
7 : Stegning, bruning og ristning
8 : Stærk kogning og stegning, brænding
9 : Stegning
Booster: Kogning af store mængder væske...
• SÅDAN SLUKKER DU FOR EN KOGEZONE
- Tryk på knappen for at vælge den ønskede kogezone.
- Tryk på knappen for at få vist varmeniveauet. Nu slukkes
zonen, indikatoren slukker efter 10 sekunder.
- Hvis du ønsker at slukke hurtigt, skal du trykke på knapperne
og samtidigt.
Varmeniveauet sænkes nu automatisk til .
Kogezonen slukkes.
• TOTALSTOP
Kogezonerne og timeren kan slukkes når som helst ved
at trykke i 3 sekunder på tænd/sluk-knappen.
• INDIKATOR FOR RESTVARME
Kontrolpanelet fortæller brugeren, hvornår overfladetemperaturen
på kogezonerne kommer op over 60°C, ved at vise følgende: )
Når temperaturen falder ned under 60°C, forsvinder -visningen.
Når madlavningen er ved at være færdig, anbefaler vi, at du
slukker for kogezonen og bruger restvarmen, indtil maden stille
og roligt er færdig.
NB! Ved strømafbrydelser forsvinder indikatoren for restvarme
fuldstændigt, selvom overfladetemperaturen er over 60°C.
• BRUG AF LYNOPVARMNING
Alle kogezoner er udstyret med "Lynopvarmning", så man kan at
opnå en hurtigere temperaturstigning på varmeområderne. Ideel
til lukning af porer i kød eller kogning af store mængder væske.
Sådan tænder du for lynopvarmningen
. Tryk på tænd/sluk-knappen .
. Tænd for den ønskede zone, tryk på knappen + for at indstille
niveau ”9”, tryk kort på knappen, og tryk på den igen. Der vises
nu skiftevis ”A” (lynopvarmning) og ”9” (varmeniveau).
. Hvis det er nødvendigt, sættes varmeindstillingen til det ønskede
niveau.
Indstilling Frigjort
energi (%)
000
U (65°C) 131
263
3115
4 16 6,5
5 19 8,5
6 32 2,5
7 45 3,5
8 65 4,5
9 100 0
Tid for
lynopvarmning
(minutter)
• PANDEDETEKTOR
Pandedetektoren er en stor fordel ved brug af kogepladen: Den
starter eller stopper automatisk varmetilførslen, når en pande
sættes på eller tages af kogepladen.
Den er derfor energibesparende.
Hvis kogezonen bruges med en egnet pande*:
varmeniveau eller , når boosterfunktionen er aktiveret.
I displayet vises
* Induktionsteknologien skal bruges sammen med kompatible
pander, der har magnetisk bund og er store nok til at fylde hele
kogezonen (se oversigten på side 39).
Hvis kogezonen bruges uden en pande eller med en upassende
pande:
I displayet vises . Zonen starter ikke. Starten annulleres, hvis
der ikke registreres en pande inden for 10 minutter.
VIGTIGT!
Hvis du vil slukke kogezonen, skal du slukke kogepladen på
normal vis – det er ikke nok bare at fjerne panden.
Pandedetektoren virker ikke som tænd/sluk-knap for
kogepladen.
F.eks. 1800 W-zone i position 6 = 32% af 1800 W, frigjort energi
= 576 W
Når ”Lynopvarmning” er aktiveret, afgiver zonen en effekt på
1800 W i 2,5 minutter og justeres derefter automatisk ned til
576 W.
. Når ”Lynopvarmning” er gennemført, er effektniveauet konstant
(ses i displayet).
40 DA
Page 42

• AKTIVERING AF BOOSTERFUNKTIONEN
Boosterfunktionen kan aktiveres med et enkelt tryk, og den forsyner
en kogezone med 1800 W eller 3000 W (afhængigt af zonen) i
en periode på 10 minutter. Ideel til kogning af store mængder
væske...
I
N
D
U
K
T
I
O
N
EFFEKT
EFFEKT-
BOOSTER
Aktivering af BOOSTER-funktionen:
- Tryk på knappen for en kogezone, der er udstyret med
boosterfunktionen.
- Tryk på knappen for at starte
boosterfunktionen. Funktionen er aktiv
i 10 minutter.
Indikatoren vises.
Mærket P (strøm) vises.
Efter en periode på 10 minutter reduceres strømeffekten til niveau 9.
Et tryk på knappen "-" annullerer boosterfunktionen, og
strømeffekten reduceres til niveau 9.
• SÅDAN PROGRAMMERER DU EN KOGEZONE
Alle kogezoner kan programmeres for højst 99 minutter. Der kan
kun programmeres én zone ad gangen.
- Tænd for den ønskede zone ved at følge ovenstående anvisninger.
LED-kontrolindikatoren tæt på varmeniveauet skal være vist.
Den angiver, at zonen er aktiveret.
- Tryk på knappen Timer.
Zonemarkeringen omkring timerdisplayet viser den kontrollerede
zone.
- Tryk på knappen for at vælge tiden i minutter.
Denne indstilling gemmes automatisk efter tre sekunder.
Den programmerede tid kan ændres når som helst ved at trykke
på knappen Timer. LED-kontrolindikatoren for timeren skal lyse.
Når tiden er gået, slukker kogezonen automatisk, og du hører
en biplyd i 1 minut. Tryk på en hvilken som helst knap for at
stoppe den.
Den programmerede tid kan nulstilles vha. knappen eller
ved at trykke på knapperne og samtidigt, hvorefter kogezonen
ikke længere er knyttet til timeren, men dog stadigvæk er aktiveret.
Så du bliver nødt til at slukke for zonen separat.
Timeren kan bruges udelukkende som alarm. Den lyder ved
udløbet af den programmerede tid.
• BRUG AF LÅSEKNAPPEN
Låsefunktionen blokerer de aktuelle indstillinger eller forhindrer,
at der tændes for pladen. Den kan også bruges ved rengøring af
kontrolknapperne, da disse kan låses, uden at pladen er tændt.
Sådan låser du:
- Tryk på tænd/sluk-knappen .
- Tænd for de ønskede kogezoner.
- Vælg et varmeniveau for hver af dem.
- Tryk på knappen for at indstille data. På denne måde
fungerer ingen andre knapper, bortset fra TÆND/SLUK-knappen.
Indikatoren for lås begynder at lyse.
Hvis du ønsker at frigøre låsefunktionen, skal du bare trykke på
knappen . Så slukker indikatoren, og alle kontrolknapperne
fungerer igen.
Hvis timeren er tændt, mens kontrolknapperne er låst, tælles tiden
automatisk, og zonen slukker ved udløbet af den programmerede
tid.
Hvis låsefunktionen er aktiveret, når der slukkes for pladen, virker
den fortsat og forhindrer enhver handling, når der tændes for
pladen igen. Tryk på knappen for at frigøre låsefunktionen.
RENGØRING OG VEDLIGEHOLDELSE
• Inden du udfører vedligeholdelsesarbejde på pladen, skal den
være helt afkølet.
• Der må kun benyttes produkter (cremer og skrabere), der er
fremstillet specielt til glaskeramiske overflader. De kan købes
hos supermarkeder.
• Undgå spild, da alt, hvad der bliver liggende på pladens overflade,
hurtigt brænder og gør rengøringen vanskeligere.
• Hold alle smeltelige materialer væk fra kogepladen, f.eks.
plastgenstande, sukker eller sukkerbaserede produkter.
VEDLIGEHOLDELSE:
- Dryp nogle få dråber specialrengøringsmiddel på overfladen.
- Tør eventuelle genstridige pletter af med en blød klud eller et
stykke let fugtet køkkenrulle.
- Tør af med en blød klud eller tør køkkenrulle, indtil overfladen
er ren.
Hvis der er genstridige pletter tilbage:
- Dryp nogle flere dråber specialrengøringsmiddel på overfladen.
- Skrab pletterne af med en skraber, som holdes i en vinkel på
30° i forhold til kogepladen.
- Tør af med en blød klud eller tør køkkenrulle, indtil overfladen
er ren.
- Gentag processen, hvis det er nødvendigt.
NOGLE FÅ TIPS:
Hyppig rengøring giver et beskyttende lag, som er vigtigt til
forebyggelse af ridser og slitage. Kontroller, at overfladen er ren,
inden kogepladen anvendes igen. Fjern mærker fra vand med
nogle få dråber eddike eller citronsaft. Tør herefter af med
køkkenrulle og nogle få dråber specialrengøringsmiddel.
Kontrolknapperne kan tages af ved grundig rengøring.
Den glaskeramiske overflade kan modstå ridser fra kogegrej med
flad bund, men det er altid bedre at løfte delene, når de flyttes fra
en zone til en anden.
Bemærk!
30° Maxi
Brug ikke en svamp med for meget vand.
Brug aldrig knive eller skruetrækkere.
En skraber med et barberblad beskadiger ikke overfladen, så
længe den holdes i en vinkel på 30°.
Hold altid skrabere med barberblade uden for børns
rækkevidde.
Brug aldrig slibemidler eller skurepulvere.
EFTERSALGSSERVICE
Inden du ringer efter Eftersalgsservice, skal du kontrollere
følgende:
– At stikket er sat korrekt i, og at sikringen er ok. Hvis fejlen ikke
kan findes:
Sluk for apparatet – forsøg ikke at reparere det – ring til
eftersalgsservicecenteret. Apparatet leveres med et garantibevis,
der sikrer gratis reparation på servicecenterets regning.
PROBLEMLØSNING
Der kommer små elektriske eller mekaniske lyde fra
induktionskogepladen.
• Dette er normalt. Varmluftsfunktionen for de elektroniske
komponenter er aktiveret.
Der kommer en let fløjtelyd fra induktionskogepladen.
• Dette er normalt. Der kan opstå en let fløjten under brug af flere
kogezoner ved maksimal effekt pga. induktorernes driftsfrekvens.
41 DA
Kogezoner, der ikke holder en regelmæssig varme, eller hvor
stegning ikke sker hurtigt nok.
• Du skal bruge grej med helt flad bund. Hvis der kan skimtes lys
mellem bund og et punkt på overfladen, overføres varmen ikke
korrekt.
• Bunden på kogegrejet skal passe nøjagtigt til diameteren på den
valgte varmezone.
Page 43

Langsom tilberedning af maden.
• Der anvendes forkert kogegrej. Bundene skal være flade, ret
tunge og have den samme diameter som den valgte kogezone.
Småridser (kan optræde som sprækker eller afskrabninger)
på glaspladen.
• Forkerte rengøringsmetoder, kogegrej med grov bund eller
grovkornede partikler (salt eller sand) mellem kogegrej og pladens
overflade.
Brug de anbefalede fremgangsmåder for rengøring. Kontroller,
at bundene er rene, inden kogegrejet tages i brug, og brug gryder
og pander med glat bund.
Metalmærker (kan optræde som ridser).
• Skub ikke kogegrej af aluminium hen over kogepladen. Brug
den anbefalede fremgangsmåde for rengøring for at fjerne
mærkerne.
• Der er anvendt forkerte materialer til rengøring. Spild eller
fedtpletter bliver siddende på overfladen, brug en skraber (med
barberblad) og det anbefalede rengøringsprodukt.
Mørke striber eller pletter.
• Brug en skraber med barberblad og det anbefalede
rengøringsprodukt.
Områder med misfarvning på kogepladen.
• Mærker fra gryder og pander af aluminium og kobber samt
mineralaflejringer fra vand eller mad kan fjernes med rensecremen.
Varme sukkerblandinger/plastik, der er smeltet fast til
overfladen.
• Se afsnittet Rengøring af glaskogeplader.
Pladen eller nogle varmezoner fungerer ikke.
• Parallelkredsene er ikke sat ordentlig fast i klemrækken.
Kontroller, at tilslutningen er foretaget i overensstemmelse med
anvisningerne på side 38.
Pladen fungerer ikke.
• Et stort spild eller en stor genstand har dækket to knapper i
mindst 10 sekunder. Tør det spildte op, eller fjern genstanden.
• Kontrolpanelet er låst. Tryk på knappen “Lås” for at låse op.
Pladen slukker ikke
• Kontrolpanelet er låst. Tryk på knappen “Lås” for at låse op.
Se afsnittet side 41.
Pladen slukker automatisk
• Et spild har dækket mindst to knapper i over 10 sekunder. Pladen
går over på sikkerhed, og der kommer en biplyd, lige så længe
knapperne er tildækket. Tør det spildte op, eller fjern genstanden.
• Kogezonerne slukker automatisk, hvis de er tændt for længe.
Se afsnittet side 39.
Varighed af tænd-/slukfunktion for kogezonerne
• Tænd-/slutcyklusserne varierer i forhold til det ønskede
varmeniveau:
- Lavt niveau: kort funktionstid.
- Højt niveau: lang funktionstid.
Indikatoren for restvarme "H" blinker
• Den elektroniske temperatur er for høj. En tekniker skal kontrollere
installationen ud fra anbefalingerne på side 38.
Kogepladen fungerer ikke, eller bestemte zoner virker ikke.
• Kredsene er ikke placeret rigtigt på klembrættet. Kontrollér, at
tilslutningen er foretaget i overensstemmelse med anvisningerne
på side 38.
42 DA
Page 44

YLEISIÄ TURVAOHJEITA
LUE OPAS HUOLELLISESTI, JOTTA SAAT LIEDESTÄSI PARHAAN MAHDOLLISEN HYÖDYN.
Suosittelemme, että säilytät asennus- ja käyttöoppaan myöhempää tarvetta varten ja merkitset ennen lieden asentamista sen sarjanumeron
alla olevaan ruutuun siltä varalta, että tarvitset huollon apua.
Laitekilpi
(sijaitsee lieden pohjassa)
• On ehdottoman suositeltavaa pitää lapset loitolla keittotasosta sen käytön aikana tai käytön jälkeen, kun kuumista keittoalueista
varoittavat merkkivalot vielä palavat, jotta ei ole vaaraa vakavista palovammoista.
• Valmistaessasi ruokaa rasvaa tai öljyä käyttäen, pidä aina tarkkaan silmällä paistoastiaa, koska kuuma rasva tai öljy syttyy helposti.
• Lieden ohjaustaulu on herkkä laite; älä laske kuumia astioita sen päälle.
• Keittoalueille ei saa laittaa alumiinifoliota tai muovisia astioita.
• Liettä on hieman puhdistettava jokaisen käyttökerran jälkeen, jotta siihen ei keräänny likaa ja rasvaa. Puhdistamatta jäänyt lika ja rasva
kuumenee seuraavalla käyttökerralla ja synnyttää savua ja epämiellyttävää käryä palonvaarasta puhumattakaan.
• Älä jätä metalliesineitä, kuten veitsiä, haarukoita tai kansia, induktioalueelle, koska suuret ja painavat esineet saattavat kuumeta.
• On parempi olla katsomatta pitkään suoraan halogeenielementteihin.
• Älä koske keittoalueisiin niiden käytön aikana tai liian pian sen jälkeen.
• Älä milloinkaan kypsennä ruokaa pelkällä keraamisella keittotasolla. Käytä aina asianmukaisia keittoastioita.
• Aseta astia aina käyttämäsi keittoalueen keskelle.
• Älä käytä tasoa leikkuulautana.
• Älä siirrä astioita vetämällä tasoa pitkin.
• Älä säilytä raskaita esineitä lieden yläpuolella. Ne voivat vaurioittaa sitä, jos ne sattuvat putoamaan liedelle.
• Älä käytä liettä työtasona.
• Älä käytä liettä säilytyspaikkana.
• Jos keittotasoon vastoin odotuksia syntyy halkeama, älä käytä liettä. Kytke välittömästi liesi irti sähköverkosta ja ota yhteyttä huoltoon.
•
Laitetta ei ole tarkoitettu lasten tai sellaisten henkilöiden käyttöön, joiden fyysinen tai henkinen toimintakyky on rajoittunut tai joilla ei
ole kokemusta tai tietoa laitteen käytöstä, muuten kuin heidän turvallisuudestaan vastaavan henkilön valvonnassa ja ohjauksessa.
• Pikkulapsia on valvottava, etteivät he pääse leikkimään laitteella.
Huomaa: Laite on voimassa olevien turvamääräysten ja sähkömagneettista laitteiden yhteensopivuutta koskevien määräysten
mukainen. Henkilöiden, joilla on sydämentahdistin, ei kuitenkaan pitäisi käyttää laitetta. Kaikki markkinoilla olevat tahdistimet
eivät välttämättä ole voimassa olevien turvamääräysten ja sähkömagneettista laitteiden yhteensopivuutta koskevien
määräysten mukaisia, joten on mahdotonta taata, etteivät laitteet saisi aikaan toisilleen vaaraa aiheuttavaa häiriötä. On
myös mahdollista, että esimerkiksi kuulolaitteen tai muiden vastaavien laitteiden käyttäjät saavat epämiellyttäviä tuntemuksia.
LIESI
Keittoalueet
Käyttöjännite
Liitäntäteho (W)
Lieden mitat (l x p x h)mm.
Asennusaukon mitat kalusteisiin
upotettaessa
(V/Hz)
(AxB)
HVI 740HVI 640
4 Inductio 4 Inductio
220-240
50/60 Hz
574 x 505 x 55 752 x 505 x 55
220-240
50/60 Hz
HGI 7544
4 Inductio
220-240
50/60 Hz
74007400 7400
752 x 505 x 55
740 x 490
Parannamme jatkuvasti tuotteidemme laatua ja saatamme tehdä kodinkoneisiin uusimpien teknisten parannusten mukaisia muutoksia.
Tämä tuote täyttää Direktiivien 73/23/EEC ja 89/336/EEC (korvattu direktiiveillä 2006/95/EC ja 2004/108/EC) mukaiset määräykset
ja myöhemmät muutokset.
43 FIN
Page 45

ASENNUS
Kodinkoneen asennus voi olla vaativa työ, joka virheellisesti tehtynä saattaa aiheuttaa vakavan vaaran kodinkoneen käyttäjälle.
Tämän vuoksi asennus pitäisi antaa ammatillisesti pätevän henkilön tehtäväksi voimassa olevien teknisten määräysten
mukaisesti. Jos tätä neuvoa ei noudateta, vaan asennuksen tekee epäpätevä henkilö, valmistaja ei vastaa mistään tuotteen
toimintahäiriöstä riippumatta siitä, aiheutuuko siitä vahinkoa tai tapaturmia.
ASENNUS KALUSTEISIIN
Kalusteiden, joihin liesi on tarkoitus asentaa, sekä kaikkien sen
vieressä olevien kalusteiden on oltava kuumuuden kestäviä.
Lisäksi kaikki koristelaminaatit on kiinnitettävä kuumuutta kestävällä
liimalla.
Asennus:
• Lieden mukana tulee vedenpitävä tiiviste.
Ennen asennusta:
- Käännä liesi ylösalaisin niin, että keraaminen taso on alaspäin.
Varmista, että keraaminen taso on suojattu.
- Asenna tiiviste lieden ympärille.
- Varmista, että se on kunnolla paikoillaan, jottei mitään pääse
valumaan kalusteiden sisään.
On tärkeää sovittaa liesitaso tasaiselle tukipinnalle.
• Väärän asennuksen aiheuttamat vääntymät voivat muuttaa
työtason teknisiä ominaisuuksia ja lieden toimintaa.
• Jätä vähintään 5 cm:n rako laitteen viereisiin pystypintoihin.
• On ehdottoman tärkeää, että laitesyvennys on annettujen mittojen
mukainen.
• Liesitason päällimmäisen asennusosan korkeus on 5,5 cm.
• Jos laite on asennettu kalusteiden väliin, laitteen pohjan ja
välipohjan tai kalusteen pinnan välisen tilan on oltava suurempi
kuin 2,5 cm, jotta ilma pääsee kiertämään. Lisäksi on
varmistettava, että laitteen takana on tuuletusaukko (8 cm) sen
koko leveydeltä.
• Liesitasoa ei voi asentaa tuulettimettoman uunin eikä
astianpesukoneen, jääkaapin, pakastimen tai pesukoneen
yläpuolelle.
• Liesitason runko asennetaan ja kiinnitetään yksikköön neljän
ohjausreiän ja niihin sopivien kiinnittimien avulla.
Sijoita neljä kiinnitintä ennen liesitason asentamista siten, että
liesitaso asettuu tarkasti tukiyksikköön.
Liesi
25 mm
mini
50 mm
• SÄHKÖPISTOKKEELLA VARUSTETTU MALLI
- Keittotaso on varustettu sähköjohdolla, jossa on
sähköpistoke, joka kytketään 220-240 V vaihevirtaan tai vaihe
- nollavirtaan. Keittotaso vaatii 25 A sulakkeen.
• ILMAN SÄHKÖPISTOKETTA OLEVA MALLI
Liesi asennetaan verkkojohdolla, joka mahdollistaa liitännän
ainoastaan 220–240 voltin virtalähteeseen vaiheiden välille
tai nollan ja vaiheen välille.
• Pistorasiaan kytkettäessä sopiva sulake valitaan tämän taulukon
perusteella.
Liesi on kuitenkin mahdollista kytkeä myös seuraavanlaisiin
virtalähteisiin:
Kaksivaihevirta: 220–240V2~, kolmivaihevirta: 220–240V3~
tai kolmivaihevirta: 380–415V3N~.
Noudata seuraavia ohjeita, kun teet uuden liitännän:
• Varmista ennen laitteen liittämistä verkkovirtaan, että laite on
suojattu sopivalla sulakkeella (katso taulukkoa) ja että sen
sähköjohdot ovat sopivasti mitoitetut laitteen normaalin toiminnan
takaamiseksi.
1- Toimet olemassa olevaa liitäntää tehtäessä:
- Käännä liesi ympäri, lasipuoli työtasoa vasten. Varo rikkomasta
lasia.
- Avaa kansi.
- Vedä virtajohto ulos.
. Poista ruuvit, jotka pitelevät sivuvirtavastuksen kiinnityslevyä, ja
irrota virtajohdon johtimet.
. Vapauta virtajohto kiertämällä auki johdon kiinnittimet.
. Vedä virtajohto ulos.
2- Toimet uutta liitäntää tehtäessä:
- Valitse virtajohto taulukon suositusten perusteella.
- Pujota virtajohto kiinnittimeen.
- Poista eriste virtajohdon johtimien päistä 10 millimetrin matkalta.
Ota huomioon suositeltu johdon pituus riviliittimeen kiinnittämistä
varten.
- Kiinnitä johdin kaavion osoittamalla tavalla asennustavan mukaan
ja ensimmäisessä vaiheessa talteen otettujen sivuvirtavastuksen
kiinnityslevyjen avulla.
- Ruuvaa johdon kiinnittimet paikoilleen ja kiinnitä kansi.
Tiiviste
Aukko
500 X 50
Aukko
500 X 10
SÄHKÖLIITÄNTÄ
"Asennuksen on oltava tavanomaisten direktiivien mukainen."
Valmistaja ei ota vastuuta vahingoista, jotka ovat seurausta
sopimattomasta käytöstä.
Varoitus:
• Tarkista aina ennen sähkötöitä mittariin merkitty verkkojännite,
ylivirtasuojan asetus, maadoituskytkennän johtavuus ja sulakkeen
sopivuus.
• Laite tulee kytkeä käyttämällä maadoitettua pistoketta tai
moninapaista kytkintä, jonka kosketinpinnat aukeavat vähintään
3 mm.
Jos liedessä on pistoke, se on asennettava niin, että siihen
tarvittaessa päästään käsiksi.
• Virtajohdon keltavihreä johdin on kytkettävä maaliittimeen sekä
virtalähteen että lieden päässä.
• Valmistaja ei vastaa onnettomuuksista, jotka aiheutuvat
maadoittamattoman laitteen käytöstä tai huonosta
maadoituskontaktista.
• Kaikissa virtajohtoon liittyvissä ongelmatilanteissa on otettava
yhteyttä huoltopalveluun tai valtuutettuun sähköasentajaan,
yhdistä johto seuraavien värien/koodien mukaisesti:
SININEN - NOLLAJOHTO (N)
RUSKEA - JÄNNITEJOHTO (L)
KELTA/VIHREÄ - MAADOITUSJOHTO ( )
44 FIN
LIITTIMIEN KIINNITTÄMINEN RIVILIITTIMEEN:
HVI 640
Sulake
Sähköjohto
Sulake
Sähköjohto
Sulake
Sähköjohto
Yksivaihevirta 220-240 V~ Kaksivaihevirta 220-240 V2~
Kolmivaihevirta 220-240 V3~ Kolmivaihevirta 380-415 V3N~
Ph = Vaihe N = Nolla T = Maa
HVI 740
Page 46

INDUKTIO
TOIMINTA
Elektroninen generaattori antaa virran laitteen sisällä olevaan
käämiin.
Tämä käämi synnyttää magneettisen kentän, ja kun astia
asetetaan liesitasolle, induktiovirrat läpäisevät sen.
Induktiovirrat muuttavat astian todelliseksi lämmönvälittäjäksi,
ja lasikeraaminen liesitaso pysyy kylmänä.
Tässä järjestelmässä on tarkoitus käyttää magneettipohjaisia
kypsennysastioita.
Induktiotekniikasta on pääasiassa kahdenlaista etua:
Kun lämpöä välittyy vain kypsennysastiaan, lämpö pysyy
enimmäistasollaan eikä sitä haihdu kypsennyksen aikana.
Lämpöhitautta ei esiinny, koska kypsennys alkaa automaattisesti
silloin, kun astia asetetaan liesitasolle, ja lakkaa, kun se nostetaan
pois.
Seuraavat tiedot auttavat valitsemaan oikeanlaiset kypsennysastiat
parhaan lopputuloksen saamiseksi.
INDUKTIOALUE
Merkintä
astioissa
Ruostumaton
teräs
Alumiini Ei voi käyttää
Valurauta Toimii hyvin
Emaloitu teräs Toimii hyvin
Lasi Ei voi käyttää
Posliini Ei voi käyttää
Kuparipohjaiset Ei voi käyttää
Tarkista astian etiketistä, sopiiko se
käytettäväksi induktioliedellä.
Käytä magneettisia kypsennysastioita (joiden
materiaalina on emaloitu rautalevy, valurauta
tai ferriittinen ruostumaton teräs), joiden
pohjassa on magneetti (astian tulee tarttua
lieteen).
Ei voi käyttää
Poikkeuksena ferromagneettinen ruostumaton
teräs
Varoitus: saattaa naarmuttaa lieden pintaa
Suosituksena tasa-, sileä- ja paksupohjaiset
astiat
KERAAMISEN LIEDEN KÄYTTÄMINEN
TURVALLINEN KODINKONE
Jos liesitaso on oikein asennettu ja sitä käytetään oikein,
ylimääräisiä turvalaitteita tarvitaan harvoin.
• Tuuletin: Suojaa ja viilentää virta- ja ohjauskomponentteja.
Tuuletin toimii automaattisesti kahdella nopeudella. Se toimii,
vaikka keittolevyt olisivat pois päältä, kunnes elektroninen
järjestelmä on tarpeeksi viilentynyt.
• Turvatransistori: Anturi tarkistaa säännöllisesti elektronisten
komponenttien lämpötilan. Jos lämpö nousee liikaa, se vähentää
automaattisesti keittolevyjen tehoa ja sammuttaa ne (tehotason
näyttö vilkkuu), kunnes komponenttien lämpötila on taas vakio,
ja tämän jälkeen liesitaso alkaa toimia uudelleen.
• Tyhjät astiat: Kunkin kuumennusalueen alapuolella on anturi,
joka heti havaitsee tyhjän astian tai lasikeraamisen tason väärän
lämpötilan.
• Käytön tunnistus: Astian tunnistin mahdollistaa työskentelyn
ja kuumennuksen. Kuumennusalueelle joutuvaa pientä esinettä
(kuten lusikkaa, veistä tai sormusta) ei tunnisteta astiaksi eikä
liesi ala kuumentaa sitä.
• Roiskeet ja ylikiehuminen: Liesi lakkaa toimimasta, jos jotakin
kiehuu yli tai roiskuu liedelle. Jos iso roiske tai esine peittää
vähintään kaksi painiketta vähintään 10 sekunnin ajaksi, lieden
toiminta keskeytyy, joten puhdista liesi, kun se ei toimi.
KEITTOASTIAT
Parhaan tuloksen saat käyttämällä korkealuokkaisia
astioita.
• Käytä aina laadukkaita keittoastioita, joissa on paksu ja
tasainen pohja: Tämän tyyppisissä keittoastioissa ei synny
paikallisia kuumia kohtia, joihin ruoka tarttuu. Paksut metalliset
padat ja kattilat jakavat lämmön tasaisesti.
• Varmista, että padan tai kattilan pohja on kuiva: Kun lisäät
pataan nestettä tai kun käytät keittoastiaa, joka on ollut
jääkaapissa, varmista, että astian pohja on täysin kuiva, ennen
kuin laitat sen liedelle. Näin vältät liesitason tahriintumista.
• Käytä kattiloita, joiden pohjan halkaisija on riittävän suuri
kokonaan peittämään keittoalueen: Kattila ei saisi olla pienempi
kuin kuumennusalue. Kun se on hieman suurempi, energiaa
käytetään mahdollisimman tehokkaasti.
1 - LIEDEN VIRTAPAINIKE
2 - KUUMENNUSALUEEN VALINTAPAINIKE
3 - NÄYTTÖ: lämpötaso, jäännöslämmön osoitin, tehostintoiminto
4 - ”-”-PAINIKE
5 - ”+” -PAINIKE
6 - ”AJASTIN” -VALINTAPAINIKE
7 - AJASTINNÄYTTÖ
9 - LUKITUSPAINIKE JA MERKKIVALO
9 - KUUMENNUSALUEEN OHJELMOINNIN OSOITIN: kun
osoitin on näkyvissä, ajastin säätää kuumennusaluetta
10 - MERKKIVALO:
. päällä: kuumennusalue tai ajastin on päällä, säätäminen on
mahdollista
. pois päältä: kuumennusalueeseen tai ajastimeen on asetettu
viimeiset käyttötiedot
11 - Tehostimen valintapainike
SÄÄDÖT
Lieden säädöt vastaavat seuraavia teholuokituksia:
INDUKTIO
Säädöt
1 2,5 10 tuntia
2 5 10 tuntia
3 7,5 5 tuntia
4 12,5 4 tuntia
5 18 3 tuntia
6 24 3 tuntia
7 45 2 tuntia
8 60 2 tuntia
9 100 1 tunti
Turvallisuuden lisäämiseksi keittoalueiden virta katkeaa
automaattisesti, jos ne jäävät päälle liian pitkäksi aikaa.
Katkaisuaika määrittyy käytetyn lämpötason mukaan.
Tehon vapautus%Käyttöaika enintään ennen
automaattikatkaisua
45 FIN
Page 47

HUOMAUTUS:
Induktioliesi toimii generaattorilla, joka tuottaa samanaikaisesti
virtaa kahdelle keittolevylle kullakin alueella:
Kukin alue voi vastaanottaa enintään 3 700 W sähkövirtaa.
Kun tehostintoiminto on päällä ja saman alueen toinen levy
saavuttaa tehotason 9 tai 8, jälkimmäinen lasketaan automaattisesti
tasolle 7, ja tieto tästä vilkkuu näytössä.
Varoitus:
ajan ja lakkaa sitten toimimasta. Levy aloittaa kuumennuksen
uudelleen asetuksella 9, generaattorin teho vähenee ja toisen
levyn tehotaso palautuu entiselleen.
Kuten tehon näytöstä näkyy, tehostin toimii 10 minuutin
KÄYTTÖ
• Kun olet kytkenyt lieteen virran päälle, odota 8 sekuntia, jotta
elektronisella ohjauksella on aikaa käynnistyä.
- Paina -painiketta 3 sekunnin ajan.
Lieden elektroninen ohjauslaite käynnistyy. Jokaisen keittoalueen
lämpötila näkyy ja valvonta-LED vilkkuu.
- Jos mitään ei tehdä 10 sekunnin kuluessa, elektroninen ohjauslaite
kytkeytyy pois päältä ja käynnistäminen on tehtävä uudelleen.
• KEITTOALUEEN KÄYNNISTÄMINEN
- Paina haluamasi keittoalueen
valintapainiketta. Näytön
valvonta-LED palaa jatkuvasti.
Se osoittaa, että kyseinen
keittoalue on käytössä.
- Valitse haluamasi kuumennusteho 1–9 painamalla - tai +
painiketta. Kun pidät + tai - painiketta painettuna,
kuumennusteho suurenee tai pienenee vähitellen.
Seuraavat tiedot ovat vain suuntaa-antavia. Kokemuksen avulla
osaat soveltaa niitä omien mieltymystesi mukaan.
0 : Pois päältä
1 : )
2 : ) ..... Sulatuslämpö
3 : Ruoan lämpimänä pitämien
4 : Lämmittäminen
5 : Sulattaminen, hauduttaminen, keittäminen, pienellä
6 : Ilman kantta keittäminen
7 : Paistaminen, lihan ruskistaminen tai paahtaminen
8 : Keittäminen ja paahtaminen korkeassa lämpötilassa
9 : Friteeraaminen
Tehostin: Suurien nestemäärien kiehauttamiseen
• ASTIAN TUNNISTUS
Kun liesi on toiminnassa, astian tunnistustoiminnosta on se hyöty,
että kypsennysalueen kuumennus alkaa tai lakkaa automaattisesti,
kun astia asetetaan liedelle tai nostetaan pois.
Tämä säästää energiaa.
lämmöllä keittäminen
• KEITTOALUEEN SAMMUTTAMINEN
- Paina haluamasi keittoalueen valintapainiketta.
- Paina painiketta, kunnes näkyy kuumennusteho . Keittoalue
kytkeytyy pois päältä ja näyttö sammuu 10 sekunnin kuluttua.
- Keittoalueen voi nopeasti kytkeä pois päältä painamalla ja
painikkeita samanaikaisesti.
Kuumennusteho laskee automaattisesti arvoon .
Keittoalue kytkeytyy pois päältä.
• KOKO LIEDEN SAMMUTTAMINEN
Kaikki keittoalueet ja ajastin voidaan milloin tahansa
kytkeä pois päältä painamalla päävirtakytkintä kolmen
sekunnin ajan.
• VAROITUS JÄLKILÄMMÖSTÄ
Ohjaustaulusta käyttäjä näkee, minkä alueiden lämpötila on vielä
yli 60°C. Niiden kohdalla näytössä on . Kun alueen lämpötila
laskee alle 60°C:n, -näyttö sammuu.
Ruokaa valmistettaessa on suositeltavaa kytkeä loppuvaiheessa
keittoalue pois päältä ja käyttää alueen jälkilämpöä ruoan
hauduttamiseen.
HUOM: Sähkökatkoksen sattuessa jälkilämmön varoitusnäyttö
sammuu, vaikka alueen lämpötila olisikin vielä yli 60°C.
• PIKAKUUMENNUKSEN KÄYTTÖ
Liedessä on "pikakuumennus"-toiminto, jonka ansiosta kaikkien
kuumennusalueiden lämpötila voidaan nostaa nopeasti. Toiminto
on ihanteellinen lihaa ruskistettaessa tai silloin, kun halutaan saada
suuria nestemääriä kiehumaan nopeasti.
Pikakuumennuksen aloittaminen
. Paina virtapainiketta .
. Kytke haluttu alue päälle, paina +-painiketta asentoon ”9”, päästä
painike hetkeksi ja paina sitä uudelleen. Näytössä vaihtelevat
”A” (pikakuumennus) ja ”9” (lämpötaso).
. Valitse tarvittaessa haluamasi lämpöasento.
Kuumennusteho Enimmäistehosta
käytössä (%)
000
U (65°C) 131
263
3115
4 16 6,5
5 19 8,5
6 32 2,5
7 45 3,5
8 65 4,5
9 100 0
Esim. 1800 W:n alue asennossa 6 = 32 % 1800 W:n vapautetusta
tehosta = 576 W.
Kun "pikakuumennus" on päällä, alue tuottaa 1800 W:n tehon
2,5 minuutin ajan ja palaa sitten takaisin 576 W:n tehoon.
. Kun "pikakuumennus" on tehty, tehotason näyttö pysyy
muuttumattomana.
Pikakuumennusaika
(minuuttia)
Edellyttäen, että kypsennysalueella käytetään oikeanlaista
astiaa*:
.
Kun tehostin on käytössä, näytössä näkyy lämpötaso tai
*Induktio edellyttää oikeankokoisia magneettipohjaisia astioita
(katso taulukko sivulla 45), jotka peittävät alueen kokonaan.
Jos kypsennysalueella ei ole astiaa tai astia on vääränlainen*:
Näytössä näkyy . Alue ei kuumene. Jos liedelle ei aseteta
astiaa 10 minuuttiin, aloitus peruuntuu.
TÄRKEÄÄ:
Kuumennusalueen sammuttamiseksi liesi on sammutettava
tavallisesti; astian nostaminen pois ei riitä. Astian tunnistusta
ei ole tarkoitettu korvaamaan lieden virtapainiketta.
46 FIN
Page 48

• TEHOSTINTOIMINNON OTTAMINEN KÄYTTÖÖN
Tehostintoiminto otetaan käyttöön yhdellä painalluksella, ja sen
aikana kypsennysalue toimii alueen mukaan 1800:n tai 3 000 W:n
teholla 10 minuutin ajan. Toiminnosta on hyötyä esimerkiksi
kiehautettaessa suuria nestemääriä.
I
N
D
U
K
T
I
O
VIRTA TEHOSTIN
TEHOSTINtoiminnon ottaminen käyttöön:
Paina tehostintoimintoon yhdistetyn
kypsennysalueen asetusnäppäintä.
Näyttöön syttyy ohjausvalo.
Käynnistä tehostin painamalla näppäintä. Tehostin
on käytössä 10 minuutin ajan.
Näkyviin tulee tehoa (power) ilmaiseva P-merkki.
Kun aika on kulunut, tehotaso laskee 9:ään.
Näppäimen "-" painallus peruuttaa tehostintoiminnon, ja tehotaso
laskee 9:ään.
• KEITTOALUEEN AJASTAMINEN
Jokainen keittoalue voidaan ajastaa enintään 99 minuutiksi.
Kerrallaan vain yksi keittoalue voi olla ajastettuna.
- Käynnistä haluamasi alue edellä annettujen ohjeiden mukaisesti.
Alueen kuumennustehonäytön vieressä olevan valvonta-LEDin
tulee palaa. Se osoittaa, että alue on päällä.
- Paina ajastinpainiketta.
Alueen merkki ajastimen näytön vieressä osoittaa, mitä aluetta
ajastetaan.
- Valitse haluamasi aika minuutteina painamalla + painiketta.
Aika tallentuu automaattisesti muistiin kolmen sekunnin kuluttua.
PUHDISTUS JA KUNNOSSAPITO
• Anna lieden jäähtyä ennen kuin huollat sitä.
• Käytä vain erityisesti keraamisille liesitasoille suunniteltuja tuotteita
(puhdistusaineita ja kaapimia). Niitä saa rautakaupasta.
• Vältä kaatamasta liedelle mitään, koska kaikki kuumalle liedelle
kaatuneet aineet palavat nopeasti kiinni, mikä vaikeuttaa
puhdistamista.
• Lieden lähistöllä ei kannata säilyttää mitään, mikä voi sulaa,
kuten muoviesineitä, sokeria tai sokeripohjaisia tuotteita.
KUNNOSSAPITO:
- Laita liesitasolle muutama pisara siihen tarkoitettua
puhdistusainetta.
- Hankaa itsepäisiä tahroja pehmeällä kankaalla tai hieman
kostutetulla talouspaperilla.
- Pyyhi pinta puhtaaksi pehmeällä kankaalla tai kuivalla
talouspaperilla.
Jos itsepäisimmät tahrat eivät hävinneet:
- Laita liesitasolle vielä muutama pisara puhdistusainetta.
- Raaputa tahroja kaapimella pitäen sitä 30 asteen kulmassa
liesitasoon nähden kunnes tahrat irtoavat.
- Pyyhi pinta puhtaaksi pehmeällä kankaalla tai kuivalla
talouspaperilla.
- Toista nämä vaiheet tarpeen mukaan.
VIHJEITÄ:
Kun liesi puhdistetaan usein, liesitason pintaan jää naarmuilta ja
kulumiselta suojaava kerros. Varmista, että liesitaso on puhdas
ennen kuin käytät sitä. Veden jättämät jäljet voi poistaa muutamalla
pisaralla etikkaa tai sitruunamehua. Pyyhi lopuksi imukykyisellä
paperilla ja käytä muutama pisara liedenpuhdistusainetta.
Ohjausnupit voidaan perinpohjaista puhdistusta varten irrottaa.
Keraaminen pinta kestää tasapohjaisten keittoastioiden hankausta.
On kuitenkin parempi siirtää ne alueelta toiselle nostamalla.
HUOM:
30° Maxi
Ohjelmoitua aikaa voidaan milloin tahansa muuttaa painamalla
ajastinpainiketta; ajastimen LEDin tulee palaa. Kun aika on kulunut,
keittoalue sammuu automaattisesti ja kuulet minuutin mittaisen
äänimerkin. Äänimerkki lakkaa, kun painat mitä tahansa painiketta.
Ajastimeen ohjelmoitu aika voidaan palauttaa arvoon joko
painamalla - painiketta tai painamalla + ja - painikkeita
samanaikaisesti; keittoalue ei tällöin ole enää kytkettynä ajastimeen,
mutta pysyy päällä. Se on siis sammutettava erikseen.
Ajastinta voidaan käyttää yksinään muistutuksena jostain; se
antaa äänimerkin asetetun ajan kuluttua.
• LUKITUSPAINIKKEEN TOIMINTA
Lukitustoiminto säilyttää senhetkiset asetukset ja estää ketään
vahingossa käynnistämästä liettä. Sitä voidaan käyttää myös
muita ohjauspainikkeita puhdistettaessa, koska näin niitä voidaan
painella ilma, että liesi käynnistyy.
Lukitus:
- Paina virtapainiketta .
- Käynnistä haluamasi keittoalueet.
- Valitse jokaiselle alueelle haluamasi kuumennusteho.
- Lukitse asetukset painamalla painiketta; nyt ei mikään
muu painike päävirtakytkintä lukuun ottamatta toimi.
Lukituksen merkkivalo syttyy.
Lukitus otetaan pois päältä painamalla uudelleen painiketta;
merkkivalo sammuu ja muut painikkeet toimivat jälleen.
Jos ajastin on käynnissä painikkeiden ollessa lukittuna, se toimii
normaalisti ja ajastettu keittoalue sammuu, kun aika on kulunut
loppuun.
Jos lukitus on päällä silloin, kun liesi kokonaan sammutetaan,
lukitus pysyy päällä liettä uudelleen käynnistettäessä ja estää siis
muiden painikkeiden käytön. Ota lukitus posi päältä painamalla
painiketta.
Älä käytä liian kosteaa sientä.
Älä missään tapauksessa käytä veistä tai ruuvitalttaa.
Parranajokoneen terällä varustettu kaavin ei vahingoita
liesitason pintaa, kunhan se pidetään 30 asteen kulmassa.
Älä jätä terävää kaavinta lasten ulottuville.
Älä käytä hionta-aineita tai hankausjauheita.
HUOLTO
Tarkista seuraavat asiat ennen huoltokorjaajan kutsumista
paikalle:
Varmista, että pistoke on pistorasiassa ja sulake ehjä. Jos vikaa
ei voida paikallistaa, sammuta liesi – älä kajoa siihen itse – ja ota
yhteyttä huoltopalveluun. Liedellä on takuutodistus, jonka voimassa
ollessa se korjataan huoltokorjaamolla ilmaiseksi.
VIANSELVITYS
Induktioliedestä kuuluu ääniä.
• Tämä on normaalia. Elektronisten komponenttien tuuletus on
meneillään.
Induktioliedestä kuuluu vihellysmäinen ääni.
• Tämä on normaalia. Induktorien toimintataajuuden takia voi
kuulua vihellystä, kun useita kypsennysalueita käytetään täydellä
teholla.
Keittoalueet eivät kiehuta tai paista kunnolla.
• Sinun tulee käyttää kattiloita, joissa on ehdottoman tasainen
pohja. Jos asetat kattilan pohjan suoran tason kulmaa vasten
ja välistä näkyy valoa, pohja ei ole suora eikä kykene siirtämään
riittävästi lämpöä.
• Kattilan pohjan halkaisijan tulisi vastata valitun keittoalueen
halkaisijaa.
47 FIN
Ruoka kypsyy hitaasti.
• Käytät vääränlaista keittoastiaa. Kattilan pohjan tulisi olla suora,
kohtuullisen paksu ja halkaisijaltaan samaa luokkaa kuin valittu
keittoalue.
Page 49

Liesitasolla on pieniä naarmuja (jotka saattavat näyttää
halkeamilta tai kulumilta).
• Liettä on puhdistettu väärällä tavalla, keittoastioissa on karheat
pohjat tai keittoastioiden pohjien alla on kiinteitä hiukkasia (suolaa
tai hiekkaa).
Käytä suositeltuja puhdistustapoja, varmista keittoastioiden
puhtaus ennen käyttöä ja käytä keittoastioita, joiden pohja on
sileä.
Metallijälkiä (saattavat näyttää naarmuilta).
• Älä vedä alumiinisia keittoastioita pitkin liesitasoa. Poista jäljet
käyttäen suositeltua puhdistusmenetelmää.
• Liettä on puhdistettu vääriä puhdistusaineita käyttäen ja pinnassa
on edelleen sille kaatuneiden aineiden jälkiä tai rasvatahroja.
Käytä kaavinta ja suositeltua puhdistusainetta.
Tummia juovia tai pilkkuja.
• Käytä kaavinta ja suositeltua puhdistusainetta.
Liesitasossa on värivirheitä.
• Alumiini- ja kuparijäljet sekä vedestä tai elintarvikkeista peräisin
olevat suolajäämät voidaan poistaa puhdistusaineella.
Liesitasoon on sulanut kuumia sokeriliuoksia tai muovia.
• Katso edellä olevia puhdistusohjeita.
Liesi on kokonaan epäkunnossa tai jotkin alueet eivät toimi.
• Suntteja ei ole oikein kytketty kytkentärimaan.
Varmista, että kytkentä on sivulla 44 annettujen ohjeiden
mukainen.
Liesi ei toimi.
• Vähintään kahden painikkeen päälle on kaatunut tai pudonnut
jotain vähintään 10 sekuntia aikaisemmin. Poista kaatunut aine
tai pudonnut esine.
• Ohjaustaulu on lukittu. Vapauta lukitus painamalla lukitusnäppäintä.
Liesi ei sammu.
• Ohjaustaulu on lukittu. Vapauta lukitus painamalla
lukitusnäppäintä.
Katso tätä käsittelevää kohtaa sivulla 47.
Liesi sammuu itsekseen.
• Vähintään kahden painikkeen päälle on kaatunut tai pudonnut
jotain vähintään 10 sekuntia aikaisemmin; liesi kytkeytyy turvatilaan
ja kuuluu äänimerkki, joka kestää siihen saakka, kun painikkeet
vapautetaan. Poista kaatunut aine tai pudonnut esine.
• Keittoalueet kytkeytyvät automaattisesti pois päältä oltuaan
päällä liian kauan. Katso tätä käsittelevää kohtaa sivulla 45.
Keittoalueiden päällä- ja pois-aikojen suhde
• Päällä- ja pois-ajat vaihtelevat sen mukaan, mikä kuumennusteho
on valittu:
- pieni teho – lyhyt päällä-aika,
- suuri teho – pitkä päällä-aika.
Jälkilämmöstä varoittava H-näyttö vilkkuu
• Elektroniikka on ylikuumentunut. Huoltokorjaajan on tarkastettava,
että asennus on tehty sivun 44 vaatimusten mukaisesti.
Liesi tai jotkin alueet eivät toimi.
• Sivuvirtavastuksia ei ole oikein kytketty kytkentärimaan. Varmista,
että kytkentä on sivulla 44 annettujen ohjeiden mukainen.
48 FIN
Page 50

The manufacturer will not be responsible for any inaccuracy resulting from printing or transcript errors contained in this brochure. We reserve the right to carry out
GB
modifications to products as required, including the interests of consumption, without prejudice to the characteristics relating to safety or function.
Der Hersteller übernimmt keine Hauftung für eventuelle Druck-oder Übersetzungsfehler dieser Bedienungsanleitung. Der Hersteller behält sich vor, technische
DE
Änderungen zur Verbesserung der Produktqualität im Interesse des Endverbrauchers vorzunehmen.
O fabricante declina toda e qualquer responsabilidade por gralhas, erros tipográficos ou de transcrição/tradução contidos neste manual. Reservamo-nos o direito de
PT
introduzir alterações nos nossos produtos, conforme necessário, tendo inclusive em atenção os interesses relativos ao respectivo consumo, sem prejuízo das
características associadas à segurança ou ao funcionamento dos electrodomésticos.
La empresa constructora declina toda responsabilidad derivada de eventuales errores de impresión contenidos en el presente libro. Se reserva además el derecho
ES
de realizar las modificaciones que se consideren útiles a los productos sin comprometer las características esenciales.
De fabrikant stelt zich niet aansprakelijk voor eventuele drukfouten in deze brochure. Kleine veranderingen en technische ontwikkelingen zijn voorbehouden.
NL
Producenten påtager sig ikke noget ansvar for unøjagtigheder, der opstår pga. tryk- eller udskriftsfejl i denne brochure. Vi forbeholder os ret til at foretage nødvendige
DA
ændringer i produkterne, herunder forbrugsinteresser, uden præjudice for egenskaberne for sikkerhed eller funktion.
Valmistaja ei vastaa mistään tämän asiakirjan paino- tai kirjoitusvirheistä johtuvista vääristä tiedoista. Varaamme oikeuden tehdä tuotteisiin muutoksia tarpeen mukaan,
FIN
kuluttajien edut mukaan lukien, huonontamatta turvallisuuteen tai toimintaan liittyviä ominaisuuksia.
02-2008 • Cod. 41027350
 Loading...