

Page 1

Excel 10
W7763C,D,E CHILLED CEILING CONTROLLERS
LNS PLUG-INS
HONEYWELL EXCEL 5000 OPEN SYSTEM
USER GUIDE
CONTENTS
Introduction .................................................................................................................................................................................. 1
Description of Devices ................................................................................................ 1
Products Covered ....................................................................................................... 2
Organization of Manual ............................................................................................... 2
Applicable Literature ................................................................................................... 2
Product Names ........................................................................................................... 2
Control Application...................................................................................................... 3
Control Provided ......................................................................................................... 3
Setpoints.......................................................................................................... 4
Bypass............................................................................................................. 5
LED/LCD ......................................................................................................... 5
Energy-Saving Features .................................................................................. 5
Occupancy Status............................................................................................ 6
Condensation Protection ................................................................................. 6
Operating Modes ............................................................................................. 7
Agency Listings........................................................................................................... 8
Construction................................................................................................................ 8
Controllers ....................................................................................................... 8
Controller Performance Specifications............................................................. 9
Configurations........................................................................................................... 10
General.......................................................................................................... 10
Type of Heating and Cooling Equipment ....................................................... 10
Digital Input.................................................................................................... 11
Excel 10 Wall Module Options ....................................................................... 11
Abbreviations and Definitions.................................................................................... 13
Application Steps ....................................................................................................................................................................... 14
Overview................................................................................................................... 14
Step 1. Plan The System .......................................................................................... 14
Step 2. Determine Other Bus Devices Required....................................................... 14
Step 3. Lay Out Communications and Power Wiring ................................................ 15
LonWorks Layout........................................................................................... 15
Power Wiring ................................................................................................. 17
Step 4. Prepare Wiring Diagrams ............................................................................. 18
General Considerations ................................................................................. 18
W7763 Controller........................................................................................... 19
LonWorks Termination Module ...................................................................... 20
Step 5. Order Equipment .......................................................................................... 21
Step 6. Plug-Ins Configuration Screens .................................................................... 22
General.......................................................................................................... 22
Output............................................................................................................ 23
Input............................................................................................................... 24
Equipment Control ......................................................................................... 25
Switching Levels ............................................................................................ 25
Zone Options ................................................................................................. 26
Miscellaneous ................................................................................................ 26
PID................................................................................................................. 27
Commissioning .............................................................................................. 27
ID Number ..................................................................................................... 27
Step 7. Troubleshooting............................................................................................ 28
Troubleshooting Excel 10 Chilled Ceiling Controllers and Wall Modules ....... 28
® U.S. Registered Trademark 74-3332-2r0909
Copyright © 2009 Honeywell Inc.
All Rights Reserved
Page 2

EXCEL10 CHILLED CEILING CONTROLLER LNS-PLUG-INS USER GUIDE
Alarms ............................................................................................................28
Broadcasting the Service Message ................................................................30
W7763 Controller Status LED ........................................................................30
Manual Mode..................................................................................................30
Appendix A: Using A LNS tool to commission a Chilled Ceiling Controller..........................................................................31
Temperature Sensor Calibration................................................................................31
Appendix B: Configuring for Master/Slave Operation .............................................................................................................32
Output Configuration Options ....................................................................................32
Input Configuration Options .......................................................................................32
Equipment Control Options........................................................................................32
Zone Control Options.................................................................................................32
Network Variable Binding...........................................................................................32
Appendix C: LON Interface.........................................................................................................................................................33
74-3332-2
Page 3
EXCEL 10 CHILLED CEILING CONTROLLER LNS-PLUGINS USER GUIDE
INTRODUCTION
Description of Devices
The W7763C, D and E Controllers are three Chilled Ceiling
Controllers in the Excel 10 family product line. They cover a
wide range of control applications including radiators,
induction units, chilled ceiling, and chilled beam and are
suitable for either wall mounting or unit mounting. Heating
systems can be water or electric, and cooling systems can be
chilled water supply or compressors. Extensive timing
features make the W7763 especially suitable for systems
using electric heat and compressors. The W7763 Controllers
are capable of stand-alone operation; however, optimum
functional benefits are achieved when the network
communication capabilities are used.
The zone controlled by the W7763 Controller will typically use
an Excel 10 wall module with a temperature sensor for space
temperature measurement, setpoint adjustment, bypass
push-button, status LED, and LCD display. See page 2 for
form numbers of Excel 10 wall module literature for further
information.
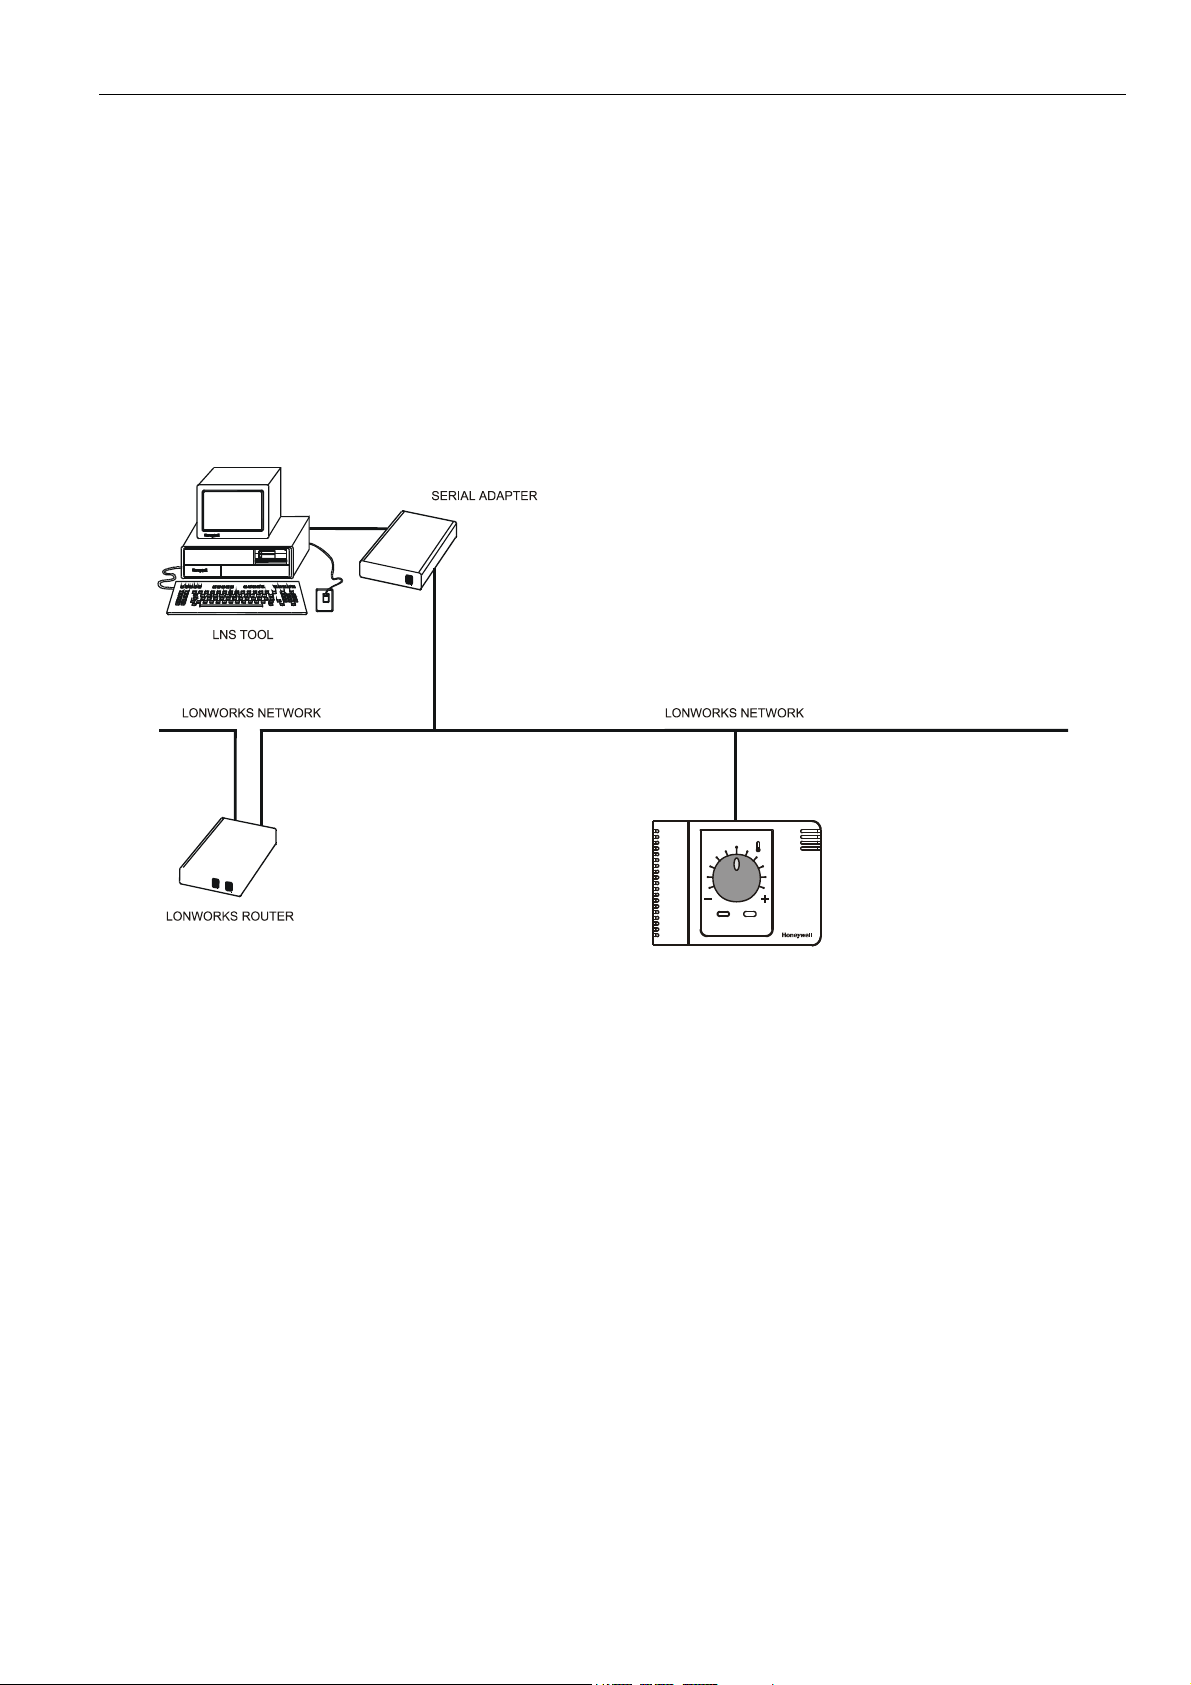
Fig. 1 shows an overview of a typical system layout.
EXCEL 10 CHILLED
CEILING CONTROLLER
Fig. 1. Typical system overview
74-3332-2
1
Page 4

EXCEL10 CHILLED CEILING CONTROLLER LNS-PLUG-INS USER GUIDE
Products Covered
This System Engineering Guide describes how to apply the
Excel 10 Chilled Ceiling Controller and the accessories to
typical Chilled Ceiling applications. The specific devices
covered include:
• W7763C, D and E Chilled Ceiling Controllers.
• T7460 Wall Modules.
• T7560 Wall Modules.
Organization of Manual
The Introduction and Application Steps 1 through 5 provide
the information needed to make accurate ordering decisions.
Application Step 6 and the Appendices include configuration
engineering that can be started using a LNS tool after the
devices and accessories are ordered. Application Step 7 is
troubleshooting. Information provided in support of the use of
third-party LonWorks communication packages to configure
Chilled Ceiling Controllers is found in the Appendices.
The organization of the manual assumes a project is being
engineered from start to finish. If you are adding to, or
changing an existing system, the Table of Contents can guide
you to the relevant information.
Applicable Literature
The following is a list of documents that contains information
related to the Excel 10 Chilled Ceiling Controller and the
EXCEL 5000 System in general.
prod. lit.
no.
74-2989
95-7485
74-3083 Excel 10 T7460 Wall Modules - Specification Data
95-7610
74-3097 Excel 10 T7560 Wall Modules - Specification Data
95-7620
74-2697 Excel 10 T7770 Wall Modules - Specification Data
95-7538
74-2950
74-2951
95-7509
95-7554
95-7510 Excel 10 Q7751A Router - Installation Instructions
95-7511
74-2039 XBS User’s Manual
74-5018 XBS Application Guide
Excel 10 W7763C,D,E Chilled Ceiling Controller Specification Data
Excel 10 W7763C,D,E Chilled Ceiling Controller Installation Instructions
Excel 10 T7460 Wall Modules - Installation
Instructions
Excel 10 T7560 Wall Modules - Installation
Instructions
Excel 10 T7770 Wall Modules - Installation
Instructions
Excel 10 Q7750A, Excel 10 Zone Manager Specification Data
Excel 10 Q7750A Excel 10 Zone Manager Checkout and Test Manual
Excel 10 Q7750A Zone Manager - Installation
Instructions
Excel 10 FTT/LPT 209541B Termination Module Installation Instructions
Excel 10 Q7752A Serial Interface - Installation
Instructions
title
Product Names
The W7763 Controller is available in three models:
• W7763C Chilled Ceiling Controller with integral setpoint
adjustment, temperature sensor, and bypass push-button.
• W7763D Chilled Ceiling Controller with integral setpoint
adjustment only.
• W7763E Chilled Ceiling Controller with no integral setpoint
adjustment, sensor, or bypass push-button.
The W7763 Chilled Ceiling Controllers can use any of the
following Wall Modules:
• T7460A with temperature sensor.
• T7460B with temperature sensor and setpoint adjustment.
• T7460C with temperature sensor, setpoint adjustment, and
bypass button and LED.
• T7770A Wall Module with temperature sensor and optional
E-Bus jack.
• T7770B Wall Module with temperature sensor, setpoint
adjustment, and E-Bus jack.
• T7770C Wall Module with temperature sensor, setpoint
adjustment, bypass button and LED, and E-Bus jack.
• T7770D Wall Module with temperature sensor, bypass
button and LED, and E-Bus jack.
Other products:
• Q7750A Excel 10 Zone Manager.
• Q7751A Bus Router (US only).
• Q7752A Serial Adapter (US only).
• AK3781 E-Bus (non-plenum): 22 AWG (0.325 mm
twisted pair solid conductor, non-shielded wire (one twisted
pair) (US only).
• AK3782 E-Bus (non-plenum): 22 AWG (0.325 mm
twisted pair solid conductor, non-shielded wire (two twisted
pairs) (US only).
• AK3791 E-Bus (plenum): 22 AWG (0.325 mm
pair solid conductor, non-shielded wire (one twisted pair)
(US only).
• AK3792 E-Bus (plenum): 22 AWG (0.325 mm
pair solid conductor, non-shielded wire (two twisted pairs)
(US only).
• C7608A Return Air Sensor (Europe only).
• VF20A Strap-on Temperature Sensor (Europe only).
2
)
2
)
2
) twisted
2
) twisted
74-3332-2 2
Page 5
EXCEL 10 CHILLED CEILING CONTROLLER LNS-PLUGINS USER GUIDE
Control Application
Chilled Ceiling systems in commercial buildings control room
temperature through the control of heat and/or cold water
valves. W7763 Chilled Ceiling Controllers cover a wide range
of applications including radiators, induction units, chilled
ceiling and chilled beam, and fan coil units. The Chilled
Ceiling controller is typically connected to an Excel 10 wall
W7763E CHILLED
CEILING CONTROLLER
CHILLED WATER
TEMP SENSOR
module which incorporates a temperature sensor, setpoint
and a bypass or override button. Connection of a humidity
sensor and chilled water temperature sensor allow calculation
of the dewpoint for condensation prevention. Fig. 2 shows a
typical Chilled Ceiling control application.
WALL MODULE
SENSOR
WITH TEMP
SENSOR
WINDOW
CONTACT
HUMIDITY
1
Digital wall module T7560B has internal humidity sensor.
Fig. 2. Typical W7763 Chilled Ceiling control application.
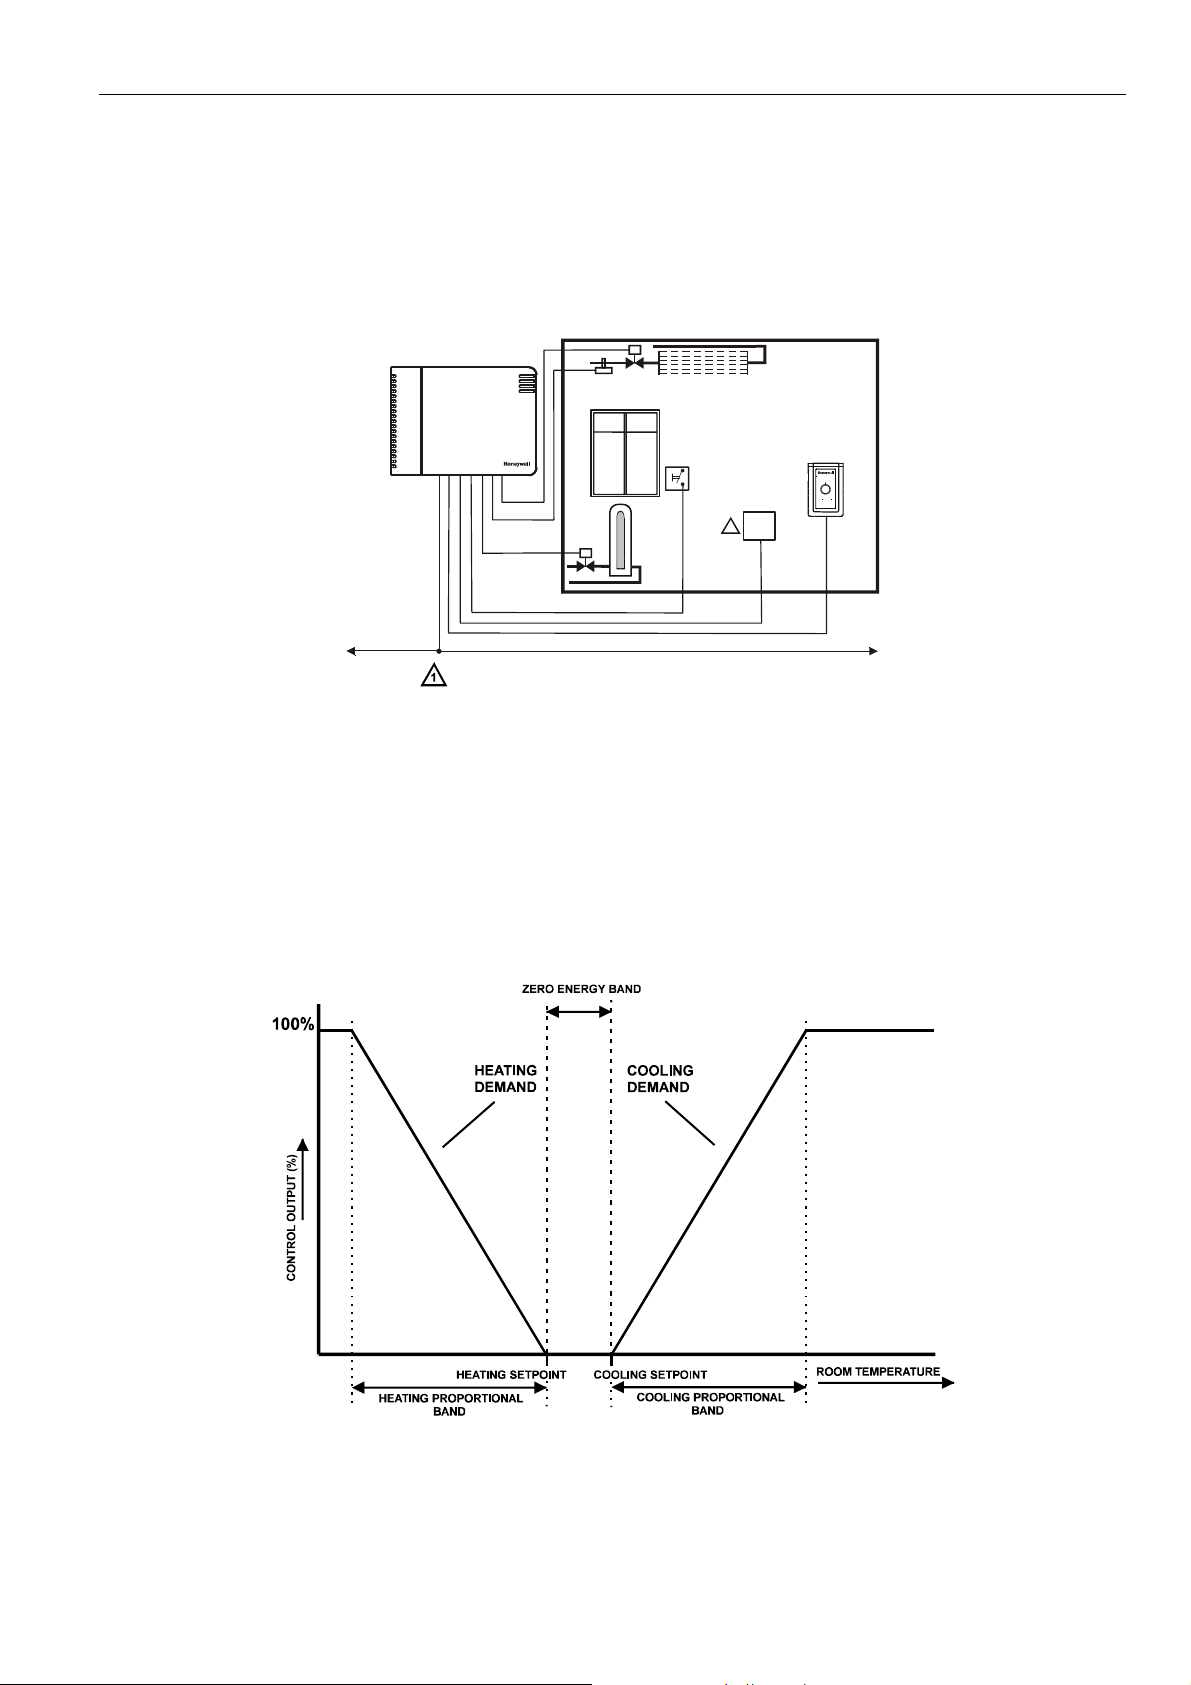
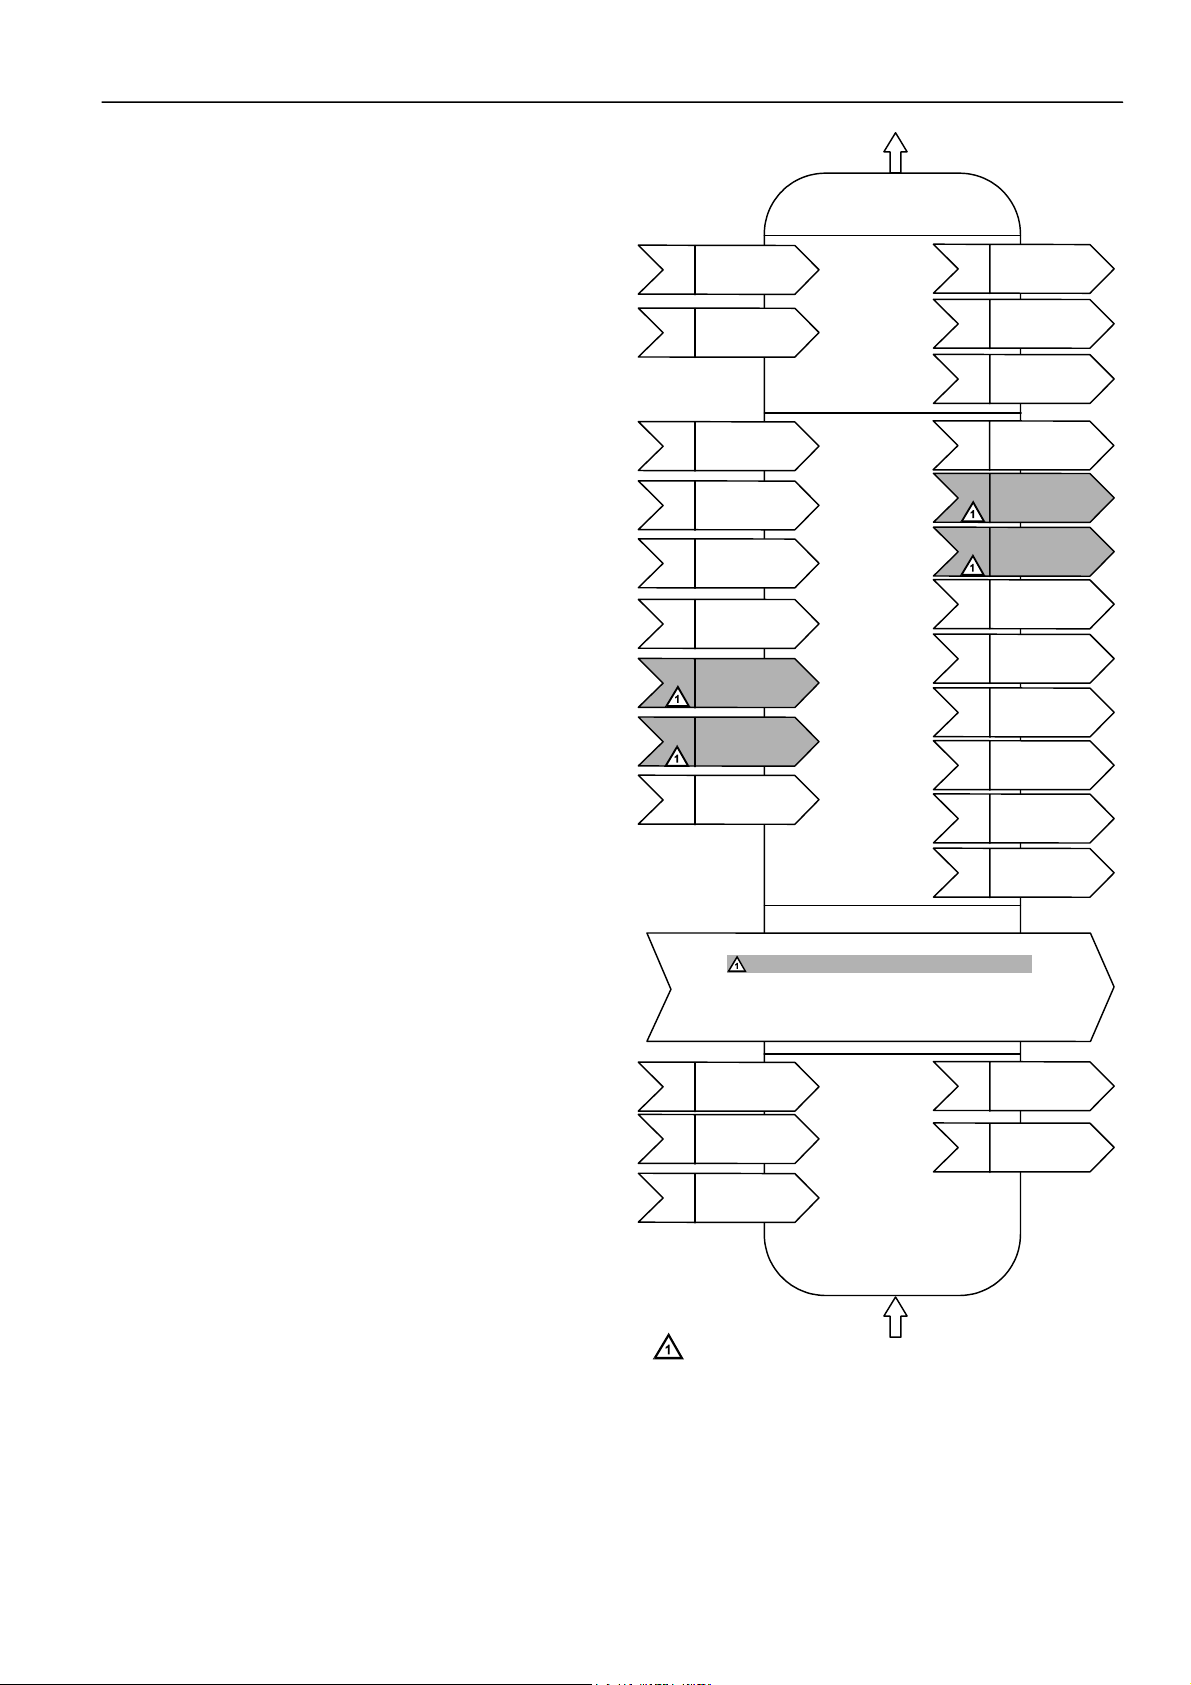
Control Provided
The basic control sequence for a W7763 Chilled Ceiling
Controller is shown in Fig. 3. As space temperature falls
below the heating setpoint, the heating output is increased. As
space temperature increases above the cooling setpoint, the
cooling output is modulated to 100%. Switching levels for
staged heating/cooling are configurable.
LonWorksLonWorks
W7763 Chilled Ceiling Controllers use a PID control algorithm
where each of the three parameters can be configured. There
are additional configurable boost parameters (HeatBoost and
CoolBoost) which specify a range outside of which the heating
or cooling outputs are turned on fully for faster response (for
thermal actuators this specifies the control hysteresis). The
controllers are delivered with factory defaults for each of the
parameters.
Fig. 3. Control sequence diagram.
74-3332-2
3
Page 6
EXCEL10 CHILLED CEILING CONTROLLER LNS-PLUG-INS USER GUIDE
Setpoints
Setpoint Knob
W7763C and D Chilled Ceiling Controllers have a built-in
setpoint potentiometer. W7763E controllers may have an
Excel 10 wall module with setpoint potentiometer connected
to them. When configured setpoint knob, the value from the
setpoint knob is used to calculate the Cooling or Heating
Occupied Setpoint. There are two options that determine how
the setpoint to be used by the control algorithm is calculated:
Relative (or Offset) and Absolute Middle. When configured for
Relative, the Wall Module setpoint knob represents a number
from -5° to +5°C (-9° to +9°F) which is added to the software
occupied setpoints for the heat and the cool modes (Cooling
Occupied Setpoint and Heating Occupied Setpoint). When
SptKnob is set to Absolute Middle, the setpoint knob becomes
the center of the Zero Energy Band (ZEB) between the
cooling and heating occupied setpoints. The range of the ZEB
is found by taking the difference between the configured
heating and cooling occupied setpoints; therefore, for
Absolute Middle, the actual setpoints are found as follows:
nvoActiveSetPt (in cooling mode) =
nvoSensor.remote_set_point+ (Cooling Occupied
Setpoint - Heating Occupied Setpoint) / 2
nvoActiveSetPt (in heating mode) = SrcRmTempSptHw -
(Cooling Occupied Setpoint - Heating Occupied
Setpoint) / 2
During Standby and Unoccupied modes, the remote setpoint
knob is ignored, and the configured setpoints for those modes
Setpoint Limits
Setpoint knob limits are provided by Minimum Limit Setpoint
Pot and Maximum Limit Setpoint Pot. The occupied setpoints
used in the control algorithms are limited by these
parameters. When the setpoint knob is configured to be
Absolute Middle, the lowest actual setpoint allowed is equal to
Minimum Limit Setpoint Pot, and the highest actual setpoint
allowed is equal to Maximum Limit Setpoint Pot. When the
setpoint knob is configured to be Relative, the lowest actual
setpoint allowed is equal to Heating Occupied Setpoint Minimum Limit Setpoint Pot, and the highest allowed is equal
to Cooling Occupied Setpoint + Maximum Limit Setpoint Pot.
Setpoint from Network
When not configured to use the wall module, nviSetPt must
be bound to another node that provides a setpoint. When
bound and a valid update is received, nviSetPtis used with the
appropriate ZEB:
ZEBoccupied = Cooling Occupied Setpoint - Heating
Occupied Setpoint
ZEBstandby = Cooling Standby Setpoint- Heating Standby
Setpoint
The Unoccupied setpoint does not depend on nviSetPt at all.
Setpoint Offset
Third party nodes may be bound to nviSetPtOffset to shift the
setpoint in the range of -10 delta °C to +10 delta °C.
are used instead.
Table 1. Example setpoint values based upon default configuration - Absolute Middle setpoint knob (°C).
Occupancy
Mode
Configured
Cooling Spt.
Configured
Heating Spt. ZEB
Setpoint
1
Knob
Effective
Cooling Spt.
2,3
Effective
Heating Spt.
2,4
Occupied 23 21 2 21 22 20
Standby 25 19 6 21 24 18
Unoccupied 28 16 12 X 28 16
NOTES:
1. Sample value shown. Limited by default configuration settings to the range of 12 to 30°C.
2. Limited to the range of 10 to 35°C.
3. = Setpoint Knob + (ZEB/2)
4. = Setpoint Knob – (ZEB/2)
Table 2. Example setpoint values based upon default configuration - Relative setpoint knob (°C).
Occupancy
Mode
Configured
Cooling Spt.
Configured
Heating Spt. ZEB
Setpoint
1
Knob
Effective
Cooling Spt.
2,3
Effective
Heating Spt.
2,4
Occupied 23 21 2 -2 21 19
Standby 25 19 6 -2 23 17
Unoccupied 28 16 12 X 28 16
NOTES:
1. Sample value shown. Limited by default configuration settings to the range of -5 to 5°C.
2. Limited to the range of 10 to 35°C.
3. = Configured Cooling Setpoint + Setpoint Knob
4. = Configured Heating Setpoint + Setpoint Knob
74-3332-2 4
Page 7

EXCEL 10 CHILLED CEILING CONTROLLER LNS PLUG-INS USER GUIDE
Bypass
Bypass Mode
During Unoccupied periods, the bypass push-button (either on
the controller itself or on the Wall Module) may be used to
cause the Occupied setpoints to be used by the control
algorithm. The mode may also be initiated by setting
nviManOccCmd to OC_BYPASS via the network The
controller remains in Bypass mode until:
1. The bypass timer has timed out, or
2. The user again presses the Wall Module push-button to
cancel Bypass mode, or
3. The occupancy schedule (nviTodEvent network input)
switches the mode to Occupied.
4. The network input nviManOccCmd is set to to OC_NUL.
The LED on the Wall Module indicates the current bypass
mode status (see Wall Module Status LED section).
Bypass Timer
When the bypass mode has been activated, the bypass timer
is set to BypTime (default of 180 minutes), at the end of which
the mode reverts to the original occupancy state. See also
Wall Module Bypass push-button section.
Continuous Unoccupied Mode
This mode is entered when a wall module is configured to
allow it and the bypass button is pressed for four to seven
seconds. This mode can also be entered via a network
command (nviManOccCmd set to OC_UNOCCUPIED). The
controller uses the Unoccupied setpoints. The controller
remains in this mode indefinitely, or until the bypass button is
pressed to exit the mode, or a network command is sent to
clear the mode.
Bypass Push-Button
W7763C Chilled Ceiling Controllers have a built-in bypass
push-button. W7763D and E controllers may have an
Excel 10 wall module with bypass push-button connected to
them. There are three ways to configure the bypass pushbutton (see Table 14 for further information):
NONE
BYPASS_UNOCCUPIED
BYPASS_ONLY
Override Priority
The Chilled Ceiling controller can be configured to arbitrate
overrides coming from the bypass push-button and the
network. There are two possible states which have the
following meanings:
LAST_WINS-Specifies that the last command received
from either the wall module or nviManOccCmd
determines the effective override state.
NETWORK_WINS-Specifies that when nviManOccCmd is
not OC_NUL, then the effective occupancy is
nviManOccCmd regardless of the wall module override
state.
LED/LCD
LED Override
The wall module’s LED shows the override from the bypass
button or from the network.
• LED on ⇒ Override Bypass
• One flash per second ⇒ Override Unoccupied
• Two flashes per second ⇒ Override Standby or Occupied
• LED off ⇒ No Override
• Four flashes per second ⇒ Controller answers network
management wink command.
LED Occupancy
The wall module’s LED shows the effective occupancy mode.
• LED on ⇒ Effective Occupied or Bypass
• One flash per second ⇒ Effective Standby
• LED off ⇒ Effective Unoccupied
• Four flashes per second ⇒ Controller answers network
management wink command.
LCD Display
This mode is only used for T7560 Wall Modules. The
occupancy mode is represented by the following symbols:
⇒ Effective Occupied or Bypass
⇒ Effective Standby
⇒ Effective Unoccupied
⇒ Controller is off
and ⇒ Controller is off, frost protection is enabled.
Flashing symbols represent the Override mode:
⇒ Override Occupied or Bypass
⇒ Override Standby
⇒ Override Unoccupied
⇒ Controller answers the network management wink
command.
Energy-Saving Features
Standby Mode
The digital input for an occupancy sensor (usually a motion
detector) provides the controller with a means to enter an
energy-saving Standby mode whenever there are no people
in the room. Standby mode occurs when the scheduled
occupancy is Occupied and the occupancy sensor indicates
no people currently in the room. If no occupancy sensor is
connected directly to the controller, an occupancy sensor from
another node may be bound to the network input
DestOccSensor. The controller can also be put in Standby
mode by setting nviManOccCmd to OC_STANDBY via the
network. When in Standby mode, the W7763 uses the
Standby Cooling or Heating setpoint (SptCoolStby or
SptHeatStby).
Window Sensor
The digital input for a window contact provides the algorithm
with a means to disable its temperature control activities if
someone has opened a window or door in the room. If no
window sensor is connected to the controller, the sensor from
another node may used by binding it to nviWindow. Frost
protection remains active (controller enables heating circuit
with room temperatures below 46°F (8°C)). Normal
temperature control resumes when the window closes.
74-3332-2
5
Page 8
EXCEL10 CHILLED CEILING CONTROLLER LNS PLUG-INS USER GUIDE
Demand Limit Control
When a high-electrical-demand signal is received from an
energy management system via the LonWorks network
(nviDlcShed), the controller uses Demand Limit Control Bump
to shift the current setpoint (down for heating and up for
cooling) by the configured value to save energy.
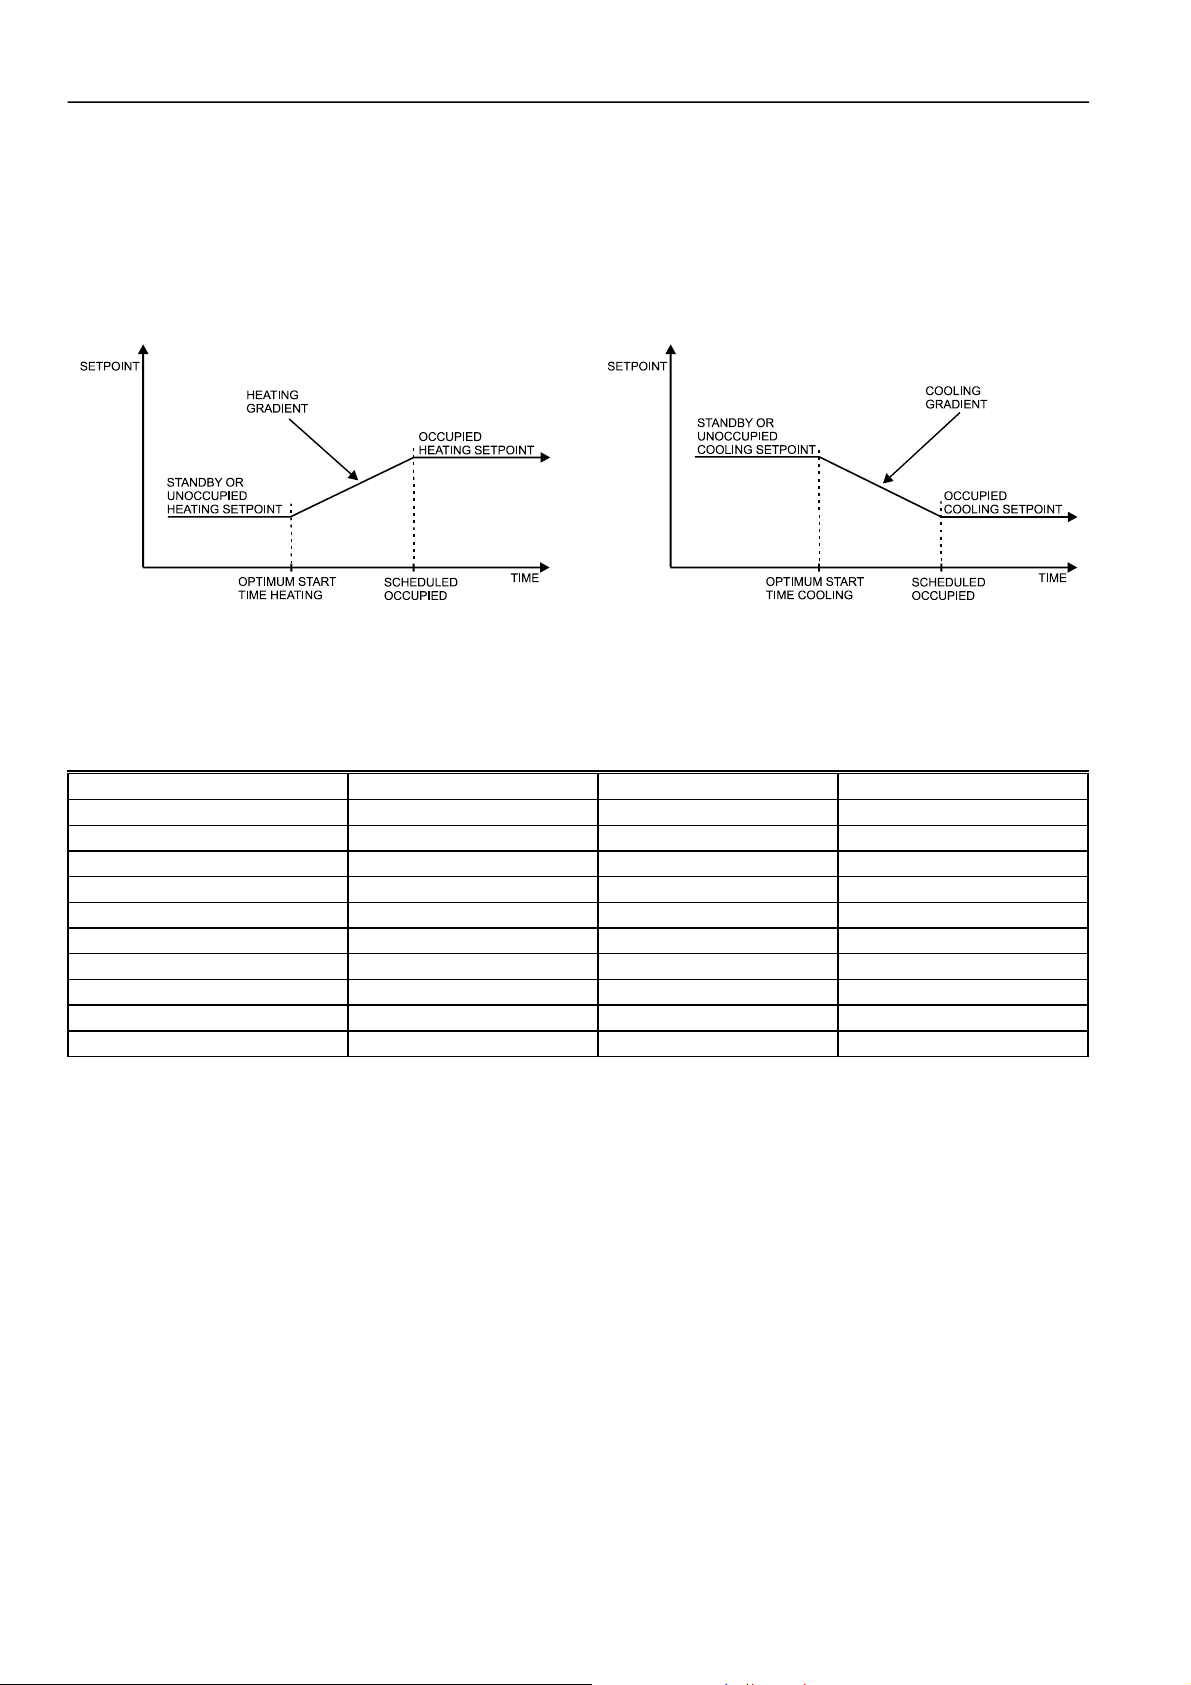
Fig. 4. Optimum start - heating.
Optimum Start Gradients
There are two parameters, Cool Rec Ramp and Heat Rec
Ramp, that can be configured to cause the cooling and
heating setpoints respectively to ramp up to their Occupied
settings from their Unoccupied or Standby settings prior to
scheduled Occupancy. The Chilled Ceiling controller uses the
configured rates to determine the optimum time to start
increasing the heating or cooling demand. See the following
figures. The configuration parameters are in K/hour.
Fig. 5. Optimum start - cooling.
Occupancy Status
The occupancy status is determined based upon the following table. Manual override may come from the network input
nviManOccCmd or from the bypass push-button.
Table 3. Effective Occupancy Mode Arbitration
Scheduled occupancy mode Occupancy sensor status Manual override status Effective operating mode
Occupied Occupied Not assigned OC_OCCUPIED
Occupied Not occupied Not assigned OC_STANDBY
X X Occupied OC_OCCUPIED
X X Unoccupied OC_UNOCCUPIED
X X Standby OC_STANDBY
Occupied X Bypass OC_OCCUPIED
Standby X Not assigned OC_STANDBY
Standby X Bypass OC_OCCUPIED
Unoccupied X Not assigned OC_UNOCCUPIED
Unoccupied X Bypass OC_BYPASS
X=Don't care
Condensation Protection
W7763 Chilled Ceiling Controllers have several possibilities
for protection from condensation, using a calculated or
configured dewpoint and/or condensation switch.
Dewpoint Calculation
If the controller has humidity and chilled water inputs, either
directly connected or from the network, it will actively calculate
the dewpoint based upon room temperature and humidity. If
configured to do so, the controller will close the cooling valve
and issue an alarm if the chilled water temperature drops
below the dewpoint plus a configurable safety band. If no
humidity input is available, the controller will use a fixed
configured dewpoint.
Condensation Switch
The digital input can be configured for a condensation switch
which will close the cooling valve when condensation is
detected. This feature is independent of the comparison of the
chilled water temperature to the dewpoint and remains active
even if the dewpoint protection is disabled.
74-3332-2 6
Page 9

EXCEL 10 CHILLED CEILING CONTROLLER SYSTEM ENGINEERING
Operating Modes
The possible modes of operation are listed in Table 4.
Table 4. Modes of Operation for Excel 10 Chilled Ceiling Controller.
Mode Description Events Causing a Controller to Switch to This Mode
Operational Modes (NV Reference)
START-UP AND
WAIT
FLOATING
OUTPUTS SYNCH
COOLING The Excel 10 Chilled Ceiling
HEATING The Excel 10 Chilled Ceiling
MANUAL No control algorithms are active.
FACTORY TEST Control algorithm is disabled; special
DISABLED Control algorithms are terminated,
Control algorithms are disabled.
Outputs stay in their initial positions.
Physical inputs are periodically read
and digital filtering of analog inputs is
turned off to speed up settling time.
Network input variables are received
and output variables are sent
periodically.
The Chilled Ceiling Controller drives
the floating control valves to their
initial positions and then transitions to
one of the control modes.
Controller is controlling in the Cooling
mode.
Controller is controlling in the Heating
mode.
Physical inputs are periodically read
and digital filtering of analog inputs is
turned off to speed up settling time.
Network input variables are received
and output variables are sent
periodically Outputs may be turned on
or off by
nviTest.
factory test program runs.
outputs are turned off (turn-off
sequences are active). Frost
protection is disabled.
settings in network input
This is the first mode after an application restart.
When the effective occupancy changes to unoccupied or
standby, after start-up or 24 hours have elapsed since the last
start-up, the Chilled Ceiling Controller transitions to this mode..
Network input (nviApplicMode) has a value of HVAC_COOL or
HVAC_AUTO and the space temperature is above the cooling
setpoint.
Network input (nviApplicMode) has the value of HVAC_HEAT or
HVAC_AUTO and the space temperature is below the heating
setpoint..
Network input (nviManualMode) has value of MODE_MANUAL.
This mode is for factory testing only.
Network input (nviManualMode) has a value of
MODE_DISABLED.
74-3332-2
7
Page 10
EXCEL10 CHILLED CEILING CONTROLLER LNS PLUG-INS USER GUIDE
Agency Listings
Table 5 provides information on agency listings for Excel 10 Chilled Ceiling Controller products.
Table 5. Agency listings.
Device Agency Comments
W7763 Chilled Ceiling
Controller
CE General Immunity per European Consortium standards EN50081-1 (CISPR 22
Class B) and EN 50082-1:1992 (based on Residential, Commercial, and Light
Industrial).
EN 61000-4-2 IEC 1000-4-2 (IEC 801-2) Electromagnetic Discharge.
EN 50140, EN 50204 IEC 1000-4-3 (IEC 801-3) Radiated Electromagnetic Field.
EN 61000-4-4 IEC 1000-4-4 (IEC 801-4) Electrical Fast Transient (Burst).
Radiated Emissions and Conducted Emissions.
EN 55022:1987 Class B.
CISPR-22: 1985.
FCC Complies with requirements in FCC Part 15 rules for a Class B Computing
Device.
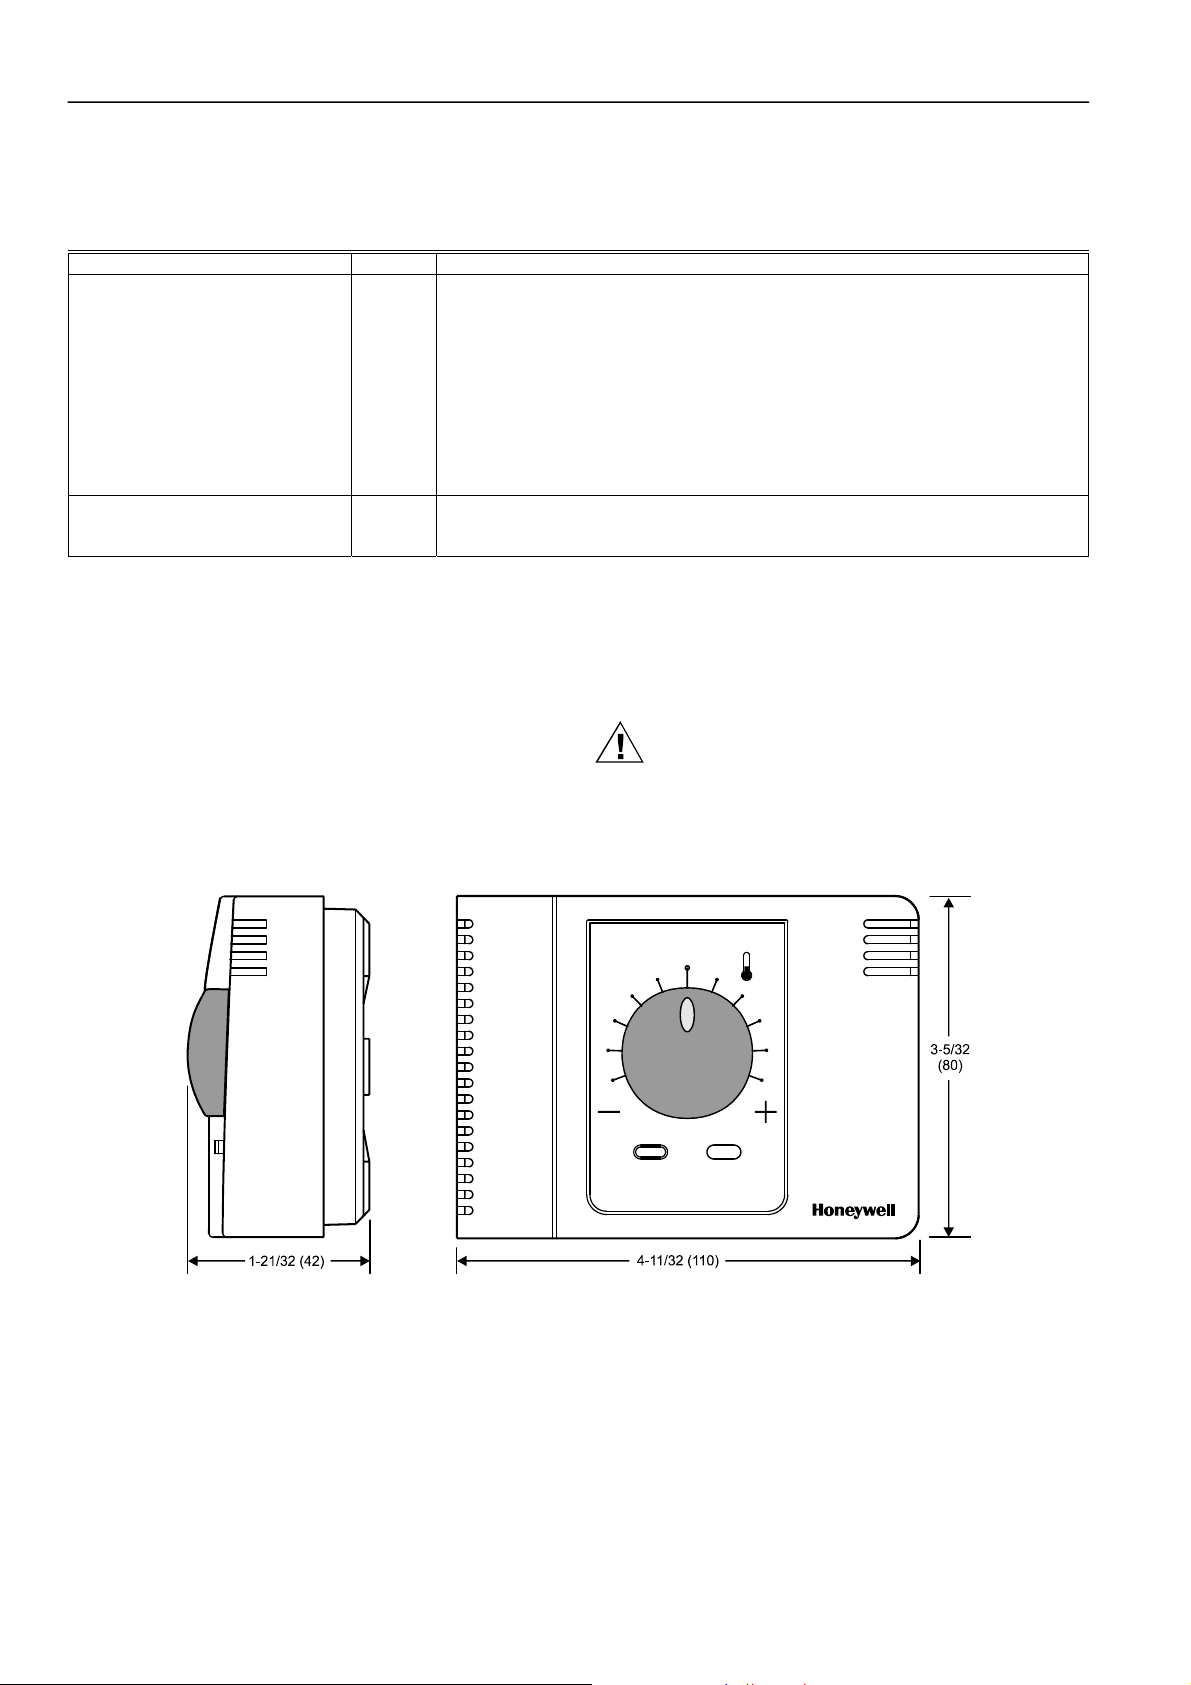
Construction
Controllers
The Excel 10 W7763 Chilled Ceiling Controller is available in
three basic models. The W7763C and D have a built-in
setpoint adjustment knob, available in relative or absolute
(degrees C or degrees F) scales. The W7763C also has a
temperature sensor and bypass push-button and LED. The
W7763E has no built-in setpoint adjustment, temperature
sensor or bypass push-button, and as such requires setpoint
and temperature inputs either from a direct-connected wall
module or from the LonWorks network. All of the controllers
are powered by 24 Vac.
All wiring connections to the controllers are made at screw
terminal blocks accessible beneath a plastic safety cover.
Mounting dimensions are shown in Fig. 6.
CAUTION
Turn off power prior to connecting to or removing
connections from any terminals to avoid electrical
shock or equipment damage.
Fig. 6. W7763 construction in inches (mm).
74-3332-2 8
Page 11
EXCEL10 CHILLED CEILING CONTROLLER LNS PLUG-INS USER GUIDE
Controller Performance Specifications
Power Supply:
24 Vac ± 20%, -15%, 50/60 Hz.
Operating Temperature:
32° to 122°F (0° to 50°C).
Shipping/Storage Temperature:
-40° to 158°F (-40° to 70°C).
Relative Humidity:
5% to 95% noncondensing
Inputs:
Temperature Sensors:
20k ohm NTC
Setpoint Potentiometer:
10k ohm
Digital Input:
Closed ≤ 400 ohms (1.5 mA)
Open ≥ 10k ohms (4.8 V)
Humidity Sensor:
0 to 10 Vdc
Outputs:
Triac voltage range:
24 Vac ± 20%.
Triac maximum current ratings:
250 mA continuous
650 mA surge for 30 sec.
IMPORTANT:
When any device is energized by a Triac, the device
must be able to sink a minimum of 15 mA. If nonHoneywell motors, actuators, or transducers are to
be used with Excel 10 Chilled Ceiling Controllers,
compatibility must be verified.
Interoperability
The W7763 Controllers use the Echelon Bus LonTalk
protocol. They support the L
“Fan Coil Unit Controller”, version 2.0. Fig. 7 shows the
implementation used.
ONMARK Functional Profile # 8020
nviSpaceTemp
nv1
SNVT_temp_p
nviSetPoint
nv2
SNVT_temp_p
nviFanSpeedCmd
nv6
SNVT_switch
nviOccCmd
nv7
SNVT_occupancy
nviApplicMode
nv8
SNVT_hvac_mode
nviSetPtOffset
nv9
SNVT_temp_p
nviWaterTemp
nv10
SNVT_temp_p
nviDischAirTemp
nv17
SNVT_temp_p
nviEnergyHoldOff
nv18
SNVT_switch
nviSensorOcc
SNVT_Occupancy
nviEmerg
SNVT_hvac_emerg
Hardware
Output
Fan Coil Unit Controller
Object #8020
nvoHeatOutput
nv3
SNVT_lev_percent
Mandatory
Network
Var ia ble s
Optional
Network
Var iable s
nvoCoolOutput
nv4
SNVT_lev_percent
nvoFanSpeed
nv5
SNVT_switch
nvoTerminalLoad
nv11
SNVT_lev_percent
nvoLoadAbs
nv12
SNVT_power
nvoDischAirTemp
nv13
SNVT_temp_p
nvoReheat
nv14
SNVT_switch
nvoSpaceTemp
nv15
SNVT_temp_p
nvoEffectSetPt
nv16
SNVT_temp_p
nvoEffectOcc
nv19
SNVT_occupancy
nvoEnergyHoldOff
nv20
SNVT_switch
nvoUnitStatus
nv21
SNVT_hvac_status
Configuration Properties
nc49 - nciSndHrtBt SNVT_time_sec mandatory
nc52 - nciMinOutTm SNVT_time_sec optional
nc48 - nciRcvHrtBt SNVT_time_sec optional
nc17 - nciLocation SNVT_str_asc optional
nc60 - nciSetPnts
nc59 - nciNumValve
SNVT_temp_setpt
SNVT_count
Manufacturer
Defined
mandatory
optional
nvoSensorOcc
SNVT_occupancy
Section
nvoDigitInState
SNVT_switch
nviReheatRelay
SNVT_switch
Hardware
Input
NOT SUPPORTED.
Fig. 7. LONMARK Fan Coil Unit object profile.
74-3332-2
9
Page 12

EXCEL10 CHILLED CEILING CONTROLLER LNS PLUG-INS USER GUIDE
Configurations
General
The following sections provide an overview of the Excel 10
Chilled Ceiling Controller options related to inputs and
outputs. See Application Step 6. Plug-Ins Configuration
Screens for a complete list of configuration options and
defaults.
Table 6. Hardware options summary.
Option Possible configurations
Chilled Ceiling system type two-pipe
four-pipe
Heating actuator type floating
floating-mid (one for
heat/cool)
one-stage
two-stage
three-stage
PWM
thermal
Cooling actuator type floating
floating-mid (one for
heat/cool)
one-stage
two-stage
three-stage
PWM
thermal
Digital input 1 not used
window closed
occupied sensor
movement
window open
unoccupied sensor
heat changeover input
no movement
Analog input 2 not used
chilled water temperature
Analog input 3 not used
humidity
Wall module option local
shared
Space temperature sensor
type
NOTE: 1 The floating-mid option is only for changeover
applications and uses only one of the two outputs.
none
NTC non-linearized
1
1
cool changeover
Type of Heating and Cooling Equipment
W7763 controllers can operate with either two-pipe or fourpipe systems. A two-pipe system requires a changeover input
to the controller (hardware or network input).
W7763 controllers can operate with a variety of actuators for
heating and cooling equipment. Floating actuators can be
used which will require specifying the valve run time during
configuration of the controller. Valve action can be configured
as either direct or reverse. When in a two-pipe system with a
changeover input, a floating actuator can be used which has
the middle position (50%) as the zero energy position. The
cool range is then 0 to 50% and the heat range 50 to 100%.
The output must configured as floating-mid.
Multi-stage systems can be controlled with up to three
different stages of heating/cooling control. Switching levels
are specified in % of control level (see Fig. 8) as is a
hysteresis setting which applies to all switching levels.
Heating and Cooling switching levels and hysteresis are
specified separately. Minimum off times can be configured,
and a minimum on time can also be configured.
PWM electronic valves and thermal actuators can also be
connected and can be configured as either direct or reverse
action. The cycle time must be specified during configuration.
For PWM valves the zero and full positions must also be
configured.
74-3332-2 10
Page 13
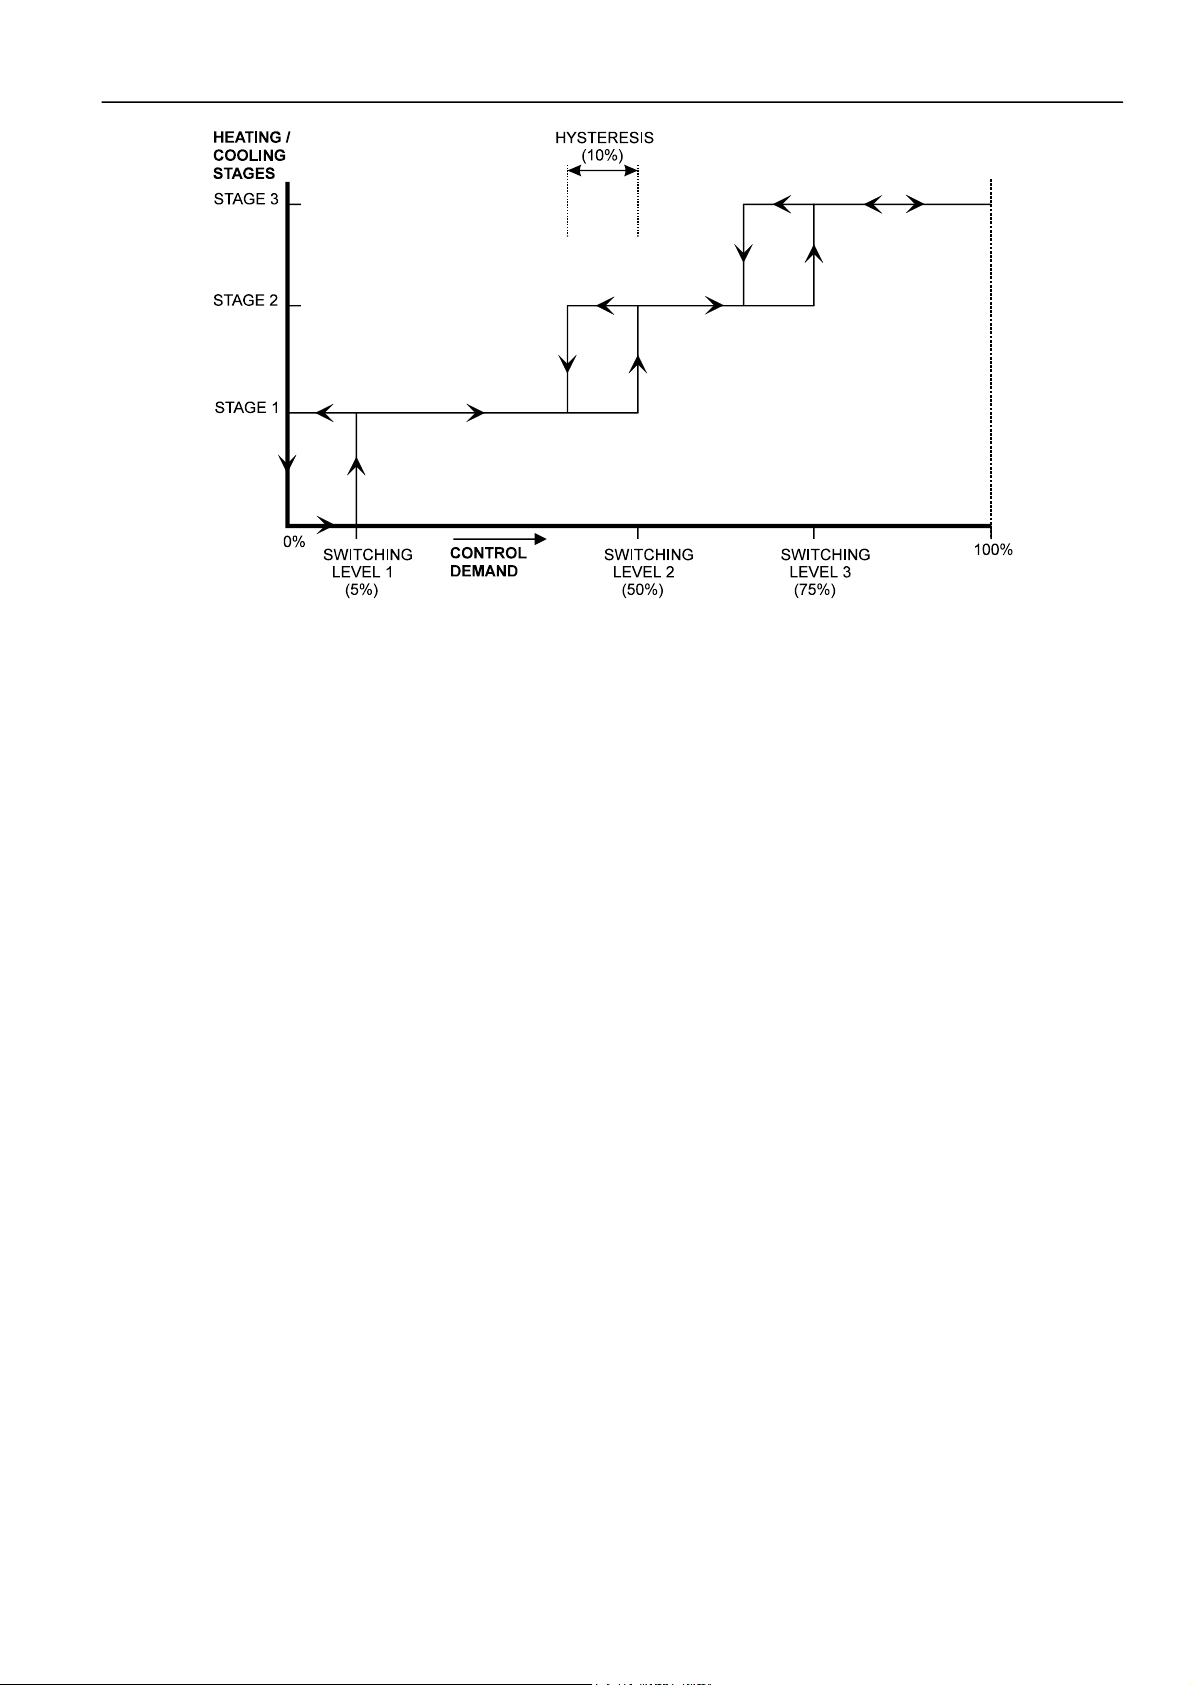
EXCEL10 CHILLED CEILING CONTROLLER LNS PLUG-INS USER GUIDE
Fig. 8. Three-stage heating/cooling switching (defaults for switching levels and hysteresis shown).
Digital Input
There is a single digital input to the W7763 Controller which
may be configured to accommodate an occupancy sensor, a
window open/closed contact, a condensation detector, or a
changeover input. It is possible to configure the input for
either normally-open or normally-closed contacts for any of
the switches. Choose the option which corresponds to the
condition of a closed contact (input high).
The control algorithm in the Chilled Ceiling Controller uses the
Occupancy Sensor, if configured, to determine the Effective
Occupancy mode of operation(see Table 3). If the Time Of
Day (TOD) schedule indicates an Occupied state, and the
Occupancy Sensor contact is closed, the Effective Occupancy
mode will be Occupied. However, if the TOD schedule
indicates an Occupied state and the Occupancy Sensor
contact is open, then the Effective Occupancy mode will be
Standby. The flow control algorithm will then control to the
Standby Cooling and Heating Setpoints.
Configuring the digital input for movement or no movement
(dependent upon normally-open or normally-closed contacts)
adds a delay of 15 minutes to the occupancy sensor such that
the space is considered occupied until 15 minutes has
elapsed since the last movement is detected.
If the digital input is configured as a window open/closed
contact, heating and cooling control will be disabled while the
window is detected open. Frost protection will be in effect,
however, and heating control will be enabled if the
temperature drops below 46°F (8°C). A set of contacts may
be wired in series for multiple windows.
When configured for a condensation switch, the controller will
close the cooling valve when condensation is detected.
The input may also be configured for changeover for a twopipe system. The input can accommodate a switch that is
closed for heating and open for cooling or open for heating
and closed for cooling.
NOTE: The Excel 10 Chilled Ceiling Controller has limited
power available (only 1.5 mA/4.8 V) for checking the
digital input for contact closures. Ensure that
contacts used remain within the specified resistance
tolerance range (closed ≤ 400) even when aged.
Excel 10 Wall Module Options
A typical Chilled Ceiling installation requires an Excel 10 wall
module containing a 20k ohm NTC room temperature sensor
and additional features depending on the wall module type
(see Excel 10 wall module literature for further information).
The W7763C Chilled Ceiling Controller has the following
features built-in and requires no external wall module:
— setpoint adjustment
— bypass button
— status LED
— a LonWorks network access jack
The W7763D has a setpoint knob and LonWorks jack but may
require a wall module for temperature sensing and bypass
button/LED functions. The W7763E Controller has only the
LonWorks jack and would normally require a wall module.
IMPORTANT
Wall modules with fan speed switches must not be
used with W7763 Chilled Ceiling Controllers.
The Chilled Ceiling Controller can be configured to use a
return air sensor rather than the sensor in the controller or
wall module. Setpoint adjustments can be configured as
relative or absolute, and upper and lower limits can be set.
The bypass button can be configured to override the control
mode to occupied for a configurable bypass time and to
override the control mode indefinitely to unoccupied or it may
be configured to only override to occupied. The button may
also be used to cancel the override.
74-3332-2
11
Page 14

EXCEL10 CHILLED CEILING CONTROLLER LNS PLUG-INS USER GUIDE
Common Temperature Control (Master/Slave Controllers)
When one or more Chilled Ceiling Controllers serve a
common area and a single temperature sensor is to be used,
a master/slave arrangement can be configured. One Excel 10
Chilled Ceiling Controller is configured for the local wall
module with the desired options. The other Excel 10 Chilled
Ceiling Controller(s) will be configured without wall modules
and with certain network variables bound with the master
controller. Refer to Appendix B of this document for more
details.
IMPORTANT
The slave units must have the same HVAC
equipment connected to it as the master units.
The slave units will not use any internal temperature
setpoints or control algorithms. The master controller
determines heating/cooling output based upon
setpoints and occupancy and command mode status
and communicates this to the slave via the network.
See Appendix B, Configuring for Master/Slave
Operation, for more information,
74-3332-2 12
Page 15

EXCEL10 CHILLED CEILING CONTROLLER LNS PLUG-INS USER GUIDE
Abbreviations and Definitions
Echelon
EMI - Electromagnetic Interference; electrical noise that
EMS - Energy Management System; refers to the
EEPROM - Electrically Erasable Programmable Read Only
EPROM - Erasable Programmable Read Only Memory; the
Firmware - Software stored in a nonvolatile memory medium
I/O - Input/Output; the physical sensors and actuators
I x R - I times R or current times resistance; refers to Ohms
K - Degrees Kelvin.
LNS LON Network Service
®
- The company that developed the LONWORKS®
network and the Neuron
®
chips used to
communicate on the LonWorks network .
can cause problems with communications signals.
controllers and algorithms responsible for calculating
optimum operational parameters for maximum
energy savings in the building.
Memory; the variable storage area for saving user
Setpoint values and factory calibration information.
firmware that contains the control algorithms for the
Excel 10 Chilled Ceiling Controller.
such as an EPROM.
connected to a controller.
Law: V = I x R.
LonWorks Segment - A LonWorks section containing no
more than 60 nodes. Two segments can be joined
together using a router.
NEC - National Electrical Code; the body of standards for
safe field-wiring practices.
NEMA - National Electrical Manufacturers Association; the
standards developed by an organization of
companies for safe field wiring practices.
NV - Network Variable; an Excel 10 Controller parameter
that can be viewed or modified over the LonWorks
network.
OEM - Original Equipment Manufacturer; the company that
builds the fan coil units.
PC - Personal Computer.
Pot - Potentiometer; a variable resistance electronic
component located on Excel 10 wall modules. Used
to allow user-adjusted Setpoints to be input into the
Excel 10 Chilled Ceiling Controller.
TOD - Time-Of-Day; the scheduling of Occupied and
Unoccupied times of operation.
VA - Volt-Amperes; a measure of electrical power output
or consumption as applicable to an ac device.
Vac - Voltage alternating current; ac voltage as opposed to
dc voltage.
74-3332-2
13
Page 16
EXCEL10 CHILLED CEILING CONTROLLER LNS PLUG-INS USER GUIDE
C
APPLICATION STEPS
NOTEBOOK P
Overview
Steps one through seven, see Table 7, address
considerations for engineering an Excel 10 Chilled Ceiling
System. These steps are guidelines intended to aid
understanding of the product I/O options, bus arrangement
choices, configuration options and the Excel 10 Chilled
Ceiling Controllers´ role.
Table 7. Application steps.
Step No. Description
1 Plan The System
2 Determine Other Bus Devices Required
3 Lay out Communication and Power Wiring
4 Prepare Wiring Diagrams
5 Order Equipment
6 Plug-Ins Configuration Screens
7 Troubleshooting
Step 1. Plan The System
Plan the use of the W7763 Controllers according to the job
requirements. Determine the location, functionality and sensor
or actuator usage. Verify the sales estimate of the number of
W7763 Controllers and wall modules required for each model
type. Also check the number and type of output actuators and
other accessories required.
When planning the system layout, consider potential
expansion possibilities to allow for future growth. Planning is
very important to be prepared for adding HVAC systems and
controllers in future projects.
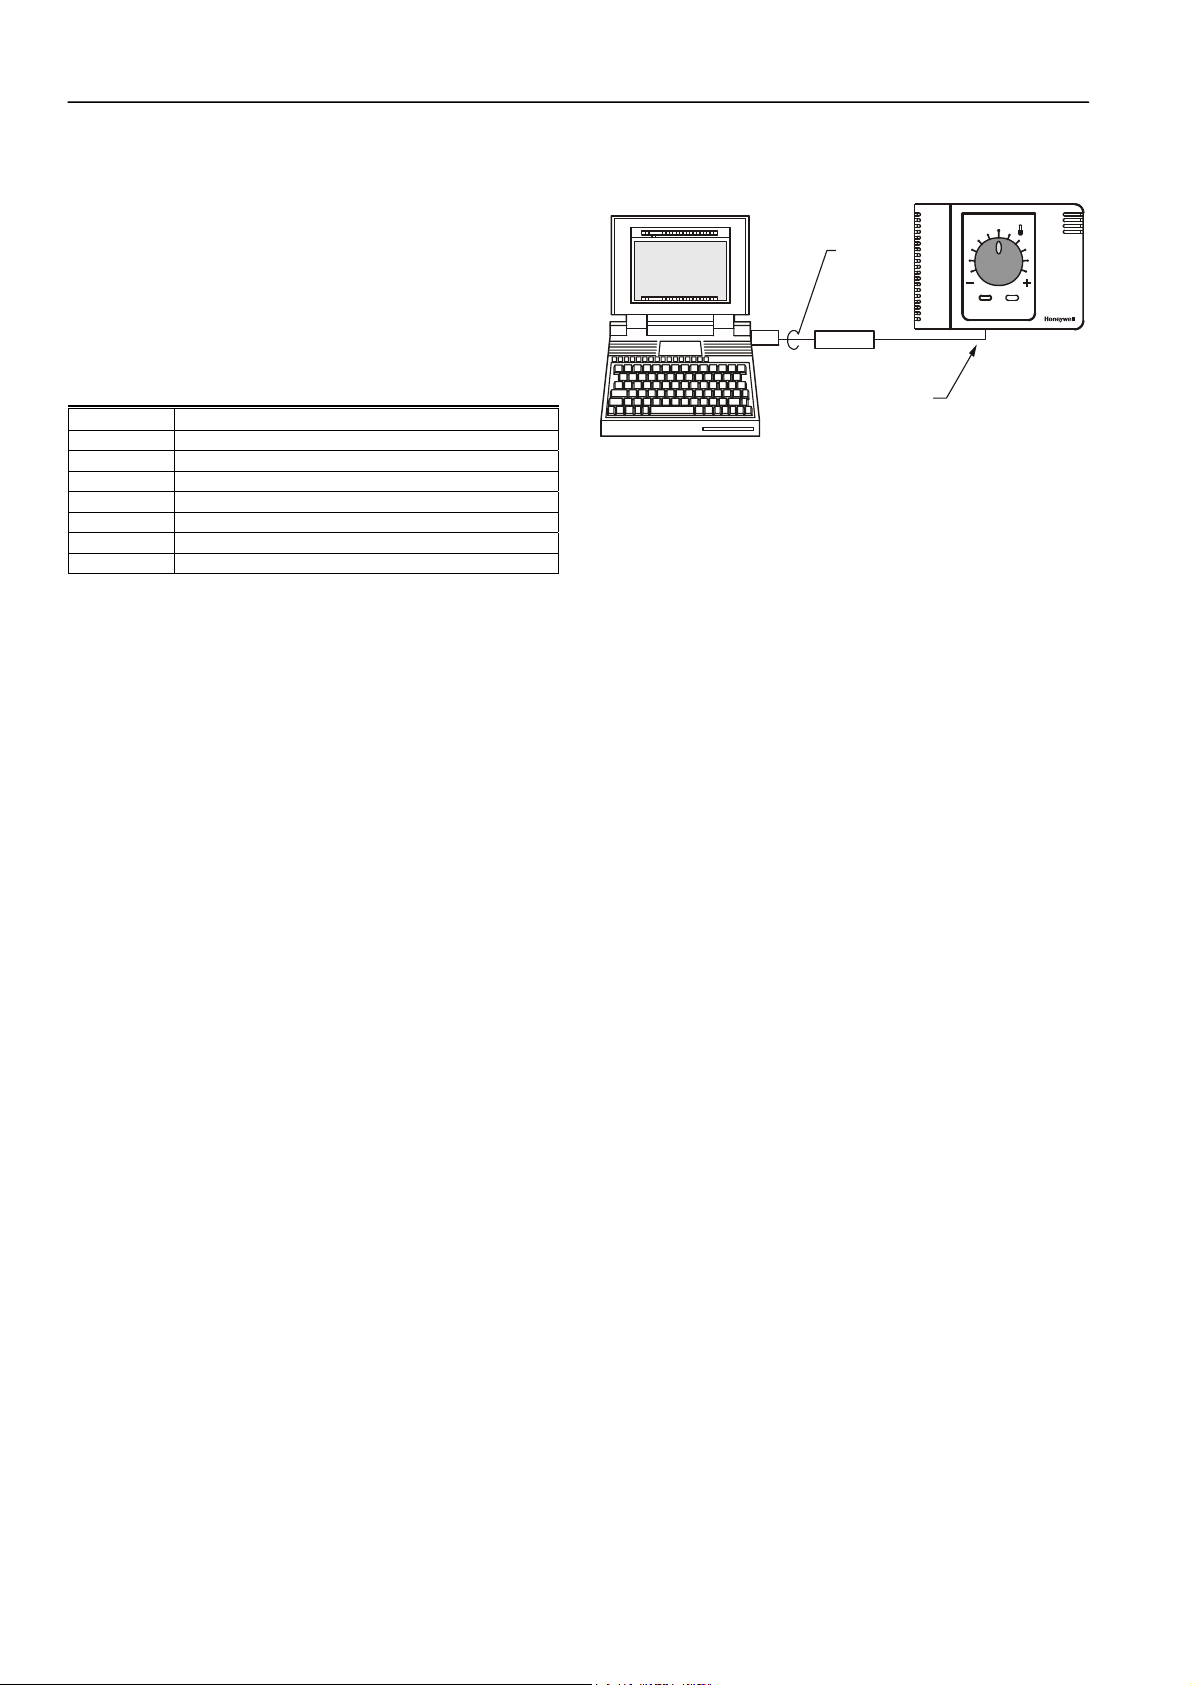
USING LNS TOOL
Fig. 9. Connecting the portable operator terminal to the
The LonWorks communication loop between controllers must
be laid out according to the guidelines applicable for that
topology. Chilled Ceiling Controllers use FTT technology that
allows daisy chain, star, loop or combinations of these bus
configurations. See Application Step 3. Lay Out
Communications and Power Wiring, for more information on
bus wiring layout, and see Fig. 10, Fig. 11, and Fig. 12 in
Application Step 4. Prepare Wiring Diagrams, for wiring
details.
It is important to understand the interrelationships between
controllers on the LonWorks network early in the job
engineering process to ensure their implementation when
configuring the controllers. (See Application Step 6. Plug-Ins
Configuration Screens, for information on the various Excel
10 Chilled Ceiling Controller parameters and on Excel 10
Chilled Ceiling Controller point mapping).
The T7770 Wall Modules can be installed only as I/O devices,
or additional wiring can be run to them for the LonWorks
network. It must be determined and documented prior to
installation which T7770 Wall Modules will have their
LonWorks network jacks connected.
Step 2. Determine Other Bus Devices
Required
A maximum of 62 nodes can communicate on a single
LonWorks segment. If more nodes are required, a router is
necessary. Using a router allows up to 125 nodes, divided
between two LonWorks segments. The router accounts for
two of these nodes (one node on each side of the router).
SHIELDED
INTERFACE
CABLE
RS-232
SERIAL
PORT
SLTA
LONWORKS PORT
LonWorks network.
CHILLED CEILING CONTROLLER
74-3332-2 14
Page 17

EXCEL10 CHILLED CEILING CONTROLLER LNS PLUG-INS USER GUIDE
Table 8. LonWorks configuration rules and device node numbers.
One LonWorks Segment Example Maximum Number of Nodes Equals 62
Maximum number of Excel 10 Controllers 60 nodes (T7460/T7560/T7770 wall modules are not
LonWorks nodes)
Total 62 nodes
Two LonWorks Segments Example Maximum Number of Nodes Equals 125
Maximum number of Excel 10 Controllers in segment number one 60 nodes (T7460/T7560/T7770 wall modules are not
LonWorks nodes)
Maximum number of Excel 10 Controllers in segment number two 60 nodes (T7460/T7560/T7770 wall modules are not
LonWorks nodes)
Total 125 nodes
The maximum length of a FTT LonWorks segment is 4600 ft
(1400 m) for a daisy chain configuration or 1650 ft (500 m)
total wire length and (400 m) node-to-node for any other type
of configuration.
NOTE: For FTT LonWorks segments the distance from each
transceiver to all other transceivers and to the
termination must not exceed the maximum node-tonode distance. If multiple paths exist, the longest
one should be used for the calculation.
If longer runs are required, add a Router to partition the
system into two segments.
In addition, all LonWorks segments require the installation of
a Bus Termination Module. For a FTT LonWorks segment,
one or two Termination Modules may be required depending
upon the bus configuration. See Application Step 3. Lay Out
Communications and Power Wiring, and the LonWorks
Termination Module subsection in Application Step 4 for more
details.
encoding. Wire the LonWorks network using level IV 22 AWG
or plenum rated level IV 22 AWG nonshielded, twisted pair,
solid conductor wire as the recommended wire size (see
Table 10 for part numbers). A FTT LonWorks can be wired in
daisy chain, star, loop or any combination thereof as long as
the maximum wire length requirements given in Step 2 are
met.
NOTE: Due to the transformer isolation, the bus wiring does
not have a polarity; that is, it is not important which
of the two LonWorks terminals are connected to
each wire of the twisted pair.
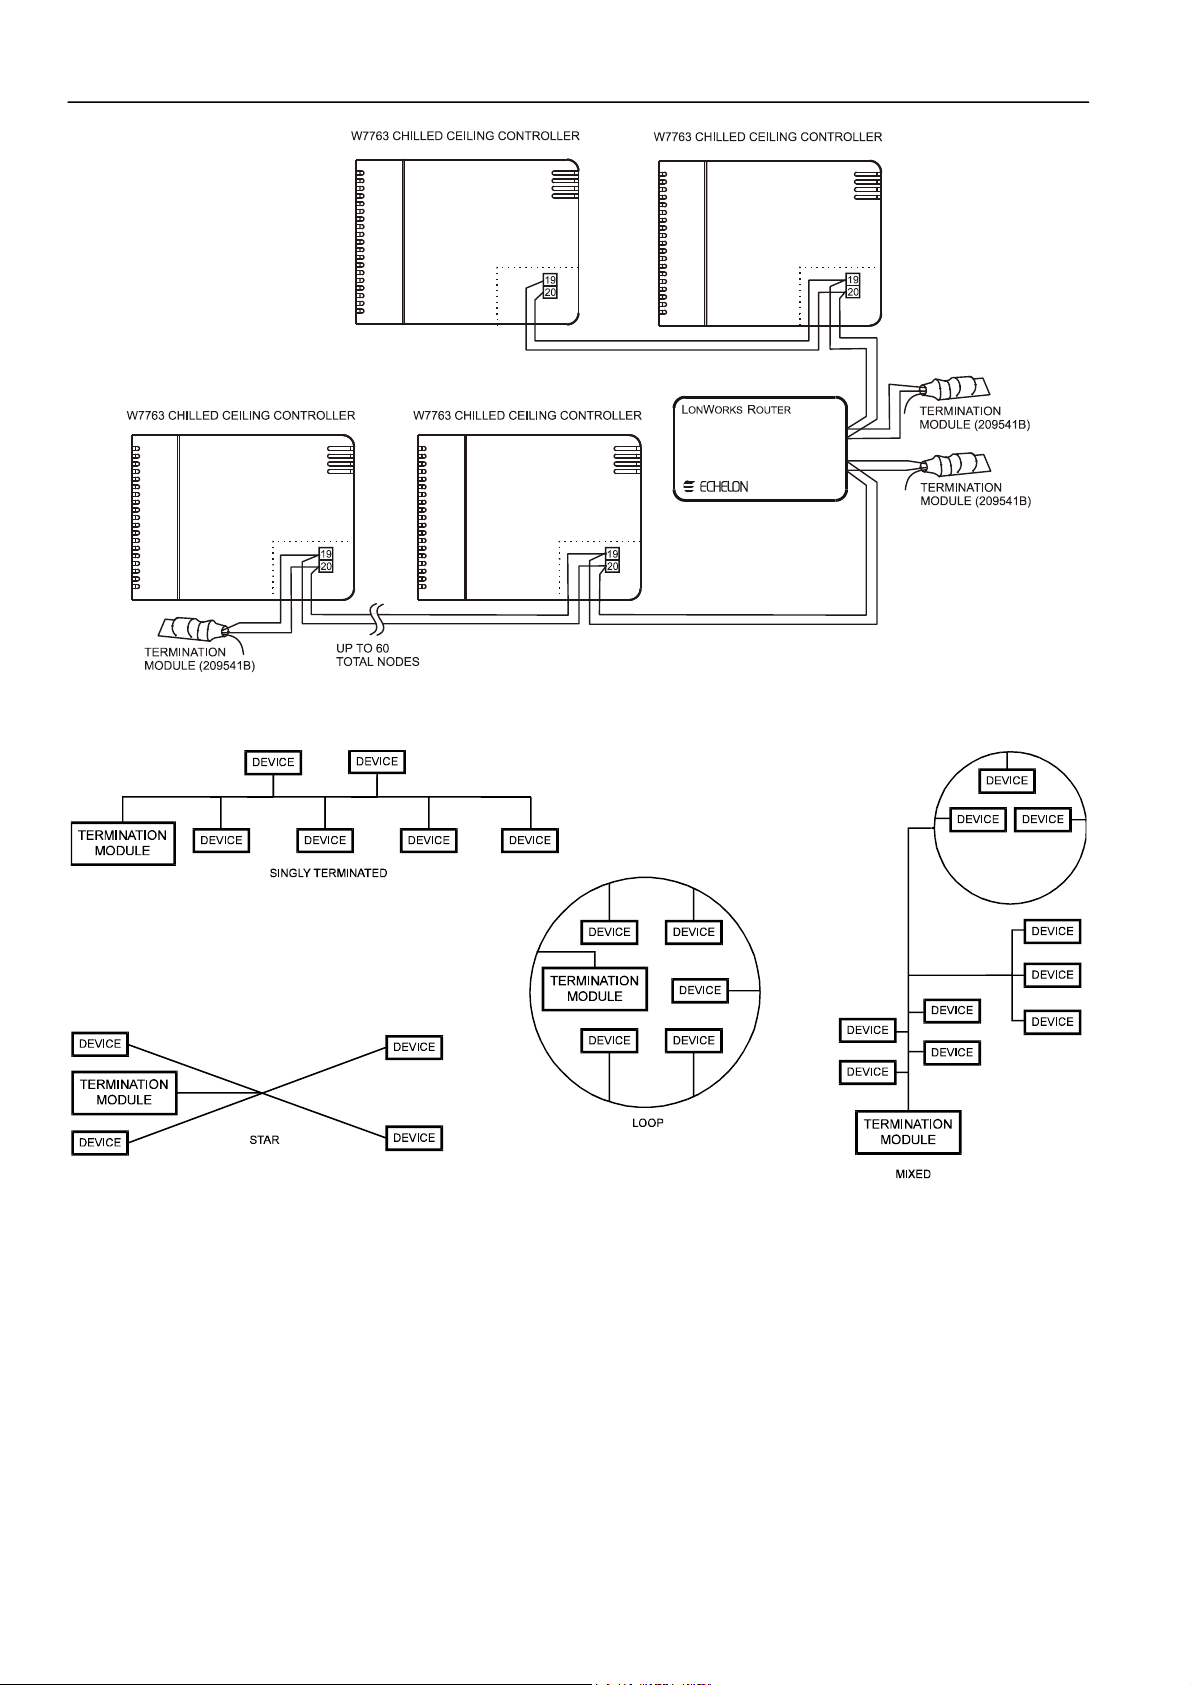
LonWorks networks can be configured in a variety of ways,
but the rules listed in Table 8 always apply. Fig. 10 and Fig.
11 depict two typical daisy chain LonWorks network layouts;
one as a single bus segment that has 60 nodes or less, and
one showing two segments. Fig. 12 shows examples of free
topology bus layouts using 2000-series devices. The bus
configuration is set up using the Network Manager tool.
Step 3. Lay Out Communications and Power
Wiring
LonWorks Layout
The communications bus, LonWorks, is a 78-kilobit serial link
that uses transformer isolation and differential Manchester
Fig. 10. LonWorks wiring layout for one daisy-chain network segment.
74-3332-2
15
Page 18
EXCEL10 CHILLED CEILING CONTROLLER LNS PLUG-INS USER GUIDE
Fig. 11. LonWorks wiring layout for two daisy-chain network segments.
Fig. 12. Free topology LonWorks layout examples.
NOTE: See the LonWorks Termination Module section for
additional details.
IMPORTANT
Notes on Communications Wiring:
• All field wiring must conform to local codes and
ordinances.
• Do not use different wire types or gauges on the
same LonWorks segment. The step change in
line impedance characteristics would cause
unpredictable reflections on the bus. When using
different types is unavoidable, use a Q7751A
Router at the junction.
74-3332-2 16
Page 19
EXCEL10 CHILLED CEILING CONTROLLER LNS PLUG-INS USER GUIDE
• Do not use shielded cable for LonWorks wiring
runs. The higher capacitance of the shielded
cable will cause degradation of communications
throughput. In noisy (high EMI) environments,
avoid wire runs parallel to noisy power cables, or
lines containing lighting dimmer switches, and
keep at least 3 in. (76 mm) of separation between
noisy lines and the LonWorks cable.
• Make sure that neither of the LonWorks wires is
grounded.
Power Wiring
A power budget must be calculated for each Excel 10 W7763
Controller to determine the required transformer size for
proper operation. A power budget is simply the summing of
the maximum power draw ratings (in VA) of all the devices to
be controlled by an Excel 10 W7763 Controller. This includes
the controller itself, the equipment and various contactors and
transducers, as appropriate, for the Excel 10 configuration.
Power Budget Calculation Example
The following is an example power budget calculation for a
typical W7763 Excel 10 Chilled Ceiling Controller.
Assume a W7763 unit with a thermal actuator for cooling
control and an electric actuator for heating. The power
requirements are:
Device VA Information obtained from
Excel 10 W7763 0.5 W7763
Chilled Ceiling Controller Specification Data
Z100A 12.0 Product Data
Thermal actuator
M7410A 0.7 Product Data
Electric Actuator
TOTAL: 13.2 VA
The Excel 10 System example requires 13.2 VA of peak
power; therefore, a 48 VA CRT 2 (20 VA AT20A for US)
Transformer is able to provide ample power for this controller
and its accessories.
Table 9. VA Ratings For Transformer Sizing.
Device Description VA
W7763C,D,E Excel 10 Chilled Ceiling Controller 0.5
T7560A DWM 0.2
Z100A Thermal actuator 12.0
M7410A Electric actuator 0.7
For contactors and similar devices, the in-rush power ratings
should be used as the worst case values when performing
power budget calculations. Also, the application engineer
must consider the possible combinations of simultaneously
energized outputs and calculate the VA ratings accordingly.
The worst case, that uses the largest possible VA load,
should be determined when sizing the transformer.
Line Loss
Excel 10 Controllers must receive a minimum supply voltage
of 20 Vac. If long power or output wire runs are required, a
voltage drop due to Ohms Law (I x R) line loss must be
considered. This line loss can result in a significant increase
in total power required and thereby affect transformer sizing.
The following example is an I x R line-loss calculation for a
200 ft (61m) run from a transformer to a W7750 CVAHU
Controller drawing 37 VA using two 18 AWG (1.0 mm
2
) wires.
The formula is:
Loss = [length of round-trip wire run (ft)] x [resistance in
wire (ohms per ft)] x [current in wire (amperes)]
From specification data:
18 AWG twisted pair wire has 6.38 ohms per 1000 feet.
Loss = [(400 ft) x (6.38/1000 ohms per ft)] x
[(37 VA)/(24V)] = 4.0 volts
This means that four volts are going to be lost between the
transformer and the controller; therefore, to assure the
controller receives at least 20 volts, the transformer must
output more than 24 volts. Because all transformer output
voltage levels depend on the size of the connected load, a
larger transformer outputs a higher voltage than a smaller one
for a given load. Fig. 13 shows this voltage load dependence.
In the preceding I x R loss example, even though the
controller load is only 37 VA, a standard 40 VA transformer is
not sufficient due to the line loss. From Fig. 13, a 40 VA
transformer is just under 100 percent loaded (for the 37 VA
controller) and, therefore, has a secondary voltage of 22.9
volts. (Use the lower edge of the shaded zone in Fig. 13 that
represents the worst case conditions.) When the I x R loss of
four volts is subtracted, only 18.9 volts reaches the controller,
which is not enough voltage for proper operation.
In this situation, the engineer basically has three alternatives:
1. Use a larger transformer; for example, if an 80 VA
model is used, see Fig. 13, an output of 24.4 volts
minus the four volt line loss supplies 20.4 volts to the
controller. Although acceptable, the four-volt line-loss in
this example is higher than recommended. See the
following IMPORTANT.
2. Use heavier gauge wire for the power run. 14 AWG (2.0
2
mm
) wire has a resistance of 2.57 ohms per 1000 ft
which, using the preceding formula, gives a line-loss of
only 1.58 volts (compared with 4.02 volts). This would
allow a 40 VA transformer to be used. 14 AWG (2.0
2
mm
) wire is the recommended wire size for 24 Vac
wiring.
3. Locate the transformer closer to the controller, thereby
reducing the length of the wire run, and the line loss.
The issue of line-loss is also important in the case of the
output wiring connected to the Triac digital outputs. The same
formula and method are used. The rule to remember is to
keep all power and output wire runs as short as practical.
When necessary, use heavier gauge wire, a bigger
transformer, or install the transformer closer to the controller.
74-3332-2
17
Page 20
EXCEL10 CHILLED CEILING CONTROLLER LNS PLUG-INS USER GUIDE
IMPORTANT
No installation should be designed where the line
loss is greater than two volts to allow for nominal
operation if the primary voltage drops to 102 Vac
(120 Vac minus 15%) or 193 Vac (230 minus 15%).
To meet the National Electrical Manufacturers Association
(NEMA) standards, a transformer must stay within the NEMA
limits. The chart in Fig. 13 shows the required limits at various
loads.
With 100 percent load, the transformer secondary must
supply between 23 and 25 volts to meet the NEMA standard.
When a purchased transformer meets the NEMA standard
DC20-1986, the transformer voltage-regulating ability can be
considered reliable. Compliance with the NEMA standard is
voluntary.
The following Honeywell transformers meet this NEMA
standard:
Transformer Type VA Rating
AT20A 20
AT40A 40
AT72D 40
AT87A 50
AK3310 Assembly 100
IMPORTANT (US ONLY)
If the W7763 Controller is used on Heating and
Cooling Equipment (UL 1995) devices and the
transformer primary power is more than 150 volts,
connect the transformer secondary to earth ground,
see Fig. 14.
27
26
25
24
23
22
21
20
19
18
SECONDARY VOLTAGE
17
16
15
14
0 50 100 150
% OF LOAD
M993
200
Fig. 13 NEMA class 2 transformer voltage output limits.
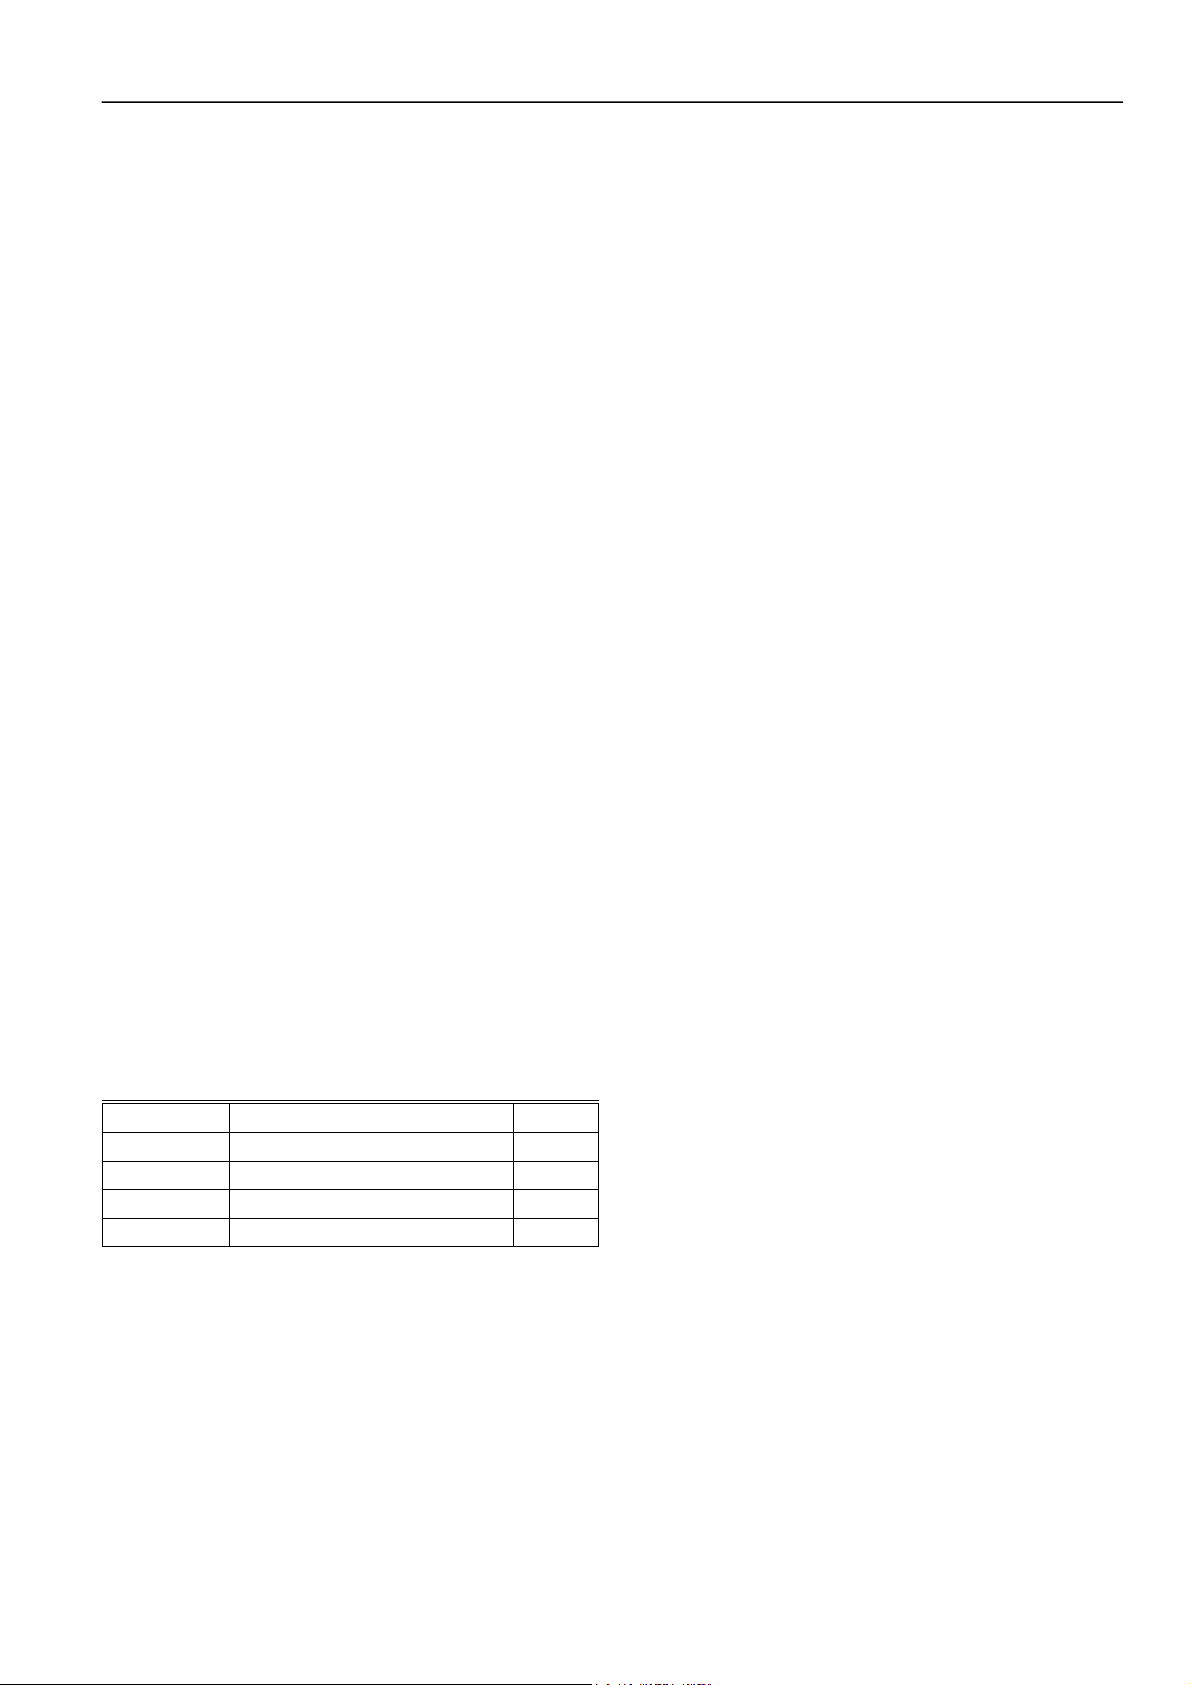
If the W7763 Controller is used in UL 1995 equipment and the
primary power is more than 150 Vac, ground one side of the
transformer.
Fig. 14 Power wiring details for one Excel 10 per
IMPORTANT
Notes on power wiring:
• All field wiring must conform to local codes and
ordinances or as specified on installation wiring
diagrams.
• To maintain NEC Class 2 and UL ratings, the
installation must use transformers of 100 VA or less
capacity.
• For multiple controllers operating from a single
transformer, the same side of the transformer
secondary must be connected to the same input
terminal in each controller.
• For the W7763 Controller (which has Triac outputs),
all output devices must be powered from the same
transformer as the one powering the W7763
Controller.
• Use the heaviest gauge wire available, up to
14 AWG (2.0 mm
(1.0 mm
connections.
2
) for all power and earth ground
• To minimize EMI noise, do not run Triac and/or relay
output wires in the same conduit as the input wires
or the LonWorks communications wiring.
• Unswitched 24 Vac power wiring can be run in the
same conduit as the LonWorks cable.
Step 4. Prepare Wiring Diagrams
General Considerations
The purpose of this step is to assist the application engineer
in developing job drawings to meet job specifications. Wiring
details for the W7763 Chilled Ceiling Controller are shown in
Fig. 14. Table 11 gives additional details for output
connections.
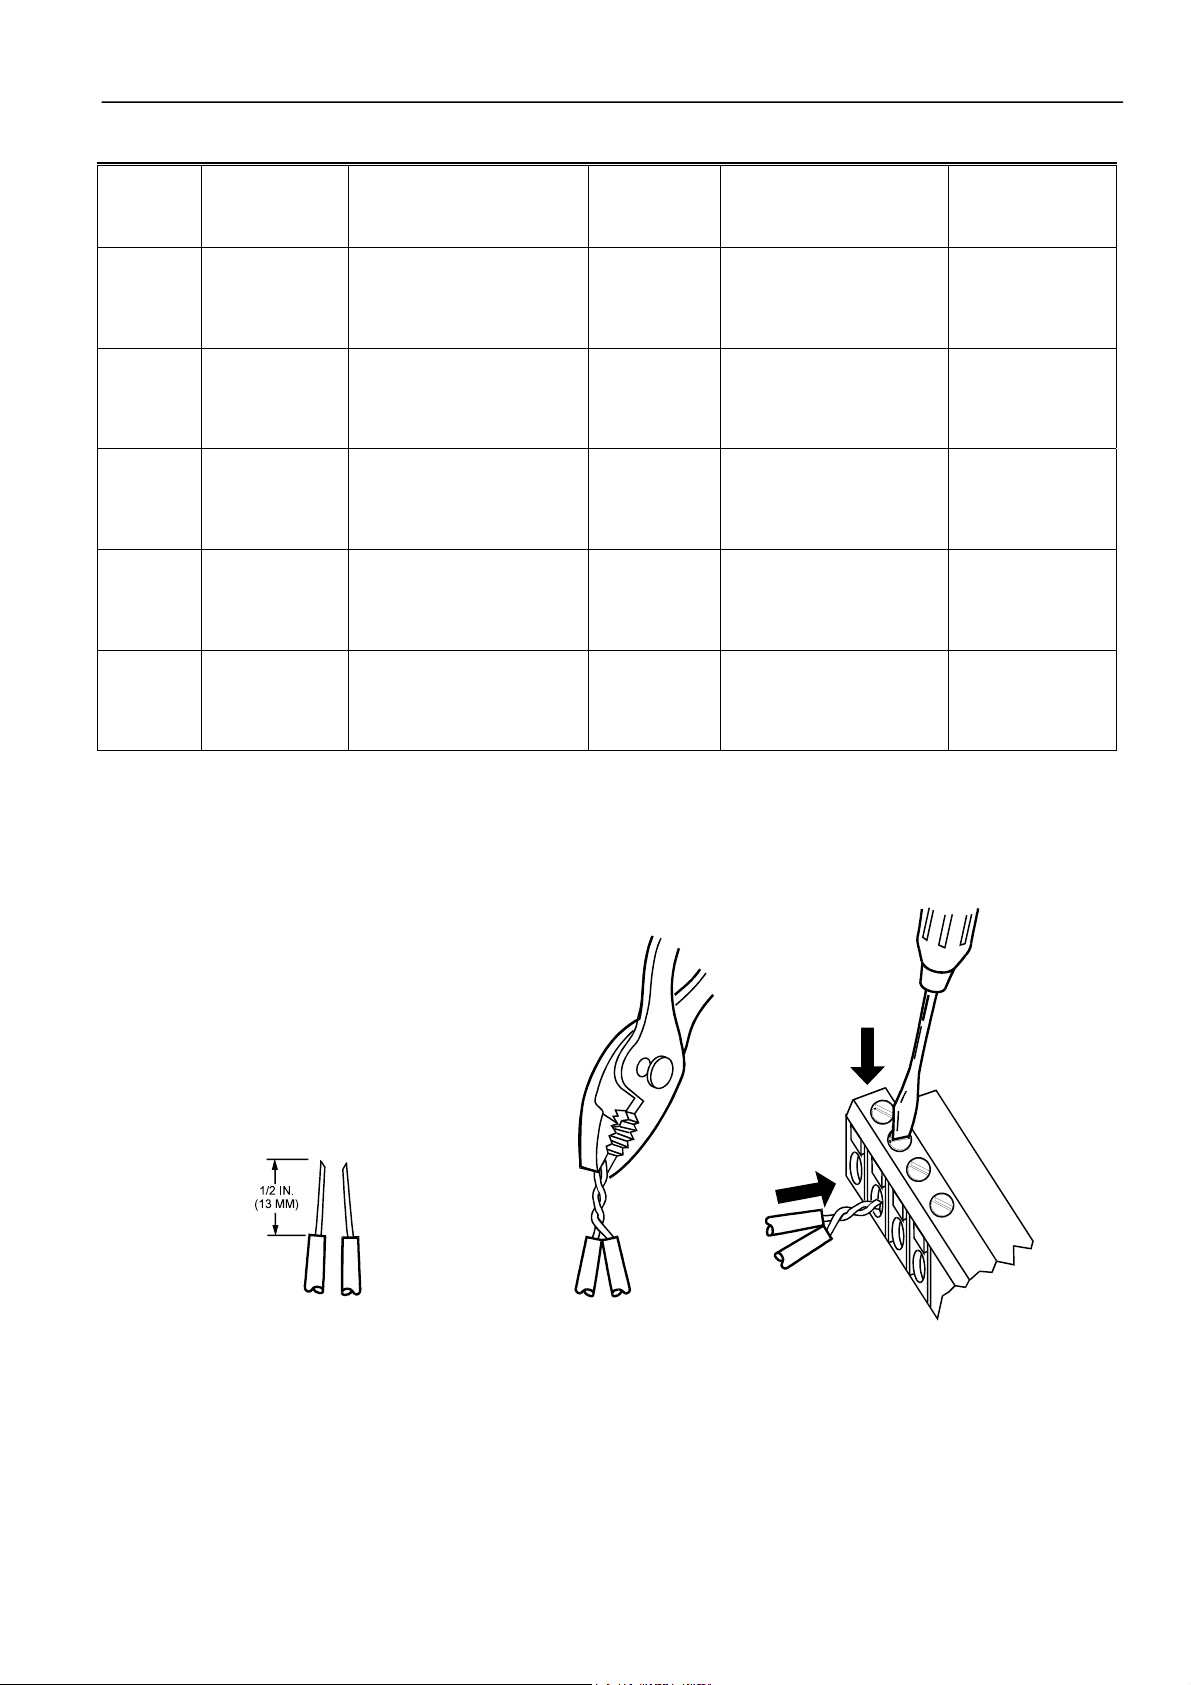
NOTE: For field wiring, when two or more wires are to be
attached to the same connector block terminal, be
sure to twist them together. Deviation from this rule
can result in improper electrical contact. See Fig. 15.
Table 10 lists wiring types, sizes, and length restrictions for
Excel 10 Chilled Ceiling Controller products.
transformer.
2
) with a minimum of 18 AWG
74-3332-2 18
Page 21
EXCEL10 CHILLED CEILING CONTROLLER LNS PLUG-INS USER GUIDE
Table 10. Field wiring reference table (US part numbers shown).
Wire
Function
LonWorks
(Plenum)
LonWorks
(Non-
Recommended
Minimum Wire
Size AWG
2
(mm
)
Construction
22 AWG Twisted pair solid conductor,
nonshielded.
22 AWG Twisted pair solid conductor,
nonshielded.
plenum)*
Input
Wiring
Sensors
Contacts
14 to 20 AWG
(2.0 to 0.5 mm
Multiconductor (usually five-
2
)
wire cable bundle). For runs
>100 ft (30 m) twisted pair or
shielded cable is
recommended.
Output
Wiring
Actuators
Relays
14 AWG (2.5
2
mm
)
(18 AWG (1.0
2
mm
) acceptable
Any pair nonshielded (use
heavier wire for longer runs).
for short runs)
Power
Wiring
14 AWG
(2.5 mm
2
Any pair nonshielded (use
)
heavier wire for longer runs).
NOTE: PVC wire must not be used where prohibited by local fire regulations.
W7763 Controller
Fig. 16 illustrates W7763 Controller terminal block
assignments and wiring for a sample Chilled Ceiling
installation. All connections are made at terminal blocks.
Specification
or
Requirement
Level IV 140°F
(60°C) rating
Level IV 140°F
(60°C) rating
140°F (60°C)
rating
NEC Class 2
140°F (60°C)
rating
NEC Class 2
140°F (60°C)
rating
Table 11 lists wiring information for wiring all of the possible
actuator types.
Vendor Wire Type
Honeywell (US)
Maximum Length
ft (m)
See Step 2
AK3791 (one twisted pair)
AK3792 (two twisted pairs)
(Europe: Belden
9H2201504)
Honeywell (US)
See Step 2
AK3781 (one twisted pair)
AK3782 (two twisted pairs)
(Europe: Belden
9D220150)
Standard thermostat wire 82.5 ft (25m)
Honeywell (US)
200 ft (60m)
AK3702 (18 AWG)
AK3712 (16 AWG)
AK3754 (14 AWG)
or equivalent
Honeywell (US)
AK3754 (14 AWG)
(twisted pair)
AK3909 (14 AWG) single
conductor or equivalent
Limited by line loss
effects on power
consumption.
(See Line Loss
subsection.)
1. STRIP 1/2 IN. (13 MM) FROM W IRES TO
BE ATTACHED AT ONE TERMAINAL
2. TWIST WIRES TOGETHER WITH
PLIERS (A MINIMUM OF THREE
TURNS).
3. CUT TWIST ED END OF WIRES TO 3/16 IN. (5 MM) BEFORE
INSERTING INTO TERMINAL AND TIGHTENING SCREW . THEN
PULL ON EACH WIRE IN ALL TERMINALS TO CHECK FOR GOOD
MECHANICAL CONNECTION.
Fig. 15. Attaching two or more wires at terminal blocks.
74-3332-2
19
Page 22

EXCEL10 CHILLED CEILING CONTROLLER LNS PLUG-INS USER GUIDE
HUMIDITY
24 VAC
WALL MODULE
0-10V
N
I
1
C
O
2
3
N
I
4
N
I
5
C
O
6
LED
BYPASS
7
SETPT
8
SENSOR
9
GND
CONNECTIONS
1
2
10
Wall module setpoint connection for W7763E only.
Wall module bypass and LED connections for W7763D and E only.
OCCUPANCY SENSOR
CHANGEOVER CONTACT
AIRFLOW CONTACT
WINDOW CONTACT
MOTION SENSOR
T7560B connection to W7763
8
DWM
T7560B
with
integrated
humidity
sensor
7
6
5
4
3
2
1
CHILLED
WATER TEMP
1
…
W7763
6
Chilled
Ceiling
7
Controller
8
9
10
24 VAC
24 VAC
COM
11
…
Fig. 16. W7763 Chilled Ceiling Controller wiring example.
Table 11. Output assignments for various actuator types.
Output type Out 1 Terminal Out 2 Terminal
13 14 15 16 17 18
Floating 24 Vac open close 24 Vac open close
1-stage 24 Vac on/off — 24 Vac on/off —
2-stage 24 Vac stage 1 stage 2 24 Vac stage 1 stage 2
3-stage 24 Vac stage 1 stage 2 24 Vac stage 1 stage 2
stage 3 stage 3
PWM 24 Vac PWM — 24 Vac PWM —
Thermal 24 Vac on/off — 24 Vac on/off —
LonWorks Termination Module
One or two LonWorks Termination Modules, part no.
209541B, are required for a LonWorks with FTT devices on it,
depending upon the configuration. Double termination is only
required when the network is a daisy-chain configuration and
the total wire length is greater than 1640 ft (500 m). The
maximum lengths described in Step 2 must be adhered to for
either a daisy chain or free topology LonWorks layout. See
Fig. 17 for connection details for a doubly terminated bus.
See Fig. 18 for connection details for a singly terminated bus.
W7763 CHILLED
CEILING CONTROLLER
24 VAC
11
T
3
U
P
M
2
3
,
T
U
P
2
T
U
P
1
M
1
2
2
1
24 VAC
24 VAC COM
OUT 1 COM
OUT 1 OPEN
OUT 1 CLOSE
OUT 2 COM
OUT 2 OPEN
OUT 2 CLOSE
E-BUS (LON)
E-BUS (LON)
12
13
14
15
16
17
18
19
20
24 VAC COM
COM
OPEN
CLOSE
L
ONWORKS
ONWORKS
L
HEAT
+
NETWORK IN
NETWORK OUT
Fig. 17. Termination Module connections for a doubly-
terminated FTT network.
COM
OPEN
CLOSE
120/240 VAC
COOL
-
Fig. 18. Termination Module connections for a singly-
terminated FTT network.
74-3332-2 20
Page 23

EXCEL10 CHILLED CEILING CONTROLLER LNS PLUG-INS USER GUIDE
Step 5. Order Equipment
After compiling a bill of materials through completion of the previous application steps, refer to Table 12 for ordering information.
Contact Honeywell for information about Controllers and Wall Modules with no logo.
Table 12. Excel 10 Chilled Ceiling Controller ordering information.
Part Number Product Description Comments
Excel 10 Chilled Ceiling Controllers
W7763C1016 with setpoint knob, temp. sensor, bypass °F absolute
W7763C1024 with setpoint knob, temp. sensor, bypass °C absolute
W7763C1032 with setpoint knob, temp. sensor, bypass +/- relative
W7763D1014 with setpoint knob, bypass °F absolute
W7763D1022 with setpoint knob, bypass °C absolute
W7763D1030 with setpoint knob, bypass +/- relative
W7763E1003 no setpoint knob, sensor, or bypass
Excel 10 Wall Modules
T7460
T7560
T7770
Excel 10 Sensors
C7068A1007 (Europe) Air Temperature Sensor Return air
Echelon-Based Components and Parts
Q7751A2002 (US)
(UK)
(Europe)
Q7752A2001 (US)
(UK)
(Europe)
Termination Module, part no.
209541B
205979A (US only) SLTA Connector Cable for LonWorks Serial interface to wall module or controller.
Cabling
— Serial Interface Cable, male DB-9 to female DB-9
Honeywell (US)
AK3791 (one twisted pair)
AK3792 (two twisted pairs)
Belden 9H2201504 (Europe)
Honeywell (US)
AK3781 (one twisted pair)
AK3782 (two twisted pairs)
Belden 9D220150 (Europe)
Honeywell (US) AK3725 Inputs: 18 AWG (1.0 mm2) five wire cable bundle. Standard thermostat wire
Honeywell (US) AK3752
(typical or equivalent)
Honeywell (US) AK3702
(typical or equivalent)
Honeywell (US) AK3712
(typical or equivalent)
Honeywell (US) AK3754
(typical or equivalent)
FTT LonWorks Router
FTT LonWorks Serial Interface (SLTA)
Two required per LonWorks segment.
or female DB-25.
LonWorks (plenum): 22 AWG twisted pair solid
conductor, nonshielded.
LonWorks (non-plenum): 22 AWG twisted pair
solid conductor, nonshielded.
Outputs/Power: 14 to 18 AWG (2.5 to 1.0 mm2). NEC Class 2 140°F (60°C) rating
18 AWG (1.0 mm2) twisted pair. Non-plenum
16 AWG (1.5 mm2) twisted pair. Non-plenum
14 AWG (2.5 mm2) two conductor. Non-plenum
See Excel 10 wall module literature for details.
Order from local Echelon supplier (Europe)
Order from local Echelon supplier (Europe)
Obtain locally from any computer hardware
vendor.
Level IV 140°F (60°C) rating
Level IV 140°F (60°C) rating
74-3332-2
21
Page 24

EXCEL10 CHILLED CEILING CONTROLLER LNS PLUG-INS USER GUIDE
Step 6. Plug-Ins Configuration Screens
General
This section will provide details on the configuration options
for W7763 Controllers. See Appendix C for reference
information.
Using Plug-Ins
The configuration process is primarily performed in a series of
screens seen as file tabs under the menu option Application
Selection and is easily followed using the tables included in
this section. There are 8 file tabs:
• Output
• Input
• Equipment Control
• Switching Levels
• Zone Options
• Miscellaneous
• PID
• Wiring (information only, no configuring).
The specific parameters to be configured in each of these four
four categories are tabulated in the following subsections. For
a complete list of all Excel 10 Chilled Ceiling Controller NV´s,
see Appendix C.
74-3332-2 22
Page 25

EXCEL10 CHILLED CEILING CONTROLLER LNS PLUG-INS USER GUIDE
Output
The available options for output configurations with the default values shown are listed in Table 13. See Control Provided and
Configurations sections above for more information about parameters.
Table 13. Chilled Ceiling Controller output configuration options.
Function Configuration options Default
Safety1 ceiling protection (enables dewpoint calculation and
condensation protection).
no ceiling protection (condensation switch input may still
be used for protection)
System type two pipe (1 valve)
four pipe (2 valves)
Output1 (triac 1 and 2) control2 not used
cooling
heating
heat/cool changeover
Output 1 (triac 1 and 2) type floating
floating-mid
3
1-stage
2-stage
3-stage
PWM
thermal
Output 2 (triac 3 and 4) control2 not used
cooling
heating
heat/cool changeover
Output 2 (triac 3 and 4) type floating
floating-mid
3
1-stage
2-stage
3-stage
PWM
thermal
NOTES:
1. Humidity and chilled water temperature inputs are required. If no humidity input is available, the configured dewpoint (see
Zone Options) is used instead of a calculated value.
2. The output mode settings only apply to a 4-pipe system. In a 2-pipe system output1 will always operate in changeover mode.
3. The floating-mid option is only for changeover applications and uses only one of the two outputs.
The operation of the triacs based upon the output type is given in Table 11.
ceiling protection
four pipe
heating
floating
cooling
floating
74-3332-2
23
Page 26

EXCEL10 CHILLED CEILING CONTROLLER LNS PLUG-INS USER GUIDE
Input
The available options for input configurations with the default values shown are listed in Table 14. Temperature sensor settings
may apply to either the built-in sensor (W7763C), remote wall module (for W7763D, E controllers), or a sensor connected
directly to the controller. Override button settings may apply to either the built-in button (W7763C) or remote wall module button
(for W7763D, E controllers). Setpoint knob settings may apply to the built-in setpoint knob (W7763C, D) or remote wall module
(for W7763E controllers). See Control Provided and Configurations section above for more information on parameters.
Table 14. Chilled Ceiling Controller input configuration options.
Function Configuration options Default
Space temperature sensor no sensor
sensor
Bypass button none - bypass button is disabled.
bypass unoccupied - bypass button overrides current mode to occupied
for configurable bypass time for button press of 1.1 to 4 seconds (single
press with T7560) or permanently overrides to unoccupied for button
press of 4.1 to 7 seconds (more than 5 seconds with T7560).
bypass
- bypass button only overrides current mode to occupied and to
cancel the override again.
LED/LCD LED override - shows override from bypass button or from network.
LED occupancy - shows effective occupancy mode.
LCD display - only used with T7560 Wall Modules; occupancy mode is
represented by different symbols.
Setpoint knob no knob
relative
absolute middle
Minimum limit setpoint pot limit for setpoint knob in either degrees F (absolute setpoint, 53.6 to
86°F) or DDF (relative setpoint, -9 to 9 DDF)
(limit for setpoint knob in either degrees C (absolute setpoint, 12 to
30°C) or K (relative setpoint, -5 to 5 K))
Maximum limit setpoint pot limit for setpoint knob in either degrees F (absolute setpoint, 53.6 to
86°F) or DDF (relative setpoint, -9 to 9 DDF)
(limit for setpoint knob in either degrees C (absolute setpoint, 12 to
30°C) or K (relative setpoint, -5 to 5 K))
Digital input 1 not used
window closed
window open
occupied sensor
unoccupied sensor
cool changeover
heat changeover
condensation
no condensation
movement
no movement
Analog input 2 cold water
not used
Analog input 3 humidity
not used
NOTES:
1. The temperature sensor option no sensor requires that either the Chilled Ceiling controller is configured as a slave unit
receiving heating and cooling control levels from the master unit via the network, or that it is receiving temperature
information over the network from another device.
2. The digital input option to be selected is the condition in which the input will be high (switch contact closed).
sensor
bypass unoccupied
LED override
relative
-9 DDF (53.6°F for
absolute setpoint)
(-5 K (12°C for
absolute setpoint))
9 DDF (86°F for
absolute setpoint)
(5 K (30°C for
absolute setpoint))
not used
not used
not used
74-3332-2 24
Page 27

EXCEL10 CHILLED CEILING CONTROLLER LNS PLUG-INS USER GUIDE
Equipment Control
The available options for equipment control configurations with the default values shown are listed in the following tables. See
Configurations section above for more information on parameters.
Table 15. Chilled Ceiling Controller equipment control configuration options.
Function Configuration options Default
Output 1 valve direction1 direct
reverse
Output 2 valve direction1 direct
reverse
Output 1 minimum stage off time 0 to 600 seconds 90 s
Output 2 minimum stage off time 0 to 600 seconds 90 s
Output 1 valve run time/PWM
period/minimum stage on time
Output 2 valve run time/PWM
period/minimum stage on time
PWM zero position2 0 to 100% 0%
PWM full position2 0 to 100% 100%
NOTES:
1. Valve action settings apply to floating, PWM, or thermal types.
2. Settings apply to both actuators if both are PWM.
floating/floating-mid - valve run time (20 to 600 seconds)
PWM - cycle time (20 to 600 seconds)
1, 2, and 3-stage - minimum on time (0 to 1200 seconds)
floating/floating-mid - valve run time (20 to 600 seconds)
PWM - cycle time (20 to 600 seconds)
1, 2, and 3-stage - minimum on time (0 to 1200 seconds)
direct
direct
150 s
150 s
Switching Levels
The available options for switching level configurations with the default values shown are listed in the following tables. See
Configurations section above for more information on parameters.
Table 16. Chilled Ceiling Controller Heating/Cooling stages configuration options.
Function Configuration options Default
Cooling stage 1 switching level 0 to 100% 5%
Heating stage 1 switching level 0 to 100% 5%
Cooling stage 2 switching level 0 to 100% 50%
Heating stage 2 switching level 0 to 100% 50%
Cooling stage 3 switching level 0 to 100% 75%
Heating stage 3 switching level 0 to 100% 75%
Cooling hysteresis 0 to 100%, 10%
Heating hysteresis 0 to 100% 10%
74-3332-2
25
Page 28

EXCEL10 CHILLED CEILING CONTROLLER LNS PLUG-INS USER GUIDE
Zone Options
The available options for input configurations with the default values shown are listed in the following tables. See Control
Provided and Configurations sections above for more information on parameters.
Table 17. Chilled Ceiling Controller zone configuration options.
Function Configuration options Default
Cooling occupied setpoint1
Heating occupied setpoint
Cooling standby setpoint
Heating standby setpoint
Cooling unoccupied setpoint
Heating unoccupied setpoint
1,2
50 to 95°F (10 to 35°C) 73.4°F (23°C)
1,2
50 to 95°F (10 to 35°C) 69.8°F (21°C)
1,2
50 to 95°F (10 to 35°C) 77°F (25°C)
1,2
50 to 95°F (10 to 35°C) 66.2°F (19°C)
1,2
50 to 95°F (10 to 35°C) 82.4°F (28°C)
1,2
50 to 95°F (10 to 35°C) 60.8°F (16°C)
Dewpoint setpoint 50 to 95°F (10 to 35°C) 95°F (35°C)
Dewpoint safety 1.8 to 7.2 DDF (1 to 4 K) 1.8 DDF (1 K)
NOTES:
1. Default setpoints are used when there is no setpoint knob and no network setpoint input.
2. Ensure that unoccupied heating<occupied heating<occupied cooling<unoccupied cooling and standby
heating<standby cooling.
Miscellaneous
The available options for the Miscellaneous tab in the Plug-Ins are listed in the following tables. See Control Provided and
Configurations sections above for more information on parameters.
Table 18. Chilled Ceiling Controller miscellaneous configuration options.
Function Configuration options Default
Bypass time 0 to 1080 minutes 180 minutes
Override priority last wins - the last command from either the wall module or from the
network has priority.
network wins - a network command always has priority until canceled.
Demand limit control bump 0 to 10 K 2 K
Cool rec ramp
-20 to 0 K/hour 0
(Cooling optimum start gradient)
Heat rec ramp
0 to 20 K/hour 0
(Heating optimum start gradient)
Last wins
74-3332-2 26
Page 29

EXCEL10 CHILLED CEILING CONTROLLER LNS PLUG-INS USER GUIDE
PID
The available options for configuring the PID parameters with the default values shown are listed in the following tables. See
Control Provided section above for more information on parameters.
Table 19. Chilled Ceiling Controller PID configuration options.
Function Configuration options Default
Cooling proportional gain1 4 to 100 K (0 = disable) 4 K
Heating proportional gain1 4 to 100 K (0 = disable) 4 K
Cooling reset time 10 to 3200 seconds (0 = disable) 300 s
Heating reset time 10 to 3200 seconds (0 = disable) 300 s
Cooling derivative time 1 to 3200 seconds (0 = disable) 0
Heating derivative time 1 to 3200 seconds (0 = disable) 0
Cooling boost temperature 0.5 to 10 K (0 = disable) 1 K
Heating boost temperature 0.5 to 10 K (0 = disable) 1 K
NOTES:
1. With version 1.0.2 and later firmware, it is possible to configure the proportional gain as low as 2 for PI control or
1.25 for P control.
Commissioning
Commissioning refers to the activities performed to optimize
the Chilled Ceiling operation to meet the job specification
requirements and overall fine-tuning of the Chilled Ceiling
control. Any LNS tool can be used to perform these activities,
as described in Appendix B.
ID Number
Each Excel 10 Chilled Ceiling Controller is shipped with an
internal Identification Number from the factory called the
Neuron© ID. This ID number is on a removable sticker on the
side of the W7763 housing and is required for identifying the
controller on the LonWorks network through the LNS tool. The
ID number can either be manually entered or it can be
received from the network. Pressing the bypass push-button
on the wall module for a Chilled Ceiling Controller or on the
controller itself causes it to broadcast a service message
containing its Neuron ID number.
74-3332-2
27
Page 30

EXCEL10 CHILLED CEILING CONTROLLER LNS PLUG-INS USER GUIDE
Step 7. Troubleshooting
Troubleshooting Excel 10 Chilled Ceiling Controllers
and Wall Modules
In addition to the following information, refer to the various
Checkout and Test manuals for these products. See
Applicable Literature section for form numbers.
Alarms
When an Excel 10 Chilled Ceiling Controller has an alarm
condition, it reports it to the central node on the LonWorks
network via the variable nvoAlarm. See Table 20. The
information contained in nvoAlarm is:
• Subnet Number: The LonWorks subnet that contains
the Excel 10 Chilled Ceiling Controller node that has the
alarm condition.
• Node Number: The Excel 10 Chilled Ceiling Controller
node that has the alarm condition.
• Alarm Type: The specific alarm being issued and return
to normal. An Excel 10 Chilled Ceiling Controller can
provide the alarm types listed in Table 20.
All current alarms are contained in a variable called
nvoAlarmStatus (User Addresses SrcAlarmStatus1,
SrcAlarmStatus2, and SrcAlarmStatus3) which is composed
of three bytes (nvoAlarmStatus.alarm_bit[n] with n = 0 through
through 2) with a bit corresponding to each of the alarms
listed in Table 20. The coding is ordered in that the least
significant bit of nvoAlarmStatus.alarm_bit[0] corresponding to
alarm type 1, the most significant bit corresponding to alarm
type 8, the least significant bit of nvoAlarmStatus.alarm_bit[1]
corresponding to alarm type 9, and so on. Even alarms that
are suppressed in nvoAlarm (see below) are contained in
nvoAlarmStatus.
Also, the Excel 10 Chilled Ceiling Controller variables,
nvoAlarmLog.type[n], where n is 0 through 4, that store the
last five alarms to occur in the controller, are available.
Certain alarm conditions are suppressed conditionally as
follows:
If an input network variable with failure detect is bound to the
same node as nvoAlarm, then nvoAlarm and nvoAlarmLog do
not report the related Chilled Ceiling Controller variable
receive failure error, and its associated return to normal.
Suppression only occurs when the nvoAlarm is bound to only
one node using L
after the input variable has actually received a network
variable from the node since the latest application restart (or
power-up condition).
ONWORKS subnet/node addressing and only
74-3332-2 28
Page 31

EXCEL10 CHILLED CEILING CONTROLLER LNS PLUG-INS USER GUIDE
Table 20. Excel 10 Chilled Ceiling Controller alarms.
Name of alarm or alarm bit Alarm type
number
No Alarm/Return to Normal:
RETURN_TO_NORMAL 128 Return to no error after being in an error condition. This code is added
ALARM_NOTIFY_DISABLED 255 The alarm reporting has been turned off by the nviManualMode
NO_ALARM 0 No errors since last application restart; initial condition
Chilled Ceiling Alarms:
ALARM_NODE_OFF 1 Control algorithm has stopped due to controller disabled, or in test
ALARM_FROST 2 The space temperature is below the frost alarm limit. The alarm
ALARM_INVALID_SETPOINTS 3 One of the setpoints is not in the valid range
ALARM_TEMP_SENSOR 4 Temperature sensor failed
ALARM_SETPOINT_KNOB 5 Remote setpoint potentiometer failed
ALARM_FD_SPACE_TEMP 8 nviSpaceTemp is bound and has failed in receiving an update within its
ALARM_FD_APPL_MODE 9 nviApplicMode is bound and has failed in receiving an update within its
ALARM_FD_SETPT_OFFSET 10 nviSetPtOffset is bound and has failed in receiving an update within its
ALARM_FD_TOD_EVENT 11 nviTodEvent is bound and has failed in receiving an update within its
ALARM_FD_DLC_SHED 12 nviDlcShed is bound and has failed in receiving an update within its
ALARM_FD_HUMIDITY 13 nviSpaceRH is bound and has failed in receiving an update within its
ALARM_FD_OD_TEMP 14 nviOdTemp is bound and has failed in receiving an update within its
ALARM_FD_SENSOR_OCC 15 nviSensorOcc is bound and has failed in receiving an update within its
ALARM_FD_WINDOW 16 nviEnergyHoldOff is bound and has failed in receiving an update within
ALARM_FD_MAN_HEAT 17 nviManHeat is bound and has failed in receiving an update within its
ALARM_FD_MAN_COOL 18 nviManCool is bound and has failed in receiving an update within its
ALARM_FD_COOL_TEMP 19 The software is not compatible with the hardware configuration
ALARM_H2O_TOO_COOL 20 The chilled water temperature has fallen below the dewpoint plus
ALARM_CONDENSATION 21 Condensation has been detected. This causes the cooling valve to be
Meaning of alarm code or alarm bit
numerically to another alarm code to indicate that the error condition
has returned to normal.
=SUPPRESS_ALARMS. No more alarms are reported until
nviManualMode turns on alarm reporting or upon application restart.
mode, or other conditions
condition remains until the temperature exceeds the alarm limit plus
hysteresis.
specified FAILURE_DETECT_TIME
specified FAILURE_DETECT_TIME
specified FAILURE_DETECT_TIME
specified FAILURE_DETECT_TIME
specified FAILURE_DETECT_TIME
specified FAILURE_DETECT_TIME
specified FAILURE_DETECT_TIME
specified FAILURE_DETECT_TIME
its specified FAILURE_DETECT_TIME
specified FAILURE_DETECT_TIME
specified FAILURE_DETECT_TIME
specified by the hardware configuration resistor value. Compatibility is
checked only once after application restart.
safety band. This causes the cooling valve to be closed.
closed.
74-3332-2
29
Page 32

EXCEL10 CHILLED CEILING CONTROLLER LNS PLUG-INS USER GUIDE
K
Broadcasting the Service Message
The Service Message allows a device on the LonWorks
network to be positively identified. The Service Message
contains the controller Neuron ID number and, therefore, can
be used to confirm the physical location of a particular Excel
10 Chilled Ceiling Controller in a building.
When an Assign Neuron ID command is issued from the LNS
tool, the node goes into the SERVICE_MESSAGE mode for
one minute. In the SERVICE_MESSAGE mode, pressing the
occupancy override button on the remote wall module causes
the Service Message to be broadcast on the network. All
other functions are normal in the SERVICE_MESSAGE
mode. If an Chilled Ceiling Controller does not have a bypass
button connected, press the service pin button on the
controller itself, located as shown in the following figure.
SERVICE LED
W7763 Controller Status LED
The LED on the upper right of the controller provides an
indication of device status. The LED has the following states:
1. Off—no power to the processor.
2. Continuous on—processor is initialized state.
3. Slow blink—controlling, normal state.
4. Fast blink—controller in alarm.
Manual Mode
The Chilled Ceiling Controller can be put into a manual mode
that disables the control algorithms and allows manual setting
of outputs for system checkout. The variable nviManualMode
must be set to Mode_Manual using the LNS tool. Inputs are
read and digital filtering of analog inputs is turned off to speed
up settling time. Input network variables are received, and
output network variables are sent periodically. Triac outputs
can be set to any combination of on/off or can be set to a test
position based upon the configured valve runtime/cycle time.
The override LED can be commanded on/off in this mode
also.
E-BUS JAC
SERVICE
BUTTON
Fig. 19. Chilled Ceiling Controller LED and service
button.
74-3332-2 30
Page 33

EXCEL10 CHILLED CEILING CONTROLLER LNS PLUG-INS USER GUIDE
APPENDIX A: USING A LNS TOOL TO COMMISSION A CHILLED CEILING
CONTROLLER
Temperature Sensor Calibration
The temperature sensor in the Excel 10 wall modules can be
calibrated to correct for sensor inaccuracies, wire resistance,
etc. This allows the Excel 10 Chilled Ceiling Controller to
sense the space temperature with a high degree of accuracy.
Procedure
Select the controller being worked on with the LNS tool.
From within the LNS tool, with the desired Chilled Ceiling
plant loaded and the SLTA connected to the LonWorks
network, perform the following procedure:
1. Select a controller symbol from a network diagram.
2. Click on Monitor from the Controller menu. Once the
LNS tool logs on to the controller, the schematic for that
Chilled Ceiling is displayed with point values and
statuses.
3. Click on Calibrate Point(s)... from the Monitor menu.
This pops up the Temperature Calibration dialog box.
4. The box displays the Current Value of the sensor and
the current Offset; it also contains a field for entering
the actual Measured Value. When a value is typed in
and Calibrate is clicked, the offset value is
automatically calculated, displayed, and written to the
Excel 10 Chilled Ceiling Controller.
Fig. 20. Calibration dialog box.
NOTE: Record the offset value to be manually restored
if additional downloads are performed.
5. Click on Close after completing adjustments.
74-3332-2
31
Page 34

EXCEL10 CHILLED CEILING CONTROLLER LNS PLUG-INS USER GUIDE
APPENDIX B: CONFIGURING FOR MASTER/SLAVE OPERATION
More than one W7763 Chilled Ceiling Controller may be used
to control the temperature of a room. In this situation one
controller must be identified as the master unit which will
perform the temperature control algorithm. The other Chilled
Ceiling controllers in the room are designated as slave units,
and their control algorithms are disabled. The slave units
receive heating, and cooling information from the master
controller via network variables sent across the E-Bus. There
can be a maximum of one wall module active in the room, and
it must be wired directly to the master controller. If a slave
controller has a wall module connected to it, the wall module
will be ignored.
Configuration of the master controller is the same as for any
controller operating alone in a room. Configuration of the
slave controllers must follow the rules described in this
section. The following sections correspond to the screens in
the LNS tool used for configuring Chilled Ceiling controllers.
An additional section discusses binding of network variables
to support master/slave configurations.
Output Configuration Options
Slave devices must have their outputs configured identically
with the master controller. The same system type and
actuator types must be used. Valve run times, cycle times,
and PWM zero and full position configuration options must be
the same as well.
Input Configuration Options
Slave controllers may have wall modules connected to them,
but they must be deactivated while the controllers are
operating as slave units. They must be configured for no
temperature sensor. The digital input may be used on the
slave units for window open/closed and must be configured as
such. In the case of window sensing, the window status
network variable must be mapped to the master controller, as
the slave controller does not execute the control algorithm.
Equipment Control Options
Valve action settings must be the same as for the master
controller. Output staging hysteresis and minimum stage off
times should be the same as in the master controller.
All heating and cooling stage switching levels should be
identical to those of the master controller.
Zone Control Options
All zone temperature control options including PID settings
and miscellaneous settings are used only by the master
controller and are ignored in the slave units.
Network Variable Binding
In a master/slave configuration, the control algorithm is
executed in the master controller only. Heating and cooling
output as calculated by the control algorithm is then sent via
the network to the slave controllers. The master controller
output variables nvoHeatOutput and nvoCoolOutput must be
bound using a LNS tool to the slave input variables
nviManHeat and nviManCool, respectively.
For a master/slave system using heat/cool changeover, the
master controller output variable nvoApplicMode must be
bound to the slave controllers’ input variable nviApplicMode.
The active wall module must be connected to the master
controller.
74-3332-2 32
Page 35

EXCEL10 CHILLED CEILING CONTROLLER LNS PLUG-INS USER GUIDE
APPENDIX C: LON INTERFACE
The tables are divided as follows:
Table C2—Configuration variables
Table C3—Input variables
Table C4—Output variables
Table C5—Unused variables
NOTE: Table C5 includes network variables related to reheat. The W7763 Chilled Ceiling Controller does not have outputs for
direct connection of these devices, however the network inputs and outputs could be used for a master/slave
configuration with a slave controller which does have such outputs (e.g., W7752D). Such a configuration is not
recommended. For more information about these network variables, see form number 74-3330, W7752 Fan Coil Unit
Controllers LNS Plug-Ins User Guide.
74-3332-2
33
Page 36

Page 37

EXCEL10 CHILLED CEILING CONTROLLER LNS PLUG-INS USER GUIDE
Table C2: Configuration Variables for W7763 Controllers
Engineering Units:
English (Metric) or
NvName Field Name States plus Range Value Default Comments
nciApplVer application_type UBYTE, 0 to 255 0 ApplicationType identifies the current application number of the
nciApplVer version_no UBYTE, 0 to 255 0 VersionNo identifies the version number of the Excel 10
nciApplVer time[0] UBYTE, 0 to 255 0
nciApplVer time[1] UBYTE, 0 to 255 0 See above.
nciApplVer time[2] UBYTE, 0 to 255 0 See above.
nciApplVer time[3] UBYTE, 0 to 255 0 See above.
nciDeviceName ch[0-17] UBYTE, 0 to 255 0
nciLocation SNVT_str_asc 0x00
nciMaxSendTime SNVT_temp_p
0 to 6553 seconds
Digital
State or
0s from factory
Excel 10.
application.
The time stamp of the last change to the Excel 10 application
configuration. Time meets the ANSI C time stamp requirement
specifying the number of seconds elapsed since midnight (0:00:00),
January 1, 1970. It is represented in the Intel Format and is four
bytes in length.
nciDeviceName contains the name of each device. This is an ASCII
string with a size of 18 characters. A name with all NULLs means
that the device has not been configured.
This configuration property can be used to provide more descriptive
physical location information than can be provided by the Neuron
Chip's 6-byte location string.
This is the configuration property used to control the maximum time
that expires before the node object automatically transmits
nvoStatus. This provides a heartbeat output that can be used by
the destination objects to ensure that the node is still healthy. The
heartbeat output may be disabled by setting nciMaxSendTime = 0.
35 74-3332-2
Page 38

EXCEL10 CHILLED CEILING CONTROLLER LNS PLUG-INS USER GUIDE
Table C2: Configuration Variables for W7763 Controllers
Engineering Units:
English (Metric) or
NvName Field Name States plus Range Value Default Comments
nciRcvHrtBt SNVT_time_sec
0 to 6553 seconds
0 = Disabled
nciSndHrtBt SNVT_time_sec
0 to 6553 seconds
0 = Disabled
Digital
State or
0s from factory
0 s from factory
This is the configuration property used to control the maximum time
that elapses after the last update to
• nviApplicMode
• nviDlcShed
• nviEnergyHoldOff
• nviManCool
• nviManHeat
• nviSensorOcc
• nviSetPtOffset
• nviSpaceTemp
• nviTodEvent
before these NV inputs adopt their default values. Setting
nciRcvHrtBt = 0 means, that the assigned NV input does not wait
for an periodic update, and that it will never revert to any default
when not receiving an update. If nviSpaceTemp and nviApplicMode
are not received at regular intervals that are less than the heartbeat
time, the controller will assume that there is a communication
failure and revert to Occupied mode.
This is the configuration property used to control the maximum time
that expires before the object automatically transmits the current
value of
• nvoActiveSetPt
• nvoAlarm
• nvoApplicMode
• nvoChcStatus
• nvoCoolOutput
• nvoEnergyHoldOff
• nvoHeatOutput
• nvoSensorOcc
• nvoSpaceDewPt
• nvoSpaceTemp
• nvoTerminalLoad
• nvoUnitStatus
This provides a heartbeat output that can be used by the
destination objects to ensure that the node is still healthy. The
heartbeat output may be disabled by setting nciSndHrtBt = 0.
74-3332-2 36
Page 39

EXCEL10 CHILLED CEILING CONTROLLER LNS PLUG-INS USER GUIDE
Table C2: Configuration Variables for W7763 Controllers
Engineering Units:
English (Metric) or
NvName Field Name States plus Range Value Default Comments
nciCntrlSettings switch_level_cool[0] SNVT_lev_percent
0 to 100%, 0 = Disable
nciCntrlSettings switch_level_cool[1] SNVT_lev_percent
0 to 100%, 0 = Disable
nciCntrlSettings switch_level_cool[2] SNVT_lev_percent
0 to 100%, 0 = Disable
nciCntrlSettings switch_level_heat[0] SNVT_lev_percent
0 to 100%, 0 = Disable
nciCntrlSettings switch_level_heat[1] SNVT_lev_percent
0 to 100%, 0 = Disable
nciCntrlSettings switch_level_heat[2] SNVT_lev_percent
0 to 100%, 0 = Disable
nciCntrlSettings staging_hysteresis[0] SNVT_lev_percent
0 to 100%
nciCntrlSettings staging_hysteresis[1] SNVT_lev_percent
0 to 100%
nciEnergyManag si_dlc_setpt_bump SNVT_temp_p
0 to 10 K
nciEnergyManag si_optstart_grad[0] SNVT_temp_p
-20 to 0 K/hr
Digital
State or
5% This is the switching level to turn on stage 1 of the cooling
50% This is the switching level to turn on stage 2 of the cooling
75% This is the switching level to turn on stage 2 of the cooling
5% This is the switching level to turn on stage 1 of the heating
50% This is the switching level to turn on stage 2 of the heating
75% This is the switching level to turn on stage 3 of the heating
10% This value only applies to cool outputs configured as multistage
10% This value only applies to heat outputs configured as multistage
2 K This is used to shift the temperature setpoint during demand limit
0 K/hr This is the cooling gradient used by the optimum start function to
equipment (if configured as multistage).
equipment (if configured as multistage).
equipment (if configured as multistage).
equipment (if configured as multistage).
equipment (if configured as multistage).
equipment (if configured as multistage).
outputs and specifies the hysteresis between switching the cool
stages ON and OFF.
outputs and specifies the hysteresis between switching the heat
stages ON and OFF.
control load shedding. When nviDlcShed is different from zero, the
current occupancy setpoint will be decreased by this value for
heating and increased for cooling.
calculate the optimum time for starting to decrease the effective
setpoint smoothly from the unoccupied or standby cooling setpoint
to the occupied cooling setpoint.
37 74-3332-2
Page 40

EXCEL10 CHILLED CEILING CONTROLLER LNS PLUG-INS USER GUIDE
Table C2: Configuration Variables for W7763 Controllers
Engineering Units:
English (Metric) or
NvName Field Name States plus Range Value Default Comments
nciEnergyManag si_optstart_grad[1] SNVT_temp_p
0 to 20 K/hr
nciChcConfig room_temp_sensor BYTE
NO_TEMP_SENSOR
NTC_NON_LINEARIZED
nciChcConfig DI1_config BYTE
DI_WINDOW_CLOSED
DI_OCCUPIED_SENSOR
DI_AIR_FLOW
DI_CHANGEOVER_COOL
DI_WINDOW_OPEN
DI_UNOCCUPIED_SENS
DI_CHANGEOVER_HEAT
DI_CONDENSATION
DI_NO_CONDENSATION
DI_MOVEMENT
DI_NO_MOVEMENT
DI_NOT_USED
nciChcConfig AI2_config BYTE
AI2_COLD_WATER
AI2_NOT_USED
nciChcConfig AI3_config BYTE
AI3_HUMIDITY
AI3_NOT_USED
74-3332-2 38
Digital
State or
0 K/hr This is the heating gradient used to determine the optimum time to
0
2
0
1
2
3
4
5
7
8
9
10
11
255
0
255
0
255
start increasing the current effective setpoint smoothly to the
occupied setpoint at the beginning of scheduled occupancy.
NTC_NON_LINEARIZED This specifies whether a direct wired room temperature sensor is
connected to the node or room temperature value from the network
is used.
DI_NOT_USED This variable specifies the digital input function and type of switch.
The option to be selected is the one which is the condition for a
closed switch contact (e.g., normally-closed window switch contact
= DI_WINDOW_CLOSED, normally-open window switch contact =
DI_WINDOW_OPEN).
NOTE: The digital input cannot be configured for an airflow detector
with the LNS tool.
DI_MOVEMENT and DI_NO_MOVEMENT are supported starting
with CHC2 version 1.0.2. These configuration settings cause the
controller to retain the occupied state for 15 minutes after the last
movement is detected.
AI2_NOT_USED When configured to AI2_COLD_WATER, a sensor is used to limit
the chilled water temperature. If the chilled water exceeds the
dewpoint limit (excluding safety band) for more than 5 minutes, the
cooling valve will be closed and the alarm
ALARM_H2O_TOO_COLD will be issued. Heat outputs operate
normally. If the chilled water temperature is provided from the
network (nviCoolTemp), it has priority over a locally wired sensor.
AI3_NOT_USED When configured to AI3_HUMIDITY an analog humidity sensor is
supported which is used to calculate the dewpoint. If the humidity
level is provided from the network (nviSpaceRH), it has priority over
a locally wired sensor.
Page 41

EXCEL10 CHILLED CEILING CONTROLLER LNS PLUG-INS USER GUIDE
Table C2: Configuration Variables for W7763 Controllers
Engineering Units:
English (Metric) or
NvName Field Name States plus Range Value Default Comments
nciChcConfig DewpointSetPt SNVT_temp_p
10 to 35°C
nciChcConfig DewpointSafety SNVT_temp_p
1 to 4 K
nciChcConfig chilled_ceiling Bit
NO
YES
nciChcConfig output_mode[0] BYTE
OUTP_COOLING
OUTP_HEATING
OUTP_CHANGEOVER
OUTP_NOT_USED
nciChcConfig output_mode[1] BYTE
OUTP_COOLING
OUTP_HEATING
OUTP_CHANGEOVER
OUTP_NOT_USED
Digital
State or
35°C This defines the chilled ceiling water temperature setpoint to avoid
1 K This is the dewpoint safety band for limiting the cold ceiling inlet
0
1
0
1
2
255
0
1
2
255
condensation in applications without a humidity sensor or if the
humidity sensor fails. If a humidity sensore is available (locally or
via nviSpaceRH), this variable will be ignored.
temperature to above the dew point to prevent condensation.
YES This configuration variable enables dewpoint protection. If the
chilled water temperature falls below the dewpoint (either
calculated from humidity and room temperature or from
nciChcConfig.DewpointSetPt) plus the safety band
(nciChcConfig.DewpointSafety), the cooling valve is closed. If not
configured for dewpoint protection, the condensation switch (either
direct wired or via nviCondensation) will still close the cooling valve
if condensation is detected..
OUTP_HEATING This specifies the operating mode of the output 1.
OUTP_COOLING This specifies the operating mode of the output 2. This setting is
ignored for nciNumValve = TWO_PIPE.
39 74-3332-2
Page 42

EXCEL10 CHILLED CEILING CONTROLLER LNS PLUG-INS USER GUIDE
Table C2: Configuration Variables for W7763 Controllers
Engineering Units:
English (Metric) or
NvName Field Name States plus Range Value Default Comments
nciChcConfig output_type[0] BYTE
FLOATING
ONE_STAGE
TWO_STAGE
THREE_STAGE
PWM
THERMAL
FLOATING_MID
nciChcConfig output_type[1] BYTE
FLOATING
ONE_STAGE
TWO_STAGE
THREE_STAGE
PWM
THERMAL
FLOATING_MID
nciChcConfig valve_reverse_0 Bit
DIRECT
REVERSE
nciChcConfig valve_reverse_1 Bit
DIRECT
REVERSE
nciChcConfig cycle_time[0] SNVT_time_sec
0 to 1200 s for stage output
0 to 600 s for floating output
20 to 600 s for PWM output
74-3332-2 40
Digital
State or
0
1
2
3
4
5
6
0
1
2
3
4
5
6
0
1
0
1
150 s for floating This specifies for the output 1 configured as
FLOATING This specifies the output type to drive the connected actuator for
the output 1:
FLOATING/FLOATING_MID - This setting considers
valve_reverse[] and cycle_time[]. Synchronization is performed at
every restart and at least once per day.
ONE_STAGE - Triac 2 is not used.
TWO_STAGE/THREE_STAGE - Triac 1 and 2 used (triac 1 and 2
both on for stage 3). When configured as multistage, cycle_time
and min_stage_off_time are considered.
PWM/THERMAL - Triac 2 is not used. Triac 1 operates as a pulsewidth modulated output, and the cycle time must be specified in
cycle_time[]. For PWM outputs, PwmZeroPosn and PwmFullPosn
must also be specified.
FLOATING This specifies the output type to drive the connected actuator for
the output 2 (see above).
DIRECT This setting applies to outputs only that have been configured as
FLOATING, PWM, or THERMAL and specifies the direct/reverse
operation of output 1.
DIRECT This setting applies to outputs only that have been configured as
FLOATING, PWM, or THERMAL and specifies the direct/reverse
operation of output 2.
• FLOATING: the runtime of the valve (time to run from fully
closed to fully open)
• PWM: the cycle time
• ONE_STAGE, TWO_STAGE, and THREE_STAGE: minimum
ON time before switching to the next stage.
Page 43

EXCEL10 CHILLED CEILING CONTROLLER LNS PLUG-INS USER GUIDE
Table C2: Configuration Variables for W7763 Controllers
Engineering Units:
English (Metric) or
NvName Field Name States plus Range Value Default Comments
nciChcConfig cycle_time[1] SNVT_time_sec
0 to 1200 s for stage output
0 to 600 s for floating output
20 to 600 s for PWM output
nciChcConfig min_stage_off_time[0] SNVT_time_sec
0 to 600 seconds
nciChcConfig min_stage_off_time[1] SNVT_time_sec
0 to 600 seconds
nciChcConfig PwmZeroPosn SNVT_lev_percent
0 to 100%
nciChcConfig PwmFullPosn SNVT_lev_percent
0 to 100%
nciChcGains si_pid_Xp[0] SNVT_temp_p
1.25 to 100 K, 0 = Disable
nciChcGains si_pid_Xp[1] SNVT_temp_p
1.25 to 100 K, 0 = Disable
nciChcGains si_pid_Tn[0] SNVT_time_sec
10 to 3200 seconds
0 = Disable
nciChcGains si_pid_Tn[1] SNVT_time_sec
10 to 3200 seconds
0 = Disable
41 74-3332-2
Digital
State or
150 s for floating This specifies for the output 2 configured as
90 s This is only used for ONE_STAGE, TWO_STAGE, and
90 s This is only used for ONE_STAGE, TWO_STAGE, and
0% This specifies the zero position for PWM actuators. This setting
100% This specifies the fully open position for PWM actuators. This
4 K This is the throttling range for use in the proportional portion of the
4 K This is the throttling range for use in the proportional portion of the
300 s This is the integral time for use in the integral portion of the PID
300 s This is the integral time for use in the integral portion of the PID
• FLOATING: the runtime of the valve (time to run from fully
closed to fully open)
• PWM: the cycle time
• ONE_STAGE, TWO_STAGE, and THREE_STAGE: minimum
ON time before switching to the next stage.
THREE_STAGE output 1 and specifies the minimum OFF time
before switching to the next stage.
THREE_STAGE output 2 and specifies the minimum OFF time
before switching to the next stage
applies to PWM actuators only and is used for both actuators if both
are configured as PWM actuators.
setting applies to PWM actuators only and is used for both
actuators if both are configured as PWM actuators.
PID loop gain for the cooling mode. Since CHC2 version 1.0.2, the
range of configurable values is 2 to 100 K for PI or 1.25 for P
control. For older versions, the valid range is 4 to 100 K.
PID loop gain for the heating mode. Since CHC2 version 1.0.2, the
range of configurable values is 2 to 100 K for PI or 1.25 for P
control. For older versions, the valid range is 4 to 100 K.
loop gain for the cooling mode.
loop gain for the heating mode.
Page 44

EXCEL10 CHILLED CEILING CONTROLLER LNS PLUG-INS USER GUIDE
Table C2: Configuration Variables for W7763 Controllers
Engineering Units:
English (Metric) or
NvName Field Name States plus Range Value Default Comments
nciChcGains si_pid_Tv[0] SNVT_time_sec
10 to 3200 seconds
0 = Disable
nciChcGains si_pid_Tv[1] SNVT_time_sec
10 to 3200 seconds
0 = Disable
nciChcGains si_boost[0] SNVT_temp_p
0.5 to 10 K
0 = Disable
nciChcGains si_boost[1] SNVT_temp_p
0.5 to 10 K
0 = Disable
nciNumValve SNVT_count
TWO_PIPE
FOUR_PIPE
nciSetPnts occupied_cool SNVT_temp_p
10 to 35°C
nciSetPnts standby_cool SNVT_temp_p
10 to 35°C
nciSetPnts unoccupied_cool SNVT_temp_p
10 to 35°C
nciSetPnts occupied_heat SNVT_temp_p
10 to 35°C
Digital
State or
0 s This is the derivative time for use in the derivative portion of the
0 s This is the derivative time for use in the derivative portion of the
1 K This is the temperature range to be added to the cooling setpoint,
1 K This is the temperature range to be subtracted from the heating
1
2
23°C This is the default setpoint for the occupied cooling setpoint that is
25°C This is the configured setpoint that applies to the standby cooling
28°C This is the configured setpoint that applies to the unoccupied
21°C This is the default setpoint for the occupied heating setpoint that is
PID loop gain for the cooling mode.
PID loop gain for the heating mode.
above which the cooling output is fully open to allow a faster
response. For thermal actuators it is the hysteresis for thermal
control algorithm.
setpoint, below which the heating output is fully open to allow a
faster response. For thermal actuators it is the hysteresis for
thermal control algorithm.
FOUR_PIPE This is the configuration property used to specify a two-pipe system
(one valve) or a four-pipe system (two valves). If set to TWO_PIPE,
only the output terminals for output1 are used. If set to
FOUR_PIPE, output1 and output2 are defined by
nciChcConfig.output_mode[].
used in case there is no locally wired setpoint knob or nviSetpoint
has not been bound. Where the ZEB for occupied is used, this
derives from the difference of occupied_cool and occupied_heat.
mode. Where the ZEB for standby is used, it derives from the
difference of standby_cool and standby_heat.
cooling mode.
used in case there is no locally wired setpoint knob or nviSetpoint
has not been bound. Where the ZEB for occupied is used, this
derives from the difference of occupied_cool and occupied_heat.
74-3332-2 42
Page 45

EXCEL10 CHILLED CEILING CONTROLLER LNS PLUG-INS USER GUIDE
Table C2: Configuration Variables for W7763 Controllers
Engineering Units:
English (Metric) or
NvName Field Name States plus Range Value Default Comments
nciSetPnts standby_heat SNVT_temp_p
10 to 35°C
nciSetPnts unoccupied_heat SNVT_temp_p
10 to 35°C
nciWallMod ui_bypass_time UWORD
0 to 1080 minutes
nciWallMod si_low_setpt SNVT_temp_p
-5 to 5 K for relative
12 to 30°C for absolute
nciWallMod si_high_setpt SNVT_temp_p
-5 to 5 K for relative
12 to 30°C for absolute
nciWallMod si_space_temp_zero_cal SNVT_temp_p
-5 to 5 K
nciWallMod use_wall_mod_st_pt Bit
NO
YES
Digital
State or
19°C This is the configured setpoint that applies to the standby heating
16°C This is the configured setpoint that applies to the unoccupied
180 min This is the parameter that determines the time the controller
-5 K (relative) This is the low limit for the setpoint knob. It can be relative or
5 K (relative) This is the high limit for the setpoint knob. It can be relative or
0 K The space temperature sensor is corrected by adding this
0
1
mode. Where the ZEB for standby is used, it derives from the
difference of standby_cool and standby_heat.
heating mode.
remains in OCCUPIED mode before reverting to the original
occupancy mode after pressing the override button at the wall
module or initiating BYPASS via the network. When the bypass
mode has been activated, the bypass timer is set to
ui_bypass_time. When the timer expires,
nvoChcStatus.occ_status.hw_override reverts from OC_BYPASS
to OC_NUL to quit the bypass override function.
absolute depending on the configuration in
nciWallMod.set_pnt_knob.
absolute depending on the configuration in
nciWallMod.set_pnt_knob.
calibration setting (an offset value) to the sensed value.
YES This specifies whether the setpoint used is from the knob on the
wall module connected to the controller or ifrom the network via
nciTempSetPts. If set to NO, all setpoints to be used come from the
network via nciTempSetPts. If set to YES, an additional option
set_pnt_knob must be set to specify type of setpoint adjustment
(see below).
43 74-3332-2
Page 46

EXCEL10 CHILLED CEILING CONTROLLER LNS PLUG-INS USER GUIDE
Table C2: Configuration Variables for W7763 Controllers
Engineering Units:
English (Metric) or
NvName Field Name States plus Range Value Default Comments
nciWallMod set_pnt_knob 2 Bits
OFFSET
ABSOLUTE_MIDDLE
nciWallMod override_type 2 Bits
NO_BUTTON
BYPASS_UNOCCUPIED
BYPASS
nciWallMod override_priority Bit
LAST_WINS
NETWORK_WINS
nciWallMod display_type Bit
LED_OVERRIDE
LED_OCCUPANCY
LCD_DISPLAY
Digital
State or
0
2
0
1
2
0
1
0
1
2
OFFSET This setting specifies the usage of the setpoint knob on the wall
module for the occupied setpoint. OFFSET specifies a relative
scale on the wall module where the setpoint is calculated by adding
the setpoint potentiometer value (± 5 K) to the appropriate value of
nciTempSetPts. ABSOLUTE_MIDDLE specifies an absolute scale
on the wall module. The setpoint knob directly determines the
center point of occupied cooling and heating setpoints. The
respective cooling and heating setpoint is determined by the
setpoint knob position adding or subtracting half of the user
selectable ZEB defined in nciSetPnts.<occ_mode>_cool or
nciSetPnts.<occ_mode>_heat . This applies to <occ_mode>
OCCUPIED and STANDBY.
BYPASS_UNOCCUPIED This setting determines the behavior of the override button.
BYPASS_UNOCCUPIED allows overriding the current occupancy
mode to OCCUPIED for a configurable bypass time, or causing a
permanent override to UNOCCUPIED. BYPASS allows only the
temporary override to OCCUPIED and canceling it.
LAST_WINS This setting configures the priority of the local (wall module) or
central (network interface) override concerning override button. If
NETWORK_WINS is set and the network sends value NUL, then
the override button is active.
LED_OVERRIDE This setting configures the display of occupancy and/or override.
LED_OVERRIDE shows the override from the bypass button or
from the network. LED_OCCUPANCY shows the effective
occupancy mode. LCD_DISPLAY is only used for T7560 Wall
Modules. The display shows the occupancy mode with different
symbols, and the override mode with flashing symbols.
74-3332-2 44
Page 47

EXCEL10 CHILLED CEILING CONTROLLER LNS PLUG-INS USER GUIDE
Table C3: Input Variables for W7763 Controllers
Engineering Units:
English (Metric) or
NvName Field Name States plus Range Value Default Comments
nviApplicMode SNVT_hvac_mode
HVAC_AUTO
HVAC_HEAT
HVAC_COOL
HVAC_OFF
HVAC_NUL
nviCondensation value SNVT_switch
0 to 100%
nviCondensation state SNVT_switch
OFF
ON
NUL
nviCoolTemp SNVT_temp_p
0 to 70°C
327.67°C = INVALID
nviDlcShed BYTE
NORMAL
SETPOINT_SHIFT
Digital
State or
0
1
3
6
255
0
0
1
255
INVALID
0
1
HVAC_AUTO
(if bound but fails to be
received or at application
restart)
(at application restart)
NUL
(at application restart)
(at application restart)
0 (if bound but fails to be
received or at application
restart)
This is an input that coordinates the controller operation with the
main equipment controller. Dependent on the supply energy
available, the main equipment controller commands the Chilled
Ceiling controller to operate in heat mode only, cool mode only or
heat and cool mode if appropriate to the configuration. HVAC_AUTO
means that both heating and cooling equipment are available, and
the current mode is determined by the control algorithm depending
upon the room temperature and effective setpoint. HVAC_AUTO is
invalid for changeover applications. When the Digital input is
configured as Heat/Cool changeover input, this input will always
have priority over the network nviApplicMode’s HVAC_HEAT or
HVAC_COOL.
This input allows use of a condensation switch from another node on
the network. The network input has priority over a sensor connected
directly to the controller.
See above.
This is the input for the chilled water temperature coming from
another node on the network to be used for dewpoint protection. It is
compared to either the calculated dewpoint or configured dewpoint
(if no humidity sensor is available) plus the safety band and causes
the controller to shut down the cooling valve if it is below the limit.
The network input has priority over a sensor connected directly to
the controller.
This is an input from an energy management system. When it is 0,
the temperature control algorithm operates in a normal mode. When
it is 1, the effective setpoint will be shifted by the amount defined in
nciEmergyManag.si_dlc_setpt_bump. For cooling the effective
setpoint will be increased, for heating the effective setpoint will be
decreased always regarding the frost limits.
45 74-3332-2
Page 48

EXCEL10 CHILLED CEILING CONTROLLER LNS PLUG-INS USER GUIDE
Table C3: Input Variables for W7763 Controllers
Engineering Units:
English (Metric) or
NvName Field Name States plus Range Value Default Comments
nviEmerg SNVT_hvac_emerg
EMERG_NORMAL
EMERG_PRESSURIZE
EMERG_DEPRESSURIZE
nviInUse UWORD
0 to 65535
nviManCool SNVT_lev_percent
0 to 100%
163.835% = INVALID
nviManHeat SNVT_lev_percent
0 to 100%
163.835% = INVALID
nviManOccCmd SNVT_occupancy
OC_OCCUPIED
OC_UNOCCUPIED
OC_BYPASS
OC_STANDBY
OC_NUL
Digital
State or
0
1
2
0 (if bound but fails to be
This can be used for master/slave installations where the cool output
This can be used for master/slave installations where the heat
0
1
2
3
255
EMERG_NORMAL
(at application restart)
received), 65535 (for 60 s at
application restart)
OC_NUL
(at application restart)
It is an emergency input from a device that determines the correct
action during a given emergency (such as a fire).
• EMERG_NORMAL: terminates EMERG_PRESSURIZE or
EMERG_DEPRESSURIZE and restores the control algorithm.
• EMERG_PRESSURIZE: heat/cool outputs off.
• EMERG_DEPRESSURIZE: heat/cool outputs closed.
This is used by the engineering tool or other supervisory node that it
is “logged on” to the controller node. It should be set every minute,
or the controller will reset it after 60s to automatically log off the
supervisory node.
is controlled by an external controller node. In this case, the output
signal of the external cool control algorithm (0-100%) has to be
bound to nviManCool which would take over the task of the local
(slave) control algorithm while the switch levels operate as locally
configured. The heating output will be closed.
output is controlled by an external controller node. In this case, the
output signal of the external heat control algorithm (0-100%) has to
be bound to nviManHeat which would take over the task of the local
(slave) control algorithm while the switch levels operate as locally
configured. The cooling output will be closed.
This is an input from an network connected operator interface or
other node that indicates the state of
(schedule override). It has priority over the time program
(nviTodEvent). When the BYPASS mode is set, then the Bypass
time is active. When the bypass time is elapsed, the master
controller automatically sets nviManOccCmd to OC_NUL.
nviManOccCmd does not provide a failure detect mechanism in
case no periodic update is received.
manual occupancy control
74-3332-2 46
Page 49

EXCEL10 CHILLED CEILING CONTROLLER LNS PLUG-INS USER GUIDE
Table C3: Input Variables for W7763 Controllers
Engineering Units:
English (Metric) or
NvName Field Name States plus Range Value Default Comments
nviManualMode BYTE
MODE_ENABLE
MODE_DISABLE
MODE_MANUAL
SUPPRESS_ALARMS
UNSUPPRESS_ALARMS
nviRequest object_id SNVT_obj_request
UWORD
0=Node Object
1=Fan Coil Object
nviRequest object_request object_request_t
Enum from Echelon defined
RQ_NORMAL
RQ_UPDATE_STATUS
RQ_UPDATE_ALARM
RQ_REPORT_MASK
nviSensorOcc SNVT_occupancy
OC_OCCUPIED
OC_UNOCCUPIED
OC_BYPASS
OC_NUL
Digital
State or
0
1
2
3
4
This input variable belongs to the Node Object and provides the
0
2
4
5
0
1
2
255
MODE_ENABLE and
UNSUPPRESS_ALARMS
(at application restart)
See above. Commanding any modes other the ones listed will result
OC_NUL
(if bound but fails to be
received or at application
restart)
This is an input that is used to disable the controller’s control
algorithms in order to manually set its physical outputs. The
controller still responds to smoke purge even when disabled or set
to manual or factory test mode. It remains unchanged until another
mode has been commanded or an application restart has been
performed.
• MODE_ENABLE: starts the control algorithm at an initial state
after MODE_DISABLE or MODE_MANUAL.
• MODE_DISABLE: all outputs switched off, the alarm
ALARM_NODE_OFF is issued.
• MODE_MANUAL: all control loops are disabled and the alarm
ALARM_NODE_OFF is issued. The outputs can be controlled
manually via the nviTest command
• SUPPRESS_ALARMS: nvoAlarm is not sent and
nvoAlarmStatus and nvoAlarmLog are not updated until
UNSUPPRESS_ALARMS is set or an application restart.
• UNSUPPRESS_ALARMS: releases alarm suppression after
SUPPRESS_ALARMS.
mechanism to request a particular mode for a particular object within
a node.
in an “invalid_request” when reading nvoStatus.
This allows an occupancy sensor of another Excel 10 controller to
be used to indicate the sensed occupancy state of the space.
OC_NUL means no input is available because it is not bound, bound
but not received periodically, or not configured by
nciChcConfig.DI1_config. More than one occupancy sensor may be
bound to nviSensorOcc. If any one sensor detects occupancy, the
controller considers the space occupied.
47 74-3332-2
Page 50

EXCEL10 CHILLED CEILING CONTROLLER LNS PLUG-INS USER GUIDE
Table C3: Input Variables for W7763 Controllers
Engineering Units:
English (Metric) or
NvName Field Name States plus Range Value Default Comments
nviSetPoint SNVT_temp_p
10 to 35°C
327.67°C = INVALID
nviSetPtOffset SNVT_temp_p
-10 to 10 K
327.67°C = INVALID
nviSpaceRH SNVT_lev_percent
163.835% = INVALID
nviSpaceTemp SNVT_temp_p
0 to 40°C
327.67°C = INVALID
nviTest output1_cmd BYTE
NORMAL_HC_MODE
OFF1_OFF2
ON1_OFF2
OFF1_ON2
ON1_ON2
TESTPOSITION
Digital
State or
INVALID
0 (if bound but fails to be
INVALID
INVALID
NORMAL_HC_MODE
(at application restart)
received or at application
restart)
(at application restart)
(if bound but fails to be
received or at application
restart)
(at application restart)
This is an input intended for binding third party nodes to authorize
them for setpoint modifications. When this has been bound and a
valid update is received, the local configured setpoints will no longer
be directly used to determine the current occupancy setpoint. For
OCCUPIED and STANDBY modes, this is used with the appropriate
ZEB (derived from the configured setpoints), for UNOCCUPIED
mode the setpoint does not depend on this input, but on
nciTempSetPts.unoccupied_cool/_heat only. nviSetpoint is stored in
RAM and gets lost after power failure. In this case the setpoints of
nciTempSetPts will be used until a valid nviSetpoint is received.
This is an input intended for binding third party nodes to authorize
them for setpoint shifting. nviSetPtOffset is stored in RAM and will
be initialized to zero after application restart or power failure. If
nviSetPtOffset is bound and fails to be received periodically as
configured with nciRcvHrtBt, it will be reset to zero.
This input allows the use of a humidity sensor from another node to
be used for calculating the dewpoint. The network input has priority
over a sensor connected directly to the controller.
This is the space temperature transmitted from another Excel 10
controller or another node that has a temperature sensor wired to it.
If bound or has a value other than INVALID, then it is used as the
sensed space temperature instead of the wired wall module's
temperature. nviSpaceTemp may be set to a value other than
INVALID using a LNS tool when nviSpaceTemp is not bound to set
the temperature to a fixed value.
This is used by factory test, OEM field test, field installation, and
field testing to manually command the physical output 1 when the
node has been put into manual mode (nviManualMode =
MODE_MANUAL).
NORMAL_HC_MODE: output 1 remains in its current position
OFF1_OFF2, ON1_OFF2, OFF1_ON2, ON1_ON2: set the individual
triacs on or off
TESTPOSITION: sets output based on output1_test_pos.
74-3332-2 48
Page 51

EXCEL10 CHILLED CEILING CONTROLLER LNS PLUG-INS USER GUIDE
Table C3: Input Variables for W7763 Controllers
Engineering Units:
English (Metric) or
NvName Field Name States plus Range Value Default Comments
nviTest output1_test_pos SNVT_lev_percent
0 to 100%
nviTest output2_cmd BYTE
NORMAL_HC_MODE
OFF1_OFF2
ON1_OFF2
OFF1_ON2
ON1_ON2
TESTPOSITION
nviTest output2_test_pos SNVT_lev_percent
0 to 100%
nviTest override_LED BYTE
NORMAL_LED_MODE
LED_OFF
LED_ON
nviTodEvent current_state SNVT_tod_event.current_state
OC_OCCUPIED
OC_UNOCCUPIED
OC_STANDBY
OC_NUL
nviTodEvent next_state SNVT_tod_event.next_state
OC_OCCUPIED
OC_UNOCCUPIED
OC_STANDBY
OC_NUL
nviTodEvent time_to_next_state SNVT_tod_event.time_to_next_
state
UWORD
0 to 2880 minutes
Digital
State or
0 (at application restart) This is used for the TESTPOSITION of the output1_cmd and is
0
1
2
3
4
5
0 (at application restart) Same as output1_test_pos for output 2
0
1
2
0
1
3
255
0
1
3
255
0 (if bound but fails to be
NORMAL_HC_MODE
(at application restart)
NORMAL_LED_MODE
(at application restart)
OC_OCCUPIED
(if bound but fails to be
received or at application
restart)
OC_OCCUPIED
(if bound but fails to be
received or at application
restart)
received or at application
restart)
based on the configured runtime/cycle time.
Same as output1_cmd for output 2.
This can be used to test the wall module LED when nviManualMode
= MODE_MANUAL..
This indicates to the node whether the space is currently scheduled
to be occupied, standby or unoccupied.
This indicates to the node whether the next scheduled occupancy
mode will be occupied, standby or unoccupied. This information is
required by the controller to perform the optimum start strategy.
This is the time in minutes until the next change of scheduled
occupancy state. This data is also used by the optimum start
calculation (see nciEnergyManag).
49 74-3332-2
Page 52

EXCEL10 CHILLED CEILING CONTROLLER LNS PLUG-INS USER GUIDE
Table C3: Input Variables for W7763 Controllers
Engineering Units:
English (Metric) or
NvName Field Name States plus Range Value Default Comments
nviEnergyHoldOff value SNVT_switch.value
0 to 100%
nviEnergyHoldOff state SNVT_switch.state
CLOSED
OPEN
NO_WINDOW
Digital
State or
0 (if bound but fails to be
0
1
255
received or at application
restart)
NO_WINDOW
(if bound but fails to be
received or at application
restart)
This allows a window contact node or another controller to be used
as remote window contact. More than one nvoEnergyHoldOff may
be bound to one nviEnergyHoldOff, which allows one node to be
used to handle several distributed window contacts. In this case the
control process assumes an open window, if at least one bound
window node detects an open window. ‘Window Closed’ would be
assumed if all nvoEnergyHoldOffs bound to nviEnergyHoldOff
indicate the window being closed for at least the failure detect time
(nciSndHrtBt).
See above.
74-3332-2 50
Page 53

EXCEL10 CHILLED CEILING CONTROLLER LNS PLUG-INS USER GUIDE
Table C4: Output Variables for W7763 Controllers
Engineering Units:
English (Metric) or
NvName Field Name States plus Range Value Default Comments
nvoActiveSetPt SNVT_temp_p
10 to 35°C
327.67=INVALID
nvoAlarm subnet UBYTE
0 to 255
nvoAlarm node UBYTE
0 to 255
nvoAlarm
(continued)
type UBYTE
ALM_NO_ALARM
ALM_NODE_OFF
ALM_FROST
ALM_INVALID_SETPNT
ALM_TEMP_SENSOR_FAIL
ALM_SETPNT_KNOB_FAIL
ALM_FAN_SPEED_SW_FAIL
ALM_FAN_FAILURE
ALM_COMFAIL_SPACETEMP
ALM_COMFAIL_HVACMODE
ALM_COMFAIL_SETPTOFFS
ALM_COMFAIL_SCHEDOCC
ALM_COMFAIL_DLC
ALM_COMFAIL_SPACE_RH
ALM_COMFAIL_ODTEMP
ALM_COMFAIL_OCCSENSOR
ALM_COMFAIL_WINDOW
ALM_COMFAIL_MANHEAT
ALM_COMFAIL_MANCOOL
ALM_COMFAIL_COOL_TEMP
ALM_H2O_TOO_COLD
ALM_CONDENSATION
RETURN_TO_NORMAL
RTN_NODE_OFF
RTN_FROST
RTN_INVALID_SETPNT
RTN_TEMP_SENSOR_FAIL
RTN_SETPNT_KNOB_FAIL
Digital
State or
This is an output showing the active setpoint of the control
The subnet is the LONWORKS subnet number (in domain entry
The node is the LONWORKS node number (in domain entry 1 of
0
1
2
3
4
5
6
7
8
9
10
11
12
13
14
15
16
17
18
19
20
21
128
129
130
131
132
133
RETURN_TO_NORMAL
(at application restart)
algorithm. It is based on the occupancy setpoints, the offset
and recovery ramping.
1 of the node’s domain table).
the node’s domain table).
This is an output reporting the latest changed error condition
detected in the node. The first 5 bits are used for the alarm
type number, and this number is added to
RETURN_TO_NORMAL (128) when the error condition is no
longer true. Each error condition/return-to-normal is issued
only once. The type is also recorded in nvoAlarmLog and
nvoChcStatus.alarm_type.
Alarm reporting is suppressed by settin nviManualMode to
SUPPRESS_ALARMS, in which case nvoAlarm.type is set to
ALARM_NOTIFY_DISABLEd. Alarm reporting is turned on
again by setting nviManualMode to UNSUPPRESS_ALARMS,
after which all existing alarms (or ALM_NO_ALARM) are
reported one at a time.
51 74-3332-2
Page 54

EXCEL10 CHILLED CEILING CONTROLLER LNS PLUG-INS USER GUIDE
Table C4: Output Variables for W7763 Controllers
Engineering Units:
English (Metric) or
NvName Field Name States plus Range Value Default Comments
nvoAlarm
nvoAlarmLog alarm_type[0] Same as nvoAlarm.type
nvoAlarmLog alarm_type[1] Same as nvoAlarm.type See nvoAlarm.type See above.
nvoAlarmLog alarm_type[2] Same as nvoAlarm.type See nvoAlarm.type See above.
nvoAlarmLog alarm_type[3] Same as nvoAlarm.type See nvoAlarm.type See above.
nvoAlarmLog alarm_type[4] Same as nvoAlarm.type See nvoAlarm.type See above. nvoAlarmLog.alarm_type[4] is the oldest alarm.
nvoAlarmStatus
error_bit[0] UBYTE
RTN_COMFAIL_SPACETEMP
RTN_COMFAIL_HVACMODE
RTN_COMFAIL_SETPTOFFS
RTN_COMFAIL_SCHEDOCC
RTN_COMFAIL_DLC
RTN_COMFAIL_SPACE_RH
RTN_COMFAIL_ODTEMP
RTN_COMFAIL_OCCSENSOR
RTN_COMFAIL_WINDOW
RTN_COMFAIL_MANHEAT
RTN_COMFAIL_MANCOOL
RTN_COMFAIL_COOL_TEMP
RTN_COMFAIL_H2O_TOO_COLD
RTN_COMFAIL_CONDENSATION
ALARM_NOTIFY_DISABLED
Bit coded Alarm:
ALM_NODE_OFF
ALM_FROST
ALM_INVALID_SETPNT
ALM_TEMP_SENSOR_FAIL
ALM_SETPNT_KNOB_FAIL
ALM_COMFAIL_SPACETEMP
Digital
State or
136
137
138
139
140
141
142
143
144
145
146
147
148
149
255
See nvoAlarm.type A central node may poll the nvoAlarmLog output for a short
1
2
4
8
16
128
history of alarms. It contains the last five alarms reported via
nvoAlarm. At the time a new nvoAlarm is issued, nvoAlarmLog
is updated.
This is a polled output containing a list of all the current errors
detected by the node. A search for error conditions in the node
is made periodically. A central node may poll the
nvoAlarmStatus output for all of the current errors.
nvoAlarmStatus contains all the current detected errors even
though they may be suppressed for reporting by nvoAlarm.
74-3332-2 52
Page 55

EXCEL10 CHILLED CEILING CONTROLLER LNS PLUG-INS USER GUIDE
Table C4: Output Variables for W7763 Controllers
Engineering Units:
English (Metric) or
NvName Field Name States plus Range Value Default Comments
nvoAlarmStatus error_bit[1] UBYTE
Bit coded Alarm:
ALM_COMFAIL_HVACMODE
ALM_COMFAIL_SETPTOFFS
ALM_COMFAIL_SCHEDOCC
ALM_COMFAIL_DLC
ALM_COMFAIL_TEMPRESET
ALM_COMFAIL_ODTEMP
ALM_COMFAIL_OCCSENSOR
ALM_COMFAIL_WINDOW
nvoAlarmStatus error_bit[2] UBYTE
Bit coded Alarm:
ALM_COMFAIL_MANHEAT
ALM_COMFAIL_MANCOOL
ALM_HW_SW_MISMATCH
nvoApplicMode SNVT_hvac_mode
HVAC_AUTO
HVAC_HEAT
HVAC_COOL
HVAC_OFF
nvoCoolOutput SNVT_lev_percent
0 to 100%
163.835% = INVALID
nvoDigitInState value SNVT_switch.value
0 to 100%
nvoDigitInState state SNVT_switch.state
OFF
Digital
State or
1
2
4
8
16
32
64
128
1
2
4
0
1
3
6
This is the cooling output that is typically used for monitoring or
This indicates the binary states of the controller’s digital input
0
See above.
See above.
HVAC_OFF
(at application restart)
See above.
This is an output used to coordinate the slave devices with the
master controller. It reflects the current heat/cool medium
based on supply energy available. This is required for
configurations with heat/cool changeover. HVAC_OFF
switches the heat/cool control off while still providing frost
protection and reporting status and alarms.
bound to a cooling actuator node or another controller
operating as slave. nvoCoolOutput will be transmitted
immediately when its value has changed significantly (>= 1%),
and periodically according to nciSndHrtBt. The output value
represents the output of the control algorithm but is limited to a
range of 0% to 100%.
which can be configured to support a window contact, an
occupancy sensor, an airflow contact, heat/cool changeover
contact or monitoring contact. It can be bound to another Excel
10 controller or a third party node.
53 74-3332-2
Page 56

EXCEL10 CHILLED CEILING CONTROLLER LNS PLUG-INS USER GUIDE
Table C4: Output Variables for W7763 Controllers
Engineering Units:
English (Metric) or
NvName Field Name States plus Range Value Default Comments
ON
NOT_ASSIGNED
nvoEffectOcc
nvoChcStatus field_no UBYTE
nvoChcStatus effect_occ SNVT_occupancy
SNVT_occupancy
OC_OCCUPIED
OC_UNOCCUPIED
OC_BYPASS
OC_STANDBY
FIELD_EFFECT_OCC
FIELD_HW_OVERRIDE
FIELD_SCHED_OCC
FIELD_EFF_SEN_OCC
FIELD_NET_MAN_OCC
FIELD_HW_SEN_OCC
FIELD_R_O_LED
FIELD_MODE
FIELD_ALARM_TYPE
FIELD_DLC_SHED
FIELD_EFF_WINDOW_OPEN
FIELD_HW_WINDOW_OPEN
FIELD_EXTERNAL_ACTIVE
FIELD_CONDENSATION_STATE
FIELD_OUTPUT_POS_1
FIELD_OUTPUT_POS_2
FIELD_REHEAT_RELAY
FIELD_ACTIVE_SET_PT
FIELD_SPACE_TEMP
FIELD_COOL_TEMP
FIELD_HUMIDITY
FIELD_REST_BYPASS_TIME
OC_OCCUPIED
OC_UNOCCUPIED
OC_BYPASS
Digital
State or
1
255
0
1
2
3
1
2
3
4
5
6
7
8
9
10
11
12
14
15
17
18
19
20
21
22
23
24
0
1
2
This is the output reflecting the effective occupancy mode
derived from the time schedule, occupancy sensor,
override button, and network occupancy override.
This is used to indicate which other data field in nvoChcStatus
has changed since the last time nvoChcStatus was sent on the
network. If any field has had a significant change, only that
field is updated, and field_no indicates which field. If three or
more fields have changed significantly, then all fields are
updated and field_no is set to 0. All fields are also updated
every refresh time (55s).
This is the effective occupancy mode resulting from scheduled
occupancy mode, occupancy sensor information, bypass pushbutton, or manual operator interface.
74-3332-2 54
Page 57

EXCEL10 CHILLED CEILING CONTROLLER LNS PLUG-INS USER GUIDE
Table C4: Output Variables for W7763 Controllers
Engineering Units:
English (Metric) or
NvName Field Name States plus Range Value Default Comments
OC_STANDBY
nvoChcStatus hw_override SNVT_occupancy
OC_UNOCCUPIED
OC_BYPASS
OC_NUL (No Override)
nvoChcStatus
nvoChcStatus
(continued)
nvoChcStatus eff_sen_occ SNVT_occupancy
nvoChcStatus net_man_occ SNVT_occupancy
nvoChcStatus hw_sen_occ SNVT_occupancy
nvoChcStatus r_o_led SNVT_occupancy
sched_occ SNVT_occupancy
OC_OCCUPIED
OC_UNOCCUPIED
OC_BYPASS
OC_STANDBY
OC_NUL (No Override)
OC_OCCUPIED
OC_UNOCCUPIED
OC_NUL (No Override)
OC_OCCUPIED
OC_UNOCCUPIED
OC_BYPASS
OC_STANDBY
OC_NUL
OC_OCCUPIED
OC_UNOCCUPIED
OC_NUL
OC_OCCUPIED
OC_UNOCCIPIED
OC_BYPASS
OC_STANDBY
OC_NUL
Digital
State or
3
0
2
255
0
1
2
3
255
0
1
255
0
1
2
3
255
0
1
255
0
1
2
3
255
It reports the current state of the remote override button.
It reports the current scheduled occupancy received via the
network.
This reports the effective state of occupancy sensor(s)
connected either to the input terminals from the network.
This reports the manual occupancy from the network.
It reports the state of the occupancy sensor wired to the node.
This variable reports the current state of the remote override
LED which indicates the effective schedule override resulting
from the bypass push-button or a network override.
OC_OCCUPIED: 2 flashes per second
OC_UNOCCIPIED: 1 flash per second
OC_BYPASS: on
OC_STANDBY: 2 flashes per second
OC_NUL: off
55 74-3332-2
Page 58

EXCEL10 CHILLED CEILING CONTROLLER LNS PLUG-INS USER GUIDE
Table C4: Output Variables for W7763 Controllers
Engineering Units:
English (Metric) or
NvName Field Name States plus Range Value Default Comments
nvoChcStatus
(continued)
nvoChcStatus
nvoChcStatus alarm_type Same as nvoAlarm.type This is the latest alarm detected by the node (if any) and has
nvoChcStatus dlc_shed Bit
nvoChcStatus eff_window_open Bit
nvoChcStatus hw_window_open Bit
nvoChcStatus condensation_state Bit
nvoChcStatus output_position[0] SNVT_lev_percent This indicates the position of the output 1.
74-3332-2 56
mode BYTE
CTL_COOL
CTL_HEAT
CTL_PRESSURIZE
CTL_DE_PRESSURIZE
CTL_MODE_MANUAL
CTL_MODE_FACTORY_TEST
CTL_FLOATING_OUT_SYNCH
CTL_START_UP_WAIT
CTL_DISABLED
NOT ACTICE
ACTIVE
CLOSED or NOT_ASSIGNED
OPEN
CLOSED or NOT_ASSIGNED
OPEN
NO_CONDENSATION
CONDENSATION
Digital
State or
0
1
2
3
4
5
6
8
255
0
1
0
1
0
1
0
1
This is the current operating mode of the node determined by
many inputs and arbitrated by control logic.
CTL_PRESSURIZE and CTL_DE_PRESSURIZE disable the
heat/cool outputs.
CTL_MODE_MANUAL allows turning on and off outputs
manually through nviTest.
CTL_MODE_FACTORY_TEST is intended only for the factory.
CTL_FLOATING_OUT_SYNCH allows enough time (150%
valve run time) for the valve(s) are at their initial positions
(control algorithms are active). The controller then goes into
one of the normal operating modes, such as CTL_COOL.
When the effective occupancy changes to unoccupied or 24
hours have elapsed since the last start-up or
CTL_FLOATING_OUT_SYNCH mode, the controller enters
this mode again to reset the floating output position tracking.
CTL_START_UP_WAIT is the first mode after an application
restart. No control algorithms are active, and heat/cool outputs
stay in their default positions. CTL_FLOATING_OUT_SYNCH
follows.
CTL_DISABLED disables heat/cool control.
the same value as nvoAlarm.type.
This indicates the state of the demand limit control.
This indicates the real status of the window detection, either
from the digital input or from the network.
This indicates the status of the digital input configured as
window detection.
This output indicates the status of the condensation switch, if
configured for one. If not configured, the status is 0.
Page 59

EXCEL10 CHILLED CEILING CONTROLLER LNS PLUG-INS USER GUIDE
Table C4: Output Variables for W7763 Controllers
Engineering Units:
English (Metric) or
NvName Field Name States plus Range Value Default Comments
0 to 100%
163.835% = INVALID
nvoChcStatus output_position[1] SNVT_lev_percent
0 to 100%
163.835% = INVALID
nvoChcStatus active_set_pt SNVT_temp_p
10 to 35°C
327.67°C = INVALID
nvoChcStatus space_temp SNVT_temp_p
0 to 40°C
327.67°C = INVALID
nvoChcStatus cool_temp SNVT_temp_p
0 to 70°C
nvoChcStatus humidity SNVT_lev_percent
0 to 100%
nvoChcStatus rest_bypass_time UWORD
0 to 65535 Min
nvoChcStatusP field_no Same as nvoChcStatus.
nvoChcStatusP effect_occ Same as nvoChcStatus. Same as nvoChcStatus.
nvoChcStatusP hw_override Same as nvoChcStatus. Same as nvoChcStatus.
nvoChcStatusP sched_occ Same as nvoChcStatus. Same as nvoChcStatus.
nvoChcStatusP eff_sen_occ Same as nvoChcStatus. Same as nvoChcStatus.
nvoChcStatusP net_man_occ Same as nvoChcStatus. Same as nvoChcStatus.
nvoChcStatusP hw_sen_occ Same as nvoChcStatus. Same as nvoChcStatus.
nvoChcStatusP r_o_led Same as nvoChcStatus. Same as nvoChcStatus.
nvoChcStatusP mode Same as nvoChcStatus. Same as nvoChcStatus.
327.67°C = INVALID
163.835% = INVALID
Digital
State or
This indicates the position of the output 2.
This reports the current temperature control point calculated
This reports the current space temperature used for the control
This output provides the chilled water temperature from the
The output provides the humidity from the humidity sensor
This shows the current value in minutes of the active bypass
Same as nvoChcStatus except not sent as heartbeat. This
from the various setpoints, operating modes, and optimum
start-up gradients.
algorithm.
sensor connected directly to the controller. If not configured, it
shows INVALID.
connected directly to the controller. If not configured, it shows
INVALID.
timer
variable is sent only in response to a poll request, typically
from a supervisory device.
57 74-3332-2
Page 60

EXCEL10 CHILLED CEILING CONTROLLER LNS PLUG-INS USER GUIDE
Table C4: Output Variables for W7763 Controllers
Engineering Units:
English (Metric) or
NvName Field Name States plus Range Value Default Comments
nvoChcStatusP alarm_type Same as nvoChcStatus. Same as nvoChcStatus.
nvoChcStatusP dlc_shed Same as nvoChcStatus. Same as nvoChcStatus.
nvoChcStatusP eff_window_open Same as nvoChcStatus. Same as nvoChcStatus.
nvoChcStatusP hw_window_open Same as nvoChcStatus. Same as nvoChcStatus.
nvoChcStatusP condensation_state Same as nvoChcStatus Same as nvoChcStatus.
nvoChcStatusP output_position[0] Same as nvoChcStatus. Same as nvoChcStatus.
nvoChcStatusP output_position[1] Same as nvoChcStatus. Same as nvoChcStatus.
nvoChcStatusP active_set_pt Same as nvoChcStatus. Same as nvoChcStatus.
nvoChcStatusP cool_temp Same as nvoChcStatus. Same as nvoChcStatus.
nvoChcStatusP humidity Same as nvoChcStatus. Same as nvoChcStatus.
nvoChcStatusP space_temp Same as nvoChcStatus. Same as nvoChcStatus.
nvoChcStatusP rest_bypass_time Same as nvoChcStatus. Same as nvoChcStatus.
nvoHeatOutput SNVT_lev_percent
0 to 100%
163.835% = INVALID
nvoSensor override_button Bit
NOT_PRESSED
PRESSED
nvoSensor contact_state_DI1 Bit
CONTACT_OPEN
CONTACT_CLOSED
nvoSensor raw_data[0] UWORD
0 to 65535 for Space Temp
nvoSensor raw_data[2] UWORD
0 to 65535 for Setpoint Knob
Digital
State or
This is the heating output which is typically used for monitoring
0
1
0
1
This contains the analog to digital converter count measured
See above.
or bound to a heat actuator node or another Excel 10 controller
operating as slave. nvoHeatOutput will be transmitted
immediately when its value has changed significantly (>= 1%),
and periodically according to nciSndHrtBt. The output value
represents the output of the control algorithm but is limited to a
range of 0% to 100%.
This indicates the status of the override push-button.
This indicates the state of the digital input.
from the analog value. This count represents the measured
time during the second part of each a/d conversion.
74-3332-2 58
Page 61

EXCEL10 CHILLED CEILING CONTROLLER LNS PLUG-INS USER GUIDE
Table C4: Output Variables for W7763 Controllers
Engineering Units:
English (Metric) or
NvName Field Name States plus Range Value Default Comments
nvoSensor remote_set_point SNVT_temp_p
-5 to 5 K for relative
12 to 30°C for absolute
nvoSensor space_temp SNVT_temp_p
0 to 40°C
327.67°C for INVALID
nvoSensor
nvoSensorOcc SNVT_occupancy
nvoSpaceDewPt SNVT_temp_p
nvoSpaceTemp SNVT_temp_p
nvoStatus object_id UWORD
59 74-3332-2
ub_hard_config BYTE
INITIAL
W7763C
W7763D
W7763E
INVALID
OC_OCCUPIED
OC_UNOCCUPIED
OC_NUL (No Sensor)
0 to 40°C
327.67°C = INVALID
0 to 40°C
327.67°C = INVALID
NODE_OBJECT
Digital
State or
This is the set point from the wall module setpoint knob and
This is the measured space temperature accurately reported
0
3
4
5
255
0
1
255
INVALID
INVALID
0
may be absolute or relative depending upon
nciWallMod.set_pnt_knob.
between 0°C and 40°C.
INITIAL
(at application restart)
OC_NUL
(at application restart)
(at application restart)
(at application restart)
This output belongs to the Node Object and reports the status
This is used to establish hardware-dependent factory default
configuration settings for the Chilled Ceiling controller.
This is an output showing the state of the hard wired
occupancy sensor, if one is configured by
nciChcConfig.DI1_config. OC_NUL means no input is
available because it is not bound or not configured by
nciChcConfig.DI1_config.
This output reports the dewpoint calculated by the controller
based on room temperature and humidity.
This is the sensed space temperature at the node taken from
the locally wired sensor. It is typically bound to nviSpaceTemp
of another node that may not have its own space temperature
sensor but controls the same space. It is also used for
monitoring purposes, showing the current space temperature
used for the control algorithm. nvoSpaceTemp is transmitted
immediately when its value has changed significantly (> 0.5
delta°C). The reported space temperature includes the offset
correction nciWallMod.si_space_temp_zero_cal. If a space
temperature sensor is not connected or is shorted or if
nviSpaceTemp is bound to another node, nvoSpaceTemp is
not reported on the network.
for any object on a node. This is the answer to the nviRequest.
Page 62

EXCEL10 CHILLED CEILING CONTROLLER LNS PLUG-INS USER GUIDE
Table C4: Output Variables for W7763 Controllers
Engineering Units:
English (Metric) or
NvName Field Name States plus Range Value Default Comments
CHC_OBJECT 1
nvoStatus invalid_id Bit
VALID_ID
INVALID_ID
nvoStatus invalid_request Bit
VALID_REQUEST
INVALID_REQUEST
nvoStatus disabled Bit
ENABLED
DISABLED
nvoStatus comm_failure Bit
COMMUNICATION_OK
COMMUNICATION_FAILURE
nvoStatus in_alarm Bit
NO_ALARM
IN_ALARM
nvoStatus report_mask Bit
NO_REPORT_MASK
REPORT_MASK
nvoTerminalLoad SNVT_lev_percent
-163...163%
163.835% = INVALID
nvoUnitStatus mode SNVT_hvac_mode
HVAC_HEAT
HVAC_COOL
Digital
State or
0
1
0
1
0
1
0
1
0
1
0
1
This is an output showing the terminal load, which is a
1
3
This indicates whether nviRequest uses a fault object ID.
This indicates whether nviRequest uses a fault request.
This indicates whether the device is enabled or disabled
(nviManualMode = DISABLE).
This indicates whether an update nviRcvHrtBt is missing.
This indicates whether an alarm occured. See nvoAlarm.
This shows the answer to nviRequest > REPORT_MASK
percentage between -160% and +160% based on the control
output level. Negative values indicate heating load and positive
values indicate cooling load. 100% is the full terminal capacity.
An absolute terminal load value of more than 100% indicate
that the terminal is not able to supply the required heating or
cooling energy which at the zone controller should cause a
demand for more supply energy. nvoHeatOutput will be
transmitted immediately when its value has changed
significantly (>= 1%).
This output variable reports the last operating mode of the
control algorithm. It is not set to HVAC_OFF if the Heating and
Cooling Output shows 0%. HVAC_OFF is set when the Device
74-3332-2 60
Page 63

EXCEL10 CHILLED CEILING CONTROLLER LNS PLUG-INS USER GUIDE
Table C4: Output Variables for W7763 Controllers
Engineering Units:
English (Metric) or
NvName Field Name States plus Range Value Default Comments
HVAC_OFF 6 is disabled from nviRequest, nviManualMode or
nvoUnitStatus heat_output_primary SNVT_lev_percent
0 to 100%
163.835% = INVALID
nvoUnitStatus cool_output SNVT_lev_percent
0 to 100%
163.835% = INVALID
nvoUnitStatus in_alarm UBYTE
NO_ALARM
ALARM
ALARM_NOTIFY_DISABLED
nvoEnergyHoldOff value SNVT_switch.value
0 to 100%
nvoEnergyHoldOff state SNVT_switch.state
CLOSED
OPEN
NO_WINDOW
nroPgmVer id[0] UBYTE, 67 = C
nroPgmVer id[1] UBYTE, 72 = H Second character.
nroPgmVer id[2] UBYTE, 67 = C Third character.
nroPgmVer id[3] UBYTE, 49 = 1 Fourth character.
nroPgmVer major_ver UBYTE, 0 to 255
Digital
State or
This reports the actual heating output value. Any change
This reports the actual cooling output value. A change of more
0
1
255
0 (at application restart) This reports the status of the window sensor. It allows the hard
0
1
255
This identifies the Excel 10 node type by an eight byte constant
Major Functional Release Number:
nviApplicMode.
forces nvoUnitStatus to be transmitted immediately.
than 1% forces nvoUnitStatus to be transmitted immediately.
This reports the actual alarm status of the controller and is set
to ALARM_NOTIFY_DISABLE when nviManualMode =
SUPPRESS_ALARMS.
wired window sensor to be used by other nodes on the
network.
NO_WINDOW
(at application restart)
See above.
describing the node type, major and minor functional release
number and bug fix. First character.
1. Add or delete a network variable (NV), nv field.
2. Change the name of a nv or nv field.
3. Range or type (short / long) of data in a nv field is
61 74-3332-2
Page 64

EXCEL10 CHILLED CEILING CONTROLLER LNS PLUG-INS USER GUIDE
Table C4: Output Variables for W7763 Controllers
Engineering Units:
English (Metric) or
NvName Field Name States plus Range Value Default Comments
NroPgmVer minor_ver UBYTE, 0 to 255
nroPgmVer bug_ver UBYTE, 0 to 255
nroPgmVer node_type UBYTE, 22 = CHC1 Node type number.
Digital
State or
Minor Functional Release Number:
Bug Fix Number:
changed.
4. Enumerated value list of a nv field is changed.
NOTE:
Algorithm changes or bug fixes may also be included.
1. Network variables are unchanged.
2. Functionality of the control algorithm has been revised
and affects compatibility with other nodes or the
equipment being controlled.
3. The network interface or physical input / output
subsystem was revised and affects compatibility with
other nodes.
NOTE:
Bug fixes may also be included in a minor functional
release.
Network variables are unchanged. A change to the algorithm,
network interface, or physical input/output subsystem was
made that does not affect compatibility with other nodes or the
equipment controlled by the node.
74-3332-2 62
Page 65

EXCEL10 CHILLED CEILING CONTROLLER LNS PLUG-INS USER GUIDE
Table C5: Unused Variables for W7763 Controllers
Engineering Units:
English (Metric) or
NvName Field Name States plus Range Value Default Comments
nciApplVer not_used1 UBYTE
nciApplVer not_used2 UBYTE
nciCntrlSettings reheat_switch_level SNVT_lev_percent
0 to 100%
nciCntrlSettings reheat_hysteresis SNVT_lev_percent
0 to 100%
nciCntrlSettings reserve 7 bits
nciChcConfig not_used 3 bits
nciChcConfig reheat_config BYTE
REHEAT
FREE_USE
REL_NOT_USED
nciChcConfig unused1 2 bits
nciChcConfig spare_field[0] UBYTE
nciChcConfig spare_field[1] UBYTE
nciWallMod spare_field[0] UBYTE
nciWallMod spare_field[1] UBYTE
nviReheatRelay value SNVT_switch
0 to 100%
nviReheatRelay state SNVT_switch
OFF
ON
NUL
nviTest reheat_cmd BYTE
NORMAL_HC_MODE
OFF1_OFF2
ON1_ON2
nvoChcStatus external_active Bit
EXTERNAL_NOT_ACTICE
EXTERNAL_ACTIVE
63 74-3332-2
Digital
State or
100%
5%
0
1
255
0
1
4
0
1
REL_NOT_USED
NORMAL_HC_MODE
Page 66

EXCEL10 CHILLED CEILING CONTROLLER LNS PLUG-INS USER GUIDE
Table C5: Unused Variables for W7763 Controllers
Engineering Units:
English (Metric) or
NvName Field Name States plus Range Value Default Comments
nvoChcStatus not_used 2 bits
nvoChcStatus reheat_active SNVT_lev_disc
ST_OFF
ST_ON
ST_NUL (No Reheat)
nvoChcStatus spare_field[0] WORD
nvoChcStatusP external_active Same as nvoChcStatus
nvoChcStatusP not_used Same as nvoChcStatus
nvoChcStatusP reheat_active Same as nvoChcStatus
nvoChcStatusP spare_field[0] Same as nvoChcStatus
nvoReheat value SNVT_switch.value
0 to 100%
nvoReheat state SNVT_switch.state
OFF
ON
NO_REHEAT
nvoSensor not_used 6 bits
nvoSensor raw_data[1] UWORD
0 to 65535
nvoStatus out_of_limits Bit not supported
nvoStatus open_circuit Bit not supported
nvoStatus out_of_service Bit not supported
nvoStatus mechanical_fault Bit not supported
nvoStatus feedback_failure Bit not supported
nvoStatus over_range Bit not supported
nvoStatus under_range Bit not supported
nvoStatus electrical_fault Bit not supported
nvoStatus unable_to_measure Bit not supported
Digital
State or
0
4
255
0
1
2
74-3332-2 64
Page 67

EXCEL10 CHILLED CEILING CONTROLLER LNS PLUG-INS USER GUIDE
Table C5: Unused Variables for W7763 Controllers
Engineering Units:
English (Metric) or
NvName Field Name States plus Range Value Default Comments
nvoStatus fail_self_test Bit not supported
nvoStatus self_test_in_progress Bit not supported
nvoStatus locked_out Bit not supported
nvoStatus manual_control Bit not supported
nvoStatus in_override Bit not supported
nvoStatus reserved1 Bit not supported
nvoStatus reserved2 Bit not supported
nvoUnitStatus heat_output_secondary SNVT_lev_percent
0 to 100%
163.835% = INVALID
nvoUnitStatus econ_output SNVT_lev_percent
not supported
Digital
State or
65 74-3332-2
Page 68

EXCEL10 CHILLED CEILING CONTROLLER LNS PLUG-INS USER GUIDE
Manufactured for and on behalf of the Environmental and Combustion Controls Division of Honeywell Technologies Sàrl, Rolle, Z.A. La Pièce 16, Switzerland by its Authorized Representative:
Automation and Control Solutions
Honeywell GmbH
Böblinger Strasse 17
71101 Schönaich
Germany
Phone: (49) 7031 63701
Fax: (49) 7031 637493
http://ecc.emea.honeywell.com
Subject to change without notice. Printed in Germany
74-3332-2r0909
 Loading...