

Honeywell TP-COMPACT-WK User Manual

Dehumidifier
EN
User Manual
Avfuktare
SE
Luftkylare Användarmanual
Read and save these instructions before use
Déshumidificateur
FR
Mode d'emploi
Lire ces instructions avant l'utilisation et
les conserver
Deshumidificador
ES
Manual de Instrucciones
Lea y guarde estas instrucciones antes
de usar la unidad
Ontvochtiger
NL
Gebruiksaanwijzing
Lees de gebruiksaanwijzing zorgvuldig en
bewaar deze goed
Luftentfeuchter
DE
Benutzerhandbuch
Lesen sie die anleitung vor dem gebrauch
und heben sie sie auf
Deumidificatore
IT
Manuale Utente
Läs och spara dessa instruktioner innan
användning
Lokalt Klimaanlæg
DK
Brugervejledning
Læs og gemme disse instrukser inden brug
Osuszacz Powietrza
PL
Instrukcja obsługi
Przeczytaj i zachowaj tę instrukcję przed
użyciem
Ilmankuivaaja
FI
Käyttäjän Opas
Lue ohjeet ennen käyttöä ja säästä ne
Desumidificador
PT
Manual do Utilizador
Leia e guarde estas instruções antes da
utilização
ǹijȣȖȡĮȞIJȒȡĮȢ
GR
ǼȖȤİȚȡȓįȚȠȤȡȒıIJȘ
Leggere attentamente le istruzioni prima
dell'utilizzo dell'apparecchio
ǻȚĮȕȐıIJİțĮȚijȣȜȐȟIJİĮȣIJȑȢIJȚȢȠįȘȖȓİȢʌȡȚȞĮʌȩIJȘ
ȤȡȒıȘ
Model / Modèle / Modelo /Modello /
Model / Modelo / Modelo /
ȂȠȞIJȑȜȠ
TPCOMPACTWK
www.jmatek.com
E-mail: support.eu@jmatek.com
:

THANK YOU
Thank you for purchasing a Honeywell Dehumidifier. This User Manual is intended to provide you
with important information needed to set up, operate, maintain and troubleshoot this product.
SAFETY RULES
WARNING -- READ AND SAVE THESE INSTRUCTIONS BEFORE USING THIS PRODUCT.
The use of electrical products may create hazards that include, but are not limited to injury, fire,
electrical shock. Failure to follow these instructions may damage and/ or impair its operation and
void the warranty. In case there is any inconsistency or conflict between the English version and any
other language version of the content of this material, the English version shall prevail.
When using electrical appliances, basic safety precautions should always be followed:
DO NOT touch the dehumidifier or the electrical plug with wet hands.
•
Check the household voltage to ensure it matches the appliance's
•
specification.
Before operating, remove all packaging material and check for any
•
damage that may have occurred during shipping.
DO NOT operate any product with a damaged cord or plug.
•
DO NOT use an extension cord with this appliance.
•
DO NOT run power cord under carpeting, or cover it with rugs or
•
runners. Keep the cord away from areas where it may be tripped over.
Always unplug the dehumidifier before emptying the water tank.
•
The water collected in the tank must be discarded. The water should
•
never be used for drinking.
Always unplug the dehumidifier and remove the water from the water
•
tank before cleaning, servicing or relocating the unit.
Remove the power cord from the electrical receptacle by grasping and
•
pulling on the power cord plug-end only, never pull the cord.
This appliance has been manufactured for use in domestic
•
environments and must not be used for other purposes.
DO NOT use the product in areas where gasoline, paint or other
•
flammable goods and objects are used or stored.
This dehumidifier is designed for indoor residential applications only.
•
It should not be used for commercial or industrial applications.
•
DO NOT attempt to repair or adjust any electrical or mechanical
functions of the dehumidifier, as this may cause danger and void the
warranty.
EN
1

SAFETY RULES (CONTINUED)
DO NOT cover the air inlet or outlet on the appliance as this may cause
•
the unit to fail.
DO NOT insert or allow objects to enter any ventilation or exhaust
•
opening as this may damage the product and could cause electrical
shock or fire.
If the supply cord is damaged, it must be replaced by the manufacturer,
•
its service agent or similarly qualified persons in order to avoid a
hazard.
DO NOT let children play with this appliance, packaging or included
•
plastic bag.
If the unit is damaged or it malfunctions, do not continue to operate
•
it. Unplug the product from the electrical outlet. Refer to the
troubleshooting section and contact the customer support center.
Always place the dehumidifier on a leveled floor.
•
Never install the product near a bathtub or any water container.
•
Store in a dry area, away from direct sunlight, when not in use.
•
This appliance and its packaging materials are not intended for use by
•
persons (including children or elderly) with reduced physical, sensory
or mental capabilities, or lack of experience and knowledge, unless
they have been given supervision or instructions concerning the use of
the appliance by a person responsible for their safety.
Always grip the top handle and keep the unit upright when transporting
•
from room to room – DO NOT tilt the product on its side or upsidedown.
If the dehumidifier was transported tilted on its side, you must position
•
it upright again and wait at least 4 hours before using it.
WARNING: To reduce the risk of fire or electric shock, do not use this
•
appliance with any solid state speed control device.
This marking indicates that this product should not be disposed with other household
wastes throughout the EU. To prevent possible harm to the environment or human
health from uncontrolled waste disposal, recycle it responsibly to promote the
sustainable reuse of material resources. To return your used device, please use the
return and collection systems or contact the retailer where the product was purchased.
They can take this product for environmental safe recycling.
EN
2
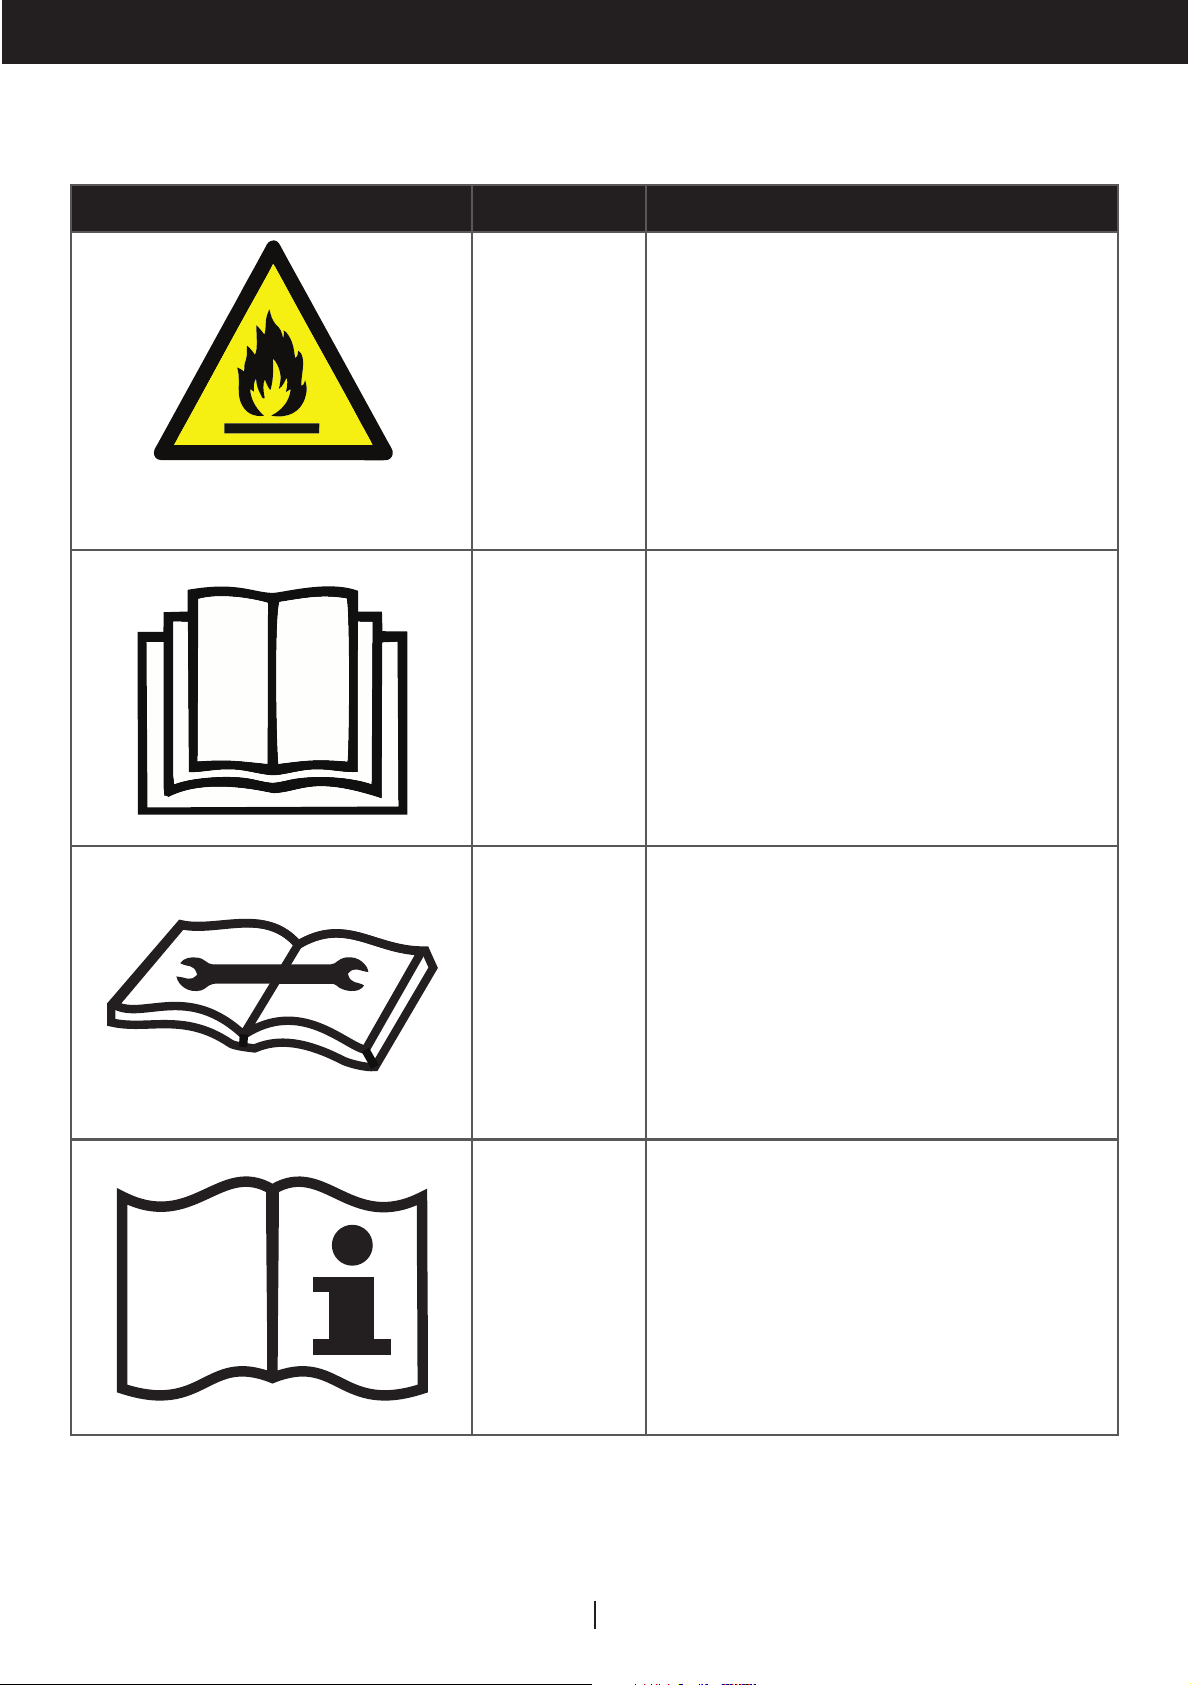
REGULATION STATEMENT
TP-COMPACT-WK - R290
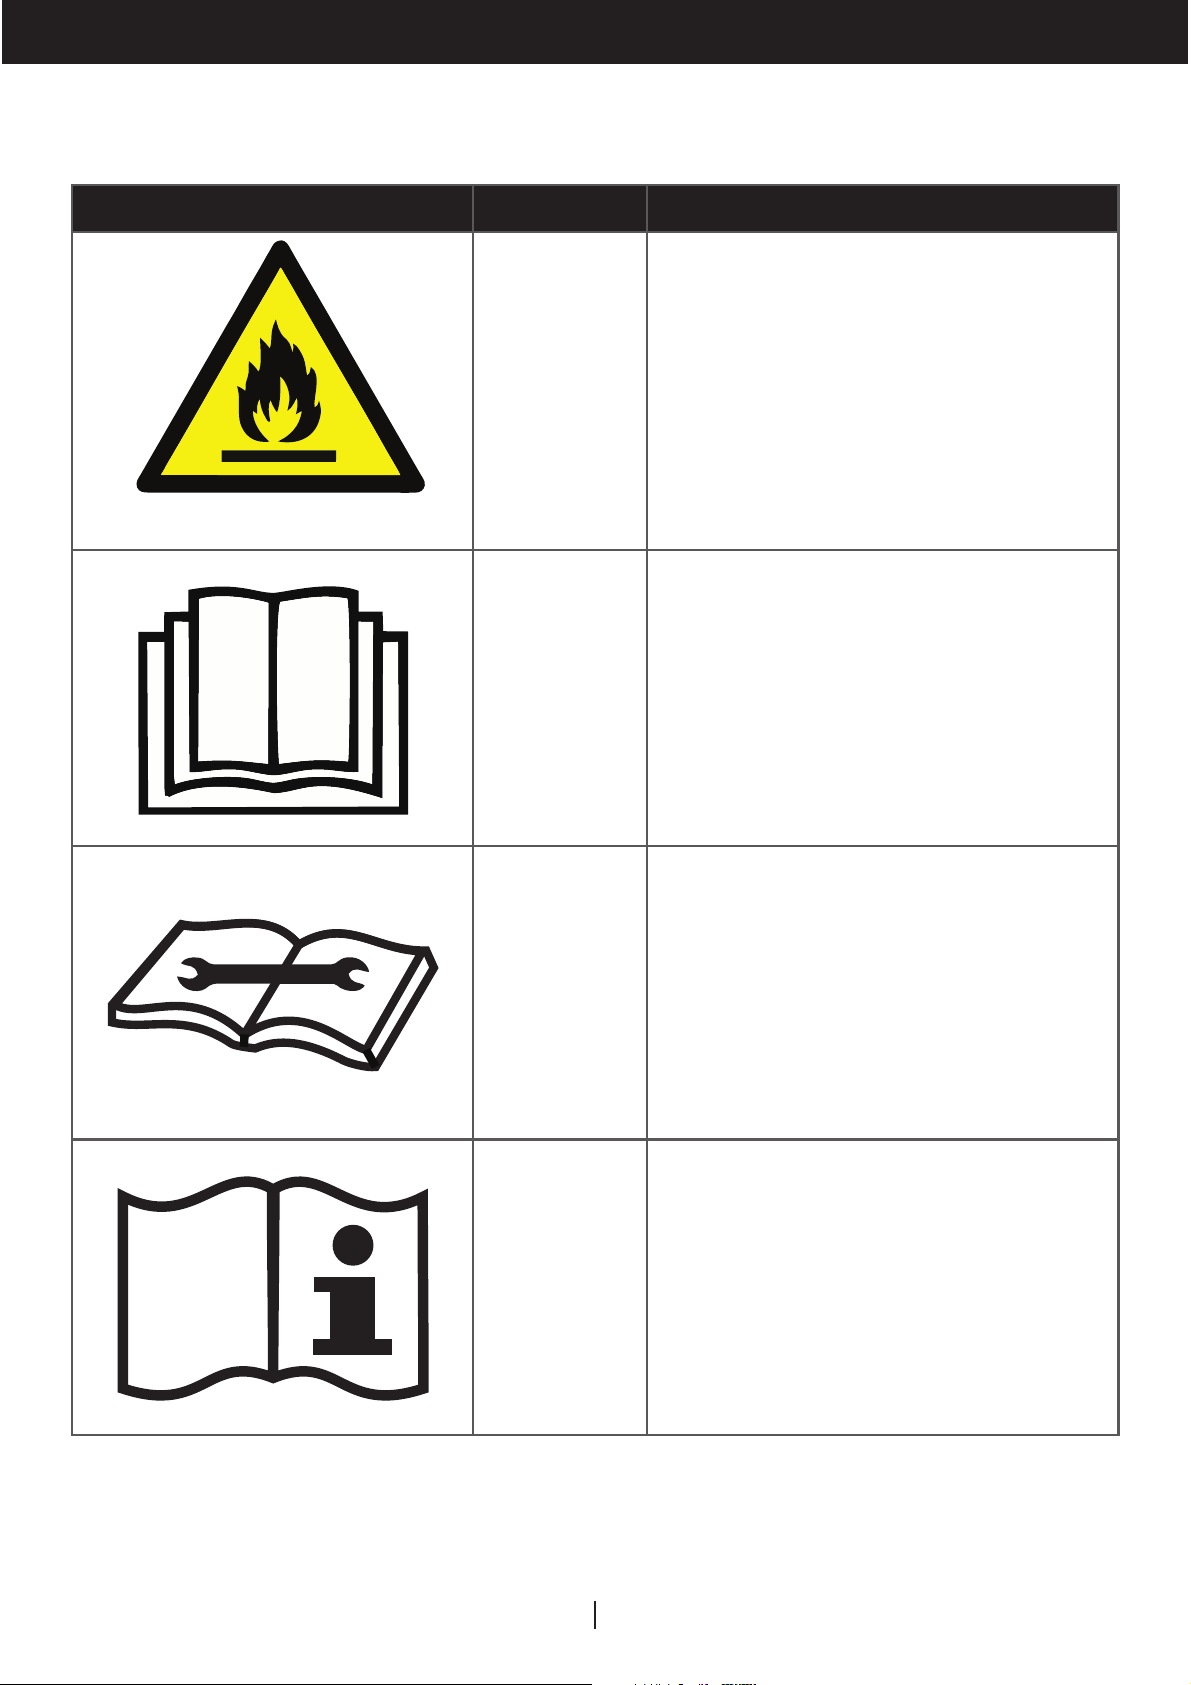
SYMBOL NOTE EXPLANATION
This symbol shows that this
appliance uses a flammable
Caution, risk of fire, R290
WARNING
CAUTION
refrigerant. If the refrigerant
is leaked and exposed to an
external ignition source, there
is a risk of fire.
This symbol shows that the
operation manual should be
read carefully.
This symbol shows that a
CAUTION
CAUTION
service personnel should be
handling this equipment with
reference to the installation
manual.
This symbol shows that
information is available such
as the operating manual or
installation manual.
EN
3

REGULATION STATEMENT (CONTINUED)
Additional warnings for appliances with R290 refrigerant gas.
•
Read the instruction carefully before using the appliance.
•
When defrosting or cleaning, do not use any method other than those
recommended by the manufacturer.
•
Do not place the appliance in a room with continuous sources of
ignition (e.g. open flame, operating gas appliance or working electrical
heater).
•
Do not pierce and do not burn.
•
Do not perforate any part of the refrigerant circuit.
•
Refrigerant gas may be odorless.
•
The appliance must be installed, used and stored in an area that is
greater than 4 m
•
Accumulation of possible refrigerant leaks in an unventilated room
2
.
could lead to fire or explosion should the refrigerant come in contact
with electric heaters, stoves or other sources of ignition.
•
The appliance must be stored in a way to prevent mechanical damage.
•
Only individuals authorized by an accredited organization certifying
their competence to handle refrigerants in compliance with industry
legislation should work on the refrigerant circuit.
•
R290 refrigerant gas complies with European environmental directives.
•
This appliance contains a certain number of grams (see rating label at
the back of the unit) of R290 refrigerant gas. The maximum refrigerant
charge amount is 0.05 kg.
Repair must be performed based on the recommendations from
the manufacturer. Maintenance and repair that requires the
assistance of other qualified personnel must be performed under
the supervision of specialists in the use of flammable refrigerants.
4EN

HOW A DEHUMIDIFIER WORKS
When the dehumidifier is switched ON, a fan pulls moisture-laden air into the dehumidifier where it
passes through dehumidifying coils inside the unit. These coils condense moisture from the air
and collect it in the Water Tank. The dry air is then exhausted from the dehumidifier. The air flows
through the air vents of the dehumidifier into the room as dry, warm air.
IMPORTANT: The dehumidifier is designed to operate between 45°F (7°C) and 95°F (35°C).
The dehumidifier’s performance may be greatly reduced if room temperature is beyond this
temperature range.
SELECTING A LOCATION - IMPORTANT
•
Before using the dehumidifier, place the unit UPRIGHT for at least 1 hour before use to allow the
refrigerant to stabilize. If the unit was tilted on its side or upside-down during transportation, set
the unit upright for 4 hours before use.
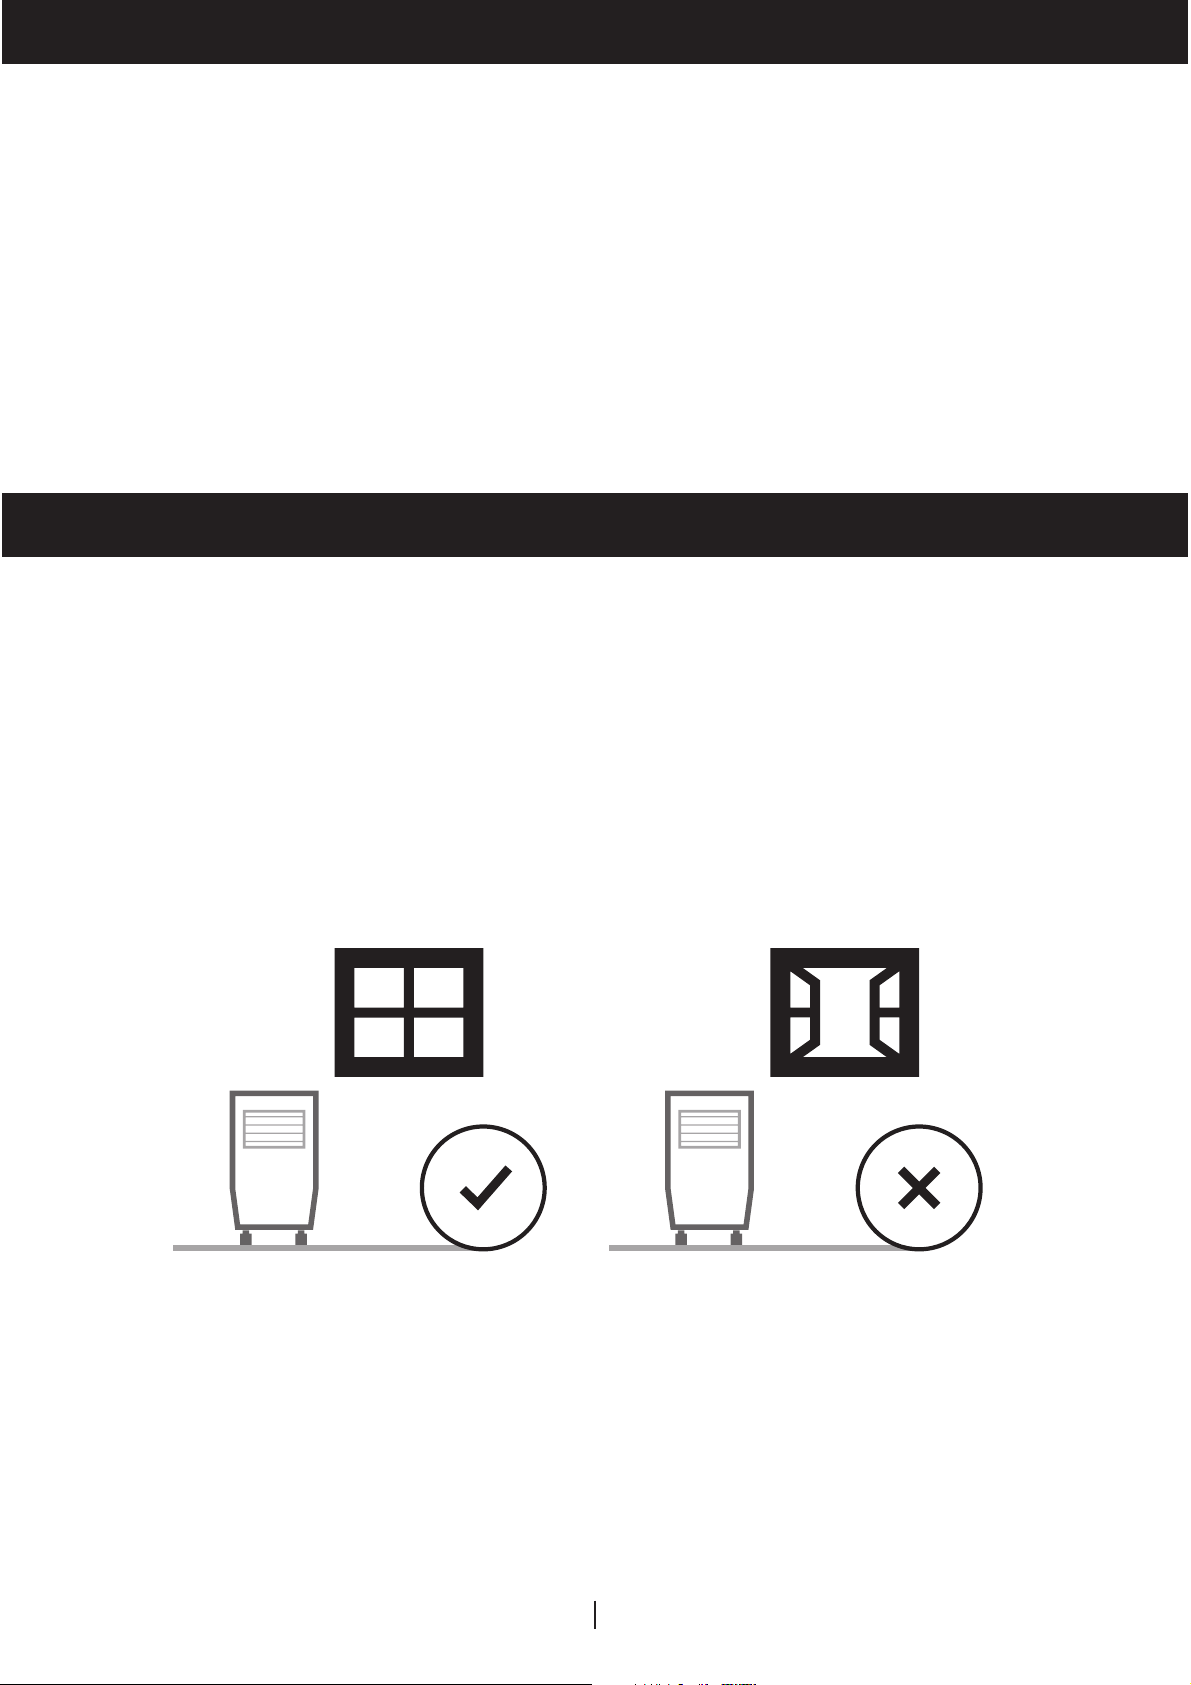
For optimal efficiency, the dehumidifier must be operated in an enclosed area. Keep all doors,
•
windows and other outside entrances to the room closed.
EN
5
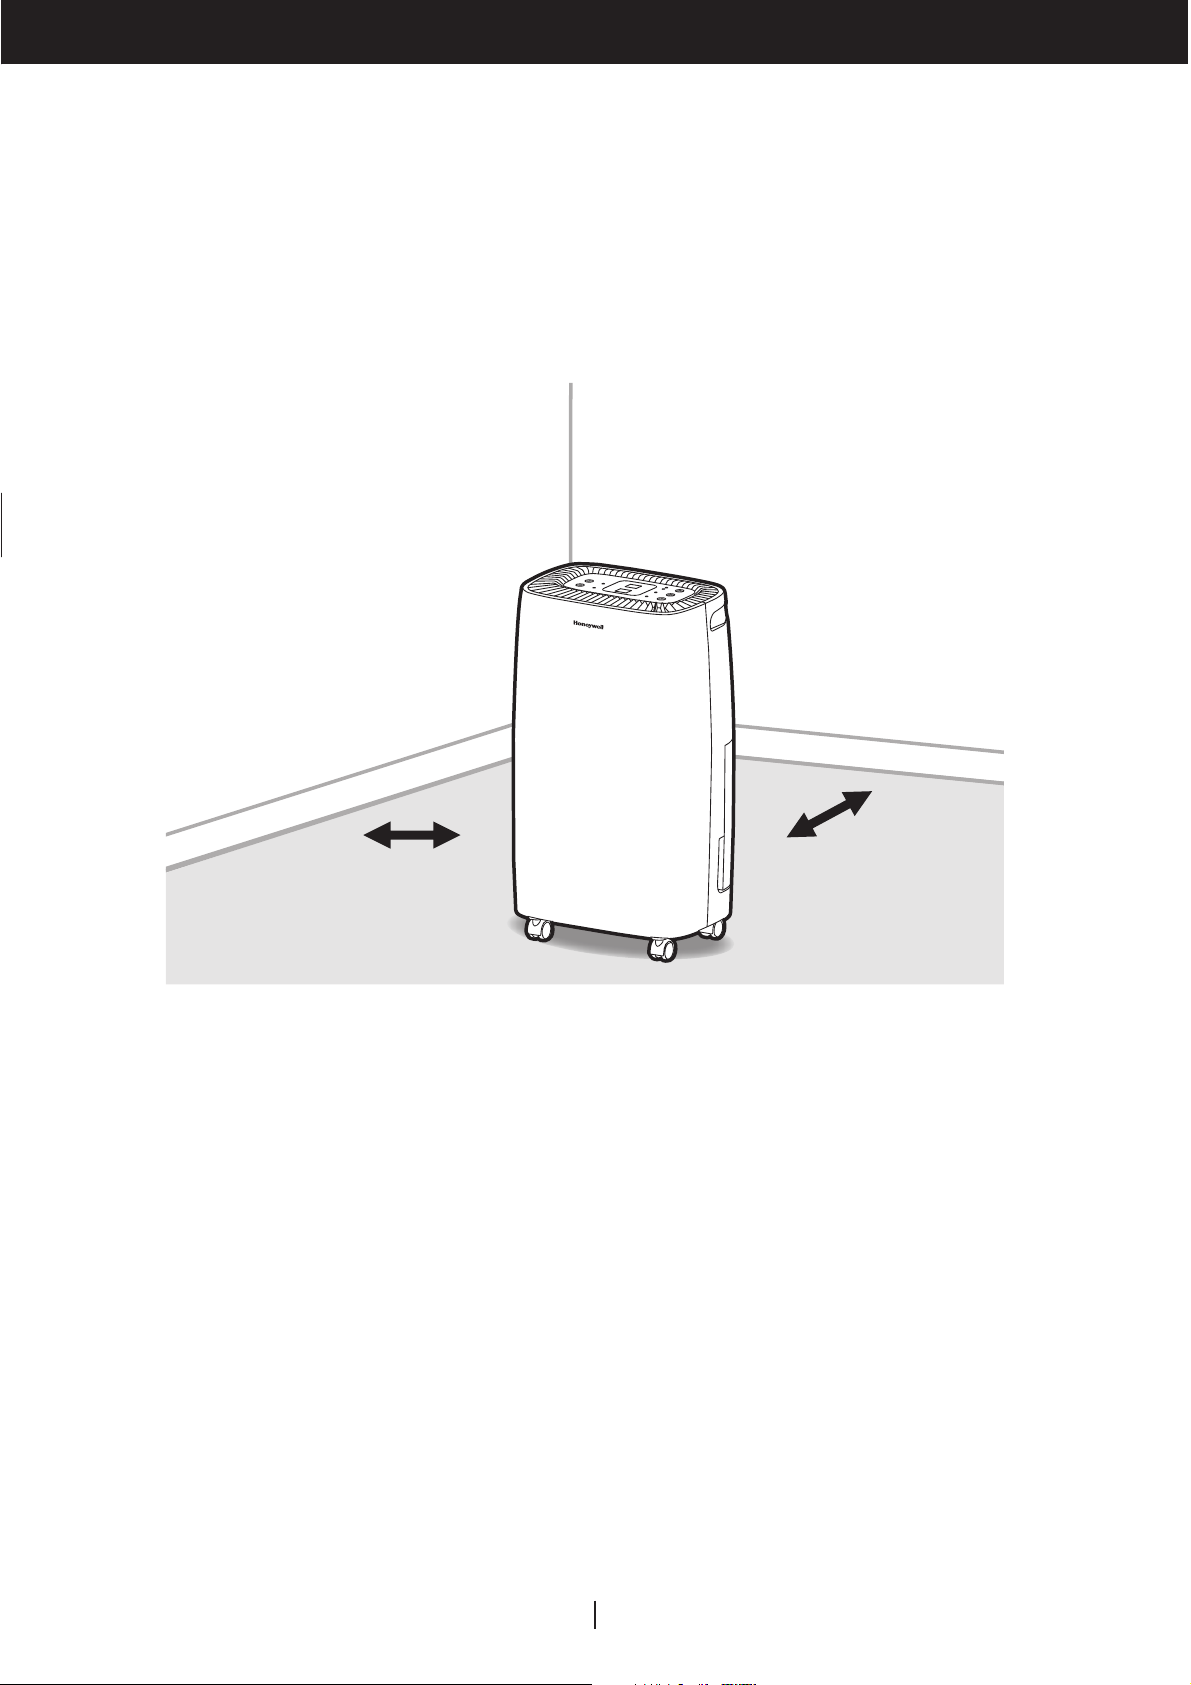
SELECTING A LOCATION - IMPORTANT (CONTINUED)
Place the dehumidifier in an area where the temperature will not drop below 45°F (7°C)
•
Place the dehumidifier at least 7.87 inches (20 cm) away from other objects (e.g. curtains or
•
furniture) that may restrict airflow from the back or through the air vents of the unit.
The dehumidifier must be positioned on a level floor.
•
7.87 inches (20 cm) 7.87 inches (20 cm)
IMPORTANT: The effectiveness of the dehumidifier can be influenced by different factors. One
factor is the rate at which new, moisture-laden air enters the room and the amount of air circulating
in and out of the area to be dehumidified. For example, if a door to a basement is constantly
opened, letting new, moisture-laden air into the room, dehumidification will take longer than
if the door was kept closed. If the dehumidifier is in a room with a storage closet or cabinets, it
will have little or no effect in drying the inside of the storage closet or cabinets unless there
is adequate circulation of air in and out of these spaces. To dehumidify these spaces, open the
storage door or cabinet doors to allow air circulation. You may find that installing a second
dehumidifier may be required for larger enclosed areas.
EN
6

UNPACKAGING THE DEHUMIDIFIER
This Dehumidifier is packaged with a colored or transparent tape to secure some parts during
•
transportation. Remove the colored or transparent packaging tape from the unit.
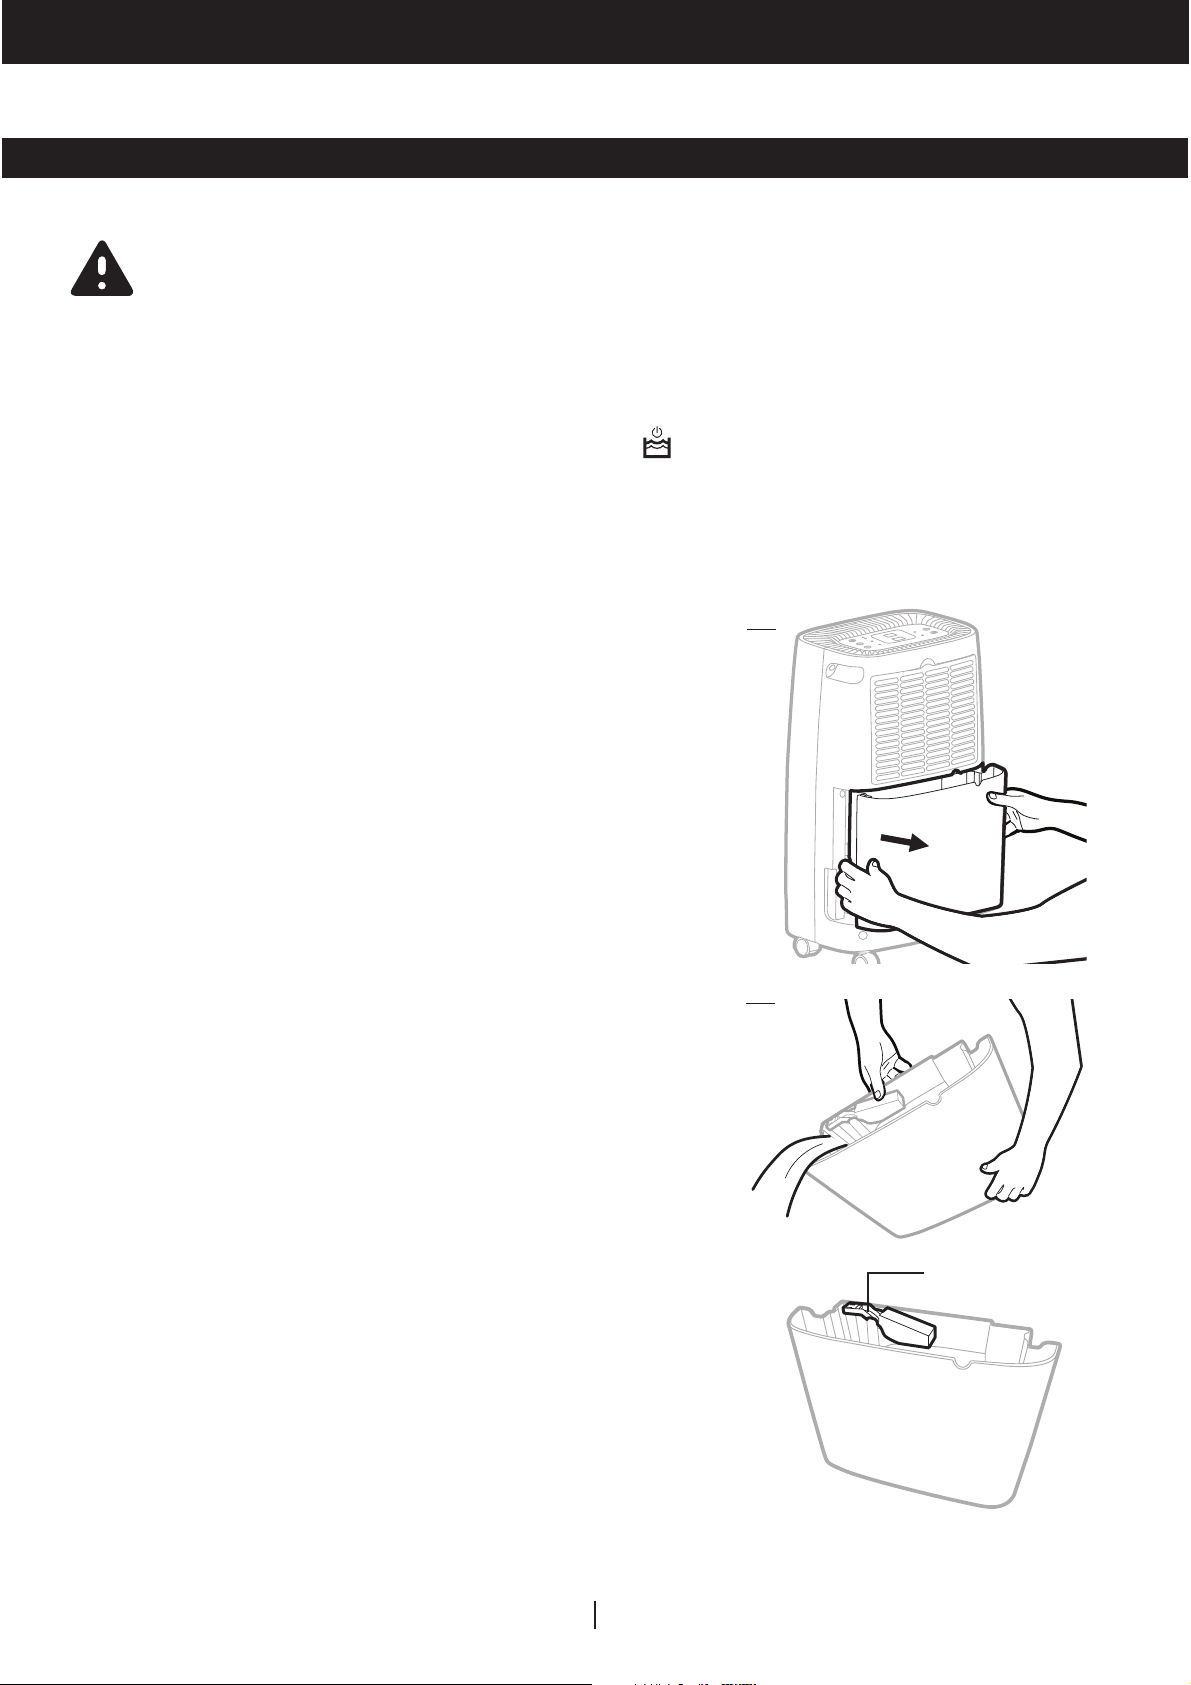
1.
Gently pull the Water Tank from out of the dehumidifier.
Remove the power plug, drain hose and other accessories,
2.
which is placed inside the tank of the dehumidifier.
Once all accessories have been removed, replace the
3.
Water Tank. Make sure that the tank is properly positioned.
•
There is a Float inside the Water Tank that senses the water
level to automatically stop dehumidification when the Water
Tank is full. Make sure the Float is positioned correctly
inside the Water Tank by ensuring it lies level with the top
edge of the Water Tank.
Float
DO NOT REMOVE THIS FLOAT.
7EN

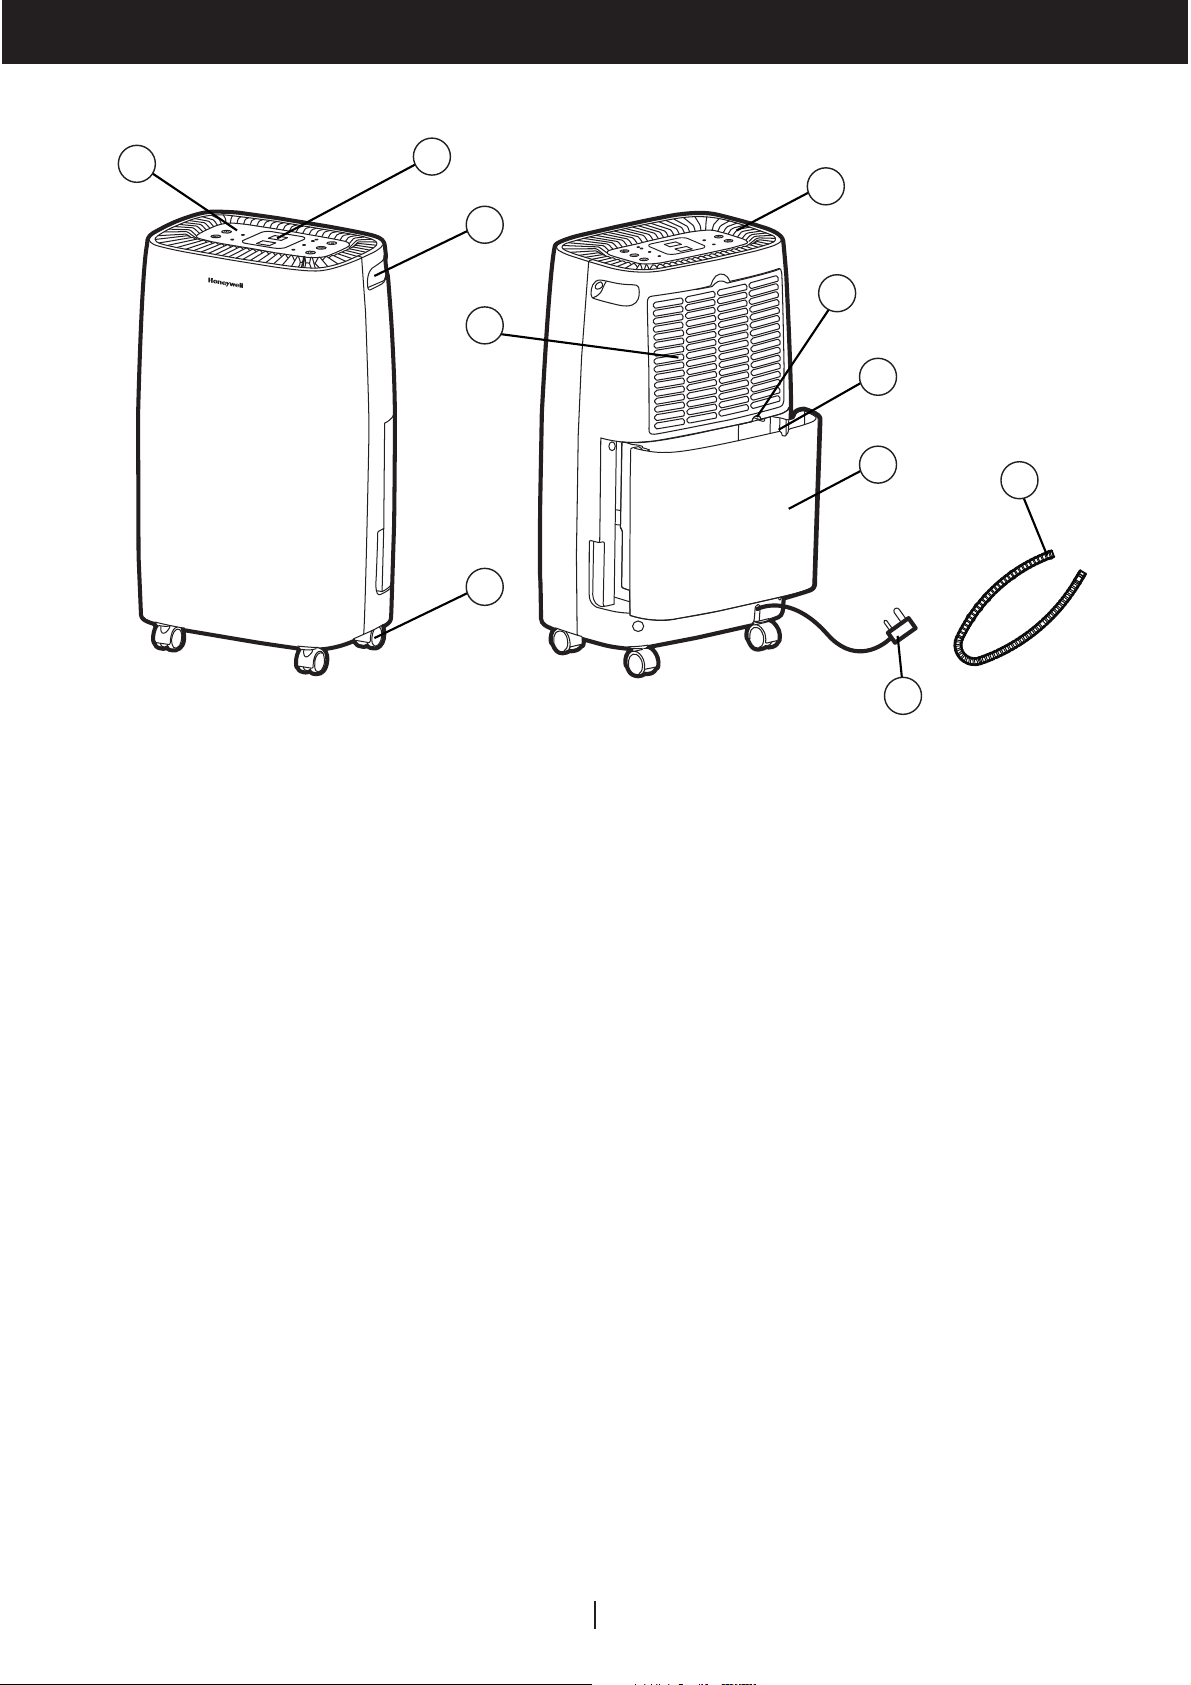
PARTS DESCRIPTION
1
2
3
4
5
6
7
8
9
11
10
1) Control Panel 7) Direct Drain Outlet
2) LED Display 8) Float
3) Handle 9)
4) Washable Grill and Dust Filter 10) Power Cord & Plug
5) Casters 11) Continuous Water Drain Tube
6)
Air Vent
Water Tank
EN
8

USE & OPERATION
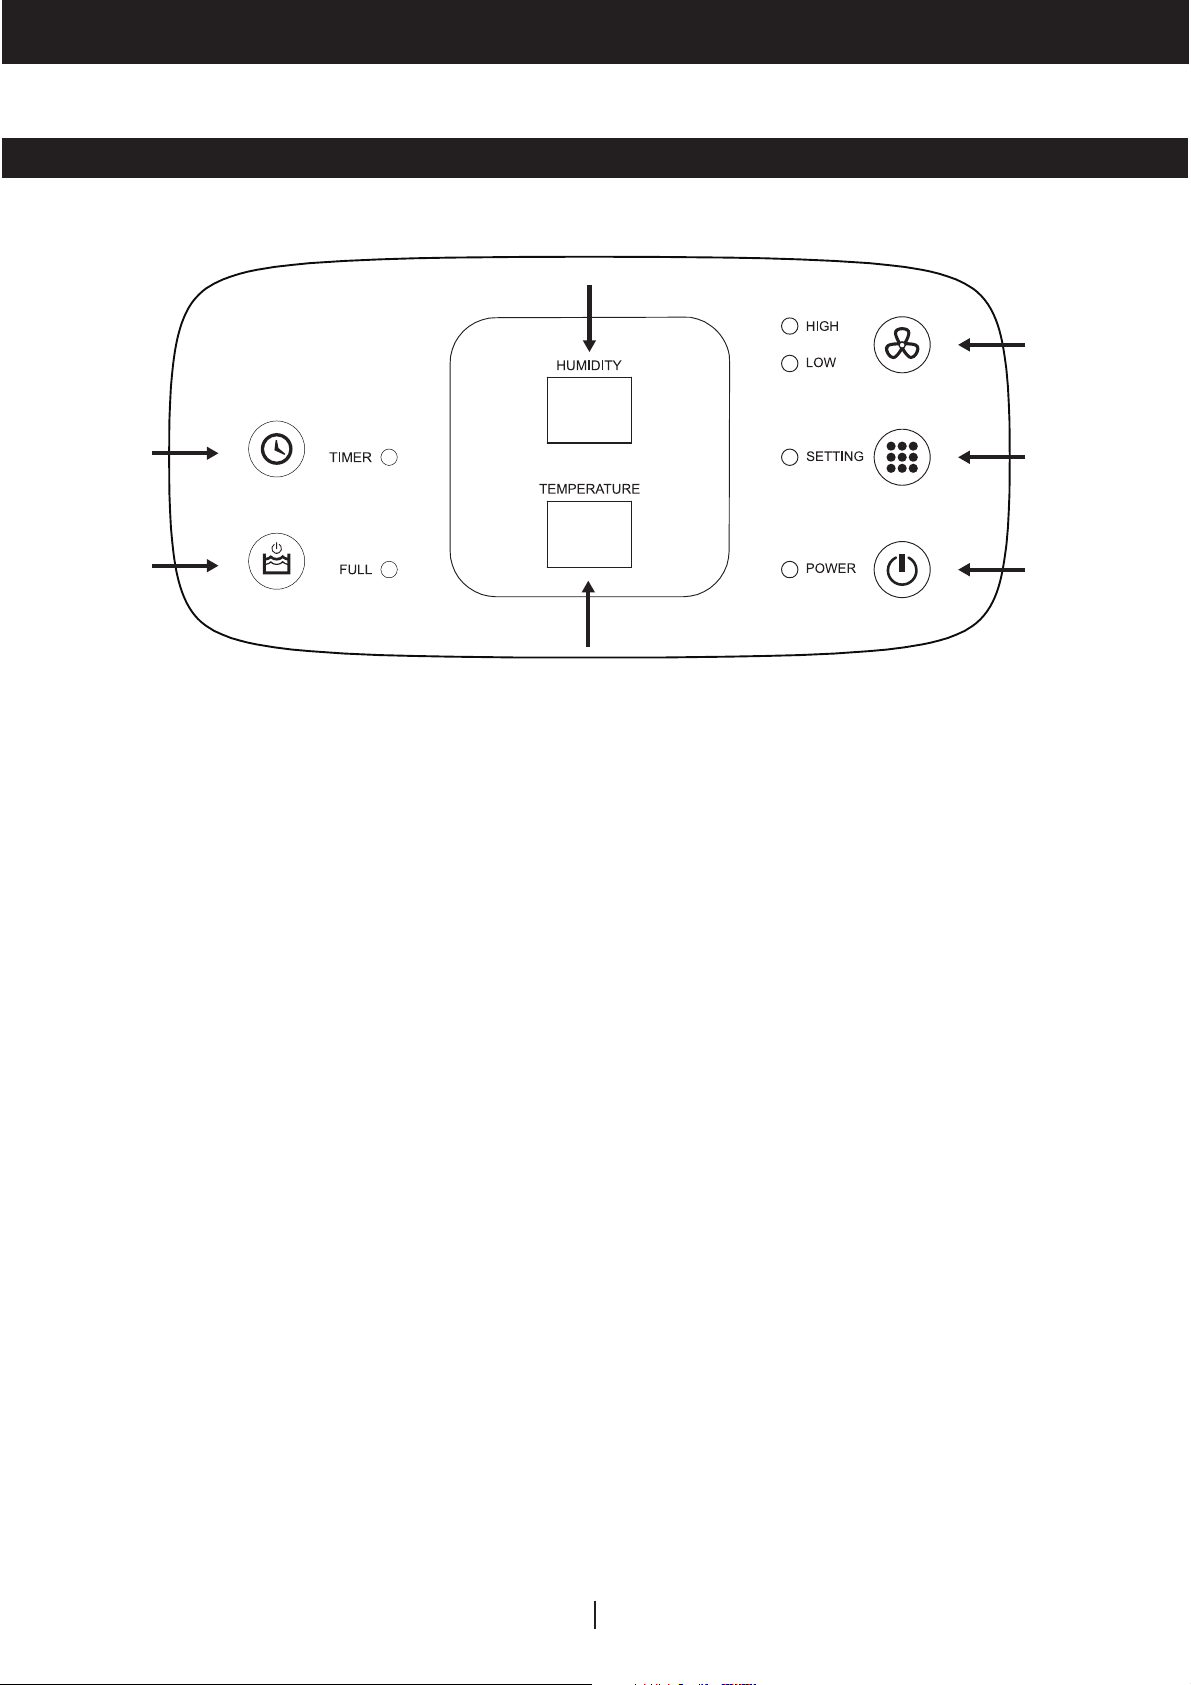
CONTROL PANEL
(7)
(3)
(5)
(4)
(6)
) Power Control 5) Timer Control
2) Setting Control 6) Temperature Display
3) Fan Speed Control 7) Humidity Display
4) Water Tank Full Alert
(2)
(1)
9EN
USE & OPERATION (CONTINUED)
FUNCTION BUTTONS
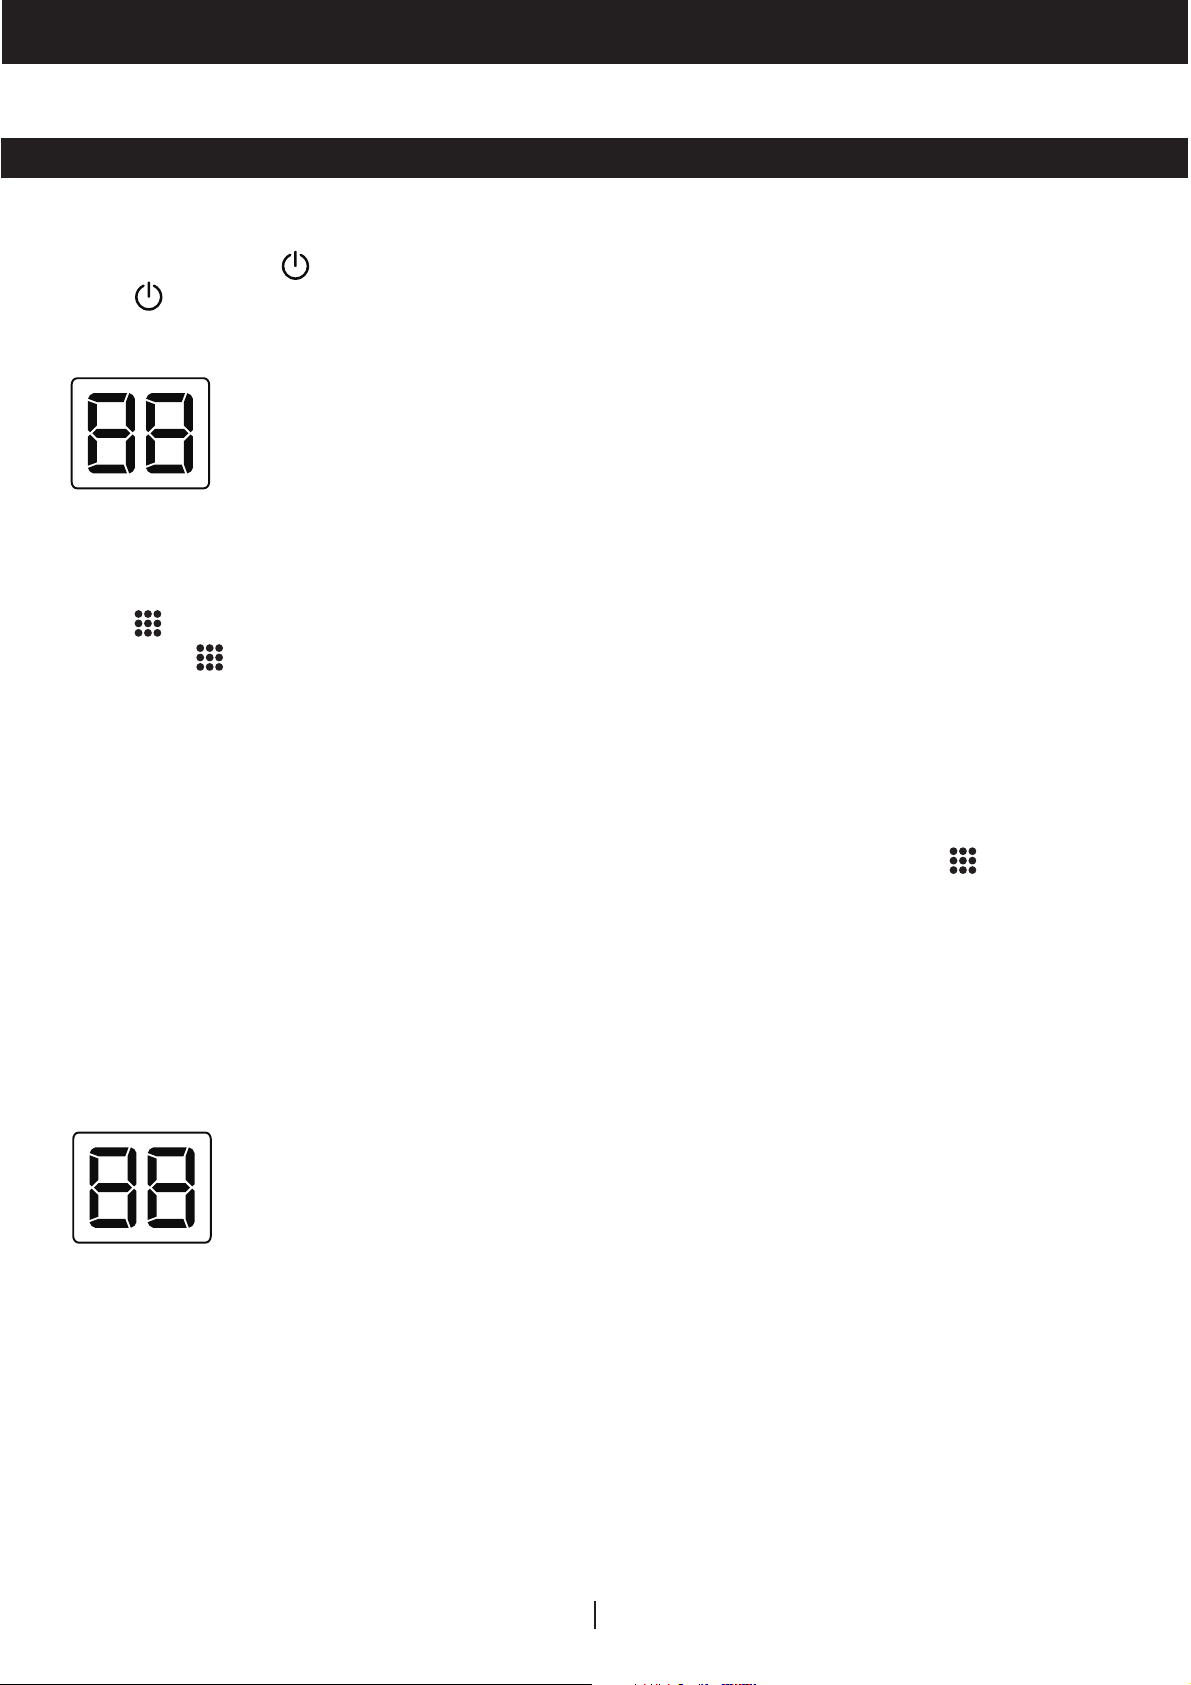
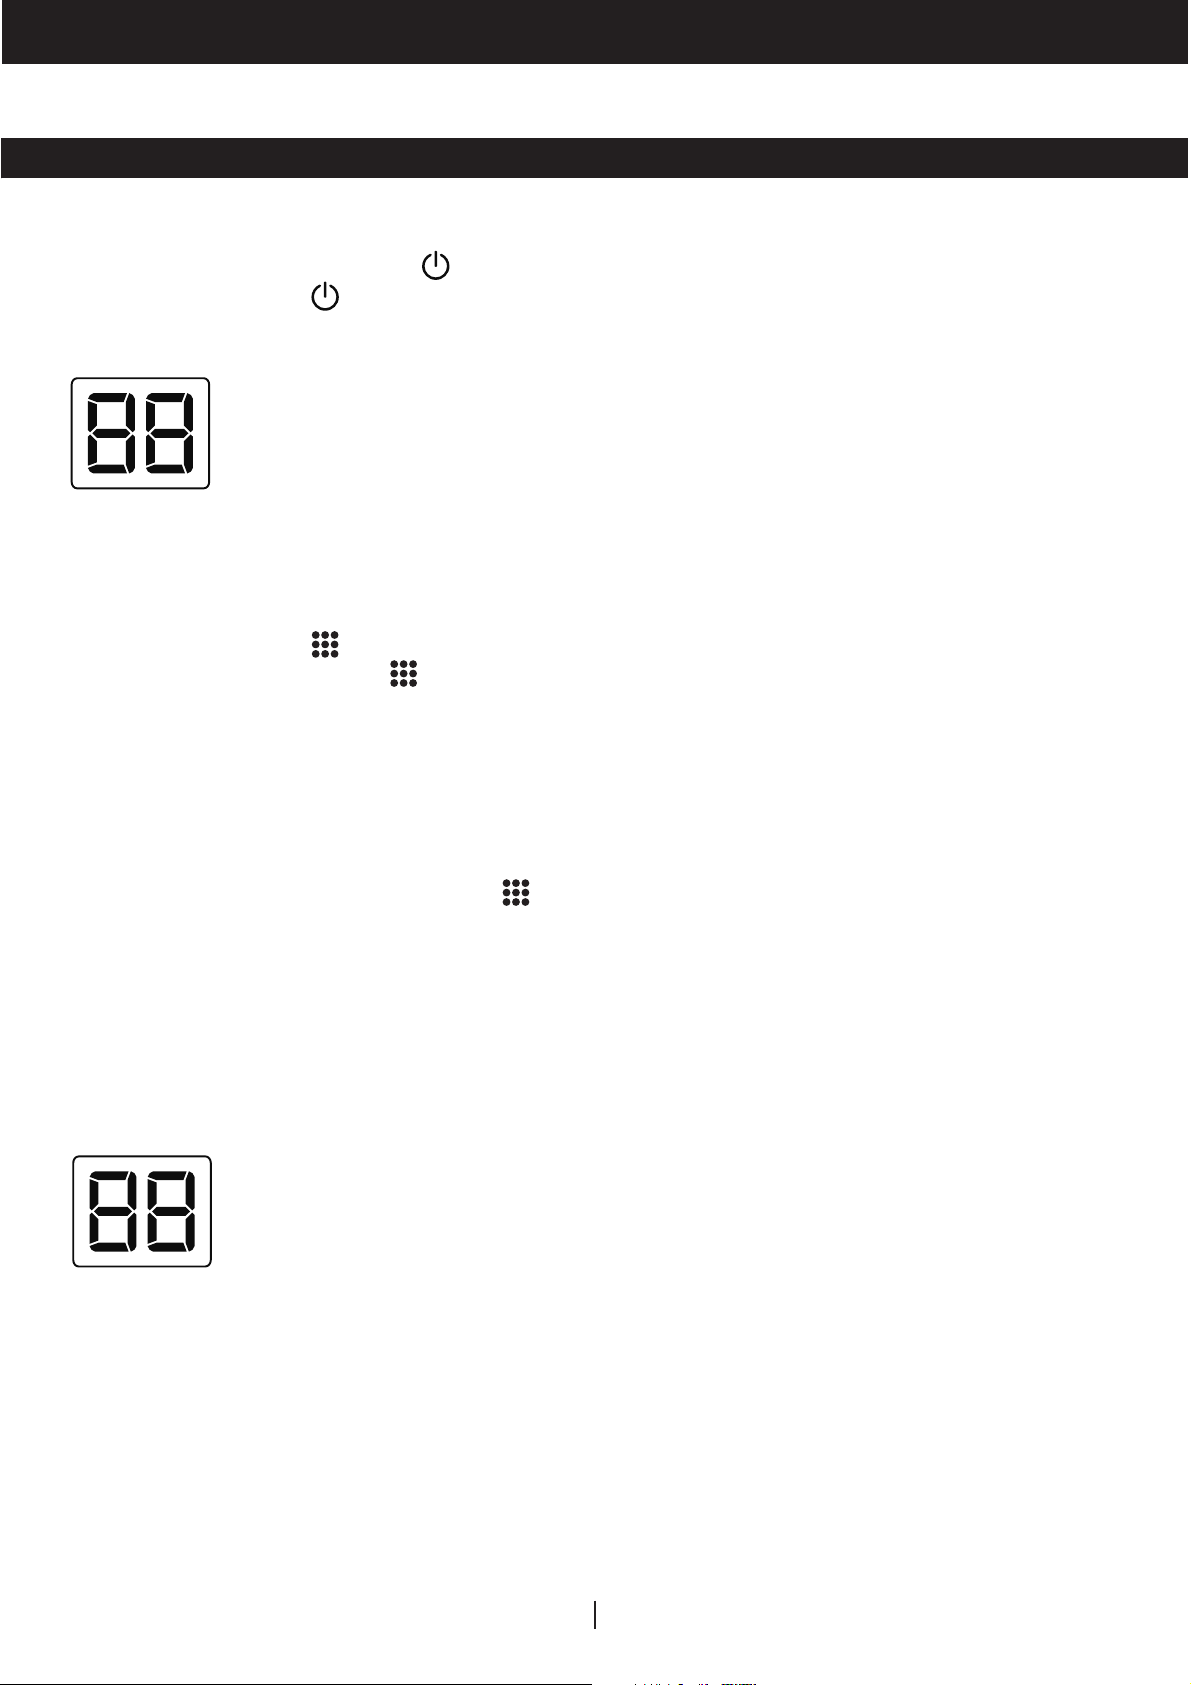
POWER CONTROL
Press to switch the dehumidifier ON or OFF.
HUMIDITY CONTROL SETTING
When the unit is switched ON, the Humidity Display shows the current humidity percentage. When
current humidity is lower than 35% RH, the Humidity Display will show "Lo" . When current humidity
is higher than 95% RH, the Humidity Display will show "Hi".
Press to select your preferred humidity level. The humidity is adjusted in increments of 5%
by pressing . The adjustable Relative Humidity (RH) range is between 40% RH to
80% RH. Five seconds after setting the preferred humidity setting, the display will revert back
to displaying the current humidity.
Recommended Settings: It is recommended to leave the unit running at 40% humidity at
High Fan Speed during the first 2 to 3 days until
the Relative Humidity has been reduced to a more comfortable level, press to choose a
higher RH% that maintains a comfortable humidity level thereafter. A recommended healthy
humidity level is between 40% and 50%.
NOTE: The humidity sensor senses current humidity in the surrounding area. It is normal for a few
degrees of variance to the humidity sensitivity from the sensor.
TEMPERATURE DISPLAY
When the unit is switched ON, the Temperature Display show the current Temperature (°C).
damp odors are removed. After a few days when
EN
10
USE & OPERATION (CONTINUED)
FUNCTION BUTTONS (CONTINUED)
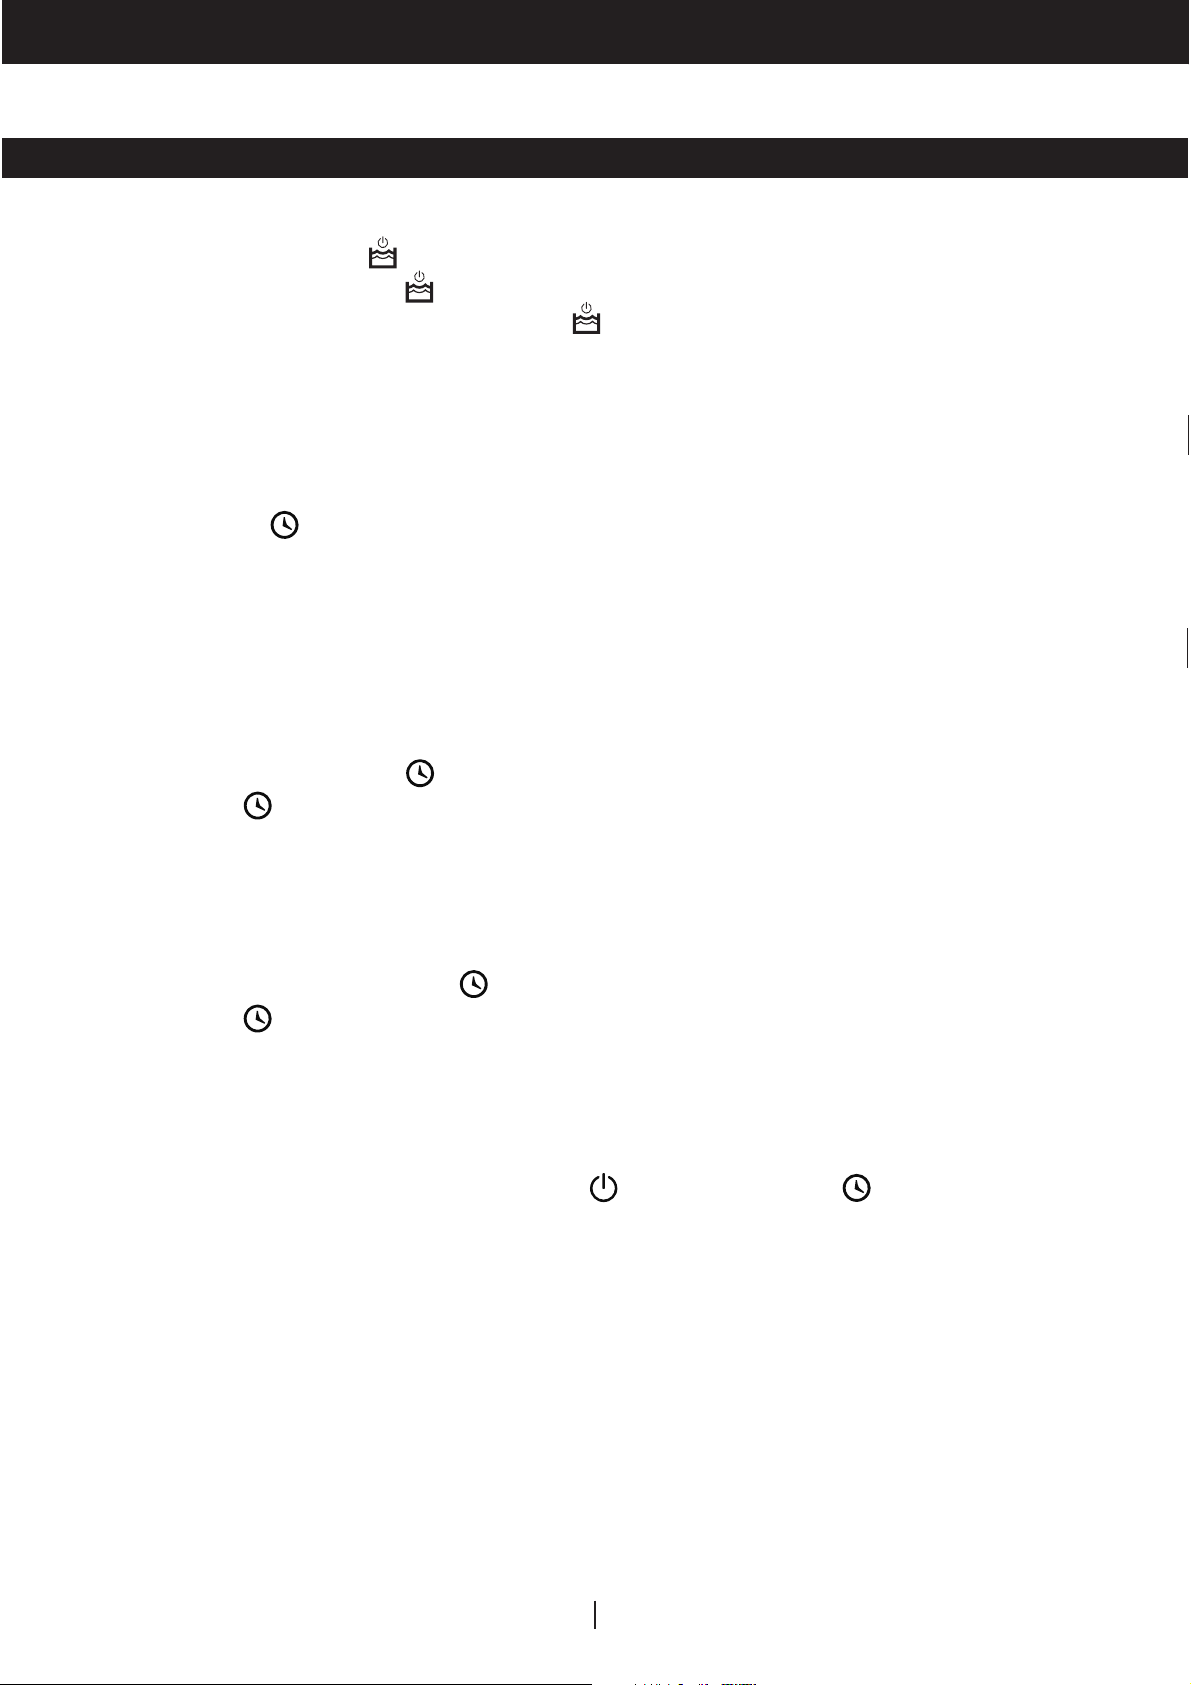
WATER TANK FULL ALERT
When the Water Tank is full, the indicator will be illuminated. The unit will beep within 15 seconds.
The compressor will shut off. To switch off the indicator light, empty the Water Tank and when
replacing it ensure the tank is secured properly in place.
IMPORTANT:
cause the tank to spillover.
TIMER CONTROL
The dehumidifier can be set to automatically switch ON or OFF for a selected period of time (between
1-24 hour intervals). The Timer hours selection is displayed on the Temperature Display.
NOTE: Before setting the Timer control, make sure there is power to the unit.
Auto-Off Timer:
While the unit is running, press , the indicator light will illuminated and the Temperature Display
will flash, press to select the number of hours (1-24 hours) you want the unit to run before it
switches off. In 5 seconds without further operation, the Timer starts function. Timer must be set
again after each use.
Auto-On Timer:
When unit is in Standby Mo
will flash. Press to select the number of hours (1-24 hours) you want the unit to turn on. In 5
seconds without further o
humidity setting will be maintained. The unit will turn on and continue running until the Water Tank
is full or until you switch it off manually. Timer must be set again after each use.
Do not place the Water Tank on the floor when full. In case of an uneven base which may
de, press , the indicator light will illuminated the Temperature Display
peration, the Timer will start to function. The previous fan speed and
NOTE: To cancel any Timer settings, simply press again, and the timer indicator light will
disappear.
NOTE: The Power
indicator light will illuminated, it indicates the unit is on Standby Mode.
EN
11

USE & OPERATION (CONTINUED)
FUNCTION BUTTONS (CONTINUED)
FAN SPEED CONTROL
There are two fan speeds - High and Low. When, the high indicator light is illuminated, the unit is
operating on High speed. When the Low Indicator Light is illuminated, the unit is operating on Low
speed.
AUTO RESTART FUNCTION
This unit is equipped with an Auto Restart feature. When there is a power outage, the dehumidifier
will automatically resume all its previous settings upon regaining power.
AUTOMATIC DEFROST
Frost may build up on the internal coils of the unit. When there is frost build up, the internal
compressor will turn off and the fan will continue to run until the frost has melted. Once the internal
coils have defrosted and dried, the compressor and fan will automatically restart and dehumidifying
will resume.
EN
12
USE & OPERATION (CONTINUED)
DRAINING THE WATER
WARNING: Always drain and discard water collected from dehumidification.
The water is not clean and cannot be used for drinking.
1. Draining water collected in the Water Tank
The condensed water can be collected directly into the Water Tank. When the Water Tank is full, the
dehumidifier will automatically shut OFF and the indicator will illuminate on the control
panel followed by a beeping sound.
IMPORTANT: Do not move the dehumidifier when the Water Tank is full as it may heavy and can
cause water spillage.
1.1
Locate the Water Tank at the front of the dehumidifier.
Gently pull the water tank out.
1.2
Carry the Water Tank to a sink to empty.
1.3
Replace the empty Water Tank back into the front of
the dehumidifier. Please make sure that the tank is
properly positioned. The safety feature ensures that
any misalignment of the tank and the unit will prevent
the unit from turning back on.
IMPORTANT: Improper alignment or positioning of the
Water Tank will cause the unit to pause operation, the
warning light on top of the dehumidifier will illuminate
followed by a beeping sound, until the Water Tank is fitted
properly.
1.1
1.2
NOTE: There is a Float inside the Water Tank that senses
the water level to automatically stop dehumidification when
the Water Tank is full. Make sure the Float is positioned
correctly inside the Water Tank by ensuring it lies level with
the top edge of the Water Tank.
DO NOT REMOVE THIS FLOAT.
EN
13
Float
USE & OPERATION (CONTINUED)
DRAINING THE WATER (CONTINUED)
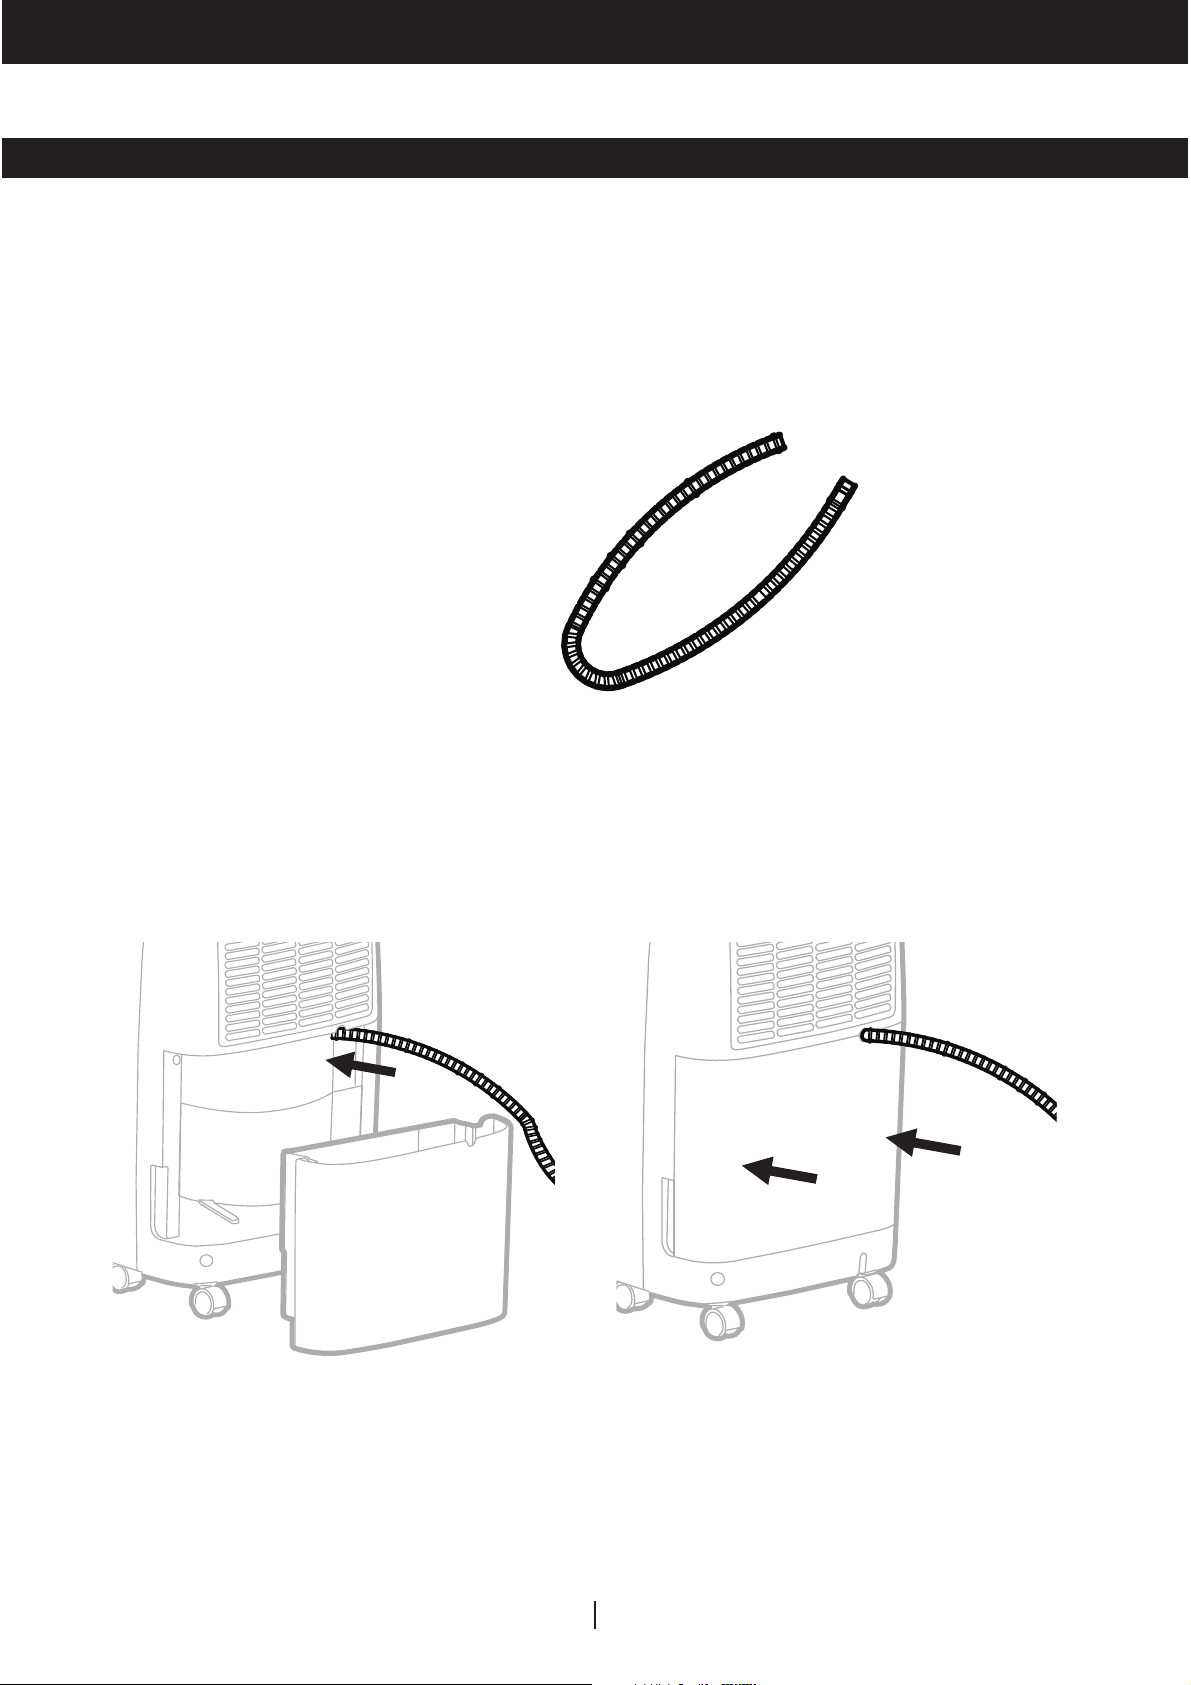
2. Continuous Water Drainage – Using a Continuous Water Drain Tube
A Continuous Water Drain Tube is included with this unit. To activate the continuous water draining
function, you will require a suitable water drain (e.g. sink or drain hole at floor level) near the
dehumidifier.
Continuous Water
Drain Tube
3.28 ft. (1 m)
Insert the Continuous Water Drain Tube into the drain port.
2.1
Make sure the Continuous Water Drain Tube is secured to ensure there will be no leaks. If there
are leaks, the tube and drain port may not be connected properly. Disconnect, replace and
tighten again.
EN
14
USE & OPERATION (CONTINUED)
DRAINING THE WATER (CONTINUED)
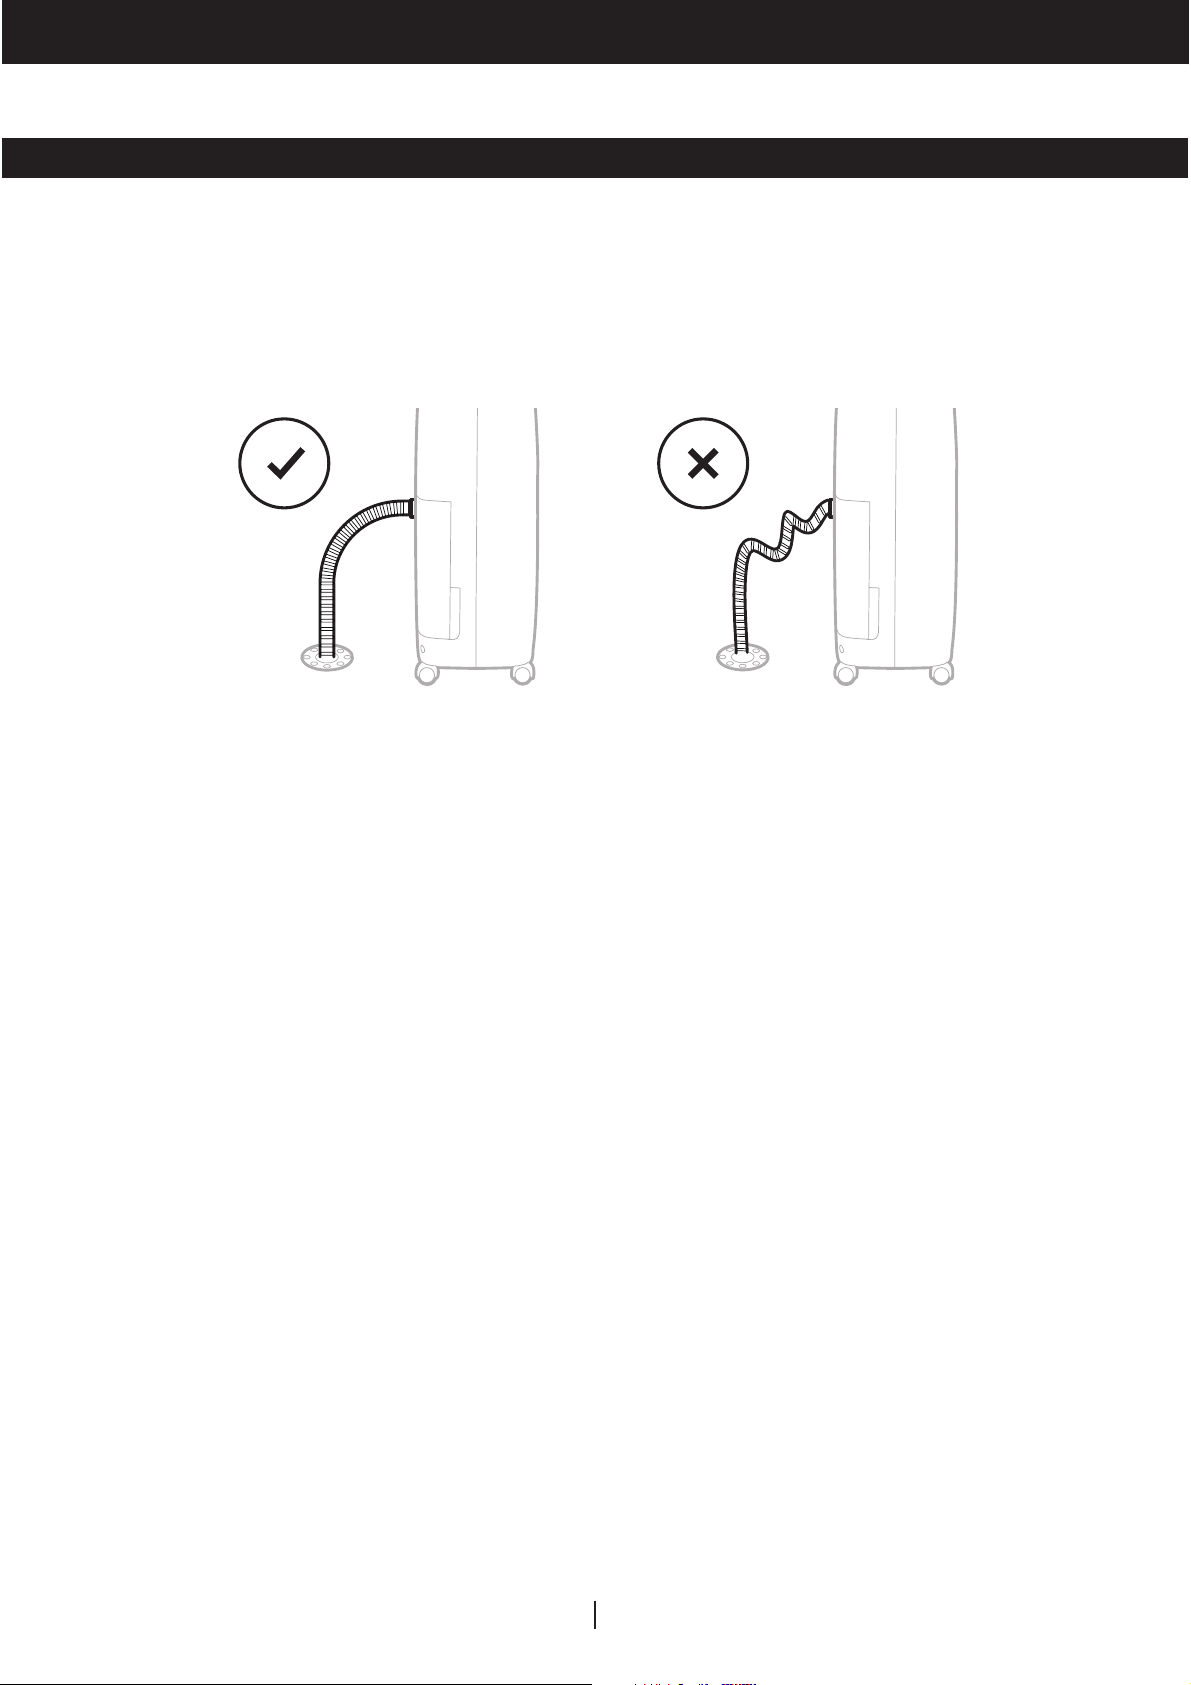
Position the other end of the Continuous Water Drain Tube in the sink or drain. Make sure the
2.2
tube is not bent or kinked which might stop the water flow. Make sure the tube is secured over
the drain and will not fall out of place causing unwanted water spillage.
IMPORTANT: Make sure water can flow down the Continuous Water Drain Tube by keeping the tube
angled down and free of bends or kinks.
IMPORTANT: If the unit is placed on uneven ground, or the Continuous Water Drain Tube is installed
incorrectly, the water may fill the Water Tank and stop running. Please check whether the ground is
uneven and reinstall the Drain Tube.
EN
15
USE & OPERATION (CONTINUED)
CLEANING & MAINTENANCE
WARNING: Always switch OFF the dehumidifier and unplug it from the electrical outlet before
attempting any cleaning or maintenance of this product.
Appliance Maintenance:
• Switch OFF the appliance before disconnecting the power supply.
• Only use a soft cloth to clean the appliance.
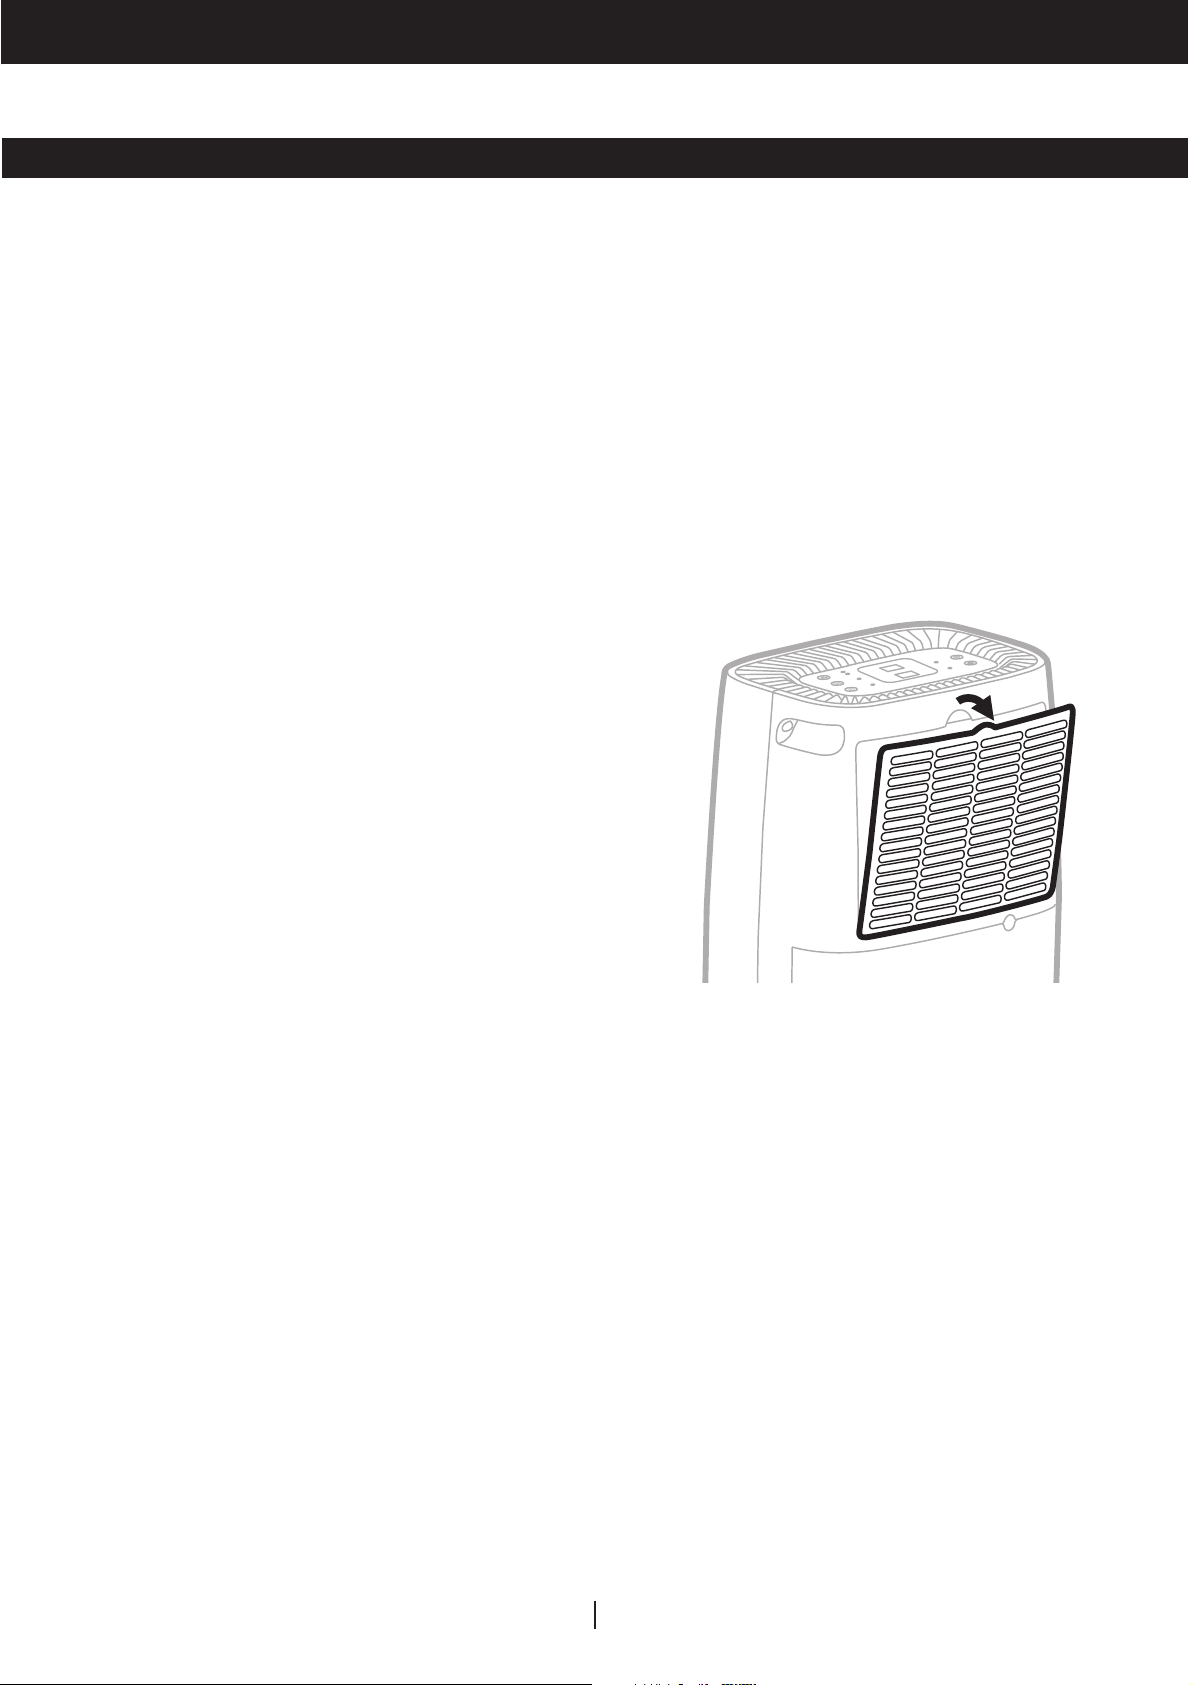
Dust Filter Maintenance:
The Dust Filter located at the back of the unit. A dirty filter clogged by dust particles can reduce the
efficiency of the dehumidifier. For optimum dehumidification, it is recommended to clean the dust
filter every 2 weeks:
Switch off and unplug the dehumidifier from the
1.
electrical outlet.
Carefully pull out the Grill and Dust Filter from the
2.
dehumidifier.
Rinse the Grill and Dust Filter under running water,
3.
or vacuum away the dust with a vacuum cleaner.
After cleaning the Grill and Dust Filter, dry in a
4.
cool, shaded place, then carefully reinstall into the
unit.
End of Season Storage & Maintenance:
If the appliance will not be used for an extended period of time:
Switch OFF the unit and unplug from the electrical power outlet.
•
Empty the Water Tank and let it dry. If your dehumidifier is connected to the continuous drain
•
tube, you must disconnect the drain tube.
Remove the dust filter and clean with water. Let the dust filter dry and reinstall back into the unit.
•
•
Make sure all parts of the dehumidifier and accessories are dry before storage.
•
Cover the dehumidifier with a cloth/ plastic bag before storage, to protect the surface from dust
and scratches.
•
It is recommended to coil the power cord and store it off the floor to ensure it is protected from
bends and kinks.
•
Store the unit upright in a dry location, away from direct sunlight.
EN
16
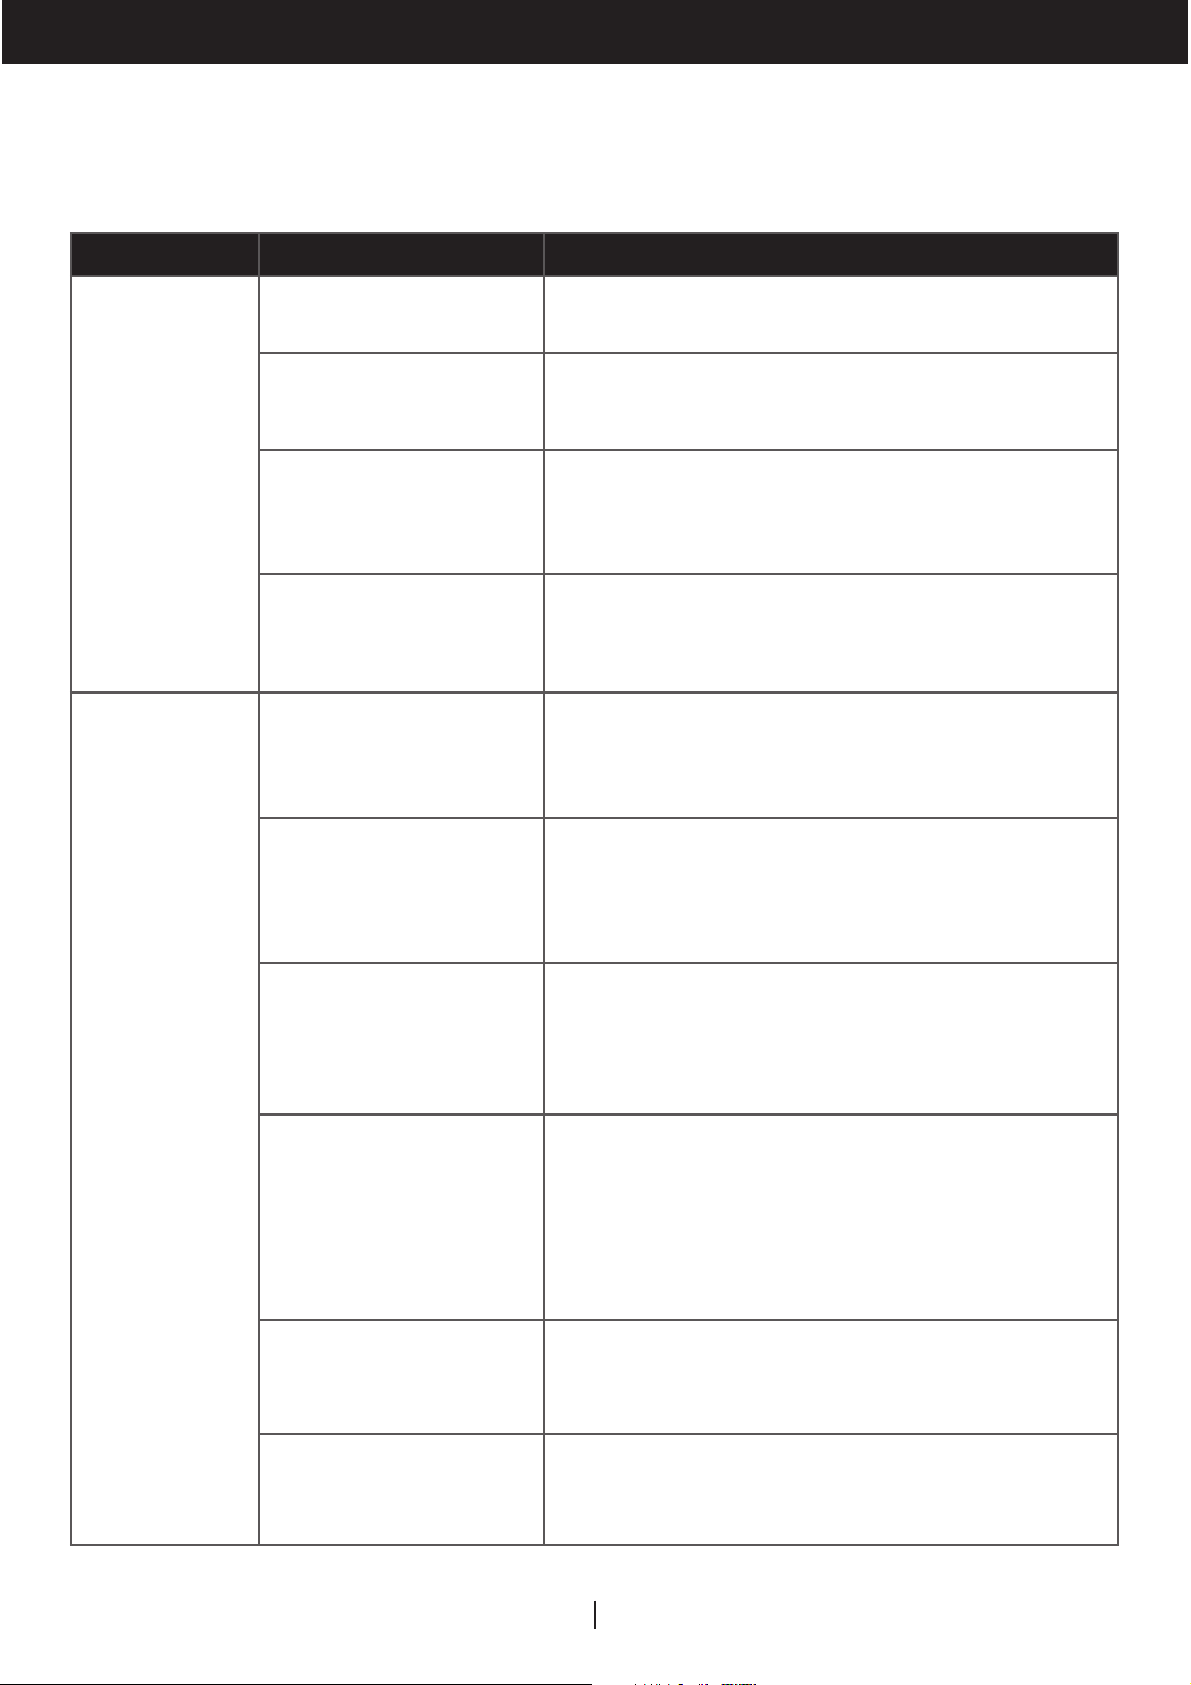
TROUBLESHOOTING GUIDE
The following troubleshooting guide addresses the most common problems. If problems persist, call
customer service.
PROBLEM POSSIBLE CAUSE SOLUTION
No electricity. Check for power.
Dehumidifier
does not start
The power cord is not
properly plugged in.
The safety switch
activated on the
electrical plug.
The Water Tank is not in
the correct position.
The humidity level setting
is too high.
A door or window is open,
letting in new moisture.
Remove and reconnect the power cord.
Reset the safety switch and wait for 3 minutes to
pass. Contact customer service if problem persists.
Position the Water Tank correctly into the unit. Unit
will not operate until the Water Tank is secure in
place.
Decrease the humidity level setting.
Make sure all windows or doors to the
outside are closed and tightly sealed.
Unit runs but
the humidity
level does
not decrease
There are other sources
of humidity in the room
(e.g. boiling water in pot).
The temperature in the
room is too low.
The Dust Filter is dirty/
blocked.
Air outlet or intake is
blocked.
Switch on the dehumidifier when these
sources are not present.
The dehumidifier is designed to operate between
45°F (7°C) and 95°F (35°C). Moisture removal is
greatly reduced if room temperatures exceed this
temperature range.
Clean the Dust Filter.
Remove blockage.
EN
17
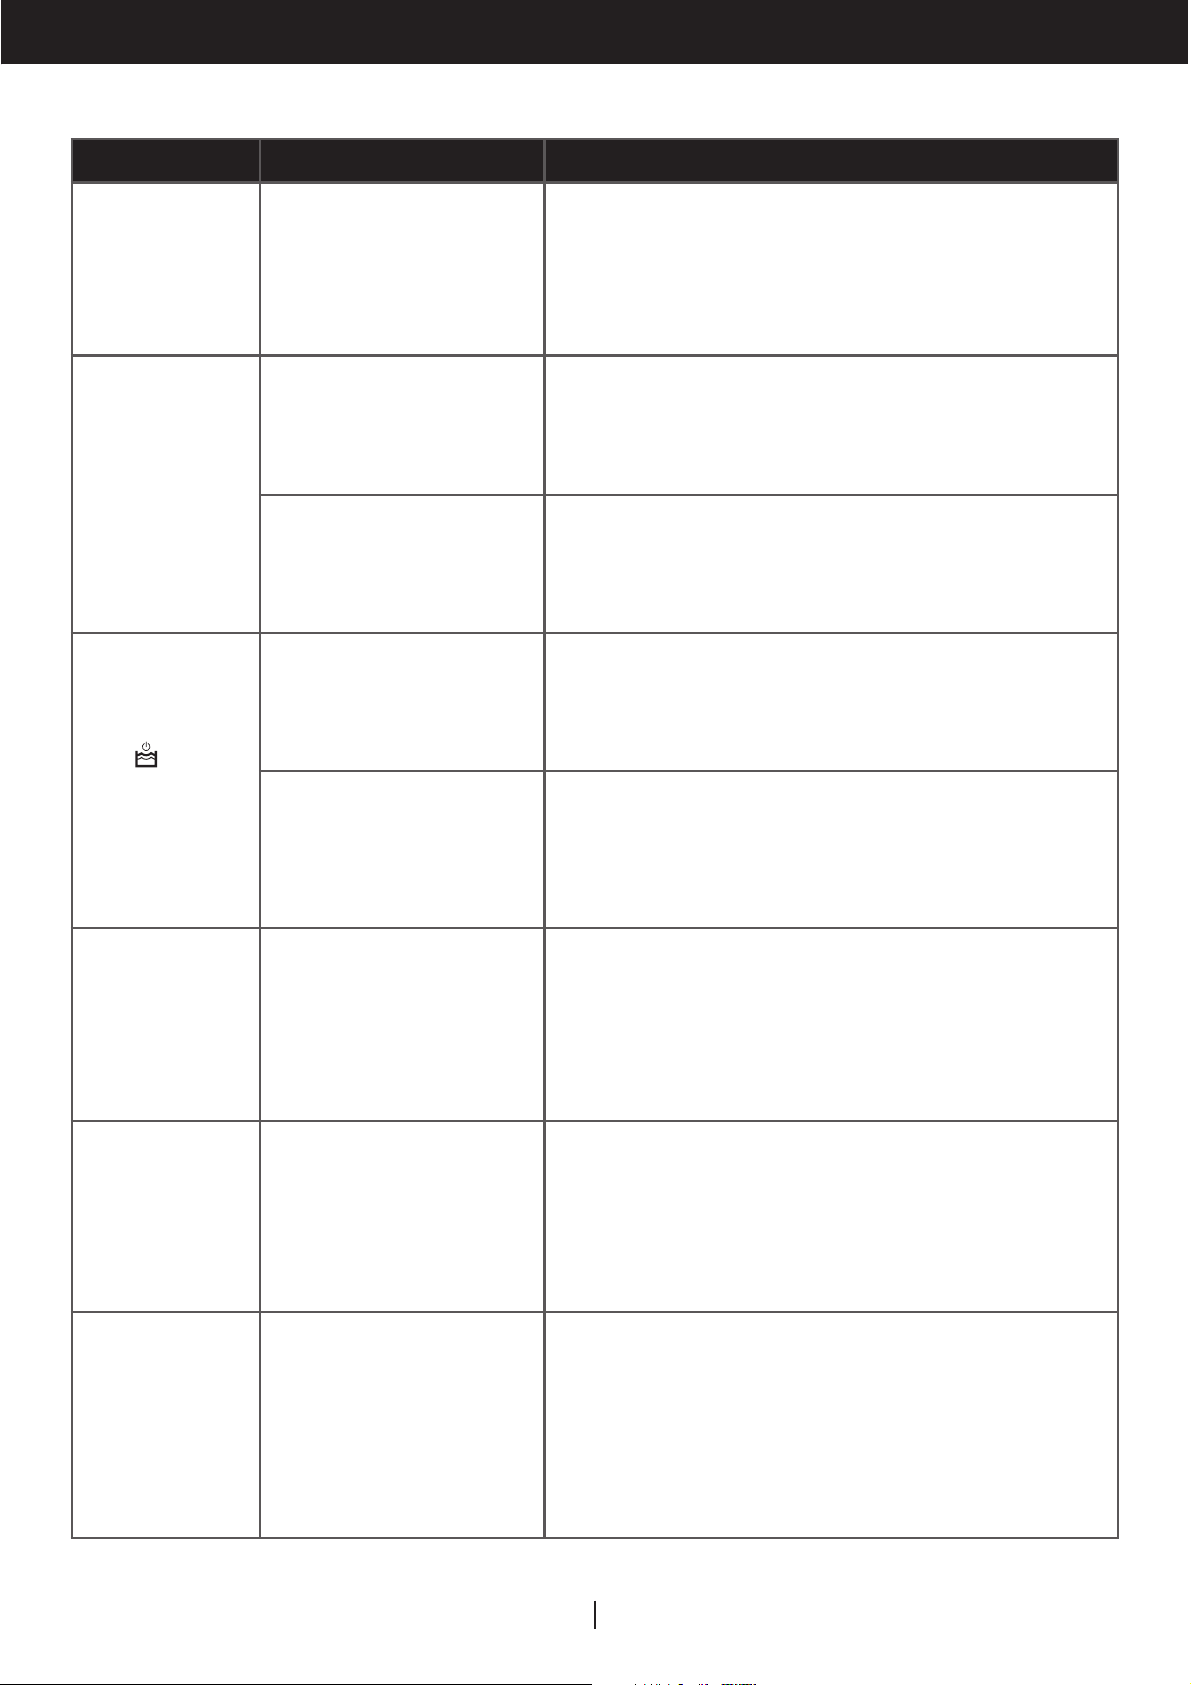
TROUBLESHOOTING GUIDE (CONTINUED)
PROBLEM POSSIBLE CAUSE SOLUTION
Unit runs but
the humidity
level does
not decrease
Dehumidifier
runs constantly/
does not stop
Water Tank
Full is
illuminated
and the unit is
beeping
Insufficient time for the
dehumidifier to remove
moisture.
Area to be dehumidified
is too large.
A door or window is open,
letting in new moisture.
The Water Tank is full. Empty the Water Tank.
The Water Tank is not in
the correct position.
After initial installation, allow 24 hours to maintain
desired dryness.
The capacity of your dehumidifier may not be
adequate for the room it is used in. It is recommended
to add an extra dehumidifier for large areas.
Make sure all windows or doors to the
outside are closed and tightly sealed.
Position the Water Tank correctly into the unit. Unit
will not operate until the Water Tank is secure in
place.
The unit is
blowing cold air
out of the top
vent
Frost appears
on the coils
Connected
the continuous
drain but
the water
condensation is
not draining out
the tube
The purpose of the top
air vent is to distribute air
into the room.
Dehumidifier has been
recently turned on in low
room temperatures
(usually below 45°F
(7°C)).
Some floors may have
an uneven surface
which may affect the
continuous drainage
function
The temperature of the air from the vent depends
on the room environment and other factors. It can
fluctuate and this is normal. No action required.
This is normal. Frost will disappear in an hour
or so after the dehumidifier is switched OFF.
Raise the front of the Dehumidifier ½ to 1 inch
(1.27 cm to 2.54 cm) from the floor. The water
condensation will drain out the back hose and not
into the bucket.
EN
18
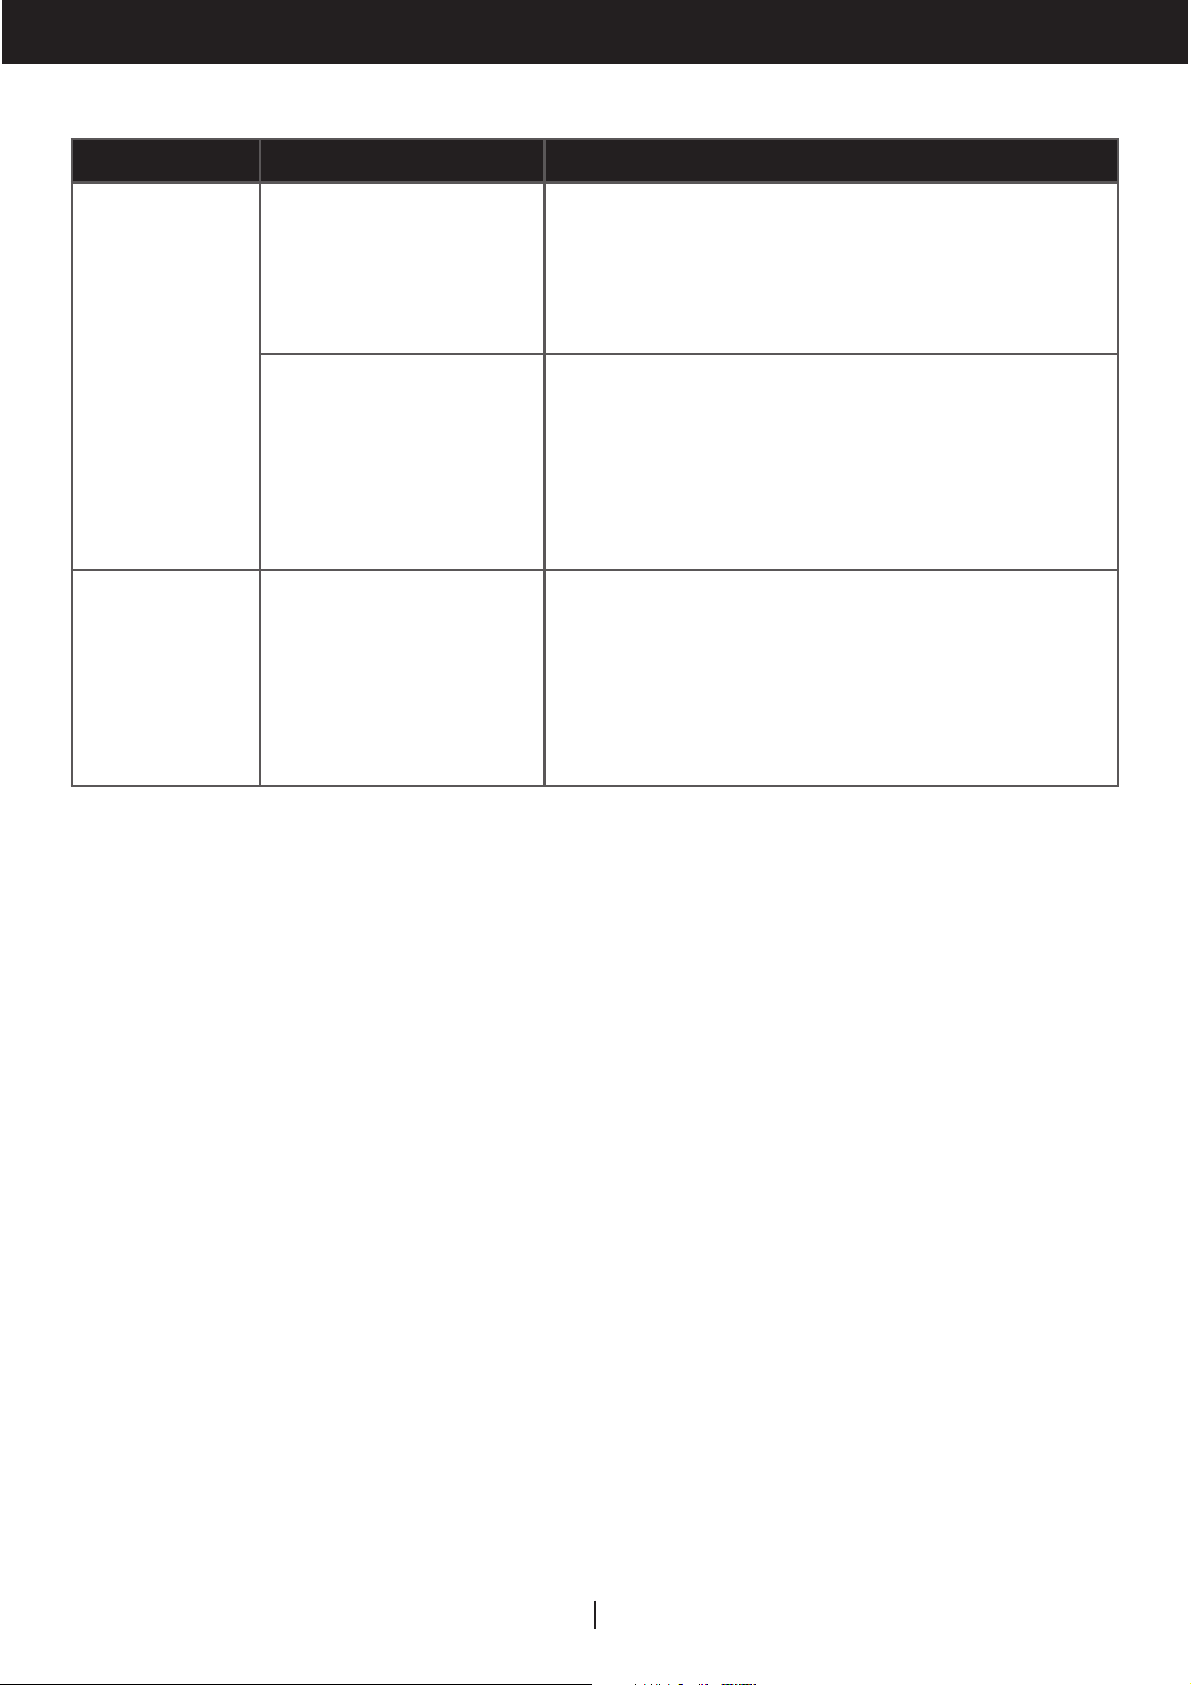
TROUBLESHOOTING GUIDE (CONTINUED)
PROBLEM POSSIBLE CAUSE SOLUTION
The drain hose may be
loose.
Water on
the floor
You intended to use the
Water Tank to collect
water but the continuous
drain hose is still
connected.
Noise Fan is working.
Check the connections between the hose and the
drain outlet on the unit. See Continuous Water
Drainage section.
Disconnect the hose if using the Water Tank to collect
water. See Continuous Water Drainage section.
Wind from the fan can create sounds during
operation. This is a normal sound.
EN
19

MERCI
Merci d'avoir acheté un déshumidificateur Honeywell. Ce manuel d'utilisation contient d'importantes
informations sur l'installation, le fonctionnement, l'entretien et le dépannage de ce produit.
RÈGLES DE SÉCURITÉ
MISE EN GARDE -- LIRE ET CONSERVER CES INSTRUCTIONS AVANT UTILISATION DE CE PRODUIT.
L'utilisateur d'appareils électriques peut provoquer un certain nombre de dangers, notamment un
incendie, une électrocution et des blessures. Le non-respect de ces instructions peut endommager
et/ou altérer son fonctionnement et annuler la garantie. En cas de divergence ou de conflit entre la
version anglaise et la traduction, la version anglaise prévaudra.
Pendant l'utilisation d'un appareil électrique, il est impératif de suivre les précautions de base en
matière de sécurité :
NE PAS toucher le déshumidificateur ou la fiche électrique avec des mains
•
humides.
Vérifier le voltage du circuit électrique de la maison pour s’assurer qu’il corre
•
spond aux spécifications de l'appareil.
Retirer, avant toute utilisation, le matériel d'emballage et inspecter l'appareil
•
afin de vérifier l'absence de dommages qui auraient pu survenir au cours
du transport.
NE PAS UTILISER un appareil dont la fiche et/ou le cordon sont
•
endommagés.
NE PAS UTILISER de rallonge électrique avec cet appareil.
•
NE PAS placer le cordon d'alimentation sous la moquette et ne pas couvrir
•
ce cordon avec un tapis ou un recouvrement similaire. Vérifier que le
cordon d'alimentation ne constitue pas un obstacle potentiel ou un risque
de trébuchement.
Toujours débrancher le déshumidificateur avant de vider le réservoir d'eau.
•
L'eau recueillie dans le réservoir doit être jetée. Cette eau est non buvable et
•
ne doit jamais être consommée.
Toujours débrancher le déshumidificateur et retirer l'eau du réservoir d'eau
•
avant de procéder au nettoyage, à l'entretien ou au transport de l'appareil.
Débrancher le cordon d'alimentation de la prise électrique en tirant
•
seulement l'extrémité de la fiche électrique. Ne jamais tirer sur le cordon.
Cet appareil a été fabriqué pour un usage domestique seulement, et ne doit
•
pas être utilisé à d'autres fins.
NE PAS utiliser l'appareil dans des zones où essence, peinture ou autres
•
produits et objets inflammables sont utilisés ou entreposés.
Le déshumidificateur est conçu uniquement pour des applications
•
résidentielles intérieures. Il ne doit pas être utilisé pour des applications
commerciales ou industrielles.
NE PAS essayer de réparer ou d'ajuster des fonctions électriques ou
•
mécaniques du déshumidificateur. Une telle action pourrait entraîner un
certain nombre de dangers et annuler la garantie.
FR
1

RÈGLES DE SÉCURITÉ (SUITE)
NE PAS couvrir l'entrée ou la sortie d'air sur l'appareil au risque
•
d'entraîner un dysfonctionnement de l'appareil.
NE PAS insérer d'objets ou leur permettre de pénétrer dans la
•
ventilation ou l'orifice de sortie, car cela pourrait endommager
l'appareil et provoquer un incendie ou un choc électrique.
Si le cordon d'alimentation est endommagé, il devra être remplacé
•
par le fabricant, son service après-vente ou un technicien qualifié afin
d'éviter tout danger.
NE PAS laisser les enfants jouer avec cet appareil, l'emballage ou le
•
sac en plastique inclus.
•
En cas de dommage ou de dysfonctionnement de l'appareil, NE PAS
continuer son utilisation. Débrancher le produit de la prise électrique.
Consulter la section sur le dépannage et contacter le service client.
•
Toujours placer le déshumidificateur sur un sol de niveau.
•
Ne jamais installer l'appareil à proximité d'une baignoire ou d'un
contenant rempli d'eau.
•
Entreposer dans un endroit sec,à l'abri des rayons directs du soleil
lorsque l'appareil n'est pas utilisé.
•
Cet appareil et ses matériaux d'emballage ne sont pas prévus pour
une utilisation par des personnes (y compris enfants et personnes
âgées) aux capacités physiques, sensorielles ou mentales réduites
ou dénuées d'expérience et de connaissances, sauf si elles on pu
bénéficier, par l'intermédiaire d'une personne responsable de leur
sécurité, d'une surveillance ou d'instructions préalables concernant
l'utilisation de l'appareil.
•
Toujours utiliser la poignée latérale et maintenir l'appareil à la verticale
pendant le déplacement d'une pièce à l'autre – NE PAS incliner le
produit sur le côté ou le positionner à l'envers.
•
Si pendant le déplacement, le déshumidificateur a été incliné sur le
côté, repositionner l'appareil dans sa position verticale et attendre au
moins 4 heures avant utilisation.
•
MISE EN GARDE: Pour réduire le risque d'incendie ou de choc
électrique, ne pas utiliser l'appareil avec un appareil à un variateur
d'intensité à semi-conducteur.
Ce marquage indique que ce produit ne doit pas être éliminé avec les autres déchets
ménagers dans toute l'Union européenne. Pour prévenir tout effet nocif potentiel
pour l'environnement ou la santé humaine provenant d'une mise au rebut incontrôlée,
procéder au recyclage responsable afin de promouvoir la réutilisation durable des
ressources matérielles. Pour éliminer l'appareil usagé, utiliser les systèmes de retour
et collecte, ou contacter le fournisseur où le produit a été acheté. Par ce moyen, le
produit sera collecté pour un recyclage garantissant le respect de l'environnement.
FR
2
PRINCIPE DE RÉGLEMENTATION
TP-COMPACT-WK - R290
SYMBOLE
Attention,
risque d'incendie, R290
REMARQUE
MISE EN
GARDE
ATTENTION
EXPLICATION
Ce symbole indique que
l'appareil utilise un réfrigérant
inflammable. Une fuite ou
une exposition à une source
d'ignition externe entraînera un
risque d'incendie.
Ce symbole indique qu'il faut
lire attentivement le manuel
d'opération.
ATTENTION
ATTENTION
Ce symbole indique qu'un
technicien doit intervenir sur
cet appareil en se rapportant
au manuel d'installation.
Ce symbole indique que des
informations sont disponibles
(p. ex. dans le manuel
d’opération ou le manuel
d’installation).
FR
3

PRINCIPE DE RÉGLEMENTATION (SUITE)
Des mises en garde supplémentaires s'appliquent aux appareils
contenant des gaz réfrigérants R290.
•
Lire attentivement les instructions avant utilisation de l'appareil.
•
Au moment du dégivrage ou du nettoyage, ne pas utiliser d'autres
procédés que ceux recommandés par le fabricant.
•
Ne pas placer l'appareil dans une pièce où il existe des sources
d'ignition fonctionnant en continu (p. ex. des flammes nues, un
appareil à gaz en fonctionnement ou un chauffage électrique en
fonctionnement).
•
Ne pas percer et/ou brûler.
•
Ne pas perforer les composants du circuit de refroidissement.
•
Les gaz réfrigérants peuvent être inodores.
•
L'appareil doit être installé, utilisé et entreposé dans un espace
supérieur à 4 m
•
Dans une pièce non ventilée, une accumulation liée à d'éventuelles
2
.
fuites de réfrigérant pourrait provoquer un incendie ou une explosion
si le réfrigérant entrait en contact avec des chauffages électriques, des
cuisinières ou d'autres sources d'ignition.
•
L'appareil doit être entreposé de manière à prévenir tout dommage
mécanique.
•
Seules les personnes qui auront été préalablement autorisées par un
organisme accrédité attestant leurs compétences à manipuler les
réfrigérants dans le respect des lois encadrant l'industrie pourront
travailler sur le circuit de refroidissement.
•
Le gaz réfrigérant R290 est conforme aux directives environnementales
de l'Union européenne.
•
Cet appareil contient une certaine quantité (voir la plaque signalétique
à l'arrière de l'appareil) de gaz réfrigérant R290. La charge maximale
de réfrigérant est de 0,05 kg.
Les réparations doivent être effectuées seulement sur les
recommandations du fabricant. Les opérations d'entretien et de
réparation qui requièrent l'intervention d'une personne qualifiée
doivent être effectuées sous la supervision de spécialistes dans
l'utilisation des réfrigérants inflammables.
FR
4
PRINCIPE DE FONCTIONNEMENT D'UN DÉSHUMIDIFICATEUR
Lorsque le déshumidificateur est en marche, un ventilateur aspire l'air chargé d'humidité jusque
dans les bobines de déshumidification situées à l'intérieur de l'appareil. Ces bobines condensent
l'humidité de l'air pour une capture dans le réservoir d'eau. L'air sec est ensuite évacué du
déshumidificateur. L'air circule dans la pièce par les bouches d'aération du déshumidificateur en tant
qu'air chaud et sec.
IMPORTANT : Le déshumidificateur est conçu pour fonctionner entre 7 °C et 35 °C. La performance
du déshumidificateur peut être considérablement réduite si la température de la pièce dépasse cette
plage de température.
CHOIX DE L'EMPLACEMENT - IMPORTANT
Avant d'utiliser le déshumidificateur, placez l'appareil en position VERTICALE pendant au moins
•
1 heure pour permettre au réfrigérant de se stabiliser.
Si l'appareil était incliné sur le côté ou positionné à l'envers pendant le transport, installez
l'appareil en position verticale pendant 4 heures avant toute utilisation.
Pour une efficacité optimale, le déshumidificateur doit être utilisé dans un espace clos. Gardez
•
fermées toutes les portes, les fenêtres et les autres entrées extérieures menant à la pièce.
FR
5

CHOIX DE L'EMPLACEMENT - IMPORTANT (SUITE)
Placez le déshumidificateur dans un endroit où la température ne descendra pas au-dessous de
•
7 °C.
Placez le déshumidificateur à une distance d'au moins 20 cm des autres objets (p. ex. rideaux
•
ou meubles) qui peuvent restreindre le flux d'air à l'arrière de l'appareil ou à travers ses bouches
d'aération.
Le déshumidificateur doit être placé sur un sol de niveau.
•
7.87 pouces
(20 cm)
IMPORTANT: L'efficacité du déshumidificateur peut être influencée par différents facteurs.
L'un des facteurs est la vitesse à laquelle l'air chargé d'humidité pénètre dans la pièce et la quantité
d'air circulant à l'intérieur et à l'extérieur de l'espace à déshumidifier. Par exemple, si une porte
d'un sous-sol est constamment ouverte, laissant l'air chargé d'humidité pénétrer dans la pièce, la
déshumidification sera plus longue que si la porte est maintenue fermée. Si le déshumidificateur est
dans une pièce où sont installés des armoires ou des placards de rangement, cette configuration
aura peu - ou pas d'effet - au niveau du séchage à l'intérieur des armoires ou des placards de
rangement, à moins d'avoir une circulation d'air adéquate à l'intérieur et à l'extérieur de ces espaces.
Pour déshumidifier ces espaces, ouvrez la porte de l'armoire ou du placard de rangement afin
de permettre la circulation de l'air. Vous constaterez peut-être que l'installation d'un deuxième
déshumidificateur est nécessaire pour les espaces clos ayant une plus grande superficie.
7.87 pouces
(20 cm)
FR
6

RETRAIT DE L'EMBALLAGE DU DÉSHUMIDIFICATEUR
Le déshumidificateur est emballé à l'aide d'un ruban adhésif coloré ou transparent pour sécuriser
•
certains composants pendant le transport. Retirez le ruban adhésif coloré ou transparent de
l'appareil.
1.
Tirez doucement le réservoir d’eau hors du déshumidificateur.
2.
Retirez la fiche d’alimentation, le tuyau de vidange et les
autres accessoires qui sont placés à l’intérieur du réservoir
du déshumidificateur.
3.
Une fois que tous les accessoires ont été retirés, replacez
le réservoir d’eau. Assurez-vous que le réservoir est correctement positionné.
•
Un flotteur se trouve dans le réservoir d'eau pour détecter le
niveau d'eau et arrêter automatiquement la déshumidification
lorsque le réservoir d'eau est plein. Assurez-vous que le
flotteur est correctement positionné à l'intérieur du réservoir
d'eau en vérifiant que le flotteur est à niveau avec le bord
supérieur du réservoir d'eau.
Flotteur
NE RETIREZ PAS CE FLOTTEUR.
7FR
DESCRIPTION DES COMPOSANTS
1
2
3
4
5
6
7
8
9
11
10
1) Panneau de commande 7) Sortie de vidange directe
2) Afficheur LED 8) Flotteur
3) Poignée 9)
4) Filtre à poussière et grille lavables 10) Cordon et fiche d'alimentation
5) Roulettes 11) Tuyau de vidange continue de l'eau
6)
Bouche d'aération
Réservoir d'eau
FR
8
UTILISATION ET FONCTIONNEMENT
PANNEAU DE COMMANDE
(7)
(3)
(5)
(4)
(6)
) Commande d'alimentation 5) Commande de la minuterie
2) Commande de réglages 6) Affichage de température
Commande de la vitesse de
3)
ventilation
7) Affichage d'humidité
4) Alerte de réservoir d'eau plein
(2)
(1)
9FR
UTILISATION ET FONCTIONNEMENT (SUITE)
BOUTONS DE FONCTION
COMMANDE D'ALIMENTATION
Appuyez sur la touche pour mettre le déshumidificateur en marche ou à l'arrêt.
RÉGLAGE DE L'HUMIDITÉ
Lorsque l'appareil est en fonctionnement, l'écran d'affichage indique le pourcentage d'humidité
actuel. Lorsque l'humidité actuelle est inférieure à l'humidité relative (HR) de 35 %, l'écran
d'affichage de l'humidité indiquera "Lo" (faible). Lorsque l'humidité actuelle est supérieure à
l'humidité relative (HR) de 95 %, l'écran d'affichage de l'humidité indiquera "Hi" (élevée).
Appuyez sur la touche pour sélectionner le taux d'humidité souhaité. L'humidité sera ajustée par
palier de 5 % en appuyant sur . La plage d'humidité relative (HR) est comprise entre 40 % et 80 %.
Cinq secondes après le réglage de l'humidité souhaitée, l'afficheur indiquera de nouveau l'humidité
actuelle.
Réglages recommandés: Il est recommandé de laisser l'appareil en fonctionnement à 40 %
d'humidité sur la vitesse rapide de ventilation pendant les 2 ou les 3 premiers jours jusqu'à
l'élimination des odeurs d'humidité. Après quelques jours, lorsque l'humidité relative a été réduite à
un niveau plus confortable, appuyez sur pour sélectionner un taux d'humidité relative plus élevé
qui maintiendra un niveau d'humidité confortable par la suite. Un taux d'humidité sain se situe entre
40 % et 50 %.
REMARQUE : Le capteur d'humidité détecte l'humidité actuelle dans la région avoisinante. En
raison de la sensibilité, il est normal d'observer un écart de quelques degrés au niveau de l'humidité
détectée par le capteur.
AFFICHAGE DE LA TEMPÉRATURE
Lorsque l'appareil est en fonctionnement, l'écran d'affichage de la température indique la
température actuelle (°C).
FR
10
 Loading...