

Page 1
Smart Dehumidifier
User Manual - Honeywell Air Comfort App
Read and save these instructions before use
Model:
TP30A / TP50A / TP70A
Series
www.jmatek.com
E-mail: info@jmatek.com
Page 2

USER MANUAL - HONEYWELL AIR COMFORT APP
Thank you for purchasing a Honeywell Smart Dehumidifier. This user manual is intended
to provide you with important information needed to set up, operate, maintain and
troubleshoot this product.
DOWNLOADING THE APP
The Smart Dehumidifier has added features to allow you to operate the dehumidifier
remotely using a smart device, and to use voice commands through an Amazon Echo
device, to control the unit.
Set up the Honeywell Air Comfort App on your smart phone or tablet to connect the
Honeywell Smart Dehumidifier for WiFi and Voice control.
IMPORTANT:
between the Dehumidifier and the App.
A 2.4 GHz WiFi network is required for proper connection and operation
iOS 8.0 or later Android 4.3 or later
SEARCH “HONEYWELL AIR COMFORT” AND INSTALL
EN
1
Page 3

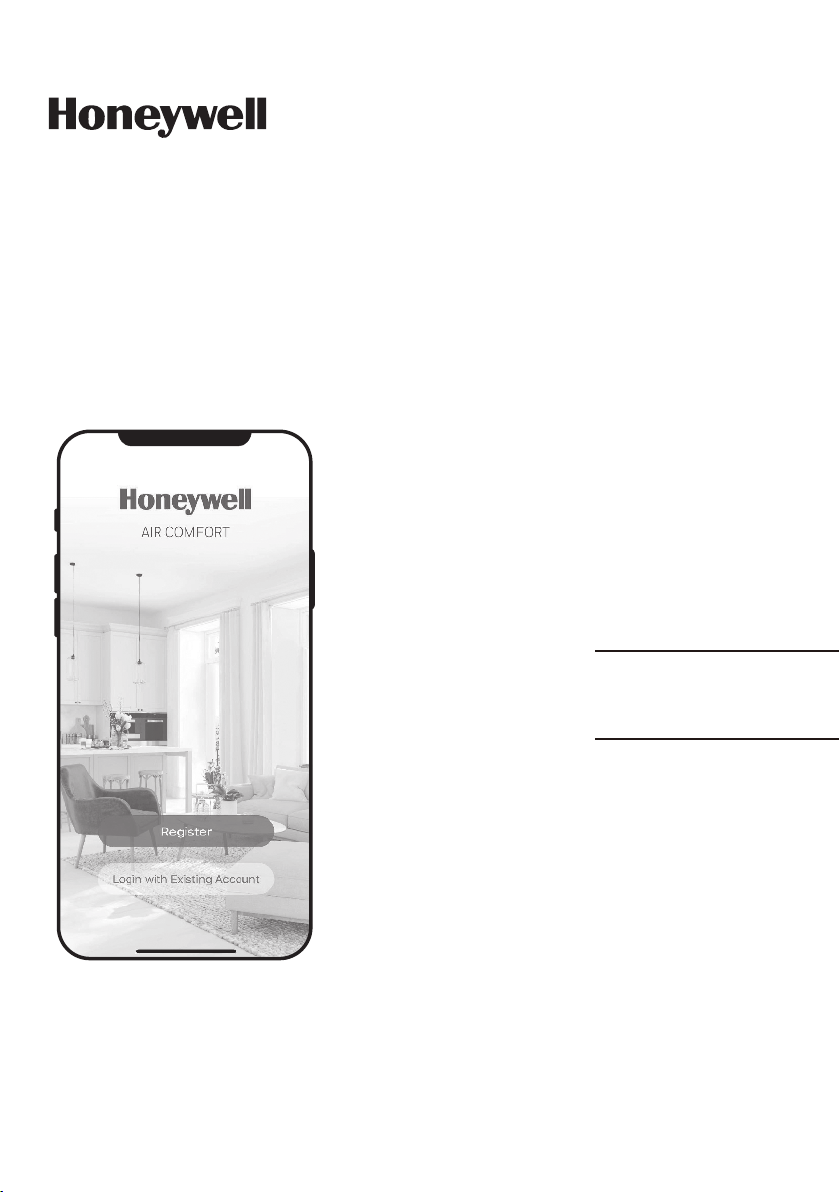
REGISTERING AN ACCOUNT
1
a. Open the app.
b. Tap Register.
4
2A
2B
a. Enter your email*
(2A) or mobile phone
number (2B).
b. Tap Get Verification
Code.
5
3
a. Enter the verification
code.
b. The verification code
should be recieved
& entered within 60
seconds. If time is
exceeded, go back and
get another code.
6
a. Set the password.
b. Tap Done.
The user will receive a verification email from “system.az@notice.2.ismartlife.me” with contact name “Honeywell
*
Air Comfort” and subject title “Registration Verification Code”. If email is not received in your inbox, check your
junk or spam folders. If you didn’t receive a verification email after 60 seconds, click the resend button.
a. Tap Create Family.
EN
2
a. Set the Family Name
and Family Location.
b. Mark the location of
the dehumidifier.
c. Tap Done.
Page 4
CONNECTION METHODS FOR WIFI SETUP
The Smart Dehumidifier has two different setup modes:
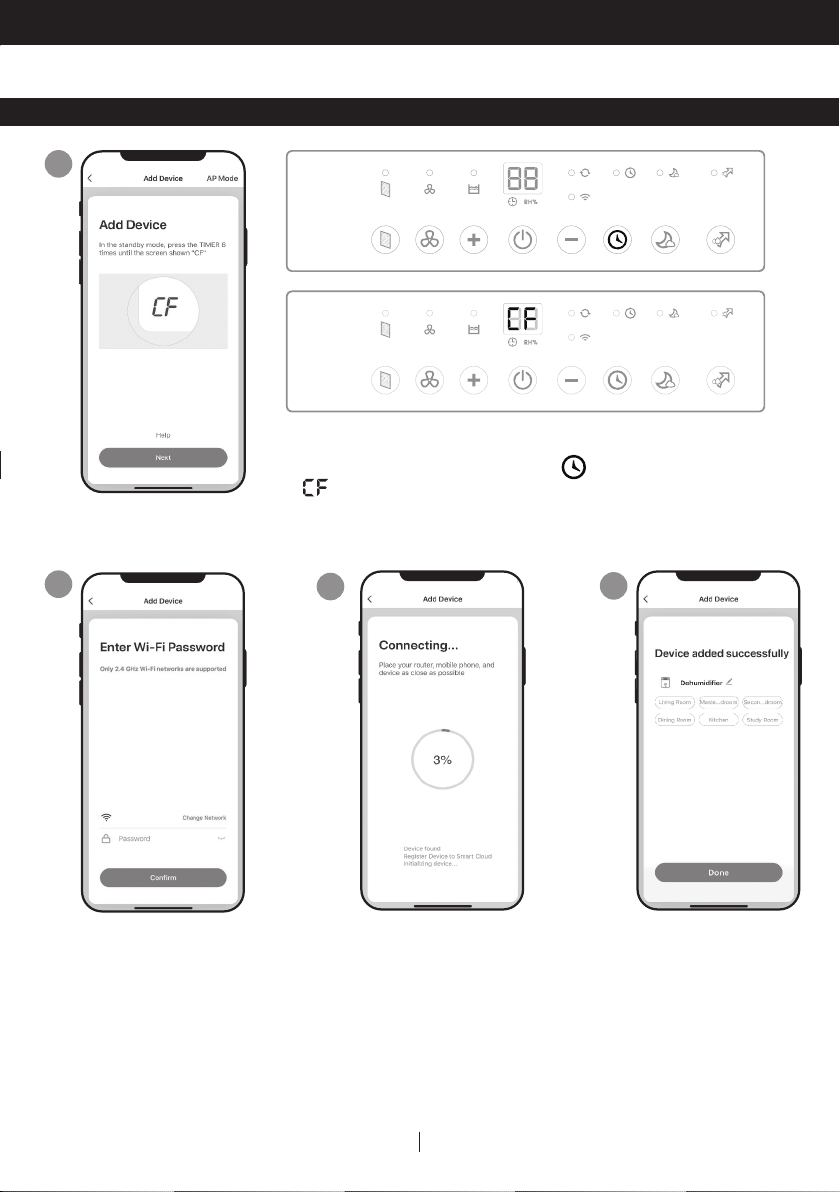
CF (Quick Connection): The CF mode is a quick and simple way to set the unit up.
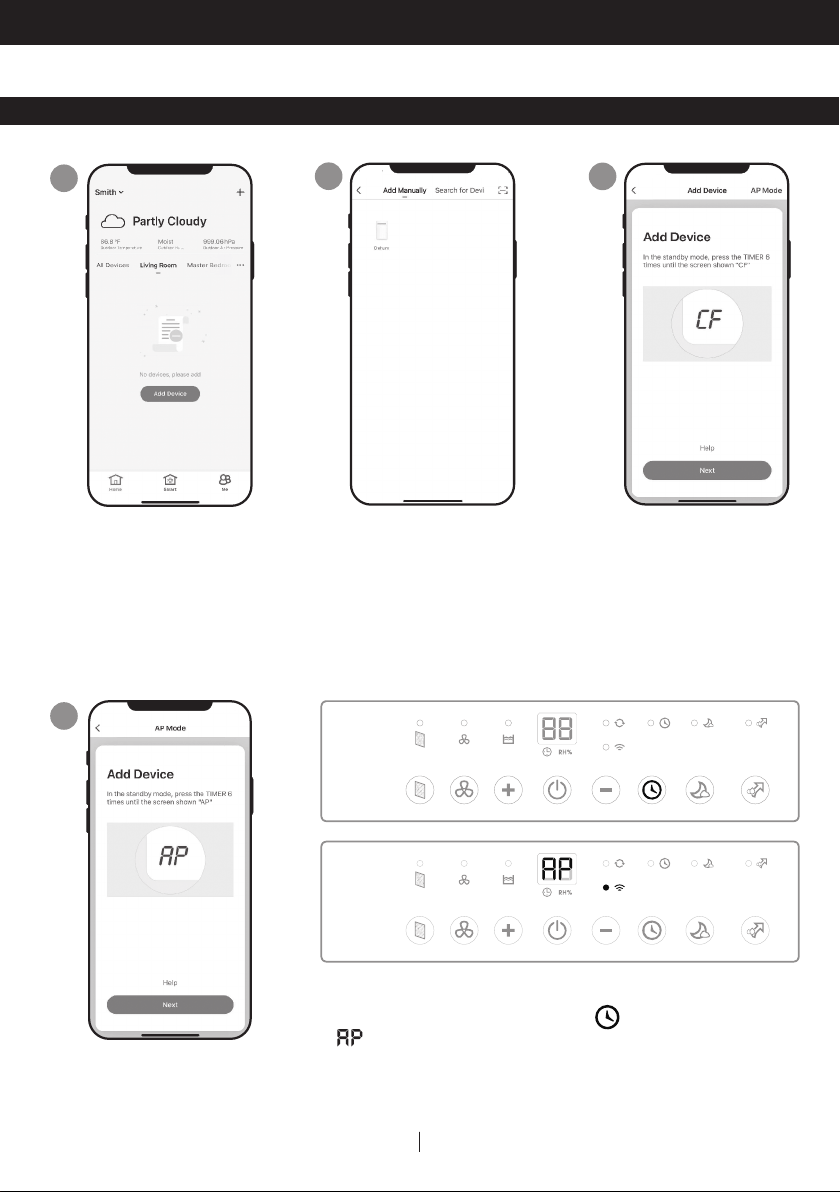
AP (Access Point): The AP mode uses a direct local WiFi connection between your phone
and the dehumidifier to upload the network details.
Before starting the setup, please ensure that your Smart Dehumidifier is plugged in and
turned OFF (in Standby Mode) for the connection type you are attempting. The display on
the Dehumidifier will confirm the current connection mode during setup.
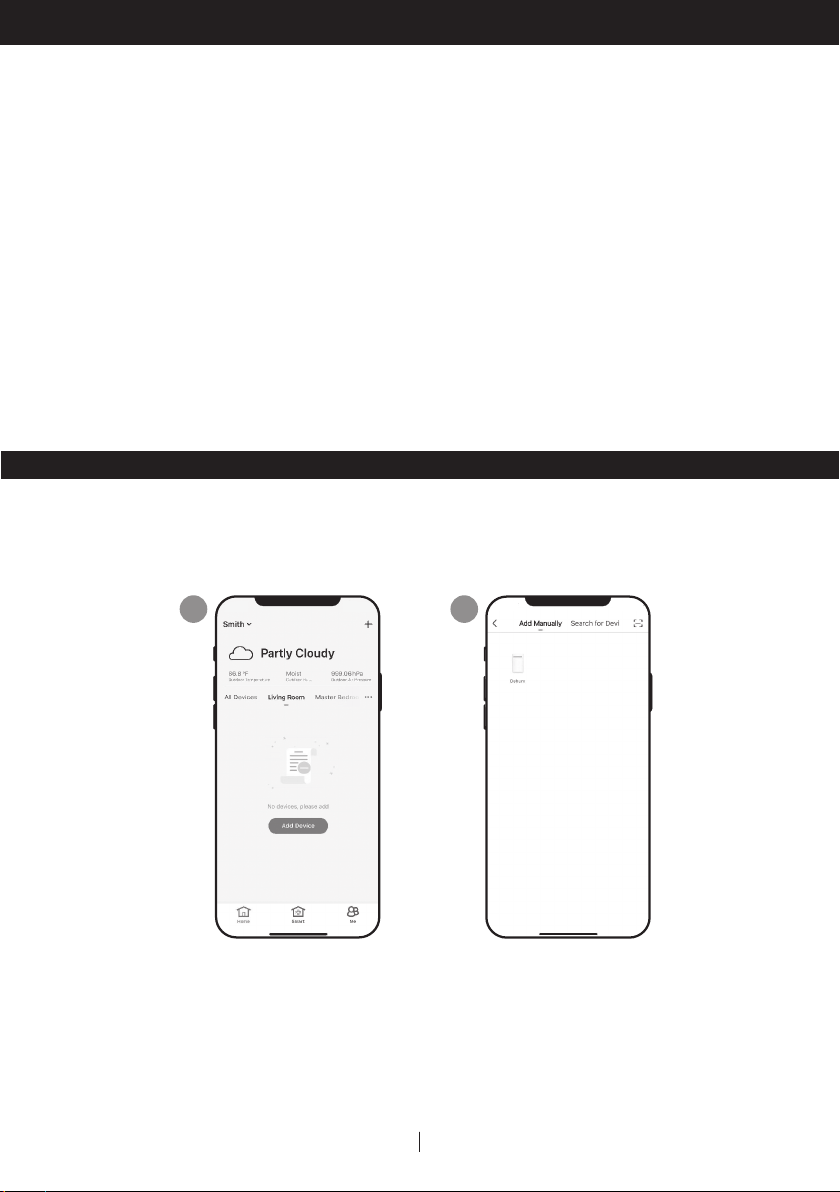
CONNECTING IN CF MODE
1
a. Tap Add Device.
2
a. Tap Dehum icon.
3EN
Page 5
CONNECTION METHODS FOR WIFI SETUP (CONTINUED)
CONNECTING IN CF MODE (CONTINUED)
3
a. Switch on the dehumidifier.
b. On the Dehumidifier, Press the button 6 times until
displays on the unit.
c. Tap Next.
4
a. Choose the WiFi
network.
b. Enter the WiFi password.
c. Tap Confirm.
5
is completed.
6
a. Tap Done.a. Wait until the connection
4EN
Page 6
CONNECTION METHODS FOR WIFI SETUP (CONTINUED)
CONNECTING IN AP MODE
1
a. Tap Add Device.
4
2
a. Tap Dehum icon.
3
a. Tap AP Mode in the top
right corner.
a. Switch on the dehumidifier.
b. On the Dehumidifier, press the button 6 times until
displays on the unit.
c. Tap Next.
5EN
Page 7

CONNECTING THE APP IN AP MODE (CONTINUED)
CONNECTING IN AP MODE (CONTINUED)
5
network.
b. Enter the WiFi
password.
c. Tap Confirm.
8
6
a. Tap Go to Connect.a. Choose the WiFi
7
a. Tap the Smartlife-XXXX
network
(WiFi board number).
b. Once connected, press
the home/back button
on your device and go
back to the Honeywell Air
Comfort App.
9
a. Wait until the
connection is
completed.
a. Tap Done.
6EN
Page 8

USING THE APP
MAIN SCREEN
1) Family (User)
Settings
2) Current Weather
Conditions
3) a. Current Outdoor
Temperature
b. Outdoor Humidity
- Dry: 040%RH
- Comfortable: 4070%RH
- Moist: above 70%RH
c. Outdoor Air Pressure
d. Outdoor Wind Speed
4) Connected Devices
5) Home Button
6) Smart Control Button
FAMILY SETTINGS
1 7
2
3
4
5
6
Setting the Family (User) Name
Managing rooms
Mahwah, New Jersey
Setting the Family Location
7) Adding a device
8) Room Locations
8
9) a. Device Sequence
9
b. Room Management
a. Family/User
10)
Management
b. Message Center
c. Help Center
d. Settings
- Voice ON/OFF
- Push Notifications
10
ON/OFF
- About
- Clear Cache
- Log Out
Adding a Family (User) member
Leave Group
John Smith
john.smith@gma
Setting the administrator
7EN
Page 9

USING THE APP (CONTINUED)
BASIC CONTROLS
1
a. Tap Dehumidifier.
Go back to main screen
Dehumidifier on/off
Pre-set humidity level
Current humidity level
Humidity down button
2
a. Tap to switch the
dehumidifier on/off.
Device settings:
a. Device Name
b. Device Location
c. Check Device Network
d. Third-party Control
(Voice Activated Control)
e. Share Device
f. Create Group
g. Device Information
h. Feedback
i. Add to Home Screen
j. Check for Firmware
Upgrade
k. Remove Device
l. Restore to Factory
Defaults
Humidity up button
Fan speed button
Timer set button
8EN
Page 10

USING THE APP (CONTINUED)
SETTING THE FAN SPEED
a. Tap fan speed button.
b. Select Low or High fan speed.
SETTING THE TIMER
Time selection
Timer days selection
Save settings
Timer Off settings
Select for unit to turn OFF
after unit completes
selected time period.
Timer On settings
Select for unit to turn ON
after selected time period
of being idle ends.
a. Tap Timer set button.
b. Tap Add Timer.
c. Set the timer(s).
d. When the timer is set, tap Save.
9ENEN
Page 11

USING THE APP (CONTINUED)
ADDING A SCENARIO
The Scenario feature allows you to set up multiple Dehumidifiers under one Scenario and
control them on one dashboard as needed. When you click on the Scenario, all Dehumidifiers will switch ON at the same time using previous settings.
E.g.: If you had set up a Dehumidifier in the Living Room and one in the Basement, you
can create a “Scenario 1” to switch both dehumidifiers on at the same time.
1
a. Tap Smart control
button.
b. Tap Add Scenario.
2
a. Tap Edit Name to set
the name of the
scenario.
b. Tap the background
to set the background
image of the scenario.
c. Tap Add Action to add
action of the
scenario.
3
a. Select the Enable or
Disable Automation.
Tap .
b. Select the Time-Lapse
of the action. Tap .
c. Select the Device and
the action (on/off).
Tap .
d. Tap Switch. Select the
action for the device to
perform (on/off).
e. Tap Save and then
Next.
f. Tap Save.
EN
10
Page 12

USING THE APP (CONTINUED)
ADDING AN AUTOMATION SCENARIO
The Automation Scenario feature allows you to set up multiple dehumidifiers under one
Scenario and it will automatically activate those dehumidifiers when there is a change in
outdoor environment conditions.
PreSet Outdoor Humidity Conditions:
Dry: 040%RH Comfortable: 4070%RH Moist: above 70%RH
When a change in outdoor condition is met, the pre-set Automation Scenario will switch
ON or OFF all Dehumidifiers set up in that Automation Scenario.
E.g.: If you had set up a Dehumidifier in the Living Room and one in the Basement, you
can create an “Automation Scenario 1” to switch both dehumidifiers on at the same
time when outdoor humidity changes from “Comfortable” to “Moist”. When the outdoor
humidity changes to “Moist” level , the dehumidifiers will automatically switch ON using
previous settings. The Dehumidifiers will continue running until internal room humidity
reaches previous desired humidity settings.
IMPORTANT: If environment conditions remain constant, for example, it stays “moist”,
the Dehumidifier will not activate automatically unless it senses a change in the pre-set
humidity conditions from “Dry” to “Comfortable” or “Comfortable” to “Moist”.
1 2
a. Tap Smart control button.
b. Tap Automation.
c. Tap Add Automation
Scenario.
a. Tap Edit Name to set the name
of the automation scenario.
b. Tap the background to set the
background image of the
automation scenario.
c. Tap Add Condition to add the
condition of the automation
scenario activation.
11
EN
Page 13

USING THE APP (CONTINUED)
ADDING AN AUTOMATION SCENARIO (CONTINUED)
3
a. Tap Device.
b. Tap Dehumidifier.
4
a. Select function(s) for the
b. Tap Next.
5 6
dehumidifier to perform,
when the automation
scenario condition(s) is/are
met.
a. Tap Add Action to set the
action to be performed
when the automation
scenario
condition(s) is/are met.
b. Tap Next.
EN
a. Tap Effective Period
to select when the
automation scenario
should activate.
b. Tap Next.
c. Tap Save.
12
Page 14

FOR VOICE ACTIVATED CONTROL
Connecting to an Amazon Echo Device:
NOTE: Ensure your Amazon Echo device is switched on and connected to the WiFi
network.
a. Open the "Amazon Alexa" app on your smart device.
b. Tap and then Skills & Games.
c. Tap and type "Honeywell Air Comfort". Tap the Honeywell Air Comfort skill.
d. Tap Enable To Use button.
e. Enter your Honeywell Air Comfort App login and password.
f. Tap Link Now and then tap Authorize.
g. Tap Done.
h. Tap Discover Device. Choose "Dehumidifier".
i. Tap Sst Up Device Choose a group for the device or tap Skip.
j. Choose "Dehumidifier".
k. Tap Done.
CONTROLLING THE DEHUMIDIFIER WITH ECHO
Switching On/Off:
Say: "Alexa, turn on/off dehumidifier".
Setting the Speed:
Say: "Alexa, set speed to XX percent."
(Low speed: XX = 0 to 50; High speed: XX = 51 to 99)
Setting the Target Humidity Level:
Say: "Alexa, set dehumidifier to XX percent."
Humidity Conditions:
Dry: 040%RH Comfortable: 4070%RH Moist: above 70%RH
Switching the Scenario/ Automation Scenario On/Off:
Say: "Alexa, switch <Scenario Name> on/off."
13
EN
Page 15

TROUBLESHOOTING
Problem Possible Cause Solution
Mobile smart device’s WiFi
is switched off.
Switch on the mobile
phone’s WiFi.
Unable to register/login to
an account.
Dehumidifier cannot pair
with the Honeywell Air
Comfort App.
WiFi signal is too weak.
Dehumidifier is not
connected to the the
electrical outlet.
WiFi signal is too weak.
The default pairing mode
does not work.
WiFi connection frequency
is incorrect.
WiFi password is incorrect.
WiFi network is invisible.
Install a WiFi extender
(not included).
Move the smart
dehumidifier closer to the
WiFi router.
Connect the dehumidifier
to the socket-outlet.
Install a WiFi extender
(not included).
Move the smart
dehumidifier closer to the
WiFi router.
Pair the dehumidifier in
AP mode (see section on
“Connecting in AP Mode”)
Select a 2.4 GHz WiFi
network
Use a correct WiFi
password.
Set the WiFi network to
visible.
WiFi name uses foreign
characters.
The encryption method of
the router’s wireless setting
is wrong.
14
EN
Set the WiFi name to
use alphanumerical
characters and numbers
only.
Set the encryption method
of the router’s wireless
setting to “WPA2PSK”
and the authentication
type to “AES”, or both are
set as automatic.
Note: “802.11n only” is
not allowed in wireless
mode.
Page 16

TROUBLESHOOTING (CONTINUED)
Problem Possible Cause Solution
Turn off the WiFi
The number of connected
devices reached the limit of
the router.
Dehumidifier cannot pair
with the Honeywell Air
Comfort App. (Continued)
The router has enabled the
wireless MAC address filter.
functions of some of the
connected devices.
Re-configure the router.
Remove the device from
the MAC address filter on
the router.
Ensure the device is not
prohibited by the router to
connect to the network.
15EN
Page 17

JMATEK Limited
Manulife Financial Centre,
Kwun Tong, Hong Kong
Phone: 85225595522
Email: info@jmatek.com
Web: www.jmatek.com
Made in China
© 2020 JMATEK Limited. All rights reserved.
The Honeywell Trademark is used under license
from Honeywell International Inc.
Honeywell International Inc. makes no
representations or warranties with respect to this product.
This product is manufactured by Airtek Int'l Corp. Ltd.
(subsidiary of JMATEK Ltd.).
 Loading...