

Page 1
Stay connected to your home or business. Connect
remotely from anywhere in the world.
TToottaall C
Usseerr
U
Coonnnneecctt
Guuiiddee
G
K14741 12/08 Rev. B
Page 2
TRADEMARKS
Honeywell is a registered trademark of Honeywell International Inc.
Windows and Windows Vista are trademarks, or registered trademarks of Microsoft Corporation in
the United States and other countries.
Java is a trademark of Sun Microsystems, Inc.
QuickTime® is a registered trademark of Apple Inc., registered in the U.S. and other countries.
All other trademarks are the properties of their respective owners.
Page 3

Total Connect User Guide
Contents
Overview ....................................................................................................................................................... 2
Obtaining a Total Connect account............................................................................................................... 2
Setting up your PC for connecting to Total Connect..................................................................................... 3
Additional Settings for use with Optiflex ...................................................................................................4
Accessing Total Connect ..............................................................................................................................4
Using Total Connect......................................................................................................................................5
My Profile .................................................................................................................................................. 6
Manage Users...........................................................................................................................................6
Deleting Users ...................................................................................................................................... 7
Edit Device Names ...................................................................................................................................8
Remote Access......................................................................................................................................... 9
System Status ....................................................................................................................................10
Zone Status ........................................................................................................................................11
Device Control .................................................................................................................................... 11
Event History ...................................................................................................................................... 12
Users .................................................................................................................................................. 13
Keypad ...............................................................................................................................................15
Setup .................................................................................................................................................. 15
Video.......................................................................................................................................................17
Optiflex Viewing Window Functions ...................................................................................................17
Using the Email Archive feature .........................................................................................................24
Configure Email ......................................................................................................................................25
Configure SMS........................................................................................................................................26
Event History...........................................................................................................................................27
Logout ..................................................................................................................................................... 27
Controlling your system using Text Messages ...........................................................................................28
Contacting Technical Support..................................................................................................................... 31
1
Page 4

Total Connect User Guide
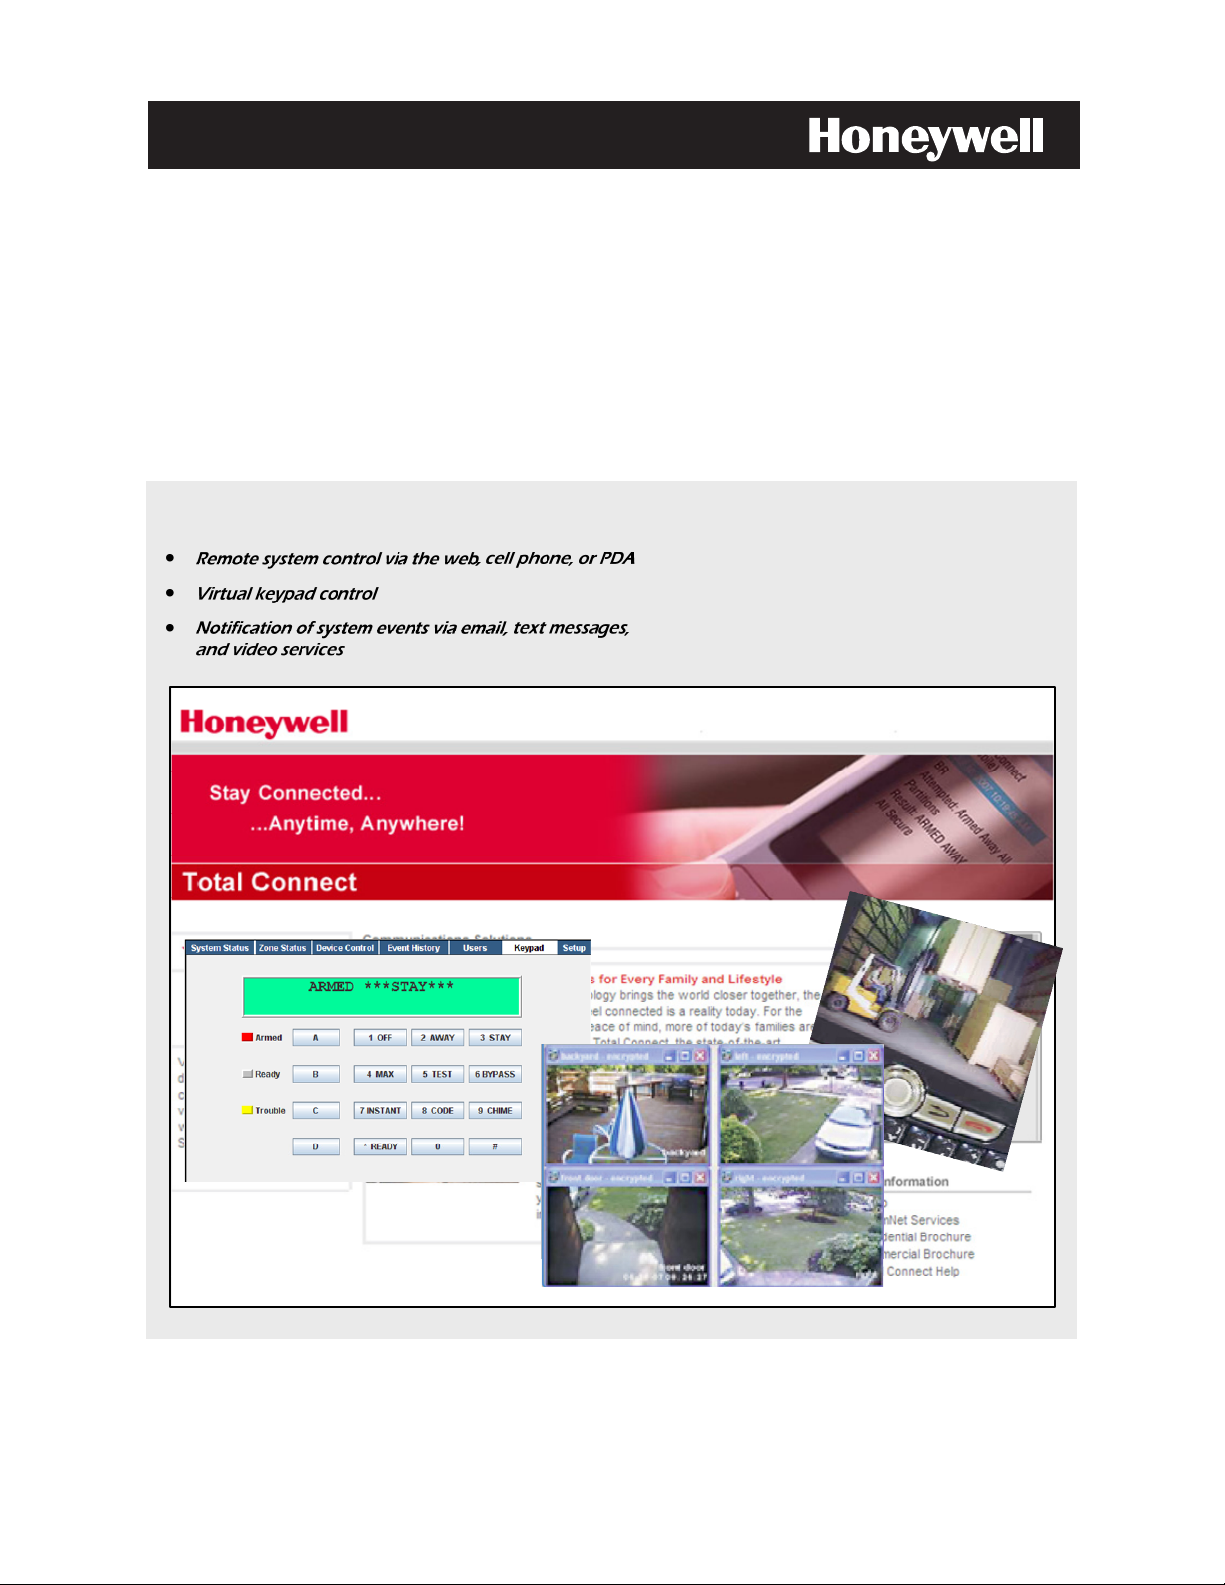
Overview
The Total Connect web site enables end users to remotely access their security system via an internet
web browser, or wireless communications devices such as; cell phones, and PDAs (that support
GSM/GPRS and SMS Text Messaging with short codes). Please check with your wireless carrier to be
certain your device supports these protocols.
As a Total Connect user, you can manage and run your security system from almost anywhere in the
world, check its status, and receive event notifications. You can also enable other people to receive
event notifications.
Depending on the specific security system tasks to be accomplished, different communication methods
are used.
End User Tasks Communication Method
Editing user profile
Viewing security system status
Controlling the security system
remotely
Configuring Email and Text
message notifications
Viewing the security system
event history
Receiving System Event
Notifications
You can also enable additional cell phones or PDAs to be notified of system events by email or text
messaging, and you can customize the names of events to be received.
• computer's web browser
• text message via a cell phone and PDA, or an emulated keypad
using a computer's web browser or PDA
• text message via a cell phone and PDA, or an emulated keypad
using a computer's web browser or PDA
• computer's web browser
• computer's web browser
• email
• text messages to a cell phone or PDA
Note: You will be able to access your security system via Honeywell’s Total Connect
website, once the dealer has enabled you.
This guide provides a tour of the Total Connect
you can remotely control your security system using your PC, or by sending simple text message
commands from your cell phone or PDA.
web site, explaining each function, then focuses on how
Obtaining a Total Connect account
The dealer/installer will set up your account and define the events you want to be notified of. These
events match the output relay triggering events that were programmed in the control panel.
Note: The Dealer/Installer should refer to the "AlarmNet Direct User Guide" for information on
configuring the hardware and creating a Total Connect
Once the dealer assigns you a login name and password, you will receive a “Welcome” email message
with your login name
your password
Connect web site or using your cell phone/PDA that supports GSM/GPRS and Text Messaging (SMS).
along with some helpful information. You will receive another email message with
. You will then be able to receive notifications, and access your system via the Total
web account for you.
2
Page 5
Total Connect User Guide
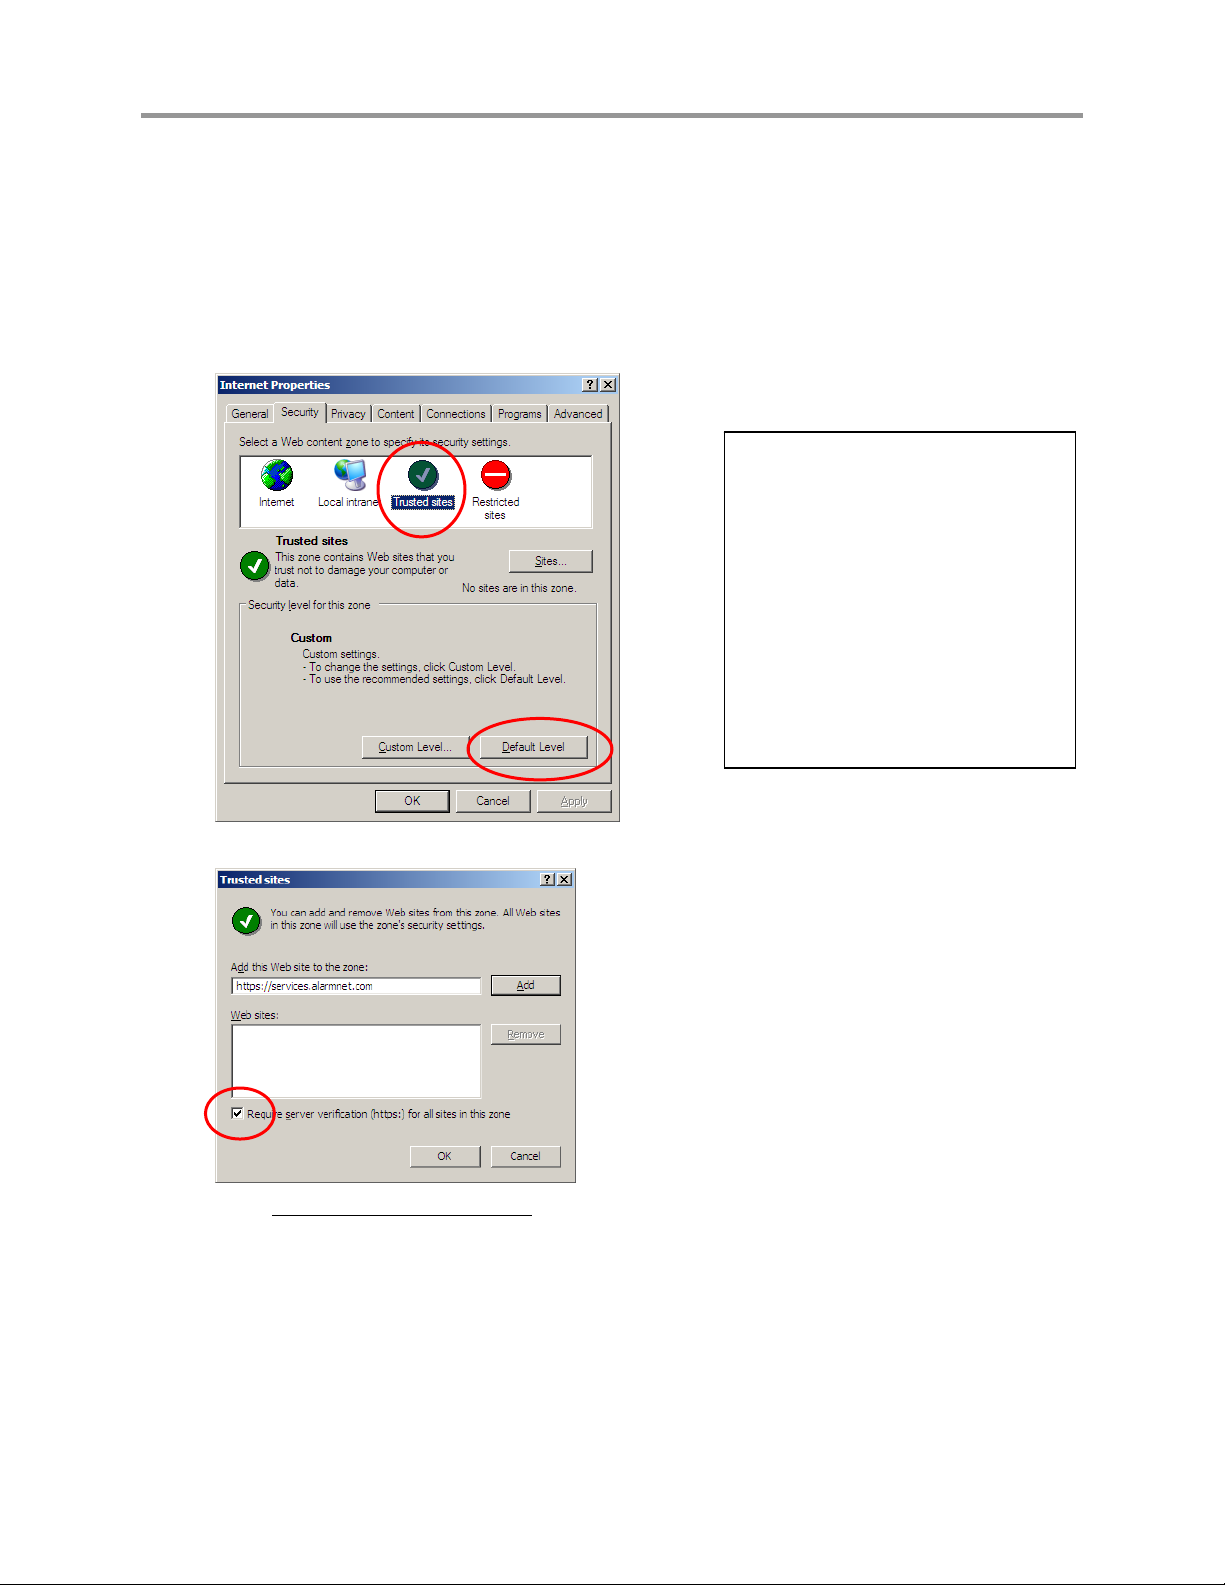
Setting up your PC for connecting to Total Connect
It is recommended that you add the Total Connect web site to your browser's Trusted Sites list. This is
especially important if you are also accessing Optiflex video.
1. Ensure you have Administrator privileges for the PC. From Internet Explorer navigate Tools >
Internet Options. Then select the Security tab.
2. In the upper pane, select Trusted sites. To ensure the security level for this zone has the correct
levels, click Default Level.
Note: Depending on what version
of Windows you are using screen
appearance will vary, and certain
buttons may have different labels.
For example; Windows XP will often
use the term OK on a button that
saves the data and closes the
active window, whereas Windows
Vista will often use the term CLOSE
as an equivalent.
Refer to the applicable guide for
your operating system.
3. Click Sites.
4. In the Add this Web site to the zone
Require server verification . . . box.
5. Click Add, then click OK. Click OK again to close out the window.
field, enter https://services.alarmnet.com, then check the
3
Page 6
Total Connect User Guide
Additional Settings for use with Optiflex
Note: Total Connect Video operates with Optiflex Video Controller Hardware and
ActiveX-based "Optiflex Connect" viewing software that is currently supported by Internet
Explorer 6+ in the Windows Vista and Windows XP operating systems.
1. Log into Total Connect. (Refer to the next topic if necessary.)
2. At the left navigation bar, click Video. To connect, click the Optiflex Connect button. A
separate window opens, then depending on your browser settings you may be prompted to
"display nonsecure items?", please answer Yes to this prompt.
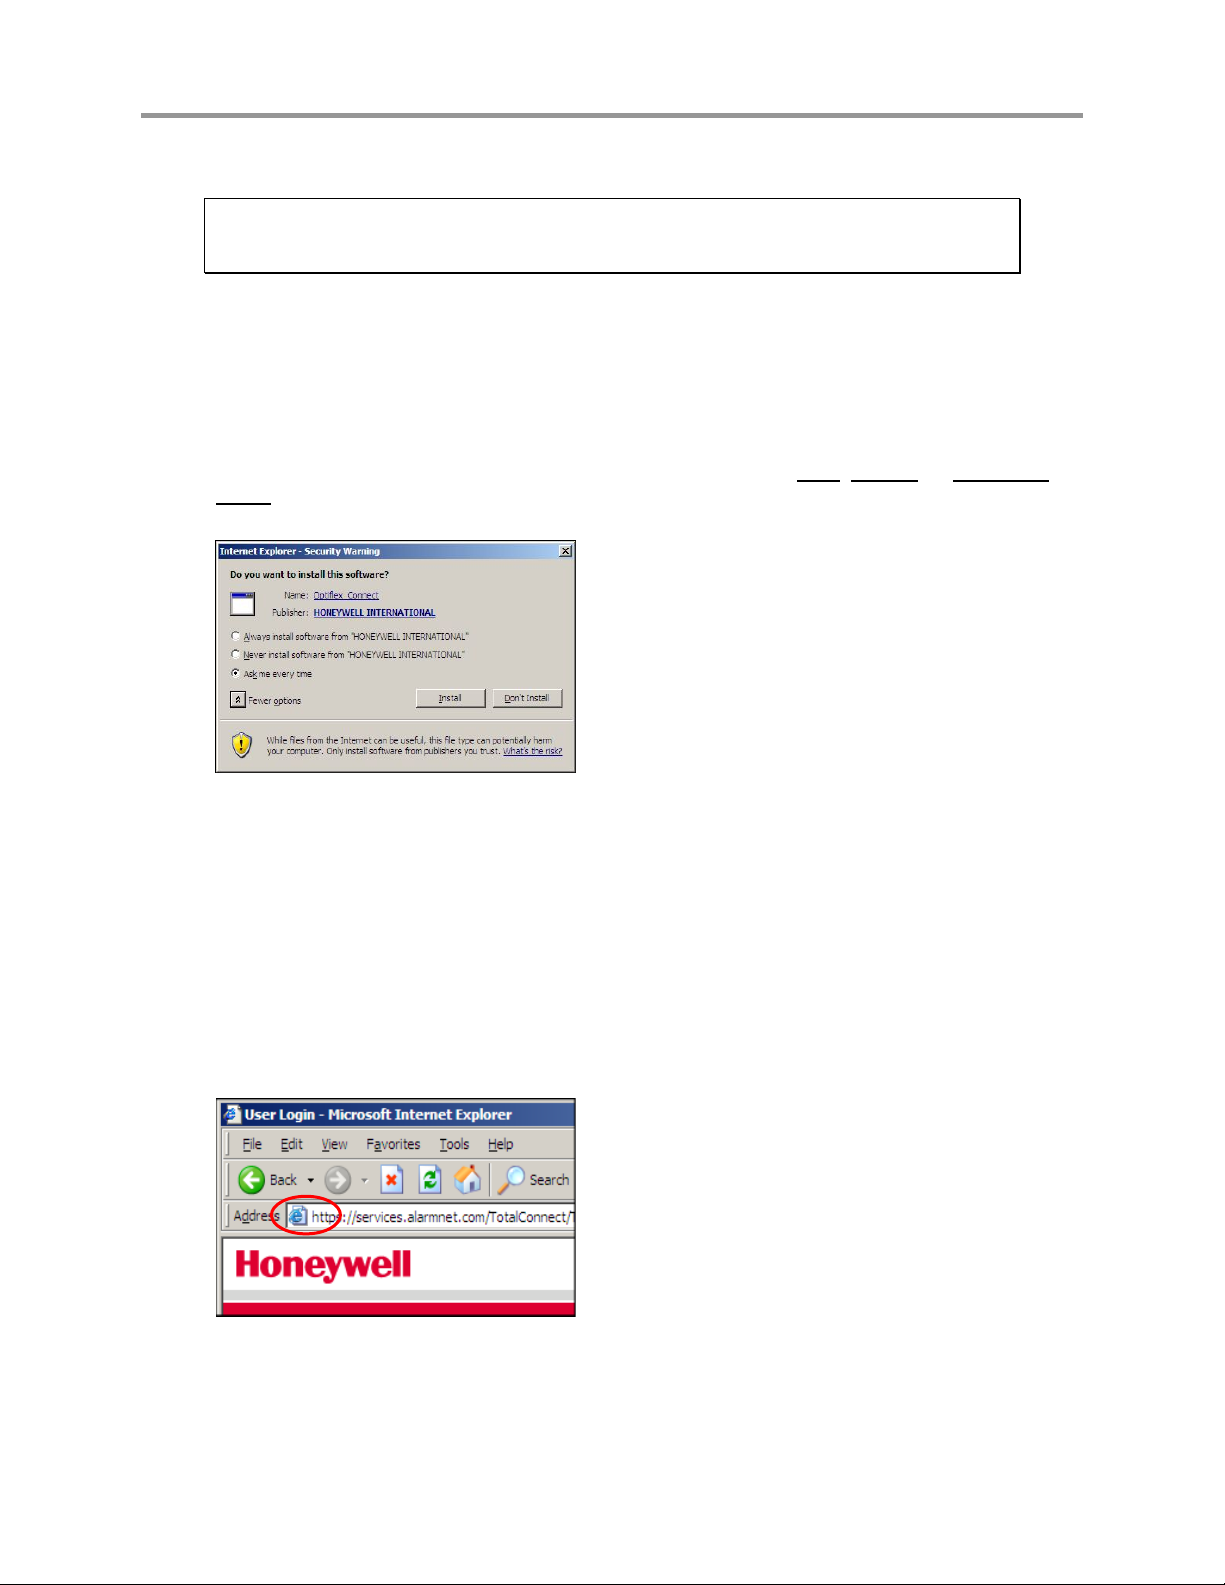
Note: The first time you access your video service, or any time that an update is needed you will
be prompted to install the necessary software, or update.
Next your network authorization will be checked, then if you need Java
, ActiveX, or QuickTime
player installed on your system (or an update to an existing version), a prompt will appear.
Please install when prompted. For example, an ActiveX prompt is shown below.
3. Follow any of the prompts to complete the installation/upgrade of any Java, Active X, or
QuickTime components.
Accessing Total Connect
To access Total Connect, visit the following link:
https://services.alarmnet.com/TotalConnect
After the page loads, create a desktop shortcut by positioning the cursor over the address icon, left click
the mouse and drag it onto the desktop.
4
Page 7
Total Connect User Guide
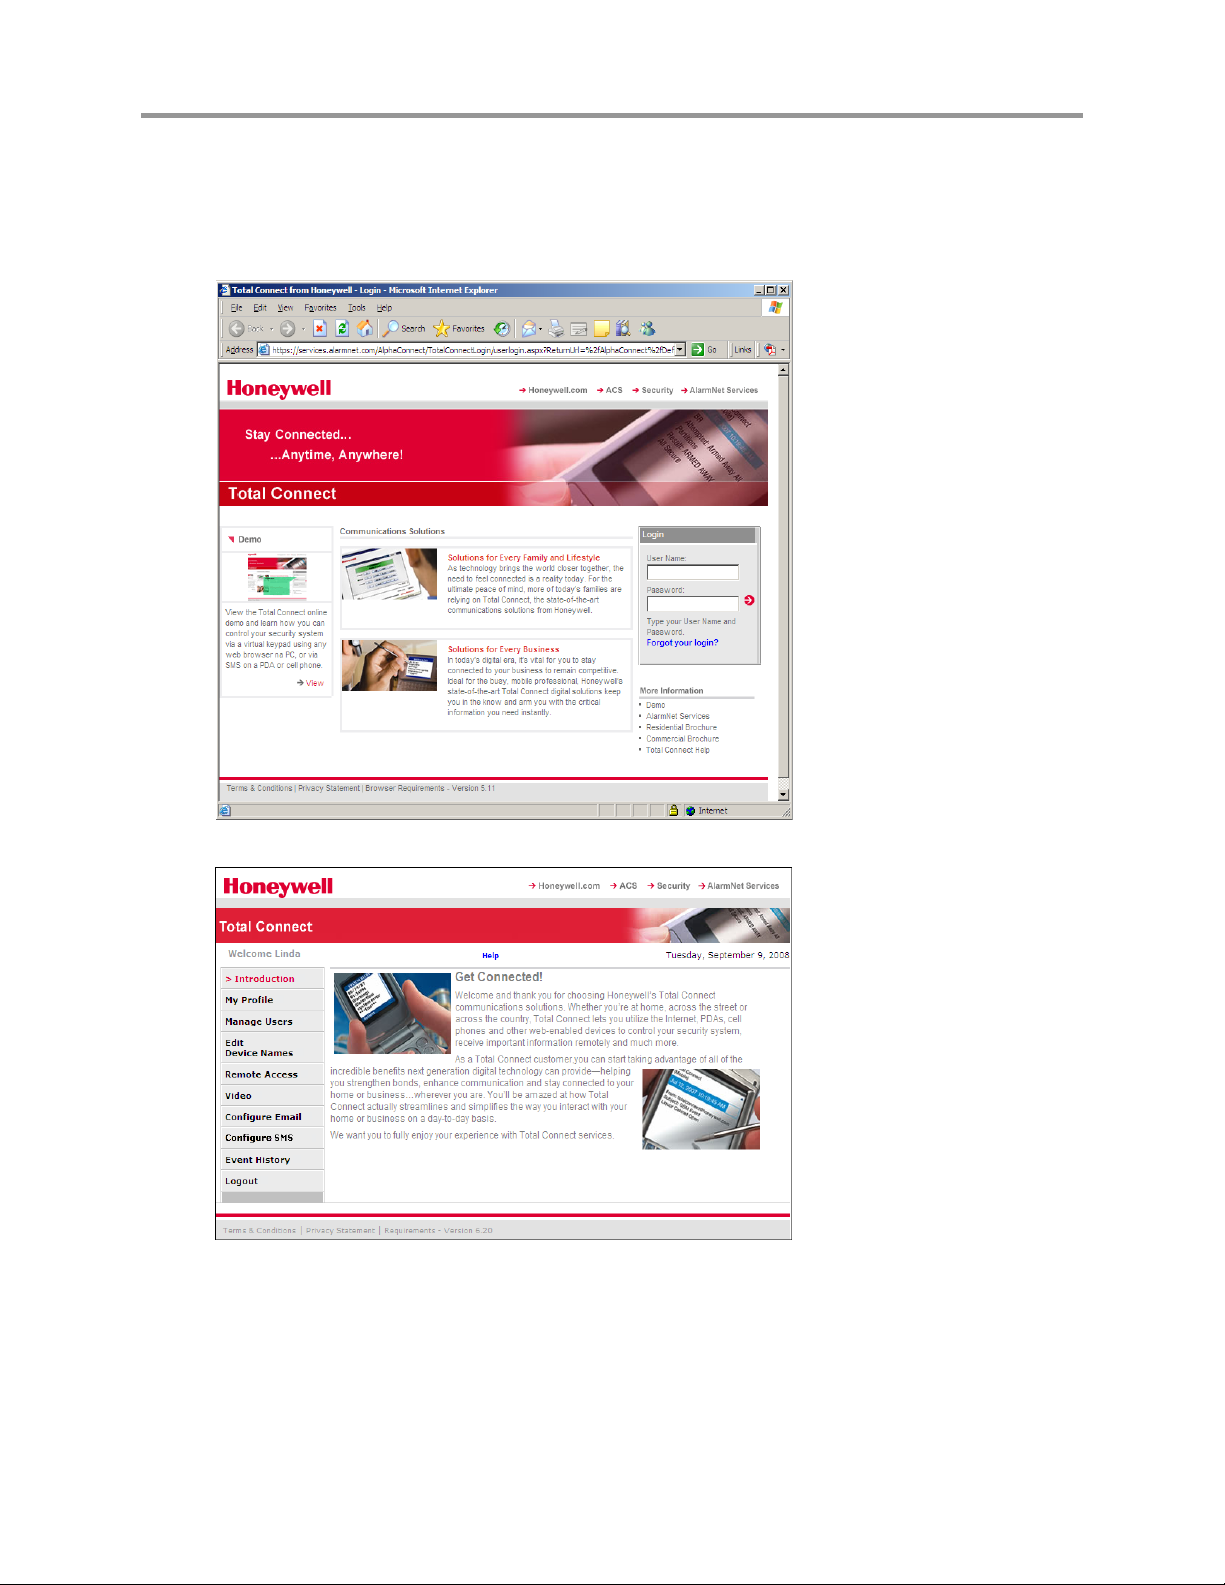
Using Total Connect
Navigate to the Total Connect home page using either the desktop shortcut (created in the last
paragraph) or by typing the address into the browser's address field. The Total Connect Login page
appears.
Enter your User Name and Password, then press Enter. The "Welcome" window appears.
Total Connect is easy to navigate. The layout consists of a navigation bar on the left, and an information
window on the right.
By clicking on a category in the Navigation bar, the associated information window is displayed. (Note
the selected category in the Navigation bar will be in RED.) From the information window you can view,
edit, add, or delete information.
The following paragraphs will explore the various Total Connect categories.
5
Page 8
Total Connect User Guide
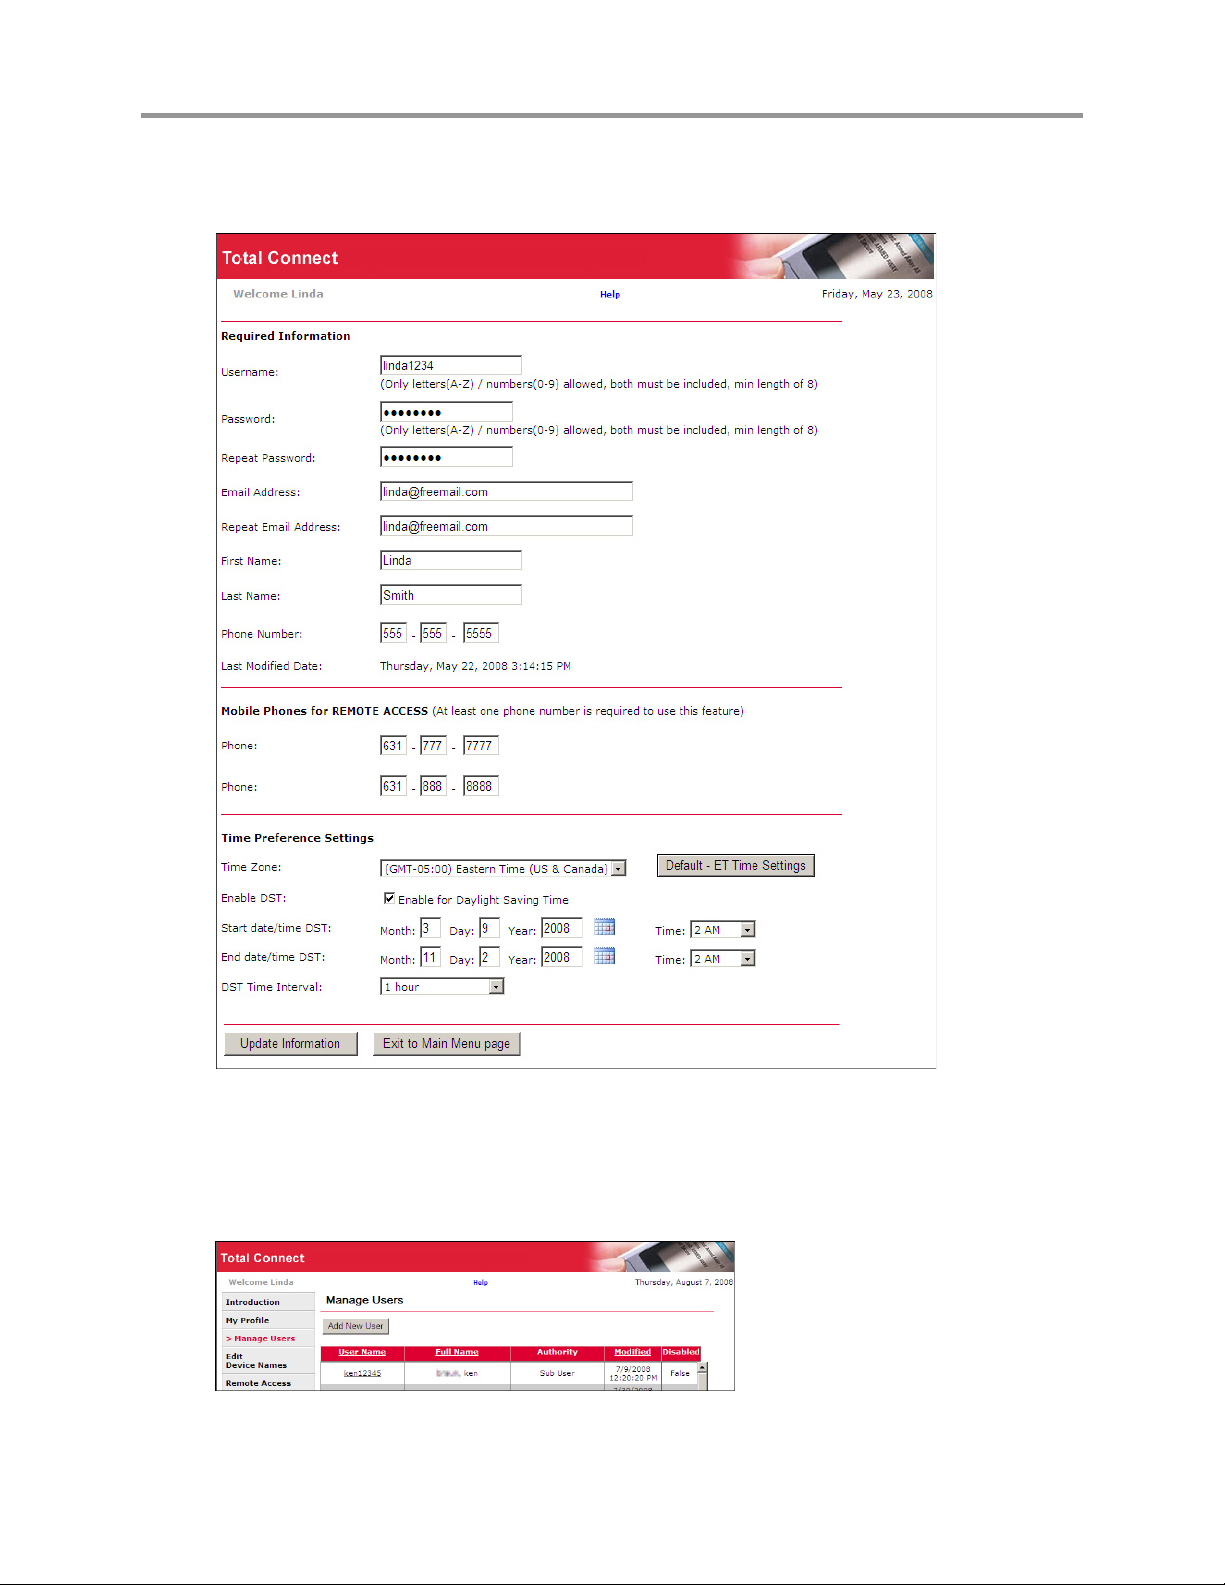
My Profile
This category enables you to edit your profile. You can change your password, email address, phone
number, and enter your mobile device phone numbers for use with SMS and mobile control.
Edit your profile and click Update Information, or click Exit to Main Menu page if no changes are made.
Manage Users
This category enables you to provide others access to your Total Connect account. This is very useful for
adding company or family members that require access. Note, that you can edit an existing user by
clicking their User Name and editing their profile. To add a new user, click Add New User.
A new user profile form appears. Enter the required information, then click Add User. Click OK to
acknowledge the confirmation message and additional fields will appear on the form.
6
Page 9
Total Connect User Guide
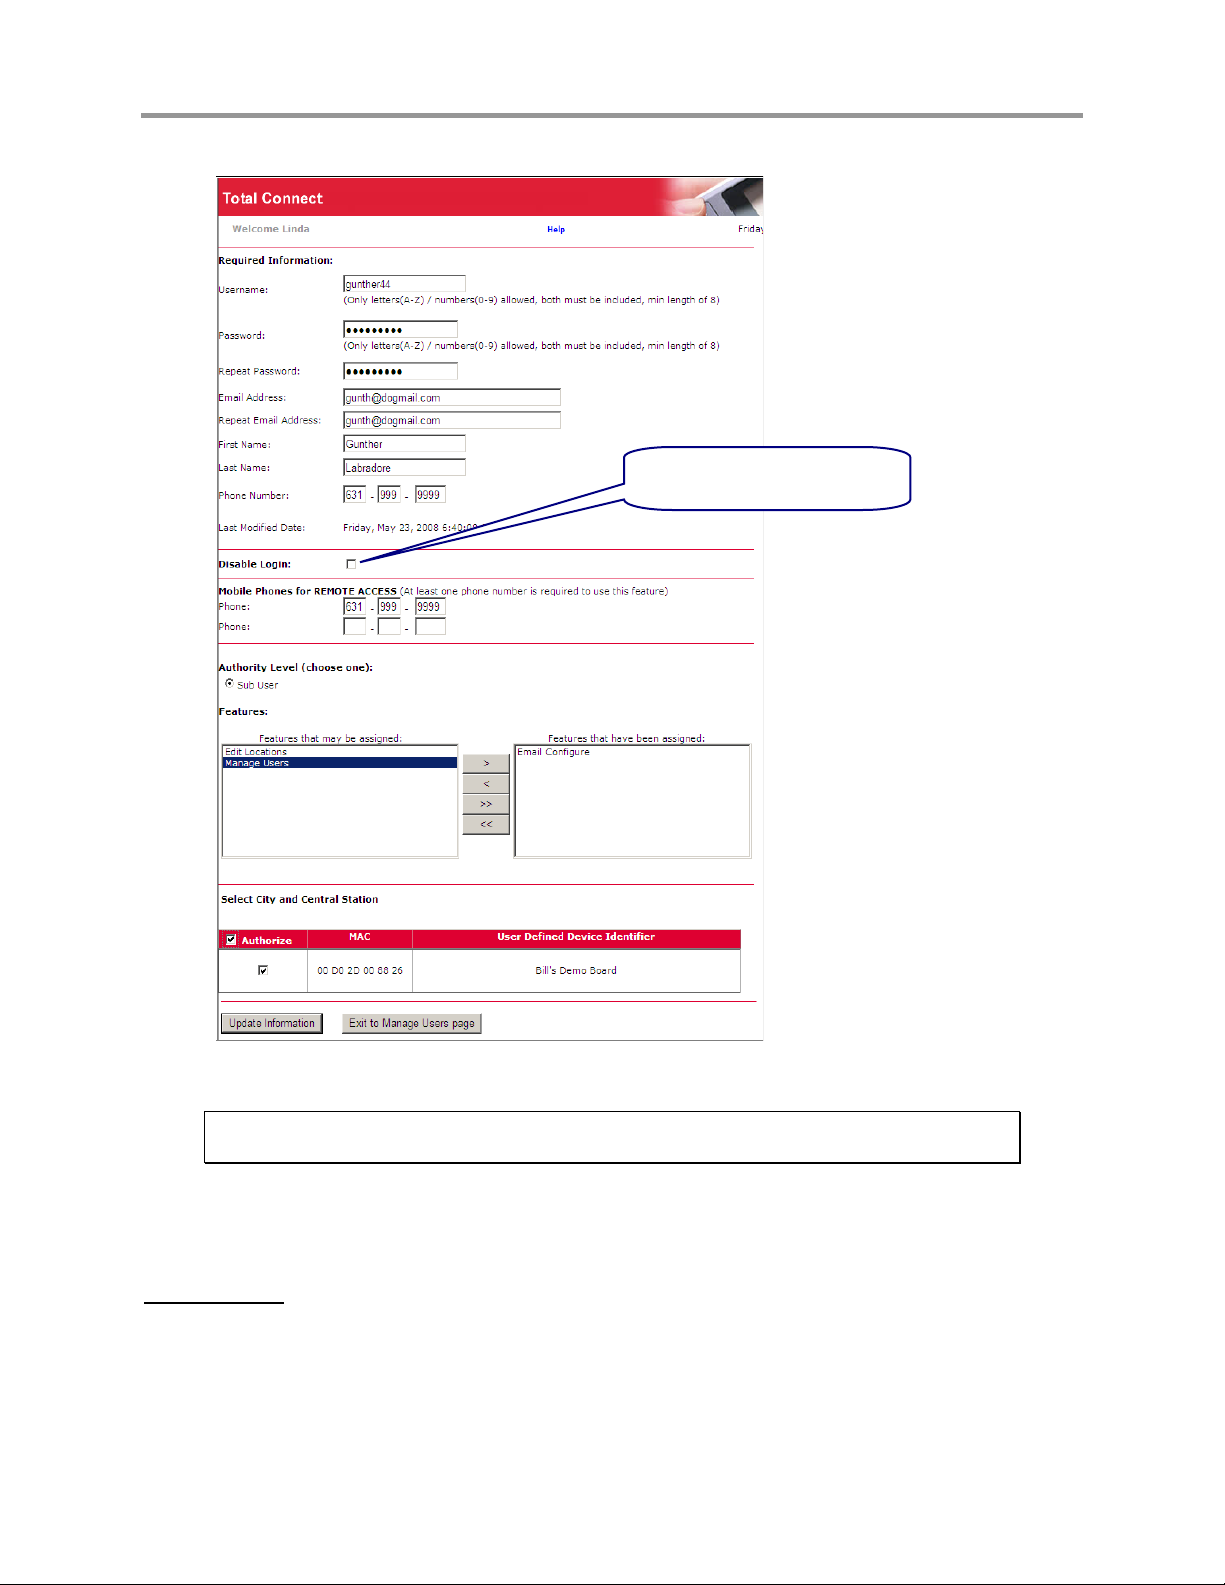
Note: In order to control the security system the user must have a system user code.
Check this box to deny access
to Total Connect for this user.
If desired enter at least one phone number for remote access, then select the Authority Level and
Features.
IMPORTANT: Please understand that if a Sub User is assigned the "Manage Users"
feature, that Sub User can then assign features to other Sub Users.
Check the Authorize box to assign the security system to the sub user.
When you have completed the form, click Update Information. A confirmation message appears. Click
OK, then click Exit to Manage Users page. You can add more users in the same manner.
Deleting Users
Users can only be deleted by the dealer. When a remote service account is deleted by the dealer, that
account and all subordinate users are deleted. However, sub users may be denied remote services
access by going to Manage Users, selecting the user and checking the Disable Login box. Then click
the Update information button.
7
Page 10
Total Connect User Guide
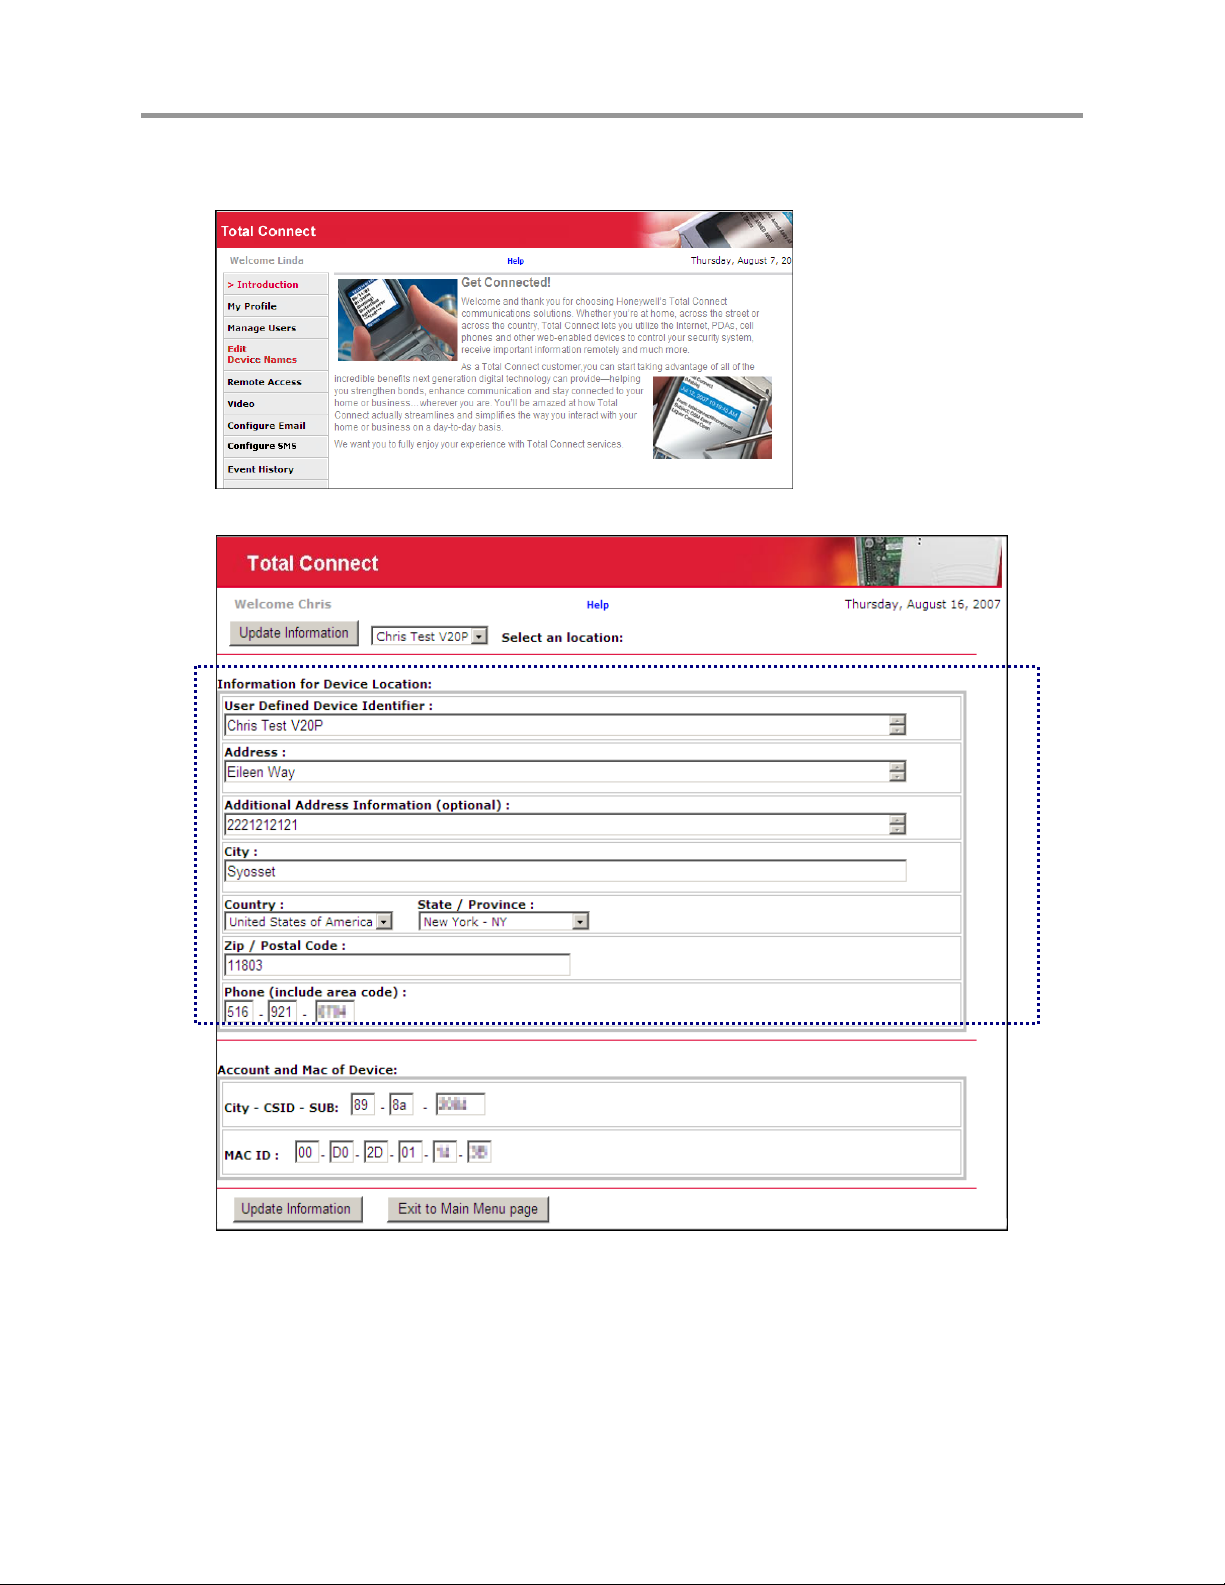
Edit Device Names
This category enables you to edit device alias and address information in the database.
Edit the desired information.
You can edit the information in this box.
If you have multiple locations, use the drop-down menu then for each location edit the device information
for that site.
Click Update Information, then click OK to the first confirmation message. A device has been updated
message appears, click OK, then click Exit to Main Menu page.
8
Page 11
Total Connect User Guide
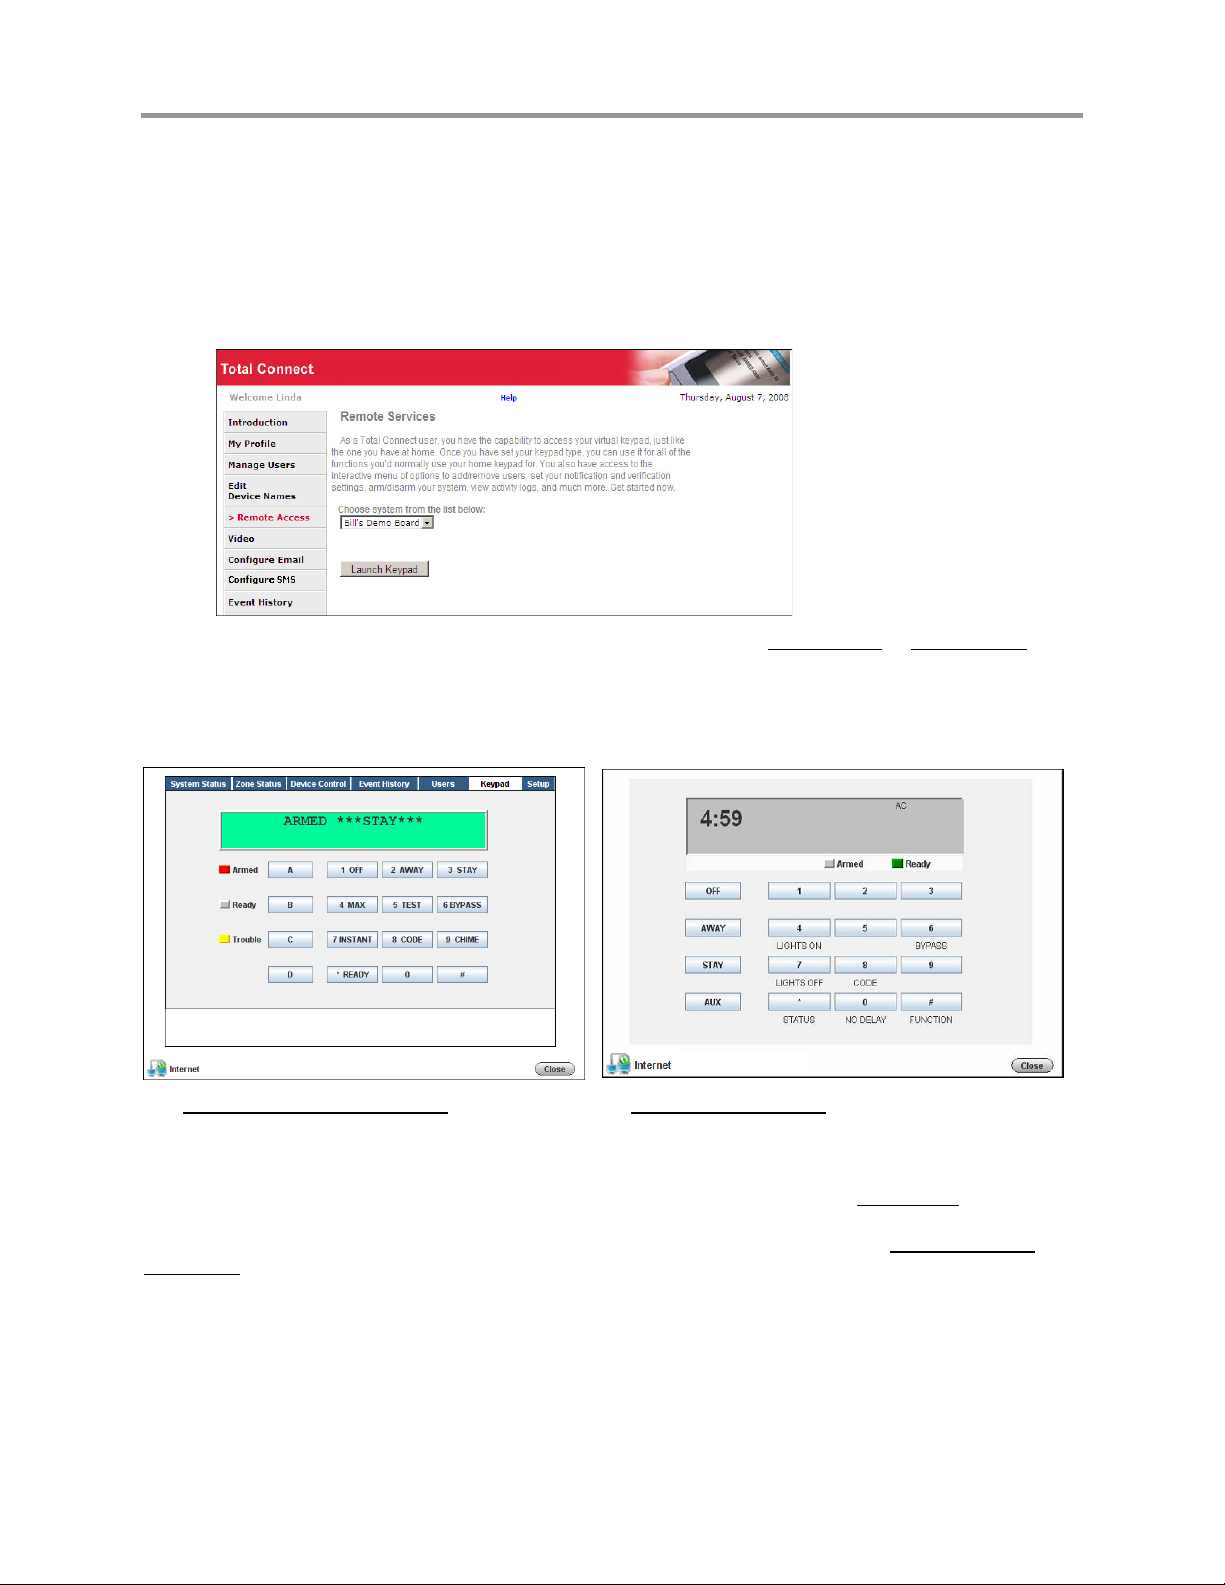
Remote Access
This category enables you to access and control your security system using an emulated keypad, or if the
security system's control panel is programmed for an AUI (Advanced User Interface) remote keypad, you
will have access to an enhanced keypad with tabs.
To access your security system, select the name of the system using the drop-down menu. Then click
Launch Keypad. (If Java needs to be installed or updated on your PC, you will be prompted to install it.
Just follow the on-screen prompts.)
If your remote access account has been configured by the dealer as a Keypad Only
keypad with NO tabs will appear. With any remote keypad, functions are performed in the same manner
as on a local keypad, however you CANNOT initiate panics. (Refer to your control panel user guide for
operating the system.)
or Lynx Keypad, a
Below are examples of these keypad types:
Enhanced Keypad with tabs
Note: On the LYNX keypad, if a loss of AC power occurs at the security system the green Ready LED
becomes yellow, and the red Armed LED becomes pink. Additionally, the AUX button does not function.
However, if your remote access account has been configured by the dealer as a Full Control
will access an enhanced interface with tabbed windows. When the Launch Keypad button is clicked,
first an applet window appears. Then a security screen appears, after entering your Security System
User Code, and clicking OK you will access an enhanced interface.
Note: If a "CONNECTION LOST" message appears, close the applet screen, and click Launch Keypad
again.
Keypad with no tabs (LYNX keypad shown)
keypad, you
This screen will appear whenever you attempt to access your security system (with a Full Control
keypad type) remotely.
9
Page 12

Total Connect User Guide
After access is granted, a tabbed screen appears allowing various categories of security system
information to be viewed or controlled. Select the tab to access the desired category.
System Status
The System Status tab displays a status summary on the top half, and the bottom half allows control of
your system partitions (if applicable).
10
Page 13

Total Connect User Guide
Zone Status
The Zone Status tab provides a view of all the zones in the system, or a selected partition. Zones can be
bypassed or made active again as desired. Additionally, you can add or edit the description of a zone.
Note that if you edit an existing zone description, that description will be the description that appears for
remote access, and will not appear on the system local keypads.
Device Control
The Device Control tab displays the current status of all security system programmed relays, and enables
you to remotely turn them on or off. Note that for commercial panels, the Description column is populated
automatically. To control a device, choose the device and select On or Off as desired.
11
Page 14

Total Connect User Guide
Event History
The Event History tab enables you to view and print the event history for the system or any partition. A
drop-down "Event Types" menu enables you to filter the events to be viewed.
12
Page 15

Total Connect User Guide
Users
The Users tab enables you to manage security system user codes. This function is further divided into
Manage User Names
and Manage User Codes tabs. By selecting the Manage User Names tab, you can
view the users, and assign a personal name to each user.
For residential panels, the screen below appears with all the fields as shown. For commercial panels, the
Get Panel's User Assignments button does not appear.
Notice under "User Names", there are three columns; Num
, Panel, and Personal. The Num column
shows the user slots in the control panel. The Panel column shows the names saved in the control panel
that are associated with the users (if names were entered for graphic AUI keypad use). The Personal
column is available only for remote services, and enables you to assign a personal name or other identifying information to a user.
This does not appear
for commercial control
panels.
Residential Panels - Viewing and Assigning Personal Names:
1. Click Get Panel's User Assignments. Users that have names saved in the control panel's AUI
descriptor fields will appear (except for the Master User, user #2) and populate the "Panel"
column only.
This also checks each user slot in the panel (up to the first 40) to determine if that slot is
assigned. If the user slot is assigned, it puts an asterisk in the Num column. In the above
screen, notice that slots 8, 9, and 12 are not assigned, so no asterisk appears next to the
number.
2. In the Panel column, if there is no user name associated with a user, but the user number has an
asterisk, you may enter a name for that user here. If you want to add a NEW user, choose a
Panel column slot that is not being used (no asterisk) and enter the NEW user.
3. In the Personal column, you can assign a Personal name, or edit an existing Personal name for a
user. Just enter the desired Personal name in the field, and click the Save Users button. Note
that this only saves the information to the remote services database. It DOES NOT overwrite the
information in the control panel.
4. You can now click the Manage User Codes tab to edit new and existing user profiles.
13
Page 16

Total Connect User Guide
Commercial Panels - Assigning Personal Names:
WARNING: If there are user codes in the control panel, make sure you enter the same codes in the
database. If you enter users in slots where users already exist in the control panel, those users will be
overwritten. Adding new users depends on your knowledge of which control panel user slots are not
being used. It is preferable to add a new user locally at the control panel.
In commercial panels, the fields can only be populated manually. In the "Panel" column you should enter
the AUI descriptors that are programmed in the control panel. For convenience, you can also assign a
Personal name, or edit an existing Personal name for a user. Just enter the desired Personal name in
the field, and click the Save Users button. Note that information entered into the Personal
column is only
saved to the remote services database. It DOES NOT overwrite the information in the control panel. You
can now click the Manage User Codes tab to edit new and existing user profiles.
Managing User Codes:
To manage user codes, click the Manage User Codes tab. From this window, you can modify the
permissions of an existing user or setup permissions for a new user. This is where you can view and edit
permissions for each user.
Master – can Arm, Disarm,
Bypass zones, and add Users.
Normal – can Arm, Disarm,
and Bypass zones.
Guest – can Arm, can Disarm
only if the guest code was
used to arm.
You can retrieve the desired user by selecting the Code or Name search method. Choose the search
method by clicking the Code or Name search choices.
If you chose to search by "Code", enter the user's code in the User Code field and click Get Info by.
If you chose to search by "Name", select the name using the Panel (Personal) Names drop-down field,
then click Get Info by.
The permissions for this user are retrieved. You can now assign or change permissions and user code
for that person. After making changes, click Save User. You can also delete users by clicking Delete
User.
Note: For Commercial
control panels, if you want User #2 to be able to manage user codes, you must
first enable User #2 for global access to all partitions on that control panel.
14
Page 17

Total Connect User Guide
Keypad
The Keypad tab enables you to control the security system using an emulated keypad. Functions are
performed in the same manner as on a local keypad, however you CANNOT initiate panics. (Refer to
your control panel user guide for instructions on operating the system.) Note that you can also use the
number keys on your PC's keyboard (ensure the "Caps Lock" key is off) to perform most actions.
Setup
Note: This tab is available ONLY to a Master user that has authority to ALL partitions.
The Setup tab enables you to assign convenient familiar names to zones, partitions, and devices. It is
further divided into the following tabs.
• Panel Info – Displays the model, firmware version, and emulated keypad version for the control
panel.
• Name Zones – Enables you to assign familiar names to the zones. Edit the desired field, then
click Save Zone Names.
• Name Partitions – Enables you to assign familiar names to the partitions. Edit the desired field,
then click Save Partition Settings.
• Name Devices – Enables you to assign familiar Device Names to system devices by editing the
desired field. In addition, the "Use" column allows you to enable access and control
of individual
devices. After you have made changes, click Save Device Settings.
• Recover – Enables you to rebuild the data retrieved from the panel and saved to the remote
services database. It does not modify or affect the actual data stored in the control panel. You
must enter your user code to perform this function.
Note that when data is saved, it only saves the information to the remote services database. It DOES
NOT overwrite the information in the control panel.
15
Page 18

Total Connect User Guide
16
Page 19

Total Connect User Guide
Video
This category enables you to connect, view, and configure your Optiflex camera video. (Note, if you have
Optiflex as part of your system, and it has been added to your Total Connect account, this Video category
will appear.)
Note: Refer to the topic "Setting up your PC for connecting to Total Connect" at the
beginning of this guide for detailed information on setting up the PC for use with
Optiflex.
To connect, click the Optiflex Connect button. A separate window opens, then depending on your
browser settings you may be prompted to "display nonsecure items?", please answer Yes to this prompt.
Next your network authorization will be checked, then if you need Java, ActiveX, or QuickTime player
installed on your system, or an update to an existing version, a prompt will appear. Please install when
prompted.
Optiflex Viewing Window Functions
Link to this Guide.
Connection
status.
Link to Optiflex
tutorials.
Select Optiflex
system from dropdown menu, then
click CONNECT.
Opens a configuration window
for sending a series of camera
shots to an email address.
Closes
window.
Allows panning of
window with
multiple cameras.
Select options menu
here, or simply right click
anywhere to select.
Window may be
dragged to size.
17
Page 20

The Options Menu is described below.
Options Menu Function
(cameras)
All of your cameras will appear here with a check mark adjacent to the selected
ones. These selections can be toggled.
Preset Size
Enables you to select from four preselected camera window sizes. Alternately,
you can drag any camera window to size.
Playback
Opens a Playback window to enable playing back any of 19 video clips. Up to 19
video clips are cached in the Optiflex hardware. As new clips are added, the
oldest of 19 clips (unless locked) is automatically deleted.
Total Connect User Guide
Normally your system will automatically trigger the capture of video clips based on
events or motion detection. And if your system is equipped with an 8132 keypad,
the triggered camera will automatically be displayed at the keypad.
However you can also manually capture a video clip from Total Connect by right
clicking on the Optiflex Viewing Window and from the options menu, selecting
18
Page 21

Options Menu Function
Record Clip and choosing the camera. A video clip is then stored in the Optiflex
hardware cache. (A video clip may contain up to 10 frames depending on its
visual complexity.)
Save Cache
Archive
Remote
Prev/Play/Next
Show Frames/Hide Frames – Opens a multi-frame window showing the
Speed
Lock
Archive
Delete
Refresh
Total Connect User Guide
When selected it copies all the video clips
(up to 19) that are
in the Optiflex hardware cache, and stores them on your PC
as .DAT files.
XP path is C:\Documents and Settings\<user name>\Local
Settings\Temp\
VISTA path is C:\Users\<user name>\App Data\Local\Temp\
When selected brings up a list of archived files that are
stored on your PC. These clips can be selected and played.
When selected enables access to the video clips stored in
the Optiflex hardware cache.
These clips can be selected and played.
The Prev and Next buttons allow easy selection of video
clips. When the Play button is activated, the video clip will
play, and the Play button toggles to a Stop function.
individual frames
within the video clip.
(A video clip may
contain up to 10
frames depending
on its visual complexity.)
Individual frames
can be selected and
saved to your hard
drive by clicking the
Save Image button.
Adjusts the playback speed for the video clip.
By locking a video clip it remains in the Optiflex hardware
cache until deleted. Select the video clip, and click Lock.
Note, that video clips cannot be unlocked, however they can
be deleted. The locked flag also marks that clip as being
important and remains with the clip if archived.
Allows saving one or more selected video clips to your PC.
Select one or more files then click Archive. The video clips
will be stored on your PC.
Enables selecting one or more video clips from the archive to
delete. Select, then click Delete. The video clips are deleted
from your PC.
Click to refresh the video clip listing.
19
Page 22

Options Menu Function
Archive
Total Connect User Guide
When a new video clip is captured it
is stored on the AlarmNet web
server and appears in this listing,
and it appears in the Playback >
Remote listing.
Video clips in this listing may be
moved or copied from the AlarmNet
web server to your PC.
Up to 100 video clips can be stored
on the AlarmNet web server.
Record Clip
Refresh List
Select All Clips
Move
Click to refresh the listing.
Easy method to select all clips.
Moves a selected clip from the AlarmNet web server to the
Playback Archive on your PC. (Clip is deleted from the Web
Service.)
Copy
Copies a selected clip from the AlarmNet web server to the
Playback Archive on your PC.
Delete
Cancel
Deletes a selected clip from the AlarmNet web server.
Exits the Archive window.
Normally your system will automatically trigger the capture of video clips based on
events or motion detection. And if your system is equipped with an 8132 keypad,
the triggered camera will automatically be displayed at the keypad.
However you can also manually capture a video clip
from Total Connect by right clicking on the Optiflex
Viewing Window and from the options menu,
selecting Record Clip and choosing the camera. A
video clip is then stored in the Optiflex hardware
cache.
(A video clip may contain up to 10 frames depending
on its visual complexity.)
20
Page 23

Options Menu Function
Setup > Video
Enables setting of preferences for each camera.
Total Connect User Guide
This area enables setting
options for each particular
camera.
Select the camera using the
Cam # drop-down list. Then
set your preferences.
Click OK to save your
preferences.
If you have a NTSC monitor
attached to your Optiflex
hardware, this area enables
you to choose what will be
displayed on that monitor.
Cam # Drop-down selection for the camera to be setup.
Enabled Used to enable or disable a camera.
Display Date and
Used to overlay the date and time on the camera window.
Time
Enable Automatic
Recording
Record from time to
time
Check this box to enable recording video clips from this
camera.
Enables specifying the number of frames prior to the Record
Clip command that is captured for the video clip. A range of
up to 9 frames prior to the Record Clip
command can be
captured. (A video clip may contain up to 10 frames
depending on its visual complexity.)
Camera Label Allows an identification label to be applied to a camera.
Label Position Determines where on the camera window the information
overlay will appear. This information includes the camera
label, date, and time.
Auto Video Switch Check this box if your system is equipped with an 8132
keypad, the triggered camera will automatically be displayed
at the keypad.
All-View / or
1, 2, 3, 4, 5, 6
Camera Dwelling
Time
Enables all cameras to be displayed on the NTSC monitor,
or just a particular camera.
Enables choosing a 2 or 4-second dwell time on the NTSC
monitor for each camera included in the tour.
Tour Setup Enables including all cameras or just the first 4 cameras on
the video tour displayed on the NTSC monitor.
Set Time Zone Sets the GMT time offset for your time zone. Example;
Eastern Standard time has an offset
of – 5 as shown below.
Eastern = – 5 Mountain = – 7
Central = – 6 Pacific = – 8
OK Saves settings and closes window.
Cancel Closes window without saving the settings.
21
Page 24

Options Menu Function
Setup > System
Enables viewing hardware, software, and network details.
(viewing pane)
Get New Enables retrieving an upgrade for your Optiflex software.
Reset Resets the Optiflex system.
Clean Cache Clears cached data in the Optiflex hardware cache.
Done Closes the System window.
Playlist Details
Total Connect User Guide
Displays network, and Optiflex hardware and software
information about your system.
Includes additional information in the on the cameras
used with your Optiflex system.
Playlist information without the "Playlist Details" box checked.
Refresh playback
list automatically
Playlist information with the "Playlist Details" box checked.
Sets the video clip listing in the Playback window to
update automatically.
22
Page 25

Options Menu Function
Stream
Select the desired camera window, then select Stream, to open up a QuickTime
player window that provides higher resolution and smoother video.
This is useful for detailed monitoring of one camera but uses more bandwidth.
Total Connect User Guide
Select desired
camera to stream.
Enables increasing or
decreasing the size of the
streaming video window.
Preferences
This option enables you to balance your streaming bandwidth and image quality. It
affects all cameras. Select your preference, then click OK.
23
Page 26

Total Connect User Guide
Using the Email Archive feature
The EMAIL / ACHIVE button opens a
configuration window that lets you set up
the email recipients that can receive a
series of camera snapshots. Additional
options enable selecting the desired
cameras, and automatic scheduling of
captures and email notification.
After configuration, this feature enables you to send a series of camera shots via email when the Record
Clip command is invoked.
Note: As you hover over each column heading, a tool tip appears that explains what the
option is used for.
After the configuration settings are chosen, click Save.
24
Page 27

Total Connect User Guide
Configure Email
This category enables you to view which security system events are configured to be reportable via email
or text messaging. When any of these events become active, Total Connect notifies you by email and/or
text messages.
• The Enabled
• The Event Text
• The Normal State
column allows you to select which events you want reported.
column enables you to enter some descriptive text for the event.
column enables you to enter some descriptive text that will be used for
notification of this state. Note, if no text is entered in this field but there is text in the Event Text
field, notifications WILL NOT be sent.
• The Activated State
column enables you to enter some descriptive text that will be used for
notification of this state. Note, if no descriptive text is entered in this field, a generic notification
WILL be sent informing you the event is active.
Up to eight events can be reported, depending on your system configuration.
You may also send email
notifications to text message
destinations.
See your carrier for more
information.
The Mailing List section of this screen enables you to assign up to six email addresses to be notified of
these events.
The Email Subject field allows you to create a meaningful subject line for the email notifications.
25
Page 28

Total Connect User Guide
Configure SMS
This category allows you to assign which mobile communication devices (cell phones and PDAs) you can
use to send system commands and receive confirmation replies. These must be devices that support text
messaging via SMS (Short Message Service) along with short codes. If you do not know whether your
device supports short codes, please contact your wireless carrier.
1. If you have not been entered in the
Configure SMS category of Total
Connect, a Terms And Conditions
agreement will pop up. Read the
Terms and Conditions and check the
Accept Terms and Conditions box.
Then click the Save Terms and
Conditions button. This will authorize
the service for your account.
2. Next the Configure SMS screen can be accessed.
3. Ensure a SMS System Abbreviation Name is assigned to the device. If no abbreviation has
been assigned, you can add one now. Under the SMS System Abbr Name column, assign a
short SMS System Abbreviation
identification of a particular system. In the example above, the system abbreviation BO was
assigned.
Note: The SMS System Abbreviation
to each device. The system abbreviation allows for simple
is required for sending text messages to control the system.
26
Page 29

Total Connect User Guide
4. Under Grant SMS Access, for each user phone, check the corresponding box if you want SMS
control. (The phone numbers displayed are those that were entered in the "My Profile" section.)
5. Click Save.
Event History
This category displays a history of email events, user SMS requests, and actions that have occurred.
Logout
Used to exit the Total Connect site.
27
Page 30

Total Connect User Guide
Controlling your system using Text Messages
By using a wireless communications device that supports Text Messaging (SMS) with short codes, you
can send text message commands to control your security system. This must be done from one of the
devices that was granted SMS access. Refer to the "Configure Mobile" topic in this document.
Notes:
• You cannot control the security system using SMS text messages while a "Remote Access"
session is being conducted.
• SMS command service will work properly only after a prior remote connection has been made
successfully via the java applet in Total Connect. In addition, any changes to the control panel
configuration may result in the SMS service not working properly. It is important to make sure
each time the panel configuration is modified (even if changing the keypad home’s partition) that
a successful java applet Total Connection session is executed prior to exercising SMS service.
• For LYNX panels, the zone number will not appear in an SMS reply message.
• For control panels that use a GPRS only communications device, you must wait 2-3 minutes
between sending SMS messages to allow the communications device time to reset.
Text message commands are sent to the short code "alarm" followed by the text message. You can
create the text message using the following method:
28
Page 31

Total Connect User Guide
1. From your wireless device, generate a Text Message to be sent to the short code “alarm.”
2. Using the following Text Message Format, compose the Text Message.
Used as a field delimiter.
system
abbreviation
This name must
match the “SMS
system abbreviation”
assigned to the
security system.
Sample Text Message to your security system in the New York City Office to bypass zone 4:
command 4-digit user code
space
space
Up to two alpha
characters:
a = Arm Away
as = Arm Stay
b = Bypass Zone
d = Disarm
o = Output device
s = Status Request
This is your
security system
user code.
space
optional
field
space
Optional Field used for either:
Zone # (3 digits; xxx, add leading zeros
as necessary)
Partition # (as 1 digit; x)
Output Device # (as 2 digits; xx, add
leading zeros as necessary)
optional
device
command
Used ONLY when using the
“O” command.
on = turn on device
off = turn off device
nyc b 1234 004
Sample Text Message to your security system in the New York City Office to arm away partition 3:
nyc a 1234 3
Sample Text Message to your security system in the New York City Office to turn on programmed output device 3:
nyc o 1234 03 on
Sample Text Message to your security system in the New York City Office to retrieve the status of partition 2:
nyc s 1234 2
3. Send the Text Message.
4. Confirmation reply is received informing you of the command results.
29
Page 32

Total Connect User Guide
Below are the text message command field definitions and their format.
[system abbreviation]
[command] = a, as, b, d, o, or s (See table below.)
cccc = user code
p = optional partition number (Not necessary for a single partition system.)
xxx = zone (Add leading zeros as necessary to obtain 3 digits.)
xx = output to be controlled (Add leading zeros as necessary to obtain 2 digits.)
A typical reply to a text message command would contain the attempted command
date and time stamp
.
Command and Text Message Format Text Message Reply
Arm system Away
[system abbreviation] a cccc p
Arm System Stay
[system abbreviation] as cccc p
Bypass Zone
[system abbreviation] b cccc xxx
Bypass Zone (with optional partition number)
[system abbreviation] b cccc xxx p
(The use of the optional partition number
allows zones to be bypassed in partitions
other than the home partition.)
Disarm system
[system abbreviation] d cccc p
Turn programmed output on (or off)
[system abbreviation] o cccc xx on / off
Status Request
[system abbreviation] s cccc
If successful, you will receive an Armed Away
is time and date stamped.
If successful, you will receive an Armed Stay
time and date stamped.
If successful, you will receive an Zone Bypassed
that is time and date stamped, along with general system status.
If successful, you will receive an Zone Bypassed
that is time and date stamped, along with general system status.
If successful, you will receive an Disarmed
time and date stamped.
Will receive a General Panel
your user code authority. This message is time and date stamped.
The current System Status
Arming state, disarmed state, and troubles.
status message that is in relation to
message will be received. This includes;
, the results, and a
status message that
status message that is
status message
status message
status message that is
30
Page 33

Total Connect User Guide
Command and Text Message Format Text Message Reply
Help
help, h, info, ?, i
For a registered phone
message Command Key and Format information. Additionally you
will receive web site and email contact information, and information
on how to opt-out of remote services. Typical information is shown
below:
SMS Remote Control Service, Powered By Honeywell
Inc.
KEY
a=System Abbreviation
p=optional partition#
cccc=user code
For details log into you account at CMD
a A cccc p=Arm Away
a AS cccc p=Arm Stay
a B cccc xxx=Bypass zone xxx
a D cccc p=Disarm
a O cccc xx On/Off=Turn output xx on or off
a S cccc=Get Status
https://services.alarmnet.com/totalconnect
, you will receive messages containing text
For further details contact your alarm dealer.
Text the word STOP to opt-out.
For an unregistered phone, you will receive a message containing
web site and email contact information.
stop, quit cancel, unsubscribe, terminate,
end
You will receive this message:
SMS Remote Control Service, Powered By
Honeywell Inc. for this cell phone has been
terminated.
https://services.alarmnet.com/totalconnect
For further details contact your alarm
dealer.
Contacting Technical Support
Before you contact Technical Support, be sure you:
• Referred to the online help!
• Entered all data correctly and did not enter the letter O for the number zero.
• Note your customer account number.
Please have this information handy and contact your security system dealer.
31
Page 34

ÊK147414Š
K14741 12/08 Rev. B
2 Corporate Center Drive, Suite 100
P.O. Box 9040
Melville, NY 11747
©
Copyright
2008 Honeywell International Inc.
www.honeywell.com/security
 Loading...