

Page 1
T7525/T7526 Thermostat Touchpad
User Guide
Total H me
RC24
®
PERFECT
CLIMATE
Copyright © 1995 Honeywell Inc. • All Rights Reserved
69-0860-1
Page 2

T7525/T7526 THERMOSTAT TOUCHPAD
69-0860—1
Page 3

T7525/T7526 THERMOSTAT TOUCHPAD
CONTENTS
What You Can Do
Using the Touchpad ........................................................................................................................... 1
Touchpad Screens ........................................................................................................................... 1
Temperature Control Functions ........................................................................................................................... 3
Temporarily Change the Setpoint Temperature Using
T7525A/T7526A Thermostat Touchpads (Manual Changeover) ..................... 3
Temporarily Change the Setpoint Temperature Using
T7525C/T7526C Thermostat Touchpads (Auto Changeover)......................... 4
Hold the Temperature ......................................................................................... 5
Cancel the Temperature Hold ............................................................................. 5
Change the Program Setpoint Temperatures...................................................... 6
Change the Time a Period Starts........................................................................ 7
Change the Operating Mode of Heating/Cooling Equipment ............................... 8
Change the Operating Mode of Ventilation Equipment........................................ 9
Change the Time and Day.................................................................................. 10
i
69-0860—1
Page 4

T7525/T7526 THERMOSTAT TOUCHPAD
69-0860—1
Page 5
TOUCHPAD SCREENS
T7525/T7526 THERMOSTAT TOUCHPAD
WHAT YOU CAN DO USING THE TOUCHPAD
Using the T7525/T7526 Thermostat Touchpad, you can easily adjust your energy
management heating/cooling system to keep your home comfortable, and at the same
time, conserve energy and lower your utility bills. Do this by using the following Easy-to
use™ functions programmed into the Touchpad:
• Hold Temperature—you can maintain a temperature until you manually cancel it.
• Settings and Schedules—you can:
— Change the setpoint temperature.
— Change the daily schedules.
• Heat/Cool Equipment—you can:
— Switch the system to HEAT, COOL, or OFF.
— Switch the fan to ON or AUTO.
•Ventilation—you can switch the fan to ON or AUTO.
• Present Time/Day—you can change the time and day.
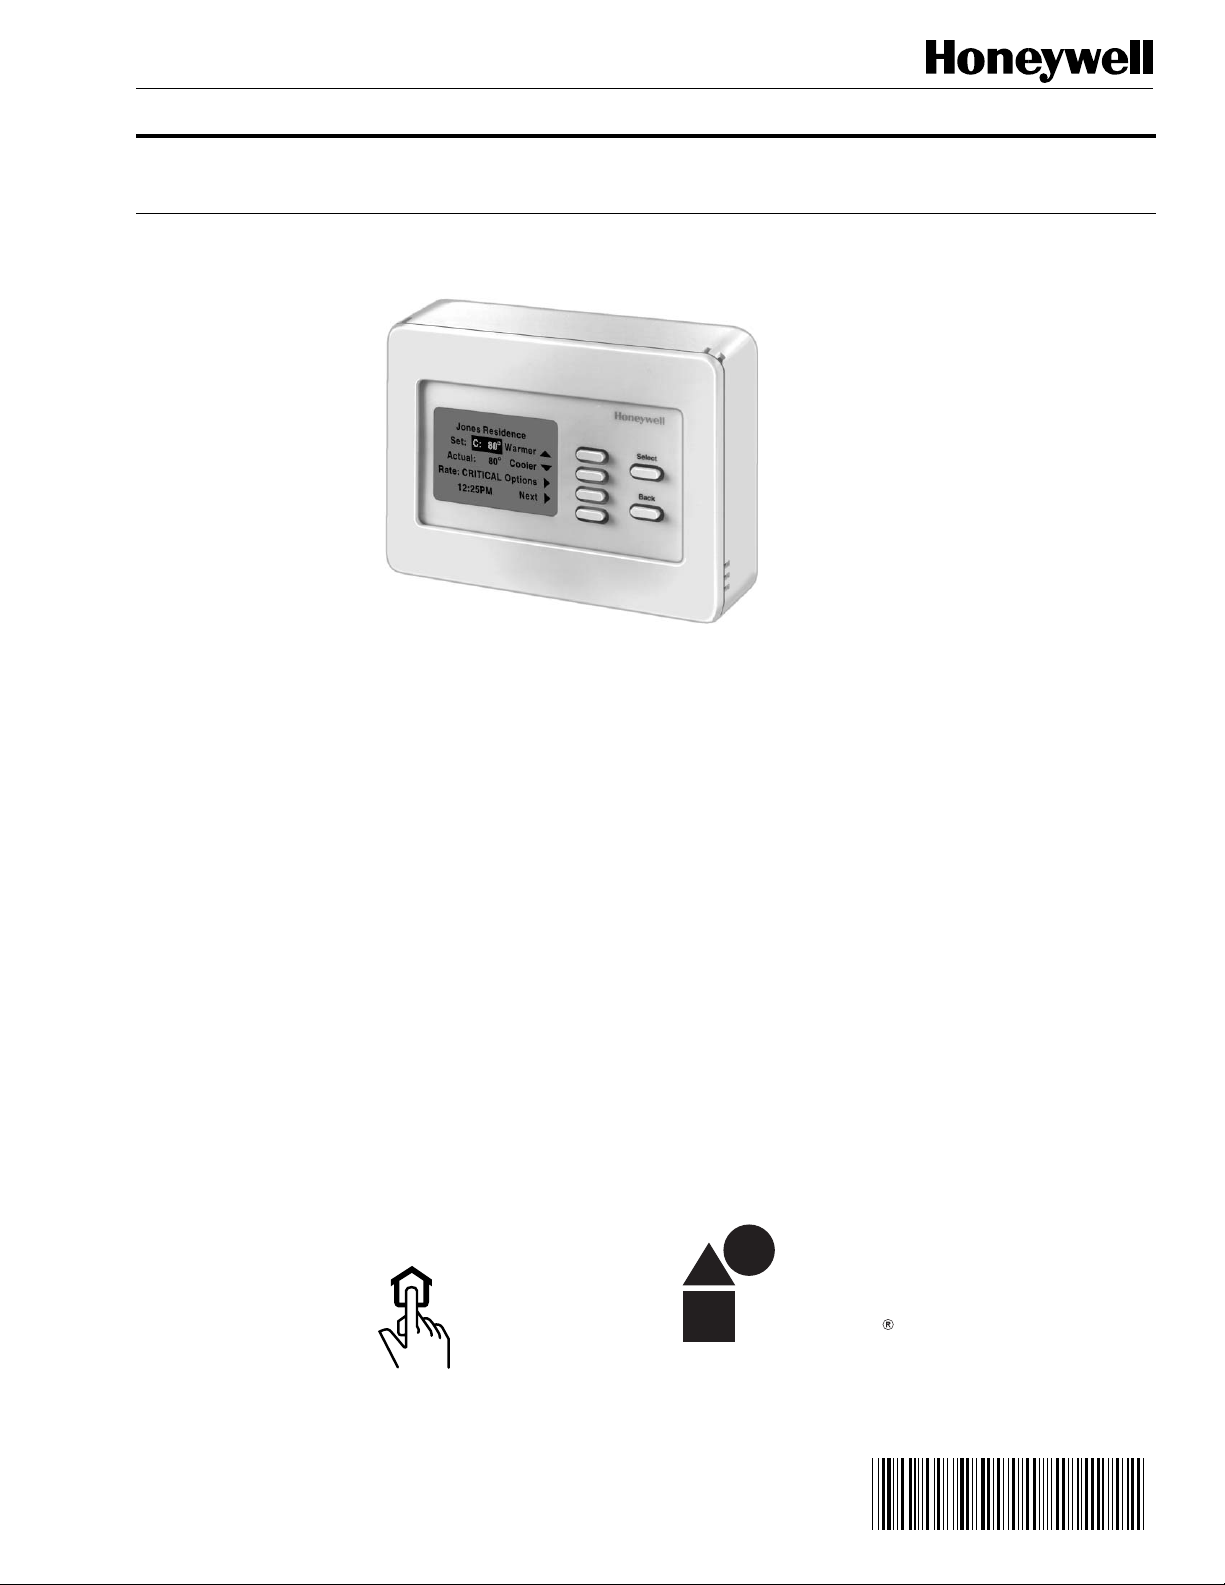
TOUCHPAD SCREENS
o
Set: C: 80
Actual: 80
Rate: NORMAL
12:25PM Mon
o
SOFT KEYS
Options
Hold Temperature
C = COOLING SETPOINT
H = HEATING SETPOINT
Warmer
Cooler
Options
Next
More
TEXT DETERMINED
BY UTILITY
Select
Back
UTILITY OPTIONS LINES
Select
Back
M4467
M4468
The Base screen displays automatically after two minutes of inactivity at the Touchpad.
Backlighting is activated by pressing any key on the Touchpad. See the Backlighting
section for more information on backlighting.
Other screens display depending on which keys are pressed (Select, Back, or soft
keys).
The Touchpad will notify you when certain faults occur in your heating and cooling
system through messages displayed on the first line of the screen. Once the fault is
corrected, the fault message is automatically removed and the programmed text is
restored on the first line of the screen.
If the Touchpad is connected to a gateway utility, programmed utility options are
displayed on the top two lines of the first Options menu.
1
69-0860—1
Page 6

T7525/T7526 THERMOSTAT TOUCHPAD
69-0860—1
2
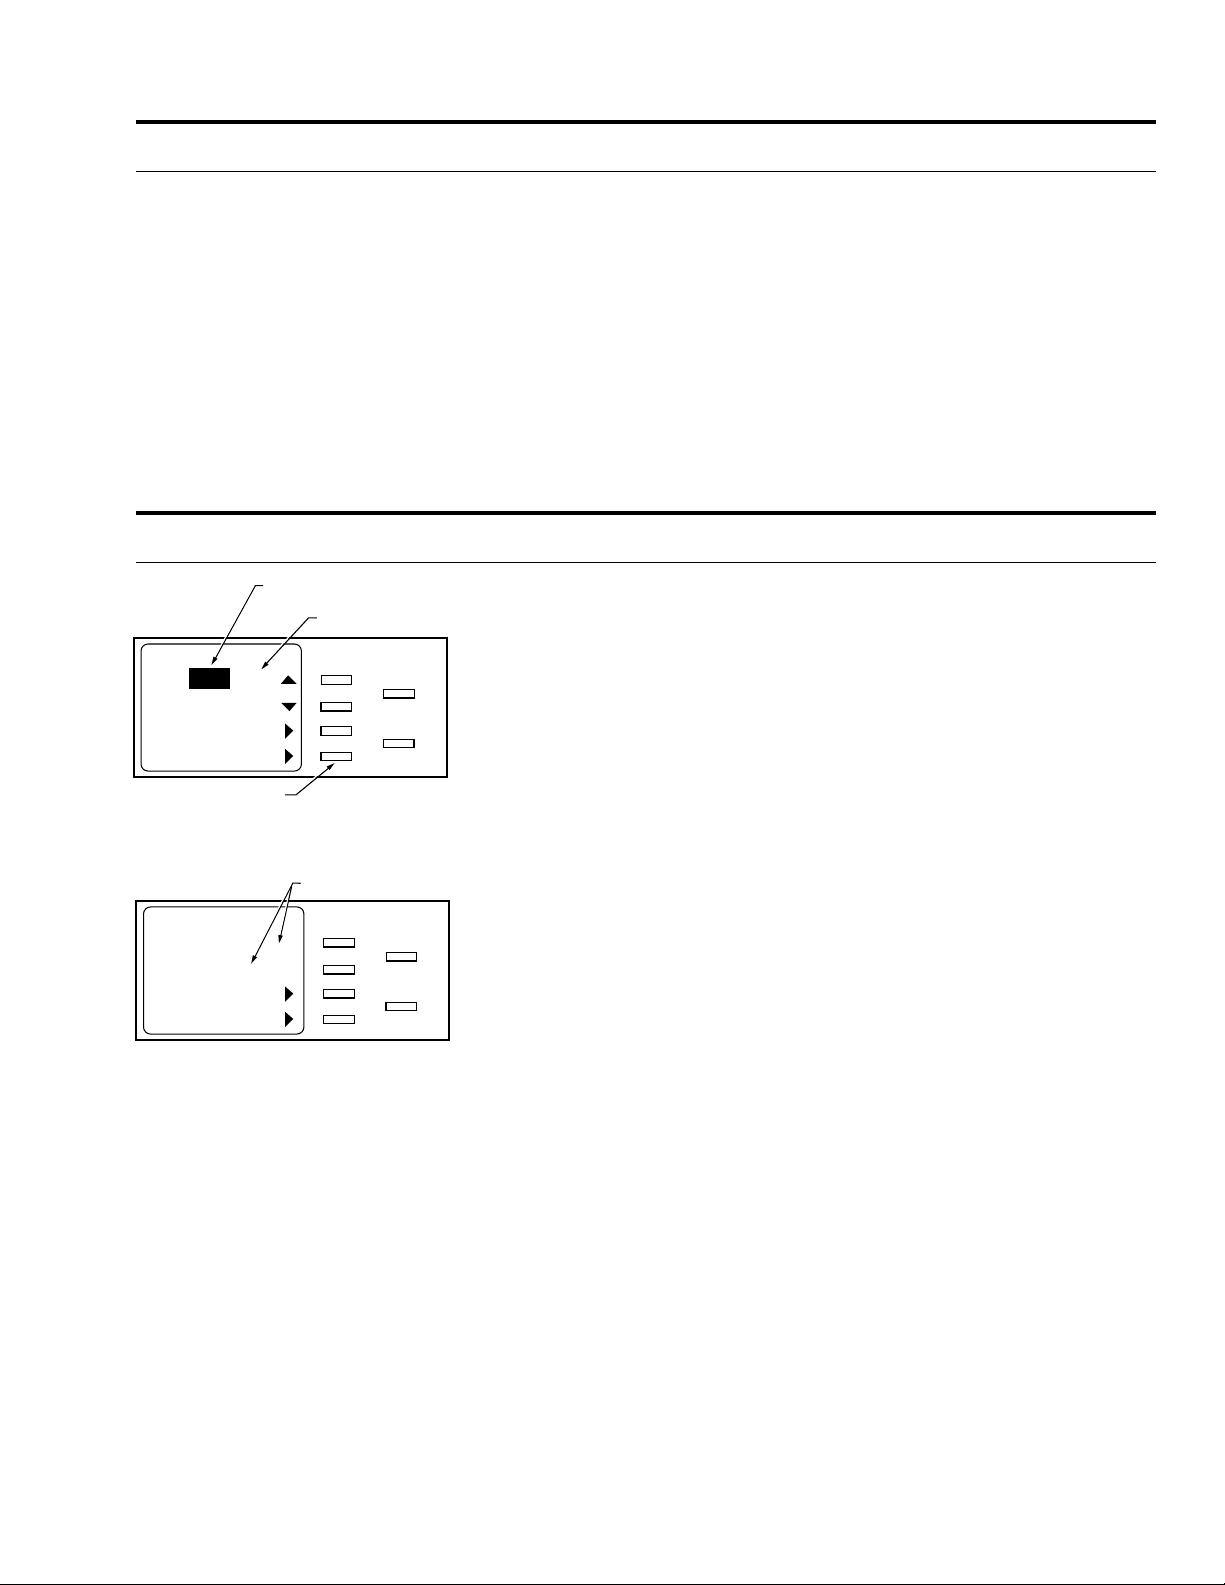
Page 7

USING THE TOUCHPAD
T7525/T7526 THERMOSTAT TOUCHPAD
TEMPERATURE CONTROL FUNCTIONS
Temporarily Change the Setpoint Temperature
Using T7525A/T7526A Thermostat Touchpads (Manual Changeover)
Base Screen
o
Set: C: 80
Actual: 80
Rate: NORMAL
12:25PM Mon
Warmer
o
Cooler
Options
Next
First Options Menu
Options
Hold Temperature
More
Second Options Menu
Options
Run Schedule
Climate Control
Present Time/Day
More
Step 1
Select
Back
Step 2
Select
Back
Step 2
Select
Back
M8625A
M8626A
M8627A
You can temporarily change (override) the setpoint temperature. Follow these steps:
NOTE: To terminate this procedure, press the Back key within one minute. Screen
displays the Base screen.
1. From the Base screen, repeatedly press the Warmer or Cooler soft key until the
desired setpoint temperature displays. The setpoint temperature range is 45° to
88°F (7° to 31°C).
2. To accept the change, press Select. If you press the Options or Next soft key or
do not press a key for one minute, the change will also be accepted. The screen
displays the Base screen. The screen displays the actual temperature and the
heating/cooling setpoint.
NOTE: To accept the temporary setpoint change and perform another function,
press the Options soft key. Screen displays the first Options menu. The
new temperature setting remains in effect until the next scheduled period
or, if so configured, when the unit price rate changes.
The new temperature setting remains in effect until the next scheduled period or, if
so configured, when the utility price rate changes.
The temporary change can be canceled and the system returned to the original
setpoint temperature by pressing the Run Schedule soft key in the second
Options menu.
3
69-0860—1
Page 8

T7525/T7526 THERMOSTAT TOUCHPAD
Temporarily Change the Setpoint Temperature
Using T7525C/T7526C Thermostat Touchpads (Auto Changeover)
USING THE TOUCHPAD
Base Screen with a Change Heat
o
Set: C: 80
Actual: 80
Rate: NORMAL
12:25PM Mon
Warmer
o
Cooler
Options
Select
Back
Next
or Change Cool
Soft Key
Steps 2 & 3
First Options Menu
o
Set: C: 80
Actual: 80
12:25PM Mon
Second Options Menu
Base Screen
Warmer
o
Cooler
Change Heat
Next
Options
Hold Temperature
More
Options
Run Schedule
Climate Control
Present Time/Day
More
Select
Back
Select
Back
Select
Back
Step 1
M8625A
M4469
Step 4
M8626A
Step 4
M8627A
You can temporarily change (override) the setpoint temperature. Follow these steps:
NOTE: To terminate this procedure, press the Back key within one minute. Screen
displays the Base screen.
1. From the Base screen, press either the Warmer or Cooler soft key. The Options
soft key becomes either a Change Heat or Change Cool soft key depending on
which set point type (H or C) is currently displayed.
2. Press the Change Heat or Change Cool soft key until the desired setpoint type
(H or C) is displayed.
3. Press either the Warmer or Cooler soft key repeatedly until the desired setpoint
temperature displays. The setpoint temperature range is 45° to 88°F (7° to 31°C).
NOTE: A minimum 3 degree F (2 degree C) deadband is maintained between
the heating and cooling setpoints. If either setpoint is adjusted into the
deadband, the other setpoint will automatically change to maintain the
minimum 3 degree F differential.
4. To accept the change, press Select. If you press the Options or Next soft key or
do not press a key for one minute, the change will also be accepted. The screen
displays the Base screen. The screen displays the Base screen. The screen
displays the actual temperature and the heating/cooling setpoint.
NOTE: To accept the temporary setpoint change and perform another function,
press the Options soft key. Screen displays the first Options menu. The
new temperature setting remains in effect until the next scheduled period
or, if so configured, when the unit price rate changes.
The new temperature setting remains in effect until the next scheduled period or, if
so configured, when the utility price rate changes.
The temporary change can be canceled and the system returned to the original
setpoint temperature by pressing the Run Schedule soft key in the second
Options menu.
69-0860—1
4
Page 9

USING THE TOUCHPAD
T7525/T7526 THERMOSTAT TOUCHPAD
Hold the Temperature
Base Screen
o
Set: C: 80
Actual: 80
Rate: NORMAL
12:25PM Mon
Warmer
o
Cooler
Options
Next
First Options Menu
Options
Hold Temperature
More
Base Screen
o
Hold: C: 80
Actual: 80
Rate: NORMAL
12:25PM Mon
Warmer
o
Cooler
Options
Next
First Options Menu
Options
Cancel Temperature Hold
More
Step 1
Select
Back
Step 2
Select
Back
Step 1
Select
Back
Step 2
Select
Back
M8625A
M8626A
M4470
M4471
You can hold the current setpoint temperature until you manually cancel it. Follow
these steps:
1. From the Base screen, press the Options soft key. The screen displays the first
Options menu.
2. Press the Hold Temperature soft key. The screen displays the Base screen. The
screen displays the actual temperature and the heating/cooling setpoint. The hold
remains in effect until you manually cancel it.
Cancel the Temperature Hold
You can cancel the temperature hold. Follow these steps:
1. From the Base screen, press the Options soft key. The screen displays the first
Options menu.
2. Press the Cancel Temperature Hold soft key. The screen displays the Base
screen. The screen displays the actual temperature and the heating/cooling
setpoint.
or
a. Press the More soft key. The screen displays the second Options menu.
b. Press the Run Schedule soft key. The screen displays the Base screen.
The screen displays the actual temperature and the heating/cooling
setpoint.
Second Options Menu
Options
Run Schedule
Climate Control
Present Time/Day
More
Step 2
Select
Back
M8627A
5
69-0860—1
Page 10

T7525/T7526 THERMOSTAT TOUCHPAD
Change the Program Setpoint Temperatures
USING THE TOUCHPAD
Base Screen
o
Set: C: 80
Actual: 80
Rate: NORMAL
12:25PM Mon
Warmer
o
Cooler
Options
Next
First Options Menu
Options
Hold Temperature
More
Second Options Menu
Options
Run Schedule
Climate Control
Present Time/Day
More
Climate Control Menu
Climate Control
Settings and Schedules
Heat/Cool Equipment
Ventilation
Step 1
Select
Back
Step 2
Select
Back
Step 3
Select
Back
Step 4
Select
Back
M8625A
M8626A
M8627A
You can change the setpoint temperature. Follow these steps:
1. From the Base screen, press the Options soft key. The screen displays the first
Options menu.
2. Press the More soft key. The screen displays the second Options menu.
3. Press the Climate Control soft key. The screen displays the Climate Control
menu.
4. Press the Settings and Schedules soft key. The screen displays the Settings
and Schedules menu.
5. Press the ▲ or ▼ soft key repeatedly until the desired selection (Weekday,
Saturday, or Sunday) displays.
6. Press the Temperature Settings soft key. The screen displays the current
settings for each period for the selected day.
NOTE: H refers to the heating setpoint; C refers to the cooling setpoint.
7. Press the soft key for the period to be changed. The screen displays the settings
for that period.
8. Press the Change Heat or Change Cool soft key until the desired setpoint type
(Heat or Cool) is displayed.
9. Press the ▲ or ▼ soft key repeatedly until the desired temperature setting
displays. The setpoint temperature range is 45° to 88°F (7° to 31°C).
10. Perform one of the following:
a. To accept the new setting, press the Select key or do not press a key for
one minute. The screen displays the current settings for the selected day.
Settings and Schedules Menu
Settings and Schedules
Weekday
Temperature Settings
Day Schedule
Current Settings Screen
Sunday Settings
Wake H: 70˚ C: 78˚
Leave H: 62˚ C: 78˚
Return H: 70˚ C: 78˚
Sleep H: 64˚ C: 78˚
Steps 6 & 7
Current Period Settings Screen
(Change Cool Shown)
Weekday-Leave Settings
o
Heat: 62
Change Cool
Steps 8-10
Step 5
Select
Back
Select
Back
Select
Back
M8628A
M8629A
M4472
M8630A
b. To cancel the temperature entered in step 9, press the Back key within one
minute. The screen displays the current settings for the selected day.
NOTE: For systems using the T7525C/T7526C Thermostat Touchpads (auto
changeover), a minimum 3 degree F (2 degree C) deadband is
maintained between the heating and cooling setpoints. If either setpoint
is adjusted into the deadband, the other setpoint will automatically
change to maintain the minimum 3 degree F differential.
11. Repeat steps 7 through 10 for any other heating or cooling setpoints that need to
be changed.
12. Press the Select key. The screen displays the Settings and Schedules menu.
13. Repeat steps 4 through 11 for any other days that need to be changed.
14. Press the Select key repeatedly until the Base screen displays.
69-0860—1
6
Page 11

USING THE TOUCHPAD
T7525/T7526 THERMOSTAT TOUCHPAD
Change the Time a Period Starts
Base Screen
o
Set: C: 80
Actual: 80
Rate: NORMAL
12:25PM Mon
Warmer
o
Cooler
Options
Next
First Options Menu
Options
Hold Temperature
More
Second Options Menu
Options
Run Schedule
Climate Control
Present Time/Day
More
Climate Control Menu
Climate Control
Settings and Schedules
Heat/Cool Equipment
Ventilation
Step 1
Select
Back
Step 2
Select
Back
Step 3
Select
Back
Step 4
Select
Back
M8625A
M8626A
M8627A
You can change the time a period starts. Follow these steps:
1. From the Base screen, press the Options soft key. The screen displays the first
Options menu.
2. Press the More soft key. The screen displays the second Options menu.
3. Press the Climate Control soft key. The screen displays the Climate Control
menu.
4. Press the Settings and Schedules soft key. The screen displays the Settings
and Schedules menu.
5. Press the ▲ or ▼ soft key repeatedly until the desired selection (Weekday,
Saturday, or Sunday) displays.
6. Press the Day Schedule soft key. The screen displays the schedule for the
selected day.
7. Press the soft key for the period to be changed. The screen displays the start time
for that period with the Hours field highlighted.
8. Press the Next field soft key repeatedly until the desired field (Hours, Minutes, or
AM/PM) is highlighted.
9. Press the ▲ or ▼ soft key repeatedly until the desired time displays (minutes
change in 10 minute increments/decrements).
10. Repeat steps 8 and 9 for each field, as required.
11. Perform one of the following:
a. To accept the new time, press the Select key or do not press a key for one
minute. The screen displays the current settings for the selected day.
Settings and Schedules Menu
Settings and Schedules
Weekday
Temperature Settings
Day Schedule
Current Schedule Screen
Weekday Schedule
Wake 6:00 AM
Leave 8:00 AM
Return 5:00 PM
Sleep 10:00 PM
Current Period Screen
Weekday-Leave Time
: 00 AM
8
Next Field
Cancel This Period
M8628A
Step 5
Select
Back
M8629A
Steps 6 & 7
Select
Back
M4473
Steps 8-11
Select
Back
M4474
b. To cancel the time entered in step 9, press the Back key within one
minute. The screen displays the schedule for the selected day.
12. Repeat steps 7 through 10 for any other periods that need to be changed.
13. Press the Select key. The screen displays the Settings and Schedules menu.
14. Repeat steps 4 through 11 for any other days that need to be changed.
15. Press the Select key repeatedly until the Base screen displays.
7
69-0860—1
Page 12

T7525/T7526 THERMOSTAT TOUCHPAD
Change the Operating Mode of Heating/Cooling Equipment
USING THE TOUCHPAD
Base Screen
o
Set: C: 80
Actual: 80
Rate: NORMAL
12:25PM Mon
Warmer
o
Cooler
Options
Next
First Options Menu
Options
Hold Temperature
More
Second Options Menu
Options
Run Schedule
Climate Control
Present Time/Day
More
Climate Control Menu
Climate Control
Settings and Schedules
Heat/Cool Equipment
Ventilation
Step 1
Select
Back
Step 2
Select
Back
Step 3
Select
Back
Step 4
Select
Back
M8625A
M8626A
M8627A
You can change the operating mode of heating and cooling equipment. Follow these
steps:
1. From the Base screen, press the Options soft key. The screen displays the first
Options menu.
2. Press the More soft key. The screen displays the second Options menu.
3. Press the Climate Control soft key. The screen displays the Climate Control
menu.
4. Press the Heat/Cool Equipment soft key. The screen displays the Heat/Cool
Equipment menu with the current operating mode highlighted.
5. Perform one of the following:
a. To change the operating mode, repeatedly press the Change System soft
key until the desired operating mode displays (HEAT, COOL, and OFF for
conventional systems and EM HEAT, HEAT, COOL, and OFF for heat
pumps).
NOTE: For systems using the T7525C/T7526C Thermostat Touchpads
(auto changeover), an additional selection (AUTO) is available.
NOTE: Select EM HEAT after a heat pump fault message (for example,
Heat Pump Failure) displays at the Touchpad. After the fault is
corrected, select one of the other operating modes.
b. To change the fan, repeatedly press the Change Fan soft key until the
desired operating mode displays (AUTO and ON).
6. Perform one of the following:
a. To accept the changes, press the Select key. The screen displays the
Climate Control menu.
Heat/Cool Equipment Menu
Heat/Cool Equipment
Change System
OFF
Change Fan
AUTO
On
Aux On
M8628A
Steps 5 & 6
Select
Back
M8631A
b. To cancel step 5, press the Back key within one minute. The screen
displays the Climate Control menu.
7. Press the Select key. The screen displays the Options menu.
8. Press the Select key. The screen displays the Base screen.
69-0860—1
8
Page 13

USING THE TOUCHPAD
T7525/T7526 THERMOSTAT TOUCHPAD
Change the Operating Mode of Ventilation Equipment
Base Screen
o
Set: C: 80
Actual: 80
Rate: NORMAL
12:25PM Mon
Warmer
o
Cooler
Options
Next
First Options Menu
Options
Hold Temperature
More
Second Options Menu
Options
Run Schedule
Climate Control
Present Time/Day
More
Ventilation Screen
Ventilation
AUTO
Change Mode
Step 1
Select
Back
M8625A
Step 2
Select
Back
M8626A
Step 3
Select
Back
M8627A
Steps 4-6
Select
Back
You can change the operating mode of ventilation equipment (if installed). Follow these
steps:
1. From the Base screen, press the Options soft key. The screen displays the first
Options menu.
2. Press the More soft key. The screen displays the second Options menu.
3. Press the Climate Control soft key. The screen displays the Climate Control
menu.
4. Press the Ventilation soft key. The screen displays the Ventilation screen with the
current operating mode highlighted.
NOTE: If ventilation is not a part of the system, the screen displays a message
that ventilation was not installed.
5. To change the operating mode, repeatedly press the Change Mode soft key until
the desired operating mode displays (AUTO and ON).
6. Perform one of the following:
a. To accept the changes, press the Select key. The screen displays the
Climate Control menu.
b. To cancel step 5, press the Back key within one minute. The screen
displays the Climate Control menu.
7. Press the Select key repeatedly until the Base screen displays.
M8632A
9
69-0860—1
Page 14

T7525/T7526 THERMOSTAT TOUCHPAD
USING THE TOUCHPAD
Change the Time and Day
First Options Menu
o
Set: C: 80
Actual: 80
Rate: NORMAL
12:25PM Mon
Second Options Menu
Present Time/Day Screen
Present Time + Day
Warmer
o
Cooler
Options
Next
Options
Hold Temperature
More
Options
Run Schedule
Climate Control
Present Time/Day
More
8:35AM
Monday
Next Field
Auto Set
Step 1
Select
Back
M8625A
Step 2
Select
Back
M8626A
Step 3
Select
Back
M8627A
Steps 4 & 5
Select
Back
M8633A
You can change the time and day. Follow these steps:
1. From the Base screen, press the Options soft key. The screen displays the first
Options menu.
2. Press the More soft key. The screen displays the second Options menu.
3. Press the Present Time/Day soft key. The screen displays the Present Time +
Day screen with the Hour field highlighted.
4. Perform one of the following:
— Change the time:
a. Press the Next Field soft key repeatedly until the desired field is
highlighted (Hour, Minute, or AM/PM).
b. Press the ▲ or ▼ soft key repeatedly until the desired time displays.
c. Repeat steps a and b for each field, as required.
— Change the day:
a. Press the Next Field soft key repeatedly until the Day field is
highlighted.
b. Press the ▲ or ▼ soft key repeatedly until the desired day displays.
5. Perform one of the following:
a. To accept the changes, press the Select key. The screen displays the
second Options menu.
NOTE: The time and day displayed at the Touchpad can be restored to
the utility time and day by pressing the Auto Set soft key in the
Present Time + Day screen. The time will automatically revert to
the utility time whenever the system updates. Therefore, only the
day of week can actually be set.
Base Screen
69-0860—1
b. To terminate this procedure, press the Back key within one minute. The
screen displays the second Options menu.
6. Press the Select key repeatedly until the Base screen displays.
10
Page 15

T7525/T7526 THERMOSTAT TOUCHPAD
69-0860—1
Page 16

T7525/T7526 THERMOSTAT TOUCHPAD
USING THE TOUCHPAD
Home and Building Control Home and Building Control Helping You Control Your World
Honeywell Inc. Honeywell Limited—Honeywell Limitée
1985 Douglas Drive North 740 Ellesmere Road
Golden Valley, MN 55422 Scarborough, Ontario
M1P 2V9
69-0860—1
Printed in U.S.A. 69-0860—1 Rev. 5-95
QUALITY IS KEY
 Loading...