

Page 1
‘.
Page 2
Page 3
,
Con~raiulations!
You are the owner of on&of the finest thermostats
t?“w produced by Honeywell.
The unique features of the T7400 Programmable
Commercial Thermostat,satisfy the special
requirements of commercial single zone aif
conditioning systems, and provide convenience and
temperature control accuracy that is un~oralleled in
the industrv n7is thermostat also includes enerav
saving feaiures which allow it to minimize the &rgy
needed to maintain comfort conditions by using
outdoor air for ‘We” cooling whenever possible.
A thorough review of this Owner’s Guide will help you
identify those features which will maximize comfoit,
convenience and savings in your application.
Terms and words that may not be familiar to you are
explained in the glossary at the end of this guide.
Page 4
STARTUP
When power is first applied, an internal startup
prcgrom begins. This reauires 1 minute to complete.
and takes place after any total loss of power (supply
voltage and backup battery).
During this titie, default temperature set point values
exe used for temperature control. These CIIC: heating
68 F (20 C]. economizer 72 F (22 C), and cooling 78 F
(26 C]. Following the statiup period. you can enter
new set points which will @e ,used in place of these
default values.
Should a power failure occur after your time and
temperature schedule entries are made, the backup
battery will maintain your schedule. As long as either
system or battery backup power is present, your
program is available and will be used for’
temperature control.
OPERATION
IMPORTANT:
Note that the T7400 svstem will not read
instonton~usly to s&t point changes. Except os
mentioned below, the minimum stage on- and otf-
times will oIwoys be followed. Although the
temperature control monitoring occurs constantly,
the temperature display updates approximately
every 2 minutes unless the ROOM TEMPERATURE key is
depressed.
The temperature control program takes effect after
the startup period. If space temperature is far below
set point, CI stage of heat could turn on within 1
minute of startup. This is the only exception to the
heating minimum off-time of 2 minutes.
If mechanical cooling is called for. the minimum offtime of 4 minutes will elapse after the 1 minute
startup period (5 minutes total).
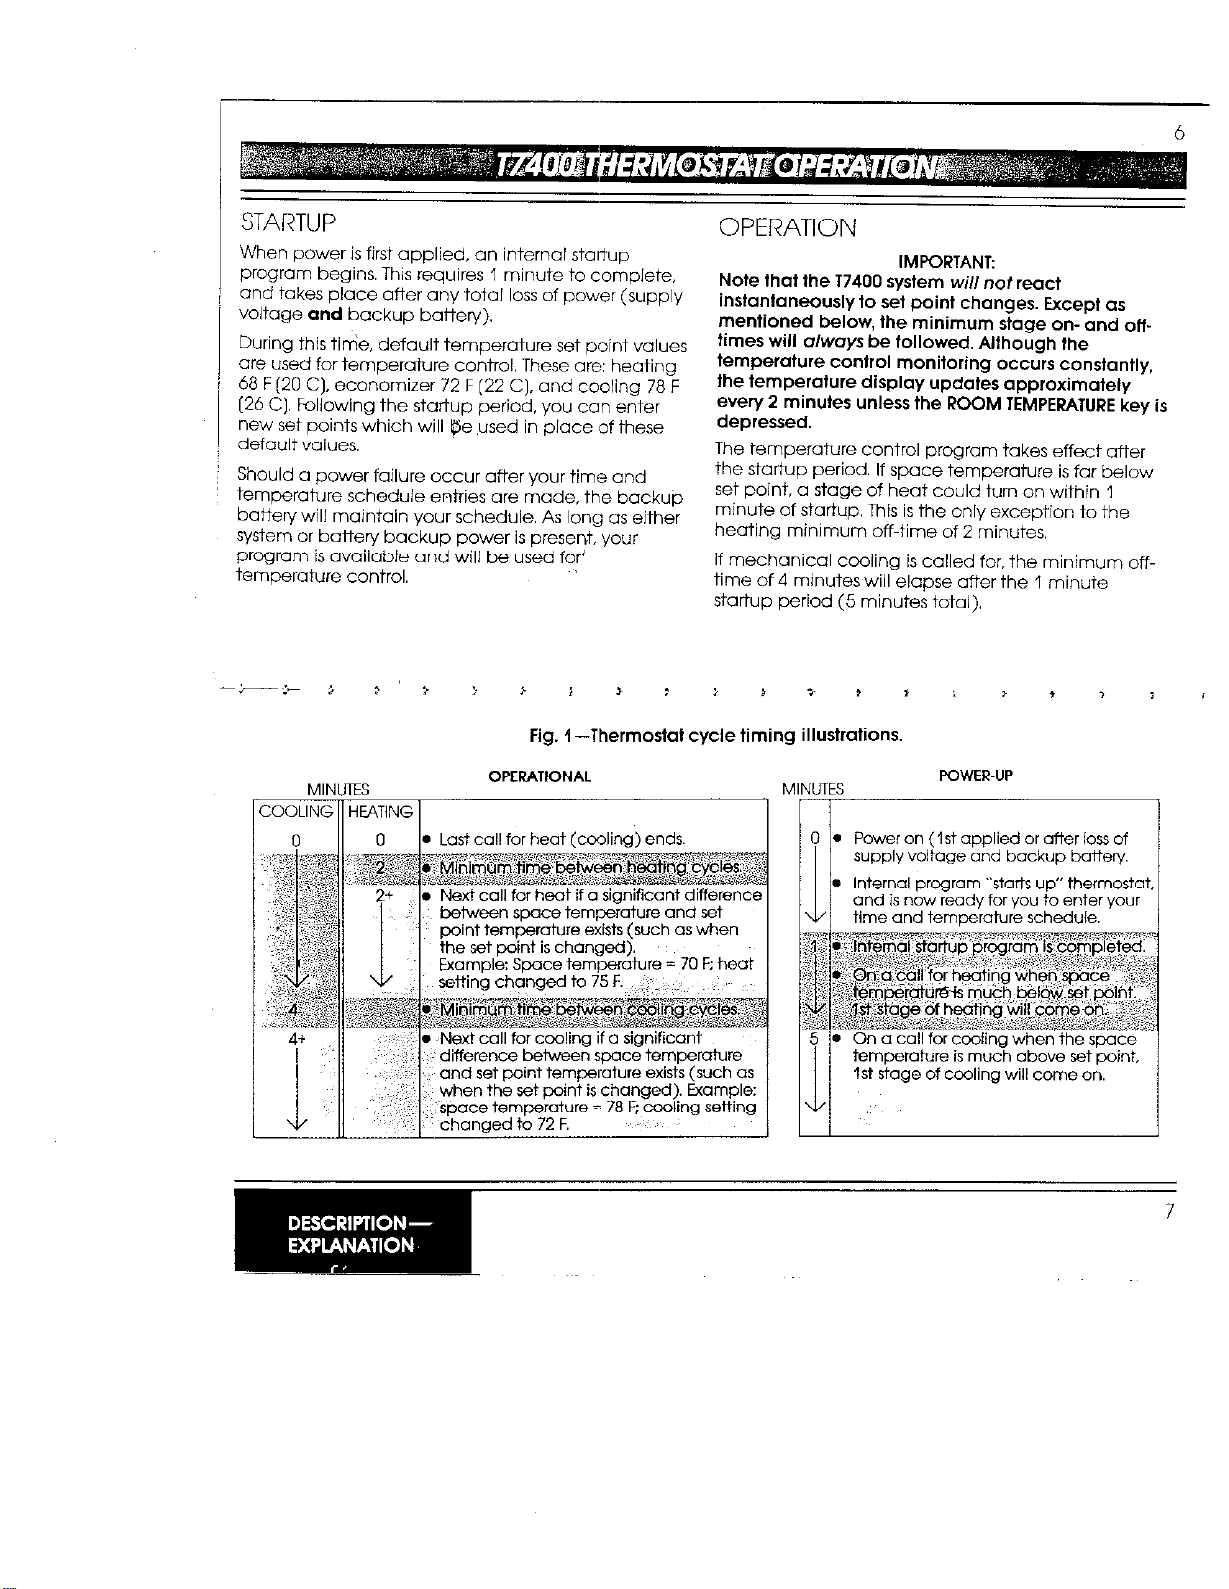
MINUTES
1 COOLING 1 HEATING 1
>
Fig. 1 -Thermostat cycle timing illustrations
OPERATIONAL
xe temizerature = 70 F; heat 1
,
i
MINUTES
I
POWER-UP
I I
0 . Power on (1 st applied or after ioss of
supply voltage and backup
/I/
battery.
7
Page 5
PROGRAM SCHEdJCE
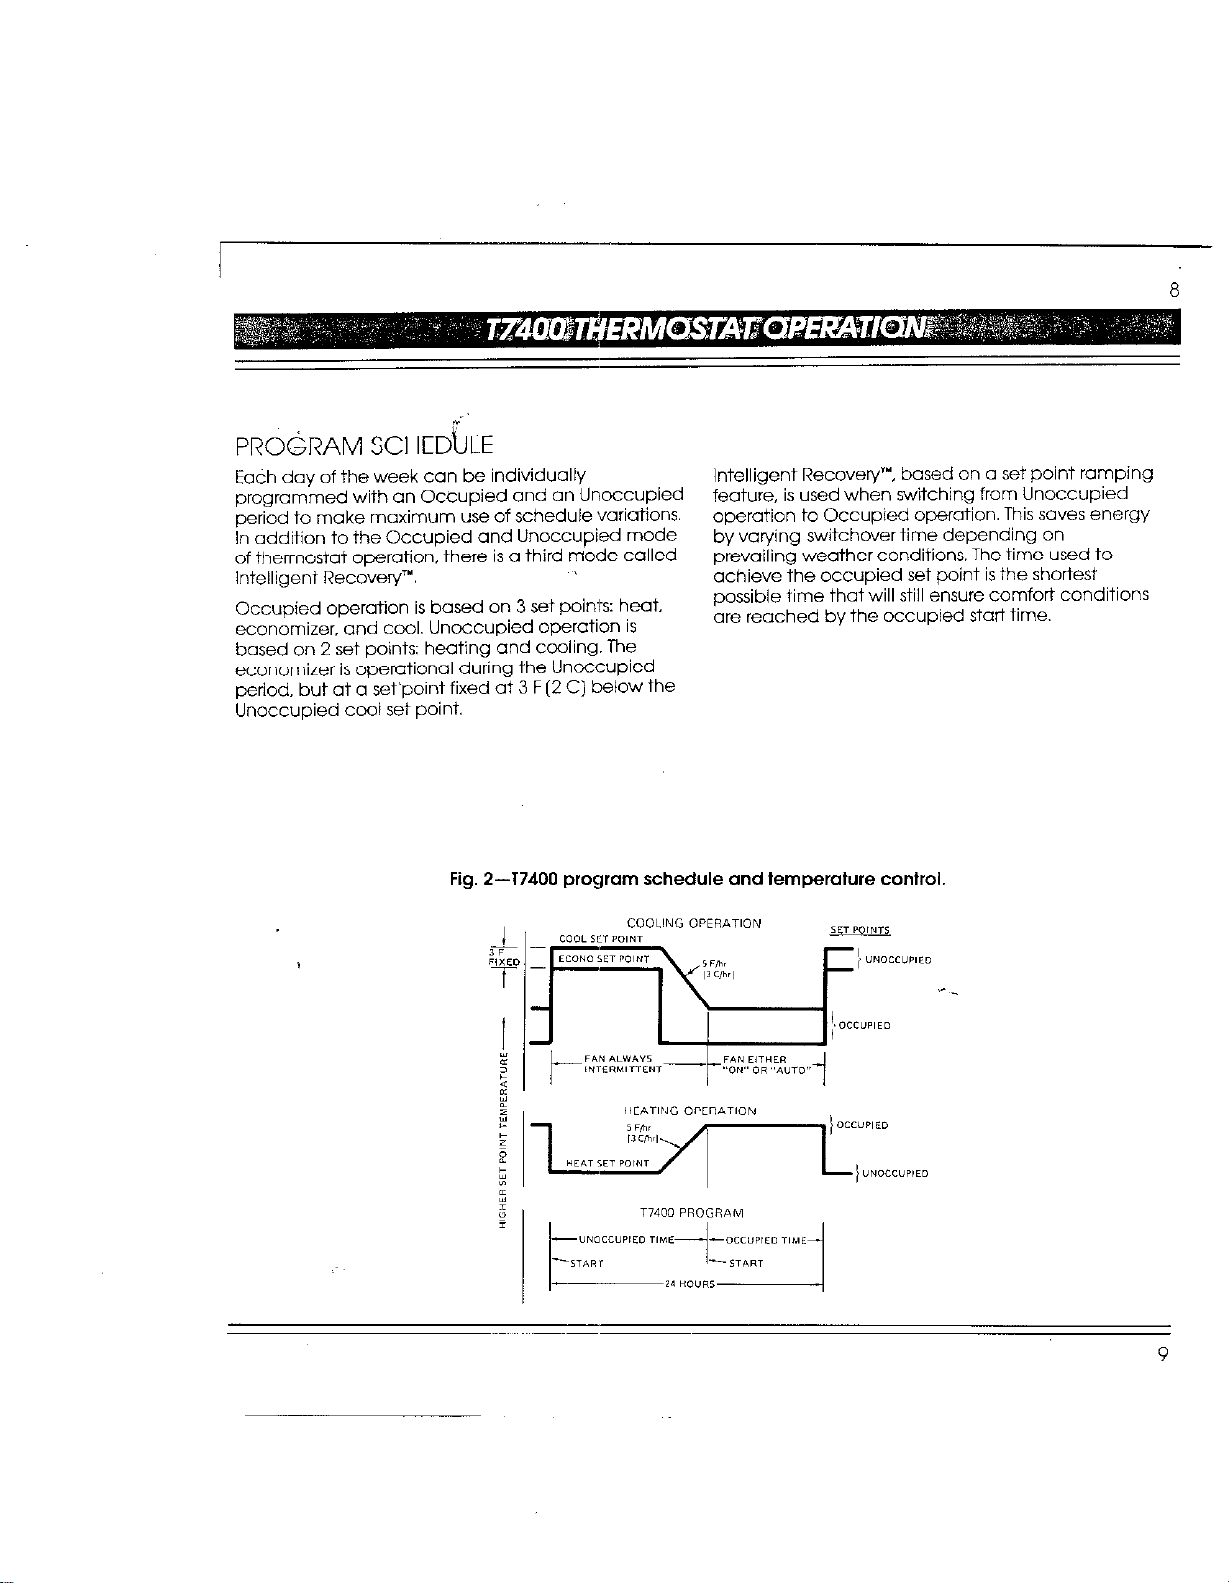
Each day of the week ccl” be individually
programmed with an Occupied and an Unoccupied
period to make maximum use of schedule variations.
In addition to the Occupied and Unoccupied mode
of thermostat operation. there is CI third mode called
Intelligent Recovery”.
Occupied operation is based on 3 set points: heat.
economizer. and cool. Unoccupied operation is
based on 2 set points: heating and cooling. l%he
economizer is operational during the Unoccupied
period, but at a s&point fixed at 3 F (2 C) helow the
Unoccupied cool set point.
Fig. 2-17400 program schedule and temperature control.
Intelligent Recovery’“, based on CI set point ramping
feature, is used when switching from Unoccupied
operation to Occupied operation. This selves energy
by varying switchover time depending on
prevailing weather conditions. The time used to
achieve the occupied set point is the shortest
possible time that will still ensure comfort conditions
are reached by the occupied stat time.
Page 6

I
10
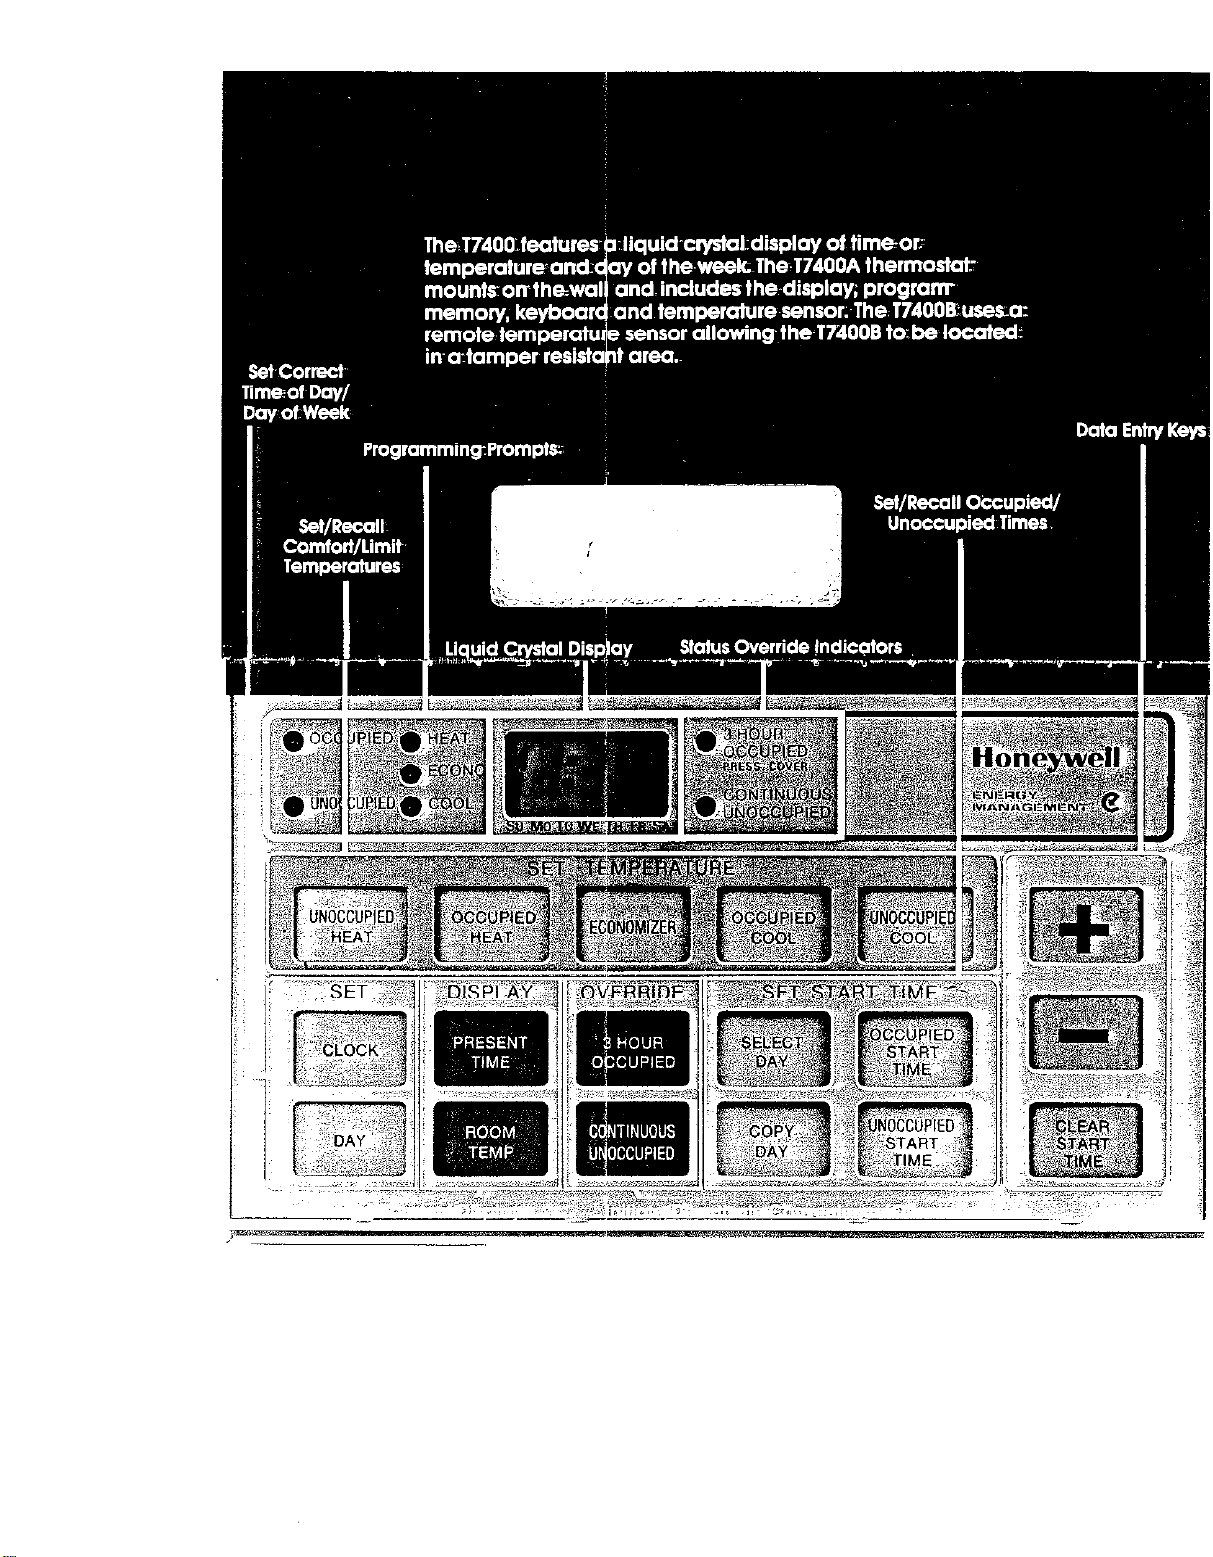
Convenient keyboard layout provides effortless
program entry. .youi avenue to maximum energy
and cost savings.
The following pages provide function-by-function
instructions to progrcrr the T7400 Programmable
Commercial Thermostat.
The following general steps are required to enter your
weekly time and temperature schedule into the
T7400. See the pages indicated for detailed
programming instructions.
l
Enter the correct time and day.
(3ee pages 14 through 17.)
l
Enter the temperature set points you want for programming step. ~For example. to review the
heating. economizer, and cooling system
l
To review program entries. simply press the
same function keys used to begin each
ECONOMIZER temperature set point, press the
operation. ECONOMIZER key.
l
(See pages 18 through 27.)
l
For each day of the week. enter starting time for
For sample schedules and their programs. see
pages 32 through 37.
the periods when your building will be
occupied and unoccupied. (See pages 28
through 31.)
11
Page 7
I
SELECTING~HE DESIRED OPERATING
DISPLAY
. PRESENT TIME and ROQM TEMPERATURE keys
•~ If neither key is pressed, T7400 will automatically
(Optional)
allow you to select c@tinuous display of time or
temperature. respectively.
revert to a display of,,present time within 2
minutes of the last keypress.
l
T7400 will default to Occupied mode and
control to respective Heat, Economizer. and
Cool set points of 68 F. 72 F, and 78 F until
thermostat is reprogrammed.
LOSS Of External Power
l
Blinking display of time or temperature
indicates loss of external power. The backup
botteiy maintains your time and temperature
schedule during the power loss.
l
Keyboard and red indicator lights exe
inoperative while the 77400 is on batteN power
12
PROBLEM INDICATORS
Loss of Stored Program
l
Blinking display of 3 dashes (- -) indicates 10%
of stored program. (Three steady dashes
represent an occupied or unoccupied time slot
that is not programmed.)
TEMPORARILY OVERRIDING THE
17400’s PROGRAM
l
3 HOUR OCCUPIED key allows you to <activate
the temperature set points programmed for
your building’s occupied period for 3 hours.
l
‘Once pressed. the 3 HOUR OCCUPIED key can
be pressed again to cancel this command,
and return the T7400 to program control.
l
CONTINUOUS UNOCCUPIED key allows you to
activate the temperature set points
programmed for your building’s unoccupied
period for an indefinite time.
(optional)
Failure of Temperature Sensor
. While in the ROOM TEMP display mode. 0
display of (- “) indicates failure of wiring or
the temperature sensor.
. System will safely deenergize all heating and
cooling stages if cI sensor failure occurs.
l Once
l
l
pressed. the CONTINUOUS UNOCCUPIED
key must be pressed again to cancel this
command, and return the 17400 to piogiam
control.
The 3.HOUROCCUPIED and
CONTINUOUS UNOCCUPIED keys cannot be
used at the same tir&The last key pressed will
be in control.
Red indicators near the display window show
when 3 HOUR OCCUPIED and
CONTINUOUS UNOCCUPIED ovenide
functions are activated.
13
Page 8

SET CLOCK KEYS
TO SET CLOCK
1. Press CLOCK
2. Press + or - until display shows correct time.
NOTES
The + and keys adjust theclock ahead
and back.respectively.
As you approach the correct time, repeatedly
tap the + or - key to adjust minutes one at a
time.
Page 9

SET DAY KEYS
TO SET DAY
1. Press DAY key.
2. Press + or - until pointer on the display
identifies the correct day of the week.
NOTE
Su=Sundoy: Mo=Monday; Tu=Tuesday;
We=Wednesday; Th=Thursday: Fr=Friday;
Sa=Saturdav.
d
17
Page 10

L
UNOCCUPIED HEAT SET KEYS
TO SET UNOCCUPIED HEAT
TEMPERATURE
1. Press UNOCCUPIED HEAT. Red UNOCCUPIED and
HEAT indicators show that you have selected the
WOCCUPIED HEATset point for programming. The
display will show either the default or last entered
unoccupied heat set point.
2. Press + 01 - until display shows the heating
temperature you want to maintain during the
unoccupied period.
NOTES
UNOCCUPIED HEAT temperature is the heating system
set point for the period when your building will be
unoccupied.
Maximum sewing cannot exceed the OCCUPIED HEAT
set point (red OCCUPIED indicator comes on while +
key is depressed to show when you have reached the
upper adjustment limit). _ _
Lower limit of the UNOCCUPIED HEAT setting is
32 F (4 C].
Upper limit of UNOCCUPIED HEAT setting can be
changed by adjusting the OCCUPIED HEAT set point.
(See example in Fig. 3, page 37.)
19
Page 11

L
[~~~Jl
~~~-;;-J~,
4 ‘III
I / 1 1 / I
OCCUPIED HEAT TEMPERATURE SET KEYS
TO SET OCCUPIED HEAT TEMPEL!ATURE
1. Press OCCUPIED HEAT. Red OCCUPIED and HEAT
indicators show that you have selected tlx
OCCUPIED HEATset point for programming. The
display will show either the default or last entered
occupied heat set point.
2. Press + or until display shows the heating
temberature you want to maintain during the
occupied period.
NOTES
OCCUPIED HEAT temperature is the hentinn
system set point for the period whei n vow buildina
will be occupied.
Minimum OCCUPIED HEAT setting cannot be
lower than the UNOCCUPIED HEAT set point
(red UNOCCUPIED indicator comes on while the
key
is
depressed to show when you hove reached
the lower adjustment limit).
Maximum OCCUPIED HEAT setting is 2 F (1 C]
lower than the economizer set point (red
ECONOMIZER indicator comes on while the +
key is depressed to show when you have reached
the upper adjustment limit).
Limits of OCCUPIED HEAT setting can be
changed by adjusting the UNOCCUPIED HW
and ECONOMIZER set points. (See example in
?,~^ ^-~
FIQ. J,
PClQe
d,.)
1
21
Page 12

ECONOMIZER TEMPERATURE SET KEYS
TO SET ECONOMIZER TEMPERATlJRE
1. Press ECONOMIZER. Red OCCUPIED and
ECONOMIZER indicators show that you have
selected the ECONOMIZER set point for
programming. The display will show either the
default or last entered economizer set point.
2. Press\+ or - until display shows the temperature you
would like to maintain with economizer operation
during OCCUPIED period.
NOTES
ECONOMIZER set point is the temperature at which
the economizer (“free” outdoor air cooling) is
allowed to function if conditions allow.
The programmed ECONOMIZER set point is active
only during your building’s OCCUPIED period. During
the unoccupied period, the economizer is controlled
at 3 F [2 C) below the programmed UNOCClJPlED
COOL set point.
Minimum ECONOMIZER setting is 2 F (1 C) higher than
the OCCUPIED HEAT set point (red HEAT indicator
comes on while the - key is depressed to show when
you have reached the lower adjustment limit).
Maximum ECONOMIZER sewing is 3 F [2 C) lower than
the OCCUPIED COOL set point (red COOL indicator
comes on while the + key is depressed to show when
you have reached the uppF!adjustment limit).
Limits of ECONOMIZER setting can be changed by
adjusting the OCCUPIED HEAT and OCCUPIED COOL
set points. (See example in Fig. 3. page 37.)
23
Page 13

OCCUPIED COOL TEMPERATURE SET KEYS
24
TO SET OCCUPIED COOL
TEMPERATURE
I. Press OCCUPIED COOL. Red OCCUPIED and COOL
indicators show that you have selected the
OCCUPIED COOL set point for programming. The
display will show either the default or last entered
occupied cool set point.
2. Press + or - until display shows the mechanical
cooling temperature you want to maintain for the
occupied period.
NOTES
OCCUPIED COOL temperature is the mechanical
cooling system set point for the period when your
building will Se occupied.
Minimum OCCUPIED COOL setting is 3 F (2 C)
higher than the ECONOMIZER set point (red
ECONO indicator comes 0” while the - key is
depressed to showwhe” you-have reached the
lower adjustment limit).
Maximum OCCUPIED COOL sewing cannot
exceed the UNOCCUPIED COOL set point (red
UNOCCUPIED indicator comes on while the +
key is depressed to show when you have reached
the upper adjustment limit).
Limits of OCCUPIED COOL setiing can be
changed by adjusting the ECONOMIZER and
UNOCCUPIED COOLset points. (See example in
Fig. 3,
page
37.)
25
Page 14

UNOCCUPIED COOI _ TEMPERATURE SET KEYS
TO SET UNOCCUPIED COOL
TEMPERATURE
1. Press UNOCCUPIED COOL. Red UNOCCUPIED and
COOL indicators show that you have selected the
UNOCCUPIED COOLset point for programming.
The display will show either the default a last
entered unoccupied cooling set point.
2. Press + or until display shows the mechanical
cooling temperature you want to maintclin for the
unoccupied period.
NOTES
UNOCCUPIED COOL temperature is the mechanical
cooling system set point for the period when ycxr
building will be unoccupied.
Minimum UNOCCUPIED COOL setting cannot be
lower than the OCCUPIED COOL set point (red
OCCUPIED indicator comes on while the - key is
depressed to show when you have reached the lower
adjustment limit).
Lower limit of UNOCCUPIED COOL setting can be
changed by adjusting the OCCUPIED COOL set
point. (See example in Fig. 3. page 37.)
Upper limit of the UNOCCUPIED COOL sewing is 99 F
(40
C).
27
Page 15

lD
“1
SET START TIME KEYS
TO SE3 START TIMES
1. Press SELECT DAY. Display shows CI day-of-week
indicator.
: 2. Press + or - until indicator identifies the dnv of
week you want to program (Sunday. for &le).
3. Press OCCUPIED START TIME. Red OCCUPIED
indicator shows that VW have selected the
OCCUPIED period for’progromming. Display shows
the start time currently programmed for the
OCCUPIED period. If no start time has been
programm&d. 3 dashes (- -) will be displayed.
4. Press + or - until the start time you want for a”
OCCUPIED period appears on the display. If you
do not want a” OCCUPIED period to start on the
selected day, press CLEAR START TIME.
5. Press UNOCCUPIED STARTTIME. Red UNOCCUPIED
indicator shows that you have selected tl?e
UNOCCUPIED period for programming. Display
shows the start time currently programmed for the
UNOCCUPIED period. If no start time has been
programmed. 3 dashes (- -) will be displayed.
6. Press + and -until the start time you want for
UNOCCUPIED period appears on the display. If you
do not want an UNOCCUPIED period to start on
the selected day, press CLEAR STARTTIME.
7. Repeat steps 1 through 6 for each remaining day
of the week, or refer to following steps on Copy
Day.
Program times are entered in IO-minute increments.
Each day of week has one OCCUPIED START TIME and
one UNOCCUPIED START TIME slot available for
programming.
Each “day is the 24.hour period from 12 am. to 12
a.m. (midnight to midnight).
If you want the same schedule of start times on 2 or
more days. you have the option of using the COPY
DAY feature to avoid repeating the daily schedule
entry See next 2 pages for COPY DAY instructions.
29
Page 16

COPY DAY KEYS
;: TO COPY DAY NOTES
; 1. Press SELECT DAY
1 2. Press + or - until display indicator identifies the
day with OCCUPIED START TIME and UNOCCUPIED
START TIME YOU want to CODY to another dov.
I
3. Press COP‘j DAY to begin <he copy.
4. Press + or until CI seconddisplay indicator
identifies the day to which you want to copy the
first dav’s schedule.
5. Press 6OPY DAY to complete the copy.
6. If you want to copy the same schedule to
additional days. repeat steps 4 and 5 for each
additional day.
The COPY DAY procedure is optional. Start times
for each day of the week con be programmed as
described in the preceding instructions, TO SF3
START TIMES.
If you use the COPY DAY feature. review all start
time schedules to verify that copying was
completed without error.
31
Page 17

SAMPLE SCHEDULE 1
In this sample schedule, the owner wants the
building’s temperature to be at the OCCUPIED
HEAT/COOL set point beginning at 7:00 a.m. on
Monday~through Saturday!
The building’s UNOCCUPIED times vary On
Monday, Tuesday, Thursday, and Friday. the
building is UNOCCUPIED beginning at 500 p.n?.
The UNOCCUPIED period starts later on
Wednesday (9~00 p.m.). and earlier on Sotway
(II:00 a.m.).
On Sunday, the building is unoccupied all day.
Neither an OCCUPIED period nor an
UNOCCUPIED period starts on Sunday. The
building is UNOCCUPIED starting at II:00 am,
on Saturday. and remains UNOCCUPIED until
Monday morning at 7:OO am
In programming Sunday’s schedule, the
CLEAR START TIME key would be used to clear
OCCUPIED START and UNOCCUPIED START times for
Sunday.
Note that start times for Tuesday. Thursday. and Friday
are identical to those for Monday. Each day can be
programmed separately. Optionally. Monday’s start
times can be entered, then the Monday schedule
copied into each of the other 3 days with the aid of
the COPY DAY key.
Sunday
Monday
Tuesday
Wednesday
Thursday
Friday
Saturdav
OCCUPIED
Stari times
(CLEAR)
7:oo a.m.
700 a.m.
700 a.m.
7:oo a.m.
7:oo a.m.
700 a.m.
UNOCCUPIED
Start times
(CLEAR)
500 p.m.
5:oo p.m.
9:oo p.m.
500 p.m.
5:oo p.m.
1 I:00 a.m.
33
Page 18

SAMPLE SCHEDULE 2
In this sample schedule, the owner wants the
building’s temperature to be at the OCCUPIED
HEAT/COOL set point storticg at 1 I:00 a.m. Monday
through~saturday. The Ocoupied period will end at
I:00 a.m. on the following weekday mornings. and at
midnight on Saturday. On Sunday, the building will
be unoccupied all day, so the CLEAR STARTTIME key
would be used to clear Sunda\is OCCUPIED START
time.
The UNOCCUPIED START times vary. The bu/lding is
occupied on Saturday from 1 I:00 a.m. until midnight.
Since Saturday ends ond Sunday begins exactly at
midnight (17~00 am.). an UNOCCUPIED period should
start at 1200 o.m on Sunday. This gives the desired
result of on UNOCCUPIED set mint ail day Sunday
when Sunday’s OCCUPIED START time has been
cleared.
The building will remain unoccupied until Monday at
1 I:00 am. No UNOCCUPIED START time is needed on
-
Monday because the UNOCCUPIED period would
have aireody been established on Sunday. in
programming Monda\/s schedule, the
CLEAR STARTTIME key would be used to clear the
UNOCCUPIED START time for Monday.
On Tuesday through Saturday, the building is
unoccupied starting at I:00 a.m. Unlike Sample
Schedule 1, the UNOCCUPIED periods on these days
start before the OCCUPIED periods. Remember, o 24.
hour day begins at 1200 am. Each day3 set point
schedule should be planned by reference to this
time.
Doily schedules of start times ore identical for
Tuesday through Saturday. Each day co” be
programmed separately. Optionally, Tuesday’s start
times con be entered, then the Tuesday schedule
copied into each of the other 4 days with the aid of
the COW DAY key.
OCCUPIED
Start timesa
Sunday
Monday
Tuesday
Wednesday
Thursday
Friday
Saturday
oTime at which you want your building to reach
the OCCUPIED HEAT/COOL
point.
hime at which you want your building to
control at the UNOCCUPIED HEATiCaL
temperature set point.
CLEAR
11:oo a.m.
ll:oo a.m.
1 I:00 a.m.
II:00 a.m.
II:00 a.m.
II:00 a.m.
temperatUre Set
UNOCCUPIED
stars fimesb
1200 a.m.
CLEAR
I:00 a.m.
I:00 0.m.
I:00 a.m.
I:00 a.m.
I:00 a.m. .’ .
Page 19

FORM TO ENTER YQUR
SCHEDULE OF OCCUPIED AND
UNOCCUPIED START TIMES
Sunday
Monday
Tuesday
Wednesday
Thursday
Friday
Saturday
OCCUPIED
Start
timesa
UNQCCUPIED
start time&
~__
--
aTime at which you want your building to reach
the OCCUPIED HEAT/COOL temperature set
point.
% ~me at which you want your building to
control at the UNOCCUPIED HEAT/COOL
temperature set point,
~_~ -~__ ~-
Fig. J-Example of temperature set points and resulting adjustment ranges.
37
Page 20

-
38
l
Review and write down the program contained
in the.thermostat. Use th#? form on the preViOUS
page.
NOTE: Save the program information. The battery
replacement procedure results in the loss of the
thermostat program.
. Loosen Allen screw at each corner alo”; the
bottom of thermostat.
l
Remove thermostat by winging bottom away
and upward from wallplate or subbase
(see Fig. 4).
l
If bottew replacement is required,
replace
only
with o f&h’Mailo~ MNlM)4’or equiv&nt C?-v61t
alkaline battery. Place battery in the clip on the
wallplate or subbase. Fold the battery wire!;
against the wallplate (subbase).
Fig. 4-Install backup battery
It is not necessary to disconnect power supply to the
system during battery replacement. This would cause
backup battery operation and battery drain until the
system is powered up.
. Reattach T7400 to wallplate. and secure by
tightening both Allen screws along bottom of
thermostat. Do not overtighten.
l
Reprogram the 77400 thermostat using the
program written down earlier.
Page 21

L3ackupBattery-A bat& located in the 17400
thermostat that provides electricity to maintain your
time and temperature schedule during power loss. If
the battery is dead or runs down during o power
failure, the time and temperature schedule will be
lost. However. the thermostat will control to 11
standard Set of “default” set points when bower is
restored
Default Set Points-Temperature sewings of 458 F for
heating, 72 F for economizer. and 78 F for ccooling
that ore built into the T7400. These assure that the
system will remain operational even if the thermostat
is not programmed ‘or the time and temperature
schedules are lost due to battery failure.
Economizer-An auxiliary control system which
allows use of
COOI
outdwr air for “‘ke” Caling. in
place of eiectrical air conditioning equipment. The
T7400 has 2 cooling set points. economizer and
mechanical cooling. Based on the availability of
outdoor air for ‘free” cooling, the 77400 will control
at the lower economizer set point providing
increased comfort without the extra expense of
running mechanical cooling. Only if outdoor air
cannot or does not sufficiently cool the space will
mechanical cooling be allowed to run. and then
only at the higher mechanical cooling set point.
“Free” Cooling-See Economizer.
intelligent Recovery”-A control method which
,i adjuGs the heating warmup and cooling pulldown
time periods based on outside weather conditions.
Commonly refered to OS “optimized start.”
Mechanical Cooling-Cooling that is provided by
running compressors to extract heat from the
conditioned space.
Minimum ON/Oft Times-Fixed minimum on/off
equipment run times used to prevent harmful short
cycling (turning on and off too often) which con
significantly reduce equipment life or cause
permanent damage.
Occupied Ti?mperoture Set Point-The heating,
economizer. and cooling temperature settings used
when the room or building is scheduled to be
occupied.
Occupied Start Time-The selected time at which the
-_
air conditioned space is to reach the comfort
temperature for people occupying the room.
Set Point-The selected temperature at which the
heating/cooling system is to maintain the
conditioned space. There ore separate set points for
heating. economizer. and cooling in the OCCUPIED
and UNOCCUPIED time pefiods.
Page 22

42
Single Zone Air Conditioning System-A packaged
system that includes heating, cooling, and air
distribution equipment. It might also include an
economizer (see Economizer). These systems are selfcontained. often roof mounted. and condition the air
in q specific local area v&h its own thermostat. Larger
buildings may have 2 or more areas or zones, each
with its own air conditioning system and thermostat.
Thermostat Cycle-The time necessary for the
heating or cooling equipment to come on, operate.
and turn and remain off until the next tir& it is
needed. Cycle time is controlled by thethermostat.
For example. mechanical cooling equipment might
Unoccupied Temperature Set Point-The heating
and cooling temperature settings used when the
room or building is scheduled to be unoccupied.
Unoccupied Start Time-The selected time at which
the air conditioned space is allowed to become
cooler/warmer to save energy. NOTE: can be
temporarily overridden by using the “3-Hour Override”
key.
7-Day Program-Each day of the week (7 days) may
be individually scheduled for occupied or
unoccupied start times. This allows maximum
flexibility for building scheduling.
turn on and then go off 4 times in an hour.
IF.
Heating will not come on. or
Cooling will not come on.
Then.
Wait for the minimum off-time delay of 2 to 4
minutes. Recall temperature set points to verify
correct settings.
No heating/cooling with blinking display of time or There will be no heating/cooling as the heating/
temperature. cooling system power is off. The backup battery is
maintaining the program schedule.
Too wcxm (cooling), or Recall the Occupied Start schedule to check for the
Too cool (heating). desired time. Also check the temperature set
points to verify correct settings.
Blinking display of 3 dashes (- -). Indicates loss of stored time and temperature
schedule. Check/replace the backup battery and
reenter time and temperature schedule.
Steady display of 3 dashes (- -) during pro- Indicates an Occupied or Unoccupied time that is
gramming. not programmed.
or..
If these steps do not solve your problem, call your building
maintenance supervisor or service technicjon.
Page 23

 Loading...