

SH-771E
SH-772E
SH-773E
QUICK HEATER
USER INSTRUCTIONS
SCHNELLHEIZER
GEBRAUCHSANWEISUNG
RADIATEUR SOUFFLANT RAPIDE
MANUEL D’UTILISATION
SNELVERWARMER
GEBRUIKSAANWIJZING
CALEFACTOR RÁPIDO
MANUAL DEL USUARIO
TERMOVENTILADOR
MANUAL UTILIZADOR
TERMOVENTILATORE A
RISCALDAMENTO RAPIDO
MANUALE D'USO
GB
D
F
NL
E
P
I
VÄRMEFLÄKT
BRUKSANVISNING
SVE
PIKALÄMMITIN
OHJEKIRJA
ΕΓΧΕΙΡΙ∆ΙΟ ΧΕΙΡΙΣΜΟΥ
HIZLI ISITICI
KULLANIM TAL‹MATLARI
БЫСТРОДЕЙСТВУЮЩИЙ НАГРЕВАТЕЛЬ
ИНСТРУКЦИИ ПО ЭКСПЛУАТАЦИИ
SZYBKI OGRZEWACZ POWIETRZA
INSTRUKCJA OBS¸ UGI
OHŘÍVAČ VZDUCHU K RYCHLÉMU VYTÁPĚNÍ
NÁVOD K POUŽITÍ
FIN
GR
T
RS
PL
CZ
GYORSFŰTŐ
HASZNÁ LATÍ UTASÍTÁ S
HU
AR
HURTIGVARMER
BRUGERHÅ NDBOG
NOR
EL-VARMEBLÆSER
BRUKSANVISNING
DNK
2
CONTENTS
INHALTSVERZEICHNIS
SOMMAIRE
INHOUDSOPGAVE
ÍNDICE
ÍNDICE
INDICE
INNEHÅLLSFÖRTECKNING
INNHOLTSFORTEGNELSE
INDHOLDSFORTEGNELSE
SISÄLLYSLUETTELO
ΠΕΡΙΕΧΟΜΕΝΑ
FIHRIST
Содержание
SPIS TREŚCI
OBSAH
TARTALOMJEGYZÉK
ˇ
GB
4
7
10
14
17
21
24
28
31
34
37
40
43
46
50
54
57
64
D
F
NL
E
P
I
SVE
FIN
GR
T
RS
PL
CZ
HU
AR
NOR
DNK
ENGLISH
DEUTSCH
FRANÇAIS
NEDERLANDS
ESPAÑOL
PORTUGUÊS
ITALIANO
SVENSKA
SUOMI
EΛΛHNIKA
TÜRKÇE
ГАРАНТИЯ
POLSKI
CESKY
MAGYAR
NORSK
DANSK
ˇ
3
(13)
(3)
(4)
(8)
(7)
(6)
(14)
(16)
(15)
(1)
(2)
(5)
(17)
(18)
(9)
(12)
(11)
(10)

4
ENGLISH
IMPORTANT SAFETY INSTRUCTIONS
Read all instructions before operating this quick
heater. Keep these instructions.
1. Operate the quick heater out of the reach of
children.
2. Do not operate the quick heater outdoors.
3. Place the quick heater on a level, firm surface.
Make sure it is in a stable position, so that it
cannot fall over or fall down.
Only operate
the quick heater in an upright position.
4. Unravel the Supply Cord (15) before use.
Failure to do so could cause overheating
and possible fire hazard.
5. Do not use an extension cord or a
solid-state speed-control device. Doing so
could cause overheating, fire hazard or
electric shock.
6. Only connect the quick heater to a
single-phase AC supply to the voltage
shown on the rating plate.
7. Always disconnect cord at wall plug before
removing the quick heater, touching,
moving, cleaning or when not in use.
Do not pull on Supply Cord (15) when
disconnecting it.
8. Do not operate the quick heater in rooms
with explosive gases or while using
inflammable solvents, varnish, glue etc.
9. Do not place the quick heater directly below
a socket.
10. Do not use this quick heater in the
immediate surroundings of a bath, shower
or swimming pool.
11. This quick heater must not be used in any
kind of vehicle (e.g. builder’s huts, lifts,
camper vans, motor vehicles, cars) and
similar, self-contained space.
12. If wall-mounted do not fix to combustible
material such as wooden, synthetic or
plastic surfaces.
13. Caution: The Air Outlet (6) gets hot during
operation (above 80 °C or 175 °F). Keep
combustible material such as furniture,
cushions, bedding, paper, curtains, clothes
at least 1 meter away from the quick heater.
14. Keep the quick heater clean. Make sure that
the Air Inlet (14) and Outlet (6) are
unobstructed. Do
not allow any objects to
enter into the Air Inlet (14) and Outlet (6).
Do
not cover the quick heater. This could
cause overheating, fire hazard or electric
shock.
15. Do not immerse the quick heater in water or
other liquids and do not pour water or other
liquids over the appliance or into the Air
Inlet (14) or Outlet (6).
16. Clean the quick heater regularly and follow
the “Cleaning Instructions”.
17. If the Supply Cord (15) of the quick heater
is damaged it must be repaired by a repair
shop appointed by the manufacturer, as
special purpose tools are required.
18. Do not operate the quick heater if it is
damaged, faulty or is not working properly.
Disconnect it from the electricity supply.
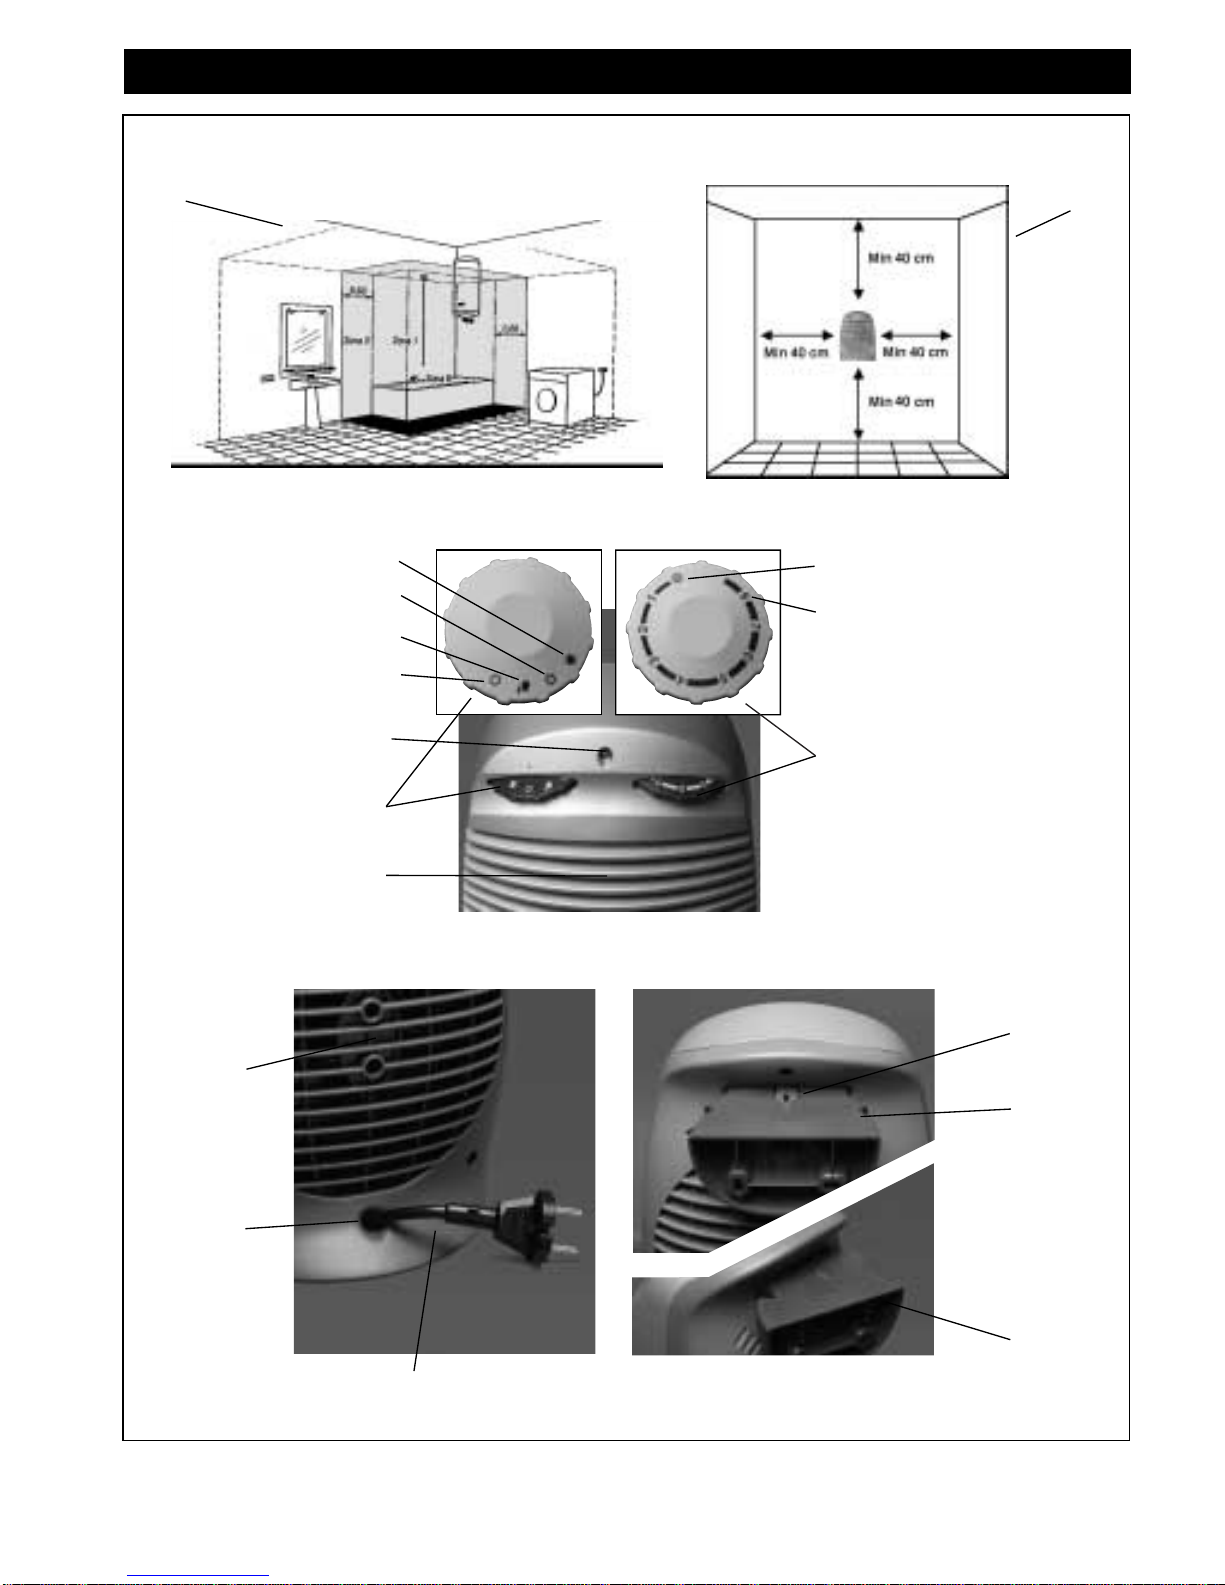
PARTS IDENTIFICATION
1. Opening for Wall-Mounting Support
2. Wall-Mounting Support
3. Installation Zones
4. Safety Distances
5. Variable Air Flow Range
6. Air Outlet
7. Power Switch
8. Pilot Light
9. Thermostat Switch
10. Off-Position
11. Warm Air 1000 W Low Speed
12. Warm Air 1200 W Low Speed
13. Hot Air 2000 W High Speed
14. Air Inlet
15. Supply Cord with plug
16. Cord Storage
17. Room Temperature approx. 5 °C
18. Room Temperature approx. 30 °C
OPERATION
First Time Use
1.
Read all instructions before using the quick
heater.
2. Unpack the quick heater and the Supply
Cord (15); remove all packaging material
and discard. Packaging material can be
recycled.
3. Place the quick heater on a level, firm
surface. Make sure it is in a stable
position, so that it cannot fall over or fall
down. A safety distance of at least 40 cm
from any objects must be kept.

5
ENGLISH
Cord Storage
1.
This quick heater is equipped with Cord
Storage (16). To securely store the Supply
Cord (15), fully put it into the Storage (16)
by pressing it through the hole.
2. Before operating the quick heater make
sure that the Supply Cord (15) is fully
pulled out and extended.
Wall Assembly
If you would like to wall-mount the quick heater,
follow these instructions:
1. Slightly press a screwdriver onto the
marking of the Wall-Mounting Support (2)
and take the Support (2) off the quick
heater.
2. Make sure that the minimum Safety
Distances (4) to walls, floors and ceilings
are kept.
3. Drill holes of Ø 6 mm in the wall, using the
Support (2) as an assembly stencil.
4. Insert plugs of Ø 6 mm into the holes and
fix the Wall-Mounting Support (2) with two
screws of Ø 5 mm.
5. Suspend the Opening for the Wall-
Mounting Support (1) onto the Support (2),
until you hear a “click”. The quick heater is
now securely installed.
6. Choose the desired air flow position within
the variable air flow range (5) by turning
the quick heater into the desired position.
7. If you want to take the quick heater off the
Wall-Mounting Support (2), make sure it is
centered. Then follow instructions
under 1.
Operating Instructions
SH-771E Quick Heater with Thermostat Switch
SH-772E Quick Heater with Power and
Thermostat Switch
SH-773E Quick Heater with Power and
Thermostat Switch, Pilot Light and
Wall-Mounting Support
1. Check that the Power Switch (7) is in
off-position (10). Plug the Supply Cord (15)
into the outlet.
Do not touch the Supply
Cord (15) with wet hands.
2. Check that the Air Inlet (14) and Outlet (6)
are not covered.
The Air Inlet (14) and
Outlet (6) must not be covered during
operation.
3. To operate the quick heater by use of the
Power Switch (7) and/or Thermostat Switch
(9) follow the below instructions.
4. Before removing or moving the quick
heater turn the Power Switch (7) to the offposition (10) and disconnect it from the
electricity supply.
Power Switch
1.
Turn the Power Switch (7) clockwise to one
of the four settings:
Off (10)
Warm Air 1000 W
„Whisper-quiet operation“ (11)
Warm Air 1200 W (12)
Hot Air 2000 W (13)
2. When the Power Switch (7) is in the Hot
Air 2000W (13) position it cannot be
turned further clockwise, only
counter-clockwise.
Thermostat Switch
1.
If equipped with a Power Switch (7) make
sure that it is turned to one of the heat
settings.
2. Turn the Thermostat Switch (9) clockwise to
the highest setting 8 (18).
3. When the desired room temperature is
reached, turn the Thermostat Switch (9)
counter-clockwise until you hear a “click”.
The quick heater stops operating.
4. Now turn the Thermostat Switch (9) a little
clockwise again. The quick heater will
maintain the selected room temperature by
automatically switching the quick heater on
and off.
5. The further you turn the Thermostat Switch
(9)
clockwise, the higher the heating
temperature. The highest setting 8 (18)
corresponds to a room temperature of
approx. 30 °C, the lowest setting
(17) to approx. 5 °C.
6. It is normal that the Thermostat will not
operate the quick heater when the room
temperature is
above 30 °C.
7. When the room temperature is below 5 °C
the quick heater will operate until the room
temperature is above 5 °C.
8. When the Thermostat Switch is in position
8 (18) it cannot be turned further
clockwise, only counter-clockwise.

6
ENGLISH
Pilot Light
1.
The Pilot Light (8) will only illuminate when
the quick heater is in operation.
Overheating shut-off
1.
This quick heater is equipped with an overheating shut-off. It
automatically shuts off
the quick heater in case of overheating.
2. If such case occurs the Pilot Light (8)
remains illuminated, although the quick
heater does not operate. Turn the Power
Switch (7) to the off-position (10) and
disconnect the appliance from the electricity
supply.
3. Let the quick heater cool down for at least
15 – 20 minutes.
4. Remove any obstructions from the Air Inlet
(14) or Outlet (6) that may have caused
or overheating.
5. To operate the quick heater again, follow
the instructions under
“Operating
Instructions”
.
CLEANING AND CARE
We recommend to clean the quick heater
frequently. In order to not impair the
performance of the quick heater, follow the
instructions for Cleaning and Care.
Cleaning
1.
Before cleaning, turn the Power Switch (7)
to the off-position (10) and unplug the unit.
2. Clean the Air Inlet (14) and Outlet (6) with
a vacuum cleaner to remove dust from the
motor and the heating element.
3. Use a soft, damp cloth to wipe the external
surfaces.
4. To operate the quick heater follow the
instructions under
„Operating Instructions”
Care
1.
This quick heater does not require any
special care.
2. In case the quick heater must be repaired,
contact an authorised specialist.
3. If the Supply Cord (15) must be repaired,
only a
type 2*1 mm2H05VVF HAR Cord
must be used.
CONDITION OF SALE
As a condition of sale, the purchaser assumes
responsibility for the proper use and care of this
appliance in accordance with these printed
instructions. The purchaser or user must judge
himself or herself when to use the appliance and
the length or use.
NOTE: IF YOU EXPERIENCE A PROBLEM
WITH YOUR QUICK HEATER PLEASE SEE
WARRANTY FOR INSTRUCTIONS. PLEASE
DO NOT ATTEMPT TO REPAIR THE QUICK
HEATER YOURSELF. DOING SO WILL
VOID THE WARRANTY AND COULD
CAUSE DAMAGE OR PERSONAL INJURY.
Technical specifications are subject to change.
 Loading...