

Carbon Monoxide Alarm
Owners Manual
Model SF350RVUL
CAREFULLY READ AND UNDERSTAND THE CON TENTS
OF THIS I NSTRUCTION MANUAL BEFORE USING THE
ALARM. STORE TH E MANUAL IN A SA FE PLACE FOR
FUTURE REFERENCE. PAY PARTICULAR ATTENTION TO
THE SAFE TY WARNINGS. PASS THE MANUAL ON TO ANY
SUBSEQUE NT USERS OF THE ALARM.
WARNING
Activation of your CO alarm’s audible horn
indicates the presence of carbon monoxide (CO)
which can KILL YOU.
WARNING. TH IS P RODUCT IS INTENDED FOR USE IN
ORDINARY
INDOOR LO CATIONS OF FAMILY LIVING UNI TS. I T I S
NOT DE SIGNED TO M EASURE CO MPLIANCE W ITH OCCUPATIONAL
SAFETY AND HEALTH ADMI NISTRATION ( OSHA) CO MMERCIAL OR
INDUSTR IAL STANDARDS.
INDIVIDUALS WHO ARE AT SP ECIAL RISK FRO M CARBON
MONOXIDE EXP OSURE BY REASON O F AGE, PREGNANCY
OR MEDICAL CON DITION MAY C ONSIDER USING WARNING
DEVICES W HICH PROVIDE AUDIBLE AND VISUAL SIGNALS
FOR CARBON MONOXIDE CONCENTRATION UNDER 30PPM. IF
IN DOUBT CONSULT YOUR MEDICAL PRACTITIONER.
THIS CARBON MONOXIDE ALARM IS NOT:
Designed to detect smoke, fire or any gas other than carbon
monoxide.
To be seen as a substitute for the proper servicing of fuel-burning
appliances or the sweeping of chimneys.
To be used on an intermittent basis, or as a portable alarm for
the spillage of combustion products from fuel-burning appliances
or chimneys.
CAUTION
This carbon monoxide alarm is designed for indoor use only. Do not expose
to rain or moisture. Do not knock or drop the alarm. Do not open or tamper
with the alarm as this could cause malfunction. The alarm will not protect
against the r isk of carbon monoxide poisoning when the batteries have
drained. The alarm will only indicate the presence of carbon monoxide gas
at the sensor. Carbon monoxide gas may be present in other areas.
IMPORTANT
Carbon monoxide is produced by the incomplete combustion of
fuels such as wood, charcoal, coal, heating oil, paraffin, gasoline,
natural gas, propane, butane, etc.
Ideally, it is recommended that a carbon monoxide alarm
should be installed in or near every room that has a fuel burning
appliance such as any gas fireplaces, furnaces, room heaters,
water heaters, cookers, grills, etc.
Ensure that the alarm buzzer can be heard by all those who
are intended to hear it. Seek medical help if it is suspected that
a member of the household is suffering from carbon monoxide
poisoning.
If the alarm sounds, make sure to investigate the problem.
Ignoring the alarm may result in sickness, injury or death. (CO
may be present even if nothing is seen or smelled by the user).
Alarm should be tested once per week. If further details are
required which
do not appear in this manual contact Ser vice at
847 955 4016.
•
•
•
•
•
•
•
•
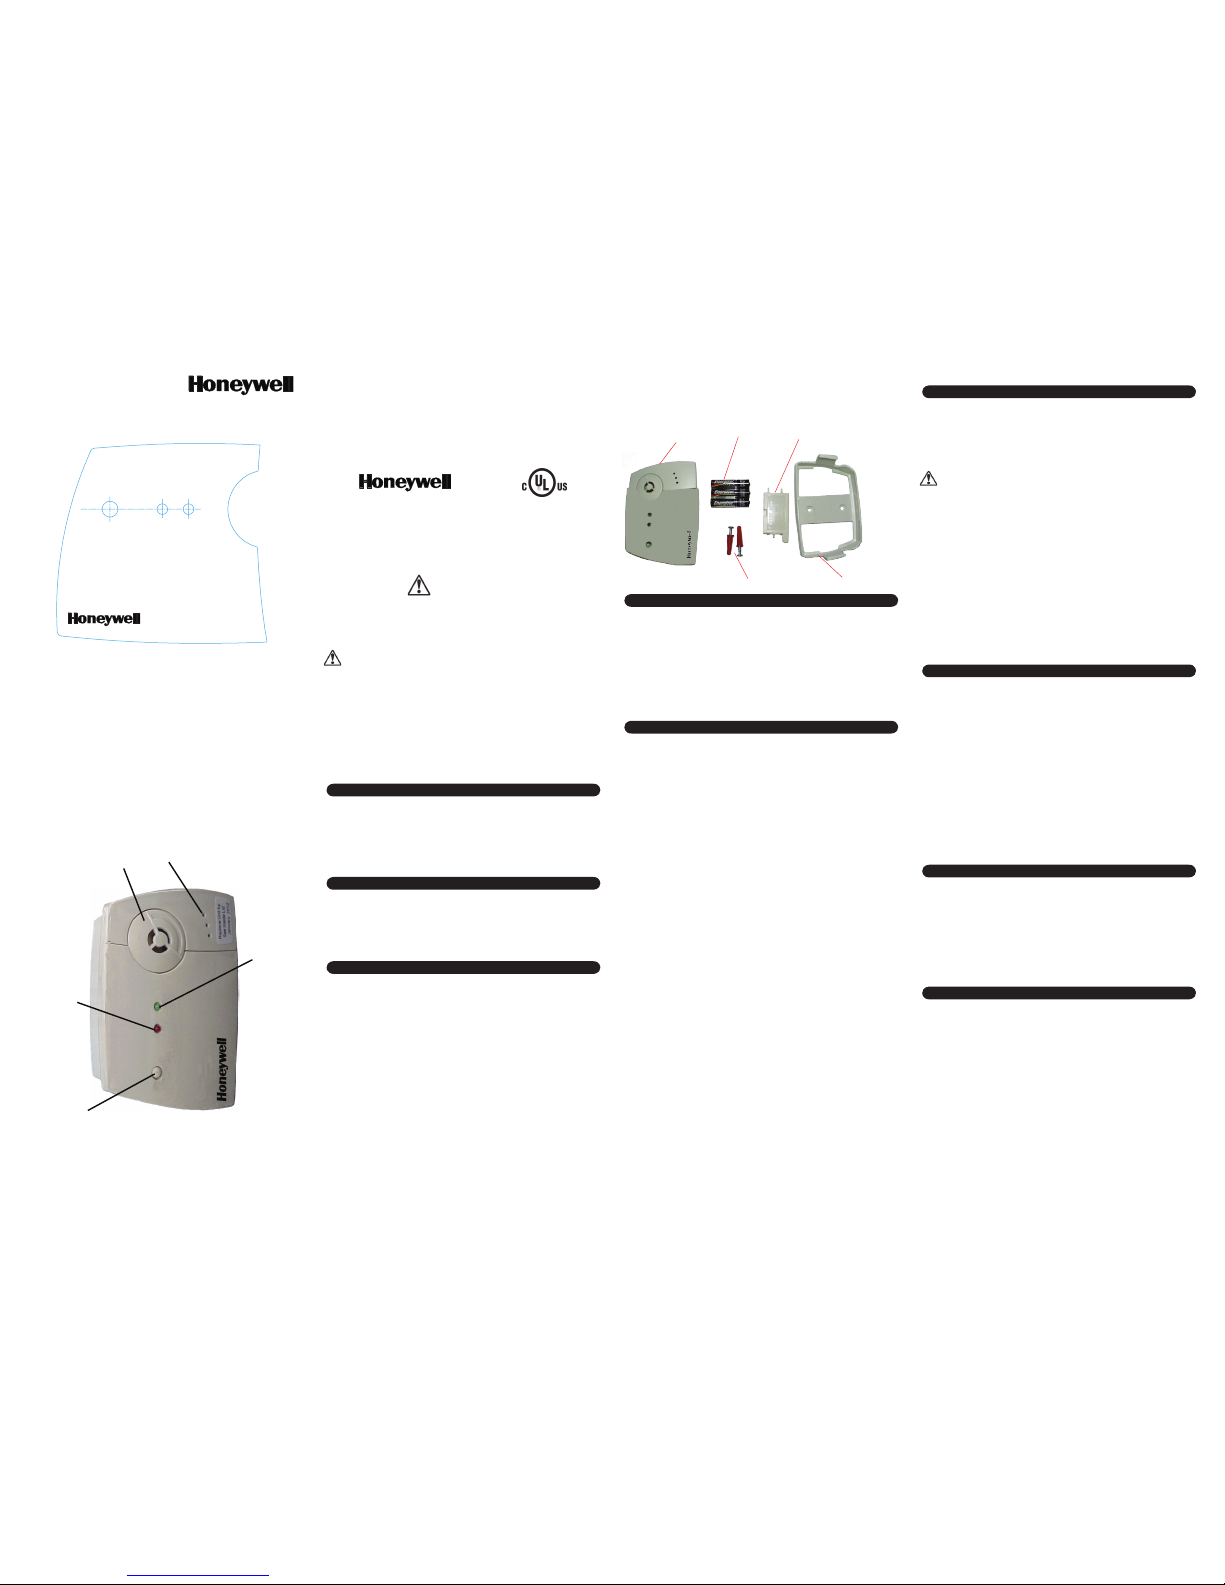
This pack contains: One alarm, 3 ‘AAA’ batteries, Battery compartment
cover, Screw pack, Mounting bracket, Owners Manual
IMPORTANT INFORMATION ON INSIDE OF LID
INFORMATIONS IMPORTANTES SE TROUVEN
T A L’INTÉRIEUR DO COVERCLE
TEST
SILENCE ALARM
ESSAI
ALARM
MOVE TO
FRESH AIR
ALARME
SE DÉPLACER
À L’AIR FRAIS
POWER
MARCHE
CARBON MONOXIDE ALARM
AVERTISSEUR MONOXYDE DE CARBONE
CO Alarm
“AAA” Batteries
Screws w/Anchors
Battery Compartment
Cover
Mounting Bracket
INTRODUCTION
Thank you for purchas ing this alarm which is d esigned to detect the
presence of carb on monoxide. This manual contains information on
the installation and operation of the CO alar m. The green light flashes
at approximately 60 -second intervals to indica te the alarm is operating
correctly. The red light will flash co ntinuously and the horn wi ll sound
if carbon monoxide is detected. The alarm is suitable for us e in areas
where cooking an d heating appliances burn f uels such as wood,
charcoal, coal, oil, gas, etc.
This carbon monoxide alarm is designed to detect carbon monoxide gas
from any source of combustion.
WHAT IS CARBON MONOXIDE?
Carbon monoxide (CO) is a highly poisonous gas which is released
when fuels are burnt. It is invisible, has no smell and is therefore very
difficult to detect with the human senses. Under normal conditions, in a
room where fuel burning appliances are well maintained and correctly
ventilated, the amount of carbon monoxide released into the room by
appliances is not dangerous.
These fuels include: Wood, coal, charcoal, oil, natural gas, gasoline,
kerosene, and propane.
Common appliances are often sources of CO. If they are not properly
maintained, are improperly ventilated, or malfunction, CO levels can rise
quickly. CO is a real danger now that homes are more energy efficient.
“Air-tight” homes with added insulation, sealed windows, and other weatherproofing can “trap” CO inside.
SYMPTOMS OF CO POISONING
These symptoms are related to CO POISONING and should be discussed with ALL household members.
Mild Exposure:
Slight headache, nausea, vomiting, fatigue (“flu-like” symptoms).
Medium Exposure:
Throbbing headache, drowsiness, confusion, fast heart rate.
Extreme Exposure:
Convulsions, unconsciousness, heart and lung failure. Exposure to
carbon monoxide can cause brain damage, death.
WARNING!
Some individuals are more sensitive to CO than others, including people
with cardiac or respiratory problems, infants, unborn babies, pregnant
mothers, or elderly people can be more quickly and severely affected by
CO. Members of sensitive populations should consult their doctors for
advise on taking additional precautions.
IN WHICH ROOM TO PUT THE ALARM
Installing CO Alarms in Recreational Vehicles or Mobile Homes.
For minimum security, a CO Alarm should be centrally located outside of
each separate sleeping area in the immediate vicinity of the bedrooms.
For more security, install additional Alarms in each separate bedroom.
The Alarm should be located at least 6 inches (152mm) from all exterior
walls and at least 3 feet (0.9 meters) from supply or return vents.
Warning!
Test units after the RV has been in storage, before each trip, and once
a week while in use. Failure to test units used in RVs as described may
remove your protection.
In general, install CO Alarms:
Inside every bedroom, especially if people sleep with the door
partly or completely closed.
In the hall near every sleeping area. If your home has multiple
sleeping areas, install a unit in each.
For additional coverage, install Alarms in all rooms, halls, and
storage areas, where temperatures normally remain between 40°F
(4°C and 38°C ).
Ideally an alarm should be fitted in or near every room that contains a
furnace or fuel burning heat source. However, if there is more than one
appliance the following points should be taken into account:
An alarm should be installed in any family living unit containing a
fuel-burning appliance or fireplace or having an attached garage.
WHERE NOT TO PUT THE ALARM
Do not place the alarm in the following areas:
Outside the building.
In or below a cupboard.
In a damp or humid area.
Directly above a sink or stove/oven.
Next to a door or window or anywhere that would be affected by
drafts.
Where the air flow to the alarm would be obstructed by curtains
or furniture.
When dirt or dust could collect and block the sensor, and stop it from
functioning.
In an area where the temperature could drop below 40°F (4.4°C)
or rise to above 100°F (37.8°C).
Where it could be easily knocked, damaged, or where it could be
inadvertently removed.
Within 5 feet (1.5m) of any cooking appliance.
CARE AND MAINTENANCE OF THE ALARM
The alarm should be tested weekly by pressing and holding the test/reset
button on the front of the alarm for several seconds. The alarm is precalibrated at the factory and requires no maintenance other than to clean
the outside casing occasionally with a cloth. Ensure that the holes on
the front of the alarm are not blocked with dirt and dust. DO NOT USE
CLEANING AGENTS, BLEACH OR POLISH.
The unit requires 3 x 1.5V alkaline batteries. The following are suitable
replacements: Gold Peak 24A LR03, Energizer E92 LR03
Use only the batteries listed. Use of batteries not listed may affect
performance of the unit.
USING THE ALARM
To activate the alarm, insert the 3 batteries which are included, fit the
battery compartment cover and close the detector lid (battery
compartment cover cannot be fitted unless batteries are inserted.)
When inserting the batteries, ensure the polarity is correct - ie: positive
end of battery (+) aligns with the (+) symbol in the battery housing. The
green and red lights will flash briefly and the horn will sound a short
chirp.
Press the test/reset button and check that the red light flashes and the
horn sounds. The alarm is now operating and ready for use.
•
•
•
•
•
•
•
•
•
•
•
•
•
•
IMPORTANT INFORMATION ON INSIDE OF LID
INFORMATIONS IMPORTANTES SE TROUVENT A L’INTÉRIEUR DU COVERCLE
POWER
ALARM
MOVE TO
FRESH AIR
TEST
SILENCE ALARM
CARBON MONOXIDE ALARM
AVERTISSEUR MONOXYDE DE CARBONE
MARCHE
ALARME
SE DÉPLACER
À L’AIR FRAIS
ESSAI
Owners Manual
Model SF350RVUL
Carbon Monoxide Alarm
IMPORTANT INFORMATION ON INSIDE OF LID
INFORMATIONS IMPORTANTES SE TROUVENT A L’INTERIEUR DU COVERCLE
CARBON MONOXIDE ALARM
AVERTISSEUR MONOXYDE DE CARBONE
ESSAI
ALARME
SE DÉPLACER
À L’AIR FRAIS
MARCHE
Buzzer
Gas Inlet
Green Power Light
Red Alarm Light
Test Button
Silence Alarm
TEST
SILENCE ALARM
ALARM
MOVE TO
FRESH AIR
POWER
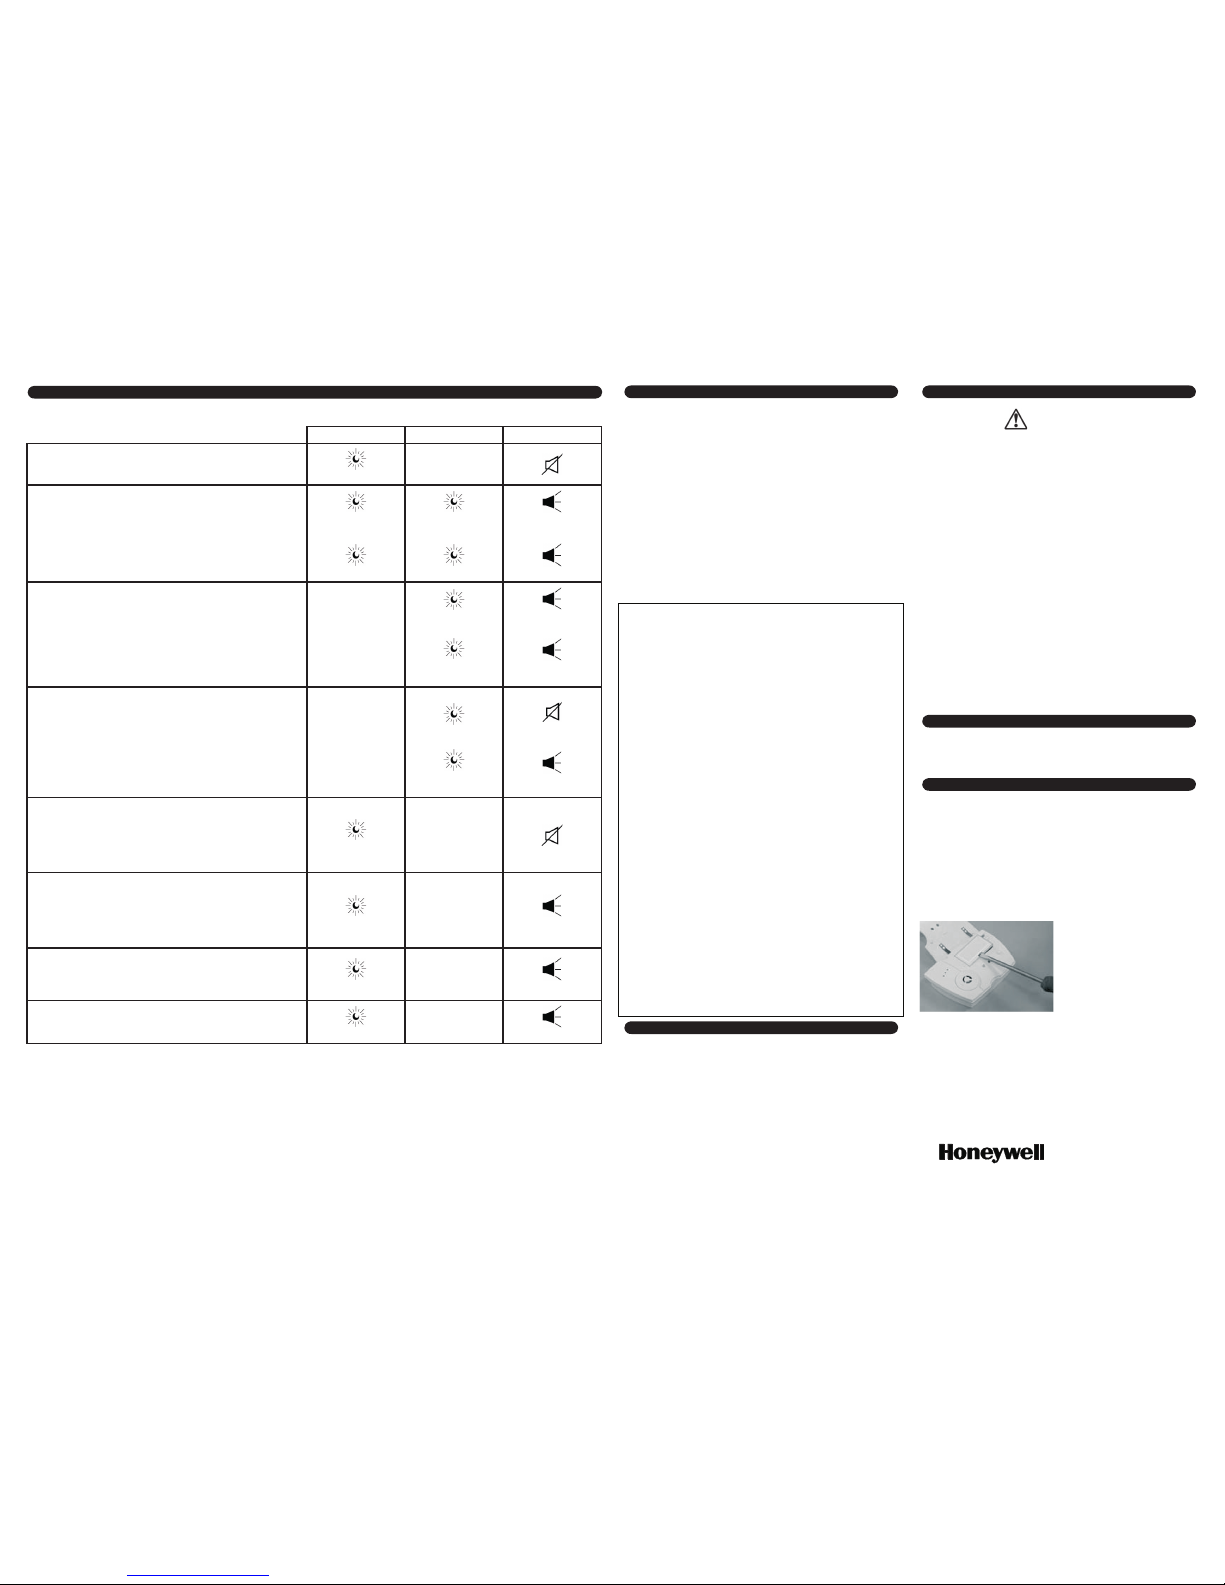
OPERATION OF THE ALARM
The alarm is not fitted with an on/off switch, it is automatically switched on when the 3 batteries are inserted. This is to ensure that the alarm cannot be
inadvertently switched off and therefore fail to detect a build-up of carbon monoxide.
Green Light Red Light Buzzer
Normal Operation
When no carbon monoxide is present, the green power light will flash
approximately once every 60 seconds.
1 every 60 sec
Test / Reset Button (in Normal operation)
If required, the alarm operation can be checked for
correct operation by pushing the Test/Reset button
on the front of the unit. This will generate two Alarm
Sequences, 5 seconds apart.
First Sequence:
On for duration switch
pressed
4 flashes
4 beeps
Second
Sequence:
1 flash 4 flashes
4 beeps
Alarm Conditions
When the unit detects carbon monoxide the alarm signal is sounded
continuously. The red alarm light will flash and the alarm will sound approximately 4 times every 5 seconds.
When the unit has been in alarm for a period of approximately 4 minutes, the alarm signal will be given every 60 seconds.
4 every 5 sec
4 every 60 sec
4 beeps
4 beeps
Test / Reset Button (in Alarm condition)
If required, the audible alarm signal can be silenced for a period of 6
minutes by pushing the Test/Reset button on the front of the unit. The
red light will continue to flash.
If the carbon monoxide is still present after the 6 minute period, the
audible alarm will resume the previous alarm condition. The Test/Reset button should not be used repeatedly and the actions “What to do
when the alarm sounds” should be followed.
4 every 5 sec
4 every 60 sec
no beep for 6 min
4 beeps every 60 sec
Return to Normal Operation
When the carbon monoxide gas disperses, the alarm will stop. The
green light will flash approximately once every 60 seconds (normal
operation). The user should check for the source of CO any time the
alarm has sounded, even if the alarm has returned to its normal working
conditions.
1 every 60 sec
Battery Replacement / Fault Warning
When the batteries need replacing the unit will sound 1 short beep
once every 60 seconds. The batteries must then be replaced with
fresh batteries. The green light will flash once as normal. If the
detector continues to sound 1 short beep every 60 seconds it must
be replaced.
1 every 60 sec
1 beep every 60 sec
Sensor Fault
If the sensor develops a fault the unit will sound 2 short beeps once
every 60 seconds.
The unit must then be replaced.
2 every 60 sec
2 beep every second
End of Life
The unit has reached the end of its 5 year life and must be replaced.
3 every 60 sec
3 beeps every second
WALL MOUNTING THE ALARM
Tools you will need: pencil, drill with 3/16” or 5mm dr ill bit, flathead
screwdriver, hammer.
Choose a location on the wall. Do not install the alar m closer that 4”
from the wall meets the ceiling.
Hold the mounting bracket against the wall, and make a mark inside
each keyhole where you will drill your mounting hole.
Use a 3/16” drill bit to drill through the marks you made for the
mounting holes.
Insert the plastic screw anchors into the mounting holes until they are
flush with the wall. If necessary. Tap them gently with a hammer.
Line up the mounting bracket up with the screw anchors, and screw
the bracket onto the wall.
Insert the CO Alarm onto the mounting bracket until you feel it click
into place.
Press the test/reset button on the front of the alarm, hold for several seconds
and check that the red light flashes and the audible alarm sounds. The alarm
can also be hung by a single screw using one of the ‘keyholes’ on the back
of the alarm.
LIMITED WARRANTY
Manufacturer (“Mfr”) of this product, warrants that for a period of five years
from the date of purchase, this product will be free from defects in material
and workmanship. Mfr, at its option, will repair or replace this product or
any component of the product found to be defective during the warranty
period. Replacement will be made with a new or remanufactured product
or component. If the product is no longer available, replacement may be
made with a similar product of equal or greater value. This is your exclusive
warranty.
This warranty is valid for the original retail purchaser from the date of the
initial retail purchase and is not transferable. Keep the original sales receipt.
Proof of purchase id required to obtain warranty performance. Mfr’s dealers,
service centers or retail stores selling Mfr products do not have the right to
alter, modify or any way change the terms and conditions of this warranty.
This warranty does not cover normal wear of parts or damage resulting from
any of the following negligent use or misuse of the product, use on improper
voltage or current, use contrary to the operating instructions, disassembly,
repair or alteration by anyone other than Mfr or an authorized service
center. Further, the warranty does not cover acts of god, such as fire, flood,
hurricanes and tornadoes or any batteries that are included with this unit.
Mfr shall not be liable for any incidental or consequential damages caused
by the breach of any express or implied warranty. Except to the extent
prohibited by applicable law, any implied warranty of the merchantability or
fitness for a particular purpose is limited in duration to the duration of the
above warranty. Some states, provinces, or jurisdictions do not allow the
exclusion or limitation of incidental or consequential damages or limitations
on how long an implied warranty lasts, so the above limitations or exclusion
may not apply to you. This warranty gives you specific legal rights, and
you may also have other rights that vary from state to state, or province
to province.
How to Obtain Warranty Service:
Service: If service is required, do not return the product to your retailer.
In order to obtain warranty service, contact Manufacturer at 847 955 4016,
7.30 AM to 5.00 PM, Central Standard Time, Monday through Friday. To
assist in serving you, please have the model number and date of purchase
available when calling.
Battery: Manufacturer makes no warranty, express or implied, written or oral,
including that of merchantability or fitness for any par ticular purpose, with
respect to battery.
SPECIFICATIONS
Model: SF350RVUL
Gas Detected: Carbon monoxide
Detection Principle: Electro-chemical cell
Alarm Indication: Audible and visual alarm
Alarm Levels: 70ppm Between 60 and 240 minutes
150ppm Between 10 and 50 minutes
400ppm Between 4 and 15 minutes
Operating Temperature: 40°F to +100°F
Humidity Range: 15 to 95% RH
Warm-up time after
initial switch on: Instantaneous
Dimensions: 4.33” x 2.99” x 1.33”
Weight: 4.93 oz
1.
2.
3.
4.
5.
6.
WHAT TO DO WHEN THE ALARM SOUNDS
WARNING
Activation of your CO alarm’s audible horn
indicates the presence of carbon monoxide (CO)
which can KILL YOU.
Operate reset/silence button.
Call your emergency service
(Phone: ____________________________) [fire department
or 911].
Immediately move to fresh air – outdoors or by an open door/window.
Do a head count to check that all persons are accounted for. Do not
re-enter the premises nor move away from the open door/window
until the emergency services have arrived, the premises have been
aired out and your alarm remains in its normal condition.
After following steps 1-3, if your alarm reactivates within a 24-
hour period, repeat steps 1-3 and call a qualified technician
(Phone: ____________________________) to investigate for
sources of CO from fuel burning equipment and appliances and
inspect for proper operation of this equipment. If problems are
identified during this inspection have the equipment serviced
immediately. Note any combustion equipment not inspected by the
technician and consult the manufacturers’ instructions, or contact
the manufacturers directly, for more information about CO safety
and this equipment. Make sure that motor vehicles are not and
have not been operating in an attached garage or adjacent to the
residence.
SELF-ADHESIVE LABELS
Please add the telephone number of your emergency services and a
qualified technician to the labels provided and place one copy next to the
appliance and the other near a source of fresh air where you plan to
gather in the event of an alarm.
TO REPLACE BATTERIES
Pull down lid of alarm. Place a screwdriver (or similar tool)
in the slot at the top of the battery compartment cover and remove.
Carefully remove old batteries from battery housing and dispose
of old batteries with care.
Using only batteries listed in ‘Care and Maintenance of Alar m’ insert 3
new batteries, ensuring they snap securely into place and cannot be
shaken loose. Replace battery compar tment cover and close detector
lid. Press the test/reset button and check that the red light flashes and
the horn chirps. The detector is now operating and ready for use.
NOTE:
WITH THE BATTERI ES
REMOVE D IT WIL L NOT B E
POSS IBLE TO CL OSE THE
ALAR M LID.
Dispose of the alarm in accordance with local regulations.
WARNING: DO N OT DISPOSE OF IN FIRE.
For technical or sales inquiries, or to obtain a replacement alarm,
please call the service department at (847) 955-4016.
Honeywell Analytics Inc.
405 Barclay Boulevard
Lincolnshire, Illinois 60096
1.
2.
3.
4.
1998M0670 Rev 3
 Loading...