

Page 1

ScanPal™ EDA51
powered by Android™
Quick Start Guide
EDA51-A-EN-QS-01 Rev A
11/19
Page 2

Out of the Box
Make sure that your shipping box contains these items:
• ScanPal EDA51 mobile computer
(Model EDA51-0 or EDA51-1)
• Rechargeable Li-ion battery (see page 7)
• Hand strap (optional)
• Product documentation
If you ordered accessories for your mobile computer, verify that
they are also included with the order. Be sure to keep the original
packaging in case you need to return the mobile computer for
service.
Note: EDA51-0 models do not include a WWAN radio.
Memory Card Specifications
Honeywell recommends the use of Single Level Cell (SLC)
industrial grade microSD™ or microSDHC™ memory cards with
ScanPal mobile computers for maximum performance and
durability. Contact a Honeywell sales representative for
additional information on qualified memory card options.
1
Page 3
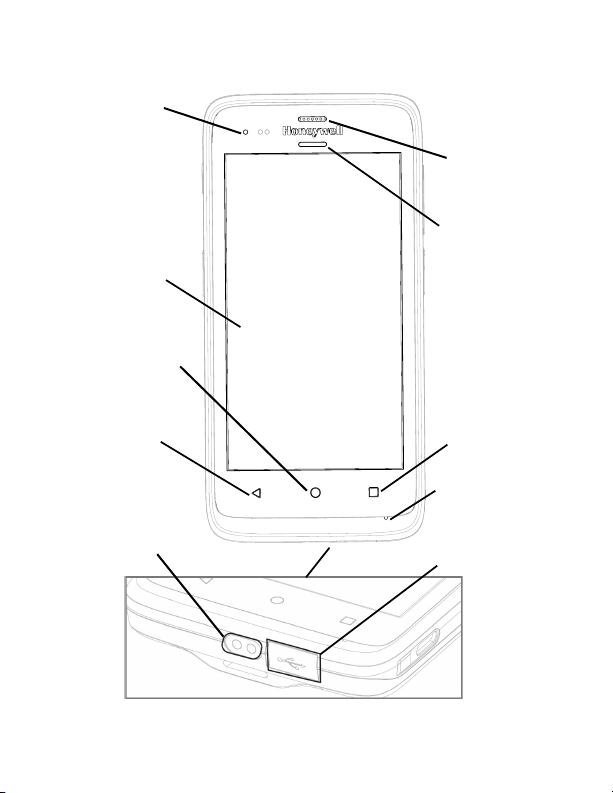
Mobile Computer Features
Power Indicator
Touch Panel
Home Key
Speaker
Scan Status LED
Return Key
I/O Connector
Function Key
Microphone
USB Cover
2
Page 4
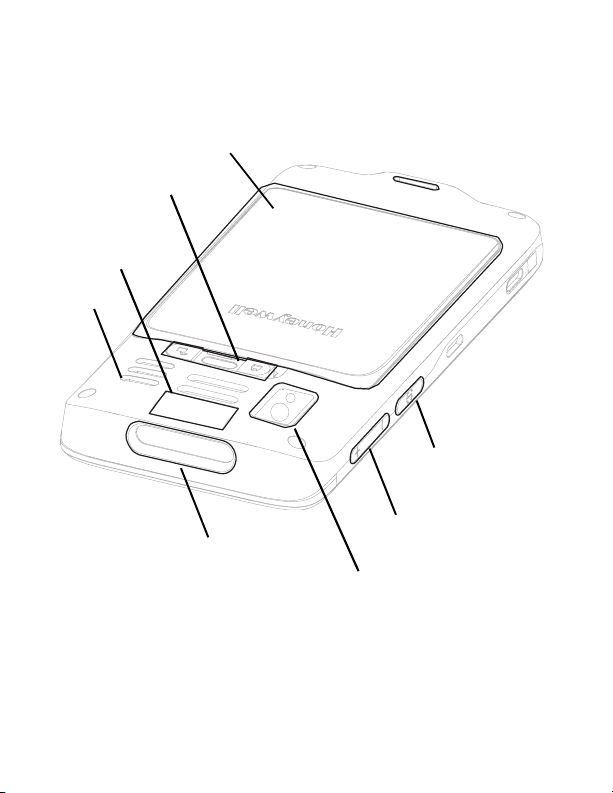
Battery Cover
Battery Latch
Laser Safety
Label Location
Speaker
Scan Button
Scan Engine
Volume Button
Camera Lens and
Flash
3
Page 5

Remove the Battery Cover
1
2
3
5
4
4
Page 6
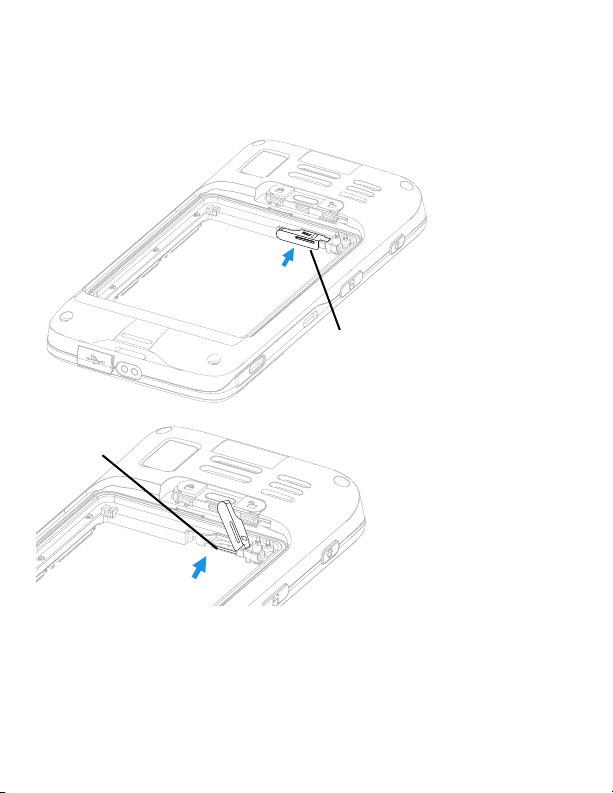
Install a Nano SIM Card
SIM
Only EDA51-1 (WWAN) models support Nano SIM card use for
cellular phone feature.
Card Cover
SIM Card
Note: Always power off the computer before attempting to install or
remove a card.
5
Page 7
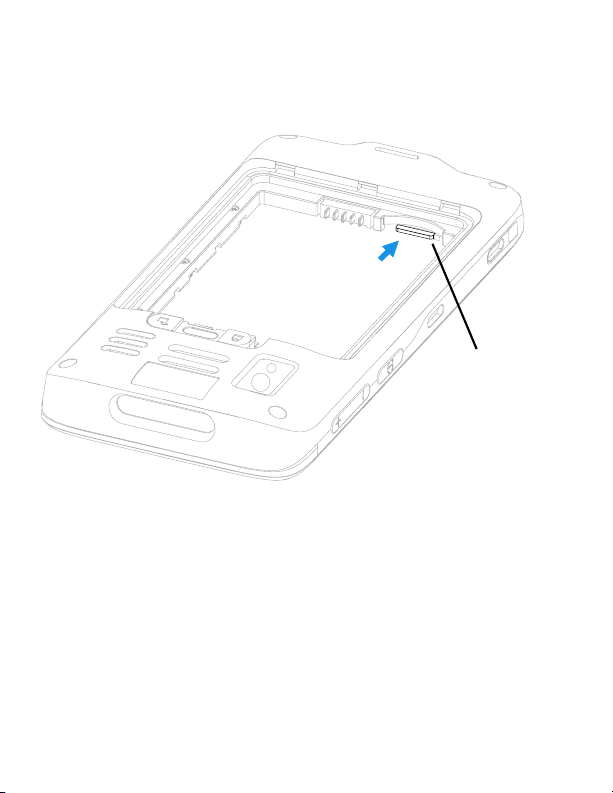
Install a MicroSD Card (Optional)
Note: Format the microSD card before initial use.
MicroSD
Note: Always power off the computer before attempting to install or
remove a card.
6
Page 8
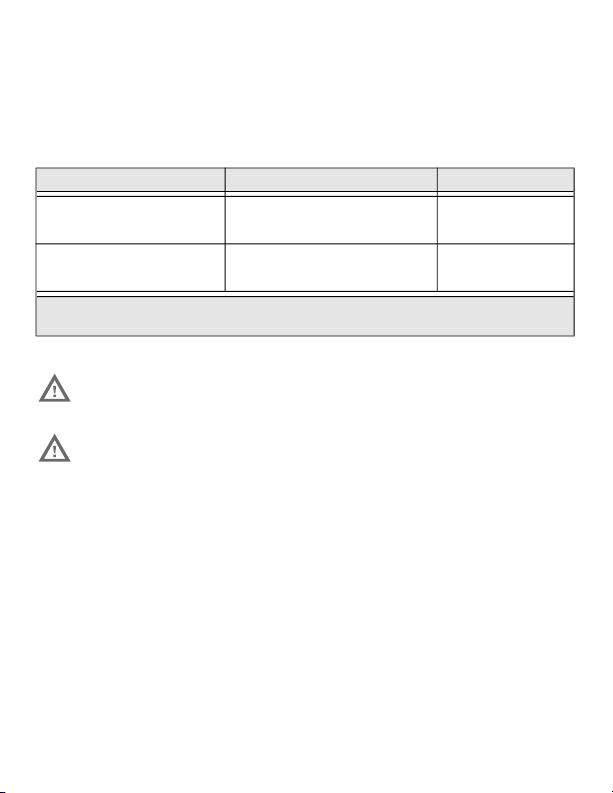
About the Battery
The EDA51 mobile computer ships with a Li-ion battery
manufactured for Honeywell International Inc.
Model Configuration battery P/N Power
EDA51-0 50129589-001,
50134176-001
EDA51-1 50129589-001,
50134176-001
Configuration number (CN) is located on the label in the battery well of
the mobile computer.
We recommend use of Honeywell Li-ion battery
packs. Use of any non-Honeywell battery may result
in damage not covered by the warranty.
Ensure all components are dry prior to placing the
battery in the computer. Mating wet components
may cause damage not covered by the warranty.
3.8 VDC,
15.2 watt-hour
3.8 VDC,
15.2 watt-hour
7
Page 9
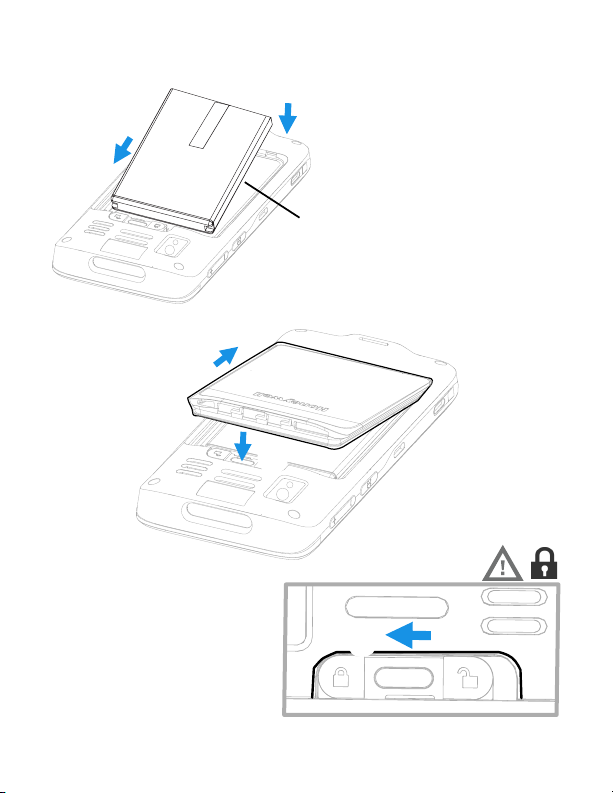
Install the Battery
1
3
2
Battery
(Refer to page 7)
4
5
8
Page 10
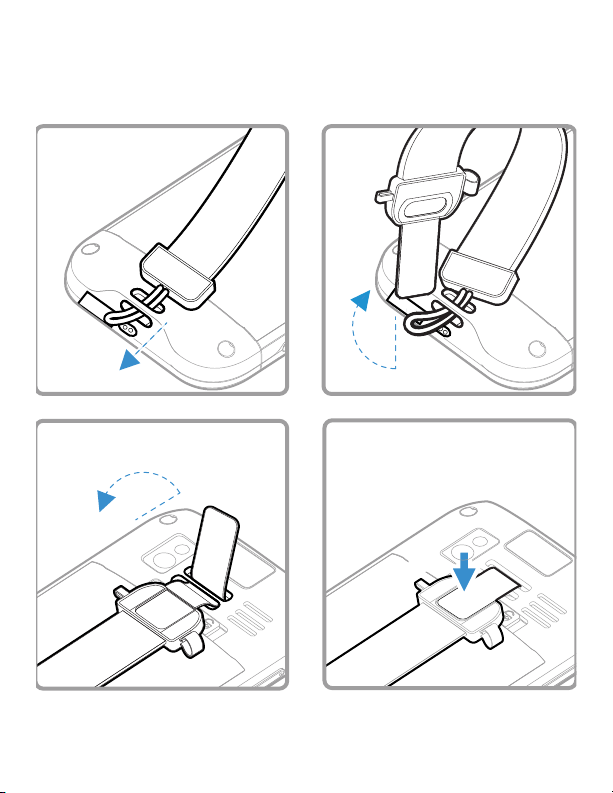
Install the Hand Strap (Optional)
2
1
3
4
9
Page 11

Charge the Mobile Computer
The EDA51 mobile computer ships with a partially charged
battery. Charge the battery with a EDA51 Series charging device
for a minimum of 4.5 hours. Using the computer while charging
the battery increases the time required to reach a full charge.
We recommend the use of Honeywell accessories and
power adapters. Use of any non-Honeywell
accessories or power adapters may cause damage not
covered by the warranty.
EDA51 mobile computers are designed for use with the
following EDA51 charging accessories: Single Charging Dock,
Quad Bay Charge Base, Quad Battery Charger, and USB Cable.
For more information about accessories, see the “ScanPal
EDA51 Mobile Computer Accessories Guide” at
www.honeywellaidc.com.
Ensure all components are dry prior to mating the
computers and batteries with peripheral devices.
Mating wet components may cause damage not
covered by the warranty.
10
Page 12

Turn Power On/Off
The first time you power on the computer, a Welcome screen
appears. You can either scan a configuration bar code or use the
Wizard to manually set up the computer. Once setup is
complete, the Welcome screen no longer appears on startup
and Provisioning mode is automatically turned off (disabled).
To turn the computer on:
• Press and hold the Power button for approximately 3 seconds,
and then release.
To turn the computer off:
1. Press and hold the Power button until the options menu
appears.
2. Touch Power Off.
Note: You should always power off the computer before removing the
battery.
Sleep Mode
Sleep mode automatically turns the touch panel display off and
locks the computer to save battery power when the computer is
inactive for a programmed period of time.
1. Press and release the Power button to wake the computer.
2. Drag the toward the top of the display to unlock the
computer.
11
Page 13

Adjust the Display Sleep Time
To adjust the amount of time before the display sleeps after
inactivity:
1. Swipe up on the touch screen.
2. Select Settings > Display > Advanced > Sleep.
3. Select the amount of time before the display goes to sleep.
4. Touch to return to the Home screen.
12
Page 14
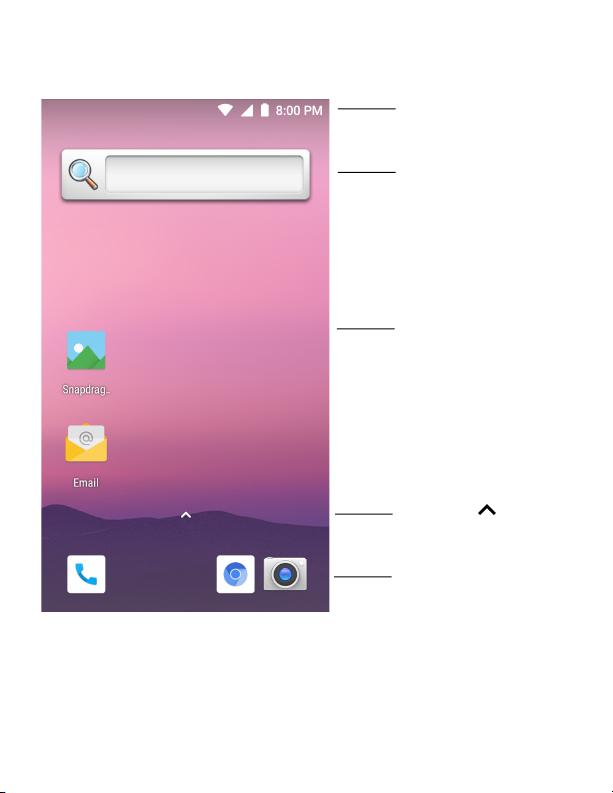
About the Home Screen
Notification /
Status Bar
Search Bar
Home Screen Panel
Swipe up to
access all apps.
Favorites Tray
To learn how to customize the Home screen, see the User Guide.
13
Page 15
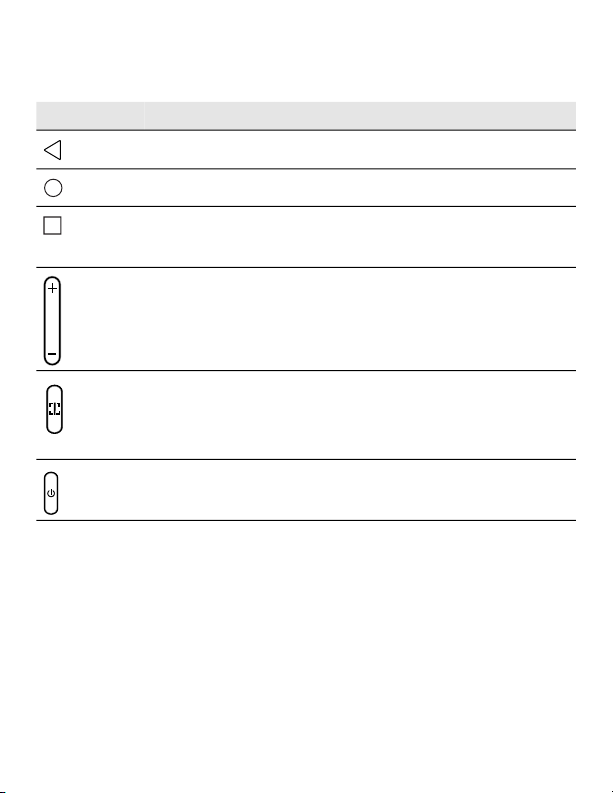
Navigation and Function Buttons
Button Description
Back Return to the previous screen.
Home Return to the Home screen.
Recent Apps View and switch between recently
used apps.
Volume Press the top of the button to raise
the speaker volume.
Press the bottom of button to
lower the speaker volume.
Scan Press left or right Scan button to
trigger the scanner.
Power button See page 11.
For button locations, see Mobile Computer Features on page 2.
To learn more about how to re-map a button, see the User Guide.
14
Page 16
About Provisioning Mode
After completing the out-of-box set up process, Provisioning
mode is automatically turned off. Scanning a bar code to install
applications, certificates, configuration files, and licenses on
the computer is restricted unless you enable Provisioning mode
in the Settings app. To learn more, see the user guide.
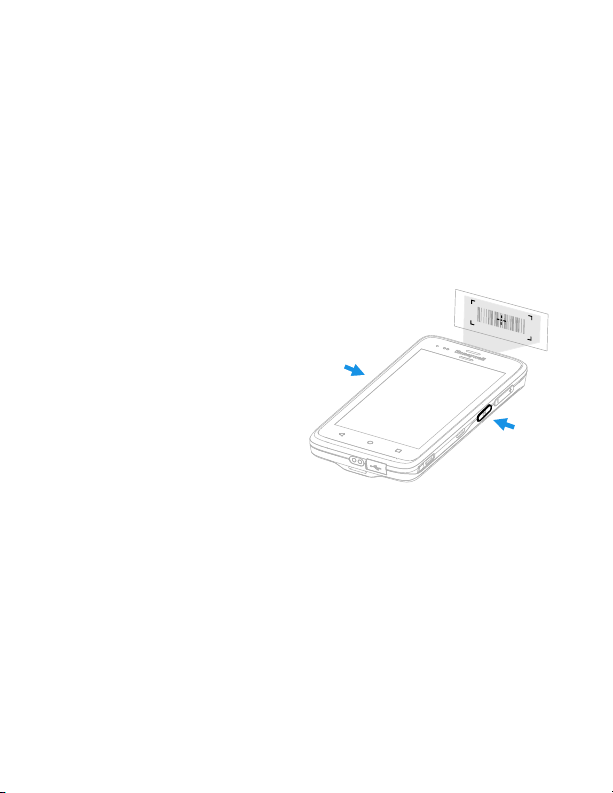
Scan a Bar Code with the Scan Demo
For optimum performance, avoid reflections by scanning the
bar code at a slight angle.
1. Swipe up on the screen.
2. Select Demos > Scan
Demo.
3. Point the computer at
the bar code.
4. Touch Scan on the
screen or press and
hold any Scan button.
Center the aiming beam
over the bar code.
The decode results appear on the screen.
Note: In the Scan Demo app, not all bar code symbologies are enabled
by default. If a bar code does not scan, the correct symbology may
not be enabled. To learn how to modify the default app settings,
see the User Guide.
15
Page 17

Sync Data
To move files between your EDA51 and a computer:
1. Connect the EDA51 to your computer using a USB charge/
communication accessory.
2. On the EDA51, swipe down from the top of the screen to see
the notifications panel.
3. Touch the Android System USB charging notification twice
to open the options menu.
4. Select either Transfer files or Transfer photos (PTP).
5. Open the file browser on your computer.
6. Browse to the EDA51. You can now copy, delete, and move
files or folders between your computer and EDA51 as you
would with any other storage drive (e.g., cut and paste or
drag and drop).
Note: When Provisioning mode is turned off, some folders are hidden
from view in the file browser.
16
Page 18

Restart the Mobile Computer
You may need to restart the mobile computer to correct
conditions where an application stops responding to the system
or the computer seems to be locked up.
1. Press and hold the Power button until the options menu
appears.
2. Select Restart.
To restart the computer if the touch panel display is
unresponsive:
• Press and hold the Power button for approximately 8 seconds
until the computer restarts.
Note: To learn about advanced reset options, see the User Guide.
Support
To search our knowledge base for a solution or log into the
Technical Support Portal and report a problem, go to
www.hsmcontactsupport.com.
Documentation
Product documentation is available at www.honeywellaidc.com.
17
Page 19

Limited Warranty
For warranty information, go to www.honeywellaidc.com and
click Resources > Product Warranty.
Patents
For patent information, see www.hsmpats.com.
Trademarks
Android is a trademark of Google LLC.
Disclaimer
Honeywell International Inc. (“HII”) reserves the right to make
changes in specifications and other information contained in
this document without prior notice, and the reader should in all
cases consult HII to determine whether any such changes have
been made. The information in this publication does not
represent a commitment on the part of HII.
HII shall not be liable for technical or editorial errors or
omissions contained herein; nor for incidental or consequential
damages resulting from the furnishing, performance, or use of
this material. HII disclaims all responsibility for the selection
and use of software and/or hardware to achieve intended
results.
This document contains proprietary information that is
protected by copyright. All rights are reserved. No part of this
document may be photocopied, reproduced, or translated into
another language without the prior written consent of HII.
Copyright © 2019 Honeywell International Inc. All rights
reserved.
18
 Loading...