

Page 1

PC43K
Integrated Print/Scan Solution
powered by Android™
User Guide
Page 2

Disclaimer
Honeywell International Inc. (“HII”) reserves the right to make changes in specifications and other information contained in
this document without prior notice, and the reader should in all cases consult HII to determine whether any such changes
have been made. The information in this publication does not represent a commitment on the part of HII.
HII shall not be liable for technical or editorial errors or omissions contained herein; nor for incidental or consequential
damages resulting from the furnishing, performance, or use of this material. HII disclaims all responsibility for the selection and use of software and/or hardware to achieve intended results.
This document contains proprietary information that is protected by copyright. All rights are reserved. No part of this document may be photocopied, reproduced, or translated into another language without the prior written consent of HII.
Copyright 2020 Honeywell International Inc. All rights reserved.
Web Address:
www.honeywellaidc.com
Trademarks
Google, Android, Google Play, Google Pay and other marks are trademarks of Google LLC.
Bluetooth trademarks are owned by Bluetooth SIG, Inc., U.S.A. and licensed to Honeywell.
Qualcomm and Snapdragon are registered trademarks or trademarks of Qualcomm Incorporated in the United States
and/or other countries.
Microsoft® Windows®, Windows NT®, Windows 2000, Windows ME, Windows XP, and the Windows logo are trademarks or
registered trademarks of Microsoft Corporation.
Other product names or marks mentioned in this document may be trademarks or registered trademarks of other companies and are the property of their respective owners.
Patents
For patent information, refer to www.hsmpats.com.
Page 3

TABLE OF CONTENTS
Customer Support ....................................................................................................................... vii
Technical Assistance ............................................................................................................ vii
Product Service and Repair ............................................................................................... vii
Limited Warranty ..................................................................................................................viii
Caution Statements............................................................................................................... ix
Chapter 1 - Get Started ....................................................................................1
Features ............................................................................................................................................. 1
Kiosk Front View .......................................................................................................................2
Back View (Power Port).......................................................................................................... 2
Side View .....................................................................................................................................3
Printer Lid Open View ............................................................................................................ 3
Swing Arms Movement Range ...........................................................................................4
Tablet Movement Range.......................................................................................................4
Printer Features........................................................................................................................ 5
Tablet Features .........................................................................................................................5
About Home Screen .........................................................................................................6
Navigation Buttons ..........................................................................................................6
PC43K Applications.......................................................................................................... 7
Scan Features............................................................................................................................7
Chapter 2 - Set Up the Kiosk ........................................................................... 9
Loading the Media......................................................................................................................... 9
Open Printer Media Lid for Media Loading .................................................................. 9
Load Media for Tear-off Printing.................................................................................... 10
Load Media for Cut-off Printing ..................................................................................... 13
PC43K User Guide iii
Page 4

Load Media for Label Dispenser.....................................................................................14
Load External Media............................................................................................................16
Power on the Kiosk ......................................................................................................................17
Print a Test Label .........................................................................................................................18
About Scan Engine......................................................................................................................19
Scan a Code.............................................................................................................................19
Chapter 3 - Using the Kiosk.......................................................................... 21
Kiosk Applications .......................................................................................................................21
PC43K-Demo Application..................................................................................................21
Register at an Event.......................................................................................................22
Return an Item .................................................................................................................22
Ship a Package ................................................................................................................23
PC43K- Firmware Updater for Printer...........................................................................24
How to Update Firmware .............................................................................................24
Honeywell App Lock.............................................................................................................25
Enable App Lock .............................................................................................................25
How to Use.........................................................................................................................26
Change Account Password.........................................................................................29
Android Applock Security Warning..........................................................................30
Chapter 4 - USB Connectivity...................................................................... 31
Connectivity ...................................................................................................................................31
Installing Customized Applications .....................................................................................32
Deleting Customized Applications .......................................................................................34
Chapter 5 - Troubleshooting........................................................................ 35
Error Alerts and Solutions ........................................................................................................35
Troubleshoot Kiosk Problems and Find Solutions .........................................................36
Kiosk Problems.......................................................................................................................36
Kiosk Default Settings ...............................................................................................................37
Disabled Features .................................................................................................................37
iv PC43K User Guide
Page 5

Chapter 6 - Maintenance...............................................................................39
Clean the Kiosk..............................................................................................................................39
Clean the Touch Panel and Scanner Window.............................................................40
Clean the Printhead..............................................................................................................40
Clean the Platen Roller........................................................................................................41
Clean the Exterior of the Kiosk .........................................................................................42
Appendix A - Specifications ..........................................................................43
Kiosk Specification ......................................................................................................................43
Printer Supported Command Languages ...................................................................43
Media Sensors ........................................................................................................................43
Scanner Specifications .......................................................................................................44
Supported Symbologies ...............................................................................................44
N3680 Scan Engine Reading Distances ...............................................................44
Dimension Illustration ...............................................................................................................45
PC43K Width ...........................................................................................................................45
PC43K Length and Height.................................................................................................45
Wall Mount Bracket.....................................................................................................................46
PC43K User Guide v
Page 6

vi PC43K User Guide
Page 7

Customer Support
Technical Assistance
To search our knowledge base for a solution or to log in to the Technical Support
portal and report a problem, go to www.hsmcontactsupport.com.
For our latest contact information, see www.honeywellaidc.com/locations.
Product Service and Repair
Honeywell International Inc. provides service for all of its products through service
centers throughout the world. To find your service center, go to
www.honeywellaidc.com and select Support. Contact your service center to obtain
a Return Material Authorization number (RMA #) before you return the product.
To obtain warranty or non-warranty service, return your product to Honeywell
(postage paid) with a copy of the dated purchase record. To learn more, go to
www.honeywellaidc.com and select Service & Repair at the bottom of the page.
For ongoing and future product quality improvement initiatives, the mobile
computer comes equipped with an embedded device lifetime counter function.
Honeywell may use the lifetime counter data for future statistical reliability
analysis as well as ongoing quality, repair, and service purposes.
Prepare Kiosk for Service & Repair Shipping
Keep all original packaging material in the event that you need to return the kiosk
for service. To prepare the kiosk and avoid potential damage during transit:
1. Turn off the AC power switch.
2. Remove the AC power adapter from the kiosk and from the AC power socket.
3. Press and hold the power button of the tablet until the options menu appears.
Tap Power off.
4. Remove the media installed in the printer.
PC43K User Guide vii
Page 8
5. Lower the swing arms to front.
6. Use the original packing materials to secure and protect the kiosk in the box.
7. Securely seal the shipment.
Note: Honeywell is not responsible for any damage caused during shipment/transit.
Limited Warranty
For warranty information, go to www.honeywellaidc.com and click Resources >
Product Warranty.
viii PC43K User Guide
Page 9

Caution Statements
Caution: Read and review the warnings in this manual carefully before
Caution: Observe all safety and accident prevention regulations
Caution: You must implement both hardware and software safety
Caution: To reduce the risk of electric shock or fire, keep the cover closed
Caution: The load for each peripheral connected through USB port
Caution: Do not store the kiosk without using it for a long period of time.
connecting the kiosk.
applicable to your specific region and application.
precautions to prevent the possibility of undefined system
states.
and turn off the kiosk when not in use. There are no
user-serviceable parts inside the power supply unit.
should not exceed 500mA.
If storing for over 6 months, make sure to charge by turning on
the kiosk.
PC43K User Guide ix
Page 10

x PC43K User Guide
Page 11

CHAPTER
1
GET STARTED
The PC43K is designed to provide a compact, self-customizable solution for
deploying a kiosk with scan and print capability. Integrated with Honeywell’s
compact printer, Android enabled Honeywell tablet, and a versatile Honeywell
scanner, the PC43K comes with fully articulated swing arms for easy user access.
Honeywell provides demo applications and Power Tool applications that make the
PC43K user-friendly and easy to deploy. The demo application provides a selflearning framework to develop your custom kiosk application. The kiosk is powered
through an AC power adapter.
Features
• Fully integrated printer, tablet, and scanner
• Fixed or fully articulated arms for easy viewing
• Large multi-touch panel
• Supports printing on multiple media types
• Supports uploading custom-designed application
• WLAN IEEE 802.11 a/b/g/n/ac
• Honeywell Power Tools and PC43K-Demo Application
• Honeywell App Lock application
• Desktop and wall mount design
PC43K User Guide 1
Page 12
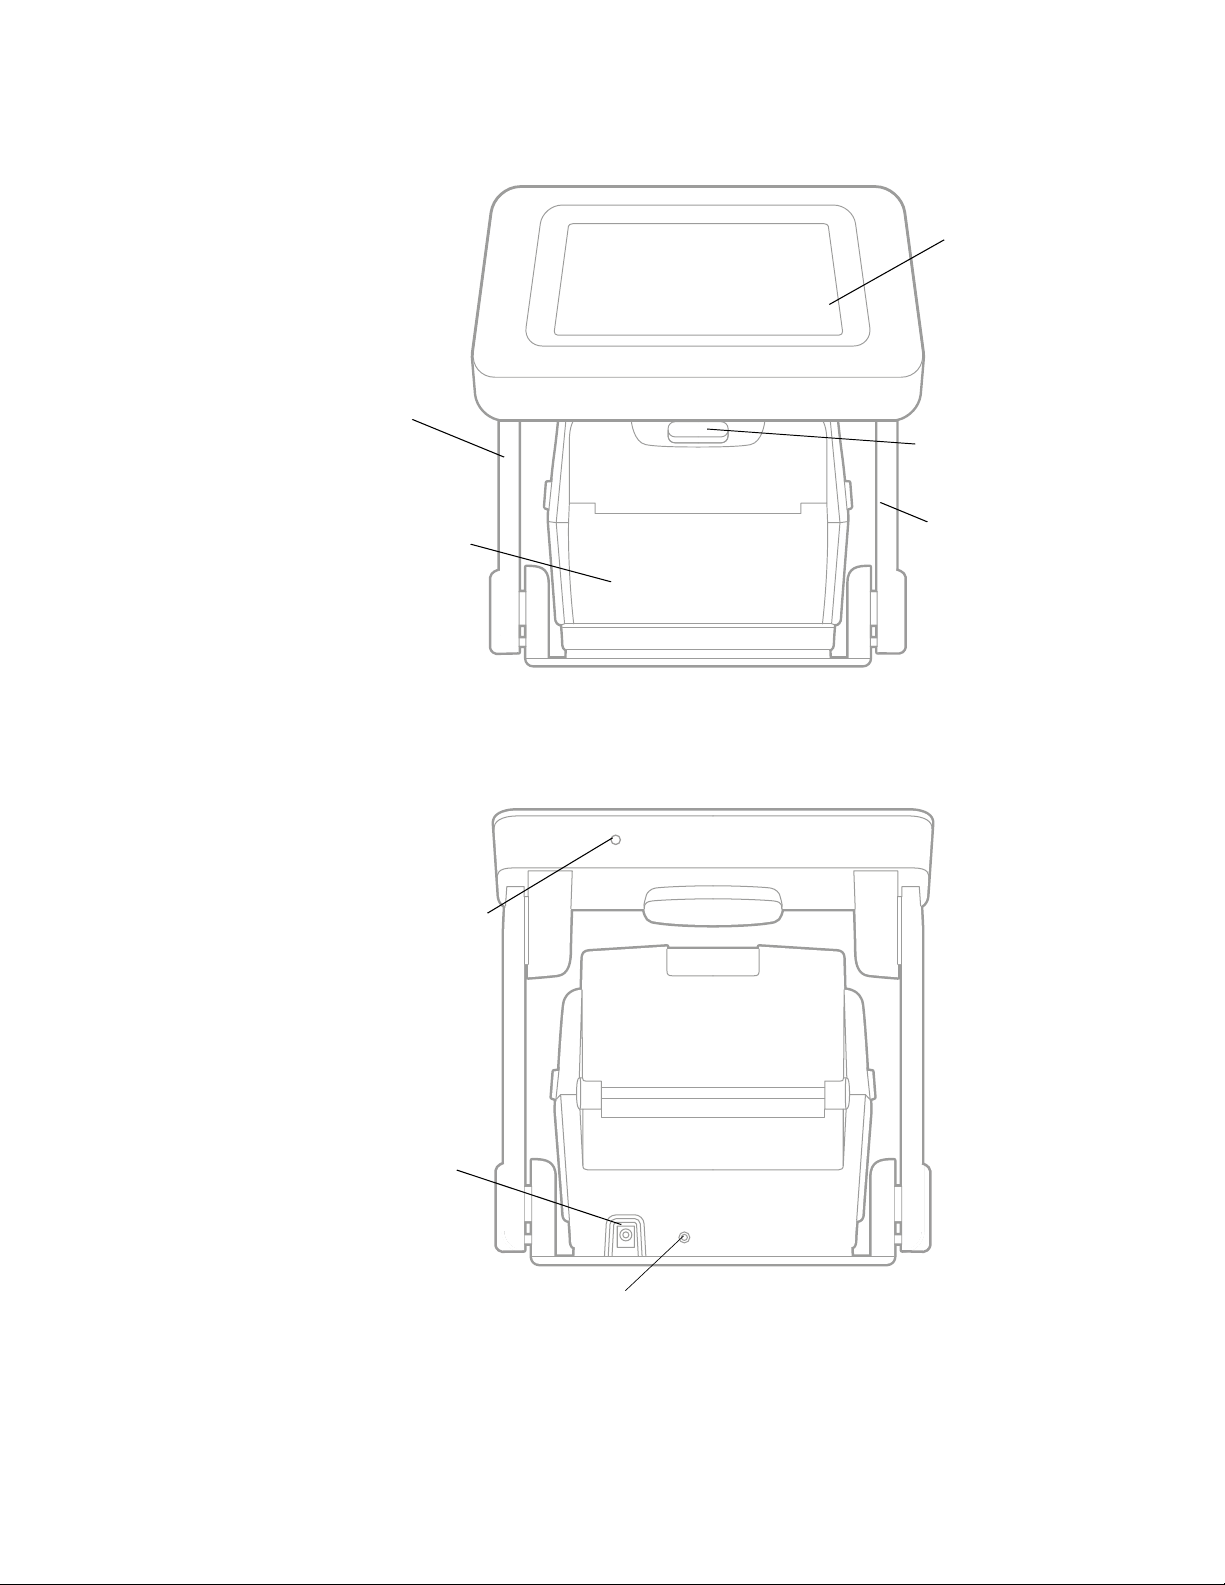
Kiosk Front View
Swing Arm
Multi-Touch Panel
Scanner
Printer
:
Back View (Power Port)
Tablet Power Button
Swing Arm
AC Power Jack
Power LED
2 PC43K User Guide
Page 13
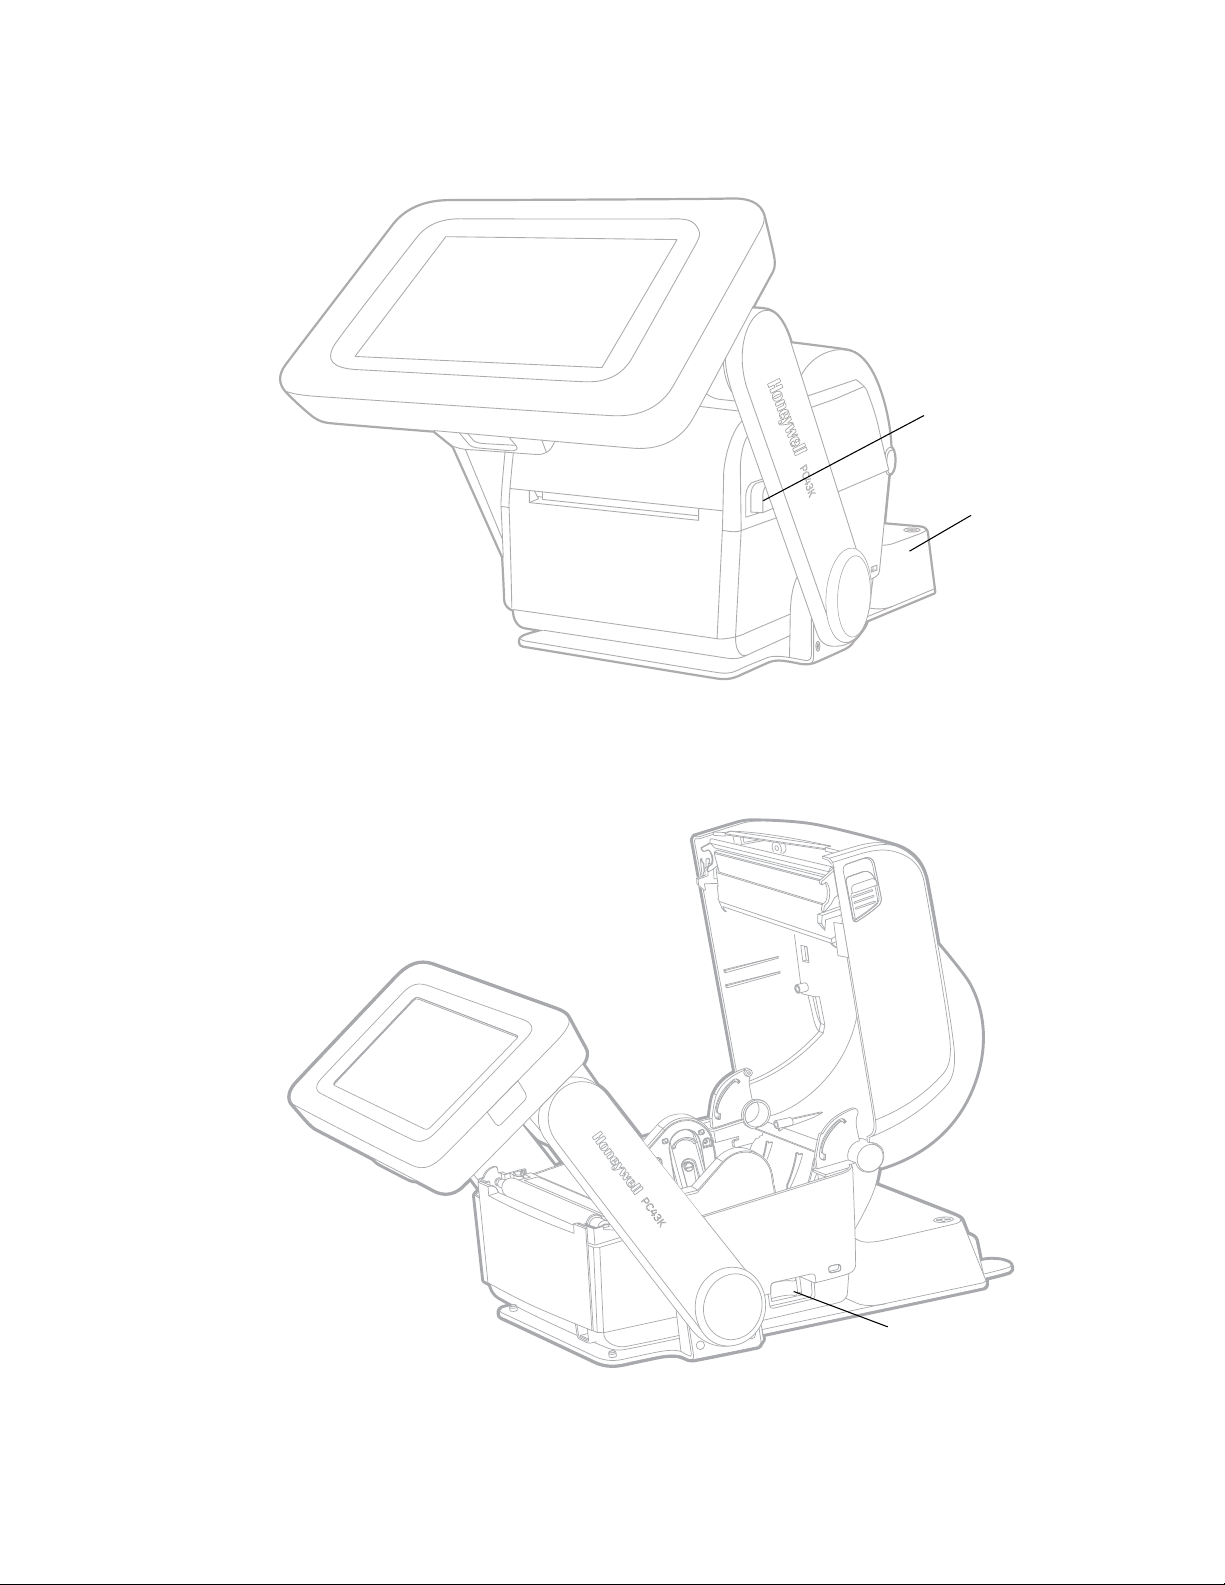
Side View
Printer Latch
USB Hub
Printer Lid Open View
Printer Switch
PC43K User Guide 3
Page 14
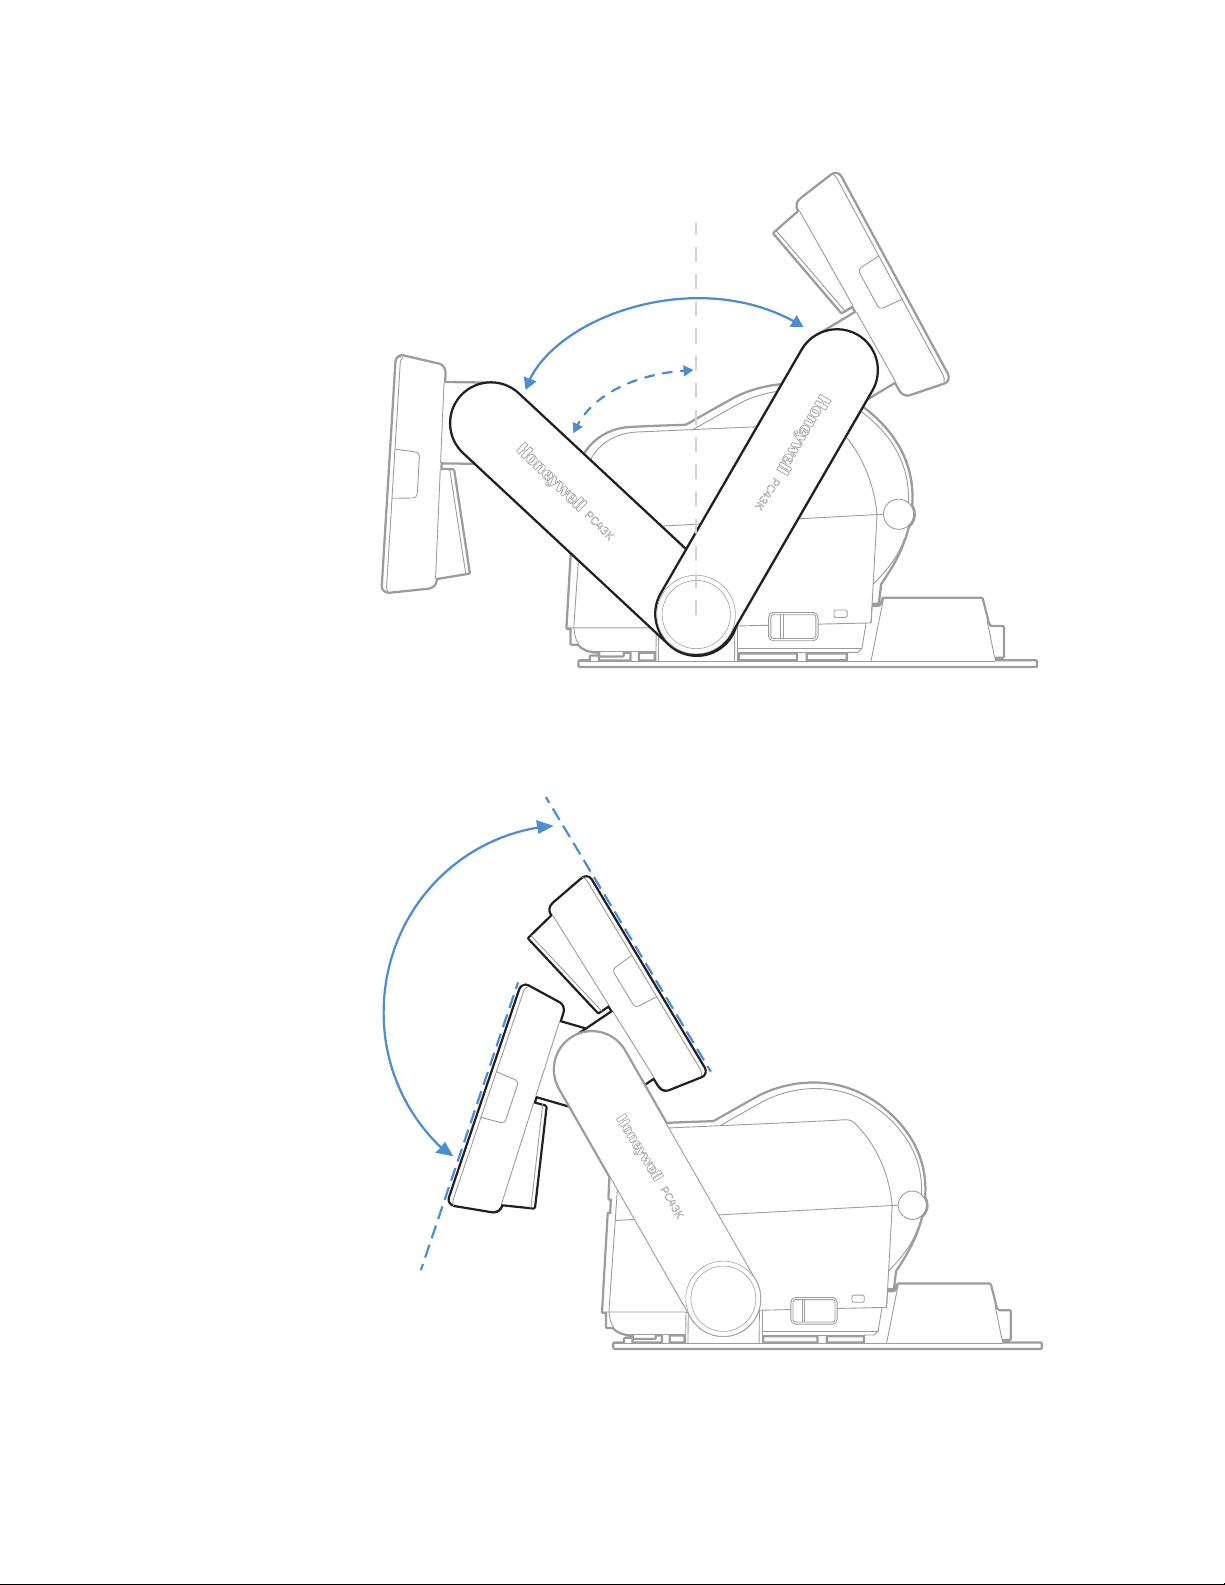
Swing Arms Movement Range
75°
45°
Tablet Movement Range
o
105
4 PC43K User Guide
Page 15

Printer Features
The PC43K has an integrated direct thermal (DT) printer that delivers:
• Print speeds of up to 8 ips (203 dpi printhead) or 6 ips (300 dpi printhead)
Note: For efficient power management, Honeywell recommends printing at a default speed
of 4 ips.
• Multiple selectable printer languages including Honeywell Fingerprint/Direct
Protocol.
Note: For detailed information about the printer, refer to the PC43d User Guide.
Tablet Features
The tablet has a 7-inch full-touch screen that supports touch input with fingers or
gloved hands.
• Android 8 (Oreo), upgradable to Android P and Q
• 2 GB RAM, 32GB flash memory
• 7-inch HD (1280 x 720) bright color LCD with backlight
• Large display with multi-touch panel
• NFC technology for short-range wireless data transmission
• WLAN IEEE 802.11 a/b/g/n/ac; Wi-Fi Certified
• Bluetooth Class 2 v4.2
• Honeywell Power Tools and PC43K - Demo Application
• Honeywell App Lock application
PC43K User Guide 5
Page 16
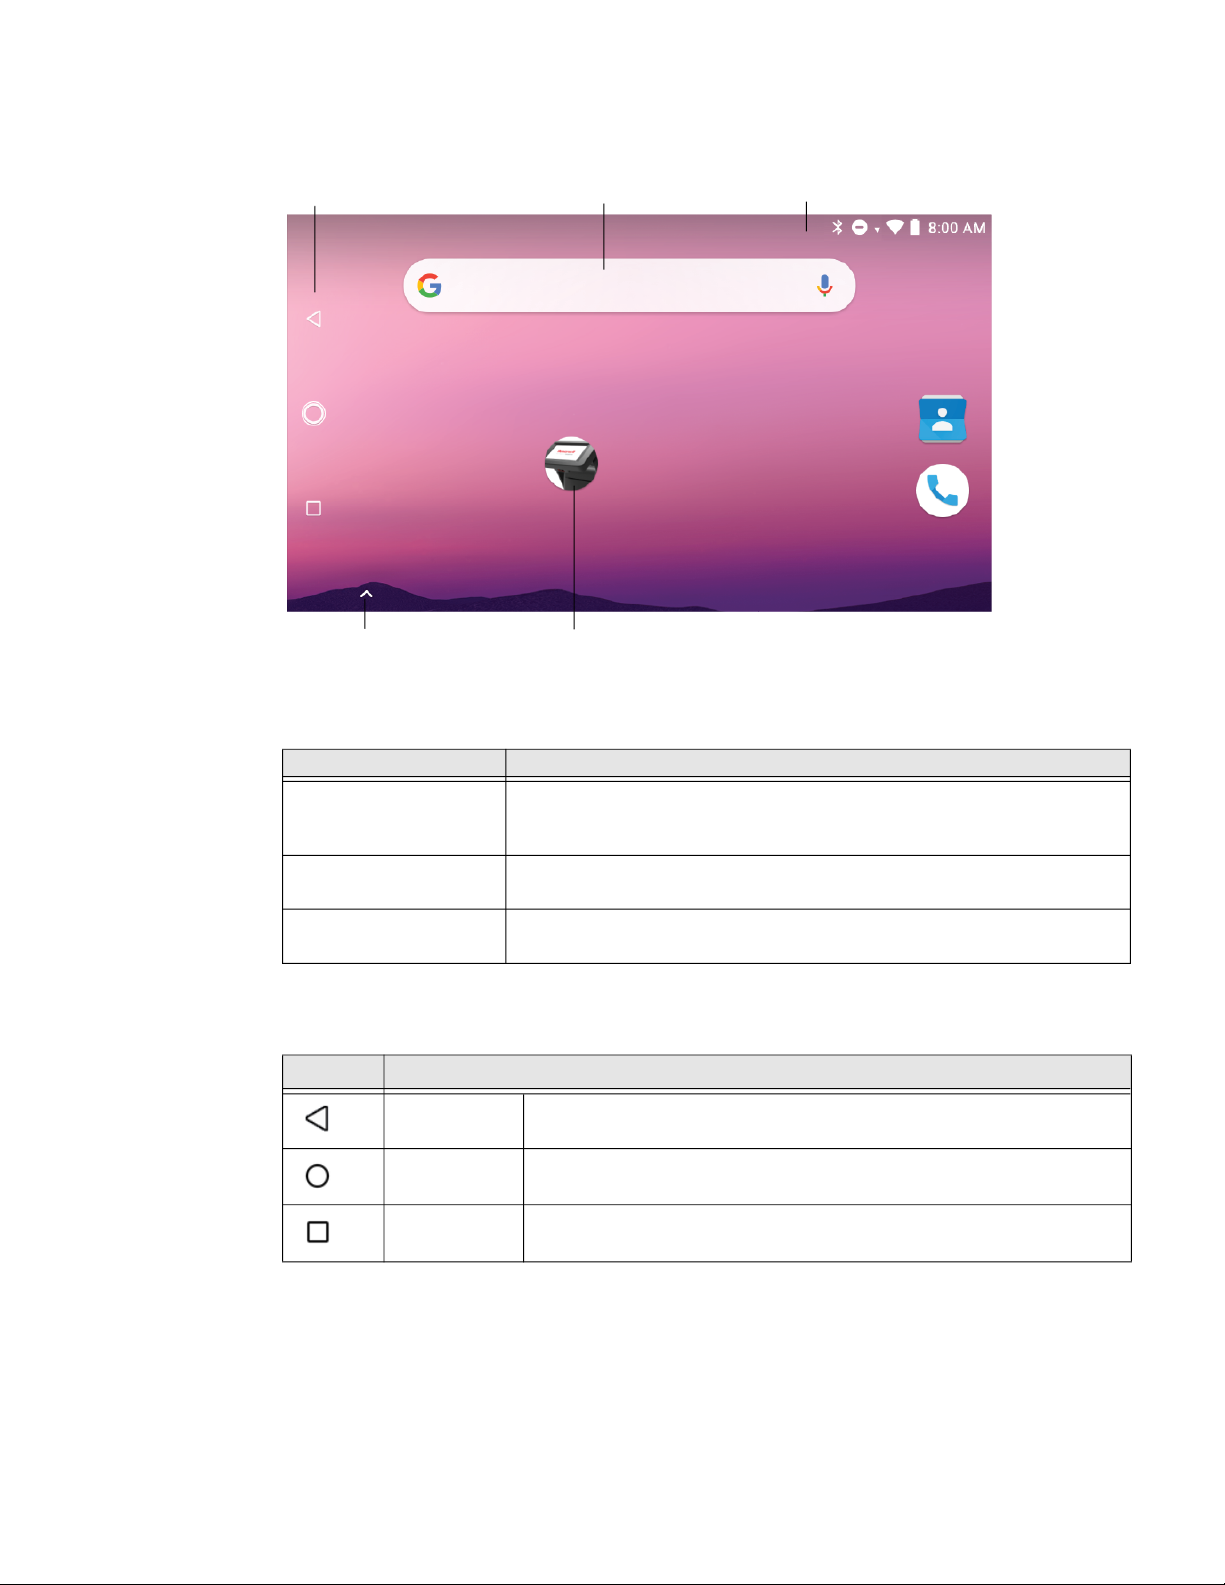
About Home Screen
Navigation Buttons
Swipe up to access
all apps
Home screen features
Item Description
Notification Panel/
Status Bar
Search Bar Search the Internet using Google search. Touch the microphone to
PC43K-Demo App Kiosk demo application. Demonstrates the basic capabilities of the kiosk
Search Bar
PC43K-Demo App
Status icons to the left tell you when an app has sent you notifications.
System icons to the right display current network state, time, and battery
information.
initiate voice search.
and is not intended as a functional business solution.
Notification/Status Bar
Navigation Buttons
Button Description
Back Tap to return to previous screen.
Home Tap to return to Home screen.
Recent Apps Tap to view and switch between recently accessed applications.
Note: The ScanPal EDA71 built-in scanner is disabled. The N3680 scanner is integrated
with the kiosk.
6 PC43K User Guide
Page 17

The tablet does not need separate charging as it is continuously connected to
power. A special feature is added to the kiosk to cut-off charging when the battery
is fully charged preventing the battery from overcharging.
Note: For detailed information about the tablet, refer to the ScanPal EDA71 User Guide.
PC43K Applications
To learn more about Honeywell Applications, go to www.honeywellaidc.com.
Honeywell PC43K Applications
Icon Application Descriptions
PC43K-Demo Demonstrates the basic capabilities of the kiosk and is not
intended as functional business solution.
PC43K-FW Update Application to update the printer firmware.
App Lock To configure app restrictions for kiosk applications.
Scan Features
PC43K comes equipped with N3680 scan engine. The N3680 barcode scan engine
is fully decoded 2D imager that utilizes Honeywell decoding and imaging
technology. The scanner supports wide variety of symbologies including 1D and
2D barcodes, composite code, and postcode.
The N3680 series scanner supports comprehensive, highly flexible scanning in
real applications.
• Enhanced performance scanning and imaging capabilities
• Ability to scan hard-to-read codes including codes from mobile phone screens
• CMOS sensor with 640 x 480 pixel resolution
• Frame rate of 30fps
• Aimer with red LED dot
For the detailed list of supported barcode symbologies, go to Supported
Symbologies.
Note: For detailed information about the scanner, refer to the N3680 2D Scan Engine
datasheet.
PC43K User Guide 7
Page 18

8 PC43K User Guide
Page 19

CHAPTER
SET UP THE KIOSK
2
This section contains information about loading media, setting up the kiosk,
printing a test label, and adjusting the printer.
Loading the Media
The kiosk can print on labels, tickets, tags, and continuous stock. The procedure
you use to load media depends on how you operate the kiosk and the options you
have installed.
Note: For more information about the media calibration, see the PC43d User Guide.
Open Printer Media Lid for Media Loading
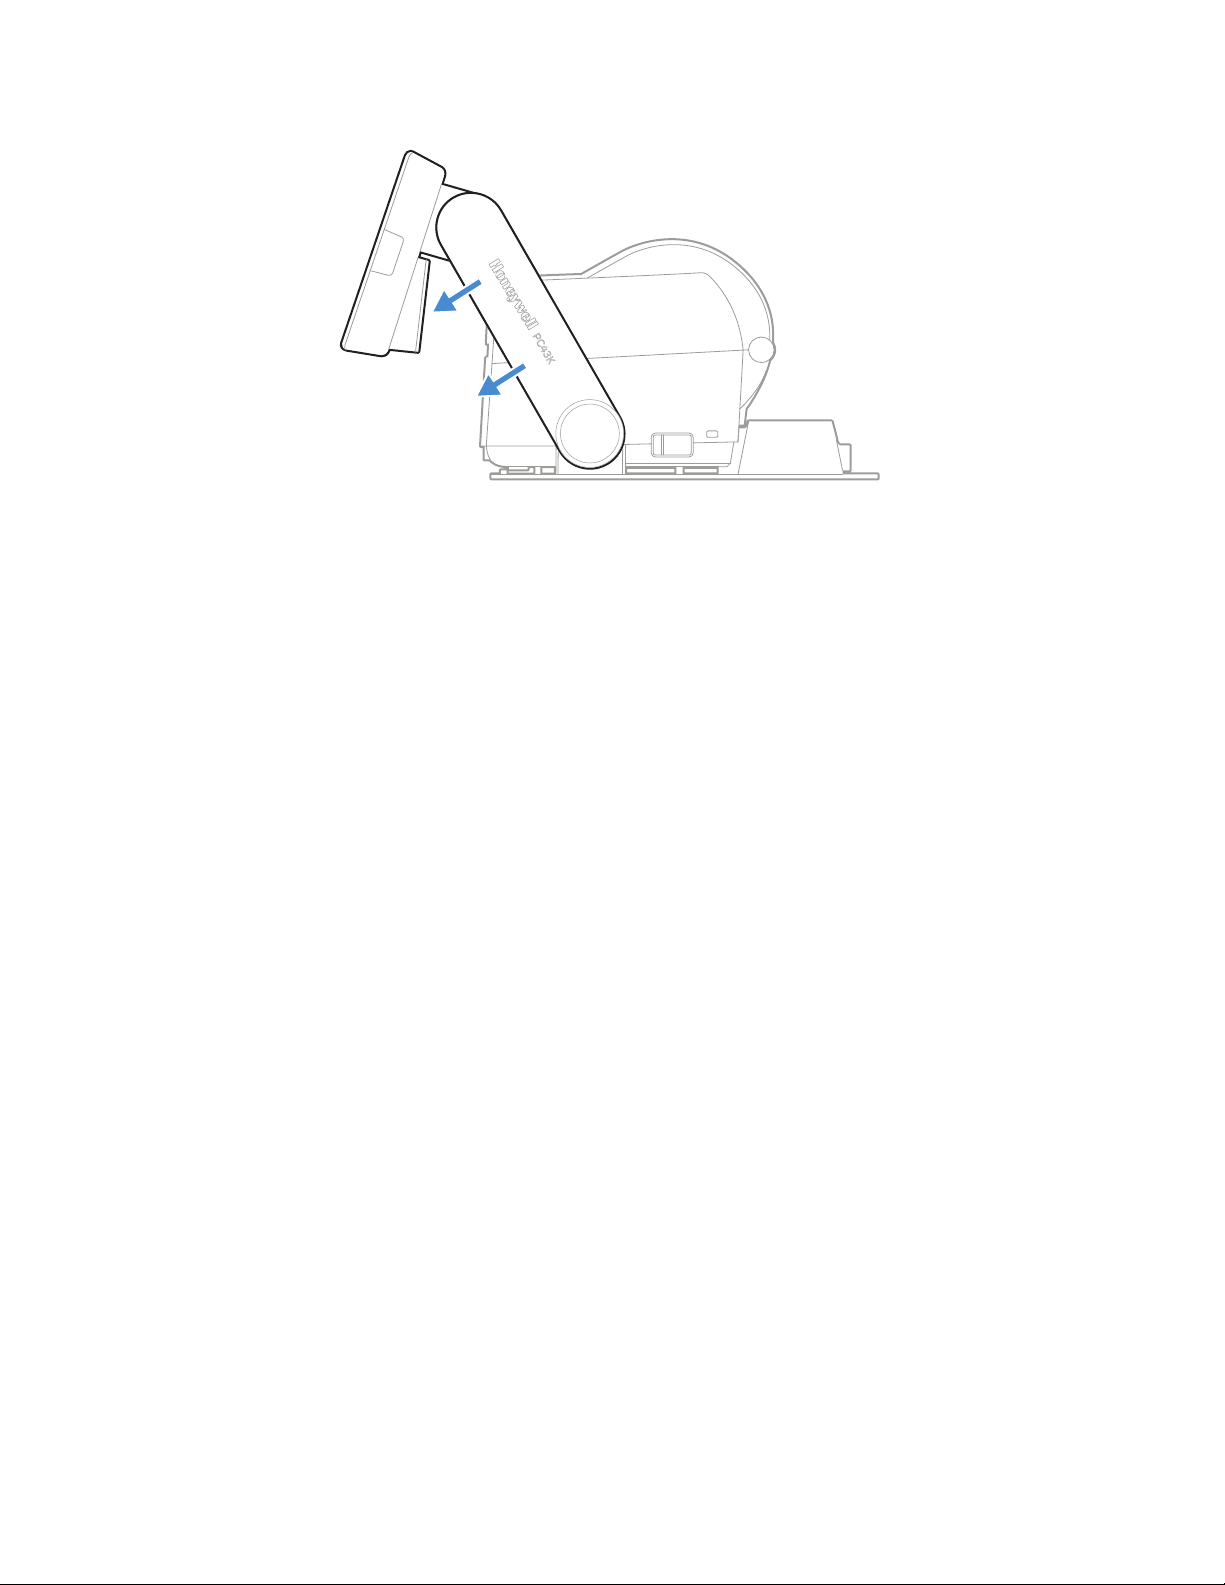
Media can be loaded in the printer by opening the printer lid.
1. Push the swing arms to the rear of the kiosk and pull one or both the printer
latches forward.
PC43K User Guide 9
Page 20

2. Pull the swing arms to the front and open the printer lid.
Warning: Moving parts are exposed when the cover is open. Make sure
the printer cover is closed before operating the kiosk.
Note: For detailed information about the printer, see the PC43d User Guide.
Load Media for Tear-off Printing
Tear-off printing is applicable to media with perforation. Printed labels, tickets, and
other printed media are manually torn from the front of the printer. These types of
media can be used for tear-off printing:
• Non-adhesive continuous stock
• Self-adhesive continuous stock with liner
• Self-adhesive labels with liner
• Tickets with black marks, with or without perforations
Warning: The tear bar contains sharp edges. Keep your fingers and other
body parts away from the tear bar.
10 PC43K User Guide
Page 21

To load the media for tear-off printing,
1. Load the media roll on to the printer. Follow steps 1 - 2 from Open Printer
Media Lid for Media Loading.
Note: For large rolls of media stored outside the printer, such as an external media holder,
feed the media through the external media feed slot.
2. To adjust the media holders of different media size:
a. Pull the locking tab up.
b. Slide the media holders to adjust the distance between them and place the
media roll between the holders.
PC43K User Guide 11
Page 22

c. Make sure the media holders are snug against the sides of the media roll
and press the tab down to lock the media holders in place.
3. If you are using notched or black mark stock, slide the label stop sensor so the
notches or marks pass over the sensor.
12 PC43K User Guide
Page 23

4. Thread the media under the tip guides on the media holders and past the front
of the printer.
5. Close the printer lid until it snaps shut.
6. Use the tablet and respective application to print on the media.
Load Media for Cut-off Printing
Cut-off printing is applicable to media where each label is automatically cut from
the media roll immediately after the label is printed. You can also use self-adhesive
labels with a liner making sure to cut only the liner.
Follow steps 1-2 from Load Media for Tear-off Printing, then:
1. Thread the media under the tip guides on the media holders.
PC43K User Guide 13
Page 24

2. Thread the media into the slot in the cutter accessory and out through the front
of the cutter.
3. Close the printer lid until it snaps shut.
4. Access the print application in the kiosk to print on the media.
Load Media for Label Dispenser
Follow steps 1-3 from Load Media for Tear-off Printing, then:
1. Thread the media under the tip guides on the holders.
2. Open the label dispenser front door.
3. Remove the label closest to the end of the liner.
14 PC43K User Guide
Page 25

4. Route the liner through the slot in the front door of the label dispenser. The liner
should be over the roller in the printer and under the roller in the front door of
the label dispenser.
Note: Do not pull on the media to take up the slack.
5. Close the front door.
6. Close the printer lid until it snaps shut.
7. Use the tablet and respective application to print on the label.
PC43K User Guide 15
Page 26

Load External Media
To use large rolls of media or tag stock (up to 8-in diameter), you can load the
media from outside the printer.
1. Place the media behind the printer.
2. Feed the media into the printer through the external media feed slot.
External media
feed slot
3. Thread the media through the media holders or media guides as you would for
media installed inside the printer.
16 PC43K User Guide
Page 27

Power on the Kiosk
After you have installed the media, power on the kiosk for the first time.
To power up the kiosk,
1. Connect one end of the power adapter cord to the back of the kiosk and the
other end to AC power.
Warning: Installing the kiosk requires the power cord to be connected to
a socket-outlet with a grounded connection.
2. The kiosk boots up and displays the lock screen.
PC43K User Guide 17
Page 28

3. Swipe up to unlock the tablet home screen.
4. Press the power switch located on the right side of the printer unit.
Warning: Do not put your fingers inside the print mechanism when the
power is on.
Users may perform customized settings (for example, set date, time, display
settings, etc.) once the tablet is turned on for the first time.
Print a Test Label
You can access the PC43K-Demo application to print a test label.
1. Connect the kiosk to power and turn on the kiosk.
2. Make sure to load direct thermal media (4 in x 6 in) and adjust the media holder.
3. From the PC43K-Demo, select Register at an Event.
4. Enter the details and select Print Badge.
18 PC43K User Guide
Page 29

About Scan Engine
The scan engine emits scanning beams for accurate barcode aiming. The scan
engine has a viewfinder that projects a bright red aiming beam that corresponds to
the scan engine’s horizontal field of view.
The aiming beam is smaller when the code is closer to the scan engine and larger
when it is farther from the scan engine. Symbologies with smaller bars or elements
should be read closer to the scanner window. Symbologies with larger bars or
elements should be read farther from the scanner window. If the code being
scanned is highly reflective (for example, laminated), it may be necessary to tilt the
o
code up 15
In the demo application, any operation that requires scanning input will
automatically turn on the scan LED in the kiosk. You can adjust the swing arms of
the kiosk to securely scan any item.
Scan a Code
You can access the PC43K-Demo application to scan a test code.
1. Open PC43K-Demo, select Register at an Event.
2. Place the code under the scan window. A beep sound confirms a successful
scan.
to 18o to prevent unwanted reflection.
PC43K User Guide 19
Page 30

20 PC43K User Guide
Page 31

CHAPTER
USING THE KIOSK
3
This section contains information about the kiosk application and its use cases.
Kiosk Applications
The kiosk application details all the use cases of the PC43K.
The kiosk comes with three main applications.
• PC43K-Demo
• PC43K-FW Update
• Honeywell App Lock
PC43K-Demo Application
The demo application demonstrates the basic capabilities of the kiosk and is not
intended as a functional business solution. The demo application shows the
operating features of the following functions.
• Register at an Event
• Return an Item
• Ship a Package
PC43K User Guide 21
Page 32

Register at an Event
The Register at an event function in the demo application demonstrates the
following features of the application.
• Enter user code and print
• Scan a code and print
• Event registration and generate code
Return an Item
The Return an item function in the demo application demonstrates the following
features of the application.
• Scan a receipt
• Enter barcode value
22 PC43K User Guide
Page 33

Ship a Package
You can enter the user details where the item is to be shipped and print the
shipping label.
PC43K User Guide 23
Page 34

PC43K- Firmware Updater for Printer
The firmware update application allows the user to install the latest firmware to the
printer.
Download the latest firmware file to your PC and copy to your thumb drive.
Software downloads can be accessed through the Technical Support Downloads
Portal (https://hsmftp.honeywell.com
Softwares > Printers > Desktop > PC23PC43PD43 > Current > Firmware.
How to Update Firmware
1. Connect the USB thumb drive with the downloaded firmware file to the USB
port of the USB hub. To access the USB hub, follow step 1 - 3 from Installing
Customized Applications.
2. Tap on the PC43K-FW Update icon.
). For PC43K firmware file, navigate through
3. Tap File.
4. The firmware file in the USB thumb drive will be displayed. Tap on the firmware
file. Tap Upload.
24 PC43K User Guide
Page 35

The firmware installation will begin and may take up to 30 minutes to complete.
Note: Do not interrupt the upload process. The printer will reboot once the installation is
complete.
Honeywell App Lock
App Lock is an Android application that can be used to lock unwanted applications
and restrict users from accessing them.
The functions of the Honeywell App lock include:
1. Locks the Home page to prevent users from accessing contents unrelated to
work; any exit from App Lock would require administrator’s authority.
2. Supports the selections of automatic operation of one or more programs when
switching on the device.
3. Supports white list of defined programs, and bars forbidden software.
By default, the app lock is not enabled for the kiosk applications. Once the App lock
application is accessed, the kiosk will be operated in app lock condition, which
would require administrator’s authority.
Enable App Lock
1. Tap on the App Lock icon
2. Scroll down the Settings page, and tap on the AppLock Switch .
3. Log in by entering the administrator’s login and password.
Note: First time user would need to enter Username as admin and password as admin059
to login.
You may choose to change the username and password after logging in for
security reasons.
PC43K User Guide 25
Page 36

How to Use
1. Tap on the menu icon located in the top right-hand corner of the AppLock-
screen.
a. Log Out: Tap to return to login page to switch user account.
b. Settings: Tap to access user configuration.
c. About: Tap to check description of the software function.
2. Tap Settings. Upon accessing the administrator’s Settings function, the user
can view and edit User Configuration and Other Actions.
a. The User configuration settings are,
• Manage users: Create new user, edit and manage users.
• Logout verify: Enable verified logout.
• Enable MTP: Enable for media file transfer.
• Export configurations: Exports user account configuration information in
.json file (Downloads > IPSM Card > Honeywell > applock). Copy the .json file
to other devices to export configuration.
Note: To view and copy the .json file, you may need to turn on Provisioning mode. To learn
how to turn on Provisioning mode, refer to ScanPal EDA71 User Guide.
26 PC43K User Guide
Page 37

b. The Other actions settings are,
• Scan deploy: Scan the exported barcode for rapid configuration.
• Edit about information: Edit app lock application details.
• Check update: Check the current version of the application.
• AppLock switch: Turn off to disable App lock application.
3. To create and edit new user, tap Manage users. A Manage accounts list page is
displayed.
a. Tap on the menu icon and tap Create New User.
b. Create new user by entering the username and password in the Account
register page and tap Next.
c. A pop-up is displayed that a new account has been added successfully. Tap
OK. Upon successful addition of a user, a Whitelist apps configuration
page is displayed.
d. All the available apps are displayed with a checkbox, select the application
that must be accessible for the new user and tap Next.
PC43K User Guide 27
Page 38

e. Select the application for automatic launch by tapping on the checkbox in
the Autorun app configuration page and tap Next.
f. You may choose the user settings in the Select user settings page and tap
Finish.
g. At this point, the user will remain in the administrator’s account and may
continue to add other new accounts.
4. Access Manage users to view the list of accounts currently entered in the
device.
28 PC43K User Guide
Page 39

a. Tap on any account to display its account configuration.
• Manage whitelist apps: Revise the White List in the account.
• Configure autorun list: Change the account’s automatic launch function.
• Select user settings: Choose required user settings.
• Delete user: Delete user’s account.
• Reset password: Change the password for the user’s account.
• Show QR code: Display and save QR code for each user account
configuration information to local file for scanning and configuration.
5. Tap Logout to come out of the administrator’s account.
6. Enter user details to log in to the user account.
7. To disable Honeywell App Lock,
a. Logout from the user account and login to administrator’s account.
b. Go to Settings and turn off the AppLock switch. Tap OK.
Change Account Password
To change the password,
1. Tap on the menu icon located in the top right-hand corner of the AppLock-
screen.
2. Tap Settings > Manage users > admin (user account name) > Reset password
3. Enter the old and new password in the field provided.
4. Tap Done.
Note: It is recommended to change the admin username and password after logging in for
the first time.
PC43K User Guide 29
Page 40

Android Applock Security Warning
It is important not to re-configure the Android KeyRemap setting to open an
application that is not intended to be able to run when in the Kiosk mode, as this
will not be blocked by Applock.
This is a known limitation with certain Android OS releases, and for security
assurance on the Koisk, it is strongly recommended not to use the KeyRemap
setting. Prior to deployment with Applock enabled, ensure the whitelist is set
accordingly, and that KeyRemap is not set to open any unintended application.
30 PC43K User Guide
Page 41

CHAPTER
USB CONNECTIVITY
4
This chapter details how to access the USB hub of the kiosk and install customized
applications.
Connectivity
The USB hub of the kiosk is where the tablet, printer, and scanner are integrated
together. It also houses the USB port for uploading customized applications.
Printer USB B
Tablet
Scanner
USB for .apk
AC Power
The ports and connections of the kiosk are as follows:
• The power connector from the printer is connected to the Printer Power of the
USB hub.
• The USB Type B connector from the printer is connected to the USB port of the
USB Hub.
• The tablet is connected to the micro USB port of the USB hub.
• The scanner unit is connected to the micro USB port of the USB hub.
PC43K User Guide 31
Page 42

For additional printer configuration, you can connect the printer to a desktop PC.
Note: You must install InterDriver to use a USB connection on a Windows PC.
Installing Customized Applications
You can upload any customized application to the tablet using a USB thumb drive.
The customized application must be designed to suit the Android environment and
the file must be in .apk format.
Copy the customized application to a USB thumb drive, and:
1. Pull the kiosk swing arms forward.
2. Remove the USB hub casing.
32 PC43K User Guide
Page 43

3. Connect the USB thumb drive in the top USB port.
Caution: Users are advised to perform this operation carefully to avoid any
damages to the USB hub.
4. A USB icon will be displayed on top of the home screen. Drag the icon
downwards and tap on the USB name.
5. The folder will display the files available in the USB thumb drive.
6. Tap on the .apk file from the folder.
7. Tap Install on the bottom right-hand corner of the screen.
8. Tap Done when prompted.
9. The customized application icon will appear on the home screen.
PC43K User Guide 33
Page 44

Deleting Customized Applications
You can delete any uploaded customized application by accessing the application
folder in the tablet.
1. Tap Settings > Apps & notifications. It will display a list of applications in the
kiosk.
2. Tap on the application that needs to be removed. Tap Uninstall.
3. Tap OK, to confirm uninstall.
4. The application is removed from the kiosk.
34 PC43K User Guide
Page 45

CHAPTER
TROUBLESHOOTING
5
Error Alerts and Solutions
Use this table to understand and troubleshoot some common error alerts you may
receive and how to fix them.
Error Alert Solution
Printhead Lifted Lower the printhead.
Out of Media Load media in the printer.
Media Low The diameter of the remaining roll of media is lower than the specified
value in the Media Low Diameter setting. Replace the media.
Label Stop Sensor
(LSS) detects no label
PC43K-FW Update
isn’t responding
There is no connected
USB device
Load media in printer.
To close the app and start again, tap Close App,
or tap Wait.
Try these possible solutions in order.
• The AC power connection to the kiosk might be loose or removed.
Check for loose connection.
• Make sure the printer switch is turned on.
Note: For printer and tablet related troubleshooting procedures, refer to the PC43d User
Guide and ScanPal EDA71 User Guide, respectively.
PC43K User Guide 35
Page 46

Troubleshoot Kiosk Problems and Find Solutions
Use this section to find possible solutions to kiosk problems.
Kiosk Problems
Problems Solution
Touch panel not responding Try these possible solutions in order.
• Make sure the touch panel is clean and dirt free. Clean
with a soft cloth and try again.
• Restart the tablet by long pressing the tablet power
button, tap Restart.
Application is not responding Tap recent apps button, tap Close All. Re-open app.
Unable to connect to Wi-Fi Turn on the airplane mode in the tablet for a few seconds and
turn off and try connecting to Wi-Fi again.
Screen not rotating during tablet
rotation
Printer not calibrating after closing
the printer lid
The printer does not feed media
correctly
There are dark lines along the
media path
The media wrinkles The media might not be set-up appropriately. Remove the
USB thumb drive not detected Pull out the USB thumb drive and re-insert.
Failed scan Try these possible solutions in order.
Try these possible solutions in order.
• Reboot the tablet.
• The screen rotation might be turned off. Turn on and try
again. Settings > Display > Advanced > Auto-rotate
screen > tap to turn on.
• If the screen rotation is on, try turning it off and then on
again.
Try these possible solutions in order.
• The media may be stuck between the platen roller and tip
guide. Remove the media and set-up appropriately.
• The power connection to the kiosk might be loose or
turned off, check and try again.
Remove the media from the media compartment and reinstall
the media.
The printhead might be dirty. Clean the Printhead and try
again.
media and set-up appropriately.
• The scanner may not have detected the barcode. Aim the
code to the scanner LED and scan again.
• The barcode might not be supported by the scan engine.
Check the supported barcode.
• Make sure the barcode size is supported by the scan
engine.
Note: Users are refrained from upgrading the kiosk to a lower version of current Android
software.
36 PC43K User Guide
Page 47

Kiosk Default Settings
The kiosk is shipped with default settings which suit the demo application in the
kiosk. To learn how to change these settings for the customized application, refer
to the PC43d User Guide and the ScanPal EDA71 User Guide, respectively.
Disabled Features
The kiosk is integrated with the PC43d printer, ScanPal EDA71 tablet, and N3680
scan engine. Not all the features of the integrated devices are enabled in the
PC43K.
The following lists the disabled features of the PC43d printer.
• Ethernet Connection
• LCD/Icon interface
The following lists the disabled features of the tablet.
• Internal Scanner
• Camera feature
• Phone feature (for example, calls, messages, etc.)
• Sim Card access
• Micro SD
PC43K User Guide 37
Page 48

38 PC43K User Guide
Page 49

CHAPTER
MAINTENANCE
6
This section details the procedure to be followed for maintaining the kiosk.
Clean the Kiosk
To properly maintain the kiosk, you should clean it regularly. You can clean these
parts of the kiosk:
• Touch panel and scanner window
• Printhead
• Platen roller
• Exterior of kiosk
Caution: To avoid possible injury or damage to the kiosk, never insert any
pointed or sharp objects into the kiosk.
Caution: Use only the cleaning agents specified in this section.
Honeywell is not responsible for damage caused by any other
cleaning materials used on this kiosk.
Caution: Isopropyl alcohol is a highly flammable, moderately toxic, and
mildly irritating substance.
Warning: Disconnect the power cord from the socket-outlet before
installing user service parts in the kiosk.
Warning: The printer in the kiosk contains a coin cell battery and is NOT
user-replaceable. Keep children away from the kiosk when the
kiosk is in service.
PC43K User Guide 39
Page 50

Follow these guidelines for cleaning the kiosk:
• Always remove the power cord before cleaning.
• Never spray the kiosk with water. Protect it from water when cleaning the
premises.
Clean the Touch Panel and Scanner Window
To keep the kiosk touch panel and scanning window in good condition, you may
need to clean them as often as needed. The touch panel and scanner window
withstands application of the following cleaning agents when applied to a clean
soft cloth and removed immediately with a dry soft cloth.
• Acetic acid, 10% in water
• Ethyl alcohol, 10% in water
• Mild soap solutions
To clean,
1. Turn off the printer switch, remove the power cables.
2. Press and hold the tablet power button, tap Power off.
Note: Make sure that the cleaning solutions do not come in contact with power cables.
3. Dip a clean cloth towel in the cleaning agent and wring out the excess.
4. Wipe off the touch panel and scanner window. Do not allow any abrasive
material to touch these surfaces.
5. Wipe dry.
6. Let it air dry completely before using the kiosk again.
Clean the Printhead
Cleaning the printhead on a regular basis is important for the life of the printhead
and for the print quality. Clean the printhead each time you replace the media.
Follow this procedure to clean the printhead using the cleaning card. If you need to
clean additional residue from the platen roller or tear bar, use a cotton swab
moistened with isopropyl alcohol.
Caution: Never use any sharp tools for removing stuck labels. The
Warning: The printhead/motor may be hot. Allow the printhead/motor to
printhead and rollers are delicate.
cool.
1. Turn the kiosk off and disconnect the kiosk from power.
2. Open the printer lid and remove the media.
3. Insert most of the cleaning card under the printhead, and then lower the
printhead.
40 PC43K User Guide
Page 51

4. Pull out the cleaning card and raise the printhead.
5. Wait for approximately 30 seconds to allow the cleaning fluid to dissolve the
residue.
6. Repeat steps 3 through 5 if necessary.
7. If necessary, clean residue from the platen roller or tear bar with a cotton swab
moistened with isopropyl alcohol.
8. Once the parts are dry, replace the media in the printer. Close the printer lid,
reconnect, and turn on the kiosk.
The printhead can be replaced with a new one if it wears out due to continuous
print operation. Make sure to restart the kiosk after replacing with the new
printhead. For more information on how to replace the printhead, refer to PC43d
User guide.
Clean the Platen Roller
Follow this procedure to remove, clean, and replace the platen roller as part of
standard maintenance for the kiosk. Honeywell recommends that you check the
platen roller for debris and clean it each time you replace the media.
1. Turn the kiosk off and disconnect the kiosk from power.
2. Push the swing arms to the rear of the kiosk.
3. Pull one or both of the printer latches, pull the swing arms forward and lift the
printer lid.
4. Remove the installed media.
5. Press the roller latches apart and tilt them up.
PC43K User Guide 41
Page 52

6. Pull the latches up to remove the platen roller from the printer.
7. Remove any adhesive residue from the roller with a cotton swab moistened with
isopropyl alcohol.
8. Reverse Steps 5 and 6 to install the roller.
9. Press the latches onto the printer until they snap into place.
10. Replace the media in the printer.
11. Close the printer lid until it snaps shut.
Clean the Exterior of the Kiosk
Keep the exterior of the kiosk clean. Maintaining a clean exterior will reduce the risk
of dust or foreign particles reaching the inside of the kiosk and affecting printer
function.
Move the arm of the kiosk to clean in between the gaps.
Use a soft cloth moistened with water or a mild detergent when cleaning the kiosk
exterior. Keep the surface surrounding the kiosk clean as well.
42 PC43K User Guide
Page 53

APPENDIX
SPECIFICATIONS
A
Kiosk Specification
1. Go to www.honeywellaidc.com
2. Navigate to the PC43K product page.
3. Locate Products tab.
4. Click on your kiosk model.
5. Select one of the following tabs:
• Specifications: Kiosk specifications are listed here.
• Documents: Download the Data Sheet, Quick Start Guide, User Guide,
Regulatory Information, and other product documentation.
Printer Supported Command Languages
• Autosense
• Fingerprint
• Direct Protocol (DP)
• Intermec Printer Language (IPL)
• Datamax Printer Language (DPL)
• Zebra Simulator (ZSim)
Media Sensors
• Label stop sensor
• Cover Open
• Label taken (on cutter and label dispenser accessories)
For fonts, supported font types, barcode symbologies, and graphic file types of the
printer refer to the PC43d User Guide.
PC43K User Guide 43
Page 54

Scanner Specifications
For mechanical, electrical, environmental, and performance related specifications
of the scanner, refer to the N3680 2D Scan Engine datasheet.
Supported Symbologies
The scanner supports the following symbologies:
1D Symbologies 2D Symbologies Postal Codes
Codabar Aztec Code Australian Post
Code 11 Chinese Sensible (Han Xin) Code British Post
Code 128 Codablock A Canadian Post
Code 2 of 5 Codablock F China Post
Code 39 Data Matrix Japanese Post
Code 93 and 93i MaxiCode Korea Post
EAN/JAN-13 MicroPDF417 Netherlands Post
EAN/JAN-8 PDF417 Planet Code
IATA Code 2 of 5 QR Code Postnet
Interleaved 2 of 5
Matrix 2 of 5
MSI
GS1 DataBar
UPC-A
UPC-E
UPC-A/EAN-13 with Extended
Coupon Code
Coupon GS1 Code 32 (PARAF)
EAN-UCC Emulation
N3680 Scan Engine Reading Distances
The reading distances for different symbologies are,
Symbology Near Distance (cm [in]) Far Distance (cm [in]) Delta (cm [in])
100% UPC 5.5 [2.1] 28.0 [11.0]
5 MIL CODE 39 6.1 [2.4] 13.0 [5.1]
20 MIL CODE 3 6.0 [2.4] 38.0 [15.0]
6.7 MIL PDF417 6.0 [2.4] 12.5 [4.9]
10 MIL DATA MATRIX 6.0 [2.4] 13.0 [5.1]
20 MIL QR 5.0 [2.0] 23.0 [9.0]
44 PC43K User Guide
22.5 [8.9]
6.9 [2.7]
32.0 [12.6]
6.5 [2.5]
7.0 [2.7]
18.0 [7.0]
Page 55

Dimension Illustration
245 mm
(9.64 in)
178 mm
(7.00 in)
408 mm
(16.06 in)
248 mm
(9.76 in)
PC43K Width
PC43K Length and Height
PC43K User Guide 45
Page 56

Wall Mount Bracket
You can mount the kiosk vertically on a wall or other surface. The kiosk must be
mounted so the media output slot faces down. Use the following guideline for
selecting a mounting location:
• Choose a location within 1.5m (5ft) of an electrical outlet.
• Choose M5 mounting hardware (not supplied) for the mounting surface.
• The mounting hardware must provide at least 7mm (0.275 in) of clearance
between the mounting surface and the bottom of the screw head. The screw
head must be 6 to 8m (0.24 in to 0.33 in).
• Honeywell recommends using pan-head or flathead screws with appropriate
anchors for drywall, cement, concrete block, or plasterboard walls. Use wood
screws only for wooden surfaces, and ensure the screw is long enough to be
sunk to a depth of at least 15mm (0.59 in).
Caution: Be sure the mounting surface can safely support the weight of
the kiosk.
Refer to the wall mount template and drill holes on the mounting surface.
1. Install the mounting hardware. If you need to use anchors, use them first.
2. Place the kiosk mounting holes on the mounting hardware and slide the kiosk
to lock it in place.
46 PC43K User Guide
Page 57

Honeywell
9680 Old Bailes Road
Fort Mill, SC 29707
www.honeywellaidc.com
™
PC43K-A-EN-UG-01 Rev B
07/20
 Loading...