

Page 1
NetAXS™
Access Control Unit
User’s Guide
If this panel is to be added to an
existing loop, then all panels
need to be upgraded. Please
see www.honeywellaccess.com.
April 2009 © 2009 Honeywell. All rights reserved. 800-04410, Revision A
Page 2

Copyright© 2009 Honeywell. All rights reserved.
All product and brand names are the service marks, trademarks, registered trademarks,
or registered service marks of their respective owners. Printed in the United States of
America. Honeywell reserves the right to change any information in this document at
any time without prior notice.
Microsoft and Windows are registered trademarks of Microsoft Corporation.
Windows Server is a trademark of Microsoft Corporation.
Ordering Information
Please contact your local Honeywell representative or visit us on the web at
www.honeywellaccess.com for information about ordering.
Feedback
Honeywell appreciates your comments about this manual. Please visit us on the web at
www.honeywellaccess.com to post your comments.
Page 3

CONTENTS
What’s New in Release 3.1.8
Dynamic Screens and Performance Enhancements ..................................................................... ix
Multi-language Support
CSV Reports and Card Upgrade
Reverse IP
............................................................................................................................................ x
Chapter 1 Connecting to the Web Server
1.1 Overview ........................................................................................................................................ 1
1.2 Connecting to the Web Server
1.3 Reading the Select Panel
Chapter 2 Configuring via the Web Server
2.1 Overview ...................................................................................................................................... 10
2.2 Configuring the System
2.2.1 Host/Loop Communications Tab .......................................................................... 11
2.2.2 General Tab ........................................................................................................... 14
2.2.3 File Management Tab............................................................................................ 17
2.2.4 Network Tab.......................................................................................................... 20
2.2.5 Site Codes Tab....................................................................................................... 21
2.2.6 Downstream Devices Tab...................................................................................... 23
2.3 Configuring Time Management
2.3.1 Current Time Tab .................................................................................................. 24
2.3.2 Time Zones Tab..................................................................................................... 26
2.3.3 Holidays Tab ......................................................................................................... 29
2.4 Configuring the Doors
2.4.1 Reader Tab............................................................................................................. 31
2.4.2 Outputs Tab ........................................................................................................... 38
2.4.3 Inputs Tab.............................................................................................................. 42
2.5 Configuring Access Levels
2.6 Maintaining Cards
2.6.1 Adding New Cards ................................................................................................ 47
2.6.2 Displaying and Modifying Cards .......................................................................... 49
2.6.3 Deleting Cards ....................................................................................................... 50
2.6.4 Displaying Reports ................................................................................................ 51
.................................................................................................................... ix
...................................................................................................... x
.................................................................................................... 2
.............................................................................................................. 7
............................................................................................................. 11
............................................................................................... 24
................................................................................................................ 31
........................................................................................................ 45
....................................................................................................................... 47
NetAXS™ Access Control Unit User’s Guide, Document 800-04410, Revision A iii
Page 4

2.7 Configuring Other I/O & Groups Tab ..................................................................................... 52
2.7.1 Inputs Tab.............................................................................................................. 52
2.7.2 Outputs Tab ........................................................................................................... 55
2.7.3 Groups Tab ............................................................................................................ 57
2.8 Configuring Interlocks
2.9 Configuring Users
............................................................................................................... 59
....................................................................................................................... 61
Chapter 3 Configuring via WIN-PAK
3.1 Overview ...................................................................................................................................... 65
3.2 Adding a New NetAXS™ Panel
3.2.1 Creating the Panel with Quick Start Wizard ......................................................... 66
3.2.2 Configuring the Panel Manually ........................................................................... 67
.............................................................................................. 66
Chapter 4 Monitoring NetAXS™ Status
4.1 Overview ...................................................................................................................................... 75
4.2 Monitoring Alarms
4.3 Monitoring Events
4.4 Monitoring Inputs
4.5 Monitoring Outputs
4.6 Monitoring System Status
..................................................................................................................... 76
...................................................................................................................... 79
....................................................................................................................... 82
.................................................................................................................... 85
......................................................................................................... 87
Chapter 5 Upgrading NetAXS™ Firmware
A.1 Overview ..................................................................................................................................... 89
A.2 NetAXS™ Release 3.1.8 Upgrade Procedure
A.2.1 Planning the Upgrade ........................................................................................... 89
A.2.2 Mixed Revision Loops.......................................................................................... 89
A.2.3 Uploading Data from the Panel ............................................................................ 90
A.2.4 Upgrades to Gateway vs. Multi-drop Panels ........................................................ 90
A.2.5 Upgrade Notes ...................................................................................................... 92
A.2.6 Clearing the Cache in the Internet Browsers Used by the
NetAXS™ Web Server .......................................................................................... 93
....................................................................... 89
Index
iv www.honeywell.com
Page 5

LIST OF FIGURES
Figure 1-1: NetAXS™ Web Server Hub Connection ................................................................ 2
Figure 1-2: NetAXS™ Web Server Direct Connection ............................................................. 3
Figure 2-1: NetAXS™ System Configuration Flow Chart ...................................................... 10
Figure 2-2: Configuration > System >Host/Loop Communications Tab ................................. 11
Figure 2-3: Configuration > System > General Tab ................................................................. 14
Figure 2-4: Configuration > System > File Management Tab ................................................. 17
Figure 2-5: Configuration > System > Network Tab ............................................................... 20
Figure 2-6: Configuration > System > Site Codes Tab ............................................................ 21
Figure 2-7: Configuration > System > Downstream Devices Tab ........................................... 23
Figure 2-8: Configuration > Time Management > Current Time Tab ..................................... 24
Figure 2-9: Configuration > Time Management > Time Zones Tab ....................................... 26
Figure 2-10: Configuration > Time Management > Holidays Tab .......................................... 29
Figure 2-11: Configuration > Doors > Reader > General Tab ................................................. 31
Figure 2-12: Configuration > Doors > Reader > Card Formats Tab ........................................ 35
Figure 2-13: Discrete Lock Output Configuration ................................................................... 38
Figure 2-14: Configuration > Doors > Outputs > Group Tab >Lock ....................................... 39
Figure 2-15: Configuration > Doors > Inputs Tab ................................................................... 42
Figure 2-16: Configuration > Access Levels ........................................................................... 45
Figure 2-17: Cards > Add Cards .............................................................................................. 47
Figure 2-18: Cards > Card Data ............................................................................................... 49
Figure 2-19: Cards > Delete Cards ........................................................................................... 50
Figure 2-20: Configuration > Other I/O & Groups > Inputs Tab ............................................. 53
Figure 2-21: Configuration > Other I/O & Groups > Outputs Tab .......................................... 55
Figure 2-22: Configuration > Other I/O & Groups > Groups Tab ........................................... 57
Figure 2-23: Configuration > Interlocks .................................................................................. 59
Figure 2-24: Configuration > Users ......................................................................................... 62
Figure 3-1: Quick Start Wizard - Panel Screen ........................................................................ 66
Figure 3-2: WIN-PAK Panel Configuration Screen - Basic Tab ............................................. 67
Figure 3-3: WIN-PAK Panel Configuration Screen - Card Format Tab .................................. 68
Figure 3-4: WIN-PAK Panel Configuration Screen - Time Zones Tab ................................... 69
Figure 3-5: WIN-PAK Panel Configuration Screen - Options Tab ......................................... 70
Figure 4-1: Status > Alarms > Unacknowledged Tab .............................................................. 76
Figure 4-2: Status > Alarms > Acknowledged Tab .................................................................. 77
Figure 4-3: Status > Events > Panel Tab .................................................................................. 79
Figure 4-4: Status > Events > Web Tab ................................................................................... 81
Figure 4-5: Status > Inputs ....................................................................................................... 82
NetAXS™ Access Control Unit User’s Guide, Document 800-04410, Revision A v
Page 6

Figure 4-6: Status > Outputs > Doors/Aux/Other/DnStr Tab .................................................. 85
Figure 4-7: Status > Outputs > Groups Tab ............................................................................. 86
Figure 4-8: Status > System ..................................................................................................... 87
vi www.honeywell.com
Page 7

LIST OF TABLES
Table 1-1: Reading the Select Panel ............................................................................................7
Table 2-1: Configuration > System > Host/Loop Communications Tab Field Descriptions.....12
Table 2-2: Configuration > System > General Tab Fields ........................................................14
Table 2-3: Configuration > Time Management Tab Field Descriptions ................................... 25
Table 2-4: Configuration > Doors > Reader Tab Descriptions .................................................33
Table 2-5: Configuration > Doors > Reader > Card Format Fields ..........................................35
Table 2-6: Configuration > Doors > Output Tab Field Descriptions ........................................41
Table 2-7: Configuration > Doors > Inputs Tab Field Descriptions .........................................44
Table 2-8: Cards > Add Cards Field Descriptions ....................................................................48
Table 2-9: Cards > Reports Field Descriptions .........................................................................51
Table 2-10: Configuration > Other I/O & Groups > Inputs Tab Field Descriptions ................. 54
Table 2-11: Configuration > Other I/O & Groups > Outputs Tab > Fields ..............................56
Table 2-12: Configuration > Other I/O & Groups > Groups Tab Field Descriptions ...............58
Table 2-13: Configuration > Interlocks > Field Descriptions ...................................................60
Table 3-1: Interlock Reassignments for NetAXS™ ..................................................................72
Table 4-1: Status > Alarms Field Descriptions .........................................................................77
Table 4-2: Status > Events > Panel Tab Field Descriptions ......................................................80
NetAXS™ Access Control Unit User’s Guide, Document 800-04410, Revision A vii
Page 8

viii www.honeywell.com
Page 9

What’s New in Release 3.1.8
Dynamic Screens and Performance Enhancements
Dynamic screens are screens that can refresh data without re-submitting. In the
Honeywell NetAXS™ panel, there is now a persistent connection between the web
screens and the panel. This allows status updates from the panel to be pushed out to
the screens automatically to display the data seamlessly on the screen.
In addition to the dynamic screens, other panel-side enhancements have been made
that improve screen performance. Now the web server detects when panels of a loop
come online faster. In the past, there was a 30- to 45-second delay during which a
panel could be online before the web would detect it. Data transfer between the panel
and web browsers has been optimized to reduce bandwidth requirements and improve
screen response times overall.
Multi-language Support
Multi-language support consists of “language files” installed with the firmware or
imported to a panel. A language selection is available on a per-user basis. The
language files are available by upload from the panel or from the Honeywell website.
You can customize the upload.
There are options to import, export, or delete the language files from a panel. During
upgrades, the language files with default names are replaced by those included with
the firmware, so we recommend that customizations be saved and imported with a
different filename than any present after upgrade. After toggling firmware sets, some
phrases may change or appear in English until the language file(s) matching the active
firmware version are imported, or the next upgrade is completed.
NetAXS™ Access Control Unit User’s Guide, Document 800-04410, Revision A ix
Page 10

CSV Reports and Card Upgrade
CSV Reports and Card Upgrade
A requested feature was added to the NetAXS™ panel to support card holder updates and additions to
the database via a CSV (comma separated variable) file. In order to support this, a CSV report is first
created via a request from the web page. This report can be edited directly or loaded into a spreadsheet
to be edited. If loaded into a spreadsheet, the file can be saved in CSV format. The modified CSV file
can then be downloaded to the gateway and loop panels.
Also, an option is provided to either replace or append the card database. Replacing the database
deletes the existing card database, and appending the existing database adds new cards and updates to
existing cards, if needed. This file is downloaded first to the gateway panel, and then automatically to
each downstream panel. The file is sent to the downstream panel as a background process that allows
other web screens to continue to operate. Note that the panels will not need to reboot after the file is
downloaded.
Reverse IP
Reverse IP is implemented in the NetAXS™ panel to function with the WIN-PAK CS Reverse IP
communication setting. This allows the panel to exist behind a firewall while communication to
WIN-PAK CS is conducted on a pre-set port. This allows the NetAXS™ panel to be on a DHCP
network. Reverse IP connections are currently limited to one NetAXS™ panel per WIN-PAK CS port.
The NetAXS™ panel does not currently support encrypted reverse IP communication.
x www.honeywell.com
Page 11

Connecting to the Web Server
In this chapter...
Overview 1
Connecting to the Web Server 2
1.1 Overview
A NetAXS™ access control site is configured with a host system and NetAXS™
access control units that exceed existing N-1000-III/IV, Pro Series specifications and
approvals, and that communicate with each other and with a variety of input and
output devices. Each access control unit, or panel, has four reader ports. See the
NetAXS™ NX4L1 Installation Guide, NetAXS™ NX4S1 Installation Guide, or
NetAXS™ NX4S2 Installation Guide to view illustrations of the supported NetAXS™
system configurations.
1
You can communicate with the NetAXS™ access control unit either through a host
software system or by connecting to the NetAXS™ web server by an Ethernet
connection. This chapter describes how to connect to the NetAXS™ web server.
Chapter 2 describes how to use the NetAXS™ web interface after you are connected
to the NetAXS™ panel through the NetAXS™ web server. Chapter 3 describes how
to use the web server interface.
NetAXS™ Access Control Unit User’s Guide, Document 800-04410, Revision A 1
Page 12
Connecting to the Web Server
Connecting to the Web Server
1.2 Connecting to the Web Server
This section describes how to connect a computer to the NetAXS™ web server via Ethernet and
Internet Explorer.
Notes:
• The NetAXS™ panel that you are connecting to the computer is the Gateway panel. DIP switch
6 on a Gateway panel must be set to ON for a successful connection.
• The Microsoft Windows™ screen captures used in this section reflect the Windows 2000™
platform. If you are using another Windows™ platform, the screens will be somewhat
different.
Perform the following steps:
1. Connect your computer's Ethernet port and the NetAXS™ panel's Ethernet Port by using either
of two methods:
a. Connect both the computer’s Ethernet port and the NetAXS™ panels Ethernet port to an
Ethernet hub with standard Ethernet patch cables.
Figure 1-1: NetAXS™ Web Server Hub Connection
Terminal
Ethernet Port
Ethernet Port
Ethernet
Cable
Ethernet Hub NetAXS Panel
b. Connect the computer’s Ethernet port directly to the NetAXS™ panel’s Ethernet port
with an Ethernet cable.
2 www.honeywell.com
Page 13
Figure 1-2: NetAXS™ Web Server Direct Connection
Connecting to the Web Server
Connecting to the Web Server
Terminal
Ethernet Port
Ethernet
Cable
2. Configure the computer’s network connection:
a. Select
Start > Settings > Control Panel.
b. Click Network and Dial-up Connections.
NetAXS Panel
NetAXS™ Access Control Unit User’s Guide, Document 800-04410, Revision A 3
Page 14
Connecting to the Web Server
Connecting to the Web Server
c. Identify your local Ethernet connection (commonly labeled Local Area Connection), and
right click the icon to display the Local Area Connection Properties screen.
4 www.honeywell.com
d. Highlight the Internet Protocol (TCP/IP) connection.
e. Click
f.
Properties to display your system’s current Internet Protocol properties.
Important: Keep a record of your computer’s current network configuration as it appears
in this screen. You will need to re-instate this configuration later.
g. Select “Use the following IP address."
h. Enter "192.168.1.10" in the IP address field.
i. Enter "255.255.255.0" in the Subnet mask field.
Page 15
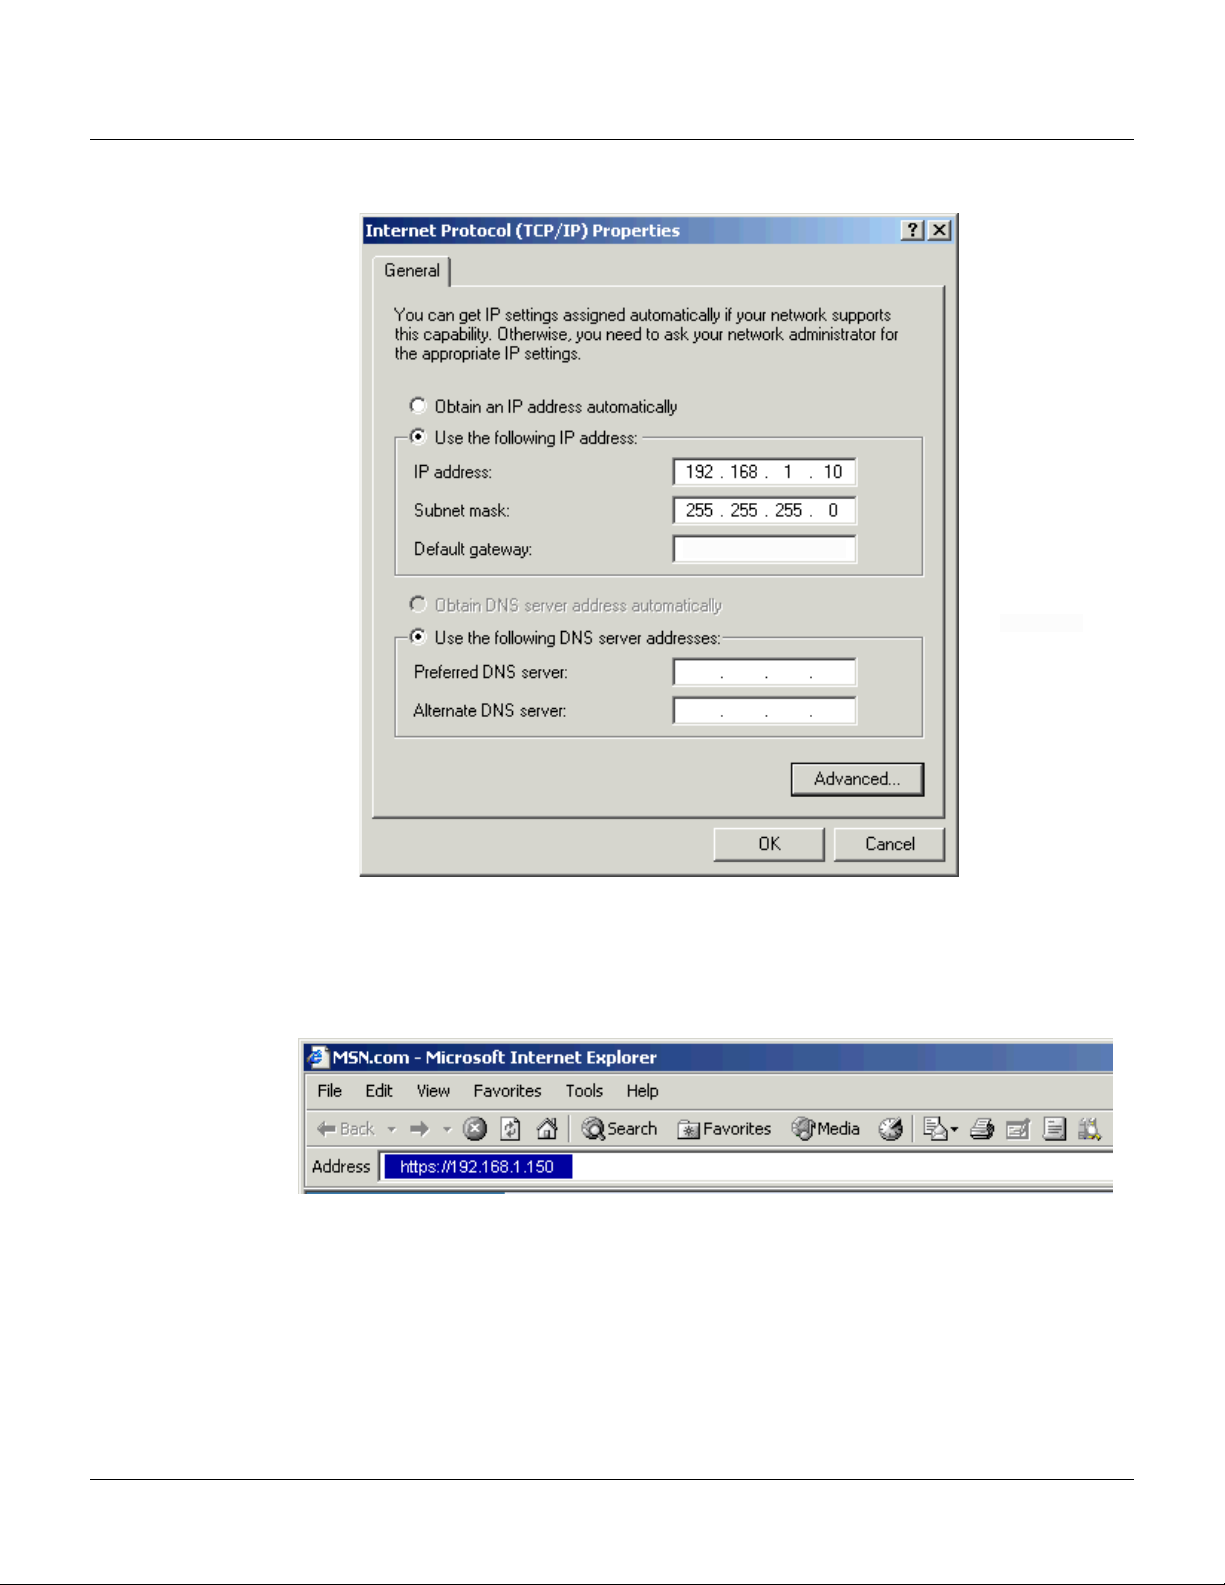
Connecting to the Web Server
Connecting to the Web Server
j. Click OK to accept the entries.
3. Open your browser (Internet Explorer shown below), and enter https://192.168.1.150 as the
target address.
NetAXS™ Access Control Unit User’s Guide, Document 800-04410, Revision A 5
Page 16
Connecting to the Web Server
Connecting to the Web Server
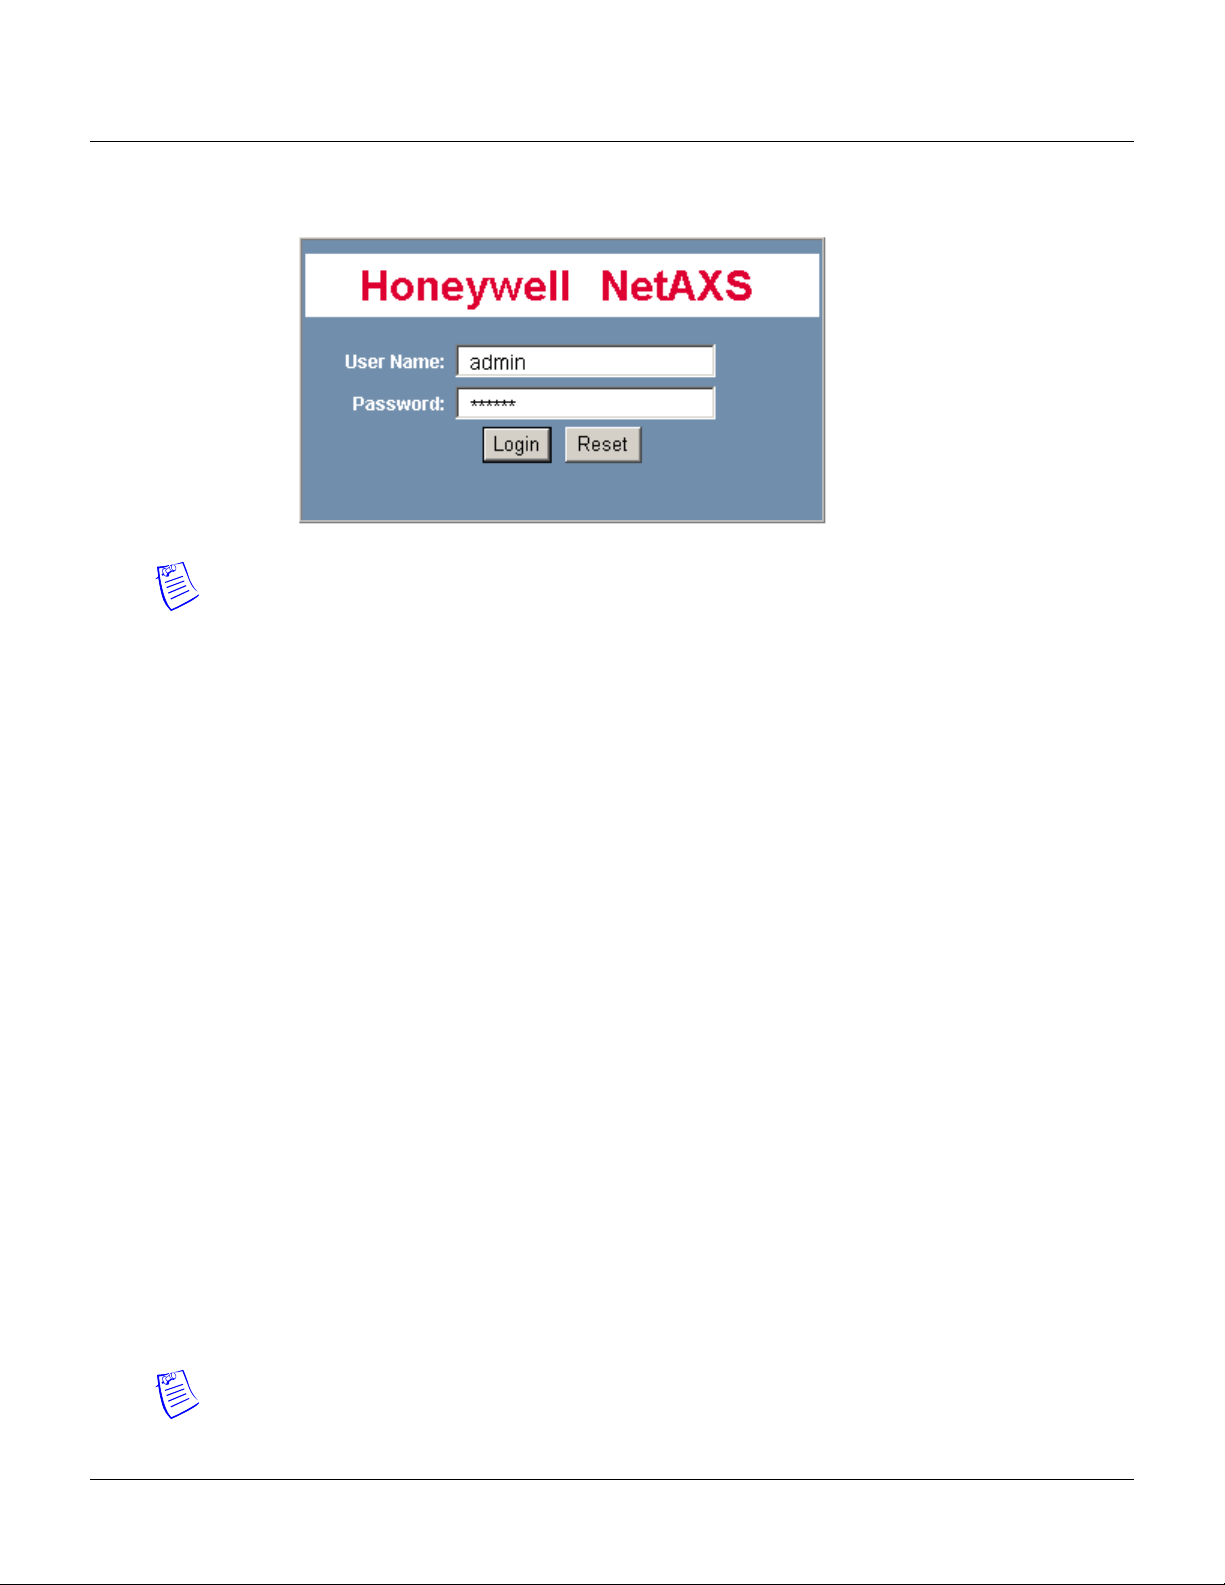
4. Press the Enter key to display the Honeywell NetAXS™ login screen.
Note: If you are using Microsoft Internet Explorer 7, and you receive a certificate error
message, follow these steps to clear it:
a. Enter the IP Address of the panel into the URL box.
b. Click Continue to the website (not recommended) to display the login screen.
c. Click Certificate Error at the top-right of the IP Address. The “Untrusted Certificate”
screen appears.
d. Click the View Certificates bar. The “Certificate Information” screen appears.
e. Click Install Certificate. The “Certificate Import Wizard” screen appears.
f. Click Next and follow the prompts; leave all settings at their default values. A Security
Warning asks if you want to install the certificate.
g. Click Ye s. A Certificate Import Wizard message states “The import was successful.”
h. Click OK. The Certification Information message appears again.
i. Click OK.
j. Close the web browser and re-open it.
k. Enter the IP Address again into the URL box. The login screen appears without the
certificate error
5. Enter “admin” in the User Name field, and enter “admin” in the Password field. Both the user
name and password are case-sensitive.
6. Click
Login to display the NetAXS™ main window. Note that the Select Panel column on the
right edge of the screen displays all panels available to the computer. This list will include the
gateway panel that you are connected to over Ethernet and any downstream panels connected
via RS-485 to the Gateway panel.
Note: It is recommended that you change your default user name (admin) and password
(admin) to a new user name and password at this time. To do this, proceed to the instructions in
Chapter 2, Configuring the NetAXS™ System, Steps to modify a user:, page 63.
6 www.honeywell.com
Page 17
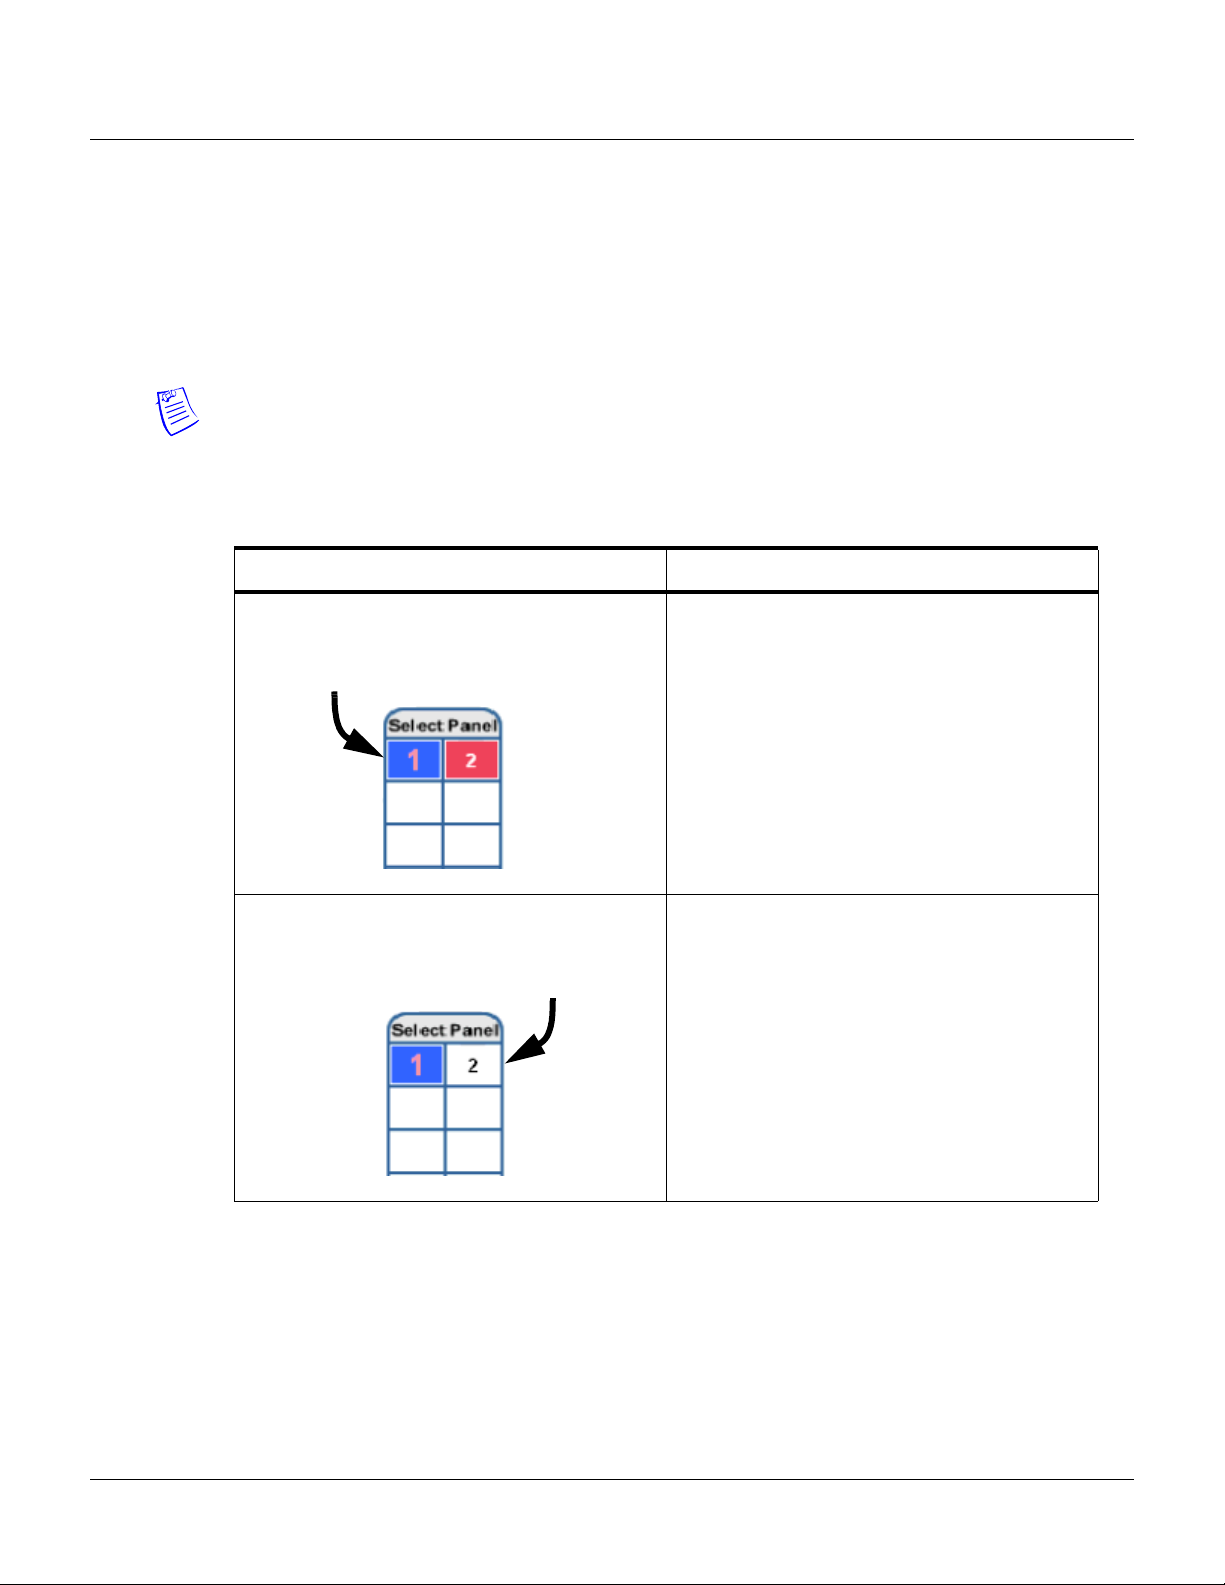
1.3 Reading the Select Panel
The Select Panel is located at the right margin of the NetAXS™ web server main screen, shown in the
preceding section. The presence of a number in one of the Select Panel cells indicates that its
associated panel is online. For example, if you see a number 1 in a cell, this indicates that panel 1 is
online. The combinations of size and color of the number and the color of the cell background indicate
the panel’s status, as shown in the following table:
Notes:
• Holding the cursor over a cell also displays a popup message, which conveys the panel in that
cell is online or selected.
• The Select Panel refreshes automatically when the panel’s status changes.
Table 1-1: Reading the Select Panel
Cell Display Status
Connecting to the Web Server
Reading the Select Panel
Large red number on a blue background, such as
“1” in the example below:
Small black number on white background, such as
“2” in the example below:
Panel 1 is selected, and it has unacknowledged
alarms.
Panel 2 is not selected and it has no
unacknowledged alarms.
NetAXS™ Access Control Unit User’s Guide, Document 800-04410, Revision A 7
Page 18
Connecting to the Web Server
Reading the Select Panel
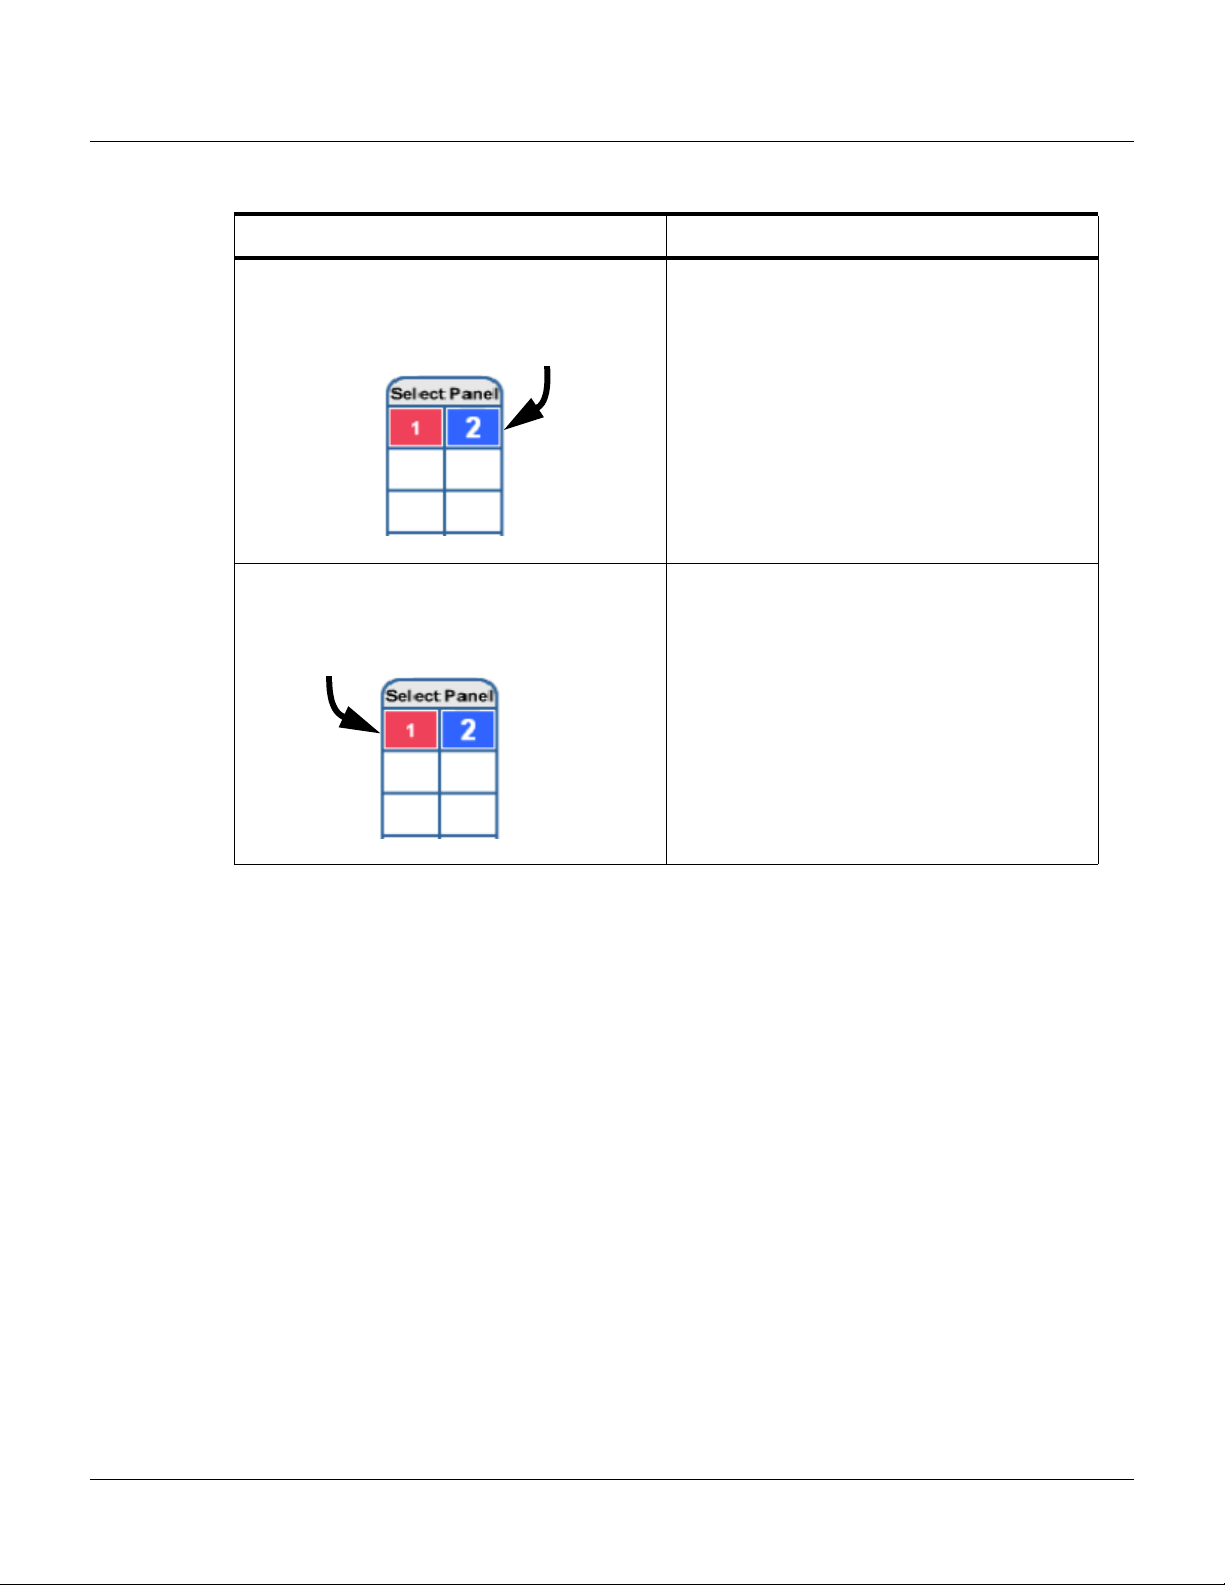
Table 1-1: Reading the Select Panel (continued)
Cell Display Status
Large white number on blue background, such as
“2” in the example below:
Small white number on a red background, such as
“1” in the example below:
Panel 2 is selected, and it has no unacknowledged
alarms.
Panel 1 is not selected, but it does have
unacknowledged alarms.
8 www.honeywell.com
Page 19

Configuring via the Web Server
In this chapter...
Overview 10
Configuring the System 11
Configuring the Doors 31
Configuring Other I/O & Groups Tab 52
Configuring Interlocks 59
Configuring Time Management 24
Configuring Access Levels 45
Configuring Users 61
2
NetAXS™ Access Control Unit User’s Guide, Document 800-04410, Revision A 9
Page 20
Configuring via the Web Server
Configuring the System
2.1 Overview
This chapter explains the NetAXS™ configuration functions as accessed via the NetAXS™ web
server. These functions should be performed only by the NetAXS™ system administrator or service
personnel.
Caution: The sequence of NetAXS™ configuration tasks is critical. If the sequence given below is not
followed, the NetAXS™ system cannot be successfully configured.
The flow chart in Figure 2-1 shows the order in which to perform the administrative functions.
Figure 2-1: NetAXS™ System Configuration Flow Chart
Configure the Panel
Configuration > System > Host/Loop Communications (Host/Loop
Communications Tab, page 11)
Configuration > System > Network (Network Tab, page 20)
Configuration > System > General (General Tab, page 14)
Configuration > System > Site Codes (Site Codes Tab, page 21)
Configure the Time Zones
Configuration > Time Management > Time Zones (Time Zones Tab, page 26)
Configure the Doors
Configuration > Doors > Reader (Reader Tab, page 31)
Configuration > Doors > Output (Outputs Tab, page 38)
Configuration > Doors > Inputs (Inputs Tab, page 42)
Configure the Access Levels
Configuration > Access Levels (Configuring Access Levels, page 45)
Create the Cards
Cards > Add Cards (Adding New Cards, page 47)
10 www.honeywell.com
Assign Access Levels to Cards
Cards > Add Cards (Adding New Cards, page 47)
Page 21
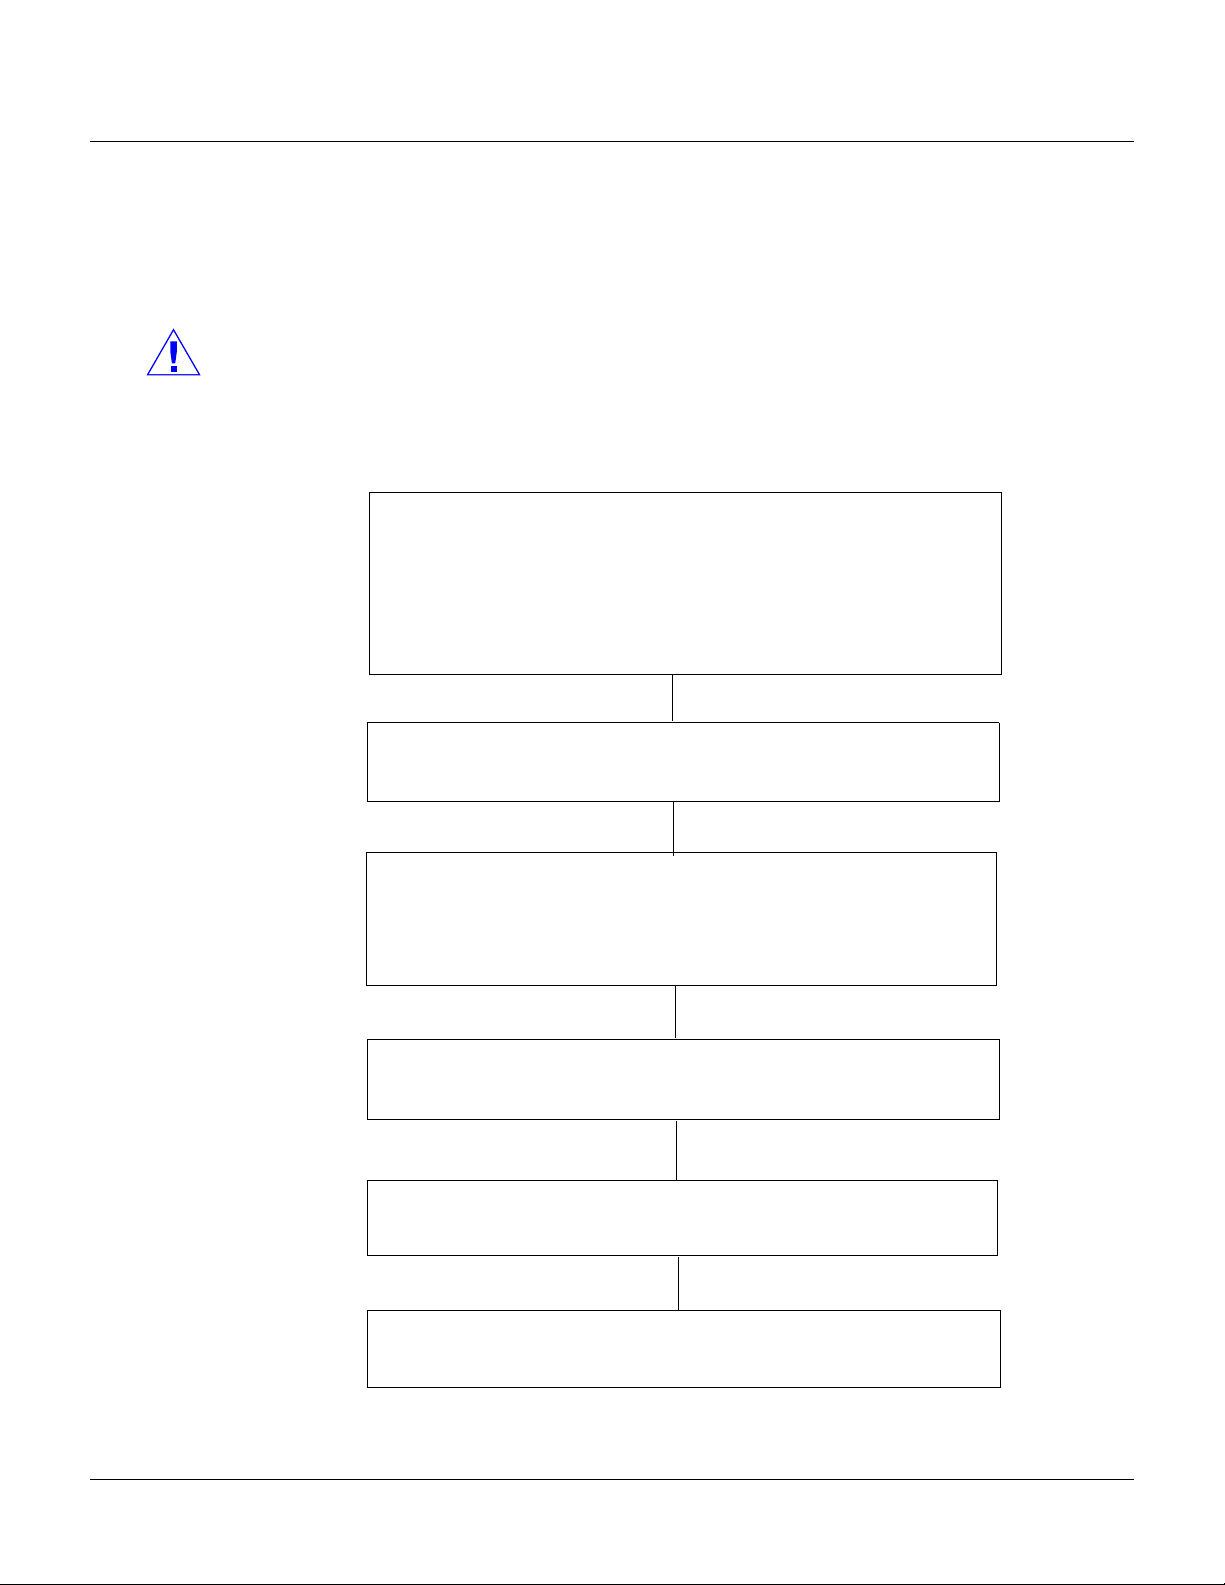
2.2 Configuring the System
2.2.1 Host/Loop Communications Tab
In order to maintain your NetAXS™ system configuration or to monitor its status, you must connect to
the NetAXS™ panel by using one of two modes:
• Host mode (monitor only) – a host software system, such as WIN-PAK™, connects to the panel
(through the NetAXS™ gateway panel, which has an on-board PCI communications adapter),
and it enables you to monitor the status of the NetAXS™ system. The on-board PCI adapter
functions as an interface between a host computer’s RS-232 port and one or more panels
connected on the Multidrop line.
• Web mode (configure and monitor) – the NetAXS™ web server connects to the panel and
enables you to configure the panel and monitor system status.
This tab enables you to select and configure the communication mode you will use to connect to the
panel.
Note: A Gateway panel installed with release 3.1.8 or newer of NetAXS™ firmware cannot
communicate fully with previous versions of NetAXS™ that may be installed on existing panels. If
your panels are running release 2 (v2.2.21 or older), they must be upgraded to release 3.
Configuring via the Web Server
Configuring the System
Click the
Host/Loop Communications tab:
Figure 2-2: Configuration > System >Host/Loop Communications Tab
NetAXS™ Access Control Unit User’s Guide, Document 800-04410, Revision A 11
Page 22

Configuring via the Web Server
Configuring the System
The Host/Loop Communications tab enables you to:
• Configure the following host settings:
– Connection type (host or web server)
– Communications type
–Baud rate
– Port number
– Time sync
• Configure the loop baud rate for communication among downstream panels.
Steps: Use the descriptions in the following table to configure the settings:
Table 2-1: Configuration > System > Host/Loop Communications Tab Field Descriptions
Host/Loop Setting Description
Host Connection type Specifies the type of physical connection
between the host and the Gateway panel.
If you are connecting from a host software
system such as WIN-PAK, select one of the
following three connection options:
Direct via TCP/IP – Host connects directly to
the panel using the TCP/IP protocol.
Reverse TCP/IP – Panel connects directly to
the host system using the TCP/IP protocol.
You must enter the host IP address in the Host
IP Address field. The communication is not
encrypted.
Direct via RS-232 – Host connects directly to
the panel via the RS-232 protocol.
Hub Mode (modem) – Host and the panel
both connect to a modem.
If you will be connecting to the panel through
the NetAXS™ web server, click None.
(Currently not supported)
12 www.honeywell.com
Comms Type Specifies the type of communications.
Ack/NAK – Provides a response (either an
acknowledgement or a
non-acknowledgement) in a transmission
between the host and panel(s). This is the
recommended communications type.
Non Ack/NAK – Does not provide a response
(either an acknowledgement or a
non-acknowledgement) in a transmission
between the host and panel(s).
Page 23

Configuring via the Web Server
Configuring the System
Table 2-1: Configuration > System > Host/Loop Communications Tab Field Descriptions (continued)
Host/Loop Setting Description
Baud Rate Specifies the transmission rate (bits per
second) between the host and the panel. Select
the highest rate that your modem will support
(19,200 bps is recommended).
Port Number Specifies the port number for the Ethernet port
(default is 3001).
Host IP Address Enter the host system (or WIN-PAK server) IP
address here if you selected
in the Connection Type field on this screen.
Time Sync Synchronizes the panel’s time with the host’s
time.
Enabled – Causes the panel(s) to be
automatically time-synchronized with the
host.
Reverse TCP/IP
Loop Baud Rate Specifies the transmission rate (bits per
second) among the downstream NetAXS™
panels on the loop. For NetAXS™
downstream panels, it is recommended that
you select 115,200.
Force Baud Reset
Tells all downstream NetAXS™ panels to
change to the selected Downstream baud rate.
This saves the user from having to go to each
panel one by one
NetAXS™ Access Control Unit User’s Guide, Document 800-04410, Revision A 13
Page 24

Configuring via the Web Server
Configuring the System
2.2.2 General Tab
Click Configuration > System in the NetAXS™ menu to display the System Configuration (General)
screen:
Figure 2-3: Configuration > System > General Tab
The General Tab enables you to:
• Set the general configuration settings.
• Reset the panel.
Steps: Use the descriptions in the following table to configure the general settings, and click Submit
Changes
Table 2-2: Configuration > System > General Tab Fields
Parameter Description
Name Unique name that identifies the panel.
Address Displays the address set by the panel’s DIP switches.
Type Displays “NetAXS” as the panel type.
14 www.honeywell.com
:
Page 25

Configuring via the Web Server
Configuring the System
Table 2-2: Configuration > System > General Tab Fields
Parameter Description
Boot Time Displays the time that power was applied to the NetAXS™ panel.
Reset Reboots the panel. A reset does not change the current configuration
in the database.
Anti-Passback
Enabled – Enables anti-passback, which prevents an entrant to an
area from passing his card back to another potential entrant.
Local – Enforces anti-passback only at doors configured locally to
the panel controlling the original card read.
Global – Enforces anti-passback at panels throughout the NetAXS™
system after a successful card read at any one of the system’s readers.
Forgiveness – Causes all system codes to be reset at midnight every
day. This enables a cardholder who exited the building in the evening
without using his card to use his card for entry the following
morning.
Gateway Panel Addr Sets the panel address of the Gateway panel, or the panel directly
connected to the host system.
Web Session Timeout Activates a web session timeout after the specified time period has
elapsed. Define the time period either in minutes or in hours. Enter
the number in the box, then select either minutes or hours.
Hybrid Mode
Enabled – Implements a superior method of communication that
provides dynamic database synchronization between the NetAXS™
database and WIN-PAK SE Release 2 or WIN-PAK PE Release 2. It
allows full web functionality while using a WIN-PAK SE Release 2
or WIN-PAK PE Release 2 as the host. When connected to
WIN-PAK SE Release 2 or WIN-PAK PE Release 2 or later,
WIN-PAK enables you to:
• approve changes made via the web interface.
• import those changes into the WIN-PAK database.
• disapprove those changes and revert the panel's
configuration to the configuration stored in the WIN-PAK
database.
Note: Consult your Honeywell Access Control representative for the
latest list of Host software packages that support this feature.
Free Egress
Enabled – Configures the panel for free egress. Reader 1 activates
output 1, reader 2 activates output 2, reader 3 activates output 3, and
reader 4 activates output 4. Inputs 1, 3, 5, and 7 are egress defaults
that activate outputs 1, 2, 3, and 4, respectively. Inputs 2, 4, 6, and 8
are status defaults for outputs 1, 2, 3, and 4, respectively.
NetAXS™ Access Control Unit User’s Guide, Document 800-04410, Revision A 15
Page 26

Configuring via the Web Server
Configuring the System
Table 2-2: Configuration > System > General Tab Fields
Parameter Description
Duress Detect Enabled – Enables the user to trigger an alarm or output device in
times of duress, such as when the operator is forced to grant access
against his will to an unauthorized person. This feature is available
only when the reader is configured with a “Card and Pin” access
mode (see Reader Tab, page 31).
When this feature is enabled, you can configure an auxiliary output
with a pulse time and connect it to a device with an interlock (see
“Outputs Tab“ on page 55 for the output configuration).
During normal operation, the duress output does nothing. To energize
the output, the cardholder presents his card to a reader that is
configured for Card and PIN access (see “Reader Tab“ on page 31).
The cardholder then enters a PIN that is either one number higher or
one number lower than his correct PIN. For example, if his PIN is
2222, the cardholder would enter either 2221 or 2223. Even though
the PIN is incorrect, the door will still open normally, but the duress
output pulses and an alarm is generated. In this way, the cardholder
notifies others without detection by the unauthorized person.
Continuous Card Reads
Enabled – Enables continuous card reading while the output is being
energized. When this option is not enabled, a reader will not be able
to read a second card during the pulsing of the output caused by the
previous card read.
Reader LEDs Identifies the color of a reader LED when a grant is authorized.
Cardholder Note 1 Specifies any information field you might want to put on a card. For
example, if you enter “Department” here, a field labeled
“Department” appears on the card. The user who creates the card
would then enter the cardholder’s department name. See Adding
New Cards, page 47.
Cardholder Note 2 Specifies any information field you might want to put on a card. For
example, if you enter “Phone Number” here, a field labeled “Phone
Number” appears on the card. The user who creates the card would
then enter the cardholder’s telephone number. See Adding New
Cards, page 47.
16 www.honeywell.com
Page 27
Configuring via the Web Server
Configuring the System
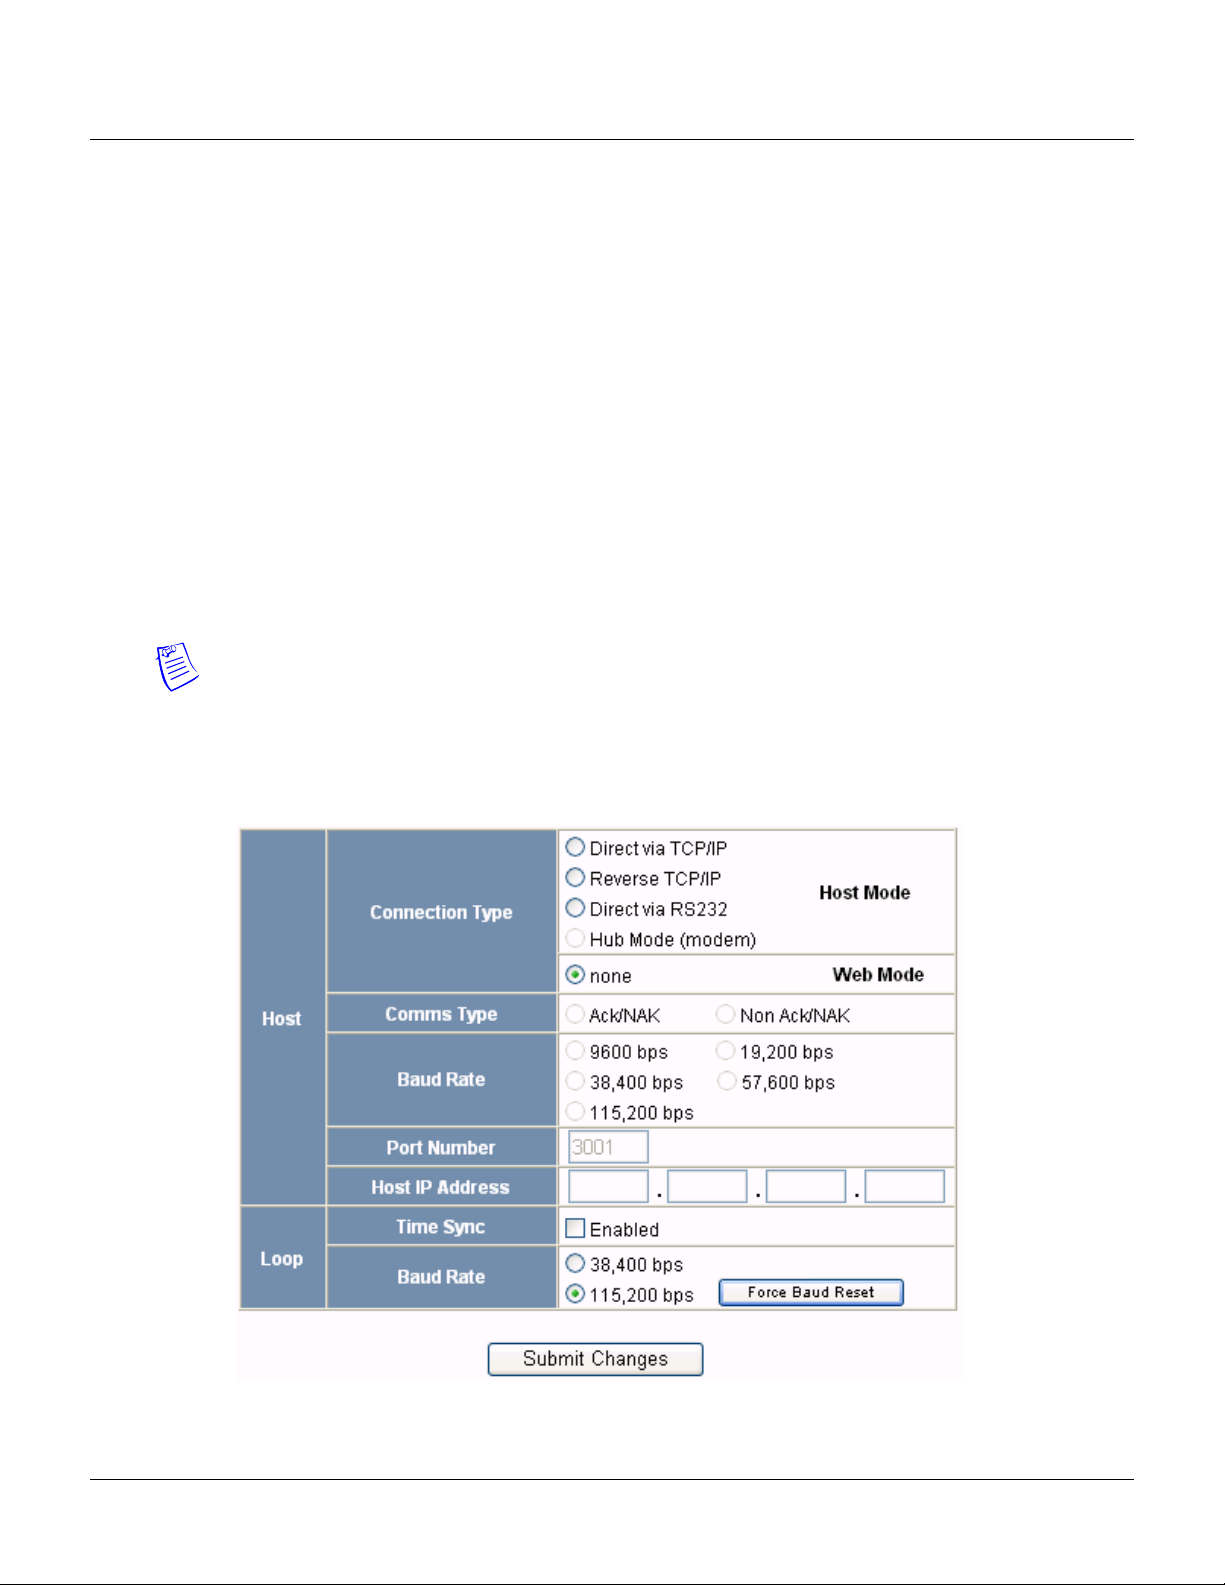
2.2.3 File Management Tab
Firmware is software that is embedded in the NetAXS™ board. The firmware provides this web
interface and all access control functionality. Periodically, the firmware is updated. This tab enables
you to download new versions of the firmware, revert to a previous version of the firmware, upload
and/or download card and configuration databases.
Click
File Management to display the File Management tab:
Figure 2-4: Configuration > System > File Management Tab
The File Management tab enables you to:
• View and re-set the current firmware configuration.
• Revert to another firmware version.
• Restore (or download) firmware.
• Back up (or upload) panel, card, and configuration data from the panel to the host system.
• Restore (or download) card database files.
• Restore (or download) backup files from the host to the panel.
• Delete a file.
NetAXS™ Access Control Unit User’s Guide, Document 800-04410, Revision A 17
Page 28

Configuring via the Web Server
Configuring the System
Steps to reset the firmware version:
1. In the Active Image column, click to select the firmware version to which you want to revert.
The prompt “Switching to an alternate firmware set requires a panel reboot” appears.
2. Click
Steps to restore (or download) firmware:
OK to reboot the panel.
1. Click Browse to locate the firmware file.
2. Click
Download to download the selected firmware file.
Note: Every panel has its own database, and each panel’s database must be backed up
individually.
Steps to back up (or upload) data from the panel to the host system:
1. From the Upload dropdown list, select one of the following types of upload from the panel to
the host system:
• Card and common configuration data—uploads cards, time zones, card formats,
holidays, access levels, and site codes in a .CSV file.
• Panel configuration data—uploads inputs, outputs, groups, interlocks, readers, and panel
configuration in a .CSV file.
• Card, common, and panel configuration data—uploads both the card and panel
configuration items in a .CSV file.
• Card report (short)—uploads the Card Number, Last Name, First Name, Trace, VIP,
Limited Use, Card Expiration, Temporary, Supervisor, and Access Level card values in a
.CSV file.
2. Click
backup file on your PC. Be sure to give the backup file a useful name for easy identification
and restoring.
Note: Card report (short and long) data is stored in a 64-bit format. Microsoft Excel displays up to 32
characters. Therefore, you should save the report and then open the it in Notepad, instead of opening
the report immediately in the default .CSV format in Excel.
18 www.honeywell.com
• Card report (long)—uploads the Card Number, Last Name, First Name, Trace, VIP,
Limited Use, Card Expiration, Temporary, Supervisor, Access Levels, Site Codes,
Number of Bits, Pin, Info 1, Info 2, Time Zones, Activation Date, Issue Level, APB
State, and Control Device card values in a .CSV file.
• Alarms and events report—uploads the Date, Time, Event Type, Acknowledged Date,
Acknowledged Time, and Message of Alarms/Events for alarms and events in a .CSV
file.
• Language: English default, Spanish, French, Italian, Dutch, Czech, and simplified
Chinese. This is a text file that uploads a language package that translates the text on all
of the web screens for a user who has specified a language preference.
Upload to upload the data to the host PC or laptop. Follow the instructions to save a
Page 29

Configuring via the Web Server
Configuring the System
Steps to download a card database report (.CSV file) from the host system to the panel:
1. Click Browse to locate the .CSV file.
2. Click
Download to download the file. If the file is in the correct report format, this message
appears: “Would you like to append or replace the database? Access Control does not function
while replacing a database, and updating may take several minutes.” If the file is not in the
correct report format, a message states the error condition.
If the database update is successful, this message appears: “Update Successful. Restarting Access
Control.” If the database update is not successful, a message states the error condition.
Steps to restore (or download) backup files from the host system to the panel:
1. Click Browse to locate the backup file.
2. Click
Steps to delete language files:
Download to download the selected backup file.
1. From the Delete dropdown list, select the language file you want to delete.
2. Click
Delete to delete the file.
NetAXS™ Access Control Unit User’s Guide, Document 800-04410, Revision A 19
Page 30
Configuring via the Web Server
Configuring the System
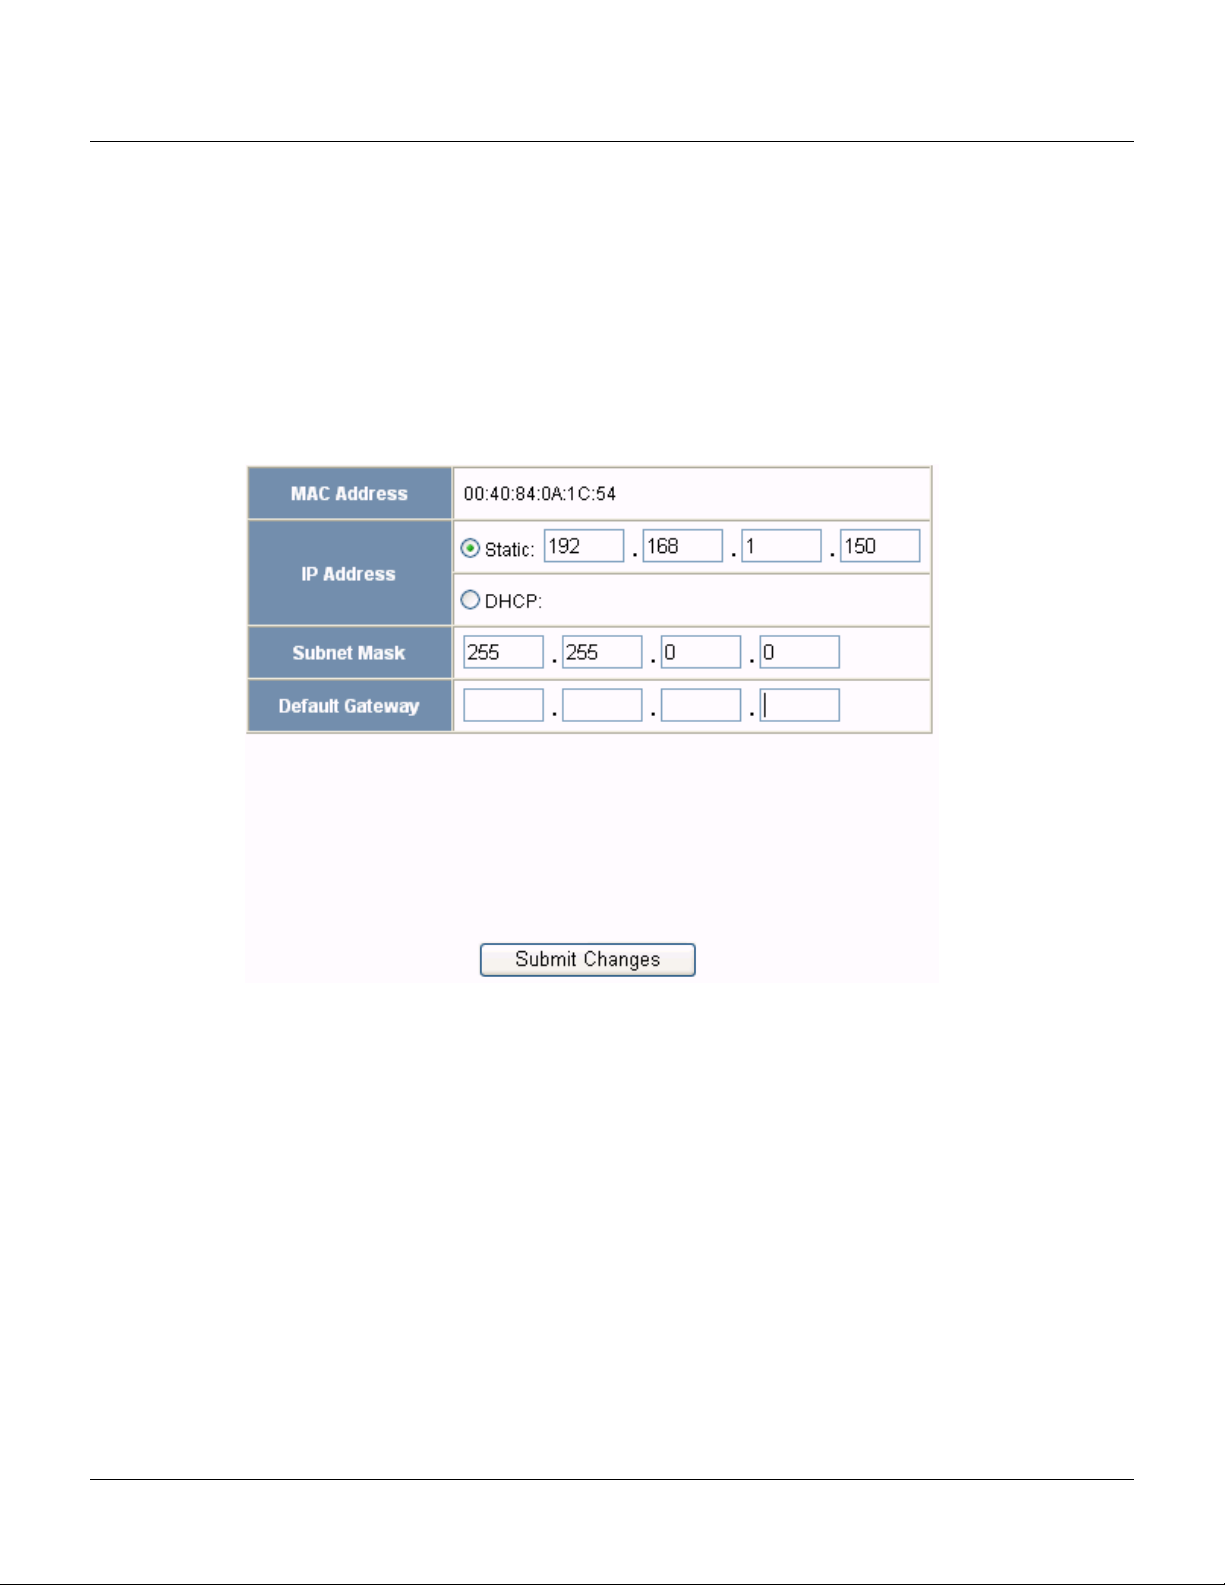
2.2.4 Network Tab
Your NetAXS™ panel is physically configured in one of a number of possible network configurations.
See the “System Configuration” section in the NetAXS™ NX4L1 Installation Guide, NetAXS™ NX4S1
Installation Guide, and NetAXS™ NX4S2 Installation Guide for illustrations of the supported network
configurations. For the panel to function in any of these configurations, the other panels and devices in
the network must know the panel’s network addresses.
Click
Network to display the Network tab:
Figure 2-5: Configuration > System > Network Tab
The Network tab enables you to:
• View the panel’s MAC address.
• View and edit the panel’s IP address.
• View and edit the panel’s subnet mask.
• View and edit the panel’s default gateway.
20 www.honeywell.com
Page 31

Configuring via the Web Server
Configuring the System
2.2.5 Site Codes Tab
Site codes identify an enterprise’s site. You can create a maximum of eight site codes to serve as
secondary IDs (in addition to the card number) on the card for additional validation.
Click
Site Codes to display the Site Codes tab:
Figure 2-6: Configuration > System > Site Codes Tab
The Site Codes tab enables you to:
• Create one or more site codes.
• View existing site codes.
• Modify an existing site code.
• Delete a selected site code.
• Delete all site codes.
Steps to create a site code:
1. Enter a name for the site code in the Name field.
2. Enter a unique number (up to five digits) for the site code in the Site Code field.
3. Click
Steps to modify a site code:
Add Site Code to create the site code.
1. Click the site code’s number in the Num column to select the site code.
NetAXS™ Access Control Unit User’s Guide, Document 800-04410, Revision A 21
Page 32

Configuring via the Web Server
Configuring the System
2. Click Modify to display the Name and Site Code fields.
3. Modify the name or site code number as you desire, and click
Steps to delete a site code:
1. In the Num column, click the number of the site you want to delete.
2. Click
3. Click
Steps to delete all site codes:
1. Click
2. Click
Delete to display a prompt.
OK to delete the site code.
Delete All Codes to display a prompt.
OK to delete the codes.
Modify again.
22 www.honeywell.com
Page 33

Configuring via the Web Server
Configuring the System
2.2.6 Downstream Devices Tab
The NetAXS™ downstream devices provide the NetAXS™ panel with additional inputs and outputs.
The NetAXS™ panel supports two downstream board types:
• NX4IN—Provides 32 supervised, four-state inputs that are limited to 2.2K ohms resistance.
The NX4IN must be assigned network addresses 1 and 2.
• NX4OUT—Provides two supervised inputs and 16 SPDT relay outputs; each input is limited to
2.2K ohms resistance. The NX4OUT must be assigned network addresses 3-6.
Notes:
• The NX4IN and NX4OUT network addresses are set by the DIP switches on each board. Refer
to the NetAXS™ NX4IN/NX4OUT Input/Output Configuration Guide for more information
about configuring the NX4IN and NX4OUT boards.
• A NetAXS™ panel supports a maximum of six daisy-chained downstream boards—two
NX4IN and four NX4OUT boards. The boards connect to the NetAXS™ panel’s Downstream
port (Terminal Block 10).
Click the
Downstream Devices tab:
Figure 2-7: Configuration > System > Downstream Devices Tab
The Downstream Devices tab enables you to:
• View and modify the names of the devices that communicate with the panel.
• View the types and addresses of the devices that communicate with the panel.
NetAXS™ Access Control Unit User’s Guide, Document 800-04410, Revision A 23
Page 34
Configuring via the Web Server
Configuring the System
2.3 Configuring Time Management
This set of time-related functions includes:
• Setting the current time by which the panel will function.
• Creating the time zones by which the panel will control the operation of the inputs, outputs,
groups, readers, access levels, and cards through access levels.
• Defining the holiday schedule.
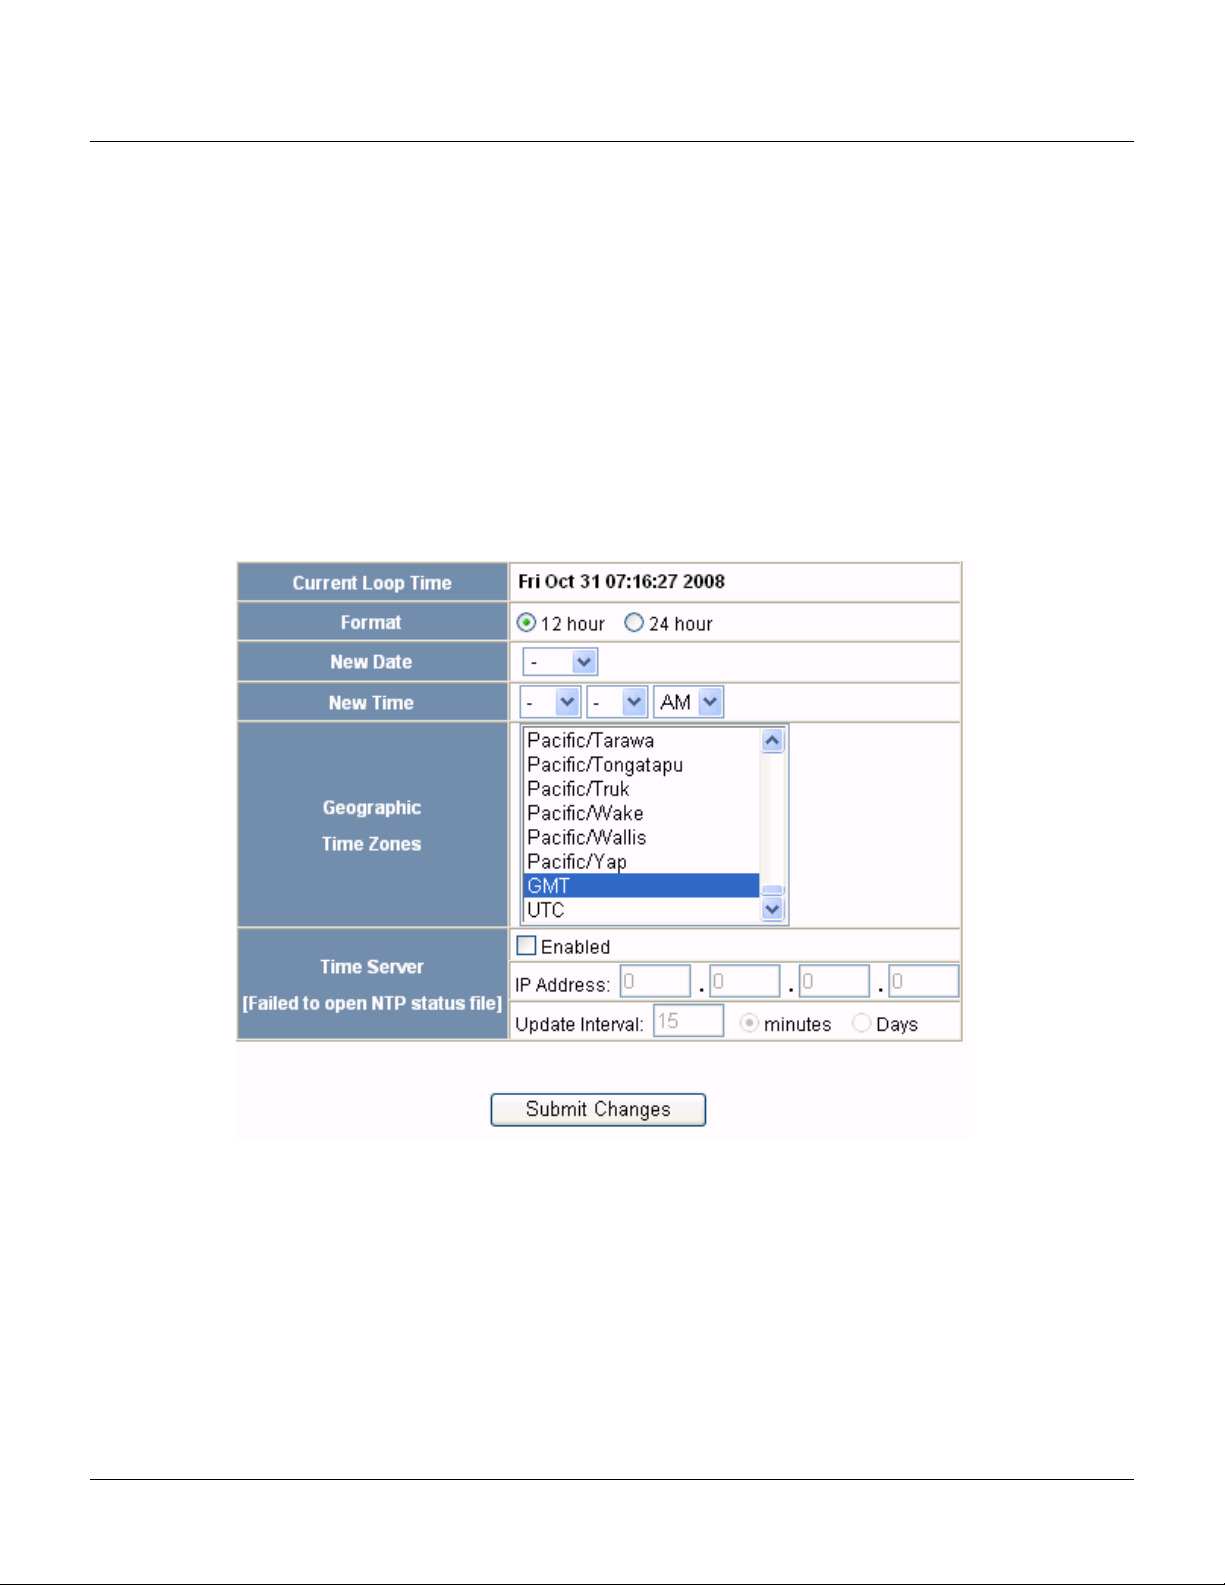
2.3.1 Current Time Tab
Click Current Time to display the Current Time screen:
Figure 2-8: Configuration > Time Management > Current Time Tab
The Current Time tab enables you to:
• Set the current loop time.
• Specify the time format (12 hour/24 hour).
• Set a new date.
• Set a new time.
• Set the geographic time zone.
• Specify the time server being used.
• Force a time synchronization between the panel and the time server.
24 www.honeywell.com
Page 35

Steps
: Use the descriptions in the following table to configure the time settings:
Table 2-3: Configuration > Time Management Tab Field Descriptions
Setting Description
Current loop time Displays by default the current time setting in
day/month/date/hour/minutes/seconds. For example:
Fri Oct 31 07:16:27 2008.
Configuring via the Web Server
Configuring the System
Format
12 hour – The 24-hour day is divided into two 12-hour
halves, a.m. and p.m.; each half is numbered 1-12.
24 hour – The hours in the 24-hour day are numbered
consecutively 0-23.
New Date Specifies a new date to be the current date. Use the
dropdown lists to set the month and date, and click the
calendar icon to specify a different year.
New Time Specifies a new time to be the current time. Use the
dropdown lists to set the hour, minute, and AM or PM.
Geographic Time
Zone
Select the geographic time zone in which the panel will
operate. The time zones are written in the [continent/city]
format. Find the appropriate continent, and then identify the
city with the closest longitude to the panel’s location. In the
United States, you might find these time zone associations
more familiar:
Eastern Time: America/New York
Central Time: America/Chicago
Mountain Time: America/Denver
Pacific Time: America/Los Angeles
Time Server Enter the IP address of the machine whose time is used as
the standard for all panels.
Enabled – Select to enable the specified machine to be the
active time server.
IP Address – Enter the IP address of the time server.
Update Interval – Specifies the interval of time between
each automated synchronization.
NetAXS™ Access Control Unit User’s Guide, Document 800-04410, Revision A 25
Page 36

Configuring via the Web Server
Configuring the System
2.3.2 Time Zones Tab
The NetAXS™ panel controls access by using time zones, or time schedules. Inputs, outputs, groups,
readers, access levels, and cards through access levels are all configured with time zones by which
they will be energized or de-energized, enabled or disabled. For example, you might assign a group of
outputs to be energized from 12:00 a.m. to 6:00 a.m. every day. The 12:00 a.m. to 6:00 a.m., Sunday
through Saturday, time period is called a time zone. The Time Zones tab enables you to create the time
zones you will use to configure your NetAXS™ system.
Click
Time Zones to display the Time Zones screen:
Figure 2-9: Configuration > Time Management > Time Zones Tab
The Time Zones tab enables you to:
• Create a new time zone.
• Modify a time zone.
• Delete a time zone.
Steps to create a time zone:
1. Enter the name of the new time zone in the
2. Enter a start time and an end time for the time zone.
3. Select the days of the week during which the time zone will be in effect.
26 www.honeywell.com
Name field.
Page 37

Configuring via the Web Server
Configuring the System
4. If the time zone will be linked to another time zone, select the “linked to” time zone’s number
from the drop down list.
Caution: We recommend that you read the explanation of time zone linking below (see Linking
Time Zones) before you link time zones. An example is provided to help you create the links
successfully.
5. Click the
Steps to modify a time zone:
Add Time Zone button.
1. In the Tz column, click the number of the time zone you want to modify.
2. Change the time zone settings as you desire.
3. Click the
Steps to delete a time zone:
Caution: Do not delete a time zone that is currently in use.
Modify button to accept the changes.
1. In the Tz column, click the number of the time zone you want to delete.
2. Click the
3. Click
Delete button.
OK at the delete prompt.
Linking Time Zones
You assign each Time Zone a specific start time and end time. The maximum time range is from 12:00
a.m. to 11:59 p.m. Note that the time range cannot cross midnight. You can set this time range to be
effective for any day of the week, including weekends (Monday, Tuesday, Wednesday, Thursday,
Friday, Saturday, and Sunday). These days can also include holidays, which are considered special
days that take precedence over a standard day. Also, since Access Levels, Outputs, Inputs, Groups can
only be given one Time Zone selection at a time, you can link Time Zones together to create bigger
time zones that could not fit into a single Time Zone.
For example, suppose you must create a Cleaning Crew Time Zone. The time zone(s) are to be set up
as follows: Monday-Friday 5 p.m.-1 a.m., Saturday and Sunday 8 a.m.-1 p.m., no holidays. This
becomes three separate time zones, as follows.
Time Zone # Time Range
2 Monday-Friday, 5 p.m.-11:59 p.m.
(Remember, the time range cannot cross
midnight, so 11:59 p.m. is the limit.)
3 Tuesday-Saturday, 12:00 a.m.-1:00 a.m.
4 Saturday-Sunday, 8:00 a.m.-1:00 p.m.
NetAXS™ Access Control Unit User’s Guide, Document 800-04410, Revision A 27
Page 38

Configuring via the Web Server
Configuring the System
Note: Time Zone 1 is reserved as a default with a time range of 24 hours, seven days a week.
So, we need to add three time zones to the panel. Then, with the Link Time Zone feature, you can link
them so that they all work together:
1. Add Time Zone 2 and select Monday, Tuesday, Wednesday, Thursday, and Friday. Enter a start
time of 5:00 p.m.and an end time of 11:59 p.m. Leave the Link to Time Zone field blank.
2. Add Time Zone 3 and select Monday, Tuesday, Wednesday, Thursday, and Friday. Enter a start
time of 12:00 a.m. and an end time of 1:00 a.m. In the Link to Time Zone field, select Time
Zone 2 to link Time Zones 2 and 3 together.
3. Add Time Zone 4 and select Saturday and Sunday. Enter a start time of 8:00 a.m. and an end
time of 1:00 p.m. In the Link to Time Zone field, select Time Zone 3 to link Time Zones 2, 3,
and 4 together.
Linked in this way, Time Zone 4 tells the NetAXS™ system that it is also to use Time Zone 3, and
Time Zone 3 tells the system that it is to also use Time Zone 2. Since Time Zone 4 is the “start” of this
linked chain, it is the Time Zone that would be operative for the Cleaning Crew Access Level. That is,
the doors to which the cleaning crew would have access would be assigned Time Zone 4. And, by
assigning them Time Zone 4, they would also have access during Time Zones 3 and 2—because they
are linked.
Note that in this example, Time Zone 2 is not linked to Time Zone 4. This is by rule. Time Zone links
should start on one end and stop at other. If you link the start of a Time Zone chain to the end, you
create a condition called a “circular interlock,” which would cause your time zones to not function
properly. The panel will send you a warning, should you try to create a circular interlock.
28 www.honeywell.com
Page 39

2.3.3 Holidays Tab
Holidays are days when no work is scheduled at the facility. These holidays are used in time zone
configuration (see “Time Zones Tab“ on page 26).
Configuring via the Web Server
Configuring the System
Click the
Holidays tab:
Figure 2-10: Configuration > Time Management > Holidays Tab
The Holidays tab enables you to:
• Create a holiday.
• Modify a holiday.
• Delete a holiday.
Note: Holidays should be considered special days of a week. They are similar, but of higher rank than
the standard Monday-Sunday. If a day programmed as a Holiday should occur in the panel, the panel
will treat that day as the Holiday type, regardless of the actual day of the week (Monday-Sunday).
During this Holiday, only Time Zones that contain that specific Holiday type will work. The Holiday
allows users to further customize how the panel works. For example, the user can block access to a
building on that day, or grant special access during that day.
Each Holiday added is considered a full day, extending from midnight to midnight. The options
available when configuring a holiday are Annual, Type, Date and Year. While Annual is enabled, the
date added as a Holiday will be a Holiday every year. This disables the Annual check box and allows a
user to select a specific year, so that only during that date and year will the Holiday selection work.
NetAXS™ Access Control Unit User’s Guide, Document 800-04410, Revision A 29
Page 40

Configuring via the Web Server
Configuring the System
While Annual is selected, the Year box is grayed out. The NX4 can support three different Holiday
Types (Type 1, Type 2, and Type 3), but a user can only select one type per day. Also of note, a single
calendar day cannot be set for more than one type of Holiday. For example, the 4th of July could be a
Type 1 Holiday, but then Type 2 and 3 would not be able to work on the 4
events that require multiple days will require a Holiday entry for each date that is to be special. For
example, Thanksgiving is usually two days, Thursday and Friday. Both of these days would require a
separate Holiday date entry and use the same Holiday Type. Beyond that, Type 1, 2, and 3 can be
configured any way you wish.
Steps to create a holiday:
th
of July. Holidays or special
1. Enter the name of the new holiday in the
2. If the holiday will occur annually, select the
Name field (up to 25 characters).
Annual checkbox.
3. Assign a type to the holiday, either Type 1, Type 2, or Type 3. The type you assign will map to
a time zone configuration, and the holiday will be regarded according to the rules of that time
zone (see “Time Zones Tab“ on page 26).
4. Select the holiday’s month and date from the drop down lists.
5. Click the
Steps to modify a holiday:
Add Holiday button.
1. In the Holiday column, click the number of the holiday you want to modify.
2. Change the holiday settings as you desire.
3. Click the
Steps to delete a holiday:
Modify button to accept the changes.
1. In the Holiday column, click the number of the holiday you want to delete.
2. Click the
3. Click
Delete button.
OK at the delete prompt.
30 www.honeywell.com
Page 41

2.4 Configuring the Doors
Each NetAXS™ panel supports four doors. For each door, you must configure the readers, inputs, and
outputs.
Configuring via the Web Server
Configuring the System
At Configuration > Doors in the task menu at the left margin of the NetAXS™ screen, click
display the Door Configuration screen for door 1. Follow the same procedures below for doors 2, 3,
and 4 for each panel.
2.4.1 Reader Tab
A reader is a device that reads cards and either grants or denies access at the door.
Click the
Figure 2-11: Configuration > Doors > Reader > General Tab
1 to
Reader tab:
The Reader tab enables you to:
• Define the time zone during which the reader will be disabled. When the reader is disabled,
neither exit nor entry by Card and PIN mode or Card or PIN mode is allowed. Also, free egress
is not allowed.
Note: Should a conflict arise among the time zones set in the Access Mode Time Zones box on
the Reader > General tab, priority is given to the time zone that is highest in the list of time
zones displayed on the tab. Therefore, the Disabled time zone has highest priority, and the Card
Only time zone has lowest priority.
NetAXS™ Access Control Unit User’s Guide, Document 800-04410, Revision A 31
Page 42

Configuring via the Web Server
Configuring the System
• Define the time zone during which the reader will be in lockdown mode (see Time Zones Tab,
page 26 for details about setting time zones). When the reader is in lockdown mode, entry is
prevented but egress is still allowed.
• Define the reader’s access mode (the combination of card and/or PIN entry required by the
reader). Note that the access mode defined here for the door can be overridden by a card
assigned with a VIP card type (see “Adding New Cards“ on page 47 for information about
assigning a VIP card type).
• Enable the Card Only, PIN Only, Card and PIN, and Card or PIN access modes with either the
Supervisor or Escort rule:
– Supervisor Rule: When the supervisor presents his card during the specified time zone just
once, he gains access but does not enable access for non-supervisory personnel.
– Escort Rule: This rule requires a supervisor escort for a non-supervisor.
• Configure the anti-passback feature. When enabled, the anti-passback feature prevents an
entrant to an area from passing his card back to another potential entrant. Note that
anti-passback must first be enabled at the Configuration > System > General screen (see
General Tab, page 14).
• Specify the data format the reader must use to read the card data.
• Reconfigure a selected format’s data layout.
32 www.honeywell.com
Page 43

Configuring via the Web Server
Steps
:
1. Use the descriptions in the table below to configure the General reader settings.
Table 2-4: Configuration > Doors > Reader Tab Descriptions
Setting Description
Access Mode Specifies the validation conditions required at the door before
access is granted. For each access mode, you must also select a
time zone from the drop down list. The time zone is the schedule
by which the access mode is effective.
Disabled – Ignores all card reads (except from a VIP card),
allows neither exit nor entry by Card-and-PIN mode or
Card-or-PIN mode. Also, free egress is not allowed.
Lockdown – Ignores all card reads (except from a VIP card),
denies door entry but allows egress.
Card and Pin – Grants access only with both a successful card
read and a valid PIN entry at the door’s keypad. You can
perform the card read and PIN entry in either sequence.
Card or Pin – Grants access with either a successful card read or
a valid PIN number entry at the door’s keypad.
Pin Only – Grants access with only a valid PIN number entered
at the door’s keypad.
Card Only – Grants access with only a successful card read.
Supervisor – Enables a supervisor to enter without allowing
access to others. When the supervisor presents his card during
the time zone just once, he gains access but does not enable
access for non-supervisory personnel. If the supervisor presents
his card twice, he enables access for all non-supervisory
personnel as well. After the supervisor presents his card twice to
allow general access, he can disable the general access for the
time zone by presenting his card again twice consecutively.
Escort – Requires a supervisor escort for a non-supervisor
cardholder. The supervisor must present his card first, then the
non-supervisor must present his card within ten seconds of the
supervisor’s card read.
Configuring the System
NetAXS™ Access Control Unit User’s Guide, Document 800-04410, Revision A 33
Page 44

Configuring via the Web Server
Configuring the System
Table 2-4: Configuration > Doors > Reader Tab Descriptions
Setting Description
Anti-Passback Configures the anti-passback feature, which prevents an entrant
Duress Output Configures the output that will trip when a cardholder enters a
to an area from passing his card back to another potential
entrant. Note that anti-passback must first be enabled at the
Configuration > System > General screen (see General Tab,
page 14).
Enabled – Enables the anti-passback feature.
Hard – Does not allow a second entry on the same card without
an exit; validates in/out status before allowing entry.
Soft – Allows entry on the same card without an exit; however,
an event is generated that indicates violation.
Out – Applies to readers located inside the area. Cardholders use
these readers when attempting to exit the area.
In – Applies to readers located outside the area. These are
readers that cardholders use when attempting to enter the area.
“duress PIN” at a keypad/card reader. A duress PIN is the PIN a
user enters at a keypad when being forced (perhaps in a robbery)
to open a door. The user enters his normal PIN, except one of the
digits is one number higher or lower than the normal digit. This
PIN opens the door, but it also triggers the designated duress
output and produces an alarm.
The duress output feature requires the following:
• “Duress” must be enabled on the Configuration > System
> General tab.
• A time zone must be selected for “Card and PIN” on the
Configuration > Doors > Reader tab.
2. Click Card Formats at the side of the tab. A card format tells the panel how the card number
will be read. The panel supplies the format to the card readers. Then, the card readers can
correctly read the card.
34 www.honeywell.com
Page 45

Figure 2-12: Configuration > Doors > Reader > Card Formats Tab
Configuring via the Web Server
Configuring the System
3. Click to highlight each desired card format listed in the Available box, and click the green right
arrow button to move the format(s) into the Selected box.
Note: If you select no formats, the reader will function in legacy mode and the reader interprets
the panel’s formats. If you select a subset of formats for a given reader, the reader will interpret
only those formats and ignore formats that are not selected.
4. Click
Submit Changes.
5. If you want to create a new card format, click the New Format button to display an empty Card
Format Data Layout screen. Use the field descriptions given in the following table to define the
layout and click
Note: To disable a field, enter “--” in the Start Bit box and “0” in the Num Bits box.
Save.
Table 2-5: Configuration > Doors > Reader > Card Format Fields
Setting Description
Name Displays the name by which the format will be listed in the
Card Formats tab. The name is user-defined.
Reverse Bit Order Returns the message from the reader in reverse bit order
(least significant bit first and most significant bit last).
NetAXS™ Access Control Unit User’s Guide, Document 800-04410, Revision A 35
Page 46

Configuring via the Web Server
Configuring the System
Table 2-5: Configuration > Doors > Reader > Card Format Fields (continued)
Setting Description
Concatenated Site
Combines the Site Code and Card ID as one unique number.
Code
Total Num Bits Lists the total number of bits on the card.
Even Parity Lists where on the card that even parity is being observed.
Start Bit – first bit in the card where even parity begins.
Num Bits – Number of bits to the right of the start bit,
including the start bit, to include in the even parity check.
Odd Parity Lists where on the card that odd parity is being observed.
Start Bit – first bit in the card where odd parity begins.
Num Bits – Number of bits to the right of the start bit,
including the start bit, to include in the odd parity check.
CID A Lists where on the card the Card ID A is listed.
Start Bit – first bit in the card where card ID begins.
Num Bits – Number of bits to the right of the start bit,
including the start bit, that comprise the card ID.
Most formats require only CID A, and not CID B, C, or D.
CID B Lists where on the card the Card ID B is listed.
Start Bit – first bit in the card where card ID begins.
Num Bits – Number of bits to the right of the start bit,
including the start bit, that comprise the card ID.
Most formats require only CID A, and not CID B, C, or D.
36 www.honeywell.com
Card ID C Lists where on the card the Card ID C is listed.
Start Bit – first bit in the card where card ID begins.
Num Bits – Number of bits to the right of the start bit,
including the start bit, that comprise the card ID.
Most formats require only CID A, and not CID B, C, or D.
Card ID D Lists where on the card the Card ID D is listed.
Start Bit – first bit in the card where card ID begins.
Num Bits – Number of bits to the right of the start bit,
including the start bit, that comprise the card ID.
Most formats require only CID A, and not CID B, C, or D.
Page 47

Configuring via the Web Server
Configuring the System
Table 2-5: Configuration > Doors > Reader > Card Format Fields (continued)
Setting Description
Site Code A Lists where on the card the Site Code A is listed. Consult
the card manufacturer for detail on the card detail.
Start Bit – first bit in the card where the card’s Site Code
begins.
Num Bits – Number of bits to the right of the start bit,
including the start bit, that comprise the Site Code.
Most card formats require only Site Code A.
Site Code B Lists where on the card the Site Code B is listed. Consult the
card manufacturer for detail on the card detail.
Start Bit – first bit in the card where the card’s Site Code
begins.
Num Bits – Number of bits to the right of the start bit,
including the start bit, that comprise the Site Code.
Most card formats require only Site Code A.
Site Code C Lists where on the card the Site Code C is listed. Consult the
card manufacturer for detail on the card detail.
Start Bit – first bit in the card where the card’s Site Code
begins.
Num Bits – Number of bits to the right of the start bit,
including the start bit, that comprise the Site Code.
Most card formats require only Site Code A.
Site Code D Lists where on the card the Site Code D is listed. Consult
the card manufacturer for detail on the card detail.
Start Bit – first bit in the card where the card’s Site Code
begins.
Num Bits – Number of bits to the right of the start bit,
including the start bit, that comprise the Site Code.
Most card formats require only Site Code A.
6. If you want to change an existing card format’s data layout, double-click the format’s name on
the list of existing formats to display the Card Format Data Layout screen. Use the descriptions
in the table above to edit the layout’s fields. Then, click
name) or
the default settings for the card format, click
Save as (to save with a different format name) to save the edited format. To return to
Reset. To delete the card format, click Delete.
Update (to save in the format’s current
NetAXS™ Access Control Unit User’s Guide, Document 800-04410, Revision A 37
Page 48

Configuring via the Web Server
Configuring the System
2.4.2 Outputs Tab
An output, or output relay, is a switch on the panel that either energizes or de-energizes or pulses an
output device, such as a door lock or an LED. For example, a successful card read at a reader (input
device) causes the output relay switch on the panel board to change the normal state of a door lock
(output device), so that the normally locked door strike releases and permits entry. This tab configures
the lock and reader LED output relays, either as individual (discrete) outputs or groups of outputs.
Click the
Outputs tab. The Lock > Discrete tab window appears, enabling you to configure an
individual lock output. Select the output number in the dropdown list at the top of the screen. Note that
lock and reader LED outputs are associated with each of the four doors on a NetAXS™ panel.
Figure 2-13: Discrete Lock Output Configuration
To view a configuration of a group of outputs, click
dropdown list at the top of the screen. The group configuration appears. Note that you can only view
38 www.honeywell.com
Group and select the group number from the
Page 49

Configuring via the Web Server
Configuring the System
the group configuration from this screen. To edit the Group configuration, click Configuration > Other
I/O & Groups
in the side panel.
Figure 2-14: Configuration > Doors > Outputs > Group Tab >Lock
NetAXS™ Access Control Unit User’s Guide, Document 800-04410, Revision A 39
Page 50

Configuring via the Web Server
Configuring the System
The LED Reader dialog box enables you to configure the Reader LED:
The Outputs tab enables you to:
• Configure the following for each of the door’s output locks and reader LEDs:
–Name
– Pulse time
– Time zones
– Latching
–Interlock
– Time zone card toggle
– First card rule
40 www.honeywell.com
Page 51

Configuring via the Web Server
Configuring the System
Steps
: Use the descriptions in the following table to configure each individual lock or Reader LED:
Table 2-6: Configuration > Doors > Output Tab Field Descriptions
Setting Description
Name Enter a unique name to identify the device.
Pulse Time Specifies the duration for which the device will assume abnormal
status. For example, it specifies how long a horn will sound or a door
strike will remain released. Enter the desired number of hours (1024
maximum), minutes (60 maximum), and seconds (60 maximum).
The sum of all three units comprises the pulse time. Note that you
can express seconds in tenths of a second. The default pulse time of
the reader LED is two seconds, and the default pulse time of the door
lock is 10 seconds. You may want to change the reader LED pulse
time to match the pulse time of the door lock, for example, to enable
a guard to know that the door is still open, or to support handicap
access.
Time Zones Specifies two schedules:
•
Energized – sets the period during which the output switches
are automatically energized.
•
Disable Interlock – sets the period during which the interlock, or
a programmed interaction between selected inputs and outputs
will be disabled.
Latching When selected, this toggles a relay with either a valid card, interlock,
or manual pulse.
Interlock Enables you to disable the interlock, or programmed interaction
between two points.
TZ Card Toggle Requires, like the First Card Rule, a valid card read within the time
zone to enable the time zone (period in which doors are unlocked) to
take effect. Unlike the First Card Rule, however, the user can swipe
the card a second time to return the doors to a locked state. Note that
both TZ Card Toggle and First Card Rule cannot be enabled at the
same time.
First Card Rule Requires a valid card read within the time zone to enable the time
zone (period in which doors are unlocked) can take effect. Note that
both TZ Card Toggle and First Card Rule cannot be enabled at the
same time.
NetAXS™ Access Control Unit User’s Guide, Document 800-04410, Revision A 41
Page 52

Configuring via the Web Server
Configuring the System
2.4.3 Inputs Tab
Three inputs are associated with each of the four doors on a NetAXS™ panel:
• Status – Provides the following door status information:
• Egress – Allows the door to open or close normally without generating an alarm.
• Tamper – Reports abnormal handling of the reader device or wiring.
Click to display the
Inputs tab:
Figure 2-15: Configuration > Doors > Inputs Tab
Note that there are four possible Mode configurations. Shown in the screen above is the Normally
Closed/Unsupervised Mode. The following screens show the remaining modes:
42 www.honeywell.com
Page 53

Configuring via the Web Server
Configuring the System
The Inputs tab enables you to:
• Define the Status, Egress, and Tamper inputs’ access modes.
• Specify the Status, Egress, and Tamper shunt time, or the period of time the door’s normal state
will be ignored.
• Specify the Status, Egress, and Tamper debounce time, or the period of time the input must
remain in its new state before it is recognized as being in the new state.
• Specify the time zones for the Status, Egress, and Tamper inputs.
• Enable or disable Auto-Relock for the Status inputs.
NetAXS™ Access Control Unit User’s Guide, Document 800-04410, Revision A 43
Page 54

Configuring via the Web Server
Configuring the System
Steps: Use the descriptions in the table below to configure the Status, Egress, and Tamper inputs, then
click
Submit Changes:
Table 2-7: Configuration > Doors > Inputs Tab Field Descriptions
Setting Description
Mode
Normally Closed – Specifies that the door’s normal state is
closed.
Normally Open – Specifies that the door’s normal state is open.
Unsupervised – Specifies that the door’s electrical circuit is
wired in one path without alternative paths supervised by
resistors.
Supervised – Specifies that the door’s electrical circuit is wired
with alternative paths supervised by resistors.
R1 & R2 Values – Specifies the resistor values being used in the
supervised modes. The default is 2.2K.
Shunt Time Specifies the amount of time for which the inputs will be
shunted, or de-activated. For example, it specifies how long a
door strike will remain released. Enter the desired number of
hours (1024 maximum), minutes (60 maximum), and seconds
(60 maximum). The sum of all three units comprises the shunt
time. Note that you can express seconds in tenths of a second.
Time Zones
Shunt – Specifies the time period during which the input will be
ignored.
Disable Interlock – Specifies the time period during which the
programmed action on this input from another point will be
disabled.
Disable Alarm Msgs – Specifies the time period during which
Alarm and Normal will not be reported, but Short and Cut will
be reported.
Auto-Relock Causes the door to re-lock immediately when the door status
44 www.honeywell.com
switch closes after entry. The output relay that controls the door
strike de-energizes when the associated input returns to normal
state instead of remaining energized for the duration of the pulse
time. To enable Auto-Relock, de-select the
Disable checkbox,
and select the associated output from the drop down list.
Page 55

2.5 Configuring Access Levels
Every card is assigned an access level. The access level specifies the time zone, or time schedule,
during which the card holder can be granted access at a specific door. For example, an access level
embedded in an employee’s card might allow the employee to enter the facility only through door 2
from 6:00 a.m. to 6:00 p.m., Monday through Friday.
This section explains how to create the access levels that subsequently can be assigned to cards.
Note: Since an access level is defined by door and time zone configurations, you must configure the
door (see “Configuring the Doors“ on page 31) and the time zone (see “Configuring Time
Management“ on page 24) before configuring an access level.
Click Access Levels to display the Access Level Configuration screen:
Figure 2-16: Configuration > Access Levels
Configuring via the Web Server
Configuring the System
The Access Levels screen enables you to:
• Create an access level.
• Modify an access level.
• Delete an access level.
• Set a Time Zone for each door.
NetAXS™ Access Control Unit User’s Guide, Document 800-04410, Revision A 45
Page 56

Configuring via the Web Server
Configuring the System
Steps to create an access level:
1. Select the door(s). The access level will allow access only at the door(s) you select here.
2. Enter the name of the access level in the
Name field. This should be a unique name that
identifies the general user group.
3. Select the time zone you want from the drop down list in the
Time Zone field. The access level
will allow access to the card holder only during this time zone.
4. Click the
Steps to assign a Time Zone to a door:
Add Level button.
1. Select the checkbox next to the door you desire. The Time Zone field appears.
2. From the Time Zone dropdown list, select the Time Zone you want to assign to the door. Note
that a Time Zone must be configured in Configuration > Time Management before it appears in
the dropdown list.
Steps to modify an access level:
1. From the drop down list in the Level field, select the number of the access level you want to
modify.
2. Make the desired modifications.
3. Click the
Steps to delete an access level:
Modify button.
1. Select the number of the access level you want to delete from the drop down list in the
field.
Level
2. Click the
3. Click
Delete button.
OK at the prompt to delete the access level.
Note that when you create an access level for a panel in a loop configuration, you must manually
configure this access level at each panel in the loop. For example, suppose you have three panels in a
loop, and you add a Master Access level to panel 1 and you configure readers 1-4 on panel 1 with this
access level. When you save the access level configuration at panel 1, the access level is automatically
copied to panels 2 and 3. However, the readers at panels 2 and 3 are not yet configured. So you still
must go to panels 2 and 3 to assign the access level to the readers at these panels. To do this, navigate
back to the Select Panel on the NetAXS™ main screen, select the next panel in the loop, and configure
that panel’s doors according to the instructions in this section.
46 www.honeywell.com
Page 57

2.6 Maintaining Cards
A card is encoded with a unique number and the card holder’s rights to access NetAXS™ system
resources. For example, in addition to its unique number, a card would allow the card holder to be
granted access to certain doors during a certain time of day.
2.6.1 Adding New Cards
Click Cards > Add Card(s) to display the Add New Card(s) screen:
Figure 2-17: Cards > Add Cards
Configuring via the Web Server
Configuring the System
The Add New Card(s) screen enables you to:
• Create cards encoded with the following information:
– Card number(s)
– Card holder name (first and last names)
– Card type
– Personal Identification Number (PIN)
– Trace capability
– Expiration date
NetAXS™ Access Control Unit User’s Guide, Document 800-04410, Revision A 47
Page 58

Configuring via the Web Server
Configuring the System
– Use limits
– Card holder note 1
– Card holder note 2
– Access levels
Steps:
Use the field descriptions in the following table to complete the card fields and click
Table 2-8: Cards > Add Cards Field Descriptions
Field Description
Card Number(s) Specifies the unique number by which the card holder will be
identified. A card number is required.
Card Holder Name Identifies the card holder. A card holder first and last name is
required. Each name can have up to 25 characters.
Card Type Specifies whether the card holder is a Supervisor, Employee, or a
VIP. A temporary (Temp) flag can be set for each type of card holder.
When the Temp flag is enabled, the expiration date becomes an
active field. Note that the Temp box is active when the panel is
configured for visitor cards in Configuration > System > General
(see “General Tab“ on page 14). A card type is required.
PIN Specifies the Personal Identification Number (PIN) for the card
holder. A PIN is optional; however, if the door reader is configured to
require PIN identification (see “Reader Tab“ on page 31), then you
must create a PIN for the card holder here. The PIN number has a
maximum of six digits.
Add Card(s):
Trace Sends an alarm message to the alarm monitor whenever a card with
Expiration Date Specifies the date that a temporary employee’s card is de-activated.
Use Limits Specifies the number of times a card may be read at a card reader to
Note 1 Provides a user-defined field. See Configuring the System, page 11
Note 2 Provides a user-defined field. See Configuring the System, page 11
48 www.honeywell.com
trace enabled is presented at a reader. This feature provides a trace of
the cardholder’s path through the facility.
which it has valid access. Specify the number-of-uses limit as the
number of times access may be granted.
for information about how this field is defined for the Add New Card
template.
for information about how this field is defined for the Add New Card
template.
Page 59

2.6.2 Displaying and Modifying Cards
Use this function to display specified cards and modify them.
Click
Cards > Card Data to display the search screen with which you can find and display specified
cards.
Figure 2-18: Cards > Card Data
Configuring via the Web Server
Configuring the System
The Display or Modify Card(s) screen enables you to:
• Display cards by searching on any of the following keys:
– Card number
– Card holder’s last name
• Modify the displayed card(s)
Steps:
1. Enter a value for either of the search keys (card number or cardholder last name).
2. Click the
Display/Modify Card(s) button. The cards specified in step 1 appear.
3. Use the field descriptions given in the table in Tabl e 2-8 on page 48 to complete the card fields
and click
Submit Modification(s):
NetAXS™ Access Control Unit User’s Guide, Document 800-04410, Revision A 49
Page 60

Configuring via the Web Server
Configuring the System
2.6.3 Deleting Cards
Click Cards > Delete Card(s) to display the Delete Cards screen:
Figure 2-19: Cards > Delete Cards
The Delete Card(s) screen enables you to:
• Delete cards retrieved by any of the following keys:
– Card number
– Range of card numbers
– Card holder’s last name
Steps:
1. Enter a value for any of the search keys (card number, card number range, or cardholder name).
2. Click
3. Click
Delete Card(s) to delete all cards matching the search keys you entered.
OK at the prompt to delete the card.
50 www.honeywell.com
Page 61

2.6.4 Displaying Reports
Use this function to display a report of all cards and card data. You can display the cards either by the
cardholder’s last name or by the card number.
Click
Cards > Reports to display the Card Reports screen.
The Card Reports screen enables you to:
• View card records by the cardholder’s last name.
• View card records by the cards’ numbers.
Steps:
1. Click the By Name tab to display the card records by the cardholders’ last names.
2. Click the By Number tab to display the card records by the cards’ numbers.
3. Use the descriptions given in the following table to read the card records (see “Adding New
Cards“ on page 47 for more information about card data):
Configuring via the Web Server
Configuring the System
Table 2-9: Cards > Reports Field Descriptions
Field Description
Last Shows the cardholder’s last name.
First Shows the cardholder’s first name.
Card Number Shows the card number.
Site Shows the Site Code number. A Site Code is a user-configured name
that identifies the site, or location, of the cardholder’s access. See
“Site Codes Tab“ on page 21 for more information about Site Codes.
To determine the Site Code name associated with the Site Code
number, click
Codes tab.
PIN Shows the Personal Identification Number (PIN) for the card holder.
The PIN number has a maximum of six digits.
Access Level
Shows the access level(s) configured for the cardholder. An access
level specifies the time zone, or time schedule, during which the card
holder can be granted access at a specific door. See “Configuring
Access Levels“ on page 45 for more information about access levels.
To determine an access level’s defined hours, click
Access Levels
Configuration > System > Site Codes to display the Site
Configuration >
to display the Access Level Configuration screen.
Type Shows the card type. The card type specifies whether the card holder
is configured as a supervisor (Supervisor), employee (Employee), a
VIP (VIP), or a combination of these types.
Temp Indicates (with a check mark) that the card is a temporary card.
NetAXS™ Access Control Unit User’s Guide, Document 800-04410, Revision A 51
Page 62

Configuring via the Web Server
Configuring the System
Table 2-9: Cards > Reports Field Descriptions (continued)
Field Description
Activation Date Shows the date the card was activated.
Expiration Date Shows the date the card expires.
Use Limit Indicates the number of times the card will be granted access.
APB State Indicates whether or not anti-passback is enabled on the card.
Note 1 Displays informational text that may have been entered in the Note 1
field.
Note 2 Displays informational text that may have been entered in the Note 2
field.
2.7 Configuring Other I/O & Groups Tab
The NetAXS™ panel provides up to 14 inputs and eight outputs. Two of the inputs and four of the
outputs are “other” inputs and outputs, because you can use them for other than door lock/unlock
functions. This section explains how to configure these other inputs, outputs, and groups (for pulse and
time zone).
2.7.1 Inputs Tab
This tab enables you to configure other input devices on inputs 13 and 14 on Terminal Block 8, and on
the inputs on downstream NX4IN boards daisy-chained to Terminal Block 10. The downstream inputs
are numbered 25-96.
Note: The NetAXS™ panel supports two downstream board types:
A NetAXS™ panel supports a maximum of six daisy-chained downstream boards—two NX4IN boards
and four NX4OUT. An NX4IN module has 32 supervised, four-state inputs that are limited to 2.2K
ohms resistance. The NX4OUT has two supervised inputs and 16 SPDT relay outputs; each input is
limited to 2.2K ohms resistance. Each board is configured with a unique address in the Configuration >
System > Downstream Devices tab (see “Downstream Devices Tab“ on page 23).
On panels with internal power supply, the Power Fail input generates an alarm when primary power is
lost as indicated by the power supply. The Panel Tamper input generates an alarm when the NetAXS™
cabinet has been forced open. The Downstream inputs are available for general use.
• NX4IN – Provides 32 inputs and no outputs.
• NX4OUT – Provides two inputs and 16 outputs.
Note: You can also configure the Power Fail and the Panel Tamper inputs for general use, if you choose
not to wire them for power and tamper detection.
52 www.honeywell.com
Page 63
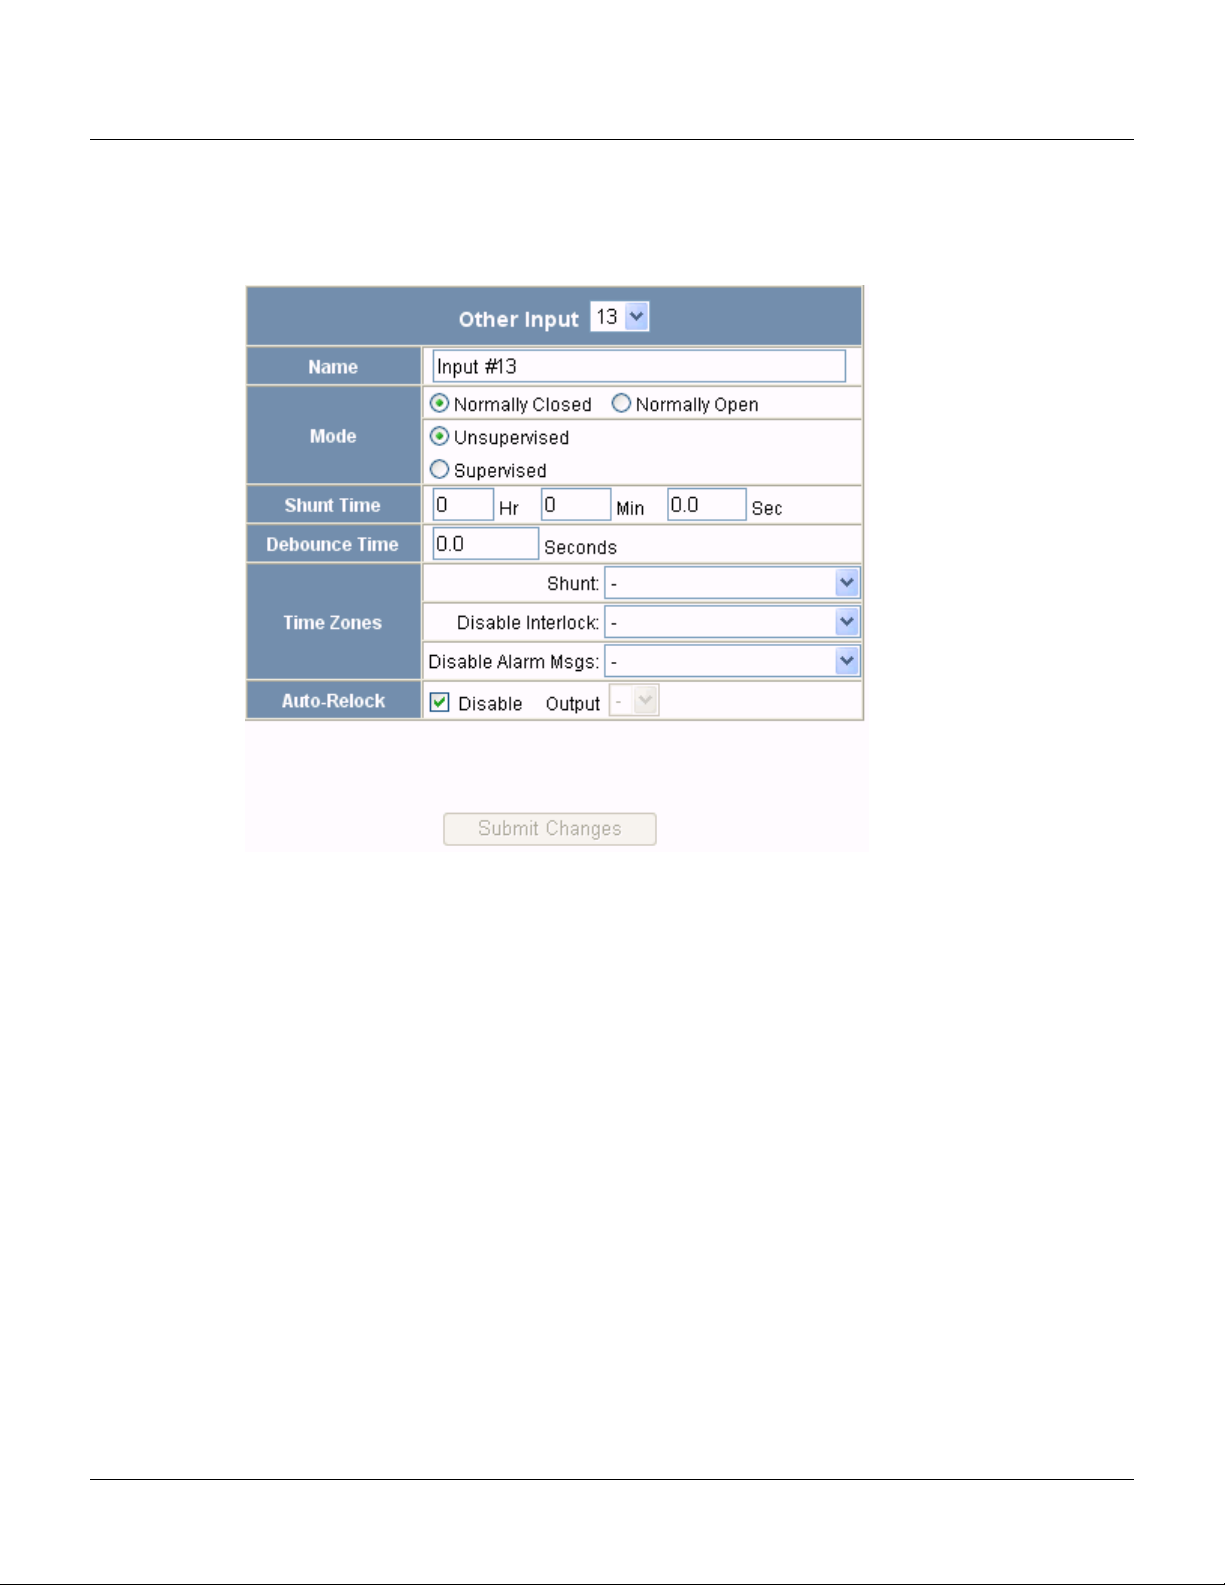
Click Inputs to display the Inputs screen:
Figure 2-20: Configuration > Other I/O & Groups > Inputs Tab
Configuring via the Web Server
Configuring the System
The Input tab enables you to:
• Configure the mode, debounce time, and time zones for another input (input 13 and input 14).
• Configure the mode, shunt time, debounce time, time zones, and auto-relock for the
downstream inputs provided by downstream input/output boards (NX4IN or NX4OUT).
NetAXS™ Access Control Unit User’s Guide, Document 800-04410, Revision A 53
Page 64

Configuring via the Web Server
Configuring the System
Steps: Use the descriptions in the following table to configure other panel inputs and downstream
inputs:
Table 2-10: Configuration > Other I/O & Groups > Inputs Tab Field Descriptions
Setting Description
Name Enter a unique name to identify the device.
Mode
Normally Closed – Specifies that the door’s normal state is
closed.
Normally Open – Specifies that the door’s normal state is open.
Unsupervised – Specifies that the door’s electrical circuit is
wired in one path without alternative paths supervised by
resistors.
Supervised – Specifies that the door’s electrical circuit is wired
with alternative paths supervised by resistors.
Shunt Time Specifies the amount of time for which the inputs will be
shunted, or de-activated. The maximum number of hours is 1.
When the hour field is blank, the maximum number of minutes
is 59. When 1 is entered in the hour field, the maximum number
of minutes is 45. The sum of all three units comprises the shunt
time. Note that you can express seconds in tenths of a second.
Debounce Time Specifies the period of time the input must remain in a new state
before generating an alarm. For example, if a Normal state is
changed to Alarm, the state must remain in Alarm for five
seconds before an alarm is generated.
Time Zones
Shunt – Specifies the time period during which the input will be
shunted.
Disable Interlock – Specifies the time period during which the
programmed action on this input from another point will be
disabled.
Disable Alarm Msgs – Specifies the time period during which
the input will generate no alarms.
Auto-Relock Causes the door to re-lock immediately when the door status
54 www.honeywell.com
switch closes after entry. The output relay that controls the door
strike de-energizes when the associated input returns to normal
state instead of remaining energized for the duration of the pulse
time. To enable Auto-Relock, de-select the
Disable checkbox,
and select the associated output from the drop down list.
Page 65

2.7.2 Outputs Tab
This tab enables you to configure the four NetAXS™ auxiliary outputs (outputs 5-8) that are
physically located on the panel board, and the outputs on downstream NX4OUT boards daisy-chained
to Terminal Block 10. A NetAXS™ panel supports a maximum of four NX4OUT boards, and each
board provides two inputs and 16 outputs. The downstream outputs are numbered 17-80.
Click
Outputs to display the Auxiliary Output screen for the on-board outputs:
Figure 2-21: Configuration > Other I/O & Groups > Outputs Tab
Configuring via the Web Server
Configuring the System
The Outputs tab enables you to:
• Configure the following for each of the auxiliary outputs -- on board the panel as well as
downstream:
–Name
– Pulse time
NetAXS™ Access Control Unit User’s Guide, Document 800-04410, Revision A 55
Page 66

Configuring via the Web Server
Configuring the System
Steps: Use the descriptions in the following table to configure each output device:
Table 2-11: Configuration > Other I/O & Groups > Outputs Tab > Fields
Setting Description
Name Enter a unique name to identify the device.
Pulse Time Specifies the duration for which the device will assume
Time Zones Defines the period of time during which inputs, outputs, groups,
abnormal status. For example, it specifies how long a horn will
sound or a door strike will remain released. The maximum
number of hours is 1. When the hour field is blank, the
maximum number of minutes is 59. When 1 is entered in the
hour field, the maximum number of minutes is 45. The sum of
all three units comprises the pulse time. Note that you can
express seconds in tenths of a second.
readers, access levels, and cards will either be energized or
de-energized, enabled or disabled.
Latching When selected, this toggles a relay with either a valid card,
interlock, or manual pulse.
Interlock Enables you to disable the interlock, or programmed interaction
between two points.
56 www.honeywell.com
Page 67

2.7.3 Groups Tab
This tab enables you to configure outputs in groups. For example, you might want a group of horns in
your facility to sound for the same duration or to be enabled or disabled according to the same
schedule, or time zone. You might want a group of doors to be energized or de-energized during the
same time zone. A NetAXS™ web server supports up to 64 output groups.
Click
Groups to display the Groups screen:
Figure 2-22: Configuration > Other I/O & Groups > Groups Tab
Configuring via the Web Server
Configuring the System
The Groups tab enables you to:
• Associate any of the panel’s eight output relays in one or more groups.
• Configure the following for each group:
–Pulse Time
– Energized TZ (Time Zone)
– Interlock Disabled TZ (Time Zone)
– Latch
NetAXS™ Access Control Unit User’s Guide, Document 800-04410, Revision A 57
Page 68

Configuring via the Web Server
Configuring the System
Steps: Use the descriptions in the following table to configure each group:
Table 2-12: Configuration > Other I/O & Groups > Groups Tab Field Descriptions
Setting Description
Name Enter a unique name to identify the group.
Pulse Time Specifies the duration for which the device will assume
Energized TZ Specifies the period during which the group of output relays are
abnormal status. For example, it specifies how long a horn will
blow or a door strike will remain released. The maximum
number of hours is 1. When the hour field is blank, the
maximum number of minutes is 59. When 1 is entered in the
hour field, the maximum number of minutes is 45. The sum of
all three units comprises the pulse time. Note that you can
express seconds in tenths of a second.
automatically energized.
Interlock Disabled TZSpecifies the period during which the interlocks that control the
group’s outputs will be disabled.
Latch Toggles the state of the outputs between energized and
de-energized status upon every activation (code use, interlock,
or manual pulse).
58 www.honeywell.com
Page 69

2.8 Configuring Interlocks
An interlock is a programmed connection between two points. The interlock causes an input point,
output point, or group of output points to act in a specified manner when another input point, output
point, or group of output points changes its state. An action on one point cause a reaction from a
second point on the same panel or attached downstream board. For example, when a motion detector
(input) detects movement, it causes a horn (output) to sound.
Click
Interlocks to display the Interlocks Configuration screen:
Figure 2-23: Configuration > Interlocks
Configuring via the Web Server
Configuring the System
The Interlocks screen enables you to:
• Create, modify, and delete interlocks.
• Enable or disable existing interlocks.
NetAXS™ Access Control Unit User’s Guide, Document 800-04410, Revision A 59
Page 70

Configuring via the Web Server
Configuring the System
Steps to create an interlock:
1. Click the
New Interlock button to display the screen.
2. Use the descriptions in the following table to configure the interlock:
Table 2-13: Configuration > Interlocks > Field Descriptions
Interlock element Description
Trigger Specifies the input, output, or output group for
which a change of state will cause a reaction from
another input, output, or group. Also, use the drop
down list to specify the number of the input,
output, or group.
Reacting Component Specifies the input, output, or output group that
will react to a change of state from the trigger
point. Also, use the drop down list to specify the
number of the input, output, or group.
Reacting Component’s
Action
Upon Trigger Alarm – Specifies the reacting
component’s action when the trigger’s change of
state occurs. Select the action from the Upon
Trigger Alarm drop down list.
Upon Trigger Normal – Specifies the reacting
component’s action when the trigger’s change of
state occurs. Select the action from the Upon
Trigger Normal drop down list.
3. Click the
Steps to modify an interlock:
1. In the Int Lk column, click the number of the interlock you want to modify.
2. Click the
3. Use the descriptions in the table above to make the desired modifications in the empty Trigger,
Reacting Component, and Reacting Component’s Action fields for the selected interlock.
4. Click the
Steps to delete an interlock:
1. In the Int Lk column, click the number of the interlock you want to delete.
2. Click the
complete the deletion.
60 www.honeywell.com
Add Interlock button to create the interlock.
New Interlock button.
Add Interlock button to complete the modification.
Delete Interlock button to display the Delete Interlock screen, and click OK to
Page 71

Configuring via the Web Server
Configuring the System
Steps to enable/disable an interlock
1. To enable an interlock, click the
2. To disable an interlock, click the
2.9 Configuring Users
A user is one who will be using the NetAXS™ software interface in one or more of the following
functional roles:
• Operator – Monitors the system’s operation. The Operator user can perform the following
tasks:
– View (only) panel I/O status, alarms, events, and card database.
– Pulse/shunt I/O points.
– Acknowledge alarms.
– Generate reports.
• Service – Provides diagnostic and support service for the NetAXS™ system. The Service user
can perform the following tasks:
– View (only) panel I/O status, alarms, events, card database, and configurations.
– Pulse/shunt I/O points.
– Acknowledge alarms.
– Generate reports.
– Add, edit, or delete cards.
• Administrator – Configures the NetAXS™ system. The administrator can perform all tasks:
– View (only) panel I/O status, alarms, events, card database, and configurations.
– Pulse/shunt I/O points.
– Acknowledge alarms.
– Generate reports.
– Add, edit, or delete cards.
– Edit all panel configurations (I/O, readers, card formats, site codes, networking, groups,
interlocks, panel time, holidays, time zones, access levels, and users).
– Perform firmware uploads and downloads.
– Manage user accounts (create, delete, update).
:
Enable button.
Disable button.
NetAXS™ Access Control Unit User’s Guide, Document 800-04410, Revision A 61
Page 72
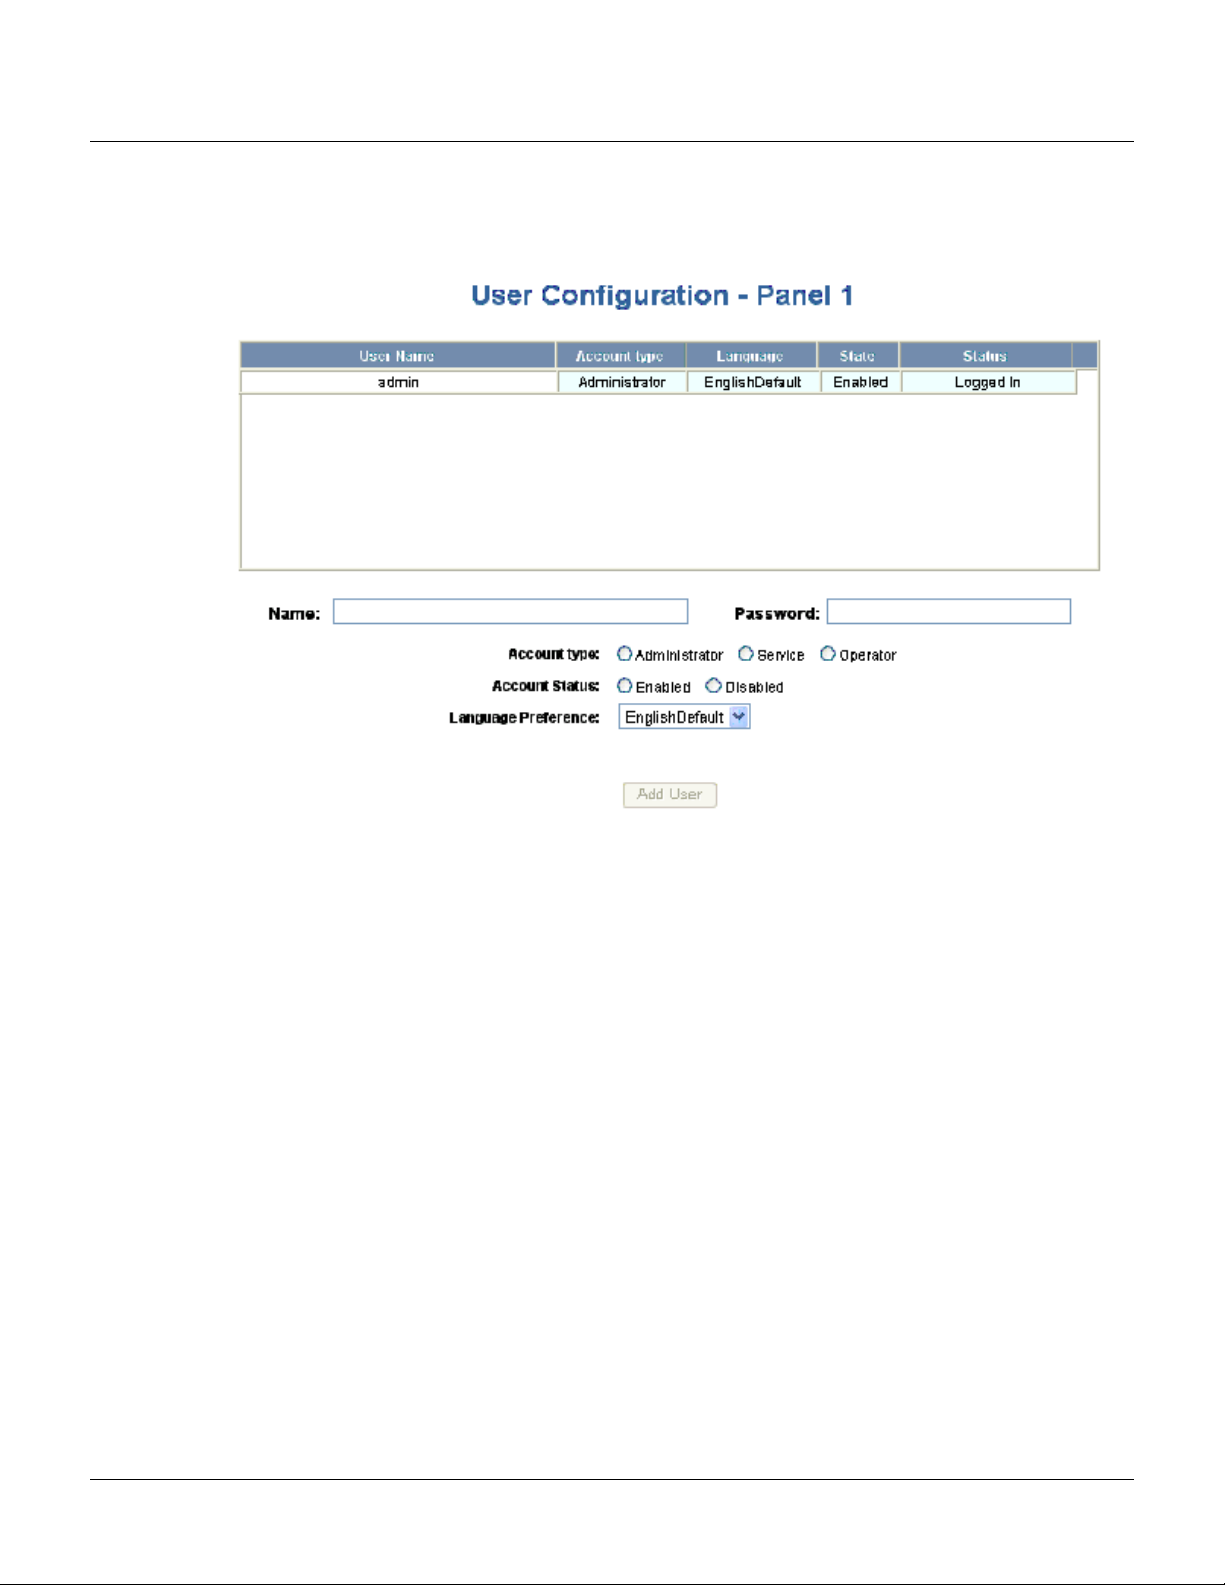
Configuring via the Web Server
Configuring the System
.Click Users to display the User Configuration screen:
Figure 2-24: Configuration > Users
The User Configuration screen enables you to:
• Create a user.
• Modify a user.
• Delete a user.
• Enable and disable a user account.
• View the user’s current login status, either logged in or logged out.
Steps to create a user:
1. Click the
2. Enter the user’s name in the
3. Enter a unique password in the
New User button.
Name field (at least five characters).
Password field (at least five characters). Note that a duplicate
password will not be accepted.
4. Select the type in the
Account Type field.
62 www.honeywell.com
Page 73

5. Select the Account Status:
– Enabled – Activates the user account (the user can log in).
– Disabled – De-activates the user account (the user cannot log in).
6. Select the user’s Language Preference from the dropdown list.
Configuring via the Web Server
Configuring the System
7. Click the
Steps to modify a user:
1. In the
Add User button.
User Name field, click the name of the user you want to modify.
2. Change the name, password, account type, or account status.
3. Click the
Steps to delete a user:
Modify button.
1. In the User Name column, click the user account you want to delete.
2. Click the
3. Click
Delete button.
OK at the prompt to delete the user account.
NetAXS™ Access Control Unit User’s Guide, Document 800-04410, Revision A 63
Page 74

Configuring via the Web Server
Configuring the System
64 www.honeywell.com
Page 75

Configuring via WIN-PAK
In this chapter...
Overview 65
Adding a New NetAXS™ Panel 66
3.1 Overview
This chapter explains the NetAXS™ configuration functions as accessed via the
Quick Start Wizard (QSW) in WIN-PAK 2005, WIN-PAK PRO 2005, WIN-PAK SE,
and WIN-PAK PE. The QSW creates the ADV options and adds the panel to the
Control Map and the Master Access Level.
3
These functions should be performed only by the NetAXS™ system administrator or
service personnel.
Notes:
• WIN-PAK 2.0, release 4, uses the same steps provided in this chapter to
configure NetAXS™; however, its screens are not exactly the same.
• NetAXS™ cannot be added to WIN-PAK PRO Release 4 or older.
• For a new Site installation, or for adding to an existing Site, follow the
procedures in this chapter as you would when you add an N-1000-IV-X panel.
One exception to this is that the NetAXS™ panel does not support the use of
the C-100-A1 (20ma current loop installations). Therefore, when you select
the Loop type, 485 ACK<-NAK is the only supported type. Direct is reserved
for NS2P; C-100 is not supported.
• If the NetAXS™ panel is configured as a Gateway panel, it appears to
WIN-PAK as an N-485-PCI or N-485-HUB. Using the NetAXS™ panel as a
Gateway, you should not add N-1000/PW-2000 panels as a downstream panel
to the NetAXS™ gateway. The NetAXS™ gateway is designed for more
efficient downstream communications than what can be supported by the
N-1000/PW2000 panels.
NetAXS™ Access Control Unit User’s Guide, Document 800-04410, Revision A 65
Page 76

Configuring via WIN-PAK
Adding a New NetAXS™ Panel
The NetAXS™ Gateway panel’s baud rate is set configured via the NetAXS™ web server (see
the NetAXS™ Access Control Unit Installation Guide for instructions). When you set the Loop
Type in the QSW to 485 ACK-NAK, you define the baud rate to be 19.2 kilobits per second.
This baud rate and the panel’s baud rate must match to communicate properly. For WIN-PAK
SE or WIN-PAK PE systems, you can adjust the baud rate of the N-485 device to 115 kilobits
per second for optimum performance.
3.2 Adding a New NetAXS™ Panel
To add a NetAXS™ panel, first create the panel in the WIN-PAK Quick Start Wizard, and then
complete the configuration manually with the WIN-PAK Panel Configuration screen.
3.2.1 Creating the Panel with Quick Start Wizard
Add a new panel by selecting its Loop and configuring the following from the Quick Start Wizard
Panel screen:
• Panel type (Select N1000-4X/PW2000-4X from the dropdown list)
• Panel name (Loop[Loop number]-Panel [Panel address]
• Panel address (Select from the dropdown list)
Figure 3-1: Quick Start Wizard - Panel Screen
Note: Each panel on a communication loop must have a unique address. The address must correspond
with the address that is set by DIP switches on the panel.
After adding the NetAXS™ panel via the QSW, you must update the Reader and Input interlocks to
match them with the default wiring of the NetAXS™ panel. Proceed to “Configuring the Panel
Manually“ on page 67 and make the necessary changes.
66 www.honeywell.com
Page 77
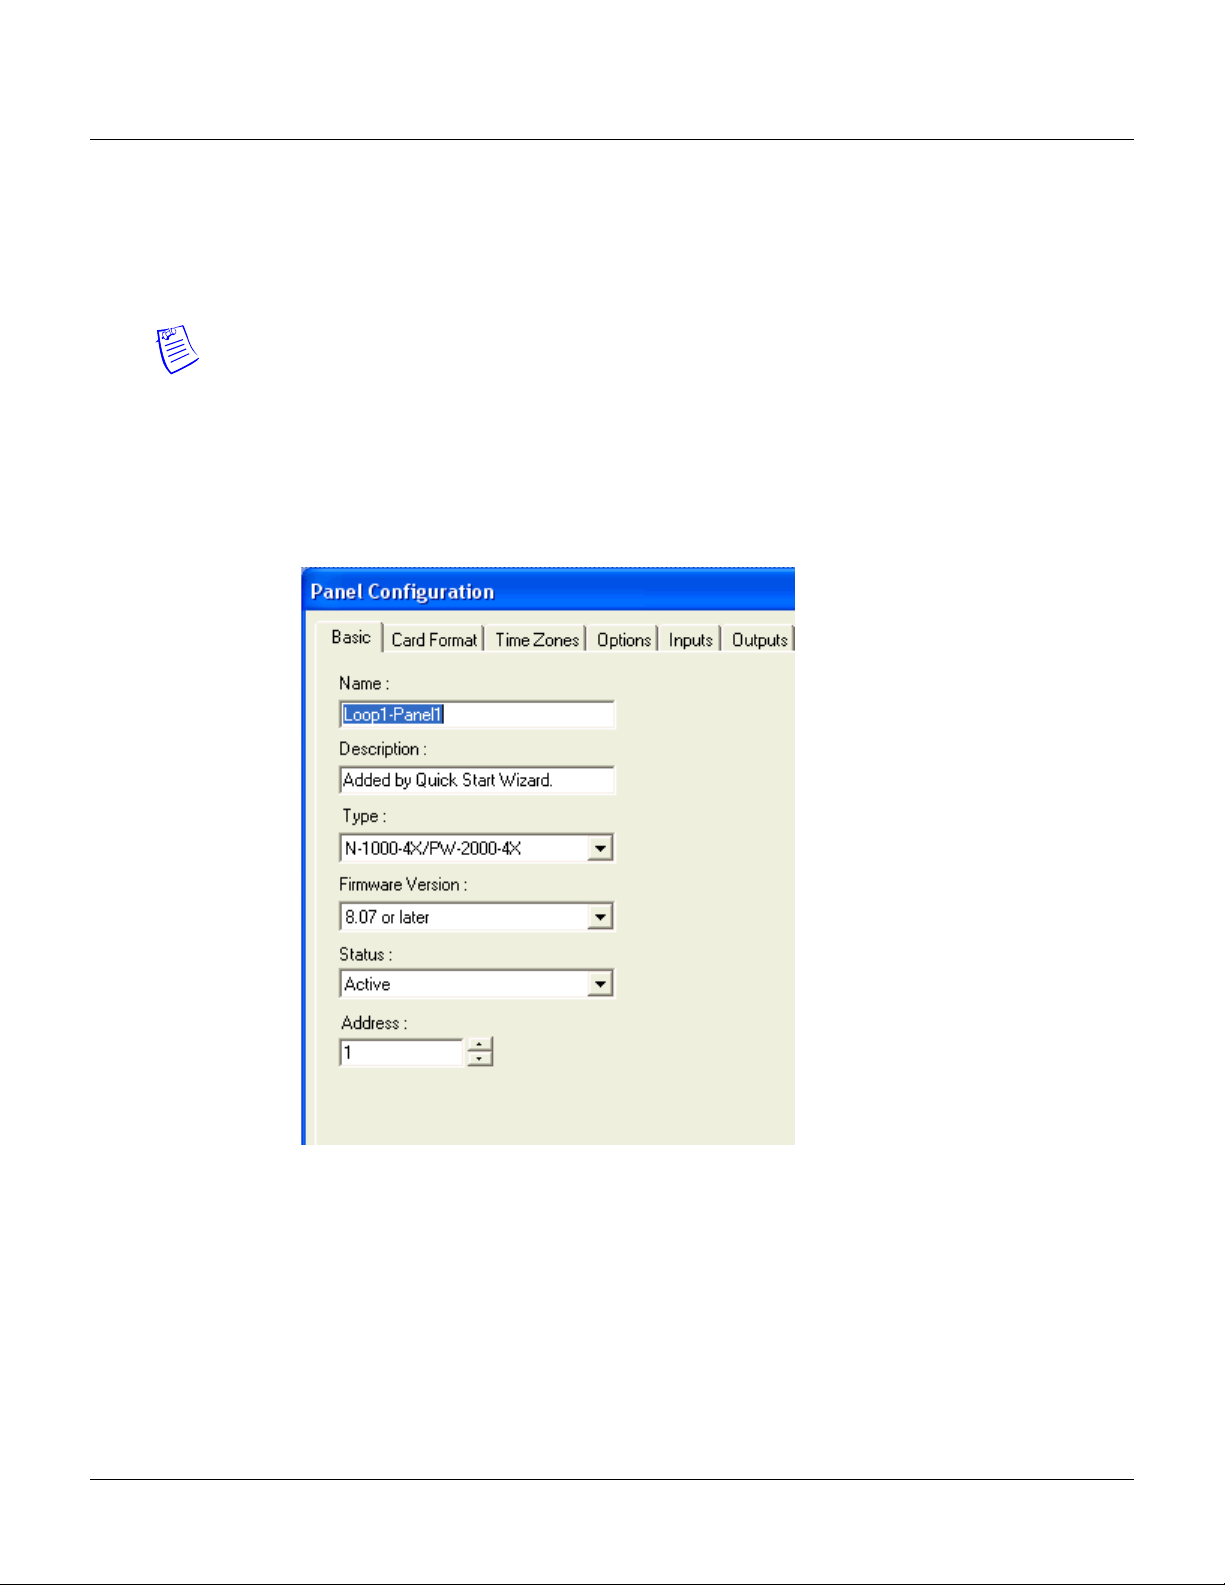
3.2.2 Configuring the Panel Manually
Use the WIN-PAK Panel Configuration screen to complete the NetAXS™ panel configuration
manually. All of the configuration screen options are supported for NetAXS™ panel configuration,
except where they are noted otherwise in this section.
Note: You cannot initialize the NetAXS™ panel from the WIN-PAK Control Map until you complete
the steps in this section.
If you are using the Device Map to add the NetAXS™ panel manually, add it as you would an
N-1000-IV-X panel.
1. Display the Basic tab of the WIN-PAK Panel Configuration screen. The Name, Description,
and Type fields contain the entries selected in the Quick Start Wizard:
Figure 3-2: WIN-PAK Panel Configuration Screen - Basic Tab
Configuring via WIN-PAK
Adding a New NetAXS™ Panel
2. Enter the following selections for the remaining fields:
– Firmware version – 8.07 or later.
– Status – Active.
– Address – Select the appropriate panel number.
NetAXS™ Access Control Unit User’s Guide, Document 800-04410, Revision A 67
Page 78
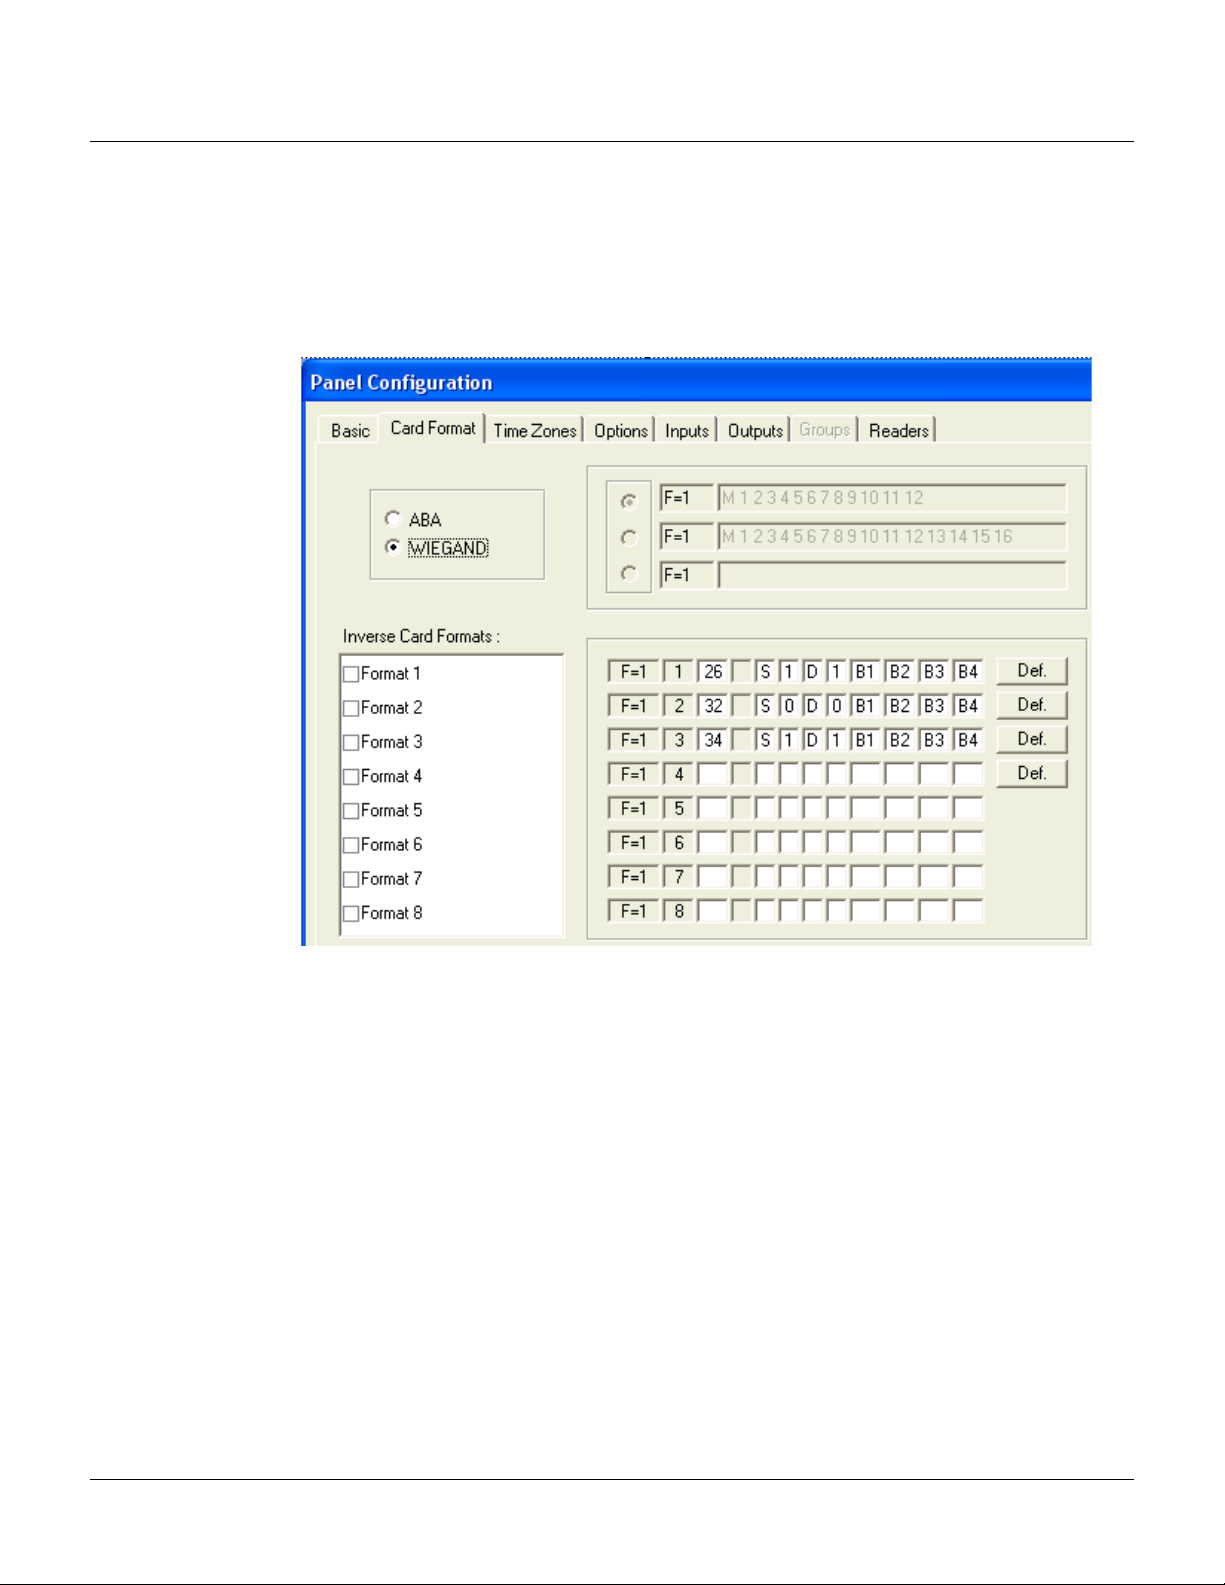
Configuring via WIN-PAK
Adding a New NetAXS™ Panel
3. Add the ADV.
4. Click
OK.
5. Display and complete the Card Format tab:
Figure 3-3: WIN-PAK Panel Configuration Screen - Card Format Tab
68 www.honeywell.com
Page 79

6. Display and complete the Time Zones tab:
Figure 3-4: WIN-PAK Panel Configuration Screen - Time Zones Tab
Configuring via WIN-PAK
Adding a New NetAXS™ Panel
Note: All Time Zones and Holidays are supported for a NetAXS™ panel.
NetAXS™ Access Control Unit User’s Guide, Document 800-04410, Revision A 69
Page 80

Configuring via WIN-PAK
Adding a New NetAXS™ Panel
7. Display and complete the Options tab:
Figure 3-5: WIN-PAK Panel Configuration Screen - Options Tab
Notes:
• All options are supported for a NetAXS™ panel except the Advanced U option. When using
• You can select Keypads; however, the NetAXS™ panel does not support the matrixed
70 www.honeywell.com
Groups, you must select both AEP boards in the Hardware Options box. The NX4OUT board
functions as two AEP-3 boards, and it provides outputs 17-32.
keypads (for example, KP-10, KP-12, or PR-PROXPRO-K2). The supported readers include
the PR-PROXPRO-K (HU/5355AGK000 and OT35xx and OT36xx series readers and
keypads.
Page 81

Configuring via WIN-PAK
Adding a New NetAXS™ Panel
8. Click the Advanced button to display the Advanced Options screen, and select the desired
advanced options. Note that the Advanced U option is not supported for the NetAXS™ panel.
9. Display and complete the Inputs tab. If you are using the NetAXS™ inputs to monitor the door
status or activate a request to exit, then you must reassign the interlocks as indicated below. If
you are not using panel inputs for door status or egress, you only need to dissolve the
interlocks. Note that if you do not dissolve the default N-1000-IV interlocks, an error will occur
during NetAXS™ panel initializations.
All Inputs tab functions are available to NetAXS™ configuration. However, not all inputs are
available and their default functions have changed. NetAXS™ supports inputs 1-14. The
default functions are listed below. Their default values are assumed to be zero, unless otherwise
noted. You must change the interlocking.
NetAXS™ Access Control Unit User’s Guide, Document 800-04410, Revision A 71
Page 82

Configuring via WIN-PAK
Adding a New NetAXS™ Panel
10.Use the following procedure to reassign the interlocks:
a. Display the Readers tab, and then display the first input’s configuration window. Select
None, and click OK. This dissolves all input interlocks and changes the Shunt Time to 0.
This allows the input to be properly redefined for use with NetAXS.
b. Repeat the preceding step for each input for each reader on this tab.
c. After all interlocks on all inputs for each reader have been dissolved, reassign the
interlocks according to Tab le 3-1 below:
Table 3-1: Interlock Reassignments for NetAXS™
Interlock Function
1 Door egress for Door 1
2 Door status switch for Door 1. Shunt time is 15 seconds.
3 Door egress for Door 2.
4 Door status switch for Door 2. Shunt time is 15 seconds.
5 Door egress for Door 3.
6 Door status switch for Door 3. Shunt time is 15 seconds.
7 Door egress for Door 4.
8 Door status switch for Door 4. Shunt time is 15 seconds.
72 www.honeywell.com
9 Reader 1 tamper/auxiliary.
10 Reader 2 tamper/auxiliary.
11 Reader 3 tamper/auxiliary.
Page 83
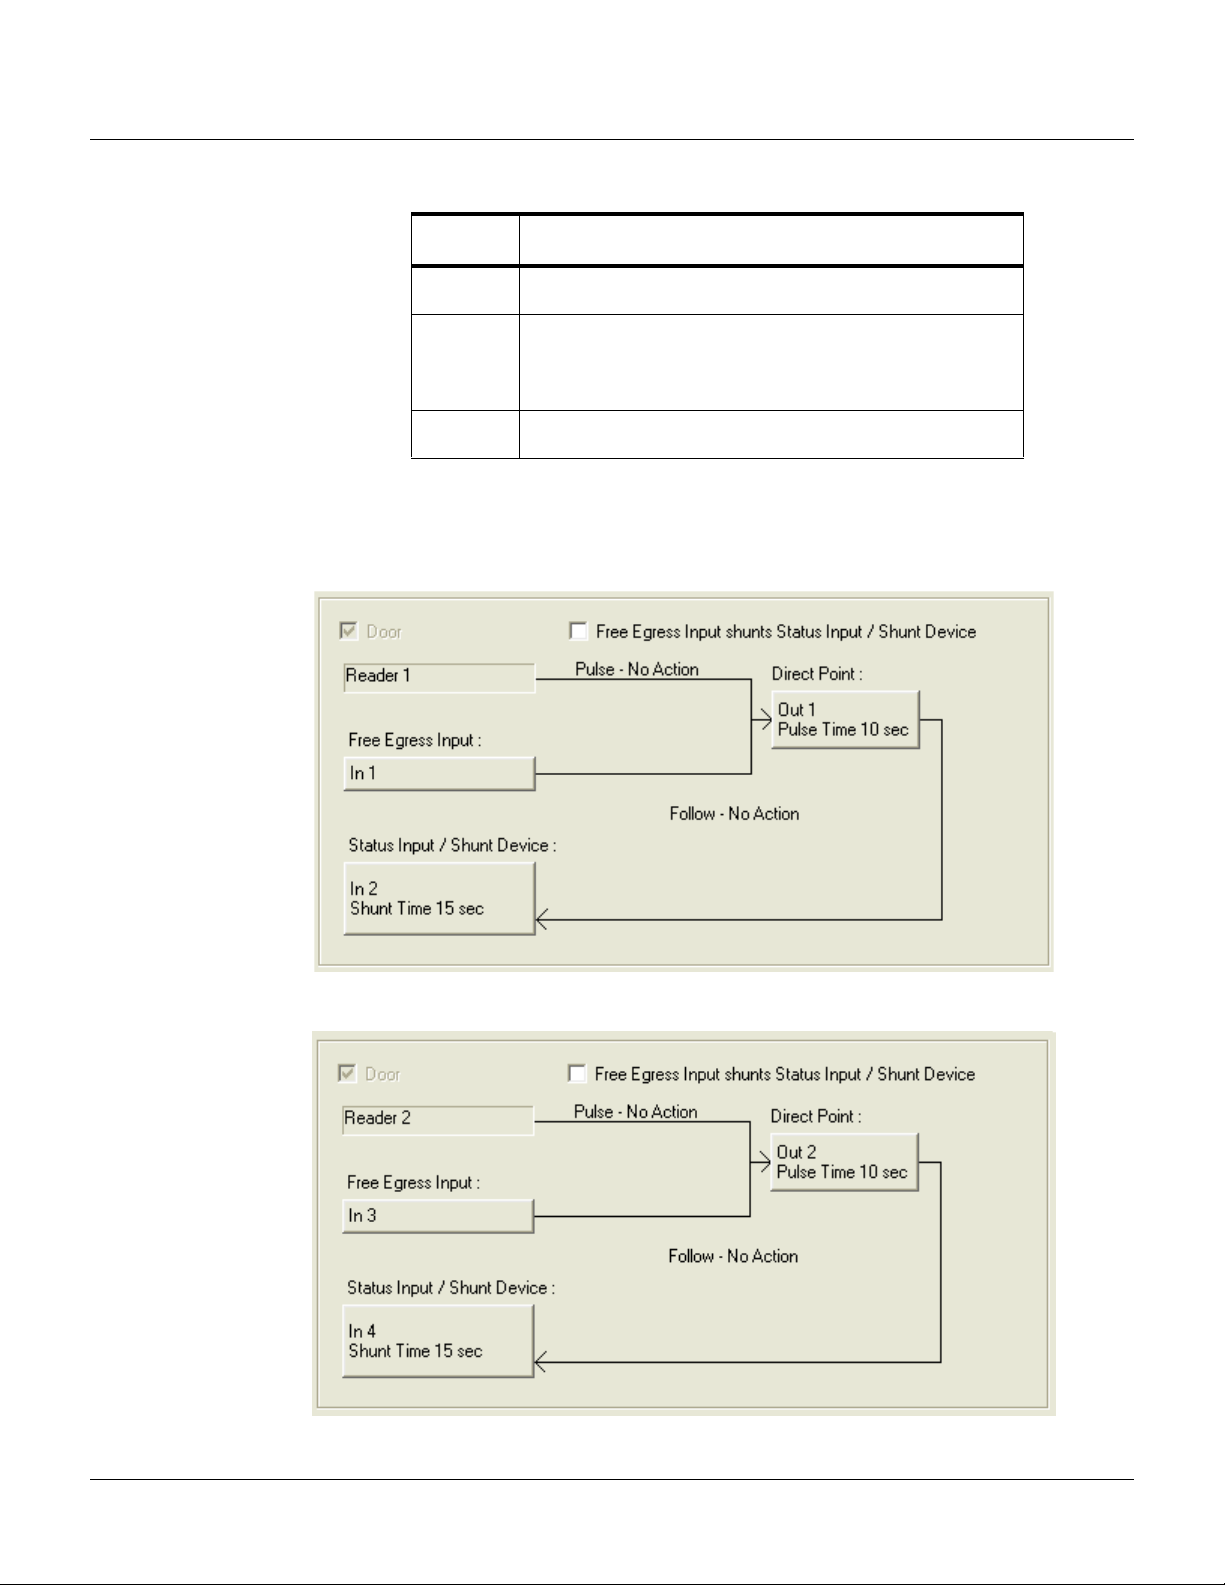
Configuring via WIN-PAK
Adding a New NetAXS™ Panel
Table 3-1: Interlock Reassignments for NetAXS™ (continued)
Interlock Function
12 Reader 4 tamper/auxiliary.
13 Primary power status - external (or General input). There is
also a system primary power alarm 17 that reports through
the ADV and is not a wired port.
14 Tamper (or General input).
The screen captures shown below show the configuration for the default interlocking for a single
door:
NetAXS™ Access Control Unit User’s Guide, Document 800-04410, Revision A 73
Page 84

Configuring via WIN-PAK
Adding a New NetAXS™ Panel
11.The configuration of a NetAXS™ panel via WIN-PAK is now complete. Configuration is
optional on the Outputs and Groups tabs.
74 www.honeywell.com
Page 85

Monitoring NetAXS™ Status
In this chapter...
Overview 75
Monitoring Alarms 76
Monitoring Events 79
Monitoring Inputs 82
Monitoring Outputs 85
Monitoring System Status 87
4
4.1 Overview
This chapter is written for the NetAXS™ operator who will monitor the following
NetAXS™ status:
• Alarms – Alarms are events, or system transactions, that have been assigned
alarm status. These often include events such as an invalid card read or a
forced door.
• Events – Events are the recorded transactions of the NetAXS™ system. For
example, an event card found, number of users logged in.
• Inputs – Inputs are terminals located on the NetAXS™ panel; the inputs are
wired to input devices, such as a door-position switch.
• Outputs – Output relays are relays located on the NetAXS™ panel that are
connected to output devices, such as a door lock.
• System – This includes current capacities and limits.
NetAXS™ Access Control Unit User’s Guide, Document 800-04410, Revision A 75
Page 86
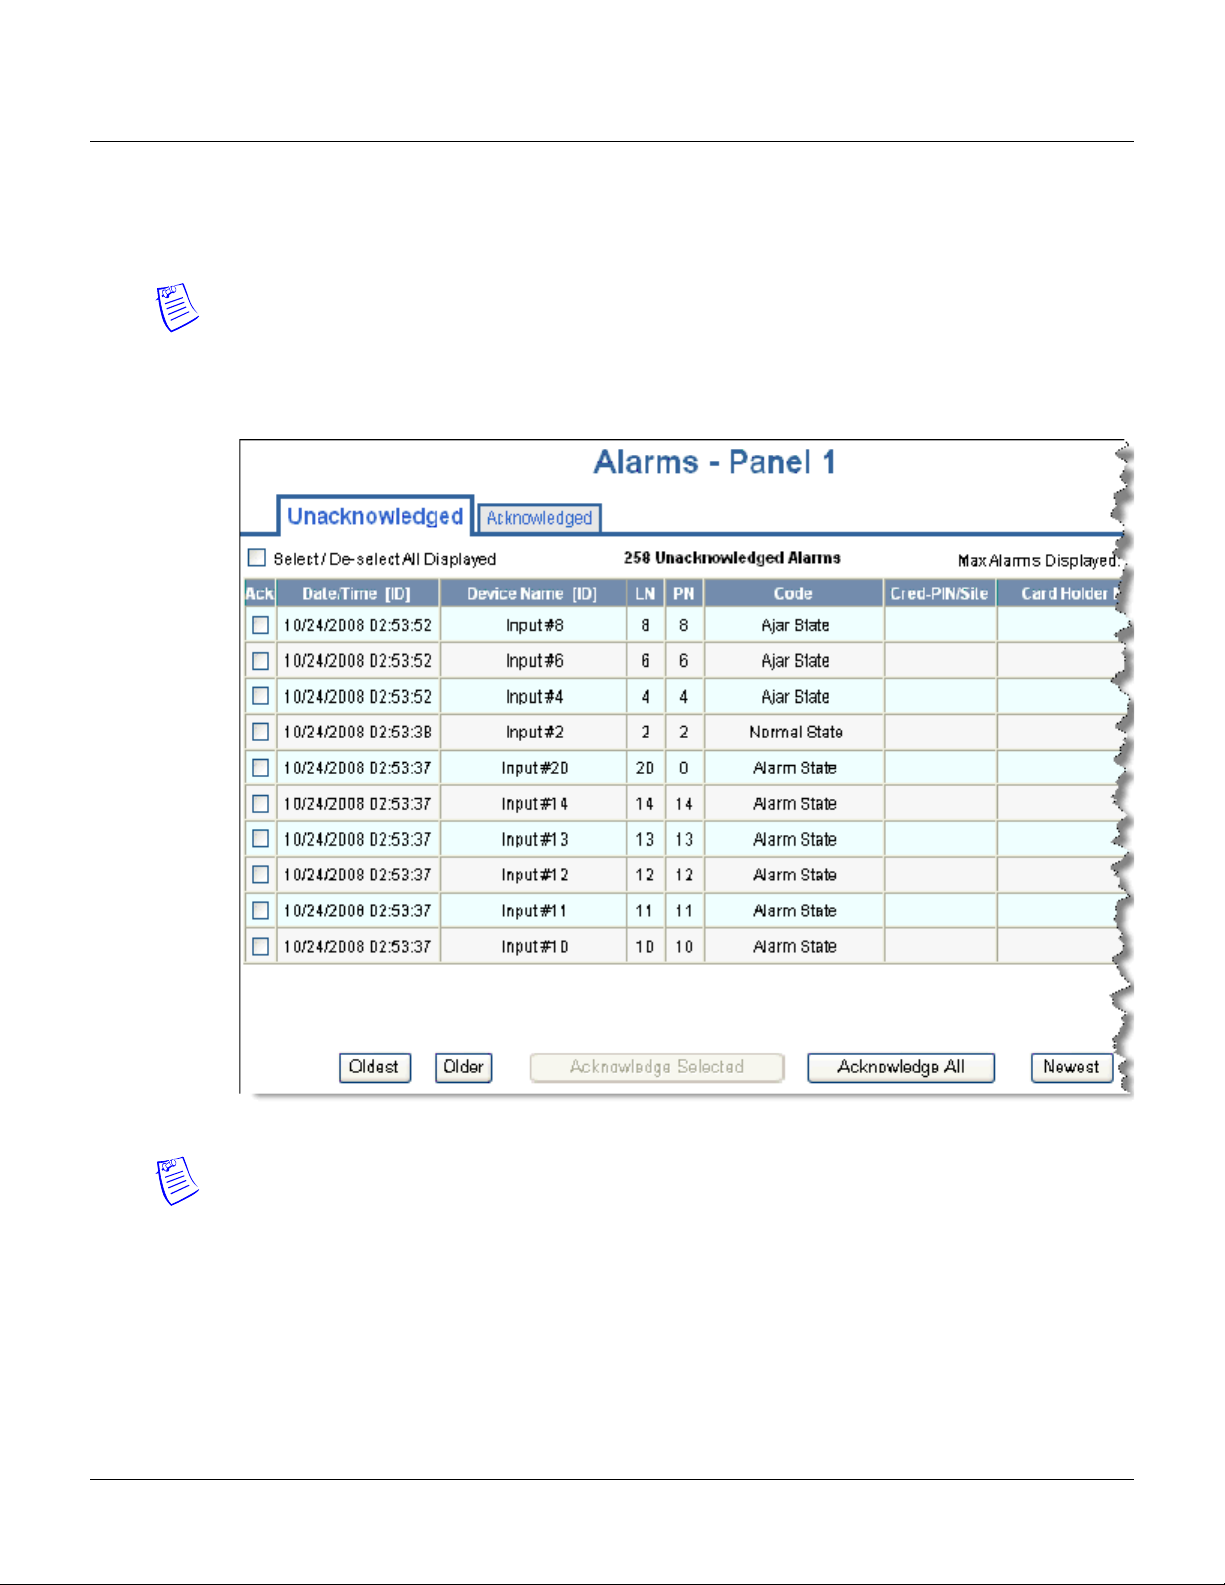
Monitoring NetAXS™ Status
Monitoring Alarms
4.2 Monitoring Alarms
Alarms are viewed as system-generated messages that may indicate the need for user attention.
Note: From the drop down menu at the upper-right corner of each Alarms tab, you can configure the
tab to display alarms in groups of 10, 25, 50, or 75.
Click
Status > Alarms to display the Unacknowledged Alarms tab:
Figure 4-1: Status > Alarms > Unacknowledged Tab
Notes:
• You can display the oldest alarms first by clicking Oldest, or display the newest alarms first by
clicking
of alarms.
• The Alarms screen dynamically refreshes when new alarms are generated.
76 www.honeywell.com
Newest. Click Older to scroll through the list by displaying the next oldest tab display
Page 87

Click the Acknowledged tab to display the acknowledged alarms:
Figure 4-2: Status > Alarms > Acknowledged Tab
Monitoring NetAXS™ Status
Monitoring Alarms
The following table describes the information displayed on both the Unacknowledged alarms tab and
Acknowledged alarms tab:
Table 4-1: Status > Alarms Field Descriptions
Column Head Description
Ack
(Unacknowledged
tab only)
Date/Time [ID] Provides the date and exact time the alarm was generated according
NetAXS™ Access Control Unit User’s Guide, Document 800-04410, Revision A 77
Enables you to select any or all of the alarms that you want to
acknowledge. Note that acknowledging an alarm simply means that
you acknowledge that the alarm exists; an acknowledgement does
not mean action has been taken. To acknowledge an alarm, select the
check box and click the
Note that you can select or de-select all of the alarms by selecting or
de-selecting the Select/De-select All Displayed check box.
to the panel’s time.
Acknowledge Selected Alarms button.
Page 88

Monitoring NetAXS™ Status
Monitoring Alarms
Table 4-1: Status > Alarms Field Descriptions (continued)
Column Head Description
Date/Time (ID) Identifies the date and time the alarm was generated.
Device Name [ID] Identifies the device that generated the alarm.
LN
Logical device number – the unique name or number given to the
alarm-generating device when the device was configured in
Configuration > Doors.
PN
Physical device number – the unique number assigned to the device
on the NetAXS™ board.
Code Identifies the current state of the device that generated the alarm. For
example, the possible states could include:
• Normal State
•Alarm State
•Ajar State
•Card Found
• Card Not Found?
Cred-PIN/Site Identifies the card.
Card Holder Name Identifies the last name of the card holder who energized the input
device when the alarm was generated.
78 www.honeywell.com
Page 89
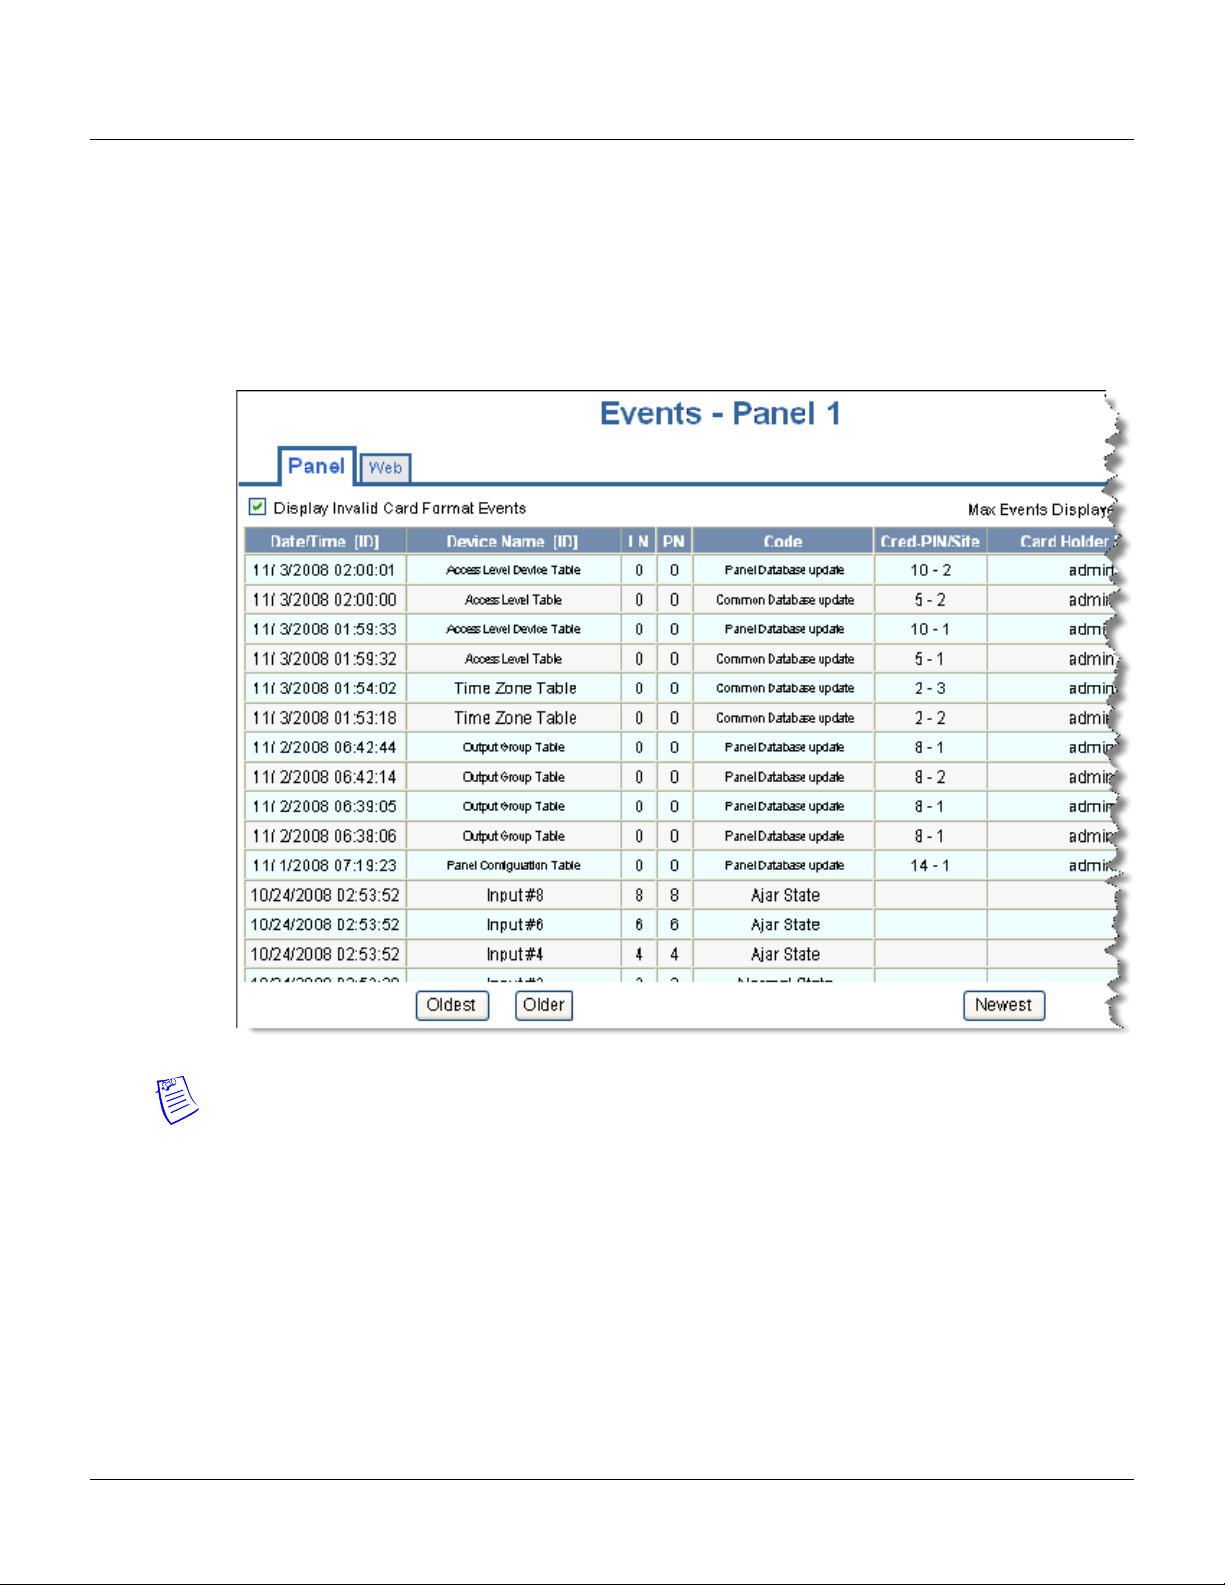
4.3 Monitoring Events
The Events page monitors both panel- and web-generated events. For example, a panel event is the
reading of a card by a reader. A web event example is a user logon.
Click
Status > Events to display the Panel event tab:
Figure 4-3: Status > Events > Panel Tab
Monitoring NetAXS™ Status
Monitoring Events
Notes:
• You can display the oldest events first by clicking Oldest at the bottom of the tab, or display the
newest events first by clicking
Newest. Click Older to scroll through the list by displaying the
next oldest tab display of events.
• The Events screen dynamically refreshes when new events are generated.
NetAXS™ Access Control Unit User’s Guide, Document 800-04410, Revision A 79
Page 90

Monitoring NetAXS™ Status
Monitoring Events
The following table describes the information displayed on the Panel events tab:
Table 4-2: Status > Events > Panel Tab Field Descriptions
Column Head Description
Date/Time [ID] Provides the date and exact time the event was generated, according
Device Name [ID] Identifies the device that generated the event.
to the panel’s name.
LN
Logical device number – the unique name or number given to the
event-generating device when the device was configured in
Configuration > Doors.
PN
Physical device number – the unique number assigned to the device
on the NetAXS™ board.
Code Briefly describes the event.
Cred-PIN/Site Identifies the card.
Card Holder Name Identifies the last name of the card holder who energized the input
device when the alarm was generated.
80 www.honeywell.com
Page 91

Click Status > Events > Web to display the Web events tab:
Figure 4-4: Status > Events > Web Tab
Monitoring NetAXS™ Status
Monitoring Events
Note: The number of active users is indicated in the upper left corner of the tab.
NetAXS™ Access Control Unit User’s Guide, Document 800-04410, Revision A 81
Page 92

Monitoring NetAXS™ Status
Monitoring Inputs
4.4 Monitoring Inputs
A NetAXS™ panel supports door, panel, and auxiliary inputs. The door inputs provide egress and
tamper status, the panel inputs provide power fail and tamper status, and the auxiliary inputs support
any downstream status.
Status > Inputs to display the Input Status screen:
Click
Figure 4-5: Status > Inputs
The Input Status screen enables you to:
• View the current status of each input (Normal, Alarm, Cut, Short, Shunted).
• Shunt or un-shunt any input. When an input is shunted, the alarm is de-activated. This is a way
you can allow the input to grant access without falsely signalling an alarm. The default state of
an input point is “un-shunted.”
• Restore the input to its configured time zone. A time zone is a specified time period during
which the input will be shunted and the alarm de-activated. (see “Configuring Time
Management“ on page 24).
82 www.honeywell.com
Page 93

Steps
Monitoring NetAXS™ Status
Monitoring Inputs
:
1. To shunt or un-shunt an input, click the input name to display a prompt. Click
the shunt or un-shunt.
OK to complete
NetAXS™ Access Control Unit User’s Guide, Document 800-04410, Revision A 83
Page 94
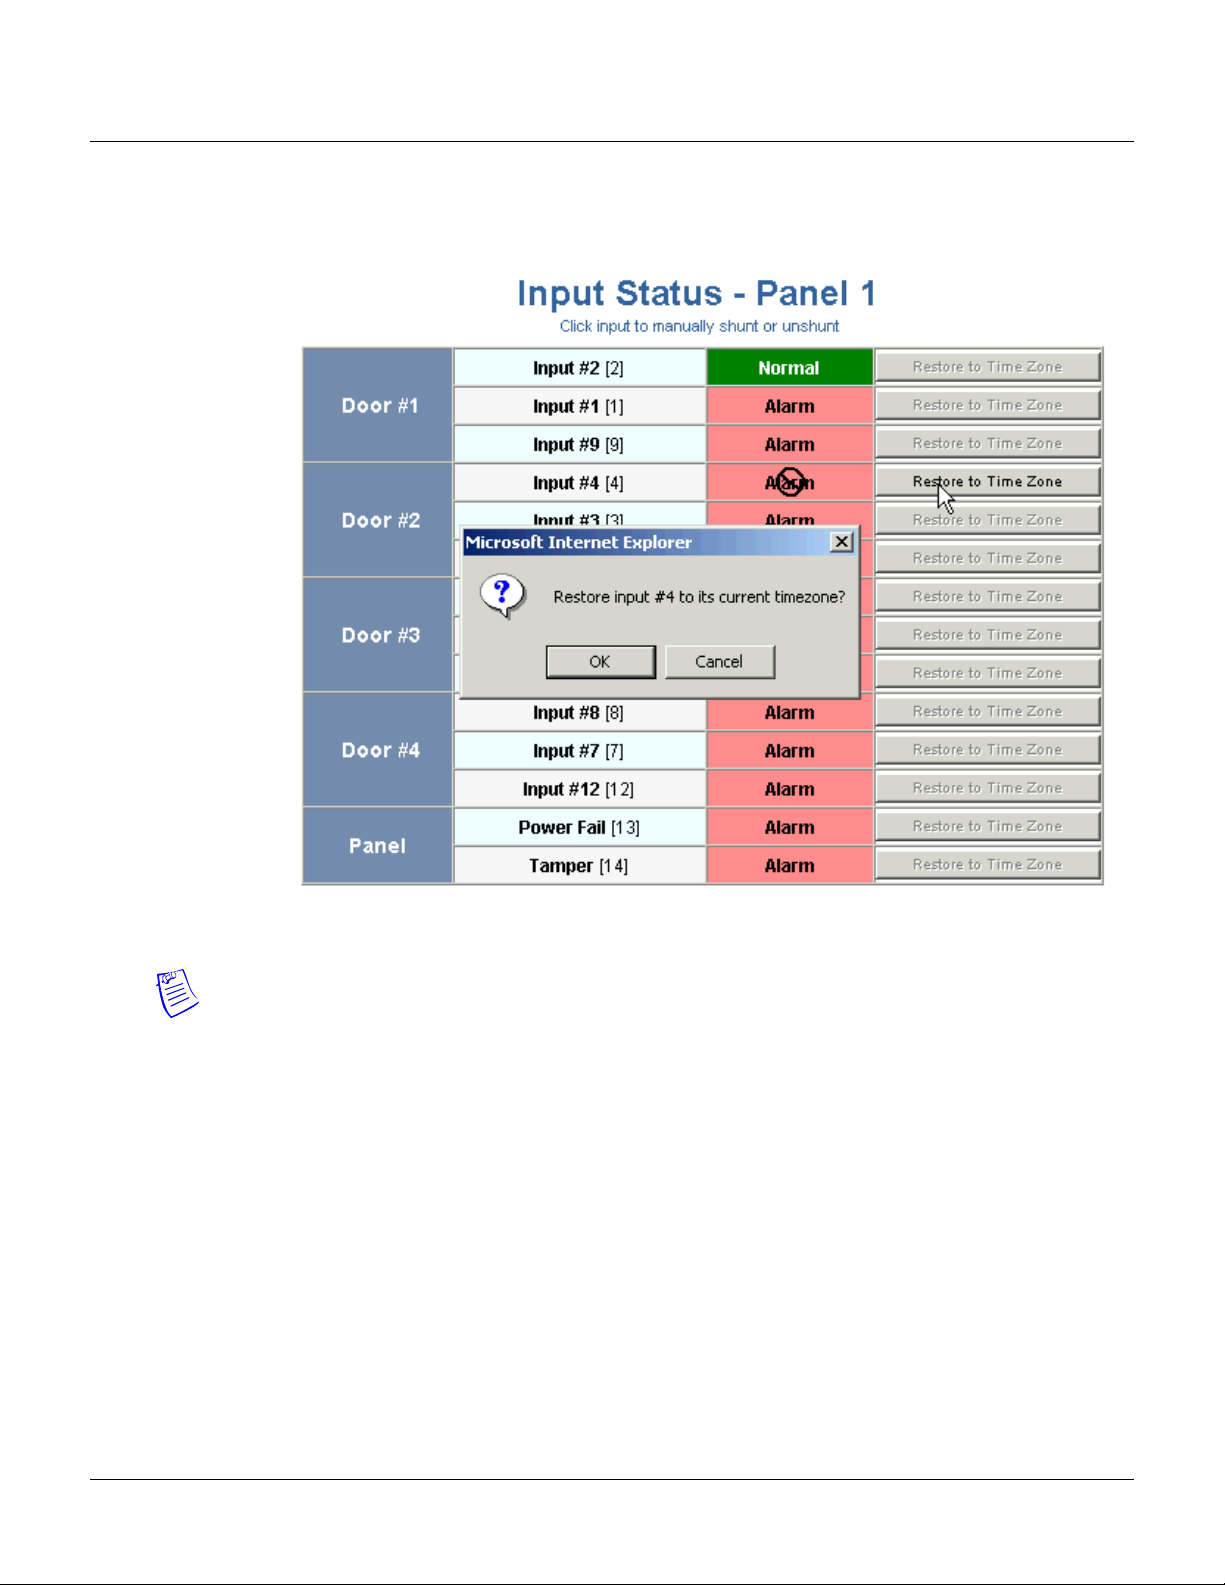
Monitoring NetAXS™ Status
Monitoring Inputs
2. To restore the input to its shunt state based on its configured time zone, click the input’s Restore
to Time Zone
time zone.
button to display a prompt. Click OK to complete the restoration to the configured
Note: The Input Status screen dynamically refreshes when input status changes.
84 www.honeywell.com
Page 95
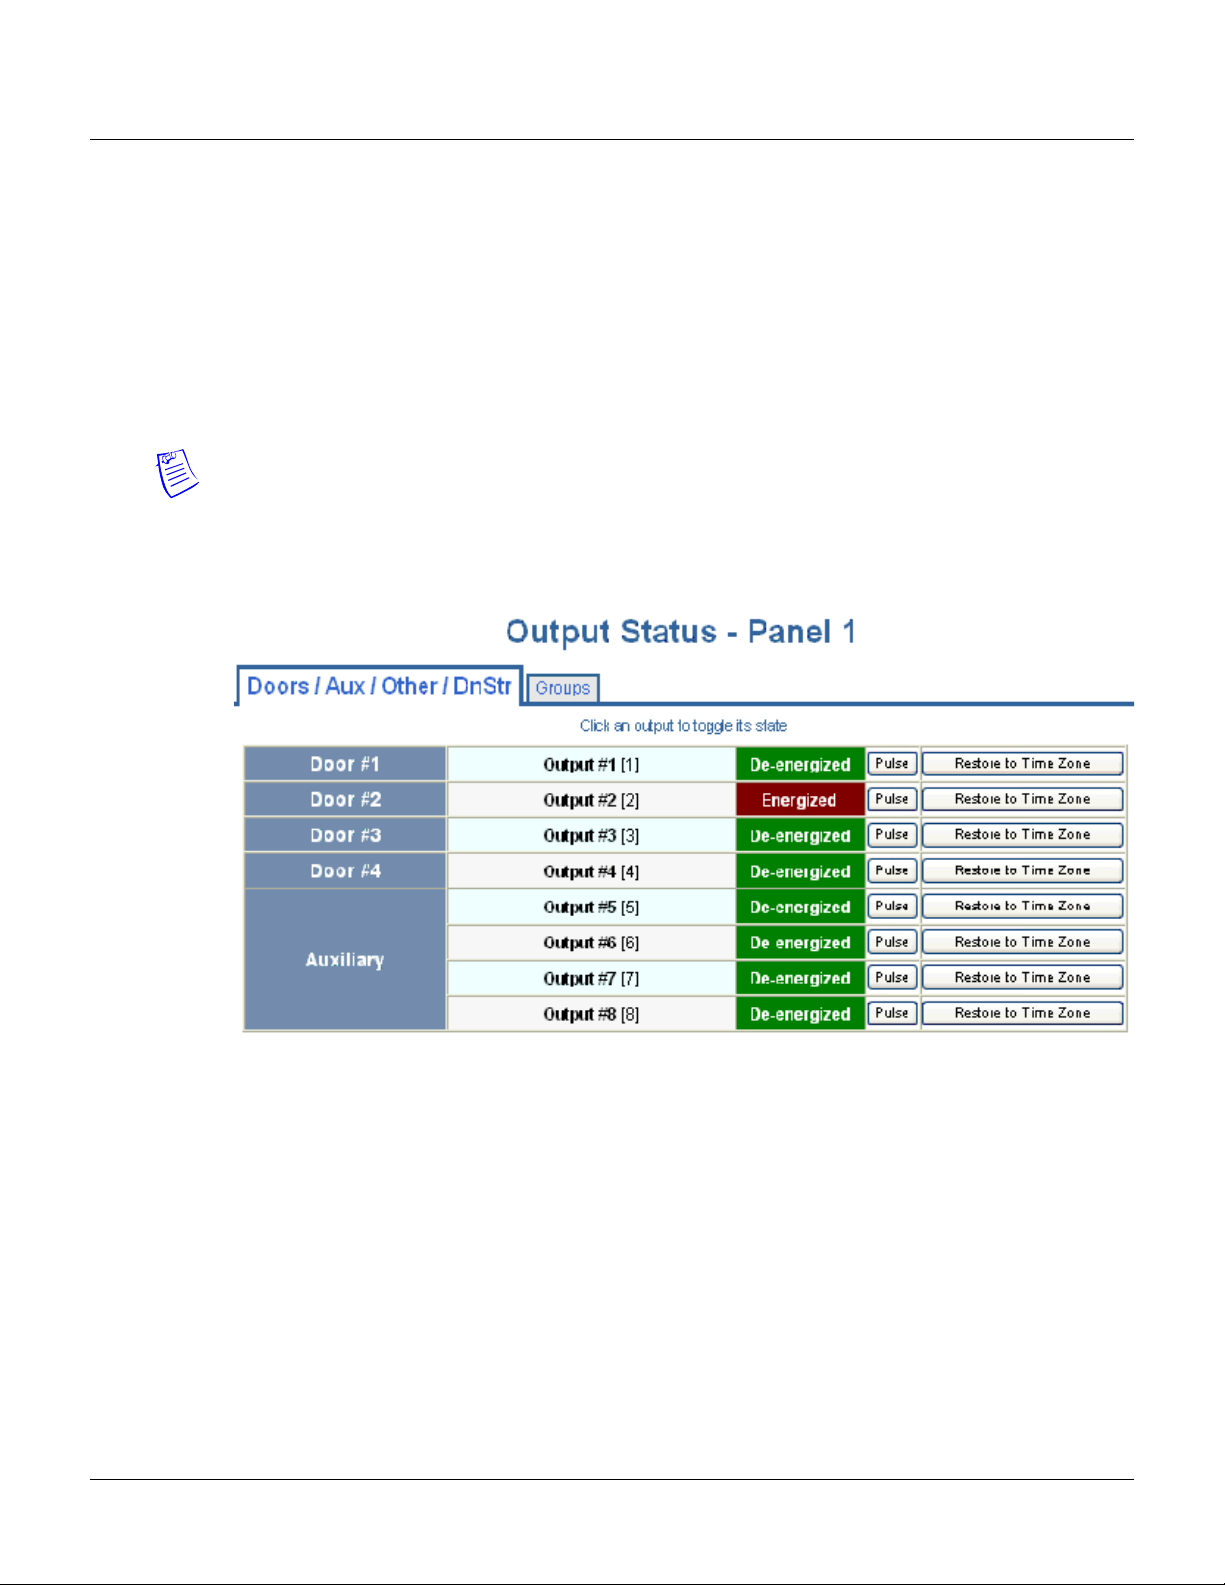
4.5 Monitoring Outputs
An output is an output device that changes its normal state when it is energized, pulsed, or time-zone
controlled. For example, a successful card read at a reader pulses a door lock. The lock changes its
normally locked state to an unlocked state and the cardholder opens the door.
A NetAXS™ panel supports one output for each of its four doors. The panel also supports four
additional outputs for auxiliary devices and 64 downstream outputs. Outputs can be configured singly
as discrete outputs (see “Outputs Tab“ on page 38 and “Outputs Tab“ on page 55) or collectively as a
group of outputs (“Groups Tab“ on page 57).
Note: The Pulse and Restore to Time Zone buttons will only function when an output or group has a
valid pulse time or a time zone assigned.
Click
Status > Outputs to display the Doors/Aux/Other/DnStr tab of the Output Status screen:
Figure 4-6: Status > Outputs > Doors/Aux/Other/DnStr Tab
Monitoring NetAXS™ Status
Monitoring Outputs
NetAXS™ Access Control Unit User’s Guide, Document 800-04410, Revision A 85
Page 96

Monitoring NetAXS™ Status
Monitoring Outputs
Click Status > Outputs > Groups to display the Groups tab of the Output Status screen:
Figure 4-7: Status > Outputs > Groups Tab
The Output Status tab enables you to:
• View the current status of each output in the Discrete tab (Energized or De-energized).
• View the current status of each output group in the Groups tab.
• Energize or de-energize any output or group indefinitely.
• Pulse any output. This energizes the output or group for a configured period of time (see
“Outputs Tab“ on page 38).
• Restore the output to its configured time zone. A time zone is a specified time period during
which the output will be energized. (see “Configuring Time Management“ on page 24).
Steps:
1. To energize an output or group of outputs for an indefinite period of time, click the
De-energized button to display a prompt. Click OK to complete the change to “Energized.”
To de-energize an output or group of outputs for an indefinite period of time, click the
button to display a prompt. Click
OK to complete the change to “De-energized.”
2. To Pulse an output or group of outputs for the configured period of time, click the
to display a prompt. Click
OK to start the pulse. Note that the Pulse button will be greyed out if
no output is attached.
3. To reset the output behavior according to its configured time zone, click the
button to display a prompt. Click OK to restore the time zone. Note that the Restore to
Zone
Restore to Time
Time Zone button will be greyed out if no output is attached.
Note: The Output Status screen dynamically refreshes when the output status changes.
Energized
Pulse button
86 www.honeywell.com
Page 97
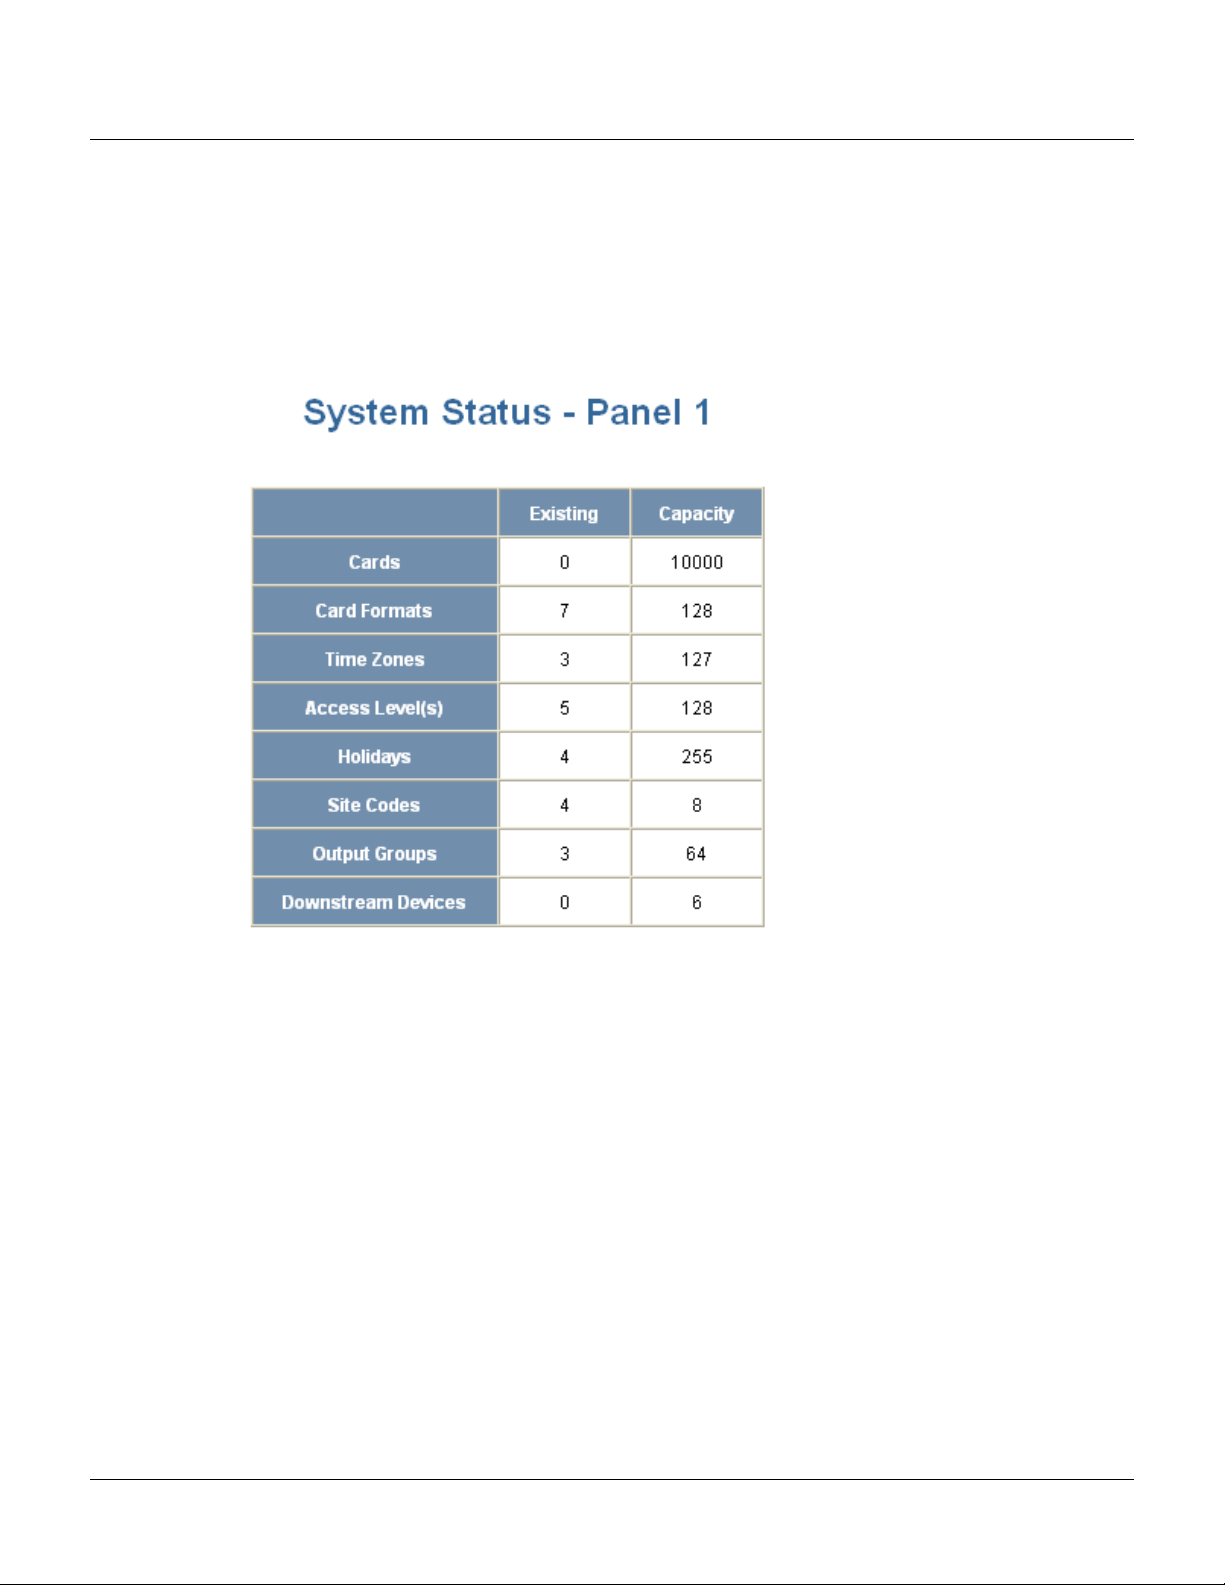
4.6 Monitoring System Status
This feature provides basic monitoring of objects in the NetAXS™ system other than alarms, events,
inputs, and outputs.
Click
Status > System to display the System Status screen:
Figure 4-8: Status > System
Monitoring NetAXS™ Status
Monitoring System Status
The System Status screen enables you to:
View the following status of system objects other than alarms, events, inputs, and outputs:
• Number of currently configured instances of the object.
• Maximum number of object instances that can be configured.
NetAXS™ Access Control Unit User’s Guide, Document 800-04410, Revision A 87
Page 98

Monitoring NetAXS™ Status
Monitoring System Status
88 www.honeywell.com
Page 99

Upgrading NetAXS™ Firmware
A.1 Overview
This appendix provides instructions for upgrading NetAXS™ firmware to release
3.1.8.
This version is a new release; it replaces all builds of releases 1 and 2, and it includes
all functionality provided in NetAXS™ releases 1 and 2. See “What’s New in Release
3.1.8“ on page ix for a description of the new features included in release 3.1.8.
This release package includes three components:
• 1-NetAXSupdaterApp.bin—updater file.
• 2-NetAXSOSimage363.bin—operating system file.
• 3-NetAXSimage03.01.08.bin—applications file.
Note that the files are preceded with a number to indicate the order in which you
install them.
A
A.2 NetAXS™ Release 3.1.8 Upgrade Procedure
A.2.1 Planning the Upgrade
Because upgrading a loop takes some time, you will want to plan the upgrade to
minimize its impact on the access control of your building. You should allow for
approximately 20 minutes to upgrade one gateway panel, and 25 minutes for one
downstream panel (switched to gateway mode). Depending upon your configuration,
you may be able save time by starting multiple panel upgrades on your loop
simultaneously.
A.2.2 Mixed Revision Loops
In a loop configuration, upgrade the gateway panel first. If you are running version
2.1.11 or older on the downstream panels, you must upgrade your whole loop to
release 3. Even if you are running version 2.2.21, we recommend that you upgrade
your entire loop to release 3.
A gateway installed with release 3, however, can still communicate with downstream
panels while they are running release 2. If you leave your downstream panels installed
with an older version, all functionality will be available except access-level editing.
NetAXS Access Control Unit User’s Guide, 800-04410, Revision A 89
Page 100

Upgrading NetAXS™ Firmware
NetAXS™ Release 3.1.8 Upgrade Procedure
Release 3 has a new access-level database; therefore, any release 3 access-level database changes will
not take effect until the entire loop is upgraded to release 3.
A.2.3 Uploading Data from the Panel
Note: Before you upgrade a web-based panel, we recommend that you back up your databases. The
upgrade scripts bring all your panel data forward into the new version without the need for user
intervention. Therefore, it is always recommended to have backup copies of your panel’s databases,
and an upgrade provides an opportunity to keep your backups current. Use following procedure to
backup each of your panel’s databases. The backup features are per panel, so you need to select the
panel to backup.
1. In the web server, select Configuration > System > File Management.
2. Click File Management to display the File Management tab.
3. Under “upload,” select each of the following upload options from the drop-down menu: Cards
and Common Configuration; Panel Configuration; Card, Common, and Panel Configuration.
4. Click Upload to upload the data to the host PC or laptop.
5. Follow the instructions to save a backup file on your PC. Give the backup file a useful name for
easy restoring.
A.2.4 Upgrades to Gateway vs. Multi-drop Panels
You can upgrade multi-drop panels in the same way you upgrade the gateway panels via the web
screen, but multi-drop panel downloads (via 485) are currently very slow (an average of about two
hours).
In order to reduce the time required to install this version on your “downstream” panel, you can
remove each panel from the loop and configure it as a gateway panel. To do this, refer to the NetAXS™
Access Control Unit User’s Guide, section 1-2, “Connecting to the NetAXS™ Web Server,” and
follow these steps:
1. Set DIP switch 6 to “ON.”
2. Connect directly to each panel via a Local Area Network or a direct-connect Ethernet
connection.
3. Return their configuration back to a downstream panel once the upgrade has been successfully
completed.
Note: You cannot have more than one gateway on a loop, so it is critical that you disconnect the 485
cables on the panel you are upgrading.
To perform the upgrade, follow these steps:
1. Before starting, make sure your panels are not buffered. If you have not logged in to the web
pages lately, or WIN-PAK has not been connected recently, you should login and make sure
you have current events coming in. This will ensure that the panels are not buffered, and you
will not have to wait for the un-buffer to complete before starting. If you try to login and get
“time-outs,” your panels are probably buffered and you should wait for them to complete their
un-buffer before starting the upgrade.
90 www.honeywell.com
 Loading...