

Page 1

XP Series Personal Gas Detector
Operating Instructions and
Maintenance Manual
Page 2

Page 3

1. Introduction ...........................................................................................5
2. Turning the Detector On and Off ..........................................................6
3. Display Features
4. Gas Alarms ............................................................................................7
5. Maximum (Peak) Gas, STEL and TWA Reading .................................. 9
6. Performing a Self-Test ........................................................................10
7. Testing Sensors and Alarms (Bump Testing) ................................... 11
8. Low Battery..........................................................................................11
9. Error Codes .........................................................................................11
10. Alarm Occurred Indication ............................................................... 11
11. Confidence Flash/beep .....................................................................12
12. Zero Calibration (Oxygen Span) ......................................................12
13. Span Calibration (Toxic Versions Only)
14. Changing the Detector Set-up .........................................................15
15. Specifications ....................................................................................19
16. Contacting Honeywell Analytics ......................................................20
17. Sensor Cross Sensitivity Data ......................................................... 21
18. Accuracy Statement ..........................................................................23
19. Replacing the Battery or Sensor .....................................................23
20. Warnings ............................................................................................ 24
21. Warranty ............................................................................................. 25
22. Other Gases .......................................................................................27
23. Replacement Parts
24. Calibration Accessories ...................................................................29
XP Series Personal Gas Detector
Table of Contents
...................................................................................7
...........................................13
............................................................................ 28
3
Page 4

This manual is supplied pre-printed in English only. Alternative language versions are available for
download from the Honeywell Analytics website: www.honeywellanalytics.com
Dit handboek is alleen beschikbaar in de Engelse taal. Alternatieve talen versies zijn electronisch
beschikbaar via onze web pagina van Honeywell Analytics: www.honeywellanalytics.com
Ce manuel est four ni préimprimé en anglais seulement. Les versions alternatives de langue sont
disponibles pour le téléchargement du website www.honeywellanalytics.com de Honeywell Analytics
Se provee este manual imprimió en inglés solamente. Las versiones alter nativas de la lengua están
disponibles para la transferencia directa del website www.honeywel lanalytics.com de Honeywel l
Analytics
Questo manuale viene fornito stampato solo in Inglese. Versioni in altre lingue, incluso l’italiano, sono
disponibili e possono essere scaricate dal sito web della Honeywell Analytics www.honeywellanalytics.
com
Diese Bedienungsanleitung wird in gedruckter Form nur in englischer Sprache verfügbar sein. Zusätzliche
Sprachen stehen zum Download auf folgender Webseite zur Verfügung. www.honeywellanalytics.com
4
XP Series Personal Gas Detector
Page 5

WARNING: Read Manual Prior to Use
1. Introduction
The XP Series is an easy to use, personal gas detector, designed for monitoring the atmosphere for
potentially hazardous levels of oxygen deficiency or toxic gas. It has built-in cell decay compensation,
thermal shock protection, and Reflex™, a patented sensor failure detection system, for maximum
reliability.
SAFETY INFORMATION
Substitution of components may impair intrinsic safety
•
Only use specified batteries: Energizer® CR2 or Sanyo CR2
•
Do not activate the detector after the date on the packaging
•
Perform a self-test prior to each day’s use (See Section 6)
•
Do not use in oxygen-enriched atmospheres
•
Periodically test the sensor’s response to gas by exposing the detector to a target gas concentration
•
that exceeds the alarm set points. Manually verify that the audible, visual and vibrating alarms
are activated.
Exposure to extremely high levels of over-range gas may cause temporary loss of sensor accuracy.
•
Allow detector to stabilize in a zero gas atmosphere before reuse. It is recommended to perform
a sensor response gas test prior to reuse.
IMPORTANT NOTICE
Honeywell Analytics can take no responsibility for the use of its equipment if it is not used in accordance
with the appropriate issues and/or amendments of the relevant manual. If further details are required
which do not appear in this manual, contact Honeywell Analytics or their agent.
Honeywell Analytics shall not be liable for any incidental or consequential damages in connection with
any deletions, errors or omissions in this manual.
XP Series Personal Gas Detector
5
Page 6

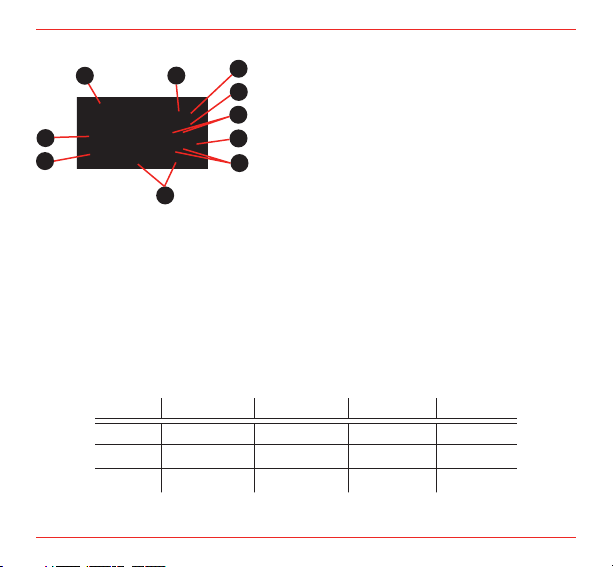
What’s in the Box?
Visual Alarm
Display
Gas Type
Audible Alarm
On/Off Button
Sensor
Belt Clip
Up Button
Down Button
XP Series Personal Gas Detector
•
Test Adapter
•
Operating Instructions and Maintenance Manual
•
Certificate of Calibration
•
Product Overview
2. Turning the Detector On and Off
Press the On/Off button for one second and the XP will turn on.
The detector will emit 5 beeps and 5 flashes. XP will warm up for 30 seconds, showing a countdown in
seconds and the Test Pass icon ( ) will be flashing. It will then perform a self-test. If the detector passes
the Test Pass icon ( ) is displayed. If the Test Fail icon ( ) is displayed then the detector has failed the
self-test – please refer to the instructions in Section 6.
To turn off the XP press and hold the On/Off button for 5 seconds - a countdown will be displayed.
6
XP Series Personal Gas Detector
Page 7
3. Display Features
A
B
C
D
E
F
G
H
I
J
Battery
A.
Fail Icon
B.
Self-Test Pass Icon
C.
Level 1: O2 and Toxics
D.
Level 2: Toxics
Level 2: O
E.
F.
G.
H.
I.
The XP LCD has a backlight that will operate automatically whenever an alarm occurs, and also whenever
any button is pressed.
J.
2
STEL/TWA Alarm
Cal. Status Icon
Low Peak (O2), High Peak (Toxics)
Gas Concentration and Units
Alarm Icon
4. Gas Alarms
The XP has two levels of instantaneous gas alarms, of which the level 2 alarm is more urgent than the
level 1 alarm. XP also has a 15 minute STEL alarm and an 8 hour TWA alarm. The alarm set points can
be set by the user on the detector. It is supplied with the following default alarm set points:
Gas Type Level 1 Alarm Level 2 Alarm STEL Alarm TWA Alarm
H2S 10 ppm 15 ppm 15 ppm 10 ppm
For other toxic gases, see Section 22 Other Gases.
CO 35 ppm 100 ppm 400 ppm 35 ppm
O
2
XP Series Personal Gas Detector
23.5% v/v 19.5% v/v N/A N/A
7
Page 8

Alarm Level Display* Audible Alarm Visual Alarm Vibrating Alarm
blink
blink
blink
blink
3 beeps per
second
5 beeps per
second
5 beeps per
second
5 beeps per
second
Level 1 alarm
Level 2 alarm
STEL alarm
TWA alarm
* Examples shown for H2S
Note:
When the detected gas level returns to a safe level the gas alarm will stop, unless the alarm
mode is set to latching. The user cannot cancel an alarm.
If the measured reading exceeds the range of the sensor then the numerical digits will flash
the full scale value.
3 flashes per
second
5 flashes per
second
5 flashes per
second
5 flashes per
second
Once every 2
Once every 2
Once every 2
Once every 2
seconds
seconds
seconds
seconds
8
XP Series Personal Gas Detector
Page 9

5. Maximum (Peak) Gas, STEL and TWA Reading
The XP records the maximum readings (and also, minimum for oxygen) measured, and the STEL and
TWA values (except oxygen). These can be viewed by pressing the Up/Down buttons to scroll through
the displays.
a) normal CO b) the CO STEL/TWA values measured
STEL value TWA value
c) the maximum (peak CO) reading measured
To clear the peak reading, press the On/Off button once when the peak value is displayed on the LCD.
XP Series Personal Gas Detector
9
Page 10

6. Performing a Self-Test
When the On/Off button is pressed the detector checks the sensor, circuit, batteries, audible and visual
alarms, and vibrating alarm.
The XP reminds the user that a Self-Test is required by blinking the Test Pass icon ( ) 24 hours after
switch-on. The Self-Test must then be performed, by pressing the On/Off button. The detector will do
the following:
Turn on all the display elements
•
Test the audible and visual alarms and vibrating alarm
•
Check the battery, electronic circuit and sensor
•
Display the level 1 and level 2 alarm set points
•
Display the STEL and TWA alarm set points
•
Display the peak, STEL and TWA values
•
Display the result of the self-test as follows:
•
Self-Test Result Display Audible Alarm Visual Alarm
Pass None None
Fail 1 long beep 1 flash
If the self-test fails, repeat the self-test. The XP will warm up for one minute before the next self-test is
performed. If it fails three consecutive times then the detector will display an error code (see Section
9).
Additionally, the XP will periodically check its batter y, electronic circuit and sensor. If it fails, the Test
Fail icon ( ) will be shown and the Test Pass icon ( ) will blink. If it passes then the Test Pass icon
will be displayed.
10
XP Series Personal Gas Detector
Page 11

7. Testing Sensors and Alarms (Bump Testing)
To maintain optimal accuracy, the detector should be periodically supplied with a known concentration
test gas (bump test) and if the readings are outside of 15% of the applied gas concentration, a span
calibration should be performed, under conditions of standard temperature (15°C to 25°C/59˚F to 77˚F),
humidity and pressure. Follow local regulations and/or your company’s policy on the frequency of bump
testing. For more information on test gas, contact your local Honeywell Analytics representative.
8. Low Battery
When the XP battery level reaches a preset level it will warn the user that the battery is low and needs
replacing by generating a beep and flashing the LED once every 5 seconds. Also, the battery icon ( )
will flash. When the battery is finally exhausted an error code E02 will be displayed (see Section 9) and
a beep generated once every second.
9. Error Codes
Error Code Reason
E 01 Reflex™ error
E 02 Low battery
Example
E 04 System Fault
E 08 EEPROM Error
10. Alarm Occurred Indication
If an alarm has occurred while the XP has been turned on, the relevant alarm level icon ( or or )
will be displayed. This will be cleared when either the On/Off button, Up or Down button is pressed.
XP Series Personal Gas Detector
11
Page 12

11. Confidence Flash/beep
The visual alarm and audible alarm will flash/beep once every 30 seconds, to indicate that the XP is
operating. The user can select whether this feature is activated or not, and whether it is an audible signal,
visual signal or both (see Section 14). If any error or fault is detected, the confidence flash will stop. The
factory default is no flash and no beep.
12. Zero Calibration (Oxygen Span)
Zero calibration must be performed in a clean atmosphere, and it is recommended
that it be performed daily or after any gas alarm. Depress the On/Off button 2 times.
The detector will initiate a zero with a countdown showing a ‘0’ for zero calibration,
followed by a countdown from ‘20’ to ‘00’.
blink
When the zero calibration has been completed the XP will indicate a pass by beeping
twice and flashing 2 times, and the ( ) icon will flash for 5 seconds.
If the zero calibration fails, the XP will give a single beep and a single flash, the Test
Fail icon ( ) will be displayed, and the zero calibration should be repeated.
12
XP Series Personal Gas Detector
Page 13

13. Span Calibration (Toxic Versions Only)
Calibrate the detector at least every 12 months (O2, H2S, CO), depending on use and exposure to
contaminants. The other toxic gases (Cl2, H2, HCN, NH3, NO2, SO2) should be calibrated at least every
6 months. To carry out the span calibration the user requires the following additional equipment to be
available, which can be purchased from Honeywell Analytics.
Gas cylinder containing a known concentration calibration gas as follows:
•
Toxic Gas
H2S 25 ppm in air or N
CO 100 ppm in air or N
Recommended
Calibration Gas
Concentration
2
2
See Section 22 for other toxic gases
A gas regulator supplying the gas at 300 ml/min flow rate
•
Tubing for use betwee n the regula tor and the test adaptor (See Sect ion 24, Cali brat ion
•
Accessories)
The following is a list of calibration times (in seconds) for the different toxic gases. The detectors are
pre-programmed with the appropriate calibration time.
Calibration Gas
Concentration Range
20-30 ppm
70-200 ppm
Toxic Gas
CO 60 H2S 60
Cl
2
H
2
HCN 250 SO
XP Series Personal Gas Detector
Calibration
Time
300 NH
120 NO
Toxic
Gas
3
2
2
Calibration
Time
300
180
120
13
Page 14

Important Note for Cl2 Users:
Honeywell Analytics recommends dedicating a regulator for use with Cl2 gas to avoid lower calibration readings due to cross-interference with other gases.
Prior to performing the span calibration with Cl2 detectors it is recommended that the user purge the
regulator for 5 minutes (300 seconds) with Cl2 gas to ensure the regulator is properly conditioned.
This should be done any time a significant amount of time has passed since the regulator was last used
(i.e. days).
Carry out the zero calibration procedure as described in Section 12. A span calibration can only be
performed if the zero calibration is successful. At the end of the zero calibration procedure, the On/Off
button must be pressed continuously for 5 seconds while the Test Pass icon ( ) is flashing. If the Menu
Lock feature has been activated then the unit prompts the user to enter the password. If the correct
password is entered then the span gas concentration will be displayed and can be changed with the
Up and Down buttons (refer to Section 22 for the table of span gas concentration ranges for the limits).
Press the On/Off button to select the span gas concentration. Connect the gas cylinder and test adaptor
and apply the gas at 300 ml/min. The detector will count down the appropr iate calibration time for the
gas type. When the count down is below 100, the detector will display a ‘C’ (for calibration) in addition
to the count down value. This sequence is shown below:
1. Password 2. SPAN gas 3. Start Count down
(only in Menu lock concentration
mode, otherwise skip)
4. End Count down 5. SPAN calibration OK 5-1. SPAN calibration fail
If the span calibration is successful the detector will give 2 beeps, 2 flashes and will display the Test
Pass icon ( ). If the span calibration fails, the detector gives a long beep, long flash, displays the Test
Fail icon ( ), and the calibration remains as it was before the span calibration was attempted. If the
span calibration fails, verify the calibration gas expiration date and concentration, then rer un the span
calibration procedure.
14
XP Series Personal Gas Detector
Page 15

14. Changing the Detector Set-up
The XP is provided with a means for the user to change the following aspects of its operation:
Alarm 1 set point
•
Alarm 2 set point
•
Latching/non-latching alarms (factory default is non-latching)
•
STEL alarm set point
•
TWA alarm set point
•
Set the confidence signal as a beep, flash, beep and flash or none
•
Set a new password (or disable the password function), which allows access to change the gas
•
concentration for carrying out a span calibration
To access these functions press and hold both the Up and Down buttons on the side of the detector for
3 seconds. The XP will generate two beeps and 2 flashes, and enter the Set-up mode. If the Menu Lock
feature has been activated then the detector prompts the user to enter the password before entering
setup mode.
The following display will be shown while the two buttons are being pressed and held:
XP Series Personal Gas Detector
15
Page 16

In set-up mode, pressing the Up or Down button selects the function and pressing the On/Off button
activates the function, so that the displayed value may be changed. For each value, pressing the Up
button increases the displayed value, pressing the Down button decreases the displayed value, and
pressing the On/Off button sets the displayed value. Once the displayed value has been changed and
accepted, then the new value is stored within the detector. The value can be returned to its previous
value by pressing the Up and Down buttons together, e.g.
Prompt UP button to increase
On/Off button to accept Up + Down button to cancel
If no button is pressed within 20 seconds or both buttons are pressed together the XP will revert back
to its normal gas monitoring mode.
The flowchart diagram on the following page explains the process.
16
XP Series Personal Gas Detector
Page 17

Enter the password
Alarm 1 set
Alarm 2 set
Alarm latch OFF
STEL alarm set
TWA alarm set
Only if the “Menu Lock” option is turned on.
Structure of Instrument Setup Menu
Alarm latch ON
Confidence beep and flash Confidence beep
Current password Menu lock New password
XP Series Personal Gas Detector
Confidence flash
No confidence beep
or flash
17
Page 18

The user can select whether the detector set-up menu is password protected. All settings are
maintained, even when the XP is turned off. Note that the initial password (which can be changed) is
‘000’.
Menu lock Menu unlock
18
XP Series Personal Gas Detector
Page 19

15. Specifications
Operating Life
Sensor Range
For other gases See Section 22
Alarm Set points
For other gases See Section 22
Calibration
Operating Temperature -4°F to +122°F (-20°C to +50°C) (temperature compensated)
Humidity 5-95% RH (non-condensing)
Audible Alarm 95db @ 4” (95db @ 10cm)
Visual Alarm High intensity red LEDs
Vibrating Alarm Standard
Display Backlit Custom LCD
Typically up to three years before battery replacement, assuming 8
hours use per day and 3 minutes of alarm per day*
CO 0 to 999 ppm
H2S 0 to 250 ppm
O
2
0 to 30% v/v
Level 1 Level 2 STEL TWA
CO ppm 35 100 400 35
H2S ppm 10 15 15 10
O2 % 23.5 19.5 - -
Toxics Zero and Span adjustment
O
2
Span adjustment
XP Series Personal Gas Detector
19
Page 20

Sensor Type Electrochemical (replaceable)
Diagnostics
Self-test of circuitry, battery, LCD, software Sensor test using
Reflex™
Battery 3V Lithium (replaceable) Energizer CR2 or Sanyo CR2 only
IP Rating IP65 (IP54 for sensor aperture)
ATEX II G EEx ia IIC T4
Intrinsic Safety
UL/ C-UL Class I, Div. 1, Groups A,B,C&D, T4
RFI/EMC CE EN50270:1999 and EN55011
Dimensions 3.6“ (H) x 2“ (W) x 1.1“ (D) (93 mm x 50 mm x 27 mm) excluding clip
Weight
Toxics 81.5g (2.8oz)
O
2
93.0g (3.3oz)
*Excessive alarms will significantly reduce the battery life
16. Contacting Honeywell Analytics
To contact Honeywell Analytics, call: +1 800 433 7220 (USA and Canada)
+ 41 (0)44 943 4300 (ROW)
Or visit our web-site at www.honeywellanalytics.com
20
XP Series Personal Gas Detector
Page 21

17. Sensor Cross Sensitivity Data
H2S SureCell Cross Sensitivity Data
Gas Type Concentration Applied
Carbon Monoxide 50 0
Sulfur Dioxide 2 0
Nitrogen Dioxide 3 0
Nitric Oxide 25 0
Chlorine 0.5 0
Hydrogen 100 0
Ethylene 100 0
Carbon Dioxide 5000 0
(ppm)
Reading
(ppm H2S)
XP Series Personal Gas Detector
21
Page 22

CO SureCell Cross Sensitivity Data
Gas Type Concentration Applied
Hydrogen Sulfide 25 0
Sulfur Dioxide 50 0.5
Nitrogen Dioxide 800 20
Nitric Oxide 50 8
Chlorine 2 0
Hydrogen 100 20
Ethylene 100 85
Ammonia 100 0
O2 Cross Sensitivity Data
(ppm)
Reading
(ppm CO)
Gas Type Concentration Applied Reading
Hydrogen 100% -9%
Methane 100% 0
Nitrogen Dioxide 25 ppm 0
22
(%v/v O2)
XP Series Personal Gas Detector
Page 23

18. Accuracy Statement
To achieve optimal accuracy, the detector should be periodically supplied with a known concentration test
gas, and if the readings are outside of 15% of the applied gas concentration, a span calibration should
be performed, under conditions of standard temperature (15°C to 25°C), humidity and pressure.
Poisons should not affect the accuracy of the XP but certain compounds can block the gas access port
of the sensor, such as silicone oils, giving a lower than expected reading.
19. Replacing the Battery or Sensor
The XP battery and sensor can be replaced (see Section 20, Warnings). The following items are
needed:
Replacement battery Energizer® CR2 or Sanyo CR2 only (Lumidor P/N: MiniMAX-XP-BATT or
•
Neotronics P/N: 0140-0003)
Replacement sensor filter (Lumidor P/N: MiniMAX-XP-07 or Neotronics P/N: 2566-0249)
•
Crosshead (Phillips) screwdriver
•
Replacement sensor: (See Section 23)
•
Use only the sensor specifically designed for the XP. Otherwise the detector will not detect the target
gas. Full disassembly is not necessary if only the battery needs replacement.
Carry out the following procedure in a safe area:
Turn the detector off.
1.
See illustration on page 24 on how to replace the battery or sensor.
2.
After replacement, switch on the XP and perform a self-test, to ensure that the display and electronics
3.
are operating correctly, and perform a zero calibration. (If the detector does not turn on after battery
replacement, check the polarity is correct, as indicated.)
After replacing the sensor, calibrate the XP.
4.
Note:
Dispose of battery according to local or national regulations.
XP Series Personal Gas Detector
23
Page 24

20. Warnings
Detector Label
Body Seal
Sensor Filter
O-Ring
Plug-in Sensor
Main PCB (only remove if
changing sensor)
Main PCB Screw
Battery - Note polarity
Positive (+) should face the side
of the instrument where the two
buttons are located.
Detector Case - Rear
Detector Case Screws
Detector Case - Front
+
-
The use of any battery other than the ones indicated will void the intrinsic safety approval of the
detector.
Substitution of any components could void the intrinsic safety approval of the detector. Replace batteries
only in a safe area.
Warning:
Remove the battery before removing this insulator. Be sure that the insulator is secured in
place prior to re-installing the battery.
24
XP Series Personal Gas Detector
Page 25

21. Warranty
All products are designed and manufactured to the latest internationally recognized standards by
Honeywell Analytics under a Quality Management system that is certified to ISO 9001:2000.
Device Warranty Terms
XP Series
(Models other than H2S, CO and O2)
XP Series
(H2S, CO and O2 models only)
Service Warranty Terms
Replacement with new product within the
A. Full warranty period as specified in Warranty
first 90 days of the original warranty period.
Repair (or replacement with new or
B.
reconditioned product at HA discretion)
after the first 90 days of the original warranty
period.
Components replaced under original
product warranty.
Repair or Replacement outside of original
warranty period.
12 months from date of switch on / installation
provided this takes place prior to the ‘Activate
Before’ / install by date. Pro rata after ‘Activate
Before’ / install by date.
24 months from date of switch on / installation
provided this takes place prior to the ‘Activate
Before’ / install by date. Pro rata after ‘Activate
Before’ / install by date.
Terms above.
Pro-rata warranty realized as balance of
original warranty specified in Warranty Terms
above, or equivalent discounted price on a new,
fully warranted instrument or component.
Warranted against same fault for 3 months
from date of repair
XP Series Personal Gas Detector
25
Page 26

Warranty Conditions
The HA Limited Product Warranty only extends to the sale of new and unused products to the original buyer where
1.
purchased from a HA authorized distributor or service center.
Not covered are:
2.
consumable items such as dry-cell batteries, lters and fuses or routine replacement parts due to the normal wear
•
and tear of the product;
any product which in HA’s opinion has been altered, neglected, misused or damaged by accident or abnormal
•
conditions of operation, handling, use or severe sensor poisoning; or failure to maintain and calibrate the product
as prescribed in the product documentation;
defects attributable to improper installation, repair by an unauthorized person or the use of unauthorized accessories/
•
parts on the product;
Any claim under the HA Product warranty must be made within the warranty period and as soon as reasonably possible
3.
after a defect is discovered.
If a warranty claim is being sought it is the responsibility of the buyer to return the product to the distributor or HA
4.
authorized service center along with a full description of the fault. If no description of the fault is provided, HA reserves
the right to charge an investigation fee.
A warranty claim will only be accepted if a proof of purchase is submitted and all conditions contained within this Warranty
5.
are met. When, in the opinion of HA, a warranty claim is valid, HA will repair or replace the defective product according
to the terms herein. Where repair or replacement provides signicant upgrade, enhancement or modication of the
instrument, HA reserve the right to charge a reasonable fee in respect of such.
In the course of the investigation it may be determined that recalibration of the instrument is required. In such cases,
6.
calibration charges may apply.
Please note that if, in the opinion of HA the warranty claim is not valid, HA reserves the right to charge for an investigation,
7.
any repair work carried out and for any attendance by its service engineer at the usual rates in force at the time the
claim was received.
In no event shall HA’s liability exceed the original purchase price paid by the buyer for the product.
8.
After the effective date, this warranty supersedes all existing warranty statements and HA makes no other warranty
9.
expressed or implied except as stated above.
26
XP Series Personal Gas Detector
Page 27

22. Other Gases
Default Alarm Set Points
Gas Type Range Level 1 Alarm Level 2 Alarm STEL Alarm TWA Alarm
SO2150 ppm 2 ppm 5 ppm 5 ppm 2 ppm
Cl
50 ppm 0.5 ppm 1 ppm 1 ppm 0.5 ppm
2
HCN 100 ppm 5 ppm 10 ppm 10 ppm 5 ppm
NO2150 ppm 3 ppm 5 ppm 5 ppm 3 ppm
H
999 ppm 100 ppm 500 ppm N/A N/A
2
NH3100 ppm 25 ppm 50 ppm 35 ppm 25 ppm
Calibration Gas Concentration
Toxic Gas
SO
2
Cl
2
Recommend
Calibration Gas
Concentration
10 ppm in air or N
HCN 10 ppm in N
NO
NH
2
H
2
3
10 ppm in air 5~20 ppm 6 months
200 ppm in air or N
25 ppm in air or N
XP Series Personal Gas Detector
5 ppm in N
Calibration Gas
Concentration
Range
2
2
2
2
2
2~20 ppm 6 months
1~20 ppm 6 months
5~20 ppm 6 months
100~200 ppm 6 months
25~100 ppm 6 months
Calibration
Frequency
27
Page 28

23. Replacement Parts
Lumidor
Part Number
XP-LBL-O2 2566-0251 Replacement O2 label
XP-LBL-CO 2566-0252 Replacement CO label
XP-LBL-H2S 2566-0253 Replacement H2S label
XP-LBL-CL2 2566-0254 Replacement Cl2 label
XP-LBL-SO2 2566-0255 Replacement SO2 label
XP-LBL-NO2 2566-0256 Replacement NO2 label
XP-LBL-HCN 2566-0258 Replacement HCN label
XP-LBL-NH3 2566-0257 Replacement NH3 label
XP-LBL-H2 2566-0259 Replacement H2 label
MiniMAX-XP-07 2566-0249 Replacement XP Sensor Filter
MiniMAX-XP-BATT 0140-0003 Replacement Energizer® CR2 or Sanyo CR2 Battery
HOR132 2566-0260 Replacement XP Sensor O-Ring
HOR133 2566-0261 Replacement XP Body Seal
Energizer® is a trademark of the Eveready Battery Company, Inc.
Neotronics
Part Number
Item
28
XP Series Personal Gas Detector
Page 29

Replacement Sensors
Sensor
O2 EGS265
CO EGS267
H2S EGS268
Cl2 EGS254 2566-0243
SO2 EGS244 2566-0244
NO2 EGS255 2566-0245
NH3 EGS257 2566-0246
HCN EGS246-K 2566-0247
H2 EGS272 2566-0248
24. Calibration Accessories
Item
Spare Test Adaptor MiniMAX-XT-01 2566-0121
Tubing 402-190-120
Regulator N600-1002-10
XP Series Personal Gas Detector
Lumidor
Part Number
Lumidor
Part Number
Neotronics
Part Number
2566-0240
2566-0241
2566-0242
Neotronics
Part Number
29
Page 30

30
XP Series Personal Gas Detector
Page 31

XP Series Personal Gas Detector
31
Page 32

Find out more
www.honeywellanalytics.com
Customer business center
Americas
Honeywell Analytics
400 Sawgrass Corporate Pkwy
Suite 100
Sunrise, FL 33325
Tel: +1 954 514 2700
Toll free: +1 800 538 0363
Fax: +1 954 514 2784
sales@zelana.com
Customer business centre
Europe and the rest of the world
Honeywell Analytics
Wilstrasse 11-U11
CH-8610 Uster
Switzerland
Tel: +41 (0)1 943 4300
Fax: +41 (0)1 943 4398
sales@zelana.co.uk
www.honeywell.com
Customer business center
Canada
Honeywell Analytics - Vulcain
4004 Matte Boulevard
Unit G
Brossard, QC J4Y 2P4
Toll free: +1 800 563 2967
Fax: +1 888 967 9938
sales@vulcaininc.com
Issue 2
H_MAN-XPSeries_V2
December 2006
© 2006 Honeywell Analytics
 Loading...