

Honeywell HX3 User Manual

HX3
Wearable Computer
Microsoft® Windows® CE 5 Operating System
Battery Charger User's Guide

Disclaimer
Honeywell International Inc. (“HII”) reserves the right to make changes in specifications and other information contained in this
document without prior notice, and the reader should in all cases consult HII to determine whether any such changes have
been made. The information in this publication does not represent a commitment on the part of HII.
HII shall not be liable for technical or editorial errors or omissions contained herein; nor for incidental or consequential damages
resulting from the furnishing, performance, or use of this material.
This document contains proprietary information that is protected by copyright. All rights are reserved. No part of this document
may be photocopied, reproduced, or translated into another language without the prior written consent of HII.
© 2007-2012 Honeywell International Inc. All rights reserved.
Web Address: www.honeywellaidc.com
Microsoft®Windows, ActiveSync®, MSN, Outlook®, Windows Mobile®, the Windows logo, and Windows Media are
registered trademarks or trademarks of Microsoft Corporation.
Intel®and Intel XScale®are trademarks or registered trademarks of Intel Corporation or its subsidiaries in the United States
and other countries.
Summit Data Communications, the Laird Technologies Logo, the Summit logo, and "Connected. No Matter What" are
trademarks of Laird Technologies, Inc.
The Bluetooth®word mark and logos are owned by the Bluetooth SIG, Inc.
Symbol®is a registered trademark of Symbol Technologies. MOTOROLA, MOTO, MOTOROLA SOLUTIONS and the
Stylized M Logo are trademarks or registered trademarks of Motorola Trademark Holdings, LLC and are used under license.
Wavelink®, the Wavelink logo and tagline, Wavelink Studio™, Avalanche Management Console™, Mobile Manager™, and
Mobile Manager Enterprise™ are trademarks of Wavelink Corporation, Kirkland.
Acrobat®Reader © 2012with express permission from Adobe Systems Incorporated.
Other product names or marks mentioned in this document may be trademarks or registered trademarks of other companies
and are the property of their respective owners.
Patents
For patent information, please refer to www.honeywellaidc.com/patents.
Limited Warranty
Refer to www.honeywellaidc.com/warranty_information for your product’s warranty information.

Table of Contents
Chapter 1: Introduction 1-1
About this Guide 1-1
Setup Overview 1-1
Cautions and Warnings 1-2
Battery Charger 1-2
Lithium-Ion Battery Pack 1-2
Components 1-3
Battery Charger 1-3
Battery Charging Pocket 1-4
Installation 1-5
Assemble the Power Supply 1-5
Setup 1-6
Charging Batteries 1-7
Inserting a Battery into the Charging Pocket 1-8
Remove the Battery from the Charging Pocket 1-8
Interpreting the Charging Pocket LEDs 1-9
RED Continuous - on any charge pocket 1-9
RED FLASHING - on any charge pocket 1-9
RED FLASHING - on all charge pockets 1-9
GREEN - on any charge pocket 1-9
YELLOW - on any charge pocket 1-9
NO LIGHT - on any charge pocket 1-9
NO LIGHT - on all charge pockets 1-9
Using the Charge/Analyze Pocket 1-10
Begin Analyzing 1-11
Battery Charger Help 1-12
Charger Cleaning, Storage and Service 1-14
Cleaning 1-14
Storage 1-14
Service 1-14
Battery Cleaning, Storage and Service 1-15
Cleaning 1-15
Storage 1-15
Service 1-15
Technical Specifications 1-16
Electrical 1-16
Temperature 1-16
i

Dimensions 1-16
Chapter 2: Set up a Battery Maintenance Routine 2-1
Introduction 2-1
Extending Battery Life 2-1
Self-Discharge 2-1
Peripheral Devices 2-2
Maintenance Routine 2-3
Label the Batteries 2-3
A Simple Battery Usage Routine 2-4
Sample Log for Battery Maintenance 2-5
Chapter 3: Technical Assistance 3-1
ii

Chapter 1: Introduction
The HX3Battery Charger is designed to simultaneously charge six rechargeable Lithium Ion (Li-Ion) battery packs. The time
required for charging is dependent upon the battery pack temperature and conditions.
The battery charger should be located in an area where it:
l Is well ventilated.
l Is not in high traffic areas.
l Locates or orients the AC cord so that it will not be stepped on, tripped over or subjected to damage or stress.
l Has enough clearance to allow easy access to the power port on the back of the device.
l Is protected from rain, dust, direct sunlight or inclement weather.
This device is intended for indoor use only and requires an indoor AC power source. The charger is not approved for use in
Hazardous Locations.
This device cannot charge/recharge coin cell batteries sealed inside the mobile device, if any.
About this Guide
This HX3 Battery Charger User's Guide is intended to familiarize the user with the safety and operating instructions necessary
to use theHX3 Battery Charger (Model HX2A310CHGR6US, HX2A311CHGR6WW) to charge rechargeable lithium-ion
battery packs (HX2A301BATTSTD, HX2A302BATTEXT) .
This guide should be readily available to all users and maintenance personnel using this battery charger.
Setup Overview
The following instructions are abbreviated and intended to give an overview of the process to be followed.
1. Assemble the power supply.
2. Connect the power supply to the charger.
3. Insert a battery into a charging bay.
4. When the battery is charging, the setup process is complete.
Note: Store the charger and batteries when not in use in a cool, dry, protected place.
Note: Batteries used by the HX3 body worn Voice device are charged, recharged and analyzed using the HX2 labeled
battery charger.
Please refer to the HX3 User's Guide for instruction when connecting and removing batteries.
1-1

Cautions and Warnings
Battery Charger
l There is a risk of explosion if the HX3 Li-Ion battery in the charging pocket is replaced by an incorrect type. Other
batteries or battery packs may burst causing injury or property damage.
l Do not insert any other type of Li-Ion battery in the HX3 battery charging pocket.
l Do not allow cleaning agents of any kind to contact the battery charging contacts; they may be damaged. If necessary,
clean them with a soft-bristle, dry brush or compressed air.
l Disconnect the charger from AC power by pulling the plug; not the cord.
l Use care when inserting battery. Do not "slam" or slide the battery into the pocket, this could damage the charger.
l Keep dirt and foreign objects out of the battery pocket. Do not short circuit any of the contacts in the battery pocket, this
could result in injury or property damage.
l Do not disassemble or perform modifications to the charger. There are no user serviceable components in the charger.
Lithium-Ion Battery Pack
l Dispose of used Li-Ion batteries according to the instructions for the type of battery.
l When not in use, lay the battery pack contact-side up in a protected environment.
l Do not store the Li-Ion battery pack in direct sunlight or anywhere the battery pack cannot cool down.
l If the Li-Ion battery pack is hot after removal from the HX3, allow it to cool at room temperature or in a cool air stream
before placing it in the charger.
l Do not dispose of Li-Ion batteries into a fire. Burning will generate hazardous vapors and may cause the battery to
explode. Failure to observe this warning may result in injury from inhalation of vapors or burns from flying debris.
l Do not immerse Li-Ion batteries in water or any other liquid. If batteries are immersed, contact Honeywell.
l Do not disassemble or perform modifications to the battery. There are no user serviceable components in the battery.
l Do not place the Li-Ion battery into a pocket or toolbox with conductive objects (coins, keys, tools, etc.). A Li-Ion battery
placed on damp ground or grass could be electrically shorted.
l Do not store Li-Ion batteries above 140°F (60°C) for extended periods.
l Failure to observe these warnings could result in injury or damage to the battery from rapid discharge of energy or
battery overheating.
l Electrolyte Burns.Be careful when handling batteries. If a battery is broken or shows signs of leakage do not attempt to
charge it. Dispose of it! Lead and Nickel-based cells contain a chemical solution that burns skin, eyes, etc. Leakage
from cells is the only possible way for such exposure to occur. In this event, rinse the affected area thoroughly with
water. If the solution contacts the eyes, get immediate medical attention.
l Electrical Burns. Batteries are capable of delivering high currents when accidentally shorted. Accidental shorting can
occur when contact is made with jewelry, metal surfaces, conductive tools, etc., making the objects very hot. Never
place a charged battery in a pocket or case with keys, coins, or other metal objects.
1-2
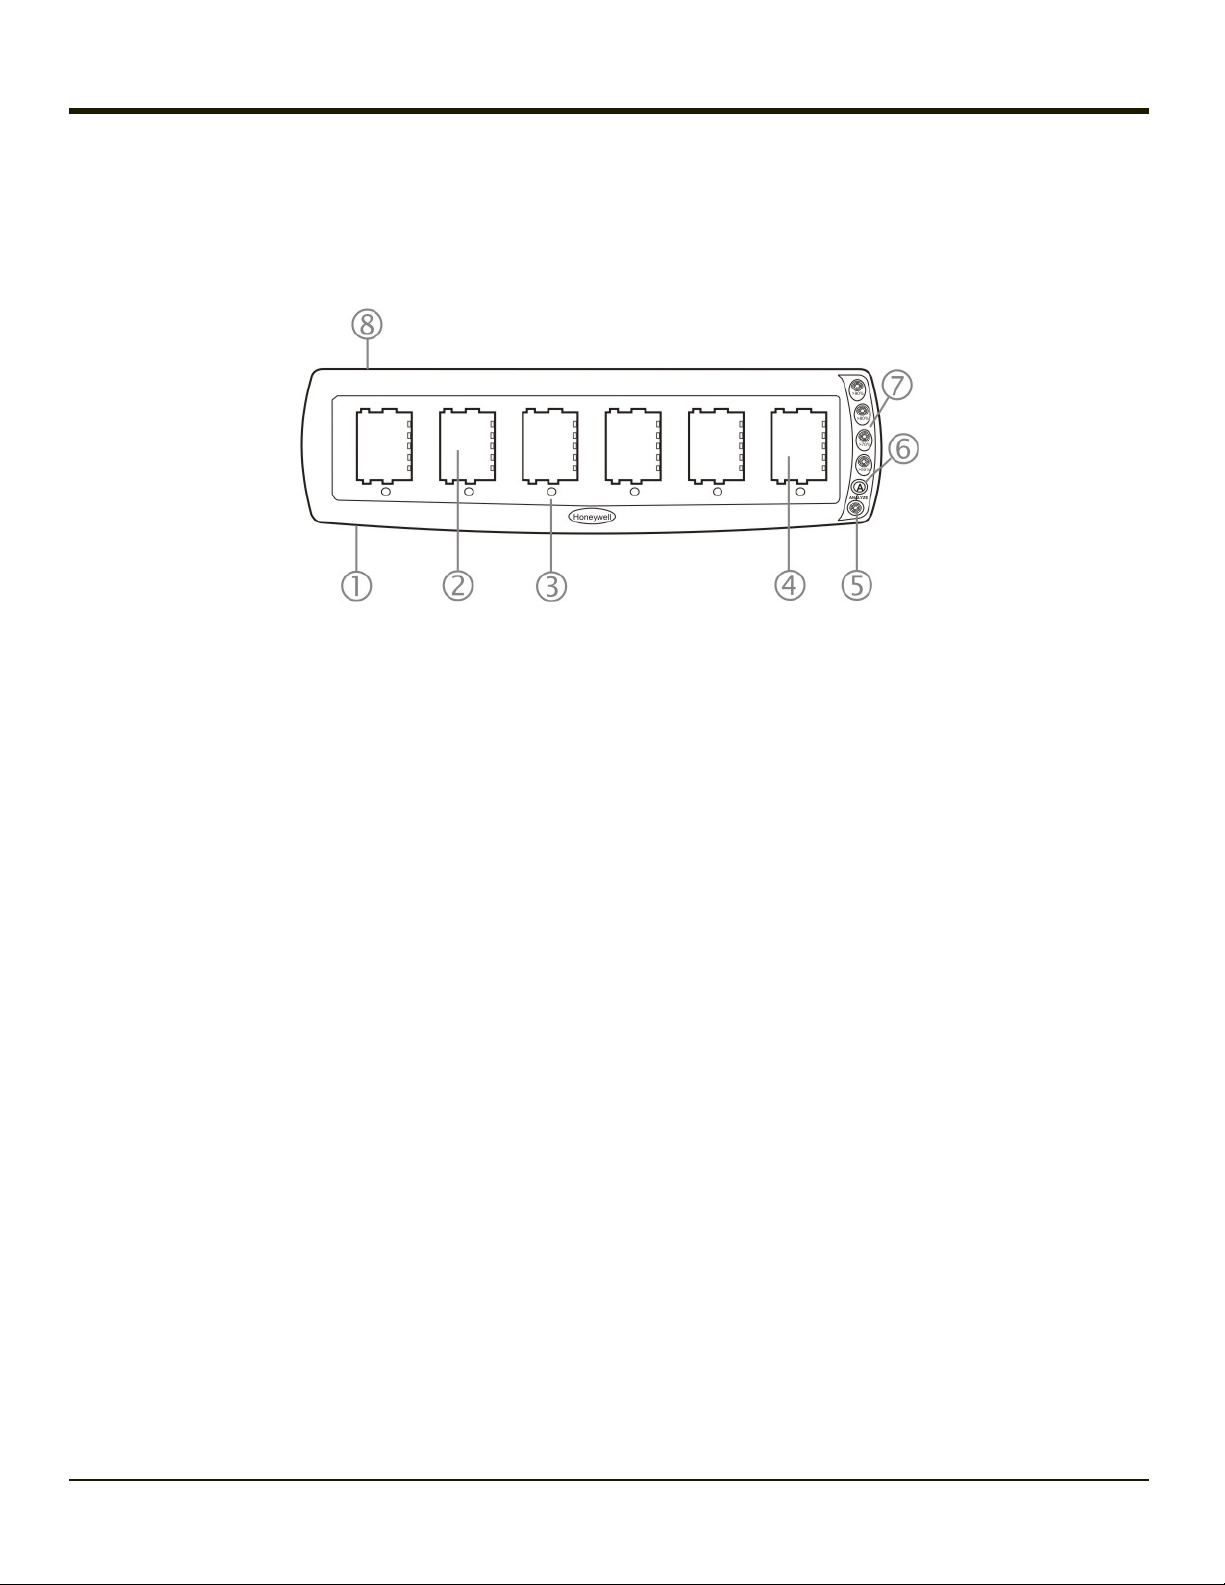
Components
Battery Charger
1. Front
2. Battery Charging Pocket
3. Battery Charge LED Indicator
4. Analyze Pocket
5. Analyze LED
6. Analyze Dome Switch
7. Analyze Progress LEDs
8. AC/DC Power Connector
1-3

Battery Charging Pocket
1. Battery Charging Pocket
2. Alignment Ribs
3. Battery Charging Contacts
4. Battery Charge Progress LED
Note: Batteries used by the HX3 body worn Voice device are charged, recharged and analyzed using the HX2 labeled
battery charger.
1-4
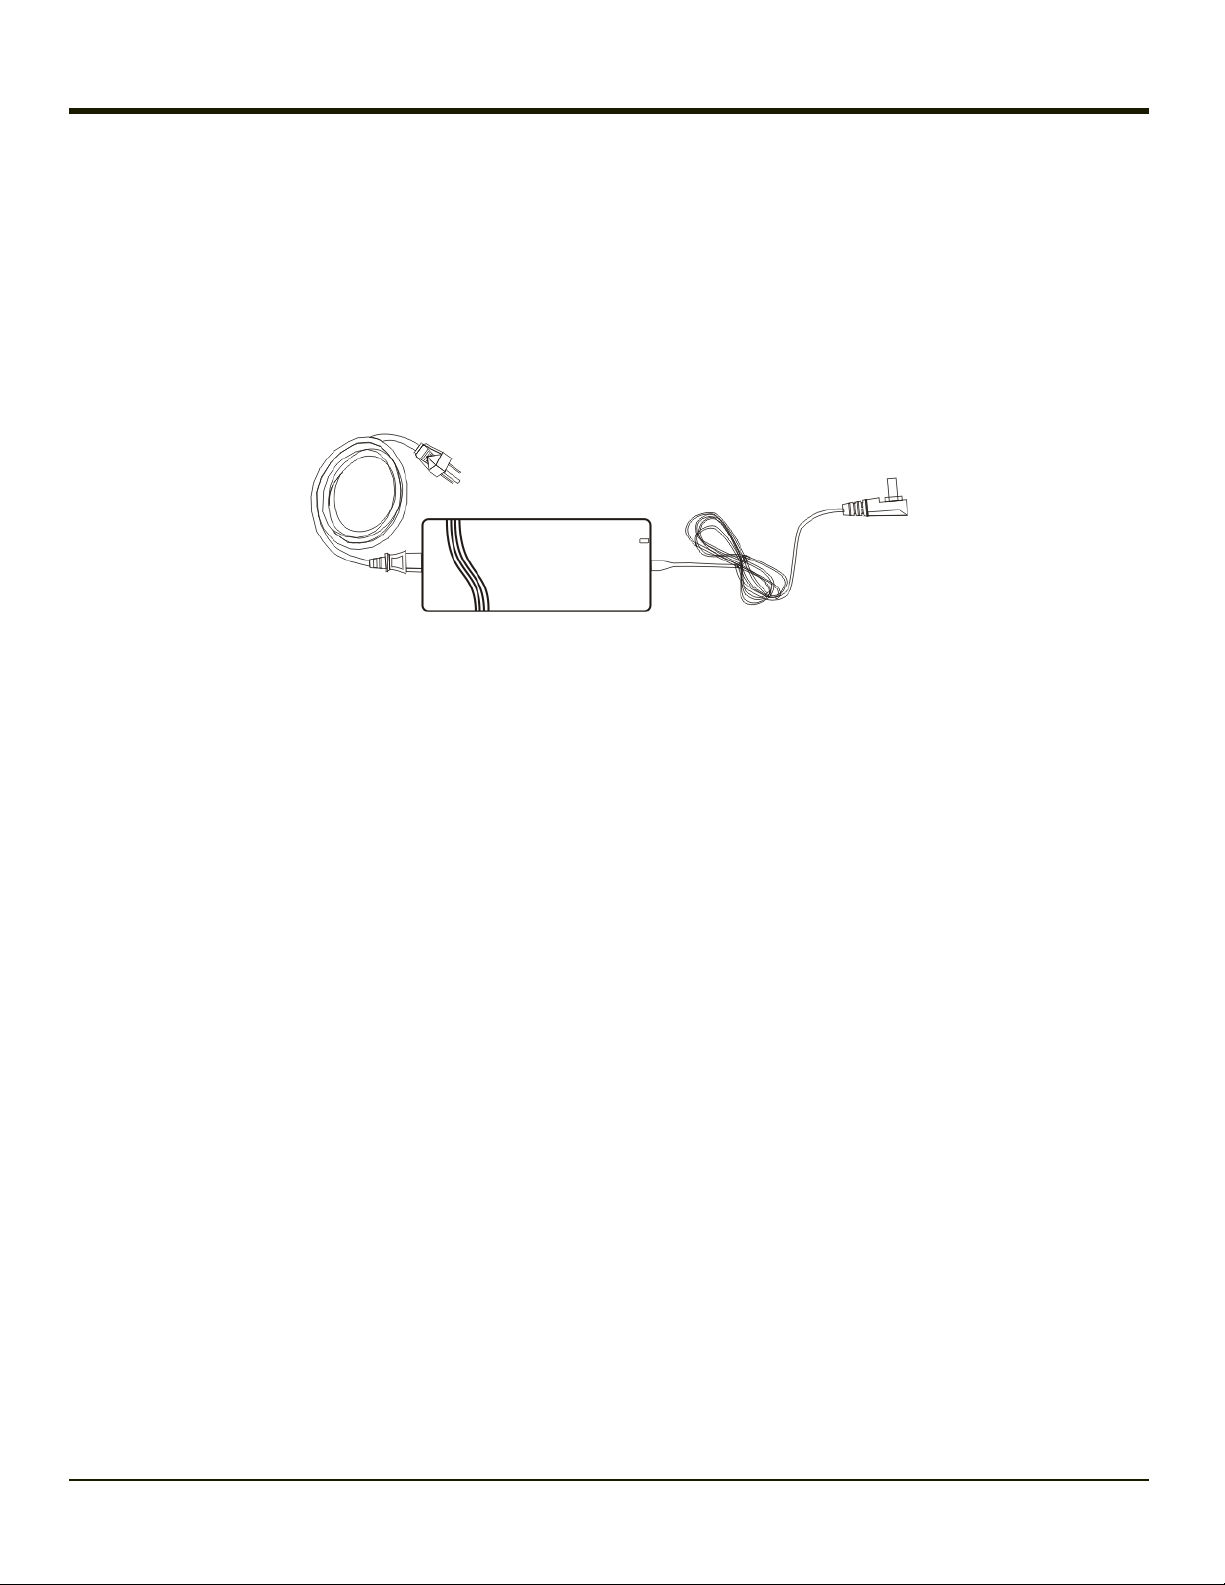
Installation
Assemble the Power Supply
Assemble the AC adapter for the HX3 Battery Charger before connecting it to the charger.
The AC power supply for the battery charger is shipped with the battery charger. Contact Technical Assistance if there is no
AC cable.
The battery charger power supply is intended for use with the HX3 battery charger only.
l Plug the 3-prong end of the cable into an AC wall outlet.
l Firmly press the female end of the power cable into the male connector on the AC power adapter. An LED on the power
adapter illuminates when AC power is available.
l AC power is now being applied to the power adapter.
1-5
 Loading...