

Page 1
OWNER’S MANUAL
3 US GALLONS (11.3 LITERS)
OUTPUT PER DAY
WARM MOISTURE HUMIDIFIERS
Models:
HWM-330
HWM-331
HWM-335
The Honeywell trademark is used by Kaz, Inc. under license from Honeywell Intellectual Properties, Inc.
4 US GALLONS (15.1 LITERS)
OUTPUT PER DAY
WARM MOISTURE HUMIDIFIER
Model:
HWM-450
QuickSteam_OM_04-25-06.qxd 4/25/06 4:53 PM Page 1
Page 2

2
When using electrical appliances, basic precautions should always be
followed to reduce the risk of fire, electric shock, and injury to persons,
including the following:
1. Always place this humidifier on a firm, flat and level surface. This humidifier may not work properly
on an uneven surface.
2. Do not place humidifier directly on wood furniture or other surfaces that could be damaged by water.
3. CAUTION: To reduce the risk of severe burns, place this humidifier in an area where it is not
accessible to children.
4. Do not place the humidifier near any heat sources such as stoves, radiators, and heaters.
5. Before using the humidifier, check the power cord for any signs of damage. If the cord is found to be
damaged, DO NOT USE and return the humidifier to the manufacturer under the warranty agreement
for repair.
6. This appliance has a polarized plug (one blade is wider than the other). To reduce the risk of shock,
this plug is intended to fit only one way in a polarized outlet. If the plug does not fit fully in the outlet,
reverse the plug. If it still does not fit, contact a qualified electrician. DO NOT attempt to defeat this
safety feature.
7. To disconnect the humidifier, first turn controls to the OFF position, then grip the plug and pull it from
the wall outlet. Never pull by the cord.
8. A loose fit between the AC outlet (receptacle) and plug may cause overheating and a distortion of the
plug. Contact a qualified electrician to replace loose or worn outlet.
9. The humidifier should always be unplugged and emptied when not in operation or while being
serviced or cleaned.
10. Never tilt or attempt to move the humidifier while it is operating or filled with water. UNPLUG the
humidifier before moving.
11. This humidifier requires regular cleaning. Refer to the CLEANING instructions provided. Never
clean the humidifier in any manner other than as instructed in this manual. You may have to
clean your unit once per week or more depending on the mineral content of your water.
12. Do not immerse the base in water or other liquid. Do not pour water in the humidifier outlet.
13. Do not direct steam directly at individuals, walls or furniture.
14. When a humidifier is used in a closed room or small rooms, check periodically for proper ventilation,
as excessive humidity can cause condensation stains on walls.
15. Do not attempt to remove Medicine Cup, Power Unit, Water Tank, Water Tray or Mineral
Absorption Pad during operation, or within 10-15 minutes after the humidifier has been turned
“off” and unplugged. Serious injury may result. The Water Tray and Mineral Absorption Pad
should only be removed for cleaning and maintenance purposes.
16. DO NOT touch the steam vapor. Steam can cause severe burns.
17. DO NOT block the mist grille. This will damage the humidifier.
IMPORTANT SAFETY
INSTRUCTIONS
READ AND SAVE THESE SAFETY INSTRUCTIONS
BEFORE USING THIS HUMIDIFIER
QuickSteam_OM_04-25-06.qxd 4/25/06 4:53 PM Page 2
Page 3
3
Introduction
HOW DOES IT WORK?
WARM MOISTURE SYSTEM:
Water passes into the unit where it is heated and purified by the QuickSteam
™
heating plate. The unit then
pulls the air through the top vent and spreads invisible, bacteria-free mist into the room.
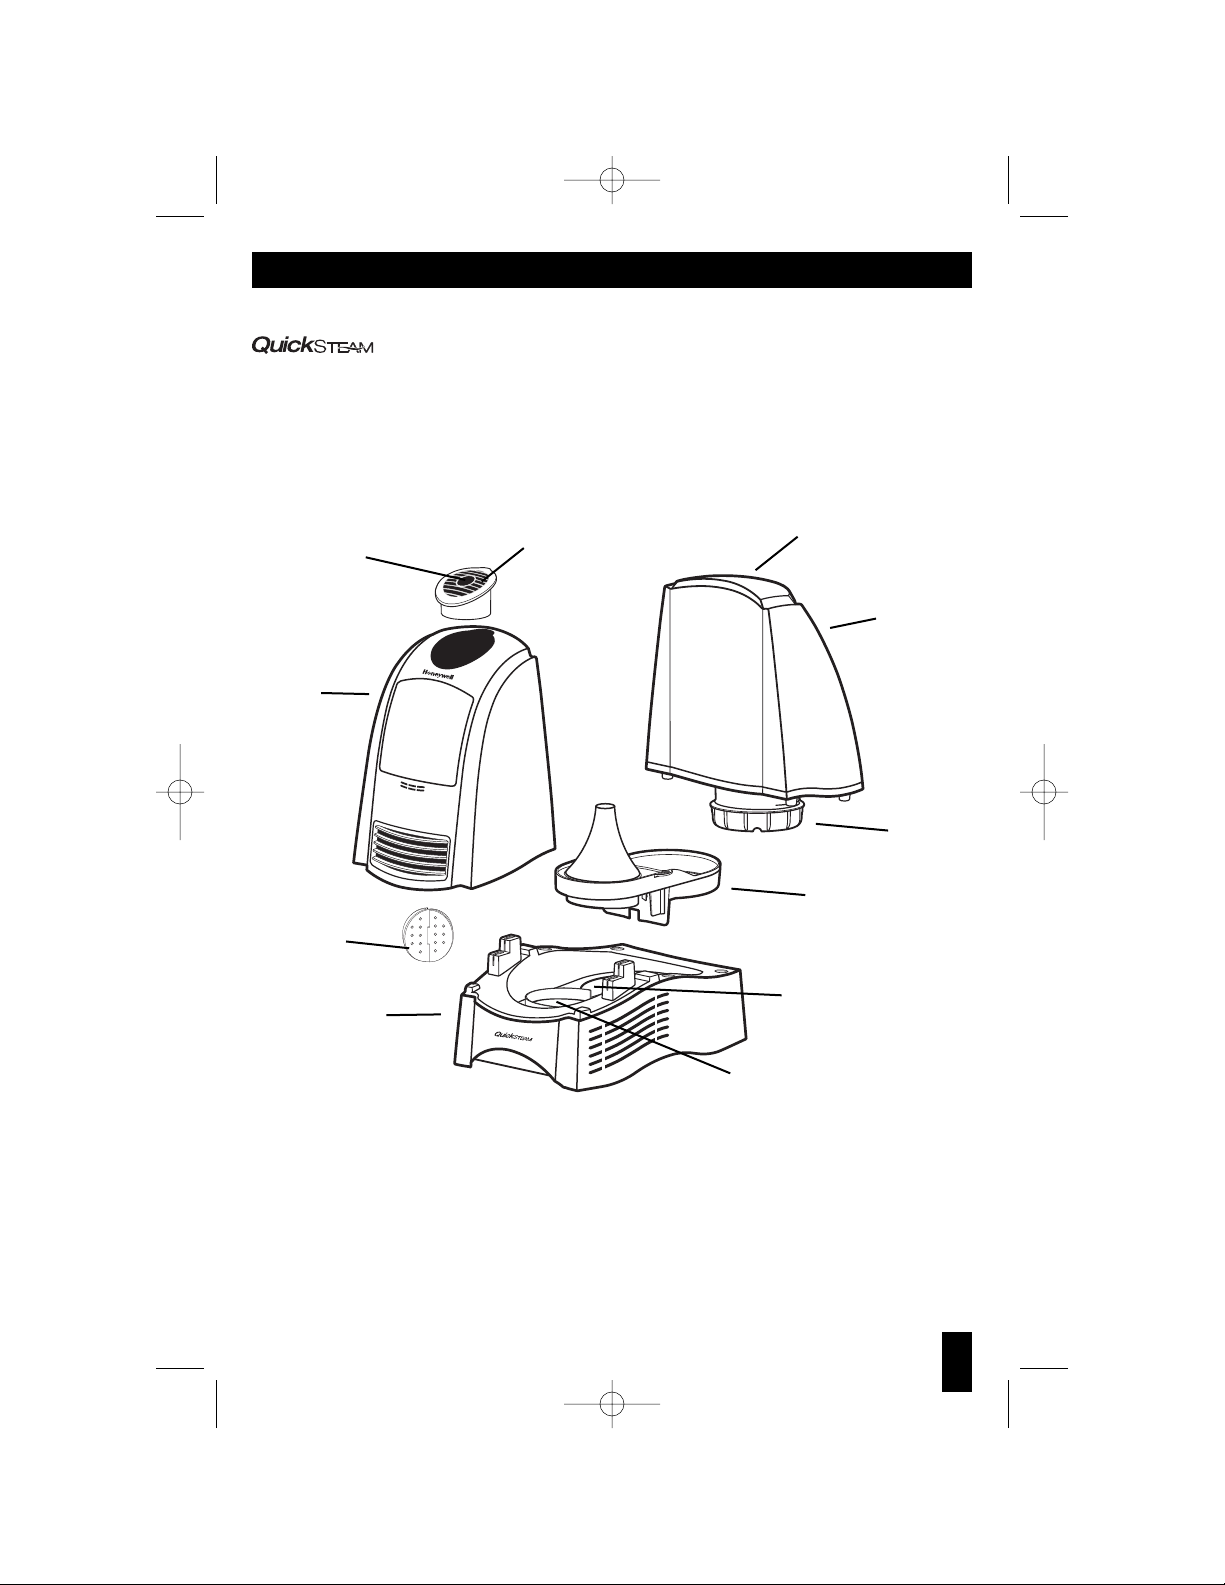
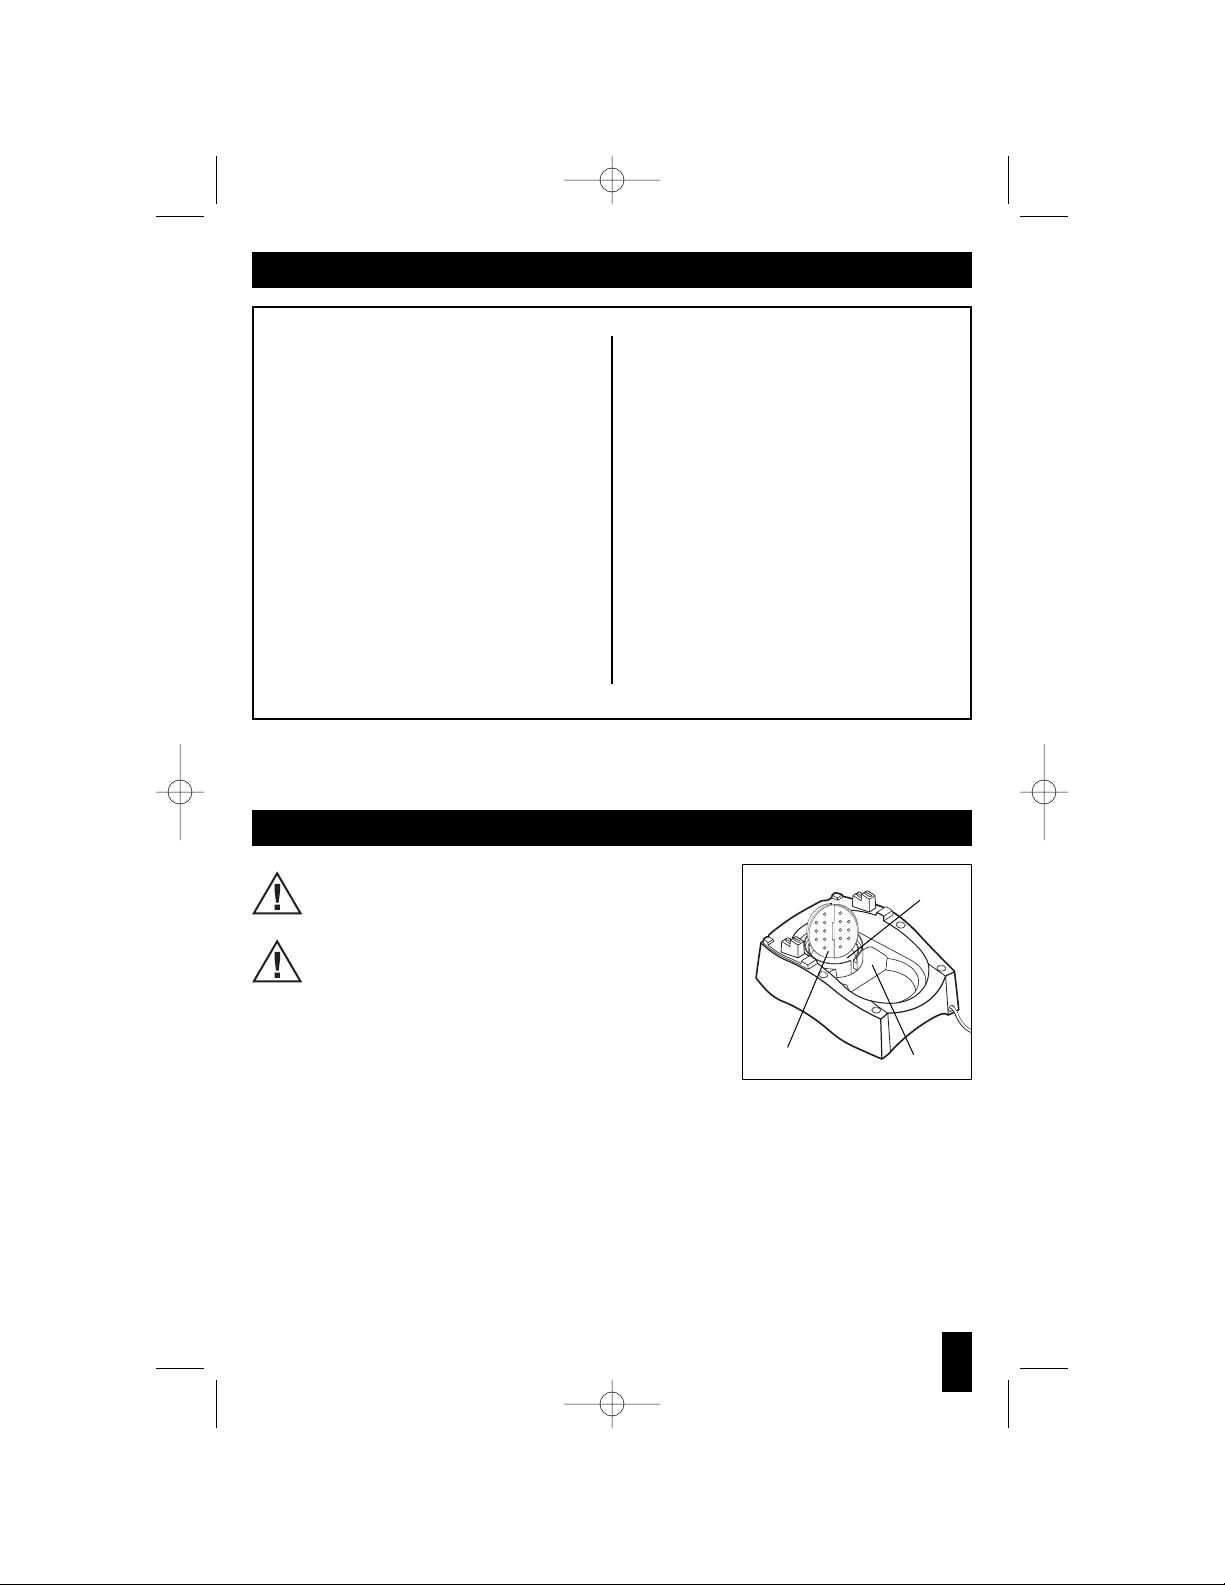
Your humidifier is made up of these parts:
Water Tank
Power
Unit
Base
Medicine Cup
Removable Water Tray
Fill Cap
Tank Handle
Mineral
Absorption
Pad
Heating Plate
Mist Grille
Mineral Reservoir
QuickSteam_OM_04-25-06.qxd 4/25/06 4:53 PM Page 3
Page 4
4
Set-Up
NOTE: We recommend that the humidifier be disinfected prior to
first use. Please see CLEANING INSTRUCTIONS.
Select a firm, level, flat location - at least six inches (15 cm) from
any wall or object for proper air flow (Fig. 1). Place the humidifier
on a water-resistant surface, as water can damage furniture and
some flooring.
Kaz will not accept responsibility for property damage caused by
water spillage.
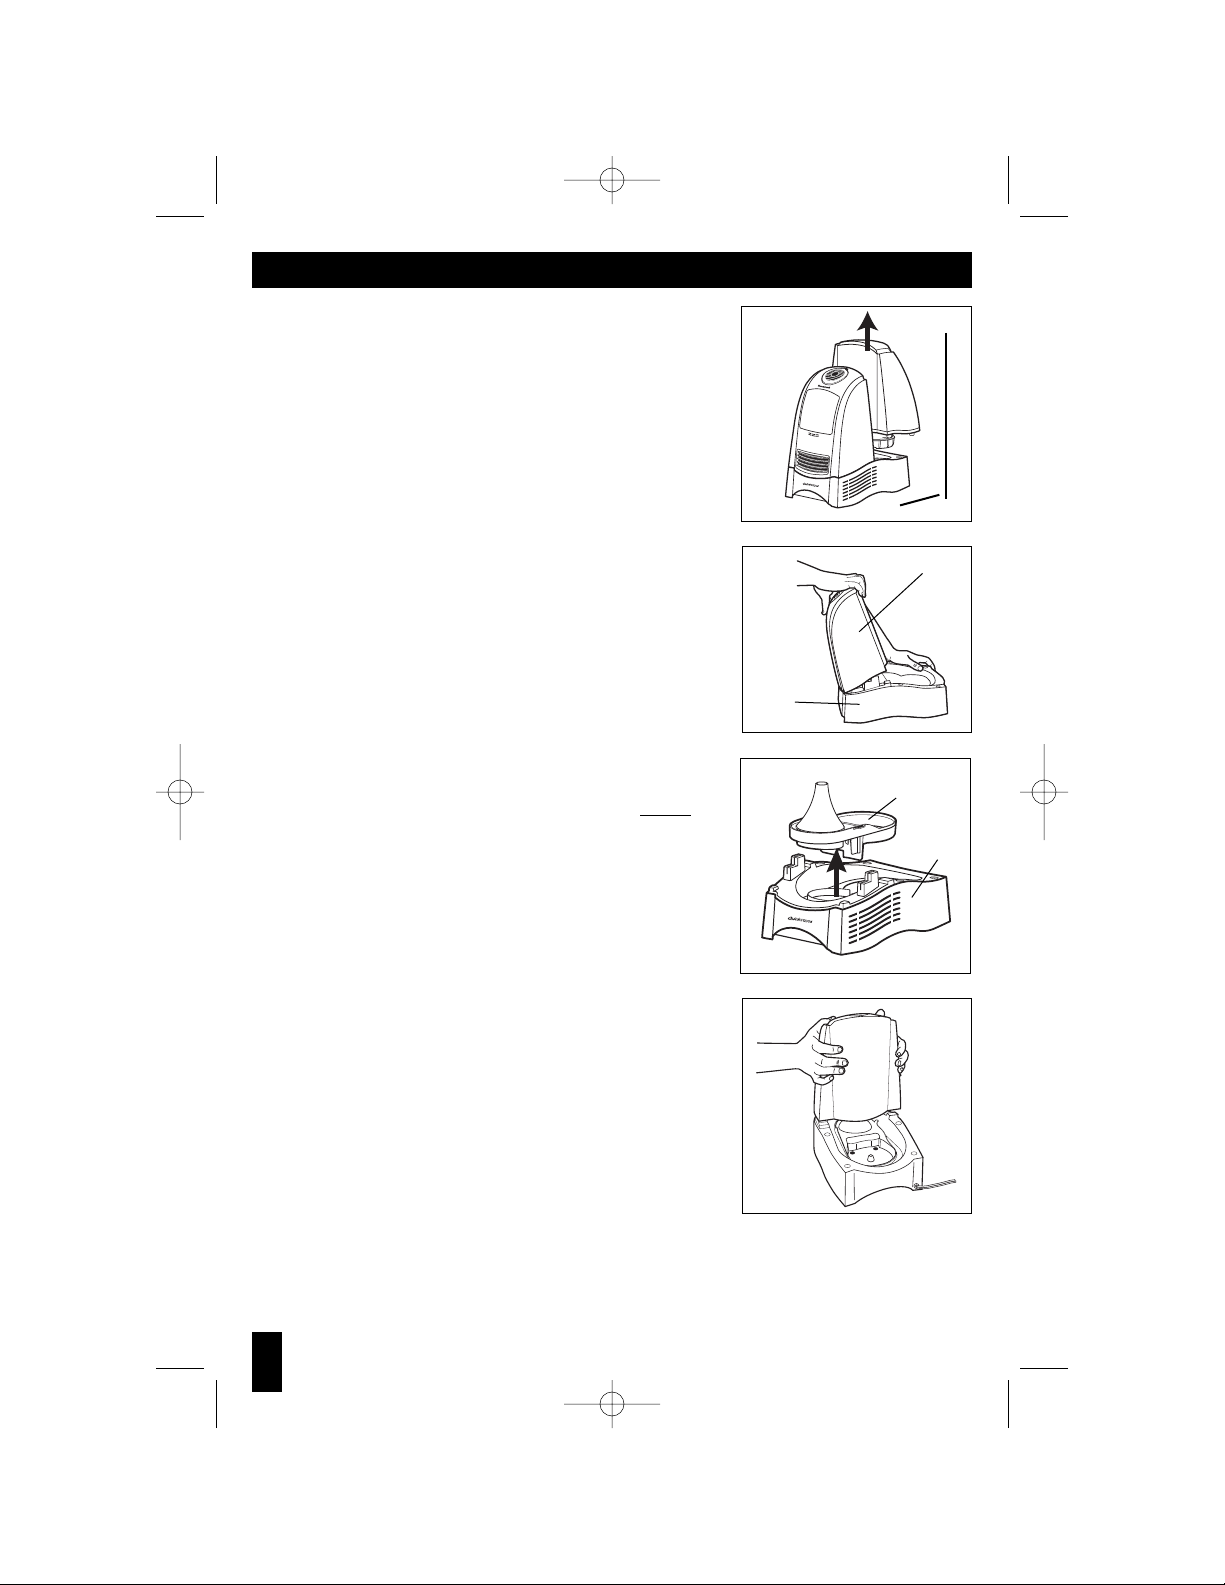
• Remove the Water Tank by grasping handle and pulling straight up
(Fig. 1). Set aside.
• Remove the Power Unit by grasping it and lightly tilting forward
while pulling up. You will feel the unit disengage from its lock
(Fig. 2). Set the Power Unit aside.
• Remove the Water Tray (Fig. 3). Set the Water Tray aside.
• Place one Mineral Absorption Pad flat on the Heating Plate.
See the MINERAL ABSORPTION PAD section (page 5) for
more information.
• Replace the Water Tray.
• Replace the Power Unit, making sure it is installed properly.Align
the back of the Power Unit directly behind the tabs of the Base and
press down firmly. You will hear a slight click. Your Power Unit will
be flush with the Base (Fig. 4).
• Fill the Water Tank with cool tap water (Fig. 5). See the FILLING
section (page 5) for more information.
NOTE: Save your box for end of season storage. (See END OF
SEASON CARE AND STORAGE section.)
Fig. 1
WALL
6"
Fig. 2
Base
Power
Unit
Fig. 3
Removable
Water Tray
Base
Fig. 4
QuickSteam_OM_04-25-06.qxd 4/25/06 4:53 PM Page 4
Page 5
5
Mineral Absorption Pad Instructions
CAUTION: HOT SURFACES MAY CAUSE SEVERE BURNS.
DO NOT TOUCH ANY SURFACES UNTIL THEY HAVE COOLED.
Water contains minerals and other particles. The amount of minerals varies dependent on your local water
supply. It is common for these minerals to stick to your humidifier’s Heating Plate and in turn decrease the
performance of your humidifier. Mineral Absorption Pads trap the minerals and help prevent stubborn
mineral buildup on your Heating Plate.
• Before starting your humidifier, place one Mineral Absorption Pad flat on the Heating Plate. After the
humidifier has been operating, the water and all internal parts will become HOT, and caution should be
exercised when handling the Mineral Absorption Pad. Please allow the humidifier water and all internal
parts to cool down (at least 10-15 minutes). Use tongs or long tweezers when handling the pad to
prevent burns.
• The life of the Mineral Absorption Pad will vary, depending on the mineral content of the water being
used. Using normal/moderate mineral content water the Mineral Absorption Pad should be changed
after approximately 2 weeks of continuous use. Again, the life of the pad will vary dependent on your
usage and mineral content of your water.
• For indications that your Mineral Absorption Pad needs to be changed, examine it AFTER the water has
cooled down to see if it is still soft and pliable. If the pad is stiff and hard you should replace it. Another
sign that indicates your Mineral Absorption Pad must be changed is scale buildup on your heating plate.
Filling
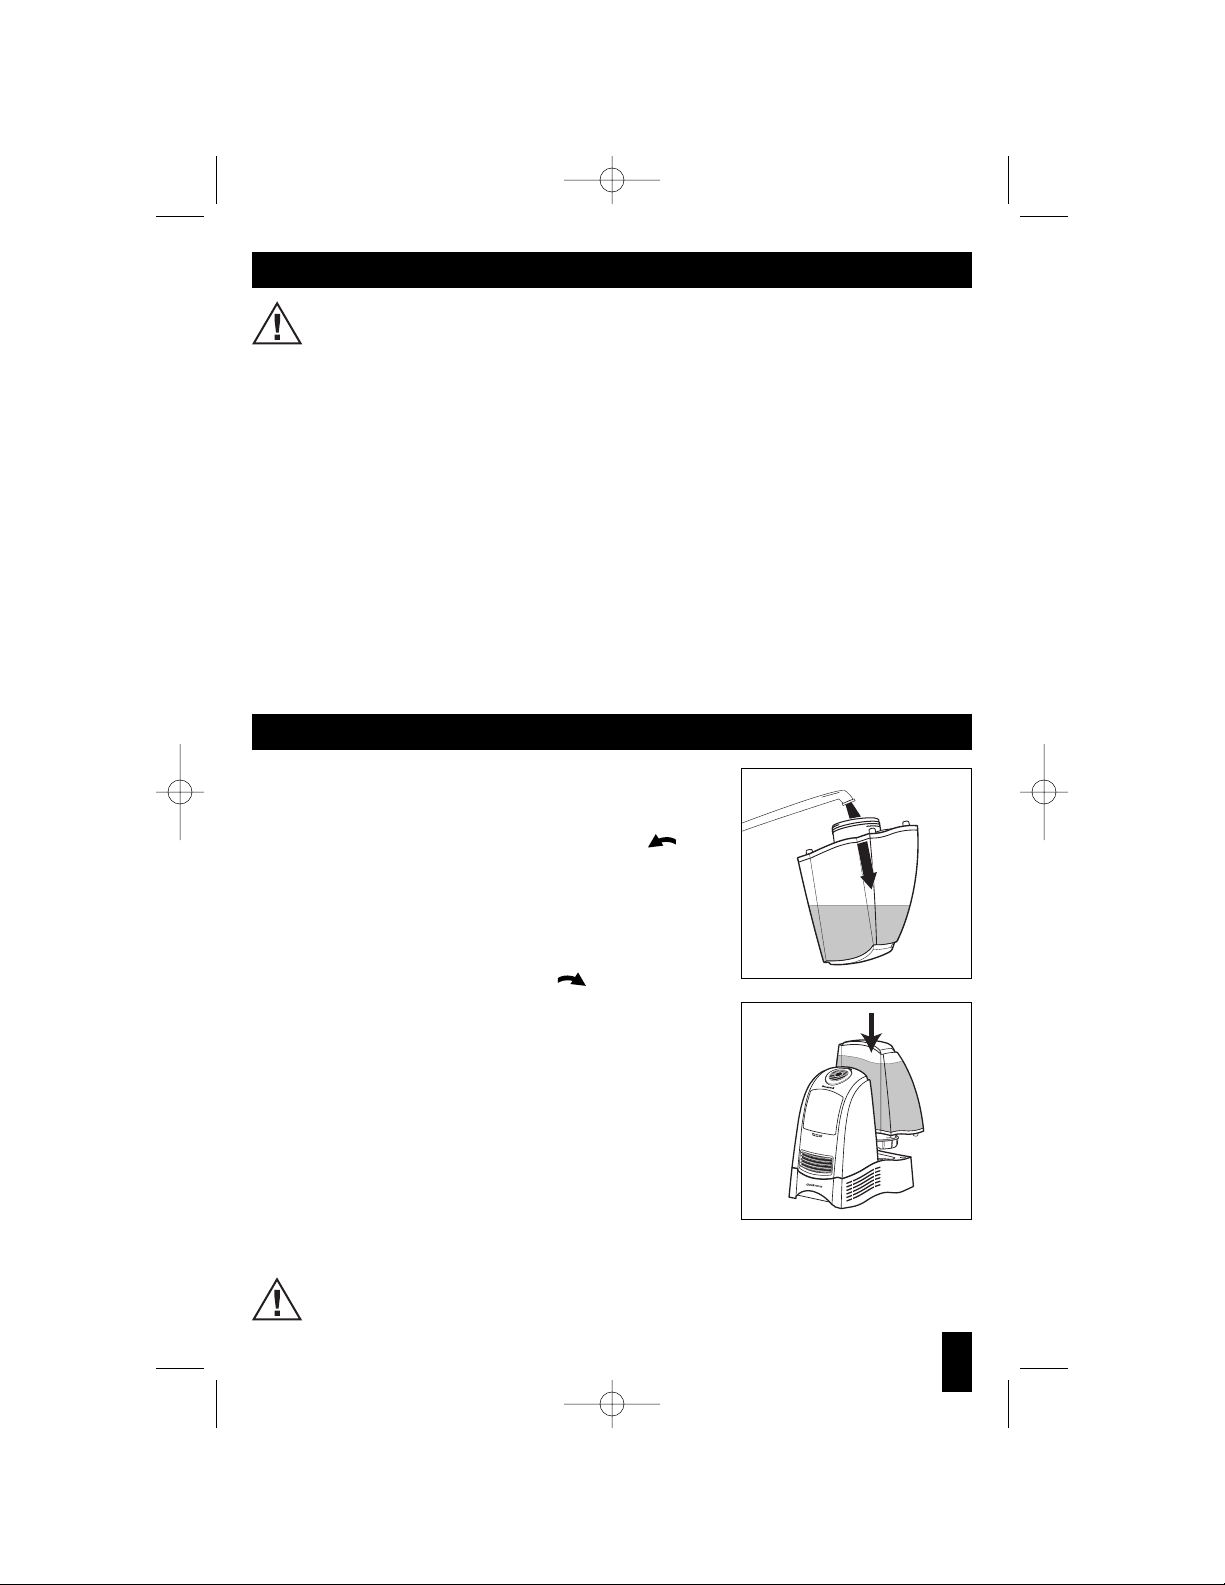
• Remove the Water Tank by grasping handle and pulling straight
up. Set aside (Fig. 1).
• Turn the Water Tank upside down so that the Fill Cap is facing
up; unscrew the Fill Cap by turning it counter-clockwise and
set aside.
• Fill the Water Tank with COOL tap water (Fig. 5). DO NOT USE HOT
WATER. Doing so may damage the humidifier.
• Distilled water is not necessary but should be considered in hard
water areas to prevent mineral build-up.
• Replace the fill cap by turning it clockwise .
DO NOT OVER-TIGHTEN. Turn the Water Tank right-side up.
NOTE: Do not add any medication or other additives to water.
NOTE: When carrying the filled Water Tank, please use the
handle and place your other hand under the tank for additional
support.
• Position the Water Tank in the humidifier and push into place
(Fig. 6).
• Some water will flow into the Removable Tray when the filled
Water Tank is properly in place.
• Once the filled Water Tank has been positioned, do not attempt to
move the humidifier.To avoid leaking, you should never move the
humidifier while filled with water.
CAUTION: Do not pour water into the grille on the top of
the humidifier. Doing so may damage the humidifier or
cause personal injury.
Fig. 5
Fig. 6
QuickSteam_OM_04-25-06.qxd 4/25/06 4:53 PM Page 5
Page 6
6
Manual Control Operation (Models HWM-330 and HWM-331)
POWER
CAUTION: DO NOT PLUG IN THE HUMIDIFIER WITH
WET HANDS AS AN ELECTRICAL SHOCK COULD
OCCUR.
• With the power switch in the OFF position, plug the filled humidifier
into a polarized 120V outlet. DO NOT FORCE THE POLARIZED PLUG
INTO THE OUTLET; it will only fit one way.
OUTPUT / MOISTURE CONTROL
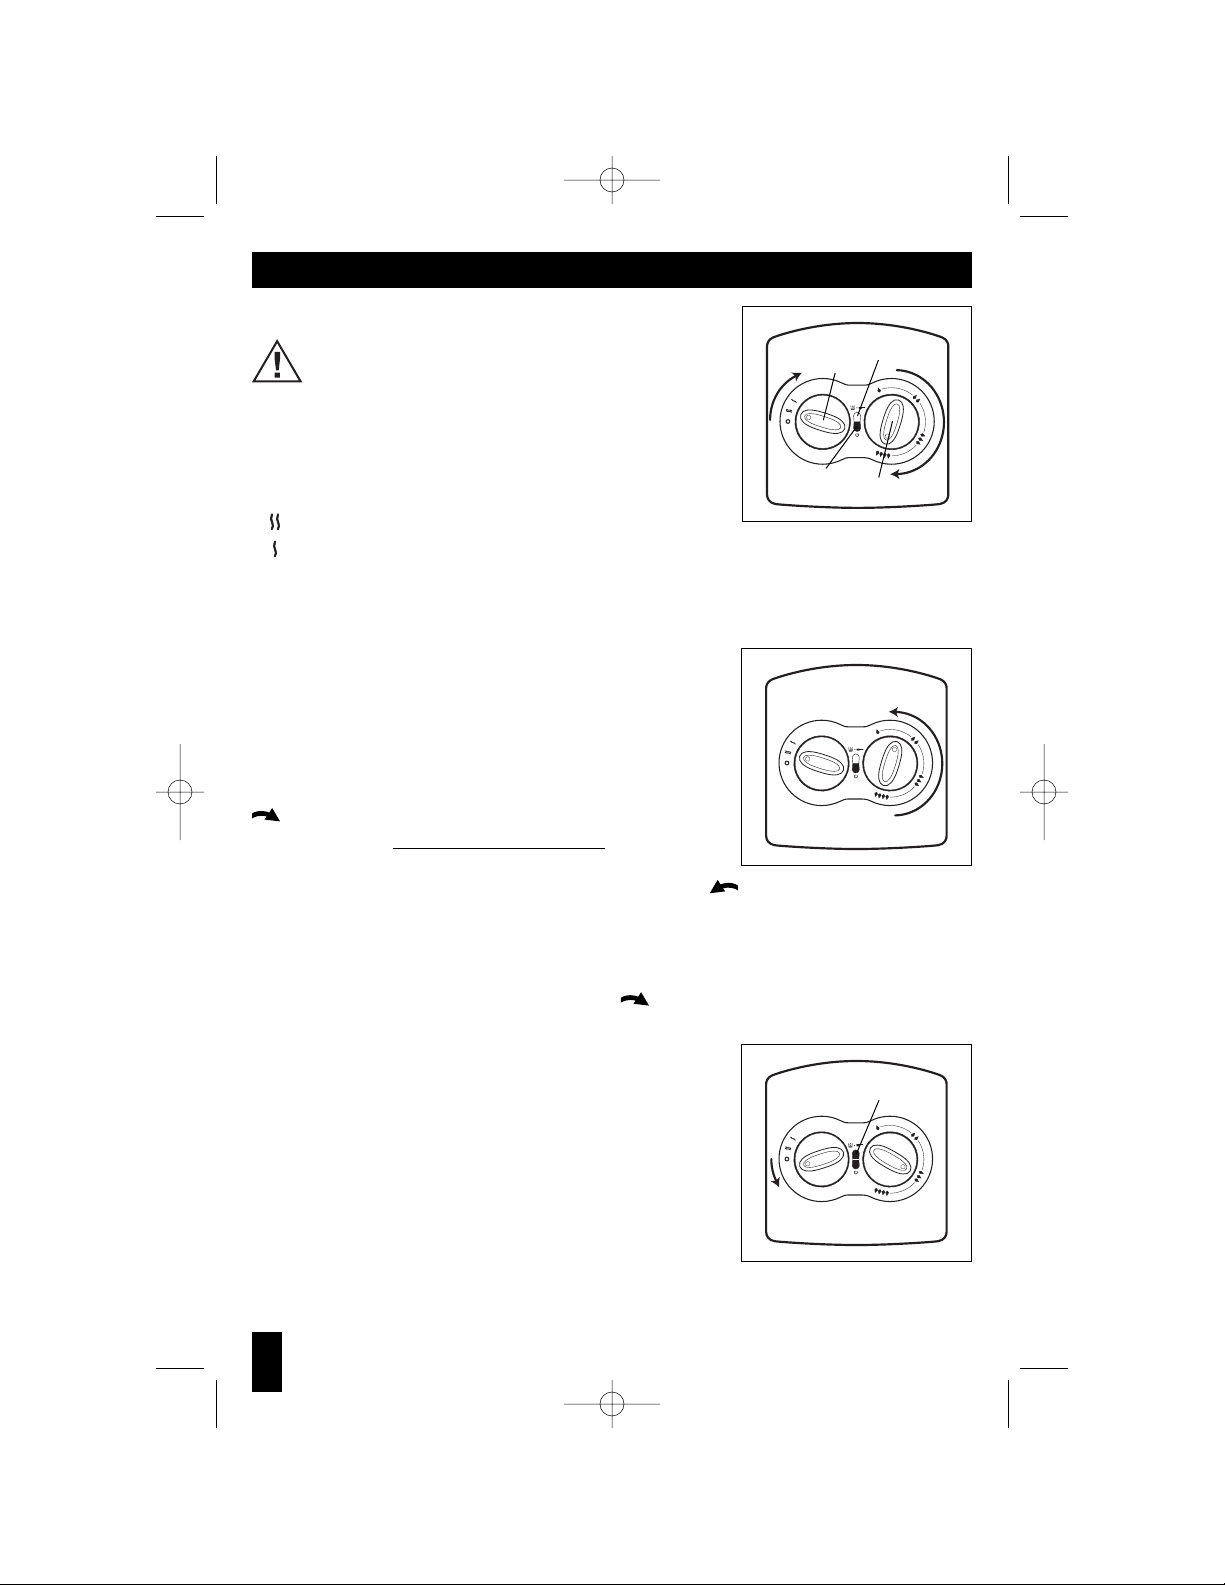
• Set the Moisture Control knob to the desired position (Fig. 7).
HIGH: For fast humidifying
LOW: For everyday moisture control
• Continuous Mode - Your unit will run continuously at your selected output level until you shut it off or it
runs out of water.
ADVANCED MIST™ HUMIDISTAT
The Advanced Mist™Humidistat allows you to adjust and select the
humidity level to your personal preference. Your humidifier will turn on
and off throughout the day and night to maintain the desired humidity
level you have selected.
HOW TO SET THE HUMIDISTAT
First, turn the Humidifier on and select your moisture/output level. Set
the Advanced Mist
™
Humidistat on HIGH by turning the knob clockwise
to the end (Fig. 7).
• Let the humidifier run on high for a least one hour
or until your room
has reached a comfortable humidity level.
• At this point, slowly turn your Humidistat knob counter-clockwise until the humidifier shuts off
(Fig. 8).
• Now that your Humidistat knob is set, the humidifier will automatically turn back on when your room
drops below your comfort setting and will automatically turn off again when the setting is reached.
NOTE: If the humidifier will not start or restart when you select a moisture level, the Advanced Mist
™
Humidistat may be set too low. Turn the dial clockwise to the end (Fig. 7).
REFILL / CLEAN HUMIDIFIER
• When the Refill/Clean indicator light is illuminated it implies your unit
is out of water or you need to clean your humidifier (Fig. 9).
• Check your water level. If your Tank is empty, turn your Power knob
to the OFF position, remove the Tank and refill it as described in the
FILLING section.
• If your water level is full, this implies it’s time to clean your
humidifier. Please turn off and unplug the unit and refer to the
CLEANING section.
NOTE: Your unit’s performance will decrease if you do not clean
your heating plate. Your unit may continuously shut off and output
will decrease.
NOTE: Do not turn on the unit until the tank is refilled and reinstalled.
Refill/
Clean
Fig. 7
Fig. 8
Moisture
Control
Knob
Humidistat
Knob
Power
Light
(Illuminated)
Fig. 9
Refill/Clean Light
(Illuminated)
QuickSteam_OM_04-25-06.qxd 4/25/06 4:53 PM Page 6
Page 7
EasySet™Control Operation (Model HWM-335)
POWER
CAUTION: DO NOT PLUG IN THE HUMIDIFIER WITH
WET HANDS AS AN ELECTRICAL SHOCK COULD
OCCUR.
• With the power OFF, plug the filled humidifier into a polarized 120V
outlet. DO NOT FORCE THE POLARIZED PLUG INTO THE OUTLET; it
will only fit one way.
STEP 1: POWER
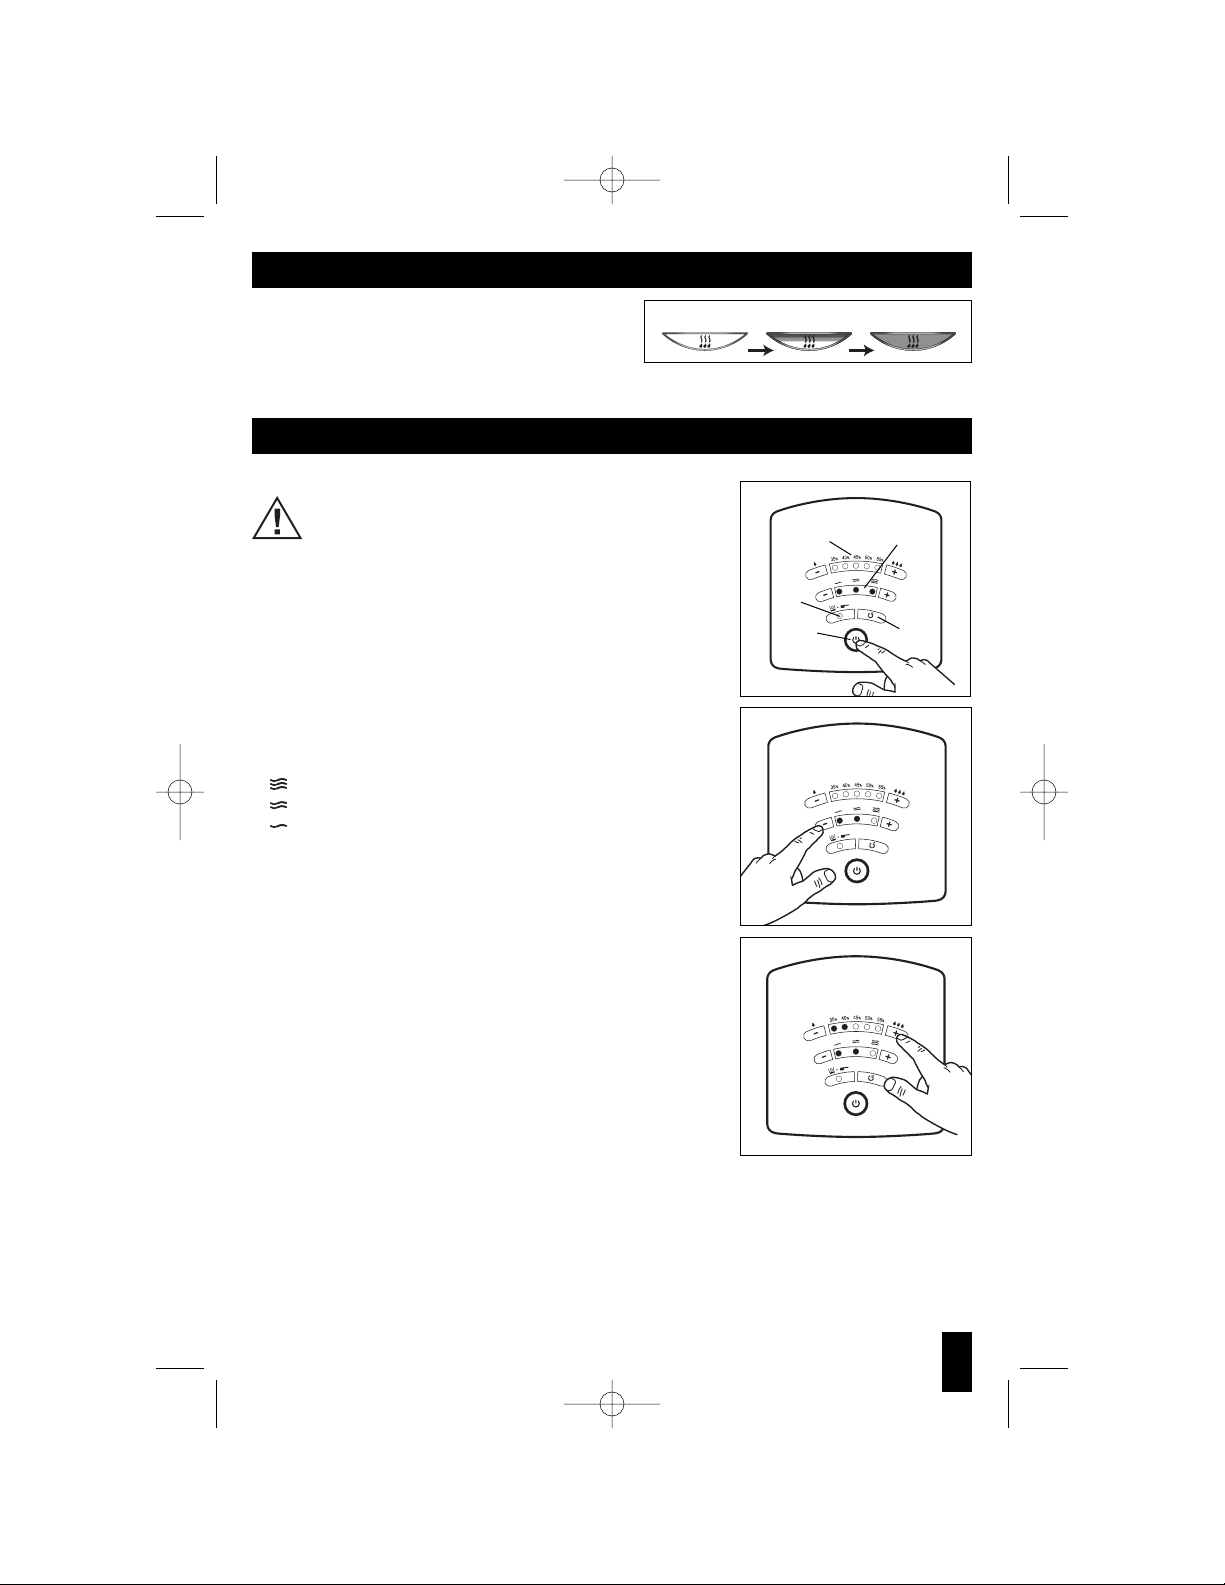
• Press the Power button to start the humidifier. Your humidifier will
automatically start on High power, continuous run (Fig. 11).
• To turn your humidifier OFF simply press the Power button again.
STEP 2: OUTPUT / MOISTURE CONTROL
Your unit has three output/moisture levels:
HIGH: For fast humidifying
MED: For everyday moisture control
LOW: For minimum operation (ideal for nighttime use)
• Push the Up button (+) to increase output level and push the Down
button (-) to decrease output level. The LED's will illuminate to
reflect which level you have selected (Fig. 12).
• Continuous Mode: Your unit will run continuously at your selected
output level until you shut it off or it runs out of water.
STEP 3: SET HUMIDITY
• Set your desired humidity anywhere between 35% and 55%.
• Push the Up button (+) to increase desired humidity and push the
Down button (-) to decrease desired humidity. The LED's will
illuminate to reflect which desired humidity level you have selected
(Fig. 13).
For example: If you set your humidity at 40%, the 35% and 40%
LED’s will be illuminated.
• Once you have set your desired humidity, the unit will operate under
this desired setting until the unit is turned off.
• When the desired room humidity has been reached the unit will automatically shut off. (The humidity
LED's will remain illuminated.)
• Your unit will turn back on when your room decreases beyond your set level.
NOTE: Your room humidity can often fluctuate. It is normal for your unit to turn itself on and off
throughout the day as it is monitoring your changing environment.
To go back to Continuous Mode, turn your unit off and then back on and select your desired output setting
(see Step 2).
Fig. 11
Moisture
Control
Humidistat
Control
Power
Button
(On/Off)
Fig. 12
Fig. 13
Refill/
Clean
Light
Reset
Button
7
Manual Control Operation (HWM-331)
NOTE: This product is equipped with a Vapor Mist Sensor
Badge
(Fig 10). When the Vapor Mist Sensor Badge located on
the medicine cup, turns from grey to blue warm moisture
is being emitted from the humidifier. Do not touch the medicine cup or warm moisture outlet grille
unless the unit has been turned off and the Vapor Mist Sensor Badge has turned back to grey.
Fig. 10
QuickSteam_OM_04-25-06.qxd 4/25/06 4:53 PM Page 7
Page 8
POWER
CAUTION: DO NOT PLUG IN THE HUMIDIFIER WITH
WET HANDS AS AN ELECTRICAL SHOCK COULD
OCCUR.
• With the power OFF, plug the filled humidifier into a polarized 120V
outlet. DO NOT FORCE THE POLARIZED PLUG INTO THE OUTLET; it will
only fit one way.
STEP 1: POWER
• Press the Power button to start the humidifier. Your humidifier will
automatically start on High power, continuous run. The display will be
illuminated and will reflect the current room humidity (Fig. 15).
• To turn your humidifier OFF simply press the Power button again.
STEP 2: OUTPUT / MOISTURE CONTROL
Your unit has three output/moisture levels:
HIGH: For fast humidifying
MED: For everyday moisture control
LOW: For minimum operation (ideal for nighttime use)
• To change your moisture level, press the moisture control button
( ) up or down (Fig. 16).
• Once you have selected your moisture level the display will go back to showing the current room
humidity after 3 seconds.
NOTE: If you wish to change or check your output/moisture setting simply press the Moisture Control
button once and it will show you your setting. If you would like to change it, continue to push the button up
or down until you have reached your desired setting. Again, after 3 seconds the display will revert to
showing the current room humidity.
Continuous Mode: Your unit will run continuously at your selected output level until you shut it off or it runs
out of water.
STEP 3: TIMER CONTROL
• You can set your Timer for up to 18 hours. This function should only be used if you desire that the
humidifier be automatically shut off after a certain period of time.
8
Digital EasySet™Control Operation (Model HWM-450)
Humidistat
Control
Moisture
Control
Timer
Control
Desired
Humidity
Light
Refill/Clean
Light
Reset
Button
EasySet™Control Operation (Model HWM-335) cont’d.
REFILL / CLEAN INDICATOR
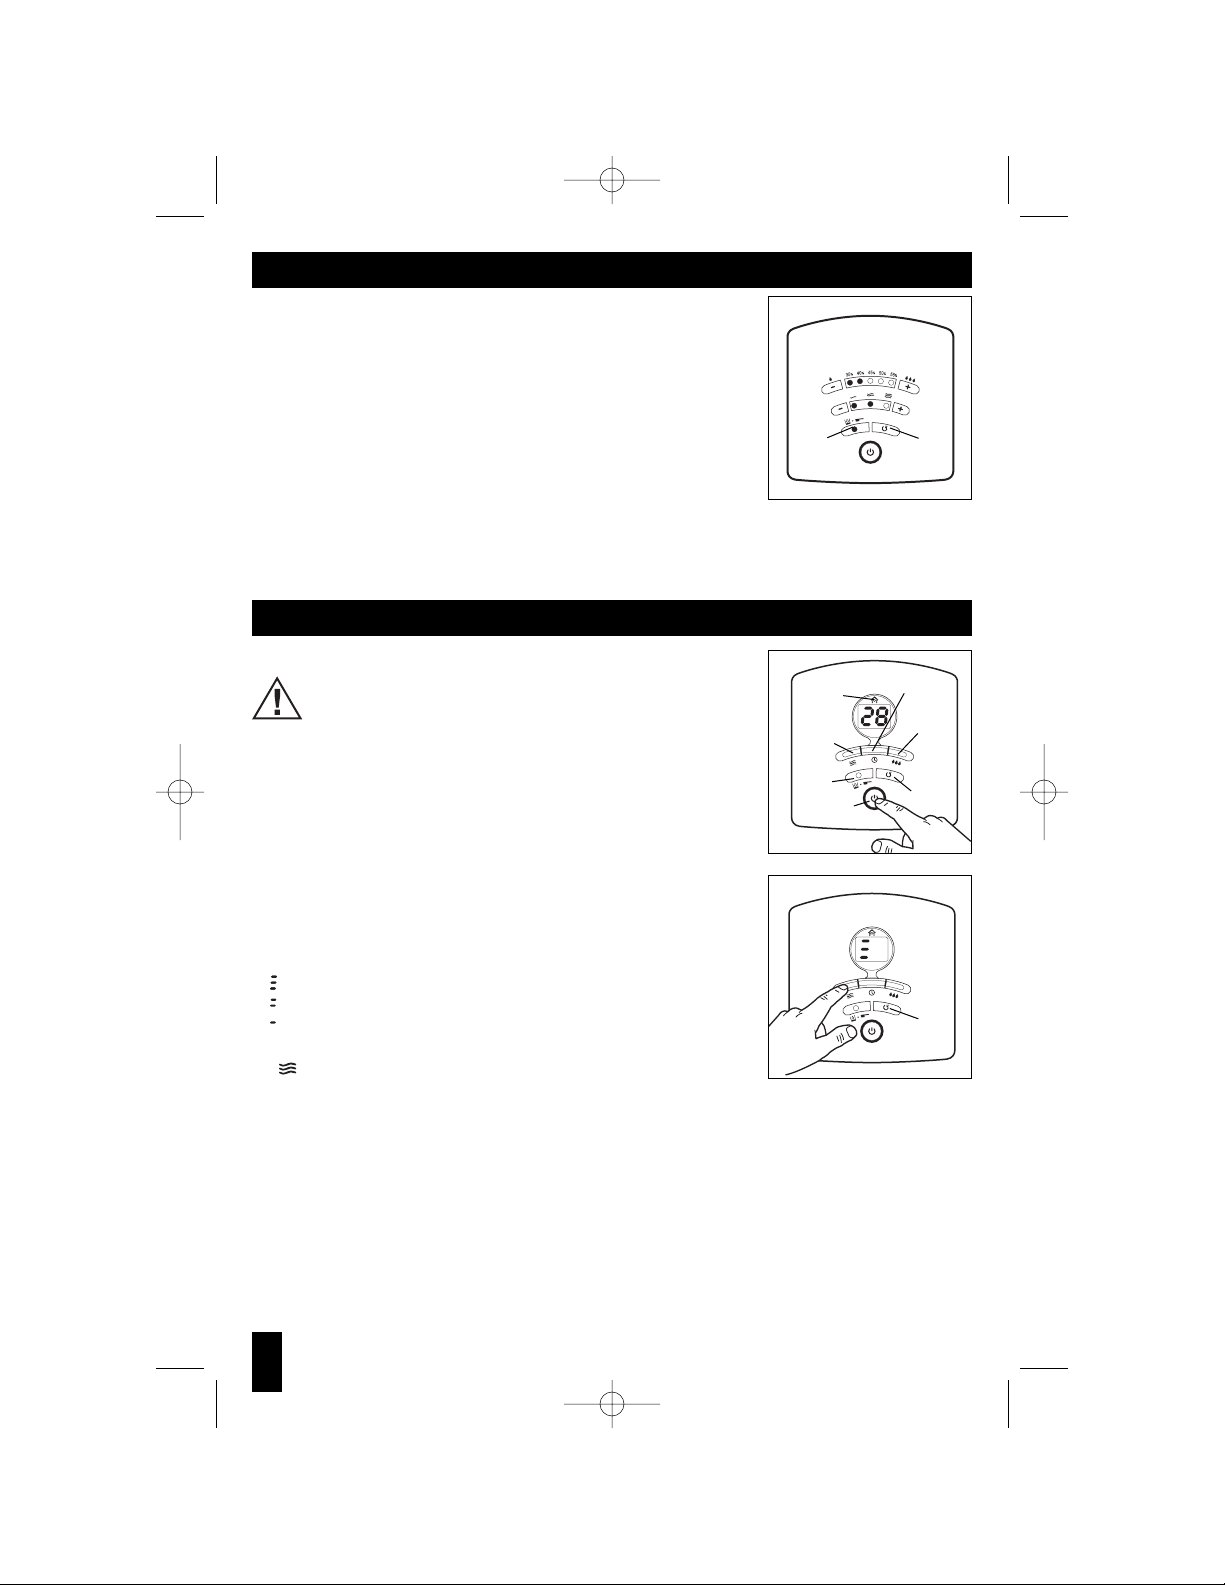
• When the Refill/Clean indicator light is illuminated it implies your unit is
out of water or you need to clean your humidifier (Fig. 14).
• Check your water level. If the Tank is empty, remove the Tank and refill it
as described in the FILLING section.
• Press the Reset button to restart the humidifier after the Tank is
reinstalled.
• The humidifier will then resume to its previous settings.
• If the water level is full, this implies it’s time to clean your
humidifier. Please turn off and unplug the unit and refer to the CLEANING section.
NOTE: Do not press the Reset button until the Tank is refilled and reinstalled.
NOTE: Your unit’s performance will decrease if you do not clean your Heating Plate. You unit may
continuously shut off and output will decrease.
Fig. 14
Refill/Clean
Light
(illuminated)
Fig. 15
Fig. 16
Reset
Button
Reset
Button
Power Button
(On/Off)
QuickSteam_OM_04-25-06.qxd 4/25/06 4:53 PM Page 8
Page 9

• Press the Timer button ( ) up or down to set how many hours you
would like the humidifier to run (Fig. 17).
• When the display indicates your desired time, wait 3 seconds.
• After 3 seconds, your desired time is set and the display will revert
back to showing the current room humidity.
NOTE: If you wish to change your Timer setting or check to see how
much time is left simply press the Timer button once and it will show
you the time left. If you want to change the time remaining, continue to
push the button up or down until you have reached your desired time.
Again, after 3 seconds the display will revert to showing the current
room humidity.
STEP 4: SET HUMIDITY
• You can set your desired humidity in 1% increments anywhere from
25% to 65%.
• To set your desired humidity, press the Humidity button ( ) up
or down (Fig. 18).
• When the display indicates your desired humidity setting wait
3 seconds.
• After 3 seconds your desired humidity is set and the display will
revert back to showing the current room humidity.
NOTE: If you wish to change your Humidity setting or check to see what
you set, simply press the Humidity button once and it will show you the
set humidity. If you want to change it, continue to push the button up
or down until you have reached your new desired humidity. Again, after
3 seconds the display will revert to showing the current room humidity.
• Once you have set your humidity the unit will operate under this
desired setting until the unit is turned off.
• When your desired room humidity has been reached your unit will
shut off and the House Icon ( ) on the top of your display will
illuminate (Fig. 19). It will stay illuminated until your desired humidity
decreases at which time your unit will turn back on.
NOTE: Your room humidity can often fluctuate. It is normal for your
unit to turn itself on and off throughout the day as it is monitoring
your changing environment.
REFILL / CLEAN INDICATOR
• When the Refill/Clean indicator light is illuminated it implies your unit
is out of water or you need to clean your humidifier.
• Check your water level. If your Tank is empty, remove the Tank and
refill it as described in the FILLING section.
• Press the Reset button to restart the humidifier after the Tank is reinstalled (Fig. 20).
• The humidifier will then resume to its previous settings.
• If your water level is full, this implies it’s time to clean your humidifier. Please turn off and
unplug the unit and refer to the CLEANING section.
NOTE: Do not press the Reset button until the Tank has been refilled and reinstalled.
NOTE: Your unit’s performance will decrease if you do not clean your heating plate. Your unit may
continuously shut off and output will decrease.
Digital EasySet™Control Operation (Model HWM-450) cont’d.
Fig. 18
Fig. 19
Fig. 20
9
Fig. 17
QuickSteam_OM_04-25-06.qxd 4/25/06 4:53 PM Page 9
Page 10
CAUTION: HOT STEAM MAY CAUSE SEVERE BURNS
DO NOT TOUCH THE MEDICINE CUP UNTIL IT HAS COOLED.
Soothing vapor can be distributed into the air by using the Medicine Cup
at the top of the unit. To add medicine to the Medicine Cup:
• Turn the humidifier OFF and wait 10 minutes for the unit to cool.
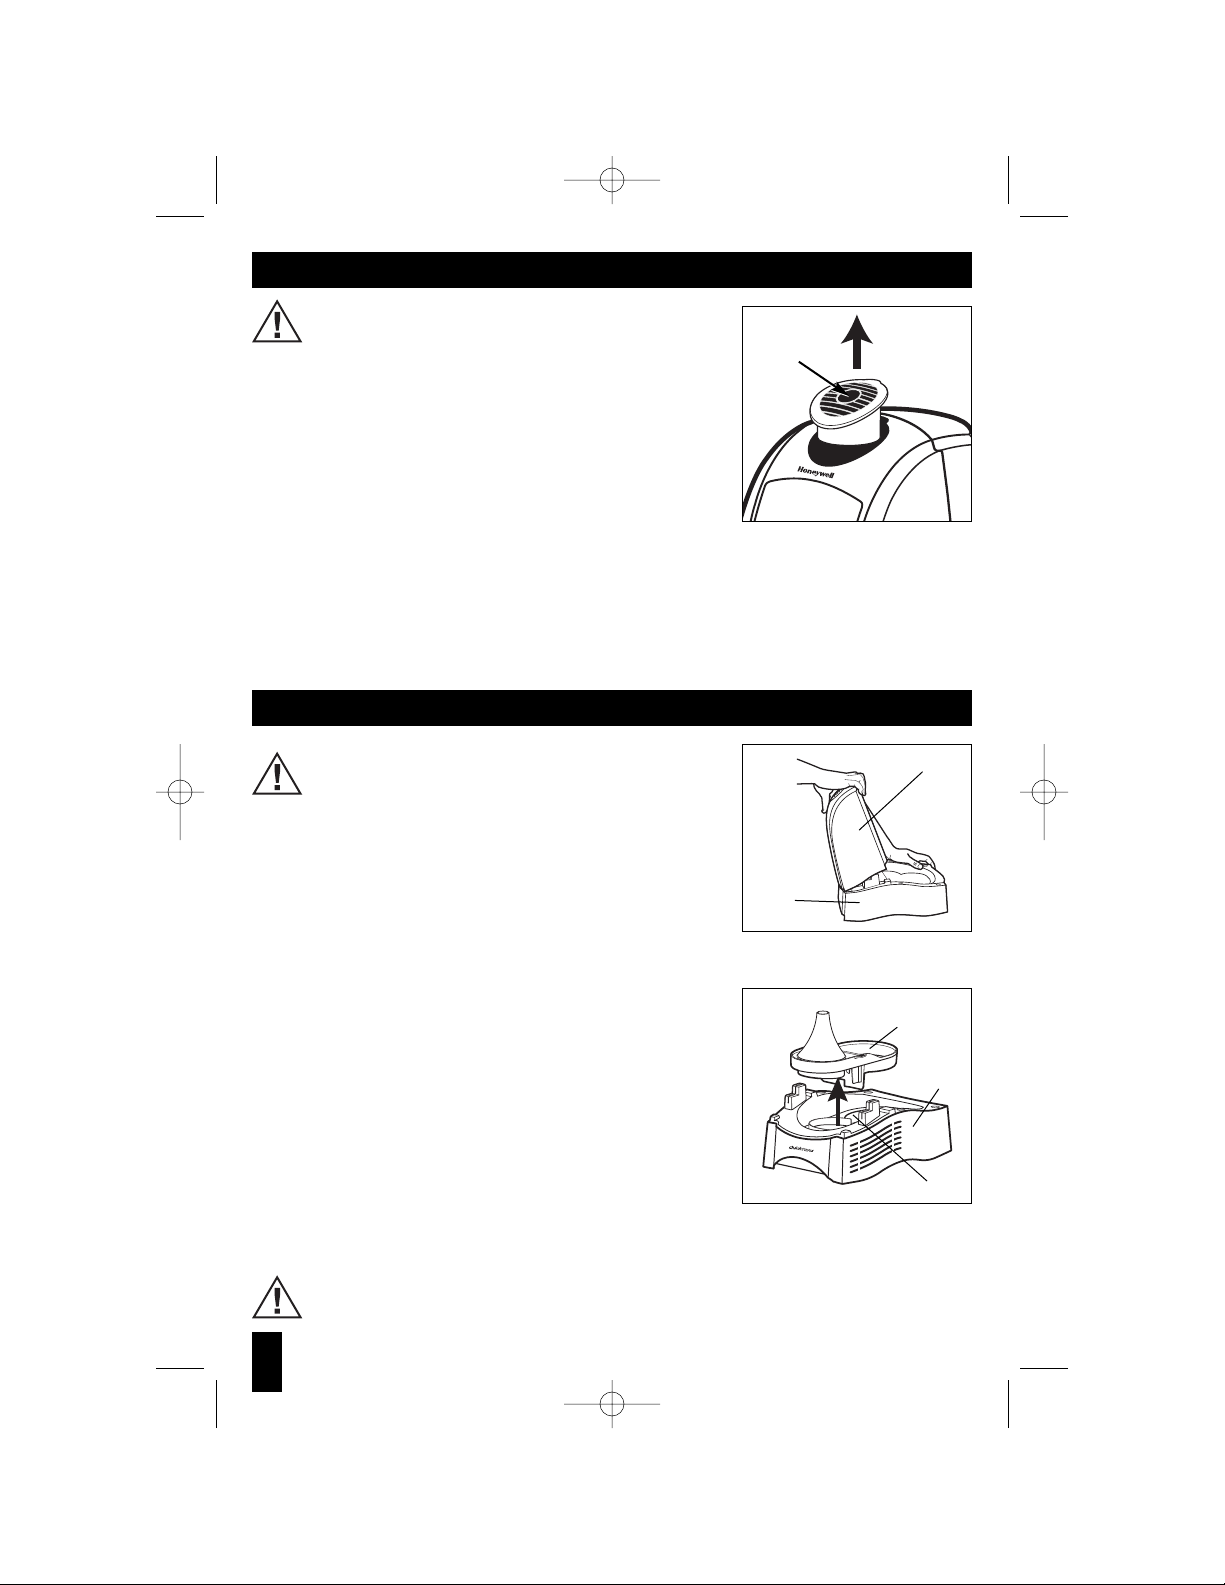
• Remove the Medicine Cup from the unit by pulling firmly upward
(Fig. 21).
• Fill the cup halfway with liquid medicine. Only place the medicine
in the small oval area. Do not put medicine in the grille area.
• Carefully reinstall the Medicine Cup back into the unit.
• After use, remove and clean the Medicine Cup with warm water. Reinstall the clean and dry Medicine
Cup into the unit.
WARNING: DO NOT use any liquid medicines other than those specifically recommended for use
with steam vaporizers or warm HUMIDIFIERS. DO NOT pour medicine through the front or side
grilles or add it to the water tank.
Kaz assumes no responsibility for consequences resulting from the use of medicine in this humidifier.
Fig. 21
Place
medicine
here
Medicine Cup
10
CAUTION: DO NOT CLEAN THE HUMIDIFIER WITH THE
POWER CORD PLUGGED IN THE ELECTRICAL OUTLET
AS AN ELECTRICAL SHOCK COULD OCCUR.
We recommend cleaning the humidifier once a week. It may require
cleaning more often if you have hard water, notice a build up of
impurities or detect unpleasant odors. The importance of routine
cleaning and care cannot be over emphasized.
Cleaning involves two steps: SCALE REMOVAL and DISINFECTING.
Be sure to perform these in the proper order to avoid harmful
chemical interactions.
• First, turn off and unplug the humidifier. Wait at least 10-15 minutes for the unit to cool.
• Remove the Water Tank.
• To remove the Power Unit, grasp the Power Unit and lightly tilt
forward while pulling up. You will feel the unit disengage from its lock
(Fig. 22). Set the Power Unit aside.
• Remove the Water Tray (Fig. 23) and set aside. Be sure to
thoroughly clean the Water Reservoir in the Base. Minerals often
accumulate in this area, so special attention should be used.
• Empty any water from the Base and Removable Tray.
• Be sure the Heating Plate has cooled sufficiently.
• Remove the Mineral Absorption Pad using tweezers or tongs and
check the condition of the Mineral Absorption Pad and the Heating Plate found on the Base. If build-up of
minerals is heavy, follow the Cleaning the Heating Plate instructions.
CAUTION: DO NOT SUBMERGE THE BASE IN WATER. DOING SO MAY CAUSE PROPERTY
DAMAGE OR PERSONAL INJURY. ALLOW THE HUMIDIFIER TO DRY COMPLETELY BEFORE
PLUGGING INTO POWER OUTLET.
Weekly Cleaning
Fig. 22
Base
Power
Unit
Fig. 23
Removable
Water Tray
Mineral Reservoir
Base
QuickSteam_OM_04-25-06.qxd 4/25/06 4:53 PM Page 10
Page 11
11
STEP ONE:
SCALE REMOVAL
Removable Tray
1. Fill the Removable Water Tray (Fig. 3) with:
• 1 cup (8 oz.) of undiluted white vinegar
2. Let solution stand for 20 minutes.
3. With the vinegar in the Removable Tray, clean
all interior surfaces with a soft cloth or brush to
help remove scales.
4. Rinse the Removable Tray thoroughly with
water to remove scale and cleaning solution.
STEP TWO:
DISINFECTING
Water Tank/Removable Tray
1. Fill the Water Tank with:
• 1 teaspoon of household bleach
and
• 1 gallon of water
Pour some of this solution into the
Removable Tray.
2. Let solution stand for 20 minutes.
3. Rinse with water until the smell of bleach
is gone.
NOTE: Removable Water Tray and Medicine Cup
are top shelf dishwasher safe.
NOTE: THE USE OF OTHER WATER TREATMENT PRODUCTS, CHEMICALS, SOAPS, DETERGENTS OR
ABRASIVE CLEANSERS NOT RECOMMENDED IN THIS MANUAL MAY CAUSE DAMAGE TO THE
HUMIDIFIER OR AFFECT PERFORMANCE.
CAUTION: HOT SURFACES MAY CAUSE SEVERE BURNS.
DO NOT TOUCH ANY SURFACES UNTIL THEY HAVE
COOLED.
CAUTION: DO NOT CLEAN THE HUMIDIFIER WITH THE
POWER CORD PLUGGED IN THE ELECTRICAL OUTLET
AS AN ELECTRICAL SHOCK COULD OCCUR.
If the output drops, or the Refill/Clean light remains on, even while
there is water in the tank, the mineral build-up may need to be
removed from the Heating Plate and the Mineral Reservoir. You may
also have to replace the Mineral Absorption Pad.
How often you perform this special maintenance depends upon the
hardness of the water you are using and how quickly mineral deposits form on the interior surfaces of
the humidifier.
1. Turn off and unplug the humidifier. Allow at least 15 minutes for the unit to cool.
2. The Heating Plate is on the bottom of the Base. To access it, grasp the Power Unit and lightly tilt it
forward while pulling up. You will feel the unit disengage from its lock (Fig. 22). Set the Power Unit aside.
3. Remove the Water Tray and set aside (Fig. 23).
4. Remove the Mineral Absorption Pad using tweezers or tongs to prevent burns.
5. BE SURE THE HEATING PLATE HAS COOLED SUFFICIENTLY. Empty any water from the base and remove
mineral debris from the Mineral Reservoir. Be sure to clean the Mineral Reservoir thoroughly.
Fig. 24
Heating
Plate
Mineral
Absorption Pad
Mineral
Reservoir
Cleaning the Heating Plate
Weekly Cleaning cont’d.
QuickSteam_OM_04-25-06.qxd 4/25/06 4:53 PM Page 11
Page 12

Consumer Relations
Mail questions or comments to:
Kaz, Inc.
Consumer Relations Dept.
250 Turnpike Road
Southborough, MA 01772
Please be sure to specify model number.
Call us toll-free at: 1-800-477-0457
E-mail: consumerrelations@kaz.com
Or, visit our website at: www.kaz.com
Electrical Ratings
The Honeywell QuickSteam™ Series models are rated at 120V, 60 Hz.
NOTE: DO NOT RETURN PRODUCT TO STORE. IF YOU EXPERIENCE A PROBLEM, PLEASE CALL US
TOLL-FREE AT 1-800-477-0457. OUR CONSUMER RELATIONS TEAM WILL HELP AND ADVISE NEXT
STEPS.
CAUTION: DO NOT OPEN THE POWER UNIT OR BASE YOURSELF.
DOING SO MAY VOID YOUR WARRANTY AND CAUSE DAMAGE TO
THE HUMIDIFIER OR PERSONAL INJURY.
Replacement Mineral Absorption Pads
Mineral Absorption Pads: Model Number HMP-12P
12
End-of-Season Care and Storage
• Follow the CLEANING
instructions when the humidifier will not be used for at least one week or more,
or at the end of the season.
• Dry the humidifier completely before storing. DO NOT store with water inside the Removable Tray, Base
or Water Tank.
• Pack the unit in its original carton and store in a cool, dry location.
• Before next use, remember to clean your humidifier.
Cleaning the Heating Plate cont’d.
6. Use a non-metallic brush or soft, dry cloth to wipe the Heating Plate (Fig. 24). The Heating Plate is made
of stainless steel so be sure to use non-abrasives. Some deposits may remain, but should not interfere
with the operation of the unit.
CAUTION: DO NOT CLEAN THE HEATING PLATE UNDER RUNNING WATER.
DOING SO MAY CAUSE PROPERTY DAMAGE OR PERSONAL INJURY.
QuickSteam_OM_04-25-06.qxd 4/25/06 4:53 PM Page 12
Page 13

Troubleshooting
Problem Possible Cause Corrective Action
Power
Unit is not running, Unit needs cleaning Clean the unit (Heating Plate, Mineral Ditch, etc.) and
some lights are on change Mineral Absorption Pad as needed
Unit is out of water Refill and reinstall Water Tank
Humidity level set too low Reset humidity to a higher level
Unit is too hot Turn off the power and let the unit cool down
Power Unit is not installed Reinstall Power Unit
properly
Unit is not set on level Place the unit on a firm, flat, and level surface
surface
There is too much moisture Turn off the power and completely dry out the unit
inside the unit
Unit is not running, no lights Unit is off due to timer Press Power button
Power unit is not Reinstall Power unit
installed properly
Power outage Press Power button
Humidity level was set but Humidity level set too low Reset humidity to a higher level
unit does not start
Humidity level was set but Humidity level set too high Reset humidity to a lower level
unit does not shut off
Tripping the circuit breaker Too many appliances Remove excessive appliance(s) or place the
plugged in the same circuit humidifier in a different circuit
Light flickering Electrical interference Place the humidifier in a different circuit (power outlet)
Sound
Crackling, popping sound Unit needs cleaning Clean the unit (Heating Plate, Mineral Reservoir, etc.)
and change Mineral Absorption Pad as needed
Gurgling sound Unit is operating normally None needed
There is no difference in Unit is operating normally None needed
sound between the high
and low setting
Humidity Display
Humidity display is too high Moisture/condensation Turn off the power and completely dry out the unit
accumulated in humidity sensor
Unit is overfilled with water Drain the excess water from the base and completely
dry out the unit
Humidity display is too low Unit is too hot Turn off the power and let the unit cool down
Condensation
Condensation forming Humidity level set too high Reset humidity to a lower level and/or reduce the
on the walls and/or windows Output level
Unit is placed too close to Relocate the unit
the wall and/or windows
Steam/condensation Unit is overfilled with water Drain the excess water from the base and completely
coming out of the front grill dry out the unit
13
QuickSteam_OM_04-25-06.qxd 4/25/06 4:53 PM Page 13
Page 14

©2006 Kaz, Inc. All Rights Reserved.
P/N: 31IM0330195
You should first read all instructions before
attempting to use this product.
A. This 3 year limited warranty applies to repair
or replacement of product found to be
defective in material or workmanship. This
warranty does not apply to damage resulting
from commercial, abusive, unreasonable use
or supplemental damage. Defects that are the
result of normal wear and tear will not be
considered manufacturing defects under
this warranty.
KAZ IS NOT LIABLE FOR INCIDENTAL OR
CONSEQUENTIAL DAMAGES OF ANY NATURE.
ANY IMPLIED WARRANTY OF
MERCHANTABILITY OR FITNESS FOR A
PARTICULAR PURPOSE ON THIS PRODUCT IS
LIMITED IN DURATION TO THE DURATION OF
THIS WARRANTY.
Some jurisdictions do not allow the exclusion
or limitation of incidental or consequential
damages or limitations on how long an implied
warranty lasts, so the above limitations or
exclusions may not apply to you. This warranty
gives you specific legal rights, and you also
may have other rights which vary from
jurisdiction to jurisdiction. This warranty
applies only to the original purchaser of this
product from the original date of purchase.
B. At its option, Kaz will repair or replace this
product if it is found to be defective in material
or workmanship. Defective product should be
returned to the place of purchase in
accordance with store policy. Thereafter, while
within the warranty period defective product
may be returned to Kaz.
C. This warranty does not cover damage resulting
from any unauthorized attempts to repair or
from any use not in accordance with the
instruction manual.
D. Return defective product to Kaz, Inc. with a
brief description of the problem. Include proof
of purchase and a $10 US/$15.50 CAN check
or money order for handling, return packing
and shipping charges. Please include your
name, address and a daytime phone number.
You must prepay shipping charges. Send to:
In U.S.A.:
Kaz, Inc.
Attn: Returns Department
4755 Southpoint Drive
Memphis, TN 38118
USA
In Canada:
Kaz, Inc.
Attn: Returns Department
510 Bronte Street South
Milton, ON L9T 2X6
Canada
3 Year Limited Warranty
14
QuickSteam_OM_04-25-06.qxd 4/25/06 4:53 PM Page 14
Page 15

MANUEL D’UTILISATION
RENDEMENT DE
11,3 LITRES (3 GALLONS US)
PAR JOUR
HUMIDIFICATEURS À VAPEUR TIÈDE
Modèles :
HWM-330
HWM-331
HWM-335
La marque de commerce Honeywell est utilisée par Kaz, Inc. avec l’autorisation de Honeywell Intellectual Properties, Inc.
RENDEMENT DE
15,1 LITRES (4 GALLONS US)
PAR JOUR
HUMIDIFICATEUR À VAPEUR TIÈDE
Modèle :
HWM-450
QuickSteam_OM_04-25-06.qxd 4/25/06 4:53 PM Page 15
Page 16

16
L'utilisation d'appareils électriques nécessite des précautions élémentaires
afin de réduire les risques d'incendie, de choc électrique ou de blessures.
Parmi les précautions à observer, on compte les suivantes :
1. Toujours placer l’humidificateur sur une surface ferme, plane et bien horizontale. Cet appareil peut ne pas fonctionner
correctement s’il est placé sur une surface inégale.
2. Éviter de placer l’humidificateur directement sur un meuble en bois ou sur toute autre surface pouvant être
endommagée par l’eau.
3. MISE EN GARDE : Afin de réduire les risques de brûlure grave, placer l’humidificateur hors de la portée des enfants.
4. Éviter de placer l’humidificateur près d’une source de chaleur comme un poêle, un radiateur ou un appareil de
chauffage.
5. Avant d'utiliser l'humidificateur, vérifier le cordon d'alimentation pour s’assurer qu’il n'est pas endommagé. Si le
cordon est endommagé, NE PAS UTILISER l’appareil et le retourner au fabricant, conformément à la garantie, pour une
réparation.
6. Ce produit est équipé d'une fiche polarisée (fiche dont l'une des lames est plus large que l'autre). Afin de réduire les
risques de choc électrique, cette fiche ne peut être insérée que d'une seule manière dans la prise de courant
polarisée. Si la fiche ne s'insère pas complètement dans la prise, tourner la fiche. Si la fiche ne s'insère toujours pas
dans la prise, contacter un électricien. ÉVITER de contourner le dispositif de sécurité que constitue la fiche polarisée.
7. Pour débrancher l’appareil, tourner d’abord les boutons de commande à la position « OFF », puis tirer la fiche hors de
la prise de courant. Ne jamais tirer sur le cordon.
8. Une connexion trop lâche entre la fiche et la prise de courant c.a. peut entraîner une surchauffe et une déformation de
la fiche. Contacter un électricien pour faire remplacer les prises de courant lâches ou usées.
9. Toujours débrancher et vider l’humidificateur quand celui-ci ne sert pas ou durant son entretien ou son nettoyage.
10. Éviter d’incliner ou de déplacer l’humidificateur quand celui-ci est en marche ou rempli d’eau. DÉBRANCHER
l’humidificateur avant de le déplacer.
11. Cet humidificateur nécessite un nettoyage régulier. Consulter les instructions de NETTOYAGE ci-jointes. Ne
jamais nettoyer l’humidificateur d’une autre façon que celle indiquée dans le présent manuel. Selon la teneur
en minéraux de l’eau utilisée, l’appareil devra peut-être être nettoyé une fois par semaine ou plus.
12. Ne pas immerger la base dans l’eau ou dans tout autre liquide. Éviter de verser de l’eau dans l’orifice d’évacuation de
la vapeur.
13. Éviter de diriger la vapeur vers une personne, un mur ou un meuble.
14. Quand un humidificateur est utilisé dans un espace clos ou une petite pièce, s’assurer qu’il y a une bonne ventilation :
une humidité excessive peut produire des taches de condensation sur les murs.
15. Ne pas essayer d’enlever le contenant à médicament, le bloc moteur, le réservoir d’eau, le plateau à eau ou le
tampon d’absorption des minéraux lorsque l’appareil fonctionne, ou de 10 à 15 minutes après que
l’humidificateur a été éteint et débranché. Cela pourrait causer des blessures graves. Le plateau à eau et le
tampon d’absorption des minéraux ne devraient être enlevés que pour des raisons de nettoyage et d’entretien.
16. NE PAS toucher à la vapeur : elle peut causer des brûlures graves.
17. NE PAS obstruer la grille d’évaporation, ce qui endommagerait l’humidificateur.
IMPORTANTES INSTRUCTIONS
DE SÉCURITÉ
LIRE LES INSTRUCTIONS DE SÉCURITÉ SUIVANTES AVANT
D’UTILISER L’HUMIDIFICATEUR, ET LES CONSERVER.
QuickSteam_OM_04-25-06.qxd 4/25/06 4:53 PM Page 16
Page 17

17
Introduction
COMMENT L’HUMIDIFICATEUR FONCTIONNE-T-IL?
Système à vapeur tiède QuickSteam :
L’eau circule dans l’appareil où elle est chauffée et purifiée par la plaque chauffante QuickSteam
MC
.
L’appareil pousse ensuite l’air par l’évent du dessus et libère dans la pièce une vapeur invisible, qui ne
contient pas de bactérie.
L’humidificateur se compose des pièces suivantes :
Réservoir
d’eau
Bloc
moteur
Base
Contenant à
médicament
Plateau à eau amovible
Bouchon de
remplissage
Poignée du réservoir
Tampon
d’absorption
des minéraux
Plaque chauffante
Grille de sortie
de la vapeur
Réservoir à minéraux
QuickSteam_OM_04-25-06.qxd 4/25/06 4:53 PM Page 17
Page 18

18
Installation
REMARQUE : Il est recommandé de désinfecter l’humidificateur
avant de l’utiliser pour la première fois. Se référer aux
instructions d’entretien.
Installer l’humidificateur sur une surface ferme, plane et bien
horizontale, à au moins 15 cm (6 po) des murs ou de tout autre objet
afin de permettre une bonne circulation d’air (Fig. 1). Déposer
l’humidificateur sur une surface résistante à l’eau, car l’eau risque
d’endommager les meubles et certains revêtements de sol.
Kaz n’assume aucune responsabilité quant à tout dommage
matériel causé par un déversement d’eau.
• Enlever le réservoir d’eau en le tenant par la poignée et en le tirant
vers le haut (Fig. 1). Le mettre de côté.
• Enlever le bloc moteur en le tenant et en l’inclinant légèrement
vers l’avant tout en le tirant vers le haut. On sent alors le bloc
moteur se dégager de son verrou (Fig. 2). Mettre le bloc moteur de
côté.
• Enlever le plateau à eau (Fig. 3). Le mettre de côté.
• Placer un tampon d’absorption des minéraux à plat sur la plaque
chauffante. Se référer à la section TAMPON D’ABSORPTION DES
MINÉRAUX (page 19) pour plus d’informations.
• Replacer le plateau à eau.
• Replacer le bloc moteur en s’assurant qu’il est installé
correctement. Aligner l’arrière du bloc moteur directement derrière
les languettes de la base et appuyer fermement : un léger clic se
fera entendre. Le bloc moteur sera aligné avec la base (Fig. 4).
• Remplir le réservoir avec de l’eau fraîche du robinet (Fig. 5). Se
référer à la section REMPLISSAGE
(page 19) pour plus
d’informations.
REMARQUE : Conserver la boîte pour le remisage de fin de
saison. (Se référer à la section ENTRETIEN DE FIN DE SAISON ET
REMISAGE.)
Fig. 1
MUR
15 cm
(6 po)
Fig. 2
Base
Bloc
moteur
Fig. 3
Plateau à eau
amovible
Base
Fig. 4
QuickSteam_OM_04-25-06.qxd 4/25/06 4:53 PM Page 18
Page 19

19
Instructions pour les tampons d’absorption des minéraux
MISE EN GARDE : LES SURFACES CHAUDES PEUVENT CAUSER DES BRÛLURES GRAVES.
NE TOUCHER À AUCUNE SURFACE TANT QU’ELLE N’EST PAS FROIDE.
L’eau contient des minéraux et d’autres particules. La quantité de minéraux varie selon l’alimentation en eau de
chaque région. Il est courant que ces minéraux se fixent à la plaque chauffante des humidificateurs, diminuant
ainsi le rendement des appareils. Les tampons d’absorption des minéraux retiennent les minéraux et
aident à prévenir l’accumulation tenace de minéraux sur la plaque chauffante.
• Avant de mettre l’humidificateur en marche, placer le tampon d’absorption des minéraux à plat sur la
plaque chauffante. Après avoir fait fonctionner l’humidificateur, l’eau et les pièces internes sont
CHAUDES, il faut donc manipuler le tampon d’absorption des minéraux avec PRÉCAUTION. Laisser
refroidir l’eau de l’humidificateur et les pièces internes (pendant de 10 à 15 minutes minimum). Afin
d’éviter les brûlures, utiliser des pinces ou des pincettes pour manipuler le tampon.
• La durée de service du tampon d’absorption des minéraux varie selon la teneur en minéraux de l’eau
utilisée. Quand celle-ci contient un taux de minéraux de normal à modéré, le tampon d’absorption des
minéraux devrait être remplacé après environ 2 semaines d’utilisation continue. Une fois de plus, la
durée de service du tampon varie selon l’usage et la teneur en minéraux de l’eau utilisée.
• Pour savoir s’il faut remplacer le tampon d’absorption des minéraux : APRÈS avoir laissé l’eau refroidir,
vérifier le tampon pour voir s’il est encore mou et souple. S’il est rigide et dur, il doit être remplacé. Un
autre signe indiquant qu’il faut remplacer le tampon d’absorption des minéraux : quand du calcaire
commence à se former sur la plaque chauffante.
Remplissage
• Enlever le réservoir d’eau en le tenant par la poignée et en le tirant vers le
haut. (Fig. 4).
• Tourner le réservoir d’eau à l’envers de sorte que le bouchon de remplissage
soit vers le haut; dévisser le bouchon en le tournant dans le sens anti-horaire,
puis le mettre de côté.
• Remplir le réservoir avec de l’eau FRAÎCHE du robinet (Fig. 5). NE PAS
UTILISER D’EAU CHAUDE, car cela pourrait endommager l’humidificateur.
• Il n’est pas nécessaire d’utiliser de l’eau distillée. Par contre, dans les régions
où l’eau est dure, son utilisation est préférable afin de prévenir l’accumulation
de minéraux.
• Remettre le bouchon de remplissage en le vissant dans le sens horaire.
ÉVITER DE LE VISSER TROP SERRÉ. Retourner le réservoir d’eau à l’endroit.
REMARQUE : Ne pas ajouter de médicaments ni tout autre additif à l’eau.
REMARQUE : Pour transporter le réservoir rempli d’eau, utiliser la poignée et
placer une main sous le réservoir pour un meilleur support.
• Placer le réservoir d’eau dans l’humidificateur et l’insérer bien en place
(Fig. 6).
• Quand le réservoir rempli d’eau est placé correctement, de l’eau se déverse
dans le plateau amovible.
• Une fois le réservoir rempli d’eau en place, ne pas tenter de déplacer
l’humidificateur. Pour éviter les fuites d’eau, ne jamais déplacer
l’humidificateur quand il est rempli d’eau.
MISE EN GARDE : Ne pas verser d’eau par la grille située sur le
dessus de l’humidificateur, ce qui pourrait endommager
l’humidificateur ou causer des blessures.
Fig. 5
Fig. 6
QuickSteam_OM_04-25-06.qxd 4/25/06 4:53 PM Page 19
Page 20

20
Fonctionnement des commandes manuelles (modèle HWM-330 et HWM-331)
ALIMENTATION
MISE EN GARDE : ÉVITER D’AVOIR LES MAINS MOUILLÉES AU
MOMENT DE BRANCHER L’HUMIDIFICATEUR, AU RISQUE DE
RECEVOIR UN CHOC ÉLECTRIQUE.
• Placer le bouton d’alimentation à la position « OFF », puis brancher
l’humidificateur rempli d’eau dans une prise de courant polarisée de 120 V.
ÉVITER DE FORCER POUR INSÉRER LA FICHE POLARISÉE DANS LA PRISE : elle ne
peut s’insérer que d’une seule manière.
RÉGLAGE DE LA PRODUCTION D’HUMIDITÉ
• Régler le bouton de réglage de la production d’humidité à la position souhaitée
(Fig. 7).
Élevé (HIGH) : pour atteindre rapidement le taux d’humidité désiré;
Bas (LOW) : pour le fonctionnement quotidien.
• Mode continu. L’appareil fonctionne sans arrêt selon le réglage d’émission de vapeur choisi, jusqu’à ce qu’il soit éteint ou
qu’il soit vide.
HUMIDISTAT ADVANCED MIST
MC
Grâce à l’humidistat Advanced MistMC, on peut régler le taux d’humidité selon ses
préférences. L’humidificateur se mettra en marche et s’arrêtera tout au long de la
journée et de la nuit afin de maintenir le taux d’humidité choisi.
RÉGLAGE DE L’HUMIDISTAT
Mettre l’humidificateur en marche et choisir le degré de production d’humidité
souhaité. Régler ensuite l’humidistat Advanced Mist
MC
au réglage élevé (HIGH) en
tournant complètement le bouton dans le sens horaire (Fig. 7).
• Laisser l’humidificateur fonctionner à l’intensité maximale pendant au moins une
heure
ou jusqu’à ce que la pièce ait atteint un taux d’humidité confortable
• Tourner alors lentement le bouton de l’humidistat dans le sens anti-horaire, jusqu’à ce que l’humidificateur s’arrête
(Fig. 8).
• Maintenant que le bouton de l’humidistat est réglé, l’humidificateur se remettra automatiquement en marche quand le
taux d’humidité de la pièce descendra sous le taux choisi, et il s’éteindra à nouveau automatiquement quand le taux
d’humidité choisi sera atteint.
REMARQUE : Si l’humidificateur ne se met (ou remet) pas en marche après avoir réglé le taux d’humidité, c’est peut-être que
l’humidistat Advanced Mist
MC
est réglé à un degré trop bas. Tourner alors complètement le bouton dans le sens horaire
(Fig. 7).
REMPLISSAGE/NETTOYAGE DE L’HUMIDIFICATEUR
• Quand le voyant Remplissage/Nettoyage s’allume, cela signifie que l’appareil est
vide ou qu’il doit être nettoyé (Fig. 9).
• • Vérifier le niveau d’eau. Si le réservoir est vide, régler le bouton d’alimentation
à la position « OFF », puis enlever le réservoir et le remplir tel que décrit dans la
section REMPLISSAGE.
• Si le réservoir est plein, cela signifie qu’il faut nettoyer l’humidificateur.
Mettre l’appareil hors tension et le débrancher, puis se référer aux
instructions d’entretien.
REMARQUE : Le rendement de l’appareil diminuera si la plaque chauffante
n’est pas nettoyée. L’appareil pourrait s’éteindre continuellement et l’émission
de vapeur sera moindre.
REMARQUE : Ne pas remettre l’appareil en marche tant que le réservoir n’est pas rempli et remis en place.
Remplissage/
Nettoyage
Fig. 7
Fig. 8
Bouton de réglage de la
production d’humidité
Bouton de
l’humidistat
Voyant d’alimentation
(allumé)
Fig. 9
Remplissage/Nettoyage
d’alimentation (allumé)
QuickSteam_OM_04-25-06.qxd 4/25/06 4:53 PM Page 20
Page 21

21
Fonctionnement des commandes EasySetMC(modèle HWM-335)
ALIMENTATION
MISE EN GARDE : ÉVITER D’AVOIR LES MAINS MOUILLÉES AU
MOMENT DE BRANCHER L’HUMIDIFICATEUR, AU RISQUE DE RECEVOIR
UN CHOC ÉLECTRIQUE.
•
Lorsqu’il est hors tension, brancher l’humidificateur rempli d’eau dans une prise
de courant polarisée de 120 V. ÉVITER DE FORCER POUR INSÉRER LA FICHE
POLARISÉE DANS LA PRISE : elle ne peut s’insérer que d’une seule manière.
ÉTAPE 1 : MISE EN MARCHE
•
Appuyer sur le bouton d’alimentation pour mettre l’humidificateur en marche. Il
se mettra automatiquement à fonctionner à l’intensité élevée (High) et en mode
de fonctionnement continu (Fig. 11).
•
Pour éteindre l’humidificateur, il suffit d’appuyer à nouveau sur le bouton d’alimentation.
ÉTAPE 2 : RÉGLAGE DE LA PRODUCTION D’HUMIDITÉ
L’appareil possède trois réglages de production d’humidité :
Élevé (HIGH) : pour atteindre rapidement le taux d’humidité désiré;
Moyen (MED) : pour le fonctionnement quotidien;
Bas (LOW) : pour un fonctionnement plus lent (idéal pendant la nuit).
•
Appuyer sur le bouton plus (+) pour augmenter la production d’humidité, et sur
le bouton moins (-) pour la diminuer. Les voyants à DEL s’allument pour indiquer
quel degré a été choisi (Fig. 12).
• Mode continu. L’appareil fonctionne sans arrêt selon le réglage d’émission de
vapeur choisi, jusqu’à ce qu’il soit éteint ou qu’il soit vide.
ÉTAPE 3 : RÉGLAGE DU TAUX D D’HUMIDITÉ
•
Régler le taux d’humidité à n’importe quel taux situé entre 35 et 55 %.
•
Appuyer sur le bouton plus (+) pour augmenter le taux d’humidité, et sur le bouton moins (-) pour le
diminuer. Les voyants à DEL s’allument pour indiquer quel taux d’humidité a été choisi (Fig. 13).
Par exemple : Si on règle le taux d’humidité à 40 %, les voyants à DEL 35 % et 40 % s’allument.
•
Une fois le taux d’humidité réglé, l’appareil fonctionne selon ce réglage jusqu’à
ce qu’on mette l’appareil hors tension.
•
Quand la pièce atteint le taux d’humidité souhaité, l’appareil s’arrête
automatiquement. (Toutefois, les voyants à DEL restent allumés.)
•
L’appareil se remet en marche quand le taux d’humidité de la pièce descend
sous le taux réglé.
REMARQUE : Le taux d’humidité d’une pièce varie constamment. Il est donc
normal que l’appareil se mette en marche et s’arrête tout au long de la
journée, car il maintient continuellement le taux d’humidité de la pièce.
Pour revenir au mode continu, éteindre l’appareil, puis le remettre en marche et
choisir la production d’humidité souhaitée (voir l’étape 2).
Fig. 12
Fig. 13
Fonctionnement des commandes manuelles (HWM-331)
REMARQUE: Ce produit est équipé d’un détecteur de
vapeur (Fig 10). Quand l’humidificateur produit de la
vapeur tiède, le détecteur de vapeur se trouvant sur le
contenant à médicament passe du gris au bleu. Quand
l’humidificateur produit de la vapeur tiède, le détecteur de vapeur se trouvant sur le contenant à
médicament passe du gris au bleu.
Fig. 10
Fig. 11
Réglage de la
production d’humidité
Boutons de réglage
de l’humidistat
Bouton
d’alimentation
Voyant
Remplissage/
Nettoyage
Bouton de
redémarrage
QuickSteam_OM_04-25-06.qxd 4/25/06 4:53 PM Page 21
Page 22

ALIMENTATION
MISE EN GARDE : ÉVITER D’AVOIR LES MAINS MOUILLÉES AU MOMENT DE BRANCHER L’HUMIDIFICATEUR,
AU RISQUE DE RECEVOIR UN CHOC ÉLECTRIQUE.
•
Lorsqu’il est hors tension, brancher l’humidificateur rempli d’eau dans une prise de courant polarisée de 120 V. ÉVITER DE
FORCER POUR INSÉRER LA FICHE POLARISÉE DANS LA PRISE : elle ne peut s’insérer que d’une seule manière.
ÉTAPE 1 : MISE EN MARCHE
•
Appuyer sur le bouton d’alimentation pour mettre l’humidificateur en marche. Il se mettra automatiquement à fonctionner à
l’intensité élevée (High) et en mode de fonctionnement continu. L’écran s’allumera et affichera le taux d’humidité actuel de
la pièce (Fig. 15).
•
Pour éteindre l’humidificateur, il suffit d’appuyer à nouveau sur le bouton
d’alimentation.
ÉTAPE 2 : RÉGLAGE DE LA PRODUCTION D’HUMIDITÉ
L’appareil possède trois réglages de production d’humidité :
Élevé (HIGH) : pour atteindre rapidement le taux d’humidité désiré;
Moyen (MED) : pour le fonctionnement quotidien;
Bas (LOW) : pour un fonctionnement plus lent (idéal pendant la nuit).
•
Pour changer le réglage du taux d’humidité, appuyer sur le bouton de réglage
de l’humidité ( ) vers le haut ou vers le bas (Fig. 16).
•
Une fois le taux d’humidité réglé, l’écran revient à l’affichage du taux d’humidité
actuel de la pièce après 3 secondes.
REMARQUE : Si on désire changer ou vérifier le réglage du taux d’humidité, il suffit
d’appuyer une fois sur le bouton de réglage de l’humidité : l’écran affichera le
réglage. Pour le changer, continuer d’appuyer sur le bouton, vers le haut ou vers le
bas, jusqu’à ce que le réglage voulu soit atteint. Une fois encore, l’écran reviendra
à l’affichage du taux d’humidité actuel de la pièce après 3 secondes.
Mode continu. L’appareil fonctionne sans arrêt selon le réglage de production
d’humidité choisi, jusqu’à ce qu’il soit éteint ou qu’il soit vide.
ÉTAPE 3 : RÉGLAGE DE LA MINUTERIE
•
On peut régler la minuterie pour une période allant jusqu’à 18 heures. N’utiliser
cette fonction que si on souhaite que l’humidificateur cesse de fonctionner
automatiquement après un certain temps.
22
Fonctionnement des commandes numériques EasySetMC(modèle HWM-450)
Fig. 15
Fig. 16
Bouton de
réglage de
l’humidistat
Réglage de la
production
d’humidité
Bouton de
réglage de la
minuterie
Voyant du taux
d’humidité désiré
Voyant
Remplissage/Nettoyage
Bouton de
redémarrage
Fonctionnement des commandes EasySetMC(modèle HWM-335) – suite
VOYANT REMPLISSAGE/NETTOYAGE
•
Quand le voyant Remplissage/Nettoyage s’allume, cela signifie que l’appareil est
vide ou qu’il doit être nettoyé (Fig. 14).
•
Vérifier le niveau d’eau. Si le réservoir est vide, l’enlever et le remplir tel que
décrit dans la section REMPLISSAGE.
•
Après avoir replacé le réservoir, appuyer sur le bouton de redémarrage (reset)
pour remettre l’humidificateur en marche.
•
L’humidificateur se remet alors à fonctionner selon les derniers réglages.
•
Si le réservoir est plein, cela signifie qu’il faut nettoyer l’humidificateur.
Mettre l’appareil hors tension et le débrancher, puis se référer aux
instructions d’entretien.
REMARQUE : Ne pas appuyer sur le bouton de redémarrage tant que le réservoir n’est pas rempli et remis en place.
REMARQUE : Le rendement de l’appareil diminuera si la plaque chauffante n’est pas nettoyée. L’appareil pourrait
s’éteindre continuellement et l’émission de vapeur sera moindre.
Fig. 14
Remplissage/Nettoyage
d’alimentation (allumé)
Bouton de
rétablissement
(Reset)
Bouton d’alimentation
(On/Off)
Bouton de
rétablissement
QuickSteam_OM_04-25-06.qxd 4/25/06 4:53 PM Page 22
Page 23

•
Appuyer sur le bouton de réglage de la minuterie ( ) vers le haut ou vers le bas, pour régler le nombre d’heures de
fonctionnement désiré de l’humidificateur (Fig. 17).
•
Quand l’écran affiche la durée voulue, attendre 3 secondes.
•
Après 3 secondes, la durée est réglée et l’écran revient à l’affichage du taux d’humidité actuel de la pièce.
REMARQUE : Si on désire changer le réglage de la minuterie ou vérifier pendant
combien de temps l’appareil fonctionnera encore, il suffit d’appuyer une fois sur le
bouton de réglage de la minuterie : l’écran indiquera le temps qu’il reste. Pour le
changer, continuer d’appuyer sur le bouton, vers le haut ou vers le bas, jusqu’à ce
que le temps voulu soit atteint. Une fois encore, l’écran reviendra à l’affichage du
taux d’humidité actuel de la pièce après 3 secondes.
ÉTAPE 4 : RÉGLAGE DU TAUX D’HUMIDITÉ
•
On peut régler le taux d’humidité par tranches de 1 %, entre 25 et 65 %.
•
Pour régler le taux d’humidité, appuyer sur le bouton de réglage de l’humidité
( ) vers le haut ou vers le bas (Fig. 18).
•
Quand l’écran affiche le taux d’humidité voulu, attendre 3 secondes.
•
Après 3 secondes, le taux d’humidité est réglé et l’écran revient à l’affichage du
taux d’humidité actuel de la pièce.
REMARQUE : Si on désire changer le réglage du taux d’humidité ou le vérifier, il
suffit d’appuyer une fois sur le bouton de réglage de l’humidité : l’écran indiquera le
taux d’humidité réglé. Pour le changer, continuer d’appuyer sur le bouton, vers le
haut ou vers le bas, jusqu’à ce que le taux d’humidité voulu soit atteint. Une fois
encore, l’écran reviendra à l’affichage du taux d’humidité actuel de la pièce après 3
secondes.
•
Une fois le taux d’humidité réglé, l’appareil fonctionne selon ce réglage jusqu’à
ce qu’on mette l’appareil hors tension.
•
Quand la pièce atteint le taux d’humidité voulu, l’appareil s’arrête et l’icône de
maison ( ), située au haut de l’écran, s’allume (Fig. 19). Elle reste allumée
jusqu’à ce que taux d’humidité baisse. L’appareil se remet alors en marche.
REMARQUE : Le taux d’humidité d’une pièce varie constamment. Il est donc
normal que l’appareil se mette en marche et s’arrête tout au long de la
journée, car il maintient continuellement le taux d’humidité de la pièce.
VOYANT REMPLISSAGE/NETTOYAGE
•
Quand le voyant Remplissage/Nettoyage s’allume, cela signifie que l’appareil est
vide ou qu’il doit être nettoyé.
•
Vérifier le niveau d’eau. Si le réservoir est vide, l’enlever et le remplir tel que
décrit dans la section REMPLISSAGE.
•
Après avoir replacé le réservoir, appuyer sur le bouton de redémarrage (reset)
pour remettre l’humidificateur en marche (Fig. 20).
•
L’humidificateur se remet alors à fonctionner selon les derniers réglages.
• Si le réservoir est plein, cela signifie qu’il faut nettoyer l’humidificateur.
Mettre l’appareil hors tension et le débrancher, puis se référer aux
instructions d’entretien.
REMARQUE : Ne pas appuyer sur le bouton de redémarrage tant que le
réservoir n’est pas rempli et remis en place.
REMARQUE : Le rendement de l’appareil diminuera si la plaque chauffante n’est pas nettoyée. L’appareil pourrait
s’éteindre continuellement et l’émission de vapeur sera moindre.
Fonctionnement des commandes numériques EasySetMC(modèle HWM-450) – suite
Fig. 18
Fig. 19
Fig. 20
Fig. 17
23
QuickSteam_OM_04-25-06.qxd 4/25/06 4:53 PM Page 23
Page 24

24
MISE EN GARDE : LA VAPEUR CHAUDE PEUT CAUSER DES BRÛLURES
GRAVES. NE PAS TOUCHER AU CONTENANT À MÉDICAMENT TANT
QU’IL N’EST PAS FROID.
L’humidificateur peut émettre une vapeur apaisante grâce au contenant à médicament
qui se trouve sur le dessus de l’appareil. Pour mettre un médicament dans le
contenant à médicament :
•
Mettre l’humidificateur hors tension et le laisser refroidir pendant 10 minutes.
•
Retirer le contenant à médicament de l’appareil en le tirant fermement vers le
haut (Fig. 21).
•
Remplir le contenant à moitié de médicament liquide. Verser seulement le
médicament dans la petite partie ovale. Ne pas verser le médicament dans
la région de la grille.
•
Replacer avec précaution le contenant à médicament dans l’appareil.
•
Après usage, enlever et nettoyer le contenant à médicament à l’eau tiède. Replacer le contenant à médicament propre et
sec dans l’appareil.
AVERTISSEMENT : NE PAS UTILISER UN MÉDICAMENT LIQUIDE AUTRE QUE CEUX RECOMMANDÉS EXPRESSÉMENT
POUR L’USAGE DANS UN VAPORISATEUR OU UN HUMIDIFICATEUR À VAPEUR TIÈDE. NE PAS VERSER LE MÉDICAMENT
PAR LES GRILLES AVANTS OU LATÉRALES NI DANS L’EAU DU RÉSERVOIR.
Kaz n’assume aucune responsabilité quant à tout incident découlant de l’utilisation d’un médicament dans cet humidificateur.
Fig. 21
Verser le
médicament ici
Contenant à médicament
MISE EN GARDE : NE PAS NETTOYER L’HUMIDIFICATEUR QUAND IL
EST ENCORE BRANCHÉ DANS UNE PRISE DE COURANT, AU RISQUE DE
RECEVOIR UN CHOC ÉLECTRIQUE.
Il est recommandé de nettoyer l’humidificateur une fois par semaine. Il devra peutêtre être nettoyé plus souvent dans les régions où l’eau est dure, ou si on remarque
une accumulation d’impuretés ou une odeur désagréable. On n’insistera jamais
assez sur l’importance du nettoyage et de l’entretien courants.
Le nettoyage compte deux étapes, soit L’ENLÈVEMENT DE L’INCRUSTATION et la
DÉSINFECTION. S’assurer d’effectuer ces opérations dans l’ordre afin d’éviter
une interaction dangereuse des produits chimiques.
•
Mettre l’humidificateur hors tension et le débrancher. Laisser refroidir
l’appareil pendant au moins de 10 à 15 minutes.
•
Enlever le réservoir d’eau.
•
Pour enlever le bloc moteur, le tenir et l’incliner légèrement vers l’avant tout en
le tirant vers le haut. On sent alors le bloc moteur se dégager de son verrou
(Fig. 22). Mettre le bloc moteur de côté.
•
Enlever le plateau à eau (Fig. 23) et le mettre de côté. S’assurer de nettoyer à
fond le réceptacle à eau dans la base. Les minéraux s’accumulent souvent
dans cette partie, il faut donc y porter une attention particulière.
•
Vider l’eau se trouvant dans la base et dans le plateau amovible.
•
S’assurer que la plaque chauffante a assez refroidi.
•
Enlever le tampon d’absorption des minéraux à l’aide de pinces ou de pincettes :
vérifier son état ainsi que celui de la plaque chauffante qui se trouve dans la base. Si l’accumulation de minéraux est
importante, suivre les instructions de nettoyage de la plaque chauffante.
MISE EN GARDE : ÉVITER D’IMMERGER LA BASE DANS L’EAU, AU RISQUE DE CAUSER DES DOMMAGES
MATÉRIELS OU DES BLESSURES. LAISSER L’HUMIDIFICATEUR SÉCHER COMPLÈTEMENT AVANT DE LE
BRANCHER.
Entretien hebdomadaire
Fig. 22
Base
Bloc
moteur
Fig. 23
Plateau à eau
amovible
Réservoir à minéraux
Base
QuickSteam_OM_04-25-06.qxd 4/25/06 4:53 PM Page 24
Page 25

25
ÉTAPE 1 :
ENLÈVEMENT DE L’INCRUSTATION
Plateau amovible
1. Remplir le plateau amovible (Fig. 3) avec :
•
1 tasse (250 ml) de vinaigre blanc non dilué
2. Laisser agir la solution pendant 20 minutes.
3. Sans vider le vinaigre du plateau amovible, nettoyer
toutes les surfaces internes à l’aide d’un linge doux ou
d’une brosse souple afin d’enlever l’incrustation.
4. Rincer à fond le plateau amovible avec de l’eau pour
enlever l’incrustation et la solution nettoyante.
ÉTAPE 2 :
DÉSINFECTION
Réservoir d’eau et plateau amovible
1. Remplir le réservoir d’eau avec :
•
1 cuiller à thé d’eau de Javel
et
•
4 litres (1 gal.) d’eau
Verser un peu de cette solution dans le plateau
amovible.
2. Laisser agir la solution pendant 20 minutes.
3. Rincer à l’eau jusqu’à ce que l’odeur d’eau de Javel ait
disparu.
REMARQUE : Le plateau à eau amovible et le contenant à
médicament vont au lave-vaisselle, dans le plateau
supérieur.
REMARQUE : L’UTILISATION DE TOUT AUTRE PRODUIT DE TRAITEMENT D’EAU, PRODUIT CHIMIQUE, SAVON,
DÉTERGENT OU NETTOYANT ABRASIF QUI N’EST PAS RECOMMANDÉ DANS LE PRÉSENT MANUEL PEUT ENDOMMAGER
L’HUMIDIFICATEUR OU NUIRE À SON RENDEMENT.
MISE EN GARDE : LES SURFACES CHAUDES PEUVENT CAUSER DES
BRÛLURES GRAVES. NE TOUCHER À AUCUNE SURFACE TANT
QU’ELLE N’EST PAS FROIDE.
MISE EN GARDE : NE PAS NETTOYER L’HUMIDIFICATEUR QUAND IL
EST ENCORE BRANCHÉ DANS UNE PRISE DE COURANT, AU RISQUE
DE RECEVOIR UN CHOC ÉLECTRIQUE.
Si le rendement de l’appareil diminue ou si le voyant Remplissage/Nettoyage reste
allumé même quand il y a de l’eau dans le réservoir, c’est peut-être parce qu’il
faut enlever l’accumulation de minéraux sur la plaque chauffante et dans le
réservoir à minéraux. Il faut peut-être aussi remplacer le tampon d’absorption des
minéraux.
La fréquence de cet entretien spécial dépend de la dureté de l’eau utilisée et de la vitesse à laquelle les dépôts minéraux se
forment sur les surfaces internes de l’humidificateur.
1. Mettre l’humidificateur hors tension et le débrancher. Le laisser refroidir pendant au moins 15 minutes.
2. La plaque chauffante se trouve au fond de la base. Pour y avoir accès, tenir le bloc moteur et l’incliner légèrement vers
l’avant tout en le tirant vers le haut. On sent alors le bloc moteur se dégager de son verrou (Fig. 22). Mettre le bloc moteur
de côté.
3. Enlever le plateau à eau et le mettre de côté (Fig. 23).
4. Enlever le tampon d’absorption des minéraux à l’aide de pinces ou de pincettes afin d’éviter les brûlures.
5. S’ASSURER QUE LA PLAQUE CHAUFFANTE A SUFFISAMMENT REFROIDI. Vider l’eau se trouvant dans la base et enlever
les débris minéraux dans le réservoir à minéraux. S’assurer de nettoyer à fond le réservoir à minéraux.
Fig. 24
Plaque
chauffante
Tampon d’absorption
des minéraux
Réservoir
à minéraux
Nettoyage de la plaque chauffante
Entretien hebdomadaire (suite)
QuickSteam_OM_04-25-06.qxd 4/25/06 4:53 PM Page 25
Page 26

26
Service à la clientèle
Adressez toute question ou remarque à :
Kaz, Inc.
Consumer Relations Dept.
250 Turnpike Road
Southborough, MA 01772
Prière de spécifier le numéro de modèle.
Composez sans frais le 1 800 477-0457
Envoyez un courriel à consumerrelations@kaz.com
Ou visitez notre site Web à www.kaz.com
Caractéristiques électriques assignées
Les appareils de la série QuickSteamMCde Honeywell ont les caractéristiques assignées suivantes : 120 V, 60 Hz.
REMARQUE : NE RAMENEZ PAS L’APPAREIL À L’ENDROIT OÙ IL A ÉTÉ ACHETÉ. EN CAS DE PROBLÈME, VEUILLEZ
TÉLÉPHONER SANS FRAIS AU 1 800 477-0457. UN DE NOS PRÉPOSÉS AU SERVICE À LA CLIENTÈLE VOUS AIDERA ET
VOUS CONSEILLERA SUR LES ÉTAPES À SUIVRE.
MISE EN GARDE : NE TENTEZ PAS D’OUVRIR VOUS-MÊME LE BLOC MOTEUR OU LA BASE, CE QUI POURRAIT
ANNULER LA GARANTIE ET RISQUERAIT D’ENDOMMAGER L’HUMIDIFICATEUR ET OCCASIONNER DES
BLESSURES.
Tampons d’absorption des minéraux de rechange
Tampons d’absorption des minéraux : Numéro de modèle HMP-12P
Entretien de fin de saison et remisage
•
À la fin de la saison, ou dans le cas où l’humidificateur ne sera pas utilisé pendant plus d’une semaine, nettoyer l’appareil
conformément aux instructions d’entretien.
•
Laisser sécher l’humidificateur complètement avant de le remiser. ÉVITER de laisser de l’eau dans le plateau amovible, la
base ou le réservoir d’eau au moment de le ranger.
•
Placer l’humidificateur dans son emballage initial et le ranger dans un endroit frais et sec.
•
Avant de réutiliser l’humidificateur, penser à le nettoyer.
Nettoyage de la plaque chauffante (suite)
6. Utiliser une brosse non métallique ou un linge doux et sec pour nettoyer la plaque chauffante (Fig. 24). Celle-ci est faite en
acier inoxydable, il faut donc s’assurer d’utiliser des objets non abrasifs pour la nettoyer. Des dépôts peuvent subsister
sans toutefois nuire au fonctionnement de l’appareil.
MISE EN GARDE : NE PAS NETTOYER LA PLAQUE CHAUFFANTE SOUS LE ROBINET, AU RISQUE DE CAUSER
DES DOMMAGES MATÉRIELS OU DES BLESSURES.
QuickSteam_OM_04-25-06.qxd 4/25/06 4:53 PM Page 26
Page 27
Dépannage
Problème Cause possible Solution
Alimentation
L’appareil ne fonctionne pas, mais L’appareil a besoin d’être nettoyé. Nettoyer l’appareil (plaque chauffante, réservoir à minéraux, etc.)
quelques voyants sont allumés. et, au besoin, changer le tampon d’absorption de minéraux.
Le réservoir est vide. Remplir le réservoir d’eau et le remettre en place.
Le taux d’humidité est réglé trop bas. Régler le taux d’humidité à un degré plus élevé.
L’appareil est trop chaud. Éteindre l’appareil et le laisser refroidir.
Le bloc moteur n’est pas installé Réinstaller le bloc moteur.
correctement.
L’appareil n’est pas placé sur une Placer l’appareil sur une surface ferme, plane et bien horizontale.
surface bien horizontale.
Il y a trop d’humidité dans l’appareil. Éteindre l’appareil et le laisser sécher complètement.
L’appareil ne fonctionne pas La minuterie a éteint l’appareil. Appuyer sur le bouton d’alimentation.
et aucun voyant n’est allumé.
Le bloc moteur n’est pas installé Réinstaller le bloc moteur.
correctement.
Interruption d’alimentation. Appuyer sur le bouton d’alimentation.
Le taux d’humidité a été réglé, mais Le taux d’humidité est réglé trop bas. Régler le taux d’humidité à un degré plus élevé
l’appareil ne se met pas en marche.
Le taux d’humidité a été réglé, mais Le taux d’humidité est réglé trop haut. Régler le taux d’humidité à un degré plus bas.
l’appareil ne s’arrête pas.
Le disjoncteur s’est déclenché. Trop d’appareils sont branchés Débrancher les appareils qui ne sont pas nécessaires ou
sur le même circuit. brancher l’humidificateur sur un autre circuit.
Les voyants s’allument et s’éteignent. Interférence électrique. Brancher l’humidificateur sur un autre circuit (prise de courant).
Bruits
Crépitement, craquement L’appareil a besoin d’être nettoyé. Nettoyer l’appareil (plaque chauffante, réservoir à minéraux, etc.)
et, au besoin, changer le tampon d’absorption de minéraux.
Gargouillements L’appareil fonctionne normalement. Aucune
Il n’y a aucune différence sonore L’appareil fonctionne normalement. Aucune
entre le réglage élevé et le réglage bas.
Affichage du taux d’humidité
Le taux d’humidité affiché est De la vapeur et/ou de la condensation se Éteindre l’appareil et le laisser
trop élevé. sont formées sur le capteur d’humidité. sécher complètement.
Il y a trop d’eau dans l’appareil. Vider l’excédent d’eau qui se trouve dans la base et laisser
sécher complètement l’appareil.
Le taux d’humidité affiché est L’appareil est trop chaud. Éteindre l’appareil et le laisser refroidir.
trop bas.
Condensation
De la condensation se forme Le taux d’humidité est réglé trop haut. Régler le taux d’humidité à un degré plus bas et/ou réduire
sur les murs et/ou sur les vitres. l’émission de vapeur.
L’appareil est placé trop près des murs Déplacer l’appareil.
et/ou des vitres.
Il y a de la vapeur qui sort de la Il y a trop d’eau dans l’appareil. Vider l’excédent d’eau qui se trouve dans la base et laisser
grille avant. sécher complètement l’appareil.
27
QuickSteam_OM_04-25-06.qxd 4/25/06 4:53 PM Page 27
Page 28

28
© 2006 Kaz, Inc. Tous droits réservés.
P/N : 31IM0330195
Prière de lire toutes les instructions avant de
tenter d'utiliser ce produit.
A. Cette garantie limitée de 3 ans s'applique à la
réparation ou au remplacement d'un produit
comportant un vice de matière ou de maind'?uvre. Cette garantie ne s'applique pas aux
dégâts découlant d'un usage commercial,
abusif ou déraisonnable, ni aux dégâts
supplémentaires. Les défaillances résultant de
l’usure normale ne sont pas considérées
comme des vices de fabrication en vertu de la
présente garantie.
KAZ N'EST NULLEMENT RESPONSABLE
POUR LES DOMMAGES FORTUITS OU
INDIRECTS, QUELS QU'ILS SOIENT. TOUTE
GARANTIE IMPLICITE DE QUALITÉ
MARCHANDE ET DE CONVENANCE RELATIVE
À CE PRODUIT A LA MÊME DURÉE LIMITE
QUE LA PRÉSENTE GARANTIE.
Dans certaines régions, on ne permet pas
l’exclusion ou la limitation des dommages
fortuits ou indirects, ni les limites de durée
applicables à une garantie implicite; par
conséquent, il est possible que ces limitations
ou exclusions ne s’appliquent pas dans votre
cas. Cette garantie vous confère des droits
précis, reconnus par la loi. Ces droits diffèrent
d’une région à l’autre, et il est possible que
vous en ayez d’autres. Cette garantie
s'applique uniquement à l'acheteur initial de
ce produit, à compter de la date de l'achat
initial.
B. À sa discrétion, Kaz réparera ou remplacera ce
produit si l'on constate qu'il comporte un vice
de matière ou de main-d'?uvre. Tout produit
défectueux devrait être retourné à l'endroit où
il a été acheté, conformément à la politique du
magasin. Par la suite, tout produit défectueux
dont la garantie est toujours valide peut être
retourné à Kaz.
C. Cette garantie ne couvre pas les dommages
découlant des tentatives de réparation non
autorisées ou de toute utilisation non conforme
au présent manuel.
D. Retourner tout produit défectueux à Kaz, Inc.,
accompagné d'une brève description du
problème. Inclure une preuve d'achat et un
chèque ou un mandat de poste de 10,00 $US
ou de 15,50 $CAN pour les frais de
manutention, d'emballage de retour et
d'expédition. Prière d’indiquer nom, adresse et
numéro de téléphone durant la journée. Les
frais d'expédition doivent être payés à
l'avance. Adresser à :
Aux États-Unis :
Kaz, Inc.
Attn: Returns Department
4755 Southpoint Drive
Memphis, TN 38118
USA
Au Canada :
Kaz, Inc.
Attn : Returns Department
510 Bronte Street South
Milton (Ontario) L9T 2X6
Canada
Garantie limitée de 3 ans
QuickSteam_OM_04-25-06.qxd 4/25/06 4:53 PM Page 28
Page 29

MANUAL DE
UTILIZACIÓN
RENDIMIENTO DE 11,3 LITROS
(3 GALONES) DIARIOS
HUMIDIFICADORES DE VAPOR CALIENTE
Modelos :
HWM-330
HWM-331
HWM-335
Kaz, Inc. utiliza la marca de comercio Honeywell con autorización de Honeywell Intellectual Properties, Inc.
RENDIMIENTO DE 15,1 LITROS (4
GALONES) DIARIOS
HUMIDIFICADORES DE VAPOR CALIENTE
Modelo :
HWM-450
QuickSteam_OM_04-25-06.qxd 4/25/06 4:53 PM Page 29
Page 30

30
El uso de aparatos eléctricos requiere las siguientes precauciones
elementales para minimizar los riesgos de incendio, choque eléctrico o
heridas:
1. Coloque el humidificador sobre una superficie firme, plana y nivelada, pues puede que no funcione
sobre una superficie desigual.
2. Evite colocar el humidificador directemente sobre un mueble de madera ni ninguna otra superficie
que pueda dañarse con el agua.
3. CUIDADO: para evitar los riesgos de quemaduras graves, coloque el humidificador fuera del alcance
de los niños.
4. No ponga el humidificador cerca de ninguna fuente de calor como estufas, radiadores o aparatos de
calefacción.
5. Antes de usar el humidificador, compruebe que el cable de alimentación no esté dañado. En caso
contrario, NO USE EL APARATO, devuélvalo al fabricante para que lo repare, de acuerdo con la
garantía.
6. Este aparato viene con un enchufe polarizado (una patilla más ancha que otra). Para minimizar el
riesgo de choque eléctrico, sólo hay una forma de introducir el enchufe en la toma de corriente
polarizada. Si el enchufe no entra completamente, gírelo. Si aún así no logra introducir el enchufe en
la toma, llame a un electricista. El enchufe polarizado es un dispositivo de seguridad, NO LO EVITE.
7. Para desenchufar el aparato, apague los botones y saque el enchufe de la toma de corriente. Nunca
desenchufe el aparato tirando del cable de alimentación.
8. Una conexión suelta entre la salida de corriente alterna y el enchufe puede provocar recalentamiento
y deformación del enchufe. Pida a un electricista que cambie las tomas de corriente defectuosas o
sueltas.
9. Apague y vacíe el humidificador siempre que no vaya a usarlo y para limpiarlo o efectuar su
mantenimiento.
10. No incline ni desplace el humidificador mientras esté funcionando o esté lleno de agua.
DESENCHUFE el humidificador antes de moverlo.
11. Su humidificador requiere una limpieza asidua. Consulte las instrucciones de LIMPIEZA
adjuntas. No limpie el humidificador de ninguna otra forma que no sea la indicada en el
presente manual. Dependiendo de la cantidad de minerales del agua usada, deberá limpiar el
humidificador una vez por semana o más.
12. No sumerja la base en agua ni en ningún otro líquido. Evite verter agua por el orificio de salida del
vapor.
13. Nunca oriente el vapor directamente hacia personas, paredes o muebles.
14. Si usa el humidificador en un espacio cerrado o en una habitación pequeña, compruebe
periódicamente que haya la adecuada aireación pues demasiada humedad provocará manchas de
condensación en las paredes.
IMPORTANTES INSTRUCCIONES
DE SEGURIDAD
LEA Y CONSERVE LAS SIGUIENTES INSTRUCCIONES
DE SEGURIDAD ANTES DE USAR EL HUMIDIFICADOR
QuickSteam_OM_04-25-06.qxd 4/25/06 4:53 PM Page 30
Page 31

15. No intente retirar el recipiente para medicamentos, el bloque motor, el depósito del agua, la
bandeja amovible ni el filtro de absorción minerales mientras que el aparato esté funcionando
ni durante los 10-15 minutos después que lo haya desenchufado, podría causar graves
heridas. La bandeja de agua y el filtro de absorción de minerales sólo deben retirarsese para
la limpieza y el mantenimiento.
16. NO toque el vapor, podría quemarse.
17. NO obstruya la rejilla de salida del vapor, dañaría el humidificador.
31
INTRODUCCIÓN
¿CÓMO FUNCIONA?
SISTEMA DE VAPOR CALIENTE :
El agua circula por el aparato y es calentada y purificada por el elemento térmico QuickSteam
MC
.
Seguidamente, el aparato empuja el aire por la salida de aire superior dispersando en la habitación un
vapor invisible y exento de bacterias.
Partes del humidificador:
Depósito
de agua
Bloque
motor
Base
Recipiente para
medicamentos
Bandeja de agua
amovible
Tapón de
llenado
Asa del depósito
Filtro de
absorción
de minerales
Elemento
térmico
Rejilla de salida
del vapor
Depósito para minerales
QuickSteam_OM_04-25-06.qxd 4/25/06 4:53 PM Page 31
Page 32

32
Instalación
NOTA: Le recomendamos desinfectar el humidificador antes de
usarlo por primera vez. Consulte las INSTRUCCIONES DE
LIMPIEZA.
Coloque el humidificador sobre una superficie firme, plana y nivelada,
a al menos 15 cm (6 pulgadas) de las paredes y de cualquier otro
objeto para obtener una circulación de aire adecuada (Fig. 1).
Coloque el humidificador sobre una superficie resistente al agua,
pues el agua puede dañar los muebles y ciertos tipos de piso.
Kaz no se hace responsable de los daños materiales originados
por derrames de agua.
• Saque el depósito sujetando el asa y tirando hacia arriba (Fig. 1).
Colóquelo a un lado.
• Quite el bloque motor sujetándolo e inclinándolo ligeramente hacia
delante mientras tira hacia arriba, hasta que note que se suelta
(Fig. 2). Colóquelo a un lado.
• Quite la bandeja de agua (Fig. 3). Déjela a un lado.
• Coloque un filtro de absorción minerales horizontalmente sobre el
elemento térmico. Véase la sección FILTRO DE ABSORCIÓN DE
MINERALES (página 5) para más información.
• Vuelva a colocar la bandeja de agua.
• Vuelva a colocar el bloque motor asegurándose de instalarlo
correctamente. Alinee la parte trasera del bloque motor
directamente tras las lengüetas de la base y empuje firmemente
hasta que oiga un ligero clic. El bloque motor estará alineado con
la base (Fig. 4).
• Llene el depósito con agua fría del grifo (Fig. 5). Véase la sección
LLENADO (página 5) para más información.
NOTA : Conserve el embalaje para guardar el humidificador al
final de la temporada. (Véase la sección LIMPIEZA AL FINAL DE
LA TEMPORADA Y ALMACENAMIENTO.)
Fig. 1
WALL
6"
Fig. 2
Base
Power
Unit
Fig. 3
Removable
Water Tray
Base
Fig. 4
QuickSteam_OM_04-25-06.qxd 4/25/06 4:53 PM Page 32
Page 33
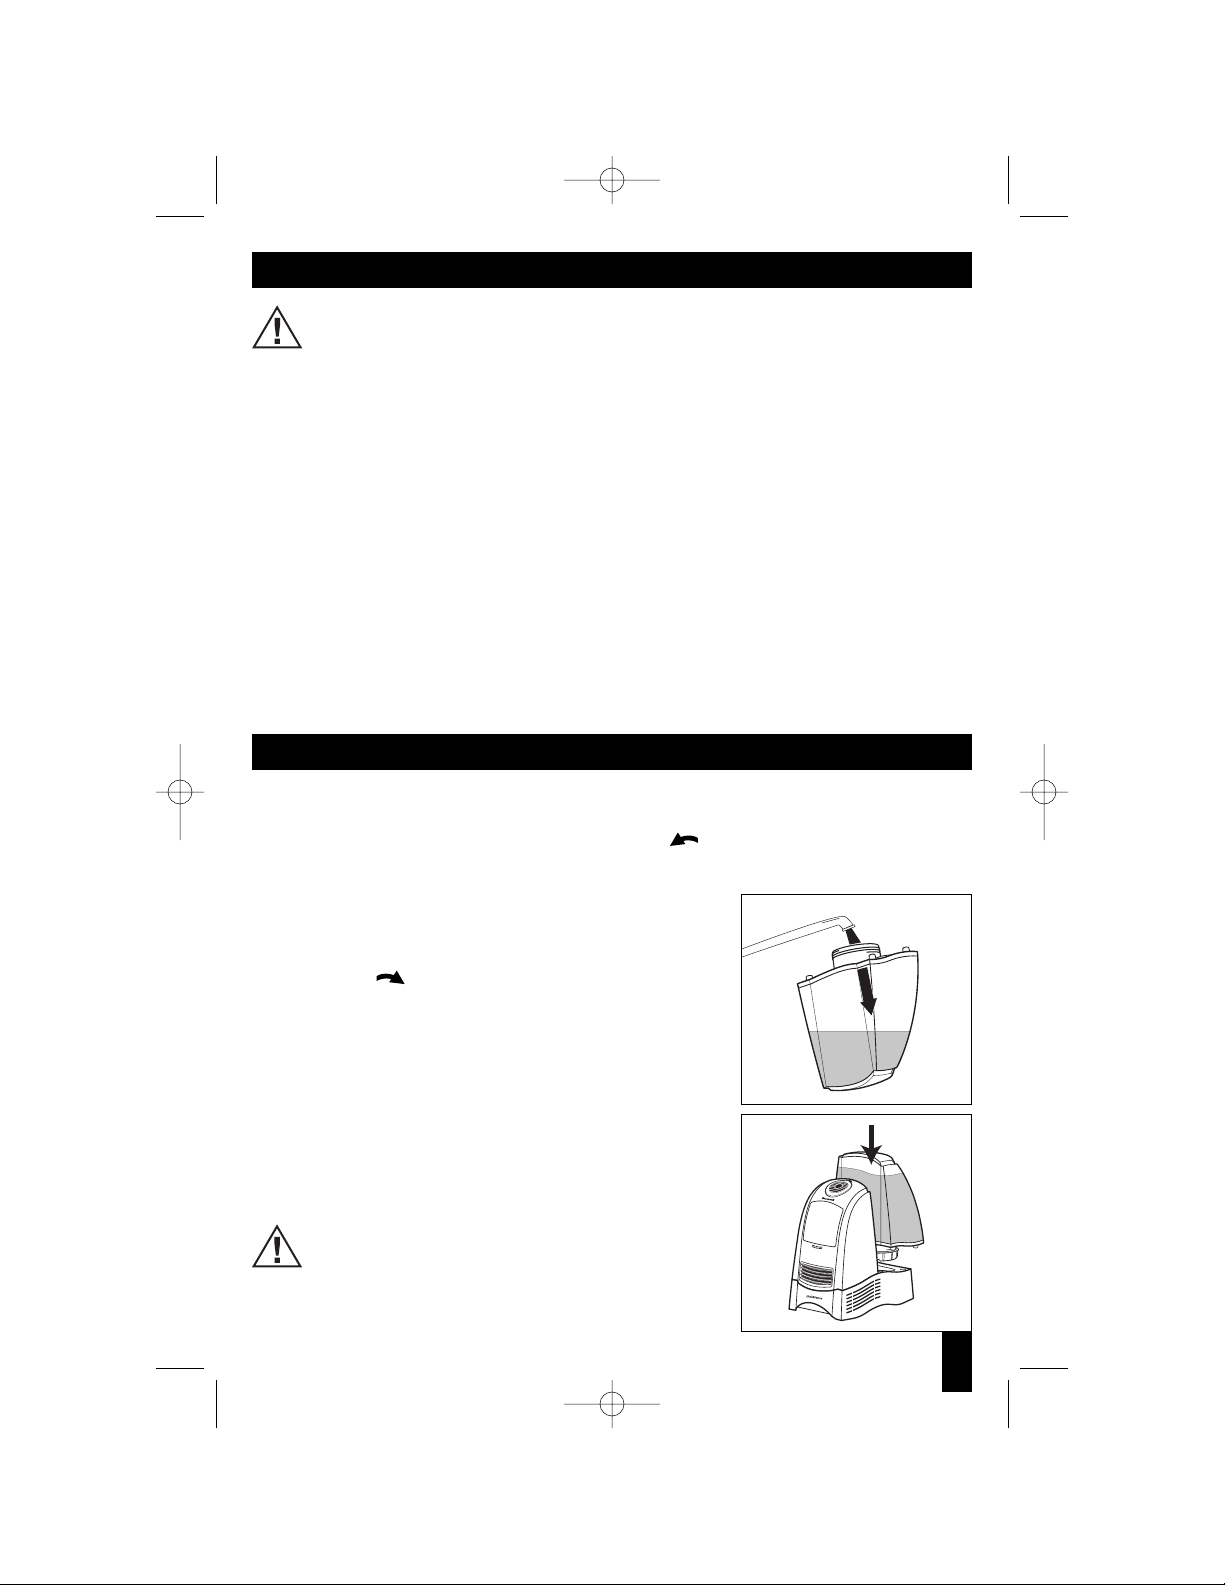
33
Instrucciones para los filtros de absorción de minerales
CUIDADO : LAS SUPERFICIES CALIENTES PUEDEN CAUSAR QUEMADURAS GRAVES.
NO TOQUE NINGUNA SUPERFICIE HASTA QUE NO SE ENFRÍE.
El agua contiene minerales y otras partículas. La cantidad de minerales varía según el tipo de agua de
cada región. Los minerales suelen fijarse al elemento térmico de los humidificadores disminuyendo su
eficacia. Los filtros de absorción de minerales retienen los minerales y disminuyen la acumulación
tenaz de minerales en el elemento térmico.
• Antes de poner en marcha el humidificador, coloque el filtro de absorción de minerales horizontalmente
sobre el elemento térmico. Después que el humidificador haya estado funcionando, el agua y las piezas
internas están CALIENTES por lo que debe manipular el filtro de absorción de minerales con
PRECAUCIÓN. Deje enfriarse el agua del humidificador y las piezas internas (10 a 15 minutos como
mínimo). Para evitar quemarse, use unas tenazas o unas pinzas para manipular el filtro.
• La duración del fitro de absorción de minerales varía según el contenido en minerales del agua usada.
Si su contenido en minerales es normal o moderado, deberá reemplazar el filtro de absorción de
minerales cada 2 semanas aproximadamente, si usa el humidificador continuamente. Una vez más, la
duración del filtro varía según el uso y la cantidad de minerales que contenga el agua usada.
• Para saber si necesita cambiar el filtro de absorción de minerales: DESPUÉS que haya dejado enfriarse
el agua, compruebe si el filtro sigue aún blando y flexible. Si está rígido y duro, debe cambiarlo. Otra
característica que le indica que el filtro de absorción de minerales debe ser sustituido es cuando el
elemento térmico empieza a tener escamas.
Llenado
• Saque el depósito sujetando el asa y tirando hacia arriba. Colóquelo a un lado (Fig. 4).
• Voltee el depósito de forma que la tapa de llenado quede mirando hacia arriba. Desenrosque la tapa de
llenado girándola en sentido contrario a las agujas del reloj y déjela a un lado.
• Llene el depósito con agua FRÍA del grifo (Fig. 5). NO USE AGUA CALIENTE, podría dañar el
humidificador.
• No es necesario utilizar agua destilada a menos que la dureza del
agua lo requiera para evitar la acumulación de minerales.
• Vuelva a colocar la tapa de llenado girándola en el sentido de las
agujas del reloj . NO APRIETE DEMASIADO. Vuelva a poner
derecho el depósito.
NOTA: no añada medicamentos ni ningún otro aditivo al agua.
NOTA: cuando mueva el depósito lleno de agua, sírvase del asa con
una mano y coloque la otra bajo el depósito para sostenerlo mejor.
• Coloque el depósito del agua en el humidificador e introdúzcalo hasta
encajarlo (Fig. 6).
• Si el depósito está colocado correctamente, debe caer agua en la
bandeja amovible.
• Una vez colocado el depósito lleno, no intente mover el humidificador.
Para evitar derrames, nunca mueva el humidificador una vez lleno.
CUIDADO: no vierta agua por la rejilla de la parte superior
del humidificador , podría dañarlo o causar lesiones.
Fig. 5
Fig. 6
QuickSteam_OM_04-25-06.qxd 4/25/06 4:53 PM Page 33
Page 34

34
Funcionamiento en modo manual (modelo HWM-330 y HWM-331)
PUESTA EN MARCHA
CUIDADO: NO ENCHUFE EL HUMIDIFICADOR CON LAS MANOS MOJADAS, PUEDE RECIBIR UN
CHOQUE ELÉCTRICO.
• Apague el interruptor de alimentación y enchufe el humidificador lleno
de agua en una toma de corriente polarizada de 120 V. NO FUERCE EL
ENCHUFE POLARIZADO PARA METERLO EN LA TOMA DE CORRIENTE.
El enchufe sólo entra de una sola manera en la toma.
CONTROL DE LA INTENSIDAD DE LA HUMEDAD
• Ajuste el selector de intensidad de la humedad en la posición que
desee (Fig. 7).
ELEVADA: para conseguir rápidamente la humedad deseada
BAJA: para el funcionamiento diario
• Modo continuo: el humidificador funcionará ininterrumpidamente
emitiendo vapor a la intensidad programada hasta que Ud. lo pare o
se vacíe.
REGULADOR DEL GRADO DE HUMEDAD
ADVANCED MIST
MC
El regulador de humedad Advanced MistMCle permite obtener el grado de
humedad que desee. El humidificador se pondrá en marcha y se
detendrá automáticamente día y noche para mantener el grado de
humedad seleccionado.
AJUSTE DEL REGULADOR DE HUMEDAD
Ponga en marcha el humidificador y seleccione la intensidad de la
humedad deseada. Seguidamente, coloque el regulador del grado de
humedad Advanced Mist
MC
al máximo girando completamente el selector
en el sentido de las agujas del reloj (Fig. 7).
• Deje el humidificador funcionando al máximo durante una hora como
mínimo o hasta que el nivel de humedad de la habitación sea
confortable.
• Seguidamente, gire lentamente el selector del grado de humedad en
el sentido contrario a las agujas de un reloj hasta que el
humidificador se detenga (Fig. 8).
• Una vez programado el regulador del grado de humedad, su
humidificador volverá a ponerse en marcha automáticamente cuando el nivel de humedad de la
habitación sea inferior al programado y se apagará automáticamente cuando obtenga dicho nivel.
NOTA: si el humidificador no se pone (o no vuelve a ponerse) en marcha una vez ajustada la intensidad de
la humedad, puede que haya programado el regulador del grado de humedad Advanced Mist
MC
demasiado
bajo. Gire completamente el selector en el sentido de las agujas de un reloj (Fig.7).
LLENADO / LIMPIEZA DEL HUMIDIFICADOR
• Cuando se prenda la luz de llenado/limpieza, significa que el humidificador está vacío o que debe
limpiarlo (Fig. 9).
• Compreube el nivel del agua. Si el depósito está vacío, apague el interruptor de alimentación y quite el
depósito. Llénelo siguiendo las instrucciones de LLENADO.
• Si el depósito está lleno significa que debe limpiar el humidificador. Apague y desenchufe el
aparato y siga las instrucciones de LIMPIEZA.
Llenado/
limpieza
Fig. 7
Fig. 8
Selector de la
intensidad de
la humedad
Regulador del grado
de humedad
Luz de
alimentación
(prendida)
Fig. 9
Luz de
lenado/limpieza
(prendida)
QuickSteam_OM_04-25-06.qxd 4/25/06 4:53 PM Page 34
Page 35

PUESTA EN MARCHA
CUIDADO: NO ENCHUFE EL HUMIDIFICADOR CON LAS
MANOS MOJADAS, PUEDE RECIBIR UN CHOQUE
ELÉCTRICO.
• Compruebe que el interruptor de alimentación está apagado y
enchufe el humidificador lleno de agua a una toma de corriente
polarizada de 120 V. NO FUERCE EL ENCHUFE POLARIZADO PARA
METERLO EN LA TOMA DE CORRIENTE. El enchufe sólo entra de una
sola manera en la toma.
ETAPA 1 : PUESTA EN MARCHA
• Ponga en marcha el humidificador pulsando el interruptor
alimentación. Su humidificador se pondrá en marcha
automáticamente al máximo y en modo continuo (Fig. 11).
• Para apagar el humidificador, basta con volver a pulsar el interruptor
de alimentación.
ETAPA 2 : CONTROL DE LA INTENSIDAD DE
LA DE HUMEDAD
El humidificador tiene 3 niveles de intensidad de humedad:
ELEVADA: para conseguir rápidamente la humedad deseada
NORMAL: para el funcionamiento diario
BAJA: para un funcionamiento más lento (ideal durante la noche)
• Pulse el botón (+) para aumentar la producción de humedad y el
botón (-) para disminuirla. Los diodos fotoemisores LED se
prenderán para indicar la intensidad seleccionada (Fig. 12).
• Modo continuo: el humidificador funcionará ininterrumpidamente
emitiendo el vapor a la intensidad programada hasta que Ud. lo pare
o que se vacíe.
ETAPA 3 : AJUSTE DEL GRADO DE HUMEDAD
• Ajuste el grado de humedad que desee, entre el 35 % y el 55 %.
• Pulse el botón (+) para aumentar el grado de humedad y el botón (-)
para disminuirlo. Los LED se prenderán para indicar el grado de
humedad seleccionado (Fig. 13).
Por ejemplo : Si ha seleccionado el 40 % de humedad, los LED de 35 % y 40 % se prenderán.
• Una vez programado el grado de humedad deseado, el humidificador funcionará según dicho ajuste
hasta que lo apague.
35
Funcionamiento en modo EasySetMC(modelo HCM-335)
Fig. 11
Selector de la
intensidad de
la humedad
Regulador del
grado de
humedad
Interruptor
(On/Off)
Fig. 12
Fig. 13
Luz de
llenado/
limpieza
Botón de
reiniciación
NOTA: el rendimiento de su humidificador disminuirá si no limpia el elemento térmico. Su
humidificador puede detenerse continuamente y emitir menos vapor.
NOTA: antes de poner en marcha el humidificador debe llenar de agua el depósito y volver a
colocarlo en su sitio.
Funcionamiento en modo manual (HWM-331)
REMARQUE: Ce produit est équipé d’un détecteur de
vapeur (Fig 10). Quand l’humidificateur produit de la
vapeur tiède, le détecteur de vapeur se trouvant sur le
contenant à médicament passe du gris au bleu. Quand
l’humidificateur produit de la vapeur tiède, le détecteur de vapeur se trouvant sur le contenant à
médicament passe du gris au bleu.
Fig. 10
QuickSteam_OM_04-25-06.qxd 4/25/06 4:53 PM Page 35
Page 36

• Una vez alcanzado el grado de humedad deseado en la habitación, el
aparato se detendrá automáticamente. (Los LED del grado de
humedad permanecerán prendidos.)
• El humidificador volverá a ponerse en marcha cada vez que la
humedad de la habitación sea inferior a la seleccionada.
NOTA: el grado de humedad de una habitación varía
constantemente. Es normal que el humidificador se ponga en
marcha y se detenga continuamente durante todo el día para
mantener el grado de humedad programado.
Para volver al modo continuo, apague y vuelva a prender el
humidificador y, seguidamente, seleccione la intensidad de la humedad
deseada (véase la etapa 2).
LUZ LLENADO / LIMPIEZA
• Cuando se prenda la luz de llenado/limpieza, significa que el humidificador está vacío o que debe
limpiarlo (Fig. 14).
• Compruebe el nivel del agua. Si el depósito está vacío, quítelo y llénelo siguiendo las instrucciones de
LLENADO.
• Vuelva a colocar el depósito en su sitio y pulse el botón de reiniciación (RESET) para volver a poner en
marcha el humidificador.
• El humidificador volverá a ponerse en funcionamiento según estaba programado.
• Si el depósito está lleno, significa que debe limpiar el humidificador. Apague y desenchufe el
aparato y siga las instrucciones de LIMPIEZA.
NOTA: antes de poner en marcha el humidificador debe llenar de agua el depósito y volver a
colocarlo en su sitio.
NOTA: el rendimiento de su humidificador disminuirá si no limpia el elemento térmico. Su
humidificador puede detenerse continuamente y emitir menos vapor.
36
PUESTA EN MARCHA
CUIDADO: NO ENCHUFE EL HUMIDIFICADOR CON LAS
MANOS MOJADAS, PUEDE RECIBIR UN CHOQUE
ELÉCTRICO.
• Compruebe que el interruptor de alimentación está apagado y
enchufe el humidificador lleno de agua a una toma de corriente
polarizada de 120 V. NO FUERCE EL ENCHUFE POLARIZADO PARA
METERLO EN LA TOMA DE CORRIENTE. El enchufe sólo entra de una
sola manera en la toma.
ETAPA 1 : PUESTA EN MARCHA
• Ponga en marcha el humidificador pulsando el interruptor de
alimentación. Su humidificador se pondrá en marcha automáticamente al máximo y en modo continuo.
La pantalla se prenderá y aparecerá el grado de humedad real de la habitación (Fig. 15).
• Para apagar el humidificador, basta con volver a pulsar el interruptor.
ETAPA 2 : CONTROL DE LA INTENSIDAD DE LA HUMEDAD
El humidificador tiene 3 niveles de intensidad de la humedad:
Funcionamiento en modo EasySetMCdigital (modelo HWM-450)
Fig. 15
Regulador
del grado
de humedad
Selector de la
intensidad
de la humedad
Botón del
temporizador
Luz del
grado de
humedad
deseado
Luz de
llenado/
limpieza
Luz de
llenado/limpiez
a (prendida)
Fig. 14
Interruptor
(On/Off)
Botón de
reiniciación
Botón de
reiniciación
Funcionamiento en modo EasySetMC(modelo HCM-335) (continuación)
QuickSteam_OM_04-25-06.qxd 4/25/06 4:53 PM Page 36
Page 37

37
ELEVADA: para conseguir rápidamente la humedad deseada
NORMAL: para el funcionamiento diario
BAJA: para un funcionamiento más lento (ideal durante la noche)
• Para cambiar el nivel de intensidad de la humedad, pulse el selector
correspondiente
( ) hacia arriba o hacia abajo (Fig. 16).
• Una vez programado el nivel de intensidad de la humedad, espere 3
segundos y el grado de humedad real de la habitación volverá a
aparecer en la pantalla.
NOTA: si desea cambiar o comprobar el grado de humedad, basta con
pulsar el selector de intensidad de la humedad para que el nivel
programado aparezca en la pantalla. Para cambiarlo, mantenga
pulsado el botón hacia arriba o hacia abajo hasta que aparezca el grado deseado. Espere 3 segundos y
el grado de humedad real de la habitación volverá a aparecer en la
pantalla.
Modo continuo: el humidificador funcionará ininterrumpidamente
emitiendo vapor a la intensidad programada hasta que Ud. lo pare o
que se vacíe.
ETAPA 3 : AJUSTE DEL TEMPORIZADOR
• Puede ajustar el temporizador por un período de hasta 18 horas. Use
esta función únicamente si desea que el humidificador se detenga
automáticamente transcurrido cierto tiempo.
• Pulse el botón del temporizador ( ) hacia arriba o abajo para
programar el tiempo que desee que su aparato funcione (Fig. 17).
• Cuando aparezca en la pantalla el tiempo deseado, espere 3 segundos y la humedad ambiente volverá a
aparecer en la pantalla.
NOTA : para cambiar el ajuste del temporizador o comprobar cuánto
tiempo queda, basta con pulsar una vez el botón del temporizador y
aparecerá el tiempo que queda en la pantalla. Para modificar el tiempo
que queda, mantenga pulsado el botón del temporizador hacia arriba o
abajo hasta que obtenga el tiempo deseado. Pasados 3 segundos, la
humedad ambiente volverá a aparecer en la pantalla.
ETAPA 4 : AJUSTE DEL GRADO DE HUMEDAD
• Puede programar el grado de humedad que desee, entre el 25 % y el
65 %, grado a grado.
• Para ajustar el grado de humedad, pulse el selector del grado de humedad ( ) hacia arriba o abajo
(Fig. 19).
• Una vez que aparezca el grado de humedad deseado, espere 3
segundos.
• Pasados 3 segundos, el grado de humedad está programado y
volverá a aparecer el nivel de humedad real de la habitación.
NOTA : para cambiar el grado de humedad programado o comprobarlo,
basta con pulsar una vez el selector del grado de humedad y aparecerá
en la pantalla. Para modificarlo, mantenga pulsado el selector del grado
de humedad hacia arriba o abajo hasta que obtenga el grado deseado.
Pasados 3 segundos, el nivel de humedad ambiente volverá a aparecer
en la pantalla.
Digital EasySet™Control Operation (Model HWM-450) (continuación)
Fig. 18
Fig. 19
Fig. 17
Fig. 16
Botón de
reiniciación
QuickSteam_OM_04-25-06.qxd 4/25/06 4:53 PM Page 37
Page 38

• Una vez programado el grado de humedad, el humidificador
funcionará según dicho ajuste hasta que lo apague.
• Una vez alcanzado el grado de humedad deseado en la habitación, el
aparato se detendrá. Entonces se prenderá el símbolo de una casa
( ) en la parte superior de la pantalla (Fig. 18), el cual permanecerá
prendido hasta que baje el grado de humedad de la habitación y el
humdificador vuelva a ponerse en marcha.
NOTA: el grado de humedad de una habitación varía
constantemente. Es normal que el humidificador se ponga en
marcha y se detenga continuamente durante todo el día para
mantener el grado de humedad programado.
LUZ DE LLENADO/LIMPIEZA
• Cuando se prenda la luz de llenado/limpieza, significa que el humidificador está vacío o que debe
limpiarlo.
• Compreube el nivel del agua. Si el depósito está vacío, quítelo y llénelo siguiendo las instrucciones de
LLENADO.
• Vuelva a colocar el depósito en su sitio y pulse el botón de reiniciación (RESET) para volver a poner en
marcha el humidificador (Fig. 20).
• El humidificador volverá a ponerse en funcionamiento según estaba programado.
• Si el depósito está lleno, significa que debe limpiar el humidificador. Apague y desenchufe el
aparato y siga las instrucciones de LIMPIEZA.
NOTA: antes de poner en marcha el humidificador debe llenar el depósito de agua y volver a
colocarlo en su sitio.
NOTA: el rendimiento de su humidificador disminuirá si no limpia el elemento térmico. Su
humidificador puede detenerse continuamente y emitir menos vapor.
38
CUIDADO : EL VAPOR CALIENTE PUEDE CAUSAR
QUEMADURAS GRAVES. NO TOQUE EL RECIPIENTE PARA
MEDICAMENTOS MIENTRAS NO ESTÉ FRÍO.
Sírvase del recipiente para medicamentos situado en la parte superior del
aparato si desea obtener vapor medicamentoso. Para poner un
medicamento en dicho recipiente:
• Apague el humidificador y deje que se enfríe durante 10 minutos.
• Retire el recipiente para medicamentos del humidificador tirando
con fuerza hacia arriba (Fig. 21).
• Llene la mitad del recipiente con el medicamento líquido. Vierta el
medicamento únicamente en la parte pequeña ovalada, nunca en la zona de la rejilla
• Vuelva a colocar con cuidado el recipiente para medicamentos en el aparato.
• Tras su uso, retire el recipiente para medicamentos del humidificador y lávelo con agua caliente. Una
vez limpio y seco vuelva a colocarlo en el humidificador.
CUIDADO: USE ÚNICAMENTE MEDICAMENTOS LÍQUIDOS ESPECIALMENTE RECOMENDADOS PARA
VAPORIZADORES O HUMIDIFICADORES DE VAPOR CALIENTE. NO VIERTA EL MEDICAMENTO POR LA
REJILLA DELANTERA NI FRONTAL NI TAMPOCO EN EL DEPÓSITO PARA EL AGUA.
KAZ QUEDA EXENTA DE TODA RESPONSABILIDAD RELATIVA AL USO DE MEDICAMENTOS EN EL
PRESENTE HUMIDIFICADOR.
Fig. 21
Vierta aquí el
medicamento
Recipiente para Medicamentos
Digital EasySet™Control Operation (Model HWM-450) (continuación)
Fig. 20
QuickSteam_OM_04-25-06.qxd 4/25/06 4:53 PM Page 38
Page 39

39
CUIDADO: NO LIMPIE EL HUMIDIFICADOR MIENTRAS ESTÉ
CONECTADO A UNA TOMA DE CORRIENTE, PODRÍA RECIBIR
UN CHOQUE ELÉCTRICO.
Se recomienda limpiar el humidificador una vez por semana o más si el
agua del grifo es dura, si se acumulan impurezas o si el aparato
desprende un olor desagradable. No nos cansaremos de recalcar la
importancia de la limpieza y el mantenimiento asiduos.
La limpieza se efectúa en 2 etapas: quitar las incrustraciones y
desinfectar. Dichas etapas no deben invertirse para evitar una
interacción peligrosa de los productos químicos.
• Apague y desenchufe el humidificador. Deje que se enfríe entre 10 y 15 minutos como mínimo.
• • Quite el depósito del agua.
• Quite el bloque motor sujetándolo e inclinándolo ligeramente hacia
delante al mismo tiempo que tira hacia arriba hasta que note que se
suelta (Fig. 22). Colóquelo a un lado.
• Quite la bandeja de agua (Fig. 23). Déjela a un lado. No olvide
limpiar el fondo del receptáculo de agua en la base, los
minerales suelen acumularse en él, por lo cual merece especial
atención.
• Vacíe el agua de la base y de la bandeja amovible.
• Compruebe que el elemento térmico se ha enfriado suficientemente.
• Retire el filtro de absorción de minerales con unas tenazas o una pinzas e inspecciónelo. Inspeccione
igualmente el elemento térmico de la base. Si hay mucha acumulación de minerales, siga las
instrucciones de limpieza del elemento térmico.
CAUTION: DO NOT SUBMERGE THE BASE IN WATER. DOING SO MAY CAUSE PROPERTY
DAMAGE OR PERSONAL INJURY. ALLOW THE HUMIDIFIER TO DRY COMPLETELY BEFORE
PLUGGING INTO POWER OUTLET.
LIMPIEZA SEMANAL
Fig. 22
Base
Power
Unit
Fig. 23
Removable
Water Tray
Mineral Reservoir
Base
ETAPA 1:
QUITAR LAS INCRUSTRACIONES
Bandeja amovible
1. Llene la bandeja amovible (Fig. 3) con :
• 1 taza (250 ml) de vinagre blanco no diluido
2. Deje actuar durante 20 minutos.
3. Sin retirar el vinagre de la bandeja, limpie
todas las superficies interiores con un paño
suave o un cepillo blando para eliminar las
incrustraciones.
4. Enjuague a fondo con agua la bandeja
amovible para eliminar las incrustraciones
y la solución de lavado.
ETAPA 2 :
DESINFECCIÓN
Water Tank/Removable Tray
1. Fill the Water Tank with:
• 1 teaspoon of household bleach
and
• 1 gallon of water
Pour some of this solution into the
Removable Tray.
2. Let solution stand for 20 minutes.
3. Rinse with water until the smell of bleach
is gone.
NOTA: la bandeja de agua amovible y el
recipiente para medicamentos pueden lavarse en
la parte superior del lavaplatos.
NOTA: la bandeja de agua amovible y el recipiente para medicamentos pueden lavarse en la parte
superior del lavaplatos.
QuickSteam_OM_04-25-06.qxd 4/25/06 4:53 PM Page 39
Page 40

40
CUIDADO: LAS SUPERFICIES CALIENTES PUEDEN CAUSAR
GRAVES QUEMADURAS. NO LAS TOQUE HASTA QUE NO
ESTÉN FRÍAS.
CUIDADO: NO LIMPIE EL HUMIDIFICADOR MIENTRAS ESTÉ
ENCHUFADO A UNA TOMA DE CORRIENTE, PUEDE RECIBIR
UNA DESCARGA ELÉCTRICA.
Si la eficacia del humidificador dismuye o la luz de llenado/limpieza
permanece prendida a pesar de que el depósito esté lleno, quizás
deba limpiar el elemento térmico y el depósito para minerales de los
minerales acumulados. También puede que necesite sustituir el filtro
de absorción de minerales.
La frecuencia de estos cuidados especiales dependerá de la dureza del agua y de la rapidez a la que se
acumulen los minerales en las superficies interiores del humidificador.
1. Apague y desenchufe el humidificador. Déjelo enfriar al menos 15 minutos.
2. El elemento térmico se encuentra en el fondo de la base. Para acceder a éste, incline el motor
ligeramente hacia delante a la vez que tira de él hacia arriba hasta que se suelte (Fig. 22). Deje el
motor a un lado.
3. Retire la bandeja de agua y déjela a un lado (Fig. 23).
4. Retire el filtro de absorción de minerales con unas tenazas o unas pinzas para no quemarse.
5. COMPRUEBE QUE EL ELEMENTO TÉRMICO SE HA ENFRIADO SUFICIENTEMENTE. Vacíe el agua que se
encuentra en la base y quite los restos minerales del depósito para minerales. No olvide limpiar el
fondo del depósito para minerales.
6. Use un cepillo no metálico o un paño suave y seco para limpiar el elemento térmico (Fig. 24). El
elemento térmico es de acero inoxidable, no puede usar objetos abrasivos para limpiarlo. No se
preocupe si quedan algunos residuos, no afectarán al funcionamiento del aparato.
CUIDADO: NO LIMPIE EL ELEMENTO TÉRMICO BAJO EL GRIFO, PODRÍA DAÑARLO O
DAÑARSE.
Fig. 24
Elemento
térmico
Filtro de absorción
de minerales
Depósito para
minerales
Limpieza del elemento térmico
QuickSteam_OM_04-25-06.qxd 4/25/06 4:53 PM Page 40
Page 41

41
Atención al Cliente
Envíe sus preguntas o comentarios a:
Kaz, Inc.
Consumer Relations Dept.
250 Turnpike Road
Southborough, MA 01772
Mantenimiento al Final de Temporada y Almacenamiento
• Al final de la temporada o si no va a usar el humidificador durante una semana o más, límpielo
siguiendo las instrucciones de LIMPIEZA.
• Deje secar el humidificador completamente antes de guardarlo. NO lo guarde con agua en la bandeja
amovible, en la base ni en el depósito.
• Meta el humidificador en su embalaje original y guárdelo en un lugar fresco y seco.
• Antes de volver a usar el humidificador recuerde que debe limpiarlo.
Filtros de Absorción de Minerales de Recambio
Filtros de absorción de minerales: Número de modelo HMP-12P
Características Eléctricas
Las características eléctricas de los aparatos de la serie QuickSteamMCde Honeywell son : 120 V, 60 Hz.
NOTA: NO DEVUELVA EL APARATO AL LUGAR DONDE LO COMPRÓ. EN CASO DE PROBLEMA CON EL
APARATO, LLÁMENOS GRATIS AL 1 800 477-0457. UNO DE NUESTROS EMPLEADOS DEL SERVICIO DE
ATENCIÓN AL CLIENTE LE AYUDARÁ Y LE SUGERIRÁ CÓMO PROCEDER.
CUIDADO: NO INTENTE ABRIR EL BLOQUE MOTOR NI LA BASE, PODRÍA ANULAR LA
GARANTÍA Y DAÑAR EL HUMIDIFICADOR O ACCIDENTARSE.
Por favor, indique el número de modelo.
Llame gratis al: 1-800-477-0457
Envíe un correo electrónico a: consumerrelations@kaz.com
O visite nuestro sitio Web: www.kaz.com
QuickSteam_OM_04-25-06.qxd 4/25/06 4:53 PM Page 41
Page 42

42
Problemas
Problema Causa posible Solución
Funcionamiento
El humidificador no funciona, Necesita limpiar el humidificador. Limpie el aparato (elemento térmico, depósito
pero hay luces prendidas. para minerales, etc.) y si es necesario, cambie
el filtro de absorción de minerales.
El depósito está vacío. LLene el depósito de agua y vuelva a colocarlo.
El grado de humedad está Aumente el ajuste del grado de humedad.
demasiado bajo
El aparato está demasiado caliente Apague el aparato y deje que se enfríe.
El bloque motor no está Vuelva a instalar el bloque motor.
instalado correctamente.
El aparato no está sobre una Coloque el aparato sobre una superficie firme,
superficie bien horizontal. llana y bien horizontal.
Hay demasiada humedad Apague el aparato y
en el aparato. déjelo secar completamente.
El humidificador no funciona El temporizador lo ha detenido. Pulse el interruptor
y todas las luces están de alimentación.
apagadas.
El bloque motor no está instalado Vuelva a instalar el bloque motor.
correctamente.
Interrupción de la corriente. Pulse el interruptor de alimentación.
El grado de humedad está El grado de humedad está Aumente el ajusteunit does not start
programado, pero el aparato programado demasiado bajo. del grado de humedad.
no se pone en marcha.
El grado de humedad está El grado de humedad está Disminuya el ajusteunit does not shut off
programado, pero el aparato programado demasiado alto. del grado de humedad.
no se detiene.
El fusible ha saltado. Demasiasdos aparatos conectados Desenchufe los aparatos que no sean necesarios
al mismo circuito. o conecte el humidificador a otro circuito.
Las luces se prenden Interferencia eléctrica. Conecte el humidificador a
y se apagan. otro circuito (toma de corriente).
Ruidos
Crepitación, crujido Necesita limpiar el humidificador. Limpie el aparato (elemento térmico,
depósito para minerales, etc.)
Gorgoteo El humidificador funciona No necesaria.
normalmente.
Hace el mismo ruido El humidificador funciona No necesaria.
funcionando al máximo normalmente.
que al mínimo.
QuickSteam_OM_04-25-06.qxd 4/25/06 4:53 PM Page 42
Page 43

Humedad en la pantalla
La humedad programada Hay vapor y/o condensación Apague el humidificador
es demasiado elevada. en el detector de humedad. y deje que se seque completamente.
Hay demasiada agua Vacíe el excedente de agua de la base y
en su humidificador. deje secar completamente el humidificador.
La humedad programada El humidificador está Apague el humidificador
es demasiado elevada. demasiado caliente. y deje que se enfríe.
Condensación
Hay vaho en las paredes El grado de humedad programado Disminuya el ajuste del grado de humedad y/o
o en los cristales. es demasiado elevado. reduzca la intensidad de la humedad.
El humidificador se encuentra Desplace el humidificador.
demasiado cerca de las paredes
y/o ventanas.
Hay vapor y/o concensación Hay demasiada agua en el Vacíe el excedente de agua completely de la base
que sale de la rejilla delantera. humidificador. deje y secar completamente el humidificador.
43
Problemas (continuación)
QuickSteam_OM_04-25-06.qxd 4/25/06 4:53 PM Page 43
Page 44

44
© 2006 Kaz, Inc. Reservados todos los derechos.
P/N : 31IM0330195
Por favor, lea todas las instrucciones antes de
usar el radiador.
A. La presente garantía limitada de 3 años cubre
la reparación o sustitución de todo producto
con un defecto de fábrica o de mano de obra.
Esta garantía excluye los defectos ocasionados
por el uso comercial, abusivo o desrazonable y
los daños adicionales. Los fallos resultantes
del desgaste normal no se consideran defectos
de fábrica en virtud de la presente garantía
KAZ QUEDA EXENTA DE TODA
RESPONSABILIDAD POR DAÑOS FORTUITOS
O INDIRECTOS DE TODO TIPO. TODA
GARANTÍA IMPLÍCITA DE CALIDAD
COMERCIAL O DE CONVENIENCIA
RELACIONADA CON ESTE PRODUCTO
TENDRÁ LA MISMA VIGENCIA QUE LA
PRESENTE GARANTÍA.
En ciertos lugares no se permite la exclusión o
limitación a daños fortuitos o indirectos, ni los
límites de duración aplicables a una garantía
implícita. Por consiguiente, es posible que
estas limitaciones o exclusiones no se apliquen
en su caso. Esta garantía le confiere unos
derechos precisos, reconocidos por la ley.
Dichos derechos difieren de un lugar a otro y
es posible que usted tenga otros. La presente
garantía sólo será válida con la compra inicial
del producto a partir de la fecha de compra
inicial.
B. Kaz se reserva todo derecho de reparación o
sustitución del presente producto si se
constata que presenta un defecto de fábrica o
mano de obra. Todo producto defectuoso debe
devolverse al lugar donde lo compró y de
acuerdo con la política de dicho comercio.
Seguidamente, todo producto defectuoso cuya
garantía esté en vigor, podrá ser devuelto a
Kaz.
C. Esta garantía no cubre los daños ocasionados
por tentativas de reparación no autorizadas o
por el uso no conforme con el presente
manual.
D. Para devolver un producto defectuoso a Kaz,
Inc., adjunte una descripción breve del
problema junto con una prueba de compra y
un cheque o giro postal de 10,00 $ US ó 15,50
$ CAD para los gastos de manutención,
embalaje de vuelta y reenvío. Indique su
nombre, dirección y un número de teléfono
donde podamos localizarle durante el día. Los
gastos de envío deben pagarse por
adelentado. Enviar a:
En los Estados Unidos :
Kaz, Inc.
Attn: Returns Department
4755 Southpoint Drive
Memphis, TN 38118
USA
En Canadá:
Kaz, Inc.
Attn: Returns Department
510 Bronte Street South
Milton (Ontario) L9T 2X6
Canada
GARANTÍA LIMITADA DE 3 AÑOS
QuickSteam_OM_04-25-06.qxd 4/25/06 4:53 PM Page 44
 Loading...