

Page 1
Honeywell
Excel CARE
INSTALLATION GUIDE
EN1B-0478GE51 R1216
HONEYWELL EXCEL 5000 OPEN SYSTEM
Page 2

EN1B-0478GE51 R1216 Copyright © 2016 Honeywell Inc. • All Rights Reserved
Trademark Information Echelon, LON, L
ONMARK, LONWORKS, LonBuilder, NodeBuilder, LonManager,
LonTalk, LonUsers, LonPoint, Neuron, 3120, 31701, the Echelon logo, the LonMark
logo, and the LonUsers logo are trademarks of Echelon Corporation registered in
the United States and other countries. LonLink, LonResponse, LonSupport, and
LonMaker are trademarks of Echelon Corporation.
BACnet is a registered trademark of the American Society of Heating, Refrigerating
and Air-Conditioning Engineers, Inc.
Microsoft and Windows are registered trademarks of Microsoft Corporation. Other
brands and their products are trademarks or registered trademarks of their
respective holders and should be noted as such.
Page 3

EN1B-0478GE51 R1216
Excel CARE
V 10.07.00
INSTALLATION GUIDE
Software License Advisory This document supports software that is proprietary to Honeywell Inc. and/or to third
party software vendors. Before software delivery, the end user must execute a
software license agreement that governs software use. Software license
agreement provisions include limiting use of the software to equipment furnished,
limiting copying, preserving confidentiality, and prohibiting transfer to a third party.
Disclosure, use, or reproduction beyond that permitted in the license agreement is
prohibited.
Page 4

INSTALLATION GUIDE CARE
EN1B-0478GE51 R1216
Page 5

CARE INSTALLATION GUIDE
5 EN1B-0478GE51 R1216
CONTENTS
APPLICABLE LITERATURE .............................................................................................. 7
SYSTEM REQUIREMENTS ................................................................................................ 7
INSTALLATION .................................................................................................................. 8
USB DRIVER INSTALLATION FOR WINDOWS 7 .......................................................................................... 10
EXCEL WEB Controller ........................................................................... 10
EXCEL WEB II Controller ........................................................................ 10
USB DRIVER INSTALLATION FOR WINDOWS 8 .......................................................................................... 15
FALCON Controller ................................................................................. 15
EAGLE Controller .................................................................................... 16
USB DRIVER INSTALLATION FOR WINDOWS 10 ........................................................................................ 20
MAINTENANCE OF CARE .............................................................................................................................. 21
LICENSING ....................................................................................................................... 22
CUSTOMIZE WINDOWS DEFAULT REGIONAL AND LANGUAGE SETTINGS ............ 23
Page 6

INSTALLATION GUIDE CARE
EN1B-0478GE51 R1216 6
Page 7

CARE INSTALLATION GUIDE
7 EN1B-0478GE51 R1216
APPLICABLE LITERATURE
Form No. Title
74-5587 (US) Excel CARE User Guide
EN2B-0182 (Europe)
74-3556 (US) Excel Live CARE User Guide
EN2B-0183 (Europe) Instructions for using Live CARE software to access controller files on-line and
simulate operation
74-5577 (US) Excel CARE Control Icons User Guide
EN2B-0184 (Europe) Descriptions and application examples of control icons used in the CARE control
strategy
EN2B-162 RACL Editor User Guide
Graphical Editor for creation oft strategy logic programs for Excel 800/500
controllers.
74-3594 (US) ASPECD Editor User Guide
EN2B-185 (Europe) Provides functions to modify the user interface for Excel Operator Terminals
EN2B-0289GE51 EXCEL W EB User Guide
Comprehensive description of the EXCEL WEB BACnet controller function
EN2B-0092 Excel 50/100/500/600/800 Software Description
Fundamentals of the Excel 5000 system
EN2B-1031GE02 Excel OpenLink Point Server User & Installation Guide
EN3B-1007 Excel OpenLink Point Server Flyer
SYSTEM REQUIREMENTS
Hardware Requirements
• Minimum Pentium PC 133 MHz (333 MHz highly recommended).
• Graphic board and monitor, which support at least 1024 x 768 pixel
(1024 x 768 recommended)
• Minimum 32 MB RAM (128 MB recommended)
• Minimum* 100 free space on PC disk drive (200 MB recommended)
Printers supported by MS-Winword (HP LaserJet recommended)
* Check for free space while in Windows. When Windows is running, it can use
large pieces of disk space, for example, for a temporary swap file. If you check
while in DOS, you may think you have enough memory, but you will have less
after you start Windows. For software localization and creation of local language
installations, a minimum of 100 MB free disk space is required.
Software Requirements
• Microsoft
®
Windows 7, -8
For Enhanced Printout: Office 2007 and 2010 for Windows 7, Office 2007, 2010
and 365 for Windows 8
• For localization of the software components: Visual Localize 2.01.01 or higher.
Page 8

INSTALLATION GUIDE CARE
EN1B-0478GE51 R1216 8
INSTALLATION
Windows 7 and 8 Administrator Privileges
If CARE 10.07.00 is installed on a Windows 7 or Windows 8 PC, the CARE user
must have administrator privileges. If the CARE user has set up the PC on which
CARE will be installed, administrator privileges are automatically assigned to the
user by default. If the CARE user has not set up the PC, the administrator must
provide administrator privileges to the user or must install CARE on the user´s PC.
IMPORTANT
CARE can only be run as non-administrator if it has been installed in any
of the fore-mentioned ways.
The following CARE components cannot be installed under Windows 64Bit Versions:
- LiveCARE
- ASPECD Editor
- RACL Editor
Windows 8 .NET
When installing CARE the first time, you must be connected to the internet to
ensure proper installation of .NET.
LNS
With Windows 8 you cannot support LNS. Hence, all functions based on LNS, e.g.
database synchronization and plugins, will not work. Normal LON engineering
within CARE is fully supported.
Several Licenses of It is only possible to install one Version of CARE 10.07.00 on the same PC.
CARE 10.07.00 on Same PC?
Different CARE Versions When installing CARE 10.07.00 into a CARE folder where a previous CARE version
on Same PC is installed, all files of the previous CARE installation will be deleted. If you want to
keep an old CARE version running on the same PC additionally to CARE 10.07.00,
you should install CARE 10.07.00 into a different folder.
In case of installation of CARE 1.3.X and CARE 10.07.00 on the same PC, CARE
10.07.00 should not be installed into the "CARE"-subdirectory because this is the
directory automatically used by the CARE 1.3.X setup procedure. Choose a
different name, e.g. C:\CAR10.07.00 instead.
In case the element library of an already installed CARE version is different from the
element library of CARE 10.07.00, run an element library backup in your legacy
CARE version. This is required only for CARE 1.4.1 and higher. The element library
backup could then be merged in the new CARE version via the
“Database/Import/Element Library” command as soon as the new CARE version is
installed.
Installation Path The DOS path is restricted to 17 characters. This limit can easily be reached when
selecting an installation directory consisting of several folder levels of which each
level is relatively long. To use long paths to be displayed in the Windows Explorer
without exceeding the DOS restriction it is recommended to use no subfolders. The
folder name can then be as long as desired:
Example:
C:\CARE100_LICENSE_FOR_MR_KLEIN_ßTEST_30062012
The length of the DOS path affects also the function of the CAREDB.TAF file which
CARE uses for its database functions. Your PC may already have an older version
of this file that is in use by other RAIMA-type applications. To ensure that CARE
finds the correct CAREDB.TAF file, the DOS path to the CARE installation directory
should be less than 17 characters.
CentraLine Software and CARE It is possible to run CARE and ARENA, and COACH on the same PC at the same
time.
General Procedure 1. Start Windows software, if not already operating.
Page 9

CARE INSTALLATION GUIDE
9 EN1B-0478GE51 R1216
2. Insert the protection plug containing the valid CARE license.
3. Check the amount of free disk space that is available on the drive where you
want to install CARE.
IMPORTANT
If a CARE directory already exists, first back up the CARE database and
Element Library, then copy your specific PIC and XFM files and the default
files from the PCBSTD folder to a save location.
4. Download the CARE installation files from http://tools.ge51.honeywell.de.
5. Extract the .ZIP. file to a folder on a local PC drive.
IMPORTANT
CARE must not be installed from a network drive because the Repair and
Modify functions will not be available.
6. For Windows 7 and 8, right-click the SETUP.EXE program and then click Run
as administrator.
RESULT: The Welcome dialog box displays.
7. Click Next > to continue.
RESULT: A dialog box with the license agreement displays.
8. Read the license agreement carefully. Then click Yes
RESULT: The Choose Destination Location dialog box displays.
9. Keep default destination folder or click Browse button and choose another
folder where you want CARE to be installed.
NOTES: The DOS path is restricted to 17 characters. This limit can easily be
reached when selecting a destination location consisting of several
folder levels of which each level is relatively long. To use long paths to
be displayed in the Windows Explorer without exceeding the DOS
restriction it is recommended to use no subfolders. The folder name
can then be as long as desired:
Example:
C:\CARE902_LICENSE_FOR_MR_KLEIN_ßTEST_30062011
10. Click Next >.
RESULT: The Select Components dialog box displays.
11. Select the CARE components you want to be installed.
NOTES: To use ASPECD Editor and/or RACL Editor, an additional license has
to be ordered.
DIN Element library installs a CARE database without elements, but
with DIN pic files and one heating, cooling and air-conditioning
element library.
12. Click Next > to continue.
RESULT: The Select Program folder dialog box displays.
13. Edit program folder name, if desired, or confirm by clicking Next >.
14. The Start Copying Files dialog box is displayed showing all selected
components.
Page 10
INSTALLATION GUIDE CARE
EN1B-0478GE51 R1216 10
15. Click Next > to continue.
RESULT: Setup installs the selected components. Setup also creates a copy
of the existing CARE.INI file in the Windows and WINNT directory,
respectively.
After all files have been copied, the InstallShield Wizard Complete
dialog box is displayed
16. Click Finish to close the setup.
USB Driver Installation for Windows 7
NOTE: This chapter refers to different target audiences, CentraLine and
Honeywell. In the functional descriptions and screenshots, the CentraLine
product names EXCEL WEB and EXCEL WEB II are shown and used,
whereas in the CARE software, the CentraLine product names are
replaced with the selectable Honeywell product names of the EXCEL WEB
and EXCEL WEB II.
EXCEL WEB Controller
NOTE: The access to the EXCEL WEB controller via USB from a Windows 7 PC
does not need a driver installation for the D-Link DUB E100 USB adapter.
A driver installation is only necessary if you would add a further USB
network card to your PC using the D-Link DUB E100 USB adapter. If so,
download the corresponding driver from the manufacturer´s home page
and install the driver via standard procedure for Windows 7 drivers.
The EXCEL WEB controller will be connected to the CARE PC as shown in the
following figure.
EXCEL WEB II Controller
For connecting the EXCEL WEB II controller to the CARE PC you need an USB
cable of type A Male to type B Male (Type B standard).
The EXCEL WEB II controller will be connected to the CARE Windows 7 PC as
shown in the following figure.
Page 11
CARE INSTALLATION GUIDE
11 EN1B-0478GE51 R1216
Driver Variants Depending on the firmware version there are different ways to install the USB
driver.
1. On most PC the update is done automatically with the Windows update
function.
2. Or you can use the driver delivered with CARE (procedure starts with step 7).
3. For firmware 4.00.00 or higher you can use the Microsoft driver from your
Windows 7 installation (procedure starts with step 17).
Procedure 1. Insert the A Male connector of the USB cable into an USB interface jack of the
PC and insert the B Male connector into the controller´s USB device interface
jack.
RESULT: The Found New Hardware Wizard is enabled in the Windows Task
Line.
2. In the Windows Task Line, double-click the icon.
RESULT: The Driver Software Installation message box displays.
3. If no RNDIS/Ethernet Gadget driver was found as indicated by the message ´X
No driver found`, click Change setting… button.
RESULT: The Device Installation Settings dialog box displays.
Page 12
INSTALLATION GUIDE CARE
EN1B-0478GE51 R1216 12
4. Select No, let me choose what to do, and then select Install driver software
from Windows Update if it is not found on my computer.
5. Click Save Changes button.
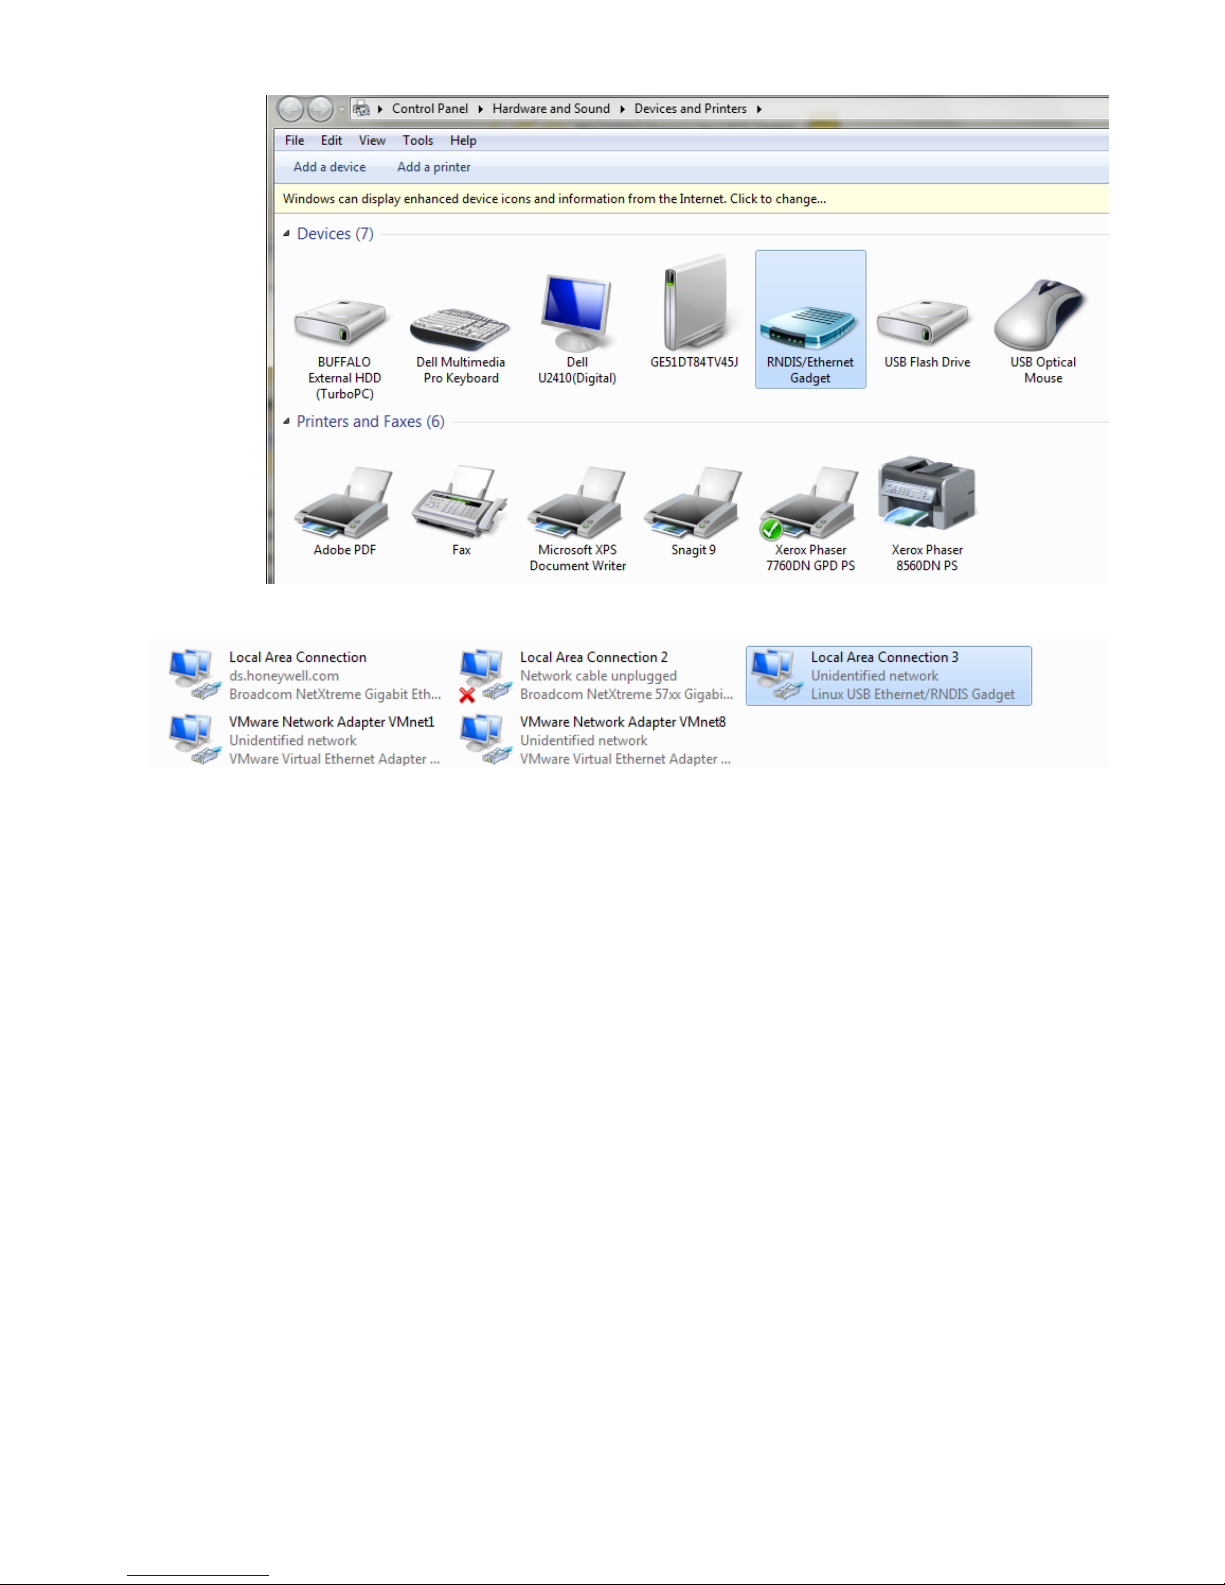
RESULT: Software tries to install the RNDIS/Ethernet Gadget driver. If the
driver is successfully installed, it can be seen in the following
locations within Windows (see figures below):
In Control Panel \ Hardware and Sound \ Devices and Printers
Page 13
CARE INSTALLATION GUIDE
13 EN1B-0478GE51 R1216
In Control Panel \ Network and Internet \ Network Connections
In Control Panel \ Device Manager \ Network Adapters
Page 14

INSTALLATION GUIDE CARE
EN1B-0478GE51 R1216 14
6. If the driver has still not been successfully installed, do the following:
7. Right-click on the driver in the Network adapters folder in the Device
Manager, and then click Update Driver Software.
8. Click Browse my computer for driver software
9. Click Let me Pick from a list of device drivers on my computer.
10. Click Have Disk…
11. Click Browse… and navigate to the folder
<drive:>\CARE\drivers.
12. Depending on your Windows operating system type (32 bit or 64 bit), select the
RNDIS USB driver (32Bit) or the RNDIS USB driver (64Bit) file, and then click
Open.
13. Click OK.
14. Select Linux USB Ethernet/RNDIS Gadget, and then click Next>.
15. If a warning message displays, click Continue Anyway.
RESULT: Windows will install the driver.
16. Click Close
17. Check the successful installation of the driver as described in step 5.
18. If this still does not work, use the driver shipped with Windows.
Page 15

CARE INSTALLATION GUIDE
15 EN1B-0478GE51 R1216
19. Right-click on the driver in the Network adapters folder in the Device
Manager, and then click Update Driver Software.
20. Click Browse my computer for driver software
21. Click Let me Pick from a list of device drivers on my computer.
22. Uncheck the Show compatible hardware box
23. Select the Manufacturer Microsoft Corporation
24. Select Remote NDIS Compatible Device
25. Check the successful installation of the driver as described in step 5.
26. If the device status is “This device cannot start. (Code 10)”, reboot your PC.
USB Driver Installation for Windows 8
FALCON Controller
NOTE: The access to the FALCON controller via USB from a Windows 8 PC does
not need a driver installation for the D-Link DUB E100 USB adapter. A
driver installation is only necessary if you would add a further USB network
card to your PC using the D-Link DUB E100 USB adapter. If so, download
the corresponding driver from the manufacturer´s home page and install
the driver via standard procedure for Windows 7 drivers.
Page 16

INSTALLATION GUIDE CARE
EN1B-0478GE51 R1216 16
The FALCON controller will be connected to the CARE PC as shown in the
following figure.
EAGLE Controller
For connecting the EAGLE controller to the CARE PC you need an USB cable of
type A Male to type B Male (Type B standard).
The EAGLE controller will be connected to the CARE Windows 8 PC as shown in
the following figure.
Procedure 1. Insert the A Male connector of the USB cable into an USB inferface jack of the
PC and insert the B Male connector into the controller´s USB device interface
jack.
2. In Windows, start the device manager.
Page 17

CARE INSTALLATION GUIDE
17 EN1B-0478GE51 R1216
3. Click Other devices, then right-click RNDIS/Ethernet Gadget and then select
Update driver Software…
RESULT: The Update Driver Software – RNDIS/Ethernet Gadget dialog
displays.
4. Click Browse my computer for driver Software…
Page 18

INSTALLATION GUIDE CARE
EN1B-0478GE51 R1216 18
5. Click Let me pick from a list of device drivers on my computer.
6. Select Network adapters.
Page 19

CARE INSTALLATION GUIDE
19 EN1B-0478GE51 R1216
7. Select Microsoft.
8. Select USB-RNDIS-Adapter, and then click Next button.
RESULT: The Update Driver Warning message box displays.
Page 20

INSTALLATION GUIDE CARE
EN1B-0478GE51 R1216 20
9. Confirm the warning by clicking Yes button.
RESULT: The driver will be installed successfully as indicated by the final
message box.
10. Click Close button.
USB Driver Installation for Windows 10
For controllers with firmware 4.00.00 or higher, the appropriate driver is
automatically installed with a Windows update. For firmware 3.04.05 or lower, the
automatic installation does not work: Please download the appropriate USB driver
prior to the installation at:
http://catalog.update.microsoft.com/v7/site/ScopedViewRedirect.aspx?updateid=37
e35bd4-d788-4b83-9416-f78e439f90a2
Please connect the controller to the PC as described in the "USB Driver Installation
for Windows 8" section and perform the general installation procedures for drivers
in Windows 10.
Page 21

CARE INSTALLATION GUIDE
21 EN1B-0478GE51 R1216
Maintenance of CARE
The CARE Installation procedure is part of the CARE Setup Maintenance program,
which includes a Repair and a Remove function in addition.
Modify
Use the Modify function to install additional components or to remove already
installed components.
Repair
Use the Repair function for restoring files which have been deleted accidentally.
The Repair function may corrupt CARE database files when restoring deleted
database files.
Remove
Use the Remove function to completely remove the current CARE version from your
PC. Note that all projects and the database will be deleted. Do the respective
backups before using this maintenance option.
Page 22

INSTALLATION GUIDE CARE
EN1B-0478GE51 R1216 22
LICENSING
Honeywell engineering software can be ordered either as CD from the Customer
Service Center Schönaich (CSC)/GE51 or by download at:
http://web.ge51.honeywell.de/productsupport/website/tools.htm
These versions are unregistered demo versions with restricted functionality
(Evaluation mode).
IMPORTANT
Honeywell engineering software can only be ordered by Honeywell
affiliates using the Honeywell ordering system. Thus, external customers
must order via their Honeywell representative.
To continue with the whole functionality, you need a valid license key for the demo
version. This key is provided on an USB protection plug. Depending on the license,
various features are provided.
The licensing can quickly be done either by using the CARE License Manager
(automatic background connection to the Honeywell License Server, or directly on
the Honeywell License Server (
http://license.ge51.honeywell.de).
The licensing is based on three parts:
• Voucher number
Delivered with the USB protection plug
• Reference key
Automatically created on the hardware where CARE has been installed
• License key
Automatically created by the Honeywell License server (see How to activate a
new license described in the Help on First Steps window of the License
Manager).
Procedure 1. Insert the USB protection plug that contains the valid license into an USB
socket of the CARE PC.
2. Start CARE.
3. Open CARE Registration dialog box by clicking on Help menu.
4. Click menu item Help, then submenu item Registration.
RESULT: The License Manager window and its Online Help displays.
5. Follow the instructions on How to activate a new license described in the
Help on First Steps window.
Page 23

CARE INSTALLATION GUIDE
23 EN1B-0478GE51 R1216
CUSTOMIZE WINDOWS DEFAULT REGIONAL AND LANGUAGE SETTINGS
In order to setup an Excel 5000 system that uses any language other than the
respective Windows default language, you must customize the Regional and
Language Options Settings in Windows as a prerequisite before working with
CARE and Excel Online. In addition, for successful application engineering, the
controller must be equipped with the appropriate firmware and XI582 with the
appropriate EPROM.
For all settings to be done, please refer to the country and language settings table
that lists the settings for:
• Windows
• CARE
• Excel Online
• XI852 EPROM
• Controller firmware
For information on coding special characters in Western, Eastern and Turkish
languages, please refer to the character settings tables following the country and
language settings table.
To customize Windows, refer to the procedure following the character settings
tables.
Table 1. Country and Language Settings
Country
Windows Version /
Regional and
Language Options
Settings
CARE Country
Code / Location
Selection
Controllers with Internal Text MMI
Controllers with
Internal Graphic
MMI
Controllers with
External XI581/2
Controllers with
XL Touch
XL Online
Controller
Type
XL 40
XL 50
XL 50
XL100/500/800 XL50/100/500/800
OS-No.
XL40A2MMI
XL40AI
(required
firmware)
XL50-MMI-xxxx
XL50D
XL50A-MMI-
xxxx
XL50A-UMMI-
xxxx
(required
firmware)
XL50CH
XL50CY
XL50TW
XL50ACH
XL50ACY
XL50ATW
(required
firmware)
XI581/2
XI581B/2B
(required
hardware)
XI882A
(required firmware)
Several Arabic
Arabic
(not supported)
not supported not supported not supported
not supported
not supported
not
supported
Australia English (Australia) Australia
XL50I207.02C
or higher
EU50L207.02C
or higher
EU50L207.02C or
higher
XI581B/2B-EU
2.0.5.3
Western
Albania Albanian
not supported XL50I207.02C
or higher
EU50L207.02C
or higher
EU50L207.02C or
higher
XI581B/2B-EU
not supported
Western
Austria
German (Austria)
Austria
XL50I207.02C
or higher
EU50L207.02C
or higher
EU50L207.02C or
higher
XI581B/2B-EU
2.0.5.3
Western
Belgium Dutch (Belgium),
French (Belgium)
Belgium
XL50I207.02C or
higher
EU50L207.02C
or higher
EU50L207.02C or
higher
XI581B/2B-EU
2.0.5.3
Western
Bulgaria Bulgarian
Russia
not supported not supported EU50L207.02C or
higher
XI581B/2B-EU
not supported
Cyrillic
Brazil
Portuguese (Brazil) Brazil
XL50I207.02C
or higher
EU50L207.02C
or higher
EU50L207.02C or
higher
XI581B/2B-EU
not supported
Western
Canada English (Canada)
Canada
XL50I207.02C
or higher
EU50L207.02C
or higher
EU50L207.02C or
higher
XI581B/2B-EU
2.0.5.3
Western
Page 24

INSTALLATION GUIDE CARE
EN1B-0478GE51 R1216 24
Country
Windows Version /
Regional and
Language Options
Settings
CARE Country
Code / Location
Selection
Controllers with Internal Text MMI
Controllers with
Internal Graphic
MMI
Controllers with
External XI581/2
Controllers with
XL Touch
XL Online
Controller
Type
XL 40
XL 50
XL 50
XL100/500/800 XL50/100/500/800
OS-No.
XL40A2MMI
XL40AI
(required
firmware)
XL50-MMI-xxxx
XL50D
XL50A-MMI-
xxxx
XL50A-UMMI-
xxxx
(required
firmware)
XL50CH
XL50CY
XL50TW
XL50ACH
XL50ACY
XL50ATW
(required
firmware)
XI581/2
XI581B/2B
(required
hardware)
XI882A
(required firmware)
China
Chinese (Simplified) PR China
not supported not supported EU50L207.02C or
higher
XI581B/2B-EU
XI581B/2B-CH
not supported
CHINESE_
BIG5
Croatia Croatian
Slovakia
XL50I207.02C
or higher
EU50L207.02C
or higher
EU50L207.02C or
higher
XI581B/2B-EU
not supported
Central
European
Czech
Republic
Czech
Slovakia
XL50I207.02C
or higher
EU50L207.02C
or higher
EU50L207.02C or
higher
XI581B/2B-EU
not supported
Central
European
Denmark Danish
Denmark
XL50I207.02C
or higher
EU50L207.02C
or higher
EU50L207.02C or
higher
XI581B/2B-EU
not supported
Western
Finland Finnish
Finland
XL50I207.02C
or higher
EU50L207.02C
or higher
EU50L207.02C or
higher
XI581B/2B-EU
not supported
Western
France
French
France
XL50I207.02C
or higher
EU50L207.02C
or higher
EU50L207.02C or
higher
XI581B/2B-EU
2.0.5.3
Western
Germany German
Germany
XL50I207.02C
or higher
EU50L207.02C
or higher
EU50L207.02C or
higher
XI581B/2B-EU
2.0.5.3
Western
Several Hebrew
Hebrew
XL50I207.02C
or higher
EU50L207.02C
or higher
EU50L207.02C or
higher
XI581B/2B-EU
not supported
Western
Hungary Hungarian
Slovakia
XL50I207.02C
or higher
EU50L207.02C
or higher
EU50L207.02C or
higher
XI581B/2B-EU
not supported
Central
European
Iceland Icelandic
Iceland
XL50I207.02C
or higher
EU50L207.02C
or higher
EU50L207.02C or
higher
XI581B/2B-EU
not supported
Western
Ireland
English (Ireland)
Ireland
XL50I207.02C
or higher
EU50L207.02C
or higher
EU50L207.02C or
higher
XI581B/2B-EU
2.0.5.3
Western
Italy
Italian
Italy
XL50I207.02C
or higher
EU50L207.02C
or higher
EU50L207.02C or
higher
XI581B/2B-EU
2.0.5.3
Western
Japan Japanese Japan not supported not supported not supported XI581B/2B-JP 2.0.5.3 Japanese
Korea Korean Korea not supported not supported not supported not supported not supported Western
Several Several
Latin America XL50I207.02C
or higher
EU50L207.02C
or higher
EU50L207.02C or
higher
XI581B/2B-EU
not supported
Western
Lithuania Lithuanian
not supported not supported not supported EU50L207.02C or
higher
XI581B/2B-EU
not supported
Cyrillic
Macedonia Macedonian
Russia
not supported not supported EU50L207.02C or
higher
XI581B/2B-EU
not supported
Cyrillic
Mexico
Spanish (Mexico)
Mexico
XL50I207.02C
or higher
EU50L207.02C
or higher
EU50L207.02C or
higher
XI581B/2B-EU
2.0.5.3
Western
Morocco French
France
XL50I207.02C
or higher
EU50L207.02C
or higher
EU50L207.02C or
higher
XI581B/2B-EU
2.0.5.3
Western
Netherlands
Dutch
Netherlands
XL50I207.02C or
higher
EU50L207.02C
or higher
EU50L207.02C or
higher
XI581B/2B-EU
2.0.5.3
Western
New
Zealand
English
(New Zealand)
New Zealand XL50I207.02C
or higher
EU50L207.02C
or higher
EU50L207.02C or
higher
XI581B/2B-EU
2.0.5.3
Western
Page 25

CARE INSTALLATION GUIDE
25 EN1B-0478GE51 R1216
Country
Windows Version /
Regional and
Language Options
Settings
CARE Country
Code / Location
Selection
Controllers with Internal Text MMI
Controllers with
Internal Graphic
MMI
Controllers with
External XI581/2
Controllers with
XL Touch
XL Online
Controller
Type
XL 40
XL 50
XL 50
XL100/500/800 XL50/100/500/800
OS-No.
XL40A2MMI
XL40AI
(required
firmware)
XL50-MMI-xxxx
XL50D
XL50A-MMI-
xxxx
XL50A-UMMI-
xxxx
(required
firmware)
XL50CH
XL50CY
XL50TW
XL50ACH
XL50ACY
XL50ATW
(required
firmware)
XI581/2
XI581B/2B
(required
hardware)
XI882A
(required firmware)
Norway Norwegian
Norway
XL50I207.02C
or higher
EU50L207.02C
or higher
EU50L207.02C or
higher
XI581B/2B-EU
2.0.5.3
Western
Poland
Polish
Slovakia
XL50I207.02C
or higher
EU50L207.02C
or higher
EU50L207.02C or
higher
XI581B/2B-EU
not supported
Central
European
Portugal Portuguese
Portugal
XL50I207.02C
or higher
EU50L207.02C
or higher
EU50L207.02C or
higher
XI581B/2B-EU
not supported
Western
Romania Romanian
Slovakia
XL50I207.02C
or higher
EU50L207.02C
or higher
EU50L207.02C or
higher
XI581B/2B-EU
not supported
Central
European
Russia
Russian
Russia
not supported not supported EU50L207.02C or
higher
XI581B/2B-EU
not supported
Cyrillic
Serbia
Serbian (Latin, Bosnia
and Herzegovina)
not supported not supported not supported EU50L207.02C or
higher
XI581B/2B-EU
not supported
Cyrillic
Slovakia Slovak
Slovakia
XL50I207.02C or
higher
EU50L207.02C
or higher
EU50L207.02C or
higher
XI581B/2B-EU
not supported
Central
European
Slovenia Slovenian
Slovakia
XL50I207.02C
or higher
EU50L207.02C
or higher
EU50L207.02C or
higher
XI581B/2B-EU
not supported
Central
European
Spain
Spanish
Spain
XL50I207.02C
or higher
EU50L207.02C
or higher
EU50L207.02C or
higher
XI581B/2B-EU
2.0.5.3
Western
Sweden Swedish
Sweden
XL50I207.02C
or higher
EU50L207.02C
or higher
EU50L207.02C or
higher
XI581B/2B-EU
2.0.5.3
Western
Switzerland
German
(Switzerland), French
(Switzerland), Italian
(Switzerland)
Switzerland
XL50I207.02C
or higher
EU50L207.02C
or higher
EU50L207.02C or
higher
XI581B/2B-EU
2.0.5.3
Western
Taiwan
Chinese (Taiwan)
Taiwan
not supported not supported TW50L207.02C or
higher
XI581B/2B-TW not supported
Thai
Tunisia French
France
XL50I207.02C
or higher
EU50L207.02C
or higher
EU50L207.02C or
higher
XI581B/2B-EU
2.0.5.3
Western
Turkey
Turkish
Turkey
XL50I207.02C
or higher
EU50L207.02C
or higher
EU50L207.02C or
higher
XI581B/2B-EU
not supported
Turkish
U.A.E.
Arabic (U.A.E.)
Arabic
(not supported)
not supported not supported not supported
not supported
not supported
not
supported
Ukraine Ukrainian
Russia
not supported not supported EU50L207.02C or
higher
XI581B/2B-EU
not supported
Cyrillic
United
Kingdom
English
(United Kingdom)
United Kingdom XL50I207.02C
or higher
EU50L207.02C
or higher
EU50L207.02C or
higher
XI581B/2B-EU
2.0.5.3
Western
United
States
English
United States XL50I207.02C or
higher
EU50L207.02C
or higher
EU50L207.02C or
higher
XI581B/2B-EU
XI581B/2B-TW
2.0.5.3
Western
Page 26

INSTALLATION GUIDE CARE
EN1B-0478GE51 R1216 26
Country
Windows Version /
Regional and
Language Options
Settings
CARE Country
Code / Location
Selection
Controllers with Internal Text MMI
Controllers with
Internal Graphic
MMI
Controllers with
External XI581/2
Controllers with
XL Touch
XL Online
Controller
Type
XL 40
XL 50
XL 50
XL100/500/800 XL50/100/500/800
OS-No.
XL40A2MMI
XL40AI
(required
firmware)
XL50-MMI-xxxx
XL50D
XL50A-MMI-
xxxx
XL50A-UMMI-
xxxx
(required
firmware)
XL50CH
XL50CY
XL50TW
XL50ACH
XL50ACY
XL50ATW
(required
firmware)
XI581/2
XI581B/2B
(required
hardware)
XI882A
(required firmware)
TW50L207.02C
or higher
XL50L207.02C
or higher
TW50L207.02C or
higher
XL50L207.02C or
higher
XI581B/2B-CH
XI581B/2B-JP
XI581B/2B-CY
Table 2. Character Settings (Western Europe)
Hex
Dec Char Unicode ISO/IEC 10646-1:2000 Character Name
20 32 32 SPACE
23 35 # 35 NUMBER SIGN
24 36 $ 36 DOLLAR SIGN
25 37 % 37 PERCENT SIGN
26 38 & 38 AMPERSAND
27 39 ' 39 APOSTROPHE
28 40 ( 40 LEFT PARENTHESIS
29 41 ) 41 RIGHT PARENTHESIS
2E 46 . 46 FULL STOP
30 48 0 48 DIGIT ZERO
31 49 1 49 DIGIT ONE
32 50 2 50 DIGIT TWO
33 51 3 51 DIGIT THREE
34 52 4 52 DIGIT FOUR
35 53 5 53 DIGIT FIVE
36 54 6 54 DIGIT SIX
37 55 7 55 DIGIT SEVEN
38 56 8 56 DIGIT EIGHT
39 57 9 57 DIGIT NINE
3A 58 : 58 COLON
40 64 @ 64 COMMERCIAL AT
Page 27

CARE INSTALLATION GUIDE
27 EN1B-0478GE51 R1216
Hex
Dec Char Unicode ISO/IEC 10646-1:2000 Character Name
41 65 A 65 LATIN CAPITAL LETTER A
42 66 B 66 LATIN CAPITAL LETTER B
43 67 C 67 LATIN CAPITAL LETTER C
44 68 D 68 LATIN CAPITAL LETTER D
45 69 E 69 LATIN CAPITAL LETTER E
46 70 F 70 LATIN CAPITAL LETTER F
47 71 G 71 LATIN CAPITAL LETTER G
48 72 H 72 LATIN CAPITAL LETTER H
49 73 I 73 LATIN CAPITAL LETTER I
4A 74 J 74 LATIN CAPITAL LETTER J
4B 75 K 75 LATIN CAPITAL LETTER K
4C 76 L 76 LATIN CAPITAL LETTER L
4D 77 M 77 LATIN CAPITAL LETTER M
4E 78 N 78 LATIN CAPITAL LETTER N
4F 79 O 79 LATIN CAPITAL LETTER O
50 80 P 80 LATIN CAPITAL LETTER P
51 81 Q 81 LATIN CAPITAL LETTER Q
52 82 R 82 LATIN CAPITAL LETTER R
53 83 S 83 LATIN CAPITAL LETTER S
54 84 T 84 LATIN CAPITAL LETTER T
55 85 U 85 LATIN CAPITAL LETTER U
56 86 V 86 LATIN CAPITAL LETTER V
57 87 W 87 LATIN CAPITAL LETTER W
58 88 X 88 LATIN CAPITAL LETTER X
59 89 Y 89 LATIN CAPITAL LETTER Y
5A 90 Z 90 LATIN CAPITAL LETTER Z
5F 95 _ 95 LOW LINE
61 97 a 97 LATIN SMALL LETTER A
62 98 b 98 LATIN SMALL LETTER B
63 99 c 99 LATIN SMALL LETTER C
64 100 d 100 LATIN SMALL LETTER D
65 101 e 101 LATIN SMALL LETTER E
66 102 f 102 LATIN SMALL LETTER F
67 103 g 103 LATIN SMALL LETTER G
68 104 h 104 LATIN SMALL LETTER H
69 105 i 105 LATIN SMALL LETTER I
Page 28

INSTALLATION GUIDE CARE
EN1B-0478GE51 R1216 28
Hex
Dec Char Unicode ISO/IEC 10646-1:2000 Character Name
6A 106 j 106 LATIN SMALL LETTER J
6B 107 k 107 LATIN SMALL LETTER K
6C 108 l 108 LATIN SMALL LETTER L
6D 109 m 109 LATIN SMALL LETTER M
6E 110 n 110 LATIN SMALL LETTER N
6F 111 o 111 LATIN SMALL LETTER O
70 112 p 112 LATIN SMALL LETTER P
71 113 q 113 LATIN SMALL LETTER Q
72 114 r 114 LATIN SMALL LETTER R
73 115 s 115 LATIN SMALL LETTER S
74 116 t 116 LATIN SMALL LETTER T
75 117 u 117 LATIN SMALL LETTER U
76 118 v 118 LATIN SMALL LETTER V
77 119 w 119 LATIN SMALL LETTER W
78 120 x 120 LATIN SMALL LETTER X
79 121 y 121 LATIN SMALL LETTER Y
7A 122 z 122 LATIN SMALL LETTER Z
7E 126 ~ 126 TILDE
80 128 Ç 199 LATIN CAPITAL LETTER C W ITH CEDILLA
81 129 ü 252 LATIN SMALL LETTER U WITH DIAERESIS
82 130 é 233 LATIN SMALL LETTER E WITH ACUTE
83 131 â 226 LATIN SMALL LETTER A WITH CIRCUMFLEX
84 132 ä 228 LATIN SMALL LETTER A WITH DIAERESIS
85 133 à 224 LATIN SMALL LETTER A WITH GRAVE
86 134 å 229 LATIN SMALL LETTER A WITH RING ABOVE
87 135 ç 231 LATIN SMALL LETTER C WITH CEDILLA
88 136 ê 234 LATIN SMALL LETTER E WITH CIRCUMFLEX
89 137 ë 235 LATIN SMALL LETTER E WITH DIAERESIS
8A 138 è 232 LATIN SMALL LETTER E WITH GRAVE
8B 139 ï 239 LATIN SMALL LETTER I WITH DIAERESIS
8C 140 î 238 LATIN SMALL LETTER I WITH CIRCUMFLEX
8D 141 ì 236 LATIN SMALL LETTER I WITH GRAVE
8E 142 Ä 196 LATIN CAPITAL LETTER A WITH DIAERESIS
8F 143 Å 197 LATIN CAPITAL LETTER A WITH RING ABOVE
90 144 É 201 LATIN CAPITAL LETTER E WITH ACUTE
91 145 æ 230 LATIN SMALL LETTER AE
Page 29

CARE INSTALLATION GUIDE
29 EN1B-0478GE51 R1216
Hex
Dec Char Unicode ISO/IEC 10646-1:2000 Character Name
92 146 Æ 198 LATIN CAPITAL LETTER AE
93 147 ô 244 LATIN SMALL LETTER O WITH CIRCUMFLEX
94 148 ö 246 LATIN SMALL LETTER O WITH DIAERESIS
95 149 ò 242 LATIN SMALL LETTER O WITH GRAVE
96 150 û 251 LATIN SMALL LETTER U WITH CIRCUMFLEX
97 151 ù 249 LATIN SMALL LETTER U WITH GRAVE
98 152 ÿ 255 LATIN SMALL LETTER Y WITH DIAERESIS
99 153 Ö 214 LATIN CAPITAL LETTER O WITH DIAERESIS
9A 154 Ü 220 LATIN CAPITAL LETTER U WITH DIAERESIS
9B 155 ø 248 LATIN SMALL LETTER O WITH STROKE
9D 157 Ø 216 LATIN CAPITAL LETTER O WITH STROKE
9F 159 ƒ 402 LATIN SMALL LETTER F WITH HOOK
A0 160 á 225 LATIN SMALL LETTER A WITH ACUTE
A1 161 í 237 LATIN SMALL LETTER I WITH ACUTE
A2 162 ó 243 LATIN SMALL LETTER O WITH ACUTE
A3 163 ú 250 LATIN SMALL LETTER U WITH ACUTE
A4 164 ñ 241 LATIN SMALL LETTER N WITH TILDE
A5 165 Ñ 209 LATIN CAPITAL LETTER N WITH TILDE
A8 168 ¿ 191 INVERTED QUESTION MARK
B5 181 Á 193 LATIN CAPITAL LETTER A WITH ACUTE
B6 182 Â 194 LATIN CAPITAL LETTER A WITH CIRCUMFLEX
B7 183 À 192 LATIN CAPITAL LETTER A WITH GRAVE
C6 198 ã 227 LATIN SMALL LETTER A WITH TILDE
C7 199 Ã 195 LATIN CAPITAL LETTER A WITH TILDE
D0 208 ð 240 LATIN SMALL LETTER ETH
D1 209 Ð 208 LATIN CAPITAL LETTER ETH
D2 210 Ê 202 LATIN CAPITAL LETTER E WITH CIRCUMFLEX
D3 211 Ë 203 LATIN CAPITAL LETTER E WITH DIAERESIS
D4 212 È 200 LATIN CAPITAL LETTER E WITH GRAVE
D5 213 ı 305 LATIN SMALL LETTER DOTLESS I
D6 214 Í 205 LATIN CAPITAL LETTER I WITH ACUTE
D7 215 Î 206 LATIN CAPITAL LETTER I WITH CIRCUMFLEX
D8 216 Ï 207 LATIN CAPITAL LETTER I WITH DIAERESIS
DE 222 Ì 204 LATIN CAPITAL LETTER I WITH GRAVE
E0 224 Ó 211 LATIN CAPITAL LETTER O WI TH ACUTE
E1 225 ß 223 LATIN SMALL LETTER SHARP S
Page 30

INSTALLATION GUIDE CARE
EN1B-0478GE51 R1216 30
Hex
Dec Char Unicode ISO/IEC 10646-1:2000 Character Name
E2 226 Ô 212 LATIN CAPITAL LETTER O WITH CIRCUMFLEX
E3 227 Ò 210 LATIN CAPITAL LETTER O WITH GRAVE
E4 228 õ 245 LATIN SMALL LETTER O WITH TILDE
E5 229 Õ 213 LATIN CAPITAL LETTER O WITH TILDE
E6 230 µ 181 MICRO SIGN
E7 231 þ 254 LATIN SMALL LETTER THORN
E8 232 Þ 222 LATIN CAPITAL LETTER THORN
E9 233 Ú 218 LATIN CAPITAL LETTER U WITH ACUTE
EA 234 Û 219 LATIN CAPITAL LETTER U WI TH CIRCUMFLEX
EB 235 Ù 217 LATIN CAPITAL LETTER U WITH GRAVE
EC 236 ý 253 LATIN SMALL LETTER Y WITH ACUTE
ED 237 Ý 221 LATIN CAPITAL LETTER Y WITH ACUTE
EF 239 ´ 180 ACUTE ACCENT
F8 248 ° 176 DEGREE SIGN
Table 3. Character Settings (Eastern Europe)
Hex
Dec Char Unicode ISO/IEC 10646-1:2000 Character Name
20 32 32 SPACE
23 35 # 35 NUMBER SIGN
24 36 $ 36 DOLLAR SIGN
25 37 % 37 PERCENT SIGN
26 38 & 38 AMPERSAND
27 39 ' 39 APOSTROPHE
28 40 ( 40 LEFT PARENTHESIS
29 41 ) 41 RIGHT PARENTHESIS
2E 46 . 46 FULL STOP
30 48 0 48 DIGIT ZERO
31 49 1 49 DIGIT ONE
32 50 2 50 DIGIT TWO
33 51 3 51 DIGIT THREE
34 52 4 52 DIGIT FOUR
35 53 5 53 DIGIT FIVE
36 54 6 54 DIGIT SIX
37 55 7 55 DIGIT SEVEN
38 56 8 56 DIGIT EIGHT
Page 31

CARE INSTALLATION GUIDE
31 EN1B-0478GE51 R1216
Hex
Dec Char Unicode ISO/IEC 10646-1:2000 Character Name
39 57 9 57 DIGIT NINE
3A 58 : 58 COLON
40 64 @ 64 COMMERCIAL AT
41 65 A 65 LATIN CAPITAL LETTER A
42 66 B 66 LATIN CAPITAL LETTER B
43 67 C 67 LATIN CAPITAL LETTER C
44 68 D 68 LATIN CAPITAL LETTER D
45 69 E 69 LATIN CAPITAL LETTER E
46 70 F 70 LATIN CAPITAL LETTER F
47 71 G 71 LATIN CAPITAL LETTER G
48 72 H 72 LATIN CAPITAL LETTER H
49 73 I 73 LATIN CAPITAL LETTER I
4A 74 J 74 LATIN CAPITAL LETTER J
4B 75 K 75 LATIN CAPITAL LETTER K
4C 76 L 76 LATIN CAPITAL LETTER L
4D 77 M 77 LATIN CAPITAL LETTER M
4E 78 N 78 LATIN CAPITAL LETTER N
4F 79 O 79 LATIN CAPITAL LETTER O
50 80 P 80 LATIN CAPITAL LETTER P
51 81 Q 81 LATIN CAPITAL LETTER Q
52 82 R 82 LATIN CAPITAL LETTER R
53 83 S 83 LATIN CAPITAL LETTER S
54 84 T 84 L ATIN CAPITAL LETTER T
55 85 U 85 LATIN CAPITAL LETTER U
56 86 V 86 LATIN CAPITAL LETTER V
57 87 W 87 LATIN CAPITAL LETTER W
58 88 X 88 LATIN CAPITAL LETTER X
59 89 Y 89 LATIN CAPITAL LETTER Y
5A 90 Z 90 LATIN CAPITAL LETTER Z
5F 95 _ 95 LOW LINE
61 97 a 97 LATIN SMALL LETTER A
62 98 b 98 LATIN SMALL LETTER B
63 99 c 99 LATIN SMALL LETTER C
64 100 d 100 LATIN SMALL LETTER D
65 101 e 101 LATIN SMALL LETTER E
66 102 f 102 LATIN SMALL LETTER F
Page 32

INSTALLATION GUIDE CARE
EN1B-0478GE51 R1216 32
Hex
Dec Char Unicode ISO/IEC 10646-1:2000 Character Name
67 103 g 103 LATIN SMALL LETTER G
68 104 h 104 LATIN SMALL LETTER H
69 105 i 105 LATIN SMALL LETTER I
6A 106 j 106 LATIN SMALL LETTER J
6B 107 k 107 LATIN SMALL LETTER K
6C 108 l 108 LATIN SMALL LETTER L
6D 109 m 109 LATIN SMALL LETTER M
6E 110 n 110 LATIN SMALL LETTER N
6F 111 o 111 L ATIN SMALL LETTER O
70 112 p 112 LATIN SMALL LETTER P
71 113 q 113 LATIN SMALL LETTER Q
72 114 r 114 LATIN SMALL LETTER R
73 115 s 115 LATIN SMALL LETTER S
74 116 t 116 LATIN SMALL LETTER T
75 117 u 117 LATIN SMALL LETTER U
76 118 v 118 LATIN SMALL LETTER V
77 119 w 119 LATIN SMALL LETTER W
78 120 x 120 LATIN SMALL LETTER X
79 121 y 121 LATIN SMALL LETTER Y
7A 122 z 122 LATIN SMALL LETTER Z
7E 126 ~ 126 TILDE
80 128 Ç 199 LATIN CAPITAL LETTER C WITH CEDILLA
81 129 ü 252 LATIN SMALL LETTER U WITH DIAERESIS
82 130 é 233 LATIN SMALL LETTER E WITH ACUTE
83 131 â 226 LATIN SMALL LETTER A WITH CIRCUMFLEX
84 132 ä 228 LATIN SMALL LETTER A WITH DIAERESIS
85 133 ů 367 LATIN SMALL LETTER U WITH RING ABOVE
86 134 ć 263 LATIN SMALL LETTER C WITH ACUTE
87 135 ç 231 LATIN SMALL LETTER C WITH CEDILLA
88 136 ł 322 LATIN SMALL LETTER L WITH STROKE
89 137 ë 235 LATIN SMALL LETTER E WITH DIAERESIS
8A 138 Ő 336
LATIN CAPITAL LETTER O WITH DOUBLE
ACUTE
8B 139 ő 337 LATIN SMALL LETTER O WITH DOUBLE ACUTE
8C 140 î 238 LATIN SMALL LETTER I WITH CIRCUMFLEX
8D 141 Ź 377 LATIN CAPITAL LETTER Z WITH ACUTE
Page 33

CARE INSTALLATION GUIDE
33 EN1B-0478GE51 R1216
Hex
Dec Char Unicode ISO/IEC 10646-1:2000 Character Name
8E 142 Ä 196 LATIN CAPITAL LETTER A WITH DIAERESIS
8F 143 Ć 262 LATIN CAPITAL LETTER C WITH ACUTE
90 144 É 201 LATIN CAPITAL LETTER E WITH ACUTE
91 145 Ĺ 313 LATIN CAPITAL LETTER L WITH ACUTE
92 146 ĺ 314 LATIN SMALL LETTER L WITH ACUTE
93 147 ô 244 LATIN SMALL LETTER O WITH CIRCUMFLEX
94 148 ö 246 LATIN SMALL LETTER O WITH DIAERESIS
95 149 Ľ 317 LATIN CAPITAL LETTER L WITH CARON
96 150 ľ 318 LATIN SMALL LETTER L WITH CARON
97 151 Ś 346 LATIN CAPITAL LETTER S WITH ACUTE
98 152 ś 347 LATIN SMALL LETTER S WITH ACUTE
99 153 Ö 214 LATIN CAPITAL LETTER O WITH DIAERESIS
9A 154 Ü 220 LATIN CAPITAL LETTER U WITH DIAERESIS
9B 155 Ť 356 LATIN CAPITAL LETTER T WITH CARON
9C 156 ť 357 LATIN SMALL LETTER T WITH CARON
9D 157 Ł 321 LATIN CAPITAL LETTER L WITH STROKE
9F 159 č 269 LATIN SMALL LETTER C WITH CARON
A0 160 á 225 LATIN SMALL LETTER A WITH ACUTE
A1 161 í 237 LATIN SMALL LETTER I WITH ACUTE
A2 162 ó 243 LATIN SMALL LETTER O WITH ACUTE
A3 163 ú 250 LATIN SMALL LETTER U WI TH ACUTE
A4 164 Ą 260 LATIN CAPITAL LETTER A WITH OGONEK
A5 165 ą 261 LATIN SMALL LETTER A WITH OGONEK
A6 166 Ž 381 LATIN CAPITAL LETTER Z W I TH CARON
A7 167 ž 382 LATIN SMALL LETTER Z WITH CARON
A8 168 Ę 280 LATIN CAPITAL LETTER E WITH OGONEK
A9 169 ę 281 LATIN SMALL LETTER E WITH OGONEK
AB 171 ź 378 LATIN SMALL LETTER Z WITH ACUTE
AC 172 Č 268 LATIN CAPITAL LETTER C WITH CARON
AD 173 ş 351 LATIN SMALL LETTER S WITH CEDILLA
B5 181 Á 193 LATIN CAPITAL LETTER A WITH ACUTE
B6 182 Â 194 LATIN CAPITAL LETTER A WITH CIRCUMFLEX
B7 183 Ě 282 LATIN CAPITAL LETTER E WITH CARON
B8 184 Ş 350 LATIN CAPITAL LETTER S WITH CEDILLA
BD 189 Ż 379 LATIN CAPITAL LETTER Z WITH DOT ABOVE
BE 190 ż 380 LATIN SMALL LETTER Z WITH DOT ABOVE
Page 34

INSTALLATION GUIDE CARE
EN1B-0478GE51 R1216 34
Hex
Dec Char Unicode ISO/IEC 10646-1:2000 Character Name
C6 198 Ă 258 LATIN CAPITAL LETTER A WITH BREVE
C7 199 ă 259 LATIN SMALL LETTER A WITH BREVE
D0 208 đ 273 LATIN SMALL LETTER D WITH STROKE
D1 209 Đ 272 LATIN CAPITAL LETTER D WITH STROKE
D2 210 Ď 270 LATIN CAPITAL LETTER D WITH CARON
D3 211 Ë 203 LATIN CAPITAL LETTER E WITH DIAERESIS
D4 212 ď 271 LATIN SMALL LETTER D WITH CARON
D5 213 Ň 327 LATIN CAPITAL LETTER N WITH CARON
D6 214 Í 205 LATIN CAPITAL LETTER I WITH ACUTE
D7 215 Î 206 LATIN CAPITAL LETTER I WITH CIRCUMFLEX
D8 216 ě 283 LATIN SMALL LETTER E WITH CARON
DD 221 Ţ 354 LATIN CAPITAL LETTER T WITH CEDILLA
DE 222 Ů 366 LATIN CAPITAL LETTER U WITH RING ABOVE
E0 224 Ó 211 LATIN CAPITAL LETTER O WITH ACUTE
E1 225 ß 223 LATIN SMALL LETTER SHARP S
E2 226 Ô 212 LATIN CAPITAL LETTER O WITH CIRCUMFLEX
E3 227 Ń 323 LATIN CAPITAL LETTER N WITH ACUTE
E4 228 ń 324 LATIN SMALL LETTER N WI TH ACUTE
E5 229 ň 328 LATIN SMALL LETTER N WITH CARON
E6 230 Š 352 LATIN CAPITAL LETTER S WITH CARON
E7 231 š 353 LATIN SMALL LETTER S WITH CARON
E8 232 Ŕ 340 LATIN CAPITAL LETTER R WITH ACUTE
E9 233 Ú 218 LATIN CAPITAL LETTER U WITH ACUTE
EA 234 ŕ 341 LATIN SMALL LETTER R WITH ACUTE
EB 235 Ű 368
LATIN CAPITAL LETTER U WITH DOUBLE
ACUTE
EC 236 ý 253 LATIN SMALL LETTER Y WITH ACUTE
ED 237 Ý 221 LATIN CAPITAL LETTER Y WITH ACUTE
EE 238 ţ 355 LATIN SMALL LETTER T WITH CEDILLA
F8 248 ° 176 DEGREE SIGN
FB 251 ű 369 LATIN SMALL LETTER U WITH DOUBLE ACUTE
FC 252 Ř 344 LATIN CAPITAL LETTER R WITH CARON
FD 253 ř 345 LATIN SMALL LETTER R WITH CARON
Page 35

CARE INSTALLATION GUIDE
35 EN1B-0478GE51 R1216
Table 4. Character Settings (Turkey)
Hex
Dec Char Unicode ISO/IEC 10646-1:2000 Character Name
20 32 32 SPACE
23 35 # 35 NUMBER SIGN
24 36 $ 36 DOLLAR SIGN
25 37 % 37 PERCENT SIGN
26 38 & 38 AMPERSAND
27 39 ' 39 APOSTROPHE
28 40 ( 40 LEFT PARENTHESIS
29 41 ) 41 RIGHT PARENTHESIS
2E 46 . 46 FULL STOP
30 48 0 48 DI GI T ZERO
31 49 1 49 DIGIT ONE
32 50 2 50 DIGIT TWO
33 51 3 51 DI GI T THREE
34 52 4 52 DIGIT FOUR
35 53 5 53 DIGIT FIVE
36 54 6 54 DIGIT SIX
37 55 7 55 DIGIT SEVEN
38 56 8 56 DIGIT EIGHT
39 57 9 57 DI GI T NINE
3A 58 : 58 COLON
40 64 @ 64 COMMERCIAL AT
41 65 A 65 LATIN CAPITAL LETTER A
42 66 B 66 LATIN CAPITAL LETTER B
43 67 C 67 LATIN CAPITAL LETTER C
44 68 D 68 LATIN CAPITAL LETTER D
45 69 E 69 LATIN CAPITAL LETTER E
46 70 F 70 LATIN CAPITAL LETTER F
47 71 G 71 LATIN CAPITAL LETTER G
48 72 H 72 LATIN CAPITAL LETTER H
49 73 I 73 LATIN CAPITAL LETTER I
4A 74 J 74 LATIN CAPITAL LETTER J
4B 75 K 75 LATIN CAPITAL LETTER K
4C 76 L 76 LATIN CAPITAL LETTER L
4D 77 M 77 LATIN CAPITAL LETTER M
4E 78 N 78 LATIN CAPITAL LETTER N
Page 36

INSTALLATION GUIDE CARE
EN1B-0478GE51 R1216 36
Hex
Dec Char Unicode ISO/IEC 10646-1:2000 Character Name
4F 79 O 79 LATIN CAPITAL LETTER O
50 80 P 80 LATIN CAPITAL LETTER P
51 81 Q 81 LATIN CAPITAL LETTER Q
52 82 R 82 LATIN CAPITAL LETTER R
53 83 S 83 LATIN CAPITAL LETTER S
54 84 T 84 LATIN CAPITAL LETTER T
55 85 U 85 LATIN CAPITAL LETTER U
56 86 V 86 LATIN CAPITAL LETTER V
57 87 W 87 LATIN CAPITAL LETTER W
58 88 X 88 LATIN CAPITAL LETTER X
59 89 Y 89 LATIN CAPITAL LETTER Y
5A 90 Z 90 LATIN CAPITAL LETTER Z
5F 95 _ 95 LOW LINE
61 97 a 97 L ATIN SMALL LETTER A
62 98 b 98 L ATIN SMALL LETTER B
63 99 c 99 LATIN SMALL LETTER C
64 100 d 100 LATIN SMALL LETTER D
65 101 e 101 LATIN SMALL LETTER E
66 102 f 102 LATIN SMALL LETTER F
67 103 g 103 LATIN SMALL LETTER G
68 104 h 104 LATIN SMALL LETTER H
69 105 i 105 LATIN SMALL LETTER I
6A 106 j 106 LATIN SMALL LETTER J
6B 107 k 107 LATIN SMALL LETTER K
6C 108 l 108 LATIN SMALL LETTER L
6D 109 m 109 LATIN SMALL LETTER M
6E 110 n 110 LATIN SMALL LETTER N
6F 111 o 111 LATIN SMALL LETTER O
70 112 p 112 LATIN SMALL LETTER P
71 113 q 113 LATIN SMALL LETTER Q
72 114 r 114 LATIN SMALL LETTER R
73 115 s 115 LATIN SMALL LETTER S
74 116 t 116 LATIN SMALL LETTER T
75 117 u 117 LATIN SMALL LETTER U
76 118 v 118 LATIN SMALL LETTER V
77 119 w 119 LATIN SMALL LETTER W
Page 37

CARE INSTALLATION GUIDE
37 EN1B-0478GE51 R1216
Hex
Dec Char Unicode ISO/IEC 10646-1:2000 Character Name
78 120 x 120 LATIN SMALL LETTER X
79 121 y 121 LATIN SMALL LETTER Y
7A 122 z 122 LATIN SMALL LETTER Z
7E 126 ~ 126 TILDE
80 128 Ç 199 LATIN CAPITAL LETTER C WITH CEDILLA
81 129 ü 252 LATIN SMALL LETTER U WITH DIAERESIS
82 130 é 233 LATIN SMALL LETTER E WITH ACUTE
83 131 âyyy 226 LATIN SMALL LETTER A WITH CIRCUMFLEX
84 132 ä 228 LATIN SMALL LETTER A WITH DIAERESIS
85 133 à 224 LATIN SMALL LETTER A WITH GRAVE
86 134 å 229 LATIN SMALL LETTER A WITH RING ABOVE
87 135 ç 231 LATIN SMALL LETTER C WITH CEDILLA
88 136 ê 234 LATIN SMALL LETTER E WITH CIRCUMFLEX
89 137 ë 235 LATIN SMALL LETTER E WITH DIAERESIS
8A 138 è 232 LATIN SMALL LETTER E WITH GRAVE
8B 139 ï 239 LATIN SMALL LETTER I WITH DIAERESIS
8C 140 î 238 LATIN SMALL LETTER I WITH CIRCUMFLEX
8D 141 ı 305 LATIN SMALL LETTER DOTLESS I
8E 142 Ä 196 LATIN CAPITAL LETTER A WITH DIAERESIS
8F 143 Å 197 LATIN CAPITAL LETTER A WITH RING ABOVE
90 144 É 201 LATIN CAPITAL LETTER E WITH ACUTE
91 145 æ 230 LATIN SMALL LETTER AE
92 146 Æ 198 LATIN CAPITAL LETTER AE
93 147 ô 244 LATIN SMALL LETTER O WITH CIRCUMFLEX
94 148 ö 246 LATIN SMALL LETTER O WITH DIAERESIS
95 149 ò 242 LATIN SMALL LETTER O WITH GRAVE
96 150 û 251 LATIN SMALL LETTER U WITH CIRCUMFLEX
97 151 ù 249 LATIN SMALL LETTER U WITH GRAVE
98 152 İ 304 LATIN CAPITAL LETTER I WITH DOT ABOVE
99 153 Ö 214 LATIN CAPITAL LETTER O WITH DIAERESIS
9A 154 Ü 220 LATIN CAPITAL LETTER U WITH DIAERESIS
9B 155 ø 248 LATIN SMALL LETTER O WITH STROKE
9D 157 Ø 216 LATIN CAPITAL LETTER O WITH STROKE
9E 158 Ş 350 LATIN CAPITAL LETTER S WITH CEDILLA
9F 159 ş 351 LATIN SMALL LETTER S WITH CEDILLA
A0 160 á 225 LATIN SMALL LETTER A WI TH ACUTE
Page 38

INSTALLATION GUIDE CARE
EN1B-0478GE51 R1216 38
Hex
Dec Char Unicode ISO/IEC 10646-1:2000 Character Name
A1 161 í 237 LATIN SMALL LETTER I WITH ACUTE
A2 162 ó 243 LATIN SMALL LETTER O WITH ACUTE
A3 163 ú 250 LATIN SMALL LETTER U W ITH ACUTE
A4 164 ñ 241 LATIN SMALL LETTER N WITH TILDE
A5 165 Ñ 209 LATIN CAPITAL LETTER N WITH TILDE
A6 166 Ğ 286 LATIN CAPITAL LETTER G WITH BREVE
A7 167 ğ 287 LATIN SMALL LETTER G WITH BREVE
A8 168 ¿ 191 INVERTED QUESTION MARK
B5 181 Á 193 LATIN CAPITAL LETTER A WITH ACUTE
B6 182 Â 194 LATIN CAPITAL LETTER A WITH CIRCUMFLEX
B7 183 À 192 LATIN CAPITAL LETTER A WITH GRAVE
C6 198 ã 227 LATIN SMALL LETTER A WITH TILDE
C7 199 Ã 195 LATIN CAPITAL LETTER A WI TH TILDE
D2 210 Ê 202 LATIN CAPITAL LETTER E WITH CIRCUMFLEX
D3 211 Ë 203 LATIN CAPITAL LETTER E WI TH DIAERESIS
D4 212 È 200 LATIN CAPITAL LETTER E WI TH GRAVE
D6 214 Í 205 LATIN CAPITAL LETTER I WITH ACUTE
D7 215 Î 206 LATIN CAPITAL LETTER I WITH CIRCUMFLEX
D8 216 Ï 207 LATIN CAPITAL LETTER I WITH DIAERESIS
DE 222 Ì 204 LATIN CAPITAL LETTER I WITH GRAVE
E0 224 Ó 211 LATIN CAPITAL LETTER O WITH ACUTE
E1 225 ß 223 LATIN SMALL LETTER SHARP S
E2 226 Ô 212 LATIN CAPITAL LETTER O WITH CIRCUMFLEX
E3 227 Ò 210 LATIN CAPITAL LETTER O WITH GRAVE
E4 228 õ 245 LATIN SMALL LETTER O WITH TIL DE
E5 229 Õ 213 LATIN CAPITAL LETTER O WITH TILDE
E6 230 µ 181 MICRO SIGN
E9 233 Ú 218 LATIN CAPITAL LETTER U WITH ACUTE
EA 234 Û 219 LATIN CAPITAL LETTER U WITH CIRCUMFLEX
EB 235 Ù 217 LATIN CAPITAL LETTER U WITH GRAVE
EC 236 ì 236 LATIN SMALL LETTER I WITH GRAVE
ED 237 ÿ 255 LATIN SMALL LETTER Y WITH DIAERESIS
F8 248 ° 176 DEGREE SIGN
Page 39

CARE INSTALLATION GUIDE
39 EN1B-0478GE51 R1216
Procedure 1. In Windows, click Start>Settings>Control panel.
2. Double-click Regional and Language Options. The Regional and Language
Options dialog box displays.
3. On the Regional Options tab under Standards and formats, select the
language for displaying standards and formats such as format numbers,
currencies, dates, and time.
4. Under Location, select the matching country for supporting you with local
services such as news and weather.
5. Select the Languages tab.
6. If you want to support Arabic, Armenian, Georgian, Thai, Hebrew, Indic, Thai
and Vietnamese languages, check Install files for complex script and right-
to-left languages (including Thai).
7. If you want to support Japanese, Chinese and Korean languages, check Install
files for East Asian languages under Supplemental language support.
8. Make sure that you have the necessary harddisk space indicated in the
message boxes displayed. Close the message boxes by clicking OK.
After confirming by clicking OK or Apply, the additional files will be installed on
the PC.
9. After successful installation, repeat steps 1 through 5, and then proceed with
step 10.
10. Click Details button. The Text Services and Input Languages dialog box
displays. The actual input language is selected in Default input language and
the corresponding installed services are highlighted in bold under Installed
services.
Page 40

INSTALLATION GUIDE CARE
EN1B-0478GE51 R1216 40
11. To add a new input language, click the Add button. The Add Input Language
dialog box displays.
12. In Input Language, select the language, in this case Italian. Check/select
optional settings for Keyboard layout/IME, Handwriting recognition and Speech
if available and if desired.
13. Click OK. The new language and its services are added to the Installed
Services list and can be selected as default input language.
Page 41

CARE INSTALLATION GUIDE
41 EN1B-0478GE51 R1216
14. In Default input language, select the language, in this case Italian.
15. In the Text Services and Input Languages dialog box, click the Language bar
button. The Language Bar Settings dialog box displays. Check Show the
Language bar on the desktop and Show additional Language bar icons in
the task bar. These enabled options allow toggling between several
language(s) on the desktop and in the taskbar after the customization is
finished.
16. Click OK.
17. In the Text Services and Input Languages dialog box, click OK, and then select
the Advanced tab in the Regional and Language Options dialog box.
Page 42

INSTALLATION GUIDE CARE
EN1B-0478GE51 R1216 42
18. In Language for non-Unicode programs, select the language, in this case
Italian.
19. Click OK to save all settings. The Advanced message box may display.
20. Follow the instructions described in the message box, and close the message
box. The Change Regional Options message box displays.
21. Restart the PC by clicking Yes. After restart, the new language, in this case
Italian is added to the Language bar.
Page 43

CARE INSTALLATION GUIDE
43 EN1B-0478GE51 R1216
22. Check the language in the Language bar.
23. For selecting the language in CARE, COACH, XL-Online respectively in
COACH Online, please refer to the corresponding Online Help and/or PDF
documentation.
Page 44

Manufactured for and on behalf of the Environmental and Combustion Controls Division of Honeywell Technologies Sàrl, Rolle, Z.A. La Pièce 16, Switzerland by its Authorized Representative:
Automation and Control Solutions
Honeywell GmbH
Böblinger Strasse 17
71101 Schönaich, Germany
Phone +49 (0) 7031 637 01
Fax +49 (0) 7031 637 740
http://ecc.emea.honeywell.com
EN1B-0478GE51 R1216 S ubj ect to change without notice
 Loading...