

Page 1

PROGRAMMABLE THERMOSTAT
Page 2

WGicome to tha world of comfort and savings with your new Honeywell Magic Stat® electronic
thermostat. The Magic Stat® name is synonymous with innovation and state-of-the-art electronic
controls.
Your new thermostat will automatically control the temperature in your home within one degree of
your programmed setting, keeping you comfortable while saving energy, when programmed
according to the instructions in this manual. The automatic recovery feature calculates when to
start the heat or air conditioning so the home is at the comfort temperature at the time you
program.
Each day can be programmed differently or, if desired, the first day's program may be automatically
copied to the rest of the week. Six different heating/cooling temperatures can be entered tor each
day.
TABLE OF CONTENTS
INSTALLING THE BATTERY........................................................................................ 2
FEATURES OF YOUR NEW THERMOSTAT.........................................................................3
PROGRAMMING AND SETTING......................................................................................6
CHANGING...........................................................................................................15
TROUBLESHOOTING.................................................................................................I9
RELAY ORDERING INFORMATION
LIMITED ONE-YEAR WARRANTY.................................................................................25
...............................................................................
23
69-8023—2
Page 3
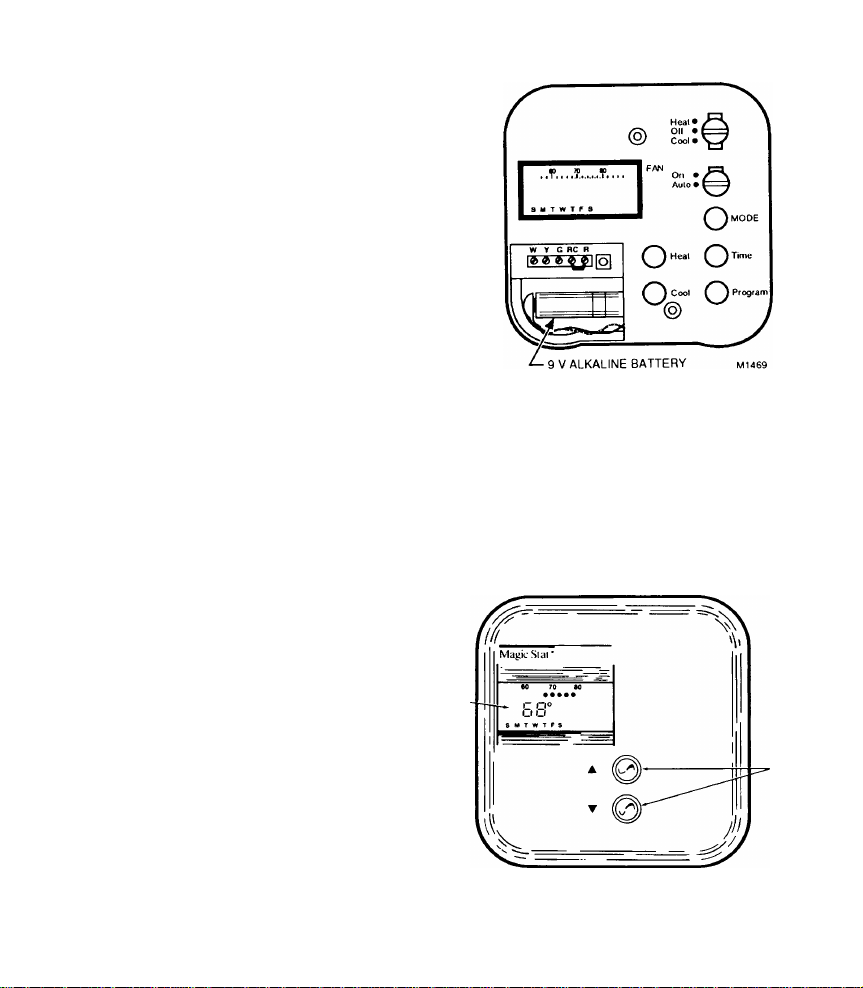
INSTALLING THE BATTERY
A 9 V alkaline battery (purchase separately) must
be installed to save the program in case of a power
outage, and if programming the thermostat before
installing it.
For best results, replace the battery once every
three years to prevent loss of program.
FEATURES OF YOUR NEW THERMOSTAT
LCD DISPLAY—During operation, shows
room temperature and programmed tem
perature range continuously, or acts as a
digital clock. During programming, shows
the day of the week, time of day, and pro
grammed temperature range.
UP A and DOWN T BUTTONS—Lets you
change the temperature setting without
opening the cover.
LCD
DISPLAY
UPA AND
DOWN ▼
BUTTONS
Outside view of thermostat
69-8023—2
Page 4
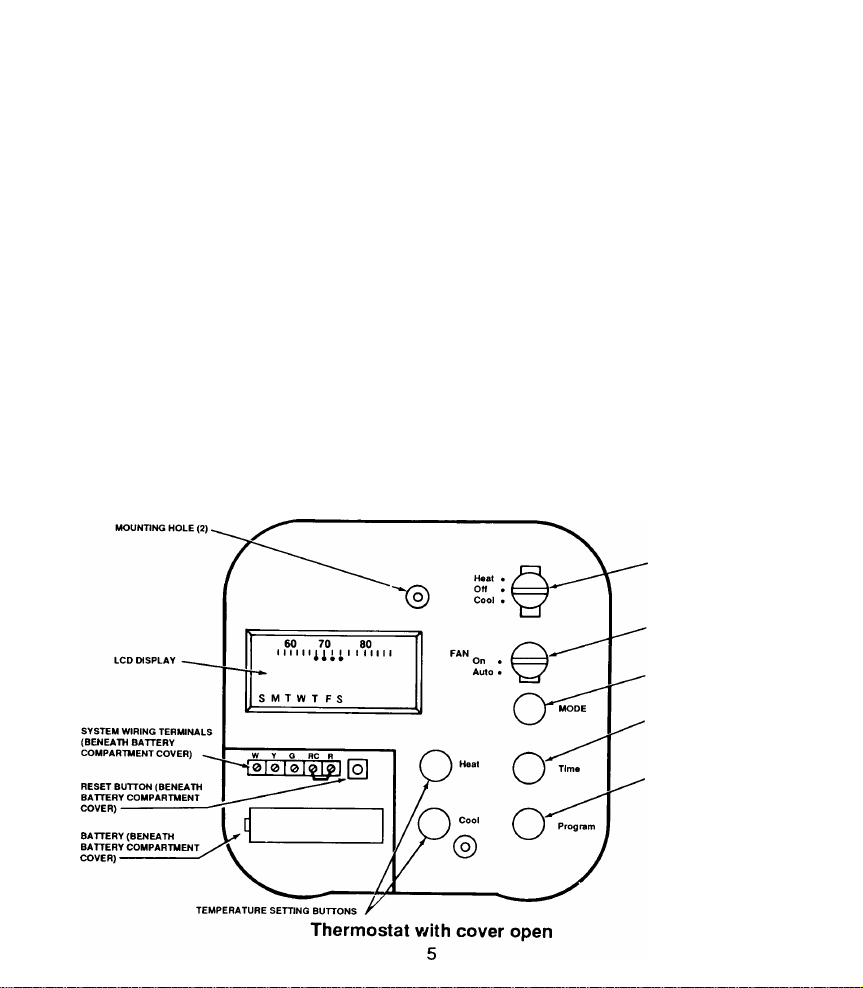
SYSTEM SWITCH—Lets you select heating or cooling operation. In OFF, furnace and air
conditioner are both turned off, while the thermostat remembers your program so it can resume
control when set back to HEAT or COOL.
FAN SWITCH—Lets you select ON for continuous fan operation, or AUTO for fan operation as
needed during heating and cooling.
MODE SELECTION BUTTON—Use to change modes—manual mode, setting the day and the
clock modes, temperature display mode, or time display mode.
TIME PROGRAMMING BUTTON—Use to set the correct day, hour, and minute, and to set the
desired times when programming temperature changes.
PROGRAM REVIEW BUTTON—Use when starting, reviewing, canceling, or changing the program.
HEAT BUTTON—Use to setthe desired temperatures in your heating program; to raise the setting,
hold the button; to lower the setting, tap it.
COOL BUTTON—Use to set the desired temperatures in yourcooling program;to lowerthe setting,
hold the button; to raise the setting, tap it.
RESET BUTTON—Small white button beneath battery cover which erases everything to start over.
BATTERY—9 V alkaline battery allows armchair programm ing before installation and 3-year backup
in case of power outage.
PROGRAMMING INSTRUCTIONS (NOT SHOWN)—Inside thermostat cover.
SYSTEM SWITCH
’ MODE SELECTION
BUTTON
. TIME
PROGRAMMING
BUTTON
PROGRAM REVIEW
BUTTON
69-8023—2
Page 5
PROGRAMMING AND SETTING
You will program your thermostat once for the entire year, entering your temperatures for both
the heating and air conditioning seasons. You may enter heating temperatures between 54° F and
82° F, and cooling temperatures between 62° F and 88° F. A cool setting above 88° F (HI) leaves
the cooling off at any temperature.
The first program you set will be automatically copied into all 7 days. You may make changes later
to your program for the weekend. This typical weekday schedule suggests setting for atypical week;
fill in the blanks with your preferred schedule and use as a guide when programming.
Typical
Activity
Wake up
Leave Home
Arrive Home
After Dinner
Retire
Suggested
Time Schedule
6:15 AM
7:30 AM
5:00 PM
8:00 PM
10:45 PM
Your Time
Schedule
Program A Typical Weekday Schedule
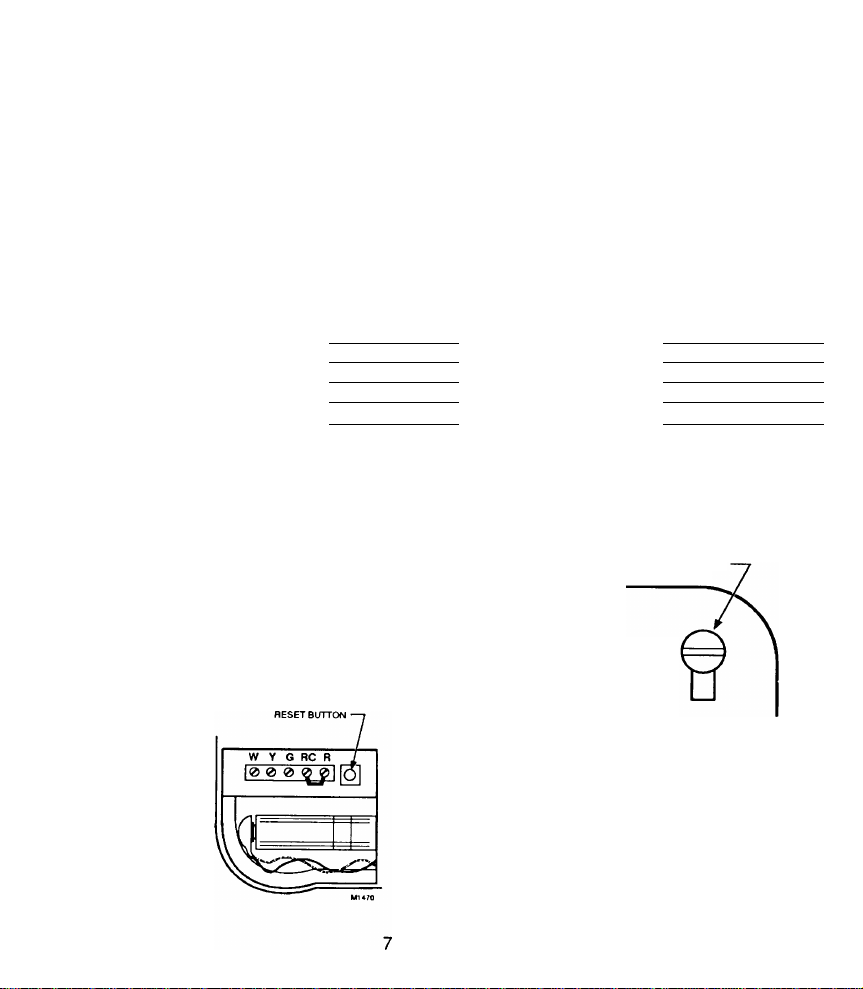
7ou may program the CT3100 in your hand
before installation, oronthewall. If programming
Defore installation, the display will go blank durng programming if no buttons are pressed for
several seconds. There is no need to start over;
proceed where you left off, and the display will
eappear. However, if the CT3100 is already
vired to the wall when
irogramming, the dis)lay will stay on.
^ress reset button
jnder battery cover to
:lear out any program
>r setting already in the
nemory.
Suggested Program
Temperatures (° F)
Heat
68
54
68
72
60
Move the system switch
to HEAT. The display will
show current room tem
perature with MANUAL.
MANUAL indicates that
even though there is no
program in the thermostat,
it can be used as a manual
thermostat by selecting a
temperature using the UP
and DOWN
buttons when
the cover is
closed.
®®©®©©©
Cool
74
80
74
74
80
SYSTEM SWITCH
Heat
Off
Cool
nn
%Lf
Your Program
Temperatures
Heat Cool
69-8023—2
Page 6

Enter Your First Program
A Program Press and release. The display shows PRO^ GRAM with the time 12:00 AM.
Enter a Program Point
I Time
Heat
As you program, you will notice the dots under the temperature
scale, which appear or disappear to correspond to the settings
vou are making.
Cool Press until the desired cooling temperature for
After the first setting is made, the display shows that 7 days a
week, starting at 6:00 AM, the thermostat will turn on the heat
when the temperature drops below 70° F (when the system
switch is set to HEAT), or turn on the air conditioning when the
temperature rises above 76° F (when the system switch is set
to COOL).
Press until the time you want the temperature
change to occur is displayed; hold the button
down to move time ahead; tap to move back
(6:00 AM shown in example).
Press until the desired heating temperature for
that time is reached; hold the button down to
raise the temperature; tap to lower it (70° F
shown).
8
that time is reached; hold the button down to
lower the temperature; tap to raise it (76° F
shown).
# run ^
iu:uiui
®®®®®©®
Od
Ojf
®®®®®©®
C nn A«
Lf.'ULf
®@®®®©®
To enter the rest of your programs for the first day, repeat the
steps under “Enter a Program Point” (page 8), until up to 6
changes have been entered.
69-8023—2
Page 7

Review Your Program
A Program Press to review the points you have already set. Hold the button to move
When you are satisfied that the first day’s entries are correct, proceed to setting the day and clock.
Setting the clock will automatically copy the program into all 7 days of the week. You will be instructed
how to change the programs for weekends when you get to the CHANGING section.
forward to the next program; tap to set back.
10
Set the Day and Clock
® MODE Press. Display will show SET CLOCK, and a
^ flashing circle around Sunday.
# Zt nra
s; M T w T F s
SET CLOCK
Time Press to select today’s day (Wednesday
shown).
MODE Press. Display will show the hour flashing.
11
t Z*
fL. :UiLJ
< Z* nn
ItmfLJ SET CLOCK
s m\t (g) t f s
«V ®
69-8023—2
Page 8

Time Press to set the correct hour; note AM or PM
(1:00 PM shown).
* 11»#
Kimfimf S€T CLOCK
S M T T F S
MODE Press. Display will show the minutes
flashing.
Time Press to set the correct minutes (1 ;15 PM
shown).
12
MODE Press to return to normal temperature
display.
You are done programming, unless you want to make changes for
specific days. See CHANGING section. Also see CHANGING
section for information on daylight-saving or standard time
changes.
»Jtjiiji SET CLOCK
S H T T \F S
69-8023—2
13
69-8023—2
Page 9

CHANGING
Changing One Day’s Program
^ Program Hold until the program you wish to change is
displayed. Be sure you are on the day you wish
to change (Saturday at 6:00 AM is shown).
tZ ran
UILfU
i ■ T W T F ®
Heat
or
Cool
^ MODE Press to return to normal temperature display.
If you were programming your thermostat in your hand, and it is not
yet installed, please refer to installation manual form number 698024 for installation instructions.
Hold and watchthedots underthetemperature
scale disappear. When they are gone, the pro
gram has been eliminated. Enter your new
program as instructed under “Enter a Program
Point” on page 8.
14
Changing For Dayiight-Saving or Standard Time
To move clock ahead an hour in the spring...
^ MODE Tap until SET CLOCK shows and the hour is
Time
flashing.
Hold until the clock advances one hour.
»r f~in
S « T W T F 0
tin ntr»
iLflULf SET CLOCK
8 W T F 0
f 4 rèn
I t'lLJiJ ™ acT CLOCK
8 y T W T F 0
MODE Tap until normal temperature display returns.
15
"“in
iLS
8 y T W T F 8
69-8023—2
Page 10

To move clock back an hour in the fall...
^ MODE Tap until SET CLOCK shows and the hour is
flashing.
Time Tap until the clock backs up one hour.
MODE Tap until normal temperature display returns.
16
Temporarily Overriding Your Program
A short term override is used to change the temperature for ap
proximately three hours. At the end of this time, the program is
resumed.
■ H T W T F (i)
8 y T W T F 8
SET CLOCK
fLf
' Up A
or
I Down ▼
With thermostat door closed, press to adjust
temperature setting to desired shortterm over
ride (3-hour) temperature (62° F shown).
A manual override is used to change the temperature indefinitely,
such as when you go on vacation. The thermostat will suspend the
daily program and hold the temperature you desire until you change
it back.
17
8 y T W T F 8
c
SET
69-8023—2
Page 11

MODE Tap until MANUAL is displayed.
I Up
or
' Down
MODE When you want to cancel manual override, tap
Close thermostat door, press to adjust tem
perature to desired setting (62° F shown).
repeatedly until normal temperature display
shows.
18
TROUBLESHOOTING
Your thermostat requires little or no attention. Before you call for service, please check as
indicated in the following guide.
PROBLEM
No display.
CHECK
—system switch. May be in OFF
position.
—fuse or circuit breaker.
—furnace power switch. May be
OFF.
—thermostat connections.
—other.
Move system switch to HEAT or
COOL position.
If blown or tripped, replace fuse or
reset breaker.
Move switch to ON.
Turn OFF power to furnace. Check
for correct terminal hookups. Re
pair any frayed or broken wires.
Firmly tighten all terminal screws.
Contact a qualified service techni
cian for assistance.
ACTION
19
69-8023—2
Page 12

Troubleshooting, œntinued
PROBLEM
Display goes
blank for several
minutes during long
furnace burn cycle,
then recovers.
No heat.
No cooling.
Note: The CT3100
is not designed
for cooling-only
systems.
Troubleshooting, continued
PROBLEM
No cooling,
(continued)
Time button
advances to next
program point
instead of by
15-minute
increments.
—air filter and fan belt.
—possible power interruptions
during part of furnace cycle.
—pilot flame. May be out.
—fuse or circuit breaker.
—system switch. May be in OFF
or HEAT position.
—fuse or circuit breaker.
—condenser switch position.
Located outdoors and may be
turned OFF.
—thermostat connections.
—other.
—number of temperature settings
programmed; thermostat will
take up to six.
CHECK
CHECK
ACTION
Replace if necessary.
May require isolating relay to
eliminate power interruptions. See
Table 1 in installation manual form
number 69-8024.
Relight pilot flame per furnace
manufacturer's instructions.
If fuse is blown or breaker tripped,
replace or reset.
Move switch to COOL position.
If fuse is blown or breaker tripped,
replace or reset.
Move to ON position.
continued
20
ACTION
Turn OFF power to cooling system
and furnace. Check for correct
terminal hookups. Repair any
frayed or broken wires. Firmly
tighten all terminal screws.
Contact a qualified service tech
nician for assistance.
Erase one setting before adding
another.
continued
21
69-8023—2
Page 13

Troubleshooting, continued
PROBLEM
Thermostat will not —number of heating and cooling
CHECK ACTION
Reset thermostat; re-enter program.
allow you to make temperature combinations in
a temperature your weekly program; thermosetting. stat will accept a maximum of
eight.
Toll-free Installation and Programming Assistance
For all questions concerning this thermostat, please read and follow the instructions. If additional
assistance is needed, call our toll-free Consumer Affairs group number at 1 -800-468-1502, Monday-
Friday, 7:30 a.m.-4:00 p.m. Central time.
--------------------------------------------------NOTICE
-------------------------------------------------
This equipment is a Class B digital apparatus which complies with Canadian Radio Interfer
ence Regulations, CRC c. 1374.
22
RELAY ORDERING INFORMATION
Send orders to; Honeywell Inc., Consumer Affairs MNlO-1462,1885 Douglas Dr. N.. Golden Valley, MN 55422-3992.
Part No.
MS100Q Isolating Relay Kit $10
MS101Q
Check enclosed [ ] Money order enclosed
Charge to my Visa card #
exp. date
Charge to my MasterCard #_________________________
exp. date
[ ] Charge to my Discover Card #
exp. date
NOTE: Credit card orders may also be made by calling 1-800-468-1502 Monday-Friday 7:30 a.m.-4:00 p.m.. Central time.
Send to: Name_____________________________________________________________________________________________________________
Description Price Ea.
Isolating Relay & 24 V
Transformer Kit
________________
________________
________________
Address
City
_____
Your daytime phone number
___________________________
signature
signature
signature
_________________
________________
__________________________________________________________________________________
$20
Shipping/
Handling Quantity
$3.00
$3.00
Subtotal
Your local sales tax
Total
State
Total
Price
.Zip.
23 69-8023—2
Page 14

Honeywell warrants all products listed in this book to be free from defects in workmanship or materials, under normal use and service, for a period
of one ( 1 ) year from the date of purchase by the consumer. If, at any time during the warranty period, the product is defective or malfunctions, Honeywell
shall repair or replace it (at Honeywell’s option) within a reasonable period of time.
If the product is defective:
a) , return it, with a bill of sale, receipt, or other dated proof of purchases to the retailer from which you purchased it, or
b) . package it carefully, along with a bill of sale, receipt or other dated proof of purchase and a short description of the malfunction, and mail
it. postage prepaid, to the following address:
This warranty does not cover removal or reinstallation costs. This warranty shall not apply if it is shown by Honeywell that the defect or malfunction
was caused by damage which occurred while the product was in the possession of a consumer.
Honeywell's responsibility shall be to repair or replace the product within the terms stated above. HONEYWELL SHALL NOT BE LIABLE FOR ANY
LOSS OR DAM AGE OF ANY KIND, INCLUDING ANY INCIDENTALORCONSEQUENTIALDAMAGES RESULTING. DIRECTLY OR INDIRECTLY.
FROM ANY BREACH OF ANY WARRANTY, EXPRESS OR IMPLIED, OR ANY OTHER FAILURE OF THIS PRODUCT. Some states do not allow
the exclusion or limitation of incidental or consequential damages, so this limitation may not apply to you.
THIS WARRANTY IS THE ONLY EXPRESS WARRANTY HONEYWELL MAKES ON THIS PRODUCT. THE DURATION OF ANY IMPLIED
WARRANTIES, INCLUDING THE WARRANTIES OF MERCHANTABILITY AND FITNESS FOR A PARTICULAR PURPOSE, IS HEREBY LIMITED
TO THE ONE YEAR DURATION OF THIS WARRANTY. Some states do not allow limitations of how long an implied warranty lasts, so the above
limitation may not apply to you.
This warranty gives you specific legal rights, and you may have other rights which vary from state to state.
If you have any questions concerning this warranty, please write our Consumer Affairs Department, Honeywell Inc., 1885 Douglas Drive North, Golden
Valley. MN 55422-3992 or call 1-800-468-1502, Monday-Friday, 7:30-4:00 Central time.
Honeywell Inc.
Returned Goods
1050 Berkshire Lane
Plymouth, MN 55441-4437
25 69-8023—2
LIMITED ONE-YEAR WARRANTY
Page 15

TYPICAL ENERGY SAVINGS FOR REPRESENTATIVE CITIES IN THE U.S.
^1% Savings for Once-A-Day, 1(TF offset % Savings for Twice-A-Day, 10*Foffset* % Savings for 5*F summer offset
11 iiJ
San
Francisco
•Based on 1(TF offset-(5®F offset gives
This thermostat is manufactured under one or more of the following patents. U.S. Patent No. 4,172.555. RE32.960. 4,314.665; 4.335.847, 4.356.962; 4.408.711, 4.410.132; 4.469.274;
4.531.064; 4.606.401; 4.627.245; 4,635.708; 4.669,654. 4,683.939; 4.685.614; 4.695.942 Other Patents Pending.
approx. 55 percent of these savings.) lo asOB
S.M.
Rev. 8-90
Dallas
Los Angeles San Diego
Atlanta
® Honeywell Inc. 1988
Form Number 69-8023—2
©Honeywell Inc. 1990
 Loading...