

Page 1
INSTALLATION MANUAL
KN 62/62A/64
DISTANCE MEASURING
MANUAL NUMBER 006-00144-0007
REVISION 7 November, 2004
EQUIPMENT
Page 2

WARNING
Prior to the export of this document, review for export license requirement is needed.
COPYRIGHT NOTIC E
©1979, 2000, 2004 Honeywell International Inc.
REPRODUCTION OF THIS PUBLICATION OR ANY PORTION THEREOF BY ANY MEANS
WITHOUT THE EXPRESS WRITTEN PERMISSION OF HONEYWELL IS PROHIBITED,
EXCEPT TO THE EXTENT REQUIRED FOR INSTALLATION OR MAINTENANCE OF THE
RECIPIENT'S EQUIPMENT. FOR FURTHER INFORMATION CONTACT THE MANAGER,
TECHNICAL PUBLICATIONS, HONEYWELL, ONE TECHNOLOGY CENTER, 23500 WEST
105TH STREET OLATHE KS 66061 TELEPHONE: (913) 782-0400.
Page 3

BENDIX/KING KN 62/62A/64
REVISION HISTORY
KN 62/62A/64 Installation Manual
Part Number: 006-00144-0007
For each revision, Add, delete or replace pages as indicated.
REVISION: 7, November, 2004
ITEM ACTION
All pages Remove and Replace
Rev 7, November/2004 00144I06.TDC Page R-1
Page 4

BENDIX/KING KN 62/62A/64
THIS PAGE RESERVED
Rev 7, November/2004 00144I06.TDC Page R-2
Page 5

BENDIX/KING KN 62/62A/64
SECTION I
GENERAL INFORMATION
1.1 INTRODUCTION..........................................................................................1-1
1.2 EQUIPMENT DESCRIPTION ......................................................................1-1
1.3 TECHNICAL CHARACTERISTIC ................................................................1-1
1.3.1 DME CHANNEL SOURCES ........................................................................1-3
1.3.2 UNIT RESONANT FREQUENCY ................................................................1-5
1.4 UNITS AND ACCESSORIES.......................................................................1-5
1.4.1 KN 62 DME ..................................................................................................1-5
1.4.2 KN62A..........................................................................................................1-5
1.4.3 KN 64 DME ..................................................................................................1-5
1.4.4 KN 62/62A/64 INSTALLATION KIT ..............................................................1-6
1.5 LICENSE REQUIREMENTS........................................................................1-6
SECTION II
INSTALLATION
2.1 GENERAL INFORMATION ..........................................................................2-1
2.1.1 KN 62A.........................................................................................................2-1
2.1.2 KN 62 AND KN 64........................................................................................2-1
2.2 UNPACKING AND INSPECTING EQUIPMENT ..........................................2-1
2.3 EQUIPMENT INSTALLATION......................................................................2-1
2.3.1 AVIONICS COOLING REQUIREMENTS FOR PANEL
MOUNTED EQUIPMENT.............................................................................2-1
2.3.2 KN 62/62A/64 INSTALLATION.....................................................................2-2
2.3.3 MOLEX CONNECTOR ASSEMBLY.............................................................2-3
2.3.4 DME ANTENNA INSTALLATION .................................................................2-3
SECTION III
OPERATION
3.1 GENERAL....................................................................................................3-1
Rev 7, November/2004 00144I06.TDC Page TOC-1
Page 6

BENDIX/KING KN 62/62A/64
LIST OF FIGURES
FIGURE 1-1 KN 62/62A/64 CRITICAL FREQUENCIES....................................1-5
FIGURE 2-1 MOLEX TERMINALS AND TOOLS...............................................2-5
FIGURE 2-2 KN 62/62A/64 PIN FUNCTION .....................................................2-8
FIGURE 2-3 ANTENNA CABLE ASSEMBLY.....................................................2-11
FIGURE 2-4 KN 62/62A/64 INTERCONNECT ..................................................2-13
FIGURE 2-5 KN 62/62A/64 TO NARCO NAV 122 INTERCONNECT ...............2-15
FIGURE 2-6 DUAL SLIP CODE CONTROL UNIT INTERCONNECT ...............2-17
FIGURE 2-7 DUAL BCD CONTROL UNIT INTERCONNECT...........................2-19
FIGURE 2-8 DUAL 2X5 CONTROL UNIT INTERCONNECT............................2-21
FIGURE 2-9 SLIP CODE AND 2X5 CONTROL UNIT INTERCONNECT..........2-23
FIGURE 2-10 SLIP CODE AND BCD CONTROL UNIT INTERCONNECT.........2-25
FIGURE 2-11 2X5 AND BCD CONTROL UNIT INTERCONNECT .....................2-27
FIGURE 2-12 NAV 1 - NAV 2 CHANNELING OF A KN 62/62A/64 FROM
2 KX 155/165’S .............................................................................2-29
FIGURE 2-13 KN 62/62A/64 OUTLINE AND MOUNTING DRAWING................2-31
FIGURE 2-14 KN 62/62A/64 INSTALLATION DRAWING....................................2-33
FIGURE 2-15 KN 62/62A/64 INSTALLATION DRAWING....................................2-35
FIGURE 2-16 KN 60 ANTENNA INSTALLATION DRAWING ..............................2-37
FIGURE 2-17 KN 61 ANTENNA INSTALLATION DRAWING ..............................2-39
FIGURE 2-18 030-00005-0000 CONNECTOR ASSEMBLY................................2-43
FIGURE 3-1 KN 62/62A/64 FREQUENCY MODE.............................................3-2
FIGURE 3-2 KN 62/62A/64 GROUND SPEED/TIME-TO-STATION MODE.......3-2
FIGURE 3-3 KN 62/62A/64 REMOTE MODE....................................................3-3
Rev 7, November/2004 00144I06.TDC Page TOC-2
Page 7

BENDIX/KING KN 62/62A/64
LIST OF TABLES
TABLE 1-1 SHIFTED BCD DME CHANNELING CODES...............................1-3
TABLE 1-2 2X5 DME CHANNELING CODES.................................................1-4
TABLE 1-3 SLIP CODE DME CHANNELING CODES....................................1-4
TABLE 1-4 KN 62/62A/64 INSTALLATION KIT................................................1-6
TABLE 2-1 KN 62/62A/64 PIN FUNCTION LIST.............................................2-9
Rev 7, November/2004 00144I06.TDC Page TOC-3
Page 8

BENDIX/KING KN 62/62A/64
Rev 7, November/2004 00144I06.TDC Page TOC-4
Page 9

BENDIX/KING KN 62/62A/64
SECTION I
GENERAL INFORMATION
1.1 INTRODUCTION
This manual contains information relative to the physical, mechanical, and electrical characteristics and installation procedures for the KN 62/62A/64 DME. The KN 64 has lower output power
than the KN 62/62A. The KN 64 is not TSO’ed.
1.2 EQUIPMENT DESCRIPTION
The KN 62/62A/64 is a panel mounted, 200 channel DME employing th e latest state of the art so lid-state transmitter and large scale integrated circuit (LSI) technology. All tuning is done electronically using a single crystal, digital, frequency synthesizer. The unit has a gas discharge display
that simultaneously indicates range, speed, and time-to-station or range and frequency. An automatic dimming circuit adjusts the brightness of the display to compensate for changes in ambient
light level.
,
Range, speed, and time-to-station are measured digitally, using two LSI
are employed in the digital frequency synthesizer and display circuitry.
The KN 62/62A/64 can be channeled internally using its own frequency selection knobs or externally from any of the common NAV receiver codes.
s. Two other LSI circuits
The KN 62/62A/64 is an extremely compact DME requiring only 1. 3 inches of panel height. It can
be operated with any DC input from 11 to 33 volts. Power consumption is only 15 watts at any
input voltage; thus, forced air cooling is
not required.
1.3 TECHNICAL CHARACTERISTICS
SPECIFICATION CHARACTERISTIC
TSO COMPLIANCE (KN 62A only): F.A.A. TSO C66a
KA 60 Antenna: FAA TSO C66a and TSO C74c
KA 61 Antenna: FAA TSO C66c, C74c, C112, C118, C147
RTCA DO-160 Environmental
Categories
KN 62A: /A1B1/A/PKS/XXXXXXZBBBA
KA 60: /D2/A/JY/XXXXXXXXXXX
RTCA DO-160D Environmental
Categories
KA 61: [D2X]ACB[SCMYL,RG]XRFXX-
SXXXXXXX[XXXX][2A]AX
CHANNELS: 200 channels
ELECTRICAL: A. All solid state transmitter
Rev 7, November/2004 00144I06.TDC Page 1-1
B. Electronically tuned by single crystal, digital,
frequency synthesizer
C. Range, speed, and time-to-station measured
digitally, using large scale integrated circuits
Page 10

BENDIX/KING KN 62/62A/64
SPECIFICATION CHARACTERISTIC
D. Gas discharge display
OUTPUT POWER: 50 watts peak, pulsed power minimum (35 watts,
KN 64)
100 watts nominal (50 watts, KN 64)
MAXIMUM DISPLAY RANGE:* 389 nautical miles
PANEL HEIGHT: 1.3 inches (3.30 cm) maximum
ACQUISITION SENSITIVITY: -82dBm minimum, -87dBm nominal
(-78dBm minimum, -87dBm nominal, KN 64)
NOTE
*THE MAXIMUM RANGE AT WHICH THE DME
WILL LOCK UP IS DETERMINED BY ALTITUDE
AND GROUND STATION OUTPUT POWER AND
SENSITIVITY.
SPECIFICATION CHARACTERISTIC
RANGE ACCURACY:*
GROUND SPEED ACCURACY:
TIME-TO-STATION ACCURACY:
SEARCH TIME: 1.0 second nominal
MEMORY TIME: 11 to 15 seconds
AUDIO OUTPUT (IDENT): Level adjustable up to 15mW INTO 600 OHM
MAXIMUM ALTITUDE: 50,000 feet
KN 62/62A/64 OVERALL DIMENSIONS (in-
cluding mounting rack and connectors)
.1 NAUTICAL MILES OR ± .14%, WHICH-
±
EVER IS GREATER, FROM 0 TO 99.9 NAUTICAL MILES
1 NAUTICAL MILE FROM 100 TO 389
±
NAUTICAL MILES
1 KNOT OR ± 1%, WHICHEVER IS
±
GREATER FROM 0 TO 999 KNOTS
1 MINUTE FROM 0 TO 99 MINUTES
±
LOAD, nominally set for 2mW
LENGTH 12.258 INCHES (31.135 cm)
WIDTH: 6.312 inches (16.032 cm)
HEIGHT: 1.300 inches ( 3.302 cm)
WEIGHT: 2.6 LBS (1.18 KG) nominal
Rev 7, November/2004 00144I06.TDC Page 1-2
Page 11

BENDIX/KING KN 62/62A/64
POWER REQUIREMENTS: 11-33VDC at 15 watts
066-1068-04 AND 066-1088-01 ONLY
BACKLIGHTING: NOMINAL 14VDC AT 2 WATTS
NOMINAL 28VDC AT 2 WATTS
CHANNELING SOURCES: a. Internal
b. External control head providing shifted
BCD code such as KFS 560B.
c. External control head providing ARINC 2 x
5 code such as KX 170 and KFS 560B.
d. External control head providing slip code
such as KX 170A, KX 170B, KX 175A, and KX
175B.
1.3.1 DME CHANNEL SOURCES
The KN 62/62A/64 can be channeled by the internal channeling tunning knobs or it may be chan-
neled by an external source. The KN 62/62A/64 will accept external channeling in the form of
Shifted BCD, ARINC 2X5, or Bendix/King Slip code. The tunning logic for each of the three types
of channeling is given in tables 1-1, 1-2, and 1-3.
TABLE 1-1 SHIFTED BCD DME CHANNELING CODES
Frequency
Mhz
108 0000.0X0000.X01
109 0001.1X0001.X50
110 0010.2X0010
111 0011.3X0011
112 0100.4X0100
113 0101.5X0101
114 0110.6X0110
115 0111.7X0111
M8 M4 M2 M1 .X
Mhz
K800K400K200K100.XX
Mhz
K50
116 1000.8X1000
117 1001.9X1001
0 = Connected to Remote Control Common
1 = Open
Rev 7, November/2004 00144I06.TDC Page 1-3
Page 12
BENDIX/KING KN 62/62A/64
TABLE 1-2 2 x 5 DME CHANNELING CODES
Frequency Mhz
MA ME MC MD X
Mhz
KA KE KC KD .XX
Mhz
K5
0
108 0110.0X1011.X01
109 0011.1X0111.X50
110 1011.2X0101
111 0111.3X1101
112 0101.4X1110
113 1101.5X1100
114 1110.6X1001
115 1100.7X1010
116 1001.8X0110
117 1010.9X0011
0 = Connected to Remote Control Common
1 = Open
TABLE 1-3 SLIP CODE DME CHANNELING CODES
Frequency Mhz
108 1101.0X0011.X01
109 1110.1X0001.X50
110 0111.2X0000
111 0011.3X1000
112 0001.4X1100
113 1000.5X0110
114 0100.6X1011
115 1010.7X1101
116 0101.8X1110
117 0010.9X0111
0 = Connected to Remote Control Common
1 = Open
M0 M1 M2 M3 .X
Mhz
K0 K1 K2 K3 .XX
Mhz
K50
Rev 7, November/2004 00144I06.TDC Page 1-4
Page 13
BENDIX/KING KN 62/62A/64
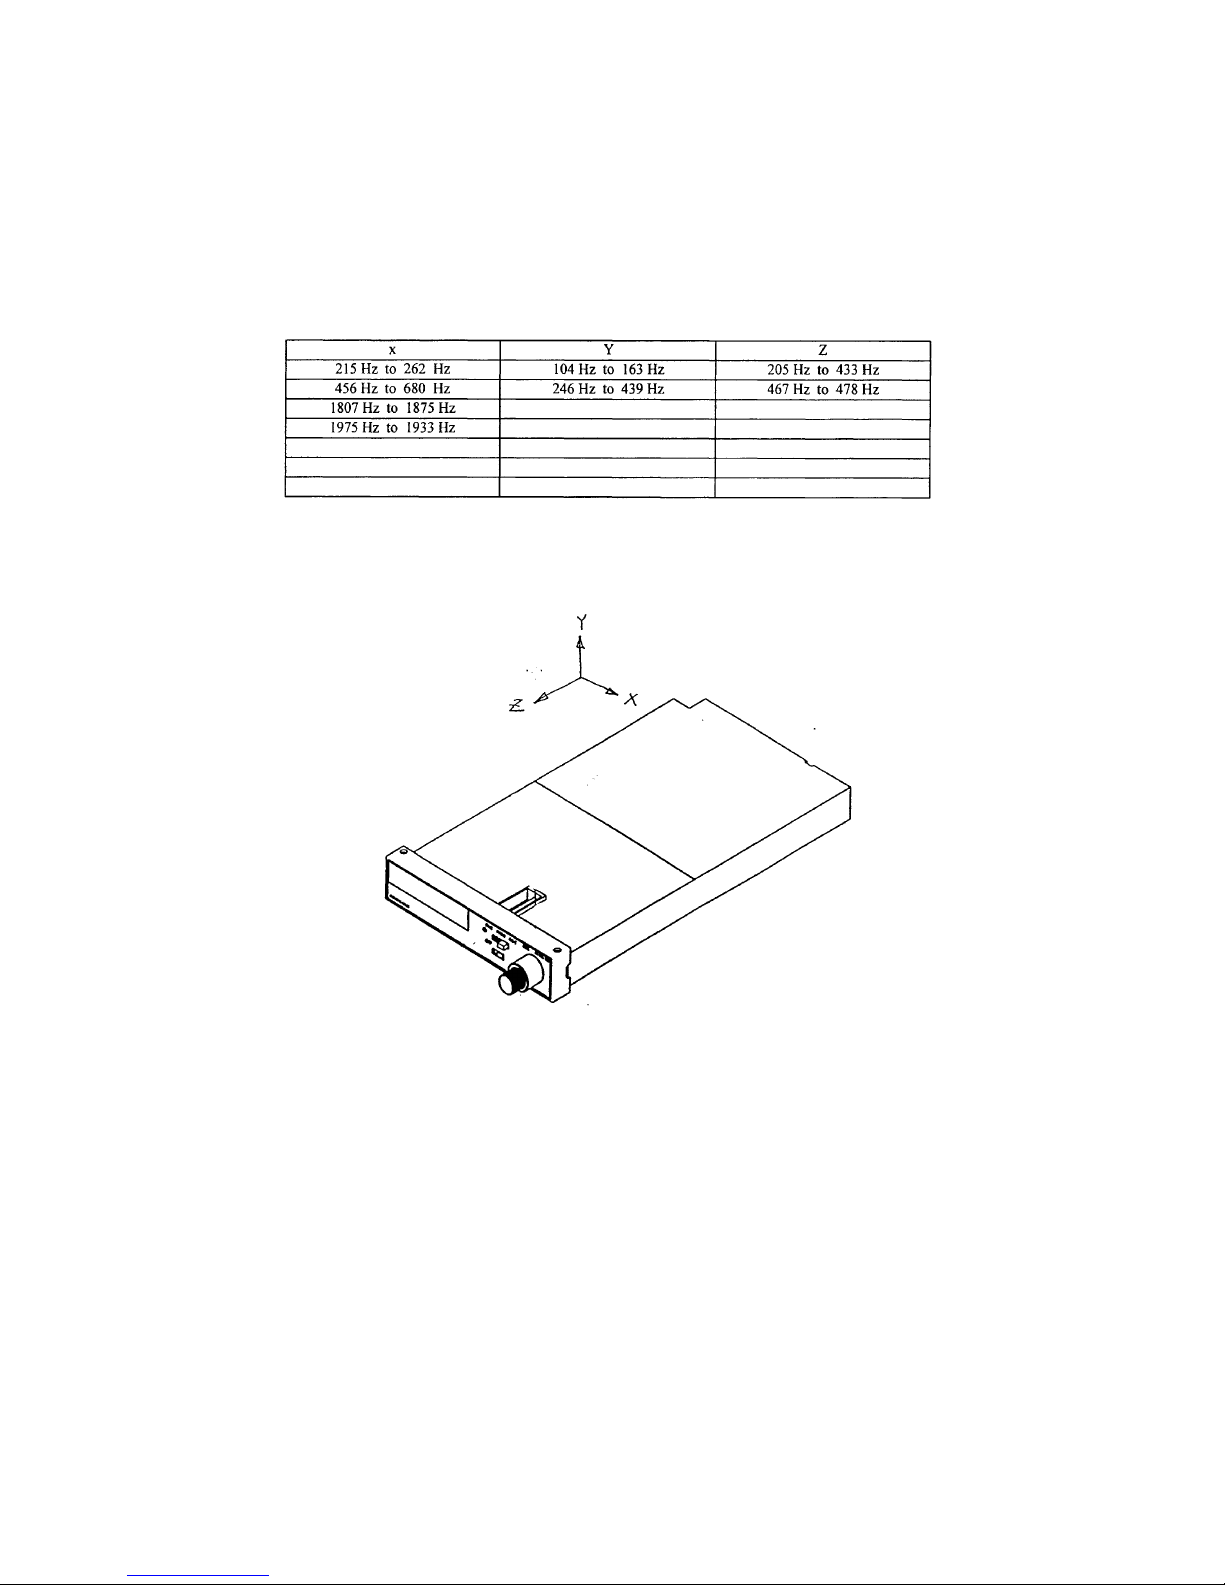
1.3.2 UNIT RESONANT FREQUENCIES
The following critical frequencies are mechanical resonance of the unit under test that have peak
acceleration amplitude greater than twice the input acceleration amplitude. There were no observed changes in performance of the unit under test.
Figure 1-1 KN 62/62A/64 CRITICAL FREQUENCIES
1.4 UNITS AND ACCESSORIES
1.4.1 KN 62 DME
The KN 62 is available in only one version under P/N 066-1064-00.
1.4.2 KN 62A DME
The KN 62A is available in two versions, P/N 066-1068-01 and P/N 066-1068-04.
1.4.3 KN 64 DME
The KN 64 is available in two versions, P/N 066-1088-00 and 066-1088-01.
Rev 7, November/2004 00144I06.TDC Page 1-5
Page 14

BENDIX/KING KN 62/62A/64
1.4.4 KN 62/62A/64 INSTALLATION KIT
The KN 62/62A/64 installation kit, P/N 050-01611-XXXX is available in two versions. The -0000
and the -0001. The contents of the kit are listed below:
TABLE 1-4 KN 62/62A/64 INSTALLATION KIT
PART NUMBER
050-01611-xxxx
030-00005-0000 CONNECTOR, BNC UG 88C/U 1 0
030-00101-0002 PANEL MOUNT PLUG 1 1
030-01094-0053 CONNECTOR 1 1
030-01107-0022 CONNECTOR TERM 22T 1 1
089-02051-0024 NUT SPEED U 6-32 4 4
089-02353-0001 NUT CLIP 6-32 4 4
089-05903-0007 SCREW, PHP 4-40X7/16 2 2
089-06012-0008 Screw, FHP 6-32X1/2 4 4
089-08003-0034 WASHER, SPLIT LOCK #4 2 2
089-08168-0002 WASHER WAVE 1 1
089-08252-0030 WASHER 2 2
090-00019-0007 RING RETAINER .438 1 1
DESCRIPTION -0000
Rev. AA
-0001
Rev. AC
1.5 LICENSE REQUIREMENTS
NONE
Rev 7, November/2004 00144I06.TDC Page 1-6
Page 15

BENDIX/KING KN 62/62A/64
SECTION II
INSTALLATION
2.1 GENERAL INFORMATION
This section contains information relative to the installation and wiring of the KN 62/62A/64 DME.
A close adherence to methods and procedures discussed herein is required.
2.1.1 KN 62A ONLY
The conditions and tests required for TSO approval of this article are minimum performance stan-
dards. It is the responsibility of those desiring to install this article either on or within a specific
type or class of aircraft to determine that the aircraft installation conditions are within TSO standards. The article may be installed only if further evaluation by the applicant documents an acceptable installation and is approved by the Administrator.
2.1.2 KN 62 AND KN 64
The conditions and tests performed on this article are minimum performance standards. It is the
responsibility of those desiring to install this article either on or within a specifice type or class of
aircraft to determine that the aircraft installation conditions are within these perfomrance standards. The article may be installed only if further evaluation by the applicant documents an acceptable installation and is approved by the Administrator.
2.2 UNPACKING AND INSPECTING EQUIPMENT
Exercise extreme care when unpacking the equipment. Make a visual inspection of the unit for
evidence of damage incurred during shipment. If a claim for damage is to be made, save the shipping container to substantiate the claim. The claim should be promptly filed with the transpo rtation
company. It would be advisable to retain the container and packaging material after all equipment
has been removed in the event that equipment storage or reshipment should become necessary.
2.3 EQUIPMENT INSTALLATION
2.3.1 AVIONICS COOLING REQUIREMENTS FOR PANEL MOUNTED EQUIPMENT
The greatest single contributor to increased reliability of all modern day avionics is to limit the max-
imum operating temperature of the individual units. While modern day individual circuit designs
consume much less electrical energy, the watts per cubic inch dissipated within avionics units remains much the same due to high density packaging techniques utilized. Consequently, the importance of providing avionics stack cooling is still with us.
Rev 7, November/2004 00144I06.TDC Page 2-1
Page 16

BENDIX/KING KN 62/62A/64
While each individual unit may not require forced air cooling, the combined heat load of several
units operating in a typical avionics stack will significantly degrade the reliability of the avionics if
provisions for stack cooling are not incorporated in the initial installation. Recommendations on
stack cooling are contained in Bendix/King Installation Bulletin #55 and #143 revised. Failure to
provide stack cooling will certainly lead to increased avionics maintenance costs and may void the
Honeywell warranty.
2.3.2 KN 62/62A/64 INSTALLATION (FIGURES 2-1 THROUGH 2-18)
A. Plan a location on the aircraft panel that is clearly visible and within easy access of the pilot.
B. Avoid mounting the KN 62/62A/64 close to heater vents or other high heat sources.
C. Compass safe distance is 8 inches for worst case deflection of one degree.
D. Install the mounting rack in the aircraft using 6-32 x 1/2 flat head phillips screws (P/N 089-
06012-0008) and 6-32 clip nuts (P/N 089-02353-0001). The screws are inserted from the
inside through the holes in the sides of the mounting rack.
E. Connect the harness wires to the connector pins and insert the connector pins into the rear
of the Molex connector. See Section 2.3.3 and Figures 2-1 and 2-2.
F. Mount the Molex connector on the two hex spacers at the rear of the mounting rack. Use
two 4-40 x 7/16 pan head, phillips screws (P/N 089-05903-0007) and two #4 split lock washers (P/N 089-08003-0034). Orient the connector so the polarizer key is closer to the side
next to the antenna connector.
G. Connect the antenna cable to the antenna connector (Figure 2-3).
H. Install the antenna connector in the mounting rack from the outside as shown in Figures 2-
14, 2-15. Secure connector in place with three washers and a retaining ring as shown in the
figure.
I. Install the KN 62/62A/64 into the mounting rack and secure by turning the hold down adjust-
ment screw (accessible through a hole in the front panel) clockwise with an allen hex
wrench until it is locked in place (Figure 2-13).
J. The audio output of the KN 62/62A/64 is set for approximately 2mW into 600 ohms at the
factory. If a different level is desired, readjust the audio level adjustment, accessible through
the top cover (Figure 2-13).
K. For 066-1068-04 and 066-1088-01 units with backlit Nomenclature refer to interconnect
drawings for interconnect to lighting buss.
L. When operating dual KN 62/62A/64’s, the respective DME’s will interfere with each other
when the NAV frequencies differ by 5.3 MHz (for example, 108.00 MHz and 113.3 MHz).
This interference results in premature flags or loss of ”lock-on”. Should this occur, one of
the KN 62/62A/64’ s shou ld be eithe r turned off or tuned to a different NAV frequency so that
the 5.3 MHz difference is eliminated.
Rev 7, November/2004 00144I06.TDC Page 2-2
Page 17

BENDIX/KING KN 62/62A/64
2.3.3 MOLEX CONNECTOR ASSEMBLY (FIGURE 2-1)
A. Solderless Contact Terminal Assembly using Molex Crimper
Refer to instructions in Section 2.3.3.
B. Solderless Contact Terminal Assembly using Pliers
1. Strip each wire 5/32” f or contact terminal (P/N 030-01107-0030). (The last two digits of
the contact terminal part number indicate the number of terminals furnished).
2. Tin the exposed conductor.
3. Using needle nose pliers, fold over each conductor tab in turn, onto the exposed conductor. When both tabs have been folded, firmly press the tabs against the conductor.
4. Repeat step 3 for insulator tabs.
5. Apply a small amount of solder (using minimum heat) to the conductor/tab connection
to assure a good electromechanical joint.
C. Contact Insertion into Molex Connector Housing
1. After the contact terminals have been installed on the wiring harness, the contact terminals can be inserted into the proper location in the connector housing (P/N 03001094-0053). The terminal cannot be inserted upside down. Be sure to push the terminal all the way in, until a click can be felt or heard.
2. The self-locking feature can be tested by gently pulling on the wire.
D. Extraction of Contact from Molex Connector
1. Slip the flat narrow blade of a Molex contact ejector tool, HT-1884 (P/N 047-05009-
0001) under the contact on the mating side of the connector. By turning the connector
upside down one can see the blade slide into the stop.
2. When the ejector is slid into place , the loc k ing k ey of the contact is raised, allowing the
contact to be removed by pulling moderately on the lead.
3. Neither the contact nor position is damaged by removing a contact; however, the contact should be checked visually before reinstalling in connector, to be certain that
retaining tab ”A” extends as shown (see Figure 2-1) for retention in connector.
2.3.4 DME ANTENNA INSTALLATION
2.3.4.1 General
a. The antenna should be well removed from any projections, the engine(s), and propeller(s).
It should also be well removed from landing gear doors, access doors, or other openings
which will break the ground plane for the antenna.
b. The antenna should be mounted on a bottom surface of the aircraft and in a v ertical position
when the aircraft is in level flight.
c. Avoid running other cables or wires near the antenna cable.
d. Avoid mounting the antenna within three (3) feet of the ADF sense antenna or any COMM
Rev 7, November/2004 00144I06.TDC Page 2-3
Page 18

BENDIX/KING KN 62/62A/64
antenna and six (6) feet from a transponder antenna.
e. Where practical, plan the antenna location to keep cable lengths as short as possible, and
avoid sharp bends in the cable to minimize the VSWR.
f. To prevent RF interference, the antenna must be physically mounted a minimum distance of
three feet from the KN 62/62A/64.
g. A back-up plate should be used for added strength on thin-skinned aircraft.
h. The antenna should be kept clean. If left dirty (oil covered) the range of the DME may be
affected.
i. On pressurized aircraft, the antenna should be sealed using RTV (P/N 016-01082-0000)
around the connector and mounting hardware.
j. All antennas should be sealed around the outside for moisture protection.
2.3.4.2 KA 60/61 Installation (Refer to Figure 2-16 and 2-17)
a. Peel the backing off the antenna template and apply template to the aircraft at the desired
mounting location.
b. Drill or cut the proper size holes for mounting the antenna, then remove the template.
c. Using the antenna as a stencil, draw a line around the base of the antenna that will come
into contact with the aircraft. Then carefully scrape off the paint within the stenciled area.
Lightly sand the bare metal with fine sandpaper to insure removal of all paint and protective
coatings.
d. Sand the inside area of the aircraft where the backing plate will be located to remove the
chromate or other protective finish.
e. Apply Alumiprep No. 33 (P/N 016-01127-0000) following the directions on the container to
cleanse the metal of any residue.
f. Apply Alodine No. 1001 (P/N 016-01128-0000) following the directions on the container.
g. Rivet the backing plate (P/N 047-04570-0000) into place, if required.
h. Mount the antenna using #8 star washers (P/N 089-08017-0037) and 8-32 nuts (P/N 089-
02148-0032) included with the antenna.
i. RGU 400 or equivalent coaxial cable is normally used on installations having a cable run of
ten feet or less. For cable runs from ten to twenty feet, use RG 142B/U cable (P/N 024-
00002-0000).
j. Inspect coaxial cable connector for proper center contact, then fasten it securely to the
antenna.
Rev 7, November/2004 00144I06.TDC Page 2-4
Page 19

BENDIX/KING KN 62/62A/64
FIGURE 2-1 MOLEX TERMINALS AND TOOLS
Rev 7, November/2004 00144I06.TDC Page 2-5
(Sheet 1 of 3)
Page 20

BENDIX/KING KN 62/62A/64
FIGURE 2-1 MOLEX TERMINALS AND TOOLS
Rev 7, November/2004 00144I06.TDC Page 2-6
(Sheet 2 of 3)
Page 21

BENDIX/KING KN 62/62A/64
FIGURE 2-1 MOLEX TERMINALS AND TOOLS
Rev 7, November/2004 00144I06.TDC Page 2-7
(Sheet 3 of 3)
Page 22

BENDIX/KING KN 62/62A/64
FIGURE 2-2 KN 62/62A/64 PIN FUNCTION
Rev 7, November/2004 00144I06.TDC Page 2-8
Page 23

BENDIX/KING KN 62/62A/64
TABLE 2-1 KN 62/62A/64 PIN FUNCTION LIST
A --------------------- ! AUDIO LOW
B --------------------- ! AUDIO HI
C --------------------- DME COMMON
D --------------------- ! SLIP CODE SELECT
E --------------------- +14vdc LIGHT DIMMER
F --------------------- +28vdc LIGHT DIMMER SELECT
H <-- --------------------- K400/KE/K1 DME CHANNEL LINE
J --------------------- ! 2X5 CODE SELECT
K --------------------- ! 10 BIT FREQUENCY
L <-- --------------------- ! RNAV/CHAN REQ
M --------------------- BCD CODE SELECT
N <-- --------------------- DME REQUEST
P --------------------- RESERVED
R <-- --------------------- ALTITUDE REQUEST
S --------------------- GROUND
1 --------------------- A/C GROUND
2 --------------------- A/C POWER
3 --------------------- A/C POWER
4 <-- --------------------- K200/KC/K2 CHANNEL LINE
5 <-- --------------------- K50/K50/K50 CHANNEL LINE
6 <-- --------------------- K100/KD/K3 CHANNEL LINE
7 <-- --------------------- K800/KA/K0 CHANNEL LINE
8 <-- --------------------- M1/MD/D3 CHANNEL LINE
9 <-- --------------------- M2/MC/M2 CHANNEL LINE
10 --------------------- NO CONNECTION
11 <-- --------------------- M4/ME/M1 CHANNEL LINE
12 <-- --------------------- M8/MA/M0 CHANNEL LINE
13 <-- --------------------- DATA BUS
14 <-- --------------------- CLOCK BUS
15 --------------------- A/C GROUND
IN OUT
Rev 7, November/2004 00144I06.TDC Page 2-9
Page 24

BENDIX/KING KN 62/62A/64
Rev 7, November/2004 00144I06.TDC Page 2-10
Page 25

BENDIX/KING KN 62/62A/64
Rev 6, May/2004 00144I06.TDC Page 2-11
FIGURE 2-3 ANTENNA CABLE ASSEMBLY
(P/N 030-00101-0002, R-9)
Page 26

BENDIX/KING KN 62/62A/64
Rev 6, May/2004 00144I06.TDC Page 2-12
Page 27

BENDIX/KING KN 62/62A/64
Rev 6, May/2004 00144I06.TDC Page 2-13
FIGURE 2-4 KN 62/62A/64 INTERCONNECT
(Dwg. No. 155-01296-0000, R-8)
Page 28

BENDIX/KING KN 62/62A/64
Rev 6, May/2004 00144I06.TDC Page 2-14
Page 29

BENDIX/KING KN 62/62A/64
Rev 6, May/2004 00144I06.TDC Page 2-15
FIGURE 2-5 KN 62A/64 TO NARCO NAV 122 INTERCONNECT
(Dwg. No. 155-01339-0000, R-5)
Page 30

BENDIX/KING KN 62/62A/64
Rev 6, May/2004 00144I06.TDC Page 2-16
Page 31

BENDIX/KING KN 62/62A/64
Rev 6, May/2004 00144I06.TDC Page 2-17
FIGURE 2-6 DUAL SLIP CODE CONTROL UNIT INTERCONNECT
(Dwg. No. 155-01334-0000, R-5)
Page 32

BENDIX/KING KN 62/62A/64
Rev 6, May/2004 00144I06.TDC Page 2-18
Page 33

BENDIX/KING KN 62/62A/64
Rev 6, May/2004 00144I06.TDC Page 2-19
FIGURE 2-7 DUAL BCD CONTROL UNIT INTERCONNECT
(Dwg. No. 155-01335-0000, R-5)
Page 34

BENDIX/KING KN 62/62A/64
Rev 6, May/2004 00144I06.TDC Page 2-20
Page 35

BENDIX/KING KN 62/62A/64
Rev 6, May/2004 00144I06.TDC Page 2-21
FIGURE 2-8 DUAL 2 x 5 CONTROL UNIT INTERCONNECT
(Dwg. No. 155-01336-0000, R-5)
Page 36

BENDIX/KING KN 62/62A/64
Rev 6, May/2004 00144I06.TDC Page 2-22
Page 37

BENDIX/KING KN 62/62A/64
Rev 6, May/2004 00144I06.TDC Page 2-23
FIGURE 2-9 SLIP CODE AND 2 x 5 CONTROL UNIT INTERCONNECT
(Dwg. No. 155-01333-0000, R-5)
Page 38

BENDIX/KING KN 62/62A/64
Rev 6, May/2004 00144I06.TDC Page 2-24
Page 39

BENDIX/KING KN 62/62A/64
Rev 6, May/2004 00144I06.TDC Page 2-25
FIGURE 2-10 SLIP CODE AND BCD CONTROL UNIT INTERCONNECT
(Dwg. No. 155-01337-0000, R-5)
Page 40

BENDIX/KING KN 62/62A/64
Rev 6, May/2004 00144I06.TDC Page 2-26
Page 41

BENDIX/KING KN 62/62A/64
Rev 6, May/2004 00144I06.TDC Page 2-27
FIGURE 2-11 2 x 5 AND BCD CONTROL UNIT INTERCONNECT
(Dwg. No. 155-01338-0000, R-5)
Page 42

BENDIX/KING KN 62/62A/64
Rev 6, May/2004 00144I06.TDC Page 2-28
Page 43

BENDIX/KING KN 62/62A/64
Rev 6, May/2004 00144I06.TDC Page 2-29
FIGURE 2-12 NAV 1 - NAV 2 CHANNELING OF A KN 62/62A/64 FROM TWO KX 155/165’S
(Dwg. No. 696-3423-00, R-0)
Page 44

BENDIX/KING KN 62/62A/64
Rev 6, May/2004 00144I06.TDC Page 2-30
Page 45

BENDIX/KING KN 62/62A/64
Rev 6, May/2004 00144I06.TDC Page 2-31
FIGURE 2-13 KN 62/62A/64 OUTLINE AND MOUNTING DRAWING
(Dwg. No. 155-05280-0000, R-AA)
Page 46

BENDIX/KING KN 62/62A/64
Rev 6, May/2004 00144I06.TDC Page 2-32
Page 47

BENDIX/KING KN 62/62A/64
Rev 6, May/2004 00144I06.TDC Page 2-33
FIGURE 2-14 KN 62/62A/64 INSTALLATION DRAWING
(Dwg. No. 155-05281-0000, R-4)
Page 48

BENDIX/KING KN 62/62A/64
Rev 6, May/2004 00144I06.TDC Page 2-34
Page 49

BENDIX/KING KN 62/62A/64
Rev 6, May/2004 00144I06.TDC Page 2-35
FIGURE 2-15 KN 62/62A/64 INSTALLATION DRAWING
(Dwg. No. 155-05281-0001, R-1)
Page 50

BENDIX/KING KN 62/62A/64
Rev 6, May/2004 00144I06.TDC Page 2-36
Page 51

BENDIX/KING KN 62/62A/64
Rev 6, May/2004 00144I06.TDC Page 2-37
FIGURE 2-16 KA 60 ANTENNA INSTALLATION DRAWING
(Dwg. No. 155-05289-0000, R-AB)
Page 52

BENDIX/KING KN 62/62A/64
Rev 6, May/2004 00144I06.TDC Page 2-38
Page 53

BENDIX/KING KN 62/62A/64
Rev 6, May/2004 00144I06.TDC Page 2-39
Figure 2-17 KA 61 Installation Drawing
(Page 1 of 2)
Page 54

BENDIX/KING KN 62/62A/64
Rev 6, May/2004 00144I06.TDC Page 2-40
Page 55

BENDIX/KING KN 62/62A/64
Rev 6, May/2004 00144I06.TDC Page 2-41
Figure 2-17 KA 61 Installation Drawing
(Page 2 of 2)
Page 56

BENDIX/KING KN 62/62A/64
Rev 6, May/2004 00144I06.TDC Page 2-42
Page 57

BENDIX/KING KN 62/62A/64
Rev 6, May/2004 00144I06.TDC Page 2-43
FIGURE 2-18 030-00005-0000 CONNECTOR ASSEMBLY
(Dwg. No. 155-05267-0000, R-0)
Page 58

BENDIX/KING KN 62/62A/64
Rev 6, May/2004 00144I06.TDC Page 2-44
Page 59

BENDIX/KING KN 62/62A/64
SECTION III
OPERATION
3.1 GENERAL
It is recommended that power to the KN 62/62A/64 be turned on only after engine start-up, as this
procedure increases the reliability of the solid state circuitry.
The KN 62/62A/64 front panel controls consist of an ON-OFF switch, a function switch, and frequency selection knobs (Figure 3-1). The function switch determines both the information displayed and the channeling source for the KN 62/62A/64. In Remote (RMT) mode, the KN 62/62A/
64 is channeled from an external control head, and the display shows range, speed, and t ime -tostation. In Frequency (FREQ) mode, the KN 62/62A/64 is channeled from its own frequency selection knobs, and the display shows range and frequency. In Ground Speed/Time-to-Station
(GS/T) mode, the KN 62/62A/64 holds the last internally selected frequency and displays range,
speed, and time-to-station.
The frequency hold feature in GS/T mode is necessary to prevent accidental rechanneling of the
DME when frequency is not being displayed. To prevent the unit from displaying false information,
the KN 62/62A/64 will display dashes and stay in ”search” whenever power is turned on or momentarily interrupted in GS/T mode. Normal operation is re-established by switching to FREQ or
RMT mode.
When the KN 62/62A/64 is locked to a ground station, range is displayed to the nearest 0.1 nautical mile from 0 to 99.9 nautical miles and to the nearest 1 nautical mile from 100 to 389 nautical
miles. Ground speed is displayed to the nearest knot from 0 to 999 knots. Time-to-station is displayed to the nearest minute from 0 to 99 minutes. The display also indicates 99 minutes for any
computed time- to-station greater than 99 minutes. When the KN 62/62A/64 is in search mode,
dashes are displayed instead of range, speed, and time-to-station. An automatic dimmin g circuit
adjusts the brightness of the display to compensate for changes in ambient light level. The dimming is controlled by a photocell mounted behind the front panel to the left of the display. Backlighting of nomenclature on 066-1068-04 and 066-1088-01 is connected and controlled directly by
aircraft dimming bus.
The audio output of the KN 62/62A/64 can be set as high as 15 milliwatts into 600 ohms using the
audio level adjustment accessible through the top cover. It is set for approximately 2mW output
at the factory. It is desirable to use the audio to identify the DME ground stations being received.
The effective range of the KN 62/62A/64 DME depends on many factors; most important being the
altitude of the aircraft. When the aircraft is on the ground, the KN 62/62A/64 usually will not re-
ceive DME stations due to line-of-sight signal limitations. Other contributing factors to the DME,s
effective range are the location and altitude of the ground transmitter, transmitter power output,
and the degree of maintenance of the ground facility. The distance measured by the KN 62/62A/
64 is slant-range distance (measured on a slant from aircraft to ground station) and should not be
confused with actual ground distance. The difference between ground distance and slant-range
distance is smallest at low altitude and long range. These distances may differ considerably when
in close proximity to a VOR/DME facility. However, if the range is three times the altitude or gre ater, this error is negligible. In order to obtain accurate ground speed and time-t o-station, the aircraft
must be tracking directly to or from the station.
Rev 6, May/2004 00144I06.TDC Page 3-1
Page 60

BENDIX/KING KN 62/62A/64
When operating dual KN 62/62A/64’s, the respective DME’s will interfere with each other when
the NAV frequencies differ by 5.3MHz (for example, 108.00MHz and 113.3MHz). This interference results in premature flags or loss of ”Lock-On”. Should this occur, one of the KN 62/62A/64’s
should be either turned off or tuned to a different NAV frequen cy so that the 5.3MHz difference is
eliminated.
FIGURE 3-1 KN 62/62A/64 frequency mode
FIGURE 3-2 KN 62/62A/64 ground speed/time-to-station mode
Rev 6, May/2004 00144I06.TDC Page 3-2
Page 61

BENDIX/KING KN 62/62A/64
FIGURE 3-3 KN 62/62A/64 remote mode
Rev 6, May/2004 00144I06.TDC Page 3-3
Page 62

BENDIX/KING KN 62/62A/64
Rev 6, May/2004 00144I06.TDC Page 3-4
 Loading...