

Page 1

Honeywell WLAN
Secure Wireless Client (SWC)
For:
Dolphin
™
6000 Terminal with Windows® Mobile 6.5
Dolphin™ 6100/6500 Terminal with Windows® CE 5.0
Dolphin
Dolphin™ 7600 Terminal with Windows® CE 5.0
Dolphin
Dolphin
Dolphin
Dolphin
Dolphin
™
6100/6500 Terminal with Windows® Embedded
Handheld 6.5
™
7600 Terminal with Windows Mobile
™
7850 Terminal with Windows Mobile
™
9700 Terminal with Windows Mobile
™
9900 Terminal with Windows Mobile
™
99EX Terminal with Windows® Embedded
Handheld 6.5
®
6
®
5.0
®
6.5
®
6.1
User’s Guide
Page 2

Disclaimer
Honeywell International Inc. (“HII”) reserves the right to make changes in specifications and other information contained in this document without prior notice, and the reader should in all cases consult HII to
determine whether any such changes have been made. The information in this publication does not represent a commitment on the part of HII.
HII shall not be liable for technical or editorial errors or omissions contained herein; nor for incidental or
consequential damages resulting from the furnishing, performance, or use of this material.
This document contains proprietary information that is protected by copyright. All rights are reserved. No
part of this document may be photocopied, reproduced, or translated into another language without the
prior written consent of HII.
Web Address: www.honeywellaidc.com
Trademarks
Dolphin, Dolphin RF, HomeBase, Mobile Base, and QuadCharger are trademarks or registered trademarks of Hand Held Products, Inc. or Honeywell International Inc.
Microsoft, Windows, Windows Mobile, Windows CE, Windows NT, Windows 2000, Windows ME, Windows XP, ActiveSync, Outlook, and the Windows logo are trademarks or registered trademarks of Microsoft Corporation.
Other product names mentioned in this manual may be trademarks or registered trademarks of their
respective companies and are the property of their respective owners.
Patents
For patent information, please refer to www.honeywellaidc.com/patents.
©2007–2011 Honeywell International Inc. All rights reserved.
Page 3

Table of Contents
Chapter 1 - Configuring the WLAN Connection
Introduction ..........................................................................................................................1-1
Accessing the WLAN SWC..................................................................................................1-1
Command Bar Icon Colors.............................................................................................1-2
Connection Status Indicator ...........................................................................................1-2
Enabling the WLAN Radio Driver.........................................................................................1-3
Establishing a Connection ...................................................................................................1-3
Config Tab ...........................................................................................................................1-6
Activating the Configuration ...........................................................................................1-6
Config Tab Buttons ........................................................................................................1-6
Using the Scan Feature .................................................................................................1-7
Network Window ..................................................................................................................1-8
Association Modes .........................................................................................................1-9
Common Configurations ....................................................................................................1-13
WEP .............................................................................................................................1-13
PEAPv1-MSCHAPV2...................................................................................................1-14
WPA-PSK.....................................................................................................................1-14
Static IP........................................................................................................................1-15
Status Tab..........................................................................................................................1-16
Chapter 2 - Working in Ad Hoc Mode
Introduction ..........................................................................................................................2-1
Requirements.......................................................................................................................2-1
Initiating an Ad Hoc Connection...........................................................................................2-1
Chapter 3 - Setting up the WLAN SWC with DeviceConfig
Overview ..............................................................................................................................3-1
Configuring the DeviceConfig.exm File................................................................................3-1
Setting up the Terminal ..................................................................................................3-2
Enabling a Profile ...........................................................................................................3-2
Changing Power Save Mode ...............................................................................................3-3
Chapter 4 - Administrative Tools
Overview ..............................................................................................................................4-1
IP Tab ..................................................................................................................................4-1
i
Page 4

Advanced Tab ..................................................................................................................... 4-2
STATUS......................................................................................................................... 4-3
STATUS_VERBOSE ..................................................................................................... 4-3
SCAN............................................................................................................................. 4-3
SCAN_RESULTS .......................................................................................................... 4-3
LIST_NETWORKS ........................................................................................................4-4
SELECT_NETWORK ....................................................................................................4-4
ENABLE_NETWORK .................................................................................................... 4-4
REMOVE_NETWORK................................................................................................... 4-4
SAVE_CONFIG ............................................................................................................. 4-4
DISCONNECT............................................................................................................... 4-4
REASSOCIATE ............................................................................................................. 4-4
DHCP release................................................................................................................ 4-4
DHCP renew.................................................................................................................. 4-4
DEBUG on..................................................................................................................... 4-4
DEBUG off..................................................................................................................... 4-4
Technical Assistance........................................................................................................... 5-1
Online Technical Assistance.......................................................................................... 5-1
ii
Page 5
1
Configuring the WLAN Connection
Introduction
Note: Screen captures/icons in this user’s guide may differ from what appears on your device.
The WLAN Secure Wireless Client (SWC) configures the wireless connection of the 802.11b/g radio for
numerous Dolphin terminals.
Windows Mobile
6.5
Dolphin 9700 Dolphin 7600 Dolphin 7850 Dolphin 7600 Dolphin 99EX
Dolphin 6000 Dolphin 9900 Dolphin 6100 Dolphin 6100
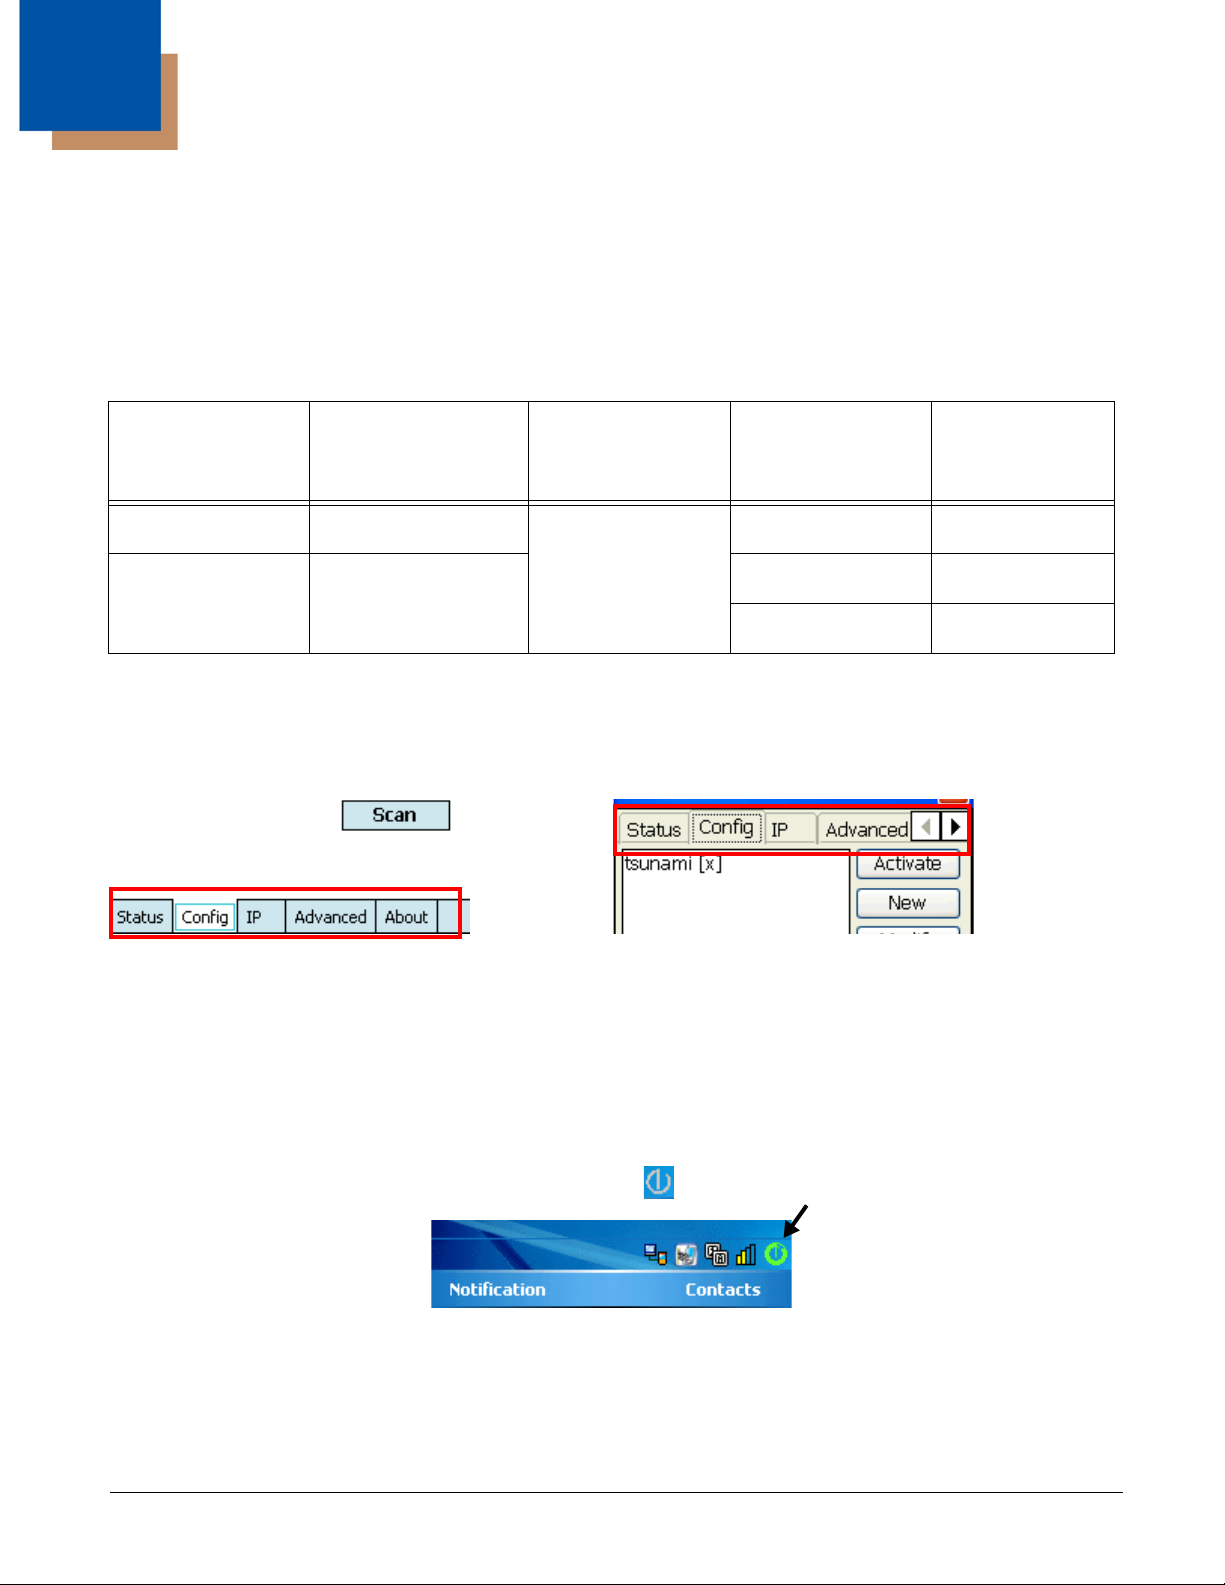
The different operating systems format the application windows of the SWC differently. For example, on
terminals running Windows CE, the tabs appear at the top of the window whereas on terminals running
Windows Mobile, the tabs appear at the bottom of the window.
Windows Mobile Windows CE
Despite the different formatting, the content of the application window is the same on both terminals.
Windows Mobile 6 Windows Mobile
5.0
Windows CE 5.0 Windows
Embedded
Handheld 6.5
Dolphin 6500 Dolphin 6500
Server-Assigned IP Addresses
Please note that all server-assigned IP addresses use Dynamic Host Configuration Protocol (DHCP).
Accessing the WLAN SWC
On the Today screen, tap the icon in the command bar .
This icon displays in different colors to indicate the status of the radio; see Command Bar Icon Colors on
page 1-2.
The SWC opens displaying the Status tab, which is empty until a connection is configured. After a
connection to an access point or network is configured and active, this tab displays the connection
status.
1 - 1
Page 6

Command Bar Icon Colors
The icon in the command bar on the Today screen changes according to the status of the radio.
Color Meaning Matching Status
Gray
The radio is
• D i s a b l e d
• I d l e
• N o t c o n n e c t i n g
Yellow The connection is
• Associating (icon stops spinning)
NO RADIO
RADIO OFF
DISCONNECTED
INACTIVE
ASSOCIATING
AUTHENTICATING
• Authenticating (icon stops spinning)
• Negotiating DHCP address (icon spins clockwise)
• O u t - o f - R a n g e
Red Authentication failed and the connection failed as a result. ASSOCIATED
(but not authenticated)
Green The connection is authenticated with a valid DHCP address. COMPLETE
Note: The color of the icons matches the status displayed on the Status Tab (see page 1-16).
Connection Status Indicator
The command bar contains a status strength indicator.
The bars indicate the strength of the signal when the radio is transmitting.
If the radio is not transmitting, a small “x” appears over the bars.
1 - 2
Page 7

Enabling the WLAN Radio Driver
!
The radio driver must be enabled for the radio to transmit a signal at all. You cannot connect to a network
unless the radio is enabled.
For this Terminal Configuration, Do this…
Dolphin 6100/6500/7600 with Windows
CE 5.0
Dolphin 6000 with Windows Mobile 6.5
Dolphin 6100 with Windows
Embedded Handheld 6.5
Dolphin 6500 with Windows
Embedded Handheld 6.5
Dolphin 7600 with Windows Mobile 6
Dolphin 9900 with Windows Mobile 6.1
Dolphin 9700 with Windows Mobile 6.5
Dolphin 99EX with Windows
Embedded Handheld 6.5
Dolphin 7850
For details about enabling and disabling the radios on each terminal, refer to the User’s Guide for each
terminal, which are available for download from the web site: www.honeywellaidc.com.
Tap the UP arrow in the lower, right corner of the
screen.
Ta p Start > Settings > Connections tab >
Dolphin Wireless Manager.
Ta p Start > Settings > Connections tab > Radio
Manager.
Establishing a Connection
Requirements
The parameters you enter in the SWC depend entirely upon the wireless network established in
your facility. If you do not know what to enter in these fields, contact your network administrator.
1. On the Today screen or Desktop, tap the icon in the command bar .
2. Tap the Config tab and tap New.
1 - 3
Page 8

3. You can create multilple profiles that use the same SSID by giving each profile a unique name in the
“Profile Name” field on the Network window.
4. Type in the SSID.
5. Select a specific band if the connection is to be limited to b/g/n or a/n (2.4 GHz or 5.0 GHz).
6. Select the Assoc. Mode that corresponds to your network configuration from the drop-down list.
Select To connect with… For more information…
None No authentication or encryption. None (page 1-9)
WEP WEP encryption. WEP (page 1-11)
IEEE 802.1X (WEP) EAP authentication. IEEE 802.1X (WEP) (page 1-9)
WPA-Personal (PSK)
WPA2-Personal (PSK)
WPA-Enterprise (EAP)
WPA2-Enterprise
(EAP)
Note: The Dolphin 7600 with Windows CE 5.0 does not support EAP methods.
WPA encryption and PSK
authentication.
WPA encryption and EAP
authentication.
WPA-Personal (PSK) & WPA2Personal (PSK) (page 1-11)
WPA-Enterprise (EAP) &
WPA2-Enterprise (EAP) (page
1-12)
7. The fields and options required by the association mode, encryption, and EAP methods appear on
the
Network Window (see page 1-8) after each is selected.
8. If required by the association mode, select the Encryption method.
9. If required by the association mode, select the EAP Method; (see page 1-9).
10. If required or desired, enter keys or passwords.
11. Tap OK. You are returned to the Config tab where the SSID now appears in the list.
1 - 4
Page 9
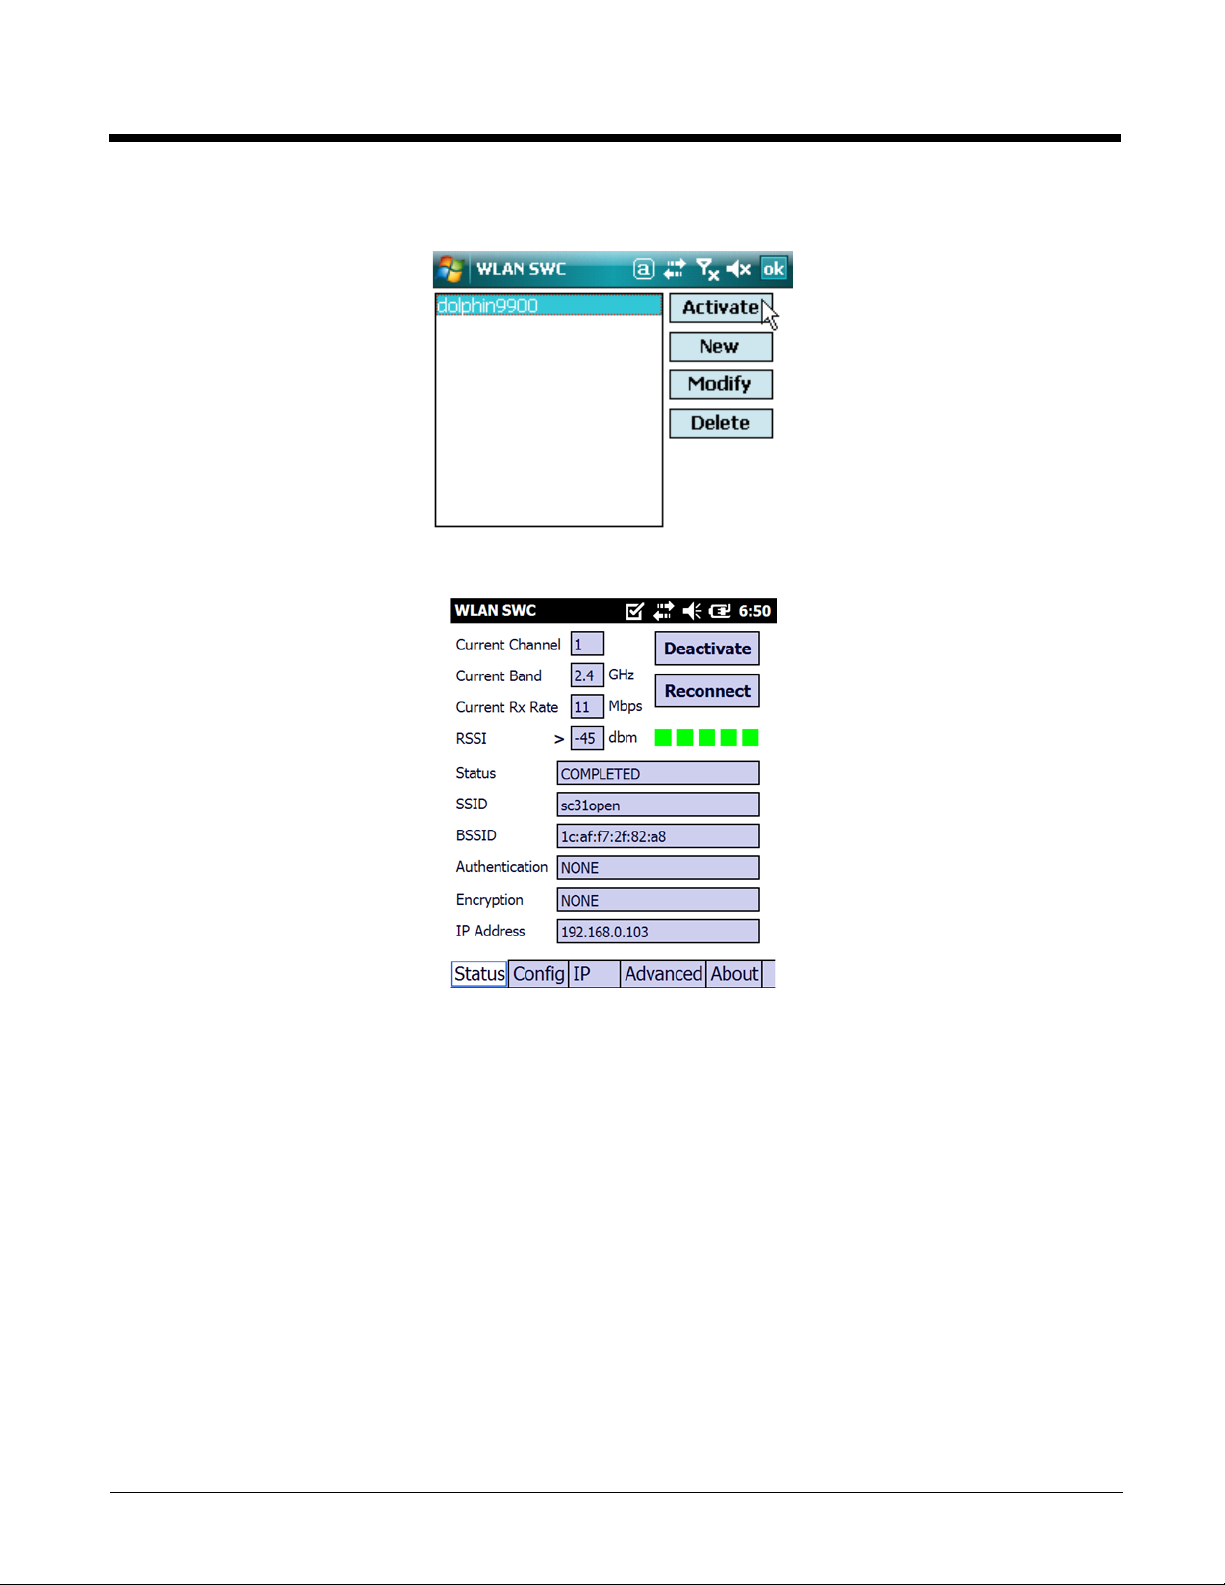
12. Select the device in the list and tap Activate. The configuration activates and the Dolphin terminal
attempts to connect to the network according to the parameters you entered.
13. The Status tab appears displaying the connection status.
1 - 5
Page 10
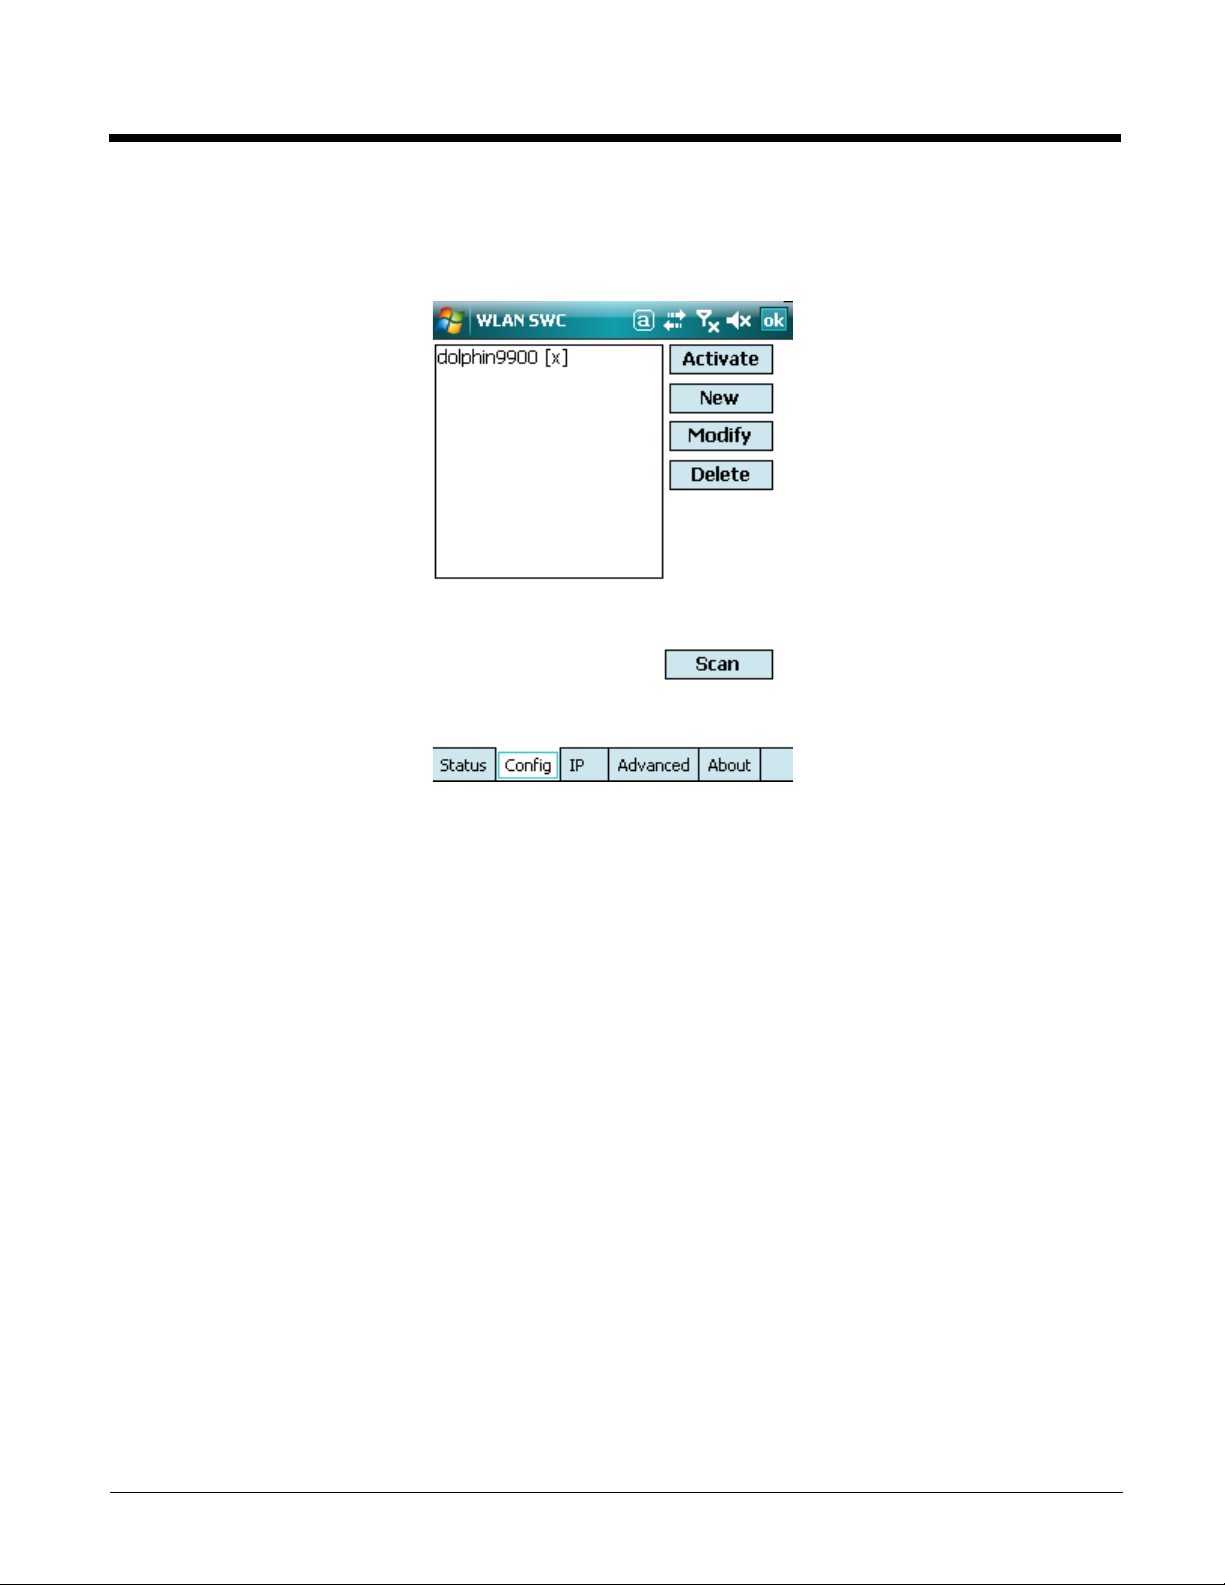
Config Tab
You manage connections and configurations on the Config tab. You also determine which configuration
the terminal uses to connect.
Activating the Configuration
To connect, you must select the configuration in the list and tap Activate. The terminal will not attempt to
connect until you tap Activate.
The Config tab stores all the configurations you have created in the list but activates only one
configuration at a time. To switch connections, simply select it on the Config tab and tap Activate.
On the Config tab, an “[x]” appears next to the activated configuration.
Config Tab Buttons
Modify To modify an existing configuration, select it in the list and tap Modify. The Network
window appears displaying the data for the selected configuration. Make your
changes and tap OK to save. Then, tap Activate to start connecting.
Add To manually add a connection, tap Add. A blank Network window appears.
Complete Steps 5–8 of Establishing a Connection (see page 1-3).
Delete To delete a connection, select it in the list and tap Delete.
1 - 6
Page 11
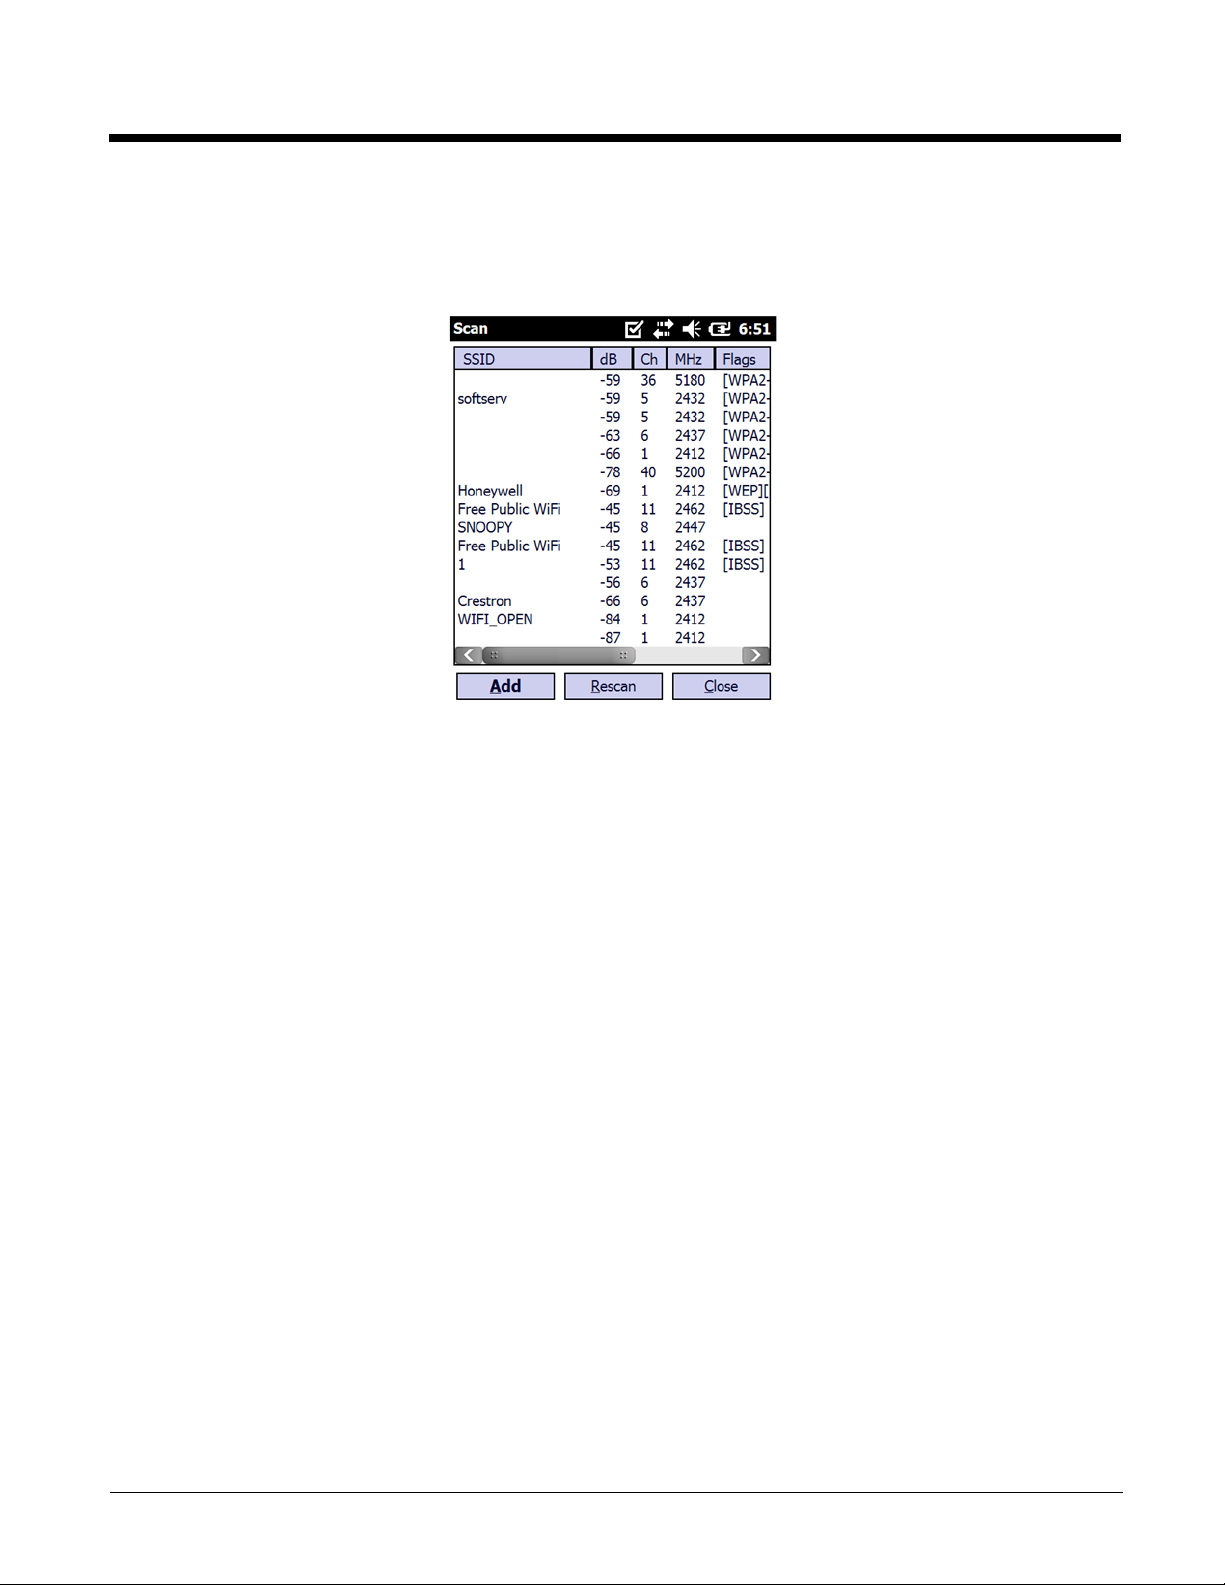
Using the Scan Feature
The Scan button on the Config tab queries for the local, configured, wireless network for devices in range
of the terminal. when you tap Scan on the Config tab, the query starts, and the results appear on the
Scan window appears.
Buttons
Add Tap this button after you’ve selected an item in the list. It opens the Network
Window (see page 1-8) so that you can configure the connection.
Rescan Tap this button to rescan the wireless network if you don’t see the Access Point
you’re looking for in the list.
Close Tap this button to close the Scan window and return to the Config Tab.
Columns
SSID Displays the SSID of the Access Point. (This is the name of the Access Point you
are connecting to.)
db Displays the signal in dBMs.
Ch Displays the operating channel number.
MHz Displays the operating frequency in MHz
Flags Displays the association mode and encryption required to connect to the device.
BSSID Displays the full BSSID. (This is the MAC address of the Access Point.)
1 - 7
Page 12

Network Window
The Network window contains the configuration options to configure how the terminal connects to your
wireless network.
You access the Network window from the Config Tab (see page 1-6) by
• Tapping New on the Config tab.
• Scanning for wireless network devices and adding them to your network; see Using the Scan
Feature on page 1-7.
• Selecting an existing configuration and tapping Modify.
The Network window prompts you to complete the fields required by the connection options you select.
For example,
No Authentication or
Encryption
WPA (EAP) WEP
(Use the Browse button to load files located on the terminal into this configuration.)
1 - 8
Page 13

Association Modes
The association mode you select from the Assoc. Mode drop-down list determine the fields that appear
on the Network window. Different types of association modes require specific information or offer certain
configuration options.
The available association modes are:
• None (see page 1-9)
• WEP (see page 1-11)
• IEEE 802.1X (WEP) (see page 1-9)
• WPA-Personal (PSK) & WPA2-Personal (PSK) (see page 1-11)
• WPA-Enterprise (EAP) & WPA2-Enterprise (EAP) (see page 1-12)
Note: The Dolphin 7600 with Windows CE 5.0 does not support EAP methods.
None
Selecting None as the association mode means that there is no authentication or encryption in the
connection process.
IEEE 802.1X (WEP)
Available EAP Methods
IEEE 802.1X (WEP) (page 1-9) and WPA-Enterprise (EAP) & WPA2-Enterprise (EAP) (page 1-12)
support the following EAP methods:
• LEAP
• PEAPv0-MSCHAPV2
• PEAPv1-MSCHAPV2
• PEAPv1-GTC
• PEAPv1-TLS
• FAST-MSCHAPV2
• FAST-GTC
• FAST-TLS
• TLS
• TTLS-MD5
• TTLS-MSCHAPV2
• TTLS-GTC
Completing the EAP Fields
Depending on the EAP method selected, the following fields (may) appear or disappear based on what
the selected protocol requires or offers for its configuration:
Field Description
Identity This is the 802.1X identity supplied to the authenticator. The identity value
can be up to 63 ASCII characters and is case-sensitive.
Password This is the password used for MD5-Challenge or EAP authentication. It may
contain up to 63 ASCII characters and is case-sensitive. Asterisks appear
instead of characters for enhanced security.
1 - 9
Page 14

Field Description
Anonymous ID Enter the anonymous ID. This ID creates a tunnel through which the real ID
(as entered in the Identity field) can pass. For additional security, make this
ID different than the one entered in the Identity field.
File Store
Cert Store
Click one of these radio buttons to select the location of the certificate(s).
For example, if the certificate is stored in IPSM or an SD card as a file, then
use File Store. Or, if the certificate is installed on the device in the Windows
Certificate Store, then choose Cert Store.
CA Cert. & Client
Cert.
Private Key
Ta p t h e Browse button to load a CA or Client certificate located on the
terminal .
• CA certificates are any certificates created by a certified authority (CA).
• Client certificates contain information that identifies the user, as well as information
about the organization that issued the certificate. This ensures that you can encrypt
data end-to-end.
Ta p t h e Browse button to load a private key located on the terminal .
Priv Key Pass If you have loaded a private key, enter the password that unlocks the private
key.
Tunnel PAC &/or
Machine PAC
Ta p t h e Browse button to load a tunnel and/or machine PAC located on the
terminal .
Note: For EAP-FAST, a one-time provisioning exchange establishes a shared
secret, called a Protected Access Credential (PAC) Key. That PAC Key is used
for all subsequent authentications.
Provisioning Provisioning refers to service activation and involves programming various
network databases with the customer's information.
Select the provisioning method from the following options:
• No Provisioning
• A n o n y m o u s
• Authenticated
• Anonymous + Authenticated
1 - 10
Page 15

WEP
When you select WEP as the association mode, you can select Open or Shared Encryption and enter
your keys.
WPA-Personal (PSK) & WPA2-Personal (PSK)
Supported Encryption Methods
• TKIP
• AES-CCMP
• TKIP+CCMP
PSK (Pre-Shared Key)
The PSK field is where you enter the pre-shared key. This field accepts ASCII keys between 8–63
characters long. A hexadecimal PSK can also be entered instead of an ASCII key. Hexadecimal PSKs
must be exactly 64 characters and can only contain hexadecimal digits (A–F, 0–9).
Characters are visible the first time you enter them in this field; however, those characters will appear as
asterisks (*) the next time this configuration is opened.
1 - 11
Page 16

Secret passwords or encryption keys are entered into both sides of the message exchange ahead of
time. Preshared keys (PSK) are typed into the clients and servers (authentication servers, access points,
etc.).
WPA-Enterprise (EAP) & WPA2-Enterprise (EAP)
Note: The Dolphin 7600 with Windows CE 5.0 does not support EAP methods.
Supported Encryption Methods
• TKIP
• AES-CCMP
• TKIP+CCMP
Available EAP Methods
The following EAP methods are supported:
• LEAP
• PEAPv0-MSCHAPV2
• PEAPv1-MSCHAPV2
• PEAPv1-GTC
• PEAPv1-TLS
• FAST-MSCHAPV2
• FAST-GTC
• FAST-TLS
• TLS
• TTLS-MD5
• TTLS-MSCHAPV2
• TTLS-GTC
For details, see Completing the EAP Fields on page 1-9.
The checkbox under the Password field prompts the user to the SSID and password every connection
attempt.
1 - 12
Page 17

Common Configurations
This section contains some of the most common network configurations in detail, including:
• WEP (see page 1-13)
• PEAPv1-MSCHAPV2 (see page 1-14)
• WPA-PSK (see page 1-14)
WEP
When you select WEP as the association mode, you can select Open or Shared encryption to
authenticate via a specific key.
1. On the Today screen, tap the icon in the command bar .
2. Tap the Config tab.
3. Tap New.
4. On the Network window, type in the SSID.
5. Select WEP as the Assoc. Mode.
6. You have a choice of Encryption methods:
Encryption=OPEN Encryption=SHARED
• In fields Key 1—Key 4, enter the key.
The format of each key
SWC validates the key length and will not let you save a key in the wrong format.
• Tap OK and you are returned to the Config tab.
7. On the Config tab, select the network in the list and tap Activate.
8. The terminal begins connecting.
9. When connected, the Status Tab (page 1-16) appears displaying the results.
must match
the Key Length and Key Type you selected in Step 6. The
1 - 13
Page 18

PEAPv1-MSCHAPV2
1. On the Today screen, tap the icon in the command bar .
2. Tap the Config tab.
3. Tap New.
4. On the Network window, type in the SSID.
5. Select IEEE 802.1X (WEP) as the Assoc. Mode.
6. Select PEAPv1-MSCHAPV2 as the EAP Method.
7. Enter the Identity (see page 1-9) and Password (see page 1-9).
8. If you want to, you can enter an Anonymous ID (see page 1-10) or a CA or Client certificate (see
page 1-10).
(If you selected PEAPv1-TLS, you can also load a Private Key (page 1-10) and enter a private key
password.)
9. Tap OK and you are returned to the Config tab.
10. On the Config tab, select the network in the list and tap Activate.
11. The terminal begins connecting.
12. When connected, the Status tab (see page 1-16) appears displaying the results.
WPA-PSK
1. On the Today screen, tap the icon in the command bar .
2. Tap the Config tab.
3. Tap New.
4. On the Network window, type in the SSID.
5. Select WPA-Personal (PSK) as the Assoc. Mode.
6. Select the Encryption method (TKIP, AES-CCMP, or TKIP + CCMP).
7. Enter the pre-share key (see page 1-11) in the PSK field.
8. Tap OK and you are returned to the Config tab.
9. On the Config tab, select the network in the list and tap Activate.
10. The terminal begins connecting.
11. When connected, the Status Tab (page 1-16) appears displaying the results.
1 - 14
Page 19

Static IP
You establish a static IP through the radio driver, not the SWC. After the static IP address is established
in the radio driver, you configure your wireless connection in SWC as usual.
Setting up a Static IP on Windows Mobile-based devices (7600, 7850, 9700, 9900 and 99EX)
1. Tap Start > Settings > Connections tab > Network Cards.
2. Tap on the network adapter.
The adapter name will begin with “SWC IM” followed by the radio driver name in parentheses.
3. The IP address tab opens. Select Use specific IP address.
a. Enter the IP address:
b. Enter the Subnet mask:
c. Enter the Default gateway:
4. Tap OK.
5. Open the SWC and configure the wireless connection.
Setting up a Static IP on Windows CE 5.0 (6100/6500/7600)
1. Tap Start > Control Panel > Network and Dial-up Connections.
2. Double-tab the radio driver.
1 - 15
Page 20

3. The radio driver opens displaying the IP Address tab. Select Specify an IP address.
a. Enter the IP address:
b. Enter the Subnet mask:
c. Enter the Default gateway:
4. Tap OK.
5. Open the SWC and configure the wireless connection.
Status Tab
The Status tab displays the connection status of the current, activated connection; see Activating the
Configuration on page 1-6.
If the radio is enabled and a radio configuration is activated, the Status tab opens when you tap the icon
on the Today screen displaying the status of the current connection.
Deactivate
The Deactivate button disconnects the device from the network and deactivates the profile.
Reconnect
Use the Reconnect button to refresh the connection by forcing the client to disconnect first.
1 - 16
Page 21

Status
NO RADIO The SWC does not recognize the WLAN radio driver.
RADIO OFF The radio is not enabled.
DISCONNECTED The radio connection is disconnected.
INACTIVE There are either no profiles or there are no activated profiles on the Config tab.
ASSOCIATING The terminal connection is associating.
ASSOCIATED The terminal connection is associated.
AUTHENTICATING Authentication is in process.
COMPLETE The connection is associated, authentication completed successfully, and active.
BSSID
The BSSID is the MAC address of the Access Point.
1 - 17
Page 22

1 - 18
Page 23

2
Working in Ad Hoc Mode
Introduction
Most installed wireless LANs today use "infrastructure" mode that requires the use of one or more
access points. With this configuration, the access point provides an interface to a distribution system
(e.g., Ethernet), which enables wireless users to utilize corporate servers and Internet applications.
As an optional feature, however, the 802.11 standard specifies "ad hoc" mode, which allows the radio
network interface card (NIC) to operate in what the standard refers to as an independent basic service
set (IBSS) network configuration. With an IBSS, there are no access points. User devices communicate
directly with each other in a peer-to-peer manner.
Even though it is a peer-to-peer connection, there must still be a host and a client; a host to initiate an ad
hoc connection and a client to join an existing ad hoc connection.
Requirements
Both peer devices must have static IPs with the same Default Gateway. Therefore, you must set up a
static IP on the terminal (see Static IP on page 1-15).
Initiating an Ad Hoc Connection
You need to set up an ad hoc profile in the SWC.
1. Tap the icon in the command bar .
2. Tap the Config tab and tap New.
3. On the Network window, select Ad Hoc or Ad Hoc (WEP) as the Assoc Mode.
4. In the SSID field, enter the network name to use for the connection.
5. Tap OK.
6. On the Config tab, select the name of the profile (the SSID name) and tap Activate to launch the
connection.
2 - 1
Page 24

2 - 2
Page 25

3
Setting up the WLAN SWC with DeviceConfig
Overview
You can use the DeviceConfig Power Tool to configure the SWC. Simply configure the DeviceConfig.exm
file with the SWC’s settings, save it to the
When you enable the WiFi radio, the SWC will connect according to the settings in the DeviceConfig.exm file.
Configuring the DeviceConfig.exm File
On your workstation or your terminal, open the DeviceConfig.exm file in EZConfig. The following instructions show the workstation method.
1. Click Start > All Programs > Honeywell > Dolphin Power Tools and Demos > EZConfig Editor.
\IPSM\Autoinstall folder and cold boot the Dolphin terminal.
2. Tap the Open icon and select the DeviceConfig.exm file.
3. Right-click and select Enable on the following sections: Radio Manager > WiFi > Security >
Supplicant > Profile 1.
The WiFi section is disabled by default. Enabling this section turns the 802.x radio on at startup.
4. Select the Profile 1 section.
3 - 1
Page 26

5. The keys in the Profile 1 section match the field on the Network Window (see page 1-8). Double-tap
on each key value you want to configure and select the desired configurations from the drop-down
list.
6. The items in each drop-down list are the same as the items in the drop-down lists on the Network
Window (see page 1-8).
7. Select or enter all the items required by your configuration.
a. For Tunnel PAC, Machine PAC, and CA and Client Certificate keys, enter the exact path on the
terminal where the PAC and certificate files are located.
The PAC and certificate files must be saved on the terminal first!
b. If your configuration uses WEP, select the key type from the drop-down list.
Key validation does not occur when you enter the key in WEP Key1–4 but does occur when the
DeviceConfig.exm file is activated on the terminal.
8. Save the DeviceConfig.exm file on your workstation for future reference and close.
Setting up the Terminal
1. Move the configured DeviceConfig.exm file to the \IPSM\Autoinstall folder on the Dolphin terminal.
2. Cold boot the terminal.
3. The SWC should start connecting using the DeviceConfig settings during Autoinstall.
4. After Autoinstall in complete, tap the SWC icon on the Today screen .
5. Verify that the configuration is connected and correct.
Enabling a Profile
You can have multiple profiles in the SWC section; however, one needs to be selected as the default configuration so that the configuration connects when the terminal boots up.
To select a default configuration, enter the name of the profile as the Value in the Active Profile key of
3 - 2
Page 27

the SWC section
Changing Power Save Mode
Power Save Mode is enabled in the radio by default.
3 - 3
Page 28

3 - 4
Page 29

4
Administrative Tools
Overview
The SWC offers a number of tools to help you administer your network configurations.
IP Tab
The IP tab enables you to view statistics about the terminal and active network connection.
Release IP Tap this button to release the current IP address (usually assigned by DHCP).
Renew IP Tap this button to obtain a new IP address from the DHCP server.
4 - 1
Page 30

Advanced Tab
Tap Run.
The results display below.
Select the report from
the drop-down list.
The Advanced tab runs several reports that allow you to monitor the background processing of the SWC.
In addition, you can also execute certain commands.
The SWC supports the following reports and commands (the available options vary depending on the
version of SW:
• STATUS (see page 4-3)
• STATUS_VERBOSE (see page 4-3)
• SCAN (see page 4-3)
• SCAN_RESULTS (see page 4-3)
• LIST_NETWORKS (see page 4-4)
• SELECT_NETWORK (see page 4-4)
• ENABLE_NETWORK (see page 4-4)
• SAVE_CONFIG (see page 4-4)
• DISCONNECT (see page 4-4)
• REASSOCIATE (see page 4-4)
• DHCP release (see page 4-4)
• DHCP renew (see page 4-4)
• REMOVE_NETWORK (see page 4-4)
4 - 2
Page 31

STATUS
STATUS queries and retrieves current WPA/EAPOL/EAP status information.
For example:
bssid=02:00:01:02:03:04
ssid=test network
pairwise_cipher=CCMP
group_cipher=CCMP
key_mgmt=WPA-PSK
wpa_state=COMPLETED
ip_address=192.168.1.21
Supplicant PAE state=AUTHENTICATED
suppPortStatus=Authorized
EAP state=SUCCESS
STATUS_VERBOSE
STATUS_VERBOSE is the same as STATUS with more verbosity (i.e., more variable=value pairs).
For example:
bssid=02:00:01:02:03:04
ssid=test network
id=0
pairwise_cipher=CCMP
group_cipher=CCMP
key_mgmt=WPA-PSK
wpa_state=COMPLETED
ip_address=192.168.1.21
Supplicant PAE state=AUTHENTICATED
suppPortStatus=Authorized
heldPeriod=60
authPeriod=30
startPeriod=30
maxStart=3
portControl=Auto
Supplicant Backend state=IDLE
EAP state=SUCCESS
reqMethod=0
methodState=NONE
decision=COND_SUCC
ClientTimeout=60
SCAN
Performs a new BSS scan.
SCAN_RESULTS
Displays the latest scan results. Fields are separated with by a “/” character.
For example:
bssid / channel / signal level / flags / ssid
00:09:5b:95:e0:4e 2412 208 [WPA-PSK-CCMP] jkm private
02:55:24:33:77:a3 2462 187 [WPA-PSK-TKIP] testing
00:09:5b:95:e0:4f 2412 209 jkm guest
4 - 3
Page 32

LIST_NETWORKS
Lists configured networks. Fields are separated by a “/” character.
For example:
network id / ssid / bssid / flags
0 example network any [CURRENT]
SELECT_NETWORK
Selects a network (disable others). Network ID can be received from the LIST_NETWORKS (page 4-4)
command output.
ENABLE_NETWORK
Enables a network. Network ID can be received from the LIST_NETWORKS (page 4-4) command output.
REMOVE_NETWORK
Removes a network. Network ID can be received from the LIST_NETWORKS (page 4-4) command output.
SAVE_CONFIG
Saves the current configuration.
DISCONNECT
Disconnects and wait for REASSOCIATE command before connecting.
REASSOCIATE
Forces the current connection to reassociate.
DHCP release
Releases the current IP address.
Running this command performs the same function as tapping Release IP on the IP Tab (page 4-1).
DHCP renew
Contacts the DHCP server to obtain a new IP address.
Running this command performs the same function as tapping Release IP on the IP Tab (page 4-1).
DEBUG on
Enables debug output to a file in IPSM.
DEBUG off
Disables previously enabled debug output.
4 - 4
Page 33

Technical Assistance
If you need assistance installing or troubleshooting your device, please call your distributor or the nearest
technical support office:
North America/Canada
Telephone: (800) 782-4263
E-mail: hsmnasupport@honeywell.com
Latin America
Telephone: (803) 835-8000
Telephone: (800) 782-4263
E-mail: hsmlasupport@honeywell.com
Brazil
Telephone: +55 (11) 5185-8222
Fax: +55 (11) 5185-8225
E-mail: brsuporte@honeywell.com
Mexico
Telephone: 01-800-HONEYWELL (01-800-466-3993)
E-mail: soporte.hsm@honeywell.com
Europe, Middle East, and Africa
Telephone: +31 (0) 40 7999 393
Fax: +31 (0) 40 2425 672
E-mail: hsmeurosupport@honeywell.com
Hong Kong
Telephone: +852-29536436
Fax: +852-2511-3557
E-mail: aptechsupport@honeywell.com
Singapore
Telephone: +65-6842-7155
Fax: +65-6842-7166
E-mail: aptechsupport@honeywell.com
China
Telephone: +86 800 828 2803
Fax: +86-512-6762-2560
E-mail: aptechsupport@honeywell.com
Japan
Telephone: +81-3-6730-7344
Fax: +81-3-6730-7222
E-mail: aptechsupport@honeywell.com
Online Technical Assistance
You can also access technical assistance online at www.honeywellaidc.com.
Page 34

™
Honeywell Scanning & Mobility
9680 Old Bailes Road
Fort Mill, SC 29707
www.honeywellaidc.com
WLANSupp-UG Rev J
7/11
 Loading...