


Optimus 5100LP
User manual

User manual O5100
Table of contents
1 About this document ....................................................................................................... 4
1.1 Revision history ......................................................................................................... 4
1.2 Keystrokes. ............................................................................................................... 4
1.3 Windows Controls. .................................................................................................... 4
1.4 PDA Keys .................................................................................................................. 4
1.5 Stylus Actions ............................................................................................................ 4
2 Batteries and Power ....................................................................................................... 5
2.1 Overview ................................................................................................................... 5
2.2 Suspend Mode .......................................................................................................... 5
2.2.1 Suspending ............................................................................................................ 5
2.2.2 Resuming .............................................................................................................. 5
2.3 Battery ....................................................................................................................... 6
2.4 Battery Warnings and Cautions ................................................................................. 7
2.5 Battery Disposal ........................................................................................................ 9
2.6 Extend battery life ...................................................................................................... 9
3 Reset O5100 ................................................................................................................ 10
3.1 Software reset ......................................................................................................... 10
3.2 Factory mode .......................................................................................................... 11
4 Using O5100 ................................................................................................................. 12
4.1 Desktop ................................................................................................................... 12
4.2 Inbox ....................................................................................................................... 13
4.3 Internet Explorer ...................................................................................................... 14
4.4 Quick ScanSet Application ...................................................................................... 15
4.5 Word Pad ................................................................................................................ 16
4.6 Installing Programs .................................................................................................. 17
4.6.1 Using an Installation Wizard ................................................................................ 17
4.6.2 Installing Programs Manually ............................................................................... 17
4.6.3 Using ActiveSync to Add to the Start Menu ......................................................... 18
4.7 Removing Programs ................................................................................................ 19
5 Configuring a PDA ........................................................................................................ 20
5.1 Stylus ...................................................................................................................... 21
5.2 Backlight .................................................................................................................. 22
5.2.1 Battery power ....................................................................................................... 22
5.2.2 External power ..................................................................................................... 23
5.2.3 Keyboard backlight .............................................................................................. 24
5.3 Bluetooth ................................................................................................................. 25
5.4 Date and Time ......................................................................................................... 26
5.5 Dialing ..................................................................................................................... 27
5.6 Display properties .................................................................................................... 28
5.6.1 Background ......................................................................................................... 28
5.6.2 Appearance ......................................................................................................... 29
5.7 Input Panel .............................................................................................................. 30
5.8 Internet Settings ...................................................................................................... 31
5.9 Keyboard properties ................................................................................................ 34
5.10 Network and dialup connections .......................................................................... 35
5.10.1 Change IP address or DHCP settings ............................................................... 36
5.11 Owner .................................................................................................................. 37
5.12 Password ............................................................................................................. 38
5.13 PC Connection ..................................................................................................... 39
5.14 Power properties .................................................................................................. 40
© All rights reserved.
HONEYWELL 2

User manual O5100
5.14.1 Battery tab ......................................................................................................... 40
5.14.2 Power off tab ...................................................................................................... 40
5.14.3 Wireless power tab ............................................................................................ 41
5.14.4 Factory Mode tab ............................................................................................... 41
5.15 Program buttons ................................................................................................... 42
5.16 Regional settings .................................................................................................. 43
5.17 Scanner configure ................................................................................................ 44
5.18 Storage manager ................................................................................................. 47
5.19 System Properties ................................................................................................ 48
5.19.1 General .............................................................................................................. 48
5.19.2 Memory .............................................................................................................. 48
5.19.3 Device Name ..................................................................................................... 49
5.20 Terminal server client licences ............................................................................. 49
5.21 Volume & sounds properties ................................................................................ 50
6 Networks, Communications and Connections .............................................................. 51
6.1 Microsoft® ActiveSync ............................................................................................ 52
6.1.1 Installation ........................................................................................................... 52
6.1.2 Setting up a Partnership ...................................................................................... 53
6.1.3 Exploring the Mobile Device ................................................................................ 54
6.1.4 ActiveSync File Synchronization .......................................................................... 55
6.2 Wireless network ..................................................................................................... 57
6.2.1 Enabling Wireless LAN ........................................................................................ 57
6.2.2 Set up wireless network ....................................................................................... 58
6.2.3 Preferred networks .............................................................................................. 60
6.2.4 Automatic connections ......................................................................................... 60
6.2.5 Connect to wireless network ................................................................................ 61
6.3 Blue tooth ................................................................................................................ 62
6.3.1 Turn on Bluetooth ................................................................................................ 62
6.3.2 Connect to other devices ..................................................................................... 63
6.3.3 Pairing Bluetooth devices .................................................................................... 64
6.3.4 Setting up connection to mobile phone ................................................................ 65
6.3.5 Connecting to internet .......................................................................................... 68
6.4 Virtual Private network ............................................................................................ 70
6.4.1 Setting up Virtual Private Network connection ..................................................... 70
6.4.2 Connect to VPN network ..................................................................................... 71
7 FCC Regulations .......................................................................................................... 71
8 IC Notice ....................................................................................................................... 72
© All rights reserved.
HONEYWELL 3

User manual O5100
1 About this document
1.1 REVISION HISTORY
Version Date Description Author
0.0 04.25.2011 1. Initial version released Dennis
1.2 KEYSTROKES.
Filenames, paths, keystrokes entered by the user are shown in this typeface.
1.3 WINDOWS CONTROLS.
Windows controls including command bar sequences, prompts, dialog boxes, fields, pulldown lists, checkboxes and radio-buttons are printed in this bold typeface.
1.4 PDA Keys
Keys on the PDA are bracketed by "greater than" and "less than" characters (< >) to
distinguish them from keys on the PC, example, <ENTER>.
1.5 STYLUS ACTIONS
Single Tap or Select – tap the display screen once with the stylus to activate a specific
button or select an item from a pull-down list.
Double-Tap – tap the stylus twice rapidly in the same location to open an application.
Tap and Hold – tap and hold the stylus to view the context menu.
© All rights reserved.
HONEYWELL 4

User manual O5100
2 Batteries and Power
2.1 OVERVIEW
Battery charging, installation, and information about the single-slot dock, battery charger
and power cable are located in the Quick Reference Guide.
2.2 SUSPEND MODE
The PDA will go into suspend or sleep mode when it is idle for a configurable period of time,
by default it is configured to 3 minutes. The idle duration can be customized using the
Power control panel (refer to "Power off Tab" on page 41). Suspend mode works and looks
just like you have turned the unit off. Press the < On/Off > key to suspend (put to sleep)
the O5100. Press < On/Off > key again for the PDA to resume its previous state.
Use the Battery Power control panel to set the idle duration and suspend mode initiation.
This will save battery power when PDA is not in use.
2.2.1 Suspending
The following conditions will suspend (put the PDA to sleep):
Press the < On/Off > key while the unit is on.
The sleep timer expires, which indicates that there has been no use for a specified
period of time.
The battery pack is completely discharged.
2.2.2 Resuming
Use one of the following methods to resume (wake up the PDA):
Press < On/Off > key to suspend or resume (wake up).
Put the PDA into a dock or connect to data cable.
When a battery pack completely discharges while the unit is in suspend mode, the PDA
remains suspended until the discharged battery is changed or PDA is connected to charger.
© All rights reserved.
HONEYWELL 5

User manual O5100
2.3 BATTERY
- 3.7V, 2200mAh (Standard battery)
Top:
Bottom:
- 3.7V, 3300mAh (Extend battery)
Top:
Bottom:
© All rights reserved.
HONEYWELL 6

User manual O5100
2.4 BATTERY WARNINGS AND CAUTIONS
Prior to using the PDA for the first time, you MUST charge the battery pack. The initial
charging cycle for both the battery pack and back-up battery takes approximately
thirteen (13) hours. Subsequent charging cycles take four (4) hours.
If you remove the battery pack or it completely discharges, there is a 2 hour window in
which to insert a charged battery pack before the backup battery completely discharges. If
your backup battery completely discharges, the contents of the RAM memory will be lost. If
your backup battery is less than fully charged, there is proportionally smaller window of time
available.
Use only the batteries, charger and cradle supplied by a POINT MOBILE or POINT MOBILE
dealer. The use of other battery supplies can damage the PDA and void your warranty. For
the correct supplies for the O5100, please contact your POINT MOBILE reseller.
Lithium-ion Polymer battery packs can get hot, explode, ignite and/or cause serious injury if
exposed to improper situations.
Follow the safety warnings listed below:
Do not place the battery pack in fire or heat the battery.
Do not install the battery pack backwards so the polarity is reversed.
Do not connect the positive terminal and negative terminal of the battery pack to
each other with any metal object (such as wire).
Do not carry or store battery pack together with metal objects.
Do not pierce the battery pack with nails, strike the battery with a hammer, step on
the battery or otherwise subject it to strong impacts or shocks.
Do not solder directly onto the battery pack.
Do not expose battery pack to liquids, or allow the battery contacts to get wet.
Do not disassemble or modify the battery pack.
The battery pack contains safety and protection devices, which, if damaged, may cause the
battery pack to generate heat, explode or ignite.
Do not discharge the battery pack using any device except for the specified device. When it
is used in devices other than the specified device, the battery pack can be damaged or its
life expectancy reduced. If the device causes an abnormal current to flow, it may cause the
battery pack to become hot, explode or ignite and cause serious injury.
In the event the battery pack leaks and the fluid gets into one's eye, do not rub the eye.
Rinse well with water and immediately seek medical care. If left untreated, the battery fluid
could cause damage to the eye.
Always charge the battery pack within the temperature range of 32°-113°F (0°-45°C).
Do not place the battery pack in microwave ovens, high-pressure containers or on induction
cookware.
© All rights reserved.
HONEYWELL 7

User manual O5100
Immediately discontinue use of the battery pack if, while using, charging or storing the
battery, it emits an unusual smell, feels hot, changes color or shape, or appears abnormal in
any other way.
Do not place the battery pack in or near fire, on stoves or other high temperature locations.
Do not place the battery pack in direct sunlight or use or store the battery pack inside cars in
hot weather. Doing so may cause the battery pack to generate heat, explode or ignite.
Using the battery pack in this manner may also result in a loss of performance and a
shortened life expectancy.
POINT MOBILE recommends annual replacement of rechargeable battery packs to ensure
maximum performance.
© All rights reserved.
HONEYWELL 8

User manual O5100
2.5 BATTERY DISPOSAL
Replace the battery pack only with one sold by a POINT MOBILE reseller.
When the battery is worn out, insulate the battery contacts with adhesive tape or a similar
material prior to disposal.
Please recycle Lithium-Ion Batteries.
Do not throw Lithium-Ion Batteries in the trash.
2.6 EXTEND BATTERY LIFE
We recommend you to follow few steps witch extend battery life
For first time do not turn on unit until batteries are charged for minimum of 13 hours.
Turn off wireless devices (Wifi/Bluetooth) when they are not needed,
Set display backlight timeout as low as possible
Set keyboard backlight timeout as low as possible
If possible turn off vibration when good read.
Set device turn off after idle for time as short as possible.
© All rights reserved.
HONEYWELL 9
User manual O5100
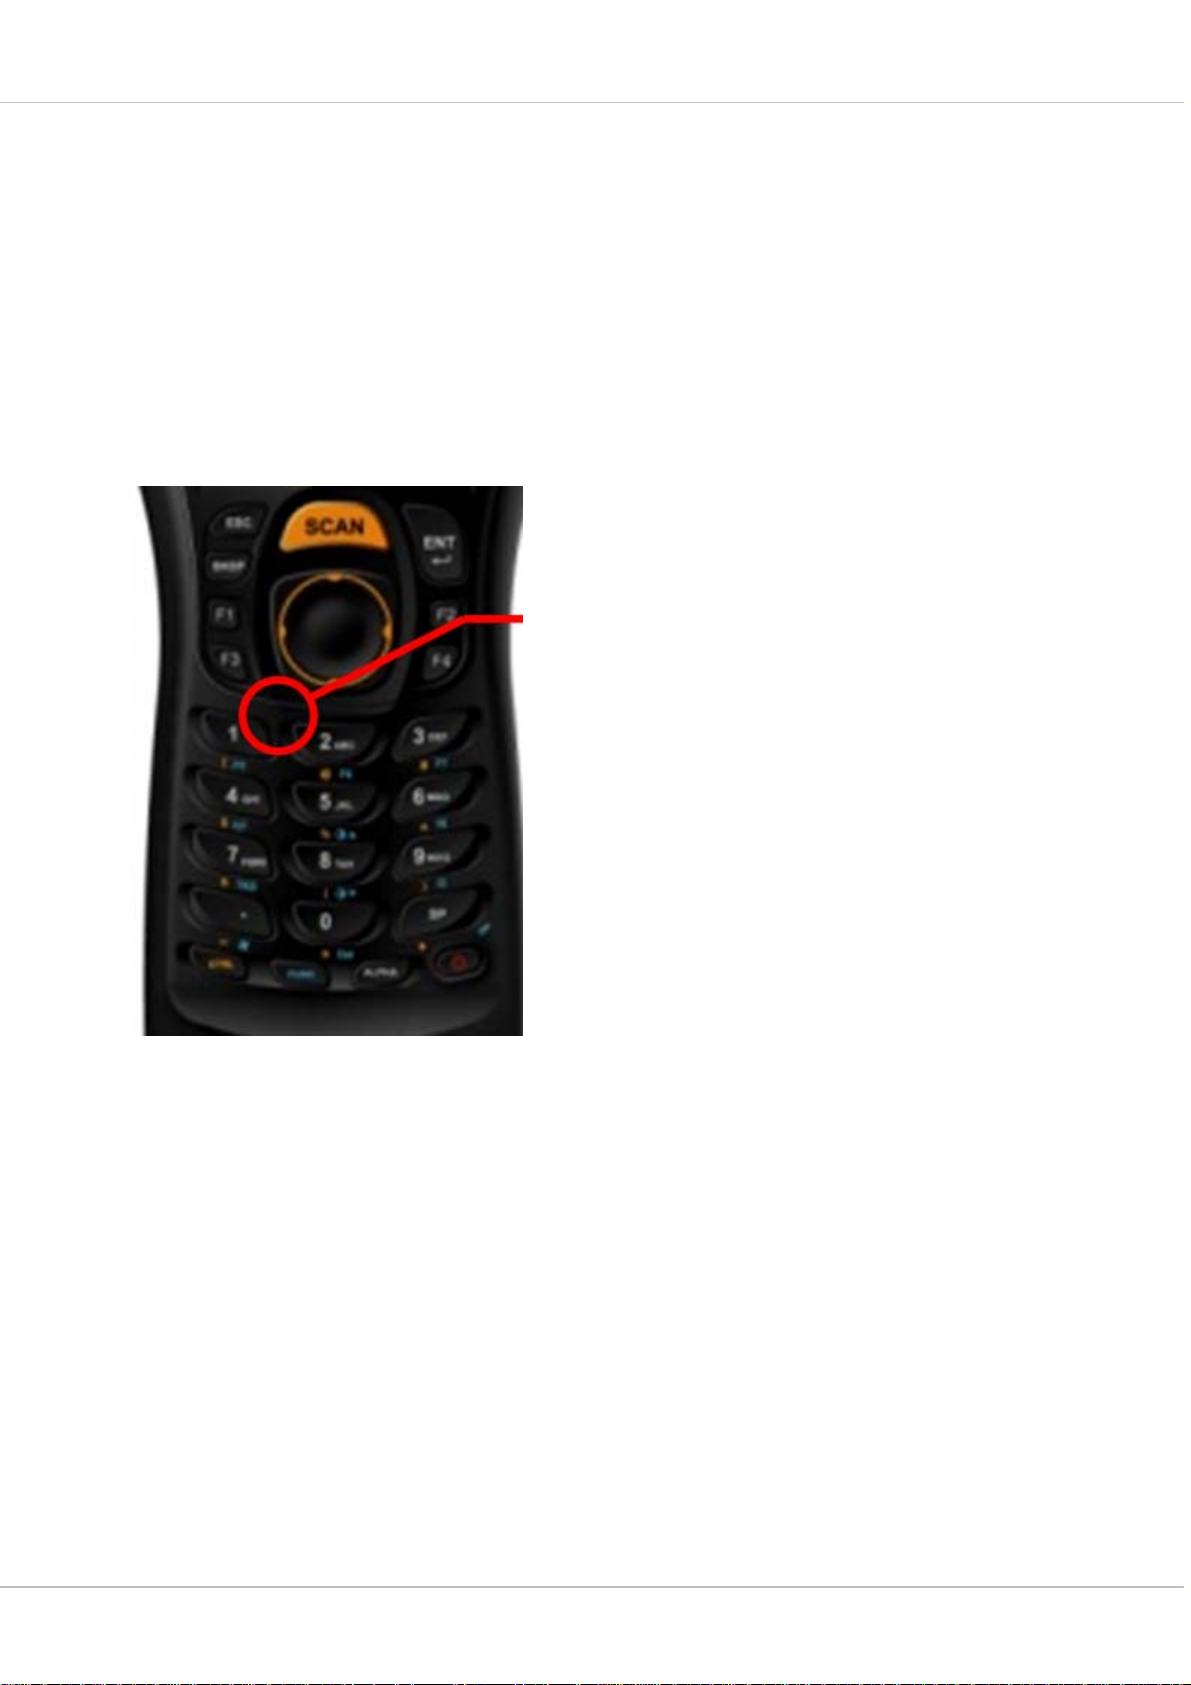
3 Reset O5100
3.1 SOFTWARE RESET
If device hangs up or does not respond to any action
please perform software reset.
Using stylus press reset button for 1 second and release.
Reset button is located
All unsaved data will be lost when performing a
software reset.
© All rights reserved.
HONEYWELL 10

User manual O5100
3.2 FACTORY MODE
If devices performance becomes unstable or settings
have been changed to state when it is not possible to
revert them.
It is recommended to perform reset to factory mode.
Press the [Power button] and [Reset button] at the same
time for Cold Reset and then release the [Reset button]
only. After that, you can see boot menu
If it shows boot log in the LCD, enter password key using keypad
If you see boot menu screen, press key in order for entering download mode and press
button [ 1 ] + [ 2 ] + [enter] in order.
All data and custom settings will be lost if Factory
mode is performed. It is recommended to backup all
your data to removable storage or to other computer
before performing a Factory mode.
© All rights reserved.
HONEYWELL 11
User manual O5100
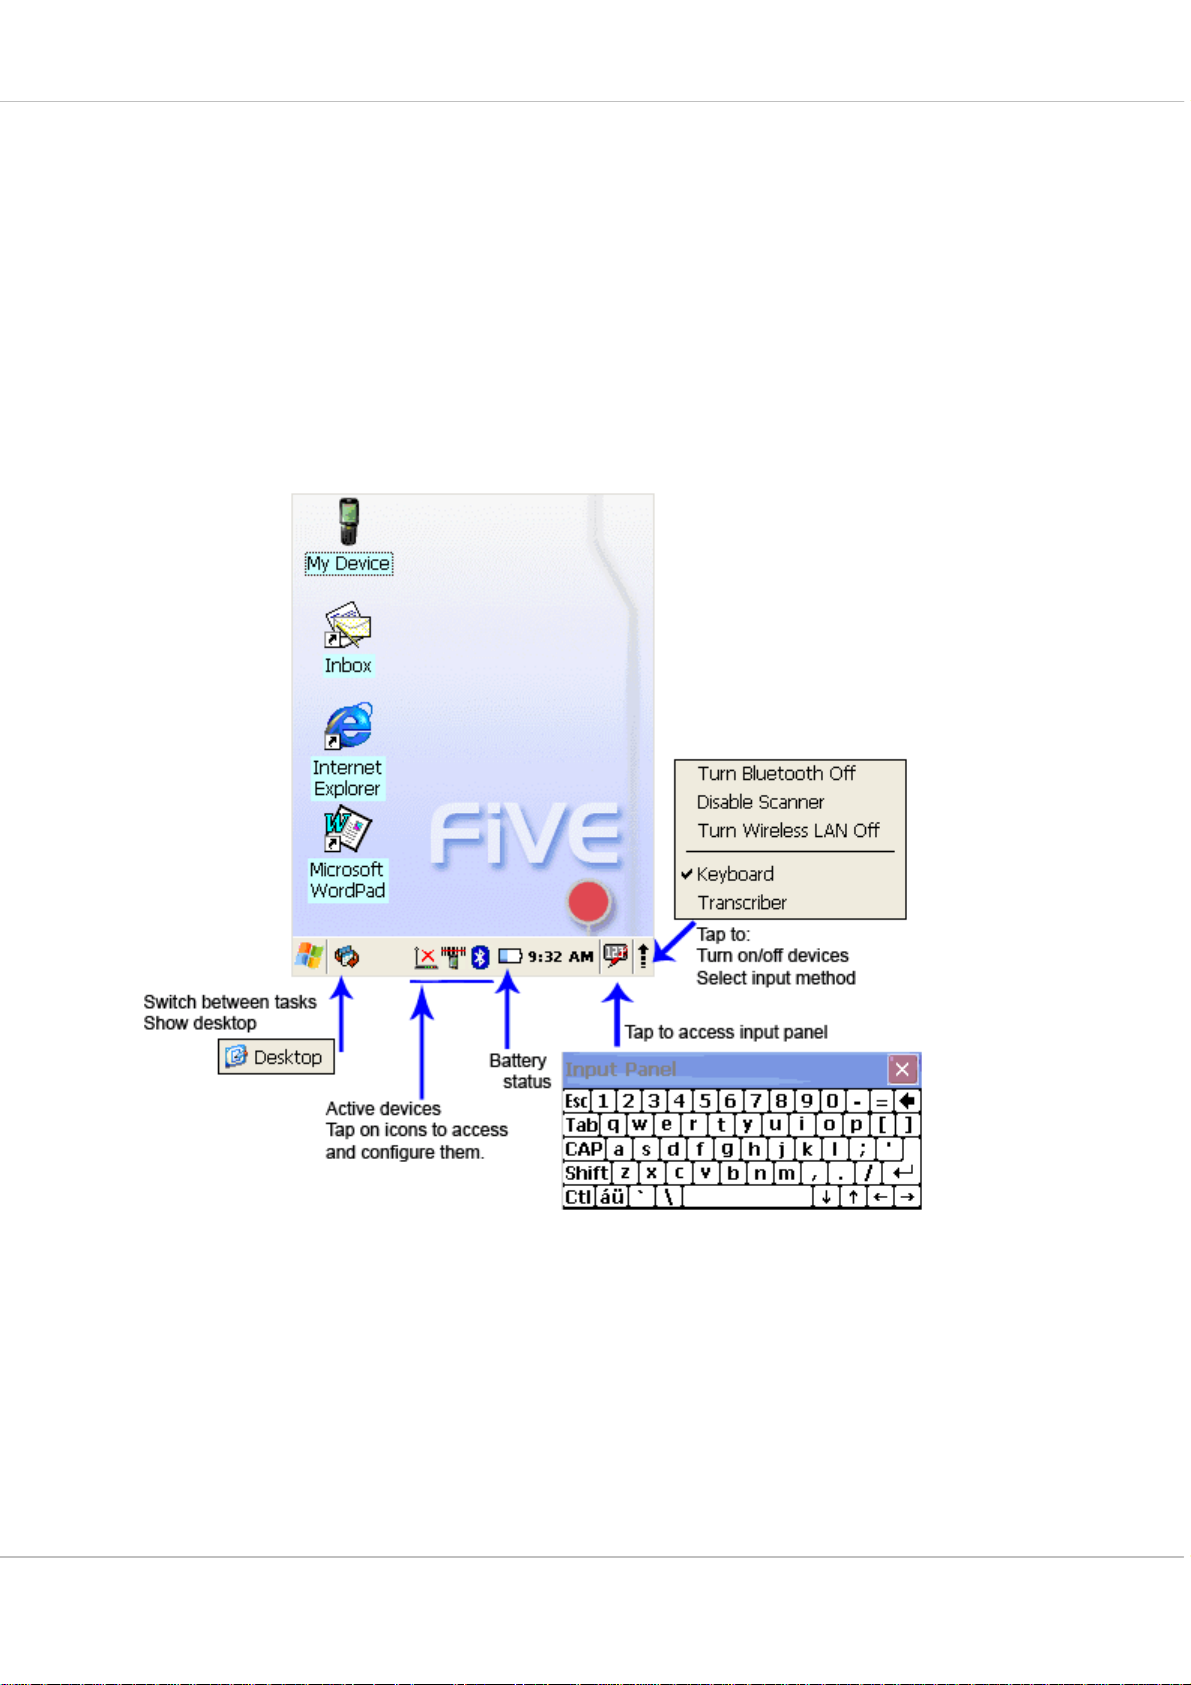
4 Using O5100
4.1 DESKTOP
Workflow is like all other Microsoft operational systems.
To run program - double tap on a shortcut icon on
desktop or run program from Start menu.
Below is standard O5100 desktop layout.
© All rights reserved.
HONEYWELL 12
User manual O5100
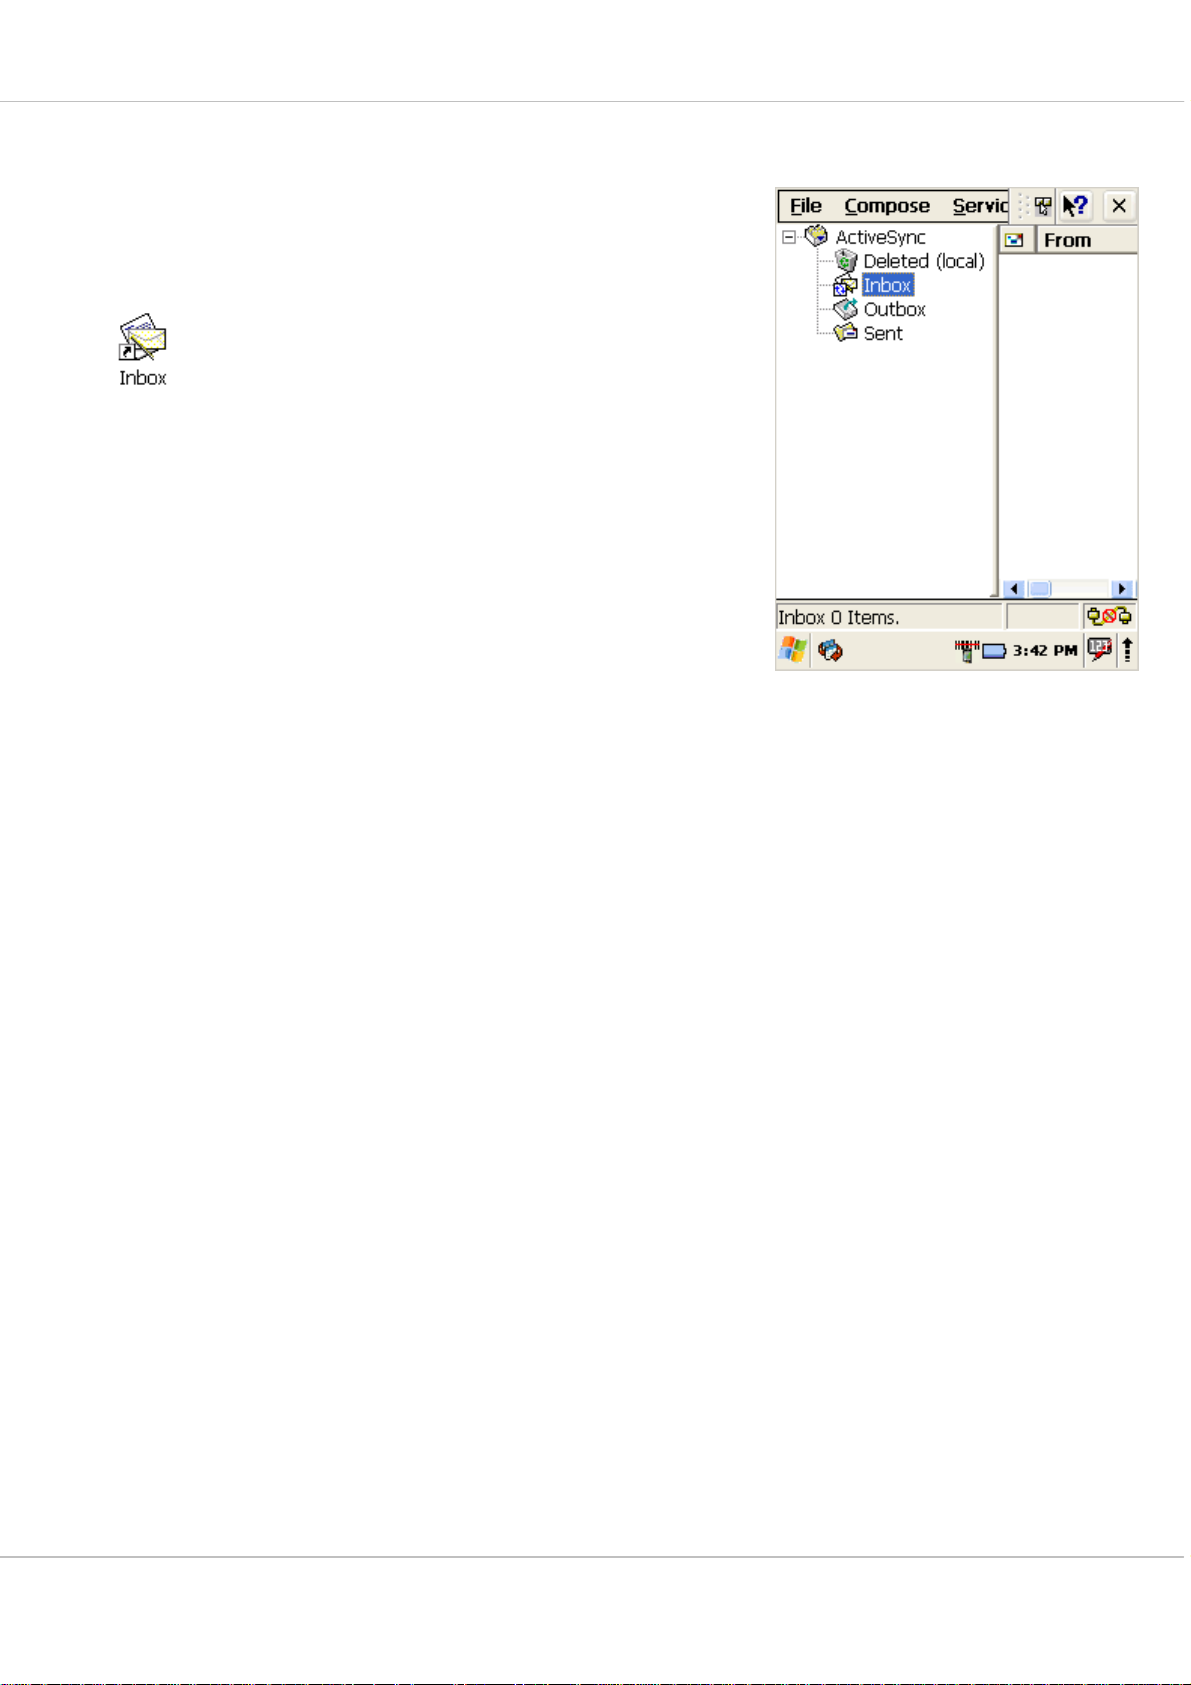
4.2 INBOX
The PDA comes with Inbox for Windows CE .NET
installed from the factory. Inbox is a familiar Microsoft
email interface.
To set up Inbox:
1. Select Start > Programs > Inbox
2. Select Services > Options from the command
bar.
3. Drag the dialog to show the right edge to configure
email.
4. Select Add...
5. Select Service Type and enter in name of email
service in the Service name field.
6. Select the type of service.
7. Enter the server and user information in the Mail
Service Definition.
8. Configure your inbox using the Mail General
Preferences dialog.
9. Configure your mail retrieval settings using the
Mail Inbox Preferences.
10. Press OK to complete the Inbox configuration.
Receiving email
1. Select Services > Connect from the command
bar.
2. Select Services > Send/Receive Mail from
the command bar to manually retrieve mail. Any
pending email appears in the inbox after
connecting.
© All rights reserved.
HONEYWELL 13

User manual O5100
4.3 INTERNET EXPLORER
The PDA comes with Internet Explorer for Windows
CE .NET installed
Open Internet Explorer by selecting
Start > Programs > Internet Explorer.
To set a default home page,
1. Navigate to the desired default web page.
2. Select Tools > Options from the command bar.
3. Enter the desired URL in the Start Page field.
4. Press the OK button
Internet Explorer uses sliding menus for application and
navigation control. Tap and drag the sliding menus to the
left or right to see the hidden menu items and toolbars.
© All rights reserved.
HONEYWELL 14
User manual O5100
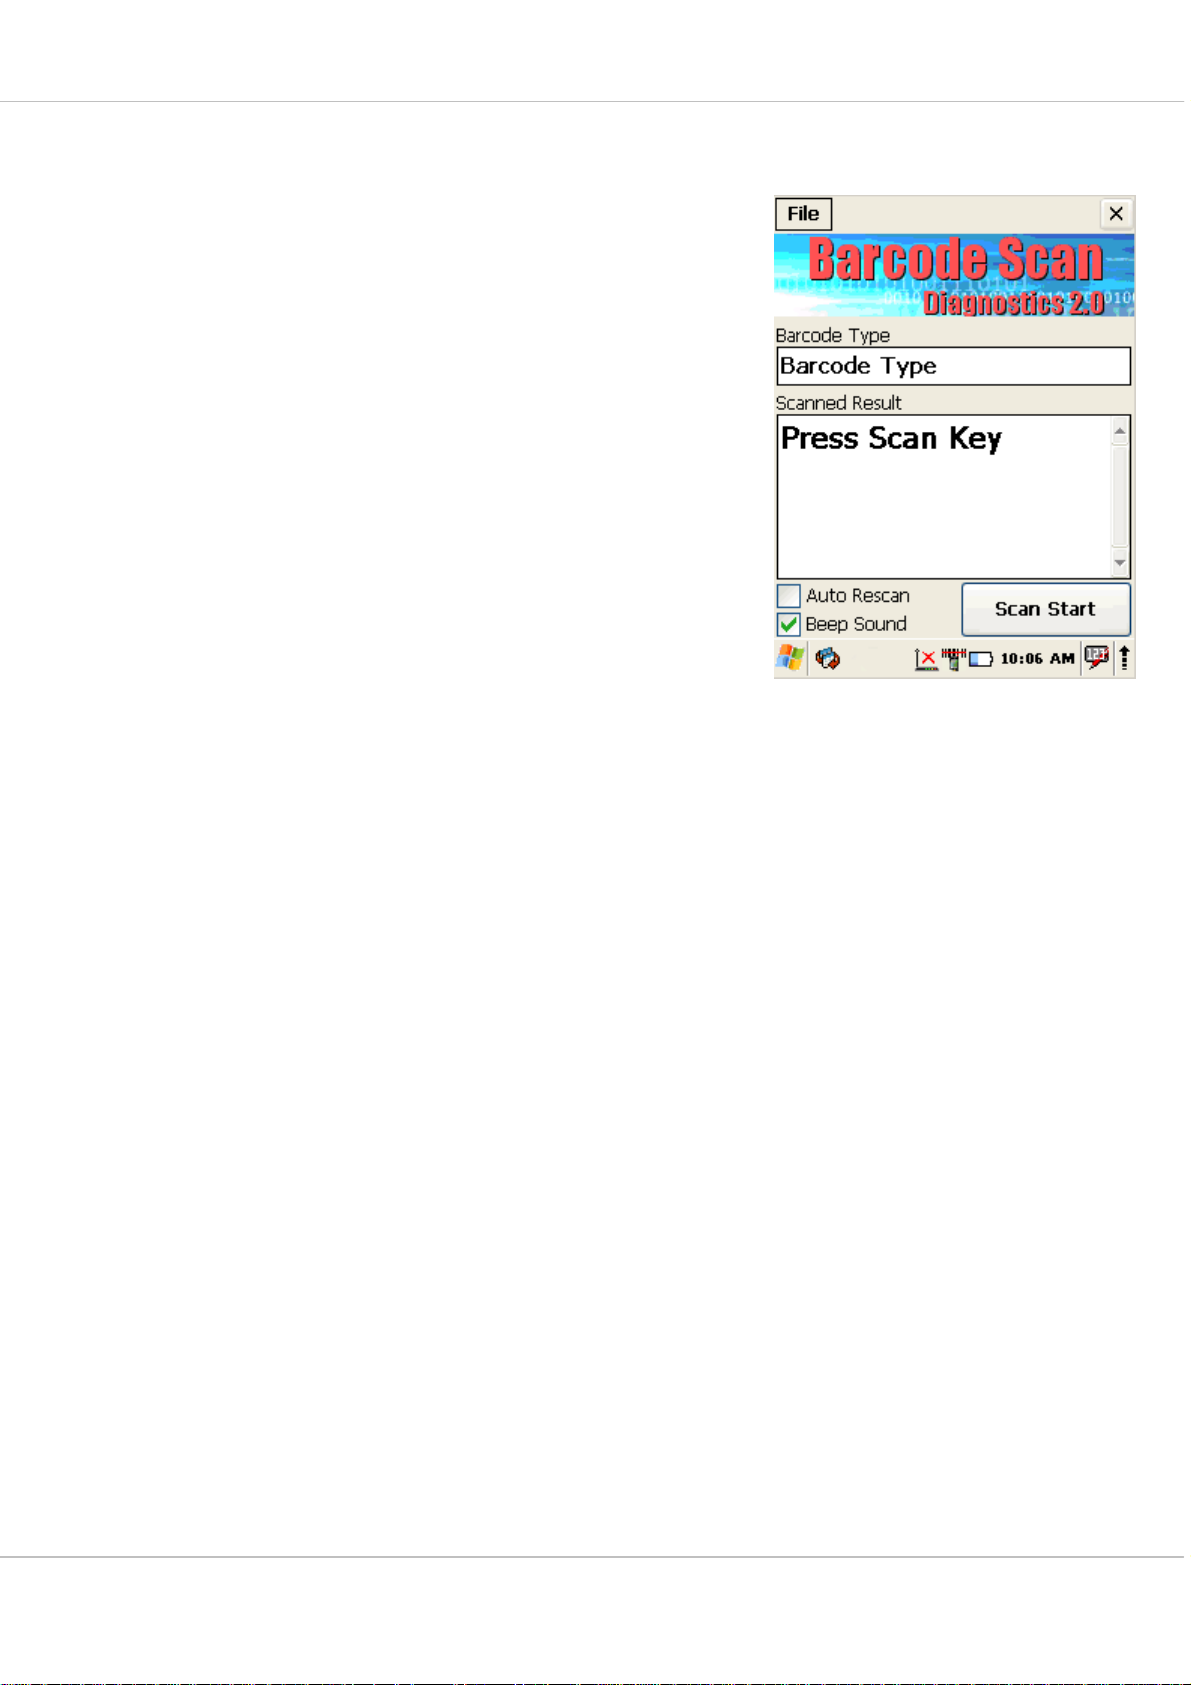
4.4 QUICK SCANSET APPLICATION
O5100 comes with preinstalled scanner software.
Application works in background and has a System try
icon next to battery level icon.
Test barcode scanning
Go to Start > Programs > Scanner > Scandiag
to open scan dialog
Refer to Scanner configuration, Section 5.17 for more
information about scanner settings
© All rights reserved.
HONEYWELL 15
User manual O5100
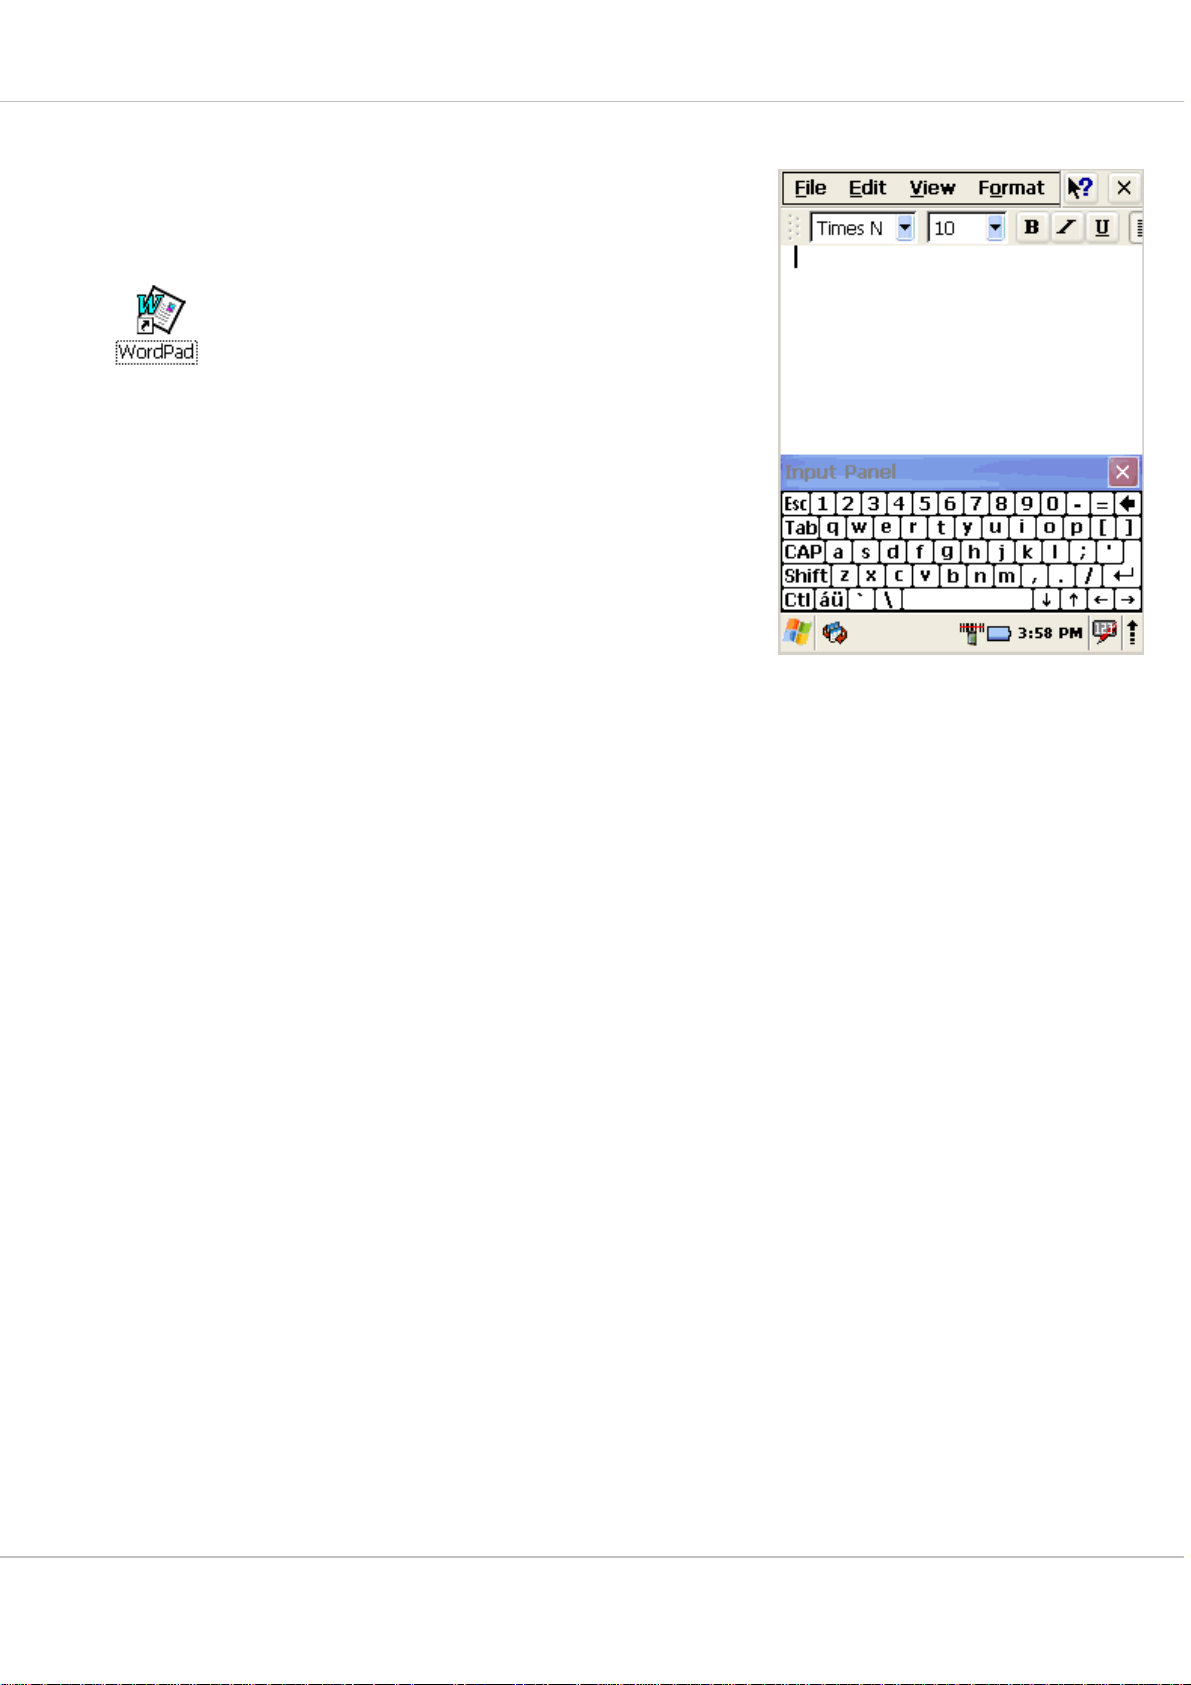
4.5 WORD PAD
The PDA comes with WordPad for Windows CE .NET
installed from the factory.
To start Wordpad, select
Start > Programs > Microsoft WordPad.
The following text and document file types are compatible
with WordPad:
Text (* . txt)
Word Document (* . doc)
Rich Text File (*.rtf)
WordPad (*.pwd)
When you transfer file types other than * . pwd to the
Windows CE .NET device, it translates the files into a
compressed Windows CE .NET file type.
© All rights reserved.
HONEYWELL 16

User manual O5100
4.6 INSTALLING PROGRAMS
Programs pre-installed on the device are stored in ROM (read only memory). You cannot
remove, or modify this software. You may add programs and data files to RAM (random
access memory) or into memory card. Please follow the directions provided with the
software to install it.
4.6.1 Using an Installation Wizard
If the file has an installer, the installation wizard begins. Follow the directions on the screen.
Once the software is installed on your desktop computer, the installer transfers the
software to your terminal automatically.
4.6.2 Installing Programs Manually
If the file does not contain an installer, an error message indicates the program is valid but
is designed for a different type of computer.
1. Install * . cab, * . exe, * . zip, setup. exe files, or other files designed for the device.
2. Windows CE .NET applications will also work on the device.
Start by downloading the program to your desktop computer (or insert the CD or disk that
contains the program into your desktop computer).
1. Select Start > Settings > Control Panel > System > General on
device. Make a note of the information in the processor field.
2. Read the installation instructions, ReadMe files, or manual that comes with the
program. Many programs provide installation instructions. If you cannot find installation
instructions for the program in the ReadMe file or manual, use ActiveSync Explorer to copy
the program file to the Program Files folder on your device. For more information on copying
files using ActiveSync, refer to the ActiveSync online Help.
3. Connect your PDA and desktop computer.
4. Double-click the * . exe file.
5. Once the installation is complete, you double-tap the program icon from your desktop,
or select Programs > program icon to select it.
© All rights reserved.
HONEYWELL 17

User manual O5100
4.6.3 Using ActiveSync to Add to the Start Menu
1. Use the Explorer in ActiveSync on your desktop computer to explore the files on your
PDA and locate the program. For more information on using ActiveSync, refer to the
ActiveSync online Help.
2. Right-click on the program, then select Create Shortcut.
3. Move the shortcut to the Programs folder in the Windows folder. The shortcut
appears on the menu.
© All rights reserved.
HONEYWELL 18
User manual O5100
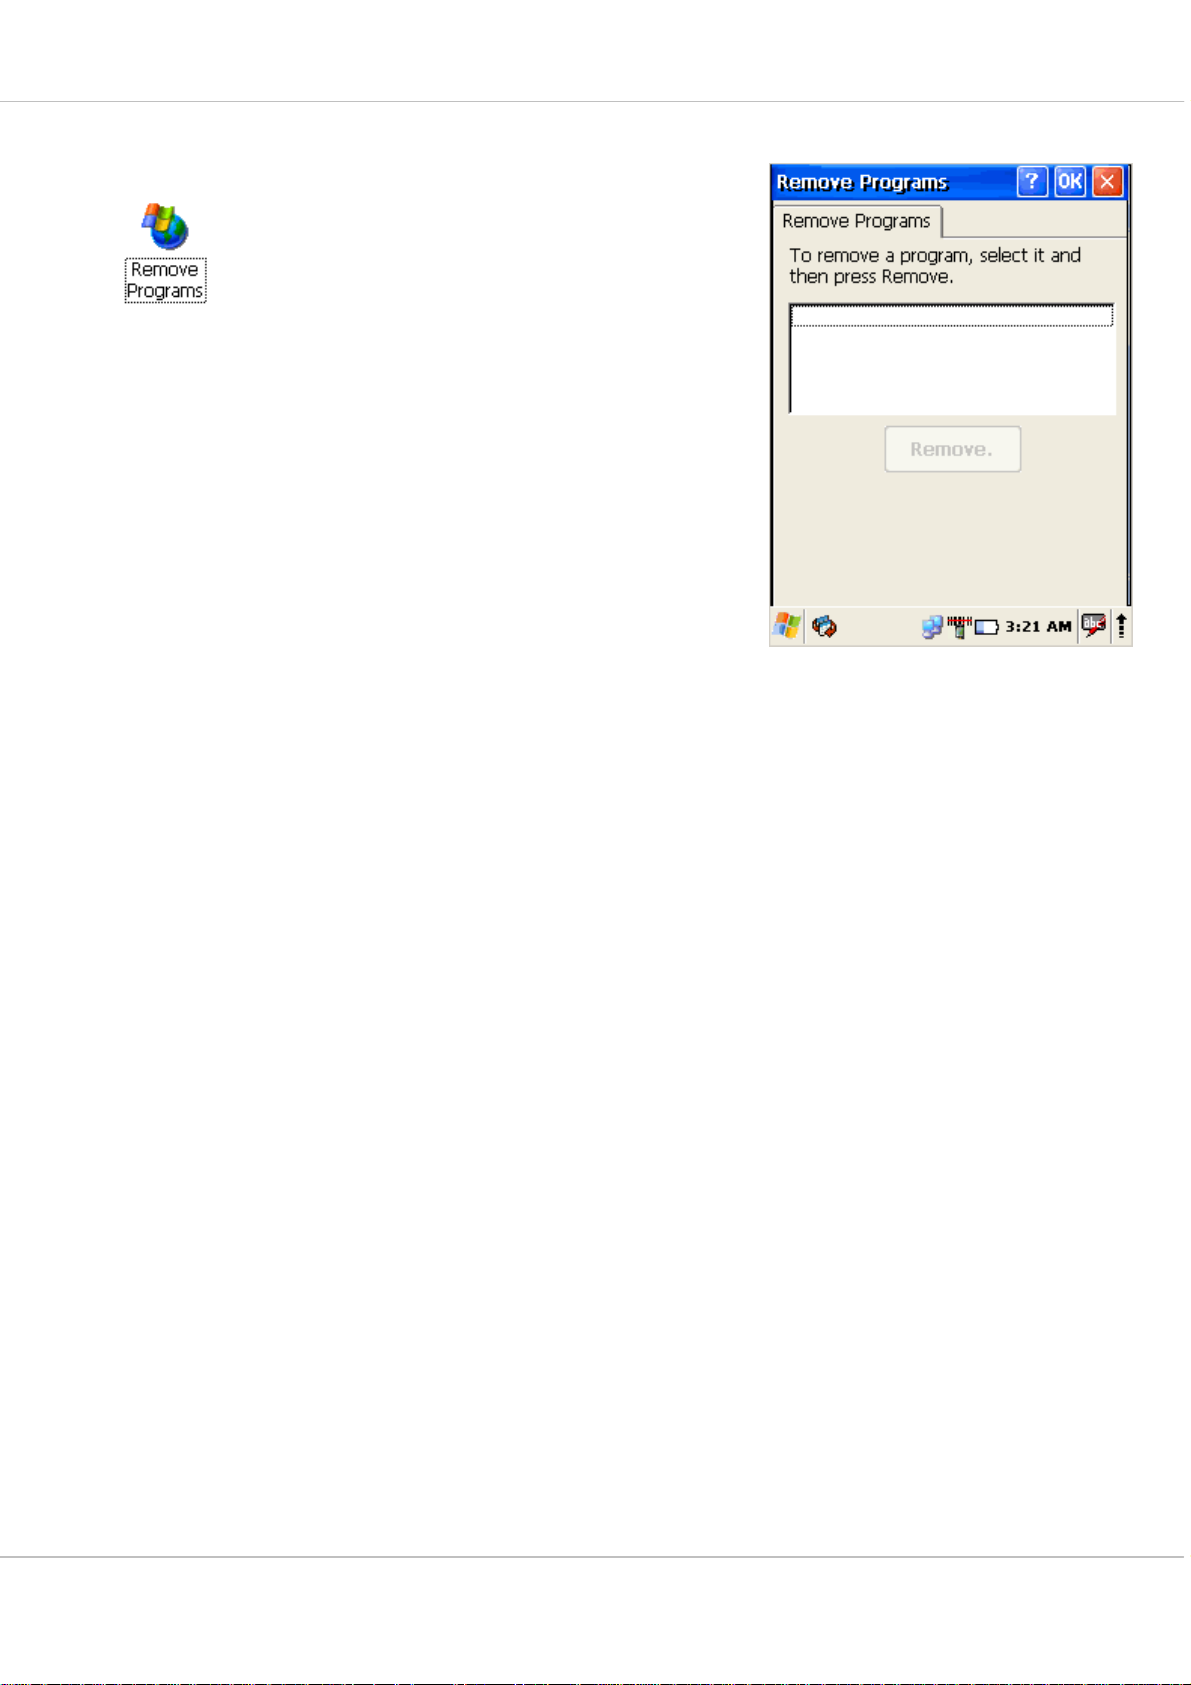
4.7 REMOVING PROGRAMS
Only user installed programs can be removed.
To remove a program
1. select
Start > Settings > Control Panel >
Remove Programs
2. Select the program you wish to remove from the
list
3. Press Remove.
4. After uninstall tap on OK
© All rights reserved.
HONEYWELL 19

User manual O5100
5 Configuring a PDA
Customizing the Settings
To change the settings on your new PDA, select
Start > Settings > Control Panel
The list of settings (except Quick ScanSet applet) is
standard Windows CE .NET settings. For more
information on the Windows CE .NET operating system,
please refer to Microsoft's website at
http://www.microsoft.com/windows/embedded/ce.net/
.
© All rights reserved.
HONEYWELL 20
User manual O5100
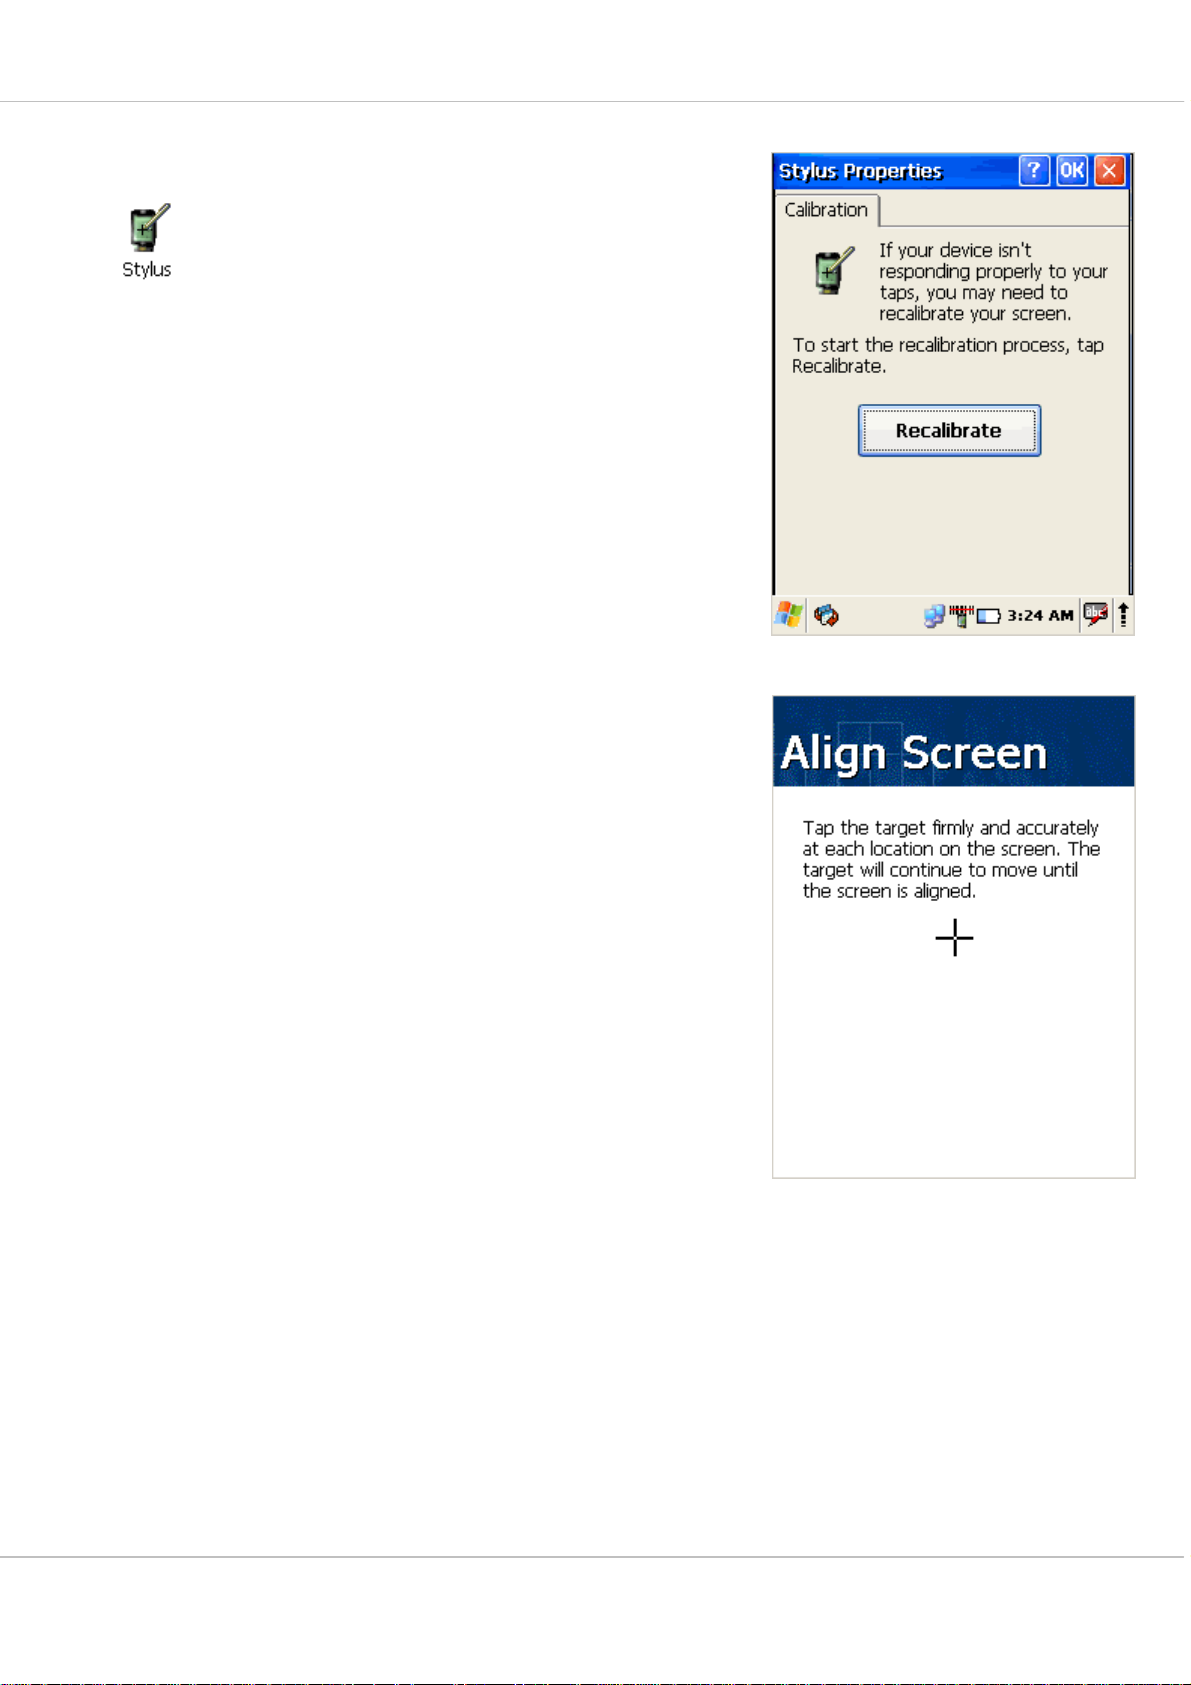
5.1 STYLUS
You might need to align the touch screen (i.e. when you
notice that when you attempt to select one item with the
stylus, another item is erroneously selected).
To align the touch screen,
1. Open
Start > Settings > Control Panel >
Stylus
OR
2. Press < FUNC > + < Space > on keyboard
3. Align Screen dialog shows on screen
4. Carefully press and briefly hold stylus on the centre of
the target as the target moves around the screen.
© All rights reserved.
HONEYWELL 21
User manual O5100
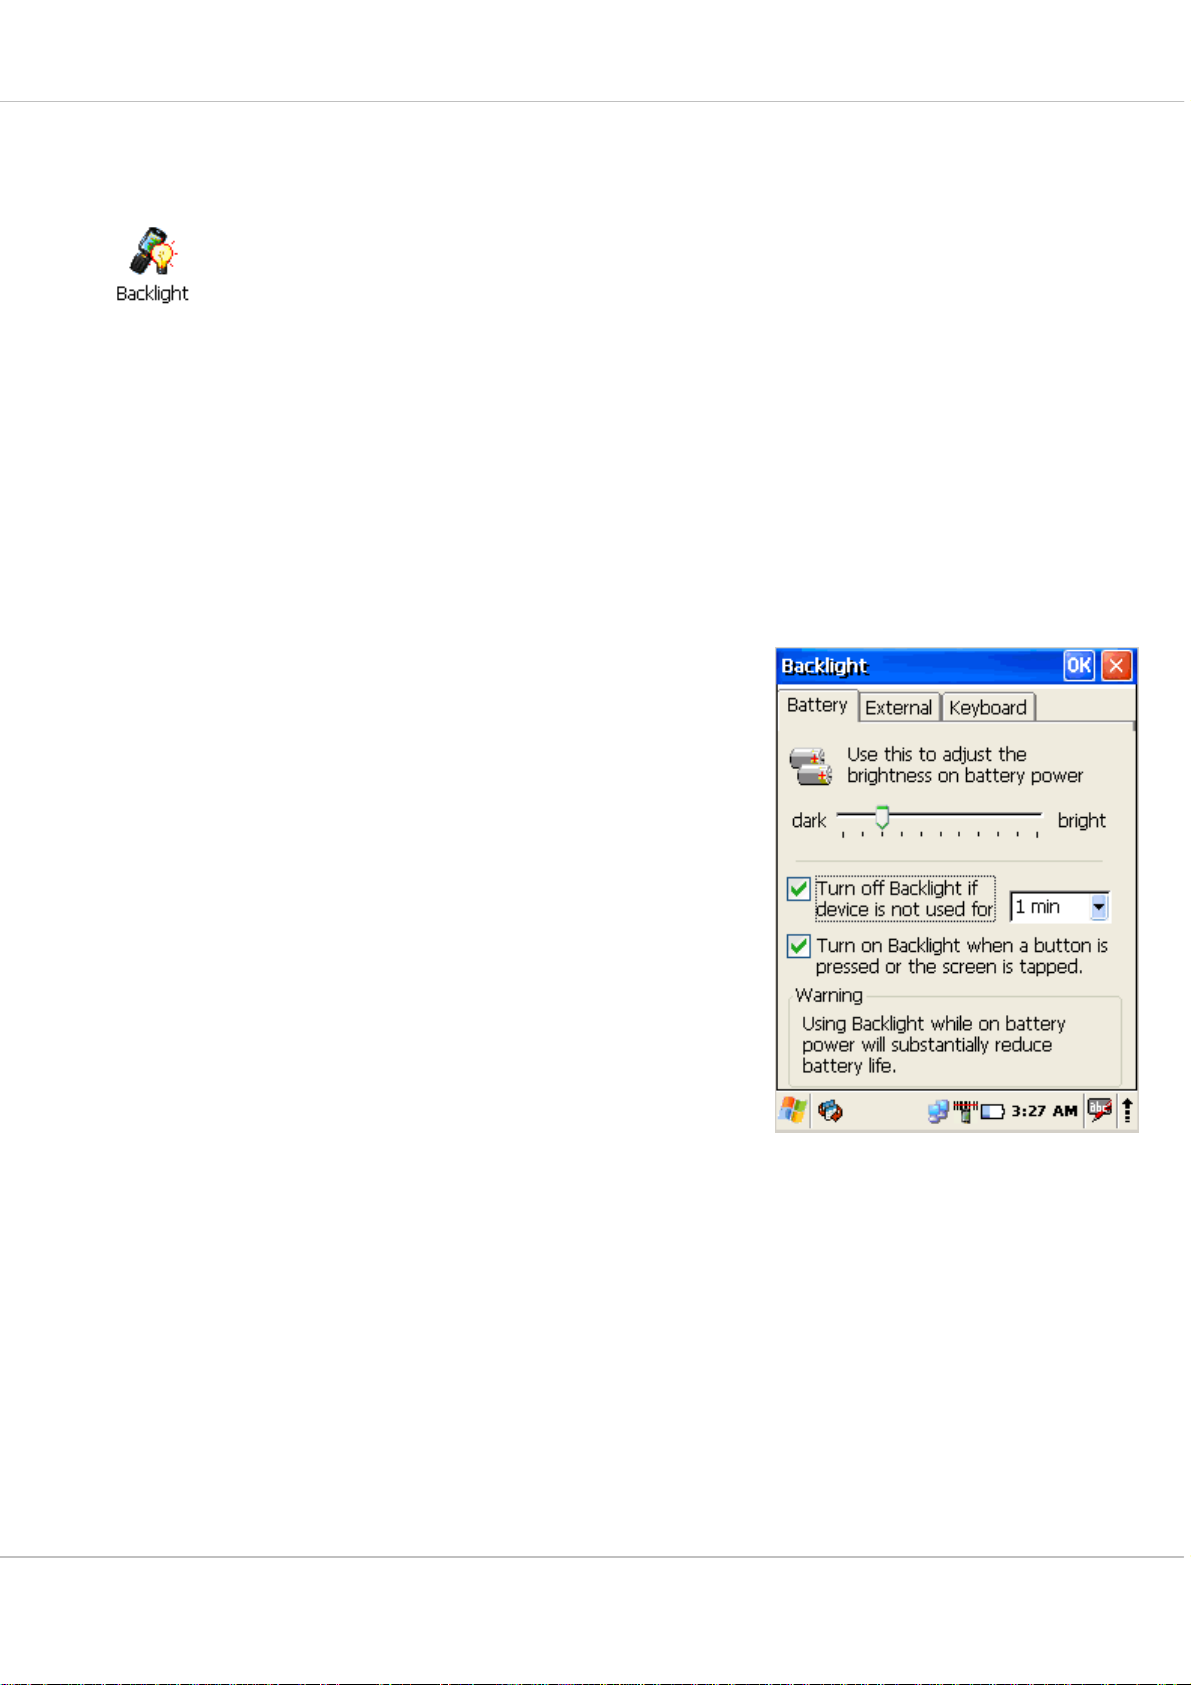
5.2 BACKLIGHT
Modify display and keyboard backlight brightness. Also
set backlight options (i.e. turn off time).
To modify backlight settings open:
Start > Settings > Control Panel >
Backlight
5.2.1 Battery power
Modify display backlight settings when device runs on
batteries.
Set display brightness level
Set backlight timeout time.
Available options:
10 sec (by default)
30 sec
1 min
2 min
3 min
4 min
5 min
Enable to turn on backlight when a button is
pressed or the screen is tapped
To extend battery life it is recommended to set display
backlight turn off time as short as possible.
To extend battery life it is recommended to set display
backlight brightness level as low as possible.
© All rights reserved.
HONEYWELL 22

User manual O5100
5.2.2 External power
Modify display backlight settings when device runs on
external power.
Set display brightness level
Set backlight timeout time.
Available options:
10 sec (by default)
30 sec
1 min
2 min
3 min
4 min
5 min
Enable to turn on backlight when a button is
pressed or the screen is tapped
Device is plugged into external power supply and those
settings do not affect battery life.
© All rights reserved.
HONEYWELL 23

User manual O5100
5.2.3 Keyboard backlight
Set keyboards backlight timeout.
By default this is turned off.
© All rights reserved.
HONEYWELL 24

User manual O5100
5.3 BLUETOOTH
Select
Start > Settings > Control Panel >
Bluetooth device Properties
Click Scan Device button to scan Bluetooth devices in
range.
About connecting to Bluetooth enabled devices read
more at section 6.3 – Bluetooth.
© All rights reserved.
HONEYWELL 25

User manual O5100
5.4 DATE AND TIME
In the Date/Time options, you can change the year,
month, date, time, time zone, or select automatic adjust
for Daylight Savings Time.
To set or change the date and time:
1. Open Date/Time Properties
Start > Settings > Control Panel >
Date/Time
2. Select month
Tap on month name to open a pull down list of
months or press the arrow buttons on either side of
the month to increase or decrease the month.
3. Change the year
Tap on the year to open a numeric dial.
Select the up arrow to increase the value; select
the down arrow to decrease the value.
Or you can type a new value in the field.
4. Change the time,
select the hour, minute, seconds, or AM/PM and
select the up arrow to increase the value; select/tap the
down arrow to decrease the value. You can also type a
new time value in the field.
5. Select your correct time zone from the pull-down list.
6. To automatically adjust the clock for Daylight Savings
Time, enable the checkbox at the bottom of the screen.
7. Select Apply to make save your changes [and make
additional modifications] or select OK to exit the
Date/Time settings.
© All rights reserved.
HONEYWELL 26

User manual O5100
5.5 DIALING
Change dialling properties
1. Select
Start > Settings > Control Panel >
Dialing
2. Tap on Edit to change dialing patterns and prefixes
3. To exit, press OK from the command bar, or press the
< ENT > key on the keypad
© All rights reserved.
HONEYWELL 27

User manual O5100
5.6 DISPLAY PROPERTIES
To modify the display and/or backlight of the PDA refer to
the following:
5.6.1 Background
Change background image:
The current file is located in the Windows directory with
the POINT MOBILE logo file named logo.bmp. Place a
new image in the Windows directory. Image must be
exactly 240 by 320 pixels.
1. Select Start > Settings > Control Panel
> Display.
2. Press Browse and select new image.
3. Tap on OK to save settings.
© All rights reserved.
HONEYWELL 28

User manual O5100
5.6.2 Appearance
Change Windows appearance default settings:
1. Select
Start > Settings > Control Panel >
Display > Appearance tab.
2. Select form Items dropdown menu desired item
3. Press on color box to change items color
4. To save your created appearance scheme tap on
Save...
5. To exit the Backlight settings, press OK from the
control bar.
© All rights reserved.
HONEYWELL 29

User manual O5100
5.7 INPUT PANEL
Adjust input panel behaviour and settings.
Change the Soft Input Panel settings:
1. Select
Start > Settings > Control Panel >
Input Panel
2. Change the desired settings.
3. To change the Soft Keyboard Options, tap on the
Options
4. Change the soft keyboard options , selecting from:
Large or small keys.
Using gestures for space, backspace, shift,
and enter.
5. To exit the Soft Keyboard Options, press OK on the
control bar, or press the < ENT > key on the
keypad.
6. To exit Input Panel settings, press OK from the
control bar, or press the < ENT > key on the
keypad.
© All rights reserved.
HONEYWELL 30

User manual O5100
5.8 INTERNET SETTINGS
To change the Internet default settings:
1. Select
Start > Settings > Control Panel >
Internet Options
2. On the General tab type in the URL of the
desired start page and the desired search engine. You
can also change the Cache Size, clear the Cache, and
clear the History.
3. On the Connection tab modify the network
access settings as desired.
© All rights reserved.
HONEYWELL 31

User manual O5100
4. On the Security tab change browsing security
options.
5. On the Privacy tab set cookies options
6. On the Advanced tab change advanced browser
options
© All rights reserved.
HONEYWELL 32

User manual O5100
7. On the Popups tab specify to allow to show or
block popups
8. To exit Internet Options, press OK from the control
bar, or press the < ENT > key on the keypad.
© All rights reserved.
HONEYWELL 33

User manual O5100
5.9 KEYBOARD PROPERTIES
Adjust device actions while keyboard key is pressed
down.
1. Select
Start > Settings > Control Panel >
Keyboard
2. Enable character repeat -
3. Adjust Repeat delay slider to change delay time
between two inserted symbols while keyboard key
is pressed.
4. Adjust Repeat rate slider to change repeat rate
when keyboard key is pressed.
5. To exit Keyboard properties, press OK from the
control bar, or press the < ENT > key on the
keypad.
© All rights reserved.
HONEYWELL 34

User manual O5100
5.10 NETWORK AND DIALUP CONNECTIONS
To create new or edit current network connection settings
1. Select
Start > Settings > Control Panel >
Network and Dial-up Connections
2. Double tap on Make New Connection
3. Enter connection name
4. Select connection type
5. Press Next
6. Configure connection
© All rights reserved.
HONEYWELL 35

User manual O5100
5.10.1 Change IP address or DHCP settings
1. Select
Start > Settings > Control Panel >
Network and Dial-up Connections
2. Tap and hold on connection
3. Press Properties
4. Select to automatically obtain an IP address via
DHCP or manually enter address
5. Click on Name Servers tab and enter DNS
servers IP addresses
6. To exit Network connection properties, press OK
from the control bar, or press the < ENT > key on
the keypad.
© All rights reserved.
HONEYWELL 36

User manual O5100
5.11 OWNER
To change the Owner default settings:
1. Select
Start > Settings > Control Panel >
Owner
2. Enter data using the input panel or the keypad on
the PDA.
3. In the Notes tab set additional notes.
4. In the Network ID tab enter information to gain
access to network resources.
5. To exit the Owner Properties control panel, press
OK from the control bar, or press the < ENT > key
on the keypad.
© All rights reserved.
HONEYWELL 37

User manual O5100
5.12 PASSWORD
To change the Password default settings:
1. Select
Start > Settings > Control Panel >
Password
2. Enter the desired password twice as indicated in
the two fields.
3. Select to enable password protection at power-on.
4. To exit the Password properties panel, press
OK from the control bar, or press the < ENT > key
on the keypad.
© All rights reserved.
HONEYWELL 38

User manual O5100
5.13 PC CONNECTION
The PC Connection control panel determines how
ActiveSync works with the PDA. To modify the default
settings:
1. Select
Start > Settings > Control Panel >
PC Connection.
2. Select the first checkbox to enable direct
connections to the desktop computer.
3. Tap the Change Connection button to modify
the connection method from USB or Serial.
4. To exit the Change Connection dialog, press OK
from the control bar, or press the < ENT > key on
the keypad.
© All rights reserved.
HONEYWELL 39

User manual O5100
5.14 POWER PROPERTIES
5.14.1 Battery tab
To see main and backup battery level indicators open
Start > Settings > Control panel > Power >
Battery tab or double tap on Battery icon in
taskbar.
5.14.2 Power off tab
To adjust power management settings,
1. Select
Start > Settings > Control Panel >
Power > Power Off tab
2. Set idle time when on battery power before device
suspends.
3. Set idle time when on external power before
device suspends.
4. To exit, press OK from the comm and bar, or press
the < ENT > key on the keypad.
To save battery life it is recommended to set idle time as
short as possible.
© All rights reserved.
HONEYWELL 40

User manual O5100
5.14.3 Wireless power tab
Turn on or off and set detailed configuration of the
wireless devices.
1. Open
Start > Settings > Control Panel >
Power > Wireless power tab
2. Enable Max Power. Wireless device will work
with maximum power. This option shortens battery
life.
3. Automatically Connect – after wake up
device will automatically reconnect to available
preferred wireless network.
4. Tap on Wireless power button to turn on
wireless.
5. Tap on BlueTooth Power button to turn on
Bluetooth wireless device.
6. To exit, press OK from the comm and bar, or press
the < ENT > key on the keypad.
5.14.4 Factory Mode tab
If devices performance becomes unstable or settings
have been changed to state when it is not possible to
undo them then it is recommended to perform reset to
factory mode.
1. Select
Start > Settings > Control Panel >
Power > Factory Mode tab
2. Tap on Factory Mode
3. Confirm by taping on Yes
4. After restart you will need to align screen
All data and custom settings will be lost if Factory
mode is performed. It is recommended to backup all
your data to removable storage or to other computer
before performing a Factory mode.
© All rights reserved.
HONEYWELL 41

User manual O5100
5.15 PROGRAM BUTTONS
1. Select
Start > Settings > Control Panel >
Program Buttons
2. Select program buttons from list
3. Chose its type:
Default – button will be assigned default function
No function – button does not have any
functions
Scan key – button is used as Scan key
Application – click on Open button and select
application to bind with this key
4. To exit, press OK from the command bar, or press
the < ENT > key on the keypad
© All rights reserved.
HONEYWELL 42

User manual O5100
5.16 REGIONAL SETTINGS
To change the Regional Settings defaults:
1. Select
Start > Settings > Control Panel >
Regional Settings.
2. Select the desired language/location.
3. Review the Appearance Samples in the bottom
half of the screen. Select the tab at the top for any
settings you wish to change. Options to modify include
Number, Currency, Time, and Date.
4. To exit Regional Settings, press OK from the
control bar, or press the <Enter> key on the keypad.
© All rights reserved.
HONEYWELL 43

User manual O5100
5.17 SCANNER CONFIGURE
To change the Scanner Settings and bar code types,
complete as follows:
Go to
Start > Programs > Scanner > QuickScanSet
to open the bar code scanning application. The only
indicator that the program is open is the bar code System
Tray icon. QuickScanSet starts automatically as device
boots.
Select/tap the bar code icon in the System Tray to open
the menu shown in image on the left.
• Select Settings to open the Scanner Configure
applet.
© All rights reserved.
HONEYWELL 44

User manual O5100
Section Option Description
Basic Scanning Trigger timeout (sec) Set scanner timeout time
Good read off Scanner will stop scanning after
good read.
Enable continuous scan Scanner will scan continuous
until if checked good read.
Rescan after (sec) Set rescan time if enabled
continuous scan
Keyboard wedge
If enable
Keyboard wedge - software
program that interfaces with
a computer to translate
data read by a device other
than a keyboard, such as a
magnetic strip or bar code
reader or other such
scanning device, into
keyboard data.
Notifier Beep
If enabled – plays audio
sound
LED Enable Enable visual scan indicators
Vibrator
If enabled
Wedge Barcode ID Transmit Barcode ID Enable to transmit barcode ID
Label Prefix Enter labels prefix
Filter Accept Set filter conditions to accept
Symbologies Select barcode types you want to read
Details Enable this code Tap/enable this checkbox to
Features Select the desired features you
Length Set the minimum and maximum
General Try with Current Setting This button is enabled only if
Enable Check to enable keyboard
wedge
Options:
“Type writing“;
“Copy & paste”
Select data input method
according software you use
Termination code Select the desired barcode end
method from the pull down list
Volume Set sounds volume
Succeed Set sound to indicate good read
Fail Set sound to indicate bad read
Succeed: Set devices vibration time after
good read
Fail: Set devices vibration time after
bad read.
Suffix Enter labels suffix
Deny Set filter conditions to deny
enable the selected bar code
type.
wish to enable for that specific
bar code type.
lengths from the pull-down lists.
If the numbers are the same,
acceptable bar codes will only
be that length. Not all types will
have this option enabled.
you make changes to the
current settings. 1. Tap the Try
with Current Setting button. 2.
Press the <Scan> key. 3. Check
the result. 4. If you wish to keep
the new current settings, select
the Commit Current Setting
© All rights reserved.
HONEYWELL 45

User manual O5100
button.
Commit Current Setting After modifying the current
settings, if you wish to keep
them, select the Commit Current
Setting button.
Load Factory Default After modifying the current
settings, if you wish to return to
the factory defaults, tap the
Load Factory Default button.
Revert to last setting After modifying the current
settings, if you wish to return to
the previous settings, tap the
Revert to Last Setting button.
© All rights reserved.
HONEYWELL 46

User manual O5100
5.18 STORAGE MANAGER
To change the Storage Properties control panel default
settings:
1. Insert secure digital (SD) storage card into the
PDA. Select
Start > Settings > Control Panel >
Storage Manager
2. From the Storage manager pull-down list, select
the desired storage device.
3. You can also format, perform scandisk and defrag.
4. To save and exit the Storage Properties
control panel, press OK from the control bar, or
press the < ENT > key on the keypad.
Formatting the DiskOnChip will erase all files and
programs stored in Flash Memory.
© All rights reserved.
HONEYWELL 47

User manual O5100
5.19 SYSTEM PROPERTIES
Refer to the System control panel for information related
to the system.
5.19.1 General
Select
Start > Settings > Control Panel > System
> General tab to determine the following information
about your PDA:
Operating system
Model
Boot time
OS load time
WiFi MAC address
Bluetooth MAC address
Devices Serial Number
Wireless device address is shown when wireless devices
are turned on for the first time.
5.19.2 Memory
Move the slider to adjust memory allocation.
Move slider to the left for more memory to run programs.
Move it to the right for more storage space.
© All rights reserved.
HONEYWELL 48

User manual O5100
5.19.3 Device Name
Your device uses this information to identify itself to other
computers.
The Input Panel will open to facilitate data entry.
5.20 TERMINAL SERVER CLIENT LICENCES
Select
Start > Settings > Control Panel >
Terminal server client Licenses
© All rights reserved.
HONEYWELL 49

User manual O5100
5.21 VOLUME & SOUNDS PROPERTIES
Select
Start > Settings > Control Panel > Volume
& sounds
Adjust sound volume and enable sounds.
Change sounds for different items.
Copy custom wav file into /windows directory and select it
from list.
To save and exit the Volume & sounds properties
control panel, press OK from the control bar, or press the
< ENT > key on the keypad.
© All rights reserved.
HONEYWELL 50

User manual O5100
6 Networks, Communications and Connections
The screen shots in the manual were taken and the procedures were written using
Windows® XP. If you are using Windows® NT or Windows® 2000, appearance and
procedures may be slightly different.
© All rights reserved.
HONEYWELL 51

User manual O5100
6.1 MICROSOFT® ACTIVESYNC
6.1.1 Installation
Microsoft® ActiveSync is a file transfer tool to synchronize the files on a PC with the files on
your PDA. O5100 comes from the factory with ActiveSync loaded.
If you have ActiveSync already installed on your PC, make sure that you have v4.5 or
higher.
To install Microsoft® ActiveSync, complete the following steps on the PC:
1. Download ActiveSync from Microsoft® Windows CE .NET website:
http://www.microsoft.com/mobile/pocketpc/downloads/.
2. Install the most current version of Microsoft® ActiveSync (v4.5 or higher) on the host
PC
© All rights reserved.
HONEYWELL 52

User manual O5100
6.1.2 Setting up a Partnership
During the Microsoft ActiveSync installation, you were prompted to create a partnership with
your mobile device. When you set up a partnership, you select synchronization and file
conversion settings, which are contained in a file on your desktop computer. This file
enables your desktop computer to recognize your device. Only devices that have a
partnership with a desktop computer can synchronize information between the two
computers.
Partnerships are stored in ActiveSync and have the same name as the corresponding
device. Your desktop computer can set up partnerships with many different mobile devices,
but a device can have partnerships with only two computers.
For more information on partnerships, please refer to your Microsoft ActiveSync
documentation or help file.
© All rights reserved.
HONEYWELL 53

User manual O5100
6.1.3 Exploring the Mobile Device
To transfer files, complete the following steps on the host PC:
Transferring Files
Select Start > Programs > Microsoft ActiveSync.
Double-click on the ActiveSync icon in the System Tool Tray.
After you have established a connection with your PDA, click on the Explore button at the
top of the ActiveSync window (or select Explore from the File menu).
Navigate to the target directory on your portable and copy the desired file by using the
Copy/Paste method or dragging and dropping the desired file(s) into the folder.
Depending on the file type, ActiveSync may convert the file into a format appropriate for the
Windows CE .NET device.
© All rights reserved.
HONEYWELL 54

User manual O5100
6.1.4 ActiveSync File Synchronization
ActiveSync file synchronization requires an ActiveSync
partnership between the O5100 and the Host PC.
Select Tools >Options from the ActiveSync command bar
to configure the synchronization options.
© All rights reserved.
HONEYWELL 55

User manual O5100
Place the file to be synchronized in the Synchronization folder created in your My
Documents directory. During the ActiveSync connection, all files in the Synchronization
folder will be synchronized to the \My Documents directory on the O5100.
© All rights reserved.
HONEYWELL 56

User manual O5100
6.2 WIRELESS NETWORK
O5100 comes from factory with default built in wireless network adapter. You can connect
device to secured wireless networks or open network.
To connect to secured network contact network administration.
Wifi card MAC address can be found under
Start > Settings > Control Panel > System.
If no address is shown please turn Wireless LAN on.
6.2.1 Enabling Wireless LAN
1. Tap on arrow and open device control window
2. Select Turn Wireless LAN On
This also can be done by:
1. Open
Start > Settings > Control Panel >
Power > Wireless power
2. Select Wireless power ON
Wireless Icon appears on taskbar.
© All rights reserved.
HONEYWELL 57

User manual O5100
6.2.2 Set up wireless network
To set up connection to wireless network:
Double-tap on Network icon.
Select Wireless information
Select a network and press connect or right tap for more
options. Double tap on Add New … to set up new
connection when network is not visible.
© All rights reserved.
HONEYWELL 58

User manual O5100
1. Enter Network name (SSID)
2. Check if This is an ad hoc network.
Ad hoc is a network connection method when
connection is established for the duration of one
session and requires no base station. Instead,
devices discover others within range to form a
network for those computers. Devices may
search for target nodes that are out of range by
flooding the network with broadcasts that are
forwarded by each node.
3. Select encryption
AES - Advanced Encryption Standard
TKIP - Temporal Key Integrity Protocol
4. Select authentication methods:
Open
Shared
WPA
WPA2
WPA2-PSK
WPA-PSK
Wi-Fi Protected Access (WPA and WPA2) is a class of systems to secure wireless (Wi-Fi)
computer networks. It was created in response to several serious weaknesses found in the
previous system, Wired Equivalent Privacy (WEP). WPA implements the majority of the
IEEE 802.11i standard, and was intended as an intermediate measure to take the place of
WEP while 802.11i was prepared. WPA is designed to work with all wireless network
interface cards, but not necessarily with first generation wireless access points. WPA2
implements the full standard, but will not work with some older network cards.
Pre-shared key mode (PSK, also known as personal mode) is designed for networks
without of an 802.1X authentication server. Each user must enter a passphrase to access
the network. The pass phrase may be from 8 to 63 printable ASCII characters or 64
hexadecimal digits (256 bits). The pass phrase may be stored on the user's computer at
their discretion under most operating systems to avoid re-entry. The pass phrase must
remain stored in the Wi-Fi access point.
5. Enter Network key (network passphrase/ password) and if needed Key index.
6. Select EAP type
Extensible Authentication Protocol, or EAP, is a universal authentication framework
frequently used in wireless networks and Point-to-Point connections.
© All rights reserved.
HONEYWELL 59

User manual O5100
TLS - Transport Layer Security
PEAP - Protected Extensible Authentication Protocol, Protected EAP, or simply PEAP, is a
method to securely transmit authentication information, including passwords, over wired or
wireless networks.
6.2.3 Preferred networks
In some areas there are more than one wireless networks
available to connect.
Select wireless network and tap on Advanced … button.
Tap on Network name and use control buttons Up/Down
to change priority or Delete – to remove network from
list.
6.2.4 Automatic connections
Also check to what device can automatically connect:
All available
Only access points
Only computer – to computer
© All rights reserved.
HONEYWELL 60

User manual O5100
6.2.5 Connect to wireless network
Selected desired connection and tap on Connect button.
About IP addresses or DHCP server –
see section: Change IP address or DHCP settings
© All rights reserved.
HONEYWELL 61

User manual O5100
6.3 BLUE TOOTH
Bluetooth wireless technology is a short-range communications technology to connect
portable and/or fixed devices while maintaining high levels of security.
6.3.1 Turn on Bluetooth
1. Select device panel
2. Tap on Turn Bluetooth On
3. In task bar Bluetooth icon appears
© All rights reserved.
HONEYWELL 62

User manual O5100
6.3.2 Connect to other devices
Before connecting make sure that other devices
Bluetooth connection is enabled.
1. Double tap on Bluetooth icon in task bar or
Start > Settings > Control Panel >
Bluetooth Device properties
2. Bluetooth manager appears on screen
3. Tap Scan Device button
Available services of all devices in range will be shown in
Bluetooth manager.
© All rights reserved.
HONEYWELL 63

User manual O5100
6.3.3 Pairing Bluetooth devices
To connect to Bluetooth device usually they must be
paired – on each device entered same passkey number.
If you connect to devices without input methods (printers,
headsets etc.), please refer to devices user manual about
pairing.
1. Double tap on desired devices service
2. Select Trusted from dropdown menu
3. You will be prompted
4. Click on Yes button
5. Enter random 4 digits (if pairing with device without
possibility to input (refer to devices user manual) and tap
on Yes
6. Enter same digits on other device when prompted.
7. After pairing double tap on devices service and
select Active
© All rights reserved.
HONEYWELL 64

User manual O5100
6.3.4 Setting up connection to mobile phone
Use GSM mobile phone as modem to connect to Internet using GPRS (General Packet
Radio Service) data connection.
Contact your mobile phone provider about GPRS configuration, coverage and fees and
check mobile phone manual if your phone supports GPRS data transfer and has a
Bluetooth connection available.
This is also available if your mobile phone and network supports 3G data transfer.
1. Check if your mobile phone is configured and
connected to GPRS.
2. Turn mobile phones Bluetooth on
3. Select
Start > Settings >
Network and Dial-up Connections
4. Double tap on Make New Connection
5. Chose Dial–up connection and press Next
© All rights reserved.
HONEYWELL 65

User manual O5100
6. Press Bluetooth
7. Select and activate data modem service of your
mobile phone (see more - Pairing Bluetooth devices) and
press OK
8. From Select a modem: dropdown menu select
Mobile phone modem and press Next
© All rights reserved.
HONEYWELL 66

User manual O5100
9. Enter dial-up phone number (contact mobile
network services provider for more information about
connecting to Internet using mobile phone)
10. Tap on Finish
© All rights reserved.
HONEYWELL 67

User manual O5100
6.3.5 Connecting to internet
1. Double tap on New connection
2. Enter User Name, Password and Domain
(contact mobile phone service provider)
© All rights reserved.
HONEYWELL 68

User manual O5100
3. Press Dial properties… to edit dialling codes
and prefixes.
4. Tap on Connect to connect mobile phone.
5. Run Internet Explorer
6. Select
Tools > Options > Connection tab
7. From Autodial name dropdown list select
created connection
© All rights reserved.
HONEYWELL 69

User manual O5100
6.4 VIRTUAL PRIVATE NETWORK
A virtual private network (VPN) is a private communications network often used to
communicate confidentially over a public network. VPN traffic can be carried over a public
networks on top of standard protocols, or over a service provider's private network. A VPN
can send data across secured and encrypted private channels between two points.
6.4.1 Setting up Virtual Private Network connection
To set up VPN connection to secured server
1. Open
Start > Settings > Network and Dial-up
connection
2. Double tap on Make new connection
3. Enter connection name, ex., My Connection
4. Select Virtual Private Network (PPTP)
5. Tap on Next
6. Enter Host name or IP address
7. Check TCP/IP Settings …
8. Check Security settings…
Enable Preview user name and password if
you need to enter username and password when
logging into VPN server. This option will show
login screen when connecting to VPN.
9. Tap on Finish button.
© All rights reserved.
HONEYWELL 70

User manual O5100
6.4.2 Connect to VPN network
1. Open
Start > Settings >
Network and Dial-up connections
2. Double tap on VPN connection
3. Enter Username, Password and Domain
4. Click on OK
5. After authorization tap on Hide to hide status
window.
According to VPN network specifics – you will need to
reconnect to your VPN network if device is turned off and
on.
To disconnect from VPN network
1. Double tap on VPN icon in task bar
2. Click Disconnect
7 FCC Regulations
This device complies with part 15 of the FCC Rules. Operation is subject to the following
two conditions: (1) This device may not cause harmful interference, and (2) this device must
accept any interference received, including interference that may cause undesired operation.
© All rights reserved.
HONEYWELL 71

User manual O5100
This device has been tested and found to comply with the limits for a Class B digital
device, pursuant to Part 15 of the FCC Rules. These limits are designed to provide
reasonable protection against harmful interference in a residential installation. This
equipment generates, uses and can radiated radio frequency energy and, if not installed
and used in accordance with the instructions, may cause harmful interference to radio
communications. However, there is no guarantee that interference will not occur in a
particular installation If this equipment does cause harmful interference to radio or television
reception, which can be determined by turning the equipment off and on, the user is
encouraged to try to correct the interference by one or more of the following measures:
-Reorient or relocate the receiving antenna.
-Increase the separation between the equipment and receiver.
-Connect the equipment into an outlet on a circuit different from that to which the receiver is
connected.
-Consult the dealer or an experienced radio/TV technician for help.
Changes or modifications not expressly approved by the party responsible for compliance
could void the user‘s authority to operate the equipment.
4RF Exposure Information
This device meets the government’s requirements for exposure to radio waves.
This device is designed and manufactured not to exceed the emission limits for exposure to
radio frequency (RF) energy set by the Federal Communications Commission of the U.S.
Government.
8 IC Notice
This device complies with Industry Canada license-exempt RSS standard(s). Operation is
subject to the following two conditions:
(1) this device may not cause interference, and
(2) this device must accept any interference, including interference that may cause
undesired operation of the device.
Le présent appareil est conforme aux CNR d'Industrie Canada applicables aux appareils
radio exempts de licence. L'exploitation est autorisée aux deux conditions suivantes:
(1) l'appareil ne doit pas produire de brouillage, et
(2) l'utilisateur de l'appareil doit accepter tout brouillage radioélectrique subi, même si le
brouillage est susceptible d'en
This Class B digital apparatus complies with Canadian ICES-003.
Cet appareil numérique de la classe B est conforme à la norme NMB-003 du Canada.
IC: 1693B-5100LP
IMPORTANT NOTE:
IC Radiation Exposure Statement
This EUT is compliance with SAR for general population/uncontrolled exposure limits in IC
RSS-102.
© All rights reserved.
HONEYWELL 72
 Loading...