

Page 1
Technical Manual
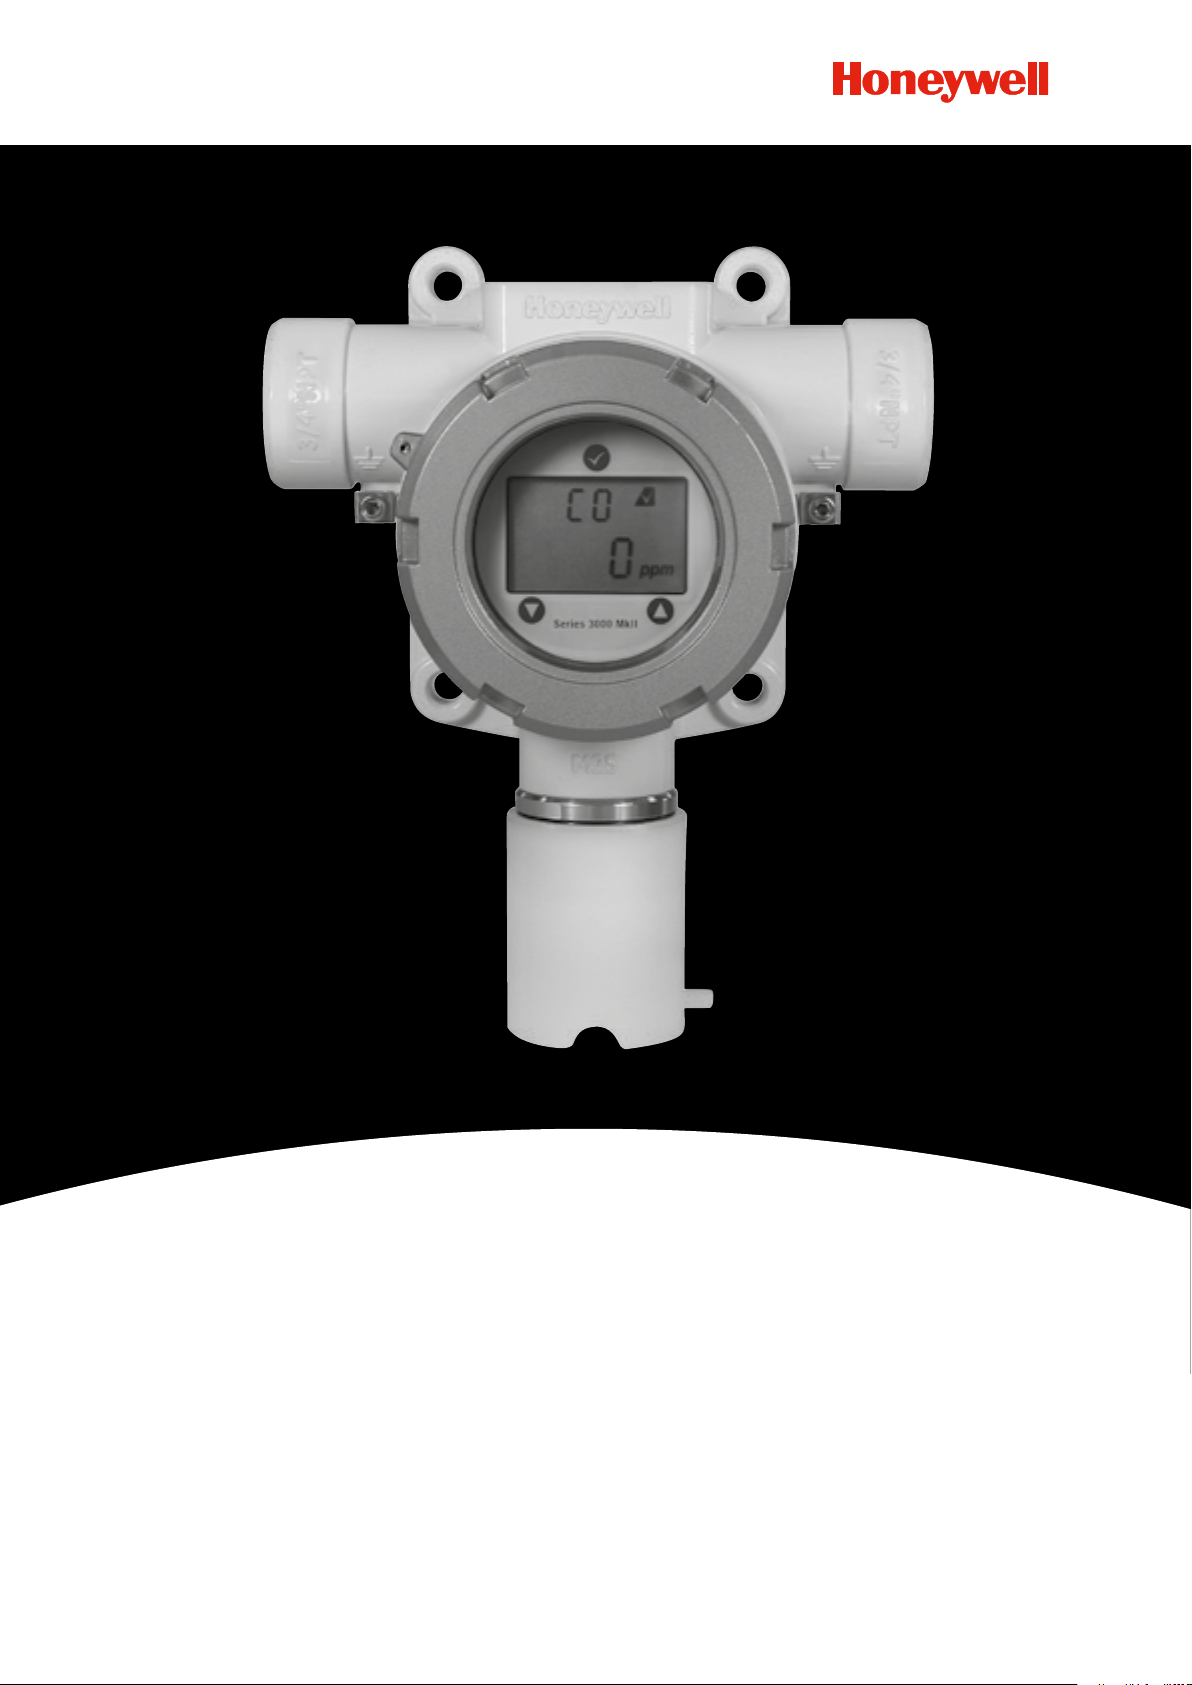
Series 3000 MkII
Gas Detector
Page 2

SERIES 3000 MKII TECHNICAL MANUAL S3KMKIIMAN_MAN0878_Issue 8_08/2015
1. Safety
Ensure that this Operating Manual is read and understood BEFORE installing / operating /
maintaining the equipment.
Pay particular attention to Warnings and Cautions.
All document Warnings are listed here and repeated where appropriate at the start of the relevant
chapter(s) of this Operating Manual.
Cautions appear in the sections / sub-sections of the document where they apply.
Warnings
Series 3000 MkII is designed for installation and use in Zone 1 or 2 or 21 or 22 hazardous
areas in Europe and Class I Division 1 or 2 and Class II Division 1 or 2 area applications
in North America.
Installation must be in accordance with the recognized standards of the appropriate
authority in the country concerned.
Access to the interior of the detector, when carrying out any work, must only be
conducted by trained personnel.
Before carrying out any work ensure local regulations and site procedures are followed.
Appropriate standards must be followed to maintain the overall certication of the detector.
To reduce risk of ignition of hazardous atmospheres, conduit runs must have a seal tting
connected within 18 inches of the enclosure.
To reduce the risk of ignition of hazardous atmosphere, de-classify the area or
disconnect the equipment from the supply circuit before opening the detector enclosure.
Keep assembly tightly closed during operation.
Never attempt to open a junction box / enclosure in potentially hazardous atmospheres.
The detector must be earthed / grounded for electrical safety and to limit the effects
of radio frequency interference. An earth / ground point is provided inside and outside the
unit. The internal grounding shall be used as the primary equipment ground. The external
terminal is only a supplemental bonding connection where local authorities permit or
require such a connection.
The enclosure of the remotely mounted sensor assembly contains Aluminium.
Care must be taken to avoid ignition hazards due to impact or friction when installed
in a Zone 1 location.
Take care when handling sensors as they may contain corrosive solutions.
Do not tamper or in any way disassemble the sensor.
Do not expose to temperatures outside the recommended range.
Do not expose sensor to organic solvents or ammable liquids.
At the end of their working life, sensors must be disposed of in an environmentally
safe manner. Disposal should be according to local waste management requirements
and environmental legislation.
Alternatively, sensors may be securely packaged and returned to
Honeywell Analytics clearly marked for environmental disposal.
Electrochemical cells should NOT be incinerated as they may emit toxic fumes.
2
Page 3

SERIES 3000 MKII TECHNICAL MANUAL S3KMKIIMAN_MAN0878_Issue 8_08/2015
2. Information
Honeywell Analytics can take no responsibility for installation and / or use of its equipment if this is not
done in accordance with the appropriate issue and / or amendment of the Operating Manual.
The reader of this Operating Manual should ensure that it is appropriate in all details for the exact
equipment to be installed and / or operated. If in doubt, contact Honeywell Analytics for advice.
The following types of notices are used throughout this Operating Manual:
WARNING
Identies a hazardous or unsafe practice which could result in severe injury
or death to personnel.
Caution: Identies a hazardous or unsafe practice which could result in
minor injury to personnel, or product or property damage.
Note: Identies useful / additional information.
Every effort has been made to ensure the accuracy of our documents, however, Honeywell Analytics
can assume no responsibility for any errors or omissions in our documents or their consequences.
Honeywell Analytics greatly appreciates being informed of any errors or omissions that may be found
in the contents of any of our documents.
For information not covered in this document, or there is a requirement to send comments / corrections
about this document, please contact Honeywell Analytics using the contact details given on the back
page of this document.
Honeywell Analytics reserve the right to change or revise the information supplied in this
document without notice and without obligation to notify any person or organization of such
revision or change. If information is required that does not appear in this document, contact
the local distributor / agent or Honeywell Analytics.
3
Page 4

SERIES 3000 MKII TECHNICAL MANUAL S3KMKIIMAN_MAN0878_Issue 8_08/2015
3. Table of contents
1 Safety 2
2 Information
3 Table of contents
4 Introduction
4.1 Product overview
4.2 Transmitter
4.3 Smart sensor
4.4 Accessories
4.4.1 Pipe mounting bracket
4.4.2 Sunshade / Deluge Protection
4.4.3 Remote sensor mounting kit
4.4.4 Duct mounting kit
4.4.5 Calibration gas ow housing
4.4.6 Collecting cone
5 Installation
5.1 Mounting and location of detectors
6 Electrical connections
6.1 Detector wiring schematic
6.2 Typical maximum installed cable lengths
6.3 Terminal connections
6.4 Cable and earth / ground connection
7 First time switch on
8 Magnetic switch activation
8.1 Default conguration
8.2 Calibration
8.2.1 Zeroing and span calibration
8.2.2 Zeroing and span calibration of Hydrogen Sulde sensors
8.2.3 Zeroing and span calibration of Ethylene Oxide sensors
9 Display and user interface
10 Monitoring mode
11 Review mode
12 Menu mode
12.1 Menu mode operation table
13 Detector fault / warning message display
13.1 Detector fault / warning operation
13.2 Reex™ cell fault diagnosis
14 General maintenance
14.1 Functional gas test
14.2 Detector operational life
15 Servicing
15.1 Sensor replacement
15.2 Serviceable sensor cell replacement
16 Remote sensor mounting kit installation details
17 General specications
18 Ordering information
19 Warranty / liability statement
20 CE certicates
21 Certication
21.1 UL/CSA control drawing
21.2 Sensor Cartridge and Remote Sensor Accessory control drawing
21.3 Main unit UL/CSA hazardous area nameplate
21.4 Main unit ATEX/IECEx hazardous area nameplate
21.5 Sensor label ATEX/UL/c-UL
21.6 Remote sensor ATEX/UL/c-UL hazardous area nameplate
3
4
5
5
5
6
6
6
6
6
6
6
7
8
9
11
12
12
13
13
15
16
17
18
18
21
21
22
24
24
24
25
26
26
26
27
27
28
29
29
31
32
34
35
36
37
39
40
41
42
42
43
43
4
Page 5
SERIES 3000 MKII TECHNICAL MANUAL S3KMKIIMAN_MAN0878_Issue 8_08/2015
4. Introduction
The Series 3000 MkII gas detector is designed to detect toxic or oxygen gas hazards in Zone 1 or 2 or 21 or 22
hazardous areas in Europe and North American Class I Division 1 or 2 areas and Class II Division 1 or 2 areas. A
local LCD provides gas type and concentration information and when magnetically activated enables non-intrusive
one man calibration and operation. The sensor interface to the transmitter is Intrinsically Safe (IS) allowing it to be
‘hot swapped’ without the need for removing power to the detector. The replacement plug in smart sensors are
supplied pre-calibrated. A remote sensor mounting kit allows the sensor to be mounted up to 50 feet (15 meters)
from the explosion proof transmitter housing. The output from the transmitter is an industry standard 2 wire 4-20mA
loop (sink) suitable for connection to a wide range Honeywell Analytics or 3rd party control equipment / PLCs.
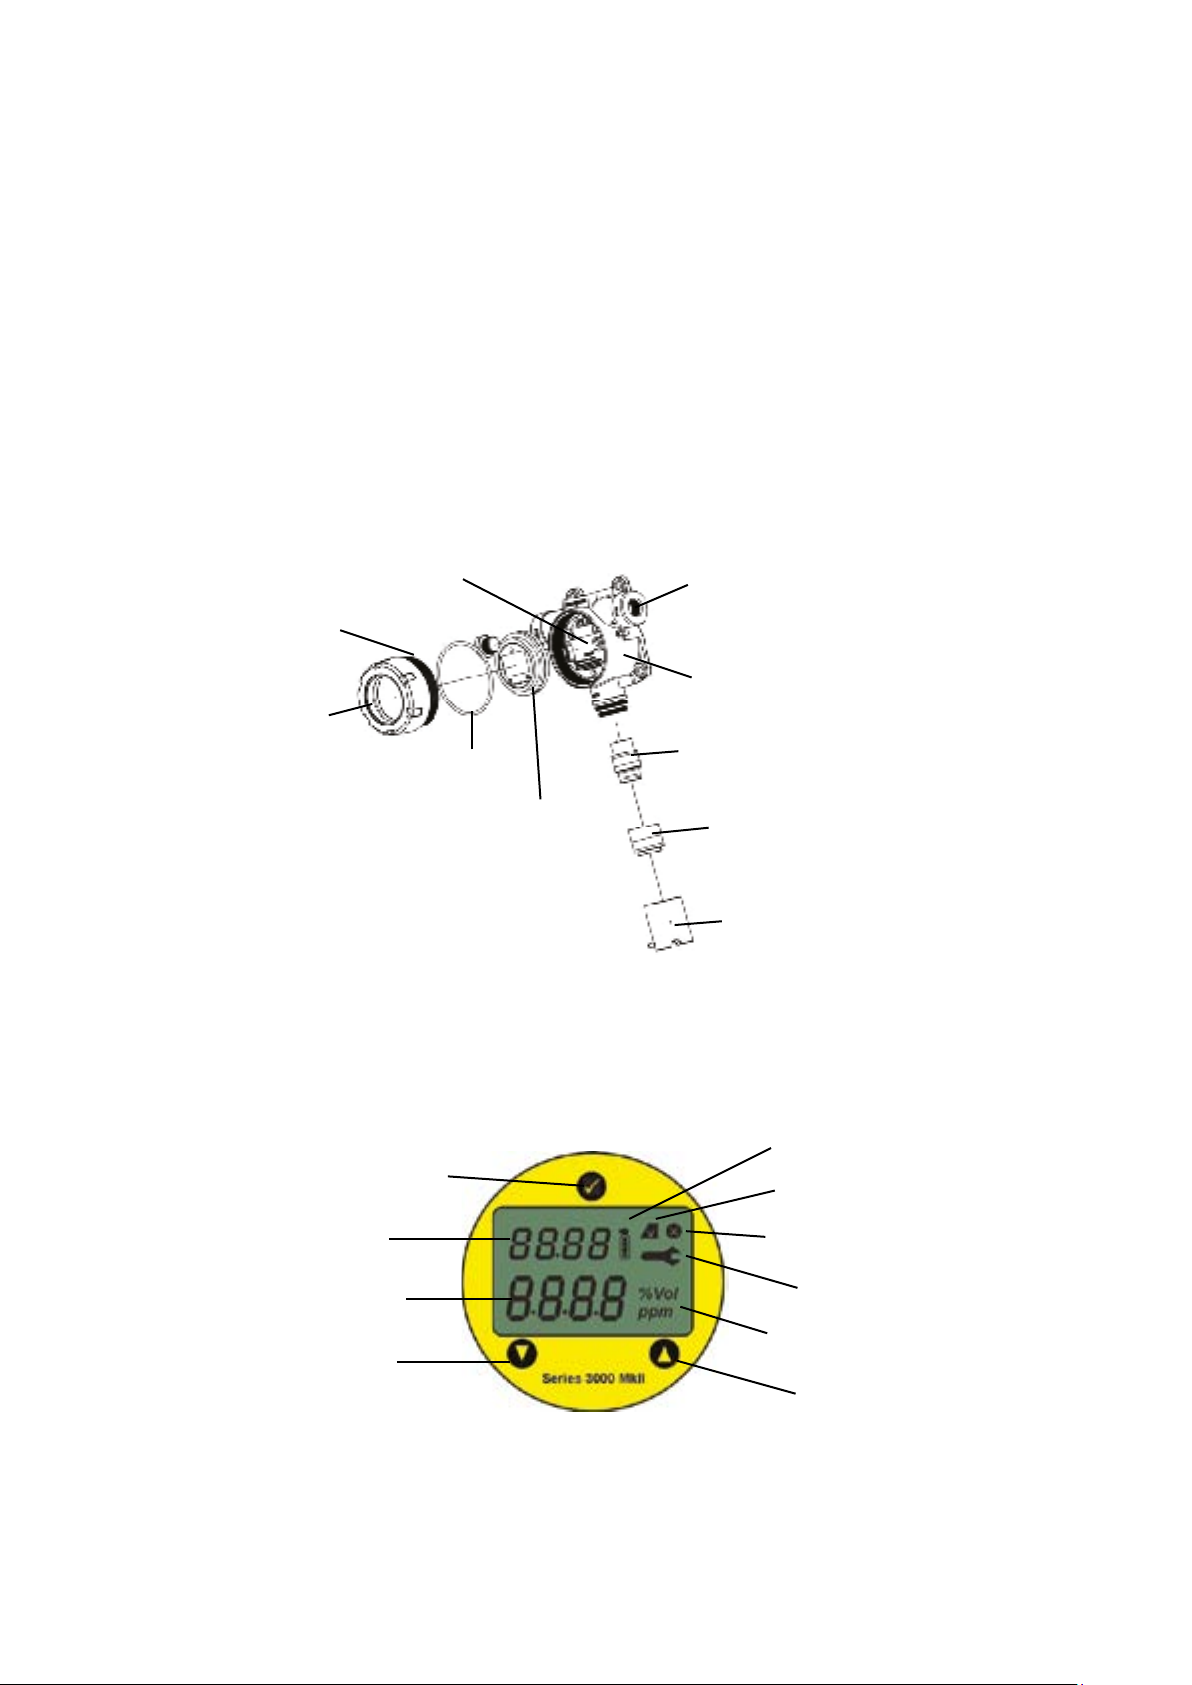
4.1 Product overview
The Series 3000 MkII detector comprises of the main parts shown below.
Terminal Module and
IS Barrier
Locking Screw
M20 or 3/4"NPT
cable/conduit entry (x2)
Transmitter Enclosure
Cover
Seal
Display Module
Diagram 1: Series 3000 MkII Exploded View
Smart Sensor
Sensor Retainer
Weatherproof Cover
4.2 Transmitter
The transmitter cover has a glass window which allows use of the magnet to activate the three user
interface magnetic switches that are located on the front of the display module. This allows for nonintrusive set up and operation. The display provides both numerical and icon information.
Magnetic
MENU/ENTER Switch
Gas Type Warning/Fault Icon
Calibration Icon
Test Pass Icon
Gas Reading
Magnetic
DOWN Switch
Diagram 2: Series 3000 MkII Display and Magnetic Switches
5
Inhibit Icon
Measuring Units
UP Switch
Magnetic
Page 6

SERIES 3000 MKII TECHNICAL MANUAL S3KMKIIMAN_MAN0878_Issue 8_08/2015
The cover can be unscrewed to allow removal of the display module. Beneath the display module is
the terminal module and IS barrier where all electrical connections to the detector are made.
Electrical connections are made via 2 x M20 cable entries or 2 x 3/4"NPT conduit entries (certication
dependent). A suitable blanking plug is supplied which must be used to seal any unused entry.
The smart sensor plugs into the bottom of the transmitter and is secured by the sensor retainer.
The weatherproof cover is tted over the top of the sensor and screws onto the bottom of the transmitter
enclosure. The weatherproof cover has a spigot that allows the attachment of tubing for the application
of bump test gas.
4.3 Smart sensor
The smart sensor is manufactured from stainless steel and is supplied 100% tested and calibrated
(refer to section for start up procedure). The sensor is serviceable, allowing replacement of the sensor
cell (see section 15 for details of sensor or cell replacement).
The sensor can be ‘hot swapped’ without the need to remove power to the detector (subject to local
regulations and procedures).
4.4 Accessories
Series 3000 MkII has various accessories available as detailed below:
4.4.1 Pipe mounting bracket
The optional pipe mounting bracket (part number SPXCDMTBR) allows mounting of the Series 3000
MkII transmitter to a mounting pipe (horizontal or vertical) of diameter 20.0-80.0mm (0.8"-3.1").
4.4.2 Sunshade / Deluge Protection
The Sunshade / Deluge Deluge Cover (P/N:SPXCDSDP) is an optional accessory that may be tted to
the integral mounting plate. This accessory is designed to protect Series 3000 MkII from overheating in
exposed hot and arid climates, particularly offering additional protection from thermal shock in Tropical
Environments.
4.4.3 Remote sensor mounting kit
The remote sensor mounting kit (part number S3KRMK) allows the sensor to be remotely mounted via
an IS cable kit, up to 50 feet (15 meters) from the transmitter. The kit includes 50 feet of screened cable,
cable glands and remote terminal box. The cable can be cut to the required length and then terminated
at the remote terminal box. See section 16 for further installation details.
4.4.4 Duct mounting kit
The duct mounting kit (part number S3KDMK) can be used to allow detection of O2, CO, H2 and H2S
gases in ducts. Refer to manual part number MAN0639 for further details.
4.4.5 Calibration gas ow housing
The calibration gas ow housing (S3KCAL) is used to apply calibration test gas to the sensor. It push ts
onto the bottom of the sensor and can be tted without removing the weatherproof cover. See section
8.2 for further details on calibrating the detector.
6
Page 7

SERIES 3000 MKII TECHNICAL MANUAL S3KMKIIMAN_MAN0878_Issue 8_08/2015
Note: The spigot on the side of the weatherproof cover is supplied for bump test purposes only
(see section 14.1 for further details).
4.4.6 Collecting cone
The collecting cone (part number S3KCC) can be used to assist in the detection of ‘non-sticky’ gases
that are lighter air (i.e. Hydrogen only). It is simply tted in place of the weatherproof cover.
7
Page 8

SERIES 3000 MKII TECHNICAL MANUAL S3KMKIIMAN_MAN0878_Issue 8_08/2015
5. Installation
Prior to installation refer to the transmitter control drawing 3000E3160 and remote sensor control
drawing 3000E3157 shown in section 21.
Warnings
Series 3000 MkII is designed for installation and use in Zone 1 or 2 or 21 or 22 hazardous
areas in Europe and Class I Division 1 or 2 and Class II Division 1 or 2 area
applications in North America.
Installation must be in accordance with the recognized standards of the appropriate
authority in the country concerned.
Access to the interior of the detector, when carrying out any work, must only be
conducted by trained personnel.
Before carrying out any work ensure local regulations and site procedures are
followed. Appropriate standards must be followed to maintain the overall
certication of the detector.
To reduce risk of ignition of hazardous atmospheres, conduit runs must have a seal
tting connected within 18 inches of the enclosure.
To reduce the risk of ignition of hazardous atmosphere, de-classify the area or
disconnect the equipment from the supply circuit before opening the detector
enclosure. Keep assembly tightly closed during operation.
Never attempt to open a junction box / enclosure in potentially hazardous
atmospheres.
The detector must be earthed / grounded for electrical safety and to limit the effects
of radio frequency interference. An earth / ground point is provided inside and
outside the unit. The internal grounding shall be used as the primary equipment
ground. The external terminal is only a supplemental bonding connection where
local authorities permit or require such a connection.
Take care when handling sensors as they may contain corrosive solutions.
Do not tamper or in any way disassemble the sensor.
Do not expose to temperatures outside the recommended range.
Do not expose sensor to organic solvents or ammable liquids.
At the end of their working life, sensors must be disposed of in an environmentally
safe manner. Disposal should be according to local waste management
requirements and environmental legislation.
Alternatively, sensors may be securely packaged and returned to
Honeywell Analytics clearly marked for environmental disposal.
Electrochemical cells should NOT be incinerated as they may emit toxic fumes.
All cable entry devices and blanking elements shall be certied in type of explosion
protection ameproof enclosure “d”, suitable for the conditions of use and correctly
installed and have an ingress protection rating of at least IP6X.
Unused apertures shall be closed with suitable blanking elements.
8
Page 9
SERIES 3000 MKII TECHNICAL MANUAL S3KMKIIMAN_MAN0878_Issue 8_08/2015
5.1 Mounting and location of detectors
Caution: The location of the detectors should be made in accordance with
any relevant local and national legislation, standards or codes of practice.
Always replace detectors with a detector of the same type.
The detector should be mounted where the gas is most likely to be present. The following points should
be noted when locating gas detectors.
• When locating detectors consider the possible damage caused by natural events e.g. rain or ooding.
• Consider ease of access for functional testing and servicing.
• Consider how escaping gas may behave due to natural or forced air currents.
Note: The placement of detectors should be determined following the advice of experts having specialist
knowledge of gas dispersion, experts having knowledge of the process plant system and equipment
involved, safety and engineering personnel. The agreement reached on the location of detectors should
be recorded.
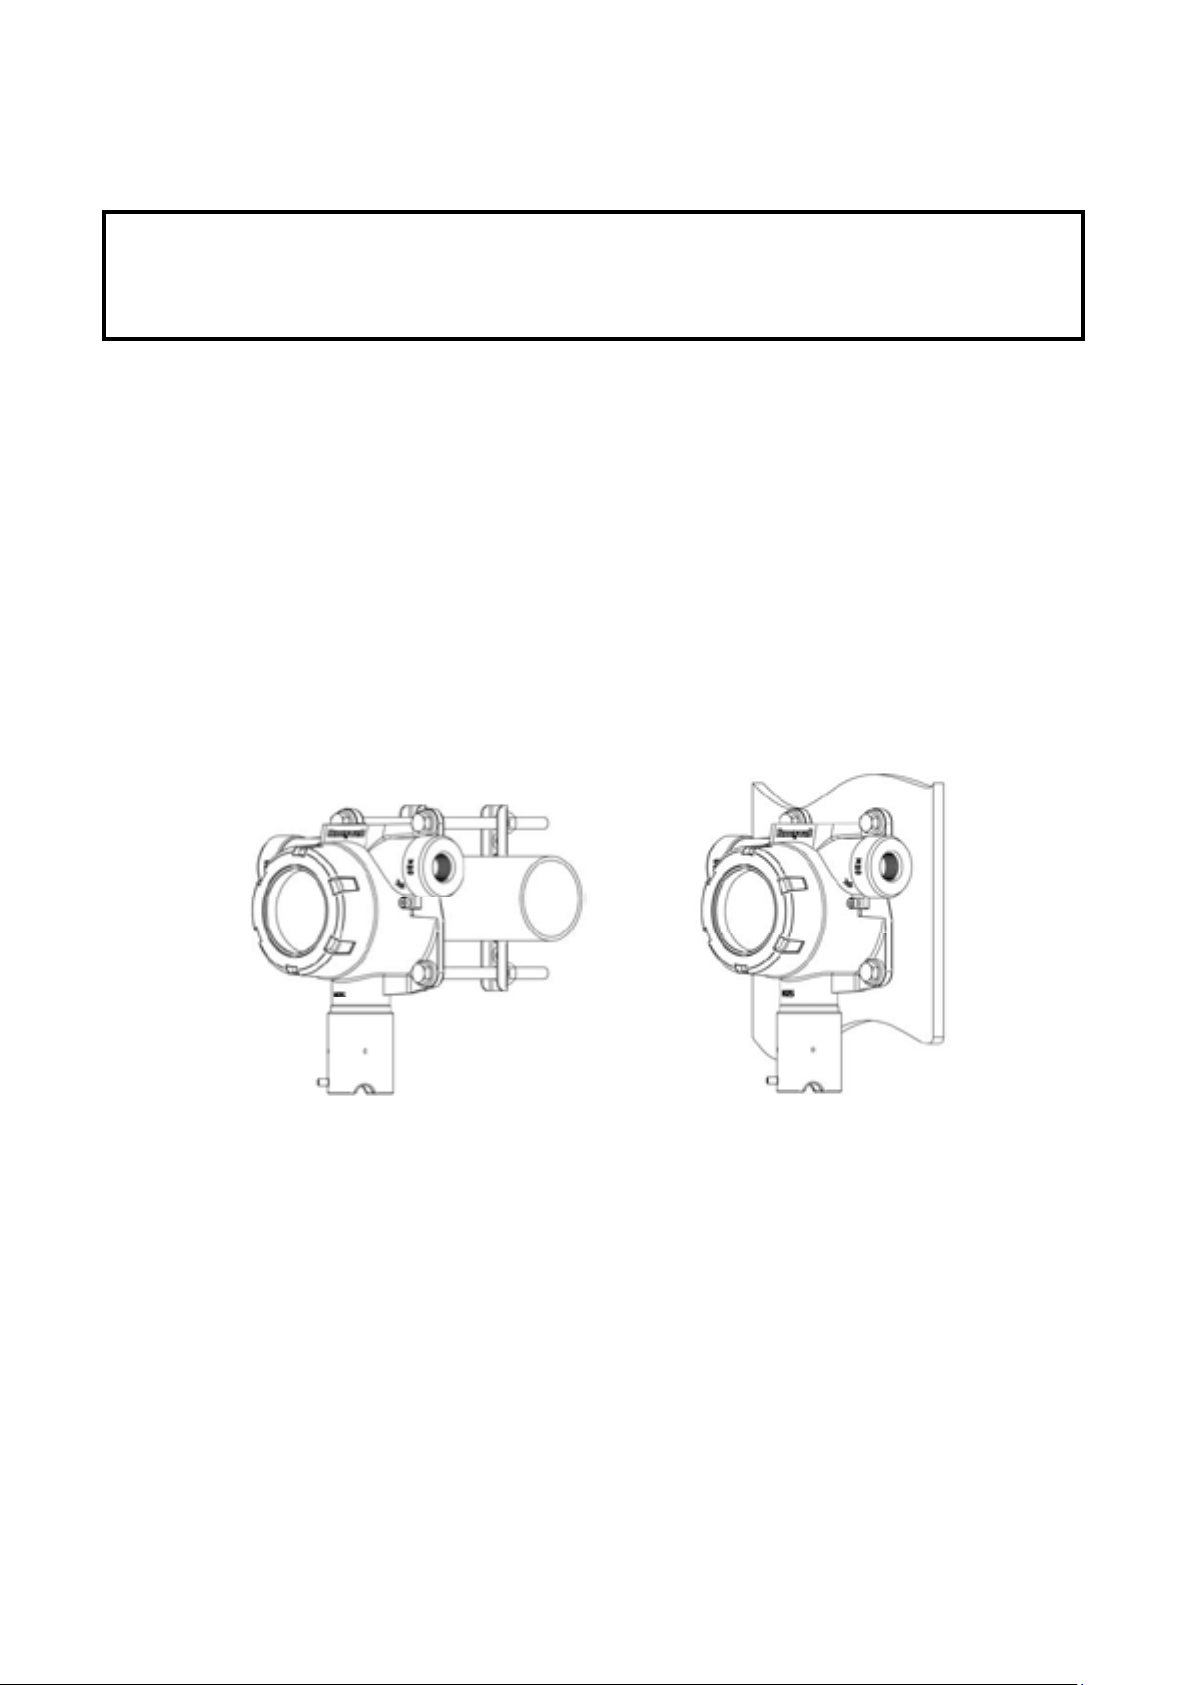
Mount the Series 3000 MkII with the sensor pointing downwards. Integral mounting lugs (suitable for
M8 bolts) are provided on the Series 3000 MkII transmitter housing for mounting the detector to a wall.
An optional pipe mounting bracket (part number SPXCDMTBR) is available for mounting to a pipe /
pole of diameter 20.0¬-80.0mm (0.8" to 3.1").
Diagram 3: Pipe Mounted Diagram 4: Wall Mounted
9
Page 10
SERIES 3000 MKII TECHNICAL MANUAL S3KMKIIMAN_MAN0878_Issue 8_08/2015
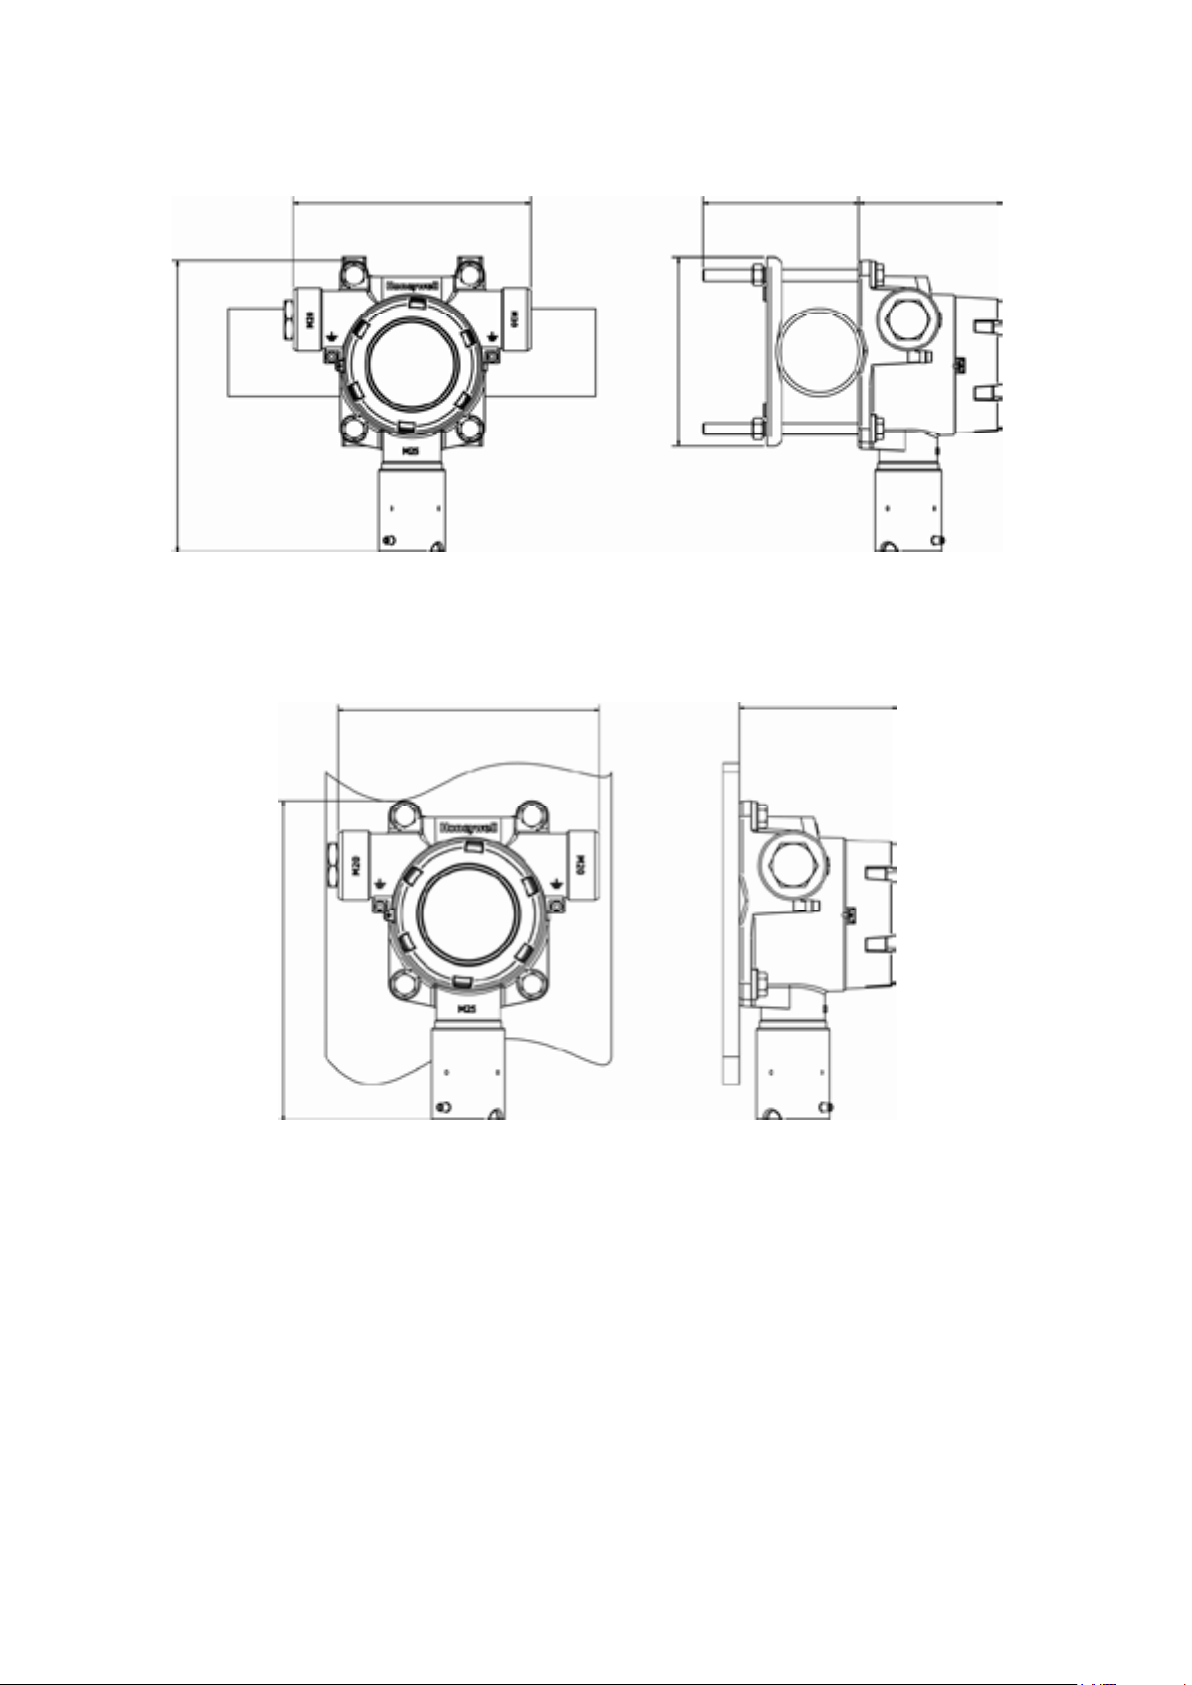
201mm (7.9”)
164mm (6.4”)
130mm (5.1”)
Diagram 5: Pipe Mounting Outline Dimensions
164mm (6.4”)
99mm (3.9”) 108mm (4.2”)
99mm (3.9”)
201mm (7.9”)
Diagram 6: Wall Mounting Outline Dimensions
10
Page 11

SERIES 3000 MKII TECHNICAL MANUAL S3KMKIIMAN_MAN0878_Issue 8_08/2015
6. Electrical connections
Prior to installation refer to the transmitter control drawing 3000E3160 and remote sensor control drawing
3000E3157 shown in section 21.
Warnings
Series 3000 MkII is designed for installation and use in Zone 1 or 2 or 21 or 22 hazardous
areas in Europe and Class I Division 1 or 2 and Class II Division 1 or 2 area applications in
North America.
Installation must be in accordance with the recognized standards of the appropriate
authority in the country concerned.
Use copper wiring only.
Access to the interior of the detector, when carrying out any work, must only be
conducted by trained personnel.
Before carrying out any work ensure local regulations and site procedures are
followed. Appropriate standards must be followed to maintain the overall
certication of the detector.
To reduce risk of ignition of hazardous atmospheres, conduit runs must have a seal
tting connected within 18 inches of the enclosure.
To reduce the risk of ignition of hazardous atmosphere, de-classify the area or
disconnect the equipment from the supply circuit before opening the detector
enclosure. Keep assembly tightly closed during operation.
Never attempt to open a junction box / enclosure in potentially hazardous
atmospheres.
The detector must be earthed / grounded for electrical safety and to limit the effects
of radio frequency interference. An earth / ground point is provided inside and
outside the unit. The internal grounding shall be used as the primary equipment
ground. The external terminal is only a supplemental bonding connection where
local authorities permit or require such a connection.
Take care when handling sensors as they may contain corrosive solutions.
Do not tamper or in any way disassemble the sensor.
Do not expose to temperatures outside the recommended range.
Do not expose sensor to organic solvents or ammable liquids.
At the end of their working life, sensors must be disposed of in an environmentally
safe manner. Disposal should be according to local waste management
requirements and environmental legislation.
Alternatively, sensors may be securely packaged and returned to
Honeywell Analytics clearly marked for environmental disposal.
11
Page 12
SERIES 3000 MKII TECHNICAL MANUAL S3KMKIIMAN_MAN0878_Issue 8_08/2015
Diagram 8: Wiring Schematic Type 2
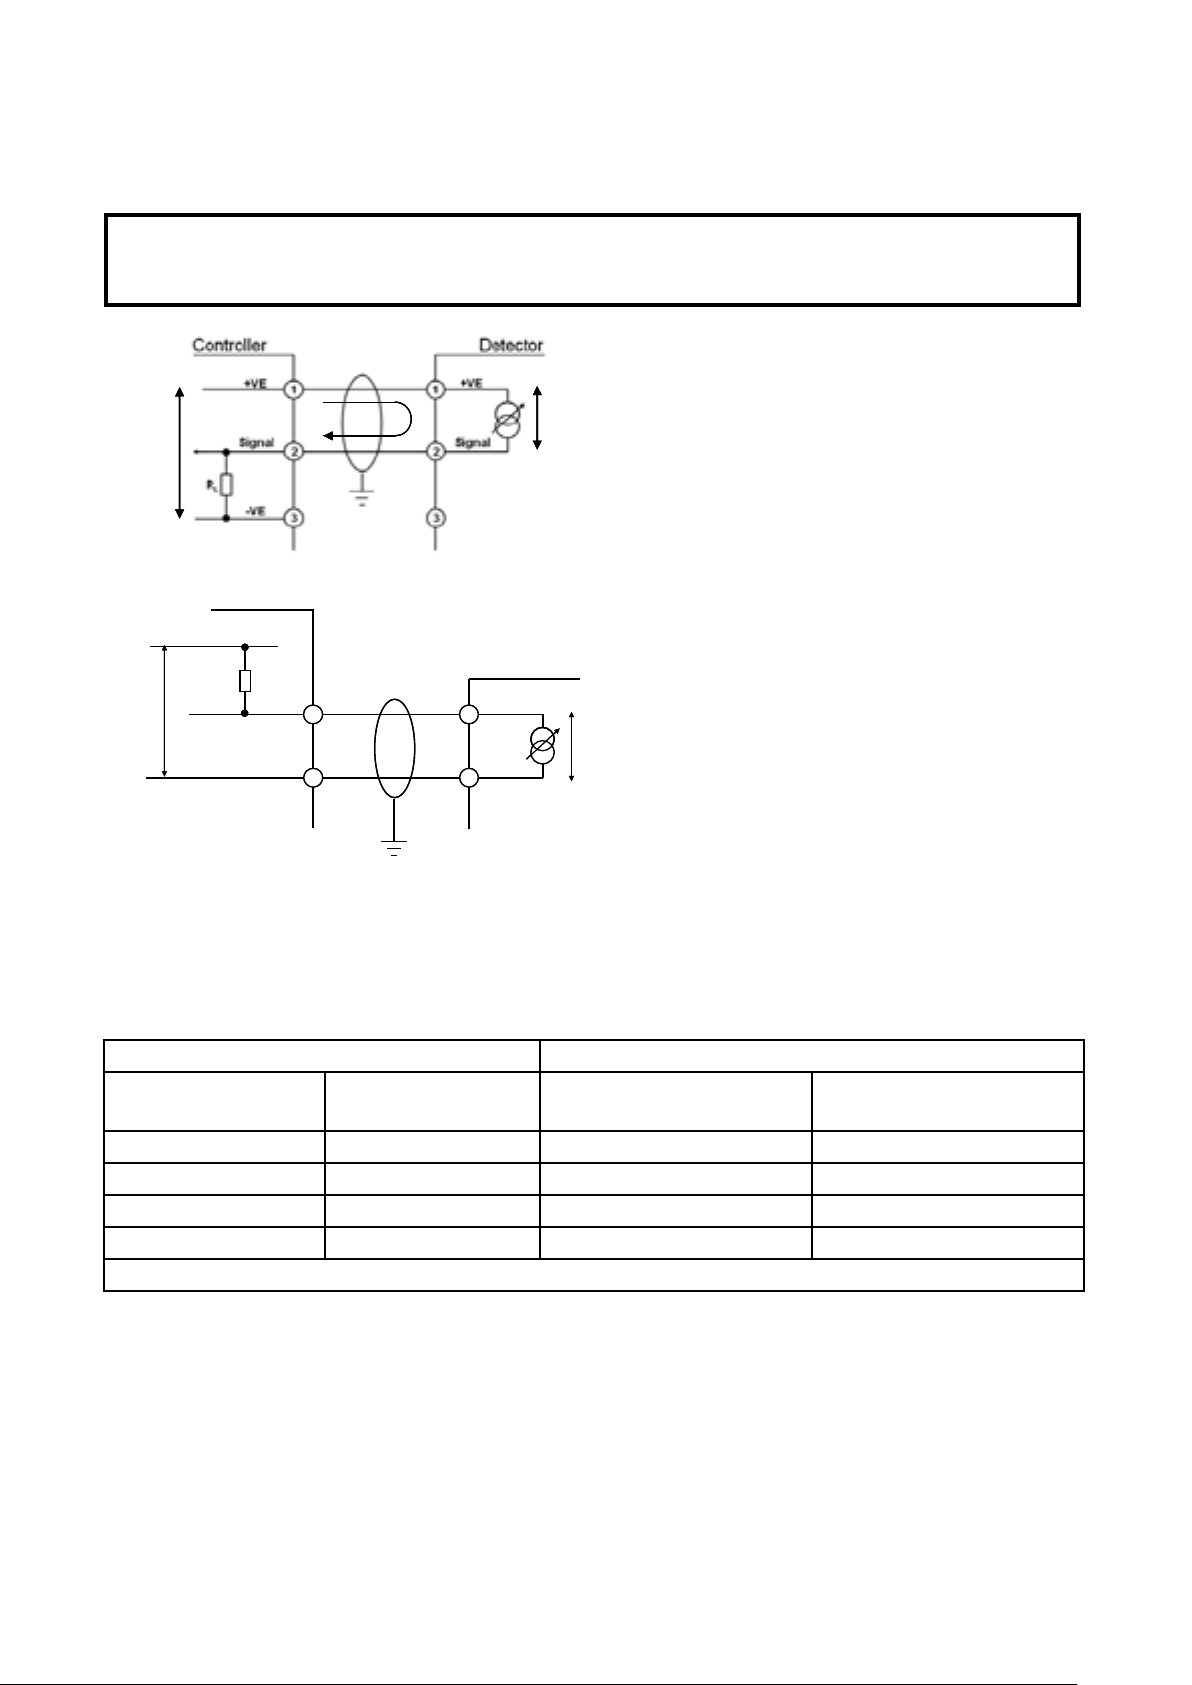
6.1 Detector wiring schematic
Caution: All electrical connections should be made in accordance with any
relevant local or national legislation, standards or codes of practice.
R
R
R
c
c
c
V
V
I
I
I
m
m
m
V
V
V
c
c
c
V
Detector Supply V
• 17Vdc (+/-10%) < Vd < 32Vdc (max)
d
d
d
Maximum Detector Signal I
• Im = 22mA (over range)
Cable Resistance R
• Subject to cable type
Diagram 7: Wiring Schematic Type 1
Controller
Controller
+VE
+VE
R
R
L
L
Signal
Signal
V
V
c
c
-VE
-VE
R
R
c
c
1
1
I
I
m
m
2
2
1
1
2
2
Detector
Detector
+VE
+VE
-VE
-VE
V
V
• Typical values are:
Load Resistor of Control Panel R
• Assumed 33Ω (min) / 250Ω (max)
d
d
Controller Supply Voltage V
• Subject to controller manufacturer
• Assumed nominal of 24Vdc
6.2 Typical maximum installed cable lengths
d
m
c
2
(20AWG*) = 36.8Ω/km (59.2Ω/mi)
0.5mm
2
1.0mm
(17AWG*) = 19.5Ω/km (31.4Ω/mi)
2
1.5mm
(16AWG*) = 12.7Ω/km (20.4Ω/mi)
2
2.0mm
(14AWG*) = 10.1Ω/km (16.3Ω/mi)
c
*nearest equivalent
L
The formula for calculating the maximum installed cable length between a controller and detector D
(meters) is given below.
D = ( ( ( Vc - Vdmin - ( Im * RL ) ) / ( 2 * Im * Rc ) ) ) * 1000
Typical cable data Cable distance km (mi)
Cable size Cable resistance
Rc Ω/km (Ω/mi)
Example 1 Input
impedance RL = 33Ω
Example 2 Input
impedance RL = 250Ω
0.5mm2 (20AWG*) 36.8 (59.2) 3.9 (2.4) 0.9 (0.6)
1.0mm2 (17AWG*) 19.5 (31.4) 7.3 (4.5) 1.7 (1.1)
1.5mm2 (16AWG*) 12.7 (20.4) 11.2 (7.0) 2.7 (1.7)
2.0mm2 (14AWG*) 10.1 (16.3) 14.1 (8.8) 3.4 (2.1)
*Nearest equivalent
Notes:
• Distance km=kilometres, mi=miles.
• Assuming Vc=24Vdc, Vdmin=17Vdc, Im=22mA
For the value of RC, use the data supplied by the manufacturer of the cable to be used for the
specic installation.
12
Page 13
SERIES 3000 MKII TECHNICAL MANUAL S3KMKIIMAN_MAN0878_Issue 8_08/2015
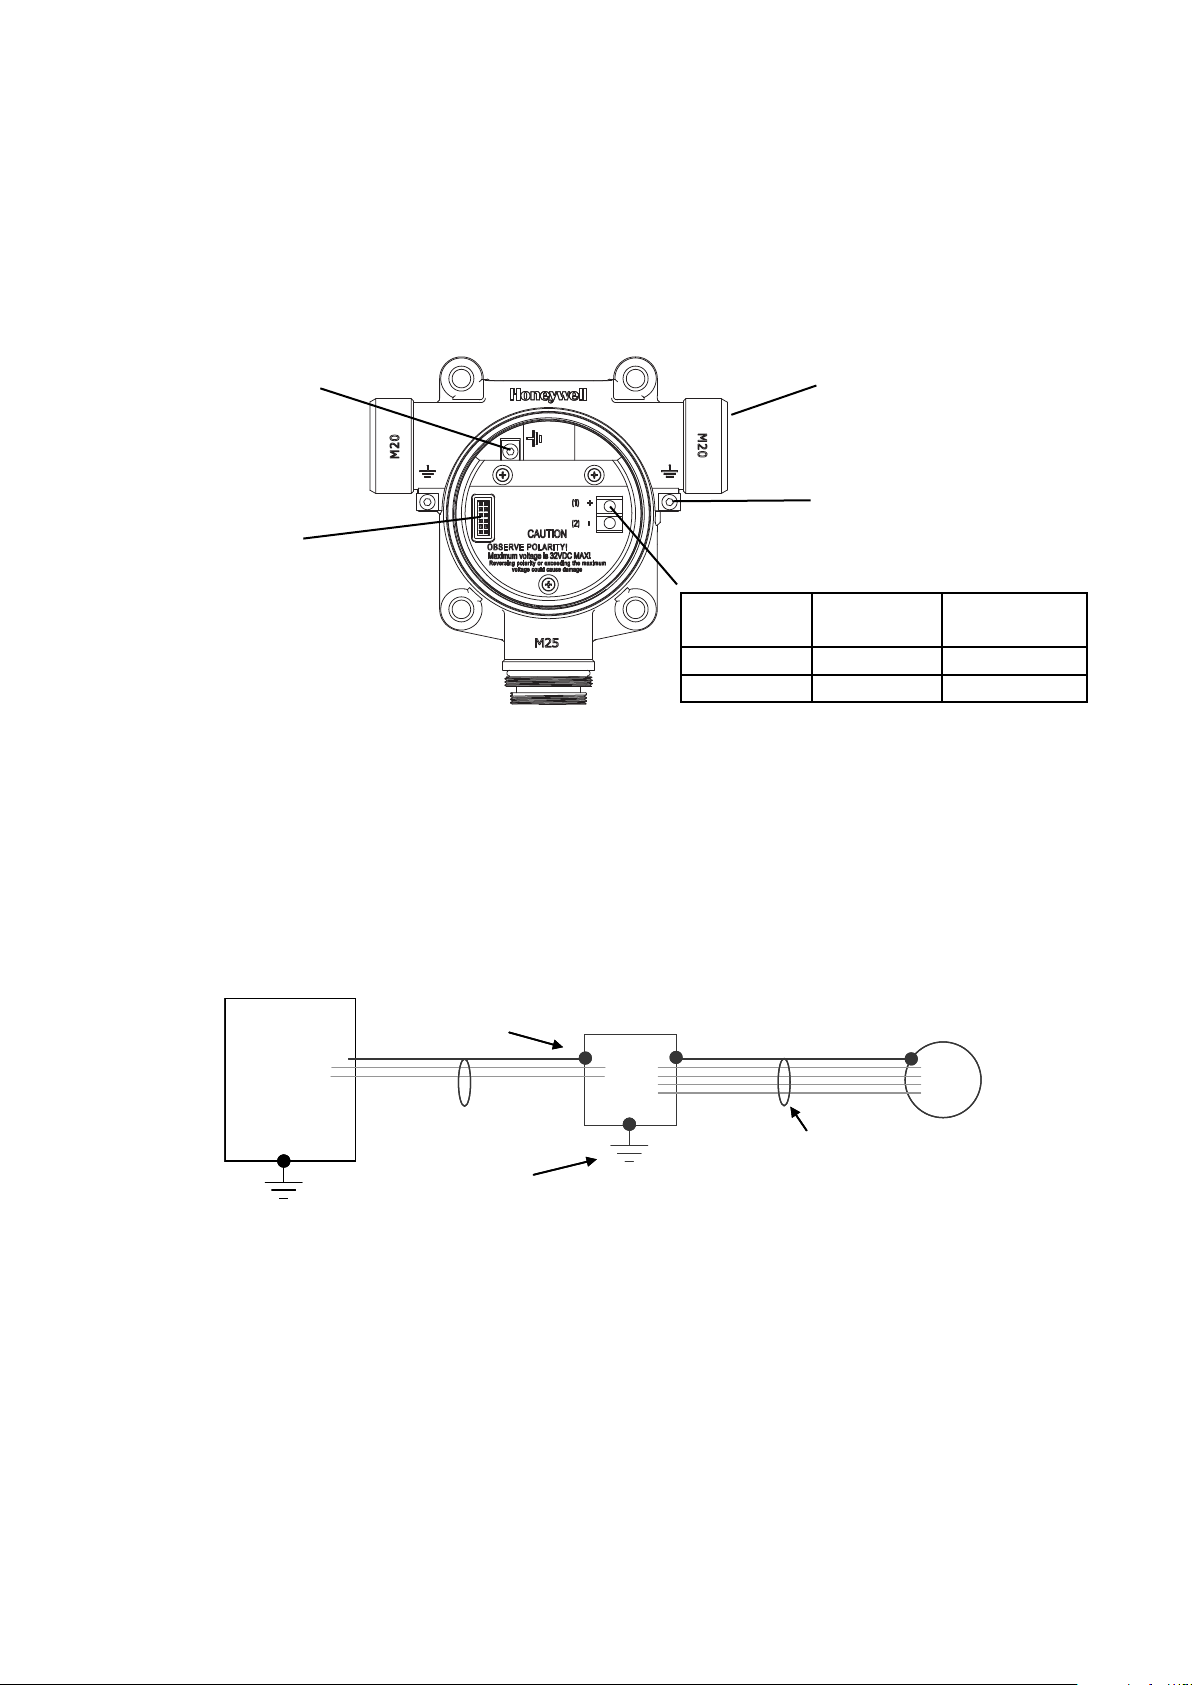
6.3 Terminal connections
All electrical connections are made at the terminal module. To access the terminal module follow the
procedure below:
1. Remove the detector’s cover by unscrewing it in a counter-clockwise direction.
2. Remove the display module by pulling it rmly away from the enclosure without twisting it.
Internal Earth/
Conduit/Cable Entry
Ground Connection
Supplementary
External Earth/
Display Module
Ground Connection
Plug in Socket
Note: Nominal tightening
torque of 6.9lb-in. to be
applied to the terminal
clamping screws.
Terminal
number
Detector
Terminal
Controller
Connection
1 + +VE
2 - Signal
6.4 Cable and earth / ground connection
Between the Controller and Transmitter use 2 core (plus screen 90% coverage), suitably mechanically
protected copper cable with a suitable M20 explosion-proof gland, or ¾ in. NPT steel conduit, with 0.5
to 2.0mm2 (equivalent approx. 20 to 14AWG) conductors. Ensure the cable gland is installed correctly
and fully tightened.
To ensure good EMC/RFI immunity bond the system to ground / earth as shown in the diagram below.
Transmitter
Controller
Controller
Bonded Point
Bonded Point
Earth Point
Earth Point
Transmitter
Cable Screen
Cable Screen
Or
Or
Metal Conduit
Metal Conduit
Sensor
Sensor
Notes:
• No two ‘Earth Points’ should be connected via screen and / or conduit so as to avoid ‘ground loops’.
(Except between the sensor and transmitter which is a digital link).
• Where multiple ‘Earth Points’ are unavoidable (e.g. transmitter mounted on metal superstructure
which is earthed then screen and / or conduit to controller should be isolated appropriately).
• ‘ Bonded Points’ (continuity of screen) may be achieved using appropriate glands / cable or conduit;
internal and external ‘Earth Points’ in the transmitter are provided.
13
Page 14

SERIES 3000 MKII TECHNICAL MANUAL S3KMKIIMAN_MAN0878_Issue 8_08/2015
When all electrical connections have been made, ret the display module and cover using the
procedure below:
1. Ensure that none of the wires in the terminal area may cause an obstruction.
2. Align the display module plug with the socket on the terminal module.
3. Push the display module rmly, without twisting, until fully home.
4. Ret the cover by screwing clockwise until tight.
14
Page 15

SERIES 3000 MKII TECHNICAL MANUAL S3KMKIIMAN_MAN0878_Issue 8_08/2015
7. First time switch on
After mounting and wiring the transmitter, the plug in sensor should be tted and the installation visually
and electrically tested as below.
WARNING
Prior to carrying out any work ensure local and site procedures are
followed. Ensure that the associated control panel is inhibited so as
to prevent false alarms.
Minimum and maximum controller alarm levels should not be set at less
than 10% or greater than 90% of the full scale range of the detector.
Caution: The following procedure should be followed carefully and only performed
by suitably trained personnel.
1. Check that the transmitter is wired correctly according to this manual and the associated control
equipment manual.
2. Unscrew the weatherproof cover, loosen the sensor retainer locking screw and unscrew the retainer.
3. Plug in the sensor taking care to align the sensor pins with the connector holes in the pcb.
Caution: For toxic sensors, remove the shorting clip from the bottom of the sensor
prior to installation. For O2 sensor, there is no shorting clip provided.
Caution: Ethylene Oxide sensors are supplied on a transportation board in order to
keep the cell biased at the correct level. Once removed from the transportation board
the sensor should be tted to the detector as soon as possible.
If the sensor is not tted to the transportation board or a powered detector, its bias will
decay and the sensor will take up to 24 hours to recover. During this period the sensor
will not function as a gas detector, reporting a gas reading above full scale.
4. Ret the sensor retainer, tighten the locking screw and ret the weatherproof cover.
5. Apply power to the associated controller which will in turn provide power to the detector.
6. The detector output will be forced to 3mA (default fault / inhibit).
7. The detector display will enter a start up routine rst displaying all the LCD segments and symbols, then
the transmitter loads the data from the sensor and checks if it is the same type transmitter and sensor
software version numbers, gas type, the detection range and span calibration gas level, estimated
time to next calibration due, self test result, and nally warm up period shown as a countdown to 0.
(Countdown time varies from 30 seconds to 3 minutes, depending on the sensor type).
8. Once countdown is complete, the detector will enter normal ‘monitoring’ mode.
Note: Calibration is mandatory before the detector can be used for gas monitoring. Refer to Section
8.2 Calibration for the proper procedure.
15
Page 16

SERIES 3000 MKII TECHNICAL MANUAL S3KMKIIMAN_MAN0878_Issue 8_08/2015
8. Magnetic switch activation
Series 3000 MkII uses magnetic switches to enable non-intrusive operation. To activate a magnetic switch,
hold the magnet up to the glass window directly over the magnetic switch area. The switch is activated
when you then remove the magnet. For example: to put the detector into Menu Mode hold the magnet
over the ‘’ magnetic switch for 5 seconds, and then remove the magnet. The detector enters menu
mode on removal of the magnet (not automatically after 5 seconds). Similarly, when changing values or
navigating in a menu using the ‘’ magnetic switches, hold the magnet up to the glass window directly
over the switch momentarily, and then remove to activate the switch. In some menus where the displayed
value can be changed the magnet can be held over the switch and the numeral on the display will scroll
through the available values. Remove the magnet when the required value is displayed.
For the purposes of this manual, the instruction to use ‘’, ‘’ or ‘’, means to activate the relevant
magnetic switch as described above.
16
Page 17

SERIES 3000 MKII TECHNICAL MANUAL S3KMKIIMAN_MAN0878_Issue 8_08/2015
8.1 Default conguration
Series 3000 MkII detectors are supplied with a default conguration as shown below. The settings for
full scale range, calibration gas level, calibration interval, inhibit current & timeout and access password
can be changed to suit individual applications.
Detector 4-20mA output signal
Fault / Under-range 3mA
Inhibit 3mA (default). Selectable 4mA (toxic), 17.4mA (oxygen)
Zero signal 4mA
Full scale 20mA
Overrange 22mA
Other settings
Inhibit time out 0 (no time out). Selectable 0 to 240 minutes (5 min steps). If 0 is
selected, output current is permanently inhibited.
Calibration Interval & Display / Output. Cal Interval 180 days (selectable 30-360). Three options for overdue
warning indication (selectable off, via display only or via display and
3mA output).
Password 000 (password disabled). If changed then password is activated.
Change back to 000 to de-activate.
Gas Selectable Full
Scale Range
Oxygen 25.0%/Vol only 25.0%VOL n/a 20.9%/Vol (Fixed) 20.9%/Vol
Hydrogen Sulde 10.0 to 50.0ppm 15.0ppm 0.1ppm
Hydrogen Sulde 50 to 500ppm 100ppm 10ppm 50ppm
Carbon Monoxide 100 to 1,000ppm 300ppm 100ppm 100ppm
Sulfur Dioxide 5.0 to 20.0ppm 15.0ppm 5.0ppm 5.0ppm
Ammonia 50 to 200ppm 200ppm 50ppm 100ppm
Ammonia 200 to 1,000ppm 1,000ppm 50ppm 300ppm
Chlorine 5.0 to 20.0ppm 5.0ppm 5.0ppm 2.0ppm
Chlorine Dioxide 1.00ppm only 1.00ppm n/a 0.5ppm
Nitric Oxide 100ppm only 100ppm n/a 50
Nitrogen Dioxide 5.0 to 50.0ppm 10ppm 5.0ppm 5ppm
Hydrogen 1,000ppm only 1,000ppm n/a 500ppm
Hydrogen 9,999ppm only 9,999ppm n/a 5000ppm
Hydrogen Chloride 10.0 to 20.0ppm 10ppm 1.0ppm 5.0ppm
Hydrogen Cyanide 30.0ppm only 30.0ppm n/a 10.0ppm
Hydrogen Fluoride 12.0ppm only 12.0ppm n/a 5.0ppm
Ozone 0.4ppm only 0.4ppm n/a 0.2ppm
Phosphine 1.2ppm only 1.2ppm n/a 0.5ppm
Flourine 4.00pm only 4.00ppm n/a 2.00ppm
Ethylene Oxide 20.0 to 50.0ppm 25.0ppm 5.0ppm 10.0ppm
Default Range Steps Selectable Cal
Gas Range
30 to 70% of
selected full
scale range
Default Cal
Point
10ppm
Notes:
1. Default ranges have been selected based upon recommended exposure limits set around the world.
2. Where ranges signicantly above the recommended defaults are needed select a gas cal point
near to the required alarm point or between 30 and 70% of full scale. Consideration must be given
to providing adequate ventilation of the calibration gas and ensure there is no exposure of the user
to toxic levels of gas.
For details of how to change the conguration for full scale range, calibration gas level, calibration
interval, inhibit current & timeout and access password refer to section 12.
17
Page 18

SERIES 3000 MKII TECHNICAL MANUAL S3KMKIIMAN_MAN0878_Issue 8_08/2015
8.2. Calibration
WARNINGS
It is recommended to bump test the sensors frequently to ensure proper operation.
8.2.1 Zeroing and span calibration
Caution: Before initial calibration allow the detector to stabilize for 30
minutes after applying power. When in zeroing and span calibration mode
the current output from the detector is inhibited (default 3mA) to avoid false alarms.
It is recommended for most sticky gases the tubing should be PTFE with
short pieces of rubber tube to make the nal connection due to the
inexibility of PTFE. This minimizes adhesion of the gas to the tube surface
and allows for more accurate measurement.
For Hydrogen Sulde or Ethylene Oxide-type sensors refer to to sections 8.2.2 or 8.2.3
respectively before conducting calibrations.
Note: It is recommended that the calibration is made where the sensor / transmitter have stabilized with
their local environment. It is recommended that calibrations be performed at a stable temperature in
which the system is to be used. Re-calibration is recommended if the temperature of local environment
has varied by more than +/-15 degrees C from the temperature of calibration.
It is essential that the sensor is tested frequently to be sure the system is operating properly. Typically
gas detectors should be tested at least twice per year. However it is recommended that testing is
conducted on a more frequent basis after initial start up as sensor operation and performance will vary
in different environmental conditions and in the presence of other gases. It is the responsibility of the
user to determine an appropriate calibration frequency for the application.
To calibrate the detector, use an appropriate span gas cylinder, ow regulator set to 300-375mL/min,
tubing, magnet and calibration gas ow housing. A compressed air cylinder (20.9%Vol oxygen) should
be used to perform the zero calibration if the area where the detector is located contains any residual
amount of the target gas. If no residual gas is present then the background air can be used to perform the
zero calibration. Contact your Honeywell Analytics representative for details of suitable calibration kits.
To calibrate the detector follow the procedure below.
Note: the Oxygen sensor does not require a zeroing procedure. Background air (20.9%Vol oxygen)
can be used to span the oxygen sensor in place of a compressed air cylinder (20.9%Vol oxygen). For
oxygen sensors only do parts 1-4, 13, 14 (if compressed air cylinder is used), 15-19 and 24 of the
procedure below.
1. If using compressed air, push the calibration gas ow housing onto the bottom of the sensor and
apply the gas.
2. To access the calibration mode, hold the end of the magnet over the switch located at the top centre
of the detector display for at least 5 seconds and then remove.
3. The display will indicate the rst menu mode menu ‘SEt CAL’.
18
Page 19

SERIES 3000 MKII TECHNICAL MANUAL S3KMKIIMAN_MAN0878_Issue 8_08/2015
4. Put the magnet over the ‘’ switch and remove to enter the Calibration menu.
5. The display will show the current gas reading, ‘ZEro’ and the ‘
’ icon ashes.
6. When the zero gas reading is stable use ‘ to conrm zero calibration.
7. If successful the display shows ‘ZEro PASS’ (if not successful, the display shows ‘ZEro FAIL’ and
returns to menu mode).
8. If using zero-air, turn it off. Zeroing is complete and saved.
9. The display shows ‘SPAn’ with ‘YES’ ashing.
10. If span calibration is required use ‘’ proceed to the next step. If span calibration is not required,
use ‘▲▼’ to select ‘No’ and ‘’ to return to menu mode.
11. The display shows the current calibration span gas concentration ashing. Use ‘▲▼’ to change the
calibration span gas concentration, and ‘’ when required span calibration level is set.
12. Span calibration point is displayed with ‘YES’ ashing. Use ‘’ to conrm or ‘▲▼’ to select ‘No’ and
return and enter a new span calibration point.
13. The display will show the current gas reading, ‘SPAN’ and the ‘
’ icon ashes.
14. Connect the regulator to the span gas cylinder.
15. Apply the span gas to the sensor using the calibration gas ow housing. The live gas reading is
displayed. When the reading is stable, use ‘’ to conrm span calibration.
16. If the sensor cell has been replaced the following display may be shown.
19
Page 20

SERIES 3000 MKII TECHNICAL MANUAL S3KMKIIMAN_MAN0878_Issue 8_08/2015
Display in turn
Toggle by Up/Down Key
Display in turn
Toggle by Up/Down Key
Display in turn
Toggle by Up/Down Key
Display in turn
Toggle by Up/Down Key
Display in turn
Toggle by Up/Down Key
17. Use ‘▲▼’ to select ‘YES’ if the sensor cell has been replaced or ‘No’ if it has not been replaced.
WARNING
Answer Yes to “CELL/rEPL” ONLY in cases where the “Serviceable Sensor Cell
Replacement” procedure (sec. 15.2) was been performed. Answering Yes in cases
where the cell has not been replaced could result in the inability of the Series 3000
to recognize an old cell with an inadequate output.
It is recommended to bump test the sensors frequently to ensure proper operation.
18. If the sensor cell has been replaced use ‘’ to conrm the gas reading.
19. If the span calibration is successful the instrument will briey display ‘SPAn PASS’ (if fails ‘SPAN
FAIL’ displayed and returns to menu mode).
Note: the calibration due warning counter is reset after a successful calibration. See section 12 for
further details of setting a calibration due warning.
20. The display alternates between “Pur GAS” and the gas reading to indicate that the unit is expecting
the span gas to be removed from the sensor.
21. Promptly switch off the calibration span gas and remove the calibration gas ow housing from the
sensor to allow the gas to disperse.
22. When the reading falls below 50% of the calibration gas level the display indicates a countdown
(up to 180 seconds dependant on gas type).
23. When the countdown is nished, the calibration procedure is complete.
24. The instrument returns to the ‘SEt CAL’ menu. Activate the ‘▲’ or ‘▼’ switch to select another menu
or select ‘QuIT’ to return to normal monitoring mode.
20
Page 21

SERIES 3000 MKII TECHNICAL MANUAL S3KMKIIMAN_MAN0878_Issue 8_08/2015
8.2.2 Zeroing and span calibration of Hydrogen Sulde sensors
Hydrogen Sulde sensors can be affected by extreme humidity changes. A sudden increase in ambient
humidity can result in a short-term positive drift in the instrument’s reading. A sudden decrease in ambient
humidity can result in a short-term negative drift in the instrument’s reading. These are most likely to
be noticed during calibration with dry or cylinder gas.
When calibrating Hydrogen Sulde cartridges the following should be taken into account while following
the procedure in 8.2.1:
1. To zero the sensor, use a compressed air cylinder of 20.9%Vol oxygen (not Nitrogen). Do not use
background air.
2. Apply the gas to the sensor for three minutes before using ‘’ to conrm the zero calibration.
3. If a span calibration is to be performed, the span calibration gas should be applied to the sensor
immediately after the zeroing procedure. Do not allow the sensor to return to ambient air conditions
between steps 2 and 3.
4. Apply the span gas for two minutes before using ‘’ to conrm the span calibration.
8.2.3 Zeroing and span calibration of Ethylene Oxide sensors
Ethylene Oxide sensors can be affected by extreme humidity changes. A sudden increase in ambient
humidity will result in a short-term positive drift in the instrument’s reading. A sudden decrease in
ambient humidity will result in a short-term negative drift in the instrument’s reading. These are most
likely to be noticed during calibration with dry or cylinder gas.
When calibrating Ethylene Oxide sensors the following should be taken into account while following
the procedure in 8.2.1:
If the sensor is to be zero calibrated only (no span calibration), the calibration should be performed in
clean ambient air or cylinder air (not Nitrogen) humidied to approximately ambient humidity levels.
If performing a full calibration (zero and span) the following procedure should be used:
1. Apply clean, dry air (not Nitrogen) to the sensor for 5 minutes. Do not use background air.
2. Zero the sensor using ‘✓’ to conrm the zero calibration.
3. Apply the span calibration gas to the sensor immediately after the zeroing procedure. Do not
allow the sensor to return to ambient air conditions between steps 2 and 3.
4. Apply the span gas to the sensor for ve minutes before using ‘✓’ to conrm the span calibration.
5. After the span calibration, the sensor should be allowed to recover in clean ambient air, or cylinder
air humidied to approximately ambient humidity levels for fteen minutes and then should be zero
calibrated under these conditions. Note that this does not affect the span sensitivity of the instrument.
21
Page 22

SERIES 3000 MKII TECHNICAL MANUAL S3KMKIIMAN_MAN0878_Issue 8_08/2015
9. Display and user interface
The display module comprises of an LCD and 3 magnetic user interface switches. The three switches (‘▲’
UP, ‘▼’ DOWN and ‘’ MENU / ENTER) are located above and below the LCD display as shown below:
Calibration Icon
Magnetic
MENU/ENTER
Switch
Gas Type
Gas Reading
Magnetic
DOWN Switch
Diagram 11: Display and User Interface
Magnetic DOWN switch (▼)
The DOWN switch is used to scroll through status or menu items or to decrease a value.
Magnetic UP switch (▲)
The UP switch is used to scroll through status or menu items or to increase a value.
Magnetic MENU / ENTER switch ()
The MENU / ENTER switch is used to enter the Review and Menu modes, to enter a selected value
and to clear a Warning / Fault that has been rectied.
Gas Type
Series 3000 MkII can be tted with different sensors to measure 15 different gases. So the user can
identify which gas the detector is measuring, it shows the gas formula of the sensor tted on the display.
See diagram 12 for a list of the different gases and their corresponding gas formula displays.
Test Pass Icon
Warning/Fault Icon
Inhibit Icon
Measuring Units
Magnetic
UP Switch
Gas Reading
The gas reading displays the current measured gas concentration.
Measuring units (%Vol/ppm)
The toxic gas measurement units are in parts per million (ppm) and the oxygen gas measurements
units are in percent by volume (%Vol).
Calibration icon
When performing a zero calibration, the zero calibration icon ( ) is displayed. When performing a span
calibration the span calibration icon ( ) is displayed.
22
Page 23

SERIES 3000 MKII TECHNICAL MANUAL S3KMKIIMAN_MAN0878_Issue 8_08/2015
Inhibit icon ( )
The inhibit icon displayed when in the congure inhibit, bump test and force current menu modes.
Warning / Fault icon ( )
The warning / fault icon is displayed if a warning or fault is detected and if a zero or span calibration fails.
Test Pass icon ( )
The test pass icon is displayed after a successful zero / span calibration. In monitoring mode it ashes
every second indicating that no warnings / faults are detected and that the unit is functioning properly.
Diagram 12: Gas Type and Formula displays
23
Page 24

SERIES 3000 MKII TECHNICAL MANUAL S3KMKIIMAN_MAN0878_Issue 8_08/2015
10. Monitoring mode
After power up and successful completion of the start up routine the detector will enter monitoring mode.
The detector display shows gas type and measuring units that it is congured for and the current gas
reading (e.g. CO 0ppm in the example below).
11. Review mode
Review mode allows the user to review the software version of the transmitter and sensor, gas type,
full scale range, span calibration point, estimated time to next calibration and test result. To activate
review mode hold the magnet over the MENU/ENTER switch for more than 2 seconds (and less than
5 seconds). The information is shown in sequential order and then the detector returns to monitoring
mode. The mA output of the detector continues to represent the current gas reading (i.e. the output is
not put into inhibit). If any fault exists, the output will be 3mA (Fault default).
12. Menu mode
Menu mode has 9 menus. A description of the menus and their function is given in the table below:
Menu Display Description
Calibration
Set Range
Congure Inhibit
Set Password
Calibration Interval
Bump Test
Force Current
Change Sensor
Quit
Allows zero and span calibration of the detector. The calibration
point can also be selected. See section 8.2 for detailed calibration
instructions.
Allows the detector full scale range to be changed. See section 8.1
for default and selectable full scale ranges by gas sensor type.
Set the inhibit current to 3 or 4mA (toxic sensors) or 3 or 17.4mA
(oxygen sensors). Set inhibit timeout period, or put unit into
permanent inhibit (set timeout to 0).
Set or disable password protection of menu mode.
Enable/disable calibration due warning. Set the calibration due warning
interval. Select if warning is off, via display or via display and 3mA output.
Allows checking of detector response to gas with the output inhibited.
Force the detectors current output to a value between 4 and 20mA.
Change a sensor without causing the unit to display an F04 ‘no
sensor detected’ fault message.
Quit menu mode and return to monitoring mode.
24
Page 25

SERIES 3000 MKII TECHNICAL MANUAL S3KMKIIMAN_MAN0878_Issue 5_07/2013
12.1 Menu mode operation table
Menu mode allows the user to perform calibration and congure parameters such as full scale range, calibration gas level, calibration interval, inhibit current & timeout and set a password. To activate menu mode hold the
magnet over the MENU/ENTER switch for at least 5 seconds and then remove. Menu mode can be password protected to prevent unauthorized person from changing parameters. Initially the password is set to ‘000’ meaning
it is disabled. While in menu mode, the output current of the detector is inhibited to prevent false alarms.
Use the table below to help navigate the menus and make conguration changes. The menus are shown in the left hand column. Use ▲▼ to select the required menu and ‘’ to enter. Follow the information and instructions in
the table from left to right from the required menu.
▲▼ OK ▲▼ OK ▲▼ OK ▲▼ OK ▲▼
GAS READING, ‘SPAn’ AND FLASHING
‘
’ ICON DISPLAYED. APPLY SPAN GAS AND
USE ‘’ WHEN READING STABLE. IF OK
‘PASS’ & ‘PurG’ DISPLAYED (IF FAIL ‘SPAN
FAIL’ DISPLAYED AND RETURNS TO MENU).
REMOVE SPAN GAS. WHEN READING <50%
OF SPAN POINT, COUNTDOWN BEGINS &
UNIT RETURNS TO MENU MODE.
UNIT RETURNS TO MENU MODE
UNIT RETURNS TO MENU MODE
SEt CAL
SEt rAn9
ConF
Inhb
SEt
PASS
CAL
2
Int
bumP
tESt
ForC
Curr
CHAn
3
SEnS
9u It
CURRENT SPAN CALIBRATION
GAS READING, ‘ZEro’ AND FLASHING ‘
1
ICON DISPLAYED. APPLY ZERO GAS AND
USE ‘’ WHEN READING IS STABLE. ‘ZEro
’
PASS’ DISPLAYED IF OK, FAULT CODE
AND RETURNS TO MENU IF NOT. ‘
‘SPAN YES’ DISPLAYED TO ASK IF
YOU NOW WANT TO PERFORM SPAN
CALIBRATION. USE ‘’ TO PROCEED OR
USE ▲▼ TO SELECT ‘No’ AND RETURN
TO MENU MODE.
FLASHING. USE ▲▼ TO CHANGE AND ‘’
TO CONFIRM. NEW SPAN CALIBRATION
POINT DISPLAYED WITH ‘YES’ FLASHING.
USE ‘’ TO CONFIRM (OR ▲▼ TO
SELECT ‘No’ AND RETURN TO SELECT
NEW VALUE).
‘rAn9’ DISPLAYED & CURRENT RANGE
FLASHES. USE ▲▼ TO SELECT
DIFFERENT RANGE (SEE SECTION 8.1
FOR AVAILABLE RANGES).
‘Curr’ DISPLAYED WITH ‘
CURRENT INHIBIT mA VALUE FLASHES.
USE▲▼ TO SELECT NEW VALUE (3 OR
4mA TOXICS, OR 3 OR 17.4mA OXYGEN
VERSION).
‘PASS’ DISPLAYED WITH FIRST DIGIT
OF THE PASSCODE FLASHING. USE ▲
TO SELECT 1ST DIGIT OF CURRENT
PASSWORD. USE ▼ TO MOVE TO NEXT
DIGIT AND SET REST OF PASSCODE.
Int’ DISPLAYED WITH CURRENT
CALIBRATION INTERVAL FLASHING.
USE ▲▼ TO CHANGE INTERVAL.
’ ICON.
NEW RANGE DISPLAYED. ‘YES’ FLASHES.
USE ‘’ TO CONFIRM (OR ▲▼ TO
SELECT ‘no’ AND RETURN TO STEP 1).
‘tImE’ DISPLAYED WITH ‘ ’ ICON.
CURRENT INHIBIT TIMEOUT PERIOD
(MINUTES) FLASHES. USE ▲▼ TO SET
NEW TIMEOUT. (IF SET TO 000 OUTPUT
IS PERMANENTLY INHIBITED).
NEW PASSCODE DISPLAYED WITH ‘YES’
FLASHING. USE ‘’ TO CONFIRM (OR ▲▼
TO SELECT ‘No’ AND RETURN TO SELECT
NEW VALUE).
NEW INTERVAL DISPLAYED WITH ‘YES’
FLASHING. USE ‘’ TO CONFIRM (OR ▲▼
TO SELECT ‘no’ AND RETURN TO SELECT
NEW INTERVAL).
UNIT RETURNS TO MENU MODE.
NEW TIMEOUT DISPLAYED. ‘YES’
FLASHES. USE ‘’ TO CONFIRM (OR ▲▼
TO SELECT ‘no’ AND RETURN TO SELECT
NEW VALUE).
UNIT RETURNS TO MENU MODE
‘duE’ DISPLAYED WITH ‘No’, ‘LCD’ OR
‘both’ FLASHING. USE ▲▼ TO SELECT
REQUIRED CAL DUE WARNING OUTPUT.
CURRENT GAS CONCENTRATION DISPLAYED
WITH OUTPUT INHIBITED ‘
APPLY BUMP TEST GAS AND CHECK PEAK
’ ICON FLASHING.
REMOVE GAS. FALLING REAL TIME GAS
READING DISPLAYED.
UNIT RETURNS TO MENU MODE
READING ON DISPLAY.
Curr’ DISPLAYED WITH ‘
FORCE CURRENT ‘4.00’ FLASHES. USE ▲▼
’ ICON. DEFAULT
UNIT RETURNS TO MENU MODE
TO CHANGE TO REQUIRED MA LEVEL.
‘SENS’ DISPLAYED. REMOVE SENSOR. FIT
NEW SENSOR. DISPLAY SHOWS ‘LOAd
SENS’. ‘SAmE GAS’ DISPLAYED (‘NEW GAS’
UNIT RETURNS TO MENU MODE
IF DIFFERENT GAS TYPE SENSOR FITTED)
THEN ‘WArm’ COUNT DOWN.
QUITS MENU MODE AND RETURNS TO
MONITORING MODE.
1 Refer to section 8.2 for detailed zero and span calibration procedures. A detector tted with an oxygen sensor will skip the zeroing procedure. Re-calibrate the detector if left un-powered for periods in excess of 24 hours.
2 The calibration due warning counter is automatically reset after a successful calibration.
3 To exit the Change Sensor Menu without changing the sensor, use ‘’.
25
Page 26

SERIES 3000 MKII TECHNICAL MANUAL S3KMKIIMAN_MAN0878_Issue 8_08/2015
13. Detector fault / warning message display
The table below shows the warning / fault codes, their meaning and recommended action.
Warning / Fault
Code
Warnings
W01
W02 Calibration overdue. Re-calibrate detector. Disable warning
W03 Transmitter temperature limits exceeded.
Faults
F01 Sensor / transmitter comms failure Replace sensor
F02 Cell failure Replace sensor
F03 Zero drift (>5% of scale) Re zero / calibrate
F04 No sensor detected Replace sensor
F05 Sensor EEPROM corrupted Replace sensor
F06 Low supply voltage
F07 Comms monitoring failure
F08 RAM read / write fault
F09 Flash memory corrupted Replace detector
F10 Flash code memory corrupted Replace detector
F11 DAC output mismatch
Description Action
Sensor operating temperature limits
exceeded.
Use ‘’ to clear when within limits
Use ‘’ to clear when within limits
Check supply voltage.
Replace detector.
Use ‘’ to clear. Replace detector.
Cycle power to detector.
Replace detector
Cycle power to detector.
Replace detector
13.1 Detector fault / warning operation
Faults are signalled via the code on the display and 3mA (default) output. If the condition causing the
fault clears the 4-20mA returns to normal operation, but the display will continue to indicate the fault
code. This allows the user to see the code before using ‘’ (>2 seconds and <5 seconds) to clear the
code from the display.
Warnings are signalled via the code on the display. Warnings do not affect the mA output of the detector*.
If the condition causing the warning clears, the display will continue to show the warning code until user
uses ‘’ to clear the code from the display.
Any faults or warnings where the condition causing it still exists cannot be cleared.
*Note: The calibration due warning can be congured to produce a fault output (see section 12 for
further details).
13.2 Reex™ cell fault diagnosis
Series 3000 MkII employs the patented Reex™cell fault diagnosis routine. Reex™ checks for cell
presence, cell dry out and cell open or short circuit. In the event of an electrochemical cell failing this test,
the sensor fault code is displayed. Reex™ is automatically initiated by the transmitter at 8 hourly intervals.
It is also initiated on power up, sensor exchange or sensor cell exchange.
Note: Regular response gas checks and calibrations should still be carried out. Reex™ is not used
on Nitric Oxide or Oxygen cells.
26
Page 27

SERIES 3000 MKII TECHNICAL MANUAL S3KMKIIMAN_MAN0878_Issue 8_08/2015
14. General maintenance
WARNINGS
Appropriate standards must be followed to maintain the specied operation of the detector.
It is recommended to bump test the sensors frequently to ensure proper operation.
Note: It is recommended that the system is visually and functionally checked regularly to ensure correct
operation. The frequency of the checks should be determined subject to particular site conditions.
As a guide Honeywell Analytics recommend the following checks and frequency.
Frequency Check
Every 3 months Visual check of controller, detectors and installation for mechanical damage.
Ensure the sensor is clear of obstruction.
Every 6 months Functional gas test (see below). Adjust frequency according to site conditions.
Caution: The following procedure should be followed carefully and only
performed by suitably trained personnel. The system will produce alarms
unless suitably inhibited at the controller.
14.1 Functional gas test
It is essential that the sensor is tested frequently to be sure the system is operating properly. Typically gas
detectors should be tested at least twice per year. However it is recommended that testing is conducted
on a more frequent basis after initial start up as sensor operation and performance will vary in different
environmental conditions and in the presence of other gases. It is the responsibility of the user to determine
an appropriate calibration frequency for the application. The weatherproof cover has a spigot for attaching
tubing from a gas cylinder. This may be used for a simple functional (or bump) test of the sensor. However,
this method may not be suitable for all gas types and / or applications due to environmental conditions.
It is the responsibility of the user to ensure suitability of this method for each application.
1. Follow the procedure for Bump Test in section 12.1.
2. If the difference between reading and applied gas concentration is outside the acceptable limits for
the application follow the procedures for zeroing and calibrating the detector (see section 8.2.1).
3. If reading is still inaccurate replace the sensor (see section 15.1).
27
Page 28

SERIES 3000 MKII TECHNICAL MANUAL S3KMKIIMAN_MAN0878_Issue 8_08/2015
14.2 Detector operational life
Typical life of a toxic gas sensor is dependant on the application, frequency and amount of gas exposure.
Under normal conditions (3 monthly visual inspection and 6 monthly test/re-calibration) the toxic sensor has
an expected life equal to or greater than the lifetime as listed below:
18 months for chlorine, chlorine dioxide and uorine sensors.
12 months for ammonia, hydrogen chloride, and hydrogen uoride sensors
(see ammonia note below).
24 months for oxygen and other toxic sensors.
Refer to section 15 for sensor replacement procedures.
Caution: Oxygen decient atmospheres (less than 6%V/V) may result in
inaccuracy of reading and performance.
Note: Ammonia electrochemical cells are reliable and suitable for applications where no background
concentration of ammonia exists. Under these conditions the cells are expected to operate for 12 to
24 months.
These ammonia cells are of the consumptive type. Their operating life can be adversely affected by
continuous or excessive exposure to ammonia, or by prolonged exposure to high temperatures and
moisture.
To ensure continued detection availability it is recommended that the detectors are regularly bump
tested and a relevant cell replacement program be implemented.
28
Page 29

SERIES 3000 MKII TECHNICAL MANUAL S3KMKIIMAN_MAN0878_Issue 8_08/2015
15. Servicing
WARNINGS
Take care when handling sensors as they may contain corrosive solutions.
Do not tamper or in any way disassemble the sensor. Do not expose to
temperatures outside the recommended range. Do not expose sensor to
organic solvents or ammable liquids.
At the end of their working life, sensors must be disposed of in an
environmentally safe manner. Disposal should be according to local waste
management requirements and environmental legislation. Alternatively,
sensors may be securely packaged and returned to Honeywell Analytics
clearly marked for environmental disposal. Sensors should NOT be
incinerated as they may emit toxic fumes.
Caution: The following procedure should be followed carefully and only
performed by suitably trained personnel.
A fault condition will be signalled by the detector if the sensor is removed
with the unit under power.
15.1 Sensor replacement
Caution: For biased sensors (e.g. Nitric Oxide and Ethylene Oxide) remove the
sensor stabilizer from the bottom of the sensor prior to installation.
Using diagram 13 as a guide, follow the procedure below:
1. Check that the label on the new sensor is the correct gas type.
2. Enter the change sensor menu (see section 12).
3. Unscrew the weatherproof cover, loosen the retainer locking screw and unscrew the sensor retainer.
4. Remove the old sensor by pulling without twisting.
5. Plug in the new sensor taking care to align the sensor pins with the connector.
6. Ret the sensor retainer, tighten the locking screw and ret the weatherproof cover.
7. Countdown time of up to 180 seconds (dependant on sensor type) is displayed.
8. Re-calibrate the detector following the procedures in section 8.2.
29
Page 30

SERIES 3000 MKII TECHNICAL MANUAL S3KMKIIMAN_MAN0878_Issue 8_08/2015
Transmitter
Old Sensor
3
2
1
New Sensor
4
Sensor Retainer &
Locking Screw
5
6
Diagram 13: Replacing Plug In Sensor
30
Page 31

SERIES 3000 MKII TECHNICAL MANUAL S3KMKIIMAN_MAN0878_Issue 8_08/2015
15.2 Serviceable sensor cell replacement
Caution: For toxic sensors, remove the shorting clip from the bottom
of the sensor prior to installation. For O2 sensor, there is no shorting clip provided.
Caution: There are two types of sensor cap – teon coated (black) and stainless steel.
Ensure that a teon coated sensor cap is retted for S3KXSF1SS (HF), XSR1SS (HCl) and
XSU1SS (F2) cells.
The serviceable sensor allows replacement of the cell inside the sensor. The cell can only be replaced
with the same type cell. To replace the cell follow the procedure below.
1. Enter the change sensor menu (see section 12).
2. Unscrew the weatherproof cover, loosen the sensor retainer locking screw and unscrew the sensor retainer.
3. Remove the old sensor by pulling without twisting.
4. Unscrew the sensor cap.
5. Remove the old cell by pulling without twisting.
6. Ensure the new cell is the same type as the old cell.
7. Plug the new cell into the sensor, taking care to align the sensor pins with the connector holes in the pcb.
8. Ret the sensor, taking care to align the sensor pins with the connector.
9. Ret the sensor cap, ensuring that it is the correct type. Ret the sensor retainer, tighten the locking
screw and ret the weatherproof cover.
10. Countdown time of up to 180 seconds (dependant on sensor type) is displayed.
11. Re-Calibrate the detector following the procedures in section 8.2.
New cell
Sensor Cap
Old cell
Diagram 14: Serviceable Sensor Cell Replacement
31
Page 32

SERIES 3000 MKII TECHNICAL MANUAL S3KMKIIMAN_MAN0878_Issue 8_08/2015
16. Remote sensor mounting kit
installation details
Cautions: Take care not to cut the cable too short. Once cut, additional lengths of cable
cannot be added as this will invalidate the I.S certication. We also recommend that a loop
of cable is made at the junction box to allow slack for any future re-termination.
The enclosure of the remotely mounted sensor contains aluminium. Care must be taken
to avoid ignition hazards due to impact or friction when installed in the Zone 1 location.
All cable entry devices and blanking elements shall be certied in type of
explosion protection ameproof enclosure “d”, suitable for the conditions of use
and correctly installed.
The remote sensor mounting kit is used to remotely mount the sensor from the transmitter. To remotely
mount the sensor, follow the procedure below and refer to Control Drawing 3000E3157 in section 21.
Remote sensor
terminal
1 Yellow Power
2 Green RX
3 Blue TX
4 White Clock
5 Red Stabilizing pin
6 Black Ground
Ground /
Earth point
Wire
Colour
Shield
Description
Ground /
Earth point
Diagram 15: Remote Sensor Mounting Kit
1. Unscrew the weatherproof cover, loosen the retainer locking screw and unscrew the sensor retainer.
2. Remove the sensor by pulling without twisting.
3. Plug the remote sensor cable connector into the bottom of the transmitter.
4. Route the cable to the location where the remote sensor is to be mounted.
5. If necessary, cut the cable to the required length.
6. Mount the remote sensor junction box ensuring enough room below to t the sensor and
weatherproof cover.
7. Attach the cable to the remote terminal box via the gland provided.
32
Page 33

SERIES 3000 MKII TECHNICAL MANUAL S3KMKIIMAN_MAN0878_Issue 8_08/2015
8. Make the wiring connections as shown.
9. Fit the terminal box lid.
10. Plug the sensor into the socket at the bottom of the terminal box.
11. Fit the sensor retainer, tighten the locking screw and t the weather proof cover.
12. Calibrate the detector following the procedure is section 8.2.1.
33
Page 34

SERIES 3000 MKII TECHNICAL MANUAL S3KMKIIMAN_MAN0878_Issue 8_08/2015
17. General specications
Series 3000 MkII Detector
Use Rugged and reliable gas detector for the protection of personnel from toxic and oxygen gas hazards. Suitable for use in
Detectable Gases & Performance (See notes below)
Gas
Oxygen 25.0%/Vol only 25.0%VOL n/a 20.9%/Vol
Hydrogen Sulde 10.0 to 50.0ppm 15.0ppm 0.1ppm
Hydrogen Sulde 50 to 500ppm 100ppm 10ppm 50ppm 30 +/-2 or +/-20% <0.5ppm/yr-40°C / -40°F 55°C / 131°F
Carbon Monoxide 100 to 500ppm 300ppm 100ppm 100ppm 30 +/-2 or +/-20% <2ppm/yr -40°C / -40°F 55°C / 131°F
Sulfur Dioxide 5.0 to 20.0ppm 15.0ppm 5.0ppm 5.0ppm 40 +/-0.3 or +/-20% <2%/mo -40°C / -40°F 55°C / 131°F
Ammonia 50 to 200ppm 200ppm 50ppm 100ppm 180 +/-10 or +/-20% <5%/6 mo -20°C / -4°F 40°C / 104°F
Ammonia 200 to 1,000ppm 1,000ppm 50ppm 300ppm 180 +/-15 or +/-20% <5%/6 mo -20°C / -4°F 40°C / 104°F
Chlorine 5.0 to 20.0ppm 5.0ppm 5.0ppm 2.0ppm 90 +/-0.3 or +/-20% <2ppm/yr -10°C / 14°F 55°C / 131°F
Chlorine Dioxide 1.00ppm only 1.00ppm n/a 0.5ppm 120 +/-30% <5%/yr -20°C / -4°F 55°C / 131°F
Nitric Oxide 100ppm only 100ppm n/a 50ppm 50 +/-3 or +/-20% <2%/mo -20°C / -4°F 55°C / 131°F
Nitrogen Dioxide 5.0 to 50.0ppm 10ppm 5.0ppm 5ppm 60 +/-3 or +/-20% <2%/mo -20°C / -4°F 55°C / 131°F
Hydrogen 1,000ppm only 1,000ppm n/a 500ppm 90 +/-10 or +/-25% <2%/mo -20°C / -4°F 55°C / 131°F
Hydrogen 9,999ppm only 9,999ppm n/a 5000ppm 90 +/-25 or +/-30% <10%/6 mo-20°C / -4°F 55°C / 131°F
Hydrogen Chloride 10.0 to 20.0ppm 10ppm 1.0ppm 5.0ppm 150 +/-1 or +/-20% <20%/yr -20°C / -4°F 40°C / 104°F
Hydrogen Cyanide 30.0ppm only 30.0ppm n/a 10.0ppm 200 +/-1.0ppm or +/-30% <2%/mo -20°C / -4°F 55°C / 131°F
Hydrogen Fluoride 12.0ppm only 12.0ppm n/a 5.0ppm 300 +/-30% <20%/yr -20°C / -4°F 55°C / 131°F
Ozone 0.400ppm only 0.400ppm n/a 0.200ppm 60 +/-0.020ppm or +/-30% <5%/mo -20°C / -4°F 55°C / 131°F
Phosphine 1.2ppm only 1.2ppm n/a 0.5ppm 33 +/-0.03 or +/-20% <10%/yr -20°C / -4°F 40°C / 104°F
Fluorine 4.00ppm only 4.00ppm n/a 2.00ppm 35 +/-0.3ppm or +/-20% <10%/yr -20°C / -4°F 55°C / 131°F
Ethylene Oxide 20.0 to 50.0ppm 25.0ppm 5.0ppm 10.0ppm 125 +/-1.5ppm or +/-20% <5%/yr -20°C / -4°F 55°C / 131°F
Electrical
Connections and
Power
Recommended
Cable
Signal
Construction
Material Transmitter: Epoxy painted aluminium alloy LM25 or 316 Stainless Steel. Sensor: 316 Stainless Steel with PTFE filter
Entries 2 x M20 (for ATEX/IECEx Approval) or 2 x 3/4NPT (for UL Approval)
Maximum
Dimensions
Weight
Environmental
IP Rating IP66 (EN 60529). NEMA 4X (Not tested by UL but by another Third Party Laboratory)
Certified
Operating
Temperature
Operating Humidity
Operating
Pressure
Storage Conditions
Certification
Approvals
Notes: Detection performance is temperature and humidity dependent. Listed data is based at 20°C, 50% RH only.
Response time is longer when operating in colder temperatures.
*When operating in Hazardous Area applications the detector must not be operated outside the certified temperature
range. See Certification details for UL, c-UL and ATEX/IECEx certified temperature ranges. 1 +55C intermittent
European Zone 1 or 2 or 21 or 22 hazardous areas and North American Division 1 or 2 areas.
Selectable Full
Scale Range
Default
Range
Steps
Selectable Cal
Gas Range
(Fixed)
30 to 70% of
selected full
scale range
Response
Default
Cal Point
20.9%/Vol 15 +/-0.5% O2 <4%/yr -30°C / -22°F 55°C / 131°F
10ppm 30 +/-0.3 or +/-20% <0.5ppm/yr-40°C / -40°F 55°C / 131°F
Time
(T90)
secs
Accuracy
(ppm or % of
applied gas)
Drift over
time
Operating Temperature*
Min Max
2 wire loop powered
17Vdc (+/-10%) to 32Vdc (max.)
22mA max. overrange
2 wire with screen (90% coverage) or conduit.
2
0.5mm
(20AWG) to 2.0mm2 (14AWG) Max.
0-100% FSD 4-20mA
Max. overrange 22mA
Inhibit = Selectable 3mA (fault) or 4mA for toxic sensors or 3mA (fault) or 17.4mA for oxygen sensors.
Fault = 3mA
164 x 201 x 99mm (6.4 x 7.9 x 3.9 inches)
Aluminium alloy LM25 : 1.7kg (3.75lbs.)
Stainless Steel 316: 3.7kg (8.16lbs.)
ATEX/IECEX: -20°C to +55°C (-4°F to +131°F)
UL/cUL: -40°C to +55°C (-40°F to +131°F)
Continuous 20-90%RH (non condensing)
Intermittent 0-99%RH (non condensing)
90-110kPa
Transmitter:15°C to 30°C (59°F to 86°F) 30-70% RH (non condensing)
To ensure the optimum operational life of electrochemical cell sensors, replacement cells should be stored in
sealed packaging in cool dry conditions and preferably kept refrigerated at temperatures between 0 and 20
degrees C.
Transmitter: UL/c-UL Class I, Div. 1 & 2, Groups B, C & D; Class II, Div. 1 Groups E, F & G, Class II, Div. 2,
Groups F & G; Class I, Zone 1, Group IIB + H2 Hazardous Locations.
Remote Sensor Accessory: UL/c-UL = Class I, Div. 1, Groups A, B, C & D; Class II Division 1 & 2, Groups E, F
& G; Class 1, Zone 0, Group IIC; Class II, Zone 20
Transmitter: ATEX:
II 2 (1) GD db [ia IIC Ga] IIB + H2 T4 Gb, Ex tb [ia IIIC Da] IIIB T135°C Db
Remote Sensor Accessory: ATEX: II 1GD Ex ia IIC T4 Ga Ex ia IIIC T135ºC Da
Transmitter: IECEx Ex db [ia IIC Ga] IIB + H2 T4 Gb, Ex tb [ia IIIC Da] IIIB T135°C Db
Remote Sensor Accessory: IECEx: Ex ia IIC T4 Ga Ex ia IIIC T135ºC Da
CE compliant in accordance with:
ATEX Directive 94/9/EC
EMC Directive 2004/108/EC (EN50270:2006)
34
1
Page 35

SERIES 3000 MKII TECHNICAL MANUAL S3KMKIIMAN_MAN0878_Issue 8_08/2015
18. Ordering information
Transmitter
Part number Description
S3KAL2 ATEX/IECEx approved Series 3000 MkII toxic and oxygen transmitter, Aluminium LM25 and 2 x M20 Entries
S3KAS2 ATEX/IECEx approved Series 3000 MkII toxic and oxygen transmitter, Stainless Steel 316 and 2 x M20 Entries
S3KUL2 UL/cUL approved Series 3000 MkII toxic and oxygen transmitter, Aluminium LM25 and 2 x 3/4"NPT Entries
S3KUS2 UL/cUL approved Series 3000 MkII toxic and oxygen transmitter, Stainless Steel 316 and 2 x 3/4"NPT Entries
S3KNL2 Inmetro approved Series 3000 MkII toxic and oxygen transmitter, Aluminium LM25 and 2 x 3/4"NPT Entries
S3KNS2 Inmetro approved Series 3000 MkII toxic and oxygen transmitter, Stainless Steel 316 and 2 x 3/4"NPT Entries
Series 3000 MkII transmitter is supplied complete with integral wall mounting lugs, 2 x M20 or 3/4"NPT (certification dependent) entries, 1 x hex wrench set,
weatherproof cap, operating magnet, test certificate and instruction manual. Units are 100% inspected prior to despatch from the factory.
Serviceable Sensor (316 Stainless Steel)
S3KXSO1SS Oxygen 0-25%VOL
S3KXSC1SS Carbon Monoxide 0-300ppm (100 to 500ppm, 100ppm)
S3KXSH1SS Hydrogen Sulfide 0-15.0ppm (10.0 to 50.0ppm, 0.1ppm)
S3KXSH2SS Hydrogen Sulfide 0-100ppm (50 to 500ppm, 10ppm)
S3KXSL1SS Chlorine 0-5.0ppm (5.0 to 20.0ppm, 5.0ppm)
S3KXSZ1SS Ozone 0-0.40ppm
S3KXSS1SS Sulfur Dioxide 0-15.0ppm (5.0 to 20.0ppm, 5.0ppm)
S3KXSX1SS Chlorine Dioxide 0-1.00ppm
S3KXSM1SS Nitrogen Monoxide 0-100ppm
S3KXSN1SS Nitrogen Dioxide 0-10.0ppm (5.0 to 50.0ppm, 5.0ppm)
S3KXSG1SS Hydrogen 0-1000ppm
S3KXSG2SS Hydrogen 0-9,999ppm
S3KXSR1SS Hydrogen Chloride 0-10.0ppm (10.0 to 20.0ppm, 1.0ppm)
S3KXSY1SS Hydrogen Cyanide 0-30.0ppm
S3KXSF1SS Hydrogen Fluoride 0-12.0ppm
S3KXSA1SS Ammonia 0-200ppm (50 to 200ppm, 50ppm)
S3KXSA2SS Ammonia 0-1000ppm (200 to 1000ppm, 50ppm)
S3KXSP1SS Phosphine 0-1.20ppm
S3KXSU1SS Fluorine 0-4.00ppm
S3KXSE1SS Ethylene Oxide 0-25.0ppm (20.0 to 50.0ppm, 5.0ppm)
Accessories
SPXCDMTBR Pipe Mounting Bracket
SPXCDSDP Sunshade / Deluge Protection
S3KCAL Calibration gas flow housing
S3KCC Collecting cone (for use when detecting Hydrogen gas only)
S3KDMK Duct mounting kit (for use when detecting O2, CO, H2S or H2 gas)
S3KRMK
Consumables: Spare Cells for use with Serviceable Sensor
S3KO1SS Oxygen 0-25%VOL
S3KC1SS Carbon Monoxide 0-300ppm (100 to 500ppm, 100ppm)
S3KH1SS Hydrogen Sulfide 0-15.0ppm (10.0 to 50.0ppm, 0.1ppm)
S3KH2SS Hydrogen Sulfide 0-100ppm (50 to 500ppm, 10ppm)
S3KL1SS Chlorine 0-5.0ppm (5.0 to 20.0ppm, 5.0ppm)
S3KZ1SS Ozone 0-0.40ppm
S3KS1SS Sulfur Dioxide 0-15.0ppm (5.0 to 20.0ppm, 5.0ppm)
S3KX1SS Chlorine Dioxide 0-1.00ppm
S3KM1SS Nitrogen Monoxide 0-100ppm
S3KN1SS Nitrogen Dioxide 0-10.0ppm (5.0 to 50.0ppm, 5.0ppm)
S3KG1SS Hydrogen 0-1000ppm
S3KG2SS Hydrogen 0-9,999ppm
S3KR1SS Hydrogen Chloride 0-10.0ppm (10.0 to 20.0ppm, 1.0ppm)
S3KY1SS Hydrogen Cyanide 0-30.0ppm
S3KF1SS Hydrogen Fluoride 0-12.0ppm
S3KA1SS Ammonia 0-200ppm (50 to 200ppm, 50ppm)
S3KA2SS Ammonia 0-1000ppm (200 to 1000ppm, 50ppm)
S3KP1SS Phosphine 0-1.20ppm
S3KU1SS Fluorine 0-4.00ppm
S3KE1SS Ethylene Oxide 0-25.0ppm (20.0 to 50.0ppm, 5.0ppm)
Spares
S3KM20P M20 Blanking Plug
S3KNPTP 3/4"NPT Blanking Plug
S3KDM Replacement display module
S3KTM Replacement terminal module
S3KTMTS Terminal screw and ‘U’ clamp (bag of 20)
S3KWP Weatherproof cap
S3KMKIIMAN Instruction manual
SPXCDMAG Magnet
SPXCDHWES Hex wrench for earth screw
SPXCDEBS Earth Bracket and Screws
ATEX/UL/cUL approved remote sensor mounting kit (includes enclosure with sensor socket, 50 feet of digital
cable and glands, transmitter cable plug, mounting screws)
35
Page 36

SERIES 3000 MKII TECHNICAL MANUAL S3KMKIIMAN_MAN0878_Issue 8_08/2015
19. Warranty / liability statement
All products are designed and manufactured to the latest internationally recognized standards by Honeywell
Analytics under a Quality Management system that is certied to ISO 9001. As such Honeywell Analytics
warrants its products against defective parts and workmanship and will repair or (at its option) replace
any instruments which are or may become defective under proper use within 12 months from date of
commissioning by an approved Honeywell Analytics representative or 18 months from date of shipment
from Honeywell Analytics, whichever is the sooner. This warranty does not cover disposable batteries or
damage caused by accident, abuse, abnormal operating conditions or poisoning of sensor.
Defective goods must be returned to Honeywell Analytics premises accompanied by a detailed description
of any issue. Where return of goods is not practicable Honeywell Analytics reserves the right to charge for
any site attendance where any fault is not found with the equipment. Honeywell Analytics shall not be liable
for any loss or damage whatsoever or howsoever occasioned which may be a direct or indirect result of
the use or operation of the Contract Goods by the Buyer or any Party.
This warranty covers instrument and parts sold to the Buyer only by authorized distributors, dealers and
representatives as appointed by Honeywell Analytics. The warranties set out in this clause are not pro rata,
i.e. the initial warranty period is not extended by virtue of any works carried out there under.
In no event will Honeywell Analytics be liable for any incidental damages, consequential damages, special
damages, punitive damages, statutory damages, indirect damages, loss of prots, loss of revenues, or
loss of use, even if informed of the possibility of such damages. Honeywell Analytic's liability for any claims
arising out of or related to this product will in no case exceed the order value. To the extent permitted by
applicable law, these limitations and exclusions will apply regardless of whether liability arises from breach
of contract, warranty, tort (including but not limited to negligence), by operation of law, or otherwise.
36
Page 37

SERIES 3000 MKII TECHNICAL MANUAL S3KMKIIMAN_MAN0878_Issue 8_08/2015
20. EC Declaration of Conformity
A full EC declaration of conformity is available on the CD accompanying the product. This document lists
the European Standards with which the Series 3000 MKII complies.
37
Page 38

SERIES 3000 MKII TECHNICAL MANUAL S3KMKIIMAN_MAN0878_Issue 8_08/2015
21. Certication
The Series 3000 MkII main unit is available in 6 versions: ATEX/IECEx approved version (Aluminium
version part number S3KAL2, Stainless Steel version part number S3KAS2) and UL/CSA approved
version (Aluminium version part number S3KUL2, Stainless Steel version part number S3KUS2)
and Inmetro approved version (Aluminium version part number S3KNL2, Stainless Steel version part
number S3KNS2). The remote sensor accessory has both ATEX and UL/CSA approval on the same part
(part number S3KRMK). The following sections detail the approvals and certication nameplates.
ATEX / IECEx Special Conditions of Use
S3KX***** Series EC Cartridges
When installed in the Series 3000 MkII Transmitter, the Transmitter's Tamb rating of -20°C to +55°C must
be observed. When the Cartridge is installed remotely using the S3KRMK, a Tamb of -40°C to +55°C is
permissible however "W03 Sensor Operating Limits Exceeded” will be issued when temperatures are
outside limits published in Sec 17. General Specications.
S3KRMK Remote Mount Sensor Kit
The enclosure of the S3KRMK contains aluminium. Care must be taken to avoid ignition hazards due to
impact or friction when installed in Zone 1 locations.
Intrinsic Safe Information for Capacitance and Inductance
For installations in which both the Ci and Li of the intrinsically safe apparatus exceeds 1% of the Co and
Lo parameters of the associated apparatus (excluding the cable), then 50% of Co and Lo parameters are
applicable and shall not be exceeded. The reduced capacitance of the external circuit (including cable)
shall not be greater than 600 nF for Group IIC. Be aware that the sensors and S3K-RMK Remote Sensor
Accessory listed in this manual meet these requirements.
Flameproof Joints
The ameproof joints are not intended to be repaired.
38
Page 39

SERIES 3000 MKII TECHNICAL MANUAL S3KMKIIMAN_MAN0878_Issue 8_08/2015
21.1 UL/CSA control drawing
39
Page 40

SERIES 3000 MKII TECHNICAL MANUAL S3KMKIIMAN_MAN0878_Issue 8_08/2015
Sensor Sensor Sensor
Part No. Part No. Part No.
H2S(LL)
Gas Type Gas Type Gas Type
21.2 Sensor Cartridge and Remote Sensor Accessory control drawing
XNXXSY1SS
XNXXSF1SS
XNXXSZ1SS
XNXXSR1SS
XNXXSG1SS
XNXXSG2SS
S3KXSY1SS or
S3KXSR1SS or
S3KXSG2SS or
S3KXSG1SS or
HCl
H2(L )
S3KXSA1SS or
NH3(L )
S3KXSO1SS or
O2
HCN
H2(H)
XNXXSL2SS
XNXXSL1SS
XNXXSA1SS
XNXXSA2SS
S3KXSL2SS or
S3KXSL1SS or
S3KXSA2SS or
Cl2(L)
Cl2(H)
NH3(H)
XNXXSH3SS
XNXXSH2SS
XNXXSH1SS
XNXXSO1SS
S3KXSH2SS or
S3KXSH1SS or
S3KXSH3SS or
H2S( H)
H2S( L)
XNXXSP1SS
S3KXSF1SS or
S3KXSZ1SS or
S3KXSP1SS or
HF
O3
PH3
XNXXSN1SS
XNXXSX1SS
S3KXSX1SS or
ClO2
XNXXSC1SS
S3KXSC1SS or
CO
XNXXSE1SS
XNXXSM1SS
S3KXSN1SS or
S3KXSE1SS or
S3KXSM1SS or
NO
NO2
ETO
XNXXSU1SS
XNXXSS2SS
XNXXSS1SS
S3KXSU1SS or
S3KXSS2SS or
S3KXSS1SS or
F2
SO2( H)
SO2(L )
40
Page 41

SERIES 3000 MKII TECHNICAL MANUAL S3KMKIIMAN_MAN0878_Issue 8_08/2015
Honeywell Series 3000 MkII
Honeywell Analytics Ltd. Poole, Dorset, UK BH17 0RZ
Gas Detector for use in Haz. Loc. as to Fire, Electrical Shock
and Explosion Hazards Only. Associated Apparatus - Read
manual and install as per Control Dwg 3000E3160.
Suitable for use in and provides intrinsically safe circuit.
Cl. I, Div. 1 & 2, Grps. B, C & D; Cl. II, Div. 1, Grps E, F & G; Cl. II
Div. 2, Grps. F & G; Cl. I, Zone 1, Grp. IIB + H2 Haz. Loc. Temp code T4
32VDC MAX Class 2; Pmax =0.6W; Um=250V Tamb. -40°C to +55°C.
Entity Parameters
: Uo=5.88V;Io=0.124A;Po=0.183W;Lo=1mH;Co=10uF
5N80
WARNING: To Reduce The Risk Of Ignition Of Hazardous
Atmospheres, Disconnect The Equipment From The Supply
Circuit Before Opening Enclosure. Keep Tightly Closed When
in Operation. Conduit Runs Must Have a Seal Fitting
Connected Within 18 in Of The Enclosure.
WARNING: Substitution Of Components May Impair
Intrinsic Safety Avertissment: La Substitutution
De Composants Peut Compromettre La Securite Intrinseque.
[Exia]
Model No: S3KXX2 S/N :
Made in Korea
THIS DOCUMENT HAS BEEN GENERATED USDING
ADOBE ILLUSTRATOR AND MUST ONLY BE UPDATED BY A.I.
NOTES
1. Serial No. Format:
S/N: SIIPPPYYWWNNN
Sequence number
Week of MFG
Year of MFG
Part Code
Issue State
SUPPLIER CODE
2. Serial No. Size : 56.0X44.8 mm
3. The generic model number, S3KXX2 will be
replaced by one of the following model numbers
based on material.
Series 3000 MkII-ATEX Model No’s
Model No Housing Material
S3KAX2 ADC12
S3KAL2 LM25
S3KAS2 316 Stainless Steel
Honeywell Series 3000 MkII
Honeywell Analytics Ltd. Poole, Dorset, UK BH17 0RZ
Read Manual prior to use.
Temp. Code T4 32Volts DC. Class 2, Pmax=0.6W, Um=250V
Tamb.-20℃ To +55℃
0344
Entity Parameters
Uo=5.88V;Io=0.124A;Po=0.183W;
Lo=1mH; Co=10uF
II 2 (1) GD Ex db [ia IIC Ga] IIB + H
2
T4 Gb
Ex tb [ia IIIC Da] IIIB T135℃ Db
DEMKO 07 ATEX 0709149X
IECEx UL 11.0011X
Ex db [ia IIC Ga] IIB + H
2
T4 Gb
Ex tb [ia IIIC Da] IIIB T135℃ Db
Made in Korea
Model No : S3KXX2 S/N :
21.3 Main unit UL/CSA hazardous area nameplate
21.4 Main unit ATEX/IECEx hazardous area nameplate
41
Page 42

SERIES 3000 MKII TECHNICAL MANUAL S3KMKIIMAN_MAN0878_Issue 8_08/2015
THIS DOCUMENT HAS BEEN GENERATED USDING
ADOBE ILLUSTRATOR AND MUST ONLY BE UPDATED BY A.I.
2. Serial No. Format:
S/N: SIIPPPYYWWNNN
Sequence number
Week of MFG
Year of MFG
Part Code
Issue State
SUPPLIER CODE
3. Part No. Table:
FM MARK
2D Bar Code
Activation Date
Part No. for XNX(see part no. table)
Serial No. (see notes)
Part No. for S3000 (see part no. table)
Gas type (see part no. table)
XNXXSL2SS
XNXXSL1SS
XNXXSA2SS
XNXXSA1SS
XNXXSS2SS
XNXXSS1SS
XNXXSH3SS
XNXXSH2SS
XNXXSH1SS
XNXXSO1SS
S3KXSX1SS
XNXXSX1SS
- - - - - -Cl2(L)
S3KXSL1SSCl2(H)
S3KXSA2SSNH3(H)
S3KXSA1SSNH3(L)
- - - - - -SO2(H)
S3KXSS1SSSO2(L
)
ClO2
- - - - - - H2S(LL)
S3KXSH2SSH2S(H)
S3KXSH1SS
N/A
H2S(L)
S3KXSO1SS
N/A
O2
Part No. for
S3000
Gas
Type
Cl I, II Grp. A, B, C, D, E, F, G T4
II 1GD Ex ia IIC T4 Ga Ex ia IIIC T135℃ Da
Exia
1180
Rev.
Activate By:
Serial No.:
Sensor Cartridge
Honeywell Analytics Ltd.
Poole, Dorset, UK BH17 0RZ
Part No.:
Control Dwg: N/A
DEMKO: 08 ATEX 0804823X AEx ia per 3000E3159
IECEx: UL 08.0013X, Ex ia IIC T4 Ga Ex ia IIIC T135℃ Da
NOTES
1. Borders shown identify fields
for variables and are not printed.
XNXXSO1FM
XNXXSH1FM
Revision No.
1. Label for XNXXSH1FM, XNXXSC1FM and XNXXSO1FM
Activation Date
Part No. for XNX(see part no. table)
Serial No. (see notes)
Part No. for S3000 (see part no. table)
Gas type (see part no. table)
Cl I, II Grp. A, B, C, D, E, F, G T4
II 1GD Ex ia IIC T4 Ga Ex ia IIIC T135℃ Da
Exia
1180
Rev.
Activate By:
Serial No.:
Sensor Cartridge
Honeywell Analytics Ltd.
Poole, Dorset, UK BH17 0RZ
Part No.:
Control Dwg: 3000E3157 3000E3159
DEMKO: 08 ATEX 0804823X
IECEx: UL 08.0013X, Ex ia IIC T4 Ga Ex ia IIIC T135℃ Da
Revision No.
2. Label for others
2D Bar Code
THIS DOCUMEN T HAS BEEN GENER ATED USDING
ADOBE ILLUSTRATOR AND MUST ONLY BE UPDATED BY A.I.
NOTES
1. Serial no. format
S/N: SIIPPPYYWWNNN
Sequence number
Week of MFG
Year of MFG
Part Code
Issue State
60 mm
55 mm
Honeywell Inc. Miramar, FL, USA 33025 (optional)
Honeywell Analytics Ltd, Poole, Dorset, UK BH17 0RZ
1180
II 1GD Ex ia IIC T4 Ga
Ex ia IIIC T135℃ Da
DEMKO 08 ATEX 0804823X
IECEx UL 08.0013X
Ex ia IIC T4 Ga
Ex ia IIIC T13 5℃ Da
S/N:
GAS DETECTOR FOR USE IN HAZARDOUS LOCATIONS
ONLY AS TO INTRINSIC SAFETY
Intrinsically Safe for use in Class I, Division 1, Groups A, B,
C & D; Class II, Division 1 & 2, Groups E, F & G; Class I,
Zone 0, Group IIC; Class II, Zone 20; ATEX II 1GD Ex ia IIC
When installed per either Control Drawing 3000E3157 or
3000E3159 and applicable requirement of Associated
Apparatus
Tamb -40℃ to 55℃ Temp Code T4
Ui=5.88V; Ii=0.124A; Pi=0.183W; Li=0mH; Ci=5uF
Honeywell
Model # S3KRMK Remote Sensor Accessory
5N80
T4 Ga, Ex ia IIIC T135℃ Da Hazardous Loc.
21.5 Sensor label ATEX/UL/c-UL
21.6 Remote sensor ATEX/UL/c-UL hazardous area nameplate
Honeywell
Model # S3KRMK Remote Sensor Accessory
Honeywell Inc. Miramar, FL, USA 33025 (optional)
Honeywell Analytics Ltd, Poole, Dorset, UK BH17 0RZ
GAS DETECTOR FOR USE IN HAZARDOUS LOCATIONS
ONLY AS TO INTRINSIC SAFETY
Intrinsically Safe for use in Class I, Division 1, Groups A, B,
C & D; Class II, Division 1 & 2, Groups E, F & G; Class I,
Zone 0, Group IIC; Class II, Zone 20; ATEX II 1GD Ex ia IIC
T4 Ga, Ex ia IIIC T135℃ Da Hazardous Loc.
When installed per either Control Drawing 3000E3157 or
3000E3159 and applicable requirement of Associated
Apparatus
Tamb -40℃ to 55℃ Temp Code T4
5N80
S/N:
Ui=5.88V; Ii=0.124A; Pi=0.183W; Li=0mH; Ci=5uF
1180
II 1GD Ex ia IIC T4 Ga
Ex ia IIIC T135℃ Da
DEMKO 08 ATEX 0804823X
IECEx UL 08.0013X
Ex ia IIC T4 Ga
Ex ia IIIC T135℃ Da
42
Page 43

Contact Honeywell Analytics:
Find out more
www.honeywellanalytics.com
Europe, Middle East, Africa
Life Safety Distribution AG
Javastrasse 2
8604 Hegnau
Switzerland
Tel: +41 (0)44 943 4300
Fax: +41 (0)44 943 4398
gasdetection@honeywell.com
Customer Service
Tel: 00800 333 222 44 (Freephone number)
Tel: +41 44 943 4380 (Alternative number)
Fax: 00800 333 222 55
Middle East Tel: +971 4 450 5800 (Fixed Gas Detection)
Middle East Tel: +971 4 450 5852 (Portable Gas Detection)
Americas
Honeywell Analytics Inc.
405 Barclay Blvd.
Lincolnshire, IL 60069
USA
Tel: +1 847 955 8200
Toll free: +1 800 538 0363
Fax: +1 847 955 8210
detectgas@honeywell.com
www.honeywell.com
Technical Services
EMEA: HAexpert@honeywell.com
US: ha.us.service@honeywell.com
A
P: ha.ap.service@honeywell.com
Asia Pacific
Honeywell Analytics Asia Pacific
#701 Kolon Science Valley (1)
43 Digital-Ro 34-Gil, Guro-Gu
Seoul 152-729
Korea
Tel: +82 (0)2 6909 0300
Fax: +82 (0)2 2025 0328
India Tel: +91 124 4752700
analytics.ap@honeywell.com
Please Note:
While every effort has been made to ensure accuracy in this publication, no
responsibility can be accepted for errors or omissions. Data may change, as
well as legislation, and you are strongly advised to obtain copies of the most
recently issued regulations, standards, and guidelines. This publica tion is not
intended to form the basis of a contract.
Issue 8_11-15
H_MAN0878_EMEA
3000M1002_8_ECO_HAA150027
© 2015 Honeywell Analytics
12642
 Loading...