

Operation & Installation Guide Limited Warranty
MHES2754DE0708
ENGLISH
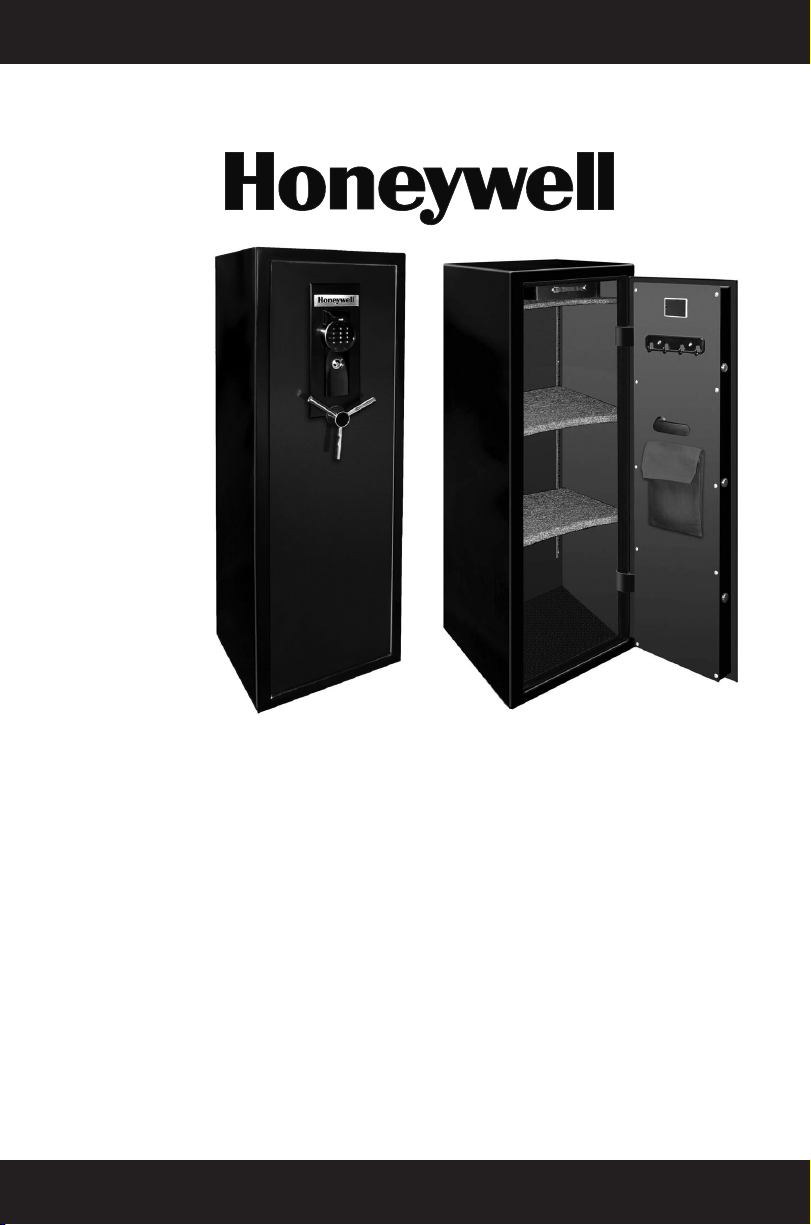
Model 2754D / 2754DE
DIGITAL
EXECUTIVE SAFE
with Override Key
Read These Instructions Very Carefully!
Home and Office Security Safes

Index
Overview of your safe .........................................
Opening safe for the first time .........................
Programming a personal code ..........................
Emergency override key .....................................
Battery replacement ...........................................
Adjustable storage shelves ................................
Mounting your safe .............................................
Use, care and maintenance ...............................
Customer support ................................................
Safe Identification Record...................................
Limited Warranty...................................................
Page 1
Page 2
Page 3
Page 4
Page 5
Page 6
Page 7
Page 8
Page 9-10
Inside
Back
Cover
Back
Cover
For Your Protection
• Do not remove the serial number label from the safe.
• Always store keys away from (AND NEVER INSIDE) safe.
• Record all safe identification #’s on Safe Identification
Record (last page).
• Save this manual and NEVER keep it inside the safe.
Overview of Your Safe
WELCOME!
Your new Honeywell Executive Gun Safe will provide years of safe and secure
protection for your valuables, important documents, guns and other personal items. All
Honeywell safes are designed and built using the highest manufacturing standards to
ensure maximum user satisfaction under a variety of conditions. With proper care, your
Honeywell safe will provide “Peace of Mind” for many years to come.
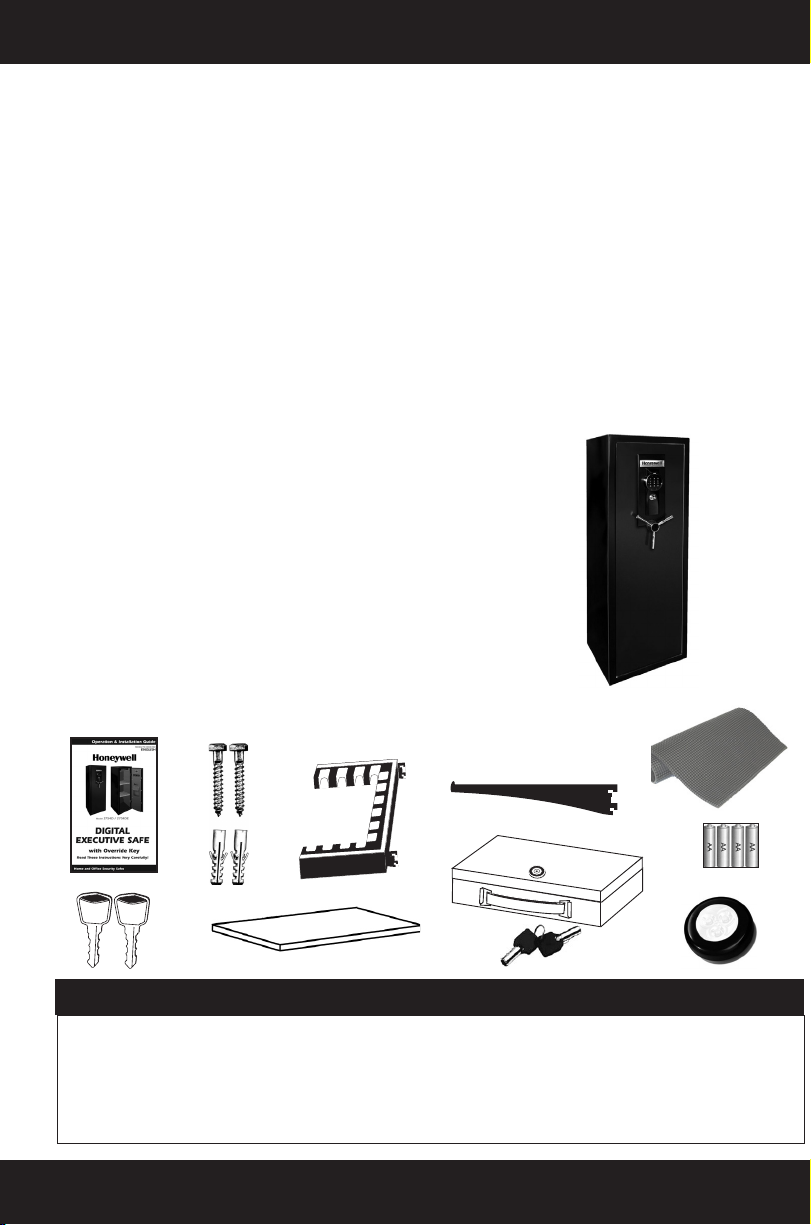
Package Contents
The following list outlines the items and quantities of each included with your
new safe. Please carefully check the list to confirm that all items have been
received. If any item is missing, then please contact Customer service
@ 1-800-223-8566.
A.
Operation & Installation Guide 1 ea
B.
Emergency Override Keys 2 ea
C.
Mounting Hardware Kit 1 ea
D.
Removable Gun Rack 1 ea
E.
Removable Shelves 3 ea
F.
Shelf Brackets 6 ea
G.
Removable Locking Storage Box
(includes 2 keys) 1 ea
H.
Rubber Floor Mat 1 ea
I.
AA Batteries 4 ea
J.
LED Light 1 ea
H.
F.
D.
A.
B.
C.
E.
G.
I.
J.
Important: DO NOT RETURN SAFE TO STORE
If you are missing parts, have difficulty programming your safe or have any other
questions pertaining to its proper use and care, DO NOT RETURN your safe to
the store. Please contact Customer Service at 1-800-223-8566 (USA & Canada)
for assistance Monday through Friday, 7:30 am to 4:30 pm Pacific Standard Time or visit
our website at www.HoneywellSafes.com
Home and Office Security Safes
1

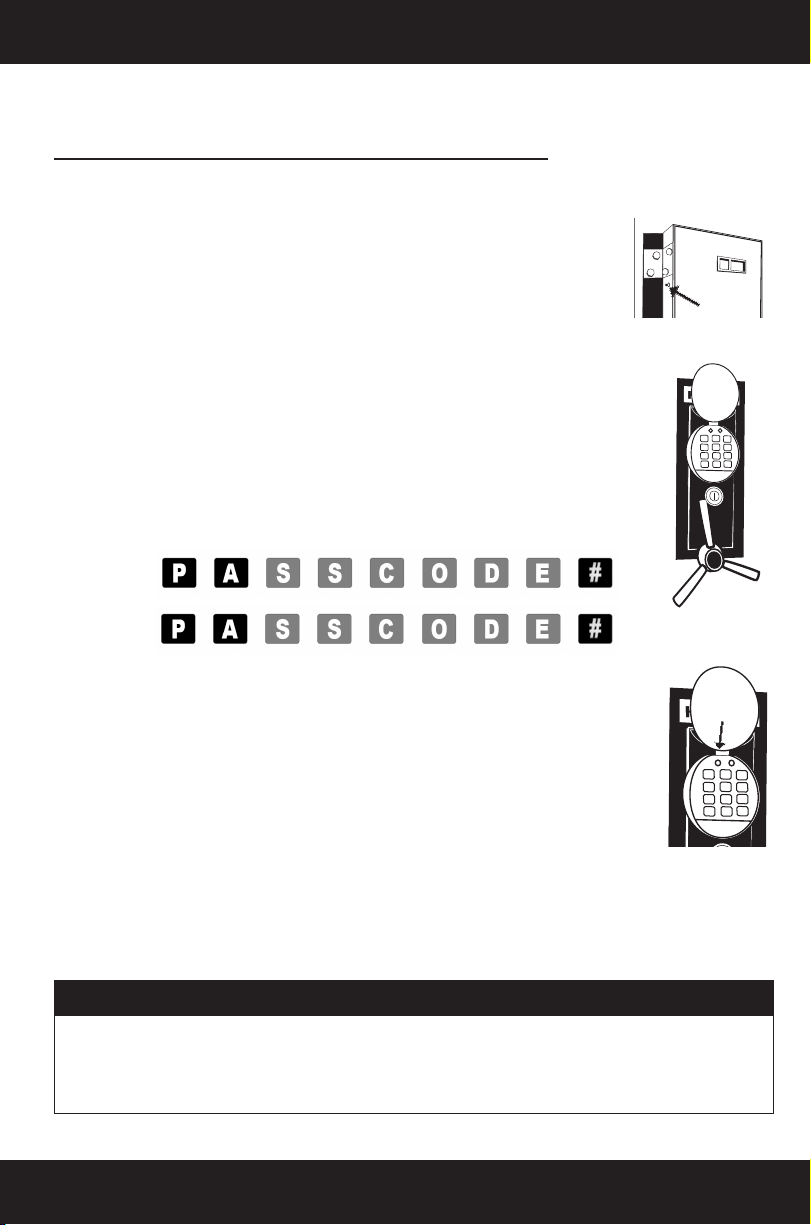
Opening Safe For The First Time
1
4
7
*
2
5
8
0
3
6
9
#
Before using the digital keypad on your new safe, you will need to install
the 4 AA batteries included with the safe. Please follow the instructions on
page 4 Using the Emergency Override Key to open the safe. Next, follow the
instructions on page 5 Changing and Installing New Batteries.
Opening Your Safe for the First Time Using
the Pre-set Factory Code
1. When the cover is opened, the keypad is activated and the
keypad backlight will turn on and remain on for approximately 5
seconds. When the backlight turns off, the keypad is still active
and the backlight will turn on again when any key is pressed.
2. The pre-set three digit factory Passcode is 159. Enter this
Passcode as follows:
GREEN
LIGHT
Note: All entries are accompanied by a beep and the green light
will flash.
3. After properly entering the entire sequence, the green light will
turn on and the lock will “click”. You now have 5 seconds to
open the safe by rotating the spindle handle clockwise to
the right.
Important: IF HANDLE WILL NOT TURN
If the spindle handle will not rotate to the right after the green light comes on,
first rotate the spindle handle slightly back to the left until it stops, then rotate
upwards to the right again to open.
4. Once the spindle handle has been turned to the right, the Live Bolts will be
disengaged and retract into the door. You have successfully unlocked the
safe and the door is now in the unlocked position.
5. Leave the safe door open and proceed to Programming a Personal Passcode.
Important: SECURITY LOCKOUT PERIODS
For added security, the safe will automatically “Lockout” entry for 15 minutes
after three attempts to open with an invalid Passcode.
2
1
4
7
*
2
5
8
0
3
6
9
#
Programming a Personal Passcode
1
4
7
*
2
5
8
0
3
6
9
#
Programming a Personal Passcode
For security reasons, it is very important that you program
your own personal Passcode into the digital lock. The factory
Passcode 159 should be changed immediately.
To program your own unique 3-8 digit Passcode, follow these
steps:
1. With the safe in the open position, press in on the small
reset button located on the inside top edge of the door.
NOTE: After pressing the reset button, the red and green
lights on the keypad will flash to indicate the programming
is authorized and you have 10 seconds to begin.
2. Open the protective cover on the front of the safe to expose
the keypad.
3. Enter your new 3-8 digit Passcode followed by the # Key.
Immediately repeat the sequence, beginning with the new
Passcode followed by the # Key.
PASSCODE
RESET BUTTON
4. The green light will light up solid, indicating your new
Passcode has been successfully entered.
5. Your new Passcode will now be comprised of the 3-8 digit
sequence you selected, always followed by the # sign. The
factory pre-set Passcode will no longer open the safe.
6. You may change your Passcode at any time by repeating
the same steps.
7. It is important that you write down your personal Passcode
and secure it in a safe location away from the safe.
NOTE: If you forget your personal Passcode, access to the
safe can be made using the Emergency Override Key.
(See page 4)
Important: ENABLE/DISABLE SOUND
Once the batteries are installed, if you do not hear a beep when entering
the factory pre-set Passcode or during the personal Passcode re-programming
process, enter the following key sequence into the digital keypad: # * #
This will turn the sound on. Repeat the process if you want the sound turned off.
Home and Office Security Safes
GREEN
LIGHT
3

Emergency Override Key
1
4
7
*
2
5
8
0
3
6
9
#
Using the Emergency Override Key
Your safe is equipped with an emergency key lock which allows immediate access in
case you forget your Passcode or the batteries need replacing.
1. Insert one of the override keys (2 included) into the bypass lock located
beneath the keypad.
2. Turn the key slighty to the left and hold in position while turning the
spindle handle clockwise to the right.
3. Pull the door open and reprogram your Personal Code or replace
dead batteries.
Emergency Interior Escape Latch
Your safe is equipped with an Emergency Escape Latch to allow the safe to be
easily opened from the inside in the unlikely event that someone should become
locked inside the safe. To engage, pull down on the lever handle and push the
door open.
4

Battery Replacement
1
4
7
*
2
5
8
0
3
6
9
#
Low Battery Indicator
Every time the keypad is activated, the system automatically
checks the power level remaining in the batteries. If the power
falls below a certain level, the red light will flash every two
seconds to indicate the need for new batteries. See changing
and installing new batteries for instructions on replacing the
batteries.
Changing and Installing New Batteries
IMPORTANT: Replacing the batteries will not erase your personal
Passcode from memory. However, dead batteries will prevent the use
of the digital keypad. Access to the safe will have to be made using the
emergency override key.
1. Using your personal Passcode or override key, open the safe
door and locate the battery compartment on the back of the door.
2. Press firmly in on the right side of the battery compartment
cover and slide to the left to open.
3. Remove the 4 dead batteries and replace with 4 new Alkaline
AA batteries. Make sure that they are installed in the proper
direction as illustrated on the battery compartment interior.
4. Replace the cover and, prior to closing the door,
test your Passcode.
RED
LIGHT
Battery
Compartment
NOTE: Proper disposal of discharged batteries is encouraged!
Home and Office Security Safes
5

Adjustable Storage Shelves
Tap here
Shelves / Gun rack
To allow for greater flexibility and further accommodate
your particular storage needs, this safe includes
(3) adjustable/removable shelves and (1) gun rack.
To install shelves:
1. Determine the desired location of your shelf and note the
corresponding support guide slots on the vertical standards
that are best suited to support the shelf in that location.
2. Insert (1) shelf bracket tab into the desired slot on
vertical standard.
3. Once in place, tap down on the bracket to lock into position.
4. Repeat procedure for 2nd bracket on other side.
5. Install the shelf (tilting if necessary) and lowering into
position on the brackets.
To install gun rack:
The removable gun rack is designed with two permanently
affixed mounting brackets on the back side.
1. Determine the desired location on the vertical standards where
the gun rack will be installed.
2. The left and right gun rack brackets should then be inserted
into the support guide slots on the upright standards at the
pre-determined location.
3. Once installed into the proper guide slots, each bracket should
be tapped down to lock in place.
4. To remove or reposition, gently tap up on the bottom of the
rack at the bracket location and the gun rack will release.
Important:
Make sure both brackets are installed and locked in place at the same height
on the vertical standards so that the shelf and/or gun rack are level.
6

Mounting Your Safe
Mounting Hardware Kit
Many customers prefer to bolt their safe to the wall or floor to
increase protection from theft and resistance to tipping. This safe was
manufactured with (2) bolt down holes pre-drilled in the back panel
and (2) in the floor.
Floor Mounting:
1. Place safe in desired position.
2. Remove the protective liner from the floor of the safe and
locate the pre-drilled 5/8 in. holes.
3. Anchor the safe using the mounting hardware kit which
includes (2) 3 in. x 3/8 in. lag screws and anchors.
4. Once completed, replace protective liners.
Wall Mounting:
DO NOT ATTEMPT TO REMOVE INTERIOR
WALL BOARD!
1. Locate predrilled holes on outside back of safe.
2. From the outside drill a small (1/8 in. max.) pilot hole
through the center of the predrilled hole and through
the wall board until visible from the inside of the safe.
3. From the inside of safe drill a 3/8 in. hole through the pilot
hole and out the back of the safe.
4. Place safe in desired position. Securing back of safe to at
least one wall stud is important.
5. Anchor the safe using the mounting hardware kit which
includes (2) 3 in. x 3/8 in. lag screws and anchors.
Home and Office Security Safes
7

Use, care and maintenance
1
4
7
*
2
5
8
0
3
6
9
#
Appropriate Use of Your Safe
This Honeywell Executive Safe protects records and many other valuables.
Testing shows that the interior temperature of the safe remains below 350°F
(177°C) for 30 minutes during a fire up to 1700°F (927°C) when used properly.
Your safe must be closed and latched in order to properly protect the contents
from fire.
Important:
Because pearls sustain heat damage at temperatures below 350° F, we advise
that you DO NOT store pearls in this safe.
Safe Care and Maintenance
When properly maintained, your safe will continue to operate and accurately
read the authorized Passcode for many years. In order to ensure optimum
performance of your safe, please follow these simple precautions:
Replace Batteries – For best results and performance, we recommend that the
batteries be replaced at least once a year or sooner depending on amount of
use.
8
Clean Hands - Never attempt to operate the digital keypad if your hands have
excessive dirt, debris or liquids on them.
Clean Safe – To clean the surface of your safe, it is recommended that you
use a mild cleaner (e.g., window cleaner) to avoid scratching or discoloring
the surface. Always wipe dry and NEVER use abrasive cleansers on the safe or
digital keypad.
Moisture – If the safe is stored in an area of high moisture content (such as near
the ocean or in a tropical climate), moisture from the environment may become
trapped inside the safe. If this applies to you, open the safe on a regular basis to
promote air circulation.
For future reference, store this Operation and Installation Guide in a secure area
away from the safe. DO NOT DISCARD!

Customer Support
Your Safe’s Unique Identification Numbers
When contacting Customer Service, you should be prepared to supply some
important information that specifically identifies your safe. This information is
extremely important to assuring prompt and accurate customer assistance.
It is strongly recommended that you identify and record the following information
in the “Safe Identification Record” form located on the inside back cover of this
manual:
Model Number
Serial Number
Key Number
Locating Model and Serial Numbers
Most Honeywell safes include a small metallic silver or gray tag affixed to one
of the surfaces. This tag is usually located on the front or right side of the safe.
This tag contains the Serial Number, and on selected models a similar tag is
attached containing the Model Number. If a Model Number tag is not attached
to the safe, then it can be located on the front or side panel of the box that the
safe was packaged in. Write this number down for future reference.
Key Number
The Key Number is located on the key. If you do not have the key, the number
is also located on the front of the actual lock.
Important: DO NOT REMOVE TAGS!
In case your safe becomes inoperable or you lose your keys, these identification
numbers will be needed to correct the problem. It is recommended that the
number tags remain in place on the safe. If removal is necessary, then they
should be attached to the inside back cover of the Operation and Installation
Guide. Store in a safe and secure place for future reference.
Home and Office Security Safes
9

1
4
7
*
2
5
8
0
3
6
9
#
1
4
7
*
2
5
8
0
3
6
9
#
Customer Support
How to Contact Us
Phone: 1-800-223-8566 (USA and Canada)
Monday through Friday, 7:30 am to 4:30 pm Pacific Standard Time
Email: CustomerService@HoneywellSafes.com
In addition to the required information regarding your safe, you must include the
best time and proper telephone number to reach you during our normal Customer
Service hours.
Mail: Attn: Customer Service Dept.
SISCO
2835 E. Ana Street
Rancho Dominguez, CA 90221
Internet: www.HoneywellSafes.com
EUROPE
Mail:
Freightways Distriservices B.V.
P.O. Box 3077
2220 CB Katwij
The Netherlands
+31(0) 71.409.0721
AUSTRALIA
Mail:
Customer Service Dept.
Master Distributors
11 Howleys Rd.
Notting Hill VIC 3168
03-9538-9200
Ordering Replacement Keys
If a key becomes misplaced or you would like additional keys, you may conveniently
purchase them from our Customer Service Department. You must supply the following
information to assure accurate processing:
• Name / Address / Telephone
• Safe Model Number / Serial Number
• Key Number located on the key and or key lock (Select models only)
• Number of keys requested
• E-mail address if available
Payment options
In the USA, replacement keys are available for a fee and credit card orders are accepted
by telephone or via our web site. Checks or Money Orders are required for orders
received by mail and should be made payable to SISCO®. Contact our Customer
Service Department for costing information prior to ordering.
10

Notes
Home and Office Security Safes
11

Notes
12

Safe Identification Record
Model Number
Serial Number
Key Number
Digital Passcode Record
Your Passcode must be at least 3 digits and no more than 8 digits followed
by the # sign.
Important:
Once your personal Passcode is programmed, the factory pre-set code will no
longer open the safe.
Home and Office Security Safes

If your Honeywell safe fails to operate because of a manufacturing defect any time up to five (5)
years from the date of original purchase, we will, at our discretion, repair or replace the unit at no
charge to the original owner. A copy of your sales receipt is required as Proof of Purchase.
The consumer must first contact SISCO® Customer Service (800-223-8566, USA and Canada;
310-638-1182 outside of USA and Canada, or via E-mail at CustomerService@HoneywellSafes.com)
during the Term of the Limited Warranty for authorization on the repair or replacement of the safe.
For the repair of the safe, SISCO Customer Service may provide approval for taking it to a local
locksmith. For the replacement of the safe, the consumer must return it, prepaid, to SISCO
(2835 E. Ana St., Rancho Dominguez, CA 90221). SISCO will replace the safe with a comparable
model, shipping prepaid.
WHAT IS NOT COVERED
SISCO’s responsibility and the consumer’s rights are limited to the repair or replacement of the
defective safe, as stated above.
This Warranty does not apply if the product has been damaged by improper installation, neglect,
accident, misuse, exposure to extremes of heat or humidity, terrorism, war, acts of God, or as a
result of service or modification by other than an authorized service center. While your SISCO safe is
warranted to be free of mechanical defect during the Term of Limited Warranty, the Warranty does
not apply to the finish of the safe.
SISCO is not responsible for any costs associated with removing or installing this product.
SISCO is not responsible for damage or loss of the contents of the safe nor for the unauthorized
removal of contents.
SISCO is not responsible for any damages incurred to the safe during shipment.
This Limited Warranty applies only to new SISCO safes, purchased by the original owner, and is not
transferable to second owners or “factory seconds” safes purchased by the consumer.
No implied Warranty of salability or fitness exists other than those descriptions provided on the
packaging, instructions and advertising. No other covenants or warranties, either implied or stated,
written or oral, are hereby present. Some states do not allow limitations on how long an implied
Warranty lasts, so the above limitations may not apply to you.
This Warranty gives you specific rights and you may also have other rights which vary from state to
state.
The Honeywell trademark for Home/Office Safes is used with permission. Honeywell Safes are
distributed exclusively by SISCO. Honeywell makes no representations or warranties with respect to
this product or service. The Honeywell Trademark is used under license from Honeywell Intellectual
Properties Inc. by SISCO.
 Loading...