

Honeywell 15100, 15102 Owner's Manual
Air Caddy
™
WITH NIGHTLIGHT
Owner’s Manual
For Model 15100 Series Air Caddy
™
OFF
F
eb
Jan
Mar
A
p
r

READ AND SAVE THESE SAFETY
INSTRUCTIONS BEFORE USING THIS
AIR CADDY
When using electrical appliances, basic precautions should
always be followed to reduce the risk of fire, electric shock,
and injury to persons, including the following:
1. Read all instructions before operating the Air Caddy.
2. Place the Air Caddy where it is not easily knocked over by persons in the
household.
3. Always turn the Air Caddy to the OFF position and unplug from the wall outlet
when not in use.
4. To disconnect the Air Caddy, first turn the control to the OFF position, grip the AC
adapter and pull it from the wall outlet. Never pull by the cord.
5. Do not use any product with a damaged cord or AC adapter or if the product
malfunctions, is dropped or damaged in any manner. Keep the cord away from
heated surfaces.
6. Do not use the Air Caddy outdoors.
7. Never use the Air Caddy unless it is fully assembled.
8. Do not run the power cord under carpets, and do not cover it with throw rugs.
Arrange the cord such that it will not be tripped over.
9. Do not use the Air Caddy where combustible gases or vapors are present.
10. Do not expose the Air Caddy to rain, or use near water, in a bathroom, laundry
area or other damp location.
11. The Air Caddy must be used in its upright position.
12. Do not allow foreign objects to enter the ventilation or exhaust opening as this
may cause electric shock or damage to the Air Caddy. Do not block air outlets or
intakes.
13. Locate the Air Caddy near the outlet and avoid using an extension cord.
14. A loose fit between the AC outlet (receptacle) and the AC adapter may cause
overheating and a distortion of the AC adapter. Contact a qualified electrician to
replace loose or worn outlet.
15. Do not sit, stand or place heavy objects on the Air Caddy.
16. Disconnect the AC adapter before servicing.
WARNING: To reduce the risk of fire or electric shock, do not use this Air
Caddy with any solid-state speed control device. Use only model number
MKA35-12003 adapter with this unit. DO NOT USE ANY OTHER AC ADAPTER
WITH THIS AIR CADDY. DO NOT USE THIS AC ADAPTER WITH ANYTHING
ELSE.
IMPORTANT SAFETY
INSTRUCTIONS
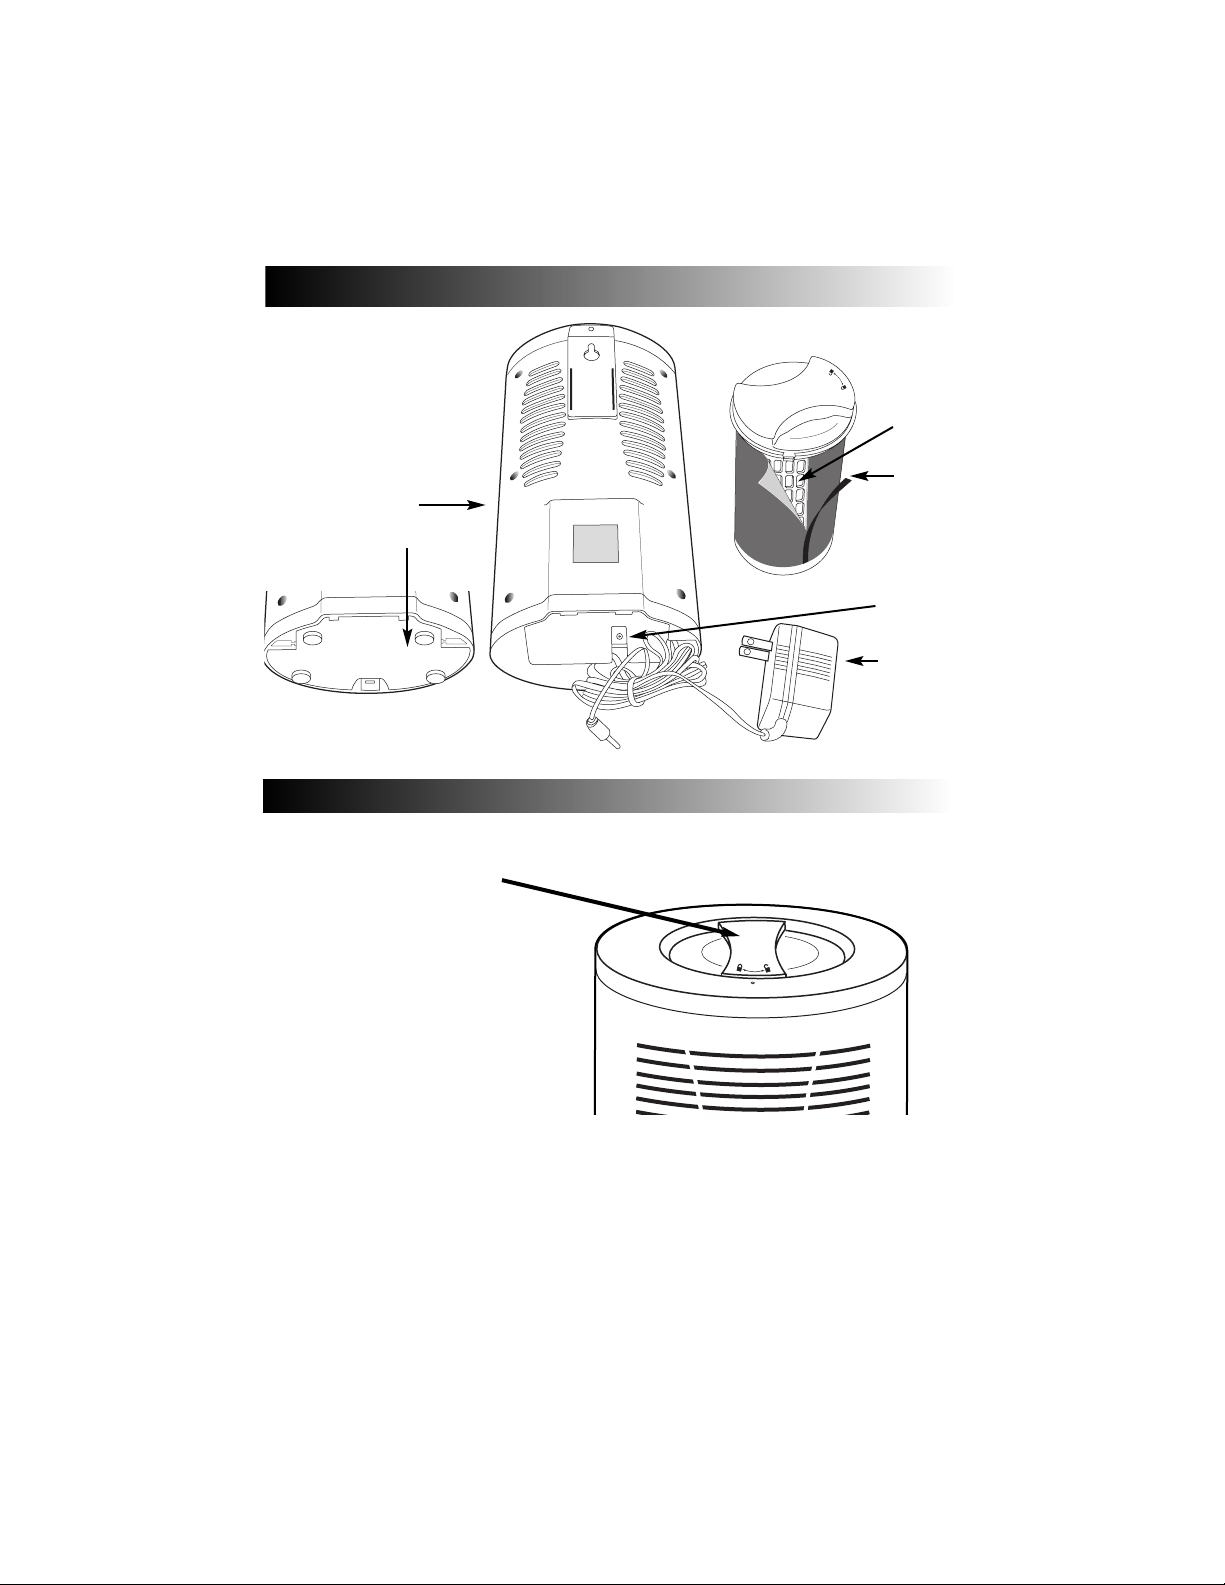
Parts and Assembly
A. Air Caddy unit
B. Reusable plastic
filter cartridge
C. Filter
D. AC adapter plug
receptacle
E. AC adapter
F. Bottom plate
A
B
C
D
E
Installation/Filter Replacement
7. Turn it clockwise until it drops into position.
8. Move the calendar forward three months each time you replace the filter.
9. Plug the unit back into a 120V AC outlet and turn it back on.
The Air Caddy is most effective when the filter is replaced every three months.
1. Turn the Air Caddy off and unplug it
from the outlet.
2. Gently turn the filter lock
counterclockwise to unlock the top.
3. Slide the filter cartridge out.
4. Remove the fabric filter from the
reusable plastic cartridge and
discard the filter. See letters B and C
in the Parts and Assembly section.
5. Wrap a new filter around the
reusable cartridge, making sure that
the black side of the filter is facing
out. Position the seam of the filter so
that it faces the rear of the air caddy.
Secure the filter with fasteners.
6. Slide the filter and cartridge back
into the unit.
F
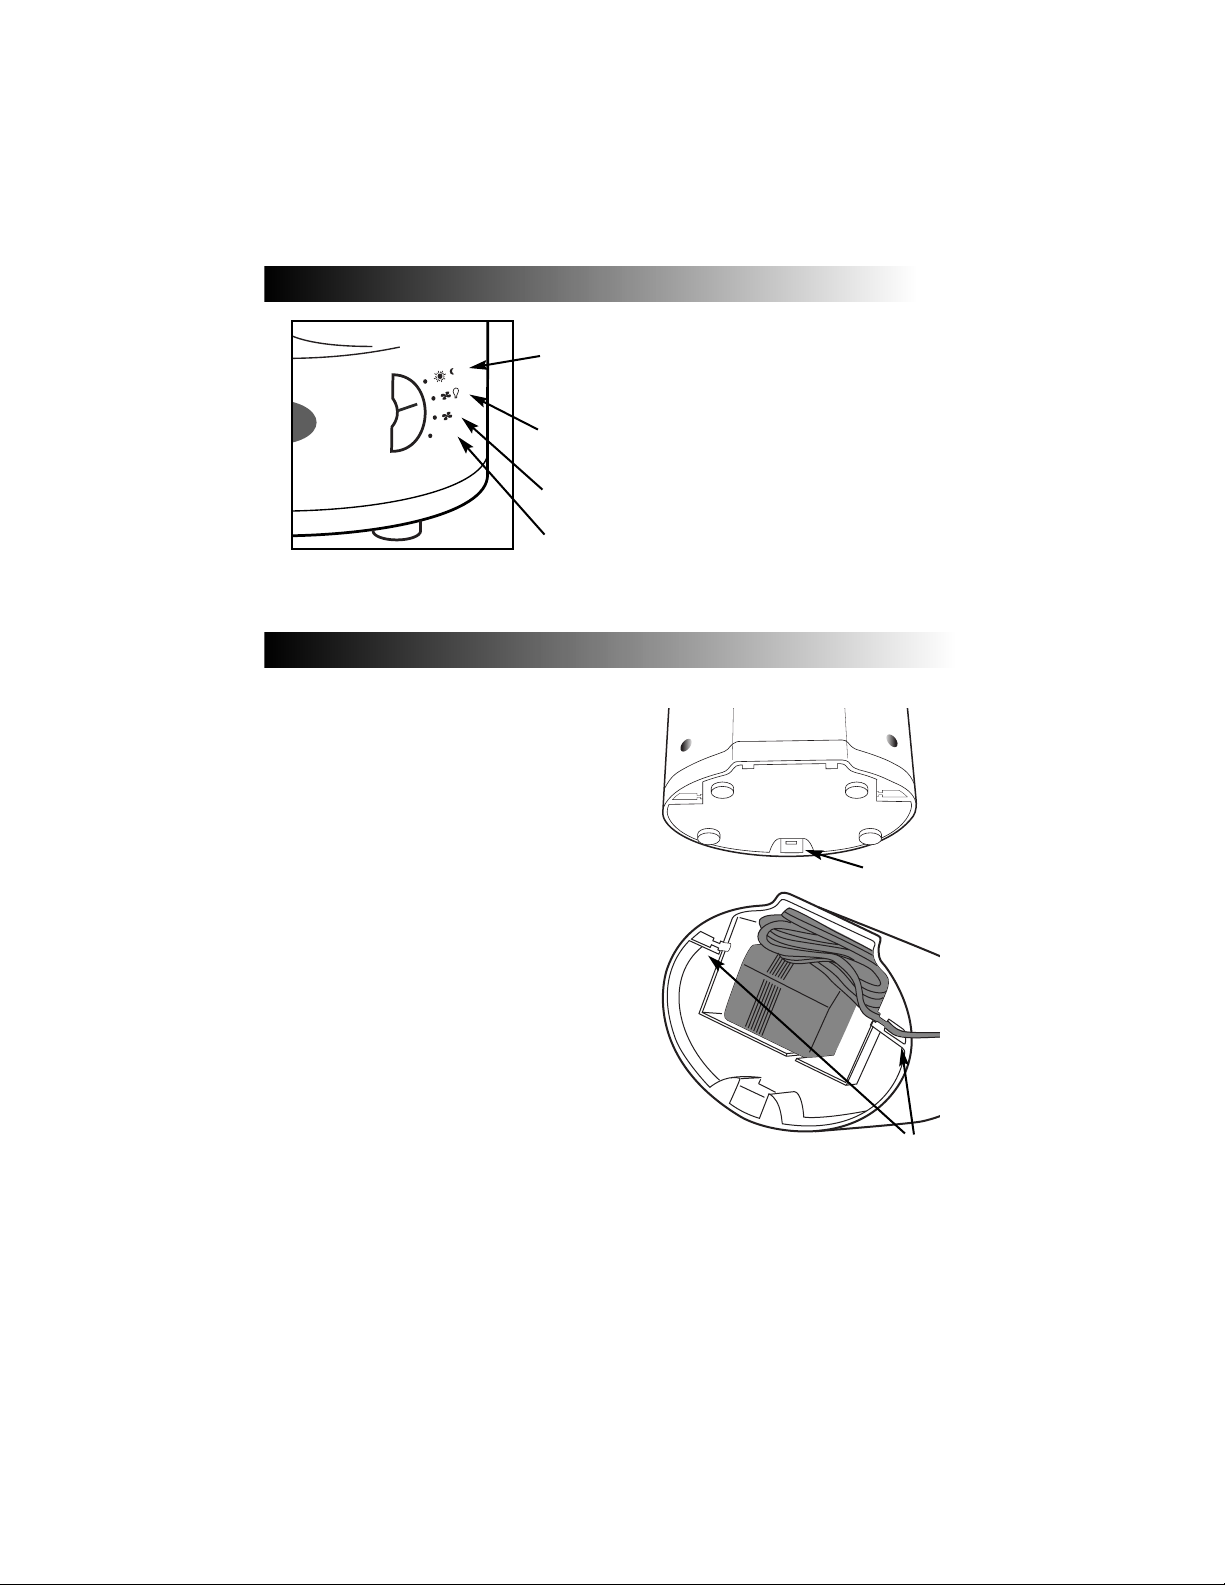
Unit is on with filtering photoelectric cell;
as the room darkens, night light will
come on.
Unit is on and filtering with night light
always on.
Unit is on and filtering.
Unit is off.
Controls
Operation
1. Make sure that the control knob is turned
to OFF.
2. Place the filter in the unit. The filter is
packaged separately. For instructions, see
the section Installation/Filter Replacement.
3. Open the bottom panel by placing your
thumb on the plastic tab, pushing toward
the center of the unit, and pulling up.
4. Remove the AC adapter plug that comes
with the unit.
5. Insert the AC power cord into the 12V AC
receptacle inside the unit. See letter D in
the Parts and Assembly section.
6. Slide the cord to the edge of the base and
replace the bottom panel door, making sure
that the power cord fits through one of the
notches indicated.
7. Plug the AC adapter into a grounded 120V
AC receptacle.
8. Turn the Air Caddy on.
Notches
Plastic Tab
OFF
Cleaning the Air Caddy
• Unplug the Air Caddy before cleaning.
No user serviceable parts. Do not disassemble.
• Wipe the surface using a soft, damp cloth.
Important: DO NOT immerse the Air Caddy in water. DO NOT use gasoline, paint thinner
or other chemicals to clean the Air Caddy. Store your Air Caddy in a clean, dry place.
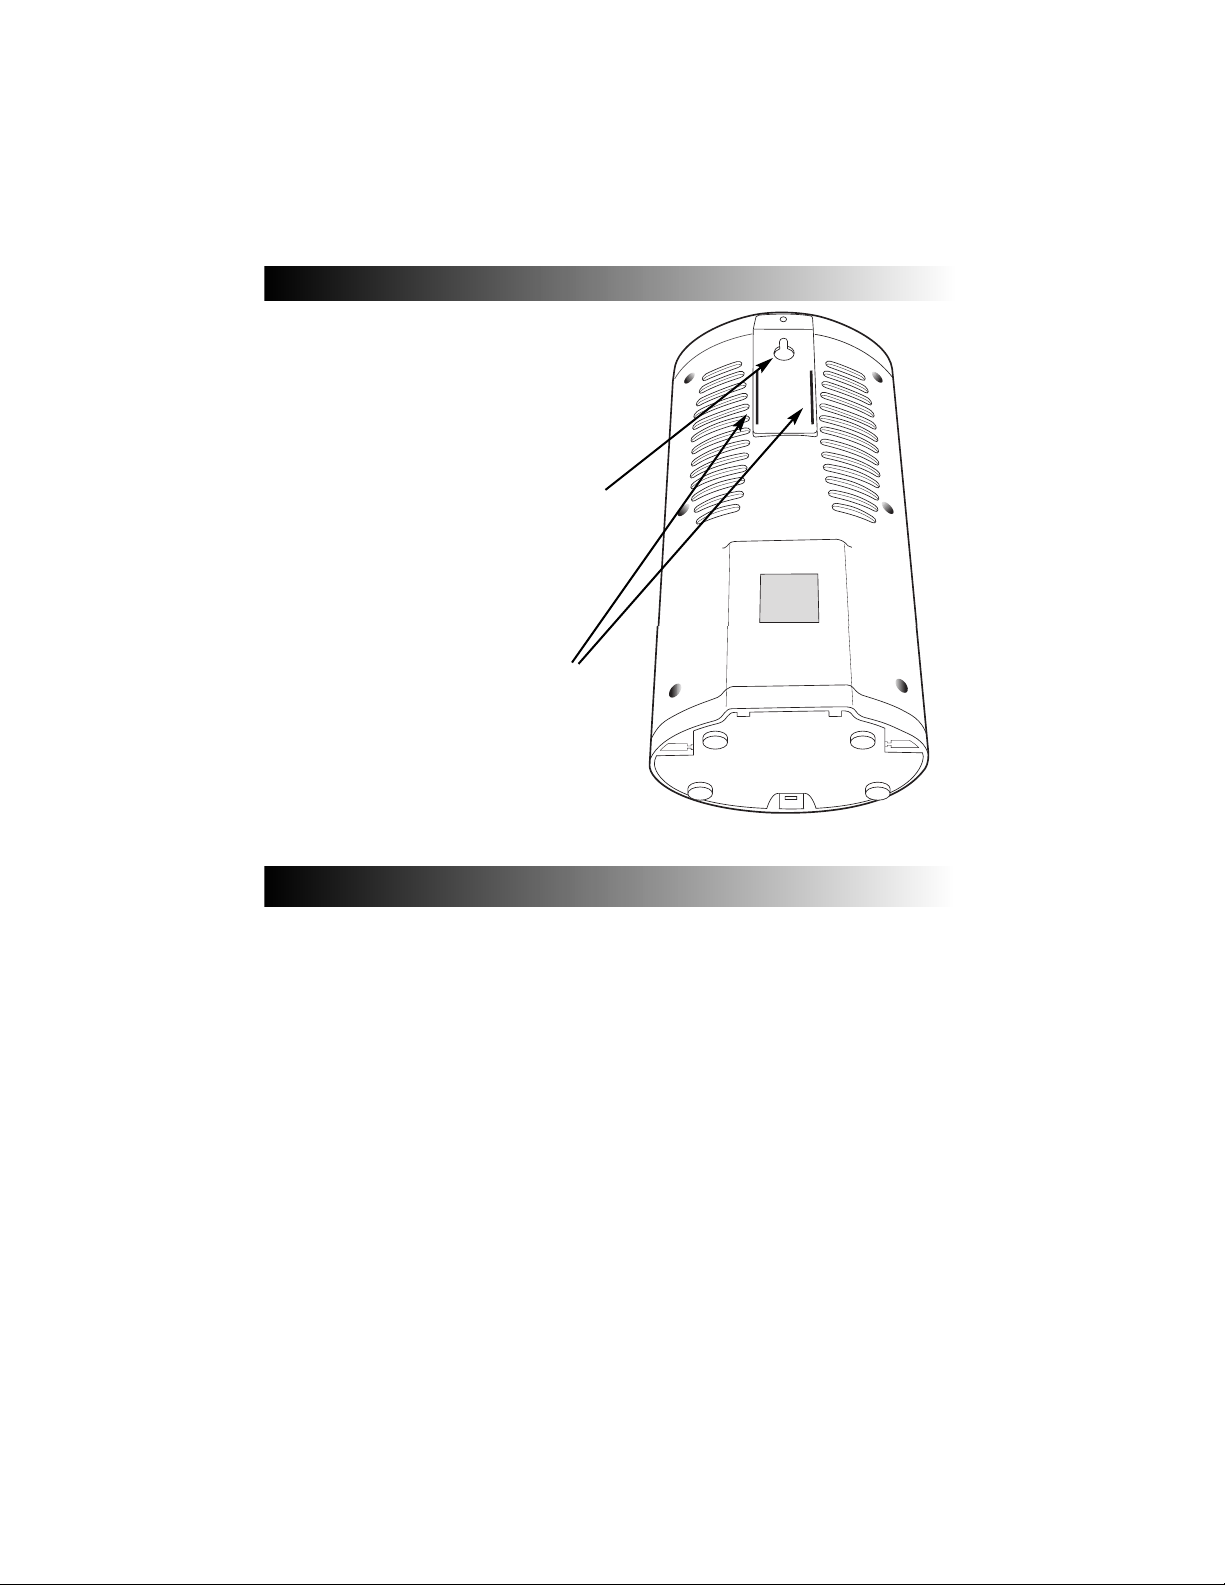
Air Caddy Placement
Wall
The unit comes equipped with one screw
and wall anchor.
1. To attach to the wall, mark the location
and insert the screw in the wall. Use
the anchor if necessary.
2. Gently place the Air Caddy onto the
screw, matching the hole on the rear of
the unit with the screw.
Any Stationary and Safe
Surface such as a Metal
File Cabinet
The unit is equipped with two magnetic
strips that can be used to attach it to
metal file cabinets. Simply attach the back
of the unit to a metal surface.

One Year Limited Warranty
Honeywell Air Caddy
TM
Model Series No. 15100
This product has been engineered and crafted with great care for your satisfaction. Be
sure to fill out and return the enclosed card within 10 days of purchase.
A. This limited warranty applies to repair or replacement of product found to be
defective in material or workmanship within 1 year of the date of purchase. This
warranty does not apply to damage resulting from commercial, abusive, or unreasonable
use. Defects that are the result of normal wear and tear will not be considered
manufacturing defects under this warranty. HONEYWELL IS NOT LIABLE FOR
INCIDENTAL OR CONSEQUENTIAL DAMAGES OF ANY NATURE. ANY IMPLIED
WARRANTY, INCLUDING MERCHANTABILITY OR FITNESS FOR A
PARTICULAR PURPOSE, ON THIS PRODUCT IS LIMITED IN DURATION TO THE
DURATION OF THIS LIMITED WARRANTY. Some regions do not allow the exclusion
or limitation of incidental or consequential damages or limitations on how long an implied
warranty lasts, so the above limitations or exclusions may not apply to you. This
warranty gives you specific legal rights, and you also may have other rights which vary
from region to region. This warranty applies only to the original purchaser of this
product.
B. At its option, Honeywell will repair or replace this product if it is found to be defective
in material or workmanship. Defective product should be returned to the place of
purchase in accordance with store policy or to Honeywell.
C. This warranty does not cover damage resulting from unauthorized attempts to repair
or from any use not in accordance with this manual.
D. This warranty DOES NOT cover the filter except for material or workmanship
defects.
E. Return defective product to the following address with a brief description of the
problem. Include proof-of-purchase and a U.S. $10.00/ Canadian $15.00 check or
money order for handling, return packing and shipping charges. Please include your
name, address and daytime phone number. You must prepay shipping charges. Mark
carton "Attention Returns Department"
Ship to:
In USA:
Honeywell
Returns Department
4755 Southpoint Drive
Memphis, TN 38118 U.S.A.
In Canada:
Honeywell
510 Bronte St. South
Milton, Ontario Canada L9T 2X6

© 2002 Honeywell. All Rights Reserved. 4/02
P/N 035-00442-000 Rev. 0
AW 043-50324-000
If you experience a problem with your Air Caddy, please see owner’s guide for
instructions. Please do not attempt to repair the Air Caddy yourself. Doing so may
void the warranty and could cause damage or personal injury. If the problem still
persists, please call:
Honeywell
Consumer Relations Dept.
Toll free 1-800-332-1110
E-mail: honeywell@protocolusa.com
Be sure to register your product online at www
.honeywellconsumerproducts.com or
complete and return the enclosed product registration card within 10 days of purchase.
Mail Questions or Comments to:
Honeywell
Consumer Relations Dept.
250 Turnpike Road
Southborough, MA 01772 U.S.A.
Or e-mail us at honeywell@protocolusa.com
Visit our website at www.honeywellconsumerproducts.com
 Loading...