

Page 1

honestech
Video Editor 7.0
User Guide
BOM part # : BEDVM101
Page 2

2. honestech
End User License Agreement
IMPORTANT : READ THE FOLLOWING TERMS AND CONDITIONS CAREFULLY BEFORE CONTINUING
THIS INSTALLATION.
IF YOU DO NOT AGREE WITH THESE TERMS AND CONDITIONS, PROMPTLY REMOVE THE
SOFTWARE FROM YOUR COMPUTER AND RETURN THE SOFTWARE, INCLUDING THE
DOCUMENTATION, TO YOUR SUPPLIER AND YOUR MONEY WILL BE REFUNDED. IF YOU
DOWNLOADED THIS SOFTWARE, PLEASE REMOVE THE SOFTWARE FROM YOUR COMPUTER AND
CONTACT YOUR SUPPLIER TO REQUEST A REFUND.
In this license agreement (the “License Agreement”), you (either individual or an entity), the purchaser of
the license rights granted by this License Agreement, are referred to as “licensee” or “You”. Honest
Technology is referred to as the “Licensor”. The current version of the accompanying software
(“Software”) and documentation (“Documentation”) are collectively referred to as the “Licensed Product”.
Licensor may furnish hardware with the Licensed Product (“Hardware”)
1. License
In accordance with the terms and conditions of this License Agreement, the Software is the property of
the Licensor and is protected by Copyright Law. While the Licensor continues to own the Software,
the Licensor grants the Licensee, after Licensee’s acceptance of this License Agreement, the Limited,
non-exclusive license to use on copy of the current version of Licensed Product as described below.
The Software is “used” on a computer when it is loaded into the temporary memory (i.e., RAM) or
installed into the permanent memory (e.g., hard disk, CD-ROM, or other storage device) of that
computer, except that a copy installed on a network server for the sole purpose of distribution to
another computer is not considered “in use”. Except as may be modified by a license addendum which
accompanies this License Agreement, the Licensee’s rights and obligations with respect to the use of
this Software are as follows:
You May,
I. Use the Software for commercial or business purposes in the manner described in the
Documentation.
II. Use the Software to share Internet connection, transfer data, files and images among the
computer in the manner described in the Documentation.
You May Not,
I. Copy the documentation that accompanies Software.
II. Sublicense or lease any portion of the Software.
III. Make illegal duplication of the software.
2. Copyright and Trade Secrets. All rights in and to the Licensed Product including, but not limited to,
copyrights and trade secrets rights, belong to Licensor, and Licensor holds title to each copy of the
Software. The licensed Product is protected by United States Copyright Laws and international treaty
Provisions.
3. Term. This License Agreement is effective until terminated. Licensee may terminate this License
Agreement if Licensee breaches any of the terms and conditions herein. Upon termination of this
License Agreement for any reason, Licensee shall return to Licensor or otherwise destroy the Licensed
Product and all copies of the Licensed Product. Upon request of Licensor, Licensee agrees to certify in
writing that all copies of the Software have been destroyed or returned to Licensor. All provisions of
this Agreement relating to disclaimers of warranties, limitation of liability, remedies, or damages, and
Licensor’s proprietary rights shall survive termination.
4. Executable Code. The Software is delivered in executable code only. Licensee shall not reverse
engineer, compile or otherwise disassemble the Software.
Page 3

3. Video Editor 7.0
5. Limited Warranty
a. Licensor does not warrant that the functions contained in the Licensed Product and Hardware
will meet Licensee’s requirements or that the operation of the Software and Hardware will be
uninterrupted or error-free. Licensor does warrant that the media on which the Software is
furnished and the hardware will be free from defects in materials and workmanship under normal
use for a period of thirty (30) days from the date of delivery (“Warranty Period”). This Limited
Warranty is void of failure of the media on which the Software is furnished has resulted from
accident, abuse, or misapplications.
b. EXCEPT AS PROVIDED ABOVE, THE LICENSED PRODUCT IS PROVIDED “AS IS”
WITHOUT WARRANTY OF ANY KIND, EITHER EXPRESS OR IMPLIED INCLUDING, BUT
NOT LIMITED TO, IMPLIED WARRANTIES OF MERCHANTABILITY AND FITNESS FOR A
PARTICULAR PURPOSE, AND THE ENTIRE RISK AS TO THE QUALITY AND
PERFORMANCE OF THE LICNESED PRODUCT AND HARDWARE IS WITH LICENSE.
6. Limitation of Liability
a. Licensor ’s sole obligation or liability and licensee’s exclusive remedy under this agreement shall
be the replacement of the defective media on which the software is furnished and/or the
hardware according to the limited warranty above.
b. In no event will licensor be liable for any consequential, incidental or indirect damages including,
without limitation, any loss of data or information, loss of profits, loss savings, business
interruption or other pecuniary loss, arising out of use of or liability to use the software or
documentation or any hardware, even if licensor has been advised of the possibility of such
damages, or for any claim by any third party.
7. General
a. Any Software and Hardware provided to Licensee by Licensor shall not be exported or re-
exported in violation of any export provisions of the United States or any other applicable
jurisdiction. Any attempt to sublicense, assign or transfer any of the rights, duties or obligations
hereunder is void. This Agreement shall be governed by and interpreted under the laws of the
State of New Jersey, United States of America, without regard to its conflicts of law provisions.
Licensor and Licensee agree that the U.N. Convention on Contracts for the International Sales of
Goods shall not apply to this License Agreement.
b. This License Agreement may only be modified or amended by a written license addendum that
accompanies this License Agreement or by written document that has been signed by both you
and Licensor. Site licenses and other types of enterprise licenses are available upon request.
Pleas contact Licensor or your supplier for further information.
c. Any controversy or claim arising out of or relating to this Agreement, or the breach of this
Agreement, shall be settled by arbitration administered by the American Arbitration Association in
accordance with its Commercial Arbitration Rules and Judgment upon the award rendered by the
arbitrator may be entered in any court having jurisdiction thereof. The arbitration shall be held in
New Jersey, United States of America.
If you have any other questions concerning this License Agreement, or if you desire to contact Licensor for
any reason, please contact Honest Technology.
Copyright 2006
Honest Technology Inc.
All Rights reserved.
Page 4

4. honestech
Table of Contents
END USER LICENSE AGREEMENT ....................................................................................... 2
TABLE OF CONTENTS............................................................................................................ 4
1. INTRODUCTION ................................................................................................................ 6
1-1. MINIMUM SYSTEM REQUIREMENTS ....................................................................... 6
2. OVERVIEW OF STEPS ...................................................................................................... 7
3. HONESTECH VIDEO EDITOR INSTALLATION ................................................................ 10
4. USING HONESTECH VIDEO EDITOR ............................................................................... 14
4.1. IMPORTING VIDEO, IMAGES AND AUDIO FILES ..................................................... 15
4.2. ADDING TO THE STORYBOARD OR TIMELINE ....................................................... 24
4.2.1. Editing in Storyboard ........................................................................... 26
4.2.2. Editing in the Timeline ......................................................................... 28
4.2.3 Editing a Clip ......................................................................................... 29
4.3 ADDING SPECIAL EFFECTS ...................................................................................... 32
4.4 ADDING TRANSITION EFFECTS ................................................................................ 35
4.4 ADDING TRANSITION EFFECTS ................................................................................ 35
4.5. ADDING OVERLAY EFFECTS ................................................................................... 37
4.6. ADDING TITLE EFFECTS ........................................................................................... 39
4.7. THE OUTPUT WIZARD ............................................................................................... 41
4.7.1 Create a video file .................................................................................. 42
4.7.2. Creating a Disc ................................ ..................................................... 48
Page 5

5. Video Editor 7.0
4.7.3. Writing to DV-Tape ................................................................................ 49
4.7.4. Creating audio files. ............................................................................. 50
4.7.5. Creating Custom Output Profiles ........................................................ 51
4.8. OUTPUT TO DISC ...................................................................................................... 52
4.8.1. Screen Menu Settings .......................................................................... 53
4.8.2. Changing Text ....................................................................................... 54
4.8.3. Changing the Background Image ........................................................ 54
4.8.4. Number of movie clips per Menu Page ............................................... 55
4.8.5. Navigational Buttons ............................................................................ 55
4.8.6. Output Options ..................................................................................... 56
4.8.7 OUTPUT SPECIFICATION...................................................................... 58
5. UNINSTALL HONESTECH VIDEO EDITOR ...................................................................... 59
Page 6
6. honestech
1. INTRODUCTION
Thanks for choosing honestech Video Editor!
honestech Video Editor is a powerful piece of video editing software that can help you
produce a professional-looking video from personal videos, digital still images, and audios.
honestech Video Editor employs a user-friendly interface and smart and useful features to
make it easy, even for first-time users, to navigate through it without getting lost or
confused.
honestech Video Editor's high performance MPEG encoding engine saves edited digital
videos into small, high quality MPEG-1, MPEG-2, AVI (including compressed AVI), DV-AVI,
and WMV (Window Media) format.
honestech Video Editor can manage and edit multiple files simultaneously. Each video file
can be edited on "Full Rendering", "Smart Rendering" and "GOP (Group Of Picture)" level.
honestech Video Editor allows you to insert text into video clips and add music files for the
audio function.
Title, Transition, Special Effects, and Overlay functions have been added and now provide
a more convenient editing environment.
A Timeline feature, which combines drag-and-drop editing and easy-to-understand editing
functions, has been added.
1-1. MINIMUM SYSTEM REQUIREMENTS
Processor: Intel Pentium IV 1GHz or equivalent
Operating System: Windows XP , Vista
Memory: 256MB of RAM
Direct-X: 9.0
CD Burner: for VCD/SVCD
DVD Burner: for DVD
Others:
Direct-X 9.0
Windows Medial Format SDK 9
Windows Media Player 7
Page 7

7. Video Editor 7.0
2. OVERVIEW OF STEPS
1. Easily add or move files with simple drag-and-drop.
Use drag-and-drop to move files easily from the Source Collection area to the Storyboard
or Timeline.
DV-AVI video clips can be transferred to a digital camcorder. Note: AVI files need to be
converted to DV-AVI first.
Supported file formats include:
1. MPEG-1 (VCD)
2. MPEG-2 (SVCD, DVD)
3. WMV (Window Media Format)
4. DV- AVI
5. AVI
Note
To compress an AVI file lnto DV-AVI format, you must have appropriate CODEC installed
on your PC.
2. Streaming Video Merge Method:
3. Title editing
Fast MPEG merge (GOP boundary cut)
1. Performs editing in GOP (Group Of Picture) frame units.
2. “Fast” editing and saving requires no additional encoding.
3. Ideal for merging two (or more) files in identical MPEG formats.
Smart Rendering
1. Uses GOP editing mode for MPEG files and “Key Frame" editing mode
for AVI files.
2. Encodes only the edited portion of video files.
3. Property setting changes can be applied to only specific clips/frames of
video.
4. Does not support DV-AVI, Type-1 video format files.
Full Rendering
1. Customizable: editing can be done on a frame-by-frame basis.
2. Flexible:
a. Render video files in different formats together.
b. Create output files in different formats.
c. Select the format of output video files after editing (titling,
audio, special and transition effects) is completed.
3. Re-encodes all the video frames.
Add titles to existing video clips.
Create titles in straight or curved line formats.
Display titles over the entire video or selected scenes only.
Page 8

8. honestech
4. Special effects
Add a variety of special effects (filters) to your video.
Three types of filters available: color, effect, and transition.
5. New overlay functions
Similar to the picture-in-picture feature seen on many televisions, this feature allows
you to display two clips on a single screen.
6. Timeline feature makes it easy to edit video.
Edit video easily using simple drag-and-drop, making your editing tasks incredibly
simple.
You can zoom in or out of Timeline for project overview and for precise editing.
7. You can import and record video clips from a PC camera, TV (TV tuner) or camcorder.
8. You can burn your movies on DVD, VCD, SVCD or mini-DVD in either NTSC or PAL format.
9. Project File Automatic Save function.
Automatically saves project files, safeguarding your projects from accidental loss and
eliminating the need for manual saving. To enable this feature, the “Project File
Automatic Save” option must be turned on.
10. Change the speed of video or audio clips.
You can add dynamic effects to your video and audio by increasing or decreasing the
playback speed. The slow motion playback option can add dramatic effects to
emotional scenes. The fast motion playback option is great for humorous or action
scenes.
11. Undo/Redo
You can undo or redo editing. You can easily move back and forth between the
previous and current stages of your work.
12. Jump Function
You can jump to a specific frame/time in the video file.
13. Detect Scenes function
Detects where you made a break in the recording and automatically splits your video into
separate scenes of clips.
Page 9

9. Video Editor 7.0
14. Split/Combine Clip.
15. Mute the audio portion of a Video Clip.
16. Adding audio fade in / fade out.
17. Change the volume level of video or audio clip.
18. Supports WMV9 User Defined Profile. (Supports all Windows Media Video (WMV) V8/9)
Page 10

10. honestech
3. honestech VIDEO EDITOR INSTALLATION
3.1. Insert the installation CD in the CD-ROM drive.
3.2. Setup process will automatically start. If the installation does not start automatically, please
double-click on honestech VideoEditor70.EXE file.
3.3. Installation process will start with the following screen.
3.4. Following welcome screen will appear. Click [Next >] to continue.
Page 11

11. Video Editor 7.0
3.5. The End-User License Agreement will appear as shown below, if you accept, click [Yes] to
continue.
3.6. Use the default destination folder or change it by clicking on [Browse…] button. Then click
[Next] to continue.
Page 12

12. honestech
3.7. Select Program Folder screen will be displayed next. Accept the default folder or choose your
program folder and click [Next >] to continue.
3.8. Setup status screen will appear as shown below. This step is done automatically.
3.9. Windows Media Runtime Setup window will appear, click [Yes] to continue.
Page 13

13. Video Editor 7.0
3.10. Windows Media User License Agreement will appear, click [Yes] to continue.
3.11. Files will automatically install and following the setup completed window will appear. Click [OK]
to finish Windows Media Runtime Setup.
3.12. honestech Video Editor Setup is now complete; click [Finish] to complete the installation.
Page 14

14. honestech
4. USING honestech VIDEO EDITOR
You can start using honestech Video Editor 7.0 by simply double clicking on this icon.
You can also start the program by running:
START PROGRAMS honestech VIDEO EDITOR 7.0 honestech VIDEO EDITOR 7.0
The main screen will be displayed when you start Video Editor 7.0.
Starting a Project
It is strongly recommended that you save your project. All your works can be saved as a project,
allowing you to come back and continue working from where you left off.
1. New Project : This creates a new project. Enter the name of the new project in the New
Project Dialog Box.
Page 15

15. Video Editor 7.0
2. Open Project : Open an existing project in a new window. You can only open one project at
a time.
3. Save Project : Saves the current project with its current name and directory.
4. Save Project As : Saves the current project under a new project name.
5. Project Properties : Displays the properties of the current project. You can assign the
author name, company info and comments for the project.
6. Project File Automatic Save : This feature will save the project automatically. To enable
this feature, the “Project File Automatic Save” option must be turned on.
4.1. Importing video, images and audio files
You can select the source video clip(s) you want to edit.
Options:
1. Capture
2. Directly from Camcorder
3. Open from file
To capture from a device such as PC cameras, click the button. This will open the
capture option screen in the left panel as shown below.
Page 16

16. honestech
4.1.1. Selecting Video Capture Device
From the drop-down menu shown above, select your video input source. Video Editor 7.0 will
automatically detect all available video input devices and list them here.
1. Video Device: Select the video device from the list in the drop-down menu.
2. Set Video Device Settings : Change TV tuner setting, input source, and device type.
4.1.2. Selecting Audio Device
1. Audio Device : Select the audio device.
2. Set Audio Device Settings : Select the input source of the device selected. (Select
Line-in normally)
4.1.3. Capture Device: Capture Settings
Page 17

17. Video Editor 7.0
1. Select video format. (VCD / SVCD / DVD)
2. Select video type. (NTSC / PAL)
3. Select video quality. (Best/Good/Normal/Average – higher video quality will
result in bigger file size)
4. Split Size takes the guess work out by automatically splitting the file size of
the captured video according to the format and capacity of the disc capacity
you are planning to burn the movie to. The output files are partitioned
according to the capacity of the disk to be burned (CD/DVD).
5. The maximum recording time is determined depending on the output
format and the available space on your hard drive. Files cannot be created which exceed this time.
(This is ideal for monitoring and recording activities at home while you are away for a short period
of time. Not recommended for an extended period of time)
6. Set the recording duration time. If you know the length of
the source video, you don’t have monitor the entire capture
process from beginning to the end. By setting the duration
time, and Video Editor 7.0 will record for the amount of the time set and then stop automatically.
If you do not set a recording duration time, the recording will continue until you manually stop it.
7.
Specify the location where the capture video will be saved. You can also change the file name to
help identify your video clip better.
8. Click this button to start recording/capturing
9. Click this button to stop the recording/capturing.
10.
Displays the status of the recording depending on your recording duration time, and/or the maximum
recording time.
To capture from devices such as TV, click the button. This will open the capture option
screen in the left panel as shown below.
Page 18

18. honestech
1. TV Channel
: Move channel up.
: Move channel down.
: CATV (Cable TV)
: TV w/ antenna.
Page 19

19. Video Editor 7.0
4.1.4. Camcorder : Capture Settings
Click the button to capture from a camcorder. The following screen will be displayed.
1. Select the video format (VCD, SVCD, DVD, etc.).
2. Select the quality setting (Best/Good/Normal/Average).
3. Select the output size based on the writable media that you are using.
Please not that this will split the file into multiple files if the output file is
larger than the output size selected.
4.
Specify the location where the capture video will be saved. You can also change the file name to
help identify your video clips better
5.
Player control buttons: Record, Play, Stop, Fast Forward, Fast Rewind, Fast Forward, and Step
Reverse.
Page 20
20. honestech
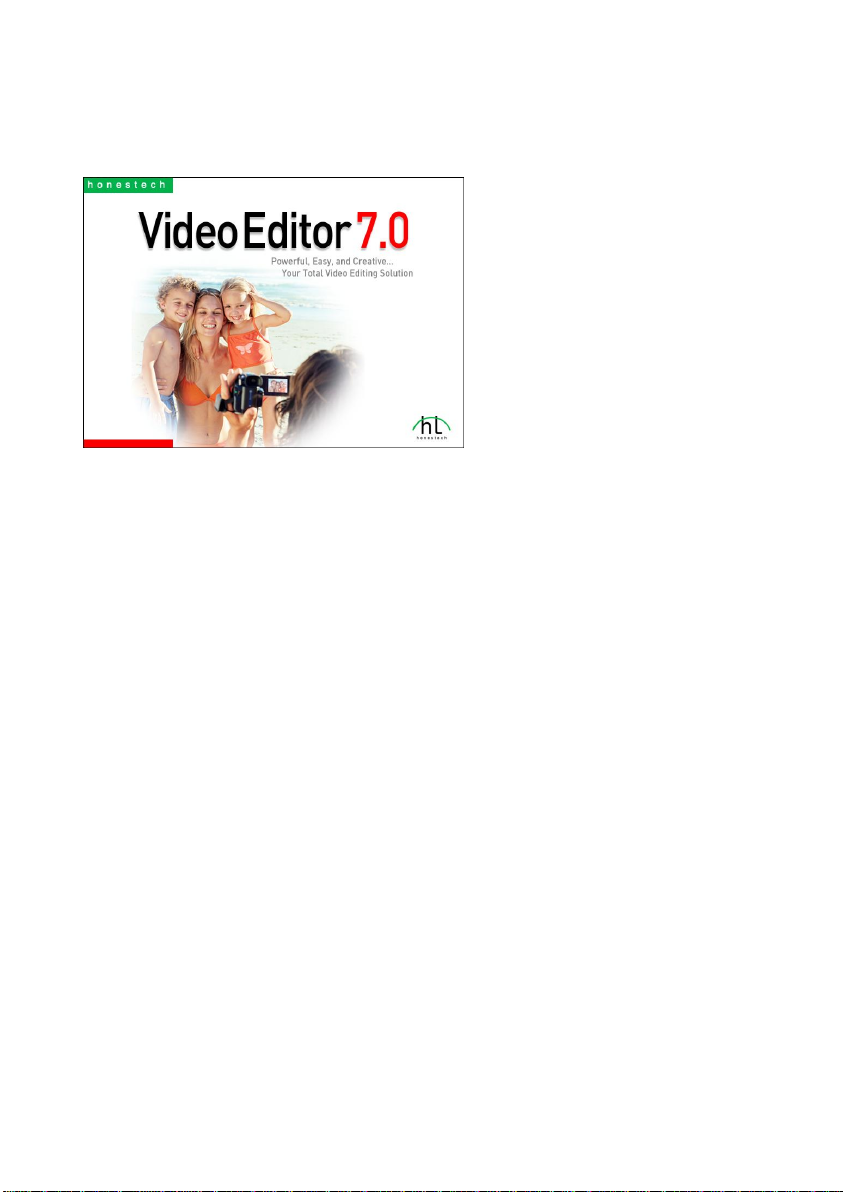
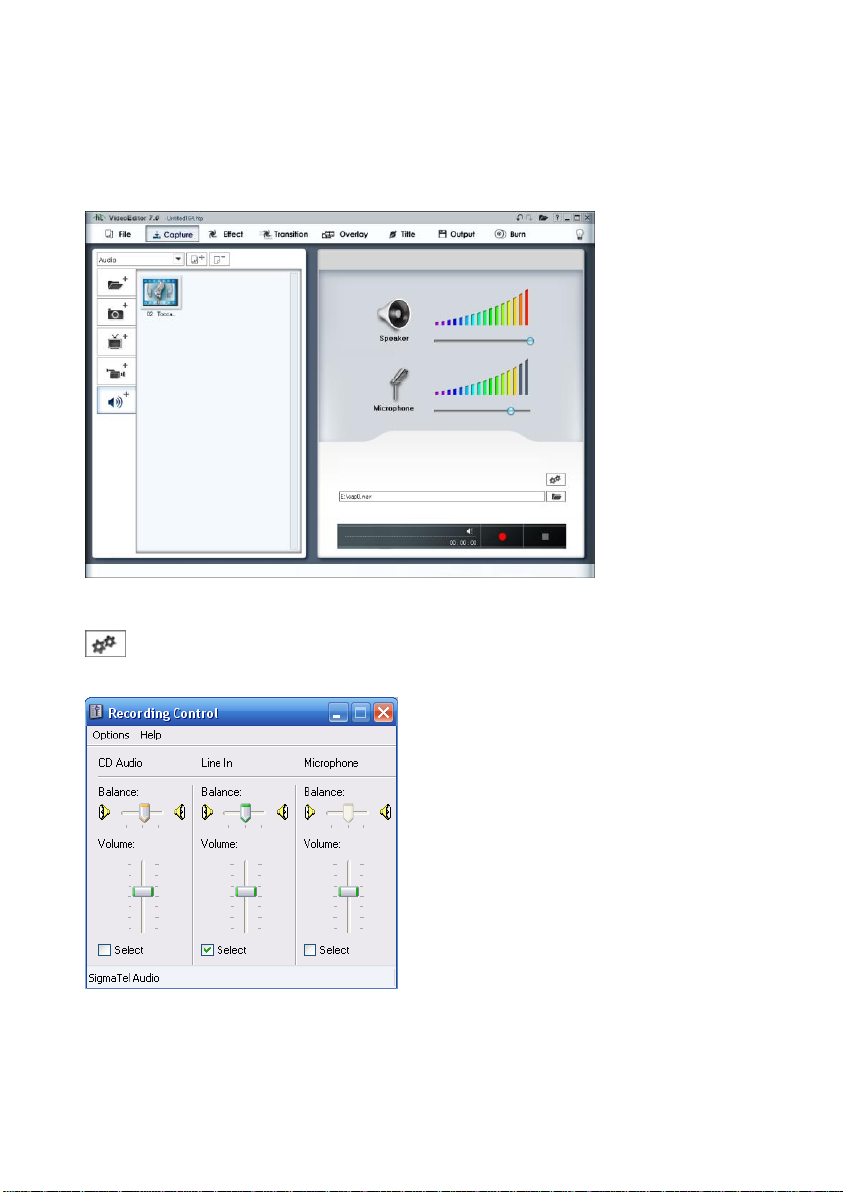
4.1.5. Microphone : Capture Settings
You can record audio and use it as background music or narration in your video projects.
Set Audio Device Setting
: Select the input source and audio levels.
Page 21

21. Video Editor 7.0
4.1.6. Adding and Deleting Video Clips
Click the button to add video clips to the library. Each video clip added will be displayed as
a thumbnail in the Video library. Select video from the top menu.
You may also remove the video clips from your video library by selecting the video clip and clicking
button.
4.1.7. Adding and Deleting Image Clips
Change the selection to Image, and then click to add, and click button to remove.
4.1.8. Adding and Deleting Audio Clips
Change the selection to Image, and then click to add, and click button to remove
images.
Page 22

22. honestech
4.1.9. Adding and Deleting Color Clips
Change the selection to color, and then click to add, and click button to remove.
NOTE
When you click button, [New Color Clip…] dialog opens as shown below.
In [New Color Clip…] dialog, you can select a color.
4.1.10. View Source Clip Properties
This allows you to see the properties of the Source Clip (format, file path, file size, frame rate, etc.)
To view the properties of a Source Clip
Right-click on the selected Source Clip and choose PROPERTIES. The Properties dialog box will
open.
Page 23

23. Video Editor 7.0
4.1.11. Detect Scene function
Detects where you made a break in the recording and automatically splits your video into
separate scenes of clips.
Using the “Detect Scenes” function, to automatically split your video into separate scenes or clip.
1. Select a video clip that you want to split using the “Detect Scene” function.
2. Right-click on the selected clip, and you will see a popup menu screen.
3. Select “Detect Scenes” in the popup menu, and scene detection progress will be
displayed to the right side in the player window.
To stop the scene detection process before completion, click STOP or select
CLOSE in the play window popup menu.
4. The video clips that contain detected scenes show icon in the corner of the
original video clip.
NOTE
To show the detected scenes, select the small folder icon, or select a "View
Detect Scenes List" in the popup menu.
To return to the Video Clip Collection, click button.
Page 24

24. honestech
4.2. Adding to the Storyboard or Timeline
After adding various video, photo, and audio clips to the library, you can move the files to the Player
Window for additional editing.
Video clips can be added to the Player Window for editing or dragged directly into the Storyboard or
Timeline.
B
C
A
A. Adding Directly to the Storyboard (Drag-and-Drop)
B. Moving clips into the Player Window for editing
C. Using the Cut marked frames button to move editited clips to the Storyboard
Page 25

25. Video Editor 7.0
Photo Images can be with ease by moving them directly into the Storyboard or Timeline with a simple
drag-and-drop.
A
B
Audio clips can be added to the Player Window for trimming or added directly into the timeline.
B
C
A. Move directly into the Storyboard or Timeline. (Drag-and-Drop)
B. Double click to view it in the player.
A
Page 26

26. honestech
A. Drag an audio file directly the timeline. There are two audio tracks, and you can
add audio file to either one of them.
* You can add a voice-over on one track and background music on another track.
B. Audio file moved into the player window for trimming.
C. Using the “Cut Marked Frames” button to move edited audio clips to the timeline or
storyboard.
4.2.1. Editing in Storyboard
You can combine video clips, image clips, transitions, and special effects.
To add transitional effects:
1. Select the Transition tab.
2. Select the Transition marker between the two clips you want to provide a transition for.
3. In the Transition Properties window, you can make changes to the transition.
Page 27

To change the length of a video clip:
1. Select a video clip.
2. In the Player Window, use the buttons to change how long the video
will play.
[Video Clip]
You can change the display duration for the image clips:
1. Select an image clip.
2. Right-click on the clip.
3. From the popup menu, select "Set photo duration..."
4. Set photo duration (ex. 5 second) for the selected image. (This setting will
determine how long each photo image will be displayed.)
27. Video Editor 7.0
[Image Clip]
Page 28

28. honestech
NOTE
Image clip duration can only be changed from within the Storyboard. The position of the
clip is controlled from the Timeline.
4.2.2. Editing in the Timeline
You can combine video clips, image clips, audio clips, and various effects in the Timeline. You can
change the position and duration of the clips and add various effects.
• Move Clip: Select a clip and move it to a different position within the Timeline.
• Adjust Clip Size: Position the cursor at the edge of each clip. When the cursor changes to
.. , move to the left or right to adjust the clip size.
1. (Timeline Zoom In): Zoom into the timeline, for more precise editing.
2. (Timeline Zoom Out): Zoom out to see the overall timeline.
3. (Video Track): Apply Transitions and Special Effects after moving video or image clips to
the Video Track.
4. (Overlay Track): Use this track to apply overlays, transitions and special effects to video
clips.
5. (Title Track): This is for titles only.
6. (Audio Track): This is for audio files only.
Page 29

29. Video Editor 7.0
4.2.3 Editing a Clip
4.2.3.1 Split a Clip
You can split or cut video clips on the timeline, creating multiple video clips out of a single clip. This
can be done by using the split feature.
To split a clip, To Split a Clip
1. Select a clip. Move the time slider to the position of the split.
2. Right-click on the clip to display a popup menu.
3. Select SPLIT in the popup menu, and you can split the clip.
4.2.3.2 Change the speed of a Video or Audio Clip:
You can increase or decrease the speed of your clip with the motion speed feature.
You can add dynamic effects to your video and audio by increasing or decreasing the
playback speed. The slow motion playback option can add dramatic effects to
emotional scenes. The fast motion playback option is great for humorous or action
scenes.
To change the speed of a Video or Audio Clip,
1. Select a clip.
2. Right-click on the clip to display a popup menu.
3. Select "motion speed"
* You can change the speed of clip from 0.125X to 8X.
* When you change the speed of a video clip, you may need to mute
...the audio to avoid unexpected audio effects.
Page 30

30. honestech
4.2.3.3 To mute the audio portion of a Video Clip
To mute the audio portion of a video clip,
1. Select the clip you want to modify.
2. Right-click the clip to display the popup menu.
3. From the popup menu, select "Audio Mute." The muted clip will display the "x" icon.
This can also be done by selecting the Mute button in the bottom right corner of the
screen.
4.2.3.4 To add a Fade in/Fade out to the audio portion of a video or audio clip.
Fade in and Fade out the audio of an individual clip by using the audio Fade in/Fade out tool.
To Fade in/Fade out the audio portion of a clip.
1. Select the clip you want to modify.
2. Press the Fade In button to add a fade in or the Fade out button for a fade out.
These buttons are contained in a box, located to the right of clip volume control in
the bottom right corner of the screen.
3. When applied to a clip, the button turns blue in color.
4.2.3.5 Restoring the original volume of a video or audio clip.
To restore the original volume:
1. Select the clip you want to modify.
2. Right-click the clip to display the popup menu.
3. From the popup menu, select "Restore to Original Volume"
Page 31

* “Restore to Orignal Volume” does NOT reset the audio Fade in/out setting. To reset the
Fade In/Out setting, you must deselect the Fade In/Out buttons.
4.2.3.6 Changing the volume
To adjust the volume,
1. Select the clip you want to modify.
2. Adjust the volume by moving the volume control slide to the left or right.
31. Video Editor 7.0
* This only changes the volume of an individual clip, not the entire timeline.
Page 32

32. honestech
4.3 Adding Special Effects
There are 6 different groups of special effect filters you can apply to your video
clips or photos.
1. (Color Filter) : Adjust the color of a video clip or photo.
2. (Effect Filter) : Zoom in/out, diffusion, mosaic, etc…
3. (Ghost & Noise Reduction Filter) : Blur, sharpen, contrast, etc…
4. (Transition In Filter) : A variety of animated transitions that transition from black to the
5. (Effect Filter) : A variety of effects that are applied to the entire length of the clip.
6. (Transition Out Filter) : A variety of animated transitions that transition to black from the
You can easily apply one of the many effects to your clips using the drag-and-drop method.
end of the clip.
start of the clip.
Page 33

33. Video Editor 7.0
Once the effect is dragged into the clip, you will see the effect icon
appear inside the thumbnail
This icon represents that the clip has an effect applied to it. As
soon as the effect is applied, the effect properties window will
appear on the right side of the effect list window as shown.
When an effect is applied to video clips, you can set the area
and level of effect.
Effect setting has 2 modes:
1. Basic setting: the effect level will remain same.
2. Advanced setting: the effect level can change.
Within the effect properties window you can assign an area that the
effect will be applied to by simply dragging the dotted box to where
you want the effect to be applied.
You can also change the intensity of the effect by the LEVEL slide
bar.
After you have chosen your area, and intensity, you can click on to apply the effect or you
can click to exit the properties.
1. Basic effect settings
An area can be designated so the effect occurs only
within the specified area.
Page 34

34. honestech
2. Advanced effect settings
An area and level can be set so that the effect occurs
only within the specified area and level.
After you add various effects to your clips, you can preview the result by clicking on the preview
button. If you do not like the effect that you have added, you can remove the effect by right-clicking
on the clip and selecting .
Page 35

4.4 Adding Transition Effects
Add beautiful transitions between your clips. Choose from 86 transtition effects
available.
35. Video Editor 7.0
You will see small transition markers between the video clips as shown below. Simply drag-anddrop the transition effect you wish to use into the small window shown below to add the transitional
effect.
Page 36

36. honestech
Transition Types : There are multiple transition effects to choose from.
Setting Up Transitions
3D Transitions Wipe Transitions
Slide Transitions Stretch Transitions
Etc : Diverse Transitions
You can also change the transition view by selecting a different view.
View from Icon & Name, Icon Only and Name Only choices.
A A. Preview Window: Provides immediate playback of video edits.
B. Background Color: Set the background color.
C. Direction: Set the direction of the transition.
D. Section Setup: You can adjust the section where the two clips
overlap. On the Timeline, you can adjust the section by
moving the clips.
B E. Number of horizontal and vertical lines: Adjust the number of
horizontal and vertical lines.
C E
Click on this button to accept changes
D
Click this button to cancel and exit the properties
Page 37

4.5. Adding Overlay Effects
Overlay is similar to the picture-in-picture feature on many TV sets. It allows you
to display two clips on a single screen or overlap two clips.
To Apply an Overlay:
1. Select the Overlay option.
2. An overlay list will appear on the left side of the screen.
3. Drag and drop the overlay you want to apply onto the Overlay Track.
4. Once the overlay has been added, the Overlay Properties window will open on the right
side of the screen.
5. This icon will indicate the clip that the overlay has been applied to.
37. Video Editor 7.0
[Result Screen]
Page 38

38. honestech
NOTE
An overlay can only be applied to video clips in the Overlay Track.
Setting Up Overlays:
You can change the Overlay Properties to achieve different overlay effects.
A. Mixing/Mixing 2 property (image transparency) and
Luminance keys
B. Color key property (removes or displays only the selected
color)
C. Changes the selection area (selected area or entire area).
D. Changes the effect you have set up.
C
D
B
A
The following images show the overlay effect. For example, the image in the tab “B” is displayed on
top of the image in the tab “A” (zoom in or zoom out mode).
[Tab A] [Result Screen] [Tab B]
Page 39

4.6. Adding Title Effects
Add a title to your video.
To add a title to your clip:
1. Select Title option.
2. A title list will appear on the left side of the screen.
3. Drag and drop the title you want to apply into the Title Track.
4. Once the title has been added, the Title Properties window will open.
5. You can set attributes including size, width, border, and shadow.
NOTE
Titles can be applied only in the Timeline.
39. Video Editor 7.0
Page 40

40. honestech
Title Editing
When you select the button from the Title Properties window, the Text Input (title entry)
window will appear as shown below.
A
B D
C E
A. Set font type and size
B. Set font color.
C. Add shadow effect and color.
D. Change outline color and thickness.
E. When the Outline option is checked, you can adjust the level of the outline (fade in or fade
out).
Page 41

4.7. The Output Wizard
All the effects and changes you have made in the Timeline or Storyboard are
applied and merged into a single file. When you press the OUTPUT button, The
Output Wizard Window opens.
41. Video Editor 7.0
The output window contains four output options on the left and a preview screen on the right. The
Output Options are described below:
1. (Create a video file) : To create files in MPEG1, MPEG2, AVI, DV-AVI, or WMV format.
2. (Creating a Disc) : To produce a movie file that you can burn to a disc.
3. (Writing to DV-Tape) : To write to a DV-Tape.
4. (Create an audio file) : To create an audio file in WAV format.
Page 42

42. honestech
4.7.1 Create a video file
Video Editor 7.0 allows you to create video files in various formats including AVI, DV-AVI, WMV,
MPEG-1, and MPEG-2 format.
F
A
B
C
D
E
To create a video file,
A. Select MPEG1, MPEG2, AVI, DV-AVI, and WMV.
B. Select a profile. (If there is no profile that suits your needs, you can create a custom profile.)
C. Confirm the folder and file names. To change the folder and file names, click button.
D. Confirm whether the selected profile fits your desired output settings.
E. Click the Record/Output button. This process may take a long time.
To stop the process before completion, click the button or select
from the popup menu in Player window.
You can preview your video prior to output by selecting the play button.
F. To return to the edit mode after completion, click the button.
Page 43

43. Video Editor 7.0
4.7.1.1 Save in MPEG format
Rendering Method : Fast MPEG merge (GOP boundary cut)
To use the Fast Method, all video clips being rendered must be the same MPEG format.
This makes inserting and deleting frames simple and fast.
The output video format will match the original MPEG format.
Customizing of video and audio settings is not possible; function property settings are
made inactive.
Type : Displays MPEG format of file to be rendered.
Video
o Resolution: Displays video resolution (screen size).
o Frame Rate: Displays Frames Per Second (fps).
o Bit Rate: Displays Bits Per Second (bps).
Audio
o Sampling Rate: Displays Sampling Frequency (KHz).
o Bit Rate: Displays Bits Per Second (bps).
Rendering Method : Smart Rendering
Encodes only a portion of the entire video as needed.
Only the edited title, audio, and the segments with special effects of the original streaming
video will be encoded, while the remainder of the original video will be saved as is.
If various effects are applied to the entire movie clip, the whole movie will be re-rendered.
When movie clips with different video formats are combined, the format of the output file
will be set to match the format of the Base streaming video file. Movie clips with formats
that do not match the Base streaming video file will be re-rendered.
Select the Base streaming video file using the button.
The video settings cannot be changed, and only the audio settings can be changed.
Page 44

44. honestech
Type : Display MPEG type
Video
o Resolution: Displays Resolution (screen size).
o Frame Rate: Displays Frames Per Second (fps).
o Bit Rate: Displays Bits Per Second (bps).
Audio
o Sampling Rate: Displays sampling frequency (KHz).
o Bit Rate: Displays Bits Per Second (bps).
Rendering Method : Full Rendering
Flexible: Renders movie clips together that are formatted with different video and audio
settings
Customizable: Allows manual selection of the output video and audio settings
Encoding: Entire video will be be encoded.
o Type : Select MPEG type
Supports MPEG-1, VCD, MPEG-2, SVCD and DVD. Both NTSC and
PAL standards are supported.
o Video
Resolution: Select resolution (screen size).
Frame Rate: Select Frames Per Second (fps).
Bit Rate: Select Bits Per Second (bps).
o Audio
Sampling Rate: Select Sampling Frequency (KHz).
Bit Rate: Select Bits Per Second (bps).
4.7.1.2 Save in AVI Format
1. Smart Rendering:
Only edited segments (title, audio and special effects) are encoded while unedited
segments maintain the original image. This improves video quality.
Page 45

45. Video Editor 7.0
If the video clip being edited is the entire video, the entire video is rendered again.
If more than one streaming video is edited, all of the videos are encoded and saved to the
format of the "base streaming file" format.
Videos being encoded are fixed in their format while the audio track may be adjusted.
2. Video (Supports NTSC and PAL):
Resolution: select video screen size (Resolution: 160 x 120 ~ 720 x 576). Resolution
settings are inactive when the Smart Rendering method is deactivated.
Frame Rate (FPS): Set video frame rate (Frames Per Second: FPS) range: 10 FPS ~ 30
FPS. This feature is deactivated when Smart Rendering is selected.
Video CODEC: Displays a drop-down list of CODECs registered on the user's PC.
Set Video Properties for the selected video CODEC, using the button.
3. Audio
Sampling Rate: Set Audio Sampling Frequency (Sampling Frequency: 16000Hz ~
48000Hz).
Audio CODEC: Show the list of audio CODEC's registered on the user’s PC.
NOTE
For more information about a CODEC, refer to manual provided by the codec developer.
4.7.1.3 Save in DV-AVI format
1. DV-AVI Type
Type 1: Video file in Digital Video format.
- This is the native format of video in a digital camcorder.
Page 46

46. honestech
- Video and audio are in the same stream.
- Requires a splitter that divides video and audio.
Type 2: Video file in general AVI format.
- Video is compressed in DV format.
- Video and audio are in separate streams.
- Needs to be converted into type 1 to be transferred to a digital camcorder.
2. Video resolution: Select NTSC or PAL.
NTSC: 720 x 480 resolution
PAL: 720x 576 resolution
3. Audio sample rate: Select audio frequency.
32kHz
48kHz
4. Video output is generated.
4.7.1.4 Saving Windows Media (WMV) File
Select a Profile Index from the list.
Page 47

47. Video Editor 7.0
1. Profile : The profile includes the audio and video codecs, output video size, audio sample
rate, bit rate , etc. If there is no preference profile, then you can create a custom profile
by using the Profile Generator of Windows Media Encoder.
Output using your own custom profile,
o Check . Then button will be enabled.
o Using button, you can import a custom profile.
o You can modify the bit-rate, audio codec, and audio format. (However, the
imported profile will not store these values.)
o Click OK button to create an output in WMV format.
NOTE
For more information on making a custom profile, please refer to the manual provided by
Windows Media Encoder.
2. Video: Supports NTSC or PAL standards (Video broadcasting standards used in different
regions of the world). NTSC is the video standard used in North America and Japan, and
PAL is the video standard used in Europe.
Resolution: Displays the video resolution or picture size (width x length)
Frame Rate: Display video frame rate - Frames Per Second (fps)
Bit Rate: Displays Bits Per Second (bps).
3. Audio
Sampling Rate: Displays the Audio Sampling Frequency (Hz)
Bit Rate: Displays the Audio Bit Rate - Bit Per Second (bps)
Stereo: Displays the audio presentation type (Stereo, Mono)
NOTE
Contact Microsoft(R) for more information about the settings and uses of Windows Media
Format (Video/Audio CODEC). All rights to Microsoft CODECs belong to Microsoft(R).
Page 48

48. honestech
4.7.2. Creating a Disc
F
A
B
C
D
E
To produce a movie file that you can burn to disc.
A. Select VCD, SVCD, or DVD Format.
B. Select NTSC or PAL from the drop-down list.
C. Confirm the folder and file names. To change the folder and file names, click button.
D. Confirm whether the selected profile fits to your desired output.
E. Click the Record/Burn button. This process may take a long time.
To stop the process before completion, click button or select
from the popup menu in the play window.
You can confirm the output process through the preview window on the right.
F. To return to the edit mode after completion, click button.
Page 49

4.7.3. Writing to DV-Tape
D
B
A
C
To write to DV-Tape.
A. Confirm the write position of the DV-Tape.
B. Import the file you want to write to DV-Tape by selecting icon.
C. Click the Record/Write button. This process may take a long time.
• To stop the process before completion, click button.
• You can confirm the output process through the preview window on the right.
D. To return to the edit mode after completion, click button.
49. Video Editor 7.0
Page 50

50. honestech
4.7.4. Creating audio files.
Creating files in WAV format.
E
A
B
C
D
To create an audio file,
A. Select the audio Codec and format.
B. Confirm the folder and file names. To change the folder and file names, click button.
C. Confirm whether the selected profile fits to your desired output.
D. Click the Record/Output button. This process may take a long time.
• To stop the process before completion, click button or select
from the popup menu in play window.
• You can confirm the output process through the preview window on the right.
E. To return to the edit mode after completion, click button.
Page 51

51. Video Editor 7.0
4.7.5. Creating Custom Output Profiles
The profile includes specified audio and video codecs, output video size, audio sample rates, bit
rates, etc.
To create a new custom profile,
1. Select CUSTOM category. The , , and
buttons will now be available.
2. Create a new profile by clicking the button.
3. Remove the current selected profile by using the button.
4. To view the detailed information of the profile, click the button.
5. To edit the selected project file, select the button.
NOTE
When you select from the DEFAULT category, you cannot use ,
and buttons
Page 52

52. honestech
4.8. Output to Disc
Click “Burn” to create a VCD, SVCD, or DVD disc.
Specify the format of the output video.
You can also import video clips that you have previously worked on or saved to your computer by
clicking on the button. This button will open a dialogue window allowing you to browse your
file system and locate your files. You can then select video files (e.g. mpeg, DVD) to add as a part
of your movie clip. To remove any movie clips from the movie file pool click on the button.
Begin by selecting the output video format that matches your disc format.
Page 53

53. Video Editor 7.0
Click on the chapter button to open the ADD CHAPTER window and add chapters to your
movie.
You will notice movie clip(s) added to your movie file pool will automatically be added into the screen
menu shown below.
4.8.1. Screen Menu Settings
Screen menu settings allow you to change the appearance of the main title page for your VCD,
SVCD, or DVD.
The text of the menu title and movie clip name
Background image of your menu
Number of clips per menu page
Navigational buttons
NOTE
When the CREATE MENU option is unchecked; the Screen Menu will not appear.
Page 54

54. honestech
4.8.2. Changing Text
One of the ways to organize your movies is by setting a proper title. You can change your menu title
and movie clip name within the screen menu by simply double clicking on the menu title or the movie
clip. The screen below will appear.
The text input window, allows you to change the name of your movie clip or menu title, as well as the
font type, size, and color. You can also use BOLD, italic, or the UNDERLINE font features.
4.8.3. Changing the Background Image
You can change the background image by clicking on this button and selecting your
preferred image from the list of thumbnail choices.
Besides choosing from the list of default background image, you can
also personalize your screen menu by adding your own background
images. Simply click on the Add Photo(s) button and choose your own
background image.
Your new background image will then be applied to the menu title page.
If you have multiple menu pages, you can apply different background
images for each page.
Page 55

4.8.4. Number of movie clips per Menu Page
You can set the number of movie clips to be displayed on each menu page. Use the
drop-down menu and select the number of clips you wish to place on each page.
4.8.5. Navigational Buttons
Use this button to change the navigational buttons.
Navigational buttons only appear if you are using more than one menu
page. They allow you to browse between menu pages and select the
movie clip(s) you want to play when watching your disc.
There are many button designs to choose from. Simply click on the
button you wish to use, and click [OK].
55. Video Editor 7.0
Page 56

56. honestech
4.8.6. Output Options
Use the output options to configure your disc prior to burning your movie.
Clicking the Output Options button will display the option window below and allow you
to change your disc configuration.
1. Select the CD/DVD writing device.
2. Select video standard
NTSC is used in North America and Japan; PAL is used in Europe.
3. Select sound format
4. Make UDI File
5. Record to media
LPCM encodes at 96 kHz/24-bit comparable to the WAV format.
Check this box to make a UDI (Universal Disc Image) file on your hard drive
instead of burning your movie to a disc.
If you select this menu, your movie will be burned to a CD or DVD.
Page 57

57. Video Editor 7.0
6. After burning, remove a created file. Removes the temporarily created disc image from
the Temp Folder location below. Recommended
when burning to disc.
7. Disc Name
Create a custom title for your CD/DVD.
8. Temp Path
Click on this icon to browse and select the directory to be used as a Temp folder.
9. OK/Exit
Save the setting and close the Option Dialogue window.
Cancel setting changes and close the Option Dialogue window.
10. Eject CD/DVD Drive
11. Close CD/DVD Drive
12. Erase Rewritable Disc
13. Press the Burn Button to start burning.
Page 58

58. honestech
4.8.7 OUTPUT SPECIFICATION
• DVD (Digital Versatile Disc) Spec
NTSC
Size: MPEG2 720 X 480 pixels
Video bit rate: Up to 9.8 Mbit/sec
Frame rate: 29.97 frames/sec
Audio: LPCM, MPEG-1 Layer2
PAL
Size: MPEG2 720 X 576 pixels
Video bit rate: Up to 9.8 Mbit/sec
Frame rate: 25.00 frames/sec
Audio: LPCM, MPEG-1 Layer2
• VCD (Video CD)
MPEG1 352 X 240 NTSC
Size: MPEG1 352 X 240 pixels
Video bit rate: 1150 kbit/sec
Frame rate: 29.97 frames/sec
Audio: 224 kbit/sec MPEG-1 Layer2
MPEG1 352 X 288 PAL
Size: MPEG1 352 X 288 pixels
Video bit rate: 1150 kbit/sec
Frame rate: 25.00 frames/sec
Audio: 224 kbit/sec MPEG-1 Layer2
• SVCD (Super Video CD)
NTSC
Size: MPEG2 480 X 480 pixels
Video bit rate: max 2524 kbit/sec MPEG-2 (if the audio is in 224 kbit/s), audio
+ video max bitrate is 2748 kbit/s.
Frame rate: 25.00 frames/sec
Audio: from 32 - 384 kbit/sec MPEG-1 Layer2
PAL
Size: MPEG2 480 X 576 pixels
Video bit rate: max 2524 kbit/sec MPEG-2 (if the audio is in 224 kbit/s), audio
+ video max bitrate is 2748 kbit/s.
Frame rate: 25.00 frames/sec
Audio: from 32 - 384 kbit/sec MPEG-1 Layer2
Page 59

59. Video Editor 7.0
5. UNINSTALL honestech VIDEO EDITOR
5.1. Find program group
You can uninstall VIDEO EDITOR 7.0 from its program group. Go to the Start Menu and find
the VIDEO EDITOR 7.0 program group, and then follow the steps below.
START PROGRAMS honestech VIDEO EDITOR 7.0 Uninstall honestech VIDEO EDITOR
7.0
5.2. Select to uninstall
When you click UNINSTALL, you will see a pop-up screen for confirmation.
Please click [Yes] to uninstall.
5.3. Start Uninstall Process
The uninstall process will begin. Please wait for the process to complete.
5.4. Uninstall Completed
When the confirmation message is displayed, click [OK] to finish the process.
Page 60

60. honestech
honestech Products
Page 61

honestech
VHS to DVD 3.0
honestech VHS to DVD 3.0 is a revolutionary
software that allows the easy and simple
production of DVD/CD movies. Now you can save
and keep your priceless home videos forever in
sharp and crystal clear DVD/CD.
Videotapes can deteriorate over time. Deteriorated
videos will have color bleed, white specks, and
other distortions. Don’t risk this happening to
YOUR home video collection!
Archive your home video collection with its
irreplaceable memories onto lasting DVD/CD with
honestech VHS to DVD 3.0.
Features
1. Adjustable Recording Time
Recording will be made for the duration of time
you set. With one click, you can capture and
burn it onto a media of your choice.
2. Various Effects and Menu Creation
Offers many different transition effects and
filters, and lets you create your own menus.
3. Convenient File Management
Movie clips are managed in a File Pool for ease
of viewing, editing, and deleting.
4. Supports Most Burning Devices
Supports CD-R/RW, DVD+/-R/RW, DVD+/-RW,
DVD+/-RW DL.
5. PSP and iPod Formats Supported
Capture and convert video into MPEG-4 format,
and watch it on your PSP, and iPod.
6. Audio Recording
Record audio from cassettes, LP records, and
video tapes; and create MP3 files or audio CDs.
System Requirements
• Capture Device:
TV/Video Capture Card or
USB Video Capture Box
• Operating system:
Windows XP
Windows Vista
(http://www.honestech.com/vista)
• Processor:
Pentium IV 2.0 GHz
or equivalent
• Memory:
256MB of RAM
• Video Output:
DVD,VCD, SVCD,AVI,WMV,
MPEG-4
• Other:
DirectX 9.0 or higher
Windows Media Player 6.4
(or higher)
CD Writer for VCD, SVCD
DVD Writer for DVD
Page 62

62. honestech
honestech
VHS to DVD 3.0 Deluxe
honestech VHS to DVD 3.0 Deluxe is a
revolutionary software that allows the easy and
simple production of DVD/CD movies. Now you
can save and keep your priceless home videos
forever in sharp and crystal clear DVD/CD.
Videotapes can deteriorate over time. Deteriorated
videos will have color bleed, white specks, and
other distortions. Don’t risk this happening to
YOUR home video collection!
Archive your home video collection with its
irreplaceable memories onto lasting DVD/CD with
honestech VHS to DVD 3.0 Deluxe
Features
1. Adjustable Recording Time
Recording will be made for the duration of time
you set. With one click, you can capture and
burn it onto a media of your choice.
2. Various Effects and Menu Creation
Offers many different transition effects and
filters, and lets you create your own menus.
3. Convenient File Management
Movie clips are managed in a File Pool for ease
of viewing, editing, and deleting.
4. Supports Most Burning Devices
Supports CD-R/RW, DVD+/-R/RW, DVD+/-RW,
DVD+/-RW DL.
5. PSP and iPod Formats Supported
Capture and convert video into MPEG-4 format,
and watch it on your PSP, and iPod.
6. Audio Recording
Record audio from cassettes, LP records, and
video tapes; and create MP3 files or audio CDs.
System Requirements
• Operating System:
Windows XP Service Pack 2
Windows Vista
(http://www.honestech.com/vista)
• USB 2.0 Host Controller/Port
• Processor:
Intel® Pentium® 4 2.4 GHz,
Pentium® D, Pentium® M 1.3 GHz,
Pentium Core™ Duo or equivalent,
or AMD® Athlon® 64 processor is
recommended
• Memory:
256MB of RAM
• Video Output:
DVD,VCD, SVCD,AVI,WMV,MPEG-4
• Other:
Composite (RCA) cable
1. Audio cable (3.5mm to composite)
2. Audio cable (3.5mm to 3.5mm)
DirectX 9.0 or higher
Windows Media Player 6.4 (or higher)
CD Writer for VCD, SVCD
DVD Writer for DVD
* USB 2.0 Video Capture Device Included.
Page 63

honestech
Fireman CD/DVD Burner 3.0
honestech Fireman CD/DVD Burner 3.0 allows
you to create data, audio, or video discs. You can
also import audio from music CDs and create
system backup/recovery discs and
bootableCD/DVD.
With DVD Authoring Studio, you can create your
own stylish video DVD with ease. Create photo
slideshow DVD of using your digital photos that
you can also play on your home DVD player.
Using LightScribe discs, you can create custom
laser-etched CD/DVD labels with your own photos,
artwork, and text.
You can make and burn ISO images which provide
a way to store all files on a disc as a single file.
Erase CD/DVD RW discs and create CD/DVD
labels and covers.
Features
1. Data Burnning
- Data CD
- Data DVD
- Audio and data CD
- Bootable CD
- Bootable DVD
2. Audio Burning
- Audio CD
- MP3 CD/DVD
- WMA CD/DVD
- Audio and data CD
- Import audio from music CD
3. Video Burning
- DVD
- Video CD
- Super Video CD
- DVD-video files
4. Backup
- Create backup files
- Restore from backup files
5. Utilities
- Erase CD/DVD
- View disc information
- Create disc Label/Cover
- Supports LightScribe
63. Video Editor 7.0
- Can view/slideshow photo
- Create/burn ISO image
BONUS SOFTWARE
- honestech DVD Authoring Studio 2.0
System Requirements
• Operating System:
Windows XP
Windows Vista
(http://www.honestech.com/vista)
• Processor:
Pentium III 800 MHz or equivalent
• Memory: 256MB of RAM
• HDD:
Minimum 10GB of free space
• Writer:
DVD-ROM, DVD-R/RW, DVD-RAM,
DVD+R/RW, DVD-Dual, DVD-Multi,
or DVD-ROM/CD-RW drive with 1394,
USB2.0, ATAPI, or SCSI interface
• LightScribe:
requires optical drive with
LighScribe feature
• Audio device:
PCI sound card, USB audio box,
or integrated sound card
• AGP or PCI graphics card that
supports DirectDraw overlay.
• Resolution:
minimum of 1024 x 768 or
1280 x 1024 recommended.
Page 64

64. honestech
honestech
DVD Authoring Studio 2.0
With honestech DVD Authoring Studio 2.0, you
can archive up to 27 hours movie in one dual-layer
DVD. Create your own high-quality DVD movies
with thie powerful software. Simply capture video
from your web cam, digital camera or TV using
your TV tuner/capture device and convert the
video into DVD.
Features
1. Ultra-Long DVD format
Archive 16 hours of video on a DVD or 27 hours
of video on dual-layer DVD.
2. Capture
Capture videos in various formats from TV
capture card and USB camera or DV
Camcorder.
3. Import from DVD
Import videos from existing DVD movies.
4. Edit
Edit videos or photo shows, transitions, effects,
texts, audios and trims.
5. Menu
Provides various DVD menu themes, and
supports motion menu.
6. Various outputs
Support Ultra-Long DVD, DVD, VCD, SVCD,
MPEG files, VIDEO_TS folder and disc image
file.
7. Dual-Layer Support
Support dual-layer DVD burning.
8. Copy Disc
Make back up copies of your CD/DVD.
Operation System
Windows XP SP2
Windows Vista Ready
(http://www.honestech.com/vista)
System Requirements
DirectX 9.0 or higher
Pentium IV 1 GHz or higher
256MB RAM or more
Page 65

65. Video Editor 7.0
honestech
Burn DVD 3.2
honestech Burn DVD 3.2 lets your convert your
video of various formats into DVD, VCD and
SVCD. The simple 3 step interface guides user
through the entire process. honestech Burn DVD
3.2 is easy enough for novice yet powerful enough
for experienced users.
Features
1. Automatic MPEG Conversion Feature
Atomatically detects and convert the original
video file into DVD, Video CD or SVCD format.
2. Audio Format Selection
Audio formats can be converted to LPCM in
order to be played at PS2.
3. Menu Creation
Create customized DVD or Video CD menus
with ease using the templates.
4. Test Recording Feature
Test your DVD/CD writer before actually
burning DVD/CD.
5. Data CD
Supports data burning on CD media.
6. UDF (Universal Disk Format, DVD Image
File) Creation
You can make and burn UDF image file which
provides a way to store all files on a disc as a
single file.
7. XVCD and XSVCD Format Support
Create high-quality video CDs using XVCD and
XSVCD formats.
Operation System
Windows XP SP2
Windows Vista Ready
(http://www.honestech.com/vista)
System Requirements
DirectX 9.0 or higher
Pentium IV 1 GHz or higher
256MB RAM or more
Page 66

66. honestech
honestech
Video Editor 7.0
honestech Video Editor 7.0 provides user-friendly
interface which allows even beginners to create
and edit amazing videos.
Compress and save your edited videos in high
quality MPEG-1, MPEG-2, AVI, DV-AVI and WMV
video format.
Various rendering options: Full Rendering, Smart
Rendering or Fast GOP (Group of Pictures)
encoding methods.
Title, Transition, Special Effects, and Overlay
features allow you to personalize your videos with
ease.
Features
1. Cut/Merge video clips.
2. Add special effects to your video clips (82
special effects provided).
3. Add Transiton effects to your video clips (84
transition effects provided).
4. Add Title effects to your video clips (79 title
effects provided).
5. Import video from various video sources (VCRs,
camcorders, TV, etc.) using your video capture
device.
6. Create DVD, VCD, SVCD, and mini-DVD.
System Requirements
• Video Input:
AVI, DV-AVI, MPEG-1, MPEG-2,
VCD, SVCD, DVD, WMV,
DVR-MS(only Windows XP)
• Image input:
JPEG, BMP, PNG
• Audio input:
MP3, WAV
• Video Output:
AVI, DV-AVI, MPEG-1, MPEG-2,
WMV, VCD, SVCD, DVD
• Audio Output:
WAV
• Operating system:
Windows XP, Vista
• Processor:
Pentium IV 1GHz or equivalent
• Memory:
256MB of RAM
• Other:
Microsoft DirectX 9.0 or higher
Windows Media Format SDK 9
(or higher)
Windows Media Player 7
(or higher)
CD Writer for VCD, SVCD
DVD Writer for DVD
Page 67

67. Video Editor 7.0
honestech
Easy Video Editor 2.0
honestech Easy Video Editor 2.0 is an easy-to-use
program that allows even a novice to split and
merge video files of various formats.
Features
1. Supports various video formats: AVI, DV-AVI,
MPEG and WMV and are supported for input
and output. WMV output format is supported for
video streaming on the internet.
2. Multiple video files can be rendered
simultaneously.
3. Large files can easily be split to several smaller
video files: split by play time, number of files, or
by file size.
4. Merge multiple small files, regardless of video
formats.
Operation System
Windows XP SP2
Windows Vista Ready
(http://www.honestech.com/vista)
System Requirements
Intel Pentium MMX or IV
64MB RAM or more
DirectX 8.1 (or above)
Windows Media Player 7 (or above)
Windows Media Format 9 (or above)
Page 68

68. honestech
honestech
Photo DVD 3.0
honestech Photo DVD 3.0 is a simple program
that allows you to create personalized photo slide
shows on CD/DVD to watch on your television or
computer. You can even add background music
or a narrated audio file to your slide show.
Features
1. Create photo slide shows to various video
formats including DVD, VCD, SVCD, mini-DVD,
MPEG, AVI, DV-AVI, and WMV.
2. Edit Pictures
honestech Photo DVD 3.0 allows you to edit
your pictures and add text or special effects.
3. Add Background Music
You can add audio files to your photo slide show.
4. Add Transition Effects
You can add transition effects between your
pictures.
5. Preview
Preview your photo slide show before burning it
to CD/DVD.
Operation System
Windows XP SP2
Windows Vista Ready
(http://www.honestech.com/vista)
System Requirements
DirectX 9.0 or higher
Pentium IV 1GHz or higher
256MB RAM or more
15GB HDD or more
CD or DVD writer
Page 69

honestech
Video Patrol 5.0
honestech Video Patrol 5.0 provides a
comprehensive personal video monitoring
surveillance solution. You can monitor your
home or office from anywhere with broadband
internet access. You can control up to three
cameras at a time, send e-mail notices to specified
email accounts, and schedule monitoring time
slots. You can record surveillance videos in
MPEG format when a motion is detected.
Features
1. Basic Surveillance
Record video (in mpeg format) continuously or
only when a motion is detected. You can also
specify motion from certain area within viewing
area of PC camera to trigger the surveillance
system.
2. Email Notification
Send email notices to specified e-mail
adresses
3. Scheduled Monitoring
Specify desired monitoring time slots for
surveillance system to be active. (e.g…: one,
daily, or weekly)
4. Multiple PC Cameras
Supports up to three PC cameras, and you
select individual detection mode and response
action for each PC camera. In order to avoid
conflict in device recognition by your PC, we
recommend that you use different brand or
model for multiple PC camera opration.
5. Data Backup/Burning
You can create backup video files on CD or
DVD
6. File List Management
Easily manage the recorded video files with
browsing and selection feature for watching or
burning.
7. FTP Server Option
Back up your videos by uploading them to your
FTP server or burn DVD (if available)
69. Video Editor 7.0
8. Free Online membership (www.my-iptv.com)
View surveillance video from PDA, Sony PSP
and PDA mobile phone
System Requirements
• Capture Device:
USB Camera
• Operating System:
Windows XP
Windows Vista
(http://www.honestech.com/vista)
• Processor:
Pentium IV 2.0 GHz or
equivalent
• Memory:
256MB of RAM
• Other:
DirectX 8.1 or higher
Windows Media Player 6.4
(or higher)
CD Writer for Data-CD
DVD Writer for Data-DVD
• Video Output:
MPEG-1, MPEG-1 VBR
Page 70

70. honestech
honestech
MY-IPTV Anywhere™
Deluxe
MY-IPTV Anywhere™ provides a sensible solution
to set up your own broadcasting company from
home. The software allows you to deliver your
home or local TV programs to anywhere in the
world as long as you have broadband internet
access. Experience your local, hometown TV
programs while traveling to another city, state or
even overseas.
Your local, hometown TV programs can be
delivered to you using MY-IPTV AnywhereTM's built
in MPEG-4, H.264 software compression
technology.
Once you have registered with honestech's free
online membership, connection to your home PC
and local TV programs is completely hassle free.
No need to worry about IP addresses or servers.
The connection is peer to peer so you can be
assured of a secured connection.
Features
1. Channel Changing & Surfing
Switch and search TV channels from outside
your home or anywhere else in the world.
2. PVR and Scheduled Recording
Schedule and record TV programs with an
intuitive Internet based TV programming tool.
3. DVD Burning
Burn recorded TV programs onto a DVD with
ease (DVD burner required).
4. High Quality Picture
MY-IPTV Anywhere™ utilizes the latest MPEG-
4 H.264 giving a television quality broadcast.
Operation System
Windows XP SP2
Windows Vista
(http://www.honestech.com/vista)
System Requirements
USB 2.0 Connection
Pentium IV 1.4 GHz or higher
128MB RAM or more
2GB HDD or more
DirectX 9.0 or later
Windows Media Player 6.4 or higher
Broadband Internet Connection Required
* MY- IPBOX (USB 2.0 TV/Video Capture Box) included.
Page 71

71. Video Editor 7.0
honestech
MY-IPTV&CAM Anywhere™
Deluxe
MY-IPTV & CAM Anywhere™ combines the power
to access your home TV programs and personal
video monitoring surveillance system from
anywhere in the world where broadband internet is
available!
MY-IPTV Anywhere™
The software allows you to deliver your home or
local TV programs to anywhere in the world as
long as you have broadband internet access.
Experience your local, hometown TV programs
while traveling to another city, state or wherever
your travels take you. Your local, hometown TV
programs can be delivered to you using MY-IPTV
Anywhere™'s built-in H.264 video compression
technology.
MY-IPCAM Anywhere™
Provides a comprehensive personal video
monitoring surveillance solution. With MY-IPCAM
Anywhere™, your PC becomes a powerful
surveillance system. MY-IPCAM Anywhere™
records video when motion is detected, and
provides remote real-time monitoring function.
Controls up to three cameras at a time, send email notices to specified email accounts, and
schedule monitoring time slots. You can record
and burn surveillance videos in MPEG format.
You can manage watching TV and monitoring
personal surveillance from Honestech’s FREE
online membership, which also takes care of
hassle-free per-to-peer connection to your PC
from anywhere.
Features
1. MY-IPTV Anywhere™
• Channel Changing & Surfing
• PVR and Scheduled Recording
• DVD Burning
• High Quality H.264 video compression
2. MY-IPCAM Anywhere™
• Basic Surveillance
• Email Notification
• Scheduled Monitoring
• Multiple PC Cameras
• Data Backup/Burning
• File List Management
Operation System
Windows XP SP2
Windows Vista
(http://www.honestech.com/vista)
System Requirements
Designed for analog signals/channels only.
USB 2.0 host controller
Processor : Pentium IV 1.8 GHz or higher
Memory : RAM 256MB or higher
HDD : 2GB or more
DirectX 9.0 or later
Windows Media Player 6.4 or higher
Broadband Internet Connection Required
* MY-IPBOX - TV&CAM (USB 2.0 TV/Video Capture
Device & PC Camera) included.
Page 72

72. honestech
honestech
DVD Player 3.0
honestech DVD Player 3.0 is a small but powerful
DVD player. Supports all standard formats, and
provides complete navigation controls. You can
also customize the DVD player with various skins
provided.
Features
• Parental controls
• Various skins available
• Auto-resume playback
• Bookmark feature
Video Support
• MPEG 1 / 2 decoding
• Subtitle display
• Video always on top
Audio Support
• Dolby
• LPCM
• MPEG 1 Layer 2
Operation System
Windows XP
Windows Vista
(http://www.honestech.com/vista)
System Requirements
DirectX 8.1 or higher
Windows Media Player 6.4 or higher
Pentium III 700 MHz or higher
256MB RAM or more
DVD Optical Drive
VGA Card with H/W acceleration
Sound Card
Page 73

73. Video Editor 7.0
honestech
Rapid Video Blogger
Easily create User-Generated Content from any
media type with the honestech Rapid Video
Blogger.
Compile a video blog content with your music,
photos, video and more.
Features
• Various Templates
• Photo Editing
• Supports TV/video capture cards &
USB PC cameras
• Video Editing
• Preview
• Various Output Formats
System Requirements
• Operating System:
Windows XP Service Pack 2
Windows Vista
(http://www.honestech.com/vista)
• Processor:
Pentium III 1.0 GHz or equivalent
• Memory:
512MB of RAM
• Other:
16 MB or more of video memory
Microsoft DirectX 9.0c or higher
Optional Devices
• DVD Burner
• TV/video capture card or
USB PC cam
Input/Output Formats
• Video Input:
MPEG-1, MPEG-2, WMV,
ASF, AVI
• Photo Input:
BMP, JPEG
• Audio Input:
MP3, WAV
• File Output:
MPEG-1, MPEG-2, WMV
• Disc Output:
VCD, SVCD, DVD
• Photo Editing:
BMP, JPEG, GIF, PNG, TIFF
Page 74

74. honestech
honestech
Claymation Studio
Capture images using a digital camera, webcam
or DV camcorder,
create characters, apply small changes, and add
background images
and music to create your own claymation movies.
Features
• Onionskin
• Rotoscope
• Chroma key
• Supports WMV & AVI format
• Audio Recording
• Simple Frame Editing
• Supports Project Format
System Requirements
• Operating System:
Windows XP
Windows Vista
(http://www.honestech.com/vista)
• Processor:
Pentium IV 1.8GHz or equivalent
• Memory:
128MB of RAM
(256MB or higher recommended)
• Other:
Microsoft DirectX 9.0(or higher)
Windows Media Format
SDK 9 (or higher)
Windows Media Player 7
(or higher)
Optional Devices
• Video Capture Device:
Web Camera , DV-Camcorder
• Audio Capture Device:
microphone
Input/Output Formats
• Image input:
JPEG, BMP, PNG, GIF
• Audio input:
MP3, WAV
• Video Output:
AVI, WMV
Page 75

honestech
Backpack Journalist
Powerful digital video editing software that allows
users to capture and edit audio/video and then
transmit over the internet, all in real-time.
Features
1. Capture
• DV Connection Display
• Device Control
• Auto Capture
• Manual Capture
• Batch Capture
• Scene Change Detection (SCD)
• Continuous recording and Pre-Roll playback
option
• Timer
• Audio Information Display
2. Editong
• 3 timeline tracks
• Clip source management based on Bin type
• Automatic clip insertion from Clip monitor to
timeline
• Adding still images to the beginning or the end
of a clip
• .Customizing the timeline for production of
news clips with time length restriction
3. Rendering & Transmission
• Easy Transmission
• Transmission Configuration
• Auto Error Correction
System Requirements
• Operating System:
Windows XP Service Pack 2
Windows Vista Ready
(http://www.honestech.com/vista)
• Processor:
Pentium IV 2.4 GHz or equivalent
• Memory:
512MB of RAM
(1024 MB or more recommended)
75. Video Editor 7.0
Coming soon..
• HDD:
20 GB+ hard drive space for video capture
and editing
• Screen Resolution:
1024 x 768, 32-bit color or above
• Microphone:
Required for recording voice-overs
• Video Capturing Device:
DV camcorder connected via OHCI-compliant
IEEE1394
• File Transfer:
Internet connection request for file transfer
• Other:
Microsoft DirectX 9.0c (or higher)
Windows Media Player 7 (or higher)
• Video Input:
DV-AVI
• Image Input:
JPEG, BMP, TGA
• Audio Input:
MP3, WAV
• Video Output:
WMV, DV
• Output Resolution:
720x480, 360x240
Page 76

76. honestech
Honestech, Inc.
North and Latin America
P.O. Box 26365 Austin, TX 78755
Phone : 1-877-484-6246 or 512-514-6222
Fax : 512-248-2215
eMail :support@honestech.com
France: support@honestech-fr.com
http://www.honestech.com
Honest Technology Taiwan
Address : Room 6E08, No. 5, Sec. 5, Hsin-Yi
Road., Taipei, Taiwan, R.O.C
< Taipei World Trade Center >
Tel : +886 2 8780 8023
Fax : +886 2 8780 4582
eMail : Taiwan@honestech.com
Honest Technology Japan
Address : MS Bldg 6F, 2-25-4, Taitou, Taitou-Ku,
Tokyo, 110-0016 JAPAN
eMail : japan@honestech.com
Honest Technology Korea
Address : Kyung-Dong Bldg, 5F, 906-5 JijokDong, Yuseong-Gu, Daejeon, Korea 305-330
Tel : +82-42-477-0717~8
Fax : +82-42-477-0719
eMail : support@honestech.co.kr
 Loading...