

Page 1

honestech
Video Editor 8.0
User Guide
Page 2

2. honestech
End User License Agreement
IMPORTANT : READ THE FOLLOWING TERMS AND CONDITIONS CAREFULLY BEFORE CONTINUING
THIS INSTALLATION.
IF YOU DO NOT AGREE WITH THESE TERMS AND CONDITIONS, PROMPTLY REMOVE THE
SOFTWARE FROM YOUR COMPUTER AND RETURN THE SOFTWARE, INCLUDING THE
DOCUMENTATION, TO YOUR SUPPLIER AND YOUR MONEY WILL BE REFUNDED. IF YOU
DOWNLOADED THIS SOFTWARE, PLEASE REMOVE THE SOFTWARE FROM YOUR COMPUTER AND
CONTACT YOUR SUPPLIER TO REQUEST A REFUND.
In this license agreement (the “License Agreement”), you (either individual or an entity), the purchaser of
the license rights granted by this License Agreement, are referred to as “licensee” or “You”. Honest
Technology is referred to as the “Licensor”. The current version of the accompanying software
(“Software”) and documentation (“Documentation”) are collectively referred to as the “Licensed Product”.
Licensor may furnish hardware with the Licensed Product (“Hardware”)
1. License
In accordance with the terms and conditions of this License Agreement, the Software is the property of
the Licensor and is protected by Copyright Law. While the Licensor continues to own the Software,
the Licensor grants the Licensee, after Licensee‟s acceptance of this License Agreement, the Limited,
non-exclusive license to use on copy of the current version of Licensed Product as described below.
The Software is “used” on a computer when it is loaded into the temporary memory (i.e., RAM) or
installed into the permanent memory (e.g., hard disk, CD-ROM, or other storage device) of that
computer, except that a copy installed on a network server for the sole purpose of distribution to
another computer is not considered “in use”. Except as may be modified by a license addendum which
accompanies this License Agreement, the Licensee‟s rights and obligations with respect to the use of
this Software are as follows:
You May,
I. Use the Software for commercial or business purposes in the manner described in the
Documentation.
II. Use the Software to share Internet connection, transfer data, files and images among the
computer in the manner described in the Documentation.
You May Not,
I. Copy the documentation that accompanies Software.
II. Sublicense or lease any portion of the Software.
III. Make illegal duplication of the software.
2. Copyright and Trade Secrets. All rights in and to the Licensed Product including, but not limited to,
copyrights and trade secrets rights, belong to Licensor, and Licensor holds title to each copy of the
Software. The licensed Product is protected by United States Copyright Laws and international treaty
Provisions.
3. Term. This License Agreement is effective until terminated. Licensee may terminate this License
Agreement if Licensee breaches any of the terms and conditions herein. Upon termination of this
License Agreement for any reason, Licensee shall return to Licensor or otherwise destroy the Licensed
Product and all copies of the Licensed Product. Upon request of Licensor, Licensee agrees to certify in
writing that all copies of the Software have been destroyed or returned to Licensor. All provisions of
this Agreement relating to disclaimers of warranties, limitation of liability, remedies, or damages, and
Licensor‟s proprietary rights shall survive termination.
4. Executable Code. The Software is delivered in executable code only. Licensee shall not reverse
engineer, compile or otherwise disassemble the Software.
Page 3

3. Video Editor 8.0
5. Limited Warranty
a. Licensor does not warrant that the functions contained in the Licensed Product and Hardware
will meet Licensee‟s requirements or that the operation of the Software and Hardware will be
uninterrupted or error-free. Licensor does warrant that the media on which the Software is
furnished and the hardware will be free from defects in materials and workmanship under normal
use for a period of thirty (30) days from the date of delivery (“Warranty Period”). This Limited
Warranty is void of failure of the media on which the Software is furnished has resulted from
accident, abuse, or misapplications.
b. EXCEPT AS PROVIDED ABOVE, THE LICENSED PRODUCT IS PROVIDED “AS IS”
WITHOUT WARRANTY OF ANY KIND, EITHER EXPRESS OR IMPLIED INCLUDING, BUT
NOT LIMITED TO, IMPLIED WARRANTIES OF MERCHANTABILITY AND FITNESS FOR A
PARTICULAR PURPOSE, AND THE ENTIRE RISK AS TO THE QUALITY AND
PERFORMANCE OF THE LICNESED PRODUCT AND HARDWARE IS WITH LICENSE.
6. Limitation of Liability
a. Licensor ‟s sole obligation or liability and licensee‟s exclusive remedy under this agreement shall
be the replacement of the defective media on which the software is furnished and/or the
hardware according to the limited warranty above.
b. In no event will licensor be liable for any consequential, incidental or indirect damages including,
without limitation, any loss of data or information, loss of profits, loss savings, business
interruption or other pecuniary loss, arising out of use of or liability to use the software or
documentation or any hardware, even if licensor has been advised of the possibility of such
damages, or for any claim by any third party.
7. General
a. Any Software and Hardware provided to Licensee by Licensor shall not be exported or re-
exported in violation of any export provisions of the United States or any other applicable
jurisdiction. Any attempt to sublicense, assign or transfer any of the rights, duties or obligations
hereunder is void. This Agreement shall be governed by and interpreted under the laws of the
State of New Jersey, United States of America, without regard to its conflicts of law provisions.
Licensor and Licensee agree that the U.N. Convention on Contracts for the International Sales of
Goods shall not apply to this License Agreement.
b. This License Agreement may only be modified or amended by a written license addendum that
accompanies this License Agreement or by written document that has been signed by both you
and Licensor. Site licenses and other types of enterprise licenses are available upon request.
Pleas contact Licensor or your supplier for further information.
c. Any controversy or claim arising out of or relating to this Agreement, or the breach of this
Agreement, shall be settled by arbitration administered by the American Arbitration Association in
accordance with its Commercial Arbitration Rules and Judgment upon the award rendered by the
arbitrator may be entered in any court having jurisdiction thereof. The arbitration shall be held in
New Jersey, United States of America.
If you have any other questions concerning this License Agreement, or if you desire to contact Licensor for
any reason, please contact Honest Technology.
Copyright 2009
Honest Technology Inc.
All Rights reserved.
Page 4

4. honestech
Table of Contents
END USER LICENSE AGREEMENT ....................................................................................... 2
TABLE OF CONTENTS ............................................................................................................ 4
1. INTRODUCTION ................................................................................................................ 6
1.1. WHAT IS HONESTECH VIDEO EDITOR 8.0? ............................................................ 6
1.2. MINIMUM SYSTEM REQUIREMENTS ........................................................................ 6
2. HONESTECH VIDEO EDITOR INSTALLATION ................................................................. 7
3. USING HONESTECH VIDEO EDITOR 8.0 (EASY MODE) ................................................. 12
3.1. IMPORT OR CAPTURE VIDEO ................................................................................... 12
3.2. SPLIT AND ARRANGE CLIPS ................................ ..................................................... 20
3.3 ADD EFFECTS ............................................................................................................. 22
3.4. PUBLISH ..................................................................................................................... 23
3.4.1. Publish to Disc: ....................................................................................... 23
3.4.2. Publish to Video File: .............................................................................. 30
3.4.3 Upload to YouTube .................................................................................. 32
3.4.4 Convert Video for iPod/PSP..................................................................... 33
4. ADVANCED MODE OF HONESTECH VIDEO EDITOR 8.0 ............................................... 34
4.1. IMPORTING VIDEO, PHOTO AND AUDIO FILES ....................................................... 36
4.2. CAPTURING VIDEO FROM WEBCAM OR CAMCORDERS ....................................... 37
4.2.1 Selecting Video Capture Device. ............................................................. 37
4.2.2. Video Recording ................................................................ ..................... 39
4.2.3. Audio Recording ..................................................................................... 40
4.2.4. Viewing Media Properties ....................................................................... 41
4.2.5. Auto Scene Detection ............................................................................. 42
4.3. ADDING CLIPS TO THE STORYBOARD OR TIMELINE ............................................. 44
Page 5

5. Video Editor 8.0
4.3.1. Adding Video Clips ................................................................................. 44
4.3.2. Adding Photos ........................................................................................ 45
4.3.3. Adding Audio .......................................................................................... 46
4.3.4. Editing in Storyboard .............................................................................. 47
4.3.5. Editing in the Timeline ............................................................................ 50
4.3.6. Editing a Clip .......................................................................................... 51
4.4. ADDING SPECIAL EFFECTS ...................................................................................... 54
4.5. ADDING TRANSITION EFFECTS ............................................................................... 57
4.6. Adding Overlay Effects .............................................................................. 59
4.7. ADDING TITLE EFFECTS ........................................................................................... 61
4.8. CREATING OUTPUT ................................................................................................... 63
4.8.1. Output Video File .................................................................................... 64
4.8.2. Burn Disc ................................................................................................ 72
4.8.3. Write DV-Tape ........................................................................................ 73
4.8.4. Extract Audio .......................................................................................... 74
4.9. DVD CREATION .......................................................................................................... 75
4.9.1. Menu Title Option ................................................................................... 76
4.9.2. Text Options ........................................................................................... 77
4.9.3. Background for Menu Title Page ............................................................. 77
4.9.4. Clips Per Menu Page .............................................................................. 78
4.9.5. Navigation Buttons ................................................................................. 78
4.9.6. Chapter Creation .................................................................................... 79
4.9.7. Output Options ....................................................................................... 81
4.9.8. Output Specification................................................................................ 82
5. UNINSTALL HONESTECH VIDEO EDITOR 8.0 ................................................................. 84
Page 6

6. honestech
1. INTRODUCTION
1.1. What is honestech Video Editor 8.0?
honestech Video Editor is a powerful video editing program that can help you
produce a professional-quality video from personal videos, digital still images,
and audio.
honestech Video Editor employs a user-friendly interface and smart and useful
features to make it easy, even for first-time users, to navigate through it without
getting lost or confused.
honestech Video Editor's high performance MPEG encoding engine saves
edited digital videos into small, high quality MPEG-1, MPEG-2, AVI (including
compressed AVI), DV-AVI, and WMV (Window Media) format.
honestech Video Editor can manage and edit multiple files simultaneously.
Each video file can be edited on "Full Rendering", "Smart Rendering" and "GOP
(Group Of Picture)" level.
honestech Video Editor allows you to insert text into video clips and add music
files for the audio function.
Title, Transition, Special Effects, and Overlay functions have been added and
now provide a more convenient editing environment.
A Timeline feature, which combines drag-and-drop editing and easy-to-
understand editing functions, has been added.
1.2. Minimum System Requirements
Processor: Intel Pentium IV 1GHz or equivalent
Operating System: Windows XP SP2/3, Windows Vista
Memory: 256MB of RAM
Direct-X: 9.0
CD Burner: for VCD/SVCD
DVD Burner: for DVD
Others:
Direct-X 9.0
Windows Medial Format SDK 9
Windows Media Player 7
Page 7
7. Video Editor 8.0
2. honestech Video Editor Installation
2.1. Insert the installation CD in the CD-ROM drive.
2.2. Setup process will automatically start. If the installation does not start automatically,
please double-click on Setup.exe file on the installation CD.
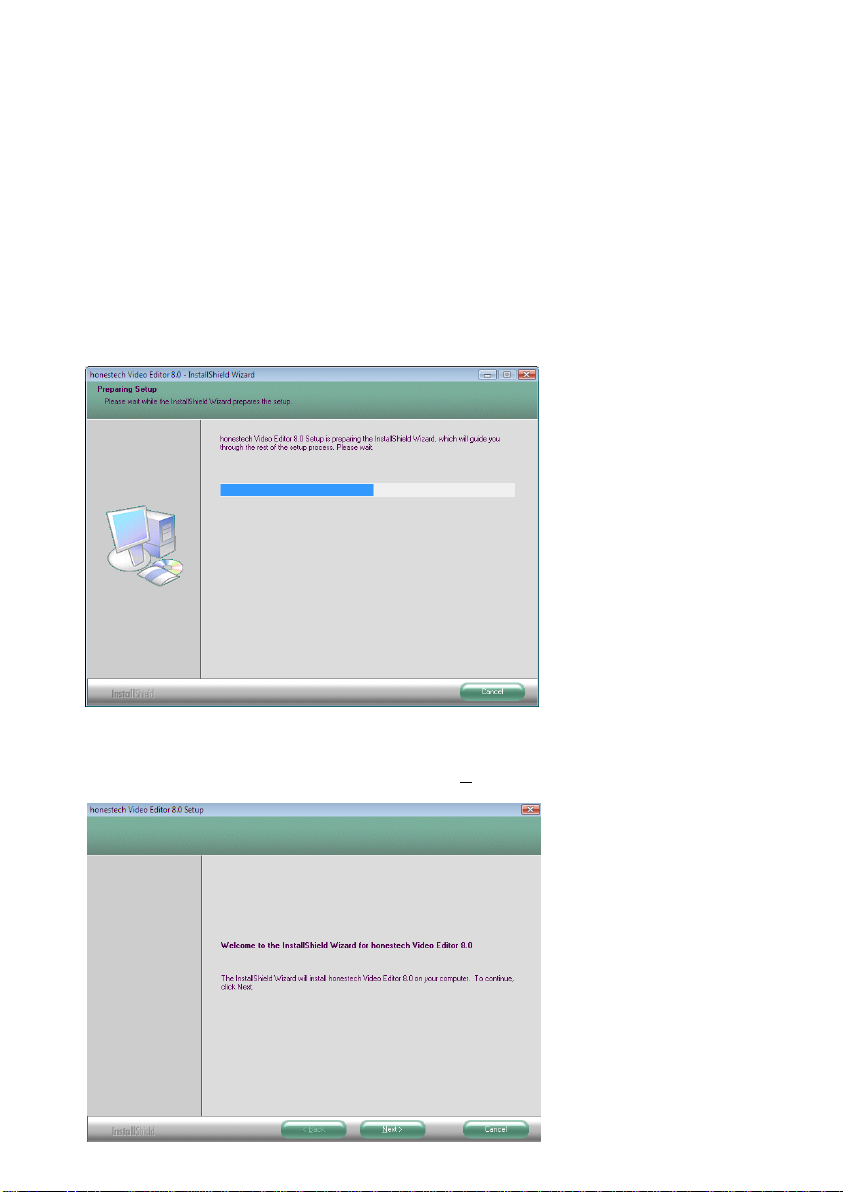
2.3. Installation process will start with the following screen.
2.4. Following welcome screen will appear. Click [Next >] to continue.
Page 8
8. honestech
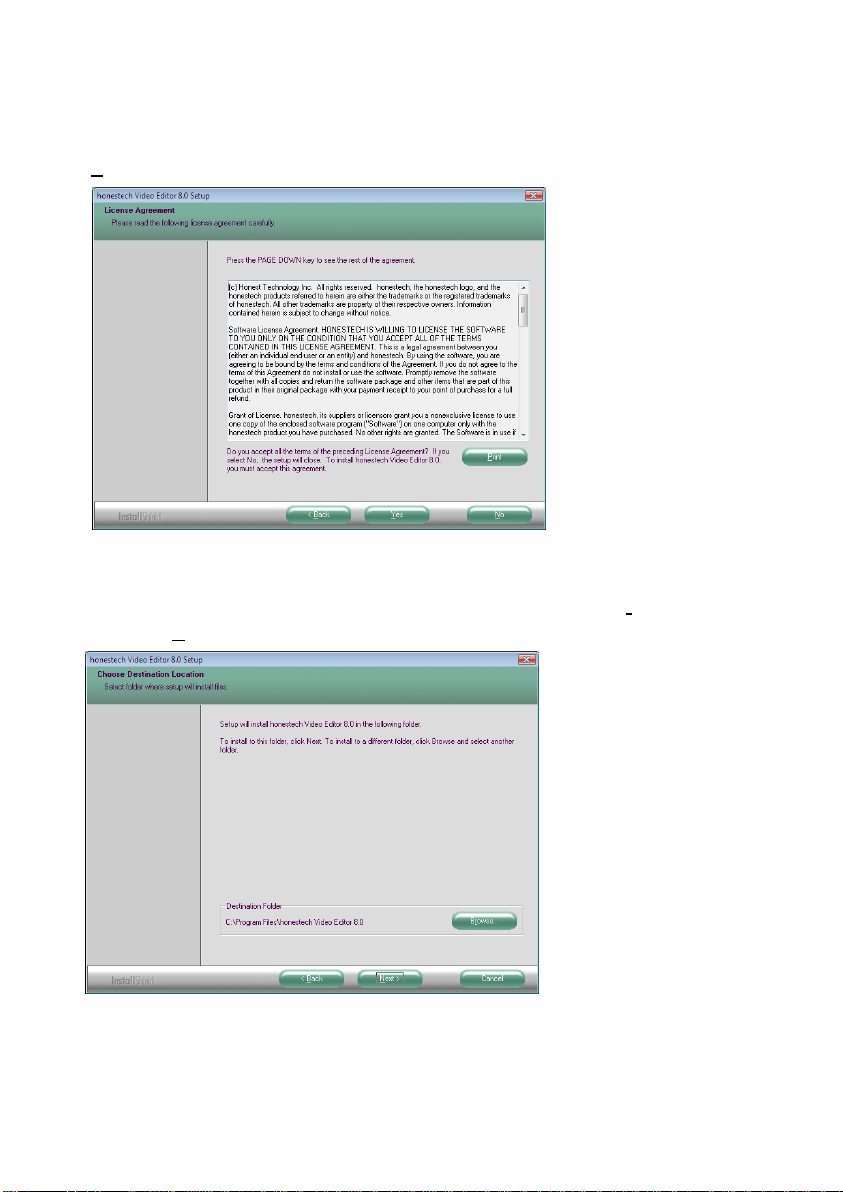
2.5. The End-User License Agreement will appear as shown below, if you accept, click
[Yes] to continue.
2.6. Use the default destination folder or change it by clicking on [Browse…] button.
Then click [Next] to continue.
Page 9

9. Video Editor 8.0
2.7. Select Program Folder screen will be displayed next. Accept the default folder or
choose your program folder and click [Next >] to continue.
2.8. Setup status screen will appear as shown below. This step is done automatically.
Page 10

10. honestech
2.9. Installing Adobe Reader. This is optional if you already have Adobe Reader installed
on your PC.
2.10. Allow the installation of Adobe Reader by clicking on [Run].
Page 11

11. Video Editor 8.0
2.11. honestech Video Editor Setup is now complete; click [Finish] to complete the
installation.
Page 12

12. honestech
3. Using honestech Video Editor 8.0 (Easy Mode)
You can start Video Editor 8.0 Easy Mode by clicking “Easy Mode” from the main menu
screen. Video Editor 8.0 allows you to import videos from your hard drive or a playback
device connected to your computer, edit and arrange the video, then publish it.
3.1. Import or Capture Video
In this section, you will capture your video.
Select and click on the video input source that you would like to use.
Import File: Click to import from an existing video file.
Import from DV Cam: Click to import from a DV-camcorder.
Import from HDV Cam: Click to import from an HDV camcorder.
Import from webcam: Click to record video using a webcam or record video
Page 13

from a non-hardware encoding capture device.
Capture Window:
13. Video Editor 8.0
Video Playback Controls: Click to play, pause, stop,
rewind, or fast forward the video. These options are not available when
capturing from an analog device.
Record: Click to start recording.
Stop: Click to stop recording. The recorded video will be saved in
your output folder.
Recording Time: Enter a value (hours:
Page 14
14. honestech
minutes: seconds) to set the duration of the recording. The recording will stop
automatically after the duration has elapsed. This is very useful if you know the
length of the movie you are recording. It is recommended that you always set a
recording time to prevent unnecessary or unwanted recordings from consuming
valuable recording space on your computer‟s hard drive. You can always stop
the recording manually before the recording time has fully elapsed.
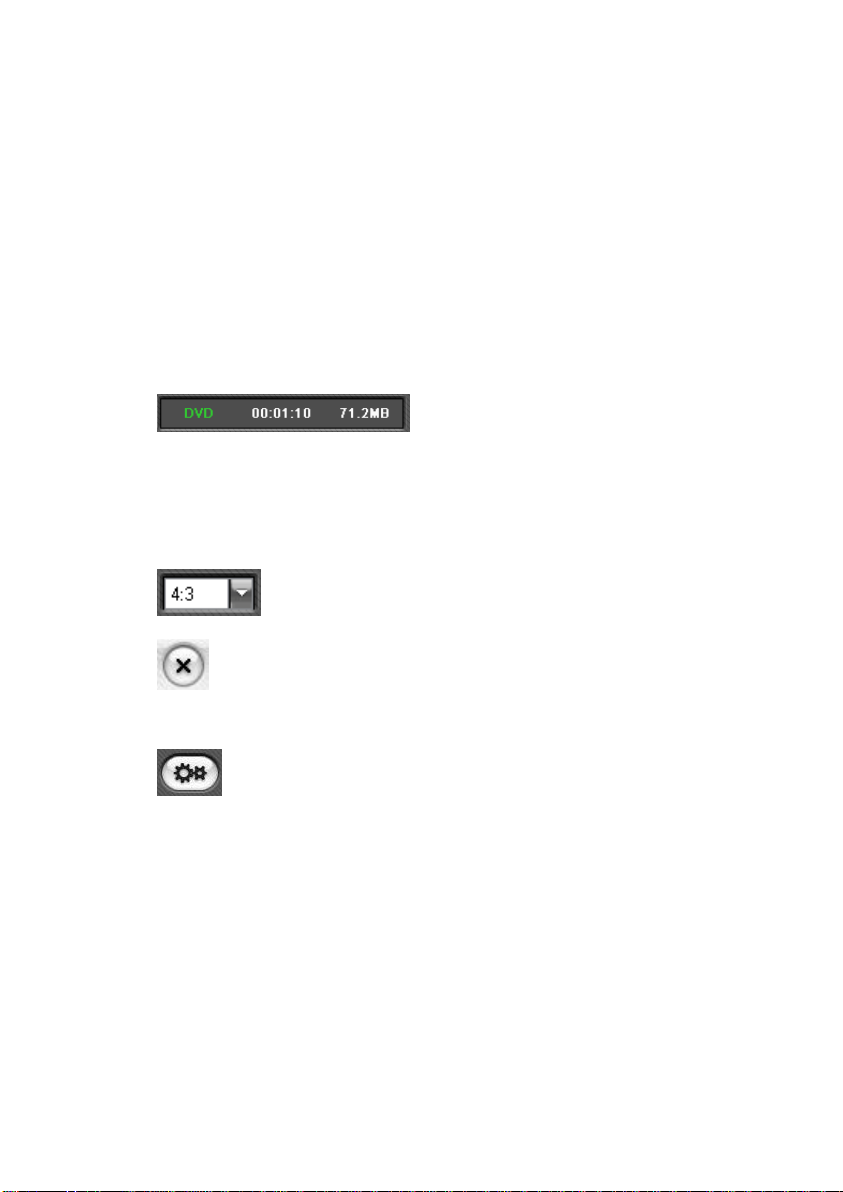
Recording Status: This panel displays the
selected recording format, recording time elapsed, and file size of the current
recording.
Aspect Ratio: Set the aspect ratio for your recorded video.
Exit: Click to exit the capture window and return to the editing screen.
Options: Click to select your video input device (e.g. webcam or DV
camcorder), choose your recording format and change the recording quality
(affects record time).
Page 15
Selecting Video Capture Device:
15. Video Editor 8.0
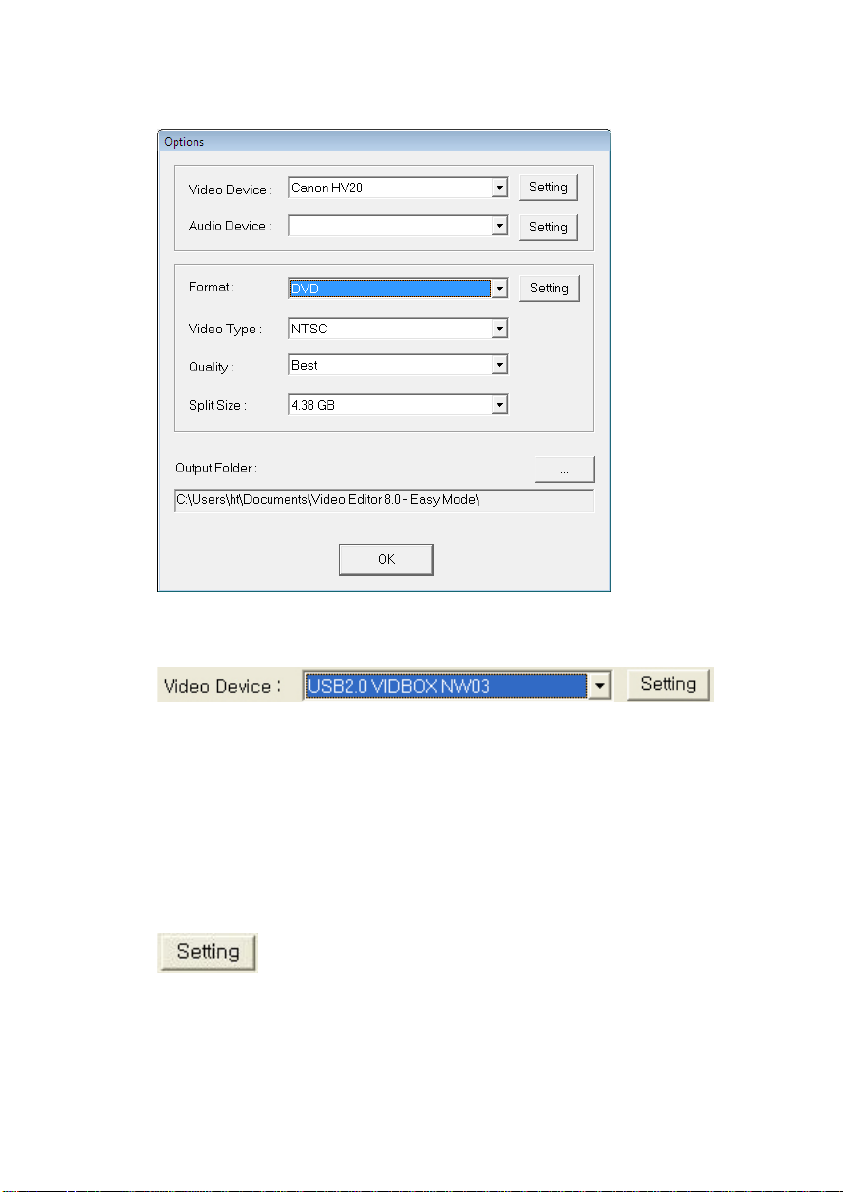
Using the drop-down menu shown above, you can select the video input device.
Video Editor 8.0 will detect and list all available video input devices (select
USB2.0 VIDBOX if you are using the VIDBOX).
Note: Importing video and audio is only possible with a “non-hardware
encoding” capture device.
Video Device Settings: Select the type of video input cable you
have connected to your video device.
Page 16

16. honestech
Selecting Audio Capture Device:
Select the audio device that you want to use (select USB VIDBOX Audio or
USB Audio Device if you are using the VIDBOX).
Audio Device Settings: Configure the settings of the selected
audio device and adjust the volume (if allowed).
Page 17

Video Recording Format:
17. Video Editor 8.0
Select the video file format from the drop down menu (VCD / SVCD / DVD /
Long DVD / AVI / WMV).
Video Format Settings: Configure additional settings based on
the selected video format.
- DVD, Long DVD
You can select from three Resolution Settings: (352*240(288) /
352*480(576) / 720*480(576) ). Long DVD format will allow you to
record longer video to your writable DVD than the normal DVD format,
but video quality will be slightly lower.
Note: Selecting a resolution higher than the recommended setting may cause
dropped frames, resulting in poor video quality.
Page 18

18. honestech
- WMV
Enter Header Information for WMV files.
Selecting Video Type:
Select the video standard format you wish to record your video in (e.g. NTSC /
PAL; * Select NTSC for North America).
Selecting Video Quality:
Adjust the quality for the recorded file (Best / Good / Normal / Average). The
higher the quality, the bigger the file size it will be. Lower quality settings will
enable you to burn more video to a single CD/DVD.
Maximum recording time under each setting for DVD (This is an approximate
calculation, and the results may vary slightly depending on the video/audio
type.)
Best: 1 hour (SL DVD); 2 hours (DL DVD)
Page 19

19. Video Editor 8.0
Good: 1 hour & 20 minutes (SL DVD); 2 hours & 40 minutes (DL
DVD)
Normal: 1 hour & 40 minutes (SL DVD); 3 hours & 20 minutes (DL
DVD)
Average: 2 hours (SL DVD); 4 hours (DL DVD)
SL DVD = Single Layer DVD (4.7GB); DL DVD = Dual Layer DVD (8.5GB)
Note: The difference between Best and Average quality settings is nominal and
will be difficult to detect on average display or analog TV screens.
Selecting Split Size:
The Split Size feature automatically splits recorded video files if they exceed the
selected size. This helps to ensure that your video files will fit onto one DVD/CD.
Use 4.38 GB when burning to single layer DVDs and 7.5 GB for dual layer
DVDs.
Selecting Output Folder:
Specify the location on your hard drive where your recorded video files will be
saved.
Page 20

20. honestech
Video Clip Board
Storyboard
Preview Screen
3.2. Split and Arrange Clips
In this section, you will split your video into smaller clips and arrange them.
Video Clip Board:
Recorded or imported video clips will be added to the Video Clip Board in icon
format.
Preview Screen:
To begin editing a video clip, double-click on the clip in the Video Clip Board to
move it to the Preview Screen. You can also drag the video clip over to the
Preview Screen.
Play: Click to preview your work.
Page 21
Play head: Click and drag to change the position of the video in the Preview
Screen.
Split: Click to split the video at the position of the play head marker. The
original video will be divided into two segments and moved back to the Video
Clip Board. By repeating this procedure, you can remove unwanted segments.
Storyboard:
21. Video Editor 8.0
Previous Frame: Click to go back a single frame.
Next Frame: Click to advance the video by a single frame.
Select a video clip that you want to use, and drag it down to the Storyboard.
Within the Storyboard, you can click and drag a clip to move it. Dragging a clip
to the left or right will change its sequence. A vertical bar will appear to show
you where the clip is going to be placed on the timeline.
You can later merge all the clips in the Storyboard together to create your final
video.
Next: Click to go to the next step when you are finished arranging your clips.
Back: Click to go back to a previous step. This will allow you to import or
capture additional video clips at a later time.
Page 22

22. honestech
3.3 Add Effects
In this section, you will alter your video with transitions, effects, and title screens.
Default intro title clip, ending credit clip and transition effects are added to the Storyboard
automatically.
If you would like to add a new effect to one of your clips, first select the clip that you
would like to apply effects to in the Storyboard. Once you have selected a clip in the
Storyboard, click one of the tabs to choose how you would like to change the video. The
options available are Transitions, Effects or Titles.
Transitions:
Click on the Transitions Tab and select a transition from the options available. Drag the
option you selected down to the transition box located in between two video clips.
Effects:
Click on the Effects Tab and select an effect from the options available. Drag the option
you selected down to the video clip you would like to add it to. Small icons will appear on
the clip indicating that an effect has been applied.
Page 23

23. Video Editor 8.0
Titles:
Click on the Titles Tab and select a title from the options available. Drag the option you
selected down to the video clip you would like to add it to. Small icons will appear on the
clip indicating that a title has been applied.
3.4. Publish
In this section, you will publish your video to a disc or output your project to a video file
on your hard drive. You will need to select the type of output that you would like to create.
You can choose between creating a video file and creating a disc.
3.4.1. Publish to Disc:
Menu Navigation Buttons: Click to access the chapter
submenu, navigate backwards and forwards, and return to the title page of your DVD
menu.
Page 24

24. honestech
Chapters:
Create Chapter Points: Click to begin adding chapters to a clip that
you have selected.
Use the transport controls to locate positions within
your clip that you want to create chapter points for.
Auto clip detection : Select this option to automatically
insert a chapter point for each clip added to the Storyboard in the Edit screen.
*Chapter points will not be added to the intro title and ending credits.
Manual chapter insertion : Select this option to add
individual chapter points anywhere within a clip.
Number of chapters to insert : Select this
option to automatically add the selected number of chapter points evenly throughout
the video
Page 25

Note: 1. You cannot insert a chapter point in the last 25 seconds of video.
2. You must have minimum 2 seconds gap between two consecutive
chapter points.
Add: Click to add the selected chapter type.
Remove: Select a chapter and click this button to remove the selected
chapter.
Apply: Click to apply chapters to the video.
Exit: Click to exit without saving.
25. Video Editor 8.0
Customizing DVD Menu:
Select Theme: Click to select a theme for your DVD Title Menu.
This will change the way the buttons and thumbnails on your menu
look.
Select Background Image: Click to select a background image for
your DVD Title Menu.
Select Background Music: Click to add background music to your
DVD Title Menu.
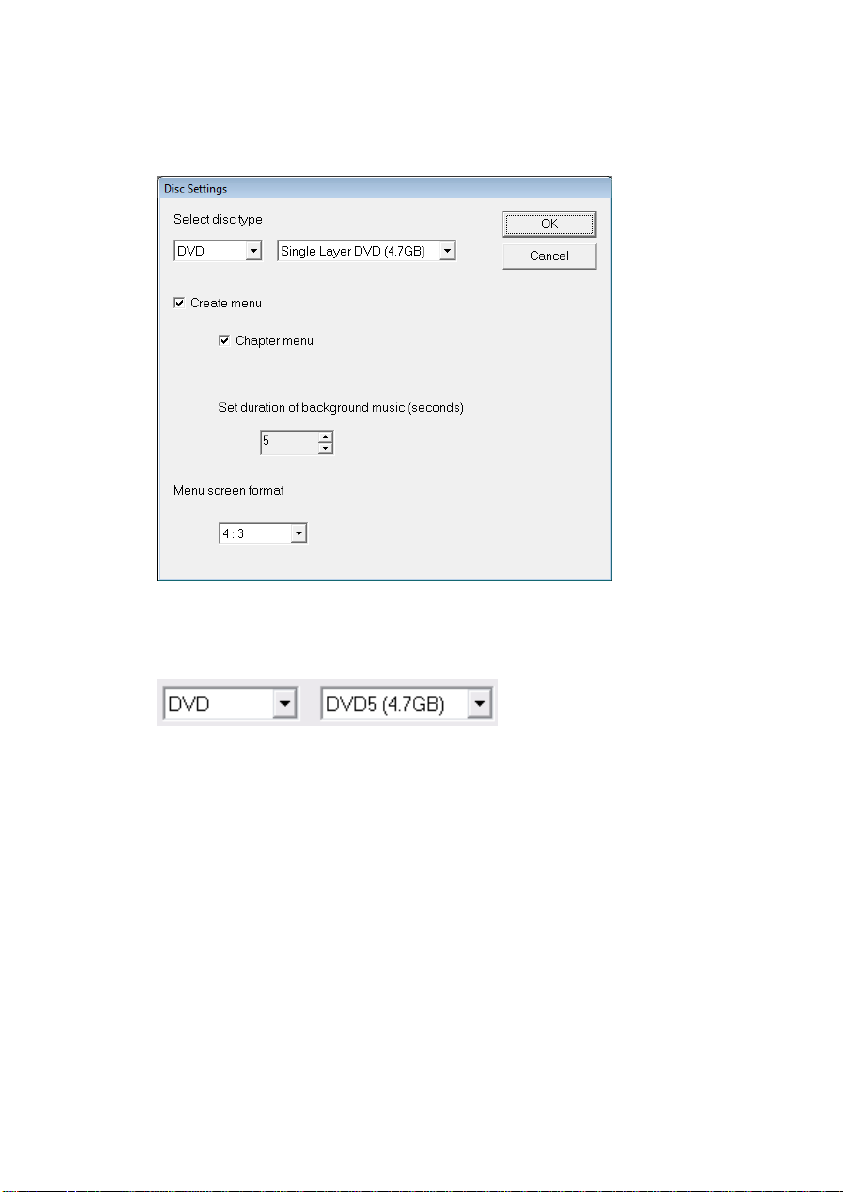
Option: Click to change DVD Menu Options
Page 26
26. honestech
Selecting Disc type:
Using the drop-down menus shown above, you can change the type of disc you
are using, and in some cases, the capacity of your disc (i.e. Single Layer/Dual
Layer).
- Create Menu
Check this option if you would like to create a DVD title menu.
- Chapter Menu
Check this option if you would like to create a menu screen for selecting
individual chapters.
Page 27
27. Video Editor 8.0
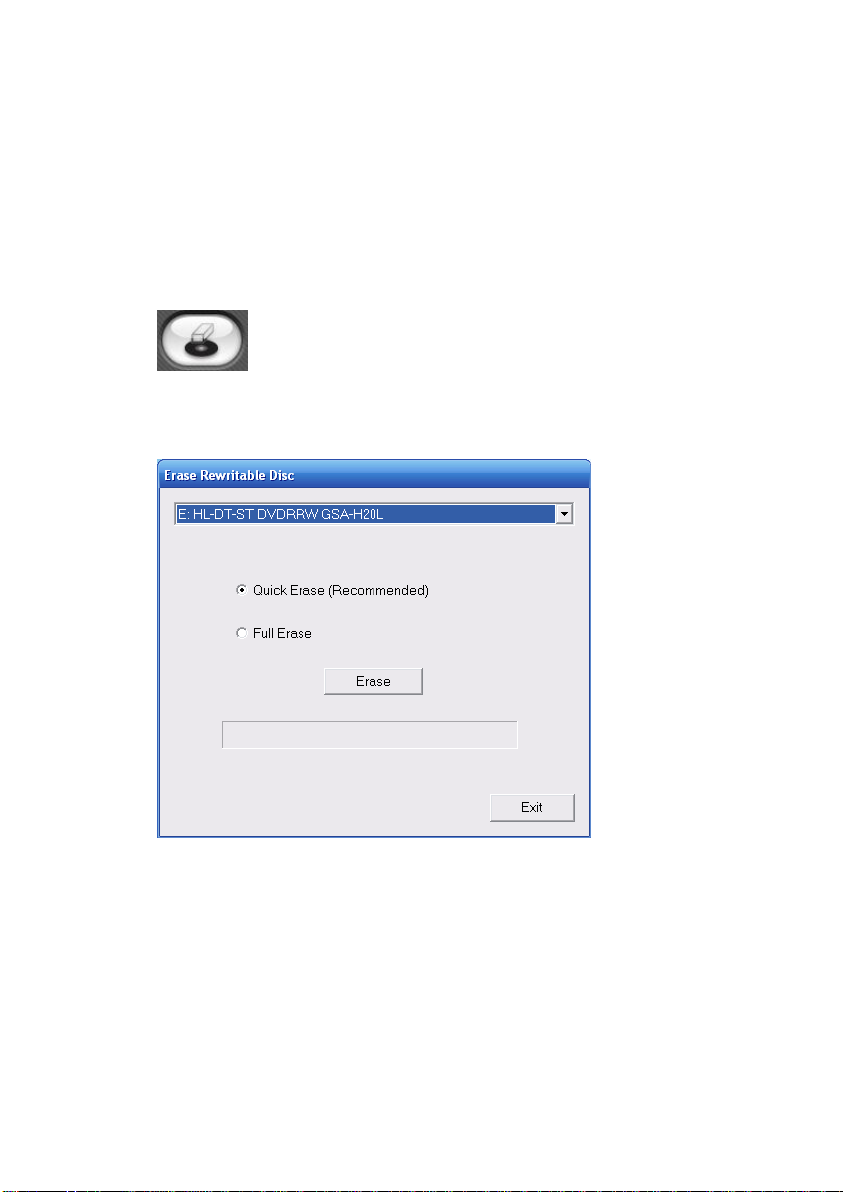
Changing Menu Screen Format:
This changes your menu screen‟s aspect ratio.
Erase Disc: Click to erase all information on a re-writeable disc
that is currently in your drive.
Page 28
28. honestech
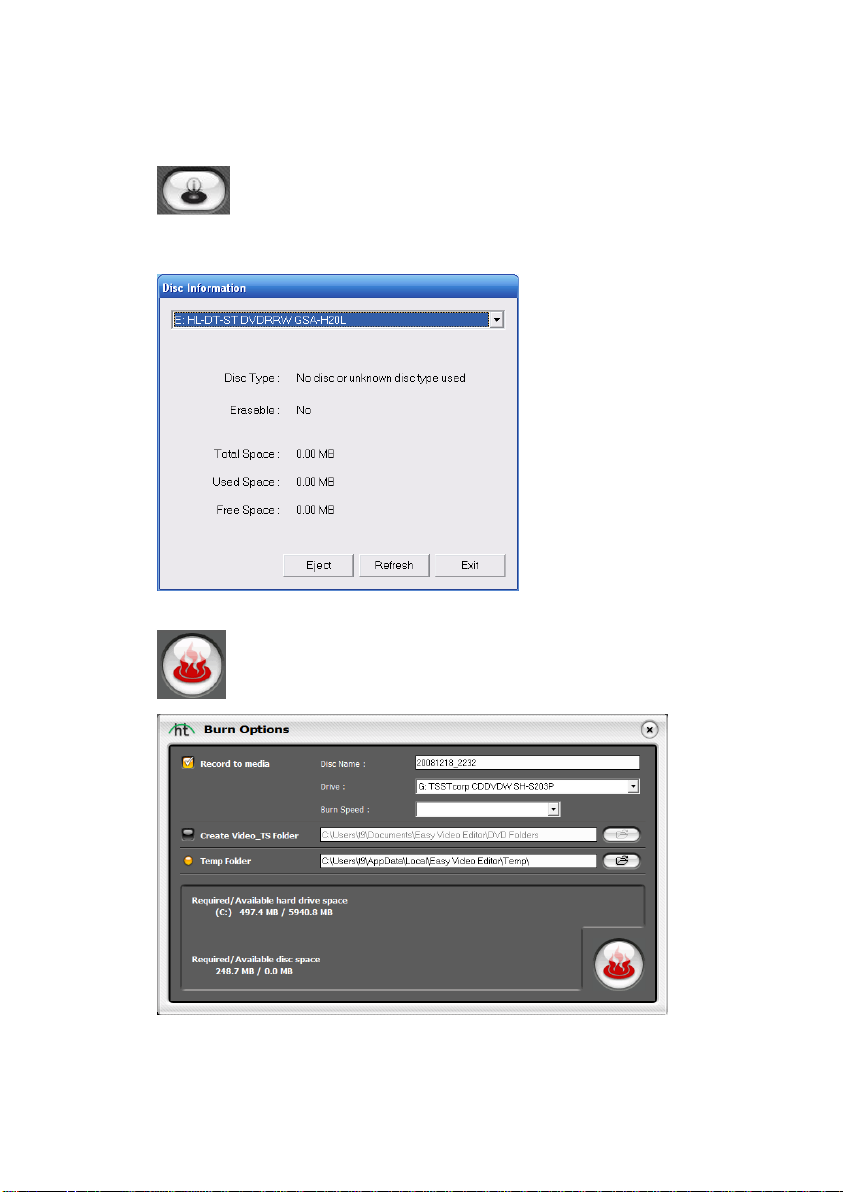
Disc Info: Click to get information about the disc currently in your
drive.
Start: Click to open the Option screen and begin burning.
Page 29

29. Video Editor 8.0
- Record to media
Check this option when burning to DVD or CD. Typically this is the only option
you will need to have checked.
- Disc name: Enter disc name
- Drive: Select a DVD writer
- Write Speed: Select disc writing speed.
- Create DVD folder
Create DVD video folder (VIDEO_TS) and select a location on your hard drive
where you would like to save the DVD video folder.
- Make UDI
Create an image of the DVD disc and select a location on your hard drive
where you would like to save the file.
- Temp Folder
Select a temp folder where temporary files/folders will be stored.
Page 30
30. honestech
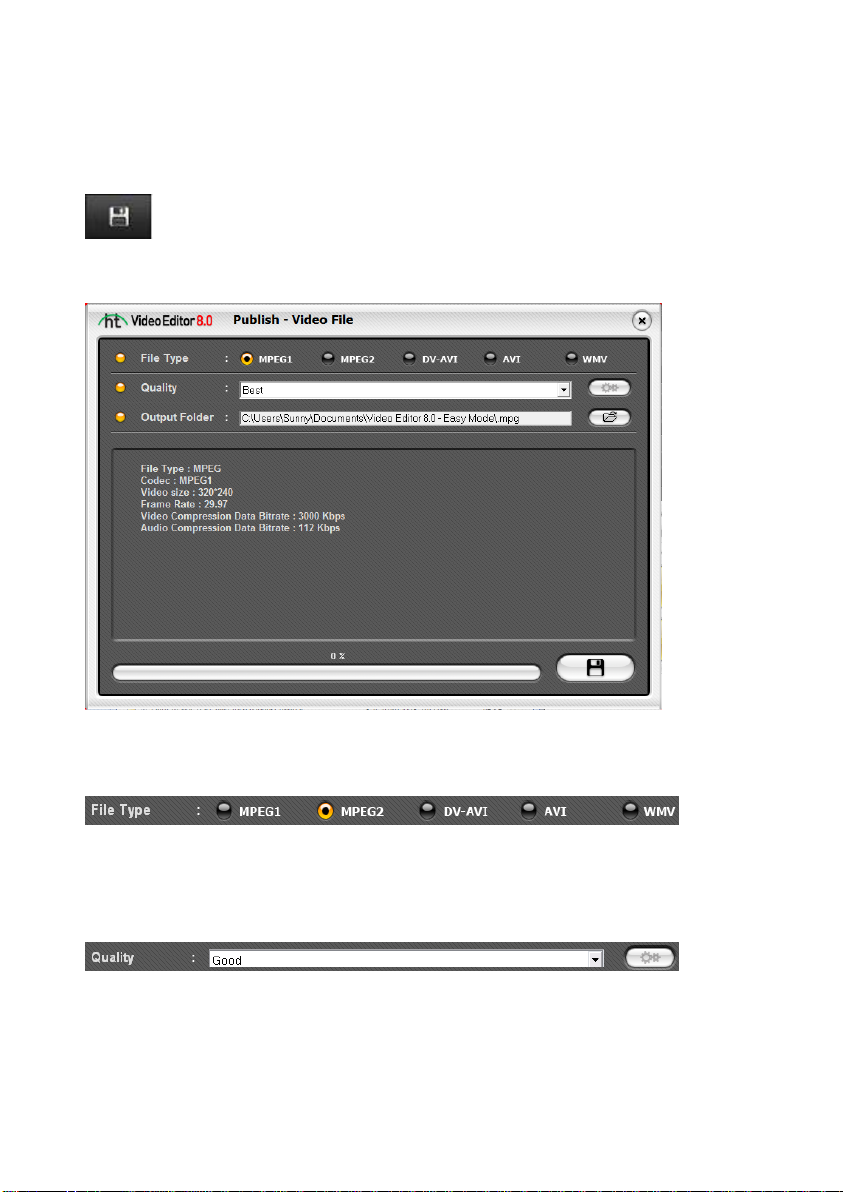
3.4.2. Publish to Video File:
Publish – Video File: Click to select the output video format.
Output Video File Format:
Choose
your output file type. The options available are MPEG1, MPEG2, DV-AVI, AVI or WMV.
Output Video Quality:
Select a quality setting for your video. A higher quality will result in a larger file size.
Certain file formats have additional quality settings which can be accessed by clicking on
the gears icon to the right.
Page 31
31. Video Editor 8.0
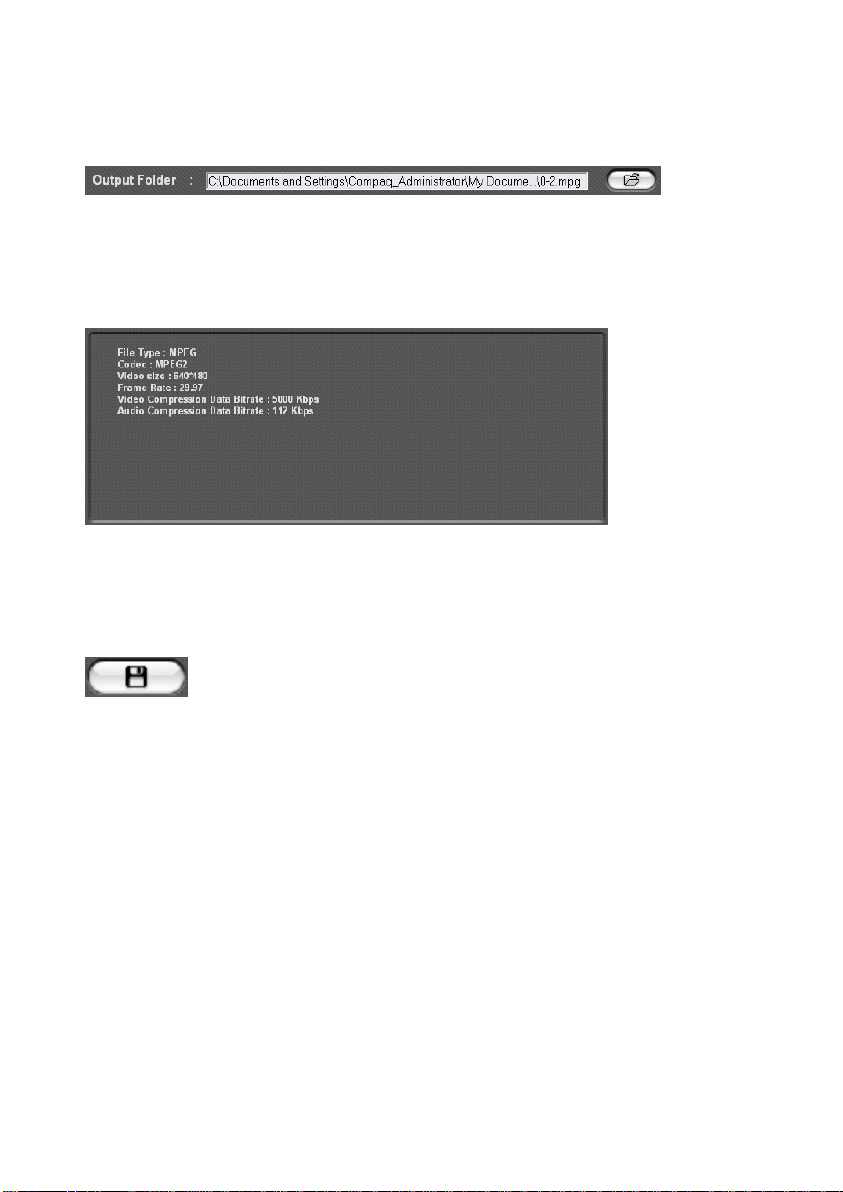
Output Folder:
This field displays the folder where your videos will be saved. You can change the output
folder location by clicking on the folder icon to the right.
Output Video Properties:
This window displays details about your video. The properties that are visible in this
window will be updated as you make changes to the video format, quality, codecs, etc…
Start: Click to convert your file into the new format. The video will be
placed in the Output folder once the process has completed.
Page 32
32. honestech
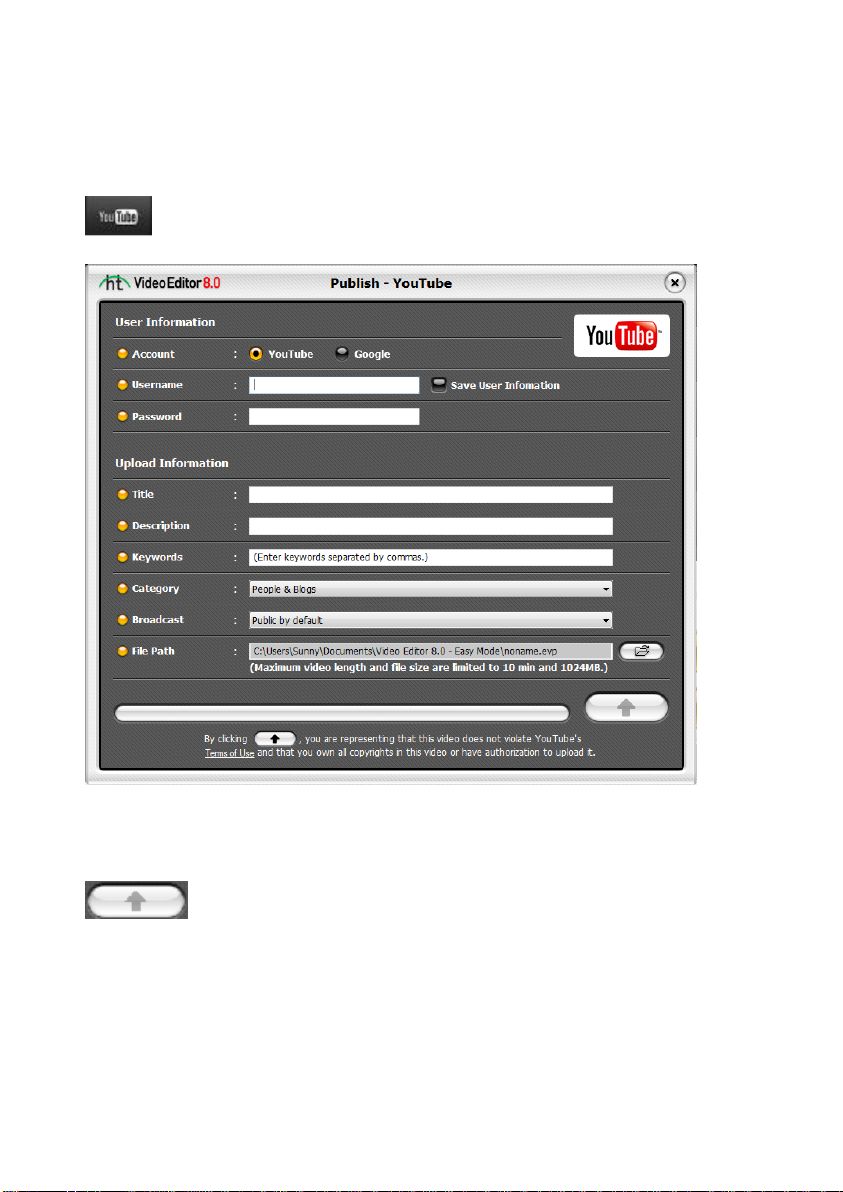
3.4.3 Upload to YouTube
Publish – YouTube: Click to open the YouTube Uploader screen.
Enter your YouTube account information and video information.
Upload: Click to upload to YouTube automatically.
Page 33
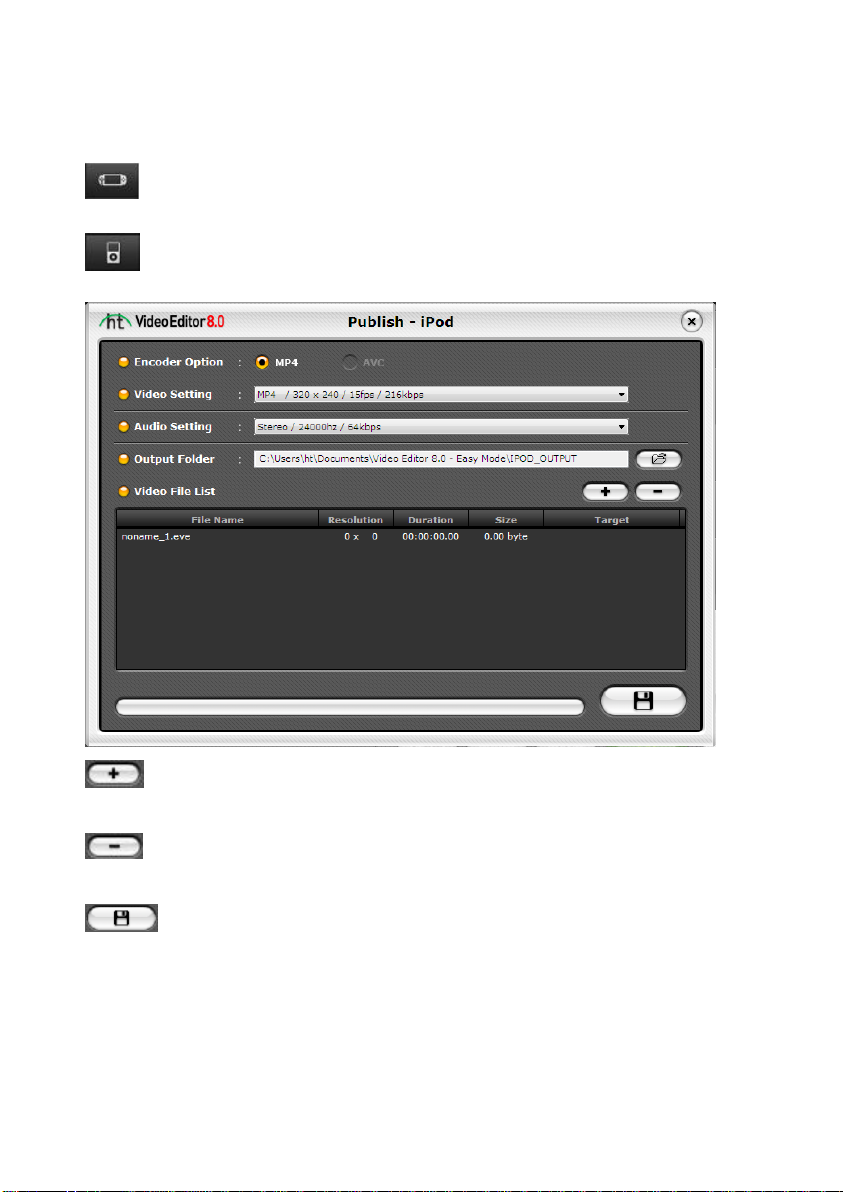
3.4.4 Convert Video for iPod/PSP
Publish – PSP: Click to launch the PSP Converter.
Publish – iPod: Click to launch the iPod Converter.
33. Video Editor 8.0
Add Files: Click to browse your hard drive and select the file(s) that you would
like to convert to PSP or iPod format.
Remove Files: Click to remove a file from the file list before beginning the
conversion process.
Start: Click to convert your file into the new format. The video will be placed in
the Output folder once the process has completed.
Note: Changing the encoder option, video/audio settings and output folder is optional.
Using the default settings is recommended.
Page 34
34. honestech
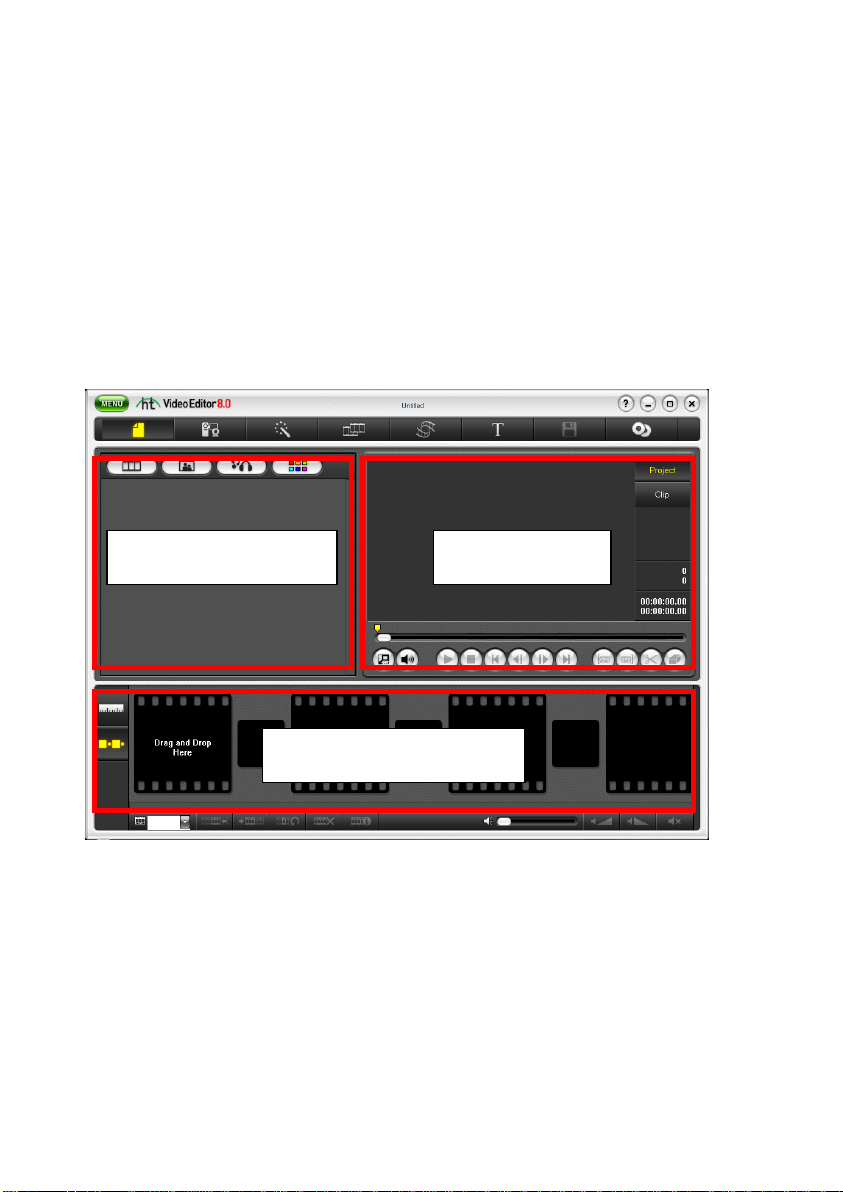
Video Clip Board
Storyboard/Timeline
Edit Window
4. Advanced Mode of honestech Video Editor 8.0
You can start Video Editor 8.0 Advanced Mode by clicking “Advanced Mode” from the
main menu screen. The Advanced Mode provides additional editing tools using the
timeline. 82 special effects, 84 transitions, and 79 title effects will turn your video into
professional quality movies.
The main screen will be displayed when you start Video Editor 8.0.
Page 35
35. Video Editor 8.0
Starting a Project
-What is a project?
A project file is a small reference file that points the program to your work. A project
file will not contain actual work, but instead indicates which files are needed and what
work you have done with that particular project.
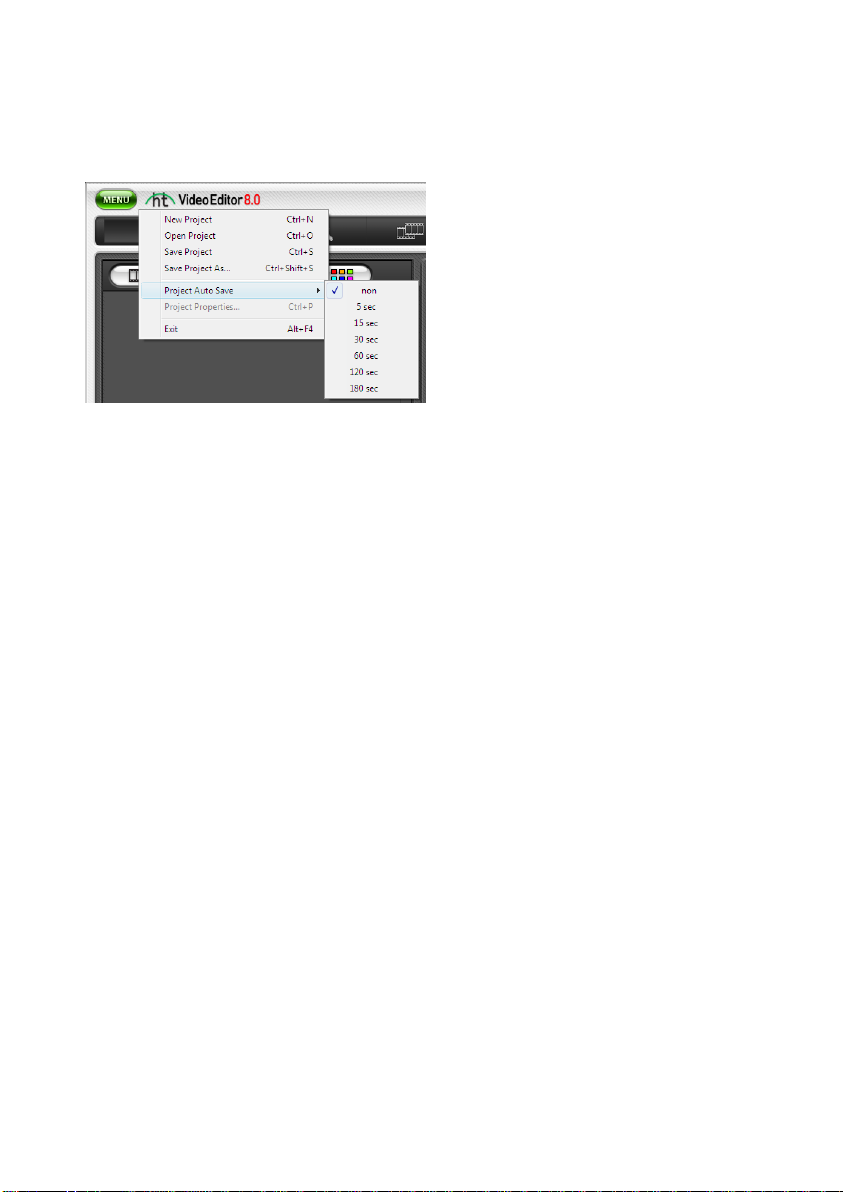
New Project: This creates a new project. Enter the name of the new project in the
New Project Dialog Box.
Open Project: Open an existing project in a new window. You can only open one
project at a time.
Save Project: Saves the current project with its current name and directory.
Save Project As: Saves the current project under a new project name.
Project Properties: Displays the properties of the current project. You can assign
the author name, company info and comments for the project.
Project File Automatic Save: This feature will save the project automatically. To
enable this feature, the “Project File Automatic Save” option must be turned on.
Page 36
36. honestech
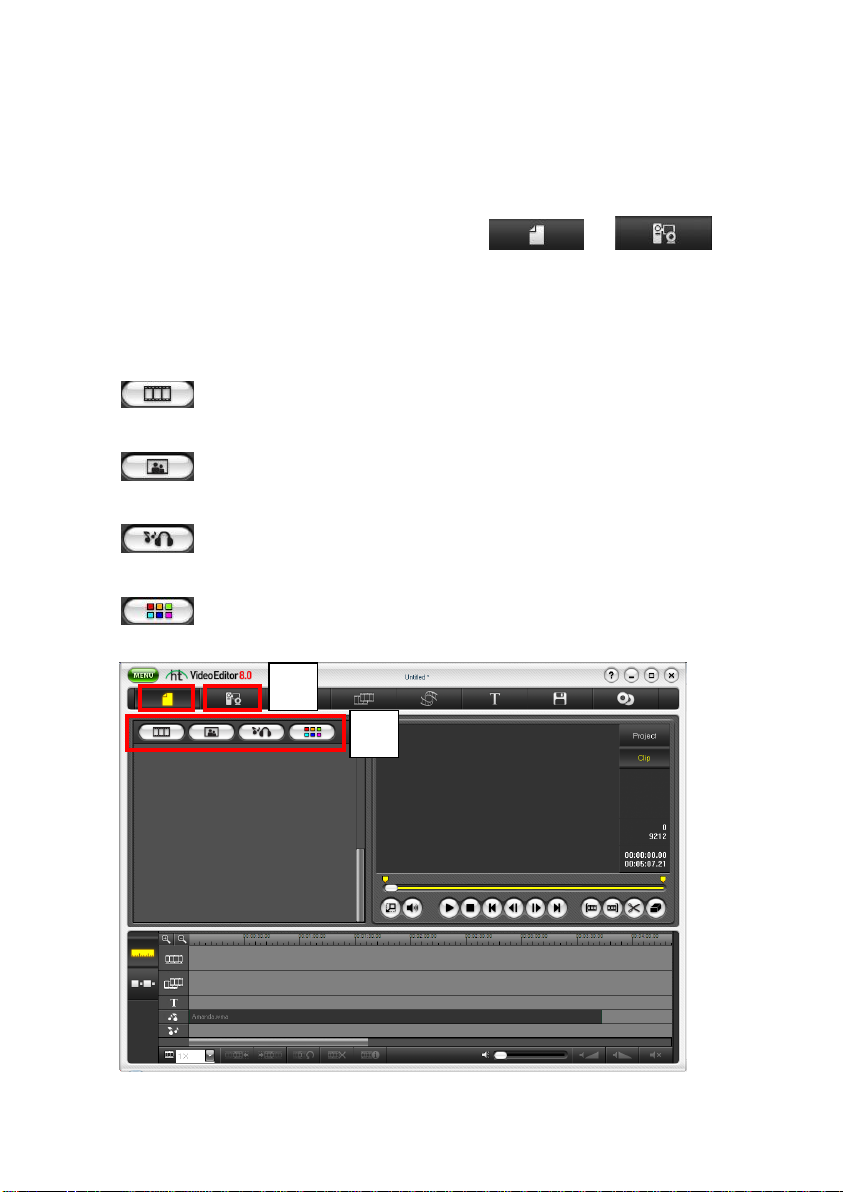
1
2
4.1. Importing Video, Photo and Audio Files
You can import existing media files by clicking on the or tab.
Click on one of the buttons below to import medial files. Then you need to browse and
select a media file you want to import.
Import video files: Click to browse your hardrive for a video file.
Import image files: Click to browse your hardrive for a still image (photo).
Import audio files: Click to browse your hardrive for an audio file.
Create color clip: Click to create a solid-color still image clip.
Page 37
37. Video Editor 8.0
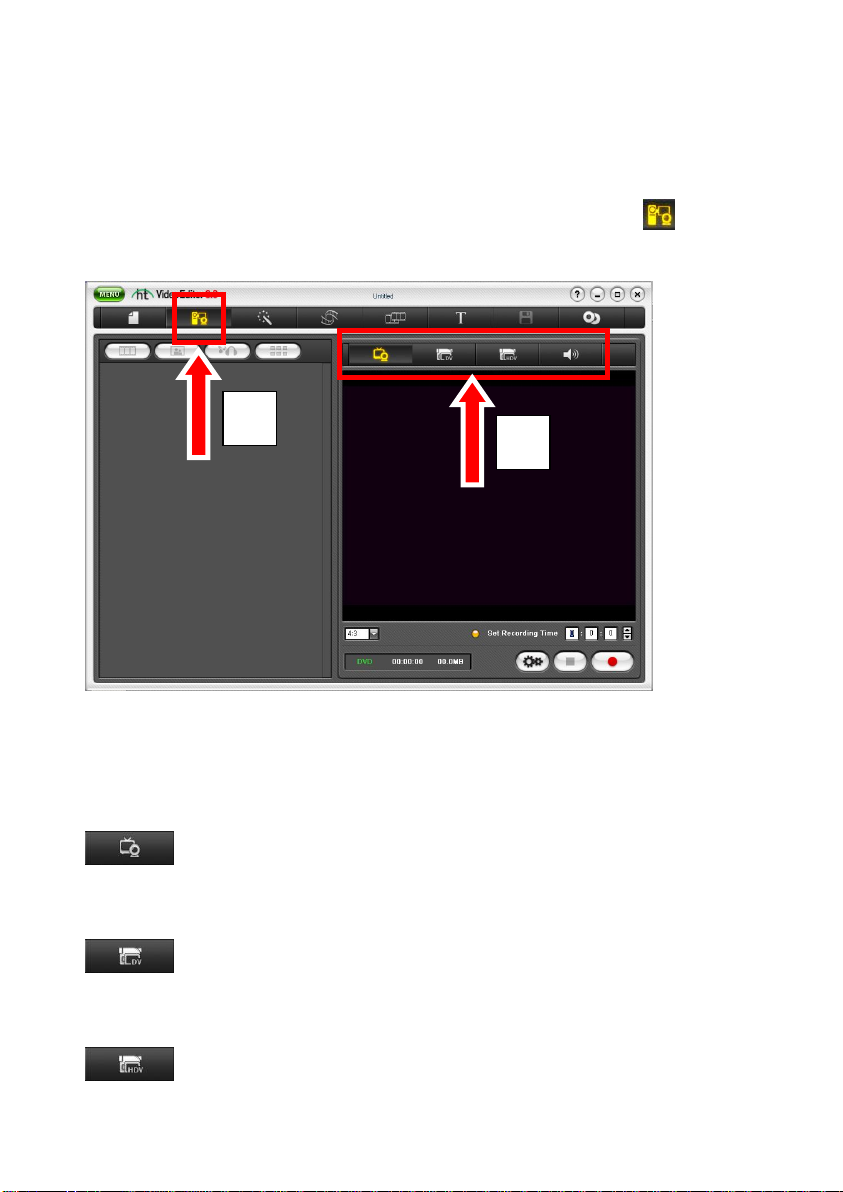
1
2
4.2. Capturing video from webcam or camcorders
To capture from video devices such as webcams or camcorders, click the tab. This
will open the Capture Panel on the right as shown below.
4.2.1 Selecting Video Capture Device.
Choose a capture method.
Record from webcam/analog device: Click to record from a USB webcam
or video capture device (e.g. VCR or analog camcorder)
Record from DV camcorder: Click to record from a DV camcorder (via
Firewire/IEEE1394 cable)
Record from HDV camcorder: Click to record from an HDV camcorder (via
Page 38
38. honestech
Firewire/IEEE1394 cable)
Record audio: Click to record from an audio device (e.g. microphone).
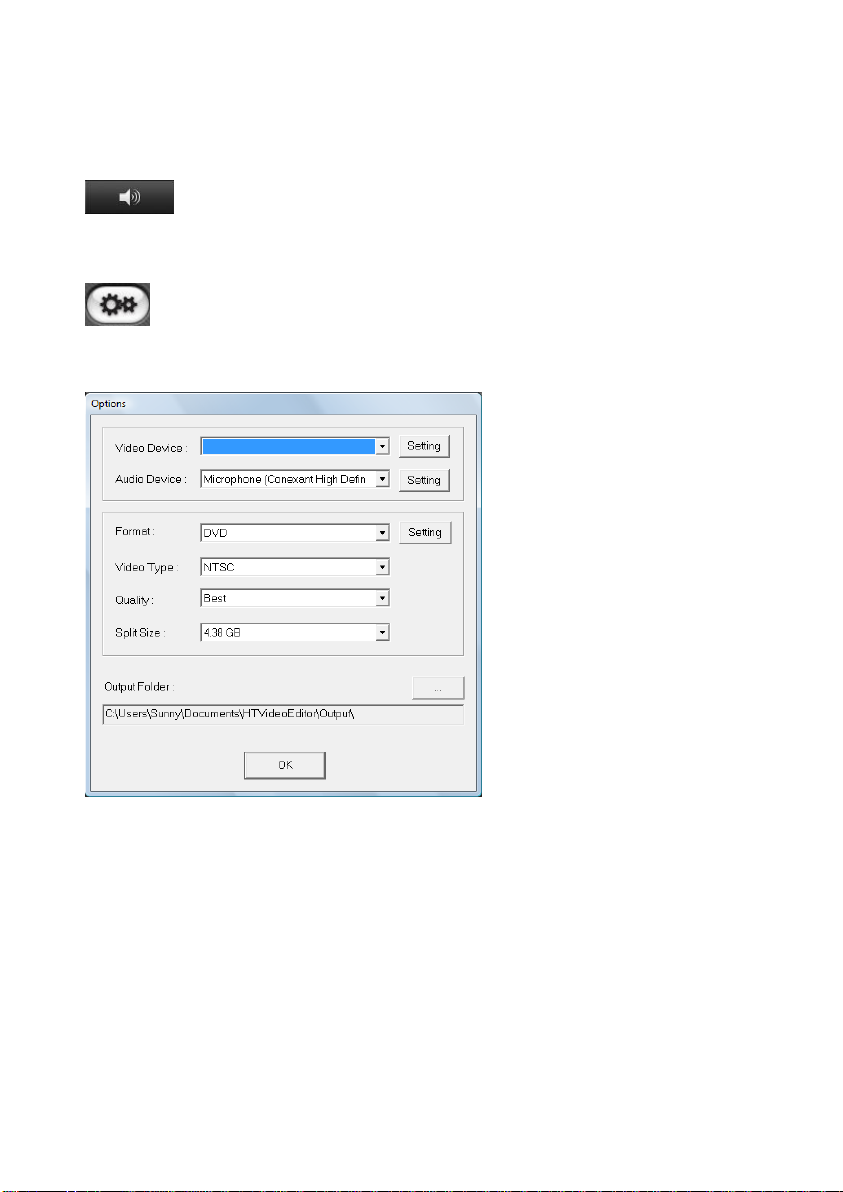
Options: Click to open the “Options” window to make changes to your capture
properties.
Video Device: Click the drop-down menu to select a video capture device.
Additional options for your capture device can be accessed by clicking on the
„Setting” button.
Audio Device: Click the drop-down menu to select an audio capture device.
Additional options for your capture device can be accessed by clicking on the
„Setting” button.
Format: Click the drop-down menu to select a video format (DVD / VCD / SVCD).
Video Type: Click the drop-down menu to select a video type (NTSC / PAL). Select
NTSC for North America.
Page 39
39. Video Editor 8.0
Quality: Click the drop-down menu to select your desired video quality
(Best/Good/Normal/Average). A higher video quality will result in a larger file size.
Split Size: The Split Size feature automatically splits recorded video files if they
exceed the selected size. This helps to ensure that your video files will fit onto one
DVD/CD. Use 4.38 GB when burning to single layer DVDs and 7.5 GB for dual layer
DVDs.
4.2.2. Video Recording
You can use the buttons in the Capture Panel to control the playback on a DV/HDV
camcorder and record video from your video playback device.
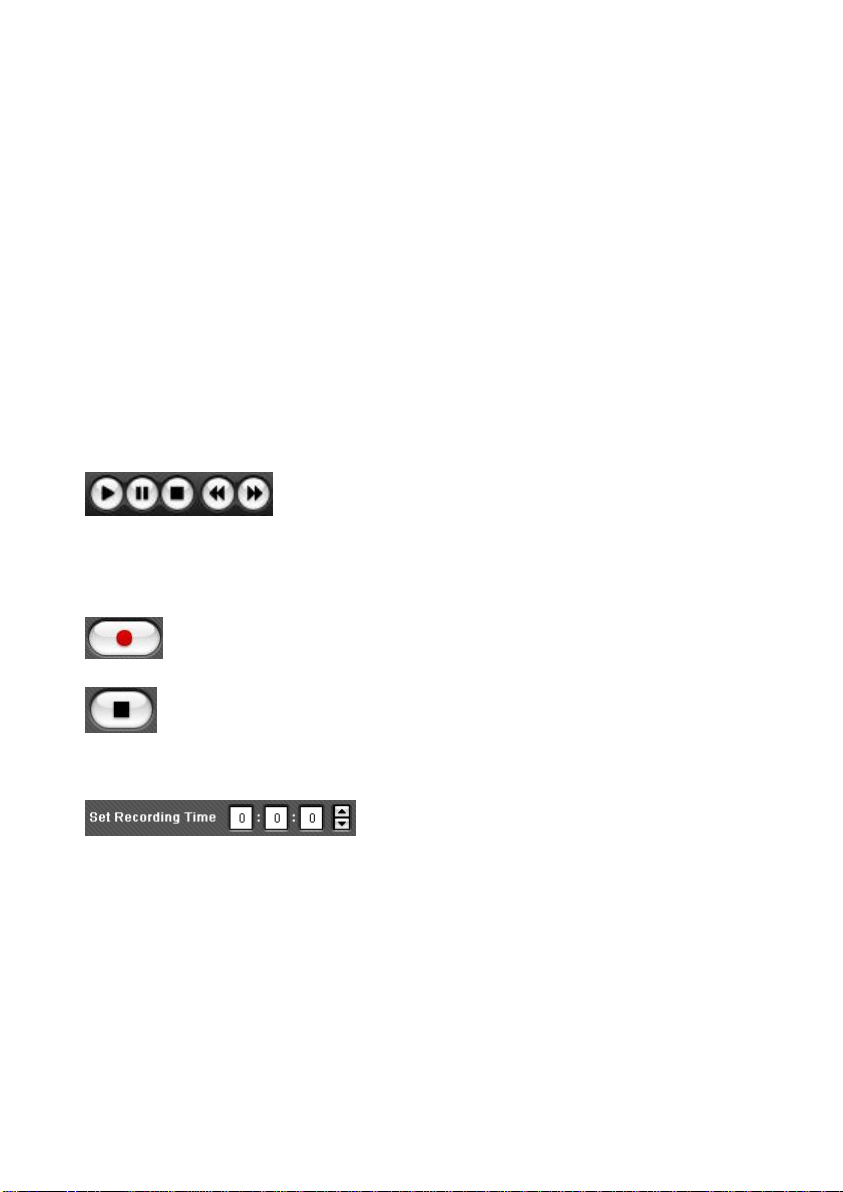
Video Playback Controls: Click to play, pause, stop, rewind,
or fast forward the video. These options are not available when capturing from an analog
device.
Record: Click to start recording.
Stop: Click to stop recording. The recorded video will be saved in your output
folder and a thumbnail of the video file will appear in the Video Clip Board.
Recording Time: Enter a value (hours: minutes:
seconds) to set the duration of the recording. The recording will stop automatically after
the duration has elapsed. This is very useful if you know the length of the movie you are
recording. It is recommended that you always set a recording time to prevent
unnecessary or unwanted recordings from consuming valuable recording space on your
computers hard drive. You can always stop the recording manually before the recording
time has fully elapsed.
Page 40
40. honestech
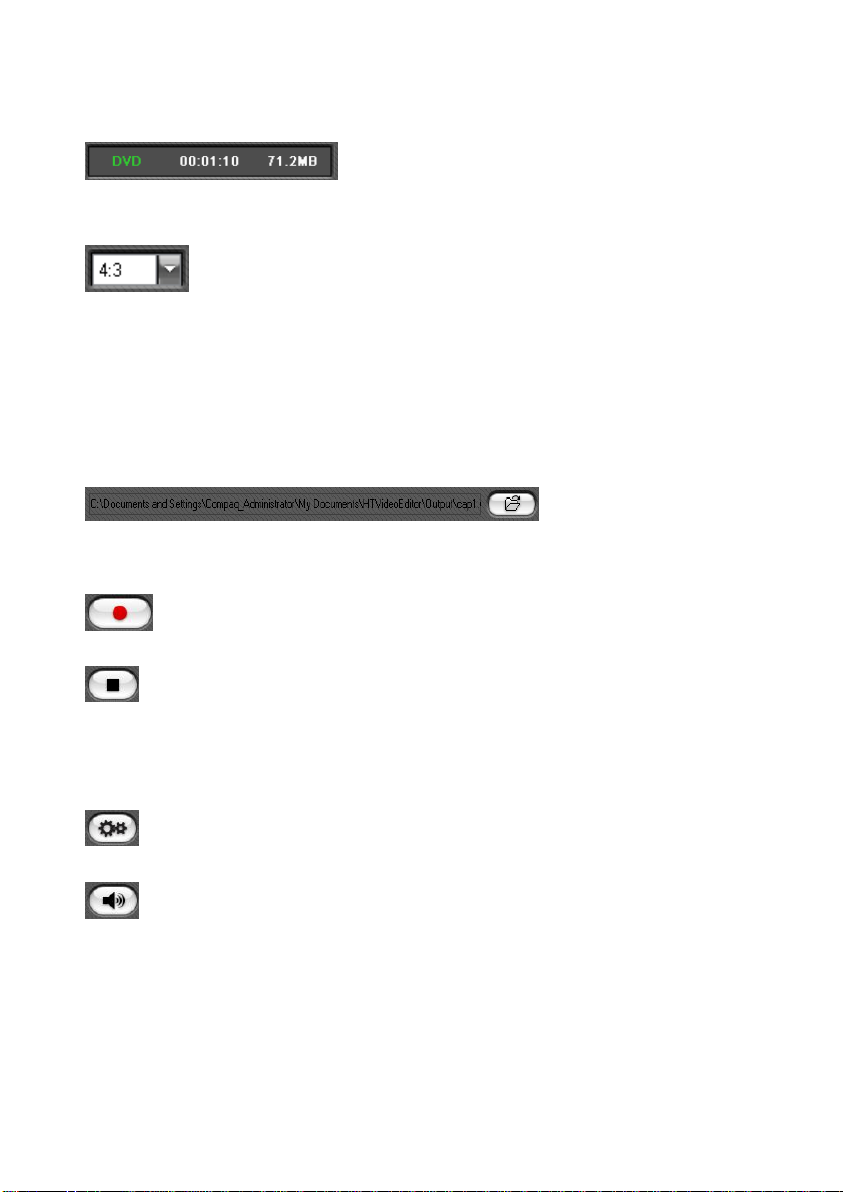
Recording Status: This panel displays the selected
recording format, recording time elapsed, and file size of the current recording.
Aspect Ratio: Set the aspect ratio for your recorded video.
4.2.3. Audio Recording
You can record audio and use it as background music or narration in your video projects.
Change work directory:
Click to browse for an output folder location.
Record: Click to start recording audio from a microphone.
Stop: Click to stop recording. The resulting audio file will be saved in the work
directory that is selected and a thumbnail of the audio file will appear in the Video Clip
Board.
Audio Setting: Click to adjust the recording volume.
Mute: Click to mute your computer speakers. This can help prevent an audio
feedback loop when recording your audio.
Page 41
41. Video Editor 8.0
4.2.4. Viewing Media Properties
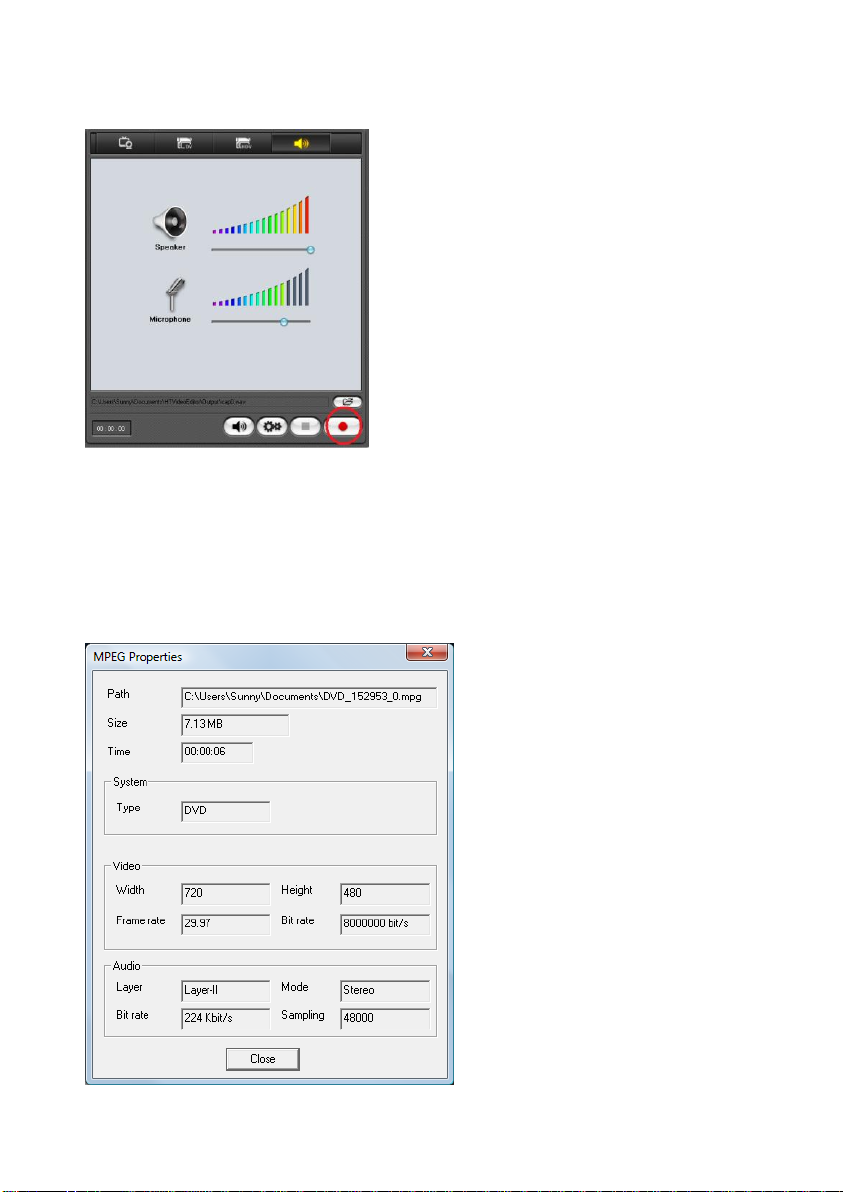
After capturing or importing your audio and video you can view the properties of each
media file by right-clicking on it and selecting “Properties…” You will see a Properties
window with detailed information on the medial file as shown below.
Page 42
42. honestech
4.2.5. Auto Scene Detection
This tool will detect scene changes in your video and automatically splits the video into
separate chapters wherever a break occurs in the recording.
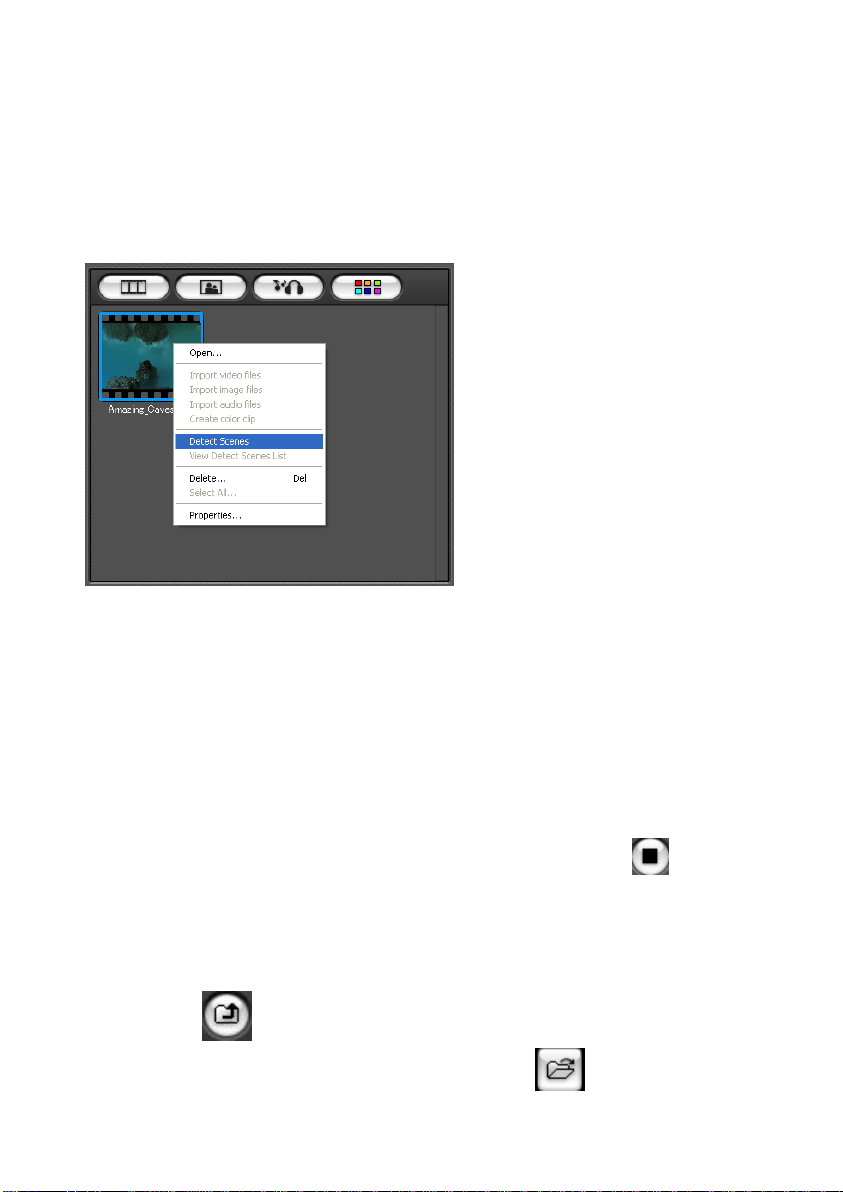
-How do I use the “Detect Scenes” function to split a video into separate clips?
Select a video clip that you want to split using the “Detect Scene” function.
Right-click on the selected clip to access the context menu screen.
Select “Detect Scenes” in the context menu.
The scene detection progress will be displayed to the right side in the player
window.
To stop the scene detection process before completion, click or select
CLOSE in the play window popup menu.
Once the scene detection for the selected clip is done, the selected clip will be
split into multiple clips.
Click to return to the Video Clip Board.
Video clips that contain detected scenes will have icon in the corner of
Page 43

43. Video Editor 8.0
the original video clip as shown below. You can click on this to show the
detected scenes for that specific video clip.
Page 44
44. honestech
C
A
B
4.3. Adding Clips to the Storyboard or Timeline
After adding various video, photo, and audio clips to the library, you can move the files to
the Preview window for additional editing.
4.3.1. Adding Video Clips
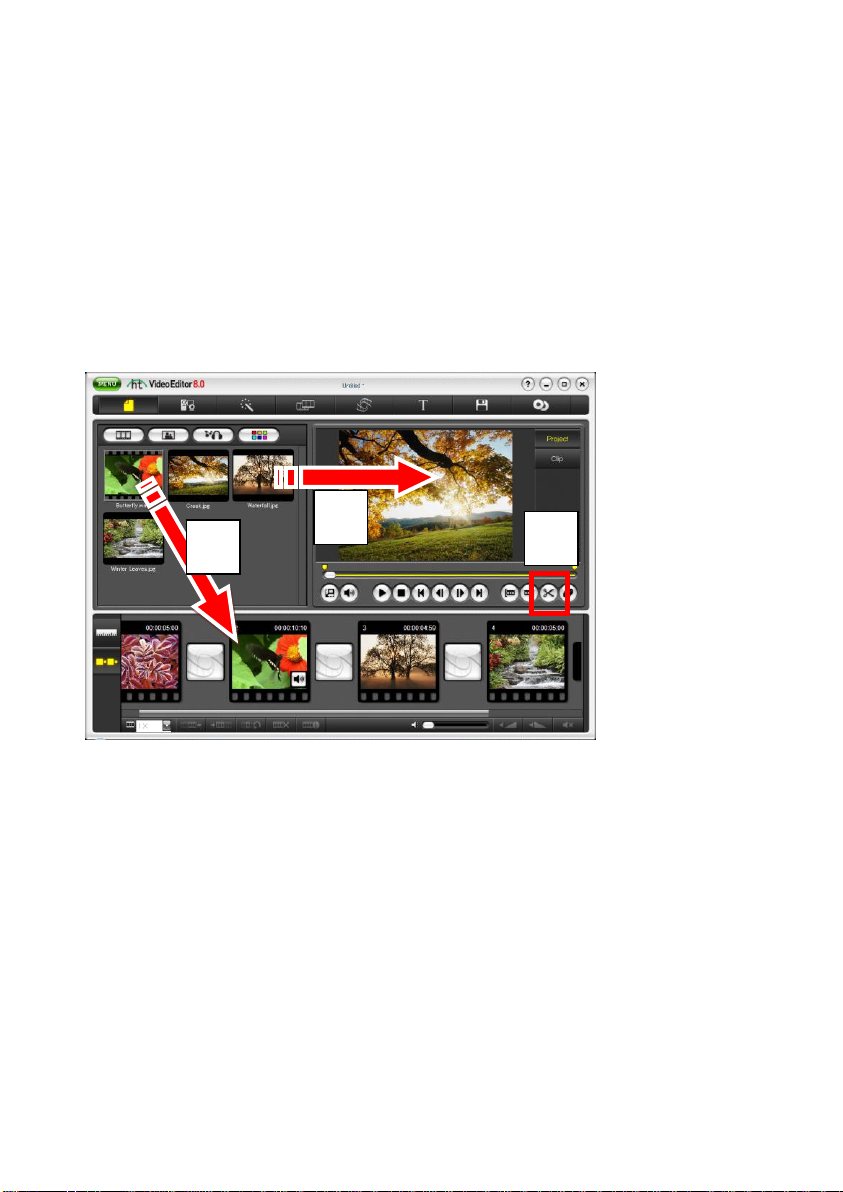
Video clips can be added to the Edit window by dragging and dropping the clip directly
into the Storyboard or Timeline.
A. Adding Directly to the Storyboard (Drag and drop).
B. Preview or edit the clip in the Edit window.
C. Using the Cut marked frames button to move edited clips to the Storyboard.
Page 45
4.3.2. Adding Photos
A
B
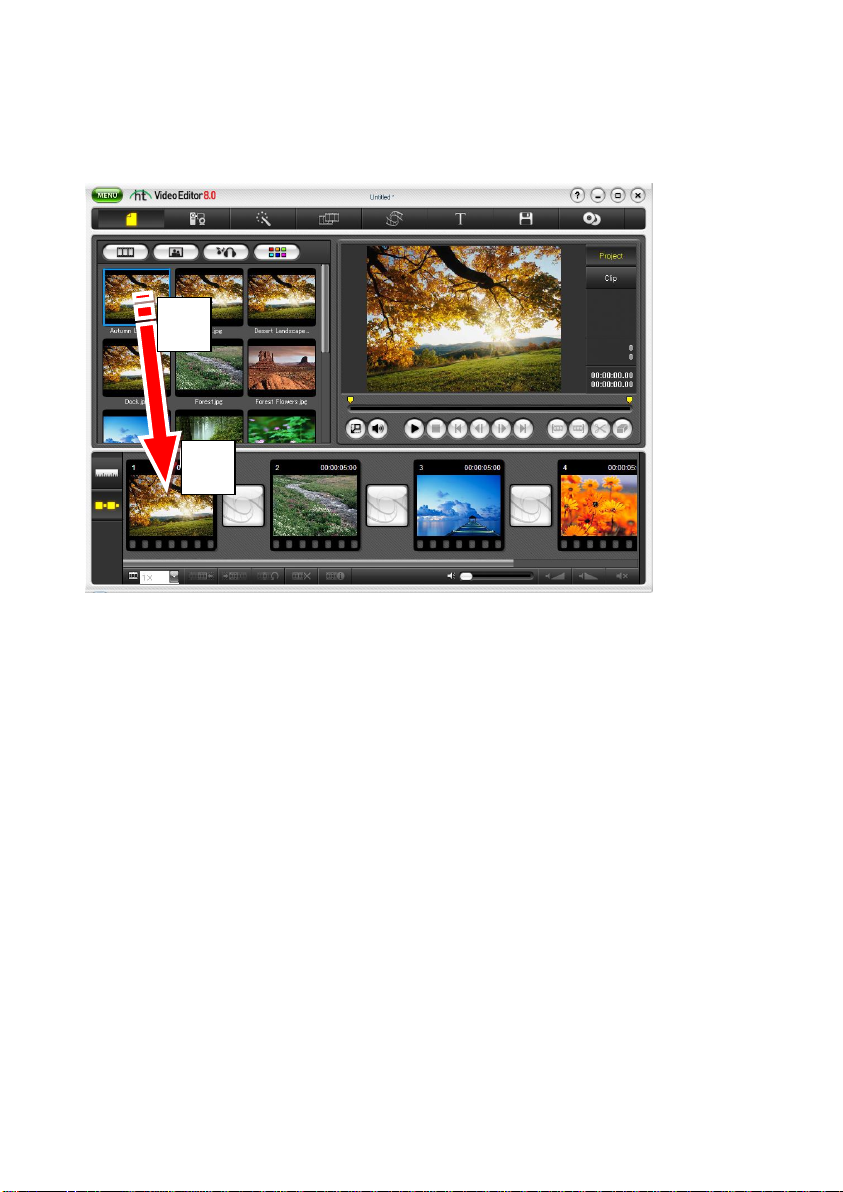
Photos can be added into the storyboard (Drag and drop).
A. Move the photo image directly into the Storyboard or Timeline (Drag and
drop).
B. Double click on the photo image to preview it in the Edit window.
45. Video Editor 8.0
Page 46
46. honestech
A
4.3.3. Adding Audio
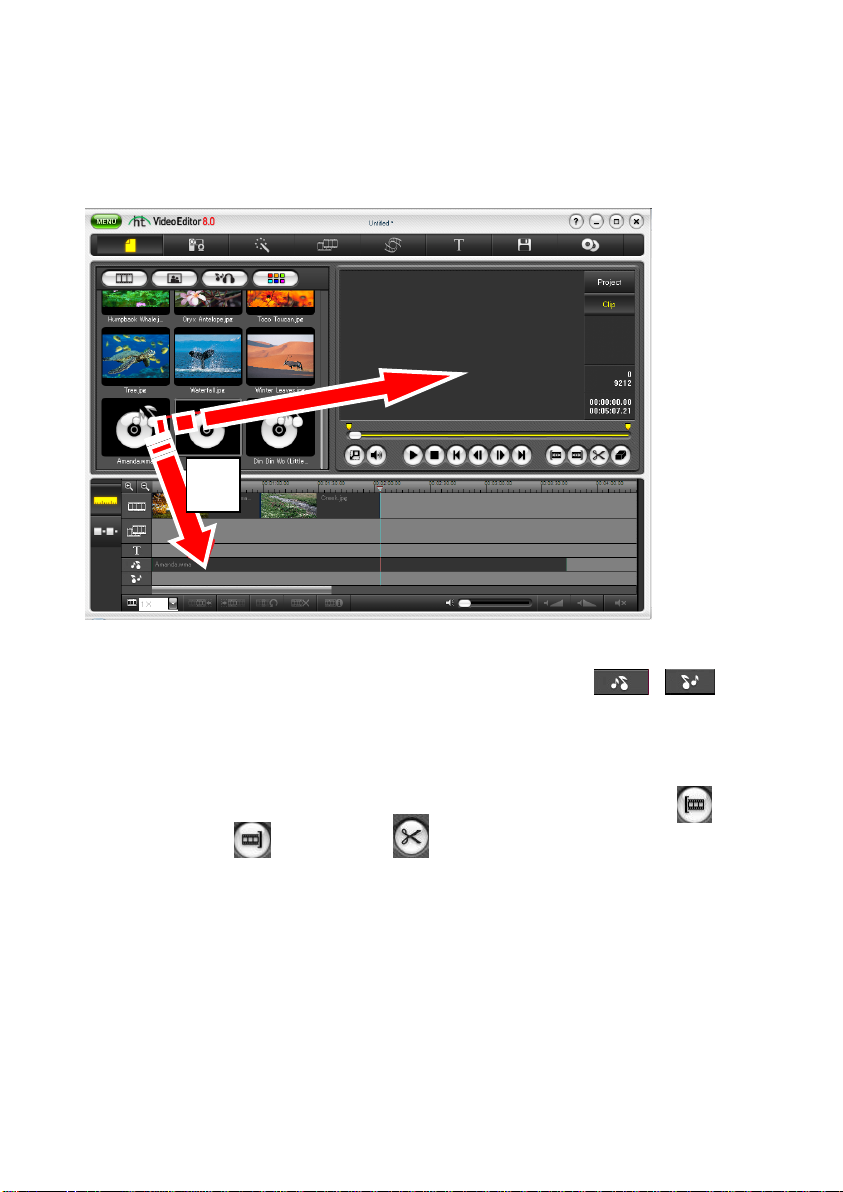
Audio clips can be added to the Edit Window for trimming or added directly into the
timeline.
A. Drag an audio file directly the timeline. There are two audio tracks, and it
is possible to add an audio file to either one of them.
* You can add a voice-over on one track and background music on another
track.
B. Audio file moved into the player window for trimming.
C. After marking the beginning and the end of an audio clip with
and , you can use to move the selected audio
segment to the timeline or storyboard.
Page 47
47. Video Editor 8.0
4.3.4. Editing in Storyboard
Combine video clips and image clips with transitions and other special effects.
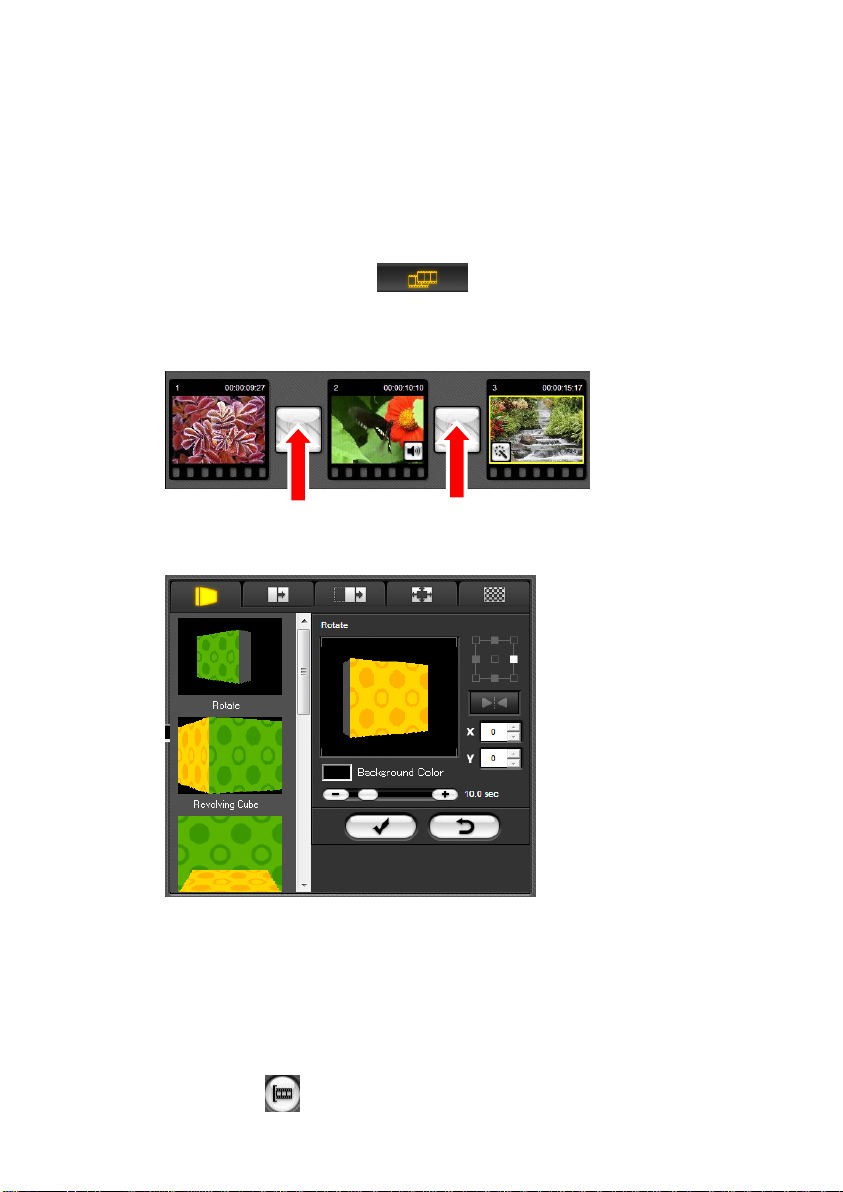
To add a transitional effect:
1. Select the Transition tab.
2. Select the transition marker between the two clips you would like to add the
transition effect to.
3. In the Transition Properties window, you can adjust the transition effect to
your liking.
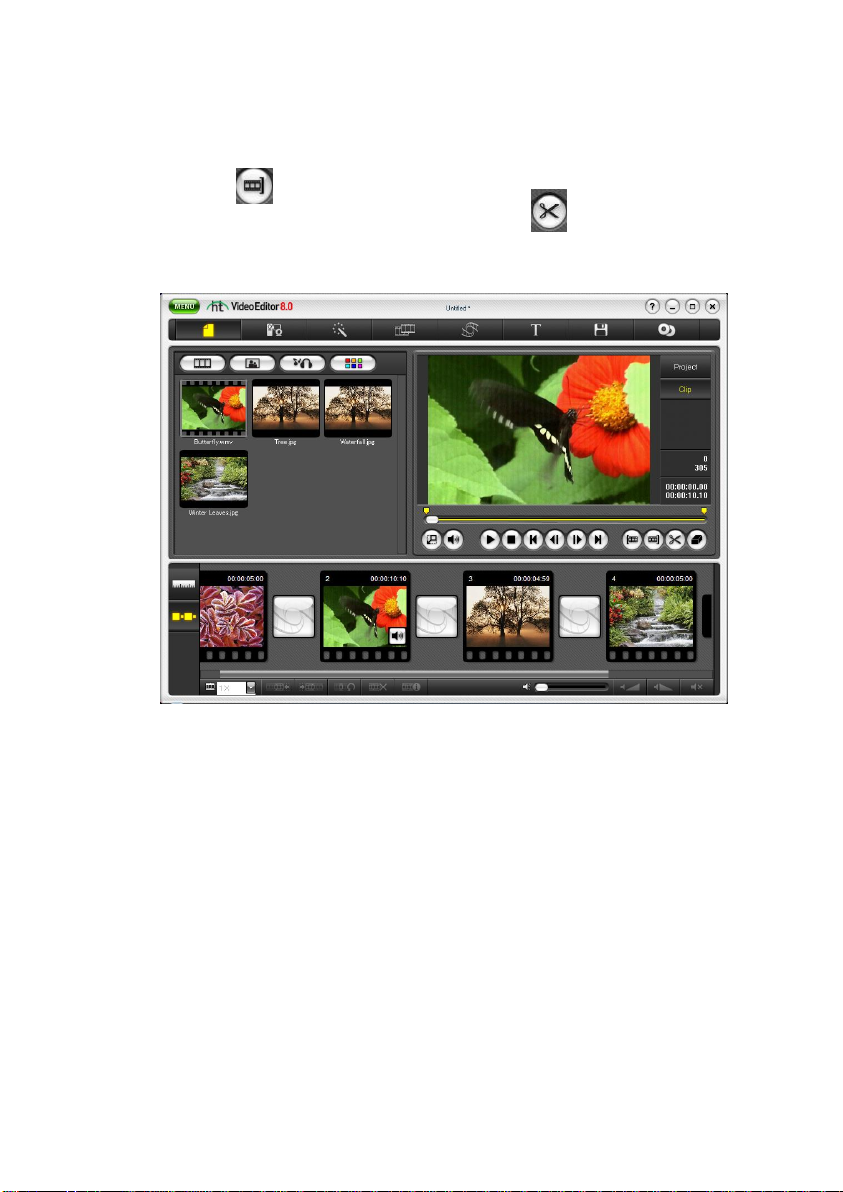
To cut or edit a video clip:
1. Select a video clip.
2. Position the scroll bar to the beginning of the segment that you want keep
and click
Page 48
48. honestech
3. Position the scroll bar to the end of the segment that you want to keep and
click
4. To cut out the selected video segment, click . The video clip will be
placed in the Storyboard.
[Video Clip]
Page 49
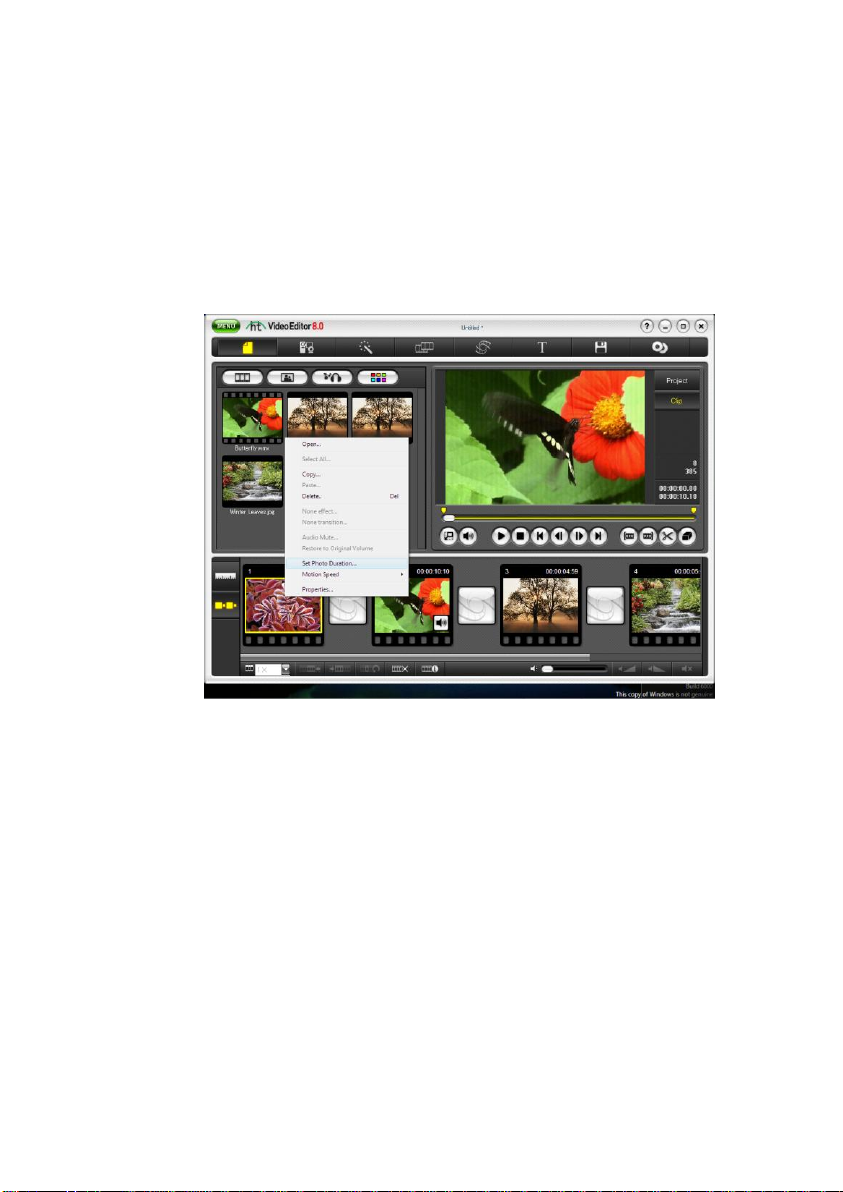
To change the display duration for an image clip:
1. Right-click on an image clip in the storyboard.
2. From the context menu, select "Set photo duration..."
3. Set a photo duration (ex. 5 second) for the selected image. This setting
will determine how long each photo image will be displayed.
49. Video Editor 8.0
[Image Clip]
NOTE: Image clip duration can only be changed from within the Storyboard.
The position of the clip is controlled from the Timeline.
Page 50
50. honestech
4.3.5. Editing in the Timeline
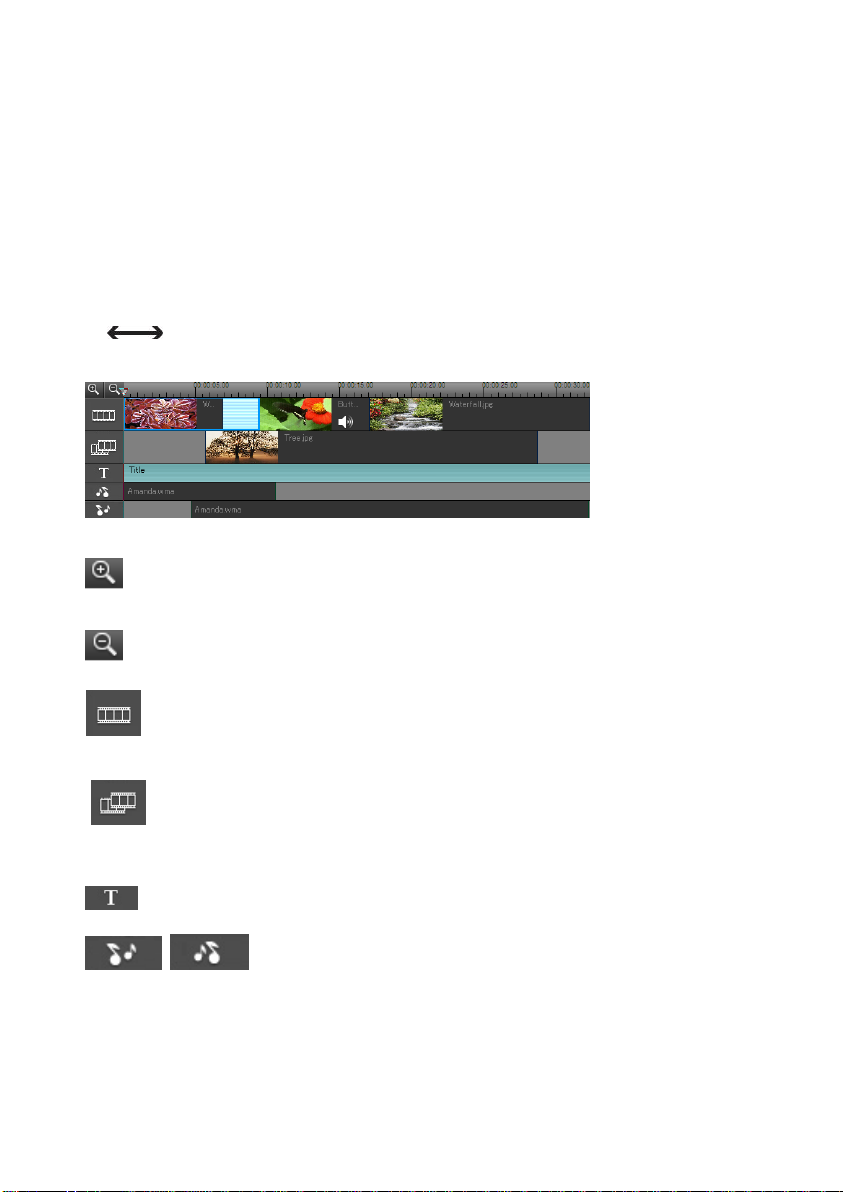
Combine video clips, image clips, audio clips with various effects in the Timeline. Change
the arrangement and duration of the clips and add various effects.
Move Clip: Select a clip and move it to a different position within the Timeline.
Adjust Clip Size: Position the cursor at the edge of each clip. When the cursor changes
to , drag the border to the left or right to adjust the clip size.
Timeline Zoom In: Zoom into the timeline, for more precise editing.
Timeline Zoom Out: Zoom out to see the overall timeline.
Video Track: Transitions and Special Effects can be added after moving video
or image clips to the Video Track.
Overlay Track: Use this track to apply overlays, transitions and special effects
to video clips.
Title Track: This track is for titles only.
Audio Track: These tracks are for audio files only.
Page 51
51. Video Editor 8.0
4.3.6. Editing a Clip
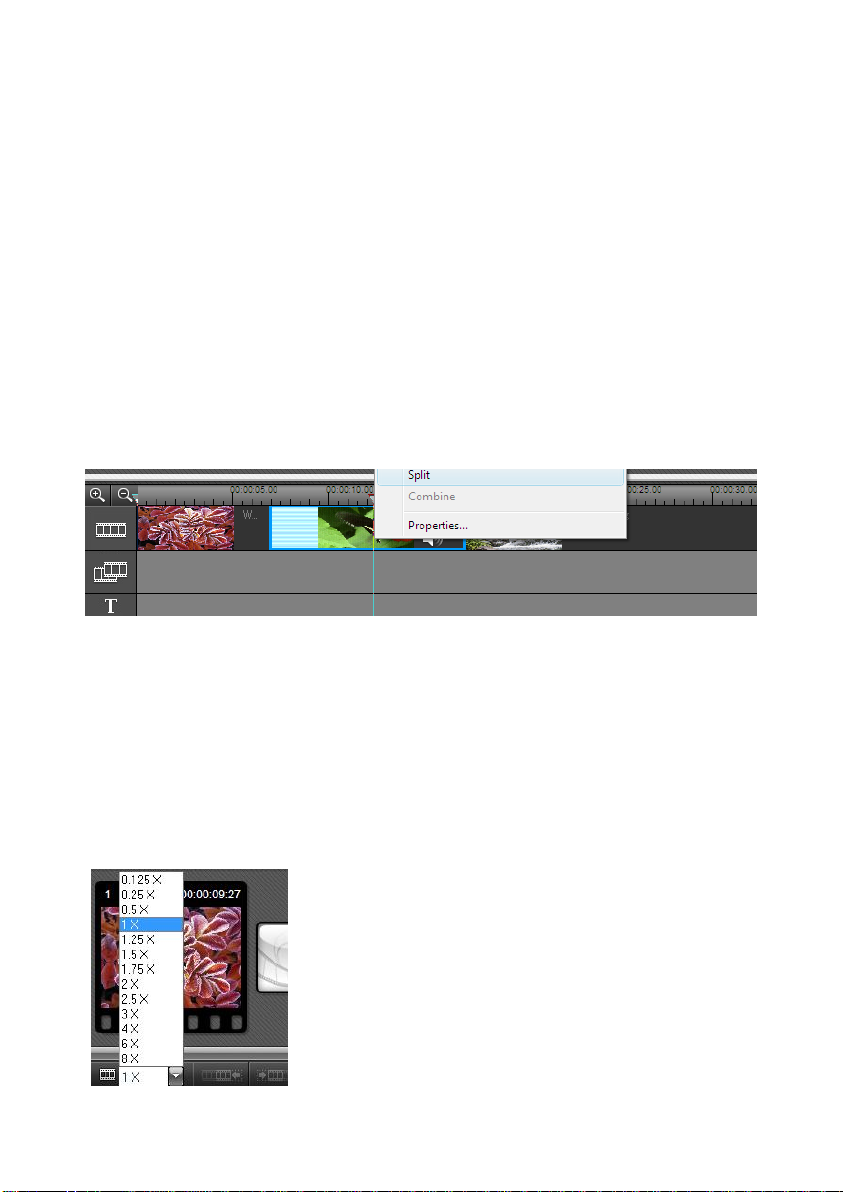
A. Splitting a Clip
Split or cut video clips on the timeline, creating multiple video clips out of a single clip.
This can be done by using the split feature.
To split a clip:
1. Select a clip. Move the time slider to the position of the split.
2. Right-click on the clip to display a popup menu.
3. Select SPLIT in the popup menu, and you can split the clip.
B. Changing the speed of a Video or Audio Clip
Increase or decrease the speed of your clip with the motion speed feature. You can add
dynamic effects to your video and audio by increasing or decreasing the playback speed.
The slow motion playback option can add dramatic effects to emotional scenes. The
fast motion playback option is great for humorous or action scenes.
To change the speed of a Video or Audio Clip:
1. Select a clip.
2. Right-click on the clip to display a popup menu.
3. Select "motion speed" and choose an option.
The range of available options is from 0.125X to
8X normal speed.
Note: When you change the speed of a video clip, you may
need to mute the audio to avoid unexpected audio effects.
Page 52
52. honestech
C. Muting the audio portion of a Video Clip
Prevent the audio on a video clip from playing using the mute feature.
To mute the audio portion of a video clip:
1. Select the clip you want to modify.
2. Right-click the clip to display the popup menu.
3. From the popup menu, select "Audio Mute." The muted clip will display
the "x" icon. This can also be done by selecting the Mute button in the
bottom right corner of the screen.
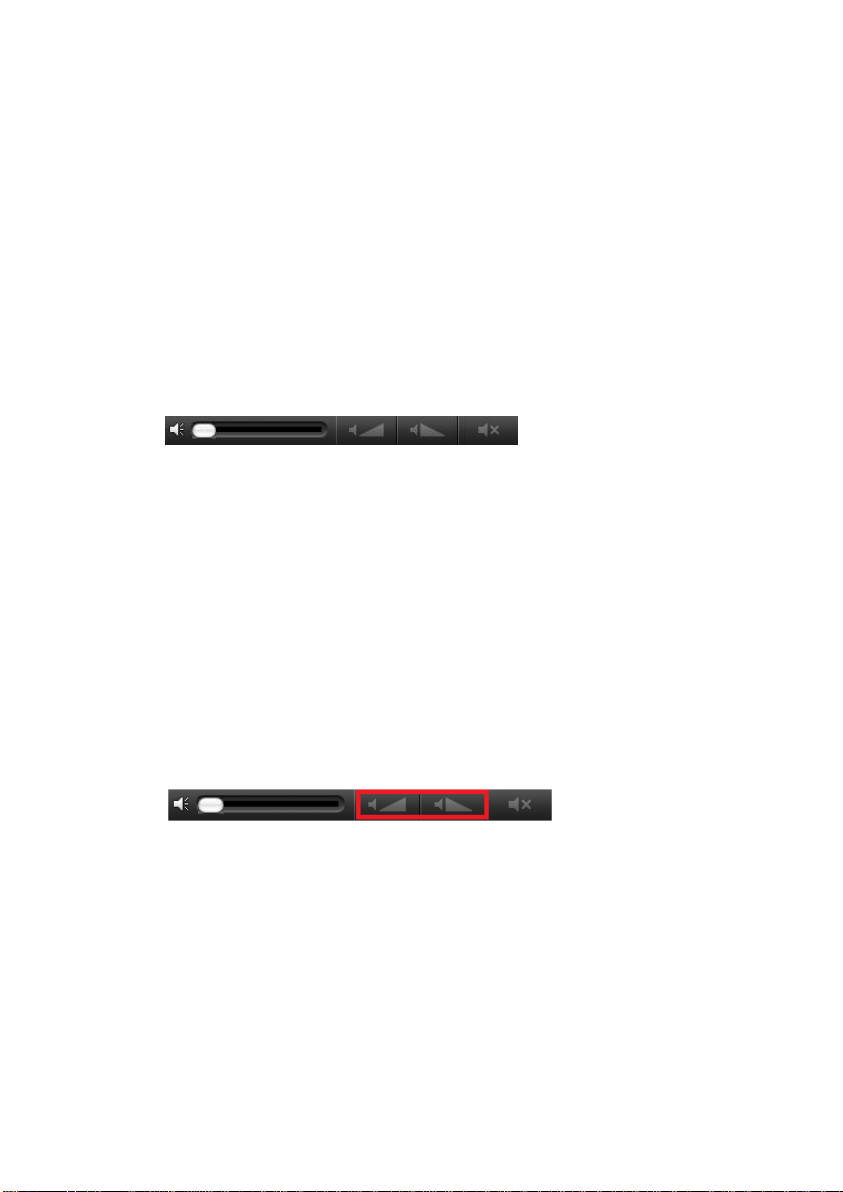
D. Adding a fade in/fade out to the audio portion of a video or audio clip
Fade in and fade out the audio of an individual clip by using the audio Fade in/Fade out
tool.
To fade in/fade out the audio portion of a clip:
1. Select the clip you want to modify.
2. Press the Fade In button to add a fade in or the Fade Out button for a
fade out. These buttons are contained in a box, located to the right of clip
volume control in the bottom right corner of the screen.
3. When applied to a clip, the button turns blue in color.
E. Restoring the original volume of a video or audio clip
Undo changes made to the audio portion of a clip using the restoration feature.
To restore the original volume:
1. Select the clip you want to modify.
2. Right-click the clip to display the popup menu.
3. From the popup menu, select "Restore to Original Volume"
Page 53
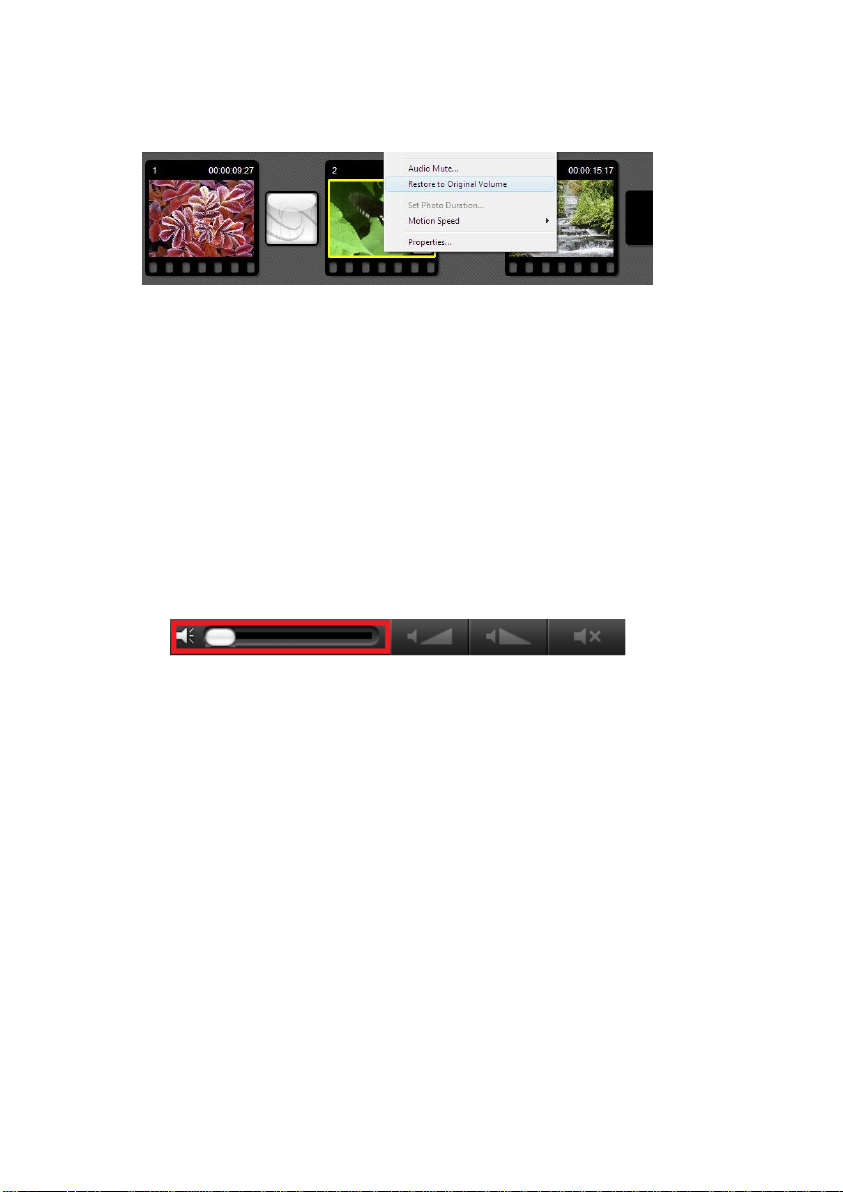
NOTE: “Restore to Orignal Volume” does NOT reset the audio Fade in/out setting.
To reset the Fade In/Out setting, you must deselect the Fade In/Out buttons.
F. Changing the volume
Adjust the volume of your audio using the volume control slider bar.
To adjust the volume,
1. Select the clip you want to modify.
2. Adjust the volume by moving the volume control slide to the left or right.
53. Video Editor 8.0
NOTE: This only changes the volume of an individual clip, not the entire
timeline.
Page 54
54. honestech
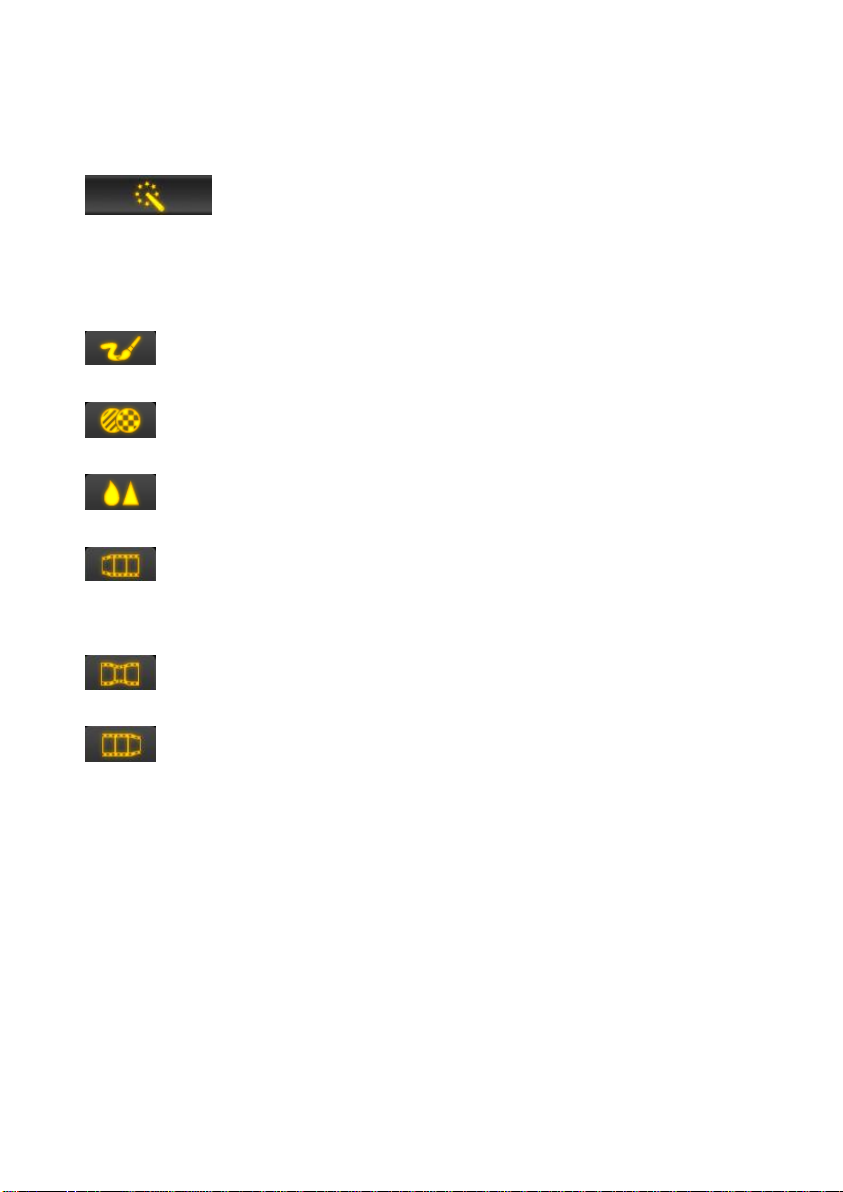
4.4. Adding Special Effects
There are 6 different groups of special effect filters you can apply to
your video clips or photos.
Color Filter: Adjust the color of a video clip or photo.
Effect Filter: Zoom in/out, diffusion, mosaic, etc…
Ghost & Noise Reduction Filter: Blur, sharpen, contrast, etc…
Transition In Filter: A variety of animated transitions that transition from black
to the end of the clip.
Effect Filter: A variety of effects that are applied to the entire length of the clip.
Transition Out Filter: A variety of animated transitions that transition to black
from the start of the clip.
Page 55
55. Video Editor 8.0
Effects Control
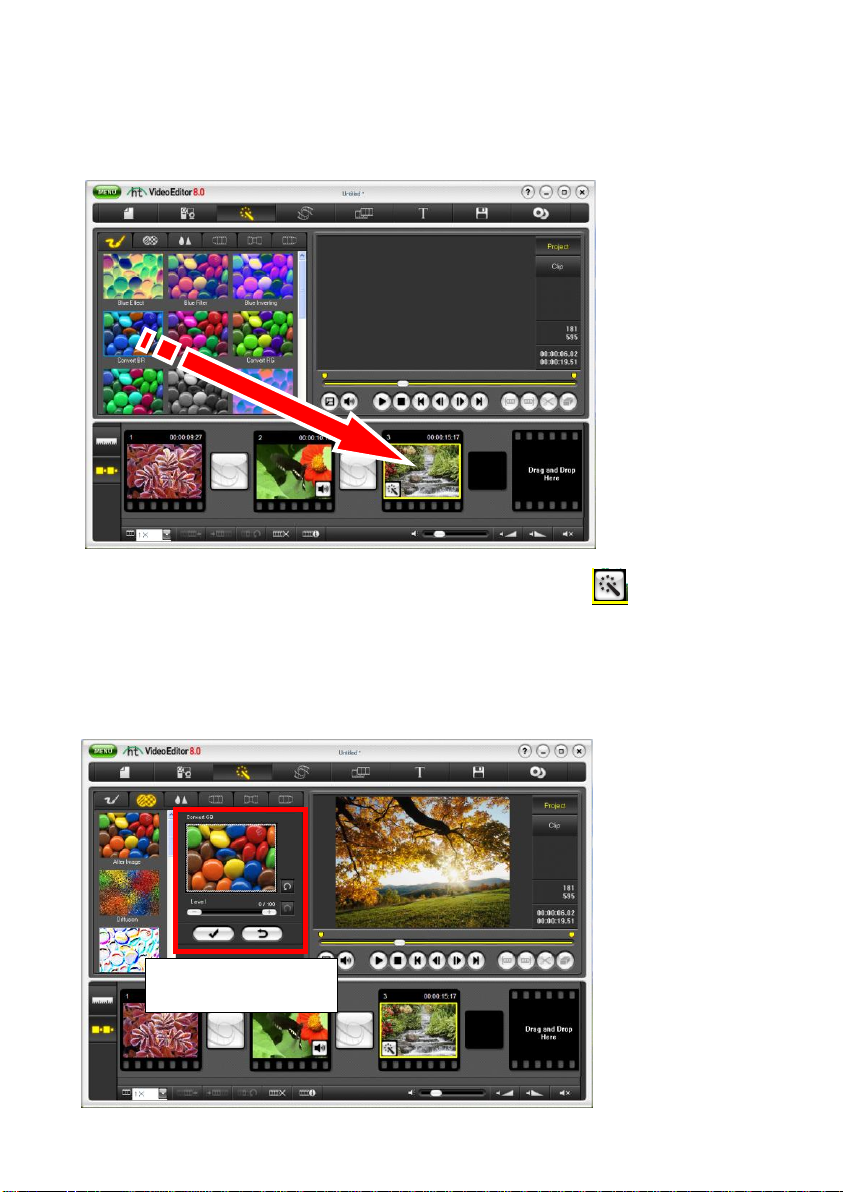
You can easily apply one of the many effects to your clips using the drag and drop
method.
Once the effect is dragged into the clip, you will see the effect icon appear inside
the thumbnail. This icon symbolizes that an effect has been applied to the clip.
After you apply the selected effect to the clip, you can adjust the intensity, direction, or
style of the effect using the Effects Control panel.
Page 56
56. honestech
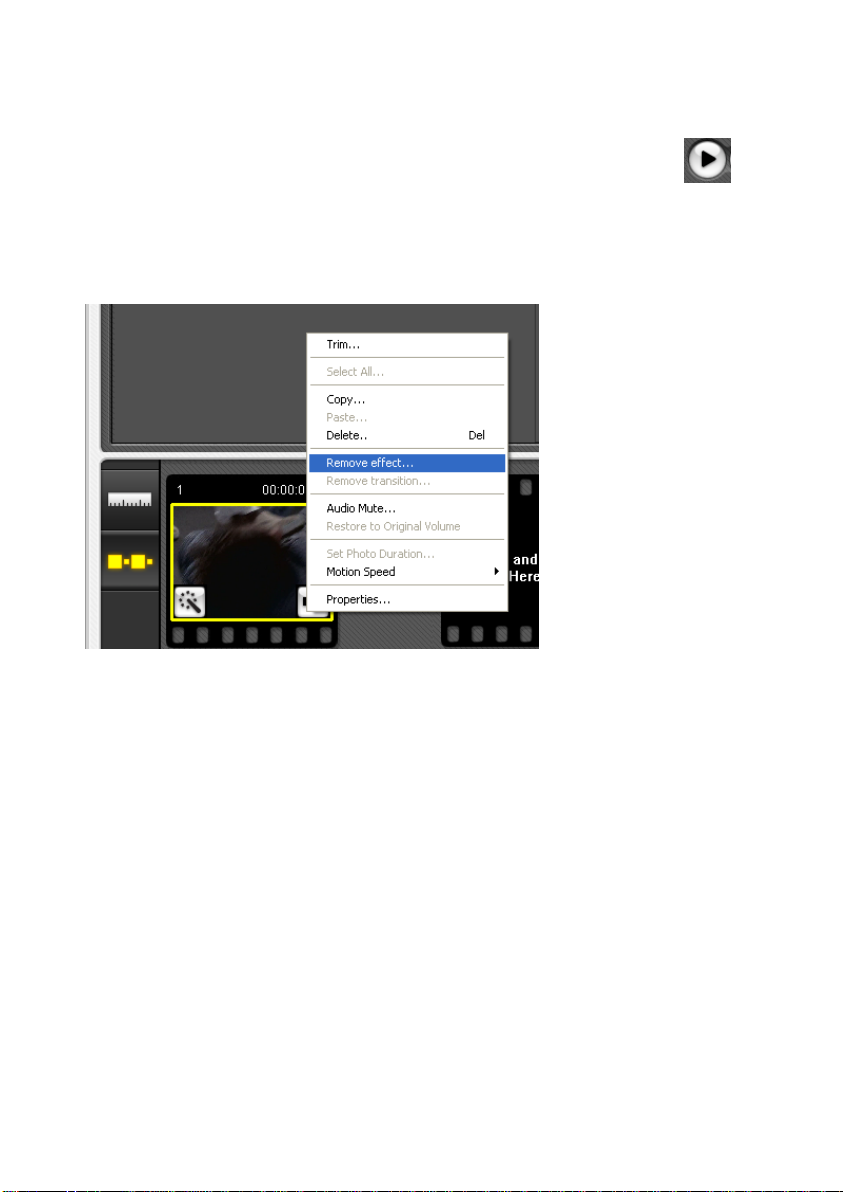
After adding various effects to your clips, you can preview the result by clicking in
the Edit window. If you do not like the effect that you have applied, you can remove the
effect by right-clicking on the clip and select “Remove effect”.
Page 57
4.5. Adding Transition Effects
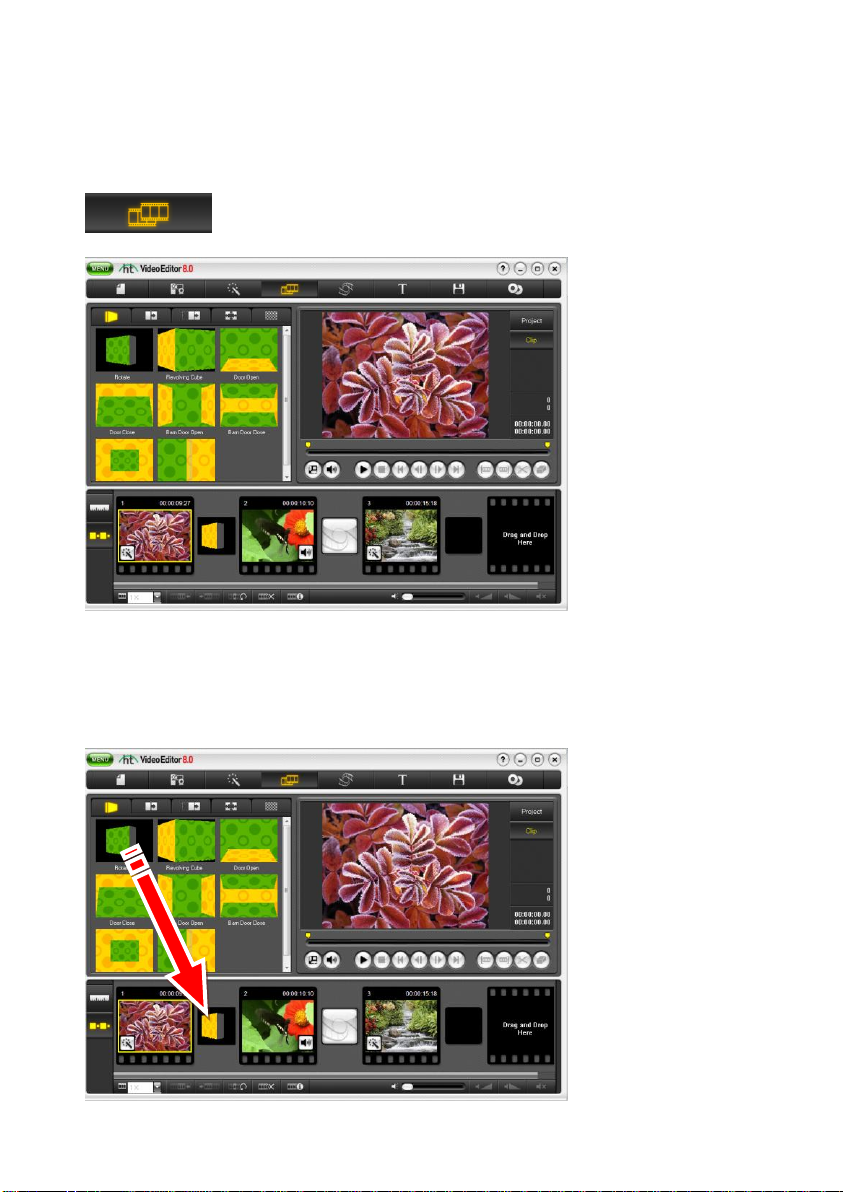
Add beautiful transitions between your clips. Choose from 86
available transtition effects.
57. Video Editor 8.0
You will see small transition markers between the video clips as shown below. Simply
drag and drop the transition effect you wish to use into the small window shown below to
add the transitional effect.
Page 58
58. honestech
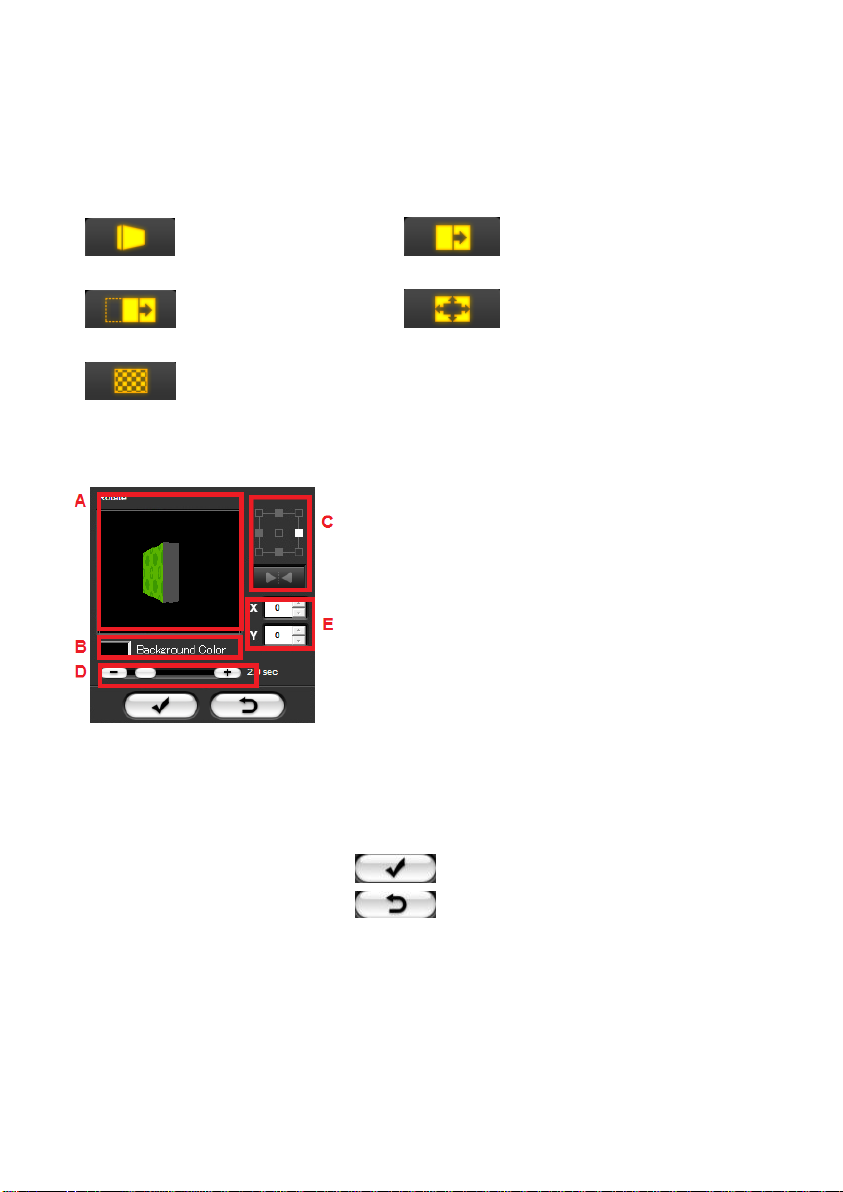
Transition Types: There are multiple transition effects to choose from.
3D Transitions Wipe Transitions
Slide Transitions Stretch Transitions
Diverse Transitions
Transition Properties
A. Preview: Displays the transition style.
B. Background Color: Set the background color.
C. Direction: Set the direction of the transition.
D. Section Setup: You can adjust the section
where the two clips overlap. On the Timeline,
you can adjust the section by moving the clips.
E. Number of horizontal and vertical lines: Adjust
the number of horizontal and vertical lines.
Click on this button to accept changes.
Click this button to undo the changes and
exit the properties
Page 59
59. Video Editor 8.0
4.6. Adding Overlay Effects
Overlay is similar to the picture-in-picture feature on many TV sets. It
allows you to display two clips on a single screen or overlap two clips.
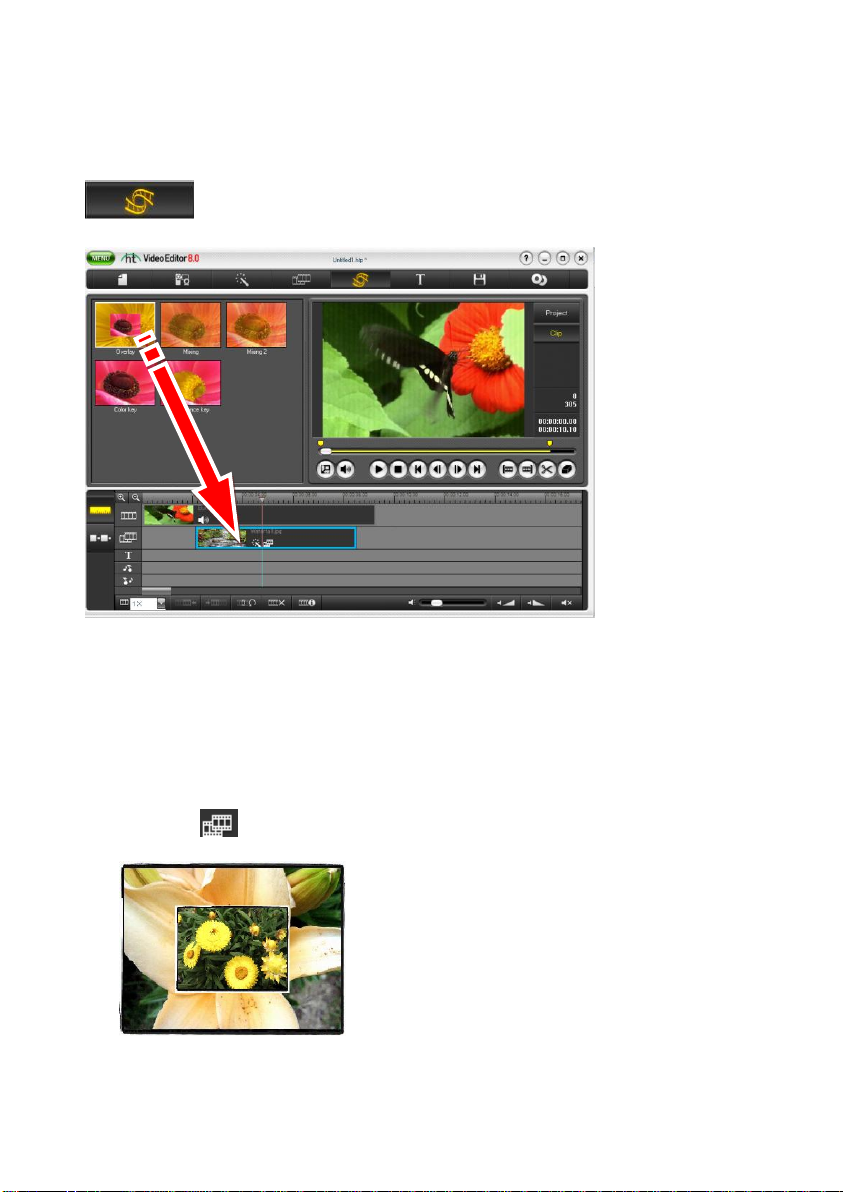
To Apply an Overlay:
1. Select the Overlay option.
2. An overlay list will appear on the left side of the screen.
3. Drag and drop the overlay you want to apply onto the Overlay Track.
4. Once the overlay has been added, the Overlay Properties window will open on
the right side of the screen.
5. This icon will indicate the clip that the overlay has been applied to.
[Result Screen]
NOTE: An overlay can only be applied to video clips in the Overlay Track.
Page 60
60. honestech
A B C
D
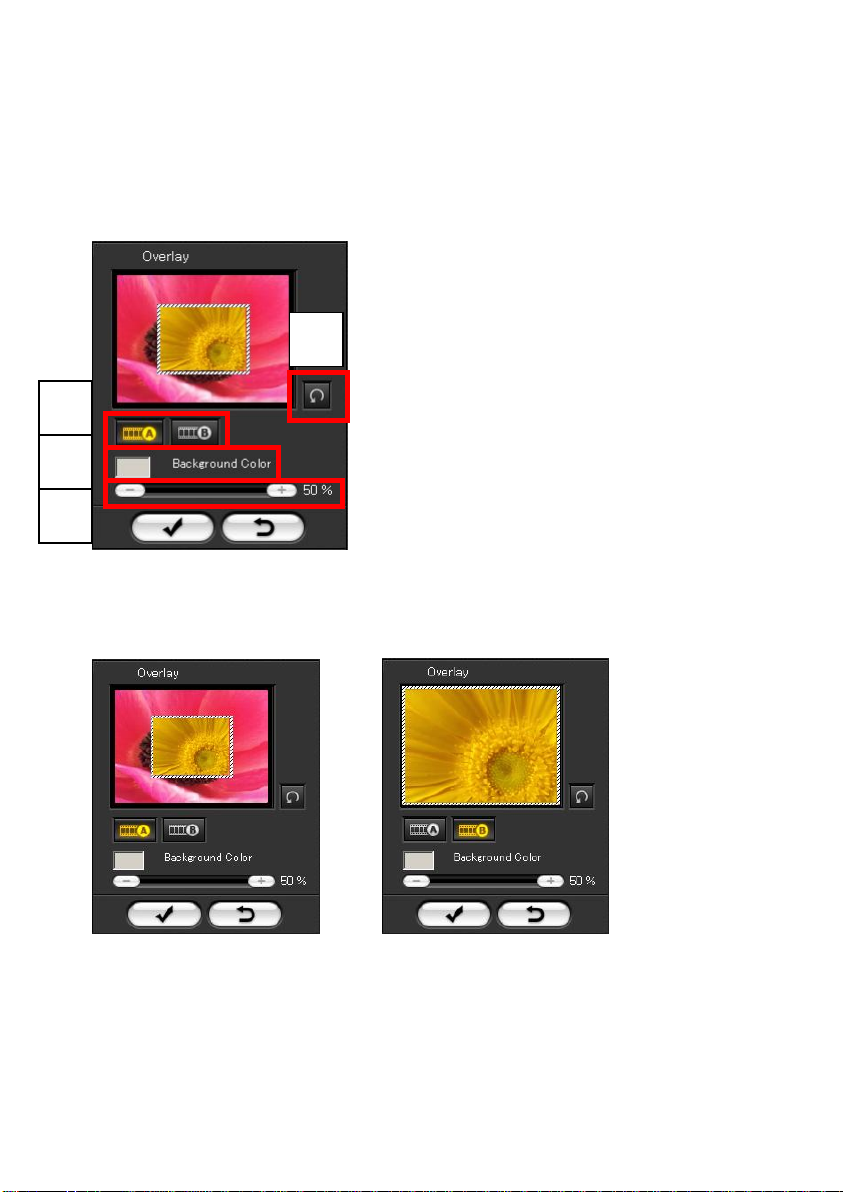
Setting Up Overlays:
You can change the Overlay Properties to achieve different overlay effects.
A. Image Switch: Click to switch between the
two videos being used in your overlay.
B. Reset: Undo all the changes you made.
C. Background Color: changes the background
color (used for Color Key effect only).
D. Mixing Slider Bar: Drag to adjust image
transparency and luminance of the selected
image.
The following images show the overlay effect. For example, the image in the tab “B” is
displayed on top of the image in the tab “A” (zoom in or zoom out mode).
[Tab A] [Tab B]
Page 61
4.7. Adding Title Effects
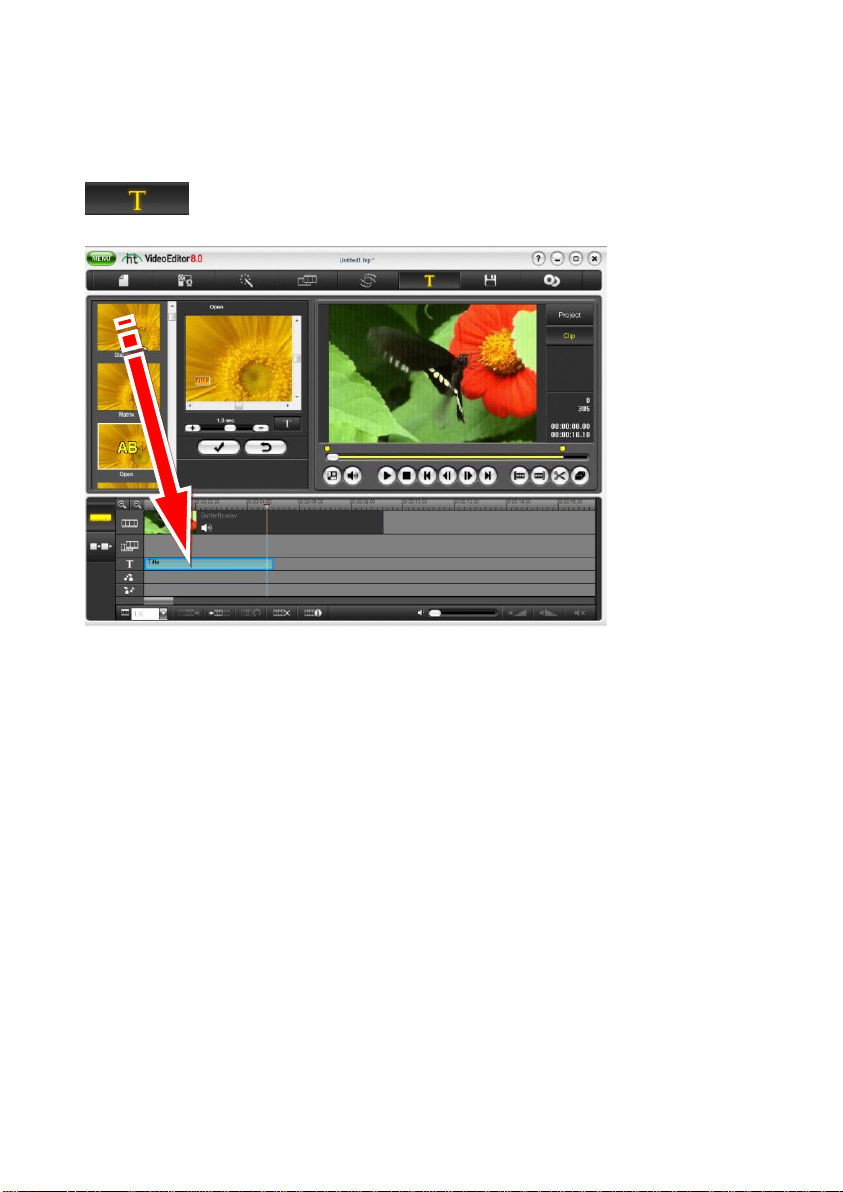
Add a title to your video.
To add a title to your clip:
1. Select Title option.
2. A title list will appear on the left side of the screen.
3. Drag and drop the title you want to apply into the Title Track.
4. Once the title has been added, the Title Properties window will open.
5. You can set attributes including size, width, border, and shadow.
NOTE: Titles can be applied only in the Timeline.
61. Video Editor 8.0
Page 62
62. honestech
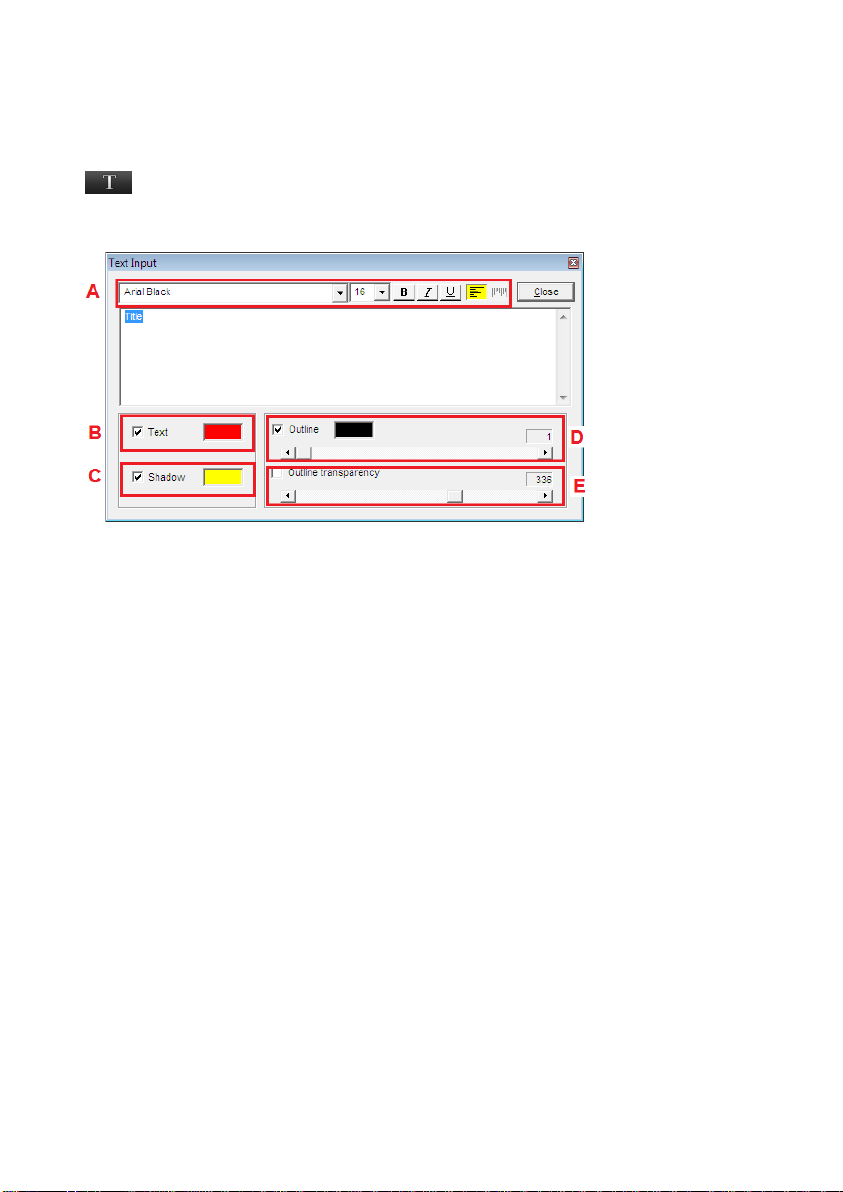
Title Editing
Title Properties: Click to open the Title Properties window (as shown below).
A. Set font type and size
B. Set font color.
C. Add shadow effect and color.
D. Change outline color and thickness.
E. When the Outline option is checked, you can adjust the level of the outline
(fade in or fade out).
Page 63
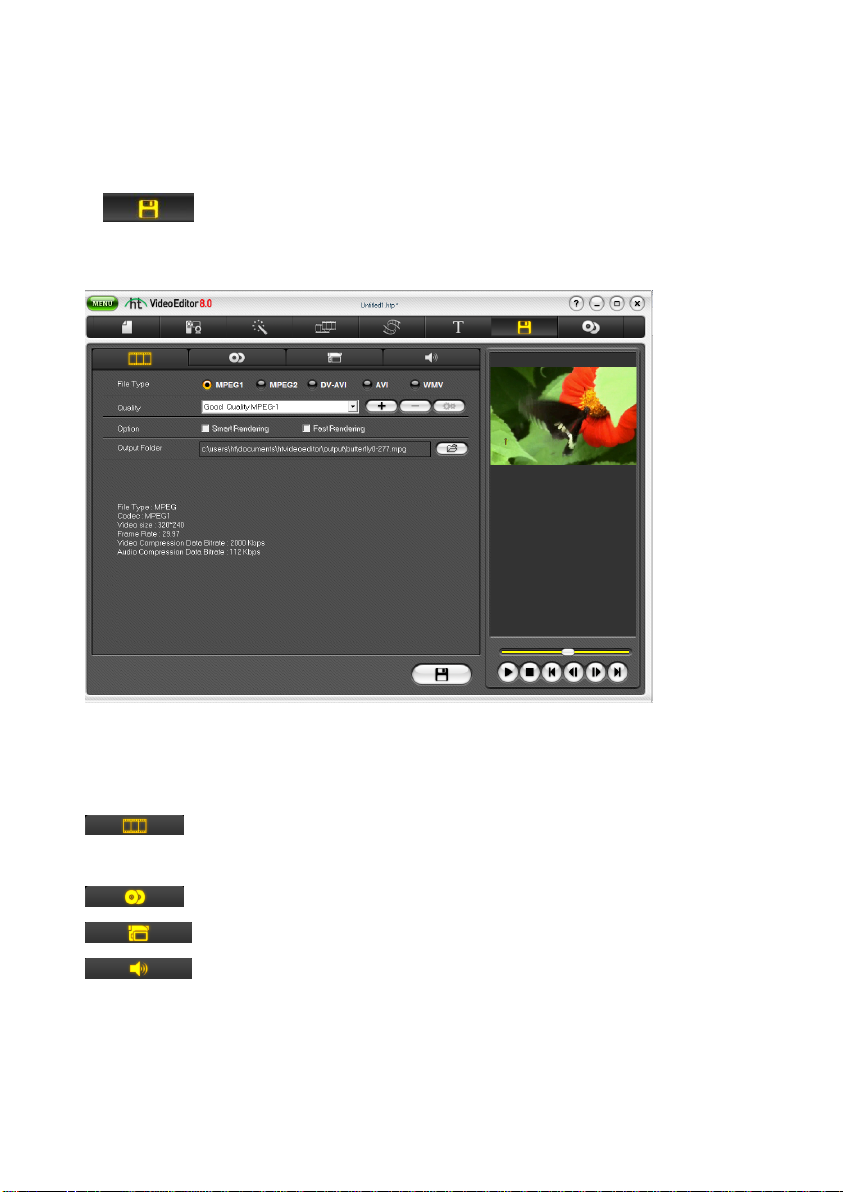
4.8. Creating Output
Output: Click to open the output options window. From this window you
can apply the effects and changes you have made and merge
everything into a single file.
63. Video Editor 8.0
The output window contains four output options on the left and a preview screen on the
right. The Output Options are described below:
Publish Video File: Create video files in MPEG1, MPEG2, AVI, DV-AVI, or
WMV format.
Publish Disk: Create a disc (DVD, VCD or SVCD).
Write to DV-tape: Output the video to a DV-tape.
Output audio: Extract audio and use it to create a WAV file.
Page 64
64. honestech
4.8.1. Output Video File
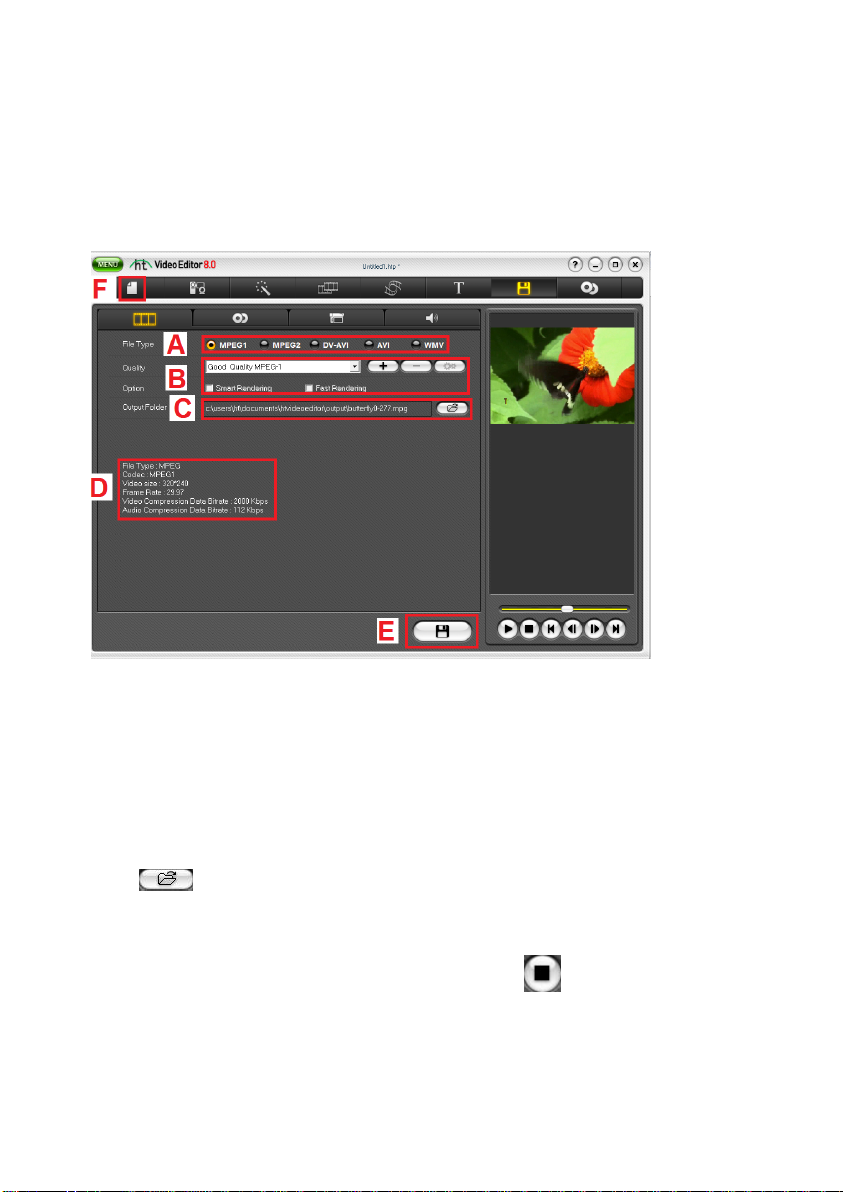
Create a video files in one of any number of available formats. This includes AVI, DV-AVI,
WMV, MPEG-1, and MPEG-2 formats.
To create a video file:
A. Select from MPEG1, MPEG2, AVI, DV-AVI or WMV.
B. Select a profile (If there is no profile that suits your needs, you can create a
custom profile).
C. Confirm the folder and file names. To change the folder and file names, click
button.
D. Confirm whether the selected profile fits your desired output settings.
E. Click the Record/Output button. This process may take a long time.
To stop the process before completion, click the
You can preview your video prior to output by selecting the play button.
Page 65
65. Video Editor 8.0
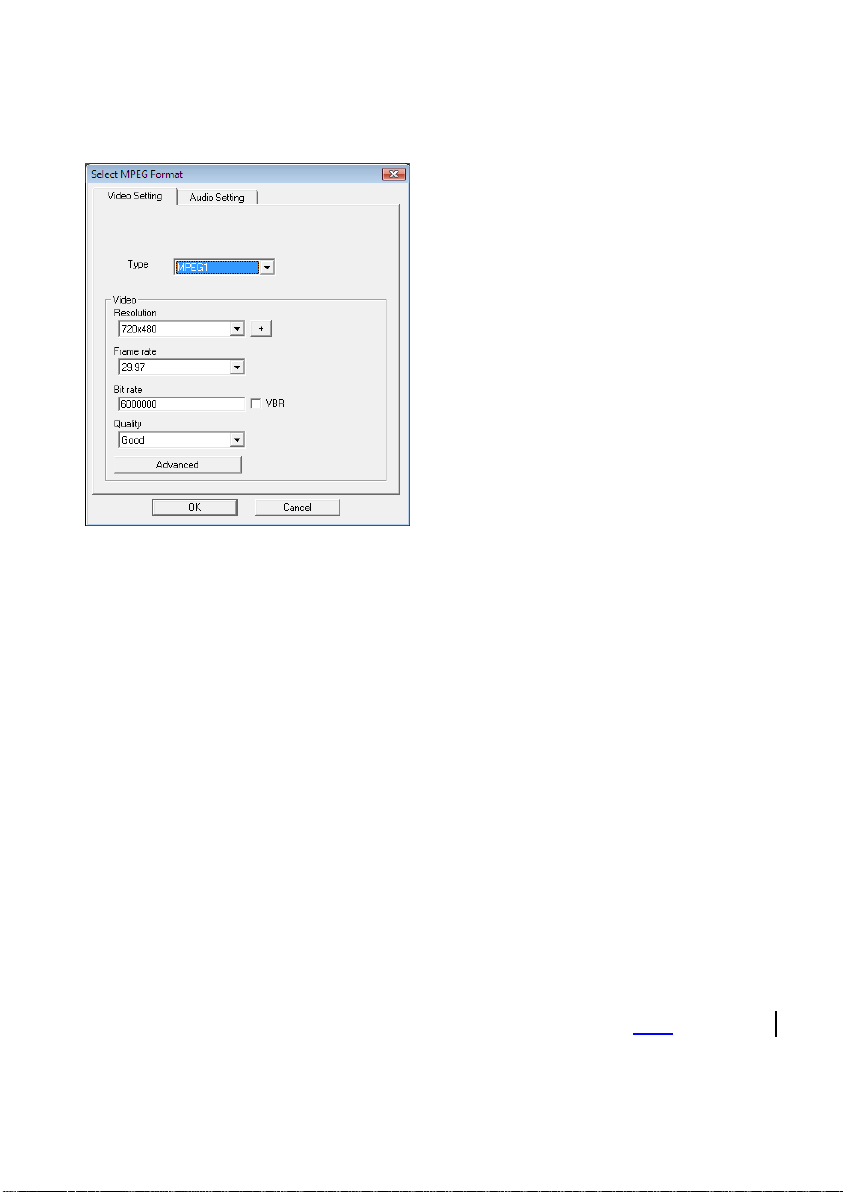
4.8.1.1. MPEG format
Rendering Method : Fast MPEG merge (GOP boundary cut)
To use the Fast Method, all video clips being rendered must be the same
MPEG format. This makes inserting and deleting frames simple and fast.
The output video format will match the original MPEG format.
Customizing of video and audio settings is not possible; function property
settings are made inactive.
Type : Displays MPEG format of file to be rendered.
Video
o Resolution: Displays video resolution (screen size).
o Frame Rate: Displays Frames Per Second (fps).
o Bit Rate: Displays Bits Per Second (bps).
Audio
o Sampling Rate: Displays Sampling Frequency (KHz).
o Bit Rate: Displays Bits Per Second (bps).
Rendering Method : Smart Rendering
Re-encodes only the portions of the video that are needed.
Only the edited title, audio, and segments with special effects from the original
streaming video will be encoded, while the remainder of the original video will
be saved as is.
Page 66

66. honestech
If various effects are applied to the entire movie clip, the whole movie will be re-
rendered.
When movie clips with different video formats are combined, the format of the
output file will be set to match the format of the Base streaming video file.
Movie clips with formats that do not match the Base streaming video file will
be re-rendered.
Select the Base streaming video file using the button.
The video settings cannot be changed, and only the audio settings can be
changed.
Type : Display MPEG type
Video
o Resolution: Displays Resolution (screen size).
o Frame Rate: Displays Frames Per Second (fps).
o Bit Rate: Displays Bits Per Second (bps).
Audio
o Sampling Rate: Displays sampling frequency (KHz).
o Bit Rate: Displays Bits Per Second (bps).
Rendering Method : Full Rendering
Flexible: Renders movie clips together that are formatted with different video
and audio settings
Customizable: Allows manual selection of the output video and audio settings
Encoding: Entire video will be be encoded.
o Type : Select MPEG type
Supports MPEG-1, VCD, MPEG-2, SVCD and DVD. Both
NTSC and PAL standards are supported.
o Video
Resolution: Select resolution (screen size).
Frame Rate: Select Frames Per Second (fps).
Bit Rate: Select Bits Per Second (bps).
o Audio
Sampling Rate: Select Sampling Frequency (KHz).
Bit Rate: Select Bits Per Second (bps).
Page 67
67. Video Editor 8.0
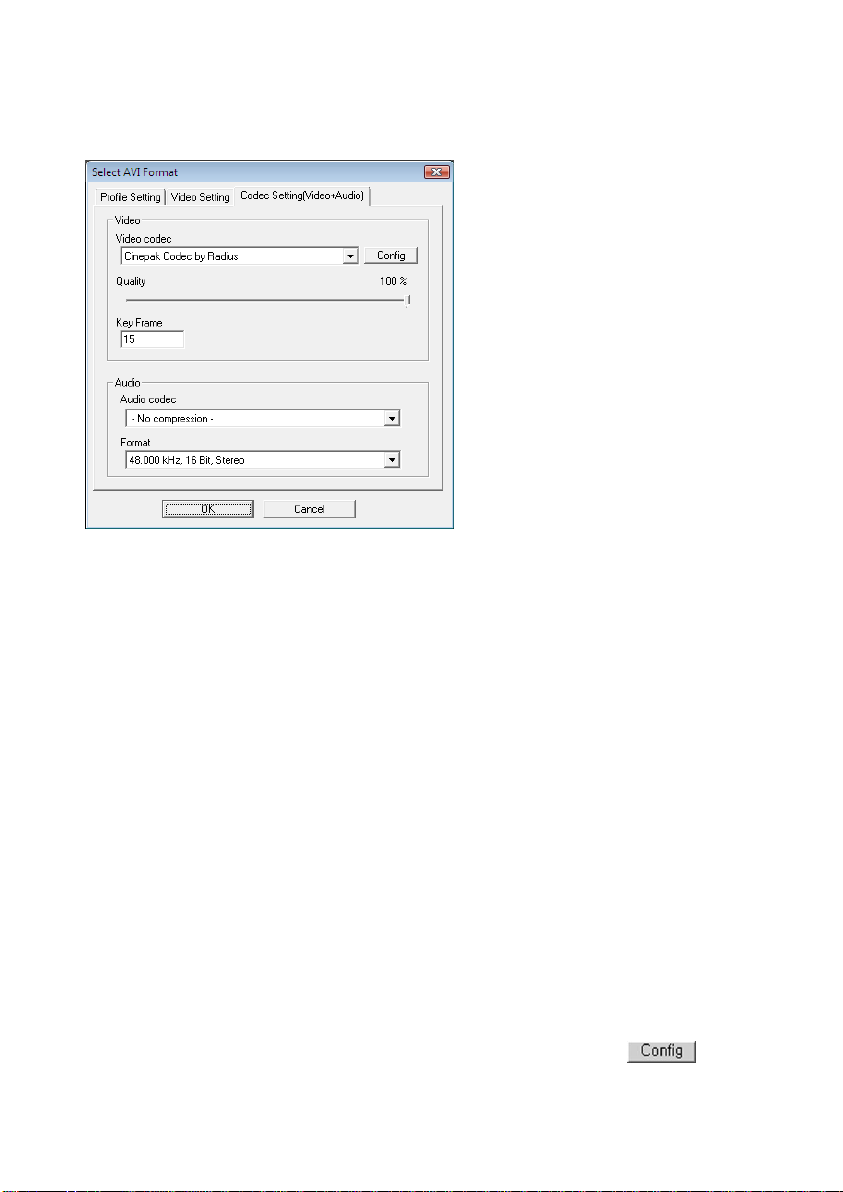
4.8.1.2. AVI Format
1. Smart Rendering:
Only edited segments (title, audio and special effects) are encoded while
unedited segments maintain the original image. This improves video quality.
If the video clip being edited is the entire video, the entire video is rendered
again.
If more than one streaming video is edited, all of the videos are encoded and
saved to the format of the "base streaming file" format.
Videos being encoded are fixed in their format while the audio track may be
adjusted.
2. Video (Supports NTSC and PAL):
Resolution: select video screen size (Resolution: 160 x 120 ~ 720 x 576).
Resolution settings are inactive when the Smart Rendering method is
deactivated.
Frame Rate (FPS): Set video frame rate (Frames Per Second: FPS) range: 10
FPS ~ 30 FPS. This feature is deactivated when Smart Rendering is selected.
Video CODEC: Displays a drop-down list of CODECs registered on the user's
PC.
Set Video Properties for the selected video CODEC, using the
button.
Page 68

68. honestech
3. Audio
Sampling Rate: Set Audio Sampling Frequency (Sampling Frequency: 16000Hz
~ 48000Hz).
Audio CODEC: Show the list of audio CODEC's registered on the user‟s PC.
NOTE: For more information about a CODEC, refer to manual provided by the
codec developer.
Page 69
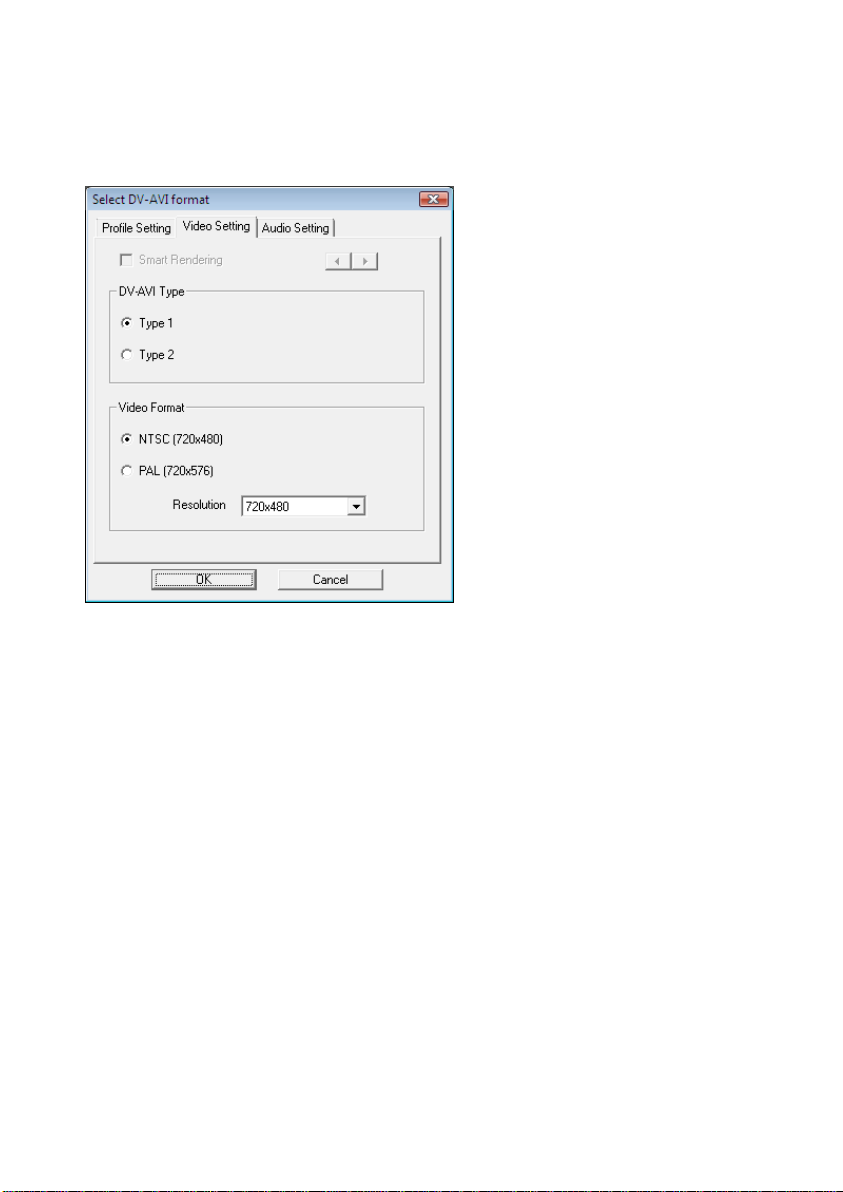
4.8.1.3. DV-AVI File Format
1. DV-AVI Type
Type 1: Video file in Digital Video format.
- This is the native format of video in a digital camcorder.
- Video and audio are in the same stream.
- Requires a splitter that divides video and audio.
Type 2: Video file in general AVI format.
- Video is compressed in DV format.
- Video and audio are in separate streams.
- Needs to be converted into type 1 to be transferred to a digital
camcorder.
2. Video resolution: Select NTSC or PAL.
NTSC: 720 x 480 resolution
PAL: 720x 576 resolution
3. Audio sample rate: Select audio frequency.
32kHz
48kHz
4. Video output is generated.
69. Video Editor 8.0
Page 70
70. honestech
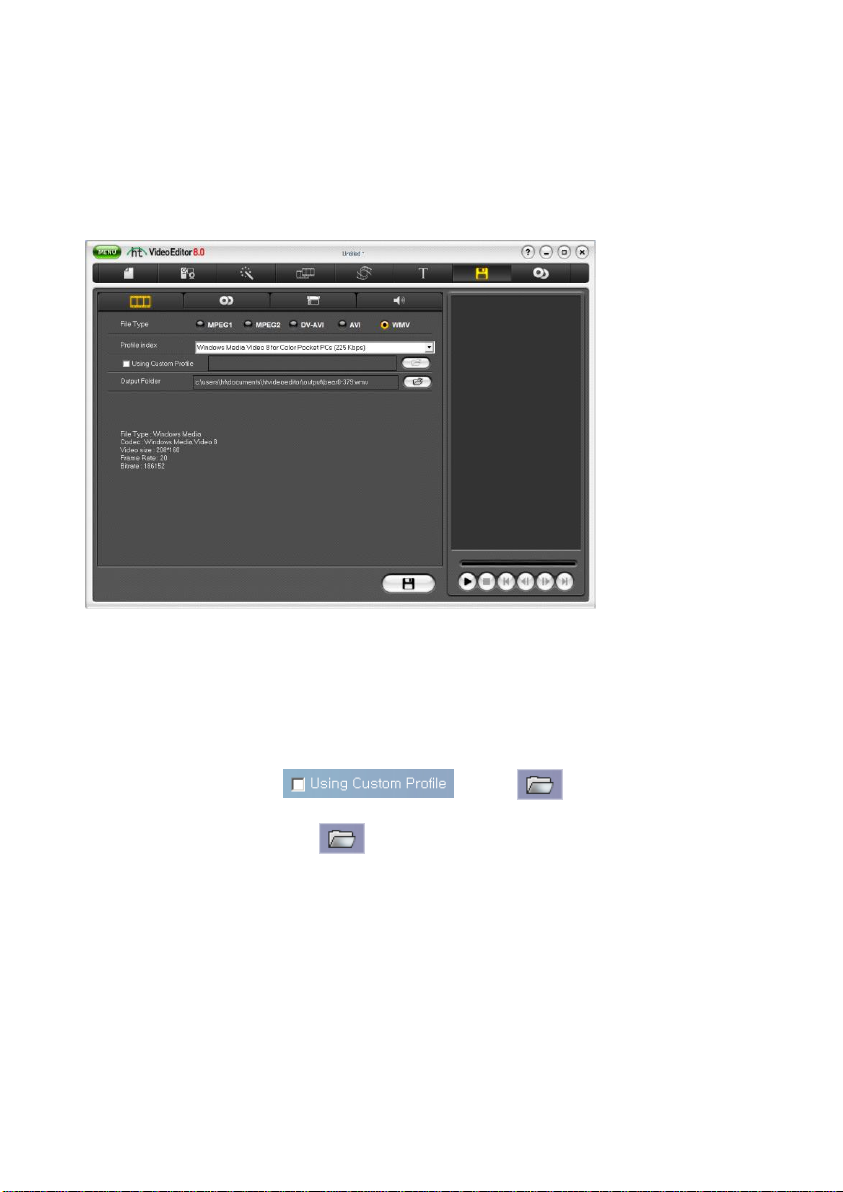
4.8.1.4. Windows Media Video (WMV) File
Select a Profile Index from the list.
Profile: The profile includes audio and video codecs, output video size, audio sample rate,
bit rate, etc. If there is no preference profile, you can create a custom profile by using the
Profile Generator of Windows Media Encoder.
Output using your own custom profile,
o Check . The button will then be
enabled.
o Using the button, you can import a custom profile.
o You can modify the bit-rate, audio codec, and audio format. (However,
the imported profile will not save these modified values.)
o Click the OK button to create an output in WMV format.
NOTE: For more information on making a custom profile, please refer to the
manual provided by Windows Media Encoder.
Page 71

1. Video: Supports NTSC or PAL standards (Video broadcasting standards used
in different regions of the world). NTSC is the video standard used in North
America and Japan, and PAL is the video standard used in Europe.
Resolution: Displays the video resolution or picture size (width x length)
Frame Rate: Display video frame rate - Frames Per Second (fps)
Bit Rate: Displays Bits Per Second (bps).
2. Audio
Sampling Rate: Displays the Audio Sampling Frequency (Hz)
Bit Rate: Displays the Audio Bit Rate - Bit Per Second (bps)
Stereo: Displays the audio presentation type (Stereo, Mono)
NOTE: Contact Microsoft(R) for more information about the settings and uses
of Windows Media Format (Video/Audio CODEC). All rights to Microsoft
CODECs belong to Microsoft(R).
71. Video Editor 8.0
Page 72
72. honestech
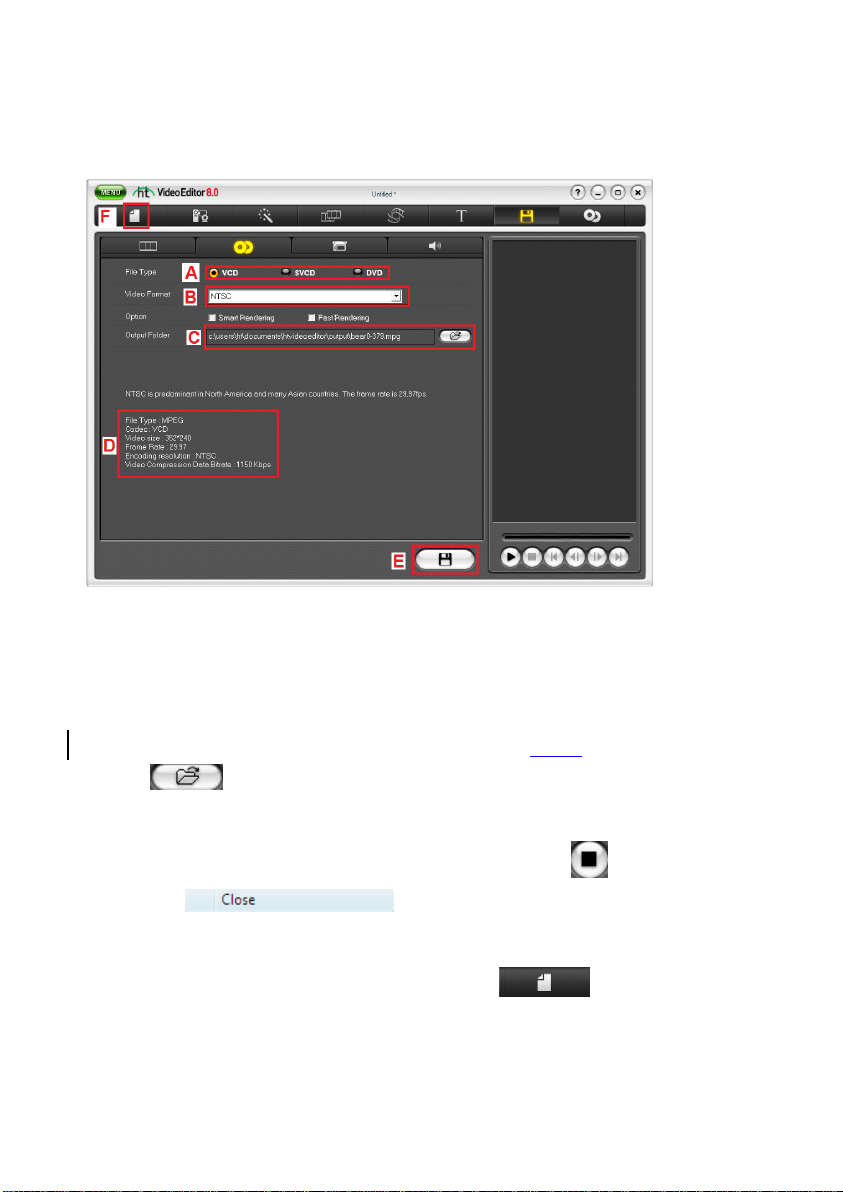
4.8.2. Burn Disc
To produce a movie file that you can burn to disc.
A. Select VCD, SVCD, or DVD Format.
B. Select NTSC or PAL from the video format drop-down list.
C. Confirm the output folder and file names. To change the output folder and file names,
click .
D. Confirm whether the selected profile meets your desired output requirements.
E. Click the Record/Burn button. This process may take a long time.
To stop the process before completion, click the button or select
from the popup menu in the play window.
You can confirm the output process through the preview window on the
right.
F. To return to the edit mode after completion, click the button.
Page 73
73. Video Editor 8.0
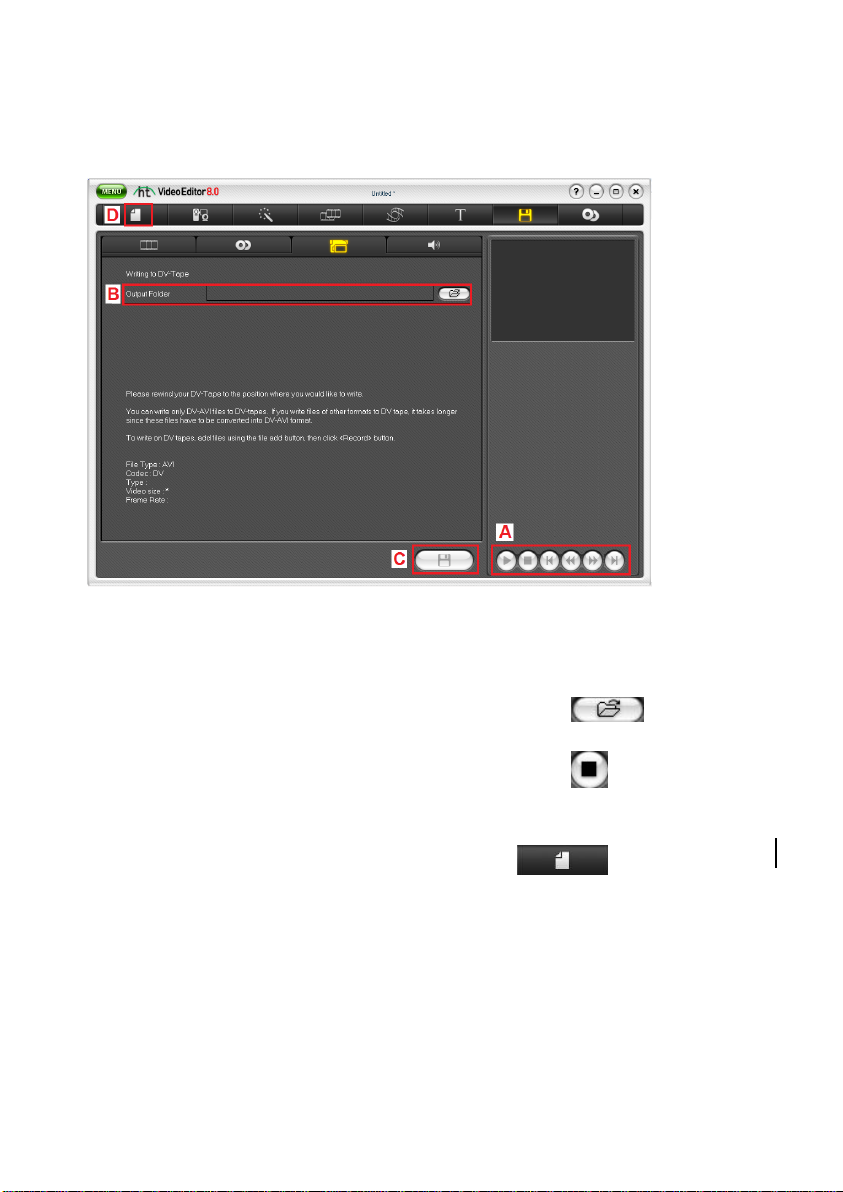
4.8.3. Write DV-Tape
To write to DV-Tape.
A. Confirm the write position of your DV-Tape.
B. Import the file you want to write to DV-Tape by selecting the icon.
C. Click the Record/Write button. This process may take a long time.
• To stop the process before completion, click the button.
• You can confirm the output process through the preview window on the
right.
D. To return to the edit mode after completion, click the button.
Page 74
74. honestech
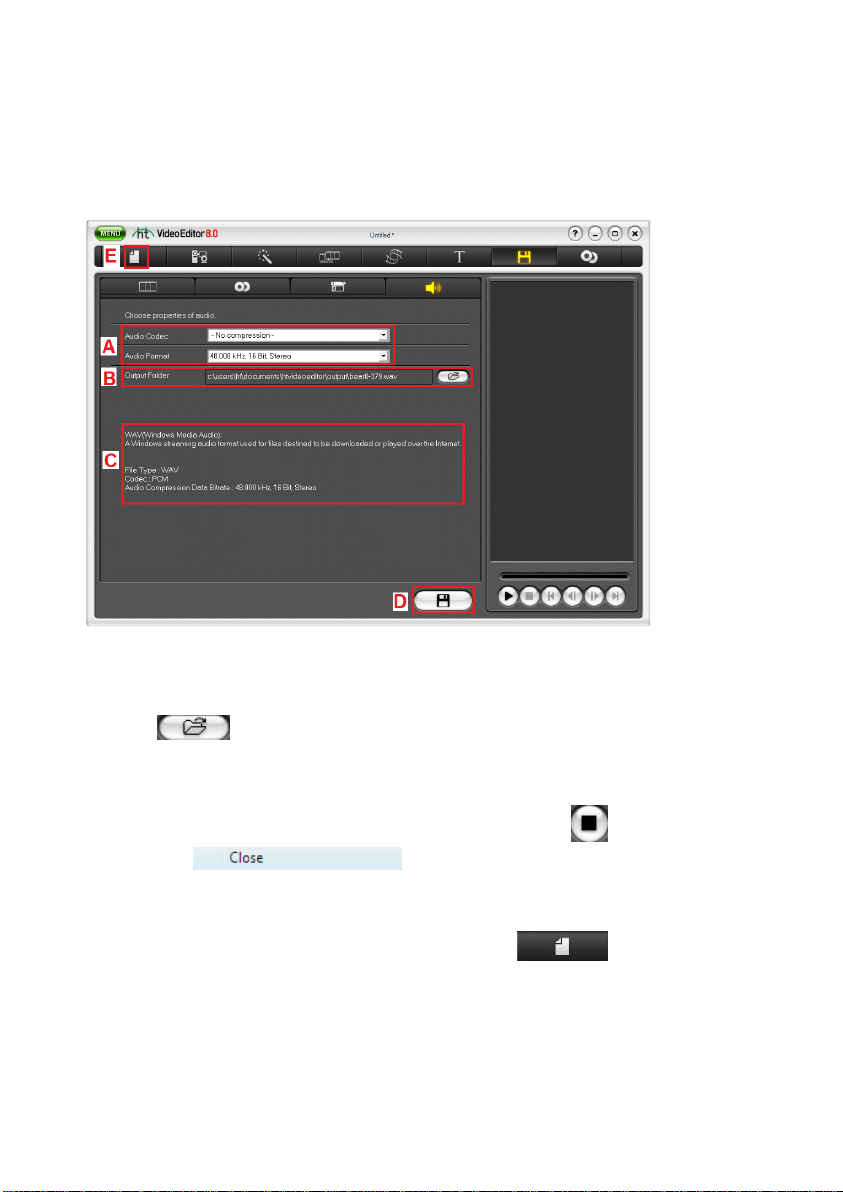
4.8.4. Extract Audio
Extract audio from the video and save it in WAV format.
A. Select the Audio Codec and Format.
B. Confirm the Output folder and file names. To change the Output folder and file names,
click the button.
C. Confirm whether the selected profile meets your desired output requirements..
D. Click the Record/Output button. This process may take a long time.
To stop the process before completion, click the button or select
from the popup menu in the play window.
You can confirm the output process through the preview window on the
right.
E. To return to the edit mode after completion, click the button.
Page 75
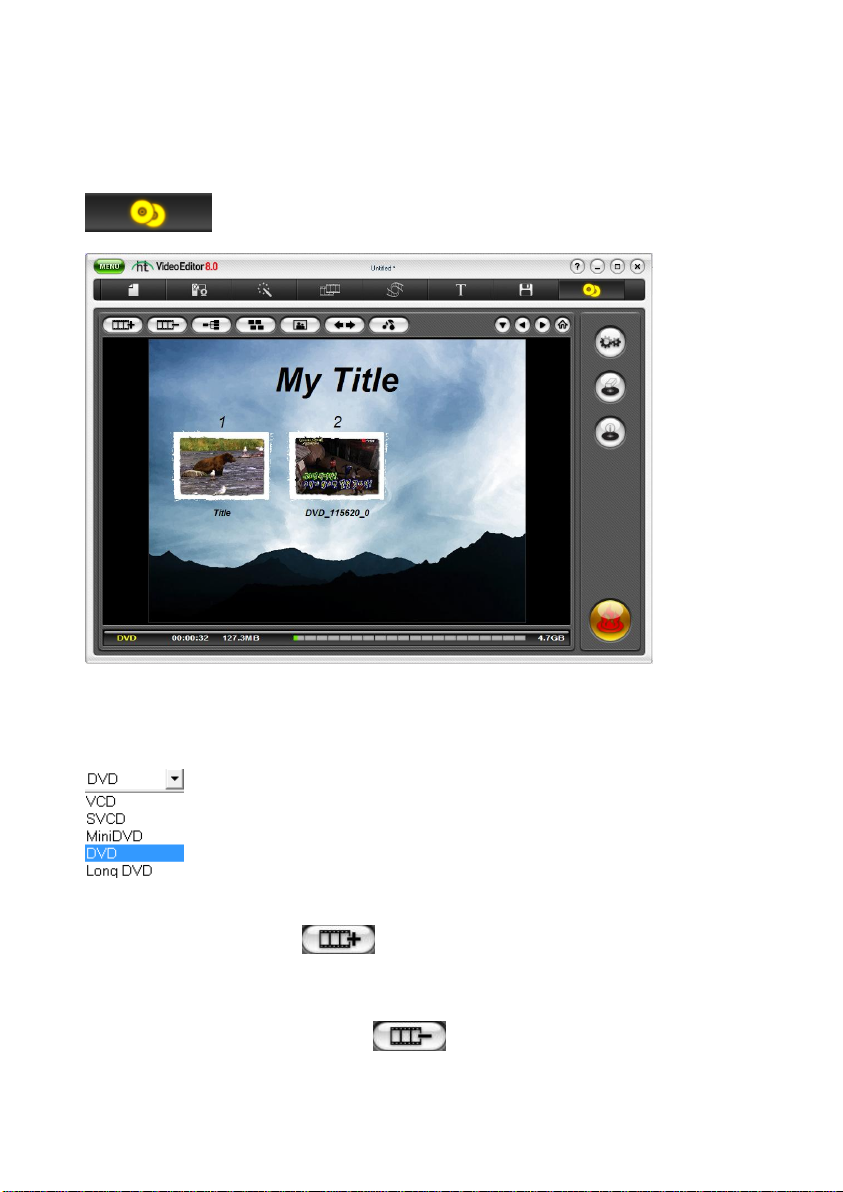
4.9. DVD Creation
75. Video Editor 8.0
Click “Burn” to create a VCD, SVCD, or DVD disc with DVD menu.
Specify the format of the output video.
Begin by selecting the video format output that matches your disc format.
You can also import video clips that you have previously worked on or saved to your
computer by clicking on the button. This button will open a dialogue window
allowing you to browse your file system and locate your files. You can then select video
files (e.g. mpeg, avi, wmv) to add as a part of your movie clip. To remove any movie clips
from the movie file pool click on the button.
Page 76
76. honestech
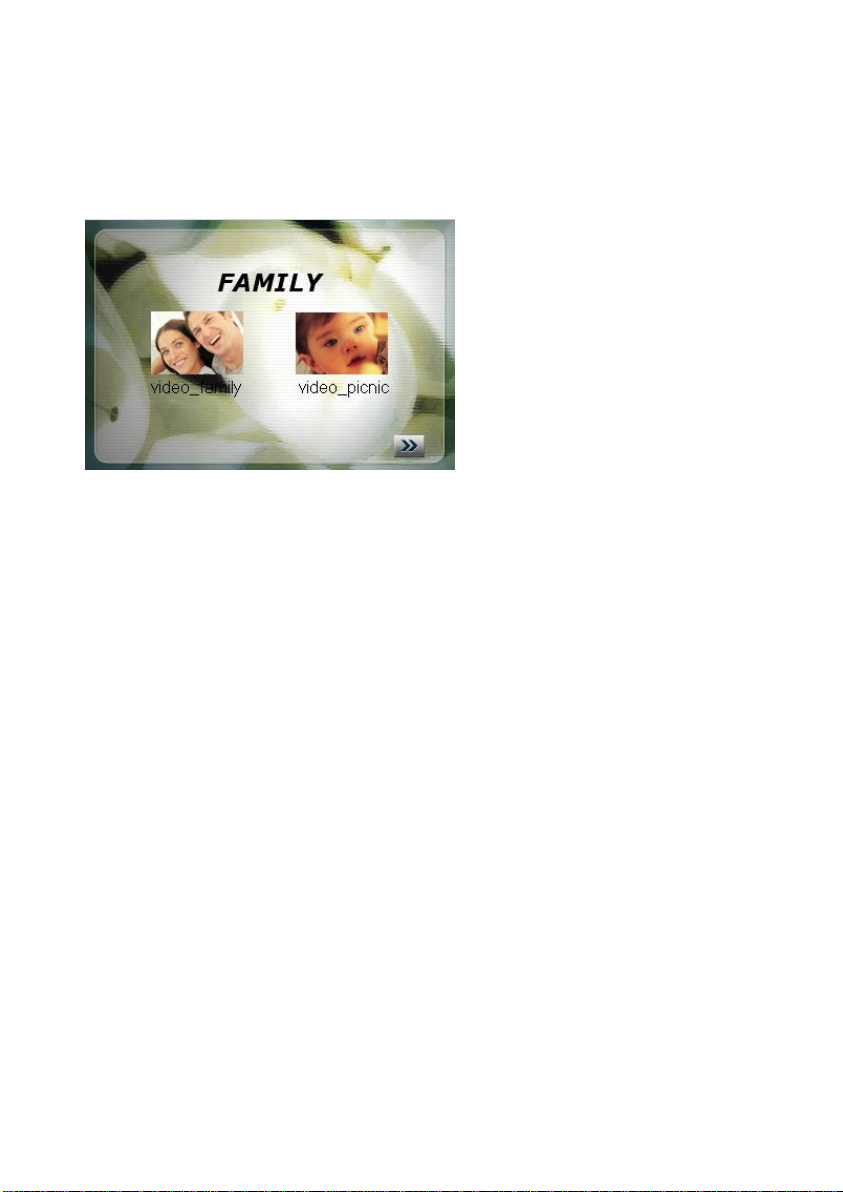
You will notice movie clip(s) added to your movie file pool will automatically be added into
the screen menu shown below.
4.9.1. Menu Title Option
Screen menu settings allow you to change the appearance of the main title page for your
VCD, SVCD, or DVD.
The text of the menu title and movie clip name
Background image of your menu
Number of clips per menu page
Navigational buttons
NOTE: When the CREATE MENU option is unchecked; the Menu Title screen
will not appear.
Page 77
77. Video Editor 8.0
4.9.2. Text Options
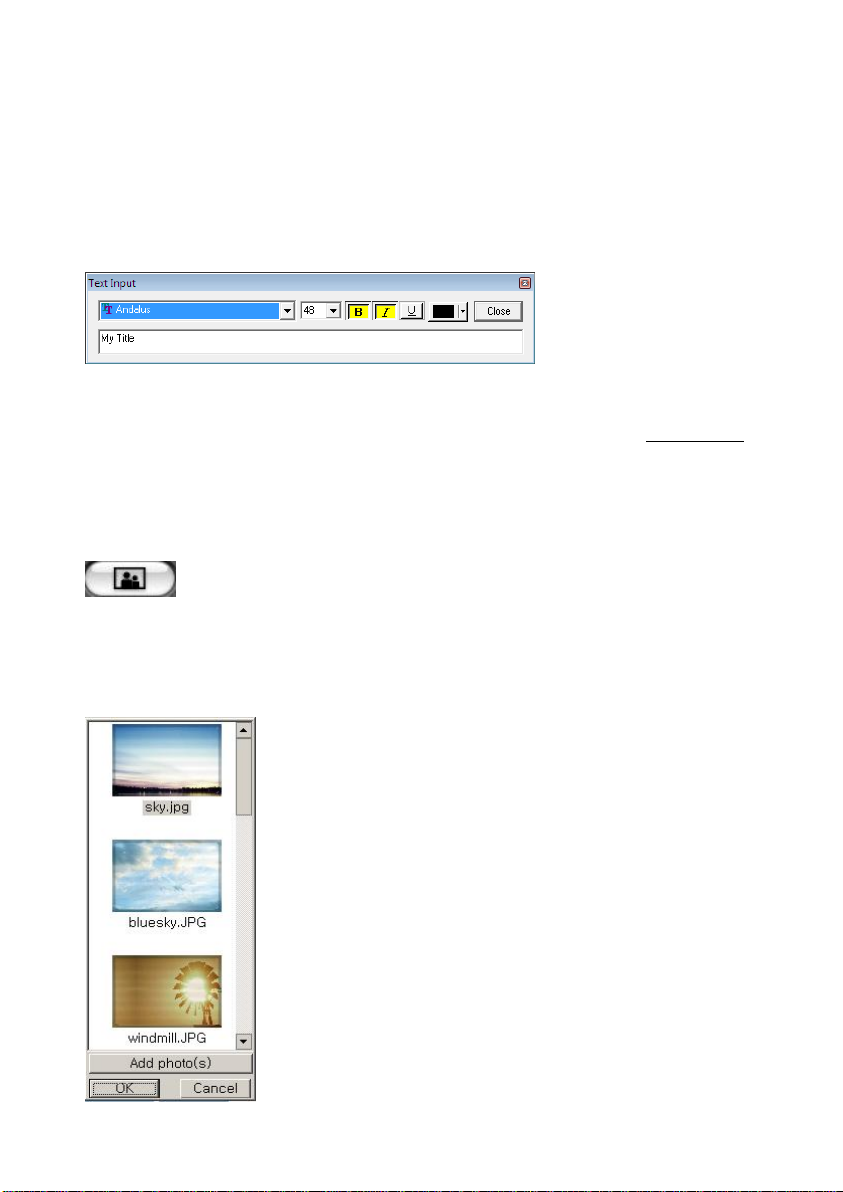
One of the ways to organize your movies is by setting a proper title. You can change your
menu title and movie clip name within the screen menu by simply double clicking on the
text you wish to change. The screen below will appear.
The text input window, allows you to change the name of your movie clip or menu title, as
well as the font type, size, and color. You can also use BOLD, italic, or the UNDERLINE
font features.
4.9.3. Background for Menu Title Page
You can change the background image by clicking on the background
button and selecting your preferred image from the list of thumbnail
choices.
Besides choosing from the list of default background image, you
can also personalize your menu background by adding your
own images. Simply click on the Add Photo(s) button and
choose your own background image.
Your new background image will then be applied to the menu
title page.
If you have multiple menu pages, you can apply different
background images for each page.
Page 78
78. honestech
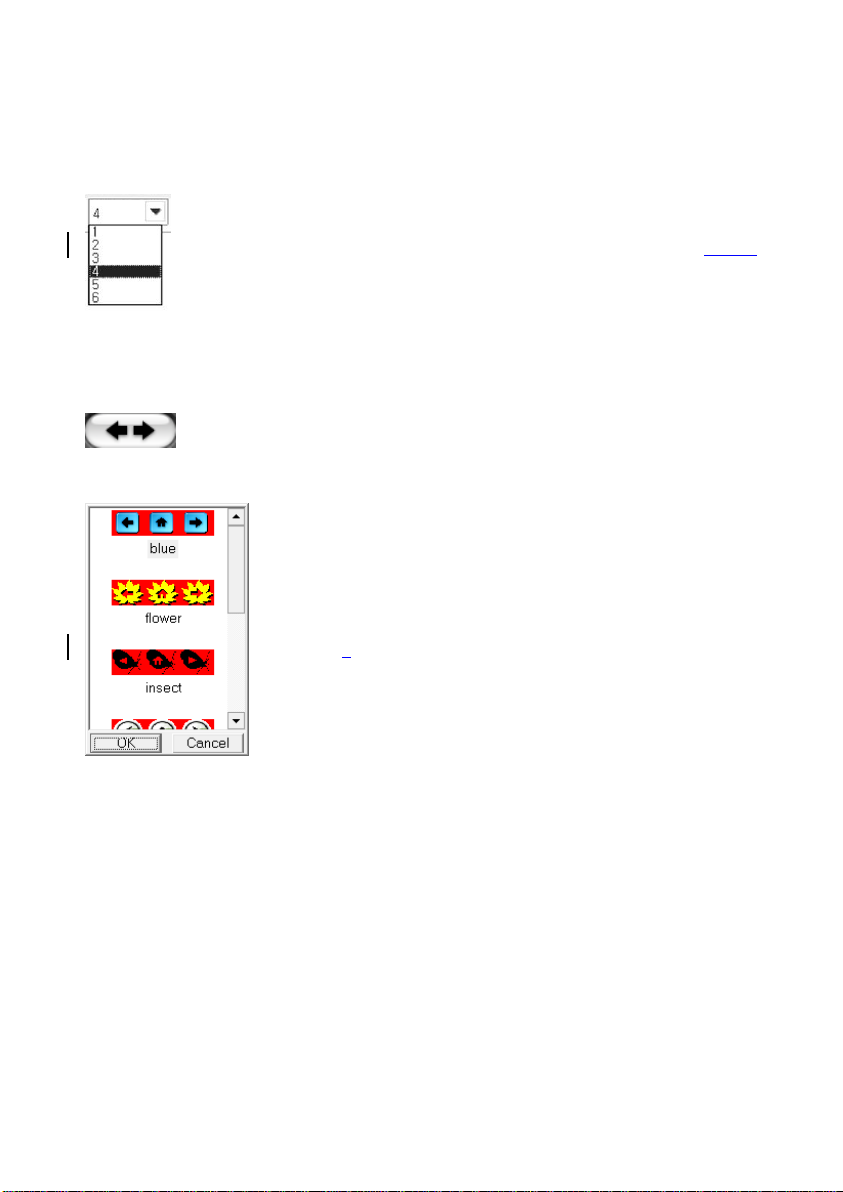
4.9.4. Clips Per Menu Page
You can set the number of movie clips to be displayed on each menu page.
Use the drop-down menu and select the number of clips you wish to appear
on each page.
4.9.5. Navigation Buttons
Use this button to change the navigational buttons.
Navigational buttons only appear if you are using more than one
menu page. They allow you to browse between menu pages or
quickly return to the home menu page.
There are many button designs to choose from. Simply click on
the buttons you wish to use, and click [OK].
Page 79
79. Video Editor 8.0
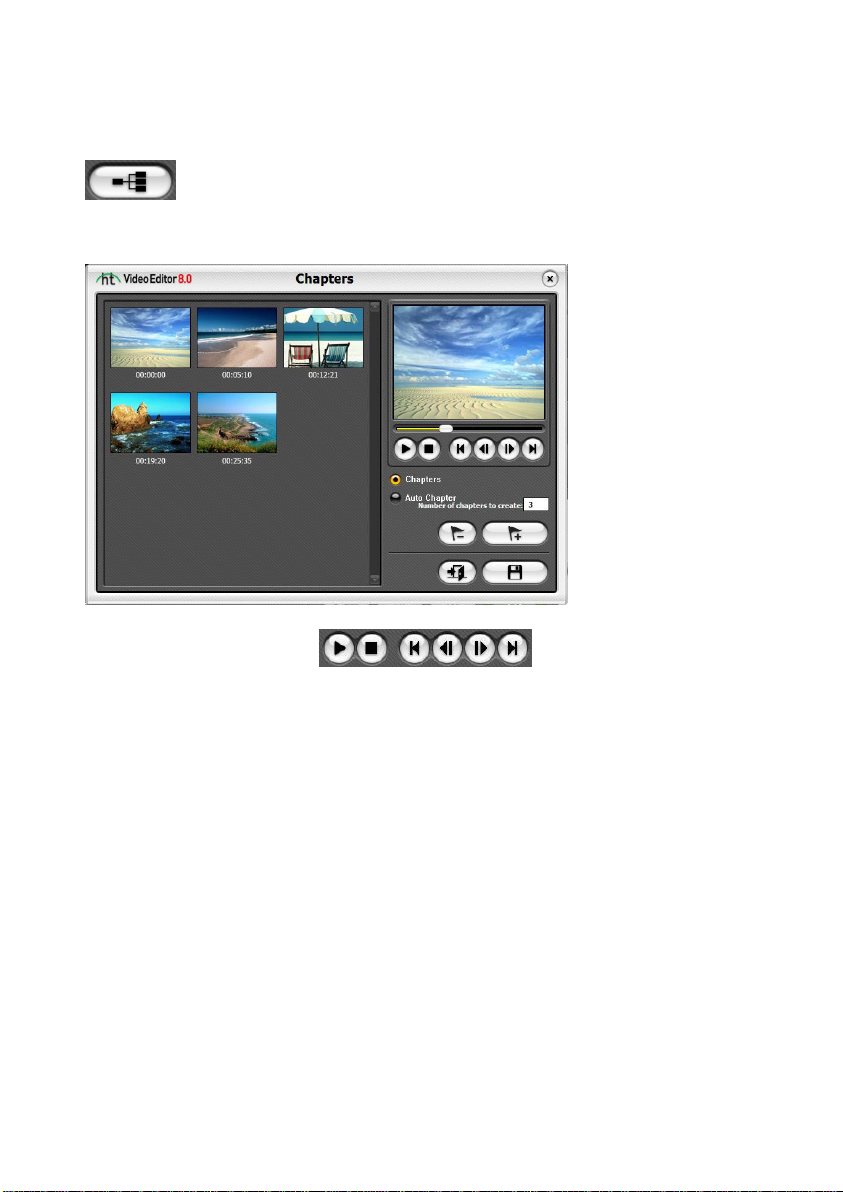
4.9.6. Chapter Creation
Create Chapter Points: Click to begin adding chapters to a clip that you
have selected.
Use the transport controls to locate positions within
your clip that you want to create chapter points for.
o Auto scene detection:
Select this option will automatically insert a chapter point whenever the scene
changes. Chapter points will not be added to the Intro title and ending credit.
o Manual chapter insertion:
Select this option to add individual chapter points anywhere within a
clip.
o Number of chapters to insert:
Select this option to automatically add the selected number of chapter points evenly
throughout the video.
Page 80
80. honestech
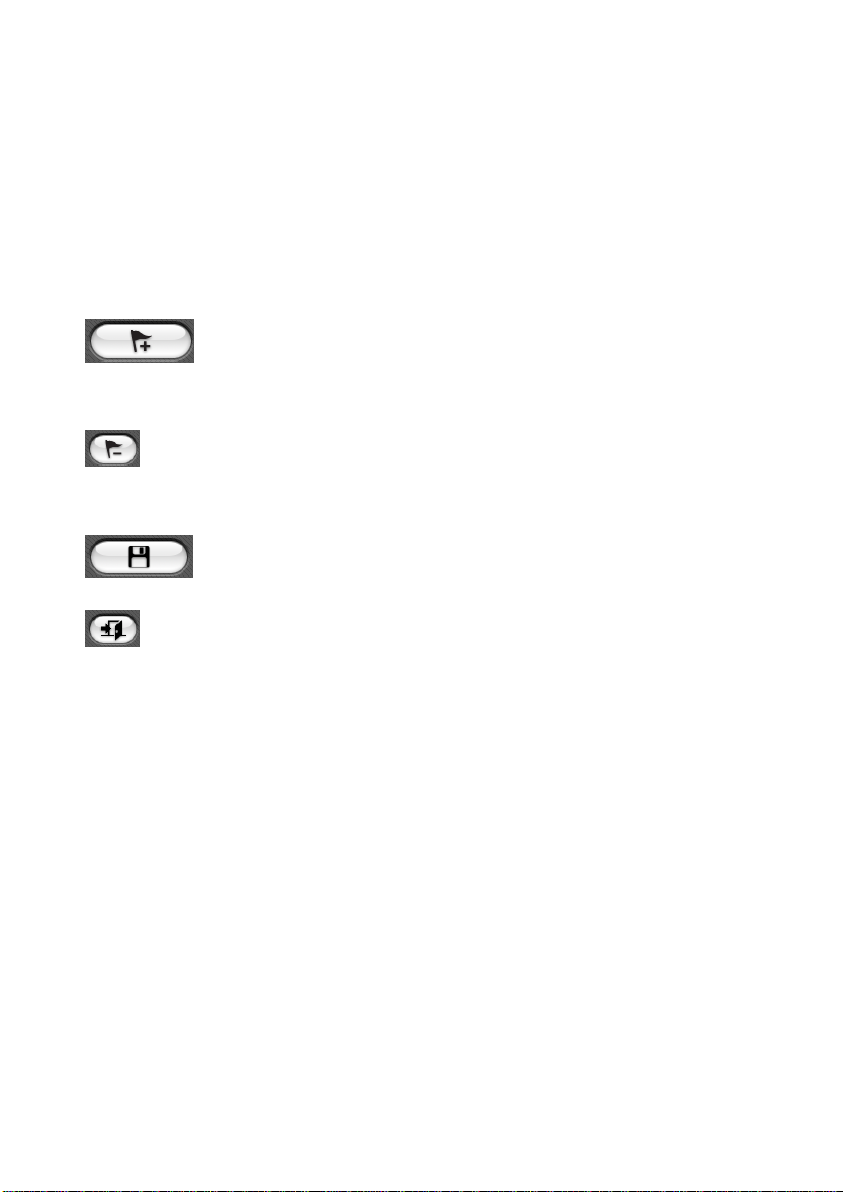
Note: 1. You cannot insert a chapter point in the last 25 seconds of video.
2. You must have minimum 2 seconds gap between two consecutive
chapter points.
Add: Click to add a chapter point at the current play position or to add
auto chapters evenly throughout the video.
Remove: Select a chapter point and click this button to remove the selected
chapter point.
Apply: Click to apply chapter points to the video.
Exit: Click to exit without saving.
Page 81
4.9.7. Output Options
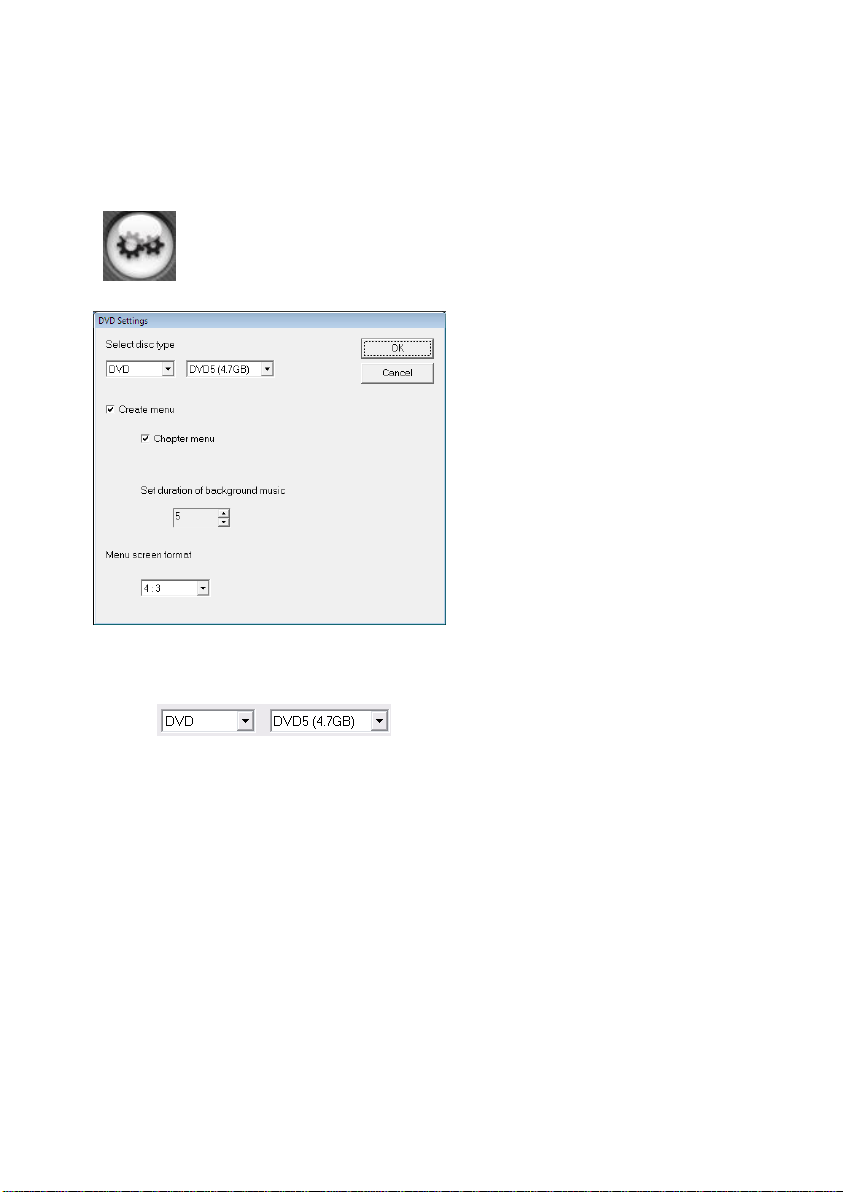
Use the output options to configure your disc prior to burning your movie.
Clicking the Output Options button will display the option window below
and allow you to change your disc configuration.
81. Video Editor 8.0
Selecting Disc type:
Using the drop-down menus shown above, you can change the type of disc you
are using, and in some cases, the capacity of your disc (i.e. Single Layer/Dual
Layer).
-Create Menu
Check this option if you would like to create a DVD title menu.
-Chapter Menu
Check this option if you would like to create a menu screen for selecting
individual chapters.
Page 82

82. honestech
4.9.8. Output Specification
• DVD (Digital Versatile Disc) Spec
NTSC
Size: MPEG2 720 X 480 pixels
Video bit rate: Up to 9.8 Mbit/sec
Frame rate: 29.97 frames/sec
Audio: LPCM, MPEG-1 Layer2
PAL
Size: MPEG2 720 X 576 pixels
Video bit rate: Up to 9.8 Mbit/sec
Frame rate: 25.00 frames/sec
Audio: LPCM, MPEG-1 Layer2
• VCD (Video CD)
MPEG1 352 X 240 NTSC
Size: MPEG1 352 X 240 pixels
Video bit rate: 1150 kbit/sec
Frame rate: 29.97 frames/sec
Audio: 224 kbit/sec MPEG-1 Layer2
MPEG1 352 X 288 PAL
Size: MPEG1 352 X 288 pixels
Video bit rate: 1150 kbit/sec
Frame rate: 25.00 frames/sec
Audio: 224 kbit/sec MPEG-1 Layer2
Page 83

• SVCD (Super Video CD)
NTSC
Size: MPEG2 480 X 480 pixels
Video bit rate: max 2524 kbit/sec MPEG-2 (if the audio is in 224
kbit/s), audio + video max bitrate is 2748 kbit/s.
Frame rate: 25.00 frames/sec
Audio: from 32 - 384 kbit/sec MPEG-1 Layer2
PAL
Size: MPEG2 480 X 576 pixels
Video bit rate: max 2524 kbit/sec MPEG-2 (if the audio is in 224
kbit/s), audio + video max bitrate is 2748 kbit/s.
Frame rate: 25.00 frames/sec
Audio: from 32 - 384 kbit/sec MPEG-1 Layer2
83. Video Editor 8.0
Page 84
84. honestech
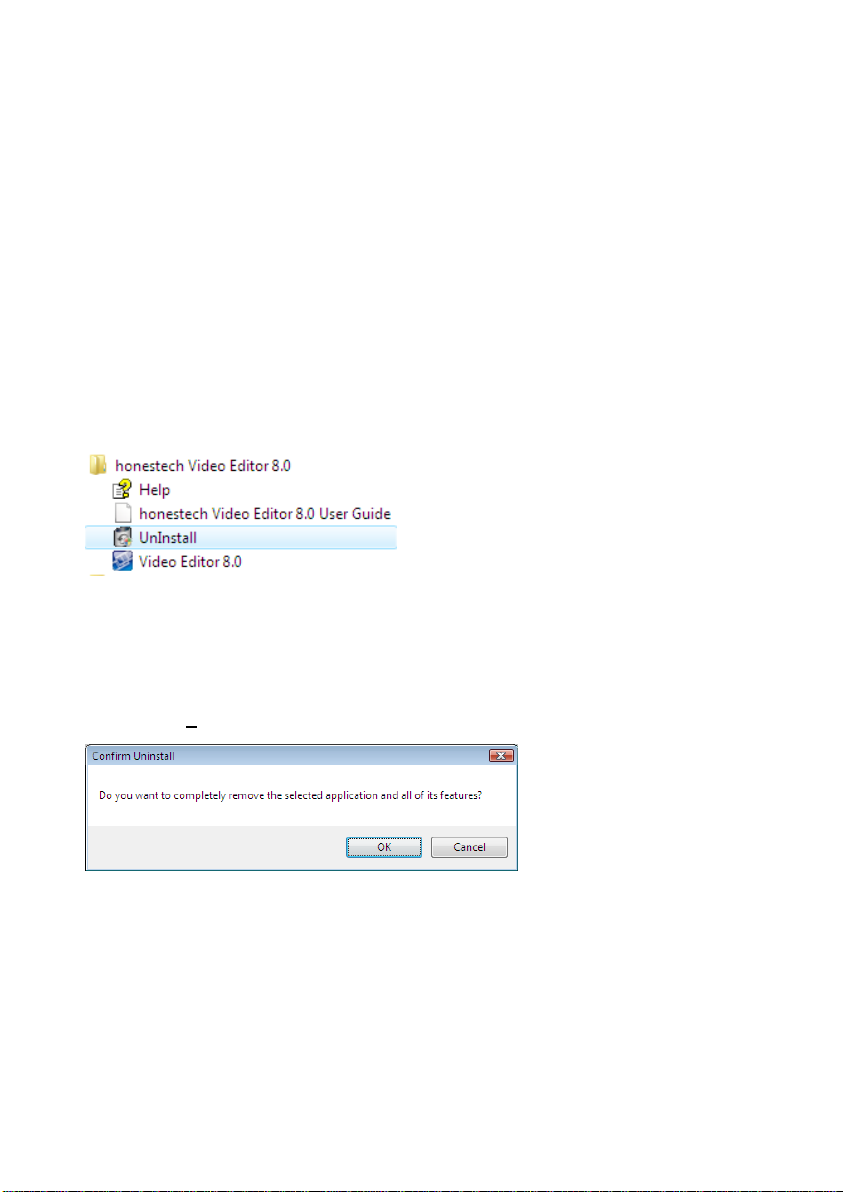
5. Uninstall honestech Video Editor 8.0
6.1. Find program group
You can uninstall VIDEO EDITOR 8.0 from its program group. Go to the Start Menu and
find the VIDEO EDITOR 8.0 program group, and then follow the steps below.
START PROGRAMS honestech VIDEO EDITOR 8.0 Uninstall honestech VIDEO
EDITOR 8.0
6.2. Select to uninstall
When you click UNINSTALL, you will see a pop-up screen for confirmation.
Please click [Yes] to uninstall.
Page 85
85. Video Editor 8.0
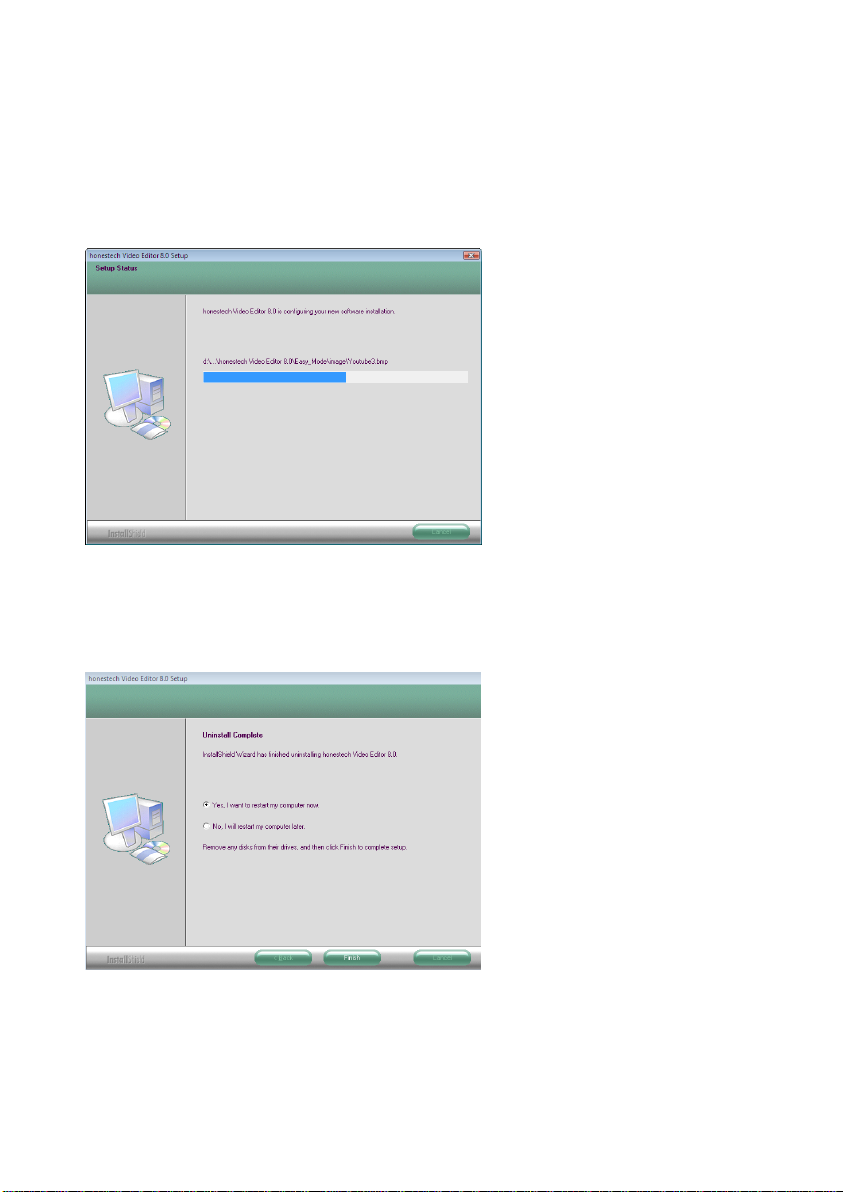
6.3. Start Uninstall Process
The uninstall process will begin. Please wait for the process to complete.
6.4. Uninstall Completed
When the confirmation message is displayed, click [OK] to finish the process.
Page 86

Honestech, Inc.
North and Latin America
P.O. Box 26365 Austin, TX 78755
For local and international support phone number,
please visit our website:
www.honestech.com/support
Honest Technology Europe
United Kingdom: [email protected]
France: [email protected]
Germany: [email protected]
Spain: [email protected]
Honest Technology Taiwan
Address : Room 6E08, No. 5, Sec. 5, Hsin-Yi
Road., Taipei, Taiwan, R.O.C
< Taipei World Trade Center >
Honest Technology Japan
Honest Technology Korea
Address : Kyung-Dong Bldg, 5F, 906-5 Jijok-Dong,
Yuseong-Gu, Daejeon, Korea 305-330
 Loading...